home landscape design - mississippi state university · an ideal home landscape design should have...
TRANSCRIPT

Awell-designed and functionalhome landscape can add toyour family’s joy and
increase the value of your property.Modern landscapes are meant to bebeautiful and useful. A well-planned landscape provides yourfamily with recreation, privacy, andpleasure. Conscientious homeowners know that thelandscape should also have a positive environmentalimpact. Figures 1 and 2 depict the front and backyards of a Southern home. Throughout this publica-tion, each step of landscape design is illustratedusing this sample landscape. If you want to jumpahead, the completed landscape plan is Figure 33.
This publication is designed for avid gardenersand gives simple, basic approaches to creating a visu-ally appealing, practical home landscape. If you arecomputer savvy, you may find it helpful to use alandscape design software program to help youthrough the process.
By following the step-by-step process of landscapedesign, you can beautify your property, add to itsvalue and bring it to life with your own personalityand style. The best landscapes reflect the uniquenessof the family and the region. Whether you want to doit yourself or leave it to a professional, this publica-tion will help you understand the process that isinvolved in designing a landscape. Understandingthe process will help you to ask the right questionswhen and if you consult a professional.
Home Landscape Design
Figure 1. Front landscape. Drawing by Richard Martin III.
Figure 2. Back landscape. Drawing by Richard Martin III.

2
Professional HelpThe idea of designing a home landscape can intimidate
even serious gardeners. Wise people know their limitations.Consulting a professional when necessary can prevent costlymistakes. For this reason, don’t let the cost of a designer keepyou from asking one for help at any time during the designprocess.
Keep in mind that you can hire a professional to help youduring a particular step without hiring one to do the entiredesign. For example, you might need help developing yourbase plan and site analysis, or you might ask for a consulta-tion when you have the first draft of your landscape design toget a professional’s opinion and input. Safety is always a con-sideration for constructed items, such as retaining walls,arbors, and steps. A licensed landscape architect can help youcreate a design to ensure these items are safe (see Workingwith a Landscape Architect at http://msucares.com/lawn/landscape/resources/architect.html). Landscape contractorscan help you build and install your ideas (see Working with aLandscape Contractor at http://msucares.com/lawn/landscape/resources/contractor.html).
You should develop a relationship with the staff of yourfavorite garden center and involve them in your plan. Theycan certainly tell you about the plants they grow and sell.
Sources of InspirationDon’t be afraid to scour landscape design books, the
Internet, other residential landscapes, or other sources ofinformation. Use them to spark your imagination and helpyou formulate design ideas that will work for your landscape.A list of regional books and references may be found athttp://msucares.com/lawn/landscape/resources/books.html.Attend the garden and patio shows that occur in your area.You’ll find everything you need, from professional servicesand building materials to plants and scores of adaptable ideas.
But, by far, the best source of landscaping ideas is yourmemories of gardens, landscapes, and natural places. You maywant to recreate that corner herb garden that you rememberso vividly from your grandmother’s yard. Or it may be thatsecluded garden bench tucked away under a bower of sweet-heart roses that holds nice memories for you. It could even bethose wild muscadine grape vines you climbed as a child toreach the plump, juicy fruit—all these memories could berecreated and mixed with the desires of other family membersto create a landscape that you and your family will treasurefor years to come.
You may do most of your initial landscape planning in yourhead. But to capture those ideas most effectively, write downthese observations, ideas, and expectations as they come toyou. Use your digital camera to take pictures of plant combi-nations, landscapes, or gardens that are particularly appeal-ing. You can even take digital pictures of magazine or bookpages that show plants or landscape ideas you like. Then youcould create a home landscape idea file on your computer forreference later when you start the actual design process.
Value of Landscaping An ideal home landscape design should have value in four
ways: aesthetically, economically, functionally, and environ-mentally.
AestheticAesthetic value can be achieved in many ways: by enhanc-
ing beautiful areas, creating new ones, or screening unattrac-tive parts of the property. Using features in a landscape thatimpact all five senses can add to your pleasure and enjoymentof the landscape.
EconomicA well-designed landscape can increase the value of your
home and property by as much as 15 percent. Landscapingcan also reduce energy costs by buffering seasonal tempera-tures. Research indicates that heating or cooling bills could bereduced by as much as 30 percent by the proper placement ofplants around the home. For example, proper placement ofshade trees could provide cooling in summer, while evergreentrees could block cold winds in winter.
FunctionLandscaping offers a special functional value, too. Well-
placed trees, shrubs, turf, and construction features increasethe amount of the property you use. A little shade in the rightplace, a little sun in another, a place for the kids to play, a pri-vate patio, pool, or deck—all these add to the enjoyment ofbeing outside.
Landscaping helps you solve problems and cut down onmaintenance. For example, groundcover used on a steep hillin the yard can help you avoid lawn maintenance headaches,and groundcover on a very steep slope may be essential toprevent erosion.
EnvironmentEnvironmental benefits of a good landscape design can pro-
vide climate control and many other energy-saving measures.For example, trees and shrubs can influence wind, water, light,noise, and temperature around the home landscape. Water canbe conserved and used more efficiently. Plants can also pro-vide erosion control and a habitat for wildlife. In addition,plants in the landscape help clean the air of dust and somepollutants. Proper plant selection and placement can deter fireand criminal activity.
Steps in Developing a Landscape PlanAll good ideas begin with a plan. Homeowners who begin
installation without a developed plan may end up unhappywith the results. An unplanned home landscape built in sepa-rate steps sometimes does not coordinate well together whencompleted. Form a detailed overall plan before beginninginstallation. A good landscape design can provide a plan forphased installation, allowing a large or expensive landscape tobe completed in stages as resources become available. A plan isa logical series of decisions that becomes the best overall idea.

3
There are seven basic steps to creating a landscape plan:1. Develop a base plan2. Conduct a site analysis3. Assess family needs and desires4. Locate use areas5. Design outdoor use areas6. Select and place plant symbols on plan7. Establish priorities for implementation
Step 1. Develop base plan or plot plan
PurposeBegin by developing a simple, scaled drawing of your exist-
ing landscape from a bird’s-eye view. This map, or base plan,should accurately locate the property lines, house, drives,walks, fences, utility lines, existing trees, and other featuresthat can affect your landscape development. There are manyways to measure and record the features of your landscapeonto paper. Try one or more of the following techniques.
Identifying Your Property LinesThis step can be much easier if you obtain a map that shows
the property lines and the house’s location on the property.This may be a plat, a deed map, the architect’s or builder’splans, or a topographical plan with contour lines showing thesite’s elevation or graduation. The map may include the fixedstructures and hardscape—house, driveway, sidewalks, fences,walls, etc.
Depending on where you live, a plat may have been includ-ed in the papers you acquired when you purchased yourhome. If not, you may be able to obtain it from the city orcounty assessor’s office. While you’re there, you can request acopy of all local ordinances regarding easements, heightrestrictions, building codes, and any other regulations thatcould impact your landscaping project.
If you have difficulty verifying your property lines, youmay need to call a registered land surveyor to locate and veri-fy your property boundaries. You may use this survey plan asthe basis for your scaled drawing.
Getting StartedDevelop your base plan by using a piece of tracing paper to
make a rough sketch of your property. If you have a largeproperty, you may want to break the base plan into severaldrawings (front, side, or backyard areas of the landscape) oruse large paper. Regardless, your sketch should show yourproperty’s general shape. Be sure to label the street and prop-erty lines. A directional arrow to indicate north is useful.
Gathering EquipmentGather the equipment needed to take and record accurate
measurements: 50- or 100-foot tape measure, pencils, erasers,and a large clipboard to hold your tracing paper. You mayfind that a measuring wheel works better for you than a tapemeasure. You will also need graph paper or a drawing scale totransfer your rough sketch into a scaled drawing. It is better tohave a partner to help you take measurements using a tape
measure. If you don’t have help, use a long screwdriver to gothrough the loop on the end of the tape and into the ground tohold it in place as you measure.
Taking MeasurementsNow take the rough sketch of your property and begin to
take measurements using the techniques described in the fol-lowing sections. After all the measurements have been made,the rough sketch can be brought back indoors and a final baseplan drawn to scale. For properties smaller than an acre, ascale of 1 inch = 10 feet (measure with an engineer’s scale), or1⁄8” = 1 foot (measure with an architect’s scale) are appropriatedrawing scales. For planting beds having a large variety ofspecies, the architectural scale of ¼” = 1 foot may be chosen.This larger scale can be a good choice when needing to showgreater detail, such as in beds located adjacent to buildings orhardscape areas. Construction drawings for a building (alsocalled floor plans) are frequently drawn in ¼” scale, and thesecan be used as a base map for your planting plan. Use anarchitectural ruler or an engineer’s scale to measure. Thesesupplies are available at most drafting or art shops. See Figure3 for a sample base plan.
The base plan should show the following information:• All property lines
• Bodies of water (streams, lakes, ponds, low areas)
• Buildings, including
- floor plan with doors and windows
- downspouts
- outside water spigots
- outside electrical outlets
- decks and overhangs
- air conditioner units
- utility connections and meters
- driplines
• All walls, fences, utility boxes and poles, fire hydrants, etc.
• Roads, drives, parking areas, walks and paths, patios, swimming pools
• On- and off-site utilities, above- and belowground, including electric, telephone, gas, water, sewer, septic tanks, and field drains. Notify Miss Utility (#811) to have underground utilities located.
• Existing vegetation, especially large trees
• Off-site elements including adjoining roads and drives, bodies of water, and structures
• Compass directions showing north, east, south, and west
• The scale size of the base plan
Identifying Property LinesFind your property lines by using the plat, survey records,
or other records. Measure each property line with a tape meas-ure and record it on your rough sketch. If your property hasside boundaries that are not parallel or if your home is notparallel to at least one boundary, you must make an additional

4
Figure 3. Base plan. Drawing by Richard Martin III.

5
measurement to draw the correctcorner angles in your final draw-ing. Ask another person to helpyou by standing on the propertyline while you sight along thehouse wall toward them. Ask themto move to the left or to the right,as needed, to be in line with yoursight line down the wall. Thenmeasure the distance from yourhelper along the boundary line tothe nearest corner. (Referencepoints D to H in Figure 4.)
In a similar manner, ask yourhelper to stand on the front prop-erty line. Align him or her on yoursight line as you look down theside wall of the house towardhim/her. Again, record the dis-tance from your helper to eachproperty line. (Reference points Ato E and A to D in Figure 4.)
Locating House on PropertyAccurately locate the front cor-
ner of the house by first measuringthe distance from the street to the corner of the house (A to Bas shown in Figure 4). Then measure the distance from theside property line to the front corner (B to F as shown inFigure 4). Locate a back corner of the house by measuringfrom the street to the back corner (A to C), and then measurefrom the back corner to the side property line (C to G).
You can record the measurements of each side of the houseby using a set of blueprints of your home, by using the surveyrecord, or by making measurements of each side. Be sure toindicate location of doors, width of windows, and heightabove ground level. Don’t forget to measure heights fromground level of porches and decks. See Figure 5 for themethod of measuring windows and doors.
Locating Outlying Landscape FeaturesYou are now ready to locate the other features of the proper-
ty. These features include above- and belowground utilitiessuch as gas, water, electric, telephone, and sewer lines. Alsoincluded are TV cable, septic tank, field lines, utility meters,water faucets, roof overhangs, retaining walls, and fences.Don’t forget to include existing trees and other plants youwant to keep in the new landscape design. Depending on thequantity and locations of existing plants you plan to remove,you may also want to include them, especially if you will notbe performing the removal yourself. If all of these features willnot fit easily onto one base plan, you can create other plans toinclude features such as existing plant material and physicalstructures. See Figure 6.
Door
Window
Window
Window10’–0”
7’–2”
18’–4”
25’–4”
31’–5”
34’–0”
44’–2”
49’–2”
57’–0”
MEASURING METHODS:
TapeMeasure
House
Figure 4. Measuring property lines.
Figure 5. Baseline measuring: Used to locatedoors and windows.

6
Figure 6. Inventory of existing plant material and physical structures. Drawing by Richard Martin III.

7
Natural features such as ditches, ravines, and steep slopesshould be included. Also include neighboring buildings andexisting vegetation, especially large trees, that will impactyour landscape. You can locate these outlying features on yourrough sketch by measuring in two directions from a knownreference point, such as the house, street, or property line.
House
North18’
6’
A B
C
D
6’2”
6’4”
1. Record the measurement from the house corner straight out to point A, which is aligned with the corner of the first tree.
2. Measure from point A to the center of the first tree, point B.
3. Measure straight out from point B to the point that aligns with the center of the second tree, point C.
4. Measure straight out from point C to the center of the second tree, point D.
Tree
47.5’
radius47.5’radius
A
B
House
Figure 8. Triangulation measurement.
Figure 7. Measuring to outlying objects.
See Figure 7 for a method of using the sight line of the houseto locate an existing tree in the landscape. Trees or other fea-ture points can also be located by a triangulation measure-ment (Figure 8). Measure the distance from two known points(A and B), marking on the base plan where these two dis-tances meet along radii drawn by a compass.

8
Measuring Curved AreasYou may have a curved bed, driveway, or other area. To
measure the curve, you need a straight line from which tomeasure. If the area does not have a wall or fence backing it,create a line with string and stakes, a hose, or another measur-ing tape. Start at one end of the curved area. Lay out the tape
Transferring Measurements to Final Base PlanThe final base plan should be drawn on graph paper using
the largest scale that will fit your property area. For example,a property area measuring 100 feet by 70 feet would easily fiton one 8 ½ x 11 piece of 10 x 10 squares per inch graph paperif using a scale of 1 inch = 10 feet.
Graph paper is sold at bookstores and the office supply sec-tions of large discount stores. Review your rough sketch andmeasurements of your property and landscape features. Startthe final base plan by drawing a line across the bottom of thegrid to represent the edge of the street or road in front of yourhouse. If you have a corner lot, draw a second line to indicatethe side street. Now, mark the compass directions on yourbase plan by indicating north with an arrow. Place east, south,and west in the appropriate area.
You should find out all of the restrictions, easements, andrights-of-way associated with your property. In most cities, thesidewalks are on city property, with the homeowner’s proper-ty line beginning somewhere inside the sidewalk. You shouldavoid permanent plantings or construction in the easementareas, which are commonly used for widening streets andaccommodating utilities.
After determining the distance of the easement, locate yourfront property line on your paper and draw it in lightly. Then,
North
Curb 3’ increments
Street
Figure 9. Measuring curved areas.
Bay Window
Yard
4’
1’4” 1’4”
8”
sidepane
8”
A B C D
North
1. Measure out from the house to points A and D to find out how far the window projects into the yard.
2. Measure from A to B, from D to C, and from C to B to find the width of the window.
Figure 10. Measuring angled features.
Measuring Angled Features Be careful with angled surfaces that are created by bay win-
dows, decks, patios, and other irregularly shaped protrusions.These can be tricky to measure. A simple technique to meas-ure an angled feature is illustrated in Figure 10.
from the beginning point of the line to the outside edge of thecurve to measure the distance. Repeat this process every 3 feetuntil you have measured the entire area. This will result in aseries of dots on your base map that reflects the curving edgeof the area. Connect the dots to determine the general shape ofthe area. See Figure 9.

9
measure and draw in the side and back boundaries of yourproperty. If your side boundaries are not parallel, you shoulddraw the front boundary line and then use the sight line todraw the back boundary line. The side boundary line can thenbe located by using the measurements from reference points Ato E and D to H as explained earlier in Figure 4. By establish-ing these four boundary lines, you have an accurate outline ofyour property.
Now, you can draw in your house by locating the cornerthat you measured for your rough sketch. It will be a certaindistance from the street and a certain distance from the nearestproperty line. Count the squares on your graph paper andlocate the corner of the house. Then draw in the measure-ments and shape of your home. Be sure to indicate doors, win-dow heights and widths, and windowsill height from groundlevel.
Next, transfer all the other features from your rough sketch,including all features that will have an effect on your land-scape design.
To draw in a curved feature on your final plan, transferfrom your tracing paper the series of dot measurements alongthe curved edge of the area onto your scaled drawing. Thenuse a French curve to approximate the curved line. (Frenchcurves are available from office supply stores.) Rotate theFrench curve until some part of the inner or outer edge touch-es at least three points you have located. This curved line willaccurately represent your feature.
When you have added all the features, you have a veryaccurate base plan of your property. Again, if it is not possibleto accurately include all features on one base plan, you cancreate another base plan or inventory sheet that shows, forexample, plant and physical structure inventory as shown inFigure 6. It might be helpful to create this plan on tracingpaper so it could be placed over the base plan to create a com-plete “picture” of the property. See Figure 3 for base plan. Thecompleted base plan is your reference map while developingyour landscape plan.
Before proceeding to Step 2, carefully review the followinglist and make any needed additions to your base plan.
Step 1 Checklist1. Accurate property lines
2. Proper location of house, drives, walks, fences, patios, porches,decks, etc.
3. Location, kind, and condition of all trees and plants
4. Electrical poles, lines, exterior outlets, and meters
5. Gas, water, and sewer lines, including cleanout locations, and meters
6. Telephone and TV cables (above- or belowground)
7. Manholes in storm sewers and fire hydrants
8. Compass directions showing north, east, south, and west
9. Roof overhang, downspouts, water spigots, windows, and doors
10.Locations of steep slopes, drainage swales, and where site water is draining
11.Soil types and their characteristics
12.Existing building and neighborhood architectural styles
13.Locations of storage and functional use areas
Step 2. Conduct a site analysis
PurposeAnalyzing the site’s environmental conditions and taking
inventory of other conditions of the site, including soil, is animportant step. Accurate analysis of the site will help youunderstand existing conditions. You can then modify areasthat need improvements and make the most of natural areas.Note wind, sun, and shade patterns, as well as water move-ment and terrain levels that impact where you locate play,cooking, garden, entertaining, pool, and other activity areas ofthe landscape.
Observing Over TimeFor the most accurate site analysis, record observations of
the site for a year before you start to change any of it. Forexample, if you purchased your home and property duringthe winter months, it would be a good idea to go through onegrowing season to determine the best areas for spring bulbs,perennials, or other plants.
A year of observing your landscape may sound excessive,but taking your time has an advantage. If you move too fast,you could destroy one of your landscape’s assets before youare even aware of it. Observing how the sun moves acrossyour property during the year, where shade occurs, wherewater collects, which views are concealed or revealed bydeciduous vegetation, and where privacy or lighting is neededis essential to creating an effective landscape.
Take time to determine where the favored pathways run.Where is the best spot to store gardening tools or equipment?It takes time to see the best views to enhance or the less attrac-tive views to conceal. Remember to conduct part of your siteanalysis from inside your house, observing the views fromwindows and doors through the season. The view of yourlandscape as seen from inside your house is very important.Unattractive features should be hidden from view and attrac-tive features emphasized.
Getting StartedStart the site analysis by taping your base map onto a rigid
piece of cardboard or other material for stability. Take a cleansheet of tracing paper and place it over the base plan. Trace allexisting features from the base plan—property lines, outline ofthe house, existing structures, paving, and plants. This dupli-cate will become your site analysis.

10
Recording the LandscapeRefer to Figure 11 and the Step 2 Checklist to guide you
through the site analysis items. The following paragraphs willhelp you accurately record features and patterns of sun,shade, wind, noise, soils, land form, surface drainage, andviews. Put labels on the approximate location of each item orcondition. Use arrows to indicate patterns of access, views,and slopes, labeling each one. Now take a look at what youhave created. You should have an emerging picture of whatyour property looks like.
Look at the relationship between spaces. Is your parkingspace near the door you use most often? You may realize thatyou have incompatible zones of use side by side. Can you seeand smell the dog pen while sitting on your patio? You mayneed to move or screen the pet area. What is the view fromyour family room picture window? Hopefully, it isn’t theneighbor’s woodpile or messy tool shed. Add notes, circles,and arrows as needed to show how existing zones of thehouse and yard work together or clash. The more detailed youmake your site analysis, the better tool you will have whenyou go through the other steps in the design process.
Understanding Environmental Features or PatternsSun and Shade
The angle of the sun as it moves across the property in dif-ferent seasons of the year is very important in determininghow to plan for shaded and open areas. In Mississippi, thesummer sun rises slightly to the northeast, is straight over-head at 12 noon, and sets slightly to the northwest. Look atyour property and make notes on the summer sun’s effects onyour house. Indicate shady and open areas. See Figures 11and 12.
Also consider the winter sun’s effects. The winter sun risesin the southeast, remains low in the southern sky, and sets inthe southwest. Use arrows to indicate how the winter sunaffects your house. By knowing the sun’s movements in sum-mer and winter, you can decide where to locate summer shadeand where to provide open areas to allow the winter sun towarm your home and outdoor living area.
Wind Wind can be harsh and cruel during the winter but bring a
cool breath of relief during the summer. In most areas ofMississippi, the winter winds are from the north and north-west. Summer winds are from the south and southwest. Thethree coastal counties of Mississippi enjoy a southerly Gulfbreeze during most of the year. Look at your property anddetermine the orientation of the prevailing winds. This infor-mation will help you determine the natural placement ofscreens to protect you from harsh winds.
NoiseEveryone will not be fortunate enough to enjoy the quiet of
country living. Homes in cities and suburbs can be constantlybombarded with noise from motor vehicles, activities ofneighbors, and industry. Many noises can be buffered by
planting densely foliated trees and shrubs. Look at the proper-ty and determine if you and your family will have objection-able noises. Make these notes on your analysis sheet.
Soils and Land FormSoils greatly affect the choices of trees, shrubs, and lawn
grass. It is especially important to look at the soil around thehouse’s foundation. Modern construction techniques usuallyturn up subsoil that is spread near the foundation. These sub-soils are often tight clays lacking in structure or texture neces-sary for good plant growth. If you propose to use foundationplants, you must consider these soils.
You should take a soil test every 20 feet along the sides ofthe house and 2 feet out from the walls. Take the soil samplescarefully and do not allow mortar mix or concrete chips to beincluded. These materials could ruin the test results and yourplants. Make sure to remove those undesirable materialsbefore soil preparation. For information on how to take andsubmit a soil sample, contact your local Extension office. Thecounty Extension office can supply you with soil sample boxesand the instruction sheet. You can also view the MississippiState University Extension Service online video “Taking a SoilSample” here: http://msucares.com/gardenvideos/.
Surface DrainageNext, you should determine the direction of surface water
drainage. Use arrows to indicate how water runs off the prop-erty. Also indicate any areas where water runs onto your prop-erty from neighbors and vice versa. Take special note of anyareas that are eroding, or washing away. In addition, indicateareas where water stands for long periods of time. It is best toperform these observations during multiple rain events ofvarying duration or intensity.
ViewsYour site analysis should determine the desirability of views
seen from all sides of your property as well as from inside thehouse. Indicate these on your analysis notes.
Review the checklist below before proceeding to Step 3.
Step 2 Checklist1. Sun patterns and movements by season across the property
2. Hot areas, shady areas, and cool areas
3. Areas that need shade
4. Windy areas
5. Noise screens
6. Existing soil conditions, especially around home foundation
7. Soil test results
8. Poorly drained, wet, soggy, or low areas
9. Surface water drainage routes, including downspouts, drainage swales, and areas water drains
10.Areas where erosion is occurring
11.Slope of property, including banks, gullies, ditches, hills, knolls, etc.

11
Figure 11. Site analysis. Drawing by Richard Martin III.

12
Figure 12. Solar angles in Mississippi. Drawing by Richard Martin III.

13
12.Condition of all trees and shrubs
13.Good views and poor views (both on and off property)
14. Items that need to be replaced or repaired, including fences, driveways, walls, walkways, patios, etc.
15.Health and condition of lawn
16.Valuable wildlife plants and areas
17. Invasive, exotic plants to be removed
18.Any other features that need to be improved
Step 3. List the family’s wants and needs
Assessing your family's needsWith a complete base plan and a thorough understanding of
the site, you are now ready to list your proposed use areas.Each family's needs vary with their outdoor activities. Theseare the types of areas you may consider when developingyour landscape plan:
• Pet areas, such as open lawn and pens
• Cooking areas
• Sun bathing, lounging, or reading areas
• Entertaining areas
• Recreation areas
• Outdoor storage for equipment, firewood, vehicles, or boats
• Gardens, water features, pathways
• Attractions for birds, butterflies, and other wildlife
As you consider the areas you will include, be realistic.How much time are you willing to spend maintaining gardensand use areas? Be sure to budget how much you are willing tospend for various improvements.
Step 4. Locate the use areas The outdoor areas of your property should tie into the areas
and activities within your home. For example, outdoor cook-ing areas should be located near indoor kitchen or diningfacilities. Service and storage areas should be located awayfrom main use areas and views from the home. Patios anddecks should connect directly into main entrances of thehome.
Take another sheet of tracing paper and overlay onto thebase plan. Draw zones where these different use areas couldbest occur and their approximate sizes. Try several differentschemes until the best layout is evident.Figure 13 shows an example of a general layout plan.
Step 5. Develop outdoor use areasIt is easier to develop each of the outdoor use areas sepa-
rately and later combine them into the overall plan. Imagineyourself sitting within or using each area as you develop thedesign ideas. For example, to design a patio space, firstdecide on the elements that would make a successful seatingarea. You may include seats, tables, overhead shade struc-tures, a sense of enclosure, views, water features, or other ele-ments. Reviewing your home landscape idea file, looking at
garden magazines and books, and visiting other successfulspaces may provide visual ideas to assist you. Remember tokeep in mind the important principles from your site analysisso that your proposed use areas do not conflict with other ele-ments, such as utility lines, water drainage, and other existingconditions.
To get an idea of the size of a space, use a garden hose toapproximate the outline for the area. Move the garden hose toadjust the size of the space until it is the appropriate scale andform. It is best to select building material types and forms thatwill match and fit the character of the home and the surround-ing area. After you have chosen the size that seems best in thelandscape, transfer this general outline to the landscape planat its proper scale.
Considerations for designing or creating outdoor living spacesJust as a room in a house has walls, ceilings, and floors, so
does a landscape space. As each room is designed for a specif-ic function—kitchen for preparing food, living room forleisure, bedroom for sleeping—so are outdoor use areas.Outdoor spaces should accommodate their functions: eating,relaxing and talking, playing, or gardening. See Figures 14, 15,and 16 for examples of these outdoor use areas.
Outdoor “ceilings” may be composed of constructed materi-als such as building overhangs, arbors, fabrics, or other mate-rials. See Figure 17. They may even include the open sky orthe branches of large canopy trees overhanging the space.
Many different floor materials may be used in an outdoorspace, and detailed flooring materials such as pebbles or brickmay provide a rich ground texture. There are many goodpaving materials that provide a wealth of colors and patterns.A solid pavement allows for permanent heavy use and pro-vides direction for traffic (Figure 18). Turf and vegetatedgroundcovers are suitable for areas that are infrequently trod-den, and may provide a strong contrast to nearby hardscapematerials (Figure 19).
Fences or building sides can provide a sense of enclosure.“Walls” may be constructed of stone, brick, concrete, wood, ormetal (Figures 20 and 21).
To hide adjacent views, these walls work best when morethan 6 feet tall. Wood slat fences or open masonry block mayprovide a sense of enclosure yet still allow breezes into thearea. Evergreen plants can be dense enough to allow for priva-cy while still allowing some air to pass through.
Just as a room in a house has hallways and doors, court-yards and other landscape spaces also have pathways andentry areas. These should be designed to make one feel thatthey are transitioning to or entering a special place. Gates area wonderful way to separate different outdoor spaces (Figures20, 21, and 22).
An entry may be framed into a courtyard space by using apergola or trellis, creating an inviting entrance. These separatethe patio space from the lawn or front entry.

14
Figure 13. Locating use areas. Drawing by Richard Martin III.

15
Figure 14. This outdoor living space consists of two separate areas. The chairs, buffet table, and food cartin the foreground form a seating area. The dining table and chairs to the back create a dining area. Theseareas are defined and enclosed with a brick wall, shrubs, trees, and container plants. Photo by Lelia Kelly.
Figure 15. Providing convenient spaces for sitting throughout the garden makes the landscape more enjoy-able and usable. The low hedge encloses the space and adds texture. Photo by Lelia Kelly.
Garden rooms are designedfor the activities and functionsthat will take place there—such as sitting and relaxing.Make sure the areas are com-fortable. For example, in aSouthern climate it is especial-ly important to provide shadefrom the hot sun (Figure 23).
For social spaces, includeseats and tables, a place toserve food, and lighting fornight functions. Organize seat-ing in nooks or crannies awayfrom the main walkways(Figure 24). This keeps seatingout of the main traffic path andoffers more privacy.
Small, personal spaces createopportunities to providedetailed features. Adding lushplants, urns and planters, andjust the right bench in just theright spot can create a richenvironment.
A key for creating personalspaces is to keep all thingssized for the number of peoplethat will typically use them.For example, a small wallornament would get lost in alarge garden, but a small areais the perfect place to putdetailed features such as artobjects and garden ornaments.Water is a wonderful elementto add to gardens, whether it isa still, shallow pool with a fewlilies or a feature with a sprayhead that provides more activi-ty. Small courtyards and gar-den spaces are appropriateplaces for sculptures and fea-tures of interest. Any area fornight gatherings is a greatplace to add fire for cooking,warmth, light, or character.Small spaces can also show-case strong plant textures(Figure 25).
Richly textured plants, suchas palms and bamboos, do nottake much room because theyare tall and grow out of a nar-

16
Figure 16. Outdoor fireplaces make wonderful places to gather in the cooler times of the year. Seating andother accents, such as potted plants and sculpture, make this area attractive year-round. Photo by LeliaKelly.
Figure 17. A swing covered with an arbor provides shade and a “ceiling” for this quiet corner of the gar-den. Photo by Lelia Kelly.
row bed area. This is also theperfect place for fragrantplants, such as roses, garde-nias, and jasmine. The wallsactually contain the aromassomewhat, so you can reallyappreciate the subtle scents ofplants.
Here are a few use areas toconsider:Vehicular access and parking
Most likely your drivewayand walk already exist, butthey can be changed if there isa more functional and practi-cal solution. Think about thearrival of your guests or your-self and how you would liketo be welcomed to your home.Would you like to see flowersat your driveway entrance, topark in a shaded spot, to haveenough pavement at the edgesas you step from your car?Should there be a separationfrom the drive and parking tothe entry walk of the home?These are all personal consid-erations that add to the quali-ty of your life and guests’experience. Walkways
Add walks where they areneeded, including along thestreet or to connect from thestreet to your home. Beforeadding any permanent pavingtypes, always check the loca-tion of property and setbacklines. There are many differenttypes of paving materials forwalks and drives, and there isa wide variety of installationcosts.
An important considerationis whether to use a permeableor impermeable paving materi-al (Figure 26). Permeablemeans that rainwater can filterthrough or around the paving,and impermeable means thatrainwater cannot filter throughthe paving material. Loosegravel, unmortared brick on

17
Figure 18. If an outdoor “room” will receive heavy traffic, you may wish to consider installing a hard sur-face. A wide variety of paving materials is available, offering a wealth of colors and patterns. Photo anddesign by Pat Drackett. Landscape contractor: GroundScape Inc., Biloxi.
Figure 19. For infrequently trodden areas, consider grass or low groundcovers. When selecting turf, researchthe maintenance needs and durability of the varieties you consider. Photo and design by Pat Drackett.
sand, or permeable concrete orasphalt are examples of perme-able paving. Urban areas withexpansive amounts of imper-meable paving are experienc-ing severe water quality prob-lems in local streams and arehaving concerns with drop-ping water aquifers. Because ofthese water problems, somecommunities are limiting theamount of impermeablepaving allowed in site devel-opment.
The front walk should con-nect your front entrance towhere your guests park or tothe street. You may considerproviding a walkway from theoutdoor public area to the pri-vate area, so that guests willnot have to go through yourhouse or garage to get to thebackyard party area. The walk-way form should reflect themain type of form usedthroughout the design. Forexample, if you are usingcurved planting beds, thewalkway may curve as well toprovide an organizedapproach. Walks should bewide enough for comfortableuse. A minimum of 4 1⁄2 feet istypically wide enough for twopeople to walk side-by-sidetogether. To add interest to awalkway, consider varying itswidth. Walks should always bedesigned for safety and com-fort, and public walks must beaccessible for disabled or eld-erly people. Consult with aprofessional for any walkwaysthat require retaining walls,ramps, or steps.Accenting the main entrance
For small front lots, the mostimportant focal point from thestreet is the front door. Themain public entry should beeasily identifiable and attrac-tive. Typically, all other ele-

18
Figure 20. This courtyard garden is enclosed with a high brick wall softened by lush vines. The door caneither allow a view into another area of the garden or add mystery to what lies beyond. Photo by Lelia Kelly.
Figure 21. This beautiful wrought-iron gate serves as both an architectural feature and a security featureby limiting access to this backyard from a sidewalk along a city street. Passersby can still enjoy the viewinto the garden room beyond. Photo by Lelia Kelly.
ments in the front yard shouldaccent and highlight the frontentry rather than compete forits attention. The front entrylocation on the home deter-mines the visual balance of thefront composition. Study theappearance of your house.Imagine the entrance as a pivotpoint for balancing. The housemay appear heavier on oneside. The “light” side mayneed more mass (larger plants,etc.) to balance the visualweight of the “heavy” side. Putting it all together
The form of outdoor useareas should complement thearchitecture of the home andsurrounding structures. Forexample, if the home has rec-tangular forms, then rectangu-lar shaped patios, plantingbeds, fences, walls, and waterfeatures are appropriate. Clearand simple designs are alwaysbest, as combining variousforms can be difficult toachieve successfully.
Label another sheet of trac-ing paper “preliminary plan.”Draw your ideal vision of eachspace to scale on this paper.Keep imagining and refiningeach space until it is fullyresolved.
Step 6. Select and placeplant symbols on plan Section One: Selecting plants
Deciding which plants are tobe used in your landscape planmay seem overwhelming inthe beginning, particularly ifyou have limited experiencewith plants. Use your siteanalysis to help you selectplants that fit the conditions ofyour property. For example, ifthe front beds are in full sun,choose plants suited to fullsun. It is helpful to first make alist of the microclimates found

19
in your yard, such as sunny andwell-drained, shady and moist,etc. Then, research the plantsyou are interested in and learnabout their site requirements.List each plant under its appro-priate microclimate. Find out thefollowing information aboutpotential plants to figure outwhether they can be used inyour plan:
• Light requirements
• Soil moisture and pH requirements
• Mature size
• Rate of growth
• Maintenance requirements
• Susceptibility to pests and diseases
• USDA hardiness zone
• Heat tolerance
NOTE: The series of Extensionpublications titled SelectingLandscape Plants is a greatresource to help you select plantsto fit your landscape needs.These can be found athttp://msucares.com/ under thepublications section. Plant Palette
After you have determined theplants that are appropriate foryour planting site, group theplants into categories, such asgroundcovers; annuals andperennials; low, medium, andtall shrubs; accent plants; andspecimen and canopy trees. Thiswill be the “plant palette” thatyou will select from as you layout your planting plan. It is help-ful to include a photo of eachplant and a symbol or note thatdepicts its light, moisture, andother preferences.After theplants have been divided intogroups, you will be able to seewhat microclimate they prefer.This is a good way to experimentwith various combinations ofplants and to see how certaintextures and flower colors willwork with each other.
Figure 23. This rustic bench is surrounded by cool green foliage and groundcovers and shaded by hugedeciduous hackberry and oak trees. Adding to the cool atmosphere is the birdbath. Every Southern gardenshould offer a cool place to sit on hot summer days. Photo by Lelia Kelly.
Figure 22. Gates can define the entry of your landscape or separate different spaces. This side yard has beentransformed into an interesting garden room accented by a simple but elegant metal gate. Photo by PatDrackett. Landscape contractor: GroundScape Inc., Biloxi.

20
Plant UsesConsider the specific purpose
you have in mind when choos-ing plants to include in yourplant palette. If you need toscreen an undesirable view, itmay be best to select shrubs ortrees that are evergreen. Theseare other examples of specificuses:
• Canopy trees for shade
• Specimen trees
• Foundation plantings
• Accent plants
• Hedges and screens
Ask yourself what function aplant will serve before you add itto your plan. Plants can servemore than one purpose. Treesand shrubs that screen yourproperty line may also provideyou with food, such as figs, blue-berries, pears, or mayhaws forjelly. Plants can also act as shelterfor wildlife or provide cut flow-ers or fragrance.Landscape Themes
Landscape beds can be com-posed of a collection of plantswith a specific theme, such as anherb garden, a wildflower gar-den, a rose bed, or a perennialbed. Those who enjoy flowerarranging may wish to create a“cutting bed,” where perennialsand annuals are grown solely fortheir blooms. If you like toobserve birds, butterflies, andother wildlife, see MSUExtension Publication 2402Natural Resource EnterprisesWildlife and Recreation, MississippiRecreational Gardens: Establishinga Backyard Wildlife Habitat, whichlists suitable plants and explainshow to arrange them to attractwildlife to your yard. Themegardens are often better suitedfor private areas of the yard,such as a back yard, rather thanin a public area.
Figure 24. A cozy, comfortable place to sit and visit away from the main walkways of the garden makes anice addition to the landscape. Photo by Lelia Kelly.
Figure 25. This shady understory garden contains a mixture of plants with strong, coarse textures such asfatsia, hosta, and shell ginger. Any of these plants can be used alone to draw the eye or in combination fora lush effect. Photo and design by Pat Drackett.

21
Section Two: Consider before beginning your planting designFoundation plantings
Resist crowding your residence with too many plants.Closely spaced plants may be attractive right after planting,but poor air circulation will lead to disease and pest problems.You want a long lifespan for your landscaping, not to have toreplace it every few years! Know the mature sizes of plants tobe used in your foundation plantings. The beds surroundingyour residence are visually critical because they provide visi-tors with a first impression.
Place accent trees with broad crowns, such as crape myrtles,far enough away from buildings that the canopy has ampleroom to grow. Determine the mature width you can expect fora tree you would like to use, and divide that width in half.Measure this distance out from the building and mark it. Thisis the minimum distance for the center of the tree on yourplan. You may need to go out a bit farther if you have deepeaves on your house.
Accent plants can be used on the corners and in front ofblank walls of your residence. Do not overcrowd plants nearyour front entrance, as they will grow out of proportion andmay require intensive maintenance. Color and texture can beused near your front door to lead the eye to your entrance.However, it is not necessary to use large areas of color andtexture to have an impact. Even a small amount of color willdraw attention to an area. Layer the shrubs in the planting
beds by their height, from high-est to lowest. A border of lowshrubs or groundcovers may beused along the bed edge, ifdesired.
Siding, eaves, and roof drip linesLocate plants away from
house siding, eaves, and driplines. Siding can rot or mildewwhen crowded by plants. Neverdig in or spread organic mulchover termite treatment bands.Dry soil under house eaves is aproblem when there are no gut-ters. The force of water fallingfrom the roof can be quitestrong, damaging plants, splash-ing soil against the base of thehouse, and eroding the soilbelow. River rock or limestonegravel added below the drip lineaids drainage and reduces waterdamage. Space plants to avoiddownspouts connected tounderground drainage pipe. Screening air conditioning units
Dense evergreen hedges arenot a wise choice to use for screening air conditioning units, asthey can restrict access and air flow to the unit and require fre-quent pruning. Instead, use plants with an informal, openstructure, located away from the unit. Consider screeningunits from only one side if they are visible from only oneangle, such as a street view. Lattice screens are effective andcan be one, two, or three-sided. Use vines on the lattice, awell-situated plant, or nothing at all.
Sun and shade exposureSome homes have a contrast in sun exposure along the front
of the residence, which presents a challenge if you want toprovide landscape beds that “match” on both sides. A largetree may provide shade on one side, while full sun conditionsexist on the other. If you want to have a unified, formal bal-ance, use “chameleon” species that grow well in either sun orshade.
Formal or informal Beds that are symmetrical or have angles are perceived as
formal, while asymmetrical or curvilinear beds have an infor-mal appearance. Even numbers of plants generally have a for-mal appearance, and odd numbers of plants tend to be infor-mal. However, the same number of plants can appear eitherinformal or formal, depending on their arrangement. SeeFigure 27.
Figure 26. Permeable walks, such as this paver brick path installed on compacted base material, willallow rainwater to filter through or around the paved surface. These pathways can also make previouslyunreachable areas accessible to wheelchairs or strollers. Photo by Pat Drackett. Landscape contractor:GroundScape Inc., Biloxi.

22
Outlining the planting bedsThe geometry of some beds will be dictated by the shape of
your residence and adjacent hard surfaces, such as walks,drive, retaining walls, etc., as well as by the style of your land-scape theme. Formal plans composed of architectural shapesand straight lines will require more frequent maintenance tomaintain than informal plans composed of naturalistic land-scaping and curvilinear beds.
Clean bed lines give your property a fresh, finished appear-ance (Figure 28).
Bed edging, such as paver stone or brick, coordinated toyour home or other paved surfaces, adds structure to yourlandscape. Leave enough room along the edge of beds forplants to grow to the width of the beds.Planning for lawn maintenance
Design bed edges next to lawn areas with gentle, gradualcurves that are easy for lawnmowers to navigate (Figure 29).Lawns should be accessible and wide enough to allow yourmower to pass or turn. Bed width
Wide planting beds are not easy to access. You can design apathway that passes through the bed to provide an attractiveand practical landscape feature. Garden ornaments, such assculptures, environmental art, fountains, or birdbaths can beadded along the path. Pathways can be paved brick, naturalflagstones, or simply a linear gap in the plantings, allowingfor ease of passage and maintenance.
Section Three: Locating the plants on the plan1. Preparing to draw the planting plan
You can create your planting plan on a sheet of tracing paperthat has been taped over the base map. Corrections are easierto make on tracing paper than on graph paper. Plant symbolscan be drawn lightly in pencil. Once you complete your plant-ing plan, darken the edges of plant groupings, major trees, andaccent plants to give them more visual definition. 2. Drawing planting symbols
Symbols of plants can be drawn on your plan by using a cir-cle template, which contains a variety of sizes of circles. These
templates can be found in the drafting section of most officesupply stores. To determine the size of circle to use, for exam-ple, if your base map has been drawn at a scale of 1 inch = 10feet (using an engineer’s scale), and the mature size of yourplant is about 5 feet, select a circle that measures half an inch(5⁄10, or .5 inch, according to the scale) in diameter.Correspondingly, you would use a circle measuring 1⁄5 of aninch (2⁄10, or .2 inch) for groundcover that measures 2 feetacross. A small accent tree may measure 10 to 15 feet or morein width, depending on the species, so you would choose acorresponding symbol width to represent the mature tree.Keep in mind that the thickness of your pencil lead can affectthe width of your drawn symbol. Therefore, while you are cre-ating your planting plan, it is a good idea to check symbolwidths from time to time on a scrap piece of paper.
Planting symbols can be simple circles, or you may chooseto modify them to depict certain characteristics of the plantsthey represent (Figure 30).
Deciduous plants may be shown as having a branchedappearance. Evergreens with needles can be drawn with sharpedges, while symbols for broadleaf evergreens may haverounded edges. Symbols for accent plants can be drawn toreflect their specific textures. You may wish to practice draw-ing planting symbols before you place them on your plan.Think about how you can depict each plant through a symbolthat will be recognizable when you refer to the plan. 3. Spacing plants
The mature size of a plant is very important to considerwhen creating your plan. If plants mature at 5 feet wide, it isnot advisable to locate them 3 feet apart (also called 3 feet“center to center” or “on center”) just so they will look niceand full after planting! When locating several groupings ofdifferent plant species within a bed, avoid placing the massesof plants too close to each other. Instead, leave some room fora transition between plant species. Draw your planting sym-bol to represent each plant’s mature size and resist placingthem too closely. As you locate plant symbols, remember toleave enough space for maintenance and access to utilities,such as water spigots and utility meters.4. Locating plants on the plan
Deciding the first plant to locate on your plan may seemlike a challenge. You may feel like an artist pondering a blankcanvas, wondering where to begin. However, think of thelandscape plan as a series of logical steps, and locate the mostimportant elements first. First, place on your plan the plantswith the greatest impact or importance. These may be focalpoints, trees, or accent plants. You can think of them as thestars of your show, with all the other plants becoming theirsupporting cast. Focal points
Focal points are plants with dramatic qualities that com-mand attention and draw the eye, such as a specimen tree.They can also be landscape features, such as a bench or foun-tain. They can be informal or formal, depending on where
Figure 27. In general, even quantities of plants create a formal appear-ance, while odd numbers of plants produce an informal effect.However, the same number of plants can be arranged to provide eithera formal (top row) or informal (bottom row) appearance. Image andplanting symbols by Pat Drackett.

23
Figure 28. These before and after photos show the importance of having a clear definition between plant-ing beds and turf areas. Note that beds do not need to be stuffed full of plants to have an impact. Rather,the clean beds and strong bedlines give this property a pleasant, finished appearance. Photo by PatDrackett. Landscape contractor: GroundScape Inc., Biloxi.
they are and their relationshipto other elements. The effect ofyour focal point may be dictat-ed by its relationship with sur-rounding trees, especiallywhere there are many trees.
Because the eye is drawn tofocal points, you will need toconsider the views that sur-round it. For example, atten-tion will be drawn to an unat-tractive view that is near orbeyond the focal point.Consider the angles fromwhich the focal point will beviewed. Will it be the firstthing you see when approach-ing the house? Is it a mainview from a window? Perhapsit will be a surprise featurewhen turning the corner of apathway. A focal point can bean individual plant, or it canbe part of a triangle, with theviewer on one corner, provid-ing balance to other elementsin the landscape. For example,a focal point may be located toprovide balance for the massof a large, mature tree that is a dominant element in thelandscape. Trees
When locating trees, consid-er the function they will serve.You may have a brand new lotwith no trees at all and needcanopy trees for shade. Or, ifan undesirable view needs tobe blocked, you may need touse trees that are evergreen, toprovide screening in all sea-sons. Large trees, especiallyevergreen trees, will visuallyand physically dominate yourresidence if they are locatedtoo close to the structure, mak-ing it appear crowded andsmall. Choose trees that willnot grow too large for yourproperty or interfere with utili-ties. Trees located too close toyour residence, especially ever-green trees, will dominate and

24
make it appear crowded and small. Choose treesthat will remain in proportion and scale to yourhouse. When locating large trees, leave amplespace for the sizeable root zone of those trees.Use care when planting under existing trees, astoo much disturbance can cause root loss andharm or kill the tree.
Trees can contribute to your home’s energy effi-ciency (Figure 31). Evergreen trees can be locatedto the north and west of your residence to blockwinter winds. Deciduous trees provide shade insummer and allow cooling summer breezes fromthe south. Because the summer sun travels in asoutherly arc from the east to the west, its raysare more intense in these directions; therefore,shade trees should be planted to block theseexposures. These shade trees will reduce energydemands by shading windows and walls duringthe hottest part of summer days. In the winter,when the leaves have fallen, deciduous treesallow the sun to warm your home.
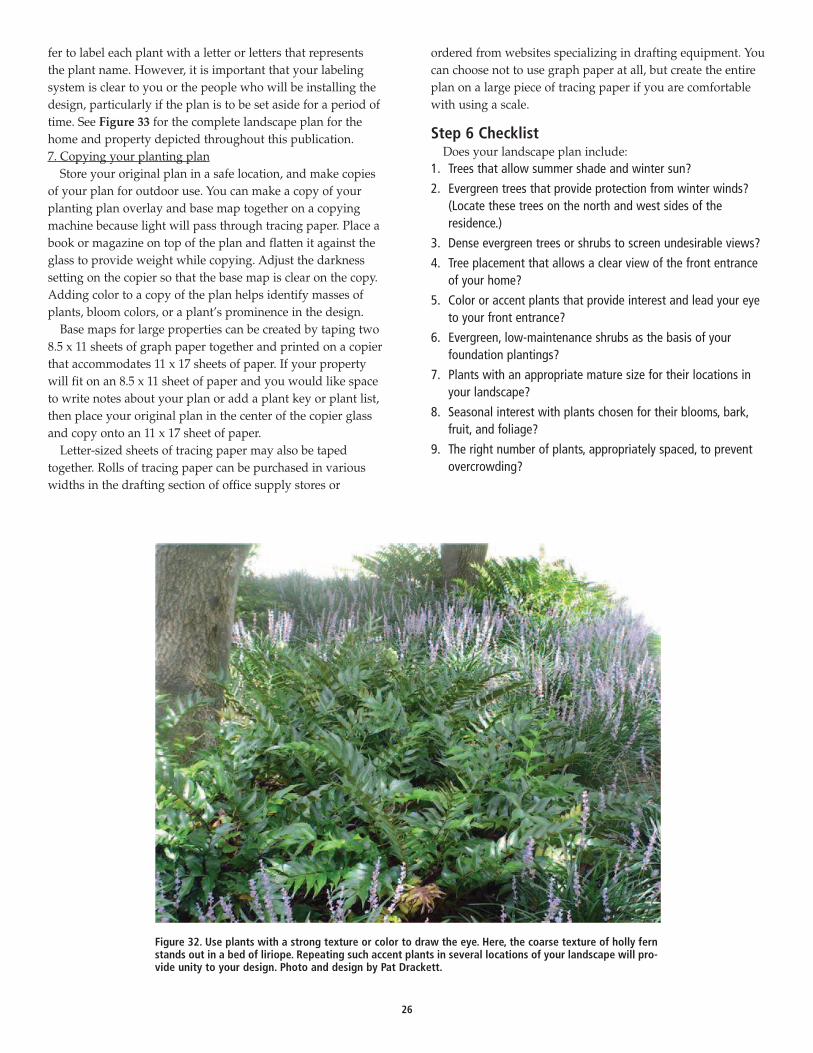
Accent plantsAccent plants serve as secondary focal points, with one ormore providing a strong color, form, or texture (Figure 32). Afocal point or specimen tree is a dominant element in the land-scape, while accent plants can be repeated in several placesand provide unity to the landscape. Filler plants
Once you have located your trees, focal points, and accentplants, and provided plants of various heights to frame them,fill in the areas around them. The placement of future plantswill go more quickly after you have developed a portion ofyour landscape. Repeating certain combinations of shrubs andgroundcovers in several areas within the design will unify thelandscape. 5. Labeling the plants on the plan
If you have room on your plan, you may want to draw aline to each plant that indicates its common name, quantity,and the container size or height. This saves time spent search-ing for symbols in a plant key. You may also want to includethe Latin name of the plant. However, there is not alwaysspace available to include all of this information. A shorthandmethod of using the quantity and first letter or two of theplant’s common name (or Latin name) can be used wherespace is limited. For example, if the plant is an azalea, it couldappear as “12 – A” or “12 – Az.” The important part is thatyour method of labeling is clear to you or the people who willinstall the plants. 6. Creating a plant key
A plant key is a list of the symbols used in your design,along with the plants they represent. Both the Latin name andthe common name for each plant may be listed, along with thesize of each plant to be purchased. A total quantity for eachplant used in the plan should also be included. You may pre-
Figure 30. Plan symbols may be modified to reflect texture or other plant characteristics.This allows the species to be quickly recognizable when you are reviewing your plantingplan. Image and planting symbols by Pat Drackett.
Figure 29. The shape of planting beds is important. Create curved bed-lines with a mechanical edger or shovel, and develop smooth, gradualcurves that will allow for easy mowing. You may wish to lay a gardenhose on the ground to get an idea of the desired shape before cuttingthe final edge. Photo by Pat Drackett. Landscape contractor:GroundScape Inc., Biloxi.

25
Figu
re 31. Placing
plants to m
aximize energy savings. D
rawing by Richard M
artin III.
26
fer to label each plant with a letter or letters that representsthe plant name. However, it is important that your labelingsystem is clear to you or the people who will be installing thedesign, particularly if the plan is to be set aside for a period oftime. See Figure 33 for the complete landscape plan for thehome and property depicted throughout this publication. 7. Copying your planting plan
Store your original plan in a safe location, and make copiesof your plan for outdoor use. You can make a copy of yourplanting plan overlay and base map together on a copyingmachine because light will pass through tracing paper. Place abook or magazine on top of the plan and flatten it against theglass to provide weight while copying. Adjust the darknesssetting on the copier so that the base map is clear on the copy.Adding color to a copy of the plan helps identify masses ofplants, bloom colors, or a plant’s prominence in the design.
Base maps for large properties can be created by taping two8.5 x 11 sheets of graph paper together and printed on a copierthat accommodates 11 x 17 sheets of paper. If your propertywill fit on an 8.5 x 11 sheet of paper and you would like spaceto write notes about your plan or add a plant key or plant list,then place your original plan in the center of the copier glassand copy onto an 11 x 17 sheet of paper.
Letter-sized sheets of tracing paper may also be tapedtogether. Rolls of tracing paper can be purchased in variouswidths in the drafting section of office supply stores or
ordered from websites specializing in drafting equipment. Youcan choose not to use graph paper at all, but create the entireplan on a large piece of tracing paper if you are comfortablewith using a scale.
Step 6 ChecklistDoes your landscape plan include:
1. Trees that allow summer shade and winter sun?
2. Evergreen trees that provide protection from winter winds? (Locate these trees on the north and west sides of the residence.)
3. Dense evergreen trees or shrubs to screen undesirable views?
4. Tree placement that allows a clear view of the front entrance of your home?
5. Color or accent plants that provide interest and lead your eye to your front entrance?
6. Evergreen, low-maintenance shrubs as the basis of your foundation plantings?
7. Plants with an appropriate mature size for their locations in your landscape?
8. Seasonal interest with plants chosen for their blooms, bark, fruit, and foliage?
9. The right number of plants, appropriately spaced, to prevent overcrowding?
Figure 32. Use plants with a strong texture or color to draw the eye. Here, the coarse texture of holly fernstands out in a bed of liriope. Repeating such accent plants in several locations of your landscape will pro-vide unity to your design. Photo and design by Pat Drackett.

27
Figu
re 33. Com
plete land
scape plan. D
rawing by Richard M
artin III.

28
Step 7. Establish priorities for implementation After you have completed your use areas and planting areas
to your satisfaction, it is wise to make a list of priorities toaccomplish the plan. Decide on the areas that need to bedeveloped first, and tackle them one at a time as your budgetand time allow. Here are a few suggestions to help you accom-plish your goals:
• Finish all land leveling and grade changes first.
• Correct all drainage problems before beginning installations.
• Complete all permanent hard surfaces, such as patios, walk-ways, driveways, and structures, first.
• Because trees take time to mature, consider planting them first.
The Low-Maintenance LandscapeWith today's busy lifestyles, homeowners are seeking ways
to reduce maintenance in the home landscape. The creation ofa low-maintenance landscape requires proper planning andwise choices. This includes identifying areas that require amore manicured look and those that can be less heavily main-tained. There are a number of landscape building materials,plant types, and design strategies that can reduce effort andexpense. The best place to begin the low maintenance land-scape is to develop a plan for your property.
Eight simple tips to create an easy-care yard:Although there is no such thing as a no-maintenance land-
scape, here are a few suggestions to minimize excessive land-scape care.
1. Reduce the total amount of unused lawn area.Beautiful lawns are expensive and high-maintenance. In
addition to the mowing, rolling, watering, fertilizing, liming,thatching, and pesticide, fungicide, and herbicide applyingthat are used to maintain a healthy lawn, lawn edging andraking can consume an extraordinary amount of time andexpense. Maintaining proper play and open lawn space areimportant for many homeowners, yet reducing unused lawnportions can save time. Easy-to-care-for trees, shrubs, andgroundcovers are excellent alternatives to excessive open lawnspace. This may be achieved by applying herbicide to theunwanted existing lawn area, planting low-care woody plantspecies, and planting a thick groundcover or layer of mulch.The first few years may require extra weeding and care, but asthe trees and shrubs establish themselves, an annual cleanupwill be all that is required.
2. Use quality, long-lasting landscape materials.As you select or replace structural features for your land-
scape, choose materials that do not require frequent replace-ment. Sidewalks, patios, decks, fences, steps, driveways, seat-ing structures, trellises and gazebos, and furniture itemsshould be durable. A concrete or brick patio will last 20 to 30years, whereas a wooden deck or brick-on-sand patio may
need replacing every 5 to 8 years. Recycled plastic lumber hasa much longer life span and reduced painting or stainingneeds than traditional treated wood for fences, decks, andsteps. Bed edgings made of concrete, brick, or stone edgingblocks will last much longer than landscape timbers or rail-road ties. Also, mowing strips (concrete or brick pavers placedat the ground level) can be used for bed edges next to turfareas to reduce the need for edging treatments. Consider theinitial cost, maintenance costs, long-term costs, and durabilitywhen selecting landscape materials.
3. Select perennial plants over annuals for landscape color.To reduce replacement costs for annual plants (plants that
last one season), consider using perennial plants (plants thatcome back every year). Depending upon your plant hardinesszone, impatiens, begonias, petunias, and marigolds mayrequire replanting every year. Choose daylilies, stokes aster,lantana, black-eyed susan, coneflowers, evening primrose, orperennial phlox for long-lasting color.
4. Avoid problem or high-maintenance plants.Hybrid tea roses, gardenias, and fruit trees are examples of
high-maintenance plants. These require regular applications ofpesticides, water, or fungicides in order to grow well inMississippi. Select plants that are resistant to insect, disease,and fungal problems; tolerant of wet or dry periods andextreme temperatures; and adaptable to poor soil conditions.
5. Use geotextiles for weed control.Geotextiles, commonly known as landscape or weed fabrics,
can reduce weeds in sunny planting beds. Placing the fabricon the ground around existing shrubs and covering it with athick layer of mulch will reduce the growth of many weedspecies. Pre-existing problem weeds should be controlled withan herbicide before covering. Geotextiles allow water and fer-tilizers through the cloth and allow plant roots to breathe. Donot use plastic sheeting, which is not permeable. Ground-covers may also be planted in open bed space to competeagainst weeds.
6. Put the right size plant in the right place.Avoid constant pruning by selecting plants that will not
exceed the desired height or width for their area. Problemplaces occur under windows, utility lines, roof eaves, viewsheds, and near doorways. These problems can be avoided byasking the nursery owner to recommend plants that do notgrow larger than the maximum height or width for the arearequired. Fast-growing plants require little or no pruning ifthey are located where they have room to grow to theirmature size, such as in site perimeters or the rear of beds.
7. Place plants in masses, not individually.Plant combinations are often more effective when planted
in masses rather than as individuals. A dense shrub borderin large island beds allows room for a mower around theoutside edge, reducing the need for edging and weeding inscattered plantings.

29
8. Keep the landscape simple.A complicated design with a wealth of landscape plants and
garden areas often requires specialized care. Don’t overdofocal points, accents, color, texture, or types of plants. Aim forbalance. Landscaping should frame your home, not dominateit. A simple, effective design and palette of easy-to-manageplants can create a beautiful, carefree landscape.
The Sustainable Sites InitiativeTM
The Sustainable Sites Initiative (SITESTM) is a new nationaleffort to create voluntary guidelines and benchmarks that pro-mote sustainable land design and construction practices.Jointly sponsored by the American Society of LandscapeArchitects, the Lady Bird Johnson Wildflower Center, and the
U.S. Botanic Garden, SITES™ provides a ranking system thatawards points for comprehensive sustainable land practicesfor built projects. The program is complementary to LEED®(Leadership in Energy and Environmental Design) GreenBuilding Rating System, and it is anticipated that the SITES™criteria will be incorporated into future versions of LEED®.
SITES™ has nine areas of focus—hydrology, soils and vege-tation, materials, monitoring, operations and maintenance,construction, pre-design assessment, site selection, and humanhealth and well-being. For more information on SustainableSites and to see examples of how these can be incorporatedinto residential landscapes, visit their website athttp://www.sustainablesites.org/.

Notes

By Dr. Lelia Kelly, Extension Professor, North Mississippi Research and Extension Center; Robert Brzuszek, Professor, Landscape Architecture;and Patricia Drackett, Director, The Crosby Arboretum, Coastal Research and Extension Center.
Portions of this publication were taken from an earlier MSU Extension publication, P479 Planning the Home Landscape, by James H. Perry.
We are an equal opportunity employer, and all qualified applicants will receive consideration for employment without regard to race, color, religion, sex,national origin, disability status, protected veteran status, or any other characteristic protected by law.
Publication 2698Extension Service of Mississippi State University, cooperating with U.S. Department of Agriculture. Published in furtherance of Acts of Congress, May8 and June 30, 1914. GARY B. JACKSON, Director (rep-1M-10-16)
extension.msstate.edu