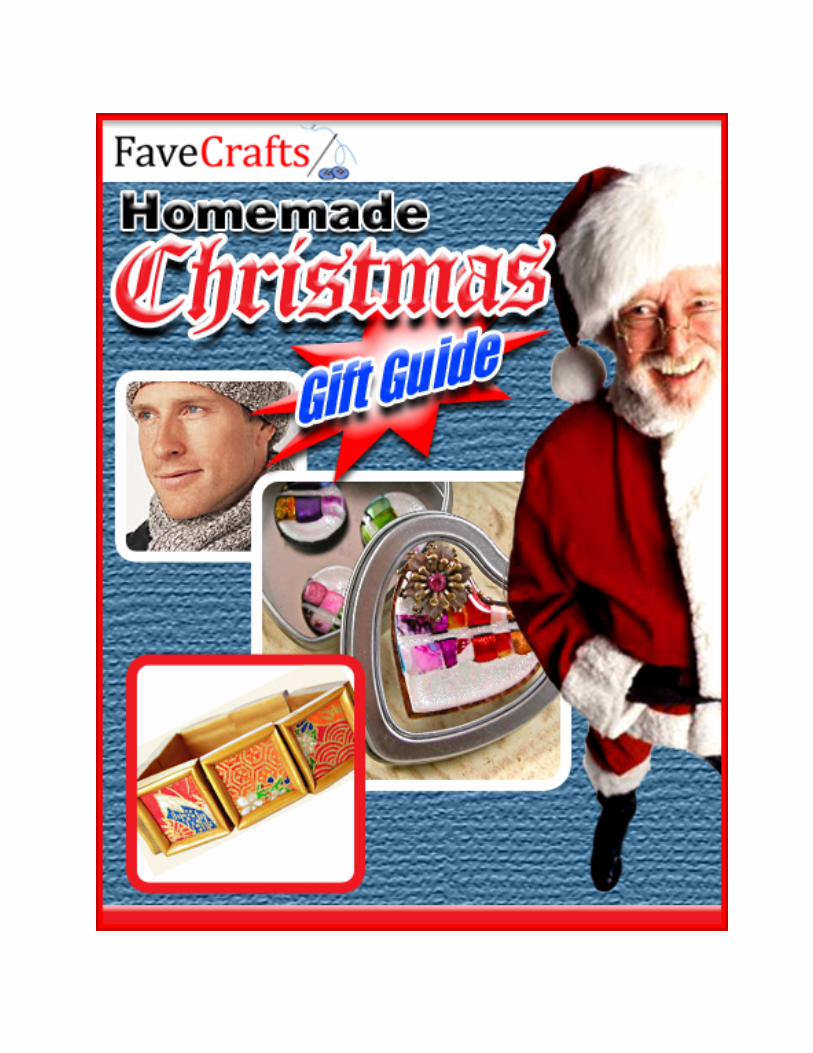
homemade christmas gift guide
DESCRIPTION
Manualidades para navidadTRANSCRIPT
Homemade Christmas Gift Guide eBook
Find thousands of free crafts, decorating ideas, handmade gifts and more at www.FaveCrafts.com. 2
Homemade Christmas Gift Guide eBook from FaveCrafts.com
Copyright 2009 by Prime Publishing LLC
All rights reserved. No part of this book may be reproduced or transmitted in any form or by any means, electronic or mechanical, including photocopying, recording, or by any information storage or retrieval system, without written permission from the publisher, except in the case of brief quotations embodied
in critical articles and reviews.
Trademarks are property of their respective holders. When used, trademarks are for the benefit of the trademark owner only.
Published by Prime Publishing LLC, 3400 Dundee Road, Northbrook, IL 60062 – www.primecp.com
Homemade Christmas Gift Guide eBook
Find thousands of free crafts, decorating ideas, handmade gifts and more at www.FaveCrafts.com. 3
Letter from the Editors
Dear Reader,
Homemade Christmas gifts are often the most cherished of all gifts, reminding the recipient of the gift‐giver who took the time to make something with his or her own hands. In addition to showing a bit of extra effort, homemade gifts are generally thriftier and more personalized. You can create a sweater, necklace or journal with little touches that make it just perfect for the recipient.
In a time when environmental concerns are important to more and more people, homemade gifts can also be better for the environment. Gift‐givers can select sustainable materials, ditch the plastic packaging on retail gifts and save themselves from driving all over town Christmas shopping. With all these considerations, FaveCrafts.com has put together a collection of homemade Christmas gifts, sorted by recipient. Find something to make for your Mom, your boyfriend or your office gift exchange.
Happy holidays!
You can find more free Christmas crafts and other holiday crafts at www.FaveCrafts.com.
Our eBooks, like all our craft projects, are absolutely FREE to members of our crafting community. Please feel free to share with family and friends and ask them to sign up at our website for our free e‐mail newsletter.
Sincerely,
The Editors of FaveCrafts
www.FaveCrafts.com
www.FaveCraftsBlog.com
Homemade Christmas Gift Guide eBook
Find thousands of free crafts, decorating ideas, handmade gifts and more at www.FaveCrafts.com. 4
Christmas Gifts Table of Contents
For Mom ........................................................................................................................................ 6
Holiday Paper Clay Bracelet ...................................................................................................................... 6
Bath Spa Mitts ........................................................................................................................................... 8
Custom‐Cut Etched Floral Vase ............................................................................................................... 10
Embellish a Tea Towel ............................................................................................................................. 12
For Dad ........................................................................................................................................ 13
Gears Cottage Clock ................................................................................................................................ 13
Hat and Scarf Set for Men ....................................................................................................................... 15
Faux Dichroic Glass Recycled Bottle........................................................................................................ 17
Dad and Son Tie‐Dye Camo Set ............................................................................................................... 19
For Sister...................................................................................................................................... 21
Holiday Pom Pom Slippers ...................................................................................................................... 21
Buttons Mirror Frame ............................................................................................................................. 23
Charms Bracelet made with Shrink Plastic.............................................................................................. 24
Sweet Collar Sewing Tutorial .................................................................................................................. 26
For Brother .................................................................................................................................. 29
Mosaic Kaleidescope Lamp ..................................................................................................................... 29
Get Those Records off the Shelf Water Fountain ................................................................................... 31
Wax Art Crystals Candles ........................................................................................................................ 32
T‐Shirt Scarf ............................................................................................................................................. 33
Homemade Christmas Gift Guide eBook
Find thousands of free crafts, decorating ideas, handmade gifts and more at www.FaveCrafts.com. 5
or Boyfriend or Husband ......................................................................................................... 36
Men's Hat and Scarf Knitting Pattern ..................................................................................................... 36
Wine Coasters ......................................................................................................................................... 37
Sailor's Embellished Box .......................................................................................................................... 39
Eco‐Friendly Bag with Industrial Felt and Recycled Leather ................................................................... 40
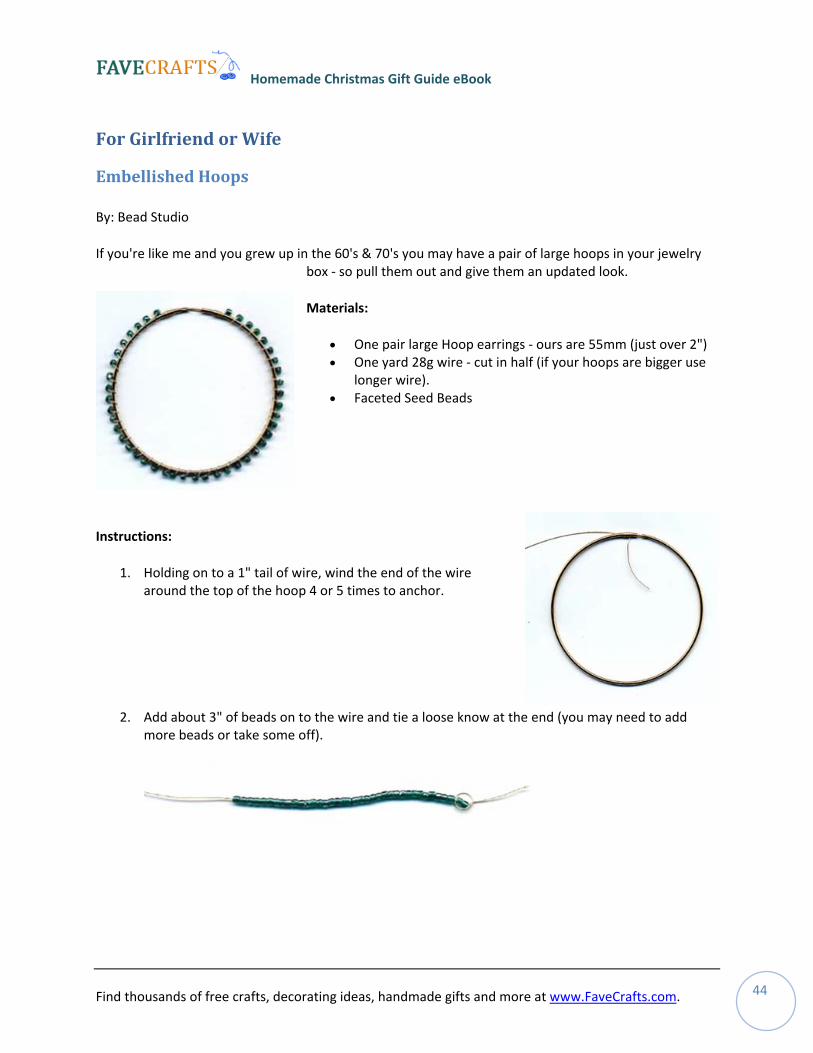
For Girlfriend or Wife ................................................................................................................ 44
Protect Your Folders ............................................................................................................................... 46
Cute Green Tie‐Dye Top .......................................................................................................................... 49
Homemade Beaded Necklace ................................................................................................................. 50
For the Kids ................................................................................................................................. 51
Cute Crochet Pals .................................................................................................................................... 53
Girls Tiered Skirt ...................................................................................................................................... 56
DIY Road Play Mats ................................................................................................................................. 57
Small Gifts for Exchanges/Secret Santa/Hostess Gifts ............................................................ 58
A Magnetic Gift Set ................................................................................................................................. 60
Holiday Soap or Ornaments .................................................................................................................... 62
Etched Floral Coasters ............................................................................................................................. 63
F
Embellished Hoops .................................................................................................................................. 44
Knit Sock Monkey .................................................................................................................................... 51
Snowman Paint Can Gift Box .................................................................................................................. 58
Homemade Christmas Gift Guide eBook
Find thousands of free crafts, decorating ideas, handmade gifts and more at www.FaveCrafts.com. 6
For Mom
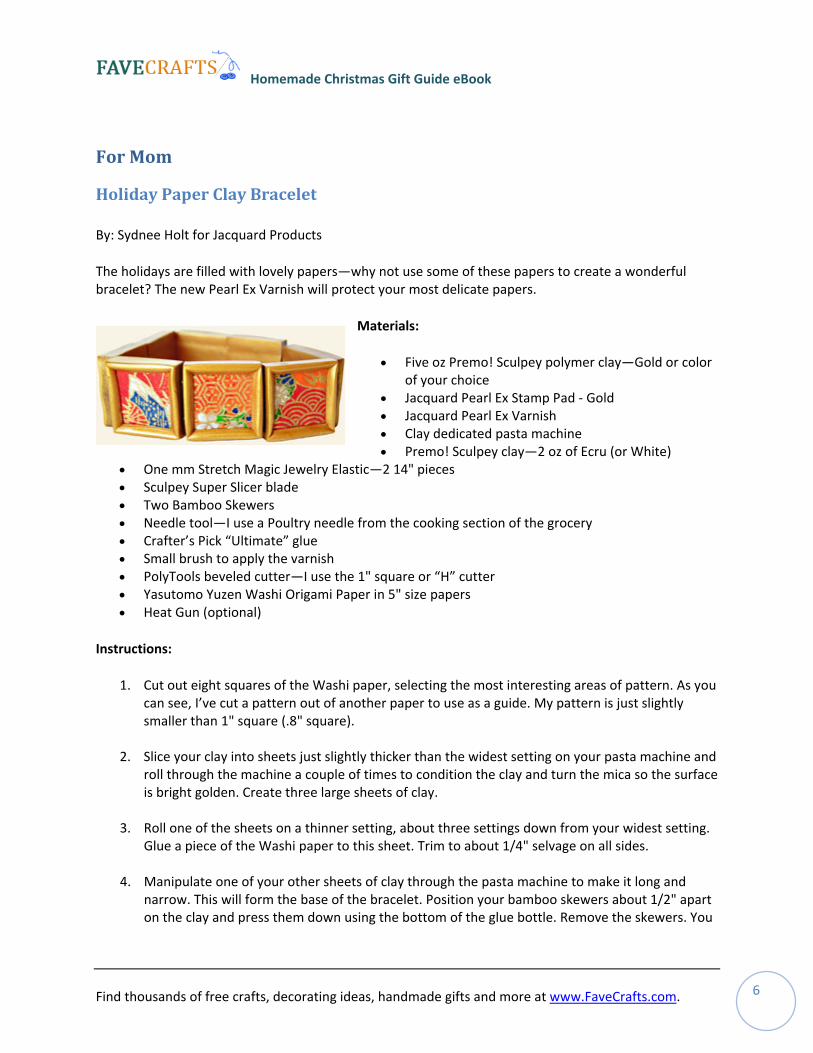
Holiday Paper Clay Bracelet
By: Sydnee Holt for Jacquard Products
The holidays are filled with lovely papers—why not use some of these papers to create a wonderful bracelet? The new Pearl Ex Varnish will protect your most delicate papers.
Materials:
• Five oz Premo! Sculpey polymer clay—Gold or color of your choice
• Jacquard Pearl Ex Stamp Pad ‐ Gold • Jacquard Pearl Ex Varnish • Clay dedicated pasta machine • Premo! Sculpey clay—2 oz of Ecru (or White)
• One mm Stretch Magic Jewelry Elastic—2 14" pieces • Sculpey Super Slicer blade • Two Bamboo Skewers • Needle tool—I use a Poultry needle from the cooking section of the grocery • Crafter’s Pick “Ultimate” glue • Small brush to apply the varnish • PolyTools beveled cutter—I use the 1" square or “H” cutter • Yasutomo Yuzen Washi Origami Paper in 5" size papers • Heat Gun (optional)
Instructions:
1. Cut out eight squares of the Washi paper, selecting the most interesting areas of pattern. As you can see, I’ve cut a pattern out of another paper to use as a guide. My pattern is just slightly smaller than 1" square (.8" square).
2. Slice your clay into sheets just slightly thicker than the widest setting on your pasta machine and roll through the machine a couple of times to condition the clay and turn the mica so the surface is bright golden. Create three large sheets of clay.
3. Roll one of the sheets on a thinner setting, about three settings down from your widest setting. Glue a piece of the Washi paper to this sheet. Trim to about 1/4" selvage on all sides.
4. Manipulate one of your other sheets of clay through the pasta machine to make it long and narrow. This will form the base of the bracelet. Position your bamboo skewers about 1/2" apart on the clay and press them down using the bottom of the glue bottle. Remove the skewers. You
Homemade Christmas Gift Guide eBook
Find thousands of free crafts, decorating ideas, handmade gifts and more at www.FaveCrafts.com. 7
should have two even channels in the clay now.
5. Set the trimmed piece of clay with the Washi paper on the channeled clay sheet, centering the Washi paper on the channels. Trim to the clay that the Washi paper is mounted on. Set aside.
6. Use your cutter on the final remaining piece of clay to cut out a square. Trim this piece to at least 3/8" selvage around the square.
7. Align this piece of clay over the Washi paper assembly.
8. Use your Super Slicer blade to trim the edges of the frame. I found that cutting closer is easier than trying to leave a large border.
9. Measure each bead against each other to maintain a matching size.
10. Recheck your channels by running the needle tool through each channel.
11. Repeat this process for each of your beads. I use 8 beads on a bracelet. You may wish to add more or less.
12. Place the beads on a sheet of unlined paper on your baking sheet and bake the beads in a preheated oven at 275° for 25 minutes. Allow the beads to cool before continuing.
13. Rub the sides of each of the beads and the top of the frame on a Gold Pearl Ex Stamp Pad. This will add golden highlights that echo the gold in the Washi paper. (This ink is water soluble, but I wear gloves to keep the ink from my hands during my photography design sessions.) Allow the ink to air dry or heat set it with a heat gun for a few moments. You can even put the beads back into the warm oven for 5‐10 minutes to set the ink.
14. Seal the clay and the paper with the Pearl Ex Varnish. Heat set the varnish with either the heat gun or the warm oven. The varnish will dry in just seconds with a heat gun!
15. Align the beads and string through the top channel of the beads. Cut the elastic, leaving 3" on each end of the beads. Flip each bead up from the bottom and thread the elastic through the bottom channel. Cut the elastic leaving the 3" selvage.
16. Gather up the ends of the elastic and tie a double knot in each set of elastic for the top and bottom channels. Once the knot is tied, gently but firmly pull on each end of the elastic to tighten the knot. Trim the knot, leaving a small selvage of about 1/4".
Homemade Christmas Gift Guide eBook
Find thousands of free crafts, decorating ideas, handmade gifts and more at www.FaveCrafts.com. 8
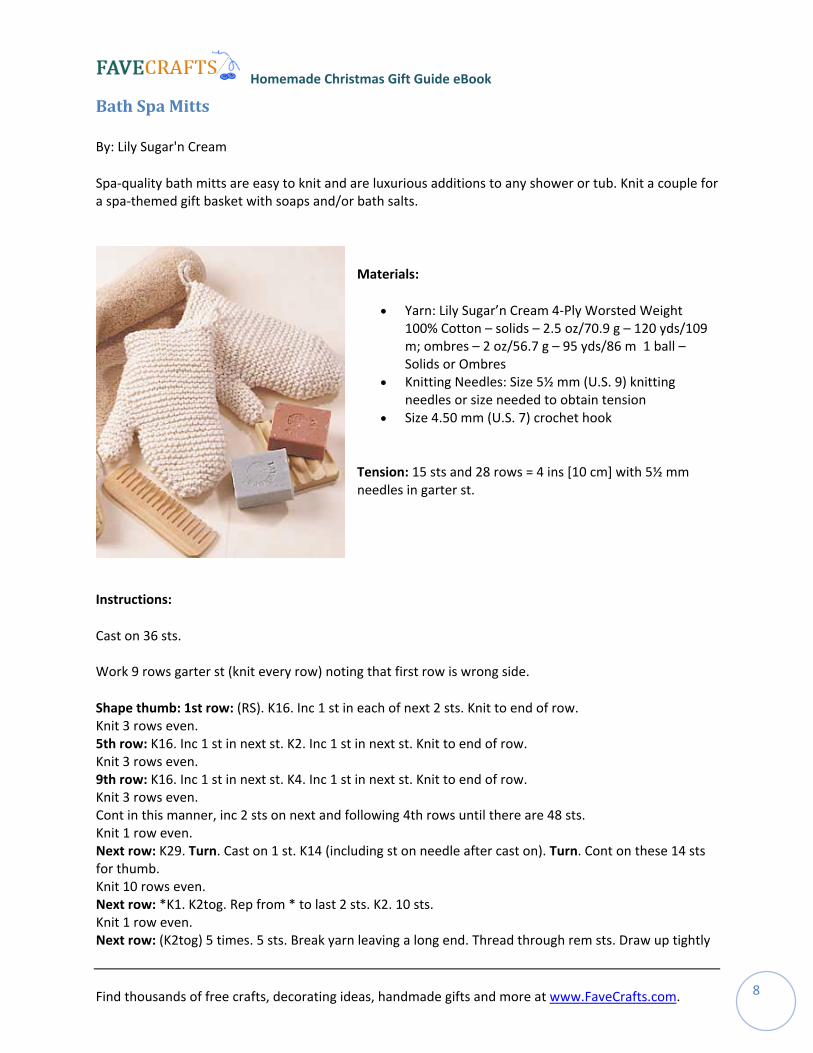
Bath Spa Mitts
By: Lily Sugar'n Cream
Spa‐quality bath mitts are easy to knit and are luxurious additions to any shower or tub. Knit a couple for a spa‐themed gift basket with soaps and/or bath salts.
Materials:
• Yarn: Lily Sugar’n Cream 4‐Ply Worsted Weight 100% Cotton – solids – 2.5 oz/70.9 g – 120 yds/10m; ombres – 2 oz/56.7 g – 95 yds/86 m 1 ball – Solids or Om
9
bres • Knitting Needles: Size 5½ mm (U.S. 9) knitting
needles or size needed to obtain tension • Size 4.50 mm (U.S. 7) crochet hook
Tension: 15 sts and 28 rows = 4 ins [10 cm] with 5½ mm needles in garter st.
Instructions:
Cast on 36 sts. Work 9 rows garter st (knit every row) noting that first row is wrong side.
Shape thumb: 1st row: (RS). K16. Inc 1 st in each of next 2 sts. Knit to end of row. Knit 3 rows even. 5th row: K16. Inc 1 st in next st. K2. Inc 1 st in next st. Knit to end of row. Knit 3 rows even. 9th row: K16. Inc 1 st in next st. K4. Inc 1 st in next st. Knit to end of row. Knit 3 rows even. Cont in this manner, inc 2 sts on next and following 4th rows until there are 48 sts. Knit 1 row even. Next row: K29. Turn. Cast on 1 st. K14 (including st on needle after cast on). Turn. Cont on these 14 sts for thumb. Knit 10 rows even. Next row: *K1. K2tog. Rep from * to last 2 sts. K2. 10 sts. Knit 1 row even. Next row: (K2tog) 5 times. 5 sts. Break yarn leaving a long end. Thread through rem sts. Draw up tightly
Homemade Christmas Gift Guide eBook
Find thousands of free crafts, decorating ideas, handmade gifts and more at www.FaveCrafts.com. 9
and fasten securely. Sew thumb seam. With RS of Mitt facing, join yarn to rem sts. Pick up and knit 2 sts under thumb. Knit to end of row. Next row: Knit, knitting tog the 2 sts picked up under thumb. 36 sts. Knit 16 rows even.
Shape top: 1st row: K1. Sl1. K1. psso. K12. K2tog. K2. Sl1. K1. psso. K12. K2tog. K1. 32 sts. 2nd and alt rows: Knit. 3rd row: K1. Sl1. K1. psso. K10. K2tog. K2. Sl1. K1. psso. K10. K2tog. K1. 28 sts. 5th row: K1. Sl1. K1. psso. K8. K2tog. K2. Sl1. K1. psso. K8. K2tog. K1. 24 sts. 7th row: K1. Sl1. K1. psso. K6. K2tog. K2. Sl1. K1. psso. K6. K2tog. K1. 20 sts. 9th row: K1. Sl1. K1. psso. K4. K2tog. K2. Sl1. K1. psso. K4. K2tog. K1. 16 sts. 11th row: (K2tog) 8 times. 8 sts. Break yarn leaving a long end. Thread through rem sts. Draw up tightly and fasten securely. Sew side seam.
Hanging Loop: With crochet hook, make a chain 2½ ins [6 cm] long. Fasten off. Sew in position at top of side seam as illustrated.
Homemade Christmas Gift Guide eBook
Find thousands of free crafts, decorating ideas, handmade gifts and more at www.FaveCrafts.com. 10
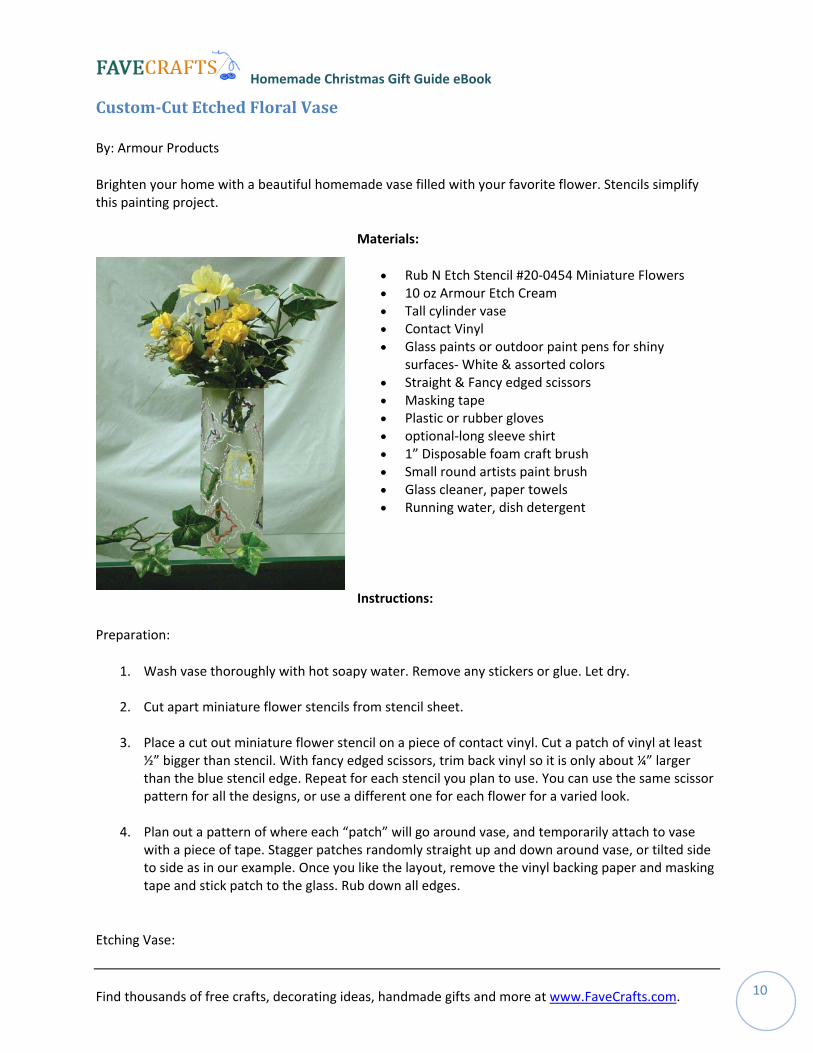
ustomCut Etched Floral Vase
By: Armour Products
Brighten your home with a beautiful homemade vase filled with your favorite flower. Stencils simplify
Materials:
• Rub N Etch Stencil #20‐0454 Miniature Flowers
outdoor paint pens for shiny
er gloves t rush
nt
Instructions:
Preparation:
1. Wash vase thoroughly with hot soapy water. Remove any stickers or glue. Let dry.
t apart miniature flower stencils from stencil sheet.
ace a cut out miniature flower stencil on a piece of contact vinyl. Cut a patch of vinyl at least
or
an out a pattern of where each “patch” will go around vase, and temporarily attach to vase e
Etching Vase:
C
this painting project.
• 10 oz Armour Etch Cream • Tall cylinder vase • Contact Vinyl • Glass paints or
surfaces‐ White & assorted colors • Straight & Fancy edged scissors • Masking tape • Plastic or rubb• optional‐long sleeve shir• 1” Disposable foam craft b• Small round artists paint brush • Glass cleaner, paper towels • Running water, dish deterge
2. Cu
3. Pl
½” bigger than stencil. With fancy edged scissors, trim back vinyl so it is only about ¼” larger than the blue stencil edge. Repeat for each stencil you plan to use. You can use the same scisspattern for all the designs, or use a different one for each flower for a varied look.
4. Plwith a piece of tape. Stagger patches randomly straight up and down around vase, or tilted sidto side as in our example. Once you like the layout, remove the vinyl backing paper and masking tape and stick patch to the glass. Rub down all edges.
Homemade Christmas Gift Guide eBook
Find thousands of free crafts, decorating ideas, handmade gifts and more at www.FaveCrafts.com. 11
1. Put on rubber gloves. Also tape a couple of pieces of paper towel around one arm or wear an g sleeve shirt to protect your skin on the arm that will hold vase. Slip your hand inside
vase if wide enough, otherwise hold with a few fingers inside.
at m of vase in a fairly straight line.
y to do this without stopping, the effect will be more even. After you have gone completely
move vinyl patches and rinse again until all cream is gone. Let dry.
owers:
1. Rub on miniature flowers in center of each un‐etched patch according to your plan and rub ording to the directions on the Rub N Etch package directions.
g a
old lon
2. Take foam craft brush and scoop up about ½ teaspoon full of Etch cream onto brush. Starting
top of the upside down vase, spread Etch cream down to bottoTraround entire vase, go back and make sure all spots have been covered, but continue to spread in only one direction down vase.
3. Wait one minute and wash off all Etch cream.
4. Re
Etching Fl
down acc
2. Cover all un‐etched areas of the patch surrounding the stencil with masking tape, overlappinlittle onto etched area.
3. Etch flowers according to basic etching instructions. Wash off and let dry.
Homemade Christmas Gift Guide eBook
Find thousands of free crafts, decorating ideas, handmade gifts and more at www.FaveCrafts.com. 12
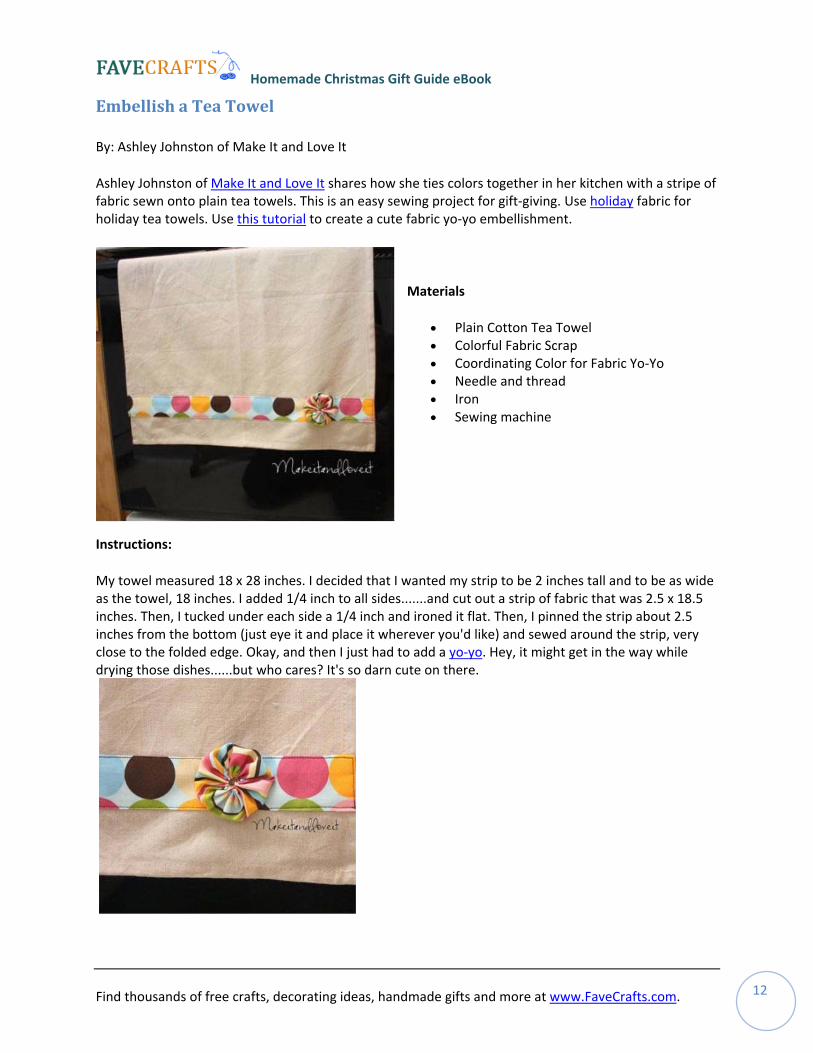
Embellish a Tea Towel
By: Ashley Johnston of Make It and Love It
Ashley Johnston of Make It and Love It shares how she ties colors together in her kitchen with a stripe of fabric sewn onto plain tea towels. This is an easy sewing project for gift‐giving. Use holiday fabric for holiday tea towels. Use this tutorial to create a cute fabric yo‐yo embellishment.
Materials
• Plain Cotton Tea Towel • Colorful Fabric Scrap • Coordinating Color for Fabric Yo‐Yo • Needle and thread • Iron • Sewing machine
Instructions:
My towel measured 18 x 28 inches. I decided that I wanted my strip to be 2 inches tall and to be as wide as the towel, 18 inches. I added 1/4 inch to all sides.......and cut out a strip of fabric that was 2.5 x 18.5 inches. Then, I tucked under each side a 1/4 inch and ironed it flat. Then, I pinned the strip about 2.5 inches from the bottom (just eye it and place it wherever you'd like) and sewed around the strip, very close to the folded edge. Okay, and then I just had to add a yo‐yo. Hey, it might get in the way while drying those dishes......but who cares? It's so darn cute on there.
Homemade Christmas Gift Guide eBook
Find thousands of free crafts, decorating ideas, handmade gifts and more at www.FaveCrafts.com. 13
For Dad
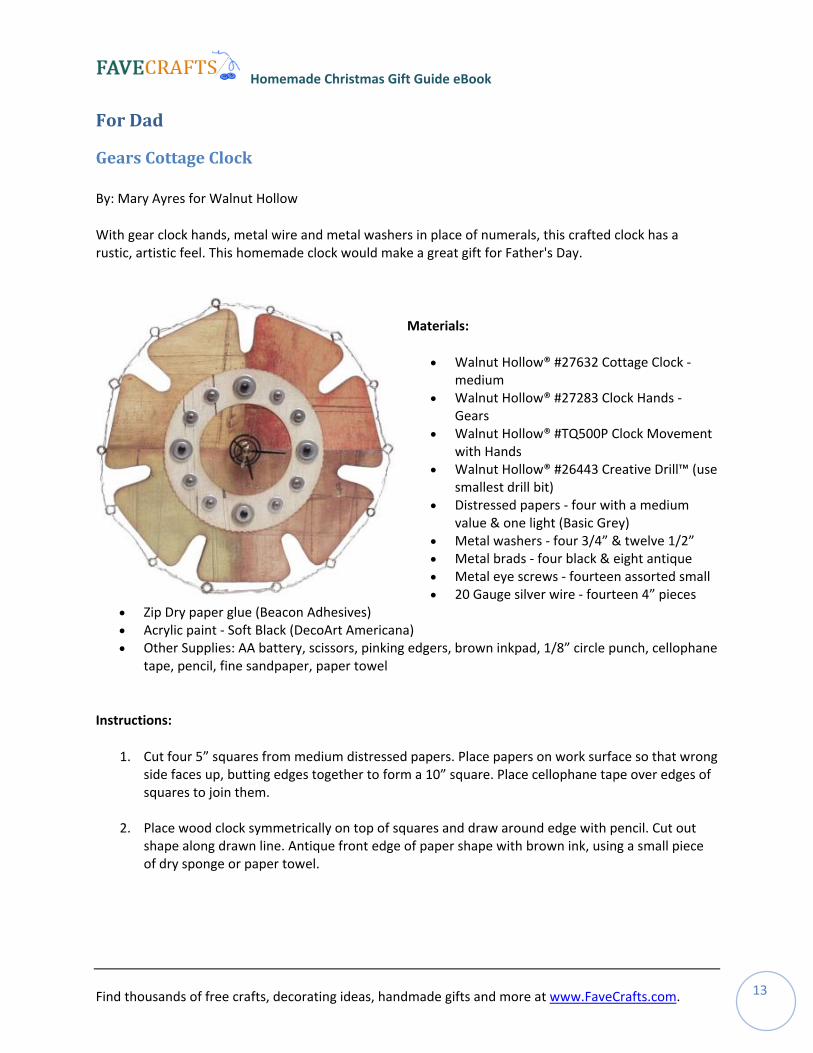
Gears Cottage Clock
By: Mary Ayres for Walnut Hollow
With gear clock hands, metal wire and metal washers in place of numerals, this crafted clock has a rustic, artistic feel. This homemade clock would make a great gift for Father's Day.
Materials:
• Walnut Hollow® #27632 Cottage Clock ‐ medium
• Walnut Hollow® #27283 Clock Hands ‐ Gears
• Walnut Hollow® #TQ500P Clock Movement
Creative Drill™ (use
medium
ll
g edgers, brown inkpad, 1/8” circle punch, cellophane tape, pencil, fine sandpaper, paper towel
Instructions:
dges together to form a 10” square. Place cellophane tape over edges of
uares to join them.
e front edge of paper shape with brown ink, using a small piece dry sponge or paper towel.
with Hands • Walnut Hollow® #26443
smallest drill bit) • Distressed papers ‐ four with a
value & one light (Basic Grey) • Metal washers ‐ four 3/4” & twelve 1/2” • Metal brads ‐ four black & eight antique • Metal eye screws ‐ fourteen assorted sma• 20 Gauge silver wire ‐ fourteen 4” pieces
• Zip Dry paper glue (Beacon Adhesives) • Acrylic paint ‐ Soft Black (DecoArt Americana) • Other Supplies: AA battery, scissors, pinkin
1. Cut four 5” squares from medium distressed papers. Place papers on work surface so that wrongside faces up, butting esq
2. Place wood clock symmetrically on top of squares and draw around edge with pencil. Cut out shape along drawn line. Antiquof
Homemade Christmas Gift Guide eBook
Find thousands of free crafts, decorating ideas, handmade gifts and more at www.FaveCrafts.com. 14
3. Cut a 5” circle from light distressed paper with pinking edgers. Cut a 4” circle from center of 5” circle. Antique edges of paper ring with brown ink. Glue ring to center of paper clock shape.
4. Glue large washers on ring, lining them up with edges of paper squares. Glue small washers on top of large washers and evenly spaced between large washers. Punch 1/8” holes in paper inside washers. Attach black brads to holes in large washers. Attach antique brads to holes in small washers.
5. Lightly sand clock. Paint back and sides of clock with Soft Black. Let dry. Sand painted black surface to distress it. Glue assembled paper clock shape to wood shape.
6. Drill starter holes close to ends of straight edges on sides of clock. Screw eyes into holes. Insert a piece of wire through each set of holes with ends even on both sides and then wrap wire ends back around wire to secure it.
7. Attach clock movement to wood clock, following manufacturer’s instructions.
Homemade Christmas Gift Guide eBook
Find thousands of free crafts, decorating ideas, handmade gifts and more at www.FaveCrafts.com. 15
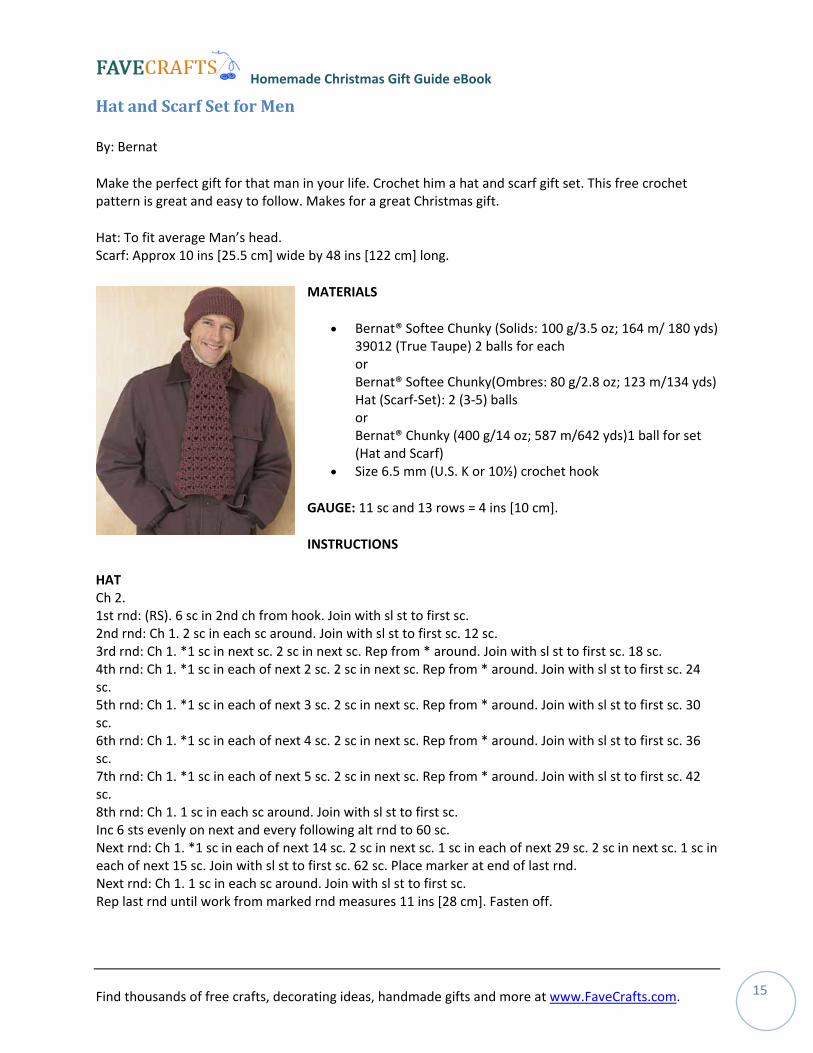
Hat and Scarf Set for Men
By: Bernat
Make the perfect gift for that man in your life. Crochet him a hat and scarf gift set. This free crochet pattern is great and easy to follow. Makes for a great Christmas gift.
Hat: To fit average Man’s head. Scarf: Approx 10 ins [25.5 cm] wide by 48 ins [122 cm] long.
MATERIALS
• Bernat® Softee Chunky (Solids: 100 g/3.5 oz; 164 m/ 180 yds) 39012 (True Taupe) 2 balls for each or Bernat® Softee Chunky(Ombres: 80 g/2.8 oz; 123 m/134 yds) Hat (Scarf‐Set): 2 (3‐5) balls or Bernat® Chunky (400 g/14 oz; 587 m/642 yds)1 ball for set (Hat and Scarf)
• Size 6.5 mm (U.S. K or 10½) crochet hook
GAUGE: 11 sc and 13 rows = 4 ins [10 cm].
INSTRUCTIONS HAT Ch 2. 1st rnd: (RS). 6 sc in 2nd ch from hook. Join with sl st to first sc. 2nd rnd: Ch 1. 2 sc in each sc around. Join with sl st to first sc. 12 sc. 3rd rnd: Ch 1. *1 sc in next sc. 2 sc in next sc. Rep from * around. Join with sl st to first sc. 18 sc. 4th rnd: Ch 1. *1 sc in each of next 2 sc. 2 sc in next sc. Rep from * around. Join with sl st to first sc. 24 sc. 5th rnd: Ch 1. *1 sc in each of next 3 sc. 2 sc in next sc. Rep from * around. Join with sl st to first sc. 30 sc. 6th rnd: Ch 1. *1 sc in each of next 4 sc. 2 sc in next sc. Rep from * around. Join with sl st to first sc. 36 sc. 7th rnd: Ch 1. *1 sc in each of next 5 sc. 2 sc in next sc. Rep from * around. Join with sl st to first sc. 42 sc. 8th rnd: Ch 1. 1 sc in each sc around. Join with sl st to first sc. Inc 6 sts evenly on next and every following alt rnd to 60 sc. Next rnd: Ch 1. *1 sc in each of next 14 sc. 2 sc in next sc. 1 sc in each of next 29 sc. 2 sc in next sc. 1 sc in each of next 15 sc. Join with sl st to first sc. 62 sc. Place marker at end of last rnd. Next rnd: Ch 1. 1 sc in each sc around. Join with sl st to first sc. Rep last rnd until work from marked rnd measures 11 ins [28 cm]. Fasten off.

Homemade Christmas Gift Guide eBook
Find thousands of free crafts, decorating ideas, handmade gifts and more at www.FaveCrafts.com. 16
SCARF Ch 27. Foundation row: (RS). 1 sc in 2nd ch from hook. 1 sc in each ch to end of ch. Turn. 26 sc. 1st row: Ch 3 (counts as dc). Miss first 2 sc. *(1 dc. Ch 1. 1 dc) in next sc. Miss next 2 sc. Rep from * to last 3 sc. (1 dc. Ch 1. 1 dc) in next sc. Miss next sc 1 in last sc. Turn. 2nd row: Ch 1. 1 sc in each of first 2 dc. *1 sc in next ch‐1 sp. 1 sc in each of next 2 dc. Rep from * to end of row. Turn. Rep last 2 rows until work from beg measures 48 ins [122 cm], ending with a 2nd row. Fasten off.
Homemade Christmas Gift Guide eBook
Find thousands of free crafts, decorating ideas, handmade gifts and more at www.FaveCrafts.com. 17
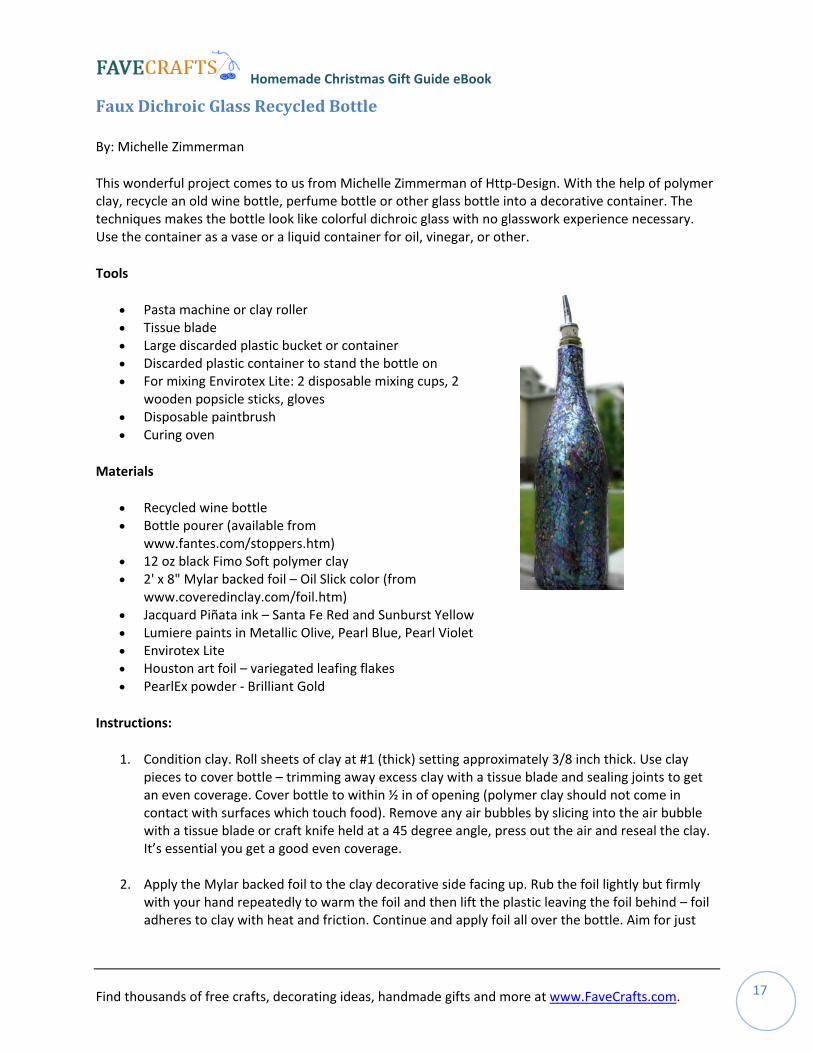
Faux Dichroic Glass Recycled Bottle
By: Michelle Zimmerman
This wonderful project comes to us from Michelle Zimmerman of Http‐Design. With the help of polymer clay, recycle an old wine bottle, perfume bottle or other glass bottle into a decorative container. The techniques makes the bottle look like colorful dichroic glass with no glasswork experience necessary. Use the container as a vase or a liquid container for oil, vinegar, or other.
Tools
• Pasta machine or clay roller • Tissue blade • Large discarded plastic bucket or container • Discarded plastic container to stand the bottle on • For mixing Envirotex Lite: 2 disposable mixing cups, 2
wooden popsicle sticks, gloves • Disposable paintbrush • Curing oven
Materials
• Recycled wine bottle • Bottle pourer (available from
www.fantes.com/stoppers.htm) • 12 oz black Fimo Soft polymer clay • 2' x 8" Mylar backed foil – Oil Slick color (from
www.coveredinclay.com/foil.htm) • Jacquard Piñata ink – Santa Fe Red and Sunburst Yellow • Lumiere paints in Metallic Olive, Pearl Blue, Pearl Violet • Envirotex Lite • Houston art foil – variegated leafing flakes • PearlEx powder ‐ Brilliant Gold
Instructions:
1. Condition clay. Roll sheets of clay at #1 (thick) setting approximately 3/8 inch thick. Use clay pieces to cover bottle – trimming away excess clay with a tissue blade and sealing joints to get an even coverage. Cover bottle to within ½ in of opening (polymer clay should not come in contact with surfaces which touch food). Remove any air bubbles by slicing into the air bubble with a tissue blade or craft knife held at a 45 degree angle, press out the air and reseal the clay. It’s essential you get a good even coverage.
2. Apply the Mylar backed foil to the clay decorative side facing up. Rub the foil lightly but firmly with your hand repeatedly to warm the foil and then lift the plastic leaving the foil behind – foil adheres to clay with heat and friction. Continue and apply foil all over the bottle. Aim for just
Homemade Christmas Gift Guide eBook
Find thousands of free crafts, decorating ideas, handmade gifts and more at www.FaveCrafts.com. 18
less than 100% coverage – small areas of black clay are desirable.
3. Using Lumiere paints and a small paintbrush, paint random long brushstrokes across the bottle. Cross the colors over each other – you’re aiming to give the project more dimension and color.
4. Using the Piñata inks, dip a brush into the inks and touch the brush to the surface of the bottle to make small dots. The inks spread on the clay so a little ink goes a long way.
5. Place the bottle into a cold oven preferably standing upright. Heat the oven to the required temperature with the bottle in it and then cure for the amount of time and at the temperature recommended by the manufacturer. Allow the bottle to cool in the oven before removing it.
6. Mix the Envirotex Lite according to manufacturer’s instructions. It works best if you pour both parts into one container and stir to mix. Pour the mix into a second container – do not scrape the excess off the sides of the first container when you do so. Continue to mix in the second container using a fresh stirring stick.
7. Stand the cured bottle on top of an upturned discarded container in the large bucket. It works best if the bottle is standing on a container slightly smaller than the bottom rim of the bottle. As the excess Envirotex Lite won’t be able to be removed from the containers, use containers you don’t mind damaging.
8. Add approximately 2 tablespoons of the variegated foil pieces and 1/8 teaspoon of gold PearlEx powder to the Envirotex Lite and mix in.
9. Place an old cork into the wine bottle to seal it. Working over the bucket, pour the Envirotex Lite over the surface of the bottle and work it in so it covers the surface of the bottle. This is best done with a disposable paint brush or a gloved hand. You must completely cover the bottle with the Envirotex Lite.
10. When the bottle is covered, stand it on the upside‐down container in the bucket, remove the cork and leave it until set. Perching it on a container ensures that excess Envirotex Lite runs off the bottom of the bottle and won’t adhere to it.
11. When dry, remove the bottle from the bucket and remove the plastic container from the bottom of the bottle. If you need to smooth the bottom of the bottle, sand the excess set Envirotex Lite with coarse sandpaper. Insert the bottle pourer cork.
Designer note: This is a fun effect and it’s fairly easy to achieve. The Envirotex Lite gives the bottle a wonderful glossy seal. For best results, follow the two step mixing process and don’t scrape the first container however tempted you are to do so! The product must be mixed thoroughly so it sets to a hard finish, if you don’t mix it well and if you scrape the sides of the container, you risk it remaining slightly tacky instead of glass like – believe me, I’ve done it before!
Homemade Christmas Gift Guide eBook
Find thousands of free crafts, decorating ideas, handmade gifts and more at www.FaveCrafts.com. 19
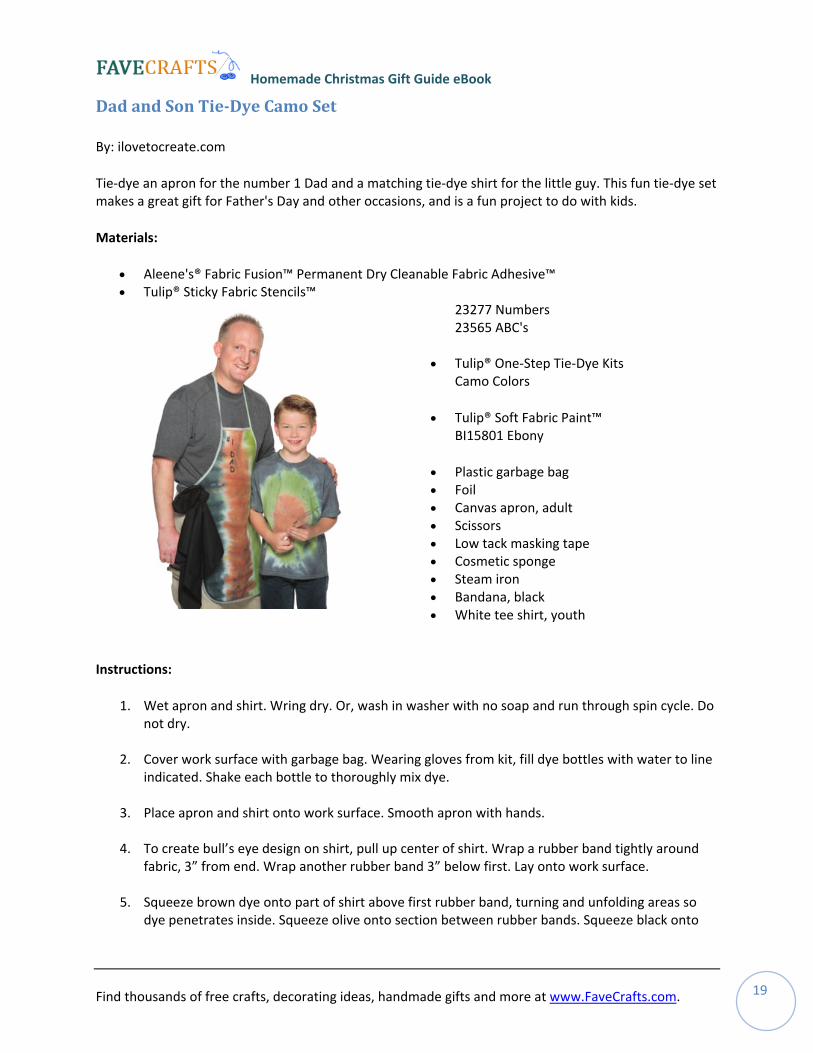
Dad and Son TieDye Camo Set
By: ilovetocreate.com
Tie‐dye an apron for the number 1 Dad and a matching tie‐dye shirt for the little guy. This fun tie‐dye set makes a great gift for Father's Day and other occasions, and is a fun project to do with kids.
Materials:
• Aleene's® Fabric Fusion™ Permanent Dry Cleanable Fabric Adhesive™ • Tulip® Sticky Fabric Stencils™
23277 Numbers 23565 ABC's
• Tulip® One‐Step Tie‐Dye Kits Camo Colors
• Tulip® Soft Fabric Paint™ BI15801 Ebony
• Plastic garbage bag • Foil • Canvas apron, adult • Scissors • Low tack masking tape • Cosmetic sponge • Steam iron • Bandana, black • White tee shirt, youth
Instructions:
1. Wet apron and shirt. Wring dry. Or, wash in washer with no soap and run through spin cycle. Do not dry.
2. Cover work surface with garbage bag. Wearing gloves from kit, fill dye bottles with water to line indicated. Shake each bottle to thoroughly mix dye.
3. Place apron and shirt onto work surface. Smooth apron with hands.
4. To create bull’s eye design on shirt, pull up center of shirt. Wrap a rubber band tightly around fabric, 3” from end. Wrap another rubber band 3” below first. Lay onto work surface.
5. Squeeze brown dye onto part of shirt above first rubber band, turning and unfolding areas so dye penetrates inside. Squeeze olive onto section between rubber bands. Squeeze black onto
Homemade Christmas Gift Guide eBook
Find thousands of free crafts, decorating ideas, handmade gifts and more at www.FaveCrafts.com. 20
remainder of shirt.
6. Leaving thin stripes of undyed areas between colors, squeeze olive lengthwise onto first third of apron, brown onto second third and black onto remainder.
7. Cover pieces with garbage bag. Let set for 4 to 6 hours. Wash in full load of water with a small amount of laundry soap and no fabric softener. Dry in dryer without softener sheet.
8. Iron apron smooth, using steam.
9. Cut desired letters and numbers from Sticky Fabric Stencils, leaving as much border as possible. Remove backing. Position letters and numbers onto bib of apron, running fingernail around edges to ensure a tight seal and trimming as needed to space evenly. Create an extended border around stencil and fill in any gaps between letters, using masking tape.
10. Squeeze a small puddle of Matte Ebony onto foil. Tap flat end of cosmetic sponge into paint. Pounce excess paint onto foil. Pounce paint into stencil, applying a thin, even coat. Remove stencil. Let dry.
11. Tie a knot at one corner of bandana. Apply a thick bead of Fabric Fusion to back of knot. Press into place on side of apron. Secure with masking tape until dry. Remove tape.
Homemade Christmas Gift Guide eBook
Find thousands of free crafts, decorating ideas, handmade gifts and more at www.FaveCrafts.com. 21
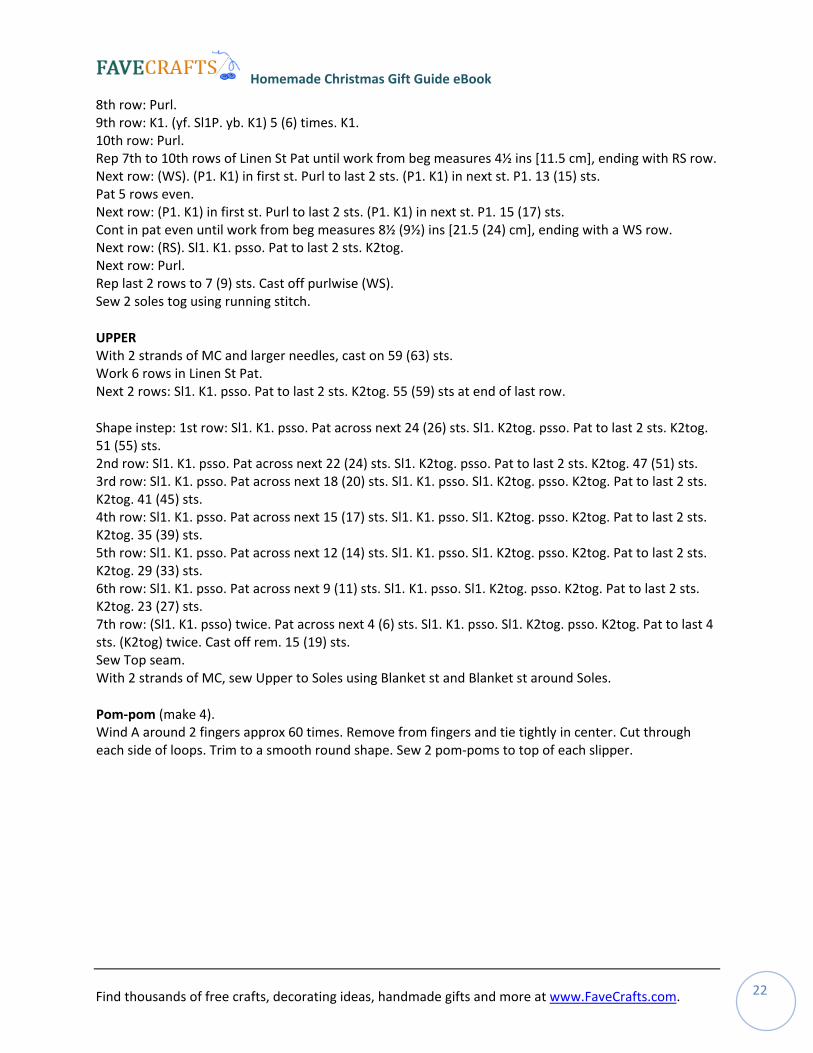
For Sister
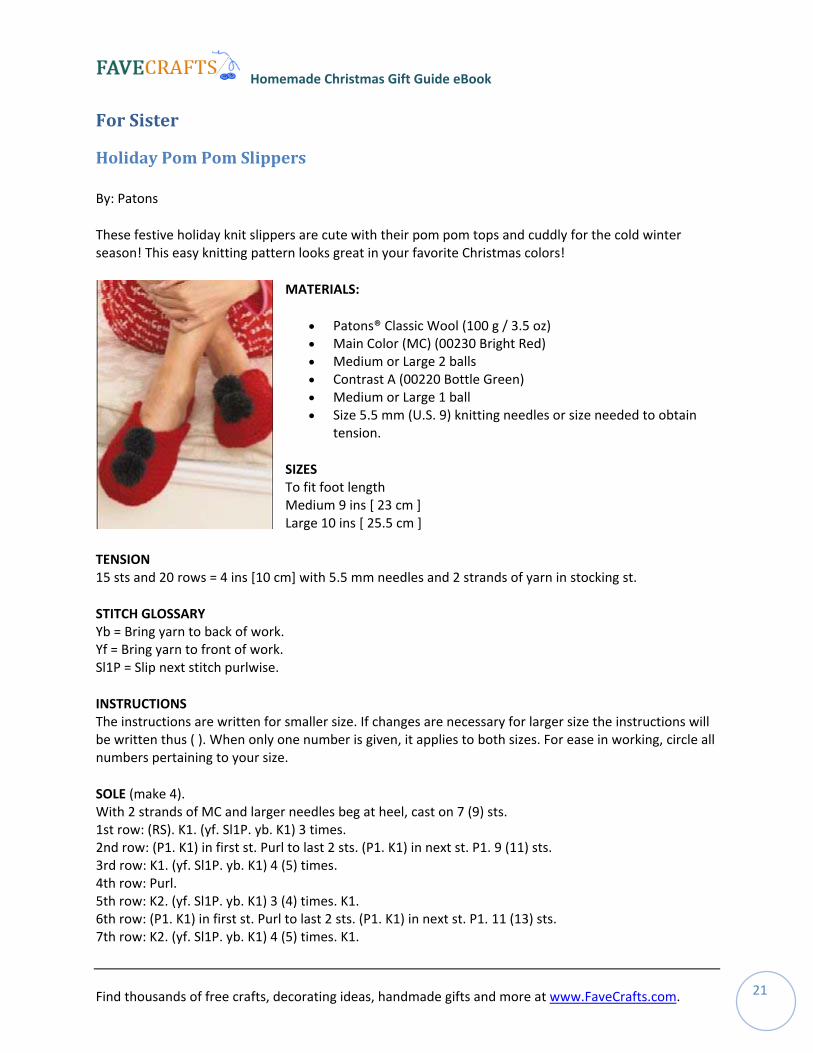
Holiday Pom Pom Slippers
By: Patons
These festive holiday knit slippers are cute with their pom pom tops and cuddly for the cold winter season! This easy knitting pattern looks great in your favorite Christmas colors!
MATERIALS:
• Patons® Classic Wool (100 g / 3.5 oz) • Main Color (MC) (00230 Bright Red) • Medium or Large 2 balls • Contrast A (00220 Bottle Green) • Medium or Large 1 ball • Size 5.5 mm (U.S. 9) knitting needles or size needed to obtain
tension.
SIZES To fit foot length Medium 9 ins [ 23 cm ] Large 10 ins [ 25.5 cm ]
TENSION 15 sts and 20 rows = 4 ins [10 cm] with 5.5 mm needles and 2 strands of yarn in stocking st.
STITCH GLOSSARY Yb = Bring yarn to back of work. Yf = Bring yarn to front of work. Sl1P = Slip next stitch purlwise.
INSTRUCTIONS The instructions are written for smaller size. If changes are necessary for larger size the instructions will be written thus ( ). When only one number is given, it applies to both sizes. For ease in working, circle all numbers pertaining to your size.
SOLE (make 4). With 2 strands of MC and larger needles beg at heel, cast on 7 (9) sts. 1st row: (RS). K1. (yf. Sl1P. yb. K1) 3 times. 2nd row: (P1. K1) in first st. Purl to last 2 sts. (P1. K1) in next st. P1. 9 (11) sts. 3rd row: K1. (yf. Sl1P. yb. K1) 4 (5) times. 4th row: Purl. 5th row: K2. (yf. Sl1P. yb. K1) 3 (4) times. K1. 6th row: (P1. K1) in first st. Purl to last 2 sts. (P1. K1) in next st. P1. 11 (13) sts. 7th row: K2. (yf. Sl1P. yb. K1) 4 (5) times. K1.
Homemade Christmas Gift Guide eBook
Find thousands of free crafts, decorating ideas, handmade gifts and more at www.FaveCrafts.com. 22
8th row: Purl. 9th row: K1. (yf. Sl1P. yb. K1) 5 (6) times. K1. 10th row: Purl. Rep 7th to 10th rows of Linen St Pat until work from beg measures 4½ ins [11.5 cm], ending with RS row. Next row: (WS). (P1. K1) in first st. Purl to last 2 sts. (P1. K1) in next st. P1. 13 (15) sts. Pat 5 rows even. Next row: (P1. K1) in first st. Purl to last 2 sts. (P1. K1) in next st. P1. 15 (17) sts. Cont in pat even until work from beg measures 8½ (9½) ins [21.5 (24) cm], ending with a WS row. Next row: (RS). Sl1. K1. psso. Pat to last 2 sts. K2tog. Next row: Purl. Rep last 2 rows to 7 (9) sts. Cast off purlwise (WS). Sew 2 soles tog using running stitch.
UPPER With 2 strands of MC and larger needles, cast on 59 (63) sts. Work 6 rows in Linen St Pat. Next 2 rows: Sl1. K1. psso. Pat to last 2 sts. K2tog. 55 (59) sts at end of last row.
Shape instep: 1st row: Sl1. K1. psso. Pat across next 24 (26) sts. Sl1. K2tog. psso. Pat to last 2 sts. K2tog. 51 (55) sts. 2nd row: Sl1. K1. psso. Pat across next 22 (24) sts. Sl1. K2tog. psso. Pat to last 2 sts. K2tog. 47 (51) sts. 3rd row: Sl1. K1. psso. Pat across next 18 (20) sts. Sl1. K1. psso. Sl1. K2tog. psso. K2tog. Pat to last 2 sts. K2tog. 41 (45) sts. 4th row: Sl1. K1. psso. Pat across next 15 (17) sts. Sl1. K1. psso. Sl1. K2tog. psso. K2tog. Pat to last 2 sts. K2tog. 35 (39) sts. 5th row: Sl1. K1. psso. Pat across next 12 (14) sts. Sl1. K1. psso. Sl1. K2tog. psso. K2tog. Pat to last 2 sts. K2tog. 29 (33) sts. 6th row: Sl1. K1. psso. Pat across next 9 (11) sts. Sl1. K1. psso. Sl1. K2tog. psso. K2tog. Pat to last 2 sts. K2tog. 23 (27) sts. 7th row: (Sl1. K1. psso) twice. Pat across next 4 (6) sts. Sl1. K1. psso. Sl1. K2tog. psso. K2tog. Pat to last 4 sts. (K2tog) twice. Cast off rem. 15 (19) sts. Sew Top seam. With 2 strands of MC, sew Upper to Soles using Blanket st and Blanket st around Soles.
Pom‐pom (make 4). Wind A around 2 fingers approx 60 times. Remove from fingers and tie tightly in center. Cut through each side of loops. Trim to a smooth round shape. Sew 2 pom‐poms to top of each slipper.
Homemade Christmas Gift Guide eBook
Find thousands of free crafts, decorating ideas, handmade gifts and more at www.FaveCrafts.com. 23
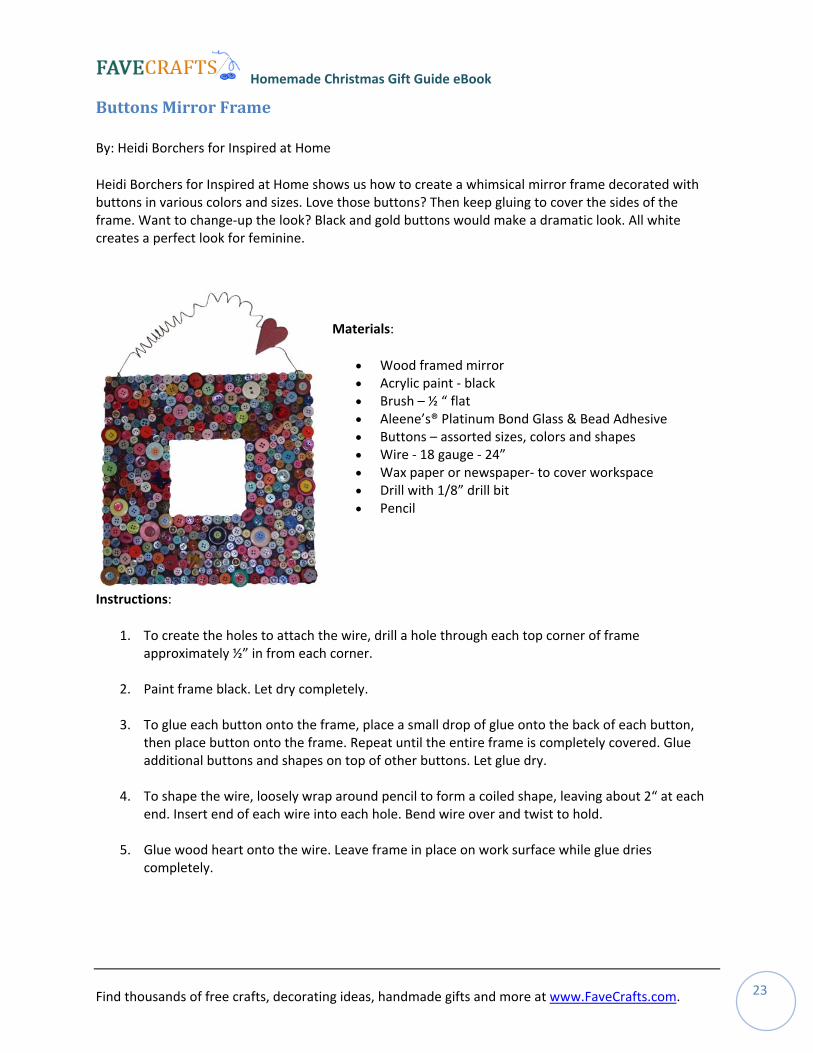
uttons Mirror Frame
By: Heidi Borchers for Inspired at Home
Heidi Borchers for Inspired at Home shows us how to create a whimsical mirror frame decorated with
Materials:
• Wood framed mirror
um Bond Glass & Bead Adhesive
per‐ to cover workspace
Instructions:
1. To create the holes to attach the wire, drill a hole through each top corner of frame
int frame black. Let dry completely.
glue each button onto the frame, place a small drop of glue onto the back of each button,
shape the wire, loosely wrap around pencil to form a coiled shape, leaving about 2“ at each
lue wood heart onto the wire. Leave frame in place on work surface while glue dries
B
buttons in various colors and sizes. Love those buttons? Then keep gluing to cover the sides of the frame. Want to change‐up the look? Black and gold buttons would make a dramatic look. All white creates a perfect look for feminine.
• Acrylic paint ‐ black • Brush – ½ “ flat • Aleene’s® Platin• Buttons – assorted sizes, colors and shapes • Wire ‐ 18 gauge ‐ 24” • Wax paper or newspa• Drill with 1/8” drill bit • Pencil
approximately ½” in from each corner.
2. Pa
3. Tothen place button onto the frame. Repeat until the entire frame is completely covered. Glue additional buttons and shapes on top of other buttons. Let glue dry.
4. Toend. Insert end of each wire into each hole. Bend wire over and twist to hold.
5. Gcompletely.
Homemade Christmas Gift Guide eBook
Find thousands of free crafts, decorating ideas, handmade gifts and more at www.FaveCrafts.com. 24
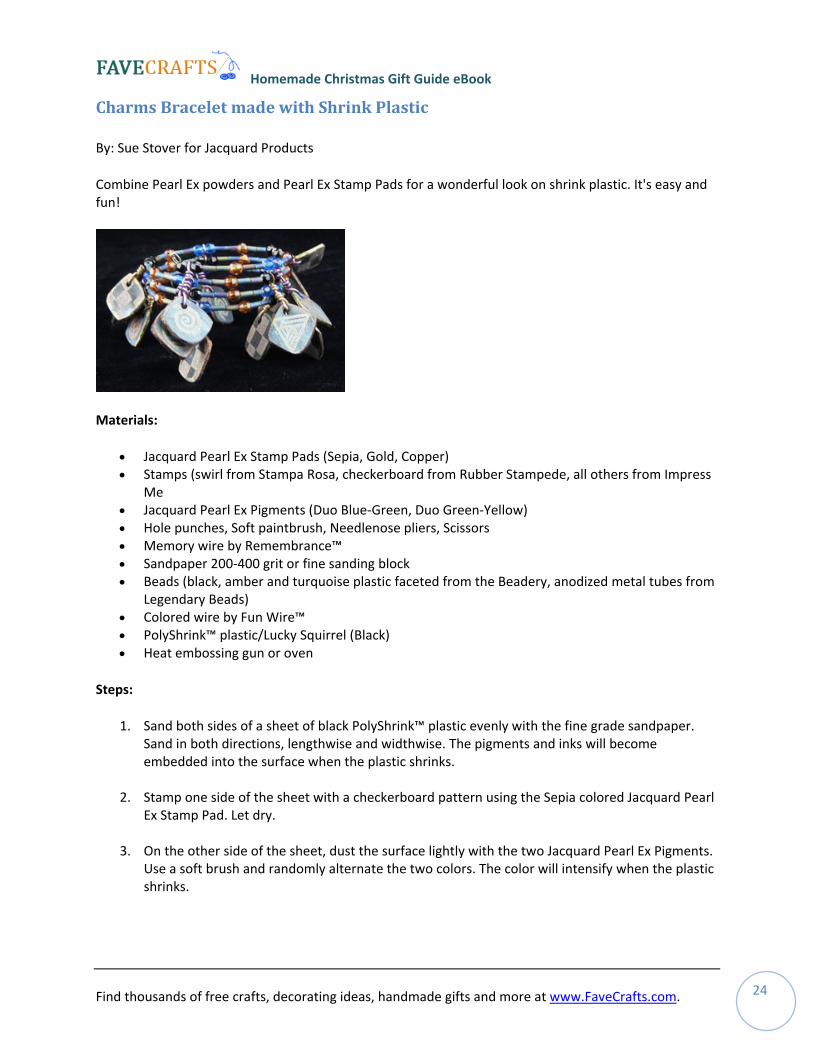
harms Bracelet made with Shrink Plastic
By: Sue Stover for Jacquard Products
Combine Pearl Ex powders and Pearl Ex Stamp Pads for a wonderful look on shrink plastic. It's easy and
C
fun!
Materials:
• Jacquard Pearl Ex Stamp Pads (Sepia, Gold, Copper) Rubber Stampede, all others from Impress
uard Pearl Ex Pigments (Duo Blue‐Green, Duo Green‐Yellow)
ding block ted from the Beadery, anodized metal tubes from
n Wire™ uirrel (Black)
Steps:
1. Sand both sides of a sheet of black PolyShrink™ plastic evenly with the fine grade sandpaper.
amp one side of the sheet with a checkerboard pattern using the Sepia colored Jacquard Pearl
n the other side of the sheet, dust the surface lightly with the two Jacquard Pearl Ex Pigments.
• Stamps (swirl from Stampa Rosa, checkerboard fromMe
• Jacq• Hole punches, Soft paintbrush, Needlenose pliers, Scissors • Memory wire by Remembrance™ • Sandpaper 200‐400 grit or fine san• Beads (black, amber and turquoise plastic face
Legendary Beads) • Colored wire by Fu• PolyShrink™ plastic/Lucky Sq• Heat embossing gun or oven
Sand in both directions, lengthwise and widthwise. The pigments and inks will become embedded into the surface when the plastic shrinks.
2. StEx Stamp Pad. Let dry.
3. OUse a soft brush and randomly alternate the two colors. The color will intensify when the plastic shrinks.
Homemade Christmas Gift Guide eBook
Find thousands of free crafts, decorating ideas, handmade gifts and more at www.FaveCrafts.com. 25
4. On top of the colored side, stamp some single motifs with the Gold and Copper Jacquard Stamp Pads. For this bracelet we used 3 different motifs and made 17 charms.
5. Cut out the shapes that you want to use. We used a square with slightly bulging sides and rounded corners. Remember that your shape will be about 45% of its original size.
6. Punch a hole in the plastic using a hole punch. We used just a round hole punch but hole punches come in many different shapes so you may want to experiment. The holes will maintain their shape even when they shrink.
7. If using a heat embossing tool, lay the piece on a flat surface that won’t be damaged by the heat embossing tool. A thick piece of wood is good. Heat the piece by aiming the tool at the plastic. The plastic will begin to move and curl when you heat it. If you feel it is shrinking too fast, hold the tool a little further away. When the piece is completely shrunk, lay flat and allow it to cool. If using an oven, put the piece of plastic on a Teflon sheet in a regular or toaster oven no hotter than 300 to 350 degrees for approximately 3 minutes.
8. After the piece is cooled, sand the edges to smooth any rough areas.
9. Roll the edges of each piece onto the Copper or Gold stamp pad to get color on the edges.
10. To make the charms dangle from the wire, we used colored wire to make an extension that could be threaded onto the memory wire. Using a copper and a purple colored wire alternately, loop through the holes in the charms. Twist the wire around itself close together and close to the charm. On the other end make a loop that the memory wire will go through and twist the wire back on itself.
11. Cut the memory wire the length you want it and twist the end in a spiral to keep the beads from falling off.
12. Place the beads and charms onto the memory wire with any sort of pattern.
13. When you come to the end of the wire, twist it into a spiral like you did with the first end.
Homemade Christmas Gift Guide eBook
Find thousands of free crafts, decorating ideas, handmade gifts and more at www.FaveCrafts.com. 26
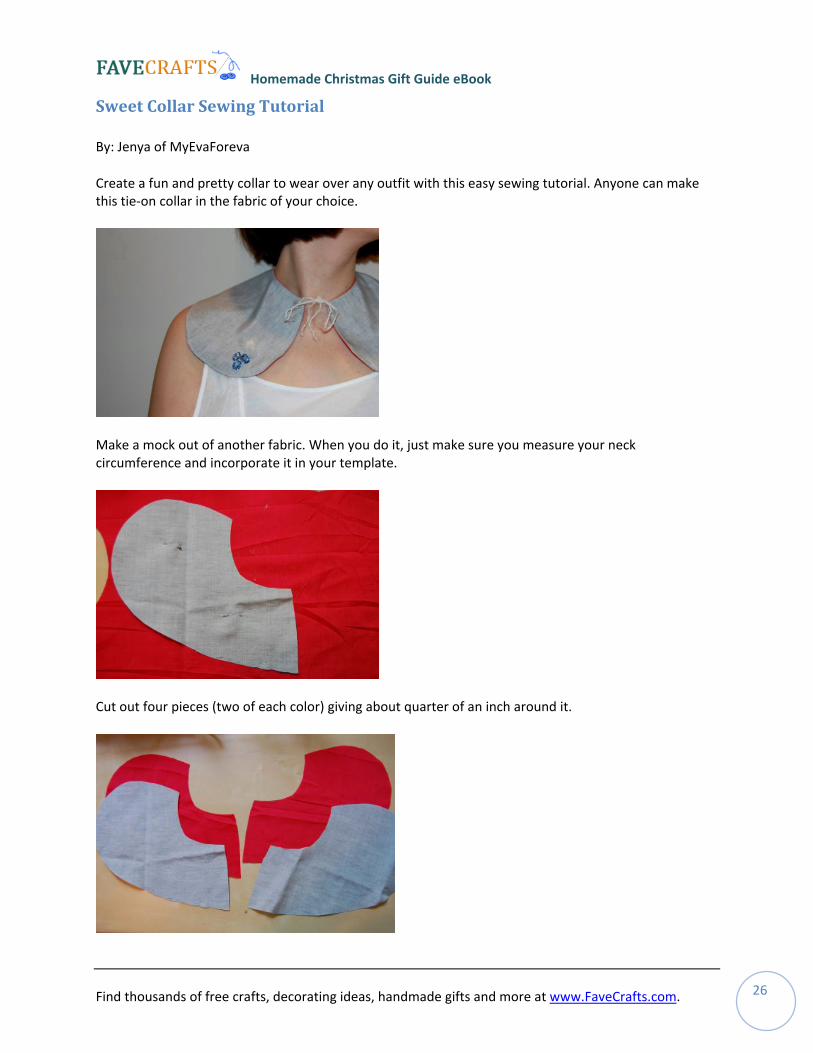
Sweet Collar Sewing Tutorial
By: Jenya of MyEvaForeva
Create a fun and pretty collar to wear over any outfit with this easy sewing tutorial. Anyone can make this tie‐on collar in the fabric of your choice.
Make a mock out of another fabric. When you do it, just make sure you measure your neck circumference and incorporate it in your template.
Cut out four pieces (two of each color) giving about quarter of an inch around it.
Homemade Christmas Gift Guide eBook
Find thousands of free crafts, decorating ideas, handmade gifts and more at www.FaveCrafts.com. 27
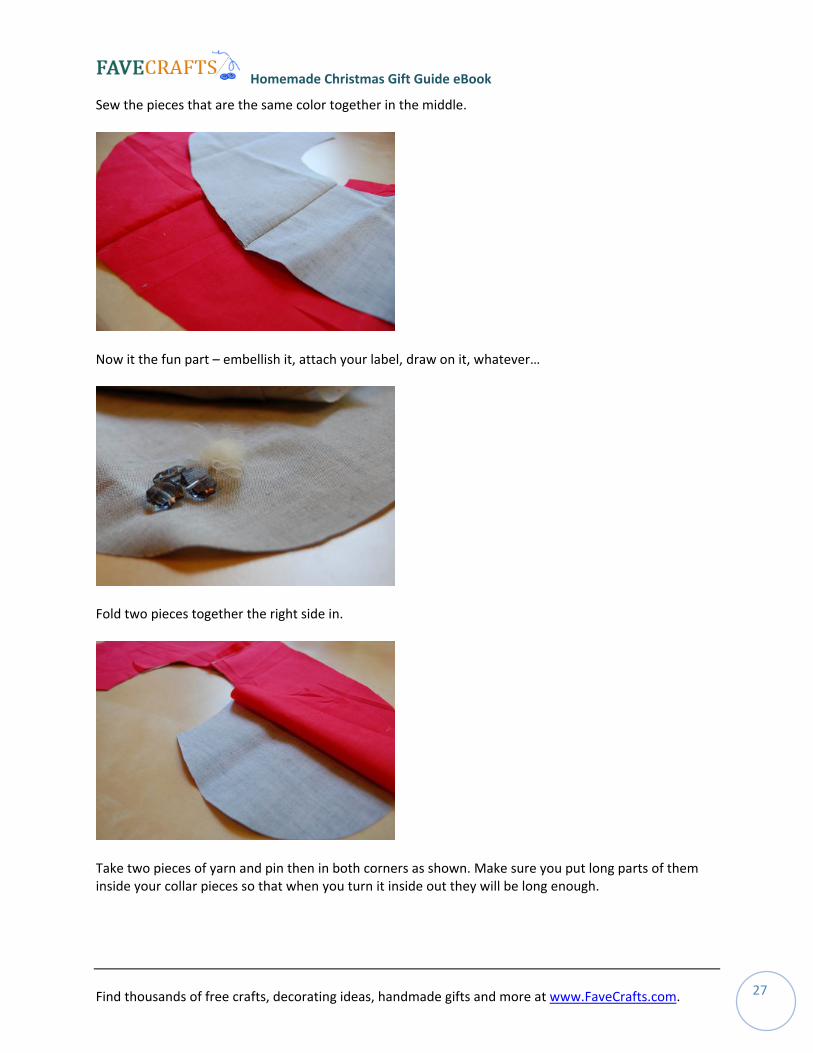
Sew the pieces that are the same color together in the middle.
Now it the fun part – embellish it, attach your label, draw on it, whatever…
Fold two pieces together the right side in.
Take two pieces of yarn and pin then in both corners as shown. Make sure you put long parts of them inside your collar pieces so that when you turn it inside out they will be long enough.
Homemade Christmas Gift Guide eBook
Find thousands of free crafts, decorating ideas, handmade gifts and more at www.FaveCrafts.com. 28
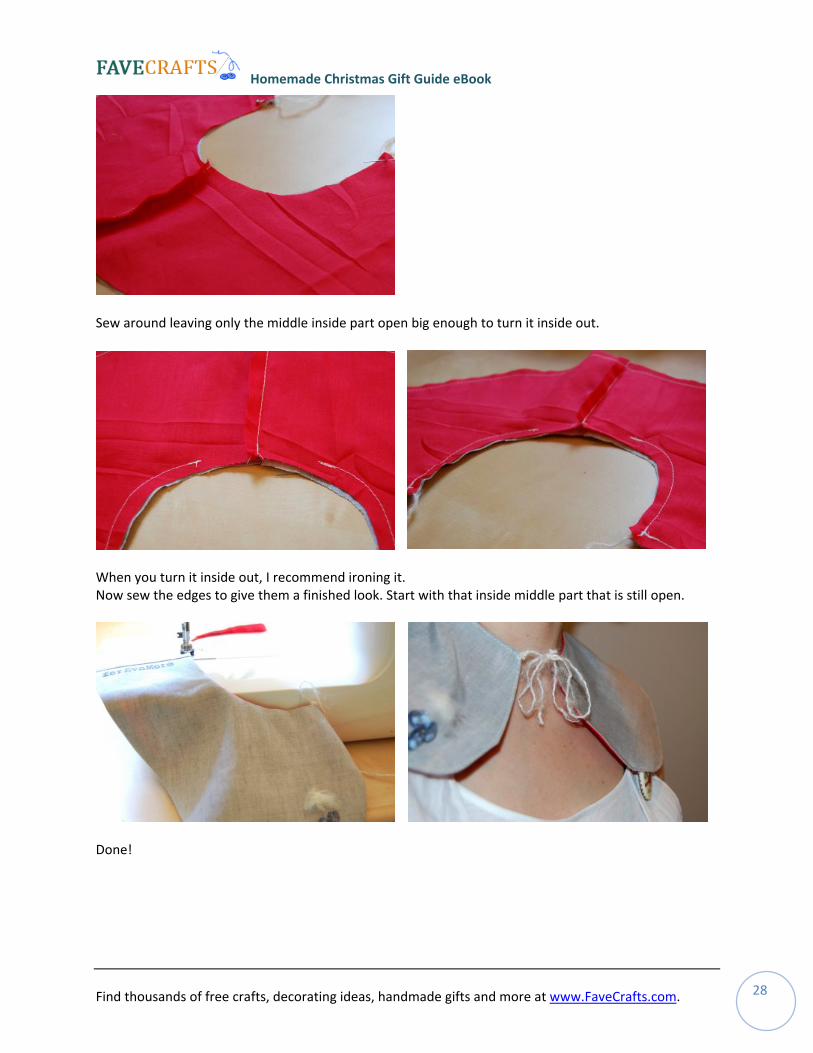
Sew around leaving only the middle inside part open big enough to turn it inside out.
When you turn it inside out, I recommend ironing it. Now sew the edges to give them a finished look. Start with that inside middle part that is still open.
Done!
Homemade Christmas Gift Guide eBook
Find thousands of free crafts, decorating ideas, handmade gifts and more at www.FaveCrafts.com. 29
For Brother
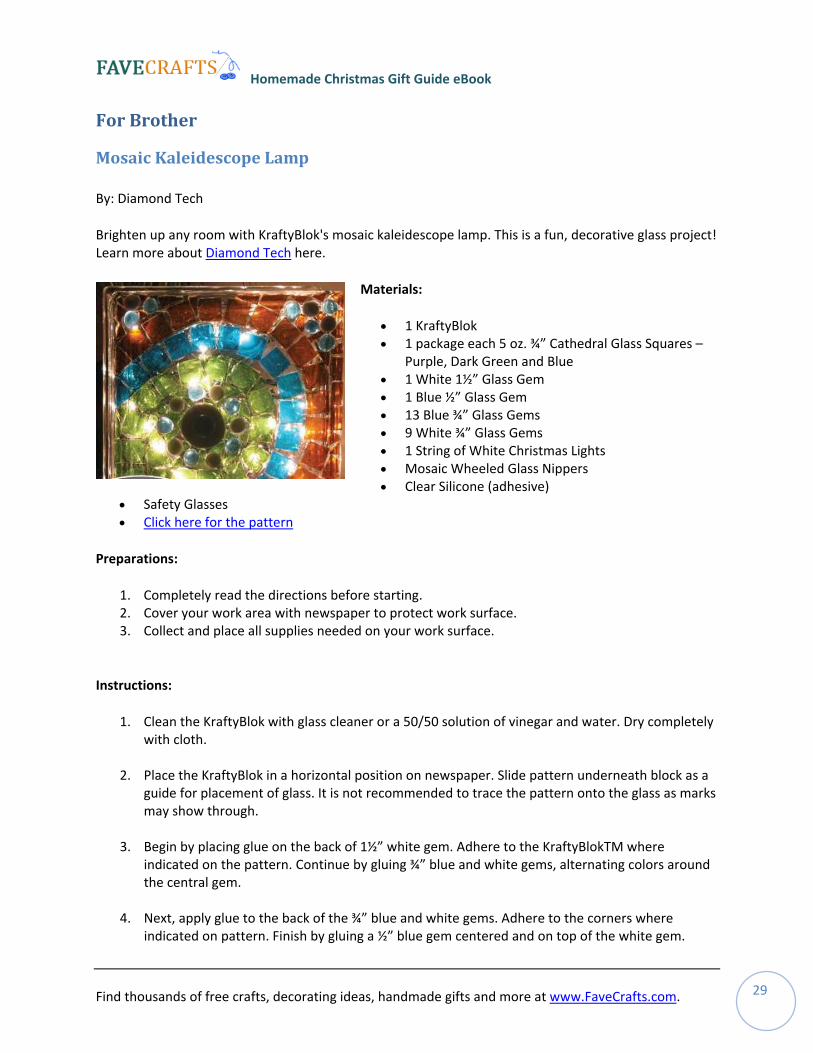
Mosaic Kaleidescope Lamp
By: Diamond Tech
Brighten up any room with KraftyBlok's mosaic kaleidescope lamp. This is a fun, decorative glass project! Learn more about Diamond Tech here.
Materials:
• 1 KraftyBlok • 1 package each 5 oz. ¾” Cathedral Glass Squares –
Purple, Dark Green and Blue • 1 White 1½” Glass Gem • 1 Blue ½” Glass Gem • 13 Blue ¾” Glass Gems • 9 White ¾” Glass Gems • 1 String of White Christmas Lights • Mosaic Wheeled Glass Nippers • Clear Silicone (adhesive)
• Safety Glasses • Click here for the pattern
Preparations:
1. Completely read the directions before starting. 2. Cover your work area with newspaper to protect work surface. 3. Collect and place all supplies needed on your work surface.
Instructions:
1. Clean the KraftyBlok with glass cleaner or a 50/50 solution of vinegar and water. Dry completely with cloth.
2. Place the KraftyBlok in a horizontal position on newspaper. Slide pattern underneath block as a guide for placement of glass. It is not recommended to trace the pattern onto the glass as marks may show through.
3. Begin by placing glue on the back of 1½” white gem. Adhere to the KraftyBlokTM where indicated on the pattern. Continue by gluing ¾” blue and white gems, alternating colors around the central gem.
4. Next, apply glue to the back of the ¾” blue and white gems. Adhere to the corners where indicated on pattern. Finish by gluing a ½” blue gem centered and on top of the white gem.

Homemade Christmas Gift Guide eBook
Find thousands of free crafts, decorating ideas, handmade gifts and more at www.FaveCrafts.com. 30
5. Apply adhesive to the back of a dark green cathedral square. Starting in the lower right corner of the KraftyBlokTM secure in place where indicated. Continue to add the dark green squares to form a circle around the gems. Continue this process with both blue and purple cathedral glass squares.
6. Nip ¾” Green, Blue and Purple glass squares into smaller pieces. Glue in place to fill the voids between glass squares.
7. When the front has dried, place the KraftyBlokTM on its side with the opening facing up. Starting at the left of the hole glue two rows of ¾” purple chips side by side leaving approximately 1/8” between each piece, until you reach the edge. Allow to dry.
8. Rotate KraftyBlokTM to the right . Glue two more evenly spaced rows of purple cathedral glass squares. Allow to dry. Continue placing two rows of purple glass squares across the side.
9. Rotate block back on its side with the opening facing up. Glue four blue cathedral glass squares to the right of the opening in two rows leaving 1/8” between each piece. Finish the side by adding two green glass squares. Allow to dry.
10. Rotate block to the left. Glue eight dark green glass squares into two rows, 1/8” apart. Add two blue squares on either side of the dark green squares and finish the double rows of glass squares with four purple squares. Glue into place and allow to dry.
11. To finish corners, nip a chip in ½, forming two rectangles, and apply pieces to the corner curves.
12. Insert string of white christmas lights in the block and allow plug to extend out. Plug‐in and enjoy!
Homemade Christmas Gift Guide eBook
Find thousands of free crafts, decorating ideas, handmade gifts and more at www.FaveCrafts.com. 31
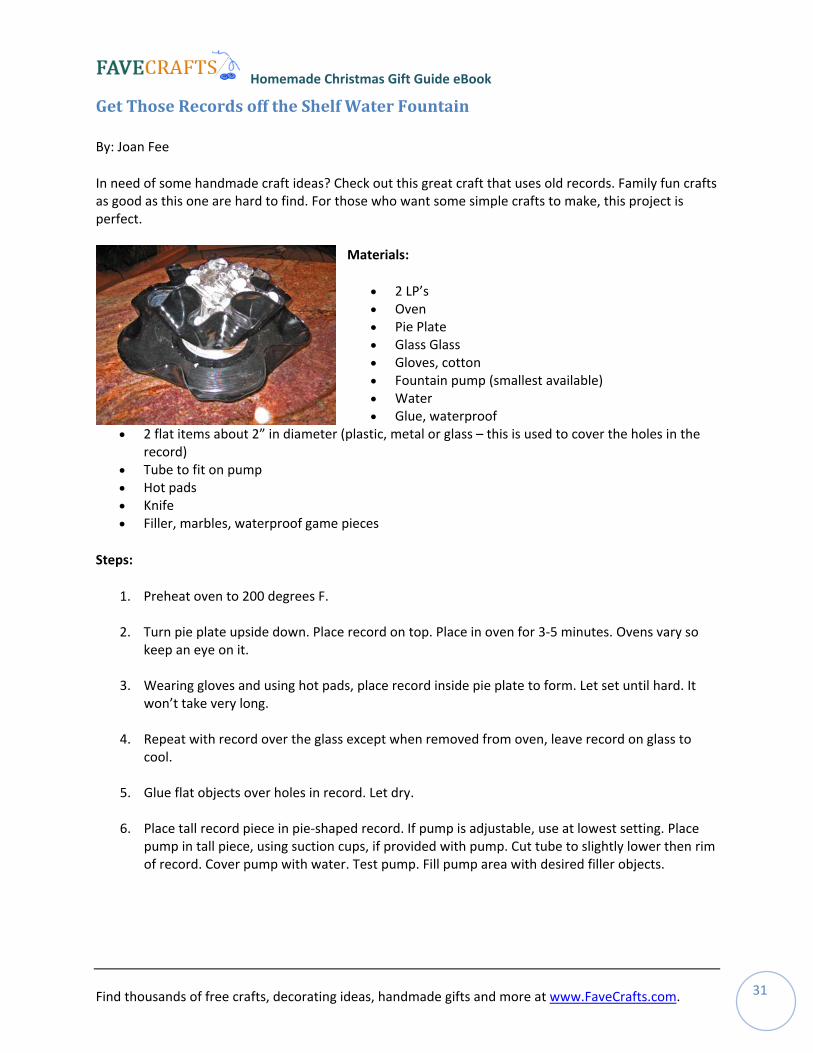
Get Those Records off the Shelf Water Fountain
By: Joan Fee
In need of some handmade craft ideas? Check out this great craft that uses old records. Family fun crafts as good as this one are hard to find. For those who want some simple crafts to make, this project is perfect.
Materials:
• 2 LP’s • Oven • Pie Plate • Glass Glass • Gloves, cotton • Fountain pump (smallest available) • Water • Glue, waterproof
• 2 flat items about 2” in diameter (plastic, metal or glass – this is used to cover the holes in the record)
• Tube to fit on pump • Hot pads • Knife • Filler, marbles, waterproof game pieces
Steps:
1. Preheat oven to 200 degrees F.
2. Turn pie plate upside down. Place record on top. Place in oven for 3‐5 minutes. Ovens vary so keep an eye on it.
3. Wearing gloves and using hot pads, place record inside pie plate to form. Let set until hard. It won’t take very long.
4. Repeat with record over the glass except when removed from oven, leave record on glass to cool.
5. Glue flat objects over holes in record. Let dry.
6. Place tall record piece in pie‐shaped record. If pump is adjustable, use at lowest setting. Place pump in tall piece, using suction cups, if provided with pump. Cut tube to slightly lower then rim of record. Cover pump with water. Test pump. Fill pump area with desired filler objects.
Homemade Christmas Gift Guide eBook
Find thousands of free crafts, decorating ideas, handmade gifts and more at www.FaveCrafts.com. 32
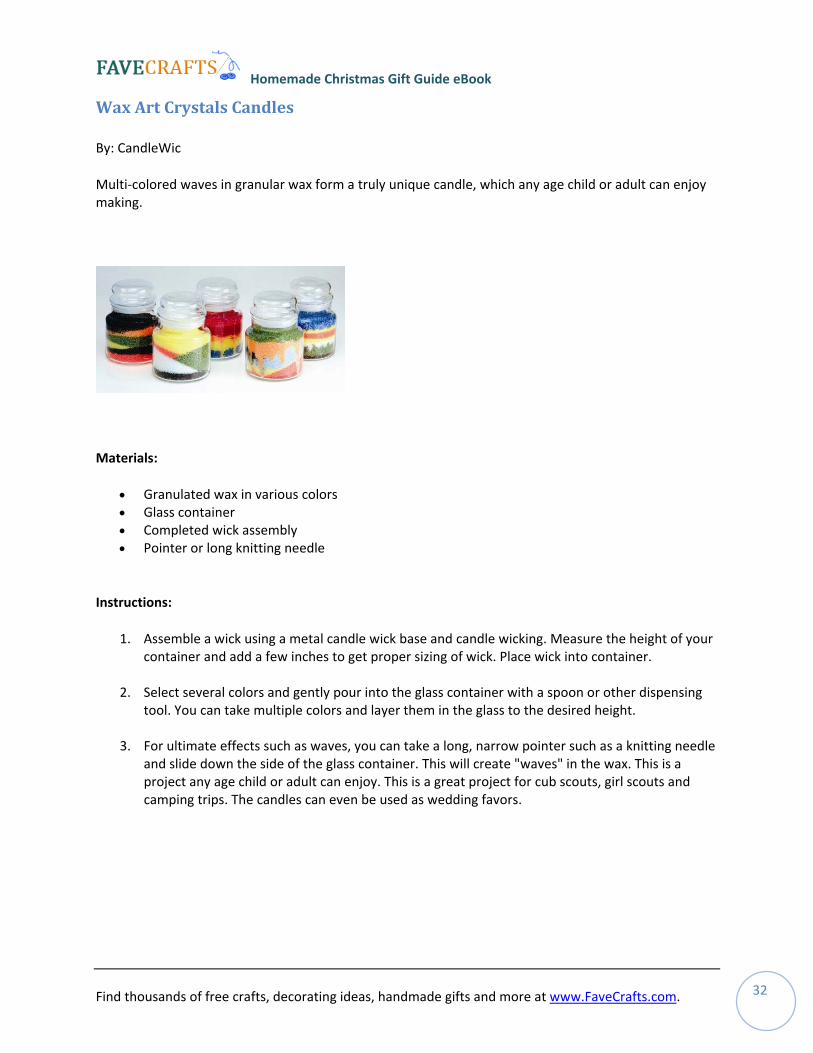
ax Art Crystals Candles
By: CandleWic
Multi‐colored waves in granular wax form a truly unique candle, which any age child or adult can enjoy
W
making.
Materials:
• Granulated wax in various colors
assembly
structions:
1. Assemble a wick using a metal candle wick base and candle wicking. Measure the height of your
lect several colors and gently pour into the glass container with a spoon or other dispensing
r ultimate effects such as waves, you can take a long, narrow pointer such as a knitting needle
• Glass container • Completed wick • Pointer or long knitting needle
In
container and add a few inches to get proper sizing of wick. Place wick into container.
2. Setool. You can take multiple colors and layer them in the glass to the desired height.
3. Foand slide down the side of the glass container. This will create "waves" in the wax. This is a project any age child or adult can enjoy. This is a great project for cub scouts, girl scouts andcamping trips. The candles can even be used as wedding favors.
Homemade Christmas Gift Guide eBook
Find thousands of free crafts, decorating ideas, handmade gifts and more at www.FaveCrafts.com. 33
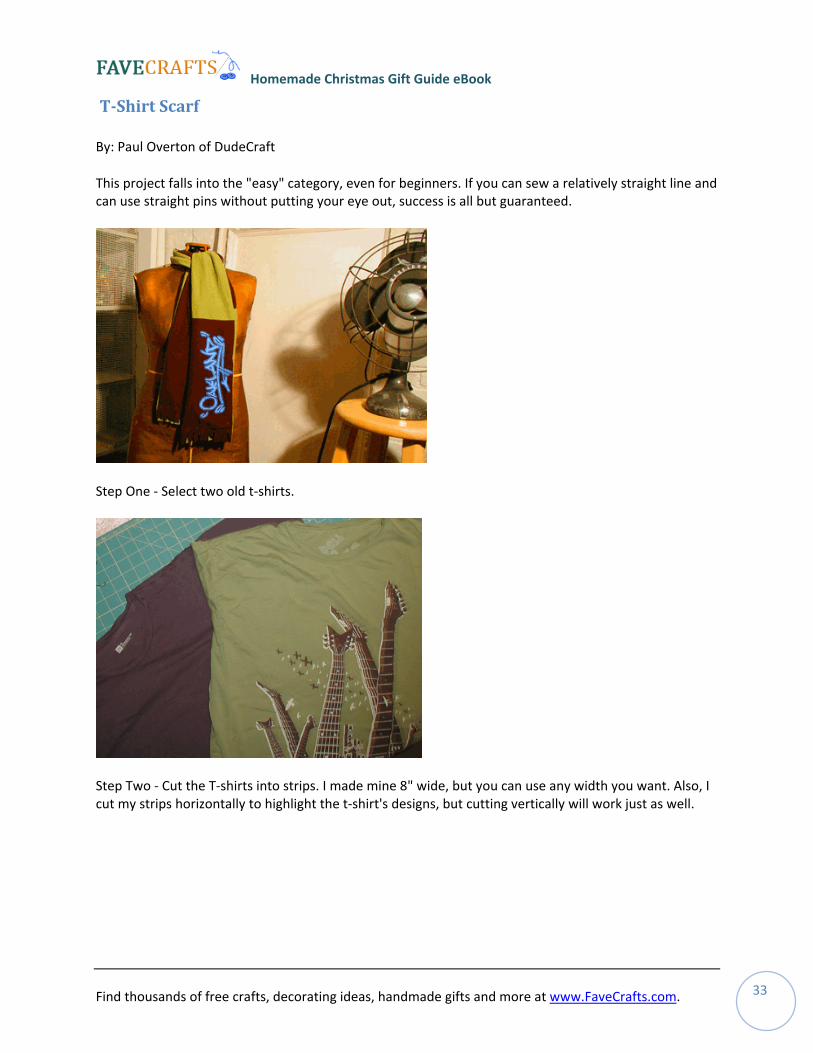
TShirt Scarf
By: Paul Overton of DudeCraft
This project falls into the "easy" category, even for beginners. If you can sew a relatively straight line and can use straight pins without putting your eye out, success is all but guaranteed.
Step One ‐ Select two old t‐shirts.
Step Two ‐ Cut the T‐shirts into strips. I made mine 8" wide, but you can use any width you want. Also, I cut my strips horizontally to highlight the t‐shirt's designs, but cutting vertically will work just as well.
Homemade Christmas Gift Guide eBook
Find thousands of free crafts, decorating ideas, handmade gifts and more at www.FaveCrafts.com. 34
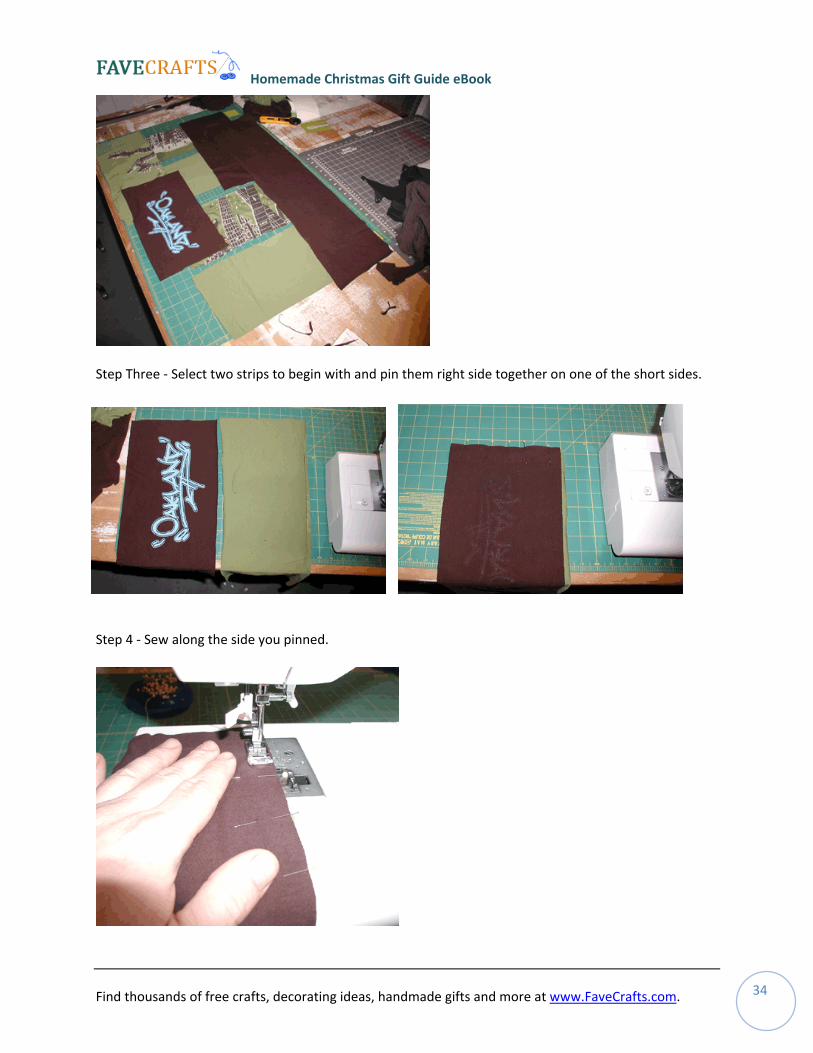
Step Three ‐ Select two strips to begin with and pin them right side together on one of the short sides.
Step 4 ‐ Sew along the side you pinned.
Homemade Christmas Gift Guide eBook
Find thousands of free crafts, decorating ideas, handmade gifts and more at www.FaveCrafts.com. 35
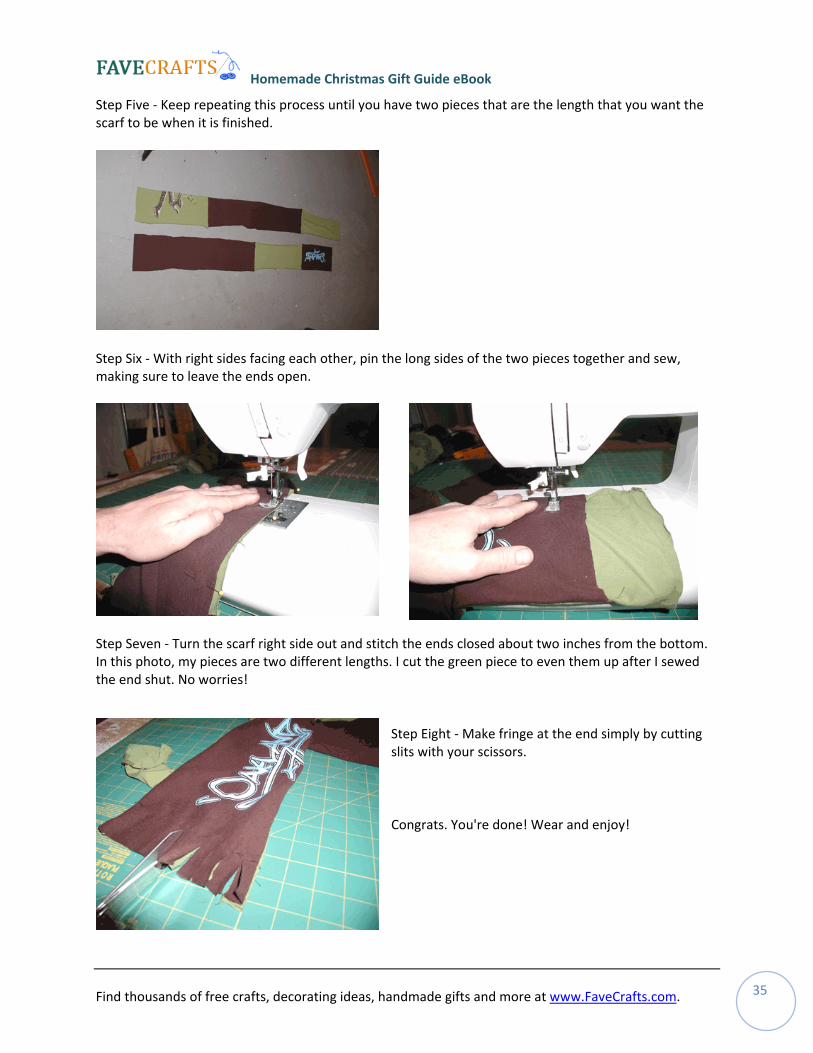
Step Five ‐ Keep repeating this process until you have two pieces that are the length that you want the scarf to be when it is finished.
Step Six ‐ With right sides facing each other, pin the long sides of the two pieces together and sew, making sure to leave the ends open.
Step Seven ‐ Turn the scarf right side out and stitch the ends closed about two inches from the bottom. In this photo, my pieces are two different lengths. I cut the green piece to even them up after I sewed e end shut. No worries!
Step Eight ‐ Make fringe at the end simply by cutting with your scissors.
ongrats. You're done! Wear and enjoy!
th
slits
C

Homemade Christmas Gift Guide eBook
Find thousands of free crafts, decorating ideas, handmade gifts and more at www.FaveCrafts.com. 36
For Boyfriend or Husband
Men's Hat and Scarf Knitting Pattern
By: Bernat
This classic knit men's hat and scarf set is a perfect winter gift for your favorite guy. It is sure to keep him nice and warm through the winter months.
Materials:
• Yarn: Bernat Denimstyle (3.5 oz/ 100 g) or yarn of choice, Hat, 1 ball, Scarf, 2 balls
• Hook: Size 5 mm (U.S. 8) knitting needles or size needed to obtain gauge.
Gauge: 18 sts and 24 rows = 4" in stocking st.
Size: Scarf: Width: 9 1/2" Length: 49"
Instructions: Scarf: Cast on 39 sts. 1st row: (RS). Knit. 2nd row: P1. *K1. P1. Rep from * to end. Rep these 2 rows until work from beg measures 49" [124.5 cm].Fasten off.
Finishing: Cut 8" [20.5 cm] lengths of yarn. Taking 3 strands tog, knot into fringe across ends.
Hat: Cast on 78 sts. 1st row: (RS). K2. *P2. K2. Rep from * to end of row. 2nd row: *P2. K2. Rep from *to last 2 sts. P2. Rep last 2 rows until work from beg measures 11 ins [28 cm] ending on a 2nd row. Shape top: 1st row: *K2tog. P2tog. Rep from * to last 2 sts. K2tog. 39 sts. 2nd row: *P1. K1. Rep from * to last st. P1. 3rd row: K1. *P1. K1. Rep from * to end of row. Rep last 2 rows once more then 2nd row once. 7th row: *K2tog. Rep from * to last st. K1. 20 sts. 8th row: Purl. 9th row: (K2tog) 10 times. 10 sts. Break yarn leaving a long end. Draw end through rem sts and fasten securely.
Sew center back seam, reversing seam half way for turn back.
Homemade Christmas Gift Guide eBook
Find thousands of free crafts, decorating ideas, handmade gifts and more at www.FaveCrafts.com. 37
Wine Coasters
By: Tilano Decorative Products Inc.
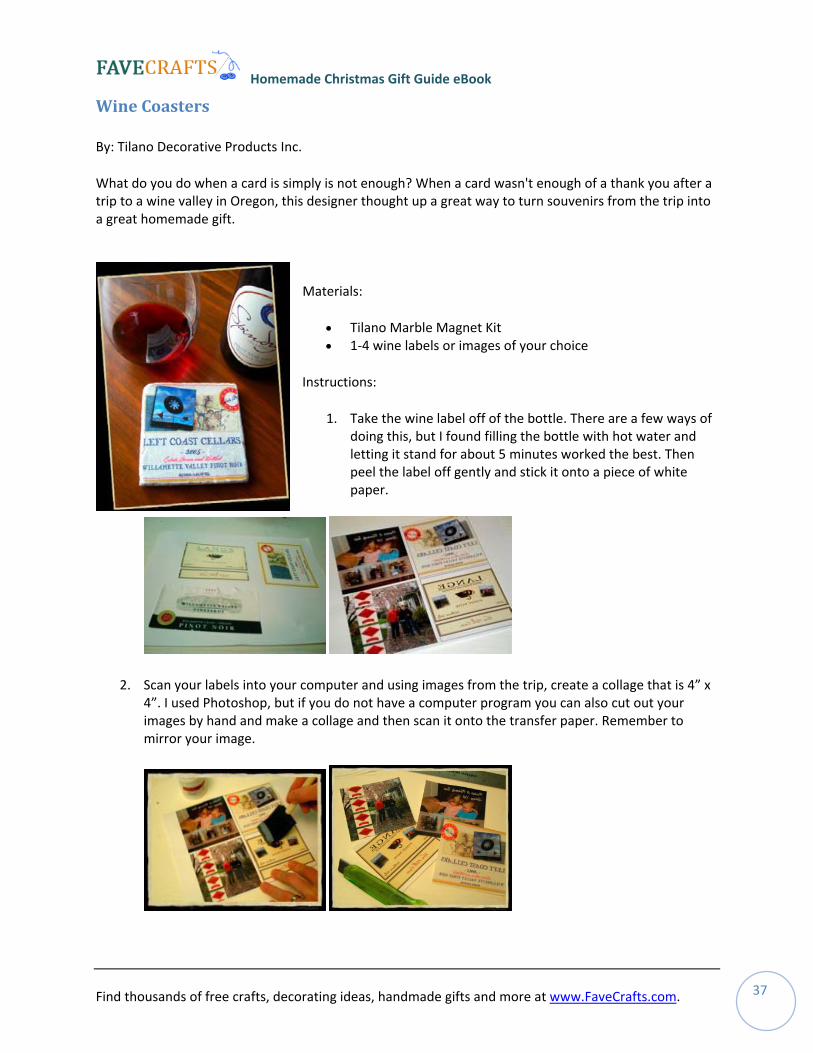
What do you do when a card is simply is not enough? When a card wasn't enough of a thank you after a trip to a wine valley in Oregon, this designer thought up a great way to turn souvenirs from the trip into a great homemade gift.
Materials:
• Tilano Marble Magnet Kit • 1‐4 wine labels or images of your choice
Instructions:
1. Take the wine label off of the bottle. There are a few ways of doing this, but I found filling the bottle with hot water and letting it stand for about 5 minutes worked the best. Then peel the label off gently and stick it onto a piece of white paper.
2. Scan your labels into your computer and using images from the trip, create a collage that is 4” x 4”. I used Photoshop, but if you do not have a computer program you can also cut out your images by hand and make a collage and then scan it onto the transfer paper. Remember to mirror your image.
Homemade Christmas Gift Guide eBook
Find thousands of free crafts, decorating ideas, handmade gifts and more at www.FaveCrafts.com. 38
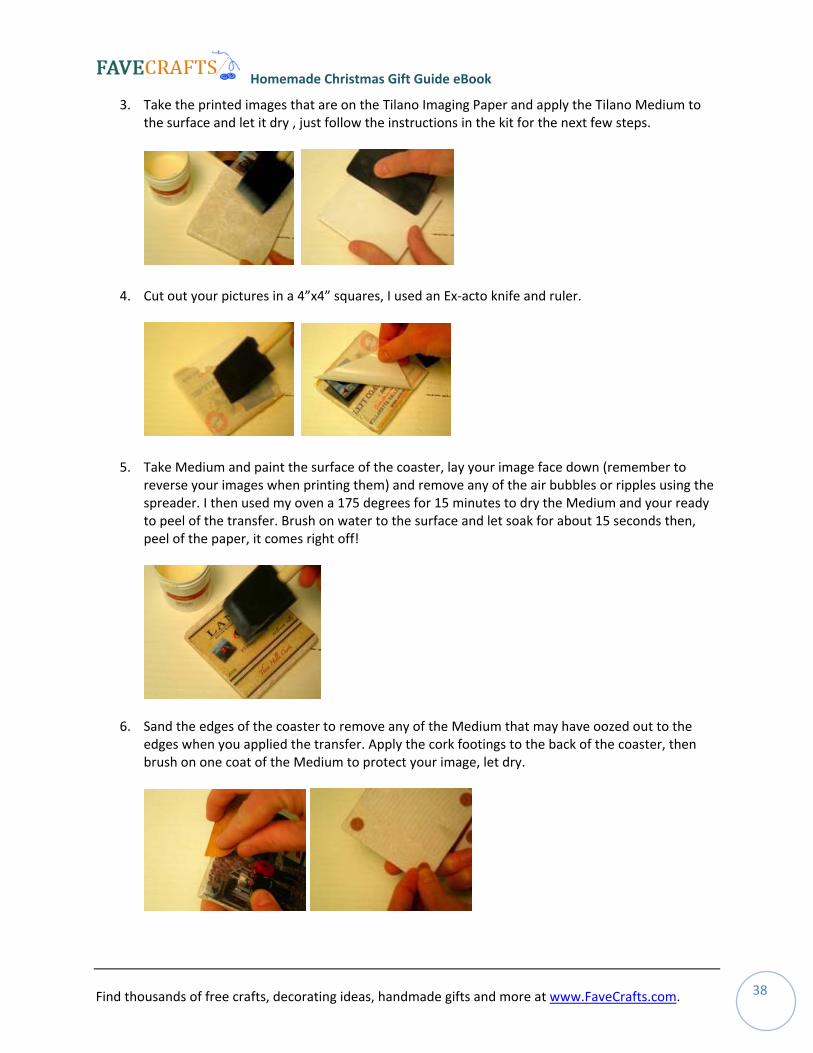
3. Take the printed images that are on the Tilano Imaging Paper and apply the Tilano Medium to the surface and let it dry , just follow the instructions in the kit for the next few steps.
4. Cut out your pictures in a 4”x4” squares, I used an Ex‐acto knife and ruler.
5. Take Medium and paint the surface of the coaster, lay your image face down (remember to reverse your images when printing them) and remove any of the air bubbles or ripples using the spreader. I then used my oven a 175 degrees for 15 minutes to dry the Medium and your ready to peel of the transfer. Brush on water to the surface and let soak for about 15 seconds then, peel of the paper, it comes right off!
6. Sand the edges of the coaster to remove any of the Medium that may have oozed out to the edges when you applied the transfer. Apply the cork footings to the back of the coaster, then brush on one coat of the Medium to protect your image, let dry.
Homemade Christmas Gift Guide eBook
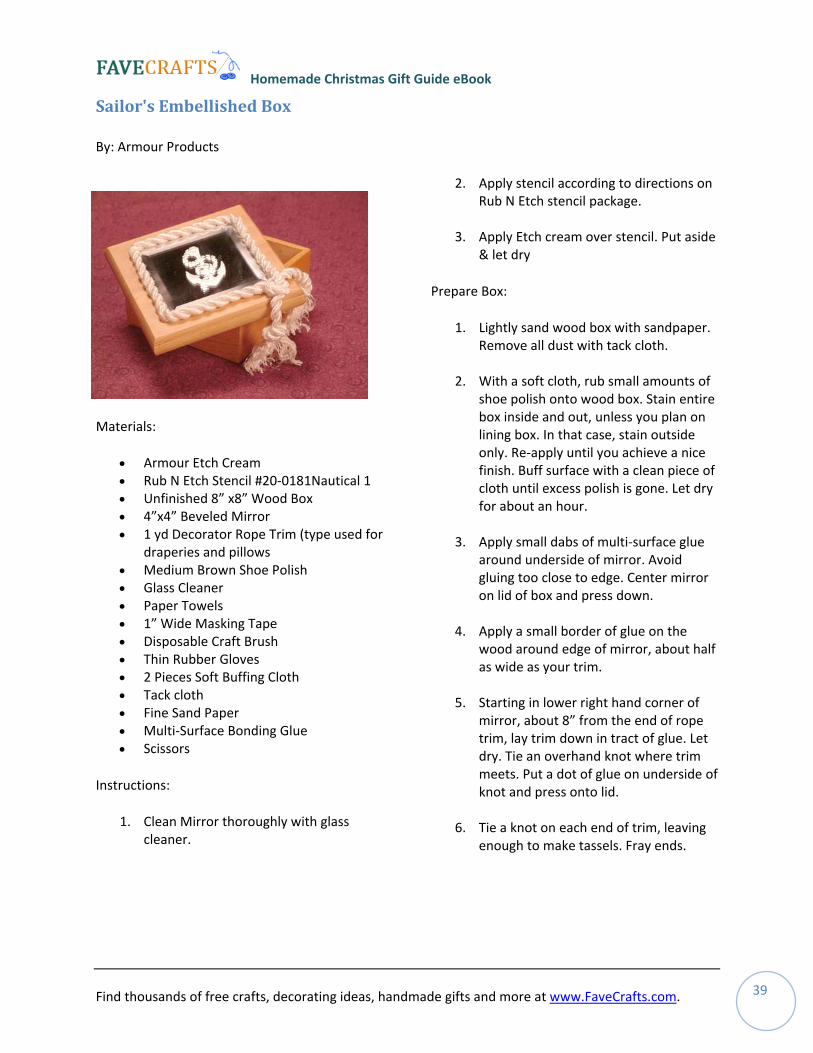
Sailor's Embellished Box
By: Armour Products
2. Apply stencil according to directions on Rub N Etch stencil package.
3. Apply Etch cream over stencil. Put aside & let dry
Prepare Box:
1. Lightly sand wood box with sandpaper. Remove all dust with tack cloth.
2. With a soft cloth, rub small amounts of shoe polish onto wood box. Stain entire box inside and out, unless you plan on lining box. In that case, stain outside only. Re‐apply until you achieve a nice finish. Buff surface with a clean piece of cloth until excess polish is gone. Let dry for about an hour.
Materials:
• Armour Etch Cream • Rub N Etch Stencil #20‐0181Nautical 1 • Unfinished 8” x8” Wood Box • 4”x4” Beveled Mirror • 1 yd Decorator Rope Trim (type used for
draperies and pillows 3. Apply small dabs of multi‐surface glue
around underside of mirror. Avoid gluing too close to edge. Center mirror on lid of box and press down.
• Medium Brown Shoe Polish • Glass Cleaner • Paper Towels • 1” Wide Masking Tape 4. Apply a small border of glue on the
wood around edge of mirror, about half as wide as your trim.
• Disposable Craft Brush • Thin Rubber Gloves • 2 Pieces Soft Buffing Cloth • Tack cloth 5. Starting in lower right hand corner of
mirror, about 8” from the end of rope trim, lay trim down in tract of glue. Let dry. Tie an overhand knot where trim meets. Put a dot of glue on underside of knot and press onto lid.
• Fine Sand Paper • Multi‐Surface Bonding Glue • Scissors
Instructions:
1. Clean Mirror thoroughly with glass cleaner.
6. Tie a knot on each end of trim, leaving enough to make tassels. Fray ends.
Find thousands of free crafts, decorating ideas, handmade gifts and more at www.FaveCrafts.com 39 .
Homemade Christmas Gift Guide eBook
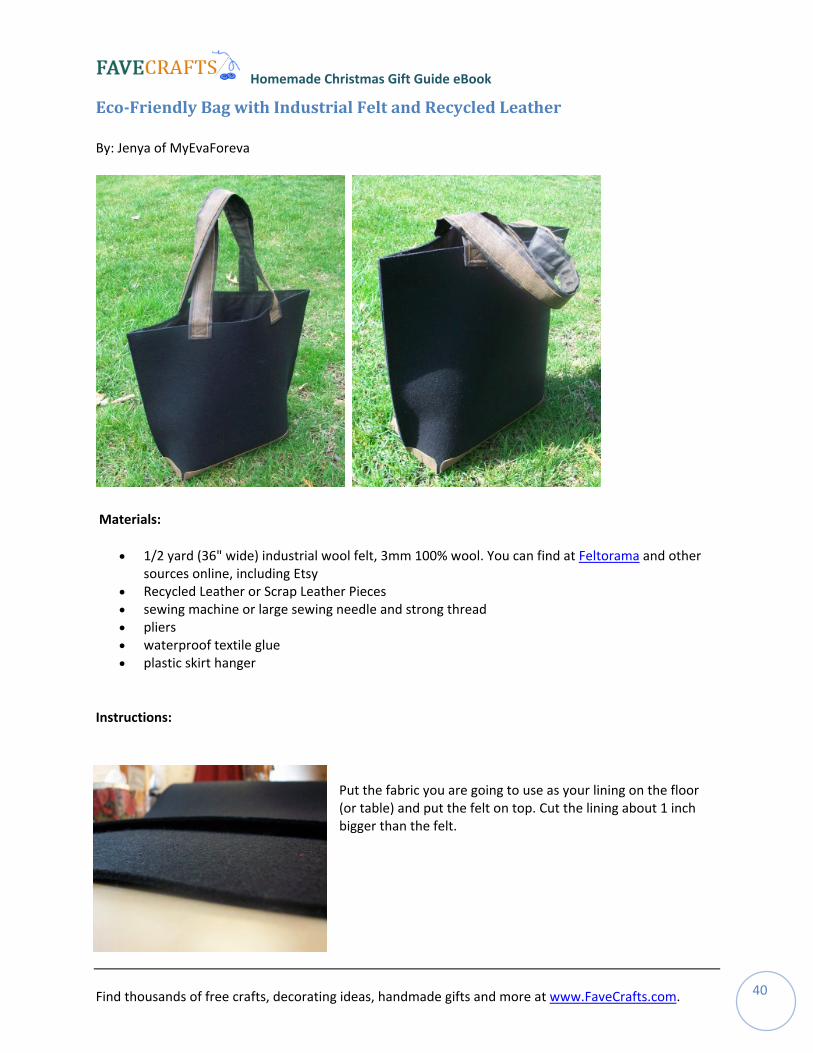
Find thousands of free crafts, decorating ideas, handmade gifts and more at www.FaveCrafts.com. 40
coFriendly Bag with Industrial Felt and Recycled Leather
By: Jenya of MyEvaForeva
E
Materials:
• 1/2 yard (36" wide) industrial wool felt, 3mm 100% wool. You can find at Feltorama and other
her Pieces d strong thread
roof textile glue
Instructions:
Put the fabric you are going to use as your lining on the floor
sources online, including Etsy • Recycled Leather or Scrap Leat• sewing machine or large sewing needle an• pliers • waterp• plastic skirt hanger
(or table) and put the felt on top. Cut the lining about 1 inch bigger than the felt.
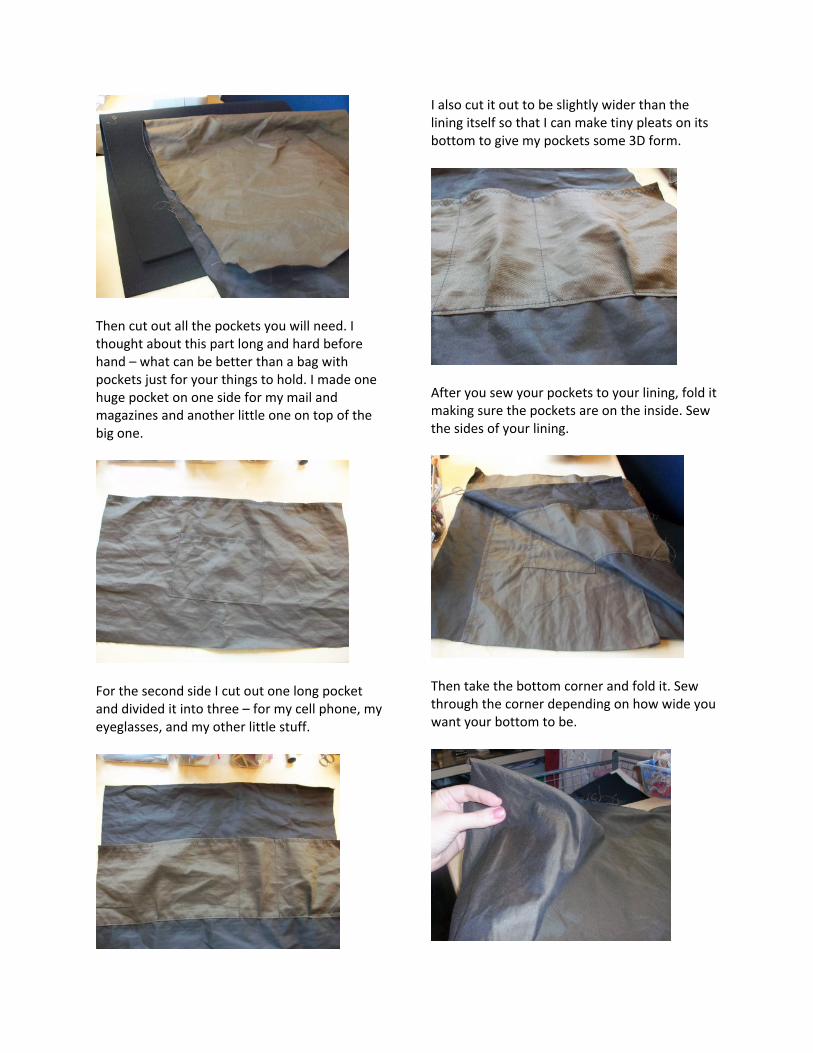
Then cut out all the pockets you will need. I thought about this part long and hard before hand – what can be better than a bag with pockets just for your things to hold. I made one huge pocket on one side for my mail and magazines and another little one on top of the big one.
For the second side I cut out one long pocket and divided it into three – for my cell phone, my eyeglasses, and my other little stuff.
I also cut it out to be slightly wider than the lining itself so that I can make tiny pleats on its bottom to give my pockets some 3D form.
After you sew your pockets to your lining, fold it making sure the pockets are on the inside. Sew the sides of your lining.
Then take the bottom corner and fold it. Sew through the corner depending on how wide you want your bottom to be.
Homemade Christmas Gift Guide eBook
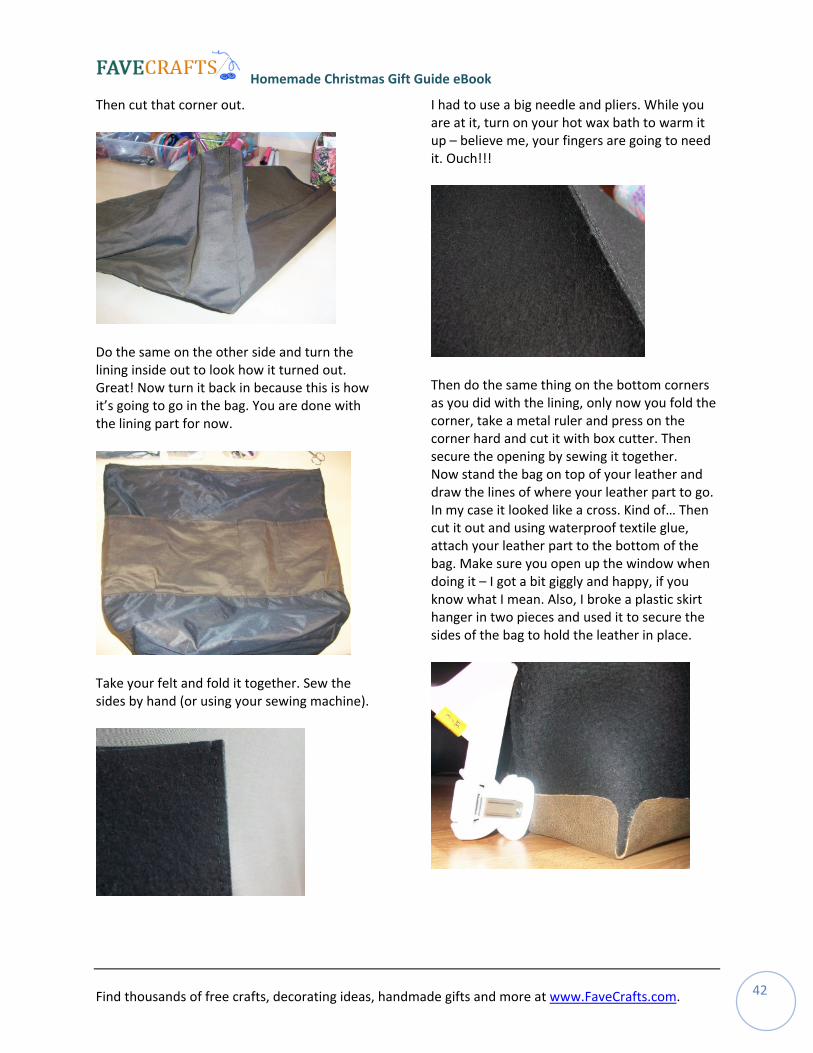
Find thousands of free crafts, decorating ideas, handmade gifts and more at www.FaveCrafts.com. 42
Then cut that corner out.
Do the same on the other side and turn the lining inside out to look how it turned out. Great! Now turn it back in because this is how it’s going to go in the bag. You are done with the lining part for now.
Take your felt and fold it together. Sew the sides by hand (or using your sewing machine).
I had to use a big needle and pliers. While you are at it, turn on your hot wax bath to warm it up – believe me, your fingers are going to need it. Ouch!!!
Then do the same thing on the bottom corners as you did with the lining, only now you fold the corner, take a metal ruler and press on the corner hard and cut it with box cutter. Then secure the opening by sewing it together. Now stand the bag on top of your leather and draw the lines of where your leather part to go. In my case it looked like a cross. Kind of… Then cut it out and using waterproof textile glue, attach your leather part to the bottom of the bag. Make sure you open up the window when doing it – I got a bit giggly and happy, if you know what I mean. Also, I broke a plastic skirt hanger in two pieces and used it to secure the sides of the bag to hold the leather in place.
Homemade Christmas Gift Guide eBook
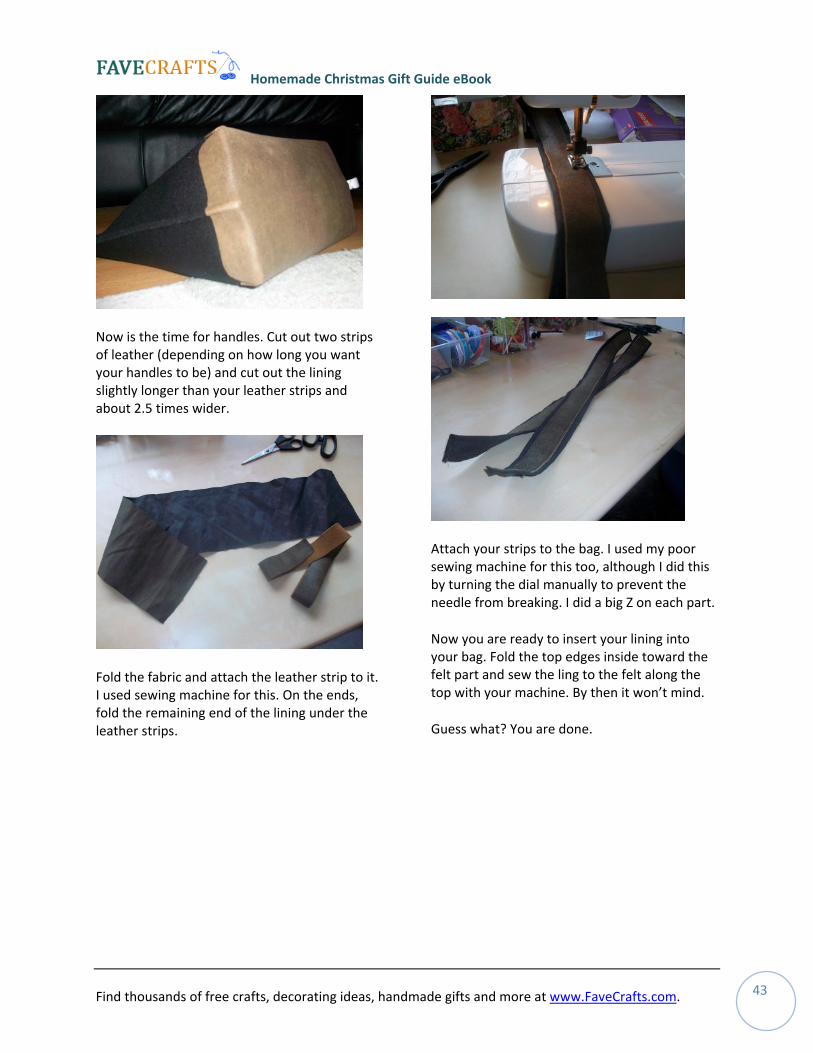
Now is the time for handles. Cut out two strips of leather (depending on how long you want your handles to be) and cut out the lining slightly longer than your leather strips and about 2.5 times wider.
Attach your strips to the bag. I used my poor sewing machine for this too, although I did this by turning the dial manually to prevent the needle from breaking. I did a big Z on each part.
Now you are ready to insert your lining into your bag. Fold the top edges inside toward the felt part and sew the ling to the felt along the top with your machine. By then it won’t mind.
Fold the fabric and attach the leather strip to it. I used sewing machine for this. On the ends, fold the remaining end of the lining under the leather strips. Guess what? You are done.
Find thousands of free crafts, decorating ideas, handmade gifts and more at www.FaveCrafts.com 43 .
Homemade Christmas Gift Guide eBook
Find thousands of free crafts, decorating ideas, handmade gifts and more at www.FaveCrafts.com. 44
For Girlfriend or Wife
Embellished Hoops
By: Bead Studio
If you're like me and you grew up in the 60's & 70's you may have a pair of large hoops in your jewelry box ‐ so pull them out and give them an updated look.
Materials:
• One pair large Hoop earrings ‐ ours are 55mm (just over 2") • One yard 28g wire ‐ cut in half (if your hoops are bigger use
longer wire). • Faceted Seed Beads
Instructions:
1. Holding on to a 1" tail of wire, wind the end of the wire around the top of the hoop 4 or 5 times to anchor.
2. Add about 3" of beads on to the wire and tie a loose know at the end (you may need to add more beads or take some off).
Homemade Christmas Gift Guide eBook
Find thousands of free crafts, decorating ideas, handmade gifts and more at www.FaveCrafts.com. 45
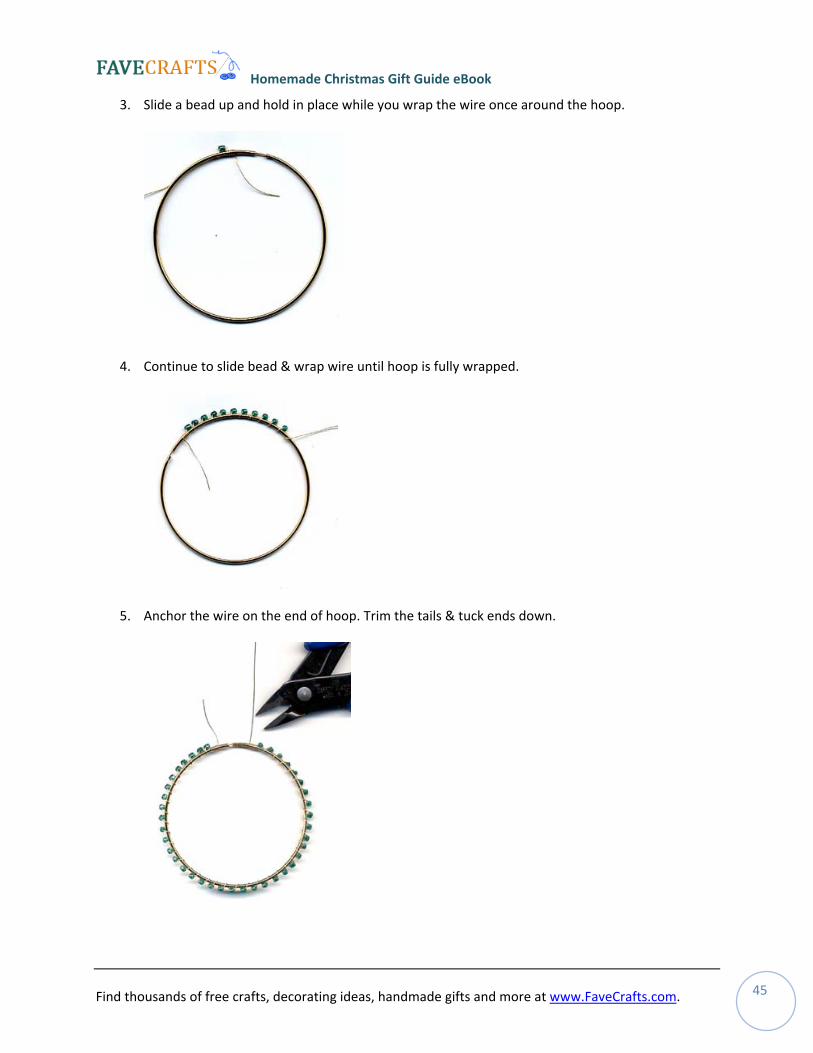
3. Slide a bead up and hold in place while you wrap the wire once around the hoop.
4. Continue to slide bead & wrap wire until hoop is fully wrapped.
5. Anchor the wire on the end of hoop. Trim the tails & tuck ends down.
Homemade Christmas Gift Guide eBook
Find thousands of free crafts, decorating ideas, handmade gifts and more at www.FaveCrafts.com. 46
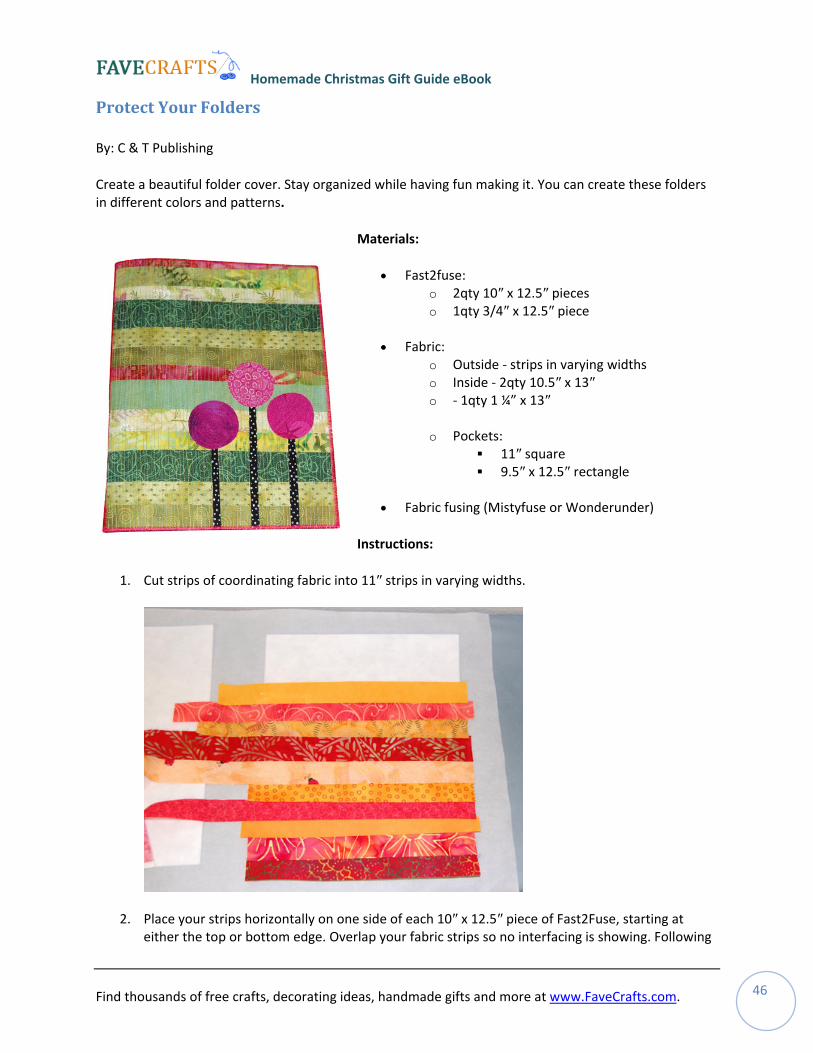
rotect Your Folders
By: C & T Publishing
Create a beautiful folder cover. Stay organized while having fun making it. You can create these folders
Materials:
• Fast2fuse: y 10″ x 12.5″ pieces
Outside ‐ strips in varying widths
ockets: ″ square
rectangle
• Fabric tyfuse or Wonderunder)
Instructions:
1. Cut strips of coordinating fabric into 11″ strips in varying widths.
P
in different colors and patterns.
o 2qto 1qty 3/4″ x 12.5″ piece
• Fabric:
o o Inside ‐ 2qty 10.5″ x 13″ o ‐ 1qty 1 ¼” x 13″
o P
11 9.5″ x 12.5″
fusing (Mis
2. Pl 12.5″ace your strips horizontally on one side of each 10″ x piece of Fast2Fuse, starting at either the top or bottom edge. Overlap your fabric strips so no interfacing is showing. Following
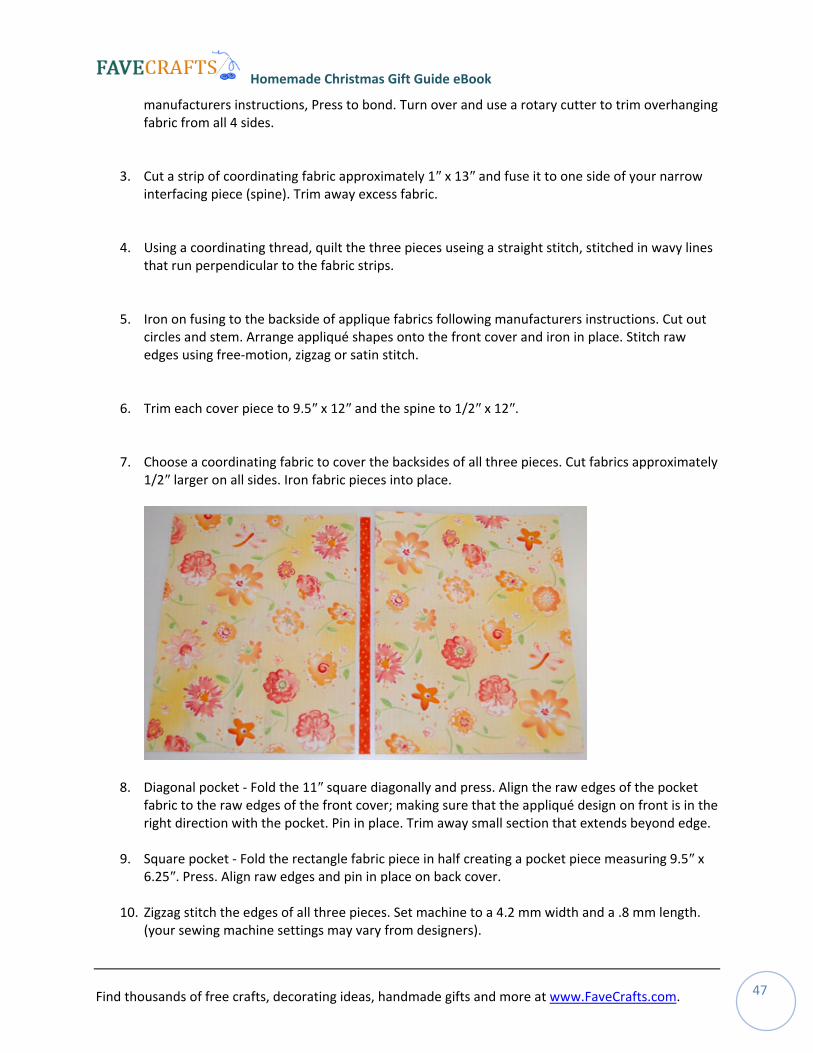
Homemade Christmas Gift Guide eBook
Find thousands of free crafts, decorating ideas, handmade gifts and more at www.FaveCrafts.com. 47
manufacturers instructions, Press to bond. Turn over and use a rotary cutter to trim overhanfabric from all 4 sides.
3. Cin
ging
ut a strip of coordinating fabric approximately 1″ x 13″ and fuse it to one side of your narrow terfacing piece (spine). Trim away excess fabric.
sing a coordinating thread, quilt the three pieces useing a straight stitch, stitched in wavy lines at run perpendicular to the fabric strips.
on on fusing to the backside of applique fabrics following manufacturers instructions. Cut out rcles and stem. Arrange appliqué shapes onto the front cover and iron in place. Stitch raw
rim each cover piece to 9.5″ x 12″ and the spine to 1/2″ x 12″.
hoose a coordinating fabric to cover the backsides of all three pieces. Cut fabrics approximately 2″ larger on all sides. Iron fabric pieces into place.
4. Uth
5. Irciedges using free‐motion, zigzag or satin stitch.
6. T
7. C1/
8. Diagonal pocket ‐ Fold the 11″ square diagonally and press. Align raw e of the pocket bric to the raw edges of the front cover; making sure that the appliqué design on front is in the
.
25″. Press. Align raw edges and pin in place on back cover.
2 mm width and a .8 mm length. our sewing machine settings may vary from designers).
the dgesfaright direction with the pocket. Pin in place. Trim away small section that extends beyond edge
9. Square pocket ‐ Fold the rectangle fabric piece in half creating a pocket piece measuring 9.5″ x 6.
10. Zigzag stitch the edges of all three pieces. Set machine to a 4.(y
Homemade Christmas Gift Guide eBook
Find thousands of free crafts, decorating ideas, handmade gifts and more at www.FaveCrafts.com. 48
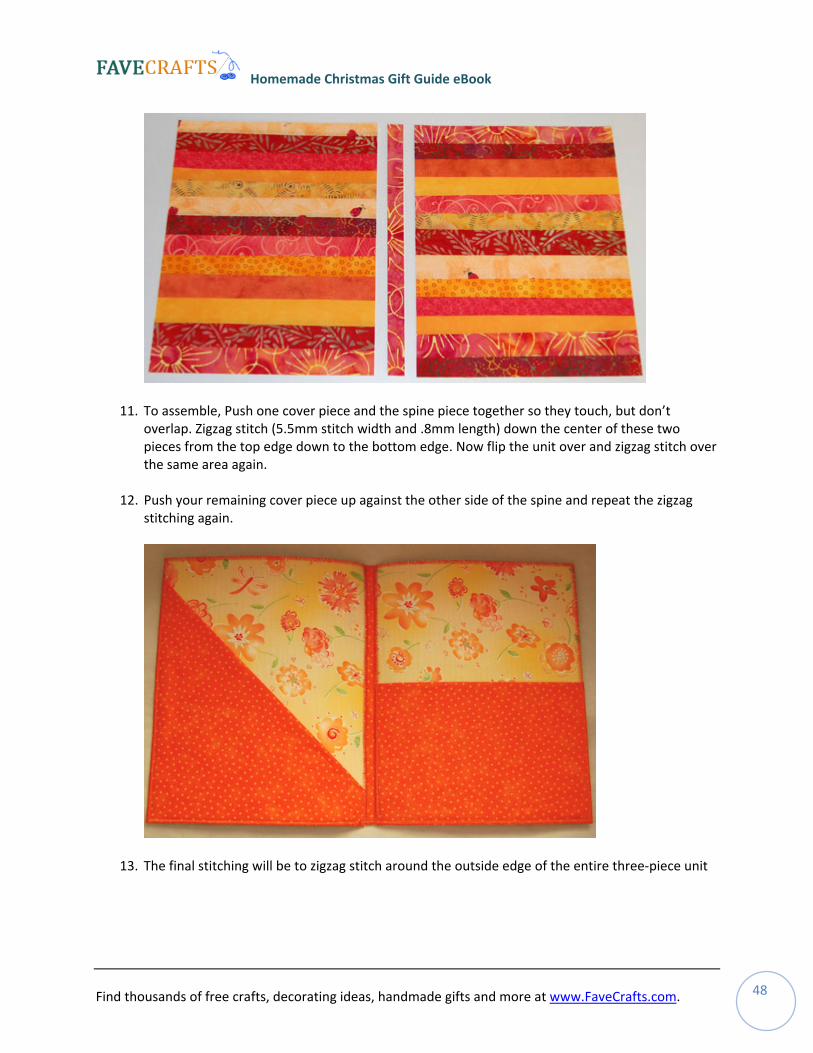
11. To assemble, Push one cover piece and the spine piece together so they tou h, but don’t erlap. Zigzag stitch (5.5mm stitch width and .8mm length) down the center of these two
h over
r piece up against the other side of the spine and repeat the zigzag itching again.
c ovpieces from the top edge down to the bottom edge. Now flip the unit over and zigzag stitcthe same area again.
12. Push your remaining covest
13. The final stitching will be to zigzag stitch around the outside edge of the t e three‐piece unit en ir
Homemade Christmas Gift Guide eBook
Find thousands of free crafts, decorating ideas, handmade gifts and more at www.FaveCrafts.com. 49
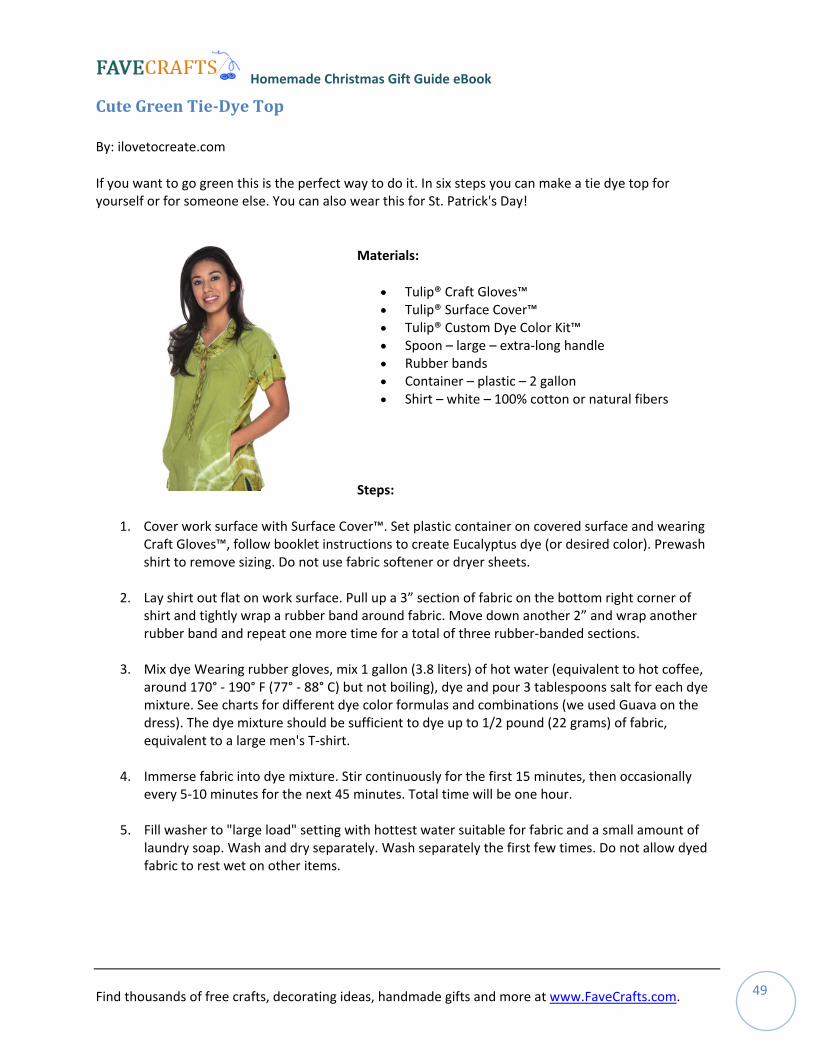
Cute Green TieDye Top
By: ilovetocreate.com
If you want to go green this is the perfect way to do it. In six steps you can make a tie dye top for yourself or for someone else. You can also wear this for St. Patrick's Day!
Materials:
• Tulip® Craft Gloves™ • Tulip® Surface Cover™ • Tulip® Custom Dye Color Kit™ • Spoon – large – extra‐long handle • Rubber bands • Container – plastic – 2 gallon • Shirt – white – 100% cotton or natural fibers
Steps:
1. Cover work surface with Surface Cover™. Set plastic container on covered surface and wearing Craft Gloves™, follow booklet instructions to create Eucalyptus dye (or desired color). Prewash shirt to remove sizing. Do not use fabric softener or dryer sheets.
2. Lay shirt out flat on work surface. Pull up a 3” section of fabric on the bottom right corner of shirt and tightly wrap a rubber band around fabric. Move down another 2” and wrap another rubber band and repeat one more time for a total of three rubber‐banded sections.
3. Mix dye Wearing rubber gloves, mix 1 gallon (3.8 liters) of hot water (equivalent to hot coffee, around 170° ‐ 190° F (77° ‐ 88° C) but not boiling), dye and pour 3 tablespoons salt for each dye mixture. See charts for different dye color formulas and combinations (we used Guava on the dress). The dye mixture should be sufficient to dye up to 1/2 pound (22 grams) of fabric, equivalent to a large men's T‐shirt.
4. Immerse fabric into dye mixture. Stir continuously for the first 15 minutes, then occasionally every 5‐10 minutes for the next 45 minutes. Total time will be one hour.
5. Fill washer to "large load" setting with hottest water suitable for fabric and a small amount of laundry soap. Wash and dry separately. Wash separately the first few times. Do not allow dyed fabric to rest wet on other items.

Homemade Christmas Gift Guide eBook
Find thousands of free crafts, decorating ideas, handmade gifts and more at www.FaveCrafts.com. 50
Homemade Beaded Necklace
By: Sue Stover for Jacquard Products
Don't spend big money on jewelry when you can make quality jewelry at home. This craft provides instructions on how to make a bead necklace.
Materials:
• Clear plastic tubing from hardware store • Ball chain, leather, fabric or ribbon to string the
beads • Jacquard Piñata Inks ‐ various colors • Jacquard Pearl Ex Stamp Pads • Rubber stamps • Scissors or tubing cutter • Can of compressed air • Metal washers
Instructions:
1. Start with about a 3" piece of plastic tubing.
2. Place a very small drop of Piñata at the inside edge of the tube. It is important not to put too much Piñata inside of the tube.
3. Tip the tube down and roll the ink around the inside of the tube. You can use a shot of the compressed air at the opening of the tube to help spread the ink.
4. Repeat with as many colors as you like.
5. When the ink is dry, you can cut the tubing up into beads of whatever length. Either before or after you cut the beads, stamp onto the outside of the bead with Jacquard Pearl Ex Stamp Pads. It may be easier to ink up the stamp and then roll the bead onto the surface of the stamp.
6. Thread the beads, alternating with the washers, onto whatever material you choose. You can use ribbon, ball chain, leather or fabric.
Homemade Christmas Gift Guide eBook
Find thousands of free crafts, decorating ideas, handmade gifts and more at www.FaveCrafts.com. 51
For the Kids
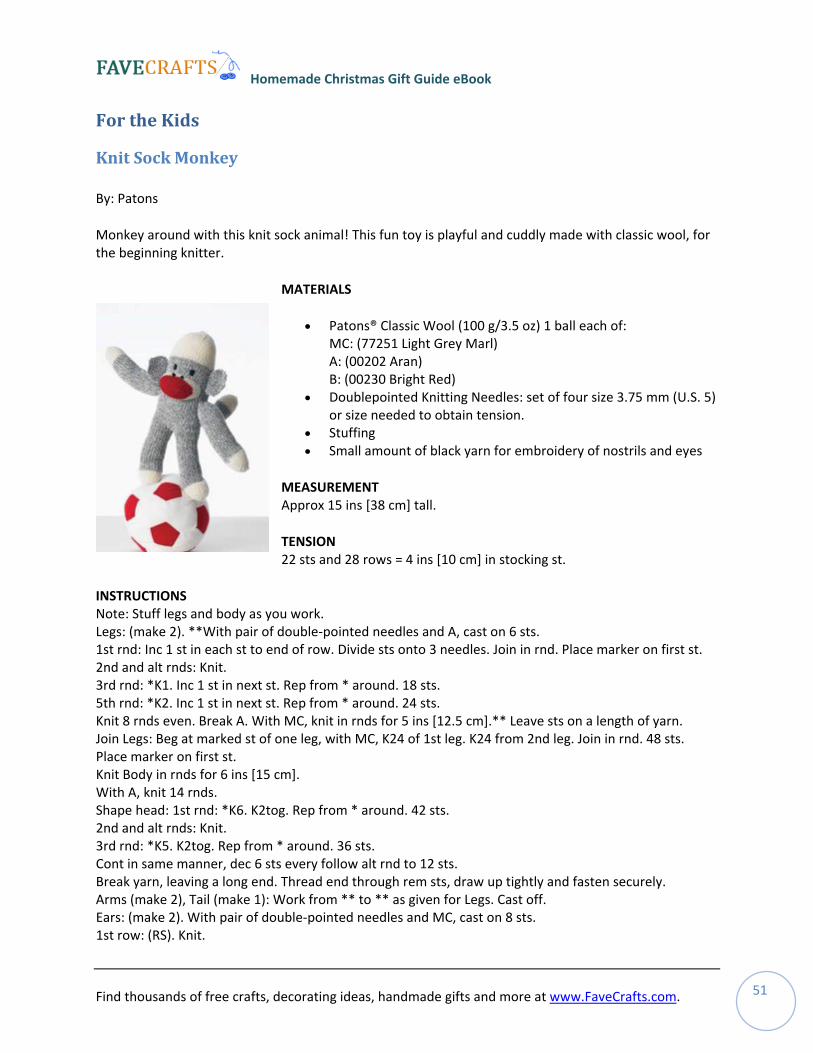
Knit Sock Monkey
By: Patons
Monkey around with this knit sock animal! This fun toy is playful and cuddly made with classic wool, for the beginning knitter.
MATERIALS
• Patons® Classic Wool (100 g/3.5 oz) 1 ball each of: MC: (77251 Light Grey Marl) A: (00202 Aran) B: (00230 Bright Red)
• Doublepointed Knitting Needles: set of four size 3.75 mm (U.S. 5) or size needed to obtain tension.
• Stuffing • Small amount of black yarn for embroidery of nostrils and eyes
MEASUREMENT Approx 15 ins [38 cm] tall.
TENSION 22 sts and 28 rows = 4 ins [10 cm] in stocking st.
INSTRUCTIONS Note: Stuff legs and body as you work. Legs: (make 2). **With pair of double‐pointed needles and A, cast on 6 sts. 1st rnd: Inc 1 st in each st to end of row. Divide sts onto 3 needles. Join in rnd. Place marker on first st. 2nd and alt rnds: Knit. 3rd rnd: *K1. Inc 1 st in next st. Rep from * around. 18 sts. 5th rnd: *K2. Inc 1 st in next st. Rep from * around. 24 sts. Knit 8 rnds even. Break A. With MC, knit in rnds for 5 ins [12.5 cm].** Leave sts on a length of yarn. Join Legs: Beg at marked st of one leg, with MC, K24 of 1st leg. K24 from 2nd leg. Join in rnd. 48 sts. Place marker on first st. Knit Body in rnds for 6 ins [15 cm]. With A, knit 14 rnds. Shape head: 1st rnd: *K6. K2tog. Rep from * around. 42 sts. 2nd and alt rnds: Knit. 3rd rnd: *K5. K2tog. Rep from * around. 36 sts. Cont in same manner, dec 6 sts every follow alt rnd to 12 sts. Break yarn, leaving a long end. Thread end through rem sts, draw up tightly and fasten securely. Arms (make 2), Tail (make 1): Work from ** to ** as given for Legs. Cast off. Ears: (make 2). With pair of double‐pointed needles and MC, cast on 8 sts. 1st row: (RS). Knit.
Homemade Christmas Gift Guide eBook
Find thousands of free crafts, decorating ideas, handmade gifts and more at www.FaveCrafts.com. 52
2nd row: Inc 1 st in first st. Knit to last 2 sts. Inc 1 st in next st. K1. Rep last 2 rows twice more. 14 sts. Knit 4 rows. Next row: K1. ssk. Knit to last 3 sts. K2tog. K1. Next row: Knit. Rep last 2 rows to 8 sts.Cast off. Muzzle: With pair of double‐pointed needles and B, cast on 8 sts. 1st row: K8, then With RS facing, turn work upside down. With 2nd needle, pick up and knit 8 sts along cast on edge. Divide sts as follows: 4 sts on 2nd and 3rd needles, 8 sts on first needle. Join in rnd. Place marker on first st. 1st rnd: 1st needle: K1. M1. Knit to last st. M1. K1. 2nd needle: K1. M1. Knit to end of needle. 3rd needle: Knit to last st. M1. K1. 2nd rnd: Knit. Rep last 2 rnds 3 times more. 32 sts. With A, rep last 2 rnds 3 times more. 44 sts. Cast off.
FINISHING Stuff muzzle lightly and sew to front. Attach ears to either side of head. Stuff arms and attach to sides. Stuff tail and attach to back. With black yarn, embroider nostrils and eyes.

Homemade Christmas Gift Guide eBook
Find thousands of free crafts, decorating ideas, handmade gifts and more at www.FaveCrafts.com. 53
Cute Crochet Pals
By: Diane Buyers for Stormy'z Crochet
This free crochet pattern is easy to make and can be given as a gift. If you like animals than this is the perfect craft for you. These crochet pals will put a smile on anyone's face.
Materials:
• Worsted weight yarn ‐about 3 oz CA for head & paws
• Small amount of yarn one shade lighter than CA (for bear's ears)
• About 3 oz CB yarn for body • Small amount white yarn and black yarn • Polyfill • Yarn needle
Raggedy Bear
Head and Body Row 1: Starting at top of head with CA, ch 11, work 2 sc in 2nd ch from hook, sc in next 8 chs, 2 sc in last ch, ch 1, turn. (12 sc) Row 2: Sc in next 2 sc, work (2 sc in next sc, sc in next 2 sc) twice, 2 sc in next sc, sc in next 3 sc, ch 1, turn. (15 sc) Row 3: 2 sc in first sc, sc in each sc to last sc, 2 sc in last sc, ch 1, turn. (17 sc) Rows 4 ‐ 5: Sc in each sc a cross, ch 1, turn. Row 6: 2 sc in first sc, sc in each sc to last sc, 2 sc in last sc, ch 1, turn.(19 sc) Rows 7 ‐ 10: Sc in each sc across, ch 1, turn. Row 11: Decrease 1 sc over next 2 sc, sc in each sc to last 2 sc, decrease 1 sc over next 2 sc, ch 1, turn. (17 sc) Row 12: Sc in each sc across, ch 1, turn. Row 13: (Decrease 1 sc over next 2 sc) twice, sc in next 9 sc, (decrease 1 sc over next 2 sc) twice, ch 1, turn. (13 sc) Row 14: Sc in each sc across, change to CB yarn at last step of last sc, break off CA yarn, ch 1, turn. Row 15: (This row starts body section) Work 2 sc in first sc, sc in each sc to last sc, 2 sc in last sc, ch 1, turn. (15 sc) Row 16: Sc in each sc across, ch 1, turn. Row 17: 2 sc in first sc, sc in each sc to last sc, 2 sc in last sc, ch 1, turn. (17 sc) Rows 18 ‐ 30: Sc in each sc across, ch 1, turn. Row 31: Decrease 1 sc over next 2 sc, sc in each sc to last 2 sc, decrease 1 sc over next 2 sc, ch 1, turn. (15 sc) Row 32: Decrease 1 sc over next 2 sc, sc in each sc to last 2 sc, decrease 1 sc over next 2 sc, fasten off. (13 sc)
Homemade Christmas Gift Guide eBook
Find thousands of free crafts, decorating ideas, handmade gifts and more at www.FaveCrafts.com. 54
Sew the 2 head and body sections together, matching yarn colors, begin by sewing head section, then stuff head firmly. Sew body section together, stuff body firmly before closing. Legs (Make 4) Note: When changing colors for stripes on rows 8 ‐ 26 of legs do not fasten off previous color, instead drop previous yarn and bring next color up side of work to change colors. Row 1: Starting at foot with either CA or color of choice (for shoe) ch 3, work 2 sc in 2nd ch from hook, 2 sc in next ch, ch 1, turn. (4 sc) Row 2: 2 sc in each sc across, ch 1, turn. (8 sc) Rows 3 ‐ 5: Sc in each sc across, ch 1, turn. Row 6: Sc in next 2 sc, work (decrease 1 sc over next 2 sc) twice, sc in next 2 sc, ch 1, turn. (6 sc) Row 7: Sc in each sc across, changing to CB yarn in last step of last sc, break off CA yarn, ch 1, turn. Rows 8‐ 10: With CB, sc in each sc across, ch 1, turn, change to white yarn at the end of row 10, drop CB yarn, do not break off. Rows 11 – 12: With white yarn, sc in each sc across, at the end of row 11 change to CB yarn on last step of last sc, drop white yarn. Rows 13 ‐ 26: Continue working in pattern, having 2 rows CB, then 2 rows of white. Fasten off both colors at the end of row 26. Sew 2 leg sections together to form one leg, sew foot together using same yarn color as foot, stuff foot. Sew leg sections with either CB or white yarn, stuff leg before closing. Sew legs to bottom of body. Arms (Make 4) Note: When changing colors for stripes on rows 6 ‐ 19 of arms do not fasten off previous color, instead drop previous yarn and bring next color up side of work to change colors. Row 1: With CA yarn and starting at paw, ch 4, sc in 2nd ch from hook and in each next 2 chs, ch 1, turn. (3 sc) Row 2: 2 sc in each sc across, ch 1, turn. (6 sc) Rows 3 ‐ 4: Sc in each sc across, ch 1, turn. Row 5: Sc in next 2 sc, decrease 1 sc over next 2 sc, sc in next 2 sc, change to CB yarn in last step of last sc, break off CA yarn, ch 1, turn. (5 sc) Rows 6 ‐ 19: Work even in sc for 2 rows CB then 2 rows of white as worked for legs. Fasten off at end of row 19. Sew 2 arm sections together to form one arm, sew paw together using CA yarn, stuff paw. Sew arm sections with either CB or white yarn, stuff arm before closing. Sew arms to sides of body pointing downward over row 17. Back Of Ears (Make 2) Row 1: With CA yarn and starting at top of ear *ch 5, work 2 sc in 2nd ch from hook, 2 dc in each next 2 chs, 2 sc in last ch, ch 1, turn. (8 sts) Row 2: 2 sc in first sc, 2 dc in each next 6 sts, 2 sc in last sc, ch 1, turn. (16 sts) Row 3: Sc in next 5 sts, 2 sc in each next 6 sts, sc in next 5 sc, fasten off. (22 sc) Front Of Ears (Make 2) Rows 1 ‐ 2:Using yarn one shade lighter than CA, work rows 1 & 2 of back of ears starting at the *. Change to CA in last step of last stitch of row 2, break off lighter shade. (16 sts) Row 3: Repeat row 3 of back of ear.
Homemade Christmas Gift Guide eBook
Find thousands of free crafts, decorating ideas, handmade gifts and more at www.FaveCrafts.com. 55
With CA, sew one front and one back ear section together to form one ear. Sew ears to top of head over sewn seam. Muzzle Rnd 1: With CA, ch 2, 6 sc in 2nd ch from hook. (6 sc) Rnd 2: 2 sc in each sc around. (12 sc) Rnd 3: (2 sc in each next 3 sc, sc in next 3 sc) around. (18 sc) Rnd 4: Sc in each sc around, join with a sl st in first sc, fasten off. Stuff muzzle and sew to center of face over rows 7 ‐ 12. With a length of black yarn, embroider nose and mouth onto muzzle. Embroider eyes over muzzle. Weave in all loose ends. Raggedy Cat: With desired color yarn, work head & body, legs and arms as for bear. Ears (Make 4) Row 1: With CA yarn and starting at top point of ear, ch 2, 3 sc in 2nd ch from hook, ch 1, turn. (3 sc) Row 2: 2 sc in first sc, sc in next sc, 2 sc in next sc, ch 1, turn. (5 sc) Row 3: Sc in each sc across, ch 1, turn. Row 4: 2 sc in first sc, sc in each sc to last sc, 2 sc in last sc, ch 1, turn. (7 sc) Row 5 ‐ 6: Sc in each sc across, ch 1, turn. At the end of row 6, DO NOT TURN. Edging: Work 5 sc up side of ear, work 3 sc in top point of ear, then work 5 sc down next side of ear to row 6, ch 1, sl st in first sc of row 6. Fasten off. Sew 2 ear sections together to form one ear. Sew ears to top of head, having the 2 sc of row 8 over the corner of head. Muzzle Row 1: With CA, and starting at side edge of muzzle, ch 3, 2 sc in 2nd ch from hook, 2 sc in next ch, ch 1, turn. (4 sc) Row 2: 2 sc in first sc, sc in each sc to last sc, 2 sc in last sc, ch 1, turn. (6 sc) Rows 3 ‐ 4: Sc in each sc across, ch 1, turn. Rows 5 ‐ 6: Decrease 1 sc over next 2 sc, sc in each sc to last 2 sc, decrease 1 sc over next 2 sc, ch 1, turn. (4, 2 sc) Rows 7 ‐ 8: 2 sc in first sc, sc in each sc to last sc, 2 sc in last sc, ch 1, turn. (4, 6 sc) Rows 9 ‐ 10: Sc in each sc across, ch 1, turn. Row 11: Decrease 1 sc over next 2 sc, sc in each sc to last 2 sc, decrease 1 sc over next 2 sc, ch 1, turn. (4 sc) Row 12: (Decrease 1 sc over next 2 sc) twice. Fasten off. With a length of CA yarn, sew muzzle to center of face over rows 7 ‐ 12, stuff muzzle before closing. With a length of black yarn embroider nose and mouth onto muzzle. With desired colors, embroider eyes over muzzle. Tail (Make 2) Row 1: With CA yarn and starting at tip of tail, ch 2, work 3 sc in 2nd ch from hook, ch 1, turn. (3 sc) Row 2: 2 sc in first sc, sc in next sc, 2 sc in last sc, ch 1, turn. (5 sc) Rows 3 – 28: Sc in each sc across, ch 1, turn. At the end of row 28, do not ch 1, fasten off. Sew the 2 tail sections together, stuffing as sewing progresses. Sew tail to back of body over row 30. Weave in all loose ends.
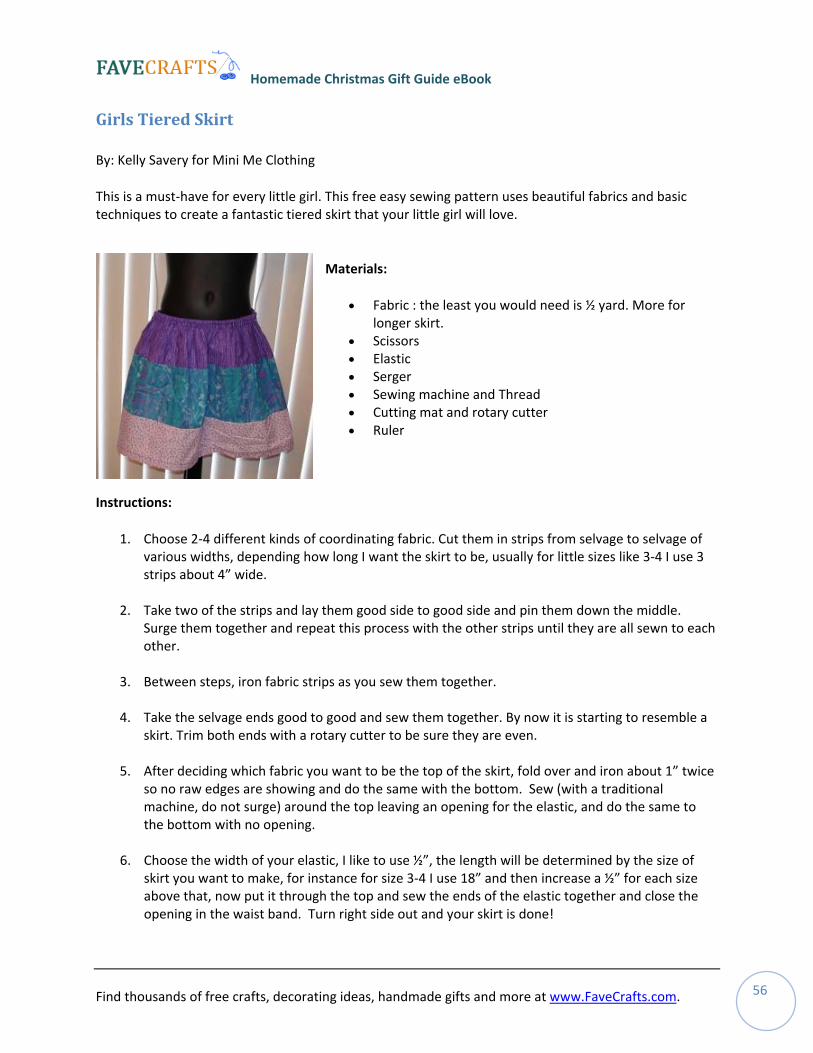
Homemade Christmas Gift Guide eBook
Find thousands of free crafts, decorating ideas, handmade gifts and more at www.FaveCrafts.com. 56
Girls Tiered Skirt
By: Kelly Savery for Mini Me Clothing
This is a must‐have for every little girl. This free easy sewing pattern uses beautiful fabrics and basic techniques to create a fantastic tiered skirt that your little girl will love.
Materials:
• Fabric : the least you would need is ½ yard. More for longer skirt.
• Scissors • Elastic • Serger • Sewing machine and Thread • Cutting mat and rotary cutter • Ruler
Instructions:
1. Choose 2‐4 different kinds of coordinating fabric. Cut them in strips from selvage to selvage of various widths, depending how long I want the skirt to be, usually for little sizes like 3‐4 I use 3 strips about 4” wide.
2. Take two of the strips and lay them good side to good side and pin them down the middle. Surge them together and repeat this process with the other strips until they are all sewn to each other.
3. Between steps, iron fabric strips as you sew them together.
4. Take the selvage ends good to good and sew them together. By now it is starting to resemble a skirt. Trim both ends with a rotary cutter to be sure they are even.
5. After deciding which fabric you want to be the top of the skirt, fold over and iron about 1” twice so no raw edges are showing and do the same with the bottom. Sew (with a traditional machine, do not surge) around the top leaving an opening for the elastic, and do the same to the bottom with no opening.
6. Choose the width of your elastic, I like to use ½”, the length will be determined by the size of skirt you want to make, for instance for size 3‐4 I use 18” and then increase a ½” for each size above that, now put it through the top and sew the ends of the elastic together and close the opening in the waist band. Turn right side out and your skirt is done!
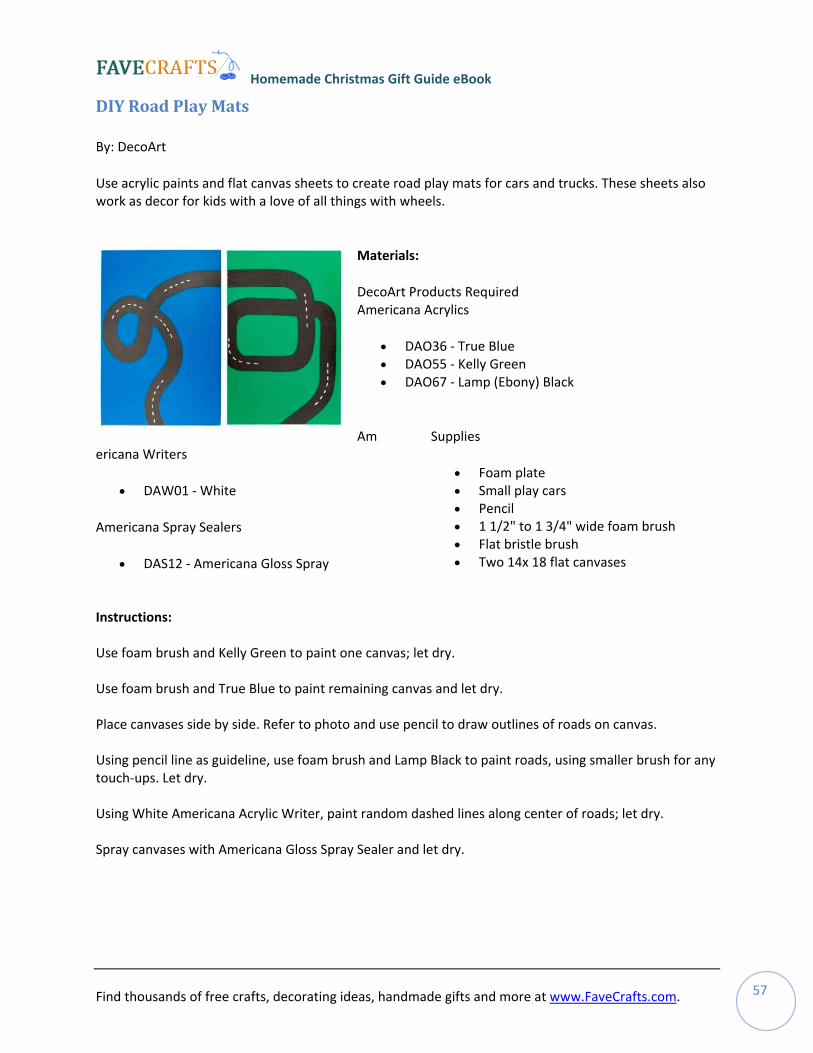
Homemade Christmas Gift Guide eBook
DIY Road Play Mats
By: DecoArt
Use acrylic paints and flat canvas sheets to create road play mats for cars and trucks. These sheets also work as decor for kids with a love of all things with wheels.
Materials:
Find thousands of free crafts, decorating ideas, handmade gifts and more at www.FaveCrafts.com. 57
DecoArt Products Required Americana Acrylics
• DAO36 ‐ True Blue • DAO55 ‐ Kelly Green • DAO67 ‐ Lamp (Ebony) Black
Am
ericana WritersSupplies
• Foam plate • Small play cars • DAW01 ‐ White • Pencil • 1 1/2" to 1 3/4" wide foam brush Americana Spray Sealers • Flat bristle brush • Two 14x 18 flat canvases • DAS12 ‐ Americana Gloss Spray
Instructions: Use foam brush and Kelly Green to paint one canvas; let dry. Use foam brush and True Blue to paint remaining canvas and let dry. Place canvases side by side. Refer to photo and use pencil to draw outlines of roads on canvas. Using pencil line as guideline, use foam brush and Lamp Black to paint roads, using smaller brush for any touch‐ups. Let dry. Using White Americana Acrylic Writer, paint random dashed lines along center of roads; let dry. Spray canvases with Americana Gloss Spray Sealer and let dry.
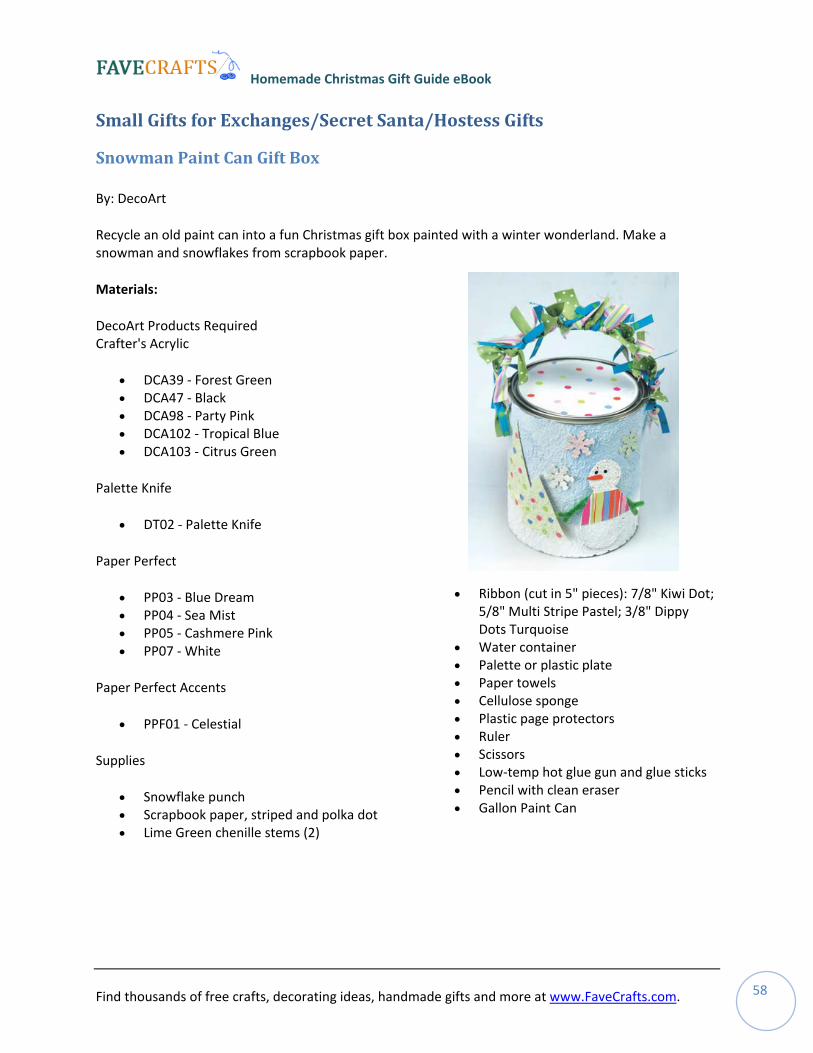
Homemade Christmas Gift Guide eBook
Find thousands of free crafts, decorating ideas, handmade gifts and more at www.FaveCrafts.com. 58
Small Gifts for Exchanges/Secret Santa/Hostess Gifts
Snowman Paint Can Gift Box
By: DecoArt
Recycle an old paint can into a fun Christmas gift box painted with a winter wonderland. Make a snowman and snowflakes from scrapbook paper.
Materials:
DecoArt Products Required Crafter's Acrylic
• DCA39 ‐ Forest Green • DCA47 ‐ Black • DCA98 ‐ Party Pink • DCA102 ‐ Tropical Blue • DCA103 ‐ Citrus Green
Palette Knife
• DT02 ‐ Palette Knife
Paper Perfect
• PP03 ‐ Blue Dream • PP04 ‐ Sea Mist • PP05 ‐ Cashmere Pink • PP07 ‐ White
Paper Perfect Accents
• PPF01 ‐ Celestial
Supplies
• Snowflake punch • Scrapbook paper, striped and polka dot • Lime Green chenille stems (2)
• Ribbon (cut in 5" pieces): 7/8" Kiwi Dot; 5/8" Multi Stripe Pastel; 3/8" Dippy Dots Turquoise
• Water container • Palette or plastic plate • Paper towels • Cellulose sponge • Plastic page protectors • Ruler • Scissors • Low‐temp hot glue gun and glue sticks • Pencil with clean eraser • Gallon Paint Can
Homemade Christmas Gift Guide eBook
Find thousands of free crafts, decorating ideas, handmade gifts and more at www.FaveCrafts.com. 59
Instructions: PREPARATION: Make one each of Sea Mist, Cashmere Pink, and White Paper Perfect sheets. (Follow label instructions for spreading Paper Perfect onto sheet protectors.) While wet, sprinkle approximately three‐fourths of the White sheet with Celestial White Glitter. Once dry, remove from sheet protectors and use as directed.
INSTRUCTIONS:
1. Use palette knife to apply Blue Dream Paper Perfect onto top three‐fourths of paint can forming wavy border at bottom edge. Apply White on remaining quarter of can, meeting the blue edge. Press sponge onto surface to remove excess moisture from Paper Perfect and compress fibers. Let dry.
2. Use scissors to cut a snowman shape from white glitter Paper Perfect sheet. Place wood snowflake onto white glitter paper and trace shape with pencil. Use scissors to cut out snowflake and two triangle tree shapes from Sea Mist sheet.
3. Use snowflake punch to cut out small snowflakes from each Paper Perfect sheet.
4. Use paint can lid and pencil to transfer circle onto polka dot scrapbook paper. Cut out circle and adhere to lid.
5. Cut "shirt" from striped scrapbook paper and nose from orange stripe of striped scrapbook paper.
6. Use pencil eraser to dot Party Pink, Tropical Blue, and Citrus Green onto trees. Let dry.
7. Dip pencil tip in Black to dot eyes on snowman.
8. Assembly: Twist chenille stems for arms and adhere to snowman back. Adhere shirt and nose to snowman, then trees, snowman, and small flakes to can. Adhere large paper snowflake onto wood shape. Thread beads on cording and adhere to large snowflake. Tie alternating colors of ribbon pieces onto can handle. Tie wood snowflake onto handle and use as a gift tag.
FRAMES:
1. Tint green Paper Perfect with Forest Green acrylic and pink Paper Perfect with Party Pink acrylic as desired.
2. Use palette knife to apply green mix on tree frame and pink mix on star frame. While wet, sprinkle with glitter or when dry, dot with paint.
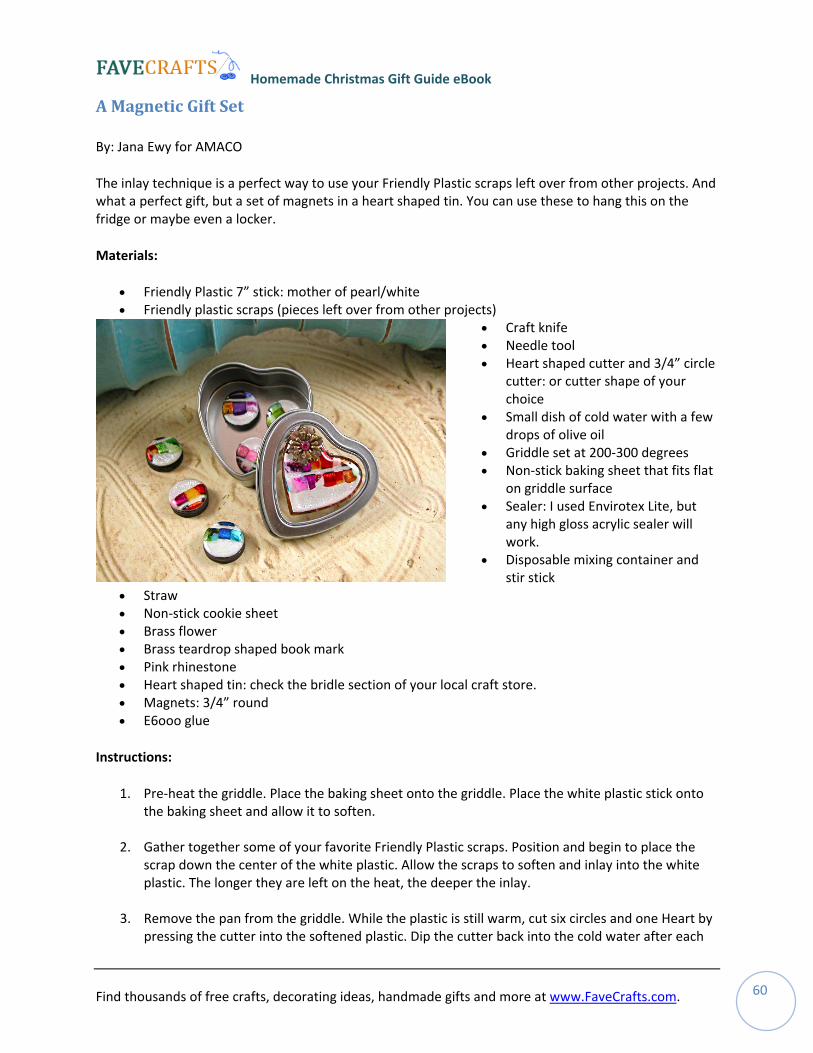
Homemade Christmas Gift Guide eBook
Find thousands of free crafts, decorating ideas, handmade gifts and more at www.FaveCrafts.com. 60
A Magnetic Gift Set
By: Jana Ewy for AMACO
The inlay technique is a perfect way to use your Friendly Plastic scraps left over from other projects. And what a perfect gift, but a set of magnets in a heart shaped tin. You can use these to hang this on the fridge or maybe even a locker.
Materials:
• Friendly Plastic 7” stick: mother of pearl/white • Friendly plastic scraps (pieces left over from other projects)
• Craft knife • Needle tool • Heart shaped cutter and 3/4” circle
cutter: or cutter shape of your choice
• Small dish of cold water with a few drops of olive oil
• Griddle set at 200‐300 degrees • Non‐stick baking sheet that fits flat
on griddle surface • Sealer: I used Envirotex Lite, but
any high gloss acrylic sealer will work.
• Disposable mixing container and stir stick
• Straw • Non‐stick cookie sheet • Brass flower • Brass teardrop shaped book mark • Pink rhinestone • Heart shaped tin: check the bridle section of your local craft store. • Magnets: 3/4” round • E6ooo glue
Instructions:
1. Pre‐heat the griddle. Place the baking sheet onto the griddle. Place the white plastic stick onto the baking sheet and allow it to soften.
2. Gather together some of your favorite Friendly Plastic scraps. Position and begin to place the scrap down the center of the white plastic. Allow the scraps to soften and inlay into the white plastic. The longer they are left on the heat, the deeper the inlay.
3. Remove the pan from the griddle. While the plastic is still warm, cut six circles and one Heart by pressing the cutter into the softened plastic. Dip the cutter back into the cold water after each
Homemade Christmas Gift Guide eBook
Find thousands of free crafts, decorating ideas, handmade gifts and more at www.FaveCrafts.com. 61
cut. This will help keep it from sticking to the plastic. Allow the plastic to cool. Use the needle tool to press under the edges of the cooled plastic and remove it from the pan. Pop out the cut shapes. If needed use the craft knife to cut around each one.
4. Apply the envirotex sealer following the manufactures instructions.
Note: I like to place my pieces on a non‐stick cookie sheet. This way if there is any run off, it will be easy to remove later. Once I have the envirotex mixed, I like to pour it into a small squeeze bottle. The application will be more precise and much easier. Blow softly, through the straw to pop any bubbles that remain. Allow the resin to dry at least 12 hours. If there has been any run off. Remove the piece from the pan by pressing the needle tool under it and lifting. You can cut the excess off with a scissor. Envirotex cures completely in 24 hours.
5. Glue the heart onto the center of the lid. Glue the rhinestone into the center of the brass flower. Position and adhere the flower onto the heart. Allow the glue to dry.
6. Glue a plastic circle onto each of the magnets. Allow the glue to dry. Place the magnets into the tin.
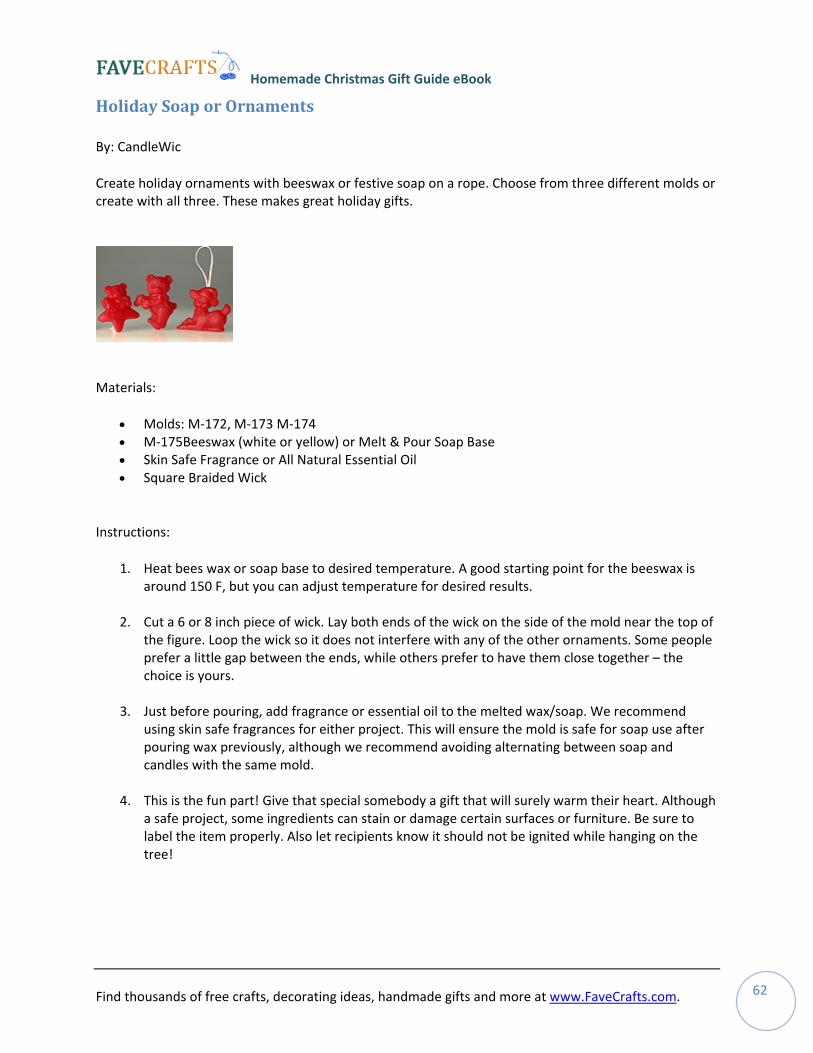
Homemade Christmas Gift Guide eBook
Find thousands of free crafts, decorating ideas, handmade gifts and more at www.FaveCrafts.com. 62
Holiday Soap or Ornaments
By: CandleWic
Create holiday ornaments with beeswax or festive soap on a rope. Choose from three different molds or create with all three. These makes great holiday gifts.
Materials:
• Molds: M‐172, M‐173 M‐174 • M‐175Beeswax (white or yellow) or Melt & Pour Soap Base • Skin Safe Fragrance or All Natural Essential Oil • Square Braided Wick
Instructions:
1. Heat bees wax or soap base to desired temperature. A good starting point for the beeswax is around 150 F, but you can adjust temperature for desired results.
2. Cut a 6 or 8 inch piece of wick. Lay both ends of the wick on the side of the mold near the top of the figure. Loop the wick so it does not interfere with any of the other ornaments. Some people prefer a little gap between the ends, while others prefer to have them close together – the choice is yours.
3. Just before pouring, add fragrance or essential oil to the melted wax/soap. We recommend using skin safe fragrances for either project. This will ensure the mold is safe for soap use after pouring wax previously, although we recommend avoiding alternating between soap and candles with the same mold.
4. This is the fun part! Give that special somebody a gift that will surely warm their heart. Although a safe project, some ingredients can stain or damage certain surfaces or furniture. Be sure to label the item properly. Also let recipients know it should not be ignited while hanging on the tree!
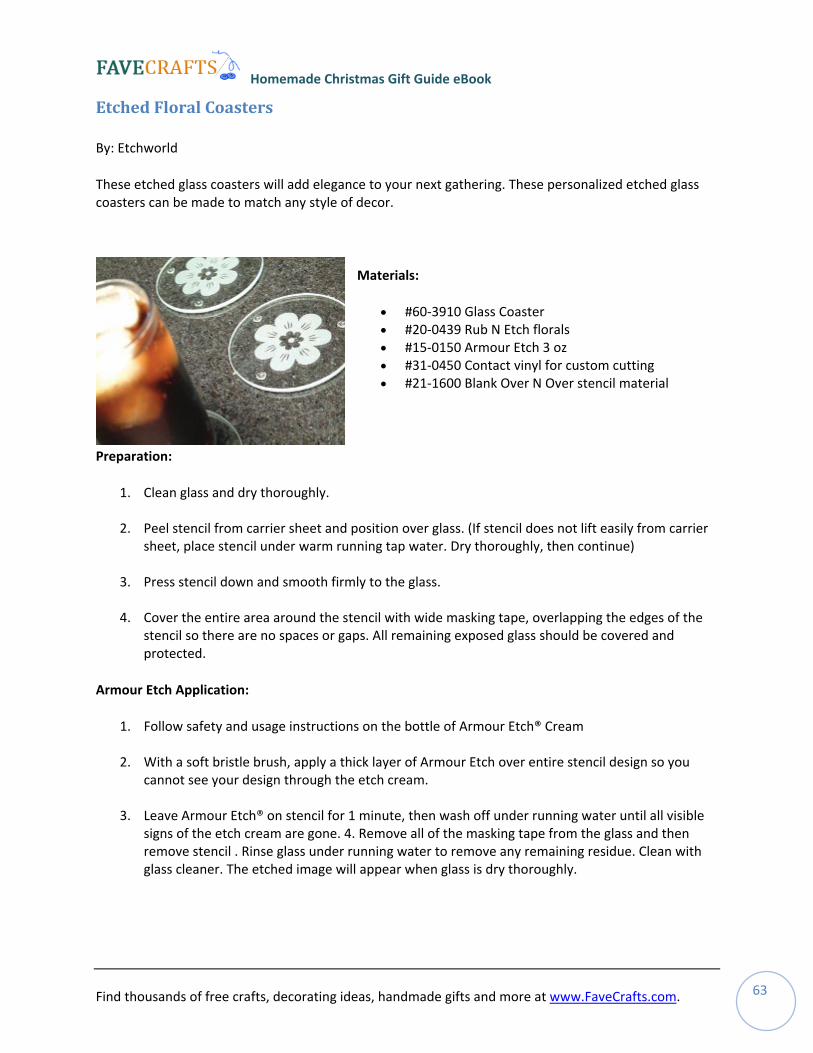
Homemade Christmas Gift Guide eBook
Find thousands of free crafts, decorating ideas, handmade gifts and more at www.FaveCrafts.com. 63
tched Floral Coasters
By: Etchworld
These etched glass coasters will add elegance to your next gathering. These personalized etched glass
Materials:
• #60‐3910 Glass Coaster rals
stom cutting al
Preparation:
1. Clean glass and dry thoroughly.
el stencil from carrier sheet and position over glass. (If stencil does not lift easily from carrier
ess stencil down and smooth firmly to the glass.
ver the entire area around the stencil with wide masking tape, overlapping the edges of the
Armour Etch Application:
1. Follow safety and usage instructions on the bottle of Armour Etch® Cream
ith a soft bristle brush, apply a thick layer of Armour Etch over entire stencil design so you
ave Armour Etch® on stencil for 1 minute, then wash off under running water until all visible
E
coasters can be made to match any style of decor.
• #20‐0439 Rub N Etch flo• #15‐0150 Armour Etch 3 oz • #31‐0450 Contact vinyl for cu• #21‐1600 Blank Over N Over stencil materi
2. Pe
sheet, place stencil under warm running tap water. Dry thoroughly, then continue)
3. Pr
4. Costencil so there are no spaces or gaps. All remaining exposed glass should be covered and protected.
2. W
cannot see your design through the etch cream.
3. Lesigns of the etch cream are gone. 4. Remove all of the masking tape from the glass and then remove stencil . Rinse glass under running water to remove any remaining residue. Clean withglass cleaner. The etched image will appear when glass is dry thoroughly.
Homemade Christmas Gift Guide eBook
Find thousands of free crafts, decorating ideas, handmade gifts and more at www.FaveCrafts.com. 64
Sand Etch Application:
1. Follow Safety instructions and usage instructions that came with your Sand Etch® blaster.
2. You will need a confined space to work like a corrugated box or Inflate ‘A’ Booth®.
3. Hold both Sand Etch blasting unit and glass object in an UPRIGHT position, perpendicular to each other with nozzle 1/2” to 1” from surface of the stencil. 4. Blast using small circular or back and forth sweeping motion over the stencil making sure the entire design is etched evenly.
4. Lightly dust off excess grit with a soft bristle brush. and wash off remaining grit residue from glass under running water. Do not wipe grit from glass with sponge or towel as this could scratch the glass.
5. Remove stencil.
6. Clean with glass cleaner.
Homemade Christmas Gift Guide eBook
Find thousands of free crafts, decorating ideas, handmade gifts and more at www.FaveCrafts.com. 65
Homemade Christmas Gift Guide eBook
eBook by www.FaveCrafts.com
Included in this eBook:
• Gifts for Mom
o Bath Mitts, pg. 8
• Gifts for Brother
o T‐Shirt Scarf, pg. 33
• Gifts for Friend
o Embellished Hoops, pg. 44
• Gifts for Husband
o Wine Coasters, pg. 37
• Gifts for Small Gift Exchange
o Magnetic Gift Set, pg. 60
Sign up for our free crafting newsletter and receive more holiday craft eBooks, free craft projects, quick tips, home décor ideas and more right in your inbox every week.