hotel manager / restaurant manager / store manager · these base features are found in the store...
TRANSCRIPT

Hotel Manager / Restaurant Manager / Store Manager
User Guide
April 2019

2
Table of Contents
Preface ..................................................................................................................................... 4
Overall Feature List .................................................................................................................. 5
List of available Reports .......................................................................................................... 6
System Requirements .............................................................................................................. 7
Conventions ............................................................................................................................. 7
Inventory ............................................................................................................................... 7
Accounting ........................................................................................................................... 7
Getting Started ........................................................................................................................ 8
System Settings ......................................................................................................................... 9
Licensing Information ............................................................................................................ 10
Manage Users/Employees ................................................................................................... 11
Add a User/Employee ....................................................................................................... 11
View User/Employee ......................................................................................................... 12
Update Employee.............................................................................................................. 13
User Password Reset .......................................................................................................... 13
Inventory ................................................................................................................................. 15
Add New Category ........................................................................................................... 15
Update Category .............................................................................................................. 16
Add a Product.................................................................................................................... 17
Update Product ................................................................................................................. 18
Add a Bundle ..................................................................................................................... 20
Update Bundle ................................................................................................................... 21
Add an Ingredient *(Restaurant and Hotel Manager only) ........................................ 21
Update Ingredient ............................................................................................................. 22
Add a Recipe *(Restaurant and Hotel Manager only) ................................................ 23
Update Recipe ................................................................................................................... 24
Restock Inventory............................................................................................................... 24
Price Lists .............................................................................................................................. 25
Stock Take ........................................................................................................................... 25
Shopping List ....................................................................................................................... 25
Point of Sale ............................................................................................................................ 26
Capturing Sales .................................................................................................................. 26
View Pending Orders ......................................................................................................... 29
Search Products ................................................................................................................. 29
Price Lists .............................................................................................................................. 29

3
Quotations .......................................................................................................................... 30
Discounts ............................................................................................................................. 32
Un-stocked Product Requests .......................................................................................... 34
Accounting............................................................................................................................. 35
Report Navigation ............................................................................................................. 36
Reverse a Sale Transaction ............................................................................................... 37
Add a Payslip Entry ............................................................................................................ 38
Add an Expense ................................................................................................................. 39
Create a NAPSA Return .................................................................................................... 39
Compute ZRA Turn Over Tax ............................................................................................ 40
Accommodation **(Hotel Manager only) ......................................................................... 41
Add Event Hall .................................................................................................................... 42
Update Event Hall .............................................................................................................. 43
Add Guest Room ............................................................................................................... 43
Update Guest Room ......................................................................................................... 44
Reserve a Room ................................................................................................................. 44
Update a reservation ........................................................................................................ 45
Check-in from reservation ................................................................................................ 46
Check-in direct .................................................................................................................. 47
Checkout ............................................................................................................................ 48
Schedule an Event............................................................................................................. 50
Cancel an Event ................................................................................................................ 51
Update an Event ................................................................................................................ 51
Confirm an Event ............................................................................................................... 52
Add extras to invoice ........................................................................................................ 53
Manage Deposits............................................................................................................... 54
Manage Discounts ............................................................................................................. 55
Room Reports ..................................................................................................................... 56
Room Invoices .................................................................................................................... 57
Event Reports ...................................................................................................................... 57
Search Room/Event History .............................................................................................. 58
Appendix ................................................................................................................................ 60

4
Preface
Welcome to the Hotel Manager / Restaurant Manager / Store Manager User Guide.
This guide outlines the system features and provides step-by-step instructions on how
to use the system.
The system primarily has 3 versions
1. Hotel Manager
2. Restaurant Manager
3. Store Manager
The feature set is cumulative in the order: Store to Restaurant to Hotel Manager.
The common features to all 3 versions1 include:
Inventory Management and Tracking
Quotations and Invoices
Point of Sale
Sales Income Reports
Expenses Reports
Margin and Net Income Computation
Employee Management and Payslips (advance and deduction capabilities)
NAPSA Return Generator and Archive
ZRA Turn Over Tax Calculator
These base features are found in the Store Manager version of the software.
Restaurant Manager builds on top of Store Manager and adds:
An order queue (auto-updates in the kitchen)
Ingredient/recipe management functions
Hotel Manager builds on top of Restaurant Manager to add accommodation
functions which include:
Event/room reservations and check-in
Event/room invoices
Pricing and other information are available at www.mnemoniclab.com.
1 This is subject to other factors such as whether the version paid for is Basic or Pro.

5
Overall Feature List
o Inventory Management and Tracking
o Quotations and Invoices
o Point of Sale Functions
o Sales Revenue Reports
o Expenses Reports
o Margin and Net Income Computation
o Employee Management and Payslips (advance and deduction capabilities)
o NAPSA Return Generator and Archive
o ZRA Turn Over Tax Calculator
o Hotel/Logde Reservation Management
o Event Scheduling
o Event and Room Booking Conflict Avoidance
o Room/Event Deposit and Discount Management

6
List of available Reports
1. Accommodation
1.1. Room Reports
1.1.1. Guests by Period
1.1.2. Failed Reservations
1.2. Event Reports
1.2.1. Confirmed Events
1.2.2. Cancelled Events
1.3. Invoice Reports
1.3.1. Individual Guest Invoices
1.3.2. Group Guest Invoices
2. Accounting
2.1. Sales Reports
2.1.1. Sales summary per cashier per day
2.1.2. Detailed day report / Invoices
2.1.3. Sales per item
2.1.4. Non-Sales Transactions
2.2. Expense Reports
2.2.1. Expenses summary report
2.2.2. Expenses by type
2.3. Margins
2.3.1. Gross margin report
2.3.2. Detailed margins
2.4. Payroll Reports
2.4.1. Payroll and payslips
2.4.2. Simulated payroll and payslips
2.5. Accommodation Income Reports **(Hotel Manager only)
2.5.1. Events Income
2.5.2. Room Income
3. Inventory
3.1. Inventory levels
3.2. Expired products
3.3. Stock take report
3.4. Price list
3.5. Shopping list
4. Point of Sale
4.1. Order Queue
4.2. All Quotations
4.3. Unsold Quotations

7
System Requirements
For the most optimal user experience, a browser which supports the following is
required:
1. Javascript (this should be enabled)
2. HTTPS support
3. HTML 5 compliant
The system has been tested and validated for the following browsers: -
Firefox, Chrome, Safari and Opera.
The system is mobile friendly and can be used comfortably on a phone, tablet or
computer.
Conventions
Below are some of the conventions and principles that are to be used when
configuring and updating values in the system.
Inventory
Category: These are groups to which products or services belong. A category
example can be “Washing Powder”. Under this category you would then have the
individual washing powder brands i.e. “Powder X – 500g”.
Products: This is smallest unit that is to be available for sale in the Point of Sale. For
example, a retailer’s smallest unit maybe a single drink bottle while a wholesaler’s
maybe a case of 24 bottles.
Therefore the wholesaler may indicate the entire case of 24 as a single product
while the retailer only indicates the single bottle as the product.
Bundles: Bundles are a custom collection of products. This is useful when selling:
A combination of products as a package/bundle.
Promotions or wholesaling products at different quantities
These bundles appear in the Point of Sale.
Ingredients: For a restaurant or hotel, the trackable ingredients of a recipe can be
saved and used to alert when these items are running low.
Recipes: These are combinations of ingredients that deduct from the current stock
every time a sale of this recipe occurs.
Accounting
Non-Sales Transactions: These are services that are offered but are not stock-able
products. For example, a Mobile Money service can be offered and its commission
tracked as part of the income.
Once marked as a non-sale transaction, a product is excluded from “Sales Only”
reports. It is however available in other income reports.

8
Getting Started
Before you log into the system, we will provide you with an address (URL), e.g.
https://store.oursite.com, at which you will access the system. A username and
password will also be provided. Browsing to the address will show a login page similar
to the one shown below.
Enter the provided username and password to login.
On successful login you will see the home page below. It is strongly recommended
that you immediately change your password.
9
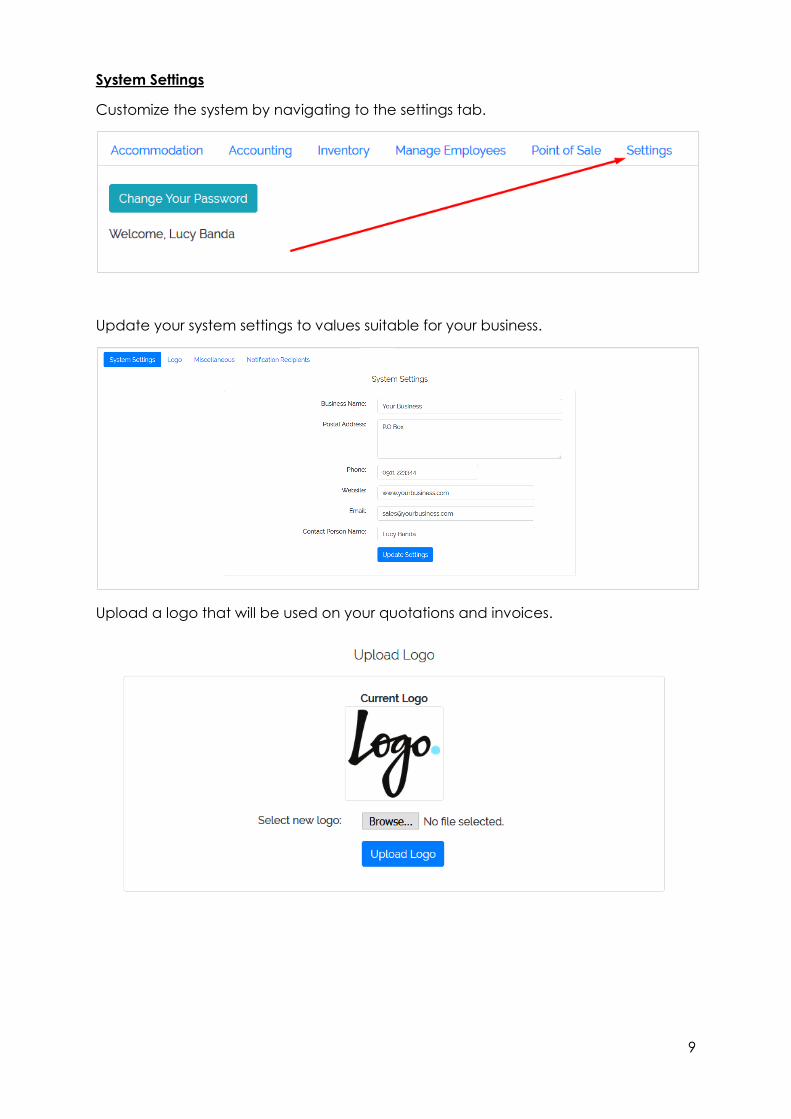
System Settings
Customize the system by navigating to the settings tab.
Update your system settings to values suitable for your business.
Upload a logo that will be used on your quotations and invoices.

10
Update the miscellaneous settings to the correct values.
For an extra fee, the system can be setup to SMS a summary of the day’s sales. The
contact information for the recipients of these alerts can also be entered.
Licensing Information
To view licensing and general system information, (on any page showing the footer
below) click the link with the version of the system you are licensed for, e.g. “Hotel
Manager Pro”.

11
The licensing details will appear as shown below.
Manage Users/Employees
Add a User/Employee
To add new users or employees to the system navigate to the “Manage Employees”
tab.

12
Click the “Add New Employee” button and complete the form.
The employee entry options include:
Commission: If the employee is to be awarded a commission, the system can
calculate it based on the net income in a period or a fixed amount can be used.
Work/Employment Status: A work status of “Not Employed Here” disables the users
access to the system and omits them from the payroll.
System Role: This is a user group that determines what the user will be able to access
on the system.
The system has two default roles of Admin and Sales.
Admin - admin role provides administrator access to the system.
Sales – sales role is limited and suitable for employees such as cashiers, etc.
Additional roles can be created on request. The permissions available to the user
can be customized per role.
View User/Employee
To view the employee’s full details, click on the employee’s name.

13
The employee details appear as below.
Update Employee
To update the employees details, first display the employees details and then click
the “Edit Employee Details” button. Update the details and save the changes.
User Password Reset
If a user forgets their password, an admin can reset their password. To reset a user’s
password, click the “Reset Password” button or the “Reset User Password” link.

14
On the reset user password page, indicate the username and new password for the
account to be reset. The admin password is the password of the currently logged in
user.

15
Inventory
To get started with setting up your inventory, navigate to the inventory tab. Please
review and be familiar with the conventions stated at the beginning of this guide.
The inventory home page displays some useful information at a glance.
1. The total amount spent to acquire the current stock (Cost Price)
2. The total resale value of the current stock (Resale Value)
3. Inventory levels showing the products that are below their minimum values
4. Products that are about to expire and those past their expiry date
Add New Category
To setup the inventory, first create the categories under which the products fall.

16
On the manage categories page locate the “Add New Category” pane and enter
the category details.
Optional: Upload a picture to use on the Point of Sale as the category image.
Once saved the new category will be listed. Repeat this for all the required
categories.
Update Category
To update a category, click the modify link and save the changes afterwards.

17
Add a Product
Click the manage products option.
On the manage products page click the “Add a Product” button.
Complete the product form.

18
The mandatory product fields are:
Product Name
Product Category
Cost Price – how much does the product cost the business
Resale Price – how much does the business resale the product for
Current Stock – how many products are currently in stock
Minimum Stock – at what count should the low stock alert appear
The optional product fields include:
Barcode – this is used to store the numeric number of the barcode on the
product.
Description
Expiry Date
Product Picture – picture to appear in the Point of Sale
Supplier Name
Supplier Number
The other product configuration options include:
Active Status: When selected, this enables the product to appear in the low
products list.
Published: When selected this product will appear in the Point of Sale if its
present in stock.
Display in shopping list: When selected this product will be displayed on the
shopping list.
Stock Take Status: When selected this product will appear on the stock take
report.
Once saved the new product will be listed. Repeat this for all the required products
Update Product
To update a product, click the modify link and save the changes afterwards.

19
To view the full product details, click on the product name.
This opens the product details page.

20
Add a Bundle
Click the manage bundles option.
On the manage bundle page click the “Add a bundle” button.
Complete the bundle form and select the products that are part of the bundle,
indicating their quantities.

21
Once saved the new bundle will be listed. Repeat this for all the required bundles.
Update Bundle
To update a bundle, click the modify link and save the changes afterwards.
Add an Ingredient *(Restaurant and Hotel Manager only)
Click the manage ingredients option.
On the manage ingredients page click the “Add an ingredient” button.

22
Complete the ingredient form and select whether to display it in the shopping list
(enabled by default).
Once saved the new ingredient will be listed. Repeat this for all the required
ingredients.
Update Ingredient
To update an ingredient, click the modify link and save the changes afterwards.

23
Add a Recipe *(Restaurant and Hotel Manager only)
Click the manage recipes option.
On the manage recipes page click the “Add a recipe” button.
Complete the recipe form and save. Note that the ingredient added earlier is now
available for use in the recipe.
Once saved the new recipe will be listed. Repeat this for all the required recipes.

24
Update Recipe
To update a recipe, click the modify link and save the changes afterwards.
Restock Inventory
To restock the inventory, navigate to the inventory tab, select the home option and
click the “Restock Inventory” button.
In the restock window, the products are listed with check boxes on their left. A
product’s quantity entry box only appears when the product is selected. Input the
quantities that are being added to the inventory.
Select the “Record as Expense” option if the value of the restock is to automatically
be saved as an expense to be used in accounting.

25
Price Lists
To view a printable price list, navigate to the inventory tab and select the “Print Price
Lists” option. This opens/downloads a pdf file which can then be printed if needed.
Stock Take
To access the stock take report, navigate to the inventory tab and select the “Take
Stock” option. This opens the stock take report in a new window.
Shopping List
To access the shopping list, navigate to the inventory tab and select the “Shopping
List” option. This opens the shopping list in a new window.

26
Point of Sale
The Point of Sale (POS) module in the system will be the primary interface for
cashiers. It provides access to:
Capturing Sales
Searching for product details
Price list with stock quantities
Issuing of quotations
Recording of requested items not stocked
To get started using the POS, navigate to the Point of Sale tab.
At a glance the POS home page provides useful information relating to the inventory
levels and the restaurant order queue.
Capturing Sales
To record a sale transaction, the system offers a touch friend interface. Within the
POS module, click the “Sale” option.

27
The POS opens in a new window and is ready for use. The categories configured
earlier in the inventory module are on the left of the window and by default, no
category is selected.
Selecting a category lists the products in the category and makes them available for
selection. In the image below, the Washing Powder category was selected to reveal
the products in it.
To perform a sale, click on the product as many times as necessary (adding it to the
cart). Switch categories and add other products as necessary.

28
Once the required products have been selected, click the complete order button.
This opens a window in which a payment method is selected and the order finalised.
In Hotel Manager, the transaction can also be charged to the room of a checked in
guest.
Click “Finish” to proceed and the order number will be displayed.

29
View Pending Orders
In Restaurant and Hotel Manager, a list of pending orders and their durations can be
viewed by selecting “Orders View”. This will display a window that is suitable to use in
the kitchen as a guide of what is outstanding.
Search Products
To search for products, enter a portion of the product name and click the search
button. This returns all products matching the entered value.
Price Lists
To view a price list, click on the “Price List” or “Price List – Wholesale” options. These
show the product/bundle prices and the available quantities as well.

30
Quotations
To issue or find quotations, click on the “Quotations” option.
To create a quotation, enter the:
1. Client Name
2. Address
3. Phone Number
4. Email Address
5. Products on the left side pane
The quotation preview pane shows a summary of the quotation information before
you generate the quotation.
To generate the quotation, click the “Generate Quotation” button. The quotation is
generated and a new window displaying the quotation opens.

31
Unsold or all quotations can be searched by clicking either “Unsold Quotations” or
“Search All Quotations”.
The search is performed with the client name and lists the matching results.

32
In the unsold quotations result, the preview icon on the left-most of each entry allows
for the review of the quotation that was issued.
The sale link allows for the instant sale of the products quoted without having to
recapture them on the Point of Sale. Before completing the order, the cashier has
the option to adjust the quantities or items required if necessary.
Discounts
A discount can be offered on a sale that has been performed. To indicate a
discount, click on the discounts option and enter the order number you intend to
discount.

33
Once the order has been located, click on the “Change Discount” link to change
the discount value.
Enter the new value and save.
The updated discount value will now appear on the invoice of that order.

34
Un-stocked Product Requests
In cases were a customer requests a product that you have never stocked, these
requests can be tracked within the system for consideration as new products to
order.
Follow up requests for the same item would then only need the cashier to click the
“Update Item” button to increment the request count.

35
Accounting
Now that sales have been captured, we head over to accounting to review our
income. Navigate to the accounting tab.
The home page gives you access to multiple reports and features.
To view sales reports, select either the “Sales Reports” option or choose a particular
report under “Sales Functions”.

36
On the various sales reports, set the start and end dates for the report and choose
the option by which to group the output. Once done click “Generate Report”.
The output of the selection above is shown below.
This approach to running reports holds true for the reports provided by the system.
Report Navigation
This table summary states the steps taken to view a particular report.
The separator “=>” demarcates the options/links to click when navigating to the
report.
For instance, our guide will summarise 1 as 2.
1. Click on the “Accounting” tab, select the “Home” option and then click the
“Print Sales Summary” button.
2. Accounting => Home => Print Sales Summary
REPORT NAME NAVIGATION
Sales Reports
Sales summary report Accounting => Sales Reports
Sales summary per cashier per day Accounting => Home => Print Sales
Summary
Detailed day report / Invoices Accounting => Home => Detailed Day
Report
Sales per item Accounting => Home => Sales per Item

37
Reverse a Sale Transaction
In the event that a sale transaction needs to be reversed, navigate to the
accounting tab, select the home option and then click the “Sales
Adjustments/Reversals” button.
On the order reversal page, enter the order number to be reversed and indicate a
comment.
Be sure to unselect the “Reverse Stock” option if you don’t want the stock to be
automatically restored by the value in the order.
Non-Sales Transactions Accounting => Home => Non-Sales
Transactions
Expense Reports
Expenses summary report Accounting => Expense Reports
Expenses by type Accounting => Expense Reports =>
Expenses by Type
Margins
Gross margin report Accounting => Margins
Detailed margins Accounting => Margins => Detailed
Margins
Payroll Reports
Payroll and payslips Accounting => Payslips
Simulated payroll and payslips Accounting => Payslips => Simulate
Payslips
Accommodation Income Reports **(Hotel Manager only)
Events Income Accounting => Home => Events Income
Room Income Accounting => Home => Room Income

38
Add a Payslip Entry
Employee payslip entries can be added to an employee to represent either extra
income or a deduction.
To add a payslip entry, navigate to the accounting tab, select the payslips option
and click the “Add Payslip Entries” button.
On the payslip entry page, select the employee, pay period and enter the other
details of the entry.

39
Add an Expense
To add an expense, navigate to the accounting tab, select the “Expense Reports”
option and click on the “Add an Expense” button.
Enter the details about the expense and select the category to which it belongs.
Create a NAPSA Return
To create a NAPSA return navigate to the accounting tab, select the home option
and click the “Create a NAPSA Return” button.
On the return creation page, select the period for which the return should apply and
then click the “Generate Return” button.
This creates a NAPSA compliant system file which can be downloaded and directly

40
uploaded on the NAPSA website if your NAPSA account number and social security
numbers were entered correctly.
These generated files are then stored in an archive where they can be downloaded
from later.
Compute ZRA Turn Over Tax
Based on the income in a period, the system can calculate a simple ZRA Turn Over
Tax amount to give you a sense of what may be due.

41
Accommodation **(Hotel Manager only)
To setup and use accommodation related functions, navigate to the
accommodation tab.
At a glance, the accommodation home page shows:
Number of available rooms
Room reservations pending
Number of occupied rooms
List of currently on-going events
Upcoming events scheduled
The first step is to create the event halls and guest rooms available. To start, select
the manage facilities option.

42
Add Event Hall
Under manage facilities, click the “Add Event Hall” button.
Enter the details about the hall and save it.
The newly added hall is now listed. Repeat this for all the required halls.

43
Update Event Hall
To update a hall, under manage facilities, click on the modify link belonging to the
hall to be updated. Update the hall details and save the changes.
Add Guest Room
Under manage facilities, click the “Add Guest Room” button. Enter the room details
and save.
The room adding form provides for setting different rates based on the number of
people occupying the room. The rates available for configuration are:
1. Single booking rate (1 Person)
2. Double booking rate (2 People)
3. Triple booking rate (3 People)
Once saved, the added room is now listed. Repeat this for all the required rooms.

44
Update Guest Room
To update a room, under manage facilities, click on the modify link belonging to the
room to be updated. Update the room details and save the changes.
Reserve a Room
To reserve a room, navigate to the accommodation tab and select the “Room
Reservations” option.
The two types of reservations that exist are individual and group.
To reserve an individual room, click on the name of the room to be reserved.
On the add a reservation page, enter the guest’s details and requirements.
45
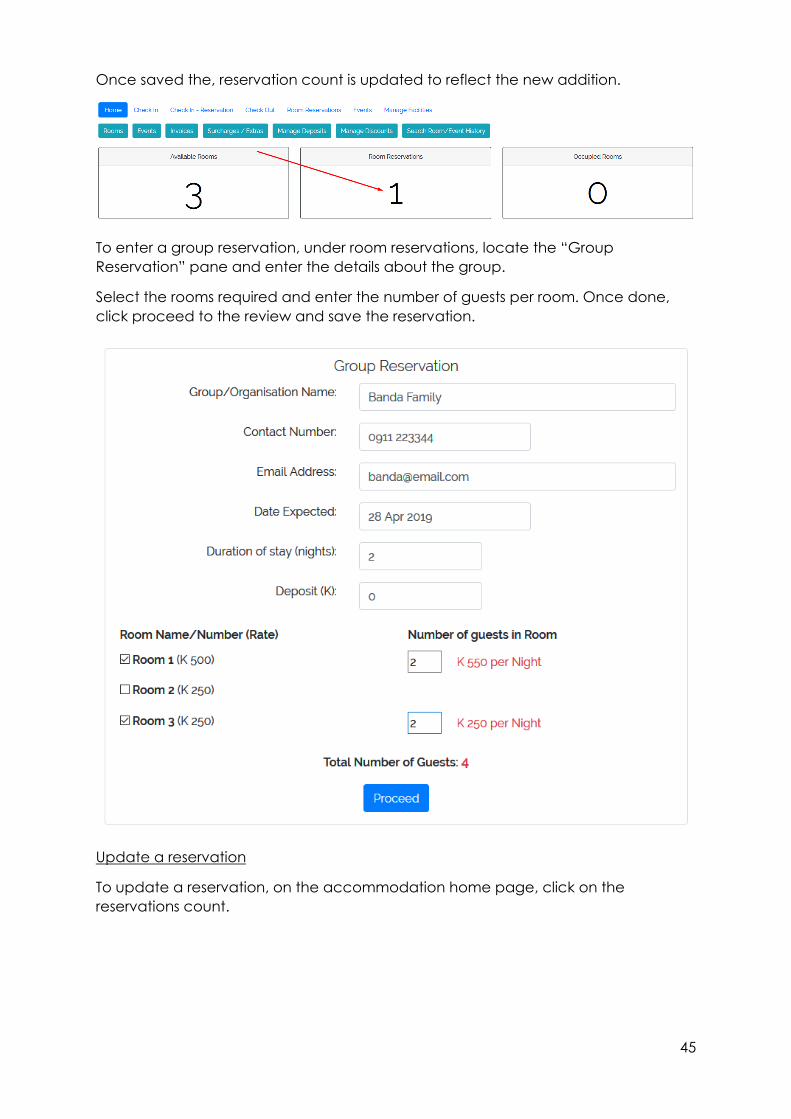
Once saved the, reservation count is updated to reflect the new addition.
To enter a group reservation, under room reservations, locate the “Group
Reservation” pane and enter the details about the group.
Select the rooms required and enter the number of guests per room. Once done,
click proceed to the review and save the reservation.
Update a reservation
To update a reservation, on the accommodation home page, click on the
reservations count.

46
Next, click on the name of the guest whose reservation you intend to update.
Update the reservation details and save.
Check-in from reservation
To check in a guest from a reservation, on the accommodation home page, click
on the reservations count.
Next, click on the “check in” link for the reservation you intend to check in.
The check in page opens allowing for final changes to be made before finally
checking in.

47
Once checked in, the available, reservation and occupied rooms count are
updated.
Check-in direct
To check in a guest without a reservation, on the accommodation home page, click
on the available rooms count.
Click the “check in” link of the room intended for check in.

48
Enter the details of the guest and proceed to check in.
This updates the counts to reflect the changes in rooms available.
Checkout
When a guest’s stay comes to an end, check them out by selecting the check out
option and clicking “Check-out” on the room they occupied.
A check out confirmation appears.

49
A guest invoice is generated for the stay.

50
Schedule an Event
To schedule an event, navigate to the accommodation tab and select the “Events”
option. Click on the name of the hall you intend to reserve.
Enter the event details and add the reservation.
Once saved, the event is then scheduled and assigned a confirmation status of
“Pending”.
To view the details of an event, click on the name of the organiser as shown below.

51
A pending event is unconfirmed and can be cancelled.
Cancel an Event
To cancel a scheduled event, click the “Cancel Event” button on the event details
page.
Update an Event
To update an event, click the “Modify Event” button on the event details page.
The event hall and date of a scheduled event cannot be modified once reserved.
To change an event date, cancel it and create a new event. The image below
shows the details that can be modified on a scheduled event.

52
Confirm an Event
When the event has begun or should no longer be cancellable, it needs to be
confirmed in the system. The confirmation makes the event invoice available for
review and printing but extra charges can still be added to it if necessary.
To confirm an event with a status of “pending”, navigate to the accommodation
tab and select the “Events” option. Click on the confirm link belonging to the event
you intend to confirm.
To finalise the confirmation, acknowledge the confirmation in the window that
appears next.

53
The confirmed invoice can now have its invoice displayed.
Below, is the event invoice.
Add extras to invoice
During or after an event or a guests stay, extras or surcharges can be added to the
invoice. To add the extra, select the “Surcharges/Extras” option under the
accommodation tab.

54
On an active invoice, add the surcharge as shown below or search for the correct
invoice to be charged.
On the add surcharge page, indicate the details of the surcharge/extra and
proceed to save it.
The surcharge/extra will now show on the invoice.
Manage Deposits
If a client makes a deposit towards a stay or an event, the deposit can either be
entered when creating the reservation or adjusted afterwards.
To adjust the amount deposited, select the “Manage Deposits” option on the home
page of the accommodation tab.

55
Search for the guest or event to update.
Click the “Change Deposit” link.
Note the current deposit and change it in the new deposit field.
Manage Discounts
To offer a discount on a stay or an event, select the “Manage Discounts” option on
the home page of the accommodation tab.
Search for the guest or event to update.

56
Click the “Change Discount” link.
Note the current discount and change it in the new discount field.
Room Reports
To view room related reports, select the rooms option under the accommodation
tab.
This shows currently occupied rooms and gives access to the list of guests in a period
and the list of failed reservations.

57
Room Invoices
To view guests room invoice, on the accommodation home page, click the
“Invoices” button.
Search the appropriate type of invoice to view (individual guest or group guest).
In the list of stays returned, click on the report icon for the guest you would like to
view an invoice for.
Event Reports

58
To view events related reports, select the events option under the accommodation
tab.
This shows currently in-progress and upcoming events. The buttons highlighted give
access to the list of confirmed events, cancelled events and invoices.
Search Room/Event History
To locate a stay or an event by name, on the accommodation home page, click on
the “Search Room/Event History” button.
Entering a portion of the name of the guest or organiser will return the results that
match.

59

60
Appendix
Demonstration versions of the system are available at:
Store Manager: https://demo-storemanager.mnemoniclab.com
Restaurant Manager: https://demo-restaurantmanager.mnemoniclab.com
Hotel Manager: https://demo-hotelmanager.mnemoniclab.com
Please use these locations for practice interactions to get a feel for the system. The
usernames and passwords are in the table below. Please use the cashier profile to
test the outcomes when accessing restricted areas in the system.
Position Username Password System Role
Manager manager manager Admin
Cashier cashier cashier Sales