how an oat plant develops
TRANSCRIPT
South Dakota State UniversityOpen PRAIRIE: Open Public Research Access InstitutionalRepository and Information Exchange
Bulletins South Dakota State University AgriculturalExperiment Station
10-1-1976
How an Oat Plant DevelopsD. L. Reeves
H. S. Sraon
Follow this and additional works at: http://openprairie.sdstate.edu/agexperimentsta_bulletins
This Bulletin is brought to you for free and open access by the South Dakota State University Agricultural Experiment Station at Open PRAIRIE: OpenPublic Research Access Institutional Repository and Information Exchange. It has been accepted for inclusion in Bulletins by an authorizedadministrator of Open PRAIRIE: Open Public Research Access Institutional Repository and Information Exchange. For more information, pleasecontact [email protected].
Recommended CitationReeves, D. L. and Sraon, H. S., "How an Oat Plant Develops" (1976). Bulletins. Paper 650.http://openprairie.sdstate.edu/agexperimentsta_bulletins/650
Bulletin 645
Agricultural Experiment Station • South Dakota State University • Brookings
CONTENTS Page
I ntrod uctio n - -- ------ --- -- ----- ----- ---- --- --- ----- -- - __________ __ _____________ 3
Identifying stages of growth---------------------------------------- 3 Oat seed - ---- ----- ------ ----------- --- -- ----- --- -- --- ----- --- --- --- ------ --- ------ 6 Germination (Stage 0) ---- ------ ------ ---- ----- ---- -- ------ -- ---- ---- - 7 Seedling growth (Stage l) ___ ----- --------------- ----------- --------- 7 Tillering (Stage 2) ----------------- ----------- ----- ---------- _______ _ 8 Stem elongation (Stage 3) ------- ----- -- ---------- --- ----- - _____ ____ 9 Boot (Stage 4) ---- - ---- - -- -------- - ---- -- --- ------- -- ------ --- --- -- ----- -- ---- 11 Heading (Stage 5) -- -- - - ------ ---- ----- ------ ------- --- ---- -- ---- -------- 11 Blooming (Stage 6) ---- -------------- --- --------- ----- -- ------- ------ --- --- 11 Milk (Stage 7) ___________ ------- --- ------ ---- - -------- ----- --- --------- ----- - 12 Dough (Stage 8) -- ------ -------- --- ---- ---- --- -- ---- -- ---- ------ ---- ----- -- 12 Ripening (Stage 9) _____ _ _ _____ ____ ____________________ ______________ 13 Nutrient uptake _______________ _ ___ ---- ---- -- ------------ -- --- - _____ __ 13 Recommendations - ---- ---- --- --- ---- -- -- --- ---- ----- ------- --- ------ -- -- --- 14
Data in this bulletin came from Chief oats grown at Brookings, SD. Work was conducted by members of the Oat Research Project at the South Dakota State University Agricultural Experiment Station. Funding for this second printing came from the Quaker Oats Company.
Published in accordance with an Act passed in 1881 by the 14th Legislative Assembly, Dakota Territory, establishing the Dakota Agricultural College and with the Act of reorganization passed in 1887 by the 17th Legislative Assembly, which established the Agricultural Experiment Station at South Dakota State University. File: 1.4-2.3-6m-6-82mb-1387D.
How an Oat Plant Develops
Oats, an important Upper Midwest small grain crop, often is the principle grain for young animals, poultry, and dairy cows.
The high value of oats as feed has long been recognized. However, not as well known are the developmental changes during the growth of an oat plant. These changes in some instances are influenced bv technology and more extensive u
'se of her
bicides and fertilizers. It is important to understand these basic developmental processes of oats so that we can use our resources to best advantage.
The reasons certain fertilizer and herbicide applications produce the effects they do-even affecting final yields-are often governed by stage of oat development at time of treatment.
D. L. Reeves and H. S. Sraon*
This publication describes the general growth, nutrient uptake, and accumulation patterns from planting to harvest. The stages of growth are related to developmental processes that occur through time.
Within each oat crop two variables affect the ultimate production. These variables are the differences between varieties and the fluctuations in the environment. It is well recognized that different fields have different yield potentials. Soil fertility and rainfall are major factors in determining the final yield, but they are always interacting with all the other factors involved in the development of the total plant.
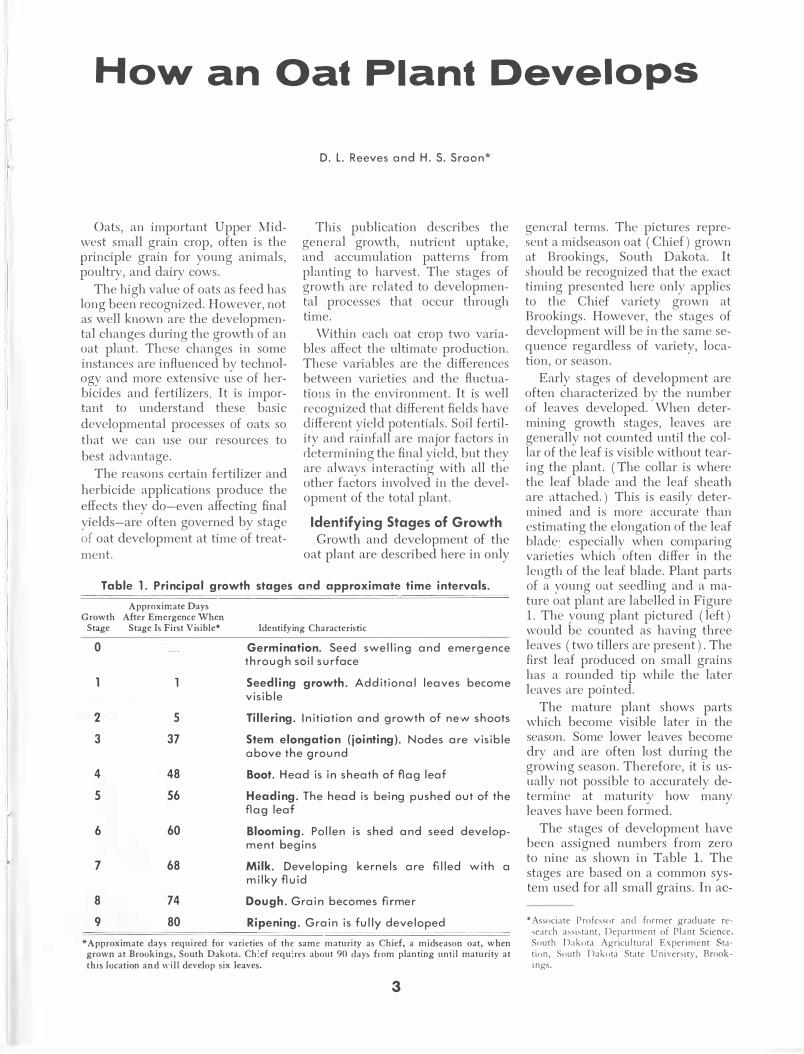
Identifying Stages of Growth Growth and development of the
oat plant are described here in only
Table 1. Principal growth stages and approximate time intervals.
Approximate Days Growth After Emergence When
Stage Stage Is First Visible*
0
2 3
4 s
6
7
8 9
s 37
48 56
60
68
74 80
Identifying Characteristic
Germination. Seed swelling and emergence through soil surface
Seedling growth. Additional leaves become visible
Tillering. Initiation and growth of new shoots
Stem elongation (jointing). Nodes are visible above the ground
Boot. Head is in sheath of fl.ag leaf
Heading. The head is being pushed out of the flag leaf
Blooming. Pollen is shed and seed development begins
Milk. Developing kernels are filled with a milky fluid
Dough. Grain becomes firmer
Ripening. Grain is fully developed
*Approximate days required for varieties of the same maturity as Chief, a mjdseason oat, when grown at Brookings, South Dakota. Ch'ef requ:res about 90 day• from planting until maturity at this location and will develop six leaves.
3
general terms. The pictures represent a midseason oat (Chief) grown at Brookings, South Dakota. It should be recognized that the exact timing presented here only applies to the Chief variety grown at Brookings. However, the stages of development will be in the same sequence regardless of variety, location, or season.
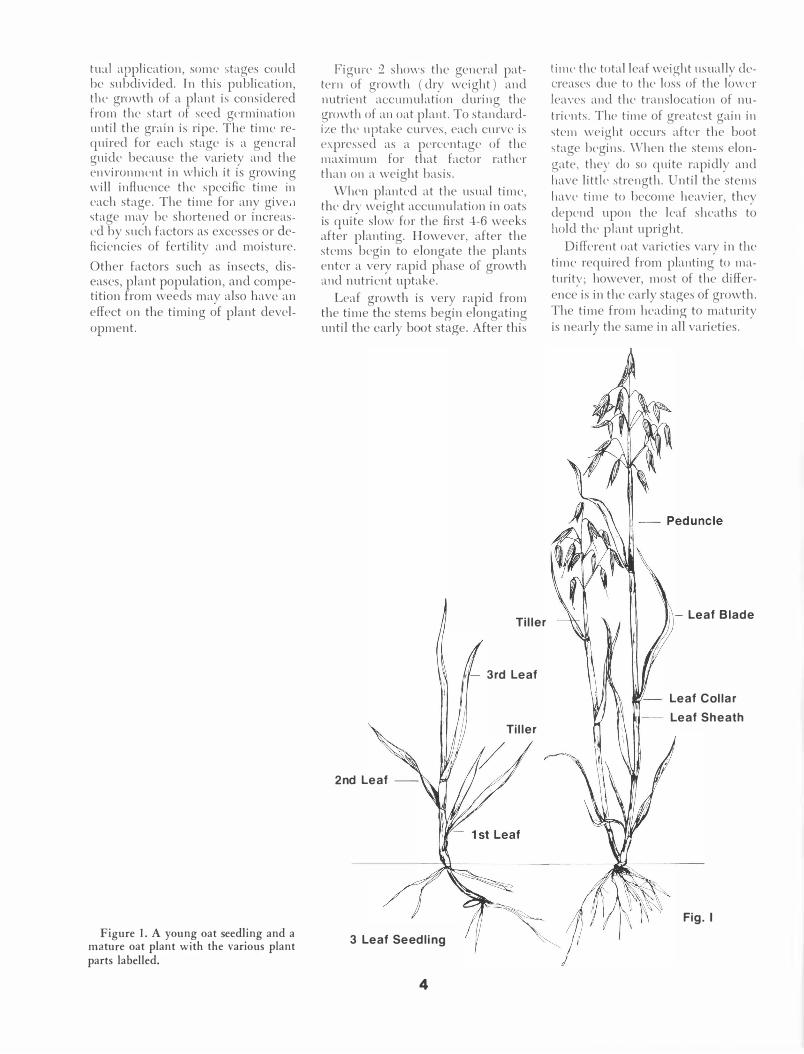
Early stages of development are often characterized by the number of leaves developed. When determining growth stages, leaves are generally not counted until the collar of the leaf is visible without tearing the plant. (The collar is where the leaf blade and the leaf sheath are attached.) This is easily determined and is more accurate than estimating the elongation of the leaf blade: especially when comparing varieties which often differ in the length of the leaf blade. Plant parts of a young oat seedling and a mature oat plant are labelled in Figure 1. The young plant pictured (left) would be counted as having three leaves (two tillers are present). The first leaf produced on small grains has a rounded tip while the later leaves are pointed.
The mature plant shows parts which become visible later in the season. Some lower leaves become dry and are often lost during the growing season. Therefore, it is usually not possible to accurately determine at maturity how many leaves have been formed.
The stages of development have been assigned numbers from zero to nine as shown in Table l. The stages are based on a common system used for all small grains. In ac-
•Associate Professor an<l former gra<luate researrh assistant, Department of Plant Science. South Dakota Agricultural Experiment Station, South Dakota State University, Brookings.
tual application, some stages could be subdivided. In this publication, the growth of a plant is considered from the start of seed germination until the grain is ripe. The time required for each stage is a general guide because the variety and the environment in which it is growing will influence the specific time in each stage. The time for any give;1 stage may be shortened or increased by such factors as excesses or deficiencies of fertility and moisture.
Other factors such as insects, diseases, plant population, and competition from weeds may also have an effect on the timing of plant development.
Figure I. A young oat seedling and a mature oat plant with the various plant parts labelled.
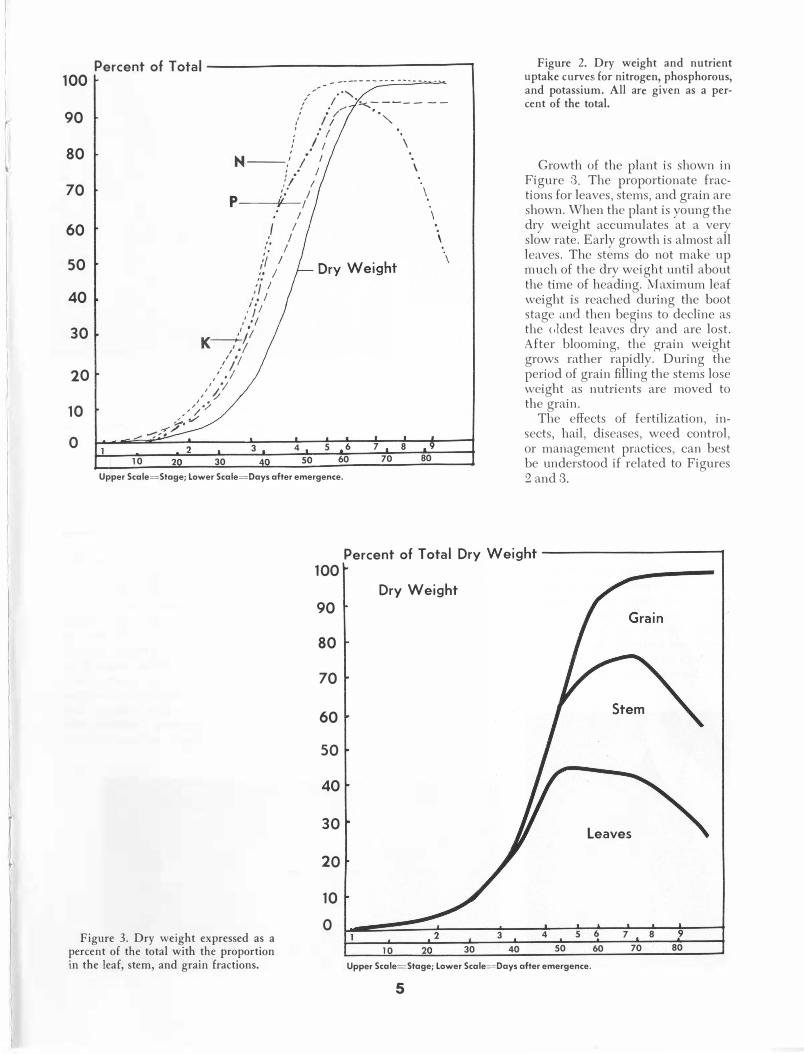
Figure 2 shows the general pattern of growth (dry weight) and nutrient accumulation during the growth of an oat plant. To standardize the uptake curves, each curve is expressed as a percentage of the maximum for that factor rather than on a weight basis.
vVhcn planted at the usual time, the dry weight accumulation in oats is quite slow for the first 4-6 weeks after planting. However, after the stems begin to elongate the plants enter a very rapid phase of growth and nutrient uptake.
Leaf growth is very rapid from the time the sterns begin elongating until the early boot stage. After this
Tiller
- 3rd Leaf
Tiller
2nd Leaf --
3 Leaf Seedling
4
time the total leaf weight usually decreases due to the loss of the lower leaves and the translocation of nutrients. The time of greatest gain in stern weight occurs after the boot stage hcgi ns. When the stems elongate, they do so quite rapidly and have little strength. Until the stems have time to become heavier, they depend upon the leaf sheaths to hold the plant upright.
Different oat varieties vary in the time required from planting to maturity; however, most of the difference is in the early stages of growth. The time from heading to maturity is nearly the same in all varieties.
- Leaf Blade
Leaf Collar Leaf Sheath
Fig. I
100
90
80
70
60
50
40
30
20
10
0
Percent of Total ------------------. -- -- - - - - - - - ... � - - � � �
,... ..,
/ .1 / ·�:----- --/ I/ ."'-, : I
I I , . N -- ,' /I
, • I
p f / I
:: I I
I
/ / '· I
/! I ,. I ,'/" I , , I
I• I ,· '1 ' .
I '
K----:...11 ,' ./
/ '/ : II , . I 'I ,'? I • / •/
/.} ,.,., _,-'/ .,.,,,,. -:'" .
3 10 30
4 50
5 6 60
Upper Scale=Stage; Lower Scale=Days after emergence.
\
\
\
7 8 70 80
Figure 2. Dry weight and nutrient uptake curve�. for nitrogen, phosphorous, and potassium. All are given as a percent of the total.
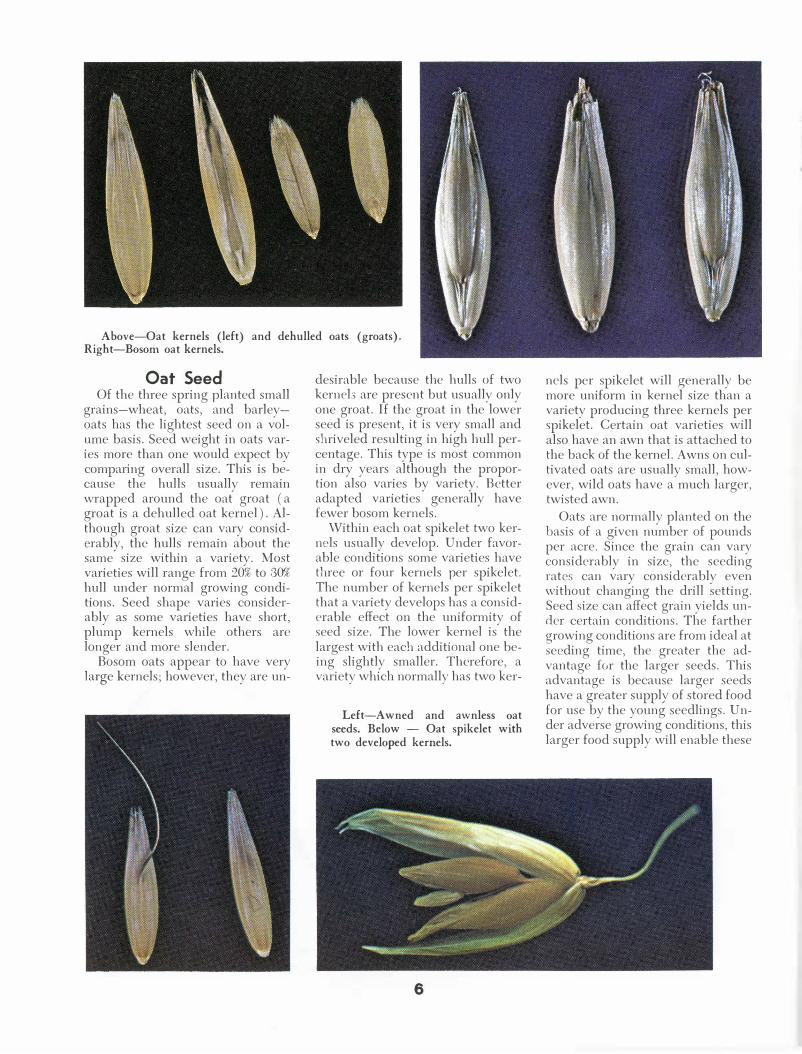
Growth of the plant is shown in Figure 3. The proportionate fractions for leaves, stems, and grain are shown. When the plant is young the dry weight accumulates at a very slow rate. Early growth is almost all leaves. The stems do not make up much of the dry weight until about the time of heading. Maximum leaf weight is reached during the boot stage and then begins to decline as the (,]dest leaves dry and are lost. After blooming, the grain weight grows rather rapidly. During the period of grain filling the stems lose weight as nutrients are moved to the grain.
The effects of fertilization, insects, hail, diseases, weed control, or management practices, can best be understood if related to Figures 2 and3.
Percent of Total Dry Weight ------------
Figure 3. Dry weight expressed as a percent of the total with the proportion in the leaf, stem, and grain fractions.
100
90
80
70
60
50
40
30
20
10
0
Dry Weight
Leaves
3 4 5 6 7 8 9 10 30 40 50 60 70 80
Upper Scale= Stage; Lower Scale=Days after emergence.
5
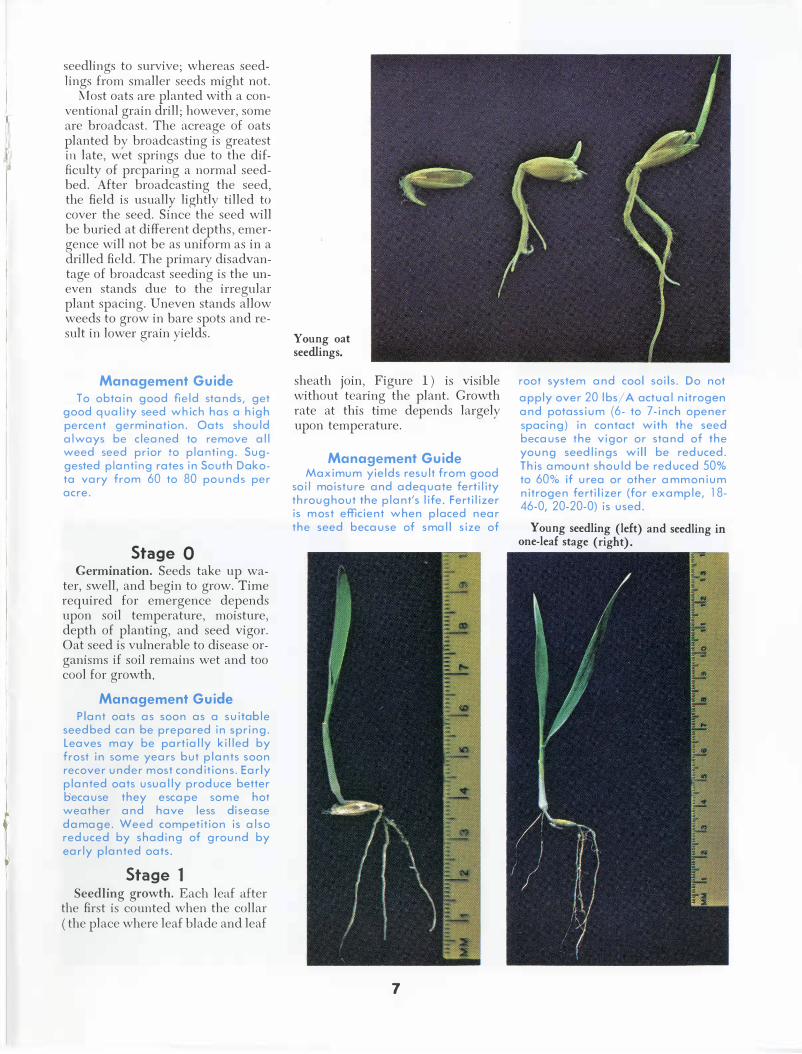
Above-Oat kernels (left) and dehulled oats (groats). Right-Bosom oat kernels.
Oat Seed Of the three spring planted small
grains-wheat, oats, and barleyoats has the lightest seed on a volume basis. Seed weight in oats varies more than one would expect by comparing overall size. This is because the hulls usually remain wrapped around the oat groat (a groat is a dehulled oat kernel). Although groat size can vary considerably, the hulls remain about the same size within a variety. Most varieties will range from 20% to 30% hull under normal growing conditions. Seed shape varies considerably as some varieties have short, plump kernels while others arc longer and more slender.
Bosom oats appear to have very large kernels; however, they are un-
desirable because the hulls of two kernels are present but usually only one groat. If the groat in the lower seed is present, it is very small and shriveled resulting in high hull percentage. This type is most common in dry years although the proportion also varies by variety. Better adapted varieties generally have fewer bosom kernels.
Within each oat spikelet two kernels usually develop. Under favorable conditions some varieties have three or four kernels per spikelet. The number of kernels per spikelet that a variety develops has a considerable effect on the uniformity of seed size. The lower kernel is the largest with each additional one being slightly smaller. Therefore, a variety which normally has two ker-
Left-Awned and awnless oat seeds. Below - Oat spikelet with two developed kernels.
6
ncls per spikelet will generally be more uniform in kernel size than a variety producing three kernels per spikelet. Certain oat varieties will also have an awn that is attached to the back of the kernel. Awns on cultivated oats are usually small, however, wild oats have a much larger, twisted awn.
Oats are normally planted on the basis of a given number of pounds per acre. Since the grain can vary considerably in size, the seeding rates can vary considerably even without changing the drill setting. Seed size can affect grain yields unrlcr certain conditions. The farther growing conditions are from ideal at seeding time, the greater the advantage for the larger seeds. This advantage is because larger seeds have a greater supply of stored food for use by the young seedlings. Under adverse growing conditions, this larger food supply will enable these
r
seedlings to survive; whereas seedlings from smaller seeds might not.
Most oats are planted with a conventional grain drill; however, some are broadcast. The acreage of oats planted by broadcasting is greatest in late, wet springs due to the difficulty of preparing a normal seedbed. After broadcasting the seed, the field is usually lightly tilled to cover the seed. Since the seed will be buried at different depths, emergence will not be as uniform as in a drilled field. The primary disadvantage of broadcast seeding is the uneven stands due to the irregular plant spacing. Uneven stands allow weeds to grow in bare spots and result in lower grain yields.
Management Guide To obtain good field stands, get
good quality seed which has a high percent germination. Oats should always be cleaned to remove all weed seed prior to. planting. Suggested planting rates in South Dakota vary from 60 to 80 pounds per acre.
Stage 0 Germination. Seeds take up wa
ter, swell, and begin to grow. Time required for emergence depends upon soil temperature, moisture, depth of planting, and seed vigor. Oat seed is vulnerable to disease organisms if soil remains wet and too cool for growth.
Management Guide Plant oats as soon as a suitable
seedbed can be prepared in spring. Leaves may be partially killed by frost in some years but plants soon recover under most conditions. Early planted oats usually produce better because they escape some hot weather and have less disease damage. Weed competition is also reduced by shading of ground by early planted oats.
Stage 1 Seedling growth. Each leaf after
the first is counted when the collar (the place where leaf blade and leaf
Young oat seedlings.
sheath join, Figure 1) is visible without tearing the plant. Growth rate at this time depends largely upon temperature.
Management Guide Maximum yields result from good
soil moisture and adequate fertility throughout the plant's life. Fertilizer is most efficient when placed near the seed because of small size of
7
root system and cool soils. Do not
apply over 20 lbs/ A actual nitrogen and potassium (6- to 7-inch opener spacing) in contact with the seed because the vigor or stand of the young seedlings will be reduced. This amount should be reduced 50% to 60% if urea or other ammonium nitrogen fertilizer (for example, 18-46-0, 20-20-0) is used.
Young seedling (left) and seedling in one-leaf stage (right).
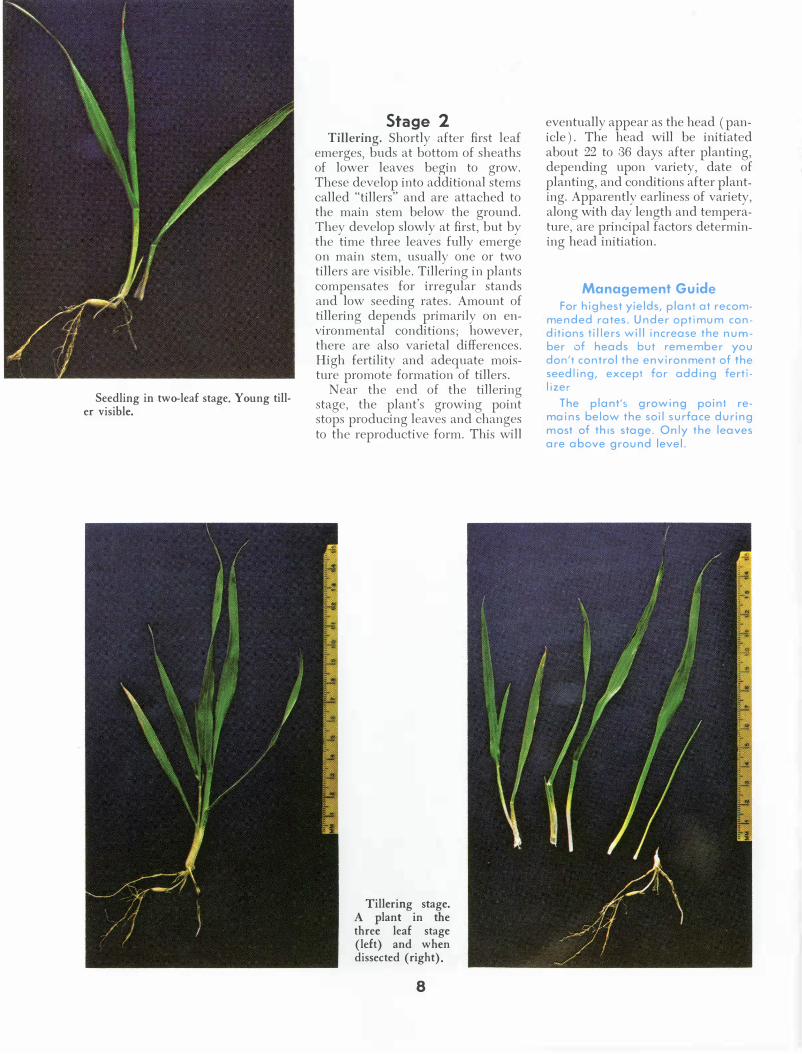
Seedling in two-leaf stage. Young tiller visible.
Stage 2 Tillering. Shortly after first leaf
emerges, buds at bottom of sheaths of lower leaves begin to grow. These develop into additional stems called "tillers" and are attached to the main stem below the ground. They develop slowly at first, but by the time three leaves fully emerge on main stem, usually one or two tillers are visible. Tillering in plants compensates for irregular stands and low seeding rates. Amount of tillering depends primarily on environmental conditions; however, there are also varietal differences. High fertility and adequate moisture promote formation of tillers.
Near the end of the tillering stage, the plant's growing point stops producing leaves and changes to the reproductive form. This will
Tillering stage. A plant in the three leaf stage (left) and when dissected (right).
8
eventually appear as the head (panicle) . The head will be initiated about 22 to 36 days after planting, depending upon variety, date of planting, and conditions after planting. Apparently earliness of variety, along with day length and temperature, are principal factors determining head initiation.
Management Guide For highest yields, plant at recom
mended rates. Under optimum conditions tillers will increase the number of heads but remember you don't control the environment of the seedling, except for adding fertilizer
The plant's growing point remains below the soil surface during most of this stage. Only the leaves are above ground level.
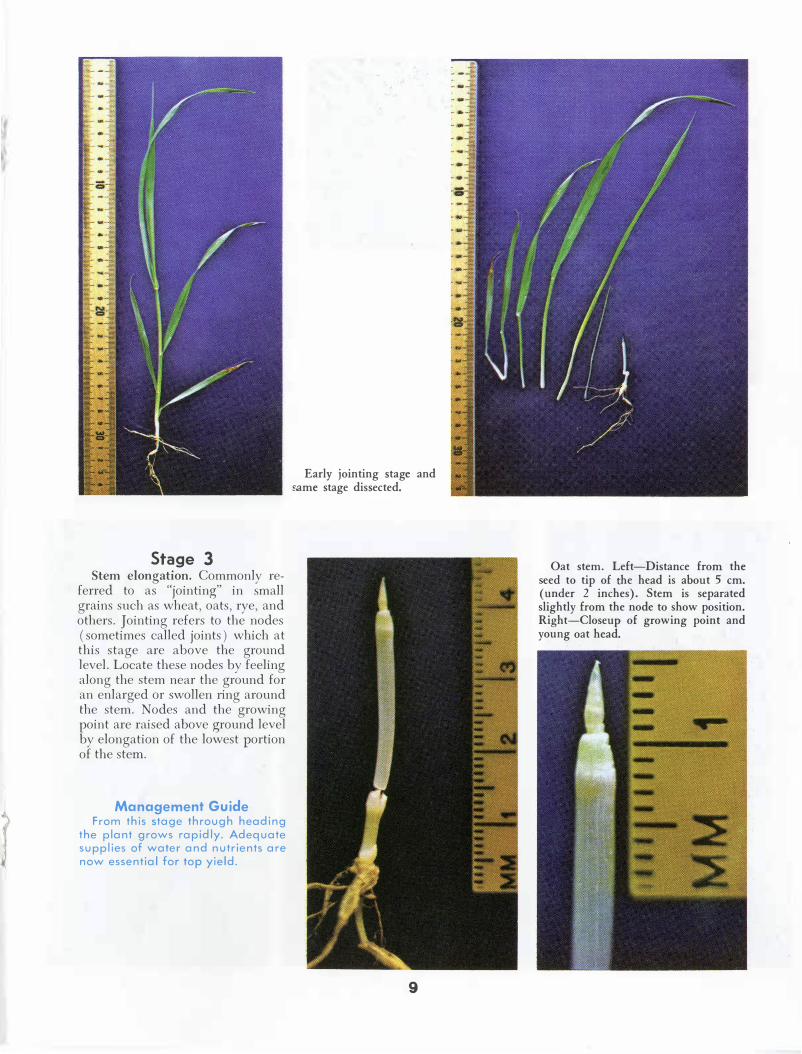
Stage 3 Stem elongation. Commonly re
ferred to as "jointing" in small grains such as wheat, oats, rye, and others. Jointing refers to the nodes ( sometimes called joints ) which at this stage are above the ground level. Locate these nodes by feeling along the stem near the ground for an enlarged or swollen iing around the stem. Nodes and the growing point are raised above ground level by elongation of the lowest portion of the stem.
Management Guide From this stage through heading
the plant grows rapidly. Adequate supplies of water and nutrients are now essential for top yield.
Early jointing stage and fame stage dissected.
9
Oat stem. Left-Distance from the seed to tip of the head is about 5 cm. (under 2 inches). Stem is separated slightly from the node to show position. Right-Closeup of growing point and young oat head.

Early boot stage. Left-Plant as removed from ground. Center-Plant dissected. Right-Closeup of heads from the two plants at left.
Left-Oat head during stem elongation stage. Center-Closeup of oat head at same stage of development as previous head. Right-Oat head in very early boot stage.
10
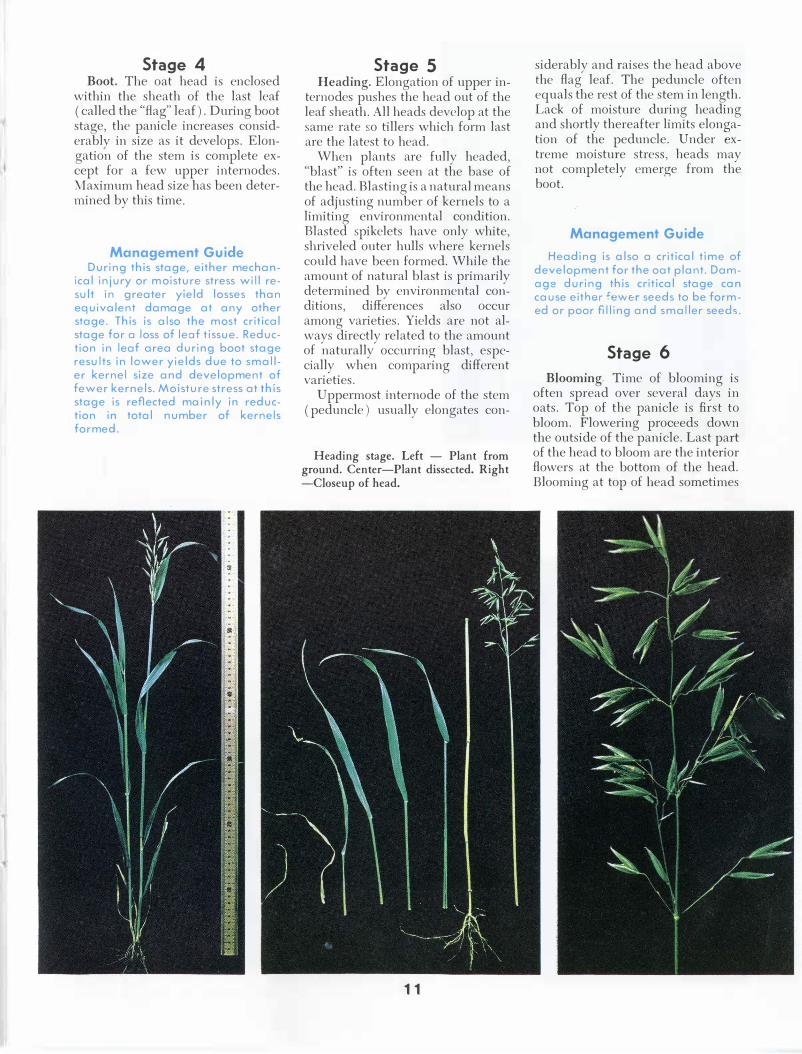
Stage 4 Boot. The oat head is enclosed
within the sheath of the last leaf (called the "flag" leaf). During boot stage, the panicle increases considerably in size as it develops. Elongation of the stem is complete except for a few upper internodes. Maximum head size has been determined by this time.
Management Guide During this stage, either mechan
ical injury or moisture stress will result in greater yield losses than equivalent damage at any other stage. This is also the most critical stage for a loss of leaf tissue. Reduction in leaf area during boot stage results in lower yields due to smaller kernel size and development of fewer kernels. Moisture stress at this stage is reflected mainly in reduction in total number of kernels formed.
Stage 5 Heading. Elongation of upper in
ternodes pushes the head out of the leaf sheath. All heads develop at the same rate so tillers which form last are the latest to head.
When plants are fully headed, "blast" is often seen at the base of the head. Blasting is a natural means of adjusting number of kernels to a limiting environmental condition. Blasted spikelets have only white, shriveled outer hulls where kernels could have been formed. While the amount of natural blast is primarily determined by environmental conditions, differences also occur among varieties. Yields are not always directly related to the amount of naturally occurring blast, especially when comparing different varieties.
Uppermost internode of the stem (peduncle) usually elongates con-
Heading stage. Left - Plant from ground. Center-Plant dissected. Right -Closeup of head.
1 1
siderably and raises the head above the flag leaf. The peduncle often equals the rest of the stem in length. Lack of moisture during heading and shortly thereafter limits elongation of the peduncle. Under extreme moisture stress, heads may not completely emerge from the boot.
Management Guide Heading is also a critical time of
development for the oat plant. Damage during this critical stage can cause either fewe:r seeds to be formed or poor filling and smaller seeds.
Stage 6 Blooming. Time of blooming is
often spread over several days in oats. Top of the panicle is first to bloom. Flowering proceeds down the outside of the panicle. Last part of the head to bloom are the interior flowers at the bottom of the head. Blooming at top of head sometimes
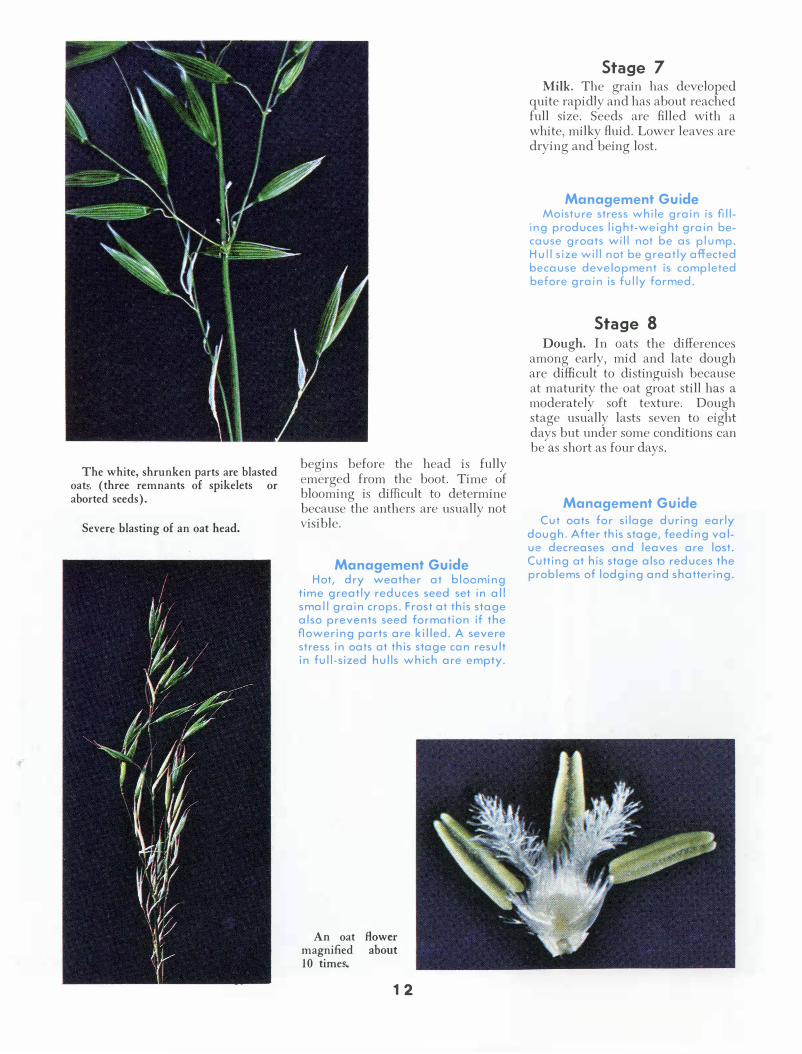
The white, shrunken parts are blasted oat�. (three remnants of spikelets or aborted seeds).
Severe blasting of an oat head.
begins before the head is fully emerged from the boot. Time of blooming is difficult to determine because the anthers are usually not visible.
Management Guide Hot, dry weather at blooming
time greatly reduces seed set in all small grain crops. Frost at this stage also prevents seed formation if the flowering parts are killed. A severe stress in oats at this stage can result in full-sized hulls which are empty.
An oat flower magnified about 10 times.
12
Stage 7 Milk. The grain has developed
quite rapidly and has about reached full size. Seeds are filled with a white, milky fluid. Lower leaves are drying and being lost.
Management Guide Moisture stress while grain is fill
ing produces light-weight grain because groats will not be as plump. Hull size will not be greatly affected because development is completed before grain is fully formed.
Stage 8 Dough. In oats the differences
among early, mid and late dough are difficult to distinguish because at maturity the oat groat still has a moderately soft texture. Dough stage usually lasts seven to eight days but under some conditions can be as short as four days.
Management Guide Cut oats for silage during early
dough. After this stage, feeding value decreases and leaves are lost. Cutting at his stage also reduces the problems of lodging and shattering.
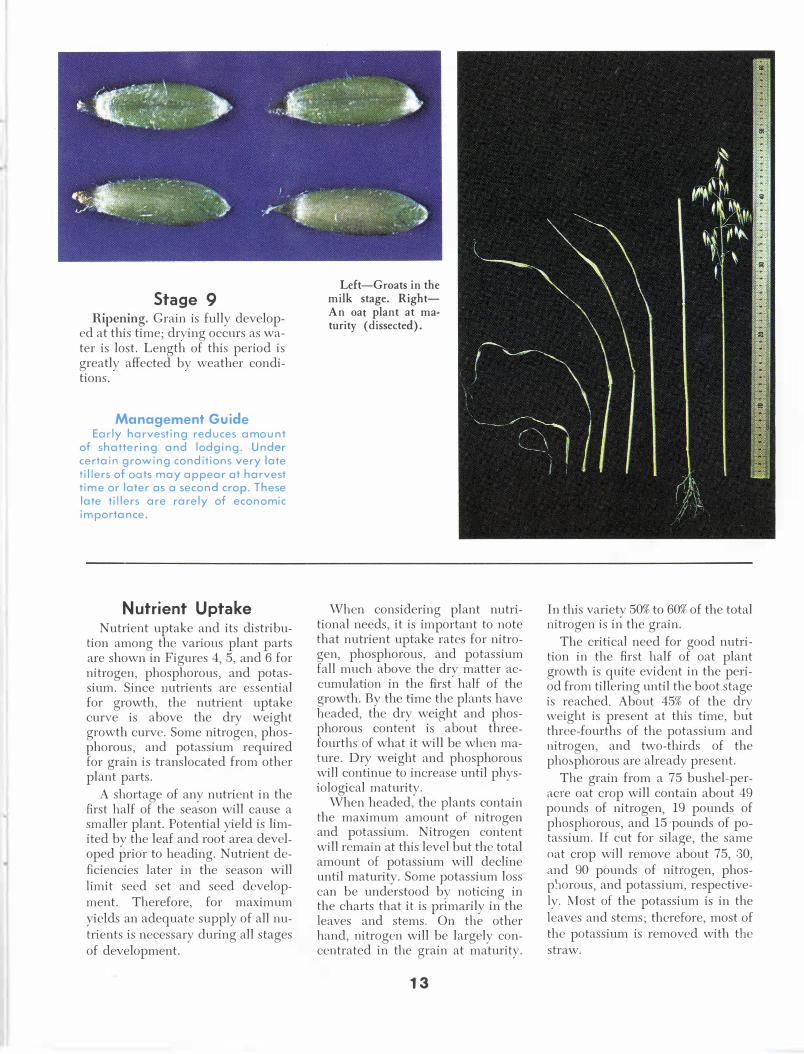
Stage 9 Ripening. Grain is fully develop
ed at this time; drying occurs as water is lost. Length of this period is greatly affected by weather conditions.
Management Guide Early harvesting reduces amount
of shattering and lodging. Under certain growing conditions very late tillers of oats may appear at harvest time or later as a second crop. These late tillers are rarely of economic importance.
Nutrient Uptake Nutrient uptake and its distribu
tion among the various plant parts are shown in Figures 4, 5, and 6 for nitrogen, phosphorous, and potassium. Since nutrients are essential for growth, the nutrient uptake curve is above the dry weight growth curve. Some nitrogen, phosphorous, and potassium required for grain is translocated from other plant parts.
A shortage of any nutrient in the first half of the season will cause a smaller plant. Potential yield is limited by the leaf and root area developed prior to heading. Nutrient deficiencies later in the season will limit seed set and seed development. Therefore, for maximum yields an adequate supply of all nutrients is necessary during all stages of development.
Left-Groats in the milk stage. RightAn oat plant at maturity (dissected).
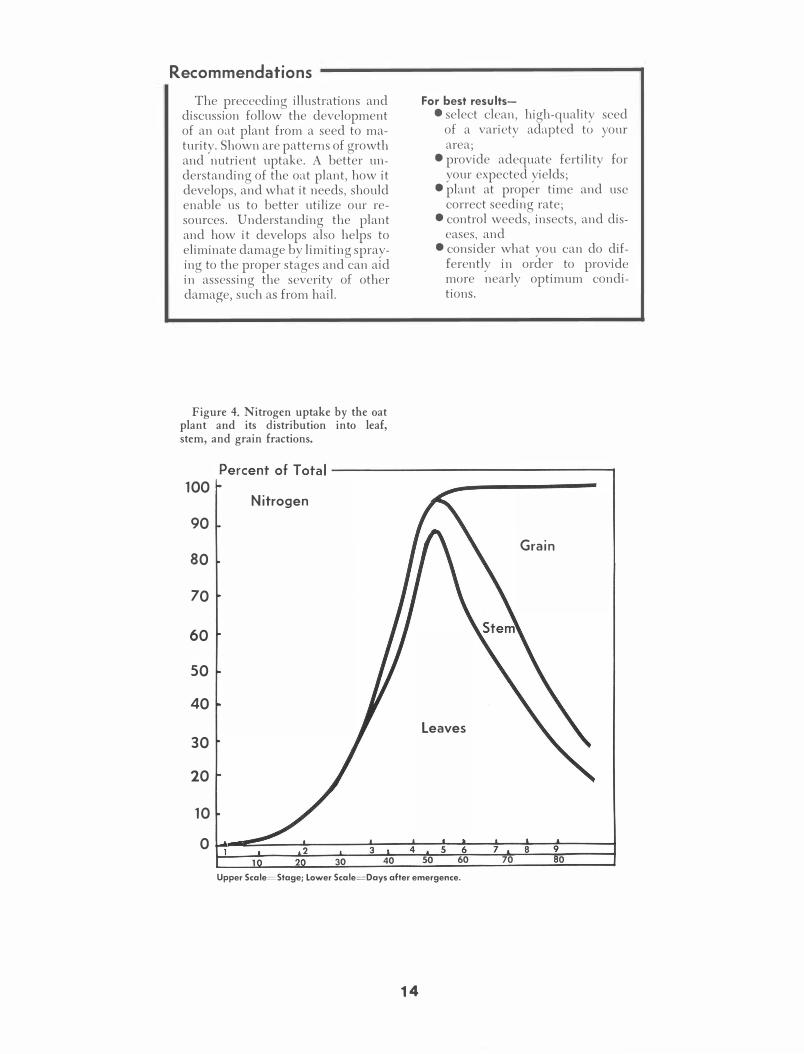
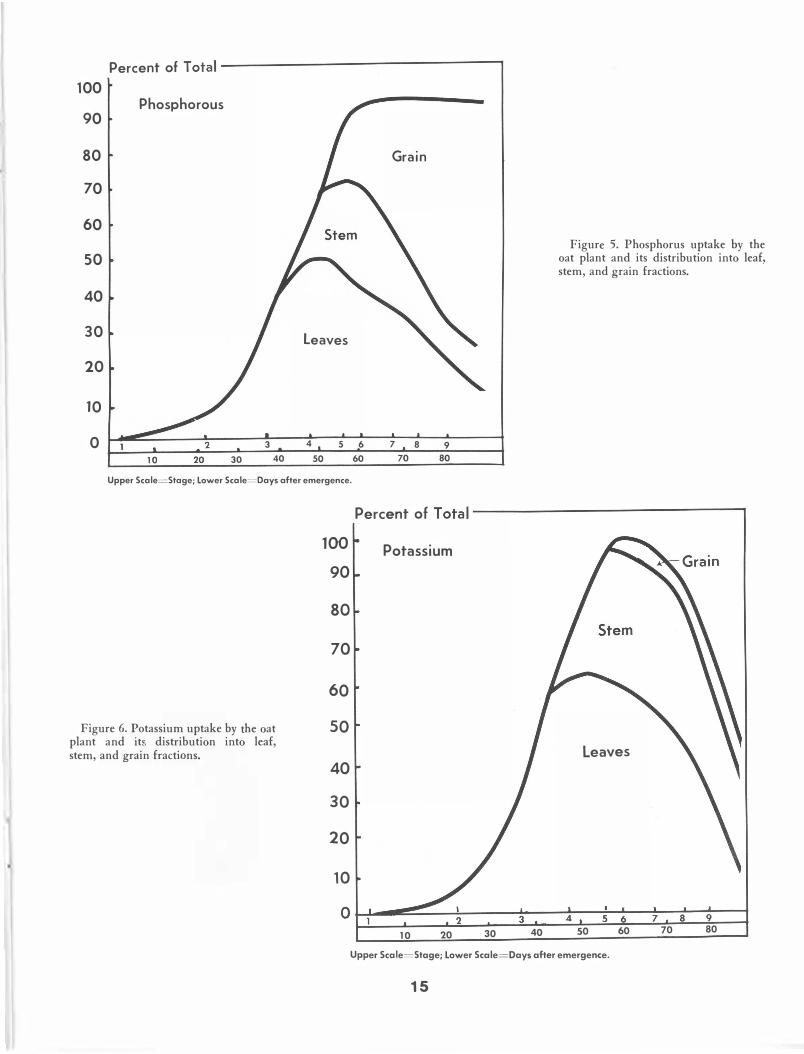
When considering plant nutritional needs, it is important to note that nutrient uptake rates for nitrogen, phosphorous, and potassium fall much above the dry matter accumulation in the first half of the growth. By the time the plants have headed, the dry weight and phosphorous content is about threefourths of what it will be when mature. Dry weight and phosphorous will continue to increase until physiological maturity.
When headed, the plants contain the maximum amount of nitrogen and potassium. Nitrogen content will remain at this level but the total amount of potassium will decline until maturity. Some potassium loss can be understood by noticing in the charts that it is primarily in the leaves and stems. On the other hand, nitrogen will be largely concentrated in the grain at maturity.
1 3
In this variety 50% to 60% of the total nitrogen is in the grain.
The critical need for good nutrition in the first half of oat plant growth is quite evident in the period from tillering until the boot stage is reached. About 45% of the dry weight is present at this time, but three-fourths of the potassium and nitrogen, and two-thirds of the phosphorous are already present.
The grain from a 75 bushel-peracre oat crop will contain about 49 pounds of nitrogen, 19 pounds of phosphorous, and 15 pounds of potassium. If cut for silage, the same oat crop will remove about 75, 30, and 90 pounds of nitrogen, phosp�10rous, and potassium, respectively. Most of the potassium is in the leaves and stems; therefore, most of the potassium is removed with the straw.
Recommendations The preceeding illustrations and
discussion follow the development of an oat plant from a seed to maturity. Shown are patterns of growth and nutrient uptake. A better understanding of the oat plant, how it develops, and what it needs, should enable us to better utilize our resources. Understanding the plant and how it develops also helps to eliminate damage by limiting spraying to the proper stages and can aid in assessing the severity of other damage, such as from hail.
Figure 4. Nitrogen uptake by the oat plant and its distribution into leaf, stem, and grain fractions.
100 Nitrogen
90
80
70
60
50
40
30
20
10
For best results-• select clean, high-quality seed
of a variety adapted to your area;
• provide adequate fertility for your expected yields;
•plant at proper time and use correct seeding rate;
•control weeds, insects, and diseases, and
•consider what you can do differently in order to provide more nearly optimum conditions.
G rain
Leaves
0 '""" ... .::���-"-�����3��-4��� 5��6�---,,���8��9'--��� 30 40 50 60 70 0
Upper Scale=Stage; Lower Scale=Days after emergence.
14
•'
Percent of Total-------------------.
100
90 Phosphorous
80
70
60
50
40
30
20
10
0 3 30 40
Leaves
4 5 6 so 60
Grain
7 8 9 70 80
Figure 5. Phosphorus uptake by the oat plant and its distribution into leaf, stem, and grain fractions.
Upper Scale=Stage; Lower Scale= Days after emergence.
Figure 6. Potassium uptake by the oat plant and it�. distribution into leaf, stem, and grain fractions.
100
90
80
70
60
so
40
30
20
10
Percent of Total----------------..
Potassium
Leaves
O J..-J1.-.. �::::::..-.....l.2--- ....J3----4L--�5�6'---�7--8.L....-L9-� 10 20 3 0 40 50 6 0 70 80
Upper Scale=Stage; Lower Scale=Days after emergence.
1 5
•