how do i…€¦ · 2. log into mybiz. 3. select ngb region. 4. select my workplace and then...
TRANSCRIPT

How do I…
Complete Rating Official (RO) Activities in the National Guard (Title 32) Performance Appraisal Application (PAA)?
September 2014
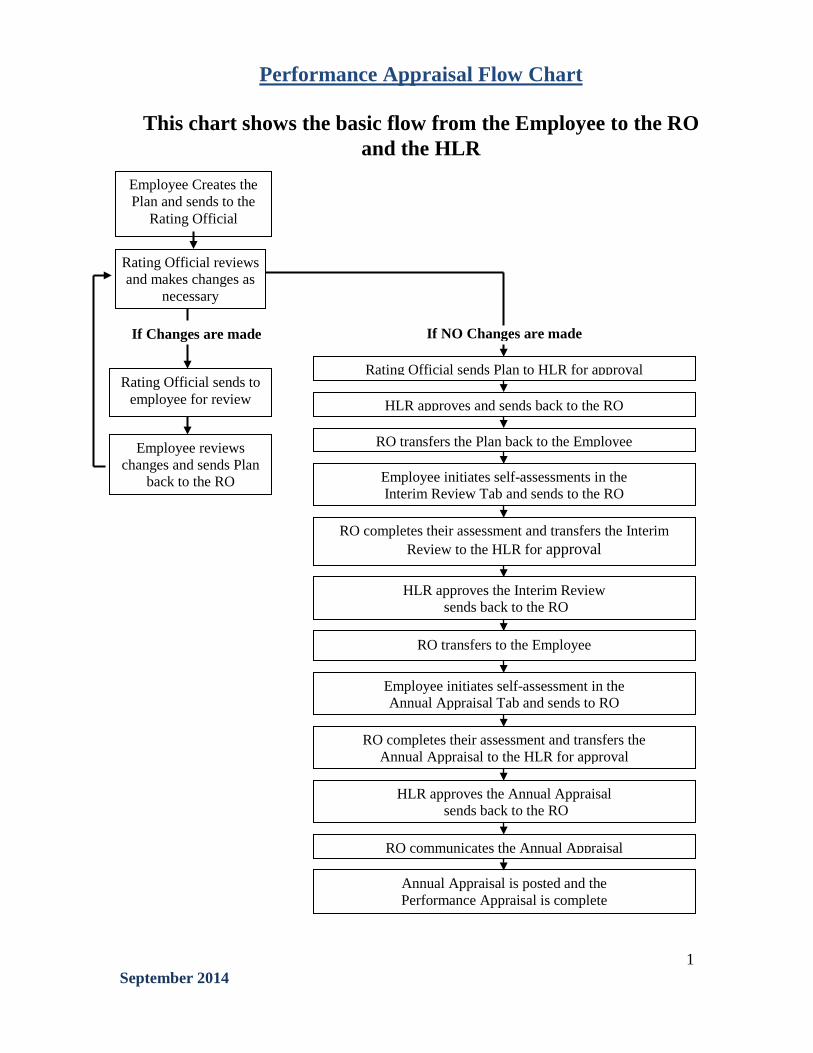
Performance Appraisal Flow Chart
This chart shows the basic flow from the Employee to the RO and the HLR
Employee Creates the Plan and sends to the
Rating Official
Rating Official reviews and makes changes as
necessary
If Changes are made If NO Changes are made
Rating Official sends to employee for review
Rating Official sends Plan to HLR for approval
Employee reviews changes and sends Plan
back to the RO
HLR approves and sends back to the RO
RO transfers the Plan back to the Employee
Employee initiates self-assessments in the Interim Review Tab and sends to the RO
RO completes their assessment and transfers the Interim
Review to the HLR for approval
HLR approves the Interim Review sends back to the RO
RO transfers to the Employee
Employee initiates self-assessment in the Annual Appraisal Tab and sends to RO
RO completes their assessment and transfers the Annual Appraisal to the HLR for approval
HLR approves the Annual Appraisal sends back to the RO
RO communicates the Annual Appraisal
Annual Appraisal is posted and the Performance Appraisal is complete
1 September 2014

Table of Contents HOW DO I…COMPLETE PERFORMANCE PLAN ACTIVITIES?
Complete a Plan the Employee has sent me 3 Complete an Interim Review the Employee has sent me 12 Complete an Annual Appraisal the Employee has sent me 19 Track Progress of Plans 24 View and Print a completed Appraisal 25
HOW DO I…COMPLETE CLOSEOUT ASSESSMENT ACTIVITIES?
Complete a Closeout Assessment the Employee has sent me 27 Transfer a Completed Closeout Assessment to another Rating Official 32 Viewing and Printing a Closeout Assessment 34
HOW DO I…COMPLETE A PLAN WITHOUT THE EMPLOYEE?
Note: You can start a Plan, Interim Review, Annual Assessment, or a Closeout Assessment without the Employee; use this function if the Employee is unavailable.
(LWOP, schools, etc.)
Create a Plan 35 Copy an Existing Plan 42 Create an Interim Review 43 Create an Annual Appraisal 46 Create a Closeout Assessment and Transfer the Plan 51
HOW DO I…APPLY ACTIONS TO MULTIPLE EMPLOYEES?
Change Rating Official for Multiple Employees 57 Copy Employee’s Current Plan for Next Rating Cycle 61 Copy One Active Plan to Multiple Employees 66 View/Print Current Employee Plan/Appraisal Info 71
HOW DO I…MAKE CHANGES AND RE-APPROVE THE JOB OBJECTIVES OF AN APPROVED PLAN?
Note: At any time after the Plan is Approved and before the Annual Appraisal, the Rating
Official can change or add Job Objectives as needed.
Change /Add and Re-Approve Job Objectives 74
2 September 2014

How do I…Complete Performance Plan Activities? Complete a plan the Employee has sent me
1. Begin at the MyBiz website at https://compo.dcpds.cpms.osd.mil/ 2. Log into MyBiz.
3. Select NGB region.
4. Select My Workplace and then Performance Appraisal Application (PAA) links.
3 September 2014
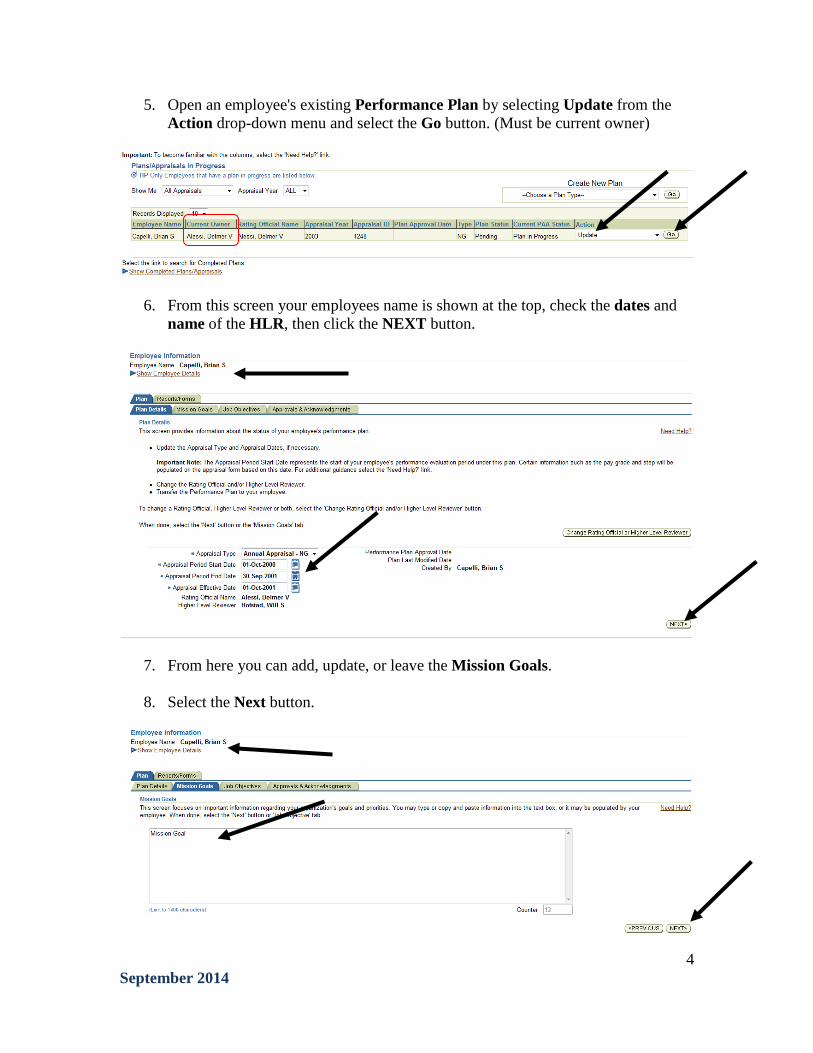
5. Open an employee's existing Performance Plan by selecting Update from the Action drop-down menu and select the Go button. (Must be current owner)
6. From this screen your employees name is shown at the top, check the dates and name of the HLR, then click the NEXT button.
7. From here you can add, update, or leave the Mission Goals.
8. Select the Next button.
4 September 2014
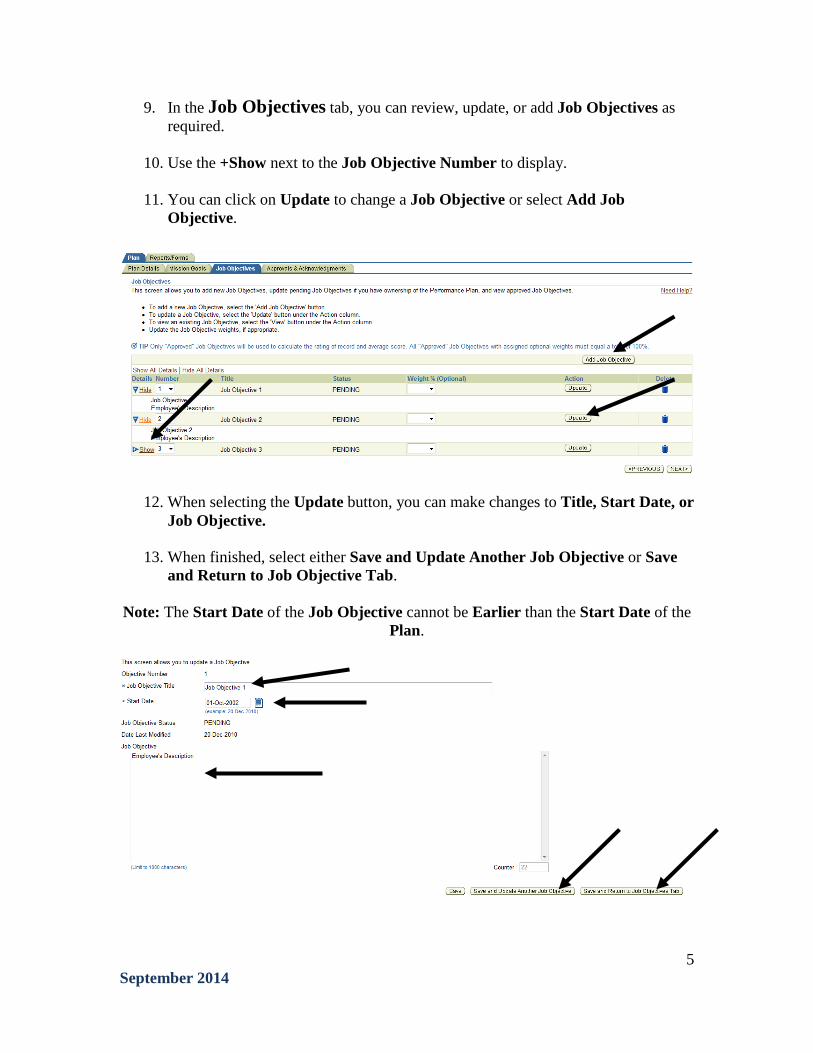
9. In the Job Objectives tab, you can review, update, or add Job Objectives as required.
10. Use the +Show next to the Job Objective Number to display.
11. You can click on Update to change a Job Objective or select Add Job
Objective.
12. When selecting the Update button, you can make changes to Title, Start Date, or Job Objective.
13. When finished, select either Save and Update Another Job Objective or Save
and Return to Job Objective Tab. Note: The Start Date of the Job Objective cannot be Earlier than the Start Date of the
Plan.
5 September 2014
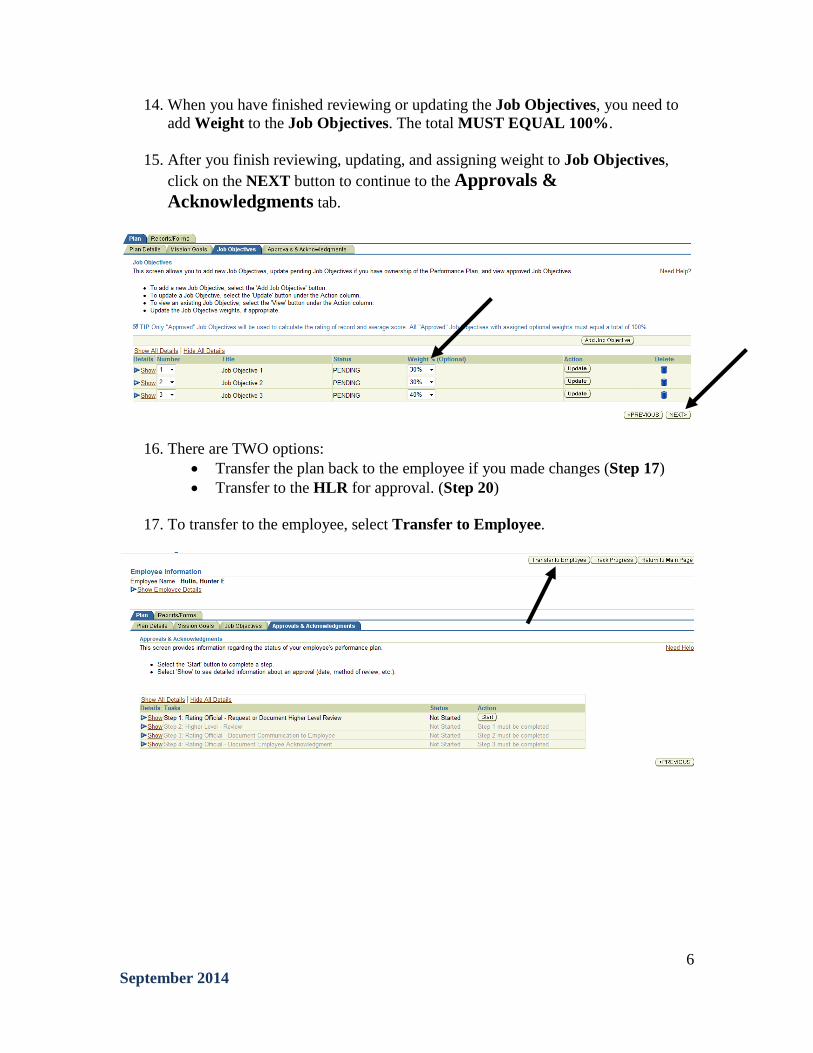
14. When you have finished reviewing or updating the Job Objectives, you need to add Weight to the Job Objectives. The total MUST EQUAL 100%.
15. After you finish reviewing, updating, and assigning weight to Job Objectives,
click on the NEXT button to continue to the Approvals & Acknowledgments tab.
16. There are TWO options: • Transfer the plan back to the employee if you made changes (Step 17) • Transfer to the HLR for approval. (Step 20)
17. To transfer to the employee, select Transfer to Employee.
6 September 2014

18. Write in the e-mail message box if needed and then select the Transfer to Employee with E-mail Notification button.
19. When you receive notification that the Employee has reviewed the changes, repeat Steps 1-16 again.
20. In Step 1: Rating Official-Request of Document Higher Level Review, select
the Start button.
21. There are TWO options: • Option A- Transfer to the HLR (Step 22) • Option B- Document for the HLR. (Step 24)
22. Option A - Select Transfer to Higher Level Reviewer With E-mail
Notification.
23. After the HLR approves and returns the Plan, go into the Plan to the Approvals & Acknowledgments tab and go to Step 27 below to continue.
7 September 2014
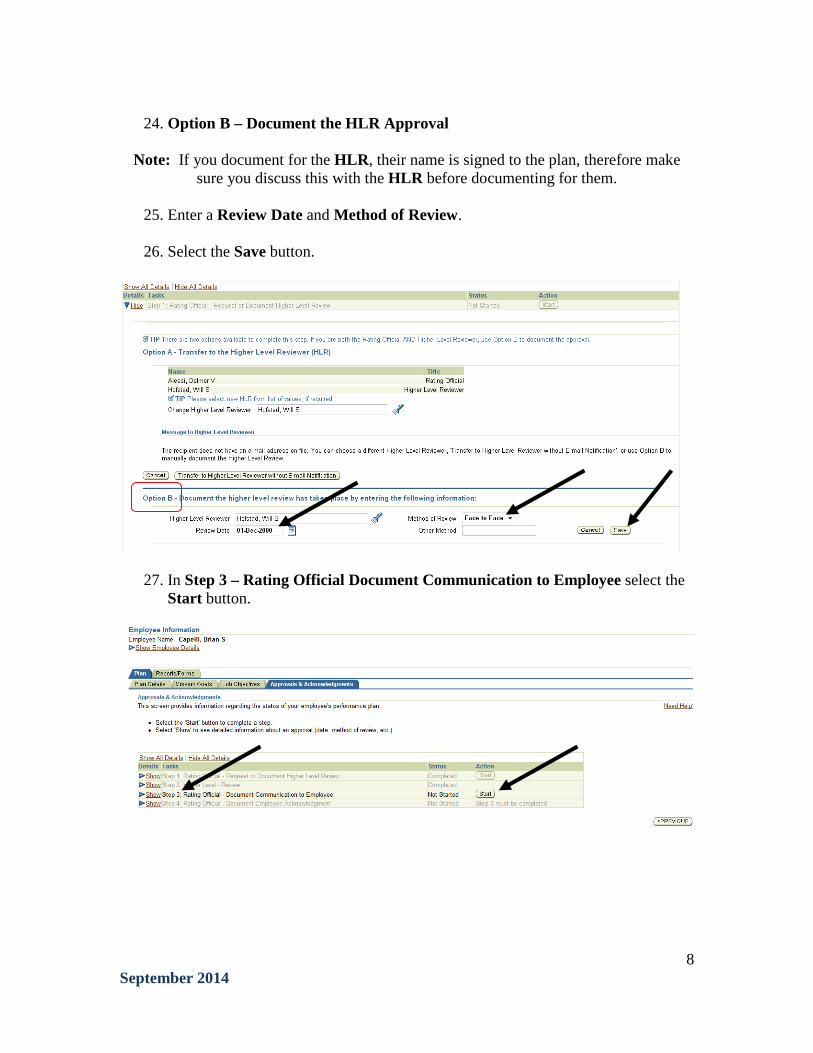
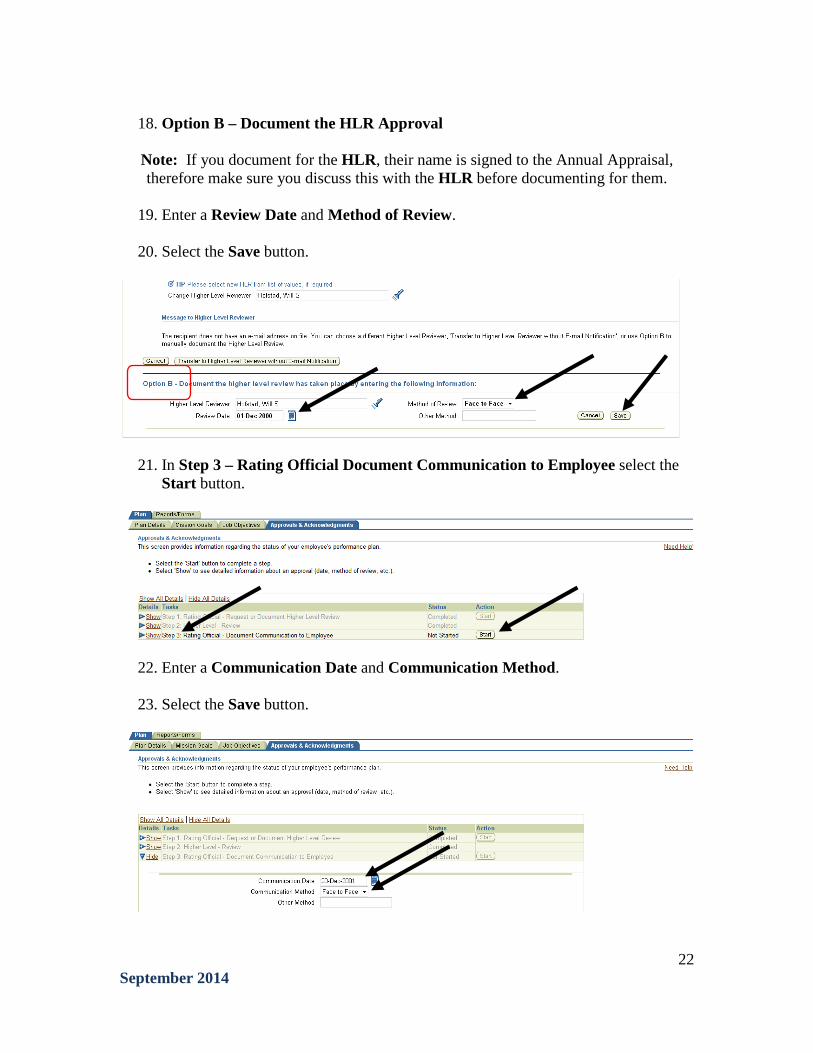
24. Option B – Document the HLR Approval
Note: If you document for the HLR, their name is signed to the plan, therefore make
sure you discuss this with the HLR before documenting for them.
25. Enter a Review Date and Method of Review.
26. Select the Save button.
27. In Step 3 – Rating Official Document Communication to Employee select the Start button.
8 September 2014

28. Enter a Communication Date and Communication Method.
29. There are TWO options: • Save and Transfer to Employee for Acknowledgment (Step 30) • Save and Go to Step 4 (document the employee’s acknowledgement)
(Step 33)
30. Select Save and Transfer to Employee for Acknowledgement button.
9 September 2014
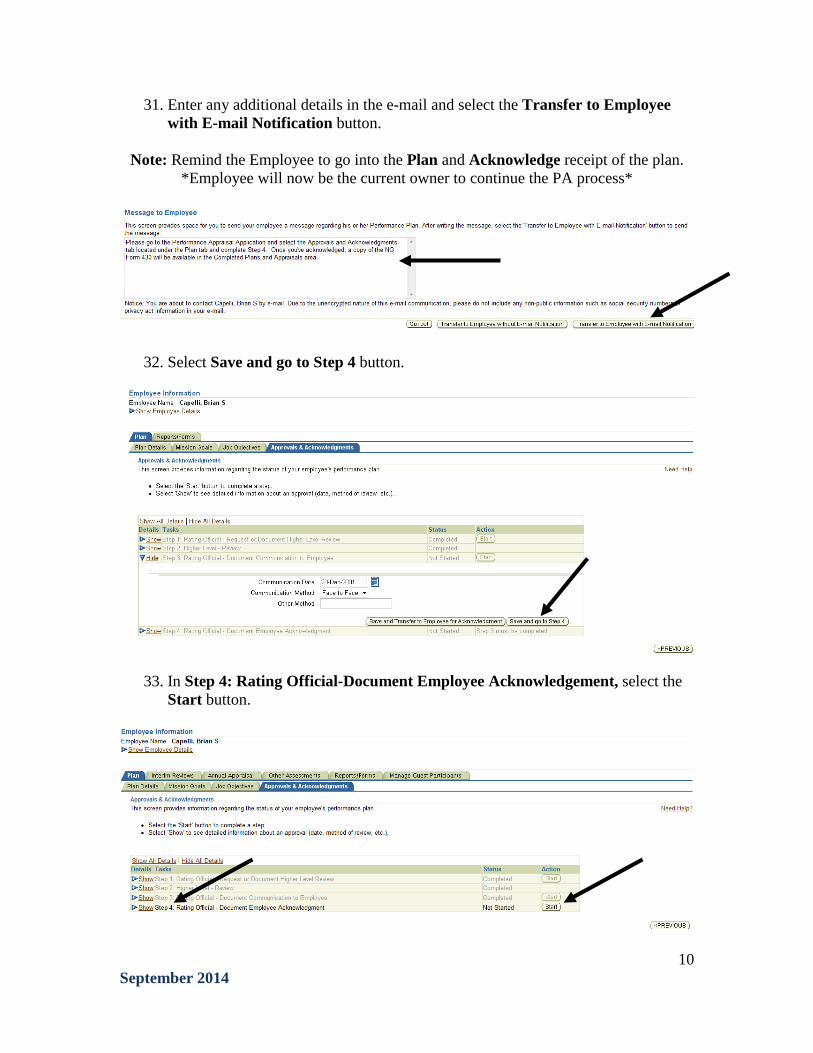
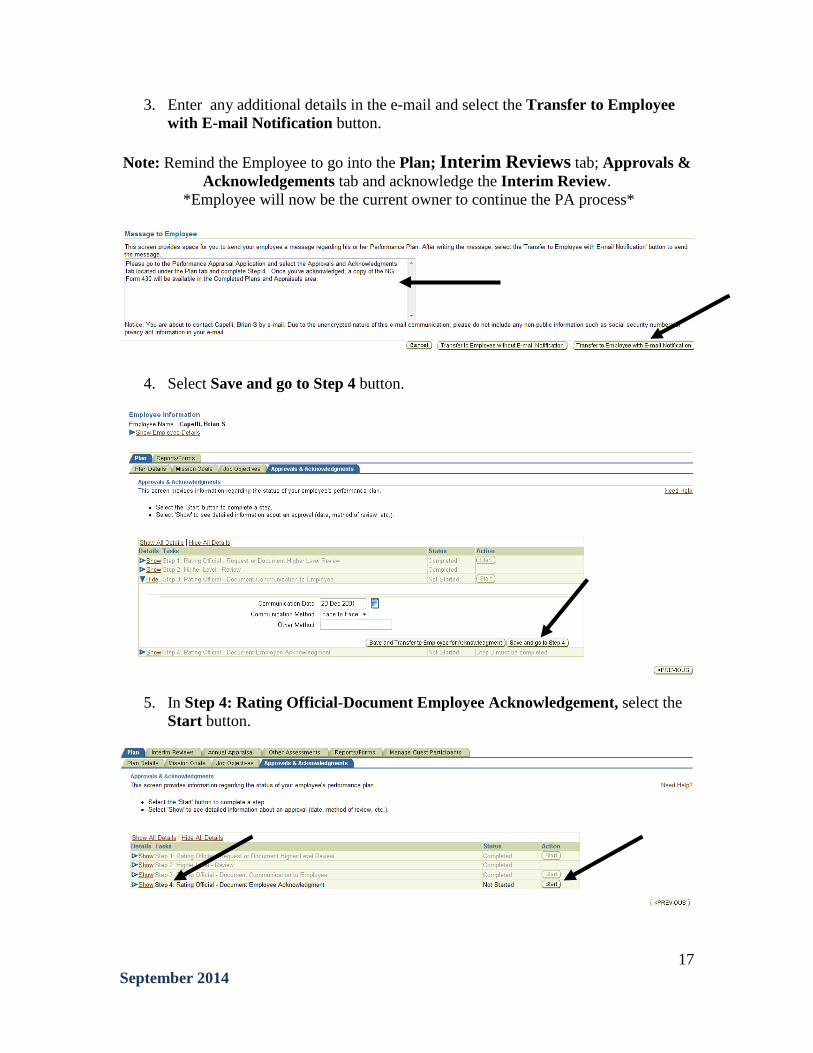
31. Enter any additional details in the e-mail and select the Transfer to Employee with E-mail Notification button.
Note: Remind the Employee to go into the Plan and Acknowledge receipt of the plan.
*Employee will now be the current owner to continue the PA process*
32. Select Save and go to Step 4 button.
33. In Step 4: Rating Official-Document Employee Acknowledgement, select the Start button.
10 September 2014
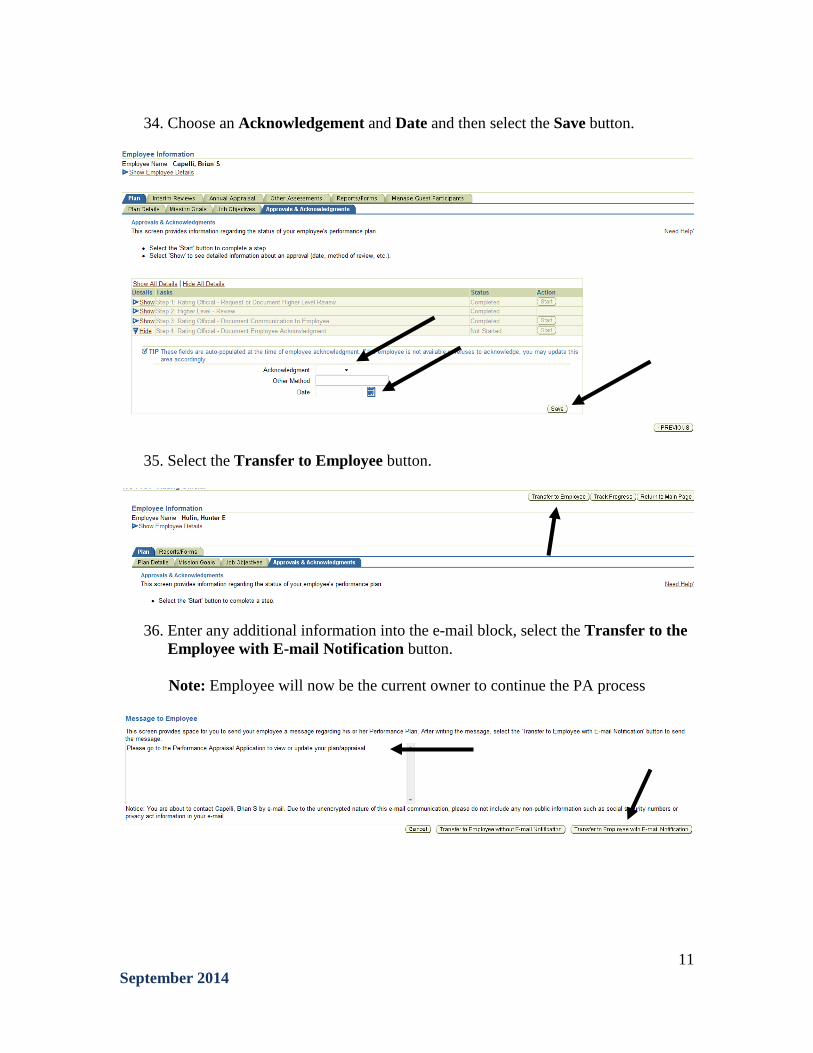
34. Choose an Acknowledgement and Date and then select the Save button.
35. Select the Transfer to Employee button.
36. Enter any additional information into the e-mail block, select the Transfer to the Employee with E-mail Notification button.
Note: Employee will now be the current owner to continue the PA process
11 September 2014
Complete an Interim Review the Employee has sent me
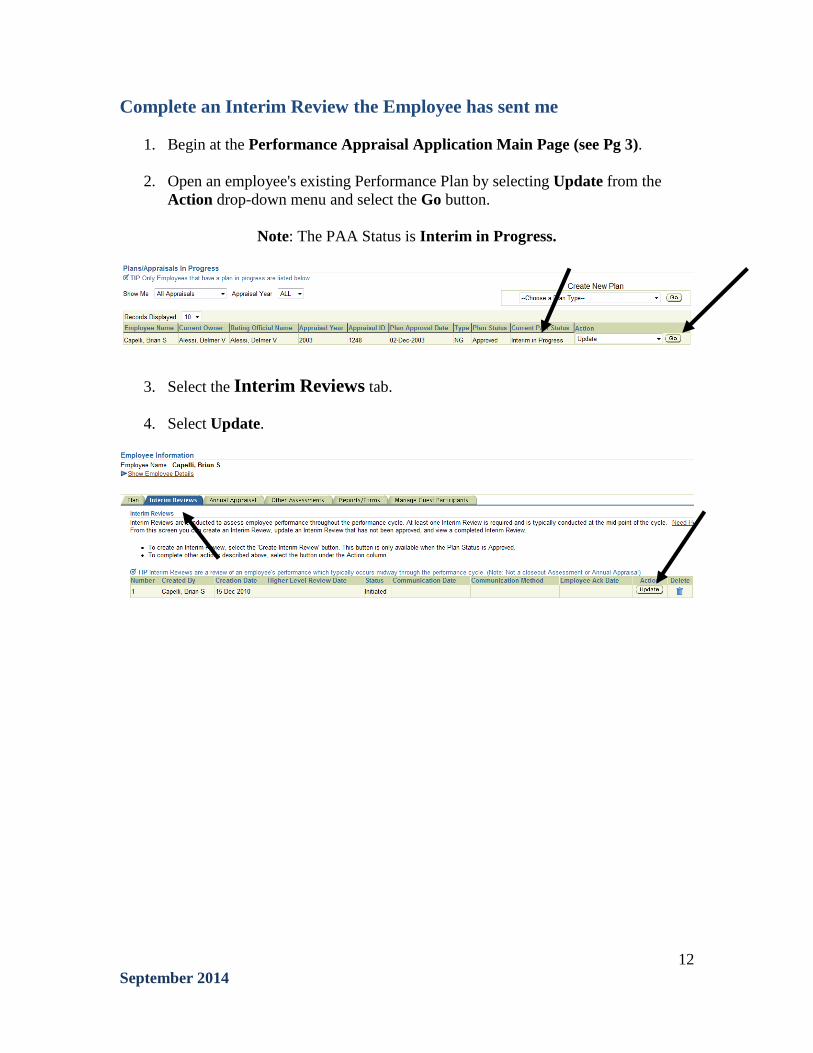
1. Begin at the Performance Appraisal Application Main Page (see Pg 3).
2. Open an employee's existing Performance Plan by selecting Update from the Action drop-down menu and select the Go button.
Note: The PAA Status is Interim in Progress.
3. Select the Interim Reviews tab.
4. Select Update.
12 September 2014
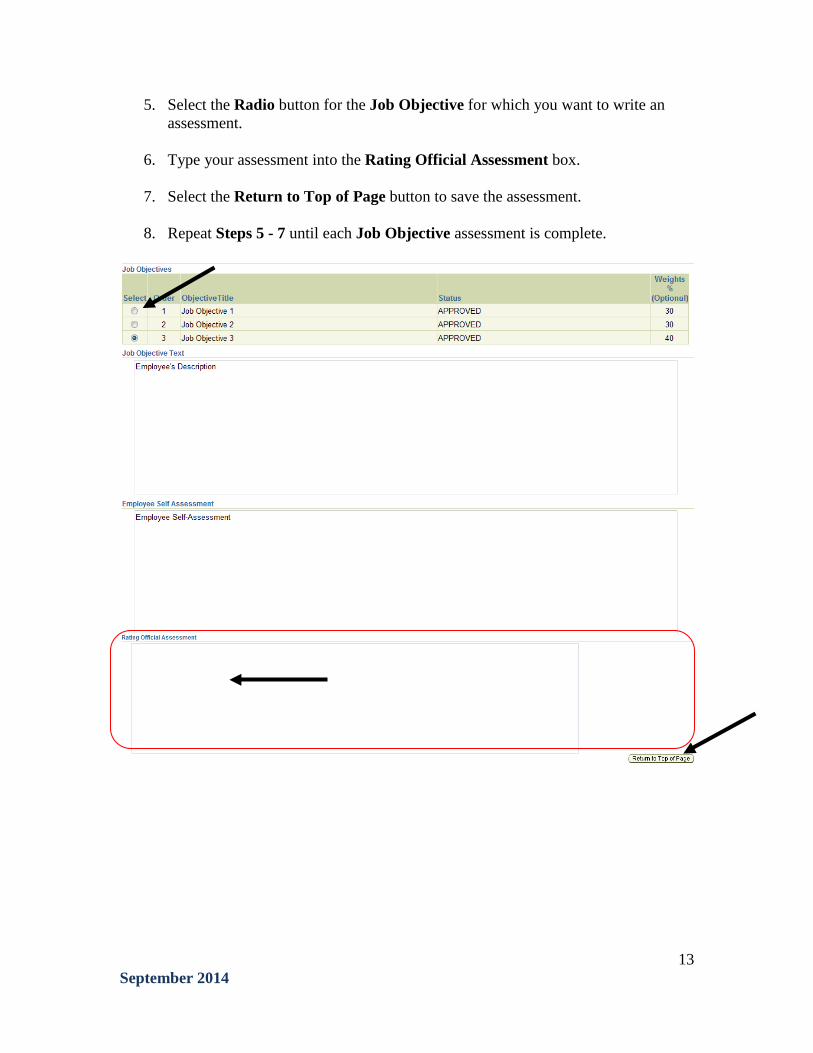
5. Select the Radio button for the Job Objective for which you want to write an assessment.
6. Type your assessment into the Rating Official Assessment box.
7. Select the Return to Top of Page button to save the assessment.
8. Repeat Steps 5 - 7 until each Job Objective assessment is complete.
13 September 2014
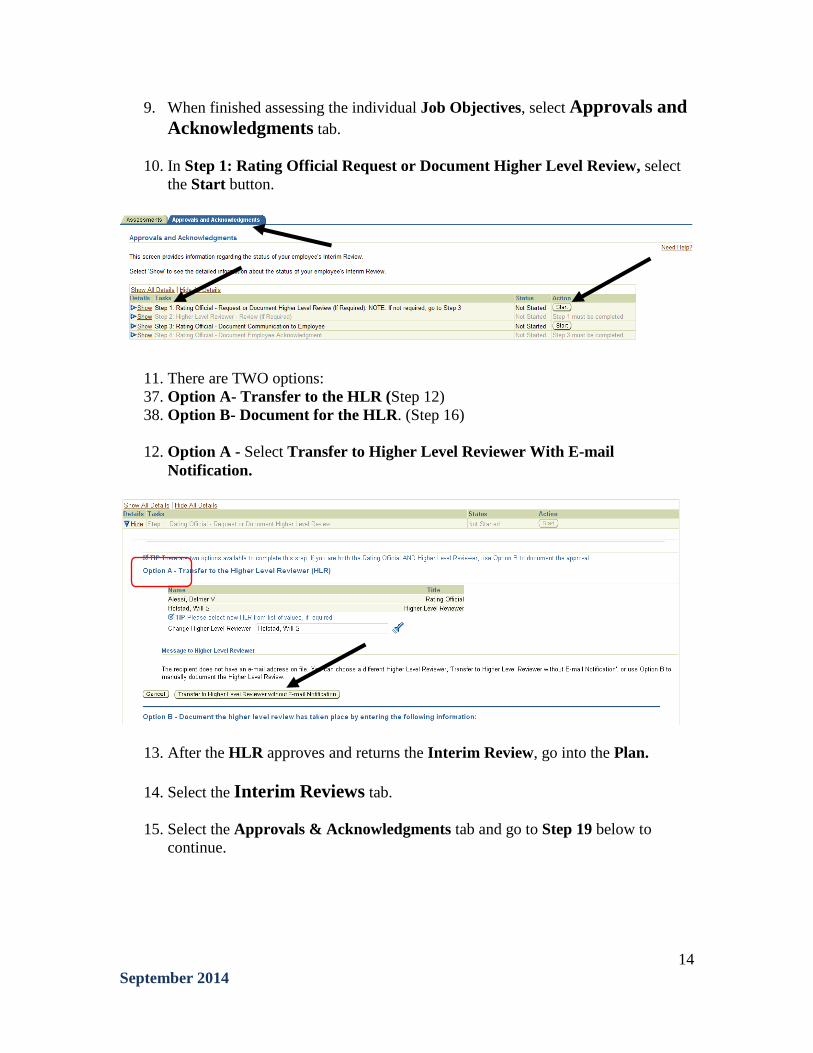
9. When finished assessing the individual Job Objectives, select Approvals and Acknowledgments tab.
10. In Step 1: Rating Official Request or Document Higher Level Review, select
the Start button.
11. There are TWO options: 37. Option A- Transfer to the HLR (Step 12) 38. Option B- Document for the HLR. (Step 16)
12. Option A - Select Transfer to Higher Level Reviewer With E-mail
Notification.
13. After the HLR approves and returns the Interim Review, go into the Plan.
14. Select the Interim Reviews tab.
15. Select the Approvals & Acknowledgments tab and go to Step 19 below to continue.
14 September 2014
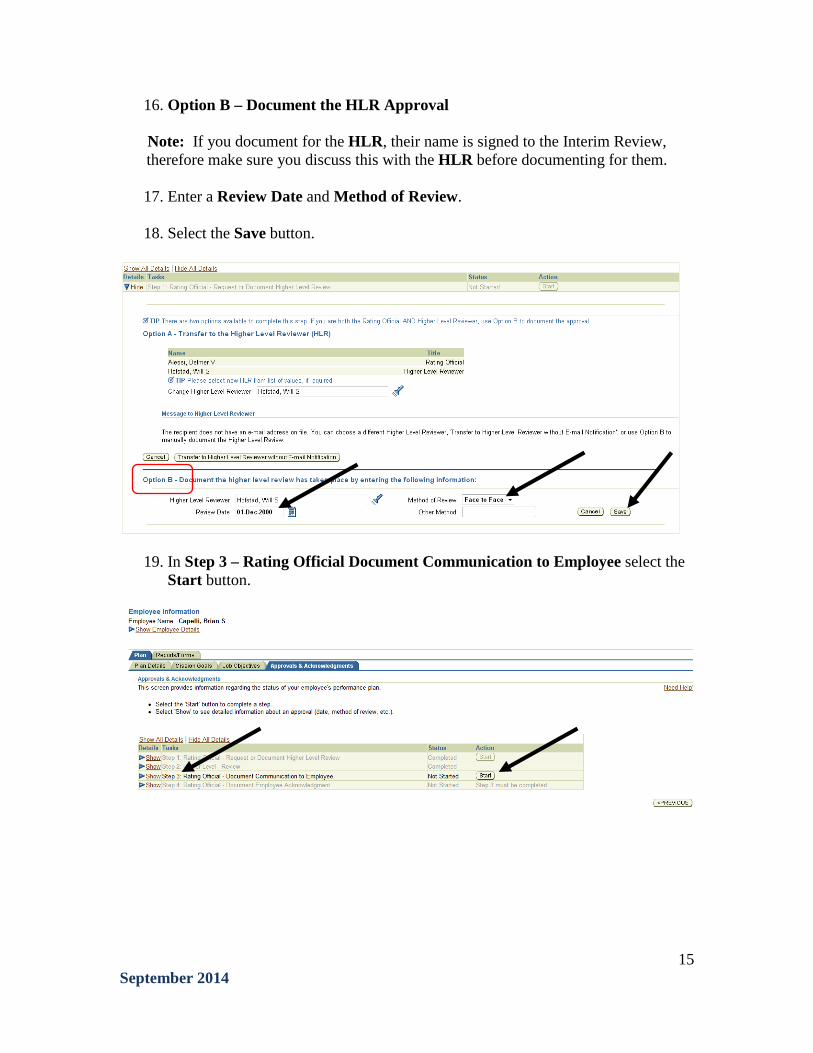
16. Option B – Document the HLR Approval
Note: If you document for the HLR, their name is signed to the Interim Review, therefore make sure you discuss this with the HLR before documenting for them.
17. Enter a Review Date and Method of Review.
18. Select the Save button.
19. In Step 3 – Rating Official Document Communication to Employee select the Start button.
15 September 2014
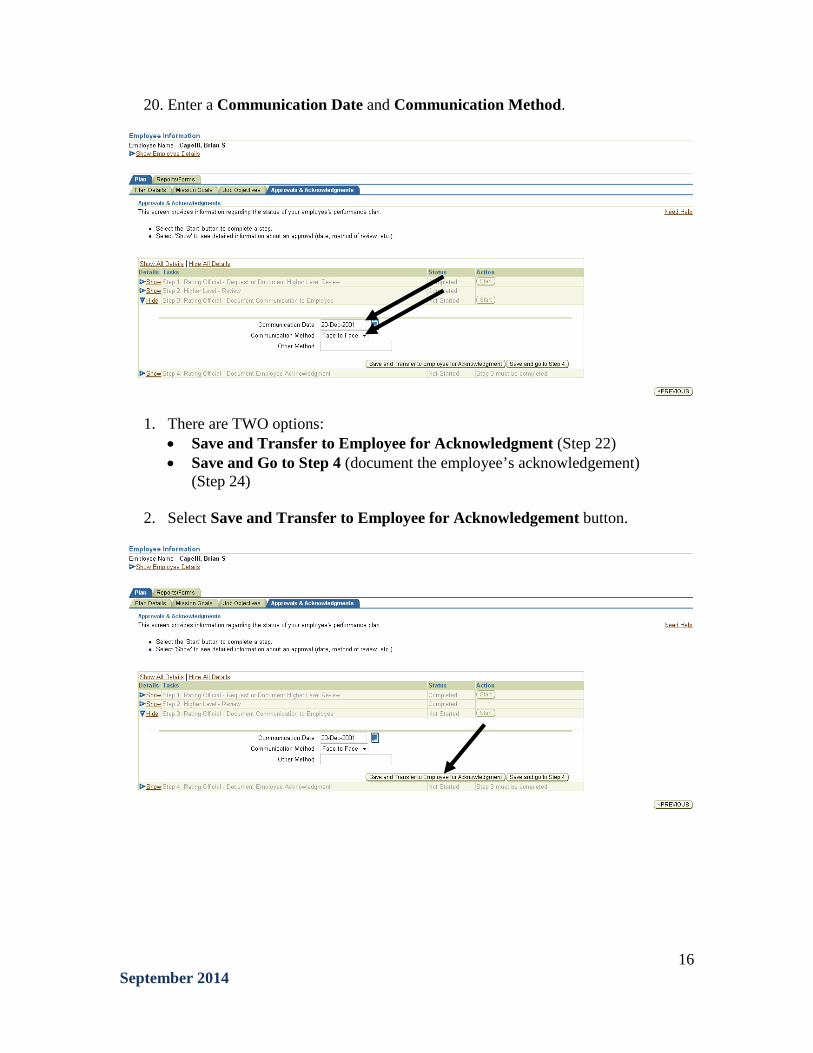
20. Enter a Communication Date and Communication Method.
1. There are TWO options: • Save and Transfer to Employee for Acknowledgment (Step 22) • Save and Go to Step 4 (document the employee’s acknowledgement)
(Step 24)
2. Select Save and Transfer to Employee for Acknowledgement button.
16 September 2014
3. Enter any additional details in the e-mail and select the Transfer to Employee with E-mail Notification button.
Note: Remind the Employee to go into the Plan; Interim Reviews tab; Approvals &
Acknowledgements tab and acknowledge the Interim Review. *Employee will now be the current owner to continue the PA process*
4. Select Save and go to Step 4 button.
5. In Step 4: Rating Official-Document Employee Acknowledgement, select the Start button.
17 September 2014
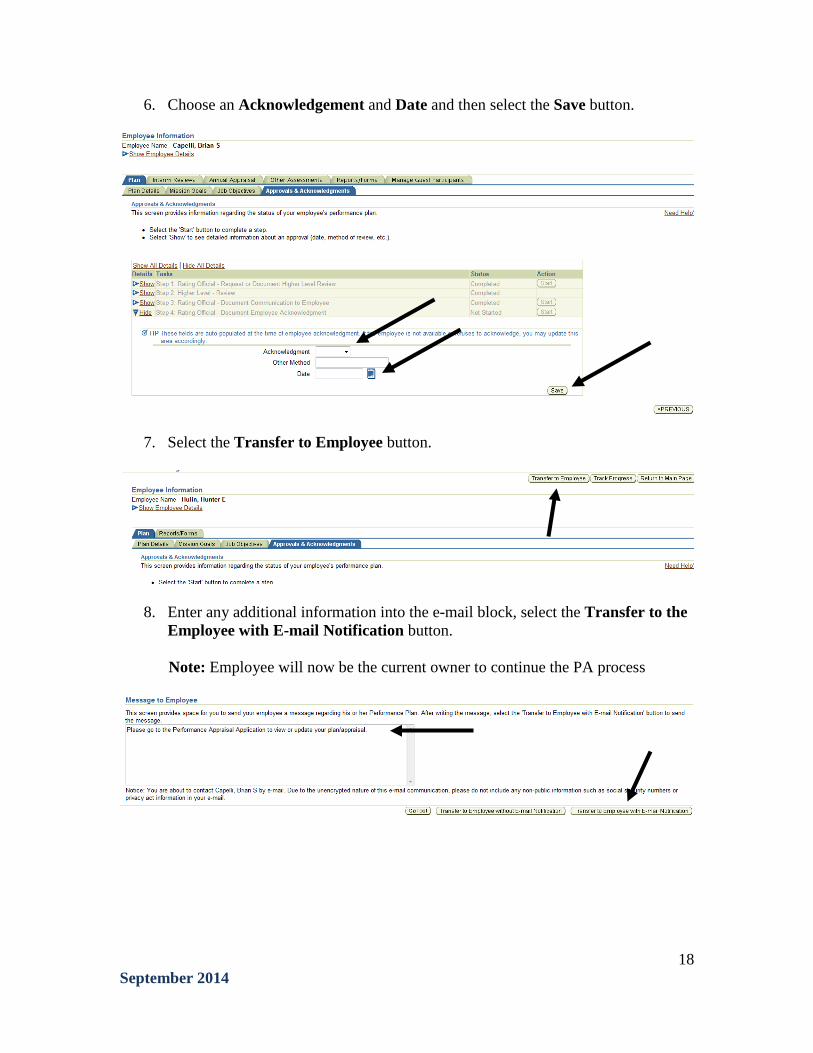
6. Choose an Acknowledgement and Date and then select the Save button.
7. Select the Transfer to Employee button.
8. Enter any additional information into the e-mail block, select the Transfer to the Employee with E-mail Notification button.
Note: Employee will now be the current owner to continue the PA process
18 September 2014

Complete an Annual Appraisal the Employee has sent me
1. Begin at the Performance Appraisal Application Main Page (see Pg 3).
2. Open an employee's existing Performance Plan by selecting Update from the Action drop down and select the Go button.
3. Select the Annual Appraisal tab.
4. Select the Assessments and Ratings tab.
5. Select the Radio button next to each Job Objective to display the Job Objective and the employee's self-assessment.
19 September 2014
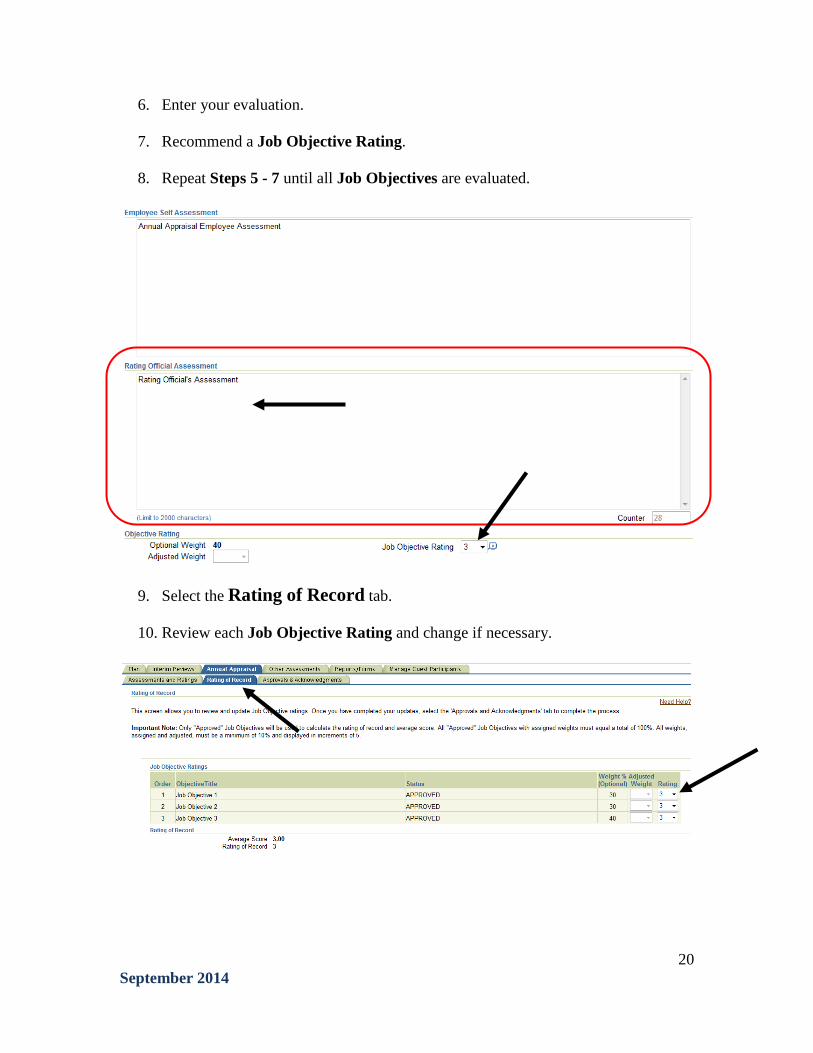
6. Enter your evaluation.
7. Recommend a Job Objective Rating.
8. Repeat Steps 5 - 7 until all Job Objectives are evaluated.
9. Select the Rating of Record tab.
10. Review each Job Objective Rating and change if necessary.
20 September 2014
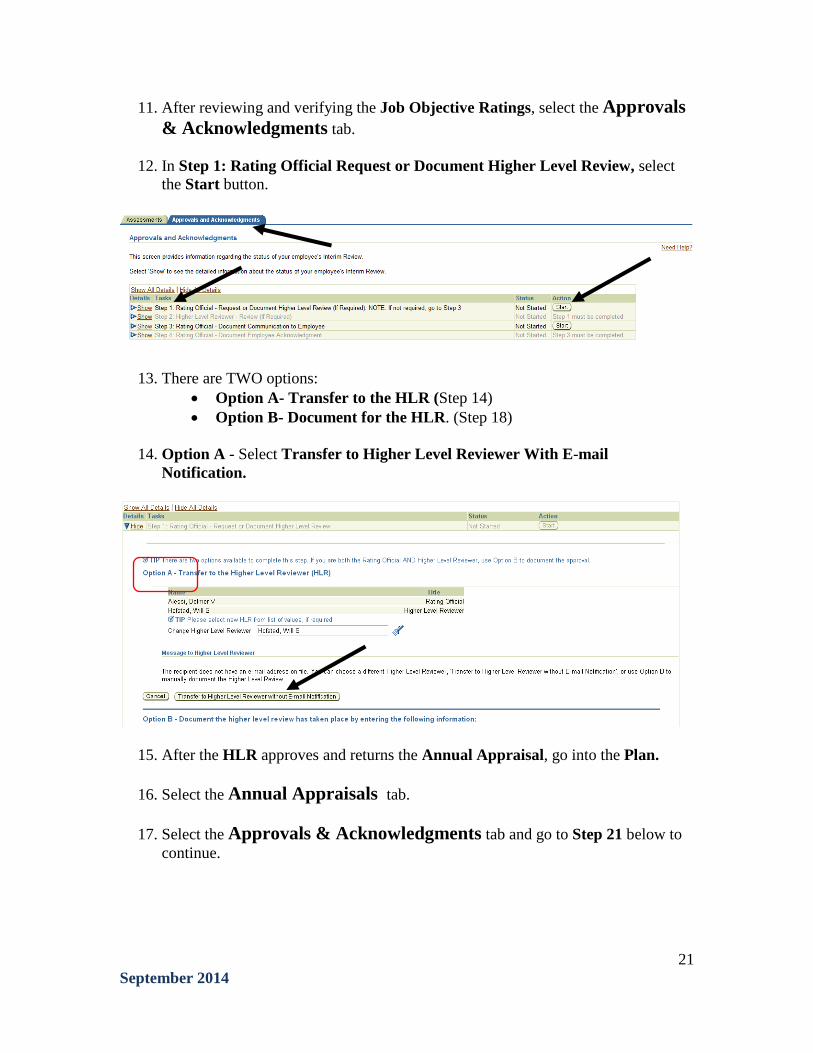
11. After reviewing and verifying the Job Objective Ratings, select the Approvals & Acknowledgments tab.
12. In Step 1: Rating Official Request or Document Higher Level Review, select
the Start button.
13. There are TWO options: • Option A- Transfer to the HLR (Step 14) • Option B- Document for the HLR. (Step 18)
14. Option A - Select Transfer to Higher Level Reviewer With E-mail
Notification.
15. After the HLR approves and returns the Annual Appraisal, go into the Plan.
16. Select the Annual Appraisals tab.
17. Select the Approvals & Acknowledgments tab and go to Step 21 below to continue.
21 September 2014
18. Option B – Document the HLR Approval
Note: If you document for the HLR, their name is signed to the Annual Appraisal, therefore make sure you discuss this with the HLR before documenting for them.
19. Enter a Review Date and Method of Review.
20. Select the Save button.
21. In Step 3 – Rating Official Document Communication to Employee select the Start button.
22. Enter a Communication Date and Communication Method.
23. Select the Save button.
22 September 2014

24. You now have the option to select the Print NG Form 430 for your records.
23 September 2014

Track progress of Plans
1. Once a plan has been started by the employee or Rating Official, you can view the progress at any time.
2. Begin at the Performance Appraisal Application Main Page (see Pg 3).
3. Select Track Progress from the drop down menu and select Go.
4. This screen will display a Check Mark only after the action is completed. This is useful to check to make sure the plan is progressing as required.
5. Select Return to Previous to get back to the Main Page.
24 September 2014

View and Print a completed Appraisal
1. Begin at the Performance Appraisal Application Main Page (see Pg 3).
2. Select the +Show Completed Plans/Appraisals drop down menu.
3. Enter the Employee’s name and select the Flashlight icon
4. After selecting the Radio button next to the employee, choose the Select button.
25 September 2014
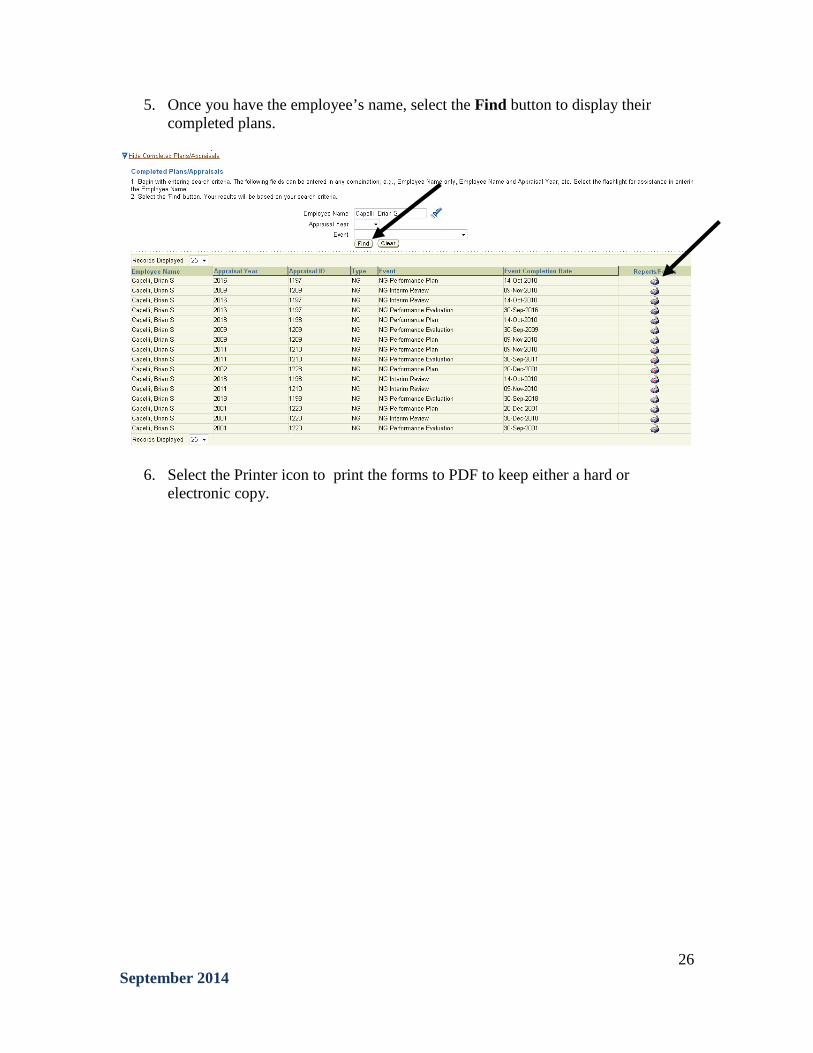
5. Once you have the employee’s name, select the Find button to display their completed plans.
6. Select the Printer icon to print the forms to PDF to keep either a hard or electronic copy.
26 September 2014
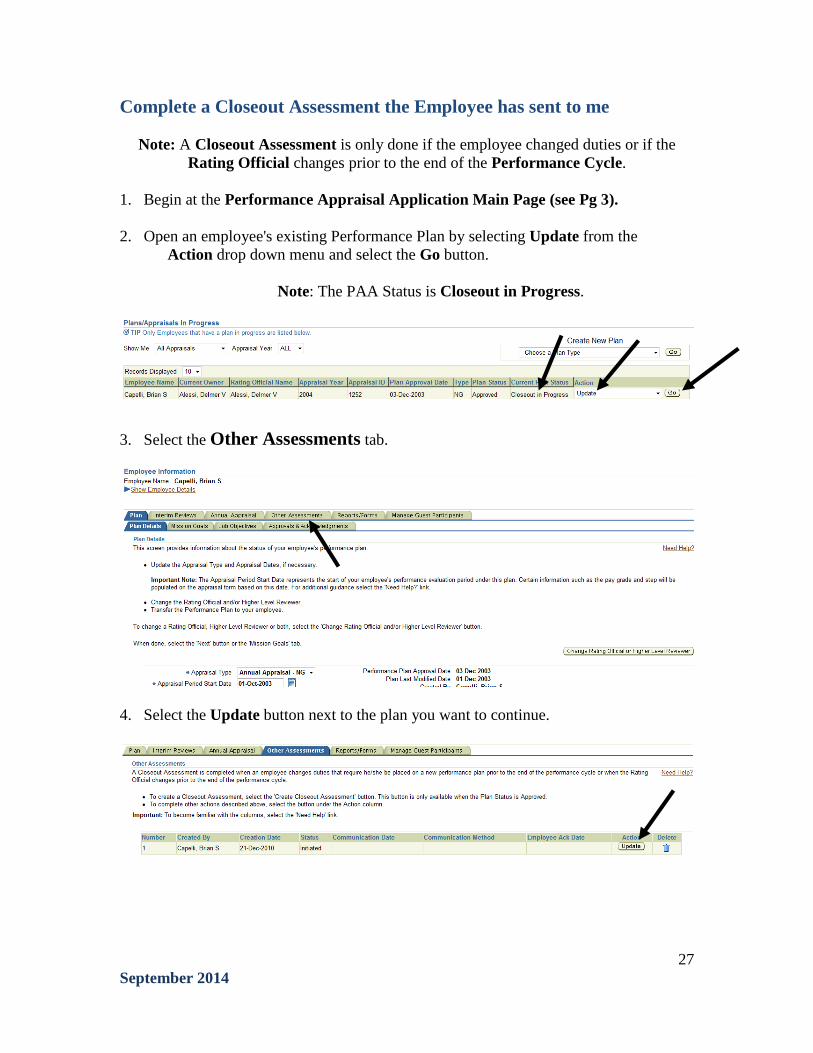
Complete a Closeout Assessment the Employee has sent to me
Note: A Closeout Assessment is only done if the employee changed duties or if the Rating Official changes prior to the end of the Performance Cycle.
1. Begin at the Performance Appraisal Application Main Page (see Pg 3). 2. Open an employee's existing Performance Plan by selecting Update from the
Action drop down menu and select the Go button.
Note: The PAA Status is Closeout in Progress.
3. Select the Other Assessments tab.
4. Select the Update button next to the plan you want to continue.
27 September 2014

5. Select the Radio button next to each Job Objective to display.
6. Enter your assessment for the Job Objective. 7. Select Return to Top of Page button to save assessment. 8. Complete Steps 5- 7 for each Job Objective.
28 September 2014
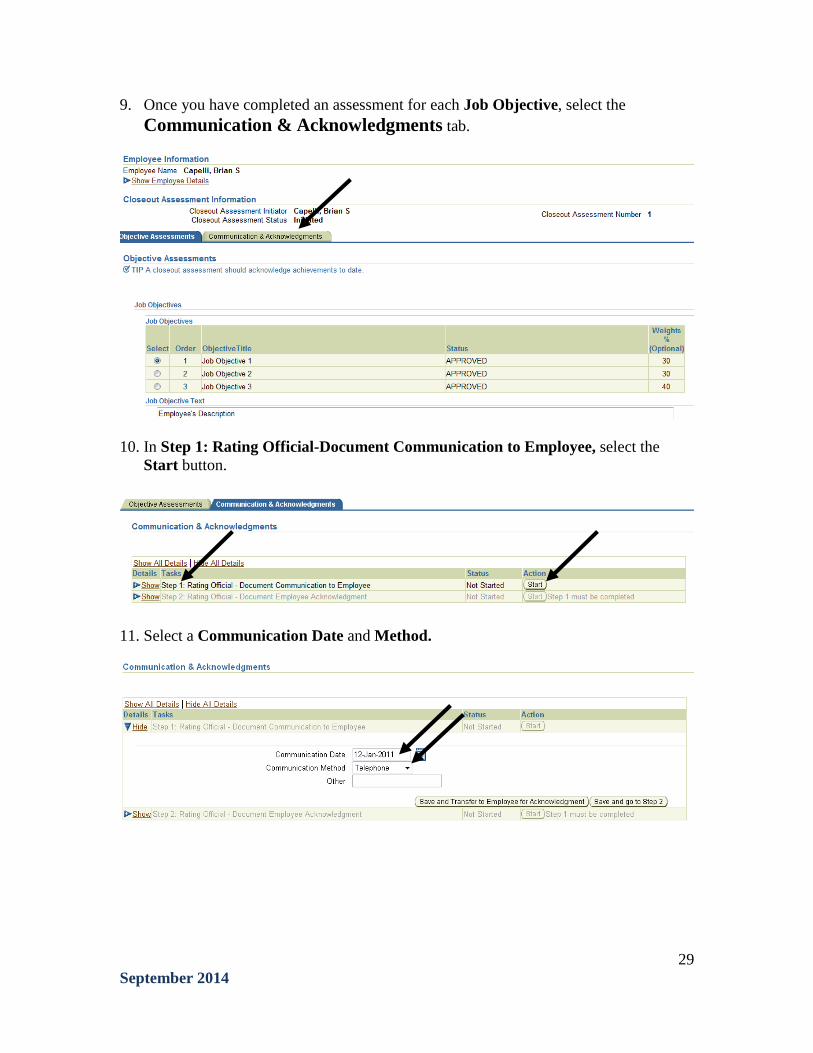
9. Once you have completed an assessment for each Job Objective, select the Communication & Acknowledgments tab.
10. In Step 1: Rating Official-Document Communication to Employee, select the
Start button.
11. Select a Communication Date and Method.
29 September 2014

12. There are TWO options:
• Save and Transfer to Employee for Acknowledgement (Step 13) • Save and go to Step 2 (Step 15)
13. Select Save and Transfer to employee for Acknowledgment button.
14. Add any additional information to the e-mail and then select the Transfer to
Employee with E-mail Notification button. Note: Remind the Employee to go into the Plan; Other Assessments tab; Approvals
& Acknowledgements tab and acknowledge the Closeout Assessment. *Employee will now be the current owner to continue the PA process*
15. Select Save and go to Step 2.
30 September 2014

16. In Step 2: Rating Official-Document Employee Acknowledgement, select the Start button.
17. Select Acknowledgment and Date then select the Save button.
31 September 2014

Transfer a Completed Closeout Assessment to another Rating Official
1. Begin at the Performance Appraisal Application Main Page (see Pg 3).
2. Select Change RO and/or HLR from the drop down menu and select the Go button.
Note: Status reads Closeout Complete.
3. Select the flashlight icon next to the Rating Official name.
4. Enter the name of the new Rating Official and select the Go button.
5. Select the Radio button next to the appropriate Rating Official and select the Select button.
6. Complete steps 3-5 if changing the HLR.
32 September 2014

7. After you have selected a new Rating Official and/or HLR, select the Save and Continue button.
8. The plan has now been transferred to the new Rating Official and they can complete the Interim Review and/or Annual Appraisal processes as required.
33 September 2014
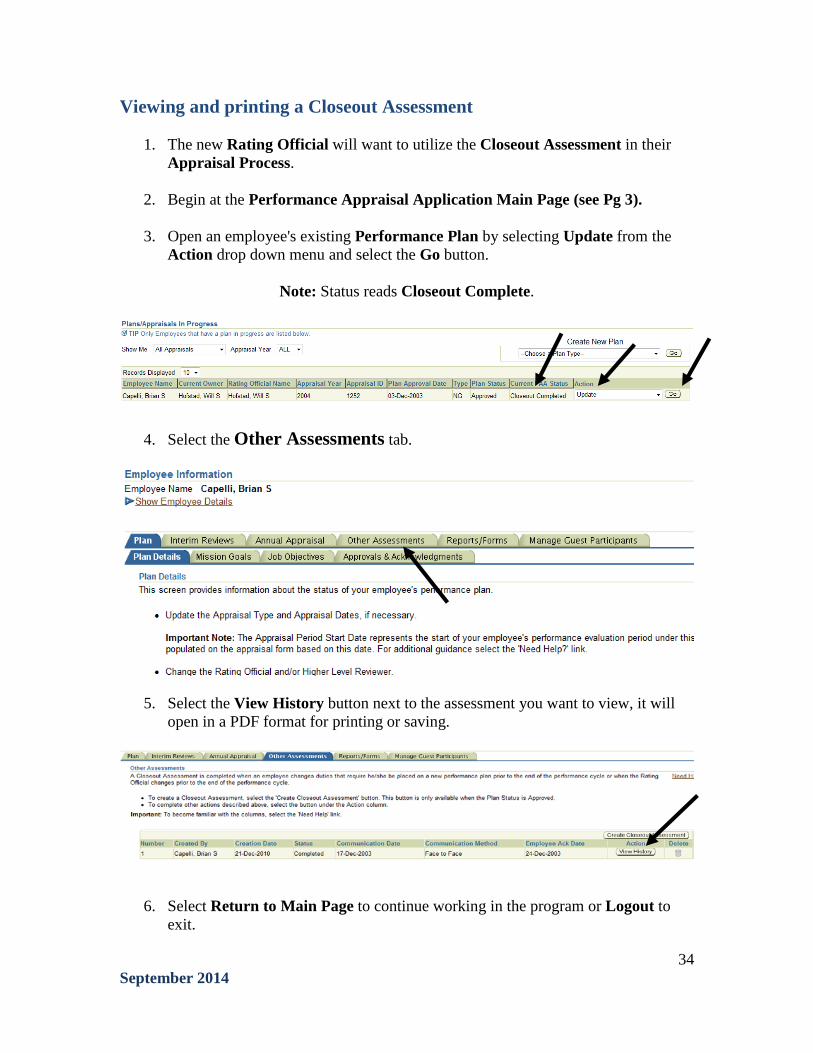
Viewing and printing a Closeout Assessment
1. The new Rating Official will want to utilize the Closeout Assessment in their Appraisal Process.
2. Begin at the Performance Appraisal Application Main Page (see Pg 3).
3. Open an employee's existing Performance Plan by selecting Update from the Action drop down menu and select the Go button.
Note: Status reads Closeout Complete.
4. Select the Other Assessments tab.
5. Select the View History button next to the assessment you want to view, it will open in a PDF format for printing or saving.
6. Select Return to Main Page to continue working in the program or Logout to exit.
34 September 2014
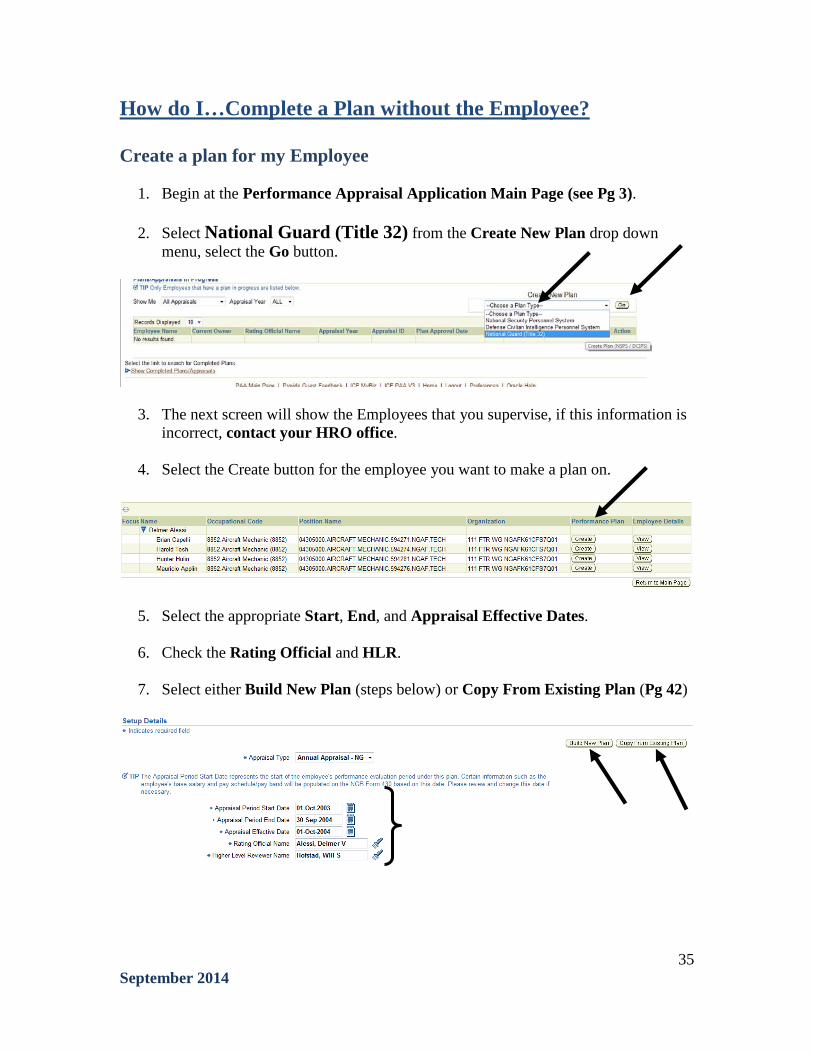
How do I…Complete a Plan without the Employee? Create a plan for my Employee
1. Begin at the Performance Appraisal Application Main Page (see Pg 3).
2. Select National Guard (Title 32) from the Create New Plan drop down menu, select the Go button.
3. The next screen will show the Employees that you supervise, if this information is incorrect, contact your HRO office.
4. Select the Create button for the employee you want to make a plan on.
5. Select the appropriate Start, End, and Appraisal Effective Dates.
6. Check the Rating Official and HLR.
7. Select either Build New Plan (steps below) or Copy From Existing Plan (Pg 42)
35 September 2014
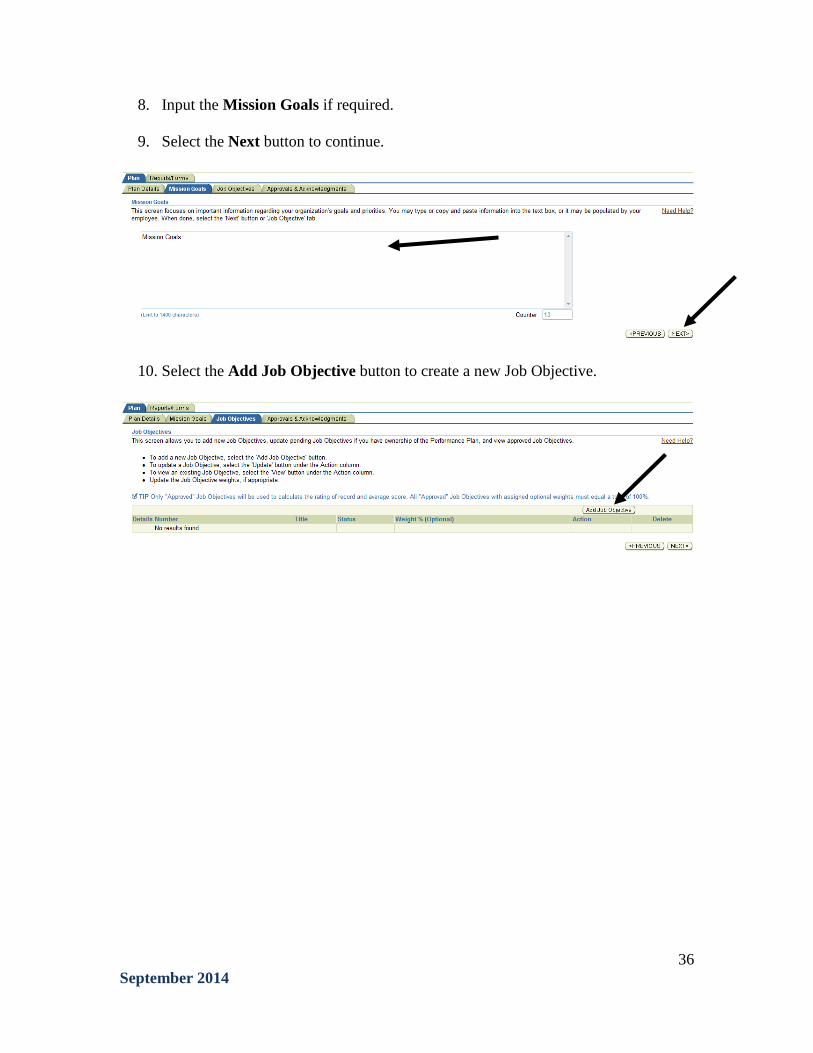
8. Input the Mission Goals if required.
9. Select the Next button to continue.
10. Select the Add Job Objective button to create a new Job Objective.
36 September 2014
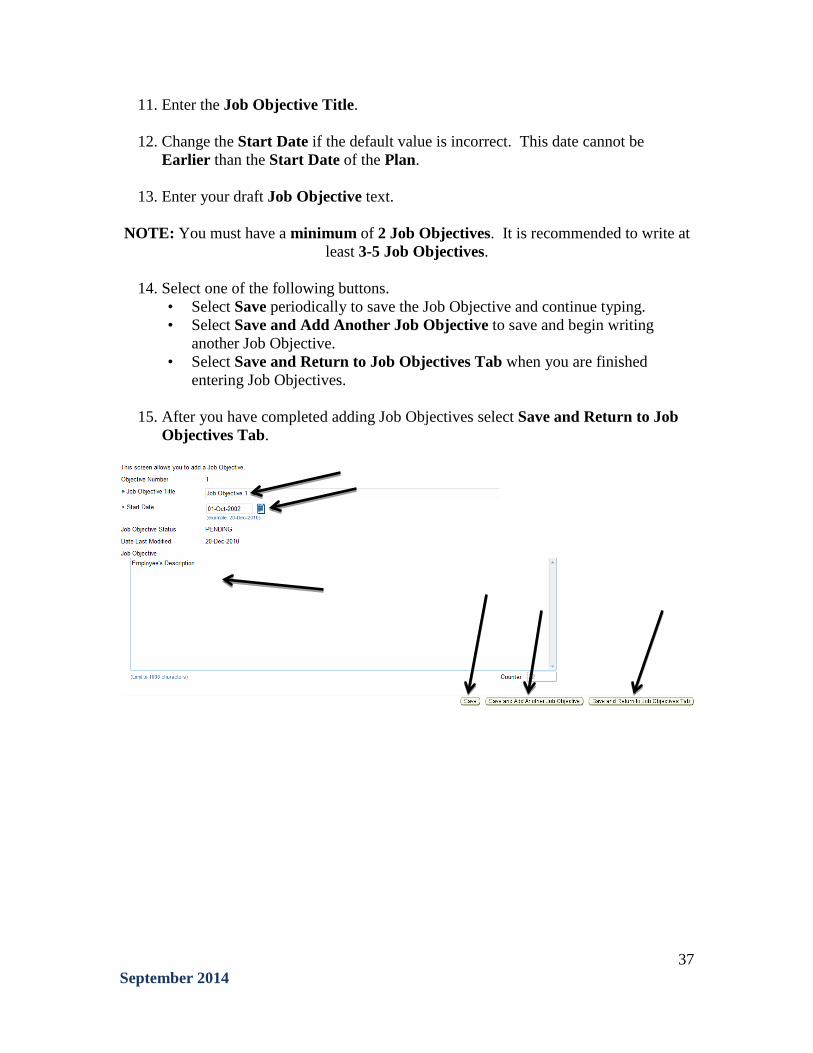
11. Enter the Job Objective Title.
12. Change the Start Date if the default value is incorrect. This date cannot be Earlier than the Start Date of the Plan.
13. Enter your draft Job Objective text. NOTE: You must have a minimum of 2 Job Objectives. It is recommended to write at
least 3-5 Job Objectives.
14. Select one of the following buttons. • Select Save periodically to save the Job Objective and continue typing. • Select Save and Add Another Job Objective to save and begin writing
another Job Objective. • Select Save and Return to Job Objectives Tab when you are finished
entering Job Objectives.
15. After you have completed adding Job Objectives select Save and Return to Job Objectives Tab.
37 September 2014
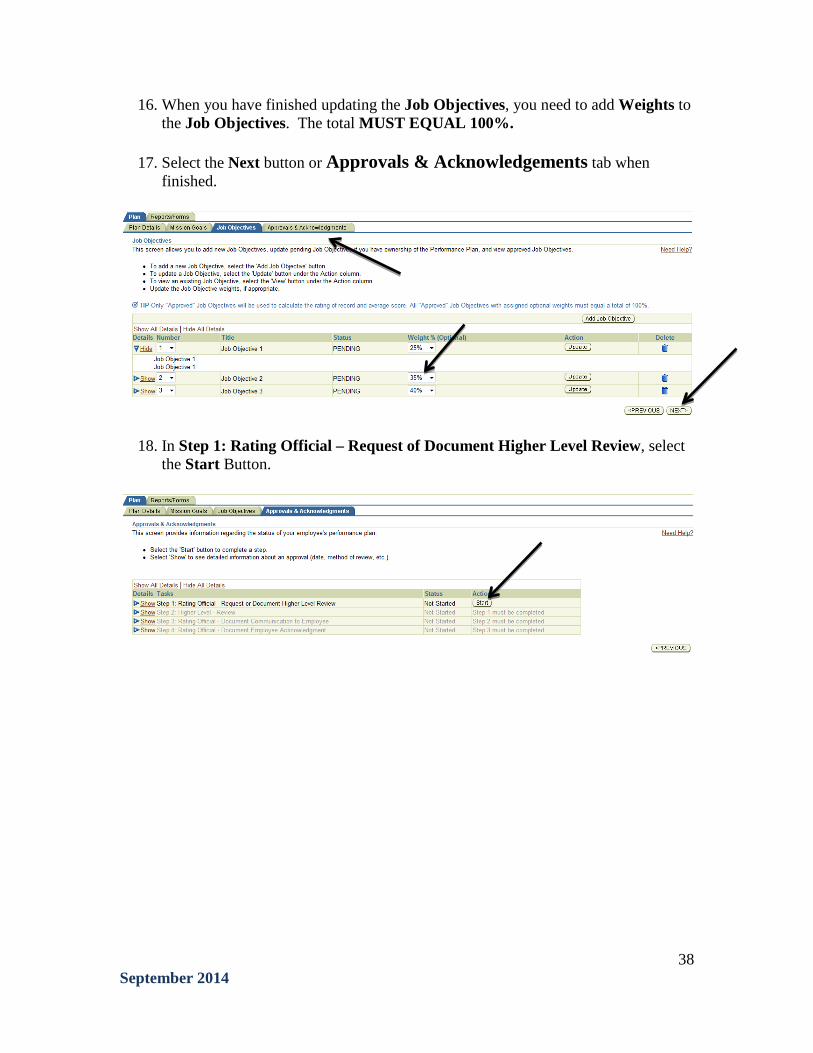
16. When you have finished updating the Job Objectives, you need to add Weights to the Job Objectives. The total MUST EQUAL 100%.
17. Select the Next button or Approvals & Acknowledgements tab when
finished.
18. In Step 1: Rating Official – Request of Document Higher Level Review, select the Start Button.
38 September 2014
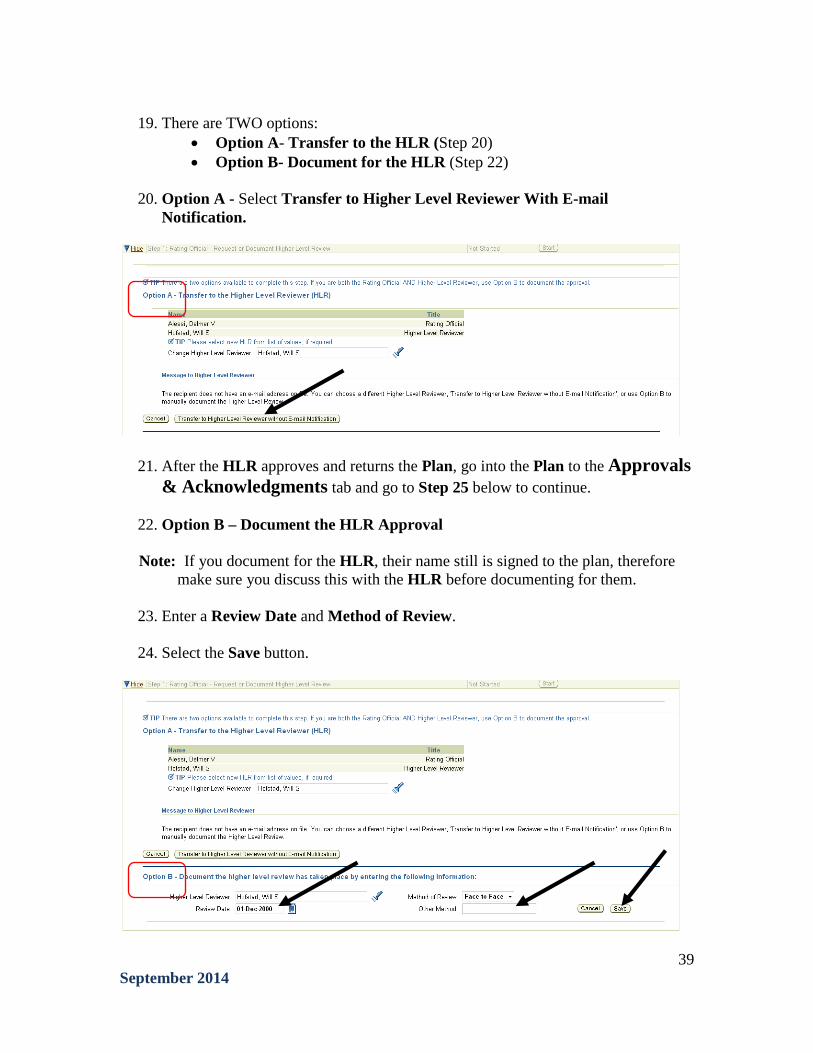
19. There are TWO options:
• Option A- Transfer to the HLR (Step 20) • Option B- Document for the HLR (Step 22)
20. Option A - Select Transfer to Higher Level Reviewer With E-mail
Notification.
21. After the HLR approves and returns the Plan, go into the Plan to the Approvals & Acknowledgments tab and go to Step 25 below to continue.
22. Option B – Document the HLR Approval
Note: If you document for the HLR, their name still is signed to the plan, therefore
make sure you discuss this with the HLR before documenting for them.
23. Enter a Review Date and Method of Review.
24. Select the Save button.
39 September 2014
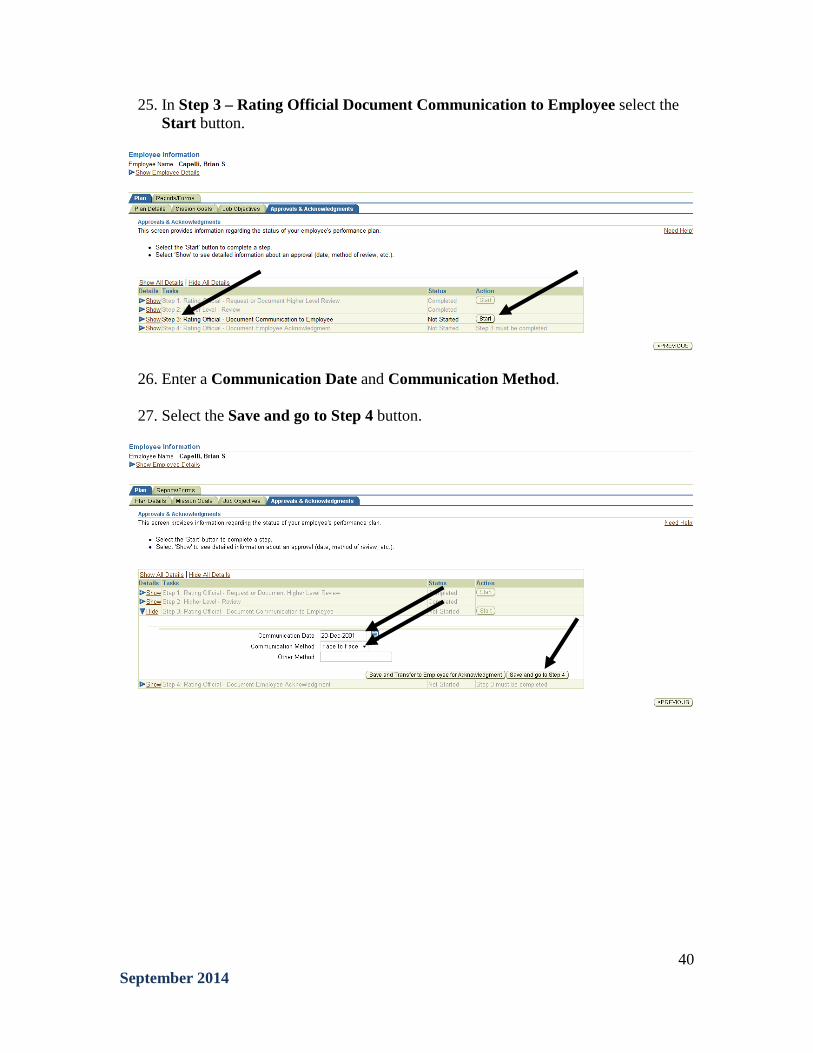
25. In Step 3 – Rating Official Document Communication to Employee select the Start button.
26. Enter a Communication Date and Communication Method.
27. Select the Save and go to Step 4 button.
40 September 2014
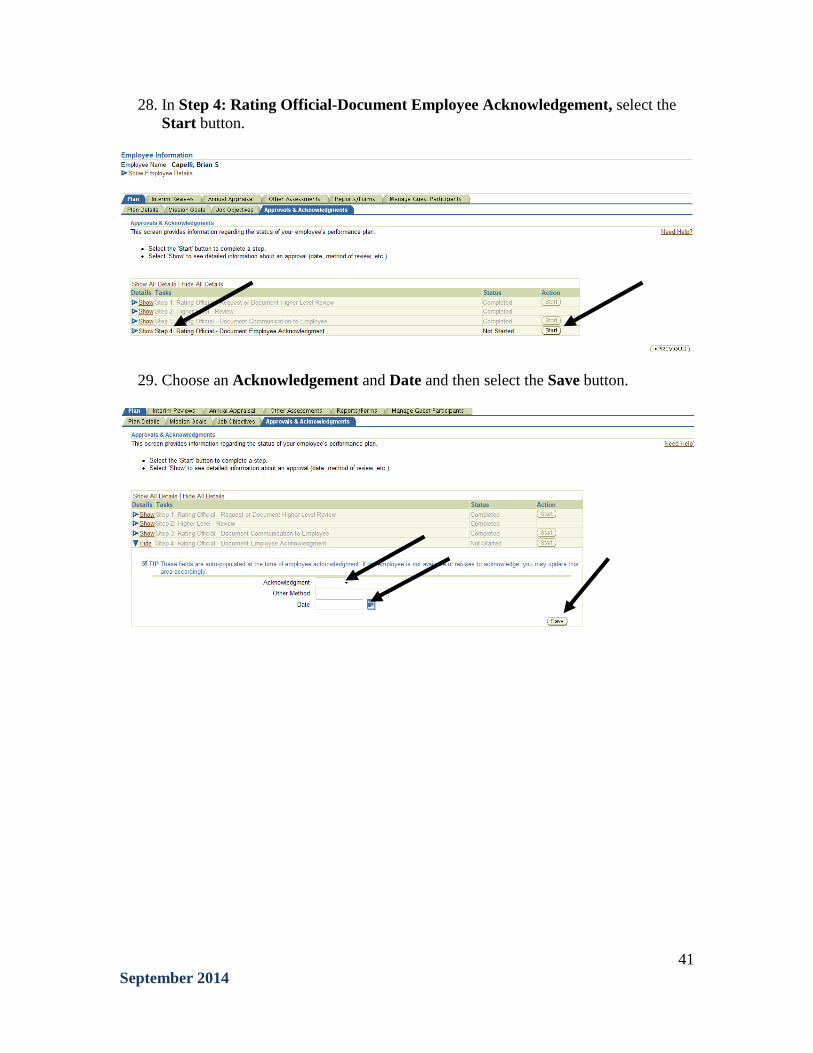
28. In Step 4: Rating Official-Document Employee Acknowledgement, select the Start button.
29. Choose an Acknowledgement and Date and then select the Save button.
41 September 2014

Copy an Existing Plan
1. Follow Steps 1-6, Pg 35.
2. From Step 7 on Pg 35, select the Copy from Existing Plan button.
3. Change the Employee Name and/or the Appraisal Effective Date if needed.
4. Select the Find button.
5. Select the Copy button for the plan you want to copy.
6. Now follow Steps 8-29 starting on Pg 36 to review and update the plan as needed.
42 September 2014
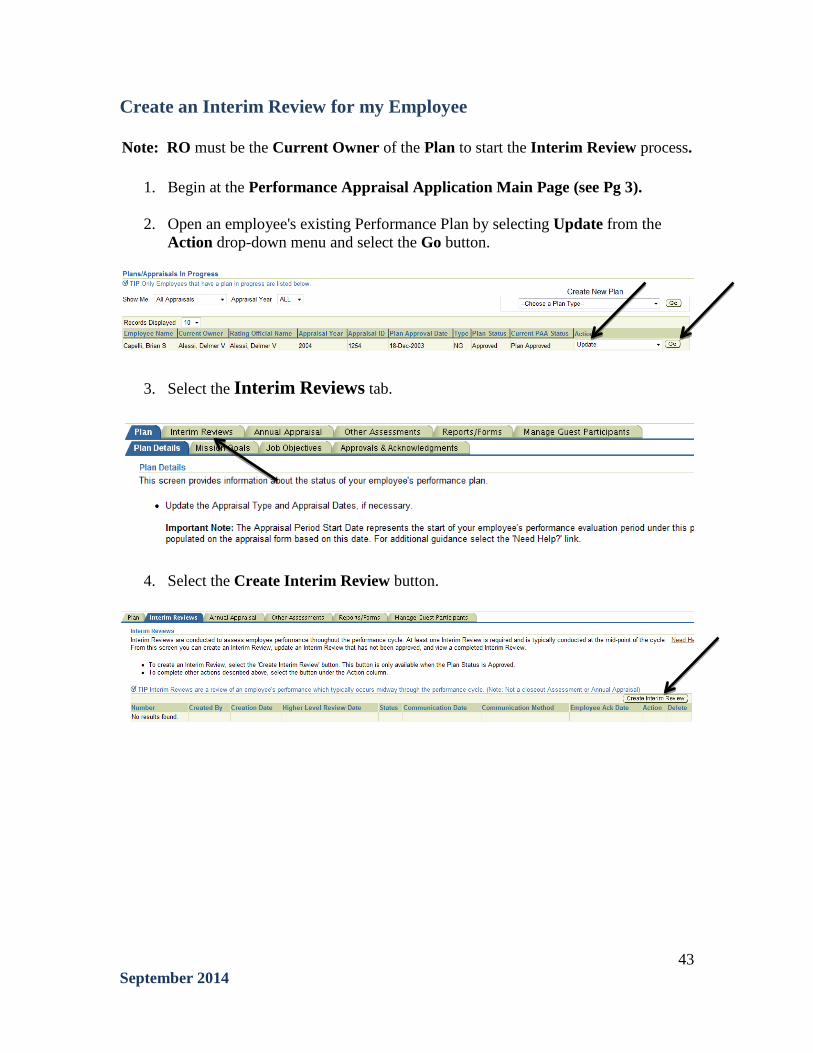
Create an Interim Review for my Employee Note: RO must be the Current Owner of the Plan to start the Interim Review process.
1. Begin at the Performance Appraisal Application Main Page (see Pg 3).
2. Open an employee's existing Performance Plan by selecting Update from the Action drop-down menu and select the Go button.
3. Select the Interim Reviews tab.
4. Select the Create Interim Review button.
43 September 2014
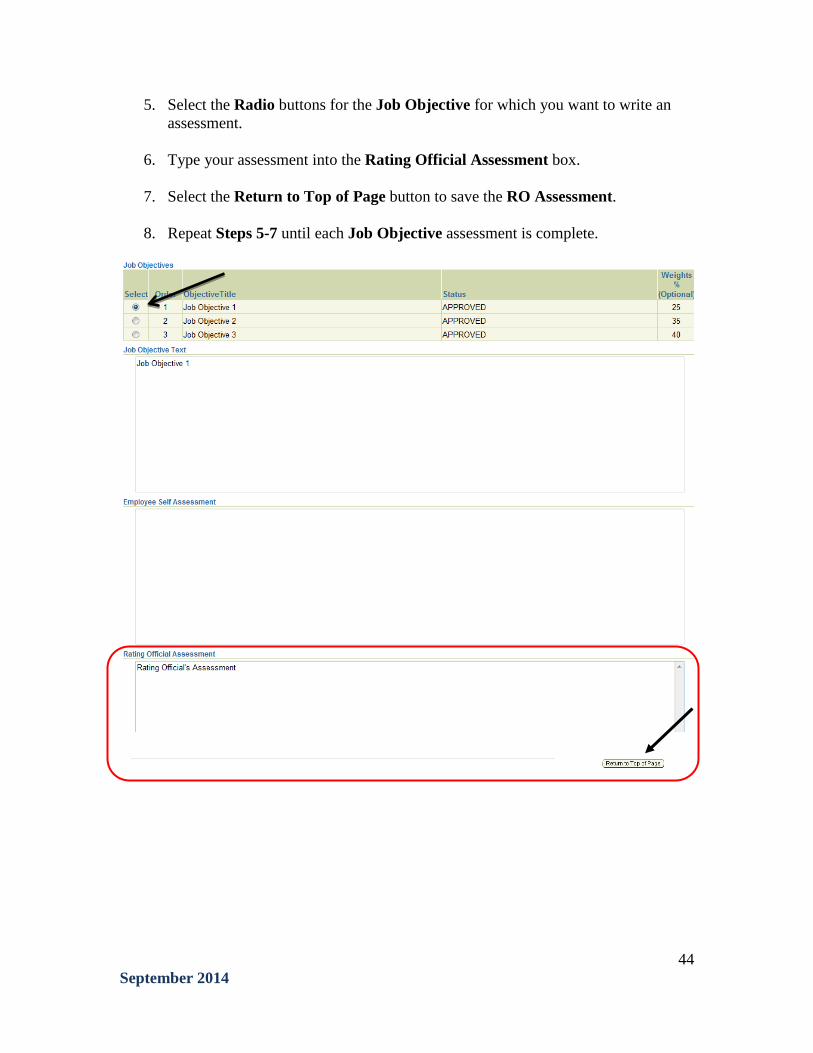
5. Select the Radio buttons for the Job Objective for which you want to write an assessment.
6. Type your assessment into the Rating Official Assessment box.
7. Select the Return to Top of Page button to save the RO Assessment.
8. Repeat Steps 5-7 until each Job Objective assessment is complete.
44 September 2014

9. After you have typed an assessment for each Job Objective, select the Approvals & Acknowledgments tab.
10. In Step 1: Rating Official – Request or Document Higher Level Review, select the Start button.
11. Now follow Steps 18-29 starting on Pg 38 to complete the Interim Review.
45 September 2014

Create an Annual Appraisal for my Employee 1. Begin at the Performance Appraisal Application Main Page (see Pg 3).
2. Open an employee’s existing Performance Plan by selecting Update from the
Action drop down menu and select the Go button
3. Select the Annual Appraisal tab.
4. Select the Assessments and Ratings tab.
5. Select the Radio button next to each Job Objective to display the Job Objective.
46 September 2014
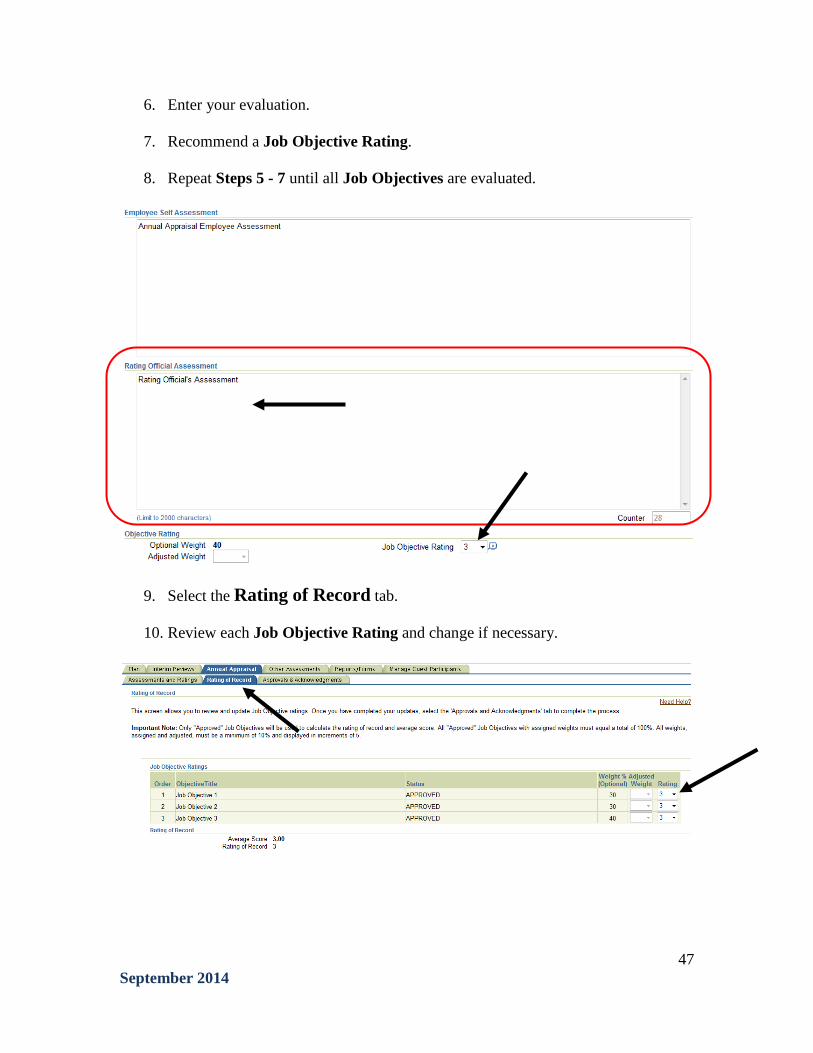
6. Enter your evaluation.
7. Recommend a Job Objective Rating.
8. Repeat Steps 5 - 7 until all Job Objectives are evaluated.
9. Select the Rating of Record tab.
10. Review each Job Objective Rating and change if necessary.
47 September 2014
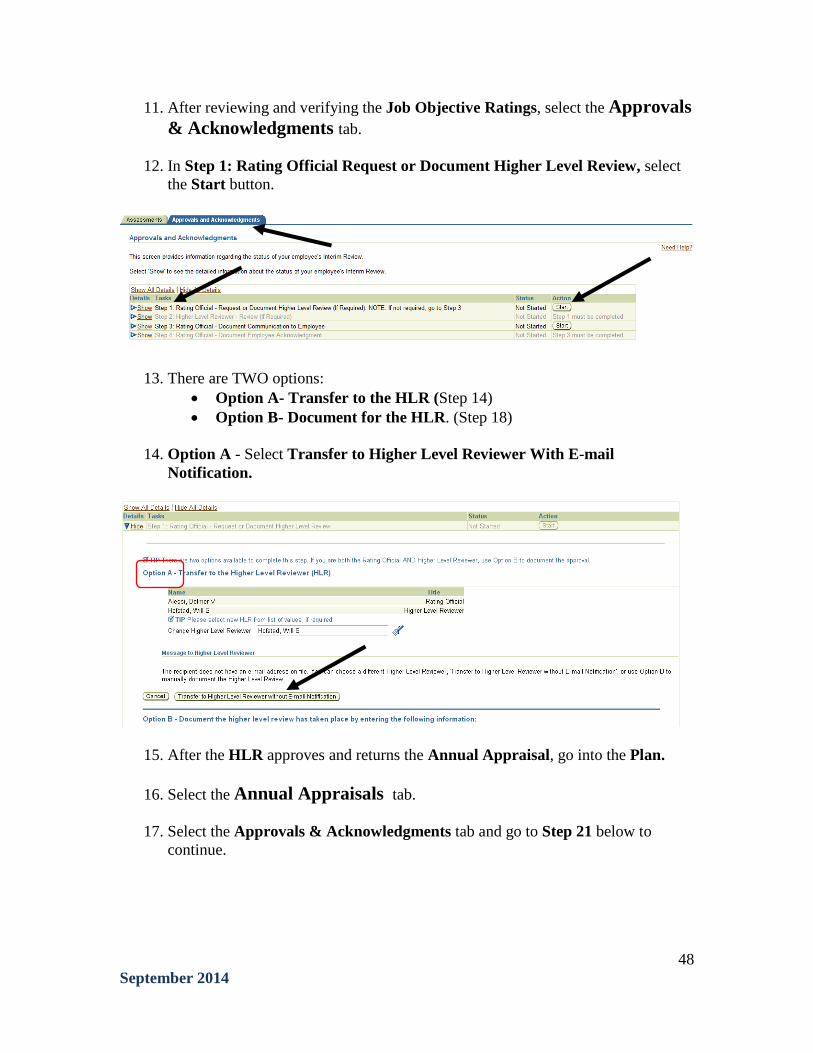
11. After reviewing and verifying the Job Objective Ratings, select the Approvals & Acknowledgments tab.
12. In Step 1: Rating Official Request or Document Higher Level Review, select
the Start button.
13. There are TWO options: • Option A- Transfer to the HLR (Step 14) • Option B- Document for the HLR. (Step 18)
14. Option A - Select Transfer to Higher Level Reviewer With E-mail
Notification.
15. After the HLR approves and returns the Annual Appraisal, go into the Plan.
16. Select the Annual Appraisals tab.
17. Select the Approvals & Acknowledgments tab and go to Step 21 below to continue.
48 September 2014

18. Option B – Document the HLR Approval Note: If you document for the HLR, their name still is signed to the Annual Appraisal,
therefore make sure you discuss this with the HLR before documenting for them.
19. Enter a Review Date and Method of Review.
20. Select the Save button.
21. In Step 3 – Rating Official Document Communication to Employee select the Start button.
22. Enter a Communication Date and Communication Method.
23. Select the Save button.
49 September 2014
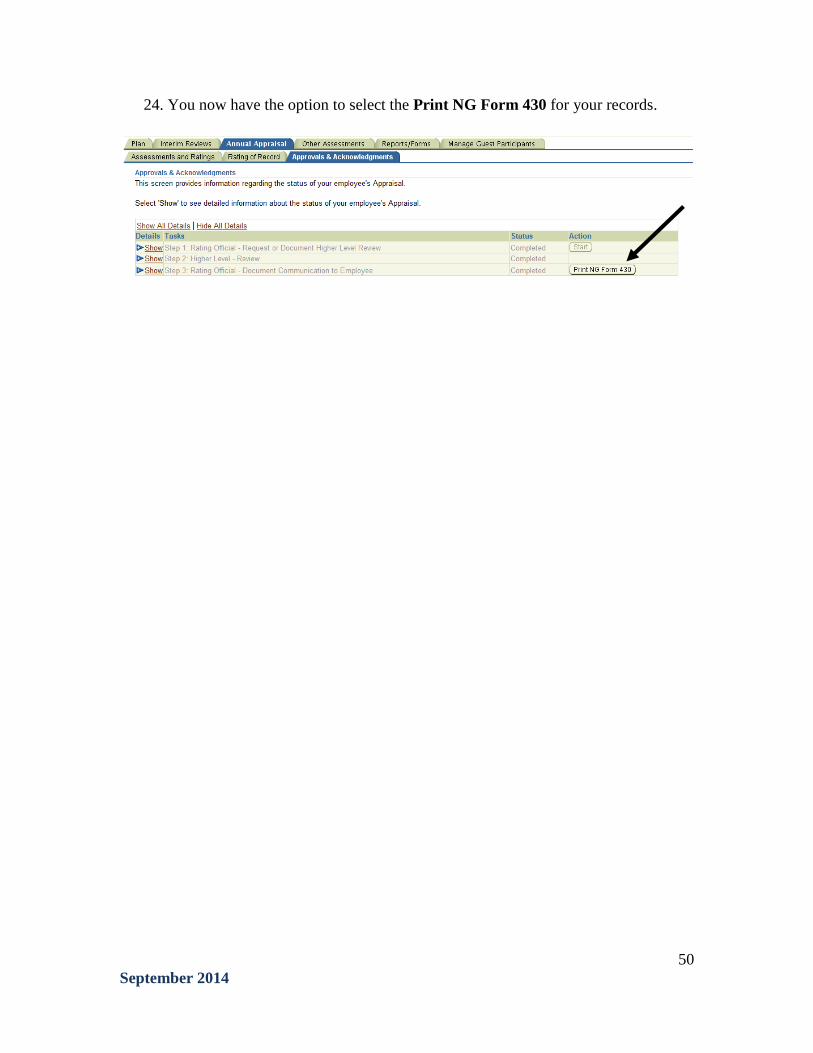
24. You now have the option to select the Print NG Form 430 for your records.
50 September 2014
Create a Closeout Assessment and Transfer the Plan for my Employee.
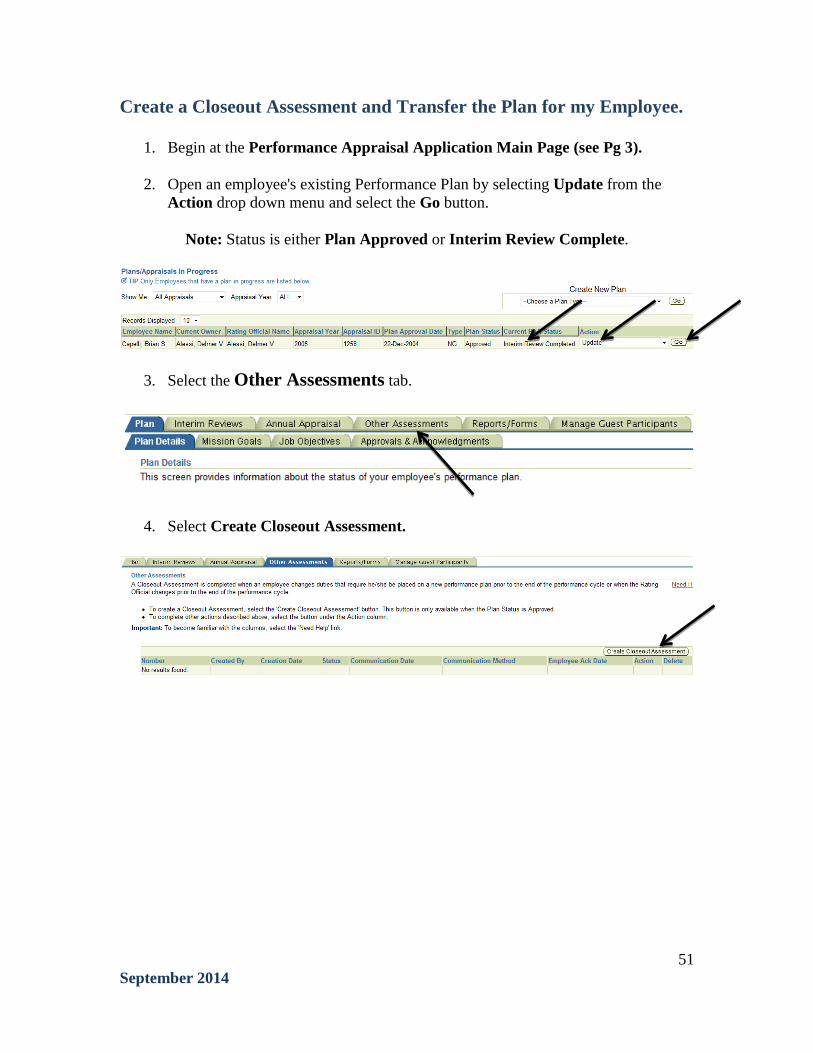
1. Begin at the Performance Appraisal Application Main Page (see Pg 3).
2. Open an employee's existing Performance Plan by selecting Update from the Action drop down menu and select the Go button.
Note: Status is either Plan Approved or Interim Review Complete.
3. Select the Other Assessments tab.
4. Select Create Closeout Assessment.
51 September 2014
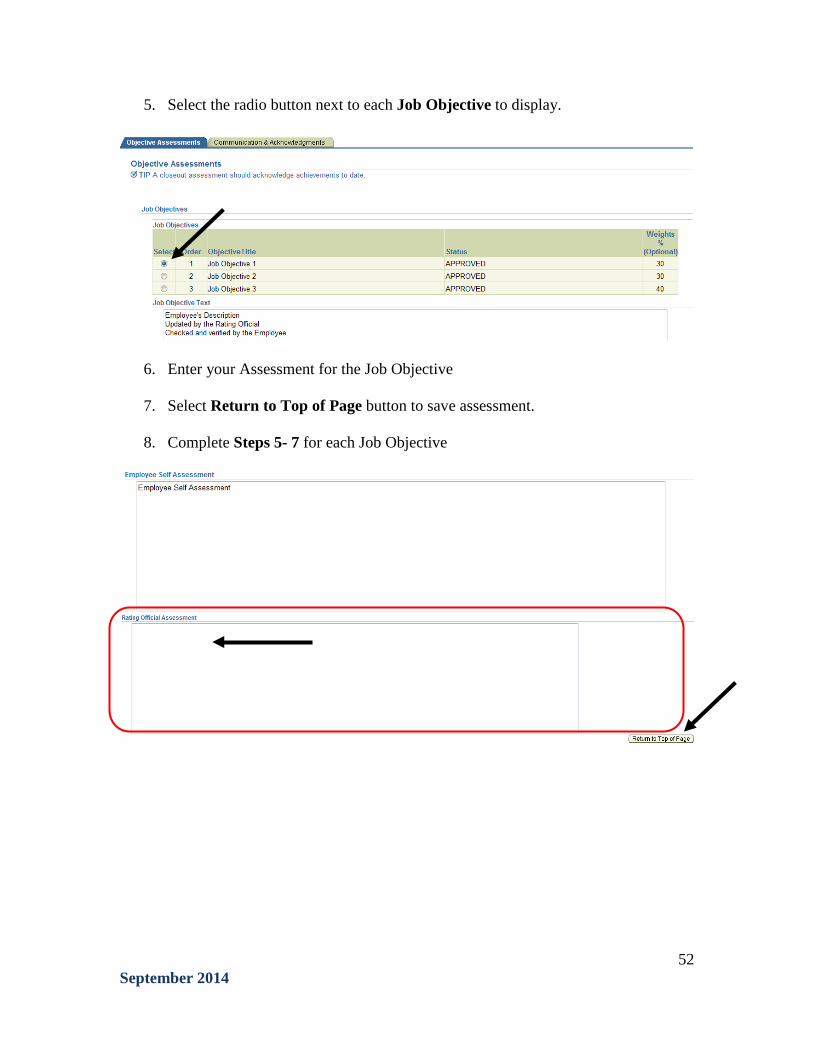
5. Select the radio button next to each Job Objective to display.
6. Enter your Assessment for the Job Objective
7. Select Return to Top of Page button to save assessment.
8. Complete Steps 5- 7 for each Job Objective
52 September 2014

9. Once you have completed an Assessment for each Job Objective, select the Communication & Acknowledgments tab.
10. In Step 1: Rating Official-Document Communication to Employee, select the Start button.
11. Select a Communication Date and Method.
12. Select Save and go to Step 2.
53 September 2014

13. In Step 2: Rating Official-Document Employee Acknowledgement, select the Start button.
14. Select Acknowledgment and Date then select the Save button.
15. Select Return to Main Page button.
54 September 2014
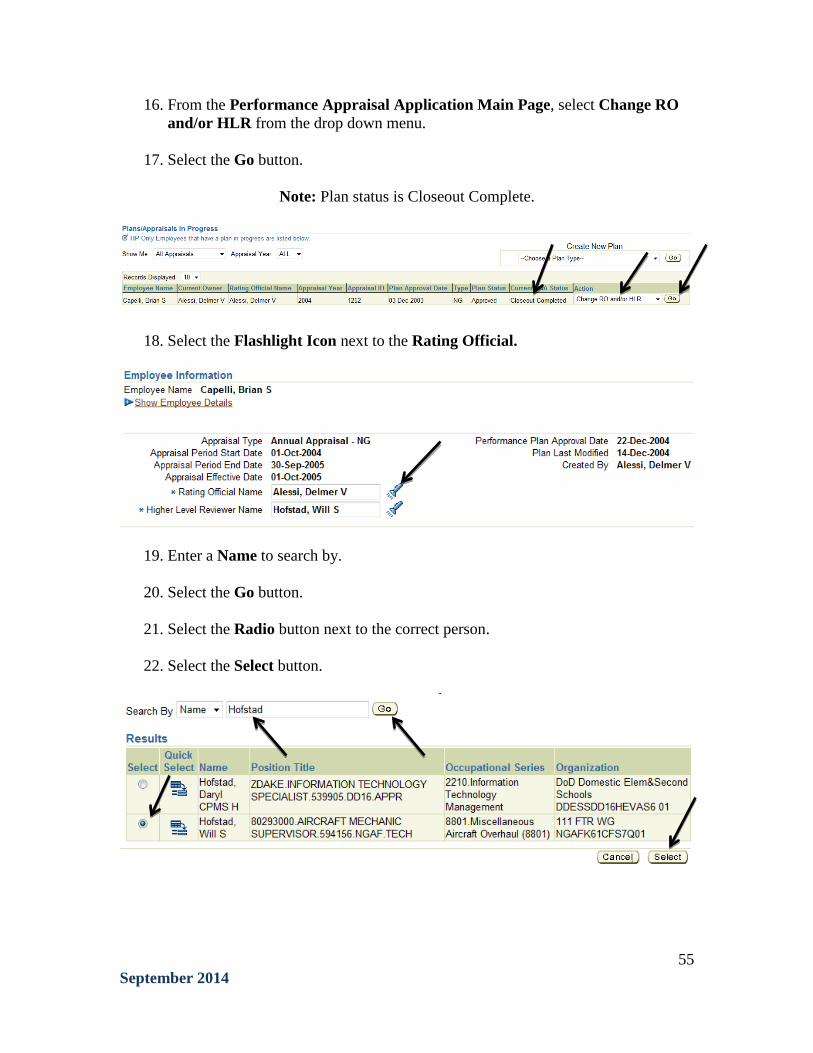
16. From the Performance Appraisal Application Main Page, select Change RO and/or HLR from the drop down menu.
17. Select the Go button.
Note: Plan status is Closeout Complete.
18. Select the Flashlight Icon next to the Rating Official.
19. Enter a Name to search by.
20. Select the Go button.
21. Select the Radio button next to the correct person.
22. Select the Select button.
55 September 2014

23. Redo Steps 18-25 for the HLR if needed. 24. After the correct Rating Official and HLR are displayed, select the Save and
Continue button.
25. The plan has been Closed Out and is Transferred to the new Rating Official and/or HLR.
56 September 2014
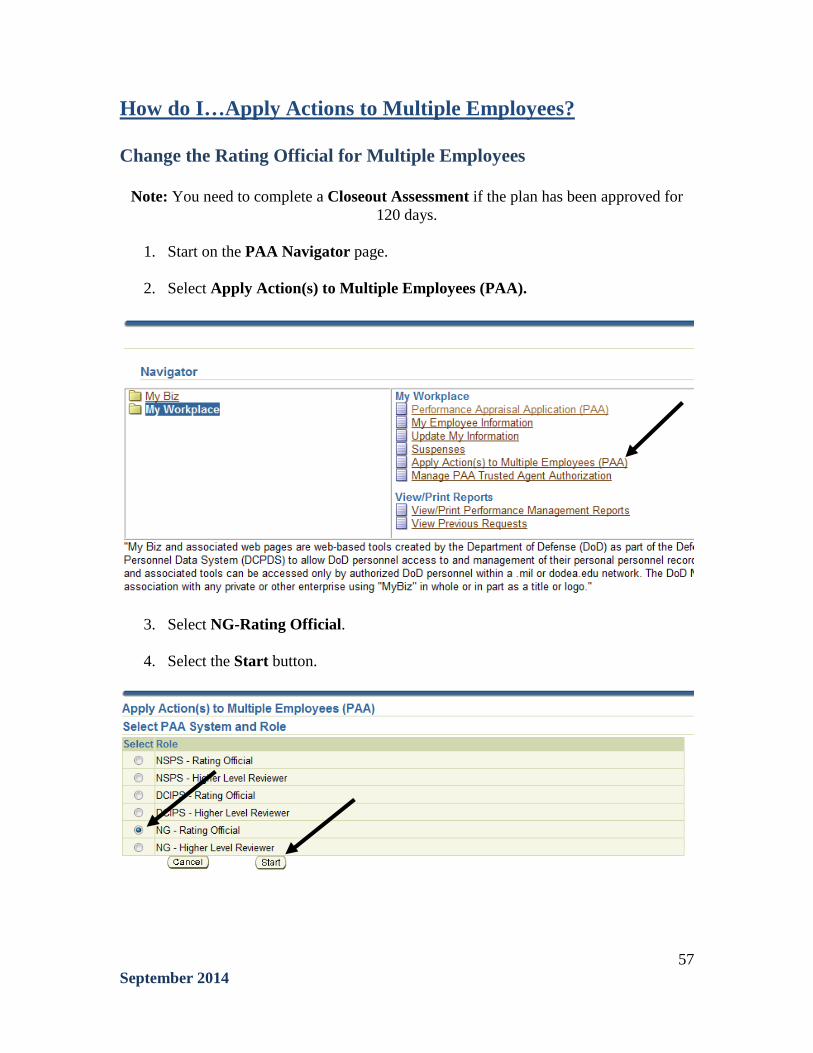
How do I…Apply Actions to Multiple Employees? Change the Rating Official for Multiple Employees
Note: You need to complete a Closeout Assessment if the plan has been approved for 120 days.
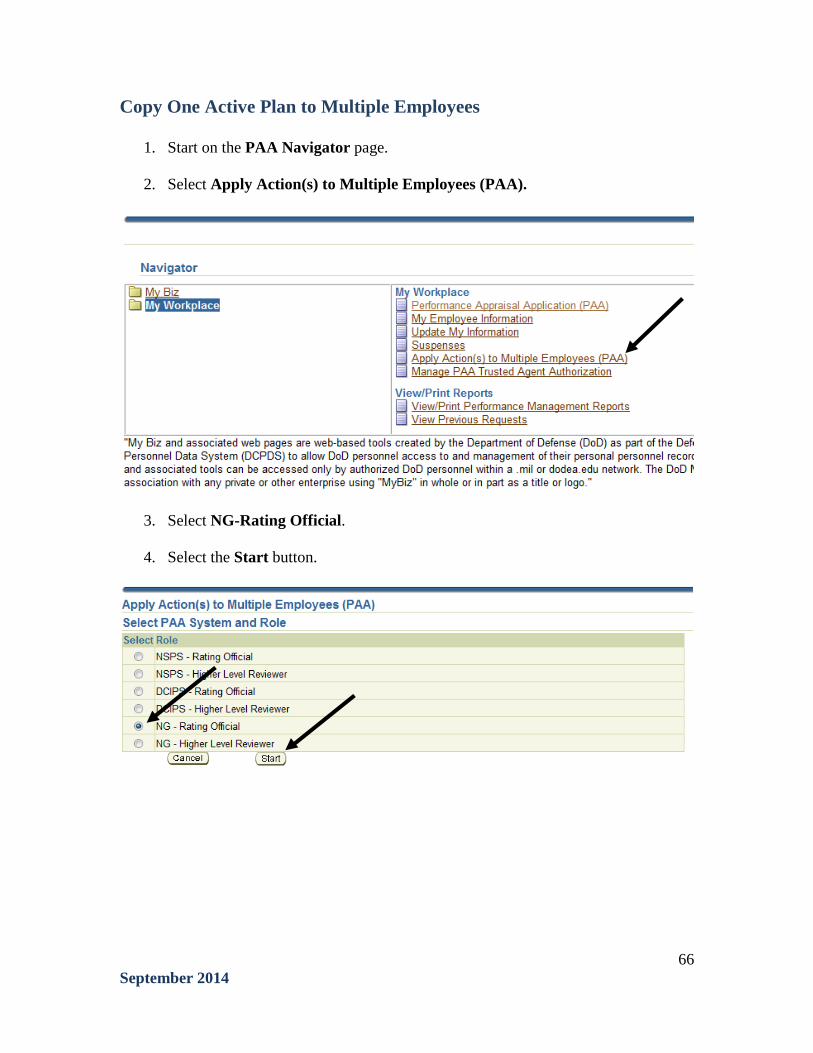
1. Start on the PAA Navigator page.
2. Select Apply Action(s) to Multiple Employees (PAA).
3. Select NG-Rating Official.
4. Select the Start button.
57 September 2014
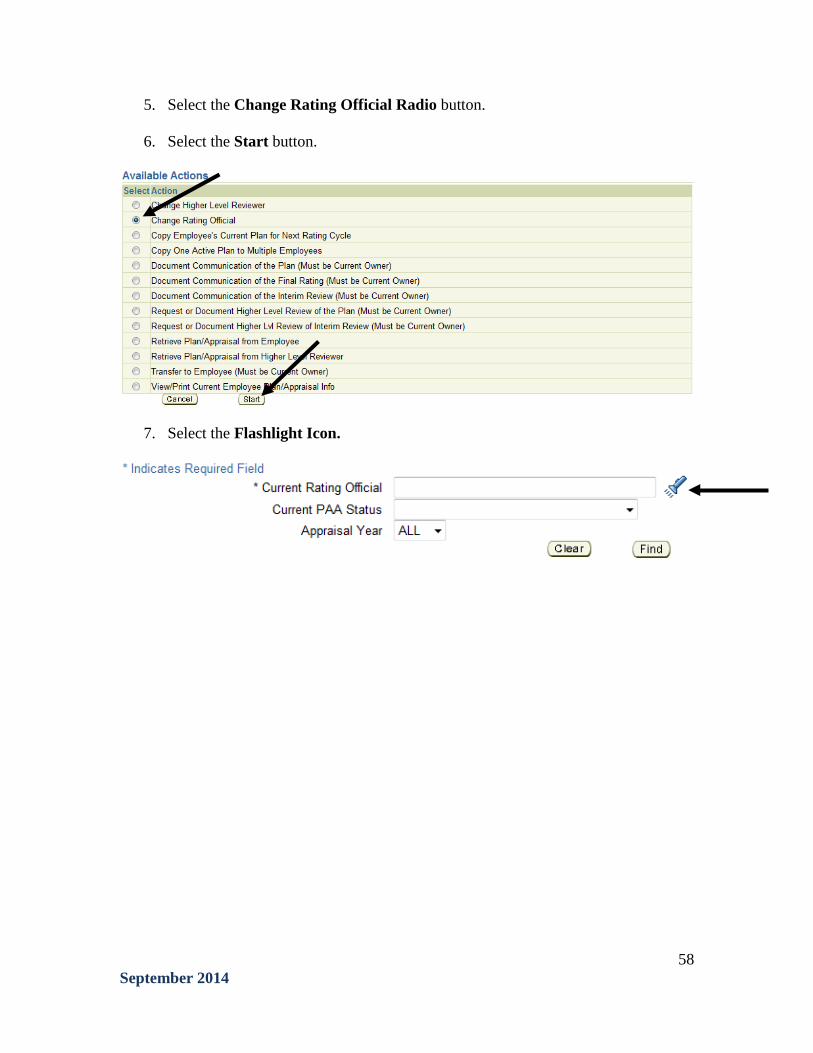
5. Select the Change Rating Official Radio button.
6. Select the Start button.
7. Select the Flashlight Icon.
58 September 2014
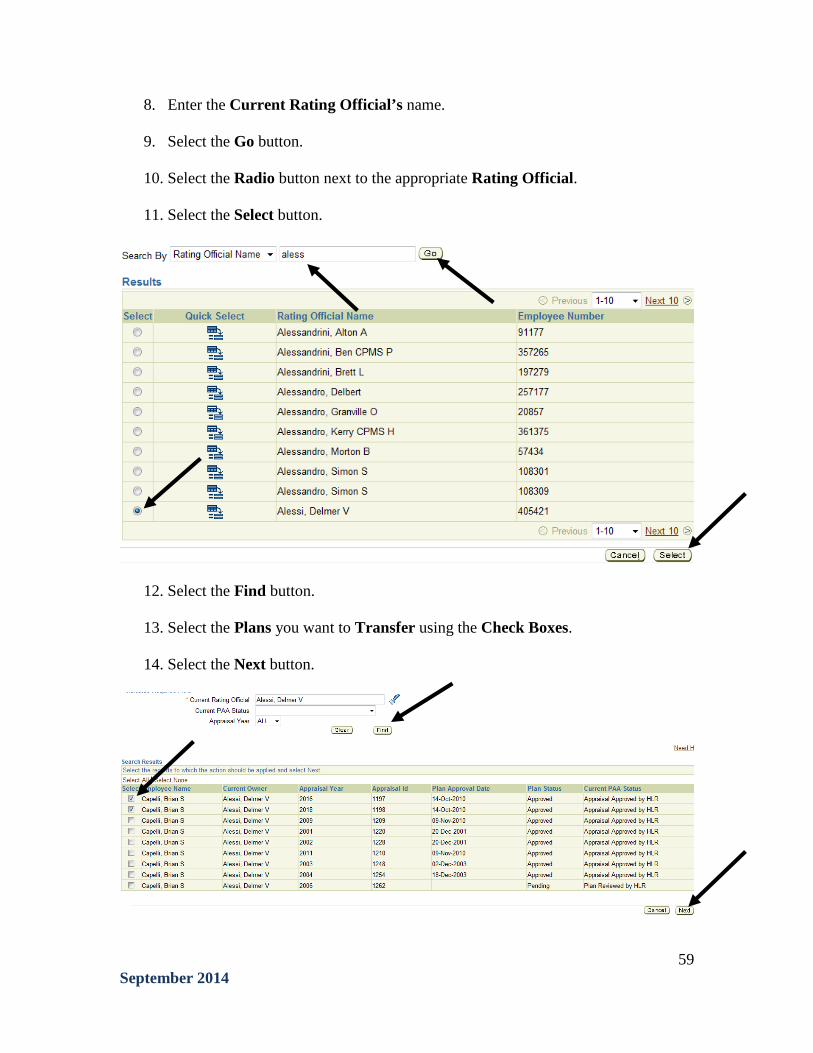
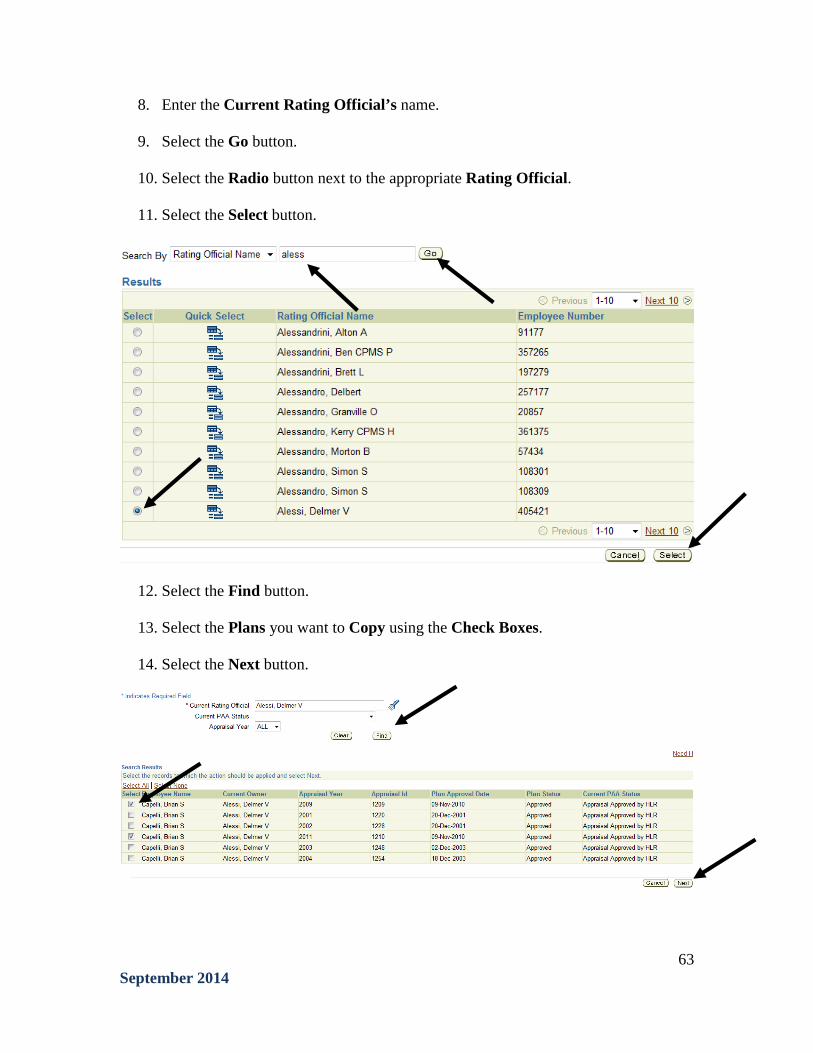
8. Enter the Current Rating Official’s name.
9. Select the Go button.
10. Select the Radio button next to the appropriate Rating Official.
11. Select the Select button.
12. Select the Find button.
13. Select the Plans you want to Transfer using the Check Boxes.
14. Select the Next button.
59 September 2014

15. Select the Flashlight Icon.
16. Enter the New Rating Official’s name.
17. Select the Go button.
18. Select the new Rating Official using the Radio button.
19. Select the Select button.
20. Select the Save button.
60 September 2014

Copy Employee’s Current Plan for Next Rating Cycle
1. Start on the PAA Navigator page.
2. Select Apply Action(s) to Multiple Employees (PAA).
3. Select NG-Rating Official.
4. Select the Start button.
61 September 2014
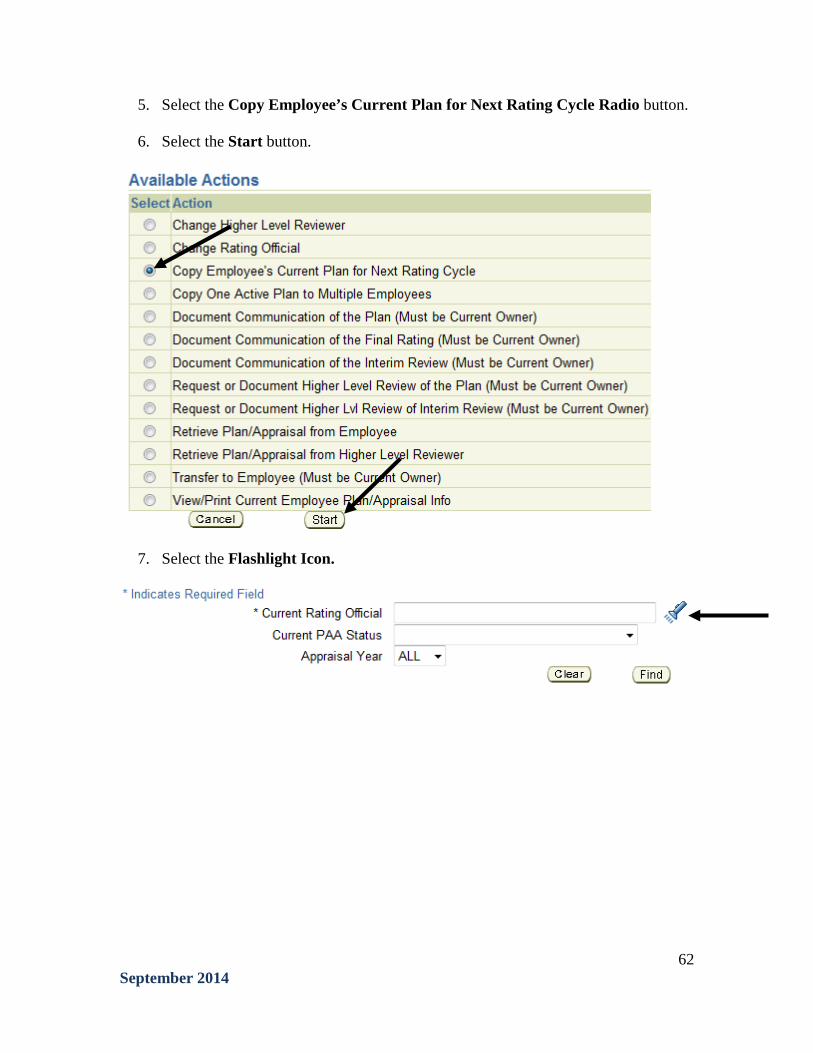
5. Select the Copy Employee’s Current Plan for Next Rating Cycle Radio button.
6. Select the Start button.
7. Select the Flashlight Icon.
62 September 2014
8. Enter the Current Rating Official’s name.
9. Select the Go button.
10. Select the Radio button next to the appropriate Rating Official.
11. Select the Select button.
12. Select the Find button.
13. Select the Plans you want to Copy using the Check Boxes.
14. Select the Next button.
63 September 2014
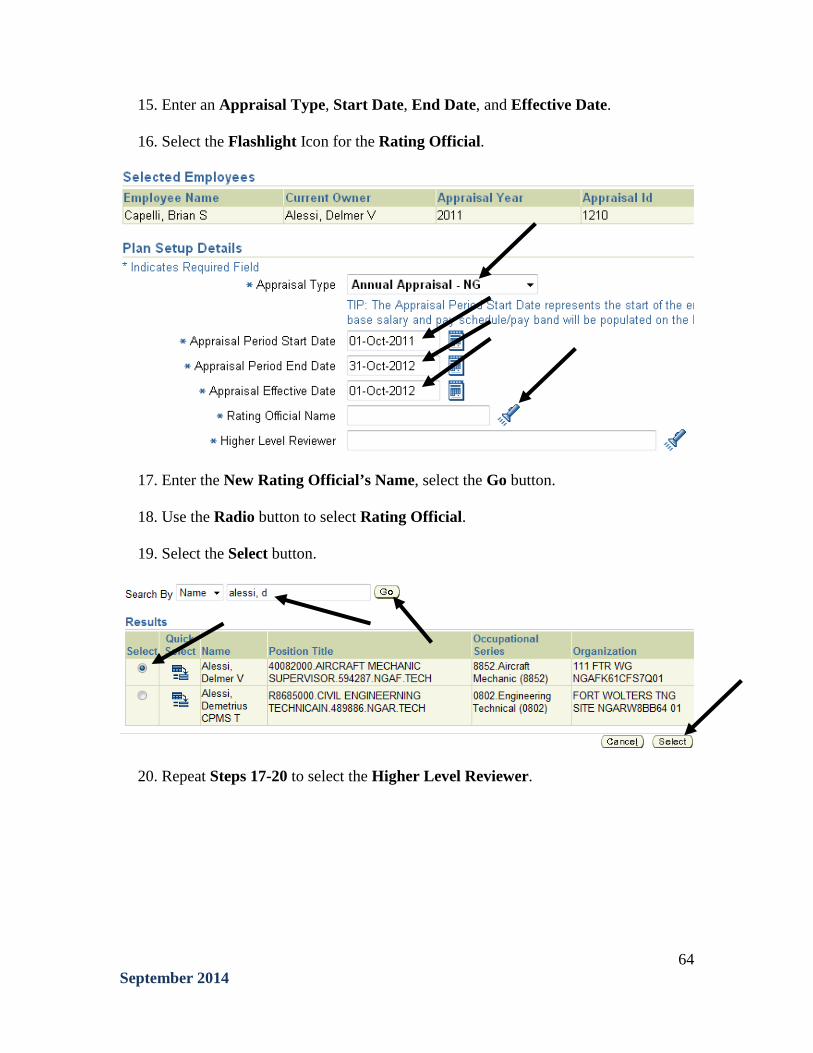
15. Enter an Appraisal Type, Start Date, End Date, and Effective Date.
16. Select the Flashlight Icon for the Rating Official.
17. Enter the New Rating Official’s Name, select the Go button.
18. Use the Radio button to select Rating Official.
19. Select the Select button.
20. Repeat Steps 17-20 to select the Higher Level Reviewer.
64 September 2014

21. After you have selected a HLR, select the Copy button.
22. Select either the Home or Logout buttons to exit.
23. Select the Return to Available Actions to continue in the program.
65 September 2014
Copy One Active Plan to Multiple Employees
1. Start on the PAA Navigator page.
2. Select Apply Action(s) to Multiple Employees (PAA).
3. Select NG-Rating Official.
4. Select the Start button.
66 September 2014

5. Select the Copy One Active Plan to Multiple Employees radio button.
6. Select the Start button.
7. Select the Employees that will be receiving the copied Plan using the Check Boxes.
8. Select the Next button.
9. Select the Flashlight Icon next to Employee Name. This is the Employee that has the plan you will be copying.
67
September 2014

10. Enter the Employee’s name you will be copying the Plan from.
11. Select the Go button.
12. Select the Radio button next to the Employee.
13. Select the Select button.
14. Select Apply Filter button.
15. Select the Radio button next to the Plan you will be copying.
16. Select the Next button.
17. Enter an Appraisal Type, Start Date, End Date, and Effective Date.
18. Select the Flashlight Icon next to Rating Official.
68 September 2014
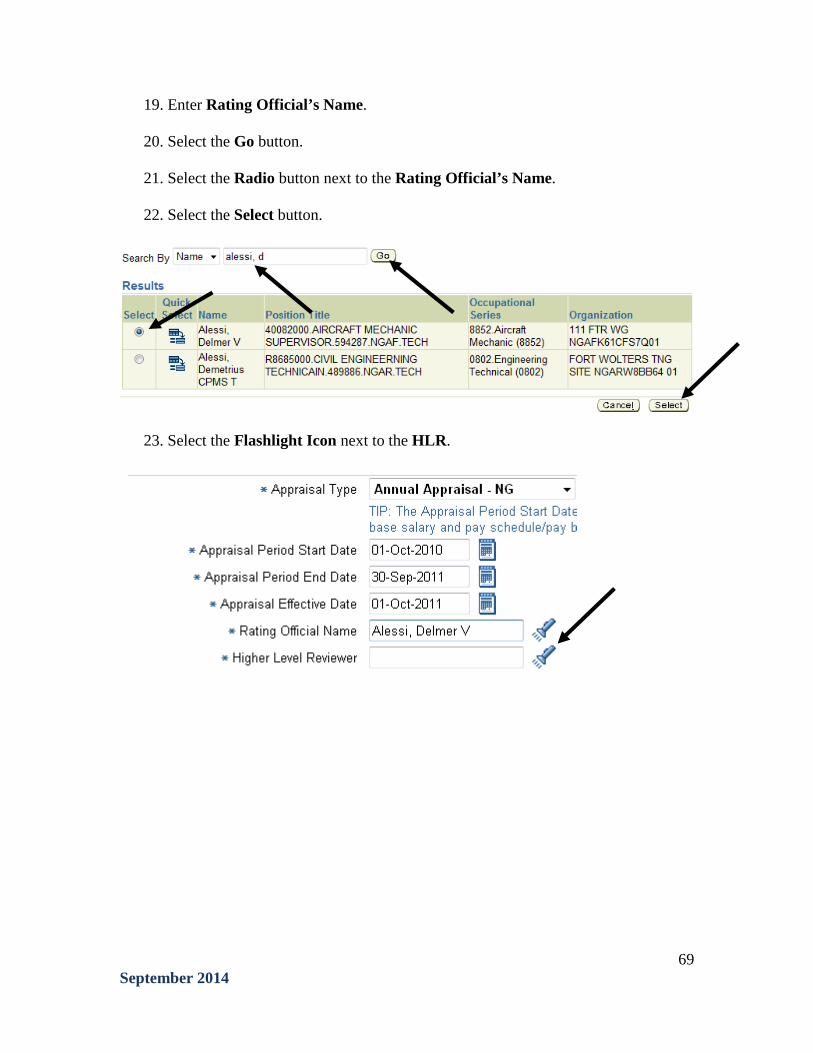
19. Enter Rating Official’s Name.
20. Select the Go button.
21. Select the Radio button next to the Rating Official’s Name.
22. Select the Select button.
23. Select the Flashlight Icon next to the HLR.
69 September 2014
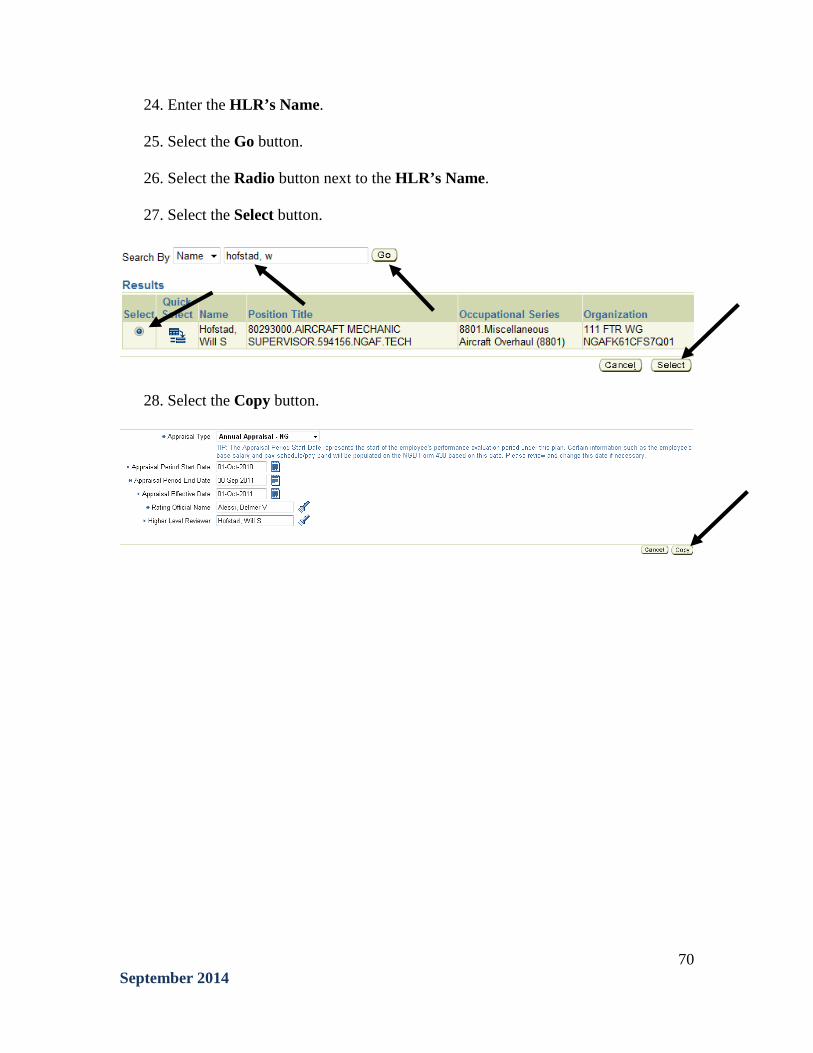
24. Enter the HLR’s Name.
25. Select the Go button.
26. Select the Radio button next to the HLR’s Name.
27. Select the Select button.
28. Select the Copy button.
70 September 2014

VIEW/PRINT CURRENT EMPLOYEE PLAN/APPRAISAL INFO
1. Start on the PAA Navigator page.
2. Select Apply Action(s) to Multiple Employees (PAA).
3. Select NG-Rating Official.
4. Select the Start button.
71 September 2014
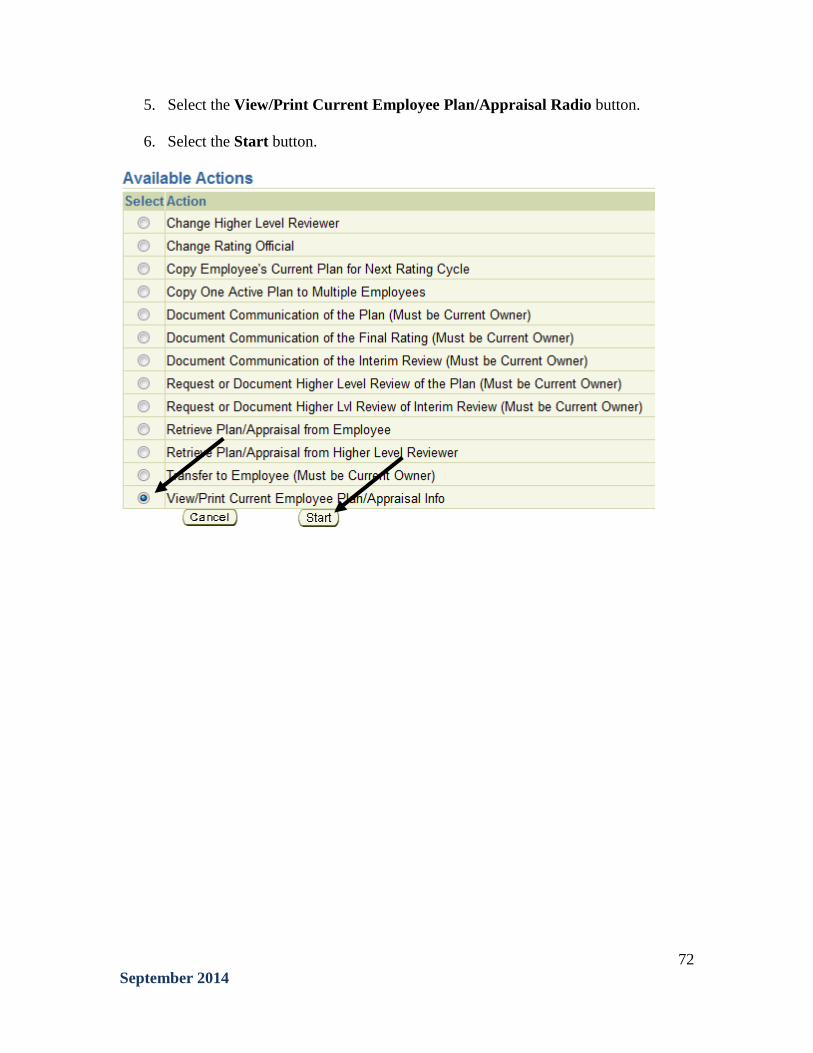
5. Select the View/Print Current Employee Plan/Appraisal Radio button.
6. Select the Start button.
72 September 2014

7. Select an Appraisal Year.
8. Select an Appraisal Status.
9. Choose a Report Orientation.
10. Make selections on which sections you wish to view.
11. Select the Submit Request button.
12. Select the Refresh button until the Phase displays Completed.
13. Select the Output icon to display the information requested.
14. Select either the Home or Logout buttons to exit.
73 September 2014

Change/Add and Re-Approve Job Objectives Note: During the PA Cycle, it may be necessary to Add/Change a Job Objective, it will
then need to be Re-Approved.
1. Begin at the Performance Appraisal Application Main Page (see Pg 3).
2. Open an employee's existing Performance Plan by selecting Update from the Action drop down and select the Go button.
3. Select the Job Objectives tab (Check to ensure you are in the Plan tab).
4. Select the +Show button to display Job Objectives.
5. Select the Update button to make changes to the Job Objective.
74 September 2014

6. Make appropriate changes to the Job Objective Title, Start Date, and/or Job Objective.
7. Select one of the following buttons.
• Select Save periodically to save the Job Objective and continue typing. • Select Save and Add Another Job Objective to save and begin writing
another Job Objective. • Select Save and Return to Job Objectives Tab when you are finished
entering Job Objectives.
8. After you have completed adding Job Objectives select Save and Return to Job Objectives Tab.
9. Select the Job Objective Re-Approvals tab.
10. In Step 1 – Rating Official – Request or Document Higher Level Review, select the Start button.
75 September 2014

11. There are TWO options: • Option A- Transfer to the HLR (Step 12) • Option B- Document for the HLR. (Step 14)
12. Option A - Select Transfer to Higher Level Reviewer With E-mail
Notification.
13. After the HLR approves and returns the Plan, go into the Plan to the Job Objective Re-Approvals tab and go to Step 17 below to continue.
14. Option B – Document the HLR Approval
Note: If you document for the HLR, their name is signed to the plan, therefore make sure you discuss this with the HLR before documenting for them.
15. Enter a Review Date and Method of Review.
16. Select the Save button.
76 September 2014
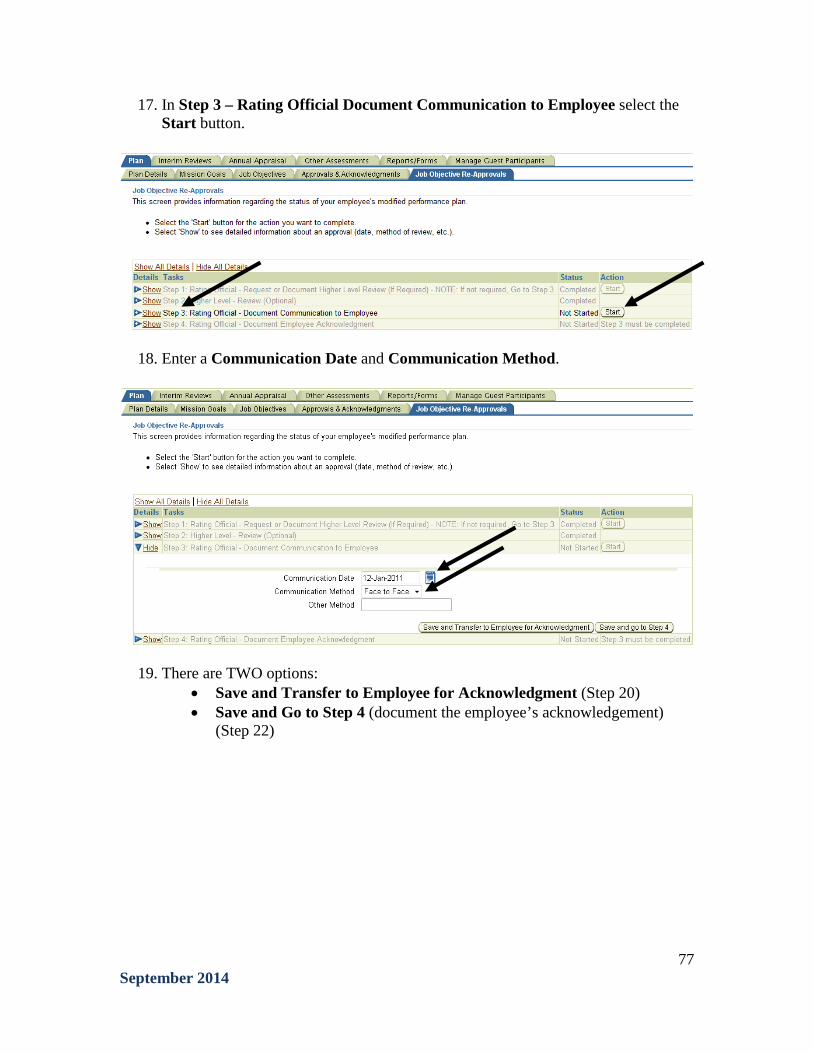
17. In Step 3 – Rating Official Document Communication to Employee select the Start button.
18. Enter a Communication Date and Communication Method.
19. There are TWO options: • Save and Transfer to Employee for Acknowledgment (Step 20) • Save and Go to Step 4 (document the employee’s acknowledgement)
(Step 22)
77 September 2014

20. Select Save and Transfer to Employee for Acknowledgement button.
21. Enter any additional details in the e-mail and select the Transfer to Employee with E-mail Notification button.
Note: Remind the Employee to go into the Plan and Acknowledge receipt of the plan.
*Employee will now be the current owner to continue the PA process*
22. Select Save and go to Step 4 button.
78 September 2014

23. In Step 4: Rating Official-Document Employee Acknowledgement, select the Start button.
24. Choose an Acknowledgement and Date and then select the Save button.
25. Select the Transfer to Employee button.
79 September 2014

26. Enter any additional information into the e-mail block, select the Transfer to the Employee with E-mail Notification button.
Note: Employee will now be the current owner to continue the PA process
80 September 2014