how does y-adapt create real world change? - climate centre curriculum... · youth action on...
TRANSCRIPT

Youth Action on Developing Adaptation Plans for Tomorrow
Y- adapt is a curriculum consisting of games and playful activities. This curriculum
helps youth to both understand climate change and to take practical action to adapt
to the changing climate in their community. These actions are local interventions
that reduce the impacts of severe weather-related events. The events can be rapid
onset events -such as heavy rain leading to flooding- or slow onset events - such
as extreme heat leading to drought. The curriculum is broken into seven sessions
each with a different goal.
How does Y-adapt create real world change?
• Knowledge and Sharing – Young people learn about climate change and will
be able to share this with their community. They will learn about how climate
change may impact their communities and about what they can do to reduce
this impact.
• Community – Young people work with their local community and also
become part of a global community of players.
• Action – Young people are motivated to work together and they learn how
they support their communities to implement adaptation solutions.

Acknowledgements
Y- adapt is the product of a collaboration between PLAN International, the Red Cross
Red Crescent Climate Centre, the Engagement Lab at Emerson College, the
Philippines Red Cross, and PLAN Ph i l ipp ines .
All Y-adapt materials are licensed with Creative Commons Attribution-
NonCommercial-ShareAlike 4.0 international License.
For further information on these materials please contact:

Table of Contents Printing Instructions.............................................. page 1
Session 1 - Introduction................................... pages 3 - 6
Duration: 45 – 60 minutes
Description: An introduction to Y-adapt ending in a creative competition where teams
present real-life examples of youth-led adaptations from around the world.
Real World Goals:
• Introduce adaptation examples that have been led by youth around the
world.
• Start thinking about how you can prepare for a changing climate in your
own community.
Session 2 - Climate Change Challenge............. pages 7 - 14
Duration: 60+ minutes
Description: A playful session that demonstrates weather compared to climate,
leading into an energetic game that teaches about the greenhouse effect, global
warming and climate change.
Real World Goals:
• Understand the difference between weather and climate.
• Understand the greenhouse effect and causes of human-induced climate
change.
• Explore how climate change may have already impacted the community.
Session 3 - Map the Hazard.......................... pages 15 - 26
Duration: 45 – 60 minutes
Description: Critical thinking challenge to map out extreme weather and its impacts.
Voting determines the most frequent and impactful hazards in the local community.
Real World Goals:
• Understand the difference between weather and climate.
• Explore the link between the greenhouse gas effect, global warming, climate
change, hazards and impacts with a focus on local context.
• Understand how more extreme weather can result in hazards and related
impacts in your community
• Determine which hazards most affect your community.

Session 4 - See the System...........................pages 27 - 39
Duration: 45 – 60 minutes
Description: A card game where teams of players compete to identify how people,
places, and things (resources) fit into systems. This is followed by an interactive
exercise in which youth systematically brainstorm the important resources in their
community.
Real World Goals:
• Understand how “people, places and things” (resources) fit into systems.
• Explore complexity and understand how different systems interact and
depend on one another.
• Understand that climate change will impact a range of systems.
Session 5 - Act to Adapt............................... pages 41 - 50
Duration: 30 – 45 minutes
Description: A giant board game that gets youth to prioritise important resources in
their community which are vulnerable to specific extreme weather events. Youth
must negotiate with each other to take individual or collective actions to protect their
community resources.
Real World Goals:
• Explore how extreme weather could affect your community.
• Explore how to you can act by yourself, or together with others.
• Experience how the impacts of climate change could become more intense.
Session 6 - Choose your Challenge...............pages 51 - 56
Duration: 45 – 60 minutes
Description: An interactive challenge in which youth must create an action plan to
make an adaptation in their community. Youth engage in a reality role-play
competition to act through challenges and solutions in implementing their plans,
before choosing the adaptation they will make in real life.
Real World Goals:
• To choose what to adapt in the community.
• To determine what resources and approaches can be used to adapt.
• To create a plan to make the adaptation.

Session 7 - Global Y-adapt Community........... pages 57 - 58
Duration: 30 – 45 minutes
Description: This is the final session of the Y-adapt curriculum. Youth will create an
Adaptation Card based on the real world adaptation that they made.
Real World Goals:
• To create an adaptation card and share it online with other youth around
the world.
FAQs.......................................................... pages 59 - 61

1
PRINTING INSTRUCTIONS
Session 1 - Introduction • Adaptation Cards - Print double sided.
Session 2 - Climate Change Challenge • Debrief Climate Cards - Print double sided.
Session 3 - Map the Hazard • Extreme Weather Events and Hazard Cards - Print single sided.
Session 4 - See the System • Resource Cards - Print double sided.
• Blank Resource Cards - Print double sided.
• Systems Cards - Print double sided.
Session 5 - Act to Adapt • You will need the Resource Cards from Session 4.
Session 6 - Choose your Challenge • Acting Challenge Card - Print single sided.
• Blank Adaptation Card - Print double sided.
Session 7 - Join the Global Y-adapt Community • Blank Adaptation Cards - Print double sided.

2

3
INTRODUCTION
Overview
Duration: 45 - 60 minutes
Description: An introduction to Y-adapt ending in a creative competition where teams
present existing adaptation examples.
Real World Goals:
• Introduce adaptation examples that have been led by youth around the
world.
• Start thinking about how you can prepare for a changing climate in your
own community.
Parts of Session 1
Activity A short role-play game that teaches youth about climate adaptations
that have been made all over the world
Debrief This section gives you important information that you should go
through with youth directly after finishing the activity
Materials 1. Printed Adaptation Cards – see resources
2. Writing / drawing materials e.g. paper, pens, pencils, markers,
chalk for all youth
Preparation
1. Prepare all the materials and familiarise yourself with this session.
2. Write the following on large piece of paper or chalkboard. Make
sure everyone can see it.
0-5 Realistic
0-5 Youth Led
0-5 Involvement
0-5 Creativity
Time! 3 minutes

4
Activity
Set Up
1. You need an area large enough for everyone to easily walk around.
2. The facilitator needs some material for score keeping, e.g. paper and pen.
3. If available, place paper and pens/pencils/markers in the room for the youth to use.
Introductions
1. Have players make a circle based on their birthday.
2. Mark a point in the room that will be January.
3. Ask players to organise themselves clockwise by month.
4. Explain that to win, players need to do this in 1 minute.
5. Once in a circle, check if the order is correct and congratulate players if they have won.
6. Tell everyone your name and your favourite place in your community.
7. Ask everyone to say their name and their favourite place in their community, in order of
birthdays. Start with January.

5
Adaptation Game
1. Read the following statement:
“Welcome in joining the global Y-adapt community! Y-adapt stands for Youth
action on developing adaptation plans for tomorrow. We will go through 7
interactive sessions where you will learn about how climate change may
affect your future. We will share inspiring examples of actions that youth
have taken in other communities around the world. At the end, you will try
to come up with creative and practical solutions to help your community deal
with the impacts of climate change. If you can do that, then not only will you
help your community, but we will also make one of these cards (show
example Adaptation Card) that will be used by other youth all over the
world!”
2. Give everyone one Adaptation Card.
3. Have everyone form groups of 2 or 3. Give the groups 2-3 minutes to:
A. Discuss all their individual Adaptation Cards.
B. Decide on one Adaptation Card that they find most inspiring.
4. Merge the smaller groups into 3 larger groups. Give the new groups roughly 5
minutes to:
A. Discuss the Adaptation Cards selected by each small group.
B. Decide on one Adaptation Card that they find most inspiring.
5. Mention that we will have an Adaptation Competition! Explain the rules:
A. The 3 large groups compete against each other to present their favourite
Adaptation Card.
B. The presentation can be a role-play, song, dance, poem, letter, drawing,
etc.
C. The Winning team is the team with the most points wins.
D. The presentations will be scored by the facilitator/small panel on 4 criteria,
each worth 0-5 points. Display these as a reminder:
0-5 Realistic - Did the presentation show a realistic action?
0-5 Youth led - Was it clearly youth led?
0-5 Involvement - Was everyone involved?
0-5 Creativity - How creative was the presentation?
E. Time limit for presentations: 3 minutes. 1 point lost for each minute over.
F. Everyone has 15-20 minutes to prepare before the competition starts.
6. Presentation Time! Each group presents their Adaptation Card.
7. Declare the winner/s and share 1 highlight from each presentation.

6
Debrief
1. Ask the youth to discuss the questions below with their neighbour (in pairs).
After each question, ask for a few examples to share with the whole group.
A. What is one key insight you have gained from the Adaptation Competition?
B. Out of all the Adaptation Cards you have seen, which one/s do you think
could be most relevant for your community?
2. Session 1 closing:
A. Congratulations, we have completed Session 1 of Y-adapt!
B. We have been introduced to climate change adaptation examples led by
youth around the world.
C. We have started to think about which actions could be relevant for your
community.
D. In our next Session, we will explore what climate change is.

7
CLIMATE CHANGE
Overview
Duration: 60+ minutes
Description: A playful activity that demonstrates weather compared to climate, and
which leads into an energetic game that teaches about the greenhouse effect, global
warming and climate change.
Real World Goals:
• Understand the difference between weather and climate.
• Understand the greenhouse effect and causes of human-induced climate
change.
• Explore how climate change may have already impacted the community.
Parts of Session 2
Activity 1 Activity 1 teaches the difference between climate and weather
Activity 2 Activity 2 is a short activity to fill out a seasonal calendar
Activity 3 Activity 3 is a game that teaches about the greenhouse effect
Debrief This is a mini lecture linked to the greenhouse gas game. It explains
the greenhouse effect, its link to extreme weather and what we might
experience in our community
Investigation This section gives instructions on what youth should do at home
before next week
Materials 1. Printed Debrief Climate Cards - see resources
2. 1 large piece of paper for the seasonal calendar
3. 80 pieces of scrap paper, roughly the size of your hand
4. String or chalk to mark out a large circle. You can also use any
other way to make a large circle. IMPORTANT: do not use any
materials the players could trip over (like stones)
5. Pieces of paper (A4), with 1 term on each: HOT; COLD; RAINY;
DRY; TODAY
6. 3 blank pieces of paper
7. 1 marker

8
Preparation
1. Prepare all the materials and familiarise yourself with this session.
2. Draw a seasonal calendar grid on large paper, see set-up for Activity 2.
Activity 1
Set Up
1. Place the 4 pieces of paper with - hot, cold, rainy & dry – on the floor with the
following setup. They should be far apart:
Answer with Your Feet
1. Explain to everyone the difference between weather and climate:
A. Weather - Refers to conditions like rain, temperature and wind at a
particular time and place.
B. Climate - What the weather is like over a long period of time (the “average”)
in a specific area (more than 30 years).

9
2. Ask everyone to think about what the weather is like right now. For example, is
the weather:
A. Hot or Cold
B. Rainy or Dry
3. Demonstrate that if they think the weather today is “hot and dry” then they
should stand in the middle of the HOT and DRY cards.
4. Ask everyone to answer with their feet what they think today’s weather is like.
They can stand anywhere between the 4 weather type cards.
5. Introduce the piece of paper with “TODAY”.” Place it on the ground in the
middle of where the youth are standing.
6. Ask everyone what the weather is normally like on their birthday. If it is normally
hot and rainy, they stand between the HOT and RAINY cards. Ask them to think
back as many birthdays as they can remember and to stand in the right spot.
7. Start with the current month. Check to see if everyone with a birthday that
month is standing in the same place. If not, ask them to discuss and agree on
what the weather is normally like that month.
8. Ask everyone to look at where the “TODAY” card is placed. Is it the same as
the normal weather that month, or different?
9. Ask everyone if they can remember what the difference is between weather and
climate.
10. Explain:
A. The card of “TODAY” shows the weather; what it is like outside right now.
B. Where all of you are standing represents the climate in your birthday
months. This is what the weather is normally like, going back as many
birthdays as you can remember.

10
Activity 2
Set Up
1. Everyone keeps standing on the HOT-COLD-DRY-RAINY grid to show what
the weather is normally like on their birthday.
2. Make a seasonal calendar on a large piece of paper and place on the floor in
the centre on the HOT-COLD-DRY-RAINY grid.
Seasonal Calendar
1. Based on the ‘answer with your feet’ exercise above, check if everyone with a
birthday in January is standing in the same place. If not, ask them to discuss
and agree on what the weather is normally like that month.
2. Ask a volunteer from the January birthday group to record their answer on the
seasonal calendar. Example: if they agree that it is normally cold and rainy in
January, the volunteer ticks () cold and rainy under January on the grid.

11
3. Repeat steps 1 and 2 for all the other months, continuing with February, March, etc.
4. Note: in case there are months where it is nobody’s birthday in that group, ask
the group to agree on the normal conditions for that month and then ask a
volunteer to tick the appropriate categories.
5. Mention: “We have now created a seasonal calendar that shows the climate in
your community. We will return to this calendar later to show the changes over
time.”
Activity 3
Set Up
1. Holding hands, have everyone form the largest circle that they can.
2. Release hands, and have everyone take two big steps back.
3. Mark a circle on the ground/floor around (just outside) the circle of people. If
indoors, use string or chalk. If outdoors on dirt, mark by having everyone drag
their feet to make a circle.
4. Create a Starting Line Area (for Heat Team) 3-5 meters (10 to 15 feet) from the
circle.
5. Place the scrap paper in 3 piles on the Starting Line for the Heat Team. You can use
something safe to hold them down or put them in bags/buckets. IMPORTANT: Do
not use objects that could hurt someone if they fell on them. Divide all the
players into two teams by having them count off A and B. Make a circle about
50 cm diameter and put it in the middle of the large circle. If possible, appoint a co-
facilitator to help with collection of cards during game play

12
How to Win
1. The team with the most cards at the end wins.
Game Play
1. Start by making Team A “Heat Team” and Team B “Greenhouse Gas Team”.
2. Tell everyone the starting line represents the sun, the large circle represents the
atmosphere and the small circle represents the Earth,
3. Greenhouse Gas Team should pick their two fastest players to start on the circle,
‘the atmosphere’.
A. For the entire game any player on the Greenhouse Gas Team MUST keep
both feet on the large circle, facing inwards and moving sideways.
B. The rest of the Greenhouse Gas Team waits on the side.
4. Heat Team starts behind the starting line, the ‘sun’.
5. Heat Team players:
A. Grab a card from one of the three piles behind the starting line.
B. Run into the large circle to touch the earth with one foot.
C. Return to the starting line area, and give that card to the (co)-facilitator.
D. Pick up a new card and repeat this as often as possible.
6. Greenhouse Gas Team must run around on the large circle and try to tag the Heat
Team.
A. Greenhouse Gas Team can only tag a heat player AFTER they have entered
the circle, touched the earth, and are trying to escape back out.
B. Greenhouse Gas Team MUST keep both feet on the circle at all times and
can move around the circle moving to the left, or to the right.

13
7. If a Heat player is tagged, they must give their card to the Greenhouse Gas Player
that tagged them and then sit out [see drawing].
8. Demonstration: ask one player of each team to demonstrate the rules and clarify
any questions.
9. At the start of game there are 2 Greenhouse Gas players.
10. The facilitator stands with the Greenhouse Gas Team. Every 10 seconds the
facilitator adds a Greenhouse Gas player to the circle. Note: be strict with timing.
11. The game ends after 3 minutes.
12. At the end of 3 minutes add up the TOTAL number of cards that the Heat Team
retrieved and gave to the facilitator. This is their score.
13. Heat cards that the Heat team gave to the Greenhouse Gas players should be
returned to the starting line. These do not count towards the scores.
14. Have the teams switch roles and play for 3 minutes again.
15. Whichever team gets the most cards wins.
Debrief
1. Ask all players:
A. What did you experience playing this game?
B. What do you think this game represents?
2. Have a mini lecture to explain what the game represents. Tell them you will ask
them to summarise at the end, so it is important they pay close attention. Read the
backs of the following cards while showing them to the youth. Cards 1 to 4 should
be read first, in order, to describe the Greenhouse Effect (card 1) being impacted
by human activities (card 2), leading to Global Warming (card 3), which impacts
our weather systems over time (card 4) and leads to Climate Change.

14
3. Ask if anyone can name any of the impacts of climate change. They can look
at the 7 images for ideas.
4. Distribute the cards to groups of players and ask them to discuss and pick 1
interesting fact from the back.
5. Discuss that impacts can be rapid onset events -such as heavy rain leading to
flooding- or slow onset events -such as extreme heat leading to drought.
6. Recap the sequence of the greenhouse effect to hazards going through each
picture consecutively and asking youth to describe.
7. Session 2 Closing:
A. Congratulations we have completed Session 2 of Y-adapt!
B. We have learned the difference between weather and climate.
C. We have explored how human activities releasing greenhouse gases lead
to climate change which exacerbates hazards around the world.
D. In the next session we will look at the impacts of climate change at the local
level in your community.
Investigation 1. Write the following 3 sentences on different pieces of A4 paper and post them next
to the seasonal calendar where everyone can see:
A. My birthday month is…
B. 30 years ago, was it colder or hotter or the same?
C. 30 years ago, was it wetter or drier or the same?
2. Participants need to go home and ask elders these questions. They should only
ask for their own birthday month. For example, if a participant was born in
January they would ask an elder, “Was January hotter or colder or the same, 30
years ago? Was January wetter or drier or the same, 30 years ago?

15
MAP THE HAZARD
Overview
Duration: 45 – 60 minutes
Description: Critical thinking challenge to map out extreme weather and its impacts.
Voting determines the most frequent and impactful hazards.
Real World Goals:
• Explore the link between the greenhouse effect, global warming, climate
change, hazards and impacts with a focus on local context.
• Understand how more extreme weather can result in hazards and related
impacts.
• Determine which hazards most affect your community.
Parts of Session 3
Activity 1 This game is intended to energise players and get them to think about
long-term impacts of sea-level rise.
Activity 2 This activity is a group brainstorming session on extreme
weather and hazards
Activity 3 This activity builds on the seasonal calendar from session to see
which changes we can observe in relation to 30 years ago and shows
what months we experience extreme weather or hazards.
Debrief This section gives you important information that you should go
through with the youth directly after finishing the activities.
Materials 1. Printed Extreme Weather Event and Hazard Card - see resources
2. 30 pieces of scrap paper, each roughly the size of your hand
3. 30 pieces of scrap paper, each roughly A4 size
4. Pens / pencils for all players
5. String or chalk to mark circles

16
Preparation
1. Prepare all the materials and familiarise yourself with this session.
2. You need the seasonal calendar from Session 2, Activity 2.
Activity 1
Sinking Island
1. Give every player a piece of scrap paper, approximately A4 size.
2. Divide players into groups of 4 - 6.
3. Players will lay the paper on the floor to make an “island”. The island can be any
shape but all the sheets must touch at least one other sheet.
4. Tell players that the paper symbolises an island which is affected by sea level rise.
5. Explain that sea level rise is making all the islands smaller. The last team to still be
staying on their island after the countdown wins.
6. Countdown from 10 to 1 and if all team members remain safely on the island by
not stepping off the paper, they proceed to the next round.
7. Before the next round, say that many years have passed and have all remaining
players step off the island. Remove 1 piece of paper from each island. Teams
CANNOT rearrange their island.
8. Players get back on their islands. Countdown from 10 to 1 again and, teams that
are safe can proceed to the next round.

17
9. Continue until there is one team left. If multiple teams get down to 1 piece of
paper and succeed, fold that piece of paper in half and play one last round.
10. Announce the winner.
18
Activity 2
For Facilitators
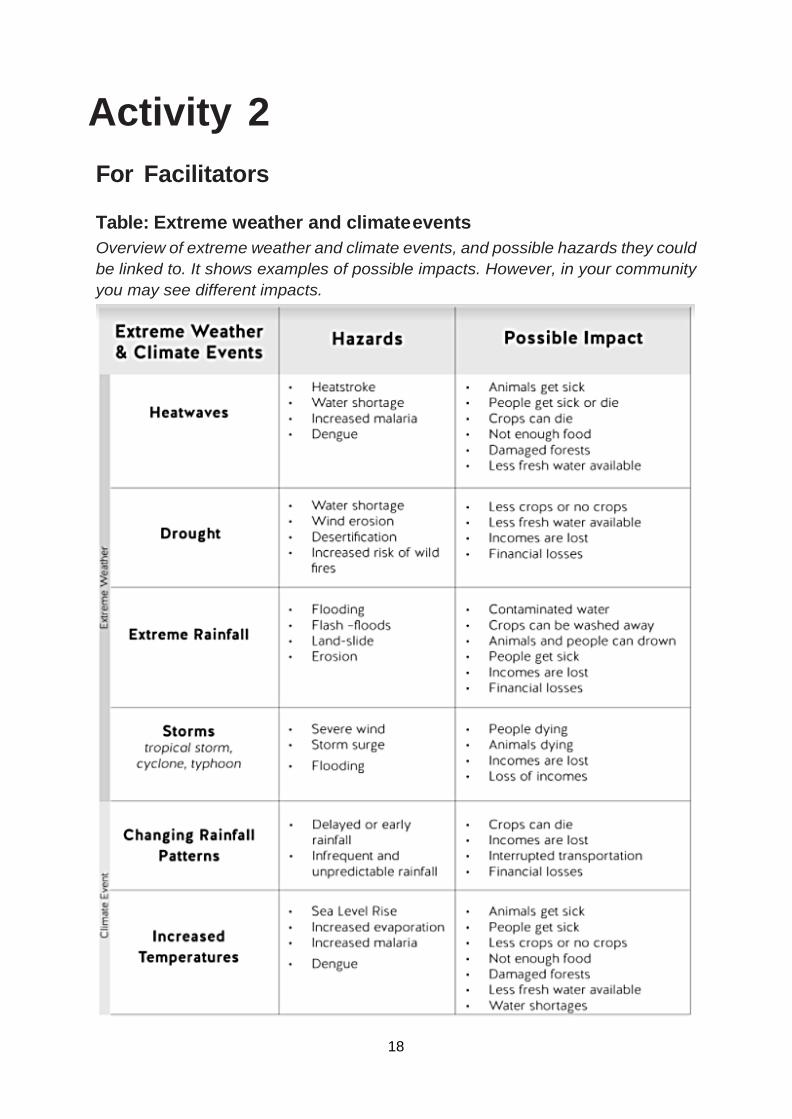
Table: Extreme weather and climate events
Overview of extreme weather and climate events, and possible hazards they could
be linked to. It shows examples of possible impacts. However, in your community
you may see different impacts.

19
Set Up
1. Place the premade Extreme Weather Event Cards and the Hazard Cards in two
separate piles.
2. Divide the youth into groups of 4 players.
Hazard Map
Part 1
1. Give groups 3 minutes to brainstorm extreme weather events and hazards that
impact their community. They should write their brainstorms on A4 paper.
2. Combine the smaller groups of 4 players into three groups total.
3. Each group should pick one extreme weather event or hazard from the
brainstorms.
4. Each group now has 5 minutes to create a series of three ‘freeze frames’
A. Using only their bodies and freezing in place, just like a photograph,
groups will need to show the beginning, middle and end of how the
extreme weather event or hazard impacts their community.
5. Each group presents their three freeze frame photographs. The facilitator can
introduce; ‘Freeze frame 1’, Freeze frame 2’, Freeze Frame 3’
6. The other groups should watch and try to guess what the hazard is and what each
freeze frame represents.
Freeze Frame 1 Freeze Frame 2 Freeze Frame 3

20
Part 2
1. Place all the Extreme Weather Event Cards in a circle facing outwards.
2. Ask everyone which Extreme Weather Event Cards are not applicable to their
community. Remove those cards.
3. Distribute all the Hazard Cards among the groups.
4. Give the groups a few minutes to place the Hazard Cards under the Extreme
Weather Event Cards that they are caused by. Example: you could place “Flood”
under “Heavy Rain,” as a flood could be a result of heavy rain.
5. The groups can discard all the Hazard Cards that do not relate to any Extreme
Weather Event Cards in their community.

21
Part 3
1. Explain that participants will now vote on the weather events and hazards that
have the biggest impacts in their community. This means they will be voting on
the premade Extreme Weather Event and Hazard Cards—not their own Impact
Cards.
2. Each participant should choose ONE extreme weather or hazard that happens
most often in their community. To show this they can draw a tick mark () on the
relevant Extreme Weather Event or Hazard card.
3. Each participant should also choose ONE extreme weather or hazard that has
a big impact in their community. To show this they can draw a star (*) on the
relevant card.
4. Select the 5 cards that have most marks on them, either tick marks, or stars.
5. Write these top 5 extreme weather events and hazards on a piece of paper.

22
Activity 3
Set Up
1. Use the seasonal calendar from Session 2, Activity 2.
2. Use the top five Extreme Weather Event and Hazard Cards, that the youth just
voted on.
Seasonal Calendar +
Add Hazards
1. Ask the youth to group themselves around the seasonal calendar in a semi-
circle in order of their birthday month.
2. Add the top 5 Extreme Weather Event and Hazard cards from Activity 2 to the
seasonal calendar.
3. Ask a participant to come up to the calendar to record the information.
4. Starting with the top ranked extreme weather and hazard. Ask the youth if the
extreme weather or hazard happens in January. They should shout ‘Yes!’ or
‘No!’
5. If ‘yes’, the participant recording the information should place a tick mark ()
under January.
6. If ‘no’, leave the space blank.
7. Continue with the other months, with youth responding ‘yes’ or ‘no’ and a
participant recording the information.
8. Repeat with the remaining four top hazards.

23
Review Investigation
1. Give youth 2 minutes to discuss with those in their birthday month their
homework findings (asking elders about weather in their birthday months). Those
who end up alone in a month should join the smallest neighbouring group.
2. Each ‘month’ should agree whether the average weather today is hotter, colder or
the same as well as wetter, drier or the same as compared to 30 years ago.
3. Going month by month, ask a participant from each month to add their findings
to the seasonal calendar.
4. Use up arrows, down arrows or equal marks to show how the current average
weather criteria (hot, cold, dry, wet) have developed over the last 30 years:
Increased:
Now more than 30
years ago
Decreased:
Now less than 30
years ago
= The same:
Similar now to 30
years ago
Future Change
1. Look at the maps of the globe (figure below) - showing how temperature and
rainfall is expected to change between now and the year 2100. The two sides
(left and right) show different effects depending on how well people all over the
world are able to reduce greenhouse gas emissions.
A. Point at the map where you live.
B. Discuss how much warmer it is likely to get – compare left and right maps to see
‘lowest’ and ‘highest’ expected change.
C. Discuss how much wetter or drier it is likely to get – compare left and right maps.
D. Ask a volunteer to draw or write the conclusion on the seasonal calendar.

24
Maps from IPCC 5th assessment report 2013 (page 20 in Summary for Policy Makers)
Taking action
1. Explain that there are two types of action we can take on climate change.
A. Actions to stop climate change from getting worse
B. Actions to deal with the effects of climate change.
2. Read the below explanation of actions to STOP climate change from getting worse.
ACTIONS TO STOP CLIMATE CHANGE FROM GETTING WORSE
We can act to stop climate change from getting worse. This means reducing the
human activities that release greenhouse gas into the atmosphere. This is called
Climate Change Mitigation.
To be really effective in stopping climate change, we need countries across the
world to reduce the amount of greenhouse gas they release. In 2016 almost all
countries pledged to take action under the Paris Agreement. The actions taken in
upcoming years will determine the amount of future warming and the extent of
climate change.

25
3. Ask if anyone can think of actions to STOP climate change from getting worse?
A. One example is for countries to stop using ‘fossil fuels’ such as coal and oil in
factories, industry and transport as they release greenhouse gases. Instead
they can use renewable energy sources such as solar, wind and hydropower.
B. Although no-one can stop climate change on their own, small changes can be
the start of much bigger change. Simple actions you can take are:
i. Reduce, Reuse, Recycle
ii. Use less heat, hot water and air-conditioning
iii. Drive less and drive smart
iv. Use energy-efficient products e.g. light bulbs
v. Use the “off” switch on your electrical appliances
vi. Plant a tree
vii. Encourage others to conserve energy
4. Read the below explanation of actions to DEAL WITH climate change impacts:
5. Ask if anyone can think of actions to DEAL WITH the climate change impacts. Think
back to session one and the ‘Adaptation Cards’ for examples.
A. One example, is a village in Niger where the dry season is becoming longer.
The youth started a community garden with vegetables that required little
water, to provide extra food in this period.
6. Mention that WIN-WIN ADAPTATIONS are adaptation actions that DEAL WITH
climate change impacts whilst also taking action to STOP climate change.
A. One example is youth clearing drains of rubbish to reduce the risk of flooding in their community (dealing with climate change), by providing rubbish bins and encouraging recycling (helping to stop climate change.)
7. Explain that Y-adapt focuses on adaptation actions to DEAL WITH climate change
impact, like the Adaptation Cards in Session 1. Whenever possible these should aim
to be Win-Win Adaptations. In the next sessions you will plan your own climate
change adaptation actions to deal with climate change in your community.
ACTIONS TO DEAL WITH CLIMATE CHANGE IMPACTS
We can take action to deal with climate change impacts. By adjusting and
adapting both the natural and human environment we can be better prepared for
climate change impacts. This is called Climate Change Adaptation.
Adaptation actions are very important today because we are already experiencing
climate change impacts across the world. Adaptation is also important for the
longer term because we know that climate change will continue into the future.

26
Debrief
1. Ask the youth to discuss the following questions with their neighbour. After each
question, ask for a few examples to share with the entire group.
A. Review the Weather, Hazards, and Impacts. What do you notice? Did
anything surprise you?
B. Review the seasonal calendar with the additional information. What do
you notice? Did anything surprise you?
2. Session 3 closing:
A. Congratulations, we have completed Session 3 of Y-adapt!
B. Remember how in Session 2, after the greenhouse gas game, we saw the
link between greenhouse gases, global warming, climate change and
extreme weather events across the world? In this session, we saw the links
between extreme weather and the impacts you could notice in your
community. The chain is getting complete!
C. We discussed that there are actions to stop climate change, and there are
actions to deal with climate change. In the next session we will start to plan
your own actions to deal with climate change in your community. We will
start by prioritising the important resources and thinking about how these
interact as systems.

27
SEE THE SYSTEM
Overview
Duration: 45 – 60 minutes
Description: A card game where teams of players compete to identify how people,
places, and things in their community fit into systems. This is followed by a brainstorm
session to start to map out what people, places, and things are important in your
community.
Real World Goals:
• Understand how “people, places and things” (resources) fit into systems.
• Explore complexity and understand how different systems interact and
depend on one another.
• Understand that climate change will impact a range of systems.
Parts of Session 4
Activity 1 This activity is a game in which players explore how people, places
and things fit into systems
Activity 2 This activity is a brainstorm session to identify important people,
places and things in your community
Debrief This section gives you important information that you should go
through directly after finishing the activities
Materials 1. Printed Resource Cards, see resources
2. Printed System Cards, see resources
3. Printed Blank Resource Cards, see resources
4. 7 large areas to list information. This could be a chalkboard or
large pieces of paper
5. Pens, pencils or markers for all youth
Preparation
1. Prepare all the materials and familiarise yourself with this session.

28
Activity 1 Introduction
“In the sessions so far we have looked at the greenhouse effect, leading to global
warming, leading to climate change and affecting extreme weather and hazards
across the world. We then looked at which hazards impact your community the
most. The end objective of these sessions is to come up with actions we can take to
reduce the impacts of these hazards in your community and deal with climate
change. However, communities are often more complex than we initially think.
Communities have many different resources that have different roles for different
groups of people. At the same time roles can cut across different resources,
showing many interlinkages and connections in a community. This can be called
complexity. In this session, we will play a game to explore complexity in an example
community.”
Set Up
1. Divide players into teams with 4 or 5 players. Each game should have between
3 - 6 teams playing.
2. Each team gets a set of three Systems Cards.
A. Two “Regular” cards.
B. One “Double points” card.
C. NOTE: Unless you are playing the advanced version of this game (see
Advanced Version below) make sure that you remove the “Stop Others
From Scoring” cards.
Remove unless
playing advanced
version

29
Explaining Systems
1. Have each team come up with a team name and write it on the front of all their
cards (the side that says Systems).
2. Use the garden card as your example. Ask players what are the benefits or roles
of a garden for a community. Do the same for the mobile phone card.
3. Explain that we have identified 5 categories to talk about the benefits or the roles
of the cards.
4. Go through each of the 5 categories. Read them out and provide an example for
each category.
A. People: Do people become smarter, more mobile, or healthier because
of this?
B. Social: Is this a group, organisation, or person that helps your community?
Or does this help people interact with each other?
C. Structure: Is this a man-made landscape or construction?
D. Nature: Is this part of the natural environment?
E. Livelihood: Does this provide money, income, food or jobs?
5. Looking at the garden card, we see that bubbles for Structure, Nature, and
Livelihood are filled in. This is because we think garden fits into those systems.
Explain to the group how, referring to the definitions.
A. Structure: a garden is a man-made landscape.
B. Nature: vegetables and fruit are all natural (not man-made) elements.
C. Livelihood: a garden could provide food, e.g. if you plant your own
tomatoes.

30
6. Ask if there are any questions.
7. Explain that on these cards not all bubbles are filled in that need to be.
8. Ask the group if they think People and/or Social should be filled in on the back
of the garden card. If yes, have them make an argument of why. If no, ask if a
garden improves people’s health. If someone has a good reason why gardens
improve peoples’ health, you could also select “People.”
9. Show that the systems on the backs of the Resource Cards are the same as on
the backs of the System cards.

31
Explaining How to Play
1. Place the three following Resource Cards picture side up for everyone to see.
2. Have the teams take one of the “Regular” System Cards.
3. Give teams a few minutes to do the following:
A. As a team, pick one of the three cards that are laid out (e.g. Agricultural
Fields, Boat, or Factory).
B. As a team, think about whether this card fits into People, Social, Structure,
Nature, and/or Livelihood.
C. If you think that the card fits into a system, fill in the system bubble on the
Regular Card.

32
4. Teams will all send 1 player to place their example card face down on the card of
their choice.
5. Show how scoring will work in the game:
A. Flip the cards over.
B. For each correct bubble filled in a team earns 1 point.
C. If a team has an incorrect bubble filled in then they can argue for why that
card fits.
D. If a team cannot argue why their bubble fits they do not get any points.
E. See examples below.

33
EXAMPLE 1:
Team Apples played on Factory. They filled in Social, Structure, and Livelihood.
Factory has Social, Structure, and Livelihood. Team apples would receive 3 points.
EXAMPLE 2:
Team Bananas played on Boat. They filled in Structure and Livelihood. Boat has
People, Structure, and Livelihood filled in. Team Bananas would receive 2 points.
EXAMPLE 3:
Team Oranges played on Agricultural Fields. They filled in People, Structure, Nature,
and Livelihood. Agricultural Fields only has Structure, Nature, and Livelihood filled
in. Team Oranges now must argue why Agricultural Fields fits into People
34
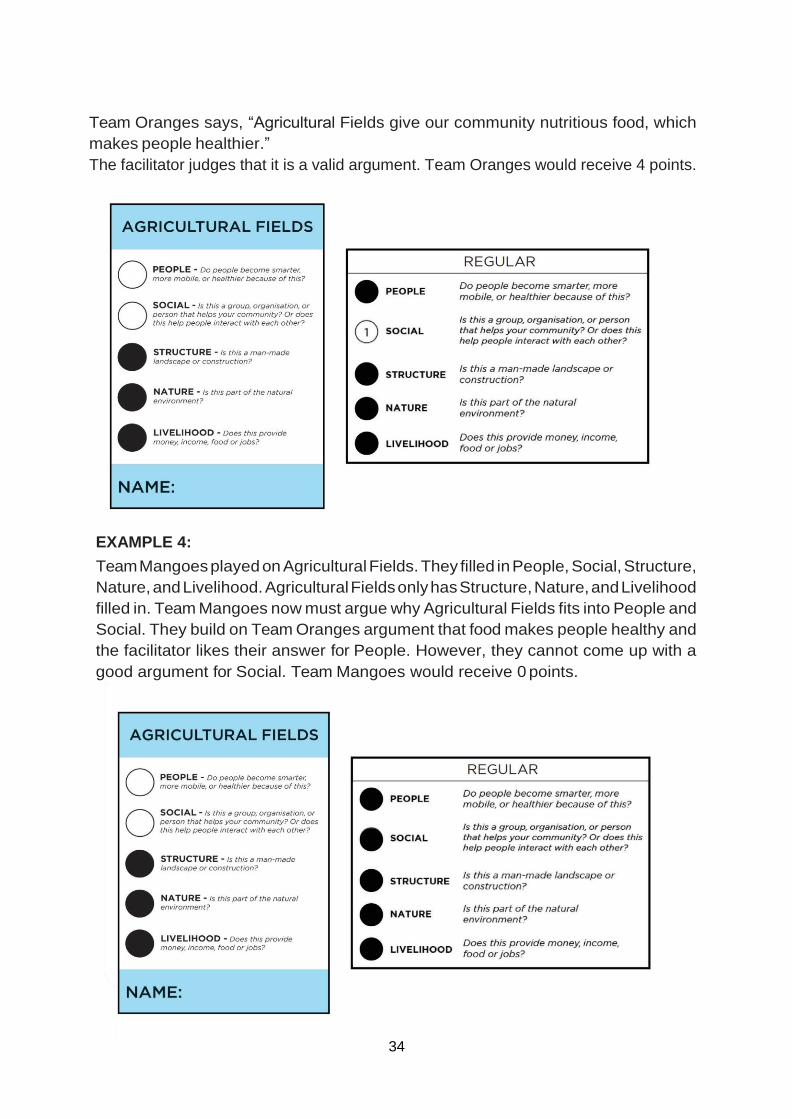
Team Oranges says, “Agricultural Fields give our community nutritious food, which
makes people healthier.”
The facilitator judges that it is a valid argument. Team Oranges would receive 4 points.
EXAMPLE 4:
Team Mangoes played on Agricultural Fields. They filled in People, Social, Structure,
Nature, and Livelihood. Agricultural Fields only has Structure, Nature, and Livelihood
filled in. Team Mangoes now must argue why Agricultural Fields fits into People and
Social. They build on Team Oranges argument that food makes people healthy and
the facilitator likes their answer for People. However, they cannot come up with a
good argument for Social. Team Mangoes would receive 0 points.

35
Explaining Other Rules
Make sure to go through the example round before explaining these.
1. The game lasts for 3 rounds. The round you just did as an example
counts as the first round.
2. Once a card is played, the facilitator will keep that card.
3. Teams can play any of their available cards that they want to.
4. Double Points will give the team double points if they are correct.
Advanced Version
1. If you feel comfortable facilitating this game you can add the card
“Stop Others From Scoring.”
2. If you use this card play 4 rounds instead of 3. Teams will use each
card one time (e.g. Regular, Regular, Double Points, Stop Others
From Scoring).
3. Stop Others From Scoring keeps other teams that played on the
same card as your team from scoring. This only affects teams that
play on the same card (e.g. Agricultural Fields in the examples
above).
A. Stop Others From Scoring gives the team that plays the card points.
B. Stop Others From Scoring only stops others if the team that
played it earns points from it.
C. If two teams play Stop Others From Scoring on the same
card and both are correct with their systems selection, then
no one scores any points on that card.
Activity 2
Preparation
1. You will need one Blank Resource Card for each student.
2. You will need one pen for each student.
3. You will need large pieces of paper or chalk boards or something
else to write on (e.g. chalk on concrete).

36
Set Up
1. Break the students into 7 groups.
2. Set up 7 large areas to write (either paper or chalk).
3. Title each area as follows:
A. Organisations
a. Example: Local Village Council or City Council
B. Jobs / Work
a. Example: Farmer, Teacher
C. Structures
a. Example: Road, Bridge
D. Mobility / Communication
a. Example: Bicycle, Cell Tower
E. Knowledge
a. Example: School
F. Health
a. Example: Clinic, Doctor
G. Nature
a. Example: Trees, River
Listing Session
1. Go through each title and example.
2. Have each group start at a different title.
3. Each group will have 1-2 minutes to write down people, places, and things in
THEIR community that they think fit into that category.
4. After 1-2 minutes, yell “ROTATE”. Groups will rotate clockwise to the next category
where they will read what is listed and add to it.
5. Continue until all groups have gone to each category once (six rotations).
Each group takes the paper for their category and lays them out on the floor, to create
a line of the seven categories.
Ranking Session
1. Students will no longer work as groups.
2. Give everyone a pen.
3. Students will have 5-10 minutes to do the following:
A. Each student gets to place tick marks (√√√) next to what they think is
most important on the lists.
B. They can place 3 tick marks and no more across all the resources.

37
C. They can place them however they want, including:
a. If they think a resource is very important they could give it 3 marks.
b. They could give 1 mark to 3 different resources.
c. They could give 1 mark to 1 resource and 2 marks to another
resource.
Example Lists
Here are some pictures of example lists.

38
List to Resource Card Session
1. Give each student a Blank Resource Card.
2. Have students write their name on the card (both sides).
3. Make sure each student has a pen.
4. Students will now choose one person/place/thing from the lists for their card by
doing the following:
A. Students can pick anything that has a check mark next to it.
B. Once they pick something they will cross it out and write its name on
their card.
C. If something is already crossed out they cannot choose it.
5. Students will now draw what they chose on the front of the card. On the back
they should fill in the bubbles for the systems that it belongs to. This step could
be done at home if the students will bring the cards back.
39
Debrief 1. Ask the youth to discuss the following questions with their neighbour (in pairs).
After each question, ask a few groups for examples to share with everyone.
A. What did you learn in this game about resources in a community?
B. What was your strategy in this game?
2. Session 4 closing:
A. Congratulations, we have completed Session 4 of Y-adapt!
B. We have seen how important people, places and things in a community can
be in many systems and that they are linked. Changes in one can cause
changes in the other. For example: if a garden is flooded, imagine that not
only the structure (like fence) or nature (plants) are impacted, but also
people may have less food to eat (livelihood). If the flood also affects other
ways of getting food (field, livestock), this can be a big problem.
C. These linkages are also important when you design your Adaptation at
the end to deal with the impacts of extreme weather in your community.
It is important to think about how one action will influence other systems
in your community.
D. In our next session, we will play a game with the resource cards you have
created. In the game, you’ll think about how your resources are
vulnerable to extreme weather and hazards in your community and how
you can act to reduce the impacts. Let’s see if you are ready to deal with
the hazards!

40
41
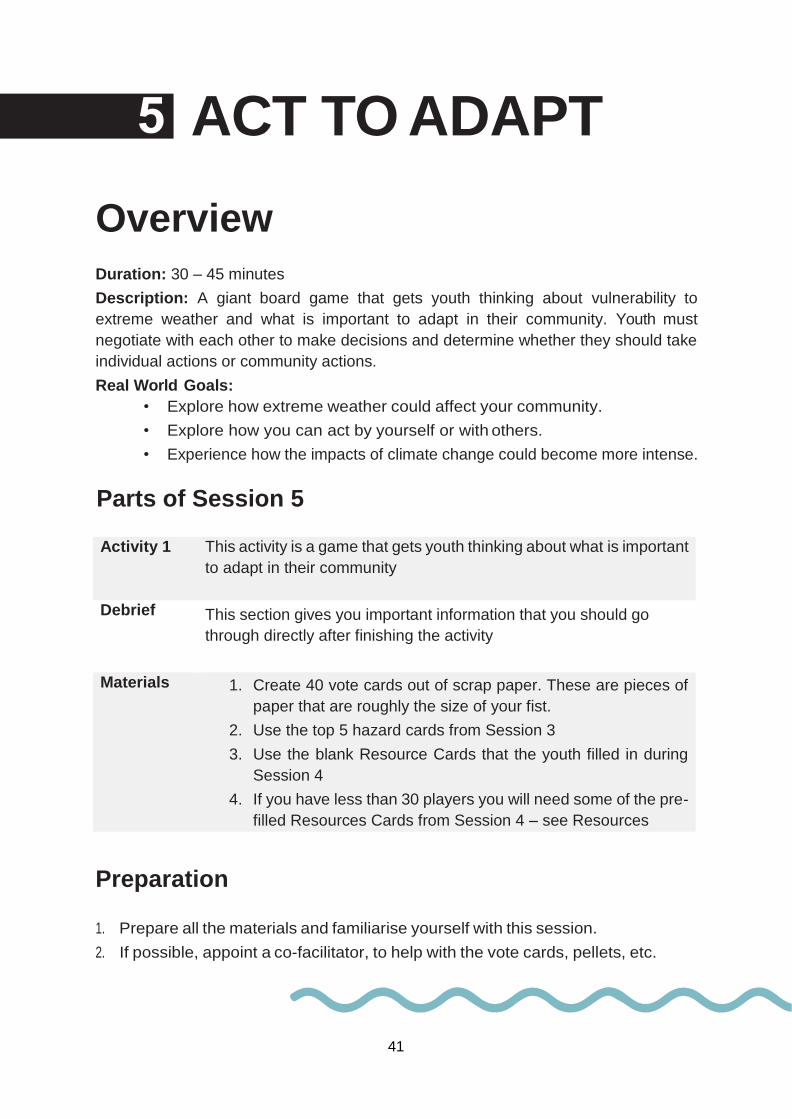
ACT TO ADAPT
Overview
Duration: 30 – 45 minutes
Description: A giant board game that gets youth thinking about vulnerability to
extreme weather and what is important to adapt in their community. Youth must
negotiate with each other to make decisions and determine whether they should take
individual actions or community actions.
Real World Goals:
• Explore how extreme weather could affect your community.
• Explore how you can act by yourself or with others.
• Experience how the impacts of climate change could become more intense.
Parts of Session 5
Activity 1
This activity is a game that gets youth thinking about what is important
to adapt in their community
Debrief
This section gives you important information that you should go
through directly after finishing the activity
Materials 1. Create 40 vote cards out of scrap paper. These are pieces of
paper that are roughly the size of your fist.
2. Use the top 5 hazard cards from Session 3
3. Use the blank Resource Cards that the youth filled in during
Session 4
4. If you have less than 30 players you will need some of the pre-
filled Resources Cards from Session 4 – see Resources
Preparation
1. Prepare all the materials and familiarise yourself with this session.
2. If possible, appoint a co-facilitator, to help with the vote cards, pellets, etc.

42
Activity
Set Up
1. Make a ‘Resource Chart’ on a wall or board, with two columns; ‘Community’ and
‘Hazards’ and five rows, listing the top 5 hazards from Session 3 down the side of
the chart
2. You will need tape to stick the youth’s resource cards to the community / hazards
chart during the game
3. Give everyone a vote card.
4. Every player should have the Resource Card that they illustrated.
A. Make sure to use at least 30 Resource Cards. You can use some of the
premade ones from Session 4 if you do not have 30 (players should sign
the front and back of them).
B. They should all be signed on the front and back.
5. Form a big circle.
A. Tell everyone to remember where they are. This is their spot for the game.
6. Make the community by having everyone put their card down in the circle,
picture side up.
A. Do this one at a time. The first player reads out loud the card that they
have and places it in the middle.
B. The second player reads out the card and places it at least 10 cm (4
inches) apart. Continue for all players.
C. The player then returns to their spot in the circle.
43
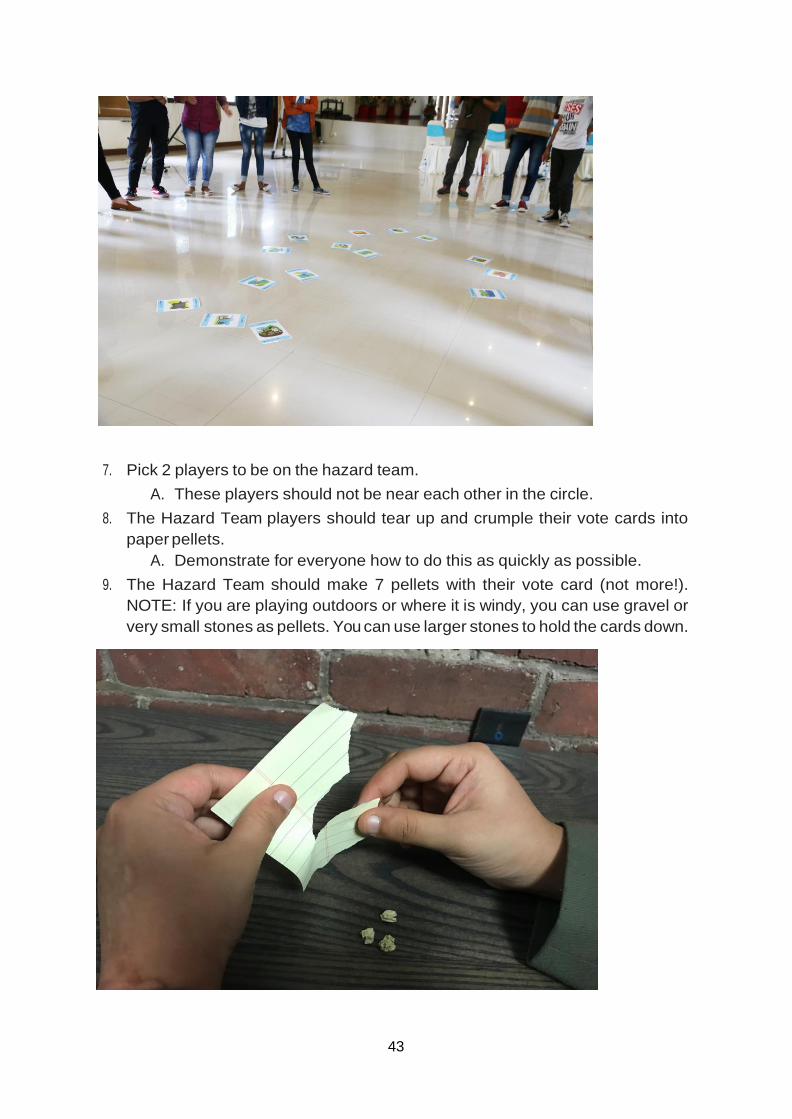
7. Pick 2 players to be on the hazard team.
A. These players should not be near each other in the circle.
8. The Hazard Team players should tear up and crumple their vote cards into
paper pellets.
A. Demonstrate for everyone how to do this as quickly as possible.
9. The Hazard Team should make 7 pellets with their vote card (not more!).
NOTE: If you are playing outdoors or where it is windy, you can use gravel or
very small stones as pellets. You can use larger stones to hold the cards down.

44
How to Win the Game
1. Explain the following:
A. The team with the most Resource Cards at the end is the winner.
B. The Hazard Team represents the top 5 hazards from Session 3 and aims
to destroy as many Resource Cards as possible. Each resource card that
is destroyed goes to the Hazard Team.
C. The Community Team aims to protect as many Resource Cards as
possible, by adapting them. Each card that is not destroyed after five
rounds is kept by the Community Team.
D. The game ends after five rounds (not including the practice rounds).
How the Hazard Team Gets Cards
1. Reveal one of the five hazard cards.
2. Using the paper pellets that you tore up as a demonstration say the following:
A. “These pellets represent the hazard (e.g. a flood)”. Without moving from
their position, the Hazard Team can throw or place these pellets on the
Resource Cards. You must throw or place all of them at once.”
3. Explain that Resource Cards are destroyed if a pellet lands and stays on them.
A. Demonstrate how to throw, or drop the pellets all at once.
B. “If a resource card is destroyed by the Hazard team, it is removed from
the floor. The Hazard Team gets that card. and the facilitator should
move it to the Resource Chart, under the ‘Hazards’ column and next to
the specific hazard for that round.
C. Whoever’s name is on the destroyed resource card joins the Hazard
Team. When a player joins the Hazard Team they should tear up their
vote card into 7 paper pellets. (Not more!)
Hazard team members should throw all 7 paper pellets at the same time

45
How the Community Team Gets Cards
1. There are two ways the community team can protect Resource Cards:
A. Community actions - “Community actions protect cards for the rest of
the game. To take a community action you will need to place your vote
card on a resource card in your community circle. For the card to be
protected it must receive votes from one third of the community. The
protected card is then moved to the community section of the Resource
Chart, next to the specific hazard for that round, and it is protected for
the rest of the game.”
Number of community
players
0-8 9-11 12-14 15-17 21-23 21-23 24-26 27-29 30
Votes needed for
a community action
2 3 4 5 6 7 8 9 20
B. Individual actions - “Individual actions protect cards for one round only. To
take an individual action, you give the vote card to the facilitator, which
allows you to flip over one Resource Card. On the back of each card
are bubbles. For flipped cards to be destroyed by the Hazard Team,
the number of pellets that land on it must be more than or equal to the
number of black bubbles. For example, a card with three black bubbles
needs at least three pellets on it to be destroyed that round. Individual
actions only last one round and at the end of the round the cards will
be flipped back over.”
Practice Round 1
1. Reveal the hazard that will impact the community –any hazard from session 3.
2. Give the Community Team 60 seconds to discuss with people next to them
about what action they should take.
A. Players cannot move from their spot in the circle.
B. Players should think about which resources are both important and
particularly vulnerable to the hazard for that round
3. Get opinions from the community team on what to protect.
A. “Community Team members, raise your hand if you think a specific
card should be protected.”
B. Pick someone who has their hand raised.

46
C. This person says which resource they want to protect and why.
D. Ask the community team “If you agree that it should be protected raise
your hand.”
E. Repeat this three times (e.g. three different community team members
will give their opinions).
4. Choose half of the players to take community actions. These players should
vote on the resource they want to protect by placing their vote cards down on
the Resource Card. Remind them how many votes are needed to protect a
resource.
Number of community
players
0-8 9-11 12-14 15-17 21-23 21-23 24-26 27-29 30
Votes needed for
a community action
2 3 4 5 6 7 8 9 20
5. Count the vote cards on each resource card. If there are enough to make a
community action to protect the resource, move the card to the Resource Chart
under ‘Community’ and next to the specific hazard for that round.
6. Choose half the players to take Individual actions. Players must hand the
facilitator their vote card. They can then flip over a Resource Card of their
choice.
7. Have the Hazard team throw their pellets.
8. Show everyone which cards were protected and which cards were destroyed.
9. Move the destroyed cards to the Resource Chart under ‘Hazards’ and next to
the specific hazard for that round.
10. Have the players of destroyed cards join the Hazard Team and make 7 pellets
each from their vote card.
11. Flip any cards protected by individual actions back over so the picture is facing
upwards and re-distribute the vote cards so each community member has one
vote.
Practice Round 2
1. Reveal the hazard that will impact the community – any hazard from session
3.
2. Give the Community Team 60 seconds to discuss with people next to them
about what action they should take.

47
A. Players cannot move from their spot in the circle.
B. Players should think about which resources are both important and
particularly vulnerable to the hazard for that round
3. Get opinions from the community team on what to protect.
A. “Community Team members, raise your hand if you think a specific
card should be protected.”
B. Pick someone who has their hand raised.
C. This person says which resource they want to protect and why.
D. Ask the community team: “If you agree that that should be protected
raise your hand.”
E. Repeat this three times (e.g. three different community team members
will give their opinions).
4. Everybody on the Community Team now chooses whether to take an
individual or community action:
A. On the count of three.
a. If players want to take a community action they will step forward.
b. If players want to take an individual action they will stay where
they are.
B. Have everyone close their eyes.
C. Count 3, 2, 1 Go.
5. Players that stepped forward to take a community action will act first by
placing their vote cards on the Resource Cards that they want to protect.
Remind them how many votes are needed to protect a card.
Number of community
players
0-8 9-11 12-14 15-17 21-23 21-23 24-26 27-29 30
Votes needed for
a community action
2 3 4 5 6 7 8 9 20
6. Count the vote cards on each resource card. If there are enough to make a
community action to protect the resource, move the card to the Resource Chart
under ‘Community’ and next to the specific hazard for that round.
7. NOTE: If the community team did not have enough votes to protect a card
make sure to point this out to them. Make sure to tell them that in the future
they might want to better communicate with how they are placing their cards,
or they may want to take an individual action instead.
8. Individual actions are taken next. Players must hand the facilitator their vote

48
card. They can then flip over a Resource Card of their choice.
9. NOTE: If no individual actions were taken ask them why.
10. Have the Hazard team throw their pellets.
11. Show everyone which cards were protected and which cards were destroyed.
12. This is the end of the practice round. Move all the cards from the Resource
Chart back to the community circle. You will now play for five rounds.
Play the Game
Make sure you completely reset the game. All players will need their vote cards.
There should only be two Hazard Team players to start. You will play for five
rounds.
Summary Steps of Each Normal Round
1. Give players on the community team a vote card.
2. Reveal the Hazard that is going to hit the community.
3. “Community Team: without moving, discuss with your neighbours what you
think you should protect.”
A. Give them 30 seconds to discuss.
4. Making the choice - “Community team, you now need to decide whether you
will take an individual or community action. Everyone shut your eyes. I am
going to say THREE, TWO, ONE, GO.’ If you want to take a community action
when I say Go, then take one step forward. If you want to take an individual
action then stay where you are.”
5. Say: “THREE, TWO, ONE, GO.”
6. Take the community action by having community place their vote cards. To
protect the resource card, they need ⅓ of the community to vote on it.
A. “Remember: you will need [x] cards to protect the Resource!”
7. Take individual actions - The players who chose to take an individual action,
give the facilitator their vote card and can flip one Resource Card over.
8. Have everyone return to their place in the circle.
9. Have the Hazard team throw or place their pellets. Destroy cards that have
pellets on them and move them to the Resource Chart under ‘Hazards’ and
next to the specific hazard for that round.
A. The players that initialed those cards join the Hazard team.
B. When a player joins the Hazard team, give them a vote card to tear up into
7 paper pellets.
10. Have the hazard team pick up the pellets – 7 each.
11. Flip cards protected by individual actions back over.
12. Give the remaining Community Team members their vote card back.

49
13. Play 4 more rounds revealing a new hazard each round.
Number of community
players
0-8 9-11 12-14 15-17 21-23 21-23 24-26 27-29 30
Votes needed for
a community action
2 3 4 5 6 7 8 9 20
Declare a Winning Team
1. Count the Hazard Team cards and the Community Team cards.
The team with the most cards wins!
Debrief
1. Ask the youth to discuss the following questions with their neighbour (in
pairs). After each question, ask for a few examples to share with the whole
group.
A. What did you experience in this game? (e.g. increasing hazards,
difference between community and individual actions)
B. What was your strategy?
C. Look at the Resource Chart. Were there any cards that were destroyed
that you wish you could have adapted?
i. Pick one or two of these cards and ask:
ii. “You’ll notice that the systems from last session are on the backs
of these cards. What would happen to these systems if these were
badly impacted in your community?”

50
2. Debrief Activity:
A. Divide the youth into six groups.
B. Give each group 3 minutes to choose a resource card that they think is
most important to protect in real life from the extreme weather and
hazards in their community
C. Think about what is important to you as young people but also about the
different groups of people in your community. Ask youth to think
carefully as in the next session they will make a real-life action plan to
protect or adapt the resource
D. Each group shares their decision.
E. Put the chosen 6 resource cards to one side, ready for the next session.
3. Session 5 closing:
A. Congratulations, we have completed Session 5 of Y-adapt!
B. We have seen how important resources in your community are vulnerable
to specific hazards.
C. We have seen how climate change will increasingly make extreme events
more intense and more frequent. And we have seen that you can protect
your community by acting alone and by acting together
D. In our next session you will plan your adaptation action for your community

51
CHOOSE YOUR CHALLENGE
Overview
Duration: 45-60 minutes
Description: A role-play game where teams act through adaptations that are specific to
their community.
Real World Goals:
• To choose what to adapt in the community.
• To determine what resources and approaches can be used to adapt.
• To create a plan to make the adaptation.
Parts of Session 6
Activity 1 This activity is a brainstorming activity to complete ‘Adaptation
Challenge’ questions to guide youth in designing their adaptation
action plan.
Activity 2 This activity is a reality role-play competition that gets youth thinking
critically through the steps of their action plan and possible challenges
and solutions.
Activity 3 This activity is an interactive activity in which youth choose which
adaptation they want to make in real life and decide next steps.
Debrief This section gives instructions on what the youth should do over
the next several weeks
Materials 1. Adaptation Cards – see resources
2. Adaptation Challenge Cards – see resources
3. Blank Adaptation Card(s) – see resources
4. Resources cards filled by youth in Session 5
5. Flipchart paper and markers
Preparation
1. Print this PDF and familiarize yourself with the different sections.
2. You will need the Resource Cards that were illustrated by the youth, with the
top 6 resource cards to protect put to one side.

52
Activity 1
Set Up
1. Break into 3 groups.
2. Layout the top six Resource Cards that were chosen in Session 5.
3. Layout the Adaptation Cards from Session 1.
4. Give each group an ‘Adaptation Challenge Card’ and a piece of flipchart paper to
make notes on.
5. Write up the ‘Adaptation Challenge’ questions on a board or large piece of paper
so everyone can see.
Action Planning
1. Read the following:
“So far during Y-adapt you have seen that youth are taking action all around the
world to adapt resources in their communities to extreme weather and hazards.
You have seen that it is crucial to act now because climate change is causing
hazards and extreme weather events to become more frequent and more intense
across the world, both today and into the future. As a group, you have identified
which hazards and extreme weather events have the greatest impact in your
community. You have also prioritised the resources that are most vulnerable and
important to adapt, in your community, whilst thinking about the different,
interconnected systems that could be effected. In this session you will now design
action plans to adapt the priority resources in your community.”
2. Each of the 3 groups should choose 1 Resource Card from the top 6 that were
prioritised at the end of Session 5.
A. This should be the resource that they think is most important to adapt to
extreme weather and hazards in their community.
3. Ask a volunteer to read out the ‘Adaptation Challenge’ questions written up on the
board. Explain that these are to guide their adaptation plans for their community.
4. Point to where the ‘Adaptation Cards’ from session 1 are laid out.
A. Youth can use these for inspiration for their own adaptation planning.
B. Read out the titles of 2 or 3 relevant adaptation card examples.
5. Explain that the groups have 20 minutes to discuss and answer the ‘Adaptation
Challenge’ questions to plan their adaptation.
A. They should write their ‘Adaptation Challenge’ ideas on the flipchart paper.
6. After 20 minutes each group should share their ideas with the whole group.

53
Activity 2
Set Up 1. Nominate 1-4 judges, perhaps teachers, community members, parents
2. Make a large chart with the competition criteria and post it on the wall:
0-5 Relevance
0-5 Realistic
0-5 Challenges
0-5 Solutions
TIME! 4 minutes
Reality role-play
1. Each of the groups should look at their answers to the ‘Adaptation Challenge’
questions and identify a key supporting group or stakeholder involved.
A. For example: Perhaps they need approval from teachers to take an
action at school; Perhaps they need support from the local council if it
is a community based action; Perhaps they need to propose their idea
to a specific group to ask for funding.
2. Each group should divide in half into two sub-groups. They should choose one
sub-group to act as themselves- ‘the youth’ implementing their action plan,
and the other sub-group to act as the ‘supporting group’ involved.
3. For each group, the youth sub-group and support sub-group sit on opposite
sides of the room. They should place their Adaptation Challenge answers in
the middle, so both sub-groups can see.

54
4. Explain that each group will perform a ‘Reality Roleplay.’
A. The ‘youth’ sub-group will present their action plan to the ‘support’ sub-
group, just like they would in real life.
B. The ‘support’ sub-group will ask the ‘youth’ sub-group questions about the
plan, just like they might do in real life.
C. The sub-groups are NOT allowed to discuss before the reality role play.
5. Explain that it will be a competition! The judges will be looking to see that the
following criteria have been considered, by both the youth’s presentation and by
the support group’s questions. There will be up to 5 points for each:
RELEVANCE
Is the action plan relevant to the community?
Does it address the impacts of a relevant hazard?
0-5 points
REALISTIC Is this a realistic youth-led action plan? 0-5 points
CHALLENGES
Have possible challenges and problems in
implementing action plans been considered?
0-5 points
SOLUTIONS Have solutions to overcome the challenges and
problems been considered and proposed?
0-5 points
TIME! 4 minutes only
Minus 1 point for each minute over!
6. Give 10 minutes preparation time. The youth groups and the support groups
prepare separately.
A. Remind them that they can NOT discuss during preparation.
7. Roleplay reality time! The three groups roleplay their action plans.
8. Judges combine scores and announce the winning group!

55
Activity 3
Choose your challenge!
1. Explain that the next step is for the youth to take real action in their communities!
A. Over the next few weeks they will be left to start implementing their action
plans as the final stage of Y-adapt.
2. Ask each group to put their ‘Adaptation Challenge’ questions in different corners of
the room. They should then return to the centre of the room.
3. Youth must choose which adaptation action they would like to take forward in real
life. It can be the one they presented or a different one. Give the youth 1 minute
to think about their decision, whilst walking around the room in silence.
A. They can walk around the ‘Adaptation Challenges’ to read through the
answers.
4. After 1 minute everyone returns to the centre of the room.
5. On the count of 5, youth must run to the corner that has the Adaptation Challenge
in it they want to make.
A. This is an individual decision.
6. Ask a few youth standing at each adaptation to explain why they chose it.
7. Ask the group to decide if they would like to proceed with several adaptations or
would all like to work together on one. They can rearrange themselves if they wish.
8. Give one extra minute for youth to make their final decisions.
9. Ask youth to write their names on the back of the ‘Adaptation Challenge’ they have
chosen to make.
10. Give the youth 5 minutes to discuss immediate next steps.
A. When will they next meet to start their adaptation?
B. Where will they meet?
C. Do they want to appoint one or two leaders?
D. Do they want to assign specific roles to different members of their group?
11. Ask each person to write a pledge noting what they personally are going to do next
on the back of the ‘Adaptation Challenge’ paper, next to their name.

56
Debrief 1. Show one of the example Adaptation Cards. Show one of the blank Adaptation
Cards. Read the following:
“Your challenge over the next month is to make an adaptation in your
community. If you can do that we will be back to help you fill out one of
these blank adaptation cards. It will be used by other youth all over the
world.”

57
JOIN THE GLOBAL Y-ADAPT
COMMUNITY
Overview
Duration: 30-45 minutes
Description: This is the final session of the Y-adapt curriculum. Youth will create an
Adaptation Card based on the real world adaptation that they made.
Real World Goals:
• To create an adaptation card and share it online with other youth around
the world.
Parts of Session 7
Activity 1
Youth will fill out an adaptation card for every adaptation they made
in their community
Materials
1. A Blank Adaptation Card for each real world adaptation
implemented – see resources
Preparation
1. Print this PDF and familarise yourself with the different sections
2. Print 1-2 Adaptation Cards from the materials for every adaptation that the youth
have made in their community since Session 6.

58
Activity
3. Help the youth fill out an adaptation card for each real world adaptation they
made.
4. Take a picture or scan both sides of the card.
5. Email it to [email protected].

59
Frequently Asked Questions (FAQs)*
• Is climate change the same thing as global warming?
No. “global warming” refers to an increase in the average temperature near the
Earth’s surface. “Climate change” refers to the broader set of changes that go
along with global warming, including changes in weather patterns, the oceans,
ice and snow, and ecosystems. Most experts now use the term “climate change”
because it gives a more complete picture of the changes that are happening
around the world.
• Why is climate change happening?
The main reason the climate is changing is because people are adding
greenhouse gases to the atmosphere. The most important greenhouse gas is
carbon dioxide, which is released whenever people burn fossil fuels to do
everyday activities like driving cars, heating buildings, and making electricity.
As greenhouse gases build up in the atmosphere, they cause the Earth to trap
extra heat, making the planet warmer.
• What is the greenhouse effect, and how does it affect the climate?
The greenhouse effect is a natural process that helps make the Earth warm
enough for us to live. It works like this: The Earth gets energy from the sun,
heats up, and then gives off energy in a different form, called infrared radiation.
Greenhouse gases in the atmosphere trap some of this energy, warming the
atmosphere. But people’s activities are adding extra greenhouse gases to the
atmosphere, so the greenhouse effect is becoming stronger and the Earth is
getting warmer.
• Does the “ozone hole” have anything to do with climate change?
No. The “ozone hole” refers to a decrease in the layer of ozone gas found high in
the Earth’s atmosphere, which helps to shield the planet from the sun’s harmful
ultraviolet rays. The ozone layer has become thinner because of chemicals
that were once commonly used in products ranging from spray cans to foam
furniture cushions. While a thinner ozone layer allows more ultraviolet rays to
reach the Earth, increasing the risk of sunburns and skin cancer, it doesn’t
cause climate change.
• Why is it a problem if the Earth’s average temperature gets a little warmer?
Temperature plays an important role in how nature works, and even a small change in
average temperature can lead to large changes in regional temperatures and
seasons where you live and have a noticeable impact on plants, animals, and other
natural processes. For example, just a one- to two-degree increase in global
temperature can lead to a much greater risk of wildfires. Some parts of the world are
warming a lot more than average, which means the effects are much more dramatic.

60
• How can the Earth be getting warmer if it’s colder than usual where I live?
The average temperature around the world is rising, and 2001–2010 was the
warmest decade on record. But that doesn’t mean we won’t still have occasional
cold spells. To see why, it’s helpful to understand the difference between weather
and climate. “Weather” refers to day–to–day conditions, such as a rainstorm or
today’s temperature. In contrast, “climate” refers to the average weather
conditions you would expect to find in a certain place, based on patterns over
many years. Day–to–day weather will always have its ups and downs, and there
will always be a chance of extreme cold events. But as the Earth’s climate gets
warmer over time, most places will experience more days with record high
temperatures and fewer days with record low temperatures.
• What is El Niño / La Niña and how does it link to climate change?
El Niño and La Niña are natural climate patterns that sometimes occur in the
Pacific Ocean. During an El Niño episode, the water in the Pacific Ocean near the
equator gets hotter than usual. And during La Niña episodes, the same water
cools. These changes are so big that they affect weather all over the world.
Weather depends a lot on ocean temperatures. As the Earth’s climate, natural
changes in the climate such as El Niño and La Niña will also change. We know
that the impacts of El Niño and La Niña - extreme rainfall, and drought will likely
become more extreme with climate change.
• Is there a link between climate change and vector-borne diseases (Dengue /
Malaria)?
Global climate change will affect all living things on this planet. For many
species, the change in their environment may mean extinction. However the
mosquito may benefit from changes in the climate. While relationships
between climate, physical and biological factors that influence disease
transmission are complex, we know that at higher temperatures mosquitoes
fly faster and further, reproduce more rapidly and bite more frequently.
• Does climate change cause forest / bush fire?
Heat from sun energy alone does not trigger forest / bush fires; they are typically
caused by humans or lightning. However, increased hot and dry conditions
increase the likelihood of fires burning longer and being more intense.
• What causes coastal erosion?
Waves, generated by storms, wind, or fast-moving motor craft, can cause
coastal erosion, which may take the form of long-term losses of sediment and
rocks, or merely the temporary redistribution of coastal sediments; erosion in
one location may result in accretion nearby.

61
• Can we prevent and reduce climate change?
All countries in the world are contributing to the greenhouse effect, some more
than others (see map). To reduce climate change, we should all emit fewer
greenhouse gases. However, if we all stopped emitting today, the earth would
continue to get warmer for decades because of all the gases that are in the
atmosphere now.
Source : https://skepticalscience.com/graphics.php?g=15
• What can I do to prevent or reduce climate change?
Though no-one can prevent climate change alone, every little change can help.
Here are 9 simple actions you can take:
• Reduce, reuse, recycle
• Use less heat and air-conditioning
• Use energy efficient light bulb
• Drive less and drive smart
• Buy energy-efficient products
• Use less hot water
• Use the “off” switch on your electrical appliances
• Plant a tree
• Encourage others to conserve energy.
• Can we prevent or reduce climate related hazards?
Extreme weather events such as heat waves, heavy rainfall and others are not
possible to be prevent by the community. However, we can limit the impact by
acting! See Adaptation Cards for examples.
*Thanks to: A Global Student’s Guide to Climate Change: US EPA for some of the
questions.