how to configure netscaler gateway 10.5 to use with...
TRANSCRIPT
How to Configure NetScaler Gateway 10.5 to use with StoreFront 2.6 and XenDesktop 7.6.
Introduction The purpose of this document is to record the steps required to configure a NetScaler Gateway for use with StoreFront and XenDesktop.
Particular attention has been paid to the use of on-board NetScaler tools for creating a server certificate for the NetScaler Gateway. It will be seen that the NetScaler is using an exported root CA from a Microsoft Certificate Server so that client systems only need a single CA certificate.
The target audience for this document includes developers and testers who wish to set up a representative environment for testing external access scenarios.
While this document only attempts to record a single configuration, it is hoped that it will act as a stepping stone for those who wish to create similar or more advanced configurations.
Contents Introduction ....................................................................................................................... 1
Network Diagram ............................................................................................................... 2
NetScaler Configuration .................................................................................................... 3
Initial setup from XenCenter Console ............................................................................. 3
Continue setup from NetScaler GUI ............................................................................... 4
Server Certificates, CA Certificates, and SSL .................................................................... 8
On the Microsoft Certificate Server ................................................................................ 8
On the NetScaler GUI .................................................................................................. 10
NTP Server ..................................................................................................................... 17
Backups - and why you might want one ........................................................................... 18
Create a NetScaler Gateway Virtual Server ..................................................................... 20
StoreFront ....................................................................................................................... 30
DNS ............................................................................................................................. 30
StoreFront – Configuring a new installation .................................................................. 30
Test the deployment from a Windows PC connected to the Internet. ............................... 37
On the Windows PC ..................................................................................................... 37
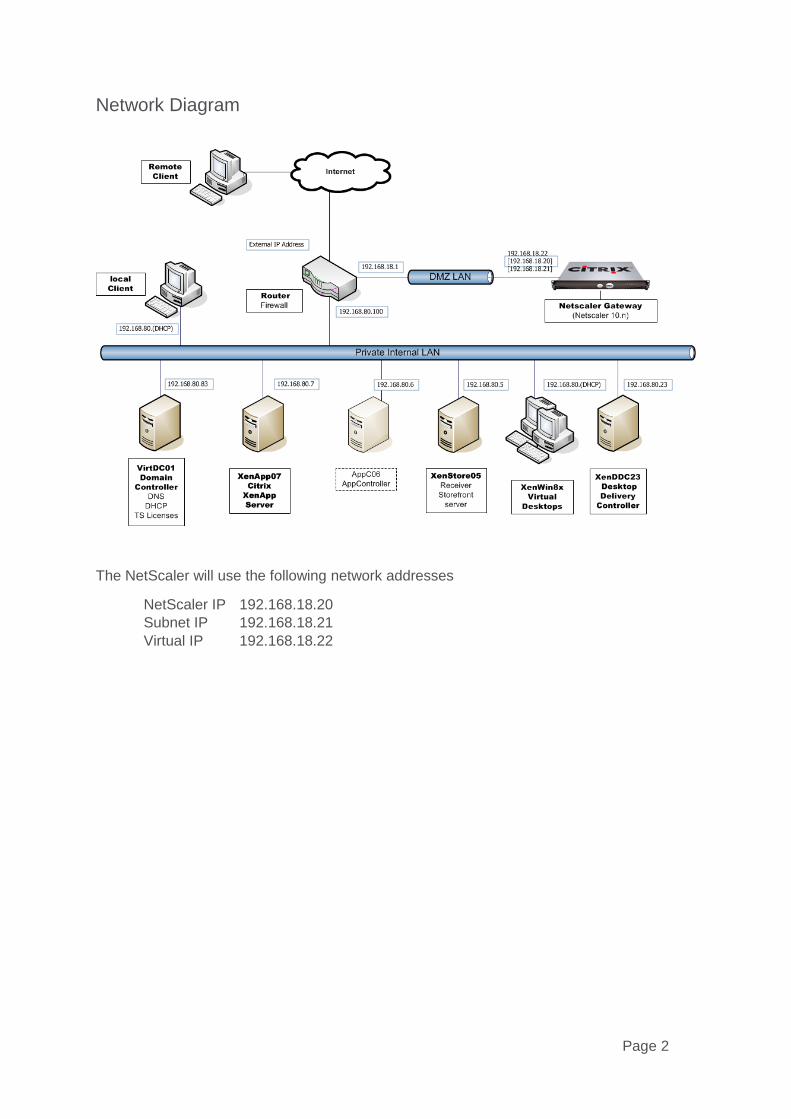
Network Diagram
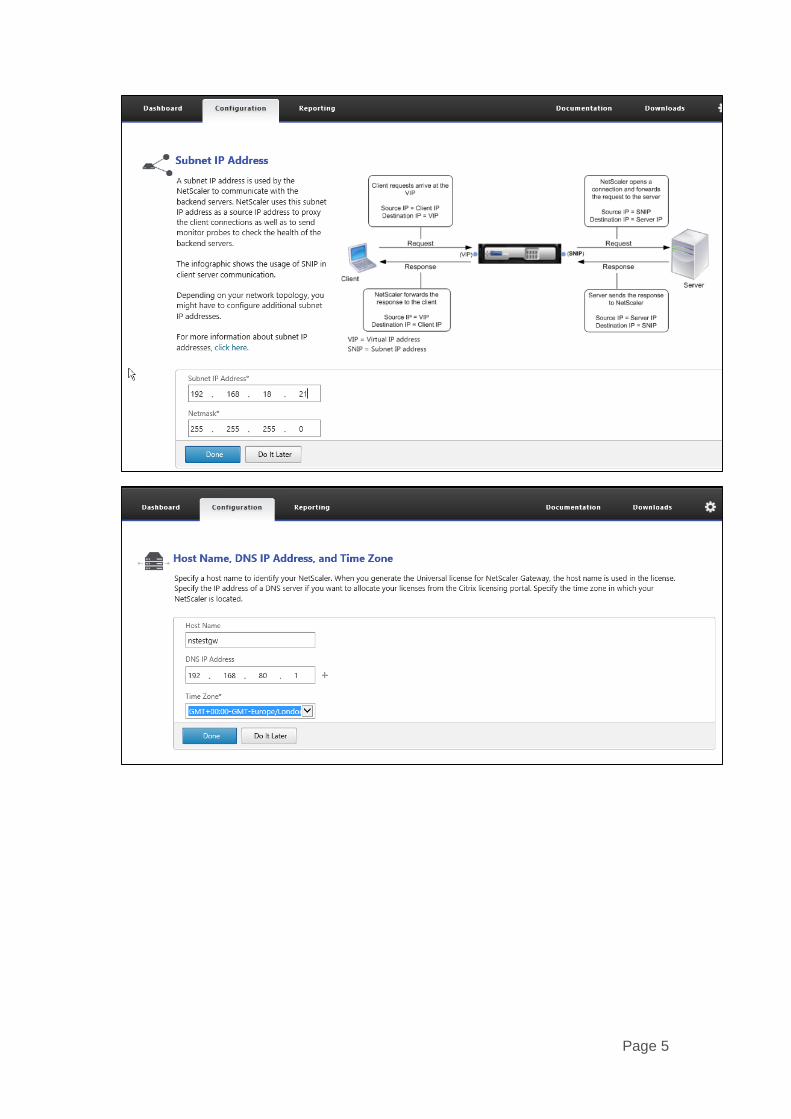
The NetScaler will use the following network addresses
NetScaler IP 192.168.18.20 Subnet IP 192.168.18.21 Virtual IP 192.168.18.22
Page 2
NetScaler Configuration This section assumes that you will be creating a NetScaler VPX virtual appliance and hosting it on XenServer.
The processes for configuring a physical NetScaler appliance, or a NetScaler VPX virtual appliance hosted on another Hypervisor is similar.
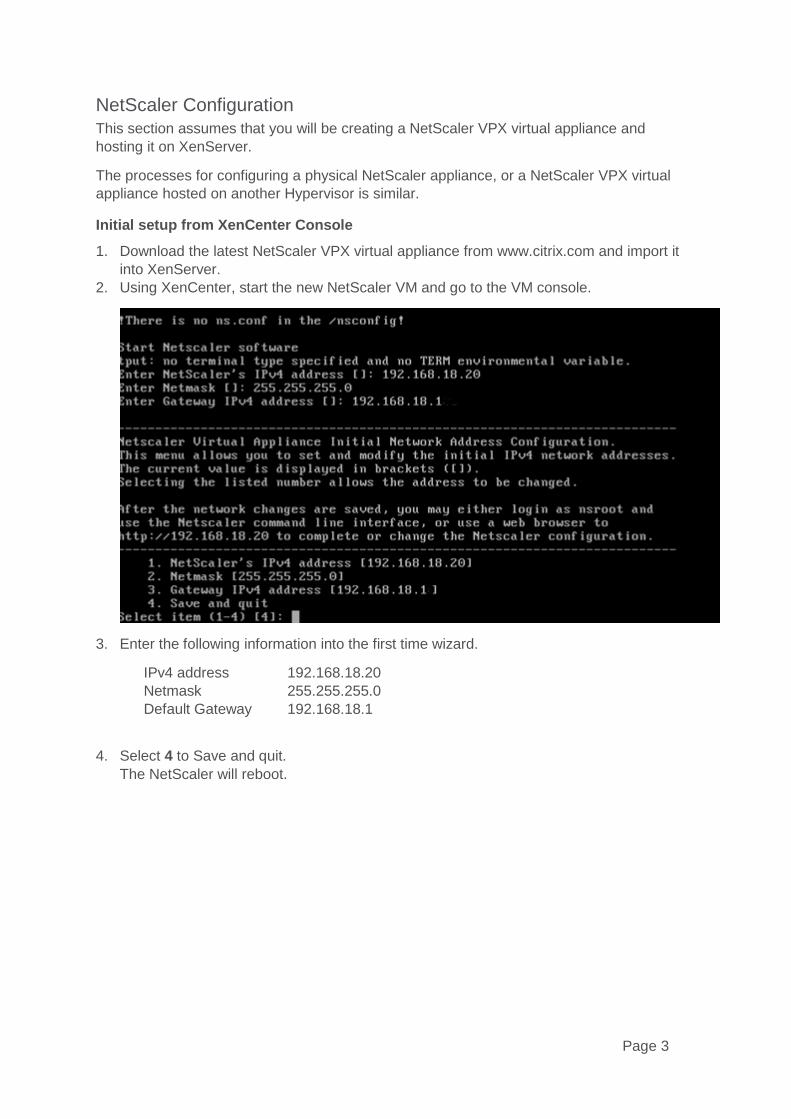
Initial setup from XenCenter Console 1. Download the latest NetScaler VPX virtual appliance from www.citrix.com and import it
into XenServer. 2. Using XenCenter, start the new NetScaler VM and go to the VM console.
3. Enter the following information into the first time wizard.
IPv4 address 192.168.18.20 Netmask 255.255.255.0 Default Gateway 192.168.18.1
4. Select 4 to Save and quit. The NetScaler will reboot.
Page 3
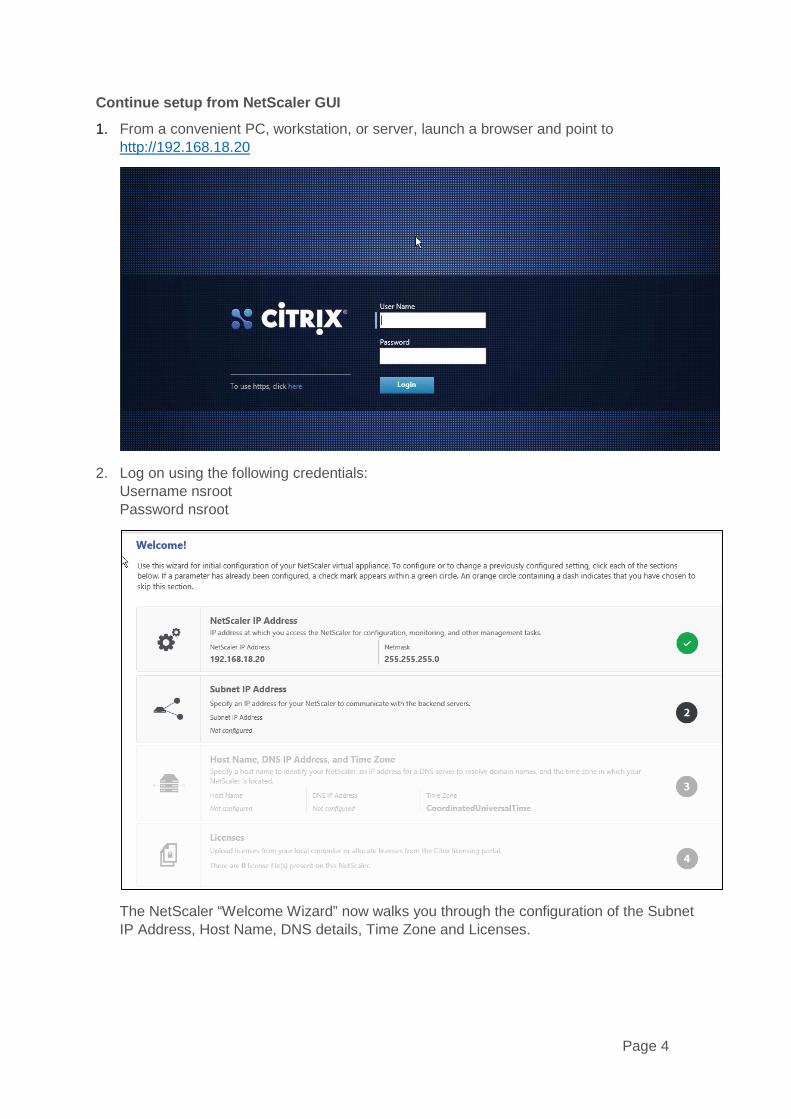
Continue setup from NetScaler GUI
1. From a convenient PC, workstation, or server, launch a browser and point to http://192.168.18.20
2. Log on using the following credentials: Username nsroot Password nsroot
The NetScaler “Welcome Wizard” now walks you through the configuration of the Subnet IP Address, Host Name, DNS details, Time Zone and Licenses.
Page 4
Page 5
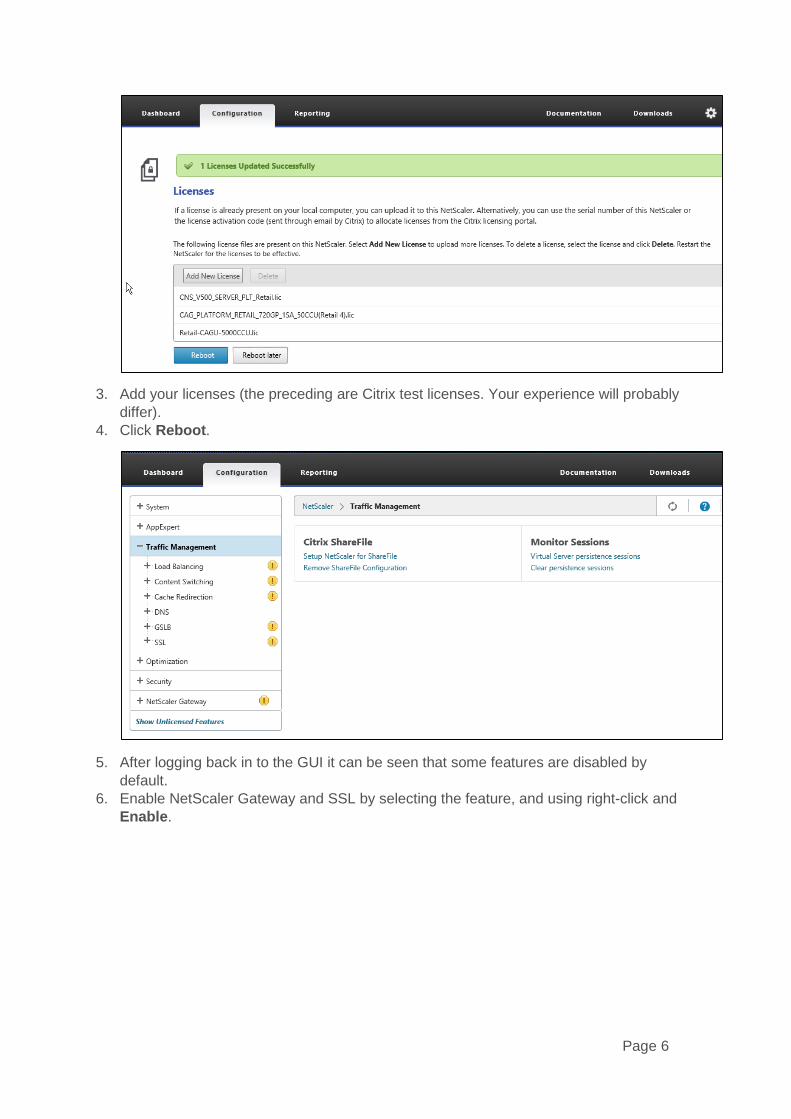
3. Add your licenses (the preceding are Citrix test licenses. Your experience will probably differ).
4. Click Reboot.
5. After logging back in to the GUI it can be seen that some features are disabled by default.
6. Enable NetScaler Gateway and SSL by selecting the feature, and using right-click and Enable.
Page 6
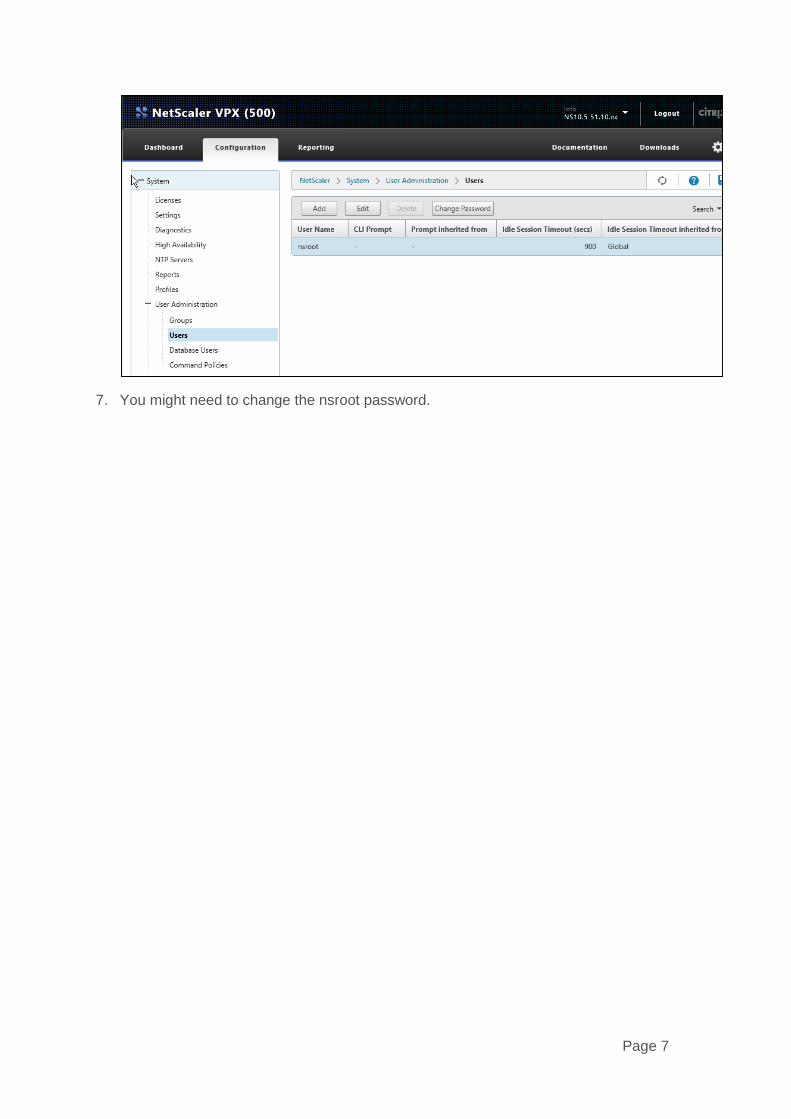
7. You might need to change the nsroot password.
Page 7
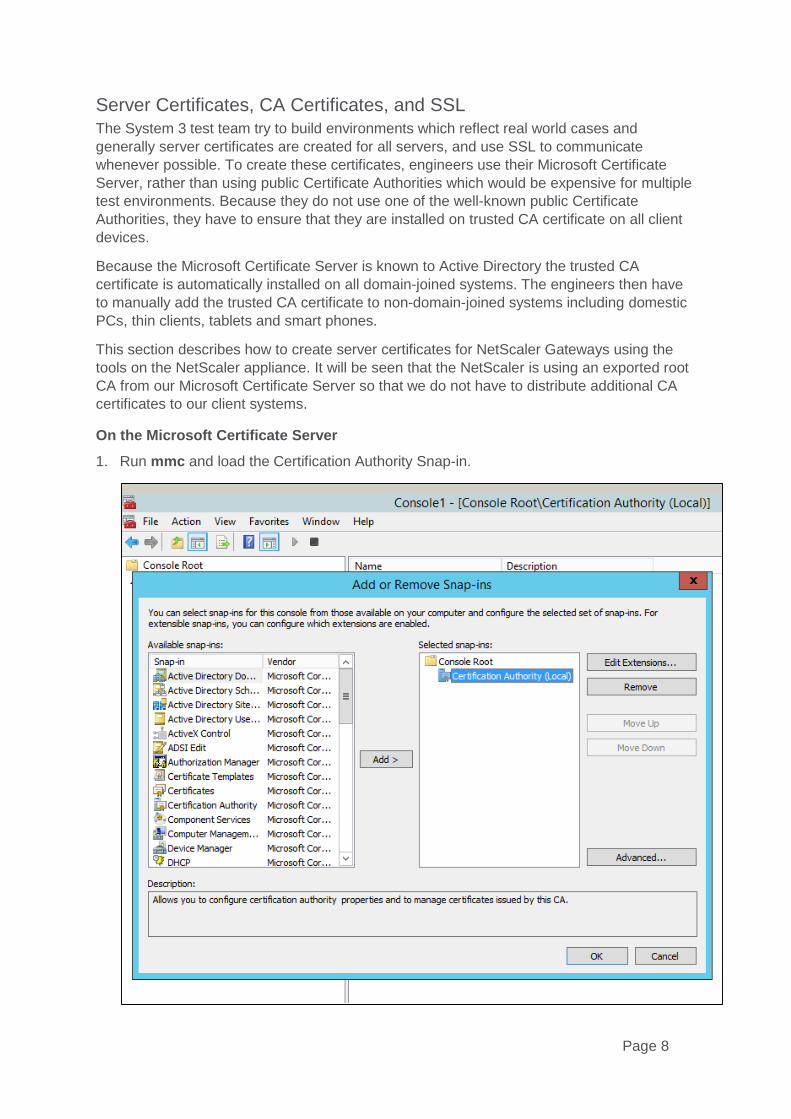
Server Certificates, CA Certificates, and SSL The System 3 test team try to build environments which reflect real world cases and generally server certificates are created for all servers, and use SSL to communicate whenever possible. To create these certificates, engineers use their Microsoft Certificate Server, rather than using public Certificate Authorities which would be expensive for multiple test environments. Because they do not use one of the well-known public Certificate Authorities, they have to ensure that they are installed on trusted CA certificate on all client devices.
Because the Microsoft Certificate Server is known to Active Directory the trusted CA certificate is automatically installed on all domain-joined systems. The engineers then have to manually add the trusted CA certificate to non-domain-joined systems including domestic PCs, thin clients, tablets and smart phones.
This section describes how to create server certificates for NetScaler Gateways using the tools on the NetScaler appliance. It will be seen that the NetScaler is using an exported root CA from our Microsoft Certificate Server so that we do not have to distribute additional CA certificates to our client systems.
On the Microsoft Certificate Server 1. Run mmc and load the Certification Authority Snap-in.
Page 8
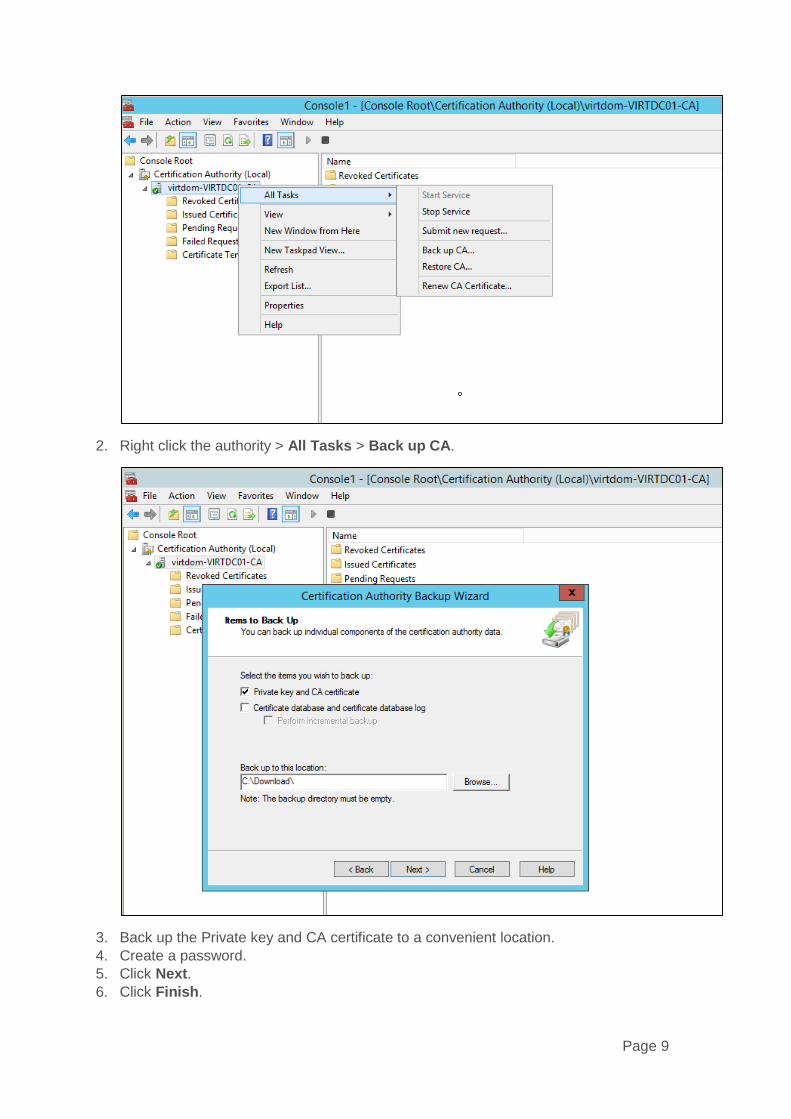
2. Right click the authority > All Tasks > Back up CA.
3. Back up the Private key and CA certificate to a convenient location. 4. Create a password. 5. Click Next. 6. Click Finish.
Page 9
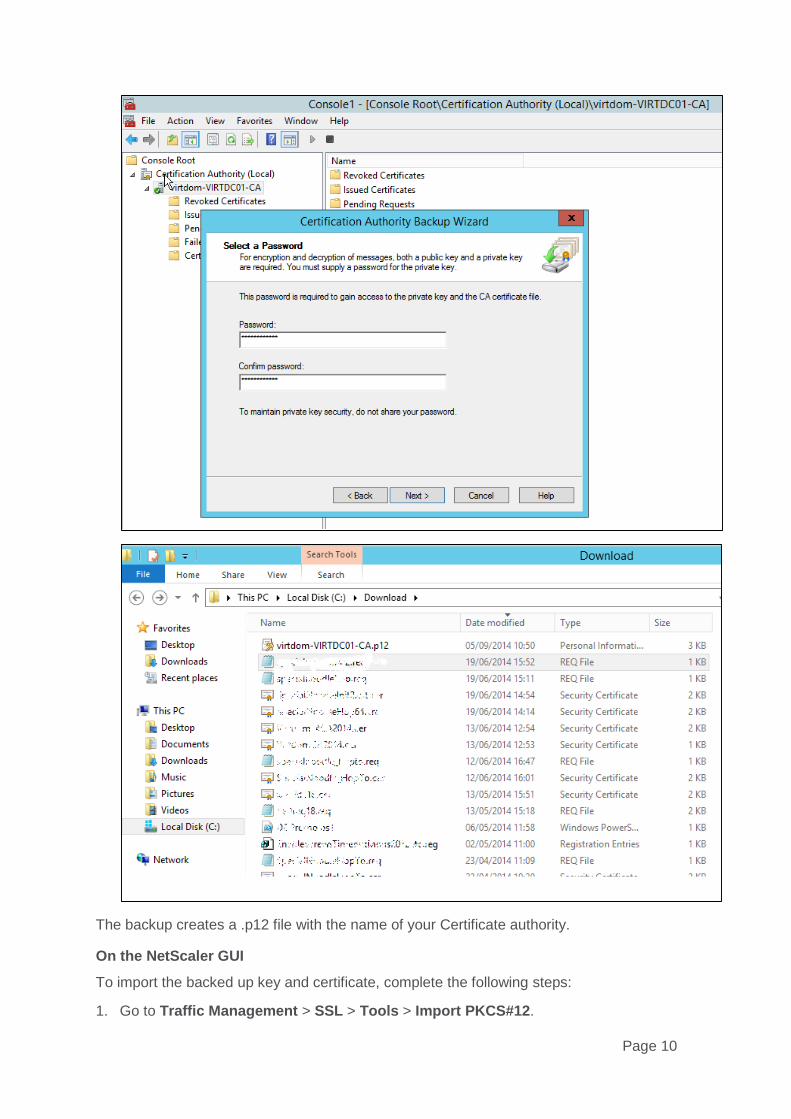
The backup creates a .p12 file with the name of your Certificate authority.
On the NetScaler GUI
To import the backed up key and certificate, complete the following steps:
1. Go to Traffic Management > SSL > Tools > Import PKCS#12.
Page 10
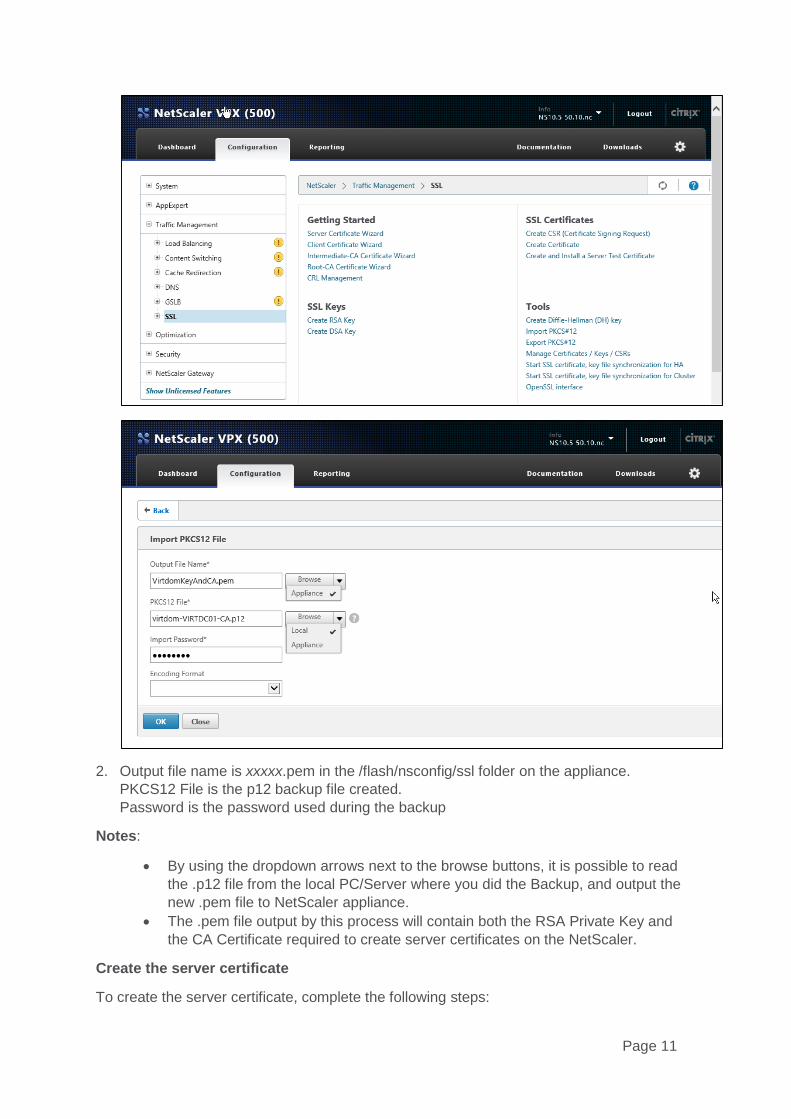
2. Output file name is xxxxx.pem in the /flash/nsconfig/ssl folder on the appliance. PKCS12 File is the p12 backup file created. Password is the password used during the backup
Notes:
• By using the dropdown arrows next to the browse buttons, it is possible to read the .p12 file from the local PC/Server where you did the Backup, and output the new .pem file to NetScaler appliance.
• The .pem file output by this process will contain both the RSA Private Key and the CA Certificate required to create server certificates on the NetScaler.
Create the server certificate
To create the server certificate, complete the following steps:
Page 11
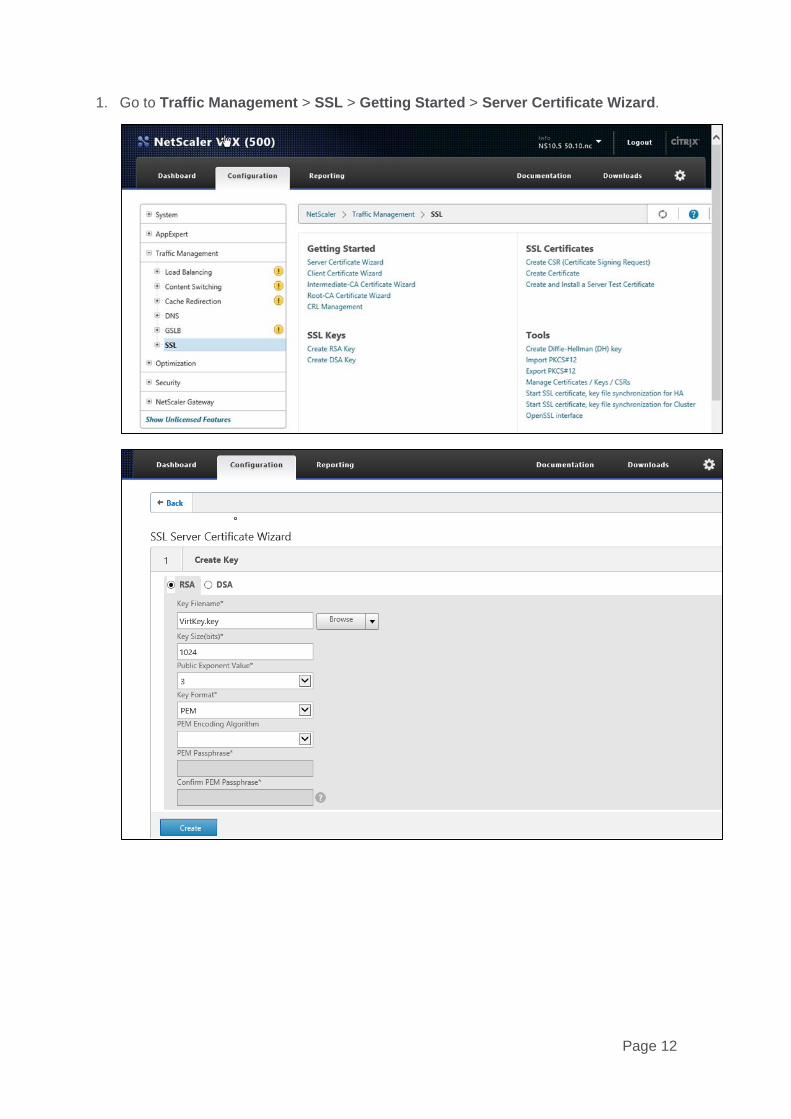
1. Go to Traffic Management > SSL > Getting Started > Server Certificate Wizard.
Page 12
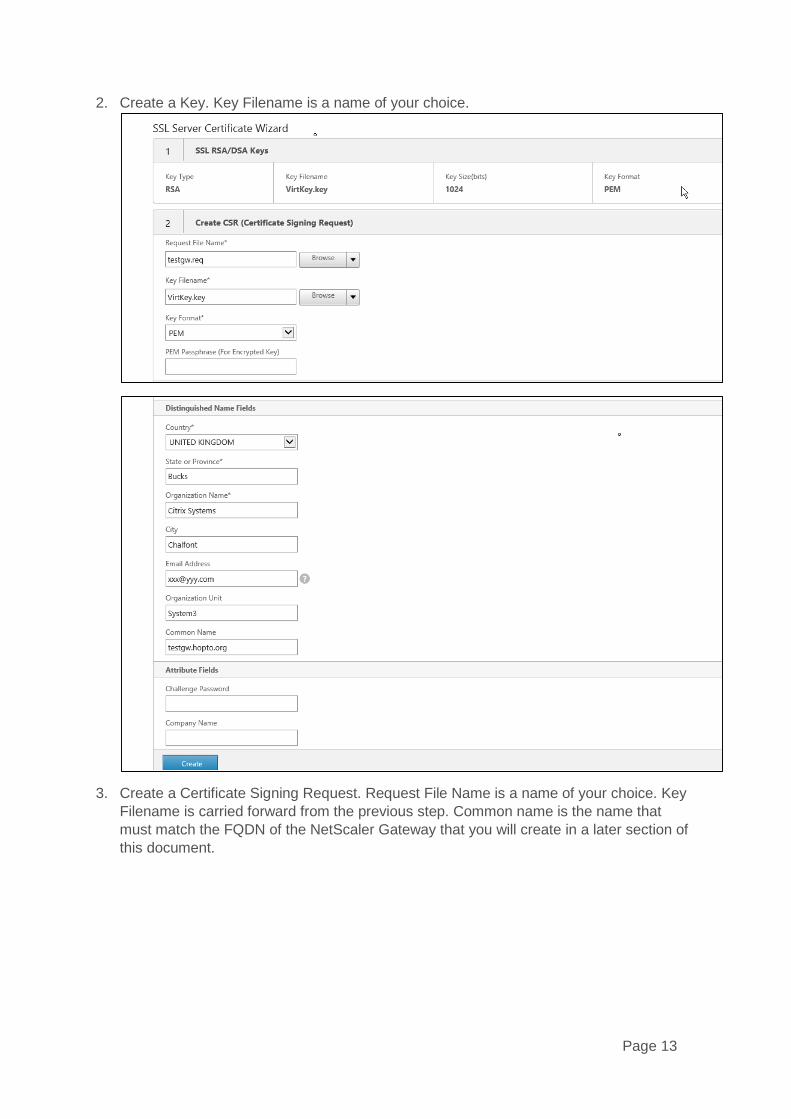
2. Create a Key. Key Filename is a name of your choice.
3. Create a Certificate Signing Request. Request File Name is a name of your choice. Key Filename is carried forward from the previous step. Common name is the name that must match the FQDN of the NetScaler Gateway that you will create in a later section of this document.
Page 13
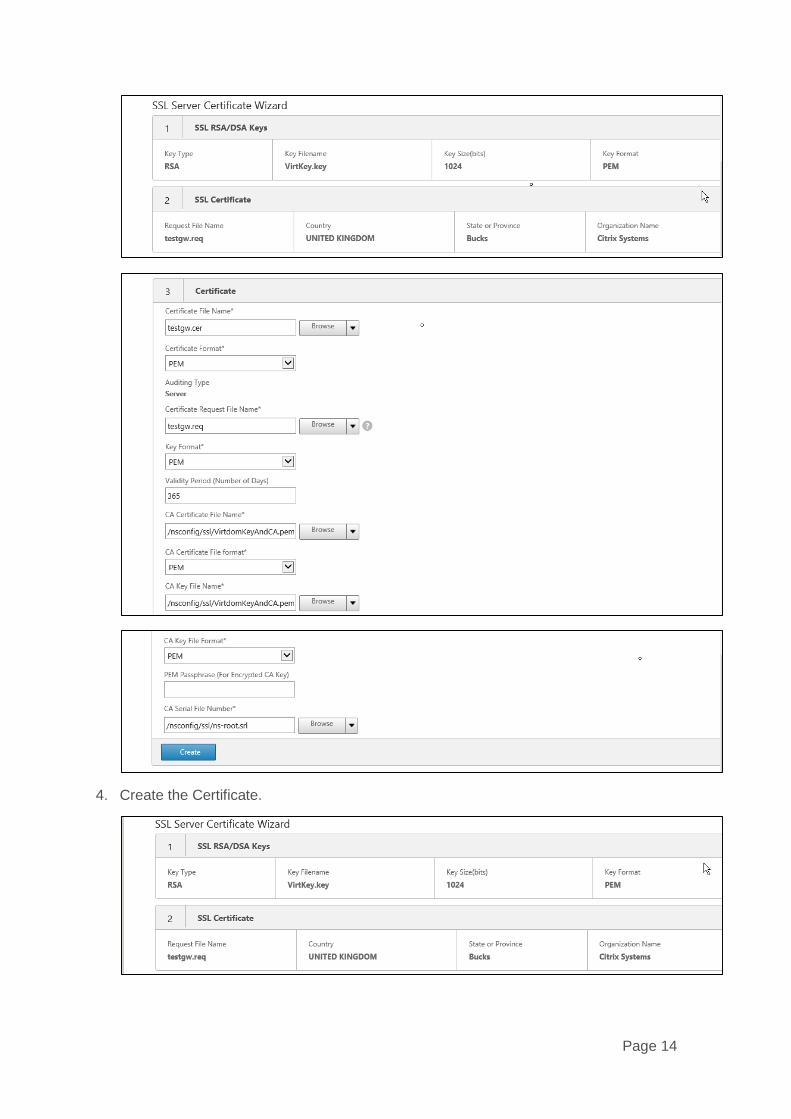
4. Create the Certificate.
Page 14
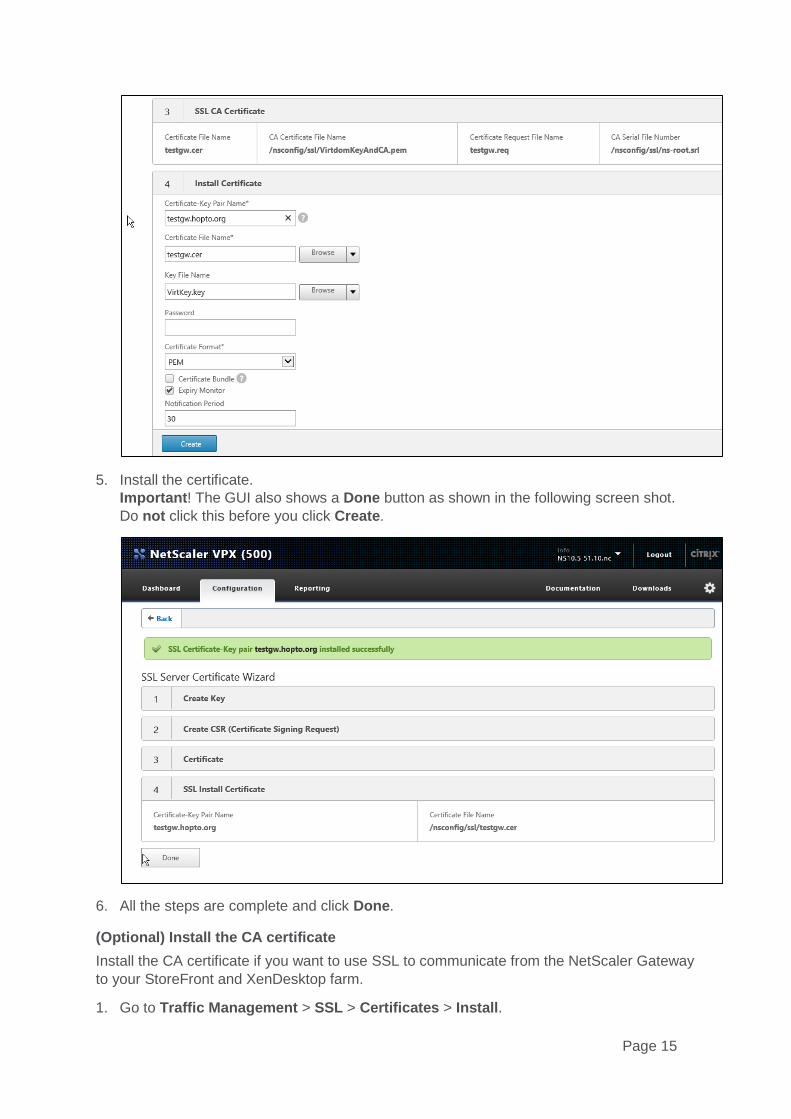
5. Install the certificate. Important! The GUI also shows a Done button as shown in the following screen shot. Do not click this before you click Create.
6. All the steps are complete and click Done.
(Optional) Install the CA certificate Install the CA certificate if you want to use SSL to communicate from the NetScaler Gateway to your StoreFront and XenDesktop farm.
1. Go to Traffic Management > SSL > Certificates > Install.
Page 15
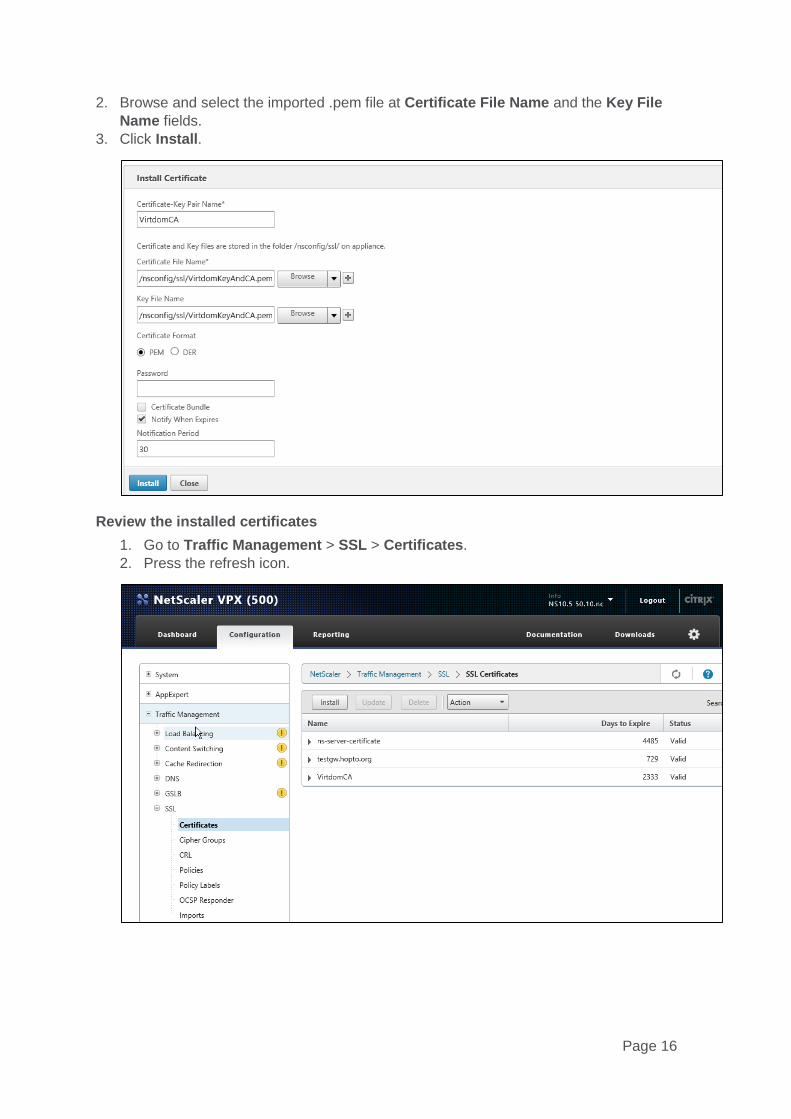
2. Browse and select the imported .pem file at Certificate File Name and the Key File Name fields.
3. Click Install.
Review the installed certificates 1. Go to Traffic Management > SSL > Certificates. 2. Press the refresh icon.
Page 16
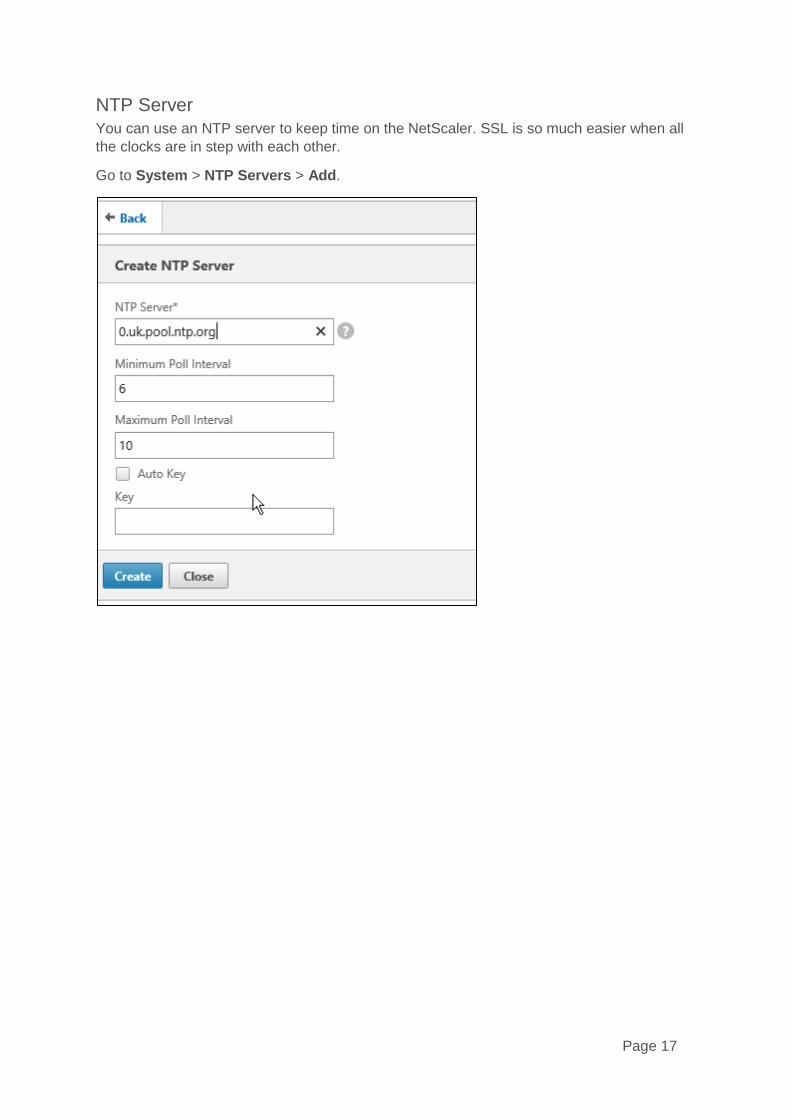
NTP Server You can use an NTP server to keep time on the NetScaler. SSL is so much easier when all the clocks are in step with each other.
Go to System > NTP Servers > Add.
Page 17
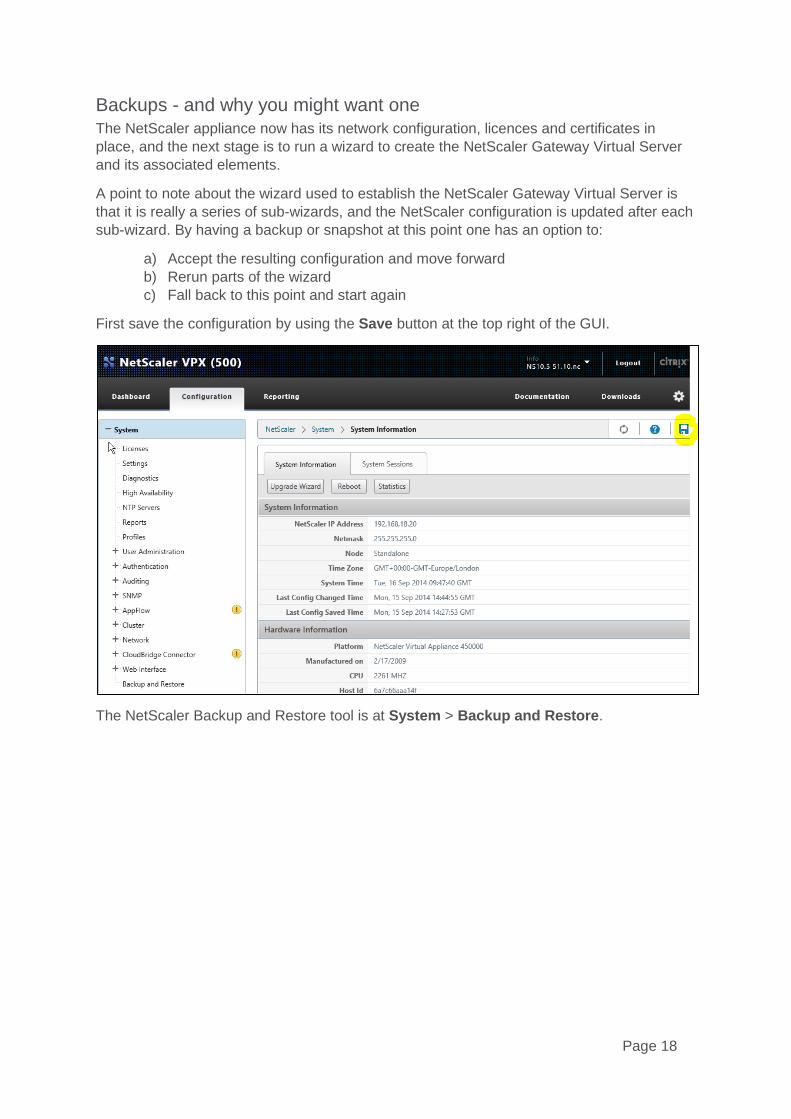
Backups - and why you might want one The NetScaler appliance now has its network configuration, licences and certificates in place, and the next stage is to run a wizard to create the NetScaler Gateway Virtual Server and its associated elements.
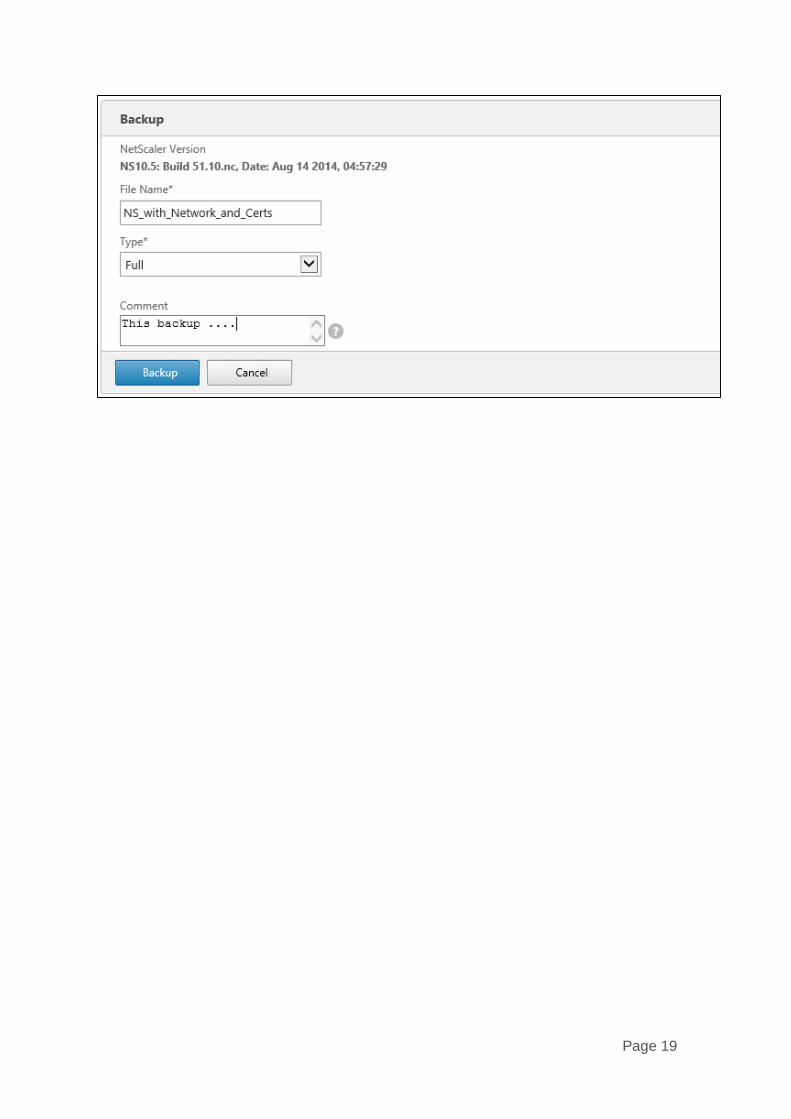
A point to note about the wizard used to establish the NetScaler Gateway Virtual Server is that it is really a series of sub-wizards, and the NetScaler configuration is updated after each sub-wizard. By having a backup or snapshot at this point one has an option to:
a) Accept the resulting configuration and move forward b) Rerun parts of the wizard c) Fall back to this point and start again
First save the configuration by using the Save button at the top right of the GUI.
The NetScaler Backup and Restore tool is at System > Backup and Restore.
Page 18
Page 19
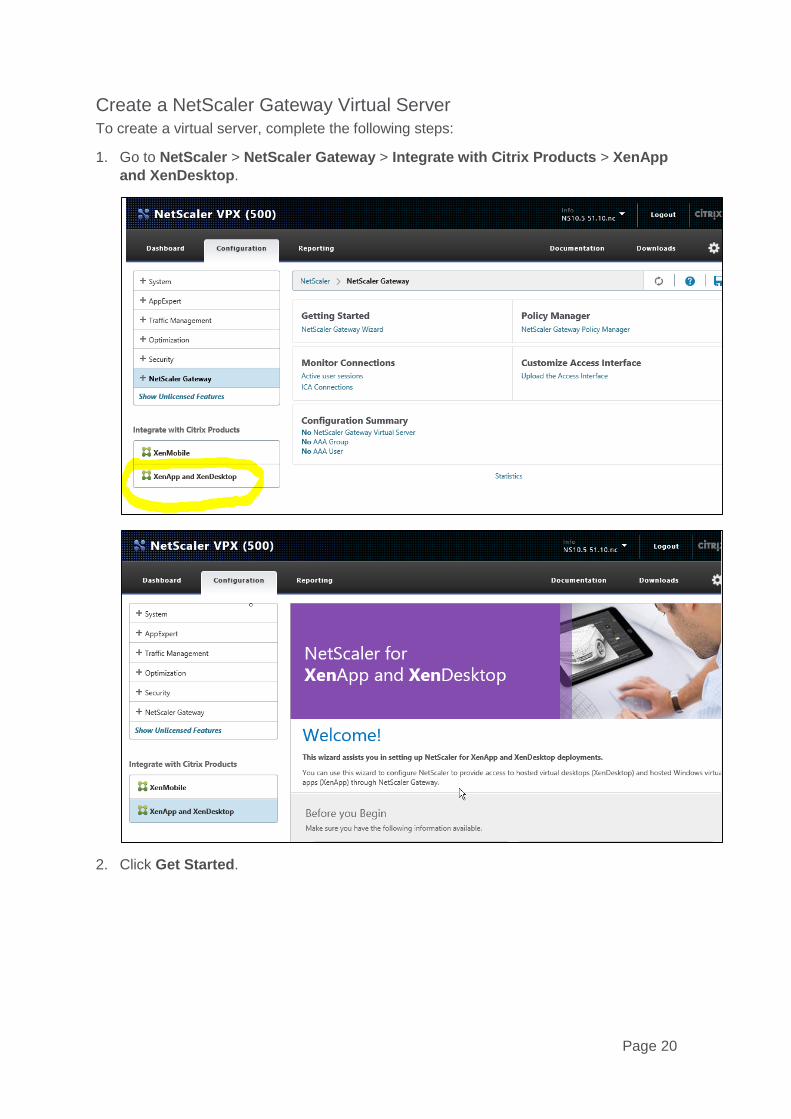
Create a NetScaler Gateway Virtual Server To create a virtual server, complete the following steps:
1. Go to NetScaler > NetScaler Gateway > Integrate with Citrix Products > XenApp and XenDesktop.
2. Click Get Started.
Page 20
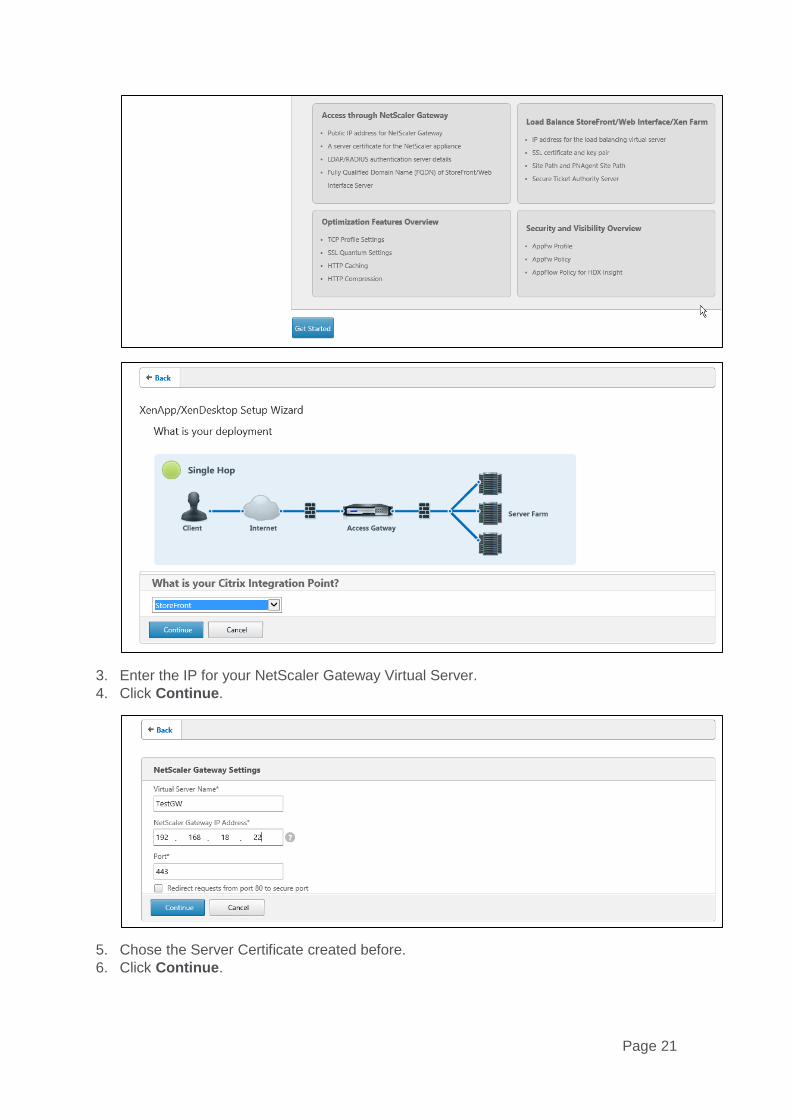
3. Enter the IP for your NetScaler Gateway Virtual Server. 4. Click Continue.
5. Chose the Server Certificate created before. 6. Click Continue.
Page 21
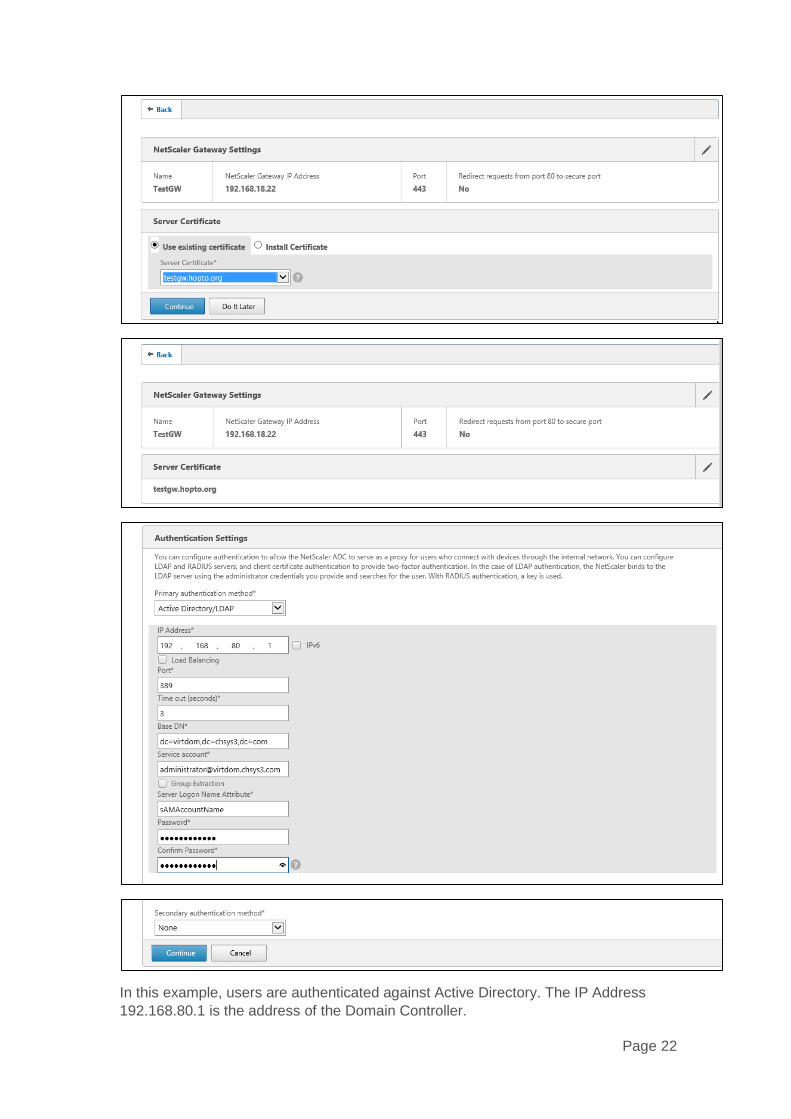
In this example, users are authenticated against Active Directory. The IP Address 192.168.80.1 is the address of the Domain Controller.
Page 22

7. Enter details and click Continue.
Page 23
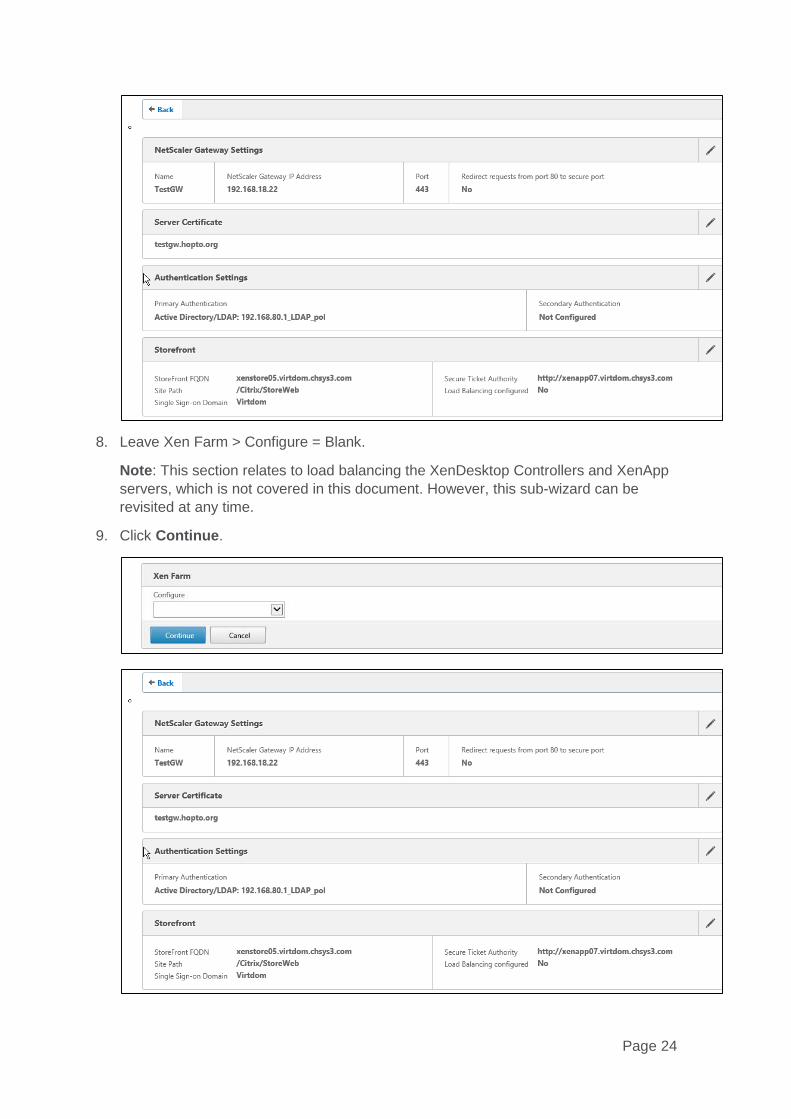
8. Leave Xen Farm > Configure = Blank.
Note: This section relates to load balancing the XenDesktop Controllers and XenApp servers, which is not covered in this document. However, this sub-wizard can be revisited at any time.
9. Click Continue.
Page 24
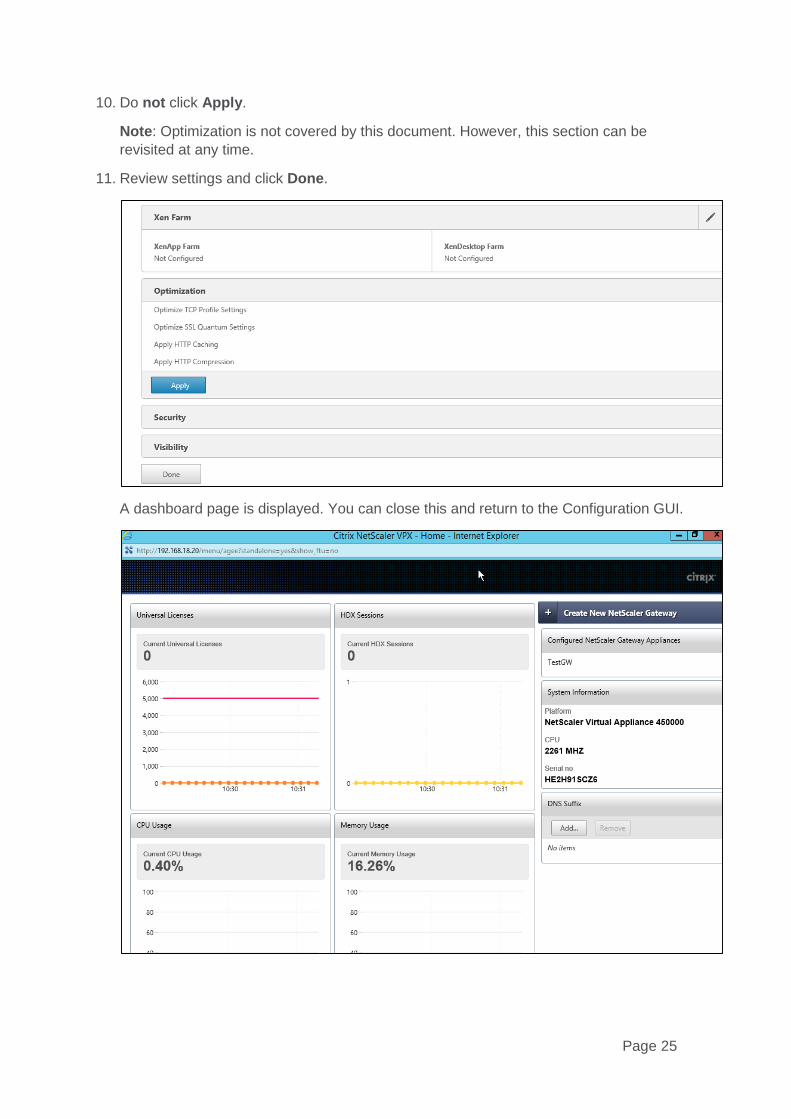
10. Do not click Apply.
Note: Optimization is not covered by this document. However, this section can be revisited at any time.
11. Review settings and click Done.
A dashboard page is displayed. You can close this and return to the Configuration GUI.
Page 25
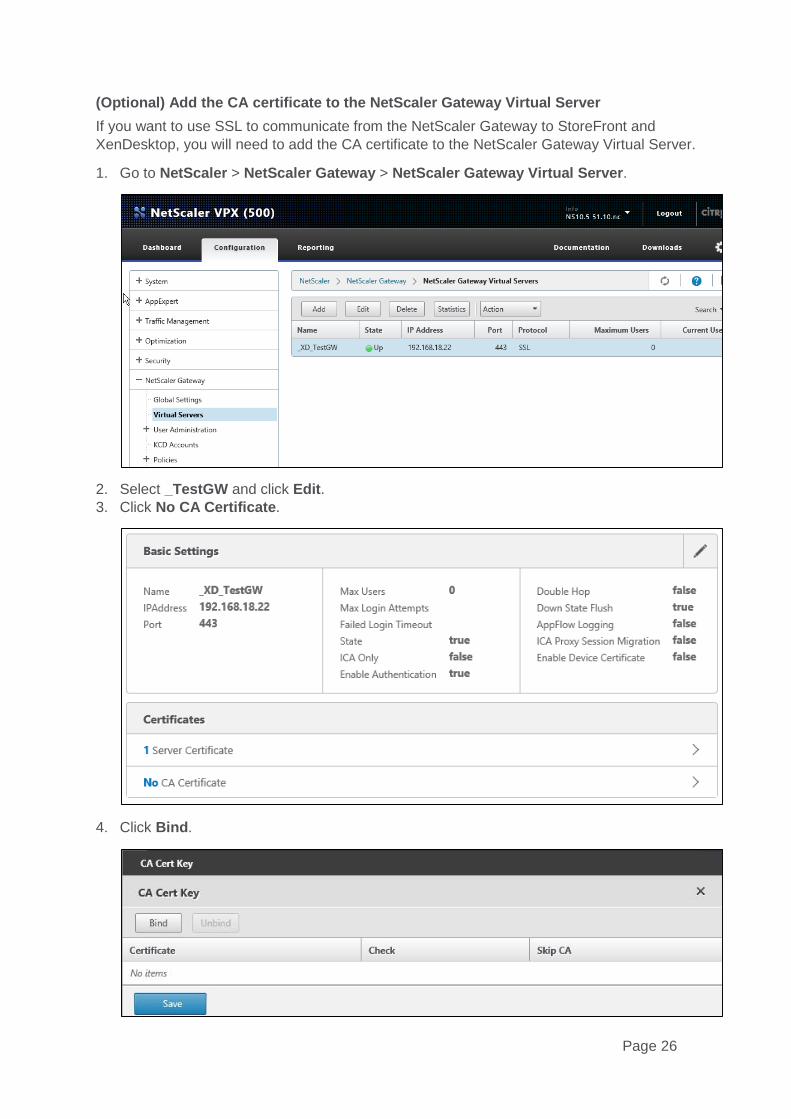
(Optional) Add the CA certificate to the NetScaler Gateway Virtual Server If you want to use SSL to communicate from the NetScaler Gateway to StoreFront and XenDesktop, you will need to add the CA certificate to the NetScaler Gateway Virtual Server.
1. Go to NetScaler > NetScaler Gateway > NetScaler Gateway Virtual Server.
2. Select _TestGW and click Edit. 3. Click No CA Certificate.
4. Click Bind.
Page 26
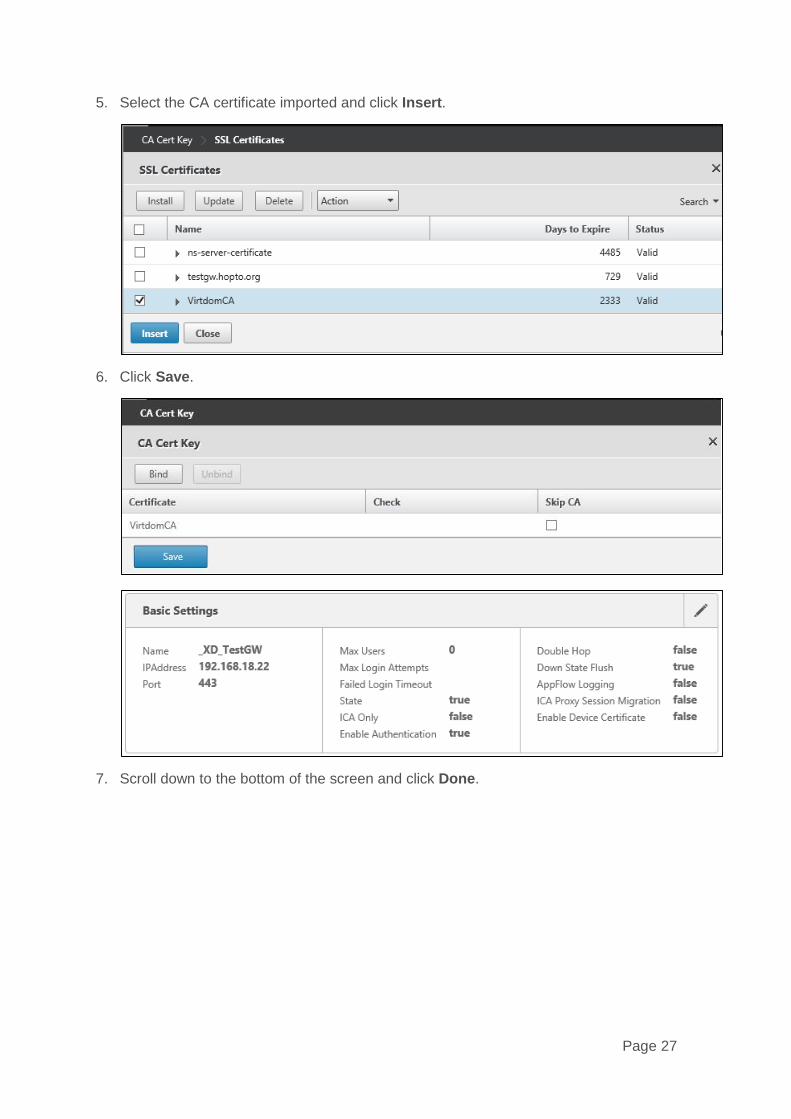
5. Select the CA certificate imported and click Insert.
6. Click Save.
7. Scroll down to the bottom of the screen and click Done.
Page 27

8. Save your work to date by clicking on the Save icon on the upper right corner.
Page 28
If you do not save after making changes to the NetScaler configuration, there is a risk that those changes will be lost when the NetScaler reboots.
Page 29

StoreFront
DNS
Check that the DNS entries for the NetScaler Gateway Virtual Server (testgw.hopto.org) point to the correct place.
• On Internet - DNS needs to point to a public address that is accessible from the Internet. This will typically be a public address on a firewall/router that is forwarded to the NetScaler Gateway Virtual Server IP
• On the private internal LAN – DNS needs to point to the local address of the NetScaler Gateway Virtual Server in the DMZ – 192.168.18.22
StoreFront – Configuring a new installation 1. Install StoreFront from your distribution media.
2. On completion, click Finish and open the StoreFront Management Console.
Page 30
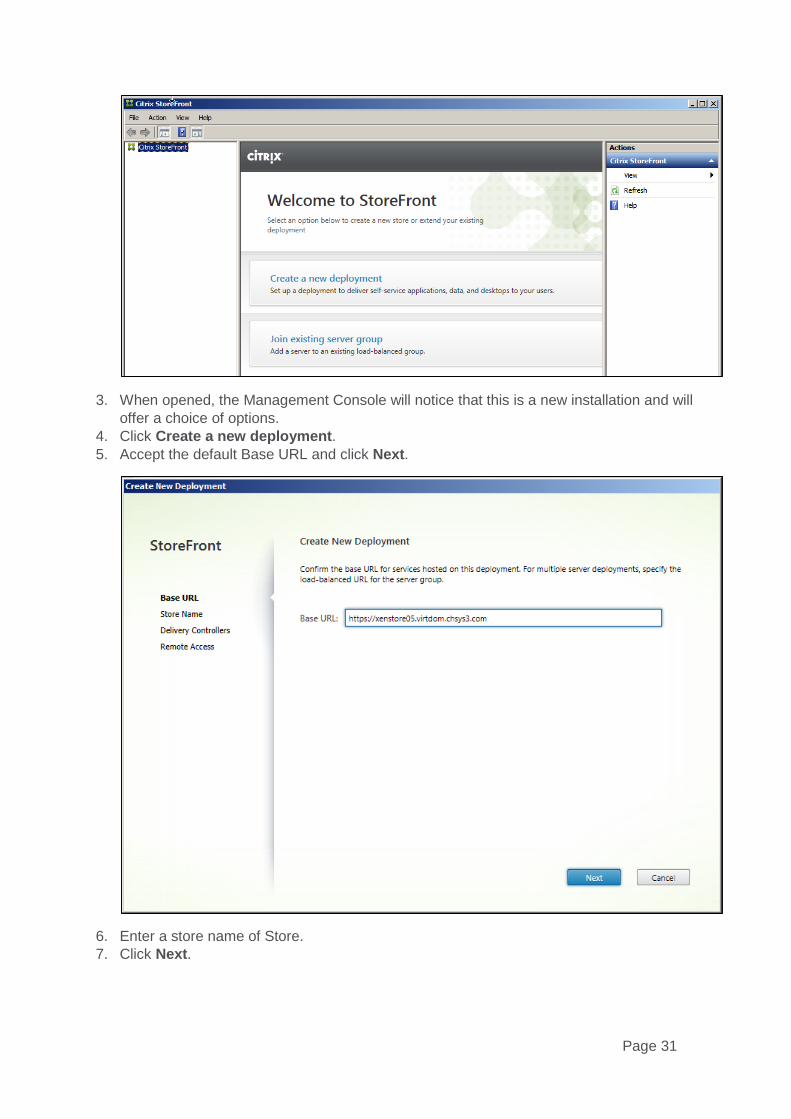
3. When opened, the Management Console will notice that this is a new installation and will offer a choice of options.
4. Click Create a new deployment. 5. Accept the default Base URL and click Next.
6. Enter a store name of Store. 7. Click Next.
Page 31
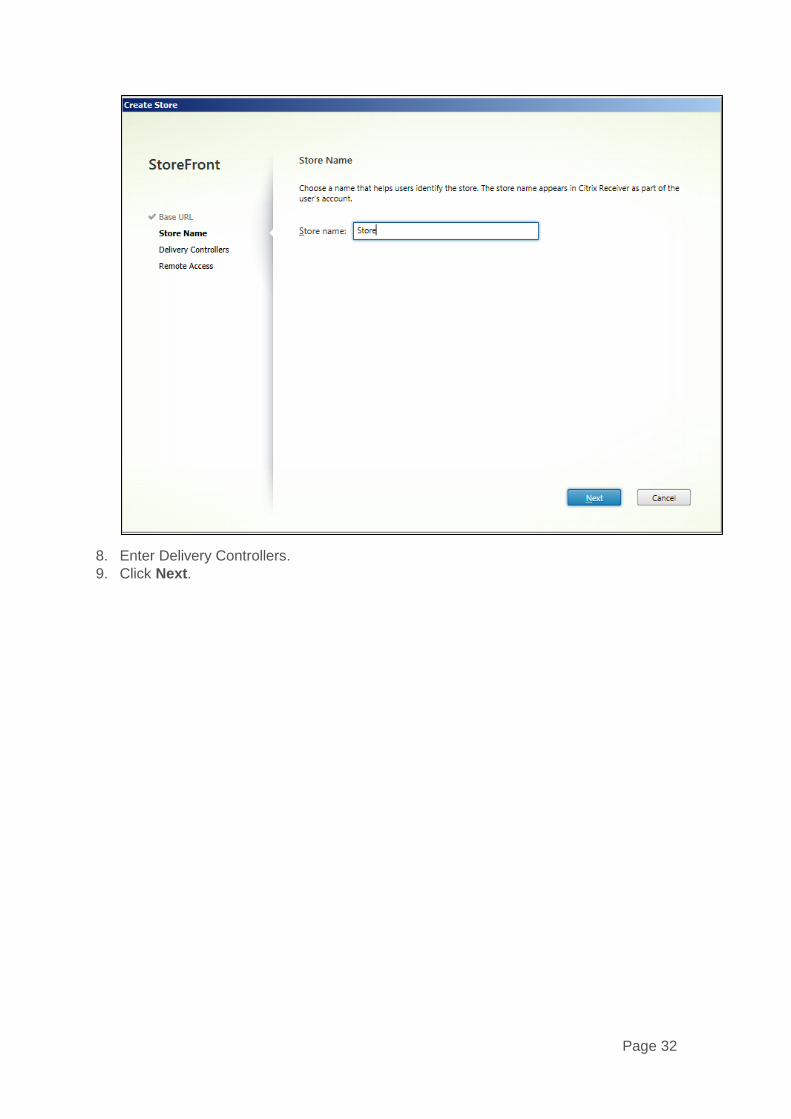
8. Enter Delivery Controllers. 9. Click Next.
Page 32
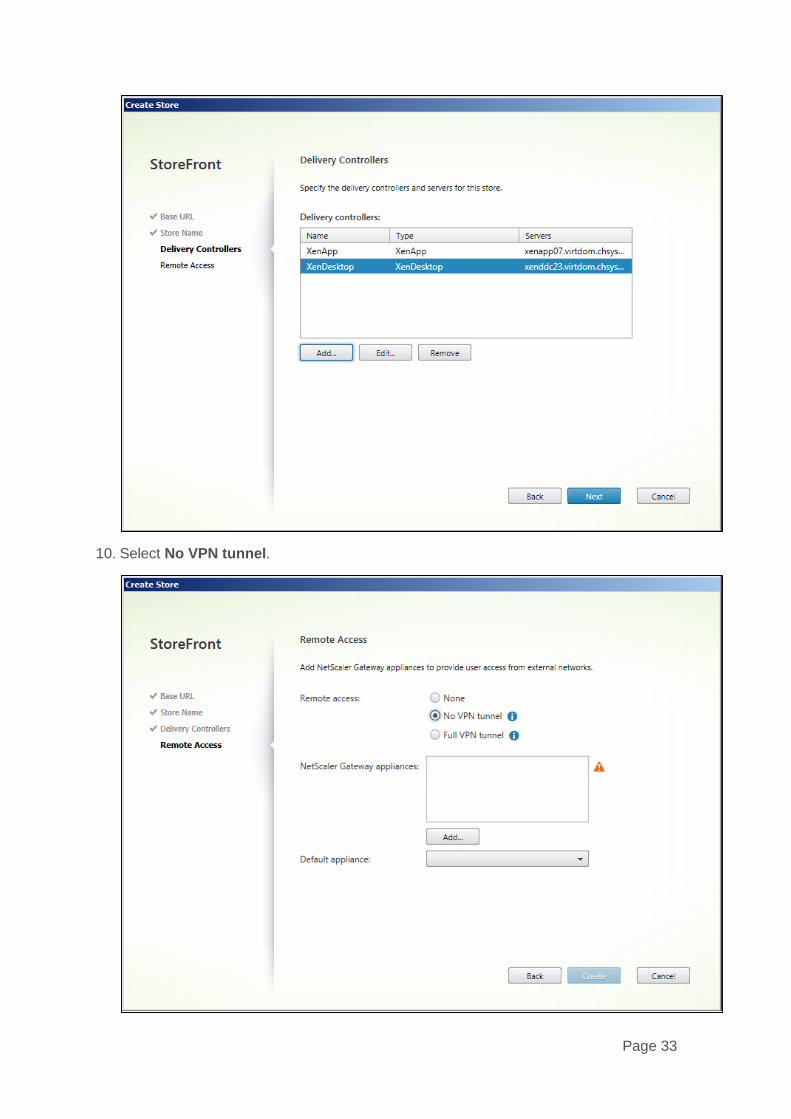
10. Select No VPN tunnel.
Page 33
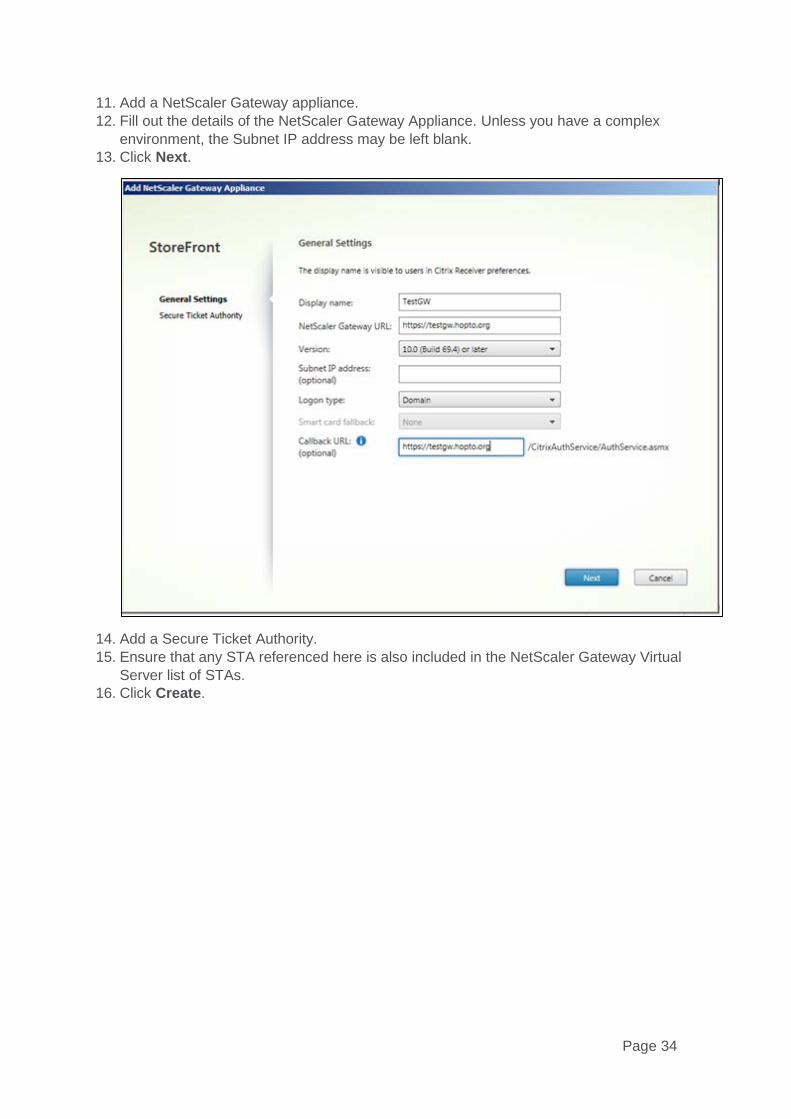
11. Add a NetScaler Gateway appliance. 12. Fill out the details of the NetScaler Gateway Appliance. Unless you have a complex
environment, the Subnet IP address may be left blank. 13. Click Next.
14. Add a Secure Ticket Authority. 15. Ensure that any STA referenced here is also included in the NetScaler Gateway Virtual
Server list of STAs. 16. Click Create.
Page 34
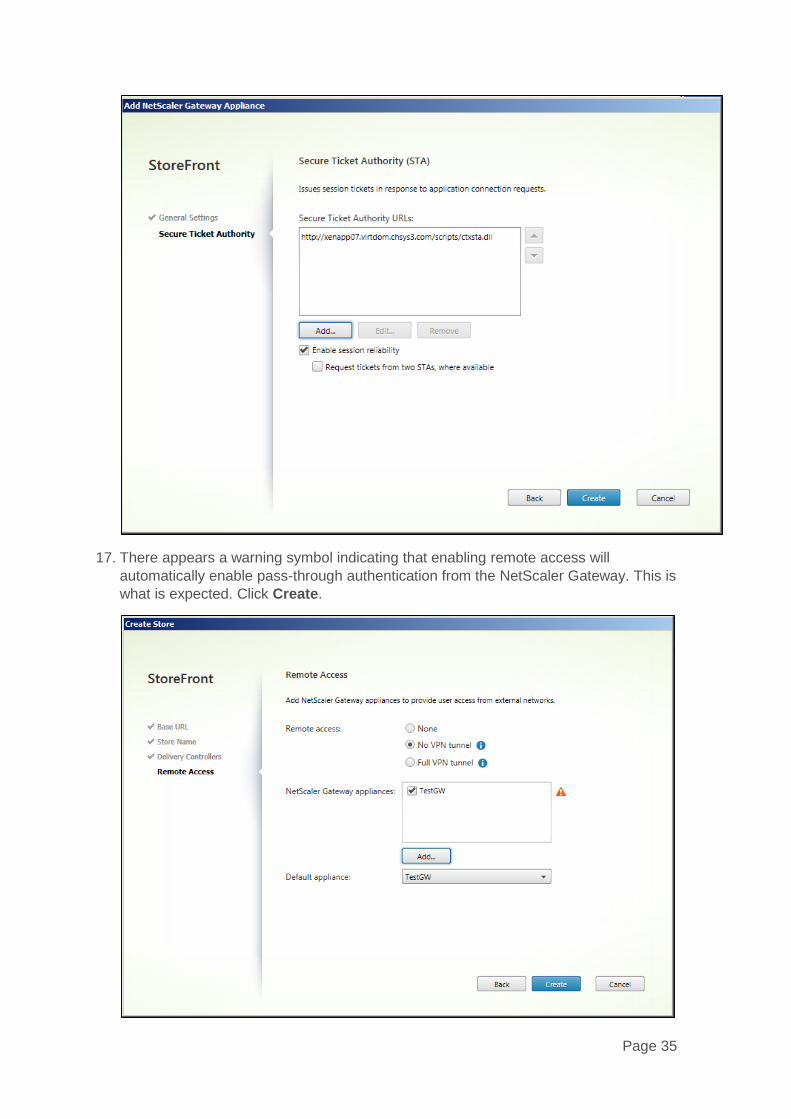
17. There appears a warning symbol indicating that enabling remote access will automatically enable pass-through authentication from the NetScaler Gateway. This is what is expected. Click Create.
Page 35
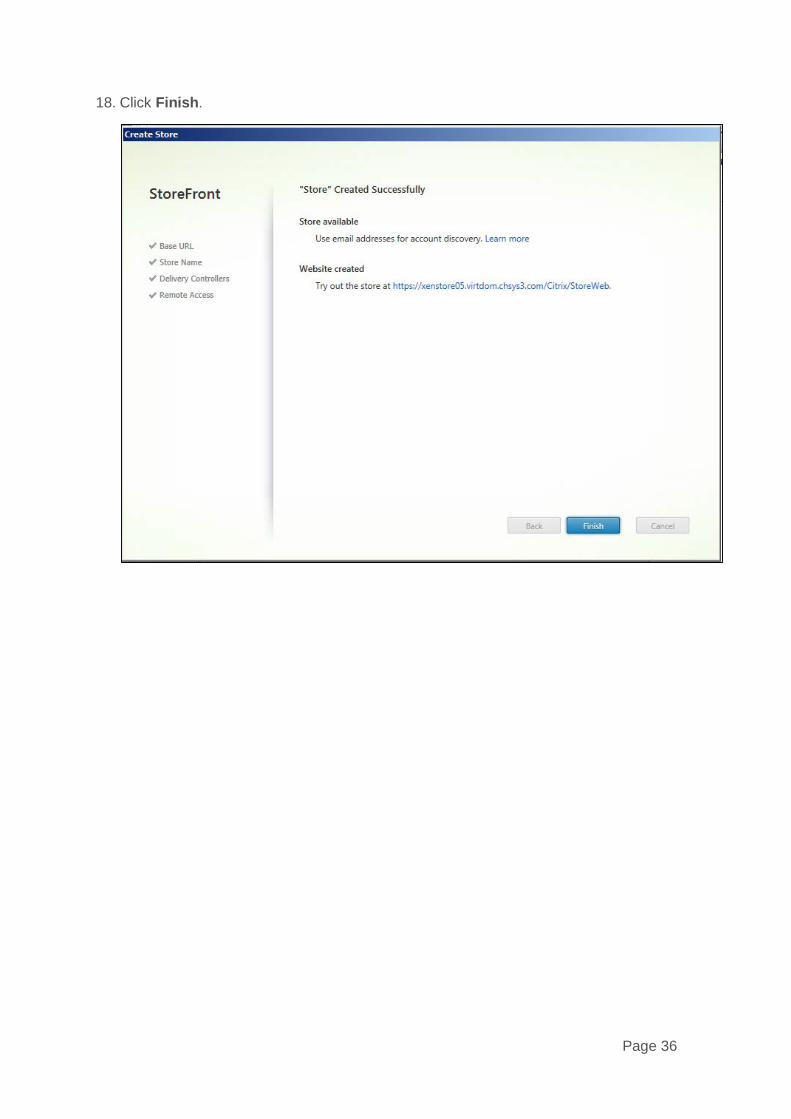
18. Click Finish.
Page 36
Test the deployment from a Windows PC connected to the Internet.
On the Windows PC
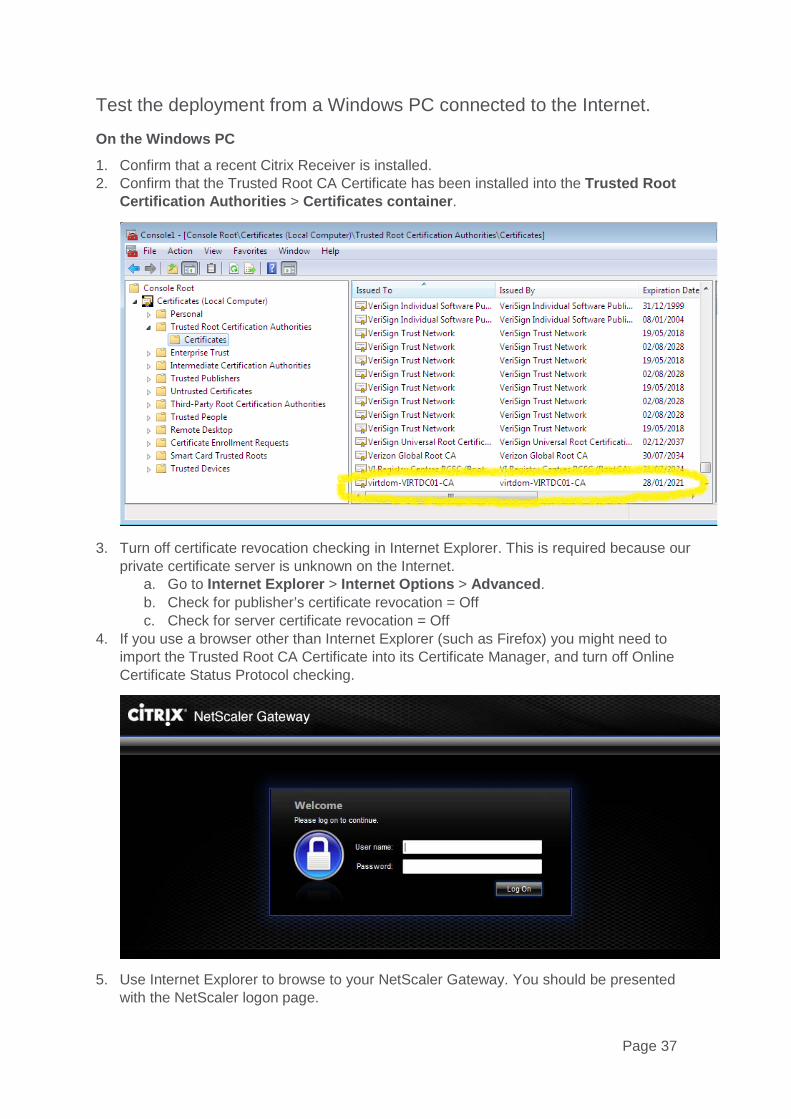
1. Confirm that a recent Citrix Receiver is installed. 2. Confirm that the Trusted Root CA Certificate has been installed into the Trusted Root
Certification Authorities > Certificates container.
3. Turn off certificate revocation checking in Internet Explorer. This is required because our private certificate server is unknown on the Internet.
a. Go to Internet Explorer > Internet Options > Advanced. b. Check for publisher’s certificate revocation = Off c. Check for server certificate revocation = Off
4. If you use a browser other than Internet Explorer (such as Firefox) you might need to import the Trusted Root CA Certificate into its Certificate Manager, and turn off Online Certificate Status Protocol checking.
5. Use Internet Explorer to browse to your NetScaler Gateway. You should be presented with the NetScaler logon page.
Page 37
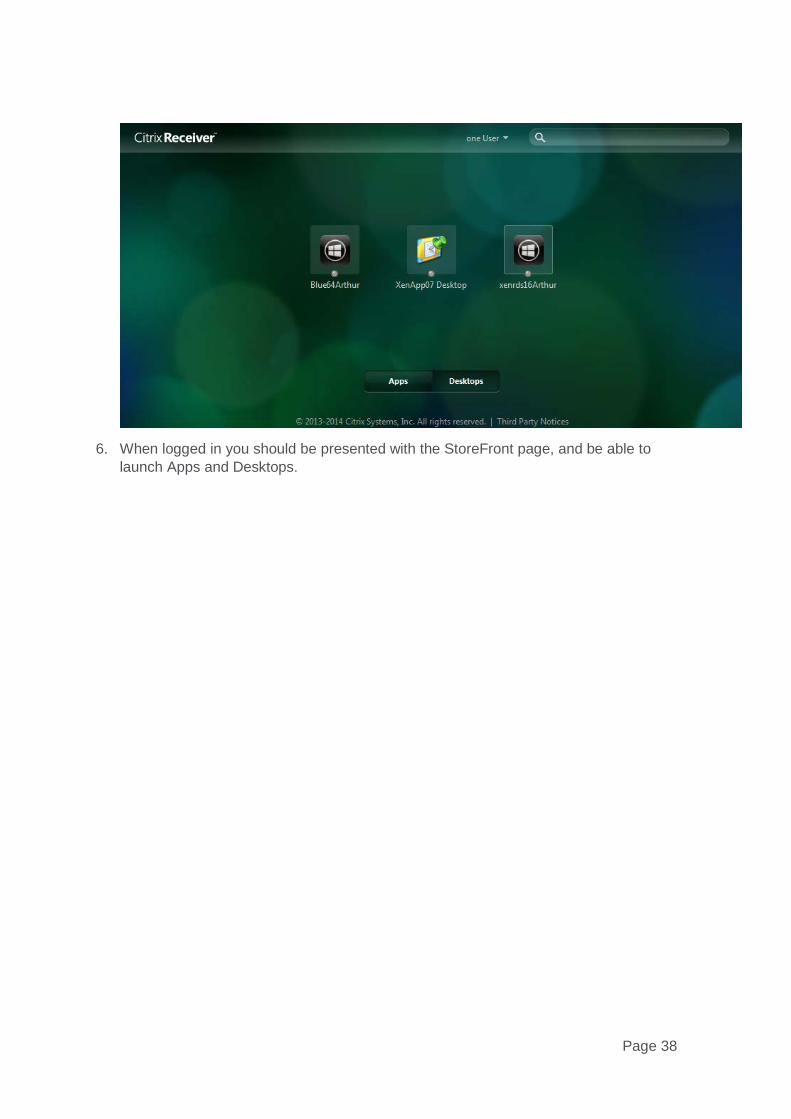
6. When logged in you should be presented with the StoreFront page, and be able to launch Apps and Desktops.
Page 38