how to create a crystal report - conner ash p.c. · how to create a crystal report . step 1: decide...
TRANSCRIPT
Conner Ash P.C. © 2015 Page 1
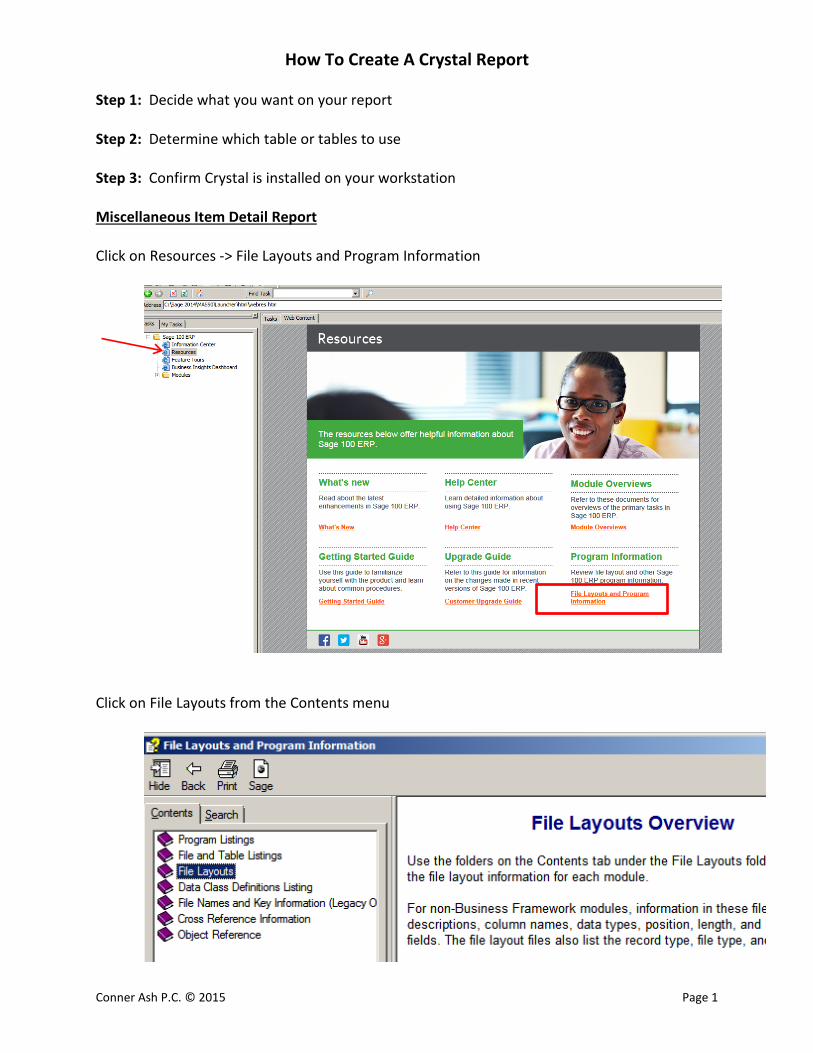
How To Create A Crystal Report Step 1: Decide what you want on your report Step 2: Determine which table or tables to use Step 3: Confirm Crystal is installed on your workstation Miscellaneous Item Detail Report Click on Resources -> File Layouts and Program Information
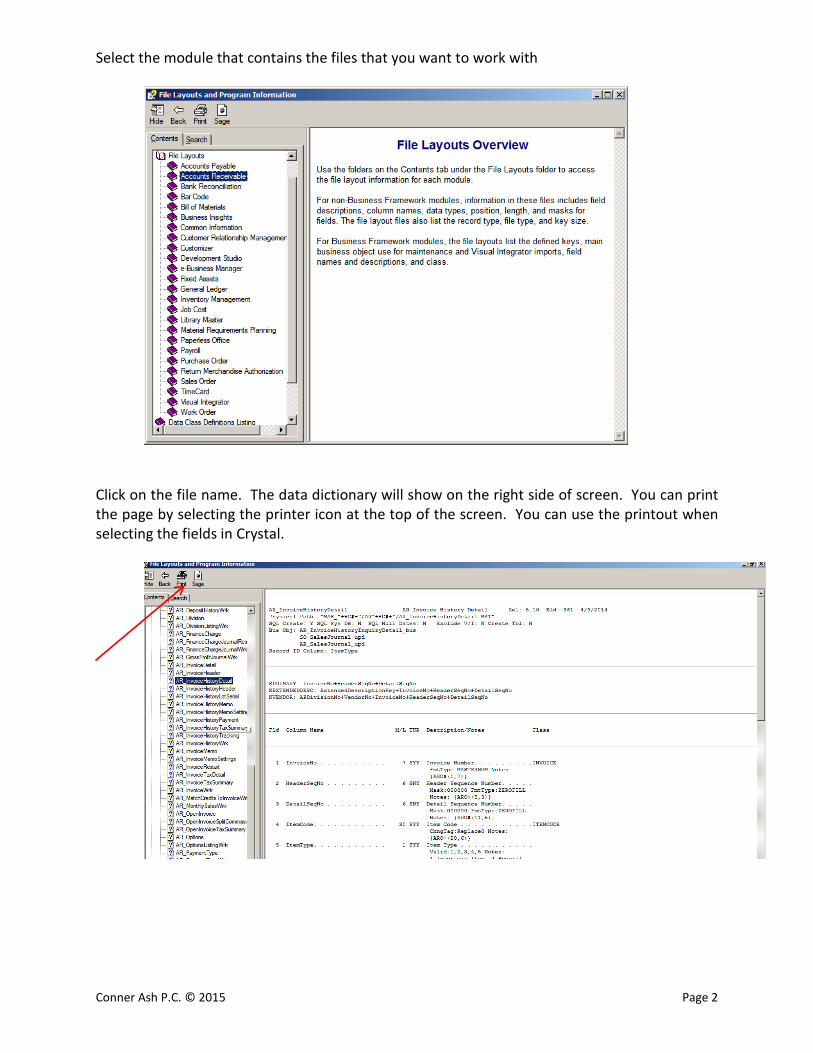
Click on File Layouts from the Contents menu
Conner Ash P.C. © 2015 Page 2
Select the module that contains the files that you want to work with
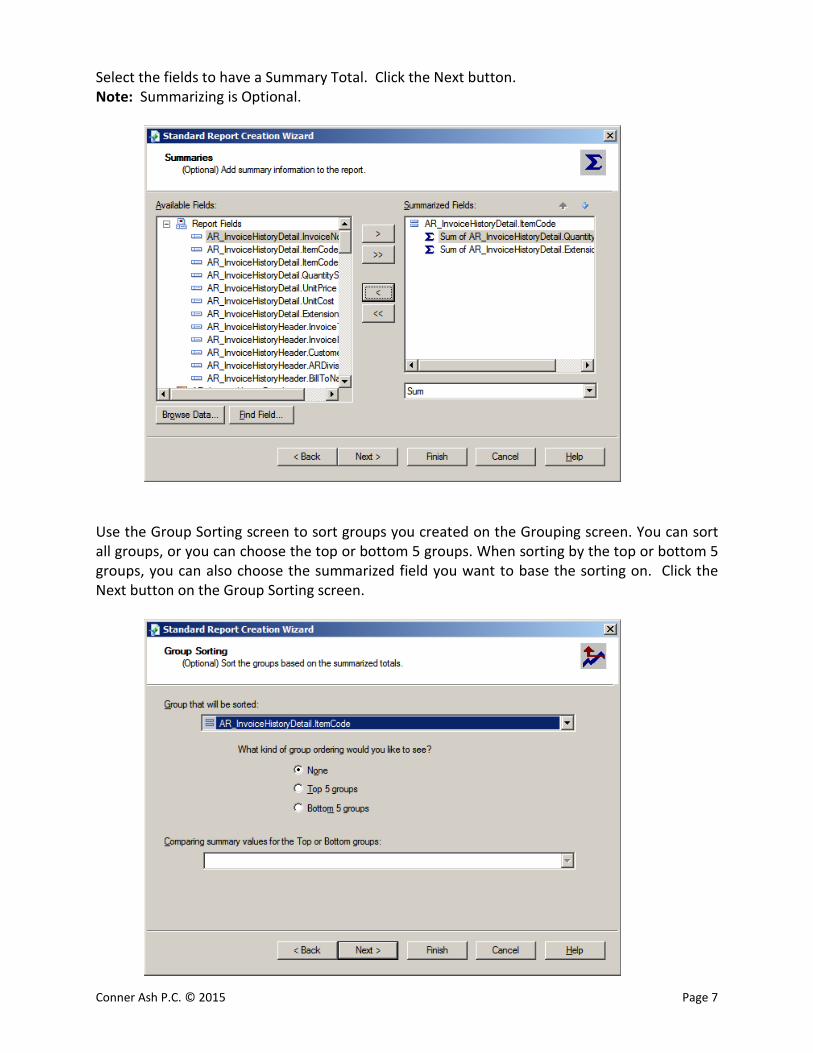
Click on the file name. The data dictionary will show on the right side of screen. You can print the page by selecting the printer icon at the top of the screen. You can use the printout when selecting the fields in Crystal.

Conner Ash P.C. © 2015 Page 3
Open Crystal Reports from your Programs list
Click on Report Wizard

Conner Ash P.C. © 2015 Page 4
Double click on the SOTAMAS90 Data Source
Select the Company Code and enter your User Logon information

Conner Ash P.C. © 2015 Page 5
Scroll down until you find the table(s) that you want to include in your report. Highlight the table and click the > button to select the tables. Once the tables are selected, click the Next button.
Click the Next button on the Link window

Conner Ash P.C. © 2015 Page 6
Select the fields from each table that you would like to appear on your report. You can move the positioning of the fields by using the up and down arrows. Click the Next button.
Select the field or fields that you will Group the data by. This will allow you to do a sub-total by Group. Click the Next button. Note: Grouping is optional.
Conner Ash P.C. © 2015 Page 7
Select the fields to have a Summary Total. Click the Next button. Note: Summarizing is Optional.
Use the Group Sorting screen to sort groups you created on the Grouping screen. You can sort all groups, or you can choose the top or bottom 5 groups. When sorting by the top or bottom 5 groups, you can also choose the summarized field you want to base the sorting on. Click the Next button on the Group Sorting screen.
Conner Ash P.C. © 2015 Page 8
Use the Chart screen to insert a graph or chart into a report. Click the Next button on the Chart screen.
Use the Record Selection screen to choose fields to select (or filter) records in a report. By selecting records in this manner, you can narrow the scope of your report and improve processing speed. Creating a record selection is an optional step in the wizard. Click the Next button.

Conner Ash P.C. © 2015 Page 9
Use the Template screen to choose from predefined formatting templates for use in your report. Adding a template is an optional step in the wizard. Click the Finish button.
Enter the Company Code and your Logon information. Crystal will access the data in the tables for this company.
Conner Ash P.C. © 2015 Page 10
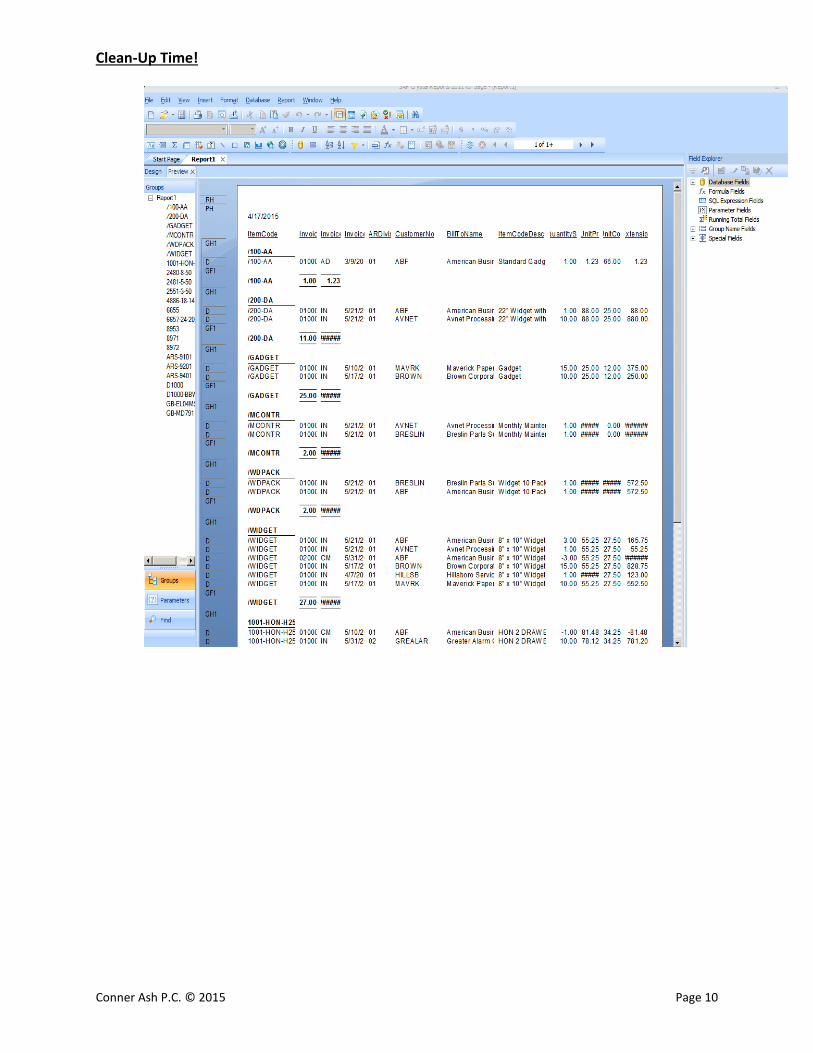
Clean-Up Time!
Conner Ash P.C. © 2015 Page 11
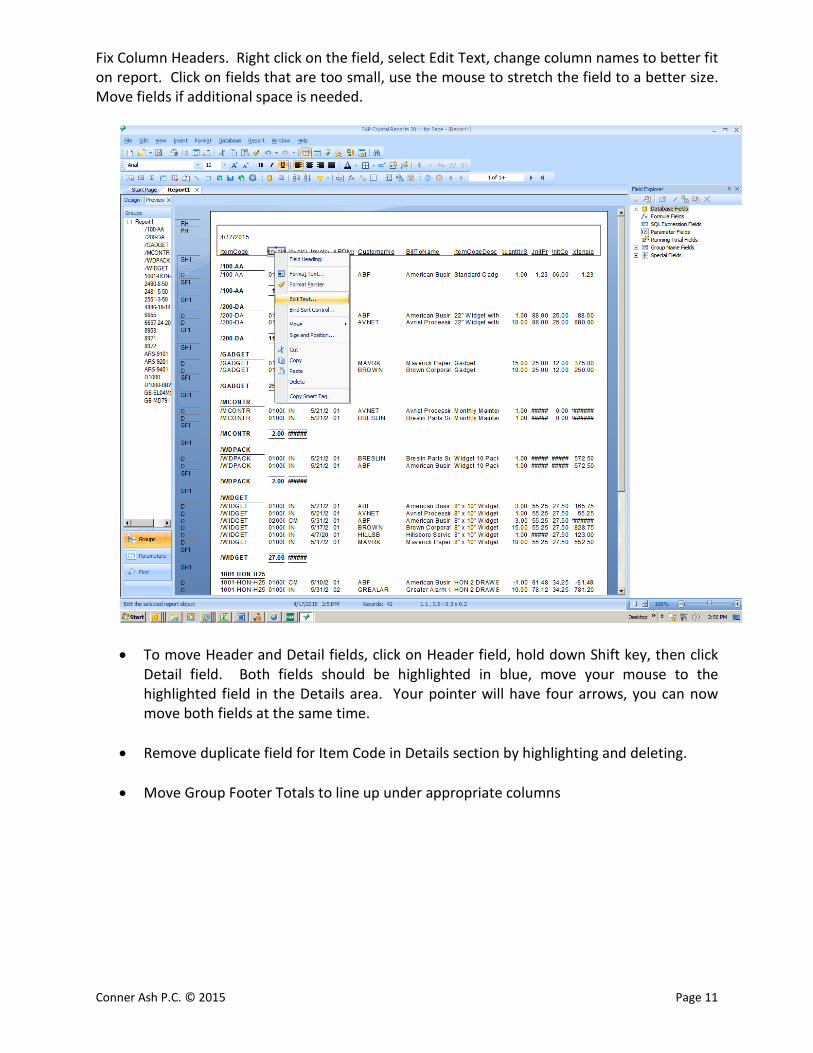
Fix Column Headers. Right click on the field, select Edit Text, change column names to better fit on report. Click on fields that are too small, use the mouse to stretch the field to a better size. Move fields if additional space is needed.
• To move Header and Detail fields, click on Header field, hold down Shift key, then click Detail field. Both fields should be highlighted in blue, move your mouse to the highlighted field in the Details area. Your pointer will have four arrows, you can now move both fields at the same time.
• Remove duplicate field for Item Code in Details section by highlighting and deleting.
• Move Group Footer Totals to line up under appropriate columns

Conner Ash P.C. © 2015 Page 12
Select Expert: To filter your record selection, click Report -> Select Expert -> Record
Choose the field that you want to filter.
Conner Ash P.C. © 2015 Page 13
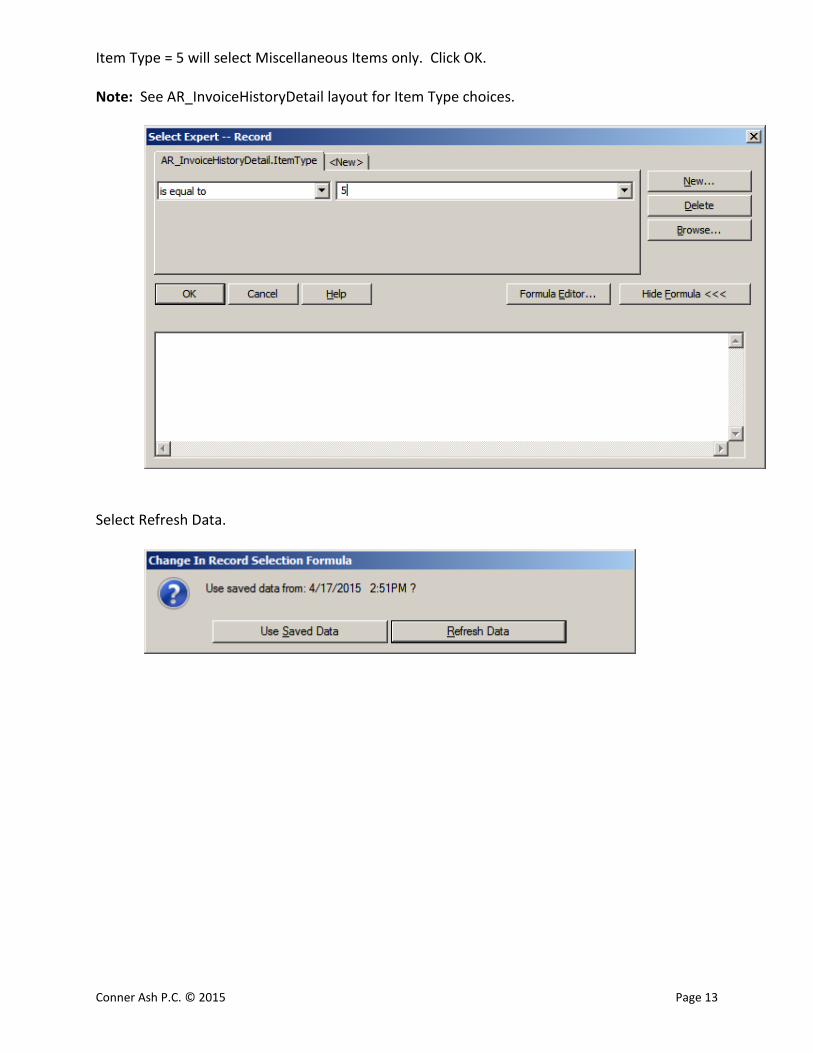
Item Type = 5 will select Miscellaneous Items only. Click OK. Note: See AR_InvoiceHistoryDetail layout for Item Type choices.
Select Refresh Data.

Conner Ash P.C. © 2015 Page 14
Conner Ash P.C. © 2015 Page 15
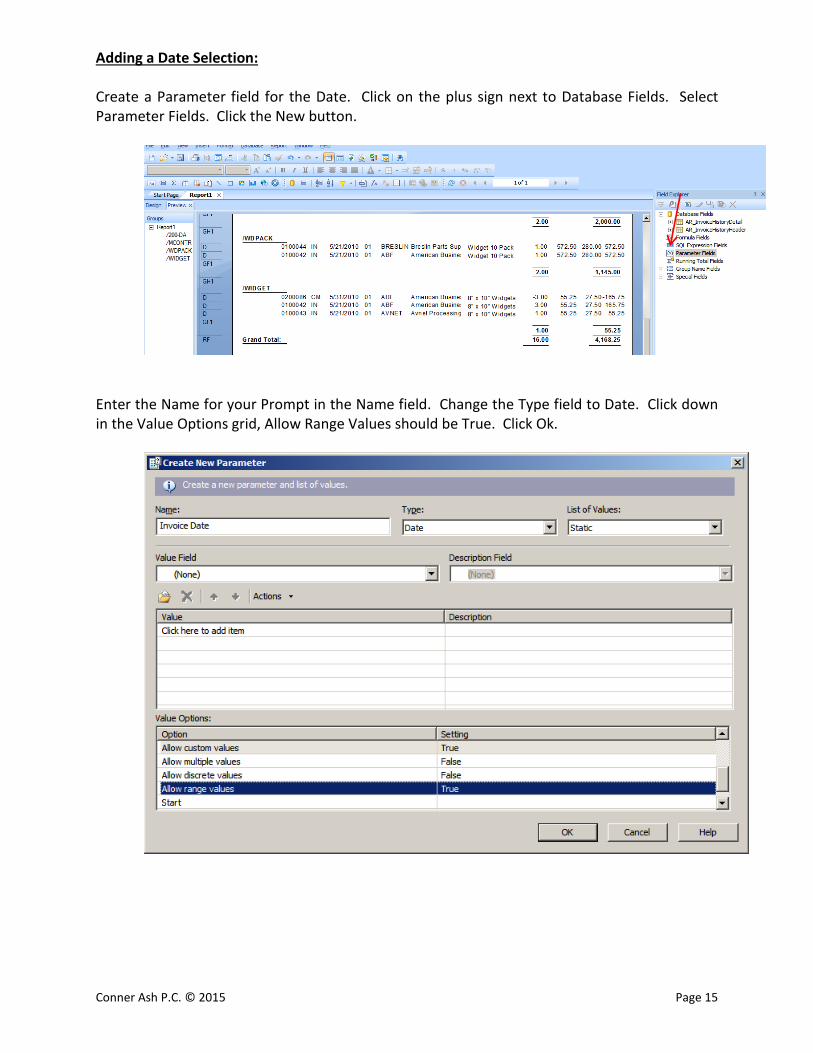
Adding a Date Selection: Create a Parameter field for the Date. Click on the plus sign next to Database Fields. Select Parameter Fields. Click the New button.
Enter the Name for your Prompt in the Name field. Change the Type field to Date. Click down in the Value Options grid, Allow Range Values should be True. Click Ok.

Conner Ash P.C. © 2015 Page 16
Click on Report -> Select Expert -> Record. Click the New tab. Select the InvoiceDate field, click Ok. Click the down arrow and select Is Equal To, then click the down arrow and select the Parameter field. Click OK.
The system will prompt for the Date.

Conner Ash P.C. © 2015 Page 17
Enter the date ranges and click OK.
Conner Ash P.C. © 2015 Page 18
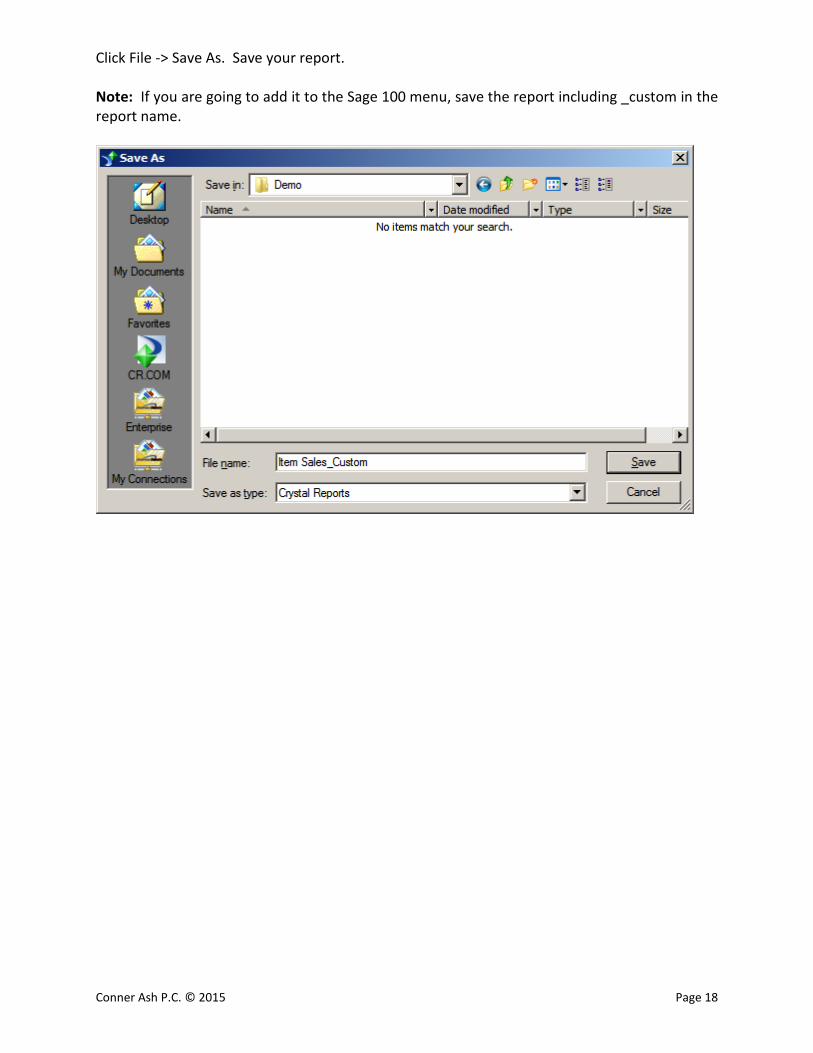
Click File -> Save As. Save your report. Note: If you are going to add it to the Sage 100 menu, save the report including _custom in the report name.
Conner Ash P.C. © 2015 Page 19
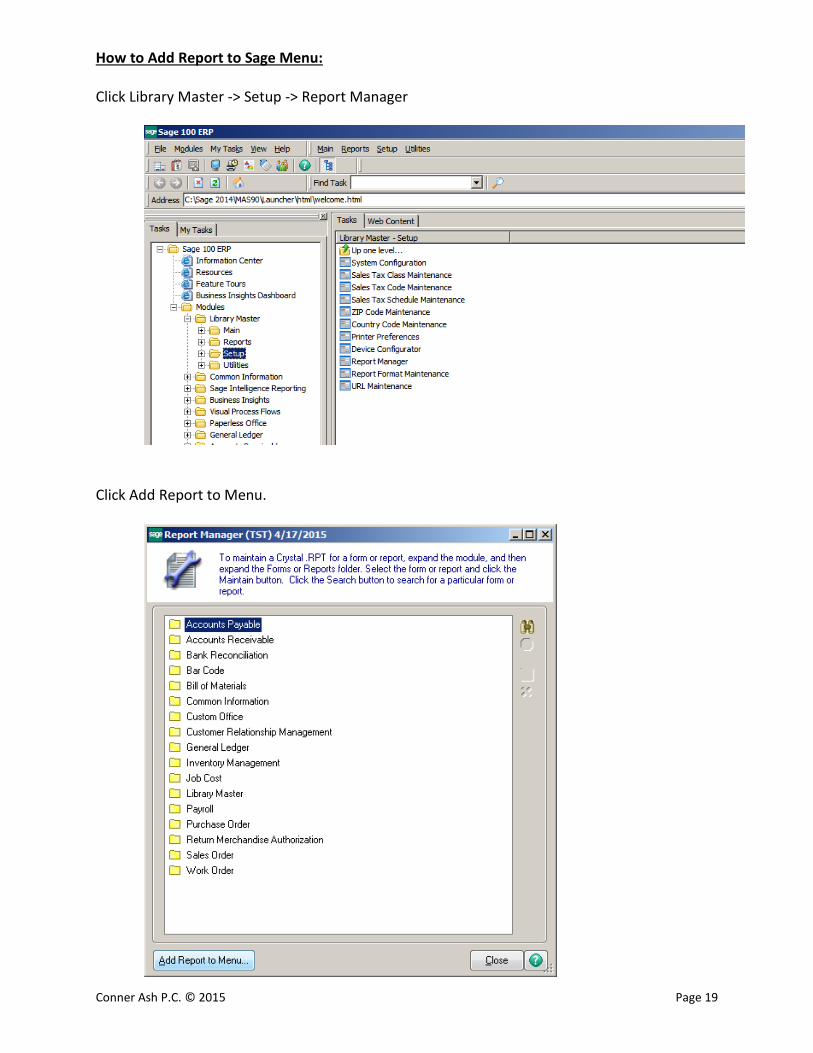
How to Add Report to Sage Menu: Click Library Master -> Setup -> Report Manager
Click Add Report to Menu.
Conner Ash P.C. © 2015 Page 20
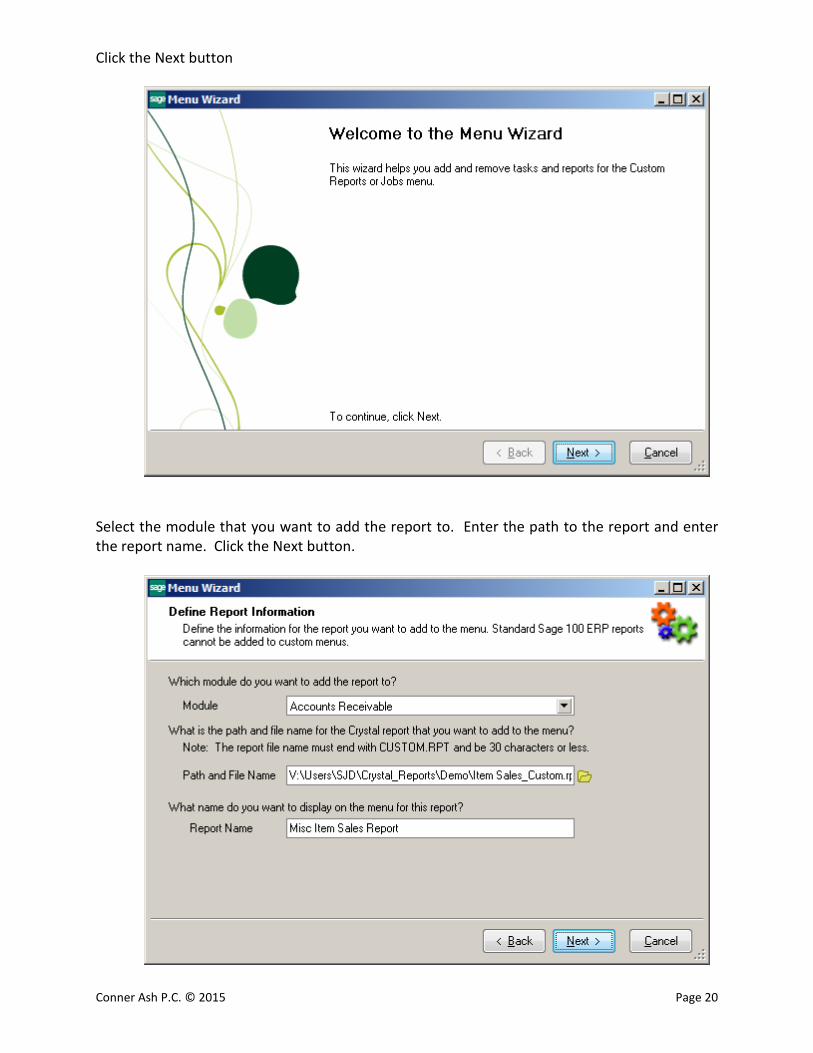
Click the Next button
Select the module that you want to add the report to. Enter the path to the report and enter the report name. Click the Next button.

Conner Ash P.C. © 2015 Page 21
Select the Roles that will have the rights to run the report. Click the Next button.
Click the Finish button and Close the Report Manager window.

Conner Ash P.C. © 2015 Page 22
Select Custom Reports from the module you added the report for.
Select the new report.

Conner Ash P.C. © 2015 Page 23
Click the Print button
The first time running the report, the system will prompt that it needs to be converted. Click Yes.
Enter the report Dates. Click the OK button.

Conner Ash P.C. © 2015 Page 24