how to fly - intouch yoga byron bay
TRANSCRIPT

australian yoga life • december 2013 - february 201464
hHandstand (Adho Mukha Vrksasana) and headstand (Salamba Sirsasana) are troublesome for many. The good news is that by going through targeted preparation, and improving our technique, these postures can be made much easier to do and even be comfortable!
So, what does it take, bio-mechanically, to achieve these postures effortlessly, and without strain?
Milestone 1Check/create adequate range of movement at the shoulder joint The first and the most important stage in achieving any posture is adequate range of movement at the required joints. For headstand and handstand, the shoulder is the crucial joint.
Why?
For each of these inversions to be steady and comfortable, the whole spine should form the axis of the posture, so that it can become the centre of gravity, and bear most of the weight just as it is designed to do in an upright standing position. In order to bear most of the load, the shape of the spine in either of these postures should be close to its shape in Mountain Pose (Tadasana). This in turn is dependent on the range of movement at the shoulder joint.
Think of the arm position required for handstand (Adho Mukha Vrksasana) as if in Tadasana. One would need to raise one’s arms beside one’s ears, have them parallel, and keep them straight. But many practitioners do not have sufficient range of motion in the shoulder joint to do this – if asked to raise the arms up beside the ears and keep them both parallel and straight, they will have to choose either keeping the elbows straight and taking the arms wider apart, or trying to keep them about parallel, but bending at the elbows.
So what will happen in the upside down version, when asked to maintain this parallel and straight arm position whilst also weight bearing on the hands? The body will compensate at the point of least resistance. The tendency is that the spine will distort from its Tadasana shape – often into a backbend shape putting strain on the shoulders and the wrists.
In headstand (Salamba Sirsasana), keeping a parallel upper arm position is also needed to maintain stability in the posture, and the correct load bearing through the spine which in headstand also crucially includes the head and neck. In order to maintain the upper arms at parallel, and a ‘Tadasana’ spine, the bent elbow arm position of the headstand requires still more rotation at the shoulder joint than the straight arm position of handstand. If we approximate
the headstand arm position from standing upright, we find that those with tightness in the shoulders will be unable to perform it without either taking the elbows much wider apart, and/or changing the spine from its neutral Tadasana shape. As the elbows get wider (due to lack of mobility at the shoulder joint) the load bearing shifts from the central axis of the spine, and begins to be spread more through the arms and shoulders. The body compensates for a lack of mobility in the shoulders and thoracic spine by moving the cervical spine into flexion (bending the neck forwards.) In a headstand, where the head is fixed on the floor, the above dynamic produces an arch at the back of the neck with the chin lifting up. If the neck is in an arched position, rather than the weight of the body being spread through the axis of the whole spine, weight is being carried on just a few neck vertebrae and their discs.
This may create increased tightness and pain in the neck and shoulders in the short term. In the long term, there is the possibility of damage to tendons, ligaments and intervertebral discs.
To check that there is adequate shoulder rotation, and to help create it if there is not, follow the instructions and pictures in the boxed text opposite for stage one of handstand and headstand preparation.
inversions:HOW TO FLY BY FLO FENTON

australian yoga life • december 2013 - february 2014 65
INvERSIONS: HOW TO FLY
Handstand preparation: stage oneFirst come onto the hands and knees, with the tops of the feet on the floor, and the tips of big toes touching the wall. Sit the hips back onto the heels. Extend the arms forward with the palms on the mat and the arms straight. Then come back up onto the hands and knees. The hands and knees should now be in the right starting position relative to one another.
Check that the hands are at least shoulder width apart, with the fingers spread and the index finger pointing directly ahead, not turned inwards. Tuck the toes under. Inhale, and as you exhale lift the hips up and back into Downward Facing Dog Pose (Adho Mukha Svanasana). Before pushing all the way back, take time to ensure that the shoulders are able to turn outwards as far as possible. Feel that the upper back is broad and that the shoulder blades are wide apart. The heels should be raised a few inches up the wall, with the balls of the feet and the toes a couple of inches away from the wall. If you have stiff feet, you may have to step the toes forward at this stage. Those who are very flexible can work the soles of the feet to the floor as shown. See image 1.
If there is adequate shoulder rotation to safely perform Handstand, there will be a continuous line formed from the hip to the wrist when the body is viewed from the side (refer image 1) not a jagged line (refer image 2). The arms should be able to easily rotate outward with the elbows straight, so that the armpits roll inward and face the sides of the chest. Only if all this is easily achieved, is the student ready to move on to stage two.
Headstand preparation: stage oneFirst come onto the hands and knees with the tops of the feet on the floor, and the tips of big toes touching the wall. Sit the hips back onto the heels. Extend the arms forward with the palms on the mat. Then come onto the elbows and knees. Check that the elbows are no wider than shoulder width apart by wrapping the hands around the opposite elbow. The first joint of the middle fingers should be able to wrap right around the outside of the elbows. Then clasp the hands with the palms together.
Inhale, and as you exhale lift the hips up and back. Position the feet as described above for Handstand. The line down the side of the body from hip to elbow should be a straight, continuous one (refer image 3) not a jagged one (refer image 4). As well, the elbows should be sufficiently far enough forward of the shoulders so there is at least a 45 degree angle between the upper arms and the floor. The head should move easily back between the upper arms (refer image 3) not jutting forward (refer image 4). There should be no tendency for the elbows to move further apart and/or the shoulders to roll inwards. Only if all this is easily achieved, is the student ready to move on to stage two.
3
1
2
4
Handstand preparation: stage one - correct
Handstand preparation: stage one - incorrect
Headstand preparation: stage one - correct
Headstand preparation: stage one - incorrect

australian yoga life • december 2013 - february 201466
INvERSIONS: HOW TO FLY
Handstand preparation: stage two
Feet up the wall (Refer image 5)
Come into Downward Facing Dog Pose with the feet to the wall as described above for Handstand stage one. If adequate flexibility is there, come back to hands and knees and walk the hands in one hand length closer to the wall. Lift the hips up and back. Now step the feet up the wall to around hip height.
The spine should be upright and parallel to the wall. The hands may need to be moved further in or out from the wall depending on spine to leg length ratios. There should be one straight line from hip to wrist. The legs should straighten easily. Check that the front ribs are not being pushed forward and that the spine isn’t moving into a backbend.
The posture should feel easy enough to stay in with an easy, smooth breath for at least 10 to 15 breathing cycles.
Headstand preparation: stage two
Feet up the wall (Refer image 6)
Come into Headstand preparation stage one as described above. If there is adequate flexibility, come back to elbows and knees and walk the elbows in about 15 centimetres closer to the wall. Lift the hips up and back. Now step the feet up the wall to around hip height and align the pose as described above for Handstand.
The spine should be upright and at right angles to the wall (the elbows may need to be further in or out from the wall depending on spine to leg length ratios.) There should be one straight line from hip to elbow. Legs should easily be straight. Check that the front ribs are not being pushed forward and that the spine is not moving into a backbend.
The posture should feel easy enough to stay in with an easy smooth breath for at least 10-15 breathing cycles.
Milestone 2Check/create adequate strength/stability to hold the posture comfortably
Once satisfied that the shoulder joint has the required range of movement, the next milestone is adequate strength in the joint and surrounding structures to hold the required alignment and stay in the pose without strain. Just like flexibility, strength takes time to build. All of the weight bearing postures on the arms, such as Downward Facing Dog Pose, Plank Pose (Chaturanga Dandasana) etc. help to build upper body strength in various ways.
To check that the required strength and stability are there, and to help build them if they are not, follow the instructions in the boxed text for Handstand and Headstand Preparation Stage Two.
Handstand preparation: stage two
Headstand preparation: stage two
5
6

australian yoga life • december 2013 - february 2014 67
Handstand technique: kicking up
9
INvERSIONS: HOW TO FLY
Handstand technique: starting position
Angle of shoulder in relation to wrist
Begin in Downward Facing Dog pose. Then step one foot a little forward. Make sure that in the starting position there is a good slope of about 45 degrees from the shoulder to the wrist, i.e. the shoulder is a long way back from the wrist at this stage (refer image 7). This will give the adequate momentum necessary to fly into the posture.
Then practice putting the brakes on. At this step, the goal is to create a dynamic and deliberate forward movement which positions the shoulder directly above the wrist, and also creates an abrupt stop there (refer image 8). A deliberate and dynamic movement is needed so that the momentum required to fly up is achieved consciously and consistently every time. However, a strong sense of where that momentum needs to stop is also needed: the shoulders should not keep going beyond the vertical, or there is a danger of collapsing and of the head hitting the wall.
Practice moving forward and putting the brakes on repeatedly until it feels natural and automatic.
Kicking up, the final step, is combining the previous steps of moving forward and putting the brakes on, with throwing the back leg up (refer image 9). The combined momentum of the forward movement of the torso and the weight of the leg being thrown up dynamically should easily move the whole spine to vertical.
Milestone 3Adopt a starting position that gives the body the biomechanical advantageThe third and final milestone is perfecting the technique used to get into these postures in order to both minimise effort and reduce strain. Even for those who have the required flexibility and strength, trying to get into either of these postures from the wrong starting position can make them all but impossible. See the instructions in the boxed text and you should be able to ‘fly’ into these inversions.
Handstand technique: ‘putting the brakes on’
8
7
Handstand technique: starting position
australian yoga life • december 2013 - february 201468
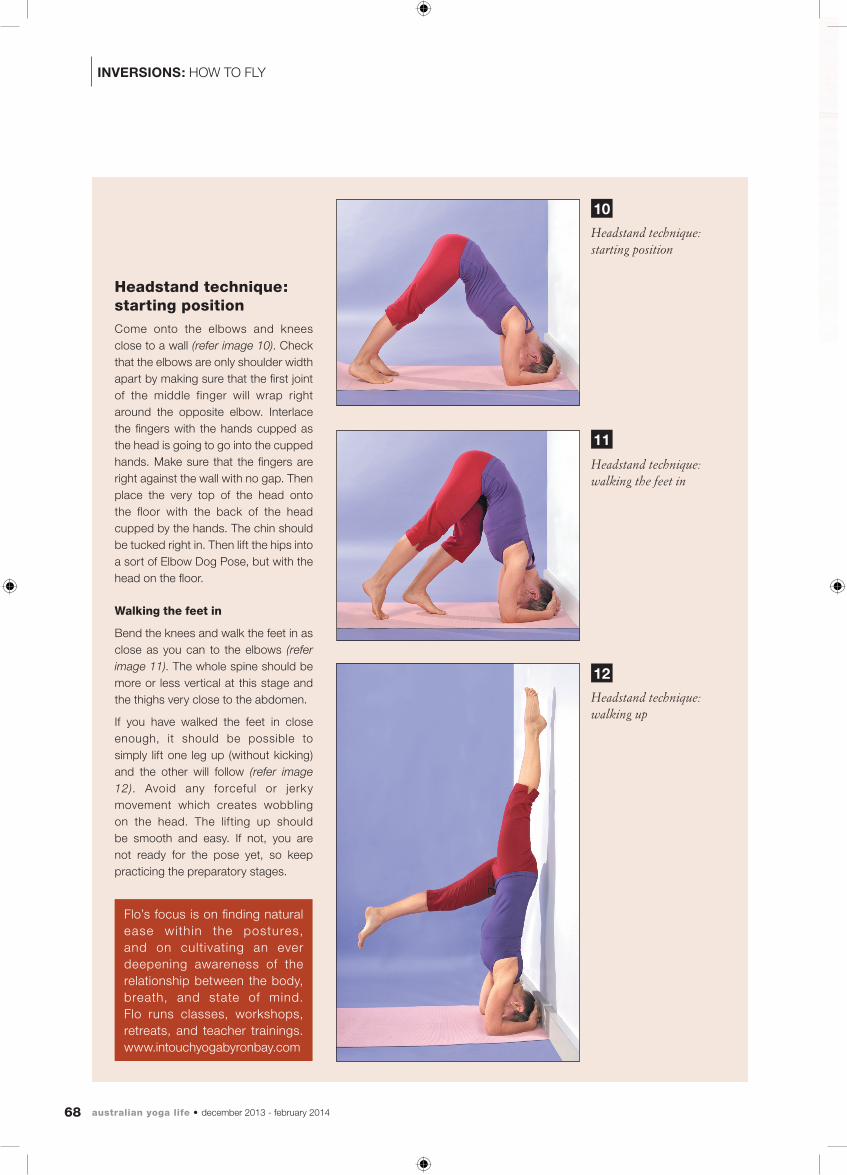
Headstand technique: walking up
12
Headstand technique: walking the feet in
11
10
Headstand technique: starting position
INvERSIONS: HOW TO FLY
Flo’s focus is on finding natural ease within the postures, and on cultivating an ever deepening awareness of the relationship between the body, breath, and state of mind. Flo runs classes, workshops, retreats, and teacher trainings. www.intouchyogabyronbay.com
Headstand technique: starting position Come onto the elbows and knees close to a wall (refer image 10). Check that the elbows are only shoulder width apart by making sure that the first joint of the middle finger will wrap right around the opposite elbow. Interlace the fingers with the hands cupped as the head is going to go into the cupped hands. Make sure that the fingers are right against the wall with no gap. Then place the very top of the head onto the floor with the back of the head cupped by the hands. The chin should be tucked right in. Then lift the hips into a sort of Elbow Dog Pose, but with the head on the floor.
Walking the feet in
Bend the knees and walk the feet in as close as you can to the elbows (refer image 11). The whole spine should be more or less vertical at this stage and the thighs very close to the abdomen.
If you have walked the feet in close enough, it should be possible to simply lift one leg up (without kicking) and the other will follow (refer image 12). Avoid any forceful or jerky movement which creates wobbling on the head. The lifting up should be smooth and easy. If not, you are not ready for the pose yet, so keep practicing the preparatory stages.