how to make basic survival foods
DESCRIPTION
How to Make Basic Survival FoodsTRANSCRIPT

A Long-Term Survival Guide - How To Make Basic Survival Foods:
How To Make Your Own Hardtack:
Hardtack, or "Army Bread", was the original army ration, before C-rations and MRE's.
Closeups of hardtack. Soak in liquid before trying to eat, or smash it up and drop it in a bowl of soup.
One problem with storing long-term survival supplies is that you can't store bread. Whole wheat stores basicallyforever, but when ground into flour, it goes rancid quickly, and bread soon starts to mold. Consequently, if youhave to make your own bread, you wind up having to grind flour and bake bread every few days.
This problem was solved a long time ago by baking flour into hardtack. It was one of the staples of settlers and theU S Army, and was often called Army Bread. The early army and cavalry often had to go long periods of timebefore being re-supplied, and they needed food that would keep without refrigeration, like hardtack and jerky.
When pioneers crossed the continent in horse-drawn, or oxen-drawn wagons, the journey often took months.Hardtack was one of the food supplies they packed because it can be kept for a long time without spoiling.
Hardtack is also easy to make, and uses only three ingredients at it's simplest (and one of those is water). It is stillavailable for sale on the east coast, where they call it pilot bread, or pilot crackers, and is carried by bush pilots andsailors as an emergency ration, but it is very easy to make your own. You can store regular crackers, and buy shelf-stable buns where MRE's are sold, but this is the cheapest and best way to make your own basic survival ration.
Homemade hardtack and jerky will keep you alive for a very long time. Here's a recipe for a basic hardtack, thatyou can make yourself. WARNING they called it hardtack for a reason. It so hard, that if you try to eat it withoutsoaking it in liquid, you might break a tooth! So, copy the pioneers soak your hardtack in water, hot tea, or soupbefore you try to eat it. You can also break it into small bits, then carefully hold a bit in the mouth, until it softens.

Ingredients 3 cups all-purpose flour, 1 cup water, and 1 teaspoon salt - that's it!
Directions Preheat the oven to 400 degrees. Mix the flour and salt together in a medium-sized bowl. Then, add thewater and stir it all together with a spoon. It will make a dry, very stiff dough.
Knead the dough on a floured surface until it's smooth. Roll the dough out until it's about 114" thick. You can cutout pieces of dough using a cookie cutter or a clean can or cup, or cut out squares of dough using a knife.
Use a fork to poke holes in several places on each piece, or make larger holes with a small wooden dowel.
Place the pieces of dough on a greased cookie sheet, and bake for 30-35 minutes, or until it has a nice color.
Carefully take the hardtack out of the oven, and set aside to cool.
Be sure to soak the hardtack before attempting to eat it. It tastes yummy with a nice warm bowl of soup.
All you really need is flour, salt, and water, but you can add other ingredients to make different kinds of hardtack.
Hardtack Recipes
Here are some recipes that are both fast and easy, and produce delicious hardtack as well. What's more, onebatch will make eight 12-inch-diameter discs which are great served "hot from the pan" with butter, and make veryconvenient snacks to enjoy while camping or backpacking, too.
OATMEAL HARDTACK:
Mix 2-1/2 cups of old-fashioned oatmeal, 3 cups of unbleached flour, 1-1/2 teaspoons of salt, and 1 teaspoon ofbaking soda in a large bowl.
Then, in a separate container, add 11/2 cups of buttermilk and 3 tablespoons of honey to 1/2 cup plus 2tablespoons of melted bacon or sausage drippings, and combine this mixture with the dry ingredients.
When the dough is thoroughly mixed, form it Into eight balls of equal size and roll each one out on a floured board(the thickness will depend on the size of your pans). Use a pegged rolling pin if such a tool is available . If not, astandard rolling pin, jar, or large drinking glass will do.
Transfer each circle to a lightly greased pizza pan, and pat and smooth the dough to fit. A fork can be used topoke holes in the dough, or a meat tenderizing tool can be used to stipple, or dent, a pattern in the surface at thispoint, if a pegged rolling pin wasn't used, and you can mark the "pie" into squares, diamonds, or triangles with aregular pizza cutter, if desired.
Put the pans in the oven for 5-1/2 minutes at 450°F, or until it is dry, but browned only around the edges.

RYE OR WHOLE WHEAT HARDTACK
Substitute 2 cups of rye flour-or 2 cups of whole wheat flour for 1 cup of the oatmeal and 1 cup of the unbleachedflour called for in the basic recipe.
You can please your taste buds with a variety of spices, too: Perhaps 1/2 teaspoon of garlic salt in the rye mixtureor 3/4 teaspoon of caraway seeds and 3/4 teaspoon of sesame seeds in the whole wheat mix might produce ahardtack that your palate finds particularly appealing.
BUCKWHEAT-MILLET HARDTACK
You might want to experiment by substituting 1 cup of buckwheat groats (kasha) for 1 cup of the basic recipe'soats, and 1 cup of millet (uncooked) for 1 cup of the unbleached flour, then adding 1/4 teaspoon more salt andspices as desired.
The result will be a bit moist, as millet doesn't absorb liquid. (If you'd like a drier bread, compensate by mixing inan additional 1/2 cup of unbleached flour.)
SUNFLOWER NUT HARDTACK
For extra-crunchy hardtack, try using 1 cup of sunflower seeds (chopped) instead of 1 cup of the oatmeal called forin the basic recipe. (You can make the same substitution in the rye or whole wheat mixtures.)
CORNMEAL HARDTACK
Replace 1 cup of the unbleached flour and 1 cup of the oatmeal included in the basic recipe with a total of 2 cupsof cornmeal.
Or, if you're basing your conversion on the rye or whole wheat variations, you can simply let 2 cups of cornmealreplace 1 cup of rye (or 1 cup of whole wheat) and one cup of the remaining unbleached flour.
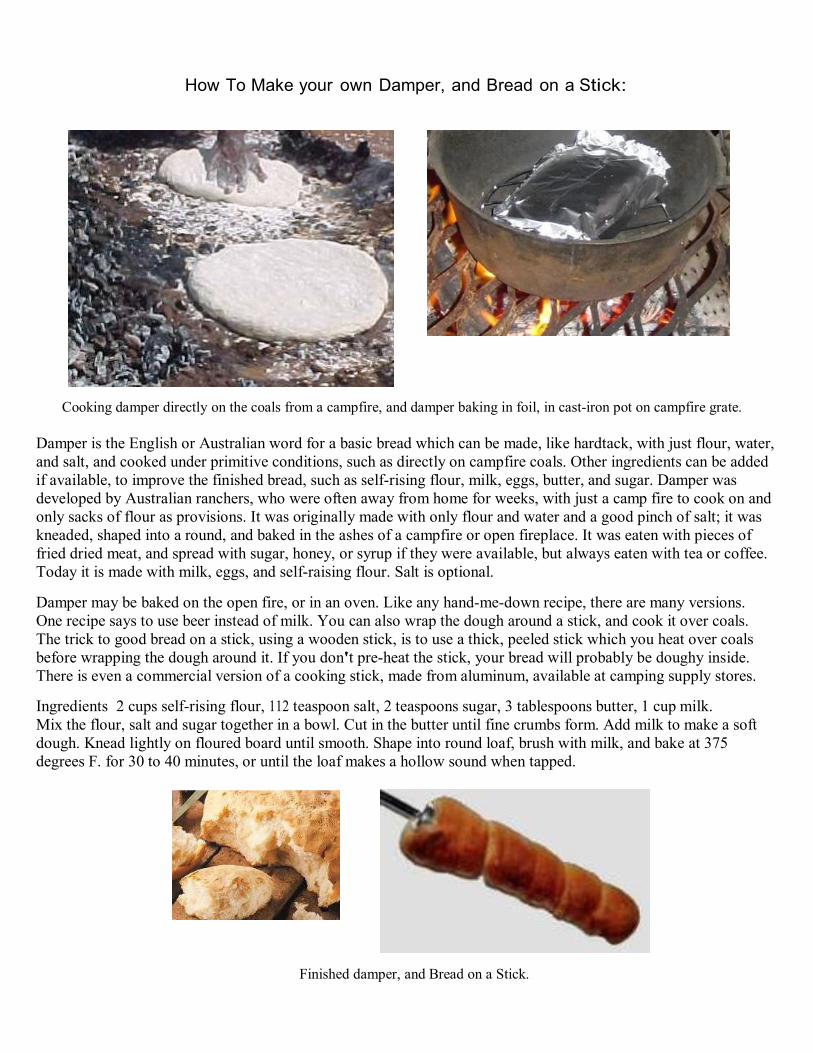
How To Make your own Damper, and Bread on a Stick:
Cooking damper directly on the coals from a campfire, and damper baking in foil, in cast-iron pot on campfire grate.
Damper is the English or Australian word for a basic bread which can be made, like hardtack, with just flour, water,and salt, and cooked under primitive conditions, such as directly on campfire coals. Other ingredients can be addedif available, to improve the finished bread, such as self-rising flour, milk, eggs, butter, and sugar. Damper wasdeveloped by Australian ranchers, who were often away from home for weeks, with just a camp fire to cook on andonly sacks of flour as provisions. It was originally made with only flour and water and a good pinch of salt; it waskneaded, shaped into a round, and baked in the ashes of a campfire or open fireplace. It was eaten with pieces offried dried meat, and spread with sugar, honey, or syrup if they were available, but always eaten with tea or coffee.Today it is made with milk, eggs, and self-raising flour. Salt is optional.
Damper may be baked on the open fire, or in an oven. Like any hand-me-down recipe, there are many versions.One recipe says to use beer instead of milk. You can also wrap the dough around a stick, and cook it over coals.The trick to good bread on a stick, using a wooden stick, is to use a thick, peeled stick which you heat over coalsbefore wrapping the dough around it. If you don't pre-heat the stick, your bread will probably be doughy inside.There is even a commercial version of a cooking stick, made from aluminum, available at camping supply stores.
Ingredients 2 cups self-rising flour, 112 teaspoon salt, 2 teaspoons sugar, 3 tablespoons butter, 1 cup milk.Mix the flour, salt and sugar together in a bowl. Cut in the butter until fine crumbs form. Add milk to make a softdough. Knead lightly on floured board until smooth. Shape into round loaf, brush with milk, and bake at 375degrees F. for 30 to 40 minutes, or until the loaf makes a hollow sound when tapped.
Finished damper, and Bread on a Stick.

How To Make your own Parched Corn:
Making Parched Corn, by browning in a skillet, and how it looks after parching.
Parching corn is simply heating dried corn kernels in a skillet until they are browned. This process makes the hardkernels softer for your teeth, and much more digestible. It's a lightweight, high energy food that was carried byIndians and hunters. It can be eaten as is, or ground into a powder, called pinole. Parched corn kernels taste sort oflike popcorn mixed with flour, but will probably never be a popular food in times of plenty. The hull pieces aresomewhat scratchy, and it is a dry food, which makes it almost mandatory to have something to drink when you eatit. It is best to nibble on two or three kernels at a time, and chew it thoroughly. It is like a crude form of Corn Nuts.
Here's how to make it Heat a small amount of oil in a skillet on low. Wipe the skillet with a paper towel so thatonly a thin coat remains, just enough to prevent the corn from sticking. Pour in enough dry kernels to almost coverthe bottom of the pan. Stir constantly to prevent burning. The kernels are done when they swell and turn light tomedium brown and begin to pop. It takes from about one to five minutes. Dump the corn out onto a plate lined witha paper towel to soak up any remaining oil or grease, then re-oil your skillet and do some more. I like it best withlots of salt. Wheat can also be parched, but parched wheat is chewy, and not as easily digested as parched corn.
Before metal skillets were available, the best way to parch corn was to build a small fire on top of a large flat rock,or a flat area of exposed rock. Once the fire was well-established, it was moved over about a foot or so with a greenstick, and the corn was then poured onto the hot stone where the fire had just been. The heated stone would parchthe corn, and if the stone cooled down before the corn was done, then you just moved the fire again and repeated.
Indians and pioneers used parched corn as an emergency ration. It was used when no game or edible plants could beobtained, and to supplement what they did catch. You can live on parched corn for a long time without digestiveproblems. Some other emergency rations can cause gas, diarrhea, and cramps. One handful of parched kernels wasone meal. They also pounded parched corn into a powder (pinole), using an improvised mortar and pestle, but youcan use a grain grinder or coffee grinder, if you have one available. This powder was usually carried in a leatherbag. One large spoonful of this powder was considered to be one meal. It was mixed with one pint of cold water,then drunk. When possible, it was mixed with sugar or honey, to give it a sweet taste. When you drink this mixture,it expands in the digestive tract, so you should be careful not to consume more than one spoonful per meal. Thepowder and water mix can also be cooked down into a porridge. You can also brown some store-bought cornmealin your oven, to make a modern shortcut version of parched corn powder. Brown the cornmeal in a 425 degree ovenfor 8-10 minutes, by spreading in a thin layer on a cookie sheet; stir several times to prevent scorching.
How to make a Pinole Hot Corn Drink, that tastes like cocoa You need 2 cups blue or white cornmeal, half a cupof sugar, half a teaspoon of cinnamon, and milk. Brown the cornmeal in a hot 425 degree oven for 8-10 minutes byspreading in a thin layer on a cookie sheet, stirring several times to prevent scorching. Add sugar and cinnamon,and use like cocoa in about the same proportions, stirred into hot milk, and simmered for 15 minutes.

How To Process Corn, With Lime:
If you have corn stored as one of your bulk survival grains, here is one way to turn it into useful food products.Masa means "dough". The masa is made from dried corn, which is soaked in water overnight, treated with a limeand water solution, and then ground into a paste. The paste is used to make corn tortillas, and tamales.To process dried corn, all you need is 1 112 pounds (or 1 quart) of dried corn, and 2 tablespoons of slaked lime, or"pickling lime" (or a handful of white wood ashes can be used as a survival substitute, if lime is not available).Directions Clean the corn, and soak it in water overnight, then place the corn in a colander, and rinse it well.
Pickling Lime, soaking corn in the lime-water mixture, rubbing corn in rinse water, and view of de-hulled corn.
Prepare the lime mixture Add 2 quarts of water to a large (at least 4 quart) noncorrosive pan. Place the pan overhigh heat, and add the lime (or ashes), and stir until it is dissolved.
Boil the corn Add the corn into the lime water, and remove any kernels that float to the top. Allow the water toboil, then reduce the heat to a simmer. If you are making the dough for tortillas, allow to boil for 2 minutes. If youare making tamale dough, simmer for 12 to 15 minutes. Remove the pan from the heat, and allow the corn to soak.For tortilla dough allow to soak, covered, overnight. For tamale dough, allow to soak for an hour.
Wash the boiled corn This step is very important. If you don't rinse and clean the corn thoroughly, your dough willtaste like lime (or ashes). Put the corn in a colander, and place it under cold running water. Use both hands, and rubthe corn between your hands, to loosen any hulls still attached to the corn. Continue until the corn hulls are allrinsed away, then drain the corn well. You will be able to see little brown "heads" left on the corn. If you aremaking Hominy, and you want the kernels to open (flower), then you need to "de-head" the kernels. This justmeans to pick off those little tips. This optional step does not affect the flavor of the Hominy, just the appearance.
Soaking corn in ashes was found to make it more digestible, and a more useful ingredient. The process of soakingcorn in lime (the chemical provided by the ash) breaks down the thick walls of the corn kernels, and allows theprotein inside to be absorbed. Once processed this way, the nutritious corn can be ground into a meal, pounded intotortillas, made into tamales, added as a thickener to stews, and used in cornbread, corncakes, and corn soup.
Mashing boilred corn on a metate, view of corn paste, finished dough ball, and grinding dry corn into cornmeal.
The traditional tool for grinding the boiled corn is the metate, which can be improvised from local stones in a long-term survival scenario. Depending on the size of your metate, place a handful or two of the boiled corn on the topsurface. Use downward pressure on the grinding stone (mano), and roll it across the corn (like a rolling pin).Continue until the corn becomes finely pulverized. Repeat until all the corn has been ground up, and collect thepaste into dough balls. The metate can also be used to grind up your dried corn into dry cornmeal, if desired.
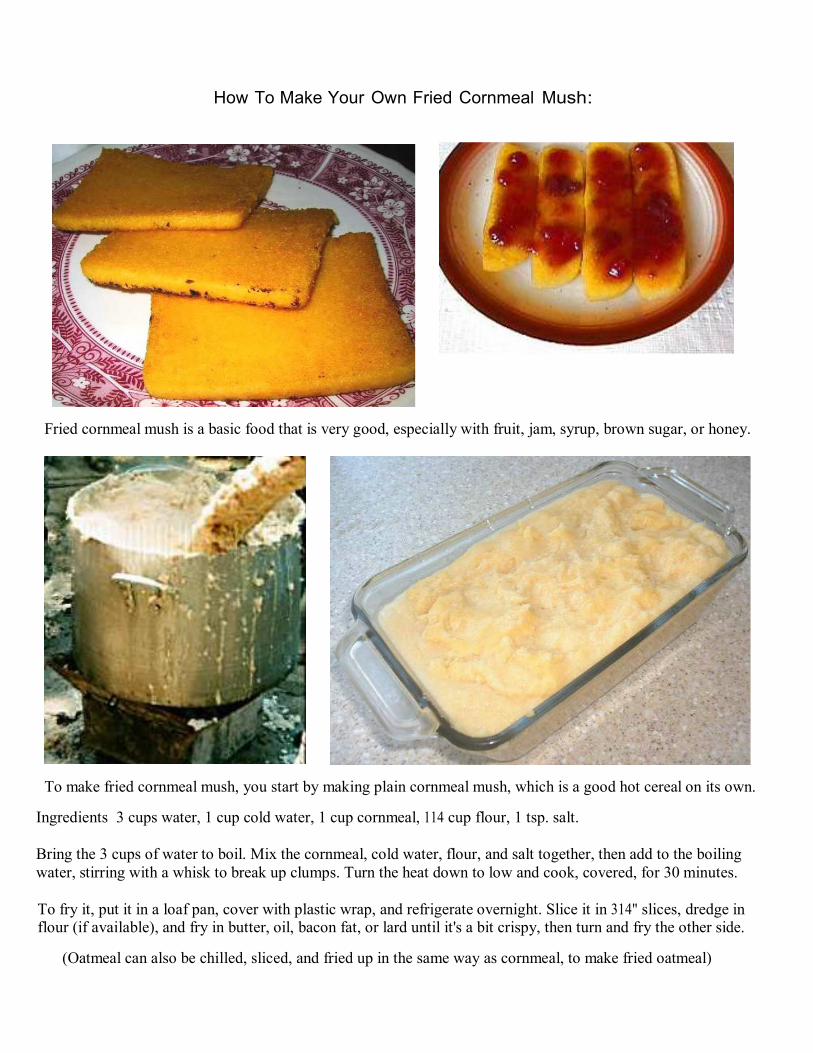
How To Make Your Own Fried Cornmeal Mush:
Fried cornmeal mush is a basic food that is very good, especially with fruit, jam, syrup, brown sugar, or honey.
To make fried cornmeal mush, you start by making plain cornmeal mush, which is a good hot cereal on its own.
Ingredients 3 cups water, 1 cup cold water, 1 cup cornmeal, 114 cup flour, 1 tsp. salt.
Bring the 3 cups of water to boil. Mix the cornmeal, cold water, flour, and salt together, then add to the boilingwater, stirring with a whisk to break up clumps. Turn the heat down to low and cook, covered, for 30 minutes.
To fry it, put it in a loaf pan, cover with plastic wrap, and refrigerate overnight. Slice it in 314" slices, dredge inflour (if available), and fry in butter, oil, bacon fat, or lard until it's a bit crispy, then turn and fry the other side.
(Oatmeal can also be chilled, sliced, and fried up in the same way as cornmeal, to make fried oatmeal)
The Steps In Making Fried Cornmeal Mush
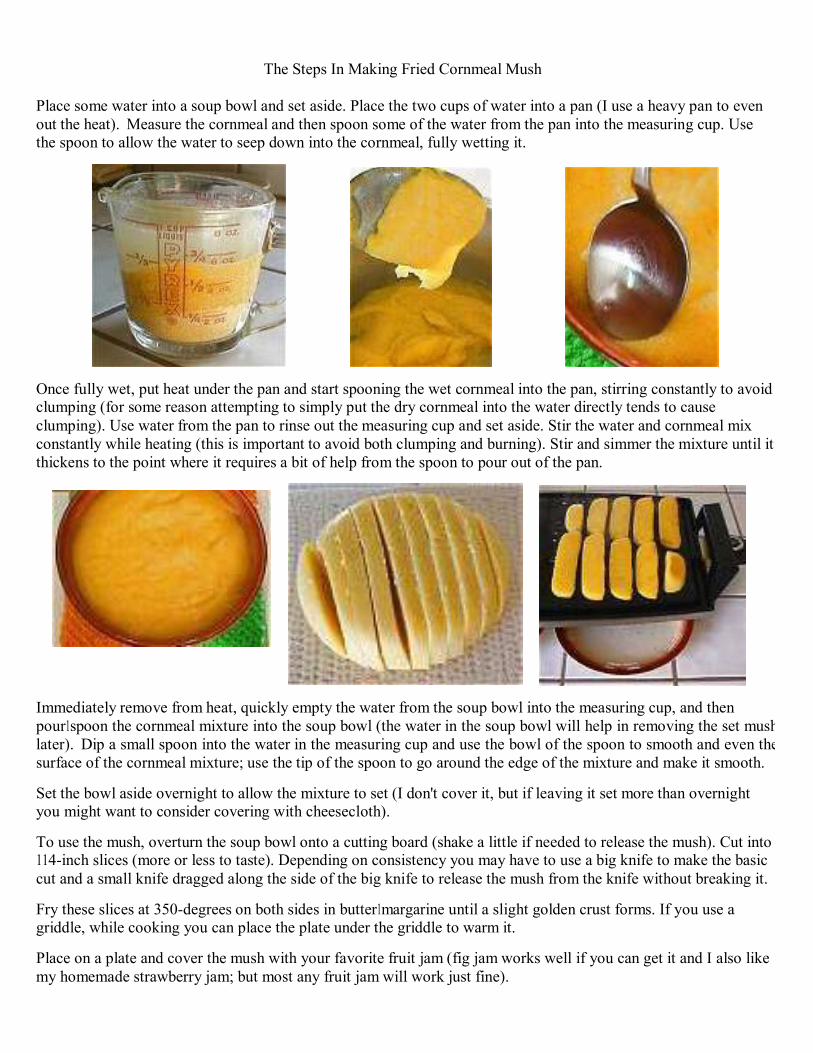
Place some water into a soup bowl and set aside. Place the two cups of water into a pan (I use a heavy pan to evenout the heat). Measure the cornmeal and then spoon some of the water from the pan into the measuring cup. Usethe spoon to allow the water to seep down into the cornmeal, fully wetting it.
Once fully wet, put heat under the pan and start spooning the wet cornmeal into the pan, stirring constantly to avoidclumping (for some reason attempting to simply put the dry cornmeal into the water directly tends to causeclumping). Use water from the pan to rinse out the measuring cup and set aside. Stir the water and cornmeal mixconstantly while heating (this is important to avoid both clumping and burning). Stir and simmer the mixture until itthickens to the point where it requires a bit of help from the spoon to pour out of the pan.
Immediately remove from heat, quickly empty the water from the soup bowl into the measuring cup, and thenpour1spoon the cornmeal mixture into the soup bowl (the water in the soup bowl will help in removing the set mushlater). Dip a small spoon into the water in the measuring cup and use the bowl of the spoon to smooth and even thesurface of the cornmeal mixture; use the tip of the spoon to go around the edge of the mixture and make it smooth.
Set the bowl aside overnight to allow the mixture to set (I don't cover it, but if leaving it set more than overnightyou might want to consider covering with cheesecloth).
To use the mush, overturn the soup bowl onto a cutting board (shake a little if needed to release the mush). Cut into114-inch slices (more or less to taste). Depending on consistency you may have to use a big knife to make the basiccut and a small knife dragged along the side of the big knife to release the mush from the knife without breaking it.
Fry these slices at 350-degrees on both sides in butter1margarine until a slight golden crust forms. If you use agriddle, while cooking you can place the plate under the griddle to warm it.
Place on a plate and cover the mush with your favorite fruit jam (fig jam works well if you can get it and I also likemy homemade strawberry jam; but most any fruit jam will work just fine).

Cornmeal mush can be eaten with any other food to bulk up the meal, and so can the fried cornmeal mush.
Small balls of cornmeal mush can also be fried in oil; these are usually called hush puppies.
Here cornmeal mush is being fried in an iron skillet, which sits on a metal tripod, used to hold it over the fireplacecoals. Any similar metal stand or grate, store-bought or improvised, is a useful addition to your survival cookingtools. The cornmeal mush was first cooked in the dutch oven shown in the background, another extremely usefulitem. Cast iron skillets and small dutch ovens are cheap, and they last forever.

How To Make Cooked Cereal, From Whole Wheat:
If you stored whole wheat as one of your bulk grains, you can grind it into flour for baking, but you can also cookit, to make a good breakfast cereal, without having to grind it up first. The whole grains of wheat are often calledWheat Berries, and they are just mature, dry wheat kernels, with the husk removed by winnowing. They are nuttyand chewy with a slight sweetness, and they retain the flavor of any broth that they are cooked in.
Just like beans, Wheat Berries must be soaked overnight to be cooked. You can soak a large quantity at one time,refrigerate them, and use them as often as you like. I have tried the following methods to cook the wheat berries -use this as a guideline and your discretion to cook them. The type of apparatus used varies the cooking times.
Wheat grains, or wheat berries, straight from the feed store. This is untreated wheat, usually used as animal feed.
Cooking Methods Whole wheat can be cooked several different ways; here are the most common ways
1) Stove top Method Rinse the wheat berries well with cold water. Place them in a bowl filled with cold water andlet soak overnight. Rinse them thoroughly and drain the water. Place them in a pan with water, bring it to a boil.Cover the saucepan and let it simmer for about 1 to 1-112 hours, until the grains are tender and chewy.
Whole wheat grains, after soaking overnight in cold water, are ready to cook.
2) Rice Cooker Method Rinse the wheat berries well with cold water. Place them in a bowl filled with cold waterand let soak overnight. Rinse them thoroughly and drain the water. For one cup berries, use 2-112 cups water andcook for about 45 min to 1 hour. It takes close to an hour for my cooker to bring the berries to a chewy state. Fluffand let it sit and steam, for another 5 min in the cooker. You can also toast the raw berries in a pan, until the colordeepens, soak them in some water (until it covers the berries) for about 2 hours, and then cook them in the ricecooker, on the brown rice cycle.
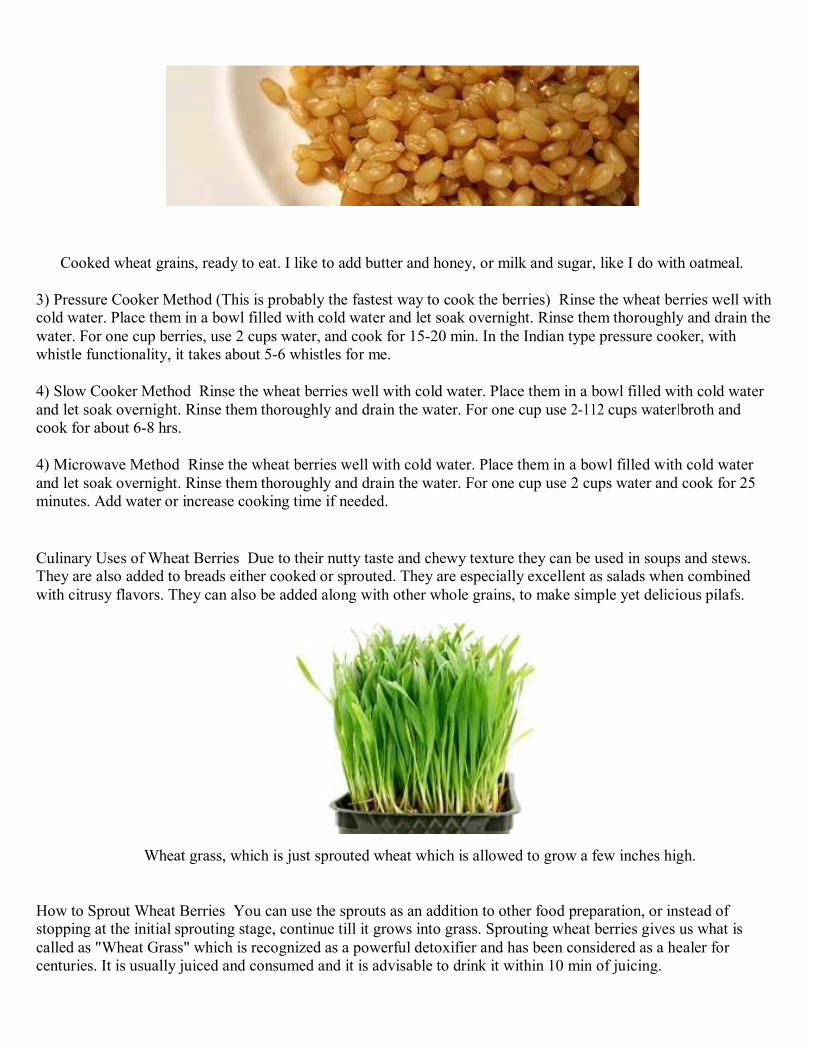
Cooked wheat grains, ready to eat. I like to add butter and honey, or milk and sugar, like I do with oatmeal.
3) Pressure Cooker Method (This is probably the fastest way to cook the berries) Rinse the wheat berries well withcold water. Place them in a bowl filled with cold water and let soak overnight. Rinse them thoroughly and drain thewater. For one cup berries, use 2 cups water, and cook for 15-20 min. In the Indian type pressure cooker, withwhistle functionality, it takes about 5-6 whistles for me.
4) Slow Cooker Method Rinse the wheat berries well with cold water. Place them in a bowl filled with cold waterand let soak overnight. Rinse them thoroughly and drain the water. For one cup use 2-112 cups water1broth andcook for about 6-8 hrs.
4) Microwave Method Rinse the wheat berries well with cold water. Place them in a bowl filled with cold waterand let soak overnight. Rinse them thoroughly and drain the water. For one cup use 2 cups water and cook for 25minutes. Add water or increase cooking time if needed.
Culinary Uses of Wheat Berries Due to their nutty taste and chewy texture they can be used in soups and stews.They are also added to breads either cooked or sprouted. They are especially excellent as salads when combinedwith citrusy flavors. They can also be added along with other whole grains, to make simple yet delicious pilafs.
Wheat grass, which is just sprouted wheat which is allowed to grow a few inches high.
How to Sprout Wheat Berries You can use the sprouts as an addition to other food preparation, or instead ofstopping at the initial sprouting stage, continue till it grows into grass. Sprouting wheat berries gives us what iscalled as "Wheat Grass" which is recognized as a powerful detoxifier and has been considered as a healer forcenturies. It is usually juiced and consumed and it is advisable to drink it within 10 min of juicing.
How To Make your own Meat Jerky:
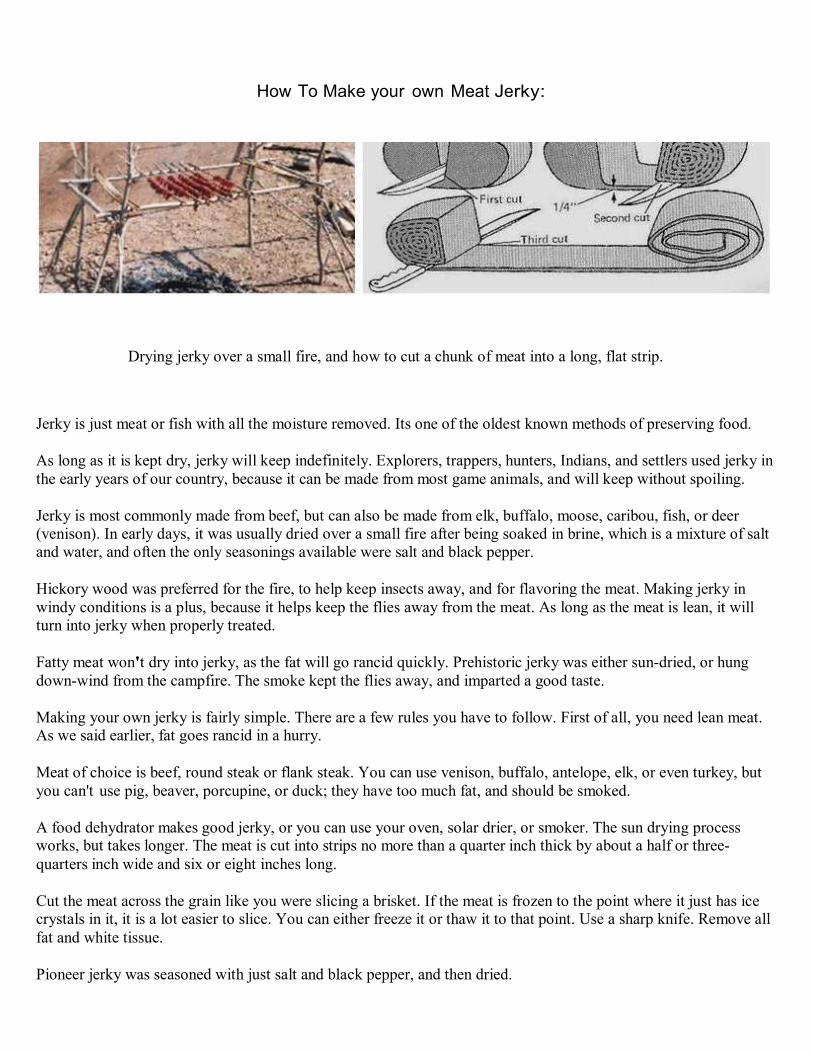
Drying jerky over a small fire, and how to cut a chunk of meat into a long, flat strip.
Jerky is just meat or fish with all the moisture removed. Its one of the oldest known methods of preserving food.
As long as it is kept dry, jerky will keep indefinitely. Explorers, trappers, hunters, Indians, and settlers used jerky inthe early years of our country, because it can be made from most game animals, and will keep without spoiling.
Jerky is most commonly made from beef, but can also be made from elk, buffalo, moose, caribou, fish, or deer(venison). In early days, it was usually dried over a small fire after being soaked in brine, which is a mixture of saltand water, and often the only seasonings available were salt and black pepper.
Hickory wood was preferred for the fire, to help keep insects away, and for flavoring the meat. Making jerky inwindy conditions is a plus, because it helps keep the flies away from the meat. As long as the meat is lean, it willturn into jerky when properly treated.
Fatty meat won't dry into jerky, as the fat will go rancid quickly. Prehistoric jerky was either sun-dried, or hungdown-wind from the campfire. The smoke kept the flies away, and imparted a good taste.
Making your own jerky is fairly simple. There are a few rules you have to follow. First of all, you need lean meat.As we said earlier, fat goes rancid in a hurry.
Meat of choice is beef, round steak or flank steak. You can use venison, buffalo, antelope, elk, or even turkey, butyou can't use pig, beaver, porcupine, or duck; they have too much fat, and should be smoked.
A food dehydrator makes good jerky, or you can use your oven, solar drier, or smoker. The sun drying processworks, but takes longer. The meat is cut into strips no more than a quarter inch thick by about a half or three-quarters inch wide and six or eight inches long.
Cut the meat across the grain like you were slicing a brisket. If the meat is frozen to the point where it just has icecrystals in it, it is a lot easier to slice. You can either freeze it or thaw it to that point. Use a sharp knife. Remove allfat and white tissue.
Pioneer jerky was seasoned with just salt and black pepper, and then dried.
Today there are two methods for seasoning the jerky; the quick-cook method and the marinade method. I like thequick-cook method, as it gets rid of any little bugs that may be lurking in the meat.
Simple Quick-Cook Method Bring a large pot of water to a rolling boil. Drop the jerky in for a minute or two untilit turns white. Dry it with paper towels, season with dry seasonings and then dry it.
Quick-Cook Method with Seasoning you need 2 cups salt, 1 cup brown sugar, 1 cup cider (or use half a cup ofsugar, and use apple juice), 1 teaspoon cloves, 1 teaspoon black pepper, Y2 teaspoon garlic powder, 2 quarts water.Mix it all in a large pot and bring to rolling boil. Don't overload the pot. Make two or three batches if needed.Leave the meat in until about one minute after the rolling boil returns. Pat dry and take to your dryer.
No-Cook Cold marinade (for approximately 1 pound of meat) you need 2 tablespoons soy sauce, 2 drops Tabasco,Yo teaspoon salt, Yo teaspoon black pepper, 1 clove garlic, minced. Mix all and put in Zip-Lock bag with meat.Massage to get meat well coated. Refrigerate overnight. Pat dry and put in dryer.
Getting the Moisture Out If you want to try the sun drying method of making jerky, you will need to findsomething to hang the meat on, so that the pieces do not touch. You put a little cotton string in the top of each pieceto hang it by. The meat goes into a location where it will get sun all day.
You will need to cover it with cheesecloth to keep the bugs off. It will take several days to dry, and you have tobring it in at night to keep the morning dew off. Jerky is "done" when it has turned nearly black and, when you bendit, it will crack but not break.
Dehydrators usually come with instructions for making jerky, specific to the brand of dehydrator.
The easiest way is to dry jerky is in your oven. You will need a wire rack for the jerky to rest on, and you want acookie sheet in the bottom of your oven to catch the drippings.
Set the oven at 140 degrees, and leave the door partially open. It will take six to eight hours to cure the jerky.Storage When your jerky is done, let it cool completely. Then put it in zip-lock bags, or air-tight jars.
It will keep better in the icebox, and it can be frozen.
If you zap frozen jerky in the microwave about thirty seconds, it will thaw and get tender.
Jerky can also be chopped up, and added to the stewpot.

How To Make your own Pemmican:
To make pemmican, first make jerky, then pound it up between rocks, like the rock hammers and anvil shown here.
Pounding jerky into powder on a rock, and finished pemmican (on a piece of rawhide), after mixing with melted fat.
How pemmican looks after fat has cooled, and commercially made pemmican bars.
Once you have made your own jerky, you can then make pemmican, which is another primitive survival food.Pemmican is just jerky which is pounded into a powder, then hot oil from rendered fat is poured over it and allowedto cool. This makes a brick of very compact, very high-calorie food. Pemmican can also be improved by addingdried fruit or berries to the jerky powder before pouring on the melted fat, and it can be molded into balls, bars, orbricks. It will keep for years without refrigeration, if sealed away from air and moisture, just like jerky. Here is howthe Indians made pemmican and stored it First they made jerky and pounded it into powder. The powder wasmixed with dried berries, and melted fat was used to bind the mixture together. The pemmican was shaped into balls,and placed into containers made of green (untanned) buffalo hide, and these folded rawhide containers were calledparfleches. They were flat, which made them easy to store and transport. Parfleches were greased along their seamsto keep out air and moisture. Pemmican could therefore be kept fresh for years. Three-quarters of a pound ofpemmican a day was a sufficient ration of food, although a hard-working traveler might eat between 1 and 2 poundsa day. A bag of pemmican, made properly, could also be cached in the ground for several years and still remainusable. Pemmican was even used as food for sled dogs on arctic expeditions, because of the high calorie content.Of course, you can also grind up jerky in a meat grinder instead of pounding it, if you have a grinder available.

How To Make your own Fruit Leather:
Making fruit leather is a simple way to preserve large quantities of fruit, without canning equipment and supplies.
How to Make Fruit Leather Line a cookie sheet with plastic wrap and tape it to the edges. Do not use wax paper or aluminumfoil. The fruit tends to stick to these. Wash and core fruit. Fruit may be pureed with or without the skin. The skin on red appleswill give the puree a nice pink to reddish color. Place pieces of fruit in blender. Puree until smooth.
Some fruits make a smoother puree if they are cooked first with a little water, then pureed. If desired, add any combination ofthe following flavorings allspice, cinnamon, cloves, honey, lemon, mint, nutmeg. When the puree is smooth, pour onto theprepared cookie sheet. Spread it around so that it is even and not too thick-118 to 114 inch thick. Leave at least 1 inch aroundthe edges so that the puree has room to spread, and the plastic wrap can be removed easily. You can make smaller pieces offruit leather by pouring small "pancake" size spots of the puree onto the cookie sheet.
Dry the fruit leather in the sun (covered by cheesecloth or insect netting to keep bugs off), in a solar food drier, in an electricdehydrator, or in an oven. Dry it until it is still rubbery (pliable). The center should not be sticky. Remove the leather from thetray while it is still warm. Peel away the plastic wrap and roll up the leather. Cooled fruit leather does not roll as easily.Individually wrap the leather in plastic wrap, or put it in an airtight bag or container.
You can combine 2 or more fruits for a unique flavor Apples combine well with all fruits, especially berries. Apricots withapples, plums, or pineapple. Bananas with apple-berry, lemon-walnut, orange-pineapple. Blueberries are best when combined.Try them with apple, peach, or cantaloupe.
You can also add spices and flavorings, but when the puree is dried, the spices and flavorings will concentrate, so use themsparingly. Some people even use chili powder. Add one spice or flavoring at a time in small amounts. Blend and taste. Youshould not be able to tell what has been added, only that something has. If you really taste a strong flavor, too much wasadded. To weaken strong flavor, dilute the puree by adding more fruit. If additional fruit is not available, dry the puree, thenspread on a topping, such as cream cheese. This will help tone down the flavor.
For added variety, you can add a garnish. Fruits, nuts, seeds, and cereals can garnish fruit leather. After pouring the puree ontothe cookie sheet, or after the puree has begun to dry but is still very sticky, add the garnish. Examples of garnishes includechopped, dried fruits, chopped dates, shredded coconut, granola, nuts, raisins, and sesame or sunflower seeds.
Storing Fruit Leather Fruit leather can be left whole, or cut into 4- to 6- inch pieces. Wrap each piece in plastic wrap so thatthe fruit leathers do not stick together. Put these wrapped pieces into an airtight container. Label container. Freezing is idealfor longer storage. Leathers that contain nuts should be stored in the freezer.
Methods of Drying
Sun Sun drying depends on the temperature and the relative humidity outside. If you live where the temperature is in the 90°swith low humidity and low air pollution, sun drying can be used. Sun drying is dependent on the weather. If it is sunny oneday and not the next, you have to finish drying your fruit by one of the other methods before it spoils. Also, when it cools atnight you have to bring the food inside. Spoilage can occur while the fruit still has enough moisture for microbial growth.Another disadvantage is time. What would take 6 to 8 hours to dry using another method, may take 2 to 4 days in the sun.
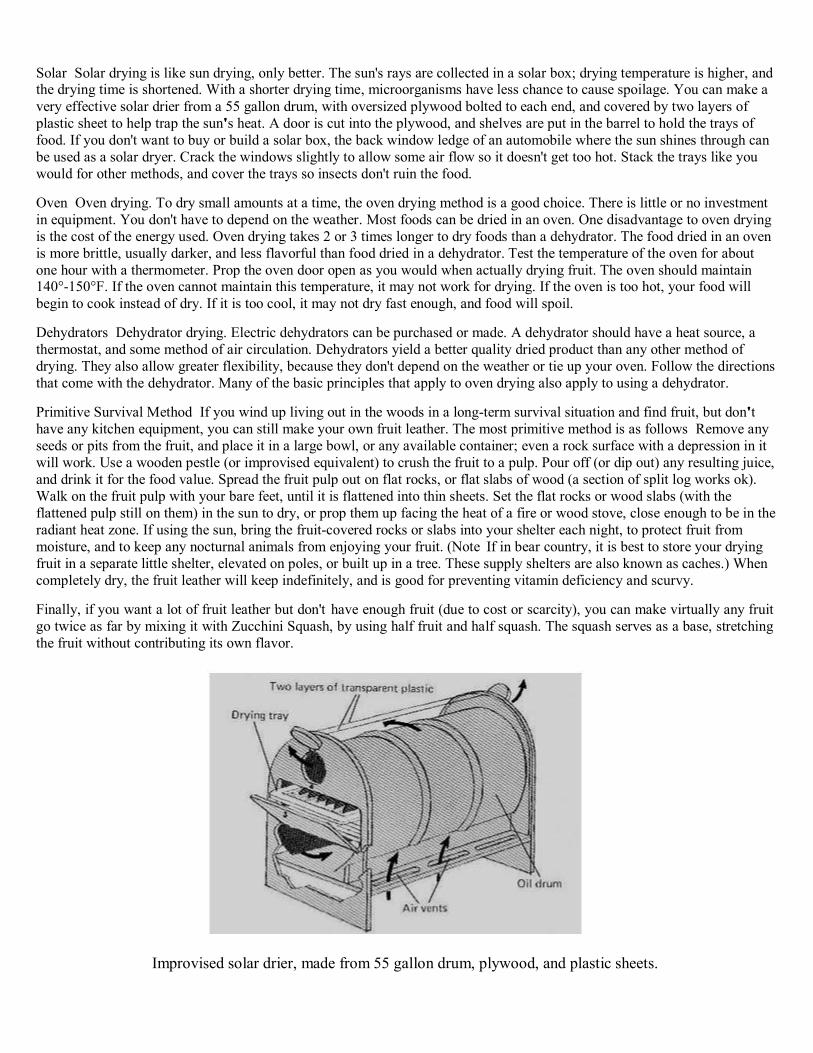
Solar Solar drying is like sun drying, only better. The sun's rays are collected in a solar box; drying temperature is higher, andthe drying time is shortened. With a shorter drying time, microorganisms have less chance to cause spoilage. You can make avery effective solar drier from a 55 gallon drum, with oversized plywood bolted to each end, and covered by two layers ofplastic sheet to help trap the sun's heat. A door is cut into the plywood, and shelves are put in the barrel to hold the trays offood. If you don't want to buy or build a solar box, the back window ledge of an automobile where the sun shines through canbe used as a solar dryer. Crack the windows slightly to allow some air flow so it doesn't get too hot. Stack the trays like youwould for other methods, and cover the trays so insects don't ruin the food.
Oven Oven drying. To dry small amounts at a time, the oven drying method is a good choice. There is little or no investmentin equipment. You don't have to depend on the weather. Most foods can be dried in an oven. One disadvantage to oven dryingis the cost of the energy used. Oven drying takes 2 or 3 times longer to dry foods than a dehydrator. The food dried in an ovenis more brittle, usually darker, and less flavorful than food dried in a dehydrator. Test the temperature of the oven for aboutone hour with a thermometer. Prop the oven door open as you would when actually drying fruit. The oven should maintain140°-150°F. If the oven cannot maintain this temperature, it may not work for drying. If the oven is too hot, your food willbegin to cook instead of dry. If it is too cool, it may not dry fast enough, and food will spoil.
Dehydrators Dehydrator drying. Electric dehydrators can be purchased or made. A dehydrator should have a heat source, athermostat, and some method of air circulation. Dehydrators yield a better quality dried product than any other method ofdrying. They also allow greater flexibility, because they don't depend on the weather or tie up your oven. Follow the directionsthat come with the dehydrator. Many of the basic principles that apply to oven drying also apply to using a dehydrator.
Primitive Survival Method If you wind up living out in the woods in a long-term survival situation and find fruit, but don'thave any kitchen equipment, you can still make your own fruit leather. The most primitive method is as follows Remove anyseeds or pits from the fruit, and place it in a large bowl, or any available container; even a rock surface with a depression in itwill work. Use a wooden pestle (or improvised equivalent) to crush the fruit to a pulp. Pour off (or dip out) any resulting juice,and drink it for the food value. Spread the fruit pulp out on flat rocks, or flat slabs of wood (a section of split log works ok).Walk on the fruit pulp with your bare feet, until it is flattened into thin sheets. Set the flat rocks or wood slabs (with theflattened pulp still on them) in the sun to dry, or prop them up facing the heat of a fire or wood stove, close enough to be in theradiant heat zone. If using the sun, bring the fruit-covered rocks or slabs into your shelter each night, to protect fruit frommoisture, and to keep any nocturnal animals from enjoying your fruit. (Note If in bear country, it is best to store your dryingfruit in a separate little shelter, elevated on poles, or built up in a tree. These supply shelters are also known as caches.) Whencompletely dry, the fruit leather will keep indefinitely, and is good for preventing vitamin deficiency and scurvy.
Finally, if you want a lot of fruit leather but don't have enough fruit (due to cost or scarcity), you can make virtually any fruitgo twice as far by mixing it with Zucchini Squash, by using half fruit and half squash. The squash serves as a base, stretchingthe fruit without contributing its own flavor.
Improvised solar drier, made from 55 gallon drum, plywood, and plastic sheets.

How To Make your own improvised Berry Pickers:
Tin can and finishing nail berry picker, and wooden berry rake (willow twigs tied with bark strips).
Wooden version of the improvised berry picker, and commercially made picker.
If you are picking berries to eat or make fruit leather, you can speed up the process greatly by making improvisedberry picking tools. The best design is just a small tin can which can be held easily in one hand, with one and one-half inch long finishing nails soldered to the open end, as shown here. The nails should be about three-eights of aninch apart. You can use sharpened pieces of wire, if you don't have nails. To pick berries, you just run the pointsthrough the berry limbs or vines, and leaves and fruit will be raked into the can.
When you have finished picking, dump leaves and all into a bucket or container of water. The leaves and twigs floatto the top, and are easy to skim off or pour off, and the berries get rinsed off at the same time. If you don't have acan, you can make a wooden version as shown. Drive the finishing nails or wire into the wood, then sharpen theends. You can also add a handle to the top of the box, to make scooping berries easier, if desired. If you don't haveany metal, you can also make a berry rake out of green twigs as shown, tied together with whatever is available. Touse the rake, you have to hold a container under it as you rub the fruit off the vines, to catch the falling berries. Itworks, but the can or wooden picker is much better. Some folks also like to stake out a cloth or blanket so that it istaught and slanted, and dump the pickings onto this. The berries roll down to the bottom, and the leaves and twigsstay on the cloth, to be shaken off later. There are also commercial versions of berry pickers available.

How to Catch Wild Yeast:
If you find yourself in a long-term survival situation, you may not have any yeast for making bread. Even if you do,your supply will eventually run out. The solution to this problem is simple; you need only "catch" some "wild"yeast, and use it instead. Hundreds of years ago, before there was packaged yeast, bakers used sourdough starter tokeep a supply of yeast alive and handy. They kept a pot of live culture in a flour and water medium, and "fed" itdaily or weekly, so that the yeast remained alive and active. To understand how sourdough starter works, let's createa batch of starter, using live yeast that is floating in the air! You will need a pottery crock, plastic container or glassjar (with a loose-fitting lid), a wooden spoon, a piece of cloth, some flour (without preservatives in it), and water.
To start a culture, mix two cups of flour and two cups of water in a glass or pottery bowl (in the old days, a bakerprobably had a special clay crock for starter). Lay a cloth over the top and let it sit on the kitchen counter. It turnsout that there is yeast floating in the air all around us all the time, and some of this yeast will make its way to yourflour1water mixture. It will then start growing and dividing. After 24 hours, you pour off about a cup of the mixtureand feed it with another cup of flour and another cup of water. In a few days, the mixture will become frothy as theyeast population grows. The froth is caused by the carbon dioxide that the yeast is generating. The starter will alsohave a bacteria, called lactobacilli, in it. This lends the slightly acidic flavor of the bread, by creating lactic acid.The alcohol that the yeast creates, and the lactic acid together are the source of sourdough bread's unique flavor.
A common question at this point is, "why doesn't the flour get infested with all sorts of mold and bacteria andbecome a disgusting health hazard?" For example, if you put a bowl of sugar water or orange juice out on thecounter, that is exactly what would happen. It turns out that the starch in bread flour is something that not a lot ofbacteria can easily handle, while sugar is very tasty to "bad" bacteria. Yeast, on the other hand, creates specialenzymes to deal with starch. The yeast and lactobacilli also "poison" the culture with the alcohol and lactic acidthey produce, and that keeps other bacteria out. Leave the starter on the kitchen counter for five days. As the starterferments, it will develop a strong aroma; bready and alcoholy and not particularly appetizing. Feed it every day ortwo by dividing it in half and adding a cup of flour and a cup of water to one half of it (you can throw the other halfaway). When you see a watery substance floating to the top, stir it. Sourdough bakers call this "hooch." Over theweek the starter will become a thick liquid, like pancake batter. It will be slightly yellowish. At this point you cando one of two things you can store it in the refrigerator to slow down the yeast, then you will only have to feed itevery 5 or 6 days. Or, you can keep it on the counter and feed it every day.
If you don't like the "wild yeast floating in the air" method, there are other ways to start a starter Get a cup ofstarter from a friend, or another baker. You take a cup of the starter, and add flour and water to make more of it.The starter can go on for years. You can also make a starter with the normal packaged yeast you buy at the store.Start it the same way as described above, and simply add a package of yeast to it. Or you can buy a packagedsourdough starter mix at the grocery store, or by mail-order. Some starters use milk instead of water, and somestarter recipes call for sugar or honey, which boosts the fermentation. There are starters that use potatoes, too.Potatoes have starch in them, and that supplies more sugar for the yeast to feast on. When it comes time to bakebread, you add a cup of this live culture to the dough, to provide the yeast needed to leaven the bread. Youreplenish the pot by adding back an equal amount of flour and water, and regular feeding keeps the culture alive.

How to Bake Sourdough Bread:
Baking Sourdough Bread You can find lots of sourdough bread recipes in cookbooks and on the Internet. You canfind recipes for sourdough white bread, rye bread, whole wheat bread, biscuits and even cake. Once you have thestarter, you can bake sourdough in countless ways.
The recipes use various terms related to starter, including sponge and poolish. Sponge often refers to themixture of starter with the flour and other dry ingredients of the recipe added. Poolish is another name for sponge.Some recipes call for proofing the starter. To proof a starter, you take a portion of it out of the refrigerator andfeed it for a day or so to get a foamy "proof" that the yeast are active.
Here's a simple sourdough recipe from a very popular cookbook that you might have on your kitchen shelf -- the"Better Homes and Gardens Cookbook," 1989 edition. This recipe cheats a little by using both sourdough starterand packaged yeast at the same time. In this case, the cup of starter provides the flavor and the packaged yeastguarantees that the bread will rise quickly and reliably.
Here is the recipe: 1 cup of sourdough starter, 5 1/2 to 6 cups of all-purpose flour, 1 package of active dry yeast (21/4 teaspoons), 1 1/2 cups of water, 3 tablespoons of sugar, 3 tablespoons of margarine or butter, 1/2 teaspoon ofbaking soda, 1/2 teaspoon of salt.
You need to have the sourdough starter at room temperature, so if you have your starter in the refrigerator, put acup of it out on the counter for a while before you start mixing the bread. You combine 2 1/2 cups of flour and theyeast in a big bowl (a 4-quart glass bowl will do). Heat the water, sugar, butter and salt until warm (110 degreesFahrenheit or so). Add the liquid to the flour and yeast mixture. Then you pour in the sourdough starter. Mix withan electric mixer on low speed for 30 seconds.
The mixture looks very smooth and creamy at this point, and smells very yeasty. Then you mix with the mixer onhigh speed for 3 minutes. This is when you begin to see the elasticity develop in the dough. It practically climbs upthe beaters to the mixer! You need to keep a scraper or a spoon on hand to push the dough back down. It'sfascinating to watch! Combine 2 1/2 cups of flour with the soda in a separate bowl. Then add it to the yeastmixture. Stir this until the dry ingredients and the starter mixture are combined. Then try to add as much of theremaining flour -- 1/2 to 1 cup -- as you can. The dough gets pretty stiff at this point.
The next step is kneading -- a part of making bread that many bakers find satisfying, because you can feel thedough changing in your hands as you knead. Put the dough on a floured surface and start pushing and pulling. Itwill take about six to eight minutes to get the dough to the right stiffness. You will know it is done when you canpush on it with your finger and it pops right back instead of denting. Shape the dough into a ball and put it into agreased bowl. Cover it and put it in a warm place to rise until it doubles in size -- about 45 to 60 minutes.
When it has doubled, punch it down -- another satisfying part of bread baking. Put the dough on a floured surfaceand divide into two parts. Cover these two lumps for about 10 minutes and let them rest. Make them into two roundloaves. Put the two loaves on a greased baking sheet, and cover again to let them rise until they are about doublein size (about 30 minutes). Then it's time to bake the loaves, in a 375-degree oven for about 30 to 35 minutes.
You should get a crusty bread with a hearty, chewy texture, and a good sourdough taste.

How To Make Your Own Primitive Beehives, for Honey and Mead:
Traditional straw "skep" beehives, which are just coiled straw baskets turned upside down, with an entrance hole for bees.
Making a straw skep beehive. Checking skeps for honeycomb.
Beehives made from sections of hollow logs. Straw skep hive with super on top.
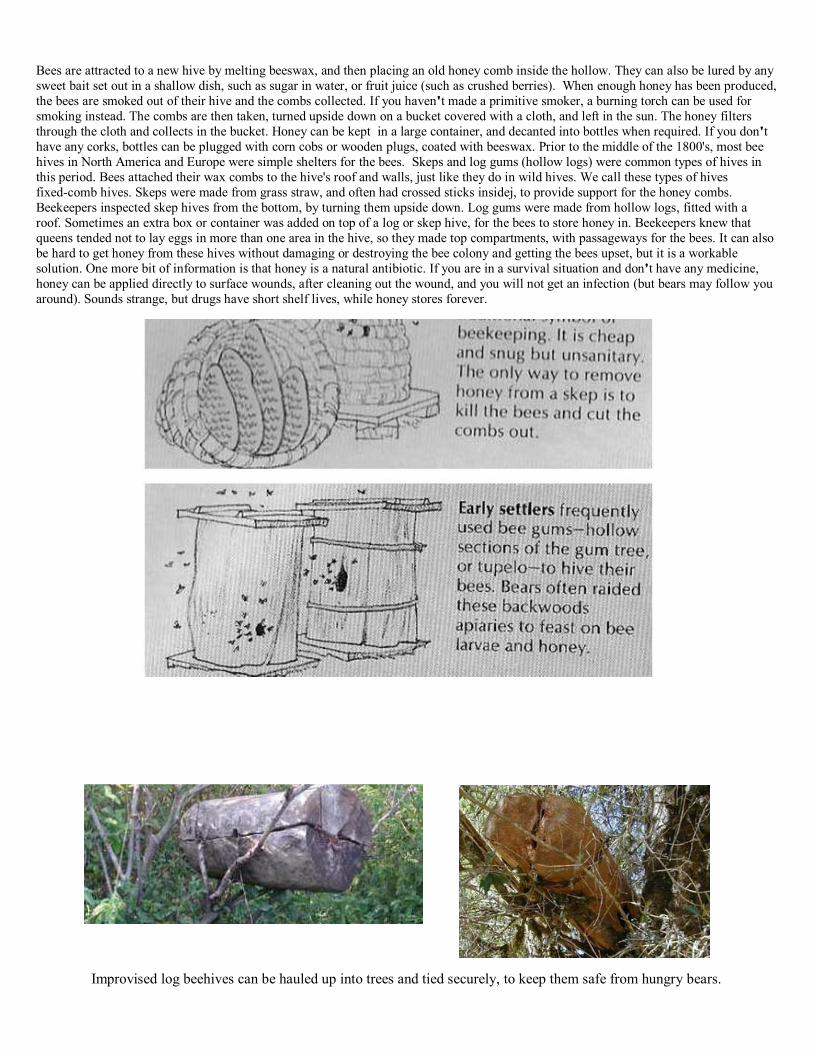
If you want sweets or alcohol and they are not available, you can build your own bee hives and produce honey and mead. Althoughprimitive styles of hives are not as efficient as modern scientific hives, anyone can build as many of these simple types as they want. Myfavorite hive is made by finding a hollow log and cutting it into four-foot long sections. These are split open for easy harvest, then tiedback together with rope or wire. The ends are sealed with rocks, clay, or wooden plugs, and a small entrance hole is drilled or chopped intothe side. The hive is then hoisted into a tree, and tied securely. Twelve of these will usually produce enough honey to last one person allyear. Hollow log sections can also be stood upright on a flat stone base, with another flat rock (or wooden slab) on top for a roof, but theseare more likely to be raided by bears. Alternatively, hives can easily be made from coiled straw baskets, called skeps. Make the basket, addsome crossed bracing sticks inside, turn it upside down on a stone or wooden base, and poke an entrance hole in the side, or insert a shortsection of plastic pipe, or piece of wood with a hole drilled in it, for an entrance. After construction, hives are left in a good location untilbees take up residence. The positioning of the hive is important. Hives must not be placed too closely together. It is also important toposition the hive away from wasps and termites, and hives are often placed in trees to avoid ants and bears.
Bees are attracted to a new hive by melting beeswax, and then placing an old honey comb inside the hollow. They can also be lured by anysweet bait set out in a shallow dish, such as sugar in water, or fruit juice (such as crushed berries). When enough honey has been produced,the bees are smoked out of their hive and the combs collected. If you haven't made a primitive smoker, a burning torch can be used forsmoking instead. The combs are then taken, turned upside down on a bucket covered with a cloth, and left in the sun. The honey filtersthrough the cloth and collects in the bucket. Honey can be kept in a large container, and decanted into bottles when required. If you don'thave any corks, bottles can be plugged with corn cobs or wooden plugs, coated with beeswax. Prior to the middle of the 1800's, most beehives in North America and Europe were simple shelters for the bees. Skeps and log gums (hollow logs) were common types of hives inthis period. Bees attached their wax combs to the hive's roof and walls, just like they do in wild hives. We call these types of hivesfixed-comb hives. Skeps were made from grass straw, and often had crossed sticks insidej, to provide support for the honey combs.Beekeepers inspected skep hives from the bottom, by turning them upside down. Log gums were made from hollow logs, fitted with aroof. Sometimes an extra box or container was added on top of a log or skep hive, for the bees to store honey in. Beekeepers knew thatqueens tended not to lay eggs in more than one area in the hive, so they made top compartments, with passageways for the bees. It can alsobe hard to get honey from these hives without damaging or destroying the bee colony and getting the bees upset, but it is a workablesolution. One more bit of information is that honey is a natural antibiotic. If you are in a survival situation and don't have any medicine,honey can be applied directly to surface wounds, after cleaning out the wound, and you will not get an infection (but bears may follow youaround). Sounds strange, but drugs have short shelf lives, while honey stores forever.
Improvised log beehives can be hauled up into trees and tied securely, to keep them safe from hungry bears.

How To Make Your Own Mead:
Mead is a honey-based alcoholic drink that you can make yourself.
If you made your own beehives and are producing honey, you can make mead, a simple alcoholic beverage, which in its simplest form isjust diluted honey, with yeast added. Here's what you will needEquipment 2 or 3 gallon stainless steel or enamel pot, Siphon tube, and 2 or 3 Two Liter soda bottles.Ingredients 48 ounces of honey, 1 gallon of water, and 1 package of brewer's yeast.Any live brewers yeast will suffice for this. Find a brewer's supply house, use the sediment from a homebrew, or borrow some fromanother brewer. If you' can't find any, use ordinary baker's yeast.
If you can't get any store-bought yeast, you can still do what people have done for thousands of years. Buy some grapes, or find some wildgrapes, pick them, and put the grapes into your honey 1 water mixture. Yeast spores grow naturally on grapes; this is why they turn intowine when crushed, the yeast is already present on the grape skins. Commercial yeasts are more efficient, and less likely to give you a badbatch, but this is the simplest primitive solution.
First, boil one gallon of water in the pot. Dissolve about half a teaspoon of honey into half a cup of lukewarm water. Add the yeast, andcover the container. Don't stir; just pour it into the warm water, and let it sit. Boil the water for 20 minutes, then stir in the bulk honey,dissolving well. Let it come back to a boil, then turn off the heat. Cover the pot, and let it cool to room temperature. Once cool (at leastbelow 80 degrees F), add the yeast-water-honey mixture. You can let your must ferment in the same pot you mixed in it. Cover it withplastic wrap to seal out air.
You should see some sign of the fermentation after several hours (gas build-up inflating the cover), but it could take a day or two to beobvious; be patient, the yeast will start converting the sugar in the honey into alcohol. The fermenting yields carbon dioxide gas, and thepressure buildup can cause the plastic wrap to pop off if some pressure cannot escape. You may have to prick a small pinhole in the cover.
The time needed to ferment depends on several variables temperature, type of yeast, and amount of sugar. If fermentation seems to stop(the plastic deflates) after only a few days, slosh or stir it a bit. This may restart fermentation. Most likely, fermentation will be completeafter a week or so, but I've seen it take as long as 14 days. When the cover deflates, and stays deflated, it is time to bottle your mead.
Bottling is easy enough--you just siphon the mead from the fermentation container into bottles, being careful not to disturb or suck up thesediment at the bottom of the pot. You want to leave behind the sediment you'll see at the bottom of the fermentation container. Thisprocess is called racking. Fill the bottles up to about 1 inch from the bottom of the bottle neck, then cap tightly. Store the bottles in a cool,dark place for two to four weeks, depending on your patience. You'll then have a nice, light, slightly sweet mead.
SANITATION. Brewing and vinting is based on near-supersaturated sugar solutions, perfect media for breeding bacterial cultures.Contamination is a bad thing, as it can make you sick, and you won't like the taste of the ruined beverage either. So everything must bekept clean. Wash everything carefully before starting the pot, siphon tube, and bottles, even the plastic wrap.
After washing, sterilize all the items. A teaspoon of ordinary bleach to a gallon of water works wonders. After sterilization, rinseeverything carefully, and store in a clean place untill each item is called for. Sterilization should be done just prior to the item's use.But despite your best efforts, if you stick to brewing and vinting, eventually you will get a contaminated batch. Things to watch for aremold at the top of the beverage in the bottle, cloudy 'veils' floating in the bottles, or a rotten smell when opened. If you have doubts,assume contamination and dispose of it.

HOW TO EAT SQUIRRELS
Most people think that humans will eat anything available, if they are hungry enough. History, however, shows thatthis is not true. Actual cases suggest that a large number of adults (and a majority of children and elderly people)will choose to go hungry, and even starve, rather than eat unfamiliar foods during famines. Many people in thismodern age have never eaten wild game, and in particular have never tried the most common of small gameanimals, like squirrel, possum, and raccoon. This type of food prejudice may be life-threatening in a long-termsurvival situation. To help your friends and family get over an aversion to eating small game, it is best if you canprepare it in a way that resembles what they are used to. To help you do this, here are recipes for squirrel, possum,and raccoon, starting with squirrel
After snaring or shooting some tasty squirrels, the best cooking method is stewing. Squirrel meat tastes like whatthe squirrel has been eating, so if your pecan or acorn crop has been under attack, recycle the flavor in cookedsquirrel meat.
Use these steps in backyard - dressing of rabbits or squirrels Bleed the animal immediately. Remove the entrailsand wipe the body cavity with a clean cloth, paper towels or dry grass. To remove the entrails of a small animal,make a cut from the anus to the ribs, taking care to avoid cutting the intestines. Remove body heat by allowing airto circulate around it. Never stack the animals or put them in the pockets of hunting jacket.
DRESSING OF SQUIRRELS AND OTHER SMALL GAME When you get home, skin and finish dressing thegame, removing any shot-damaged parts. A short soaking in a strong salt solution helps remove excessivebloodiness around shot, but is recommended only for this purpose. Skinning should be done as soon as possible.Slit along the center back with a sharp knife. Cut across 2 or 3 inches near the middle of the back of a squirrel orrabbit. Insert your fingers beneath the skin on each side of the cut and pull in opposite directions. If needed, wipethe carcass with a damp cloth to remove hair or debris. Remove the head, feet and tail.

Pull skin off and sever at the neck and feet. Wipe off loose hairs. Store dressed small game in the refrigerator (38degrees to 40 degrees F.) until ready to cook, or freeze the meat right away.
Opossums and raccoons are more difficult to skin than rabbits or squirrels. Allow the carcass to hang in a cool placefor 24 to 48 hours. When it is time to skin the animal, cut the skin from where you stopped when removing theentrails up to the chin. From the cut extending from the chin to the tail, cut the skin up each leg to the foot. Cut theskin around the base of each foot and around the neck. Pull the skin loose from each leg, the neck and finally theback. Wipe clean with a damp cloth after removing the feet, head and tail. Remove the excess fat from the carcass.
STORAGE Store dressed squirrel in the refrigerator (38 to 40 degrees F.) until ready to cook, or freeze the meatright away. Package completely dressed animals carefully in moisture-vapor-proof material--heavy duty foil, plasticfreezer bags or waxed freezer paper. Freeze immediately and store no longer than 4 to 6 months. Always thaw byplacing the package in the refrigerator for 12 to 18 hours or place under cold running water.
DRYING Small animals such as squirrels, chipmunks, and certain birds can be easily dried by simply cleaning,skinning, and opening up the carcass and then leaving it to dehydrate in the sun. After the meat is dry, the animalshould be pounded with a rock in order to split the bones and expose the marrow, then left to sun-dry a second time(if this isn't done, the marrow will rot and spoil the meat).
PREPARATION AND RECIPES The natural tenderness of small game is influenced by the age of the animal. it ishelpful to the homemaker if the hunter tags the animal as to "young" or "mature." Young animals require lesscooking than older and less tender ones and can be cooked by dry heat cooking methods.Because game animals lead a vigorous life in foraging for food, muscle cuts of older animals are likely to be lesstender, drier and less palatable than muscle cuts of domestic animals. Older game animals require more attentionwhen cooking than domestic animals which are confined during fattening. Older and less tender animals will bemore palatable when cooked with moisture.
SQUIRREL Squirrel is one of the most tender of all wild game meats. The rosy pink to red flesh of young squirrelis tender and has a pleasing flavor. The flesh of older animals is darker red in color and may require marinating orlong cooking for tenderness.
SQUIRREL STEW Use 1 cleaned and skinned squirrel, cut in serving size pieces. 4 ribs of celery, cut diagonally,1 small bay leaf, Small whole onions, Small whole potatoes, Salt, pepper and Worcestershire to taste.
Place squirrel pieces in Dutch oven or heavy skillet with a lid. Cover with water and steam until the meat is nearlytender. Add the vegetables and seasoning and cook until just tender. If thickened gravy is desired, add l tablespoonof corn starch dissolved in one-half cup of water just before serving. This is good served with corn bread.
BRUNSWICK STEW 3 squirrels, cut up, 1 cup chopped onion pieces, 4 cups or 2 No. 303 cans tomatoes, 3 quartswater, 114 cups diced bacon, 2 cups diced potatoes, 114 teaspoon cayenne, 2 cups lima beans, 2 teaspoons salt, 2cups corn, 114 teaspoon black pepper.
Place squirrel pieces in a large kettle. Add water. Bring slowly to boil; reduce heat and simmer 1 112 to 2 hours, oruntil meat is tender, skimming surface occasionally. Remove meat from bones and return to liquid. Add bacon,cayenne, salt, pepper, onion, tomatoes, potatoes and lima beans. Cook l hour. Add corn and continue to cook 10minutes. Serves six to eight. Note This recipe is particularly suitable for older, less tender animals.

BRUNSWICK STEW (100 year old recipe) Boil 4 squirrels in water. Add to the meat a generous supply oftomatoes and potatoes. When done add ten or twelve ears of corn. Remove the meat, cut into small pieces andreturn to the fire. Cook until very tender and thick. Season with butter, salt, and pepper.
FRIED SQUIRREL After cleaning, cut up for frying, soak overnight in salt water. Before frying (like chickenexactly) put squirrel in cooker oven with water and "par boil" until meat is tender when stuck with fork. Don't cookuntil meat falls off bones - as you want to batter it with flour to fry (not too fast) like chicken. Season with salt andblack pepper to taste. Rinse skinned squirrel in cold water and pat dry, dip in buttermilk and then in seasoned flourand fry in hot fat just as you would a chicken.
If the squirrel is young, you probably will not need to steam the meat. If there is any doubt, drain off excess fat inthe skillet, add about a cup of water or wine if you prefer, and steam covered for about 15 minutes. Or you maywish to pressure cook the meat for an additional 5 to 10 minutes. Make gravy in the frying fat by adding theleftover seasoned flour and milk or water. Serve over rice or with hot biscuits.
FRIED SQUIRREL # 2 1 squirrel, cut in pieces, 112 cup flour, 112 teaspoon salt, 114 cup shortening, pepper.
Mix salt and pepper with flour. Shake pieces of squirrel in flour mixture and brown in melted shortening in a heavyskillet. Lower the heat after browning and cover the skillet tightly. Cook over low heat for 112 to 1 hour or untilwell done. Remove cover during the last 10 minutes to crisp outer surfaces.
SQUIRREL FRICASSEE 1 young squirrel, cut in pieces, 3 slices bacon, 112 teaspoon salt, 1 tablespoon slicedonion, 118 teaspoon pepper, 2 teaspoons lemon juice, 112 cup flour, 113 cup beef or chicken broth.
Rub pieces of squirrel with salt and pepper and roll in flour. Pan fry with chopped bacon for 30 minutes. Add onion,lemon juice and broth and cover tightly. Cook slowly for 2 hours. Just before serving, remove squirrel and makegravy by adding water or milk and flour to the pan drippings.Variations Add l tablespoon paprika, 118 teaspooncayenne, l sliced tart apple and 2 cups broth instead of bacon and lemon juice called for in this recipe.
BROILED SQUIRREL 1 squirrel, cut up. 118 teaspoon pepper, 1 teaspoon salt, 112 teaspoon fat, Lemon wedges.
Clean squirrel. Rub with slat and pepper. Brush with fat and place on a broiling rack. Broil 40 minutes, bastingevery 10 minutes with drippings. Squeeze lemon on squirrel before serving.
Barbecued Squirrel 1 squirrel, 112 cup finely chopped onion, 114 cup margarine, 1 8-ounce can tomato sauce,314 cup pineapple juice, 2 Tablespoon lemon juice, 2 Tablespoon firmly packed brown sugar, 1 teaspoon salt,112 teaspoon dry mustard, 114 teaspoon seasoned salt, 114 teaspoon pepper.
Cook onion in butter until tender. Mix in tomato sauce, pineapple and lemon juice, brown sugar and seasonings.Cook over low heat 15-20 minutes to blend flavors. Place squirrel in bowl and pour mixture over it. Let stand 1 112to 2 hours Place squirrel pieces on grill, 7-9 inches from coals. Cook 45 minutes or until tender. Turn about every10 minutes. Baste frequently with sauce. Salt before serving. Serve with hot mustard sauce if desired.

HOW TO EAT POSSUMS
PREPARATION AND COOKING OPOSSUM Most people prefer to put an opossum in a safely wired pen to feedand fatten for two or three weeks, before eating them. Opossum meat is light in color, fine-grained and tender, withgenerous fat deposits between the bands of muscle. After properly skinning and dressing, soak possum in salt water(3 tablespoons salt to one gallon of water). Soak overnight before cooking or freezing.
TO COOK Place opossum in deep kettle, add enough water to cover well and cook well without sticking orscorching. Add l medium onion peeled and cut in half and l medium apple (not peeled and cut in half), salt toseason according to size of opossum. (Add boiling water if it cooks down before tender). Cook on medium heat fora long as it takes to have meat tender when tested with a fork stuck into it. When tender, remove onion and apple.Carefully place opossum in large baking pan. Pour some of the broth from "par boiling" (first cooking) aroundopossum in baking pan. Use lots of black pepper, sprinkle opossum lightly with flour to help brown, take spoon andput some broth lightly over flour (this is "basting"). Place in 350 degree F. oven and brown light brown or as brownas you wish - watch and continue to sprinkle top of opossum with broth (or oleo) when done and ready to eat.Opossum has to be real brown, but to keep from getting hard I usually brown it in oven to light brown on top, thenwith some broth in pan, put it on top of stove, cover and baste often and let it cook on low heat so it won't scorch.
ROASTED STUFFED OPOSSUM WITH SWEET POTATOES 1 Opossum, Dash pepper, 114 cup fat, 1 114teaspoon poultry seasoning, 112 cup chopped onion, 113 cup water, 112 cup chopped celery, 1 sweet potato perperson, 6 cups bread cubes, 1 teaspoon salt.
Melt fat in skillet; add onion and celery and cook until tender. Combine bread cubes, salt, pepper and poultryseasonings with onions and celery. Add water and mix thoroughly. Fill the body cavity. Close by sewing the skintogether with a heavy string or by skewering the skin together and lacing with a heavy string. Place, undersidedown, on a rack in shallow roasting pan. Roast at 300 degrees to 350 degrees F. for 2 to 2 112 hours, or until welldone, basting occasionally with drippings and sprinkling lightly with flour after each basting for a crisp, cracklycrust. When almost done, place boiled or baked sweet potatoes around meat and baste frequently with drippings.Remove browned opossum and potatoes to a heated large platter. Allow 314 to 1 pound per portion.
BARBECUED OPOSSUM Brown together in l tablespoon of fat 112 cup chopped onions, 114 teaspoon salt, 114cup celery. Remove from heat and stir in 1 tablespoon sugar, 1 tablespoon vinegar, 1 teaspoon salt, 114 cup catsup,114 teaspoon pepper, 2 cups chopped possum meat.
Simmer these ingredients at least l hour, adding water if necessary. Serve on toast or toasted buns. This recipe isexcellent for older, tougher possum meat, or leftover meat. It also freezes well. Makes approximately 1 quart.

HOW TO EAT RACCOONS
ROAST RACCOON 3-4 raccoons, 4 to 6 pounds each, 5 Tablespoons salt, 2 teaspoons pepper, 8 medium onions,peeled. 2 Cups flour, 1 Cup shortening, 12 small bay leaves.
Skin, draw and clean coons soon after killing. Remove, without breaking, the brown bean-shaped kernels fromunder forelegs and each thigh. (These are musk glands.)
Cut into pieces. Reserve meaty backs and legs for baking. Cook bony pieces in water to make broth for gravy anddressing. Add small amount of seasonings. Simmer until meat is tender; strain, and use only the broth.
Sprinkle back and leg pieces with salt and pepper. Then dredge with flour. Heat shortening in heavy skillet. Addmeat; brown on all sides. Transfer pieces to roaster; add onions and bay leaves. Cover.
Bake in moderate oven (350) two hours until tender. Make gravy by adding flour to drippings in pan. (Use 2 to 3 Tfor each cup of liquid or broth used).
As meat is roasting, prepare stuffing of 3 loaves of day old bread, crumbled; 2 112 t. pepper; 2 112 t. powderedsage; 4 beaten eggs, 1 112 oz. dehydrated onion soup; 4 stalks celery chopped; 112 c. butter; and 4 c. coon broth.Bake in large shallow pan in moderate oven (350 degrees F) for 30 minutes. Feeds 24 people.

How to Eat Acorns
Acorns have largely fallen into disuse by humans as a food, much less as a staple food. Acorns used to be such animportant crop that whole cultures were centered around them, especially the many Indian tribes in California.They even crafted beautiful baskets expressly for harvesting and processing Acorns. Today few people have evereven tasted an Acorn, much less eaten a hot, buttered Acorn muffin, though many are dimly aware that they aresupposed to be edible. Perhaps this is because they are intensely bitter when eaten fresh out of the shell. Acornsrequire an extra processing step to leach out the bitter tannins that make them unpalatable in the raw.
Harvesting First of all, you'll have to check out your local oaks during the spring when the leaves and underbrushare not as dense. In many areas, there are several varieties of oaks available to the acorn harvester. Some are quitemild and sweet and others pretty darned bitter. If you have a choice, try to find a variety with mild meat and only alittle initial tang of tannin. You may have to simply nibble and check, come fall. Different varieties of oak havedifferent shaped acorns. Crack a nice fat acorn with no worm hole. Examine the meat. It should be yellowish, notblack and dusty (insects). Now, simply nibble and chew up a part of the nut. If it is very bitter, spit it out and tryanother kind of acorn. When you find a grove of relatively mild acorns, note this for next year and harvest away. Asthe under story is usually very thin below a decent sized oak tree, the acorns are quite easy to pick up. Dependingon the variety of oak, your acorns will drop between late September and October, more or less. The best way I'vefound to pick up acorns is to simply pick a nice dry, sunny day as soon as the acorns begin to drop and take basketsand sacks to the woods and sit down and pick them up. If you wait too long, the squirrels and other wild critters willbeat you to them, leaving only the worm-riddled hulls behind. You can harvest Acorns every year, usually in mid-to late September. The best places to harvest them are in grassy parks or mowed lawns, as it is very difficult togather them in the undergrowth of the woods or tall grass meadows. Oak trees seems to have a cycle of production,so that the oak that yielded heavily one year might be dry for the next few years. This can make it tricky to find agood spot, as Acorn harvest tends to be somewhat hit or miss from year to year. When I happen upon an especiallygood year for Acorns and an easy harvesting spot, I try to really stock up. All Acorns are edible, but some arelarger than others and contain less tannic acid, so are much easier to process. Oaks are divided into two mainfamilies; red oaks and white oaks. Red oaks have pointed tips and white oaks have more rounded lobes on theirleaves. It's the white oaks that have the biggest and the best Acorns. I try to get the fresh fallen Acorns early in theseason, before they have started to get weathered or buried in leaf fall. Sometimes they are green when they fall,sometimes brown, either way is fine for collecting.
Processing The term "processing" brings to mind machines and chemical additives. With acorns, processingsimply means making them ready to eat. Unfortunately, there is a certain little moth that lays its eggs inside theAcorns and if you wait too long, the larva will have eaten most of the nutmeat. When I get home with my harvest, Ispread them out one layer thick, on an old sheet which I have laid on a roof, corner of the yard, or some other out-of-the-way dry, sunny place. This lets them sun dry, and prevents any possible molding before I get them shelled. Itwill also kill any insect eggs or larvae, which might be inside. If you cannot lay the acorns out in the sun, spreadthem in a single layer on cookie sheets in a 325 degree oven for an hour, to kill the moth eggs.

The next step is to shell them, and I'm sorry to say that I haven't found any other way to crack them but by tappingthem on the end, one by one with a small rock, or by squeezing each one gently, with a pair of pliers. To do this,simply sit down and crack a big bowlful of acorns, carefully examining each nut for black holes, which indicates aworm is inside rather than a wholesome plump yellowish-beige nut. Acorns are very easy to crack. The shell ispliable and quite thin. Pop the cap off, then simply grasp it with a pair of pliers and give a squeeze. Don't mash thekernel. Simply crack the shell. Then peel it off and toss the kernel into a bowl.
Preparing to shell acorns. Acorns, next to ground acorn meal.
Once they are shelled, you need to leach the bitter tannins out. This is done by boiling them. I like to chop them ina food processor first to expose more surface area to the boiling water. I find this leaches them much more quickly.To leach them, I simply put them in a cooking pot and add about twice as much water. Bring them to a boil, and boilthem for about 5-10 minutes. Then pour off the dark, bitter water and add more water. Repeat this process up to 5or 6 times, until the Acorns taste mild and palatable. When the acorn meal is mild tasting, it is ready to dry. I usuallylay out a piece of old white sheet in a basket and pour the wet meal on it. Then, gathering up the edges, jelly bagstyle, I press and squeeze, getting out as much of the water (and tannin) as possible. One caution-don't let wetacorn meal lie about for hours, or it will surely mold. Keep at the leaching process. Spread the damp meal out in ashallow layer on a cookie sheet or on sheets of your dehydrator. Then begin to dry it. In the oven, you only need thepilot light or the very lowest oven setting. As it begins to dry, take your hands and very carefully crumble anychunks which hold moisture. Slowly your meal will begin to look quite good.
The next step is to grind them into acorn flour. Acorns are so oily that they might gum up a grain mill. They arevery much like coffee beans at this point, so I use an electric coffee grinder or hand-cranked coffee mill to make theflour. Once they are ground, I sift them through a mesh strainer or flour sifter, to sift out any larger crunchyparticles. This flour can be stored in glass jars until ready to use. I've never had it get rancid even when stored atroom temperature for long periods of time. The traditional method of grinding was to use a stone (mano in thesouthwest) hand grinder to crush the meal on a large, flat stone (metate).
Acorn flour is very much like cornmeal in texture, rather than a fine flour. Therefore, when I bake with it I like touse my favorite cornmeal recipes and substitute Acorn flour. It makes wonderful Acorn cornbread, muffins, andpancakes. I use the coarser particles that I sifted out of the flour to make a coffee substitute beverage, much likechicory or roasted dandelion root.
Generally, the best acorns to harvest are those of the white oaks, such as the swamp oak, Oregon white oak, andburr oak, as they contain less bitter tannin. Luckily, nearly all acorns can be made usable with leaching, whichrenders them nutty and sweet.
Using acorn meal Some Native Peoples called acorns "grain from the tree," indicating the use they had for it as agrain in cakes, breads, and thickening for stews and soups. Today folks use "cream of this and that" soups for thesame thing. I think processed acorns taste like a cross between hazelnuts and sunflower seeds, and I often includeacorn meal in my multi-grain bread recipes. Adding half a cup of acorn meal to a two-loaf bread recipe andreducing the flour, as needed, works quite well. Because the acorn meal is a natural sweetener, I only use a bit ofhoney to feed the yeast while softening it, relying on the acorn meal to give sweetness to the bread.
As acorn meal is very dense, you will have to take care to get your bread to rise when adding it. One way to ensurethis is to use hot liquid and beat in your flour, making a batter. Then cool so you can add the yeast and the rest ofthe ingredients. This helps release wheat gluten to let the bread rise, despite heavy ingredients. Indian bread wasalways very dense and heavy, as there was seldom, if ever, wheat or yeast added to the recipe. It takes wheat gluten,as well as yeast, to make bread rise properly. Indian breads were often small, thin cakes baked before the fire onlarge, reflecting rocks. They were not puffy, large loaves as we are accustomed to today.
Apache acorn cakes 1 cup acorn meal, ground fine, 1 cup cornmeal, 114 cup honey, pinch of salt.
Mix the ingredients with enough warm water to make a moist, not sticky dough. Divide into 12 balls. Let rest,covered, for 10 minutes or so. With slightly moist hands, pat the balls down into thick tortilla-shaped breads. Bakeon an ungreased cast iron griddle over campfire coals or on clean large rocks, propped up slightly before the coals.If using the stones, have them hot when you place the cakes on them. You'll have to lightly peel an edge to peekand see if they are done. They will be slightly brown. Turn them over and bake on the other side, if necessary.These cakes were carried on journeys dry and eaten alone or with shredded meat. We cheat and add homemadebutter, too.
Multi-grain bread with acorn meal 1 112 cups rolled oats, 112 cup cornmeal, 112 cup coarse ground, leached acornmeal, 1 cup lukewarm water, 2 Tbsp. dry granulated yeast, 2 112 cups boiling water, 1 Tbsp. salt, 114 cup vegetableoil, 2 eggs, beaten, About 8 cups whole wheat flour, 112 cup honey, butter.
Pour boiling water over oats, cornmeal, and acorn meal. Set aside. Dissolve the yeast in lukewarm water. In a largemixing bowl, beat the hot oatmeal mixture with the rest of the ingredients, except for the yeast and butter, addingthe flour a cup at a time until you get a medium batter. Cool to lukewarm. Then add the yeast. Mix well and addenough flour until you have a spongy dough that is not sticky. Knead, adding flour if necessary to keep from beingsticky. Place in a greased bowl and grease the top of dough, then cover it with a moist, warm kitchen towel and setit in a warm place until it doubles in size. Punch down, knead several times, and let rise again. Shape into loavesand place in greased bread pans or on a greased cookie sheet.
This also makes great rolls, so you can use a cake pan, making golf ball sized rolls. Cover and let rise again untilalmost double. Preheat the oven to 350° F and bake for about 35 minutes or until the tops are golden brown. Brushwith butter and cool. You can also make this bread in camp, using smaller loaves and a reflector oven or forming112 inch thick by 1 inch wide by 8 inch long sticks and twisting the dough around a green stick and gently bakingover medium coals-never over flames.
So far, we've talked about using acorn meal as a grain. But the acorn is so much more versatile. Most NativeAmericans and early settlers used acorn meal as either an ingredient in mush, which is sort of a thick, mealy soup,or pounded with meat, fat, and berries, making pemmican. In a survival situation which requires lightweight, highcalorie foods, pemmican would be a good choice.

Here are a couple recipes for these uses of the acorn. (When I say "acorn meal," I mean ground, leached-till-mildacorn meal, not raw.)
Cornmeal and acorn mush 4 cups water, 1 tsp. salt, 112 cup acorn meal, ground, about 1 cup cornmeal .
Bring salted water to a boil and sprinkle the acorn meal into the boiling water, stirring briskly with a wire or twigwhisk. Then add the cornmeal. Add just enough cornmeal to make a thick, bubbling batch in which a wood spoonwill stand up fairly well. Place the saucepan in a larger container holding two inches or more of boiling water. (Usea double boiler, if you have one.) Simmer the mush until quite thick, about 45 minutes, stirring occasionally to keepit from lumping.
Cornmeal and acorn mush is very good for breakfast on a cold morning. It can be served with sweetened milk and adab of wild fruit jam or homemade butter. But it is also great as a main course lunch or dinner. You can also addsalsa or bacon bits and grated cheese on top to get great variety. This mush is very filling and will stick to your ribs.
I often make a double batch and pour the "extra" in a greased bread pan. When cooled in the fridge overnight, itbecomes quite solid and can be sliced in half inch thick slices, dipped in flour and fried in oil, first one side, thenturn and fry the other. Fried acorn and cornmeal mush is one of our absolutely favorite camp (or at-home)breakfasts. Serve it with butter, salt, and thick fruit jam or maple syrup.
You might want to try your hand at a "modern" type of pemmican. It doesn't keep on the trail for months, but it ispretty good.
Modern pemmican 1 lb. lean stewing meat, cut quite small, 112 cup dehydrated wild plums, 112 cup acorn meal.
Boil the lean stewing meat. When it is tender, drain and allow it to dry in a bowl. Grind all of the ingredientstogether in a meat grinder using a fine blade. Grind again, mixing finely, distributing the ingredients very well.Place in a covered dish and refrigerate overnight. (Or you can eat right away, but like many foods, the refrigeratingallows the flavors to blend nicely.) You can serve this on any flatbread, such as a tortilla. It is best served warm, oryou can reheat it in the pan in the oven like a meatloaf.
Acorn meal can also be used in place of a good portion (or all) of the nuts in most desserts, from brownies tocookies. It does depend on the variety of acorn you have available and the taste after leaching. Some acorn mealnever gets "nutty," only mild, while the meal of other acorns, such as those of the Emory oak, are so sweet that youcan eat them without leaching, or with very little leaching.
And don't forget the acorn pancakes
ACORN PANCAKES Break an egg into a bowl. Add 1 teaspoon salad oil, 1 teaspoon of honey or sugar, 112 cupof ground and leached acorns, 112 cup of corn meal, 112 cup of whole wheat or white flour, 2 teaspoons of doubleaction baking powder, 112 teaspoon of salt, 112 cup of milk.
Mix all together. If the batter is too thick to pour, thin it with milk. Pour pancakes into a hot, greased griddle andcook slowly until brown on both sides. Serve with butter and syrup or wild blackberry jam.