how to make earrings with beads - beaded...
TRANSCRIPT

How to Make Earrings with Beads by Poli Ness

All Rights Reserved. No part of this publication may be reproduced in any form or by
any means, including scanning, photocopying, or otherwise without prior written
permission of the copyright holder. Copyright © 2012

Table of Contents
1. Free Gift
2. Introduction
3. Few Words About Seed Beads
4. Tutorial 1 - Salmon Gold Earrings
5. Tutorial 2 - Turquoise Dangling Earrings
6. Tutorial 3 - Pink, Black and White
Earrings
7. Few Words from the Author
8. Make Money from Your Craft
9. My Other Books

1. Free Gift
Get FREE Tutorials for Making Other AMAZING
Handmade Beaded Jewelry
Claim your free membership NOW
Would you like to learn how to make other fashionable, fresh and unique handmade jewelry?
Well, I invite you to join my popular (over 31,567 thousands members around the world) online Magazine “Beading with Poli” completely for FREE! You'll be
receiving step by step jewelry making tutorials on a weekly basis directly to your email inbox.

2. Introduction
Do you want to look attractive, stylish and unique? Nowadays fashion magazines set new trends literally on everything: shoes, clothes, accessories,
jewelry. It’s not surprising that jewelry, made of seed beads, has recently become very popular.
Variety of colors, fancy forms and different textures, which you can match and
mix, will turn jewelry into masterpiece. But you will be mistaken if you think that beading with seed beads is a diligent and laborious work. There are a lot of
various techniques and simple methods available to create fabulous jewelry with seed beads.
These items of craft work will always look unique and glamorous, and what's more important they will be made by your own hands. You will be able to
create your unique jewelry, which will complete your outfit with its distinctive and glamorous design.
In this tutorial you will find comprehensible schemes, used by seed bead
jewelry designers in making simple and sophisticated items. We will explore these schemes on example of a particular jewelry item. You will then apply
these techniques while making your own items according to your fantasy and style.
You will also find photos of items and schemes with detailed instructions and
explanation how to make one or another jewelry item. Further to the above, each item has full description of materials used for beading of this item.

3. Few Words About Seed Beads
To make a new item you will need seed beads of particular size, thread or nylon thread, a needle, scissors, other findings (such as rings, clasps) and
some other instruments.
It is important to use seed beads of the sizes, described in the tutorial, for each
jewelry item. Choosing the set of colors is up to you, however. Sizes and colors are often specified on the package.

I advise you to use seed beads from one manufacturer, because same seed
beads type made by different companies are not always of the same size. We will also need special threads and needles, designed especially for beading with
seed beads. Their sizes are also specified on the package.

Other instruments and equipment, which you will need for making a particular
item, will be mentioned in each tutorial. You can purchase all the needed instruments and equipment at specialized beading stores. In case you either
face difficulties in finding such stores near you or you just prefer to order everything you need directly from the Internet, I've got a very convenient
solution for you. Instead of running around the city for finding all the required tools, I’ve provided you with an option to get all the necessary equipment
directly from suppliers whom I consistently order from.
This way you won’t only save your valuable time but you will also get the best
prices as well as high quality tools, which is very important for our kind of job. So don’t repeat my mistakes; don’t go and buy the cheapest tools and
equipment out there! It doesn’t worth it; believe me. I know exactly what I’m talking about since I went through it in the beginning of my designing career!
Invest one time in quality equipment and you’ll be able to use it literally for decades over and over again.
Anyway, in the end of the day, this is your choice which tools and equipment to
use and where to get them from. Go for whichever option you feel is the best for you. I just give you here an alternative way, which I wish somebody could
provide me with when I started.
Good luck!

4. Tutorial 1 - Salmon Gold Earrings
Tools:
Wire Cutters - Get it Here Flat Nose Pliers - Get it Here
Crimping Tool - Get it Here Beading Board - Get it Here
Findings:
4 x Head Pins - Get it Here 1 x Eye Pin - Get it Here
2 x Ear Wires - Get it Here 2 x Inch long pieces of chain (each of mine has 5 individual links) - Get it
Here
Beads:
3 x Small Gold Filigree Beads - Get it Here 1 x Medium Sized Round Gold Filigree Bead - Get it Here
1 x Large Oval Salmon Colored Glass Beads - Get it Here
Click PLAY button to watch the video tutorial

1) To start, put your medium gold bead on an eye pin, bend it backwards at
almost a 90 degree angle and trim it to less than half an inch long. (Shown in the below picture):

2) Using your needle nose pliers, make a loop with the wire to match the loop on the other side of the eyepin. (Shown in the picture below)
3) Set that aside, and put one of your small gold beads on a head pin. (Shown in the picture below)

4). Bend the wire back to almost a 90 degree angle and trim it to less than half
an inch long. (Shown in the picture below)
5). Using your needle nose pliers, make a loop with the wire on the headpin. (Shown Below)
6) Repeat this with the remaining 2 small gold beads. (Shown Below)
7) Using your flat nose pliers, grasp the loop and swing it outward to open it.
Do not bend it back as this will weaken the wire. (Shown Below)
8) Hook your open loop onto the second link of your chain. (Shown Below)

9) Close the loop in the opposite way that you opened it. (Shown Below)
10) Put the second small gold bead onto the next link down on the chain.
Then, put the third gold bead onto the 3rd link of the chain. (Shown Below)

11) Open your medium gold bead and hook it onto the top link of the chain. Close it. (Shown Below)
12) Take your large salmon colored bead and put it on a headpin. (Shown
Below)
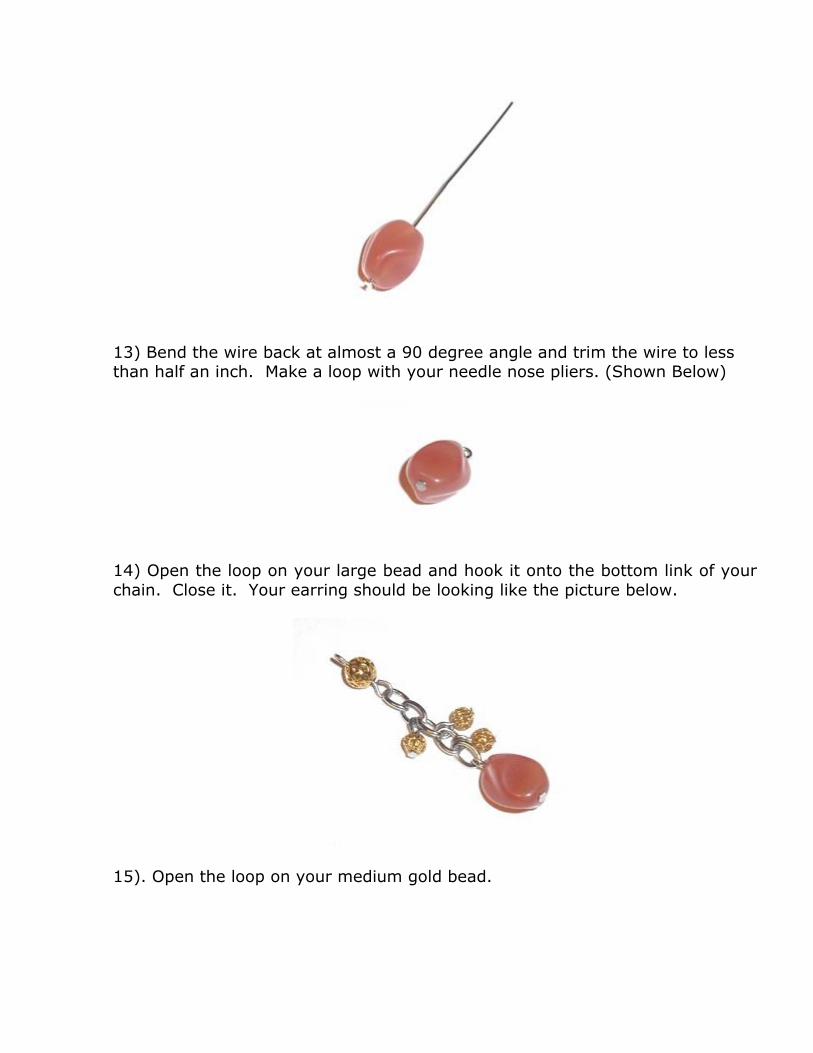
13) Bend the wire back at almost a 90 degree angle and trim the wire to less than half an inch. Make a loop with your needle nose pliers. (Shown Below)
14) Open the loop on your large bead and hook it onto the bottom link of your
chain. Close it. Your earring should be looking like the picture below.
15). Open the loop on your medium gold bead.

Hook on your ear wire and close the loop. (Shown Below)
And here is what you should get:

Would you like the entire set of Salomon bracelet, necklace and earrings like on the picture below? You can get both of my other books where i teach how to
make supplemental pieces of jewelry for as low as happy meal in McDonalds :)
Get my books here:
1. How to Make Beaded Bracelets 2. How to Make Necklaces with Beads


5. Tutorial 2 - Turquoise Dangling Earrings
Tools:
Needle Nose Pliers - Get it Here
Flat Nose Pliers - Get it Here Wire Cutters - Get it Here
Beading Board - Get it Here
Findings:
2 x Head pins - Get it Here
2 x Eye pins - Get it Here 2 x Ear wires - Get it Here
Beads:
4 x Turquoise Beads - Get it Here
6 x Freshwater Pearls - Get it Here 2 x Black Cubic Zirconia’s - Get it Here
4 x Metal Spacers - Get it Here

Click PLAY button to watch the video tutorial
1) To start, string your beads onto one of the eye-pins in the following order
(as shown in the below picture)
Pearl Bead Turquoise Bead
Metal Spacer Cubic Zirconia

Metal Spacer
Turquoise Bead Pearl Bead
2) Once you have your beads on your eye-pin, grasp the wire that is sticking out with your flat nose pliers, and bend backwards about 45 degrees. (Shown
Below)
3) Use your needle nose pliers to grasp the very tip of the wire you just bent.
Once you grasp the wire with your needle nose pliers, loop the wire around the needle nose pliers until it meets the other side, to create a loop similar to the
one on the other side of the eye-pin. (Shown Below)

Now set that piece aside.
4) Take one of your pearls and bead it onto one of your eye-pins. (Shown Below)
5) Using your flat nose pliers, bend the wire backwards approximately 45 degrees. (Shown Below). Now trim the wire leaving about a half an inch. This
will be used to make a loop in the next step.

6) With your needle nose pliers, make a loop like you did in step 3. (Shown Below)
7) Take the long beaded piece you created first, and use your flat nose pliers to grasp one of the loops and swing it outward to open it (Shown Below)
Note: Do NOT pull the loop out, as it will weaken the wire and make it
prone to breaking. Instead, swing it outwards to open it, and swing it back towards your body to close it.

8) Take your single pearl bead with the loop on one end and hook it onto the opened loop of the long beaded piece of the earring. (Shown Below)
9) Open a loop on either one of your ear wires or the loop on the other end of your long beaded piece. Hook on one of the ear-wires and close the loop with
your flat nose pliers. (Shown Below)

10) Repeat steps 1-9!
And here is what you should get:

Would you like the entire set of Salomon bracelet, necklace and earrings like on
the picture below? You can get both of my other books where i teach how to make supplemental pieces of jewelry for as low as happy meal in McDonalds :)
Get my books here:
1. How to Make Beaded Bracelets
2. How to Make Necklaces with Beads

6. Tutorial 3 - Pink, Black and White
Earrings
Tools:
Wire Cutters - Get it Here
Flat Nose Pliers - Get it Here Crimping Tool - Get it Here
Beading Board - Get it Here
Findings:
6 x Eye Pins - Get it Here
2 x Head Pins - Get it Here 2 x Ear Wires - Get it Here
Beads:
2 x Pink Disc Shaped Shell Beads - Get it Here
2 x Amber Colored Round Glass Beads - Get it Here 2 x White Round Glass Beads - Get it Here
2 x Teardrop Shaped Glass Beads - Get it Here

Click PLAY button to watch the video tutorial
1) To start, Put one of your shell beads onto one of your eye pins. (Shown in
the below picture):

2) Using your flat nose pliers, bend the wire back at a 45 degree angle and trim it leaving a little less than half an inch. With your round nose pliers, make a
loop with the wire to match the other side of the eye pin. (Shown in the picture below)
3) Put one metal bead, one white bead and one more metal bead onto another
eyepin and repeat the last step to make a loop. (Shown in the picture below)
4). Again, take an eye pin and put on one metal bead, one amber colored glass bead, and one metal bead. (Shown in the picture below)

5). Once again bend back the wire and trim it. (Shown Below)
6) Make a loop like you did with the other beads. (Shown Below)
7) Grip the loop of the first shell bead with your flat nose pliers and swing it out to open it (Shown Below)
8) Hook on your amber colored bead and close the loop. (Shown Below)
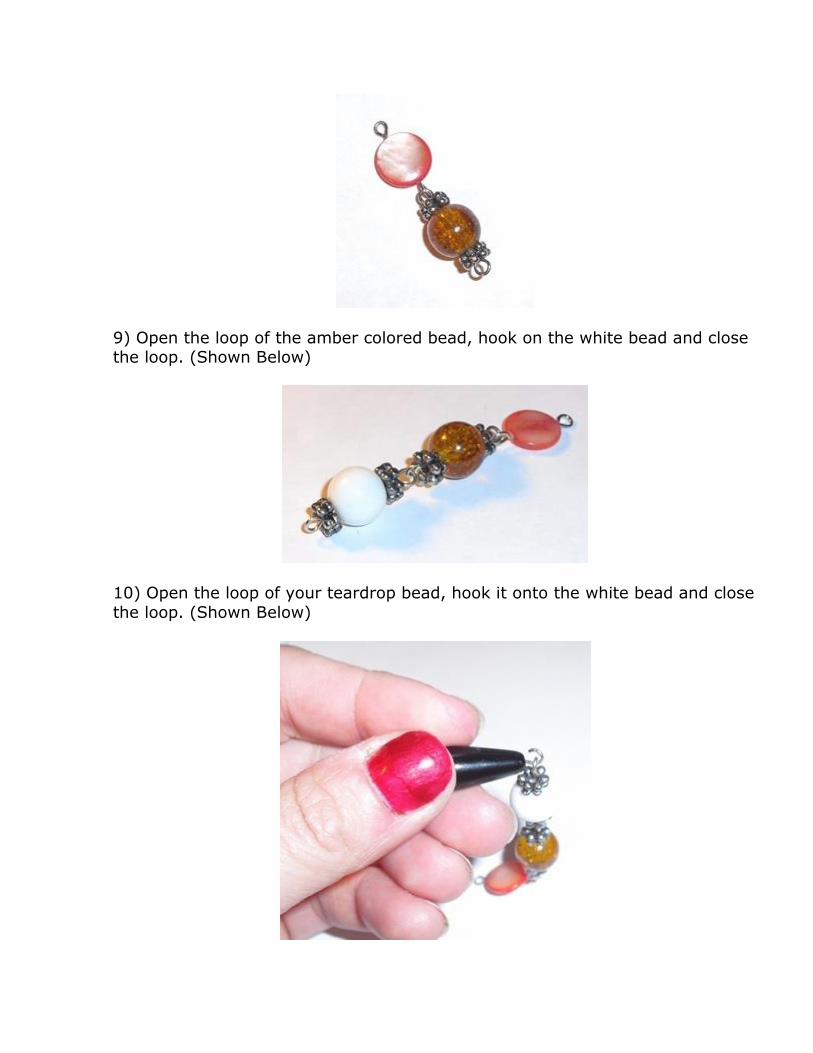
9) Open the loop of the amber colored bead, hook on the white bead and close the loop. (Shown Below)
10) Open the loop of your teardrop bead, hook it onto the white bead and close
the loop. (Shown Below)

11) Your earring should be looking like the below picture. (Shown Below)
12) Open the loop on the top of your shell bead and hook on the ear wire.
Close the loop! (Shown Below)
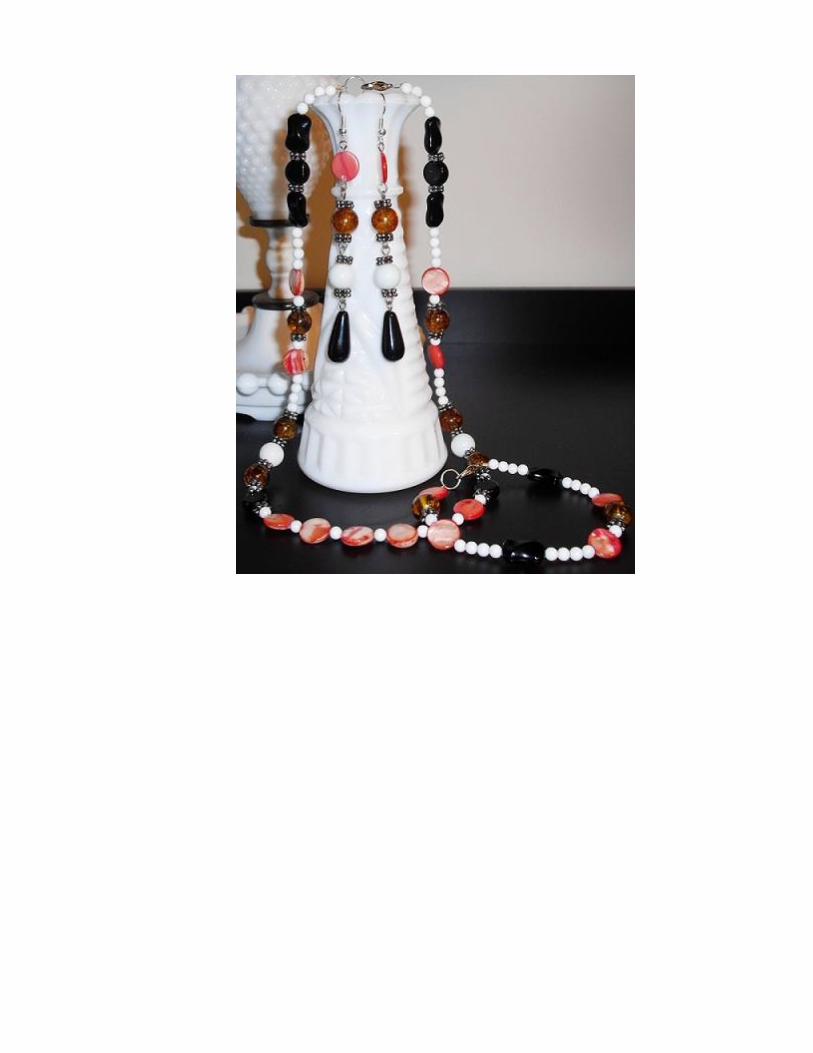
And here is what you should get:

Would you like the entire set of Salomon bracelet, necklace and earrings like on
the picture below? You can get both of my other books where i teach how to make supplemental pieces of jewelry for as low as happy meal in McDonalds :)
Get my books here:
1. How to Make Beaded Bracelets
2. How to Make Necklaces with Beads

7. Few Words from the Author
Finally you’ve reached the end of my practical guide! Congrats! Well, as you perhaps understood I’m completely passionate about handmade beaded
jewelry, probably as much as you are. In fact, this was my first book; my baby.
I would like to ask you a favor. I really want to hear your honest feedback on
how I did. I would even say I need your constructive critic. Please leave your review with you honest feedback about my book.
Click Here to Leave a Review on Amazon
I would like to know whether this book was helpful for you or you would
suggest improving, adding, or clarifying certain part of the book. Your feedback
is very important!
It won't even take three minutes of your time while every feedback will make a huge difference for me! I very appreciate your willingness to improve and make
this book even more helpful for future readers!
Get FREE Tutorials for Making Other AMAZING
Handmade Beaded Jewelry

Claim your free membership NOW
Would you like to learn how to make other fashionable, fresh and unique handmade jewelry?
Well, I invite you to join my popular (over 31,567 thousands members around
the world) online Magazine “Beading with Poli” completely for FREE! You'll be receiving step by step jewelry making tutorials on a weekly basis directly to
your email inbox.

8. Make Money from Your Craft
Finally, an Easy to Follow, Step-By-Step Roadmap
to Make Money Making Simple Wire Name
Jewelry No Matter What your Previous Experience
Get More Details Here
9. My Other Books
Here are my other best-selling books which you can get on Amazon
1. How to Make Beaded Bracelets
2. How to Make Necklaces with Beads
3. 6 Unique Handmade Jewelry Making Ideas
