how to photograph cars…. there are many genres of automotive photography: formal…minimal...
TRANSCRIPT

How to Photograph Cars…
There are many genres of automotive photography:
• Formal…minimal distracting elements…background plain• Action…cars in motion…often something [or everything] is blurred• Scenic…The scenery is equally important to the car…often a vacation capture• Close-up…highlighting some important part of a car• Involved…showing a car w/ it’s humans in some mutual activity [Racing, Concours,
Rally, Tour, etc]
Some of these genres overlap.

Formal:
The bane of automotive photography is reflections! The paint is usually quite shiny and you need to be VERY aware of what is being reflected. Older cars can have a lot of chrome. You especially should try to keep YOUR reflection out of the image! A BIG, white wall is an ideal “tool”; place the car so that the wall is reflected off the paint into your camera lens. It can help if there are a few dark lines in this wall. For, example, a garage door can be used. These dark lines help define the contours of the car. This technique works best for cars that are round and smooth; cars with a lot of hard edges tend to look too “busy” if there are straight lines reflected in their paint.

Don’t get cute and artsy-pfhartsy w/ reflections if you are attempting a formal portrait; like don’t attempt to locate another subject so that its reflection is seen in the main subject. This technique is better reserved for the other genres!
Framing of a formal portrait should normally be static and the subject centered. You don’t want to imply motion by placing the car off-center. A centered subject implies calmness.
Lighting is the next critical issue. Bright, mid-day sun can be very harsh. Deep shadows are problematic. The best lighting for a formal automotive portrait is a uniformly overcast sky. It gives very soft light that flows around the car.
Often we don’t have control of the light, so we have to fill in the shadows in post processing.

You CAN be creative occasionally w/ Formal portraits; like frame the image to only show a part of the car when there are other interesting Objects. This overlaps into the Scenic genre:
It IS possible to set up artificial lighting, but it’s VERY difficult and expensive. For the average photographer, hire someone to do this if you can’t find a way to use natural light. Patience helps you wait for ideal natural light.

Action:
There are four basic varieties:
1. Everything is in sharp focus and not blurry2. The entire car is in sharp focus, but the background is OoF [not motion blur]3. The entire car and driver are sharp and the background is blurred [motion]4. Most of the front and back of the car is blurred, but the center part and driver are
sorta sharp
The first one is easy. The second one requires a VERY expensive [long FL and large aperture] lens. The last two are difficult to take. Your success rate will be LOW!

1. Keeping everything in focus requires a small aperture [f/8 to f/11]. Keeping everything non-blurry requires a short exposure time. Depending on the speed of the car, an exposure time above 1/500 works. Combining both of these means that the camera must have a moderately high sensitivity.
There is a “Sunny 16” rule that states in bright, mid-day sun your exposure time should be 1/ISO @ f/16. Thus, an aperture of f/16 and a time of 1/500 second in bright sun requires a sensitivity of ISO 500. Opening up the lens to f/8 gives 4X the light, so the sensitivity can be reduced to ISO 125. Using f/11 and 1/2000 second, the daylight sensitivity must be ISO 1000. In cloudy or night-time conditions,the sensitivity must be higher.Once you get the exposure settings on the camera set, taking these type photos is easy.

[begin aside] An excellent tool for those of you who like and understand a bit of technology is a free software program called “Barnack”. You can get it at:
http://www.stegmann.dk/mikkel/barnack/.
It allows you to input your camera settings and the program calculates things like DoF, Field of View, Luminance, Hyperfocal Distance, etc.
There are also apps for your smart phone that calculate some of this, especially DoF. [end aside]

2. Keeping only the car in focus requires you to open the lens to lower the Depth of Field [DoF]. But if you use a VERY large aperture, only a part of the car will be in focus! For example, if the car is 100 feet away and you have selected f/2.8 on your 400mm lens, the DoF is only 3.3 feet! It’s OK to have a DoF slightly less than the depth of the car, but 3.3 feet is too shallow. Aim for something about 6 feet.
You also want a short exposure time as in #1 to minimize motion blur.

3. Keeping only the car in focus requires you to “pan” with the motion of the car and to set a moderately long exposure time; something like 1/60 to 1/125 second is a good starting spot [this is somewhat dependent on the speed of the car]. When you do this, the background is blurred horizontally.
This is moderately difficult. It helps to use a monopod and to practice a LOT.
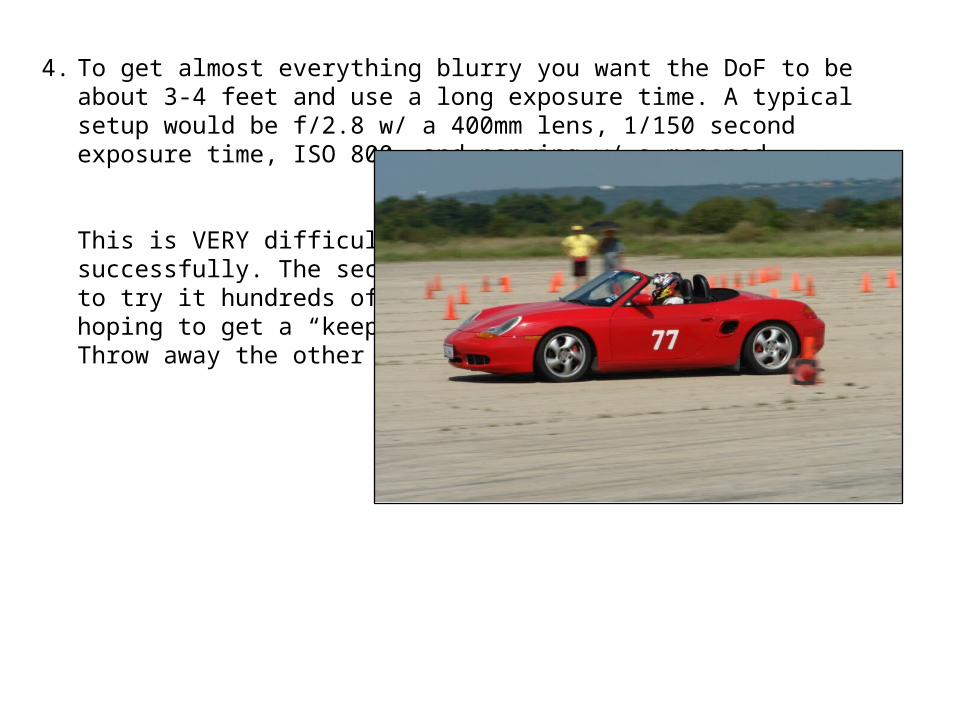
4. To get almost everything blurry you want the DoF to be about 3-4 feet and use a long exposure time. A typical setup would be f/2.8 w/ a 400mm lens, 1/150 second exposure time, ISO 800, and panning w/ a monopod.
This is VERY difficult to do successfully. The secret is to try it hundreds of times hoping to get a “keeper”.Throw away the other pix!

Scenic:
Unlike a “Formal” portrait, where it’s OK, even good, to render the background OoF, a Scenic car portrait is much like a landscape image: You want to strive to keep everything in sharp focus. This means you must maximize the DoF. It will help to have a DoF Calculator, like the previously mentioned Barnack. Unfortunately, Barnack doesn’t run on smart phones, but there are many simple DoF apps that you can download. When you get your DoF app, you will probably run into a new term: “Hyperfocal distance”. I did not include this in the Glossary because it’s so obscure that few people know about or use it. Plus, its definition is a bit ambiguous. In simple terms, it’s the distance beyond which all objects can be brought into “acceptable” focus. Since most people don’t have lenses that can be manually focused [anymore], this concept is a legacy one.
In a “Scenic” portrait, the area surrounding the car is as important as the car. Mentally take the car out of the scene and compose it according to classical rules, then place the car where it harmonizes w/ the geometry of the scene. Remember that the colors in the scene must harmonize w/ the color of the car. Since most Porsches are some shade of silver, that usually isn’t a problem. But some greens can clash with the trees and grass. For problem colors, it might be good to use an artificial backdrop, like a building or wall.
Don’t forget that some cars have a “better side”. Often the rear, front, or side simply looks better when photographed. Try several different orientations and see what looks the best. Try a corner shot; these are often best.

Then there is the issue of perspective. Perspective has several components:
• Height of the camera from the ground; in general, it’s better to get down to photograph low sports cars. Locate the camera at ½ the height of the car as a starting height and work from there. Even laying on the ground works!
• Use a lens that allows you to be 20’ to 30’ from the car. If you get up too close, the car appears to “bulge”. If you get back too far, the car appears “flat”. When making portraits of humans, the best distance is 8’ to 10’, but a car is bigger, thus the increased distance.

These perspective “rules” can be broken. Occasionally a car looks cute when photographed w/ a wide angle [WA] lens; for example a 356. Some cars look stunning when viewed from above. This is especially true of open cars. Don’t be afraid to experiment!
Don’t assume that you must frame the entire car; often getting in close can produce interesting images. The most popular close-up shots are of wheels and brake calipers, to the point of becoming a bit trite. Other popular close-up subjects are lights [both ends], instruments, controls, parts of the engine, badges, insignia, decals, etc.
A very common close-up shot is of An early 356 chrome hubcap, w/something reflected in it. The shape of the hubcap produces a “fish-eye” view of the surroundings. Take this idea and vary it. Often you can compose reflection shots in paint. Try to find a complex curve that renders the reflection in an interesting way.

Close-up:
Don’t assume that you must frame the entire car; often getting in close can produce interesting images. Again, the most popular close-up shots are of wheels and brake calipers, to the point of oversaturation.
Often moving back and taking in more of the scene can make good images. Take this idea and vary it. Combine a closeup w/ a reflection in paint. It’s OK to occasionally have your reflection in the picture.

Or reflect something recognizable like a pylon in the door as a race car passes:
Alternately, show the heat given off by an engine on a crisp day causes ripples; get a close-up shot of that [w/ a distressed pylon of course]:

Involved:
This is a broad category. PCA Regions have many opportunities to capture images of members and their cars. It’s the bread-and-butter of our newsletters and magazines. But too often photographers try to include too much in one image:
These are always a waste of time, since we have no way to print them big enough to see any details. And they often include ugly elements like power and light poles, wires, VW’s, etc.

It’s much better to use the one person/one car rule:
Yes, there are still some light poles, but they can easily be removed. The previous picture had things in the sky that would have been difficult to remove. This would have been a better image if the background was less cluttered, but some things are beyond our control.