how to save user input to a database by clicking - exsys inc · how to save user input to a...
TRANSCRIPT

How to Save User Input to a Database by Clicking the Save Button 1
How to Save User Input to a Database by Clicking a “Save” Button
In some systems, it is desirable to allow the end user to answer some questions and quit mid-session, with the ability to return to the same session later. This can be very useful when the system:
Asks many questions and takes a long time to run Asks a question that the end user may not be able
to immediately answer Requires input from several different users, each providing answers to some questions Implements a “model” that can be run in a “What-if” mode, changing some of the input values
This approach saves all the user’s input when the user hits a "Save" button, after which they can shut down their browser or exit the session without any lost input. When the user runs the system again, it will ask if they want to continue the previous run by recovering the saved data. Another approach to the problem is to automatically save all user input after they answer each question. This allows them to just leave the session with no data lost. (Separate “How To” Documents explain how to implement this approach.) Automatically saving input after each question has a much higher overhead in data being sent back to the server than that “Save Button” approach. This “Save Button” approach should be used:
If systems are to be run using the applet runtime with slow connections If the database calls take an excessive time to execute
In most other situations it may be better to use the automatic approach since it does not require any special user action. The “Save” button can be easily added to screens in either the Corvid Applet or Servlet runtimes, and set to trigger running a special Command Block if they are clicked. This allows adding special database commands in that Command Block to save data and exit the system.
A system demonstrating this “How To” can be run from the “Save Input From Button” section of:
http://www.exsys.com/support/howto
The code for the sample system can be downloaded from the same page.

How to Save User Input to a Database by Clicking the Save Button 2
Running the Sample System There are both applet and servlet versions of a sample system that illustrates this “How To”. They both ask the same questions and can be used to save data in the same way. When you run the system, the first question asks for a User ID. This is used to build a unique identifier for the saved data. You can enter any string, but to avoid reading/overwriting input from someone else, it must be unique. Be sure to remember the ID string entered since you will need it to recover the saved data. Your email address is a good choice for the User ID since it is guaranteed to be unique. (In a production system, there would be a combination of User ID and Password to assure that each user’s data is protected. That has not been added to this system to keep it simple.) The next question asks your name, enter your name or any text string. The system will then ask 2 other simple questions. The answers provided do not matter since there is no underlying decision-making logic in the system. On the first time through the system, enter a User ID, name and answer the “Color” question. When the “Pet” question is asked, click the “Save and Exit” button without answering it. That will save the data and terminate the run. Then start the system again and enter exactly the same User ID. The system will tell you that stored data was found for that ID and ask if you wish to recover it. Answer “Yes” and you will immediately be back to the “Pet” question you left off at. Answer the question, and the results will display both the input from the first session and the additional input from the second session. How it Works This technique saves all the user's answers from the current run (session) and reads that data back when the user starts another run. The data is stored in a database in a table that has two columns (fields). One column is the user's ID and the other column holds all the data of the current run (the SessionData). Saving the input requires some way to identify the specific user so that they can return to the session later. This can be provided by a login external to the Corvid system or any other approach that produces a unique ID that the user can provide when they return to the system. The session data will be stored under that ID which is why it must be unique. In a more complex system, an ID and password could be implemented to verify the user. The table holds one row (record) for each user running the KB. When the user runs the KB for the first time, a new row is created for that user. From then on, that row will be updated every time the user selects to save the data they have input. The table will have one row for every user that has ever run the KB. The SessionData will be a string (text) that contains all the variables in a format that Corvid can read. The format is variable name in [ ], followed by its value. It looks similar to:
[name] John Doe [Color] red [Pet] dog
All the SessionData will be a single string that contains Carriage Return characters. The required size (capacity) of the SessionData column is dependent upon the number of variables and the length of their values. To be sure SessionData can hold all the data, declare it to be of type BLOB or MEMO. When the user runs a KB, the KB calls the Command Block “RestoreSession”. It first counts the number of rows that have this user's ID. This is triggered by the command: IF [ss_#SavedSessions] == 1
How to Save User Input to a Database by Clicking the Save Button 3
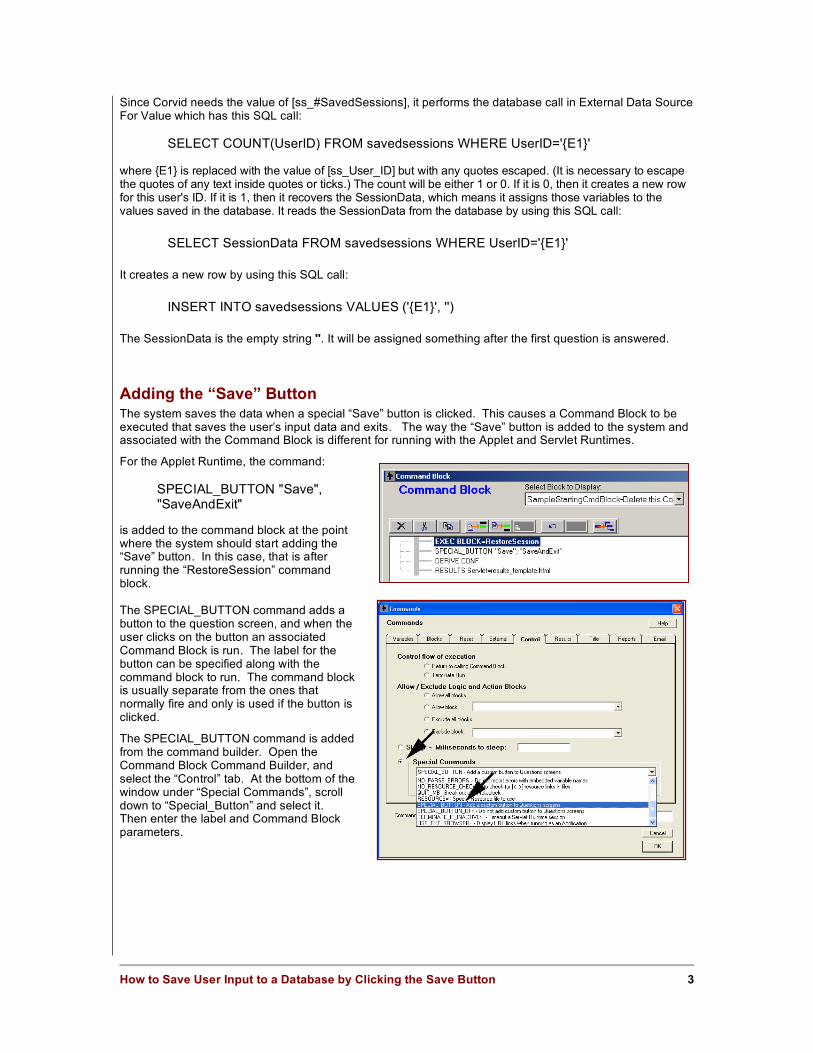
Since Corvid needs the value of [ss_#SavedSessions], it performs the database call in External Data Source For Value which has this SQL call: SELECT COUNT(UserID) FROM savedsessions WHERE UserID='{E1}' where {E1} is replaced with the value of [ss_User_ID] but with any quotes escaped. (It is necessary to escape the quotes of any text inside quotes or ticks.) The count will be either 1 or 0. If it is 0, then it creates a new row for this user's ID. If it is 1, then it recovers the SessionData, which means it assigns those variables to the values saved in the database. It reads the SessionData from the database by using this SQL call: SELECT SessionData FROM savedsessions WHERE UserID='{E1}' It creates a new row by using this SQL call: INSERT INTO savedsessions VALUES ('{E1}', '') The SessionData is the empty string ''. It will be assigned something after the first question is answered. Adding the “Save” Button The system saves the data when a special “Save” button is clicked. This causes a Command Block to be executed that saves the user’s input data and exits. The way the “Save” button is added to the system and associated with the Command Block is different for running with the Applet and Servlet Runtimes.
For the Applet Runtime, the command:
SPECIAL_BUTTON "Save", "SaveAndExit"
is added to the command block at the point where the system should start adding the “Save” button. In this case, that is after running the “RestoreSession” command block. The SPECIAL_BUTTON command adds a button to the question screen, and when the user clicks on the button an associated Command Block is run. The label for the button can be specified along with the command block to run. The command block is usually separate from the ones that normally fire and only is used if the button is clicked.
The SPECIAL_BUTTON command is added from the command builder. Open the Command Block Command Builder, and select the “Control” tab. At the bottom of the window under “Special Commands”, scroll down to “Special_Button” and select it. Then enter the label and Command Block parameters.

How to Save User Input to a Database by Clicking the Save Button 4
The command:
SPECIAL_BUTTON "Save", "SaveAndExit"
will add a “Save” button to the question screen:
For the Servlet, the “Save” button is added by using the ~EXEC_CMD_BLOCK command. This is added to the question templates that should display the “Save” button. It can be added anywhere on the FORM portion of the template.
The syntax is:
<input type="submit" name="~EXEC_CMD_BLOCK=BlockToRun" value="label"></p>
where “BlockToRun” is the name of the command block to execute if the button is clicked, and “label” is the label for the button. In this system, the command is:
<input type="submit" name="~EXEC_CMD_BLOCK=SaveAndExit" value="Save And Exit"></p>
and it will add a “Save and Exit” button to the question screen.
Regardless of which approach is used, when the user clicks the “Save” button, the “SaveAndExit” command block will be run.
This calls the SaveSession command which is has the associated SQL command:
UPDATE savedsessions SET SessionData='{E1}' WHERE UserID='{E2}' with {E2} replaced with the value of [ss_User_ID] and {E1} replaced with [~DATA_CR]. This SQL command finds the row for [ss_User_ID] and updates (overwrites) the SessionData with the text in the pseudo variable:
[~DATA_CR]
which outputs all of the input provided by the user in a form that allows Corvid to read it back in.
The EXIT command in the command block then terminates the session. Running the Sample System on Your Server
Setting up the Database Before this technique will work, there must be some database software installed on the server. The database can be any that supports ODBC or JDBC connections, such as MySql, Access, Oracle, and almost all other databases.
Create a database named SaveSession and create a table named SavedSessions. You can do so using these SQL commands:
CREATE DATABASE SaveSession; USE SaveSession; CREATE TABLE SavedSessions (UserId CHAR(50) NOT NULL, SessionData BLOB NOT NULL);

How to Save User Input to a Database by Clicking the Save Button 5
The table named SavedSessions should have 2 fields of these types: UserId: a CHAR() or similar type that is big enough to hold the largest allowed user identification string.
SessionData: a BLOB or similar type that is huge enough to hold all the variable names and their values. Edit any database command (for example, in the Variables window, select [ss_#SavedSessions] and under its Options tab click on the Database Cmd button) and click on Edit Connect Data and change the sample values to your actual values. Change the Driver and Connection strings to whatever your database requires. If your database is Microsoft Access or any other ODBC database, use these:
Driver: sun.jdbc.odbc.JdbcOdbcDriver
Connection: jdbc:odbc:your_DSN where "your_DSN" must be replaced with the System DSN name that you created for that database. The Login and Password are blank unless your database requires them. You can now test run it independently or merge it into your KB. To Test Run the Sample System You need a server that supports servlets. Even if you are running with the Corvid Applet Runtime, it must call a Servlet to perform the actual database commands. These instructions will assume you are using Tomcat on your test computer and the host will be localhost on port 8080.
Copy the folder in the SaveSessionInDBViaButtonApplet.zip file into Tomcat's webapps\ROOT folder.
(Files in the webapps\ROOT folder or its subfolders are to be served by Tomcat's web page server.)
View the contents of the folder webapps\ROOT\HowTo\Applets\SaveSessionInDBViaButton.
Open the SaveSessionByButton.CVD file.
If your host or port is not localhost:8080, click on the Properties button and change the host and port under the Database tab. Also, change the host and port in the Specific URL under the Test Run tab.
Change the database connection data as explained in the previous section. All you have to do now is copy the .cdb file to webapps\CorvidDB\ as explained in the next section. Running the Sample System with the Corvid Applet Runtime The CorvidDB Servlet must be installed and running to process the database commands. Put the CorvidDB.war file in Tomcat's webapps folder and either deploy it or restart Tomcat. Put the .cdb file in the webapps/CorvidDB/ folder. (See the instructions for CorvidDB if you have any problems). In the Properties window under the Test Run tab, specify the Specific URL to run as an applet. For example, if you put the KB files in Tomcat's 'webapps/ROOT' in a subfolder named 'SaveSessionInDBViaButton', then the Specific URL would be:
http://localhost:8080/SaveSessionInDBViaButton/SaveSessionByButton.html Under the Database tab in the Applet Runtime grouping, specify the URL for the CorvidDB. It could be something like:
http://localhost:8080/CorvidDB/corviddbservlet
Click Done.
Click on the Run button (the blue triangle). The system should run the same as the applet sample system run off the link on:
http://www.exsys.com/support/howto

How to Save User Input to a Database by Clicking the Save Button 6
Running the Sample System with the Corvid Servlet Runtime In the SaveSessionInDBViaButtonServlet.zip file are two folders, "KB" and "base".
Copy the contents of the "KB" folder into Tomcat's webapps folder.
You should now have the folder webapps\SaveSessionInDBViaButton\.
Copy the contents of "base" into Tomcat's webapps\ROOT folder.
View the contents of the folder webapps\SaveSessionInDBViaButton\.
Open the SaveSessionByButton.CVD file.
If your host or port is not localhost:8080, click on the Properties button and change the host and port in the Specific URL under the Test Run tab. Also, change the host and port under the 'Servlet' tab for the CORVID_SERVLET and CORVID_LINK_BASE.
Change the database connection data as explained in a previous section. The system should run the same as the servlet sample system run off the link on:
http://www.exsys.com/support/howto Merge the Sample System Into Your KB The sample system can also be merged into your system to provide the core functionality to save/recover input data.
1. Make a copy of the SaveSessionByButton.CVD file and open it.
2. Delete the Logic Block named “Delete this Logic Block” before you Merge.
3. Delete the variable [conf].
4. Delete the variables [name], [color] and [pet].
5. Save the modified copy of SaveSessionByButton.CVD. and exit Corvid.
6. You are ready to merge the systems. Be sure you make a backup copy of your system’s cvd file and then open your system.cvd file in Corvid editor and under the “File” menu and select “Merge”. Browse to the copy of the SaveSessionByButton.CVD file that was modified above and select it. It will be merged into your system file.
7. Copy the first two commands in the Command Block named SampleStartingCmdBlock. Paste them into your starting command block.
8. Delete the Command Block named SampleStartingCmdBlock.
9. Close all Command Blocks and Logic Blocks and pull down Run and select Set Starting Cmd Block. Make sure your starting command block is the selected command block.
10. Save the modified, merged system. It will contain the variables and blocks needed to save sessions.
11. If the system uses the Corvid Servlet Runtime, modify the question templates to add the “Save” button. This can be done by copying the code from the sample system template.
Note: If the system is modified in a way significantly changes the meaning, names or structure of variables, the saved session data in the database should be deleted, as it may not match the edited system.
© Exsys Inc. www.exsys.com