how to update supplier profiles - detroit...shay schaufele [email protected] step by...
TRANSCRIPT

HOW TO UPDATE SUPPLIER PROFILES Step by step guide to update/manage Supplier Profile
Shay Schaufele [email protected]
Step by step guide for suppliers on how to manage their City of Detroit profile-addresses, contacts, bank accounts, business certifications,
Products and Services.

1
Table of Contents Introduction.................................................................................................................................................................................... 2
Time Zone Change .......................................................................................................................................................................... 3
Organization Details tab: ............................................................................................................................................................... 11
Tax Identifiers tab: ....................................................................................................................................................................... 13
Addresses Tab: ............................................................................................................................................................................. 15
Contacts Tab: ............................................................................................................................................................................... 20
Payments Tab: ............................................................................................................................................................................. 25
Business Classifications Tab: .......................................................................................................................................................... 29
Products and Services tab: ............................................................................................................................................................ 32

2
Introduction
This step by step guide will assist the Supplier on how to update/manage your profile. This includes addresses, contacts, business certifications,
bank accounts, and products and services. Suppliers are expected to manage their profiles to ensure accurate information.
NOTE-You can make one change at a time. Once the change has been approved, then you are able to make another change.
Any changes to the Supplier Name, Tax Identifier, Payment Terms or Payment Method will not be permitted. These changes will reject immediately
when submitted. For these changes, you must contact Office of Contracts and Procurement (OCP) via email:
Log into Oracle and click the Supplier Portal icon

3
Time Zone Change
To change the Time Zone, click the down arrow next to the User initial.
A window will display. Click the Set Preferences link.

4
The Preferences window will display. Click the Regional link.

5
The General Preferences window will display. Using the dropdown arrow in the Time Zone field, select the correct time zone for your business.

6

7
Click Save and Close button to complete this action. You will return to the Preferences page.
Click on the Home (house) icon to return to the Supplier Portal home page.

8
The Supplier Portal home page will display. Under the Tasks region (left side), scroll down to Manage Profile link. Click the link to open the page.

9
Supplier Profile page will display. Click the Edit button to make changes to your supplier profile pages.

10
A Warning message will display. Click Yes to proceed.
Edit Profile Change Request page will display. Enter a detailed explanation of the change you are making in the Change Description field. There
are several tabs available for the Supplier to edit.

11
Organization Details tab:
This tab allows you to add/delete/update information regarding your company. When you have completed your change, click the Review Changes
button to continue. *NOTE-any Name change with supporting documentation must be sent to [email protected].

12
Review Changes page will display. The blue dot on the left side represents the field that has been changed.
Review the Changed From and the Changed To fields to ensure accuracy. Click Submit button when completed.
A confirmation message will display when changes has been submitted. Click OK button to complete.
Once the change request has been processed, you will see the confirmation on the Company Profile page.

13
Tax Identifiers tab:
This tab allows you to update your company’s tax information. You will not be able to update the Taxpayer ID or Federal Income Tax Type. Any
change to this field will be rejected upon submit. Once you have completed your changes, click the Review Changes button.
Review Changes page will display. The blue dot on the left side represents the field that has been changed.
Review the Changed From and the Changed To fields to ensure accuracy. Click Submit button when completed.

14
A confirmation message will display when changes has been submitted. Click OK button to complete.
Once the change request has been processed, you will see the confirmation on the Company Profile page.

15
Addresses Tab:
This tab allows you to make changes to your addresses.
If you are adding an address, click the Plus (+) icon to open a window to add your information.
If you are making a correction of an address, click the Edit (pencil icon) to open to make corrections.
16
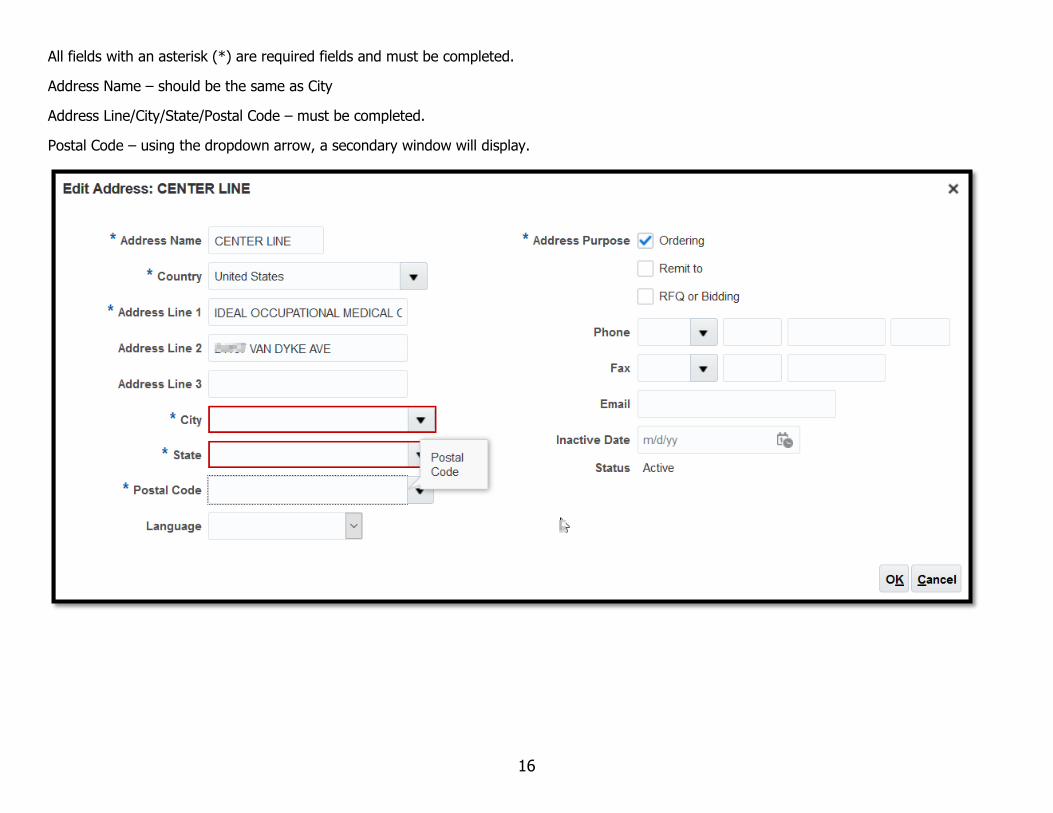
All fields with an asterisk (*) are required fields and must be completed.
Address Name – should be the same as City
Address Line/City/State/Postal Code – must be completed.
Postal Code – using the dropdown arrow, a secondary window will display.

17
Type the Postal Code first and select the Code with the 2-digit state code (ex. MI). Click OK.

18
Address Purpose – check all boxes that apply.
Ordering = for Purchase Orders
Remit to = for Payments
RFQ or Bidding = for Bids/Responses
Phone/Fax/Email – enter needed information
Click OK button to finish

19
Review Changes page will display. The blue dot on the left side represents the field that has been changed.
Review the Changed From and Changed To fields to ensure accuracy. Click Submit button when completed.
A confirmation message will display when changes has been submitted. Click OK button to complete.
Once the change request has been processed, you will see the confirmation on the Company Profile page.

20
Contacts Tab:
This tab allows you to change your contacts for your company. Contacts are staff who will be able to make changes to your company profile,
create invoices, view POs/invoices/agreements, manage bank accounts and responses to bids. Ensure that all Contacts are current and accurate.
Disable all Contacts that are not permitted to make these changes for your company.
If you are adding a Contact, click the Plus (+) icon to open a window to add your information.
If you are making a correction of a Contact, click the Edit (pencil icon) to open to make corrections.

21
Make the changes as needed. Any fields that has an asterisk is a required field.
To add a Contact Address, click the Select and Add icon (square with + symbol)

22
A secondary window with a list of available addresses will display. To select, click on the left side of the address line (it will highlight in
Blue), click Apply and then click OK.

23
Under Roles, do NOT change/delete/add to this region. Any changes to the User Account will impact your ability to log into Supplier Portal.
Click OK button to complete.

24
Review Changes page will display. The blue dot on the left side represents the field that has been changed.
Review the Changed From and Changed To fields to ensure accuracy. Click Submit button when completed.
A confirmation message will display when changes has been submitted. Click OK button to complete.
Once the change request has been processed, you will see the confirmation on the Company Profile page.

25
Payments Tab:
This tab allows you to add/edit bank accounts to your profile.
Any changes to the Payment Method will reject upon submit automatically. If you need to change your payment method, please send an email to
[email protected] with the proper documentation.

26
The Bank Accounts tab will display the current bank accounts that payments will be sent to.
If you are adding a Bank Account, click the Plus (+) icon to open a window to add your information.
If you are making a correction of a Bank Account, click the Edit (pencil icon) to open to make corrections.

27
Make the needed changes. All fields that have an asterisk are required.
Country – using the dropdown arrow, select United States
Account Number – enter your account number
Bank Name - using the dropdown arrow, select your bank
Bank Branch - using the dropdown arrow, select the branch name/routing number
Account Type - using the dropdown arrow, select Checking or Savings
Click OK button to complete.

28
Review Changes page will display. The blue dot on the left side represents the field that has been changed.
Click Submit button when completed.
A confirmation message will display when changes has been submitted. Click OK button to complete.
Once the change request has been processed, you will see the confirmation on the Company Profile page.

29
Business Classifications Tab:
This tab allows you to manage your Business Certifications. You can add/delete/change any of the classifications. It is extremely important for you
to keep your certifications current and accurate.
If you are adding Business Classification, click the Plus (+) icon to open a window to add your information.
If you are making a correction/update of Business Classification, click the Edit (pencil icon) to open to make corrections.
If you need to delete a Business Classification, click the Delete (X) icon to delete the line.

30
Once you have updated/added, a confirmation message will display. Click Confirm to continue.
Review Changes page will display. The blue dot on the left side represents the field that has been changed.
Click Submit button when completed.

31
A confirmation message will display when changes has been submitted. Click OK button to complete.
Once the change request has been processed, you will see the confirmation on the Company Profile page.

32
Products and Services tab:
This tab allows you to add/delete your NIGP (commodity) codes. The NIGP (commodity) codes are used to identify suppliers for bids/RFP/RFQs.
This is very important to maintain and keep as accurate as possible.
If you are adding NIGP (commodity) codes, click the Select and Add (square with +) icon to open a window to add your information.

33
A window will display. You can enter a word in the Description field to narrow down the list. Click Search button to display the list of values.
Select all Category Names that are applicable to your business.
Click Apply and then OK to finish.

34
Review Changes page will display. The blue dot on the left side represents the field that has been changed.
Click Submit button when completed.
A confirmation message will display when changes has been submitted. Click OK button to complete.

35
Once the change request has been processed, you will see the confirmation on the Company Profile page.
This completes the How To Guide to managing your Supplier Profile with the City of Detroit. If you have any questions/concerns, please send an
email to [email protected] for assistance.