how to use easy rotator
DESCRIPTION
A guide to how to get bestout of using Easy Rotator - a Dreamwever extension- that allows you quickly to build a slide rotatorTRANSCRIPT
Page 1 of 39 Getting The Most Out of EasyRotator®
An exclusive guide from DWUser.com – Copyright 2011 DWUser.com.
Getting The Most Out of EasyRotator®
8 Tips to help you add “Wow” to your website
An exclusive guide for registered users of EasyRotator, the world’s easiest jQuery slider / rotator builder.
Homepage: http://www.dwuser.com/easyrotator/

Page 2 of 39 Getting The Most Out of EasyRotator®
An exclusive guide from DWUser.com – Copyright 2011 DWUser.com.
Introduction
I’m Nathan Rohler, the lead developer on the EasyRotator project. First, I want to say congratulations! By installing EasyRotator, you now have access to the world’s easiest jQuery slider / rotator builder. Using EasyRotator, you can create professional, visually-engaging rotators for your site, incorporating photos, links… even audio and video.
The best thing about EasyRotator is right in the name – it’s amazingly easy. You don’t need a computer science degree to get started, and you can have a finished product in just a couple of minutes. In this guide, I’m going to go a bit deeper and share eight important tips for getting the most out of EasyRotator. These tips will help you avoid common mistakes, have fun while creating rotators, and ensure that website visitors who see your rotators have a great experience too. Let’s dive in! ~ Nathan P.S. Be sure to also check out our other free guide, Using EasyRotator To Improve Engagement and Increase Sales. It’s filled with filled with great ideas on how to use EasyRotator to improve your site – and improve engagement and boost sales along the way! P.P.S. If you have questions about anything you read in this guide, please feel free to drop us a line at [http://www.dwuser.com/].

Page 3 of 39 Getting The Most Out of EasyRotator®
An exclusive guide from DWUser.com – Copyright 2011 DWUser.com.
Contents You’ll find the following tips in this guide:
#1 - Optimize Your Images
#2 - Limit The Number of Photos in a Rotator
#3 - Rotator Not Appearing Online? Make Sure All Photos Have Been Uploaded
#4 - Use the Layout Section to Customize Your Rotators and Make Them Your Own
#5 - Use Autoplay Options To Make Your Rotator Automatically Progress from Slide to Slide
#6 - Use Linking Options to Link to Other Pages and Content on Your Site
#7 - Use Separate, Custom Thumbnail Images
#8 - Impress With Video and/or Audio
At the end of each tip, you’ll find a Bottom Line section that provides a summary of the content in that tip. If you’re pressed for time, I recommend you start by reading the Bottom Line sections for all of the tips. This will help you identify which tips you want to read in full.

Page 4 of 39 Getting The Most Out of EasyRotator®
An exclusive guide from DWUser.com – Copyright 2011 DWUser.com.
#1 –Optimize Your Images
Why Optimize?
One of the common themes you’ll find in this guide is reducing loading time. When visitors come to your site, they want to have a fully loaded page as fast as possible. In fact, recent studies have found strong correlations between longer loading times and higher bounce rates. (Bounce rate means the percentage of people who visit one page on your site then immediately leave.) Additionally, as mobile web browsing traffic continues to grow exponentially, it’s increasingly important that your site loads quickly even on lower-speed connections. Whether your rotator-bound photos are coming from a graphic designer, a photographer, or your own camera, they will most likely be in a high-resolution format. With web graphics, resolution equates to two things: display size and file size. The more pixels there are in a graphic (that is, the higher the resolution), the larger it will appear on a monitor and the more information must be transferred when it’s being loaded. Suppose you have an image that’s 1200x800 pixels. But suppose that you only display that photo online at 600x400 pixels. In this case, the web browser will download the large photo, resize it down, and display it as if it were 600x400 in the first place. While this is handy, it also means that four times more data than needed was just transferred!
Page 5 of 39 Getting The Most Out of EasyRotator®
An exclusive guide from DWUser.com – Copyright 2011 DWUser.com.
What’s the solution? You need to optimize your photos by resizing them down before putting them online. The target size when resizing should be the size at which you want them to be displayed online.
Optimizing in EasyRotator
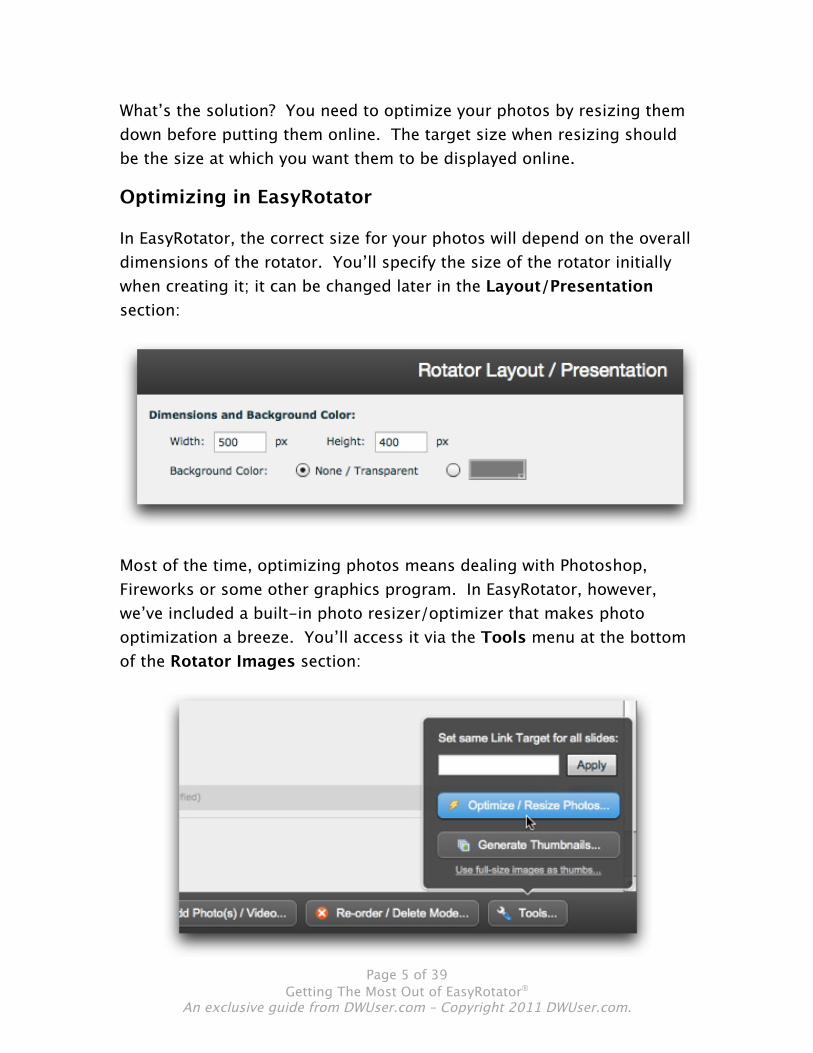
In EasyRotator, the correct size for your photos will depend on the overall dimensions of the rotator. You’ll specify the size of the rotator initially when creating it; it can be changed later in the Layout/Presentation section:
Most of the time, optimizing photos means dealing with Photoshop, Fireworks or some other graphics program. In EasyRotator, however, we’ve included a built-in photo resizer/optimizer that makes photo optimization a breeze. You’ll access it via the Tools menu at the bottom of the Rotator Images section:
Page 6 of 39 Getting The Most Out of EasyRotator®
An exclusive guide from DWUser.com – Copyright 2011 DWUser.com.
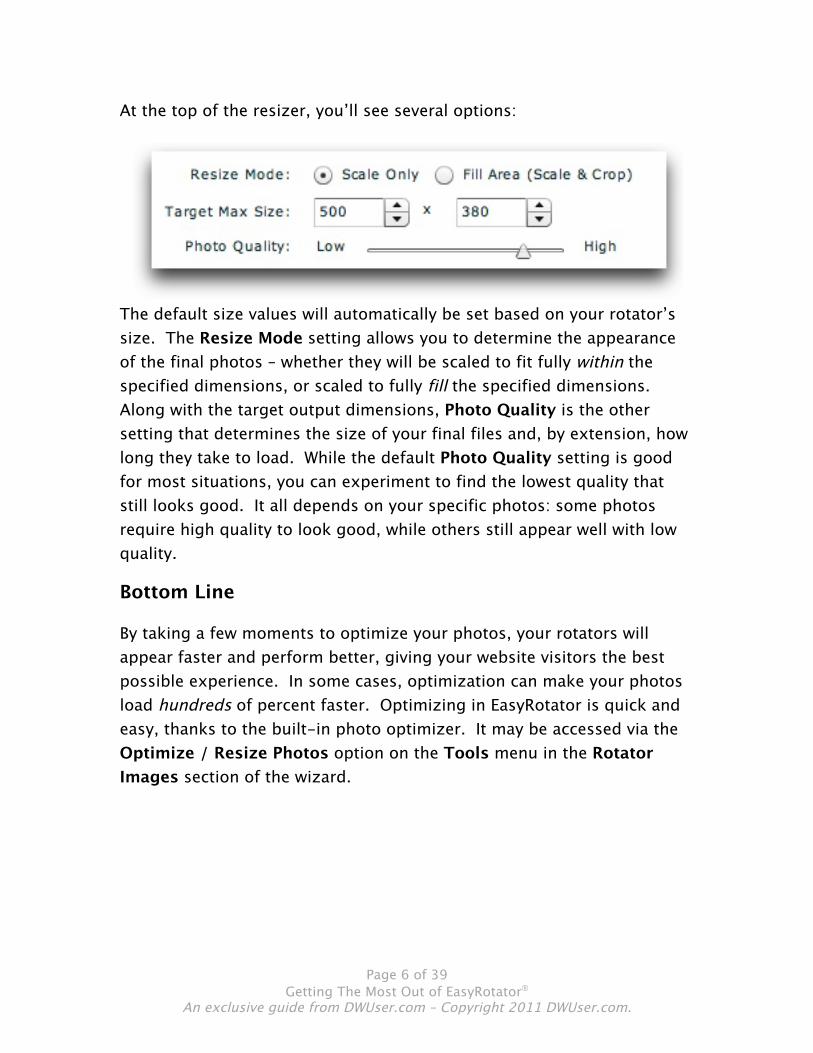
At the top of the resizer, you’ll see several options:
The default size values will automatically be set based on your rotator’s size. The Resize Mode setting allows you to determine the appearance of the final photos – whether they will be scaled to fit fully within the specified dimensions, or scaled to fully fill the specified dimensions. Along with the target output dimensions, Photo Quality is the other setting that determines the size of your final files and, by extension, how long they take to load. While the default Photo Quality setting is good for most situations, you can experiment to find the lowest quality that still looks good. It all depends on your specific photos: some photos require high quality to look good, while others still appear well with low quality.
Bottom Line
By taking a few moments to optimize your photos, your rotators will appear faster and perform better, giving your website visitors the best possible experience. In some cases, optimization can make your photos load hundreds of percent faster. Optimizing in EasyRotator is quick and easy, thanks to the built-in photo optimizer. It may be accessed via the Optimize / Resize Photos option on the Tools menu in the Rotator Images section of the wizard.
Page 7 of 39 Getting The Most Out of EasyRotator®
An exclusive guide from DWUser.com – Copyright 2011 DWUser.com.
#2 – Limit The Number of Photos in a Rotator When you have dozens of beautiful photos to show off, it can be tempting to stuff them all in one rotator. While this might seem like the easiest thing to do, there are several reasons not to use dozens and dozens of photos in a single rotator:
- First, the recurring theme of this guide: loading time. Unless you’re using very small photos (e.g. 200x200 pixels), having dozens and dozens of photos can increase the page size to the point where it noticeably bogs down even for users on low-end broadband connections. Remember that the loading time you experience when previewing in EasyRotator doesn’t reflect the loading time that will be required for internet-based viewing.
- Second, there’s the issue of server load and bandwidth usage. Suppose you put 40 photos that average 100kB each in a single rotator, but most visitors only look at the first 4 photos. This means that every visitor to your page will be unnecessarily loading almost 4MB worth of photos. If you have a low-traffic site that’s probably no big deal. But if you have a moderate- or high-traffic site, this type of bandwidth waste adds up quickly, potentially slowing down the entire site and burning through your server’s bandwidth allotment.
- Finally, the rotator template layouts are specifically designed for use with a smaller number of photos. In many cases, using dozens of photos causes the rotator interface to become more difficult for your site’s visitors to use.
While there is no magic number of photos, you should take pause before adding more than 20 to 30 photos to a rotator, depending on the photos’ filesize. If you’re near that range, you might want to have a friend on a slower connection check out your site and provide feedback. If you need to display more photos than is advisable for one rotator, there are a couple of options:
Page 8 of 39 Getting The Most Out of EasyRotator®
An exclusive guide from DWUser.com – Copyright 2011 DWUser.com.
- Create two or more separate pages, with one rotator in each. Link to each page from the other(s), or provide some other similar navigation method.
- If you have many dozens or hundreds of photos, you may want to check out our other product, the XML Flash Slideshow Creator v4 [http://www.dwuser.com/flashslideshow/]. This product (which includes iPhone, iPad and Android compatibility) has built-in advanced loading management, making it possible to include hundreds or even thousands of photos in a single photo gallery without any performance issues.
Bottom Line
EasyRotator rotators look best, perform best and are easiest to use when you keep the number of photos down. If you want to use more than 20-30 photos (depending on size), consider using several pages with one rotator in each.

Page 9 of 39 Getting The Most Out of EasyRotator®
An exclusive guide from DWUser.com – Copyright 2011 DWUser.com.
#3 – Rotator Not Appearing Online? Make Sure All Photos Have Been Uploaded Note: This tip doesn’t apply to the EasyRotator for WordPress plugin. It only applies when using the Dreamweaver Extension or Standalone version. One of the most common issues we see when helping customers is something like this:
“Help! My rotator doesn’t appear online! There are just blank white spaces where the photos should be.”
And here’s an example of what they’re seeing online:
Everything looks great… except there aren’t any images! Sometimes all of the photos are missing; other times, just a few are missing. If this ever happens to you, the problem is easily corrected. The issue is that some (or all) of the photos used in the rotator haven’t been uploaded to your server. If you’re using Dreamweaver to upload your site, select your photos in the Files panel and use the Put button to upload the files. If

Page 10 of 39 Getting The Most Out of EasyRotator®
An exclusive guide from DWUser.com – Copyright 2011 DWUser.com.
you’re using some other FTP or file transfer program, be sure that you upload all photos when upload the rest of your site’s files.
Bottom Line
If you’re using the Dreamweaver Extension or Standalone version and experience trouble with some or all photos not appearing, be sure that you’ve uploaded all the photo files. If you’re using Dreamweaver for deploying your site, select all of the image files in the Files panel and use the Put button.

Page 11 of 39 Getting The Most Out of EasyRotator®
An exclusive guide from DWUser.com – Copyright 2011 DWUser.com.
#4 – Use the Layout Section to Customize Your Rotators and Make Them Your Own
Exploring, Applying and Customizing Layout Templates
When you first launch EasyRotator, you’ll start in the Rotator Images section, where you specify the photos to display in the rotator. A layout is already selected by default, and you can create a fully-functional rotator without ever worrying about the layout. Naturally, though, one size doesn’t always fit all and your photos may be better suited to a different type of layout. That’s where the Layout / Presentation section comes in.
In this section of the wizard, you’ll find over 50 premium layout templates, hand-designed for numerous specific situations where you need a rotator. First, though, you’ll see some generic options at the top that apply to all rotators:
Page 12 of 39 Getting The Most Out of EasyRotator®
An exclusive guide from DWUser.com – Copyright 2011 DWUser.com.
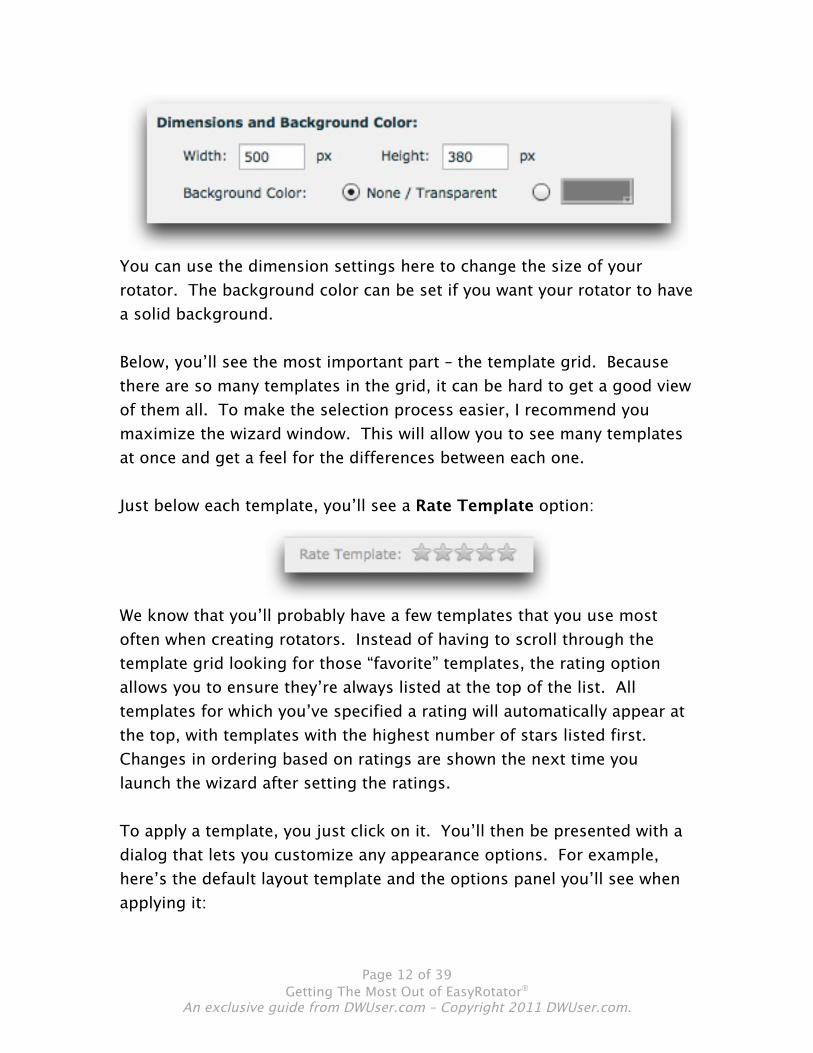
You can use the dimension settings here to change the size of your rotator. The background color can be set if you want your rotator to have a solid background. Below, you’ll see the most important part – the template grid. Because there are so many templates in the grid, it can be hard to get a good view of them all. To make the selection process easier, I recommend you maximize the wizard window. This will allow you to see many templates at once and get a feel for the differences between each one. Just below each template, you’ll see a Rate Template option:
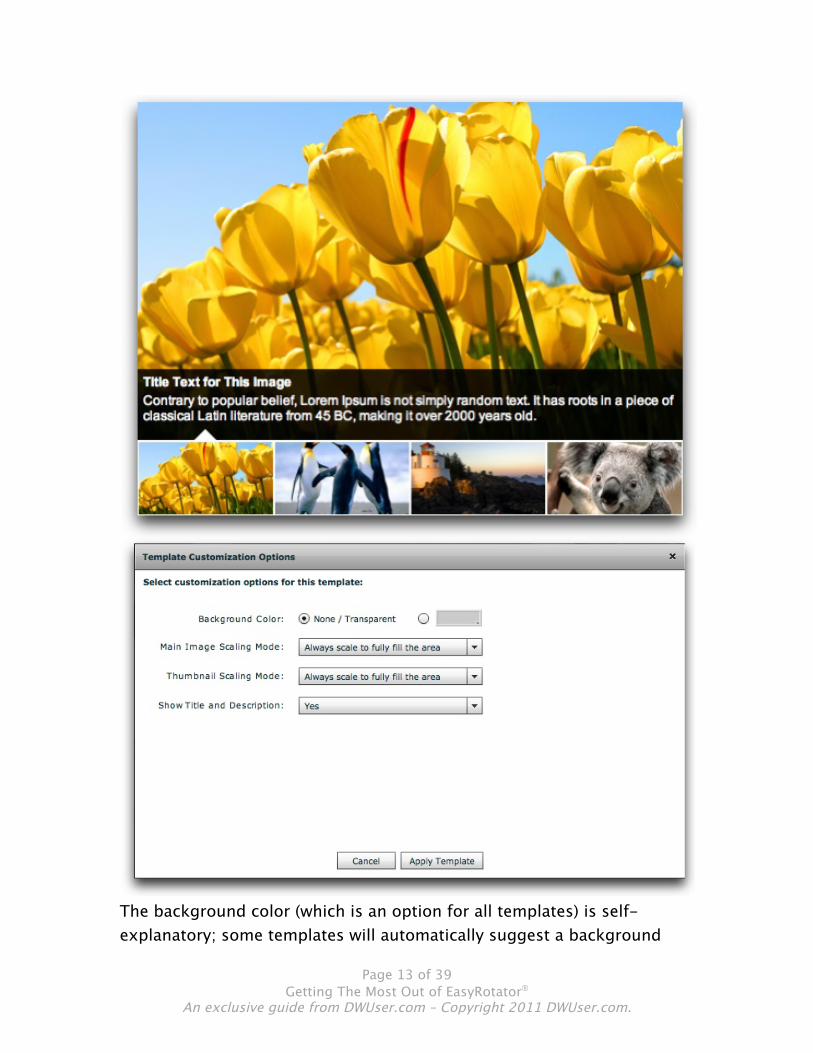
We know that you’ll probably have a few templates that you use most often when creating rotators. Instead of having to scroll through the template grid looking for those “favorite” templates, the rating option allows you to ensure they’re always listed at the top of the list. All templates for which you’ve specified a rating will automatically appear at the top, with templates with the highest number of stars listed first. Changes in ordering based on ratings are shown the next time you launch the wizard after setting the ratings. To apply a template, you just click on it. You’ll then be presented with a dialog that lets you customize any appearance options. For example, here’s the default layout template and the options panel you’ll see when applying it:
Page 13 of 39 Getting The Most Out of EasyRotator®
An exclusive guide from DWUser.com – Copyright 2011 DWUser.com.
The background color (which is an option for all templates) is self-explanatory; some templates will automatically suggest a background

Page 14 of 39 Getting The Most Out of EasyRotator®
An exclusive guide from DWUser.com – Copyright 2011 DWUser.com.
color that complements the template well, while others default to transparent. The next two options control how the images in the rotator are scaled. Image scaling options are found on almost all templates. Note that there are two separate scaling-related options. For templates like this one that show smaller versions (thumbnails) of all photos for easier selection, there is a separate scaling option just for those thumbnail images. Let’s take a closer at the available scaling options:
- No scaling / Show as much as fits disables all scaling. If the available photo area in the rotator is smaller than the photo, the photo is cropped. If the available area is larger, the smaller photo is centered within the available area.
- Scale down only centers the un-scaled photo within the available area if the photo is smaller; if it’s larger, it scales it down so all of the photo can be seen.
- Scale both up and down always scales the photo to be as big or small as needed to be fully visible while filling the maximum possible part of the available area.
- Always scale to fully fill the area ensures that the available photo area in the rotator layout is always 100% filled, even when it means cropping part of the photo off. This can be a good option for thumbnails in layout templates where the thumbs are displayed directly adjacent to each other, since these templates usually look best when the thumbnail area is fully filled.
Page 15 of 39 Getting The Most Out of EasyRotator®
An exclusive guide from DWUser.com – Copyright 2011 DWUser.com.
In the specific example of the default layout template (as shown above), notice also that there’s an option for hiding the title and description text. If you haven’t specified any title or description text and only want to showcase your photos, you should use this template option to disable the black box reserved for text. Otherwise, you’ll have an empty black box obscuring your photos!
Multi-Category Layout Templates
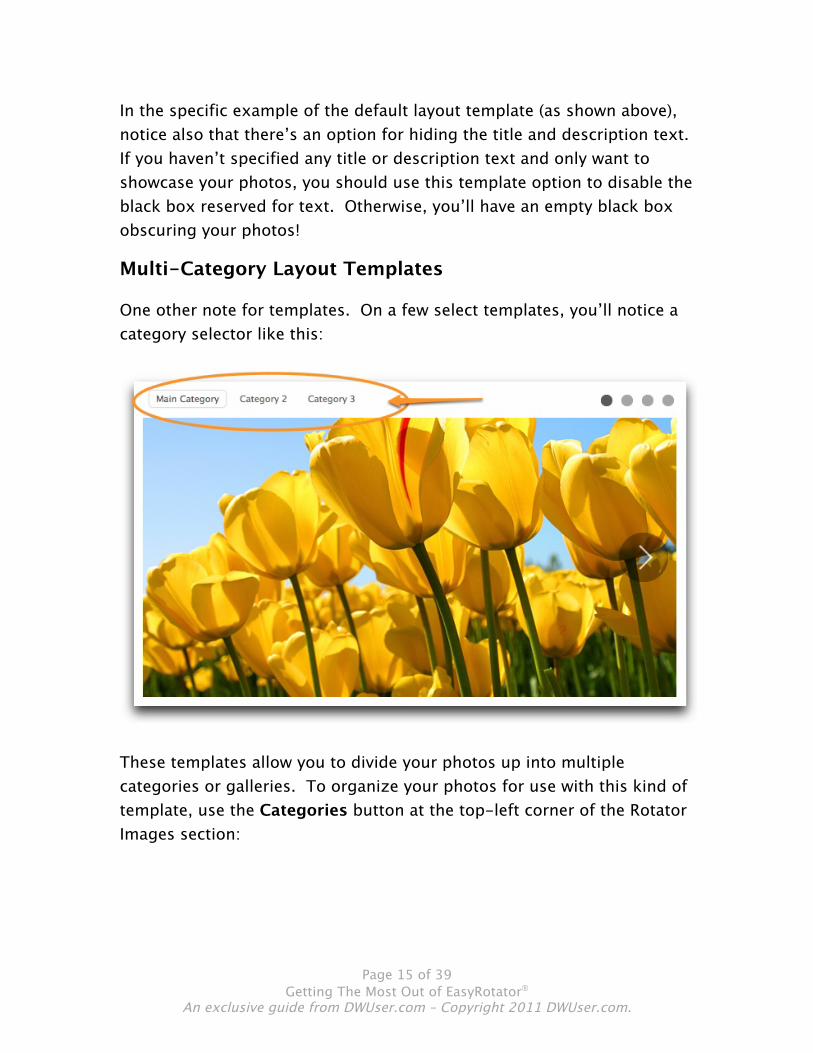
One other note for templates. On a few select templates, you’ll notice a category selector like this:
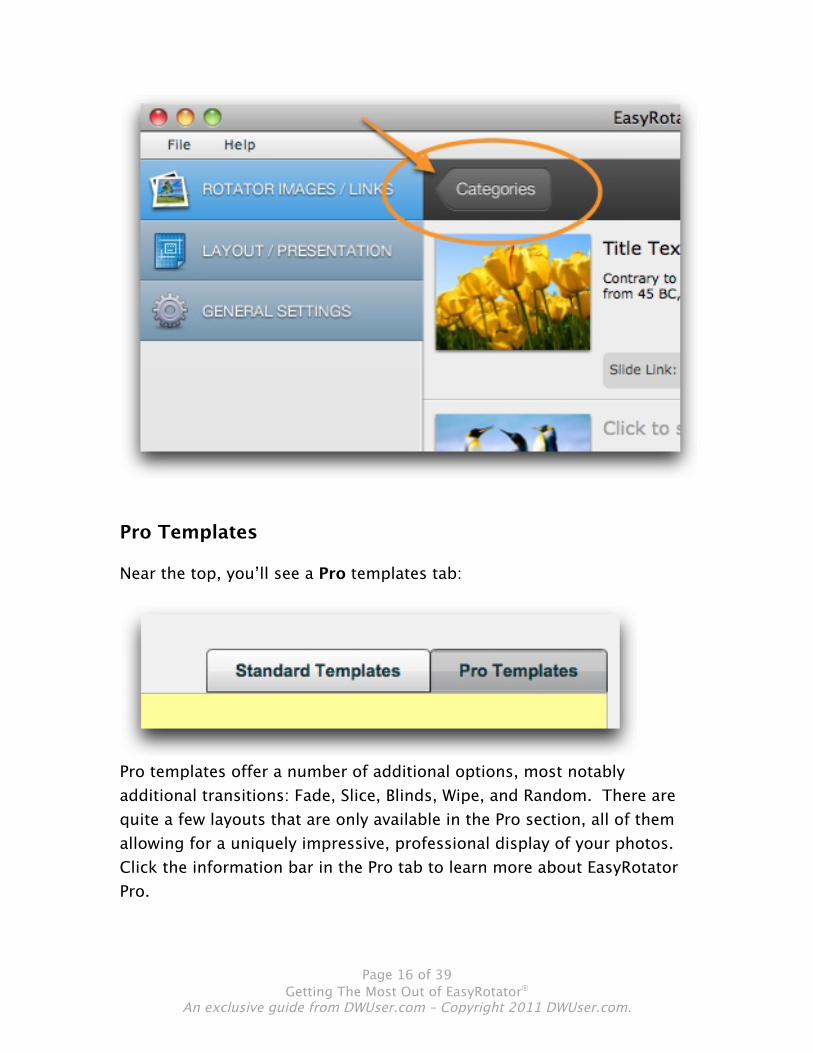
These templates allow you to divide your photos up into multiple categories or galleries. To organize your photos for use with this kind of template, use the Categories button at the top-left corner of the Rotator Images section:
Page 16 of 39 Getting The Most Out of EasyRotator®
An exclusive guide from DWUser.com – Copyright 2011 DWUser.com.
Pro Templates
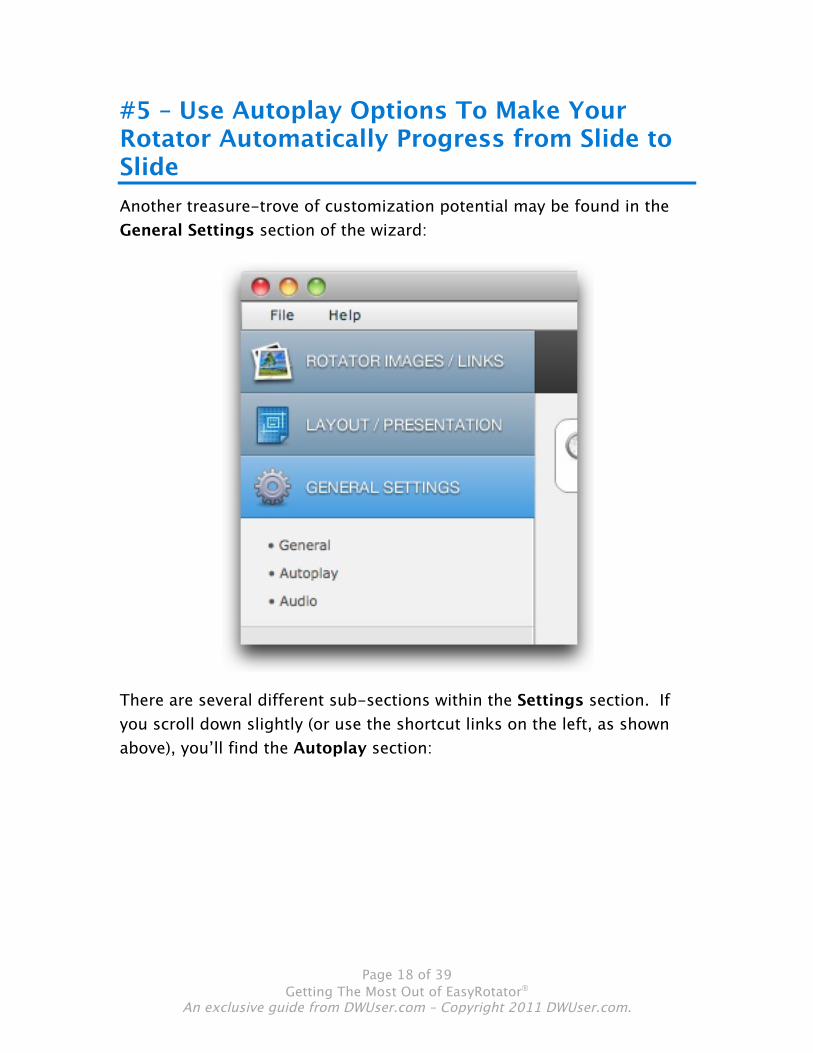
Near the top, you’ll see a Pro templates tab:
Pro templates offer a number of additional options, most notably additional transitions: Fade, Slice, Blinds, Wipe, and Random. There are quite a few layouts that are only available in the Pro section, all of them allowing for a uniquely impressive, professional display of your photos. Click the information bar in the Pro tab to learn more about EasyRotator Pro.

Page 17 of 39 Getting The Most Out of EasyRotator®
An exclusive guide from DWUser.com – Copyright 2011 DWUser.com.
Bottom Line
The Layout / Presentation section of the wizard opens up a world of possibilities for the appearance of your rotators. To get a better view of the available templates, maximize the EasyRotator wizard window. To apply a template, click on its picture, fill out any desired customizations in the options dialog, and click the Apply Template button. Even more professional templates are available in the Pro templates tab.
Page 18 of 39 Getting The Most Out of EasyRotator®
An exclusive guide from DWUser.com – Copyright 2011 DWUser.com.
#5 – Use Autoplay Options To Make Your Rotator Automatically Progress from Slide to Slide Another treasure-trove of customization potential may be found in the General Settings section of the wizard:
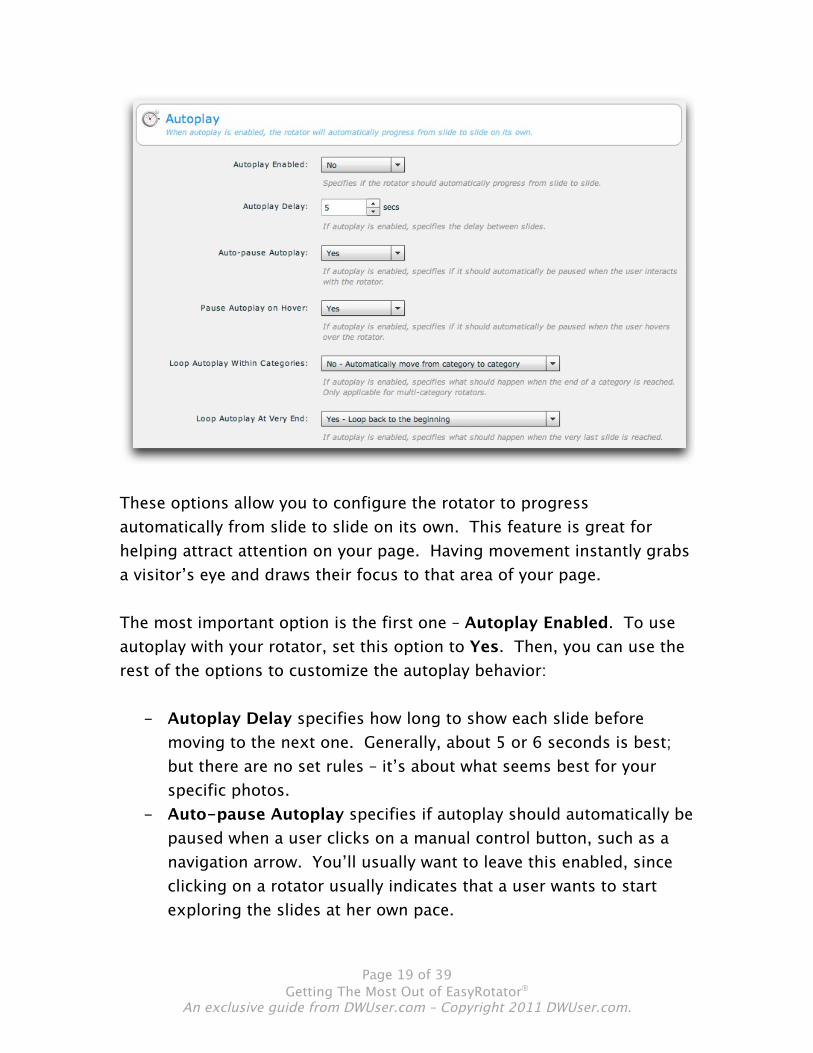
There are several different sub-sections within the Settings section. If you scroll down slightly (or use the shortcut links on the left, as shown above), you’ll find the Autoplay section:
Page 19 of 39 Getting The Most Out of EasyRotator®
An exclusive guide from DWUser.com – Copyright 2011 DWUser.com.
These options allow you to configure the rotator to progress automatically from slide to slide on its own. This feature is great for helping attract attention on your page. Having movement instantly grabs a visitor’s eye and draws their focus to that area of your page. The most important option is the first one – Autoplay Enabled. To use autoplay with your rotator, set this option to Yes. Then, you can use the rest of the options to customize the autoplay behavior:
- Autoplay Delay specifies how long to show each slide before moving to the next one. Generally, about 5 or 6 seconds is best; but there are no set rules – it’s about what seems best for your specific photos.
- Auto-pause Autoplay specifies if autoplay should automatically be paused when a user clicks on a manual control button, such as a navigation arrow. You’ll usually want to leave this enabled, since clicking on a rotator usually indicates that a user wants to start exploring the slides at her own pace.

Page 20 of 39 Getting The Most Out of EasyRotator®
An exclusive guide from DWUser.com – Copyright 2011 DWUser.com.
- Pause Autoplay on Hover specifies if autoplay should automatically pause when a user hovers over the rotator. When a user is interested in part of a page (such as a photo), she usually moves her mouse over that object. It can be annoying if you want to look at a photo and then it suddenly scrolls out of view! This option allows you to avoid that undesirable situation.
- Loop Autoplay Within Categories is an option that only applies when you’re using a layout template with multiple categories. In these instances, the option specifies what happens when the end of a category is reached – returning to the start of that category, or moving automatically to the next category.
- Loop Autoplay At Very End specifies what happens once the very final slide has been reached. The rotator can either stop, or go back to the very beginning.
Bottom Line
Grab the attention of visitors to your site by enabling autoplay in the Settings section of the wizard. Autoplay makes your rotator automatically progress from slide to slide without user interaction, providing eye-catching motion.

Page 21 of 39 Getting The Most Out of EasyRotator®
An exclusive guide from DWUser.com – Copyright 2011 DWUser.com.
#6 - Use Linking Options to Link to Other Pages and Content on Your Site Rotators can be just for looking at, but usually they’re intended to be a launching pad – a tool visitors can use to quickly find interesting content and jump to it. This is where the linking options come in. There are two ways to link to other content from a slide – applying a Slide Link (which applies a link to the entire main slide image), and including links in the title and/or description text. I’ll now go over both in detail.
Using the Slide Link Field
The most common method for adding a link to a slide is via the Slide Link field in the Rotator Images section:
Note - If you don’t see the Slide Link option as shown above, check the Editor View setting on the Editor Options... menu at the bottom of the wizard window. Either Standard or Advanced should be selected:

Page 22 of 39 Getting The Most Out of EasyRotator®
An exclusive guide from DWUser.com – Copyright 2011 DWUser.com.
Once you’ve located the Slide Link option for the slide where you want to apply a link, use the folder icon on the right edge to browse to and select the content you want to link to. This can be another web page, a PDF file… almost anything.
But what if you want to link to some other site? In that case, simply type the full URL directly in the Slide Link box:
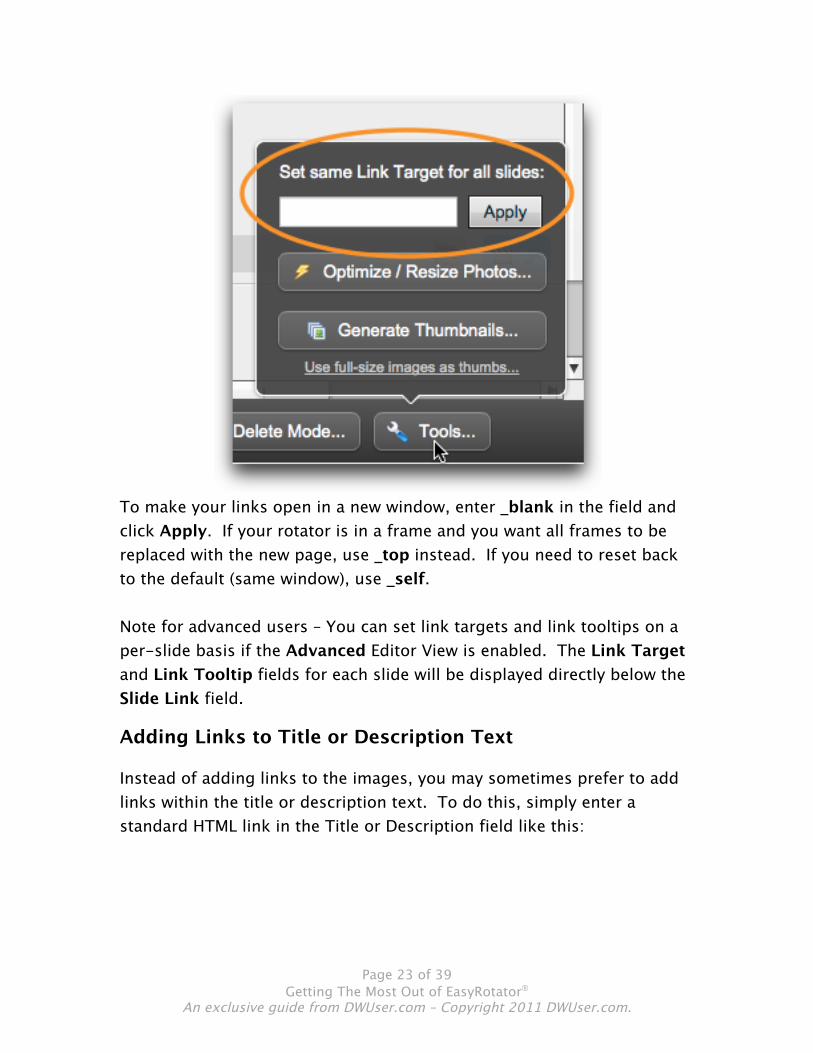
If you preview your rotator now, you’ll find that the slide’s main image has become a link that, when clicked, takes you to the specified content. By default, your links will open in the same window as the rotator. In some cases, though, you’ll want to launch links in a new window. To control in which window your links open, you’ll use the Link Target option on the Tools... menu at the bottom of the wizard window:
Page 23 of 39 Getting The Most Out of EasyRotator®
An exclusive guide from DWUser.com – Copyright 2011 DWUser.com.
To make your links open in a new window, enter _blank in the field and click Apply. If your rotator is in a frame and you want all frames to be replaced with the new page, use _top instead. If you need to reset back to the default (same window), use _self. Note for advanced users – You can set link targets and link tooltips on a per-slide basis if the Advanced Editor View is enabled. The Link Target and Link Tooltip fields for each slide will be displayed directly below the Slide Link field.
Adding Links to Title or Description Text
Instead of adding links to the images, you may sometimes prefer to add links within the title or description text. To do this, simply enter a standard HTML link in the Title or Description field like this:

Page 24 of 39 Getting The Most Out of EasyRotator®
An exclusive guide from DWUser.com – Copyright 2011 DWUser.com.
Here’s what the result looks like:
The same technique can be used to add links to the Title text. Here’s an example of the code for a link to Google’s homepage that opens in the current window:
<a href="http://www.google.com/">My Link Text</a> Or a new window:
<a href="http://www.google.com/" target="_blank">My Link Text</a>
You can learn more about the format for creating links at http://www.w3schools.com/tags/tag_a.asp Note for advanced users - You may want to use CSS styling to control the appearance of the links. If you’ve already specified styles for a tags, they will automatically be applied.

Page 25 of 39 Getting The Most Out of EasyRotator®
An exclusive guide from DWUser.com – Copyright 2011 DWUser.com.
Bottom Line
Make your rotator a launching pad for finding interesting content on your site. Add links in the Rotator Images section via the Slide Link field (to add links to the main photos), or by entering link HTML directly into the title/description fields (to include links in the title and/or description text). You can control which window the links open in via the Link Target option on the Tools... menu at the bottom of the wizard window. Use _blank to open in a new window, _top to leave all frames, or _self to reset back to the default (same window).

Page 26 of 39 Getting The Most Out of EasyRotator®
An exclusive guide from DWUser.com – Copyright 2011 DWUser.com.
#7 – Use Separate, Custom Thumbnail Images As I briefly covered in tip #4, some layout templates display thumbnail versions of the larger photos, which allows for quickly jumping to a specific photo. For example, here’s the default template, which includes a thumbnail display at the bottom:
By default, the full-size photos will be scaled down to create thumbnails. While this default value usually looks fine, there are a several reasons you may want to consider using separate thumbnail images:
- While newer browsers scale photos well, some older browsers don’t. Using separate thumbnail images can help ensure that there aren’t any scaling artifacts or graininess on the thumbnails, even in older browsers. On mobile devices, having the browser scale photos will put an unnecessary strain on the processor and battery of the device.

Page 27 of 39 Getting The Most Out of EasyRotator®
An exclusive guide from DWUser.com – Copyright 2011 DWUser.com.
- Using separate thumbnails means that the thumbnails will usually load quickly, allowing the user to see a filled-out layout much faster while the full-size photos load in the background.
In both of these situations, the solution is to use the built-in thumbnail generator to create separate, pre-scaled thumbnail images. This option may be accessed via the Generate Thumbnails button on the Tools... menu at the bottom of the wizard window:
The thumbnail generator functions similarly to the image optimizer (covered in tip #1):

Page 28 of 39 Getting The Most Out of EasyRotator®
An exclusive guide from DWUser.com – Copyright 2011 DWUser.com.
The following graphics explains visually the difference between the two resize modes:
For most templates, Fill Area will yield the best-looking results. As usual, though, the decision comes down to your personal tastes and your specific photos. The same goes for the Thumbnail Quality setting. The appropriate Maximum Size setting depends on which template you’re using. The 100x100 default is often good, but you may want to experiment to determine what yields the best results.
For Advanced Users: Completely Custom Thumbnail Images
There are another couple of situations that may come up if you’re an advanced user:
- The default thumbnails don’t always capture the focal points of your photos. Or, you want a specific cropped area of the main photo instead of a scaled version.
- You want to use completely different photos for the thumbnails (not scaled/cropped versions of the larger photos).
These cases can be addressed by using completely custom thumbnail images. To use this method, you’ll first have to create your own separate thumbnail images using the graphics editor of your choice (e.g.

Page 29 of 39 Getting The Most Out of EasyRotator®
An exclusive guide from DWUser.com – Copyright 2011 DWUser.com.
Photoshop, Fireworks, etc). Capture specific features of your full-size photos, or use totally separate photos. Once you’ve finished creating the new thumbs, switch back to the wizard. For each slide in your rotator, double-click the photo in the Rotator Images section of the wizard:
This will open the Edit Photo Sources dialog:

Page 30 of 39 Getting The Most Out of EasyRotator®
An exclusive guide from DWUser.com – Copyright 2011 DWUser.com.
The photo on the left represents the main slide image; the photo on the right represents the currently-selected thumbnail image for the slide. To apply your custom thumbnail image, use the Browse button below the right-hand image to launch the file selection dialog, then select your new custom thumb image. Click Update and your change will be applied.
Rolling Back Changes
If you ever change your mind about having separate thumbnails and want to return to the default configuration (using auto-scaled versions of the full-size photos), you can do so via the following option on the Tools... menu at the bottom of the wizard window:
Bottom Line
Some layout templates include thumbnail images. On these templates, the default configuration is to use auto-scaled versions of the full-size photos. However, you can make the thumbnails appear more quickly and improve performance by using separate thumbnail images. Thumbnails can be quickly and easily generated from within the wizard by using the

Page 31 of 39 Getting The Most Out of EasyRotator®
An exclusive guide from DWUser.com – Copyright 2011 DWUser.com.
Generate Thumbnails tool, which is accessed via the Tools... menu at the bottom of the Rotator Images section. If you’re an advanced user, you can create your own fully-custom thumbnail images for some or all slides. You will apply these custom thumbnail images via the Edit Photo Sources dialog, accessible by double-clicking on any slide preview image in the Rotator Images section.

Page 32 of 39 Getting The Most Out of EasyRotator®
An exclusive guide from DWUser.com – Copyright 2011 DWUser.com.
#8 – Impress With Video and/or Audio So you’ve built your rotator. It looks great! It’s full of great-looking photos, title and description text, and links to other interesting content on your site – all presented in a customized layout that matches your site. What’s missing? Video and audio! As you’re creating rotators, you’ll inevitably reach the point where adding video and/or audio would be the perfect touch. Fortunately, EasyRotator has built-in video and audio support too. It’s part of EasyRotator Pro, a collection of optional features that you can use for a small per-site fee ($20 for a single site, or as little as $8 if you buy several credits at once). All Pro features are included in the standard EasyRotator wizard and you can try them out for free. You only need a license when you’re ready to upload the finished rotator to your live site. You can learn more about EasyRotator Pro at http://www.dwuser.com/easyrotator/pro-info/ . All Pro features are marked in the wizard with an icon like this:
Adding Video
To add video, there are two approaches:
- The recommended approach is to use the Add Video button at the bottom of the Rotator Images section.
- Alternatively, you can add video to an existing slide by using the Video/Audio button on the bottom-right corner of any existing item in the Rotator Images section.
Here’s where you’ll access the Add Video button:

Page 33 of 39 Getting The Most Out of EasyRotator®
An exclusive guide from DWUser.com – Copyright 2011 DWUser.com.
The Add Video dialog will then open:
You can either use a YouTube video (which is easier), or your own MP4 H.264-encoded video file.

Page 34 of 39 Getting The Most Out of EasyRotator®
An exclusive guide from DWUser.com – Copyright 2011 DWUser.com.
If you choose the YouTube option, you’ll need to paste in the URL of the video’s playback page (e.g. http://www.youtube.com/watch?v=Zoygy-8PTtU ). After doing this, click Add Video and a new slide will be added to the rotator. The Video Thumbnail that you’ve specified on YouTube will be the image associated with the new slide. If you use a video file on your computer, there’s information in the dialog about how to properly encode it using a free encoder called Handbrake [ http://handbrake.fr/ ]. When using this option, you’ll be able to choose the associated slide image after selecting the file:
You can use the slider below the video to select the frame you wish to use.

Page 35 of 39 Getting The Most Out of EasyRotator®
An exclusive guide from DWUser.com – Copyright 2011 DWUser.com.
Suppose that you want to add video to an existing slide, modify the video being used on a slide, or remove video from a slide but leave the associated image. In this case, you’ll use the Video/Audio button:
In the area that opens, you can modify whether the video automatically starts, change the video source, or remove video from the slide altogether by deleting the value in the URL box:
If you’re going to change the video source, it’s generally easier to fully remove the slide (by using the Re-order / Delete Mode button at the bottom of the Rotator Images section), then re-add it via the Add Video button. If you preview, you’ll see your new video:

Page 36 of 39 Getting The Most Out of EasyRotator®
An exclusive guide from DWUser.com – Copyright 2011 DWUser.com.
The video even looks great on mobile devices!
Page 37 of 39 Getting The Most Out of EasyRotator®
An exclusive guide from DWUser.com – Copyright 2011 DWUser.com.
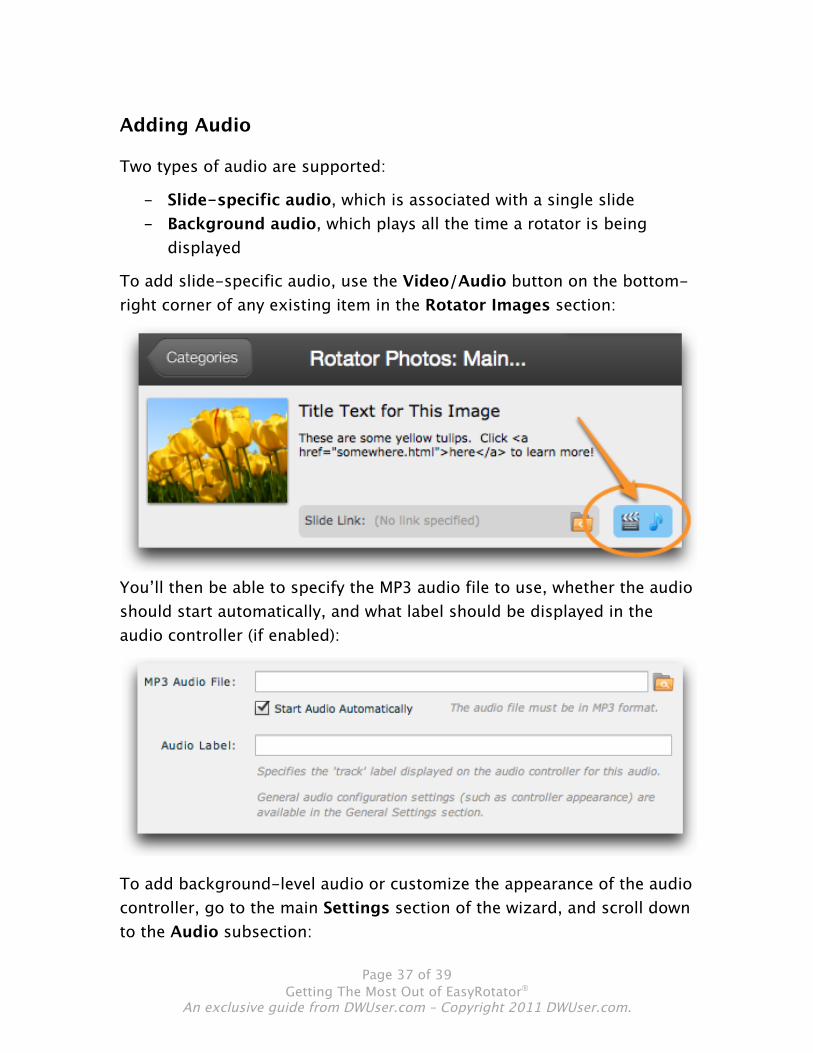
Adding Audio
Two types of audio are supported:
- Slide-specific audio, which is associated with a single slide - Background audio, which plays all the time a rotator is being
displayed
To add slide-specific audio, use the Video/Audio button on the bottom-right corner of any existing item in the Rotator Images section:
You’ll then be able to specify the MP3 audio file to use, whether the audio should start automatically, and what label should be displayed in the audio controller (if enabled):
To add background-level audio or customize the appearance of the audio controller, go to the main Settings section of the wizard, and scroll down to the Audio subsection:

Page 38 of 39 Getting The Most Out of EasyRotator®
An exclusive guide from DWUser.com – Copyright 2011 DWUser.com.
Using the Audio Controller Options, you can configure whether you want to display the audio controller, and if so, where it should go and how it should look.
Bottom Line
Adding video and/or audio is a great way to take your rotator to the next level. Video and audio support is built into EasyRotator, offered as an optional Pro feature. To add Video to a rotator, use the Add Video button at the bottom of the Rotator Images section. You can specify a YouTube URL, or a video file on your own computer (if it has been properly encoded). You can also add, modify or remove video on an existing slide via the Video/Audio button in the bottom-right corner of any item in the Rotator Images section. To add background audio that plays throughout the time the rotator is being viewed, use the Audio portion of the Settings section. You can also modify the appearance of the audio controller in that section. To add slide-specific audio to an existing slide, use the Video/Audio button in the bottom-right corner of any item in the Rotator Images section.
Page 39 of 39 Getting The Most Out of EasyRotator®
An exclusive guide from DWUser.com – Copyright 2011 DWUser.com.
Conclusion Thank you for reading Getting The Most Out of EasyRotator! The skills you’ve gained will help you quickly and easily create stunning rotators for your site. You’ve learned 8 key tips for creating rotators that attract, engage and impress visitors to your website. Have fun with your new skills!
We’re Here For You
Do you have questions about anything you’ve read? We are pleased to offer some of the best customer support you’ll find on the web. Please drop a line at http://www.dwuser.com/ and we’ll get back to you ASAP, usually within a couple of hours.
Check Out Our Other Free Guide!
If you haven’t already, be sure to check out our other free guide, Using EasyRotator To Improve Engagement and Increase Sales. It’s filled with inspiration based on real-world uses of EasyRotator. You’ll learn to enhance your site in ways that improve engagement and boost sales!