how to use rwd uperform to streamline e-learning development
TRANSCRIPT

Tips, Tricks, and Techniques for Rapid e-Learning Development December 10 & 11, 2009
Page 1Session 402 – How to Use RWD uPerform® to Streamline e-Learning Development - Jared Palmer, RWD Technologies
How to Use RWD How to Use RWD uPerformuPerform®® to to Streamline eStreamline e--Learning Development Learning Development
Jared PalmerRWD Technologieshttp://www.rwd.com
2
This Session TopicsThis Session Topics
How rapid development techniques will streamline the generation of e-Learning contentHow stencils and standards ensure consistency among different developersHow live reviews can streamline the review processHow reusing learning assets can help reduce the development effort

Tips, Tricks, and Techniques for Rapid e-Learning Development December 10 & 11, 2009
Page 2Session 402 – How to Use RWD uPerform® to Streamline e-Learning Development - Jared Palmer, RWD Technologies
Poll: Project Resources?Poll: Project Resources?
Poll #1: What resources do you have available for your e-Learning projects?
3
Poll: You?Poll: You?
Poll #2: Of these resources, which title do you typically claim?
4

Tips, Tricks, and Techniques for Rapid e-Learning Development December 10 & 11, 2009
Page 3Session 402 – How to Use RWD uPerform® to Streamline e-Learning Development - Jared Palmer, RWD Technologies
RWD RWD uPerformuPerform®®
RWD uPerform® is an authoring and content management tool for creating and delivering targeted learning.RWD uPerform® authors can easily create, edit, and publish procedures, Adobe Flash® -based simulations and eLearning courses.
5
Poll: RWD Poll: RWD uPerformuPerform®® Experience?Experience?
Poll #3: How often have you used RWD uPerform® to create e-Learning courses?
6

Tips, Tricks, and Techniques for Rapid e-Learning Development December 10 & 11, 2009
Page 4Session 402 – How to Use RWD uPerform® to Streamline e-Learning Development - Jared Palmer, RWD Technologies
Chat Input: Rapid Development?Chat Input: Rapid Development?
Enter your opinion to the following question in the Chat window:
7
What is rapid development?
““TraditionalTraditional”” DevelopmentDevelopment
8

Tips, Tricks, and Techniques for Rapid e-Learning Development December 10 & 11, 2009
Page 5Session 402 – How to Use RWD uPerform® to Streamline e-Learning Development - Jared Palmer, RWD Technologies
““RapidRapid”” DevelopmentDevelopment
9
RWD RWD uPerformuPerform ®® EnhancementsEnhancements
10

Tips, Tricks, and Techniques for Rapid e-Learning Development December 10 & 11, 2009
Page 6Session 402 – How to Use RWD uPerform® to Streamline e-Learning Development - Jared Palmer, RWD Technologies
Value TradeValue Trade--offsoffs
11
Standard Customizable
Ease of Use Programmable
Simple Complex
Case Study: Clients ProfileCase Study: Clients Profile
Client #1: Large hospital in TexasSome existing content, some expertise not yet captured
Client #2: International precious metals mining corporationMostly existing content and learning assets
12

Tips, Tricks, and Techniques for Rapid e-Learning Development December 10 & 11, 2009
Page 7Session 402 – How to Use RWD uPerform® to Streamline e-Learning Development - Jared Palmer, RWD Technologies
Streamlining TipStreamlining Tip
Prototype “Look and Feel” and get buy-in early
13
Application DemonstrationApplication Demonstration
Modifying the RWD uPerform ® template
14

Tips, Tricks, and Techniques for Rapid e-Learning Development December 10 & 11, 2009
Page 8Session 402 – How to Use RWD uPerform® to Streamline e-Learning Development - Jared Palmer, RWD Technologies
Content Creation/ConversionContent Creation/Conversion
Enter into RWD uPerform ® stencilsImport PowerPoint slidesRepurpose existing multimedia
15
RWD RWD uPerformuPerform ®® StencilsStencils
16
Tips, Tricks, and Techniques for Rapid e-Learning Development December 10 & 11, 2009
Page 9Session 402 – How to Use RWD uPerform® to Streamline e-Learning Development - Jared Palmer, RWD Technologies
Application DemonstrationApplication Demonstration
Creating content with RWD uPerform ®
17
Chat Input: Existing Assets?Chat Input: Existing Assets?
Enter your opinion to the following question in the Chat window:
18
What content pieces and learning resources already exist that you could use in your e-Learning courses?

Tips, Tricks, and Techniques for Rapid e-Learning Development December 10 & 11, 2009
Page 10Session 402 – How to Use RWD uPerform® to Streamline e-Learning Development - Jared Palmer, RWD Technologies
Reusing Learning AssetsReusing Learning Assets
Repurpose instructionally sound content and resourcesReuse existing electronic resources
19
Application DemonstrationApplication Demonstration
Importing learning assets in RWD uPerform ®
20

Tips, Tricks, and Techniques for Rapid e-Learning Development December 10 & 11, 2009
Page 11Session 402 – How to Use RWD uPerform® to Streamline e-Learning Development - Jared Palmer, RWD Technologies
Content DeploymentContent Deployment
Learning Management SystemCD-ROM
21
Streamlining TipStreamlining Tip
Determine deployment method and attributes• File size constraints for LMS upload• Assessment scoring and recording
22

Tips, Tricks, and Techniques for Rapid e-Learning Development December 10 & 11, 2009
Page 12Session 402 – How to Use RWD uPerform® to Streamline e-Learning Development - Jared Palmer, RWD Technologies
Application DemonstrationApplication Demonstration
Using RWD uPerform® to publish content
23
Poll: Stakeholder Reviews?Poll: Stakeholder Reviews?
Poll #4: How many stakeholder reviews do you conduct during an e-Learning project?
24

Tips, Tricks, and Techniques for Rapid e-Learning Development December 10 & 11, 2009
Page 13Session 402 – How to Use RWD uPerform® to Streamline e-Learning Development - Jared Palmer, RWD Technologies
Chat Input: Stakeholder Review?Chat Input: Stakeholder Review?
Enter your opinion to the following question in the Chat window:
25
How do you get stakeholders to review and
provide input on the developed course content?
Reviewing ContentReviewing Content
RWD uPerform ® annotations
26

Tips, Tricks, and Techniques for Rapid e-Learning Development December 10 & 11, 2009
Page 14Session 402 – How to Use RWD uPerform® to Streamline e-Learning Development - Jared Palmer, RWD Technologies
Reviewing ContentReviewing Content
RWD Fusion Reviewer
27
Reviewing ContentReviewing Content
Adobe Acrobat® PDF Review and Comment tools
28
Tips, Tricks, and Techniques for Rapid e-Learning Development December 10 & 11, 2009
Page 15Session 402 – How to Use RWD uPerform® to Streamline e-Learning Development - Jared Palmer, RWD Technologies
Streamlining TipStreamlining Tip
Have team members edit and modify the content directlyHave external sources review the content in the format that’s comfortable for them
29
Application DemonstrationApplication Demonstration
Using RWD uPerform® annotations
30

Tips, Tricks, and Techniques for Rapid e-Learning Development December 10 & 11, 2009
Page 16Session 402 – How to Use RWD uPerform® to Streamline e-Learning Development - Jared Palmer, RWD Technologies
Thank you for your participation!Thank you for your participation!
31
eLearning Guild Online ForumsDec. 11 & 12, 2009Session 402
FOR MORE INFORMATION, contact: Jared [email protected]://products.rwd.com

May 14, 2007
In traditional practice, the
storyboard is a key tool for
communication between
e-Learning design team
members and Subject
Matter Experts. In rapid
development, however, the
storyboard is an impedi-
ment. In this week’s article,
you will learn about a tool
that eliminates the story-
board and facilitates the
rapid design process
through the use of stencils.
Using RWD uPerform to RapidlyDesign and Develop e-LearningBy Nicholas Bird
Whether you are working for an internal or ex-
ternal customer, your goal is the same: to
create instructionally-sound content with a consistent ap-
proach. Training budgets are never limitless and requests
for training often come at the last moment. So how do
you adapt to constant demands to work faster while re-
ducing the cost? Do your solutions always involve trying
to fit a square peg in a round hole? I am going to show
you, if you are willing to do a little bit of reading, how I have learned to rapidlydesign and develop e-Learning in uPerform.
First, though, what do I mean when I say, “rapid instructional design?”For the purposes of this article, rapid instructional design is simply the has-
tening of e-Learning content development using tools, templates, and proces-ses. I don’t intend to validate or defend the values of rapid instructional de-sign, or to compare rapid design to traditional instructional design methodolo-gies. The risks attached to rapid design are well known and concerns aboutthem are valid.
With that in mind, it’s important not to underestimate the importance of be-ing able to quickly create e-Learning content while maintaining instructionalsoundness. The process of getting information from a subject matter expert(SME) into an online form that a student can learn from can be daunting, tosay the least. The right combination of tools, templates, and processes can be a catalyst for rapid design.
A publication of
THIS WEEK: Design Techniques
The eLearning Guild’s
Practical Applications of Technology for Learning
SM

Design Techniques
2LEARNING SOLUTIONS | May 14, 2007
The inspirationFor years I have been using Microsoft Word as a sto-
ryboarding tool and raving about the capabilities andsimplicity of it. The beauty of using Word is similar tothe beauty of creating Flash-based e-Learning. Word,like Flash, is on practically every corporate desktop.This means that my clients can easily review any cours-es I storyboard in Word. Consider the features thatWord offers when used as a rapid design tool:
• Templates to govern the types of screens createdand the organization of content on those screens
• Quick access to templates to add new contentscreens
• Text formatting features to ensure consistency• A quick way to receive, track, collate, and respond
to client review comments• Spelling and grammar checking• Layout, alignment, text spacing, and other format-
ting features• Table of contents that allows for organization and
movement of topics in the course• Ease of use for clients to review and add com-
mentsHowever, not all clients can see the big picture and
one of the limitations of Word is its inability to effec-
Learning Solutions e-Magazine™ is designed to serve as a catalyst for innovation and as a vehicle for the dissemination of new and practicalstrategies, techniques, and best practices for e-Learning design, devel-opment and management professionals. It is not intended to be THEdefinitive authority ... rather, it is intended to be a medium through which e-Learning professionals can share their knowledge, expertise, and expe-rience. As in any profession, there are many different ways to accomplisha specific objective. Learning Solutions will share many different per-spectives and does not position any one as “the right way,” but rather we position each article as “one of the right ways” for accomplishing anobjective. We assume that readers will evaluate the merits of each articleand use the ideas they contain in a manner appropriate for their specificsituation.
The articles in Learning Solutions are all written by people who areactively engaged in this profession — not by journalists or freelance writ-ers. Submissions are always welcome, as are suggestions for future top-ics. To learn more about how to submit articles and/or ideas, please visitour Web site at www.eLearningGuild.com.
Publisher David Holcombe
Editorial Director Heidi FiskEditor Bill BrandonCopy Editor Charles Holcombe
Design Director Nancy Marland Wolinski
The eLearning Guild™ Advisory BoardRuth Clark, Lance Dublin, Conrad Gottfredson, Bill Horton, Bob Mosher, Eric Parks, Brenda Pfaus,Marc Rosenberg, Allison Rossett
Copyright 2002 to 2007. Learning Solutions e-Magazine™ (formerly TheeLearning Developers’ Journal™). Compilation copy-right by The eLearning Guild. All rights reserved. Pleasecontact The eLearning Guild for reprint permission.
Learning Solutions e-Magazine™ is published weeklyfor members of The eLearning Guild, 375 E Street,Suite 200, Santa Rosa, CA 95404. Phone:+1.707.566.8990. www.eLearningGuild.com
So what should you expect from this article?The quality of the tools you are using has a direct
link to the speed at which you can design training. Inthe past you’ve probably read articles about usingMicrosoft Word as a storyboarding tool and rightfullyso. Microsoft Word, when used properly, is a solidtool for writing and reviewing content. In an articlepublished in the June, 2005 issue of Learning Sol-utions e-Magazine, “Using Microsoft Word for RapidStoryboard Development,” Cynthia Holmes-Radnerdoes a wonderful job of presenting a solid approachfor using Microsoft Word, AutoText, and a customtoolbar to create storyboards rapidly. More recently,Maria Leggett wrote a detailed article about usingMicrosoft InfoPath and really leveraging the value ofXML. There are benefits and challenges associatedwith each of these approaches.
This article will show you how I am using a newtool (RWD uPerform) in combination with instructionaldesign processes that have been around for years. Iintend to demonstrate how to use the e-Learning por-tion of the uPerform tool to rapidly design and devel-op e-Learning by leveraging the concept of stencils. Inaddition I will share lessons learned from years of us-ing various instructional design tools for clients, andsome pros and cons of each.
Our new processfocuses on presentingthe content for acourse in a way thatprovides SMEs with aclear picture, and aneasy method for ad-ding content and comments that thedesigners can track.The process culmi-nates in the publish-ing of SCORM-confor-mant Flash output.
tively manage file size when the course designer addsimages. As a result, storyboards in Word are generallynot image-intensive.
Some of our clients requested that we create story-boards in PowerPoint so their SMEs could better vis-ualize the final product. Our initial response to this re-quest was to take the lessons we had learned fromlong experience using Word and to apply them toPowerPoint. This adjustment eventually led us to cre-ate RWD uPerform.
uPerform differs from our previous methods. It elim-inates the storyboards from the process, with contentwritten directly into an alpha course. The idea was toprovide our IDs (Instructional Designers) with an envi-ronment to write in, and our clients with a look at theactual course layout as early in the process as possible.
There is always an adjustment period as you adopta tool or process. Although our process did changeslightly, the underlying concept remained the same.Previously, our IDs would:
• Take a course outline, • Build a storyboard, • Submit the document to the client for review in
electronic or paper form, • Incorporate comments as needed from client
SME(s), • Develop a beta e-Learning course complete with
graphics, interactions, audio, etc., • Resubmit to client for beta comments, • Incorporate client beta comments, and • Submit final course for client to place on their
training system.This process required us to manage Flash- and
non-Flash-based files that inevitably got out of syncwith each other as we moved through each review.Client comments often came in via notes, e-mails, textchanges in the storyboard (documented and not), andthrough conversations with SMEs. Without explicitcontrol of the storyboard templates, the content fromone project to another could differ as to the types ofscreens the designers were building. Lack of controlcould also lead to a need to develop a number ofone-off Flash screens. Even though we streamlinedthe process, the designers and developers had tomanually manage addition of the user interface, logos,colors, and SCORM content.
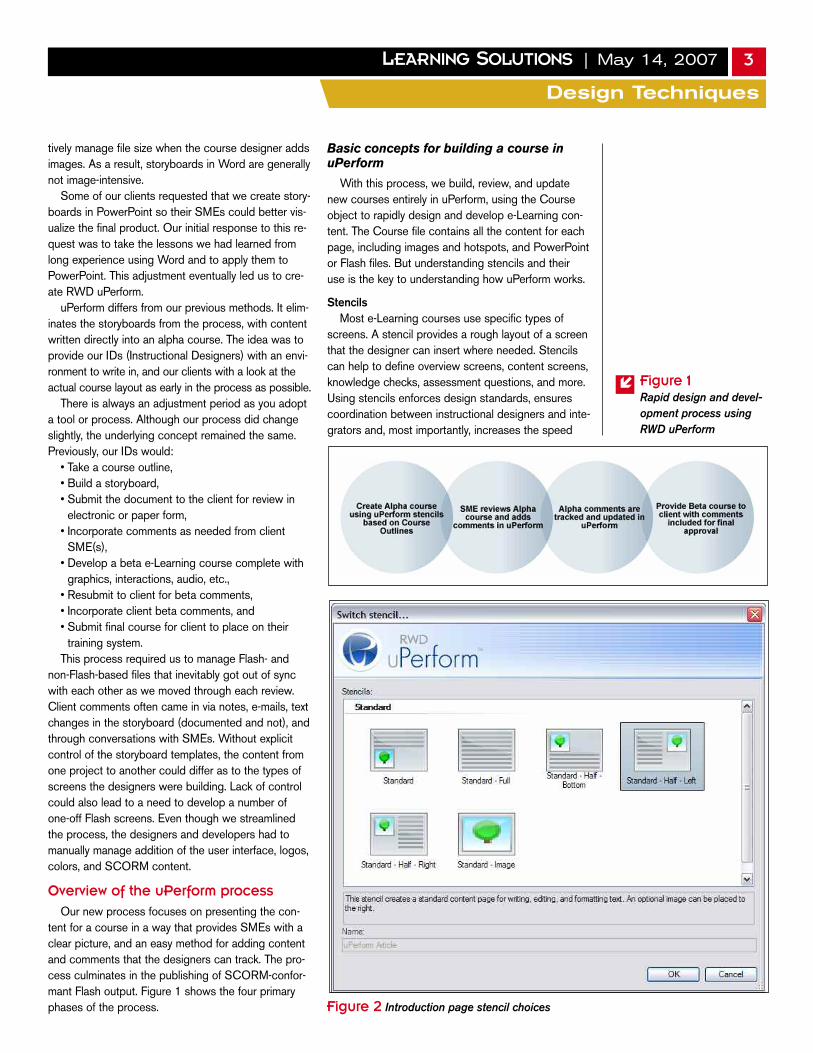
Overview of the uPerform process Our new process focuses on presenting the con-
tent for a course in a way that provides SMEs with aclear picture, and an easy method for adding contentand comments that the designers can track. The pro-cess culminates in the publishing of SCORM-confor-mant Flash output. Figure 1 shows the four primaryphases of the process.
3LEARNING SOLUTIONS | May 14, 2007
Design Techniques
Basic concepts for building a course inuPerform
With this process, we build, review, and updatenew courses entirely in uPerform, using the Courseobject to rapidly design and develop e-Learning con-tent. The Course file contains all the content for eachpage, including images and hotspots, and PowerPointor Flash files. But understanding stencils and theiruse is the key to understanding how uPerform works.
StencilsMost e-Learning courses use specific types of
screens. A stencil provides a rough layout of a screenthat the designer can insert where needed. Stencilscan help to define overview screens, content screens,knowledge checks, assessment questions, and more.Using stencils enforces design standards, ensurescoordination between instructional designers and inte-grators and, most importantly, increases the speed
�
Figure 1Rapid design and devel-opment process usingRWD uPerform
Figure 2 Introduction page stencil choices

Design Techniques
4LEARNING SOLUTIONS | May 14, 2007
with which designers and SMEs create e-Learningcourses.
Depending on the stencil she selects when shebegins to build a page, an instructional designer has anumber of different content options. Each stencil des-ignates fixed areas for the page title, text, and image.The instructional designer updates the title, enters thetext, and adds an image (or a description of the imagethat a graphic artist will create later). The stencils avail-able to the designer will vary based on the type ofpage. For example, an Introduction page will have cer-tain stencils available for use, and an Assessmentpage will have a different set of stencils available.
I will demonstrate this by showing how to select astencil for the Introduction page of a course. Eachpage that RWD uPerform generates is a construct ofa predefined stencil. As the designer begins, the firststencil she will select will be for the Introduction pageof the course. Figure 2 on page 3 shows an exampleof the stencil selection screen that uPerform presentsto the designer for the Introduction page.
Each time the designer adds a page, lesson, know-ledge check, etc., she must fill out fields based on thetype of stencil she has added. For this example, I
picked the Standard – Half – Left stencil and namedthe page uPerform Article (see Figure 2). The nextstep is to insert a page title, the content for the page,and a picture to display (See Figure 3). With a com-pleted course introduction page, the designer is readyto begin rapidly creating the rest of the e-Learningsolution.
Views in uPerform and the Course Layout PaneWhile each stencil is different, the process of insert-
ing a page and editing or updating content is the same.Beyond the basic page stencil concept, there are twoadditional important features of the uPerform environ-
Proposals to present are now being accepted.
www.eLearningGuild.com • 1.707.566.8990
The $200 Super-early Registration Discount expires June 22, 2007
N o v e m b e r 6 - 8 , 2 0 0 7 > S a n J o s e
The eLearning Developers’Conference & Expo
SM
�
Figure 3Course Introduction page

• LEARN how organizations — whether cor-porate, academic, or government — areusing different types of interactivity
• EXPLORE using different tools andprocesses for developing interactivity
• DISCOVER new e-Learning interactivity anduser engagement approaches and theories
• EXAMINE how to design various interac-tion elements
• ENSURE that your interactivity addressesall types of user and content needs
New Techniques forDesigning and Developinge-Learning Interactions
May 17 & 18, 2007
Register Today! +1.707.566.8990www.eLearningGuild.com
Hosted by:
TechnologySponsor:
5LEARNING SOLUTIONS | May 14, 2007
Design Techniques
ment that help the designer and facilitate rapid design. First, uPerform offers three views for the content.
The three views are Editor, Audio, and Preview.• Editor – This is the default view for all the work of
designing the course.• Audio – This allows the designer to link an audio
file to the page, listen to the audio file, and addtranscript information for that page. The designercan also check the transcript against the audio inthis window.
• Preview – This presents the content as it will ap-pear in the finished course.
The designer can display the course objects hehas already created in the Course Layout Pane (seeFigure 4). As the designer builds the course, he willadd pages, delete pages, and will sometimes need tochange their order. In uPerform the designer can re-arrange content by simply clicking and dragging acourse object to a new place in the sequence. Shecan reorganize entire lessons with a click of the mouse.By contrast, when using Word in conjunction withFlash under our old process, it might take hours for adesigner to update the storyboard, communicate thechanges to the development team, and then update
the Flash source files.
The View Annotations FeatureThe editable regions for each stencil let the design-
er define what the learner will see on the screen. Butdesigners do not work alone, and they must commu-nicate many of the details to others on the team whowill produce content. The Instructional Designer canuse the View Annotations area to document clientrequests, communicate image details to a graphicartist, or identify which PowerPoint file to import into
Figure 4 Course Layout Pane

Design Techniques
6LEARNING SOLUTIONS | May 14, 2007
the course. This area can also be an ideal location totrack other important information:
• The terminal and enabling objective that thisscreen addresses;
• Any type of custom Flash SWF files that a devel-oper needs to create;
• Information about the on-screen image and thealternative text;
• Information about audio that the designer maywant linked to this screen; and
• Any notes for a Client/SME as they perform areview.
Figure 5 shows what the designer sees while actu-ally creating content; the stencil with its inserted con-tent is on the left, the Course Layout Pane is on theright, and the View Annotations area is at the bottomof the screen. This is a Course Introduction page thatI created with the Standard Image stencil for a courseon effective searching. The designer can hide theView Annotations area when she does not need it, toallow for a larger viewing area. To toggle the ViewAnnotations area open or closed, the developerselects or deselects View>View Annotations fromthe menu bar at the top of the screen.
To add an annotation, the designer clicks the Clickhere to create a new Annotation Set link in theView Annotations area. Each annotation set displaysas a tab in the View Annotations area. Add moreannotation sets by right-clicking on one of the tabs.
Each annotation set displays across all pages inthe course, but the content added for a particularpage displays only for that page. As such, a bestpractice would be to use generic names for the an-notation sets like Course Objectives, Graphic Notes,etc.
Building a courseTo begin building a course in uPerform you should
have an approved course outline, as much sourcematerial as you can assemble, and any image filesthat you intend to include in the course.
It is a good idea to begin by building the infrastruc-ture of the course. It is easy to add, move, or deleteindividual pages, so you can revise and reorganizethe course content as needed at any time. Insert alesson page for each lesson you will have in the course,and an assessment page for the course. Add anyannotation sets and incorporate the content for thesepages. This will provide the structure and identifyobjectives for each lesson.
Suppose you want to create a 15-minute courseon the basics of performing an effective search. Fig-ure 5 actually shows what you might see as you useuPerform to put this together. I will walk you throughthe complete construction of the course. I'll also
show you the development of the first lesson of thecourse, Search Tools, which discusses the types ofsearch tools, which categories the search tools fallinto, and the proper search tool to use.
Setting up the course
The first step is to create the new Course file andname the course. (See Figure 6 on page 7.) We willname the course “Effective Search Fundamentals.”
After clicking the OK button, you see the SelectIntroduction Page Stencil window (see Figure 2).The introduction for this course uses the collagegraphic of various search sites that you see in Figure5. For this purpose, the appropriate stencil is Stan-dard – Image. Click the Add Picture… link on thestencil and select the collage image file.
Now you can build the course construct from theapproved course outline. The course outline showsthat there are three content lessons, a course summa-ry, and an assessment. Before adding content, youshould add the necessary pages to the Course Lay-out Pane. You insert course objects by selecting op-tions from the Insert menu, by clicking a button onthe Course toolbar, or by right-clicking on an item inthe Course Layout Pane and selecting a course ob-ject to insert. Your preference is the only factor here.My own way to add objects is by clicking the appro-priate buttons on the Course toolbar. Figure 5 showswhat the Course Layout Pane will look like after youcomplete the steps that follow in this section of thisarticle.
Before the first lesson I do want to add a screenthat covers the basic details of the course includingobjectives, intended audience, prerequisites, and dur-
It is a good idea tobegin by building theinfrastructure of thecourse. It is easy toadd, move, or deleteindividual pages, soyou can revise andreorganize the coursecontent as needed atany time. Insert a les-son page for each les-son you will have inthe course, and anassessment page forthe course. Add anyannotation sets andincorporate the con-tent for these pages.
�
Figure 5The uPerform designerinterface, showing aStandard Image stencilwith inserted content,the Course Layout Pane,and the View Annotationarea.

A common mistakemade during thereview process isassuming your SMEknows what you want.Clearly setting expec-tations with a SME isvital to a quality review.Communicating theamount of time avail-able for the review, theareas of the course theSME should be review-ing, and what consti-tutes a quality reviewcomment, are all criti-cal expectations.
7LEARNING SOLUTIONS | May 14, 2007
Design Techniques
ation. Click the Insert Page button, select the Stan-dard – Full stencil, and name the page “CourseOverview.” This stencil is text only. Identify a contenttitle to appear on the screen and the content text forthe screen after you have completed adding the ob-jects for the course.
The next step is to add a placeholder for each ofthe lessons in the course. The lessons I will add aretitled, “Search Tools,” “Performing a Search,” and“Other Searching Considerations.” Each lesson isapproximately five minutes long and includes a lessonintroduction, three or four content screens, a knowl-edge check question, and a lesson summary. Thecourse outline specifies the type of stencils to use forthe lesson introductions, knowledge checks, and les-son summaries. For continuity the lesson introductionand lesson summary screens will use the Standard –Half – Left stencil. The client has communicated thatall knowledge checks are to be multiple choice ques-tions with no images. Based on that, you know youneed to use the Multiple Choice stencil for these.
The names you give the pages are entirely up toyou but for this course we will make all lesson intro-ductions match the lesson title, name the lesson know-ledge checks “Knowledge Check,” and name the les-son summaries “Summary” in the Course LayoutPane. When we have done this, we add an Assess-ment object. This serves as the content screen thatappears before the learner takes the assessment. Thisis good for communicating the requirements of theassessment and any information the learner will needto successfully complete the assessment. Since thisis an information screen, use the Standard – Fullstencil again, for the most space for text.
Building a lesson
You have successfully constructed the shell of thecourse and are now ready to go back to the first les-son and flesh out the content and the stencils you willuse. A glance at the course outline shows that thereare three content screens in the first lesson that willneed both static text and graphics. A graphic design-er will have to make the graphics, but you need tocommunicate what the graphic designer needs tobuild. So before you begin adding content you wantto add an annotation for the course, called “GraphicNotes.” This is where you will store information for thegraphic designer so he knows what image to con-struct for each screen. Select View>View Annota-tions and then click the associated link to create anew annotation set. The Graphic Notes annotationset is now visible on all screens and you can add specific details for each screen.
Now refer back to the course outline, gather thepertinent details for this lesson and update the lesson
introduction screen content for the Search Tools les-son. Each lesson introduction will consist of a fewsentences about the value of the lesson, the objec-tives for the lesson, and the duration of the lesson.The course does not have audio for every screen butthe outline asks for audio for each lesson introductionscreen. Recording the audio will happen later, but it isyour responsibility as the ID to provide a transcriptthat tells the audio talent what to say. The audio forthis course will be a verbatim reading of the text onthe screen. Begin by copying the text in the contentarea. Select Audio from the View menu. The Audioview allows you to upload and listen to an MP3 fileand add transcript text. You can then paste the con-tent screen text in the Transcript field. This is a plaintext field with no formatting options. If instructions arenecessary, I would suggest an Audio annotation setto provide detailed instructions for the audio talent.
Now that you have updated the audio details, sel-ect View>Editor to return to the course editing screen.There are three screens to add, and since the imageswill be much wider than they are tall, apply the Stan-dard stencil type. This stencil allows for an image atthe top and text beneath. Once you have entered thecontent for each page, you can go back through andclearly identify what you are looking for in the visual.
You have now updated the lesson introduction,added and updated the content screens for the mod-ule, and added any graphic and audio details needed.To complete this module, you also need to complete
�
Figure 6Creating a new coursestarts with this screen.

Design Techniques
8LEARNING SOLUTIONS | May 14, 2007
the knowledge check and add the content for the les-son summary. This knowledge check will be multiplechoice, with no image. As the ID, you can define theinstruction text the learner sees, the question stem,and the distractors. The instructions default to “Selectthe best answer to the question.” My best practice isto typically include four distractors, in order from short-est to longest. The stencil allows you up to six distrac-tors and the ID can determine how many are used. Toidentify the correct answer the ID selects a radio but-ton.
To complete this lesson you need to add the con-tent for the lesson summary. For this course the sum-maries will include a sentence letting the learnersknow they have completed the lesson, a review of thelesson objectives, and a sentence instructing them toclick Next to continue the course.
Other things to consider
Each project is going to be different. Some will beas simple as converting an existing PowerPoint pres-entation quickly for distribution and tracking while others will include adding Flash development in thecourse and more elaborate rollovers and popups.
• PowerPoint Import: There is often a wealth ofcontent within a company already written inPowerPoint. As part of your rapid developmentyou can import PowerPoint slides directly intouPerform. This allows you to take an existing slidedeck and quickly make it a more engaging e-Learn-ing experience that can include interactions, au-dio, and assessments. You can store and trackthe results in a Learning Management System.
• Flash Import: The ability to import a single, self-contained Flash file (.swf) into uPerform as acourse page allows more advanced developers towork directly with SMEs to bring highly engagingcontent to the learner.
• Image Hotspots: The uPerform Hotspot featureallows you to specify portions of a graphic to cre-ate a rollover effect or a simple link to a Web site.The designer simply outlines the space for thehotspot, sets a few characteristics, and it is done.
• Publishing: Clicking the Publish button allowsyou to save and package your course materialsinto a folder. In that folder are all the files (such as the imsmanifest.xml) and course files you willneed to add the course to your LMS.
SME review of the courseOnce you have completed building the alpha ver-
sion of a course, you will need to submit the courseto the SME for review. In the past you might deliver aprinted version of a storyboard to a SME or an elec-tronic version in MS Word using “Track Changes” to
document issues. How often does a single personknow all aspects of the training material you are devel-oping? Normally, there are multiple people reviewingthese courses. In my experience even the best ofintentions won’t get SMEs to consolidate their com-ments. There are inevitably comments that contradictanother SME and three versions of the same story-board after review. The online reviewer built into RWDuPerform eliminates these issues by allowing SMEs toenter comments electronically that directly link to thescreen in question. You can then archive the com-ments and sort them by the name of the person whoentered the comment.
A common mistake made during the review pro-cess is assuming your SME knows what you want.Clearly setting expectations with a SME is vital to aquality review. Communicating the amount of timeavailable for the review, the areas of the course theSME should review, and what constitutes a qualityreview comment, are all critical expectations. Properlyaligning with your SME can be the difference bet-ween getting a comment that says, “Replace this”and getting a comment that identifies the exact text todelete and the exact content the SME wants added.
These instructions do not have to be complicated.Instruct your reviewers to clearly identify the positionof the error on the screen and a detailed action totake. If a SME wants an additional paragraph or a dif-ferent title, ask him to add this content in the com-ment. The instructional designer can make sure theinformation provided by the SME is reviewed for in-structional quality. Educate clients on how to managemultiple reviewers. If the client plans to have multiplepeople review the course it is best to let the personwith final signoff review the course last, with knowl-edge of the comments that other reviewers have made.It can reduce the time it takes to complete the reviewand ensures that multiple points of view are consid-ered.
Finally, make sure the SME understands what con-stitutes acceptance on his part. Many times we willask our clients to refrain from sending us anythinguntil they have completed their review. You could havean approval document for each course, or you couldsimply educate the SME that his e-mailed response,stating he has completely entered comments on thecourse, is his approval to build the course with thoseedits included. The important thing is that whateveryou choose to do, the SME is aware of it and hasagreed to the process.
Final thoughtsThe speed with which one can create high quality
content is obviously important. One of the primaryinhibitors that many of us have been working on is
A stencil provides arough layout of ascreen that the design-er can insert whereneeded. Stencils canhelp to define overviewscreens, contentscreens, knowledgechecks, assessmentquestions and more.Using stencils enforcesdesign standards,ensures coordinationbetween instructionaldesigners and integra-tors, and, most impor-tantly, increases thespeed with whichdesigners and SMEscreate e-Learningcourses.

Design Techniques
9LEARNING SOLUTIONS | May 14, 2007
This is the first article for Learning Solutions by Nicholas Bird. The eLearningGuild has previously published articles whose topics also relate to this week’s.These are available to Members in the Learning Solutions Archive online. Membersmust log in to download them. Here are the authors, the article topics, and the pub-lication dates. (Not a Guild Member? Join today for immediate access to these arti-cles and over two hundred others!)
Articles on related topics
Greg Kearsley: Department of one (April 16, 2007)Eric Parks: The online learning content challenge (December 11, 2006)Anita Rosen: Rapid e-Learning fundamentals (August 21, 2006)Mike Richards: Managing project problems (April 10, 2006)Stephanie Sanford: Team of one (January 16, 2006)Ray Jimenez: Series on rapid design, development, and production (Five parts
published between October 2005 and January 2006)
In the Archives
This publication is by the people, for the people.That means it’s written by YOU the readers and members of The eLearning Guild!We encourage you to submit articles for publication in Learning Solutions e-Mag-azine.
Even if you have not been published before, we encourage you to submit a query ifyou have a great idea, technique, case study, or practice to share with your peers inthe e-Learning community. If your topic idea for an article is selected by the editors,you will be asked to submit a complete article on that topic. Don’t worry if you havelimited experience writing for publication. Our team of editors will work with you topolish your article and get it ready for publication in Learning Solutions.
By sharing your expertise with the readers of Learning Solutions, you not onlyadd to the collective knowledge of the e-Learning community, you also gain the re-cognition of your peers in the industry and your organization.
How to Submit a Query
If you have an idea for an article, send a plain-text e-mail to our editor, Bill Brandon, at [email protected]. Refer to www.eLearningGuild.com for AuthorGuidelines.
Get It Published in...
DO YOU HAVE AN INTERESTING STRATEGY OR TECHNIQUE TO SHARE?
eliminating the need to convert our storyboards toFlash. Regardless of the tool you are using, the needto copy and paste, or to apply a conversion to thestoryboards, adds time and introduces errors into theprocess. I feel that uPerform improves the process foran ID because the content you write is not manipulat-ed in any way. Time is not spent moving content intoFlash or packaging the files for an LMS.
Author ContactNicholas Bird is a Senior Web Con-tent Developer with RWD Technolo-gies, Inc. (www.rwd.com) in Balti-more, MD. Nicholas has been in-volved in custom content develop-ment and e-Learning since 1999
when he began working with Lockheed Martin devel-oping custom ILT, and synchronous online deliverycourses training Fortune 500 employees on skills likeHTML, Website Design, JavaScript, and VBScript. Healso spent time as a trainer and Project Manager of e-Learning Technologies at QVC, Inc where he wasresponsible for all aspects of developing various train-ing solutions for internal employees and partner com-panies.
Nicholas is currently in his third year at RWD andhas been involved in the design and writing of over30 e-Learning courses for a variety of Fortune 100manufacturing, telecommunications, pharmaceutical,agricultural, and information technology companies.Nicholas really enjoys the creative process and help-ing clients and coworkers find innovative solutions totheir training needs. Nicholas has a Master’s in Bus-iness Administration focusing on Technology Man-agement from the University of Phoenix. You can contact Nicholas at [email protected].
Discuss this article in the “Talk Back to theAuthors” Forum of Community Connections(http://www. elearningguild.com/community_connec-tions/forum/ categories. cfm? catid= 17& enter-cat=y). You can address your comments to theauthor(s) of each week’s article, or you can make a general comment to other readers.
Additional information on the topics covered inthis article is also listed in the Guild ResourceDirectory.