how to use the star, spiral, and common shapes tools in
TRANSCRIPT

How to Use the Star, Spiral, and Common Shapes Tools in
CorelDRAW In addition to tools for drawing circles, square, rectangles and polygons, CorelDRAW also has specific
tools to create stars, spirals, and other common shapes. In this tutorial, we’ll show you how to create
and modify perfect and complex stars with the Star tool, symmetrical and logarithmic spirals with the
Spiral tool, and predefined shapes like arrows, banners, callouts, hearts, etc. with the Common Shapes
tool.
The Star Tool
All three tools can be found in the Shape Tools flyout. We’ll start with the Star tool.
The property bar displays the default outline width and line style for all graphic elements, which can be
changed for a shape once it’s created. You can also set the number of sides, and choose whether to
create a simple or complex star.
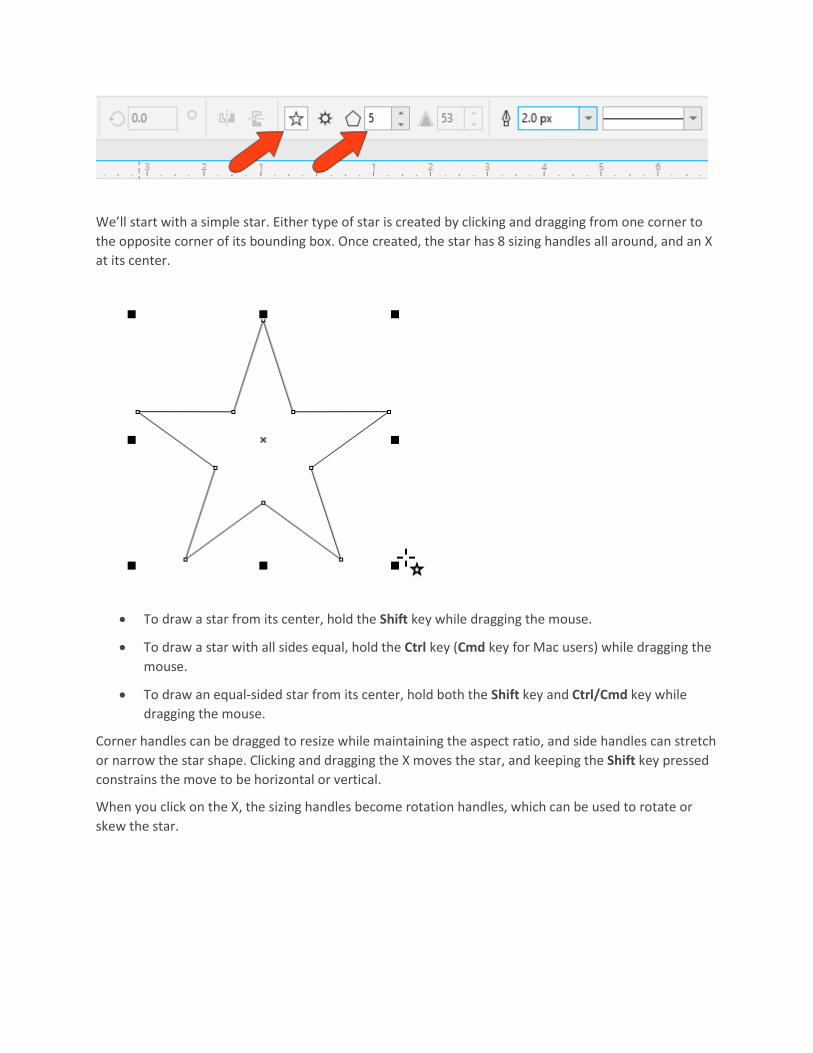
We’ll start with a simple star. Either type of star is created by clicking and dragging from one corner to
the opposite corner of its bounding box. Once created, the star has 8 sizing handles all around, and an X
at its center.
• To draw a star from its center, hold the Shift key while dragging the mouse.
• To draw a star with all sides equal, hold the Ctrl key (Cmd key for Mac users) while dragging the
mouse.
• To draw an equal-sided star from its center, hold both the Shift key and Ctrl/Cmd key while
dragging the mouse.
Corner handles can be dragged to resize while maintaining the aspect ratio, and side handles can stretch
or narrow the star shape. Clicking and dragging the X moves the star, and keeping the Shift key pressed
constrains the move to be horizontal or vertical.
When you click on the X, the sizing handles become rotation handles, which can be used to rotate or
skew the star.

0
The star center is now a circular pivot point, which you can click and drag to a different spot, and now
this point is the center of rotation.
Clicking the pivot point brings back the X and the sizing handles.
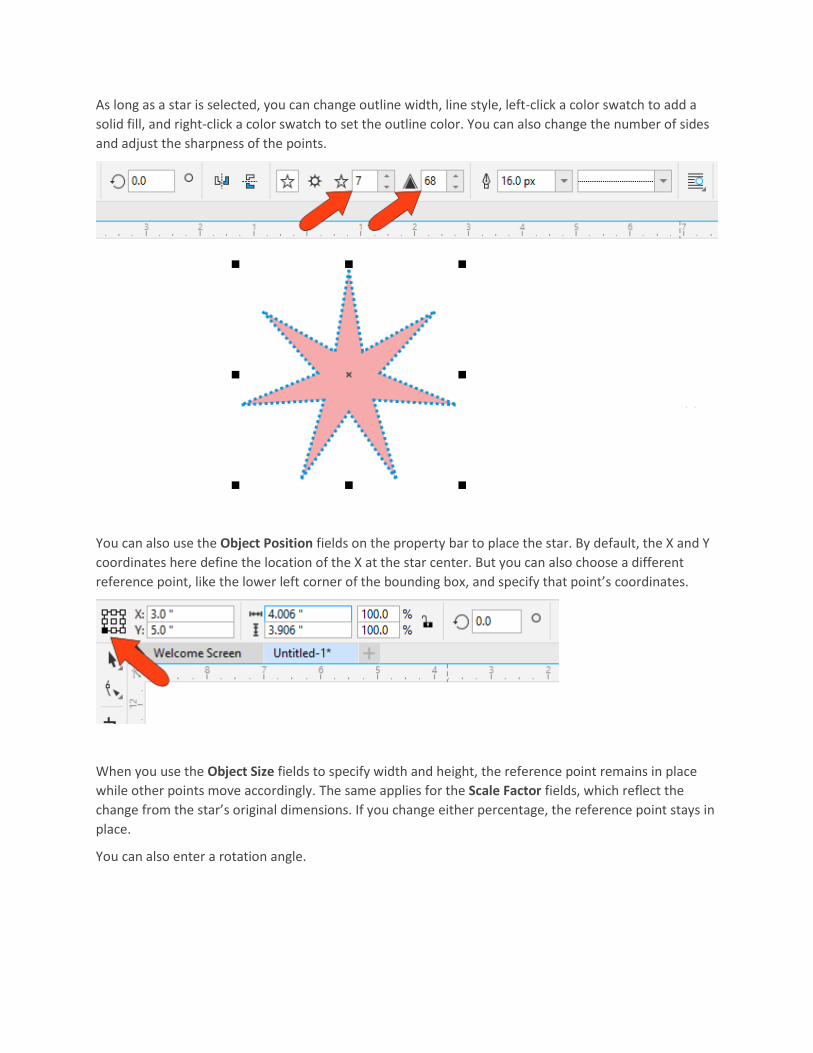
As long as a star is selected, you can change outline width, line style, left-click a color swatch to add a
solid fill, and right-click a color swatch to set the outline color. You can also change the number of sides
and adjust the sharpness of the points.
You can also use the Object Position fields on the property bar to place the star. By default, the X and Y
coordinates here define the location of the X at the star center. But you can also choose a different
reference point, like the lower left corner of the bounding box, and specify that point’s coordinates.
When you use the Object Size fields to specify width and height, the reference point remains in place
while other points move accordingly. The same applies for the Scale Factor fields, which reflect the
change from the star’s original dimensions. If you change either percentage, the reference point stays in
place.
You can also enter a rotation angle.

A complex star is created just like a simple star, but has intersecting sides.
Modifying a Star
If you want to make changes to a star you need to first select it. You can select any star while the Star
tool is active, or you can press the Spacebar to temporarily activate the Pick tool, which you can use to
select the star.
The Shape tool can be used to transform a complex star into a much more interesting shape.
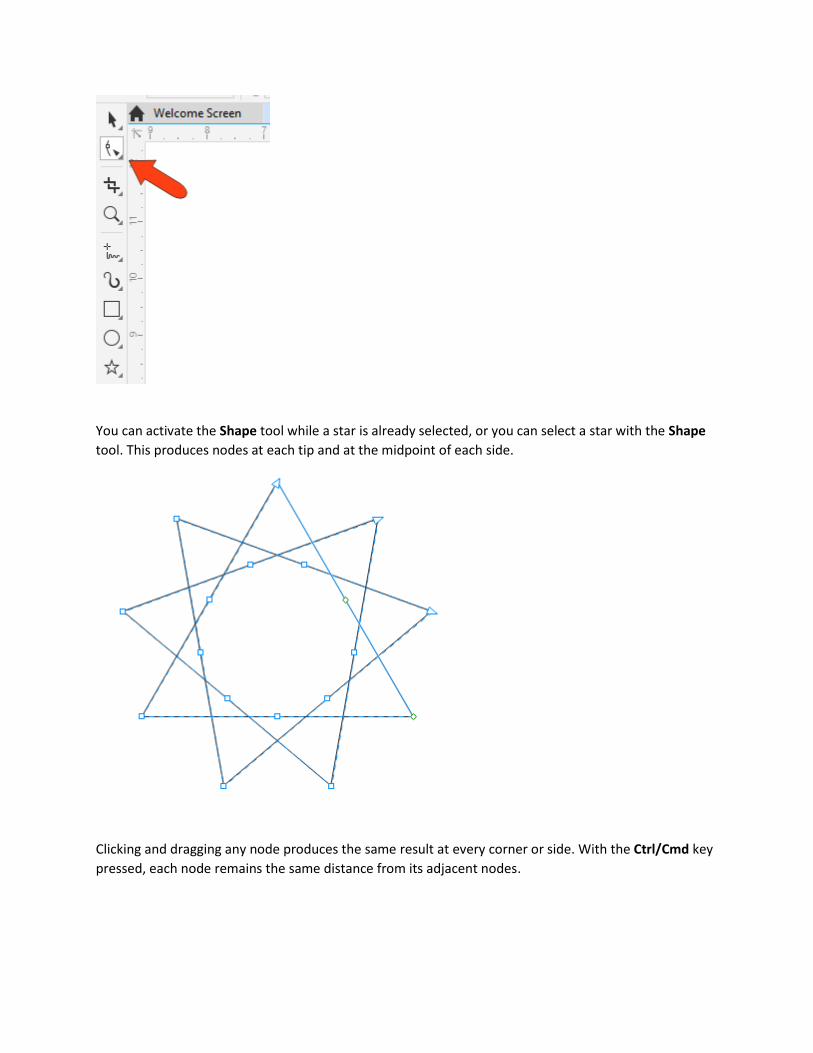
You can activate the Shape tool while a star is already selected, or you can select a star with the Shape
tool. This produces nodes at each tip and at the midpoint of each side.
Clicking and dragging any node produces the same result at every corner or side. With the Ctrl/Cmd key
pressed, each node remains the same distance from its adjacent nodes.
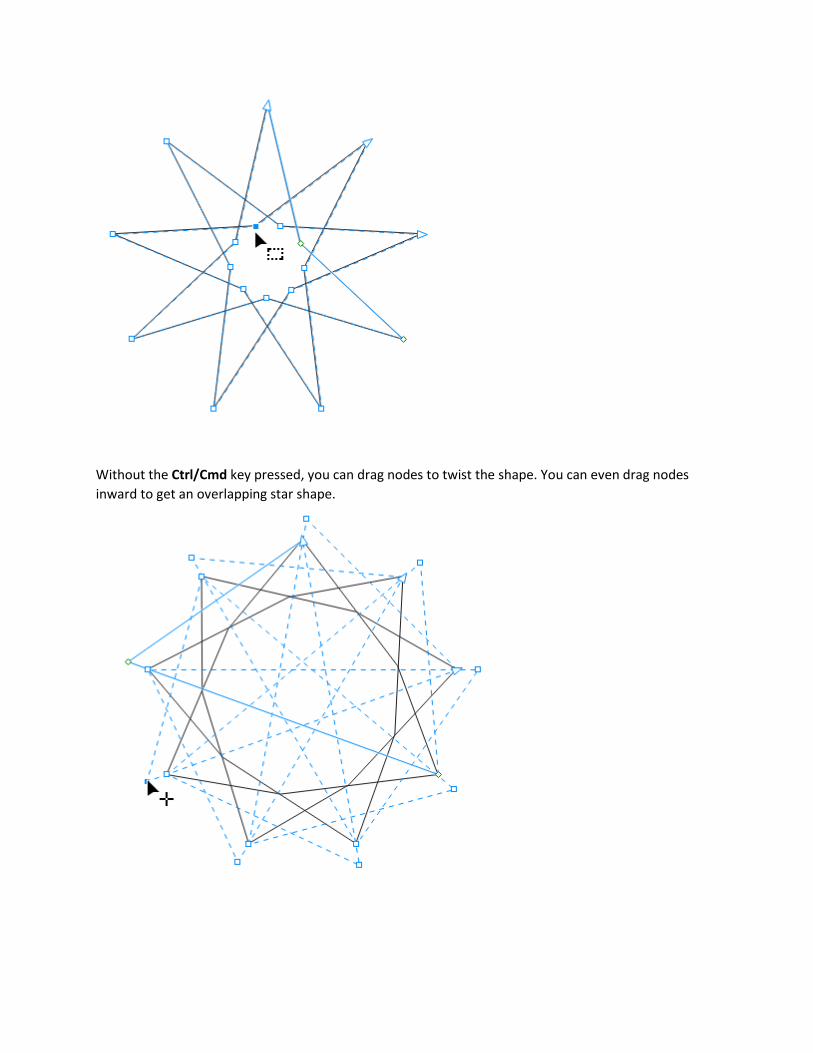
Without the Ctrl/Cmd key pressed, you can drag nodes to twist the shape. You can even drag nodes
inward to get an overlapping star shape.
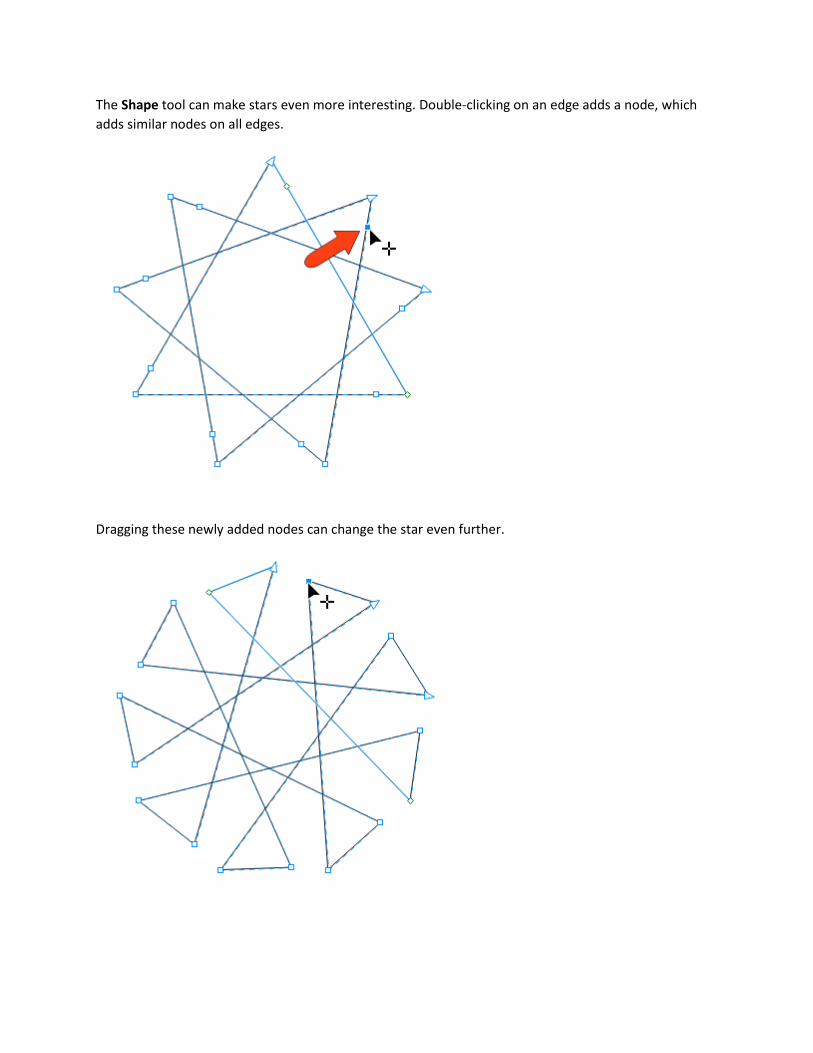
The Shape tool can make stars even more interesting. Double-clicking on an edge adds a node, which
adds similar nodes on all edges.
Dragging these newly added nodes can change the star even further.

Double-clicking a node removes it, along with the corresponding nodes on other edges. You can also
select a node and click the Convert to Curve icon on the property bar.
Now you can adjust tangency at both ends of the line segment

If you want to adjust individual nodes without maintaining even sides and corners, first press the
Spacebar to temporarily switch to the Pick tool, which selects the star. Then click the Convert to Curves
icon on the property bar.
Once converted, you can press the Spacebar to go back to the Shape tool and adjust individual
nodes. You can also drag a selection marquee around multiple nodes to move them together.

Using the Shape tool on a simple star displays nodes where points meet, and dragging nodes keeps the
star a star, or you can keep going outward until you have a polygon.
The Spiral Tool
The Spiral tool is located just below the Star tool in the flyout group and has the A shortcut on the PC.
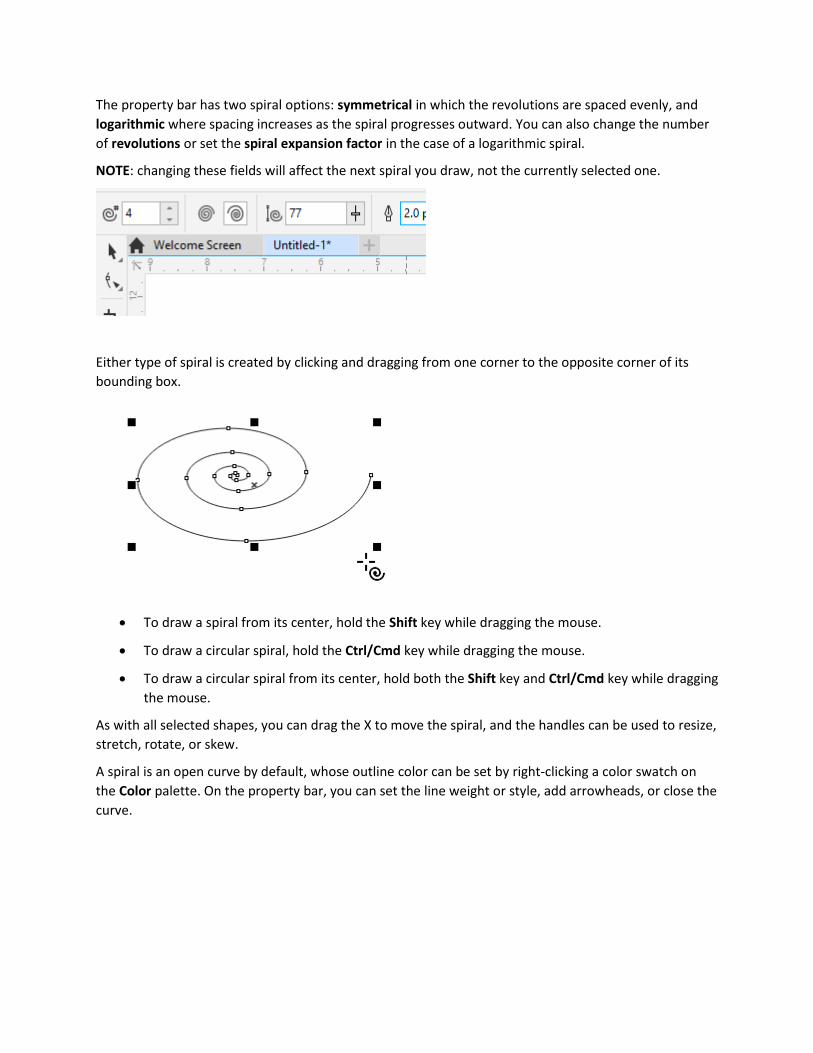
The property bar has two spiral options: symmetrical in which the revolutions are spaced evenly, and
logarithmic where spacing increases as the spiral progresses outward. You can also change the number
of revolutions or set the spiral expansion factor in the case of a logarithmic spiral.
NOTE: changing these fields will affect the next spiral you draw, not the currently selected one.
Either type of spiral is created by clicking and dragging from one corner to the opposite corner of its
bounding box.
• To draw a spiral from its center, hold the Shift key while dragging the mouse.
• To draw a circular spiral, hold the Ctrl/Cmd key while dragging the mouse.
• To draw a circular spiral from its center, hold both the Shift key and Ctrl/Cmd key while dragging
the mouse.
As with all selected shapes, you can drag the X to move the spiral, and the handles can be used to resize,
stretch, rotate, or skew.
A spiral is an open curve by default, whose outline color can be set by right-clicking a color swatch on
the Color palette. On the property bar, you can set the line weight or style, add arrowheads, or close the
curve.
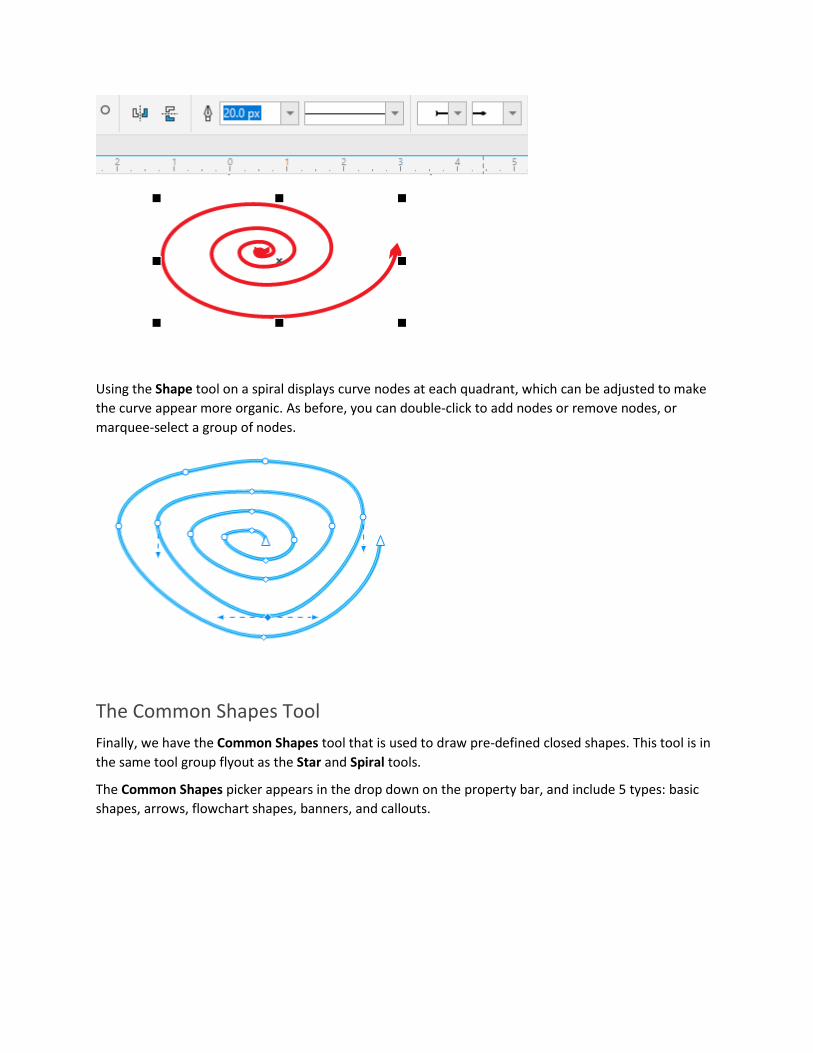
Using the Shape tool on a spiral displays curve nodes at each quadrant, which can be adjusted to make
the curve appear more organic. As before, you can double-click to add nodes or remove nodes, or
marquee-select a group of nodes.
The Common Shapes Tool
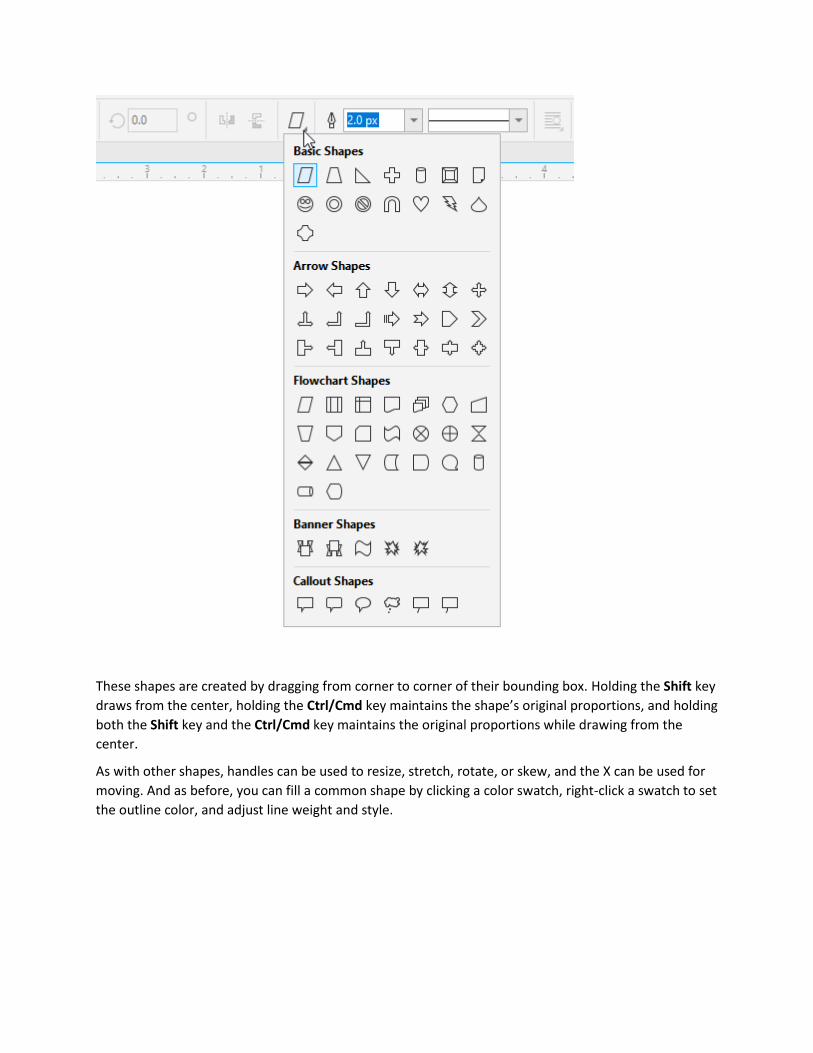
Finally, we have the Common Shapes tool that is used to draw pre-defined closed shapes. This tool is in
the same tool group flyout as the Star and Spiral tools.
The Common Shapes picker appears in the drop down on the property bar, and include 5 types: basic
shapes, arrows, flowchart shapes, banners, and callouts.
These shapes are created by dragging from corner to corner of their bounding box. Holding the Shift key
draws from the center, holding the Ctrl/Cmd key maintains the shape’s original proportions, and holding
both the Shift key and the Ctrl/Cmd key maintains the original proportions while drawing from the
center.
As with other shapes, handles can be used to resize, stretch, rotate, or skew, and the X can be used for
moving. And as before, you can fill a common shape by clicking a color swatch, right-click a swatch to set
the outline color, and adjust line weight and style.

Modifying Common Shapes
With a few exceptions, most common shapes have one or more glyphs (red square) that can be dragged
to adjust the shape.
The Shape tool generally does not provide nodes for editing common shapes. But you can right-click on
a commons shape and select Convert to curves, after which there are more nodes for editing.
Adding Text to Closed Shapes
You can add text to a common shape, or to any closed shape. First, activate the Text tool from the
Toolbox or by pressing F8.
The Text tool has three types of cursors, which depend on the position of the cursor.

When the cursor is inside a shape, the cursor symbol is an A. With this, you can click and type inside the
shape to create artistic text, which is not linked to the shape.
When the cursor is along an edge of a shape, the cursor symbol is a curve. With this, you can click and
type to create artistic text that follows that edge.
When the cursor is just inside the edge of a shape, the cursor symbol is a dotted grid. With this, you can
click and type to create paragraph text that fits the shape.
If you select and move the shape, both text along the edge, and paragraph text inside, will move along
with it.