how to use wordpress for e-commerce? - template monster · e-commerce (and a bit more) 4 before...
TRANSCRIPT

2
Table of Contents
PAGE 3 Not just blogging: an introduction to WordPress e-commerce (and a bit more)PAGE 4 WordPress e-commerce: the essentialsPAGE 5 Ok, but how exactly does WordPress sell?PAGE 5 Step 1: installing WooCommercePAGE 7 Step 2: getting the themes rightPAGE 8 Step 3: setting up your products catalogPAGE 10 Step 4: adding productsPAGE 11 Step 5: adjusting the tax, checkout and shipping optionsPAGE 14 Before we part: on managing orders and marketingPAGE 15 ConclusionPAGE 16 Thanks for reading this book!PAGE 16 Looking for a WooCommerce website? Find one at TemplateMonster.comPAGE 17 Sources and further readingPAGE 17 Images

3
If you’re reading this article, chances are you already know this: WordPress is not just a blogger’s tool.
It can be your perfect virtual market stall.
Sure, WordPress isn’t built primarily for e-commerce; its main goal is to power up (as in allowing people to control the content of their) web pages — and since there’s a variety of web pages for a variety of users with a variety of purposes, selling will inevitably be one of them.
And it’s going extremely well, too. You’ve heard of Amazon and E-bay – giants driving sales of billions per year. They’re hugely successful e-commerce companies, with continuously expanding markets and products.
However, e-commerce is more than just these behemoths. Nowadays, there’s a huge diversity in terms of e-sellers, with everyone from DIY gurus to blogging moms hopping on the bandwagon.
The point is, everybody has something to sell.
So do you.
And WordPress might just be your safest bet.
Not just blogging: an introduction to WordPress e-commerce (and a bit more)

4
Before discussing exactly how to use WordPress for e-commerce, let’s just take a brief look at some of the reasons why you’d want to use it for selling in the first place.
First of all, WordPress will allow you to naturally integrate your store into a larger, content-based context. You’ll basically be able to stick to your blog and manage your online store as one of its subsections. This is extremely convenient because it saves time and it doesn’t distract you with endless click-arounds and useless page-to-page navigations.
Apart from that, WordPress is great because it’s 100% fully customizable. This is one of its main advantages over dedicated e-commerce platforms, which don’t come anywhere close to WordPress when it comes to customization. With all the templates and the manual editing options available, there’s really nothing you cannot customize if you decide to start using WordPress for e-commerce.
Finally, WordPress is deadly secure; tens of millions of web page owners and creators trust it, and there’s a good reason to do this. Of course, nothing is 100% hack-proof; but if you take the basic safety precautions, you won’t have any significant problems. Read more here on why WordPress is a safe way to do e-commerce.
It’s safe, it’s fully customizable, and it blends naturally with your site: WordPress might just be a perfect e-commerce option for you.
WordPress e-commerce: the essentials
5
Ok, but how exactly does WordPress sell?
Selling your products online with WordPress is easier than you might imagine, and it’s definitely more accessible than using a dedicated platform like Shopify or Magento. In a nutshell, there is a plugin that you can use to turn your WordPress website into an online store.
Everything you need can be summed up in two words: WooCommerce Plugin.
It’s not the only e-commerce plugin available for WordPress users, but it’s definitely the best one.
Take a look at these wonder bullets:
- Completely free - Hugely customizable (as in plenty of extensions) - Crystal-clear statistics - More than 16 million downloads - Supporting over 37% of online stores
(In case you’re wondering, we didn’t just pull those stats out of a magic hat; check out this and that if you want to read more).
Briefly put, for beginners and advanced users alike, WooCommerce remains probably the best, easiest to use, most versatile, most dependable e-commerce tool available. And we’re here to help you use it.
Step 1: installing WooCommerce
Since you’re reading this, you have probably already installed WordPress. If you haven’t done this, you won’t be able to use WooCommerce, so we recommend you check out this great installation guide first.
Once you’ve installed WordPress, you want to install the WooCommerce by WooThemes plugin.
The installation wizard will guide you through the initial settings, and you’ll soon have two additional sections in your dashboard: WooCommerce and Products.
6
We’ll go through the WooCommerce section first, as you’ll need to do some initial setup; however, once that’s done, you’ll probably be spending most of the time in the Products section, adding and editing products.
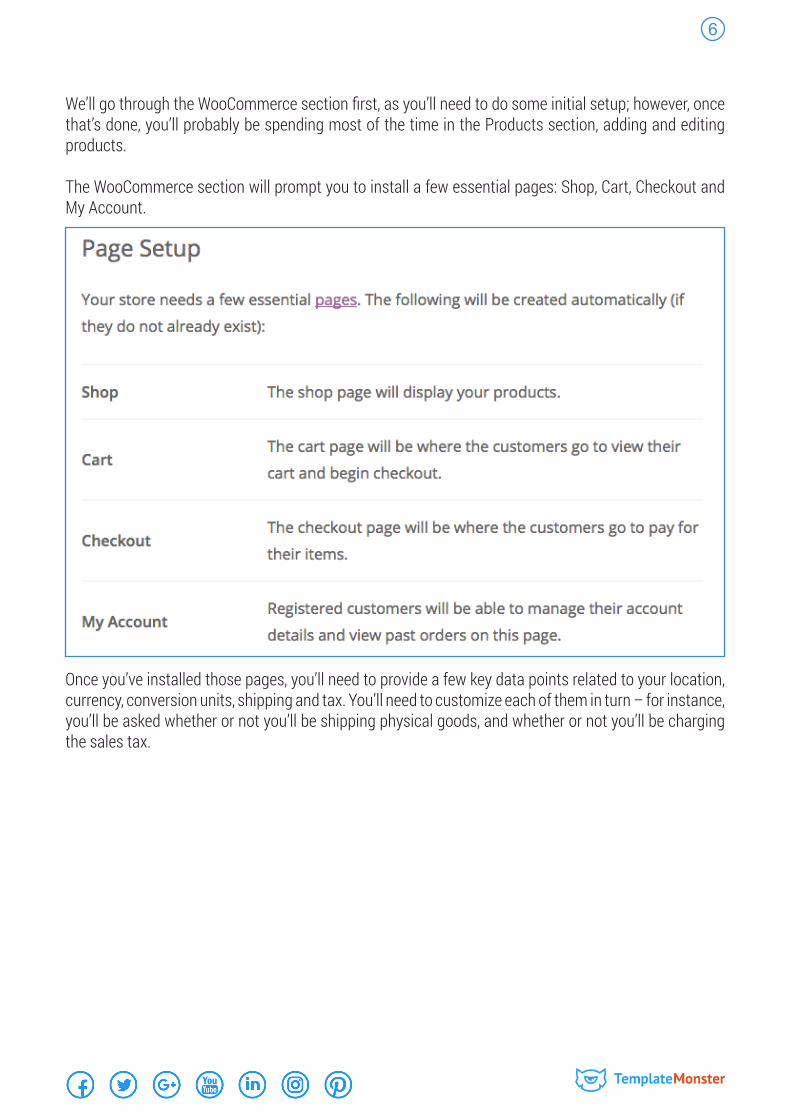
The WooCommerce section will prompt you to install a few essential pages: Shop, Cart, Checkout and My Account.
Once you’ve installed those pages, you’ll need to provide a few key data points related to your location, currency, conversion units, shipping and tax. You’ll need to customize each of them in turn – for instance, you’ll be asked whether or not you’ll be shipping physical goods, and whether or not you’ll be charging the sales tax.

7
At this point, everything’s up to you — just make sure you follow through with whatever options you select to avoid any unnecessary difficulties later on.
The next thing you’ll need to do is fill in the necessary information regarding payments. If you’re just beginning to run your online store, you may want to go with PayPal – it’s the-easiest-to-run online wallet, and you won’t really need to worry about your finances. However, depending on your location, you may not be able to withdraw the money — take a closer look at its withdrawal policy here.
There’s a number of offline payment methods that you can choose from, too, such as check payments, bank transfer or cash on delivery.
Now that you’ve finished the basic configuration, you can start setting up your products.
Step 2: getting the themes right
Before doing that, however, you might need to take care of one important thing: WordPress and WooCommerce theme compatibility.
WordPress will usually provide you with plenty of themes that are perfectly suitable for most day-to-day blogging activity, such as page adding or removal, post sorting, and the like. However,

8
a lot of default themes won’t have what it takes to support WooCommerce; even if they will display a product page, it will look ill-shaped and unprofessional.
To avoid any theme-related hassle, you’ll want to get a compatible theme.
One of the easiest options available – but also one of the most expensive – is getting a WooThemes theme. They are designed to look good and work with WooCommerce, and they’re pretty easy to install once you purchase them, but they’ll cost a pretty buck.
A second option is to work with a free WordPress theme. While they won’t cost a dime, they may also be sloppy and they may not respond well to certain functions. Use them at your own risk.
A third option, and one that is pretty reasonable in terms of pricing, is getting a Template Monster theme. They are designed by professionals, and are easy to install and work with. They support all WooCommerce functionality and they look great, too. You’ve also got a very large selection to choose from.
Step 3: setting up your products catalog
As soon as you’ve configured the basics of your online store, you’ll want to set up your products. This is not a difficult process, and you may even enjoy doing it.
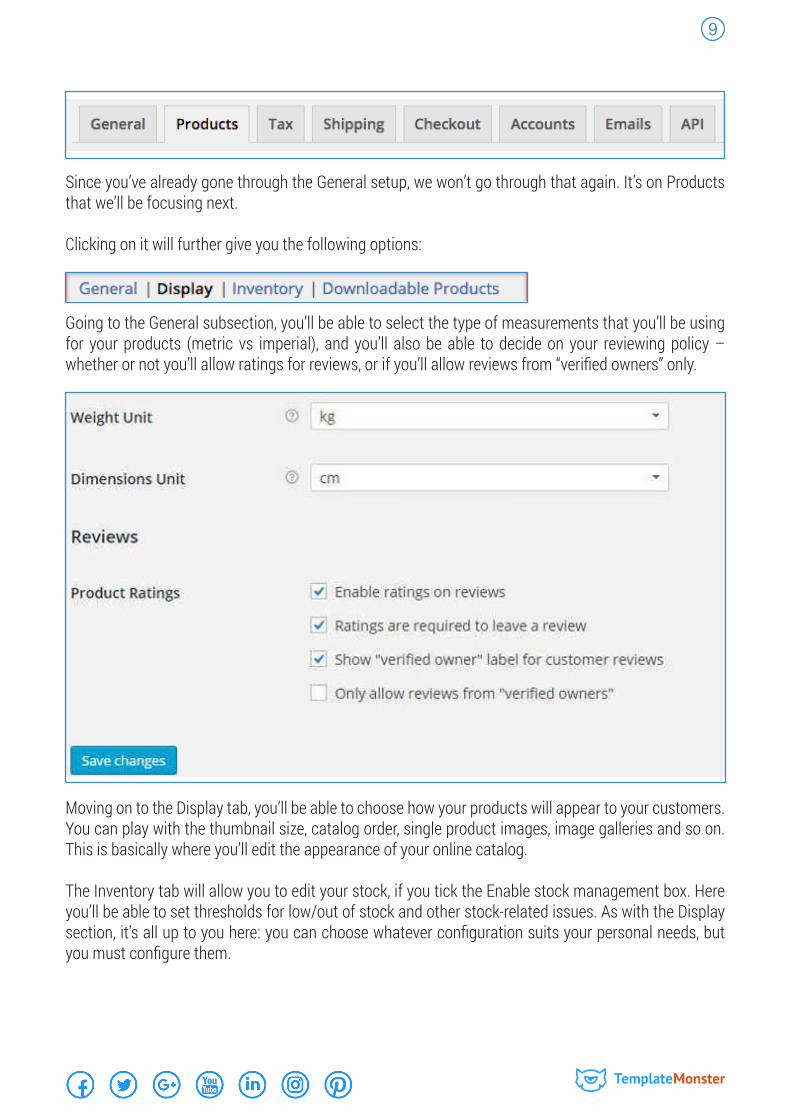
Here’s what your WooCommerce navigation toolbar will look like (Dashboard > WooCommerce > Settings):
9
Since you’ve already gone through the General setup, we won’t go through that again. It’s on Products that we’ll be focusing next.
Clicking on it will further give you the following options:
Going to the General subsection, you’ll be able to select the type of measurements that you’ll be using for your products (metric vs imperial), and you’ll also be able to decide on your reviewing policy – whether or not you’ll allow ratings for reviews, or if you’ll allow reviews from “verified owners” only.
Moving on to the Display tab, you’ll be able to choose how your products will appear to your customers. You can play with the thumbnail size, catalog order, single product images, image galleries and so on. This is basically where you’ll edit the appearance of your online catalog.
The Inventory tab will allow you to edit your stock, if you tick the Enable stock management box. Here you’ll be able to set thresholds for low/out of stock and other stock-related issues. As with the Display section, it’s all up to you here: you can choose whatever configuration suits your personal needs, but you must configure them.

10
The Downloadable Products section will allow you to manage how your customers download your products and whether or not they’re required to log in before downloading. Obviously, you don’t need to go through this section if you’re not offering downloadable goods.
Once you’ve gone through these basic product configurations, you can start adding products.
Once here, you’ll be able to select the product category that you need. You’ve got quite a few options available:
- Simple product: this is the default option, and it’s really everything you need if you’re just planning to sell traditional stuff the traditional way (for instance, books or furniture or handmade jewelry). You can adjust the price, set the description and create a product gallery.
- Downloadable product: you may be selling digital goods, such as e-books or songs, in which case you’ll go with this option. It’s all pretty down-to-earth here, too, so you’ll be able to set everything according to your preferences. Note that this is not a separate product category, it’s just a variation of the simple product – you’ll just have to tick the downloadable box.
- Variable product: think of shoe size, to get an idea of this type of product. These are basically products that come under one single catalog entry, but will be available in slightly different forms. You may want to use those if you’re selling clothes or shoes – you’ll be able to adjust the size, for instance, or you’ll be able to provide different colors for your clothes.
- Grouped product: This is basically an item that is related to others, while not being exactly similar. Think of a Nokia phone that is available either as single- or dual-sim.
- External product: if you won’t be selling it on your WooCommerce online store, you’ll want to use this option. You’ll describe your product here, but it will be sold on a different web page.
Step 4: adding products
You’ll now want to add your first product. This is where the really fun part begins, as WooCommerce lets you develop your products in any way you like. It’s really great from a marketing point of view, and you’ll be amazed with how professional your store will look, even though you may be just a beginner.
To add products, you’ll have to go to Dashboard > Products > Add New.

11
You’ve got plenty of choices for your product catalogs, you’ll just need to choose the one that suits you best. Once you’ve done that and you’ve added a few products, you’ll just need to go back to the general settings to adjust the tax, payment and shipping options.
Step 5: adjusting the tax, checkout and shipping options
Go back to the WooCommerce widget in your dashboard, and click through the tax, checkout and shipping options.
Based on your product type (that’s why you should add some products first), you’ll be able to choose the best tax options.
As you see in the screenshot above, you’ve got quite a few options to go through. You may even choose to disable taxes and tax calculations, if, for some reason or another, you’d prefer to operate this way, or if you’ll do it manually. However, if you do choose to use the plugged-in tax calculators, you’ll have plenty of options to choose from, including two ways of rounding taxes.

12
Once you’ve selected the appropriate options, you’ll want to go to the Checkout section:
As you can see, there’s a lot of checkout options that you’ll be able to choose from, including coupons and guest checkouts. You’ve probably set up the checkout options before, but you may want to go through each of them again to double-check. You can also enable secure checkout if you’ve got an SSL certificate, just to get that neat HTTPS green box before your page (all that extra security won’t hurt, either), but you don’t have to worry about it if you don’t.
Next, you’ll want to go to the Shipping section. Again, you’ll have plenty of options to choose from, including whether to use shipping at all. Obviously, unless you’re selling only digital products, you’ll want to enable shipping. You’ve also got pretty much all the shipping methods that you might need, including local pickup and international delivery.

13
Finally, if you’re wondering who’s going to take care of your shipping calculations and cash flow, you’ve got a selection of WooCommerce extensions that will do just that: here are the shipping ones, and here the cash flow. Install them and let them do the hard work for you.
14
You’ve got something to sell, and now you’ve got a great platform to sell it from.
All you need right now is people buying it.
Here’s what these great insights into how e-commerce works show us:
- SEO matters: once you know what you’re selling, it’s time to do that beautiful search engine optimization. Target those keywords or get an expert to do it for you — 30% of sales come from organic traffic, and 30% is no meager slice of the pie.
- YouTube matters: while you may want to grow a Facebook audience first, most social investment happens on YouTube. Get to that level and your chances of cashing in good money will grow. Social media-driven traffic accounts for the other 70% of traffic.
- Facebook matters, too: a visit from Facebook is worth four times one from Twitter; rather than tweeting on, focus on growing a Facebook fan base of more than 1000 and you’ve outperformed more than half of all e-commerce sites. If you’re too busy to use complicated marketing strategies and if you’ve got a buck to spare, go for a paid campaign: it will draw some audience and you’ll eventually reach that critical threshold.
- Don’t campaign during the weekends: statistics show that people visit e-commerce sites during the week significantly more than during the weekend. Take advantage of that and don’t waste your Saturdays running campaigns.
Now that you know what it takes to start an online store using WordPress and to get some marketing running for you, you may end up getting some orders. Not to worry, dealing with them is pretty straightforward – check out this great tutorial and you should have no problems managing your orders, regardless of type and location.
Before we part: on managing orders and marketing
15
Using WordPress and WooCommerce to start your online store is easier than you might imagine, and it’s one of the best options if you want to be in full control over the look of your website. It’s safe, fully customizable, and it’s extremely easy to navigate.
All in all, it’s just perfect.
And now you can use these two online tools to get your online store started. Now you know how to complete a basic WooCommerce setup according to your preferences, and you’ve got what it takes to customize your online store (remember, choosing the right theme is really important. All you need to do is put all that great info to work, and you should be selling stuff in no time — we’re sure you’ll love it every click of the way!
Conclusion
16
Hello, and thanks for reading this guide. We hope that this short book has proved you that WordPress can be a terrific and easy-to-use platform for aspiring entrepreneurs. In case you’re interested in other guides on SEO, marketing, web design, and other topics revolving around online businesses, check out our library at MonsterPost:
If you’re about to start your first online store, have a look at the professional themes from TemplateMonster. There are over 26,000 solutions to choose from, and we cover every business niche from small shops to huge ecommerce portals. Checkout our online catalogue and see it for yourself:
Thanks for Reading This Book!
Looking for a WooCommerce website? Find one at TemplateMonster.com
See other ebooks
Visit TemplateMonster

17
Sources and further reading
5 Things to Know About Ecommerce (mycommerce.com)How can I improve the security of my WordPress site? (templatemonster.com)Is WordPress Safe for E-Commerce Website? (wedevs.com)10 Reasons Why WooCommerce is Perfect For Ecommerce Startups (cmscritic.com)How to Install WordPress – Complete WordPress Installation Tutorial (wpbeginner.com)25+ Best FREE WooCommerce WordPress Themes 2016 (accesspressthemes.com)What is SSL and HTTPS? (woocommerce.com)Managing Orders (woocommerce.com)8 Important Stats Gathered from Analyzing Over 18,000 Small to Medium Ecommerce Sites (kissmetrics.com)How To Set Up a WordPress Ecommerce Website (shivarweb.com)Wordpress.orgPaypal.comWoocommerce.com
Images
Pexels.comStocksnap.ioFreeimages.comTemplatemonster.comWoocommerce.comShivarweb.comKinsta.com