hp a10 printing mailbox · stopping the printing mailbox 13 using the hp a10 printing mailbox using...
TRANSCRIPT

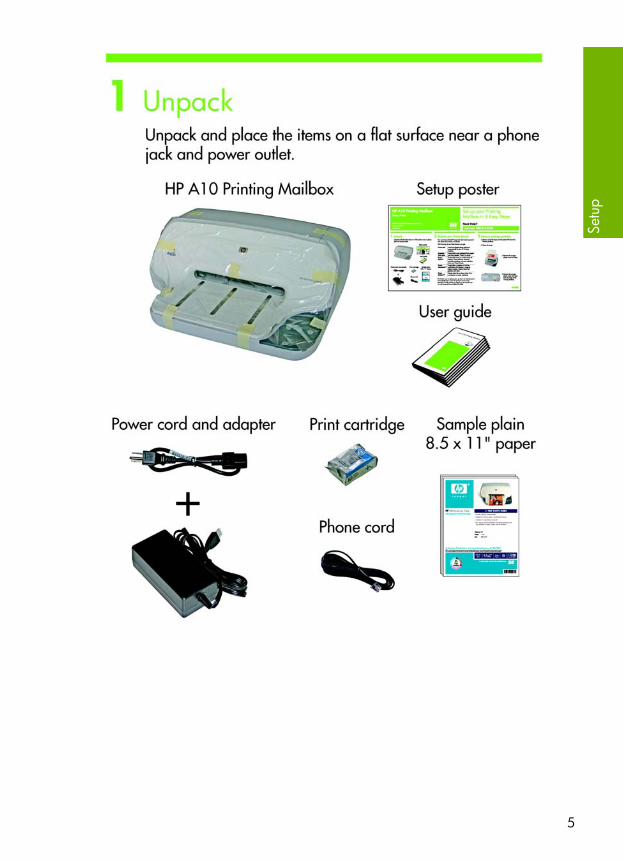
HP A10 Printing MailboxUser Guide
Part number: Q6030-90003Second edition: 10/2007
© Copyright 2007 Hewlett-Packard Development Company, L.P.The information contained herein is subject to change without notice.Reproduction, adaptation or translation without prior written permission is prohibited, except as allowed under copyright laws.PrestoSM is a service mark of Presto Services Inc.Publication number: Q6030-90003
NoticeThe only warranties for HP products and services are set forth in the express warranty statements accompanying such products and services. Nothing herein should be construed as constituting an additional warranty. HP shall not be liable for technical or editorial errors or omissions contained herein.The Hewlett-Packard Company shall not be liable for incidental or consequential damages in connection with, or arising out of the furnishing, performance, or use of this document and the program material which it describes.Note: Regulatory information can be found in the appendix.
Presto Service is required and purchased separately at www.presto.com or call 800-919-3199.
Safety informationWARNING! To prevent fire or shock hazard, do not expose this product to rain or any type of moisture.Always follow basic safety precautions when using this product to reduce risk of injury from fire or electric shock.WARNING! Potential shock hazard1. Read and understand all instructions in this User Guide.2. Use only a grounded electrical outlet when connecting the device to a power source. If you do not know whether the outlet is grounded, check with a qualified electrician.3. Observe all warnings and instructions marked on the product.4. Unplug this product from wall outlets before cleaning.5. Do not install or use this product near water or when you are wet.6. Install the product securely on a stable surface.7. Install the product in a protected location where no one can step on or trip over the power cord, and where the power cord will not be damaged.8. No operator-serviceable parts inside. Refer servicing to qualified service personnel.9. Use in a well-ventilated area.
3
Stay Connected with PrestoSM! . . . . . . . . . . . . . . . . . . . . 4
Setup. . . . . . . . . . . . . . . . . . . . . . . . . . . . . . . . . . . . . . 5
Using the HP A10 Printing Mailbox . . . . . . . . . . . . . . . . 13Stopping the Printing Mailbox. . . . . . . . . . . . . . . . . . . . . . . . . . . 13Loading Paper . . . . . . . . . . . . . . . . . . . . . . . . . . . . . . . . . . . . . 14Removing and Replacing the Print Cartridge . . . . . . . . . . . . . . . . . 16
What Should I Do... . . . . . . . . . . . . . . . . . . . . . . . . . . 19Printing Mailbox is Not Ready . . . . . . . . . . . . . . . . . . . . . . . . . . 19Lights are Blinking . . . . . . . . . . . . . . . . . . . . . . . . . . . . . . . . . . . 20
Ink light is blinking . . . . . . . . . . . . . . . . . . . . . . . . . . . . . . . . 20Paper light is blinking . . . . . . . . . . . . . . . . . . . . . . . . . . . . . . 21Ink and Paper lights are blinking . . . . . . . . . . . . . . . . . . . . . . . 22
Page is Blank . . . . . . . . . . . . . . . . . . . . . . . . . . . . . . . . . . . . . . 22Print Cartridge is Low on Ink . . . . . . . . . . . . . . . . . . . . . . . . . . . . 22Printing Mailbox is Out of Paper . . . . . . . . . . . . . . . . . . . . . . . . . 22Paper is Jammed . . . . . . . . . . . . . . . . . . . . . . . . . . . . . . . . . . . . 22Carriage is Stalled . . . . . . . . . . . . . . . . . . . . . . . . . . . . . . . . . . 23Care and Maintenance . . . . . . . . . . . . . . . . . . . . . . . . . . . . . . . 24
Cleaning the exterior . . . . . . . . . . . . . . . . . . . . . . . . . . . . . . . 24Cleaning the print cartridge contacts . . . . . . . . . . . . . . . . . . . . 24
Service and Support . . . . . . . . . . . . . . . . . . . . . . . . . . . . . . . . . 26
Appendix . . . . . . . . . . . . . . . . . . . . . . . . . . . . . . . . . . 27Specifications . . . . . . . . . . . . . . . . . . . . . . . . . . . . . . . . . . . . . . 27Regulatory Notices . . . . . . . . . . . . . . . . . . . . . . . . . . . . . . . . . . 28
Contents
Stay Connected with PrestoSM!4
Stay Connected with PrestoSM!Presto is a new and easy way to receive email and photos from friends and family, without a computer or Internet connection.
With the easy-to-use PrestoSM Service, you get:
Easy to enjoy email - Presto Mail
Email and digital photos from friends and family are delivered to your HP Printing Mailbox and printed on your desired schedule.
Protection from spam
Presto Mail is only delivered from people you have selected, called Presto Friends. There's no spam, no ads, no junk mail.
Presto StylesSM
Presto Mail comes in a wide variety of designs. Enjoy birthday, seasonal, everyday greetings and even beautiful calendars from your Presto Friends.
Presto NewsstandSM
Presto offers a selection of ad-free publications that feature a range of topics: puzzles, recipes, home and garden, and more.
Presto BulletinsSM
Simple alerts let you know when ink is running low*. And a Presto Tune announces the arrival of new messages.
To start receiving deliveries from Presto, you must activate your service. The fastest way to do so is on the Internet at www.presto.com. If you do not have access to the Internet, a family member or friend can set it up for you at www.presto.com. In addition, you can call Presto toll free at 800-919-3199.
Once your service is activated, you're ready to set up your HP Printing Mailbox. See the setup instructions on the following pages.
Presto - you're connected!
* Using genuine HP supplies ensures availability of this feature.
Setu
p
Setup
5

Setup6

Setu
p
7
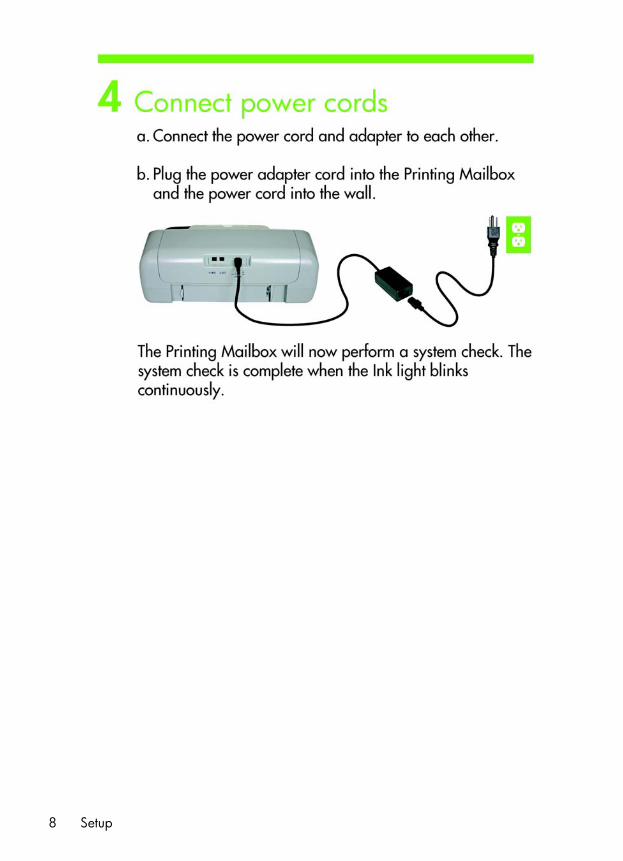
Setup8

Setu
p
9
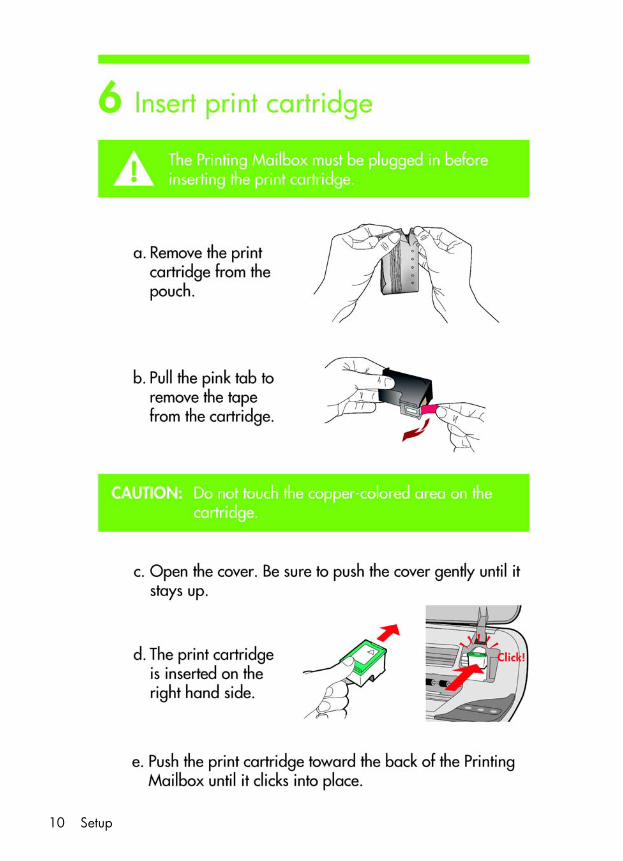
Setup10
Setu
p
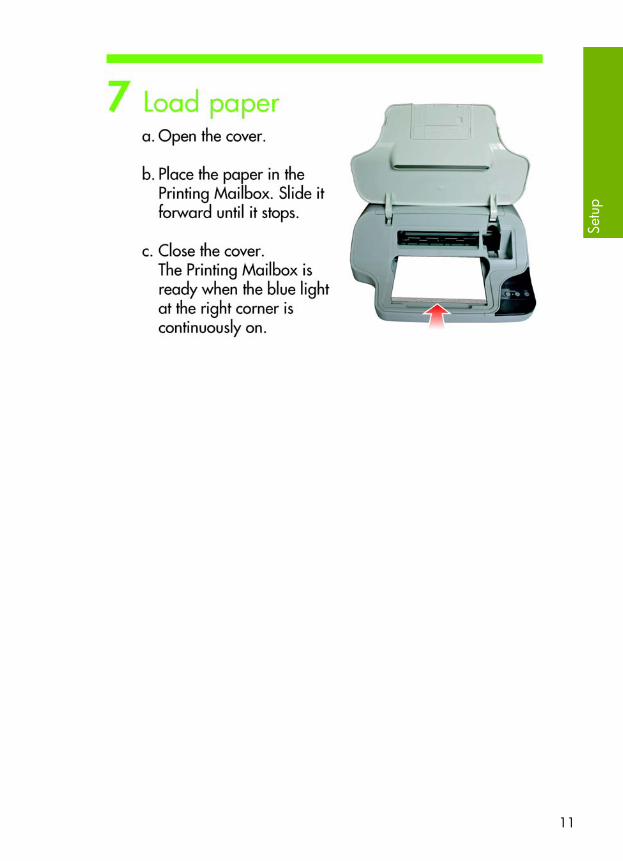
11

setup.fm Page 12 Tuesday, October 2, 2007 4:34 PM
Reminder: You must have a Presto account to receive messages. If you haven't set up your account yet, you should do so now at www.presto.com or by calling Presto toll free at 800-919-3199.
Setup12
Usi
ng th
e H
P A
10 P
rintin
g M
ailb
ox
Using the HP A10 Printing MailboxOnce you have activated your Presto Service and set up your Printing Mailbox, it will connect to the Presto Service and print your messages automatically.
Whenever your Printing Mailbox receives and prints a message, it plays a musical tune to alert you. You can change the volume of the tune using the Volume buttons (+ and –) at the front of the Printing Mailbox.
NOTE: You need to have your Printing Mailbox plugged in to the phone line and power to receive your messages.
Stopping the Printing MailboxWhen you press the Stop button, the Printing Mailbox stops whatever it is doing.
• If it is printing, it will stop printing and the page it was printing will be lost.
• If it is connected to the Presto Service via your phone line, it will release the connection so that you can make or receive phone calls.
Stopping the Printing Mailbox 13
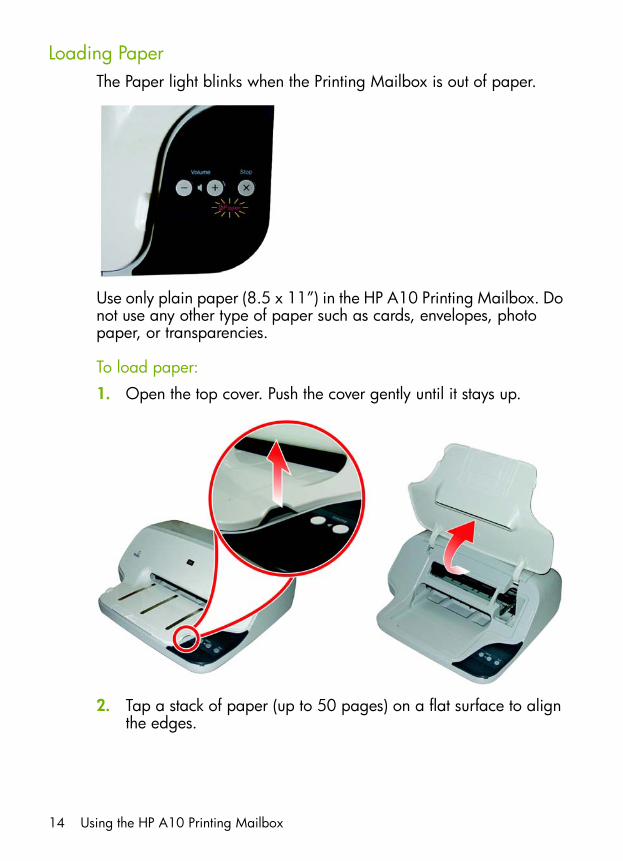
Loading PaperThe Paper light blinks when the Printing Mailbox is out of paper.
Use only plain paper (8.5 x 11”) in the HP A10 Printing Mailbox. Do not use any other type of paper such as cards, envelopes, photo paper, or transparencies.
To load paper:
1. Open the top cover. Push the cover gently until it stays up.
2. Tap a stack of paper (up to 50 pages) on a flat surface to align the edges.
Using the HP A10 Printing Mailbox14
Usi
ng th
e H
P A
10 P
rintin
g M
ailb
ox
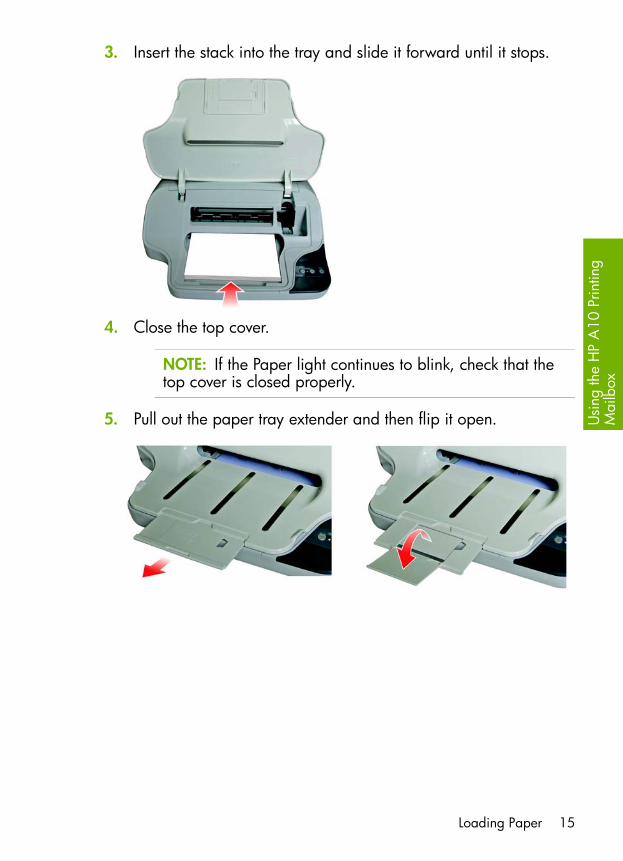
3. Insert the stack into the tray and slide it forward until it stops.
4. Close the top cover.
NOTE: If the Paper light continues to blink, check that the top cover is closed properly.
5. Pull out the paper tray extender and then flip it open.
Loading Paper 15
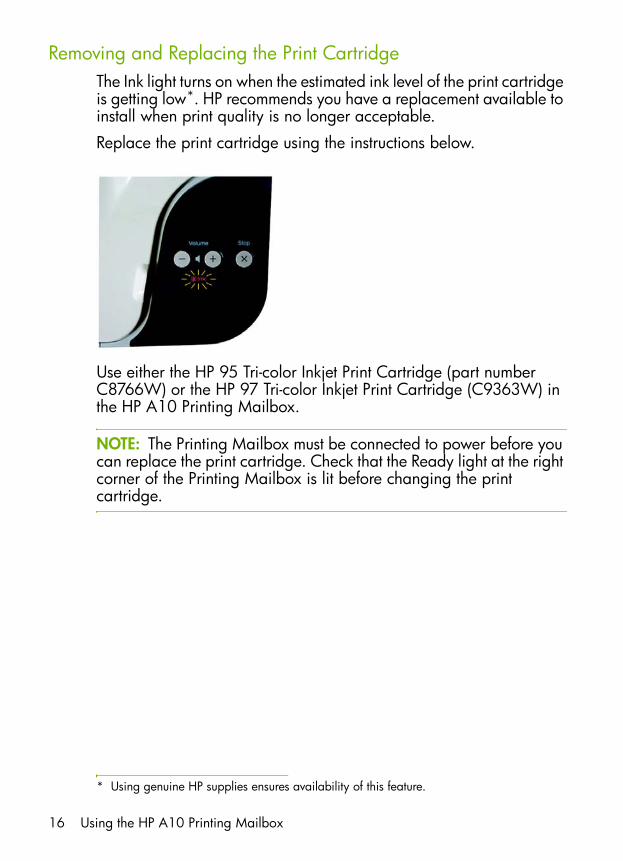
Removing and Replacing the Print CartridgeThe Ink light turns on when the estimated ink level of the print cartridge is getting low*. HP recommends you have a replacement available to install when print quality is no longer acceptable.
Replace the print cartridge using the instructions below.
Use either the HP 95 Tri-color Inkjet Print Cartridge (part number C8766W) or the HP 97 Tri-color Inkjet Print Cartridge (C9363W) in the HP A10 Printing Mailbox.
NOTE: The Printing Mailbox must be connected to power before you can replace the print cartridge. Check that the Ready light at the right corner of the Printing Mailbox is lit before changing the print cartridge.
* Using genuine HP supplies ensures availability of this feature.
Using the HP A10 Printing Mailbox16
Usi
ng th
e H
P A
10 P
rintin
g M
ailb
ox
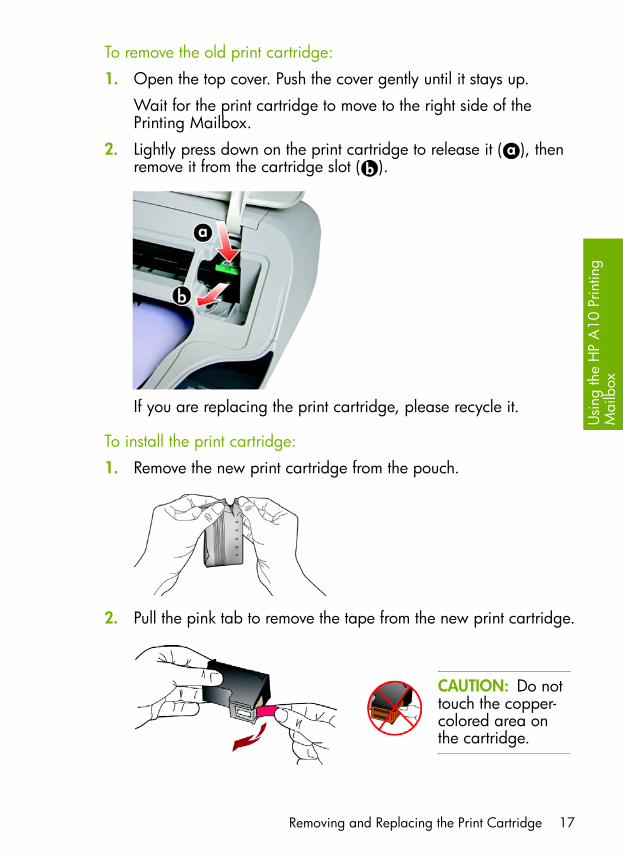
To remove the old print cartridge:
1. Open the top cover. Push the cover gently until it stays up.
Wait for the print cartridge to move to the right side of the Printing Mailbox.
2. Lightly press down on the print cartridge to release it ( ), then remove it from the cartridge slot ( ).
If you are replacing the print cartridge, please recycle it.
To install the print cartridge:
1. Remove the new print cartridge from the pouch.
2. Pull the pink tab to remove the tape from the new print cartridge.
CAUTION: Do not touch the copper-colored area on the cartridge.
Removing and Replacing the Print Cartridge 17
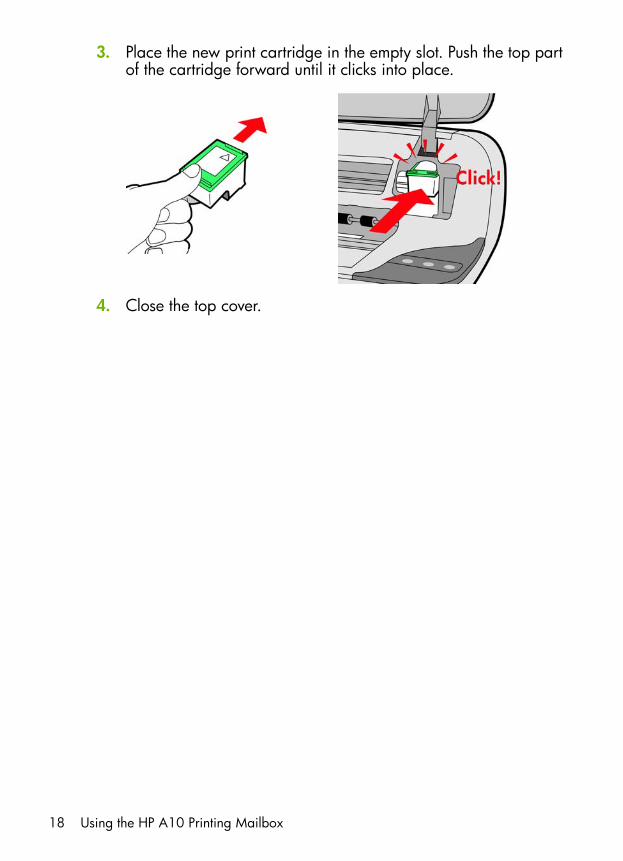
3. Place the new print cartridge in the empty slot. Push the top part of the cartridge forward until it clicks into place.
4. Close the top cover.
Using the HP A10 Printing Mailbox18
Wha
t Sho
uld
I Do.
..
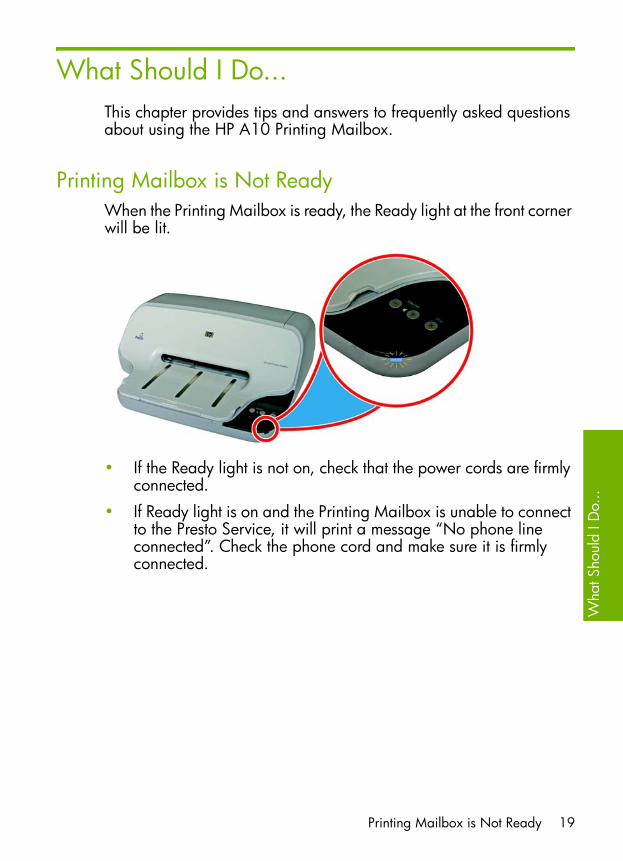
What Should I Do...This chapter provides tips and answers to frequently asked questions about using the HP A10 Printing Mailbox.
Printing Mailbox is Not ReadyWhen the Printing Mailbox is ready, the Ready light at the front corner will be lit.
• If the Ready light is not on, check that the power cords are firmly connected.
• If Ready light is on and the Printing Mailbox is unable to connect to the Presto Service, it will print a message “No phone line connected”. Check the phone cord and make sure it is firmly connected.
Printing Mailbox is Not Ready 19
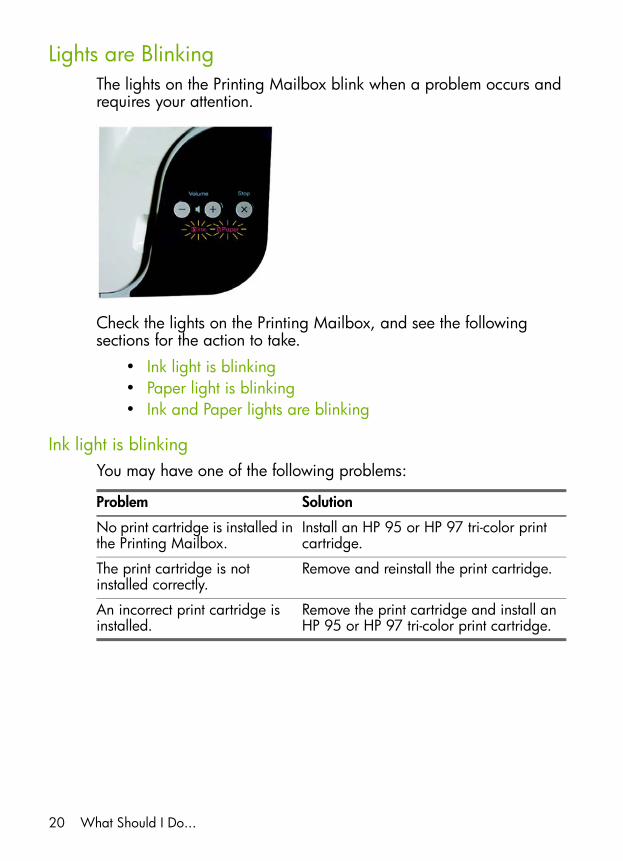
Lights are BlinkingThe lights on the Printing Mailbox blink when a problem occurs and requires your attention.
Check the lights on the Printing Mailbox, and see the following sections for the action to take.
• Ink light is blinking• Paper light is blinking• Ink and Paper lights are blinking
Ink light is blinkingYou may have one of the following problems:
Problem Solution
No print cartridge is installed in the Printing Mailbox.
Install an HP 95 or HP 97 tri-color print cartridge.
The print cartridge is not installed correctly.
Remove and reinstall the print cartridge.
An incorrect print cartridge is installed.
Remove the print cartridge and install an HP 95 or HP 97 tri-color print cartridge.
What Should I Do...20
Wha
t Sho
uld
I Do.
..
For instructions on removing and/or installing print cartridges, see “Removing and Replacing the Print Cartridge” on page 16. For instructions on cleaning the print cartridge, see “Cleaning the print cartridge contacts” on page 24.
CAUTION: Be sure to use only HP 95 Tri-color Inkjet Print Cartridge (part number C8766W) or the HP 97 Tri-color Inkjet Print Cartridge (C9363W) in the HP A10 Printing Mailbox.
NOTE: If you install a used print cartridge, the Low on Ink warning feature will not be available because the ink level is unknown.
Paper light is blinkingYou may have one of the following problems:
If the Paper light continues to blink after you have tried the above solutions, check that the top cover is closed properly.
There is a problem with the print cartridge.
• Remove and reinstall the print cartridge.
• If the Ink light continues to blink, manually clean the print cartridge and reinstall the print cartridge.
• If the Ink light continues to blink, the print cartridge is faulty and must be replaced.
• If the Ink light continues to blink after replacing the print cartridge, contact technical support (see page 26).
Problem Solution
Problem Solution
The Printing Mailbox is out of paper.
Follow the steps in “Loading Paper” on page 14 to load paper.
Incorrect type or size of paper is loaded in the Printing Mailbox.
Use only plain, 8.5 x 11” paper in the Printing Mailbox. Do not use any other type of paper such as cards, envelopes, photo paper, or transparencies.
Paper may be jammed in the Printing Mailbox.
See “Paper is Jammed” on page 22 for instructions on clearing the jam.
Lights are Blinking 21
Ink and Paper lights are blinkingThe carriage that holds the print cartridge may be stalled. See “Carriage is Stalled” on page 23 for instructions.
Page is BlankIf blank paper comes out of the Printing Mailbox after you have changed the print cartridge, you may have forgotten to remove the plastic tape (with the pink tab) from the print cartridge.
Follow the steps in “Removing and Replacing the Print Cartridge” on page 16 to remove and check the print cartridge.
Print Cartridge is Low on InkThe Ink light turns on when the estimated ink level of the print cartridge is getting low*.
HP recommends you have a replacement available to install when print quality is no longer acceptable.
To install a new print cartridge, follow the steps in “Removing and Replacing the Print Cartridge” on page 16.
Printing Mailbox is Out of PaperThe Paper light blinks when the Printing Mailbox is out of paper.
Follow the steps in “Loading Paper” on page 14.
Paper is JammedIf paper is jammed in the Printing Mailbox, always remove the paper from the back of the Printing Mailbox.
CAUTION: Trying to clear a paper jam from the front of the HP A10 Printing Mailbox can damage the print mechanism. Always access and clear paper jams through the rear panel.
* Using genuine HP supplies ensures availability of this feature.
What Should I Do...22
Wha
t Sho
uld
I Do.
..
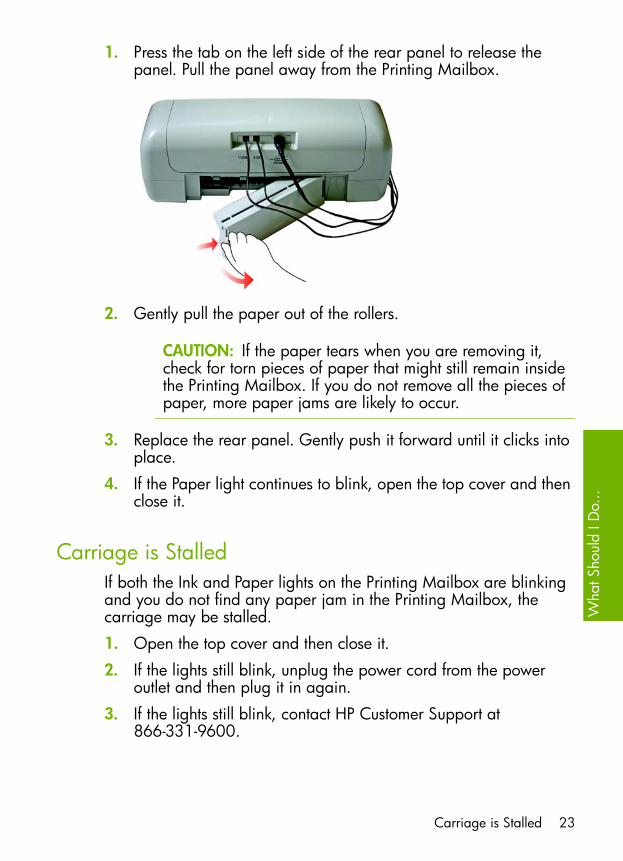
1. Press the tab on the left side of the rear panel to release the panel. Pull the panel away from the Printing Mailbox.
2. Gently pull the paper out of the rollers.
CAUTION: If the paper tears when you are removing it, check for torn pieces of paper that might still remain inside the Printing Mailbox. If you do not remove all the pieces of paper, more paper jams are likely to occur.
3. Replace the rear panel. Gently push it forward until it clicks into place.
4. If the Paper light continues to blink, open the top cover and then close it.
Carriage is StalledIf both the Ink and Paper lights on the Printing Mailbox are blinking and you do not find any paper jam in the Printing Mailbox, the carriage may be stalled.
1. Open the top cover and then close it.
2. If the lights still blink, unplug the power cord from the power outlet and then plug it in again.
3. If the lights still blink, contact HP Customer Support at 866-331-9600.
Carriage is Stalled 23
Care and MaintenanceThe HP A10 Printing Mailbox requires very little maintenance. When needed, clean only the outside of the Printing Mailbox.
Cleaning the exterior1. Unplug the power cord from the outlet.
2. Gently wipe the outside of the Printing Mailbox with a soft cloth that has been lightly moistened with water.
CAUTION: Do not use any type of cleaning solution. Household cleaners and detergents may damage the finish. Do not clean the interior of the Printing Mailbox. Keep all fluids away from the interior.
Cleaning the print cartridge contactsYou may need to clean the print cartridge contacts if the Printing Mailbox does not print even though there is ink in the print cartridge.
Before cleaning the print cartridge contacts, remove the cartridge and check that you have removed the tape from the print cartridge contacts. Then reinstall the print cartridge.
You will need the following items:
• Dry foam rubber swabs, lint-free cloth, or any soft material that will not come apart or leave fibers.
TIP: Coffee filters are lint-free and work well for cleaning print cartridges.
• Distilled, filtered, or bottled water (tap water might contain contaminants that can damage the print cartridges).
What Should I Do...24
Wha
t Sho
uld
I Do.
..
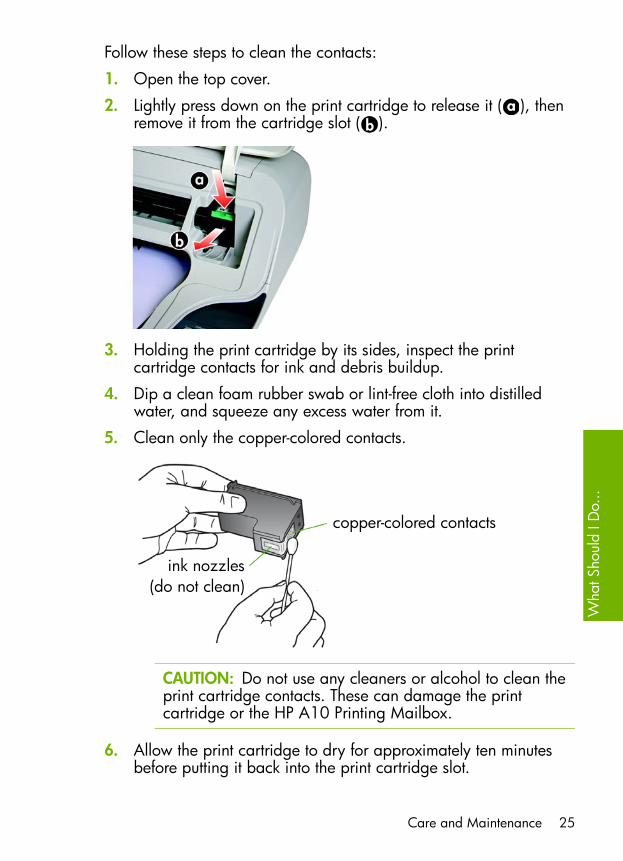
Follow these steps to clean the contacts:
1. Open the top cover.
2. Lightly press down on the print cartridge to release it ( ), then remove it from the cartridge slot ( ).
3. Holding the print cartridge by its sides, inspect the print cartridge contacts for ink and debris buildup.
4. Dip a clean foam rubber swab or lint-free cloth into distilled water, and squeeze any excess water from it.
5. Clean only the copper-colored contacts.
CAUTION: Do not use any cleaners or alcohol to clean the print cartridge contacts. These can damage the print cartridge or the HP A10 Printing Mailbox.
6. Allow the print cartridge to dry for approximately ten minutes before putting it back into the print cartridge slot.
ink nozzles(do not clean)
copper-colored contacts
Care and Maintenance 25
Service and Support
Presto Service
• For customer support, call toll free 800-919-3199.
• If you have Internet access, you can also send an email message to [email protected].
• Go to www.presto.com for more information on the Presto service.
HP A10 Printing Mailbox
• For technical support, call 866-331-9600.
• If you have Internet access,you can go to www.hp.com/support for more information on the Printing Mailbox.
What Should I Do...26
App
endi
x
Appendix
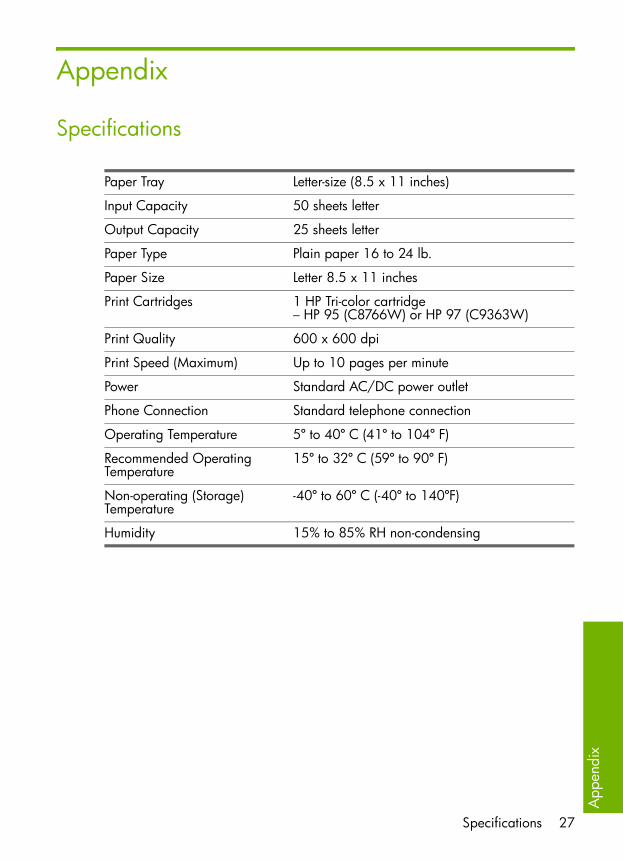
Specifications
Paper Tray Letter-size (8.5 x 11 inches)
Input Capacity 50 sheets letter
Output Capacity 25 sheets letter
Paper Type Plain paper 16 to 24 lb.
Paper Size Letter 8.5 x 11 inches
Print Cartridges 1 HP Tri-color cartridge– HP 95 (C8766W) or HP 97 (C9363W)
Print Quality 600 x 600 dpi
Print Speed (Maximum) Up to 10 pages per minute
Power Standard AC/DC power outlet
Phone Connection Standard telephone connection
Operating Temperature 5º to 40º C (41º to 104º F)
Recommended Operating Temperature
15º to 32º C (59º to 90º F)
Non-operating (Storage) Temperature
-40º to 60º C (-40º to 140ºF)
Humidity 15% to 85% RH non-condensing
Specifications 27
Regulatory NoticesThe HP Printing Mailbox meets product requirements from regulatory agencies in your country/region.This section contains the following topics:• Regulatory model identification number on page 28• Notice to users of the U.S. telephone network: FCC requirements on page 28• FCC statement on page 29• Declaration of conformity on page 30
Regulatory model identification numberFor regulatory identification purposes, your product is assigned a Regulatory Model Number. The Regulatory Model Number for your product is SNPRG-0601. This regulatory number should not be confused with the marketing name (HP A10 Printing Mailbox) or product number (Q6030A).
Notice to users of the U.S. telephone network: FCC requirementsThis equipment complies with Part 68 of the FCC rules and the requirements adopted by the ACTA. On the bottom of this equipment is a label that contains, among other information, a product identifier in the format US:AAAEQ##TXXXX. If requested, this number must be provided to the telephone company.The HP A10 Printing Mailbox is provided with a RJ11C connector for connecting this product to the telephone network. An additional RJ11C connector is provided for connecting an additional device to the telephone network from the HP A10 Printing Mailbox.A plug and jack used to connect this equipment to the premises wiring and telephone network must comply with the applicable FCC Part 68 rules and requirements adopted by the ACTA. A compliant telephone cord and modular plug is provided with this product. It is designed to be connected to a compatible modular jack that is also compliant. See installation instructions for details.The REN is used to determine the number of devices that may be connected to a telephone line. Excessive RENs on a telephone line may result in the devices not ringing in response to an incoming call. In most but not all areas, the sum of RENs should not exceed five (5.0). To be certain of the number of devices that may be connected to a line, as determined by the total RENs, contact the local telephone company. For products approved after July 23, 2001, the REN for this product is part of the product identifier that has the format US:AAAEQ##TXXXX. The digits represented by ## are the REN without a decimal point (e.g., 03 is a REN of 0.3). For earlier products, the REN is separately shown on the label.If the HP A10 Printing Mailbox causes harm to the telephone network, the telephone company will notify you in advance that temporary discontinuance of service may be required. But if advance notice isn't practical, the telephone company will notify the customer as soon as possible. Also, you will be advised of your right to file a complaint with the FCC if you believe it is necessary.The telephone company may make changes in its facilities, equipment, operations or procedures that could affect the operation of the equipment. If this happens the telephone company will provide advance notice in order for you to make necessary modifications to maintain uninterrupted service.
Appendix28
App
endi
x
There are no customer serviceable parts inside the A 10 Printing Mailbox. If trouble is experienced with the HP A10 Printing Mailbox, for repair or warranty information, please contact Hewlett-Packard technical support by calling 866-331-9600. If you have Internet access, you can go to www.hp.com/support for more information on the Printing Mailbox.If the equipment is causing harm to the telephone network, the telephone company may request that you disconnect the equipment until the problem is resolved.Connection to party line service is subject to state tariffs. Contact the state public utility commission, public service commission or corporation commission for information.If your home has specially wired alarm equipment connected to the telephone line,ensure the installation of A10 Printing Mailbox does not disable your alarm equipment. If you have questions about what will disable alarm equipment, consult your telephone company or a qualified installer.HP recommends the use of a Surge Suppressor when connecting the HP A10 Printing Mailbox to AC power. Use of a Surge Suppressor will help protect the HP A10 Printing Mailbox and the telephone network from abnormal surges on the AC powerline.
FCC statementThis equipment has been tested and found to comply with the limits for a Class B digital device, pursuant to part 15 of the FCC Rules. Operation is subject to the following two conditions: (1) this device may not cause harmful interference, and (2) this device must accept any interference received, including interference that may cause undesired operation. Class B limits are designed to provide reasonable protection against harmful interference in a residential installation. This equipment generates, uses, and can radiate radio frequency energy, and, if not installed and used in accordance with the instructions, may cause harmful interference to radio communications. However, there is no guarantee that interference will not occur in a particular installation. If this equipment does cause harmful interference to radio or television reception, which can be determined by turning the equipment off and on, the user is encouraged to try to correct the interference by one or more of the following measures:• Reorient the receiving antenna.• Increase the separation between the equipment and the receiver.• Connect the equipment into an outlet on a circuit different from that to which
the receiver is connected.• Consult the dealer or an experienced radio/TV technician for help.CAUTION: Pursuant to Part 15.21 of the FCC Rules, any changes or modifications to this equipment not expressly approved by the Hewlett-Packard Company may cause harmful interference and void the FCC authorization to operate this equipment.
Regulatory Notices 29
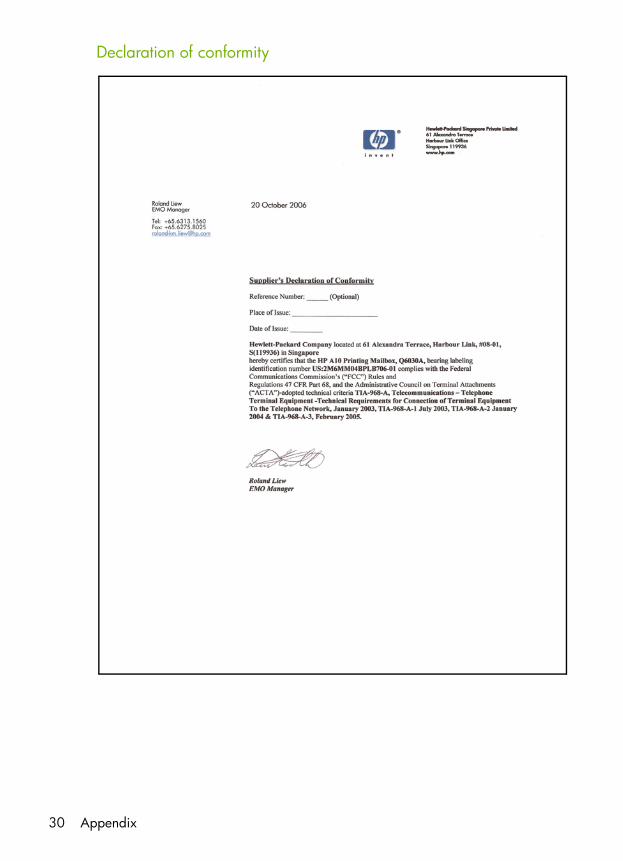
Declaration of conformity
Appendix30