hp data protector - setting up the dell dr series...
TRANSCRIPT

A Dell Technical White Paper
Setting Up the Dell™ DR Series System on HP Data Protector® 7.0 Dell Engineering April 2015

2 Setting Up the Dell™ DR Series System on HP Data Protector® 7.0 | April 2015
Revisions
Date Description
April 2015 Initial release
THIS WHITE PAPER IS FOR INFORMATIONAL PURPOSES ONLY, AND MAY CONTAIN TYPOGRAPHICAL ERRORS AND
TECHNICAL INACCURACIES. THE CONTENT IS PROVIDED AS IS, WITHOUT EXPRESS OR IMPLIED WARRANTIES OF
ANY KIND.
© 2015 Dell Inc. All rights reserved. Reproduction of this material in any manner whatsoever without the express
written permission of Dell Inc. is strictly forbidden. For more information, contact Dell.
PRODUCT WARRANTIES APPLICABLE TO THE DELL PRODUCTS DESCRIBED IN THIS DOCUMENT MAY BE FOUND
AT: http://www.dell.com/learn/us/en/19/terms-of-sale-commercial-and-public-sector Performance of network
reference architectures discussed in this document may vary with differing deployment conditions, network loads, and
the like. Third party products may be included in reference architectures for the convenience of the reader. Inclusion
of such third party products does not necessarily constitute Dell’s recommendation of those products. Please consult
your Dell representative for additional information.
Trademarks used in this text:
Dell™, the Dell logo, and PowerVault™ are trademarks of Dell Inc. Other Dell trademarks may be used in this
document. Microsoft®, Windows®, Windows Server®, Internet Explorer®, MS-DOS®, Windows Vista® and Active
Directory® are either trademarks or registered trademarks of Microsoft Corporation in the United States and/or other
countries. HP and HP Data Protector are registered trademarks of Hewlett-Packard Development Company, L.P.
Other trademarks and trade names may be used in this document to refer to either the entities claiming the marks
and/or names or their products and are the property of their respective owners. Dell disclaims proprietary interest in
the marks and names of others.

3 Setting Up the Dell™ DR Series System on HP Data Protector® 7.0 | April 2015
Table of contents Executive summary ................................................................................................................................................................................... 4
1 Installing and configuring the DR Series system ....................................................................................................................... 5
2 Setting up HP Data Protector ....................................................................................................................................................... 13
2.1 Backing up in the Windows environment ...................................................................................................................... 13
2.2 Backing up in the Unix/Linux Environment ................................................................................................................... 16
3 Creating a new backup job with the DR Series system as the target..................................................................................17
4 Setting up DR-native replication and restore from a target container .............................................................................. 23
4.1 Building the replication relationship between DR Series systems ........................................................................... 23
4.2 Running a backup for the source DR Series system ................................................................................................... 24
4.3 Preparing a replication target for restore ....................................................................................................................... 27
4.4 Restoring from a target DR Series system...................................................................................................................... 32
5 Setting up the DR Series system cleaner ................................................................................................................................... 33
6 Monitoring deduplication, compression, and performance ................................................................................................. 34
A Creating a storage device for CIFS .............................................................................................................................................. 35
B Creating a storage device for NFS ............................................................................................................................................... 37
C User commands ............................................................................................................................................................................... 38

4 Setting Up the Dell™ DR Series System on HP Data Protector® 7.0 | April 2015
Executive summary
This document provides information about how to set up the Dell DR Series system as a backup target for HP
Data Protector 7.0.
For additional information, see the DR Series system documentation and other data management application
best practices whitepapers for your specific DR Series system at:
http://www.dell.com/powervaultmanuals
Note: The build version and screenshots used in this document may vary slightly, depending on the version
of the DR Series system/HP Data Protector software version you are using.

5 Setting Up the Dell™ DR Series System on HP Data Protector® 7.0 | April 2015
1 Installing and configuring the DR Series system
1. Rack and cable the DR Series System, and power it on.
In the Dell DR Series System Administrator Guide, refer to the sections, “iDRAC Connection”,
“Logging in and Initializing the DR Series System”, and “Accessing IDRAC6/Idrac7 Using RACADM” for
information about using the iDRAC connection and initializing the appliance.
2. Log on to iDRAC using the default address 192.168.0.120, or the IP that is assigned to the iDRAC
interface. Use user name and password of “root/calvin”.
3. Launch the virtual console.
4. When the virtual console is open, log on to the system as the user administrator with the password
St0r@ge! (The “0” in the password is the numeral zero).

6 Setting Up the Dell™ DR Series System on HP Data Protector® 7.0 | April 2015
5. Set the user-defined networking preferences.
6. View the summary of preferences and confirm that it is correct.
7 Setting Up the Dell™ DR Series System on HP Data Protector® 7.0 | April 2015
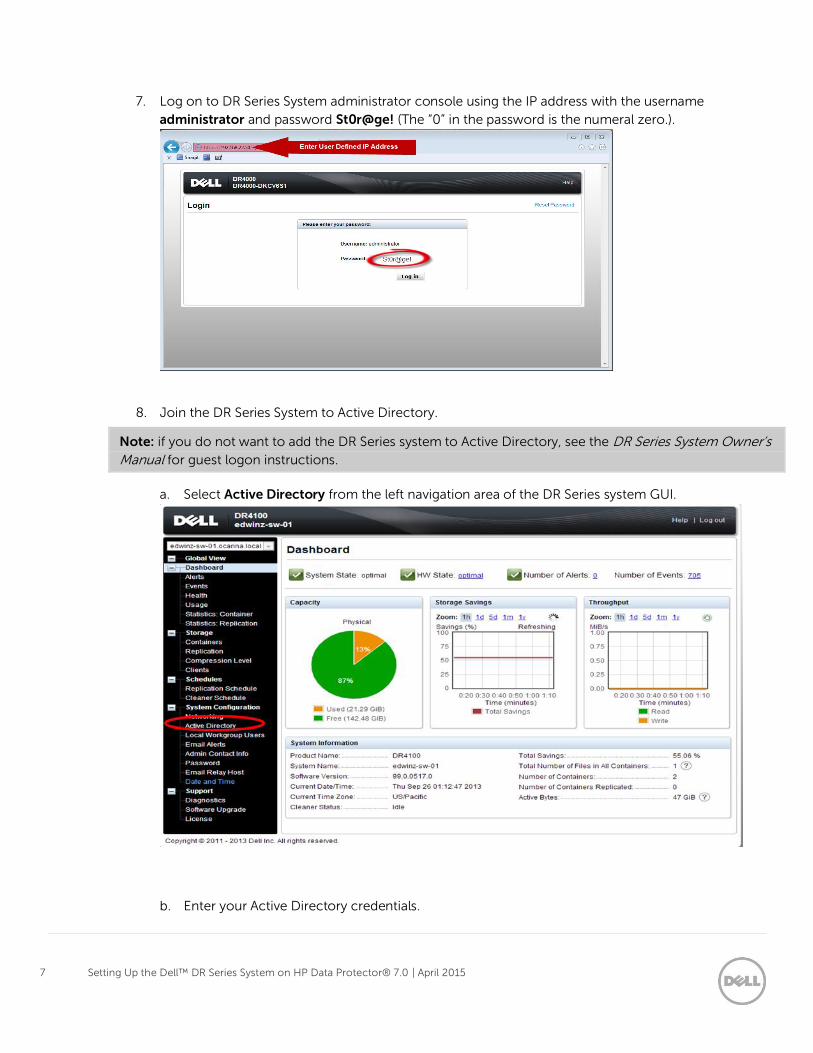
7. Log on to DR Series System administrator console using the IP address with the username
administrator and password St0r@ge! (The “0” in the password is the numeral zero.).
8. Join the DR Series System to Active Directory.
Note: if you do not want to add the DR Series system to Active Directory, see the DR Series System Owner’s
Manual for guest logon instructions.
a. Select Active Directory from the left navigation area of the DR Series system GUI.
b. Enter your Active Directory credentials.

8 Setting Up the Dell™ DR Series System on HP Data Protector® 7.0 | April 2015
9. You now need to create and mount the container. Select Containers in the left navigation area, and
then click Create at the top of the page.

9 Setting Up the Dell™ DR Series System on HP Data Protector® 7.0 | April 2015
10. Enter a Container Name and click Next.
11. Select NAS (NFS, CIFS) and click Next. (HP Data Protector supports both CIFS and NFS protocols.)

10 Setting Up the Dell™ DR Series System on HP Data Protector® 7.0 | April 2015
12. Select the NFS/CIFS protocol(s) as appropriate and click Next.
13. For NFS, set the client access credentials and click Next.

11 Setting Up the Dell™ DR Series System on HP Data Protector® 7.0 | April 2015
14. For CIFS, set the client access credentials and click Next.
Note: For improved security, Dell recommends adding IP addresses for the following (Not all environments
will have all components):
Backup console (HP Data Protector Server, HP Data Protector Clients)
15. Click Create a New Container. Confirm that the container is added.
16. Select the Container and click Edit. Reconfigure client access permissions if required and click Next.

12 Setting Up the Dell™ DR Series System on HP Data Protector® 7.0 | April 2015
17. Click Modify this container to save any changes or click Cancel to exit.

13 Setting Up the Dell™ DR Series System on HP Data Protector® 7.0 | April 2015
2 Setting up HP Data Protector
2.1 Backing up in the Windows environment
1. Open HP Data Protector Manager. Click Configure New Devices, which opens the Devices & Media
menu.
2. Right-click Devices and choose Add Device. In the next window, specify the Device Name and
Description that identifies the File Library Device. Select File Library for the Device Type, and enter
the information for the Client. Click Next.

14 Setting Up the Dell™ DR Series System on HP Data Protector® 7.0 | April 2015
Note: The Windows service account for HP Data Protector requires appropriate permissions to the DR
container share for the step below to complete successfully. See Appendix A for information about setting
up the HP Data Protector service account correctly. This should be done before the next step.
3. The next window asks for the path to the library that is the UNC path to the DR container share.
Specify a list of directories for the library. You can also specify the number of writers for the library; it
defaults to 1. Click Properties to assign proper values to the file library parameters, including Maximal
File Depot Size. Click Next.

15 Setting Up the Dell™ DR Series System on HP Data Protector® 7.0 | April 2015
4. The Media Type default is File. Click Next.
5. Click Next. The Summary window shows the total physical storage size of that particular File Library
Device on the DR container.
6. Click Finish. In the next window, click Close to close it.

16 Setting Up the Dell™ DR Series System on HP Data Protector® 7.0 | April 2015
2.2 Backing up in the Unix/Linux Environment
The procedure for the Unix/Linux environment is similar to the procedure for the Windows environment
described in the previous section. One difference is that in Step#3, you need to enter the UNIX path of the
DR container export instead of a UNC path, as described below.
For other details, please refer to the procedure for backing up Windows Environment.
NOTE: Before proceeding with this procedure, make sure that you can mount/verify the NFS share from the
UNIX/Linux client system. Please see Appendix B for how to mount/verify the NFS share.

17 Setting Up the Dell™ DR Series System on HP Data Protector® 7.0 | April 2015
3 Creating a new backup job with the DR Series system as the
target
1. In the HP Data Protector Manager, in the Context List drop-down menu, click Backup. In the
Scoping Pane, expand Backup and then click Backup Specifications. In the expanded sub-tree view,
right-click the Filesystem item and select Add Backup.
2. Select the Blank File system Backup template and click OK.
3. Check any source data set that needs to be backed up. In this example, it’s the whole local “C:\”
drive. Then click Next.

18 Setting Up the Dell™ DR Series System on HP Data Protector® 7.0 | April 2015
4. Select the devices or drives to be used as the backup target. In this example, it’s the DR container
share/export created in previous section. Check the Properties and define other parameters as
needed, and then click Next.
5. Check and verify the Backup Specification Options using the Advanced button. Then, in the
Filesystem Options section, click Advanced.

19 Setting Up the Dell™ DR Series System on HP Data Protector® 7.0 | April 2015
6. In Filesystem Options, click the Other tab. Make sure Software compression is not selected, and that
Data security is set to None.
Note: Always disable Software compression, as the DR Series system has compression built-in and does
not require additional compression on HP Data Protector. In general, additional data compression on
backup software will have a negative impact on the total savings of the DR Series system.
Also, setting Data security to None is recommended, as enabling encryption before the data stream is sent

20 Setting Up the Dell™ DR Series System on HP Data Protector® 7.0 | April 2015
to the DR Series system device prevents the data from being able to be deduplicated, which would have a
significant negative impact on total savings of the DR Series system.
7. Define Backup Job Schedule options and click Next.
8. Review the Backup Job Summary. Click Next.
9. Specify a name for the Backup Job. Click Save As to save the newly configured backup specification.

21 Setting Up the Dell™ DR Series System on HP Data Protector® 7.0 | April 2015
10. (This step is Optional, or it can be completed when the scheduled backup completes.) Click Start
Backup to run the backup. When the Start Backup window opens, click OK to start the backup.
The Backup window displays the progress of the backup session. The Session Information window
will tell you when the backup is completed.

22 Setting Up the Dell™ DR Series System on HP Data Protector® 7.0 | April 2015
23 Setting Up the Dell™ DR Series System on HP Data Protector® 7.0 | April 2015
4 Setting up DR-native replication and restore from a target
container
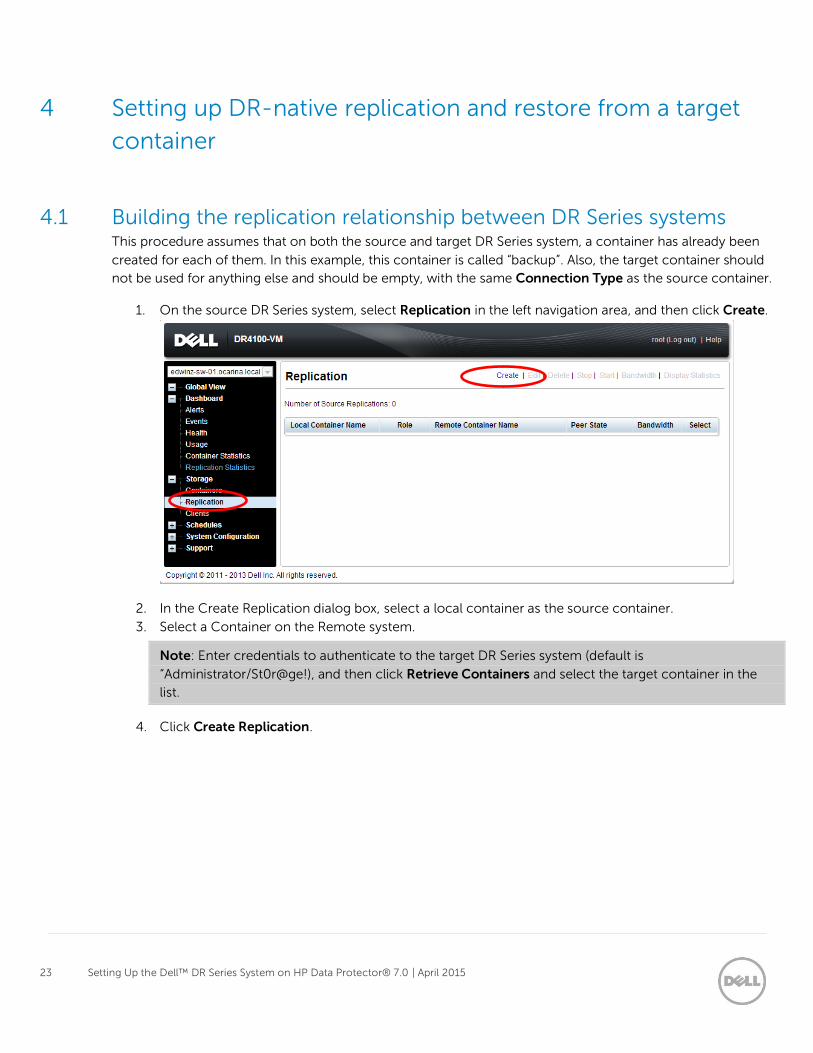
4.1 Building the replication relationship between DR Series systems This procedure assumes that on both the source and target DR Series system, a container has already been
created for each of them. In this example, this container is called “backup”. Also, the target container should
not be used for anything else and should be empty, with the same Connection Type as the source container.
1. On the source DR Series system, select Replication in the left navigation area, and then click Create.
2. In the Create Replication dialog box, select a local container as the source container.
3. Select a Container on the Remote system.
Note: Enter credentials to authenticate to the target DR Series system (default is
“Administrator/St0r@ge!), and then click Retrieve Containers and select the target container in the
list.
4. Click Create Replication.

24 Setting Up the Dell™ DR Series System on HP Data Protector® 7.0 | April 2015
5. Verify that the replication session is created which will display the Peer State as Online.
6. Monitor the replication progress under Replication Statistics, and make sure the replication Status is
INSYNC.
4.2 Running a backup for the source DR Series system

25 Setting Up the Dell™ DR Series System on HP Data Protector® 7.0 | April 2015
This procedure is optional, that is, it is only for when there is no backup data on the source DR container.
1. Add both a source DR Series system and target DR Series system as devices on HP Data Protector.
Then, create a New Backup Job with the source DR Series system as the target.
2. In the Start Backup window, click OK to start the backup using the appropriate settings. Monitor job
status.
3. When the backup job is completed, HP Data Protector creates backup files using the suffix '.fd’ on
the source DR, and the ‘.fd’ files will be replicated to the target DR Series system.

26 Setting Up the Dell™ DR Series System on HP Data Protector® 7.0 | April 2015
Source DR
Target DR

27 Setting Up the Dell™ DR Series System on HP Data Protector® 7.0 | April 2015
4.3 Preparing a replication target for restore
1. In HP Data Protector, go to Devices & Media > Media > Pools, and right-click the Media Pool
associated with the source container device and the backup set that needs to be restored. Click
Export.
NOTE: If the media pool is protected and cannot be exported, you should perform a Recycle before
Export.

28 Setting Up the Dell™ DR Series System on HP Data Protector® 7.0 | April 2015
2. Under Devices & Media > Devices, expand the source container device node, and delete the device
object that is associated with the backup set.
3. Open the HP Data Protector CLI console, and then use the command utility “omnidownload” to
download the source container library configuration from IDB.
NOTE: Refer to Appendix C for information about how to use the command “omnidownload”.

29 Setting Up the Dell™ DR Series System on HP Data Protector® 7.0 | April 2015
4. Edit the file, modify or add the object information to point to the target DR Series system, and save
this file.
5. Upload this modified configuration file to IDB using the command, omniupload.

30 Setting Up the Dell™ DR Series System on HP Data Protector® 7.0 | April 2015
6. Expand the device node, and Import the device object from the target device.
7. Click Next.

31 Setting Up the Dell™ DR Series System on HP Data Protector® 7.0 | April 2015
9. Select the Import Copy as Original checkbox, and then click Finish.
10. Verify that the import is done successfully.

32 Setting Up the Dell™ DR Series System on HP Data Protector® 7.0 | April 2015
4.4 Restoring from a target DR Series system
1. In the HP Data Protector Manager, in the Context List drop-down menu, select Restore. Run the
restore session that is associated to the backup set, click Restore.
2. Verify that the restore is done successfully.

33 Setting Up the Dell™ DR Series System on HP Data Protector® 7.0 | April 2015
5 Setting up the DR Series system cleaner Performing scheduled disk space reclamation operations are recommended as a method for recovering disk
space from system containers in which files were deleted as a result of deduplication.
The cleaner runs during idle time. If your workflow does not have a sufficient amount of idle time on a daily
basis, then you should consider scheduling the cleaner to force it to run during a scheduled time.
If necessary, you can perform the procedure shown in the following screenshot to force the cleaner to run.
After all of the backup jobs are set up, the DR Series system cleaner can be scheduled. The DR Series system
cleaner should run at least 40 hours per week when backups are not taking place, and generally after a
backup job has completed.

34 Setting Up the Dell™ DR Series System on HP Data Protector® 7.0 | April 2015
6 Monitoring deduplication, compression, and performance After backup jobs have run, the DR Series system tracks capacity, storage savings, and throughput on the
DR Series system dashboard. This information is valuable in understanding the benefits of the DR Series
system.
Note: Deduplication ratios increase over time. It is not uncommon to see a 2-4x reduction (25-50% total
savings) on the initial backup. As additional full backup jobs are completed, the ratios will increase. Backup
jobs with a 12-week retention will average a 15x ratio, in most cases.

35 Setting Up the Dell™ DR Series System on HP Data Protector® 7.0 | April 2015
A Creating a storage device for CIFS
There are two options for HP Data Protector to authenticate to the DR Series system through CIFS.
DR joined into domain: Integrate HP Data Protector Server and DR Series System with Active
Directory
o Ensure the AD user has appropriate ACLs to the DR Series System Container share
o Set the HP Data Protector service to run with this AD user <Domain\User>
DR is standalone CIFS server: Make sure HP Data Protector Inet service and CRS service use the
same Log On user. DR Series System also has the same username and password defined in Local
Workgroup Users.
Also make sure this CIFS user has appropriate access permission to the DR Series System container
share. HP Data Protector services will use this user to authenticate to DR Series System share in
Workgroup mode.
1. To set the password for local CIFS administrator on the DR Series System, log on to the DR using
SSH.
a. Log on with username Administrator and password St0r@ge!
b. Run the following command:
authenticate --set --user administrator
NOTE: The CIFS administrator account is a separate account from the administrator account used to
administer the appliance. After an authentication method is chosen, set the HP Data Protector Service
account to use the CIFS administrator account.
2. Launch the Microsoft Services Snap-in by clicking Start > Run > Services.msc > Enter.
3. Locate the Data Protector Inet and Data Protector CRS Service. Right-click Properties and click
the Log On tab.

36 Setting Up the Dell™ DR Series System on HP Data Protector® 7.0 | April 2015
NOTE: Do this step only when no backups are currently running, as restarting the services causes backup jobs to fail. Double-click the services one at a time.
If you are using local synced accounts rather than the AD account, make sure that there is a “.\”in front of the user name.
4. Click OK.
5. After changing both services for HP Data Protector, select Stop/Start to restart the two services.

37 Setting Up the Dell™ DR Series System on HP Data Protector® 7.0 | April 2015
B Creating a storage device for NFS
For NFS backup using the HP Data Protector, a target folder needs to be created as NFS share directory.
This is the location to which backup objects will be written. This is not required while adding CIFS share.
1. Mount the DR Series System NFS share onto the NFS share directory which backup objects will be
written in the HP Data Protector environment.
2. Verify the NFS share. One way is to try using the Linux command “cat /proc/mounts”. The rsize
and wsize of the nfs mount should be 512K.

38 Setting Up the Dell™ DR Series System on HP Data Protector® 7.0 | April 2015
C User commands
Omnidownload
Downloads information about a backup device and a library from the Data Protector internal
Database (IDB).
This command is available on systems with the Data Protector User Interface component installed.
Examples:
To review the information about a virtual tape library named "VTL" in ASCII format that will be
saved as the file "libVTL.txt" to the directory "C:\Temp", run:
omnidownload -library VTL -file C:\Temp\libVTL.txt
Omniupload
Uploads information about a backup device from an ASCII file to the Data Protector internal
database(IDB).
This command is available on systems with the Data Protector User Interface component installed.
Examples:
To modify library"Exabyte1" using the information in the file "/tmp/EXA", run:
omniupload -modify_library Exabyte1 -file /tmp/EXA