hp fortify on demand user guide - micro focus · · 2015-04-24hp fortifyondemand3.2userguide...
TRANSCRIPT

HP Fortify on Demand
HP Fortify on DemandUser Guide
FoD Release 3.2
Document Release Date: May 2014HP Fortify on Demand (3.2) Page 1
Software Release Date: May 2014
Legal Notices
Warranty
The only warranties for HP products and services are set forth in the express war-ranty statements accompanying such products and services. Nothing herein shouldbe construed as constituting an additional warranty. HP shall not be liable for tech-nical or editorial errors or omissions contained herein.The information contained herein is subject to change without notice.
Restricted Rights Legend
This is confidential computer software. A valid license from HP is required for pos-session, use, or copying. Consistent with FAR 12.211 and 12.212, Commercial Com-puter Software, Computer Software Documentation, and Technical Data forCommercial Items are licensed to the U.S. Government under vendor's standard com-mercial license.
Copyright Notice
© Copyright 2014 Hewlett-Packard Development Company, L.P.
Documentation UpdatesThe title page of this document contains the following identifying information:
l Software Version Number, which indicates the software version
l Document Release Date, which changes each time the document is updated
l Software Release Date, which indicates the release date of this version of thesoftware
HP Fortify on Demand 3.2 User GuideLegal Notices
HP Fortify on Demand (3.2) Page 2

PrefaceThis guide describes how to use HP Fortify on Demand (FoD).
Contacting HP FortifyIf you have questions or comments about any part of this guide, contact HP Fortify in one ofthe following ways.
Technical Support for [email protected]
Corporate HeadquartersMoffett Towers1140 Enterprise WaySunnyvale, CA 94089650.358.5600
FoD Sales650.409.1611
Websitehttp://www.hpenterprisesecurity.com
HP Fortify on Demand 3.2 User GuidePreface
HP Fortify on Demand (3.2) Page 3

ContentsHP Fortify on Demand 1Legal Notices 2Warranty 2Restricted Rights Legend 2Copyright Notice 2
Documentation Updates 2Preface 3Contacting HP Fortify 3Technical Support for Pronq 3Corporate Headquarters 3FoD Sales 3Website 3
Contents 4Chapter 1: Overview of HP Fortify on Demand 9About HP Fortify on Demand Services 9About HP Fortify on Demand File Categories for Static Assessments 9
About Analysis Files 9
About Source Code Files 10
About Static, Dynamic, and Mobile Assessments 10About Testing 10About Remediation Assessments 10
About the HP Fortify Security Rating System 11About Fortify Priority Order 11Critical 11
High 11
Medium 11
Low 11
Best Practices 11
Info 12
About Likelihood and Impact 12Likelihood 12
HP Fortify on Demand 3.2 User GuideContents
HP Fortify on Demand (3.2) Page 4

Impact 12
About the Fortify Five-Star Assessment Rating 12About HP Fortify Terminology 13
Chapter 2: Static Assessments 15About Static Assessments 15
Preparing Files for Upload 15Preparing Java Application Files 15Preparing Analysis Files (Required) 15
Preparing Source Code Files (Optional, but recommended) 16
Reviewing Files Before Clicking Submit 16
Preparing .NET Application Files 16Preparing Analysis Files (Required) 16
Pre-compiling ASP.NET Pages—Preferred Method: Using the aspnet_com-piler.exe Tool 18Using the aspnet_compiler.exe Tool to Pre-compile ASP.NET Pages 18
Preparing Analysis Files (Required) 19
Preparing Source Code Files (Optional, but recommended) 19
Reviewing Files Before Clicking Submit 20
Pre-compiling ASP.NET Pages—Alternate Method: Using an Ancillary Solu-tion in Visual Studio 20Using an Ancillary Solution in MS Visual Studio to Pre-compile ASP.NETPages 20
Preparing C and C++ Application Files in a Linux Environment 21Setting Up 21
Translating 22
Packaging 22
Preparing C and C++ Applications in a Windows Environment 23Setting Up 23
Translating 23
Packaging 23
HP Fortify on Demand 3.2 User GuideContents
HP Fortify on Demand (3.2) Page 5

Preparing COBOL Application Files 24Preparing Analysis Files (Required) 24
Reviewing Files Before Clicking Submit 24
Preparing ColdFusion Markup Language (CFML) Application Files 25Preparing Analysis Files (Required) 25
Reviewing Files Before Clicking Submit 25
Preparing Ruby or Ruby on Rails Application Files 25Preparing Analysis Files (Required) 25
Reviewing Files Before Clicking Submit 25
Preparing Visual Basic 6 (VB6) Application Files 25Preparing Analysis Files (Required) 25
Reviewing Files Before Clicking Submit 25
Preparing Python, Classic ASP, or PHP Application Files 26Preparing Analysis Files (Required) 26
Reviewing Files Before Clicking Submit 26
Creating a PHP.ini File 26
Uploading Files to HP Fortify on Demand for Static Assessment 27Chapter 3: Dynamic Assessments 29
About HP Fortify on Demand Service Levels for Dynamic Assessments 29About Premium Dynamic Assessments 29About Standard Dynamic Assessments 29About Basic Dynamic Assessment 29About Express Dynamic Assessments 29
Preparing for your HP Fortify on Demand Dynamic Assessment 30Tips for Successful Dynamic Assessments 30About Dynamic Testing Product Specifications 31
Initiating a First-Time Dynamic Assessment 31About New Site Registration 32Completing the Dynamic Set-Up Form 34Submitting the Dynamic Set-Up Form 35Changing a Dynamic Scan Request 38
HP Fortify on Demand 3.2 User GuideContents
HP Fortify on Demand (3.2) Page 6

About Subsequent Dynamic Assessments 38Submitting Applications for Follow-up Dynamic Testing 39Subsequent Dynamic Testing Submissions: Method One 39
Subsequent Dynamic Testing Submissions: Method Two 39
Chapter 4: Mobile Assessments 41About HP Fortify on Demand Mobile Assessments 41Express 41Basic 41Standard 41Premium 41
About Mobile Uploads 42About Recommended Browsers for Mobile Uploads 42Beginning a Mobile Assessment 42Preparing Android Project Files 42Preparing iOS Application Files 43Preparing BlackBerry Project Files 43Preparing Windows Project Files 44
Creating a New Mobile Application for Assessment 44Initiating a Mobile Assessment 47About New Site Registration 48Completing the Mobile Set-Up Form 48Starting Your Scan 51
Chapter 5: Completing an Assessment 55About Completing the Assessment Process 55Checking the Status of your Assessment 55Communicating with the FoD Security Team 56About When Your Assessment is Complete 57
HP Fortify on Demand 3.2 User GuideContents
HP Fortify on Demand (3.2) Page 7

Page 8 of 58HP Fortify on Demand (3.2)
HP Fortify on Demand 3.2 User GuideContents

Chapter 1: Overview of HP Fortify onDemandAbout HP Fortify on Demand ServicesHP Fortify on Demand (FoD) is a Software-as-a-Service (SaaS) solution enabling yourorganization to test the security of software quickly, accurately, affordably, andwithout the necessity of installing software to manage the process.FoD is available for static, dynamic, and mobile assessments, and we offer multipleoptions within each of those. You also have the option to purchase individual assess-ments or a one-year subscription for unlimited assessments of a particular applic-ation.
About HP Fortify on Demand File Categories for StaticAssessmentsWhen you use HP Fortify on Demand (FoD) to do a static assessment of your applic-ation, you must upload at least one zip file, which contains your analysis files. This zipfile may or may not also contain source code files.For a static analysis to provide maximum value to you, it is best if the files you submitalso contain debug compiled libraries and source code. The FoD static analyzer usesthe debug compiled binaries to identify and isolate vulnerabilities. Because auto-mated tools have the potential to over-report vulnerabilities, our auditors use yoursource code to do a manual confirmation of the validity of vulnerabilities.Your submitted zip should not contain additional compressed files, such as ZIP, TAR,or GZIP. The types of files to upload are:
1. Analysis files (required)
2. Source code files (optional, but strongly recommended)
Also note that any code you submit for assessment must be fully deployable. Thismeans, for example, that any .jar file must have executable code in it.
About Analysis Files
Analysis files are:
A. The debug-compiled executable files produced by compiling your application’ssource code files
B. The executable library and resource files produced and delivered by third partiesthat are used by your application
HP Fortify on Demand 3.2 User GuideChapter 1: Overview of HP Fortify on Demand
HP Fortify on Demand (3.2) Page 9
About Source Code Files
Source code files are the text files you compile to produce the application files.To enhance the ability of HP Fortify on Demand to customize the assessment to yourapplication, you may upload all the source code files used to produce the analysisfiles for HP Fortify on Demand.The purpose of analyzing an application with HP Fortify on Demand is to identifysecurity issues in the executable files you created by compiling your application’ssource code. In order to get complete and accurate assessment results you mustupload all of your application’s files to HP Fortify on Demand. Whenever possible, it isbest if you include debug built binaries. Debug build files enable FoD to provide theexact line numbers where vulnerabilities exist in your code. If we do not have yourdebug library, your report will refer only to file names.
About Static, Dynamic, and Mobile AssessmentsIn HP Fortify on Demand, you can upload files and initiate an assessment of yourcode for a static assessment. If you have purchased a dynamic assessment, you cantest your URL, and if you are working in a mobile environment, you can have severaldifferent types of files analyzed. Detailed instructions for each assessment type areprovided throughout this User Guide.
About TestingOur expert team conducts a thorough audit of your application for security vul-nerabilities. This includes at least two steps:
l Security Assessment: You provide HP Fortify on Demand with the analysis files,source code, or URL and external access for your application, and FoD performsautomatic testing.
l Expert Review: Software security experts at HP Fortify on Demand manuallyreview the results of our assessment to ensure the highest possible degree ofaccuracy.
About Remediation AssessmentsAll single assessment purchases include one remediation assessment, which can beperformed within a 90-day window of the initial scan.For static assessments, FoD will reassess your code after you have remediated issuesrevealed by the initial scan.For dynamic assessments, FoD will recheck the vulnerabilities discovered during theinitial assessment to ensure that they have been resolved.Note that releases are deleted from FoD after 90 days, so any remediation assess-ments must be performed within that time frame.
HP Fortify on Demand 3.2 User GuideChapter 1: Overview of HP Fortify on Demand
HP Fortify on Demand (3.2) Page 10

About the HP Fortify Security Rating SystemFortify on Demand, like all HP Fortify products, is designed to provide useful inform-ation about the vulnerability of your applications. To ensure that the results we giveyou are consistent, understandable, and actionable we have developed a set of report-ing conventions, described in the following sections.
About Fortify Priority OrderHP Fortify has defined the following six levels of priority as a way to categorize theseverity of vulnerabilities (also known as “issues”).
Critical
Critical issues are those that have both a high potential impact and a high likelihoodof occurring. Critical issues are easy to detect and exploit, and they can result in sig-nificant damage to your assets. These issues should be remediated immediately. (SQLinjection is an example of a critical issue.)
High
High-priority issues have the potential for high impact, but have a low likelihood ofoccurring. High-priority issues are often difficult for outsiders to detect and exploit,but they can result in large damage to your assets, so they represent a high securityrisk to an application. High priority issues should be remediated in your next sched-uled patch release. (A hard-coded password is an example of a high-priority issue.)
Medium
Medium-priority issues have a low potential impact but a high likelihood. Medium-pri-ority issues are easy to detect and exploit, but they typically result in small asset dam-age. These issues represent a moderate security risk to your application. Medium-priority issues should be remediated in the next scheduled product update. (Pathmanipulation is an example of a medium issue.)
Low
Low-priority issues have low potential impact and a low likelihood of occurring. Low-priority issues can be difficult for others to detect and exploit, and they typically res-ult in small asset damage. These issues represent a minor security risk to your applic-ation. Low priority issues should be remediated as time allows. (Dead code is anexample of a low issue.)
Best Practices
If you are notified that your application has “best practices” shortcomings, that meansthere are no significant vulnerabilities; just minor issues that may be less than idealfor applications of your type.
HP Fortify on Demand 3.2 User GuideChapter 1: Overview of HP Fortify on Demand
HP Fortify on Demand (3.2) Page 11

Info
“Info” is the lowest level of warning. HP Fortify may provide you with informationabout your application that does not represent a vulnerability but might be ofinterest for some reason.
About Likelihood and Impact
Likelihood
Likelihood is the probability that a vulnerability will be identified by an outsider andsuccessfully exploited.
Impact
Impact is the potential damage an attacker could do to your assets by successfullyexploiting a vulnerability. This damage could be in the form of financial loss, com-pliance violation, loss of brand reputation, negative publicity, and more.
About the Fortify Five-Star Assessment RatingA Fortify security assessment analyzes an application for a variety of software secur-ity vulnerabilities. The results of that assessment are communicated to you in a num-ber of ways, including comprehensive onscreen details and a suite of customizablereports. The most efficient snapshot of your application’s safety, though, is the Fortify five-starrating system, which provides quick information on the likelihood and impact ofdefects present in your application. A perfect rating within this system would be fivecomplete stars, indicating that no high-impact vulnerabilities were discovered.
1. A rating of one star means the application has critical vulnerabilities. Anyapplication that gets scanned automatically gets at least one star.
2. Applications receive two stars if the security review identifies any vul-nerabilities that either have a high likelihood of being exploited, orwould havea high impact if they were (but not both).
3. A three-star rating means an application has only low- to medium-severity vul-nerabilities.
4. Fortify awards four stars to applications with only low-severity vulnerabilities(even if those have a high likelihood of occurring).
Note that vulnerabilities which have a low impact but are easy to exploitshould be considered carefully, as they may pose a greater threat if anattacker exploits many of them as part of a concerted effort.
5. Five stars is Fortify’s highest rating, awarded only to applications that haveundergone a Fortify security review that identified no vulnerabilities.
HP Fortify on Demand 3.2 User GuideChapter 1: Overview of HP Fortify on Demand
HP Fortify on Demand (3.2) Page 12

About HP Fortify TerminologyIn an ongoing effort to make Fortify on Demand clear and accessible, and respond tocustomer feedback, we occasionally update terminology used in the program. Beloware a few notes that we hope will help alleviate confusion:
l Generally speaking, a project is the same thing as an application.
l And an application is sometimes referred to as an app.
l A release is the same as a project version.
l A lookup is the same thing as an attribute.
l An issue is another word for a vulnerability, or “vuln.”
l An assessment is sometimes referred to as an analysis, a scan, or a test.
l Fortify Priority Order is the same thing as Severity. Both terms refer to the hier-archy of seriousness among vulnerabilities (Critical, High, Medium, Low, BestPractices, Info).
l Fixed is sometimes used as a synonym for remediated.
l The person Assigned to an issue or application is the same as the Owner of it.
l Assessments that used to have a status of Rejected are now referred to asCanceled.
l The area that used to be called Manage Users is now called Access.
l The attributes that used to be called Tenant Lookups are now Attributeswith“Text” as their value type.
l Vendor Management replaces the former Shared Reports. To access this func-tion, use the word Vendor in the Administration menu.
l A Ticket means a request for support. Sometimes it is called a Request.
l Within the Help Center, the terms Open and New mean a question is in thehands of the FoD team, in the process of being researched or resolved. The termPendingmeans that action is required from you or your company.
l A status of Pending for a test means the same thing asWaiting for a help ticket,which is: the FoD team is waiting for a response from you before it can proceed.
l Amissing dependencymeans that code you submitted for analysis contains ref-erences to files not included in the payload. When the FoD software scans eachline of your code, it looks for the source of each reference; if it does not find them,it flags a missing dependency.
l An operation (also called amethod), is an action that a web service performs.For instance, one web service may have one WSDL that contains four operations.
HP Fortify on Demand 3.2 User GuideChapter 1: Overview of HP Fortify on Demand
HP Fortify on Demand (3.2) Page 13

Those might be, for example, Update, Create, Delete, and Diagnostic.
HP Fortify on Demand 3.2 User GuideChapter 1: Overview of HP Fortify on Demand
HP Fortify on Demand (3.2) Page 14
Chapter 2: Static AssessmentsAbout Static AssessmentsThe first step in a static assessment is to prepare your code for upload to the Fortifyon Demand portal. The preparation process differs depending on which pro-gramming language your application is in.The sections below, under Preparing Files for Upload explain the process for eachtype of code.Notes on file size:
l The normal size limit for files, if you are uploading manually, using the pro-cedures described in Preparing Files for Upload is 250 MB.
l You may upload up to 75 MB of code using the instructions for any type of code.
l If your file is larger than 75 MB, contact your TAM before uploading.
l To remove the size limit altogether, you can use the Build Server Integrationtool, called FodUpload.jar, which is explained below.
Preparing Files for UploadIn order to ensure an effective analysis of your application, we ask that you prepareyour files as described in the following sections.
Preparing Java Application FilesFor Java applications, package your analysis and source code files for upload to HPFortify on Demand in a single zip file, as follows.
Preparing Analysis Files (Required)Web application: Package in a .WAR or .EAR file. If you have multiple .WAR files, youcan package them into a zip and call it a .EAR. (You cannot have .JAR files inside other.JAR files or .EAR files inside other .EAR files in the zip.) For example, your file struc-ture may look like one of these:
1. Zip File
EARWAR
JAR
2. Zip FileWAR1
JARWAR2JAR
HP Fortify on Demand 3.2 User GuideChapter 2: Static Assessments
HP Fortify on Demand (3.2) Page 15

l Non-web applications: Package in a single zip file. (HP Fortify on Demand cannotrecursively process zip files contained within a zip package.) Ensure that thereare no precompiled JSPs.
l Ensure that all JARs are included, including third-party JAR files.
l Ensure that all files are compiled in DEBUG mode. If they are not, the assessmentwill still run but the results will not include line-of-code details for each issue.
Preparing Source Code Files (Optional, but recommended)To improve the quality of results, HP Fortify recommends that you upload all of yourapplication’s source code files to HP Fortify on Demand. Package the applicationsource code files together with your analysis files in a single zip package.If no source code is uploaded, HP Fortify auditors have nothing to look at and canonly send back results; therefore, it is important that you send source code to be ana-lyzed.
Reviewing Files Before Clicking Submit
l Make sure you have resolved all warnings presented in the HP Fortify on Demandinterface after upload.
l Select only JARs that are part of the application code. Do not select JARs that arepart of third-party libraries.
Preparing .NET Application FilesFor .NET applications, package analysis and source code files for upload to HP Fortifyon Demand as follows.
Preparing Analysis Files (Required)
l Rebuild the application in DEBUG mode to ensure that a .PDB file is produced.Only DLLs that are compiled in DEBUG mode will present filename and line num-ber resolution in the results.
l Ensure that all ASP.NET pages are precompiled. See the section below, “Pre-com-piling ASP.NET Files,” for guidance.
l Package the analysis files in a single zip file. HP Fortify on Demand cannot recurs-ively process zip files contained within a zip package.
l Ensure that all DLLs are present in the upload.
l Also ensure that executables and .config files for web applications, websites, andother files produced during the deployment process are present in the uploadfile.
l Ensure that the associated .PDB files are included in the upload file.
HP Fortify on Demand 3.2 User GuideChapter 2: Static Assessments
HP Fortify on Demand (3.2) Page 16

7. Go back to FoD and navigate to the BSI page for your application:
a. Click Applications.
b. From the list that appears, click the name of your application.
c. Click the icon in the bottom left part of the screen, called BSI.
That brings you to the screen shown below.
8. Copy the binary URL. (Highlighted in red, below.)
9. Go to MS Visual Studio.
10. Paste the URL you have just copied into the plug-in’s BSI URL text box.
HP Fortify on Demand 3.2 User GuideChapter 2: Static Assessments
HP Fortify on Demand (3.2) Page 17

11. Check the box beside Save Package After Send.
This saves a copy of your zip file on your local machine.
The plug-in zips your application’s analysis files, along with any additional files youselected.
By default, the plug-in packages both analysis (binary) files and source files.
12. If you want to include only binary files, check they box beside Binaries Only.
In most cases, however, you will want to include source files a well as binaries,in order to get more complete results. Therefore, we recommend leaving Bin-aries Only unchecked.
13. Click Add Extra Files.
A dialog box opens. Here, you can select additional files for inclusion in the uploadzip file. These may be either source files or meta-data to assist in manual analysis.
14. Click Send.
Pre-compiling ASP.NET Pages—Preferred Method: Using the aspnet_com-piler.exe ToolThere are two ways to prepare ASP.Net pages. The preferred method is to use theaspnet_compiler.exe tool. To do it that way, follow the instructions immediately below.For an alternative method, see Pre-compiling ASP.NET Pages—Alternate Method:Using an Ancillary Solution in Visual Studio.
Using the aspnet_compiler.exe Tool to Pre-compile ASP.NET Pages
1. Make sure the debug attribute of the compilation tag is set to true; that is,
HP Fortify on Demand 3.2 User GuideChapter 2: Static Assessments
HP Fortify on Demand (3.2) Page 18
<compilation debug=true /> in your web.config.
2. Locate the aspnet_compiler.exe, which can be found in the %SYSTEMROOT%\Mi-crosoft.NET\Framework\<version> directory.
3. Open the command prompt with administrator privileges (right-click CommandPrompt and choose Run as Administrator), and then run the asp_net-compiler.exe with the following options:
l >aspnet_compiler.exe -v <virtualPath> -p <physicalPath> -c-d -f <targetDir>
l <virtualPath>: Specifies the virtual path of the application to be compiled.l <physicalPath>: Specifies the full path of the root directory that containsthe application to be compiled.
l <targetDir>: The full path to the root directory that will contain the com-piled application.
4. Once the compilation is complete, check the <targetDir> to make sure that bothdll and pdb files are present. The file names should be something like App_Web_xxxx.dll and App_Web_xxxx.pdb. Package all .dll and .pdb files along with theother .dll and .pdb files from your application as a single zip file.
Note: If any file fails compilation, the entire site fails compilation.Reference: http://msdn.microsoft.com/en-us/library/ms229863(v=VS.100).aspxYou can verify that all your .aspx/.ascx files have been precompiled by opening thegenerated App_Web_xxxx.dll file using the ildasm.exe program from the .NETFramework installation. This can generally be found in the directory called C:\Pro-gram Files\Microsoft SDKs\Windows\v7.1\Bin. After loading the file, look for a _ASPand ASP namespace. Under that, you should see the .aspx files. Make sure that all arepresent (this can span multiple files), and include all of them in the payload (both the.dll and .pdb files).To view a video about ASP.NET precompilation, go to:http://www.asp.net/web-forms/videos/how-do-i/how-do-i-precompile-an-aspnet-website
Preparing Analysis Files (Required)To ensure that HP Fortify on Demand can resolve “Include” and “Library” files,ensure that the directory structure in the zip file matches the deployment directorystructure.
Preparing Source Code Files (Optional, but recommended)To improve the quality of results, HP Fortify recommends that you upload all of yourapplication’s source code files to FoD. To do this, include the application's source codefiles in the zip file you are submitting to FoD, along with your other files.
HP Fortify on Demand 3.2 User GuideChapter 2: Static Assessments
HP Fortify on Demand (3.2) Page 19

If no source code is uploaded, HP Fortify auditors have nothing to look at and canonly send back results; therefore, it is important that you send source code to be ana-lyzed.
Reviewing Files Before Clicking SubmitMake sure you resolve any warnings that appear in the HP Fortify on Demand inter-face after upload.Note: If the web.config is wrong, then you will see errors. For example, you cannothave a site under (that is, subordinate to) another site.
Pre-compiling ASP.NET Pages—Alternate Method: Using an Ancillary Solu-tion in Visual StudioThere are two ways to prepare ASP.NET pages. For the preferred method, see Pre-compiling ASP.NET Pages—Preferred Method: Using the aspnet_compiler.exe Tool.For the alternative method, follow the instructions below.
Using an Ancillary Solution in MS Visual Studio to Pre-compile ASP.NET Pages
1. Clear out any old files. To do this:
a. Close any running instances of Visual Studio.
Visual Studio precompiles the ASP.NET pages of each of your website applications toa directory named Temporary ASP.NET Files.
b. In order to clear out potentially outdated files, delete:
SYSTEMROOT%\Microsoft.NET\Framework\<version>\Temporary ASP.NETFiles
<version>:
For .NET 1.1 applications, fill <version> in with v1.1.xxxx. For .NET 2.0/3.0/3.5applications, fill it in with v2.0.xxxx. (In either case, replace xxxx with the actualdigits found on your system.)
2. Create an ancillary solution to hold website applications. To do this:
a. Create an empty solution. (MS Visual Studio precompiles the website applic-ations of your original solution as part of the solution build. Visual Studio willnot do the same for your web applications, so you must create website applic-ations for each of them and add them to this empty solution.)
b. Set the solution configuration of the empty solution you just created to debug.c. Repeat for each web application inside your original solution:
HP Fortify on Demand 3.2 User GuideChapter 2: Static Assessments
HP Fortify on Demand (3.2) Page 20

n In Solution Explorer, right-click your solution and select Add -> ExistingWeb Site....
n In the Add Existing Application pop-up, navigate to the directory of yourweb application and click Open.
n Once the website application has been added, make sure that inside web.-config you have <compilation debug="true"/>. (You may haveother attributes or even sub-elements. Just make sure that debug is set totrue.)
1. Repeat for each website application inside your original solution (for which youdid not have to create a new application in the ancillary solution). Ensure that,in web.config, the debug attribute of the compilation tag is set to true; that is:<compilation debug="true"/>
2. Make sure that debug information is omitted as part of the precompilation.
3. Perform precompilation and add the precompilation output to the uploadarchive(s).
a. Rebuild both your original solution and the solution that you created whilefollowing these steps.
b. After precompilation, each website application ends up with its own folderinside the Temporary ASP.NET Files directory containing precompilationoutput. For each website application, package the contents of its folderalongside the other items in its output folder.
Preparing C andC++ Application Files in a Linux EnvironmentHP Fortify on Demand offers a Remote C/C++ Translator, which simplifies the pack-aging and processing of C/C++ source code for analysis by FoD. If you install thistranslator utility, you no longer need to manually package and deliver all the filesnecessary to submit your application for analysis by Fortify on Demand.
Setting UpTo set up the translator utility:
1. Obtain the FoD Remote C/C++ Translator from your Technical Account Manager(TAM).
2. Copy the archive to your Linux build machine.
3. Extract the translator. (The bundle is a Gzipped tarball.)
4. Make a note of the path to the translator (sourceanalyzer).
HP Fortify on Demand 3.2 User GuideChapter 2: Static Assessments
HP Fortify on Demand (3.2) Page 21

Translating
1. Change the directory to your normal build directory.
2. Execute the sourceanalyzer command as follows, substituting your build script(or make) for “build_command”: /path_to_translator/sourceanalyzer -bfod_remote touchless build_command
Example: ~/fod_remote/bin/sourceanalyzer -b fod_remote touchlessmake all
3. Verify that the project builds correctly.
4. Make sure the name of your build session is exactly the same as the name of yourbuild.
PackagingOption 1:(Recommended) Mobile Build Session
A mobile build session lets you translate a project on one machine and analyze it onanother. When you create a mobile build session, a .mbs file that includes the filesneeded for the analysis phase is created in the build session directory. The .mbs fileis then moved to a different machine for analysis. To do this:
1. On the machine where the translation was done, issue the following commandto generate a mobile build session:
sourceanalyzer -b <build-id> -export-build-session <file.mbs>
where <file.mbs> is the file name you assign for the mobile build session.
Option 2: Workaround
Use Option 2 if your export fails, but the build and translation works.
Note: If you begin Option 2 and run into any difficulties, please file a ticket throughthe FoD Help Center. We may be able to save you some time if we know what prob-lems you experience.
1. Copy the FoD_remote build directory to a working directory.
The build directory is located here: ~/.fortify/sca5.12/build/fod_remoteExample: cp -R ~/.fortify/sca<<highestversion>>/build/fod_remote~/work/
2. Copy the source code into the work directory.
3. At this point, the work directory should look as follows:/work
HP Fortify on Demand 3.2 User GuideChapter 2: Static Assessments
HP Fortify on Demand (3.2) Page 22

fod_remotesrc
4. Zip the work directory and submit it to Fortify on Demand.
Be sure to use technology stack payload type: .mbs.
Preparing C and C++ Applications in a Windows EnvironmentHP Fortify on Demand offers a Remote C/C++ Translator, which simplifies the pack-aging and processing of C/C++ source code for analysis by FoD. If you install thistranslator utility, you no longer need to manually package and deliver all the filesnecessary to submit your application for analysis by Fortify on Demand.
Setting UpTo set up the translator utility:
1. Obtain the FoD Remote C/C++ Translator from your Technical Account Manager(TAM).
2. Copy the archive to your Windows build machine.
3. Extract the translator. (The bundle is a Gzipped tarball.)
4. Make a note of the path to the translator (sourceanalyzer).
Translating
1. Change the directory to your normal build directory.
2. Execute the sourceanalyzer command as follows, substituting your build script (ormake) for “build_command”: /path_to_translator/sourceanalyzer -b fod_remotetouchless build_command
Example: ~/fod_remote/bin/sourceanalyzer -b fod_remote touchless make all
3. Verify that the project builds correctly.
4. Make sure the name of your build session is exactly the same as the name of yourbuild.
PackagingOption 1: (Recommended) Mobile Build Session
A mobile build session lets you translate a project on one machine and analyze it onanother. When you create a mobile build session, a .mbs file that includes the filesneeded for the analysis phase is created in the build session directory. The .mbs fileis then moved to a different machine for analysis. To do this:
1. On the machine where the translation was done, issue the following commandto generate a mobile build session:
HP Fortify on Demand 3.2 User GuideChapter 2: Static Assessments
HP Fortify on Demand (3.2) Page 23

sourceanalyzer -b <build-id> -export-build-session <file.mbs>
where <file.mbs> is the file name you assign for the mobile build session.
Option 2: Workaround
Use Option 2 if your export fails, but the build and translation works.
Note: If you begin Option 2 and run into any difficulties, please file a ticket throughthe FoD Help Center. We may be able to save you some time if we know what prob-lems you experience.
1. Copy the FoD_remote build directory to a working directory.
The build directory is located here: %LOCALAPPDATA%\For-tify\sca<<highestversion>>\build\fod_remote
Example: cp -R C:\User-s\exampleuser\AppData\Local\Fortify\sca<<highestversion>>\fod_remote C:\Users\exampleuser\work
2. Copy the source code into the work directory.
3. At this point, the work directory should look as follows:/workfod_remote
src
4. Zip the work directory and submit it to Fortify on Demand.
Be sure to use technology stack payload type: .mbs.
Preparing COBOL Application FilesFor COBOL applications, package your source code files for upload to HP Fortify onDemand as follows.
Preparing Analysis Files (Required)
Prepare a single zip file that includes both the source code for your application andthe copy books.In the Upload Files for Analysiswizard, you will be asked to upload this in the sec-tion called Files for Analysis.
Reviewing Files Before Clicking Submit
Ensure that all warnings presented in the HP Fortify on Demand interface afterupload are resolved.
HP Fortify on Demand 3.2 User GuideChapter 2: Static Assessments
HP Fortify on Demand (3.2) Page 24

Preparing ColdFusion Markup Language (CFML) Application FilesFor CFML applications, package the application and source code files for upload to HPFortify on Demand as follows.
Preparing Analysis Files (Required)
Prepare one zip file containing the source code files of your application. In the UploadFiles for Analysis wizard, you will be asked to upload it into the Files for Analysis sec-tion.
Reviewing Files Before Clicking Submit
Ensure that all warnings presented in the HP Fortify on Demand interface afterupload are resolved.
Preparing Ruby or Ruby on Rails Application FilesFor applications create in either Ruby or Ruby on Rails, package your application andsource code files for upload to HP Fortify on Demand as follows.
Preparing Analysis Files (Required)
Prepare one zip file containing your entire application, as it would be deployed, andinclude all source code.In the Upload Files for Analysiswizard, you will be asked to upload this into theFiles for Analysis section.
Reviewing Files Before Clicking Submit
Ensure that all warnings presented in the HP Fortify on Demand interface afterupload are resolved.
Preparing Visual Basic 6 (VB6) Application FilesFor VB6 applications, package your application and source code files for upload to HPFortify on Demand as follows.
Preparing Analysis Files (Required)
Prepare one zip file containing the source code files of your application. In theUpload Files for Analysiswizard, you will be asked to upload it into the Files forAnalysis section.
Reviewing Files Before Clicking Submit
Ensure that all warnings presented in the HP Fortify on Demand interface afterupload are resolved.
HP Fortify on Demand 3.2 User GuideChapter 2: Static Assessments
HP Fortify on Demand (3.2) Page 25

Preparing Python, Classic ASP, or PHP Application FilesFor Python, Classic ASP, or PHP applications, package the application and source codefiles for upload to HP Fortify on Demand as follows.
Preparing Analysis Files (Required)Prepare one zip file containing the source code files of your application. In theUpload Files for Analysiswizard, you will be asked to upload it into the Files forAnalysis section.If yours is a PHP application file, make sure to include your php.ini file with your pack-age. This file helps HP Fortify on Demand identify where dependencies reside, andhelps improve the accuracy of results.
Reviewing Files Before Clicking SubmitMake sure you resolve any warnings that appear in the HP Fortify on Demand inter-face after upload.Note: The only version of Python fully supported by HP Fortify at this time is 2.6. Ifyou have another version of Python, please speak with your TAM about options.
Creating a PHP.ini FileA php.ini file is a configuration file that a server looks at to see what options havebeen turned on or off, or set to a number different from the defaults you have set forthe server. It's simply a text file with the name php.ini.You can construct a custom php.ini file and place it in your web account. You can cre-ate a php.ini file using any text editor. To create a php.ini file, open a text editor, (suchas Microsoft Notepad), add the lines you need, and save the file. You can name the fileanything you want. After you have saved it, upload the file to the directory whereyour script is located, and then rename it php.ini.
Once again, you create a php.ini file with custom settings that will override the defaultserver settings. For example, you can turn off the php setting "file_uploads" or"magic_quotes_gpc" with these lines in php.ini:
file_uploads = off
magic_quotes_gpc = no
Your php.ini file should contain only the custom settings, each on its own line as inthe above example.To see a list and description of the directive settings that can be set in a customphp.ini file (where value = 1, sets value in php.ini to ON; where value = 0, sets valuein php.ini to OFF) click this link:http://php.net/manual/en/ini.core.php
HP Fortify on Demand 3.2 User GuideChapter 2: Static Assessments
HP Fortify on Demand (3.2) Page 26

Uploading Files to HP Fortify on Demand for StaticAssessmentOnce you have prepared your files properly, as described in one of the sectionsabove, you are ready to upload them to Fortify on Demand. The steps to do that areas follows.
1. On your system, find the analysis files to be uploaded. These are the applicationfiles in either .jar or .ear format; or, if yours is a web application, packaged in a.war
2. Create one zip file that includes all files to be submitted to FoD. This shouldinclude both application files and source files.
HP Fortify on Demand 3.2 User GuideChapter 2: Static Assessments
HP Fortify on Demand (3.2) Page 27

3. In this case, your zip file would include the .java files from the src directory.
HP Fortify on Demand 3.2 User GuideChapter 2: Static Assessments
HP Fortify on Demand (3.2) Page 28

Chapter 3: Dynamic AssessmentsAbout HP Fortify on Demand Service Levels for Dynamic AssessmentsAn HP Fortify on Demand dynamic assessment tests your website for vulnerabilities.For your dynamic assessment, you can choose among four testing levels: Premium,Standard, Basic, or Express. A description of these is below.
About Premium Dynamic AssessmentsAppropriate for business-critical applications; any applications that host proprietarydata or contain financial data, PII, or other sensitive information; and applications thatperform financial transactions. This is also the right choice for applications that haverigorous compliance requirements, and/or multi-step, form-based processes.
l Begins with expert use of HP Fortify’s security scanner, WebInspect
l Includes extensive manual testing
l Includes testing for both technical and business logic vulnerabilities
l Results are manually reviewed by website security experts who examine accountstructures and contextual logic in web applications to remove false positives andassure quality results
About Standard Dynamic AssessmentsAn automated and manual solution for websites that are a regular feature of your cus-tomers’ online experience and have multi-step, form-based processes, but are not neces-sarily business-critical.
l Includes testing for technical vulnerabilities
l Includes the use of multiple automated and manual testing solutions
l Results are manually reviewed by security experts to remove any false positivesand assure quality results
About Basic Dynamic AssessmentAn automated solution for websites that are seasonal or temporary in nature.
l Includes an assessment via WebInspect’s security scanner
l All results are manually reviewed by security experts to remove false positivesand assure quality results
About Express Dynamic AssessmentsAppropriate for companies with a large number of websites who need to do fast, effi-cient testing for the most serious and prevalent vulnerabilities. Express assessments canbe a good first step, to help you identify applications that require more in-depth
HP Fortify on Demand 3.2 User GuideChapter 3: Dynamic Assessments
HP Fortify on Demand (3.2) Page 29

assessments. Express assessments are also recommended for websites you update fre-quently; since they recur at regular intervals they can alert you to new threats thatarise over time.l Tests only for cross-site scripting errors, SQL injection errors, and a limited list ofother highly prevalent issues
l Tests unauthenticated pages only
l Includes expert use of HP Fortify’s security scanner, WebInspect
l Recurs at regular intervals of your choosing (weekly, monthly, or quarterly)
Preparing for your HP Fortify on Demand Dynamic AssessmentFor all assessments, you must confirm that your web application and user credentialsare functioning before you initiate security testing. In addition, you should completeall functional and performance testing beforehand and make sure to freeze yourapplication’s code for the duration of the security test engagement. As a standard pre-caution, we recommend that you back up all of your data before beginning the testingprocess. We also recommend that, when testing is complete, you restore your datafrom a backup which you know to be good, to avoid any chance of data corruption.
Note that you do not need to open any additional ports in order to begin your assess-ment. As long as your website is accessible through the http/https default ports(80/443), that is sufficient.
Tips for Successful Dynamic AssessmentsMany users run premium dynamic assessments on applications that are hostedwithin their company’s network(s). These internal applications are usually in devel-opment, QA, or pre-production environments which are not generally exposed on theinternet. However, most companies do not want to run an assessment of their pub-licly facing production websites, because of the risks associated with dynamic scan-ning.Therefore, to plan effectively for an assessment of an internal application, we recom-mend:
l Deliver all information requested by the audit team in advance of the plannedstart date for your assessment.
l Budget the time appropriately. Assume you will need three weeks for the testwindow.
HP Fortify on Demand 3.2 User GuideChapter 3: Dynamic Assessments
HP Fortify on Demand (3.2) Page 30
o The first week is used by the FoD team to ensure that they have allnecessary access to your application. This includes configuring fire-wall rules to allow tester IP’s access to your application, imple-menting and debugging a VPN, and verifying your accountcredentials.
o The actual scanning of your application happens in the secondweek. A premium scan usually takes a full business week, assumingno interruptions.
o The third week is a buffer in case something requires additionalattention. (This could be because of accessibility issues, credentialslock-out, an accidental block of the audit by your security team,hardware problems anywhere in the process, or other unexpectedissues.)
l Assume that your assessment will identify vulnerabilities that need remedi-ation, and that you will then want to retest the application before your sitegoes live. A retest usually requires about two additional weeks.
l Ensure that all your teams know no changes should be made to the test envir-onment while security testing is going on. Neither code nor data can be alteredduring the course of the assessment. This code freeze must be in effectthroughout all of week two (and typically part of week three as well).
l Ensure that you have everything possible prepared well in advance. Set up allyour test accounts (multiple sets) and inform your development and securityteams.
l If your application is not internal, most of the same guidelines still apply. Youmay not need three weeks, but be sure to budget at least two.
About Dynamic Testing Product SpecificationsFor dynamic testing, an application is defined as a fully qualified domain name withone host name, one user type, and one user access level. A premium assessmentshould have two user access levels: one low-privileged user and one high-privilegeduser.
Initiating a First-Time Dynamic AssessmentBefore you initiate your assessment, please make sure your application is fully access-ible by an external entity. We require access and authentication to the application inorder to perform a dynamic assessment. If at any point that access is not present, theassessment stops until access can be granted or restored. We cannot meet a five-dayestimated turnaround on assessments without full undisturbed access to a stableapplication.
HP Fortify on Demand 3.2 User GuideChapter 3: Dynamic Assessments
HP Fortify on Demand (3.2) Page 31

Before you begin a dynamic assessment, you must create an application and at leastone release. For each new URL, you need a new application. For information on howto create applications and releases within FoD, see Creating New Applications.To begin your assessment of a given release:1. At the top of your screen, click Applications.
A new screen appears, with a list of all your applications.
2. Find the application you wish to assess, go to the first column on the left, and clickthe green bar labeled Start Scan.
A brief new menu appears, with the choice of Static or Dynamic.
3. Click Dynamic.
If this is the first time you are submitting this application for assessment, you willbe directed to the Setup Dynamic Scans form.
About New Site RegistrationWhen you begin a dynamic assessment of a new application, you begin by supplyingdetailed information about your application to the FoD testing team through theonline form, which is titled Setup Dynamic Scans.
HP Fortify on Demand 3.2 User GuideChapter 3: Dynamic Assessments
HP Fortify on Demand (3.2) Page 32

Notes:
l This online form replaces the former New Site Registration Form. You nolonger need to fill out that information on paper, as the online form collects thesame information.
l The Setup Dynamic Scan form must be completed only for new applications,and some new releases, being submitted to FoD for the first time. Subsequenttests of the same data or URL bypass this step.
l If you are submitting a new release, but that release is associated with an applic-ation that has already been tested, and you created your new release using“Copy Release Data," you will not have to go through this registration processagain.
l When you register an application for the first time the information requiredmay seem lengthy. However, you do not have to complete the form all at once:you may stop and start without losing data.
l A red star beside any field means a response is required.
l If you have any difficulty completing the form, contact your TAM.
HP Fortify on Demand 3.2 User GuideChapter 3: Dynamic Assessments
HP Fortify on Demand (3.2) Page 33

Completing the Dynamic Set-Up FormThe information you will need to complete the online form is as follows:
a. Your site’s URL
b. Assessment Type (Basic, Standard, Premium, or Remediation)
c. Geolocation: Select from a menu of countries
d. Environment Type: Production, Development, or QA
e. Environment Facing: Internal or External
f. Exclusions: Any URLs within your website which you do not want totest
Note: By default, FoD does not test URLs that are located outside yourapplication’s domain. However, it is still safest to list such URLs here if youare aware of any embedded in your site.Also note: If you do request that FoD test a URL belonging to anothervendor, it is your responsibility to ensure that you have the owner’s con-sent before submitting it.
g. Web Services Location (for Premium assessments only): The exact URLof your WSDL file.
h. Site availability: Specify when your application is available for testing.Use the local time in the time zone you specified on this page.
By default, all boxes are checked, which means FoD may test your applic-ation any time, without restrictions. To alter that, start by unchecking thebox beside a day of the week.Any time the All Day box beside a day is checked, that means your applic-ation is available any time that day. For example, you cannot checkSunday and then uncheck certain hours on Sunday. To indicate that yourapp is available at some times on Sunday, but not all: first, uncheck the AllDay box, and then add checkmarks beside any hours that day when theapp is available.
i. Repeat frequency: If this is a one-time scan, leave the menu on “Do notrepeat.” If you would like to set up automatic re-scans of this applic-ation on a periodic basis, use this menu to select the frequency.
j. Time zone: Select the time zone where your application is located.
k. Authentication: Select the option that is true for your site: No authen-tication, Generate unique authentication, or Authentication required.
HP Fortify on Demand 3.2 User GuideChapter 3: Dynamic Assessments
HP Fortify on Demand (3.2) Page 34

If authentication is required, enter user names and passwords for at leasttwo users.Note: If you would like to enter more credentials than this space allows, listthem in the Additional Notes box at the bottom of this form.
l. VPN Required: If yes, put a check in the box. Then fill in the VPN UserName and Password. If you do not wish to require a VPN, leave the boxblank.
m. Multi-factor Authentication: Click yes or no. If yes, provide more inform-ation in the box below.
n. External Devices: Check the boxes if you have any of these: IDS, IPS,WAF, Proxy servers, and/or a Load Balancer.
o. Upload Documents: If you would like to attach any documents relevantto your application that may be useful to the FoD testers, you can dothat here. Click Choose File to browse to the document you want toattach. Then click Upload. Note that only files with the following exten-sions can be attached here: .doc, .docx, .ppt, .txt, .pdf, .pptx.
p. Additional Notes: At the bottom of the final page is a box for you to addany more information you want the FoD testing team to know aboutbefore they begin your dynamic assessment.
q. Request for call: If you would like to speak to a TAM or other FoD per-sonnel before your assessment begins, check the final box here torequest a conference call.
Submitting the Dynamic Set-Up FormIf you need to pause before all the information is complete, click Save in the upper-right corner of the form.
1. When the form is complete and ready for submission, click Start Scan.
If anything in your form is incomplete or invalid, you will see the word Incompletein the upper-right corner, and an explanation of the issue will appear near theupper left. In the example below, the problem is that we checked AuthenticationRequired and then did not list any user names or passwords for authentication.
HP Fortify on Demand 3.2 User GuideChapter 3: Dynamic Assessments
HP Fortify on Demand (3.2) Page 35

This can be remedied either by selecting No Authentication or by entering usercredentials.
When all information is complete and useable, the status at the top changes toValid.
2. If necessary, click Save again, after correcting any errors.
3. When you see the word Valid, you may then click Start Scan.
A pop-up appears, with the heading Start Dynamic Scan. The URL to be testedappears, followed by a small box with the current date and time.
3. Click inside the date and time box.
A calendar appears.
HP Fortify on Demand 3.2 User GuideChapter 3: Dynamic Assessments
HP Fortify on Demand (3.2) Page 36

4. Select the date and time you would like your assessment to begin.
5. Click Done.
6. Click Next.
A new box appears, headed Start Dynamic Scan. This box shows a summary ofthe information you have entered on the Setup Dynamic Scans form.
7. If all information here is correct, click Start Scan.
8. If anything is not correct, click Back and change your answers on previousscreens.
Your assessment will begin at one of the times you selected when you filled out theform. If you schedule recurring assessments, this release will be scanned again at theintervals you defined until such time as you return to the Setup Dynamic Scansform and change your request.Once your Dynamic Scan Set-up Form has been submitted, with a specific date andtime requested, the status for your assessment changes to Scheduled.
This status also shows up in the list on the main Applications page.
HP Fortify on Demand 3.2 User GuideChapter 3: Dynamic Assessments
HP Fortify on Demand (3.2) Page 37

Your dynamic assessment will be completed approximately five business days afterthe date you scheduled it, if access to the application has been properly documentedand granted.Note: If you have restrictions about the time of day for your assessment, this couldhave a significant effect on the turnaround time. For example, you can expect a poten-tial doubling of the testing window if you restrict the testing times to half the day. Ifyou have any questions about this, please contact your TAM.
Changing a Dynamic Scan RequestAs soon as you click Start Scan to submit your application for a dynamic assessment,your information is transferred immediately to the FoD testing team.Important Note: If you then return to the form to change the schedule or any otherdetails about your request, that information will not be transmitted to the testingteam.If you need to make a change after you have submitted a request:
1. Click Help Center.
2. Click Submit a Ticket.
3. Enter your request on the form that appears there.
If the testing team has any questions for you after receiving that request, they willrespond directly to the ticket.
Note, also, that you are free to go back to your original Setup Dynamic Scan form atany time. Any changes you make will be submitted effectively the next time yourequest a new scan of the same application and release. They just will not change theone you have already submitted.
About Subsequent Dynamic AssessmentsAfter the first time you submit a given application and release for dynamic testing,the process is shorter. The Setup Dynamic Scans form described above, whichprovides the FoD testing team with details about your application, usually needs to becompleted only once.
HP Fortify on Demand 3.2 User GuideChapter 3: Dynamic Assessments
HP Fortify on Demand (3.2) Page 38

Submitting Applications for Follow-up Dynamic Testing
Subsequent Dynamic Testing Submissions: Method One
After the first time, if you want to submit the same application for follow-up assess-ments, follow these steps:1. At the top of your screen, click Applications.
A new screen appears, with a list of all your applications.
2. Find the application you wish to assess, go to the first column on the left, andclick the green bar labeled Start Scan.
A brief new menu appears, with the choice of Static or Dynamic.
3. Click Dynamic.
Subsequent Dynamic Testing Submissions: Method TwoAnother easy way to submit an application and release for testing, after at least oneassessment of the same URL has been completed, is through the Application Detailsarea for that application. To follow this method:1. At the top of your screen, click Applications.
A new screen appears, with a list of all your applications.
2. Click the name of the application you wish you assess.
A new screen appears, with the name of your application at the top, and aseries of tabs, arranged vertically, on the left-hand side.
3. Click the sixth tab, labeled Dynamic.
HP Fortify on Demand 3.2 User GuideChapter 3: Dynamic Assessments
HP Fortify on Demand (3.2) Page 39

The screen headed Setup Dynamic Scans appears, with the data already filledin for the application you have selected. The information in this form is basedon the answers you submitted the first time you requested an assessment ofthis application.
4. Before submitting the application again, you may change information on any ofthe form’s three pages, if you wish.
5. If you wish to submit a new scan using the same application and release, andthe same answers in the form, just click Start Scan.
HP Fortify on Demand 3.2 User GuideChapter 3: Dynamic Assessments
HP Fortify on Demand (3.2) Page 40

Chapter 4: Mobile AssessmentsAbout HP Fortify on Demand Mobile Assessments
For mobile assessments, Fortify on Demand supports all of the following uploadtypes: Android, BlackBerry, iOS, and Windows.
The following levels of mobile service are available. (Note that these terms do notmean the same thing for mobile that they do for FoD Dynamic Scans.)
l Express
l Basic
l Standard
l Premium
ExpressAn Express mobile assessment is an automated test, focused only the binary file(s)you provide to FoD. Express assessments are available for iOS and Android platformsonly.Express testing focuses primarily on privacy issues; for example, we test whetheryour application is sharing geo-location and enabling access to calendars and con-tacts.
BasicA Basic mobile assessment is a static scan; that is, it tests your code. You will berequired to upload one zip file, with your source code only.
StandardA Standard assessment for mobile is a dynamic run-time test focused on OWASP TopTen vulnerabilities. For a Standard test, you will be required to upload binary filesonly. Our live team of security experts performs all tests covered under Express plushands-on manual testing, specific testing at the network level, and a personalizedreview of the results.
PremiumPremium mobile assessments include both static and dynamic testing of your mobileapplication. This is our top level of service and includes all of the above--that is, alltests covered under Express Basic, and Standard assessments--plus hands-on atten-tion from our expert team. Our live team of security experts performs an analysis ofyour client, network, and back-end server testing, and gives you a personalizedreview of the results.
HP Fortify on Demand 3.2 User GuideChapter 4: Mobile Assessments
HP Fortify on Demand (3.2) Page 41
Note that it is not necessary to submit source code for a premium mobile assessment.If you submit both source code and binary files, FoD will do both static and dynamictesting. However, if for any reason you wish to submit binary files only, we will per-form a Premium dynamic mobile scan.
As with other types of assessments, the first step is to prepare your code for sub-mission. See About Mobile Uploads for instructions on that process.
About Mobile UploadsFoD recommends that you create a separate application for each mobile platform youare using. Also note that both binary and source code files are required for mostmobile uploads. (If yours is a Premium mobile scan, you will be asked whether youwant to include source files.) The files you send to FoD must include everythingneeded to build the project, and also information on what software you are using forthe build environment; for example, which IDE you are using.
About Recommended Browsers for Mobile UploadsFor best results when submitting code for a mobile assessment, we recommend thatyou use one of the following web browsers:
l Firefox 26, 27, and higher
l Chrome 32 and higher
l Safari 5.1.7 for Windows and 7.0.1 for Mac
l Internet Explorer 9, 10, or 11
Beginning a Mobile AssessmentThe process to begin a mobile assessment is:
1. Prepare your files as described in the following sections.
2. Notify your TAM of your desire for a mobile application assessment
3. Follow the instructions under Initiating a Mobile Assessment.
Preparing Android Project FilesFor Android applications, package your files for upload as follows.
l For an Express Mobile Assessment, send your application's binary (.apk).
l For a Basic Mobile Assessment, package your application's source code, includ-ing all third-party libraries, in a single zip file.
l For a Standard Mobile Assessment, send your application’s binary (.ipa)
HP Fortify on Demand 3.2 User GuideChapter 4: Mobile Assessments
HP Fortify on Demand (3.2) Page 42

l For a Premium Assessment prepare two separate files:
l Your application’s .APK file.
l A zip file containing your application's source code (Java) and all third-party libraries related to your application.
Preparing iOS Application FilesFor iOS applications, package your analysis and source code files as follows.
l For an Express Mobile Assessment, send your application's binary (.ipa).
l For a Basic Mobile Assessment, package your application source code (Object-ive C), including all third-party libraries, in a single zip file.
l For a Standard Mobile Assessment, send your application’s binary (.ipa)
l For a Premium Mobile Assessment, prepare two separate files:
l Your application's binary .ipa file.
l A zip file containing your application's source code and all third-party lib-raries related to your application.
Preparing BlackBerry Project FilesFor BlackBerry applications, package your binary and source code files for upload asfollows:
l For an Express Mobile Assessment, package your application's binary code intoone file.
l For a Basic Mobile Assessment, package your application's source code, includ-ing all third-party libraries, in a single zip file.
l For a Standard Mobile Assessment, send your application’s binary files.
l For a Premium Assessment, prepare two separate files:
l Package your application’s binary in one.
l Package your application's source code into a separate zip file, andinclude all third-party libraries related to your application in this samezip file.
HP Fortify on Demand 3.2 User GuideChapter 4: Mobile Assessments
HP Fortify on Demand (3.2) Page 43

Preparing Windows Project FilesFor Windows applications, contact your TAM and ask for specific instructions on howto prepare your files.
Creating a New Mobile Application for AssessmentIf you want to do a security assessment of a mobile application you have never testedin Fortify on Demand before:1. Click Applications.
A new screen appears, with the heading Applications.
2. On the right-hand side of the Applications screen, click + New Application.
A box appears, with the heading Create Application Wizard – Step 1 of 3.
HP Fortify on Demand 3.2 User GuideChapter 4: Mobile Assessments
HP Fortify on Demand (3.2) Page 44
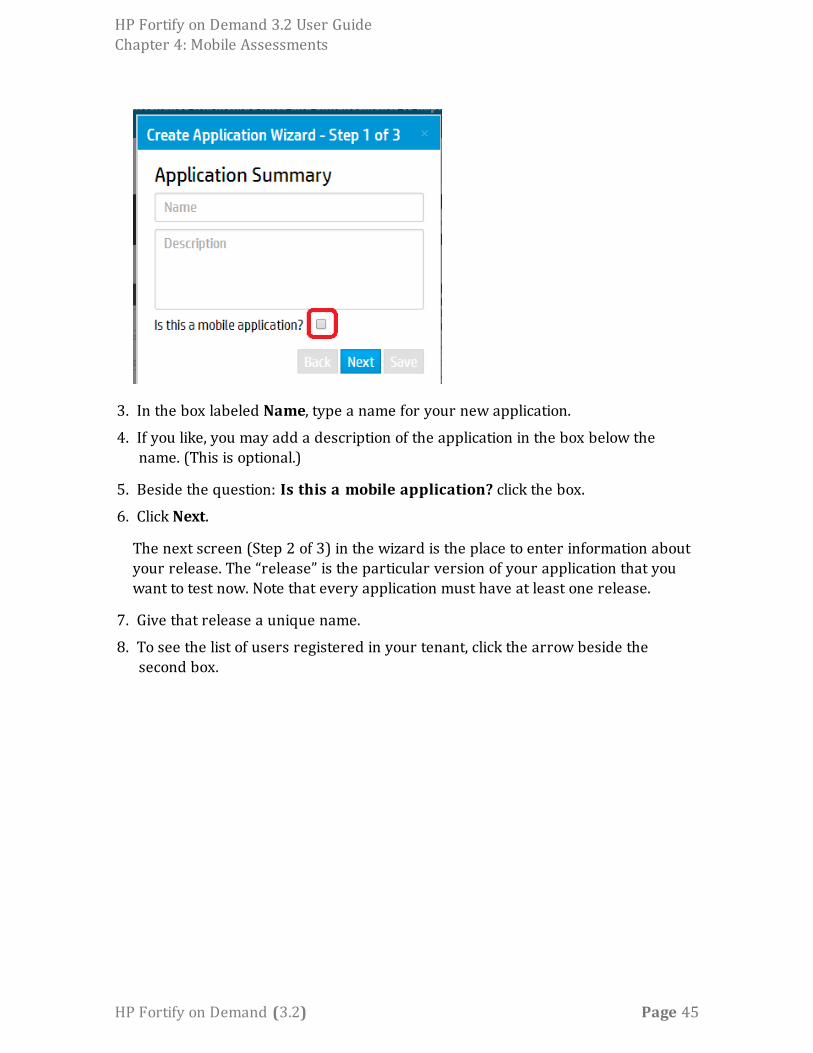
3. In the box labeled Name, type a name for your new application.
4. If you like, you may add a description of the application in the box below thename. (This is optional.)
5. Beside the question: Is this a mobile application? click the box.
6. Click Next.
The next screen (Step 2 of 3) in the wizard is the place to enter information aboutyour release. The “release” is the particular version of your application that youwant to test now. Note that every application must have at least one release.
7. Give that release a unique name.
8. To see the list of users registered in your tenant, click the arrow beside thesecond box.
HP Fortify on Demand 3.2 User GuideChapter 4: Mobile Assessments
HP Fortify on Demand (3.2) Page 45
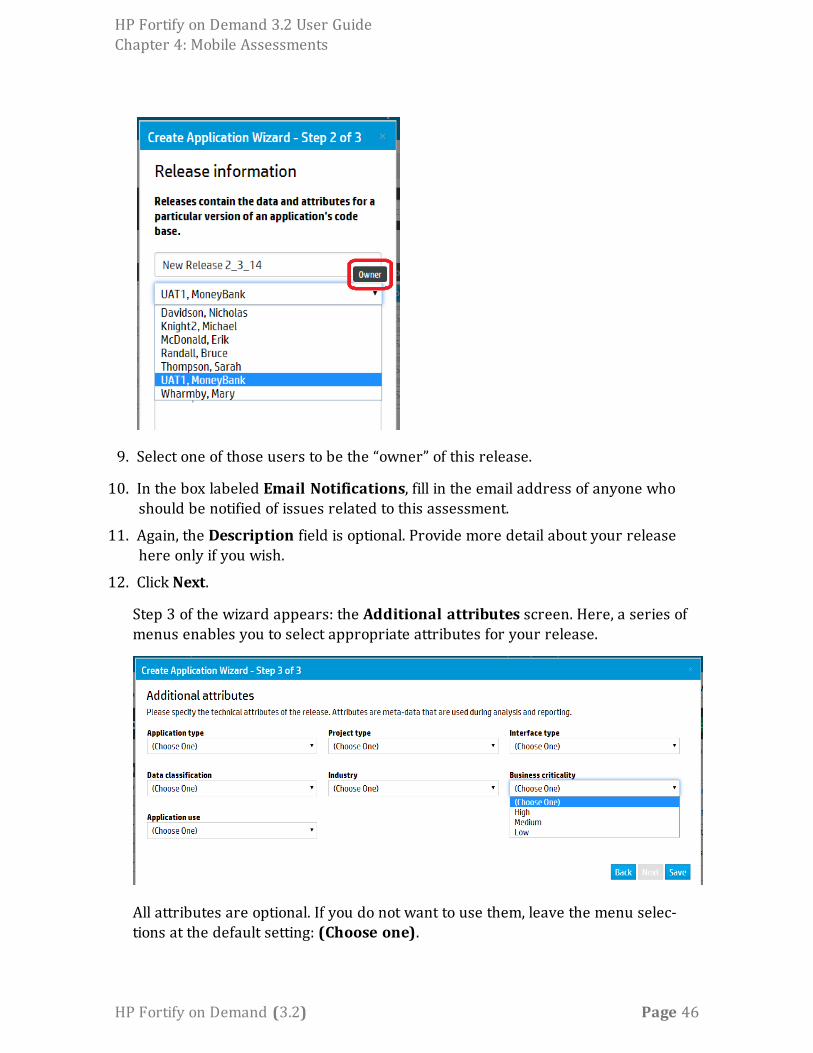
9. Select one of those users to be the “owner” of this release.
10. In the box labeled Email Notifications, fill in the email address of anyone whoshould be notified of issues related to this assessment.
11. Again, the Description field is optional. Provide more detail about your releasehere only if you wish.
12. Click Next.
Step 3 of the wizard appears: the Additional attributes screen. Here, a series ofmenus enables you to select appropriate attributes for your release.
All attributes are optional. If you do not want to use them, leave the menu selec-tions at the default setting: (Choose one).
HP Fortify on Demand 3.2 User GuideChapter 4: Mobile Assessments
HP Fortify on Demand (3.2) Page 46

Note that all application attributes are customizable. If you would like to change oradd attribute types, add additional choices to any of the attribute categories, orhide attributes you are not using, see Managing Attributes (Lookups).
13. When you are finished defining attributes, go to the bottom of the page and clickSave.
The dialog box closes and you are returned to the main Applications page, whereyou now see your new application, and its associated release(s), in the list.
Initiating a Mobile AssessmentTo begin your assessment of a given release:1. Click Applications.
A new screen appears, with a list of all your applications.
2. Find the mobile application you wish to assess, go to the first column on the left,and click the green bar labeled Start Scan.
A brief new menu appears, with the word Mobile.
3. ClickMobile.
A new page appears, with the heading Setup Mobile Scan.
HP Fortify on Demand 3.2 User GuideChapter 4: Mobile Assessments
HP Fortify on Demand (3.2) Page 47
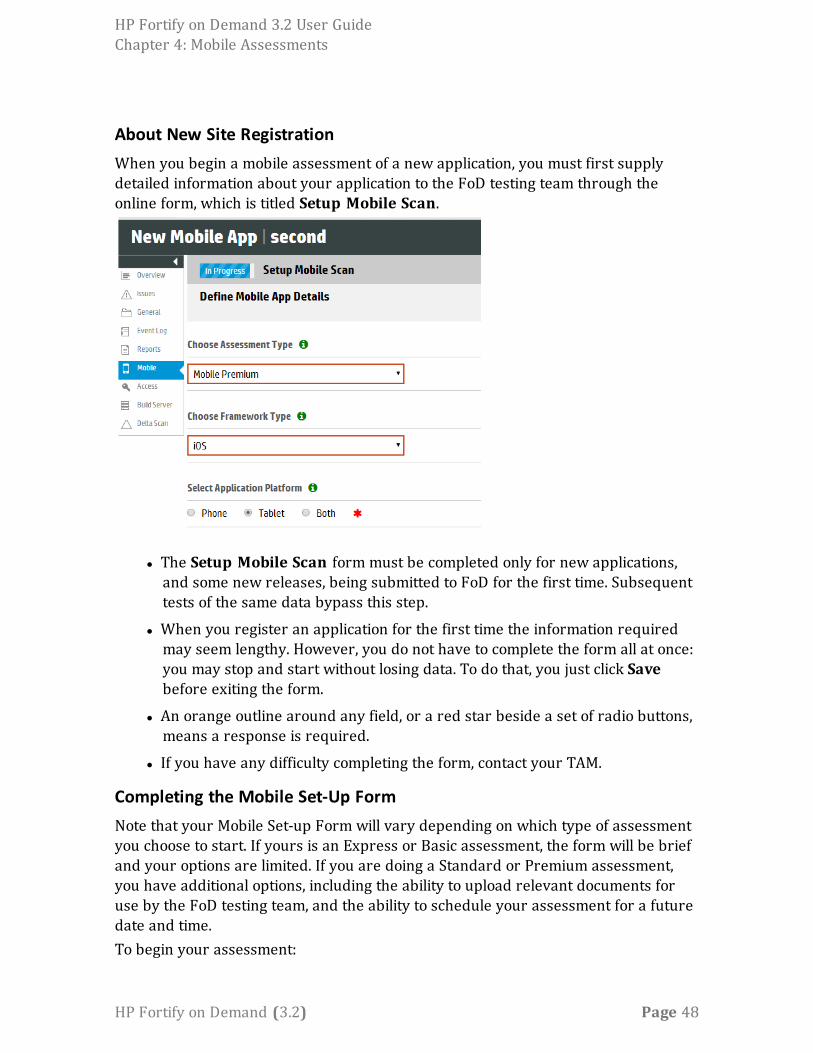
About New Site RegistrationWhen you begin a mobile assessment of a new application, you must first supplydetailed information about your application to the FoD testing team through theonline form, which is titled Setup Mobile Scan.
l The Setup Mobile Scan form must be completed only for new applications,and some new releases, being submitted to FoD for the first time. Subsequenttests of the same data bypass this step.
l When you register an application for the first time the information requiredmay seem lengthy. However, you do not have to complete the form all at once:you may stop and start without losing data. To do that, you just click Savebefore exiting the form.
l An orange outline around any field, or a red star beside a set of radio buttons,means a response is required.
l If you have any difficulty completing the form, contact your TAM.
Completing the Mobile Set-Up FormNote that your Mobile Set-up Form will vary depending on which type of assessmentyou choose to start. If yours is an Express or Basic assessment, the form will be briefand your options are limited. If you are doing a Standard or Premium assessment,you have additional options, including the ability to upload relevant documents foruse by the FoD testing team, and the ability to schedule your assessment for a futuredate and time.To begin your assessment:
HP Fortify on Demand 3.2 User GuideChapter 4: Mobile Assessments
HP Fortify on Demand (3.2) Page 48
1. Fill out the Setup Mobile Scan form.
The information you will need to complete this online form is as follows:
a. Assessment Type (Express, Basic, Standard, Premium)
b. Framework Type (iOS, Android, Windows, BlackBerry)
c. Application Platform (Phone, Tablet, Both)
Then, depending on which Assessment Type you selected, additional information maybe requested. The following information pertains to Standard and Premium Mobileassessments (but not Basic or Express).
d. User Accounts (We need at least one user name, password, and role, unlessyou choose not to require this.)
Note: This form provides space to enter two sets of credentials. If you would like toenter more, list them in the Add Build Information Or Notes box, below theUser Account area.
HP Fortify on Demand 3.2 User GuideChapter 4: Mobile Assessments
HP Fortify on Demand (3.2) Page 49

e. Any other notes you want to add in the box headed Add Build InformationOr Notes are also welcome; this section is optional.
f. Environment (Development, Quality Assurance, User Acceptance Testing, Pro-duction)
g. VPN Required: Check this box if the answer is yes. If yes, add credentials inthe boxes that appear below.
h. Multi-factor Authentication: Check this box if the answer is yes. If yes, providemore information in the box that appears below.
i. External Devices: Check any that apply. (Intrusion Detection System, IntrusionPrevention System, Web Application Firewall, Proxy Servers, Load Balancer)
j. Upload Documents: If you would like to attach any documents relevant to yourapplication that may be useful to the FoD testers, you can do that here. ClickChoose File to browse to the document you want to attach. Then click Upload.Note that only documents of up to 30 MB can be attached here, and only fileswith the following extensions: .doc, .docx, .ppt, .txt, .pdf, .pptx.
k. Additional Notes: At the bottom of the final page is a box for you to add anymore information you want the FoD testing team to know about before theybegin your dynamic assessment.
l. Pre-Assessment Call: Check this box if you would like to schedule a telephonecall with FoD personnel before submitting your application for assessment.
When you have completed the form, go to the upper-right corner of your screen,and click Save. If the form is complete, the Setup Statuswill change from Incom-plete to Valid.
2. If, instead of submitting the form now, you would like to save your informationand come back to it later, click Save at the top of the screen.
HP Fortify on Demand 3.2 User GuideChapter 4: Mobile Assessments
HP Fortify on Demand (3.2) Page 50

The data you have entered into the Setup Mobile Scan form will be saved andready for use at a later time.
3. When you are ready to begin your assessment, click Start Scan.
Starting Your ScanAfter you click Start Scan, a new series of questions begin, so that you may set yourpreferences for timing and other details.First a pop-up appears titled Start Mobile Scan – Step 1 of 2 (or Step 1 of 3). Thecenter of this box says Scan Date.
1. Put your cursor in the small box in the center, click once, and a calendar appears,as illustrated below.
2. Using that calendar, select the date and time most optimal for your assessment.
3. Click Done.
4. If yours is a remediation scan, click the box beside: Is this a remediation scan?If it is not, leave that checkbox blank.
5. Click Next.
6. Then follow the instructions below under A., B., or C., depending on whether youwant a Basic, Express, Standard, or Premium scan.
HP Fortify on Demand 3.2 User GuideChapter 4: Mobile Assessments
HP Fortify on Demand (3.2) Page 51

A. If yours is a Basic scan:
A new pop-up box appears, with the heading Start Mobile Scan – Step 2 of 2.
1. Browse to the .zip file you want to upload.
2. When the file is uploaded, click Start Scan.
A Summary box appears, informing you that your scan has started.
B. If yours is an Express or a Standard scan, follow the steps above, but upload afile with the extension .ipa or .apk.
C. If yours is a Premium scan:
The pop-up box says Start Mobile Scan – Step 2 of 3. That is because there aretwo sets of files to be uploaded.
1. Browse to the file you want to upload, which must have an extension of .ipa or.apk.
2. Click Next.
You see progress bar(s) indicating that your upload is in process.
When the .ipa or .apk is fully uploaded, a new pop-up appears with the headingStart Mobile Scan – Step 3 of 3.
HP Fortify on Demand 3.2 User GuideChapter 4: Mobile Assessments
HP Fortify on Demand (3.2) Page 52

3. Browse to your .zip file and upload that.
4. Click Start Scan.
Progress bar(s) indicate that your upload is in process.
If you choose not to upload source code for your Premium Mobile scan, you seethis message:
5. Make your selection, and continue.
When the upload process is complete, a Summary screen appears, informing youthat your scan has started.
Unless you are otherwise notified, your assessment will begin at the time you selec-ted when you filled out the form. If you schedule recurring assessments, thisrelease will be scanned again at the intervals you defined until such time as youreturn to the Setup Mobile Scan form and change your request.
HP Fortify on Demand 3.2 User GuideChapter 4: Mobile Assessments
HP Fortify on Demand (3.2) Page 53

Your mobile assessment will be completed approximately five business days afterthe date you scheduled it, if access to the application has been properly doc-umented and granted.
Note: If you have restrictions about the time of day for your assessment, this couldhave a significant effect on the turnaround time. For example, you can expect apotential doubling of the testing window if you restrict the testing times to half theday. If you have any questions about this, please contact your TAM.
You will receive email notifications when your application has been received andwhen the assessment is complete. At those points, the status on the Applicationspage will change from Not Started to In Progress and then to Completed.
HP Fortify on Demand 3.2 User GuideChapter 4: Mobile Assessments
HP Fortify on Demand (3.2) Page 54

Chapter 5: Completing an AssessmentAbout Completing the Assessment ProcessWhen your assessment is complete, there are several steps you can follow to accessand use the information learned from the test. This chapter includes information onhow to check on the status of your assessment and what to do when your assessmentis complete.
Checking the Status of your Assessment
To check the status of an assessment:
1. Click Applications.
2. Find your application in the list that appears on your screen.
Three columns on this page are headed Static, Dynamic, and Mobile.
Each of those columns shows one of the following statuses: Not Started, In Pro-gress, Canceled, Waiting, or Completed.
The columns headed Static Exp Comp and Dynamic Exp Comp tell you theexpected completion date for your assessment(s).
The column labeled Last Completed tells you when the most recent assessment ofa particular release was finished.
Note that the dates here are listed with the year first, then the month, and then theday.
Note: If you do not see one or more of the columns described above, you can causethem to show up (or otherwise change the display of this Applications grid). Forinstructions on how to do that, see Selecting Rows and Columns for Display.
HP Fortify on Demand 3.2 User GuideChapter 5: Completing an Assessment
HP Fortify on Demand (3.2) Page 55
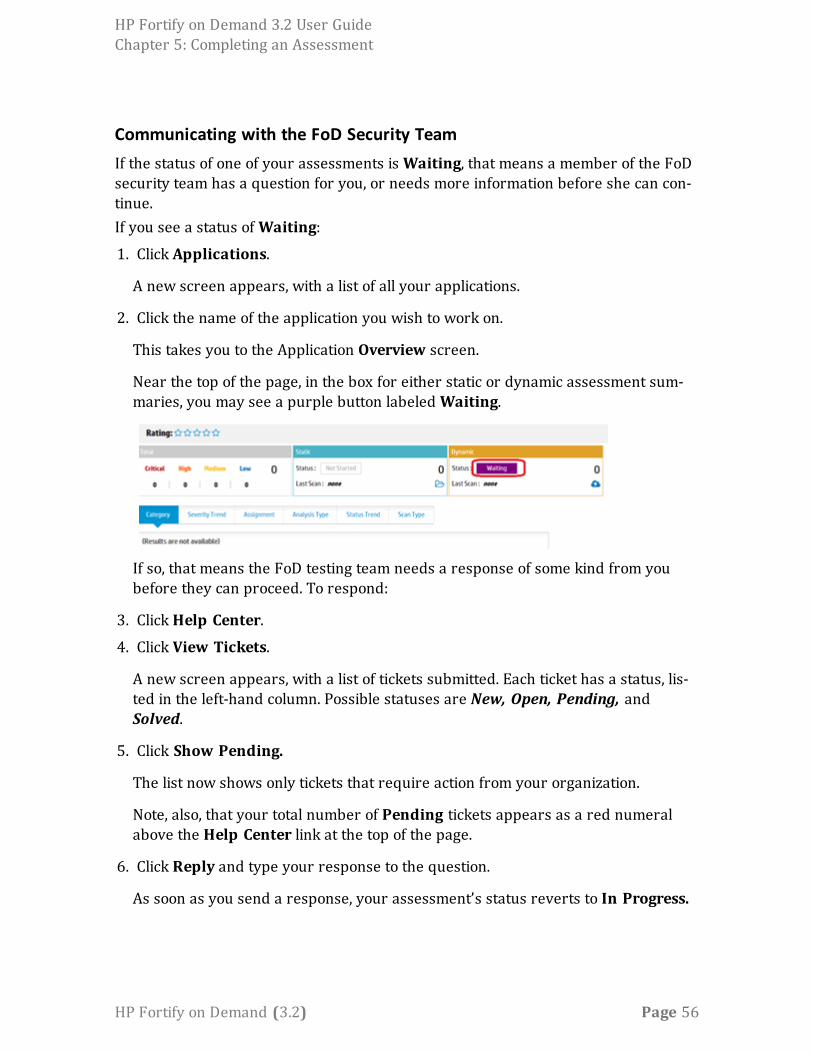
Communicating with the FoD Security TeamIf the status of one of your assessments isWaiting, that means a member of the FoDsecurity team has a question for you, or needs more information before she can con-tinue.If you see a status ofWaiting:
1. Click Applications.
A new screen appears, with a list of all your applications.
2. Click the name of the application you wish to work on.
This takes you to the Application Overview screen.
Near the top of the page, in the box for either static or dynamic assessment sum-maries, you may see a purple button labeledWaiting.
If so, that means the FoD testing team needs a response of some kind from youbefore they can proceed. To respond:
3. Click Help Center.
4. Click View Tickets.
A new screen appears, with a list of tickets submitted. Each ticket has a status, lis-ted in the left-hand column. Possible statuses are New, Open, Pending, andSolved.
5. Click Show Pending.
The list now shows only tickets that require action from your organization.
Note, also, that your total number of Pending tickets appears as a red numeralabove the Help Center link at the top of the page.
6. Click Reply and type your response to the question.
As soon as you send a response, your assessment’s status reverts to In Progress.
HP Fortify on Demand 3.2 User GuideChapter 5: Completing an Assessment
HP Fortify on Demand (3.2) Page 56
About When Your Assessment is CompleteAt the completion of the assessment, FoD checks the results for accuracy and thenreleases them to your account. At that point:
l You receive a confirmation email saying that your assessment is complete.
l You can log on to FoD to view your results.
l You can check the status, as described above, to see the completion date.
HP Fortify on Demand 3.2 User GuideChapter 5: Completing an Assessment
HP Fortify on Demand (3.2) Page 57

Page 58 of 58HP Fortify on Demand (3.2)
HP Fortify on Demand 3.2 User GuideChapter 5: Completing an Assessment