hp storageworks secure fabric os administrator …h10032. · hp storageworks secure fabric os...
TRANSCRIPT

HP StorageWorks
Secure Fabric OS administrator guide
Part number: AA–RVHUB–TESecond edition: September 2005

Legal and notice information© Copyright 2005 Hewlett-Packard Development Company, L.P.
© Copyright 2005 Brocade Communications Systems, Incorporated.
Hewlett-Packard Company makes no warranty of any kind with regard to this material, including, but not limited to, the implied warranties of merchantability and fitness for a particular purpose. Hewlett-Packard shall not be liable for errors contained herein or for incidental or consequential damages in connection with the furnishing, performance, or use of this material.
This document contains proprietary information, which is protected by copyright. No part of this document may be photocopied, reproduced, or translated into another language without the prior written consent of Hewlett-Packard. The information is provided “as is” without warranty of any kind and is subject to change without notice. The only warranties for HP products and services are set forth in the express warranty statements accompanying such products and services. Nothing herein should be construed as constituting an additional warranty. HP shall not be liable for technical or editorial errors or omissions contained herein.
Secure Fabric OS administrator guide

Secure Fabric OS administrator guide 3
About this guide. . . . . . . . . . . . . . . . . . . . . . . . . . . . . . . . . . . . . . . . . . . . . . . . . . . . . . . 7Intended audience . . . . . . . . . . . . . . . . . . . . . . . . . . . . . . . . . . . . . . . . . . . . . . . . . . . . . . . . . . . . . . . 7Related documentation . . . . . . . . . . . . . . . . . . . . . . . . . . . . . . . . . . . . . . . . . . . . . . . . . . . . . . . . . . . . 7Document conventions and symbols . . . . . . . . . . . . . . . . . . . . . . . . . . . . . . . . . . . . . . . . . . . . . . . . . . . 8HP technical support . . . . . . . . . . . . . . . . . . . . . . . . . . . . . . . . . . . . . . . . . . . . . . . . . . . . . . . . . . . . . . 9
HP-authorized reseller. . . . . . . . . . . . . . . . . . . . . . . . . . . . . . . . . . . . . . . . . . . . . . . . . . . . . . . . . . . 9Helpful web sites . . . . . . . . . . . . . . . . . . . . . . . . . . . . . . . . . . . . . . . . . . . . . . . . . . . . . . . . . . . . . . 9
1 Introducing Secure Fabric OS . . . . . . . . . . . . . . . . . . . . . . . . . . . . . . . . . . . . . . . . . . 11Management channel security . . . . . . . . . . . . . . . . . . . . . . . . . . . . . . . . . . . . . . . . . . . . . . . . . . . . . . 12
Secure Shell (SSH) . . . . . . . . . . . . . . . . . . . . . . . . . . . . . . . . . . . . . . . . . . . . . . . . . . . . . . . . . . . . 13Sectelnet . . . . . . . . . . . . . . . . . . . . . . . . . . . . . . . . . . . . . . . . . . . . . . . . . . . . . . . . . . . . . . . . 13Telnet . . . . . . . . . . . . . . . . . . . . . . . . . . . . . . . . . . . . . . . . . . . . . . . . . . . . . . . . . . . . . . . . . . 13
Switch-to-switch authentication . . . . . . . . . . . . . . . . . . . . . . . . . . . . . . . . . . . . . . . . . . . . . . . . . . . . . . 13Using PKI . . . . . . . . . . . . . . . . . . . . . . . . . . . . . . . . . . . . . . . . . . . . . . . . . . . . . . . . . . . . . . . . . . 13Using DH-CHAP. . . . . . . . . . . . . . . . . . . . . . . . . . . . . . . . . . . . . . . . . . . . . . . . . . . . . . . . . . . . . . 14
Fabric configuration server switches . . . . . . . . . . . . . . . . . . . . . . . . . . . . . . . . . . . . . . . . . . . . . . . . . . 14Fabric management policy set . . . . . . . . . . . . . . . . . . . . . . . . . . . . . . . . . . . . . . . . . . . . . . . . . . . . . . 15
2 Adding Secure Fabric OS to the fabric . . . . . . . . . . . . . . . . . . . . . . . . . . . . . . . . . . . . 17Adding Secure Fabric OS to a fabric . . . . . . . . . . . . . . . . . . . . . . . . . . . . . . . . . . . . . . . . . . . . . . . . . 17Identifying the current version of Fabric OS . . . . . . . . . . . . . . . . . . . . . . . . . . . . . . . . . . . . . . . . . . . . . 18Adding Secure Fabric OS to 3.2.x, 4.4.x, and 5.0.1 switches. . . . . . . . . . . . . . . . . . . . . . . . . . . . . . . . 18
Verifying or activating Secure Fabric OS and Advanced Zoning licenses . . . . . . . . . . . . . . . . . . . . . . 19Adding Secure Fabric OS to switches that require upgrading. . . . . . . . . . . . . . . . . . . . . . . . . . . . . . . . . 19
Upgrading to a compatible version of Fabric OS. . . . . . . . . . . . . . . . . . . . . . . . . . . . . . . . . . . . . . . 20Customizing the account passwords. . . . . . . . . . . . . . . . . . . . . . . . . . . . . . . . . . . . . . . . . . . . . . . . 21Verifying or activating Secure Fabric OS and Advanced Zoning licenses . . . . . . . . . . . . . . . . . . . . . . 21
Installing the PKICert utility . . . . . . . . . . . . . . . . . . . . . . . . . . . . . . . . . . . . . . . . . . . . . . . . . . . . . . . . . 22Using the PKICert utility. . . . . . . . . . . . . . . . . . . . . . . . . . . . . . . . . . . . . . . . . . . . . . . . . . . . . . . . . 22Removing PKI objects . . . . . . . . . . . . . . . . . . . . . . . . . . . . . . . . . . . . . . . . . . . . . . . . . . . . . . . . . . 27
Obtaining the digital certificate file . . . . . . . . . . . . . . . . . . . . . . . . . . . . . . . . . . . . . . . . . . . . . . . . . . . 27Distributing digital certificates to the switches . . . . . . . . . . . . . . . . . . . . . . . . . . . . . . . . . . . . . . . . . 28Verifying installation of the digital certificates . . . . . . . . . . . . . . . . . . . . . . . . . . . . . . . . . . . . . . . . . 31
Creating PKI objects . . . . . . . . . . . . . . . . . . . . . . . . . . . . . . . . . . . . . . . . . . . . . . . . . . . . . . . . . . . . . 32Creating PKI Certificate Reports . . . . . . . . . . . . . . . . . . . . . . . . . . . . . . . . . . . . . . . . . . . . . . . . . . . 33Accessing PKI certificate help . . . . . . . . . . . . . . . . . . . . . . . . . . . . . . . . . . . . . . . . . . . . . . . . . . . . 35
Adding Secure Fabric OS to the Core Switch 2/64 and SAN Director 2/128. . . . . . . . . . . . . . . . . . . . . 37Installing a supported CLI client on a workstation . . . . . . . . . . . . . . . . . . . . . . . . . . . . . . . . . . . . . . . . . 38Configuring authentication. . . . . . . . . . . . . . . . . . . . . . . . . . . . . . . . . . . . . . . . . . . . . . . . . . . . . . . . . 39
Selecting authentication protocols . . . . . . . . . . . . . . . . . . . . . . . . . . . . . . . . . . . . . . . . . . . . . . . . . 40Managing shared secrets . . . . . . . . . . . . . . . . . . . . . . . . . . . . . . . . . . . . . . . . . . . . . . . . . . . . . . . 41
3 Creating Secure Fabric OS policies . . . . . . . . . . . . . . . . . . . . . . . . . . . . . . . . . . . . . . 43Default Fabric and switch accessibility. . . . . . . . . . . . . . . . . . . . . . . . . . . . . . . . . . . . . . . . . . . . . . . . . 43Enabling Secure mode . . . . . . . . . . . . . . . . . . . . . . . . . . . . . . . . . . . . . . . . . . . . . . . . . . . . . . . . . . . 44Modifying the FCS policy . . . . . . . . . . . . . . . . . . . . . . . . . . . . . . . . . . . . . . . . . . . . . . . . . . . . . . . . . 48
Changing the position of a switch within the FCS policy . . . . . . . . . . . . . . . . . . . . . . . . . . . . . . . . . . 49Failing over the primary FCS switch . . . . . . . . . . . . . . . . . . . . . . . . . . . . . . . . . . . . . . . . . . . . . . . . 50
Contents
4
Creating Secure Fabric OS policies other than the FCS policy . . . . . . . . . . . . . . . . . . . . . . . . . . . . . . . . 51Creating a MAC policy . . . . . . . . . . . . . . . . . . . . . . . . . . . . . . . . . . . . . . . . . . . . . . . . . . . . . . . . 52
Creating an SNMP policy . . . . . . . . . . . . . . . . . . . . . . . . . . . . . . . . . . . . . . . . . . . . . . . . . . . . 53Telnet policy. . . . . . . . . . . . . . . . . . . . . . . . . . . . . . . . . . . . . . . . . . . . . . . . . . . . . . . . . . . . . . 54HTTP policy . . . . . . . . . . . . . . . . . . . . . . . . . . . . . . . . . . . . . . . . . . . . . . . . . . . . . . . . . . . . . . 55API policy . . . . . . . . . . . . . . . . . . . . . . . . . . . . . . . . . . . . . . . . . . . . . . . . . . . . . . . . . . . . . . . 56SES policy . . . . . . . . . . . . . . . . . . . . . . . . . . . . . . . . . . . . . . . . . . . . . . . . . . . . . . . . . . . . . . . 57Management Server policy . . . . . . . . . . . . . . . . . . . . . . . . . . . . . . . . . . . . . . . . . . . . . . . . . . . 58Serial port policy . . . . . . . . . . . . . . . . . . . . . . . . . . . . . . . . . . . . . . . . . . . . . . . . . . . . . . . . . . 59Front panel policy . . . . . . . . . . . . . . . . . . . . . . . . . . . . . . . . . . . . . . . . . . . . . . . . . . . . . . . . . . 59
Creating an Options policy. . . . . . . . . . . . . . . . . . . . . . . . . . . . . . . . . . . . . . . . . . . . . . . . . . . . . . 60Creating a DCC policy. . . . . . . . . . . . . . . . . . . . . . . . . . . . . . . . . . . . . . . . . . . . . . . . . . . . . . . . . 61Creating an SCC policy . . . . . . . . . . . . . . . . . . . . . . . . . . . . . . . . . . . . . . . . . . . . . . . . . . . . . . . . 63
Managing Secure Fabric OS policies . . . . . . . . . . . . . . . . . . . . . . . . . . . . . . . . . . . . . . . . . . . . . . . . . 64Saving changes to Secure Fabric OS policies . . . . . . . . . . . . . . . . . . . . . . . . . . . . . . . . . . . . . . . . . 64Activating changes to Secure Fabric OS policies . . . . . . . . . . . . . . . . . . . . . . . . . . . . . . . . . . . . . . . 65Adding a member to an existing policy . . . . . . . . . . . . . . . . . . . . . . . . . . . . . . . . . . . . . . . . . . . . . 65Removing a member from a policy. . . . . . . . . . . . . . . . . . . . . . . . . . . . . . . . . . . . . . . . . . . . . . . . . 66Deleting a policy . . . . . . . . . . . . . . . . . . . . . . . . . . . . . . . . . . . . . . . . . . . . . . . . . . . . . . . . . . . . . 66Aborting all uncommitted changes . . . . . . . . . . . . . . . . . . . . . . . . . . . . . . . . . . . . . . . . . . . . . . . . . 66Aborting a Secure Fabric OS transaction . . . . . . . . . . . . . . . . . . . . . . . . . . . . . . . . . . . . . . . . . . . . 67
4 Managing Secure Fabric OS . . . . . . . . . . . . . . . . . . . . . . . . . . . . . . . . . . . . . . . . . . 69Viewing Secure Fabric OS information . . . . . . . . . . . . . . . . . . . . . . . . . . . . . . . . . . . . . . . . . . . . . . . . 69
Displaying general Secure Fabric OS information . . . . . . . . . . . . . . . . . . . . . . . . . . . . . . . . . . . . . . 69Viewing the Secure Fabric OS policy database . . . . . . . . . . . . . . . . . . . . . . . . . . . . . . . . . . . . . . . . 70Displaying individual Secure Fabric OS policies . . . . . . . . . . . . . . . . . . . . . . . . . . . . . . . . . . . . . . . 71Displaying status of secure mode . . . . . . . . . . . . . . . . . . . . . . . . . . . . . . . . . . . . . . . . . . . . . . . . . . 72
Displaying and resetting Secure Fabric OS statistics . . . . . . . . . . . . . . . . . . . . . . . . . . . . . . . . . . . . . . . 72Displaying Secure Fabric OS statistics . . . . . . . . . . . . . . . . . . . . . . . . . . . . . . . . . . . . . . . . . . . . . . 74Resetting Secure Fabric OS statistics . . . . . . . . . . . . . . . . . . . . . . . . . . . . . . . . . . . . . . . . . . . . . . . 74
Managing passwords . . . . . . . . . . . . . . . . . . . . . . . . . . . . . . . . . . . . . . . . . . . . . . . . . . . . . . . . . . . . 75Modifying passwords in secure mode . . . . . . . . . . . . . . . . . . . . . . . . . . . . . . . . . . . . . . . . . . . . . . 77
Modifying the FCS switch passwords or the fabric-wide user password . . . . . . . . . . . . . . . . . . . . . 77Modifying the non-FCS switch admin password . . . . . . . . . . . . . . . . . . . . . . . . . . . . . . . . . . . . . 78
Using temporary passwords . . . . . . . . . . . . . . . . . . . . . . . . . . . . . . . . . . . . . . . . . . . . . . . . . . . . . 78Creating a temporary password for a switch . . . . . . . . . . . . . . . . . . . . . . . . . . . . . . . . . . . . . . . 78Removing a temporary password from a switch . . . . . . . . . . . . . . . . . . . . . . . . . . . . . . . . . . . . . 79
Resetting the version number and time stamp . . . . . . . . . . . . . . . . . . . . . . . . . . . . . . . . . . . . . . . . . . . . 79Adding switches and merging fabrics with secure mode enabled . . . . . . . . . . . . . . . . . . . . . . . . . . . . . . 80Preventing a LUN connection . . . . . . . . . . . . . . . . . . . . . . . . . . . . . . . . . . . . . . . . . . . . . . . . . . . . . . . 83Troubleshooting . . . . . . . . . . . . . . . . . . . . . . . . . . . . . . . . . . . . . . . . . . . . . . . . . . . . . . . . . . . . . . . . 84
A Secure Fabric OS commands and secure mode restrictions. . . . . . . . . . . . . . . . . . . . . . 89Secure Fabric OS commands . . . . . . . . . . . . . . . . . . . . . . . . . . . . . . . . . . . . . . . . . . . . . . . . . . . . . . . 89Command restrictions in secure mode . . . . . . . . . . . . . . . . . . . . . . . . . . . . . . . . . . . . . . . . . . . . . . . . . 93
Zoning commands . . . . . . . . . . . . . . . . . . . . . . . . . . . . . . . . . . . . . . . . . . . . . . . . . . . . . . . . . . . . 93Miscellaneous commands . . . . . . . . . . . . . . . . . . . . . . . . . . . . . . . . . . . . . . . . . . . . . . . . . . . . . . . 94
B Removing Secure Fabric OS . . . . . . . . . . . . . . . . . . . . . . . . . . . . . . . . . . . . . . . . . . . 97Preparing the Fabric for removal of Secure Fabric OS policies . . . . . . . . . . . . . . . . . . . . . . . . . . . . . . . . 97Disabling Secure mode . . . . . . . . . . . . . . . . . . . . . . . . . . . . . . . . . . . . . . . . . . . . . . . . . . . . . . . . . . . 97Deactivating the Secure Fabric OS License on each switch . . . . . . . . . . . . . . . . . . . . . . . . . . . . . . . . . . 98Uninstalling related items from the host . . . . . . . . . . . . . . . . . . . . . . . . . . . . . . . . . . . . . . . . . . . . . . . . 98
Index . . . . . . . . . . . . . . . . . . . . . . . . . . . . . . . . . . . . . . . . . . . . . . . . . . . . . . . . . . . . . 99
Figures1 DH-CHAP authentication. . . . . . . . . . . . . . . . . . . . . . . . . . . . . . . . . . . . . . . . . . . . . . . . . . . . . . . 41

Secure Fabric OS administrator guide 5
Tables1 Document conventions . . . . . . . . . . . . . . . . . . . . . . . . . . . . . . . . . . . . . . . . . . . . . . . . . . . . . . . . . . 82 Secure Fabric OS-supported switches and fabrics . . . . . . . . . . . . . . . . . . . . . . . . . . . . . . . . . . . . . . 123 FCS policy states . . . . . . . . . . . . . . . . . . . . . . . . . . . . . . . . . . . . . . . . . . . . . . . . . . . . . . . . . . . . . 514 Valid methods for specifying policy members . . . . . . . . . . . . . . . . . . . . . . . . . . . . . . . . . . . . . . . . . 545 Read and write behaviors of SNMP policies . . . . . . . . . . . . . . . . . . . . . . . . . . . . . . . . . . . . . . . . . . 566 Telnet policy states . . . . . . . . . . . . . . . . . . . . . . . . . . . . . . . . . . . . . . . . . . . . . . . . . . . . . . . . . . . . 577 HTTP policy states . . . . . . . . . . . . . . . . . . . . . . . . . . . . . . . . . . . . . . . . . . . . . . . . . . . . . . . . . . . . 588 API policy states . . . . . . . . . . . . . . . . . . . . . . . . . . . . . . . . . . . . . . . . . . . . . . . . . . . . . . . . . . . . . 599 SES policy states . . . . . . . . . . . . . . . . . . . . . . . . . . . . . . . . . . . . . . . . . . . . . . . . . . . . . . . . . . . . . 6010 Management Server policy states. . . . . . . . . . . . . . . . . . . . . . . . . . . . . . . . . . . . . . . . . . . . . . . . . . 6011 Serial port policy states . . . . . . . . . . . . . . . . . . . . . . . . . . . . . . . . . . . . . . . . . . . . . . . . . . . . . . . . 6112 Front panel policy states . . . . . . . . . . . . . . . . . . . . . . . . . . . . . . . . . . . . . . . . . . . . . . . . . . . . . . . . 6213 Options policy states . . . . . . . . . . . . . . . . . . . . . . . . . . . . . . . . . . . . . . . . . . . . . . . . . . . . . . . . . . 6214 DCC policy states . . . . . . . . . . . . . . . . . . . . . . . . . . . . . . . . . . . . . . . . . . . . . . . . . . . . . . . . . . . . 6415 SCC policy states. . . . . . . . . . . . . . . . . . . . . . . . . . . . . . . . . . . . . . . . . . . . . . . . . . . . . . . . . . . . . 6616 Secure mode information . . . . . . . . . . . . . . . . . . . . . . . . . . . . . . . . . . . . . . . . . . . . . . . . . . . . . . . 7217 Secure Fabric OS statistics . . . . . . . . . . . . . . . . . . . . . . . . . . . . . . . . . . . . . . . . . . . . . . . . . . . . . . 7418 Login account behavior with secure mode disabled and enabled. . . . . . . . . . . . . . . . . . . . . . . . . . . . 7819 Moving switches between fabrics. . . . . . . . . . . . . . . . . . . . . . . . . . . . . . . . . . . . . . . . . . . . . . . . . . 8320 Recovery Processes . . . . . . . . . . . . . . . . . . . . . . . . . . . . . . . . . . . . . . . . . . . . . . . . . . . . . . . . . . . 8621 Secure Fabric OS commands . . . . . . . . . . . . . . . . . . . . . . . . . . . . . . . . . . . . . . . . . . . . . . . . . . . . 9122 Zoning commands . . . . . . . . . . . . . . . . . . . . . . . . . . . . . . . . . . . . . . . . . . . . . . . . . . . . . . . . . . . . 9523 Miscellaneous Commands . . . . . . . . . . . . . . . . . . . . . . . . . . . . . . . . . . . . . . . . . . . . . . . . . . . . . . 96

6

Secure Fabric OS administrator guide 7
About this guideThis administrator guide provides information about:
• Setting up HP StorageWorks Secure Fabric OS software.• Managing your Secure Fabric OS software.
Intended audienceThis guide is intended for:
• system administrators responsible for setting up HP StorageWorks Fibre Channel Storage Area Network (SAN) switches
• technicians responsible for maintaining the Fabric Operating System (OS)
Related documentationDocumentation, including white papers and best practices documents, is available on the HP web site:
http://www.hp.com/country/us/eng/prodserv/storage.html
To access current Fabric OS 5.x related documents:
1. Locate the IT storage Products section of the web page.2. Under Networked storage, click SAN Infrastructure.3. From the SAN Infrastructure web page, locate the SAN Infrastucture products section.4. Click Fibre Channel Switches.5. Locate the B-Series-Fabric-Enterprise Class section.6. To access Fabric OS 5.x documents (such as this document), click 4/256 SAN Director and 4/256 SAN
Director power pack. The switch overview page displays.
7. Go to the Product Information section, located on the right side of the web page.8. Click Technical documents.9. Follow the onscreen instructions to download the applicable documents.
8
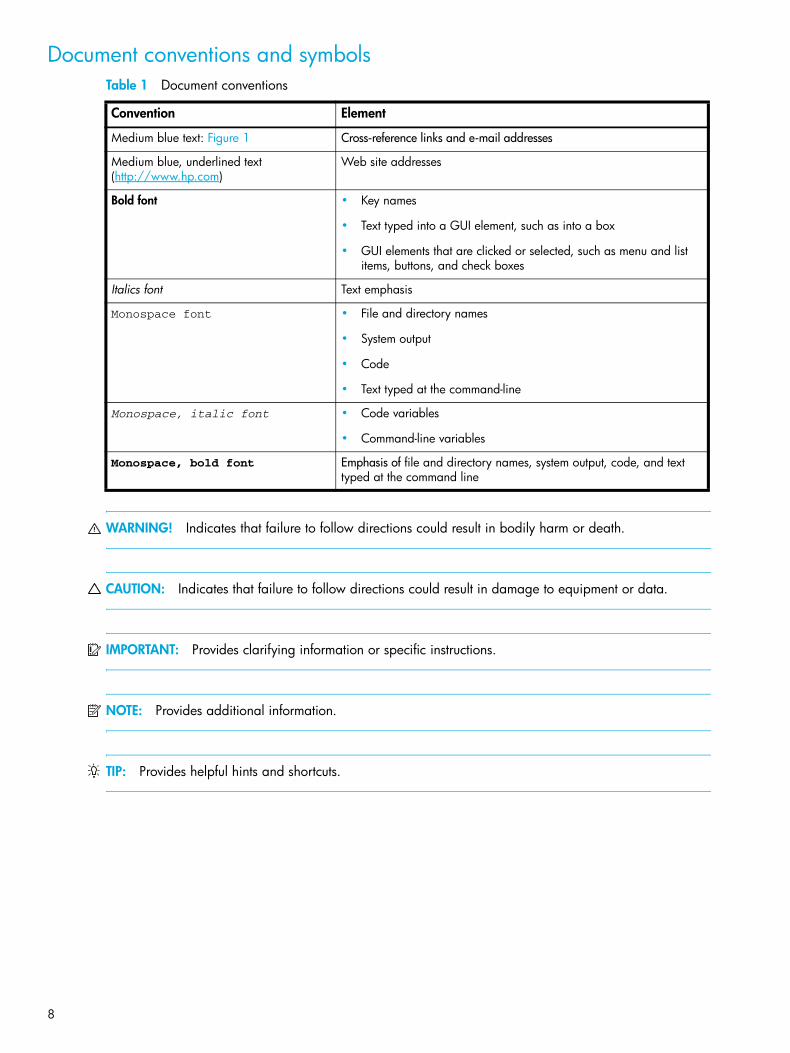
Document conventions and symbols
WARNING! Indicates that failure to follow directions could result in bodily harm or death.
CAUTION: Indicates that failure to follow directions could result in damage to equipment or data.
IMPORTANT: Provides clarifying information or specific instructions.
NOTE: Provides additional information.
TIP: Provides helpful hints and shortcuts.
Table 1 Document conventions
Convention Element
Medium blue text: Figure 1 Cross-reference links and e-mail addresses
Medium blue, underlined text (http://www.hp.com)
Web site addresses
Bold font • Key names
• Text typed into a GUI element, such as into a box
• GUI elements that are clicked or selected, such as menu and list items, buttons, and check boxes
Italics font Text emphasis
Monospace font • File and directory names
• System output
• Code
• Text typed at the command-line
Monospace, italic font • Code variables
• Command-line variables
Monospace, bold font Emphasis of file and directory names, system output, code, and text typed at the command line

Secure Fabric OS administrator guide 9
HP technical supportTelephone numbers for worldwide technical support are listed on the HP support web site: http://www.hp.com/support/.
Collect the following information before calling:
• Technical support registration number (if applicable)• Product serial numbers• Product model names and numbers• Applicable error messages• Operating system type and revision level• Detailed, specific questions
For continuous quality improvement, calls may be recorded or monitored.
HP strongly recommends that customers sign up online using the Subscriber's choice web site: http://www.hp.com/go/e-updates.
• Subscribing to this service provides you with e-mail updates on the latest product enhancements, newest versions of drivers, and firmware documentation updates as well as instant access to numerous other product resources.
• After signing up, you can quickly locate your products by selecting Business support and then Storage under Product Category.
HP-authorized resellerFor the name of your nearest HP-authorized reseller:
• In the United States, call 1-800-282-6672.• Elsewhere, visit the HP web site: http://www.hp.com. Then click Contact HP to find locations and
telephone numbers.
Helpful web sitesFor other product information, see the following HP web sites:
• http://www.hp.com • http://www.hp.com/go/storage • http://www.hp.com/support/ • http://www.docs.hp.com

10

Secure Fabric OS administrator guide 11
1 Introducing Secure Fabric OSSecure Fabric OS is an optionally licensed product that provides customizable security restrictions through local and remote management channels on an HP StorageWorks fabric.
Secure Fabric OS provides the ability to:
• Create policies to customize fabric management access• Specify which switches and devices can join the fabric• View statistics related to attempted policy violations• Manage the fabric-wide Secure Fabric OS parameters through a single switch• Create temporary passwords specific to a login account and switch• Enable and disable Secure Fabric OS as desired
Secure Fabric OS uses digital certificates based on public key infrastructure (PKI) or Diffie-Hellman with Challenge-Handshake Authentication Protocol (DH-CHAP) shared secrets to provide switch-to-switch authentication.
12 Introducing Secure Fabric OS
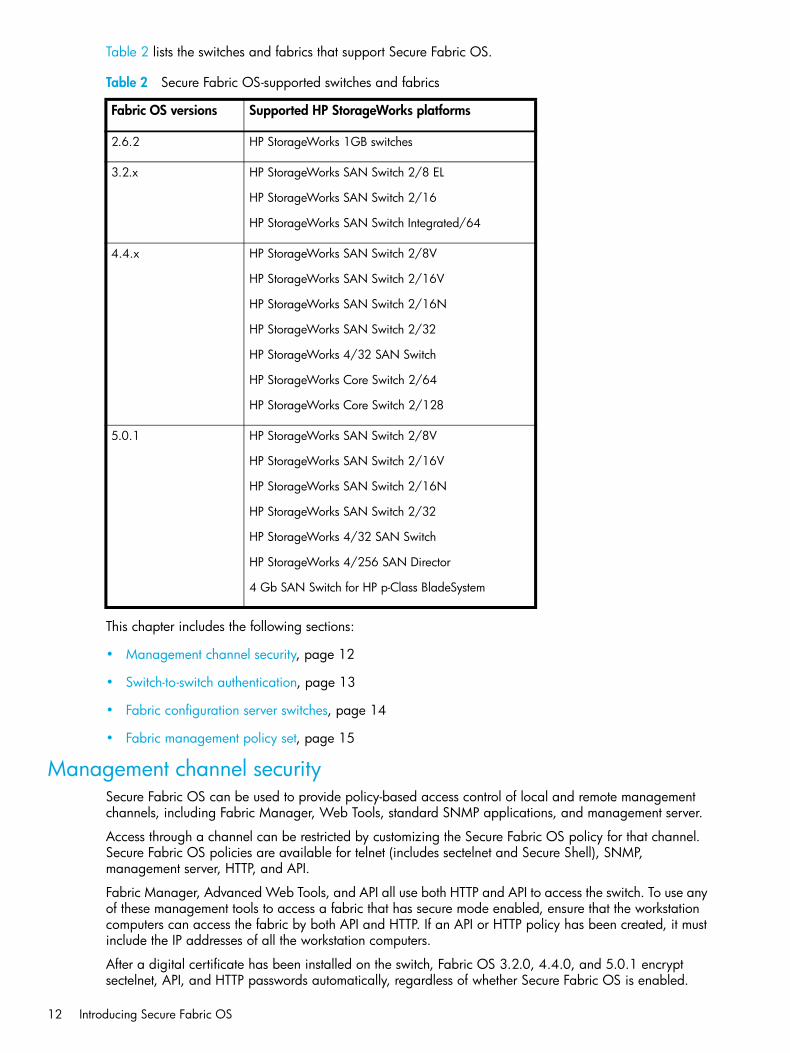
Table 2 lists the switches and fabrics that support Secure Fabric OS.
This chapter includes the following sections:
• Management channel security, page 12
• Switch-to-switch authentication, page 13
• Fabric configuration server switches, page 14
• Fabric management policy set, page 15
Management channel securitySecure Fabric OS can be used to provide policy-based access control of local and remote management channels, including Fabric Manager, Web Tools, standard SNMP applications, and management server.
Access through a channel can be restricted by customizing the Secure Fabric OS policy for that channel. Secure Fabric OS policies are available for telnet (includes sectelnet and Secure Shell), SNMP, management server, HTTP, and API.
Fabric Manager, Advanced Web Tools, and API all use both HTTP and API to access the switch. To use any of these management tools to access a fabric that has secure mode enabled, ensure that the workstation computers can access the fabric by both API and HTTP. If an API or HTTP policy has been created, it must include the IP addresses of all the workstation computers.
After a digital certificate has been installed on the switch, Fabric OS 3.2.0, 4.4.0, and 5.0.1 encrypt sectelnet, API, and HTTP passwords automatically, regardless of whether Secure Fabric OS is enabled.
Table 2 Secure Fabric OS-supported switches and fabrics
Fabric OS versions Supported HP StorageWorks platforms
2.6.2 HP StorageWorks 1GB switches
3.2.x HP StorageWorks SAN Switch 2/8 EL
HP StorageWorks SAN Switch 2/16
HP StorageWorks SAN Switch Integrated/64
4.4.x HP StorageWorks SAN Switch 2/8V
HP StorageWorks SAN Switch 2/16V
HP StorageWorks SAN Switch 2/16N
HP StorageWorks SAN Switch 2/32
HP StorageWorks 4/32 SAN Switch
HP StorageWorks Core Switch 2/64
HP StorageWorks Core Switch 2/128
5.0.1 HP StorageWorks SAN Switch 2/8V
HP StorageWorks SAN Switch 2/16V
HP StorageWorks SAN Switch 2/16N
HP StorageWorks SAN Switch 2/32
HP StorageWorks 4/32 SAN Switch
HP StorageWorks 4/256 SAN Director
4 Gb SAN Switch for HP p-Class BladeSystem

Secure Fabric OS administrator guide 13
NOTE: The Telnet button in Advanced Web Tools can be used to launch only telnet (not sectelnet or Secure Shell) and is disabled when secure mode is enabled.
On two-domain directors, messages (such as notifications of password changes) that are sent to the whole secure fabric are seen on both domains, even if the other domain is not part of the secure fabric.
Secure Shell (SSH)Fabric OS 4.4.x and 5.0.1 support SSH, enabling fully encrypted telnet sessions. Use of SSH requires installation of an SSH client on the host computer; use of SSH does not require a digital certificate on the switch.
Secure Shell access is configurable by the Telnet policy that is available through Secure Fabric OS. However, Fabric OS 4.4.x and 5.0.1 support Secure Shell whether or not Secure Fabric OS is licensed.
To restrict CLI access to Secure Shell over the network, disable telnet as described in ”Telnet” on page 13.
Secure Shell clients are available in the public domain and can be located by searching the Internet. Use clients that support version 2 of the protocol, such as OpenSSH or F-Secure.
Fabric OS 4.4.x and 5.0.1 also support the following ciphers for session encryption and hash function-based message authentication codes (HMACs):
• Ciphers: AES128-CBC, 3DES-CBC, Blowfish-CBC, Cast128-CBC, and RC4• HMACs: HMAC-MD5, HMAC-SHA1, HMAC-SHA1-96, and HMACMD5-96
NOTE: The first time a Secure Shell client is launched, a message is displayed, indicating that the server’s host key is not cached in the registry. You also see this message the first time a Secure Shell client is launched after you upgrade switch firmware.
For more information about Secure Shell, see the HP StorageWorks Fabric OS 5.x administrator guide.
SectelnetThe sectelnet client is a secure form of telnet that encrypts passwords only. It is available from HP. Fabric OS 4.4.x and 5.0.1 include the sectelnet server; the sectelnet client must be installed on the workstation computer.
The sectelnet client can be used as soon as a digital certificate is installed on the switch. sectelnet access is configurable by the Telnet policy.
TelnetStandard telnet is not available when secure mode is enabled.
To remove all telnet access to the fabric, disable telnet through the telnetd option of the configure command. This configure option does not require disabling the switch. For more information about the configure command, see the HP StorageWorks Fabric OS 5.x command reference guide.
Switch-to-switch authenticationSwitch-to-switch authentication supports the following:
• Using PKI, page 13• Using DH-CHAP, page 14
Using PKISecure Fabric OS can use digital certificates based on PKI and switch World Wide Names (WWNs) and the SLAP or FCAP protocols to identify the authorized switches and prevent the addition of unauthorized switches to the fabric. A PKI certificate installation utility (PKICert) is provided for generating certificate

14 Introducing Secure Fabric OS
signing requests (CSRs) and installing digital certificates on switches. For information about how to use the PKICert utility, see ”Using the PKICert utility” on page 28.
Support for FCAP is provided in Secure Fabric OS 3.2.x, 4.4.x, and 5.0.1 and is used instead of SLAP when both switches support it. PKI authentication automatically uses SLAP when a switch does not support FCAP.
NOTE: Fabric OS 4.4.x and 5.0.1 also use PKI digital certificates. Secure Fabric OS and Secure Sockets Layer (SSL) use different digital certificates and different methods of obtaining and installing the certificates. PKI digital certificates are used for the secure fabric, and SSL digital certificates are not. The methods described in this manual are specific to Secure Fabric OS. See the HP StorageWorks Fabric OS 5.x administrator guide for information about SSL and digital certificates.
Using DH-CHAPSecure Fabric OS 3.2.x, 4.4.x, and 5.0.1 use DH-CHAP shared secrets to provide switch-to-switch authentication and prevent the addition of unauthorized switches to the fabric. (DH-CHAP is not available with Fabric OS 2.6.x.) The default is to use FCAP or SLAP (see Using PKI). It should be explicitly enabled to authenticate using DH-CHAP.
You can specify that FCAP only, DH-CHAP only, or either be used. If either is permitted, the default order (FCAP, DH-CHAP) is used. The actual protocol is selected during dynamic negotiation.
DH-CHAP requires a pair of shared secret keys—shared secrets—between each pair of switches authenticating with DH-CHAP. Use the secAuthSecret command to manage shared secrets. See the HP StorageWorks Fabric OS 5.x command reference guide for details of the authUtil and secAuthSecret commands and see ”Configuring authentication” on page 50 for a basic procedure for configuring DH-CHAP.
Fabric configuration server switchesFabric configuration server (FCS) switches are one or more switches that are specified as trusted switches for managing Secure Fabric OS. These switches should be both electronically and physically secure. At least one FCS switch must be specified to act as the primary FCS switch, and one or more backup FCS switches are recommended to provide failover ability in case the primary FCS switch fails.
If your primary FCS switch runs Fabric OS 3.2.x, 4.4.x, or 5.0.1, you should not use a Fabric OS 2.6.2 switch (or a switch running older versions of Fabric OS 3.x.x or 4.x.x) as a backup FCS switch. Fabric OS 3.2.x, 4.4.x, and 5.0.1 introduce features that are not supported by earlier releases. These include a larger secure database (128K in 3.2.x and 256K in 4.4.x and 5.0.1), multiple-user accounts (MUA), RADIUS, and an SSL certificate, all of which are not supported by older releases.
FCS switches are specified by listing their WWNs in a specific policy called the FCS policy. The first switch that is listed in this policy and participating in the fabric acts as the primary FCS switch; it distributes the following information to the other switches in the fabric:
• Zoning configuration
• Secure Fabric OS policies
• Fabric password database
• SNMP community strings
• System date and time
NOTE: The role of the FCS switch is separate from the role of the principal switch, which assigns domain IDs. The role of the principal switch is not affected by whether secure mode is enabled.

Secure Fabric OS administrator guide 15
When secure mode is enabled, only the primary FCS switch can propagate management changes to the fabric. When a new switch joins the fabric, the primary FCS switch verifies the digital certificate; then it provides the current configuration, overwriting the existing configuration of the new switch.
Because the primary FCS switch distributes the zoning configuration, zoning databases do not merge when new switches join the fabric. Instead, the zoning information on the new switches is overwritten when the primary FCS switch downloads zoning to these switches, if secure mode is enabled on all of them. For more information about zoning, see the HP StorageWorks Fabric OS 5.x administrator guide. For more information about merging fabrics, see ”Adding switches and merging fabrics with secure mode enabled” on page 105.
The remaining switches listed in the FCS policy act as backup FCS switches. If the primary FCS switch becomes unavailable for any reason, the next switch in the list becomes the primary FCS switch. You should have at least one backup FCS switch, to reduce the possibility of having no primary FCS switch available. You can designate as many backup FCS switches as you like; however, all FCS switches should be physically secure.
Any switches not listed in the FCS policy are defined as non-FCS switches. The root and factory accounts are disabled on non-FCS switches.
For information about customizing the FCS policy, and about configuration download restrictions while in secure mode, see ”Enabling Secure mode” on page 56.
Fabric management policy setUsing Secure Fabric OS, you can create several types of policies to customize various aspects of the fabric. By default, only the FCS policy exists when secure mode is first enabled. Use the CLI or Fabric Manager (optional software) to create and manage Secure Fabric OS policies.
Secure Fabric OS policies can be created, displayed, modified, and deleted. They can also be created and saved without being activated immediately, to allow future implementation. Saved policies are persistent, meaning that they are saved in flash memory and remain available after switch reboot or power cycle.
The group of existing policies is referred to as the fabric management policy set or FMPS, which contains an active policy set and a defined policy set. The active policy set contains the policies that are activated and currently in effect. The defined policy set contains all the policies that have been defined, whether activated or not. Both policy sets are distributed to all switches in the fabric by the primary FCS switch. Secure Fabric OS recognizes each type of policy by a predetermined name.
Secure Fabric OS supports the following policies:
• FCS policy
Use to specify the primary FCS and backup FCS switches. This is the only required policy.
• Management access control (MAC) policies
Use to restrict management access to switches. The following specific MAC policies are provided:
• Read and Write SNMP policies. Use to restrict which SNMP hosts are allowed read and write access to the fabric.
• Telnet policy. Use to restrict which workstations can use sectelnet or Secure Shell to connect to the fabric (telnet is not available when Secure Fabric OS is enabled).
• HTTP policy. Use to restrict which workstations can use HTTP to access the fabric.
• API policy. Use to restrict which workstations can use API to access the fabric.
• SES policy. Use to restrict which devices can be managed by SES.
• Management Server policy. Use to restrict which devices can be accessed by management server.
• Serial Port policy. Use to restrict which switches can be accessed by serial port.

16 Introducing Secure Fabric OS
• Front Panel policy. Use to restrict which switches can be accessed by front panel.
• Options policy
Use to restrict the types of WWNs that can be used for zoning.
• Device Connection Control (DCC) policies
Use to restrict which Fibre Channel device ports can connect to which Fibre Channel switch ports.
• Switch Connection Control (SCC) policy
Use to restrict which switches can join the fabric.
Secure Fabric OS administrator guide 17
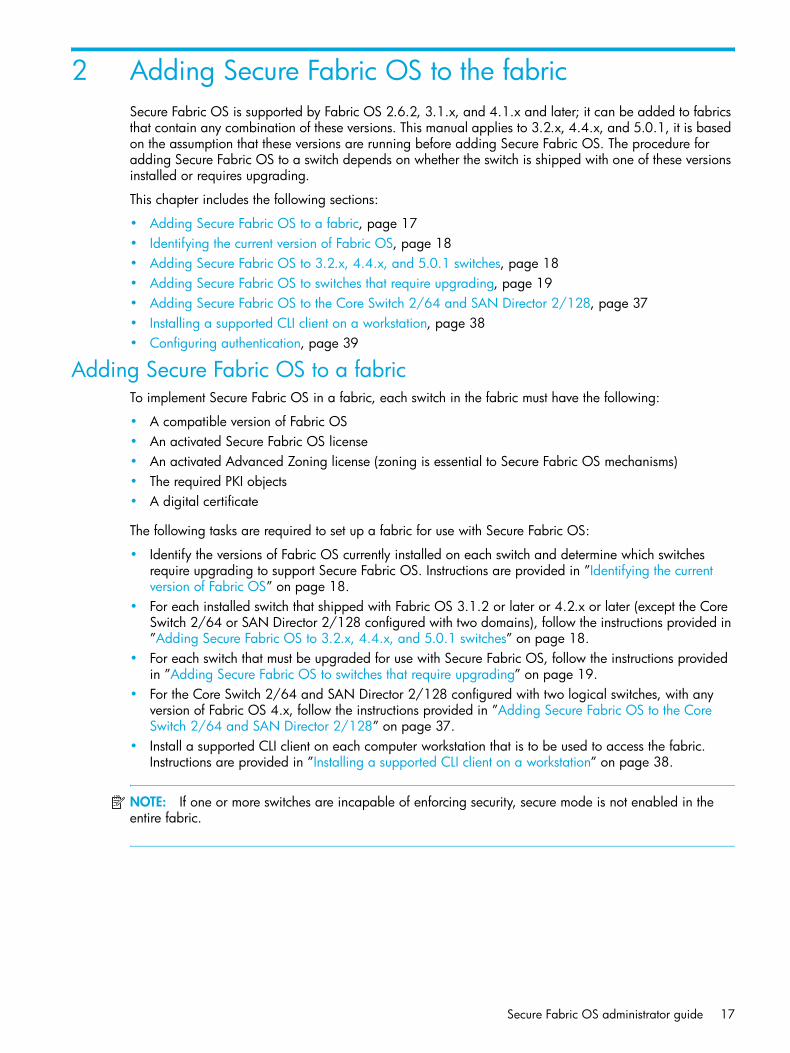
2 Adding Secure Fabric OS to the fabricSecure Fabric OS is supported by Fabric OS 2.6.2, 3.1.x, and 4.1.x and later; it can be added to fabrics that contain any combination of these versions. This manual applies to 3.2.x, 4.4.x, and 5.0.1, it is based on the assumption that these versions are running before adding Secure Fabric OS. The procedure for adding Secure Fabric OS to a switch depends on whether the switch is shipped with one of these versions installed or requires upgrading.
This chapter includes the following sections:
• Adding Secure Fabric OS to a fabric, page 17 • Identifying the current version of Fabric OS, page 18• Adding Secure Fabric OS to 3.2.x, 4.4.x, and 5.0.1 switches, page 18• Adding Secure Fabric OS to switches that require upgrading, page 19• Adding Secure Fabric OS to the Core Switch 2/64 and SAN Director 2/128, page 37• Installing a supported CLI client on a workstation, page 38• Configuring authentication, page 39
Adding Secure Fabric OS to a fabricTo implement Secure Fabric OS in a fabric, each switch in the fabric must have the following:
• A compatible version of Fabric OS• An activated Secure Fabric OS license• An activated Advanced Zoning license (zoning is essential to Secure Fabric OS mechanisms)• The required PKI objects• A digital certificate
The following tasks are required to set up a fabric for use with Secure Fabric OS:
• Identify the versions of Fabric OS currently installed on each switch and determine which switches require upgrading to support Secure Fabric OS. Instructions are provided in ”Identifying the current version of Fabric OS” on page 18.
• For each installed switch that shipped with Fabric OS 3.1.2 or later or 4.2.x or later (except the Core Switch 2/64 or SAN Director 2/128 configured with two domains), follow the instructions provided in ”Adding Secure Fabric OS to 3.2.x, 4.4.x, and 5.0.1 switches” on page 18.
• For each switch that must be upgraded for use with Secure Fabric OS, follow the instructions provided in ”Adding Secure Fabric OS to switches that require upgrading” on page 19.
• For the Core Switch 2/64 and SAN Director 2/128 configured with two logical switches, with any version of Fabric OS 4.x, follow the instructions provided in ”Adding Secure Fabric OS to the Core Switch 2/64 and SAN Director 2/128” on page 37.
• Install a supported CLI client on each computer workstation that is to be used to access the fabric. Instructions are provided in ”Installing a supported CLI client on a workstation” on page 38.
NOTE: If one or more switches are incapable of enforcing security, secure mode is not enabled in the entire fabric.

18 Adding Secure Fabric OS to the fabric
Identifying the current version of Fabric OSBefore continuing, identify the version of Fabric OS on each switch in the fabric and determine which switches must be upgraded.
To identify the current version of Fabric OS installed on each switch in the fabric:
1. Open a serial or telnet connection to each of the switches in the fabric and log in as admin.2. Issue the version command.
The following example shows the process for entering the version command on a SAN Switch 2/32:
Adding Secure Fabric OS to 3.2.x, 4.4.x, and 5.0.1 switchesIf a switch requires PKI objects, see section ”Creating PKI objects” on page 32 for information on creating the PKI objects. If a switch requires a digital certificate, see section ”Obtaining the digital certificate file” on page 27 for information on obtaining digital certificates.
The user is prompted to customize the account passwords at the first login. The prompts continue to display at each login and the passwd command remains disabled until the passwords prompts are answered.
CAUTION: Immediately changing the passwords is recommended.
NOTE: In addition to customizing the passwords for the user, admin, factory, and root accounts, setting both the boot PROM and recovery passwords is strongly recommended. For instructions on setting these passwords, see the HP StorageWorks Fabric OS 5.x administrator guide.
To set up Secure Fabric OS on a switch shipped with Fabric OS 3.2.x, 4.4.x, or 5.0.1:
1. Open a serial or telnet connection to the switch and log in as admin.The default password is password.The firmware prompts you to change all passwords.
2. Change all the passwords, using between 8 and 40 alphanumeric characters for each password, with a different password for each account.
NOTE: The initial login prompt accepts a maximum password length of eight characters. Any characters beyond the eighth character are ignored. Only the default password is subject to the eight-character limit. Any password set by the user can have a length from 8 to 40 characters.
Record the passwords and store them in a secure place; recovering passwords can require significant effort and result in fabric downtime.
3. If switches running Fabric OS 2.6.2 or 3.2.x are to be in same fabric as switches running Fabric OS 4.4.x or 5.0.1, see the HP StorageWorks Fabric OS 5.x administrator guide for instructions on configuring compatible PID modes across the switches.Switch digital certificates are checked when a switch joins a fabric, either because the switch is added to the fabric or because the switch is booting. Changes to the certificate, for example, if the certificate is removed or corrupted, might not be noticed until the switch is rebooted.
switch3900:admin> versionKernel: 2.4.2Fabric OS: v4.2Made on: Fri Jan 3 23:02:08 2003Flash: Jan 3 18:03:35 2003BootProm: 4.2.17
Secure Fabric OS administrator guide 19
NOTE: Changing the PID format causes an update to the DCC policies. If you change the PID format, use the configUpload command to create a new backup configuration file. Do not download the old file.
4. Ensure that the switch has activated Secure Fabric OS and Advanced Zoning software licenses as described in ”Verifying or activating Secure Fabric OS and Advanced Zoning licenses” on page 19 next.
Verifying or activating Secure Fabric OS and Advanced Zoning licensesThe Secure Fabric OS and Advanced Zoning features are part of the Fabric OS and can be activated by entering a corresponding license key, available from an authorized HP Account Representative. A license must be activated on each switch that implements Secure Fabric OS.
Licenses can be activated through the CLI or through Web Tools. This section provides CLI instructions only. For instructions on activating a license through Web Tools, see the HP StorageWorks Fabric OS 5.x Advanced Web Tools administrator guide.
To verify or activate a software license through the CLI:
1. Open a serial or telnet connection and log in to the switch as admin.Use your recorded password.
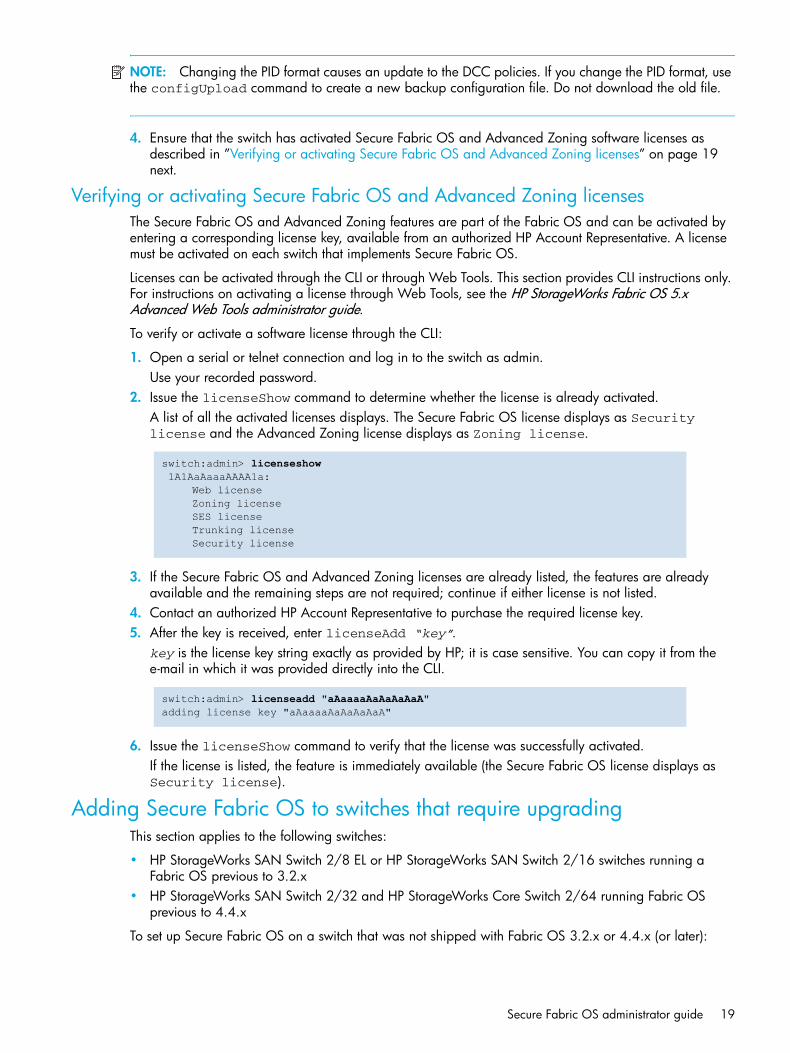
2. Issue the licenseShow command to determine whether the license is already activated.A list of all the activated licenses displays. The Secure Fabric OS license displays as Security license and the Advanced Zoning license displays as Zoning license.
3. If the Secure Fabric OS and Advanced Zoning licenses are already listed, the features are already available and the remaining steps are not required; continue if either license is not listed.
4. Contact an authorized HP Account Representative to purchase the required license key.5. After the key is received, enter licenseAdd “key”.
key is the license key string exactly as provided by HP; it is case sensitive. You can copy it from the e-mail in which it was provided directly into the CLI.
6. Issue the licenseShow command to verify that the license was successfully activated.If the license is listed, the feature is immediately available (the Secure Fabric OS license displays as Security license).
Adding Secure Fabric OS to switches that require upgradingThis section applies to the following switches:
• HP StorageWorks SAN Switch 2/8 EL or HP StorageWorks SAN Switch 2/16 switches running a Fabric OS previous to 3.2.x
• HP StorageWorks SAN Switch 2/32 and HP StorageWorks Core Switch 2/64 running Fabric OS previous to 4.4.x
To set up Secure Fabric OS on a switch that was not shipped with Fabric OS 3.2.x or 4.4.x (or later):
switch:admin> licenseshow 1A1AaAaaaAAAA1a:
Web license Zoning license SES license Trunking license Security license
switch:admin> licenseadd "aAaaaaAaAaAaAaA"adding license key "aAaaaaAaAaAaAaA"

20 Adding Secure Fabric OS to the fabric
1. If switches running Fabric OS 3.2.x are to be in the same fabric as switches running Fabric OS 4.4.x or 5.0.1, see the HP StorageWorks Fabric OS 5.x administrator guide for instructions on configuring compatible PID modes.
NOTE: Changing the PID format causes an update to the DCC policies. If you change the PID format, use the configUpload command to create a new backup configuration file. Do not download the old file.
2. Back up the configuration and upgrade the switch to Fabric OS 3.2.x, 4.4.x, or 5.0.1, as appropriate to the switch, as described in ”Upgrading to a compatible version of Fabric OS” on page 20.
3. Change the account passwords from the default values, as described in ”Customizing the account passwords” on page 21.
4. The remaining steps are determined by whether Secure Fabric OS was already in use on the switch (such as on an HP StorageWorks switch running Fabric OS 2.6.x): • If Secure Fabric OS was already in use on the switch, the upgrade is complete; do not proceed
further. To verify the existing policy set, enter the secPolicyShow command.• If Secure Fabric OS was not already in use on the switch, continue with step 5.
5. Verify or activate the Secure Fabric OS and Advanced Zoning licenses, as described in ”Verifying or activating Secure Fabric OS and Advanced Zoning licenses” on page 21.
6. Download and install the PKICert utility on the computer workstation, as described in ”Installing the PKICert utility” on page 22.
7. Create a file containing the CSRs from all the switches that require certificates, as described in ”Using the PKICert utility” on page 22.
8. Obtain digital certificates from HP, as described in ”Obtaining the digital certificate file” on page 27. 9. Distribute the certificates to the switches, as described in ”Distributing digital certificates to the switches”
on page 28.10.Verify that digital certificates are installed on all the switches, as described in ”Verifying installation of
the digital certificates” on page 31.
Upgrading to a compatible version of Fabric OSSecure Fabric OS is supported by Fabric OS 2.6.2, 3.2.x, and 4.4.x and can be implemented in fabrics that contain any combination of these versions.
NOTE: Combinations of switches running Fabric OS 2.6.2 or 3.2.x and Fabric OS 4.4.x or Fabric OS 5.0.1must use compatible PID modes. See the HP StorageWorks Fabric OS 5.x administrator guide for information about PID modes.
Changing the PID format causes an update to the DCC policies. If you change the PID format, use the configUpload command to create a new backup configuration file. Do not use the configDownload file to load the old file saved from a different PID format.
If a switch already has a Secure Fabric OS license (such as a switch running Fabric OS 2.6) and secure mode is enabled, the switch can remain in secure mode during the firmware upgrade.
To install the required versions of Fabric OS on each switch in the fabric:
1. Obtain the required firmware from HP, according to the type of switch.
2. Open a serial or telnet connection to one of the switches in the fabric and log in as admin.
The default password is password.
3. Back up the configuration by entering the configUpload command and completing the prompts. This also backs up the security policies, if the switch is an FCS switch.
4. Download the firmware to the computer workstation or server.

Secure Fabric OS administrator guide 21
5. Download the required firmware from the computer to the switch. The download process depends on the type of switch and the management interface. See the HP StorageWorks Fabric OS 5.x administrator guide for download instructions specific to the type of switch and management interface.
NOTE: If secure mode is already enabled on the switch (such as on a 1-Gb switch running 2.6), secure mode can remain enabled during the download to preserve the policies.
6. Reboot the switch.
NOTE: The required PKI objects are automatically generated when the switch is rebooted in the new version of Fabric OS. See ”Verifying installation of the digital certificates” on page 31 for steps you can take to verify the existence of the PKI objects.
7. Reboot the switch.
8. Repeat this procedure for each switch in the fabric.
Customizing the account passwordsAfter installing a new version of Fabric OS, you are prompted to customize the account passwords at the first login. These prompts display at each login and the passwd command remains disabled until the passwords are changed from the default values.
NOTE: Only the first eight characters are checked.
In addition to customizing the passwords for the user, admin, factory, and root accounts, setting the boot PROM and recovery passwords is strongly recommended for Fabric OS 4.4.x (this does not apply to 3.2.x). For instructions on setting these passwords, see the HP StorageWorks Fabric OS 5.x administrator guide.
To log in and change the passwords:
1. Open a serial or telnet connection and log in to the switch as admin.
The default password is password.
The firmware prompts you to change all passwords.
2. Change all the passwords, using between 8 and 40 alphanumeric characters for each password, with a different password for each account. The new passwords must be different from the default values.
NOTE: Record the passwords and store them in a secure place; recovering passwords can require significant effort and result in fabric downtime.
Verifying or activating Secure Fabric OS and Advanced Zoning licensesSee the instructions provided in ”Verifying or activating Secure Fabric OS and Advanced Zoning licenses” on page 19.

22 Adding Secure Fabric OS to the fabric
Installing the PKICert utilityThe PKI certificate installation utility (PKICert utility) version 1.0.6 or later is provided by HP and is used to collect certificate signing requests (CSRs) and install digital certificates on switches. The utility must be installed on a computer workstation.
To install the PKICert utility on a Solaris workstation, follow the instructions provided in the PKICert utility ReadMe file.
To install the PKICert utility on a PC workstation:
1. Go to the the HP web site to obtain the PKICert utility from HP:
http://www.hp.com/country/us/eng/prodserv/storage.html
2. Locate the Search Function window.3. Type PKICert utility and select >> to start the search.4. Extract all the files from the utility zip file into a directory.5. Execute setup.exe; the program installs a utility in a location specified during the installation.
6. Review the ReadMe file for current information about the utility.
Using the PKICert utility The PKICert utility makes it possible to retrieve CSRs from all the switches in the fabric and save them into a CSR file in XML format. PKICert also allows the user to create license reports, and it provides online help. (CSRs and PKI digital certificates also are used in Fabric OS 4.4.x and 5.0.1 with SSL certificates. The utility to retrieve certificates, the CSRs themselves, and the digital certificates for these two uses are different. See the HP StorageWorks Fabric OS 5.x administrator guide for information on SSL.)
NOTE: If this procedure is interrupted by a switch reboot, the CSR file is not generated and the procedure must be repeated. This procedure provides PC-specific examples.
The PKICert utility can be used only in nonsecure mode to generate or install certificates.
While performing the certificate request process using PKICert, the switch name should not contain spaces. If the switch name contains spaces, the CSR is rejected by the web site.
In Fabric OS 4.4.x and 5.0.1, PKICert installs only one certificate on a single-domain chassis. Previous Fabric OS versions install two certificates.
To obtain the CSR file for the fabric:
1. On a PC, double-click pkicert.exe.
The PKICert utility prompts for the events log file name.
2. Enter a file name for the events log and press Enter, or just press Enter to accept the default.
The log file is automatically created in the same directory as pkicert.exe.
PKI CERTIFICATE INSTALLATION UTILITY pki_v1.0.6
All events and errors will be recorded in an event/error log file.If the file already exists, new event/error information will beappended to it.
Enter a log file name [or just press Enter to accept the default].
[pki_events.log] => pki_events_fabric1.log

Secure Fabric OS administrator guide 23
3. When the utility prompts for the desired function, enter 1 to select CSR retrieval and press Enter.
4. When the utility prompts for the method of specifying fabric addresses, enter the desired method for entering the fabric addresses.
To manually enter the fabric address:
a. Type 1 and press Enter.
The utility prompts for the IP address or switch name of a switch in the fabric. Only one switch name or IP address is required for each fabric.
b. Enter the IP address or switch name of one of the switches in the fabric and press Enter.At least one valid IP address must be entered to continue, and the corresponding switch must be operating and available. When all the IP addresses have been entered, press Enter again to end the list.
c. When the utility prompts for the username and password for this switch, enter the username and password, then press Enter to continue.
To read the fabric addresses from a file:
a. Type 2 and press Enter.The utility prompts for the path and file name of the file. The addresses in the file must be IP addresses or switch names, each on a separate line.
PKI CERTIFICATE INSTALLATION UTILITY pki_v1.0.6FUNCTIONS
1) Retrieve CSRs from switches & write a CSR file2) Install Certificates contained in a Certificate file3) Generate a Licensed-Product/Installed-Certificates report4) Help using PKI-Cert to get & install certificatesq) Quit PKI Certificate installation utility
Enter choice> 1
PKI CERTIFICATE INSTALLATION UTILITY pki_v1.0.6Choose a method for providing fabric addresses
1) Manually enter fabric address2) Read addresses from a file (name to be given)r) Return to Main menu
Enter choice>
PKI CERTIFICATE INSTALLATION UTILITY pki_v1.0.6
Only one address per fabric is needed to get to all switches.Enter a list of one or more IP or DNS addresses (aliases) youwish to use (one per line). End the list with an empty item.
1 --> 10.32.142.1672 -->
Connecting to Fabric(s) ...
Login to fabric 1. principal switch WWN = 10:00:00:60:69:80:46:00
Username: adminPassword:
Logged into fabric 1. principal switch WWN = 10:00:00:60:69:80:46:00
Press Enter to continue >

24 Adding Secure Fabric OS to the fabric
b. Enter the path and file name of the file that contains the fabric addresses and press Enter.
The utility prompts for information about the CSR file to be created.
5. Enter the requested information:
a. Enter path and file name for the CSR file to be created; then enter y if the address was entered correctly, or enter n and reenter the address, if not.
b. Enter y to include licensed product data in the file; otherwise, enter n.
c. Enter n to retrieve CSRs only from switches that do not already have a digital certificate; or, as shown in the example, enter y to retrieve CSRs from all switches in the fabric.
NOTE: If CSRs are retrieved and digital certificates are requested for switches that already have digital certificates, the same digital certificates are provided again.
Enter the file-name of the Fabric Address file.File Name ===> \\server\Working\FabricAddresses.txt
Connecting to Fabric(s) ...
Login to fabric 1. principal switch WWN = 10:00:00:60:69:80:46:00Username:adminPassword:
Logged into fabric 1. principal switch WWN = 10:00:00:60:69:80:46:00
Press Enter to continue >
PKI CERTIFICATE INSTALLATION UTILITY pki_v1.0.6GET CERTIFICATE SIGNING REQUESTS
You must enter the file-name of the CSR output file to create. ______________________________________________________ | Note: | | * The named file will be created | | * The file-name may include a directory path | | that must already exist. | | * An extension of '.xml' will be appended to | | the file name if not already present. | | * If the file already exists, it will be | | overwritten. | ----------------------------------------------------
File Name ===> testIs the filename "test.xml" correct? (y/n): y**** WARNING, file, “test.sml”, already exists!! ****Do you want to overwrite it <y/n>? > yInclude (optional) licensed product data (y/n)? > yGet CSRs even from switches with certificates (y/n)? > y

Secure Fabric OS administrator guide 25
6. The utility prompts you to choose a fabric from which to retrieve CSRs. Enter a to retrieve CSRs from all discovered fabrics; or, as shown in the example, enter 1 to retrieve CSRs only from the fabric identified earlier; then press Enter.
7. The utility displays the success or failure of CSR retrieval. Press Enter to continue.
8. If you are ready to install digital certificates, enter 2 from the list displayed in the following Functions menu; do not quit PKICert.
PKI CERTIFICATE INSTALLATION UTILITY pki_v1.0.6
Choose a Fabric On Which to Operate
Fabric World Wide Name # Switches Principal------ ----------------------- ---------- -----------1) 10:00:00:60:69:80:46:00 34 host1_sw0a) All Fabricsr) Return to Functions menu
enter your choice> 1
PKI CERTIFICATE INSTALLATION UTILITY pki_v1.0.6
Retrieving CSR's from 1 fabric(s)1. Got a CSR for Switch: Name="sw_129", IP="10.32.142.129"2. Got a CSR for Switch: Name="sw_128", IP="10.32.142.128"3. Got a CSR for Switch: Name="sw_139", IP="10.32.142.139"4. Got a CSR for Switch: Name="sw_143", IP="10.32.142.143"5. Got a CSR for Switch: Name="sw_138", IP="10.32.142.138"6. Got a CSR for Switch: Name="sw_142", IP="10.32.142.142"7. Got a CSR for Switch: Name="Core_sw0", IP="10.32.142.166"
Wrote 12824 bytes of switch data to file: "\\server\Working\CSR_Fabric1.xml"
Success getting CSRs & writing them to a CSR file
Press Enter to continue >
PKI CERTIFICATE INSTALLATION UTILITY pki_v1.0.6FUNCTIONS
1) Retrieve CSRs from switches & write a CSR file2) Install Certificates contained in a Certificate file3) Generate a Licensed-Product/Installed-Certificates report4) Help using PKI-Cert to get & install certificatesq) Quit PKI Certificate installation utility
Enter choice> 2

26 Adding Secure Fabric OS to the fabric
9. Enter n (no) to input different fabric addresses; or, as shown in the example, enter y (yes) to continue with the current fabrics.
10.Enter the file name of the certificate input file and then enter y (yes).
11.Type 1 and press Enter to choose a fabric on which to operate by way of the WWN.
When you are finished, press Enter to return to the Functions menu.
12.To quit the installation, enter q to quit the utility; then enter y and press Enter to verify that you want to quit.
PKI CERTIFICATE INSTALLATION UTILITY pki_v1.0.6Currently Connected Fabrics
Fabric World Wide Name # Switches Principal ------ ----------------------- ---------- -----------* 10:00:00:60:69:11:f8:f9 15 sec237________________________________________________________
Use Currently Connected Fabrics?
y) Yes, continue with current fabric(s)n) No, input different Fabric addresses(es)
enter your choice> y
PKI CERTIFICATE INSTALLATION UTILITY pki_v1.0.6LOAD CERTIFICATES
Enter the file-name of the Certificate input file.File Name ===> c:/6821.xml
Is the filename “c:/6821.xml” correct? (y/n): y
PKI CERTIFICATE INSTALLATION UTILITY pki_v1.0.6
Choose a Fabric On Which to Operate
Fabric World Wide Name # Switches Principal------ ----------------------- ---------- -----------1) 10:00:00:60:69:11:f8:f9 15 sec237a) All Fabricsr) Return to Functions menu
enter your choice> 1
PKI CERTIFICATE INSTALLATION UTILITY pki_v1.0.6FUNCTIONS
1) Retrieve CSRs from switches & write a CSR file2) Install Certificates contained in a Certificate file3) Generate a Licensed-Product/Installed-Certificates report4) Help using PKI-Cert to get & install certificatesq) Quit PKI Certificate installation utility
Enter choice> q
QUIT? (y/n) y

Secure Fabric OS administrator guide 27
Removing PKI objectsYou cannot delete PKI objects in secure mode. If they are deleted when secure mode is disabled, secure mode cannot be reenabled until they are generated. If any PKI objects are missing, all the PKI objects should be deleted using the pkiRemove command and then regenerated using the pkiCreate command or by rebooting the switch. (Any missing PKI objects, except the digital certificate, are automatically regenerated when the switch is rebooted.) If the digital certificate is deleted, it must be reinstalled on the switch according to the instructions provided in ”Distributing digital certificates to the switches” on page 28.
For Fabric OS 3.2.x, use configRemove to remove all the PKI objects, enter configUpload, and then fastboot the switch. After the switch reboots, all PKI objects are available except for the certificate.
To remove PKI objects in nonsecure mode, issue the pkiremove command as shown in the following example:
If run in secure mode, the following error message is displayed:
Obtaining the digital certificate fileHP provides the digital certificates in an XML file that is generated in response to the CSRs. The digital certificate file is obtained via the following supplier web site:
IMPORTANT: The following URL will take you outside of the Hewlett-Packard web site, to a third-party supplier to obtain your digital certificate. HP is not responsible for the information outside of the HP web site.
http://www.switchkeyactivation.com/SecureFabricOSUpgrade/
You will need to provide the following information:
• The CSR file generated in the previous procedure
• E-mail address
• Technical contact
• Phone
• Country
You will receive a confirmation number and the digital certificate file, which contains a certificate for each CSR submitted.
switch:admin> pkiremove
WARNING!!!
Removing Pki objects will impair the security functionalityof this fibre channel switch. If you want secure mode enabled,you will need to get the switch certificate again.
About to remove Pki objects.ARE YOU SURE (yes, y, no, n): [no] yAll PKI objects removed.
switch:admin> pkiremove
This Switch is in secure mode.Removing Pki objects is not allowed. Exiting...

28 Adding Secure Fabric OS to the fabric
Save the digital certificate file on a secure workstation. The recommended location is in the directory with the CSR file. Making a backup copy of the digital certificate file and storing it in a secure location is recommended.
Distributing digital certificates to the switchesYou can use the PKICert utility to distribute digital certificates to the switches in the fabric. The utility ensures that each digital certificate is installed on the corresponding switch.
If you run the utility without any task argument, it defaults to interactive mode, in which it prompts for the required input.
NOTE: If this procedure is interrupted by a switch reboot, the certificate is not loaded and the procedure must be repeated.
To load digital certificates onto one or more switches while retrieving CSRs, go to step 8 of the previous section, ”Using the PKICert utility”.
To manually load digital certificates onto one or more switches:
1. On a PC, double-click pkicert.exe.
The PKICert utility prompts for the events log file name.
2. Enter a file name for the events log and press Enter; alternatively, press Enter to accept the default.
The log file is automatically created in the same directory as pkicert.exe:
3. When the utility prompts for the desired function, enter 2 to install the certificates and press Enter. For example:
PKI CERTIFICATE INSTALLATION UTILITY pki_v1.0.6
All events and errors will be recorded in an event/error log file.If the file already exists, new event/error information will beappended to it.
Enter a log file name [or just press Enter to accept the default].
[pki_events.log] => pki_events_fabric1.log
PKI CERTIFICATE INSTALLATION UTILITY pki_v1.0.6FUNCTIONS
1) Retrieve CSRs from switches & write a CSR file2) Install Certificates contained in a Certificate file3) Generate a Licensed-Product/Installed-Certificates report4) Help using PKI-Cert to get & install certificatesq) Quit PKI Certificate installation utility
Enter choice> 2

Secure Fabric OS administrator guide 29
4. When the utility prompts for the method of specifying fabric addresses, enter the desired method for entering the fabric addresses. For example:
To manually enter the fabric address:
a. Type 1 and press Enter.
The utility prompts for the IP address or switch name of a switch in the fabric. Only one switch name or IP address is required for each fabric.
b. Enter the IP address or switch name of one of the switches in the fabric and press Enter.At least one valid IP address must be entered to continue; the corresponding switch must be operating and available. When all the IP addresses have been entered, press Enter again to end the list. For example:
c. The utility prompts for the username and password for this switch. Enter the username and password; press Enter to continue. For example:
To read the fabric addresses from a file:
a. Type 2 and press Enter.
The utility prompts for the path and file name of the file. The addresses in the file must be IP addresses or switch names, each on a separate line.
b. Enter the path and file name of the file that contains the fabric addresses and press Enter.
PKI CERTIFICATE INSTALLATION UTILITY pki_v1.0.6Choose a method for providing fabric addresses
1) Manually enter fabric address2) Read addresses from a file (name to be given)r) Return to Main menu
Type choice>
PKI CERTIFICATE INSTALLATION UTILITY pki_v1.0.6
Only one address per fabric is needed to get to all switches.Enter a list of one or more IP or DNS addresses (aliases) youwish to use (one per line). End the list with an empty item.
1 --> 10.32.142.1672 -->
Connecting to Fabric(s) ...
Login to fabric 1. principal switch WWN = 10:00:00:60:69:80:46:00
Username: adminPassword:
Logged into fabric 1. principal switch WWN = 10:00:00:60:69:80:46:00
Press Enter to continue >
Enter the file-name of the Fabric Address file.File Name ===> \\server\Working\FabricAddresses.txt
Connecting to Fabric(s) ...
Login to fabric 1. principal switch WWN = 10:00:00:60:69:80:46:00

30 Adding Secure Fabric OS to the fabric
c. The utility prompts for the username and password for this switch. Enter the username and password; press Enter to continue.
The utility prompts for the path and file name of the digital certificate file provided by the HP.
5. Enter the path and file name of the digital certificate file and press Enter.
If the returned path and file name is correct, type y and press Enter; if not, type n, press Enter, retype the path and file name, and then verify that it is correct.
The utility prompts to choose the fabrics on which to install digital certificates.
6. Enter 1 to distribute certificates only to the fabric identified earlier or enter a to install certificates to all discovered fabrics; then press Enter. For example:
The new certificates are loaded onto the switches and the success or failure of each certificate is displayed.
7. Press Enter to continue.
Username: adminPassword:
Logged into fabric 1. principal switch WWN = 10:00:00:60:69:80:46:00
Press Enter to continue >
PKI CERTIFICATE INSTALLATION UTILITY pki_v1.0.6LOAD CERTIFICATES
Enter the file-name of the Certificates input file.
File Name ===> \\server\Working\DC_Fabric1.xmlIs the filename "\\server\Working\DC_Fabric1.xml" correct? (y/n): y
PKI CERTIFICATE INSTALLATION UTILITY pki_v1.0.6
Choose a Fabric On Which to Operate
Fabric World Wide Name # Switches Principal------ ----------------------- ---------- -----------1) 10:00:00:60:69:80:46:00 7. . . . host1_sw0a) All Fabricsr) Return to Functions menu
enter your choice> 1
PKI CERTIFICATE INSTALLATION UTILITY pki_v1.0.6Load Certificates onto 1 fabric(s)
1. Loaded Certificate on Switch primaryfcsswitch: WWN-10:00:00:60:69:11:fc:522. Loaded Certificate on Switch backupfcsswitch: WWN-10:00:00:60:69:11:fc:533. Loaded Certificate on Switch backupfcsswitch: WWN-10:00:00:60:69:11:fc:544. Loaded Certificate on Switch nonfcsswitch: WWN-10:00:00:60:69:11:fc:555. Loaded Certificate on Switch nonfcsswitch: WWN-10:00:00:60:69:11:fc:566. Loaded Certificate on Switch nonfcsswitch: WWN-10:00:00:60:69:11:fc:577. Loaded Certificate on Switch nonfcsswitch: WWN-10:00:00:60:69:11:fc:58
7 Certificates were loaded,0 Certificate loads failed
Press Enter to Continue.
Secure Fabric OS administrator guide 31
NOTE: The sectelnet application can be used as soon as a digital certificate is installed on the switch.
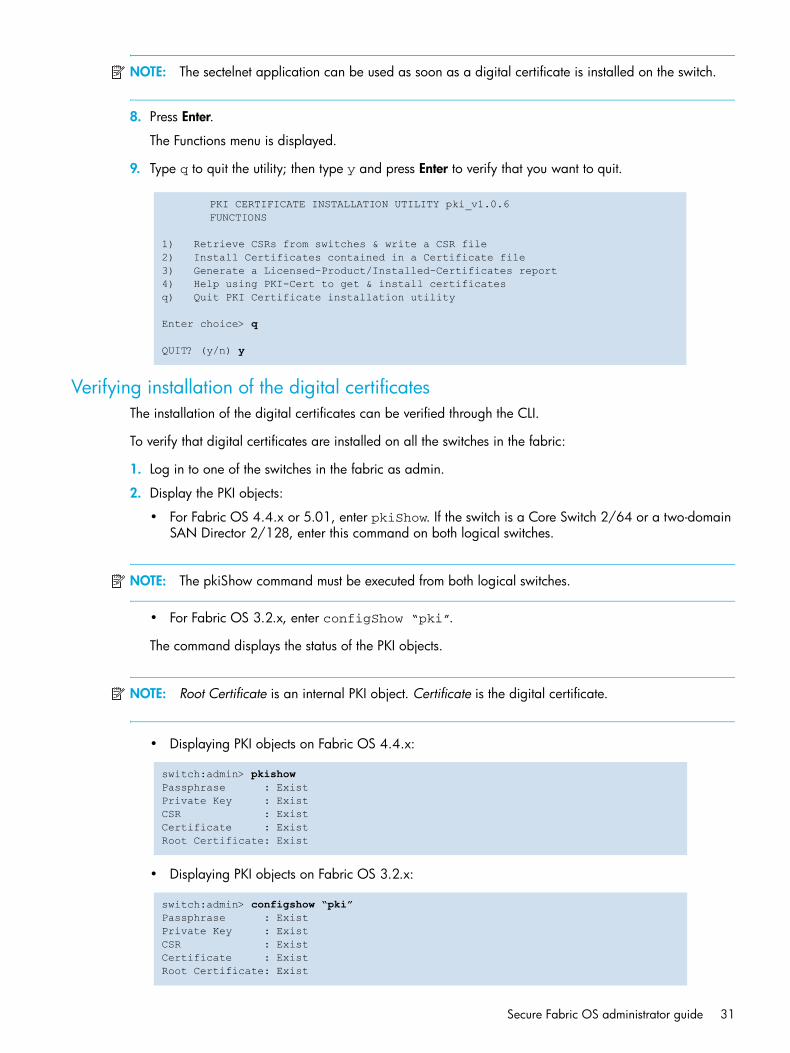
8. Press Enter.
The Functions menu is displayed.
9. Type q to quit the utility; then type y and press Enter to verify that you want to quit.
Verifying installation of the digital certificatesThe installation of the digital certificates can be verified through the CLI.
To verify that digital certificates are installed on all the switches in the fabric:
1. Log in to one of the switches in the fabric as admin.
2. Display the PKI objects:
• For Fabric OS 4.4.x or 5.01, enter pkiShow. If the switch is a Core Switch 2/64 or a two-domain SAN Director 2/128, enter this command on both logical switches.
NOTE: The pkiShow command must be executed from both logical switches.
• For Fabric OS 3.2.x, enter configShow “pki”.
The command displays the status of the PKI objects.
NOTE: Root Certificate is an internal PKI object. Certificate is the digital certificate.
• Displaying PKI objects on Fabric OS 4.4.x:
• Displaying PKI objects on Fabric OS 3.2.x:
PKI CERTIFICATE INSTALLATION UTILITY pki_v1.0.6FUNCTIONS
1) Retrieve CSRs from switches & write a CSR file2) Install Certificates contained in a Certificate file3) Generate a Licensed-Product/Installed-Certificates report4) Help using PKI-Cert to get & install certificatesq) Quit PKI Certificate installation utility
Enter choice> q
QUIT? (y/n) y
switch:admin> pkishowPassphrase : ExistPrivate Key : ExistCSR : ExistCertificate : ExistRoot Certificate: Exist
switch:admin> configshow “pki”Passphrase : ExistPrivate Key : ExistCSR : ExistCertificate : ExistRoot Certificate: Exist
32 Adding Secure Fabric OS to the fabric
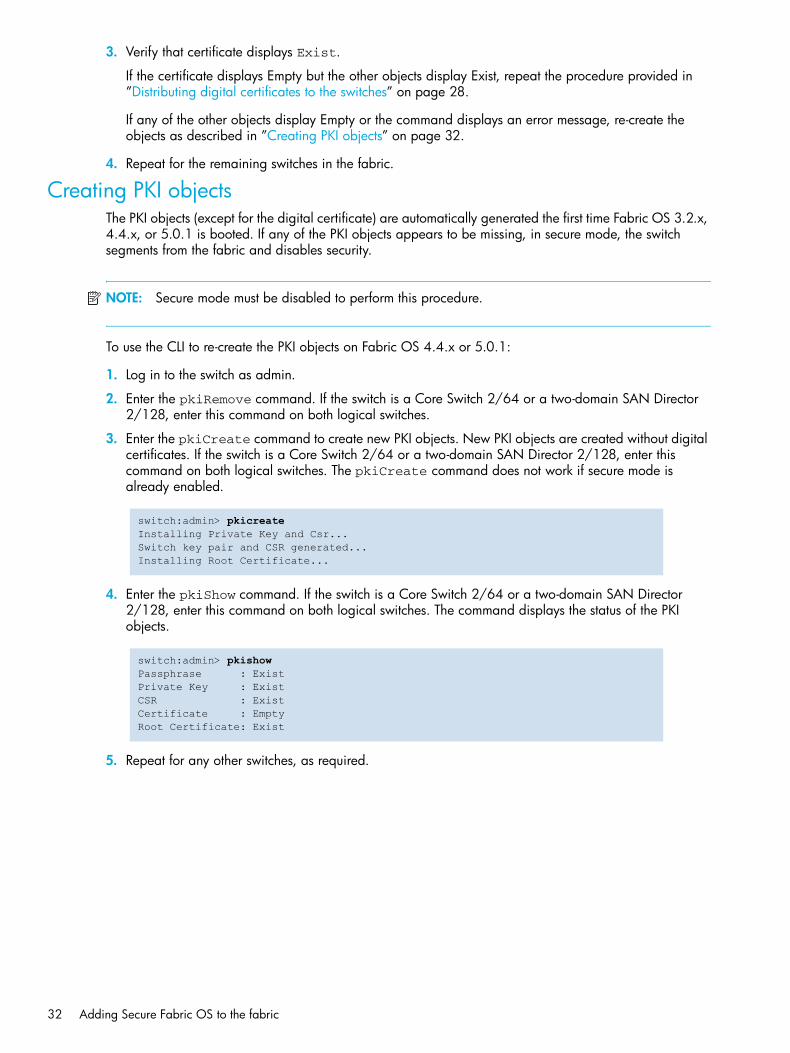
3. Verify that certificate displays Exist.
If the certificate displays Empty but the other objects display Exist, repeat the procedure provided in ”Distributing digital certificates to the switches” on page 28.
If any of the other objects display Empty or the command displays an error message, re-create the objects as described in ”Creating PKI objects” on page 32.
4. Repeat for the remaining switches in the fabric.
Creating PKI objectsThe PKI objects (except for the digital certificate) are automatically generated the first time Fabric OS 3.2.x, 4.4.x, or 5.0.1 is booted. If any of the PKI objects appears to be missing, in secure mode, the switch segments from the fabric and disables security.
NOTE: Secure mode must be disabled to perform this procedure.
To use the CLI to re-create the PKI objects on Fabric OS 4.4.x or 5.0.1:
1. Log in to the switch as admin.
2. Enter the pkiRemove command. If the switch is a Core Switch 2/64 or a two-domain SAN Director 2/128, enter this command on both logical switches.
3. Enter the pkiCreate command to create new PKI objects. New PKI objects are created without digital certificates. If the switch is a Core Switch 2/64 or a two-domain SAN Director 2/128, enter this command on both logical switches. The pkiCreate command does not work if secure mode is already enabled.
4. Enter the pkiShow command. If the switch is a Core Switch 2/64 or a two-domain SAN Director 2/128, enter this command on both logical switches. The command displays the status of the PKI objects.
5. Repeat for any other switches, as required.
switch:admin> pkicreateInstalling Private Key and Csr...Switch key pair and CSR generated...Installing Root Certificate...
switch:admin> pkishowPassphrase : ExistPrivate Key : ExistCSR : ExistCertificate : EmptyRoot Certificate: Exist
Secure Fabric OS administrator guide 33
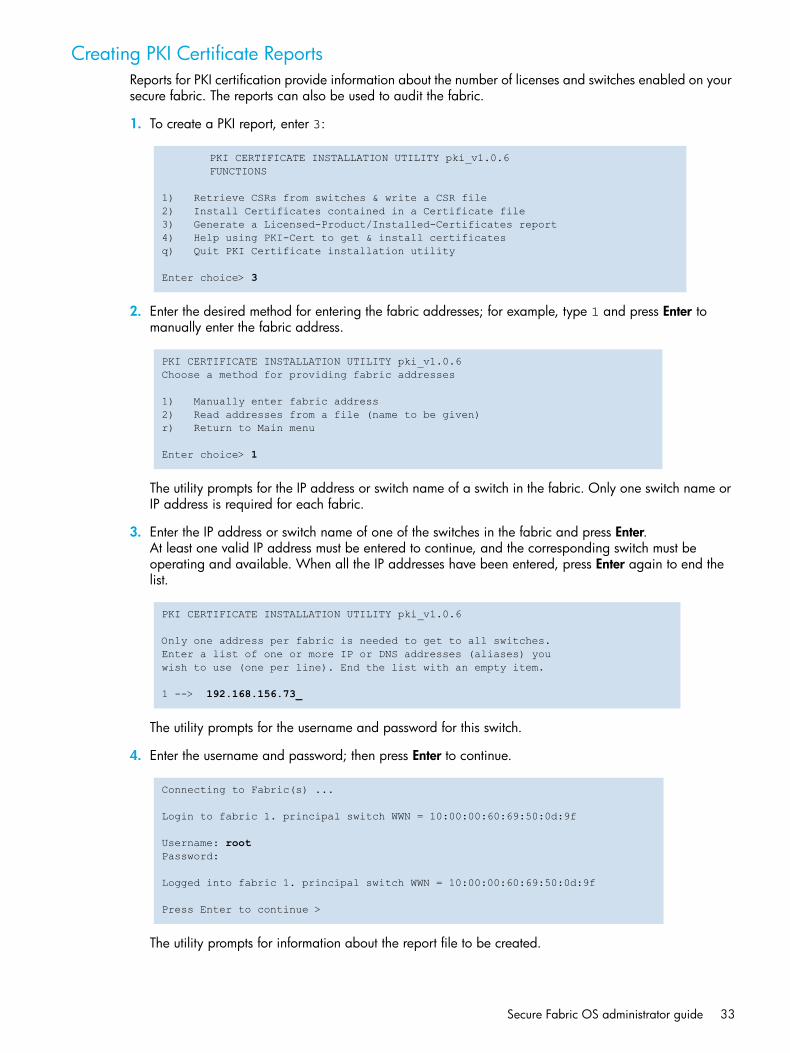
Creating PKI Certificate ReportsReports for PKI certification provide information about the number of licenses and switches enabled on your secure fabric. The reports can also be used to audit the fabric.
1. To create a PKI report, enter 3:
2. Enter the desired method for entering the fabric addresses; for example, type 1 and press Enter to manually enter the fabric address.
The utility prompts for the IP address or switch name of a switch in the fabric. Only one switch name or IP address is required for each fabric.
3. Enter the IP address or switch name of one of the switches in the fabric and press Enter.At least one valid IP address must be entered to continue, and the corresponding switch must be operating and available. When all the IP addresses have been entered, press Enter again to end the list.
The utility prompts for the username and password for this switch.
4. Enter the username and password; then press Enter to continue.
The utility prompts for information about the report file to be created.
PKI CERTIFICATE INSTALLATION UTILITY pki_v1.0.6FUNCTIONS
1) Retrieve CSRs from switches & write a CSR file2) Install Certificates contained in a Certificate file3) Generate a Licensed-Product/Installed-Certificates report4) Help using PKI-Cert to get & install certificatesq) Quit PKI Certificate installation utility
Enter choice> 3
PKI CERTIFICATE INSTALLATION UTILITY pki_v1.0.6Choose a method for providing fabric addresses
1) Manually enter fabric address2) Read addresses from a file (name to be given)r) Return to Main menu
Enter choice> 1
PKI CERTIFICATE INSTALLATION UTILITY pki_v1.0.6
Only one address per fabric is needed to get to all switches.Enter a list of one or more IP or DNS addresses (aliases) youwish to use (one per line). End the list with an empty item.
1 --> 192.168.156.73_
Connecting to Fabric(s) ...
Login to fabric 1. principal switch WWN = 10:00:00:60:69:50:0d:9f
Username: rootPassword:
Logged into fabric 1. principal switch WWN = 10:00:00:60:69:50:0d:9f
Press Enter to continue >

34 Adding Secure Fabric OS to the fabric
5. Enter the requested information:
a. Enter the path and file name for the report file to be created. Then, enter y if the address was entered correctly; if not, enter n and reenter the address. For example:
b. Enter y to include licensed product data in the file; otherwise, enter n.
c. Enter y to retrieve reports from all switches in the fabric or enter n to retrieve reports only from switches that do not already have a digital certificate.
The utility prompts you to choose fabrics to which to write reports.
6. Enter 1 to write certificate reports only to the fabric identified earlier or enter a to write certificate reports to all discovered fabrics; then press Enter:
7. Press Enter.
The Functions menu is displayed.
PKI CERTIFICATE INSTALLATION UTILITY pki_v1.0.6CREATE REPORT ON LICENSED PRODUCTS
You must enter the file-name of the report file to write. ______________________________________________________ | Note: | | * The named file will be created | | * The file-name may include a directory path | | that must already exist. | | * An extension of '.xml' will be appended to | | the file name if not already present. | | * If the file already exists, it will be | | overwritten. | ----------------------------------------------------
File Name ===> SFOS_FABIs the filename "SFOS_FAB.xml" correct? (y/n): y
PKI CERTIFICATE INSTALLATION UTILITY pki_v1.0.6
Choose a Fabric On Which to Operate
Fabric World Wide Name # Switches Principal------ ----------------------- ---------- -----------1) 10:00:00:60:69:50:0d:9f 2 sec_edge_2a) All Fabricsr) Return to Functions menu
enter your choice> 1
PKI CERTIFICATE INSTALLATION UTILITY pki_v1.0.6
Reporting on Licensed Products of these Fabrics:
Fabric World Wide Name # Switches Principal------ ----------------------- ---------- -----------1> 10:00:00:60:69:50:0d:9f 2. 2 . sec_edge_2
Wrote 545 bytes of Lic Prod info to file: “SFOS_FAB.xml”Success compiling and writing license report.Press enter to continue.

Secure Fabric OS administrator guide 35
8. Enter q to quit the utility; then type y and press Enter to verify you want to quit. For example:
Accessing PKI certificate helpThe purpose of PKI help is to obtain command line information about PKICert and obtain advice on advanced options for advanced users.
To access PKI help:
1. Enter option 4 (as shown in the following example) and follow the screen prompts:
PKI CERTIFICATE INSTALLATION UTILITY pki_v1.0.6FUNCTIONS
1) Retrieve CSRs from switches & write a CSR file2) Install Certificates contained in a Certificate file3) Generate a Licensed-Product/Installed-Certificates report4) Help using PKI-Cert to get & install certificatesq) Quit PKI Certificate installation utility
Enter choice> q
QUIT? (y/n) y
PKI CERTIFICATE INSTALLATION UTILITY pki_v1.0.6FUNCTIONS
1) Retrieve CSRs from switches & write a CSR file2) Install Certificates contained in a Certificate file3) Generate a Licensed-Product/Installed-Certificates report4) Help using PKI-Cert to get & install certificatesq) Quit PKI Certificate installation utility
Enter choice> 4
HELP USING PKI-CERT TO GET & INSTALL DIGITAL CERTIFICATIONS
NOTE:This utility will only work with switches running a FAB-OS version that supports Fabric Security (e.g. >= v2.6, v3.2, v4.3)
1) Use PKI-Cert to get CSR’s (Certificate Signing Requests) which will be written to a data file. The XML format file will contain CSR’s for each switch (identified by its WWN).
2) Next, Upload the CSR file to the Brocade Security Upgrade website. A data file will be emailed to you containing a set of digital Certificates, one for each switch, in XML format.
3) Finally, use PKI-Cert to install the Certificates. You will be prompted for the name of the data file containing the certificates.
Some options may be given on the command line such as “Log-Level.”Read help for Batch/Command-Line mode usage (y/n)? > y

36 Adding Secure Fabric OS to the fabric
2. To end help, press Enter.
HELP WITH COMMAND LINE USEAGE OF PKI CERTIFICATE UTILITY
pkicert [-gGil] [_e log-file] [-d data-file] [-a addr-file] [-A switch-addr] [-L log-level] [-u user-login -p password]
Task Options:-g Get CSRs & generate a CSR data file-G Get CSRs (even from switches with certificates)-i Install Certificates from a data file-l Licensed Product Report compile & generate
If none of the above “task” options is given, Pki-Cert will operate in “Interactive” rather than “Batch” mode.
Other OPtions:
Log-file: -e (events/errors log)Path/file-name of log file created and written to (or if it already exists, apprended to ) with event/error data
<Press Enter to Continue>
Data-file: -dPath/file-name of input or output file* If the task is “Get-CSRs” or “License Rpt”, the file is an output file
created and written to with CSR or License report data. * If the task is “Install Certificates”, dat is read from it.
Address-file: -aPath/file-name of optional input file containing IP addresses or aliases of
fabrics to which sessions should be established. If this argument is not provided, this data is read from the file indicated by environment variable ‘FABRIC_CONFIG_FILE’.
Address--IP: -AIP address of switch/fabric with which to connect for the given task.
Log-Level: -LLevel of information to write to the event log file:0 = Silent, 1 = Errors, 2 = Events + Errors, 3 = Debug-info +Events + ...
<Press Enter to Continue>
User Login: -uUser name or account login for switch given with _A option or for use as default for all switches given.
Password: -pPassword must accompany “-u UserLogin” if provided. It must be more than 5 characters.
----- END Of HELP with Batch Usage -----
<Press Enter to Continue>
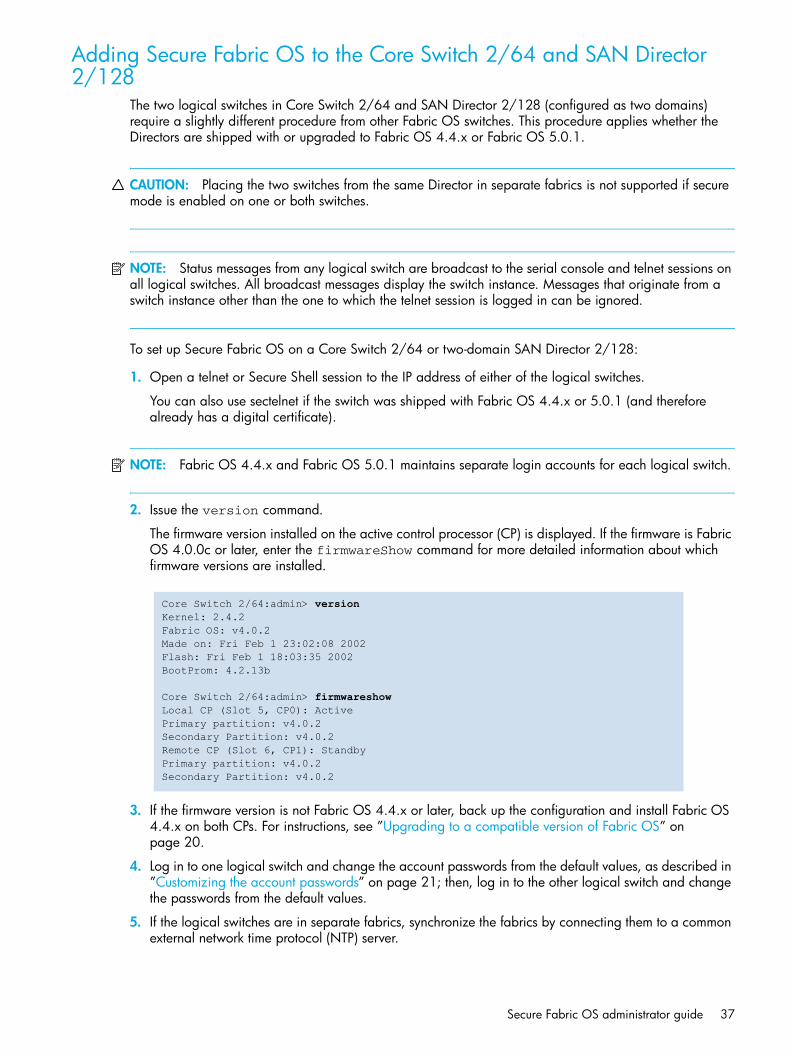
Secure Fabric OS administrator guide 37
Adding Secure Fabric OS to the Core Switch 2/64 and SAN Director 2/128
The two logical switches in Core Switch 2/64 and SAN Director 2/128 (configured as two domains) require a slightly different procedure from other Fabric OS switches. This procedure applies whether the Directors are shipped with or upgraded to Fabric OS 4.4.x or Fabric OS 5.0.1.
CAUTION: Placing the two switches from the same Director in separate fabrics is not supported if secure mode is enabled on one or both switches.
NOTE: Status messages from any logical switch are broadcast to the serial console and telnet sessions on all logical switches. All broadcast messages display the switch instance. Messages that originate from a switch instance other than the one to which the telnet session is logged in can be ignored.
To set up Secure Fabric OS on a Core Switch 2/64 or two-domain SAN Director 2/128:
1. Open a telnet or Secure Shell session to the IP address of either of the logical switches.
You can also use sectelnet if the switch was shipped with Fabric OS 4.4.x or 5.0.1 (and therefore already has a digital certificate).
NOTE: Fabric OS 4.4.x and Fabric OS 5.0.1 maintains separate login accounts for each logical switch.
2. Issue the version command.
The firmware version installed on the active control processor (CP) is displayed. If the firmware is Fabric OS 4.0.0c or later, enter the firmwareShow command for more detailed information about which firmware versions are installed.
3. If the firmware version is not Fabric OS 4.4.x or later, back up the configuration and install Fabric OS 4.4.x on both CPs. For instructions, see ”Upgrading to a compatible version of Fabric OS” on page 20.
4. Log in to one logical switch and change the account passwords from the default values, as described in ”Customizing the account passwords” on page 21; then, log in to the other logical switch and change the passwords from the default values.
5. If the logical switches are in separate fabrics, synchronize the fabrics by connecting them to a common external network time protocol (NTP) server.
Core Switch 2/64:admin> versionKernel: 2.4.2Fabric OS: v4.0.2Made on: Fri Feb 1 23:02:08 2002Flash: Fri Feb 1 18:03:35 2002BootProm: 4.2.13b
Core Switch 2/64:admin> firmwareshowLocal CP (Slot 5, CP0): ActivePrimary partition: v4.0.2Secondary Partition: v4.0.2Remote CP (Slot 6, CP1): StandbyPrimary partition: v4.0.2Secondary Partition: v4.0.2

38 Adding Secure Fabric OS to the fabric
NOTE: If the fabric contains any switches running Fabric OS 4.4.x or Fabric OS 5.0.1, the server must support a full NTP client. For switches running Fabric OS 3.2.x, the server can be SNTP or NTP.
a. Open a telnet or Secure Shell session to either of the logical switches.
b. Enter tsClockServer “IP address of NTP server”.
c. The IP address can be verified by reentering the command with no operand, which displays the current setting.
d. Repeat for the other logical switch.
6. Ensure that both logical switches have a Secure Fabric OS license activated, as described in ”Verifying or activating Secure Fabric OS and Advanced Zoning licenses” on page 19.
NOTE: Only one license key is required to enable the same feature on both logical switches.
7. Ensure that both logical switches have an Advanced Zoning license activated, as described in ”Verifying or activating Secure Fabric OS and Advanced Zoning licenses” on page 19.
8. If the firmware was upgraded, perform the following steps:
a. Download and install the PKICert utility on the PC workstation, if not preinstalled, as described in ”Installing the PKICert utility” on page 22.
b. Use the PKICert utility to create a file containing the CSRs of all the switches in the fabric, as described in ”Using the PKICert utility” on page 22.
c. Obtain digital certificates from the HP, as described in ”Obtaining the digital certificate file” on page 27.
d. Use the PKICert utility to load the certificates onto both logical switches, as described in ”Distributing digital certificates to the switches” on page 28.
e. Verify that the digital certificates are installed on both logical switches, as described in ”Verifying installation of the digital certificates” on page 31.
Installing a supported CLI client on a workstationStandard telnet sessions work only until secure mode is enabled. The following telnet clients are supported after secure mode has been enabled:
• Sectelnet is a secure form of telnet that is available for switches running Fabric OS 3.2.x, 4.4.x, or 5.0.1. For instructions on installing the sectelnet client, see the following procedures.
• SSH is a secure form of telnet that is supported only for switches running Fabric OS 4.1.x or later. You can use SSH clients that support version 2 of the protocol (for example, OpenSSH or F-Secure). See the HP StorageWorks Fabric OS 5.x administrator guide for client installation instructions.
Switch0:admin> tsclockserver "132.163.135.131"switch:admin> tsclockserver132.163.135.131
Switch0:admin> loginlogin: adminPassword: xxxxxx
Switch1:admin> tsclockserver "132.163.135.131"Switch1:admin> tsclockserver132.163.135.131
Secure Fabric OS administrator guide 39
To obtain sectelnet, go to the web site. It can be used as soon as a digital certificate is installed on the switch.
CAUTION: Ensure that all intermediate hops are secure when accessing a switch by way of sectelnet or SSH; otherwise, user passwords might be compromised.
To install the sectelnet client on a Solaris workstation:
1. Go to the following URL to obtain the Solaris version of the sectelnet file:
IMPORTANT: The following URL will take you outside of the Hewlett-Packard web site, to a third-party supplier to obtain your digital certificate. HP is not responsible for the information outside of the HP web site.
http://www.switchkeyactivation.com/SecureFabricOSUpgrade/
2. Copy the file onto the workstation.3. Decompress the tar file and install it to a location that is known to the computer, such as the directory
containing the standard telnet file. The location must be defined in the i environmental variable.
To install the sectelnet client on a PC workstation:
1. Obtain the PC version of the sectelnet file from HP and copy the file onto the workstation.
2. Double-click the zip file to decompress it.
3. Double-click the setup.exe file.
4. Install sectelnet.exe to a location that is known to the computer, such as the directory containing telnet.exe. The location must be defined in the path environmental variable.
As soon as setup completes, sectelnet.exe is available.
Configuring authenticationBy default, Secure Fabric OS on Fabric OS 3.2.x, 4.4.x, and 5.0.1 use SLAP or FCAP protocols for authentication. These protocols use digital certificates, based on switch WWN and PKI technology to authenticate switches. Support for FCAP is provided in Secure Fabric OS 3.2.x, 4.4.x, and 5.0.1 and is used when both switches support it. Authentication automatically defaults to SLAP when a switch does not support FCAP.
Alternatively, you can configure Secure Fabric OS to use DH-CHAP authentication. Use the authUtil command to configure the authentication parameters used by the switch. When you configure DH-CHAP authentication, you also must define a pair of shared secrets known to both switches. Figure 1 illustrates how the secrets are configured. In the pair, one is the local switch secret and the other is the peer switch secret. (Terms local and peer are relative to an initiator—one who initiates authentication is local and the one who responds is peer.)
Use secAuthSecret to set shared secrets on the switch. Configured, shared secrets are used at the next authentication. Authentication occurs whenever secure mode is enabled or whenever there is a state change for the switch or port. The state change can be due to a switch reboot, or a switch or port enable or disable.
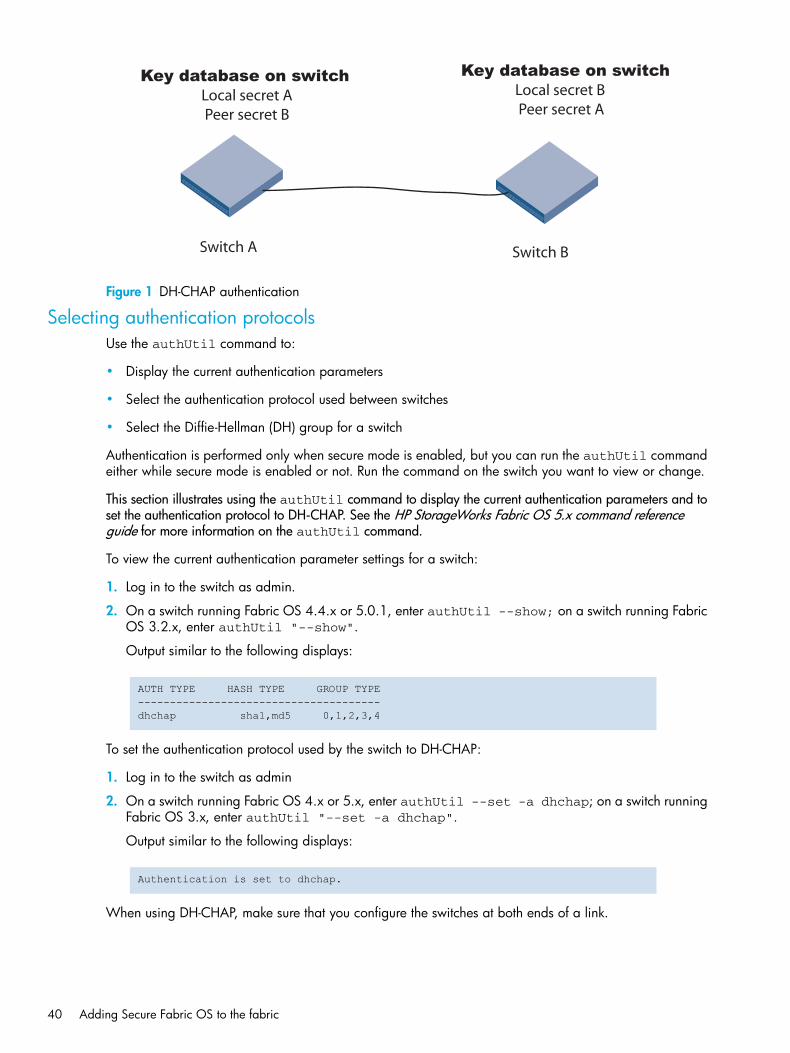
40 Adding Secure Fabric OS to the fabric
Figure 1 DH-CHAP authentication
Selecting authentication protocolsUse the authUtil command to:
• Display the current authentication parameters
• Select the authentication protocol used between switches
• Select the Diffie-Hellman (DH) group for a switch
Authentication is performed only when secure mode is enabled, but you can run the authUtil command either while secure mode is enabled or not. Run the command on the switch you want to view or change.
This section illustrates using the authUtil command to display the current authentication parameters and to set the authentication protocol to DH-CHAP. See the HP StorageWorks Fabric OS 5.x command reference guide for more information on the authUtil command.
To view the current authentication parameter settings for a switch:
1. Log in to the switch as admin.
2. On a switch running Fabric OS 4.4.x or 5.0.1, enter authUtil --show; on a switch running Fabric OS 3.2.x, enter authUtil "--show".
Output similar to the following displays:
To set the authentication protocol used by the switch to DH-CHAP:
1. Log in to the switch as admin
2. On a switch running Fabric OS 4.x or 5.x, enter authUtil --set -a dhchap; on a switch running Fabric OS 3.x, enter authUtil "--set -a dhchap".
Output similar to the following displays:
When using DH-CHAP, make sure that you configure the switches at both ends of a link.
Switch A Switch B
Key database on switch
Local secret APeer secret B
Key database on switch
Local secret BPeer secret A
AUTH TYPE HASH TYPE GROUP TYPE--------------------------------------dhchap sha1,md5 0,1,2,3,4
Authentication is set to dhchap.
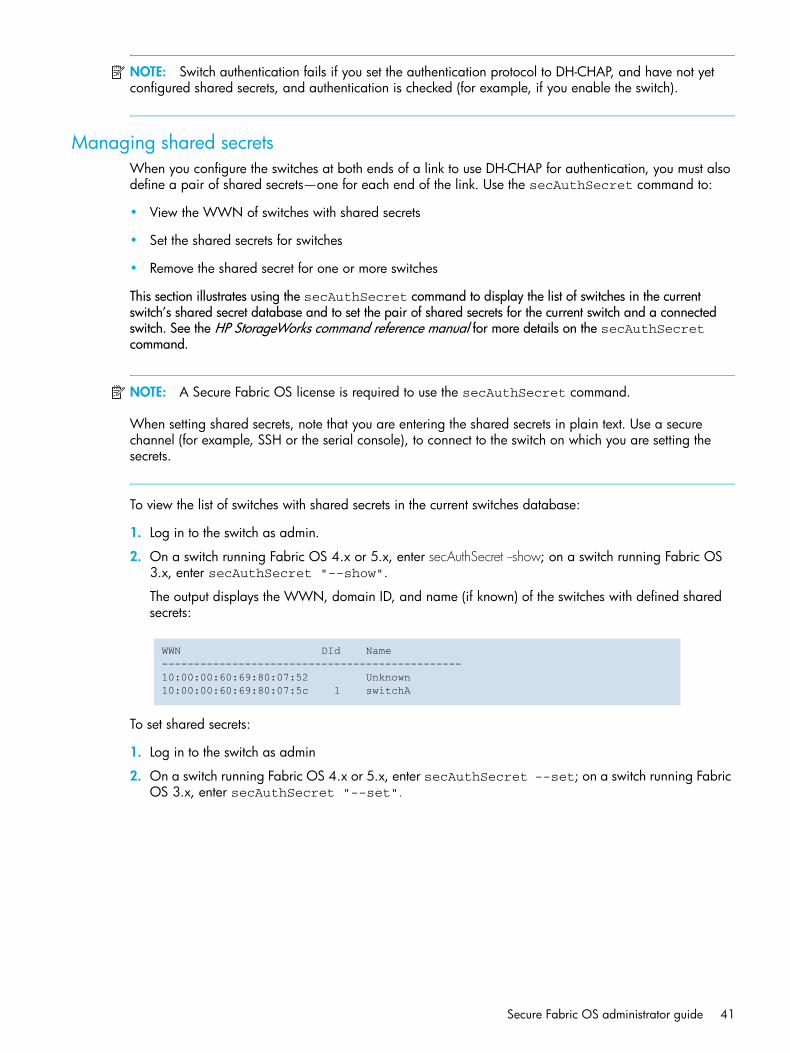
Secure Fabric OS administrator guide 41
NOTE: Switch authentication fails if you set the authentication protocol to DH-CHAP, and have not yet configured shared secrets, and authentication is checked (for example, if you enable the switch).
Managing shared secretsWhen you configure the switches at both ends of a link to use DH-CHAP for authentication, you must also define a pair of shared secrets—one for each end of the link. Use the secAuthSecret command to:
• View the WWN of switches with shared secrets
• Set the shared secrets for switches
• Remove the shared secret for one or more switches
This section illustrates using the secAuthSecret command to display the list of switches in the current switch’s shared secret database and to set the pair of shared secrets for the current switch and a connected switch. See the HP StorageWorks command reference manual for more details on the secAuthSecret command.
NOTE: A Secure Fabric OS license is required to use the secAuthSecret command.
When setting shared secrets, note that you are entering the shared secrets in plain text. Use a secure channel (for example, SSH or the serial console), to connect to the switch on which you are setting the secrets.
To view the list of switches with shared secrets in the current switches database:
1. Log in to the switch as admin.
2. On a switch running Fabric OS 4.x or 5.x, enter secAuthSecret --show; on a switch running Fabric OS 3.x, enter secAuthSecret "--show".
The output displays the WWN, domain ID, and name (if known) of the switches with defined shared secrets:
To set shared secrets:
1. Log in to the switch as admin
2. On a switch running Fabric OS 4.x or 5.x, enter secAuthSecret --set; on a switch running Fabric OS 3.x, enter secAuthSecret "--set".
WWN DId Name-----------------------------------------------10:00:00:60:69:80:07:52 Unknown10:00:00:60:69:80:07:5c 1 switchA
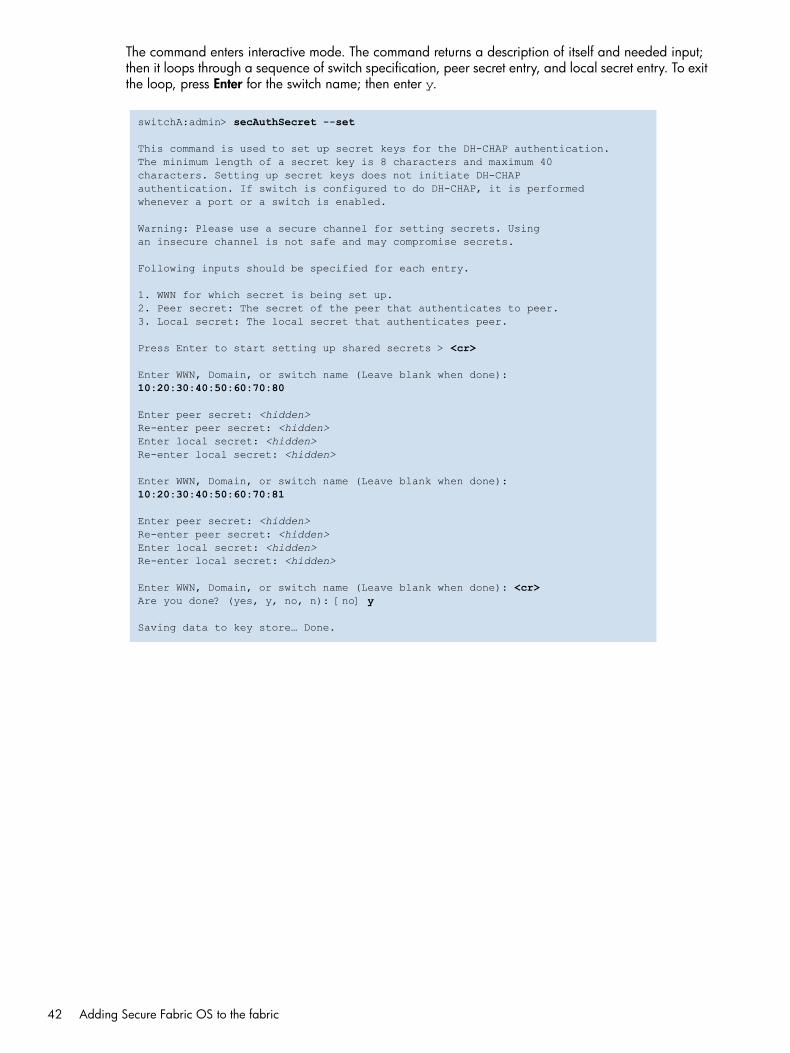
42 Adding Secure Fabric OS to the fabric
The command enters interactive mode. The command returns a description of itself and needed input; then it loops through a sequence of switch specification, peer secret entry, and local secret entry. To exit the loop, press Enter for the switch name; then enter y.
switchA:admin> secAuthSecret --set
This command is used to set up secret keys for the DH-CHAP authentication.The minimum length of a secret key is 8 characters and maximum 40characters. Setting up secret keys does not initiate DH-CHAPauthentication. If switch is configured to do DH-CHAP, it is performedwhenever a port or a switch is enabled.
Warning: Please use a secure channel for setting secrets. Usingan insecure channel is not safe and may compromise secrets.
Following inputs should be specified for each entry.
1. WWN for which secret is being set up.2. Peer secret: The secret of the peer that authenticates to peer.3. Local secret: The local secret that authenticates peer.
Press Enter to start setting up shared secrets > <cr>
Enter WWN, Domain, or switch name (Leave blank when done): 10:20:30:40:50:60:70:80
Enter peer secret: <hidden>Re-enter peer secret: <hidden>Enter local secret: <hidden>Re-enter local secret: <hidden>
Enter WWN, Domain, or switch name (Leave blank when done): 10:20:30:40:50:60:70:81
Enter peer secret: <hidden>Re-enter peer secret: <hidden>Enter local secret: <hidden>Re-enter local secret: <hidden>
Enter WWN, Domain, or switch name (Leave blank when done): <cr>Are you done? (yes, y, no, n): [no] y
Saving data to key store… Done.
Secure Fabric OS administrator guide 43
3 Creating Secure Fabric OS policiesSecure Fabric OS policies make it possible to customize access to the fabric. The FCS policy is the only required policy; all other policies are optional.
To implement Secure Fabric OS policies:
• Determine which trusted switches to use as FCS switches to manage Secure Fabric OS.
• Enable secure mode in the fabric and specify the FCS switch and one or more backup FCS switches. This automatically creates the FCS policy.
• Determine which additional Secure Fabric OS policies to implement in the fabric; then create and activate those policies. An access policy must be created for each management channel that is used.
• Verify that the Secure Fabric OS policies are operating as intended. Testing a variety of scenarios to verify optimal policy settings is recommended. For troubleshooting information, see ”Troubleshooting” on page 84.
Enable secure mode using the secModeEnable command. You can use optional arguments to the command to automate some policy-creation tasks. See the HP StorageWorks Fabric OS 5.x command reference guide for more information.
This chapter contains the following sections:
• Default Fabric and switch accessibility, page 43
• Enabling Secure mode, page 44
• Modifying the FCS policy, page 48
• Creating Secure Fabric OS policies other than the FCS policy, page 51
• Managing Secure Fabric OS policies, page 64
Default Fabric and switch accessibilityFollowing is the default fabric and switch access when secure mode is enabled but no additional Secure Fabric OS policies have been created:
• Switches:
• Only the primary FCS switch can be used to make Secure Fabric OS changes.
• Any HP StorageWorks switch can join the fabric, provided it is connected to the fabric and meets the minimum Secure Fabric OS requirements (such as Security, Advanced Zoning licenses, and digital certificates).
• All switches in the fabric can be accessed through a serial port.
• All switches in the fabric that have front panels (SAN Switch 1-Gbps switches) can be accessed through the front panel.
• Computer hosts and workstations:
• Any host can access the fabric by using SNMP.
• Any host can access any switch in the fabric by using the CLI (such as by sectelnet or Secure Shell).
• Any host can establish an HTTP connection to any switch in the fabric.
• Any host can establish an API connection to any switch in the fabric.

44 Creating Secure Fabric OS policies
Devices:
NOTE: HP does not support SES at this time, although it appears in the Secure Fabric application, and throughout this guide.
• All device ports can access SES.
• All devices can access the management server.
• Any device can connect to any Fibre Channel port in the fabric.
• Zoning: node WWNs can be used for WWN-based zoning.
Enabling Secure modeSecure mode is enabled and disabled on a fabric-wide basis. Secure mode can be enabled and disabled as often as desired; however, all Secure Fabric OS policies, including the FCS policy, are deleted each time secure mode is disabled, and they must be re-created the next time it is enabled. The Secure Fabric OS database can be backed up using the configUpload command. For more information about this command, see the HP StorageWorks Fabric OS 5.x command reference guide.
Secure mode is enabled using the secModeEnable command. This command must be entered through a sectelnet, Secure Shell, or serial connection to the switch designated as the primary FCS switch. The command fails if any switch in the fabric is not capable of enforcing Secure Fabric OS policies. If the primary FCS switch fails to participate in the fabric, the role of the primary FCS switch moves to the next available switch listed in the FCS policy.
The secModeEnable command performs the following actions:
• Creates and activates the FCS policy.
• Distributes the policy set (initially consisting of only the FCS policy) to all switches in the fabric.
• Activates and distributes the local zoning configurations.
• Fastboots any switches needing a reboot to bring the fabric up in secure mode. (Switches running Fabric OS 3.2.x, Fabric OS 4.4.x or Fabric OS 5.0.1 do not need to be rebooted to enable secure mode.)
NOTE: After running secModeEnable from a switch with Fabric OS 3.2.x, 4.4.x or 5.0.1, switches with previous OS versions reboot. Wait until the reboot of those switches completes, and then run secFabricShow to verify that all switches in the fabric are in a "Ready" state before running any commands that change security policies, passwords, or SNMP.
By default, the only policy created is the FCS policy. This policy is implemented; no other Secure Fabric OS-related changes occur to the fabric. Other Secure Fabric OS policies can be created after the fastboots are complete.
Run secModeEnable from a Fabric OS 2.6.1, 3.1.x, 4.1.x, and 4.2.x switch to distribute all default account passwords to all other switches in the fabric. In addition, Fabric OS 3.2.x, 4.4.x, and 5.0.1 switches back up existing MUAs and remove them from the existing password database.
Run secModeEnable from a Fabric OS 3.2.x, 4.4.x, or 5.0.1 switch to distribute all default account passwords and MUA information to all other Fabric OS 3.2.x, 4.4.0, and 5.0.1 switches in the fabric. Fabric OS 3.2.x, 4.4.x, and 5.0.1 switches back up their own existing MUAs and remove them from the existing password database. Fabric OS versions 2.6.1, 3.1.x, 4.1.x, and 4.2.x switches receive the default account distribution only.
Fabric OS 3.2.x, 4.4.x, and 5.0.1 provide two secModeEnable options. The default option prompts for new passwords for all default accounts and leaves the MUA passwords unchanged before distribution to

Secure Fabric OS administrator guide 45
other switches in the fabric. The other option, --currentpwd, suppresses the prompt for new default account passwords. The existing default account passwords and MUA passwords on the primary FCS switch are distributed to the rest of the fabric. The command backs up and deletes all MUAs on a receiving switch that are different from the ones on the primary FCS switch. Depending on whether optional arguments are specified or not, the command also might request new passwords for secure mode.
CAUTION: Placing the two switches from the same Core Switch 2/64 or placing the two switches of a two-domain SAN Director 2/128 in separate fabrics is not supported if secure mode is enabled on one or both switches.
The following restrictions apply when secure mode is enabled:
• Standard telnet cannot be used after secure mode is enabled; however, sectelnet can be used as soon as a digital certificate is installed on the switch. Secure Shell can be used at any time; however, telnet sessions opened prior to issuing secModeEnable remain open if secure mode is enabled using the option to preserve passwords. If telnet is completely prohibited, the telnet protocol should be disabled on each switch, using the configure command, prior to enabling secure mode.
• Several commands can be entered only from the FCS switches. See ”Command restrictions in secure mode” on page 93for a list of these commands.
• If downloading a configuration to the switch:• Download the configuration to the primary FCS switch. A configuration downloaded to a backup
FCS switch or non-FCS switch is overwritten by the next fabric-wide update from the primary FCS switch.
• If the configdownload file contains an RSNMP policy, it must also contain a WSNMP policy. • The defined policy set in the configdownload file must include the following characteristics:
• The defined policy set must exist. • The FCS policy must be the first policy.• The FCS policy must have at least one switch in common with the current defined FCS policy in
the fabric.• The active policy set in the configdownload file must have the following characteristics:
• The active policy set must exist. • The FCS policy must be the first policy. • The FCS policy must be identical to the active FCS policy in the fabric.
NOTE: If any part of the configuration download process fails, resolve the source of the problem and repeat the configDownload command. For information about troubleshooting the configuration download process, see the HP StorageWorks Fabric OS 5.x Fabric OS administrator guide.
After configDownload, the policy database might require up to 8 minutes to download.
For information about displaying the existing Secure Fabric OS policies, see ”Displaying individual Secure Fabric OS policies” on page 71.
NOTE: Enabling secure mode fastboots all Fabric OS 2.6.x switches in the fabric.
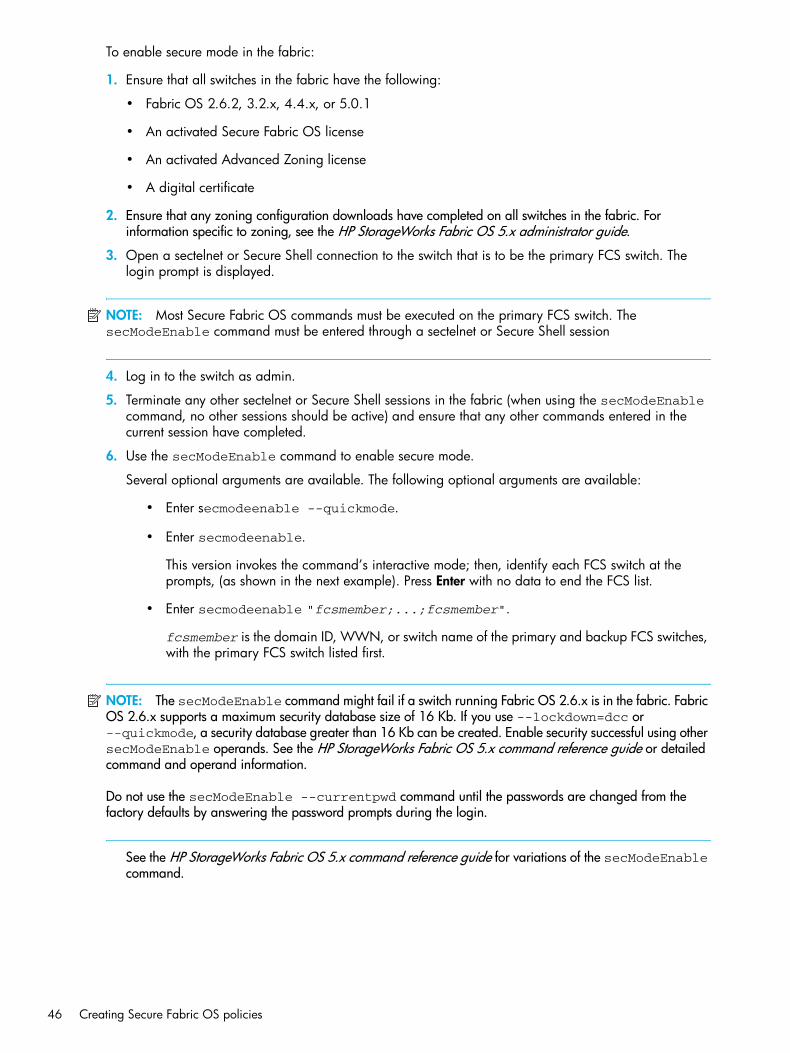
46 Creating Secure Fabric OS policies
To enable secure mode in the fabric:
1. Ensure that all switches in the fabric have the following:
• Fabric OS 2.6.2, 3.2.x, 4.4.x, or 5.0.1
• An activated Secure Fabric OS license
• An activated Advanced Zoning license
• A digital certificate
2. Ensure that any zoning configuration downloads have completed on all switches in the fabric. For information specific to zoning, see the HP StorageWorks Fabric OS 5.x administrator guide.
3. Open a sectelnet or Secure Shell connection to the switch that is to be the primary FCS switch. The login prompt is displayed.
NOTE: Most Secure Fabric OS commands must be executed on the primary FCS switch. The secModeEnable command must be entered through a sectelnet or Secure Shell session
4. Log in to the switch as admin.
5. Terminate any other sectelnet or Secure Shell sessions in the fabric (when using the secModeEnable command, no other sessions should be active) and ensure that any other commands entered in the current session have completed.
6. Use the secModeEnable command to enable secure mode.
Several optional arguments are available. The following optional arguments are available:
• Enter secmodeenable --quickmode.
• Enter secmodeenable.
This version invokes the command’s interactive mode; then, identify each FCS switch at the prompts, (as shown in the next example). Press Enter with no data to end the FCS list.
• Enter secmodeenable "fcsmember;...;fcsmember".
fcsmember is the domain ID, WWN, or switch name of the primary and backup FCS switches, with the primary FCS switch listed first.
NOTE: The secModeEnable command might fail if a switch running Fabric OS 2.6.x is in the fabric. Fabric OS 2.6.x supports a maximum security database size of 16 Kb. If you use --lockdown=dcc or --quickmode, a security database greater than 16 Kb can be created. Enable security successful using other secModeEnable operands. See the HP StorageWorks Fabric OS 5.x command reference guide or detailed command and operand information.
Do not use the secModeEnable --currentpwd command until the passwords are changed from the factory defaults by answering the password prompts during the login.
See the HP StorageWorks Fabric OS 5.x command reference guide for variations of the secModeEnable command.

Secure Fabric OS administrator guide 47
To enable secure mode using --quickmode::
To enable secure mode using the --lockdown=scc, --currentpwd, and --fcs options:
The command requests active consent to the terms of the license, the identity of the FCS switches, and the new passwords required for secure mode.
7. Skip this step if you used the --quickmode or --currentpwd options. Otherwise, enter the following passwords at the prompts, using unique passwords that are different from the default values and contain from 8 to 40 alphanumeric characters:
• Root password for the FCS switch
• Factory password for the FCS switch
switch:admin> secmodeenable --quickmode
Your use of the certificate-based security features of the software installed on this equipment is subject to the End User License Agreement provided with the equipment and the Certification Practices Statement, which you may review at http://www.switchkeyactivation.com/cps. By using these security features, you are consenting to be bound by the terms of these documents. If you do not agree to the terms of these documents, promptly contact the entity from which you obtained this software and do not use these security features. Do you agree to these terms? (yes, y, no, n): [no] y This command requires Switch Certificate, Security license and Zoning license to be installed on every switch in the fabric. PLEASE NOTE: On successful completion of this command, login sessions may be closed and some switches may go through a reboot to form a secure fabric. Non-FCS admin password will be set the same as FCS admin password. ARE YOU SURE (yes, y, no, n): [no] y Please enter current admin account password: Secure mode is enabled.
switch:admin> secmodeenable --lockdown=scc --currentpwd --fcs "*" Your use of the certificate-based security features of the software installed on this equipment is subject to the End User License Agreement provided with the equipment and the Certification Practices Statement, which you may review at http://www.switchkeyactivation.com/cps. By using these security features, you are consenting to be bound by the terms of these documents. If you do not agree to the terms of these documents, promptly contact the entity from which you obtained this software and do not use these security features. Do you agree to these terms? (yes, y, no, n): [no] y This command requires Switch Certificate, Security license and Zoning license to be installed on every switch in the fabric.
PLEASE NOTE: On successful completion of this command, login sessions may be closed and some switches may go through a reboot to form a secure fabric.
Non-FCS admin password will be set the same as FCS admin password. ARE YOU SURE (yes, y, no, n): [no] y
Please enter current admin account password:
Secure mode is enabled.

48 Creating Secure Fabric OS policies
• Admin password for the FCS switch
• User password for the fabric
• Admin password for the non-FCS switches
NOTE: The root and factory accounts are disabled on the non-FCS switches. If either of these logins is attempted on a non-FCS switch, an error message is displayed.
For example, to enter passwords after enabling secure mode:
All passwords are saved. The command distributes the new FCS policy and passwords to all switches in the fabric, activates the local zoning configurations, and fastboots all Fabric OS 2.6.2 the switches in the fabric.
NOTE: Record the passwords and store them in a secure place. Recovering passwords might require significant effort and result in fabric downtime.
Modifying the FCS policyOnly one FCS policy can exist, and it cannot be empty or deleted if secure mode is enabled. The FCS policy is named FCS_POLICY.
Changes made to the FCS policy are saved to permanent memory only after the changes have been saved or activated; they can be aborted later if desired (see ”Managing Secure Fabric OS policies” on page 64).
The FCS policy can be modified through any of the following methods:
• Using the secPolicyFCSMove command to change the position of a switch in the list, as described in ”Changing the position of a switch within the FCS policy” on page 49
• Using the secFCSFailover command to fail over the primary FCS switch role to the backup FCS switch from which the command is entered, as described in ”Failing over the primary FCS switch” on page 50
• Using the secPolicyAdd command to add members, as described in ”Adding a member to an existing policy” on page 65
• Using the secPolicyRemove command to remove members, as described in ”Removing a member from a policy” on page 66
New FCS switch root password:Re-enter new password:New FCS switch factory password:Re-enter new password:New FCS switch admin password:Re-enter new password:New FCS switch user password:Re-enter new password:New Non FCS switch admin password:Re-enter new password:Saving passwd...done.Saving Defined FMPS ...doneSaving Active FMPS ...doneCommitting configuration...done.Secure mode is enabled.Saving passwd...done.Rebooting...

Secure Fabric OS administrator guide 49
NOTE: If the last FCS switch is removed from the fabric, secure mode remains enabled but no primary FCS switch is available. To specify a new primary FCS switch, enter the secModeEnable command again and specify the primary and backup FCS switches. This is the only instance in which the secModeEnable command can be entered when secure mode is already enabled.
The possible FCS policy states are shown in Table 3.
You might not want to put Fabric OS 2.6.x switches in the FCS policy if your primary FCS switch is running Fabric OS 3.2.x, 4.4.x or 5.0.1 and using multiple-user accounts because Fabric OS 2.6.x does not support MUA. See the HP StorageWorks Fabric OS 5.x Fabric OS administrator guide for more information on MUA.
Changing the position of a switch within the FCS policyThe secPolicyFCSMove command can be used to change the order in which switches are listed in the FCS policy. The list order determines which backup FCS switch becomes the primary FCS switch if the current primary FCS switch fails.
To modify the order of FCS switches:
1. From a sectelnet or Secure Shell session, log in to the primary FCS switch as admin.2. Enter secPolicyShow “Defined”, “FCS_POLICY”.
This displays the WWNs of the current primary FCS switch and backup FCS switches.
3. Enter secPolicyFCSMove, then provide the current position of the switch in the list and the desired position at the prompts.
Alternatively, enter secPolicyFCSMove “From, To”. From is the current position in the list of the FCS switch and To is the desired position in the list for this switch.
Table 3 FCS policy states
Policy state Characteristics
No policy, or policy with no entries
Not possible if secure mode is enabled.
Policy with one entry A primary FCS switch is designated but there are no backup FCS switches. If the primary FCS switch becomes unavailable for any reason, the fabric is left without an FCS switch.
Policy with multiple entries A primary FCS switch and one or more backup FCS switches are designated. If the primary FCS switch becomes unavailable, the next switch in the list becomes the primary FCS switch.
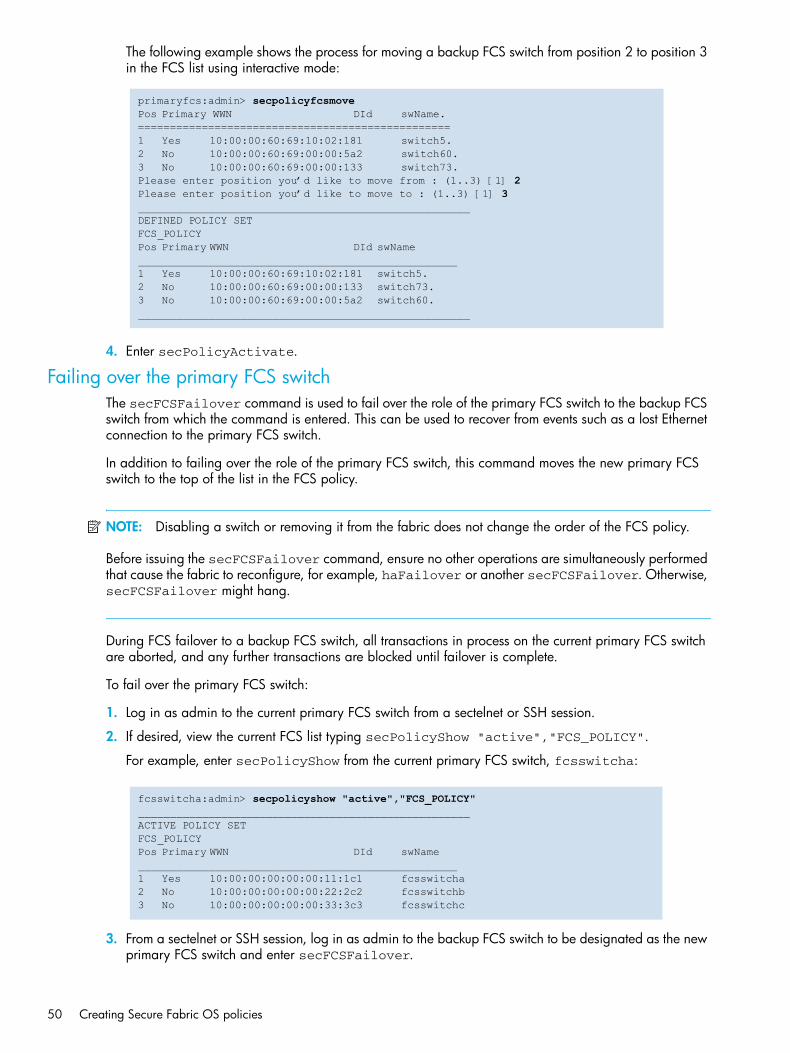
50 Creating Secure Fabric OS policies
The following example shows the process for moving a backup FCS switch from position 2 to position 3 in the FCS list using interactive mode:
4. Enter secPolicyActivate.
Failing over the primary FCS switchThe secFCSFailover command is used to fail over the role of the primary FCS switch to the backup FCS switch from which the command is entered. This can be used to recover from events such as a lost Ethernet connection to the primary FCS switch.
In addition to failing over the role of the primary FCS switch, this command moves the new primary FCS switch to the top of the list in the FCS policy.
NOTE: Disabling a switch or removing it from the fabric does not change the order of the FCS policy.
Before issuing the secFCSFailover command, ensure no other operations are simultaneously performed that cause the fabric to reconfigure, for example, haFailover or another secFCSFailover. Otherwise, secFCSFailover might hang.
During FCS failover to a backup FCS switch, all transactions in process on the current primary FCS switch are aborted, and any further transactions are blocked until failover is complete.
To fail over the primary FCS switch:
1. Log in as admin to the current primary FCS switch from a sectelnet or SSH session.
2. If desired, view the current FCS list typing secPolicyShow "active","FCS_POLICY".
For example, enter secPolicyShow from the current primary FCS switch, fcsswitcha:
3. From a sectelnet or SSH session, log in as admin to the backup FCS switch to be designated as the new primary FCS switch and enter secFCSFailover.
primaryfcs:admin> secpolicyfcsmovePos Primary WWN DId swName.=================================================1 Yes 10:00:00:60:69:10:02:181 switch5.2 No 10:00:00:60:69:00:00:5a2 switch60.3 No 10:00:00:60:69:00:00:133 switch73.Please enter position you’d like to move from : (1..3) [1] 2Please enter position you’d like to move to : (1..3) [1] 3____________________________________________________DEFINED POLICY SETFCS_POLICYPos Primary WWN DId swName__________________________________________________1 Yes 10:00:00:60:69:10:02:181 switch5.2 No 10:00:00:60:69:00:00:133 switch73.3 No 10:00:00:60:69:00:00:5a2 switch60.____________________________________________________
fcsswitcha:admin> secpolicyshow "active","FCS_POLICY"____________________________________________________ACTIVE POLICY SETFCS_POLICYPos Primary WWN DId swName__________________________________________________1 Yes 10:00:00:00:00:00:11:1c1 fcsswitcha2 No 10:00:00:00:00:00:22:2c2 fcsswitchb3 No 10:00:00:00:00:00:33:3c3 fcsswitchc

Secure Fabric OS administrator guide 51
For example, enter secFCSFailover from the backup FCS switch fcsswitchc and then enter secPolicyShow:
The backup FCS switch becomes the new primary FCS switch, and the FCS policy is modified so that the new and previous primary FCS switches have exchanged places.
Creating Secure Fabric OS policies other than the FCS policyThe FCS policy is automatically created when secure mode is enabled; other Secure Fabric OS policies can be created after secure mode is enabled. (Using the quickmode or lockdown options to the secModeEnable command also creates an SCC policy and a DCC policy.) The member list of each policy determines the devices or switches to which the policy applies.
If a policy does not exist, then no Secure Fabric OS controls are in effect for that aspect of the fabric. If a policy exists but has no members, that functionality is disabled for all switches in the fabric. As soon as a policy has been created, that functionality becomes disabled for all switches except the members listed in the policy.
NOTE: Save policy changes frequently; changes are lost if the switch is rebooted before the changes are saved.
Each supported policy is identified by a specific name, and only one policy of each type can exist (except for DCC policies). The policy names are case sensitive and must be entered in all uppercase. Multiple DCC policies can be created using the naming convention DCC_POLICY_nnn, with nnn representing a unique string.
NOTE: Uploading and saving a copy of the Secure Fabric OS database after creating the desired Secure Fabric OS policies is strongly recommended. The configUpload command can be used to upload a copy of the configuration file, which contains all the Secure Fabric OS information. For more information about this command, see the HP StorageWorks Fabric OS 5.x command reference guide.
fcsswitchc:admin> secfcsfailoverThis switch is about to become the primary FCS switch.All transactions of the current Primary FCS switch will be aborted.ARE YOU SURE (yes, y, no, n): [no] yWARNING!!!The FCS policy of Active and Defined Policy sets have been changed.Review them before you issue secpolicyactivate again.
fcsswitchc:admin> secpolicyshow "active","FCS_POLICY"____________________________________________________ACTIVE POLICY SETFCS_POLICYPos PrimaryWWN DId swName__________________________________________________1 Yes 10:00:00:00:00:00:33:3c3 fcsswitchc2 No 10:00:00:00:00:00:11:1c1 fcsswitcha3 No 10:00:00:00:00:00:22:2c2 fcsswitchb

52 Creating Secure Fabric OS policies
Specify policy members by IP address, device port WWN, switch WWN, domain IDs, or switch names, depending on the policy. The valid methods for specifying policy members are listed in Table 4.
NOTE: Save policy changes frequently; changes are lost if the switch is rebooted before the changes are saved. Save policy changes frequently; changes are lost if the switch is rebooted before the changes are saved.
NOTE: If IP addresses are used, 0 used for an octet indicates that any number can be matched for that octet. For example, 192.168.11.0 allows access for all IP devices in the range 192.168.11.0 through 192.168.11.255. If domain IDs or switch names are used, the corresponding switches must be in the fabric for the command to succeed.
Creating a MAC policyManagement access control policies can be used to restrict the following management access to the fabric:
• Access by hosts using SNMP, telnet/sectelnet/Secure Shell, HTTP, API
• Access by device ports using SES or management server
• Access through switch serial ports and front panels
Table 4 Valid methods for specifying policy members
Policy name IP address Device port WWN
Switch WWN
Domain IDs
Switch names
FCS_POLICY No No Yes Yes Yes
MAC Policies
RSNMP_POLICY Yes No No No No
WSNMP_POLICY Yes No No No No
TELNET_POLICY Yes No No No No
HTTP_POLICY Yes No No No No
API_POLICY Yes No No No No
SES_POLICY No Yes No No No
MS_POLICY No Yes No No No
SERIAL_POLICY No No Yes Yes Yes
FRONTPANEL_POLICY No No Yes Yes Yes
OPTIONS Policies
DCC_POLICY_nnn No Yes Yes Yes Yes
SCC_POLICY No No Yes Yes Yes

Secure Fabric OS administrator guide 53
The individual MAC policies and how to create them are described in the following sections. By default, all MAC access is allowed; no MAC policies exist until they are created.
NOTE: An empty MAC policy blocks all access through that management channel. When creating policies, ensure that all desired members are added to each policy.
Providing fabric access to proxy servers is strongly discouraged. When a proxy server is included in a MAC policy for IP-based management, such as the HTTP_POLICY, all IP packets leaving the proxy server appear to originate from the proxy server. This could result in allowing any hosts that have access to the proxy server to access the fabric.
Serial, telnet, and API violations that occur on the standby CP of a chassis-based platform do not display on the active CP. Also, during a high-availability failover, security violation counters and events are not propagated from the former active CP to the current active CP.
Creating an SNMP policyRead and write SNMP policies can be used to specify which SNMP hosts are allowed read and write access to the fabric. The SNMP hosts must be identified by IP address.
• RSNMP_POLICY (read access)Only the specified SNMP hosts can perform read operations to the fabric.
• WSNMP_POLICY (write access)Only the specified SNMP hosts can perform write operations to the fabric.
Any host granted write permission by the WSNMP policy is automatically granted read permission by the RSNMP policy.
How to create SNMP policies is described in ”To create an SNMP policy:” on page 54.
Table 5 lists the expected read and write behaviors resulting from combinations of the RSNMP and WSNMP policies.
Table 5 Read and write behaviors of SNMP policies
RSNMP policy WSNMP policy Read result Write result
Nonexistent Nonexistent Any host can read Any host can write
Nonexistent Empty Any host can read No host can write
Nonexistent Host B in policy Any host can read Only B can write
Empty Nonexistent This combination is not supported. If the WSNMP policy is not defined, the RSNMP policy cannot be created.
Empty Empty No host can read No host can write
Empty Host B in policy Only B can read Only B can write
Host A in policy Nonexistent This combination is not supported. If the WSNMP policy is not defined, the RSNMP policy cannot be created.

54 Creating Secure Fabric OS policies
To create an SNMP policy:
1. From a sectelnet or Secure Shell session, log in to the primary FCS switch as admin.
2. Enter secPolicyCreate “WSNMP_POLICY”, “member;...;member”.
Where member is one or more IP addresses in dot-decimal notation. The numeral 0 can be entered in an octet to indicate that any number can be matched in that octet.
For example, to create an WSNMP and an RSNMP policy to allow only IP addresses that match 192.168.5.0 read and write access to the fabric:.
3. To save or activate the new policy, enter either the secPolicySave or the secPolicyActivate command.
If neither of these commands is entered, the changes are lost when the session is logged out. For more information about these commands, see ”Saving changes to Secure Fabric OS policies” on page 64 and ”Activating changes to Secure Fabric OS policies” on page 65.
Telnet policyThe Telnet policy can be used to specify which workstations can use sectelnet or Secure Shell to connect to the fabric. The policy is named TELNET _POLICY and contains a list of the IP addresses for the trusted workstations (workstations that are in a physically secure area).
When a Core Switch 2/64 or SAN Director 2/128 is in secure mode, sectelnet or SSH sessions cannot be opened to the active CP. This prevents potential violation of the Telnet policy, since the active CP can be used to access either of the logical switches on the Core Switch 2/64, or a two-domain SAN Director 2/128. However, sectelnet or SSH sessions can be established to the IP addresses of the logical switches and to the standby CP, if allowed by the Telnet policy. If the active CP fails over, any sectelnet or SSH sessions to the standby CP are automatically terminated when the standby CP becomes the active CP.
NOTE: Static host IP addresses are required to implement the Telnet policy effectively. Do not use DHCP for hosts that are in the TELNET_POLICY, because as soon as the IP addresses change, the hosts are no longer able to access the fabric. Restricting output (such as placing a session on hold by use of a command or keyboard shortcut) is not recommended.
This policy pertains to sectelnet and Secure Shell. It does not pertain to telnet access, because telnet is not available in secure mode. Use sectelnet as soon as a digital certificate is installed on the switch.
Host A in policy Empty Only A can read No host can write
Host A in policy Host B in policy A and B can read Only B can write
primaryfcs:admin> secpolicycreate "WSNMP_POLICY", "192.168.5.0"WSNMP_POLICY has been created.
primaryfcs:admin> secpolicycreate "RSNMP_POLICY", "192.168.5.0"RSNMP_POLICY has been created.
Table 5 Read and write behaviors of SNMP policies (continued)
RSNMP policy WSNMP policy Read result Write result
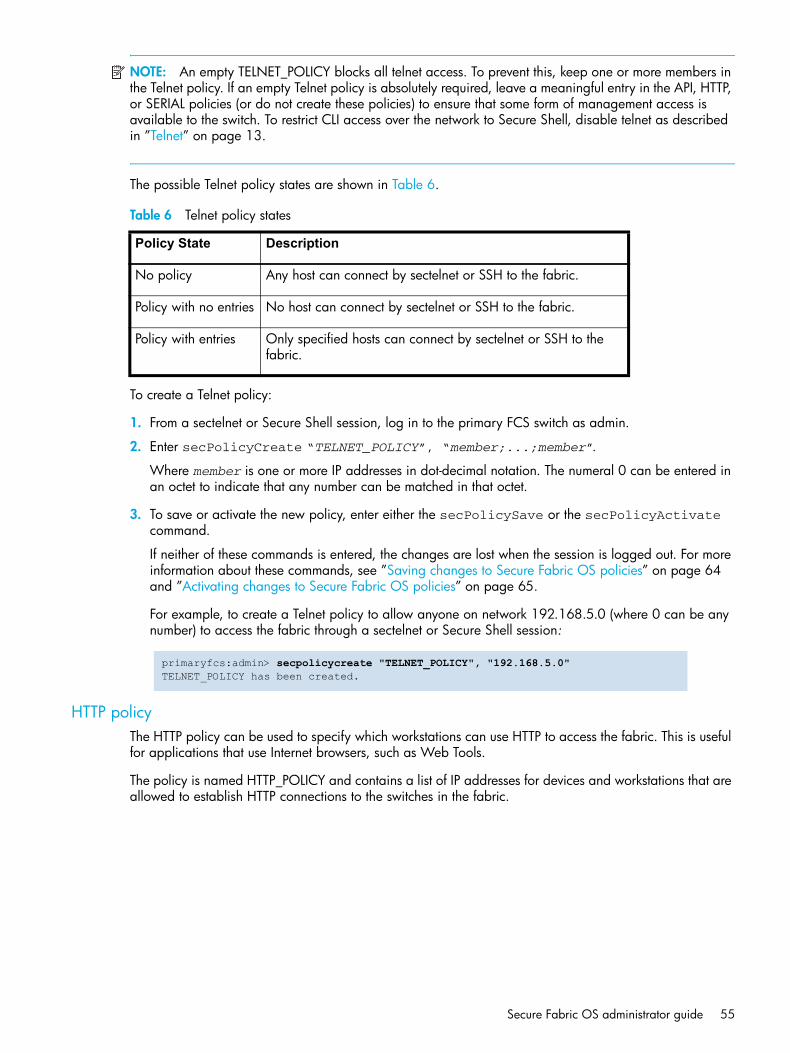
Secure Fabric OS administrator guide 55
NOTE: An empty TELNET_POLICY blocks all telnet access. To prevent this, keep one or more members in the Telnet policy. If an empty Telnet policy is absolutely required, leave a meaningful entry in the API, HTTP, or SERIAL policies (or do not create these policies) to ensure that some form of management access is available to the switch. To restrict CLI access over the network to Secure Shell, disable telnet as described in ”Telnet” on page 13.
The possible Telnet policy states are shown in Table 6.
To create a Telnet policy:
1. From a sectelnet or Secure Shell session, log in to the primary FCS switch as admin.
2. Enter secPolicyCreate “TELNET_POLICY”, “member;...;member”.
Where member is one or more IP addresses in dot-decimal notation. The numeral 0 can be entered in an octet to indicate that any number can be matched in that octet.
3. To save or activate the new policy, enter either the secPolicySave or the secPolicyActivate command.
If neither of these commands is entered, the changes are lost when the session is logged out. For more information about these commands, see ”Saving changes to Secure Fabric OS policies” on page 64 and ”Activating changes to Secure Fabric OS policies” on page 65.
For example, to create a Telnet policy to allow anyone on network 192.168.5.0 (where 0 can be any number) to access the fabric through a sectelnet or Secure Shell session:
HTTP policyThe HTTP policy can be used to specify which workstations can use HTTP to access the fabric. This is useful for applications that use Internet browsers, such as Web Tools.
The policy is named HTTP_POLICY and contains a list of IP addresses for devices and workstations that are allowed to establish HTTP connections to the switches in the fabric.
Table 6 Telnet policy states
Policy State Description
No policy Any host can connect by sectelnet or SSH to the fabric.
Policy with no entries No host can connect by sectelnet or SSH to the fabric.
Policy with entries Only specified hosts can connect by sectelnet or SSH to the fabric.
primaryfcs:admin> secpolicycreate "TELNET_POLICY", "192.168.5.0"TELNET_POLICY has been created.

56 Creating Secure Fabric OS policies
Table 7 lists possible HTTP policy states.
To create an HTTP policy:
1. From a sectelnet or Secure Shell session, log in to the primary FCS switch as admin.
2. Enter secPolicyCreate “HTTP_POLICY”, “member;...;member”.
Where member is one or more IP addresses in dot-decimal notation. The numeral 0 can be entered in an octet to indicate that any number can be matched in that octet.
3. To save or activate the new policy, enter either the secPolicySave or the secPolicyActivate command.
If neither of these commands is entered, the changes are lost when the session is logged out. For more information about these commands, see ”Saving changes to Secure Fabric OS policies” on page 64 and ”Activating changes to Secure Fabric OS policies” on page 65.
For example, to create an HTTP policy to allow anyone on the network with IP address of 192.168.5.0 (where 0 can be any number) to establish an HTTP connection to any switch in the fabric:.
API policyThe API policy can be used to specify which workstations can use API to access the fabric and which ones can write to the primary FCS switch.
The policy is named API_POLICY and contains a list of the IP addresses that are allowed to establish an API connection to switches in the fabric.
Table 8 lists possible API policy states.
Table 7 HTTP policy states
Policy State Characteristics
No policy Any host can establish an HTTP/HTTPS connection to any switch in the fabric.
Policy with no entries No host can establish an HTTP/HTTPS connection to any switch in the fabric.
Note: An empty policy causes the message The page cannot be displayed to appear when HTTP/HTTPS access is attempted.
Policy with entries Only specified hosts can establish an HTTP/HTTPS connection to any switch in the fabric.
primaryfcs:admin> secpolicycreate "HTTP_POLICY", "192.168.5.0"HTTP_POLICY has been created.
Table 8 API policy states
Policy State Characteristics
No policy All workstations can establish an API connection to any switch in the fabric.

Secure Fabric OS administrator guide 57
To create an API policy:
1. From a sectelnet or Secure Shell session, log in to the primary FCS switch as admin.
2. Enter secPolicyCreate “API_POLICY”, “member;...;member”.
Where member is one or more IP addresses in dot-decimal notation. The numeral 0 can be entered in an octet to indicate that any number can be matched in that octet.
3. To save or activate the new policy, enter either the secPolicySave or the secPolicyActivate command.
If neither of these commands is entered, the changes are lost when the session is logged out. For more information about these commands, see ”Saving changes to Secure Fabric OS policies” on page 64 and ”Activating changes to Secure Fabric OS policies” on page 65.
For example, to create an API policy to allow anyone on the network with an IP address of 192.168.5.0 (where 0 can be any number) to establish an API connection to any switch in the fabric:
SES policy
NOTE: HP does not support SES at this time, although it appears in the Secure Fabric application, and throughout this guide.
The SES policy can be used to restrict which devices can be managed by SES commands. The policy is named SES_POLICY and contains a list of device port WWNs that are allowed to access SES and from which SES commands are accepted and acted upon.
If secure mode is enabled, the SES client must be directly attached to the primary FCS switch. Then the SES client can be used to manage all the switches in the fabric through the SES product for switches.
Table 9 shows the possible SES policy states.
To create an SES policy:
Policy with no entries
No host can establish an API connection to any switch in the fabric.
Policy with entries Only specified hosts can establish an API connection to any switch in the fabric, and write operations can be performed only on the primary FCS switch.
primaryfcs:admin> secpolicycreate "API_POLICY", "192.168.5.0"API_POLICY has been created.
Table 8 API policy states (continued)
Policy State Characteristics
Table 9 SES policy states
Policy State Characteristics
No policy All device ports can access SES.
Policy with no entries No device port can access SES.
Policy with entries The specified devices can access SES.

58 Creating Secure Fabric OS policies
1. From a sectelnet or Secure Shell session, log in to the primary FCS switch as admin.
2. Enter secPolicyCreate “SES_POLICY”, “member;...;member”.
Where member is a device port WWN.
3. To save or activate the new policy, enter either secPolicySave or secPolicyActivate.
If neither of these commands is entered, the changes are lost when the session is logged out. For more information about these commands, see ”Saving changes to Secure Fabric OS policies” on page 64 and ”Activating changes to Secure Fabric OS policies” on page 65.
For example, to create an SES_POLICY that allows access through a device that has a WWN of 12:24:45:10:0a:67:00:40:
Management Server policyThe Management Server policy can be used to restrict which devices can be accessed by the management server. Fabric configuration and control functions can be performed only by requesters that are directly connected to the primary FCS switch. The policy is named MS_POLICY and contains a list of device port WWNs for which the management server implementation in Fabric OS (designed according to FC-GS-3 standard) accepts and acts on requests.
How to create a Management Server policy is described after Table 10, which shows the possible Management Server policy states.
To create a Management Server policy:
1. From a sectelnet or Secure Shell session, log in to the primary FCS switch as admin.
2. Enter secPolicyCreate “MS_POLICY”, “member;...;member”.
Where member is a device WWN.
3. To save or activate the new policy, enter either secPolicySave or secPolicyActivate.
If neither of these commands is entered, the changes are lost when the session is logged out. For more information about these commands, see ”Saving changes to Secure Fabric OS policies” on page 64 and ”Activating changes to Secure Fabric OS policies” on page 65.
For example, to create an MS_POLICY that allows access through a device that has a WWN of 12:24:45:10:0a:67:00:40:
primaryfcs:admin> secpolicycreate "SES_POLICY", "12:24:45:10:0a:67:00:40"SES_POLICY has been created.
Table 10 Management Server policy states
Policy State Characteristics
No policy All devices can access the management server.
Policy with no entries
No devices can access the management server.
Policy with entries Specified devices can access the management server.
primaryfcs:admin> secpolicycreate "MS_POLICY", "12:24:45:10:0a:67:00:40"MS_POLICY has been created.
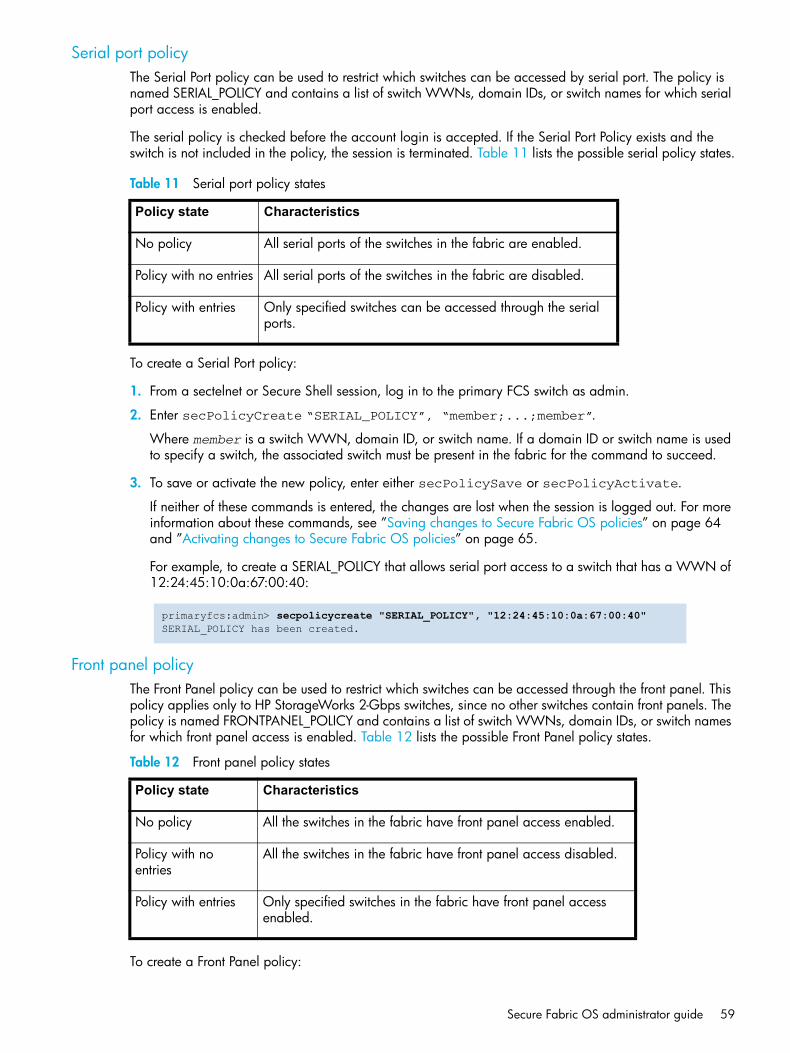
Secure Fabric OS administrator guide 59
Serial port policyThe Serial Port policy can be used to restrict which switches can be accessed by serial port. The policy is named SERIAL_POLICY and contains a list of switch WWNs, domain IDs, or switch names for which serial port access is enabled.
The serial policy is checked before the account login is accepted. If the Serial Port Policy exists and the switch is not included in the policy, the session is terminated. Table 11 lists the possible serial policy states.
To create a Serial Port policy:
1. From a sectelnet or Secure Shell session, log in to the primary FCS switch as admin.
2. Enter secPolicyCreate “SERIAL_POLICY”, “member;...;member”.
Where member is a switch WWN, domain ID, or switch name. If a domain ID or switch name is used to specify a switch, the associated switch must be present in the fabric for the command to succeed.
3. To save or activate the new policy, enter either secPolicySave or secPolicyActivate.
If neither of these commands is entered, the changes are lost when the session is logged out. For more information about these commands, see ”Saving changes to Secure Fabric OS policies” on page 64 and ”Activating changes to Secure Fabric OS policies” on page 65.
For example, to create a SERIAL_POLICY that allows serial port access to a switch that has a WWN of 12:24:45:10:0a:67:00:40:
Front panel policyThe Front Panel policy can be used to restrict which switches can be accessed through the front panel. This policy applies only to HP StorageWorks 2-Gbps switches, since no other switches contain front panels. The policy is named FRONTPANEL_POLICY and contains a list of switch WWNs, domain IDs, or switch names for which front panel access is enabled. Table 12 lists the possible Front Panel policy states.
To create a Front Panel policy:
Table 11 Serial port policy states
Policy state Characteristics
No policy All serial ports of the switches in the fabric are enabled.
Policy with no entries All serial ports of the switches in the fabric are disabled.
Policy with entries Only specified switches can be accessed through the serial ports.
primaryfcs:admin> secpolicycreate "SERIAL_POLICY", "12:24:45:10:0a:67:00:40"SERIAL_POLICY has been created.
Table 12 Front panel policy states
Policy state Characteristics
No policy All the switches in the fabric have front panel access enabled.
Policy with no entries
All the switches in the fabric have front panel access disabled.
Policy with entries Only specified switches in the fabric have front panel access enabled.
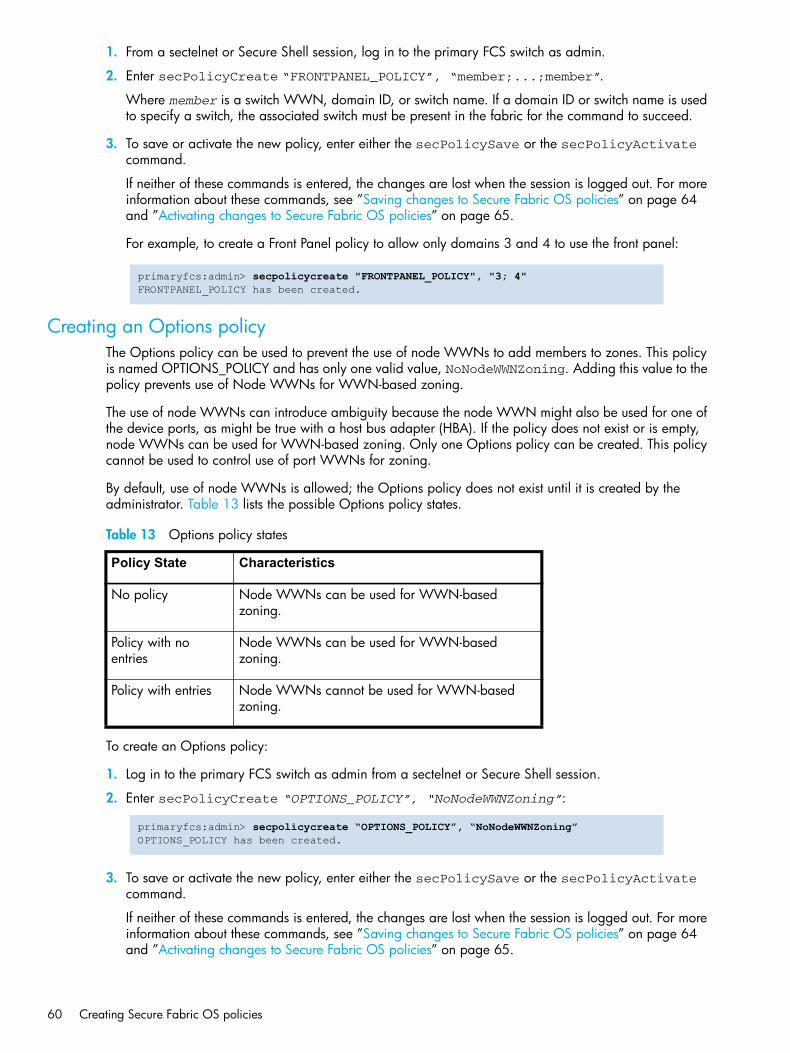
60 Creating Secure Fabric OS policies
1. From a sectelnet or Secure Shell session, log in to the primary FCS switch as admin.
2. Enter secPolicyCreate “FRONTPANEL_POLICY”, “member;...;member”.
Where member is a switch WWN, domain ID, or switch name. If a domain ID or switch name is used to specify a switch, the associated switch must be present in the fabric for the command to succeed.
3. To save or activate the new policy, enter either the secPolicySave or the secPolicyActivate command.
If neither of these commands is entered, the changes are lost when the session is logged out. For more information about these commands, see ”Saving changes to Secure Fabric OS policies” on page 64 and ”Activating changes to Secure Fabric OS policies” on page 65.
For example, to create a Front Panel policy to allow only domains 3 and 4 to use the front panel:
Creating an Options policyThe Options policy can be used to prevent the use of node WWNs to add members to zones. This policy is named OPTIONS_POLICY and has only one valid value, NoNodeWWNZoning. Adding this value to the policy prevents use of Node WWNs for WWN-based zoning.
The use of node WWNs can introduce ambiguity because the node WWN might also be used for one of the device ports, as might be true with a host bus adapter (HBA). If the policy does not exist or is empty, node WWNs can be used for WWN-based zoning. Only one Options policy can be created. This policy cannot be used to control use of port WWNs for zoning.
By default, use of node WWNs is allowed; the Options policy does not exist until it is created by the administrator. Table 13 lists the possible Options policy states.
To create an Options policy:
1. Log in to the primary FCS switch as admin from a sectelnet or Secure Shell session.
2. Enter secPolicyCreate “OPTIONS_POLICY”, “NoNodeWWNZoning”:
3. To save or activate the new policy, enter either the secPolicySave or the secPolicyActivate command.
If neither of these commands is entered, the changes are lost when the session is logged out. For more information about these commands, see ”Saving changes to Secure Fabric OS policies” on page 64 and ”Activating changes to Secure Fabric OS policies” on page 65.
primaryfcs:admin> secpolicycreate "FRONTPANEL_POLICY", "3; 4"FRONTPANEL_POLICY has been created.
Table 13 Options policy states
Policy State Characteristics
No policy Node WWNs can be used for WWN-based zoning.
Policy with no entries
Node WWNs can be used for WWN-based zoning.
Policy with entries Node WWNs cannot be used for WWN-based zoning.
primaryfcs:admin> secpolicycreate “OPTIONS_POLICY”, “NoNodeWWNZoning”OPTIONS_POLICY has been created.

Secure Fabric OS administrator guide 61
4. To apply the change to current transactions, disable the switch and then re-enable it by entering the switchDisable and switchEnable commands. This stops any current traffic between devices that are zoned using node names.
Creating a DCC policyMultiple DCC policies can be used to restrict which device ports can connect to which switch ports. The devices can be initiators, targets, or intermediate devices such as SCSI routers and loop hubs. By default, all device ports are allowed to connect to all switch ports; no DCC policies exist until they are created by the administrator.
Each device port can be bound to one or more switch ports; the same device ports and switch ports might be listed in multiple DCC policies. After a switch port is specified in a DCC policy, it permits connections only from designated device ports. Device ports that are not specified in any DCC policies are allowed to connect only to switch ports that are not specified in any DCC policies.
NOTE: Some older private loop HBAs do not respond to port login from the switch and are not enforced by the DCC policy. However, this does not create a security problem because these HBAs cannot contact any device outside of their immediate loop.
DCC policies must follow the naming convention DCC_POLICY_nnn, where nnn represents a unique string. To save memory and improve performance, one DCC policy per switch or group of switches is recommended.
Device ports must be specified by port WWN. Switch ports can be identified by the switch WWN, domain ID, or switch name followed by the port or area number. To specify an allowed connection, enter the device port WWN, a semicolon, and the switch port identification. Following are the possible methods of specifying an allowed connection:
• deviceportWWN;switchWWN (port or area number)
• deviceportWWN;domainID (port or area number)
• deviceportWWN;switchname (port or area number)
Table 14 shows possible DCC policy states.
Table 14 DCC policy states
Policy State Characteristics
No policy Any device can connect to any switch port in the fabric.
Policy with no entries
Any device can connect to any switch port in the fabric. An empty policy is the same as no policy.
Policy with entries If a device WWN is specified in a DCC policy, that device is allowed access to the fabric only if connected to a switch port listed in the same policy.
If a switch port is specified in a DCC policy, it permits connections only from devices that are listed in the policy.
Devices with WWNs that are not specified in a DCC policy are allowed to connect to the fabric at any switch ports that are not specified in a DCC policy.
Switch ports and device WWNs may exist in multiple DCC policies.

62 Creating Secure Fabric OS policies
NOTE: When a DCC violation occurs, the related port is automatically disabled and must be re-enabled using the portEnable command.
To create a DCC policy:
1. From a sectelnet or Secure Shell session, log in to the primary FCS switch as admin.
2. Enter secPolicyCreate “DCC_POLICY_nnn”, “member;...;member”.
DCC_POLICY_nnn is the name of the DCC policy to be created; nnn is a string consisting of up to 19 alphanumeric or underscore characters to differentiate it from any other DCC policies; member contains device or switch port information: deviceportWWN;switch(port):
• deviceportWWN is the WWN of the device port.
• switch can be the switch WWN, domain ID, or switch name. The port can be specified by port or area number. Designating ports automatically includes the devices currently attached to those ports. The ports can be specified using any of the following syntax methods:
(1-6) Selects ports 1 through 6.
(*) Selects all ports on the switch.
[*] Selects all ports and all devices attached to those ports.
[3, 9] Selects ports 3 and 9 and all devices attached to those ports.
[1-3, 9] Selects ports 1, 2, 3, 9, and all devices attached to those ports.
3. To save or activate the new policy, enter either the secPolicySave or the secPolicyActivate command.
If neither of these commands is entered, the changes are lost when the session is logged out. For more information about these commands, see ”Saving changes to Secure Fabric OS policies” on page 64 and ”Activating changes to Secure Fabric OS policies” on page 65.
For example, to create a DCC policy DCC_POLICY_server that includes device 11:22:33:44:55:66:77:aa and port 1 and port 3 of switch domain 1:
To create a DCC policy DCC_POLICY_storage that includes device port WWN 22:33:44:55:66:77:11:bb, all ports of switch domain 2, and all currently connected devices of switch domain 2:
To create a DCC policy DCC_POLICY_abc that includes device 33:44:55:66:77:11:22:cc and ports 1–6 and port 9 of switch domain 3:
primaryfcs:admin> secpolicycreate “DCC_POLICY_server”, “11:22:33:44:55:66:77:aa;1(1,3)”DCC_POLICY_xxx has been created
primaryfcs:admin> secpolicycreate “DCC_POLICY_storage”, “22:33:44:55:66:77:11:bb;2[*]”DCC_POLICY_xxx has been created
primaryfcs:admin> secpolicycreate “DCC_POLICY_abc”, “33:44:55:66:77:11:22:cc;3(1-6,9)”DCC_POLICY_xxx has been created

Secure Fabric OS administrator guide 63
To create a DCC policy DCC_POLICY_example that includes devices 44:55:66:77:22:33:44:dd and 33:44:55:66:77:11:22:cc, ports 1–4 of switch domain 4, and all devices currently connected to ports 1-4 of switch domain 4:
Creating an SCC policyThe SCC policy is used to restrict which switches can join the fabric. Switches are checked against the policy each time secure mode is enabled, the fabric is initialized with secure mode enabled, or an E_Port-to-E_Port connection is made.
The policy is named SCC_POLICY, and accepts members listed as WWNs, domain IDs, or switch names. Only one SCC policy may be created.
By default, any switch is allowed to join the fabric; the SCC policy does not exist until it is created by the administrator.
NOTE: When an SCC policy is activated, any non-FCS switches in the fabric not included in the policy member list are segmented from the fabric.
The possible SCC policy states are shown in Table 15.
To create an SCC policy:
1. Log in to the primary FCS switch as admin from a sectelnet or Secure Shell session.
2. Enter secPolicyCreate "SCC_POLICY", “member;...;member”.
Where member indicates a switch that is permitted to join the fabric. Switches can be specified by WWN, domain ID, or switch name. An asterisk (*) can be entered to indicate all the switches in the fabric.
3. To save or activate the new policy, enter either the secPolicySave or the secPolicyActivate command.
If neither of these commands is entered, the changes are lost when the session is logged out. For more information about these commands, see ”Saving changes to Secure Fabric OS policies” on page 64 and ”Activating changes to Secure Fabric OS policies” on page 65.
primaryfcs:admin> secpolicycreate “DCC_POLICY_example”, “44:55:66:77:22:33:44:dd;33:44:55:66:77:11:22:cc;4[1-4]”DCC_POLICY_xxx has been created
Table 15 SCC policy states
Policy state SCC policy enforcement
No policy specified
All switches may join the fabric.
Policy specified, but with no members
The SCC policy includes all FCS switches. All non-FCS switches are excluded.
Only FCS switches may join the fabric.
Policy specified, with members
The SCC policy contains all FCS switches and any switches specified in the member list. Any non-FCS switches not explicitly specified are excluded. Only FCS switches and explicitly specified non-FCS switches may join the fabric.
64 Creating Secure Fabric OS policies
For example, to create an SCC policy that allows switches that have domain IDs 2 and 4 to join the fabric:
Managing Secure Fabric OS policiesAll Secure Fabric OS transactions must be performed through the primary FCS switch only, except for the secTransAbort, secFCSFailover, secStatsReset, and secStatsShow commands.
Multiple sessions can be created to the primary FCS switch from one or more hosts. However, the software allows only one Secure Fabric OS transaction at a time. If a second Secure Fabric OS transaction is started, it fails. The only secondary transaction that can succeed is the secTransAbort command.
All policy modifications are saved in volatile memory only until the changes are saved or activated.
The following functions can be performed on existing Secure Fabric OS policies:
• ”Saving changes to Secure Fabric OS policies” on page 64 saves changes to flash memory without actually implementing the changes within the fabric. This saved but inactive information is known as the defined policy set.
• ”Activating changes to Secure Fabric OS policies” on page 65 simultaneously saves and implements all the policy changes made since the last time changes were activated. The activated policies are known as the active policy set.
• ”Adding a member to an existing policy” on page 65 adds one or more members to a policy. The aspect of the fabric covered by each policy is closed to access by all devices and switches that are not listed in that policy.
• ”Removing a member from a policy” on page 66 removes one or more members from a policy. If all members are removed from a policy, that aspect of the fabric becomes closed to all access. The last member of the FCS_POLICY cannot be removed, because a primary FCS switch must be designated.
• ”Deleting a policy” on page 66 deletes an entire policy; however, keep in mind that doing so opens up that aspect of the fabric to all access.
• ”The FCS_POLICY cannot be deleted.” on page 66 aborts all the changes to the Secure Fabric OS policies since the last time changes were saved or activated.
• ”Aborting a Secure Fabric OS transaction” on page 67 aborts (from any switch in the fabric) a Secure Fabric OS-related transaction that has become frozen (such as due to a failed host) and is preventing other Secure Fabric OS transactions.
Each of these tasks is described in the following sections.
Saving changes to Secure Fabric OS policiesYou can save changes to Secure Fabric OS policies without activating them by entering the secPolicySave command. This saves the changes to the defined policy set.
NOTE: Until the secPolicySave or secPolicyActivate command is issued, all policy changes are in volatile memory only and are lost if the switch reboots or the current session is logged out.
To save changes to the Secure Fabric OS policies without activating them:
1. From a sectelnet or Secure Shell session, log in to the primary FCS switch as admin.
primaryfcs:admin> secpolicycreate "SCC_POLICY", “2;4”SCC_POLICY has been created

Secure Fabric OS administrator guide 65
2. Issue the secPolicySave command:
Activating changes to Secure Fabric OS policiesImplement changes to the Secure Fabric OS policies using the secPolicyActivate command. This saves the changes to the active policy set and activates all policy changes since the last time the command was issued. You cannot activate policies on an individual basis; all changes to the entire policy set are activated by the command.
NOTE: Until a secPolicySave or secPolicyActivate command is issued, all policy changes are in volatile memory only and are lost upon rebooting
To activate changes to the Secure Fabric OS policies:
1. From a sectelnet or Secure Shell session, log in to the primary FCS switch as admin.
2. Enter the secPolicyActivate command:
Adding a member to an existing policyYou can add members to policies by using the secPolicyAdd command. As soon as a policy has been created, the aspect of the fabric managed by that policy is closed to access by all devices that are not listed in the policy.
To add a member to an existing Secure Fabric OS policy:
1. From a sectelnet or Secure Shell session, log in to the primary FCS switch as admin.
2. Enter secPolicyAdd “policy_name”, “member;...;member”.
Where policy_name is the name of the Secure Fabric OS policy. member is the item to be added to the policy, identified by device or switch IP address, switch domain ID, device or switch WWN, or switch name.
3. To implement the change immediately, enter the secPolicyActivate command. For example, to add a member to the MS_POLICY using the device port WWN:
To add an SNMP manager to WSNMP_POLICY:
primaryfcs:admin> secpolicysaveCommitting configuration...done.Saving Define FMPS ...done
primaryfcs:admin> secpolicyactivateAbout to overwrite the current Active data.ARE YOU SURE (yes, y, no, n): [no] yCommitting configuration...done.Saving Defined FMPS ...doneSaving Active FMPS ...done
primaryfcs:admin> secpolicyadd "MS_POLICY", "12:24:45:10:0a:67:00:40"Member(s) have been added to MS_POLICY.
primaryfcs:admin> secpolicyadd "WSNMP_POLICY", "192.168.5.21"Member(s) have been added to WSNMP_POLICY.
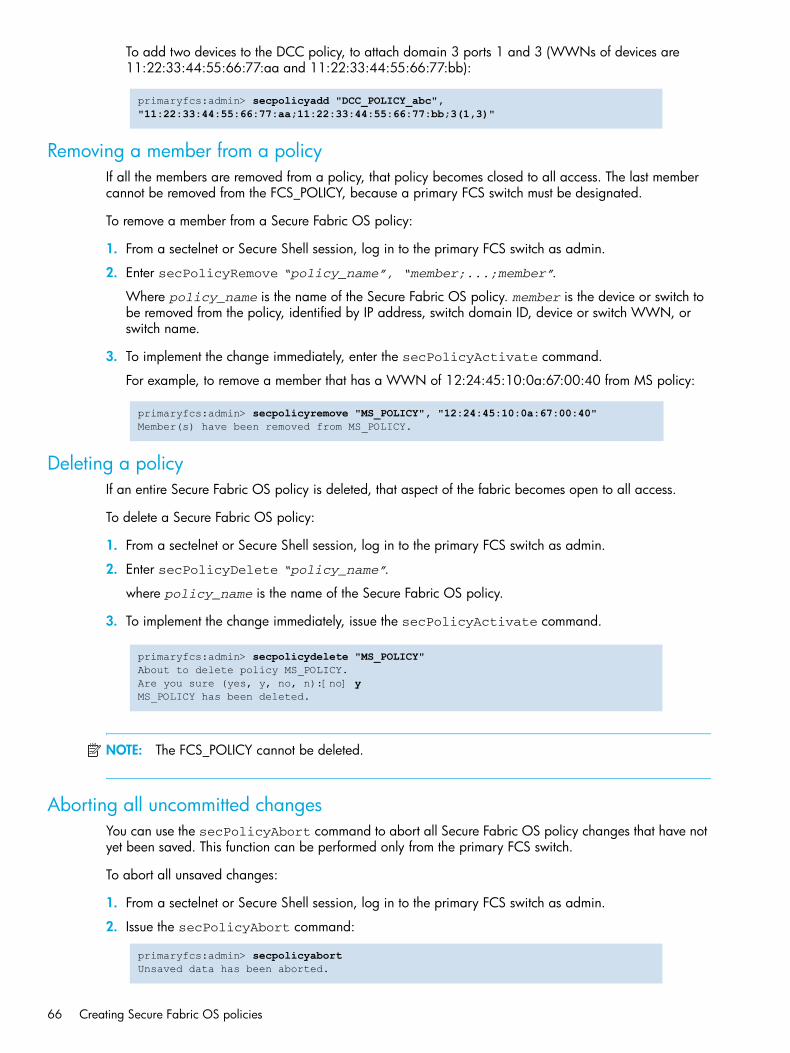
66 Creating Secure Fabric OS policies
To add two devices to the DCC policy, to attach domain 3 ports 1 and 3 (WWNs of devices are 11:22:33:44:55:66:77:aa and 11:22:33:44:55:66:77:bb):
Removing a member from a policyIf all the members are removed from a policy, that policy becomes closed to all access. The last member cannot be removed from the FCS_POLICY, because a primary FCS switch must be designated.
To remove a member from a Secure Fabric OS policy:
1. From a sectelnet or Secure Shell session, log in to the primary FCS switch as admin.
2. Enter secPolicyRemove “policy_name”, “member;...;member”.
Where policy_name is the name of the Secure Fabric OS policy. member is the device or switch to be removed from the policy, identified by IP address, switch domain ID, device or switch WWN, or switch name.
3. To implement the change immediately, enter the secPolicyActivate command.
For example, to remove a member that has a WWN of 12:24:45:10:0a:67:00:40 from MS policy:
Deleting a policyIf an entire Secure Fabric OS policy is deleted, that aspect of the fabric becomes open to all access.
To delete a Secure Fabric OS policy:
1. From a sectelnet or Secure Shell session, log in to the primary FCS switch as admin.
2. Enter secPolicyDelete “policy_name”.
where policy_name is the name of the Secure Fabric OS policy.
3. To implement the change immediately, issue the secPolicyActivate command.
NOTE: The FCS_POLICY cannot be deleted.
Aborting all uncommitted changesYou can use the secPolicyAbort command to abort all Secure Fabric OS policy changes that have not yet been saved. This function can be performed only from the primary FCS switch.
To abort all unsaved changes:
1. From a sectelnet or Secure Shell session, log in to the primary FCS switch as admin.
2. Issue the secPolicyAbort command:
primaryfcs:admin> secpolicyadd "DCC_POLICY_abc","11:22:33:44:55:66:77:aa;11:22:33:44:55:66:77:bb;3(1,3)"
primaryfcs:admin> secpolicyremove "MS_POLICY", "12:24:45:10:0a:67:00:40"Member(s) have been removed from MS_POLICY.
primaryfcs:admin> secpolicydelete "MS_POLICY"About to delete policy MS_POLICY.Are you sure (yes, y, no, n):[no] yMS_POLICY has been deleted.
primaryfcs:admin> secpolicyabortUnsaved data has been aborted.

Secure Fabric OS administrator guide 67
All changes since the last time the secPolicySave or secPolicyActivate commands were entered are aborted.
Aborting a Secure Fabric OS transactionYou can use the secTransAbort command to abort a single Secure Fabric OS transaction from any switch in the fabric. This makes it possible to abort a transaction that froze due to a failed host. If the switch itself fails, the transaction aborts by default. This command cannot be used to abort an active transaction.
To abort a Secure Fabric OS transaction:
1. From a sectelnet or Secure Shell session, log in to the primary FCS switch as admin.
2. Enter the secTransAbort command:
Any Secure Fabric OS transaction that was in process is aborted (except for the transaction of entering this command).
primaryfcs:admin> sectransabortTransaction has been aborted.

68 Creating Secure Fabric OS policies

Secure Fabric OS administrator guide 69
4 Managing Secure Fabric OSSecure Fabric OS 2.6.2, Fabric OS 3.2.x, Fabric OS 4.4.x and Fabric OS 5.0.1 can be managed through Fabric Manager and sectelnet. In addition, Secure Shell is supported for Fabric OS 4.4.x and 5.0.1. When secure mode is enabled for a fabric, all Secure Fabric OS administrative operations, all zoning commands, and some management server commands must be executed on the primary FCS switch. For a list of the commands and related restrictions, see ”Secure Fabric OS commands and secure mode restrictions” on page 117.
This chapter includes the following sections:
• Viewing Secure Fabric OS information, next
• Displaying and resetting Secure Fabric OS statistics, page 72
• Managing passwords, page 75
• Resetting the version number and time stamp, page 79
• Adding switches and merging fabrics with secure mode enabled, page 80
• Preventing a LUN connection, page 83
• Troubleshooting, page 84
Viewing Secure Fabric OS informationYou can display the following Secure Fabric OS information:
• General Secure Fabric OS-related information about a fabric
• Secure Fabric OS policy sets (active and defined)
• Information about one or more specific Secure Fabric OS policies
For information about viewing the Secure Fabric OS statistics, see ”Displaying and resetting Secure Fabric OS statistics” on page 72.
Displaying general Secure Fabric OS informationYou can use the secFabricShow command to display general Secure Fabric OS-related information about a fabric.
To display general Secure Fabric OS-related information:
1. Open a sectelnet or Secure Shell session to the primary FCS switch and log in as admin.
2. Enter the secFabricShow command. The command displays the switches in the fabric and their status (Ready, Error, Busy, or NoResp, for no response from the switch).
primaryfcs:admin> secfabricshowRole WWN DId Status Enet IP Addr Name================================================================ non-FCS 10:00:00:60:69:10:03:23 1 Ready 192.168.100.148 "nonfcs"Backup 10:00:00:60:69:00:12:53 2 Ready 192.168.100.147 "backup"Primary 10:00:00:60:69:22:32:83 3 Ready 192.168.100.135 "primaryfcs"______________________________________________________________________
Secured switches in the fabric: 3

70 Managing Secure Fabric OS
Table 16 identifies the information that displays if secure mode is enabled.
Viewing the Secure Fabric OS policy databaseUse the secPolicyDump command to display the Secure Fabric OS policy database, which consists of the active and defined policy sets. This command displays information without page breaks.
To view the Secure Fabric OS policy database:
1. From a sectelnet or Secure Shell session, log in to the primary FCS switch as admin.
2. Enter secpolicydump “listtype”, “policy_name”.
Where listtype is the type of Secure Fabric OS policy set. It can be active, defined, or an asterisk (*), which displays both versions of the policy. If a list type is not entered, both versions of the Secure Fabric OS policy display. policy_name is the name of the Secure Fabric OS policy. If you do not specify a policy name, the command displays all the policies in the specified policy set.
If you do not specify any operands, the command displays all policies in both the active and defined policy sets.
For example, to display all policies in both active and defined policy sets:
Table 16 Secure mode information
Table heading Indicates
Pos Position of switch in FCS list
Primary Yes, if switch is primary FCS, no, if not
WWN WWN of each FCS switch
DId Domain ID of each FCS switch
swName Switch name of each FCS switch
primaryfcs:admin> secpolicydump____________________________________________________ DEFINED POLICY SETFCS_POLICYPos Primary WWN DId swName__________________________________________________1 Yes 10:00:00:60:69:30:15:5c 1 primaryfcsHTTP_POLICYIpAddr__________________________________________________192.155.52.0________________________________________________________________________________________________________ ACTIVE POLICY SETFCS_POLICYPos Primary WWN DId swName__________________________________________________1 Yes 10:00:00:60:69:30:15:5c 1 primaryfcsHTTP_POLICYIpAddr__________________________________________________192.155.52.0192.155.53.1192.155.54.2192.155.55.3____________________________________________________
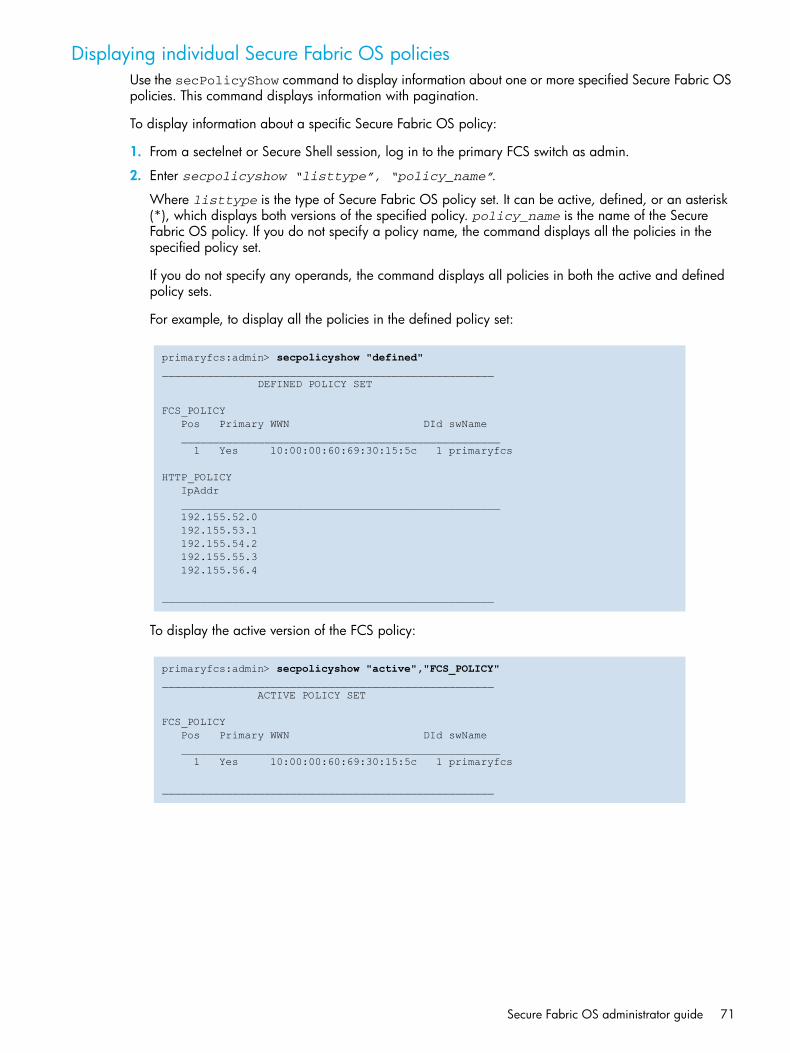
Secure Fabric OS administrator guide 71
Displaying individual Secure Fabric OS policiesUse the secPolicyShow command to display information about one or more specified Secure Fabric OS policies. This command displays information with pagination.
To display information about a specific Secure Fabric OS policy:
1. From a sectelnet or Secure Shell session, log in to the primary FCS switch as admin.
2. Enter secpolicyshow “listtype”, “policy_name”.
Where listtype is the type of Secure Fabric OS policy set. It can be active, defined, or an asterisk (*), which displays both versions of the specified policy. policy_name is the name of the Secure Fabric OS policy. If you do not specify a policy name, the command displays all the policies in the specified policy set.
If you do not specify any operands, the command displays all policies in both the active and defined policy sets.
For example, to display all the policies in the defined policy set:
To display the active version of the FCS policy:
primaryfcs:admin> secpolicyshow "defined"____________________________________________________ DEFINED POLICY SET FCS_POLICY Pos Primary WWN DId swName __________________________________________________ 1 Yes 10:00:00:60:69:30:15:5c 1 primaryfcs HTTP_POLICY IpAddr __________________________________________________ 192.155.52.0 192.155.53.1 192.155.54.2 192.155.55.3 192.155.56.4 ____________________________________________________
primaryfcs:admin> secpolicyshow "active","FCS_POLICY"____________________________________________________ ACTIVE POLICY SET FCS_POLICY Pos Primary WWN DId swName __________________________________________________ 1 Yes 10:00:00:60:69:30:15:5c 1 primaryfcs ____________________________________________________

72 Managing Secure Fabric OS
Displaying status of secure modeUse the secModeShow command to determine whether secure mode is enabled.
To determine whether secure mode is enabled:
1. From a sectelnet or Secure Shell session, log in to the primary FCS switch as admin.
2. Enter the secModeShow command. The command displays the status of secure mode, the version number and time stamp, and the list of switches in the FCS policy.
Displaying and resetting Secure Fabric OS statisticsSecure Fabric OS provides several statistics regarding attempted policy violations. This includes events such as the following:
• A DCC policy exists that defines which devices are authorized to access which switch (port) combinations, and a device that is not listed in the policy tries to access one of the defined switch (port) combinations.
• An attempt is made to log in to an account with an incorrect password.
The statistics for all DCC policies are added together.
NOTE: Rebooting the switch resets all the statistics. Secure Fabric OS statistics also can be monitored through Fabric Watch.
Each statistic indicates the number of times the monitored event has occurred since the statistics were last reset (secStatsReset command). For the Telnet policy, this includes all the automated login attempts made by the sectelnet or Secure Shell client software, in addition to the actual attempts made by the user.
On dual-CP directors, statistics are maintained separately on each CP and are counted only on the active CP. If a director fails over from the active to the standby CP, statistics are not replicated to the standby CP.
The names of the Secure Fabric OS statistics and their definitions are provided in Table 17.
switch:admin> secmodeshow
Secure Mode: ENABLED.Version Stamp: 9182, Wed Mar 13 16:37:01 2001.POS Primary WWN DId swName.=============================================1 Yes 10:00:00:60:69:00:00:5a 21 switch47.2 No 12:00:00:60:60:03:23:5b 5 switch12.
Table 17 Secure Fabric OS statistics
Statistic Definition
API_POLICY The number of attempted violations to the API policy (includes automated attempts made by client software).
AUTH_FAIL (SLAP failures)
The switch received a SLAP that it could not verify, possibly due to bad certificates, bad signature, the other side not performing SLAP, or SLAP packets that were received out of sequence. This counter is not advanced if SLAP protocol does not complete, which can happen when a switch that does not have secure mode enabled is attached to a switch that does.

Secure Fabric OS administrator guide 73
DCC_POLICY The number of attempted violations to the DCC policy.
Note: Fabric OS 4.4.0 and 5.0.1 increases the counter by 1 for each drive in a JBOD; Fabric OS 3.2.0 increases the counter by 1 for the entire JBOD.
FRONTPANEL_POLICY The number of attempted violations to the Front Panel policy.
HTTP_POLICY The number of attempted violations to the HTTP policy.
ILLEGAL_CMD(illegal command)
The number of times a command is issued on a switch where it is not allowed (such as entering secModeDisable on a non-FCS switch).
INCOMP_DB (incompatible Secure Fabric OS database)
Secure Fabric OS databases are incompatible; might be due to different version numbers, time stamps, FCS policies, or secure mode status.
INVALID_CERT (invalid certificates)
A received certificate is not properly signed by the root CA of the receiving switch.
INVALID_SIGN (invalid signatures)
A received packet has a bad signature.
INVALID_TS (invalid timestamps)
A received packet has a time stamp that differs from the time of the receiving switch by more than the maximum allowed difference.
LOGIN The number of invalid login attempts.
MS_POLICY The number of attempted violations to the MS policy.
NO_FCS (no fabric configuration server)
The number of times the switch has simultaneously lost contact with all the switches in the FCS list.
RSNMP_POLICY The number of attempted violations to the RSNMP policy.
SCC_POLICY The number of attempted violations to the SCC policy.
SERIAL_POLICY The number of attempted violations to the Serial policy.
SES_POLICY The number of attempted violations to the SES policy.
SLAP_BAD_PKT (SLAP bad packets)
SLAP packets are received with a bad transaction ID.
TELNET_POLICY The number of attempted violations to the Telnet policy (includes automated attempts made by client software).
TS_OUT_SYNC (TS out of synchronization)
The time server (TS) is out of synchronization with the primary FCS switch.
WSNMP_POLICY The number of attempted violations to the WSNMP policy.
Table 17 Secure Fabric OS statistics (continued)
Statistic Definition
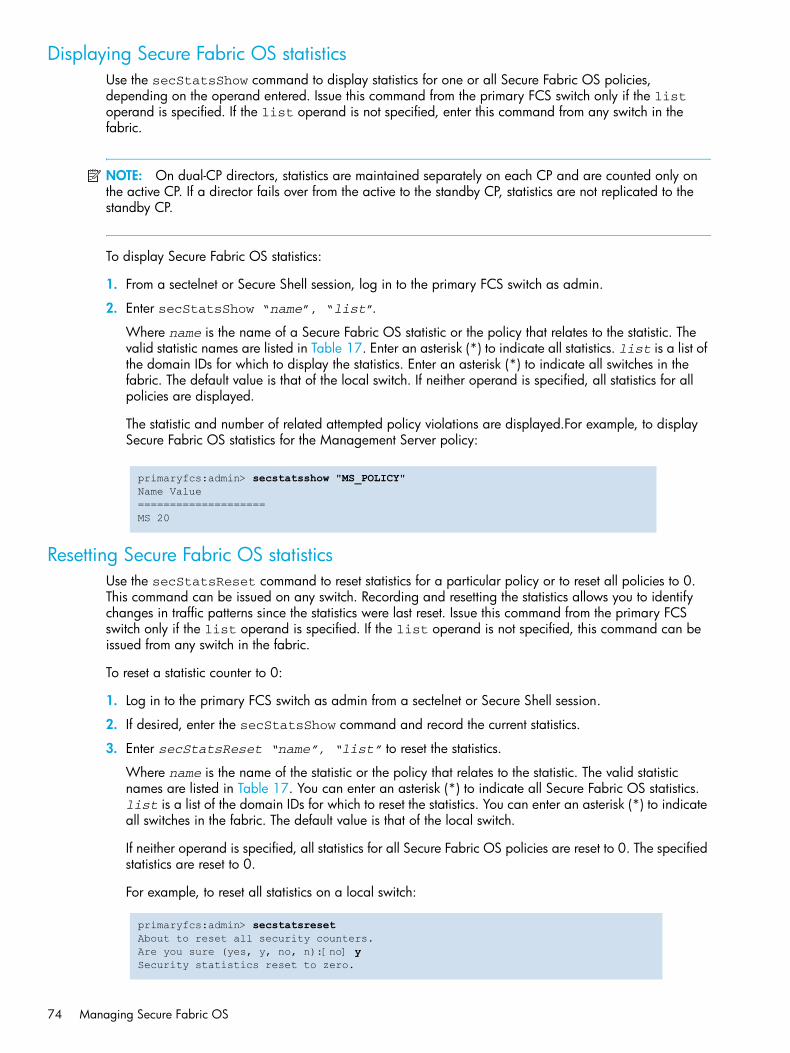
74 Managing Secure Fabric OS
Displaying Secure Fabric OS statisticsUse the secStatsShow command to display statistics for one or all Secure Fabric OS policies, depending on the operand entered. Issue this command from the primary FCS switch only if the list operand is specified. If the list operand is not specified, enter this command from any switch in the fabric.
NOTE: On dual-CP directors, statistics are maintained separately on each CP and are counted only on the active CP. If a director fails over from the active to the standby CP, statistics are not replicated to the standby CP.
To display Secure Fabric OS statistics:
1. From a sectelnet or Secure Shell session, log in to the primary FCS switch as admin.
2. Enter secStatsShow “name”, “list”.
Where name is the name of a Secure Fabric OS statistic or the policy that relates to the statistic. The valid statistic names are listed in Table 17. Enter an asterisk (*) to indicate all statistics. list is a list of the domain IDs for which to display the statistics. Enter an asterisk (*) to indicate all switches in the fabric. The default value is that of the local switch. If neither operand is specified, all statistics for all policies are displayed.
The statistic and number of related attempted policy violations are displayed.For example, to display Secure Fabric OS statistics for the Management Server policy:
Resetting Secure Fabric OS statisticsUse the secStatsReset command to reset statistics for a particular policy or to reset all policies to 0. This command can be issued on any switch. Recording and resetting the statistics allows you to identify changes in traffic patterns since the statistics were last reset. Issue this command from the primary FCS switch only if the list operand is specified. If the list operand is not specified, this command can be issued from any switch in the fabric.
To reset a statistic counter to 0:
1. Log in to the primary FCS switch as admin from a sectelnet or Secure Shell session.
2. If desired, enter the secStatsShow command and record the current statistics.
3. Enter secStatsReset “name”, “list” to reset the statistics.
Where name is the name of the statistic or the policy that relates to the statistic. The valid statistic names are listed in Table 17. You can enter an asterisk (*) to indicate all Secure Fabric OS statistics. list is a list of the domain IDs for which to reset the statistics. You can enter an asterisk (*) to indicate all switches in the fabric. The default value is that of the local switch.
If neither operand is specified, all statistics for all Secure Fabric OS policies are reset to 0. The specified statistics are reset to 0.
For example, to reset all statistics on a local switch:
primaryfcs:admin> secstatsshow "MS_POLICY"Name Value====================MS 20
primaryfcs:admin> secstatsresetAbout to reset all security counters.Are you sure (yes, y, no, n):[no] ySecurity statistics reset to zero.

Secure Fabric OS administrator guide 75
To reset the DCC_POLICY statistics on domains 1 and 69:
Managing passwordsThis section provides the following information:
• Modifying passwords in secure mode, page 77
• Using temporary passwords, page 78
When secure mode is enabled, the following conditions apply:
• Enter the passwd command on the primary FCS switch only.
• Access the root and factory accounts only from the FCS switches. Attempting to access them from a non-FCS switch generates an error message.
• The admin account (or role) remains available from all switches, but two passwords are implemented: one for all FCS switches and one for all non-FCS switches.
• Temporary passwords can be created for specific switches, making it possible to provide temporary access to another user.
The user account (or role) remains available fabric-wide regardless of whether secure mode is enabled. The characteristics of the different accounts when secure mode is enabled and disabled are described in Table 17.
You can use the multiple-user account (MUA) feature of Fabric OS 3.2.x, 4.4.x, and 5.0.1 if the primary FCS switch is running any of the Fabric OS 3.2.x, 4.4.x, or 5.0.1. Older switches do not need to be running a version of Fabric OS supporting MUA.
If a digital certificate is installed, the sectelnet and API passwords are automatically encrypted, whether or not secure mode is enabled. HTTP encrypts passwords only if secure mode is enabled.
NOTE: Record the passwords and store them in a secure place; recovering passwords might require significant effort and result in fabric downtime.
Table 18 summarizes login account behavior with secure mode disabled and enabled.
primaryfcs:admin> secstatsreset "DCC_POLICY", "1;69"Reset DCC_POLICY statistic.
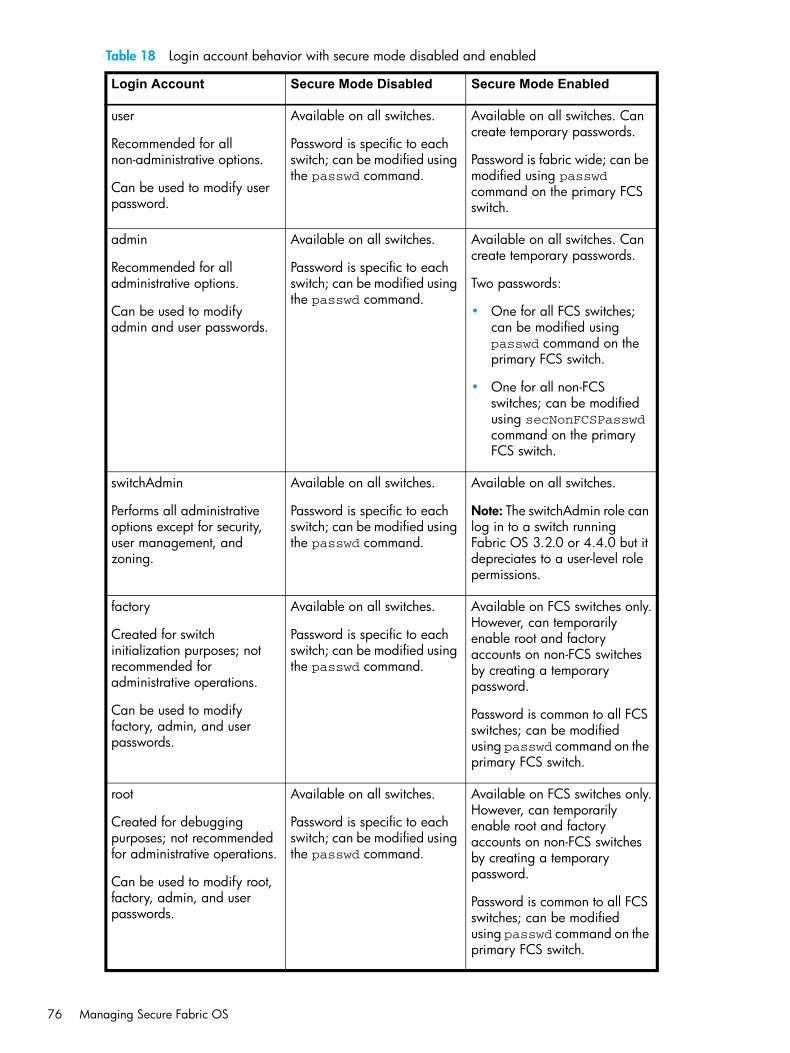
76 Managing Secure Fabric OS
Table 18 Login account behavior with secure mode disabled and enabled
Login Account Secure Mode Disabled Secure Mode Enabled
user
Recommended for all non-administrative options.
Can be used to modify user password.
Available on all switches.
Password is specific to each switch; can be modified using the passwd command.
Available on all switches. Can create temporary passwords.
Password is fabric wide; can be modified using passwd command on the primary FCS switch.
admin
Recommended for all administrative options.
Can be used to modify admin and user passwords.
Available on all switches.
Password is specific to each switch; can be modified using the passwd command.
Available on all switches. Can create temporary passwords.
Two passwords:
• One for all FCS switches; can be modified using passwd command on the primary FCS switch.
• One for all non-FCS switches; can be modified using secNonFCSPasswd command on the primary FCS switch.
switchAdmin
Performs all administrative options except for security, user management, and zoning.
Available on all switches.
Password is specific to each switch; can be modified using the passwd command.
Available on all switches.
Note: The switchAdmin role can log in to a switch running Fabric OS 3.2.0 or 4.4.0 but it depreciates to a user-level role permissions.
factory
Created for switch initialization purposes; not recommended for administrative operations.
Can be used to modify factory, admin, and user passwords.
Available on all switches.
Password is specific to each switch; can be modified using the passwd command.
Available on FCS switches only.However, can temporarily enable root and factory accounts on non-FCS switches by creating a temporary password.
Password is common to all FCS switches; can be modified using passwd command on the primary FCS switch.
root
Created for debugging purposes; not recommended for administrative operations.
Can be used to modify root, factory, admin, and user passwords.
Available on all switches.
Password is specific to each switch; can be modified using the passwd command.
Available on FCS switches only.However, can temporarily enable root and factory accounts on non-FCS switches by creating a temporary password.
Password is common to all FCS switches; can be modified using passwd command on the primary FCS switch.
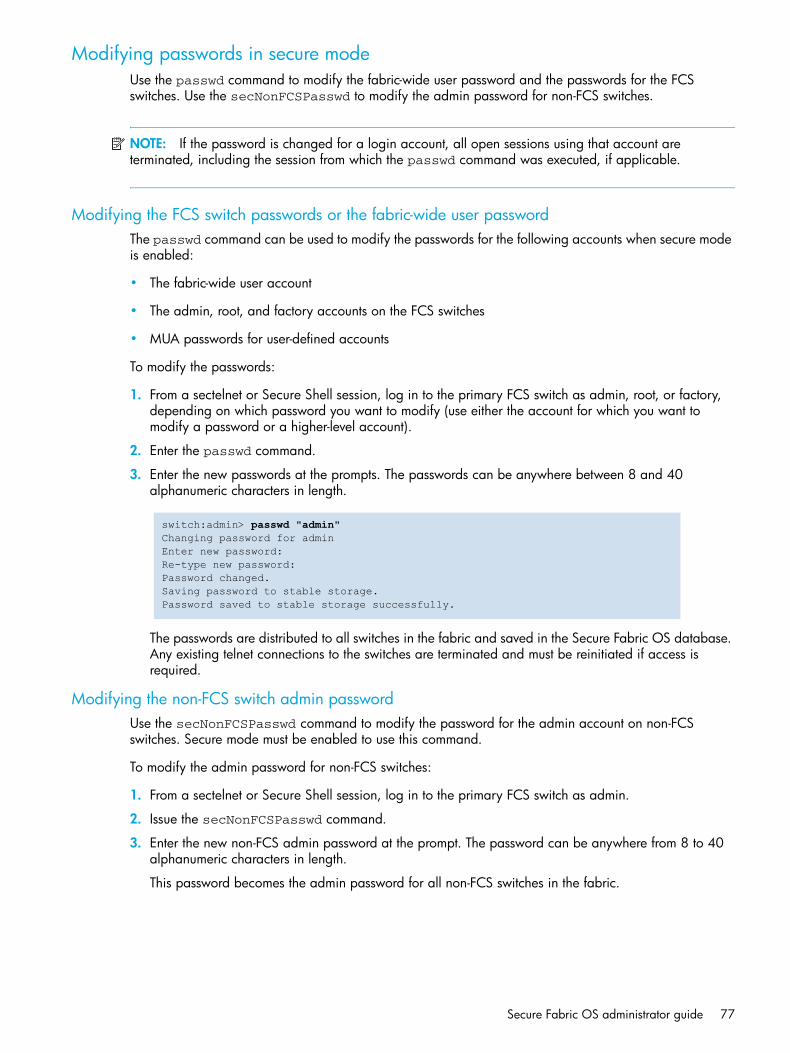
Secure Fabric OS administrator guide 77
Modifying passwords in secure modeUse the passwd command to modify the fabric-wide user password and the passwords for the FCS switches. Use the secNonFCSPasswd to modify the admin password for non-FCS switches.
NOTE: If the password is changed for a login account, all open sessions using that account are terminated, including the session from which the passwd command was executed, if applicable.
Modifying the FCS switch passwords or the fabric-wide user passwordThe passwd command can be used to modify the passwords for the following accounts when secure mode is enabled:
• The fabric-wide user account
• The admin, root, and factory accounts on the FCS switches
• MUA passwords for user-defined accounts
To modify the passwords:
1. From a sectelnet or Secure Shell session, log in to the primary FCS switch as admin, root, or factory, depending on which password you want to modify (use either the account for which you want to modify a password or a higher-level account).
2. Enter the passwd command.
3. Enter the new passwords at the prompts. The passwords can be anywhere between 8 and 40 alphanumeric characters in length.
The passwords are distributed to all switches in the fabric and saved in the Secure Fabric OS database. Any existing telnet connections to the switches are terminated and must be reinitiated if access is required.
Modifying the non-FCS switch admin passwordUse the secNonFCSPasswd command to modify the password for the admin account on non-FCS switches. Secure mode must be enabled to use this command.
To modify the admin password for non-FCS switches:
1. From a sectelnet or Secure Shell session, log in to the primary FCS switch as admin.
2. Issue the secNonFCSPasswd command.
3. Enter the new non-FCS admin password at the prompt. The password can be anywhere from 8 to 40 alphanumeric characters in length.
This password becomes the admin password for all non-FCS switches in the fabric.
switch:admin> passwd "admin"Changing password for adminEnter new password:Re-type new password:Password changed.Saving password to stable storage.Password saved to stable storage successfully.

78 Managing Secure Fabric OS
4. Reenter the new non-FCS admin password at the prompt.
The password is distributed to all switches in the fabric and saved in the Secure Fabric OS database. Any existing admin-level telnet connections to these non-FCS switches are terminated.
Using temporary passwordsCreate temporary passwords for default accounts to grant temporary access to a specific switch and login account without compromising the confidentiality of the permanent passwords; the permanent passwords also remain in effect. Temporary passwords can be removed; they are also automatically removed after a switch reboot.
NOTE: If a temporary password is set on a backup FCS switch, and the backup FCS switch then becomes the primary FCS switch, the temporary password remains in effect on that switch until the secTempPasswdReset command is entered.
Creating a temporary password for a switchUse the secTempPasswdSet command to create a temporary password. You must specify a login account and a switch domain ID.
To create a temporary admin password on a non-FCS switch:
1. From a sectelnet or Secure Shell session, log in to the primary FCS switch as admin.
2. Enter secTempPasswdSet domain, “login_name”.
Where domain is the domain ID of the switch for which you want to set a temporary password. login_name is the login account for which you want to set the temporary password.
3. Enter the admin password at the prompt.
Enter an alphanumeric password between 8 and 40 characters in length.
4. Reenter the password exactly as entered the first time.
For example, to create a temporary password for the admin account on a switch that has a domain ID of 2:
Removing a temporary password from a switchUse the secTempPasswdReset command to remove the temporary password. The permanent password remains in effect.
To remove the temporary password from a switch:
1. From a sectelnet or Secure Shell session, log in to the primary FCS switch as admin.
2. Enter secTempPasswdReset domain, “login_name”.
domain is the domain ID of the switch for which you want to remove the temporary password. login_name is the login account to which the temporary password applies.
primaryfcs:admin> secnonfcspasswdNon FCS switch password: Re-enter new password: Committing configuration...done.
primaryfcs:admin> sectemppasswdset 2, ”admin”Set remote switch admin password: swimmingRe-enter remote switch admin password: swimmingCommitting configuration........donePassword successfully set for domain 2 for admin.
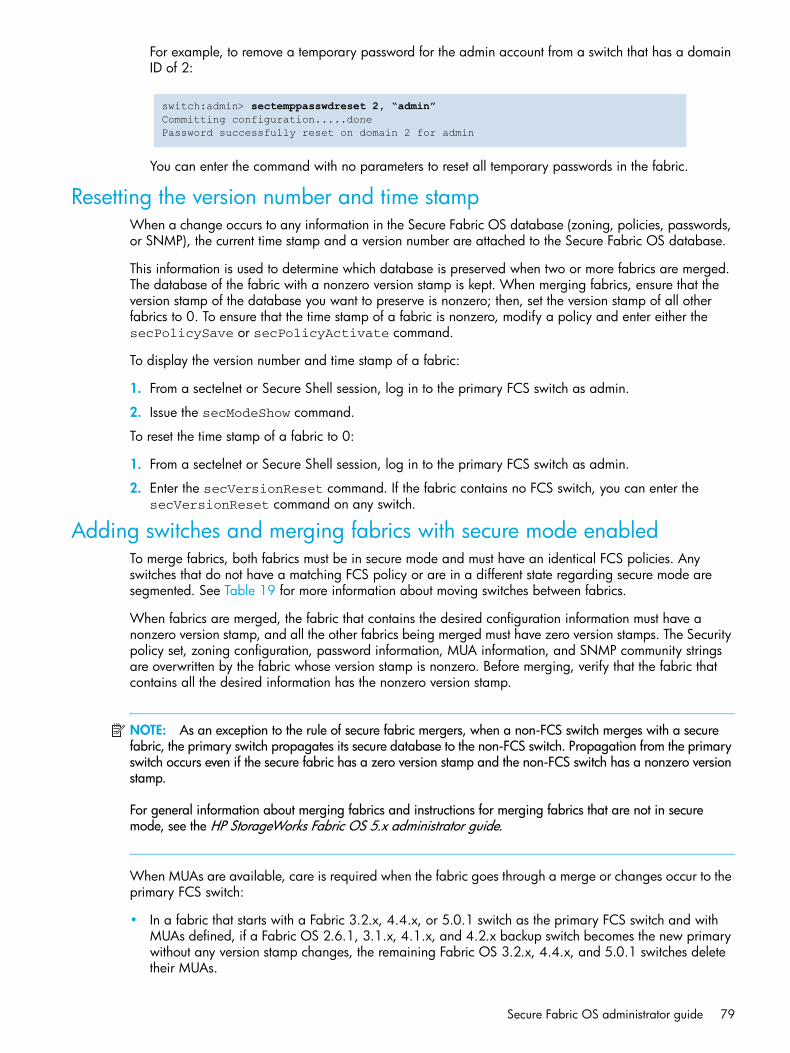
Secure Fabric OS administrator guide 79
For example, to remove a temporary password for the admin account from a switch that has a domain ID of 2:
You can enter the command with no parameters to reset all temporary passwords in the fabric.
Resetting the version number and time stampWhen a change occurs to any information in the Secure Fabric OS database (zoning, policies, passwords, or SNMP), the current time stamp and a version number are attached to the Secure Fabric OS database.
This information is used to determine which database is preserved when two or more fabrics are merged. The database of the fabric with a nonzero version stamp is kept. When merging fabrics, ensure that the version stamp of the database you want to preserve is nonzero; then, set the version stamp of all other fabrics to 0. To ensure that the time stamp of a fabric is nonzero, modify a policy and enter either the secPolicySave or secPolicyActivate command.
To display the version number and time stamp of a fabric:
1. From a sectelnet or Secure Shell session, log in to the primary FCS switch as admin.
2. Issue the secModeShow command.
To reset the time stamp of a fabric to 0:
1. From a sectelnet or Secure Shell session, log in to the primary FCS switch as admin.
2. Enter the secVersionReset command. If the fabric contains no FCS switch, you can enter the secVersionReset command on any switch.
Adding switches and merging fabrics with secure mode enabledTo merge fabrics, both fabrics must be in secure mode and must have an identical FCS policies. Any switches that do not have a matching FCS policy or are in a different state regarding secure mode are segmented. See Table 19 for more information about moving switches between fabrics.
When fabrics are merged, the fabric that contains the desired configuration information must have a nonzero version stamp, and all the other fabrics being merged must have zero version stamps. The Security policy set, zoning configuration, password information, MUA information, and SNMP community strings are overwritten by the fabric whose version stamp is nonzero. Before merging, verify that the fabric that contains all the desired information has the nonzero version stamp.
NOTE: As an exception to the rule of secure fabric mergers, when a non-FCS switch merges with a secure fabric, the primary switch propagates its secure database to the non-FCS switch. Propagation from the primary switch occurs even if the secure fabric has a zero version stamp and the non-FCS switch has a nonzero version stamp.
For general information about merging fabrics and instructions for merging fabrics that are not in secure mode, see the HP StorageWorks Fabric OS 5.x administrator guide.
When MUAs are available, care is required when the fabric goes through a merge or changes occur to the primary FCS switch:
• In a fabric that starts with a Fabric 3.2.x, 4.4.x, or 5.0.1 switch as the primary FCS switch and with MUAs defined, if a Fabric OS 2.6.1, 3.1.x, 4.1.x, and 4.2.x backup switch becomes the new primary without any version stamp changes, the remaining Fabric OS 3.2.x, 4.4.x, and 5.0.1 switches delete their MUAs.
switch:admin> sectemppasswdreset 2, “admin”Committing configuration.....donePassword successfully reset on domain 2 for admin

80 Managing Secure Fabric OS
• In a fabric with a Fabric OS 2.6.1, 3.1.x, 4.1.x, or 4.2.x switch as the primary FCS switch, when a Fabric OS 3.2.x, 4.4.x, or 5.0.1 switch merges into the fabric not as a primary and with a zero version stamp, the switch backs up and deletes its MUAs.
• In a fabric with a Fabric OS 2.6.1, 3.1.x, 4.1.x, or 4.2.x switch as the primary FCS switch, when a Fabric OS 3.2.x, 4.4.x, or 5.0.1 switch merges into the fabric as the new primary and it has MUAs, all the Fabric OS 3.2.x, 4.4.x, or 5.0.1 switches in the fabric request a download of the MUA accounts even though their version stamp matches the primary.
Table 19 indicates the results of moving switches in and out of fabrics with secure mode enabled or disabled.
NOTE: Although the following procedure does not require rebooting the fabric, there is potential for segmentation or other disruption to the fabric due to the number of factors involved in the merge process.
To merge two or more fabrics that have Secure Fabric OS implemented:
Table 19 Moving switches between fabrics
Initial state of switch
If set up as a standalone switch:
If moved into a fabric that has Secure Mode enabled and a functioning primary FCS switch:
If moved into a fabric that has Secure Mode enabled but no FCS switches are available:
If moved into a non-secure fabric:
Primary FCS switch in the FCS policy stored on switch, with secure mode enabled.
Forms a one-switch fabric with secure mode enabled, and acts as the primary FCS switch.
Segments unless FCS policies are identical. If identical, the switch is the primary FCS switch unless the other FCS switch is higher in the FCS policy.
Segments unless FCS policies are identical. If policies are identical, the switch becomes the primary FCS switch.
Segments from fabric.
Backup FCS switch in the FCS policy stored on switch, with secure mode enabled.
Forms a one-switch fabric with secure mode enabled, and acts as primary FCS switch.
Segments unless FCS policies are identical. If policies are identical, the switch is a backup FCS switch.
Segments unless FCS policies are identical. If policies are identical, the switch becomes the primary FCS switch.
Segments from fabric.
Non-FCS switch in the FCS policy stored on switch, with secure mode enabled.
Forms a one-switch fabric with secure mode enabled but no FCS switch (to specify the primary FCS switch, use the secModeEnable command).
Segments unless FCS policies are identical. If policies are identical, the switch is a non-FCS switch.
Segments unless FCS policies are identical. If policies are identical, the switch is a non-FCS switch.
Segments from fabric.
Secure mode disabled.
Standard operation. Segments from fabric.
Segments from fabric.
Standard operation.

Secure Fabric OS administrator guide 81
1. As a precaution, back up the configuration of each fabric to be merged by entering the configUpload command and completing the prompts. This also backs up the policies if Secure Fabric OS was already in use on the switch (such as on a switch running 2.6.x).
2. Ensure that all switches to be merged are running Fabric OS 2.6.2, 3.2.x, 4.4.x, or 5.0.1.
a. From a serial or telnet session, log in to one of the switches in the fabric as admin.
The default password is password.
b. Issue the version command. If the switch is a Core Switch 2/64, SAN Director 2/128 or 4/256, you can alternatively enter the firmwareShow command.
c. If the switch is not running Fabric OS 2.6.2, 3.2.x, 4.4.x, or 5.0.1, upgrade the firmware as required.
d. For information on upgrading firmware, see the HP StorageWorks Fabric OS 5.x administrator guide.
e. Customize the account passwords from the default values, as described in ”Customizing the account passwords” on page 27.
f. Repeat for each switch that you intend to include in the final merged fabric.
3. If the final merged fabric is to contain switches running Fabric OS 2.6.2 or 3.2.x and switches running Fabric OS 4.4.x or 5.0.1, the PID mode on all switches must be compatible; for more information about PID modes, see the HP StorageWorks Fabric OS 5.x administrator guide.
NOTE: If you change the PID format used on the fabric (for example, from native mode to core PID mode), you need to create new DCC policies on each switch.
4. Ensure that the Management Server Platform Database Service is consistently enabled or disabled across all the switches to be merged.
For information about management server support provided by Fabric OS, see the HP StorageWorks Fabric OS 5.x command reference guide.
5. Ensure that all switches to be merged have activated Secure Fabric OS and Advanced Zoning licenses, as described in ”Verifying or activating Secure Fabric OS and Advanced Zoning licenses” on page 24.
6. Ensure that all switches to be merged have the required PKI objects (private key passphrase, switch private key, CSR, and root certificate) and a digital certificate installed.
a. Log in to the switch as admin.
b. Enter the command supported by the Fabric OS installed on the switch:
• For Fabric OS 4.4.0 and 5.0.1, enter pkiShow.
• For Fabric OS 2.6.2 and 3.2.0, enter configShow “pki”.
A list displays the PKI objects currently installed on the switch.
NOTE: Certificate is the digital certificate. Root Certificate is an internal PKI object.
c. Verify that all of the objects display Exist.
If the digital certificate displays Empty, repeat the procedure provided in ”Distributing digital certificates to the switches” on page 35. If any of the PKI objects other than the digital certificate displays Empty, you can either reboot the switch to automatically re-create the objects or re-create them as described in ”Creating PKI objects” on page 41.
d. Repeat for the remaining switches in the fabric.
7. Install a supported CLI client on the computer workstations that manage the merged fabric.
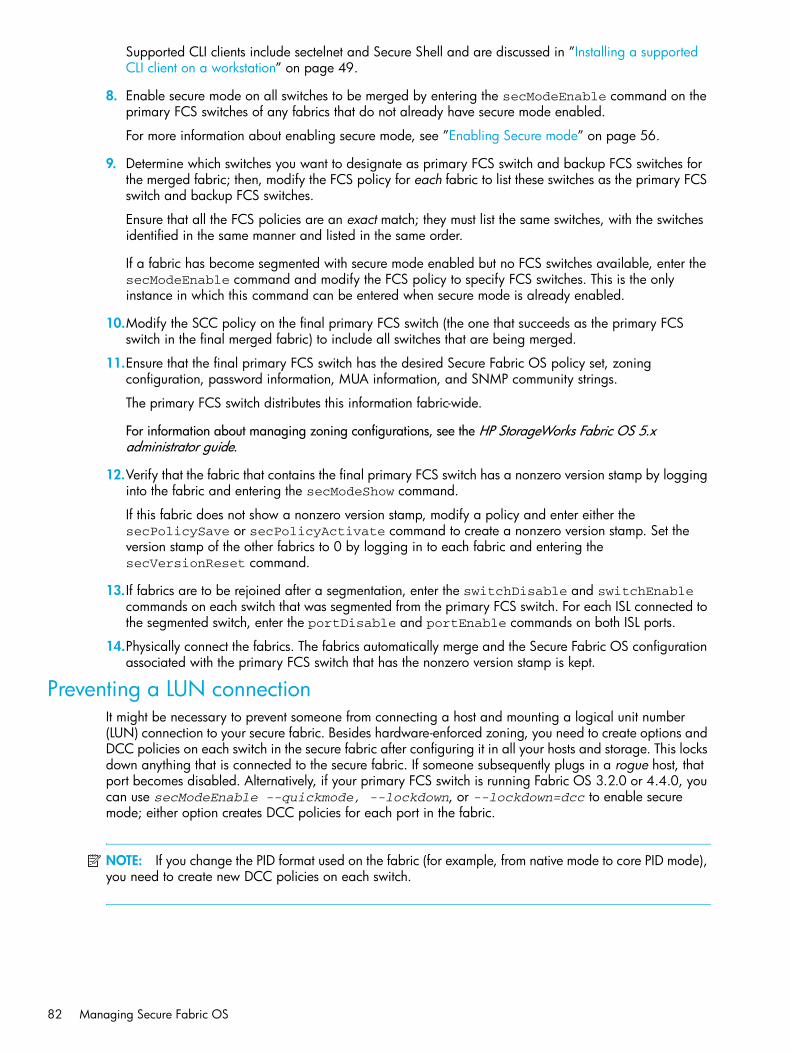
82 Managing Secure Fabric OS
Supported CLI clients include sectelnet and Secure Shell and are discussed in ”Installing a supported CLI client on a workstation” on page 49.
8. Enable secure mode on all switches to be merged by entering the secModeEnable command on the primary FCS switches of any fabrics that do not already have secure mode enabled.
For more information about enabling secure mode, see ”Enabling Secure mode” on page 56.
9. Determine which switches you want to designate as primary FCS switch and backup FCS switches for the merged fabric; then, modify the FCS policy for each fabric to list these switches as the primary FCS switch and backup FCS switches.
Ensure that all the FCS policies are an exact match; they must list the same switches, with the switches identified in the same manner and listed in the same order.
If a fabric has become segmented with secure mode enabled but no FCS switches available, enter the secModeEnable command and modify the FCS policy to specify FCS switches. This is the only instance in which this command can be entered when secure mode is already enabled.
10.Modify the SCC policy on the final primary FCS switch (the one that succeeds as the primary FCS switch in the final merged fabric) to include all switches that are being merged.
11.Ensure that the final primary FCS switch has the desired Secure Fabric OS policy set, zoning configuration, password information, MUA information, and SNMP community strings.
The primary FCS switch distributes this information fabric-wide.
For information about managing zoning configurations, see the HP StorageWorks Fabric OS 5.x administrator guide.
12.Verify that the fabric that contains the final primary FCS switch has a nonzero version stamp by logging into the fabric and entering the secModeShow command.
If this fabric does not show a nonzero version stamp, modify a policy and enter either the secPolicySave or secPolicyActivate command to create a nonzero version stamp. Set the version stamp of the other fabrics to 0 by logging in to each fabric and entering the secVersionReset command.
13. If fabrics are to be rejoined after a segmentation, enter the switchDisable and switchEnable commands on each switch that was segmented from the primary FCS switch. For each ISL connected to the segmented switch, enter the portDisable and portEnable commands on both ISL ports.
14.Physically connect the fabrics. The fabrics automatically merge and the Secure Fabric OS configuration associated with the primary FCS switch that has the nonzero version stamp is kept.
Preventing a LUN connectionIt might be necessary to prevent someone from connecting a host and mounting a logical unit number (LUN) connection to your secure fabric. Besides hardware-enforced zoning, you need to create options and DCC policies on each switch in the secure fabric after configuring it in all your hosts and storage. This locks down anything that is connected to the secure fabric. If someone subsequently plugs in a rogue host, that port becomes disabled. Alternatively, if your primary FCS switch is running Fabric OS 3.2.0 or 4.4.0, you can use secModeEnable --quickmode, --lockdown, or --lockdown=dcc to enable secure mode; either option creates DCC policies for each port in the fabric.
NOTE: If you change the PID format used on the fabric (for example, from native mode to core PID mode), you need to create new DCC policies on each switch.

Secure Fabric OS administrator guide 83
TroubleshootingSome of the most likely issues with Secure Fabric OS management and the recommended actions are described in Table 20. The information in the table is based on the assumption that the fabric was originally fully functional and secure mode was enabled.
NOTE: Some of the recommended actions might interrupt data traffic.
Table 20 Recovery Processes
Symptom Possible causes Recommended actions
Secure Fabric OS policies do not appear to be in effect.
Secure mode is not enabled.
Issue the secModeShow command. If secure mode is disabled, enter the secModeEnable command on the switch that you want to become the primary FCS switch and specify the FCS switches at the prompts.
Policy changes have not been applied.
Issue the secPolicyShow command and review the differences between the active and defined policy sets. If desired, enter the secPolicyActivate command to activate all recent policy changes.
Fabric has segmented. See possible causes and actions for One or more switches has segmented from the fabric, later in this table.
Cannot execute commands from any switch in the fabric.
All FCS switches have failed but secure mode is still enabled, preventing access to fabric.
Issue the secModeEnable command from the switch that you want to become the new primary FCS switch, and specify the FCS switches.
Note: Specify adequate backup FCS switches to prevent a recurrence of this problem.
Cannot access some or all switches in the fabric.
The MAC policies are restricting access.
Note: An empty MAC policy blocks all access through that management channel.
Use a serial cable to connect to the primary FCS switch; then, enter the secPolicyShow command to review the MAC policies.
Modify policies as necessary by either entering valid entries or deleting the empty policies.
Cannot access primary FCS switch by any management method.
Primary FCS switch has failed or lost all connections.
Log in to the backup FCS switch that you want to become the new primary FCS switch and enter the secFCSFailover command to reassign the primary FCS role to a backup FCS switch.
If no backup FCS switches are available, enter the secModeEnable command to specify a new primary FCS switch. Specify adequate backup FCS switches to prevent a recurrence.
Troubleshoot the previous primary FCS switch as required.

84 Managing Secure Fabric OS
Cannot access a device or switch port listed in the SCC or in a DCC policy.
Switch port might be disabled.
Issue the switchShow command. If the port in question is disabled, enter the portEnable command. If the switch port still cannot be accessed, enter the portEnable command for the port on the other switch.
One or more CLI sessions is automatically logged out.
Password might have been modified for login account in use, the secModeEnable command might have been issued, or switches might have changed switch roles (primary to backup, backup to primary, and so forth).
Try closing and reopening CLI session.
On chassis-based platforms, status messages from any logical switch are broadcast to the serial console and telnet sessions on all other logical switches.
The status messages from any logical switch are normally broadcast to the serial console and telnet sessions on all logical switches.
All broadcast messages display the switch instance. Messages that originate from a switch instance other than the one to which the telnet session is logged in can be ignored.
CLI session freezes or cannot be established after secure mode is enabled.
CP failed over and network routing cache(s) require updating.
Try closing and reopening CLI session. If this fails, request that your LAN administrator refresh the network router cache(s).
The policy is not listed by the secPolicyShow command.
The new policy was not saved or activated.
Save or activate the policy changes by entering the secPolicySave or secPolicyActivate command.
Incorrect policy name used.
Verify that the correct policy name was used. Policy names must be entered in all uppercase characters.
The message The page cannot be displayed is displayed when HTTP access is attempted, and response time is slow.
An HTTP policy has been created but has no members.
Add the desired members to the HTTP policy.
Unable to establish a sectelnet/SSH session to the IP address of the active CP of a Core Switch 2/64, SAN Director 2/128, or 4/256 SAN Director, or a session to the standby CP is disconnected when it becomes the active CP.
sectelnet/SSH sessions cannot be established to the IP address of the active CP in secure mode. This enables enforcement of Telnet policy for each logical switch.
Establish a sectelnet/SSH session to the IP addresses of the logical switches or the standby CP instead (if allowed by Telnet policy).
Table 20 Recovery Processes (continued)
Symptom Possible causes Recommended actions

Secure Fabric OS administrator guide 85
A security transaction appears to have been lost.
One of the switches in the fabric rebooted while the transaction was in progress.
Wait for the switch to complete booting; then, reenter the security command on the new primary FCS switch to complete the transaction.
Fabric segments after secure mode is enabled on a Core Switch 2/64, SAN Director 2/128, or 4/256 SAN Director.
CPs failed over during process of enabling secure mode.
Issue secModeEnable again on the segmented switch, using the same FCS list as used before.
One or more switches is segmented from the fabric.
Note: For instructions on rejoining fabrics, see the instructions in ”Adding switches and merging fabrics with secure mode enabled” on page 80.
SCC_POLICY is excluding the segmented switches.
Use the secPolicyAdd command on the primary FCS switch to add the switches to the SCC_POLICY.
Management server services on the segmented switches are inconsistent with rest of fabric.
Ensure that the Management Server Platform Service is consistently enabled or disabled across all the switches in the fabric. For information about the management server support provided by Fabric OS, see the HP StorageWorks Fabric OS 5.x command reference guide.
The segmented switches are missing PKI objects.
Determine the status of the PKI objects by following the procedure in ”Verifying installation of the digital certificates” on page 40. If any objects are missing, replace as described in ”Creating PKI objects” on page 41.
ISLs to the segmented switches are interrupted or a port failure occurred.
Check the hardware connections and the port status for all ISLs between the segmented switches and the fabric.
Configurations of the segmented switches diverged from rest of the fabric.
Disable the segmented switches, reset the configuration parameters to match the rest of the fabric, and reenable the switches.
FCS policies on the segmented switches are not identical to the FCS policy of the fabric.
If one or more switches is segmented without any FCS switches, enter the secModeEnable command on a segmented switch and specify an FCS policy that is identical to the FCS policy of the rest of the fabric. The segmented switch or group of switches automatically fastboots.
If one or more switches is segmented along with a primary FCS switch, modify the FCS policy as required until it is identical to the FCS policy in the rest of the fabric.
The fabric contains more than one version stamp. Might be due to no primary FCS switch being available to propagate changes across fabric.
Issue the secModeEnable command to specify a new primary FCS switch. Specify adequate backup FCS switches to prevent a recurrence. Then, for each segmented portion of the fabric that does not contain the new primary FCS switch, reset the version stamp to 0 by entering switchDisable, secVersionReset, and switchEnable.
Table 20 Recovery Processes (continued)
Symptom Possible causes Recommended actions

86 Managing Secure Fabric OS
When the SCC policy is created after a fabric segmentation, it automatically includes the segmented FCS switches.
The segmented FCS switches are still listed in the FCS policy.
Modify FCS policy to remove segmented FCS switches; then, modify or create the SCC policy as required.
Passwords that should be consistent across the fabric are not consistent.
A password recovery operation might have been performed on one or more switches.
To make the passwords consistent, log in to the switch that had the password recovered and enter the switchDisable command, followed by secVersionReset and switchEnable.
Unsaved changes to the policies are lost.
The primary FCS switch might have failed over.
Reenter the changes; then, enter the secPolicySave or secPolicyActivate command.
During sectelnet sessions, security does not enable and a hex dump displays.
During the active sectelnet session, PKI objects (key and certificate) are removed and reinstalled from another login session. This results in the certificate in the current sectelnet session becoming invalid and displaying errors.
Log out from your current sectelnet session and log back in.
Table 20 Recovery Processes (continued)
Symptom Possible causes Recommended actions

Secure Fabric OS administrator guide 87

88 Managing Secure Fabric OS
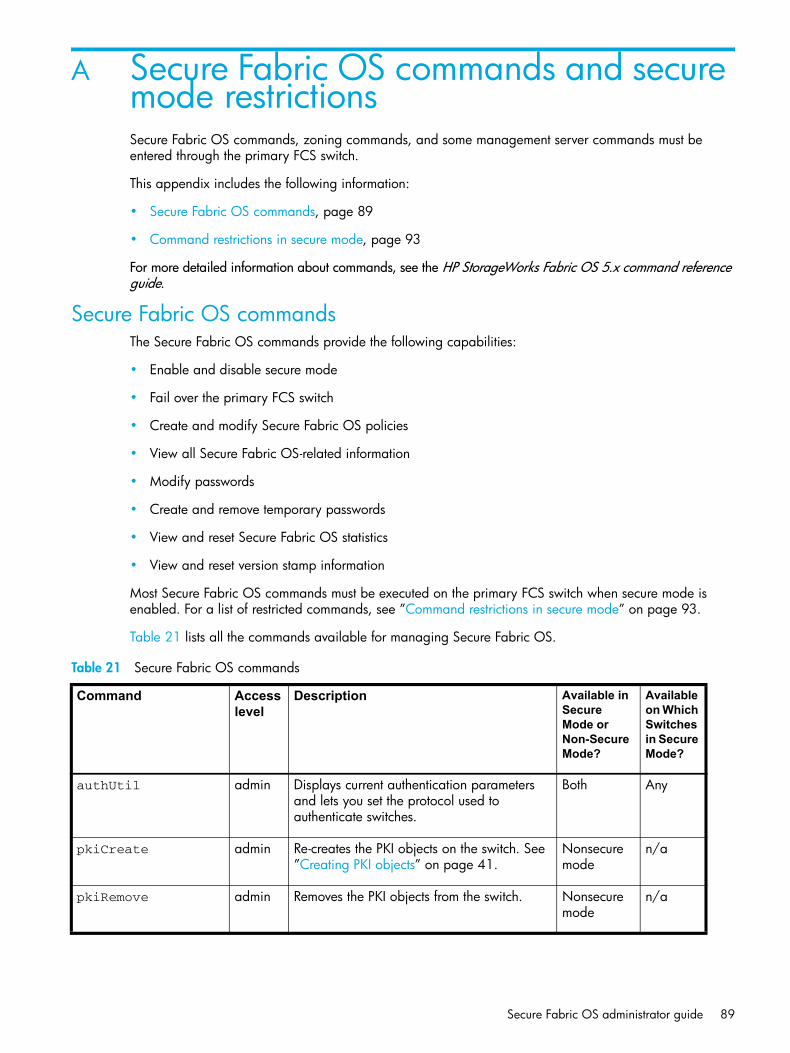
Secure Fabric OS administrator guide 89
A Secure Fabric OS commands and secure mode restrictionsSecure Fabric OS commands, zoning commands, and some management server commands must be entered through the primary FCS switch.
This appendix includes the following information:
• Secure Fabric OS commands, page 89
• Command restrictions in secure mode, page 93
For more detailed information about commands, see the HP StorageWorks Fabric OS 5.x command reference guide.
Secure Fabric OS commandsThe Secure Fabric OS commands provide the following capabilities:
• Enable and disable secure mode
• Fail over the primary FCS switch
• Create and modify Secure Fabric OS policies
• View all Secure Fabric OS-related information
• Modify passwords
• Create and remove temporary passwords
• View and reset Secure Fabric OS statistics
• View and reset version stamp information
Most Secure Fabric OS commands must be executed on the primary FCS switch when secure mode is enabled. For a list of restricted commands, see ”Command restrictions in secure mode” on page 93.
Table 21 lists all the commands available for managing Secure Fabric OS.
Table 21 Secure Fabric OS commands
Command Access level
Description Available in Secure Mode or Non-Secure Mode?
Available on Which Switches in Secure Mode?
authUtil admin Displays current authentication parameters and lets you set the protocol used to authenticate switches.
Both Any
pkiCreate admin Re-creates the PKI objects on the switch. See ”Creating PKI objects” on page 41.
Nonsecure mode
n/a
pkiRemove admin Removes the PKI objects from the switch. Nonsecure mode
n/a

90 Secure Fabric OS commands and secure mode restrictions
pkiShow All users Displays the status of the PKI objects and digital certificate on the switch. See ”Verifying installation of the digital certificates” on page 40.
Both Any
secActiveSize admin Displays the size of the active Secure Fabric OS database.
Both Any
secAuthSecret admin Displays, sets, and removes secret key information from the database or deletes the entire database.
Both Any
secCertUtil admin Manages third-party PKI-based SSL certificates in the switch.
Both Any
secDefineSize admin Displays the size of the defined Secure Fabric OS database.
Both Any
secFabricShow admin Displays Secure Fabric OS-related fabric information.
Secure mode
Any
secFCSFailover admin Transfers the role of the primary FCS switch to the next switch in the FCS policy.
Secure mode
Backup FCS switch
secGlobalShow admin Displays current state information for Secure Fabric OS, such as version stamp and status of transaction in progress.
Both Any
secHelp admin Displays a list of Secure Fabric OS commands. To use, enter the secHelp command at the CLI prompt.
Both Any
secModeDisable admin Disables secure mode. Secure mode
Primary FCS switch
secModeEnable admin Enables secure mode. See ”Enabling Secure mode” on page 56. This command cannot be entered if secure mode is already enabled unless all the FCS switches have failed.
Nonsecure mode
Available in secure mode if no FCS switches are left
Enter from intended primary FCS switch
secModeShow admin Displays current mode of Secure Fabric OS. See ”Displaying status of secure mode” on page 94.
Both Any
Table 21 Secure Fabric OS commands (continued)
Command Access level
Description Available in Secure Mode or Non-Secure Mode?
Available on Which Switches in Secure Mode?

Secure Fabric OS administrator guide 91
secNonFCSPasswd admin Sets non-FCS admin account password. See ”Modifying the non-FCS switch admin password” on page 102.
Secure mode
Primary FCS switch
secPolicyAbort admin Aborts all policy changes since changes were last saved. See ”Aborting all uncommitted changes” on page 88.
Secure mode
Primary FCS switch
secPolicyActivate admin Activates all policy changes since this command was last issued. All activated policy changes are stored in the active policy set. See ”Activating changes to Secure Fabric OS policies” on page 86.
Secure mode
Primary FCS switch
secPolicyAdd admin Adds members to a policy. See ”Adding a member to an existing policy” on page 86.
Secure mode
Primary FCS switch
secPolicyCreate admin Creates a policy. See ”Creating Secure Fabric OS policies other than the FCS policy” on page 67.
Secure mode
Primary FCS switch
secPolicyDelete admin Deletes a policy. See ”Deleting a policy” on page 87.
Secure mode
Primary FCS switch
secPolicyDump admin Displays the Secure Fabric OS policy database. See ”Viewing the Secure Fabric OS policy database” on page 92.
Secure mode
Primary or backup FCS switch
secPolicyFCSMove admin Moves an FCS member in the FCS list. See ”Changing the position of a switch within the FCS policy” on page 64.
Secure mode
Primary FCS switch
secPolicyRemove admin Removes members from a policy. See ”Removing a member from a policy” on page 87.
Secure mode
Primary FCS switch
secPolicySave admin Saves all policy changes since either secPolicySave or secPolicyActivate were last issued. All policy changes that are saved but not activated are stored in the defined policy set. See ”Saving changes to Secure Fabric OS policies” on page 85.
Secure mode
Primary FCS switch
Table 21 Secure Fabric OS commands (continued)
Command Access level
Description Available in Secure Mode or Non-Secure Mode?
Available on Which Switches in Secure Mode?

92 Secure Fabric OS commands and secure mode restrictions
secPolicyShow admin Shows members of one or more policies. See ”Displaying individual Secure Fabric OS policies” on page 93.
Secure mode
Primary or backup FCS only
secStatsReset admin Resets Secure Fabric OS statistics to 0. See ”Resetting Secure Fabric OS statistics” on page 98.
Both Any
secStatsShow admin Displays Secure Fabric OS statistics. See ”Displaying Secure Fabric OS statistics” on page 97.
Both Any
secTempPasswdReset admin Removes temporary passwords. See ”Removing a temporary password from a switch” on page 103.
Secure mode
Primary FCS switch
secTempPasswdSet admin Sets a temporary password for a switch. See ”Creating a temporary password for a switch” on page 103.
Secure mode
Primary FCS switch
secTransAbort admin Aborts the current Secure Fabric OS transaction. See ”Aborting a Secure Fabric OS transaction” on page 88.
Both Any
secVersionReset admin Resets version stamp. See ”Resetting the version number and time stamp” on page 104.
Secure mode
Primary FCS switch; if not available then non-FCS switch.
Table 21 Secure Fabric OS commands (continued)
Command Access level
Description Available in Secure Mode or Non-Secure Mode?
Available on Which Switches in Secure Mode?

Secure Fabric OS administrator guide 93
Command restrictions in secure modeThis section provides information about the restrictions that secure mode places on commands. Any commands not listed here can be executed on any switch, whether or not secure mode is enabled.
Zoning commandsAll zoning commands must be executed on the primary FCS switch, except for the cfgShow command, which can also be executed on the backup FCS switch. Table 22 lists the zoning commands.
Table 22 Zoning commands
Command Primary FCS switch
Backup FCS switch
Non-FCS switch
aliAdd Yes No No
aliCreate Yes No No
aliDelete Yes No No
aliRemove Yes No No
aliShow Yes Yes No
cfgAdd Yes No No
cfgClear Yes No No
cfgCreate Yes No No
cfgDelete Yes No No
cfgDisable Yes No No
cfgEnable Yes No No
cfgRemove Yes No No
cfgSave Yes No No
cfgShow Yes Yes No
cfgSize Yes Yes Yes
cfgTransAbort Yes No No
cfgTransShow Yes Yes No
faZoneAdd Yes No No
faZoneCreate Yes No No
faZoneDelete Yes No No
faZoneRemove Yes No No
faZoneShow Yes Yes No

94 Secure Fabric OS commands and secure mode restrictions
Miscellaneous commandsTable 23 lists which miscellaneous commands, including management server and SNMP commands, can be executed on which switches. Commands not listed here (or in the preceding two tables) can be executed on any switch.
qloopAdd Yes No No
qloopCreate Yes No No
qloopDelete Yes No No
qloopRemove Yes No No
qloopShow Yes No No
zoneAdd Yes No No
zoneCreate Yes No No
zoneDelete Yes No No
zoneRemove Yes No No
zoneShow Yes No No
Table 22 Zoning commands (continued)
Command Primary FCS switch
Backup FCS switch
Non-FCS switch
Table 23 Miscellaneous Commands
Command Primary FCS switch Backup FCS switch Non-FCS switch
agtcfgDefault Yes Yes (except cannot modify community strings)
Yes (except cannot modify community strings)
agtcfgSet Yes Yes (except cannot modify community strings)
Yes (except cannot modify community strings)
configUpload Yes Yes Not recommended.The zoning and Secure Fabric OS configurations are not uploaded if entered on a non-FCS switch.
date Yes Yes (read only) Yes (read only)
date <operand to set time>
Yes No No
msCapabilityShow Yes Yes Yes
msConfigure Yes (except ACL does not display)
Yes (except ACL does not display)
Yes (except ACL does not display)

Secure Fabric OS administrator guide 95
msPlatShow Yes Yes Yes
msplClearDB Yes No No
msplMgmtActivate Yes No No
msplMgmtDeactivate Yes No No
mstdDisable Yes Yes Yes
mstdDisable “all” Yes No No
mstdEnable Yes Yes Yes
mstdEnable “all” Yes No No
mstdReadConfig Yes Yes Yes
passwd Yes No No
tsClockServer Yes Yes (read only) Yes (read only)
tsClockServer <IP address of network time protocol (NTP) server>
Yes No No
userConfig Yes No (read only) No (read only)
wwn (display only; cannot modify WWNs in secure mode)
Yes Yes Yes
Table 23 Miscellaneous Commands (continued)
Command Primary FCS switch Backup FCS switch Non-FCS switch

96 Secure Fabric OS commands and secure mode restrictions

Secure Fabric OS administrator guide 97
B Removing Secure Fabric OSSecure Fabric OS commands, zoning commands, and some management server commands must be entered through the primary FCS switch.
You cannot remove Secure Fabric OS capability from a fabric by disabling secure mode and deactivating the Secure Fabric OS license keys on the individual switches. Removing Secure Fabric OS capability is not recommended unless absolutely required. If at all possible, consider disabling only secure mode and leaving the Secure Fabric OS feature available so that secure mode can be reenabled if desired.
One possible reason for disabling secure mode or removing Fabric OS capability includes the addition of new switches to the fabric that do not support Secure Fabric OS.
Disabling secure mode includes the following tasks:
• Preparing the Fabric for removal of Secure Fabric OS policies, page 97 • Disabling Secure mode, page 97
In addition, undertake the following tasks if desired:
• Deactivating the Secure Fabric OS License on each switch, page 98• Uninstalling related items from the host, page 98
Preparing the Fabric for removal of Secure Fabric OS policies
The following tasks are recommended to prepare the fabric before disabling secure mode:
• Review the current Secure Fabric OS policies and the devices and users affected by each policy. The current policy set can be displayed by entering the secPolicyDump command.
• Review the types of attempted policy violations that have been occurring. The current Secure Fabric OS statistics can be displayed by entering the secStatsShow command.
• Evaluate the zoning configuration and other aspects of the fabric for any changes that could be implemented to decrease the chance of security violations when Secure Fabric OS is disabled.
• Educate users to minimize security risks and the impact of any security violations.
Disabling Secure modeSecure mode is enabled and disabled on a fabric-wide basis and can be enabled and disabled as often as desired. However, all Secure Fabric OS policies, including the FCS policy, are deleted each time secure mode is disabled and must be re-created the next time it is enabled. The policies can be backed up using the configUpload and configDownload commands.
Secure mode can be disabled only through a sectelnet, Secure Shell, or serial connection to the primary FCS switch. When secure mode is disabled, all temporary passwords are reset and the corresponding login sessions are automatically terminated, but traffic is not disrupted.
For information about reenabling secure mode, see ”Enabling Secure mode” on page 44.
To disable secure mode, perform the following steps:
1. From a sectelnet, Secure Shell, or serial session, log in to the primary FCS switch as admin.2. Type secModeDisable.3. Type the password when prompted.

98 Removing Secure Fabric OS
4. Type y to confirm that secure mode should be disabled.
Secure mode is disabled, all current login sessions are terminated, and the passwords are modified as follows:• On the switches that were FCS switches, the user, admin, factory, and root passwords remain the
same as in secure mode.• On the switches that were non-FCS switches, the root, factory, and admin passwords become the
same as the non-FCS admin password.
Deactivating the Secure Fabric OS License on each switchDeactivating the Secure Fabric OS license is not required to disable Secure Fabric OS functionality.
NOTE: If the user installs and activates a feature license and then removes the license, the feature is not disabled unitl the next time the system is rebooted or a switch enable or disable is performed.
To deactivate the software license:
1. Open a CLI connection (serial or telnet) to the switch.2. Type the licenseShow command to display the Secure Fabric OS license key.
Copy the license key from the licenseShow output directly into the CLI for the next step.3. Type licenseRemove “key”:
key is the license key and is case sensitive. 4. Repeat for each switch in the fabric.
Uninstalling related items from the hostThe following items can optionally be removed from the host:
• PKICert utility• sectelnet• Secure Shell client
These items do not have to be uninstalled to disable Secure Fabric OS functionality.
Follow the standard procedure for uninstalling software from the workstation. On a Windows host computer, use the Add/Remove Programs control panel or just delete the folder. On a Solaris host, use the rm command to remove the folder.
primaryfcs:admin> secmodedisable
Warning!!!About to disable security.ARE YOU SURE (yes, y, no, n): [no] yCommitting configuration...done.Removing Active FMPS...doneRemoving Defined FMPS...doneDisconnecting current session.
switch:admin> licenseremove “1A1AaAaaaAAAA1a”removing license-key “1A1AaAaaaAAAA1a”Committing configuration...done.For license to take effect, Please reboot switch now....

Secure Fabric OS administrator guide 99
Index
Aaborting a Secure Fabric OS transaction 67aborting all uncommitted changes 66accessing PKI certificate help 35activating a license key 19activating a policy 65activating changes to Secure Fabric OS policies 65active policy set 15adding a member to an existing policy 65adding Secure Fabric OS to a fabric 17adding Secure Fabric OS to Switches that require
upgrading 19adding Secure Fabric OS to v3.2.0 or v4.4.0 switches
18adding switches with secure mode enabled 80API policy 56
about 56audience 7authentication 13
configuring 39authorized reseller, HP 9
Cchanging the position of a switch within the FCS policy
49command restrictions in secure mode 93commands
secFCSFailover 90secHelp 90secModeDisable 90secModeEnable 90secModeShow 90secNonFCSPasswd 91secPolicyAbort 91secPolicyActivate 91secPolicyAdd 91secPolicyCreate 91secPolicyDelete 91secPolicyDump 91secPolicyFCSMove 91secPolicyRemove 91secPolicySave 91secPolicyShow 92secStatsReset 92secStatsShow 92secTempPasswdReset 92secTempPasswdSet 92secTransAbort 92secVersionReset 92
configuring authentication 39conventions
document 8text symbols 8
creatingOptions policy 60policies 52
creating a DCC policy 61creating a MAC policy 52creating a temporary password for a switch 78creating an Options policy 60creating an SCC policy 63creating an SNMP policy 53creating PKI certificate reports 33creating Secure Fabric OS policies other than the FCS
policy 51customizing the account passwords 21
Ddeactivating the Secure Fabric OS license on each
switch 98default fabric and switch accessibility 43defined policy set 15deleting a policy 66digital certificate
obtaining 27digital certificates
distributing to the switches 28loading 28obtaining 27verifying 31, 32
disabling secure mode 97display general information 69displaying and resetting Secure Fabric OS statistics 72displaying general Secure Fabric OS information 69displaying individual Secure Fabric OS policies 71displaying Secure Fabric OS statistics 74displaying statistics 72displaying status of secure mode 72distributing digital certificates to the switches 28document
conventions 8related documentation 7
Eenabling secure mode 44existing policy
adding members 65
Ffabric configuration server switches 14fabric management policy set 15Fabric OS
upgrading 20Fabric OS version
identifying 18failing over the primary FCS switch 50
100
failover of primary FCS role 50FCS policy
changing the switch position 49modifying 48
FCS switchprimary failover 50
FCS switches 14FMPS 15Front Panel policy 59
Hhelp, obtaining 9HP
authorized reseller 9storage web site 9Subscriber’s choice web site 9technical support 9
HTTP policy 55
Iidentifying the current version of Fabric OS 18installing a supported CLI client on a computer
workstation 38installing the PKICERT utility 22installing the PKICert utility 22
Jjoining secure fabrics 80
Llicense key
activating 19
Mmanagement channel security 12Management Server policy 58managing passwords 75Managing Secure Fabric OS Policies 64managing shared secrets 41members
adding to a policy 65identifying 52removing from a policy 66
merging fabrics with secure mode enabled 80miscellaneous commands 94modifying passwords in secure mode 77modifying the FCS policy 48modifying the FCS switch passwords or the fabric-wide
user password 77modifying the non-FCS switch admin password 78
Nnon-FCS switches 15
Oobtaining the digital certificate file 27Options policy
creating 60
PPKI 13PKI certificate help
accessing 35PKI certificate reports
creating 33PKICERT utility 22PKICert Utility
installing 22policies
aborting current transaction 67activating 65adding members 65API MAC 56creating 52, 53, 60, 61, 63DCC 61deleting 66deleting a policy 66Front Panel 59HTTP 55identifying members 52MAC 52Management Server 58Options 60removing members 66RSNMP 53saving changes 64SCC 63Secure Fabric OS removal preparation 97Serial Port 59SES 57SNMP 53Telnet 54viewing the database 70WSNMP 53
policy setactive 15defined 15
preparing the fabric for removal of Secure Fabric OS policies 97
Rrack stability, warning 9recovery 84Recreating PKI Objects if Required 32related documentation 7removing a member from a policy 66removing a temporary password from a switch 79resetting Secure Fabric OS statistics 74resetting statistics 72resetting the version number and time stamp 79RSNMP policy 53
Ssaving changes to Secure Fabric OS policies 64secFCSFailover 90secHelp 90secModeDisable 90

Secure Fabric OS administrator guide 101
secModeEnable 90secModeShow 90secNonFCSPasswd 91secPolicyAbort 91secPolicyActivate 91secPolicyAdd 91secPolicyCreate 91secPolicyDelete 91secPolicyDump 91secPolicyFCSMove 91secPolicyRemove 91secPolicysave 91secPolicyShow 92secStatsReset 92secStatsShow 92sectelnet 13sectelnet, when available 39secTempPasswdReset 92secTempPasswdSet 92secTransAbort 92Secure Fabric OS
aborting a transaction 67adding to a fabric 17adding to switches that require upgrading 19adding to v3.2.0 or v4.4.0 switches 18deactivating 98enabling 44statistics 72
Secure Fabric OS commands 89Secure Fabric OS policies
activating changes 65creating 51
secure modedisabling 97
Secure Shell (SSH) 13secVersionReset 92Selecting Authentication Protocols 40Serial Port policy 59SES 57SES policy 57shared secrets
managing 41SNMP policies 53SSH 13statistics
definitions 72displaying 72
Subscriber’s choice, HP 9switch-to-switch authentication
CHAP 13DH-CHAP 13
symbols in text 8
Ttechnical support, HP 9telnet 13Telnet policy 54telnet, when available 39temporary password
creating 78removing 79using 78
text symbols 8troubleshooting 84
Uuncommitted changes
aborting 66uninstalling related items from the host 98upgraded switches 19upgrading to a compatible version of Fabric OS 20using temporary passwords 78using the PKICert utility 22
Vverifying installation of the digital certificates 31verifying or activating the Secure Fabric OS and
Advanced Zoning licenses 19, 21version stamp 79viewing Secure Fabric OS information 69viewing the Secure Fabric OS policy database 70
Wwarning
rack stability 9web sites
HP storage 9HP Subscriber’s choice 9
WSNMP policy 53
Zzoning commands 93

102