hp systems insight manager 5.0 installation and …...audit(5) hp-ux manpage. auditis the name and...
TRANSCRIPT
HP Systems Insight Manager 5.0Installation and User Guide
Manufacturing Part Number: 5991-2833
July 2005, Edition 2.0
©Copyright 2004-2005 Hewlett-Packard Development Company, L.P.
Legal NoticesThe information in this document is subject to change without notice.
Hewlett-Packard makes no warranty of any kind with regard to this manual, including, but not limited to, the impliedwarranties of merchantability and fitness for a particular purpose. Hewlett-Packard shall not be held liable for errors containedherein or direct, indirect, special, incidental, or consequential damages in connection with the furnishing, performance, oruse of this material.
WarrantyA copy of the specific warranty terms applicable to your Hewlett-Packard product and replacement parts can be obtainedfrom your local Sales and Service Office.
U.S. Government LicenseProprietary computer software. Valid license from HP required for possession, use or copying. Consistent with FAR 12.211and 12.212, Commercial Computer Software, Computer Software Documentation, and Technical Data for CommercialItems are licensed to the U.S. Government under vendor's standard commercial license.
Copyright Notices©Copyright 1983-2005 Hewlett-Packard Development Company, L.P. All rights reserved. Reproduction, adaptation, ortranslation of this document without prior written permission is prohibited, except as allowed under copyright laws.
Trademark NoticesAdobe® and Acrobat® are trademarks of Adobe Systems Incorporated.
HP-UX Release 10.20 and later and HP-UX Release 11.00 and later (in both 32 and 64-bit configurations) on all HP 9000computers are Open Group UNIX 95 branded products.
Intel® and Itanium® are trademarks or registered trademarks of Intel Corporation or its subsidiaries in the United Statesand other countries.
Linux® is a U.S. registered trademark of Linux Torvalds.
Java™ is a US trademark of Sun Microsystems, Inc.
Microsoft®, Windows®, and Windows NT® are U.S. registered trademarks of Microsoft Corporation.
UNIX® is a registered trademark of The Open Group.
Red Hat® is a registered trademark of Red Hat, Inc. in the United States and other countries.
SUSE® is a registered trademark of SUSE Linux AG.
Publication HistoryThe manual publication date and part number indicate its current edition. The publication date will change when a newedition is released. The manual part number will change when extensive changes are made.
To ensure that you receive the latest edition, you should subscribe to the appropriate product support service. See your HPsales representative for details.
Please direct comments regarding this guide to:
Hewlett-Packard CompanyHP-UX Learning Products3404 East Harmony RoadFort Collins, Colorado 80528-9599
Or, use this web form to send us feedback:
http://docs.hp.com/assistance/feedback.html

Typographic ConventionsWe use the following typographical conventions.
audit(5) HP-UX manpage. audit is the name and 5 is the section in the HP-UX Reference. On the web and on theInstant Information DVD, it might be a hot link to the manpage itself. From the HP-UX command line, youcan enter “ man audit ” or “ man 5 audit ” to view the manpage. See man(1).
Book Title Title of a book. On the web and on the Instant Information DVD, it might be a hot link to the book itself.
Command Command name or qualified command phrase.
ComputerOut Text displayed by the computer.
Emphasis Text that is emphasized.
Emphasis Text that is strongly emphasized.
KeyCap Name of a keyboard key. Note that Return and Enter both refer to the same key.
Term Defined use of an important word or phrase.
UserInput Commands and other text that you type.
Variable Name of a variable that you can replace in a command or function or information in a display thatrepresents several possible values.
[ ] Contents are optional in formats and command descriptions. If the contents are a list separated by |,you must choose one of the items.
{ } Contents are required in formats and command descriptions. If the contents are a list separated by |,you must choose one of the items.
... Preceding element can be repeated an arbitrary number of times.
| Separates items in a list of choices.
Table of Contents1. Product Overview ....................................................................................................... 7
Features ................................................................................................................ 7What’s New ........................................................................................................ 11Product Architecture .............................................................................................. 12Authorizations ...................................................................................................... 14
Default Toolboxes ......................................................................................... 14User Privileges .............................................................................................. 15
Tools ................................................................................................................... 15Information Storage .............................................................................................. 16
HP Systems Insight Manager Audit Log ............................................................ 16Database ..................................................................................................... 16
Database Software ................................................................................ 17Secure Access ...................................................................................................... 17
Command Line Interface ................................................................................ 17Graphical User Interface ................................................................................ 18
Secure Data Transmission ...................................................................................... 18Management Protocols .................................................................................. 18Web Server Security .................................................................................... 20Self-Signed Certificates ................................................................................. 20X Application Security ................................................................................... 20Managing Servers Behind a Firewall .............................................................. 21
2. Installation Overview and Requirements ...................................................................... 22Process Overview ................................................................................................. 22System Requirements ............................................................................................. 22
CMS Requirements ........................................................................................ 22HP-UX Central Management Server ......................................................... 22Linux Central Management Server ........................................................... 25Windows Central Management Server .................................................... 26
Managed System Requirements and Recommendations ..................................... 27SSH Requirements ................................................................................................. 30
3. Installing on Windows .............................................................................................. 31Preparing the System ............................................................................................. 31Installing and Configuring the Software ................................................................... 32Next Steps ........................................................................................................... 44
4. Installing on HP-UX 11i ............................................................................................. 45Preparing the System ............................................................................................. 45Installing and Configuring the Software ................................................................... 46Tuning HP Systems Insight Manager (Optional) ....................................................... 49Next Steps ........................................................................................................... 50
5. Installing on Linux ..................................................................................................... 52Preparing the System ............................................................................................. 52Installing and Configuring the Software ................................................................... 55
Automatically Installing HP Systems Insight Manager ........................................ 55Manually Installing HP Systems Insight Manager ............................................... 56After Installing HP Systems Insight Manager ..................................................... 58
Next Steps ........................................................................................................... 616. Upgrading from Compaq Insight Manager Service Pack 2.3 to HP Systems Insight Manager4.2 ............................................................................................................................. 62
Types of Migration ................................................................................................ 63Performing an In-Place Migration ............................................................................ 64Performing a Remote Migration .............................................................................. 65
4
7. Upgrading HP Systems Insight Manager 4.0, 4.0.1, 4.1 and 4.2 to HP Systems InsightManager 5.0 ............................................................................................................... 68
Upgrading HP Systems Insight Manager 4.0, 4.1, or 4.2 to HP Systems Insight Manager5.0 on Windows .................................................................................................. 69Upgrading HP Systems Insight Manager 4.0, 4.1 or 4.2 to HP Systems Insight Manager5.0 on HP-UX ....................................................................................................... 80Upgrading HP Systems Insight Manager 4.0.1, 4.1 or 4.2 to HP Systems Insight Manager5.0 on Linux ........................................................................................................ 82
8. Upgrading from HP Servicecontrol Manager to HP Systems Insight Manager ................... 85Upgrading from SCM 3.0 to HP Systems Insight Manager 4.2 ................................... 86Upgrading Existing Managed Systems .................................................................... 90
9. Uninstalling HP Systems Insight Manager ..................................................................... 92Uninstalling HP Systems Insight Manager from a Windows System ............................. 92Uninstalling HP Systems Insight Manager from an HP-UX System ................................. 93Uninstalling HP Systems Insight Manager from a Linux System .................................... 94
10. Using the Graphical User Interface ........................................................................... 96Accessing the GUI ................................................................................................ 96Graphical User Interface Features ........................................................................... 96Default Home Page Features .................................................................................. 97Customizing the GUI ............................................................................................. 98
Customizing the Home Page .......................................................................... 98Customizing the System Status Panel ............................................................... 99
11. Using the Command Line Interface .......................................................................... 101Logging Into the CLI ............................................................................................ 101HP Systems Insight Manager Commands ............................................................... 102
12. Initial Setup ......................................................................................................... 107Setting Up Managed Systems .............................................................................. 107
Configuring Protocol Settings ........................................................................ 128Configuring and Executing Discovery ............................................................ 130
Configuring and Executing Automatic Discovery ..................................... 130Configuring and Executing Manual Discovery ......................................... 131
Adding Users ............................................................................................. 133Configuring Email Settings ........................................................................... 135Configuring Paging Settings ......................................................................... 136Setting Up Automatic Event Handling ............................................................ 136Adding Toolboxes ....................................................................................... 141Adding Authorizations ................................................................................. 141
Setting Up Managed Storage Systems ................................................................... 143Installing SMI-S Providers ..................................................................................... 143Verifying SSL ...................................................................................................... 144
Configuring SMI-S providers ......................................................................... 144Configuring HP Systems Insight Manager to discover storage systems ................ 144
13. Configuration Options .......................................................................................... 145CPU Utilization During Data Collection .................................................................. 145
Overview ................................................................................................... 145Implementation ........................................................................................... 146
GUI Time-Out Policy ............................................................................................ 146Overview ................................................................................................... 146Implementation ........................................................................................... 146
HP Systems Insight Manager Audit Log Configuration .............................................. 147Overview ................................................................................................... 147Implementation ........................................................................................... 147
Lifetimes for Entries on the Task Results Page .......................................................... 148Overview ................................................................................................... 148
5
HP Systems Insight Manager 5.0 Installation and User Guide

Implementation ........................................................................................... 14914. Troubleshooting .................................................................................................... 150
Installation Issues ................................................................................................ 150Upgrade Issues ................................................................................................... 150
Glossary ................................................................................................................... 152Index ........................................................................................................................ 169
6
HP Systems Insight Manager 5.0 Installation and User Guide
Chapter 1. Product Overview HP Systems Insight Manager combines the strengths of Insight Manager 7, HP Toptools, and HPServicecontrol Manager to deliver a single tool for managing HP ProLiant, Integrity, and HP 9000systems running Microsoft® Windows®, Linux, and HP-UX. The core HP Systems Insight Managersoftware delivers the essential capabilities required to manage all HP server platforms.
HP Systems Insight Manager can be extended to provide system management with plug-ins for HPclients, storage, power, and printer products. Plug-in applications for rapid deployment, performancemanagement, partition management, and workload management enable you to pick the value-addedsoftware required to deliver complete lifecycle management for your hardware assets.
FeaturesHP Systems Insight Manager provides the following features:
● Easy and rapid installation. Installs on your server platform of choice running HP-UX,Windows, or Linux, or on a Windows desktop or workstation.
● First Time Wizard. Provides you with step-by-step, online guidance for performing theinitial configuration of HP Systems Insight Manager. The wizard helps you configure HP SystemsInsight Manager settings on the central management server (CMS).
● Automatic discovery and identification. Automatically discovers and identifies systemsattached to the network. Use discovery filters to prevent discovery of unwanted system types.Discovery filters enable you to limit discovery to specific network segments or IP address ranges.
● Fault management and event handling. Provides proactive notification of actualor impending component failure alerts. Automatic Event Handling enables you to configureactions to notify appropriate users of failures through e-mail, pager, or Short Message Service(SMS) gateway, and enables automatic execution of scripts or event forwarding to enterpriseplatforms, such as HP OpenView Network Node Manager or HP OpenView Operations.
Note:
Pager support is only for Windows-based CMS.
● Consistent multi-system management. Initiates a task on multiple systems or nodesfrom a single command on the CMS. This functionality eliminates the need for tedious,one-at-a-time operations on each system.
● Secure remote management. Leverages operating system security for user authenticationand Secure Sockets Layer (SSL) and Secure Shell (SSH) to encrypt management communications.
● Role-based security. Enables effective delegation of management responsibilities bygiving system administrators granular control over which users can perform which managementoperations on which systems.
7

● Tool definitions. Defines tools using simple XML documents that enable you to integrateoff-the-shelf or custom tools. These tools can be command line tools, Web-based applications,or scripts. Access to these integrated tools is governed by role-based security.
● Data collection and inventory reports. Performs comprehensive system data collectionand enables you to quickly produce detailed inventory reports for managed systems. Reportscan be generated in HTML, XML, or CSV format.
● Snapshot comparisons. Enables you to compare configuration snapshots of up to fourdifferent servers or configuration snapshots of a single server over time. This functionally assistsIT staff in pinpointing configuration issues that can contribute to system instability. Snapshotcomparisons can also be used to save a picture of standard configuration for comparisons toother systems.
● HP Version Control. Automatically downloads the latest BIOS, driver, and agent updatesfor HP ProLiant servers running Windows and Linux, identifies systems running out-of-date systemsoftware, and enables system software updates across groups of servers. For HP-UX systems,Software Distributor is integrated into HP Systems Insight Manager.
● Two user interfaces. Provides a Web browser graphical user interface (GUI) andcommand line interface (CLI) to help incorporate HP Systems Insight Manager into your existingmanagement processes.
● Edit system properties on managed systems. The Edit System Properties link onthe System Page enables users with full-configuration-rights to re-configure system propertiesfor a single system. To set system properties for multiple systems, select Options->SystemProperties->Set System Properties. This affects the system properties as reported by HPSystems Insight Manager, but does not change the properties on the target systems.
● Suspend and resume monitoring of systems. Enables you to set the timer forsuspending monitoring. This enables a system to be excluded from status polling, identification,data collection, and the automatic event handling features of HP Systems Insight Manager. TheSuspend/Resume Monitoring link under the Tools & Links tab of the System Page enablesyou to set the timer for suspending or resuming system monitoring. To suspend or resume systemmonitoring for multiple systems, select Options->System Properties->Suspend or ResumeMonitoring. The available suspend lengths include the predetermined increments of five minutes,15 minutes, one hour and one day. The suspend feature can be turned on indefinitely.
● Install OpenSSH tool. Runs from the CMS and installs the OpenSSH service onto targetWindows systems and then runs the mxagentconfig command to complete the configuration.
Note:
This is only available on Windows CMS.
● Initial ProLiant Support Pack Install optionally installs OpenSSH. HP SystemsInsight Manager enables you to install OpenSSH through the Initial ProLiant Support Pack Installprocess by selecting Install and initialize OpenSSH (Secure Shell) on the Initial ProLiantSupport Pack Install page.
8
Product Overview
Note:
This is only available on Windows CMS.
● Support for HP-UX Serviceguard clusters. HP Systems Insight Manager recognizesHP-UX Serviceguard clusters and displays them in the UI. HP Serviceguard Manager is openedby clicking a Serviceguard cluster in a search list, and provides information on the clusters.
● WBEM Indications for HP-UX, Linux, and SMI-S devices. HP Systems InsightManager enables you to subscribe and unsubscribe to WBEM indications through the GUI.You can also subscribe or unsubscribe to WBEM indications from the CLI. For HP-UX, this featureis only available on 11i v2 update 2.
● HP Instant Support Enterprise Edition (ISEE). HP Instant Support Enterprise Edition(ISEE) is a proactive remote monitoring and diagnostic tool to help manage your systems anddevices, a feature of HP support. ISEE gives you simple, unified approach to monitoring yourentire datacenter. Instead of using separate technologies for each of your platforms, you canmonitor and manage a diverse IT environment with a single solution. ISEE helps you proactivelymanage and support HP-UX, Microsoft Windows, Linux, OpenVMS, Tru64 UNIX, NonStopand Sun Solaris servers, connected peripherals, and storage and network devices. It reducescost and complexity by supporting both mission critical and non-mission critical systems anddevices. ISEE provides continuous hardware event monitoring and automated notification toidentify and prevent potential critical problems. Through remote diagnostic scripts and vitalsystem configuration information collected about your systems, ISEE enables fast restoration ofyour systems. Install ISEE on your systems to help mitigate risk and prevent potential criticalproblems.
● HP System Management Homepage. The System Management Homepage is aWeb-based application that provides a consolidated interface for single system management.By aggregating the data from HP Web-based agents and management utilities, the SystemManagement Homepage provides a common, easy-to-use interface for displaying hardwarefault and status monitoring, performance data, system thresholds, diagnostics, and softwareversion control for an individual server.
● Performance Management Pack (PMP) access. A software solution that detects,analyzes, and explains hardware bottlenecks on HP ProLiant servers and Modular Shared Array(MSA) shared storage. PMP tools available in HP Systems Insight Manager consist of OnlineAnalysis, Offline Analysis, CSV File Generator Report, System Summary Report, Static AnalysisReport, Configuration, Licensing, and Manual Log Purge. PMP is automatically installed andavailable by default with a typical installation or by option on a custom installation of HP SystemsInsight Manager from the Management CD. Licenses are applied to servers and network storageenclosures. One license is required for each server or network storage enclosure being monitoredby PMP. Five fully functional 30-day trial licenses are provided with PMP for evaluation purposes.For more information about installation, licensing, and setup, refer to the HP ProLiant EssentialsPerformance Management Pack Setup and Installation Guide on the Management CD.
● HP ProLiant Essentials Vulnerability and Patch Management Pack (VPM)access. VPM identifies and provides advice to resolve security vulnerabilities and deliversadvanced patch management through automated acquisition, optimized deployment, andcontinuous enforcement of security patches. VPM must be manually installed from the
9
Product Overview

Management CD and requires one license for each target system being managed. Five fullyfunctional non-expiring licenses, for use on servers or desktops, are provided with VPM forevaluation purposes. For more information about installation and setup, refer to the HP ProLiantEssentials Vulnerability and Patch Management Pack Quick Setup Poster and the HP ProLiantEssentials Vulnerability and Patch Management Pack User Guide, both on the ManagementCD. For more information on VPM, go to http://www.hp.com/servers/proliantessentials/vpm.
● HP ProLiant Essentials Virtual Machine Management Pack (VMM) access. VMMprovides HP Systems Insight Manager with the ability to deploy, clone, monitor, and controlVMware and Microsoft Virtual Server virtual machines. To access VMM, select Tools->VirtualMachine Management Pack. You then have options to Deploy Windows Agent and Licensing.VMM is available for installation by option with a custom installation of HP Systems InsightManager, or separately by clicking Install located under HP ProLiant Essentials Virtual MachineManagement Pack. Five fully functional 30-day trial licenses are provided with VMM forevaluation purposes. These licenses are available after VMM is installed and can be appliedto systems from the VMM Wizard. To purchase additional licenses, refer tohttp://www.hp.com/servers/proliantessentials/vmm. Refer to the HP ProLiant Essentials VirtualMachine Management Pack User Guide for more information.
● The HP ProLiant Essentials Server Migration Pack (SMP). Extends the functionalityof the VMM to provide integrated Physical-to-Virtual (P2V) and Virtual-to-Virtual (V2V) migrations.The Server Migration Pack enables you to simplify the server consolidation process, therebyfreeing you to focus on other priorities. Five fully functional 30-day trial licenses are providedwith SMP. To purchase additional licenses, refer tohttp://www.hp.com/servers/proliantessentials/smp.
● HP BladeSystem Integrated Manager in HP Systems Insight Manager. HPSystems Insight Manager delivers a blade environment designed to consolidate access to bladedeployment, configuration, and monitoring tools. Picture views are available of racks andenclosures. HP BladeSystem Integrated Manager is automatically installed with HP SystemsInsight Manager, no license key is required. To access HP BladeSystem Integrated Manager,select Tools->Integrated Consoles->HP BladeSystem. Refer tohttp://h18004.www1.hp.com/products/servers/management/bsme/index.html for moreinformation.
● HP Configure or Repair Agents. The Configure or Repair Agents feature is an HPSystems Insight Manager feature that enables you to repair credentials for SNMP settings,System Management Homepage or Management HTTP Server trust relationships on Windows,Linux, and HP-UX systems supported by HP Systems Insight Manager. Go to the Configure orRepair Agents Online Help athttp://h18000.www1.hp.com/products/servers/management/hpsim/infolibrary.html to viewthe HP Configure or Repair Agents user guide.
● HP ProLiant Essentials Rapid Deployment Pack (RDP) - Windows Edition. RDPis a multiserver deployment tool that enables IT administrators to easily deploy large volumesof servers in an unattended, automated fashion. RDP is installed separately from HP SystemsInsight Manager and requires a license for each server being managed. RDP is installed fromits own CD. Refer to http://www.hp.com/servers/rdp for information about network environmentsetup, prerequisites for the deployment server, and installation instructions. When installed, youmust register your product registration number to receive a license file. A license is required foreach server being managed by RDP.
● Data collection and inventory reports for Superdomes and othercomplexes. Data collection and reporting has been added for Superdome systems and
10
Product Overview
other cellular complexes. The type of data that can be collected includes information on chasses,cabinets, cells, memory, and hard partitions (nPars). The type of data actually collected dependson which filters are selected.
● HP Storage Essentials. HP is changing the economics of management in the data center.HP Storage Essentials is the first open, standards-based suite of storage products designed tointegrate into HP's unified server-storage management platform, HP Systems Insight Manager.For more information on HP Storage Essentials, go tohttp://h18006.www1.hp.com/products/storage/software/esuite/index.html.
● Manage SSH Keys. The SSH Keys feature enables you to view and manage the publicSSH keys, stored in the known_hosts file, from the central management server. SSH keysenable the central management server and a managed system to authenticate a secureconnection.
What’s NewWhat's New for HP Systems Insight Manager5.0?
● New look for the graphical user interface (GUI) which has the look and feel of other HP products.
● HP Systems Insight Manager no longer requires JRE to be installed on the client systems.
● Discover storage systems through their installed SMI-S providers. Refer tohttp://www.hp.com/go/hpsim/providers for information about the supported devices andSMI-S providers.
● Cluster Monitor monitors MSCS clusters only.
● Reports are now available in XML format.
● New report engine along with new default reports.
● View a consolidated list of all server and storage events from a single event viewer, and configureand take automated actions.
● View storage array capacity details, including unallocated space, RAID overhead, usable bytesassigned to ports, and usable bytes not assigned to ports.
● Flexible role-based security enables you to decide which administrators have access to serverand storage details.
● Enables you to launch server and storage element managers from a single system viewer.
● Lists and folders are now called collections.
● Ability to assign privileges to operating system user groups to give these users access to HPSystems Insight Manager without creating each individual user.
11
Product Overview

● Improved access to discovery options which includes a Discovery page with tabs for Automatic,Manual, and Hosts Files configuration.
● New command line interface (CLI) commands, including mxreport, mxcert,mxglobalprotocolsettings, mxglobalsettings, mxcollections, and mxgethostname.
● Ability to set system properties for multiple systems at the same time.
● Ability to suspend or resume monitoring of multiple systems at the same time.
● New tree view available for system and cluster collections.
● Ability to create, edit, and delete discovery tasks.
● Ability to create new command line tools including copying a file, removing a tool, and creatingcommand line, Web launch, and X window tools on HP-UX and Linux systems.
● Supports the use of an Oracle database (locally or remotely) for Windows, HP-UX, and Linux.
● Added support for managed system configuration to include Linux, HP-UX, and Windowsoperating systems.
● First Time Wizard that provides you with step-by-step, online guidance for performing the initialconfiguration of HP Systems Insight Manager, and helps you configure HP Systems InsightManager settings on the central management server (CMS)
● Supports upgrading HP Systems Insight Manager 4.x to HP Systems Insight Manager 5.0.
● The HP Services analysis tools, Web-Based Enterprise Services (WEBES), and Open ServiceEvent Manager (OSEM), generate service notifications to HP Systems Insight Manager througha specific SNMP trap type if analysis has determined there are serviceable events. If InstantSupport Enterprise Edition (ISEE) is installed, the service notification provided by WEBES andOSEM also provide status about the remote support incident.
Product ArchitectureHP Systems Insight Manager leverages a distributed architecture that can be broken into threetypes of systems (central management server (CMS), managed systems, and network clients).
The CMS and the managed systems together are called the HP Systems Insight Managermanagement domain.
12
Product Overview

Central Management ServerEach management domain has a single CMS. The CMS is the system in the management domainthat executes the HP Systems Insight Manager software and initiates all central operations withinthe domain. In addition to the HP Systems Insight Manager software, the CMS maintains a databasefor storage of persistent objects and it can reside on a separate system. Typically, applications forthe multiple-system aware (MSA) tools also reside on the CMS. These applications are not requiredto reside on the CMS. They can reside anywhere on the network.
Because the CMS is a system within the management environment, it manages itself as part of thedomain. You can add the CMS as a managed system within another management domain if youwant to manage it using a separate CMS.
Managed SystemsSystems that make up a management domain are called managed systems. A system can be anydevice on the network that can communicate with HP Systems Insight Manager, which includesservers, desktops, laptops, printers, workstations, hubs, storage systems, SANs, and routers. Inmost cases, these devices have an IP address or IPX address associated with them. A managedsystem can be managed by more than one CMS if desired.
Systems to be managed must have one or more management agents installed. There are a widevariety of agents, such as the ProLiant management agents based on SNMP, WMI found onWindows systems, or WBEM providers, such as the System Fault Management providers for HP-UX.Those agents provide management information and alerts (indications) to the CMS. The SSH agent(service) then enables the HP Systems Insight Manager CMS to log into the managed system toexecute commands through scripts.
Note:
IPX systems can only be discovered and managed on a Windows CMS.
System CollectionsSystem collections provide a way to group systems in the HP Systems Insight Manager database.A collection can be used to filter systems that share common attributes, such as operating systemtype or hardware type. System collections can also be arbitrary collections of systems. Systemscan belong to one or more system collections. Many default shared system collections are provided,and users can create their own shared and private collections. Working with system collectionsincreases your efficiency because you can perform a task on each system in a system collectionwith a single step.
Network ClientsHP Systems Insight Manager can be accessed from any network client. The network client can bepart of the management domain. The network clients must be running a compatible browser to
13
Product Overview
access the graphical user interface (GUI) or a Secure Shell (SSH) client application to securelyaccess the command line interface (CLI).
Note:
Access to the Web server on the CMS can be restricted to specific IP address rangesfor specific users.
AuthorizationsAn HP Systems Insight Manager user must have a valid operating system login on the CMS. Aftera user is added to HP Systems Insight Manager, he or she can be authorized to use a toolbox onone or more systems in the management domain.
Each toolbox is associated with a set of tools that a user might need for a particular task, such asdatabase administration or software management. Authorizing a user for a toolbox on a systemor system group enables the user to run the associated set of tools on that system or systems thatare members of the system group.
Important:
Authorization for a toolbox might enable users with non-privileged access (forexample, non-root users or users that are not members of the Windows Administratorsgroup) to run tools as root/administrator or as another specified user. Be carefulwhen granting users permission to run tools as root or administrator. Consider allthe capabilities given by a tool, above and beyond the capabilities it is designedfor, before you associate it with a toolbox.
Default ToolboxesThe All Tools toolbox is a default toolbox installed with HP Systems Insight Manager. The AllTools toolbox provides complete access to all tools for the authorized system or system group.When a tool is added to HP Systems Insight Manager, the tool is automatically added to thistoolbox. Tools cannot be removed from the All Tools toolbox, and the All Tools toolbox cannotbe deleted from HP Systems Insight Manager. If you do not want a user to have access to allavailable tools for a specific system or system group, they should not be authorized for the AllTools toolbox on that system or system group.
Caution:
Users assigned the All Tools toolbox on the central management server (CMS) canexecute commands as any user. Therefore, these users could grant thefull-configuration-rights user privilege to themselves.
14
Product Overview
Another default toolbox is the Monitor Tools toolbox. This toolbox contains tools that display thestate of managed systems but not tools that change the state of managed systems.
HP Systems Insight Manager can have up to 32 defined toolboxes, including the default toolboxes.All toolboxes other than All Tools and Monitor Tools can be enabled, disabled, or deleted.
User PrivilegesFull configuration rights user. Full-Configuration-rights users have been given specialprivileges to administer the HP Systems Insight Manager software. Full-rights users manage:
● Authorizations● Systems● System groups● Users● Toolboxes● Tools
In addition, full-rights users maintain and back up the database and monitor the HP Systems InsightManager audit log.
By default, root on an HP-UX or Linux CMS or the administrative account used to install HP SystemsInsight Manager on a Windows CMS is assigned the full configuration rights user privilege, butthis permission can later be revoked. This user is automatically authorized for the All Tools toolboxon all systems, including the CMS. The full-configuration-rights user privilege can be given to oneor more users, and HP Systems Insight Manager requires that at least one user is afull-configuration-rights user.
Limited configuration rights user. Limited configuration rights users have limited capabilityto configure the CMS. They have permission to create, modify, and delete all reports and theirown tools.
No configuration rights user. No configuration rights users cannot configure the CMS.Their ability to manage systems are based on their authorizations.
ToolsTools are applications, commands, or scripts that are launched from within HP Systems InsightManager. You can add custom tools into HP Systems Insight Manager and execute them acrossmultiple systems simultaneously. Three types of tools are supported in the HP Systems Insight Managerenvironment: Web tools, X Window tools, and command line tools.
Web tools must reside on a Web server. TheWeb server can be running on the CMS or amanaged system. HP Systems Insight Managerlaunches the URL from a CLI or GUI. When aWeb tool is launched from the command line,HP Systems Insight Manager opens a browser todisplay the tool. When a Web tool is launchedfrom the HP Systems Insight Manager GUI, itopens in the workspace or in a separate browserwindow.
Web tools
15
Product Overview
X Window tools require that an X server isrunning. These tools can reside on the CMS oron a managed system. When accessing HPSystems Insight Manager from a network client,you must have X server software running on thenetwork client to execute an X Window tool.From the CLI or GUI, HP Systems Insight Managerinvokes the X Window application using thecommand line and passes the location of the Xserver by requesting the device for display fromthe user.
X Window tools
Command line tools include applications,commands, and scripts. They can reside on theCMS or another managed system. They can belaunched directly from the CLI or GUI.
Command line tools
Information StorageHP Systems Insight Manager uses an audit log and a database to track activity and store yourmanagement domain information.
HP Systems Insight Manager Audit LogHP Systems Insight Manager logs all tasks performed by all HP Systems Insight Manager users onall systems. The information is stored in the audit log on the CMS. HP Systems Insight Managerlogs all tasks with the following information:
● Time stamp● User name● Systems● Event● Tool result
For command tools, the verbose level of stdout and stderr is frequently large and time-sensitive,so it is only logged by default for the ps command. The option to log this output for the ps andother commands is configurable. In addition, other aspects of the audit log, such as maximum filesize, is also configurable. Information about configuring the audit log is available in Chapter 13. Configuration Options and in the "Administering the Software" section of the HPSystems Insight Manager Technical Reference Guide athttp://h18013.www1.hp.com/products/servers/management/hpsim/infolibrary.html.
DatabaseHP Systems Insight Manager uses a database to store vital management domain information. Thedatabase contains information about:
● Authorizations● Systems● System lists● System group definitions● Users● Passwords
16
Product Overview
● Toolbox definitions● Tool definitions● Events● Inventory data
Database SoftwareHP Systems Insight Manager supports the use of several databases:
● PostgreSQL is supported on HP-UX or Linux CMS.
● Microsoft SQL Server Desktop Engine (MSDE) or Microsoft SQL Server 2000 is supported ona Windows CMS. HP Systems Insight Manager ships with MSDE, but you can choose to useMicrosoft SQL Server 2000, which provides more advanced enterprise features.
● Oracle 9i Release 2 is supported on all platforms.
Note:
The Oracle database must be created prior to installing HP Systems InsightManager. The thin client jar file location must be specified. HP Systems InsightManager requires Oracle database and TNS listener services to be up andrunning when system is restarted. Oracle by itself does not start the Oracledatabase and TNS listener automatically. An Oracle DBA must set theseservices to be restarted when the server is reset. Refer to Oracle Documentationfor details on how to auto start these services.
http://download-east.oracle.com/docs/html/A96167_01/post-inst.htm#sthref548[http://download-east.oracle.com/docs/html/A96167_01/post-inst.htm#sthref548l]Under the section: "Automating Database Startup and Shutdown for HP, Linuxand Solaris (Optional). " Access to this link requires registration which is free.This is a task that the Oracle DBA who manages the Oracle installation mustperform.
Secure AccessHP Systems Insight Manager utilizes several technologies to provide secure access. You can accessHP Systems Insight Manager through the command line or a Web browser. Both of these userinterfaces can be accessed from anywhere on your network.
Command Line InterfaceWhen you access HP Systems Insight Manager from the CLI, your operating system login is usedto identify you to HP Systems Insight Manager. You have access to use the HP Systems InsightManager commands based on your authorizations. If you access HP Systems Insight Manager fromany system other than the CMS, be sure you use an SSH client. Programs like telnet, rlogin, andftp do not provide encrypted access. When you use one of these applications to access HP SystemsInsight Manager, your data including your password is transmitted across the network unencrypted.In addition, these protocols are not spoof-protected. If you have a Windows CMS, then only
17
Product Overview
administrators have command line access to HP Systems Insight Manager. A remote desktopconnection to the CMS can be used to access the command line.
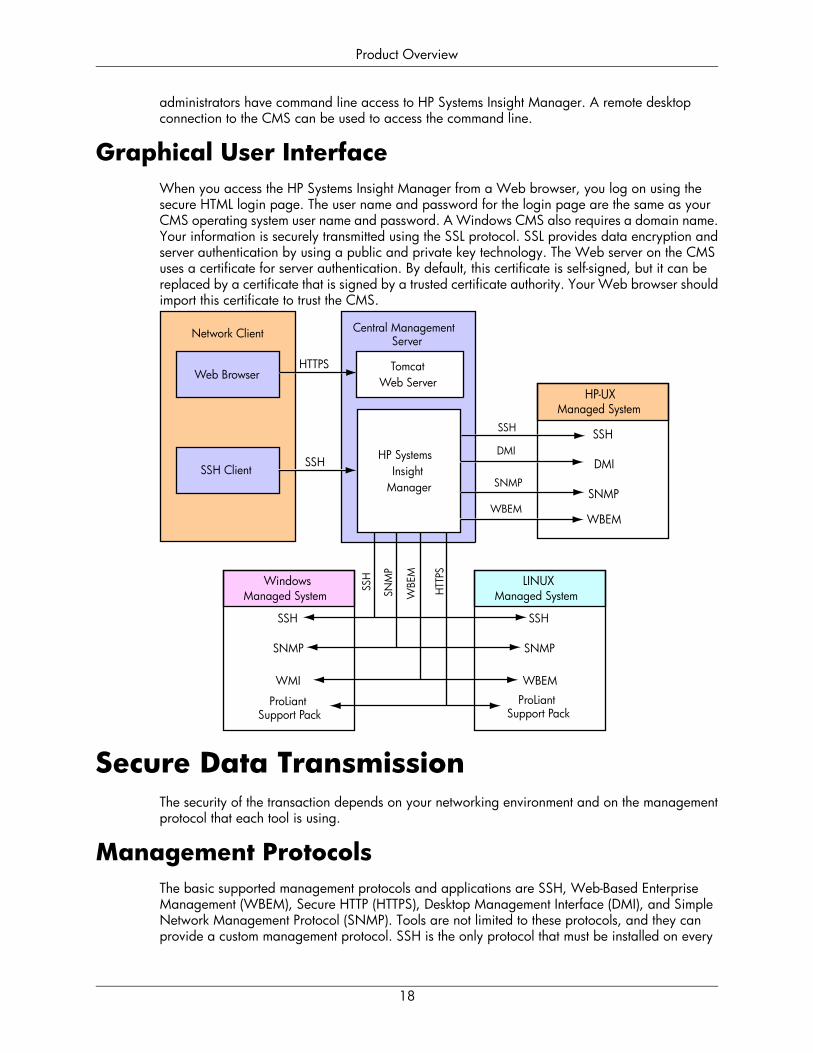
Graphical User InterfaceWhen you access the HP Systems Insight Manager from a Web browser, you log on using thesecure HTML login page. The user name and password for the login page are the same as yourCMS operating system user name and password. A Windows CMS also requires a domain name.Your information is securely transmitted using the SSL protocol. SSL provides data encryption andserver authentication by using a public and private key technology. The Web server on the CMSuses a certificate for server authentication. By default, this certificate is self-signed, but it can bereplaced by a certificate that is signed by a trusted certificate authority. Your Web browser shouldimport this certificate to trust the CMS.
Network Client Central Management Server
SSH
TomcatWeb Server
HTTPSWeb Browser
SSH Client
SSH
DMI
SNMP
WBEM
HP-UXManaged System
SSH
SNMP
WBEM
LINUXManaged System
SSH
ProLiant Support Pack
SNMP
WMI
WindowsManaged System
HP SystemsInsight
Manager
SSH
DMI
SNMP
WBEM
SSH
SNM
P
WBE
M
HTT
PS
ProLiant Support Pack
Secure Data TransmissionThe security of the transaction depends on your networking environment and on the managementprotocol that each tool is using.
Management ProtocolsThe basic supported management protocols and applications are SSH, Web-Based EnterpriseManagement (WBEM), Secure HTTP (HTTPS), Desktop Management Interface (DMI), and SimpleNetwork Management Protocol (SNMP). Tools are not limited to these protocols, and they canprovide a custom management protocol. SSH is the only protocol that must be installed on every
18
Product Overview
managed system. Tools require specific protocols, and they can only be run on a managed systemif the protocol they require is installed and configured correctly.
SSH . SSH is a program that enables you to log into another system over a network and executecommands on that system. It also enables you to move files from one system to another, and itprovides authentication and secure communications over insecure channels. SSH uses apublic/private key pair to provide a secure mechanism to authenticate and encrypt communication.SSH keys are used to identify the execute-as user on the managed system. Typically, the execute-asuser is either root or administrator, but other users can be configured, depending on the tool thatwill be executed on the managed system. The private key is kept secure on the CMS, while thepublic key is installed on each managed system.
The SSH-2 protocol is used by the Distributed Task Facility (DTF) to communicate with managedsystems. The DTF improves operator efficiency by replicating operations across the systems orsystem groups within the management domain using a single command. This functionality reducesthe load on administrators in multi-system environments. X Window and CLI tools use the DTF toexecute and support the following:
● Executing scripts, commands, and applications remotely on managed systems● Copying files to managed systems
The DTF connects the CMS to the SSH server software running on each managed system. The DTFtells the SSH server what tasks must be performed on the system. The SSH server then performs thetasks and returns the results to the DTF. The DTF consolidates the feedback it receives from all themanaged systems.
WBEM. WBEM is an industry standard that simplifies system management. It is based on aset of management and Internet standard technologies developed to unify the management ofenterprise computing environments. It provides access to both software data and hardware datathat is readable by WBEM compliant applications.
HP Systems Insight Manager keeps a database of passwords for managed systems running WBEM.The database contains the user names and passwords for each managed system, which are requiredto provide user authentication for tools using this protocol. These accounts do not need to haveother access capabilities, such as log on rights. They are only used for WBEM access by HP SystemsInsight Manager. The WBEM username and password can be set from the CLI or GUI. For moreinformation, refer to the "Administering the Software" section in the HP Systems Insight ManagerTechnical Reference Guide athttp://h18013.www1.hp.com/products/servers/management/hpsim/infolibrary.html.
HP Systems Insight Manager uses HTTPS to access WBEM data, providing a secure path for systemmanagement data. For access to Windows management data instrumented in WindowsManagement Instrumentation, a WMI Mapper running on a Windows system converts the HTTPSWBEM requests into WMI requests, which use Distributed Component Object Model and NTsecurity.
HTTPS. HTTPS is simply HTTP over SSL, a protocol that supports sending data securely overthe Web. HTTPS is used to access WBEM data as explained in the previous section, and it is usedto access ProLiant agent information. Digital certificates are used instead of user names andpasswords to establish trust between the agent and the CMS. The certificate of the CMS should beloaded into each agent to be managed by that CMS.
Desktop Management Interface (DMI). DMI is an industry standard protocol, primarilyused in client management, established by the Desktop Management Taskforce. DMI provides anefficient means of reporting client system problems. DMI compliant computers can send status
19
Product Overview
information to a CMS over a network. DMI is supported for system inventory collection where theinformation is not available from WBEM and SNMP. A Windows CMS uses DMI to gatherinformation from third-party servers. An HP-UX CMS uses DMI to gather system information fromother HP-UX systems. DMI is not supported on a Linux CMS. DMI is not a secure protocol. Therefore,anyone with access to your network will be able to intercept and view DMI transactions.
SNMP. SNMP is a set of protocols for managing complex networks. SNMP works by sendingmessages, called protocol data units (PDUs), to different parts of a network. SNMP-compliantdevices, called agents, store data about themselves in Management Information Bases (MIBs) andreturn this data to the SNMP requesters. There are multiple versions of SNMP. SNMP Version 1,used by HP Systems Insight Manager, is not a secure protocol. Therefore, anyone with access toyour network will be able to intercept and view SNMP transactions.
HP Systems Insight Manager keeps a database of read and write community names for managedsystems running SNMP. The community name must match those configured on the managementsystem. The SNMP community names and passwords can be set from the CLI or GUI. For moreinformation, refer to the "Administering the Software" section in the HP Systems Insight ManagerTechnical Reference Guide athttp://h18013.www1.hp.com/products/servers/management/hpsim/infolibrary.html.
HP Systems Insight Manager does not use SNMP SetRequests. By default, the supported operatingsystem platforms have SNMP SetRequests disabled. For improved security, do not enable SNMPSetRequests on the CMS or the managed systems. Even SNMP GetRequest responses can bespoofed, so all information from SNMP should be regarded as insecure.
Web Server SecurityHP Systems Insight Manager uses the Tomcat Web server on the CMS. Tomcat features that arenot required by HP Systems Insight Manager are turned off by default. This includes Server SideIncludes and Common Gateway Interface scripts.
Self-Signed CertificatesThe self-signed certificates used for WBEM and Web server authentication make it possible foranother system to impersonate the CMS if the valid certificate is not securely imported into the clientor browser, known as spoofing. To prevent the possibility of spoofing, use a certificate signed bya trusted Certificate Authority (CA) or securely export the certificate by browsing locally to the CMSand then securely importing it into your browser. You can also obtain the server certificate bybrowsing remotely and saving it in the browser the first time you access HP Systems Insight Manager,but this option is less secure and still susceptible to a possible "man-in-the-middle" attack. Informationabout importing CA-signed certificates is available in the "Administering the Software" section ofthe HP Systems Insight Manager Technical Reference Guide athttp://h18013.www1.hp.com/products/servers/management/hpsim/infolibrary.html.
X Application SecurityThe data exchanged between an X client (or application) running on a managed system and anX server on the network client is transmitted in clear text over the network. X clients are notrecommended in environments where security is a concern.
20
Product Overview

Managing Servers Behind a FirewallHP Systems Insight Manager supports managing servers that are located behind a firewall whenusing the SSH, HTTPS, and WBEM protocols. The SNMP and DMI protocols are not recommendedbecause they are not secure protocols. The firewall must be configured to allow this traffic throughthe firewall. The following ports are used:
● WBEM uses HTTPS over port 5989● Web agents use HTTPS over port 2381● DTF uses SSH-2 over port 22
For a complete list of ports used by HP Systems Insight Manager, refer to the Understanding HPSystems Insight Manager Security white paper. This white paper is available athttp://www.hp.com/go/hpsim/.
21
Product Overview

Chapter 2. Installation Overviewand Requirements
This chapter provides an overview of the HP Systems Insight Manager installation process, and itidentifies the system requirements for a central management server (CMS), a managed system anda network client.
Process OverviewThe installation process for HP Systems Insight Manager involves several steps. The following flowdiagram represents the process.
1. Install and configure the CMS. The procedure to complete this step is in the installation chaptersof this guide. Follow the appropriate chapter based on the operating system of your CMS.Refer to Chapter 3. Installing on Windows , Chapter 4. Installing on HP-UX 11i , or Chapter 5. Installing on Linux for details.
2. Install and configure the required management agents on the systems that will be managedby the CMS. This step is covered in the first section of Chapter 12. Initial Setup .
3. Configure HP Systems Insight Manager for your environment. The remaining sections in Chapter 12. Initial Setup cover these recommended tasks.
System RequirementsThis section identifies the hardware and software requirements and recommendations for HP SystemsInsight Manager. These requirements are broken into sections by system type for the CMS, managedsystem, and network client.
CMS RequirementsThis section contains the requirements for the CMS. These requirements are sorted by operatingsystem. Review the section of requirements that applies to your CMS. Refer to:
● "HP-UX Central Management Server" ● "Linux Central Management Server" ● "Windows Central Management Server"
HP-UX Central Management Server● Operating System
❍ HP-UX 11i v1❍ HP-UX 11i v2 September 2004
Note: The required patches must be installed for each of these operating systems. Refer to "HP-UX Patches" for more information.
● Hardware
22
❍ Any HP system (PA-RISC 2.0 or Integrity) server with minimum 2 GB RAM❍ Any HP system with Oracle installed minimum 4 GB RAM
● Software
❍ OpenSSH - distributed with OS❍ HP WBEM Services for HP-UX is installed and active for HP-UX 11i or greater❍ (Optional) Oracle 9i release 2❍ Java Out of Box installed (shipped as optional selectable software as part of OS)
● Free Disk Space
❍ 2 MB for CMS (/)❍ 400 MB for the CMS and DTF agent (/opt)❍ 500 MB minimum recommended for data (/var/opt)
● Swap Space
❍ 2 GB minimum total swap space for PA-RISC systems❍ 3 GB minimum total swap space for Intel® Itanium®-based systems
● Networking
❍ Properly configured and working DNS or WINS for host name resolution
Note:
If running OpenView NNM or OpenView Operations on the same system, the SNMPtrap listening port must be changed in those products to function properly. Refer tothe OpenView product documentation at HP Systems Insight Manager and HPOpenView white paper athttp://h18000.www1.hp.com/products/servers/management/hpsim/infolibrary.html
Note:
Legacy Novell system with only an IPX network enabled will not be manageable byan HP-UX or Linux CMS. An IP-based network must be available.
Note:
If you are using Network Information Services (NIS), check for ping localhost ofHP-UX, if no response, create/edit the file /etc/nsswitch.conf and add the
23
Installation Overview and Requirements

following entry in the file “hosts: files dns nis”. If nis server is not in the network donot add the “nis” entry in /etc/nsswitch.conf .
HP-UX Patches
There are required patches that must be installed to run HP Systems Insight Manager. For informationabout which patch to download, go tohttp://www.hp.com/products1/unix/java/patches/index.html, and select the appropriate Patch.All patches should be installed before installing HP Systems Insight Manager.
Note: To determine the Java version installed, execute:
/opt/mx/j2re/bin/java -version
Note: For more information about patches, go to http://www.hp.com/go/java, and select thePatches link in the Site information list on the left. This site determines the recommended patchesfor the Java application. If you select a patch from the table, you go directly to the IT ResourceCenter (ITRC) web site to download the patch.
Downloading and installing HP-UX patches
To download patches:
1. Browse to the patch database:
http://www2.itrc.hp.com/service/patch/mainPage.do
2. Click the HP-UX link.
3. Select the appropriate hardware and operating system. For example, 800 and 11.11.
4. Select Search by Patch IDs, enter the patch IDs, and click search.
5. Select the patches, and click add to selected patch list at the bottom of the page to adddependent patches.
6. Click download selected, and follow the directions on the screen. The gzip package is therecommended format.
To install patches:
1. Create a /var/tmp/patches directory, and copy the downloaded patches into that directory.
2. Execute:
gunzip patch_file
tar -xvf patch_file
3. Load the patches into /var/tmp/patches/depot:
./create_depot_hp-ux_11
4. Install the patches:
swinstall -x autoreboot=true -s /var/tmp/patches/depot \ *
24
Installation Overview and Requirements

Note: Only the applicable patch file sets are loaded. Continue with the installation after youreboot.
Linux Central Management Server● Operating System
❍ Red Hat Enterprise Linux 3 U4 and U5 for x86❍ Red Hat Enterprise Linux 4 U1 for x86❍ SUSE Linux Enterprise Server 8/United Linux 1.0 for x86 with Service Pack 3❍ SUSE Linux Enterprise Server 9 for x86 with Service Pack 1 or 2
● Hardware
❍ Any HP IA-32 system with:
❑ Minimum: 1.5-GHz processor and 768 MB RAM❑ Recommended: 2.4-GHz processor and 1 GB RAM❑ Any HP system with Oracle 9i installed minimum 4 GB RAM
● Software
❍ OpenSSH❍ ProLiant Support Pack for Linux 7.00 or later❍ (Optional) Oracle 9i release 2❍ For Red Hat Enterprise Linux 3.0 AS/ES update 4 and 5
❑ PostgreSQL 7.4.1
❍ For Red Hat Enterprise Linux 4
❑ PostgreSQL 7.4.7-2
❍ For SUSE Enterprise server 8, Service Pack 3
❑ PostgreSQL 7.4.0
❍ For SUSE Enterprise server 9
❑ PostgreSQL 7.4.2-36.3
Note:
PostgreSQL 8.0.x is not supported on HP Systems Insight Manager 5.0 onJapanese installations.
● Free Disk Space
❍ 2 MB for CMS (/)
25
Installation Overview and Requirements

❍ 400 MB for the CMS and DTF agent (/opt)❍ 500 MB minimum recommended for data (/var/opt)
● Swap Space
❍ 3 GB minimum total swap space for Itanium-based systems
● Networking
❍ Static or dynamic host name resolution
Note:
On Linux check for the entry 127.0.0.1 localhost, the local system IPaddress and system name in the /etc/hosts file, if not present add theentries manually.
❍ SNMP (optional)
Windows Central Management Server● Operating System
❍ Microsoft® Windows 2000 Server with Service Pack 4 for x86❍ Microsoft® Windows 2000 Advanced Server with Service Pack 4 for x86❍ Microsoft® Windows 2003 Server with Service Pack 1 for x86❍ Microsoft® Windows 2003 Server with Service Pack 1 for x86 installed on x64❍ Microsoft® Windows 2003 Enterprise with Service Pack 1 for x86❍ Microsoft® Windows 2003 Enterprise with Service Pack 1 for x86 installed on x64❍ Microsoft® Windows XP with Service Pack 2 for x86
Note: The required Windows Service Packs must be installed for each of these operatingsystems.
Note: The Windows server must have at least one partition formatted for the NT File System(NTFS) on which the HP Systems Insight Manager server software is to be installed. NTFSprovides the ability to restrict file access based on user accounts and groups. Without NTFS,the Central Management Server (CMS) cannot be adequately secured against unauthorizedaccess, and potentially sensitive operations and data could be made available to unauthorizedusers.
● Hardware
❍ Any HP ProLiant IA-32 system with:
❑ Minimum: 1.5-GHz processor with 768 MB RAM❑ Recommended: 2.4-GHz processor with 1 GB RAM
Note: HP Netserver platforms can be used for the CMS as long as the Instant Toptools softwareis not installed and all other requirements are met.
26
Installation Overview and Requirements
● Software
❍ MSDE 2000 with Service Pack 3a (bundled with HP Systems Insight Manager), or you canuse one of the following:
❑ Microsoft SQL Server 2000, Standard Edition with Service Pack 3 (for Standard Serveroperating system)
❑ Microsoft SQL Server 2000, Enterprise Edition with Service Pack 3 (for "AdvancedServer" operating system)
❑ Oracle 9i release 2
Note: Windows XP Professional does not support a local installation of SQL Server 2000,only MSDE 2000. SQL Server 2000/Oracle 9i can be used as a remote database for aCMS on Windows XP Professional.
❍ ProLiant Support Pack for Windows 6.30 or later❍ Microsoft Internet Explorer 6.0
● Free Disk Space
❍ 500 MB recommended
● Networking
❍ Static or dynamic host name resolution❍ TCP/IP
Note: Operating systems with only IPX enabled will not be identified by an HP-UX or LinuxCMS.
❍ SNMP
Managed System Requirements andRecommendations
This section contains requirements and recommendations for managed systems.
● Required Operating Systems
❍ HP Tru64❍ HP NSK❍ HP OpenVMS❍ HP-UX 11i❍ HP-UX 11i v2 September 2004❍ IBM OS/2❍ Microsoft Windows 2003 Standard for IA-32❍ Microsoft Windows 2003 Standard with Service Pack 1 for IA-32❍ Microsoft Windows 2003 Enterprise for IA-32❍ Microsoft Windows 2003 Enterprise Service Pack 1 for IA-32❍ Microsoft Windows 2003 Enterprise for Itanium-based systems❍ Microsoft Windows 2003 Enterprise with Service Pack 1 for Itanium-based systems❍ Microsoft Windows 2003 Extended Systems for x64 and AMD64
27
Installation Overview and Requirements

❍ Microsoft Windows 2003 Web Edition for IA-32❍ Microsoft Windows 2003 Data Center❍ Microsoft Windows 2003 Small-Medium Business for IA-32❍ Microsoft Windows Professional for IA-32❍ Microsoft Windows Data Center for IA-32❍ Microsoft Windows 2000 Server with Service Pack 4 for IA-32❍ Microsoft Windows 2000 Advanced Server with Service Pack 4 for IA-32❍ Microsoft Windows 2000 Server for IA-32❍ Microsoft Windows 2000 Advanced Server for IA-32❍ Microsoft Windows 2000 with Service Pack 1 or later for IA-32❍ Microsoft Windows XP with Service Pack 2❍ Microsoft Windows XP with Service Pack 1❍ Microsoft Windows XP❍ Microsoft Windows 98❍ Microsoft Windows 98 Millinium Edition❍ Microsoft Windows Virtual Server❍ Novell Netware 6.5❍ Novell Netware 6.0❍ Novell Netware 5.1❍ SCO Open Unix 8❍ SCO Unixware 7❍ SCO OpenServer 5❍ Red Hat Linux 9❍ Red Hat Linux 8❍ Red Hat Linux 7.3 Workstation❍ Red Hat Linux 7.2❍ Red Hat Enterprise Linux 4 for x86❍ Red Hat Enterprise Linux 4 for AMD64 and EM64T❍ Red Hat Enterprise Linux 4.0 for IA-32 and Itanium-based systems❍ Red Hat Enterprise Linux 3 AS for Itanium-based systems❍ Red Hat Enterprise Linux 2.1 for Itanium-based systems❍ Red Hat Enterprise Linux 2.1 for x86❍ SUN Solaris 9 Intel Platform❍ SUN Solaris 8 Intel Platform❍ SUSE Linux Enterprise Server 9 for Itanium-based systems❍ SUSE Linux Enterprise Server 9 for x86❍ SUSE Linux Enterprise Server 9 for AMD64 and Intel EM64T❍ SUSE Linux Enterprise Server 8 for Itanium-base systems❍ SUSE Linux Enterprise Server 8❍ SUSE Linux Enterprise Server 8/United Linux 1.0❍ SUSE Linux 7.2❍ SUSE Linux 7.0❍ VMWare ESX❍ VMWare GSX
Note: Operating systems with only IPX enabled will not be identified by an HP-UX or LinuxCMS.
● Required Hardware
❍ For HP-UX:
❑ Any HP PA-RISC system❑ Any HP Itanium-based system
28
Installation Overview and Requirements
❍ For Linux:
❑ Any HP IA-32 system❑ Any HP Itanium-based system
❍ For Windows:
❑ Any HP IA-32 system
● Recommended Software
Note: This software is not required, but if you want improved management capabilities, HPrecommends that you install these components.
❍ For HP-UX:
❑ SSH❑ WBEM
❍ For Linux:
❑ SSH❑ ProLiant Support Pack for Linux 7.0 or later❑ SNMP (recommended as an alternative to WBEM)❑ WBEM (for Integrity systems only)
❍ For Windows:
❑ OpenSSH 3.7.1❑ ProLiant Support Pack 6.30 or later❑ WBEM/WMI❑ SNMP (recommended as an alternative to WBEM)
● Required Networking
❍ Static or dynamic host name resolution❍ SNMP
● Managed Storage System Requirements and Recommendations
To view the latest information regarding HP Systems Insight Manager support for a particularstorage system including Fibre Channel disk arrays, switches, tape libraries, or hosts (with FibreChannel host bus adapters). Refer to the HP Systems Insight Manager SMI-S Provider web pageat:
http://www.hp.com/go/hpsim/providers..
This webpage also offers information on obtaining and installing SMI-S providers.
● Required Web Browsers
❍ For HP-UX:
29
Installation Overview and Requirements

❑ Mozilla 1.7.3 or later
To download, refer to http://software.hp.com.
❍ For Linux:
❑ Mozilla 1.7.3 or later
❍ For Windows:
❑ Microsoft Internet Explorer 6 with Service Pack 1 or later
Refer to the following note about the required security options.
Note: For all Windows Internet explorer browsers, you must have the following browsersecurity options enabled for HP Systems Insight Manager to work properly:
❑ SSL 3.0 or TLS 1.0
● Recommended Software
Note: This software is not required, but if you want improved HP Systems Insight Managercapabilities, HP recommends that you install these components, which can be purchased ordownloaded from many software suppliers.
❍ SSH Client❍ X Window Server
SSH RequirementsSSH is configured during HP Systems Insight Manager installation locally on the Central ManagementServer (CMS). Additional steps to complete the configuration on the CMS can be provided in theHP Systems Insight Manager README. Custom commands on the Tools menu require SSH onthe CMS to run properly. These commands run on the CMS with environment variables set to thecontext of specific events or devices. SSH on the CMS is also used by the Initial ProLiant SupportPack Install on the Deploy->Deploy Drivers, Firmware and Agents menu.
You can optionally install and configure SSH on each of the managed systems and have HP SystemsInsight Manager exchange keys with the managed systems (through the mxagentconfig commandor for Windows, through the Install SSH task). If you do this, then the Command Line Tools optionon the Tools menu works for these managed systems. If you choose not to configure it to workwith remote SSH clients, then these commands fail. There is no other loss of functionality withoutSSH.
30
Installation Overview and Requirements
Chapter 3. Installing on Windows Preparing the System
This procedure verifies that your system meets the minimum requirements and prepares your systemfor installation.
Note:
The Windows installer will fail if Internet Explorer 6.0 or later is not present. If InternetExplorer 5.x or earlier is installed, it must be upgraded to Internet Explorer 6.0 orlater for the HP Systems Insight Manager installation to complete successfully.
Note:
If installing HP Systems Insight Manager with a local MSDE or SQL database on aWindows XP SP2 Machine that is not a member of a domain, Simple File Sharingis automatically disabled. The Simple File Sharing setting on Windows XP Professionalchanges the way local users are authenticated.
Enabled = Guest only - local users authenticate as Guest
Disabled = Classic - local users authenticate as themselves
This can be seen in the Local Security Policy Editor under (Start> Control Panel>Administrative Tools > Local Security Policy). Select Security Settings> Local Policies>Security Options>Network access: Sharing and security model for local accounts.This change is necessary for the database install.
To verify and prepare your system:
1. Verify your system meets the minimum requirements. Refer to "System Requirements" fordetails.
2. Install the required Windows and Microsoft SQL Server 2000 Server or MSDE Service Packs.
3. Verify your system has at least one partition formatted for the NTFS file system, on which theHP Systems Insight Manager server software is to be installed.
If this requirement is not yet met, create or format an NTFS partition for use by HP SystemsInsight Manager.
4. Verify that Microsoft Access Data Components (MDAC) 2.7 Service Pack 1 or higher is installedon the central management server (CMS). To verify if this is installed, navigate to C: \ProgramFiles\Common Files\System\Ado, and right-click the icon for the msado15 .dll file. Inthe pop-up menu, select Properties, and click the Version tab to display the version number.If the file is not found in this path, use the Windows search engine to find the file. If you must
31
download MDAC, refer to http://www.microsoft.com/downloads/[http://www.microsoft.com/downloads/] and search for MDAC Service Pack.
5. Download the software or install it from the HP Management CD.
To download the software, refer to http://www.hp.com/go/hpsim, and on the upper-left ofthe page under HP management software, select Download. The HP Systems Insight ManagerDownload Page appears. Under HP Systems Insight Manager and related componentsselect HP SIM-Windows, then Download latest version of HP SIM - Windows for a fullproduct install.
Or
If you are using the Management CD, place the CD in the CD-ROM drive. The CD has anautorun feature that launches a license agreement. Accept the license agreement, and selectthe Products tab. Click Install on the HP Systems Insight Manager page. Then select Installbeside the HP Systems Insight Manager (Windows) listing to launch the Installer.
Installing and Configuring the Software1. Run setup.exe located at \hpsim\win_ia32\setup.exe to launch the HP Systems
Insight Manager Setup Shell.
Note:
HP Systems Insight Manager Setup requires Windows 2000 Server SP4,Windows 2000 Advanced Server SP4, Windows XP Professional SP2,Windows Server 2003 Standard SP1, or Windows Server 2003 EnterpriseSP1 or greater. If the installed OS does note meet these minimumrequirements, HP SIM installation will not proceed; install the appropriateservice pack and re-start the installation.
The HP Systems Insight Manager Setup screen appears. The Setup screen displays linksto the following documentation:
● Readme (readme.txt)
● Release Notes (hpsim-releaseNote.pdf)
● User Guide (hpsim-userGuide.pdf)
Note: The administrative account used to install HP Systems Insight Manager will be the initiallogin account.
2. Click Install to start the install process. The HP Systems Insight Manager setup "installationstatus" window appears with the following three stages:
● Pre-installation. Examines this system for local instances of MSDE, SQL Server 2000or Oracle 9i and will display the Optional MSDE 2000 SP3a installation screen if noneare found.
32
Installing on Windows
Note:
If the server reboots, the setup shell will restart automatically. If setupwas initiated from a mapped drive and the mapped drive is notavailable on reboot then the setup shell will fail to launch.
● Installation. Launches the Install Shell and installs HP Systems Insight Manager andother HP management software products.
● Post-installation. Completes the import of ProLiant Essentials PerformanceManagement Pack (PMP) data when necessary. Click Finish to close the setup windowand return to the desktop.
3. Click Finish. The HP Systems Insight Manager Setup Check window appears.
4. From the HP Systems Insight Manager SetUp Check window, click Install MSDE to startthe install process.
(Optional) If supported versions of MSDE, Microsoft SQL Server or Oracle9i are not detectedlocally, you will be prompted to either install MSDE 2000 Service Pack 3A or point to a remoteSQL Server or Oracle 9i installation later.
Note: For a list of supported databases, HP Systems Insight Manager Release Notes athttp://h18013.www1.hp.com/products/servers/management/hpsim/infolibrary.html fordetails.
5. After MSDE installation is complete, the installer will reboot your system if required. If the serverreboots, the Setup Shell will restart automatically and then repeat the previous step to launchthe installer. You will not see the option to install MSDE again.
6. The Welcome to HP Systems Insight Manager Installer window appears. Click Install tostart installation.
7. The Select Installation Type screen appears, click Typical to install the components listedunder the Available Components for Install with minimal user interaction or click Customto select or deselect the optional components you want to install.
Each component will be installed non-interactively for a Typical install. For the Custom install,you choose the components to install and they will be launched interactively .
Note: Before you proceed with the custom install if you are going to install ProLiant EssentialsPerformance Management Pack, HP ProLiant Essentials Virtual Machine Management Pack,or the System Management Homepage you need to refer to the following documents for specificusername requirements for the product administrator, service account and DB administrator.For more information refer to the
● HP Performance Management Pack documentation at http://www.hp.com/products/pmp[ http://www.hp.com/products/pmp/]
● HP ProLiant Essentials Virtual Machine Management Pack User Guide athttp://www.hp.com/servers/proliantessentials/vmm.
33
Installing on Windows
● System Management Homepage Installation Guide athttp://h18013.www1.hp.com/products/servers/management/agents/documentation.html
.
Note: During the Custom Install process, do not select the reboot now option if a componentrequests this. Reboot only after all components have been installed.
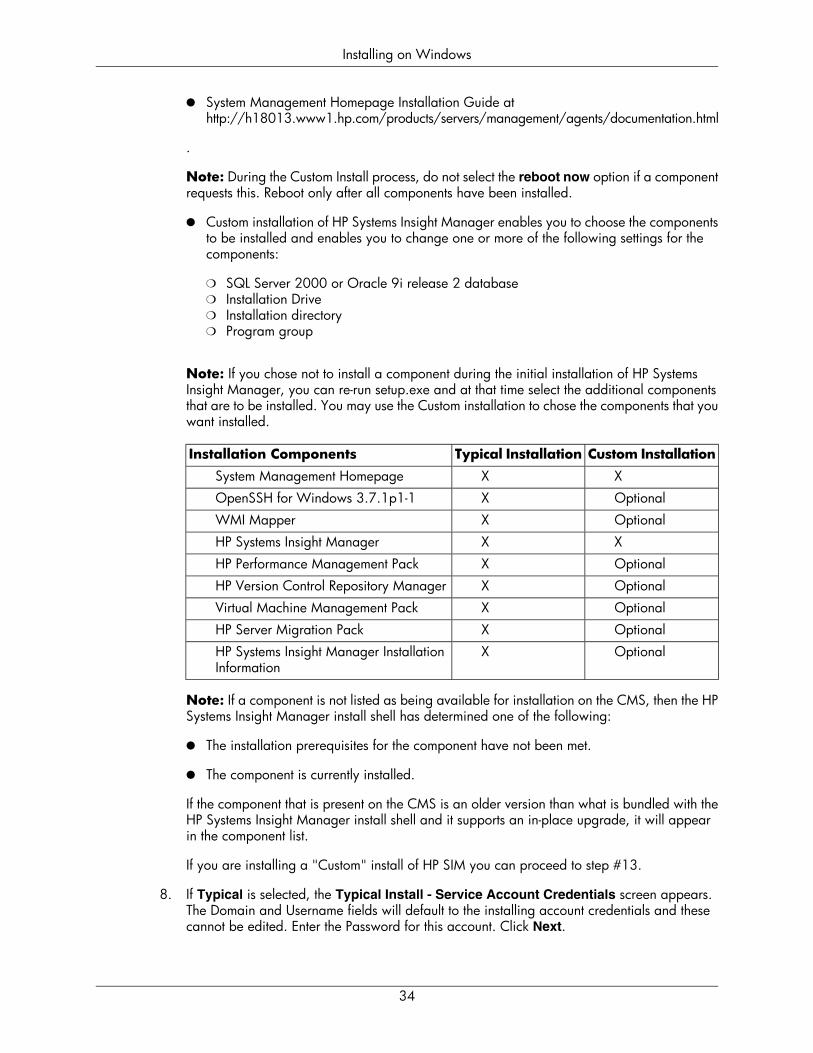
● Custom installation of HP Systems Insight Manager enables you to choose the componentsto be installed and enables you to change one or more of the following settings for thecomponents:
❍ SQL Server 2000 or Oracle 9i release 2 database❍ Installation Drive❍ Installation directory❍ Program group
Note: If you chose not to install a component during the initial installation of HP SystemsInsight Manager, you can re-run setup.exe and at that time select the additional componentsthat are to be installed. You may use the Custom installation to chose the components that youwant installed.
Custom InstallationTypical InstallationInstallation ComponentsXXSystem Management Homepage
OptionalXOpenSSH for Windows 3.7.1p1-1
OptionalXWMI Mapper
XXHP Systems Insight Manager
OptionalXHP Performance Management Pack
OptionalXHP Version Control Repository Manager
OptionalXVirtual Machine Management Pack
OptionalXHP Server Migration Pack
OptionalXHP Systems Insight Manager InstallationInformation
Note: If a component is not listed as being available for installation on the CMS, then the HPSystems Insight Manager install shell has determined one of the following:
● The installation prerequisites for the component have not been met.
● The component is currently installed.
If the component that is present on the CMS is an older version than what is bundled with theHP Systems Insight Manager install shell and it supports an in-place upgrade, it will appearin the component list.
If you are installing a "Custom" install of HP SIM you can proceed to step #13.
8. If Typical is selected, the Typical Install - Service Account Credentials screen appears.The Domain and Username fields will default to the installing account credentials and thesecannot be edited. Enter the Password for this account. Click Next.
34
Installing on Windows

Note:
For a Typical install, the HP SIM Service account will be the installingaccount. This user account will be used to run the HP Systems InsightManager service.
9. The Typical Install - Database Configuration screen appears. Enter the Account Credentialsfor the database server. The installing user account will be pre-populated in the 'Username'field and this cannot be edited. The 'Host' field will pre-populate with the local host name butthis can be edited. If using a local SQL Server or MSDE provide the password for the installinguser and click Next to proceed. Typical install requires the installing user account to exist onthe remote Database server. If your database is not local then you must supply the DatabaseServer name and the password. Click Next.
Note: In case of a reboot, if you just installed MSDE, the administrative credentials are thoseyou used to log in before installing MSDE. Windows authentication is required to connect tothe SQL server (whether locally or remotely). In addition, these credentials will also be yourHP Systems Insight Manager administrative user login credentials. Any account that is a memberof the administrator group will have administrator rights to MSDE. The local security policywill be modified to give you the following rights: log on as a service, create a token object,and replace a process level token. In addition, for Windows XP SP2, Windows 2003 SP1 orlater, Component Object Model (COM) security will be updated to allow remote access andactivation by everyone and anonymous users. See the HP Systems Insight Manager 5.0README for more details.
Note: A "Typical" install of HP Systems Insight Manager does not support the Oracle database.
10. The Typical Install-Software Selection screen appears. This screen displays the completelist of the available components with a checkbox next to each one. If the checkbox is disabledand has a check, the component is deemed a mandatory component and cannot be deselected.All the components that are under the Typical Install column of the Select Installation Typescreen should have disabled checkboxes. The amount of required disk space is also listed foreach component. Clicking the Back button will return the user to the Typical Install-DatabaseConfiguration screen. Clicking the Next button will do a disk space check for the selectedcomponents, and if enough exists, will display the Typical Install – Summary screen. TheCancel button asks for confirmation of exiting the installation.
11. On theTypical Install - Summary screen, select Install to initiate the installation process.This process installs all the products listed in the Selected Components table.
12. The Typical Install - Status screen appears. Click Finished after installation is complete.This completes Typical Installation.
This concludes the "Typical Install" of HP SIM refer to the Next Steps for more information.
13. Installing HP System Management Homepage for an In-Place custom install:
35
Installing on Windows
Note:
For more information regarding where the System Management Homepagedefault settings are stored during a Typical installation and how to changethem, refer to the System Management Homepage Installation Guide athttp://h18013.www1.hp.com/products/servers/management/agents/documentation.html
a. Click Next. The OS Groups dialog box appears.
b. Select Administrator, Operator, or User from the Operating Systems Group Namefield.
c. Enter the group name of an operating systems group in the Group Name field. ClickAdd. The group name is added. A maximum of five entries can be added for each grouplevel. Click Next to continue or Back to return to the previous page.
Note: To delete a group name, select the group name and click Delete.
d. The User Access dialog box appears. The User Access dialog box enables you toconfigure the System Management Homepage from the following access types:
● Select Anonymous Access to enable anonymous access to unsecured pages.
● Select Local Access Anonymous or Local Access Administrator to set up theSystem Management Homepage to automatically grant local IP addresses at theselected access level.
Caution: Selecting Local Access with Administrator privileges provides any userswith access to the local console full access without prompting them for a user nameor password.
e. Click Next. The Trust Mode dialog box appears.
f. Select the level of security you want to provide from one of the following trust modes:
● Trust By Certificate
i. Click Next. The Trusted Certificates dialog box appears. The TrustedCertificates dialog box allows trusted certificate files to be added to the TrustedCertificate List.
ii. Click Add File to browse and select any certificates to be included in the TrustedCertificate List. The Add File dialog box appears. If an invalid file name isentered in the file name field, an error message appears, indicating the file doesnot exist. Click OK to select another file, or click Cancel to close the dialog box.The Trusted Certificate List appears. Click Next.
Note: If you click Next without adding any certificates to the list, and nocertificates exist from a previous installation, a message appears indicating thatif you do not specify any trusted certificates, HP Systems Insight Manager cannotaccess the HP Insight Management Agent on this system. Click OK if you do notwant HP Systems Insight Manager to access the Insight Management Agent on
36
Installing on Windows
this system, or click Cancel to close the dialog box and add the trusted certificatesto the list.
Note: The Trust By Certificates option enables the System ManagementHomepage system and the HP Systems Insight Manager system to establish a trustrelationship by means of certificates. This mode is the strongest method of securitybecause it requires certificate data and verifies the digital signature beforeenabling access.
iii. The IP Binding dialog box appears.
or
i. Click Import. The Import Server Certificate dialog box appears.
ii. Enter the name or IP address of the server whose certificate you want to import.
iii. Click Get Cert. The certificate information appears.
iv. Verify the certificate information. If you want to add this certificate to the TrustedCertificate List, click Accept and the certificate is added to the TrustedCertificate List, or click Cancel if you do not want to add it to the TrustedCertificate List. The Trusted Certificate List appears. Click Next.
Note: You can add an unlimited number of trusted certificates.
v. The IP Binding dialog box appears. Click Back to return to the Trust Modedialog box.
Note: To delete a certificate, select the certificate and click Delete. The selectedcertificate is removed.
● Trust By Name
i. Select Trust By Name.
ii. Click Next. The Trusted Server dialog box appears.
Note: Although the Trust By Name mode is a slightly stronger method of securitythan the Trust All mode, it still leaves your system vulnerable to security attacks.The Trust By Name mode sets up the System Management Homepage to onlyaccept certain requests from servers with the HP Systems Insight Manager namesdesignated in the Trust By Name field. The Trust By Name option is easy toconfigure and can prevent non-malicious access. For example, you might wantto use the Trust By Name option if you have a secure network, but your networkhas two groups of administrators in two separate divisions. The Trust By Nameoption would prevent one group from installing software to the wrong system.This option does not verify anything other than the HP Systems Insight Managerserver name submitted.
iii. Enter the names of the servers you want to trust.
Note: The server name cannot contain the following characters:
~ ! ` @ # $ % ^ & * ( ) + = " : ' < > ? , | ;
37
Installing on Windows
iv. Click Add to add the name of a server you want to trust. Click Next.
v. The IP Binding dialog box appears.
Note: If you click Next without adding any server names to the list, an errormessage appears, indicating that if you do not specify any trusted server names,HP Systems Insight Manager cannot access the Insight Management Agent onthis system. Click OK to proceed without trusting any systems, or click Cancel toclose the dialog box and add server names to the list.
Note: To delete a certificate, select the certificate and click Delete. The selectedcertificate is removed.
● Trust All
i. Select Trust All. Click Next.
ii. The IP Binding dialog box appears.
Note: The Trust All option leaves your system vulnerable to security attacks andsets up the System Management Homepage to accept certain requests from anyserver. For example, you might want to use Trust All if you have a secure network,and everyone in the network is trusted.
g. Select IP Binding to enable the Subnet IP Address and NetMask.
The IP Binding dialog box enables you to bind to specific IP addresses that match aspecific Subnet IP Address or NetMask. It restricts the subnet you want to manage.
i. Enter the Subnet IP Address in the designated field.
ii. Enter the NetMask in the designated field.
iii. Click Add to add the Subnet IP Address/NetMask into the dialog box. Select aSubnet IP Address/NetMask, and click Delete to remove it from the dialog box.Click Next.
Note: You can add up to five Subnet IP Address/NetMask pairs.
Note: If you click IP Binding but do not specify the IP Address/NetMask then youmight not be able to connect to the System Management Homepage.
h. The IP Restricted Logins dialog box appears. The IP Restricted Logins dialog boxenables you to select specific IP addresses or IP address ranges to include or excludefrom gaining login access. Although optional, the System Management Homepage canrestrict login access based on the IP addresses of the machine attempting to gain access.
i. Select Enable IP Restricted Logins, and click Next. The IP Addresses to Includedialog box appears. This dialog box enables you to specify the IP address or IP addressranges to grant login access permission. If there are IP addresses in the Inclusion list,then only those IP addresses are enabled for login privileges. If there are no IP addressesin the Inclusion list, then login privileges are permitted to all IP addresses that are not inthe Exclusion list.
38
Installing on Windows
Note: A single address and ranges of addresses can be accepted in the IP RestrictedLogins dialog box. Enter the single address in the first box.
i. In the Include field, enter a beginning IP address to which you want to grant loginaccess.
ii. In the To field, enter an ending IP address to which you want to grant login access.All IP address that fall between the beginning and ending IP addresses are grantedlogin access.
iii. Click Add. The IP address or IP address range is added to the Exclusion list. Selectan IP address or IP address range, and click Delete to remove it from the Exclusionlist. Click Next.
Note: If you entered an invalid IP address or IP address range, an error messageappears indicating the IP address is invalid. Click OK. Enter a valid IP address or IPaddress range, and click Add again.
j. The IP Addresses to Exclude dialog box appears.
i. In the Exclude field, enter a beginning IP address to which you want to deny loginaccess.
ii. In theTo field, enter an ending IP address to which you want to deny login access.All IP addresses that fall between the beginning and ending IP addresses are deniedlogin access.
iii. Click Add. The IP address or IP address range is added to the Inclusion list. Selectan IP address or IP address range, and click Delete to remove it from the Inclusionlist. Click Next.
Note: If you entered an invalid IP address or IP address range, an error messageappears, indicating the IP address is invalid. Click OK. Enter a valid IP address orIP address range, and click Add again.
Note: If Next is selected without adding any IP addresses to either theInclude orExclude lists, a warning message appears stating, IP Restricted Logincheckbox will be marked as disabled. Do you want to proceedwithout adding any IP Address restrictions? If you select OK, the IPRestricted Login option on the IP Restricted Login dialog box is deselected, andthe Install Preview dialog box appears.
k. The Summary Panel appears. The Summary Panel lists the location where the SystemManagement Homepage is installed, the amount of space the installation requires, andthe summary of the options that you specified during the installation. Click Next.
l. The installation process is started.
Note: During the installation of the System Management Homepage, Cancel is disabled.If you click the X in the upper-right corner of the box, an error message appears, statingthe current operation cannot be canceled.Click Finish to complete the installation.
39
Installing on Windows
Note: If HP Systems Insight Manager is installed after System Management Homepageis installed, the System Management Homepage 2048-bit key pair will be replaced withthe HP Systems Insight Manager1024-bit key pair.
14. Installing OpenSSH for a custom install:
a. Click Next on the OpenSSH Services for the HP Systems Insight Manager SetupWizard welcome screen.
b. Select the destination location using the Browse button. Then click OK to continue. ClickNext.
c. The OpenSSH Service Log On As User screen appears. Enter your account password.The username and domain fields are pre-populated. Although the "username" and"domain" fields are pre-populated, you are allowed to change these values to specifyany user you choose. However, the account credentials you do choose must have localadministrator rights (be a member of the local "Administrators" group). Click Next.
Note:
The OpenSSH Service Log On As User screen will only appearif installing on a Windows XP or Windows 2003 system. If youare installing on a Windows 2000 system the OpenSSH Servicewill run as 'localsystem' and will not ask for credentials.
d. The Ready to Install screen appears. Click Install to continue with the installation, orclick Back to make changes.
e. After installing OpenSSH, if prompted, click No, I will restart the computer later.
f. Click Finish.
Note:
The local security policy will be modified to give you the followingrights: log on as a service, create a token object, and replace aprocess level token. See the HP Systems Insight Manager 5.0README for more details.
15. Installing WMI Mapper for a custom install:
a. Click Next on the Welcome to the Pegasus WMI Mapper v2.1 Setup Wizard screen.
b. The End-User License Agreement screen appears. Click I accept the terms in theLicense Agreement. Click Next.
c. The Choose Setup Type screen appears. Choose the setup type. (Basic requirement forHP Systems Insight Manager is Typical installation. If you choose typical omit step d.)
40
Installing on Windows

d. Select the destination location using the Browse button. Click OK. Click Next.
e. The Ready to Install screen appears. Click Install to continue with the installation, orclick Back to make changes.
f. Click Finish.
Note:
For Windows XP SP2, Windows 2003 SP1 or later, COM securitywill be updated to allow remote access and activation by everyoneand anonymous users. See the HP Systems Insight Manager 5.0README for more details.
16. Installing HP Systems Insight Manager for a custom install:
a. Click Next on the HP Systems Insight Manager welcome screen.
b. The Service Account Credentials screen appears, with User name, Password andDomain fields. The fields are pre-populated with the installing account credentials but canbe edited if needed. Provide a valid password and proceed or provide different accountdetails. This account should have administrative privileges. Click Next.
Note:
This user account will be used to run the HP Systems InsightManager service.
c. The Database Configuration screen appears. Specify Oracle or SQL Server as yourDatabase Server. Enter the requested information appropriately. Defaults are providedwhere possible.
Note: Microsoft SQL Server Desktop Engine (MSDE) is selected by default.
For Oracle:
The Oracle database must be created prior to installing HP Systems Insight Manager. AnOracle user with DBA privileges must be created in this database for the exclusive useby HP Systems Insight Manager. The thin client jar file (ojdbc14.jar) must be copied onto the system and its location must be specified during installation.
For SQL Server 2000:
If your database is local, then the Database Server name , Username, Domain andport (default is 1433) fields are pre-populated and can be changed if necessary. Providethe valid password and click Next to proceed. If your database is not local you mustsupply the name of the remote Database Server and valid values for the Domain, portand user credentials, if different from what is already populated. HP Systems InsightManager creates a database name with the format “Insight_V50_0_xxxxxxxxx
41
Installing on Windows
(timestamp).” For example, “Insight_V50_0_172541227.” It then updates thedatabase.props file which can be found in C:\Program Files\HP\SystemsInsightManager\Config.
d. Click Next. The Select Destination screen appears. Select the destination location usingthe Browse button. Click OK, then click Next.
e. The Select Start Menu Folder appears. Select or enter a different folder name usingBrowse. Click Ok, then click Next.
f. The Ready to Install screen appears. Click Install to install HP Systems Insight Manager,the Install Progress screen appears, or click Back to make any changes.
g. Click Finish when the installation is complete to close the HP Systems Insight ManagerInstaller window.
17. Installing the ProLiant Essentials Performance Management Pack (PMP) for a custom install:
Note: During the installation of the ProLiant Essentials Performance Management Pack, thefollowing warning is displayed: "As part of HP Performance Management Packinstallation the HP Systems Insight Manager service must be stoppedand restarted". Click OK to stop the service and continue with the PMP installation. TheWelcome to the Performance Management Pack Setup Wizard screen appears. Or clickCancel to abort the installation.
a. Click Next. The Database configuration screen appears.
b. Enter your account password. Click Next.
c. Installation begins. Click Finish to exit the ProLiant Essentials Performance ManagementPack setup.
Note:
ProLiant Essentials Performance Management Pack (PMP) does not supporta remote MSDE database.
18. Installing HP Version Control Repository Manager for a custom install:
a. The HP Version Control Repository Manager setup screen appears.
b. Click Install.
c. Select the directory from which HP Version Control Repository Manager will retrievesupport pack information using the Browse button. This directory must be manuallycreated later if it does not exist. Click OK. Click Next.
d. Select the Enable Automatic Update checkbox to enable automatic downloading ofProLiant Support Packs and components at a specified interval and time.
42
Installing on Windows

e. Click Finish. Installation of HP Version Control Repository Manager proceeds andcompletes. Click Close.
19. Installing Virtual Machine Management Pack for a custom install:
Note: During the installation of the HP ProLiant Essentials Virtual Machine Management Pack,this warning appears: "As part of Virtual Machine Management Pack installation the HPSystems Insight Manager service must be stopped and restarted". Click OK to stop the serviceand continue with the Virtual Machine Management Pack installation, or click Cancel to abortthe installation. If you clicked OK the Virtual Machine Management Pack Welcome screenappears.
a. Click Next. The Database configuration screen appears.
b. Enter your account password.
c. Click Next. Installation begins.
d. Click Finish to exit Virtual Machine Management Pack setup.
Note:
Virtual Machine Management Pack does not support an Oracleinstall.
20. Installing HP Server Migration Pack for a custom install:
Note: During the installation of the HP Server Migration Pack, this warning appears: "As partof HP Server Migration Pack installation the HP Systems Insight Manager service must bestopped and restarted". Click OK to stop the service and continue with the HP Server MigrationPack installation, or click Cancel to abort the installation. If you clicked OK the HP ServerMigration Pack Welcome screen appears.
a. Click Next. The Setup HP Server Migration Pack screen appears.
b. Click Finish to exit HP Server Migration Pack setup.
21. Click Finished to complete the component installation that you selected.
Note: Click Finished in the Initial Setup HP Systems Insight Manager window, to completethe installation.
22. If any of the components indicated that a reboot is necessary, reboot your system.
43
Installing on Windows

Note:
When installing HP Systems Insight Manager, CMS hostname's that exceed 15characters are truncated and the truncated name must be used in order to completethe installation. After the install you will notice two administrator accounts are created.One account includes the 'original hostname\ administrator' and the other accountincludes the 'truncated hostname\ administrator'. To sign in, you must use the originalhostname in the Domain field on the Sign in page.
Next StepsRefer to Chapter 12. Initial Setup for details about Installing and configuring the requiredmanagement agents on the systems that will be managed by the central management server (CMS).Next, complete the initial setup of HP Systems Insight Manager. Initial setup involves addingmanaged systems, adding users, setting up authorizations, and configuring event handling.
HP Systems Insight Manager is now installed and initialized on the Central Management Server.To browse to HP SIM you may utilize the icon that is placed on your desktop after installation iscomplete or start the HP Systems Insight Manager graphical user interface (GUI) using InternetExplorer or Mozilla at http://localhost:280/.
Refer to Chapter 10. Using the Graphical User Interface for details.
Note:
The HP Systems Insight Manager First Time Wizard appears the first time a user withfull configuration rights logs into HP Systems Insight Manager. The First Time Wizardconfigures only the basic settings of an initial setup for HP Systems Insight Manager.There are other options available, refer to the HP Systems Insight Manager TechnicalReference Guide athttp://h18013.www1.hp.com/products/servers/management/hpsim/infolibrary.htmlfor more information.
44
Installing on Windows

Chapter 4. Installing on HP-UX11i Preparing the System
Note:
The "\" at the end of each command line represents that the rest of the commandis on the next line.
Note:
These steps are for a fresh installation of HP Systems Insight Manager on your HP-UX11i system. If a previous version HP Systems Insight Manager or HP ServicecontrolManager is installed on your system, and you want to upgrade your data refer to Chapter 7. Upgrading HP Systems Insight Manager 4.0, 4.0.1, 4.1 and 4.2 toHP Systems Insight Manager 5.0 or Chapter 8. Upgrading from HP ServicecontrolManager to HP Systems Insight Manager for more information on upgrade.
1. This procedure verifies that your system meets the minimum requirements and prepares yoursystem for installation. Refer to "System Requirements" for details.
2. Install the latest recommended HP-UX 11i patches.
For a list of the recommended patches, refer tohttp://www.hp.com/products1/unix/java/patches/index.html for details.
3. Verify that a previous version of HP Servicecontrol Manager or HP Systems Insight Manageris not installed and configured for use, using the following commands:
swlist -l bundle B8337BA B8339BA B8338BA T2414BA
swlist -l product ServControlMgr AgentConfig SysMgmtServerSysMgmtAgent
If any of these are installed and have been configured for use, use the upgrade steps describedin Chapters 7 and 8 to save your data. If the version of the SysMgmtServer product starts withB.04 or C.04 use the steps in Chapter7, Upgrading HP Systems Insight Manager 4.0, 4.0.1,4.1 and 4.2 to HP Systems Insight Manager 5.0. If the version of the SysMgmtServer productstarts with B.03, use the steps in Upgrading from HP Servicecontrol Manager to HP SystemsInsight Manager.
Or you can uninstall HP Servicecontrol Manager or HP Systems Insight Manager using thefollowing command to do a fresh install:
45
swremove ID
where ID is the product or bundle ID. For example:
swremove – x enforce_dependencies=false B8339BA
or
swremove – x enforce_dependencies=false T2414BA
and do a fresh install. Refer to Installing and Configuring the Software for more information.
4. Download the software, or locate a copy of the software on a depot server.
To download the software, refer to http://www.hp.com/go/hpsim, and on the upper-left ofthe page under HP management software, select Download. The HP Systems InsightManager's Download Page appears. Under HP Systems Insight Manager and relatedcomponents select HP SIM-HP-UX, then Download latest version of HP SIM-HP-UX fora full product install.
5. When installing HP Systems Insight Manager Java-out-of-box (JAVAOOB) is required and willbe automatically selected for installation. For additional information, refer tohttp://www.hp.com/products1/unix/java/java2/outofbox/index.html. The kernel parametervalues it adjusts are listed in the following table.
Java Out-of-Box Settings
=3000max_thread_proc
=2063835136maxdsiz
=2048maxfiles
=2048maxfiles_lim
=512maxusers
=4097nfile
=6000nkthread
=2048nproc
=2048tcp_conn_request_max
Additionally, HP Systems Insight Manager will adjust the following kernel parameters:
=30000nfile
=2048semmns
=1024semmni
Installing and Configuring the SoftwareWhen you install HP Systems Insight Manager, the following software dependencies are required:hpSysMgmtDB, JAVAOOB, AND SSH, (HP-UX Secure Shell). If you would like HP Systems InsightManager to manage your central management server (CMS) you must install WBEM, if it is not
46
Installing on HP-UX 11i

already installed. If you downloaded your software from the Web, these dependency packagesare included in the depot file. The installation procedure is described using this depot.
To install HP Systems Insight Manager:
1. Install HP Systems Insight Manager:
swinstall -s /directory/depot –x autoreboot=true HPSIM-HP-UX
where directory is the path to the depot file and depot is the name of the depot file. Forexample:
swinstall -s /tmp/HPSIM_download.depot –x autoreboot=true HPSIM-HP-UX
Note:
All required dependencies will be selected automatically for installation.
2. (Optional, required only if you plan to use an Oracle database). Configure HP Systems InsightManager to use a newly created Oracle database using the following command:
/opt/mx/bin/mxoracleconfig
The command will execute and ask for user information for the the followinghost/port/Database/Username/Password/Jar file path with the file name.
mxoracleconfig
Or
Mxoracleconfig -h hostname -n port number -d database name -uusername -p password -j driver jar file location] [-f ]
–h Hostname
Full DNS name or IP address of the Oracle server.
-n Port number
Port number to be used to connect to the oracle instance. Default port is 1521.
–d Database name
Name of database instance.
–u Username
Database username.
–p Password
Database password for the corresponding username.
47
Installing on HP-UX 11i
–j Driver file location
Full path to thin driver jar file. This is not required if the jar file is already in the class path forHP Systems Insight Manager and jboss. Mxoracleconfig will report an error if the driver classcannot be loaded. Mxoracleconfig will not copy over a jar file if it already exists in the classpathfor HP Systems Insight Manager and jboss.
–f Force flag to force a re-run.
Typically this command is run only once. This flag is provided if a re-run is required becauseof some type of user error such as specifying the wrong Oracle server or database instance.
3. Test the prerequisites:
/opt/mx/bin/mxinitconfig –l
This verifies and list all the prerequisites are present. You can review the log file found in/var/opt/mx/logs/initconfig.log to verify that the initialization completed.
Note:
HP Systems Insight Manager recommends resolving any warnings beforecontinuing with the setup process.
4. Initialize HP Systems Insight Manager:
/opt/mx/bin/mxinitconfig -a
Note: The initialization of the upgrade is done in the background, which takes several minutes.To verify if the upgrade is 100% complete, view the file by executing the following command:
/var/opt/mx/logs/initconfig.log
5. Verify that the mxdomainmgr and mxdtf daemons are running:
ps -ef | grep mx
If they are not running, start them:
/opt/mx/bin/mxstart
6. (Optional) If you plan to run the Mozilla browser on the Central Management Server (CMS)verify that Mozilla 1.7.3 or later is installed. To verify which version is installed, open theMozilla browser and select Help> About Mozilla.
7. (Optional) to use the Central Management Server (CMS) as a managed system, install WBEM,if it is not already installed.
48
Installing on HP-UX 11i
Note:
On HP-UX 11i v2 September 2004 (B. 11 .23) WBEM is installed by default.
swinstall -s /directory/depot B8465BA
where directory is the path to the depot file and depot is the name of the depot file. Forexample:
swinstall -s /tmp/WBEM_download.depot B8465BA
Note:
To verify if WBEM (cimserver, cimserverd) daemons are running:
ps -ef | grep wbem
8. (Optional) Configure the Central Management Server (CMS) to send SNMP traps to itself.
a. Add the name of the CMS as a trapdest in the file /etc/SnmpAgent.d/snmpd.conftrap-dest: <cms_full_hostname_or_ip_address>
b. Stop the SNMP Master agent and all subagents with the command:
/sbin/init.d/SnmpMaster stop
c. Restart the SNMP Master agent and all subagents with the command:
/usr/sbin/snmpd
Note:
After installation is complete you must logout of the operating system andlog back in to configure the new parameters to your system environmentvariables.
Tuning HP Systems Insight Manager(Optional)
Using SAM or the HP-UX Kernel Configuration tool (kcweb) or kctune, complete the followingoptional manual parameter adjustments, if needed.
49
Installing on HP-UX 11i
● Set the dbc_max_pct kernel parameter. This is the percentage of physical memory that can bedynamically allocated for the Data Buffer Cache. It defaults to 50%, which is usually too high.Set this variable to the percentage of your system physical memory that equals approximately200 MB. For example, a server with 1 GB of RAM should have this value set at 20%. Refer tothe dbc_max_pct for additional details in tuning this parameter.
Note:
This value cannot be less than dbc_min_pct, which cannot be less than 1%.See the dbc_max_pct man page for additional details.
Note:
For HP-UX 11i v2 September 2004 (B. 11 .23) these parameters are dynamicand when you modify the parameters a reboot of the system is not necessary.
Next StepsInstall and configure the required management agents on the systems that will be managed by thecentral management server (CMS). Next, complete the initial setup of HP Systems Insight Manager.Initial setup involves adding managed systems, adding users, setting up authorizations, andconfiguring event handling. Refer to Chapter 12. Initial Setup for details.
HP Systems Insight Manager is now installed and initialized on the Central Management Server.Start the HP Systems Insight Manager graphical user interface (GUI) using Mozilla athttp://localhost:280/. Refer to Chapter 10. Using the Graphical User Interface for details.
Note:
The HP Systems Insight Manager First Time Wizard appears the first time a user withfull configuration rights logs into HP Systems Insight Manager. The First Time Wizardconfigures only the basic settings of an initial setup for HP Systems Insight Manager.There are other options available, refer to the HP Systems Insight Manager TechnicalReference Guide athttp://h18013.www1.hp.com/products/servers/management/hpsim/infolibrary.htmlfor more information.
Note:
If you are going to install ServiceGuard Manager for the first time, installServiceGuard Manager 5.00 for HP Systems Insight Manager 5.0. To downloadServiceGuard Manager 5.0, refer to
50
Installing on HP-UX 11i

http://www.hp.com/go/softwaredepot., for more information.
When you install HP Serviceguard Manager, it recognizes HP SIM and automaticallyregisters it for you.
51
Installing on HP-UX 11i

Chapter 5. Installing on Linux Preparing the System
This procedure verifies that your system meets the minimum requirements, and prepares your systemfor HP Systems Insight Manager installation.
Note:
The “\“ at the end of each command line represents that the command is on thesame line.
To verify and prepare your system:
1. Verify your system meets the minimum requirements. Refer to "System Requirements" fordetails.
2. Verify that HP Servicecontrol Manager is not installed by executing the following command:
rpm -qa | grep mx
This command will determine if mxcms, mxagent, or mxrepository are installed. If theyare installed, it will return the list of components starting with package name "mx". To removethem, execute the following command:
rpm -e mxcms mxagent mxrepository
3. Verify that earlier versions of PostgreSQL are not installed or if you plan to use an Oracledatabase, refer to your Oracle provider for instructions.
Note: If this is a fresh install of HP Systems Insight Manager and if PostgreSQL is installed,even if it is a supported version, you must remove it and let the HP SIM installer install asupported version unless you are installing over a previous version of HP SIM (4.0.1, 4.1 and4.2). Refer to Chapter 7. Upgrading HP Systems Insight Manager 4.0, 4.0.1, 4.1 and 4.2to HP Systems Insight Manager 5.0 for details.
Note: Removing PostgreSQL will remove your current database. If the current database mustbe saved, back it up before PostgreSQL is removed.
4. To back up your database, execute the following command:
cp –rp /var/lib/pgsql /var/lib/pgsql.oldl
The p retains the permission, time, and date of all files and folders.
5. Verify if PostgreSQL is installed by executing the following command:
rpm -qa | grep postgresql
52
If PostgreSQL is not installed, the previous command will not return any results. Refer to Step8 in the "Installing on Linux - Preparing the System" section for information. If PostgreSQL isinstalled, the previous command returns the list of components starting with package name"PostgreSQL".
6. To remove PostgreSQL-server execute the following command:
rpm –qa | grep postgresql | xargs rpm -e
This command will query the installed component starting with postgresql as the name andremove the installed component.
7. Execute the following command to remove the postgresql folder.
rm –rf /var/lib/pgsql
Note: The saved database file might not be compatible with the newer version of PostgreSQLthat is installed with HP Systems Insight Manager. If you must access the data in this file, usea system that has the older version of PostgreSQL installed.
For Oracle:
Oracle should be installed on the local system prior to installing HP Systems Insight Manager.Database and username with DBA privileges should be created or if you plan on using Oracleas the remote database, you have to have the Database and user name with DBA privilegeto configure HP Systems Insight Manager. Refer to After Installing HP Systems Insight Managerto configure HP Systems Insight Manager to use a newly created Oracle database.
8. Download the HP Systems Insight Manager software or locate a copy on a depot server. Todownload the software, refer to http://www.hp.com/go/hpsim, and on the upper-left of thepage under HP management software, select Download. The HP Systems Insight Manager'sDownload Page appears. Under HP Systems Insight Manager and related componentsselect HP SIM-Linux, then Download latest version of HP SIM-Linux for a full productinstall.
9. In the directory where you downloaded or copied the files, give users permission from readto read/write and to execute the bin file:
chmod +x *.bin
or
chmod +x HPSIM-Linux_C.05.00.00.00.bin
10. Verify that the following required software dependencies are available on your system andinstall any that are not already installed.
a. Verify that SSH is installed by executing the following command:
rpm -qa | grep ssh
If SSH is not installed the previous command will not return any results. Install SSH fromyour Linux operating system CD before continuing with the HP Systems Insight Managerinstallation.
b. Verify that SNMP is installed by executing the following command:
53
Installing on Linux
rpm -qa | grep snmp
If it is not installed the previous command will not return any results. Install SNMP fromyour Linux operating system CD before continuing with the HP Systems Insight Managerinstallation.
c. Verify that standard C++ libraries (compat-libstdc++-7.3) are installed:
rpm -qa | grep compat
If they are not installed the previous command will not return any results. Install them fromyour Linux operating system CD before continuing with the HP Systems Insight Managerinstallation.
d. Verify that the GLIBC library is installed. If you plan to install Mozilla on your CMS, thelibrary must be installed first.
rpm -qa | grep glib
If it is not installed the previous command will not return any results. Install it from yourLinux operating system CD before continuing with the HP Systems Insight Managerinstallation.
e. For Red Hat Enterprise ES Linux 3, verify that the GDK library(gdk-pixbuf-0.22.0-3.0) is installed. If you plan to install Mozilla on your CMS,this library must be installed first.
rpm -qa | grep gdk-pixbuf
If it is not installed the previous command will not return any results. Install it from yourLinux operating system CD before continuing with the HP Systems Insight Managerinstallation.
11. (Optional) If you are planning to run the Mozilla browser on the CMS, verify that Mozilla1.7.3 or later is installed. To verify which version is installed, open the Mozilla browser andselect Help->About Mozilla.
Note: Mozilla is not required on the CMS. It can be used to access HP Systems InsightManager from any network client. Most Linux distributions install Mozilla 1.0 as part of thebase operating system.
To upgrade your version of Mozilla:
a. Download the latest version for Linux at http://www.mozilla.org/download orhttp://www.mozilla.org/releases. Create a temporary directory called mozillatemp,and place the downloaded GZIP file in that directory.
b. Navigate into the mozillatemp directory and decompress the archive:
cd path/mozillatemp
tar -zxvf moz*.tar.gz
where path is the location of the temporary directory you created in the previous step.
54
Installing on Linux
c. Navigate into the mozilla-installer subdirectory that was created in the previousstep and run the installer:
cd mozilla-installer
./mozilla-installer
Follow the Mozilla install wizard to walk you through the remainder of the process.
d. Verify that Mozilla installed correctly by running the browser:
/usr/local/mozilla/mozilla
The path /usr/local/mozilla is the default install directory. If you changed the installdirectory during the installation, this command must reference your path instead.
Note: If you are running GNOME or another desktop, you can edit the properties of theMozilla icon to point to the version that you just installed.
Note: Use the Tab key to help enter in long commands accurately. Pressing the Tab key afterentering the first letter or so of each directory name automatically fills in the rest of the name.
Installing and Configuring the SoftwareThere are two kinds of installation for HP Systems Insight Manager, Installing on Linux. "Automatically Installing HP Systems Insight Manager " and "Manually Installing HP SystemsInsight Manager" .
Automatic install executes the bin file automatically laying down postgresql and HP SIM withminimal user interaction and Manual install requires that you execute the separate steps to unpackfiles, install postgresql and HP SIM.
Installation of HP Systems Insight Manager includes the PostgreSQL software dependency.
Automatically Installing HP Systems Insight ManagerTo Install HP Systems Insight Manager with PostgreSQL, execute the following step:
./HPSIM-Linux_05.xx.xx.xx.bin
Note: Refer to Chapter 5. Installing on Linux Preparing the System Step 9 for information on settingthe permission on the file.
The HPSIM-Linux_C.05.00.00.00.bin file will extract the rpm and install PostgreSQL first and thencontinue with the HP Systems Insight Manager installation.
Note:
To install HP Systems Insight Manager automatically, the following should not beinstalled: PostgreSQL and a older version of HP Systems Insight Manager.
55
Installing on Linux

Note:
After installation is complete, you must logout of the operating system and then logback in to set all the correct file permissions and system environmental's.
To complete the initial set up of HP Systems Insight Manager refer to "After Installing HP SystemsInsight Manager" .
Manually Installing HP Systems Insight Manager1. Extract the rpm files from the bin file. Be sure you set the permissions to include the right to
execute the bin for the following step.
./HPSIM-Linux_C.05.00.00.00.bin --keep --confirm
Note: Refer to Step 9 in the "Installing on Linux - Preparing the System" section for informationon setting permissions.
2. Respond negatively to the prompt to run scripts for an automatic install. The extracted files areplaced in an mxserver subdirectory.
3. To change the directory to mxserver, execute the following command:
cd mxserver
4. Install the PostgreSQL database, using the appropriate rpm files in the following order.
Note: The rpm -i command installs PostgreSQL on your system.
● For Red Hat Enterprise Linux 3 Update 3 U4 and U5 AS/ES (this command is entered withno carriage returns).
rpm -ivh postgresql-libs-7.4.1-1PGDG.i386.rpm \postgresql-7.4.1-1PGDG.i386.rpm \ postgresql-server. 7.4.1-1PGDG.i386 .rpm
● For Red Hat Enterprise Linux 4 U1 AS/ES (this command is entered with no carriagereturns).
rpm -ivh postgresql-libs-7.4.7-2PGDG.i386.rpm \ postgresql-7.4.7-2PGDG.i386.rpm \ postgresql-server. 7.4.7-2PGDG. i386 .rpm
● For SUSE Linux Enterprise Server 8/United Linux 1.0 Service Pack 3 (this command isentered with no carriage returns).
rpm -ivh postgresql-libs-7.4-0.i586.rpm \ postgresql-7.4-0.i586.rpm\ postgresql-server-7.4-0.i586.rpm
● For SUSE Linux Enterprise Server 9 Service Pack 1 or 2 (this command is entered with nocarriage returns).
56
Installing on Linux
rpm -ivh postgresql-libs-7.4.2-36.3.i586.rpm \postgresql-7.4.2-36.3.i586.rpm \postgresql-server-7.4.2-36.3.i586.rpm
5. Verify that the PostgreSQL status reads running.
● For Red Hat Enterprise Linux (all versions):
a. Execute the serviceconf command. The Service Configuration window appears.
b. Using the GUI, scroll down to the postgresql entry.
c. Select the checkbox, save the changes, and start the service.
d. Verify that the PostgreSQL daemon status is running by executing the followingcommand:
/etc/rc.d/init.d/postgresql status
● For SUSE Linux Enterprise Server 8 and SUSE Linux Enterprise Server 9:
a. View the status by executing the following command:
/etc/init.d/postgresql status
b. To configure postgresql to run during startup:
chkconfig postgresql 345
c. If the status is unused, in any version of Red Hat Linux or SUSE Linux, start the daemonby executing the following command:
For SUSE Linux Enterprise Server 8 and SUSE Linux Enterprise Server 9
/etc/init.d/postgresql start
For Red Hat Enterprise Linux (all versions)
/etc/rc.d/init.d/postgresql start
Note:
To install HP Systems Insight Manager on a system withoutOpenSSH or with a purchased version of SSH, use the--nodeps option on rpm.
For example rpm --nodeps -ivh followed by therpm files.
6. Install HP Systems Insight Manager using the rpm files by executing the following command:
57
Installing on Linux

rpm -ivh hpsim-C.05.00.00.XXXXXXX.i386.rpm \hpsim-pgsql-config-C.05.00.00.XXXXXXX.i386.rpm
Note: Both files must be installed concurrently with a single command.
Note: After installation is complete, you must logout of the operating system and log back into set all the correct file permissions and system environmental's.
After Installing HP Systems Insight Manager1. If using Oracle as your database, continue with step 2. If you are using PostgreSQL as your
database, continue with step 3.
2. For an Oracle database run
mxoracleconfig
located at /opt/mx/bin before proceeding with the following steps. This command canbe invoked with or with out command line arguments.
mxoracleconfig
You will be prompted for individual information for your Oracle database.
Or
mxoracleconfig –h hostname [-n port number] –d database name –uusername – p password [–j driver jar file location] [-f ]
–h Hostname
Full DNS name or IP address of the Oracle server.
-n Port number
Port number to be used to connect to the oracle instance. Default port is 1521.
–d Database name
Name of database instance.
–u Username
Database username.
–p Password
Database password for the corresponding username.
–j Driver file location
Full path to thin driver jar file. This is not required if the jar file is already in the class path forHP Systems Insight Manager; and jboss. Mxoracleconfig will report an error if the driver classcannot be loaded. Mxoracleconfig will not copy over a jar file it is already exists in theclasspath for HP Systems Insight Manager and jboss.
–f Force flag to force a re-run.
58
Installing on Linux
Typically this command is run only once. This flag is provided if a re-run is required becauseof some type of user error such as specifying the wrong Oracle server or database instance.
Note:
The mxoracleconfig command should be executed before themxinitconfig command so that mxinitconfig will use Oracle as thedatabase.
3. Test the prerequisites by executing the following command:
/opt/mx/bin/mxinitconfig -l
This utility should report that all server components are Acceptable and that it completedall tasks successfully.
Note: HP recommends resolving any warnings before continuing with the initializing andconfiguring HP Systems Insight Manager process.
4. Initialize and configure HP Systems Insight Manager by executing the following command:
/opt/mx/bin/mxinitconfig -a
Note: The initialization of the upgrade is done in the background, which takes several minutes.To verify if the upgrade is 100% complete, view the file by executing the following command:
/var/opt/mx/logs/initconfig.log
5. Verify that the mxdomainmgr and mxdtf daemons are running by executing the followingcommand:
ps -ef | grep mx
If they are not running, start them by executing the following command:
/opt/mx/bin/mxstart
6. Configure the system to send SNMP traps.
Note: These steps might vary slightly, depending on your version of Linux. Refer to your Linuxprovider for details if these file paths and file names do not exist on your system.
a. Verify that SNMP is installed by executing the following command:
rpm -qa | grep snmp
If it is not installed, the previous command will not return a components list. Refer to yourLinux provider for information on installing SNMP.
b. Verify if the HP Server Management Drivers and Agents from the ProLiant Support Packfor Linux is installed by executing the following command:
rpm -qa | grep hpasm
59
Installing on Linux
If it is not installed, the previous command will not return a components list. If it is installedverify if the HP Server Management Driver and agent daemon is running by executingthe following command
/etc/init.d/hpasm status
c. If the the HP Server Management Drivers and Agents daemons are running, stop themusing the following command:
/etc/init.d/hpasm stop
Note: If the HP Server Management Drivers and Agents daemon is not installed, omitthis step and step F.
d. Stop the SNMP daemon:
/etc/init.d/snmpd stop
e. Edit the snmpd.conf file using any text editor.
For Red Hat Linux run the following command for opening this file in the vi editor: vi/etc/snmp/snmpd.conf
For SUSE SLES 8 run the following command for opening this file in the vi editor: vi/usr/share/snmp/snmpd.conf
i. Remove the comment symbol (#) from the trapsink line, and add the IP address ofthe Central Management Server (CMS) this is the system which has HP Systems InsightManager application running:
trapsink IPaddress
where IPaddress is the IP address of the CMS.
ii. Add the CMS to the read-only community by adding the line:
rocommunity CommunityName IPaddress
where CommunityName is the SNMP community string used by the CMS andIPaddress is the IP address of the CMS.
Note:
Enter in the information manually if it is not present.
iii. Save the changes to the file. To save and close this file using the vi editor, press theEsc key, enter :wq!, and press the Enter key.
f. Start the SNMP daemon by executing the following command:
/etc/init.d/snmpd start
60
Installing on Linux

g. Start the HP Server Management Drivers and Agents daemon if it is installed on yoursystem:
/etc/init.d/hpasm start
Next StepsInstall and configure the required management agents on the systems that will be managed by thecentral management server (CMS). Next, complete the initial setup of HP Systems Insight Manager.Initial setup involves adding managed systems, adding users, setting up authorizations, andconfiguring event handling. Refer to Chapter 12. Initial Setup for details.
Start the HP Systems Insight Manager graphical user interface (GUI) using Mozilla or InternetExplorer at http://localhost:280/. Refer to Chapter 10. Using the Graphical User Interface for details.
Note:
The HP Systems Insight Manager First Time Wizard appears the first time a user withfull configuration rights logs into HP Systems Insight Manager. The First Time Wizardconfigures only the basic settings of an initial setup for HP Systems Insight Manager.There are other options available, refer to the HP Systems Insight Manager TechnicalReference Guide athttp://h18013.www1.hp.com/products/servers/management/hpsim/infolibrary.htmlfor more information.
61
Installing on Linux
Chapter 6. Upgrading fromCompaq Insight Manager ServicePack 2.3 to HP Systems InsightManager 4.2
Note:
In order to upgrade from Compaq Insight Manager Service Pack 2.3 to HP SystemsInsight Manager 5.0, Compaq Insight Manager Service Pack 2.3 must be upgradedto HP Systems Insight Manager 4.2 first. After this initial upgrade, follow theprocedure to upgrade HP SIM 4.2 to 5.0. Refer to Chapter 7. Upgrading HPSystems Insight Manager 4.0, 4.0.1, 4.1 and 4.2 to HP Systems Insight Manager5.0 for more information.
The HP Systems Insight Manager Data Migration Tool is used to migrate Insight Manager 7 datato HP Systems Insight Manager. The Data Migration Tool exports user-defined data from InsightManager 7 by extracting it and storing the information in a portable format. The Data MigrationTool then imports that user-defined Insight Manager 7 data into HP Systems Insight Manager. Themigration process transfers custom data, which includes:
● User accounts and privileges
● User access control settings
● User-defined folders, tasks and queries
● Discovered devices
● User-defined reports
● Device Type Manager rules
● Server certificate (for an in-place migration only)
● User-defined MIB and notice data (this must be manually recompiled)
In addition, the following data is archived:
● Received events/notices
Note:
You must be running Compaq Insight Manager Service Pack 2.3 to upgrade to HPSystems Insight Manager 4.2. If you are running a version of Insight Manager 7earlier than Insight Manager Service Pack 2.3, upgrade to Insight Manager ServicePack 2.3 before upgrading to HP SIM 4.2. If you have Insight Manager Service
62
Pack 2, 2.1, or 2.2 installed, the migration process offers an automatic upgrade toInsight Manager Service Pack 2.3. If you have a version earlier than Service Pack2, you are directed to the HP website to download the Softpaq that will enable youto upgrade to Insight Manager Service Pack 2.3. Refer to the Compaq InsightManager 7 User's Guide for information on upgrading from Insight Manager 7 toInsight Manager Service Pack 2.3. Refer to the Transitioning to HP Systems InsightManager white paper athttp://h18013.www1.hp.com/products/servers/management/hpsim/infolibrary.htmlfor more in-depth detail on this process.
Your system must also meet the operating system and SQL/MSDE requirements listedin Chapter 2. Installation Overview and Requirements .
Note:
The Data Migration Tool must be run by a user with full Windows administrativerights.
Note:
The HP Performance Management Pack was part of the Insight Manager ServicePack 2.3 installation. If it is detected on your system, a migration utility for transferringdata specific to it will also be launched.
Types of MigrationThere are two types of migration:
● In-place
● Remote
In-place migration. This type of migration enables you to install HP Systems Insight Manager,and optionally, the HP Performance Management Pack on the same server that previously ranInsight Manager 7. As part of the in-place migration process, Insight Manager 7 is disabled andcan only be re-enabled by uninstalling HP Systems Insight Manager and manually re-enablingInsight Manager 7. In-place migration preserves user-defined data including the Insight Manager7 server certificate.
Remote migration. This type of migration enables you to install HP Systems Insight Manageron a different server than Insight Manager 7. The remote migration process leaves Insight Manager7 running after data has been exported and requires you to import the Insight Manager 7 andPerformance Management Pack migration data files to your new HP Systems Insight Managerserver. Remote migration preserves user-defined data except the Insight Manager 7 Server certificate.
63
Upgrading from Compaq Insight Manager Service Pack 2.3 to HP Systems Insight Manager4.2

Performing an In-Place Migration1. Export Performance Management Pack and Insight Manager 7 data:
a. Upgrade from Insight Manager Service Pack 2.3 to HP Systems Insight Manager 4.2through the HP 7.2 Management CD or by downloading the HP Systems Insight Manager4.2 software. To download the software, go to http://www.hp.com/go/hpsim, andselect Download.
b. Begin the migration process by launching setup.exe from the download package orfrom the Management CD. Select Products->HP Systems Insight Manager ->Installon the Insight Manager 7 server. The HP Systems Insight Manager Welcome screenappears. The Welcome screen displays links to the following documentation:
● Readme (readme.txt)
● Release Notes (hpsim-releaseNote.pdf)
● User Guide (hpsim-userGuide.pdf)
A background set up screen will be displayed showing that Pre-Installation is “In Progress.”If the Performance Management Pack that was installed with Insight Manager 7 is detectedon your system, the Performance Management Pack Migration Utility for data export islaunched. Follow the screen prompts to completion before continuing with the InsightManager 7 data export.
c. On completion of the data export for the Performance Management Pack, set up detectsthat you are running Insight Manager 7 Service Pack 2.3, or later and automaticallylaunches the HP Systems Insight Manager Data Migration Tool. The Data Migration Tooldialog screen appears. Click Next to continue.
d. Select Next to confirm data export to the following directory and file: C:\ProgramFiles\HP\Systems Insight Manager Data MigrationTool\user-data.dmt. Export of data begins.
e. When the export of data successfully completes, click Next.
f. Select the In-place migration (disable Insight Manager 7) radio button.
g. Click Next. The HP Systems Insight Manager Data Migration Tool export success screenappears and indicates that Insight Manager 7 has been disabled.
h. Click Finish to continue with the installation of the HP Systems Insight Managercomponents. Refer to the Chapter 3. Installing on Windows for details. The backgroundset up screen will show that Pre-Installation is “Done” and the Installation is now “InProgress.”
2. After installing HP Systems Insight Manager and its related components on the Insight Manager7 server and clicking Finish, the background setup screen will show that Installation is “Done”and the Post-Installation is now “In Progress.” Import of Insight Manager 7 and PerformanceManagement Pack data has automatically begun:
a. After all the HP Systems Insight Manager components have been installed, the InsightManager 7 Data Migration Tool dialog screen automatically appears. Click Next. A data
64
Upgrading from Compaq Insight Manager Service Pack 2.3 to HP Systems Insight Manager4.2
import screen appears showing that the data will be imported from the following directoryand file: C:\Program Files\HP\Systems Insight Manager Data MigrationTool\user-data.dmt.
b. Click Next to start the Data Import. The process might take more than an hour dependingon the amount of user-defined data and the configuration of the HP Systems InsightManager. A status window shows the progress.
c. When data import completes, click Next. A pop-up message appears stating that the usermust log into HP Systems Insight Manager to complete the migration process by verifyinguser accounts, assigning authorizations, and enabling tasks and Automatic Event Handlingrules.
d. Click OK.
e. At the data import success screen, click Finish.
3. If the Performance Management Pack was upgraded, then the Performance Management PackMigration Utility for data import is automatically launched. Follow the screens to completion.The background set up screen will show the Post-Installation is “Done.”
4. Click Finish on the background set up screen and reboot the system at this time if any HPSystems Insight Manager components indicated the need for this.
Note:
For an in-place migration the Compaq DMI Indication handler service shouldbe disabled on the CMS.
Performing a Remote Migration1. Export Performance Management Pack and Insight Manager 7 data:
a. Acquire HP Systems Insight Manager 4.2 by either downloading the HP Systems InsightManager software from http://www.hp.com/go/hpsim, and select Download or fromthe HP 7.20 Management CD.
b. Start the migration process by launching setup.exe from the download package orfrom the Management CD, select Products->HP Systems Insight Manager->Install.
The HP Systems Insight Manager Welcome screen appears. The Welcome screen displayslinks to the following documentation:
● Readme (readme.txt)
● Release Notes (hpsim-releaseNote.pdf)
● User Guide (hpsim-userGuide.pdf)
65
Upgrading from Compaq Insight Manager Service Pack 2.3 to HP Systems Insight Manager4.2
c. A background set up screen appears showing that Pre-Installation is “In Progress.” If thePerformance Management Pack that was installed with Insight Manager 7 is detected onyour system, the Performance Management Pack Migration Utility for data export islaunched. Follow the screen prompts to completion before continuing with the InsightManager 7 data export
d. On completion of the data export for the Performance Management Pack, set up detectsthat you are running Insight Manager 7 Service Pack 2.3, or later and automaticallylaunches the HP Systems Insight Manager Data Migration Tool. The Data Migration Tooldialog screen appears
Note:
If Insight Manager 7 Service Pack 2, 2.1 or 2.2 is detected, theHP Systems Insight Manager Data Migration Tool displays an optionto upgrade to Insight Manager Service Pack 2.3. Select this optionand follow the screen prompts to install the Softpaq. Whencomplete, launch setup.exe again from the download packageor from the Management CD, select Products->HP SystemsInsight Manager->Install again to start the export of InsightManager 7 data.
e. Click Next to continue.
f. Click Next to confirm data export to the following file: C:\ProgramFiles\HP\Systems Insight Manager Data MigrationTool\user-data.dmt. Export of data begins.
g. When the export of data successfully completes, click Next.
h. Select the Remote migration (do not disable Insight Manager 7) radio button.
i. Click Next. HP Systems Insight Manager Data Migration Tool export success screenappears and instructs the user to copy the export file to the server where HP SystemsInsight Manager will be installed.
j. Click Finish to exit the Data Migration Tool. The background process will showPre-Installation is “Done” and Installation is “In Progress”
k. Cancel out of the Welcome screen for the HP Systems Insight Manager install. Thebackground set up will show that both Installation and Post-Installation are “Not Done”
l. Click Finish on the background set up screen to close it out.
m. Copy the file C:\Program Files\HP\Systems Insight Manager DataMigration Tool\user-data.dmt to a location where it can be accessed from thenew HP Systems Insight Manager 4.2 server.
n. Copy the file PMP DMT installation directory\data\pmp.jar to a locationwhere it can be accessed from the new HP Systems Insight Manager 4.2 server. ThePerformance Management Pack Data Migration Tool installation directory is usuallyc:\Program Files\HP\Performance Management Pack Data MigrationTool.
66
Upgrading from Compaq Insight Manager Service Pack 2.3 to HP Systems Insight Manager4.2

o. Go to the server to be used for the new HP Systems Insight Manager, and launchsetup.exe from the download package or from the Management CD. SelectProducts->HP Systems Insight Manager->Install to start the HP Systems InsightManager components installation. The background set up screen will show Pre-Installationis “Not Done” and Installation is now “In Progress:”
p. Click Install on the HP Systems Insight Manager welcome screen to begin the installationof HP Systems Insight Manager components. Refer to Chapter 3. Installing on Windows for details.
q. Click Finish when the installation is complete to close the HP Systems Insight ManagerInstaller window. The background set up screen will show Installation is “Done” andPost-Installation is “Not Done.”
r. Click Finish on the background set up screen to close it out.
2. Import Insight Manager 7 and Performance Management Pack data:
a. After HP Systems Insight Manager 4.2 and all its components have been installed, launchdmtshell.exe from the download package or from the Management CD on HP SystemsInsight Manager 4.2 server. The background set up screen will NOT display. The InsightManager 7 Data Migration Tool dialog screen automatically appears.
b. Click Next.
c. Specify the location of the user-data.dmt file as noted during the export process whenprompted.
d. Click OK to dismiss the prompt.
e. Click Open when the export file is located.
f. Click Next. Insight Manager 7 Data Import starts. The process might take more than anhour depending upon the amount of user-defined data and the configuration of the HPSystems Insight Manager. A status bar shows the progress.
g. Click OK.
h. Click Finish.
3. If a migration file for the Performance Management Pack was created, launch pmpdmt.exeto import the Performance Management Pack data. Follow the screens to completion, pointingto the location of the pmp.jar file as noted during the export process.
4. If the Performance Management Pack 2.1 server licenses/logged data is migrated and afterHP Performance Management Pack 3.0 is installed, launch pmpshell.exe to importPerformance Management Pack 2.1 server licenses/logged data. Follow the screens tocompletion, pointing to the PMP data file (pmp.jar) as noted during the export process.
5. Reboot the system at this time if any HP Systems Insight Manager components indicated theneed for this.
67
Upgrading from Compaq Insight Manager Service Pack 2.3 to HP Systems Insight Manager4.2
Chapter 7. Upgrading HP SystemsInsight Manager 4.0, 4.0.1, 4.1 and4.2 to HP Systems Insight Manager5.0
This chapter provides the steps to upgrade HP Systems Insight Manager 4.0, 4.1 and 4.2 onWindows and HP-UX and HP Systems Insight Manager 4.0.1, 4.1, and 4.2 on Linux systems toHP Systems Insight Manager 5.0.
Note:
The "\" at the end of each command line represents that the rest of the commandis on the next line.
Note:
If you have MSDE installed on a previous version of HP Systems Insight Managerand are using MSDE and are upgrading to HP Systems Insight Manager 5.0. HPSIM 5.0 requires that MSDE have the TCP/IP protocol enabled. Therefore, you mustenable the TCP/IP protocol when upgrading from HP Systems Insight Manager 4.xto 5.0.
● Select Start>Run and enter svrnetcn.ext
● In the Disabled Protocols box, select TCP/IP
● Click Enable
● Click OK
Note:
HP Systems Insight Manager does not support upgrading to an Oracle database.Oracle is only supported on a fresh install of HP Systems Insight Manager.
68
Upgrading HP Systems Insight Manager 4.0,4.1, or 4.2 to HP Systems Insight Manager5.0 on Windows
1. Verify that HP Systems Insight Manager 4.0, 4.1, or 4.2 is running on the system.
2. To download the software, refer to http://www.hp.com/go/hpsim, and on the upper-left ofthe screen under HP management software, select Download. The HP Systems Insight ManagerDownload Page appears. Under HP Systems Insight Manager and related componentsselect HP SIM-Windows, then Download latest version of HP SIM - Windows for a fullproduct install.
Or
If you are using the Management CD, place the CD in the CD-ROM drive. The CD has anautorun feature that launches a license agreement. Accept the license agreement, and selectthe Products tab. Click Install on the HP Systems Insight Manager page. Then select Installbeside the HP Systems Insight Manager (Windows) listing to launch the Installer.
3. Run setup.exe to launch the HP Systems Insight Manager Installer. The HP SystemsInsight ManagerSetup screen appears. The Setup screen displays links to the followingdocumentation:
● Readme (readme.txt)
● Release Notes (hpsim-releaseNote.pdf)
● User Guide (hpsim-userGuide.pdf)
4. Click Install to start the install process. The HP Systems Insight Manager setup "installationstatus" window appears with the following three stages:
● Pre-installation. Examines this system for previous versions of Insight Manager 7and runs data export tools as needed.
● Installation. Installs HP Systems Insight Manager and other HP management softwareproducts.
● Post-installation. Completes the import of ProLiant Essentials PerformanceManagement Pack (PMP) data when necessary. Click Finish to close the setup windowand return to the desktop.
5. From the HP Systems Insight Manager Installer window, click Install to launch the installprocess.
● Custom installation of HP Systems Insight Manager enables you to choose the componentsto be installed and enables you to change one or more of the following settings for thecomponents:
❍ SQL Server 2000❍ Installation Drive
69
Upgrading HP Systems Insight Manager 4.0, 4.0.1, 4.1 and 4.2 to HP Systems InsightManager 5.0

❍ Installation directory❍ Program group
Note: If you chose not to install a component during the initial installation of HP SystemsInsight Manager, you can re-run setup.exe and at that time select the additional componentsthat are to be installed. You may use the Custom installation to chose the components that youwant installed.
Custom InstallationTypical InstallationInstallation ComponentsXXSystem Management Homepage
OptionalXOpenSSH for windows 3.7.1p1-1
OptionalXWMI Mapper
XXHP Systems Insight Manager
OptionalXHP Performance Management Pack
OptionalXHP Version Control Repository Manager
OptionalXVirtual Machine Management Pack
OptionalXHP Server Migration Pack
OptionalXHP Systems Insight Manager InstallationInformation
Note: If a component is not listed as being available for installation on the CMS, then theHP Systems Insight Manager install shell has determined one of the following:
● The installation prerequisites for the component have not been met.
● The component is currently installed.
If the component that is present on the CMS is an older version than what is bundled with theHP Systems Insight Manager install shell and it supports an in-place upgrade, it will appearin the component list.
Note: SSH Server and Version Control Repository Manager components will not be listed ifthey were installed in version 4.0.
Note: If you choose not to install or upgrade a component during the upgrade of HP SystemsInsight Manager, you can re-run the setup.exe and at that time select the components that areto be installed or upgraded.
6. Click Typical to install the components listed under the Available Components for Installwith minimal user interaction or click Custom to select or deselect the optional componentsyou want to install.
7. If Typical is selected, the Typical Install - Service Account Credentials screen appears.The Domain and Username fields will default to the installing account credentials and thesecannot be edited. Enter the Password for this account. Click Next.
70
Upgrading HP Systems Insight Manager 4.0, 4.0.1, 4.1 and 4.2 to HP Systems InsightManager 5.0
Note:
For a Typical install, the HP SIM Service account will be the installingaccount. This user account will be used to run the HP Systems InsightManager service.
8. The Typical Install - Database Configuration screen appears. Enter the Account Credentialsfor the database server. The installing user account will be pre-populated in the 'Username'field and this cannot be edited. The 'Host' field will pre-populate with the local host name butthis can be edited. If using a local SQL Server or MSDE provide the password for the installinguser and click Next to proceed. Typical install requires the installing user account to exist onthe remote Database server. If your database is not local then you must supply the DatabaseServer name and the password. Click Next.
Note: In case of a reboot, if you just installed MSDE, the administrative credentials are thoseyou used to log in before installing MSDE. Windows authentication is required to connect tothe SQL server (whether locally or remotely). In addition, these credentials will also be yourHP Systems Insight Manager administrative user login credentials. Any account that is a memberof the administrator group will have administrator rights to MSDE. The local security policywill be modified to give you the following rights: log on as a service, create a token object,and replace a process level token. In addition, for Windows XP SP2, Windows 2003 SP1 orlater, Component Object Model (COM) security will be updated to allow remote access andactivation by everyone and anonymous users. See the HP Systems Insight Manager 5.0README for more details.
Note: A "Typical" install of HP Systems Insight Manager does not support the Oracle database.
9. The Typical Install-Software Selection screen appears. This screen displays the completelist of the available components with a checkbox next to each one. If the checkbox is disabledand has a check, the component is deemed a mandatory component and cannot be deselected.All the components that are under the Typical Install column of the Select Installation Typescreen should have disabled checkboxes. The amount of required disk space is also listed foreach component. Clicking the Back button will return the user to the Typical Install-DatabaseConfiguration screen. Clicking the Next button will do a disk space check for the selectedcomponents, and if enough exists, will display the Typical Install – Summary screen. TheCancel button asks for confirmation of exiting the installation.
10. On theTypical Install - Summary screen, select Install to initiate the installation process.This process installs all the products listed in the Selected Components table.
11. The Typical Install - Status screen appears. Click Finished after installation is complete.Typical Installation is complete.
Note: During the Custom Install process, do not select the reboot now option if a componentrequests this. Reboot only after all components have been installed.
For the Custom install, you choose the components to install, starting with #12. Custom Installwill launch the components interactively.
12. Installing HP System Management Homepage for an In-Place custom install:
71
Upgrading HP Systems Insight Manager 4.0, 4.0.1, 4.1 and 4.2 to HP Systems InsightManager 5.0

Note:
For more information regarding where the System Management Homepagedefault settings are stored during a Typical installation and how to changethem, refer to the System Management Homepage Installation Guide athttp://h18013.www1.hp.com/products/servers/management/agents/documentation.html
a. Click Next. The OS Groups dialog box appears.
b. Select Administrator, Operator, or User from the Operating Systems Group Namefield.
c. Enter the group name of an operating systems group in the Group Name field. ClickAdd. The group name is added. A maximum of five entries can be added for each grouplevel. Click Next to continue or Back to return to the previous page.
Note: To delete a group name, select the group name and click Delete.
d. The User Access dialog box appears. The User Access dialog box enables you toconfigure the System Management Homepage from the following access types:
● Select Anonymous Access to enable anonymous access to unsecured pages.
● Select Local Access Anonymous or Local Access Administrator to set up theSystem Management Homepage to automatically grant local IP addresses at theselected access level.
Caution: Selecting Local Access with Administrator privileges provides any userswith access to the local console full access without prompting them for a user nameor password.
e. Click Next. The Trust Mode dialog box appears.
f. Select the level of security you want to provide from one of the following trust modes:
● Trust By Certificate
i. Click Next. The Trusted Certificates dialog box appears. The TrustedCertificates dialog box allows trusted certificate files to be added to the TrustedCertificate List.
ii. Click Add File to browse and select any certificates to be included in the TrustedCertificate List. The Add File dialog box appears. If an invalid file name isentered in the file name field, an error message appears, indicating the file doesnot exist. Click OK to select another file, or click Cancel to close the dialog box.The Trusted Certificate List appears. Click Next.
Note: If you click Next without adding any certificates to the list, and nocertificates exist from a previous installation, a message appears indicating thatif you do not specify any trusted certificates, HP Systems Insight Manager cannotaccess the HP Insight Management Agent on this system. Click OK if you do notwant HP Systems Insight Manager to access the Insight Management Agent on
72
Upgrading HP Systems Insight Manager 4.0, 4.0.1, 4.1 and 4.2 to HP Systems InsightManager 5.0
this system, or click Cancel to close the dialog box and add the trusted certificatesto the list.
Note: The Trust By Certificates option enables the System ManagementHomepage system and the HP Systems Insight Manager system to establish a trustrelationship by means of certificates. This mode is the strongest method of securitybecause it requires certificate data and verifies the digital signature beforeenabling access.
iii. The IP Binding dialog box appears.
or
i. Click Import. The Import Server Certificate dialog box appears.
ii. Enter the name or IP address of the server whose certificate you want to import.
iii. Click Get Cert. The certificate information appears.
iv. Verify the certificate information. If you want to add this certificate to the TrustedCertificate List, click Accept and the certificate is added to the TrustedCertificate List, or click Cancel if you do not want to add it to the TrustedCertificate List. The Trusted Certificate List appears. Click Next.
Note: You can add an unlimited number of trusted certificates.
v. The IP Binding dialog box appears. Click Back to return to the Trust Modedialog box.
Note: To delete a certificate, select the certificate and click Delete. The selectedcertificate is removed.
● Trust By Name
i. Select Trust By Name.
ii. Click Next. The Trusted Server dialog box appears.
Note: Although the Trust By Name mode is a slightly stronger method of securitythan the Trust All mode, it still leaves your system vulnerable to security attacks.The Trust By Name mode sets up the System Management Homepage to onlyaccept certain requests from servers with the HP Systems Insight Manager namesdesignated in the Trust By Name field. The Trust By Name option is easy toconfigure and can prevent non-malicious access. For example, you might wantto use the Trust By Name option if you have a secure network, but your networkhas two groups of administrators in two separate divisions. The Trust By Nameoption would prevent one group from installing software to the wrong system.This option does not verify anything other than the HP Systems Insight Managerserver name submitted.
iii. Enter the names of the servers you want to trust.
Note: The server name cannot contain the following characters:
~ ! ` @ # $ % ^ & * ( ) + = " : ' < > ? , | ;
73
Upgrading HP Systems Insight Manager 4.0, 4.0.1, 4.1 and 4.2 to HP Systems InsightManager 5.0

iv. Click Add to add the name of a server you want to trust. Click Next.
v. The IP Binding dialog box appears.
Note: If you click Next without adding any server names to the list, an errormessage appears, indicating that if you do not specify any trusted server names,HP Systems Insight Manager cannot access the Insight Management Agent onthis system. Click OK to proceed without trusting any systems, or click Cancel toclose the dialog box and add server names to the list.
Note: To delete a certificate, select the certificate and click Delete. The selectedcertificate is removed.
● Trust All
i. Select Trust All. Click Next.
ii. The IP Binding dialog box appears.
Note: The Trust All option leaves your system vulnerable to security attacks andsets up the System Management Homepage to accept certain requests from anyserver. For example, you might want to use Trust All if you have a secure network,and everyone in the network is trusted.
g. Select IP Binding to enable the Subnet IP Address and NetMask.
The IP Binding dialog box enables you to bind to specific IP addresses that match aspecific Subnet IP Address or NetMask. It restricts the subnet you want to manage.
i. Enter the Subnet IP Address in the designated field.
ii. Enter the NetMask in the designated field.
iii. Click Add to add the Subnet IP Address/NetMask into the dialog box. Select aSubnet IP Address/NetMask, and click Delete to remove it from the dialog box.Click Next.
Note: You can add up to five Subnet IP Address/NetMask pairs.
Note: If you click IP Binding but do not specify the IP Address/NetMask then youmight not be able to connect to the System Management Homepage.
h. The IP Restricted Logins dialog box appears. The IP Restricted Logins dialog boxenables you to select specific IP addresses or IP address ranges to include or excludefrom gaining login access. Although optional, the System Management Homepage canrestrict login access based on the IP addresses of the machine attempting to gain access.
i. Select Enable IP Restricted Logins, and click Next. The IP Addresses to Includedialog box appears. This dialog box enables you to specify the IP address or IP addressranges to grant login access permission. If there are IP addresses in the Inclusion list,then only those IP addresses are enabled for login privileges. If there are no IP addressesin the Inclusion list, then login privileges are permitted to all IP addresses that are not inthe Exclusion list.
74
Upgrading HP Systems Insight Manager 4.0, 4.0.1, 4.1 and 4.2 to HP Systems InsightManager 5.0

Note: A single address and ranges of addresses can be accepted in the IP RestrictedLogins dialog box. Enter the single address in the first box.
i. In the Include field, enter a beginning IP address to which you want to grant loginaccess.
ii. In the To field, enter an ending IP address to which you want to grant login access.All IP address that fall between the beginning and ending IP addresses are grantedlogin access.
iii. Click Add. The IP address or IP address range is added to the Exclusion list. Selectan IP address or IP address range, and click Delete to remove it from the Exclusionlist. Click Next.
Note: If you entered an invalid IP address or IP address range, an error messageappears indicating the IP address is invalid. Click OK. Enter a valid IP address or IPaddress range, and click Add again.
j. The IP Addresses to Exclude dialog box appears.
i. In the Exclude field, enter a beginning IP address to which you want to deny loginaccess.
ii. In theTo field, enter an ending IP address to which you want to deny login access.All IP addresses that fall between the beginning and ending IP addresses are deniedlogin access.
iii. Click Add. The IP address or IP address range is added to the Inclusion list. Selectan IP address or IP address range, and click Delete to remove it from the Inclusionlist. Click Next.
Note: If you entered an invalid IP address or IP address range, an error messageappears, indicating the IP address is invalid. Click OK. Enter a valid IP address orIP address range, and click Add again.
Note: If Next is selected without adding any IP addresses to either theInclude orExclude lists, a warning message appears stating, IP Restricted Logincheckbox will be marked as disabled. Do you want to proceedwithout adding any IP Address restrictions? If you select OK, the IPRestricted Login option on the IP Restricted Login dialog box is deselected, andthe Install Preview dialog box appears.
k. The Summary Panel appears. The Summary Panel lists the location where the SystemManagement Homepage is installed, the amount of space the installation requires, andthe summary of the options that you specified during the installation. Click Next.
l. The installation process is started.
Note: During the installation of the System Management Homepage, Cancel is disabled.If you click the X in the upper-right corner of the box, an error message appears, statingthe current operation cannot be canceled.Click Finish to complete the installation.
75
Upgrading HP Systems Insight Manager 4.0, 4.0.1, 4.1 and 4.2 to HP Systems InsightManager 5.0

Note: If HP Systems Insight Manager is installed after System Management Homepageis installed, the System Management Homepage 2048-bit key pair will be replaced withthe HP Systems Insight Manager1024-bit key pair.
13. Installing OpenSSH for a custom install:
a. Click Next on the OpenSSH Services for the HP Systems Insight Manager SetupWizard welcome screen.
b. Select the destination location using the Browse button. Then click OK to continue. ClickNext.
c. The OpenSSH Service Log On As User screen appears. Enter your account password.The username and domain fields are pre-populated. Although the "username" and"domain" fields are pre-populated, you are allowed to change these values to specifyany user you choose. However, the account credentials you do choose must have localadministrator rights (be a member of the local "Administrators" group). Click Next.
Note:
The OpenSSH Service Log On As User screen will only appearif installing on a Windows XP or Windows 2003 system. If youare installing on a Windows 2000 system the OpenSSH Servicewill run as 'localsystem' and will not ask for credentials.
d. The Ready to Install screen appears. Click Install to continue with the installation, orclick Back to make changes.
e. After installing OpenSSH, if prompted, click No, I will restart the computer later.
f. Click Finish.
Note:
The local security policy will be modified to give you the followingrights: log on as a service, create a token object, and replace aprocess level token. See the HP Systems Insight Manager 5.0README for more details.
14. Installing WMI Mapper for a custom install:
a. Click Next on the Welcome to the Pegasus WMI Mapper v2.1 Setup Wizard screen.
b. The End-User License Agreement screen appears. Click I accept the terms in theLicense Agreement. Click Next.
c. The Choose Setup Type screen appears. Choose the setup type. (Basic requirement forHP Systems Insight Manager is Typical installation. If you choose typical omit step d.)
76
Upgrading HP Systems Insight Manager 4.0, 4.0.1, 4.1 and 4.2 to HP Systems InsightManager 5.0
d. Select the destination location using the Browse button. Click OK. Click Next.
e. The Ready to Install screen appears. Click Install to continue with the installation, orclick Back to make changes.
f. Click Finish.
Note:
For Windows XP SP2, Windows 2003 SP1 or later, COM securitywill be updated to allow remote access and activation by everyoneand anonymous users. See the HP Systems Insight Manager 5.0README for more details.
15. Installing HP Systems Insight Manager for a custom install:
a. Click Next on the HP Systems Insight Manager welcome screen.
b. The Service Account Credentials screen appears, with User name, Password andDomain fields. The fields are pre-populated with the installing account credentials but canbe edited if needed. Provide a valid password and proceed or provide different accountdetails. This account should have administrative privileges. Click Next.
Note:
This user account will be used to run the HP Systems InsightManager service.
c. The Database Configuration screen appears. Specify Oracle or SQL Server as yourDatabase Server. Enter the requested information appropriately. Defaults are providedwhere possible.
Note: Microsoft SQL Server Desktop Engine (MSDE) is selected by default.
For Oracle:
The Oracle database must be created prior to installing HP Systems Insight Manager. AnOracle user with DBA privileges must be created in this database for the exclusive useby HP Systems Insight Manager. The thin client jar file (ojdbc14.jar) must be copied onto the system and its location must be specified during installation.
For SQL Server 2000:
If your database is local, then the Database Server name , Username, Domain andport (default is 1433) fields are pre-populated and can be changed if necessary. Providethe valid password and click Next to proceed. If your database is not local you mustsupply the name of the remote Database Server and valid values for the Domain, portand user credentials, if different from what is already populated. HP Systems InsightManager creates a database name with the format “Insight_V50_0_xxxxxxxxx
77
Upgrading HP Systems Insight Manager 4.0, 4.0.1, 4.1 and 4.2 to HP Systems InsightManager 5.0

(timestamp).” For example, “Insight_V50_0_172541227.” It then updates thedatabase.props file which can be found in C:\Program Files\HP\SystemsInsightManager\Config.
d. Click Next. The Select Destination screen appears. Select the destination location usingthe Browse button. Click OK, then click Next.
e. The Select Start Menu Folder appears. Select or enter a different folder name usingBrowse. Click Ok, then click Next.
f. The Ready to Install screen appears. Click Install to install HP Systems Insight Manager,the Install Progress screen appears, or click Back to make any changes.
g. Click Finish when the installation is complete to close the HP Systems Insight ManagerInstaller window.
16. Installing the ProLiant Essentials Performance Management Pack (PMP) for a custom install:
Note: During the installation of the ProLiant Essentials Performance Management Pack, thefollowing warning is displayed: "As part of HP Performance Management Packinstallation the HP Systems Insight Manager service must be stoppedand restarted". Click OK to stop the service and continue with the PMP installation. TheWelcome to the Performance Management Pack Setup Wizard screen appears. Or clickCancel to abort the installation.
a. Click Next. The Database configuration screen appears.
b. Enter your account password. Click Next.
c. Installation begins. Click Finish to exit the ProLiant Essentials Performance ManagementPack setup.
Note:
ProLiant Essentials Performance Management Pack (PMP) does not supporta remote MSDE database.
17. Installing HP Version Control Repository Manager for a custom install:
a. The HP Version Control Repository Manager setup screen appears.
b. Click Install.
c. Select the directory from which HP Version Control Repository Manager will retrievesupport pack information using the Browse button. This directory must be manuallycreated later if it does not exist. Click OK. Click Next.
d. Select the Enable Automatic Update checkbox to enable automatic downloading ofProLiant Support Packs and components at a specified interval and time.
78
Upgrading HP Systems Insight Manager 4.0, 4.0.1, 4.1 and 4.2 to HP Systems InsightManager 5.0

e. Click Finish. Installation of HP Version Control Repository Manager proceeds andcompletes. Click Close.
18. Installing Virtual Machine Management Pack for a custom install:
Note: During the installation of the HP ProLiant Essentials Virtual Machine Management Pack,this warning appears: "As part of Virtual Machine Management Pack installation the HPSystems Insight Manager service must be stopped and restarted". Click OK to stop the serviceand continue with the Virtual Machine Management Pack installation, or click Cancel to abortthe installation. If you clicked OK the Virtual Machine Management Pack Welcome screenappears.
a. Click Next. The Database configuration screen appears.
b. Enter your account password.
c. Click Next. Installation begins.
d. Click Finish to exit Virtual Machine Management Pack setup.
Note:
Virtual Machine Management Pack does not support an Oracleinstall.
19. Installing HP Server Migration Pack for a custom install:
Note: During the installation of the HP Server Migration Pack, this warning appears: "As partof HP Server Migration Pack installation the HP Systems Insight Manager service must bestopped and restarted". Click OK to stop the service and continue with the HP Server MigrationPack installation, or click Cancel to abort the installation. If you clicked OK the HP ServerMigration Pack Welcome screen appears.
a. Click Next. The Setup HP Server Migration Pack screen appears.
b. Click Finish to exit HP Server Migration Pack setup.
20. Click Finish to complete the component installation that you selected.
Note: Click Finish in the Initial Setup HP Systems Insight Manager window, to complete theinstallation.
21. If any of the components indicated that a reboot is necessary, reboot your system.
22. After upgrading to HP Systems Insight Manager 5.0 you must sign into HP Systems InsightManager and run the Daily Device Identification task to ensure that all your associations areupdated correctly.
To run the daily Identification task:
79
Upgrading HP Systems Insight Manager 4.0, 4.0.1, 4.1 and 4.2 to HP Systems InsightManager 5.0
a. Select Tasks & Logs > View All Scheduled Tasks. The All Scheduled Tasks pageappears.
b. Select the Daily Device Identification task.
c. Click Run Now.
Upgrading HP Systems Insight Manager 4.0,4.1 or 4.2 to HP Systems Insight Manager5.0 on HP-UX
This procedure verifies that your system meets the minimum requirements and prepares your systemfor installation.
To verify and prepare your system:
1. Verify your system meets the minimum requirements.
2. Install the latest required and recommended HP-UX 11i patches.
Verify your system meets the minimum requirements. Refer tohttp://www.hp.com/products1/unix/java/patches/index.html for details.
Note: If you are running the 2002 release of HP-UX 11.11, apply the required and recommendpatches to save time during the upgrade process. If you do not apply the patches you couldsee extended upgrade times of 2 hours before you are able to log into the system after anupgrade. If initconfig.log shows 100% completion and you cannot browse into HP SIM onport 280, then stop and start the HP SIM service by running mxstop and mxstart respectively
3. Download the software, or locate a copy of the software on a depot server.
To download the software, refer to http://www.hp.com/go/hpsim, and select Downloadunder HP management software on the upper-left of the screen. The HP Systems Insight ManagerDownload Page appears. Under HP Systems Insight Manager and related componentsselect HP SIM-HP-UX, then Download latest version of HP SIM-HP-UX for a full productinstall.
4. When installing HP Systems Insight Manager Java-out-of-box (JAVAOOB) is required and willbe automatically selected for installation. For additional information, refer tohttp://www.hp.com/products1/unix/java/java2/outofbox/index.html. The kernel parametervalues it adjusts are listed in the following table.
Java Out-of-Box Settings
=3000max_thread_proc
=2063835136maxdsiz
=2048maxfiles
=2048maxfiles_lim
=512maxusers
80
Upgrading HP Systems Insight Manager 4.0, 4.0.1, 4.1 and 4.2 to HP Systems InsightManager 5.0
=4097nfile
=6000nkthread
=2048nproc
=2048tcp_conn_request_max
Additionally, HP Systems Insight Manager will adjust the following kernel parameters:
=30000nfile
=2048semmns
=1024semmni
When you install HP Systems Insight Manager, the following software dependencies arerequired: hpSysMgmtDB, JAVAOOB, AND SSH, (HP-UX Secure Shell). If you would like HPSystems Insight Manager to manage your Central Management Server (CMS) you must installWBEM, if it is not already installed. If you downloaded your software from the Web, thesedependency packages are included in the depot file. The installation procedure will bedescribed using this depot.
5. Install HP Systems Insight Manager:
swinstall -s /directory/depot –x autoreboot=true HPSIM-HP-UX
where directory is the path to the depot file and depot is the name of the depot file. Forexample:
swinstall -s /tmp/HPSIM_download.depot -x autoreboot=true HPSIM-HP-UX
6. After upgrading to HP Systems Insight Manager 5.0 you must sign into HP Systems InsightManager and run the Daily Device Identification task to ensure that all your associations areupdated correctly.
To run the daily Identification task:
a. Select Tasks & Logs > View All Scheduled Tasks. The All Scheduled Tasks pageappears.
b. Select the Daily Device Identification task.
c. Click Run Now.
7. (Optional) If you plan to run the Mozilla browser on the Central Management Server (CMS)verify that Mozilla 1.7.3 or later is installed. To verify which version is installed, open theMozilla browser and select Help> About Mozilla.To browse to HP SIM start the HP SystemsInsight Manager graphical user interface (GUI) using Internet Explorer or Mozilla athttp://localhost:280/.
Note:
The HP Systems Insight Manager First Time Wizard appears the first timea user with full configuration rights logs into HP Systems Insight Manager.The First Time Wizard configures only the basic settings. There are other
81
Upgrading HP Systems Insight Manager 4.0, 4.0.1, 4.1 and 4.2 to HP Systems InsightManager 5.0
options available, refer to the HP Systems Insight Manager TechnicalReference Guide athttp://h18013.www1.hp.com/products/servers/management/hpsim/infolibrary.htmlfor more information.
Next Steps. Install and configure the required management agents on the systems that willbe managed by the (CMS). Refer to Chapter 12. Initial Setup for details. Next, complete theinitial setup of HP Systems Insight Manager. Initial setup involves adding managed systems, addingusers, setting up authorizations, and configuring event handling. Refer to Chapter 12. InitialSetup for details.
Note:
Serviceguard integration has changed with HP Systems Insight Manager 5.0. If youhave updated from HP SIM 4.2 with Serviceguard Manager 4.02, you can stilllaunch Serviceguard Manager after selecting a cluster member from the Tools >Integrated Consoles menu. However, after you update to Serviceguard Manager5.0 available from http://www.hp.com/go/softwaredepot., you can also launchServiceguard Manager by just clicking on a cluster name.
WARNING: After upgrading from HP SIM 4.* to HP SIM 5.0 for HP-UX, do *not* remove theSD bundles HPSIM-Migration or ixPostgreSQL. One of the other of these bundles will be on yoursystem (depending on whether you are upgrading from HP SIM version 4.2.0.1.5 or a previousversion respectively) in addition to the HP SIM bundle HPSIM-HP-UX. Either bundle will contain theSD product PostgreSQL. HP SIM 5.0 for HP-UX now ships with a custom version of the PosgreSQLdatabase, shipped as the SD bundle hpSysMgmtDB, containing the SD product SysMgmtDB.However, this version of the database is only used with new installations of HP SIM when upgradingfrom HP SIM 4.*, the data remains in the PosgreSQL version of the database.
Upgrading HP Systems Insight Manager4.0.1, 4.1 or 4.2 to HP Systems InsightManager 5.0 on Linux
1. Extract the rpm files from the bin file. Be sure you set the permissions to include the right toexecute the bin for the following step.
./HPSIM-Linux_C.05.00.00.00.bin --keep --confirm
Note: Refer to Step 9 in the "Installing on Linux - Preparing the System" section for informationon setting permissions.
2. Respond negatively to the prompt to run scripts for an automatic install. The extracted files areplaced in an mxserver subdirectory.
3. To change the directory to mxserver, execute the following command:
cd mxserver
4. Install HP Systems Insight Manager using the rpm files:
82
Upgrading HP Systems Insight Manager 4.0, 4.0.1, 4.1 and 4.2 to HP Systems InsightManager 5.0

rpm -Uvh hpsim-C.05.00.00.XXXXXXX.i386.rpm \hpsim-pgsql-config-C.05.00.00.XXXXXXX.i386.rpm
Note: Both files must be installed concurrently with a single command (no carriage return).
Note: The initialization of the upgrade is done in the background, which takes several minutes.To verify if the upgrade is 100% complete, view the file by executing the following command:
cat /var/opt/mx/logs/initconfig.log
HP Systems Insight Manager is now installed and initialized on the Central ManagementServer. To browse to HP SIM start the HP Systems Insight Manager graphical user interface(GUI) using Internet Explorer or Mozilla at http://localhost:280/.
Refer to Chapter 10. Using the Graphical User Interface for details.
5. After upgrading to HP Systems Insight Manager 5.0 you must sign into HP Systems InsightManager and run the Daily Device Identification task to ensure that all your associations areupdated correctly.
To run the daily Identification task:
a. Select Tasks & Logs > View All Scheduled Tasks. The All Scheduled Tasks pageappears.
b. Select the Daily Device Identification task.
c. Click Run Now.
Note:
Some tools in the Monitor Tools toolbox of previous versions of HP Systems InsightManager have been removed from HP Systems Insight Manager 5.0. They eitherprovide administrator-type functionality or access to administrator-level files tonon-administrator users of HP Systems Insight Manager. If upgrading from a previousversion, these tools remain in the Monitor Tools toolbox. You must review the contentsof the Monitor Tools toolbox, and any other toolboxes you have created, and removethese tools accordingly.
If upgrading from HP Systems Insight Manager 4.2 or later, the list of tools include:
General Toolstype
General toolscat
General toolsfind
If upgrading from a version prior to HP Systems Insight Manager 4.2, the list of toolsinclude:
General toolstype
General toolscat
General toolsfind
83
Upgrading HP Systems Insight Manager 4.0, 4.0.1, 4.1 and 4.2 to HP Systems InsightManager 5.0

General toolscp
General toolsmv
General toolsrm
General toolscopy
General toolsdel
1. To remove the tools, sign in HP Systems Insight Manager asfull-configuration-rights user.
2. Select Options > Security > Users and Authorizations, and then select theToolboxes tab.
3. Select the Monitor Tools toolbox.
4. Click Edit.
5. In the Toolbox contents panel, select the tools to remove and click the<<button.
6. Click OK to save.
Note:
After upgrading to HP Systems Insight Manager to ensure that all network devices,racks, and enclosures are properly identified, you must run Identification. SelectOptions>Identify Systems. The Identify Systems page appears. Refer to the HPSystems Insight Manager Technical Reference Guide athttp://h18013.www1.hp.com/products/servers/management/hpsim/infolibrary.htmlfor more information.
84
Upgrading HP Systems Insight Manager 4.0, 4.0.1, 4.1 and 4.2 to HP Systems InsightManager 5.0

Chapter 8. Upgrading from HPServicecontrol Manager to HPSystems Insight Manager
This upgrade installs the HP Systems Insight Manager 4.2 files and migrates your HP SCM datato be compatible with HP Systems Insight Manager 4.2. The upgrade installation migrates allcustom data including:
● Users
● Systems
● System groups
● Tools
● Toolboxes
● Authorizations
HP Servicecontrol Manager and HP Systems Insight Manager cannot coexist on the same system.
Note:
Migration from HP Servicecontrol Manager 3.0 to HP Systems Insight Manager 4.2on a Linux CMS is not supported.
Note:
You must be running SCM 3.0 to upgrade to HP Systems Insight Manager 4.2. Ifyou are running a version of SCM earlier than 3.0, you must upgrade to 3.0 beforeupgrading to HP Systems Insight Manager 4.2. Refer to the HP ServicecontrolManager 3.0 User Guide for information on upgrading from SCM 2.5 to SCM 3.0.
Note:
Before upgrading SCM 3.0 to HP Systems Insight Manager 4.2, managed systemsshould be upgraded and have SSH installed.
85
Note:
If you have an unconfigured SCM 3.0 on your system you can still upgrade to HPSIM 4.2. If SCM 3.0 is configured and you try to install HP SIM 5.0 then the upgradewill be stopped because you must upgrade to HP SIM 4.2 first.
Upgrading from SCM 3.0 to HP SystemsInsight Manager 4.2
Note:
During an upgrade of SCM 3.0 to HP Systems Insight Manager, the existing databaseis migrated and the password is preserved in the back up directory.
Note:
When upgrading SCM 3.0 to HP Systems Insight Manager, new RMI keys and akeystore are created. The keystore is moved to a back up directory.
1. To upgrade SCM 3.0 to HP Systems Insight Manager, first verify that SCM is running byentering the following:
ps -ef | grep mx
Wait some time, and if they are not running, start the service:
/opt/mx/bin/mxstart
2. Tune the kernel using the Java-out-of-box (JavaOOB) fileset. For information on this, go tohttp://www.hp.com/products1/unix/java/java2/outofbox/index.html. [http://www.hp.com/products1/unix/java/java2/outofbox/index.html] This product can beavailable for you to install with HP Systems Insight Manager, either as part of the downloaddepot file containing HP Systems Insight Manager 5.0. or from the Application Release media.The kernel parameter values it adjusts are listed in the following table.
Note:
Java Out-of-Box is a stand-alone bundle that upon installation will rebootthe system.
86
Upgrading from HP Servicecontrol Manager to HP Systems Insight Manager
Java Out-of-Box Settings
=3000max_thread_proc
=2063835136maxdsiz
=2048maxfiles
=2048maxfiles_lim
=512maxusers
=4097nfile
=6000nkthread
=2048nproc
=2048tcp_conn_request_max
Note:
The maxusers parameter is obsolete in HP-UX 11i v2 September 2004 (B.11 .23).
3. Using SAM or the HP-UX Kernel Configuration tool (kcweb), complete the following manualparameter adjustments.
a. Set the dbc_max_pct kernel parameter. This is the percentage of physical memory thatcan be dynamically allocated for the Data Buffer Cache. It defaults to 50%, which isusually too high. Set this variable to the percentage of your system physical memory thatequals approximately 200 MB. For example, a server with 1 GB of RAM should havethis value set at 20%.
Note: This value cannot be less than dbc_min_pct, which cannot be less than 1%.
b. The JOOB file will only set the nfile parameter to 4097. Increase the nfile parameterto at least 12000. This value might be increased to 30000 depending on yourenvironment. If you get an error that you cannot open a file, increase this value.
c. For proper database operation, set the "semmns" kernel parameter to a minimum valueof 2048, and the "semmni" kernel parameter to a minimum value of 1024.
Note: For HP-UX 11i v2 September 2004 (B.11.23) these parameters are dynamic andwhen you modify the parameters a reboot of the system is not necessary.
4. Install PostgreSQL, SSH, (HP-UX Secure Shell) and WBEM
swinstall -s /directory/depot ixPostgreSQL T1471AA B8465BA
where directory is the path to the depot file and depot is the name of the depot file. Forexample:
swinstall -s /tmp/HPSIM_download.depot ixPostgreSQL T1471AA B8465BA
87
Upgrading from HP Servicecontrol Manager to HP Systems Insight Manager

Note:
To verify if WBEM (cimserver, cimserverd) and SSH (sshd) daemons arerunning:
psef | grep wbem
psef | grep ssh
5. Install HP Systems Insight Manager:
swinstall -s /directory/depot T2414BA
where directory is the path to the depot file and depot is the name of the depot file. Forexample:
swinstall -s /tmp/HPSIM_download.depot T2414BA
6. Verify that the mxdomainmgr and mxdtf daemons are running:
ps -ef | grep mx
If they are not running, start them:
/opt/mx/bin/mxstart
Steps 7 through 9 are optional.
7. Configure SNMP to send traps to the CMS:
a. Add the full hostname or IP address of the CMS as a trapdest in the file/etc/SnmpAgent.d/snmpd.conf
trap-dest: hostname_or_ip_address
b. Stop the SNMP Master agent and all subagents with the command:
/sbin/init.d/SnmpMaster stop
c. Restart the SNMP Master agent and all subagents with the command:
/usr/sbin/snmpd
8. Log into the HP Systems Insight Manager GUI. For assistance with this, refer to Chapter 10. Using the Graphical User Interface .
9. If after logging into HP Systems Insight Manager, you find that some items (toolboxes, users,tools, systems, system groups, or authorizations) did not upgrade correctly, perform thefollowing. Otherwise, continue to step 10.
IMPORTANT: These steps must be performed in the order specified. You can, however, omitto the first step that applies to you. For example, if node groups and authorizations failed tomigrate, but everything else migrated properly, start with step e.
88
Upgrading from HP Servicecontrol Manager to HP Systems Insight Manager
a. Migrate toolboxes (roles) by running the following command from the command line onthe CMS.
mxtoolbox -af /var/opt/mx/bak/3.0/zzz_mxrole.3_0.xml
If the message A toolbox named <toolbox> already exists in the systemis displayed, log into HP Systems Insight Manager and delete all toolboxes except for AllTools and Monitor Tools, and repeat this step.
b. Migrate users by running the following command from the command line on the CMS.
mxuser -af /var/opt/mx/bak/3.0/zzz_mxuser.3_0.xml
If the message A user named <user> already exists in the system isdisplayed, log into HP Systems Insight Manager and delete all users except for the userused to log in, and repeat this step.
c. Migrate tools by running the following command from the command line on the CMS:
mxtool -af /var/opt/mx/bak/3.0/zzz_mxtool.3_0.xml
This can display many Cannot add <tool> because it already exists inthe system messages, but these can be safely ignored.
d. Migrate updated definition of tools and ensure all the tools are displayed correctly withinthe HP Systems Insight Manager tool menu by running the following command from thecommand line:
sh fixmenu.sh scmtdefs.data /var/opt/mx/bak/3.0/tools/var/opt/mx/tools
e. Migrate systems (nodes) by running the following command from the command line onthe central management server.
mxnode -af /var/opt/mx/bak/3.0/zzz_mxnode.3_0.xml
If mxnode encounters any duplicate systems (nodes), it will continue properly withoutdisplaying any messages.
If mxnode encounters a hostname that cannot be resolved, the following error messageis displayed. Unknown host: <node_name>. Node ignored. The remaining nodeswill continue to be processed. However, the missing node might affect the success ofmigrating node groups.
IMPORTAINT: When the command returns, log into HP Systems Insight Manager, displaythe All Systems list, and wait for all of the expected nodes to appear in the list beforeproceeding to the next step. The amount of time varies based on system performance andthe number of nodes being added.
f. Migrate system groups (node groups) by running the following command from thecommand line on the CMS.
mxngroup -af /var/opt/mx/bak/3.0/zzz_mxngroup.3_0.xml
89
Upgrading from HP Servicecontrol Manager to HP Systems Insight Manager

If the message A node group named <group> already exists in thissystem is displayed, log into HP Systems Insight Manager and delete all node groupsexcept for All Managed Systems and CMS, and repeat this step.
If the message The name <node_name> does not represent a node in thissystem is displayed, then a node in the node group is missing, and processing on thefile stops. Add the node using mxnode -a <node_name> or log into HP Systems InsightManager and add the node through Manual Discovery, then repeat this step.
g. Migrate authorizations by running the following command from the command line on theCMS.
mxauth -af /var/opt/mx/bak/3.0/zzz_mxauth.3_0.xml
If this command encounters any duplicate authorizations, it continues properly withoutdisplaying any messages.
Note: If the names contain characters such as underscore, space, and symbols, theymight not be migrated because these characters are not supported.
h. If after taking the previous steps, items such as menus are still missing or out of place, runthe following command:
sh /opt/mx/bin/fixmenu.sh scmtdefs.data /var/opt/mx/bak/3.0/tools/var/opt/mx/tools
10. Using the GUI, add the default WBEM user name and password to the Global ProtocolSettings page.
Note: An account for at least one of the WBEM user name and password combinations mustexist on the CMS.
a. Select Options->Protocol Settings->Global Protocol Settings.
b. In the Default WBEM settings section, ensure that the Enable WBEM checkbox isselected and add the default WBEM user name and password.
c. Click OK.
Note: After upgrading to HP Systems Insight Manager, you must run identification for all networkdevices, racks, and enclosures to be displayed on the System Overview page.
In order to upgrade a Servicecontrol Manager 3.0 to HP Systems Insight Manager 5.0,Servicecontrol Manager must be upgraded to HP Systems Insight Manager 4.2 first. After this initialupgrade, follow the procedure to upgrade HP Systems Insight Manager 4.2 to 5.0. Refer to Chapter 7. Upgrading HP Systems Insight Manager 4.0, 4.0.1, 4.1 and 4.2 to HP SystemsInsight Manager 5.0 for more information.
Upgrading Existing Managed Systems1. Install SSH on the managed systems:
90
Upgrading from HP Servicecontrol Manager to HP Systems Insight Manager

On HP-UX:
a. Set up a depot that includes the SSH product.
b. Run the Install Software command on all HP-UX DTF managed systems.
mxexec -t "Install Software" -n <hpux_nodes>
This tool is MSA and requires a DISPLAY to run a GUI.
2. Upgrade the CMS. Refer to "Upgrading from SCM 3.0 to HP Systems Insight Manager 4.2" for more information.
3. On the CMS, copy the SSH-generated public key from the CMS to the managed system, andplace it in the authorized keys file of the execute-as user (root or administrator).
Important: If the CMS is not an HP-UX system: On a non-English CMS, ensure that anadministrator account (spelled exactly as follows, administrator) exists on the CMS, and thatmxagentconfig has been run on the CMS for the created administrator account.
a. Launch the Manage SSH Keys dialog box from the CMS command prompt:
mxagentconfig -a -n hostname -u username -p Password
b. Click Connect.
Alternatively you can configure SSH through the command line version of mxagentconfig. Onthe CMS, type "mxagentconfig -?" for usage.
Note:
Using the -p option will make the password available in "ps" output, so useof the -f option (with a file only readable by root) is highly recommendedwhen using mxagentconfig -a. If the –p using option is used, enclose thepassword in single quotes if the password has any special characters like& or $.
91
Upgrading from HP Servicecontrol Manager to HP Systems Insight Manager

Chapter 9. Uninstalling HPSystems Insight Manager Uninstalling HP Systems Insight Managerfrom a Windows System
Use the Add/Remove Programs feature in Windows, and complete the following steps to removeHP Systems Insight Manager and its dependencies:
1. Select HP Systems Insight Manager, click Remove. If you want to uninstall HP SystemsInsight Manager, click Yes, if not, click No, uninstall will be canceled.
Note: Removing HP Systems Insight Manager does not remove its database files. If you planto reinstall HP Systems Insight Manager, you do not have to rename or remove the old database.
2. If you clicked Yes, the HP Systems Insight Manager Component Uninstall pop-up windowappears. This window lists some of the installed components each with a check box. Thecomponents listed for uninstall are: OpenSSH Services for HPSIM 3.7.1p1-1, HPPerformance Management Pack, HP Server Migration Pack and HP Virtual MachineManagement Pack.
Note: The dependent components like HP Performance Management Pack, HP ServerMigration Pack, and HP Virtual Machine Management Pack will be selected by defaultand these selections cannot be edited. The OpenSSH Services for HPSIM 3.7.1p1-1 mightnot be selected for uninstallation.
3. Clicking Next will pop up individual confirmation dialog boxes for each of the componentselected for uninstall. Or if you want to cancel the uninstallation, click Cancel.
Note: The components listed in the HP Systems Insight Manager Component Uninstallpop-up window can also be uninstalled individually from the Add/remove Programs feature.But System Management Homepage, HP Version Control Repository Manager, PegasusWMI Mapper and MSDE can be uninstalled only from the Add/Remove Program in theControl Panel.
4. The OpenSSH Services for HP Systems Insight Manager Uninstall pop-up box appearswith this message: “Are you sure you want to completely remove OpenSSH Services for HPSystems Insight Manager and all of its components?” Click Yes to uninstall or No to cancel.If you clicked Yes to start the OpenSSH uninstallation, the Open SSH uninstall progressscreen appears. Click Accept to confirm OpenSSH was successfully removed from yourcomputer.
5. The HP Performance Management Pack for HP Systems Insight Manager Uninstallpop-up box appears with this message: “Are you sure you want to completely remove HPPerformance Management Pack for HP Systems Insight Manager and all of its components?” Click Yes to uninstall or No to cancel. If you clicked Yes to start the Performance ManagementPack uninstallation, the PMP uninstall progress screen appears. Click Accept to confirmHP Performance Management Pack was successfully removed from your computer.
92
6. The HP Server Migration Pack for HP Systems Insight Manager Uninstall pop-up boxappears with this message: "Are you sure you want to completely remove HP Server MigrationPack for HP Systems Insight Manager and all of its components?" Click Yes to uninstall or Noto cancel. Clicking Yes starts the Server Migration Pack uninstallation, the Server MigrationPack uninstall progress screen appears. Click Accept to confirm SMP was successfullyremoved from your computer.
7. The HP Virtual Machine Management Pack Uninstall box pops up with this message:"Virtual Machine Management Pack uninstallation removes Server migration Pack if it exists.Are you sure you want to proceed?". If yes, make sure that HP Systems Insight Manager andSQL Server services are running. Click Yes to uninstall or No to cancel. Clicking Yes startsthe Virtual Machine Management Pack (and SMP if it still exists) uninstallation , the VirtualMachine Management Pack uninstall progress screen appears. Click Accept to confirm VirtualMachine Management Pack was successfully removed from your computer.
8. After uninstalling the selected components, click Next on the HP Systems Insight ManagerComponent Uninstall window to proceed with the HP SIM uninstallation. The HP SIM uninstallprogress screen appears. On completion of HP SIM uninstall, a pop up window promptingfor system reboot appears. It is recommended to reboot the system to complete the uninstallprocess.
Uninstalling HP Systems Insight Managerfrom an HP-UX System
Caution:
Removing HP Systems Insight Manager permanently deletes the information in thedatabase unless you back it up before removing the software.
1. Stop the HP Systems Insight Manager daemons:
mxstop
2. Verify that the daemons are no longer running:
ps -ef | grep mx
If any of the HP Systems Insight Manager daemons are running, note their process IDs (PIDs)in the ps -ef output, and kill them:
kill -9 PID
where PID is the process ID of the daemon. For example, if the ps -ef | grep mx commanddisplays a line that looks like
root 18582 1 0 Jan 12 ? 00:13:18 /opt/mx/lbin/mxinventory, then thecommand to kill this daemon is
kill -9 18582.
93
Uninstalling HP Systems Insight Manager
3. (Optional) Back up the HP Systems Insight Manager database:
mxrepositorysave -f filename
where filename is the name of the back up file.
4. Remove the HP Systems Insight Manager software:
swremove -x enforce_dependencies=false HPSIM-HP-UX
Uninstalling HP Systems Insight Managerfrom a Linux System
Caution:
Removing HP Systems Insight Manager permanently deletes the information in thedatabase unless you back it up before removing the software.
1. Stop the HP Systems Insight Manager daemons:
/opt/mx/bin/mxstop
2. Verify that the daemons are no longer running:
ps -ef | grep mx
If any of the HP Systems Insight Manager daemons are running, record the PID and kill theprocess:
kill -9 pid
where pid is the PID of the daemon. For example,
kill -9 3456
3. (Optional) Back up the HP Systems Insight Manager database:
mxrepositorysave -f directory/filename
where directory is a unique location for the file outside of the HP Systems Insight Managerdirectory structure and filename is the name of the back up file.
Note: If you plan to remove the HP Systems Insight Manager directories later in the process,save this back up in a location outside of the default product directories.
4. Remove the HP Systems Insight Manager software:
rpm -qa | grep hpsim | xargs rpm -e
5. (Optional) If other applications are not using PostgreSQL, you can remove it:
94
Uninstalling HP Systems Insight Manager

rpm -qa | grep postgresql | xargs rpm -e
To remove the PostgreSQL folder:
rm -rf /var/lib/pgsql
95
Uninstalling HP Systems Insight Manager
Chapter 10. Using the GraphicalUser Interface
HP Systems Insight Manager provides a browser-based GUI.
Accessing the GUIThe graphical user interface (GUI ) can be accessed from http://localhost:280/ with any networkclient that is running a supported Web browser.
● Required Web Browsers
❍ For HP-UX:
❑ Mozilla 1.7.3 or later
To download, refer to http://software.hp.com.
❍ For Linux:
❑ Mozilla 1.7.3 or later
❍ For Windows:
❑ Microsoft Internet Explorer 6 with Service Pack 1 or later
Refer to the following note about the required security options.
Note: For all Windows Internet explorer browsers, you must have the following browsersecurity options enabled for HP Systems Insight Manager to work properly:
❑ SSL 3.0 or TLS 1.0
Graphical User Interface FeaturesThis section describes the graphical user interface (GUI) features. The following figure is a samplescreen shot of the GUI.
The five regions in the GUI include:
1. Banner. The banner provides a link to the Home page, a link to Sign Out of HP SystemsInsight Manager, and displays the user that is currently logged in.
2. System Status Panel. This panel provides uncleared event status, system health statusinformation, and an alarm to notify you of certain events or statuses. The System Statuspanel can be customized for your environment. If you do not need to view this panel at alltimes, you can collapse it by clicking the minus sign in the top right corner of the panel. Toexpand the panel, click the plus sign again. If the System Status panel is collapsed and analarm is received, the panel expands to show the alarm.
3. Search Panel. The search feature enables you to search for matches by system nameand common system attributes. You can also perform an advanced search for matches based
96
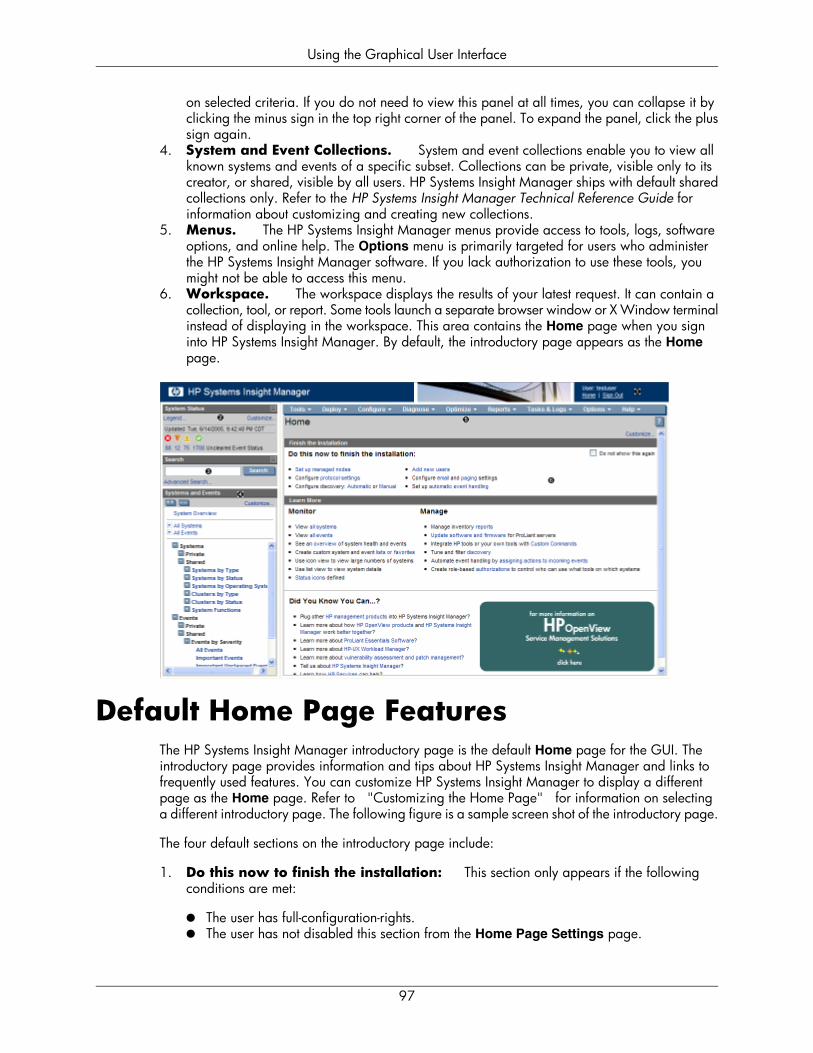
on selected criteria. If you do not need to view this panel at all times, you can collapse it byclicking the minus sign in the top right corner of the panel. To expand the panel, click the plussign again.
4. System and Event Collections. System and event collections enable you to view allknown systems and events of a specific subset. Collections can be private, visible only to itscreator, or shared, visible by all users. HP Systems Insight Manager ships with default sharedcollections only. Refer to the HP Systems Insight Manager Technical Reference Guide forinformation about customizing and creating new collections.
5. Menus. The HP Systems Insight Manager menus provide access to tools, logs, softwareoptions, and online help. The Options menu is primarily targeted for users who administerthe HP Systems Insight Manager software. If you lack authorization to use these tools, youmight not be able to access this menu.
6. Workspace. The workspace displays the results of your latest request. It can contain acollection, tool, or report. Some tools launch a separate browser window or X Window terminalinstead of displaying in the workspace. This area contains the Home page when you signinto HP Systems Insight Manager. By default, the introductory page appears as the Homepage.
Default Home Page FeaturesThe HP Systems Insight Manager introductory page is the default Home page for the GUI. Theintroductory page provides information and tips about HP Systems Insight Manager and links tofrequently used features. You can customize HP Systems Insight Manager to display a differentpage as the Home page. Refer to "Customizing the Home Page" for information on selectinga different introductory page. The following figure is a sample screen shot of the introductory page.
The four default sections on the introductory page include:
1. Do this now to finish the installation: This section only appears if the followingconditions are met:
● The user has full-configuration-rights.● The user has not disabled this section from the Home Page Settings page.
97
Using the Graphical User Interface

2. Monitor. This section provides links to common monitoring tasks, including locating andtracking systems and events. All monitoring tasks can be performed using the features andtools provided in the system and event collection area.
3. Manage. This section provides links to frequently used tools and features available fromthe menus above the workspace. These links provide access to inventory reports, software andfirmware deployment, discovery, event handling, integrating custom commands, andauthorizations.
4. Did You Know You Can...? This section provides useful tips and shortcuts, where youcan learn more about HP products, service offerings, and software.
This section appears if you have not disabled it from the Home Page Settings page.
Customizing the GUICustomizing the Home Page
Customize the HP Systems Insight Manager Home page to select which page displays when HPSystems Insight Manager is first started and to disable sections in the default introductory page.
To customize the Home page:
1. Click Home in the banner to display the Home page in the workspace.
2. Click Customize in the upper right corner of the introductory page.
Note: If the Home page has been set to something other than the default introductory page,you can access the Home Page Settings page by selecting Options->Home Page Settings.
3. Specify which page you want to use as Home page:
● Introductory page (default)● System Overview page
98
Using the Graphical User Interface
● Any specific system, cluster, or event collection
Note: The default introductory page is only available when it is set as the Home page. If youwant to view this page when it is not set as your home page, reselect it as the Home page.
4. (Optional) If the introductory page is selected as your home page, customize the content onthe page by selecting or deselecting:
● Show "Do this now to finish the install" frame. If selected, this section appears on theHome page.
● Show the "Did You Know?" image. If selected, the image in the bottom right corner ofthe Home page appears.
Customizing the System Status PanelCustomize the System Status panel to display the following status information:
● Uncleared Event Status. A count that indicates the number of uncleared event statusesthat are Critical, Major, Minor, and Normal for any given system collection. Each number is ahyperlink to a detailed list of events with that particular status. By clicking the number, an eventcollection appears with those particular events and their corresponding systems.
● Health Status. A count that indicates the number of systems, in a given system collection,that have a system health status that is Critical, Major, Minor, and Normal. Each number is ahyperlink to a detailed list of systems with that particular status. By clicking the number, a systemcollection appears with those particular systems. Health status is not shown by default but canbe configured to appear.
● Alarm. An alarm can be customized to appear for specific criteria for any given systemcollection. The alarm alerts you that a particular criterion has been met by one or more systemsin that collection. Because the Status panel is continually updated, the alarm appears until theevent is cleared, the system is removed from the collection, or the alarm customization is changedso that it no longer applies. If the System Status panel is collapsed, and an alarm occurs, itopens automatically so that the alarm is visible. You can collapse the panel, but it continues toopen as long as the alarm is relevant. To have the panel remain collapsed, you must clear theoffending event or system status or reconfigure the status display to no longer display alarms.
● Legend of Status Icons. To display a list of status icons, click Legend in the SystemStatus panel. Legend information appears in a popup window and remains open until youclose it.
To customize the System Status panel:
1. Click Customize in the upper right corner of the System Status panel. The CustomizeSystem Status page appears.
2. Select the first Show summary of, and select uncleared event status or health status.
a. Select the system collection All Systems, or select another system collection from thedropdown list.
b. Edit the Label if desired.
3. Select the second Show summary of, and select uncleared event status or health status.
99
Using the Graphical User Interface
a. Select the system collection All Systems, or select another system collection from thedropdown list.
b. Edit the Label if desired.
4. Select to Show an alarm when any system meets the condition.
a. Select the Condition.
b. Select the system collection All Systems, or select another system collection from thedropdown list.
c. Edit the Label if desired.
5. Click OK to save changes.
Note: Restore Defaults returns the customization screen to its default condition: only theuncleared event status appears in the banner. Health status and the alarm are disabled. Allpersonalized information is removed.
100
Using the Graphical User Interface

Chapter 11. Using the CommandLine Interface
HP Systems Insight Manager provides a command line interface (CLI) in addition to the graphicaluser interface (GUI). Many functions available in the GUI are also available through the CLI.
Logging Into the CLIAccess the HP Systems Insight Manager CLI directly on the CMS or from any network client usingSSH client software.
Note:
Only administrators have command line access to HP Systems Insight Manager ona Windows CMS. For security reasons, administrators should not modify the accesscontrol settings put in place by the installer.
Logging in Directly on the CMSTo log into the CLI directly on the CMS:
1. Log into the CMS using a valid user name and password.
HP Systems Insight Manager grants authorizations based on your operating system user login.
2. Open a terminal window or a command prompt window to execute HP Systems Insight Managercommands.
Remotely Using an SSH Client
Note:
The preferred way to log in remotely is using an SSH client. Telnet or rlogin works,but neither provides a secure connection.
To log into the CLI remotely using an SSH client:
1. Open an SSH client application on any network client.
2. Log into the CMS through the SSH client software, using a valid user name and password.
HP Systems Insight Manager grants authorizations based on your operating system user login.
101
HP Systems Insight Manager CommandsHP Systems Insight Manager commands are installed in the following locations on the CMS:
● For HP-UX and Linux:
/opt/mx/bin/
● For Windows:
C:\Program Files\HP\Systems Insight Manager\bin\
Note:
The Windows path will vary if HP Systems Insight Manager was not installed in thedefault location.
To view the manpages from the command line on an HP-UX and Linux use the following manpagesections:
● For HP-UX:
❍ Commands manpages are section 1M.❍ Commands that are using XML file manpages are section 4.
● For Linux:
❍ Command that are using XML file manpages are section 4.
● For Windows:
❍ Manpages are found in the following folder on Windows sytems:
HP\Systems InsightManager\hpwebadmin\webapps\mxhelp\mxportal\en\manpages
The following table provides a complete list of HP Systems Insight Manager commands. For adetailed explanation of these commands, view the associated manpages from a command promptor refer to the HP Systems Insight Manager Technical Reference Guide.
Available manpagesFunctionalityCommandmcompile(1M)Compiles a Simple Network
Management Protocol (SNMP)Management Information Base(MIB) file into an intermediateformat (.CFG) file for importinginto HP Systems InsightManager using the mxmibcommand
mcompile
102
Using the Command Line Interface

Available manpagesFunctionalityCommandmxagentconfig(1M)Configures the agent to work
with a central managementserver (CMS)
mxagentconfig
mxauth(1M) and mxauth(4)Adds, removes, or lists atoolbox-based authorization,and copies authorizations froman existing user to another user
mxauth
mxcert(1M)Creates a new certificate,imports a signed or trustedcertificate, removes a certificate,lists certificates, generates acertificate signing request, noteswhether or not to require trustedcertificates, upgrades certificatefrom HP Systems InsightManager 4.x, and synchronizespublic certificate with theSystem ManagementHomepage share directory
mxcert
mxcollections(1M)Adds, modifies, removes, andlists collections
Note: mxcollection XMLfile components and tags arecase sensitive.
mxcollection
mxdomainmgr(1M)Contains the object managersthat interact with the databaseand the Distributed Task Facility(DTF)
mxdomainmgr
mxdtf(1M)Contains the DTF that is used toremotely execute commands onmanaged systems that areequipped with Secure Shell(SSH)
mxdtf
mxexec(1M)Executes HP Systems InsightManager tools, with associatedarguments, on specific HPSystems Insight Managermanaged systems, as well asverifies the status of runningtools and enables afull-configuration-rights user tokill or cancel a running task
mxexec
mxgethostname(1M)Prints the name of the local hostin HP Systems Insight Manager
mxgethostname
103
Using the Command Line Interface
Available manpagesFunctionalityCommandmxglobalprotocolsettings(1M)Used to managed global
protocol settings, and setsglobal protocol settings fromXML and lists global protocolsettings in either detailed formator XML format
mxglobalprotocolsettings
mxglobalsettings(1M)Used to manage the globalsettings in theglobalsettings.props file
mxglobalsettings
mxinitconfig(1M) andmxinitconfig(4)
Performs initial configuration forthe CMS
mxinitconfig
mxinitconfig(1M) andmxinitconfig(4)
Logs an entry to the log file orstandard out.
mxlog
mxmib(1M)Adds, deletes, and processes alist of MIBs for HP SystemsInsight Manager and listsregistered MIBs and traps for aspecific registered MIB
mxmib
mxngroup(1M) and mxngroup(4)Adds, modifies, removes, or listssystem groups from HP SystemsInsight Manager, and adds andremoves systems from systemlist, and copies systems fromone system group to another
mxngroup
mxnode(1M) and mxnode(4)Adds, modifies, identifies,removes, or lists systems in theHP Systems Insight Managermanagement domain
mxnode
mxnodesecurity(1M)Adds, modifies, or removessecurity credentials for SNMPand Web-Based EnterpriseManagement (WBEM) protocols
mxnodesecurity
104
Using the Command Line Interface
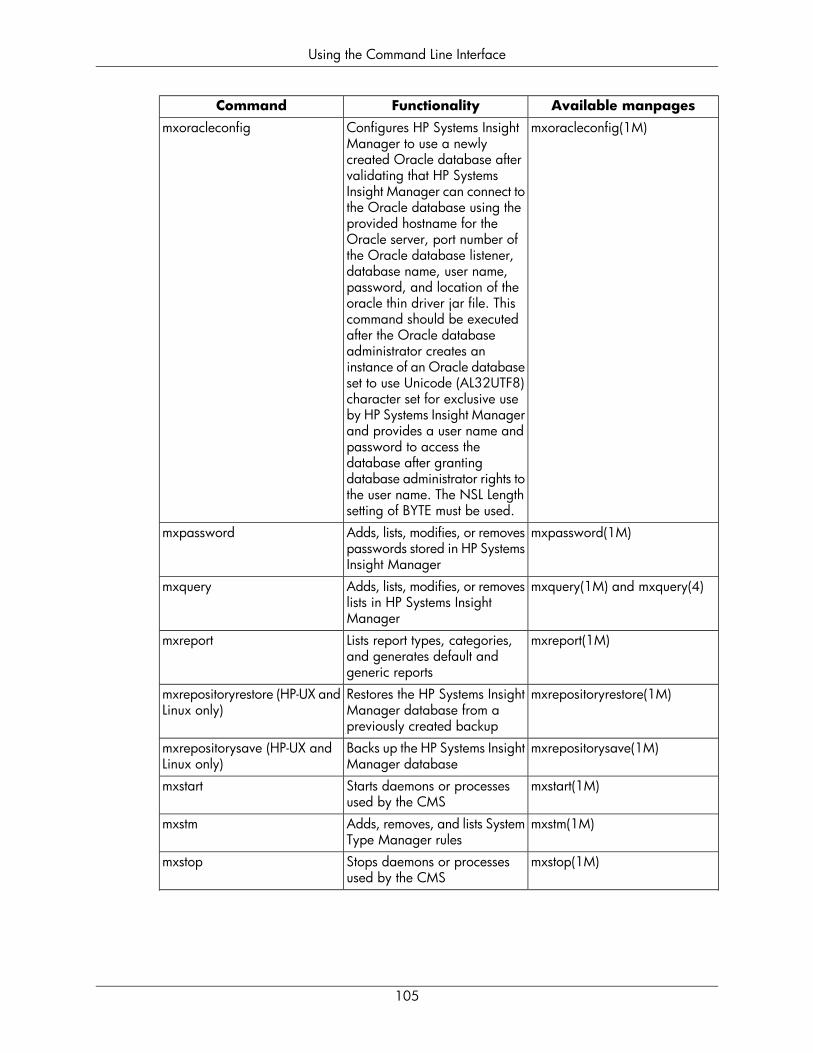
Available manpagesFunctionalityCommandmxoracleconfig(1M)Configures HP Systems Insight
Manager to use a newlycreated Oracle database aftervalidating that HP SystemsInsight Manager can connect tothe Oracle database using theprovided hostname for theOracle server, port number ofthe Oracle database listener,database name, user name,password, and location of theoracle thin driver jar file. Thiscommand should be executedafter the Oracle databaseadministrator creates aninstance of an Oracle databaseset to use Unicode (AL32UTF8)character set for exclusive useby HP Systems Insight Managerand provides a user name andpassword to access thedatabase after grantingdatabase administrator rights tothe user name. The NSL Lengthsetting of BYTE must be used.
mxoracleconfig
mxpassword(1M)Adds, lists, modifies, or removespasswords stored in HP SystemsInsight Manager
mxpassword
mxquery(1M) and mxquery(4)Adds, lists, modifies, or removeslists in HP Systems InsightManager
mxquery
mxreport(1M)Lists report types, categories,and generates default andgeneric reports
mxreport
mxrepositoryrestore(1M)Restores the HP Systems InsightManager database from apreviously created backup
mxrepositoryrestore (HP-UX andLinux only)
mxrepositorysave(1M)Backs up the HP Systems InsightManager database
mxrepositorysave (HP-UX andLinux only)
mxstart(1M)Starts daemons or processesused by the CMS
mxstart
mxstm(1M)Adds, removes, and lists SystemType Manager rules
mxstm
mxstop(1M)Stops daemons or processesused by the CMS
mxstop
105
Using the Command Line Interface

Available manpagesFunctionalityCommandmxtask(1M) and mxtask(4)Lists, executes, removes,
creates, and changes ownershipfor the HP Systems InsightManager scheduled tasks
mxtask
mxtool(1M) and mxtool(4)Adds, modifies, and removestools from HP Systems InsightManager
mxtool
mxtoolbox(1M) and mxtoolbox(4)Adds, modifies, or removestoolboxes from the HP SystemsInsight Manager system
mxtoolbox
mxuser(1M) and mxuser(4)Adds, modifies, removes, or listsusers in HP Systems InsightManager
mxuser
mxwbemsub(1M)Performs WBEM indicationsubscription functions on a setof systems, such as adding,deleting, listing, or movingsubscriptions on each of thesystems passed in as arguments
mxwbemsub
106
Using the Command Line Interface
Chapter 12. Initial Setup The initial setup involves steps for setting up managed systems, configuring discovery, configuringevent handling, adding users, and defining authorizations. It assumes that you just completed theinstallation of your central management server (CMS).
The procedures in this process are common tasks that HP Systems Insight Manager administratorsperform on a regular basis. If you are a new administrator of an existing management domain, itmight be useful for you to familiarize yourself with these procedures even though your CMS hasalready been through the initial setup.
Note:
All the information in this section is also available in the HP Systems Insight ManagerTechnical Reference Guide athttp://h18013.www1.hp.com/products/servers/management/hpsim/infolibrary.html.
Note:
The HP Systems Insight Manager First Time Wizard appears the first time a user withfull configuration rights logs into HP Systems Insight Manager. The First Time Wizardconfigures only the basic settings. There are other options available, refer to the HPSystems Insight Manager Technical Reference Guide athttp://h18013.www1.hp.com/products/servers/management/hpsim/infolibrary.htmlfor more information.
Setting Up Managed SystemsOverview
Setting up managed systems involves installing the required management agents and configuringthe supported protocols to communicate with the HP Systems Insight Manager software. The followingsteps assume that HP Systems Insight Manager is installed on the central management server (CMS)and the First Time Wizard has been completed.
Note:
Discovery must be run prior to setting up managed systems. Configuring AutomaticDiscover is part of the First Time Wizard.
To setup managed systems, there are two overall steps:
1. Installing required and optional managed system software:
107

● "Installing the ProLiant Support Pack on Windows systems for the first time"
● "Installing the ProLiant or Integrity Support Pack on a Linux system for the first time"
● "Installing the required software on an HP-UX system"
2. Configuring the managed system software:
● "Run the Configure or Repair Agents feature from the CMS"
Installing Required and Optional managedsystem software
Managed systems must have the Version Control Agent installed prior to using the Configure orRepair Agents feature to configure them.
Installing the ProLiant Support Pack on Windowssystems for the first time
For Windows systems, install the latest ProLiant Support Pack with the preconfigured componentsto all managed systems using the HP Systems Insight Manager feature Initial ProLiant SupportPack Install.
When you are installing the ProLiant Support Pack for the first time, the Initial ProLiant Support PackInstall process enables you to install a ProLiant Support Pack to a Windows system because youdo not have any HP Insight Management Agent, especially HP Version Control Agent, installed.This process also configures the systems to use the trust certificate from the HP Systems InsightManager and the setting to use the desired HP Version Control Repository Manager. After youhave run the Initial ProLiant Support Pack Install tool, then you can use the Install Software andFirmware tool to update systems.
The Install Software and Firmware feature in HP Systems Insight Manager requires that the HPVersion Control Repository Manager be installed on servers containing a repository. Installing theVersion Control Repository Manager is not part of this procedure. For more information regardinginstalling the Version Control Repository Manager, refer to the HP Version Control Installation Guideat http://h18013.www1.hp.com/products/servers/management/agents/documentation.html.
Note:
You must have Windows administrator privileges on target systems to install a ProLiantSupport Pack
108
Initial Setup
Note:
The Install Software and Firmware and Version Control Agent features are onlyavailable after the Initial ProLiant Support Pack Install process has been run.
Note:
For more information regarding ProLiant Support Packs, refer to the HP ProLiantSupport Pack and Deployment Utilities User Guide athttp://h18013.www1.hp.com/manage/psp.html.
To install a ProLiant Support Pack:
1. Select Deploy->Deploy Drivers, Firmware and Agents->Initial ProLiant Support PackInstall. The Initial ProLiant Support Pack Install page appears.
2. Select the target systems.
3. Click Next.
4. From the Enter Windows login credentials page:
a. In the User name field, enter the Windows administrator user name for the target system.
b. In the Password field, enter the administrator password for the Windows user nameentered above.
c. In the Password (Verify) field, reenter the Windows administrator password exactly asit was entered in the Password field.
d. In the Domain field, enter the Windows domain.
Note: This field can be left blank if the system is not part of a domain.
5. Click Next. The Select a Windows Support Pack page appears.
6. Under Select a Version Control Repository, select a source repository system from whichto retrieve the catalog.
The following fields display:
● Name. This field displays the name of the system.
● Status. This field displays the status of the system.
● Product Name. This field displays the name of the product.
● Trusted?. This field indicates whether the system trust relationship has been configured.To configure a trust relationship, click configure.
109
Initial Setup
Note: This section displays systems that are authorized by the current user name. If the currentuser is not authorized to view the systems, a message appears, indicating that the user doesnot have authorization rights on the system.
7. Under Select a Support Pack to Install, select a support pack to install. Click the iconto drill down and view the contents of the Version Control Repository that you selected.
Note: To expand the System Software Baseline to display all contents, click the icon
located in the upper left corner of the Select a Support Pack to Install section. Click theicon to collapse the listings.
8. Select Install and initialize SSH (Secure Shell) if you want to install and configure OpenSSHon the target systems. This option is disabled by default.
9. (Optional) Select Force downgrade or re-install the same version if you are installing aProLiant Support Pack that is older than or the same as the version currently installed. Thisoption is disabled by default.
10. By default, Reboot systems if necessary after successful install is selected. You candeselect this option if you do not want to reboot after the installation. However, the systemmust be rebooted for the new ProLiant Support Pack to be available.
11. Click Next. The Configure Support Pack page appears.
● If you select a ProLiant Support Pack 7.10, Configure a Support Pack appears. Forexample:
Note: If you select a ProLiant Support Pack that is earlier than 7.10, the following examplevaries.
To configure the 7.10 support pack:
a. Click Configure Support Pack to set up the HP Version Control Agent in the selectedSupport Pack. The Version Control Agent Setup page appears.
Note: If the Version Control Agent has already been configured, you can omit thisstep.
b. In the Computer Name field, enter the name of the system where the Version ControlRepository Manager is installed.
c. In the Administrator Password field, enter the password associated with the loginname specified.
d. Click Save to save your settings. Click Cancel to discard your settings and close theVersion Control Agent Setup page.
e. Click Next. The Download Support Pack page appears.
f. After the support pack is downloaded, click Schedule to create a scheduled task forthe Initial ProLiant Support Pack Install to run or click Run Now to run the taskimmediately.
If you select a ProLiant Support Pack 7.20 or later, the following options display.
110
Initial Setup
❍ Click Configure System Management Homepage to setup the Support Pack toestablish a trust relationship with System Management Homepage when it is installedon target systems.
Note: If the Support Pack has already been configured, you can skip this step.
Note: the trust relationship is established, click Last Update to update the status totrusted.
To configure the System Management Homepage:
a. From the Welcome to the Configuration Wizard for the HP SystemManagement Homepage Component page, click Next. The Operating SystemsGroups page appears.
b. In the Group Name field, enter the name of an operating system group that youwant to assign. For example, vcadmin.
c. In the Operating Level field, select the appropriate level for the new group fromthe dropdown list.
Note: The default Administrators Groups always have administrative access.
d. Click Add to assign the group. The new group appears under the operating systemgroup which it was assigned.
Note: You can add up to five entries per operating system group.
e. Click Next. You can click Save to save your changes up to this point, or clickCancel to discard the changes and close the wizard.
f. Local and Anonymous access enables you to select the appropriate settings toinclude:
❑ Anonymous Access. Anonymous Access is disabled by default. EnablingAnonymous Access enables a user to access the System ManagementHomepage without logging in. Select this option to allow anonymous access.
Caution: HP does not recommend the use of anonymous access.
❑ Local Access. Local Access is disabled by default. Enabling it means youcan locally gain access to the System Management Homepage without beingchallenged for authentication. This means that any user with access to the localconsole is granted full access if Administrator is selected. If Anonymous isselected, any local user has access limited to unsecured pages without beingchallenged for a username and password. Select this option to allow localaccess.
Caution: HP does not recommend the use of local access unless yourmanagement server software enables it.
g. Click Next. You can click Save to save your changes up to this point, or clickCancel to discard the changes and close the wizard.
111
Initial Setup
h. The Trust Mode options enable you to select the security required by your system.There are some situations that require a higher level of security than others.Therefore, you are given the following security options:
❑ Trust by Certificate. Sets the System Management Homepage to acceptconfiguration changes only from HP Systems Insight Manager servers withtrusted certificates. This mode requires the submitted server to provideauthentication by means of certificates. This mode is the strongest method ofsecurity since it requires certificate data and verifies the digital signature beforeallowing access. If you do not want to enable any remote configuration changes,leave Trust by Certificate selected, and leave the list of trusted systems emptyby avoiding importing any certificates.
Note:
HP strongly recommends using this option as itis more secure.
To trust by certificate:
1. Select Trust by Certificate and click Next.
2. In the Certificate Name field, click Browse to select the certificate file.After the certificate file is selected, the certificate data is displayed on thescreen.
3. Click Add. The certificate appears under Certificate Files. You can clickSave to save your changes up to this point, or click Cancel to discard thechanges and close the wizard.
4. Click Next. The IP Binding page appears.
❑ Trust by Name. Sets the System Management Homepage to acceptcertain configuration changes only from servers with the HP Systems InsightManager names designated in the Trust By Name field. The Trust By Nameoption is easy to configure. For example, you might use the trust by name optionif you have a secure network with two separate groups of administrators in twoseparate divisions. It prevents one group from installing software to the wrongsystem. This option verifies only the HP Systems Insight Manager server namesubmitted.
Note:
HP strongly recommends using the Trust byCertificate option as the other options are lesssecure.
The server name option must meet the following criteria:
112
Initial Setup

● Each server name must be less than 64 characters
● The overall length of the server name list is 1,024 characters
● Special characters should not be included as part of the server name: ~' ! @ # $ % ^ & * ( ) + = \ " : ' < > ? , |
● Semicolons are used to separate server names
To trust by name:
1. Select Trust by Name and click Next.
2. In the Trusted Server Name field, enter the server name to be trusted.
3. Click Add. The trusted system name appears under the Trusted Serverslist. You can click Save to save your changes up to this point, or clickCancel to discard the changes and close the wizard.
4. Click Next. The IP Binding page appears.
❑ Trust All. Sets the System Management Homepage to accept certainconfiguration changes from any system.
Note:
HP strongly recommends using the Trust byCertificate option as the other options are lesssecure.
To trust all servers:
1. Select Trust All. You can click Save to save your changes up to this point,or click Cancel to discard the changes and close the wizard.
2. Click Next. The IP Binding page appears.
i. IP Binding specifies from which IP addresses the System Management Homepageaccepts requests from and provides control over which nets and subnets requestsare processed.
Administrators can configure the System Management Homepage to only bind toaddresses specified in the IP Binding page. A maximum of five subnet IP addressesand netmasks can be defined.
An IP address on the server is bound if it matches one of the entered IP Bindingaddresses after the mask is applied.
113
Initial Setup
Note:
The System Management Homepage always binds to127.0.0.1. If IP Binding is enabled and nosubnet/mask pairs are configured, then the SystemManagement Homepage is only available to127.0.0.1. If IP Binding is not enabled, you bind toall addresses.
To configure IP Binding:
1. Select IP Binding. The IP Binding page appears.
2. Enter the IP address.
3. Enter the Netmask.
4. Click Add. The IP binding configuration is saved and appears under the IPBinding List.
5. Click Next. The IP Restricted Login page appears.
j. The IP Restricted Login enables the System Management Homepage to restrictlog-in access based on the IP address of a system.
You can set address restriction at installation time or by it can be set byadministrators from the IP Restricted Login page
❑ If an IP address is excluded, it is excluded even if it is also listed in the includedbox.
❑ If there are IP addresses in the inclusion list, then only those IP addresses areallowed log-in access with the exception of localhost.
❑ If no IP addresses are in the inclusion list, then log-in access is allowed to anyIP addresses not in the exclusion list.
To include or exclude IP addresses:
1. In the From field, enter the IP addresses to include or exclude. You can enteran IP address range to be included or excluded by entering a beginning IPaddress in the From field and an ending IP address in the To field.
2. From the Type field, select Include or Exclude.
3. Click Add to add the IP address or IP address range to the Inclusion List orExclusion List below.
4. Click Save. The HP System Management Homepage Login page for theSystem Management Homepage system appears. For more information aboutSystem Management Homepage, refer to the System Management HomepageOnline Help athttp://h18013.www1.hp.com/products/servers/management/agents/documentation.html.
114
Initial Setup

● Click Configure Version Control Agent to set up the HP Version Control Agent in theselected Support Pack.
Note: If the Version Control Agent has already been configured, you can skip this step.
To configure the Version Control Agent:
a. In the Computer Name field, enter the name of the system where the Version ControlRepository Manager is installed.
b. In the Login Account field, enter the login name used to connect to the VersionControl Repository Manager on the system specified.
c. In the Login Password field, enter the password associated with the login namespecified.
d. Click Save to save your settings. Click Cancel to discard your settings and close theVersion Control Agent Setup page.
e. Click Next.
12. Back in HP Systems Insight Manager, click Next to start the ProLiant Support Pack download.The Download Support Pack page appears.
13. After the support pack is downloaded, click Schedule to create a scheduled task for the InitialProLiant Support Pack Install to run or click Run Now to run the task immediately.
Installing the ProLiant or Integrity Support Pack ona Linux system for the first time
● For Linux systems, use the Linux Deployment Utility to install the latest support pack with thepreconfigured components to the local system. For more information regarding installing asupport pack using the Linux Deployment Utility, refer to http://www.hp.com/servers/psp.
Installing the required software on an HP-UX system1. Understanding the basic managed system software for HP-UX.
For HPUX, the following software, shown with minimum recommended versions, is requiredfor essential HP Systems Insight Manager functionality to operate. This software is installed bydefault as part of the latest HP-UX 11i v2 operating environments, but may need to be installedor updated on HP-UX 11i v1 or older HP-UX 11i v2 systems.
● T1471AA A.04.00 HP-UX Secure Shell
● B8465BA A.02.00.05 HP WBEM Services for HP-UX
This WBEM Services bundle contains basic system instrumentation displayed in the HP SIMProperty Pages as well as supporting collection and reporting by HP SIM Inventory functionality.
115
Initial Setup

To maximize the value of SIM for properties, inventory and events, the following should alsobe installed, available for HP-UX 11i v2 servers:
● LVMProvider R11.23 CIM/WBEM Provider for LVM
● WBEMP-LAN-00 B.11.23 LAN Provider for Ethernet/LAN Interfaces
● SysFaultMgmt A.02.00 HP-UX System Fault Management
The following, System Management Homepage for HP-UX, does not currently support the samelevel of functionality found in Windows and Linux servers. It is currently only required to supportthe latest version of Partition Manager.
● SysMgmtWeb A.2.2 HP-UX Web Based System Management User Interfaces
2. Ensuring the managed system software is installed
To see if the minimum required software is installed, login to the remote system and run thefollowing command:
$ swlist –l bundle T1471AA B8465AA
To see if the optional providers and System Management Homepage are installed, runcommands such as:
$ swlist –l bundle LVMProvider WBEMP-LAN-00 SysFaultMgmt
3. Acquiring and Installing managed system software
The SecureShell and WBEM bundles are included on the HP-UX Operating Environment andApplication Release media, as well as part of the HP Systems Insight Manager HP-UX depotdownloaded from http://www.hp.com/go/softwaredepot.
For the WBEM providers, several are available from the latest HP-UX Operating Environmentand Application Release media. Additionally, the LVMprovider and SysFaultMgmt are availablefrom http://www.hp.com/go/softwaredepot by searching for the keyword provider.
Make sure that the OnlineDiag bundle is installed on your computer.
To verify that the OnlineDiag bundle is installed, enter the following command:
swlist | grep OnlineDiag
The OnlineDiag bundle is installed on the operating environments, so if you have a recentversion of the operating environment, this should already be installed. However, if it is notinstalled, the OnlineDiagnostic bundle is available from http://www.hp.com/go/softwaredepotby searching for the keyword B6191AAE.
After the depots containing the providers have been acquired, they can be installed from themanaged system using commands such as:
$ swinstall –s <depot_location> T1471AA B8465AA
$ swinstall –s <depot_location> LVMProvider WBEMP-LAN-00 SysFaultMgmt
4. Configuring Serviceguard provider:
116
Initial Setup
A WBEM provider for Serviceguard can be optionally installed on HP Serviceguard clusters.This provider helps HP Systems Insight Manager create associations in its system lists betweenclusters and their members, as well as showing HP Serviceguard cluster status.
When using the First Time Wizard from HP Systems Insight Manager, the root user or a non-rootuser was specified for the WBEM default user. Alternatively a user may have been specificallyset for this system.
To access the Serviceguard provider from HP Systems Insight Manager if a non-root user isthe WBEM user, you must configure Serviceguard to allow that non-root user Serviceguardadministrative access.
Configuring the Managed System SoftwareThe HP Systems Insight Manager Configure or Repair Agents feature is a quick and easy way toconfigure managed systems, however it is possible to manually configure Linux and HP-UX systems.
Run the Configure or Repair Agents feature from theCMS
To run Configure or Repair Agents remotely against multiple systems simultaneously, you must haveauthorizations to run the Configure or Repair Agents tool.
You must have full CMS configuration privileges to modify the HP Systems Insight Managercommunity strings in the node security file. In addition, you must have administrator privileges forWindows systems or root privileges for Linux and HP-UX on the target systems to configure or repairthe agent settings.
Note: It is recommended that you use like operating system to configure a managed system. Forexample, use a Linux-based CMS to run Configure or Repair Agents against Linux managed systemsand HP-UX CMS to run Configure or Repair Agents against HP-UX managed systems. Windowssystems can only be configured from a Windows CMS.
To configure agents remotely:
1. Select Configure->Configure or Repair Agents from the menu.
Note: The Verify Target Systems page appears if the targets are selected before selectinga tool.
2. Add targets by first selecting from a group from the dropdown box, the contents of the selectedgroup are displayed and can be selected as targets. Or, to select the group itself check theSelect “group” itself checkbox.
3. Click Apply.The targets appear in the Verify Target Systems section.
Note: If the targets selected are not compatible with the tool, the Tool Launch OK? columnprovides a brief explanation for the problem. To remove a target, select the target and thenclick Remove Targets.
4. Select one of the following options:
● Click Add Targets to add more targets to the Target System List.
117
Initial Setup

● To remove a target, select the target and then click Run Targets.
● Click Next to specify tool parameters and to schedule the task.
5. From the Enter login credentials page:
a. In the User name field, enter the system administrator user name for the target systems.
b. In the Password field, enter the system administrator password for the user namepreviously entered.
c. In the Password (Verify) field, reenter the system administrator password exactly as itwas entered in the Password field.
d. For Windows managed systems only, in the Domain field, enter the Windows domain.
Note: The credentials used in this step must work for all target systems that have beenselected. HP recommends using domain administrator or root credentials.
6. Click Next. Click Prev to return to the previous page. The Configure or Repair Settingspage appears.
The following options are available:
● Configure SNMP. Select this option to configure SNMP settings.
If this option is selected, the following steps must be considered:
1. Select Set read community string.
Note: If only HP-UX systems with default SNMP installation are being configured atthis time, you may deselect this option. HP-UX allows read by default(get-community-name is set to public by default on HP-UX systems).
Note: If this option is selected, the Read Only community string is added to the targetsystems. If the target system is SuSE Linux or Microsoft Windows 2003, the managednodes do not always allows SNMP communication between themselves and a remotehost. This setting is modified to allow the instance of the HP Systems Insight Managersystem to communicate SNMP with these target systems.
Note: Repairing the SNMP settings adds a Read Write community string to the targetsystem only if one does not currently exist. This community string is unique for eachsystem, is composed of over thirty characters to include letters and numbers, and isonly visible to the user with administrator privileges for that system. This Read Writecommunity string is required by the Web Agent to perform certain threshold settingcapabilities. This community string is only used locally on the target system and is notused by HP Systems Insight Manager over the network.
2. Select Set traps to refer to this instance of HP Systems Insight Manager in thetarget systems' SNMP Trap Destination List. This allows the target systems to sendSNMP traps to this instance of HP Systems Insight Manager.
● Trust relationship: Set to "Trust by Certificate". Select this option to require systemsto use the Trust by Certificate trust relationship with the System Management Homepage.
118
Initial Setup
For System Management Homepage on the target systems, this option sets the trust modeto Trust by Certificate and copies the HP Systems Insight Manager system certificate tothe target system's trusted certificate directory. This enables HP Systems Insight Managerusers to connect to the System Management Homepage using the certificate forauthentication.
Note: If you experience problems later setting the trust status to Linux, refer to the HPSystems Insight Manager Online Help Troubleshooting help file under CertificateProblems for assistance.
● Set administrator password for Insight Management Agents version 7.1or earlier. Select this option to repair the administrator password on all InsightManagement Agents installed on the target systems as applicable for Windows and Linuxsystems.
Note: Deselect this option if you have Insight Management Agents 7.2 or later installed.
Note: If the remote system is running HP-UX, this option is not executed on the remotesystem since it is not applicable on HP-UX systems. If only HP-UX target systems are beingconfigured at this time, you can deselect this option.
If this option is selected, the following steps must be configured:
1. In the Password field, enter the new administrator password.
2. In the Confirm Password field, re-enter the new administrator password exactly asyou entered it previously.
● Configure secure shell (SSH) access.
If this option is selected, you must select one of the following options:
❍ Host based authentication for SSH - For more information regarding SSH, referto Secure Shell (SSH) in HP Systems Insight Manager white paper athttp://h18013.www1.hp.com/products/servers/management/hpsim/infolibrary.html.
❍ Each user has to be authenticated on the managed system
Note: If the selected systems include Linux or HP-UX systems, and options for ConfigureSNMP settings, Trust relationships and administrator password for HP InsightManagement Agent 7.1 or earlier have been selected, then SSH authentication shouldbe selected now unless already configured earlier.
Note: SSH can be configured only if the OpenSSH service is running on the managedsystems. OpenSSH can be installed on Windows systems, by running the Install OpenSSH tool under Deploy->Deploy Drivers, Firmware and Agents->Install Open SSH.
● Create subscriptions for WBEM events.
Note: This option is only applicable to Linux and HP-UX systems. If this option is selected,the target system is configured to send WBEM indications or events to HP Systems InsightManager.
119
Initial Setup

Note: Subscriptions for WBEM events can be created only if WBEM event providers areinstalled and running on the managed systems.
7. Click Run Now or you can click Schedule to run this task at a later time. Click Prev to returnto the previous page. The Task Results page appears.
Note: The Configure or Repair Agents tool can be used to update multiple target systems,each of which might potentially have different results. The information is used to display theinformation on the stdout tab. The results indicate whether the repair attempt was successful.
Note: Repair of SNMP settings, Trust relationships and administrator password for InsightManagement Agents 7.1 or earlier on Linux systems is executed by a separate task, whichcan be viewed in the tasks log menu selection. Repair of SNMP settings, Trust relationshipson HP-UX systems is executed by a separate task, which can be viewed in the tasks log menuselection. If Linux and HP-UX systems are selected, there are two Task IDs, one for Linux andone for HP-UX systems.
The Task Results page displays the following information:
● Status. This field displays the details for each target system within a task instance.
● Exit Code. This field represents the success or failure of an executable program. If thereturn value is zero or positive, the executable ran successfully. If a negative value isreturned, the executable failed.
● Target Name. This field displays the name/IP address of the target.
● The stdout Tab. This tab displays the output text information.
● The stderr Tab. This tab displays information if the executable experienced an error.
● Files Copied Tab. This tab displays what files are in the process of being copied or havebeen copied to the target system.
● View Printable Report. Reports can be printed for the currently selected target system orfor all target systems associated with the task instance.
To print a report:
1. Click View Printable Report.
An Options Message box appears, asking if you want to generate a report containingonly the currently selected target system or all systems associated with the task instance.
2. Select which report to print.
3. Click OK to print the report, or click Cancel to return to the View Task Results page.
8. If Management HTTP Server is installed on target systems, the login credentials are updatedin the Management HTTP Server password file.
120
Initial Setup

Setting Up Managed Systems ManuallyUsing HP Systems Insight Manager's Configure or Repair Agents is the easiest way to configuremanaged systems. However, the steps to manually configure Linux and HP-UX managed systemsare included in the event manual configuration is necessary.
The following sections detail how to configure managed systems on:
● "Setting Up HP-UX Managed Systems Manually"
● "Setting Up Linux Managed Systems Manually"
Setting Up HP-UX Managed Systems ManuallyYou can use the HP Systems Insight Manager Configure or Repair Agents tool to configure HP-UXmanaged systems simultaneously or you can configure each managed system manually.
Use these general steps to assist you with configuring an HP-UX system manually:
1. Install SSH (bundle T1471AA) if not previously installed.
2. Install WBEM (bundle B8465BA) if not previously installed.
3. (Optional) Configure SNMP to send traps to the CMS.
4. (Optional) Configure DMI on HPUX 11.11 systems (this step is not needed if WBEM installed).
On the CMS:
5. Configure the SSH Keys for this system.
6. Configure the default WBEM user name and password if not previously done.
Note:
SSH and WBEM are installed on HPUX 11.23 systems by default. For 11.11systems, check if installed with this command:
swlist B8465BA T1471AA
7. Subscribe to WBEM Indications/Events
On each managed system:
1. Install SSH on the managed system if not previously installed.
swinstall -s /directory/depot T1471AA
where directory is the path to the depot file and depot is the name of the depot file. Forexample:
swinstall -s /tmp/HPSIM_download.depot T1471AA
121
Initial Setup

2. Install WBEM on the managed system if not previously installed.
swinstall -s /directory/depot B8465BA
where directory is the path to the depot file and depot is the name of the depot file. Forexample:
swinstall -s /tmp/HPSIM_download.depot B8465BA
3. Configure SNMP to send traps to the CMS:
a. Add the full hostname or IP address of the CMS as a trapdest in the following file:
/etc/SnmpAgent.d/snmpd.conf
trap-dest: hostname_or_ip_address
b. Stop the SNMP Master agent and all subagents with the command:
/sbin/init.d/SnmpMaster stop
c. Restart the SNMP Master agent and all subagents with the command:
/usr/sbin/snmpd
4. Configure DMI on the managed system by adding the DNS host name of the CMS.
Note:
DMI only needs to be configured for HP-UX 11.11 and only if WBEM isnot installed.
a. Stop the DMI daemon on the managed system:
/sbin/init.d/Dmisp stop
b. Edit /var/dmi/dmiMachines by adding the host name of the CMS to the end of thisfile. Save the file.
c. Start the DMI daemon:
/sbin/init.d/Dmisp start
5. On the CMS, copy the SSH-generated public key from the CMS to the managed system usingthe mxagentconfig:
Use one of the following commands:
● mxagentconfig -a -n <hostname> -u root -f <file_with_root_password>
or
122
Initial Setup
● mxagentconfig -a -n <hostname> -u root -p <root_password>
Note: Using the -p option exposes the passwd through ps output, so use of the -f option(with a file only readable by root, and containing only the managed system root password)is highly recommended when using mxagentconfig -a. If the -p option is used, enclosethe password in single quotes if the password has any special characters, such as & or $.For more information and options, see the mxagentconfig manpage with manmxagentconfig.
6. Log into the HP Systems Insight Manager GUI. For assistance with this, refer to . Chapter 10. Using the Graphical User Interface Using the GUI, add the default WBEMuser name and password to the Global Protocol Settings page.
Note: An account for at least one of the WBEM user name and password combinations mustexist on each managed system.
Note: This step can be performed once for all the managed systems you are setting up.
a. Select Options->Protocol Settings->Global Protocol Settings.
b. In the Default WBEM settings section, ensure that the Enable WBEM checkbox isselected, and add the default WBEM user name, password, and confirmation password.
c. Click OK.
Note:
An account for at least one of the WBEM user name and passwordcombinations must exist on each managed system. If the user in the GlobalProtocol Settings does not exist on the managed node you can set per-systemWBEM user names and passwords from the System Protocol Settingspage.
7. Using the GUI, add the default WBEM user name and password to the Global ProtocolSettings page.
Note: An account for at least one of the WBEM user name and password combinations mustexist on the CMS.
a. Select Options->Protocol Settings->Global Protocol Settings.
b. In the Default WBEM settings section, ensure that the Enable WBEM checkbox isselected and add the default WBEM user name and password.
c. Click OK.
8. To subscribe to WBEM Indications/Events:
Note: For more information about OnlineDiagnostic, go to WBEM Subscriptions in HP SystemsInsight Manager white paper athttp://h18013.www1.hp.com/products/servers/management/hpsim/infolibrary.html.
123
Initial Setup
a. From the managed system, make sure WBEM is already installed.
Note: Subscribing to WBEM Indications/Events on managed systems is optional.
b. Verify that SysFaultMgmt provider is installed:
cimprovider –ls
You should see EMSWrapperProviderModule
From the CMS:
1. Verifty that WBEM has root access:
mxnodesecurity –l –p wbem –n <systemname>
To subscribe to WBEM Events, you must have root access. If the Global Protocol Settingdoes not match the managed system or does not contain root access, the subscriptionfor WBEM Indications fails. You can verify what access WBEM has by running thefollowing command line:
mxnodesecurity –l –p wbem –n <systemname>
If the managed system does not have root access, you can change the individual system.
Note: You can use the Configure or Repair Agents tool to perform this step withoutpermanently recording a root passwd.
To change the individual system:
a. Tools->System Information->System Page.
b. From the System Page, select Tools & Settings->System Protocol Settings.
2. From the CMS, run the WBEM Indications/Events command line:
mxwbemsub -l -n <systemname>
Setting Up Linux Managed Systems ManuallyYou can use the HP Systems Insight Manager Configure or Repair Agents tool to configure Linuxmanaged systems simultaneously or you can configure each managed system manually.
To manually configure Linux managed systems, perform the following on each managed system:
1. Install and configure SSH.
a. Verify that SSH is installed on the managed system:
rpm -qa | grep ssh
If it is not installed, refer to your Linux provider for information on installing SSH.
124
Initial Setup
b. On the CMS, copy the SSH generated public key from the CMS to the managed systemand place it in the authorized keys file of the execute-as user (root or administrator).
Important: On a non-English CMS, ensure that an administrator account (spelled exactlyas follows, administrator) exists on the CMS, and that mxagentconfig has been runon the CMS for the created administrator account.
i. Launch the Manage SSH Keys dialog box from the CMS command prompt:
mxagentconfig -a -n hostname -u username -p Password
ii. Click Connect.
2. Configure the system to send SNMP traps.
Note: These steps might vary slightly, depending on your version of Linux. Refer to your Linuxprovider for details if these file paths and file names do not exist on your system.
a. Verify that SNMP is installed:
rpm -qa | grep snmp
If it is not installed, refer to your Linux provider for information on installing SNMP.
b. If you have not installed the HP Server Management Drivers and Agents from the ProLiantSupport Pack for Linux, omit this step. Otherwise, stop the HP Server and ManagementDrivers and Agents daemons on the platform where you are installing HP Systems InsightManager using the following command:
/etc/init.d/hpasm stop
Note: If the HP Server Management Drivers and Agents daemon is not installed, omitthis step and step F.
c. Stop the SNMP daemon:
/etc/init.d/snmpd stop
d. Edit the snmpd.conf file using any text editor.
For Red Hat Linux run the following command for opening this file in the vi editor: vi/etc/snmp/snmpd.conf
For SuSE SLES 8 run the following command for opening this file in the vi editor: vi/usr/share/snmp/snmpd.conf
i. Remove the comment symbol (#) from the trapsink line, and add the IP address ofthe CMS:
trapsink IPaddress
where IPaddress is the IP address of the CMS.
ii. Add the CMS to the read only community by adding the line:
125
Initial Setup

rocommunity CommunityName IPaddress
where CommunityName is the SNMP community string used by the CMS andIPaddress is the IP address of the CMS.
iii. Save the changes to the file. To save and close this file using the vi editor, press theEsc key, enter :wq!, and press the Enter key.
e. Start the SNMP daemon:
/etc/init.d/snmpd start
f. Start the HP Server Management Drivers and Agents daemon if it is installed on yoursystem:
/etc/init.d/hpasm start
3. Install the Linux ProLiant Support Pack. To download this software and access installationinformation, go to http://www.hp.com/support/files.
4. Log into the HP Systems Insight Manager GUI. For assistance with this, refer to . Chapter 10. Using the Graphical User Interface .
5. Add the default WBEM user name and password to the Global Protocol Settings page inthe HP Systems Insight Manager GUI.
Note: An account for at least one of the WBEM user name and password combinations mustexist on each managed system.
Note: This step can be performed once for all the managed systems you are setting up.
a. Select Options->Protocol Settings->Global Protocol Settings.
b. In the Default WBEM settings section, ensure that the Enable WBEM checkbox isselected, and add the default WBEM user name, password, and confirmation password.
c. Click OK.
6. Add the default WBEM user name and password to the Global Protocol Settings page inthe HP Systems Insight Manager GUI.
Note: An account for at least one of the WBEM user name and password combinations mustexist on the CMS.
a. Select Options->Protocol Settings->Global Protocol Settings.
b. In the Default WBEM settings section, ensure that the Enable WBEM checkbox isselected and add the default WBEM user name, password, and confirmation password.
c. Click OK.
126
Initial Setup
ExamplesSetting up Windows managed systems
The following example describes how to setup remote Windows systems from a Windows CMS.
To configure remote Windows systems from a Windows CMS:
1. Login to the HP Systems Insight Manager on the Windows CMS with full CMS configurationprivileges.
2. Run the First Time Wizard if you have not already.
3. Run discovery if you have not already.
4. Preconfigure the System Management Homepage and version control components.
5. Install the ProLiant or Integrity Support Packs on remote systems:
● Run the Initial ProLiant Support Pack Install to install the latest ProLiant Support Pack onWindows systems.
6. Run the Configure or Repair Agents feature. For more information, refer to "Run the Configureor Repair Agents feature from the CMS" .
Setting up remote Linux systems from a Linux CMSThe following example describes how to setup remote Linux systems from a Linux CMS.
To configure remote Linux systems from a Linux CMS:
1. Login to the HP Systems Insight Manager on the Linux CMS with full CMS configurationprivileges.
2. Run the First Time Wizard if you have not already.
3. Run discovery if you have not already.
4. Preconfigure the System Management Homepage and version control components.
5. Install the ProLiant or Integrity Support Packs on remote systems:
● Run the Linux Deployment Utility to install the latest Integrity Support Pack on Linux andHP-UX systems. For more information, download the HP ProLiant Support Pack andDeployment Utilities User Guide at http://www.hp.com/servers/psp.
6. Run the Configure or Repair Agents feature. For more information, refer to "Run the Configureor Repair Agents feature from the CMS" .
127
Initial Setup
Setting up remote HP-UX systems from an HP-UXCMS
The following example describes how to set up remote HP-UX systems from an HP-UX CMS.
To configure remote HP-UX systems from an HP-UX CMS:
1. Login to the HP Systems Insight Manager on the HP-UX with full CMS configuration privileges.
2. Run the First Time Wizard if you have not already.
3. Run discovery if you have not already.
4. Ensure the managed system software is installed. For more information, refer to "Installingthe required software on an HP-UX system" .
5. Run the Configure or Repair Agents feature to configure the managed system. For moreinformation, refer to "Run the Configure or Repair Agents feature from the CMS" .
Configuring Protocol SettingsConfiguring the protocol settings defines what systems are added to HP Systems Insight Managerusing discovery.
To configure the protocol settings:
1. Select Options->Protocol Settings->Global Protocol Settings. The Global ProtocolSettings page appears.
2. In the Default ping settings section, select either Use the ICMP protocol for systemreachability (ping) check or Use the TCP protocol for system reachability (ping) checkport number 80. The Use the ICMP protocol for system reachability (ping) check is thedefault and recommended setting.
Select Use the TCP protocol for system reachable (ping) check. port number 80 if yourcompany has disabled ICMP on the corporate network or the corporate policy mandatessystem firewall software to filter out ICMP requests. For example, Windows XP has this featurebuilt in and can result in systems not being automatically discovered. This option enables youto run HP Systems Insight Manager and ping all available systems.
Note: This option only applies to IP-based systems and is available for global, system-widesettings that are used when managing all systems in HP Systems Insight Manager. It is usedby automatic discovery, hardware status polling, the ping tool, and any other tool that mustverify system availability. This option is not available on a single-system basis.
Note: If you select Use the TCP protocol for system reachable (ping) check. port number80, even though HP Systems Insight Manager attempts a connection request to the currentsystem, that system does not need any additional software running on it for this option to work.For example, HP does not require that a Web server be running on port 80. Some networkingsystems might not respond to the TCP request, which is typically seen in low end networkingequipment. Manual additions can be made if it is necessary. However, this system displaysas Critical if hardware status polling is run.
128
Initial Setup

3. Also in the Default ping (ICMP) settings section, set the Default timeout and the Defaultretries. If some systems are managed over a WAN or satellite link, use a larger timeout (forexample, 5 seconds) with at least one retry. For a LAN, a shorter time-out can be used. Thiscan be configured on a single-system basis.
4. In the Default WBEM settings section, select the Enable WBEM checkbox to allowWeb-Based Enterprise Management (WBEM) requests to be sent. Enabled is the default setting.Enter as many default user names and passwords as needed. If your network includes storagesystems, enter the user name and password of each SMI CIMOM in this section. Theidentification process attempts each of these user name and password pairs until a successfulresponse is obtained. Future WBEM requests to that system use the user name and passwordthat succeeded. For Windows-based systems, the user name should include the domain name,for example, domainname\username.
Note: Order the name and password pairs such that root and administrator passwords arelisted first and user and guest passwords are listed second. This order minimizes the searchtime.
5. In the Default HTTP settings section, select the Enable HTTP and HTTPS if it is necessaryto allow Web-based agents and other HTTP port scans to be identified. HP recommends leavingthis option enabled for proper management and discovery of systems.
6. In the Default SNMP settings section, select the Enable SNMP checkbox, which is the systemdefault, and set the Default timeout and Default retries. If some systems are managed overa WAN or satellite link, use a larger timeout (for example, 5 seconds) with at least one retry.For a LAN, a shorter timeout can be used. These settings can also be configured on asingle-system basis.
7. Enter the Default write community string. This value is case-sensitive. Only a few tools needthis option set. Community strings are case-sensitive.
8. Enter the Read community string. This value is case-sensitive. Enter as many as needed.The identification process attempts communication to the system, using each of thesecommunities in succession until a successful response is obtained. Future SNMP requests thenuse the community string that provided a successful response.
9. In the Default DMI settings section, select the Enable DMI checkbox, which is the defaultsetting, to enable Desktop Management Interface (DMI) identification to run on systems. DMIis used to manage some older desktops, HP-UX servers, and some third-party servers. If youdo not need to manage these kinds of systems, DMI can be disabled to improve discoveryperformance.
Note: DMI is not currently supported on Linux systems and is not shown in the user interface.
Note: If DMI is disabled and some systems no longer have a correct system type or productname, re-enable DMI.
Note: DMI identification is only supported on Windows and HP-UX-based central managementserver (CMS) installs. In addition, only like operating systems can be identified. For example,Windows-based CMSs can identify Windows-based DMI, and HP-UX-based CMSs can onlyidentify HP-UX-based DMI systems.
10. Click OK to accept the settings.
129
Initial Setup
Configuring and Executing DiscoveryDiscovery is the process that HP Systems Insight Manager uses to find and identify the systems onyour network to populate the database with that information. A system must first be discovered inorder to collect data and track system status. There are two basic ways to discover new systems:
● Automatic discovery. The process that HP Systems Insight Manager uses to find andidentify the systems on your network to populate the database with that information. A systemmust first be discovered to collect data and track system status.
● Manual discovery. The process that enables you to bypass a full automatic discoveryand add single and multiple systems to the database, create or import the HP Systems InsightManager database Hosts file, and create or import a generic Hosts file.
Configuring and Executing Automatic Discovery1. Select Options->Discovery. The Discovery page appears with the Automatic tab selected.
2. In the For all automatic discoveries section, select Configure general settings. TheGeneral Settings section appears.
3. Select Automatically discover a system when an event is received from it. This optionallows systems to be discovered when a trap or some other supported event is received byHP Systems Insight Manager. It uses the discovery filters and IP address exclusion ranges foradditional filtering of these events.
4. Select Automatically discover a server blade when its Integrated Lights Out managementprocessor is identified. This option adds servers that were indirectly discovered through itsmanagement processor. When these servers are discovered, they are listed with a Disabledstate on the system table view page and the only information displayed is the system serialnumber and the association to the iLO and the enclosure.
5. In the Ping exclusion ranges, templates and/or hosts files field, specify the IP addresses,templates, or hosts files containing IP addresses to exclude from the automatic discoveryprocess. This applies to both range pinging and event based auto-discovery.
Important: When discovering clusters, the ping inclusion range must include the IP addressesof the cluster and the cluster members.
6. Check the Enable discovery filters checkbox.
7. In the Discover the following system types: section, select the type of systems to bediscovered.
Important: When discovering clusters, you must include the Server system type, or so thatthe cluster members are not filtered out.
Note: This is only available when you check the Enable discovery filters checkbox.
8. In the Limit discovery to systems that meet the following criteria section, select from thefollowing:
● Any system that matches the above filter
● All manageable systems (WBEM, SNMP, DMI, WMI or HTTP support)
130
Initial Setup
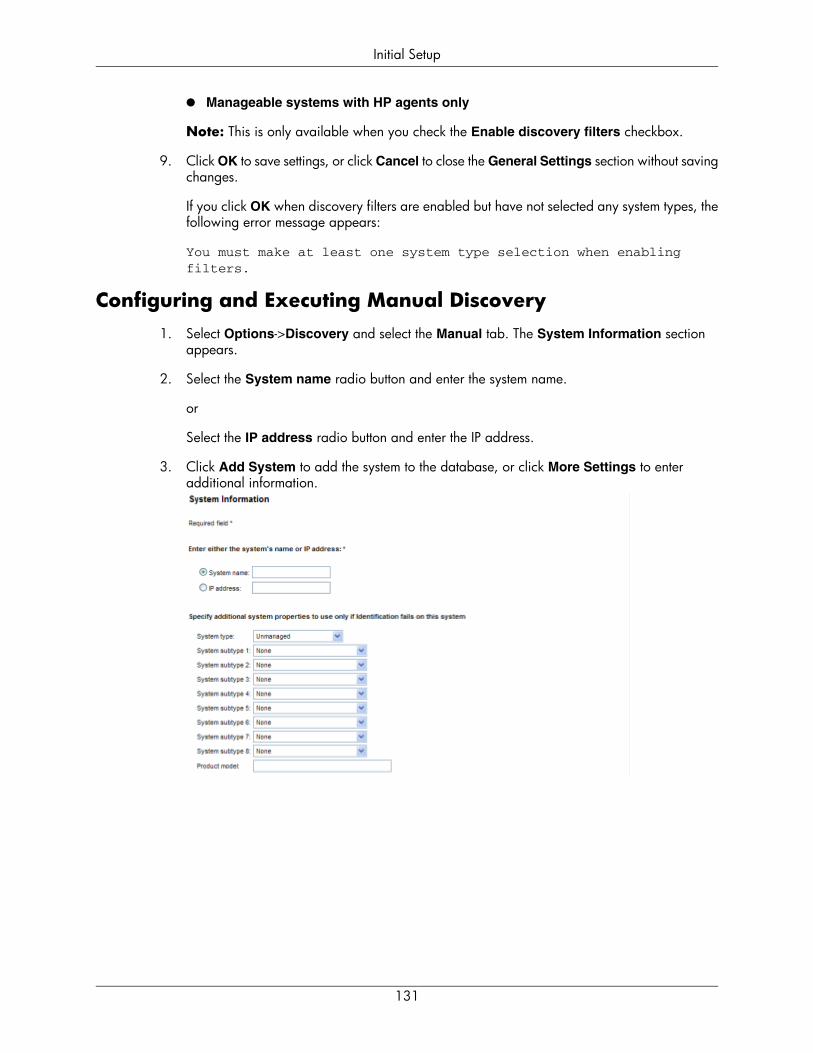
● Manageable systems with HP agents only
Note: This is only available when you check the Enable discovery filters checkbox.
9. Click OK to save settings, or click Cancel to close the General Settings section without savingchanges.
If you click OK when discovery filters are enabled but have not selected any system types, thefollowing error message appears:
You must make at least one system type selection when enablingfilters.
Configuring and Executing Manual Discovery1. Select Options->Discovery and select the Manual tab. The System Information section
appears.
2. Select the System name radio button and enter the system name.
or
Select the IP address radio button and enter the IP address.
3. Click Add System to add the system to the database, or click More Settings to enteradditional information.
131
Initial Setup
● Specify additional system properties to use only if Identification fails on this system.Includes:
❍ System type
❍ System subtype
There are eight available System subtype fields that can later be changed on SystemAttributes page.
❍ Product model
● WBEM Settings. Includes:
❍ User name
❍ Password
● SNMP Settings. Includes:
❍ Timeout (in seconds)
❍ Retries
❍ Read-only community string
❍ Write community string
4. If you clicked More Settings, click Add System to add the system immediately or click FewerSettings to return to the previous brief display. If you clicked Fewer Settings, click AddSystem to add the system to the database.
132
Initial Setup

Adding UsersCreate a new user account to sign into HP Systems Insight Manager. The account must be validon the operating system (includes Active Directory on Windows) on the central management server(CMS), and will be authenticated by the CMS. You must know the operating system user accountname of the user you are adding, but you do not need to know the password.
To create a new user:
1. Select Options->Security->Users and Authorizations->Users, and click New. The NewUser section appears.
2. In the Login name (on central management server) field, enter the operating system loginaccount name to be used to sign into HP Systems Insight Manager. This field is required.
Note: The user cannot sign into HP Systems Insight Manager if the account is not a validlogin. The account is not validated until the user tries to sign into HP Systems Insight Manager.
3. In the Domain (Windows domain for login name) field, enter the Windows domain namefor the login name if the CMS is running a Windows operating system. If left blank, the systemname of the CMS is used as the domain.
4. In the Full name field, enter the user's full name.
5. In the Phone number field, enter the user's phone number.
6. In the E-mail address field, enter the user's e-mail address.
7. In the Copy all authorizations of this user or [template] field, select a template or loginthat already has the predefined authorizations that you want to assign to the login accountyou are creating.
8. In the Central management server configuration rights section, select the level of authorityto assign to the new user from the following options:
● full, allowed to modify all central management server settings. Allows theuser total control of the database. Users can run discovery of systems and data collectiondefine users and authorizations; set Cluster Monitor configuration; configure licensing andprotocol settings; and create, modify, delete, and run reports, snapshot comparisons, tools,custom commands, events, automation tasks, and so on.
● limited, allowed to create/modify/delete all reports and their own tools.Allows the user to create new reports, edit any reports, and delete any reports (includingthe predefined reports).
● none, no configuration of central management server allowed. Allows theuser to view and run predefined reports on the CMS and all managed systems. However,the user has no configuration rights on the CMS or on the managed systems.
9. Under the Login IP Address Restrictions section, in the Inclusion ranges field, enter theIP addresses of the systems that you want this user to be able to use as a client browsing intothis CMS. If you list multiple IP addresses, separate them with a semicolon (;). Each range isa single IP address or two IP addresses separated by a dash (-). The IP addresses must beentered in the standard dotted form, for example, 15.1.54.133. Any spaces surrounding the
133
Initial Setup

semicolons or dashes are ignored. Spaces are not allowed within a single IP address in dottedform. Enter 0.0.0.0 to prevent a user from logging in through a remote system.
Important: If browsing from the central management server, ensure all IP addresses of theCMS are properly included. If browsing to localhost ensure the loopback address 127.0.0.1is also included.
10. In the Exclusion ranges field, enter the IP address of the systems that should be excludedfrom this user as clients browsing into this CMS. Use the same format in the previous step forInclusion ranges.
Note: Be sure to verify that your inclusion and exclusion ranges do not overlap.
Note: Steps 11 though 15 are only for a CMS running Windows.
11. Under the Pager Information section, in the Phone number field, enter the pager phonenumber of the user associated with this user account if you are using a Windows operatingsystem. If the Phone number field is left blank, the paging information is not saved.
12. In the PIN number field, enter the PIN number associated with the pager phone number.
13. In the Message length field, select how many characters can be accepted in the pagingmessage from the dropdown list.
14. In the Baud rate field, select the appropriate baud rate for the pager from the dropdown list.
15. In the Data format field, select the appropriate data format for the pager from the dropdownlist.
16. Click OK to save and close the New User section. You can click Apply to save and keep theNew User section open, or click Cancel to cancel the creation of this user.
The new user account is created.
User groups must exist in the operating system. For Windows, this includes Active Directory.Members of the user groups in the operating system can sign into HP Systems Insight Managerand will inherit the group's attributes for configuration rights and login IP address restrictions, aswell as the group's authorizations. When a group's configuration rights, login IP address restrictions,or authorizations are changed, this change is immediately reflected in all current members of thegroup.
To create a new user group:
1. Select Options->Security->Users and Authorizations->Users, and click New Group. TheNew User Group section appears.
2. In the Group name (on central management server) field, enter the operating system groupname to be used for logging into HP Systems Insight Manager. This field is required.
3. In the Domain (Windows domain for login name) field, enter the Windows domain namefor the group if the central management server (CMS) is running a Windows operating system.
4. In the Full name field, enter the full name for the group. This is displayed in the table on theUsers tab.
134
Initial Setup
5. In Copy all authorizations of this user or [template] dropdown list, select a template orlogin that already has the predefined authorizations that you want to assign to the group youare creating.
6. In the Central management server configuration rights section, select the level of authorityto assign to the new user group from the following options. Users that login into HP SystemsInsight Manager as members of this group inherit these configuration rights.
● full, allowed to modify all central management server settings. Allows theuser total control of the database. Users can run discovery of systems and data collectiondefine users and authorizations; set Cluster Monitor configuration; configure licensing andprotocol settings; and create, modify, delete, and run reports, snapshot comparisons, tools,custom commands, events, automation tasks, and so on.
● limited, allowed to create/modify/delete all reports and their own tools.Allows the user to create new reports, edit any reports, and delete any reports (includingthe predefined reports).
● none, no configuration of central management server allowed. Allows theuser to view and run predefined reports on the CMS and all managed systems. However,the user has no configuration rights on the CMS or on the managed systems.
7. Under the Login IP Address Restrictions section, in the Inclusion ranges field, enter theIP addresses of the systems that you want members of this user group to be able to use as aclient browsing into this CMS. If you list multiple IP addresses, separate them with a semicolon(;). Each range is a single IP address or two IP addresses separated by a dash (-). The IPaddresses must be entered in the standard dotted form, for example, 15.1.54.133. Any spacessurrounding the semicolons or dashes are ignored. Spaces are not allowed within a single IPaddress in dotted form. Enter 0.0.0.0 to prevent a user from logging in through a remotesystem.
Important: If browsing from the central management server, ensure all IP addresses of theCMS are properly included. If browsing to localhost ensure the loopback address 127.0.0.1is also included.
8. In the Exclusion ranges field, enter the IP address of the systems that should be excludedfrom members of this user groups as clients browsing into this CMS. Use the same format inthe previous step for Inclusion ranges.
Note: Be sure to verify that your inclusion and exclusion ranges do not overlap.
9. Click OK to save and close the New User Group section. You can click Apply to save andkeep the New User Group section open, or click Cancel to cancel to close the New UserGroup section without saving the new group.
Configuring Email SettingsConfiguring e-mail settings enables users to receive e-mail notification of certain events.
To configure e-mail settings:
1. Select Options->Events->Automatic Event Handling->E-mail Settings. The E-mail Settingspage appears.
135
Initial Setup

2. Specify the SMTP host in the SMTP Host box.
3. Specify the e-mail address that the management server uses when sending e-mail notificationsin the Sender's Email Address box.
4. To authenticate your SMTP server, select the Server Requires Authentication checkbox.
5. Specify the account name in Account name box.
6. Specify the password in the Password box.
7. Click OK to save changes.
Configuring Paging SettingsConfiguring paging settings enables users to receive pages to notify them of certain events.
To configure paging settings:
1. Select Options->Events->Automatic Event Handling->Modem Settings. The ModemSettings page appears.
2. Click the down arrow in the COM port dropdown box, and select the appropriate COM port.Refer to your modem documentation for details.
3. Click OK to save the setting.
Setting Up Automatic Event HandlingAutomatic event handling enables you to define an action that HP Systems Insight Manager performswhen an event is received. Automatic event handling can be set up to use the e-mail and pagingsettings that you specified in the previous sections.
To set up automatic event handling with events and system attributes that you specify now:
1. Select Options->Events->Automatic Event Handling->New Task. The Automatic EventHandling - New Task page appears.
2. Select with event and system attributes that I will specify.
3. Select name, is highlighted. Enter a name for the task in the Task name box.
4. Click Next. The step 2, Select events page appears.
5. Select the event search criteria for defining the task:
● List criteria
● Comparison option
● Value for the criteria or comparison options selected
To add additional search criteria, click Add.
6. When you have entered the information, click Next to continue with the next step or Previousto return to the previous step. The step 3, Select systems appears .
136
Initial Setup

7. Select the system criteria for defining the task.from the dropdown menus:
● List criteria
● Comparison option
● Value for the criteria or comparison options selected
8. To add additional criteria, click Add.
9. When you have entered the information, click Next to continue with the next step or clickPrevious to return to the previous step. Step 4, Select actions page appears.
10. Select from the following:
● Send page (Windows only)
Add users to be paged from the dropdown list of users by clicking >>. Click << to removeusers from the list of users to be paged. The pager number for an HP Systems InsightManager user is set on the Users and Authorizations page. If a user name in the Userslist is inactive, the pager information for the user has not been configured. You can addthe user to the list of users to be paged, but pager messages are not sent to this user untilthe pager information is provided on the Users and Authorizations page.
● Send e-mail
In the To field, enter the list of e-mail addresses that should receive the notification,separating each entry with a comma.
In the CC field, enter any e-mail address that should receive a copy of the e-mail, separatingeach entry with a comma.
In the Subject field, enter a note describing the subject of the e-mail.
In the Message Format field, select from the following formats based on the encodingpreference of the recipient:
❍ Standard. A default message format that sends a text e-mail message to the recipients
❍ Pager/SMS. An e-mail message formatted with the same information and format as apager message is sent to the recipients
❍ HTML. An e-mail message that looks like the HTML Event Details page is sent to therecipients
In the Encoding field, select from the following formats:
❍ Western European (ISO-8859-1)
❍ Unicode (UTF-8)
❍ Japanese (ISO-2022-JP)
❍ Japanese (Shift_JIS)
❍ Japanese (EUC-JP)
137
Initial Setup

● Run custom command
Select a custom command from the Name dropdown list. Custom commands are createdunder the Tools->Custom Commands->New Custom Command option.
● Assign
Enter the name of the person to whom to assign the task. The event is assigned to this userwhen received.
● Forward as SNMP trap
Enter a system name or IP address in the Name or IP text field, and click >> to add it tothe Trap recipients box.
Click Delete if you want to delete a recipient after first highlighting the name in the Traprecipients box. Use the up and down arrows to scroll to the recipient to delete.
● Write to system log
On Windows NT and Windows XP systems, the event details are written to the ApplicationLog, and the Source column of the Event Log is listed as HP Systems Insight Managerfor the logged event. On Linux and HP-UX systems, the event details are logged to thesystem log, which is usually located in the file /var/log/messages on Linux and in/var/adm/sysLog/syslog.log on HP-UX.
● Clear event
Received events are cleared based on the criteria selected when task executes.
11. After you have made your selections, click Next to continue with the next step or Previousto return to the previous step. The step 5, Select time filter appears.
12. Select the box if you want to use time filters, and select an option from the dropdown list.
a. Click Manage Filters if you want to set user defined filters.
b. Select the View time filter box. A time filter popup window appears, showing the timesselected.
If the Use time filter checkbox is not selected, actions are triggered whenever the eventsmatching the selected criteria are received.
If the Use time filter checkbox is selected, actions are triggered only when they occurduring the days and times specified by the selected time filter.
c. When you have entered the information, click Next to continue with the next step orPrevious to return to the previous step. Step 6, Review summary page appears. TheTask name, the events, system criteria, and Action(s) information are displayed. Ifa paging or e-mail option was selected, the modem and e-mail settings are displayed,along with buttons to change the settings.
13. Click Edit Modem Settings to edit the modem settings, or click Edit e-mail Settings to editthe SMTP settings.
138
Initial Setup
Note: The event and system search criteria are displayed at the bottom of the page. Thisinformation can be extremely complex and long. Therefore, you might need to scroll down toview all of the criteria.
14. Click Finish to create the new task, or click Previous to go back to the previous step.
To set up automatic event handling with an existing event list:
1. Select Options->Events->Automatic Event Handling->New Task. The Automatic EventHandling - New Task page appears.
2. Select with an existing event collection. The step 1 Select name appears.
3. Enter a name for the task in the Task name box.
4. Click Next. The step 2, Select existing event collection page appears.
5. Select the event collection from the dropdown box. This step enables you to select an eventcollection and its associated system collection. Click View to view a read-only view of theevent and system collection criteria. Click Previous to return to the previous step, or clickNext to continue with the next step. The step 3, Select actions page appears.
6. Select actions for this task. Select from the following:
● Send page (Windows only)
Add users to be paged from the dropdown list of users by clicking >>. Click << to removeusers from the list of users to be paged. The pager number for an HP Systems InsightManager user is set on the Users and Authorizations page. If a user name in the Userslist is inactive, the pager information for the user has not been configured. You can addthe user to the list of users to be paged, but pager messages are not sent to this user untilthe pager information is provided on the Users and Authorizations page.
● Send e-mail
In the To field, enter the list of e-mail addresses that should receive the notification.
In the CC field, enter any e-mail address that should receive a copy of the e-mail, separatingeach with a comma.
In the Subject field, enter a note describing the subject of the e-mail.
In the Message Format field, select from the following formats based on the encodingpreference of the recipient:
❍ Standard. A default message format that sends a text e-mail message to the recipients
❍ Pager/SMS. An e-mail message formatted with the same information and format as apager message is sent to the recipients
❍ HTML. An e-mail message that looks like the HTML Event Details page is sent to therecipients
In the Encoding field, select from the following formats:
❍ Western European (ISO-8859-1)
139
Initial Setup

❍ Unicode (UTF-8)
❍ Japanese (ISO-2022-JP)
❍ Japanese (Shift_JIS)
❍ Japanese (EUC-JP)
● Run custom command
Select a custom command from the Name dropdown list. Custom commands are createdunder the Tools->Custom Commands->New Custom Command option.
● Assign
Enter the name of the person to whom to assign the task. The event is assigned to this userwhen received.
● Forward as SNMP trap
Enter a system name or IP address in the Name or IP text field, and click >> to add it tothe Trap recipients box.
Click Delete if you want to delete a recipient after first highlighting the name in the Traprecipients box. Use the up and down arrows to scroll to the recipient to delete.
● Write to system log
On Windows NT and Windows XP systems, the event details are written to the ApplicationLog, and the Source column of the Event Log is listed as HP Systems Insight Managerfor the logged event. On Linux and HP-UX systems, the event details are logged to thesystem log, which is usually located in the file /var/log/messages on Linux and in/var/adm/sysLog/syslog.log on HP-UX.
● Clear event
Received events are cleared based on the criteria selected when task executes.
7. After you have made your selections, click Next to continue with the next step or Previousto return to the previous step. The step 4, Select time filter pages appears.
8. Select the Use time filter box if you want to use time filters, and select an option from thedropdown list.
a. Click Manage Filters if you want to set user defined filters.
b. Click View time filter. A time filter popup window appears, showing the times selected.
If the Use time filter checkbox is not selected, actions are triggered whenever the eventsmatching the selected criteria are received.
If the Use time filter checkbox is selected, actions are triggered only when they occurduring the days and times specified by the selected time filter.
140
Initial Setup
c. When you have entered the information, click Next to continue with the next step orPrevious to return to the previous step. The step 5, Review summary page appears.The Task name, the selected event collection, the events, system criteria, andAction(s) information are displayed. If a paging or e-mail option was selected, the modemand e-mail settings are displayed, along with buttons to change the settings.
9. Click Edit Modem Settings to edit the modem settings, or click Edit e-mail Settings to editthe SMTP settings.
10. Click Finish to create the new task, or click Previous to go back to the previous step.
Adding ToolboxesCreate a toolbox to configure a group of tools to which a user has access.
To add a toolbox:
1. Select Options->Security->Users and Authorizations->Toolboxes, and then click New.The New Toolbox section appears.
2. In the Name field, enter a name for the new toolbox. This field is required.
3. In the Description field, enter a description for the toolbox.
4. Select Toolbox is enabled to enable the toolbox and all authorizations created with thistoolbox.
5. In the Show tools in category field, select the category to display a list of tools in the availabletools list. Select the tools to be assigned to this toolbox in the available tools list, and click >>.
The selected tools appear in the Toolbox contents list. You can select a tool displayed inthe Toolbox contents list, and click << to remove it from the assigned tools list.
6. Click OK to save the new toolbox and close the New Toolbox section. Click Apply to savethe settings without closing the New Toolbox section, or click Cancel to cancel the newtoolbox creation and return to the Toolboxes section.
Adding AuthorizationsAuthorize your users for a toolbox on a system or group of systems.
To add authorizations:
1. Select Options->Security->Users and Authorizations->Authorizations, and then clickNew. The New Authorizations section appears.
2. In the Select dropdown box, select User(s) or UserGroup(s), and then select the users orgroups in the box. This field is required.
3. In the Enter authorizations for the selected user(s) section, select one of the followingoptions:
● Copy all authorizations of this user or [template]:
141
Initial Setup
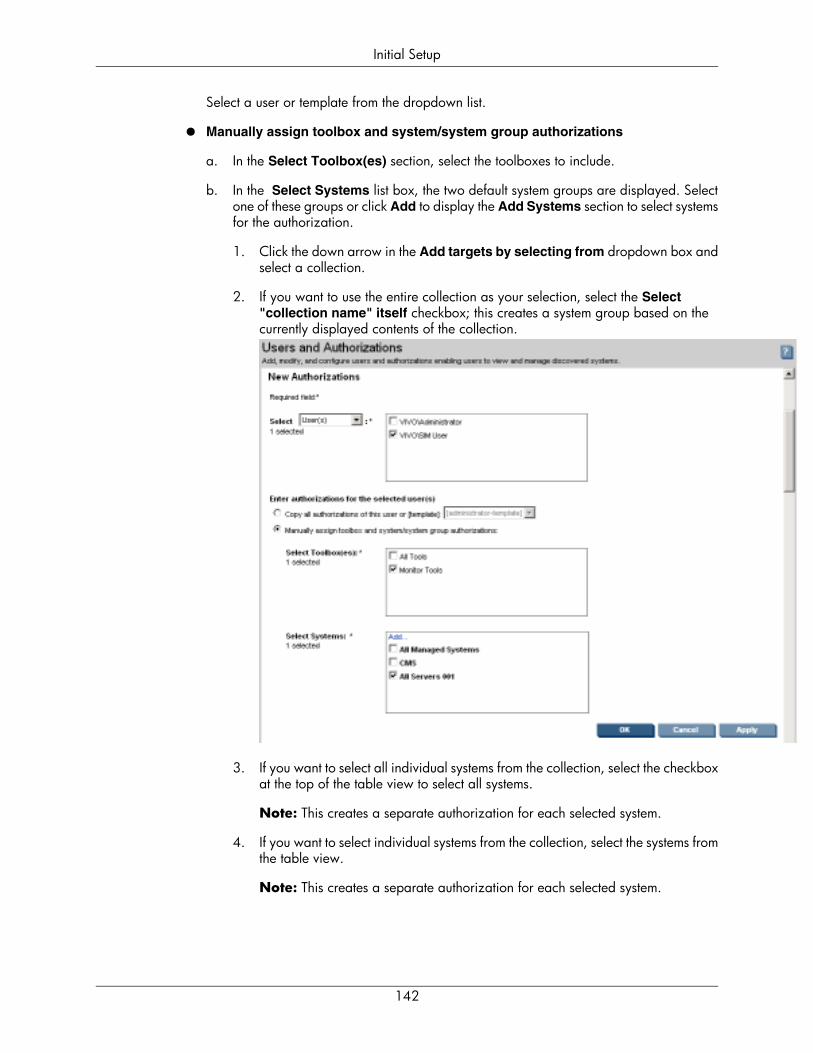
Select a user or template from the dropdown list.
● Manually assign toolbox and system/system group authorizations
a. In the Select Toolbox(es) section, select the toolboxes to include.
b. In the Select Systems list box, the two default system groups are displayed. Selectone of these groups or click Add to display the Add Systems section to select systemsfor the authorization.
1. Click the down arrow in the Add targets by selecting from dropdown box andselect a collection.
2. If you want to use the entire collection as your selection, select the Select"collection name" itself checkbox; this creates a system group based on thecurrently displayed contents of the collection.
3. If you want to select all individual systems from the collection, select the checkboxat the top of the table view to select all systems.
Note: This creates a separate authorization for each selected system.
4. If you want to select individual systems from the collection, select the systems fromthe table view.
Note: This creates a separate authorization for each selected system.
142
Initial Setup
5. Click Apply to save system selections and return to the New Authorizationssection, or click Cancel to return to the New Authorizations section withoutsaving changes.
Note: A system group is a group of systems based on a system collection and usedfor authorizations. It is a static snapshot of the contents of the collection at the timethe system group was created. There are two default system groups that are not basedon collections. The All Managed Systems system group contains every managedsystem, except the central management server (CMS). The CMS is excluded so thatusers are not mistakenly assigned the authorization to manage the CMS system itself.There is a CMS group created explicitly for the CMS. These default system groupscannot be edited, updated, or deleted.
c. If you selected individual systems of a collection, each selection populates the list boxand is selected for inclusion in the authorization. If you selected a collection and thecollection has been used previously in an authorization, a message appears statingthat a system group for the collection exists and will be updated with current sourcecollection content. This affects all authorizations associated with that collection. Whena collection is used for the first time, no message appears. A system group with thename of the collection followed by three numbers, usually 001, is displayed in theSelect Systems dropdown list box and is selected.
d. Click OK to save the new authorization and close the New Authorizations section,or if you do not want to save changes, click Cancel to cancel the creating process.
Setting Up Managed Storage SystemsStorage Management Initiative Specification (SMI-S) is a Storage Networking Industry Association(SNIA) standard that enables interoperable management for storage networks and storage devices.HP Systems Insight Manager uses this standard to discover and manage the storage systems itsupports.
You must have a storage system’s WBEM SMI-S provider installed and configured in order for HPSIM to discover it. This includes storage devices such as Fibre Channel disk arrays, switches, tapelibraries, or hosts (with Fibre Channel host bus adapters.
Refer to the HP Systems Insight Manager SMI-S Provider webpagehttp://www.hp.com/go/hpsim/providers. to view the latest information regarding HP SIM supportfor a particular device. This webpage offers information on obtaining, installing, and configuringSMI-S providers.
Installing SMI-S ProvidersEach storage vendor is responsible for the delivery and installation of the SMI-S provider for itsstorage system. The webpage referenced previously provides information on obtaining non-HPSMI-S providers. Also, consult the storage vendor’s website or representative for more informationregarding their SMI-S providers. For each storage system:
1. Verify that the applicable SMI-S provider is installed.
2. If the SMI-S provider is not installed, obtain and install it per the vendor’s installation instructions.
143
Initial Setup

Verifying SSLHP Systems Insight Manager requires that Secure Sockets Layer (SSL) is enabled for the SMI-Sprovider in order to discover and manage the storage system that the provider supports. Verifythat SSL is enabled for each SMI-S provider.
This represents HP SIM’s default global setting for SSL; however, you can modify this setting so thatSSL is disabled. When this global setting is set to disabled, all SMI-S providers must be configuredto have SSL disabled.
Note:
This is a global setting for HP SIM. All SMI-S providers must be configured to matchthe global setting. If a provider does not match this setting, the storage system itsupports will not be discovered or managed by HP SIM.
Configuring SMI-S providersOccasionally, it might be necessary to modify an SMI-S provider’s port number or password. Usethe provider’s documentation to perform these modifications.
For example, if two SMI-S providers are installed on the same host but they do not share the sameCIMOM, then you must configure the providers to use different ports to communicate with the CMS.The CIMOM is the part of the SMI-S provider that communicates with the CMS.
Configuring HP Systems Insight Manager to discoverstorage systems
After verifying that each storage system’s SMI-S provider is installed and configured, configure HPSIM to discover the storage systems.
1. Enter the user name and password for each provider’s SMI CIMOM in the Default WBEMsettings section on the “Setting Global Protocol’s page.
2. Add each SMI CIMOM IP address to the System Automatic Discovery task or to theCreating a New Discovery task. Refer to the HP Systems Insight Manager Technical ReferenceGuide at http://h18013.www1.hp.com/products/servers/management/hpsim/infolibrary.htmlfor more information.
HP Systems Insight Manager discovers the storage systems after the next automatic discovery task.If you want to discover your storage systems immediately, run the discovery task as described inthe “Running a Discovery Task” section of the the HP Systems Insight Manager Technical Referenceguide.
144
Initial Setup

Chapter 13. ConfigurationOptions
There are several configurable parameters in HP Systems Insight Manager that are not availablefrom the GUI. These parameters can only be configured by editing a configuration file on the CMS.
Note:
All HP Systems Insight Manager parameters have been set to predefined values thatare appropriate for most situations. These parameters should only be changed ifyou are experiencing issues with the default values.
There are two main default locations where configuration files are stored.
For HP-UX and Linux:
● /etc/opt/mx/config● /opt/hpwebadmin/lib
For Windows:
● C:\Program Files\HP\Systems Insight Manager\config\● C:\Program Files\HP\Systems Insight Manager\hpwebadmin\lib
The Windows directory paths vary if HP Systems Insight Manager is not installed in the defaultlocation.
These files follow the format of a Java properties file. Therefore, the keys in these files arecase-sensitive. In addition, the backslash (\) must be represented by a double-backslash (\\). Formore information about the Java property file format, refer to http://java.sun.com/.
This chapter provides information on the following configuration options:
● "CPU Utilization During Data Collection" ● "GUI Time-Out Policy" ● "HP Systems Insight Manager Audit Log Configuration" ● "Lifetimes for Entries on the Task Results Page"
CPU Utilization During Data CollectionOverview
The data collection taskruns many threads in parallel to overlap computing and database operationswith the wait for managed systems to respond. On slower systems, this could potentially saturatethe CPU for some time, depending on the processor speed of the CMS system and the number ofsystems being collected. Therefore, HP SIM provides some strategies to lessen the CPU usage.
145
ImplementationTo lessen the CPU usage during data collection on the CMS:
● Limit the number of systems that are being collected at one time. For example, create separatedata collection tasks for different groups of systems and schedule them to run at different times.
● Configure the CMS to use a remote database on a system other than the CMS. A substantialportion of the CPU load is consumed by the database during data collection. This option is onlysupported with a Windows CMS.
● Lower the DataCollectionThreadCount parameter in the globalsettings.props file.This parameter defaults to 3. Lowering it to 2 or 1 reduces the CPU demand of data collectiontasks, but it increases the time required to complete the tasks.
GUI Time-Out PolicyOverview
HP Systems Insight Manager provides two alternative time-out policies. The first time-out policy isfor environments in which HP Systems Insight Manager is used to monitor system status, which iscalled the monitor time-out policy, and it is similar to the policy used by Insight Manager 7. Thesecond time-out policy is more strict and will time-out inactive users. This is called the active time-outpolicy and it is similar to the policy used by Servicecontrol Manager.
Monitor time-out policy. The monitor time-out policy keeps sessions alive provided the userhas a Web browser window open displaying the HP Systems Insight Manager GUI. Closing thebrowser or navigating to another Web page starts the timer for the time-out period. The defaulttime-out period is 20 minutes. Users must use some other means to protect an unattended sessionfrom illegal use, such as password-protected screen savers.
Active time-out policy. The active time-out policy only keeps sessions alive if the user isactively using the GUI, such as clicking on links and buttons. Display and refresh of the banner isnot sufficient to keep the session alive. The user is timed-out either by inactivity, closing the browser,or navigating to another site. The default time-out period is 20 minutes.
Implementation● To configure the time-out policy, edit the globalsettings.props file. You can switch between
these modes or change the time-out period. The default time-out policy is the monitor policy.The monitor policy is enabled when:
EnableSessionKeepAlive=true
To enable the active time-out policy, change this value to false.
EnableSessionKeepAlive=false
● To change the default time-out period, edit the web.xml file. The default location for this fileis:
❍ For HP-UX or Linux:
146
Configuration Options

/opt/mx/jboss/server/hpsim/deploy/jbossweb-tomcat50.sar/conf/web.xml❍ For Windows:
CC:\Program Files\HP\Systems InsightManager\jboss\server\hpsim\deploy\jbossweb-tomcat50.sar\conf\web.xml
Locate the session-timeout element and set it to a new value in minutes.
<session-timeout>20</session-timeout>
HP Systems Insight Manager Audit LogConfigurationOverview
Several features of the HP Systems Insight Manager Audit Log are configurable. For example, youcan specify which tools log data and the maximum Audit Log file size. The HP Systems InsightManager Audit Log is configured through the log.properties file and tool logging is enabledor disabled through the XML tool definition files.
Tool behaviors. The XML tool definition file provides an option to disable logging ofsingle-system aware (SSA) and multiple-system aware (MSA) command tools. The log attribute forthe command element specifies whether the results of the command are output to the HP SystemsInsight Manager log file. Command output is logged by default.
Audit Log parameters. In the log.properties file, you can configure the following AuditLog parameters:
● File name● File extension● Maximum file size in megabytes● File extension of the roll-over name● Amount of memory allocated for queuing items to be written to the Audit Log
Audit Log location. The location of the Audit Log can be configured using thepath.properties file.
ImplementationChanges made to the log.properties file do not take effect until the log manager daemon orservice is restarted. For Linux and HP-UX, restart the HP Systems Insight Manager daemons usingmxstop and mxstart. For Windows, restart the HP Systems Insight Manager service.
Caution:
The queue size should be changed only with extreme care. If the queue is set toohigh, the log manager consumes too much system memory.
147
Configuration Options

Note:
When the Audit Log file reaches the maximum file size, the log is renamed withMX_LOGROLLFILEEXT extension and a new file is started. If a previous version ofthe file has already been renamed with the MX_LOG_ROLLFILEEXT extension, itwill be an automatic roll-over of an audit log file. A roll-over will not occur until atask running is completed. However, after one hour of exceeding the maximum filesize, if the task is not finished, then the audit log file will roll over to another file.
To configure the location of the Audit Log:
1. For Windows, create a file named path.properties under C:\ProgramFiles\HP\Systems Insight Manager\config.
For Linux and HP-UX, create a file named path.properties under /etc/opt/mx/config.
2. Add the following entry in the path.properties file: LOG=\\Auditlog\\Logs orLOG=C:/Auditlog/Logs .
Note: C:\\Auditlog\\Log is listed here as an example. This path is user defined.
3. For Linux and HP-UX, restart the HP Systems Insight Manager daemons (mxstop and mxstart).For Windows, restart the HP Systems Insight Manager service. After restarting the service, anew log file named mx.log resides in the directory specified in path.properties file.
Lifetimes for Entries on the Task Results PageOverview
HP Systems Insight Manager enables you to set how long entries remain on the Task ResultsPage after a task completes its results.
Short and long task lifetimes. Some task results are kept for a short time, while other taskresults are kept for a longer time. Tasks fall into one or the other category based on the type oftool associated with them. Tasks for the following tools have a short lifetime:
● Web-launch tools● Tools that run from the mxexec command line using the -O or -o options to save the command
output● Tools that run X-Window commands● Tools that specify in their tool definition the "job-log" flag as disabled including:
❍ Hardware Status Polling❍ Data Collection❍ Identify Systems❍ Software Status Polling❍ Delete Events❍ System Protocol Settings❍ Automatic Discovery❍ Hardware Status Polling
148
Configuration Options
Tools in this category have no task output, have task output that is saved outside of HP SystemsInsight Manager, or have task results that are unlikely to be of long-term interest. Tasks for all othertools have the long lifetime.
Frequently scheduled tasks. Task results can also be removed from the Task ResultsPage if a certain number of task results for a scheduled task accumulate. This setting defaults to10 instances of a single task. If more than 10 accumulate on the results page, then the oldest taskresult for this scheduled task is removed.
Last result tasks. A task result is kept indefinitely if it is the last result for a scheduled task.For example, if a scheduled task is disabled, its final task result is kept indefinitely, or until the taskis enabled and more task results accumulate.
ImplementationTo configure the short and long task lifetimes, edit the mx.properties file.
● The short lifetime defaults to 30 minutes. To change that time, edit:
MX_JOB_CACHE_TIME_COMPLETED_JOBS=30
● The long lifetime defaults to 30 days. To change that time, edit:
MX_JOB_MAX_COMPLETED_JOB_AGE=30
● Task results for frequently scheduled tasks start to drop off after 10 instances. To change thisvalue, edit:
MX_JOB_MAX_COMPLETED_JOBS_PER_TASK=10
Note:
The limit of 10 task results applies to scheduled tasks with the "job-log" flagenabled in the tool definition. Scheduled tasks for the tools with the "job-log"flag disabled have a limit of 1. This value is not configurable.
● By default, the last task results for a scheduled task is kept indefinitely. If you want to keep morethan 1 job, edit:
MX_JOB_MIN_COMPLETED_JOBS_PER_TASK=1
Note:
This many job instances per task is kept regardless of theMX_JOB_MAX_COMPLETED_JOB_AGE setting.
149
Configuration Options

Chapter 14. Troubleshooting Installation Issues
I am unable to load HP Systems Insight Manager on Windows NT 3.51 or WindowsNT 4.0.
Solution: Windows NT 3.51 and Windows NT 4.0 are not a supported platform.
You receive a Database Connection Error during the Java-based databaseinstallation portion of HP Systems Insight Manager installation.
Solution: Verify that the target Microsoft SQL Server service (MSSQL) is running (select ControlPanel->Services->MSSQLSERVER).
Upgrade IssuesWhen upgrading from previous versions of HP Systems Insight Manager to HPSystems Insight Manager 5.0, tools that are now obsolete can remain in theMonitor Tools toolbox.
If upgrading from HP Systems Insight Manager 4.2 or later, the list of tools include:
General Toolstype
General toolscat
General toolsfind
If upgrading from a version prior to HP Systems Insight Manager 4.2, the list of tools include:
General toolstype
General toolscat
General toolsfind
General toolscp
General toolsmv
General toolsrm
General toolscopy
General toolsdel
Solution:
1. To remove the obsolete tools, sign in HP Systems Insight Manager as a full-configuration-rightsuser.
2. Select Options > Security > Users and Authorizations, and then select the Toolboxes tab.
3. Select the Monitor Tools toolbox.
4. Click Edit.
150

5. In the Toolbox contents panel, select the tools to remove and click the <<button.
6. Click OK to save.
151
Troubleshooting
Glossaryagent A program that regularly gathers information or performs some
other service without the user's immediate presence. HP SystemsInsight Manager agents provide in-depth hardware and softwareinformation and subsystem status to HP Systems Insight Managerand numerous third-party management applications.See Also management agent.
alarm A user-configurable notification displayed in the System Statuspanel of HP Systems Insight Manager when certain events occur.For instance, if a monitored item changes, an alarm notifies theuser that a change has occurred.See Also trap, event.
all events Systems where any event types have occurred.
All Tools toolbox A default toolbox that provides complete access to all tools forthe authorized system or system group.
attribute A single characteristic of a manageable product or component,as in an attribute of a Management Information Format (MIF) file.A set of related attributes constitutes a group. For example, theclock speed of a processor chip is an attribute of a group thatdescribes that chip.See Also Management Information Format.
authentication The process of identifying an individual, based on a user nameand password. Authentication is distinct from authorizations andensures that the individual is who they claim to be.
authorizations A mapping of a relationship between a user, a toolbox, and asystem or system group.
automatic discovery The process that HP Systems Insight Manager uses to find andidentify the systems on your network and populate the databasewith that information. A system must first be discovered to collectdata and track system health status.
available software A listing of the software components available in the repositoryto which the Version Control Agent has been configured to point.When browsing directly into a Version Control Agent, theseadditional components can be selected for installation.
banner The section of the GUI at the top of the screen that includes theuser name and links to the Home page and sign out functions.
caution A note to indicate that failure to follow directions could result indamage to equipment or loss of information.
central management server () A system in the management domain that executes the HP SystemsInsight Manager software. All central operations within HPSystems Insight Manager are initiated from this system.
152

central processing unit pollingrate
The rate for how often the Cluster Monitor CPU Resource checksCPU utilization as reported by HP Insight Management Agent onmonitored systems.
certificate An electronic document that contains a subject's public key andidentifying information about the subject. The certificate is signedby a certificate authority (CA) to bind the key and subjectidentification together.See Also certificate authority.
certificate authority () A trusted third-party organization or company that issues digitalcertificates used to create digital signatures and public-privatekey pairs. The role of the CA in this process is to guarantee thatthe individual who has been granted the unique certificate is theindividual they claim to be.
cleared status A status condition that indicates a system is cleared.
clearing events Changing the event status from uncleared to cleared.
clients HP desktop, portable, and workstation systems.
cluster A parallel or distributed computing system made up of manydiscrete systems that form a single, unified computing resource.Clusters vary in their features, complexity, and the purposes forwhich they are best suited.
cluster IP address The IP address of the cluster.
cluster monitor A core component of HP Systems Insight Manager. Cluster Monitoradds the ability to monitor and manage multi-node clusters. ClusterMonitor also manages multiple cluster platforms in aheterogeneous environment.
cluster monitor resource A program that provides a monitoring or management functionfor clustered nodes in a cluster.
cluster system identification Information about cluster systems. This information is stored inthe database.
collections The method for grouping system or event searches.
command line interface () A program interface where commands can be executed directlyfrom the command shell of the operating system command shell.
common information model () An object-oriented schema defined by the Desktop ManagementTask Force (DMTF). CIM is an information model guide thatdescribes and shares management information enterprise-wide.CIM is designed for extending each management environmentin which it is used.
common information modelobject manager ()
A CIMOM acts as the interface for communication betweenweb-based enterprise management (WBEM) providers andmanagement applications such as HP Systems Insight Manager.A CIMOM that provides an interface for an SMI-S provider iscalled an SMI CIMOM.
153
Glossary
communications protocol See management protocol.
component A component is a single, self-describing, installable (interactiveor silent) binary file containing a single piece of software, suchas firmware image, driver, agent, or utility, that is supported bythe management and update tools.
configuration history report The Survey Utility that contains reports that show configurationdetails for server and compares configuration history files fordifferences.
Configure or Repair Agents An HP Systems Insight Manager plug-in feature that enables youto repair credentials for SNMP settings and trust relationships thatexist between HP Systems Insight Manager and target systems.You can also update Web Agent passwords on target systemsthat have 7.1 agents or earlier installed.
control tasks Sequences of instructions that are associated with a search, event,or both, such as Delete Events, Remove Disk Thresholds, Set DiskThreshold, and Set Device Access community strings.
critical status A state generated when HP Systems Insight Manager can nolonger communicate to a managed system.
custom commands Tasks that launch an application on the server that is running HPSystems Insight Manager.
data collection reports Data collection reports include information about discoveredsystems in a single instance or a historical trend analysis report.HP Systems Insight Manager supports Overwrite existing dataset (for detailed analysis), formerly known as Single InstanceData Collection task in Insight Manager 7, and Append newdata set (for historical trend analysis), formerly known asHistorical Data Collection task in Insight Manager 7. WithOverwrite existing data set (for detailed analysis), data iscollected from a system at a single instance. With Append newdata set (for historical trend analysis), data detailing thesystem history is collected.
data collection tasks Procedure that involves gathering information from a group ofmanaged systems and storing that information in the database.HP Systems Insight Manager uses Hardware Status Polling andData Collection Tasks to implement collection.
Desktop ManagementInterface ()
An industry-standard protocol, primarily used in clientmanagement, established by the DMTF. DMI provides an efficientmeans of reporting client system problems. DMI-compliantcomputers can send status information to a central managementsystem over a network.
Desktop ManagementTaskforce ()
An industry standard body that defines DMI and WBEM standardsfor the industry. HP is an active sponsor and participant in theDMTF body.
154
Glossary

digital signatures A technology used to validate the sender of a transaction. Thistechnology uses private keys to digitally sign the data and publickeys to verify the sender.
discovery A feature within a management application that finds andidentifies network objects. In HP management applications,discovery finds and identifies all the HP systems within a specifiednetwork range.
discovery filters Enables users with full-configuration-rights to prevent or allowcertain system types from ever being added to the database.
discovery template Files that can be used by automatic discovery in lieu of typingthe addresses directly in to the Ping inclusion ranges orExclusion ranges fields on the Automatic Discovery - GeneralSettings page and are designed to be used as a quick way tochange the scope of automatic discovery.
Distributed Component ObjectModel ()
An extension of the Component Object Model (COM) that enablesCOM components to communicate between clients and serverson the same network.
distributed task facility () A management application that manages the remote executionof tasks on managed systems.
DMI See Desktop Management Interface.
Domain Name Service () A service that translates domain names into IP addresses.
e-mail notification One of the notification tasks in HP Systems Insight Manager thatsends notifications through e-mail.
edit collection To modify existing collections to add or remove search criteria.
enclosure A physical container for a set of blades servers. It consists of abackplane that routes power and communication signals andadditional hardware for cabling and thermal issues. It also hoststhe CPU or server power supplies.
event Information sent to certain users that something in the managedenvironment has changed. Events are generated from SNMP trapsand are preconfigured in this release. HP Systems Insight Managerreceives a trap when an important event occurs. Events aredefined as:
● Warning. Events of this type indicate a state that mightbecome a problem.
● Informational. Events of this type require no attentionand are provided as useful information.
● Normal. Events of this type indicate that this event is nota problem.
● Minor. Events of this type indicate a warning conditionthat can escalate into a more serious problem.
● Major. Events of this type indicate an impending failure.
155
Glossary
● Critical. Events of this type indicate a failure and signalthe need for immediate attention.
event overview A chart that summarizes the uncleared events by product type.
external sites Third-party application URLs.
full-configuration-rights user A user who is automatically authorized for the All Tools toolboxon all systems, including the CMS. This type of user has beengiven special privileges to administer the HP Systems InsightManager software.
graphical user interface () A program interface that takes advantage of the graphicscapabilities of the computer to make the program easier to use.The HP Systems Insight Manager GUI is Web-enabled anddisplays in a Web browser.
hosts files A file that includes all critical system information from the HPSystems Insight Manager database, such as IP addresses.
HP Insight Management Agent A program that regularly gathers information or performs someother service without the user's immediate presence.
HP ProLiant and IntegritySupport Pack
An ProLiant and Integrity Support Pack is a set of HP softwarecomponents that have been bundled together by HP, and verifiedto work with a particular operating system. An ProLiant andIntegrity Support Pack contains driver components, agentcomponents, and application and utility components. All of theseare verified to install together.
HP ProLiant Essentials VirtualMachine Management Pack()
Provides central management and control of Virtual Machines onMicrosoft Virtual server, Vmware’s GSX and ESX. Integrated withHP Systems Insight Manager, VMM provides unified managementof HP ProLiant host servers and Virtual Machines.
HP ProLiant EssentialsVulnerability and PatchManagement Pack
The all-in-one vulnerability assessment and patch managementtool integrated into HP Systems Insight Manager, simplifying andconsolidating the proactive identification and resolution of issuesthat can impact server availability into one central console.
HP Systems Insight Managerdatabase ()
The database that stores vital information about HP Systems InsightManager, including users, systems, and toolboxes.
HP Version Control Agent () An agent that is installed on a server to enable you to see the HPsoftware installed on that server. The Version Control Agent canbe configured to point to a Version Control Repository Manageragent, enabling easy version comparison and software updatefrom the repository.
HP Version Control RepositoryManager ()
An HP agent that enables a customer to manage HP providedsoftware stored in a user-defined repository.
HyperText Transfer Protocol () The underlying protocol used by the World Wide Web.
156
Glossary

identification An aspect of the discovery process that identifies the managementprotocol and type of system.
installed version A particular HP software component that is installed on the serverthe Version Control Agent is installed on.
Instant Support EnterpriseEdition ()
Provides proactive remote monitoring, diagnostics, andtroubleshooting to help you enhance the availability of HP-UX,Microsoft Windows, Linux, OpenVMS, Tru64 Unix, NonStop,and Sun Solaris servers, as well as storage and network systemsin your data center.
Internet Protocol () Specifies the format of datagrams (packets) and the addressingscheme on a network. Most networks combine IP with TransmissionControl Protocol (TCP), which establishes a virtual connectionbetween a destination and a source.
Internetwork Packet Exchange()
A networking protocol used by the Novell NetWare operatingsystems and is a datagram (packet) protocol used forconnectionless communications.
IP range Systems with an IP address that falls in the specified range.
Java database connectivity () Similar to ODBC, this set of application program interfaces (APIs)provides a standard mechanism to allow Java applets access toa database.
Java Remote MethodInvocation ()
A set of protocols that enable Java objects to communicateremotely with other Java objects.
key A value used either alone or with an encryption decoder(corresponding public or private key) for cryptography. Intraditional private key cryptography, the communicators share akey or cipher so that each can encrypt and decrypt messages.The risk in this system is that if any party loses the key, the systemis broken. In public key cryptography, the private key isassociated with a public key, so each person in the system hasa personal private key that is never shared.
keystore A database that maintains a list of keys. The keystore can containa subject's own private key. A keystore can also contain a list ofpublic keys, as published in certificates.See Also key.
limited-configuration-rightsuser
A user who has limited capability to configure the CMS.Limited-configuration-rights users have permission to create,modify, and delete all reports and their own tools.
Major status Aggregate status information collected from the system thatindicates one or more of the monitored subsystems are notoperating properly which is impacting the system. Action shouldbe taken immediately.
managed systems Any system managed by HP Systems Insight Manager, such asservers, desktops, and Remote Insight Boards (RIBs).
157
Glossary

management agent A daemon or process running on a managed system. It receivesand executes requests from the CMS on the managed system.
management domain A collection of resources called managed systems that have beenplaced under the control of the HP Systems Insight Manager. Eachcentral management server is responsible for a managementdomain. The managed systems can belong to more than onemanagement domain.
Management HTTP Server An integrated piece of software used by the HP suite of HPWeb-enabled System Management Software to communicateover HTTP and HTTPS. It provides a uniform set of functionalityand security to HP Web-enabled System Management Software.This version is available in the ProLiant Support Pack 7.10 orearlier.
Management InformationBase ()
The data specification for passing information using the SNMPprotocol. An MIB is also a database of managed objects accessedby network management protocols.
Management InformationFormat ()
An ASCII text file in the DMI architecture that describes themanageable features and attributes of a product. The DMImaintains this information in a MIF database and makes itavailable to operating systems and management applications.The DMTF has specified MIF formats for a variety of system typesand peripheral systems.
management instrumentation Agents running on systems that provide management informationfor HTTP, DMI, or SNMP protocols.
management LAN A LAN dedicated to the communications necessary for managingsystems. It is typically a moderate bandwidth (10/100 BaseT)and secured through limited access.
management protocol A set of protocols, such as WBEM, HTTP, SNMP, or DMI, usedto establish communication with discovered systems.
management scope A set of systems within the set of all discovered systems that HPSystems Insight Manager manages.
management services The provider of a core set of capabilities such as auto-discovery,data collection, a central repository for system and eventinformation, event management, basic notification, and secureaccess. These functions are used by add-ins from HP, aManagement Solutions Partner, and HP Systems Insight Managerusers.
management tasks Procedures you set up to search systems or events.
manual discovery techniques Processes that enable you to bypass a full discovery for thefollowing tasks:
● Adding a single system● Editing the system● Creating or importing an HP Systems Insight Manager
database hosts file
158
Glossary
● Creating or importing generic hosts files
Microsoft Clustering Servicestatus page
A page that summarizes cluster status as defined by MicrosoftCluster Server and lists the status and values of MSCS-definedcluster attributes. The Cluster Monitor uses color to display statusbased on MSCS condition values (Normal, Degraded, Failed,and Other).
Minor status Aggregate status information collected from the system thatindicates one or more of the monitored subsystems are notoperating properly which is impacting the system. Action shouldbe taken as soon as possible to prevent further failure.
Monitor Tools toolbox A default toolbox that contains tools that display the state ofmanaged systems but not tools that change the state of managedsystems.
multiple-system aware () A run type that supports multi-system operations. Tools with thisrun type operate on the target systems using their own internalmechanisms instead of using the distributed task facility. The MSArun type uses the distributed task facility to launch the tool on asingle system before the tool interacting with the other managedsystems.
no configuration rights user A user who cannot configure the CMS. However, the user canview and run predefined reports on the CMS and all managedsystems.
Open Service Event Manager()
Enables you to collect, filter, and send problem reports forsupported systems (ProLiant and Integrity) running InsightManagement Agents. In addition, OSEM automatically sendsservice event notifications when a problem is detected on thesystem.
Open Service Event Manager()
Enables you to collect, filter, and send problem reports forsupported systems (ProLiant and Integrity) running InsightManagement Agents. In addition, OSEM automatically sendsservice event notifications to HP Systems Insight Manager whena problem is detected on the system.
overall software status This section indicates whether the software on the server that theVersion Control Agent is installed on has any updates availablewithin the repository in which it has been configured to monitor.
Performance ManagementPack ()
A software solution that detects, analyzes, and explains hardwarebottlenecks on HP ProLiant servers. PMP tools consist of OnlineAnalysis, Offline Analysis, Comma Separated Value (CSV) FileGenerator Report, System Summary Report, Status Analysis Report,Configuration, Licensing, and Manual Log Purge.
ProLiant Essentials license key The contractual permissions granted by HP to the customer in theform of a coded embodiment of a license that represents a specificinstance of a license. A single license can be represented by asingle key or by a collection of keys.
159
Glossary
ProLiant Support Pack A set of HP software components that have been bundled togetherby HP and verified to work with a particular operating system.A ProLiant Support Pack contains driver components, agentcomponents, and application and utility components. All of theseare verified to install together.
racks A set of components cabled together to communicate betweenthemselves. A rack is a container for an enclosure.
Red Hat Package Manager () The Red Hat Package Manager is a powerful package managerthat can be used to build, install, query, verify, update, anduninstall individual software packages. A package consists of anarchive of files and package information, including name, version,and description.
Reference Support Pack A baseline bundle of HP software components that the VersionControl Agent can be configured to point to in the repository.This setting enables users to indicate that they want to keep allof their software up to a certain Support Pack level.
remote wakeup Sometimes referred to as Wake-On-LAN (WOL). The remotepowering up of a system through its resident WOL network card,provided that the system has been enabled to be so awakenedusing the ROM or F10 Setup.
This is a capability on which HP Systems Insight Manager reliesto turn on the systems for scheduled Software Updates or ReplicateAgent Settings.
remove all disk thresholds A task provided by HP Systems Insight Manager to remove diskthresholds for systems in an associated collection. This task onlyremoves disk thresholds that were set by HP Systems InsightManager or by browsing directly to the Web agent. Anythresholds set by HP Systems Insight Manager for Windows 32,including disk thresholds, are not removed by this task.
Replicate Agent Settings A tool that can be used to copy Web-based agent settings to agroup of systems.
repository A directory containing ProLiant Support Pack or Integrity SupportPacks and Smart Components.
Resource Partition A subset of the resources owned by an operating system instance.The use of those resources is controlled through technologies suchas the Fair Share Scheduler, pSets, and Memory ResourceGroups.
A resource partition also has a set of processes associated withit, and only those processes can use the resources within theresource partition. Policies established by tools such as ProcessResource Manager (PRM), Workload Manager (WLM), or GlobalWorkload Manager (gWLM) control how resources are allocatedto the set of resource partitions within an operating systeminstance.
160
Glossary
role See toolbox.
rule set Conditions, policies, or criteria applied to system information todetermine what it is.
search criteria A set of variables (information) used to define a requested subsetof information from the set of all information. The information setthat can be filtered includes action information, some of the systeminformation, and so on. A filter is composed of an inclusion filterfollowed by an exclusion filter. The result of these two filteringoperations is called a group. An example of a filter is an SQLstatement that creates viewable information or causesmanagement operations to be performed.
Secure HTTP () An extension to the HTTP protocol that supports sending datasecurely over the Web.
Secure Shell () A program to log in to another system over a network and executecommands on that system. It also enables you to move files fromone system to another, and it provides authentication and securecommunications over insecure channels.
Secure Sockets Layer () A standard protocol layer that lies between HTTP and TCP andprovides privacy and message integrity between a client andserver. A common usage of SSL is to provide authentication ofthe server, so clients can be assured they are communicating withthe server it claims to be. It is application protocol independent.
Secure Task Execution () A feature of HP Systems Insight Manager that securely executesa task from a managed system. STE ensures that the userrequesting the task has the appropriate rights to perform the task,and encrypts the request to protect data from snooping.
security roles A feature that enables administrators to restrict system access andmanage access on a per-user or per-group basis. This capabilityenables systems administrators to delegate tasks to junior staffwithout providing access to advanced or dangerous features. Italso enables systems administrators to delegate management ofsystems to specific organizations or customers without providingaccess to systems owned by other organizations or customers.
self-signed certificate A certificate that is its own Certificate Authority (CA), such thatthe subject and the CA are the same.See Also certificate, certificate authority.
server blade Typically a very dense server system containing microprocessors,memory, and network connections that can be easily insertedinto a rack-mountable enclosure to share power supplies, fans,switches, and other components with other server blades. Serverblades tend to be more cost-efficient, aster to deploy, and easierto adapt to growth and change than traditional rack-mounted ortower servers.See Also enclosure, racks.
161
Glossary

server blade visual locator A feature designed to provide visual representation of ProLiantBL e-Class and p-Class servers within their respective enclosuresand racks.See Also enclosure, racks.
Service Advertising Protocol()
A NetWare protocol used to identify the services and addressesof servers attached to the network.
set disk thresholds A task provided by HP Systems Insight Manager to set a diskthreshold for systems in an associated collection. This thresholdis set on all disk volumes on the target system.
Shared Resource Domain () A collection of compartments—all of the same type—that sharesystem resources. The compartments can be nPartitions, virtualpartitions, processor sets (pSets), or Fair Share Scheduler (FSS)groups. A server containing nPartitions can be an SRD—as longas nPartition requirements are met. A server or an nPartitiondivided into virtual partitions can be an SRD for its virtual partitioncompartments. Similarly, a server, an nPartition, or a virtualpartition containing pSets can be an SRD for its psetcompartments. Lastly, a Server, an nPartition, or a virtual partitioncontaining FSS groups can be an SRD for its FSS groupcompartments.
A complex with nPartitions can hold multiple SRDs. For example,if the complex is divided into nPartitions, named Par1 and Par2,Par1's compartments could be virtual partitions, while Par2'scompartments are pSets.
Each compartment holds a workload. gWLM manages theworkload by adjusting the compartment's resource allocation.
Short Message Service () A convenient way to send brief text messages directly to a wirelessphone. There is a maximum message length of 140 characters.
Simple Network ManagementProtocol ()
One of the management protocols supported by HP SystemsInsight Manager. Traditional management protocol usedextensively by networking systems and most servers. MIB-2 is thestandard information available consistently across all vendors.
Single Login Permission granted to an authenticated user browsing to HPSystems Insight Manager to browse to any of the managedsystems from within HP Systems Insight Manager withoutre-authenticating to the managed system. HP Systems InsightManager is the initial point of authentication, and browsing toanother managed system must be from within HP Systems InsightManager.
single-system aware () A run type that does not support multi-system operations. Toolswith this run type are only aware of the system on which they arerunning.
SMI CIMOM See common information model object manager.
162
Glossary
SMI-S provider An industry-standard WBEM provider that implements a welldefined interface for storage management. The manufacturers ofhost bus adapters (HBAs), switches, tape libraries, and storagearrays can either integrate SMI-S providers with their systems, orprovide them as separate software packages.See Also Web-Based Enterprise Management.
SNMP communication setting Default SNMP community string used when communicating withsystems supporting SNMP communications.
SNMP trap Asynchronous event generated by an SNMP agent that the systemuses to communicate a fault.
software inventory A listing of the HP software installed on the system where theVersion Control Agent is installed.
software update A task to remotely update software and firmware.
spoofing The act of a website posing as another site to gather confidentialor sensitive information, alter data transactions, or present falseor misleading data.
standard error () The default place where the system writes error messages. Thedefault is the terminal display.
standard output () The default place to which a program writes its output. The defaultis the terminal display.
status message list A list created by Cluster Management Resources to collect entriesfound in the bottom left area of the Cluster Monitor page tobring your attention to cluster attributes that are in an abnormalstate.
status message summaryheader
The list header summary of the total number of status messagesin the list and, in parentheses, the number of status messages thathave not been examined.
status type The classification of status messages (for example, Critical, Major,Minor, Normal, Warning, and Unknown).
Storage ManagementInitiative Specification ()
A standard management interface developed by the StorageNetworking Industry Association (SNIA). SMI-S provides acommon interface and facilitates the management of storagedevices from multiple vendors. SMI-S uses industry-standardcommon information model and Web-Based EnterpriseManagement technology.
storage systems SAN-attached Fibre Channel disk arrays, switches, tape libraries,or hosts (with Fibre Channel host bus adapters).
subnet On TCP/IP networks, subnets are all systems whose IP addresseshave the same prefix. For example, all systems with IP addressesthat start with 10.10.10. would be part of the same subnet.
163
Glossary
Survey Utility An agent (or online service tool) that gathers and delivershardware and operating system configuration information. Thisinformation is gathered while the server is online.
symmetric key A common key that both the server and receiver of a messageshare and use to encrypt and decrypt a message.
system Systems on the network that communicate through TCP/IP or IPX.To manage a system, some type of management protocol (forexample, SNMP, DMI, or WBEM) must be present on the system.Examples of systems include servers, workstations, desktops,portables, routers, switches, hubs, and gateways.
system default searches Requests for data about aggregate system health status, proactivesubsystem status, and detailed component information on servers,workstations, desktops, and portables, irrespective of managementprotocol.
system group A group of systems based on a system collection; a static snapshotof the source collection at the time the system group was created.Used for authorizations.
system health status This is the overall status gathered from protocols (DMI, SNMP,WBEM, Insight Management Agents, and so on) that aresupported on a taraget system. Status is defined as:
● Critical. HP Systems Insight Manager can no longercommunicate with the system. The system was previouslydiscovered but cannot be pinged. The system might be down,powered off, or no longer accessible on the network becauseof network problems.
● Major. A major problem exists with this system. It shouldbe addressed immediately. For systems running an HP InsightManagement Agent, some component has failed. The systemmight no longer be properly functioning, and data loss canoccur.
● Minor. A minor problem exists with this system. Forsystems running Insight Management Agent, some componenthas failed but the system is still functioning.
● Warning. The system has a potential problem or is in astate that might become a problem.
● Normal. The system is functioning correctly.● Disabled. The system is disabled from monitoring but is
not necessarily turned off.● Unknown. HP Systems Insight Manager cannot obtain
management information about the system.● Informational. The system might be in a transitional or
non-error state.
system identification Identifying information about systems. This information is storedin the database. The following information is identified:
● Type of management protocol on the system (SNMP, DMI,WBEM, HTTP, and SSH)
164
Glossary

● Type of HP system (server, client, switch, router, and so on)● Network name of system
system information Information that is provided on the System Page under theIdentity tab. The system information includes:
● Network address● Network name● Description● Contact● Location● System links
system information using DMI Agents that conform to the DMI V2 standard and have passedtesting. The list of compliant DMI V2 agents can be found onhttp://www.dmtf.org.
system information usingSNMP
Agents that conform to SNMP MIB-2 standards.
system links A summary information page for a specific system that has amanagement agent.
System ManagementHomepage
An integrated piece of software used by the HP suite of HPWeb-enabled System Management Software to communicateover HTTP and HTTPS. It provides a uniform set of functionalityand security to HP Web-enabled System Management Software.
system overview report A report indicating the state of systems that is available at thetime that HP Systems Insight Manager is first opened. A systemsearch result contains the number of systems that are registeredwith the HP Systems Insight Manager databases. Systems aregrouped by their status conditions. Each number in a column isa hyperlink to a more detailed list of systems, which displays thesystems that correspond to the number in the overview.
system search Logical grouping of systems into a collection based on informationin the HP Systems Insight Manager database. After a search isdefined, you can display the results from the system view pageor associate it with a management task.
system search results The result of a system search.
system status panel The section of the GUI on the left of the screen that displays statusinformation and system or event alarms.
system type One of 12 supplied types. You can add your own based on oneof these types. For example, use Server type to create MyServertype. It is still a server and is reported on in the same way, but ithas your designation.
System Type Manager () A utility that enables you to modify the default behavior ofdiscovery and identification of objects classified as Unknown oras another category of systems are discovered and identified
165
Glossary
precisely as you require. HP Systems Insight Manager discoversand identifies the system and applies the new information whenan Unknown system matches a rule set that you specify as theprimary rule set. Furthermore, creating the new system typeprovides a System Link page for viewing the informationreturned from the system agent or from the communicationprotocol of SNMP or DMI.
task An executed instance of an HP Systems Insight Manager tool, onone or more systems or systems groups, with a specific set ofarguments.
task scheduling A master scheduling tool for the scheduling of polling, control,and notification tasks.
threshold A preset limit that produces an event when the limit is reachedor exceeded.
timed event An action that schedules necessary events. Examples of eventsinclude backups, disk storage cleanup, and so on. The userdefines the tools in this category.
Tomcat An open source implementation of Java Servlet and JavaServerPages technologies that is used by HP Systems Insight Manageras a Web server.
tool An application, command, or script that can be executed by HPSystems Insight Manager on one or more systems to perform atask.
tool category An organizational structure for grouping tools. A tool must belongto one and only one category. Tool categories can only containtools. They cannot contain other tool categories.
toolbox A defined set of tools that a user might need for a particular task,such as database administration or software management. EachHP Systems Insight Manager toolbox is associated with a set oftools.
trap An unsolicited message generated by a management agent thatindicates that an event has occurred. For example, a monitoreditem has exceeded a set threshold or changed status. Previouslycalled alarm.See Also event.
trap categories Event collection systems found by event type. SNMP trapscategorized by HP Systems Insight Manager into logical groupsaccording to their functions.
trap forwarding address The IP address of a system that has been specified to receive trapnotifications forwarded by the HP Systems Insight Managersystems.
type The classification of a system, which identifies it as a standardsystem type. The system types are client, cluster, portable, printer,
166
Glossary
remote access device, repeater, router, server, switch, unknown,workstation, and other.
uncleared event status Events that have a Critical, Major, Minor, Normal, orInformational severity.
● Critical. A failure has occurred, and immediate attentionis required.
● Major. A failure is impending.● Minor. A warning condition exists that can escalate into
a more serious problem.● Normal. These events are not a problem.● Informational. No attention required. This status is
provided as useful information
unknown status HP Systems Insight Manager cannot obtain managementinformation about the system using SNMP or DMI. Although nomanagement instrumentation information is available, the systemcan be pinged. It might have an invalid community string orsecurity setting.
user A network user with a valid login on the CMS that has beenadded to HP Systems Insight Manager.
user accounts Accounts used to sign into HP Systems Insight Manager. Theseaccounts associate a local Windows user account or a domainaccount with privilege levels and paging attributes inside HPSystems Insight Manager.
user configuration page A page in HP Systems Insight Manager that provides the abilityto create and define users that have access to the managementapplication and associated rights.
user group A group of users defined on the CMS operating system that hasbeen added to HP Systems Insight Manager. Members of the usergroup in the operating system can sign into HP Systems InsightManager.
version control Referred to as the Version Control Repository Manager installedon a Windows system for Windows and Linux Proliant systems,and Software Distributor on HP-UX operating systems. Providesan overview of the software status for all managed ProLiant orIntegrity systems and can update system software and firmwareon those systems programmatically using predetermined criteria.Version control identifies systems that are running out-of-datesystem software, indicates if an upgrade is available, andprovides reasons for upgrading. For HP-UX systems, SoftwareDistributor can be launched from an HP Systems Insight ManagerCMS against one or more installed HP-UX systems.
Version Control Agent log A listing of all the software maintenance tasks completed by theVersion Control Agent and reports resulting from those tasks.
167
Glossary
Virtual Server Environment () An integrated server virtualization offering for HP-UX, Linux, andWindows servers that provides a flexible computing environmentmaximizing usage of server resources. VSE consists of a pool ofdynamically sizeable virtual servers; each can grow and shrinkbased on service level objectives and business priorities. For moreinformation, go to http://hp.com/go/vse.
WBEM Services HP WBEM Services for HP-UX is an HP product that uses WBEMand DMTF standards to manage HP-UX system resources.
Web-Based EnterpriseManagement ()
An Industry initiative to provide management of systems, networks,users, and applications across multiple vendor environments.WBEM simplifies system management, providing better accessto both software and hardware data that is readable by WBEMcompliant applications.
Web-Based EnterpriseServices ()
A tool suite that is aimed at preventing or reducing the downtimeof a system.
Web-launch aware () A run type for tools that are launched in a Web browser usinga Web server. WLA tools can be designed to deal with multiplesystems.
Windows ManagementInstrumentation ()
An API in the Windows operating system that enables systems ina network, typically enterprise networks, to be managed andcontrolled.
workspace The section of the GUI where tools are displayed.
X client An application or tool that appears on an X server. X clients canalso be called X applications.
X server A local application that accepts X client requests and acts onthem.
X Window System A cross-platform windowing system that uses the client/servermodel to distribute services across a network. It enablesapplications or tools to run on a remote computer.
XML document A collection of data represented in XML.
168
Glossary
IndexAaccess the graphical user interface, 96active time-out, 146add authorizations, 141add toolboxes, 141add users, 133All Tools toolbox, 14audit log, 16
configure, 147authorizations, 14
add, 141automatic discovery, 130automatic event handling, 136
Bbanner
customize, 98
Ccentral management server
HP-UX system preparation, 45install HP Systems Insight Manager on HP-UX, 46install HP Systems Insight Manager on Linux, 55install HP Systems Insight Manager on Windows,32Linux system preparation, 52overview, 7remove HP Systems Insight Manager on HP-UX, 93remove HP Systems Insight Manager on Linux, 94remove HP Systems Insight Manager on Windows,92requirements, 22Windows system preparation, 31
certificate authority, 20CMS (see central management server)command line interface
log in, 101security, 17
commands, 101communication protocols (see management protocols)configuration
add authorizations, 141add toolboxes, 141add users, 133audit log, 147automatic event handling, 136data collection CPU utilization, 145discovery, 130email settings, 135
lifetimes for Task Result entries, 148managed system, 107paging settings, 136protocol settings, 128time-out policy, 146
configuration options, 145configuration rights
full, 15limited, 15no, 15
configure email settings, 135configure paging settings, 136conventions, typographic, 3CPU utilization, 145custom install, 31customization options, 145customize the graphical user interface, 98
Ddata collection
performance, 145database, 16
remote for improved performance, 145default time-out period, 146default toolboxes, 14Desktop Management Interface, 19discovery, 130Distributed Task Facility, 19DMI, 18–19DTF, 19
Eemail
configure, 135event handling, 136
Ffeatures, 7firewalls, 21firewalls ports, 21first setup (see initial setup)frequently scheduled task lifetimes, 148full configuration rights user, 15
Ggetting started, 107graphical user interface
customize, 98log in, 96overview, 96security, 18
GUI (see graphical user interface)
169

Hhealth status section, 96Home page
customize, 98overview, 96
HP Systems Insight Managercommands, 101features, 7
HP Systems Insight Manager database, 16HP Systems Insight Manager Windows Installation,31HP-UX CMS
installation and configuration, 46remove HP Systems Insight Manager, 93system preparation, 45
HTTPS, 18–19
Iin-place migration, 62initial setup, 107
add authorizations, 141add toolboxes, 141add users, 133automatic discovery, 130automatic event handling, 136configure e-mail settings, 135configure paging settings, 136discovery, 130managed systems, 107manual discovery, 131protocol settings, 128
Insight Manager 7 comparison, 7install
central management server requirements, 22managed system requirements, 27process overview, 22
install HP Systems Insight ManagerHP-UX CMS, 46Linux CMS, 55Windows CMS, 32
Llast result task lifetimes, 148legend, 96lifetimes for Task Result entries, 148limited configuration rights user, 15Linux CMS
installation and configuration, 55remove HP Systems Insight Manager, 94system preparation, 52
log incommand line interface, 101graphical user interface, 96
Mmanaged node (see managed system)managed system
discovery of, 130overview, 7protocol settings on the CMS, 128requirements, 27setup, 107
management domainoverview, 7
management protocols, 18DMI, 19HTTPS, 19SNMP, 20SSH, 19WBEM, 19
manpages, 101manual discovery, 131Microsoft SQL Server 2000, 16Microsoft SQL Server Desktop Engine (MSDE), 16monitor time-out, 146Monitor Tools toolbox, 14
Nnetwork client
overview, 7new features, 7no configuration rights user, 15node (see managed system)node group (see system group)
OOracle, 16
Ppaging
configure, 136parameter
DataCollectionThreadCount, 145EnableSessionKeepAlive, 146LOG, 147MX_JOB_CACHE_TIME_COMPLETED_JOBS, 148MX_JOB_MAX_COMPLETED_JOB_AGE, 148MX_JOB_MAX_COMPLETED_JOBS_PER_TASK,148MX_JOB_MIN_COMPLETED_JOBS_PER_TASK, 148MX_LOG_FILEEXT, 147MX_LOG_FILENAME, 147MX_LOG_FILESIZE, 147MX_LOG_QUEUESIZE, 147MX_LOG_ROLLFILEEXT, 147session-timeout, 146
170
Index
ports, 21PostgreSQL, 16protocol settings, 128protocols, 18
Rremote migration, 62remove HP Systems Insight Manager
HP-UX CMS, 93Linux CMS, 94Windows CMS, 92
repository (see database)requirements
central management server, 22managed system, 27
Ssearch, 96Secure HTTP, 19Secure Shell , 19security
access, 17certificate authority, 20command line interface, 17firewalls, 21graphical user interface, 18ports, 21self-signed certificates, 20Web server, 20X applications, 20
self-signed certificates, 20Servicecontrol Manager 3.0 comparison, 7setup
add authorizations, 141add toolboxes, 141add users, 133automatic event handling, 136configure email settings, 135configure paging settings, 136discovery, 130initial, 107managed systems, 107protocol settings, 128
short and long task lifetimes, 148Simple Network Management Protocol, 20SNMP, 18, 20spoofing, 20SSH, 18–19Storage Management Initiative Specification
storage, 143system group
overview (see )system key, 96
TTask Results Page
entry lifetime configuration, 148time-out policy
configuration, 146toolboxes, 14
add, 141tools, 15
command line, 15Web, 15X Window, 15
types of tools, 15typical install, 31typographic conventions, 3
UUpgrading Insight Manager 7
data migration tool, 62users
add, 133add authorizations, 141
WWBEM, 18–19Web Based Enterprise Management, 19Web server security, 20Windows CMS
installation and configuration, 32remove HP Systems Insight Manager, 92system preparation, 31
Windows Installation, 31
XX application security, 20
171
Index