html code generator manual - siemens · welcome to html code generator! introduction: welcome to...
TRANSCRIPT

1
HTML Code Generator V 1.0For Simatic IT Modules
CP 443-1 IT, 343-1 IT, 243-1 IT
Manual
This manual and program are freeware. Every user can use, copy or forward this program anddocumentation FREE OF CHARGE. The authors and owners of this program take noresponsibility whatsoever for the functionality and compatibility of this software. Use of thesoftware is entirely at the users own risk. Since this software is free of charge, there is nowarranty, nor claim for error correction and hotline support.

2
Table of ContentsTable of Contents ................................................................................................................... 2Welcome to HTML Code Generator! ..................................................................................... 4
Software Requirements ...................................................................................................... 4Hardware Requirements ..................................................................................................... 4Current Features: ................................................................................................................ 5Features Coming Soon! ...................................................................................................... 5
The Main Setting Screen ........................................................................................................ 6HTML Page Title ............................................................................................................... 6CPU Type .......................................................................................................................... 6Rack Number ..................................................................................................................... 6CPU Slot Number .............................................................................................................. 6Language............................................................................................................................ 6Background Color .............................................................................................................. 6Create Index ....................................................................................................................... 7Create selected S7 Applets ................................................................................................. 7
The S7 Get Applet Selection Tab ........................................................................................... 8Applet Name ...................................................................................................................... 8Variable Name ................................................................................................................... 8Data Area ........................................................................................................................... 8Data Type........................................................................................................................... 8Cycletime ........................................................................................................................... 8Format ................................................................................................................................ 8DB Number ........................................................................................................................ 9
The S7 Get Applet Selection Tab (cont.) ................................................................................ 9Address .............................................................................................................................. 9Bit Number ........................................................................................................................ 9No of Variables .................................................................................................................. 9Width ................................................................................................................................. 9Height ................................................................................................................................ 9Debug Level ....................................................................................................................... 9Edit Parameters Online ..................................................................................................... 10Use Symbolic Access ....................................................................................................... 10
The S7 Get Applet Selection Tab (cont.) .............................................................................. 10Symbol Name ................................................................................................................... 10Auto Append Rack/Slot .................................................................................................... 10Use Graphic Display ........................................................................................................ 10Min Value / Max Value .................................................................................................... 10Dimension ........................................................................................................................ 10
The S7 Put Applet Selection Tab .......................................................................................... 11Applet Name .................................................................................................................... 11Variable Name ................................................................................................................. 11Data Area ......................................................................................................................... 11Data Type......................................................................................................................... 11Format:............................................................................................................................. 11DB Number ...................................................................................................................... 11

3
Address ............................................................................................................................ 12S7 Put Applet Selection Tab (cont.) ...................................................................................... 12
Bit Number ...................................................................................................................... 12No of Values .................................................................................................................... 12Width ............................................................................................................................... 12Height .............................................................................................................................. 12Debug Level ..................................................................................................................... 12Edit Parameters Online ..................................................................................................... 12Use Symbolic Access ....................................................................................................... 12Symbol Name ................................................................................................................... 13
The S7 Put Applet Selection Tab (cont.) ............................................................................... 13Auto Append Rack/Slot .................................................................................................... 13
The S7 Ident Applet Selection Tab ....................................................................................... 13Width ............................................................................................................................... 13Height .............................................................................................................................. 13Debug Level ..................................................................................................................... 14Edit Parameters Online ..................................................................................................... 14Ident Selection Check boxes ............................................................................................. 14Rack/Slot.......................................................................................................................... 14Text Field ......................................................................................................................... 14
The S7 Status Applet Selection Tab...................................................................................... 14Width ............................................................................................................................... 14Height .............................................................................................................................. 14Debug Level ..................................................................................................................... 14Edit Parameters Online ..................................................................................................... 14Cycletime ......................................................................................................................... 15Status Selection Check boxes ........................................................................................... 15Rack/Slot.......................................................................................................................... 15Text Field ......................................................................................................................... 15
Generator Button .................................................................................................................. 16Generating your HTML Page ........................................................................................... 16
The Output Screen ............................................................................................................... 17Print ................................................................................................................................. 17Save to File ...................................................................................................................... 17Save to IT CP ................................................................................................................... 17
The FTP Screen.................................................................................................................... 18CP IP Address .................................................................................................................. 18User Name ....................................................................................................................... 18Password .......................................................................................................................... 18Filename .......................................................................................................................... 18Transfer File ..................................................................................................................... 18Cancel .............................................................................................................................. 18All Files ........................................................................................................................... 19Save Password.................................................................................................................. 19
HCG Index-Page Example ................................................................................................... 19

4
Welcome to HTML Code Generator!Introduction:Welcome to the HTML Code Generator (HCG) and Applet generation Utility V 1.0 for theSimatic IT Modules: CP 443-1 IT, CP 343-1 IT, CP 243-1 IT. With this program, any user cangenerate web pages quickly and effectively for the Simatic IT Module family. The focus is onthe use of the S7 Applets, which are part of the CP file system. We have up to 4 possibleapplets and multiple combinations of them. The 4 main applets are the S7 Get (get data fromPLC), S7 Put (write/put data to PLC), S7 Ident (Identification), and S7 Status (Status ofmodule in rack). For the most part, the generation process creates the HTML and applet codeautomatically. But, if necessary, you can refer to the manual for the IT CP’s to make codechanges or find further information which is located on Siemens customer support website at:https://support.industry.siemens.com/cs/ww/en/view/16832609
You can also use this program to change the HTML Code to build your own web pages anduse the utility as a helpful tool to learn about the applets.
Software RequirementsOperating Systems tested: Windows 98SE, NT, 2000 and XP. Internet Explorer (4.02 orhigher) tested 6.0 + Sp1. Microsoft Java VM or Sun Java (1.4.1 or higher) The Microsoft JavaVM is no longer downloadable on Microsoft’s website, but can be obtained through many 3
rd
party sites by searching on the web.
This program requires Internet Explorer version 4.02 or higher.V 6.0 + SP1 or greater is recommended!
Hardware RequirementsCP243-1 IT or CP343-1 IT or CP443-1 IT with latest firmware (latest firmware available oncustomer support website.) It might be necessary to reformat the file system of the IT CP.Read the firmware instructions carefully for this information)Valid Ethernet Network/Cabling arrangement between PC and CP PC w/ Softwarerequirements above
Comments or suggestions on the HTML Code Generator can be submitted to the hotline e-mail address: [email protected] with ATTN: HTML Code Generator in thesubject line. We can’t make any promises that we will be able to grant all requests or followup on all comments, but will try our best! All ideas for the HTML code generator will becomeSE&A property.
5
Current Features:Generation of HTML and Applet code for the 200/300/400 IT Module family CP443-1 IT,CP343-1 IT, CP243-1 IT using the built in applets S7 Get, S7 Put, S7 Ident and S7 Status.
Note: Ident and Status are not currently supported by the CP243-1! You can use the built-inIdent and Status page on the S7 200 if necessary.
Applets can be adjusted to support almost all of the different features such as applet color,data areas, data types, symbolic access, graphical display, and multi-read with S7Get.
Note: The generator cannot currently create a multi-variable Put.
Generated Pages can be printed directly to the printer and/or saved to local files. GeneratedPages can also be saved directly to the IT Modules via the built in FTP functionality and bedisplayed automatically by Internet Explorer using a hotkey (hit Shift key while pressing theTransfer button).
If selected, the utility can create a HTML page structure with a main index page and subindexfor all of the applets created in the HTML Code Generation sessions.
Warning: If you select to use the Index feature, be forewarned that this will overwrite theexisting index page! An example of using the index / sub-index feature is located on the lastpage of the manual. This should not be a problem, because the links to the standard page canstill be used by selecting your IT Cp version from the menu bar, on the HCG index page.(200, 300, or 400). See last page for example. The file system can always be restored ifnecessary. If you have files on the CP which you don’t want to be overwritten, please back upall files beforehand. See the information above in the software requirements section.This manual covers the different screens and functions of the HTML Code Generator programand explains how to use them.
Features Coming Soon!Multi-putNew Applets w/ selectable graphic display support!IT File System Restore Utility embedded.

6
The Main Setting Screen
Let’s first get started by looking at the main screen.
Tip: If you hold your mouse over the different fields in the program, help text willautomatically be displayed!
HTML Page TitlePlease enter the HTML Page title (displayed in the Browser Title).Tip: If you have the index option checked, the HTML Page title is automatically added to thesub-index column on the index page.
CPU TypeSelect the CPU Type you are working with. S7 200 or 300/400.
Rack NumberSelect the Rack number in which your CPU is located. (Normally 0 unless CPU is in anexpansion rack)
CPU Slot NumberSelect the CPU Slot number in which your CPU is located.Tip: Make sure you don’t use the CP slot here because the applets will not work!
LanguagePlease select English or German.
Background ColorPlease select the color of your applets / page withthis setting. You can choose to use default colorsor select your own with the ‘User Defined’ Option.If you opt to select your own color, another screenwill appear and allow you to customize it. Usingthe R (Red), G(Green) and B(Blue) selectors,please change the output window to the desiredcolor and hit the ‘OK’ button to continue.

7
Warning: The applets use a font, which is usually black. Using dark colors and shades maymake the display unreadable.
Create IndexIf checked, will automatically create a ‘master’ index (Navigation) file on the CP, which willcontain all generated pages (when checked). Pages must be given different names in order tobe added to the sub-index, which is a part of the ‘master’ index page. If you use the samename for a file, then the page with the same name will be overwritten and updated in theindex.
Warning! If you select to use the Index feature, be forewarned that this will overwrite theexisting index page! If necessary, the file system can be restored with the factory file systemsettings as discussed in the requirements section. See the last page of the manual for anexample of using the index feature. The S7 300/400/200 file system is also located on themanual CD supplied with the product(s).
Create selected S7 AppletsThis selection allows the user to select which applets to display on the HTML page. You cando many combinations of applets per page with this feature. (See picture below for example,notice the highlighted checkboxes.)Warning: If create selected S7 Applets is checked and no selection is made, the page will beblank.

8
The S7 Get Applet Selection Tab
Applet NamePlease enter the name of your applet here. If you are in Index Mode, the applet nameautomatically gets added to the sub-index title field.
Variable NamePlease enter the name of the variable displayed on the page
Data AreaSelect the data area you wish to read from. Supported areas (depending on CPU type andlanguage selected) are M = memory, I = input, Q= output, E = input, A=output, and DB = datablock.
Data TypeWhat is the data type you wish to read? Many different types are supported and some specialtypes will be added in the future versions of the generator.
CycletimeSet the refresh rate for the applet. The default is 5000ms (5 sec) and it is not recommended togo below this value.
FormatThe format is how the data is formatted within the applet. This is an advanced feature andnormally automatically set by the generator. In the case that the user must change the format,you can double click on the format field and hit yes on advanced mode. Then you can set theformat manually using the format field.

9
DB NumberIf you select DB under the data area field, then you set the DB Number here.
The S7 Get Applet Selection Tab (cont.)
AddressWhat is the starting address to read?
Bit NumberIf you selected bit for the data type, what is the bit number?
No of VariablesYou can read multiple variables with certain data types from the starting address using thisfield. If you select the proper types then the field becomes available.
WidthSelect the width of the applet. Be careful and don’t make the width too small or the data maynot be visible.
HeightSelect the Height of the applet. Be careful and don’t make the height too small or the data maynot be visible.
Debug LevelSelect the debug level for the applet. (See manual for more details)

10
Edit Parameters OnlineCan the user edit the applet parameters while online?
Use Symbolic AccessIf you configured the IT Module with Symbols (Hardware configuration / Symbols Tab), thenyou can opt to use the symbolic name here.
The S7 Get Applet Selection Tab (cont.)
Symbol NameWhat is the symbol name you wish to use?
Auto Append Rack/SlotSome of the symbolic names automatically get the rack/slot number appended to the symbolname (see IT CP Symbols Tab in Hardware config). Check if you would like to auto appendthe rack/slot of CPU to symbolic name.
Use Graphic DisplayIf you would like to display the data graphically then check the box and select the type ofdisplay from the dropdown.
Min Value / Max ValueWhat is the max/min for the display?
DimensionWhat is the dimension or units for the graphical display?
11
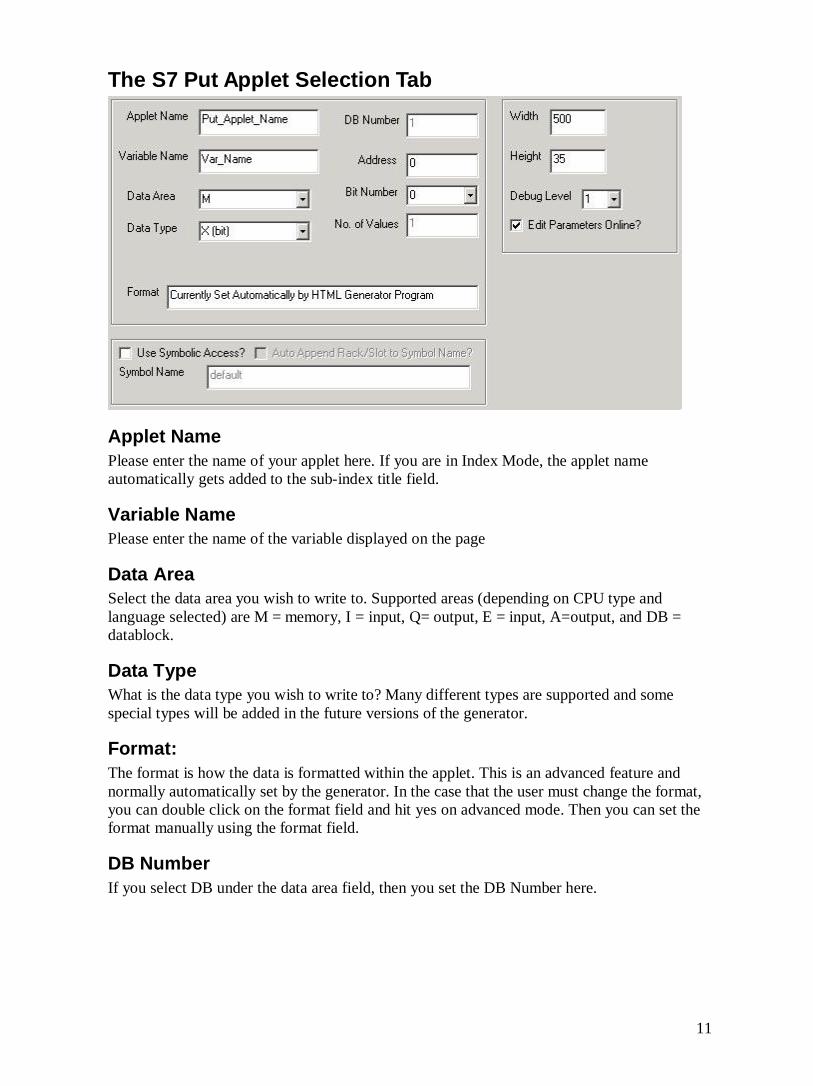
The S7 Put Applet Selection Tab
Applet NamePlease enter the name of your applet here. If you are in Index Mode, the applet nameautomatically gets added to the sub-index title field.
Variable NamePlease enter the name of the variable displayed on the page
Data AreaSelect the data area you wish to write to. Supported areas (depending on CPU type andlanguage selected) are M = memory, I = input, Q= output, E = input, A=output, and DB =datablock.
Data TypeWhat is the data type you wish to write to? Many different types are supported and somespecial types will be added in the future versions of the generator.
Format:The format is how the data is formatted within the applet. This is an advanced feature andnormally automatically set by the generator. In the case that the user must change the format,you can double click on the format field and hit yes on advanced mode. Then you can set theformat manually using the format field.
DB NumberIf you select DB under the data area field, then you set the DB Number here.

12
AddressWhat is the starting address to write?
S7 Put Applet Selection Tab (cont.)
Bit NumberIf you selected bit for the data type, what is the bit number?
No of ValuesThis field cannot be changed. The generator does not currently support a multi-put.
WidthSelect the width of the applet. Be careful and don’t make the width too small or the data maynot be visible.
HeightSelect the Height of the applet. Be careful and don’t make the height too small or the data maynot be visible.
Debug LevelSelect the debug level for the applet. (See manual for more details)
Edit Parameters OnlineCan the user edit the applet parameters while online?
Use Symbolic AccessIf you configured the IT Module with Symbols (Hardware configuration / Symbols Tab), thenyou can opt to use the symbolic name here.

13
Symbol NameWhat is the symbol name you wish to use?
The S7 Put Applet Selection Tab (cont.)
Auto Append Rack/SlotSome of the symbolic names automatically get the rack/slot number appended to the symbolname (see IT CP Symbols Tab in Hardware config). Check if you would like to auto appendthe rack/slot of CPU to symbolic name.
The S7 Ident Applet Selection Tab
WidthSelect the width of the applet. Be careful and don’t make the width too small or the data maynot be visible.
HeightSelect the Height of the applet. Be careful and don’t make the height too small or the data maynot be visible.
14
Debug LevelSelect the debug level for the applet. (See manual for details)
Edit Parameters OnlineCan the user edit the applet parameters while online?
Ident Selection Check boxesThe Ident applet supports the identification of up to 4 modules. Please select how many youwish to use.
Rack/SlotUse the rack/slot fields to tell the Ident applet what modules to identify.
Text FieldThe text field can be used for a description of the module.
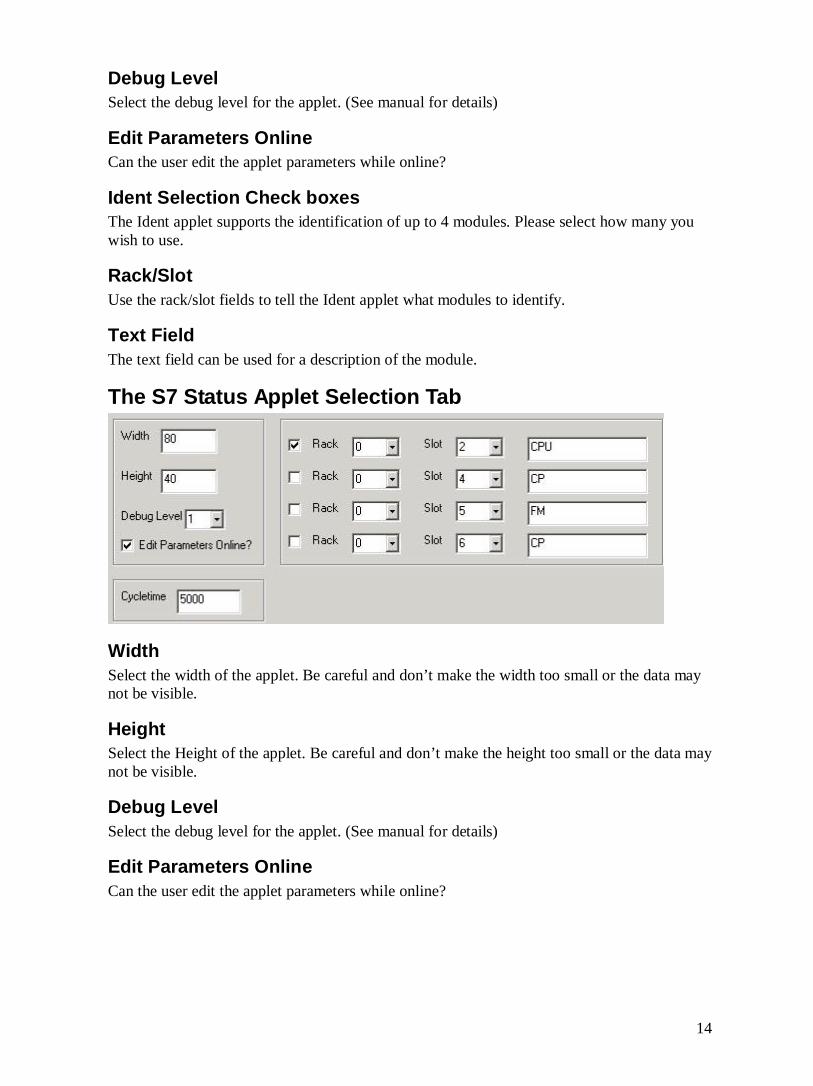
The S7 Status Applet Selection Tab
WidthSelect the width of the applet. Be careful and don’t make the width too small or the data maynot be visible.
HeightSelect the Height of the applet. Be careful and don’t make the height too small or the data maynot be visible.
Debug LevelSelect the debug level for the applet. (See manual for details)
Edit Parameters OnlineCan the user edit the applet parameters while online?

15
CycletimeSet the refresh rate for the applet. The default is 5000ms (5 sec) and it is not recommended togo below this value.
Status Selection Check boxesThe status applet supports reading the status of up to 4 modules. Please select how many youwish to use.
Rack/SlotUse the rack/slot fields to tell the status applet what modules to read the status from.
Text FieldThe text field can be used for a description of the module.

16
Generator Button
Generating your HTML PageAfter you are finished with the applet settings you can press the ‘Generate’ button toautomatically create your page and the output screen will appear. (Discussed on the followingpage).Anytime you have made changes to the applet and have not pressed generate you will see thatthe status of the Generate button is ‘RED’. In order to generate the most recent changes, hitthe Generate button again and a ‘GREEN’ Status appears along with the output window (orchanges are made to the output window if not closed).

17
The Output Screen
PrintIf you would like to Print the HTML Code press the Print Button. The print dialog willappear. You can either select a portion of the text to print or print all text.
Save to FileIf you would like to save the HTML Code and files to your local PC storage media press thisbutton. The save file dialog will appear.
Save to IT CPIf you would like to FTP the files directly to the IT CP and save to the IT files system selectthis button. The FTP Screen will appear (Discussed on the next page).

18
Another hint when using the output screen is that you can select and copy and paste using theclipboard from the output screen into another file, etc. Right click in the output field foroptions.
The FTP ScreenWarning: Password file is notprotected!The password is stored in a localfile that is not encrypted!
CP IP AddressPut in the IP Address of the CP or name of the FTP Server (if using DNS)
User NameUser Name setup in the IT CP for File system access
PasswordUser password (masked with * characters)
FilenameWhat is the name for your html file you wish to save?
Transfer FileAfter entering the proper Address, user name, password, and filename (case sensitive!) Pressthe transfer file button to attempt and store the pages to the IT Module.
Tip: If you press the Shift key when hitting the transfer button, the page will automaticallyopen in Internet Explorer upon the completion of a successful download.
CancelExit this screen and cancel FTP download

19
All FilesAll files should really only be selected one time and then disabled again. This feature storesall of the HCG (HTML Code Generator) files, graphics, etc to the module and only needs tobe done once because it takes some time.
Save PasswordIf you opt to save your password to the local file settings then select this option. See warningabove.
HCG Index-Page ExampleTo better understand how the index works please follow this procedure initially.This example assumes the IT CP is already configured and on the Ethernet segment.
Example for the first program runs when saving files directly to the IT CP from HCG usingthe index feature:
Open the HCG Program.Select the CPU Type and Rack / Slot.Check the create index checkbox.Press the ‘Generate’ Button.Click Save to IT CP.Fill in proper parameters (ip, username, password) and then check ‘all files’ (this is all thesupport files for the web page display and only needs to be done once).Type in test.htm for the filename.Click Transfer while holding the ‘Shift’ Key.Acknowledge the ‘Transfer Successful’ Box.Now you should have your first page displayed if everything worked correctly!Clicking the link on the left should display the test.htm page.
On the next run through, you will want to change some of the applet parameters (VariableName, Applet Name), try another bit, etc. Then generate again and when you save to the ITCp, change your HTML filename from test.htm to test2.htm and be sure to uncheck the AllFiles button. This only needs to be checked the first time you download to the CP for all theHCG web page support files (and can cause the download to be very slow).
The ‘create index’ checkbox should always stay checked when you want to keep adding pagesto the sub-index.

20
Now when you enter thepage, you should have twolinks in the sub index on theleft.The first link should point toyour test.htm page, and thesecond to test2.htm.--> Alsonote that on the upper rightyou can access the previousfile system index page byselecting 200,300, or 400depending on the CP in use.
Congratulations! You havejust created your firstsuccessful index / subindexpages with HCG!