html5 rte manual - ohio utilities protection service - … utilities protection service...
TRANSCRIPT

Ohio Utilities Protection Service 1-800-362-2764 or 811
www.oups.org Call Before You Dig!
For i-dig Assistance contact: 800-240-7190
Maureen Beardman, Internet/GIS Support Specialist
Shari Davies, Internet/GIS Support Specialist
Revised: 05/17
The system is compatible with most Desktop and Tablet Bowsers. Google Chrome, Mozilla Firefox or IE9 or greater. Google Chrome
is the preferred browser
The program is best viewed on a 1920x1080 Screen Resolution. You change the screen size by hitting hit Control and Scroll down
to zoom out or up to zoom in or Control +/- will do the same

TABLE OF CONTENTS
General Information Excavation Notice 3
Ticket Number Definition 3
Login 4 Ticket Menu 5-9 Inquire 5
(Repeat, Update & Cancel Notification)
New 5
Design 6
Recent Tickets 7
Search 8
+ Response 9
Logout 9
Ticket Screen/Mapping 9-24 Repeat 25-26 Update 27-28 Cancel Notification 29 Tips on Various Pop-up Boxes 30-34 Ticket Search 35-38
The system is compatible with both Desktop browsers (Google Chrome, Mozilla Firefox or IE9 or greater) and Tablet browser. Google Chrome is the Preferred Browser
The program is best viewed on a 1920x1080 Screen Resolution. You change the
screen size by hitting hit Control and Scroll down to zoom out or up to zoom in or Con-trol +/- will do the same

O.U.P.S.
3
General Information
Excavation Notice Ohio State Law requires 48 hours (two working days) excluding weekends and legal holidays, with the excavation to start within ten (10) business days notice to be given to the member facility owners prior to the start of your excava-tion. This is to insure that adequate time is given to the member facility owners to mark their underground facilities. Routine notification requests must be started within ten (10) business days from the date and time of the request. According to state law, a notification requests (i.e. ticket (reference) numbers) are valid as long as excavation has started within the ten (10) business days and your company has not left the job site and your markings are still visible and safe for digging. Notification requests need to be remarked (Updated) any time you have not started the excavation within ten (10) business days, left the job site, or markings are no longer visible. Another 48 hours (two working day) notice must be given for a relocated (Updated) notification.
Ticket Number Definition
The letter of A or B designates the O.U.P.S. server in which the ticket was created on
The first digit will be the year in which the ticket was created
The next three digits are for the Julian Date. The Julian Date beings as 001 on January 1st
The last five digits designates the sequence number
The diagram below shows the different sections of a ticket number and from where they are derived. The sequence number (below) represents the 56th ticket generated from the A server on February 18th, 2017 (February 18th is the 49th day of 2017).
A704900056 Server Designation
Julian Date
Year
Sequence Number

O.U.P.S.
4
Login
A log In box will appear for you to enter your Account (username) and Password. (Also remember there is NO Sharing of accounts and passwords. Each individual user must take the train-ing and create their own account for safety reasons. As long as your company name matches you will be able to view and edit each other’s ticket .)
Once logged in please verify your contact information is correct and then read the disclaimer and then choose I Agree to the terms and conditions accepting the responsibility and liability for all information you provide every time you login to be able to proceed to the ticket entry screen. If any of your contact information needs corrected, please call 800-240-7190 anytime Monday-Friday 8am-4:30pm for assistance.

O.U.P.S.
5
Inquire Inquire allows you to look at an existing ticket you and/or your company has entered or called in. Company name or phone number must match exactly to view.
Once you have entered the ticket # in the box, the ticket information will appear on the screen and the Option buttons will change at the top of the screen giving you the option to view Full Tkt (to view ticket information and print it), New, Repeat, Update, Design and Cancel Notification.
** Please see pages 9-29 explaining Full Tkt, New, Repeat, Update, Design and Cancel
Ticket Menu
The Option buttons are listed at the top of the Ticket Entry Screen. You can choose to do any function by clicking on that button.
New New allows you to create a new notification request.
Once you have chosen New, a dialog box will appear asking if you would like to:
Clear Ticket?
Yes, clear everything will clear all information.
Keep fields and clear mapping, Keeps the caller
information, location information but clears the map and Lot #.
Keep fields and keep mapping, Keeps the caller
information, location information and the map but clears the Lot #.

O.U.P.S.
6
Design O.U.P.S. will accept Design notification requests from designers/engineers requesting to know the location of un-derground facilities in an attempt to layout a plan for excavation activities. Since Design requests are not excava-tion requests, O.U.P.S. member facility owners have up to ten (10) business days to respond to the notification request. A response does not mean the member facilities owners will mark their underground facilities. It is the discretion of the member facility owner to provide information regarding the location of their facilities.
Design function acts the same as the New (page 5) function. Within the Design ticket notification screen please make sure you choose:
If Physical Markings are needed along with either Plans Requested or Telephone Response, a Design ticket will be sent. In the Entire Work Area Description box you must type: Customer is also requesting physical markings. A request for Physical Markings on a Design ticket DOES NOT take the place of a normal 48 hour notice of excavation. You are NOT covered to excavate on a Design ticket, so if you are going to be breaking ground also you must enter a ’New’ 48 hour notice ticket as well. You will not be able to change the Work Date field, it will automatically default to the ten working day notice instead of the routine 48 hour (two working day) notice. If Physical Markings are needed before the Design default date and time, you must enter a New 48 hour notice. To do this follow the instructions on this under Ticket Screen (see Ticket Screen page 9-24). The Work Date field will automatically default to the ten working day notice instead of the routine 48 hour (two working day) notice. This information cannot be changed and will be grayed out.
Ticket Menu Continued...
Would like Plans Requested (which
will have the member facility owners send you plans of their underground facilities)
Would like a Telephone Response
(which will have the member facility owners contact you via telephone)

O.U.P.S.
7
Ticket Menu Continued...
Recent Tickets
Recent Tickets button when hit will automatically show you ‘Your’ last 300 tickets that you have entered under your login account only. Filter button: Narrows your search option. You can search for all tickets that were entered in a certain County name, by street name, address etc... Today button: will take the last 300 tickets and filter them out only showing the last 300 tickets entered total. Yesterday button: will take the last 300 tickets and filter them out only showing the last 300 tickets entered total.
You can also edit an existing ticket by clicking on it. The ticket information will populate the screen and you will be able to choose Full Tkt (to view full ticket information and print it), New, Repeat, Update, Design and Cancel Notification.
** Please see pages 9-29, explaining Full Tkt, New, Repeat, Update, Design and Cancel
Under the Recent Ticket option in the lower right of the screen, you can Export out the ticket notifications.
Once you click CSV it automatically opens a Open/Save box to Excel.
It will list basic information for your notification requests, such as: Ticket number, Revision, Account/Username, Completed, Work Date, Type, Category, Priority, Company Name, Caller, Phone, County, Place, Address, Street, Cross St 1 , Cross St 2.
If it does not automatically open up a Microsoft Excel file please make sure that your computer is not blocking the ‘pop-up’ window. The error message location will be dependent on the browser you are using, (this example image is from Google Chrome as the browser being used).

O.U.P.S.
8
Ticket Menu Continued...
Search Search allows you to do a Ticket Search showing all Your Tickets, Phone, Company, Search for Street, Place, County and Filter.
Ticket Search options: (Allows you to look at the last 500 tickets that have been entered within the last 3 months matching the search criteria chosen, i.e. Your Tickets, Phone, Company, Search for Street, Place, County or Filter.)
Your Tickets: Allows you to review and edit your notifications you have submitted.
Phone: Allows you to review and edit all tickets with the same contact phone number on your i-dig account
information.
Company: Allows you to review and edit all tickets with the same Company name on your i-dig account infor-
mation. Company name has to match identically.
Search for Street: Allows you to search by a Street name that you and/or your company have entered/called
in to be able to view and edit it. Again, can only see tickets with matching phone # or company name that matches your i-dig account information.
Place: Allows you to search by a Place (City or Township) name that you and/or your company have entered/
called in to be able to view and edit it. Again, can only see tickets with matching phone # or company name that matches your i-dig account information.
County: Allows you to search by a County name that you and/or your company have entered/called in to be
able to view and edit it. Again can only see tickets with matching phone # or company name that matches your i-dig account information.
Filter: Narrows your search option. You can search for all tickets that were entered in a certain County name,
by street name, address etc...
Under the Recent Ticket option in the lower right of the screen, you can Export out the ticket notifications.
It will list basic information for your notification requests, such as: Ticket number, Revision, Account/Username, Completed, Work Date, Type, Category, Priority, Company Name, Caller, Phone, County, Place, Address, Street, Cross St 1 , Cross St 2.
If it does not automatically open up a Microsoft Excel file please make sure that your computer is not blocking the ‘pop-up’ window. The error message location will be dependent on the browser you are using, (this example image is from Google Chrome as the browser being used).

O.U.P.S.
9
Ticket Menu Continued...
Positive Response
What is positive response? Positive response is a closing of the communication loop. It allows each facility owner to communicate to the exca-vator the status of their one call ticket. By clicking on the +Resp tab you will be taken to the + response link on our webpage. Here you can check responses for tickets as well as learn more about Positive response… http://www.oups.org/positive-response
Logout
Will log you out of the program and bring you back to the Log In Screen.

O.U.P.S.
10
Ticket Screen
You will then begin to fill out the Dig Site Location information:
Once you have logged in and chosen a ticket function, i.e. New, Design etc., your Excavator Information will appear. This is the contact information that will be listed on the notification request. This Excavator Information can not be changed. If this information needs changed, please contact the i-dig De-partment at 800-240-7190. However, you will have the option to enter an Onsite Contact, Phone/Ext. If not, it will automatically enter ‘Same As Above’ in this area.
County: The county in which the excavation will be done. This field has a drop down box with all of the county names, from
which a county can be selected.
Place: This field has a drop down box with all of the valid place names in the county, from which a place name can be se-
lected. You must state the incorporated city or township the location falls within. DO NOT use mailing addresses.
Place Button: To be used when unsure of what county a particular city or township is located within. Making a selection will
automatically populate the County and Place Fields.
The empty box below the Place field will remain empty until the notification area is drawn on the map. If a notification falls in
more than one city and/or township, then the box will populate with what city and/or townships the notification falls within.
Addr/Street: This box is for an address and/or the street name that you are digging on and/or along if no address.
Enter the Numerical component of the physical street number and street name of the address you are digging at (ex: 100
Smith Ave). Multiple addresses may be entered, but must be in the same block range. Multiple addresses must be entered
as: (ex:) 100-199 or 1154-1186 (low to high). If the physical address has a letter or half address in it, you cannot type the
letter or half address in the address field, please place it in your Entire work area Description box. If the excavation will not
take place at an physical address just enter the street name only that you are digging on or off of. For the street name please
provide both a road direction (if applicable) and street type ending. A street can be listed as: Smith Ave — W Smith Ave —
Smith Ave NW (See HTML5 General Information Manual for all Street Type Endings and Street name abbreviations). As
you are typing in street name it can Auto-Populate the street name into that field.
Cross St 1: The name of the street that intersects the notification site street name. Please provide a cross street whenever
possible. As you are typing in street name it can Auto-Populate the street name into that field.
Cross St 2: Name of an additional intersecting street; to be used when requesting the street to be located from cross1 to
cross2 or if location falls between two streets. As you are typing in street name it can Auto-Populate the street name into that field.
Lot #: Lot, Unit, Apartment or building number or numbers of your notification site
Sub-division: Name of the subdivision that your notification site is located within.
Lookup: Finds the area on the map depending on how the information is entered within this section (whether it be an ad-
dress, at an intersection or along a street between 2 streets).
Ticket Screen

O.U.P.S.
11
Entire Work Area Description: This box is to be used to describe your ENTIRE notification description and the area needing marked. This will include: all distances from cross streets, footages off road, and any descriptive infor-mation that describes the notification area and/or any special notes that need to stay on your notifications requests.
Full description of notification area (i.e. Entire, Front, Rear of property, Both sides of Road, Entire In-
tersection)
Starting and ending points (where will the notification area begin and end)
How far and which direction does your notification area need to be located (along the road or off of
road)
If requesting a radius around an object to be located, be sure to provide the footage, i.e. “locate a 10 ft
radius around pedestal”
State if the location is marked in white (See abbreviation list…)
Mark with paint and flags (See abbreviation list…)
Mark all main & service lines (See abbreviation list…)
Expanded Words List (optional): Provides you with a drop down list to choose from on where the dig site is
taking place. When you click on one these options it will be inserted within the work area description box at the end of what ever you already have typed out in this area.
Ticket Screen Continued...
Dig Site Information

O.U.P.S.
12
Ticket Screen Continued...
Dig Site Information Continued...
Ticket Descriptions examples for locates using GPS and large areas/cross country Please read over the example below for entering this type of notification.
Street Crossing to Street Crossing:
STARTING ON THE N SIDE OF REIKER HILL RD AT A POINT 2170FT N/NE OF YEARY RD AT GPS (40.129752, 81.869191) AND GOING N 8365FT CROSSING STONE CHURCH RD AT A POINT 4700FT W OF FERNCLIFF RD AT GPS (40.151230, 81.868408) AREA IS MARKED WITH WOOD LATH WITH BLUE AND WHITE STRIPED FLAG-GING

O.U.P.S.
13
Dig Site Mapping Area Overview Finding the street/area on the map only works if a single match for the search field is found and street names are abbreviated properly. (See HTML5 General Information Manual for all Street Type Endings and Street name ab-breviations).
Ticket Screen Continued...
Various buttons for finding the notification area under
the Home and Lat/long But-ton Options
Map Display
Area
Map Tool Area

O.U.P.S.
14
Map Display Area
The yellow line outlining the map shows the map being active (can click in the bottom corner of the Map to activate without adjusting the map) Upon completion of all necessary Dig Site Information entry fields, access the map to define and select the notifica-tion area. This is to ensure that the member facility owners using a geographical mapping database are notified of your excavation. There are some instances where the excavation area is too new and will not display any of the street / cross street data. Should this occur please make a note in the Work Area Description field stating the area is new develop-ment and then draw your notification area around the bounded by area the new development falls within. Once the notification area is selected/drawn, O.U.P.S.’ internal grids will generate the list of member facility owners that will be notified within the blue notification area drawn on the map. Note and Very Important: If the notification area is not drawn properly or large enough on the map to cover your entire Work Area Description (more than 200ft off of roadway, entire length between two streets, drawing around entire mobile home parks etc…) can result in incorrect member facility owner transmission.
Notification Area
Ticket Screen Continued...
Dig Site Mapping Area Overview Continued...

O.U.P.S.
15
Zoom buttons: (+) and (-) allow you to zoom in (+) and out (-) on the Map Display Area
M button: makes the map full screen — click once to make full screen and then click again to bring back to original size.
Aerial button: allows you to view an aerial photograph of the area on the map
image. This can be useful for selecting an area where there are no roads in the mapping database. When there appears to be a disagreement between the road centerlines and the Ortho photograph, trust/select the road centerlines. The photo will be overlaid on top of the normal mapping data. You can draw your selection on the map while the photograph is displayed. Turn off the Aerial view by hitting Road’ button to view street view.
Segment button: automatically covers a highlighted street segment with the buffer distance set in the Buff field
Only works if a street segment is displayed in red on the map from using the Find Street, Intersection or Both Cross Streets options
Block: capability to select an entire block or blocks
Line button: creates precise linear polygons with mathematical extents or boundaries
Click Line and then Single click on a starting point on the map and move the mouse in any direction
and it will also measure for you as you go. (Measurements are displayed in feet, yards and miles at the bottom left hand corner of the map screen) As you keep single clicking to follow the centerline of a roadway and/or draw any shape off of road, change direction etc… the measurements displays the length of the current segment as well as the total distance from the start point.. Once you have your area you need then double click to create a linear polygon/notification area. (computer defaults to pre-set in Buff field).
Dist button: measuring tool used to determine distance between locations or objects on the map
Measurements are displayed in feet yards, and miles at the bottom left hand corner of the map screen
Click Dist and point the mouse to a start point on the map. Click and move the mouse in any direction. Single click to change direction and double click to exit the Dist tool and you will be able to view a blue line of your total measurement
When directions are changed in the Dist tool, the reading displays the length of the current segment
as well as the total distance from the start point.
Ticket Screen Continued...
Dig Site Mapping Overview Continued...
Map Tools Area
O.U.P.S.
16
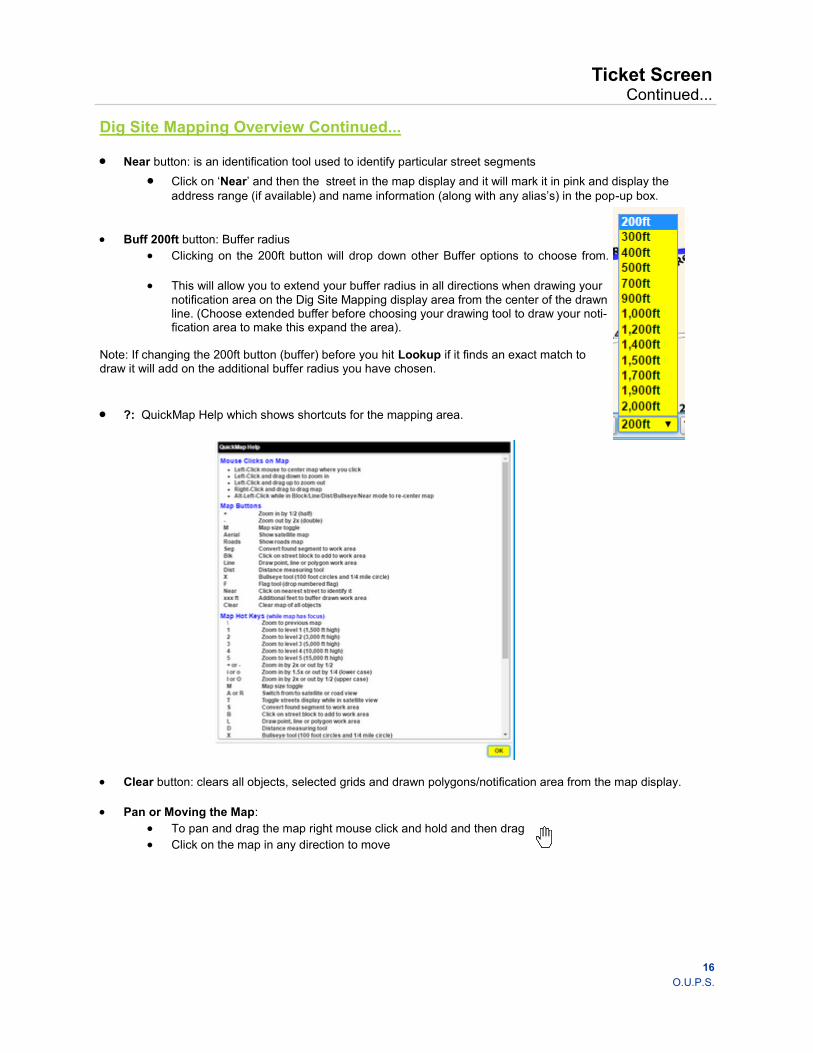
Near button: is an identification tool used to identify particular street segments
Click on ‘Near’ and then the street in the map display and it will mark it in pink and display the
address range (if available) and name information (along with any alias’s) in the pop-up box.
Buff 200ft button: Buffer radius
Clicking on the 200ft button will drop down other Buffer options to choose from.
This will allow you to extend your buffer radius in all directions when drawing your
notification area on the Dig Site Mapping display area from the center of the drawn line. (Choose extended buffer before choosing your drawing tool to draw your noti-fication area to make this expand the area).
Note: If changing the 200ft button (buffer) before you hit Lookup if it finds an exact match to draw it will add on the additional buffer radius you have chosen.
?: QuickMap Help which shows shortcuts for the mapping area.
Clear button: clears all objects, selected grids and drawn polygons/notification area from the map display.
Pan or Moving the Map:
To pan and drag the map right mouse click and hold and then drag
Click on the map in any direction to move
Ticket Screen Continued...
Dig Site Mapping Overview Continued...

O.U.P.S.
17
Find:
Street button: to change the map to the area of your notification. The given address range will be highlighted
in red and/or the street will be highlighted in red.
Intersection button: finds the 1st intersection (Addr/Street name and Cross St 1) will not automatically select
map Useful when a street address is not being used.
Both cross button: finds the Addr/Street name between both intersections if there are streets in Cross St 1
and Cross St 2. Will put a point at the intersection of your street at the Cross St 1 and Cross St 2 intersections on the map
Clear work area button: Clear the selected area but keeps the map
Zoom:
Work area button: If there is a selected area in the map and the map is moved to another area, this will take
you back to the selected area
Place button: zooms out to see the entire city/township on the map that you have enter in that box
County button: Zooms out to see the entire county on the map that you have enter in that box
Highlight:
Street (aka Addr/Street): highlights entire length of the street listed in Addr/Street field turning it Red
Cross1: highlights entire length of the street listed in Cross St 1 field turning it Green
Cross2: highlights entire length of the street listed in Cross St 2 field turning it Blue
All button: shows all streets turning them the colors shown
Clear button: removes the shown streets and their colors
The Zoom buttons: will zoom in on the entire Addr/Street, Cross St 1 or Cross St 2 (these streets must be
shown in the map before you can use the zoom).
(Note: When using the next 3 options, it is best to always select the entire block the address falls within and turning on the Aerials to view the depth of the property(ies), so your notification area covers the entire site. These Search options will only work if that county provides us with their address point data and is to be taken as informational purposes only. You must still know where you are digging).
Search
Address PT button: Searches for the exact address to pinpoint it on the map Show Address PTS button: will
show all address points on the map
Show Full Addresses button: will show all addresses on the map with full street name on the map
Clear button: will clear the address points off the map
Ticket Screen Continued...
Dig Site Mapping Overview Continued...
Home Tab:

O.U.P.S.
18
Entering the Lat/Long within this area
Can still enter 3 different formats and hit enter (dd.dddddd OR dd mm.mmmm OR dd mm ss.ss)
A red and black circle/point will ap-pear on the map and it will number it 1, 2, 3, 4 etc… depending how many lat/long points you enter. (example image below shows a locate and within that locate descrip-tion it gave 5 different lat/long points throughout its description. Just enter your first one and hit enter, then your 2nd, 3rd and so on and each time it will drop a red and black cir-cle/point and number each one.
It will ask if you want to save the lat/long to work area de-
scription after every single lat/long you enter, placing it at the bottom of your Entire Work Area Description that you typed in. If you choose ‘Yes’ each time please Do Not also use the ‘Copy Points to Location’ button which does them all at once. (see page 19 for description). Do one or the other or it will duplicate your information.
It will convert the format to fit the 1st format in the lat and long tab. If you click yes to enter into the
description, if will put the format the way it was entered in the description
Save above Lat/Long coordinates ‘N’ or ‘Y” with
ticket – will save the last GPS point entered ON-
LY in the lat/long tab area you entered it in.
Clear Lat/Long Text Button removes the GPS point so a new one can be entered. Keeping the 1st GPS point
in the map
The clear all points removes all points on the map
The clear last point button removes the last point from the map
Ticket Screen Continued...
Dig Site Mapping Overview Continued...
Lat/Long Tab:

O.U.P.S.
19
Ticket Screen Continued...
Dig Site Mapping Overview Continued...
Lat/Long Tab continued:
Show all points buttons – will show all points in the map
Copy Points to Location button will enter the points in the description, so if you have entered multiple lat/long
points it will copy them all into the work area description box at the end of your entire work area description,
you can NOT just give lat/long points only, still need to state your starting point, everything you need marked in-
between to your ending point. If you do this option please Do Not also use the ‘Save lat/long to Entire work
area description’ button after each lat/long you enter (see page 18 for description). Do one or the other or it will
duplicate your information at the bottom of the ‘Work Area Description’ Box.
Convert Distance to Points button - if measuring a distance using the ‘DIST’ , keeping single clicking to
measure/change directions and draw a line on the map. Then once done, then go and click the Convert Dis-
tance to Point button, this will drop points between the measured distances allowing you to eventually draw a
notification area/polygon or line area using the Covert Point to Polygon or Line option button. ** Please see
page19-21 explaining Convert Point to Polygon or Line option button **

O.U.P.S.
20
Convert point to Polygon button will draw a notification area/polygon area around a single point
Convert points to Line button will draw a notification area/line connecting all points
Convert the points to polygon will draw a notification area/polygon around all the points
Ticket Screen Continued...
Dig Site Mapping Overview Continued...
Lat/Long Tab continued:

O.U.P.S.
21
Ticket Screen Continued...
Dig Site Mapping Overview Continued...
Lat/Long Tab continued:
Note: you need to change the 200ft drop down to a different footage before choosing any of these auto-draw
tools: Convert Point to Polygon, Convert Points to Line, Convert the Points to Polygon, will expand the notifi-
cation area to the footage selected. ( Example image below shows 1400ft using the Convert the points to poly-
gon tool.) - Note: We suggest at least a 1400ft buffer to include any twist and turns a pipeline facility
may make.

O.U.P.S.
22
Ticket Screen Continued...
Work Information
Work date and time: defaults to the 48 hours only
(**This cannot be changed**), Ohio State Law requires 48 hours (working days) excluding week-ends and legal holidays. Please note: If you need to request an Emergency/Short of the 48/hr no-tice or Dig In (hit underground line) you must call it in to a Customer Service Representatives at 800-362-2764 or 811.
Start By Date: Excavation to start within ten (10)
working days from the date and time of the request (**This cannot be changed**)
Work Type: Type of excavation to be performed.
Common work types can be selected from the auto-populated menu or typed in manually.
Means of Excavation: Type of equipment being
used to perform excavation. Common types of equipment can be selected from the auto-populated menu or typed in manually.
Work For: The company the excavator is working for, other than yourself
Done By: Company or person who is performing the work, other than yourself
White lining – Please choose Yes or No, based on if you have marked your notification area in white or not.
**This is a mandatory Question and is required in order to submit the ticket **
Blasting: Please choose Yes or No if you are blasting (use of explosives). If you skip over this question it will
auto-fill to ‘N’.
RR or Highway: Please choose from the pull down box only if applicable. If you do choose RR or HWY
please enter the mile marker numbers (if available) in the Mile Marker From/To box provided. Highways are considered to be only:
State Routes (S R)
US Routes (U S)
Interstates (I)
Turnpike (Ohio Tpke)
Comments: ** Please be advised this box has been greyed out to prevent incorrect information/work area de-
scription information from being typed in this box and forcing online users to type all information in the ’Entire work area Description. The reason is due to all information placed in the ‘Comments’ box is automatically deleted on every New and Design ticket and when Updating an existing ticket for remarking.

O.U.P.S.
23
Get Members: Click this button to receive a listing of O.U.P.S. member facility owners who will receive the noti-fication request. This command button is active only when the map has been accessed and a notification area has been selected. Facility owners to be notified on a notification are determined by the notification area select-ed on the map
Get Mbrs button: Shows a listing of O.U.P.S. member facility owners who will receive the notification requests of the proposed excavation. Members in blue are “show codes”, meaning 1 member with multiple utilities attached to the parent code. LBP (Limited Basis Participants) members are highlighted in yellow (Effective July 1, 2013 these members started receiving direct notifications from O.U.P.S.)* Please remember that the utility companies and the locators DO NOT see and/or get a copy of the blue ‘Notification’ area drawn on the map, so please describe your entire area within the ‘Work Area Description’ box.
Ticket Screen Continued...
Member Lookup
Mbr Info button: Will open up another box showing the member information/codes and what type of lines they mark. For a complete list of the Group #’s (1-7) and what they mean please look at page 3 in the HTML5 General Information Manual.

O.U.P.S.
24
Note: If you receive this message when trying to sub-mit a ticket please hit ‘Ok’ and then hit the ‘Get Mbrs’ button again for it to change the 48 hour notice time and then ‘Submit’. You do not have to exit out of the ticket.
Before hitting the submit button... Please verify all information entered on the notification request is correct. before submitting. Dou-ble checking the address, street name (using proper abbreviations), making sure the street names used in the addr/street, Cross St 1 and Cross St 2 are matching, the digging description and the notification area drawn on the map, etc… Once the submit button is selected you will re-ceive a box stating the following.
Ticket Screen Continued...
Submit
Click Yes to add additional information to the notification ticket request or to be able to go back up to Menu button at the top left corner of the ticket to abort and go back to the Ticket Menu option. Click No to transmit the notification request to the member facility owners. The ticket number will be displayed after the notification prompt.
When clicking ‘No’ it will then give you your ticket #:
If you choose ‘Print’ another screen will open showing you the print out of the ticket . (If a separate screen does not open please check your pop-up blockers giving the screen access to open. Should see some kind of error at top of screen under web-address bar to grant permis-sions).

O.U.P.S.
25
Repeat
Repeat
Once you have inquired a ticket number and/or or choose it out of the ‘Recent Tickets’ (page 7), the ticket infor-mation will automatically be populated on the screen. Please review the notification information making sure it is the correct ticket you want to edit, then choose Repeat out of the top button functions on the screen. (Note: You will be able to retrieve and Repeat tickets for 3 months from the Original call date.) Please note:
If you need to request an Emergency or Dig In (hit underground line) you must call in to a
Customer Service Representatives at 800-362-2764 or 811.
Repeat is NOT to be used when you need to request Remarking. Please see Update, pages 27-28.
If information DOES need to be changed on your notification request a New request must be made and the existing request with incorrect information must be cancelled (see Cancel, pages 29). Repeating tickets is to be used for (look at/use drop down for list below):
To Finish Submitting the ‘Repeat’ tick-et: Once you are done selecting a reason and/or typing out your reason in the Addi-tional Comments Box, you will go back to the main ticket screen, showing your message in the ‘Comments’ box You must then hit the ‘Get Mbrs’ button to generate the list of members.
If choosing ‘Other’ you must type a reason in the ‘Additional Comments’ box and if you do not this box will appear reminding you.

O.U.P.S.
26
Repeat Continued...
After hit the ‘Get Mbrs’ button this pop-up box will appear. Hit ‘OK’.
The Repeat Date & Time shows the original start date and time.
To Finish Submitting the ‘Repeat’ ticket...
Repeat Continued...
After hitting ‘OK’, the list of Members box will activate and you have the option to pick and choose which member facility owners you would like notify. Your options are:
Leave the ‘Check Mark’ next to the member facility owners name if wanting them to be notified/send
the ticket information back out to see your repeated message and/or uncheck an of the member facili-ty owners name that you DO NOT want to notify/send the ticket information back out to.
If not wanting to choose member facility owners you can leave this area as is and the system will noti-
fy/send the ticket information back out to all member facility owners listed to see your repeated mes-sage.
It is strongly advised if you are concerned with one particular facility owner that you choose all member facility owners in the same category, utilities which fall within the same Type category (i.e., all water, all gas,
all telephones, etc) (Please refer to the HTML5 General Information Manual for listing of facility owner categories) After you are done selecting the members hit ‘Submit’, you will receive this pop-up box:
After hitting ‘NO’ it will then resubmit your ticket keeping the SAME ticket # and just adding on a revision of an –01A and/or 01B depending on the server the ticket went out on.

O.U.P.S.
27
Re-markings are only necessary if: Ohio Revised Code: 3781.28 (A) The markings are destroyed or removed before excavation is completed, the excavator shall notify the utility that the markings have been destroyed or removed, and the utility shall remark the approximate locations within 48 hours of the notice. Ohio Revised Code: 3781.31 Notice of actual commencement of excavation or of removal or markings. If the crew leaves the job site for any number of consecutive days, for safety purposes it is recommended that the lines be re-marked before any additional excavation commences. You will be able to retrieve and Update tickets for 3 months from the Original call date.
Once you have inquired a ticket number and/or or choose it out of the ‘Recent Tickets’ (page 7), the ticket infor-mation will automatically be populated on the screen. Please review the ticket information making sure it is the cor-rect ticket you want to edit, then choose Update out of the top button functions on the screen. (Note: You will be able to retrieve and Update tickets for 3 months from the Original call date.) **If after you have Inquired a notice and you have reviewed the information and it is now incorrect, you must follow the directions on how to make a New notification request and Cancel the incorrect notification request. You will then have to Cancel the original incorrect ticket (See Cancel, pages 29) Please note: If you need to request an Emergency or Dig In (hit underground line) you must call in to a Customer Service Representatives at 800-362-2764 or 811.
Update
Update
If choosing ‘Other’ you must type a rea-
son in the ‘Additional Comments’ box and if you do not this box will appear remind-ing you.

O.U.P.S.
28
Updated Continued...
To Finish Submitting the ‘Update’ ticket...
Update Continued...
After hitting ‘NO’ it will then resubmit your ticket giving you a new 48 hour (two working day) notice up to ten working days, from the current date and time and new ticket number.
The Update Date & Time shows the New 48 hour (two working day) notice up to ten working days, start date and time. You can only request a routine 48 hour (two working day) notice up to ten working days, from the current date and time. If you need to request short of this, you must call one of our Customer Service Representatives at 800-362-2764 or 811. After selecting the ‘Get Mbrs’ button this pop-up box will appear. Hit ‘OK’.
Once you are done choosing a reason and/or typing out your rea-son in the Additional Comments Box, it will then bring you back to the main ticket screen, showing your message in the ‘Comments’ box You must then hit the ‘Get Mbrs’ button to generate the list of mem-bers.

O.U.P.S.
29
A cancellation is a request to terminate an existing notification request. Cancel Notification request must adhere to the following criteria:
You are not doing the excavation at this time
You did not begin the excavation within ten working days
You have changed the original notification area/digging description to be marked
Incorrect Address and/or Street Name
You must ALWAYS Inquire a ticket first and verify the Information. Once you have inquired a ticket number and/or or choose it out of the ‘Recent Tickets’ (page 7), the ticket infor-mation will automatically be populated on the screen. Please review the ticket information making sure it is the cor-rect ticket you want to edit, then choose Cancel out of the top button functions on the screen. Please note: If you need to request an Emergency or Dig In (hit underground line) you must call in to a Customer Service Representatives at 800-362-2764 or 811.
Not doing the excavation at this time (example):
Cancel Ticket box appears
In the Reason for Cancel box enter the
following (examples):
Not digging at this time
Incorrect information/
description
Incorrect address and /or street
name
Incorrect Notification area
drawn on the map to select the proper member facility owners
Click OK
Cancel Notification
Cancel Notification
It will then pop-up a box showing you the ticket number that you just cancelled and then it will show your cancelled message in the ‘Comments’ box on the ticket/screen.

O.U.P.S.
30
If you hit the Lookup button and receive this pop-up—that means that the Addr/Street may also fall in another area (City/Township) as always please know where you are digging and choose the proper Place name (City/Township). You have 2 options to do you can hit ’Highlight all of the Streets’ and make your notification area selection by zoom-ing in from there or choose a Place name by clicking on it.
Tips on Various Pop-up Boxes
Lookup button and the different pop-up boxes you may get:
When hitting the Lookup Button: If you hit the Lookup button and receive this pop-up—that means that it is finding the streets you have typed in the Addr/Street, Cross St 1 and Cross St 2 intersecting more than once or in more than one Place name (City/ Town-ship), just hit ‘Show All’ and then zoom into your area from that point and draw you notification area.
Or if you choose a certain Place name (City/Township) it will zoom you to that street on the map within that Place name (City or Township) you chose and then you can draw your notification area from there.
Choosing ’Highlight all of the Streets’

O.U.P.S.
31
Lookup button and the different pop-up boxes you may get continued..
When hitting the Lookup Button: If you hit the Lookup button and receive this pop-up—that means that it is finding that the Addr/Street name is not matching with one of the intersections you are stating it intersects with. Example below is: Stating you are digging on N Schenley Ave between Mahoning Ave and Canfield Rd—when the ‘Lookup’ button is hit, it is finding that N Schenley Ave does not intersect with Canfield Rd but a S Schenley Ave intersects with both cross streets you listed. This then allows you to change the street name by clicking on the street name and in which street box you want to copy it to b\y selecting the correct row/column reading the street name and ’Copy Street’, ‘Copy Cross St 1’ or ‘Copy Cross St 2’ and then choose ‘Copy street names’ button to make the proper changes or choose ‘Do not copy street names’ and everything stays as you typed it. Please make sure to read the warning message if you have an address typed in the Addr/Street box.
Tips on Various Pop-up Boxes Continued...
Tips when an address is found more than once:
If you hit the Lookup button and receive this pop-up—that means that this address is being found in more than 1 block. As always it is your responsibility to know which block that address falls, if unsure select them all when drawing your notification area on the map us-ing either the ‘Line’ tool (single click to draw and double click to fill) or the ‘Blk’ tool (which selects entire blocks intersection to intersection).

O.U.P.S.
32
Lookup button and the different pop-up boxes you may get continued..
1. Below the map choose ‘Place’ under the ‘Home’ button to zoom you to the place name you have entered (City/Township) area.
2. Then click on Cross1 and Cross2 to turn your cross street s the color shown on each name (green for Cross1 and blue for Cross2) on the map. Then once finding your cross streets you can hit the ‘Zoom’ under the All and it will zoom you to that area so you can manually draw the notification area of where the unfound street falls on the map . You can turn on the aerials to see layout of the land and surrounding streets etc… This is what it zoomed into after hitting the ‘Zoom’ under the All . This continues on page 33 to see additional pop-ups you will receive during this unfound street ticket pro-cess….
Tips on Various Pop-up Boxes Continued...
Tips when a street name is not found:
f you hit the Lookup button and receive this pop-up—that means that it is not finding your Addr/Street intersecting with either of your cross streets (Cross St 1 and Cross St 2). Click ‘Ok’ and follow these steps listed below to help guide you to find your area due to whether it is a brand new street , named alley way or a private drive that we do not have in our mapping database at this time.

O.U.P.S.
33
Lookup button and the different pop-up boxes you may get continued..
Tips on Various Pop-up Boxes Continued...
Tips when a street name is not found Continued:
After you draw your notification area on the map and finish filling out the ticket and you hit the ‘Get Mbrs’ but-ton you will then received this pop-up message. Choose ‘Yes’ to continue to receive the list of members and submit the ticket. Choose ’No’ if you feel you have entered incorrect infor-mation and need to fix street name, notification area drawn on the map or what ever it is on the ticket.
Tips when hitting the ’Seg’ op-tion below the map:
If there is a section of road way highlighted in red like within the image and you try and hit the ‘Seg’ option below the map and you receive this pop-up, hit ‘OK’. You must then manually draw the notification area on the map using either the ‘Line’ tool (single click to draw and double click to fill) or the ‘Blk’ tool (which selects entire blocks intersection to intersection).

O.U.P.S.
34
When hitting the Get Mbrs button: If you hit the Get Mbrs button and receive this pop-up—that means that you streets names that you have typed in the Addr/Street, Cross St 1 and Cross St 2 boxes are not touching the blue notification area drawn on the map. If you choose ‘No’ it will bring you back to the ticket screen and will not pull up a Member list and if you choose ‘Yes’ it will generate the list of Members that will be notified. And you can continue with submitting the ticket information.
Note: This image example is from a Cross Country Pipeline locate.
Lookup button and the different pop-up boxes you may get:
Tips on Various Pop-up Boxes Continued...
Notification Area drawn on the map

O.U.P.S.
35
Ticket Search
Ticket search HTML5 - follow the steps below:
http://longterm.oups.org/newtinweb/OUPS_TicketSearch.html and enter your login account information. Works on all browsers ** Please note if you are using IE you will need IE 9 or greater.** Once logged in you can enter a date range to get tickets that your company called in. To be more specific you can put the actual ticket #.
Ticket search HTML5 Version

O.U.P.S.
36
There are 2 different ways you can use the Ticket Search Program: You can either download this Ticket Search program (to your C: Drive) or you can access the web based HTML5 version. Any notification requests submitted by your company that WERE created within the Newtin system are available to you, free of charge, by using Ticket Search. Those NOT created within the Newtin software are available from the O.U.P.S. archives. Should an archived ticket search be required, contact O.U.P.S. at 800-362-2764 or 811. Please note: A nominal search fee will apply. (The images on page 27-29 are from the downloadable version, see page 30 for the HTML5 web based version)
There are two (2) ways to search for tickets.
Within 90 days of the current date
Long Term Server Search
To search for notification requests, within 90 days of the current date, click Search and the Search Criteria window will appear. To search for notification requests that are over 90 days of the current date, click on Data Source. This will bring up a Select Data Source window. Choose OUPS Long-Term Server, it may prompt you for your username and password. Once chosen and entered, please click OK and you will be able to choose a year within in the Search Criteria window from which to search for the notification requests.
Select year if searching within the Long-Term Server
Ticket Search Continued...

O.U.P.S.
37
Ticket Search Continued...
On the Search Criteria window you will be able to enter a date range and search such things as; a Locate Request Number, County, Place, Street name, etc. Once you have entered a Search Criteria either continue on to Output Columns or choose Search. Count will give you just a count of how many tickets that match your search criteria. The Output Columns tab will allow you to customize your listing of notifi-cation requests. By default, several items are already chosen. To change this, just Check or Uncheck which columns you would like. You are able to Uncheck All and start over or Check All.

O.U.P.S.
38
Ticket Search Continued...
On the Ticket Listing window you will be able to preview all notification request information that meet your Search Crite-ria.
To view detailed information concerning a particular notification, select it and then click on Details or double click on it. A second window will appear, and you will be able Save or Print this information.
To print tickets from the Ticket Listing window, click the Print button. Specify if you want to Print Ticket List or the ticket details. All tickets will print unless Print Selected Tickets Only is checked. To print multiple tickets at one time, hold the ‘Ctrl’ button, click on each ticket needing to be printed and click Print. Be sure Print Selected Tickets Only is checked. To copy tickets from the Ticket Listing window to a text file or Excel file, click the Copy button. Specify the format and if Column Headers are needed as well. Specify only the selected tickets and then click Copy. Open the de-sired program, right click and choose Paste.