document
DESCRIPTION
Illustration: twelve:ten [w] www.twelveten.com I Use the graphics you made in the Photoshop and Illustrator tutorials to produce a small booklet… Section Four Create a booklet in InDesign CSTRANSCRIPT
Illustration: twelve:ten [w] www.twelveten.com

Section Four Create a booklet in InDesign CS
Create a booklet in
InDesign CSUse the graphics you made in the Photoshop and Illustrator tutorials to produce a small booklet…
n this section, we show you how to create an A5 leaflet using all the Photoshop and Illustrator graphics you made in the previous two tutorials.
We take you step-by-step through the design process, from creating a document grid and
duplicating page elements to using the brand new InDesign CS Story Editor and Separations Preview palette. We also detail how to define Character Styles and nest them within Paragraph Styles, another new feature in InDesign CS.
I
Section Four Create a booklet in InDesign CS
Part 1: Setting upEnsure that colour management is consistent within Creative Suite and enable your Version Cue project...
Bleeds and slugsThe term ‘bleed’ refers to the
measure beyond a page’s edge
which will be printed when
page objects are laid out to run
off that edge. Bleed, therefore,
simply compensates for any
inaccuracy when printed copies
are trimmed. ‘Slugs’ are usually
bits of text which identify the
document, issue dates, clients
or whatever you like, which sit
outside the trim of the printed
page but can still be seen
on printing plates, section
signatures, page film and so on.
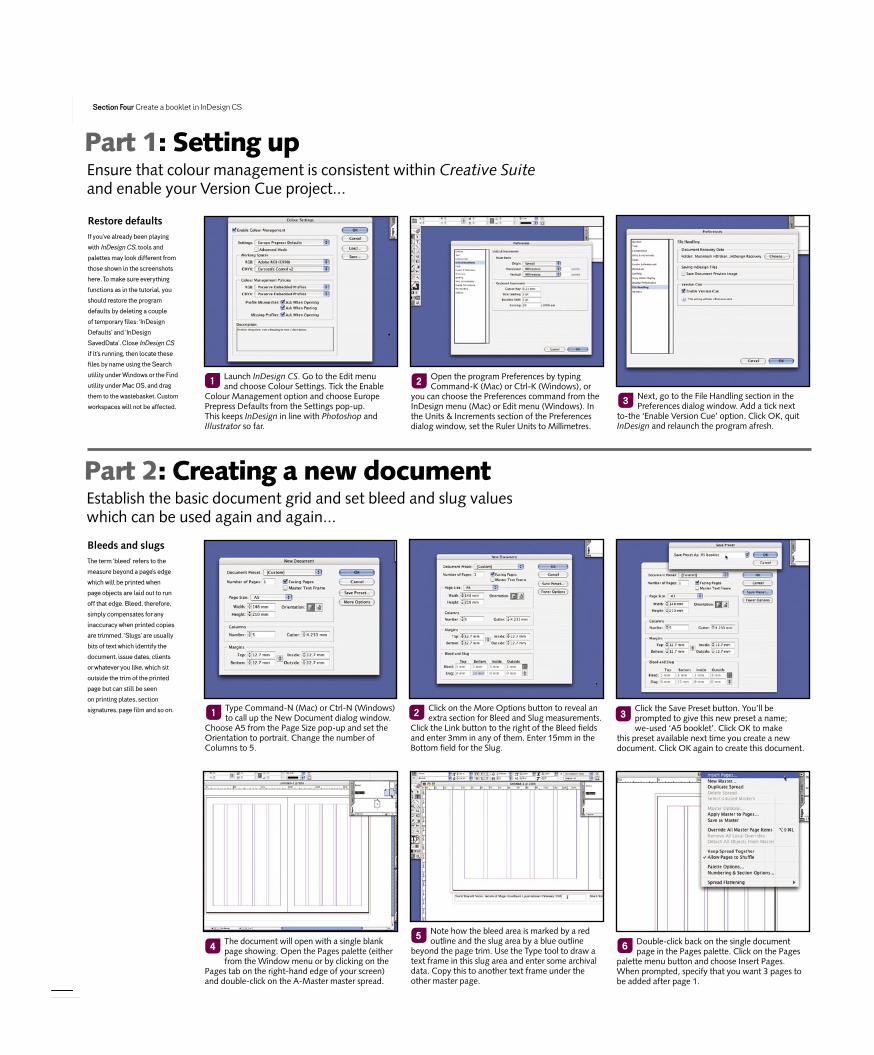
Next, go to the File Handling section in the Preferences dialog window. Add a tick next
to-the ‘Enable Version Cue’ option. Click OK, quit InDesign and relaunch the program afresh.
Open the program Preferences by typing Command-K (Mac) or Ctrl-K (Windows), or
you can choose the Preferences command from the InDesign menu (Mac) or Edit menu (Windows). In the Units & Increments section of the Preferences dialog window, set the Ruler Units to Millimetres.
Launch InDesign CS. Go to the Edit menu and choose Colour Settings. Tick the Enable
Colour Management option and choose Europe Prepress Defaults from the Settings pop-up. This keeps InDesign in line with Photoshop and Illustrator so far.
Double-click back on the single document page in the Pages palette. Click on the Pages
palette menu button and choose Insert Pages. When prompted, specify that you want 3 pages to be added after page 1.
Note how the bleed area is marked by a red outline and the slug area by a blue outline
beyond the page trim. Use the Type tool to draw a text frame in this slug area and enter some archival data. Copy this to another text frame under the other master page.
The document will open with a single blank page showing. Open the Pages palette (either from the Window menu or by clicking on the
Pages tab on the right-hand edge of your screen) and double-click on the A-Master master spread.
1 2
3
45
6
Part 2: Creating a new documentEstablish the basic document grid and set bleed and slug values which can be used again and again...
Click the Save Preset button. You’ll be prompted to give this new preset a name; we-used ‘A5 booklet’. Click OK to make
this preset available next time you create a new document. Click OK again to create this document.
Click on the More Options button to reveal an extra section for Bleed and Slug measurements.
Click the Link button to the right of the Bleed fields and enter 3mm in any of them. Enter 15mm in the Bottom field for the Slug.
Type Command-N (Mac) or Ctrl-N (Windows) to call up the New Document dialog window.
Choose A5 from the Page Size pop-up and set the Orientation to portrait. Change the number of Columns to 5.
1 2 3
Restore defaultsIf you’ve already been playing
with InDesign CS, tools and
palettes may look different from
those shown in the screenshots
here. To make sure everything
functions as in the tutorial, you
should restore the program
defaults by deleting a couple
of temporary files: ‘InDesign
Defaults’ and ‘InDesign
SavedData’. Close InDesign CS
if it’s running, then locate these
files by name using the Search
utility under Windows or the Find
utility under Mac OS, and drag
them to the wastebasket. Custom
workspaces will not be affected.
Section Four Create a booklet in InDesign CS
Document presetsOnce you’ve defined a Document
Preset, there’s no need to
enter all the settings from
scratch next time you want
to create a document to the
same specification. Just click
on the File menu, drag down to
Document Presets and choose
your named preset from the
sub-menu. This opens the New
Document dialog window with
the presets already entered. You
can skip this dialog altogether
by holding down the Shift key as
you select the preset name under
the File menu.
Fitting contentAs well as the Fit Frame To
Content and Fit Content To
Frame buttons in the Control
bar, you can conduct these tasks
with keyboard shortcuts. After
placing an image on a page, type
Command-Option-Shift-E (Mac)
or Ctrl-Alt-Shift-E (Windows)
to fit the image within the frame
proportionately, then type
Command-Option-C (Mac) or
Ctrl-Alt-C (Windows) to fit the
frame to the image, essentially
recropping to fit. Incidentally,
you can also use the Fit Frame
To Content command to shrink
oversized text frames.
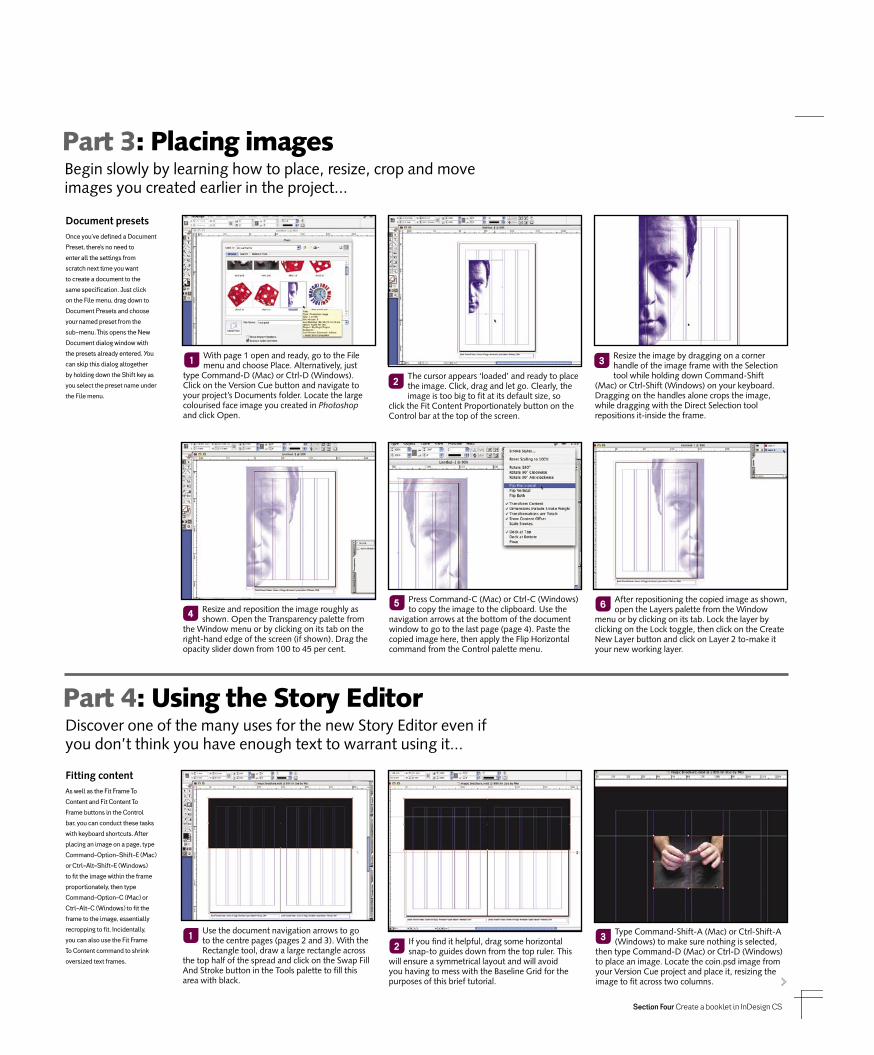
After repositioning the copied image as shown, open the Layers palette from the Window
menu or by clicking on its tab. Lock the layer by clicking on the Lock toggle, then click on the Create New Layer button and click on Layer 2 to-make it your new working layer.
Press Command-C (Mac) or Ctrl-C (Windows) to copy the image to the clipboard. Use the
navigation arrows at the bottom of the document window to go to the last page (page 4). Paste the copied image here, then apply the Flip Horizontal command from the Control palette menu.
Resize and reposition the image roughly as shown. Open the Transparency palette from
the Window menu or by clicking on its tab on the right-hand edge of the screen (if shown). Drag the opacity slider down from 100 to 45 per cent.
45 6
Part 3: Placing imagesBegin slowly by learning how to place, resize, crop and move images you created earlier in the project...
Resize the image by dragging on a corner handle of the image frame with the Selection tool while holding down Command-Shift
(Mac) or Ctrl-Shift (Windows) on your keyboard. Dragging on the handles alone crops the image, while dragging with the Direct Selection tool repositions it-inside the frame.
The cursor appears ‘loaded’ and ready to place the image. Click, drag and let go. Clearly, the image is too big to fit at its default size, so
click the Fit Content Proportionately button on the Control bar at the top of the screen.
With page 1 open and ready, go to the File menu and choose Place. Alternatively, just
type Command-D (Mac) or Ctrl-D (Windows). Click on the Version Cue button and navigate to your project’s Documents folder. Locate the large colourised face image you created in Photoshop and click Open.
1
2
3
Part 4: Using the Story EditorDiscover one of the many uses for the new Story Editor even if you don’t think you have enough text to warrant using it...
Type Command-Shift-A (Mac) or Ctrl-Shift-A (Windows) to make sure nothing is selected,
then type Command-D (Mac) or Ctrl-D (Windows) to place an image. Locate the coin.psd image from your Version Cue project and place it, resizing the image to fit across two columns.
If you find it helpful, drag some horizontal snap-to guides down from the top ruler. This
will ensure a symmetrical layout and will avoid you having to mess with the Baseline Grid for the purposes of this brief tutorial.
Use the document navigation arrows to go to the centre pages (pages 2 and 3). With the Rectangle tool, draw a large rectangle across
the top half of the spread and click on the Swap Fill And Stroke button in the Tools palette to fill this area with black.
12
3

Section Four Create a booklet in InDesign CS
Using the Story Editor continued…
Spread ruler guidesBy default, ruler guides are
specific to the page onto which
they’re dragged. This means
that dragging a guide onto one
page of a spread does not put
that guide on the facing page. To
make sure a ruler guide spans
right across the spread, drag the
guide downwards as normal, but
then move your mouse cursor
onto the left- or right-hand
pasteboard area beyond the page
trim before letting go.
Use the Story Editor to change the text as desired. You can also select all or parts of the text in the Story Editor window and apply the
usual font, size and styling changes to it. After you make changes here, the text in the layout updates too.
Type Command-Y (Mac) or Ctrl-Y (Windows). This calls up the Story Editor, opening the text
in the currently selected frame within its own word-processor-style editing window. Now you can read the text regardless of colour.
Switch to the Type tool and click and drag a text frame underneath the placed image, again
two columns wide. Type a heading or caption into the frame. You can’t see it because it’s black text on-a black background.
Compare this screenshot with the previous one to see the effect of applying the Balance Ragged Lines command. It uses built-in optical
techniques to try to make all lines in a paragraph (in this case, the heading) as equal in length as possible.
Repeat this for the two columns on page 3, placing the thimble.psd and hanky.psd
images from your Version Cue project. Edit the headings under each. Rebalance these headings by opening the Paragraph palette (Window menu) and using the Balance Ragged Lines command from its palette menu.
You’ll find that the placed image takes on the size, crop and fit you already applied to the coin.psd image which was there before
it. Double-click in the heading text underneath to activate the Type tool, then change the heading as shown.
4 5 6
4
5
6
Part 5: Layout speed tipsDuplicating page elements speeds up layout when the design is regular and the images are the same size...
Click on the image at the top of the second column on page 2. Use the Place command
as before and pick the card.psd image you created earlier. Note that the Replace Selected Item option is ticked. Click Open.
Switch to the Zoom tool and zoom out to view the whole spread. Switch to the Selection tool and Shift-click the image, heading and text
frames to select all three. Hold down the Option key (Mac) or Alt key (Windows) and drag-copy the group three times as shown.
In the white area under the image and heading, draw a new text frame across two
columns. Set the type size to 10pt in the Control palette. Type ‘1. The Vanishing Coin’. Then Control-click (Mac) or right-click (Windows) and choose Fill With Placeholder Text from the context menu.
1 23
Saving versionsDon’t forget to save this InDesign
document to your Version Cue
project’s Documents folder,
and keep saving it from time to
time as you progress through
the tutorial. With the document
working in conjunction with
Version Cue, you can then Save
A Version (File menu) whenever
you like, just as you did in
Photoshop earlier. This frees you
up to experiment with different
layout designs, knowing that you
can always return to a previously
saved version.
Section Four Create a booklet in InDesign CS
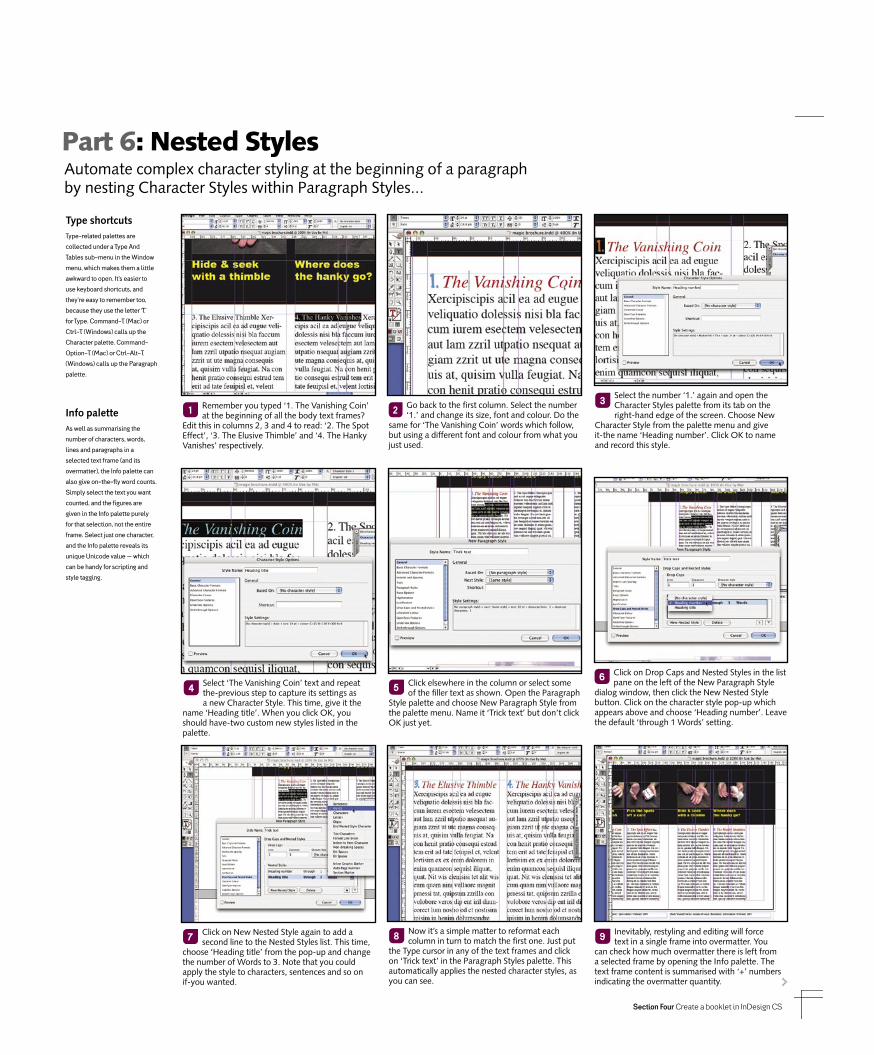
Select the number ‘1.’ again and open the Character Styles palette from its tab on the right-hand edge of the screen. Choose New
Character Style from the palette menu and give it-the name ‘Heading number’. Click OK to name and record this style.
Go back to the first column. Select the number ‘1.’ and change its size, font and colour. Do the
same for ‘The Vanishing Coin’ words which follow, but using a different font and colour from what you just used.
Remember you typed ‘1. The Vanishing Coin’ at the beginning of all the body text frames?
Edit this in columns 2, 3 and 4 to read: ‘2. The Spot Effect’, ‘3. The Elusive Thimble’ and ‘4. The Hanky Vanishes’ respectively.
Click on Drop Caps and Nested Styles in the list pane on the left of the New Paragraph Style
dialog window, then click the New Nested Style button. Click on the character style pop-up which appears above and choose ‘Heading number’. Leave the default ‘through 1 Words’ setting.
Click elsewhere in the column or select some of the filler text as shown. Open the Paragraph
Style palette and choose New Paragraph Style from the palette menu. Name it ‘Trick text’ but don’t click OK just yet.
Select ‘The Vanishing Coin’ text and repeat the-previous step to capture its settings as a new Character Style. This time, give it the
name ‘Heading title’. When you click OK, you should have-two custom new styles listed in the palette.
Inevitably, restyling and editing will force text in a single frame into overmatter. You
can check how much overmatter there is left from a selected frame by opening the Info palette. The text frame content is summarised with ‘+’ numbers indicating the overmatter quantity.
Now it’s a simple matter to reformat each column in turn to match the first one. Just put
the Type cursor in any of the text frames and click on ‘Trick text’ in the Paragraph Styles palette. This automatically applies the nested character styles, as you can see.
Click on New Nested Style again to add a second line to the Nested Styles list. This time,
choose ‘Heading title’ from the pop-up and change the number of Words to 3. Note that you could apply the style to characters, sentences and so on if-you wanted.
1 23
4 56
7 8 9
Type shortcutsType-related palettes are
collected under a Type And
Tables sub-menu in the Window
menu, which makes them a little
awkward to open. It’s easier to
use keyboard shortcuts, and
they’re easy to remember too,
because they use the letter ‘T’
for Type. Command-T (Mac) or
Ctrl-T (Windows) calls up the
Character palette. Command-
Option-T (Mac) or Ctrl-Alt-T
(Windows) calls up the Paragraph
palette.
Info paletteAs well as summarising the
number of characters, words,
lines and paragraphs in a
selected text frame (and its
overmatter), the Info palette can
also give on-the-fly word counts.
Simply select the text you want
counted, and the figures are
given in the Info palette purely
for that selection, not the entire
frame. Select just one character,
and the Info palette reveals its
unique Unicode value – which
can be handy for scripting and
style tagging.
Part 6: Nested StylesAutomate complex character styling at the beginning of a paragraph by nesting Character Styles within Paragraph Styles...

Section Four Create a booklet in InDesign CS
Screen redrawAs soon as you start placing
lots of images on an InDesign
page, system performance will
inevitably suffer. Very large
graphics and those containing
transparency layers will have
the most adverse effect. You
can speed things up by applying
the Optimised Display option
from the Display Performance
sub-menu under the Object
menu (or context menus) once
you’re happy with an image’s
size and position. You can Shift-
click multiple images and apply
Display Performance settings
in one go.
Output previewsThe Flattener and Separations
Preview palettes are not fail-
safe mechanisms for predicting
output, because they can’t tell
what a poorly configured RIP
might do to your layout. What
they can do, however, is show
you the extent of transparency
flattening according to InDesign’s
current Preferences, and how
printing ink colours will be
separated according to the
current colour management
profile set-up. If you see black
text being separated to all four
process colours, for example,
you will know that your colour
management set-up is incorrect.
Zoom out and click on the Preview Mode button at the bottom of the Tools palette. This
hides the pasteboard and all page guides. If you click and hold on the Preview Mode button, you can switch to further previews: one showing the bleed area and another revealing the slug.
Finally, place those 3D translucent dice you created. Perhaps all four dice would be too
much, so just place three of them, resizing them to differentiate the appearance. If system performance is starting to suffer, see our margin note regarding screen redraw.
Place the magic wand graphic on the page. Type Command-Shift-[ (Mac) or Ctrl-Shift-[
(Windows) to send it to the back of the layer, then move and rotate the graphic to sit just under the ‘secrets of Magic’ logo as shown.
45 6
Part 7: Finishing the cover layoutBring your Illustrator-created 3D graphics onto the front page and rework them into a cohesive layout...
Now’s the turn of all those playing card graphics, again created in Illustrator. Place
them one by one onto the page. Resize them individually and try to arrange them in an apparently random manner.
Remember that ‘Teach Yourself Series’ logo which you created using a Scribble fill in
Illustrator? Bring that onto the page as well, reduce its size and move it to the top of the page.
Go back to page 1. It’s time to finish off the layout using standard InDesign techniques. Place the ‘secrets of Magic’ logo (which you
created earlier in Illustrator) from your Version Cue project onto the page. If it looks jaggy, change its Display Performance from the context menu as shown.
1
23
Part 8: Previewing your coverThe Flattener palette enables you to see which parts of your cover will be flattened on output, and the Separations Preview lets you view on-screen proofs of the colour separations…
From the View pop-up again, choose Ink Limit and enter the maximum combined ink
percentage specified by your printing press – usually somewhere around 270 to 300 per cent. Any object on the page containing over-rich ink combinations will be highlighted in red.
Change the Highlight back to None and switch to the Separations Preview palette. From the
View pop-up, choose Separations. Click on the eye button next to Magenta to remove it from what is essentially an on-screen progressive proof.
Open the Flattener Preview palette from the Output Preview sub-menu under the Window menu. From the Highlight pop-up, choose All
Affected Objects. Although ‘preview’ is a misnomer, this palette helpfully highlights where transparency effects will be flattened at output.
12
3

Section Four Create a booklet in InDesign CS
Part 9: Finishing the back-page layoutBring the rest of your Photoshop-prepared images onto the back page and try out the expanded Stroke Styles...
Notice how the transparent backgrounds in the Photoshop-native images are treated accordingly without you having to juggle with
clipping paths. Finally, use the Stroke palette to apply one of the many new strokes to a frame outline.
Place the ‘handwatch’ images one by one. This time, however, begin in a QuarkXPress fashion
by drawing a picture frame (in our case, circular frames) and placing the images directly into them. You can then resize and recrop the watches using the Direct Selection tool.
Go to page 4 to finish off the back page quickly. From your Version Cue project, place
the ‘free watch’ graphic you created earlier in Photoshop. Rotate it to a jaunty angle and resize and reposition it near the top of the page.
With the image name selected, just click on the Update Link button at the bottom of the
palette. The image will immediately be changed to the current version, and the warning icon will vanish from the Links list. ca•p
When you go back into InDesign, the big face image will update – after a second or
two – to the latest green version. If, however, the duplicate image on the back page doesn’t update automatically at the same time, you will first need to select it in the Links palette.
As expected, the current version is now that green-looking one. There is no need to save
the document – this was already done for you by Version Cue when promoting the version in the previous two steps. So you can just close the image document.
12
3
4 56
Part 10: Updating versionsIf you’re not happy with an image in your layout, you can always revert to an earlier version of that graphic, courtesy of Version Cue…
A dialog window prompt appears, asking you to type in a descriptive comment. What is
actually happening is that Photoshop is saving a brand new version, merely copied from that earlier green version, so a comment would be helpful. All existing versions are left intact.
Photoshop CS launches and loads the image ready for editing automatically. From the File
menu, choose the Versions command. Browse the versions you saved during the Photoshop tutorial earlier, select the green example and click on the Promote To Current Version button.
Perhaps you’ve decided that there’s too much blue and purple on the front page, so
you want to change that big face image. Open the Links palette from the Window menu, locate the face.psd on page 1 and choose Edit Original from the palette menu.
1 2 3