document
DESCRIPTION
has been signed off that work should begin on the actual and empower you with expert tips along the way. cold and bleak environment, not too alien in techniques we cover over the next few pages will never fi nal painting, and also as a method of communicating matte painting. entire imaginary background from scratch, or to augment a Yet, by no means does this equate matte painting to ost matte paintings begin life as a verbal stage by stage through the process of creating a matte paintingTRANSCRIPT

Imag
e ©
Alp
Alt
iner
TUTORIALS | Digital matte painting tips
060 | 3D WORLD3D WORLD September 2006
A dark art or simply a craft to be mastered? Whatever your preconceptions, these tips from fi ve world-class matte painters should guide you towards the light ...
Digital matte painting TIPS & TRICKSTIPS & TRICKS
Our experts this issue…
● This matte painting from Alp Altiner’s forthcoming graphic novel, The Unknown, demonstrates the importance of composition. The viewer is lead into the image and across the bridge
ost matte paintings begin life as a verbal brief communicated by the fi lm’s director: “A cold and bleak environment, not too alien in its feel” or “a historically accurate view of the
Southampton Docks, circa 1912”. If the brief hasn’t already been visualised by the art department, the concept sketch becomes the digital matte painter’s fi rst job. Vital as a development tool for exploring the composition of the fi nal painting, and also as a method of communicating the look to the director, it’s only when the concept image has been signed off that work should begin on the actual matte painting.
Whether the matte painter’s role is to reconstruct an
entire imaginary background from scratch, or to augment a
rudimentary set or existing location, the craftsmanship is
essentially the same. These days, the majority of digital mattes
start with a background plate; reference footage is sourced,
then the layered paintwork begins. Colour-picking a brush and
painting from scratch is becoming an increasingly rare task, as
digital stills form the foundation of the majority of paintings.
Yet, by no means does this equate matte painting to
a Photoshop collage. Artistic talent is vital, and even with
the most competent colour grading skills in the world, the
techniques we cover over the next few pages will never
compensate adequately for a lack of artistic ability. Most of
all, you’ll need a good eye, an excellent sense of composition,
an aptitude with colours, and a solid understanding of spatial
design for the camera.
Especially for this feature, fi ve of the best matte painters
from around the world have combined to share their collective
experience, offering insights gathered over the course of their
many years in the creative industry. From selling concept art
to a director to working effectively with layers, we’ll take you
stage by stage through the process of creating a matte painting
and empower you with expert tips along the way.
DON’T RUSH THE DESIGN PROCESSIf you’re involved in designing the matte painting, spend your
time wisely and don’t rush your work. While the majority of matte
painters produce concept art digitally (with Photoshop or Painter),
others work in whichever medium is appropriate. Ensure that the
colours, composition and lighting are signed off, and that the
perspective is accurate before you move to the next stage and
begin work on the details.
M
LUBO HRISTOVWith his own matte painting company, Christov Effects and
Design, Lubo’s credits include The Last Samuraiwww.christovfx.com
DYLAN COLEBest known for his work on Return of the King, Dylan has just
completed Superman Returns as Lead Matte Painterwww.dylancolestudio.com
ALP ALTINERAward-winning matte painter and VFX Art Director, Alp Altiner’s
credits include Superman Returns and Spider-Man 3www.alpaltiner.com
DAVE EARLYCurrently Digital Matte Painting Supervisor at Cinesite,
Dave’s credits include Gladiator and the Harry Potter fi lmswww.cinesite.com
CHARLES DARBYOne of the pioneers of digital matte painting, Charles’s credits include
Titanic, Crouching Tiger, Hidden Dragon and Minority Reportwww.charlesdarby.com
TDW81.t_tips 060TDW81.t_tips 060 3/7/06 17:50:533/7/06 17:50:53

Imag
e ©
Alp
Alt
iner
Imag
es ©
Bue
na V
ista
Pic
ture
s
▲
PRESENT ONLY YOUR BEST WORKSince you’ll probably be working on several variations of ideas in
your concept drawings, use your own judgement when choosing
which to present. Although most directors like to have choices when
considering how elements of the matte painting will work with the
story, never present more than three images or you’ll inevitably be
asked to take elements from each and end up with a composition
that doesn’t work.
SELL YOUR DESIGNWhen presenting your concept work, point out which of your images
work well and provide good explanations as to why. Knowing how
to sell your work is an essential part of the process. Point out
the strengths of the images, and explain how you’ll address any
weaknesses. If you’re convinced that one of your images represents
the perfect composition, show a couple of alternatives where one
element is clearly wrong. Don’t fail to underestimate the importance
of a psychological sell.
CREATING PARALLAX WITH 2.5D PROJECTION Matte paintings are no longer confi ned to locked-off shots. Where
the shot camera rotates nodally around a locked-off position,
the matte painting can be projected onto series of planes in the
compositing software, and camera data imported to give the
impression of slight shifts in perspective via a multi-plane technique.
Known as 2.5D projection, this method can also include simple,
rendered 3D elements.
PROJECTING A MATTE PAINTING IN 3DAn alternative technique allows for even greater movement of
the camera through a scene. By camera projecting (or camera
mapping) a matte painting onto 3D geometry, the scene can be
rendered through the shot camera, with the hi-res matte painting
adding fi ne texture detail on top of the 3D geometry. A 3D
projected matte provides all the benefi ts of true perspective shifts
and real shadows, yet with a lower geometry count because details
are provided in the textures.
WORK ON A LARGER CANVAS How often has a guaranteed lock-off ended up being a ‘slight’
zoom-in on the matte painting? Expanding your canvas beyond the
Digital matte painting tips | TUTORIALS
The ‘Douglas Adams’ planet on the left was created from a cyberscan made of the author while he was still alive. The detailed matte-painted texture was
then applied, and the element was rendered as a 3D-projected matte painting. The render formed another midground layer for the compositors.
04Within Shake, the compositors then assigned the matte paint layers to cards positioned in Z-space. Each card was assigned a distance, so when the
live-action camera move – tracked from the background plate – was imported, a sense of parallax was created in the distant planets as the camera moved through the shot.
05Once the background was complete, the compositors added the 3D-rendered scaffolding and live-action plate, shot in the studio against bluescreen, as
foreground elements in Shake. Various lens effects, glows, atmospherics and colour grading were used to create this fi nal impressive shot.
06
Background layers of planets, including the Vegas planet on the right, required much less detail. But each planet was still handed off as a separate
layer to the compositors so that, within Shake, they could be positioned ‘in space’ to create a sense of parallax within the shot.
When Cinesite created the Planet Factory sequence for The Hitchhiker’s Guide to the Galaxy, David Early knew that the movement through this shot
would require a combination of 2.5D and 3D projection. Matte painter Sevendalino Khay created a projected dome backdrop for the distant stars – the fi rst in a series of layers.
01 02The layers containing the foreground planets were painted with greater resolution, as it was known that these would be used for more than one shot.
They would later be projected onto spheres and rendered in 3D through the Shot Camera to enable 3D lighting and real shifts in perspective.
03
STEP BY STEP | Working with layers
● Using a combination of stills taken from various American cities, careful grading and paintwork, Alp Altiner designed this shot to draw the eye towards the pyramidal buildings on the right
September 2006 3D WORLD3D WORLD | 061
TDW81.t_tips 061TDW81.t_tips 061 3/7/06 17:51:013/7/06 17:51:01

Imag
e ©
Bue
na V
ista
Pic
ture
s
Imag
e co
urte
sy o
f Ch
arle
s D
arby
Imag
e ©
Bue
na V
ista
Pic
ture
s. C
ourt
esy
of D
ave
Earl
y
TUTORIALS | Digital matte painting tips
standard 2,048x1,556 pixel fi lm resolution creates a safety margin
for any unplanned moves on the shot. Better still, take advantage
of the benefi ts of downsampling: double your image resolution
(work at 4,096x3,112) and you’ll enjoy the added advantage of
more comfortable paintwork. Rather than needing to ensure your
brushstrokes are pixel perfect, you’ll be able to work with broader
strokes, then downsample to 2K when your work is fi nished.
DEGRAIN THE FILM SCAN If, as is nearly always the case, a plate is the basis of your matte
painting, before starting any paintwork, you’ll need to remove grain.
Kodak’s Digital Gem Professional 2 plug-in (www.kodak.com)
works well in eliminating fi lm grain from scans, and also noise from
digital photographs. For a locked-off plate, an alternative is to have
a compositor create a grain-averaged plate from 12 consecutive
frames of the shot.
WORK IN 10-BIT COLOURSPACEIf your fi nal output will be fi lm, work in 10-bit log colourspace
wherever you can. 10-bit images maintain the full dynamic range of
the original camera negative. While maintaining all of the original
data, log images look washed-out to the naked eye, so to view them
properly, a lookup table (or LUT) is applied to the monitor. The LUT
alters the screen to show the log image as though it were a print.
If you don’t have access to lookup tables, working in 10-bit linear is
a good alternative, and while the full dynamic range of the negative
isn’t present, unless you’re making radical colour grades to the scan,
you’ll rarely see the difference. 8-bit linear is the standard for
television work, including HDTV.
BRUSH UP YOUR ART SKILLSEven with the best knowledge of Photoshop in the world, you
won’t be a great matte painter without a fair degree of natural
artistry. You’ll need to understand perspective like an expert. If
you’re still unsure about constructing multiple vanishing points,
now’s the time to pick up any of the numerous books on the
subject and hone those skills.
LEARN TO LOVE THE CLONING STAMP It may sound straightforward, but learning how to clone well is
an important trick of the trade. Good cloning is invisible cloning.
Practice removing a tree from a digital image of a landscape, or
a lamppost from the front of a brick building.
062 | 3D WORLD3D WORLD September 2006
● The live plate for the shot on the left. Since much of it would be hidden by the set, the composition of the matte painting required careful thought
Once the 3D geometry had been created, a grid texture was projected from the Projection Camera, and the scene rendered through the Shot Camera.
Areas showing excessive texture stretching, or those obscured from the view of the Projection Camera, were identifi ed as requiring separate texturing, as revealed in this render of the fi rst frame of the shot.
STEP BY STEP | Projecting a matte painting in 3D
To achieve a photorealistic crane-up on the ancient African city of Carthage, Lubo Hristov’s team decided to project a matte paint on a relatively simple 3D
model. Once the camera move was fi nalised, the Projection Camera was set up. Since the city was seen at its widest at the last frame of the shot, the Shot Camera was duplicated at this frame, locked off and renamed as the Projection Camera.
01 02Back in mental ray, three orthogonal, primary coloured distant lights were rendered through the Projection Camera. The resulting render was used
as a selection matte in Photoshop to variously isolate the ground, rooftops, side walls and front-facing walls. In the image above, each is shown as a separate colour. This was an essential step for the next part of the process.
03
● Sundown on Magrathea. Like much modern matte work, this shot from The Hitchhiker’s Guide to the Galaxy involved blending, painting and colour grading multiple digital stills together to create the perfect sunset
● Good matte painting fools the brain into believing a fl at image is a truly three-dimensional world. Virtually all of the background for this shot from The Fifth Element is a 2D matte paint
TDW81.t_tips 062TDW81.t_tips 062 3/7/06 17:51:153/7/06 17:51:15

Imag
e co
urte
sy o
f Ch
arle
s D
arby
Imag
e co
urte
sy o
f Ch
arle
s D
arby
Imag
e co
urte
sy o
f Ch
arle
s D
arby
September 2006 3D WORLD3D WORLD | 063
YOU CAN’T COLLECT TOO MUCH REFERENCE DATAMost matte painters build up their own reference libraries of images
by shooting digital stills wherever they can. Keep a digital camera
with you and jump at opportunities to go out on location. Shoot
all the stills you think you’ll need, including general views, textures
and lighting conditions. Capturing images in RAW format retains the
most data, and bracketing images around a central exposure will
provide more information about the highlights and shadow areas.
Where shots require signifi cant colour grading, shooting HDR images
may be worthwhile, but unless you’re really pushing a grade, it’s
generally considered overkill.
DON’T FORCE PHOTOGRAPHS TO FITWhile photographic images are often the best starting points for
a digital matte painting, don’t force the wrong photographs to fi t.
A good matte painting isn’t simply a collage of photographs bound
together with a few painted pixels. Rather than stretching and
Digital matte painting tips | TUTORIALS
A stone procedural shader was applied to the 3D model and rendered through the Projection Camera. The process was repeated with about 20 other brick,
stone and tile textures and procedural shaders to create a series of layers. By using the selection matte, appropriate areas within each of these images were combined to form the basis of the matte painting.
04With the texture layers combined as overlay layers in Photoshop, paintwork began. Since the lighting would be rendered in 3D in order to achieve greater
realism through real shifts in perspective, a 3D ambient and shadow lighting pass, rendered through the Projection Camera, was added as an overlay layer to preview the effect of the rendered lighting.
05The fi nal matte painting was projected back through the Projection Camera, and the shot rendered through the Shot Camera, with mental ray lighting.
Renders were graded in Shake and additional 3D elements were added, including the ocean, animated boats and people. The trees were textures projected onto cards and then rendered in 3D.
06
colour-correcting a reference image until it ‘breaks’, rely on your
artistic skills and, where required, paint areas from scratch.
3D KNOWLEDGE IS ALWAYS HELPFULThough it’s certainly no prerequisite for the job, 3D knowledge is
often benefi cial. Whether it’s in setting up your own 3D camera
projections, or using 3D models to help with perspective, so much
the better if you can produce the elements yourself. If launching
headfi rst into Maya seems overwhelming, try your hand at one of
the more self-contained modelling and rendering packages such
as Cinema 4D (www.maxon.net).
USE LAYERS SENSIBLYBe structured, label all of your layers clearly and sort them into
folders. When you’re up against a deadline and trying to tweak the
roof tiles on the fi fteenth building from the right, you’ll appreciate
a good working method. Work like a painter from background
to foreground. Start with the sky, then move on to the clouds,
● In the fi nal digital painting, the tones, composition and perspective are faithful to the original concept art (below left): proof that digital techniques do not render traditional media entirely obsolete
● For Crouching Tiger, Hidden Dragon, Charles Darby presented this single A4 watercolour to demonstrate how his fi nal matte painting would look
● Because this shot from Harry Potter and the Goblet of Fire required a zoom into the lit window, the matte painting was an enormous 20K
▲
TDW81.t_tips 063TDW81.t_tips 063 3/7/06 17:51:213/7/06 17:51:21
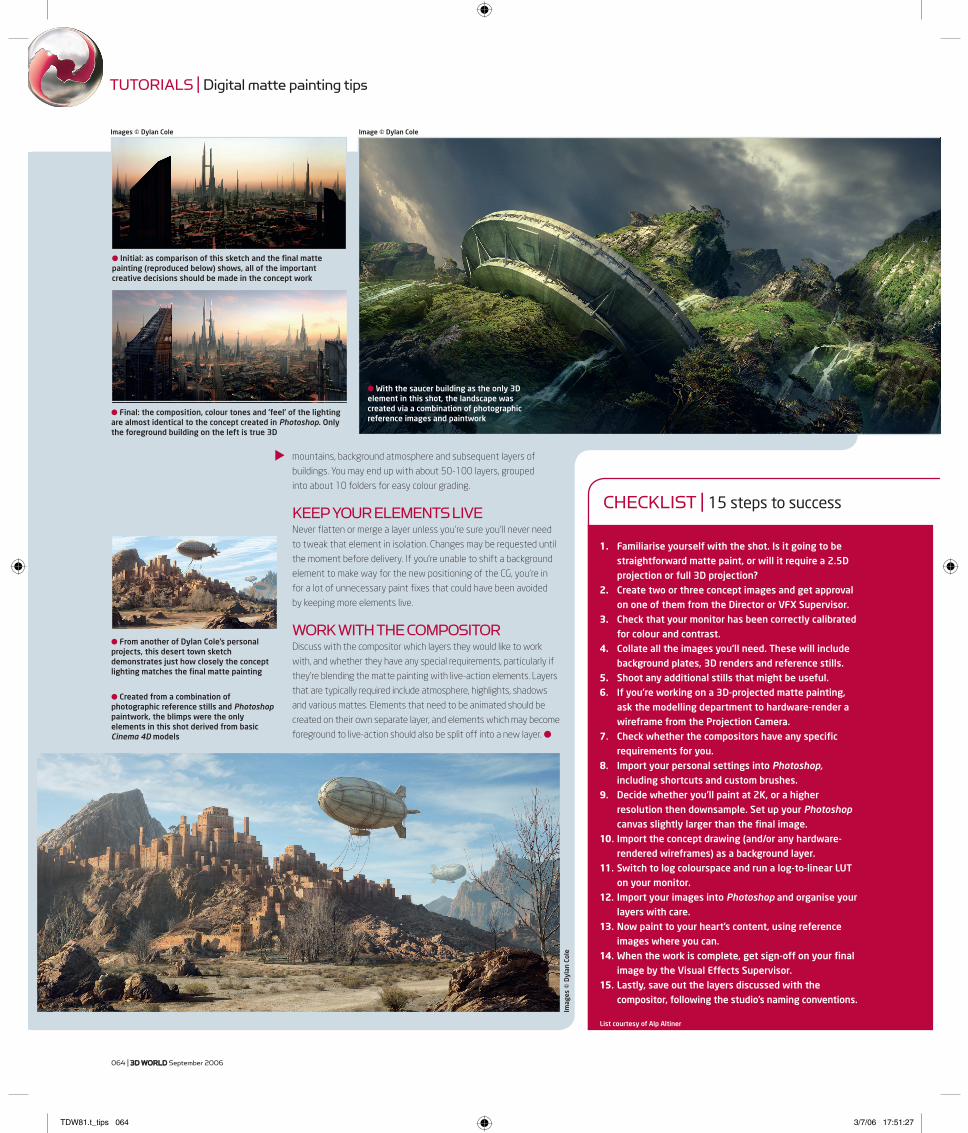
Image © Dylan ColeImages © Dylan Cole
CHECKLIST | 15 steps to success
1. Familiarise yourself with the shot. Is it going to be straightforward matte paint, or will it require a 2.5D projection or full 3D projection?
2. Create two or three concept images and get approval on one of them from the Director or VFX Supervisor.
3. Check that your monitor has been correctly calibrated for colour and contrast.
4. Collate all the images you’ll need. These will include background plates, 3D renders and reference stills.
5. Shoot any additional stills that might be useful. 6. If you’re working on a 3D-projected matte painting,
ask the modelling department to hardware-render a wireframe from the Projection Camera.
7. Check whether the compositors have any specifi c requirements for you.
8. Import your personal settings into Photoshop, including shortcuts and custom brushes.
9. Decide whether you’ll paint at 2K, or a higher resolution then downsample. Set up your Photoshop canvas slightly larger than the fi nal image.
10. Import the concept drawing (and/or any hardware-rendered wireframes) as a background layer.
11. Switch to log colourspace and run a log-to-linear LUT on your monitor.
12. Import your images into Photoshop and organise your layers with care.
13. Now paint to your heart’s content, using reference images where you can.
14. When the work is complete, get sign-off on your fi nal image by the Visual Effects Supervisor.
15. Lastly, save out the layers discussed with the compositor, following the studio’s naming conventions.
064 | 3D WORLD3D WORLD September 2006
TUTORIALS | Digital matte painting tips
mountains, background atmosphere and subsequent layers of
buildings. You may end up with about 50-100 layers, grouped
into about 10 folders for easy colour grading.
KEEP YOUR ELEMENTS LIVENever fl atten or merge a layer unless you’re sure you’ll never need
to tweak that element in isolation. Changes may be requested until
the moment before delivery. If you’re unable to shift a background
element to make way for the new positioning of the CG, you’re in
for a lot of unnecessary paint fi xes that could have been avoided
by keeping more elements live.
WORK WITH THE COMPOSITORDiscuss with the compositor which layers they would like to work
with, and whether they have any special requirements, particularly if
they’re blending the matte painting with live-action elements. Layers
that are typically required include atmosphere, highlights, shadows
and various mattes. Elements that need to be animated should be
created on their own separate layer, and elements which may become
foreground to live-action should also be split off into a new layer. ●
● Final: the composition, colour tones and ‘feel’ of the lighting are almost identical to the concept created in Photoshop. Only the foreground building on the left is true 3D
● Created from a combination of photographic reference stills and Photoshop paintwork, the blimps were the only elements in this shot derived from basic Cinema 4D models
● With the saucer building as the only 3D element in this shot, the landscape was created via a combination of photographic reference images and paintwork
● Initial: as comparison of this sketch and the fi nal matte painting (reproduced below) shows, all of the important creative decisions should be made in the concept work
● From another of Dylan Cole’s personal projects, this desert town sketch demonstrates just how closely the concept lighting matches the fi nal matte painting
▲
Imag
es ©
Dyl
an C
ole
List courtesy of Alp Altiner
TDW81.t_tips 064TDW81.t_tips 064 3/7/06 17:51:273/7/06 17:51:27
A Coastal Vulnerability Assessment Methodology for Torres ... â€؛ __data â€؛ assets â€؛ pdf_file â€؛
Culture, Creativity, Cultural - Monash Arts â€؛ __data â€؛ assets â€؛ pdf_file â€؛ ... Culture Media