hycu scom management pack for f5 big-ip user … · hycu management pack for f5 big-ip ltm (core)...
TRANSCRIPT
HYCU SCOM Management Pack for F5 BIG-IP
Product version: 5.3
Product release date: March 2018
Document edition: First
USER GUIDE
2
Legal noticesCopyright notice© 2015-2018 HYCU. All rights reserved.
This document contains proprietary information, which is protected by copyright. No part of this document may be photocopied, reproduced, distributed, transmitted, stored in a retrieval system, modified or translated to another language in any form by any means, without the prior written consent of HYCU.
TrademarksHYCU logos, names, trademarks and/or service marks and combinations thereof are the property of HYCU or its affiliates. Other product names are the property of their respective trademark or service mark holders and are hereby acknowledged.
F5, F5 Networks, and the F5 logo are trademarks of F5 Networks, Inc. in the U.S. and in certain other countries. Other F5 trademarks are identified at f5.com. Any other products, services, or company names referenced herein may be trademarks of their respective owners with no endorsement or affiliation, express or implied, claimed by F5.
Microsoft and Windows Server are either registered trademarks or trademarks of Microsoft Corporation in the United States and/or other countries.
DisclaimerThe details and descriptions contained in this document are believed to have been accurate and up to date at the time the document was written. The information contained in this document is subject to change without notice.
HYCU provides this material "as is" and makes no warranty of any kind, expressed or implied, including, but not limited to, the implied warranties of merchantability and fitness for a particular purpose. HYCU shall not be liable for errors and omissions contained herein. In no event shall HYCU be liable for any direct, indirect, consequential, punitive, special or incidental damages, including, without limitation, damages for loss and profits, loss of anticipated savings, business interruption, or loss of information arising out of the use or inability to use this document, or any action taken based on the information contained herein, even if it has been advised of the possibility of such damages, whether based on warranty, contract, or any other legal theory.
The only warranties for HYCU products and services are set forth in the express warranty statements accompanying such products and services. Nothing herein should be construed as constituting an additional warranty.
3
NoticeThis document is provided in connection with HYCU products. HYCU may have copyright, patents, patent applications, trademark, or other intellectual property rights covering the subject matter of this document.
Except as expressly provided in any written license agreement from HYCU, the furnishing of this document does not give you any license to these patents, trademarks, copyrights, or other intellectual property on HYCU products. Use of underlying HYCU product(s) is governed by their respective Software License and Support Terms.
Important: Please read Software License and Support Terms before using the accompanying software product(s).
HYCUwww.hycusoftware.com
4
ContentsEnvironment preparation 7
Installation prerequisites 7
Configuring access to F5 BIG-IP devices 9
Configuring SNMP access 9
Configuring iControl REST API access 10
Creating SCOM resource pools 17
Discovering BIG-IP devices as network devices in SCOM 17
Installation and configuration 19
Obtaining the product installation package 19
Installing the product 19
Configuring HYCU F5 BIG-IP Device Action Account 29
Setting up Data Warehouse Action Account for F5 BIG-IP devices 31
Compliance with Federal Information Processing Standards (FIPS) 32
Product licensing 33
Activating software evaluation and universal licenses 33
Activating perpetual (permanent) licenses 34
Generating license request files for all unlicensed devices 34
Generating license request files for individual devices 34
Applying license activation files 35
Functionality overview 37
General product functionality 37
Alerts 37
All Performance Graphs 37
MP Administration 37
HYCU Management Pack for F5 BIG-IP Device (Core) 37
Device performance views 38
Device Diagram 38
Hardware Alerts 38
5
HYCU Management Pack for F5 BIG-IP Device (Reports) 38
HYCU Management Pack for F5 BIG-IP LTM (Core) 39
Dashboards 39
LTM performance views 39
LTM Diagram 40
Filtering virtual servers, pools, and pool members 40
HA monitoring 40
HYCU Management Pack for F5 BIG-IP LTM (Reports) 41
HYCU Management Pack for F5 BIG-IP ASM (Core) 42
ASM Statistics Dashboard 42
ASM Security Policies 42
HYCU Management Pack for F5 BIG-IP ASM (Reports) 43
HYCU Management Pack for F5 BIG-IP DNS (Core) 43
Some of the F5 BIG-IP Devices in F5 DNS Sync Group are not in sync monitor 43
DNS Wide IP Performance view 43
Wide IPs view 43
Filtering DNS objects 43
BIG-IP objects, properties, and relationships 45
Uninstallation 47
Uninstallation overview 47
Removing included management packs 47
Uninstalling SCOM MP for F5 BIG-IP from management server 48
Troubleshooting 49
General troubleshooting guidelines 49
Problems and solutions 49
Registry key access failure during product upgrade 49
BIG-IP devices are not discovered 50
Workflows are not triggered 53
Alerts are not generated or performance data is not collected 54
ASM Statistics Dashboard is not available in the SCOM web console 54

6
ASM Statistics Dashboard is empty 54
Some virtual servers are missing in ASM Statistics Dashboard 55
Self IP Address property is empty 55
Rest Framework Version and Is Virtual properties are empty 56
Health recalculation does not change the monitor's health indicator 56
Getting assistance 56
Licensing assistance 57
Support 57
Getting additional information and latest updates 58
Before contacting HYCU Customer Support 59
Advanced tasks 60
Installing the product in quiet or passive mode 60
Upgrading the product 61
Upgrading from the version 3.0 or later 61
Upgrading from a version earlier than 3.0 61
Manually importing included management packs 63
Creating a management pack for overrides 63
Configuring HYCU F5 BIG-IP Device Action Account with Windows PowerShell 64
Adjusting SCOM configuration for large environments 67
HYCU Customer Support and information 70
Customer Support 70
Company website 70
General information 71
Feedback 71
7
Environment preparationThis chapter contains instructions for preparing your environment for installation of HYCU SCOM Management Pack for F5 BIG-IP.
Installation prerequisitesBefore installing HYCU SCOM Management Pack for F5 BIG-IP (SCOM MP for F5 BIG-IP), make sure that the following prerequisites are fulfilled:
l Product requirements documented in the HYCU SCOM Management Pack for F5 BIG-IP Release Notes are met.
l F5 BIG-IP infrastructure prerequisites:
o Your F5 BIG-IP devices are accessible.
For instructions on how to configure proper access to the BIG-IP devices, see section “Configuring access to F5 BIG-IP devices” on page 9.
l Microsoft System Center Operations Manager (SCOM) platform prerequisites:
o SCOM is installed and configured on the SCOM management servers designated for BIG-IP monitoring.
Optional. SCOM gateway servers are set up as part of the SCOM environment.
You may find the following webpages useful:
SCOM 1801: – How to install an Operations Manager management server – Install a gateway server
SCOM 2016: – How to install an Operations Manager management server – Install a gateway server
o Each of the SCOM management servers can access BIG-IP devices through standard ports of the protocols used:
n SNMP: port 161 (UDP)
n HTTPS: port 443 (TCP)
Optional. Each of the SCOM gateway servers can communicate with the SCOM management servers through the standard SCOM interconnection port:
n SCOM: port 5723 (TCP)
Chapter 1
Environment preparation
8
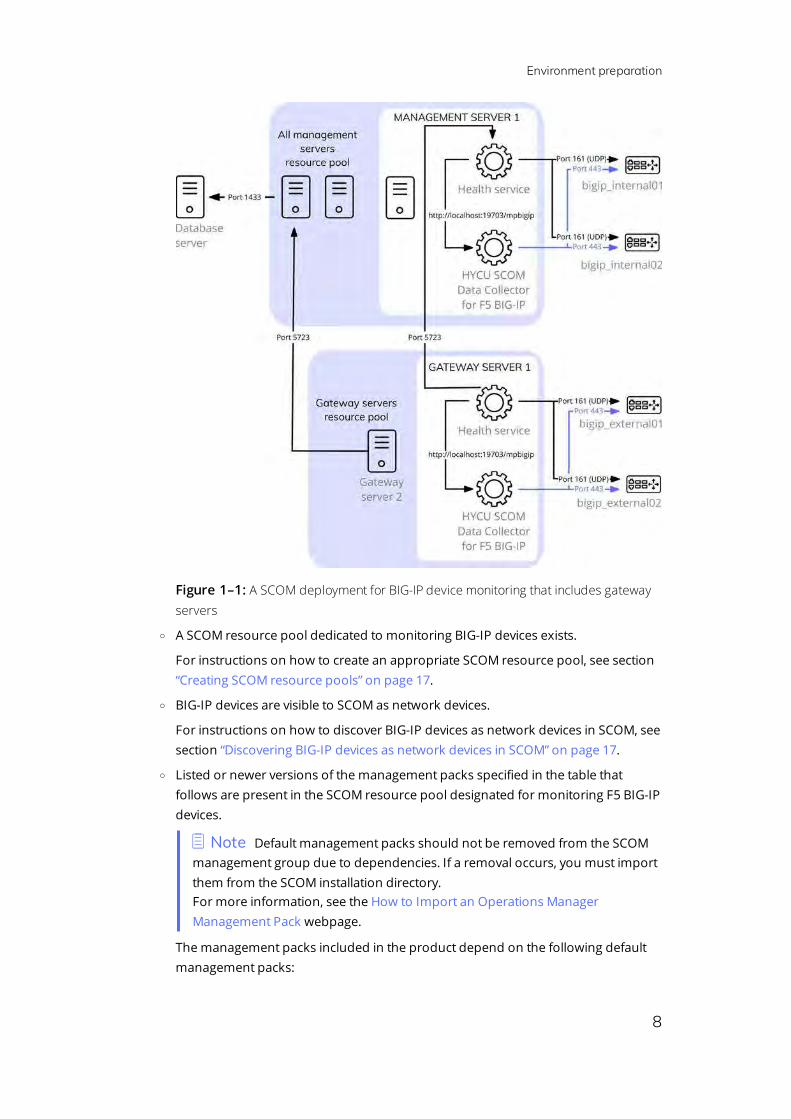
Figure 1–1: A SCOM deployment for BIG-IP device monitoring that includes gateway servers
o A SCOM resource pool dedicated to monitoring BIG-IP devices exists.
For instructions on how to create an appropriate SCOM resource pool, see section “Creating SCOM resource pools” on page 17.
o BIG-IP devices are visible to SCOM as network devices.
For instructions on how to discover BIG-IP devices as network devices in SCOM, see section “Discovering BIG-IP devices as network devices in SCOM” on page 17.
o Listed or newer versions of the management packs specified in the table that follows are present in the SCOM resource pool designated for monitoring F5 BIG-IP devices.
n Note Default management packs should not be removed from the SCOM management group due to dependencies. If a removal occurs, you must import them from the SCOM installation directory.For more information, see the How to Import an Operations Manager Management Pack webpage.
The management packs included in the product depend on the following default management packs:
Environment preparation
9
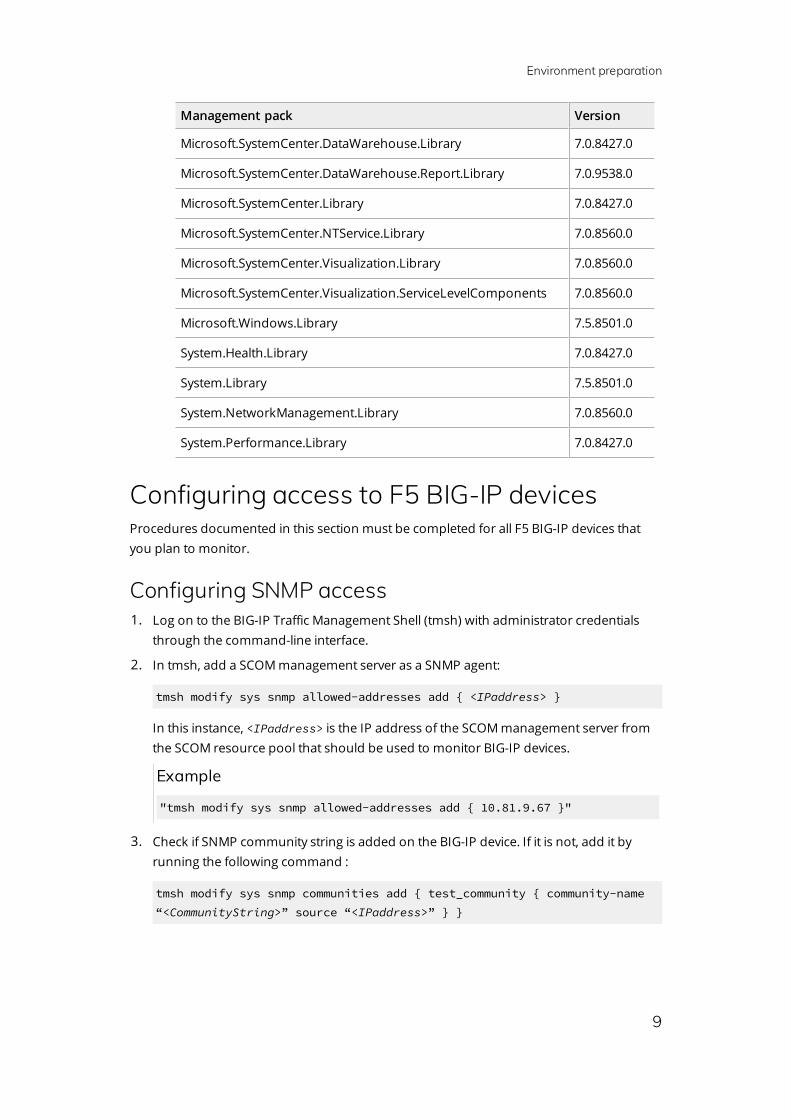
Management pack Version
Microsoft.SystemCenter.DataWarehouse.Library 7.0.8427.0
Microsoft.SystemCenter.DataWarehouse.Report.Library 7.0.9538.0
Microsoft.SystemCenter.Library 7.0.8427.0
Microsoft.SystemCenter.NTService.Library 7.0.8560.0
Microsoft.SystemCenter.Visualization.Library 7.0.8560.0
Microsoft.SystemCenter.Visualization.ServiceLevelComponents 7.0.8560.0
Microsoft.Windows.Library 7.5.8501.0
System.Health.Library 7.0.8427.0
System.Library 7.5.8501.0
System.NetworkManagement.Library 7.0.8560.0
System.Performance.Library 7.0.8427.0
Configuring access to F5 BIG-IP devicesProcedures documented in this section must be completed for all F5 BIG-IP devices that you plan to monitor.
Configuring SNMP access 1. Log on to the BIG-IP Traffic Management Shell (tmsh) with administrator credentials
through the command-line interface.
2. In tmsh, add a SCOM management server as a SNMP agent:
tmsh modify sys snmp allowed-addresses add { <IPaddress> }
In this instance, <IPaddress> is the IP address of the SCOM management server from the SCOM resource pool that should be used to monitor BIG-IP devices.
Example
"tmsh modify sys snmp allowed-addresses add { 10.81.9.67 }"
3. Check if SNMP community string is added on the BIG-IP device. If it is not, add it by running the following command :
tmsh modify sys snmp communities add { test_community { community-name “<CommunityString>” source “<IPaddress>” } }
Environment preparation
10
In this instance, <CommunityString> is the community string that should be used when discovering these BIG-IP devices in SCOM. <IPaddress> is the IP address of the SCOM management server.
The command should run for all SCOM management servers from the SCOM resource pool that you plan to use for monitoring BIG-IP devices.
Example
“tmsh modify sys snmp communities add { test_community { community-name “test” source “10.81.9.67” } }”
4. Save configuration changes:
save sys config
Configuring iControl REST API accessTo be able to monitor BIG-IP devices with iControl REST service, either a local or external BIG-IP user account needs to be created on all BIG-IP devices that you plan to monitor with the Management Pack. With F5 BIG-IP versions earlier than 11.6.0, the user needs to be associated with the administrator role, and must have access to all partitions.
This user needs Administrator role to access iControl REST API of F5 BIG-IP versions earlier than 11.6.0. The role is not used by SCOM MP for F5 BIG-IP to modify the BIG-IP device in any other way. With F5 BIG-IP versions 11.6.0 and later, user does not need to have Administrator role and read-only access can be configured.
Verification Check HTTPS accessibility by opening a web browser and accessing the https://<IPaddress> URL on each SCOM management server that you plan to use for monitoring BIG-IP devices. In this instance, <IPaddress> is the IP address of the BIG-IP device.
If the BIG-IP Web UI is displayed, then the BIG-IP can be accessed from SCOM by using the HTTPS protocol.
To monitor the BIG-IP device using a Local Account, see section “Environment preparation” on page 7. To monitor it using a Remote Account, see section “Configuring remote authentication” on page 13. To monitor it using Read-Only Account, see section “Configuring F5 BIG-IP for monitoring using a read-only account” on page 15.
n Note It is not possible to use both local and external BIG-IP user accounts on the same device. The only exception are built-in root and admin accounts.
Environment preparation
11
Creating a local accountOn each BIG-IP device:
1. Log on to the BIG-IP Traffic Management Shell (tmsh) with administrator credentials.
2. In tmsh, create a local user by executing the corresponding command. The command line depends on the product version:
F5 BIG-IP version 11.6.0 or later:
create auth user HYCUf5bigipMonitoringAccount password <MyPassword> partition-access add { all-partitions { role admin } } shell none
F5 BIG-IP version earlier than 11.6.0:
create auth user HYCUf5bigipMonitoringAccount password <MyPassword> partition-access all role admin shell none
In these instances, HYCUf5bigipMonitoringAccount is the example user name of the account, and <MyPassword> is the password that you want to use for this account. This user account must have access to all partitions.
3. Verify that the user is created. Run the following command in tmsh:
list auth user
Depending on the BIG-IP version, the command output should resemble the corresponding example output that follows.
F5 BIG-IP version 11.6.0 or later:
auth user HYCUf5bigipMonitoringAccount { description HYCUf5bigipMonitoringAccount encrypted-password $6$gjO9Xaj/$P2TkRsH4r2sdVbsdutM.FoeWPjk8gdJIIyPdhD/cV/vG5kqSl9LWvAUS.l.iAf7j8WmB61kKi8infxID1Y7CFEaX30 partition Common partition-access { all-partitions { role admin } } shell none }
F5 BIG-IP version earlier than 11.6.0:
auth user HYCUf5bigipMonitoringAccount { description "HYCUf5bigipMonitoringAccount " encrypted-password
Environment preparation
12
"$6$gjO9Xaj/$P2TkRsH4r2sdVbsdutM.FoeWPjk8gdJIIyPdhD/cV/vG5kqSl9LWvAUS.l.iAf7j8WmB61kKi8infxID1Y7CFEaX30" partition Common partition-access all role admin shell none }
4. Save system configuration.
save sys config
Verification 1. Open a web browser on one of the SCOM management servers that can access the
BIG-IP device
2. Enter the following URL:
https://<IPaddress>/mgmt/tm/cm/device?$select=version,managementIp
In this instance, <IPaddress> is the management IP address of the BIG-IP device
3. You are prompted for the credentials. Here you should enter the user name and password of the monitoring account that you have configured previously
4. If the monitoring account has been configured properly the response from the device should be a valid JSON object and it should look similar to the following response:
{ kind : "tm:cm:device:devicecollectionstate", selfLink : "https://localhost/mgmt/tm/cm/device?$select=version,managementIp&ver=11.5.0", items : [{ managementIp : "10.49.14.127", version : "11.5.0" }] }
5. If the web browser prompts for credentials again or you get a 401: Authentication Response message, it is likely that either the credentials you have entered are not valid or the user account has not been configured properly. If this occurs, check if the user account you are using actually exists on the BIG-IP device. If it exists, verify that credentials that you are using are correct, and that the user account has the Administrator role assigned to it.

Environment preparation
13
Configuring remote authentication 1. Contact your system administrator who is in charge for domain controller that you plan
to use, and obtain a user name for the user account designated for monitoring the BIG-IP devices. Account, which you are using for the external authentication, cannot be a member of the Remote Role Group.
2. On the BIG-IP device, log in to its Web UI with the user that has tmsh Terminal Access and permission to create other users.
3. Navigate to System > Users > User List.
4. Click Create.
5. Enter the User Name that you obtained from your system administrator.
6. Select the Administrator role. This role is required to access iControl REST API of F5 BIG-IP versions earlier than 11.6.0, but is not used by SCOM MP for F5 BIG-IP to modify the BIG-IP device in any way. With F5 BIG-IP versions 11.6.0 and later, user does not need to have Administrator role and read-only access can be configured. For detailed instructions, see section “Configuring F5 BIG-IP for monitoring using a read-only account” on page 15. You must first complete these Remote Authentication configuration steps before you continue with the next section, but you can assign a guest role if you wish to configure read only access.
7. Click Finished.
Verification To verify if basic authentication account has been configured properly, do the following:
1. A user that you just created should be displayed in System > Users > Users List. If this user is not displayed, check if the user that you used to create this user has tmsh Terminal Access. Access the BIG-IP using SSH and run the following command:
list auth user
The command output should resemble the following:
Environment preparation
14
You must delete the user that you just created. Run the following command:
delete auth user domainuser
Verify that it has been deleted by again executing the following command:
list auth user
Recreate the user by using the user that has permission to create users and that has access to tmsh.
2. If the user is visible on System > Users > Users List, open a web browser on one of the SCOM management servers that can access the BIG-IP device.
3. Enter the following URL:
https://<IPaddress>/mgmt/tm/cm/device?$select=version,managementIp
In this instance, <IPaddress> is the management IP address of the BIG-IP device.
4. You are prompted for the credentials. Here you should enter the user name and password of the monitoring account that you have configured previously.
5. If the monitoring account has been configured properly the response from the device should be a valid JSON object and it should look similar to the following response:
{ kind : "tm:cm:device:devicecollectionstate", selfLink : "https://localhost/mgmt/tm/cm/device?$select=version,managementIp&ver=11.5.0", items : [{ managementIp : "10.49.14.127", version : "11.5.0"
Environment preparation
15
}] }
6. If the browser again prompts you for credentials or you get a 401: Authentication Response it is likely that either the credentials you have entered are not valid or the account has not been configured properly. In case when this happens, check that the account you are using is created on the BIG-IP device. If it is created, verify that credentials that you are using are correct and that the account has Administrator role assigned to it.
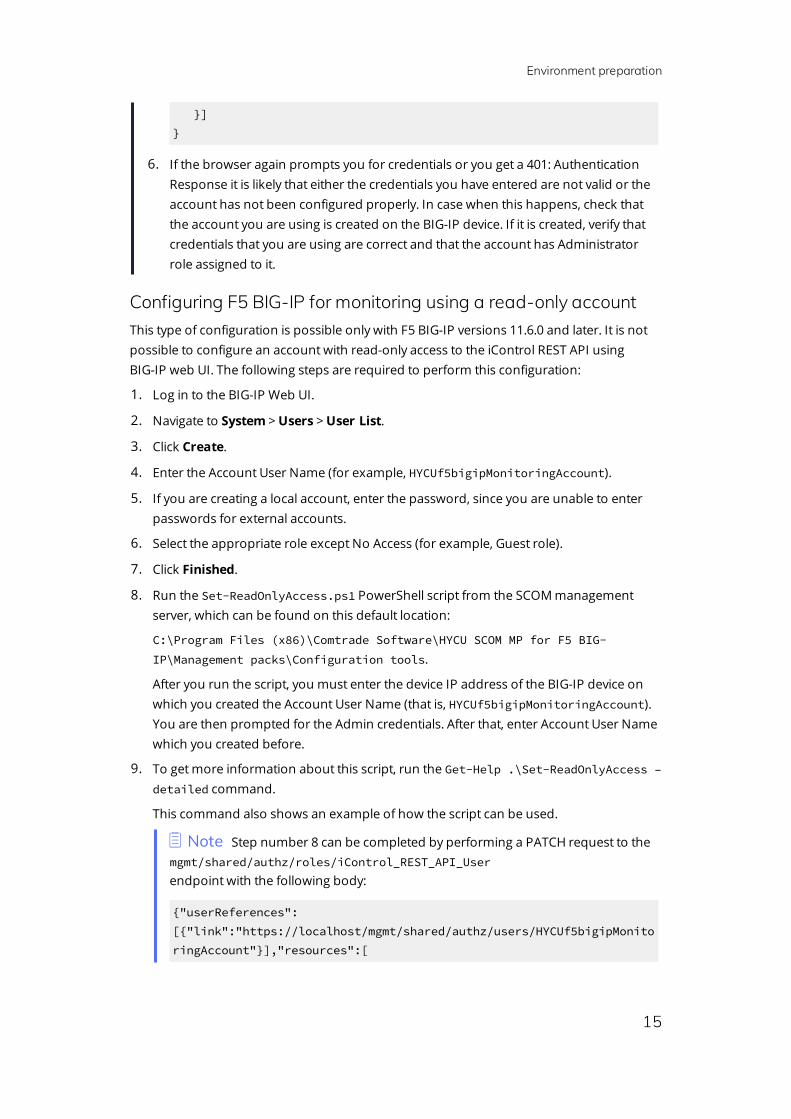
Configuring F5 BIG-IP for monitoring using a read-only accountThis type of configuration is possible only with F5 BIG-IP versions 11.6.0 and later. It is not possible to configure an account with read-only access to the iControl REST API using BIG-IP web UI. The following steps are required to perform this configuration:
1. Log in to the BIG-IP Web UI.
2. Navigate to System > Users > User List.
3. Click Create.
4. Enter the Account User Name (for example, HYCUf5bigipMonitoringAccount).
5. If you are creating a local account, enter the password, since you are unable to enter passwords for external accounts.
6. Select the appropriate role except No Access (for example, Guest role).
7. Click Finished.
8. Run the Set-ReadOnlyAccess.ps1 PowerShell script from the SCOM management server, which can be found on this default location:
C:\Program Files (x86)\Comtrade Software\HYCU SCOM MP for F5 BIG-IP\Management packs\Configuration tools.
After you run the script, you must enter the device IP address of the BIG-IP device on which you created the Account User Name (that is, HYCUf5bigipMonitoringAccount). You are then prompted for the Admin credentials. After that, enter Account User Name which you created before.
9. To get more information about this script, run the Get-Help .\Set-ReadOnlyAccess –detailed command.
This command also shows an example of how the script can be used.
n Note Step number 8 can be completed by performing a PATCH request to the mgmt/shared/authz/roles/iControl_REST_API_User endpoint with the following body:
{"userReferences":[{"link":"https://localhost/mgmt/shared/authz/users/HYCUf5bigipMonitoringAccount"}],"resources":[
Environment preparation
16
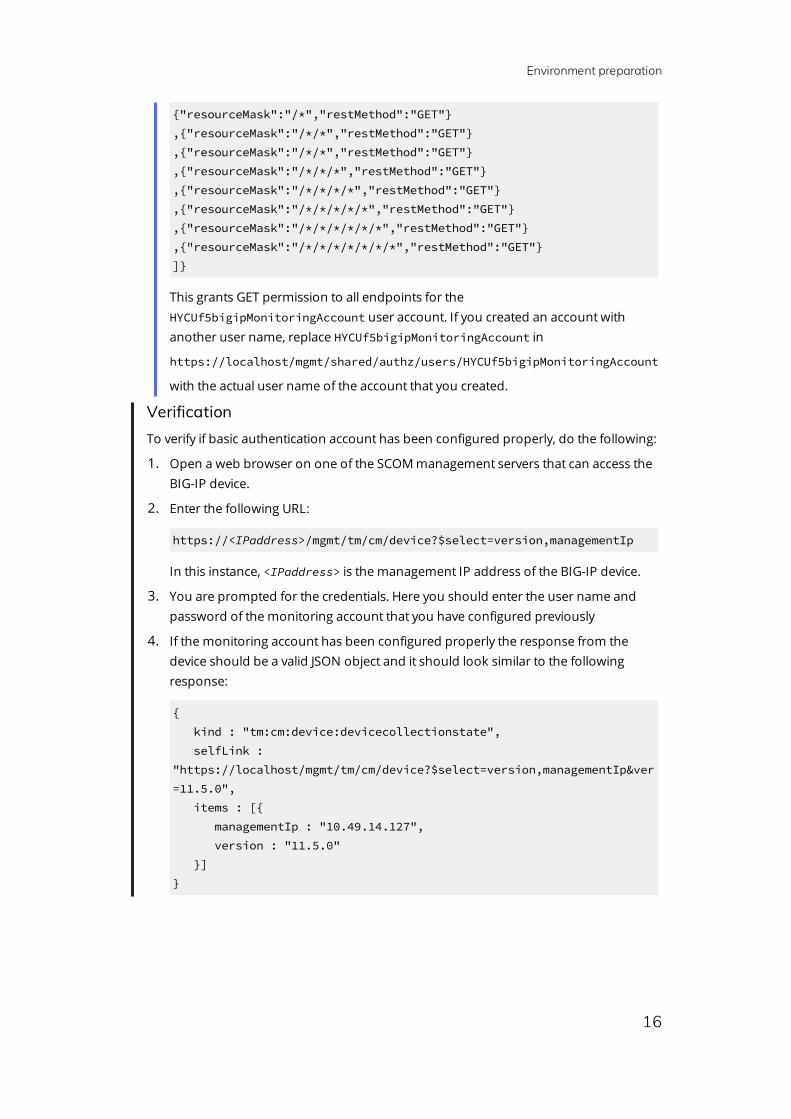
{"resourceMask":"/*","restMethod":"GET"} ,{"resourceMask":"/*/*","restMethod":"GET"} ,{"resourceMask":"/*/*","restMethod":"GET"} ,{"resourceMask":"/*/*/*","restMethod":"GET"} ,{"resourceMask":"/*/*/*/*","restMethod":"GET"} ,{"resourceMask":"/*/*/*/*/*","restMethod":"GET"} ,{"resourceMask":"/*/*/*/*/*/*","restMethod":"GET"} ,{"resourceMask":"/*/*/*/*/*/*/*","restMethod":"GET"} ]}
This grants GET permission to all endpoints for the HYCUf5bigipMonitoringAccount user account. If you created an account with another user name, replace HYCUf5bigipMonitoringAccount in
https://localhost/mgmt/shared/authz/users/HYCUf5bigipMonitoringAccount
with the actual user name of the account that you created.
Verification To verify if basic authentication account has been configured properly, do the following:
1. Open a web browser on one of the SCOM management servers that can access the BIG-IP device.
2. Enter the following URL:
https://<IPaddress>/mgmt/tm/cm/device?$select=version,managementIp
In this instance, <IPaddress> is the management IP address of the BIG-IP device.
3. You are prompted for the credentials. Here you should enter the user name and password of the monitoring account that you have configured previously
4. If the monitoring account has been configured properly the response from the device should be a valid JSON object and it should look similar to the following response:
{ kind : "tm:cm:device:devicecollectionstate", selfLink : "https://localhost/mgmt/tm/cm/device?$select=version,managementIp&ver=11.5.0", items : [{ managementIp : "10.49.14.127", version : "11.5.0" }] }
Environment preparation
17
Creating SCOM resource poolsTo achieve high availability monitoring of BIG-IP devices, a SCOM resource pool with at least two dedicated SCOM management servers should be created. This step is optional, but highly recommended.
To create a SCOM resource pool for monitoring BIG-IP devices, do the following:
1. In the SCOM Operations console, navigate to Administration > Resource Pools.
2. Right-click the pane that appears and click Create Resource Pool.
3. Enter a name for this SCOM resource pool (for example, BIG-IP Resource Pool or F5 Resource Pool), and then click Next.
4. Click Add and then click Search.
5. Select SCOM management servers that you wish to add to this SCOM resource pool, and then click Add.
6. Once you have added all designated SCOM management servers, click OK.
7. Click Next.
8. Click Create.
Verification Verify that name of the created SCOM resource pool is visible in the Administration > Resource Pools context.
Discovering BIG-IP devices as network devices in SCOMAs a prerequisite for SCOM MP for F5 BIG-IP, all F5 BIG-IP devices must be discovered and monitored as network devices by SCOM.
To achieve monitoring of BIG-IP devices in Sync-Failover device group, all devices from Sync-Failover device group must be discovered with the same Network Devices Discovery.
The following is an example scenario for discovering BIG-IP devices in the Microsoft System Center Operations Manager version 2012.
To discover BIG-IP devices as network devices in SCOM, do the following:
1. Launch the SCOM Operations console and connect to the management server.
2. Navigate to Administration > Network Management > Discovery Rules and invoke the Discover Network Devices task. The Network Devices Discovery wizard for creation of a discovery rule starts.
3. In the General Properties page, specify a discovery name, and choose a SCOM management server (Available servers) and a SCOM resource pool (Available pools, user-created) to be used for the discovery. Click Next.
Environment preparation
18
4. In the Discovery Method page, select the discovery type, for example, Explicit discovery. Click Next.
5. In the Default Accounts page, click Create Account to create an SNMP Run As account. In the Create Run As Account Wizard window, enter the community string that is set in BIG-IP. Click Create. In the Network Devices Discovery Wizard window, click Next.
6. In the Device page, add each BIG-IP device that should be monitored and associate it with the SNMP Run As account created in the previous step. For the SNMP version option select, for example, v1 or v2.
7. In the Schedule Discovery page, set the time to run the discovery rule or choose that the rule should be invoked manually. Click Next.
8. In the Summary page, verify your settings, and then click Create.
9. In the Warning dialog box, confirm account distribution by clicking Yes.
t Tip In case of issues with configuring network device discovery, follow general guidelines for network devices discovery in Microsoft System Center Operations Manager. For more information, see the How to Discover Network Devices in Operations Manager webpage.
Verification Wait until the discovery completes. At that time, all BIG-IP devices should be visible in both of the following SCOM Operations console contexts:
Monitoring > Network Monitoring > Network Devices
Administration > Network Management > Network Devices
19
Installation and configurationThis chapter contains instructions for installing, verifying the installation of, and configuring HYCU SCOM Management Pack for F5 BIG-IP (SCOM MP for F5 BIG-IP).
Obtaining the product installation packageIf you purchased a product license, go to the F5 Monitoring – HYCU webpage and sign in with your account credentials. If you do not have an account yet, apply for it at the [email protected] email address. Else, if you want to evaluate the product, go to the Free Trial | HYCU webpage.
For instructions on how to upgrade from an earlier product version, see section “Upgrading the product” on page 61.
For instructions on how to adjust configuration of Microsoft System Center Operations Manager and enable it to monitor large environments, see section “Adjusting SCOM configuration for large environments” on page 67.
This product complies with the FIPS 140-2 standard. For more information, see section “Compliance with Federal Information Processing Standards (FIPS)” on page 32.
Installing the productHYCU SCOM Management Pack for F5 BIG-IP (SCOM MP for F5 BIG-IP) consists of the following features:
l Data Collector
l Device Management pack
l LTM Management pack
l ASM Management pack
l ASM Reports Management Pack
l DNS Management pack
l LTM Reports Management pack
l Device Reports Management pack
l Support tool
l Licensing module
Chapter 2
Installation and configuration
20
l Legal documents
l Documentation
The Data Collector, Licensing module, and Support tool features must be installed on all SCOM management servers that were added to the SCOM resource pool dedicated for monitoring BIG-IP devices.
Data Collector is a Windows service, which communicates with BIG-IP devices and collects configuration and statuses for SCOM MP for F5 BIG-IP monitoring. It listens for SCOM MP for F5 BIG-IP requests and serves as a proxy with a cache functionality. SCOM MP for F5 BIG-IP and Data Collector are communicating by using the HTTP protocol. The default local communication port on the SCOM management server is 19703. This port can be changed during installation.
The Legal documents feature contains all available license and support information.
The Documentation feature contains documents of the product documentation set. For more information, see the HYCU SCOM Management Pack for F5 BIG-IP Release Notes, section Documentation.
t Tip SCOM MP for F5 BIG-IP can also be installed in quiet and passive mode. For details, see section “Installing the product in quiet or passive mode” on page 60.
To install SCOM MP for F5 BIG-IP, do the following:
1. Go to the F5 Monitoring - HYCU webpage and sign in with your account credentials.
If you do not have an account yet, apply for it at the following email address:[email protected]
2. When you are signed in, under Product download, click HYCU SCOM Management Pack for F5 BIG-IP.
3. Read through the Software License and Support Terms text. If you agree with the terms, click Accept and proceed.
4. In the Product download link line, click Download to transfer the product release archive and save it on the local system. Perform the steps that follow for each SCOM management server.
5. Copy the product release archive to the SCOM management server.
6. Log on to the SCOM management server with a user account that is assigned the Operations Manager Administrators user role.
7. In Windows Explorer, locate the HYCU.SCOM.MP.F5.BIG-IP.<Version>.zip file and extract its contents.
8. Locate the extracted HYCU.SCOM.MP.F5.BIG-IP.msi file and double-click it. The Setup Wizard starts.
Installation and configuration
21
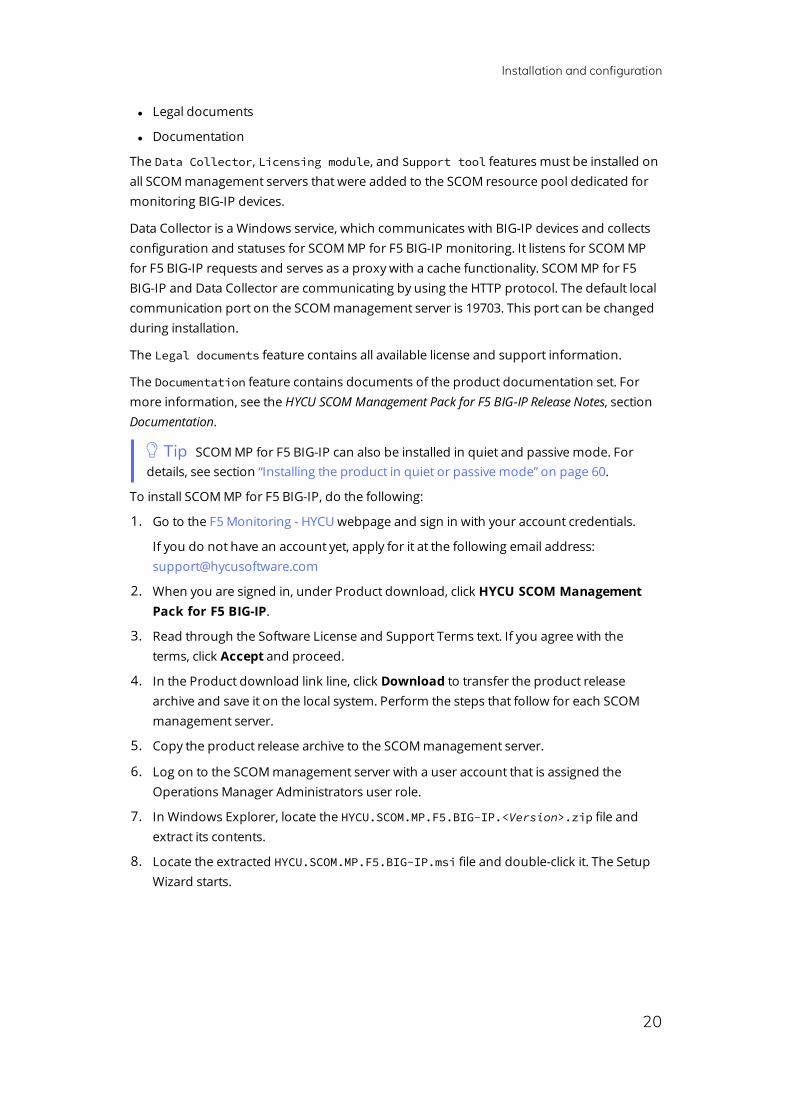
9. Choose the preferred setup type:
l Typical setup type installs most common program features:
o Data Collector
o Device management pack
o Device Reports management pack
o LTM management pack
Installation and configuration
22
o LTM Reports management pack
o ASM management pack
o ASM Reports management pack
o DNS management pack
o Support tool
o Licensing module
o Legal documents
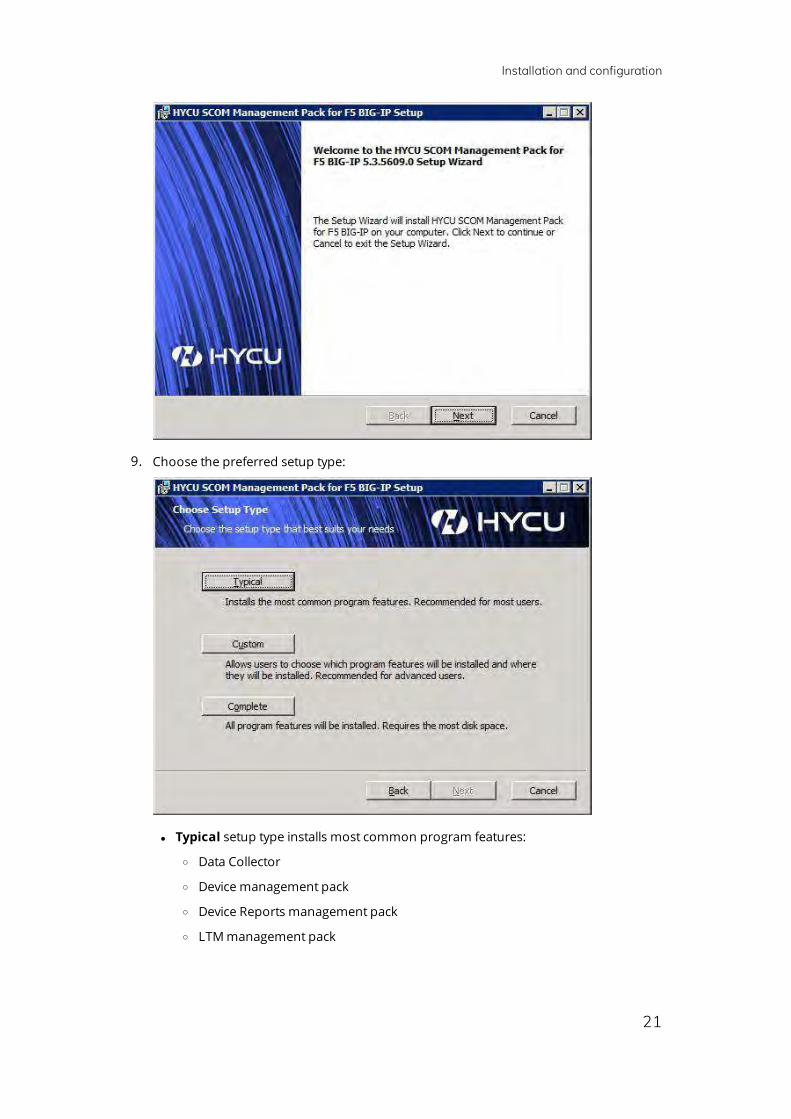
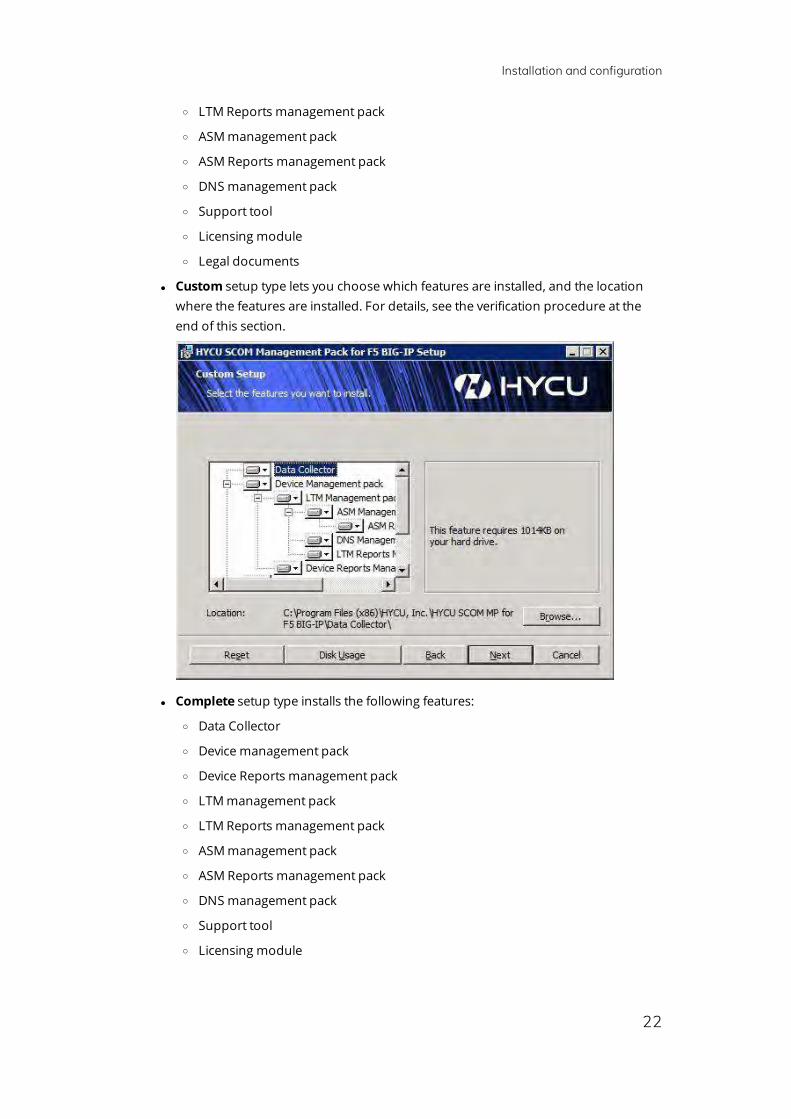
l Custom setup type lets you choose which features are installed, and the location where the features are installed. For details, see the verification procedure at the end of this section.
l Complete setup type installs the following features:
o Data Collector
o Device management pack
o Device Reports management pack
o LTM management pack
o LTM Reports management pack
o ASM management pack
o ASM Reports management pack
o DNS management pack
o Support tool
o Licensing module
Installation and configuration
23
o Legal documents
o Documentation
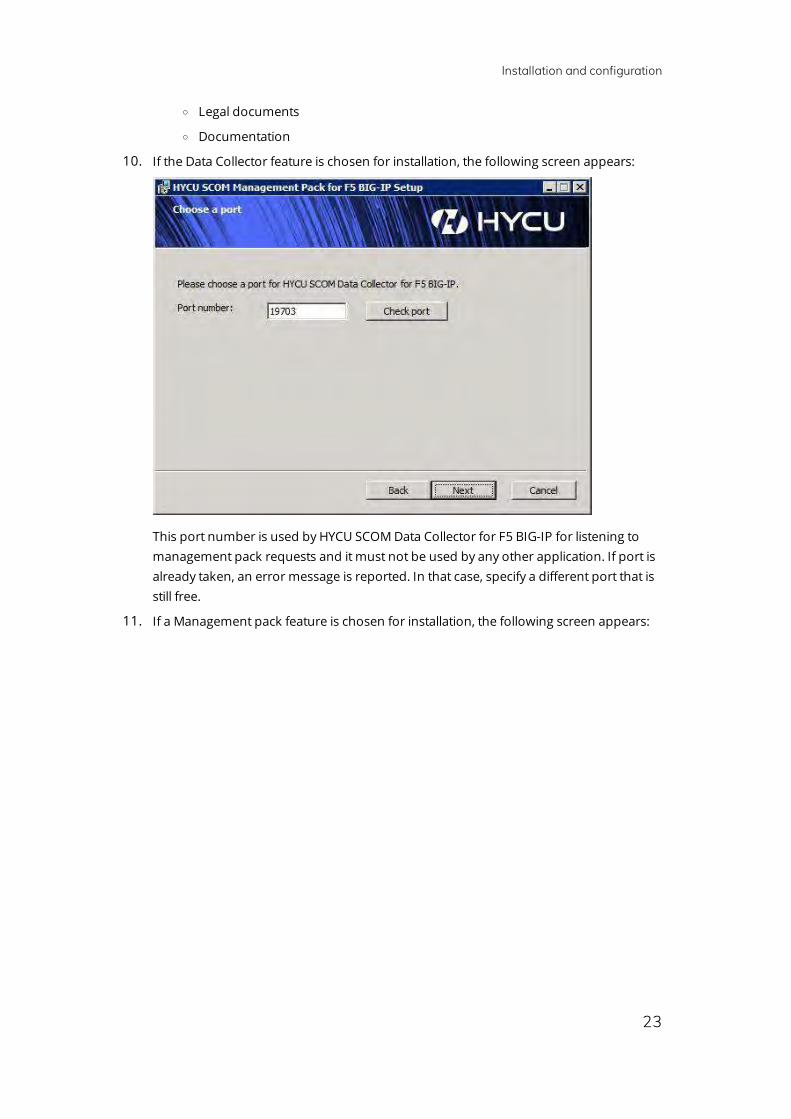
10. If the Data Collector feature is chosen for installation, the following screen appears:
This port number is used by HYCU SCOM Data Collector for F5 BIG-IP for listening to management pack requests and it must not be used by any other application. If port is already taken, an error message is reported. In that case, specify a different port that is still free.
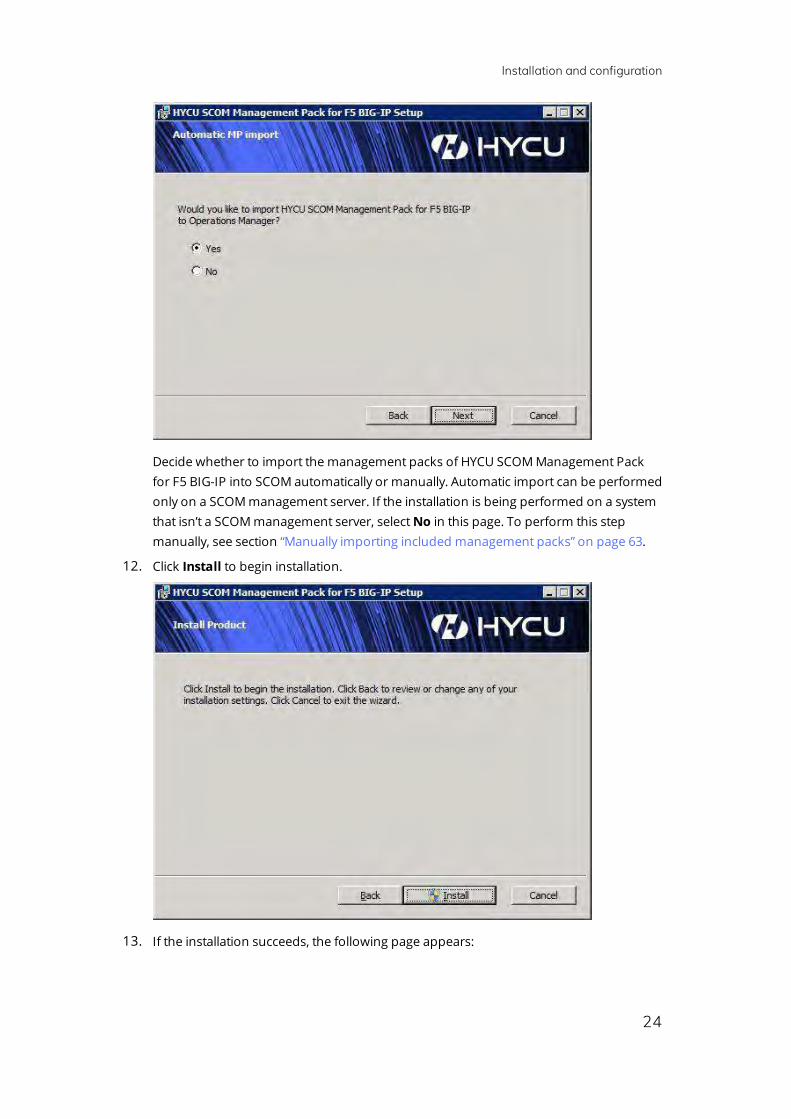
11. If a Management pack feature is chosen for installation, the following screen appears:
Installation and configuration
24
Decide whether to import the management packs of HYCU SCOM Management Pack for F5 BIG-IP into SCOM automatically or manually. Automatic import can be performed only on a SCOM management server. If the installation is being performed on a system that isn’t a SCOM management server, select No in this page. To perform this step manually, see section “Manually importing included management packs” on page 63.
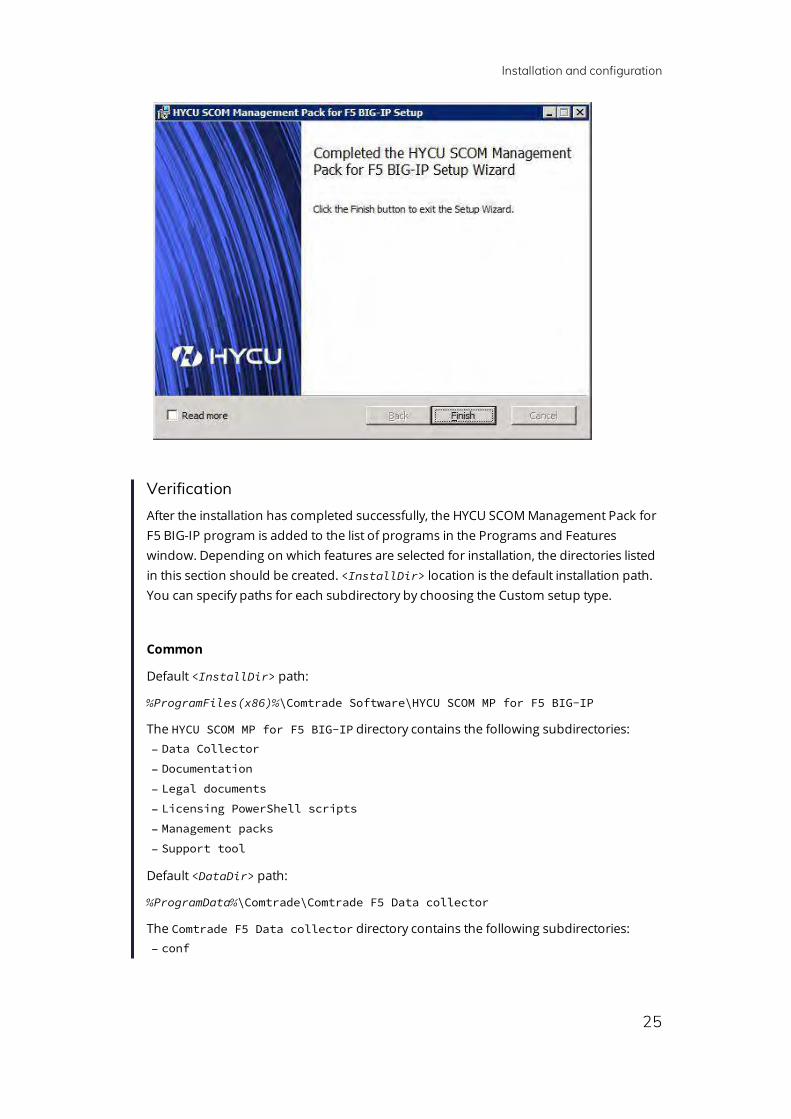
12. Click Install to begin installation.
13. If the installation succeeds, the following page appears:
Installation and configuration
25
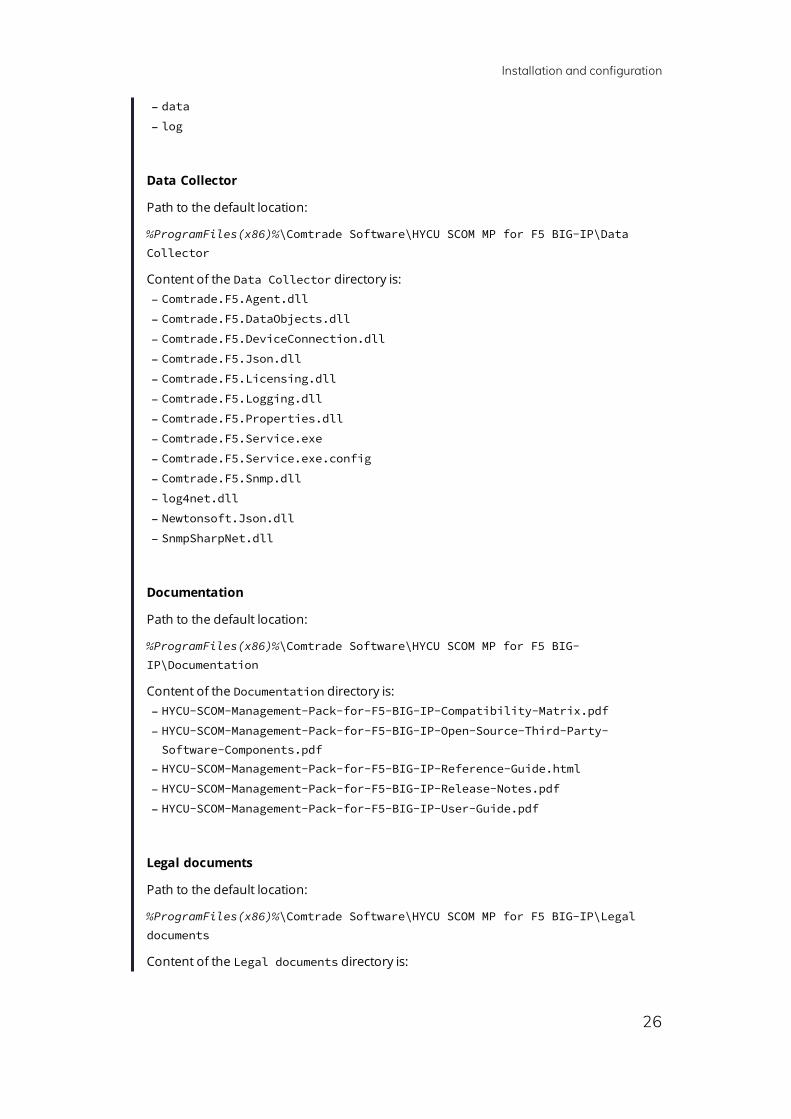
Verification After the installation has completed successfully, the HYCU SCOM Management Pack for F5 BIG-IP program is added to the list of programs in the Programs and Features window. Depending on which features are selected for installation, the directories listed in this section should be created. <InstallDir> location is the default installation path. You can specify paths for each subdirectory by choosing the Custom setup type.
Common
Default <InstallDir> path:
%ProgramFiles(x86)%\Comtrade Software\HYCU SCOM MP for F5 BIG-IP
The HYCU SCOM MP for F5 BIG-IP directory contains the following subdirectories: – Data Collector
– Documentation
– Legal documents
– Licensing PowerShell scripts
– Management packs
– Support tool
Default <DataDir> path:
%ProgramData%\Comtrade\Comtrade F5 Data collector
The Comtrade F5 Data collector directory contains the following subdirectories: – conf
Installation and configuration
26
– data
– log
Data Collector
Path to the default location:
%ProgramFiles(x86)%\Comtrade Software\HYCU SCOM MP for F5 BIG-IP\Data Collector
Content of the Data Collector directory is: – Comtrade.F5.Agent.dll
– Comtrade.F5.DataObjects.dll
– Comtrade.F5.DeviceConnection.dll
– Comtrade.F5.Json.dll
– Comtrade.F5.Licensing.dll
– Comtrade.F5.Logging.dll
– Comtrade.F5.Properties.dll
– Comtrade.F5.Service.exe
– Comtrade.F5.Service.exe.config
– Comtrade.F5.Snmp.dll
– log4net.dll
– Newtonsoft.Json.dll
– SnmpSharpNet.dll
Documentation
Path to the default location:
%ProgramFiles(x86)%\Comtrade Software\HYCU SCOM MP for F5 BIG-IP\Documentation
Content of the Documentation directory is: – HYCU-SCOM-Management-Pack-for-F5-BIG-IP-Compatibility-Matrix.pdf
– HYCU-SCOM-Management-Pack-for-F5-BIG-IP-Open-Source-Third-Party-Software-Components.pdf
– HYCU-SCOM-Management-Pack-for-F5-BIG-IP-Reference-Guide.html
– HYCU-SCOM-Management-Pack-for-F5-BIG-IP-Release-Notes.pdf
– HYCU-SCOM-Management-Pack-for-F5-BIG-IP-User-Guide.pdf
Legal documents
Path to the default location:
%ProgramFiles(x86)%\Comtrade Software\HYCU SCOM MP for F5 BIG-IP\Legal documents
Content of the Legal documents directory is:
Installation and configuration
27
– LibroLib-MIT-license.txt
– LICENSE.md
– log4netlicense.txt
– mapgalleryofreportingserviceslicense.txt
– snmpsharpnetlicense.txt
– sshnetlicense.txt
Licensing module
Paths to the default locations:
%ProgramFiles(x86)%\Comtrade Software\HYCU SCOM MP for F5 BIG-IP\Licensing PowerShell scripts
%ProgramFiles(x86)%\Comtrade Software\HYCU SCOM MP for F5 BIG-IP\Licensing PowerShell scripts\Comtrade.F5.LicensingModule
Content of the Licensing PowerShell scripts directory is: – CreateRequestFile.ps1
– CreateRequestFileForSpecifiedBigIpDevices.ps1
– ImportLicenseFile.ps1
– LicensedBigIPDevices.ps1
Content of the Comtrade.F5.LicensingModule directory is: – Comtrade.F5.LicensingModule.dll
– log4net.dll
– log4net.xml
– Microsoft.EnterpriseManagement.Core.dll
– Microsoft.EnterpriseManagement.OperationsManager.dll
Management packs
Paths to the default locations:
%ProgramFiles(x86)%\Comtrade Software\HYCU SCOM MP for F5 BIG-IP\Management packs
%ProgramFiles(x86)%\Comtrade Software\HYCU SCOM MP for F5 BIG-IP\Management packs\Configuration tools
Content of the Management packs directory is: – HYCU.SCOM.MP.F5.BIG-IP.ASM.mpb
– HYCU.SCOM.MP.F5.BIG-IP.Device.Reports.mpb
– HYCU.SCOM.MP.F5.BIG-IP.DNS.mpb
– HYCU.SCOM.MP.F5.BIG-IP.LTM.mpb
– HYCU.SCOM.MP.F5.BIG-IP.LTM.Reports.mpb
– HYCU.SCOM.MP.F5.BIG-IP.mpb
Installation and configuration
28
– HYCU.SCOM.MP.F5.BIG-IP.Reports.mpb
Content of the Configuration tools directory is: – bigIpRunAsAccountAndProfileSetup.ps1
– exampleFQDNAndCredentialsFile.txt
– Set-ReadOnlyAccess.ps1
– testcredentials.ps1
Support tool
Path to the default location:
%ProgramFiles(x86)%\Comtrade Software\HYCU SCOM MP for F5 BIG-IP\Support tool
Content of the Support tool directory is: – support.ps1
Verify the import of included management packs into SCOM
In the Monitoring view of the SCOM Operations console, F5 BIG-IP Monitoring folder should appear:

Installation and configuration
29
Figure 2–1: Elements of SCOM MP for F5 BIG-IP, as seen in the SCOM Operations console
The content of this folder highly depends on which management packs are imported.
In Reporting pane, SCOM MP for F5 BIG-IP ASM Reports (HYCU Management Pack for F5 BIG-IP ASM User Sessions report, HYCU Management Pack for F5 BIG-IP ASM Attacks report) are created.
Configuring HYCU F5 BIG-IP Device Action AccountHYCU F5 BIG-IP Device Action Account is used by HYCU SCOM Data Collector for F5 BIG-IP to access BIG-IP devices through the BIG-IP iControl REST API.
To create F5 BIG-IP Device Action Account by using SCOM Operations console, follow the procedure documented in this section. To create it by using Windows PowerShell, see
Installation and configuration
30
section “Configuring HYCU F5 BIG-IP Device Action Account with Windows PowerShell” on page 64.
To create an account for monitoring F5 BIG-IP devices, do the following:
1. On the SCOM management server where HYCU SCOM Management Pack for F5 BIG-IP is installed, start the SCOM Operations console.
2. Select the Administration view.
3. Select Run As Configuration > Accounts, and then Actions > Create Run As Account.
4. Click Next and choose Basic Authentication or Windows authentication (used for external authentication) for Run As account type.
5. Enter Display name and provide credentials for the account (user is created by following steps in section “Configuring access to F5 BIG-IP devices” on page 9).
6. Select More secure for the distribution security option and click Create to create the account.
To assign the account to BIG-IP devices, do the following
1. Log on the SCOM management server as a user with administrative privileges and start the SCOM Operations console.
2. Select the Administration view.
3. Select Run As Configuration > Profiles, double-click HYCU F5 BIG-IP Device Action Account. Choose Run As Accounts and then click Add.
4. From the drop-down list, choose previously added account, check A selected class, group, or object. Then click the Select button and choose Object.
5. In the Look for drop-down list, choose Node and click Search to start the search for network devices.
6. Add BIG-IP devices discovered as network devices (select them in the Available items list, then click Add), and click OK to save configuration.
The Run As Profile Wizard window should look like shown on the figure that follows.
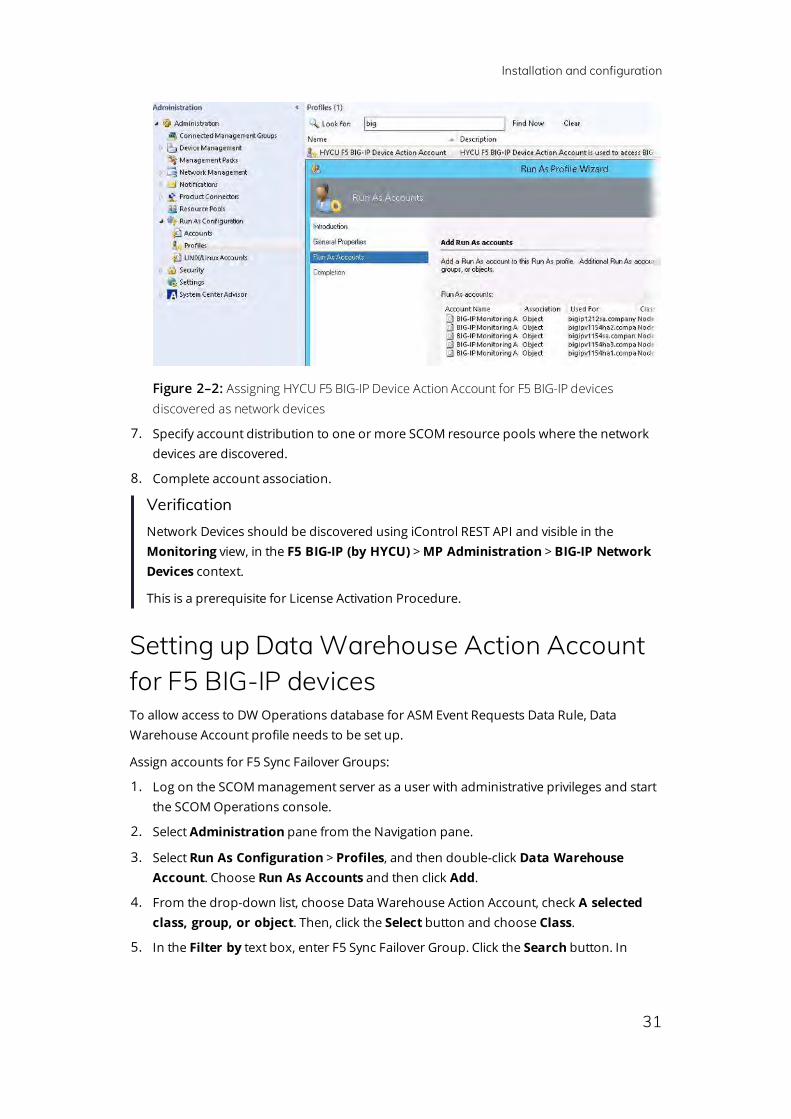
Installation and configuration
31
Figure 2–2: Assigning HYCU F5 BIG-IP Device Action Account for F5 BIG-IP devices discovered as network devices
7. Specify account distribution to one or more SCOM resource pools where the network devices are discovered.
8. Complete account association.
Verification Network Devices should be discovered using iControl REST API and visible in the Monitoring view, in the F5 BIG-IP (by HYCU) > MP Administration > BIG-IP Network Devices context.
This is a prerequisite for License Activation Procedure.
Setting up Data Warehouse Action Account for F5 BIG-IP devicesTo allow access to DW Operations database for ASM Event Requests Data Rule, Data Warehouse Account profile needs to be set up.
Assign accounts for F5 Sync Failover Groups:
1. Log on the SCOM management server as a user with administrative privileges and start the SCOM Operations console.
2. Select Administration pane from the Navigation pane.
3. Select Run As Configuration > Profiles, and then double-click Data Warehouse Account. Choose Run As Accounts and then click Add.
4. From the drop-down list, choose Data Warehouse Action Account, check A selected class, group, or object. Then, click the Select button and choose Class.
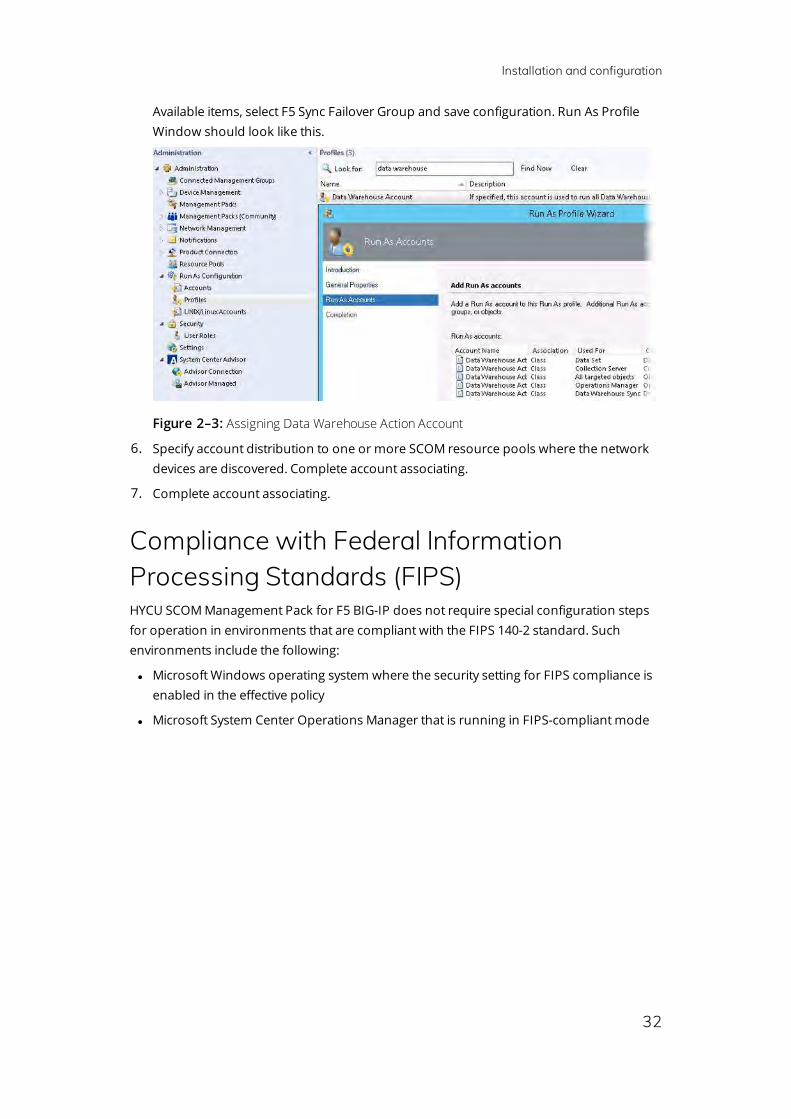
5. In the Filter by text box, enter F5 Sync Failover Group. Click the Search button. In
Installation and configuration
32
Available items, select F5 Sync Failover Group and save configuration. Run As Profile Window should look like this.
Figure 2–3: Assigning Data Warehouse Action Account
6. Specify account distribution to one or more SCOM resource pools where the network devices are discovered. Complete account associating.
7. Complete account associating.
Compliance with Federal Information Processing Standards (FIPS)HYCU SCOM Management Pack for F5 BIG-IP does not require special configuration steps for operation in environments that are compliant with the FIPS 140-2 standard. Such environments include the following:
l Microsoft Windows operating system where the security setting for FIPS compliance is enabled in the effective policy
l Microsoft System Center Operations Manager that is running in FIPS-compliant mode
33
Product licensingThis chapter explains different types of product licenses and provides instructions for obtaining the license keys and activating your licenses.
Prerequisites
Network Devices which you want to license must be discovered and visible in the Monitoring pane in the F5 BIG-IP (by HYCU) > MP Administration > BIG-IP Network Devices view.
HYCU SCOM Data Collector for F5 BIG-IP and Licensing module must be installed on all SCOM management servers in the SCOM resource pool that is dedicated for monitoring BIG-IP devices.
To find SCOM management servers that are monitoring BIG-IP devices, select Monitoring pane in the SCOM Operations console and navigate to F5 BIG-IP (by HYCU) > MP Administration > Data Collector Administration.
n Note The system where SCOM MP for F5 BIG-IP is installed does not require Internet connectivity when the product license is activated (the license key is applied).
Activating software evaluation and universal licensesFor software evaluation and universal licenses, the license activations files are provided to you by HYCU Customer Support.
To activate your license, do the following on each SCOM management server in the SCOM resource pool that is being used to monitor BIG-IP devices:
1. Copy mpbigip_licact_new.dat file to the %ProgramData%\Comtrade\Comtrade F5 Data collector folder on the SCOM server.
This step should be performed on all SCOM servers which have HYCU SCOM Data Collector for F5 BIG-IP Installed.
Verification The mpbigip_licact_new.dat file located in the %ProgramData%\Comtrade\Comtrade F5 Data collector directory should change name to mpbigip_licact.dat after 5 minutes. This happens if the HYCU SCOM Data Collector for F5 BIG-IP is receiving
Chapter 3
Product licensing
34
requests from SCOM, which is possible only if the BIG-IP devices have been previously discovered.
Activating perpetual (permanent) licensesThe perpetual (permanent) license activation procedure depends on the range of BIG-IP devices you want to include in the license request.
Generating license request files for all unlicensed devicesTo generate license request file for all unlicensed BIG-IP devices, perform the following steps on any of the SCOM management servers monitoring BIG-IP devices and has HYCU SCOM Data Collector for F5 BIG-IP installed:
1. From Start menu/screen launch Windows PowerShell and navigate to the C:\Program Files (x86)\Comtrade Software\HYCU SCOM MP for F5 BIG-IP\Licensing PowerShell scripts directory.
The specified location of the Licensing PowerShell scripts directory is the default location.
Example
cd 'C:\Program Files (x86)\Comtrade Software\HYCU SCOM MP for F5 BIG-IP\Licensing PowerShell scripts'
2. To generate license request file (mpbigip_license_requests.dat), and save it to the desired location on disk, run the CreateRequestFile.ps1 command, pass company name and path where request file should be saved.
Example
.\CreateRequestFile.ps1 'company name' 'C:\'
3. To activate the license request file, open a web browser and go to the Licensing Portal | HYCU webpage.
Register and upload previously saved license request file. The system should automatically process your request.
You should receive the license activation file mpbigip_licact_new.dat by e-mail within 10 minutes.
Save it to an appropriate location.
Generating license request files for individual devicesTo generate license request file for desired BIG-IP devices, do the following on any of the SCOM management servers monitoring BIG-IP devices and has HYCU SCOM Data Collector
Product licensing
35
for F5 BIG-IP installed:
1. From Start menu/screen launch Windows PowerShell and navigate to the C:\Program Files (x86)\Comtrade Software\HYCU SCOM MP for F5 BIG-IP\Licensing PowerShell scripts directory.The specified location of the Licensing PowerShell scripts directory is the default location.
Example
cd C:\Program Files (x86)\Comtrade Software\HYCU SCOM MP for F5 BIG-IP\Licensing PowerShell scripts
2. To generate license request file (mpbigip_license_requests.dat), and save it to the desired location on disk, run the CreateRequestFile.ps1 command, pass company name and path where request file should be saved and list of BIG-IP Management addresses of devices that should be licensed.
Example
\CreateRequestFileForSpecifiedBigIpDevices.ps1 'company name' 'C:\' '10.81.12.164','10.81.12.165'
n Note User running the CreateRequestFileForSpecifiedBigIpDevices.ps1 script should have write permissions on a directory where the request file is to be created, or the command should be run with administrator privileges.
This command should be executed by providing parameters in the order as specified in the example.
Activation keys for perpetual (permanent) licenses are node-locked and they are activated during product installation and configuration steps.
Applying license activation filesTo activate your license, do the following on each SCOM management server in the SCOM resource pool that is being used to monitor BIG-IP devices:
1. Copy the new license file mpbigip_licact_new.dat on this SCOM management server on appropriate location if it does not already exist.
2. After successful activation, when Data Collector detects new license file, it converts it to mpbigip_licact.dat or merges it with the previous one if it already exists.
Verification The mpbigip_licact_new.dat located in the %ProgramData%\Comtrade\Comtrade F5 Data collector directory should change name to mpbigip_licact.dat after 5 minutes. This happens if the HYCU SCOM Data Collector for F5 BIG-IP is receiving requests from SCOM, which is possible only if the BIG-IP devices have been previously discovered.

Product licensing
36
Devices and its configuration objects can be discovered without a valid license, but monitors and rules provided by HYCU SCOM Management Pack for F5 BIG-IP cannot function in such circumstances.
n Note An improperly performed license activation procedure has an effect on the product's monitoring functionality in general. Monitors and rules provided by SCOM MP for F5 BIG-IP do not function without a valid license.

37
Functionality overviewThis chapter contains an overview and detailed description of each SCOM MP for F5 BIG-IP feature.
General product functionality
AlertsAlerts view provides an overview of all active alerts related to the BIG-IP devices and applications delivered using BIG-IP devices. Some of the scenarios when HYCU SCOM Management Pack for F5 BIG-IP creates alerts are the following:
l Device does not have enough free storage space
l CPU utilization is high
l Local traffic virtual servers, local traffic pools, or local traffic pool members are marked unavailable, or their status is unknown.
All Performance GraphsThis folder contains performance data graphs, such as CPU Performance, Disk Partition Utilization, Memory Utilization, Network Interface Performance, Local Traffic Virtual Server Performance, Local Traffic Pool Performance, Local Traffic, and Pool Member Performance.
MP AdministrationBIG-IP Network Devices shows all devices discovered by HYCU SCOM Management Pack for F5 BIG-IP.
Data Collector Administration pane enables Data Collector service management. HYCU SCOM Data Collector for F5 BIG-IP and HYCU SCOM Data Collector for F5 BIG-IP Service Tasks are listed in Task Pane.
HYCU Management Pack for F5 BIG-IP Device (Core)This management pack locates issues in the BIG-IP device hardware components:
Chapter 4
Functionality overview
38
– CPU cores – Disk partitions – TMM memory – Other memory – Network interfaces
Device performance viewsThis folder contains performance data graphs, such as CPU Performance, Disk Partition Utilization, Memory Utilization, Network Interface Performance, and All Hardware Performance.
Device DiagramDevice Diagram view displays topology view of the discovered BIG-IP devices along with its related Hardware objects, some of which are: CPU cores, disk partitions, TMM memory, other memory, and network interfaces.
Hardware AlertsHardware Alerts view provides an overview of all active alerts related to the hardware components (CPU Cores, Disk partitions, Memory, and Network Interfaces) of BIG-IP devices.
HYCU Management Pack for F5 BIG-IP Device (Reports)To access BIG-IP device reports, do the following:
1. In the Monitoring pane, expand Monitoring and click F5 BIG-IP (by HYCU).
2. Select a BIG-IP device in one of the following views:
l MP Administration > BIG-IP Network Devices
l Device > Device Diagram View
l LTM > LTM Diagram View
l LTM > Device - Local Traffic Virtual Server Dashboard
3. In Task pane, choose one of the available BIG-IP Device Reports:
l Device Traffic Report
This report shows traffic details on a specific BIG-IP device. You can choose to show traffic only during business hours, and select the time and days of the week of your business cycle.
l Inbound License Utilization (Top N)
Functionality overview
39
This report shows license inbound utilization details for a specific device. You can choose algorithms from the drop-down list (Top N or Bottom N).
n Note The report contains no data unless the Inbound License Utilization (in %) (Performance DB DW) rule is enabled.
l Outbound License Utilization (Top N)
This report shows license outbound utilization details for a specific device. You can choose algorithms from the drop-down list (Top N or Bottom N).
n Note The report contains no data unless the Outbound License Utilization (in %) (Performance DB DW) rule is enabled.
By selecting Top N algorithm, from either of the two reports, you can identify which devices utilize their license the most and you can plan ahead if you are going to need a better license by identifying growth trends on the report. By selecting Bottom N you can identify which devices utilize their license the least, and you can organize where your applications are deployed to better utilize this license
n Note License utilization reports are only available for F5 BIG-IP versions 12.1.x and later.
HYCU Management Pack for F5 BIG-IP LTM (Core)This management pack locates issues in the LTM infrastructure (virtual servers, pools, pool members), applications which are affected and discovers unutilized resources.
Dashboards l Device – Local Traffic Virtual Server Dashboard presents relationships between devices
and virtual servers that the device contains.
l Local Traffic Pool – Pool Member Dashboard presents relationships between pools and pool members.
l Local Traffic Pool Members shows all Pool Members.
l Local Traffic Virtual Server – Pool Dashboard presents relationships between virtual servers and pools.
l SSL Certificate state view presents SSL certificate instances.
LTM performance viewsThis folder contains performance data graphs, such as Local Traffic Virtual Server Performance, Local Traffic Pool Performance, Local Traffic, and Pool Member Performance.
Functionality overview
40
LTM DiagramLTM Diagram view displays topology view of the discovered BIG-IP devices along with its related LTM and Hardware objects, some of which are: traffic groups, devices (active and passive), local traffic virtual servers, local traffic pools, and local traffic pool members.
Filtering virtual servers, pools, and pool members 1. In Authoring pane, navigate to Management Pack Objects > Object Discoveries.
2. Right-click that specific device and select Overrides > Override the Object Discovery > For all objects of class: HYCU F5 BIG-IP Applications.
3. Override Ignore Pattern with one or more regular expressions separated with logical OR.
Example ^test_|Test12
This pattern excludes all Virtual Servers, Pools, and Pool members which names begin with “test_” OR contain “Test12”. Ignore Pattern parameter is case sensitive. Identified objects are not discovered and therefore not monitored. All objects that are under the excluded object (that is, Pool and Pool Members for Virtual Server, or Pool Members for Pool) are excluded as well. SSL Certificates, which belong only to excluded Virtual Servers are excluded as well. Therefore ASM Statistics dashboard does not show statistics for this object. ASM Security policies view and custom state views do not show these objects either. HYCU Management Pack for F5 BIG-IP ASM (Reports) filters these objects after you enter the Ignore Pattern parameter.
4. Locate Include Pattern and check its Override checkbox.
Fill the Override Value cell with one or more regular expressions separated with logical OR.
If you use the same pattern as specified in the example, only Virtual Servers, Pools, and Pool members which names begin with “test_” OR contain “Test12” are discovered. If the name of Virtual Server, Pool, or Pool Member matches Include Pattern, but does not match the Ignore Pattern, the object is discovered in SCOM. If the name of Virtual Server, Pool, or Pool Member matches both Include Pattern and Ignore Pattern, it is not discovered in SCOM. SSL Certificates that are being used by excluded Virtual Servers are not discovered by HYCU SCOM Management Pack for F5 BIG-IP (SCOM MP for F5 BIG-IP). ASM Statistics Data is not collected for excluded Virtual Servers.
HA monitoringSCOM MP for F5 BIG-IP discovers traffic groups on the BIG-IP device, that contain at least one virtual server. These traffic groups are visible in LTM Diagram View. Virtual servers that are contained within that traffic group is shown in the diagram. Furthermore, it is possible
Functionality overview
41
to easily identify which devices are active and which are passive for that specific traffic group that is being displayed.
SCOM MP for F5 BIG-IP also monitors the health of a Sync Failover group. There are three monitors for Sync Failover Group:
l Number of available devices in Sync Failover Group is below threshold - This monitor checks if number of available devices in Sync Failover group is lower than predefined threshold. Monitor considers all devices that are in active or standby state available, and devices that are in any other state unavailable.
l Inconsistent states are reported for devices in Sync Failover Group - This monitor checks if devices that are in the targeted sync failover group report the same state for each other.
l F5 Sync Failover Group Configuration Monitor - This monitor checks if configuration within F5 BIG-IP devices in Sync Failover Group is synchronized. Configuration not being in sync might cause unexpected behavior such as applications not being available to end users.
l Sync Failover Group is not available for monitoring - This monitor checks if a Sync Failover group is available for monitoring. There are several reasons why a Sync Failover group could be unavailable for monitoring some of which are:
o All BIG-IP devices from targeted Sync Failover group are offline and their status cannot be obtained.
o All BIG-IP devices from targeted Sync Failover group cannot be reached, because of connectivity issues between the SCOM management server and the BIG-IP device.
o All BIG-IP devices from targeted cannot be reached because HYCU SCOM Data Collector for F5 BIG-IP has been stopped.
o SCOM MP for F5 BIG-IP license was not applied for all BIG-IP devices from targeted Sync Failover group.
HYCU Management Pack for F5 BIG-IP LTM (Reports)To access BIG-IP LTM reports, do the following:
1. In the Monitoring pane, expand Monitoring and click F5 BIG-IP (by HYCU) > LTM.
2. Select a Virtual Server in one of the following views:
l LTM Diagram View
l Device - Local Traffic Virtual Server Dashboard
l Local Traffic Virtual Server – Pool Dashboard
3. 3. In Task pane > Report Tasks choose Virtual Server Traffic Report
Functionality overview
42
This report shows traffic details on a specific Virtual Server. You can choose to show traffic only during business hours, and select time and days of the week of your business cycle.
HYCU Management Pack for F5 BIG-IP ASM (Core)This management pack identifies if application attack is in progress and visualizes attacks history.
ASM Statistics DashboardBIG-IP Application Security Manager (ASM) protects against OWASP top 10 threats, application vulnerabilities, and zero-day attacks. Choose a device from device list which have ASM module, and then choose all virtual servers configured on that device or a specific virtual server identified by its full name.
Charts contain following statistical information:
l Number of blocked sessions
l Number of alarmed sessions
l Number of transactions
l Number of Brute Force attacks
l Number of Web Scraping attacks
ASM Security Policies ASM Security Policies view shows all ASM policies.
n Note The following properties are not available in F5 BIG-IP versions earlier than 11.6.0:
– Login Enforcement – Brute Force Attack Prevention Reference – Geolocation Enforcement – Session Tracking Statuses – Login Pages – IP Intelligence – CSRF Settings

Functionality overview
43
HYCU Management Pack for F5 BIG-IP ASM (Reports)In Reporting pane, click HYCU Management Pack for F5 BIG-IP ASM Reports. Available reports are as follows:
l HYCU Management Pack for F5 BIG-IP ASM User Sessions
This report shows details about all user sessions marked as invalid by ASM on a specific BIG-IP device, and can be filtered by Source IP or Request Id.
l HYCU Management Pack for F5 BIG-IP ASM Attacks
This report shows details about all infrastructure attacks marked by ASM on a specific BIG-IP device, and can be filtered by Attack Type, Date/Time, Source IP, Geo-Location, Virtual Server, and Device.
HYCU Management Pack for F5 BIG-IP DNS (Core)
Some of the F5 BIG-IP Devices in F5 DNS Sync Group are not in sync monitorMonitors if all BIG-IP Devices in F5 DNS Sync Group are in sync.
DNS Wide IP Performance viewThis view contains DNS Wide IP performance data graphs.
Wide IPs viewWide IPs view shows all Wide IPs and their health states
Filtering DNS objects 1. In Authoring pane, navigate to Management Pack Objects > Object Discoveries.
2. Right-click F5 DNS Sync Group Discovery, and select Overrides > Override the Object Discovery > For all objects of class: All F5 DNS Wide IPs group
3. Override Ignore Pattern parameter with a regular expression.
Example test_
This pattern excludes all Wide IPs which name contains “test_”. Ignore Pattern parameter is case sensitive. Identified objects are neither discovered nor monitored.

Functionality overview
44
4. Find Include Pattern parameter and check its Override checkbox. Fill Override Value cell with a regular expression.
If name of DNS configuration object matches Include Pattern, but does not match Ignore Pattern, it is discovered in SCOM. If the name of DNS configuration object matches both Include and Ignore Pattern is not discovered in SCOM.
45
BIG-IP objects, properties, and relationshipsSCOM MP for F5 BIG-IP discovers BIG-IP objects, their statuses, and relationships between them and renders them visible in the SCOM Operations console.
Depending on the actual configuration of your BIG-IP infrastructure, objects listed in the following tables are discovered and displayed at the specified locations within the F5 BIG-IP (by HYCU) context of the Monitoring view.
BIG-IP devices
Device > Device Diagram
LTM > Device – Local Traffic Virtual Server Dashboard
LTM > LTM Diagram
MP Administration > BIG-IP Network Devices
BIG-IP CPU cores, disk partitions, memory units, and network interfaces
Device > Device Diagram
LTM > LTM Diagram
F5 LTM traffic groups
LTM > LTM Diagram
F5 LTM traffic group devices, active groups, and passive groups
LTM > LTM Diagram
F5 LTM virtual servers
LTM > Device – Local Traffic Virtual Server Dashboard
LTM > Local Traffic Virtual Server – Pool Dashboard
LTM > LTM Diagram
Chapter 5
BIG-IP objects, properties, and relationships
46
F5 LTM pools (and their relationships with LTM virtual servers)
LTM > Local Traffic Virtual Server – Pool Dashboard
LTM > LTM Diagram
F5 LTM pool members (and their relationships with LTM pools)
LTM > LTM Diagram
LTM > Local Traffic Pool Members
LTM > Local Traffic Pool – Pool Members Dashboard
LTM > Local Traffic Virtual Server – Pool Dashboard
HYCU SCOM Data Collector for F5 BIG-IP services (and the related alerts)
MP Administration > Data Collector Administration
BIG-IP SSL certificates
LTM > SSL Certificate Dashboard
LTM > LTM Diagram
BIG-IP ASM security policies
ASM > ASM Security Policies
ASM > ASM Statistics Dashboard
BIG-IP DNS wide IPs
ASM > ASM Security Policies
BIG-IP device- and device component-related alerts
Alerts
Recent SCOM MP for F5 BIG-IP tasks (statuses)
MP Administration > Task Status
47
UninstallationThis chapter contains instructions on how to completely uninstall HYCU SCOM Management Pack for F5 BIG-IP (SCOM MP for F5 BIG-IP) from your environment.
Uninstallation overviewTo uninstall SCOM MP for F5 BIG-IP, complete the following tasks on each SCOM management server where the product is installed:
1. Remove management packs included in SCOM MP for F5 BIG-IP.
2. Uninstall SCOM MP for F5 BIG-IP.
Removing included management packsTo remove management packs included in SCOM MP for F5 BIG-IP and other product references from the SCOM management server, do the following:
1. Launch the SCOM Operations console and connect to the management server.
2. In the Administration view, click Management Packs.
3. Remove reference to HYCU.SCOM.MP.F5.BIG-IP from the Microsoft.SystemCenter.SecureReferenceOverride management pack:
a. Export the management pack.
b. Make a copy of the file you exported the management pack to.
c. Edit the file copy and remove all dependencies on the SCOM MP for F5 BIG-IP configuration from it. Search for Comtrade.F5.BigIp and delete the containing references, then save your changes.
d. Delete the management pack from SCOM.
e. Import back the management pack from the edited file copy.
4. In the Management Packs pane, right-click the management pack you want to remove, and then click Delete. Remove the included management packs in the following order:
a. HYCU Management Pack for F5 BIG-IP ASM (Reports)
b. HYCU Management Pack for F5 BIG-IP ASM (Core)
c. HYCU Management Pack for F5 BIG-IP DNS (Core)
Chapter 6
Uninstallation
48
d. HYCU Management Pack for F5 BIG-IP LTM (Reports)
e. HYCU Management Pack for F5 BIG-IP LTM (Core)
f. HYCU Management Pack for F5 BIG-IP Device (Reports)
g. HYCU Management Pack for F5 BIG-IP Device (Core)
Uninstalling SCOM MP for F5 BIG-IP from management serverTo uninstall SCOM MP for F5 BIG-IP, do the following:
1. In Windows Control Panel, select Programs > Programs and Features.
2. Locate and right-click the HYCU SCOM Management Pack for F5 BIG-IP entry, then select Uninstall.
n Note A warning dialog box may appear informing you that other users are logged in to this computer. You cannot completely remove this program if another user is currently running it.
3. In the Setup Wizard, follow instructions until the uninstallation process completes.
Setup Wizard cannot remove the files that were placed to the installation directories after the installation, for example, license files or configuration files. You can delete such files after Setup Wizard completes the uninstallation process.
n Note To manually delete any files from the installation directories after the SCOM MP for F5 BIG-IP uninstallation, first make sure that these files are not used by other programs and their deletion does not cause issues.
49
TroubleshootingIf you encounter problems with using SCOM MP for F5 BIG-IP, you can often solve them yourself. This chapter contains information that may help you in such cases.
General troubleshooting guidelinesWhen investigating an issue, first verify that:
l All installation prerequisites are fulfilled and the product is configured according to the provided instructions.
l You are not running into a known product limitation. For a list of the limitations, see the HYCU SCOM Management Pack for F5 BIG-IP Release Notes.
l Your issue is not related to third-party software or hardware (F5 or Microsoft). Otherwise, contact the respective vendor for assistance.
l You have the latest operating system and software application patches installed on the affected systems. Else, install the patches and check if the issue persists.
l The affected systems are not running out of memory or storage space.
Problems and solutionsThis section lists symptoms of common problems that you may encounter while using SCOM MP for F5 BIG-IP, together with proposed actions – resolution steps.
Registry key access failure during product upgradeSymptoms
Event with ID 16010 and a message similar to the following is logged into the operating system event log:
MPBigIpGenericPropertyBagExtendedProbe.js : Issue with taking property InstallDir from registry. Error message:Invalid root in registry key "HKLM\SOFTWARE\Wow6432Node\Comtrade\BIG-IP MP\InstallDir
Possible resolution steps
While SCOM MP for F5 BIG-IP is being upgraded, product-specific keys and values are deleted from Windows registry and later created again. SCOM workflows may fail to access
Chapter 7
Troubleshooting
50
those entities in the upgrade timeframe.
Do the following:
1. Wait for the upgrade to complete. If the problem persists, proceed to the next step.
2. Check if registry keys from the event log messages actually exist; their absence denotes an incomplete product installation. If the registry keys are missing, proceed to the next step.
3. Reinstall SCOM MP for F5 BIG-IP.
BIG-IP devices are not discovered
Case 1Symptoms
One or more BIG-IP devices are not discovered and are missing in the corresponding context of the SCOM Operations console (the Monitoring > F5 BIG-IP (by HYCU) > MP Administration > BIG-IP Network Devices view).
Possible resolution steps
Do the following for each missing BIG-IP device:
1. Check if the device is discovered by SCOM as a network device. In the SCOM, go to the Administration view and expand Network Management > Network Devices.
If the device is not already discovered as a network device, follow instructions in section “Workflows are not triggered” on page 53.
If the device is already discovered as a network device, proceed to the next step.
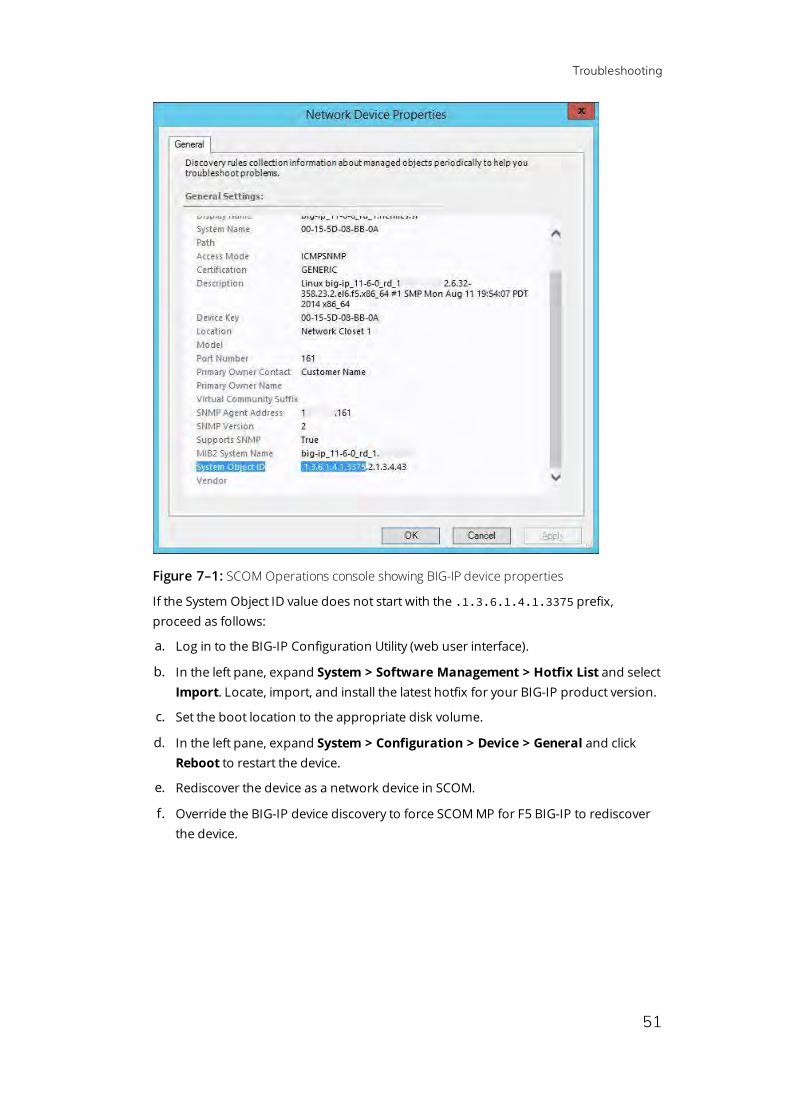
2. Check its System Object ID property in the Network Device Properties window.
Troubleshooting
51
Figure 7–1: SCOM Operations console showing BIG-IP device properties
If the System Object ID value does not start with the .1.3.6.1.4.1.3375 prefix, proceed as follows:
a. Log in to the BIG-IP Configuration Utility (web user interface).
b. In the left pane, expand System > Software Management > Hotfix List and select Import. Locate, import, and install the latest hotfix for your BIG-IP product version.
c. Set the boot location to the appropriate disk volume.
d. In the left pane, expand System > Configuration > Device > General and click Reboot to restart the device.
e. Rediscover the device as a network device in SCOM.
f. Override the BIG-IP device discovery to force SCOM MP for F5 BIG-IP to rediscover the device.
Troubleshooting
52
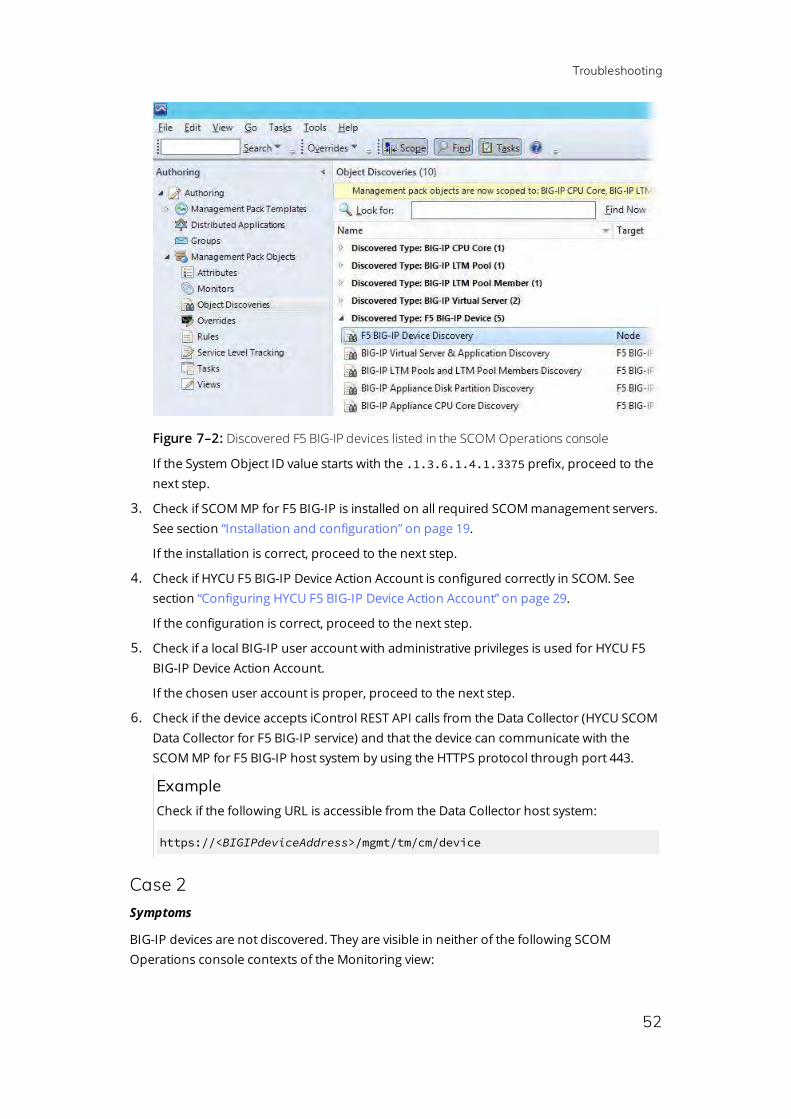
Figure 7–2: Discovered F5 BIG-IP devices listed in the SCOM Operations console
If the System Object ID value starts with the .1.3.6.1.4.1.3375 prefix, proceed to the next step.
3. Check if SCOM MP for F5 BIG-IP is installed on all required SCOM management servers. See section “Installation and configuration” on page 19.
If the installation is correct, proceed to the next step.
4. Check if HYCU F5 BIG-IP Device Action Account is configured correctly in SCOM. See section “Configuring HYCU F5 BIG-IP Device Action Account” on page 29.
If the configuration is correct, proceed to the next step.
5. Check if a local BIG-IP user account with administrative privileges is used for HYCU F5 BIG-IP Device Action Account.
If the chosen user account is proper, proceed to the next step.
6. Check if the device accepts iControl REST API calls from the Data Collector (HYCU SCOM Data Collector for F5 BIG-IP service) and that the device can communicate with the SCOM MP for F5 BIG-IP host system by using the HTTPS protocol through port 443.
Example Check if the following URL is accessible from the Data Collector host system:
https://<BIGIPdeviceAddress>/mgmt/tm/cm/device
Case 2Symptoms
BIG-IP devices are not discovered. They are visible in neither of the following SCOM Operations console contexts of the Monitoring view:
Troubleshooting
53
– F5 BIG-IP (by HYCU) > Device > Device Diagram – F5 BIG-IP (by HYCU) > MP Administration > BIG-IP Network Devices
Possible resolution steps
Do the following:
1. Verify that the BIG-IP devices are configured for monitoring. See section “Configuring access to F5 BIG-IP devices” on page 9. If the devices are properly configured, proceed to the next step,
2. Check if HYCU BIG-IP Device Action Account is configured. See section “Configuring HYCU F5 BIG-IP Device Action Account” on page 29.
Workflows are not triggered
Case 1Symptoms
No discovery, monitor, or rule workflow for SCOM MP for F5 BIG-IP is triggered on a SCOM management server.
Possible resolution steps
There may be pending updates for Windows Server or System Center Operations Manager on the SCOM management server. In this case, install the updates and restart the system.
Case 2Symptoms
SCOM MP for F5 BIG-IP monitors or rules appear to be functioning only for certain objects. For example, some of the discovered virtual servers are being monitored while others are not and their health status indicators are not set.
Possible resolution steps
BIG-IP iControl REST API service that monitors BIG-IP devices might not respond to the SCOM MP for F5 BIG-IP requests correctly or in time for the particular objects.
If the BIG-IP device is a standalone device, restart the iControl REST API service. Do the following:
1. Log in to the BIG-IP device though the command-line interface.
2. In the BIG-IP TMOS Shell (tmsh), run the following command:
restart /sys service icrd

Troubleshooting
54
Alerts are not generated or performance data is not collectedSymptoms
BIG-IP objects are not being monitored, their performance data is not collected, and their health status indicators keep being set to Healthy.
Possible resolution steps
Check if the product license is activated. For instructions on how to activate it, see chapter “Product licensing” on page 33.
To list all licensed BIG-IP devices, do the following:
1. Open a Windows PowerShell window.
2. Run the following command:
set-location "${Env:ProgramFiles(x86)}\Comtrade Software\HYCU SCOM MP for F5 BIG-IP\Licensing PowerShell scripts"
3. Run the following command:
.\LicensedBigIPDevices.ps1
ASM Statistics Dashboard is not available in the SCOM web consoleSymptoms
ASM Statistics Dashboard is not available in the SCOM web console.
Possible resolution steps
None. ASM Statistics dashboard is not compatible with the SCOM web console.
ASM Statistics Dashboard is emptySymptoms
You notice the following:
l ASM Statistics Dashboard does not display any data.
l Events with IDs 31569, 31557, 31552, 31563, and 31561 keep being logged into the operating system event log.
l Event with ID 31551 and a message similar to the following keeps being logged into the operating system event log:
Failed to store data in the Data Warehouse. The operation will be retried.
Troubleshooting
55
Exception 'SqlException': Cannot open database "OperationsManagerDW" requested by the login. The login failed. Login failed for user '<DomainName>\<UserName>'. One or more workflows were affected by this. Workflow name: Comtrade.F5.BigIp.ASM.Event.RequestsRule Instance name: <InstanceFQDN> Instance ID: {<UUID>} Management group: <GroupName>
Possible resolution steps
Check if Data Warehouse Action Account is configured properly. For instructions on how to set it up, see section “Setting up Data Warehouse Action Account for F5 BIG-IP devices” on page 31.
Some virtual servers are missing in ASM Statistics DashboardSymptoms
Data for specific virtual servers is missing in ASM Statistics Dashboard.
Possible resolution steps
HYCU Management Pack for F5 BIG-IP ASM (Core) collects statistics about attacks that are detected by the ASM module by using iControl REST API. For illegal request data to be accessible through iControl REST API, a log profile must be configured on the local traffic virtual server.
Do the following:
1. Log in to the BIG-IP Configuration Utility (web user interface).
2. In the left pane, expand Local Traffic and click Virtual Servers. In the virtual server list, select the affected virtual server.
3. In the upper toolbar, select Security > Policies.
4. Set the Log Profile option to Enabled.
5. Move the Log illegal requests entry from the Available list to the Selected list.
6. Click Update.
Self IP Address property is emptySymptoms
With F5 BIG-IP version 11.5.4, the Self IP Address device property is not set.
Possible resolution steps
To populate the property, restart the BIG-IP iControl REST API service. Run the following commands:
Troubleshooting
56
tmsh stop sys service restjavad tmsh start sys service restjavad
Rest Framework Version and Is Virtual properties are emptySymptoms
With F5 BIG-IP version 11.5.4, the Rest Framework Version and Is Virtual device properties are not set.
Possible resolution steps
None. iControl Rest API of the listed BIG-IP version does not support these properties.
Health recalculation does not change the monitor's health indicatorSymptoms
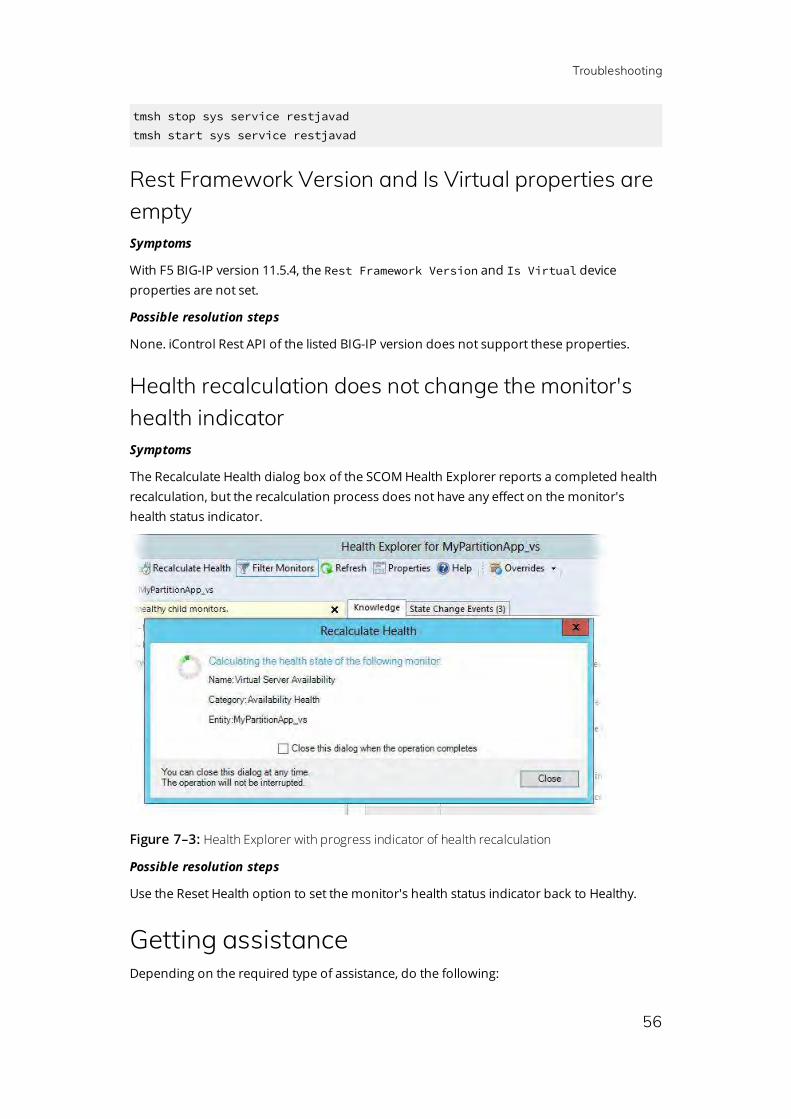
The Recalculate Health dialog box of the SCOM Health Explorer reports a completed health recalculation, but the recalculation process does not have any effect on the monitor's health status indicator.
Figure 7–3: Health Explorer with progress indicator of health recalculation
Possible resolution steps
Use the Reset Health option to set the monitor's health status indicator back to Healthy.
Getting assistanceDepending on the required type of assistance, do the following:
Troubleshooting
57
l If you need assistance with product evaluation, contact your HYCU account owner or sales representative.
l If you already purchased the product, you have a valid support agreements, and:
o You need assistance with product licensing, see section “Licensing assistance” below.
o You have an issue with the product or your monitored environment, see section “Support” below.
Licensing assistanceDepending on the service that you need, do the following:
l To generate license request files and activate licenses, follow instructions in chapter “Product licensing” on page 33.
l To change license scope and arrange any license management activities, contact your HYCU sales representative at the [email protected] email address.
l To redesignate licenses (deactivate existing licenses), go to the Licensing Portal | HYCU website. Sign in to your account and follow the License Redesignation steps.
l For any licensing-related issues or questions about the licensing process, send an email with detailed issue description (expected behavior, symptoms, screen shots, log files, and similar) or list of questions to [email protected].
n Note Make sure to include your company name and purchase order (PO) number in communication with HYCU Customer Support.
SupportIf you have an issue with the product or your monitored environment, collect the following data before contacting the Customer Support department:
l General information: – Your company name – Purchase order (PO) number
l Basic information about the environment such as: – Host operating system – Microsoft System Center Operations Manager version – F5 BIG-IP version – Version of the installed SCOM MP for F5 BIG-IP (the product) – Whether you are still evaluating the product or already using a purchased license – Whether the product is installed in a development or production environment
l Additional information such as: – Whether the product was installed or it was upgraded from an earlier version – Time when the product was installed – Time when the product was most recently reconfigured
Troubleshooting
58
– Time when you first noticed issue symptoms – Versions of the monitored applications – Operating systems on which monitored applications are running – Whether the host operating system or monitored environment were updated
recently
l Detailed explanation of the issue, including: – Expected behavior – Issue symptoms – Screen shots of the user interfaces – List of troubleshooting actions that you have already taken
The listed pieces of information are required by HYCU Customer Support so that a support engineer can efficiently investigate the issue from the very beginning. Pack the data collection into an archive, and do one of the following:
l Preferred. On the HYCU webpage, submit your request (support case) with the archive attached.
l Send an email with the attached archive to [email protected].
HYCU Customer Support will contact you shortly.
i Important If the email attachment is too large or the email is getting rejected by the company email server, deliver the archive by using Comtrade File Sharing Facility.
To deliver data by using Comtrade File Sharing Facility, do the following:
1. Open a web browser and go to the Comtrade File Sharing Facility website.
2. Click SHARE A FILE NOW and then click Browse.
3. In the Choose File to Upload dialog box, browse to and select your archive file, and then click Open.
4. Repeat step 3 for each additional file you want to send.
5. On the Comtrade File Sharing Facility webpage, click Upload Now and then allow file processing to finish.
6. In the To: text box, type [email protected] and leave other text boxes blank.
7. At the bottom of the webpage, type the given anti-spam verification code in the corresponding text box.
8. Click Process Details Now.
Getting additional information and latest updatesFor additional information about SCOM MP for F5 BIG-IP, visit the SCOM MP for F5 BIG-IP | HYCU webpage.
Troubleshooting
59
For the latest product version and most up-to-date documentation, go to the F5 Monitoring – HYCU webpage.
Before contacting HYCU Customer SupportIf you cannot solve your issue, report it. Before contacting HYCU Customer Support, make sure that:
l You perform the general checks. For details, see section “Troubleshooting” on page 49.
l You verify that your problem is not documented in this chapter. For more information, see section “Problems and solutions” on page 49.
l You collect relevant data that might be required to send to HYCU Customer Support: a description of your problem, configuration specification of your environment, and similar information. For details, see section “Customer Support” on page 70.
The HYCU Customer Support team will provide you with further instructions. Among other things, you may be asked to perform diagnostic operations in your environment and collect specific data from your systems and send it to HYCU.
n Note The HYCU Customer Support team is not qualified to solve the issues related to third-party software or hardware.
For information on how to reach HYCU Customer Support, see part “HYCU Customer Support and information ” on page 70.
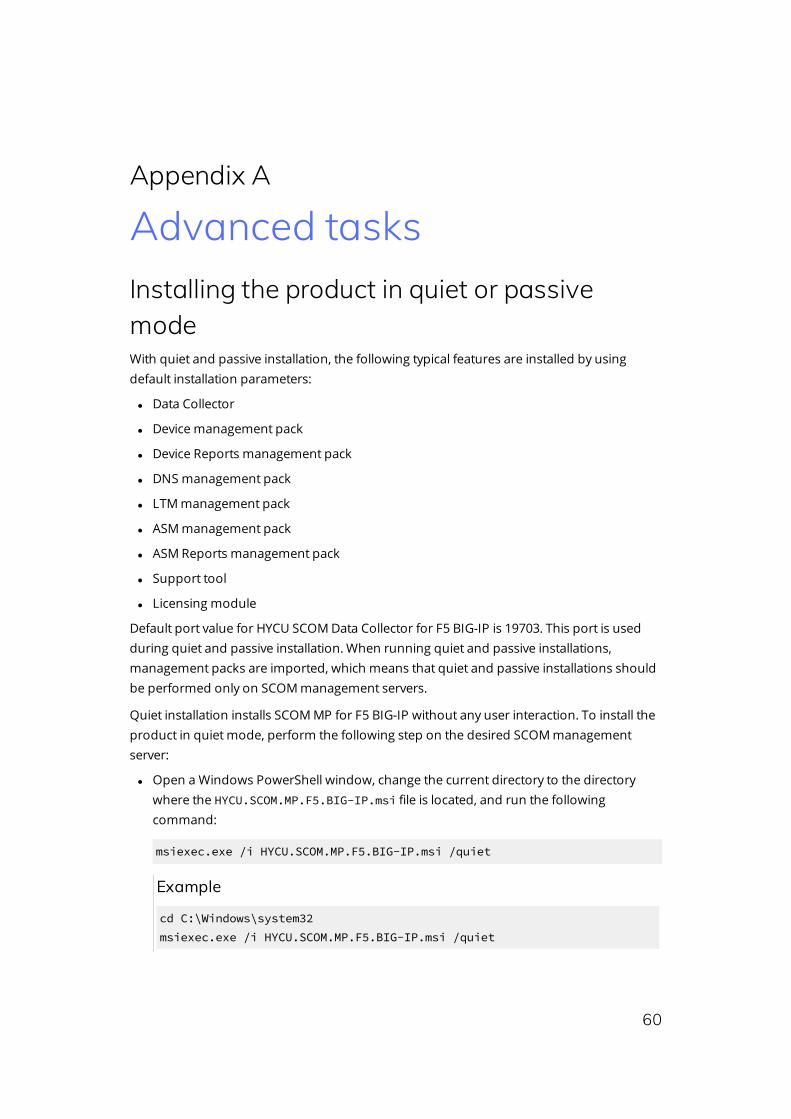
60
Advanced tasksInstalling the product in quiet or passive modeWith quiet and passive installation, the following typical features are installed by using default installation parameters:
l Data Collector
l Device management pack
l Device Reports management pack
l DNS management pack
l LTM management pack
l ASM management pack
l ASM Reports management pack
l Support tool
l Licensing module
Default port value for HYCU SCOM Data Collector for F5 BIG-IP is 19703. This port is used during quiet and passive installation. When running quiet and passive installations, management packs are imported, which means that quiet and passive installations should be performed only on SCOM management servers.
Quiet installation installs SCOM MP for F5 BIG-IP without any user interaction. To install the product in quiet mode, perform the following step on the desired SCOM management server:
l Open a Windows PowerShell window, change the current directory to the directory where the HYCU.SCOM.MP.F5.BIG-IP.msi file is located, and run the following command:
msiexec.exe /i HYCU.SCOM.MP.F5.BIG-IP.msi /quiet
Example
cd C:\Windows\system32 msiexec.exe /i HYCU.SCOM.MP.F5.BIG-IP.msi /quiet
Appendix A
Advanced tasks
61
Passive installation installs SCOM MP for F5 BIG-IP in unattended mode, which means that it displays the progress of the installation, but does not require user interaction. To install the product in passive mode, do the following on the desired SCOM management server:
l Open a Windows PowerShell window, change the current directory to the directory where the HYCU.SCOM.MP.F5.BIG-IP.msi file is located, and run the following command:
msiexec.exe /i HYCU.SCOM.MP.F5.BIG-IP.msi /passive
Example
cd C:\Windows\system32 msiexec.exe /i HYCU.SCOM.MP.F5.BIG-IP.msi /passive
Continue the process with product configuration by following instructions in section “Configuring HYCU F5 BIG-IP Device Action Account” on page 29.
n Note Quiet and passive modes of installation can be also used for upgrading the product except for upgrades from SCOM MP for F5 BIG-IP versions earlier than 3.0.
Upgrading the product
Upgrading from the version 3.0 or later 1. Run new setup package.
2. Follow the installation steps.
3. Product version in Control Panel should be upgraded.
4. In the SCOM Operations console, manually reimport the management packs if needed. For instructions on how to import the management packs included in SCOM MP for F5 BIG-IP into SCOM, see section “Manually importing included management packs” on page 63.
5. Version of management packs in SCOM should be upgraded.
Upgrading from a version earlier than 3.0 1. SCOM MP for F5 BIG-IP versions earlier than 3.0 are not upgradable to the product
version 3.0 or later. A product version earlier than 3.0 must therefore be uninstalled before SCOM MP for F5 BIG-IP 3.0 or later can be installed. For instructions on uninstalling the product, see chapter “Uninstallation” on page 47.
2. After the uninstallation process completes, run the new setup package.
3. Follow the installation steps.
4. After the installation process is complete, verify the product version in Control Panel.
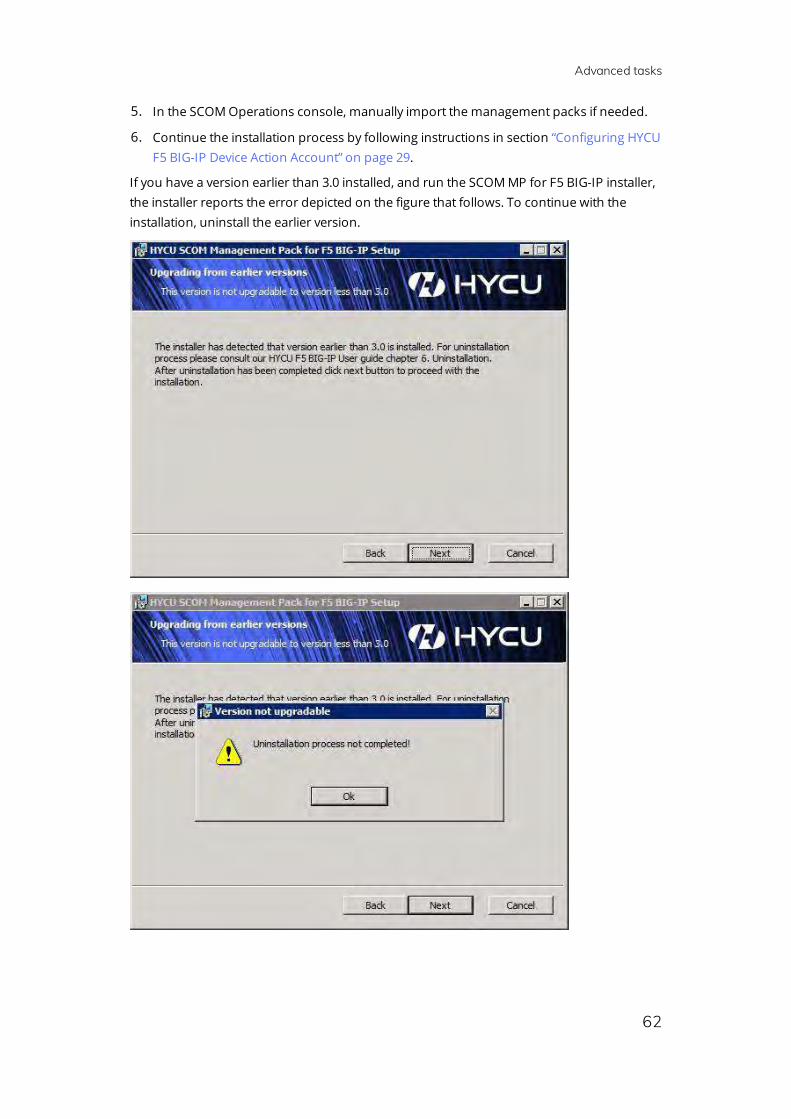
Advanced tasks
62
5. In the SCOM Operations console, manually import the management packs if needed.
6. Continue the installation process by following instructions in section “Configuring HYCU F5 BIG-IP Device Action Account” on page 29.
If you have a version earlier than 3.0 installed, and run the SCOM MP for F5 BIG-IP installer, the installer reports the error depicted on the figure that follows. To continue with the installation, uninstall the earlier version.
Advanced tasks
63
Manually importing included management packsTo import the SCOM MP for F5 BIG-IP to System Center Operations Manager, do the following:
1. Log on to the SCOM management server1 and start the SCOM Operations console.
2. In the Administration view, click Management Packs.
3. In the Actions task pane, select Import management packs.
4. Locate the management pack and click Open.
Default management packs location:
%ProgramFiles(x86)%\Comtrade Software\HYCU SCOM MP for F5 BIG-IP\Management packs
5. Import
HYCU.SCOM.MP.F5.BIG-IP.ASM.mpb HYCU.SCOM.MP.F5.BIG-IP.Device.Reports.mpb HYCU.SCOM.MP.F5.BIG-IP.DNS.mpb HYCU.SCOM.MP.F5.BIG-IP.LTM.mpb HYCU.SCOM.MP.F5.BIG-IP.LTM.Reports.mpb HYCU.SCOM.MP.F5.BIG-IP.mpb HYCU.SCOM.MP.F5.BIG-IP.Reports.mpb
6. Click Install to complete the import procedure.
If the same version of any management pack has already been imported, the SCOM Operations console shows the following status:
“A management pack contained in HYCU SCOM Management Pack for F5 BIG-IP bundle (version <Major>.<Minor>.<BuildNumber>) has already been imported”
Continue the installation and configuration process by following instructions in section “Configuring HYCU F5 BIG-IP Device Action Account” on page 29.
Creating a management pack for overridesMost vendor management packs are sealed for changes so it is not possible to change any of the original settings in the management pack file. However, customizations can be created, such as overrides or new monitoring objects, and saved to a different management pack. By default, System Center Operations Manager saves all customizations
1SCOM management server where any Management pack feature of SCOM MP for F5 BIG-IP is installed.

Advanced tasks
64
to the default management pack. As a best practice, create a separate management pack for each sealed management pack you want to customize.
Creating a new management pack for storing overrides has the following advantages:
l It simplifies the process of customizations export created in your test and pre-production environments to your production environment. For example, instead of exporting the default management pack containing customizations from multiple management packs, you can export the management pack containing customizations of a single management pack.
l You can delete the original management pack without first needing to delete the default management pack. A management pack containing customizations is dependent on the original management pack. This dependency requires deleting the management pack with customizations before deleting the original management pack. If all of your customizations are saved to the default management pack, export the default management pack, delete the customizations from the default management pack and reimport the default management pack again before deleting the management pack.
l It is easier to track and to update customizations of individual management packs.
Configuring HYCU F5 BIG-IP Device Action Account with Windows PowerShellFrom Start menu/screen launch Windows PowerShell and navigate to the C:\Program Files (x86)\Comtrade Software\HYCU SCOM MP for F5 BIG-IP\Management packs\Configuration tools directory. This Management packs directory location is the default location.
Example
cd 'C:\Program Files (x86)\Comtrade Software\HYCU SCOM MP for F5 BIG-IP\Management packs\Configuration Tools'
n Note When running the bigIpRunAsAccountAndProfileSetup.ps1 script, by default All Management Servers Resource Pool is used to distribute accounts. SCOM gateway servers are not included in All Management Servers Resource Pool, so if you are using SCOM gateway servers, make sure to choose a custom SCOM resource pool to distribute accounts.
To set up Run As accounts and distribute them to all SCOM management servers (user input required), do the following:
1. Create a file containing fully qualified domain name (FQDN), user name, and password for all BIG-IP devices in the following format:
Advanced tasks
65
domainName1,userName1,password1domainName2,userName2,password2domainName3,userName3,password3
Make sure not to have an empty new line at the end of the file.
n Note You can modify exampleFQDNAndCredentialsFile.txt file which is located in the same directory, instead of creating a new one. For more examples, see the exampleFQDNAndCredentialsFile.txt document.
2. Run the following command on the SCOM management server:
bigIpRunAsAccountAndProfileSetup.ps1 -FQDNAndCredentialsFile C:\myCredentialsFile.txt
To set up Run As accounts and distribute them to all SCOM management servers (without user input), do the following:
1. Create a file containing fully qualified domain name (FQDN), user name, and password for all BIG-IP devices in the following format:
domainName1,userName1,password1domainName2,userName2,password2domainName3,userName3,password3
Make sure not to have an empty new line at the end of the file.
2. Run the following command on the SCOM management server:
bigIpRunAsAccountAndProfileSetup.ps1 -FQDNAndCredentialsFile C:\myCredentialsFile.txt -DistributeToAll
To set up Run As accounts and distribute them to all SCOM management servers in a specific SCOM resource pool, do the following:
1. Create a file containing fully qualified domain name (FQDN), user name, and password for all BIG-IP devices in the following format:
domainName1,userName1,password1domainName2,userName2,password2domainName3,userName3,password3
Make sure not to have an empty new line at the end of the file.
2. Run the following command on the SCOM management server:
bigIpRunAsAccountAndProfileSetup.ps1 -FQDNAndCredentialsFile C:\myCredentialsFile.txt -ResourcePoolName myResourcePoolName
If the user names or passwords contain comma (,) you can specify another separator (You cannot mix different separators in the file containing credentials)

Advanced tasks
66
1. Create a file containing fully qualified domain name (FQDN), user name, and password for all BIG-IP devices in the following format:
domainName1;userName1;password1domainName2;userName2;password2domainName3;userName3;password3
Make sure not to have an empty new line at the end of the file.
2. Run the following command on the SCOM management server:
bigIpRunAsAccountAndProfileSetup.ps1 -FQDNAndCredentialsFile C:\myCredentialsFile.txt -Separator ";"
To test if the credentials for each device are correct, do the following:
1. Create a file containing fully qualified domain name (FQDN), user name, and password for all BIG-IP devices in the following format:
domainName1,userName1,password1domainName2,userName2,password2domainName3,userName3,password3
Make sure not to have an empty new line at the end of the file.
2. Run the following command on the SCOM management server:
bigIpRunAsAccountAndProfileSetup.ps1 -FQDNAndCredentialsFile C:\myCredentialsFile.txt –TestCredentials
n Note The Action Account is not associated with the devices for which the credentials of the Action Account are incorrect.
To set up Run As Account from a device which is not a SCOM management server, do the following:
1. Create a file containing fully qualified domain name (FQDN), user name, and password for all BIG-IP devices in the following format:
domainName1,userName1,password1domainName2,userName2,password2domainName3,userName3,password3
Make sure not to have an empty new line at the end of the file.
2. Run the following command:
bigIpRunAsAccountAndProfileSetup.ps1 -FQDNAndCredentialsFile C:\myCredentialsFile.txt -ManagementServerName myManagementServerName -ManagementServerCredentials (Get-Credential)This operation requires user input.
or
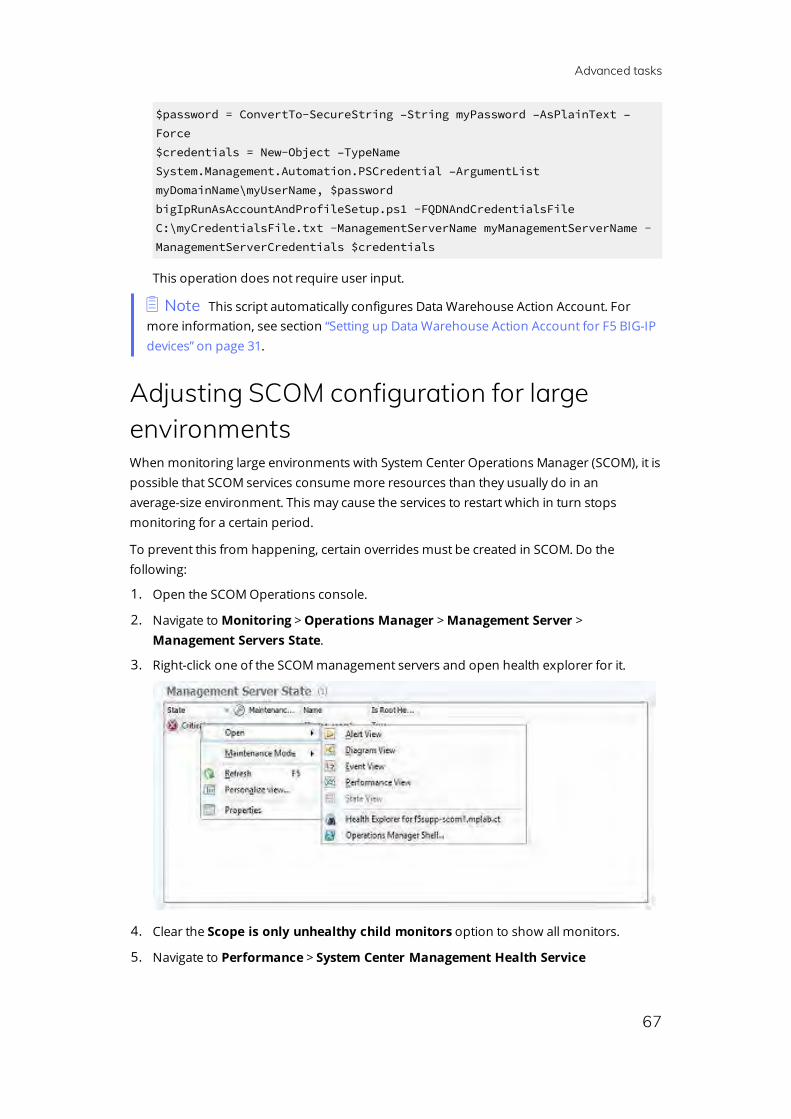
Advanced tasks
67
$password = ConvertTo-SecureString –String myPassword –AsPlainText –Force $credentials = New-Object –TypeName System.Management.Automation.PSCredential –ArgumentList myDomainName\myUserName, $password bigIpRunAsAccountAndProfileSetup.ps1 -FQDNAndCredentialsFile C:\myCredentialsFile.txt -ManagementServerName myManagementServerName -ManagementServerCredentials $credentials
This operation does not require user input.
n Note This script automatically configures Data Warehouse Action Account. For more information, see section “Setting up Data Warehouse Action Account for F5 BIG-IP devices” on page 31.
Adjusting SCOM configuration for large environmentsWhen monitoring large environments with System Center Operations Manager (SCOM), it is possible that SCOM services consume more resources than they usually do in an average-size environment. This may cause the services to restart which in turn stops monitoring for a certain period.
To prevent this from happening, certain overrides must be created in SCOM. Do the following:
1. Open the SCOM Operations console.
2. Navigate to Monitoring > Operations Manager > Management Server > Management Servers State.
3. Right-click one of the SCOM management servers and open health explorer for it.
4. Clear the Scope is only unhealthy child monitors option to show all monitors.
5. Navigate to Performance > System Center Management Health Service
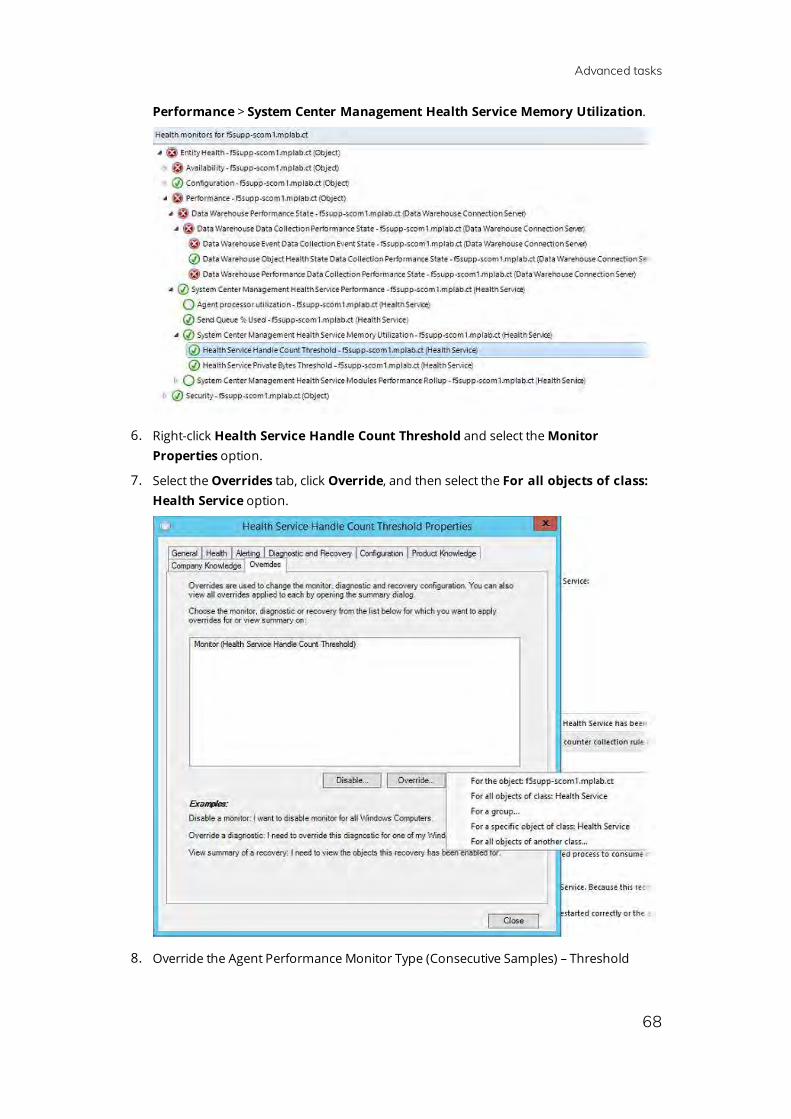
Advanced tasks
68
Performance > System Center Management Health Service Memory Utilization.
6. Right-click Health Service Handle Count Threshold and select the Monitor Properties option.
7. Select the Overrides tab, click Override, and then select the For all objects of class: Health Service option.
8. Override the Agent Performance Monitor Type (Consecutive Samples) – Threshold
Advanced tasks
69
parameter to 30,000.
9. Select a management pack that you wish to save this to and click OK.
10. Open the overrides for Health Service Private Bytes Threshold.
11. Override the Agent Performance Monitor Type (Consecutive Samples) – Threshold parameter to 6,442,450,944.
12. Select a management pack that you wish to save this to and click OK.
n Note Suggested thresholds (Agent Performance Monitor Type (Consecutive Samples) – Threshold and Agent Performance Monitor Type (Consecutive Samples) – Threshold) are calculated for a monitored environment with 150 BIG-IP devices.
Management packs used for these calculations are as follows:
l HYCU Management Pack for F5 BIG-IP Device (Core)
l HYCU Management Pack for F5 BIG-IP LTM (Core)
l HYCU Management Pack for F5 BIG-IP ASM (Core)
l HYCU Management Pack for F5 BIG-IP ASM (Reports)
70
HYCU Customer Support and information Use the communication channels listed in this section if you need:
l Help with the product licensing process
l Assistance while using the product
l Additional information about this product
l Information about other HYCU products
Customer SupportShould you require additional information or assistance while using the product, contact the vendor that shipped it.
If you have purchased the product directly from HYCU, and are experiencing a problem, search for a solution on the following webpage:support.hycusoftware.com
In the absence of an article addressing your problem, ask HYCU Customer Support for assistance: on the webpage, click Submit a request and fill in the request form. You must be signed in with a valid account prior to submission. Apply for an account at the following email address:[email protected]
Important: Before submitting a request to the Customer Support department, perform a health check on all systems that are in failed (critical, red) state and have the following information ready:
l Symptoms
l Sequence of events leading to the problem
l Commands and options that you used
l Messages you have received (a description with the date and time)
For a complete list of pieces of required support information, check troubleshooting sections in the product documentation.
Company websiteFor more information about our company and other products we offer, visit HYCU website at:www.hycusoftware.com

71
General informationFor questions related to product business or purchase of this or other HYCU products, send an email to:[email protected]
FeedbackFor comments or suggestions about this product, including its documentation, send an email to:[email protected]
We will be glad to hear from you!

www.hycusoftware.com