hydro-cast tissue treatment and functional …...displacement (denture stomatitis). clinically, this...
TRANSCRIPT

Made in USA0073010DF, R2-021616
Sultan Healthcare1301 Smile Way • York, PA 17404-0807 • USAToll Free: 800-637-8582 • Phone: 201-871-1232Fax: 201-871-0321 • www.sultanhealthcare.com
MDSS GmbH • Schiffgraben 41 • 30175 Hannover, Germany
1. PRODUCT DESCRIPTIONHydro-Cast® Tissue Treatment and Functional Impression Material is apolyethylmethacrylate-based tissue conditioning resin, denture soft linerand functional impression material.
Tissues in the edentulous mouth respond to stresses from ill-fittingdentures, which may result in pain, inflammation, swelling and tissuedisplacement (denture stomatitis). Clinically, this is uncomfortable for thepatient and delays the fabrication of new dentures. Hydro-Cast Materialhelps in reducing the clinical symptoms of denture stomatitis. Through aprocess known as dynamic adaptive stress, Hydro-Cast Material recordsa dynamic functional impression of the edentulous tissue surface as thetissue returns to normal.
1.1 DeliveryHydro-Cast Material is supplied in a Standard Package consisting of 1bottle of Powder (120g), 1 bottle of Liquid (115mL), 1 bottle of FlowReplenisher (5mL), 2 measuring vials, 1 mixing glass. The Powder andLiquid are available as individual refills. [Fig. 1]• REF 73010 – Standard Package• REF 73015 – Refill Liquid, 115mL• REF 73020 – Refill Powder, 120g
1.2 CompositionPowder: Polyethylmethacrylate resin, titanium dioxideLiquid: Butyl benzyl phthalate, ethanol, acetone
1.3 Indications• Tissue conditioning material to help reduce symptoms of denture
stomatitis caused by ill-fitting or older removable dentures.• Functional impression material for use when relining existing dentures
or fabricating new dentures using the Branching Technique.• Temporary denture soft liner.• Soft liner used with immediate dentures, provisional partials, and after
implant or other surgery.
1.4 ClassificationISO 10139-1 Short Term – Type B Class 2 Plasticized Acrylics.Hydro-Cast Material is for short term use in removable dentures.
2. SAFETY INFORMATION2.1 Warnings• Avoid eye contact with mixed material or the unmixed components to
prevent irritation. In the case of eye contact, rinse with water andcontact a physician immediately.
• Avoid ingestion or swallowing of the mixed material or the unmixedcomponents. If accidental swallowing occurs, contact a physicianimmediately.
• Avoid excessive skin contact and wear nitrile gloves when handling. • Do not use Hydro-Cast Material as a permanent denture soft liner.
2.2 Precautions• Hydro-Cast Material should not be used with patients who have a
known sensitivity or allergy to methacrylates or any of the componentsof the material.
• Follow all instructions and indications outlined in the Directions for Use. • Wear protective eyewear and nitrile gloves when mixing and handling
the material.
2.3 Adverse Reactions• Contact Allergy: Avoid use of this material with any individuals with
known sensitivities or allergies to methacrylates, phthalates or othercomponents of the product.
• Severe Eye Irritation: The Liquid component contains ethanol andacetone, which are severe eye irritants. Avoid all eye contact and wearsafety glasses when handling the material.
2.4 Storage• Replace the cap on the Liquid component immediately after use. • Keep away from direct sunlight and keep dry. Store between 40°-80°F
(5°-27°C). • The shelf life under these conditions is 3 years from manufacture.
3. USAGE INSTRUCTIONS3.1 Mixing1. Dispense equal volumes of powder and liquid in the measuring vials
provided with the kit. Add the liquid component to the mixing glass.Do not use a paper cup for mixing.
2. Add the powder to the liquid and quickly (5 seconds) mix the twocomponents using a small spatula. Cover the mixing container withplastic wrap or glass slab and allow the mixture to stand covered for5-7 minutes at room temperature. Continuous spatulation is notrecommended. [Figs. 2, 3, 4]
3. After 5-7 minutes has elapsed, uncover the mixture and check theconsistency. An appropriate working consistency is indicated by theability to roll the resin gel up onto a spatula. The material will be verysoft and somewhat runny, but not excessively so. If a slightly heavierconsistency is desired, allow the material to set for longer. [Fig. 5]It is recommended to start with a 1:1 by volume mix of powder toliquid and allowing that mix to stand covered for 5-7 minutes beforeapplication. This will give a good combination of tissue conditioningand flowability for the functional impression. However, a powder-liquidratio of up to 11⁄4 parts powder to 1 part liquid may be used if a slightlyheavier body is desired for mandibular dentures, free-end saddlepartials and adding to denture borders.
4. For reline impressions, tissue conditioning or soft lining, the materialmay be applied directly into an existing denture. Alternately the materialmay be applied to the denture in a reline jig if several changes ofmaterial are anticipated (such as with an immediate denture) or iffollowing the Branching Technique.
3.2 Direct Placement of Hydro-Cast Material1. Thoroughly wash and dry the tissue surface of the denture. 2. Using a carbide bur in a handpiece, lightly relieve any gross undercuts.
Do not relieve the borders of the denture and do not generally relievethe interior of the denture.
3. Due to the very sticky nature of Hydro-Cast Material, lubricate areaswith a water soluble lubricant that are not to be covered withHydro-Cast Material.
4. Working with the maxillary denture first, place a bead of mixedHydro-Cast Material into the residual ridge area of the denture. Using aspatula spread the material onto the palate and labial flange areas ofthe denture. Carefully insert the denture into the patient’s mouth andhave the patient very gently close against the opposing denture intomaximum intercuspation. Have the patient maintain this position for2-3 minutes. [Fig. 6]
5. Remove the denture from the patient’s mouth and trim excess materialusing a hot scalpel or electric trimmer. Replace the maxillary denture inthe patient’s mouth and repeat the procedure with the mandibulardenture. [Fig. 7]
6. Once both dentures have been lined and placed into the patient’smouth, occlusal relationship of the dentures should be checked incentric relation. Replace the dentures in the patient’s mouth and invitethe patient to converse with a member of the office staff or read aloudfor 2-3 minutes. Aggressive occlusal adjustment should be delayeduntil the Hydro-Cast Material has flowed to functional borders tostabilize the dentures (usually the first follow-up visit). It isrecommended that an occlusal indicator wax be used to checkocclusal relationships.
3.3 Follow-Up Visits1. Remove the dentures from the patient’s mouth and rinse them under
running water. Examine the tissue surfaces of the dentures for borderover extensions, border under extensions and tissue impingements. • Border over extensions and tissue impingements are visible as hard
denture base material showing through the white Hydro-Cast resin.Note: typical areas of impingement are shown in black in Figure 8.These are relieved using a carbide bur and repaired using freshlymixed Hydro-Cast Material applied to the defect.
• Border under extensions are visible as unsupported areas of TissueTreatment Material greater than 3-4 mm in length. These areas mustbe “backed up” using autopolymerizing acrylic resin to providesupport.
• To help maintain the surface, a drop of Flow Replensiher can beapplied over the patched areas using a brush or gloved finger.
2. An occlusal evaluation should be performed at every follow-upappointment. Hydro-Cast Material stabilizes the denture makingocclusal evaluations easier.
3. The consistency and color of the patient’s denture bearing tissueshould be monitored at each appointment. For patients with extremelyinflamed tissue, the Hydro-Cast Material may need to be changed ashealing takes place.
4. Schedule an additional follow-up visit 24-48 hours from the initialfollow-up visit. At the second and subsequent follow-up visits, repeatthe evaluation of the impression surface, oral tissue, and occlusalrelationships. Once all 3 areas are satisfactory to both the patient anddentist, the denture may be sent to a laboratory for reline or rebase.[Fig. 9]
3.4 Processing of the Completed Impression• The final impression may be processed into hard acrylic either by reline
or rebase. In either case, a precision processing method should beemployed to preserve the accuracy of the impression.
• The final impression should be boxed in plaster and model poured intype III stone as soon as possible after removal from the mouth topreserve accuracy.
4. DISINFECTIONThe finished impression should be disinfected using a water-basedhospital-level disinfectant in accordance with Local, State, and Federalrecommendations and regulations.
5. MAINTENANCE After 1 day in the mouth, Hydro-Cast Material treated dentures can becleaned by gentle brushing with a soft-bristled brush and clear water. Donot use commercially available chemical cleansers. Do not immersedenture in cleaning solutions.
1. 製品説明ハイドロ-キャスト® ティッシュトリートメント機能印象材は、ポリエチルメタクリレート系ティッシュコンディショニングレジン、 義歯軟質裏装材及び機能印象材です。
無歯顎の難組織は義歯の不適合によって、痛みや炎症、腫れ及び組織変位(義歯性口内炎)を引き起こす原因となります。臨床的には、患者にとっては不快であり、新しい義歯の製作を遅らせます。ハイドロ-キャストマテリアルは義歯性口内炎の臨床症状を緩和します。ハイドロ-キャストマテリアルは、動的適応応力として知られている過程を通じて、組織が正常に戻るように無歯の組織表面の適応機能印象を採得します。
1.1 納品ハイドロ-キャストマテリアルは、粉末ボトル1本(120g)、液体ボトル1本(115mL)、フロー補充液(5mL)、計量用バイアル瓶2本、ミキシンググラス1つから成るスタンダードパッケージでお届けします。粉末と液体は詰替え用としてご利用いただけます。[図1]• REF 73010 – スタンダードパッケージ• REF 73015 – 詰替え用液体, 115mL• REF 73020 – 詰替え用粉末, 120g
1.2 成分粉末:ポリエチルメタクリレート系レジン、二酸化チタン液体:フタル酸ブチルベンジル、エタノール、アセトン
1.3 効能• 不適合義歯または可撤性義歯の老朽化による義歯性口内炎の症状を緩
和するティッシュコンディショニングマテリアル • 現在使用中の義歯のリライニング時及びブランチングテクニックによ
る新しい義歯作製時に使用する機能印象材• 暫間義歯軟質裏装材• 即時義歯、局部仮義歯、及びインプラントや他の外科手術後に使用す
る軟質裏装材
1.4 分類ISO 10139- 1 短期症例 – Type B Class II 可塑性アクリル。ハイドロ‐キャストマテリアルは可撤性義歯の短期症例用に使用されます。
2. 安全性情報2.1 警告• 炎症を防ぐために本材又は練和物は、目に入らないように注意するこ
と。万一目に入った場合には、すぐに大量の流水で洗浄し、眼科医の診断を受けること。
• 本材又は練和物を摂取したり飲み込まないように注意すること。万一飲み込んでしまった場合には、すぐに医師の診断を受けること。
• 過度の皮膚接触は避け、使用する際にはニトリル手袋を着用すること。
• 最終義歯用軟質裏装材としてハイドロ‐キャストマテリアルを使用しないこと。
2.2 使用上の注意• 過敏症の患者またはメタクリル酸や本材の成分にアレルギーを持つ患
者にはハイドロ‐キャストマテリアルを使用しないこと。• 取扱説明書に書かれている全ての指示及び効能に従うこと。• 本材を扱う際には保護めがね及びニトリル手袋を着用すること。
2.3 副作用• 接触アレルギー:過敏症の患者またはメタクリル酸、フタル酸または
本材の他の成分にアレルギーを持つ患者には使用しないこと。• 深刻な目の炎症:液体成分は深刻な目の刺激薬であるエタノール及び
アセトンを含んでいるので、本材を扱う際には目に入らないように注意し、保護めがねを着用すること。
2.4 貯蔵• 使用後は速やかに液体成分のキャップを閉めること。• 直射日光を避け、乾いた状態を保つこと。華氏40°‐80°(摂氏5°‐27°)
で貯蔵すること。• そのような状態での保管期間は製造から3年間である。
3. 使用方法3.1 練和1. キット付属の計量用バイアルに同量の粉末と液体をそれぞれ分注し
ます。ミキシンググラスに液体を加えます。練和には紙コップは使用しないで下さい。
2. 粉末を液体に加え、小さいスパチュラを使用し、5秒以内に練和します。ミキシング容器にラップまたはガラス蓋で蓋をし、室温で5~7分放置します。スパチュラでかき混ぜ続けることは推奨しません。[図2、3、4]
3. 5~7分経過したら、蓋を取り、練度をチェックします。スパチュラにレジンジェルを巻きつけて容器から取り出せるくらいが目安です。マテリアルは非常に軟らかく粘性が低めですが、過剰ではないはずです。もう少し硬めにしたければ長めに放置しておきます。[図5]粉末と液体の分量は1:1から始め、使用前にその練和物を5~7分蓋をして放置しておくことを推奨します。これにより、機能印象に適したティッシュコンディショニング及び流動性を与えます。しかし、下顎義歯、遊離端仮義歯用及び義歯床縁への添加用に少し硬めにしたければ、粉末と液体の割合を粉末1 、液体1になるように使用することもできます。
4. リライン印象、ティッシュコンディショニングまたは軟質裏装には、現在使用中の義歯に直接マテリアルを使用することができます。マテリアルの変化が予想される場合(即時義歯のように)、またはブランチングテクニックに従う場合には、リライン治具の義歯にマテリアルを交互に塗布することができます。
3.2 ハイドロ‐キャストマテリアルの直接塗布1. 義歯の組織表面を十分に洗浄、乾燥します。2. ハンドピースにカーバイドバーを取り付け、大きなアンダーカット
を減らします。義歯床縁や内面は減らしたりしないこと。3. ハイドロ‐キャストマテリアルにはとても粘つく特性があるため、ハ
イドロ‐キャストマテリアルで覆わない部分には水溶性潤滑油を塗布します。
4. 上顎義歯から始め、義歯の残存顎堤に練和したハイドロ‐キャストマテリアルを一玉塗布します。スパチュラを使用し、マテリアルを義歯の口蓋及び唇側フランジの部位に拡げます。慎重に患者の口腔内に義歯を装着し、最大咬頭嵌合位に対合するように静かに口を閉じさせます。この状態で2~3分維持します。[図6]
5. 患者の口腔内から義歯を取り出し、温めた外科用メスあるいは電動トリマーを用いてはみ出たマテリアルを除去します。患者の口腔内に上顎義歯を戻し、下顎も同じ作業を繰り返します。[図7]
6. 上下顎義歯を患者の口腔内に並べて装着したら、中心位にて義歯の咬合関係を調べる必要があります。義歯を患者の口腔内に装着し、患者に2~3分スタッフと会話させたり大きな声で読書させたりします。ハイドロ‐キャストマテリアルが義歯を安定させるために機能床縁に流動するまでは強引な咬合調整は遅らせなければなりません(通常、最初の再来院まで)。咬合関係をチェックするのにオクルーザルインジケーターワックスの使用を推奨します。
3.3 再来院1. 患者の口腔内から義歯を取り外し、流水で洗い流します。組織表面
を検査し、過度の延長、延長不足の有無、及び組織インピンジメントを調べます。
• 硬い義歯床材は白いハイドロ‐キャストレジンから透けて見えるので、過度の延長及び組織インピンジメントは目に見えます。注意:典型的なインピンジメント部分は図8に黒く示しています。これらはカーバイドバーで取り除き、新たに練和したハイドロ‐キャストマテリアルを塗布することで修復できます。
• 義歯床の延長不足の場合、ティッシュトリートメントマテリアルにサポートされていない部分が3~4mm幅以上見られます。これらをサポートするためには常温重合アクリルレジンを用いて「バックアップ」しなければなりません。
• 表面を維持するためには、ブラシ或いは手袋をはめた指を使い対象面にフロー補充液を1滴塗布します。
2. 術後は来院のたびに咬合を評価する必要があります。ハイドロ‐キャストマテリアルは義歯を安定させるので咬合の評価を容易にします。
3. 組織に接する患者の義歯の粘度及び色は来院のたびにチェックする必要があります。患者の組織にひどい炎症が見られる場合には、治るまでハイドロ‐キャストマテリアルを入れ替える必要があります。
4. 最初の再来院から数えて24~48時間後に次の来院予約をして下さい。次回からは印象表面、口腔組織及び咬合関係の検査を繰り返します。その3か所が歯科医にとっても患者にとっても満足のいくものであれば、義歯を技工所でリラインまたはリベースします。[図9]
3.4 最終印象義歯• 最終印象はリラインあるいはリベースによってハードアクリルに加工
されます。どちらの場合でも、印象を正確に再現するために精密な加工法を使用しなければなりません。
• 最終印象は、口腔から外した後、正確さを保つためにできるだけ早くプラスターにボクシングをしてタイプIIIの石膏を注入します。
4. 消毒最終印象義歯は水性の病院で使用される消毒剤で、地方自治体 や都 道府 県 や国 の 推奨及び規則に 従 って消毒する必要があります。
5. メンテナンス口腔内に装着してから1日後、ハイドロ‐キャストマテリアルで処置された義歯は毛先が柔らかいブラシと透き通った水でやさしくブラッシングしてきれいにすることができます。市販されている化学洗剤は使用しないで下さい。洗浄液の中に義歯を浸さないで下さい。
Hydro-Cast® Tissue Treatment and Functional Impression MaterialDIRECTIONS FOR USE – ENGLISH
For Dental Use Only.
ハイドロ-キャスト® ティッシュトリートメント機能印象材取扱説明書歯科専用
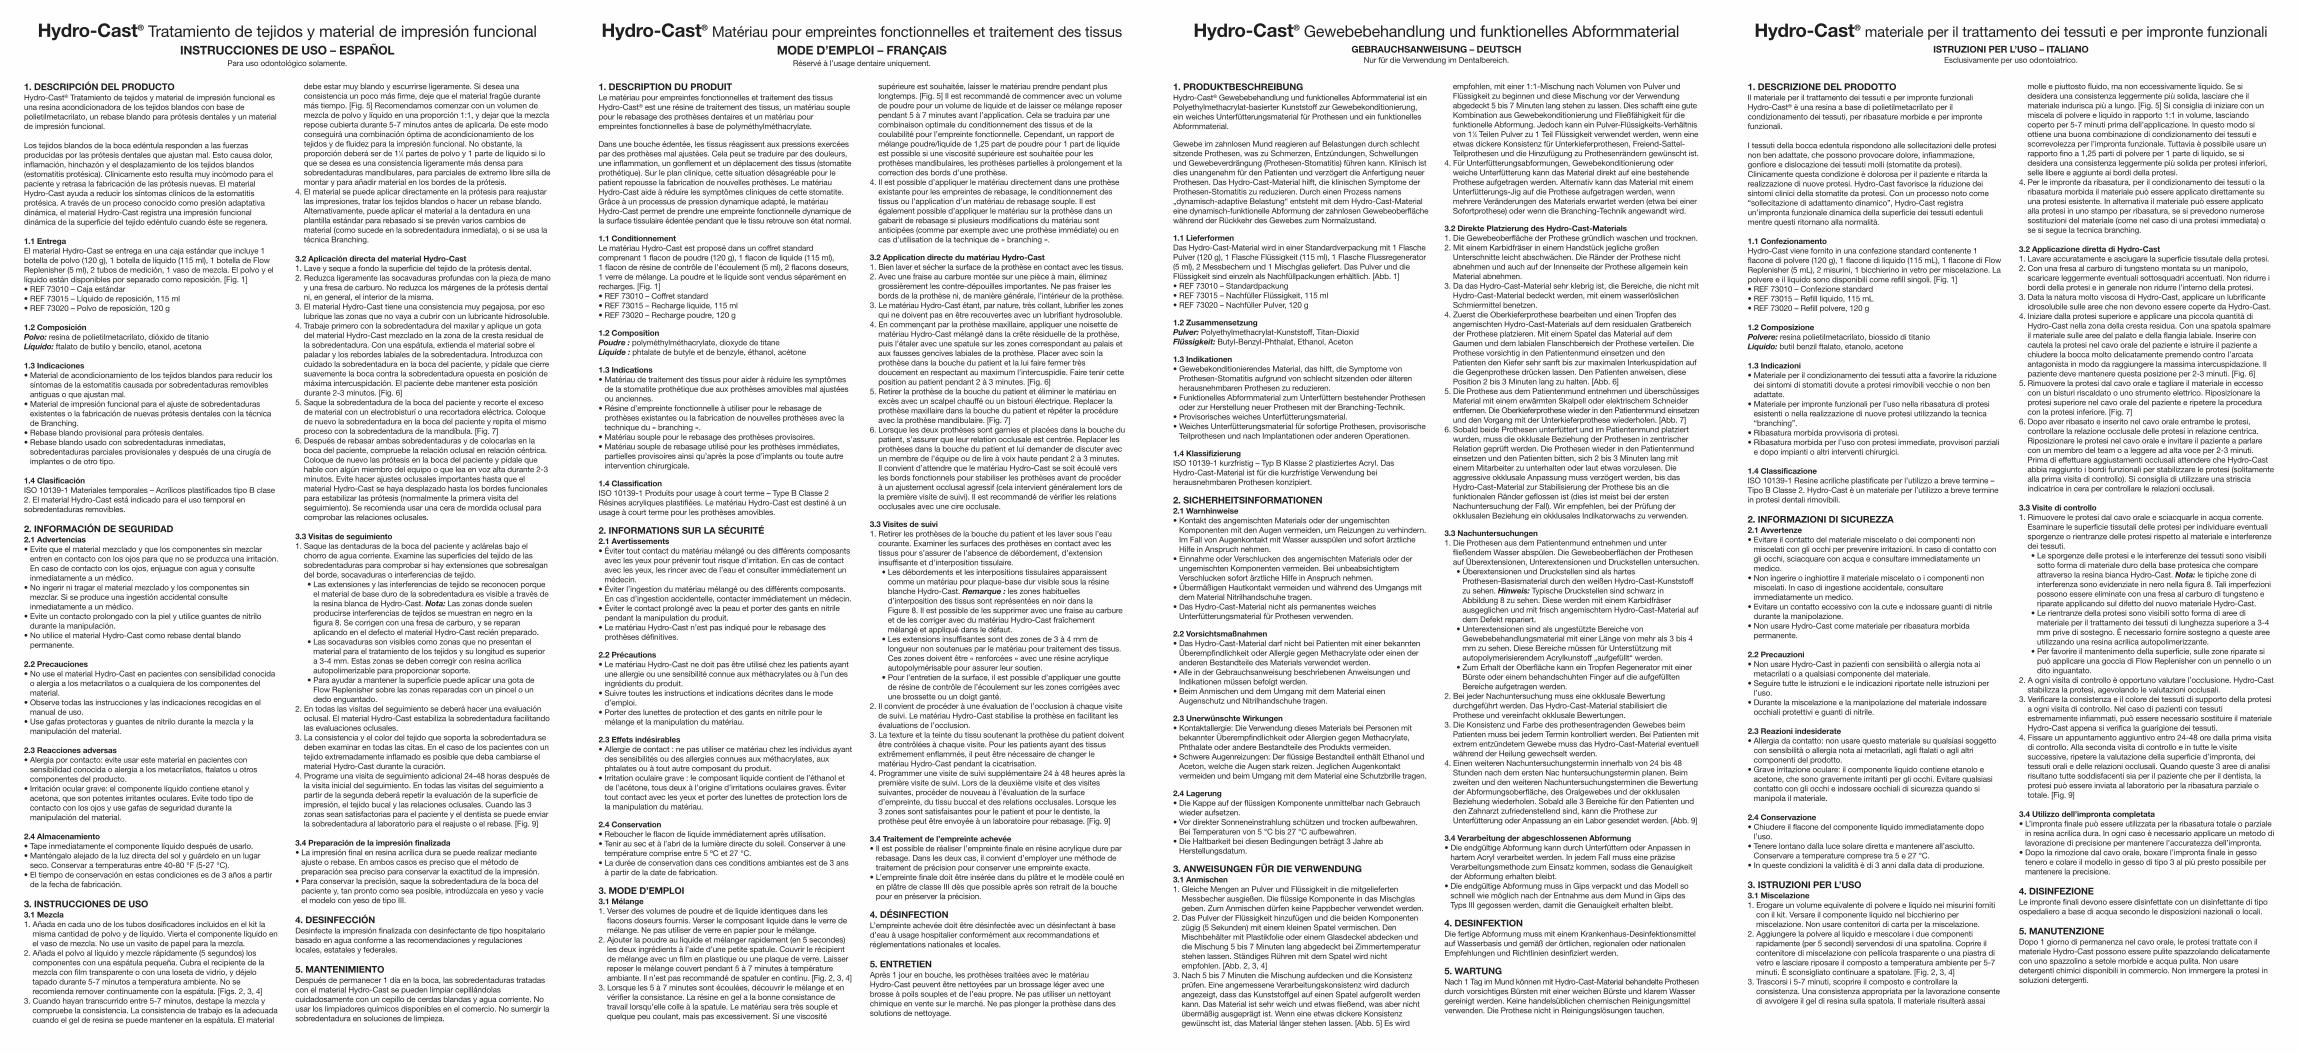
[Fig. 1] Complete Tissue Treatment KitKit completo para el tratamiento de los tejidosCoffret complet pour le traitement des tissusVollständiger GewebebehandlungskitKit completo per il trattamento dei tessutiコンプリートティッシュトリートメントキット
[Fig. 2] Always add powder to liquidAñadir siempre el polvo al líquidoToujours ajouter la poudre au liquideStets das Pulver zur Flüssigkeit hinzufügenAggiungere sempre la polvere al liquido常に粉末を液体に加える
[Fig. 4] Cover for 5-7 minutesTapar durante 5-7 minutosCouvrir pendant 5 à 7 minutes5 bis 7 Minuten lang abdeckenCoprire per 5-7 minuti蓋をして5~7分放置する
[Fig. 3] Quickly dissolve componentsDisolver rápidamente los componentesDissoudre rapidement les ingrédientsKomponenten schnell auflösenSciogliere rapidamente i componenti成分を素早く溶かす
[Fig. 5] Check consistencyComprobar la consistenciaVérifier la consistanceKonsistenz prüfenControllare la consistenza粘度をチェックする
[Fig. 7] Trim with hot knife or electric trimmerRecortar con un electrobisturí o con una recortadora eléctricaCouper avec un scalpel chauffé ou un bistouri électriqueMit erwärmtem Messer oder elektrischem Schneider zuschneidenRifilare con un coltello riscaldato o uno strumento elettrico温めたナイフまたは電気トリマーで調整する
[Fig. 6] Apply using spatulaAplicar con una espátulaAppliquer avec une spatuleMit Spatel auftragenApplicare con una spatolaスパチュラで塗布する
[Fig. 8] Areas of impingement are easily visualized, marked, and correctedLas zonas de interferencias se ven, marcan y corrigen fácilmenteLes zones d’interposition des tissus sont facilement identifiées, marquées et corrigéesImpingement-Bereiche sind gut sichtbar, werden markiert und korrigiertLe aree di interferenza sono facili da vedere, marcare e correggereインピンジメント部分は容易に見ることができ、印をつけて修復できる
[Fig. 9] Typical appearance of completed impressionAspecto típico de una impresión acabadaAspect normal de l’empreinte achevéeTypisches Erscheinungsbild der fertigen AbformungAspetto tipico dell’impronta completata最終印象の外観
Hydro-Cast® Tratamiento de tejidos y material de impresión funcionalINSTRUCCIONES DE USO – ESPAÑOL
Para uso odontológico solamente.
1. DESCRIPCIÓN DEL PRODUCTOHydro-Cast® Tratamiento de tejidos y material de impresión funcional esuna resina acondicionadora de los tejidos blandos con base depolietilmetacrilato, un rebase blando para prótesis dentales y un materialde impresión funcional.
Los tejidos blandos de la boca edéntula responden a las fuerzasproducidas por las prótesis dentales que ajustan mal. Esto causa dolor,inflamación, hinchazón y el desplazamiento de los tejidos blandos(estomatitis protésica). Clínicamente esto resulta muy incómodo para elpaciente y retrasa la fabricación de las prótesis nuevas. El materialHydro-Cast ayuda a reducir los síntomas clínicos de la estomatitisprotésica. A través de un proceso conocido como presión adaptativadinámica, el material Hydro-Cast registra una impresión funcionaldinámica de la superficie del tejido edéntulo cuando éste se regenera.
1.1 EntregaEl material Hydro-Cast se entrega en una caja estándar que incluye 1botella de polvo (120 g), 1 botella de líquido (115 ml), 1 botella de FlowReplenisher (5 ml), 2 tubos de medición, 1 vaso de mezcla. El polvo y ellíquido están disponibles por separado como reposición. [Fig. 1]• REF 73010 – Caja estándar• REF 73015 – Líquido de reposición, 115 ml• REF 73020 – Polvo de reposición, 120 g
1.2 ComposiciónPolvo: resina de polietilmetacrilato, dióxido de titanioLíquido: ftalato de butilo y bencilo, etanol, acetona
1.3 Indicaciones• Material de acondicionamiento de los tejidos blandos para reducir los
síntomas de la estomatitis causada por sobredentaduras removiblesantiguas o que ajustan mal.
• Material de impresión funcional para el ajuste de sobredentadurasexistentes o la fabricación de nuevas prótesis dentales con la técnicade Branching.
• Rebase blando provisional para prótesis dentales.• Rebase blando usado con sobredentaduras inmediatas,
sobredentaduras parciales provisionales y después de una cirugía deimplantes o de otro tipo.
1.4 ClasificaciónISO 10139-1 Materiales temporales – Acrílicos plastificados tipo B clase2. El material Hydro-Cast está indicado para el uso temporal ensobredentaduras removibles.
2. INFORMACIÓN DE SEGURIDAD2.1 Advertencias• Evite que el material mezclado y que los componentes sin mezclar
entren en contacto con los ojos para que no se produzca una irritación.En caso de contacto con los ojos, enjuague con agua y consulteinmediatamente a un médico.
• No ingerir ni tragar el material mezclado y los componentes sinmezclar. Si se produce una ingestión accidental consulteinmediatamente a un médico.
• Evite un contacto prolongado con la piel y utilice guantes de nitrilodurante la manipulación.
• No utilice el material Hydro-Cast como rebase dental blandopermanente.
2.2 Precauciones• No use el material Hydro-Cast en pacientes con sensibilidad conocida
o alergia a los metacrilatos o a cualquiera de los componentes delmaterial.
• Observe todas las instrucciones y las indicaciones recogidas en elmanual de uso.
• Use gafas protectoras y guantes de nitrilo durante la mezcla y lamanipulación del material.
2.3 Reacciones adversas• Alergia por contacto: evite usar este material en pacientes con
sensibilidad conocida o alergia a los metacrilatos, ftalatos u otroscomponentes del producto.
• Irritación ocular grave: el componente líquido contiene etanol yacetona, que son potentes irritantes oculares. Evite todo tipo decontacto con los ojos y use gafas de seguridad durante lamanipulación del material.
2.4 Almacenamiento• Tape inmediatamente el componente líquido después de usarlo.• Manténgalo alejado de la luz directa del sol y guárdelo en un lugar
seco. Conservar a temperaturas entre 40-80 °F (5-27 °C).• El tiempo de conservación en estas condiciones es de 3 años a partir
de la fecha de fabricación.
3. INSTRUCCIONES DE USO3.1 Mezcla1. Añada en cada uno de los tubos dosificadores incluidos en el kit la
misma cantidad de polvo y de líquido. Vierta el componente líquido enel vaso de mezcla. No use un vasito de papel para la mezcla.
2. Añada el polvo al líquido y mezcle rápidamente (5 segundos) loscomponentes con una espátula pequeña. Cubra el recipiente de lamezcla con film transparente o con una loseta de vidrio, y déjelotapado durante 5-7 minutos a temperatura ambiente. No serecomienda remover continuamente con la espátula. [Figs. 2, 3, 4]
3. Cuando hayan transcurrido entre 5-7 minutos, destape la mezcla ycompruebe la consistencia. La consistencia de trabajo es la adecuadacuando el gel de resina se puede mantener en la espátula. El material
debe estar muy blando y escurrirse ligeramente. Si desea unaconsistencia un poco más firme, deje que el material fragüe durantemás tiempo. [Fig. 5] Recomendamos comenzar con un volumen demezcla de polvo y líquido en una proporción 1:1, y dejar que la mezclarepose cubierta durante 5-7 minutos antes de aplicarla. De este modoconseguirá una combinación óptima de acondicionamiento de lostejidos y de fluidez para la impresión funcional. No obstante, laproporción deberá ser de 11⁄4 partes de polvo y 1 parte de líquido si loque se desea es una consistencia ligeramente más densa parasobredentaduras mandibulares, para parciales de extremo libre silla demontar y para añadir material en los bordes de la prótesis.
4. El material se puede aplicar directamente en la prótesis para reajustarlas impresiones, tratar los tejidos blandos o hacer un rebase blando.Alternativamente, puede aplicar el material a la dentadura en unaplantilla estándar para rebasado si se prevén varios cambios dematerial (como sucede en la sobredentadura inmediata), o si se usa latécnica Branching.
3.2 Aplicación directa del material Hydro-Cast1. Lave y seque a fondo la superficie del tejido de la prótesis dental.2. Reduzca ligeramente las socavaduras profundas con la pieza de mano
y una fresa de carburo. No reduzca los márgenes de la prótesis dentalni, en general, el interior de la misma.
3. El material Hydro-Cast tiene una consistencia muy pegajosa, por esolubrique las zonas que no vaya a cubrir con un lubricante hidrosoluble.
4. Trabaje primero con la sobredentadura del maxilar y aplique un gotadel material Hydro-Cast mezclado en la zona de la cresta residual dela sobredentadura. Con una espátula, extienda el material sobre elpaladar y los rebordes labiales de la sobredentadura. Introduzca concuidado la sobredentadura en la boca del paciente, y pídale que cierresuavemente la boca contra la sobredentadura opuesta en posición demáxima intercuspidación. El paciente debe mantener esta posicióndurante 2-3 minutos. [Fig. 6]
5. Saque la sobredentadura de la boca del paciente y recorte el excesode material con un electrobisturí o una recortadora eléctrica. Coloquede nuevo la sobredentadura en la boca del paciente y repita el mismoproceso con la sobredentadura de la mandíbula. [Fig. 7]
6. Después de rebasar ambas sobredentaduras y de colocarlas en laboca del paciente, compruebe la relación oclusal en relación céntrica.Coloque de nuevo las prótesis en la boca del paciente y pídale quehable con algún miembro del equipo o que lea en voz alta durante 2-3minutos. Evite hacer ajustes oclusales importantes hasta que elmaterial Hydro-Cast se haya desplazado hasta los bordes funcionalespara estabilizar las prótesis (normalmente la primera visita delseguimiento). Se recomienda usar una cera de mordida oclusal paracomprobar las relaciones oclusales.
3.3 Visitas de seguimiento1. Saque las dentaduras de la boca del paciente y aclárelas bajo el
chorro de agua corriente. Examine las superficies del tejido de lassobredentaduras para comprobar si hay extensiones que sobresalgandel borde, socavaduras o interferencias de tejido.• Las extensiones y las interferencias de tejido se reconocen porque
el material de base duro de la sobredentadura es visible a través dela resina blanca de Hydro-Cast. Nota: Las zonas donde suelenproducirse interferencias de tejidos se muestran en negro en lafigura 8. Se corrigen con una fresa de carburo, y se reparanaplicando en el defecto el material Hydro-Cast recién preparado.
• Las socavaduras son visibles como zonas que no presentan elmaterial para el tratamiento de los tejidos y su longitud es superiora 3-4 mm. Estas zonas se deben corregir con resina acrílicaautopolimerizable para proporcionar soporte.
• Para ayudar a mantener la superficie puede aplicar una gota deFlow Replenisher sobre las zonas reparadas con un pincel o undedo enguantado.
2. En todas las visitas del seguimiento se deberá hacer una evaluaciónoclusal. El material Hydro-Cast estabiliza la sobredentadura facilitandolas evaluaciones oclusales.
3. La consistencia y el color del tejido que soporta la sobredentadura sedeben examinar en todas las citas. En el caso de los pacientes con untejido extremadamente inflamado es posible que deba cambiarse elmaterial Hydro-Cast durante la curación.
4. Programe una visita de seguimiento adicional 24-48 horas después dela visita inicial del seguimiento. En todas las visitas del seguimiento apartir de la segunda deberá repetir la evaluación de la superficie deimpresión, el tejido bucal y las relaciones oclusales. Cuando las 3zonas sean satisfactorias para el paciente y el dentista se puede enviarla sobredentadura al laboratorio para el reajuste o el rebase. [Fig. 9]
3.4 Preparación de la impresión finalizada• La impresión final en resina acrílica dura se puede realizar mediante
ajuste o rebase. En ambos casos es preciso que el método depreparación sea preciso para conservar la exactitud de la impresión.
• Para conservar la precisión, saque la sobredentadura de la boca delpaciente y, tan pronto como sea posible, introdúzcala en yeso y vacíeel modelo con yeso de tipo III.
4. DESINFECCIÓNDesinfecte la impresión finalizada con desinfectante de tipo hospitalariobasado en agua conforme a las recomendaciones y regulacioneslocales, estatales y federales.
5. MANTENIMIENTODespués de permanecer 1 día en la boca, las sobredentaduras tratadascon el material Hydro-Cast se pueden limpiar cepillándolascuidadosamente con un cepillo de cerdas blandas y agua corriente. Nousar los limpiadores químicos disponibles en el comercio. No sumergir lasobredentadura en soluciones de limpieza.
Hydro-Cast® Matériau pour empreintes fonctionnelles et traitement des tissusMODE D’EMPLOI – FRANÇAIS
Réservé à l’usage dentaire uniquement.
1. DESCRIPTION DU PRODUITLe matériau pour empreintes fonctionnelles et traitement des tissusHydro-Cast® est une résine de traitement des tissus, un matériau souplepour le rebasage des prothèses dentaires et un matériau pourempreintes fonctionnelles à base de polyméthylméthacrylate.
Dans une bouche édentée, les tissus réagissent aux pressions exercéespar des prothèses mal ajustées. Cela peut se traduire par des douleurs,une inflammation, un gonflement et un déplacement des tissus (stomatiteprothétique). Sur le plan clinique, cette situation désagréable pour lepatient repousse la fabrication de nouvelles prothèses. Le matériauHydro-Cast aide à réduire les symptômes cliniques de cette stomatite.Grâce à un processus de pression dynamique adapté, le matériauHydro-Cast permet de prendre une empreinte fonctionnelle dynamique dela surface tissulaire édentée pendant que le tissu retrouve son état normal.
1.1 ConditionnementLe matériau Hydro-Cast est proposé dans un coffret standardcomprenant 1 flacon de poudre (120 g), 1 flacon de liquide (115 ml),1 flacon de résine de contrôle de l’écoulement (5 ml), 2 flacons doseurs,1 verre de mélange. La poudre et le liquide sont vendus séparément enrecharges. [Fig. 1]• REF 73010 – Coffret standard• REF 73015 – Recharge liquide, 115 ml• REF 73020 – Recharge poudre, 120 g
1.2 CompositionPoudre : polyméthylméthacrylate, dioxyde de titaneLiquide : phtalate de butyle et de benzyle, éthanol, acétone
1.3 Indications• Matériau de traitement des tissus pour aider à réduire les symptômes
de la stomatite prothétique due aux prothèses amovibles mal ajustéesou anciennes.
• Résine d’empreinte fonctionnelle à utiliser pour le rebasage deprothèses existantes ou la fabrication de nouvelles prothèses avec latechnique du « branching ».
• Matériau souple pour le rebasage des prothèses provisoires.• Matériau souple de rebasage utilisé pour les prothèses immédiates,
partielles provisoires ainsi qu’après la pose d’implants ou toute autreintervention chirurgicale.
1.4 ClassificationISO 10139-1 Produits pour usage à court terme – Type B Classe 2Résines acryliques plastifiées. Le matériau Hydro-Cast est destiné à unusage à court terme pour les prothèses amovibles.
2. INFORMATIONS SUR LA SÉCURITÉ2.1 Avertissements• Éviter tout contact du matériau mélangé ou des différents composants
avec les yeux pour prévenir tout risque d’irritation. En cas de contactavec les yeux, les rincer avec de l’eau et consulter immédiatement unmédecin.
• Éviter l’ingestion du matériau mélangé ou des différents composants.En cas d’ingestion accidentelle, contacter immédiatement un médecin.
• Éviter le contact prolongé avec la peau et porter des gants en nitrilependant la manipulation du produit.
• Le matériau Hydro-Cast n’est pas indiqué pour le rebasage desprothèses définitives.
2.2 Précautions• Le matériau Hydro-Cast ne doit pas être utilisé chez les patients ayant
une allergie ou une sensibilité connue aux méthacrylates ou à l’un desingrédients du produit.
• Suivre toutes les instructions et indications décrites dans le moded’emploi.
• Porter des lunettes de protection et des gants en nitrile pour lemélange et la manipulation du matériau.
2.3 Effets indésirables• Allergie de contact : ne pas utiliser ce matériau chez les individus ayant
des sensibilités ou des allergies connues aux méthacrylates, auxphtalates ou à tout autre composant du produit.
• Irritation oculaire grave : le composant liquide contient de l’éthanol etde l’acétone, tous deux à l’origine d’irritations oculaires graves. Évitertout contact avec les yeux et porter des lunettes de protection lors dela manipulation du matériau.
2.4 Conservation• Reboucher le flacon de liquide immédiatement après utilisation.• Tenir au sec et à l’abri de la lumière directe du soleil. Conserver à une
température comprise entre 5 ºC et 27 °C.• La durée de conservation dans ces conditions ambiantes est de 3 ans
à partir de la date de fabrication.
3. MODE D’EMPLOI3.1 Mélange1. Verser des volumes de poudre et de liquide identiques dans les
flacons doseurs fournis. Verser le composant liquide dans le verre demélange. Ne pas utiliser de verre en papier pour le mélange.
2. Ajouter la poudre au liquide et mélanger rapidement (en 5 secondes)les deux ingrédients à l’aide d’une petite spatule. Couvrir le récipientde mélange avec un film en plastique ou une plaque de verre. Laisserreposer le mélange couvert pendant 5 à 7 minutes à températureambiante. Il n’est pas recommandé de spatuler en continu. [Fig. 2, 3, 4]
3. Lorsque les 5 à 7 minutes sont écoulées, découvrir le mélange et envérifier la consistance. La résine en gel a la bonne consistance detravail lorsqu’elle colle à la spatule. Le matériau sera très souple etquelque peu coulant, mais pas excessivement. Si une viscosité
supérieure est souhaitée, laisser le matériau prendre pendant pluslongtemps. [Fig. 5] Il est recommandé de commencer avec un volumede poudre pour un volume de liquide et de laisser ce mélange reposerpendant 5 à 7 minutes avant l’application. Cela se traduira par unecombinaison optimale du conditionnement des tissus et de lacoulabilité pour l’empreinte fonctionnelle. Cependant, un rapport demélange poudre/liquide de 1,25 part de poudre pour 1 part de liquideest possible si une viscosité supérieure est souhaitée pour lesprothèses mandibulaires, les prothèses partielles à prolongement et lacorrection des bords d’une prothèse.
4. Il est possible d’appliquer le matériau directement dans une prothèseexistante pour les empreintes de rebasage, le conditionnement destissus ou l’application d’un matériau de rebasage souple. Il estégalement possible d’appliquer le matériau sur la prothèse dans ungabarit de rebasage si plusieurs modifications du matériau sontanticipées (comme par exemple avec une prothèse immédiate) ou encas d’utilisation de la technique de « branching ».
3.2 Application directe du matériau Hydro-Cast1. Bien laver et sécher la surface de la prothèse en contact avec les tissus.2. Avec une fraise au carbure montée sur une pièce à main, éliminez
grossièrement les contre-dépouilles importantes. Ne pas fraiser lesbords de la prothèse ni, de manière générale, l’intérieur de la prothèse.
3. Le matériau Hydro-Cast étant, par nature, très collant, lubrifier les zonesqui ne doivent pas en être recouvertes avec un lubrifiant hydrosoluble.
4. En commençant par la prothèse maxillaire, appliquer une noisette dematériau Hydro-Cast mélangé dans la crête résiduelle de la prothèse,puis l’étaler avec une spatule sur les zones correspondant au palais etaux fausses gencives labiales de la prothèse. Placer avec soin laprothèse dans la bouche du patient et la lui faire fermer trèsdoucement en respectant au maximum l’intercuspidie. Faire tenir cetteposition au patient pendant 2 à 3 minutes. [Fig. 6]
5. Retirer la prothèse de la bouche du patient et éliminer le matériau enexcès avec un scalpel chauffé ou un bistouri électrique. Replacer laprothèse maxillaire dans la bouche du patient et répéter la procédureavec la prothèse mandibulaire. [Fig. 7]
6. Lorsque les deux prothèses sont garnies et placées dans la bouche dupatient, s’assurer que leur relation occlusale est centrée. Replacer lesprothèses dans la bouche du patient et lui demander de discuter avecun membre de l’équipe ou de lire à voix haute pendant 2 à 3 minutes.Il convient d’attendre que le matériau Hydro-Cast se soit écoulé versles bords fonctionnels pour stabiliser les prothèses avant de procéderà un ajustement occlusal agressif (cela intervient généralement lors dela première visite de suivi). Il est recommandé de vérifier les relationsocclusales avec une cire occlusale.
3.3 Visites de suivi1. Retirer les prothèses de la bouche du patient et les laver sous l’eau
courante. Examiner les surfaces des prothèses en contact avec lestissus pour s’assurer de l’absence de débordement, d’extensioninsuffisante et d’interposition tissulaire.• Les débordements et les interpositions tissulaires apparaissent
comme un matériau pour plaque-base dur visible sous la résineblanche Hydro-Cast. Remarque : les zones habituellesd’interposition des tissus sont représentées en noir dans laFigure 8. Il est possible de les supprimer avec une fraise au carbureet de les corriger avec du matériau Hydro-Cast fraîchementmélangé et appliqué dans le défaut.
• Les extensions insuffisantes sont des zones de 3 à 4 mm delongueur non soutenues par le matériau pour traitement des tissus.Ces zones doivent être « renforcées » avec une résine acryliqueautopolymérisable pour assurer leur soutien.
• Pour l’entretien de la surface, il est possible d’appliquer une gouttede résine de contrôle de l’écoulement sur les zones corrigées avecune brossette ou un doigt ganté.
2. Il convient de procéder à une évaluation de l’occlusion à chaque visitede suivi. Le matériau Hydro-Cast stabilise la prothèse en facilitant lesévaluations de l’occlusion.
3. La texture et la teinte du tissu soutenant la prothèse du patient doiventêtre contrôlées à chaque visite. Pour les patients ayant des tissusextrêmement enflammés, il peut être nécessaire de changer lematériau Hydro-Cast pendant la cicatrisation.
4. Programmer une visite de suivi supplémentaire 24 à 48 heures après lapremière visite de suivi. Lors de la deuxième visite et des visitessuivantes, procéder de nouveau à l’évaluation de la surfaced’empreinte, du tissu buccal et des relations occlusales. Lorsque les3 zones sont satisfaisantes pour le patient et pour le dentiste, laprothèse peut être envoyée à un laboratoire pour rebasage. [Fig. 9]
3.4 Traitement de l’empreinte achevée• Il est possible de réaliser l’empreinte finale en résine acrylique dure par
rebasage. Dans les deux cas, il convient d’employer une méthode detraitement de précision pour conserver une empreinte exacte.
• L’empreinte finale doit être insérée dans du plâtre et le modèle coulé enen plâtre de classe III dès que possible après son retrait de la bouchepour en préserver la précision.
4. DÉSINFECTIONL’empreinte achevée doit être désinfectée avec un désinfectant à based’eau à usage hospitalier conformément aux recommandations etréglementations nationales et locales.
5. ENTRETIENAprès 1 jour en bouche, les prothèses traitées avec le matériauHydro-Cast peuvent être nettoyées par un brossage léger avec unebrosse à poils souples et de l’eau propre. Ne pas utiliser un nettoyantchimique en vente sur le marché. Ne pas plonger la prothèse dans dessolutions de nettoyage.
Hydro-Cast® Gewebebehandlung und funktionelles AbformmaterialGEBRAUCHSANWEISUNG – DEUTSCH
Nur für die Verwendung im Dentalbereich.
1. PRODUKTBESCHREIBUNGHydro-Cast® Gewebebehandlung und funktionelles Abformmaterial ist einPolyethylmethacrylat-basierter Kunststoff zur Gewebekonditionierung,ein weiches Unterfütterungsmaterial für Prothesen und ein funktionellesAbformmaterial.
Gewebe im zahnlosen Mund reagieren auf Belastungen durch schlechtsitzende Prothesen, was zu Schmerzen, Entzündungen, Schwellungenund Gewebeverdrängung (Prothesen-Stomatitis) führen kann. Klinisch istdies unangenehm für den Patienten und verzögert die Anfertigung neuerProthesen. Das Hydro-Cast-Material hilft, die klinischen Symptome derProthesen-Stomatitis zu reduzieren. Durch einen Prozess namens„dynamisch-adaptive Belastung“ entsteht mit dem Hydro-Cast-Materialeine dynamisch-funktionelle Abformung der zahnlosen Gewebeoberflächewährend der Rückkehr des Gewebes zum Normalzustand.
1.1 LieferformenDas Hydro-Cast-Material wird in einer Standardverpackung mit 1 FlaschePulver (120 g), 1 Flasche Flüssigkeit (115 ml), 1 Flasche Flussregenerator(5 ml), 2 Messbechern und 1 Mischglas geliefert. Das Pulver und dieFlüssigkeit sind einzeln als Nachfüllpackungen erhältlich. [Abb. 1]• REF 73010 – Standardpackung• REF 73015 – Nachfüller Flüssigkeit, 115 ml• REF 73020 – Nachfüller Pulver, 120 g
1.2 ZusammensetzungPulver: Polyethylmethacrylat-Kunststoff, Titan-DioxidFlüssigkeit: Butyl-Benzyl-Phthalat, Ethanol, Aceton
1.3 Indikationen• Gewebekonditionierendes Material, das hilft, die Symptome von
Prothesen-Stomatitis aufgrund von schlecht sitzenden oder älterenherausnehmbaren Prothesen zu reduzieren.
• Funktionelles Abformmaterial zum Unterfüttern bestehender Prothesenoder zur Herstellung neuer Prothesen mit der Branching-Technik.
• Provisorisches weiches Unterfütterungsmaterial.• Weiches Unterfütterungsmaterial für sofortige Prothesen, provisorische
Teilprothesen und nach Implantationen oder anderen Operationen.
1.4 KlassifizierungISO 10139-1 kurzfristig – Typ B Klasse 2 plastiziertes Acryl. DasHydro-Cast-Material ist für die kurzfristige Verwendung beiherausnehmbaren Prothesen konzipiert.
2. SICHERHEITSINFORMATIONEN2.1 Warnhinweise• Kontakt des angemischten Materials oder der ungemischten
Komponenten mit den Augen vermeiden, um Reizungen zu verhindern.Im Fall von Augenkontakt mit Wasser ausspülen und sofort ärztlicheHilfe in Anspruch nehmen.
• Einnahme oder Verschlucken des angemischten Materials oder derungemischten Komponenten vermeiden. Bei unbeabsichtigtemVerschlucken sofort ärztliche Hilfe in Anspruch nehmen.
• Übermäßigen Hautkontakt vermeiden und während des Umgangs mitdem Material Nitrilhandschuhe tragen.
• Das Hydro-Cast-Material nicht als permanentes weichesUnterfütterungsmaterial für Prothesen verwenden.
2.2 Vorsichtsmaßnahmen• Das Hydro-Cast-Material darf nicht bei Patienten mit einer bekannten
Überempfindlichkeit oder Allergie gegen Methacrylate oder einen deranderen Bestandteile des Materials verwendet werden.
• Alle in der Gebrauchsanweisung beschriebenen Anweisungen undIndikationen müssen befolgt werden.
• Beim Anmischen und dem Umgang mit dem Material einenAugenschutz und Nitrilhandschuhe tragen.
2.3 Unerwünschte Wirkungen• Kontaktallergie: Die Verwendung dieses Materials bei Personen mit
bekannter Überempfindlichkeit oder Allergien gegen Methacrylate,Phthalate oder andere Bestandteile des Produkts vermeiden.
• Schwere Augenreizungen: Der flüssige Bestandteil enthält Ethanol undAceton, welche die Augen stark reizen. Jeglichen Augenkontaktvermeiden und beim Umgang mit dem Material eine Schutzbrille tragen.
2.4 Lagerung• Die Kappe auf der flüssigen Komponente unmittelbar nach Gebrauch
wieder aufsetzen.• Vor direkter Sonneneinstrahlung schützen und trocken aufbewahren.
Bei Temperaturen von 5 °C bis 27 °C aufbewahren.• Die Haltbarkeit bei diesen Bedingungen beträgt 3 Jahre ab
Herstellungsdatum.
3. ANWEISUNGEN FÜR DIE VERWENDUNG3.1 Anmischen1. Gleiche Mengen an Pulver und Flüssigkeit in die mitgelieferten
Messbecher ausgießen. Die flüssige Komponente in das Mischglasgeben. Zum Anmischen dürfen keine Pappbecher verwendet werden.
2. Das Pulver der Flüssigkeit hinzufügen und die beiden Komponentenzügig (5 Sekunden) mit einem kleinen Spatel vermischen. DenMischbehälter mit Plastikfolie oder einem Glasdeckel abdecken unddie Mischung 5 bis 7 Minuten lang abgedeckt bei Zimmertemperaturstehen lassen. Ständiges Rühren mit dem Spatel wird nichtempfohlen. [Abb. 2, 3, 4]
3. Nach 5 bis 7 Minuten die Mischung aufdecken und die Konsistenzprüfen. Eine angemessene Verarbeitungskonsistenz wird dadurchangezeigt, dass das Kunststoffgel auf einen Spatel aufgerollt werdenkann. Das Material ist sehr weich und etwas fließend, was aber nichtübermäßig ausgeprägt ist. Wenn eine etwas dickere Konsistenzgewünscht ist, das Material länger stehen lassen. [Abb. 5] Es wird
empfohlen, mit einer 1:1-Mischung nach Volumen von Pulver undFlüssigkeit zu beginnen und diese Mischung vor der Verwendungabgedeckt 5 bis 7 Minuten lang stehen zu lassen. Dies schafft eine guteKombination aus Gewebekonditionierung und Fließfähigkeit für diefunktionelle Abformung. Jedoch kann ein Pulver-Flüssigkeits-Verhältnisvon 11⁄4 Teilen Pulver zu 1 Teil Flüssigkeit verwendet werden, wenn eineetwas dickere Konsistenz für Unterkieferprothesen, Freiend-Sattel-Teilprothesen und die Hinzufügung zu Prothesenrändern gewünscht ist.
4. Für Unterfütterungsabformungen, Gewebekonditionierung oderweiche Unterfütterung kann das Material direkt auf eine bestehendeProthese aufgetragen werden. Alternativ kann das Material mit einemUnterfütterungs-Jig auf die Prothese aufgetragen werden, wennmehrere Veränderungen des Materials erwartet werden (etwa bei einerSofortprothese) oder wenn die Branching-Technik angewandt wird.
3.2 Direkte Platzierung des Hydro-Cast-Materials1. Die Gewebeoberfläche der Prothese gründlich waschen und trocknen.2. Mit einem Karbidfräser in einem Handstück jegliche großen
Unterschnitte leicht abschwächen. Die Ränder der Prothese nichtabnehmen und auch auf der Innenseite der Prothese allgemein keinMaterial abnehmen.
3. Da das Hydro-Cast-Material sehr klebrig ist, die Bereiche, die nicht mitHydro-Cast-Material bedeckt werden, mit einem wasserlöslichenSchmiermittel benetzen.
4. Zuerst die Oberkieferprothese bearbeiten und einen Tropfen desangemischten Hydro-Cast-Materials auf dem residualen Gratbereichder Prothese platzieren. Mit einem Spatel das Material auf demGaumen und dem labialen Flanschbereich der Prothese verteilen. DieProthese vorsichtig in den Patientenmund einsetzen und denPatienten den Kiefer sehr sanft bis zur maximalen Interkuspidation aufdie Gegenprothese drücken lassen. Den Patienten anweisen, diesePosition 2 bis 3 Minuten lang zu halten. [Abb. 6]
5. Die Prothese aus dem Patientenmund entnehmen und überschüssigesMaterial mit einem erwärmten Skalpell oder elektrischem Schneiderentfernen. Die Oberkieferprothese wieder in den Patientenmund einsetzenund den Vorgang mit der Unterkieferprothese wiederholen. [Abb. 7]
6. Sobald beide Prothesen unterfüttert und im Patientenmund platziertwurden, muss die okklusale Beziehung der Prothesen in zentrischerRelation geprüft werden. Die Prothesen wieder in den Patientenmundeinsetzen und den Patienten bitten, sich 2 bis 3 Minuten lang miteinem Mitarbeiter zu unterhalten oder laut etwas vorzulesen. Dieaggressive okklusale Anpassung muss verzögert werden, bis dasHydro-Cast-Material zur Stabilisierung der Prothese bis an diefunktionalen Ränder geflossen ist (dies ist meist bei der erstenNachuntersuchung der Fall). Wir empfehlen, bei der Prüfung derokklusalen Beziehung ein okklusales Indikatorwachs zu verwenden.
3.3 Nachuntersuchungen1. Die Prothesen aus dem Patientenmund entnehmen und unter
fließendem Wasser abspülen. Die Gewebeoberflächen der Prothesenauf Überextensionen, Unterextensionen und Druckstellen untersuchen.• Überextensionen und Druckstellen sind als hartes
Prothesen-Basismaterial durch den weißen Hydro-Cast-Kunststoffzu sehen. Hinweis: Typische Druckstellen sind schwarz inAbbildung 8 zu sehen. Diese werden mit einem Karbidfräserausgeglichen und mit frisch angemischtem Hydro-Cast-Material aufdem Defekt repariert.
• Unterextensionen sind als ungestützte Bereiche vonGewebebehandlungsmaterial mit einer Länge von mehr als 3 bis 4mm zu sehen. Diese Bereiche müssen für Unterstützung mitautopolymerisierendem Acrylkunstoff „aufgefüllt“ werden.
• Zum Erhalt der Oberfläche kann ein Tropfen Regenerator mit einerBürste oder einem behandschuhten Finger auf die aufgefülltenBereiche aufgetragen werden.
2. Bei jeder Nachuntersuchung muss eine okklusale Bewertungdurchgeführt werden. Das Hydro-Cast-Material stabilisiert dieProthese und vereinfacht okklusale Bewertungen.
3. Die Konsistenz und Farbe des prothesentragenden Gewebes beimPatienten muss bei jedem Termin kontrolliert werden. Bei Patienten mitextrem entzündetem Gewebe muss das Hydro-Cast-Material eventuellwährend der Heilung gewechselt werden.
4. Einen weiteren Nachuntersuchungstermin innerhalb von 24 bis 48Stunden nach dem ersten Nac huntersuchungstermin planen. Beimzweiten und den weiteren Nachuntersuchungsterminen die Bewertungder Abformungsoberfläche, des Oralgewebes und der okklusalenBeziehung wiederholen. Sobald alle 3 Bereiche für den Patienten undden Zahnarzt zufriedenstellend sind, kann die Prothese zurUnterfütterung oder Anpassung an ein Labor gesendet werden. [Abb. 9]
3.4 Verarbeitung der abgeschlossenen Abformung• Die endgültige Abformung kann durch Unterfüttern oder Anpassen in
hartem Acryl verarbeitet werden. In jedem Fall muss eine präziseVerarbeitungsmethode zum Einsatz kommen, sodass die Genauigkeitder Abformung erhalten bleibt.
• Die endgültige Abformung muss in Gips verpackt und das Modell soschnell wie möglich nach der Entnahme aus dem Mund in Gips desTyps III gegossen werden, damit die Genauigkeit erhalten bleibt.
4. DESINFEKTIONDie fertige Abformung muss mit einem Krankenhaus-Desinfektionsmittelauf Wasserbasis und gemäß der örtlichen, regionalen oder nationalenEmpfehlungen und Richtlinien desinfiziert werden.
5. WARTUNGNach 1 Tag im Mund können mit Hydro-Cast-Material behandelte Prothesendurch vorsichtiges Bürsten mit einer weichen Bürste und klarem Wassergereinigt werden. Keine handelsüblichen chemischen Reinigungsmittelverwenden. Die Prothese nicht in Reinigungslösungen tauchen.
Hydro-Cast® materiale per il trattamento dei tessuti e per impronte funzionaliISTRUZIONI PER L’USO – ITALIANO
Esclusivamente per uso odontoiatrico.
1. DESCRIZIONE DEL PRODOTTOIl materiale per il trattamento dei tessuti e per impronte funzionaliHydro-Cast® è una resina a base di polietilmetacrilato per ilcondizionamento dei tessuti, per ribasature morbide e per improntefunzionali.
I tessuti della bocca edentula rispondono alle sollecitazioni delle protesinon ben adattate, che possono provocare dolore, infiammazione,gonfiore e dislocazione dei tessuti molli (stomatite da protesi).Clinicamente questa condizione è dolorosa per il paziente e ritarda larealizzazione di nuove protesi. Hydro-Cast favorisce la riduzione deisintomi clinici della stomatite da protesi. Con un processo noto come“sollecitazione di adattamento dinamico”, Hydro-Cast registraun’impronta funzionale dinamica della superficie dei tessuti edentulimentre questi ritornano alla normalità.
1.1 ConfezionamentoHydro-Cast viene fornito in una confezione standard contenente 1flacone di polvere (120 g), 1 flacone di liquido (115 mL), 1 flacone di FlowReplenisher (5 mL), 2 misurini, 1 bicchierino in vetro per miscelazione. Lapolvere e il liquido sono disponibili come refill singoli. [Fig. 1]• REF 73010 – Confezione standard• REF 73015 – Refill liquido, 115 mL• REF 73020 – Refill polvere, 120 g
1.2 ComposizionePolvere: resina polietilmetacrilato, biossido di titanioLiquido: butil benzil ftalato, etanolo, acetone
1.3 Indicazioni• Materiale per il condizionamento dei tessuti atta a favorire la riduzione
dei sintomi di stomatiti dovute a protesi rimovibili vecchie o non benadattate.
• Materiale per impronte funzionali per l’uso nella ribasatura di protesiesistenti o nella realizzazione di nuove protesi utilizzando la tecnica“branching”.
• Ribasatura morbida provvisoria di protesi.• Ribasatura morbida per l’uso con protesi immediate, provvisori parziali
e dopo impianti o altri interventi chirurgici.
1.4 ClassificazioneISO 10139-1 Resine acriliche plastificate per l’utilizzo a breve termine –Tipo B Classe 2. Hydro-Cast è un materiale per l’utilizzo a breve terminein protesi dentali rimovibili.
2. INFORMAZIONI DI SICUREZZA2.1 Avvertenze• Evitare il contatto del materiale miscelato o dei componenti non
miscelati con gli occhi per prevenire irritazioni. In caso di contatto congli occhi, sciacquare con acqua e consultare immediatamente unmedico.
• Non ingerire o inghiottire il materiale miscelato o i componenti nonmiscelati. In caso di ingestione accidentale, consultareimmediatamente un medico.
• Evitare un contatto eccessivo con la cute e indossare guanti di nitriledurante la manipolazione.
• Non usare Hydro-Cast come materiale per ribasatura morbidapermanente.
2.2 Precauzioni• Non usare Hydro-Cast in pazienti con sensibilità o allergia nota ai
metacrilati o a qualsiasi componente del materiale.• Seguire tutte le istruzioni e le indicazioni riportate nelle istruzioni per
l’uso.• Durante la miscelazione e la manipolazione del materiale indossare
occhiali protettivi e guanti di nitrile.
2.3 Reazioni indesiderate• Allergia da contatto: non usare questo materiale su qualsiasi soggetto
con sensibilità o allergia nota ai metacrilati, agli ftalati o agli altricomponenti del prodotto.
• Grave irritazione oculare: il componente liquido contiene etanolo eacetone, che sono gravemente irritanti per gli occhi. Evitare qualsiasicontatto con gli occhi e indossare occhiali di sicurezza quando simanipola il materiale.
2.4 Conservazione• Chiudere il flacone del componente liquido immediatamente dopo
l’uso.• Tenere lontano dalla luce solare diretta e mantenere all’asciutto.
Conservare a temperature comprese tra 5 e 27 °C.• In queste condizioni la validità è di 3 anni dalla data di produzione.
3. ISTRUZIONI PER L’USO3.1 Miscelazione1. Erogare un volume equivalente di polvere e liquido nei misurini forniti
con il kit. Versare il componente liquido nel bicchierino permiscelazione. Non usare contenitori di carta per la miscelazione.
2. Aggiungere la polvere al liquido e mescolare i due componentirapidamente (per 5 secondi) servendosi di una spatolina. Coprire ilcontenitore di miscelazione con pellicola trasparente o una piastra divetro e lasciare riposare il composto a temperatura ambiente per 5-7minuti. È sconsigliato continuare a spatolare. [Fig. 2, 3, 4]
3. Trascorsi i 5-7 minuti, scoprire il composto e controllare laconsistenza. Una consistenza appropriata per la lavorazione consentedi avvolgere il gel di resina sulla spatola. Il materiale risulterà assai
molle e piuttosto fluido, ma non eccessivamente liquido. Se sidesidera una consistenza leggermente più solida, lasciare che ilmateriale indurisca più a lungo. [Fig. 5] Si consiglia di iniziare con unmiscela di polvere e liquido in rapporto 1:1 in volume, lasciandocoperto per 5-7 minuti prima dell’applicazione. In questo modo siottiene una buona combinazione di condizionamento dei tessuti escorrevolezza per l’impronta funzionale. Tuttavia è possibile usare unrapporto fino a 1,25 parti di polvere per 1 parte di liquido, se sidesidera una consistenza leggermente più solida per protesi inferiori,selle libere e aggiunte ai bordi della protesi.
4. Per le impronte da ribasatura, per il condizionamento dei tessuti o laribasatura morbida il materiale può essere applicato direttamente suuna protesi esistente. In alternativa il materiale può essere applicatoalla protesi in uno stampo per ribasatura, se si prevedono numerosesostituzioni del materiale (come nel caso di una protesi immediata) ose si segue la tecnica branching.
3.2 Applicazione diretta di Hydro-Cast1. Lavare accuratamente e asciugare la superficie tissutale della protesi.2. Con una fresa al carburo di tungsteno montata su un manipolo,
scaricare leggermente eventuali sottosquadri accentuati. Non ridurre ibordi della protesi e in generale non ridurre l’interno della protesi.
3. Data la natura molto viscosa di Hydro-Cast, applicare un lubrificanteidrosolubile sulle aree che non devono essere coperte da Hydro-Cast.
4. Iniziare dalla protesi superiore e applicare una piccola quantità diHydro-Cast nella zona della cresta residua. Con una spatola spalmareil materiale sulle aree del palato e della flangia labiale. Inserire concautela la protesi nel cavo orale del paziente e istruire il paziente achiudere la bocca molto delicatamente premendo contro l’arcataantagonista in modo da raggiungere la massima intercuspidazione. Ilpaziente deve mantenere questa posizione per 2-3 minuti. [Fig. 6]
5. Rimuovere la protesi dal cavo orale e tagliare il materiale in eccessocon un bisturi riscaldato o uno strumento elettrico. Riposizionare laprotesi superiore nel cavo orale del paziente e ripetere la proceduracon la protesi inferiore. [Fig. 7]
6. Dopo aver ribasato e inserito nel cavo orale entrambe le protesi,controllare la relazione occlusale delle protesi in relazione centrica.Riposizionare le protesi nel cavo orale e invitare il paziente a parlarecon un membro del team o a leggere ad alta voce per 2-3 minuti.Prima di effettuare aggiustamenti occlusali attendere che Hydro-Castabbia raggiunto i bordi funzionali per stabilizzare le protesi (solitamentealla prima visita di controllo). Si consiglia di utilizzare una strisciaindicatrice in cera per controllare le relazioni occlusali.
3.3 Visite di controllo1. Rimuovere le protesi dal cavo orale e sciacquarle in acqua corrente.
Esaminare le superficie tissutali delle protesi per individuare eventualisporgenze o rientranze delle protesi rispetto al materiale e interferenzedei tessuti.• Le sporgenze delle protesi e le interferenze dei tessuti sono visibili
sotto forma di materiale duro della base protesica che compareattraverso la resina bianca Hydro-Cast. Nota: le tipiche zone diinterferenza sono evidenziate in nero nella figura 8. Tali imperfezionipossono essere eliminate con una fresa al carburo di tungsteno eriparate applicando sul difetto del nuovo materiale Hydro-Cast.
• Le rientranze della protesi sono visibili sotto forma di aree dimateriale per il trattamento dei tessuti di lunghezza superiore a 3-4mm prive di sostegno. È necessario fornire sostegno a queste areeutilizzando una resina acrilica autopolimerizzante.
• Per favorire il mantenimento della superficie, sulle zone riparate sipuò applicare una goccia di Flow Replenisher con un pennello o undito inguantato.
2. A ogni visita di controllo è opportuno valutare l’occlusione. Hydro-Caststabilizza la protesi, agevolando le valutazioni occlusali.
3. Verificare la consistenza e il colore dei tessuti di supporto della protesia ogni visita di controllo. Nel caso di pazienti con tessutiestremamente infiammati, può essere necessario sostituire il materialeHydro-Cast appena si verifica la guarigione dei tessuti.
4. Fissare un appuntamento aggiuntivo entro 24-48 ore dalla prima visitadi controllo. Alla seconda visita di controllo e in tutte le visitesuccessive, ripetere la valutazione della superficie d’impronta, deitessuti orali e delle relazioni occlusali. Quando queste 3 aree di analisirisultano tutte soddisfacenti sia per il paziente che per il dentista, laprotesi può essere inviata al laboratorio per la ribasatura parziale ototale. [Fig. 9]
3.4 Utilizzo dell’impronta completata• L’impronta finale può essere utilizzata per la ribasatura totale o parziale
in resina acrilica dura. In ogni caso è necessario applicare un metodo dilavorazione di precisione per mantenere l’accuratezza dell’impronta.
• Dopo la rimozione dal cavo orale, boxare l’impronta finale in gessotenero e colare il modello in gesso di tipo 3 al più presto possibile permantenere la precisione.
4. DISINFEZIONELe impronte finali devono essere disinfettate con un disinfettante di tipoospedaliero a base di acqua secondo le disposizioni nazionali o locali.
5. MANUTENZIONEDopo 1 giorno di permanenza nel cavo orale, le protesi trattate con ilmateriale Hydro-Cast possono essere pulite spazzolando delicatamentecon uno spazzolino a setole morbide e acqua pulita. Non usaredetergenti chimici disponibili in commercio. Non immergere la protesi insoluzioni detergenti.