hyperion financial data quality management install guide€¦ · · 2007-08-23data folder...
TRANSCRIPT

H Y P E R I O N ® F I N A N C I A L D A T A Q U A L I T YM A N A G E M E N T
R E L E A S E 9 . 3 . 1
I N S T A L L A T I O N G U I D E
FDM Installation Guide, 9.3.1
Copyright © 1989, 2007, Oracle and/or its affiliates. All rights reserved.
Authors: John Billinger
The Programs (which include both the software and documentation) contain proprietary information; they are providedunder a license agreement containing restrictions on use and disclosure and are also protected by copyright, patent, andother intellectual and industrial property laws. Reverse engineering, disassembly, or decompilation of the Programs, exceptto the extent required to obtain interoperability with other independently created software or as specified by law, isprohibited.
The information contained in this document is subject to change without notice. If you find any problems in thedocumentation, please report them to us in writing. This document is not warranted to be error-free. Except as may beexpressly permitted in your license agreement for these Programs, no part of these Programs may be reproduced ortransmitted in any form or by any means, electronic or mechanical, for any purpose.
If the Programs are delivered to the United States Government or anyone licensing or using the Programs on behalf of theUnited States Government, the following notice is applicable:
U.S. GOVERNMENT RIGHTS Programs, software, databases, and related documentation and technical data delivered toU.S. Government customers are "commercial computer software" or "commercial technical data" pursuant to theapplicable Federal Acquisition Regulation and agency-specific supplemental regulations. As such, use, duplication,disclosure, modification, and adaptation of the Programs, including documentation and technical data, shall be subjectto the licensing restrictions set forth in the applicable Oracle license agreement, and, to the extent applicable, the additionalrights set forth in FAR 52.227-19, Commercial Computer Software--Restricted Rights (June 1987). Oracle USA, Inc., 500Oracle Parkway, Redwood City, CA 94065.
The Programs are not intended for use in any nuclear, aviation, mass transit, medical, or other inherently dangerousapplications. It shall be the licensee's responsibility to take all appropriate fail-safe, backup, redundancy and other measuresto ensure the safe use of such applications if the Programs are used for such purposes, and we disclaim liability for anydamages caused by such use of the Programs.
Oracle is a registered trademark of Oracle Corporation and/or its affiliates. Other names may be trademarks of theirrespective owners.
The Programs may provide links to Web sites and access to content, products, and services from third parties. Oracle isnot responsible for the availability of, or any content provided on, third-party Web sites. You bear all risks associated withthe use of such content. If you choose to purchase any products or services from a third party, the relationship is directlybetween you and the third party. Oracle is not responsible for: (a) the quality of third-party products or services; or (b)fulfilling any of the terms of the agreement with the third party, including delivery of products or services and warrantyobligations related to purchased products or services. Oracle is not responsible for any loss or damage of any sort that youmay incur from dealing with any third party.

Contents
Chapter 1. Hardware and Software Requirements ..................................................................................................... 7
Chapter 2. Configuring for Installation ...................................................................................................................... 9
Pre-Installation Configuration ..................................................................................................... 9
Web Server .............................................................................................................................. 9
Application Servers ............................................................................................................... 10
Relational Database Server ................................................................................................... 10
Load Balance Server—Required Third-Party Software ...................................................... 12
FDM Installation Configuration ................................................................................................. 12
FDM Web Server Configuration .......................................................................................... 12
FDM Application Servers Configuration ............................................................................ 12
Load Balance Server Configuration ..................................................................................... 12
FDM Workbench Client Configuration .............................................................................. 13
Creating FDM Applications ........................................................................................................ 13
Settings Specific to SQL Server ............................................................................................. 13
Settings Specific to Oracle .................................................................................................... 13
Integrating with the Target Application .............................................................................. 14
Chapter 3. Installing ................................................................................................................................................. 15
FDM Components ....................................................................................................................... 15
Web Server Components ...................................................................................................... 15
Task Manager ........................................................................................................................ 15
Application Server ................................................................................................................ 16
Load Balance Manager ......................................................................................................... 16
Workbench ............................................................................................................................ 16
FDM Architecture ........................................................................................................................ 16
Preparing for Installation ............................................................................................................ 17
Disabling Virus Scanning ..................................................................................................... 17
Uninstalling Previous Releases ............................................................................................. 17
Installing FDM ............................................................................................................................. 18
Contents iii
Chapter 4. Configuring Web Server Components ..................................................................................................... 21
Enabling ASP.NET (Windows 2003 Server Only) ..................................................................... 21
Specifying the Windows Account ............................................................................................... 21
Modifying Microsoft .NET Timeout Settings ............................................................................ 22
Chapter 5. Configuring Task Manager ...................................................................................................................... 25
Chapter 6. Configuring Application Server Components .......................................................................................... 27
Chapter 7. Configuring Load Balance Manager ....................................................................................................... 29
About Load Balance Manager ..................................................................................................... 29
Specifying the Windows Account and Adding Application Servers ......................................... 29
Adding NTLM Authentication Providers ........................................................................... 31
Adding MSAD or LDAP Authentication Providers ............................................................ 31
Adding Visual Basic Script Authentication Providers ........................................................ 34
Chapter 8. Configuring Workbench .......................................................................................................................... 37
Chapter 9. Setting Up FDM Applications ................................................................................................................. 39
Creating FDM Applications ........................................................................................................ 39
Configuring FDM for SQL Server ........................................................................................ 41
Configuring FDM for Oracle ............................................................................................... 41
Importing Standard Reports ....................................................................................................... 41
Copying Standard Templates ...................................................................................................... 42
Integration Requirements ........................................................................................................... 43
Chapter 10. Configuring Adapters ............................................................................................................................ 45
About Adapters ............................................................................................................................ 45
DLL/EXE Metadata ............................................................................................................... 45
XML Metadata ...................................................................................................................... 45
Dimensions ........................................................................................................................... 46
Actions ................................................................................................................................... 46
Machine Profile ..................................................................................................................... 46
Options .................................................................................................................................. 46
About Integration with Target Applications .............................................................................. 46
Integrating with Target Applications .......................................................................................... 47
Logging on to FDM applications ......................................................................................... 47
Importing Target System Adapters ...................................................................................... 47
Registering Adapters ............................................................................................................. 51
Adding Machine Profiles ...................................................................................................... 51
Updating DCOM Settings (Hyperion Enterprise and Essbase only) ................................. 52
iv Contents
Mapping FDM Dimensions to Target Dimensions (Hyperion Enterprise and Essbaseonly) ....................................................................................................................................... 53
Logging on FDM Applications by Using the Web Client ................................................... 55
Verifying Application Settings ............................................................................................. 55
Updating Integration Settings .............................................................................................. 56
Testing the Integration Settings ........................................................................................... 56
Copying Adapters ................................................................................................................. 58
Appendix A. System Recommendations .................................................................................................................... 59
Database Server ............................................................................................................................ 59
Recommended Hardware ..................................................................................................... 59
Database Sizing ..................................................................................................................... 59
Application Server Recommended Hardware ........................................................................... 60
Web Server ................................................................................................................................... 60
Recommended Hardware ..................................................................................................... 60
.NET Process Configuration ................................................................................................ 60
Memory Recycling ................................................................................................................ 60
Application Settings ..................................................................................................................... 61
File Sharing Ports ......................................................................................................................... 61
Firewall/DCOM Settings ............................................................................................................. 62
TCP Keep Alive Settings .............................................................................................................. 62
Contents v

vi Contents

1Hardware and Software
Requirements
See FDM Install Start Here for information regarding Oracle's Hyperion® Financial Data QualityManagement (FDM) hardware and software requirements
7

8 Hardware and Software Requirements
2Configuring for Installation
In This Chapter
Pre-Installation Configuration.......................................................................................................................................9
FDM Installation Configuration...................................................................................................................................12
Creating FDM Applications.........................................................................................................................................13
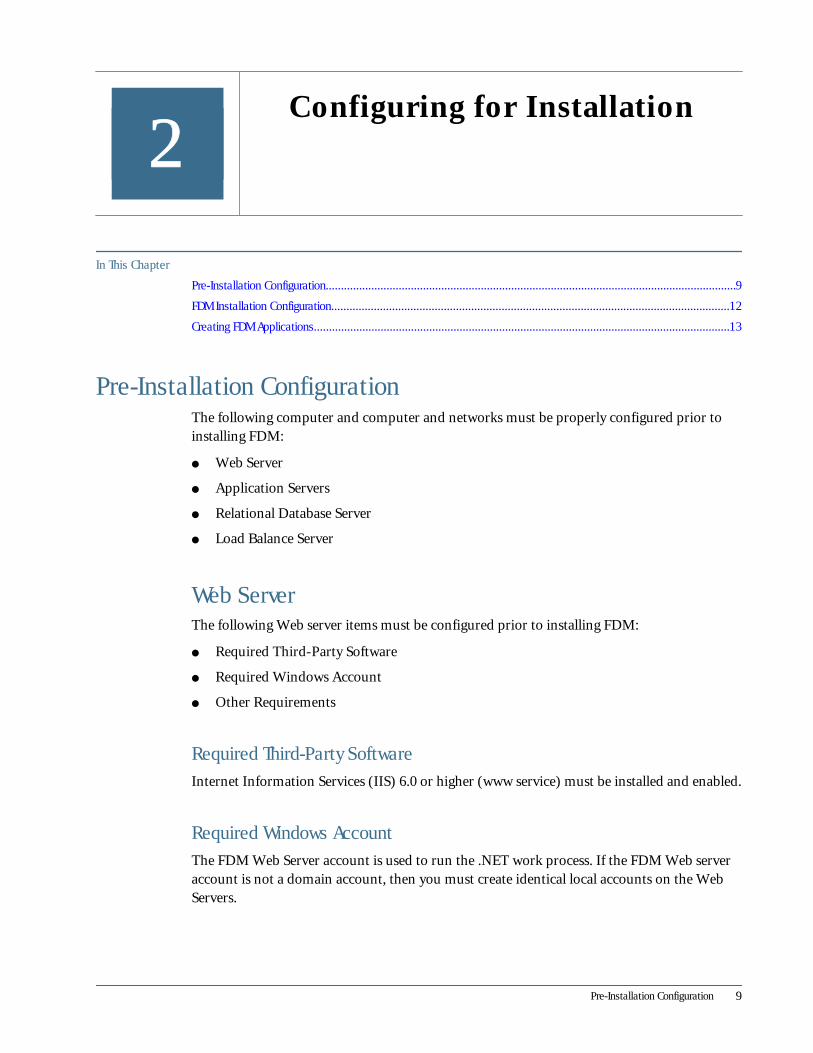
Pre-Installation ConfigurationThe following computer and computer and networks must be properly configured prior toinstalling FDM:
● Web Server
● Application Servers
● Relational Database Server
● Load Balance Server
Web ServerThe following Web server items must be configured prior to installing FDM:
● Required Third-Party Software
● Required Windows Account
● Other Requirements
Required Third-Party SoftwareInternet Information Services (IIS) 6.0 or higher (www service) must be installed and enabled.
Required Windows AccountThe FDM Web Server account is used to run the .NET work process. If the FDM Web serveraccount is not a domain account, then you must create identical local accounts on the WebServers.
Pre-Installation Configuration 9

Other RequirementsThe DCOM port 135 must be open if you are running in a DMZ environment.
Application ServersThe following items must be configured on the application servers:
● Required third-party software
● Required Windows account
Required Third-Party Software● Oracle's Hyperion® Financial Management – System 9 client, Oracle's Hyperion®
Enterprise® client, Oracle's Hyperion® Essbase® – System 9 client, or Oracle's Hyperion®Planning – System 9 client
● Oracle client (when using Oracle databases for FDM)
● Microsoft Excel 2000 or later
Required Windows AccountThe FDM Application Server account is used to launch FDM DCOM objects and FinancialManagement DCOM objects.
● Must have identical local accounts on the application servers (if the Web Server account isnot a domain account)
● Must have rights to all Financial Management DCOM objects on the Financial Managementapplication server
● Must have full access rights to FDM application folders
Relational Database ServerThe following items must be configured on the relational database server:
● Required third-party software
● Required SQL Server account (only if using SQL databases)
● Required Oracle account (only if using Oracle databases)
Required Third-Party SoftwareSQL Server 2000, SQL Server 2005, or Oracle 9i must be installed.
10 Configuring for Installation
Required SQL Server Account (only if using SQL Server databases)When accessing the SQL Server database, FDM uses the SQL Server account. FDM can useWindows Integrated Security or a specified SQL Server account.
● New FDM database accounts share SQL Server system administrator rights or databasecreator rights and bulk insert administrator rights. An account can be limited to bulk insertadministrator and db_owner rights after the database is created
● Windows accounts running MSSQL Server Windows service have read access to the FDMData folder
Required Oracle AccountFDM uses the FDM Oracle account to access the FDM Oracle database. When accessing theOracle database, FDM can use Windows Integrated Security or a specified Oracle account.
● Oracle is configured to allow connection through Windows Integrated Security. By default,the sqlnet.ora file contains the entry that enables operating system authentication.
❍ The SQLNET.AUTHENTICATION_SERVICES= (NTS) entry enables authentication bythe operating system.
❍ To create an Oracle account to connect using Windows Integrated Security, you mustknow the value of the os_authent_prefix parameter. Oracle uses the parameter toauthenticate external users. The value of the parameter is prefixed to the operatingsystem user name.
❍ Usually, the default value for the os_authent_prefix parameter is OPS$. If the valueis OPS$, the Oracle account is formatted as OPS$hostname\username, wherehostname is the machine name or domain name and username is the Windows username.
● New FDM database accounts are granted the DBA role or granted the following systemprivileges:
❍ Create Procedure
❍ Create Sequence
❍ Create Session
❍ Create Table
❍ Create Trigger
❍ Create View
● The default tablespace for the FDM Oracle account, which is Users, has unlimited quotaon the Users tablespace. If you want to ensure users do not exceed a space-used thresholdor if you have questions about the appropriate value for the quota, consult with your databaseadministrator.
Pre-Installation Configuration 11
Load Balance Server—Required Third-Party SoftwareOracle Client (when using a FDM Oracle database) must be installed.
FDM Installation ConfigurationThe following must be configured after installing FDM:
● Web Server
● Application Server
● Load Balance Server
● Workbench Client
FDM Web Server Configuration● The FDM Web server account that is specified in the pre-installation checklist is entered in
Web Config Manager
● The server that runs FDM Load Balance Manager (installed on one of the FDM applicationservers) is specified on the Load Balance Servers tab
FDM Application Servers Configuration● The integration adapter is downloaded and copied to the FDM Shared Components folder
(example: \\Hyperion\FDM\Shared Components)
● The FDM Application Server account that is specified during pre-installation is entered inApplication Server Config Manager. The FDM Application Server and Web Server accountsmust be the same
● The adapter that was copied to the FDM application server is registered (use the RegisterAdapter option from within FDM Workbench)
Load Balance Server ConfigurationThis applies to the Load Balance Manager (install on an FDM application server), and theoptional backup Load Balance Manager (install on another FDM application server).
● The FDM Application Server account that is specified during pre-installation (same accountas the FDM Web Server account) is entered in Load Balance Config Manager
● The FDM Application Servers in which Application Server Component was installed areadded in the Application Servers tab
● All authentication providers that FDM uses when authenticating user are added andconfigured in the Authentication Providers tab
12 Configuring for Installation
FDM Workbench Client ConfigurationThe Workbench is installed on any PC or on the Load Balance Server using a remote session.
● The Load Balance server group, default load balance servers, and backup load balance servers(optional) are added (using Workbench client)
● The adapter is registered on the PC. Use File > Register Adapter from Workbench aftercreating the new application or manually register the adapter by using the Regsvr 32command without creating a FDM application
Creating FDM Applications
➤ To create FDM applications:
1 Open the Web browser, and enter the following URL:
http://<WebServerName>/HyperionFDM.
You can also create a FDM applications by launching the FDM Workbench.
2 Select <New Application> and enter a valid authenticated user account.
This account is the default FDM Power (administrator) account.
3 In the General tab, enter the new FDM application name and path to the FDM application.
Settings Specific to SQL ServerIn the Database tab, enter the database server name and the name for the new SQL Serverdatabase.
● If you do not select Use Integrated Security, specify the FDM SQL Server account specifiedduring pre-installation.
● When you access FDM from the Web, select Use Integrated Security. The FDM ApplicationServer account is used to log on to the SQL Server database. When you access FDM fromWorkbench, the logon name used to log on to Workbench is used to log on to the SQL Serverdatabase
Settings Specific to OracleIn the Database tab, select OLE DB Provider: ORACLEDB.ORACLE, enter the service namefor the new Oracle connection.
● If you do not select Use Integrated Security, specify the FDM Oracle User/Schema specifiedin pre-installation
● When you access FDM from the Web, select Use Integrated Security. The FDM ApplicationServer account is used to log on to the Oracle database. When you access FDM from
Creating FDM Applications 13

Workbench, the logon name used to log on to Workbench is used to log on to the Oracledatabase
Integrating with the Target ApplicationDetailed instructions on installation and setup of integration adapters is included in Chapter 10,“Configuring Adapters”.
14 Configuring for Installation

3Installing
In This Chapter
FDM Components......................................................................................................................................................15
FDM Architecture........................................................................................................................................................16
Preparing for Installation............................................................................................................................................17
Installing FDM............................................................................................................................................................18
FDM ComponentsThe FDM installation consists of five components:
● Web Server
● Task Manager
● Application Server
● Load Balance Manager
● Workbench Client
Web Server ComponentsWeb Server components can be installed on a Web server running IIS 6.0 or higher. The Web-based interface provides access to most FDM features and can be used by end users andadministrators. On the Web server, a virtual Web directory and various FDM components areinstalled.
Task ManagerTask Manager installs a Windows service that runs scheduled tasks (FDM scripts) at specifiedintervals. Tasks can be scheduled to run repeatedly, daily, weekly, or monthly. Task Managercan be installed on any server that can access the FDM application (the Web server, theapplication server, or the data server where FDM data resides).
FDM Components 15

Application ServerThe Application Server component enables the execution of resource-intensive tasks on a serverother than the Web server, and thus can be used to limit database and file system access to aserver behind a firewall (when the Web server is in front of the firewall).
Load Balance ManagerThe Load Balance Manager component is responsible for two tasks—to load-balance the FDMapplication servers and to store the FDM application configuration. Usually, an installationplaces the Load Balance Manager component on one computer that is running the ApplicationServer component and a backup Load Balance Manager component on another applicationserver.
WorkbenchWorkbench is a Windows client application that serves as an administration and developmentenvironment. Here, you can perform common administrator tasks such as creating locations,building import formats, and creating validation and logic groups. You can also accessintegration adapters, scripts, and reports from within Workbench.
FDM ArchitectureThe following diagram depicts a frequently used architecture for FDM integrating with FinancialManagement. Use this diagram as a guideline for installing FDM components.
16 Installing

Preparing for InstallationPrior to installation, you must disable virus scanners and uninstall previous releases of FDM.
Disabling Virus ScanningDisable virus scanning on the FDM application directory and subdirectories on the data serverprior to installing FDM. The FDM application directory contains the Data, Inbox, Outbox,and Reports subdirectories.
Additionally, disable virus scanning on the FDM virtual directory and subdirectories on the Webserver. By default, the FDM virtual Web directory is installed in the following location on theWeb server:
\\Hyperion\FDM\WebServerComponents\Web Logon
Uninstalling Previous ReleasesUninstall previous releases of FDM or UpStream WebLink 8.x before installing FDM release9.3.0.
Preparing for Installation 17

➤ To uninstall previous releases:
1 Open Windows Control Panel, and select Add/Remove Programs.
2 Select Hyperion FDM 9.x.x (or WebLink 8.x.x).
3 Click Remove.
4 Reboot the computer.
Installing FDMFDM Web Server components require Microsoft .NET Framework 1.1. If the framework is notalready installed, FDM setup program installs it.
➤ To install FDM:
1 Download FDM from the Oracle E-Delivery site.
2 Open Windows Control Panel, and select Add/Remove Programs.
It is not recommended to install FDM by double-clicking Setup.exe. If the server is not runningin install mode, using this method may render FDM inoperable for other users.
3 Browse to find Setup.exe, and click Next>.
4 On the Welcome screen, click Next>.
5 On the Customer Information screen, enter the user name and organization name, and click Next>.
6 On the Destination Folder screen, click Next> to accept the default install directory.
You can install to a different folder by clicking Change. However, installing FDM in the defaultdirectory is highly recommended.
7 On the Setup Type screen, select an option:
Three options are available in the Setup Type screen: Web Server Components, Workbench,and Custom. By default, only Web Server components are installed.
18 Installing

Selecting Custom enables you to install selected components (Task Manager, Application Server,Load Balance Manager, and Workbench). See “FDM Architecture” on page 16 for assistance indetermining what components to install and where to install them.
8 Click Next>.
9 Click Next>.
10 On the Install Summary screen, review your selected options and click Next>.
11 On the Completed screen, click Finish.
Installing FDM 19

20 Installing

4Configuring Web Server
Components
In This Chapter
Enabling ASP.NET (Windows 2003 Server Only).........................................................................................................21
Specifying the Windows Account................................................................................................................................21
Modifying Microsoft .NET Timeout Settings..................................................................................................................22
This section only applies if the FDM Web Server components were installed.
Enabling ASP.NET (Windows 2003 Server Only)
➤ To enable ASP.NET:
1 From Windows Control Panel, select Add/Remove Programs.
2 Select Add/Remove Windows Components.
3 Select Application Server, and click Details.
4 Verify that ASP.NET is checked.
Specifying the Windows AccountThe FDM Web Server components use the Microsoft .NET Framework, therefore you mustspecify the Windows account under which the .NET process will run. The FDM DCOM objectsalso use this account. The permissions required for the account to run the .Net process are listedbelow. The account can be a local or domain account. The alternative to granting the permissionslisted below is to make the account a member of the local administrators group, though this isless secure. For detailed information on what access the specified Windows account requires forthe .NET Framework, refer to the following Web page:
http://msdn.microsoft.com/library/default.asp?url=/library/en-us/
dnnetsec/html/THCMCh19.asp.
If the specified account does not have administrator rights, on the Web server, the account musthave at least full control permission for the following folders and sub-folders:
● c:\Program Files\Microsoft Visual Studio .NET 2003
● c:\WINNT\Microsoft.NET
Enabling ASP.NET (Windows 2003 Server Only) 21
● c:\Program Files\Common Files\Data Dynamics\ActiveReports Pro
● c:\WINNT
The Windows account must also have full control permission on the FDM application foldersthat reside on the data server rights to the target system.
➤ To specify the Windows account:
1 From the Windows Start menu, launch Web Config Manager by selecting Programs > Hyperion > FinancialData Quality Management > Web Server Components > Web Config Manager.
2 Within the General tab of the Web Config Manager, enter the Windows account user name, password, anddomain for the .NET Web process to run under.
The account information is stored in the IIS metabase.
Note:
It is not recommended to run IIS in Isolation mode.
3 Select the Load Balance Server tab, and specify the load-balance server.
The load-balance server is the computer that stores FDM application configurations andperforms load balancing on FDM application servers. You may also specify a backup load balanceserver. If a backup is specified when you create, modify, add, or remove a FDM application, theapplication configuration file (\\Hyperion\ FDM\ Shared Components\ Config\HyperionFDMApplications.xml) is copied from the load balance server to the backup loadbalance server.
4 Restart IIS by opening a command prompt and typing IISReset.
Modifying Microsoft .NET Timeout SettingsIf a FDM process requires more than 60 minutes, the client browser session stops because theMicrosoft .NET session times out. Executing a large Hyperion consolidation or uploading andprocessing a large multi-period source file are two examples of FDM processes that may requiremore than 60 minutes. You can modify the timeout settings by modifying the Web.config fileand the Machine.config file.
On the Web server, the Web.config file is located in the following directory:
● \\Hyperion\FDM\WebServerComponents\Web site
The machine.config file is located in the following directory on the Web server:
● \\Windows\Microsoft.NET\Framework\v1.1.4322\Config
➤ To increase the timeout setting (example to change timeout setting from 60 minutes to 120minutes):
1 In the Web.config file, change “60” to “120” in the following line:
22 Configuring Web Server Components
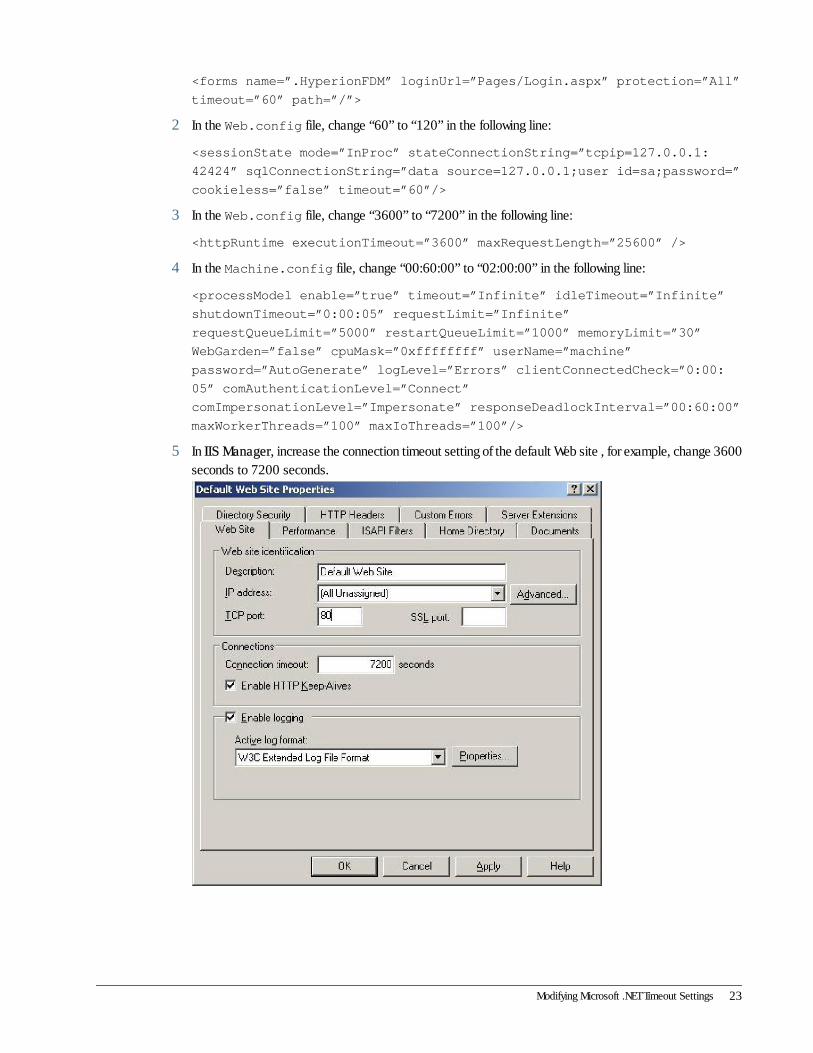
<forms name=”.HyperionFDM” loginUrl=”Pages/Login.aspx” protection=”All”
timeout=”60” path=”/”>
2 In the Web.config file, change “60” to “120” in the following line:
<sessionState mode=”InProc” stateConnectionString=”tcpip=127.0.0.1:
42424” sqlConnectionString=”data source=127.0.0.1;user id=sa;password=”
cookieless=”false” timeout=”60”/>
3 In the Web.config file, change “3600” to “7200” in the following line:
<httpRuntime executionTimeout=”3600” maxRequestLength=”25600” />
4 In the Machine.config file, change “00:60:00” to “02:00:00” in the following line:
<processModel enable=”true” timeout=”Infinite” idleTimeout=”Infinite”
shutdownTimeout=”0:00:05” requestLimit=”Infinite”
requestQueueLimit=”5000” restartQueueLimit=”1000” memoryLimit=”30”
WebGarden=”false” cpuMask=”0xffffffff” userName=”machine”
password=”AutoGenerate” logLevel=”Errors” clientConnectedCheck=”0:00:
05” comAuthenticationLevel=”Connect”
comImpersonationLevel=”Impersonate” responseDeadlockInterval=”00:60:00”
maxWorkerThreads=”100” maxIoThreads=”100”/>
5 In IIS Manager, increase the connection timeout setting of the default Web site , for example, change 3600seconds to 7200 seconds.
Modifying Microsoft .NET Timeout Settings 23

24 Configuring Web Server Components

5Configuring Task Manager
Task Manager installs a Windows service that runs scheduled tasks (FDM scripts) at specifiedintervals. Tasks can be scheduled to run repeatedly, daily, weekly, or monthly. Task Managercan be installed on any server that can access the FDM application (the Web server, theapplication server, or the data server where FDM data resides).
Task Manager consists of a Windows service and a Windows client program. You must specifythe Windows account under which the Task Manager service and the FDM DCOM objects run.The Windows account must have full control permission for the FDM application folders thatreside on the data server and rights to the target system.
➤ To configure Task Manager:
1 Launch Task Manager Configuration by selecting Start > Programs > Hyperion > Financial Data QualityManagement Task Manager > Task Manager Configuration.
2 Within the General tab of Task Manager Configuration, enter the Windows account user name, password,and domain under which the Windows service will run.
3 Click OK.
If the FDM Task Manager service is running, you must restart the service for the changes to takeeffect.
4 Select the Load Balancer Server tab, and specify the load balance server.
The load-balance server is the computer that stores the FDM application configuration andperforms load balancing on FDM application servers. You can specify a backup load balanceserver. If a backup server is specified, when you create, modify, add, or remove a FDMapplication, the application configuration file \\Hyperion\FDM\Shared Components\Config\HyperionFDMApplications.xml is copied from the load balance server to thebackup load balance server.
5 On the local machine, select Start > Programs > Administrative Tools > Local Security Policy
The Local Security Settings window is displayed. Because the Windows account is used to runa Windows service, it must have the “Login as a service” user right.
25
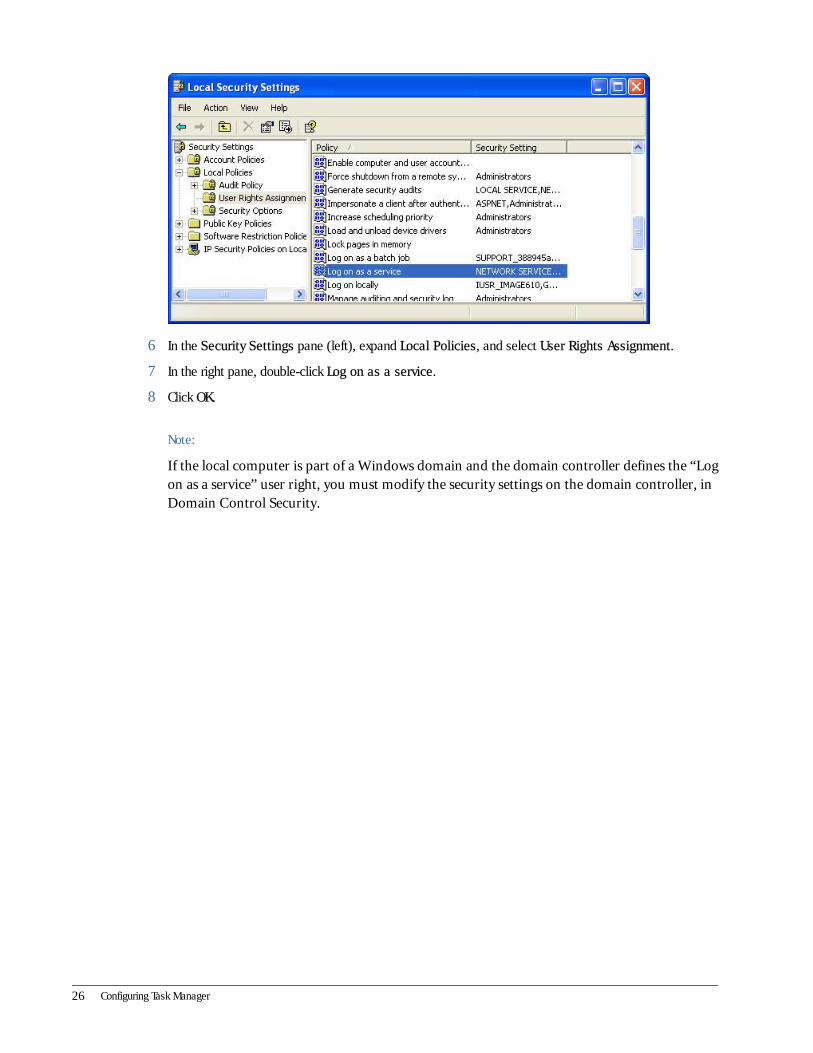
6 In the Security Settings pane (left), expand Local Policies, and select User Rights Assignment.
7 In the right pane, double-click Log on as a service.
8 Click OK.
Note:
If the local computer is part of a Windows domain and the domain controller defines the “Logon as a service” user right, you must modify the security settings on the domain controller, inDomain Control Security.
26 Configuring Task Manager
6Configuring Application Server
Components
The Application Server component enables the execution of resource-intensive tasks on a serverother than the Web server, and thus can be used to limit database and file system access to aserver behind a firewall (when the Web server is in front of the firewall).
After installing the Application Server component, you must specify the Windows account underwhich the application server DCOM objects run. The Windows account must have full controlpermission on the FDM application folders that reside on the data server and rights to the targetsystem.
➤ To configure application servers:
1 Launch Application Server Config Manager by selecting Start > Programs > Hyperion > Financial DataQuality Management > Application Server > Application Server Config Manager.
2 Enter the Windows account user name, password, and domain under which you want the application serverto run.
3 Click OK.
27

28 Configuring Application Server Components

7Configuring Load Balance
Manager
In This Chapter
About Load Balance Manager....................................................................................................................................29
Specifying the Windows Account and Adding Application Servers...............................................................................29
About Load Balance ManagerLoad Balance Manager is responsible for balancing the load on the FDM application servers andstoring the FDM application configuration. A common scenario is to install Load BalanceManager on a computer that is running the Application Server component.
Specifying the Windows Account and Adding Application ServersAfter installing Load Balance Manager, you must specify the Windows account under which theLoad Balance Manager DCOM objects run. The Windows account must have full controlpermission on the FDM application folders that reside on the data server and rights to the targetsystem.
You must also add FDM application servers and authentication providers. The configuration isstored in an xml file located at \\Hyperion\ FDM\ Shared Components\ Config\HyperionFDMLoadBalancerConfiguration.xml.
➤ To configure Load Balance Manager:
1 From the Windows Start menu, select Programs > Hyperion > Financial Data Quality Management >Load Balance Manager > Load Balance Configuration to launch the load balance configuration.
2 Select the General tab, enter the Windows account user name, password, and domain under which LoadBalance Manager will run.
3 Select the Application Servers tab, and add all servers that are running the FDM Application Servercomponent.
You can designate a server by domain name, IP address, or computer name.
About Load Balance Manager 29
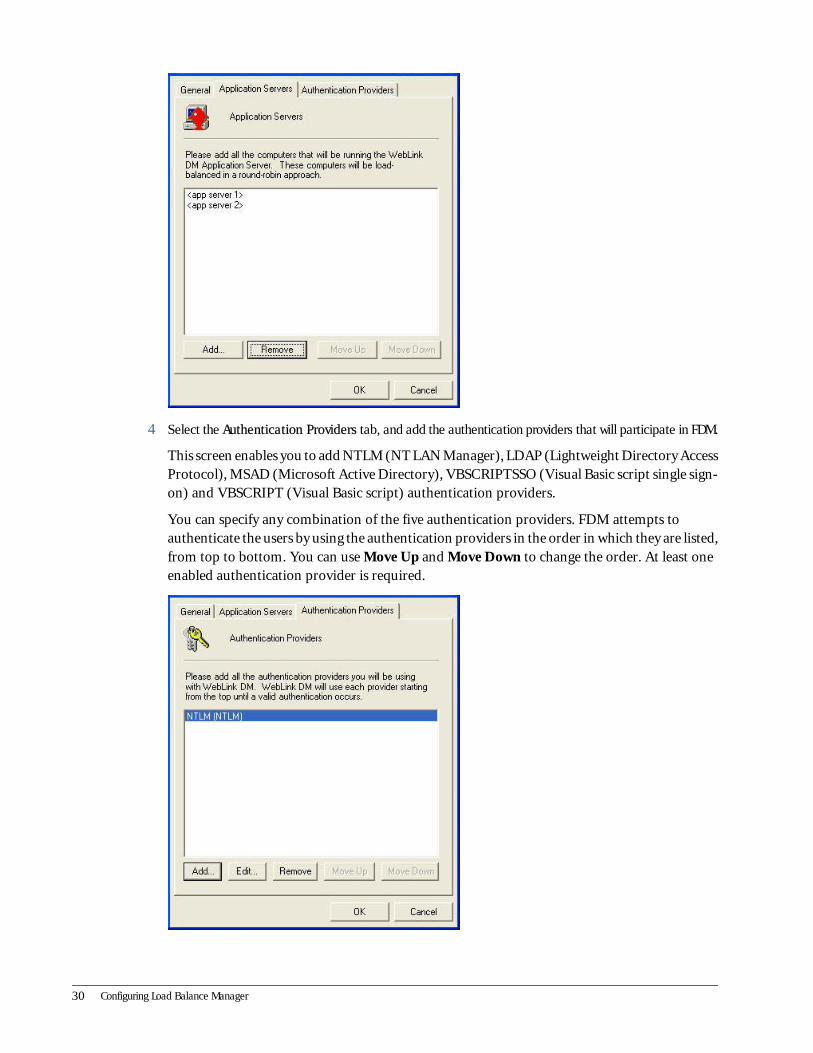
4 Select the Authentication Providers tab, and add the authentication providers that will participate in FDM.
This screen enables you to add NTLM (NT LAN Manager), LDAP (Lightweight Directory AccessProtocol), MSAD (Microsoft Active Directory), VBSCRIPTSSO (Visual Basic script single sign-on) and VBSCRIPT (Visual Basic script) authentication providers.
You can specify any combination of the five authentication providers. FDM attempts toauthenticate the users by using the authentication providers in the order in which they are listed,from top to bottom. You can use Move Up and Move Down to change the order. At least oneenabled authentication provider is required.
30 Configuring Load Balance Manager
Adding NTLM Authentication Providers
➤ To add NTLM Authentication Providers:
1 On the Authentication Providers tab, click Add.
2 Select NTLM.
3 Click OK.
The Authentication Provider dialog box is displayed.
To the right of each item there is an information icon. You can display a description of an itemby hovering the mouse over the icon associated with the item.
4 As needed, perform these actions:
● Description—Enter a description for the provider.
● App Creation Group—Specify an NT Group.
❍ Users in the group are permitted to create FDM applications. If you do not specify agroup, any valid NT account can create a FDM application.
● Enabled—Check this option to force FDM use this NTLM as an authentication provider.
❍ There must be at least one enabled authentication provider
Adding MSAD or LDAP Authentication Providers
➤ To add MSAD or LDAP authentication providers:
1 On the Authentication Providers tab, click Add.
2 Select MSAD or LDAP.
The same information is collected for both providers.
3 Click OK.
The General tab of the Authentication Provider dialog box is displayed. Hovering the mouseover an information icon (to the right of each item) prompts a description of the item to bedisplayed.
Specifying the Windows Account and Adding Application Servers 31
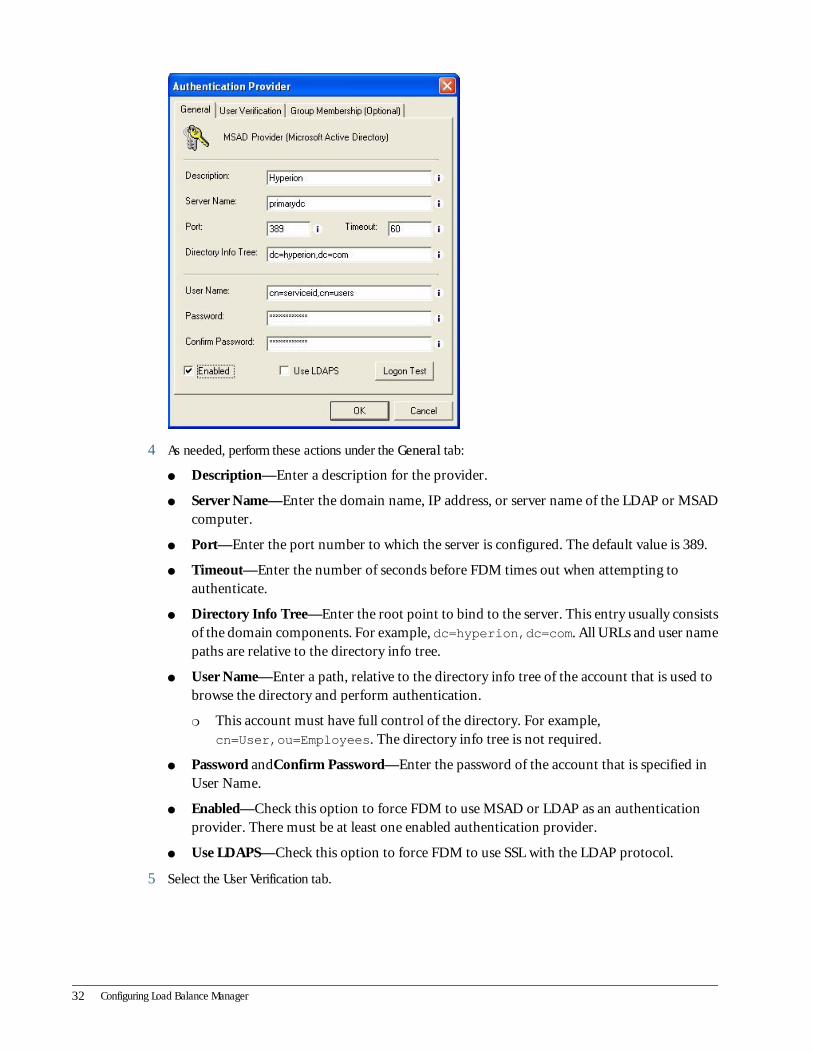
4 As needed, perform these actions under the General tab:
● Description—Enter a description for the provider.
● Server Name—Enter the domain name, IP address, or server name of the LDAP or MSADcomputer.
● Port—Enter the port number to which the server is configured. The default value is 389.
● Timeout—Enter the number of seconds before FDM times out when attempting toauthenticate.
● Directory Info Tree—Enter the root point to bind to the server. This entry usually consistsof the domain components. For example, dc=hyperion,dc=com. All URLs and user namepaths are relative to the directory info tree.
● User Name—Enter a path, relative to the directory info tree of the account that is used tobrowse the directory and perform authentication.
❍ This account must have full control of the directory. For example,cn=User,ou=Employees. The directory info tree is not required.
● Password andConfirm Password—Enter the password of the account that is specified inUser Name.
● Enabled—Check this option to force FDM to use MSAD or LDAP as an authenticationprovider. There must be at least one enabled authentication provider.
● Use LDAPS—Check this option to force FDM to use SSL with the LDAP protocol.
5 Select the User Verification tab.
32 Configuring Load Balance Manager
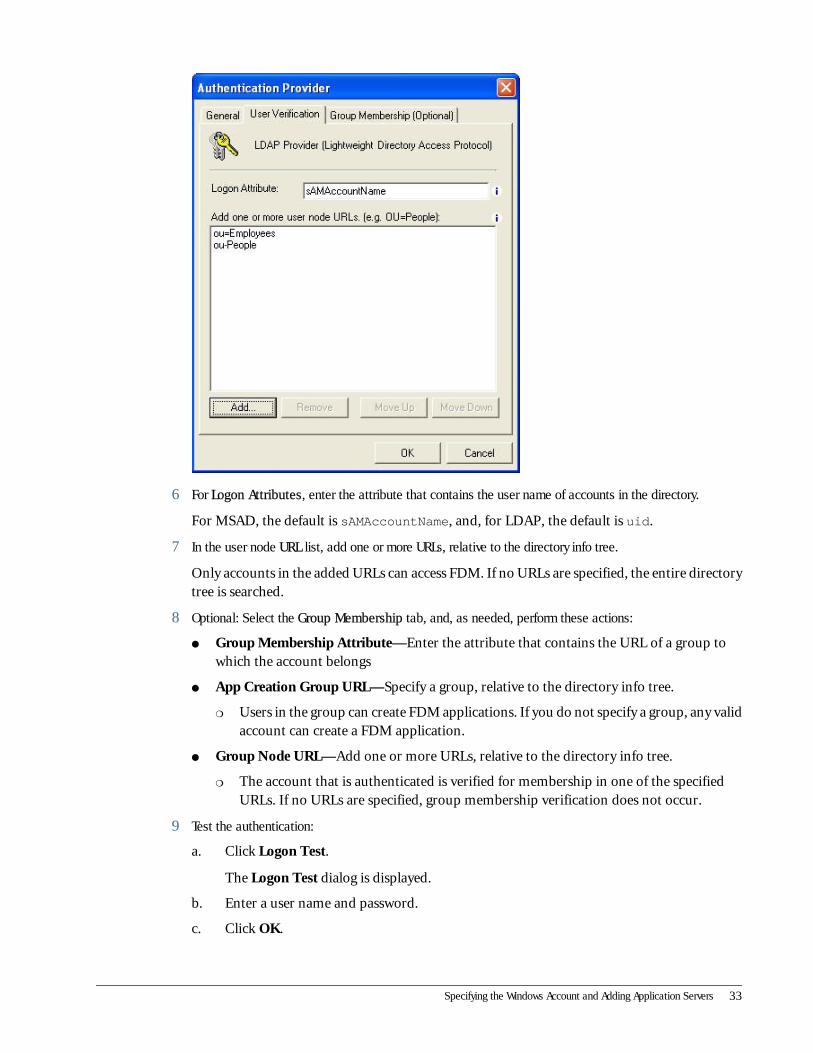
6 For Logon Attributes, enter the attribute that contains the user name of accounts in the directory.
For MSAD, the default is sAMAccountName, and, for LDAP, the default is uid.
7 In the user node URL list, add one or more URLs, relative to the directory info tree.
Only accounts in the added URLs can access FDM. If no URLs are specified, the entire directorytree is searched.
8 Optional: Select the Group Membership tab, and, as needed, perform these actions:
● Group Membership Attribute—Enter the attribute that contains the URL of a group towhich the account belongs
● App Creation Group URL—Specify a group, relative to the directory info tree.
❍ Users in the group can create FDM applications. If you do not specify a group, any validaccount can create a FDM application.
● Group Node URL—Add one or more URLs, relative to the directory info tree.
❍ The account that is authenticated is verified for membership in one of the specifiedURLs. If no URLs are specified, group membership verification does not occur.
9 Test the authentication:
a. Click Logon Test.
The Logon Test dialog is displayed.
b. Enter a user name and password.
c. Click OK.
Specifying the Windows Account and Adding Application Servers 33
Adding Visual Basic Script Authentication Providers
➤ To add Visual Basic Script authentication providers:
1 On the Authentication Providers tab, click Add.
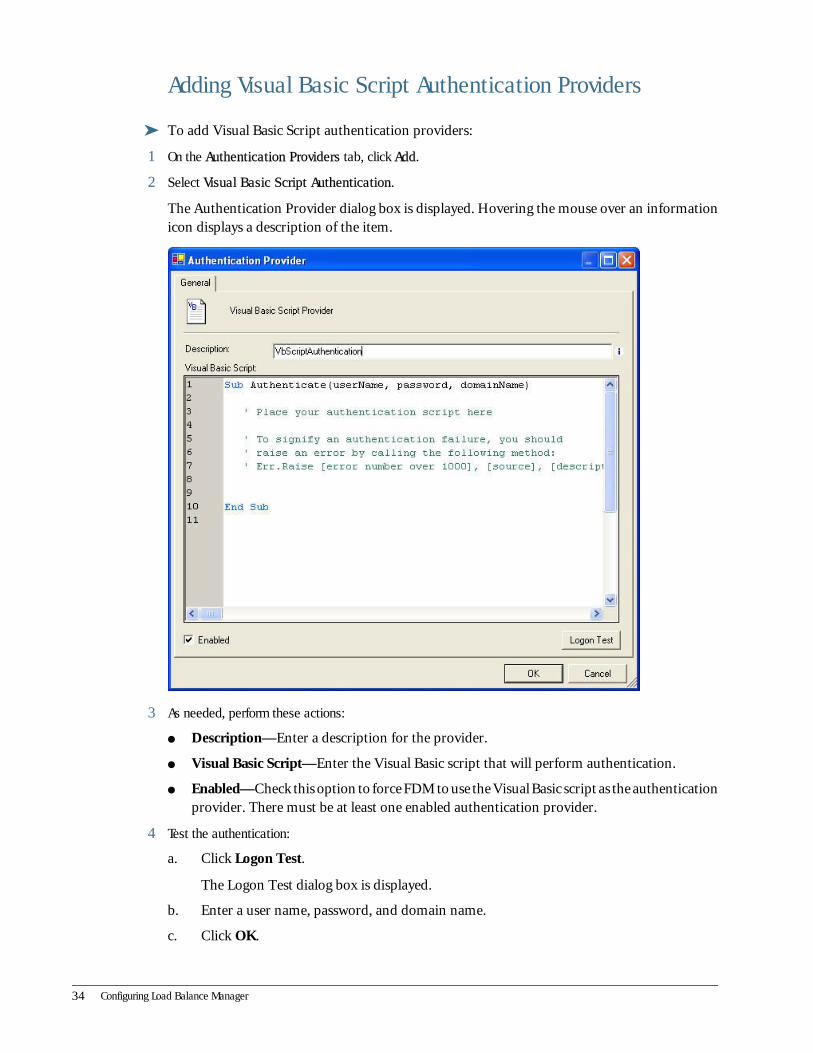
2 Select Visual Basic Script Authentication.
The Authentication Provider dialog box is displayed. Hovering the mouse over an informationicon displays a description of the item.
3 As needed, perform these actions:
● Description—Enter a description for the provider.
● Visual Basic Script—Enter the Visual Basic script that will perform authentication.
● Enabled—Check this option to force FDM to use the Visual Basic script as the authenticationprovider. There must be at least one enabled authentication provider.
4 Test the authentication:
a. Click Logon Test.
The Logon Test dialog box is displayed.
b. Enter a user name, password, and domain name.
c. Click OK.
34 Configuring Load Balance Manager

➤ To add Visual Basic script SSO authentication providers:
1 On the Authentication Providers tab, click Add.
2 Select Visual Basic Script SSO Authentication.
The following dialog box is displayed. To the right of each item is an information icon. Hoveringthe mouse over an icon displays a description of the item.
3 As needed, perform these actions:
a. Description—Enter a description for the provider.
b. Visual Basic Script—Enter the Visual Basic script that will perform single sign-onauthentication.
c. Enabled—Check this option to force FDM to use Visual Basic Script SSO as anauthentication provider.
Because SSO authentication does not apply to the FDM Workbench client, there must beat least one enabled authentication provider other than the Visual Basic script SSOauthentication.
Specifying the Windows Account and Adding Application Servers 35

36 Configuring Load Balance Manager

8Configuring Workbench
Workbench is a Windows client program that serves as an administration and developmentenvironment. It enables you to perform common administrator tasks such as creating locations,building import formats, and creating validation and logic groups. It also provides for theadministration of integration adapters, scripts, and reports.
After installing Workbench, you must specify the computer that is running FDM Load BalanceManager. This computer stores FDM application information and performs load balancing onFDM application servers.
➤ To configure Workbench:
1 Launch the Workbench client by selecting Start > Programs > Hyperion > Financial Data QualityManagement > Workbench > Workbench Client.
2 Click Add.
3 In Server Group, add Default Load Balance Server.
A domain name, IP address, or server name are all acceptable formats in which to designate the
server. You can browse for a server by clicking .
4 Optional: specify a backup load balancer server.
If a backup server is specified, when you create, modify, add, or remove a FDM application, theapplication configuration file \\Hyperion\ FDM\ Shared Components\ Config\FDMLoadBalancerGroups.xml is copied from the load balance server to the backup loadbalance server.
5 Click OK to return to the Load Balance Server Group dialog box.
6 Click Connect to attach to the selected load balance server group.
37

38 Configuring Workbench
9Setting Up FDM Applications
In This Chapter
Creating FDM Applications.........................................................................................................................................39
Importing Standard Reports.......................................................................................................................................41
Copying Standard Templates......................................................................................................................................42
Integration Requirements...........................................................................................................................................43
After the FDM software has been installed and configured, the first step is to create a new FDMapplication. The FDM application is usually created on a data server (the same server that thetarget system’s data is located).
Creating FDM Applications
➤ To create FDM applications:
1 Navigate to the FDM Logon page by typing the following URL into the browser: http:\\<WebServerName>\HyperionFDM\.
2 From Application, select <New Application> and click Logon.
3 Enter the user name, password, and domain of an account that can create FDM applications.
See “About Load Balance Manager” on page 29 for details on specifying authentication providers.The specified account is added to the FDM application as a FDM administrator.
4 On the General tab in the New Application form, enter the name, description, and path of the newapplication.
If users access the application from multiple Web and application servers, it is recommendedthat you use the UNC naming convention, to avoid problems with inconsistent drive lettermapping.
Note:
It is highly recommended to create the FDM application on the data server. When FDM importsGL data into the system, it uses a highly efficient technique that forces the SQL server processto access the GL file directly. If the FDM application path is not stored on the data server, theWindows account running the MSSQLServer Windows or Oracle service must have read accessto the FDM Inbox folder.
Creating FDM Applications 39

5 Select the Database tab, and on OLE DB Provider, select SQLOLEDB (SQL Server) orORACLEDB.ORACLE (Oracle).
6 Optional: If using Oracle, to override the default tablespace settings:
a. Click Options.
b. Select the preferred settings.
c. Click OK to return to the Database tab.
7 Click OK.
40 Setting Up FDM Applications
Configuring FDM for SQL ServerFor SQL Server setup, on the Database tab, the following fields must be completed:
● Database Server (domain name, IP address, or computer name)
● Database Name (name of the database that will be created)
● User name (database user name)
● Password (database password)
If Use Windows Integrated Security is checked, when FDM is accessed from the Web, the FDMapplication server account is used to log on to the SQL Server database. When FDM is accessedfrom Workbench, the account used to log on to Workbench is used to log on to the SQL Serverdatabase.
If Use Windows Integrated Security is not checked, you must enter a SQL Server account. Whenyou create a new FDM database, the account used to log on to the SQL Server database must bea SQL Server system administrator or have database creator rights and bulk insert administratorrights. After the database is created, the account can be limited to bulk insert administrator rightsand db_owner rights.
Configuring FDM for OracleFor Oracle setup, on the Database tab, the following fields must be completed:
● Service (Oracle service for connecting to the Oracle database)
● Database Name (name of the actual database that will be created)
● User name (database user name)
● Password (database password)
If Use Windows Integrated Security is checked, when FDM is accessed from the Web, the FDMapplication server account is used to log on to the Oracle Server database. When FDM is accessedfrom Workbench, the account used to log on to Workbench is used to log on to the Oracle Serverdatabase.
If Use Windows Integrated Security is not checked, you must enter a valid Oracle account. Whenyou create a new FDM database, the account used to log on to the Oracle database must eitherbe granted the DBA role or have the following system privileges: Create Procedure,Create Sequence, Create Session, Create Table, Create Trigger, Create
View, and Query Rewrite.
Importing Standard Reports
➤ To import standard reports:
1 From the Support section of the Oracle E-Delivery site, download the most recent release of standard reports:
Importing Standard Reports 41

● StandardReportsSQL930Active.zip—For use with SQL databases and the ActiveReports viewer
● StandardReportsOracle930Active.zip—For use with Oracle databases and theActive Reports viewer
2 Extract the file into the <application name>\templates folder.
3 From the Workbench desktop, select the Reports tab.
4 Select File > Import to open the Open Import File dialog box.
5 Locate and select the standard reports XML file and click Open.
The Import dialog box is displayed. The box contains two tabs—General and Options.
6 On the General tab, select the Reports folder.
7 On the General tab, check Save Existing Machine Profiles to disable the machine profile override, or clearSave Existing Machine Profiles to enable the machine profile override.
8 On the General tab, ensure that Remove All Report Groups is clear.
If the option is checked, existing reports are deleted before the application is updated with newreports.
9 Click OK.
The Reports directory is displayed on the Reports tab.
Copying Standard Templates
➤ To copy standard templates:
1 From the Oracle E-Delivery site, download the most recent release of standard templates
The file is named StandardTemplates.zip.
2 Extract the file into the <application name>\Templates folder.
3 Verify the templates were installed:
a. Launch the FDM Web client by using the URL http:\\<WebServerName>\HyperionFDM.
b. On the Logon page, select your application and enter a user name, password, and domain(if necessary) to log on.
Note:
The default administrator account of a new application is the user name and passwordentered to create the application.
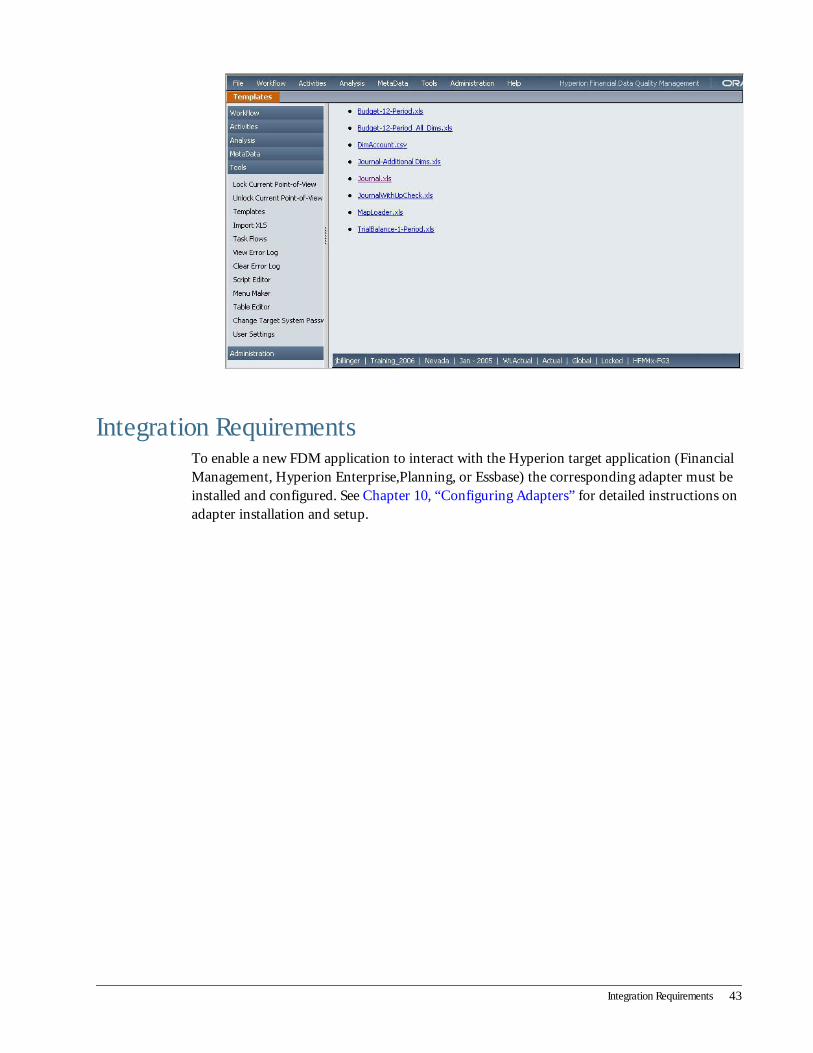
c. From the FDM desktop, select Tools > Templates.
In the right pane of the Tools screen, templates are listed as links.
42 Setting Up FDM Applications
Integration RequirementsTo enable a new FDM application to interact with the Hyperion target application (FinancialManagement, Hyperion Enterprise,Planning, or Essbase) the corresponding adapter must beinstalled and configured. See Chapter 10, “Configuring Adapters” for detailed instructions onadapter installation and setup.
Integration Requirements 43

44 Setting Up FDM Applications

10Configuring Adapters
In This Chapter
About Adapters..........................................................................................................................................................45
About Integration with Target Applications..................................................................................................................46
Integrating with Target Applications............................................................................................................................47
About AdaptersAdapters are predefined software codes that communicate with various target applications. Eachadapter is programmed to integrate one specific source (for example, SAP or SQL) or target(Essbase, Financial Management, and so on) system. Adapters are composed of two components—DLL/EXE and XML metadata. DLL/EXE files contain the system-specific instructions forinteracting with target or source systems. The XML files contain all data that relates to the currentFDM application.
DLL/EXE MetadataDLL/EXE metadata acts as a buffer between an FDM application and a target application. DLL/EXE files contain the instructions that enables FDM to communicate with specified target orsource applications (connecting to the database, loading data, extracting data, and so on). EachDLL file contains the API calls for a specific target or source application, thus enabling a FDMapplication to be flexible, to integrate with many target systems, and not to have to maintainnumerous application-specific calls within itself.
XML MetadataXML metadata acts as a second layer between an FDM application and its target applications.XML files store application setup parameters (setup options) and scripts to call API functionsand return results from target applications.
XML metadata consists of the following components:
● Dimensions
● Actions
● Machine Profile
● Options
About Adapters 45
DimensionsThe dimensions section contains all available dimension lists for the target application. Eachitem of the primary dimension section represents one available dimension and contains a scriptthat retrieves a list of all members of the dimension from the target application. The memberlists are provided to FDM. Dimensions are included only in target adapters, not in sourceadapters.
ActionsScripts interact with target applications and use adapter DLL API calls to perform such functionsas Connect, Load, ValueGet, and Export.
Machine ProfileThe machine profile contains the information required to enable FDM to determine on whichservers source and target databases are located. The machine profile also stores global logoninformation for connecting to the target application.
Note:
When Global Login is selected, FDM uses the global login user name and password to log on totarget applications. Therefore, the global login user account must have access to the targetapplication servers and security privileges within the target applications that enable FDM to loadand retrieve values to and from the target applications, regardless of the user who is logged intoFDM.
A machine profile must be configured for every computer that has FDM Application Server orFDM Task Manager installed. However, only these fields must be completed:
● Target Machine
● Source Machine
● Domain (Domain may be entered as NA if you are not using the global login ID)
OptionsThe Options section contains the default options for the FDM integration and applicationsettings for the target application. Options modified within FDM are stored in the Optionssection.
About Integration with Target ApplicationsIntegration settings are used to point FDM applications to target applications. The targetapplication is the application where data is loaded. Hyperion Enterprise, Essbase, Oracle's
46 Configuring Adapters

Hyperion® Planning – System 9, and Financial Management are examples of valid targetapplications.
One FDM application can load to an unlimited number of target applications. For example,some locations in the FDM application can load toHyperion Enterprise, while other locationsload to Financial Management. In addition, the FDM application can be configured to load tomultiple applications of one product (two or three Essbase applications, for example).
Integrating with Target ApplicationsIntegration Tasks:
1. From FDM Workbench, log on to the FDM application.
2. Import the target system adapter
3. Register the adapter
4. Add a machine profile
5. Update DCOM launching user rights (Hyperion Enterprise and Essbase only)
6. Map FDM dimensions to target dimensions (Hyperion Enterprise and Essbase only).
7. Using Web Client, log on to the FDM application.
8. Verify the application settings.
9. Update the integration settings.
10. Test the integration settings.
Note:
You must create a new FDM application before you proceed with the procedures outlined inthis chapter. See Chapter 9, “Setting Up FDM Applications” for instructions.
Logging on to FDM applications
➤ To log on FDM applications:
1 Launch FDM Workbench by selecting Programs > Hyperion > Financial Data Quality Management >Workbench > Workbench Client.
2 Log on to the application by using the same user name and password that you used to create the application.
Importing Target System Adapters
➤ To import target system adapters:
1 From the Workbench desktop, select the Adapters tab (bottom of the left pane).
2 Select File > Import to open the Open Import File dialog box.
Integrating with Target Applications 47
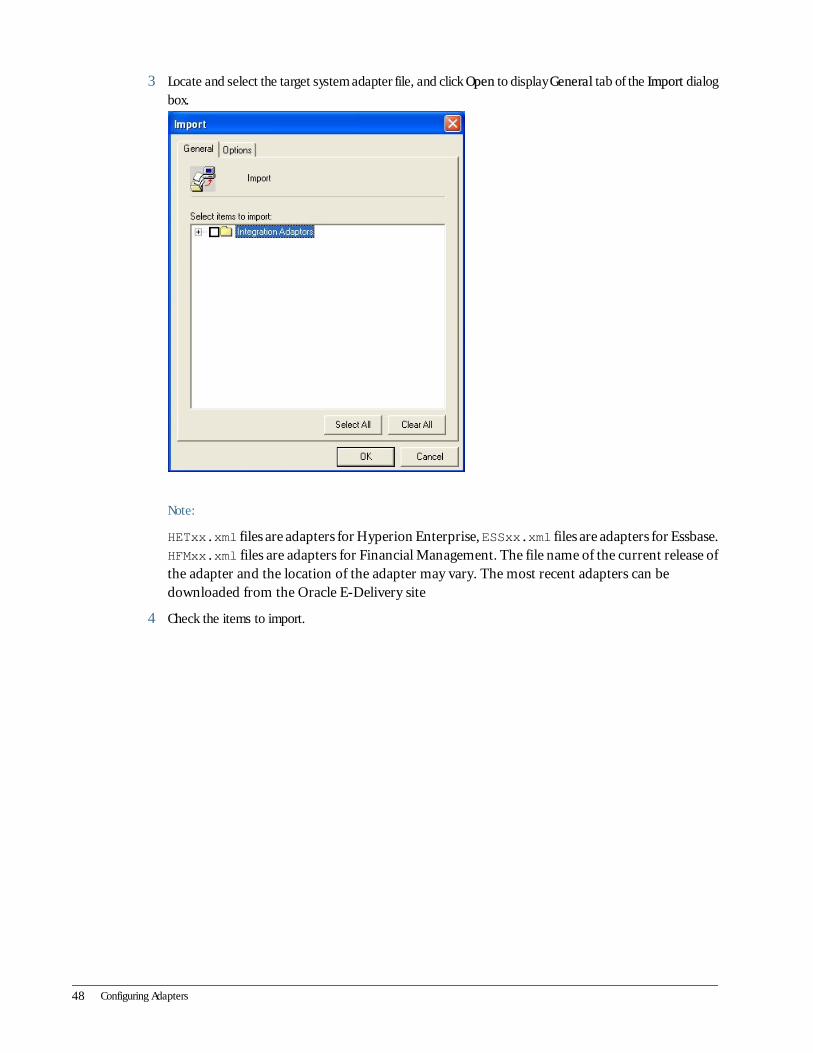
3 Locate and select the target system adapter file, and click Open to display General tab of the Import dialogbox.
Note:
HETxx.xml files are adapters for Hyperion Enterprise, ESSxx.xml files are adapters for Essbase.HFMxx.xml files are adapters for Financial Management. The file name of the current release ofthe adapter and the location of the adapter may vary. The most recent adapters can bedownloaded from the Oracle E-Delivery site
4 Check the items to import.
48 Configuring Adapters

5 Select the Options tab, and as preferred, check or clear the following options:
● Save existing machine profile—Check this option to delete all existing machine profiles.
● Remove all report groups before updating reports—Check this option to delete existingreport groups before the application is updated with new reports.
● Import maps with locations — This option has no effect when importing adapters.
Integrating with Target Applications 49

6 Click OK.
The selections are imported and displayed on the desktop under Target System Adapters.
Figure 1 Hyperion Enterprise Example
Figure 2 Essbase Example
Figure 3 Financial Management Example
50 Configuring Adapters
Registering AdaptersYou need to register an adapter only once. Therefore, for adapters that were previously registered,you can omit this procedure.
➤ To register adapters:
1 From the Workbench desktop, select File > Register Adapter.
The Register Adapter dialog box is displayed.
2 From the list, select the file (upsENxxx.exe for Hyperion Enterprise, upsFMxxx.dll for Oracle'sHyperion® Financial Management – System 9) and click Open.
Adding Machine ProfilesA machine profile must be created for every computer on which the FDM Web servercomponents, FDM Application Server, or FDM Task Manager are installed.
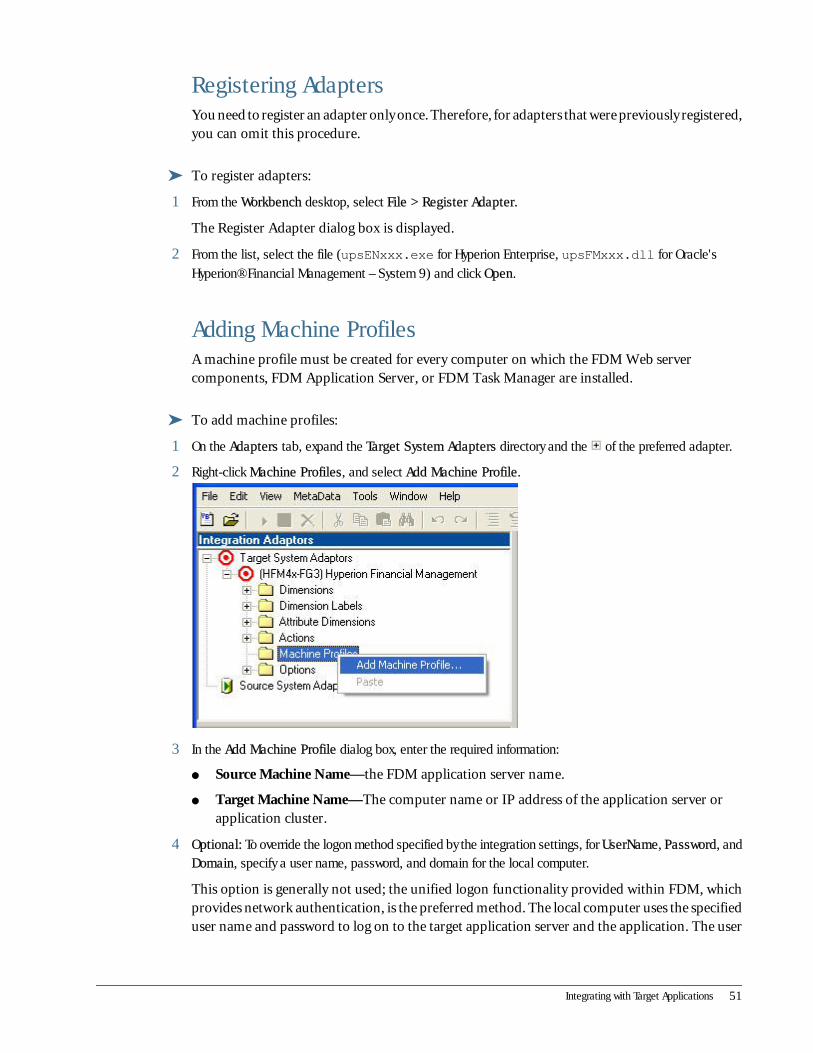
➤ To add machine profiles:
1 On the Adapters tab, expand the Target System Adapters directory and the of the preferred adapter.
2 Right-click Machine Profiles, and select Add Machine Profile.
3 In the Add Machine Profile dialog box, enter the required information:
● Source Machine Name—the FDM application server name.
● Target Machine Name—The computer name or IP address of the application server orapplication cluster.
4 Optional: To override the logon method specified by the integration settings, for UserName, Password, andDomain, specify a user name, password, and domain for the local computer.
This option is generally not used; the unified logon functionality provided within FDM, whichprovides network authentication, is the preferred method. The local computer uses the specifieduser name and password to log on to the target application server and the application. The user
Integrating with Target Applications 51

account specified must have access to the target application server and appropriate securityprivileges, regardless of the user who is logged on to FDM.
5 Click OK.
Updating DCOM Settings (Hyperion Enterprise and Essbaseonly)The upsIntBlockEB7XA.clsHypWindowEB object (Essbase) or theupsIntBlockHE6xG.clsHypWindow object (Hyperion Enterprise) must be configured to enableaccess by the user name that is configured in the application servers.
➤ To configure Windows objects:
1 From the Run command, launch DCOM Config.
2 Right-click upsIntBlockEB7XA.clsHypWindowEBand or upsIntBlockHE6xG.clsHypWIndowselect andselect Properties.
3 From the Properties window, select the Security tab, and click Edit.
4 For Launch/Activation permissions and Access, change the DCOM security settings to Custom.
5 Click Edit, and ensure that the user name running the application servers is added to the permissions.
52 Configuring Adapters

Note:
The user names of all users who run Workbench must be configured in this manner.
Mapping FDM Dimensions to Target Dimensions (HyperionEnterprise and Essbase only)The NameCat.txt file stores the Hyperion Enterprise name and category that are used todetermine whether an Oracle's Hyperion® Enterprise® account is calculated. The selected nameshould represent a typical base name, and the selected category should represent a category usedto store data.
➤ To map FDM dimensions to Hyperion Enterprise dimensions:
1 From Workbench, select the Scripts tab.
The Script Editor directory is displayed.
2 Open the Custom\General folder, and double-click the HET_EditName.Cat script.
The script is displayed in the right pane.
Integrating with Target Applications 53
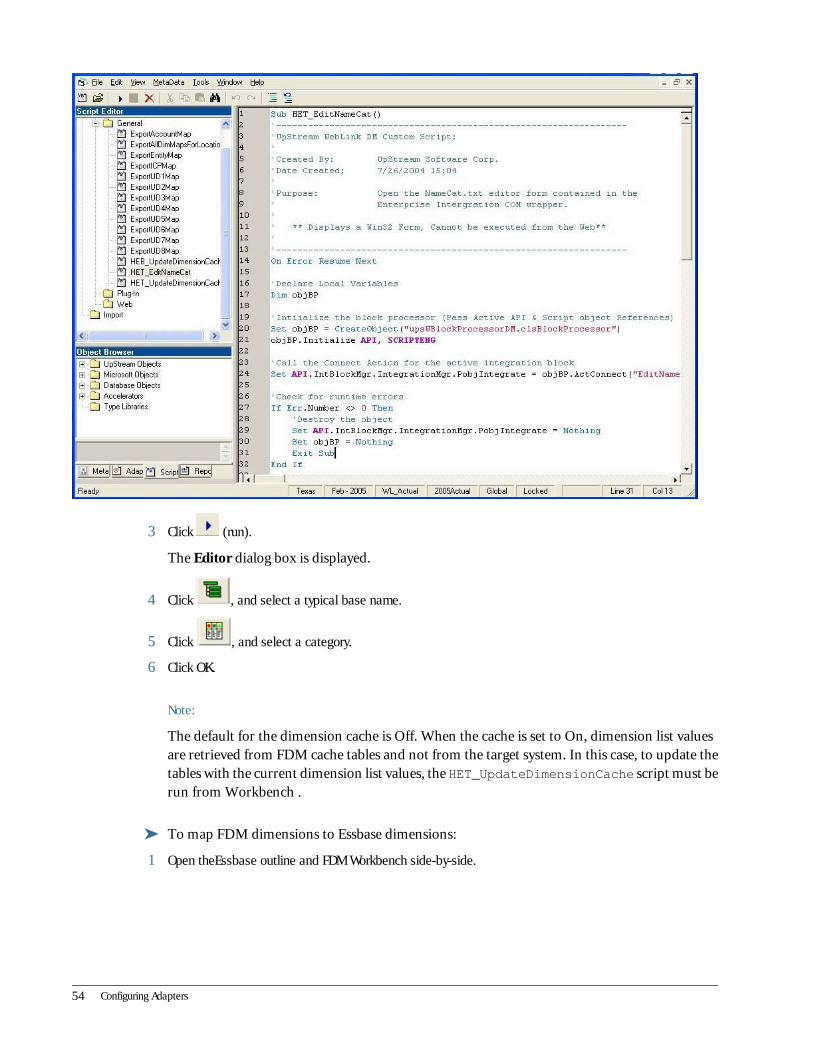
3 Click (run).
The Editor dialog box is displayed.
4 Click , and select a typical base name.
5 Click , and select a category.
6 Click OK.
Note:
The default for the dimension cache is Off. When the cache is set to On, dimension list valuesare retrieved from FDM cache tables and not from the target system. In this case, to update thetables with the current dimension list values, the HET_UpdateDimensionCache script must berun from Workbench .
➤ To map FDM dimensions to Essbase dimensions:
1 Open theEssbase outline and FDM Workbench side-by-side.
54 Configuring Adapters
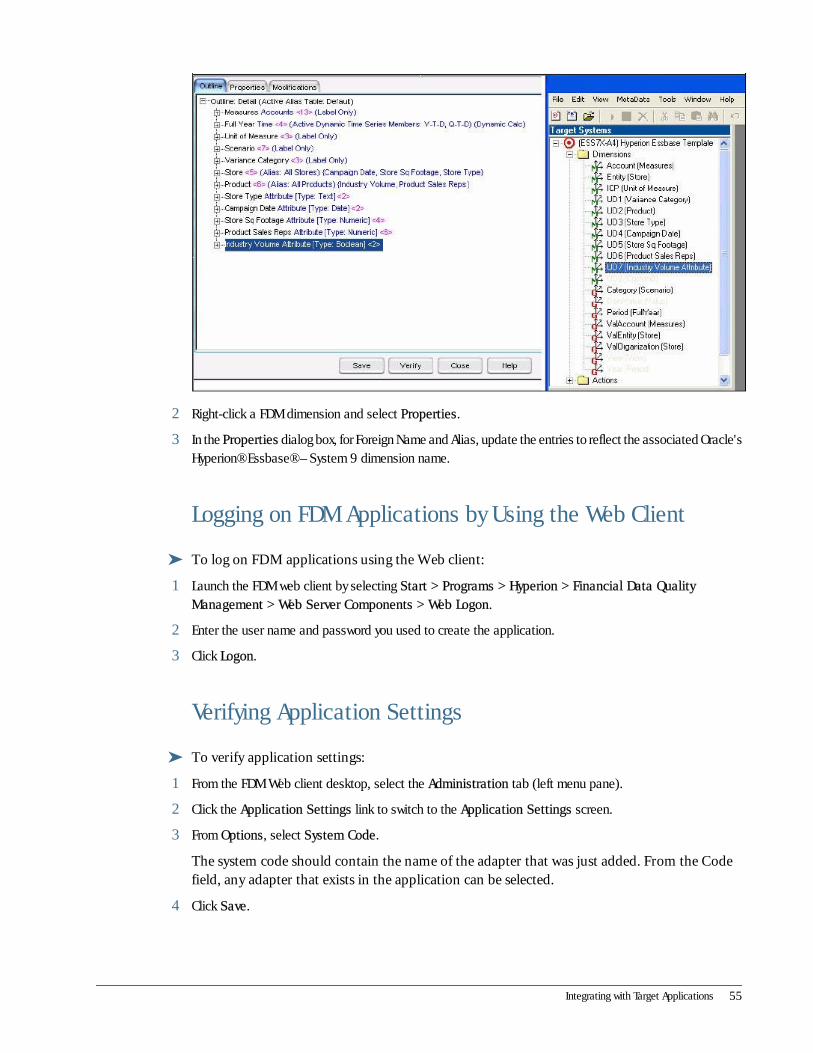
2 Right-click a FDM dimension and select Properties.
3 In the Properties dialog box, for Foreign Name and Alias, update the entries to reflect the associated Oracle'sHyperion® Essbase® – System 9 dimension name.
Logging on FDM Applications by Using the Web Client
➤ To log on FDM applications using the Web client:
1 Launch the FDM web client by selecting Start > Programs > Hyperion > Financial Data QualityManagement > Web Server Components > Web Logon.
2 Enter the user name and password you used to create the application.
3 Click Logon.
Verifying Application Settings
➤ To verify application settings:
1 From the FDM Web client desktop, select the Administration tab (left menu pane).
2 Click the Application Settings link to switch to the Application Settings screen.
3 From Options, select System Code.
The system code should contain the name of the adapter that was just added. From the Codefield, any adapter that exists in the application can be selected.
4 Click Save.
Integrating with Target Applications 55

Updating Integration Settings
➤ To update integration settings:
1 Select Administration > Integration Settings to display the Integration Settings screen.
2 From Options, select Application Name.
3 Enter the name of the target application.
4 Click Save.
Setting the Logon MethodThis option controls the method that FDM uses to log on to the target system when making aconnection.
➤ To set the logon method:
1 From the Web Client desktop, select Administration > Integration Settings
The Integration Settings screen is displayed.
2 From Options, select Logon Method, and select a method:
● Unified—The FDM user name and password are used to log on to the target system. Forthis option to be usable, the target user name and password and the FDM user name andpassword must be the same.
● Global—The user name and password specified for global logon is passed to the targetsystem. With this option, all users use the same user name and password to connect to thetarget system.
Note:
If a machine-specific user name and password is specified in FDM Workbench, it overrides thelogon method specified here for the current computer.
3 Click Save.
Using the Global Logon Information MethodThis option is used in conjunction with the Logon Method option. If Logon Method is set toGlobal, use this option to set the user name and password used to log on to the target system.Separate the user name and password with a semicolon (user name;Password).
Testing the Integration Settings
➤ To test integration settings:
1 From the Web client, select Activities > Maps.
56 Configuring Adapters

2 Click Add.
A row is added to the grid.
3 Click Browse for Target Value to display the list of target accounts.
If the integration settings are configured correctly, a window is displayed with the list of accounts.
From the FDM Web Client
If the integration settings are not correctly, an error is displayed.
Integrating with Target Applications 57
Copying AdaptersOne FDM application enables you to load to an unlimited number of target applications. Whenloading to multiple target system applications, add adapters by repeating the integrationprocedures.
If multiple target applications of one product are being loaded, you must configure additionaladapters. Although the adapters are identical, each is configured for its specific target application.You can copy adapters from within Workbench and integrate the copied adapters with otherapplications that use the target system of the original adapters.
➤ To copy adapters:
1 From Workbench, select the Adapters tab.
2 Right-click an adapter, and select Copy.
3 Enter a new name for the adapter.
4 Click OK.
The new adapter retains the attributes of the original adapter. There is no need to add a machineprofile or register the adapter.
58 Configuring Adapters
ASystem Recommendations
In This Appendix
Database Server........................................................................................................................................................59
Application Server Recommended Hardware..............................................................................................................60
Web Server................................................................................................................................................................60
Application Settings...................................................................................................................................................61
File Sharing Ports.......................................................................................................................................................61
Firewall/DCOM Settings.............................................................................................................................................62
TCP Keep Alive Settings..............................................................................................................................................62
Database ServerDatabase server topics:
● Recommended hardware
● Database sizing
Recommended Hardware● One quad P4 processor
● 1 GB RAM per 75 concurrent users (2 GB minimum)
● Multiple HDD to spread the processing
Selecting the appropriate data server hardware is critical for optimal performance of FDMapplications. If database servers are not properly sized, their operation can become problematic.Adding more application servers and improving performance for selected tasks may quicklyoverwhelm the database server.
Database Sizing● The average total disk space required per location equals .526 GB per month (based on an
average file size of 95 MB and the use of three custom dimensions). Each additionaldimension increases the estimate by approximately .025 GB.
Database Server 59

Note:
Average disk size recommendations should be adjusted based on the estimated average sizeof the files to be loaded and the number of custom dimensions to be used.
● For SQL, the database file and log file should be on separate physical drives. For Oracle, eachtablespace (Work, Index, Map Seg, and Data Seg) should be on a separate drive.
● For improved performance use the fastest HDD available.
● Document attachments affect total disk space. Each attached document is archived in theapplication file structure and occupies the same amount of disk space as the original file.
● Exported archive files affect total disk space. Each exported archive resides in the ArchiveRestore directory and occupies the same amount of disk space as the original archive.
Application Server Recommended Hardware● One dual P4 processor per 75 concurrent users
● 1 GB RAM per 75 concurrent users
Web ServerThese following are the topics related to the Web server:
● Recommended Hardware
● .NET Process Configuration
● Memory Recycling
Recommended Hardware● One dual P4 processor per 100 concurrent users
● 2 GB RAM
.NET Process ConfigurationIn the Machine.Config file:
● MaxWorkerThreads should be increased to 100.
● MaxIOThreads should be increased to 100.
Memory Recycling● By default, UpStream WebLink 8.0.6 and higher and FDM 9.0.2 and higher use IIS memory
recycling to force the Microsoft.Net process to recycle memory when the process reaches250 MB (Windows 2003) or 25% of Web Server memory (Windows 2000). These values are
60 System Recommendations

based on a Web Server running 2 GB of RAM. For servers running 4 GB of RAM the settingsshould be adjusted to 15–200 MB (Windows 2003) and 15% of memory (Windows 2000).For servers with 4 GB or more of RAM, it is extremely important that the default memorylimit be adjusted.
● By default, UpStream WebLink 8.0.6 and higher and FDM 9.x use aspnet_state service tostore session values while the IIS memory recycling process is running. The service must berunning on the Web Server for FDM to operate correctly.
See Install Start Here for information regarding hardware and software requirements.
Application SettingsYou can update FDM data segments in the FDM configuration options prior to creating FDMlocations. The data segments represent the number of data tables within the FDM application.The data tables are shared by the data load locations. To avoid data locking, 5–8 concurrent dataloaders per segment are needed (for example, 600 concurrent data loaders in one FDMapplication results in 75–120 data segments).
Note:
This setting applies for each Oracle's Hyperion® Financial Data Quality Managementapplication.
File Sharing PortsA working folder is defined for each application created in Oracle's Hyperion® Financial DataQuality Management for Hyperion Enterprise®. The FDME server and the data server share thisfolder. Because of this, file sharing must be enabled between the Oracle's Hyperion® FinancialData Quality Management for Hyperion Enterprise® servers and the data server. The portsrequired are listed here. The account that the data server service runs under must be able to readfrom this share. The account running the MSSQLSERVER service must be able to read from thisshare.
For File sharing enable ports:
Application Protocol Protocol Ports
NetBIOS Datagram Service UDP 138
NetBIOS Name Resolution UDP 137
NetBIOS Session Service TCP 139
If NET BIOS is turned off then use:
Application Settings 61
Application Protocol Protocol Ports
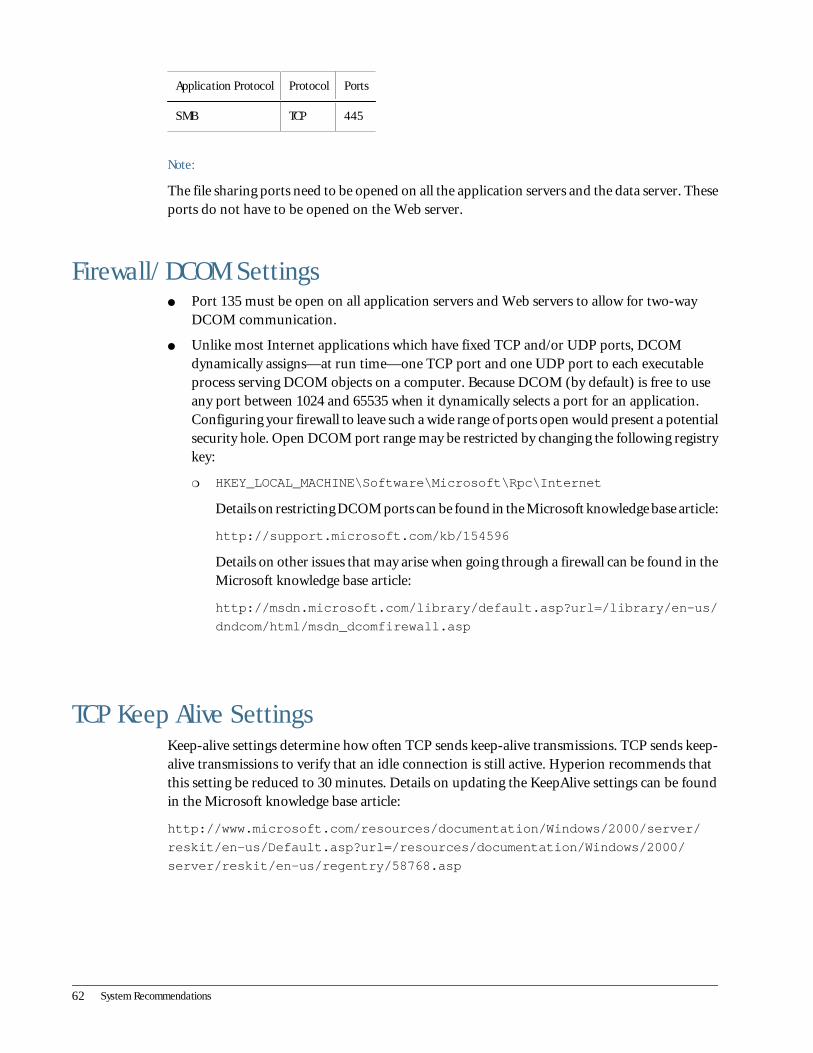
SMB TCP 445
Note:
The file sharing ports need to be opened on all the application servers and the data server. Theseports do not have to be opened on the Web server.
Firewall/DCOM Settings● Port 135 must be open on all application servers and Web servers to allow for two-way
DCOM communication.
● Unlike most Internet applications which have fixed TCP and/or UDP ports, DCOMdynamically assigns—at run time—one TCP port and one UDP port to each executableprocess serving DCOM objects on a computer. Because DCOM (by default) is free to useany port between 1024 and 65535 when it dynamically selects a port for an application.Configuring your firewall to leave such a wide range of ports open would present a potentialsecurity hole. Open DCOM port range may be restricted by changing the following registrykey:
❍ HKEY_LOCAL_MACHINE\Software\Microsoft\Rpc\Internet
Details on restricting DCOM ports can be found in the Microsoft knowledge base article:
http://support.microsoft.com/kb/154596
Details on other issues that may arise when going through a firewall can be found in theMicrosoft knowledge base article:
http://msdn.microsoft.com/library/default.asp?url=/library/en-us/
dndcom/html/msdn_dcomfirewall.asp
TCP Keep Alive SettingsKeep-alive settings determine how often TCP sends keep-alive transmissions. TCP sends keep-alive transmissions to verify that an idle connection is still active. Hyperion recommends thatthis setting be reduced to 30 minutes. Details on updating the KeepAlive settings can be foundin the Microsoft knowledge base article:
http://www.microsoft.com/resources/documentation/Windows/2000/server/
reskit/en-us/Default.asp?url=/resources/documentation/Windows/2000/
server/reskit/en-us/regentry/58768.asp
62 System Recommendations