hyundai tucson sx047 - rhino-rackvpm.cdn.rhinorack.com.au/instructions/parts/legs/sx047.pdf ·...
TRANSCRIPT

Advisory:It is essential that all bolt connections be checked after 48hrs from when you fi rst install your crossbars. Bolt connections should be checked again at regular intervals (probably once a week is enough, depending on road conditions, usage, loads and distances travelled). You should also check the crossbars each time they are refi tted. Make sure to fasten your load securely (see page 2 for advisory diagrams). Please ensure that all loads are evenly distributed and that the centre of gravity is kept as low as possible.
Caution: - The handling characteristics of the vehicle changes when you transport a load on the roof. For safety reasons we recommend you exercise extreme care when transporting wind-resistant loads. Special consideration must be taken into account when cornering and braking.Please remove crossbars when putting vehicle through an automatic car wash.- In heavy winds and high vehicle speeds, increased wind noise may be experienced within the cabin. Roof racks are designed to be quickly and easily removed should the noise level become annoying. - When fi tting to vehicle with moonroof, the roof bars have approximately 10mm clearance. After loading up your roof bars always check the moonroof has clearance during operation. If not, remove crossbars.
Note for Dealers and Fitters:It is your responsibility to ensure instructions are given to the end user or client. Rhino-Rack3 Pike Street, Rydalmere, Document No: R1452 Fit Time: 25minNSW 2116, Australia. Prepared By: Kayle Everett Issue No: 01(Ph) (02) (02) 8846 1900 Authorised By: Chris Murty Issue Date: 13/09/2017(Fax) (02) 9638 4822
These instructions remain the property of Rhino-Rack Australia Pty. Ltd. and may not be used or changed for any other purpose than intended.
Page 1 of 6
Important: 1. Please refer to your fi tting instruction to ensure that the roof racks are installed in the correct locations. 2. Check the contents of kit before commencing fi tment and report any discrepancies. 3. Place these instructions in the vehicle’s glove box after installation is complete. 4. These instructions must be followed for warranty to be upheld.
Maximum carrying capacity: 80kg (176lbs) evenly distributed over crossbars.
Hyundai Tucson SX047
On Road Cargo Allowance Off Road Cargo Allowance Roof Allowance Rack Weight
75kg / 165lb 50kg / 110lbs 80kg / 176lbs 5kg / 11lb

Page 2 of 6
Hyundai Tucson SX047
!
km/h
Not suitable for roof top tents.
WARNING! Important Load Carrying InstructionsWith utility vehicles, the cabin and the canopy move independently. Roofracks and vehicle can be damaged if the item transported is rigidly fi xed at points on both the cabin and canopy. Instead, rigidly fi x to either the cabin roofracks or the canopy roofracks.
Paddle/ Surfboards should be fi xed to the front of the vehicle.
It is required forClam Shell Roof
Top Tents to use a 3Crossbar System.
Kayaks should use additional straps to secure the load at the front and rear of the vehicle where possible. Always use Kayak Carrier Cradles when transporting Kayaks on the roof.
Optimal Setup:The Kayak should be housed in Cradles and held in place with tension straps.The front and rear of the Kayak should be fi xed to the front and rear of the vehicle. A Nose Tie Down (RBAS1) should be used to secure the front of the Kayak.
! !
! !
Strap retainer S606 to be used.

Page 3 of 6
Hyundai Tucson SX047
Parts List
Tools Required:Tape measure. Scissors. Knife.
Leg KitCrossbars(VA126S, VA126B Sold as
separate)
NOTE: Items 2 - 7 are pre-installed on legs
Item Component Name Qty Part No.1 Leg Unit 4 M7122 Rubber Insert 4 M7983 Clamp Assembly 4 CA15634 Rubber Boot 4 M8215 Outer Clamp 4 CA15846 Dowel Nut 4 -7 Adjustment Rod 4 SP2228 Metal Key 2 -9 Instructions 1 R747
+
Parts Required
1.
8.
2.
3.
4.
5.
Instructions
1 Open the Crossbar box and remove the contents. Shake the crossbar up and down to remove measurement strips and rubber buffer strips. Crossbars sold separate.
1. 2.
2 Install the Rubber Buffer Strips. Cut to size if required.
6.7.
Page 4 of 6
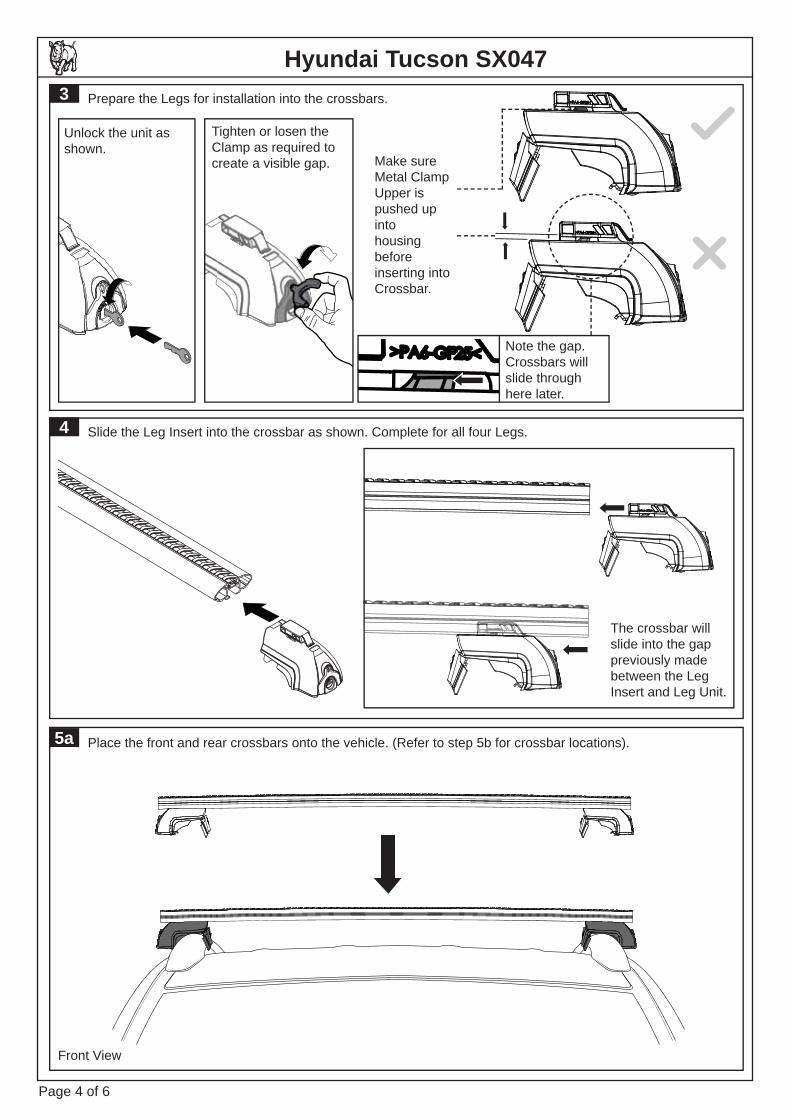
Hyundai Tucson SX0473 Prepare the Legs for installation into the crossbars.
Make sure Metal Clamp Upper is pushed up into housing before inserting into Crossbar.
Tighten or losen the Clamp as required to create a visible gap.
4 Slide the Leg Insert into the crossbar as shown. Complete for all four Legs.
The crossbar will slide into the gap previously made between the Leg Insert and Leg Unit.
5a Place the front and rear crossbars onto the vehicle. (Refer to step 5b for crossbar locations).
Front View
Unlock the unit as shown.
Note the gap. Crossbars will slide through here later.

Be sure the Leg is sitting snug with the factory rail as shown. The Rubber Insert must be in contact with the rail completely along its surface. The Outer Clamp must be gripping on the underside of the rail and the Clamp Assembly should be gripping the rear of the rail as shown.
5c
Rubber InsertClamp AssemblyOuter ClampFactory Rail
6
87 Tighten the Legs to 5Nm in place. Lock the Leg with Metal Key provided.
Measure the gap on the underside of the Crossbars. Accurately cut the underbar strips to match.
Page 5 of 6
Hyundai Tucson SX0475b
700-800mm
The crossbars can be positioned to suit individual needs anywhere on the factory rails. From the centre of the front crossbar measure back 700-800mm to the centre of the rear crossbar.
Front View
Measure from the end of the crossbar to the rear of the Leg on both sides. Adjust so both measurements are even.
(=) (=)

10 11 Insert end caps. Lock and remove key.
12 Be sure all fi ttings are secure before use.
Now slide in remaining underbar strip into the outer slot and trim off fl ush using a knife.
9 With the Underbar Strips cut to the required lengths, install them into the Crossbars. 1: Slide one end into the place behind the Leg. 2: Push the Underbar Strip up and into place along its length. 3: Be sure Strip is secure.Note: The Underbar Strips will ensure the Crossbars do not create a ‘whistling’ noise at speed.
1: 2: 3:
Slide one end of the Underbar strip in behind the Leg as shown.
Be sure the strip is fully located along its length.
Page 6 of 6
Hyundai Tucson SX047