i n s t a l l a t i o n i n s t r u c t i o n s - · pdf filetula and made invisible. ......
TRANSCRIPT

esthétique & durabilité
i n s t a l l a t i o n i n s t r u c t i o n s
looks & durability

2 - 3
index
1. Discovering DoMostYl® 3
2. tEcHnical assistancE 4
3. DoMostYl®, standard mouldings based on polyurethane 5
4. DoMostYl® custoMizED, mouldings based on expanded polystyrene 13

dOMOSTYL® CUSTOMiZed, mouldings based on expanded polystyrene
With this new concept, NMC is in a position to work on demand, no matter what type of moulding, and to produce any type of moulding, both in so far as the size and the shape are concerned, both for new builds and renovations.
DOMOSTYL® CUSTOMIZED makes it possible to produce in particular string courses, window sills, window/door frames, rosettes, headers, boss stones, consoles, keystones, columns, pilasters, etc. NMC considers all requests, even the most original.
DoMostYl® custoMizED has received a French technical approval is-sued by the cstB (scientific and technical centre for Building - France)
dOMOSTYL®, standard mouldings based on polyurethane
DOMOSTYL ® offers a unique concept of decorative sections for façades of high-density polyurethane that makes it possible without delay to put the finishing touches on façades in the course of renovation or construction. Robust and highly resistant, these products give a façade style and character, while combining speed and ease of mounting. DOMOSTYL® mouldings meet the current require-ments of construction and renovation.
DOMOSTYL® offers a range of decorative elements for façades that includes string courses, window sills, window/door frames, rosettes, headers, boss stones, consoles, and keystones.
FieLd OF appLiCaTiOn
Download the approval issued by the CSTB
Download the approval issued by IFT Rosenheim
4 - 5
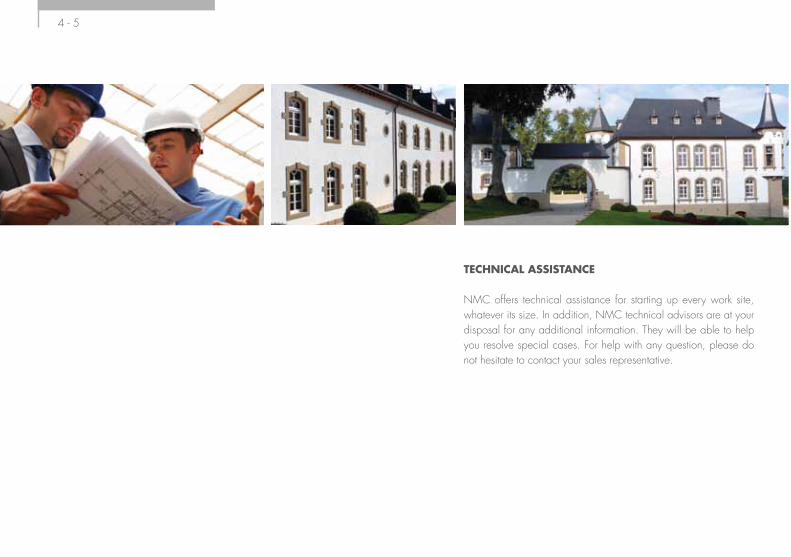
TeChniCaL aSSiSTanCe
NMC offers technical assistance for starting up every work site, whatever its size. In addition, NMC technical advisors are at your disposal for any additional information. They will be able to help you resolve special cases. For help with any question, please do not hesitate to contact your sales representative.

DOMOSTYL®
1. preparaTiOn OF The SUbSTraTe
Whatever the substrate, it must be clean, notpowdery, not greasy, dry and in good condition.Old paint and other organic coverings must bescraped off and stripped before installation of themouldings. The surfaces must be flat; a maximumdeviation of 1 cm per metre is tolerated. If need be,renovation of the substrate is required.
2. CLiMaTiC COndiTiOnS
Installation should be carried out in dry conditions,on a dry substrate and at temperatures higher than5°C. Special precautions can be taken to respondto these conditions: covering the scaffolding with atarpaulin and heating, drying of the surface beforethe application. In addition, you must ensure that the temperatures remain stable for 48 hours after application.
3. Marking The pOSiTiOn
[3a] With the help of a chalk line, mark the posi-tion of the sections on the façade.
DOMOSTYL® standard mouldings based on polyurethane Mounting on traditional substrates
[3a]
The following substrates are authorized for dOMOSTYL® : core of poured concrete
coated masonry
uncoated masonry
masonry clad with a hydraulic MPL coating (mortar, plaster, lime): in this case a cap is compulsory. In addition, mechanical fastening is necessary on this substrate with DOMOSTYL®;

6 - 7
4. CUTTing
Cut the mouldings with an appro-priate tool. We advise the use of NMC tools adapted to the size of the mouldings (in particular: VARIO cutter box with hand-saw).
[3B]
[3C] To make mounting easier, NMC recom-mends the use of pegs to hold the moulding flat on the substrate. After 24 hours the nails and pegs can be removed.
[3b] Drive the nails into the concrete on the lowerline in order to hold the moulding in place (3 nailsper length of 2 m). The nails will be pulled out after24 hours.
[3c]

DOMOSTYL®
5. gLUing
To glue the mouldings, NMC recom-mends the use of the adhesive DOMOSTYL®
HYBRIDE which is packaged in cartridges.
[5a] Proceed by single pasting to the back of the section, using an extruder nozzle. Lay down a good thick line of adhesive without a break, over the entire perimeter of the surface of the moulding ± 5 mm from the edge. In order to ensure good waterproofing, the line cannot be interrupted.
[5a]
[5b] Once the moulding is positioned, remove the surplus glue with the help of a spatula.
[5B]

8 - 9
7. MeChaniCaL FaSTening
Cases where it is necessary use me-chanical fastening in addition to gluing:
when the overhang is greater than 7cm (largesized moulding) whatever the type of substrate;
on backings of the MPL* type whate-ver the size of the moulding.
on window sills on all substrates whatever the size of the moulding.
* mortar, plaster, lime
6. TreaTMenT OF The jOinTS
Use the same adhesive for the treatment of the joints and mitre cuts. Between each length, take care to leave the joint well filled with an adhesive layer of ± 3 mm; this will be smoothed with a spa-tula and made invisible.

DOMOSTYL®
The type of dowel recommended differs ac-cording to the foundation (hollow or solid): when there is full support, use SPIT NYLONG min. 8 mm dowels which are to be hammered in, expansion opened by “nail/screw”. The expansion casing of this dowel is made of nylon with two anti-rota-tion fins and ends in a flange to hold it in place. The screw is bichromate galvanized steel. When used on hollow materials, use a SPIT PROLONG F dowel.
Mechanical fastening is always done once the gluing is completed (after 24 hours of drying). It is done with dowels.
[7a] Use 3 dowels for a length of 2 m in a pattern of one dowel in the centre and two others 10 cm from each end. For a different length, adapt the num-ber of fasteners proportionally.
[7a] [7B]
[7b] Check to see that the moulding is well adhered to the wall. Drill at the right diameter and at the right depth. The anchorage in the substrate must always be a minimum of 5 cm. Blow clean with compressed air.
Slide the dowel into the hole. Insert the screwinto the dowel, drive it in with a hammer and finishby screwing it in.
5 cm

10 - 11
8. COnTaCT SUrFaCe MOULding/ Façade
In order to avoid infiltration of water between the moulding and the substrate, it is essential to put down a waterproof seal with the DOMOSTYL®
HYBRID adhesive over the entire outer edge of the moulding. This will be immediately smoothed with a finger and may not contain any break.
9. FiniSheS
The DOMOSTYL® façade mouldings must be painted exclusively with acrylic paint intended for façades. NMC recom-mends applying a minimum of two coats of paint. The mouldings can be painted 12 hours after installation.
[7c]
[7C] Countersink the head of the screw inthe interior of the moulding with the adhesiveDOMOSTYL® HYBRID. To remove spots of HYBRIDglue on the products or the tools, use White-spirit.

DOMOSTYL®
COnSTrUCTiOn OF windOw SiLLS
The DOMOSTYL® mouldings selected for constructing window sills must be adapted to suit the dimensions of the opening. They have a slope of ± 5% on the upper part and a drip groove on the underside in order to facilitate water drain-off.
DOMOSTYL®
Construction of window sills and rainwater pipes
[1a] The ends of the window sills must be finishedwith corners cut at 45° (mitre cuts). To save time, theends (corners cut at 45°) can be assembled with thewindow sill before fastening to the façade (the daybefore, for example) or if not, at the same time as the installation.
[1a] [1a]
When the DOMOSTYL® mouldings are installed as a window sill, it is always necessary to make sure that there is a good jointing between the window sill and the opening by installing a covering made of zinc or aluminium.
rainwaTer pipeS
When a rainwater pipe is present, the moulding must be cut on both sides and must end with a 45° mitre cut.

12 - 13
3. average COnSUMpTiOn OF The dOMOSTYL ® hYbrid adheSive (290 ML CarTridge):
Traditional substrates
DOMOSTYL® m/cartridge consumption/m
doors or window frames
na, Ma2 4-4,5 m 65 ml/m
Ma1, Ma3, Ma10, Ma11, Ma12, Ma13, Ma14 2-2,5 m 100-120 ml/m
Ma15 1,5-2 m 130-170 ml/m
Ma16 3-5 m 65-85 ml/m
String courses
Ma20, Ma22 2-2,5 m 120-150 ml/m
Ma21, Ma60, Ma61 2-3 m 100-140 ml/m
window sills
Fa10, Fa11, Fa13 1-1,5m 150-200 ml/m
Fa12, Fa14, Fa15 2-2.5 m 120-150 ml/m
rosettes
ra60 3 pces 95 ml/pce
ra61 4 pces 70 ml/pce
Consoles
ca11 light, ca12 light 9 pces 30 ml/pce
ca10 light 7 pces 40 ml/pce
boss stones
Ba10 light, Ba11 light 5 pces 60 ml/pce
keystones
sa1,sa2 5 pces 60 ml/pce
headers
Ga1, Ga2 290 ml/pce
Ga3 450 ml/pce

DOMOSTYL®
1. preparaTiOn OF The SUbSTraTe Whatever the substrate, it must be clean, not powdery, not greasy, dry and in good condition. Old paint and other organic coverings must be scraped off and stripped before installation of the mouldings. The surfaces must be flat; a maximum deviation of 1 cm per metre is tolerated. If need be, renovation of the substrate is required.
important note for mounting on eTi: It is advisable in all cases to comply with the instructions of the manufacturer of the sub-coating reinforced with ETI to ensure that is completely dry before the installation of the mouldings.
2. CLiMaTiC COndiTiOnS Installation should be carried out in dry conditions,on a dry substrate and at temperatures higher than5°C. Special precautions can be taken to respondto these conditions: covering the scaffolding with atarpaulin and heating, drying of the surface beforethe application. In addition, you must ensure that the temperatures remain stable for 48 hours after application.
DOMOSTYL® CUSTOMIZED, mouldings based on expanded polystyrene MOUnTing On TradiTiOnaL & eTi SUbSTraTeS
The following substrates are authorized for DOMOSTYL® CUSTOMIZED : core of poured concrete
concrete coated with a coating, porcelain or glass paste
coated masonry
uncoated masonry
masonry clad with a hydraulic MPL coating (mortar, plaster, lime): in this case a cap and mechanical fastening are compulsory
external thermal insulation (ETI)
DOMOSTYL® CUSTOMIZED
after reception of the goods , please store placed down flat and overlying on entire length. do not store upright or leaning side ways !

14 - 15
[3b] Drive the nails into the concrete on the lower line in order to hold the moulding in place (three nails per length of 2m). The nails will be pulled out after 24 hours.
[3C] To make installation easier, NMC recom-mends the use of pegs to hold the moulding flat on the substrate. After 24 hours the nails and pegs can be removed.
[3B] [3c]
3. Marking The pOSiTiOn
[3a] With the help of a chalk line, mark the position of the sections on the façade.
[3a]
DOMOSTYL®
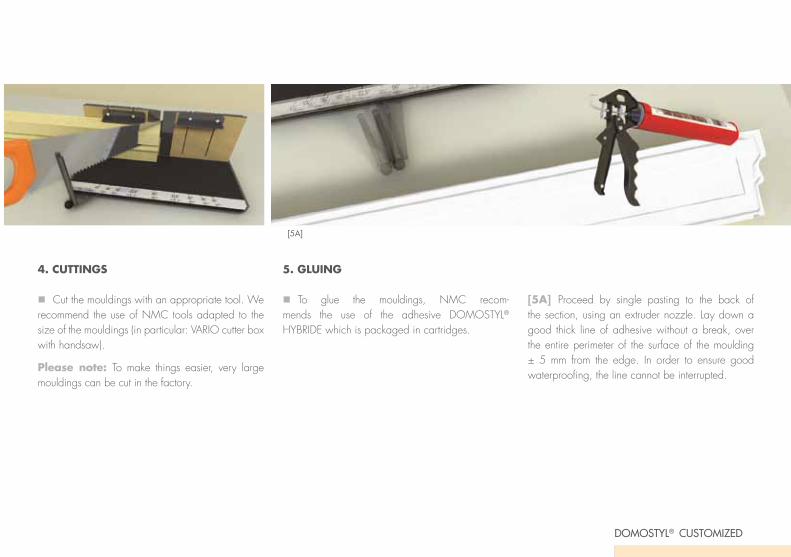
5. gLUing
To glue the mouldings, NMC recom-mends the use of the adhesive DOMOSTYL®
HYBRIDE which is packaged in cartridges.
4. CUTTingS
Cut the mouldings with an appropriate tool. We recommend the use of NMC tools adapted to the size of the mouldings (in particular: VARIO cutter box with handsaw).
please note: To make things easier, very large mouldings can be cut in the factory.
[5a] Proceed by single pasting to the back of the section, using an extruder nozzle. Lay down a good thick line of adhesive without a break, over the entire perimeter of the surface of the moulding ± 5 mm from the edge. In order to ensure good waterproofing, the line cannot be interrupted.
[5a]
CUSTOMIZED

16 - 17
6. TreaTMenT OF The jOinTS
For the treatment of joints and mitre cuts on small-sized mouldings (that is, those with an overhang of less than 7 cm), use the DOMOSTYL® FILLER mastic in a cartridge and proceed by double pasting.
[5b] Once the moulding is in position, re-move the surplus adhesive with the help of a spatula.
For the treatment of joints and mitre cuts on large-sized mouldings (overhang greater than 7cm), it is easier to proceed as follows:
[6a] For the joints, leave a space of ± 10 mm between the mouldings at the intermediate joints.
attention: particularly wet and cold weather conditions can delay the drying of the glue for several days. Once installed, the products should not in any way suffer frost for a minimum of 48 h.
[5B] [6a]

DOMOSTYL®
[6C] Once the foam has dried, plane it down andcut the excess foam with the help of a cutter.
[6b] This space will be filled with the PU foam extruded by spray can.
DOMOSTYL® CUSTOMIZED
[6B] [6c] [6D]
[6d] Hollow out the point in the shape of a “V”over ± 8 mm.

18 - 19
[6F] For the treatment of the mitre cuts, continue inthe same way.
[6e] Fill the hollow obtained in this way with DOMOSTYL® FILLER mastic and smooth out with the spatula. Use the sand provided with the mouldings to give the product an homogeneous surface.
[6E] [6E] [6F]

DOMOSTYL®
7. MeChaniCaL FaSTening
Cases where it is necessary use mechanical fastening in addition to gluing:
when the overhang is greater than 7cm (large-sized moulding) whatever the type of substrate;
on backings of the MPL* on window sills on all substrates whatever the
size of the moulding.
The mechanical fastening is always done oncethe gluing is completed (after drying for 24 hours).It is done either with dowels or with threadedrods, when the maximum size of the dowels is notsufficient.
[7a] Use 4 mechanical fasteners for a length of 2 m in a pattern of one dowel / threaded rod every 60 cm. For a different length, adapt the number of fasteners proportionally.
* mortar, plaster, lime
DOMOSTYL® CUSTOMIZED
[7a]
60 cm60 cm 60 cm

20 - 21
i. FaSTening bY dOweL
Type of dowel recommended: SPIT hammer anchor plug, complying with the European technical approval, Socotec C92909, open expansion by bichromate galvanized steel screw. The sleeve of this plug is made from nylon with anti-rotation fins and ends in a retaining collar.
[i b] Slide the dowel into the hole. Insert the screwinto the dowel, drive it in with a hammer and finishby screwing it in.
[i a] Check to see that the moulding is well adhe-red to the wall. Drill at the right diameter and at the right depth. The anchorage in the full substrate must always be a minimum of 5 cm; the anchorage in the cavity substrate must always be a minimum of 7 cm.
[i a] [i B]
SPIT NYLONGDEscription Drill DiaMEtEr (MM ) tYpE oF support ancHor DEptH
10 full support 5 cm minimum
12 ; 14 ; 16 cavity support 7 cm minimum
SPIT NYLONG
SPIT PROLONG TYPE F
5 cm
DOMOSTYL®
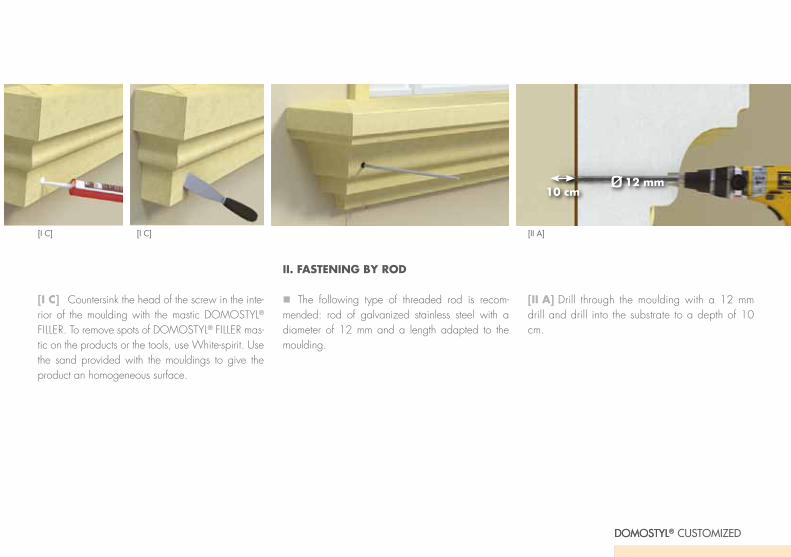
[i C] Countersink the head of the screw in the inte-rior of the moulding with the mastic DOMOSTYL® FILLER. To remove spots of DOMOSTYL® FILLER mas-tic on the products or the tools, use White-spirit. Use the sand provided with the mouldings to give the product an homogeneous surface.
ii. FaSTening bY rOd
The following type of threaded rod is recom-mended: rod of galvanized stainless steel with a diameter of 12 mm and a length adapted to the moulding.
[ii a] Drill through the moulding with a 12 mm drill and drill into the substrate to a depth of 10 cm.
[i c] [i c] [ii a]
DOMOSTYL® CUSTOMIZED
22 - 23
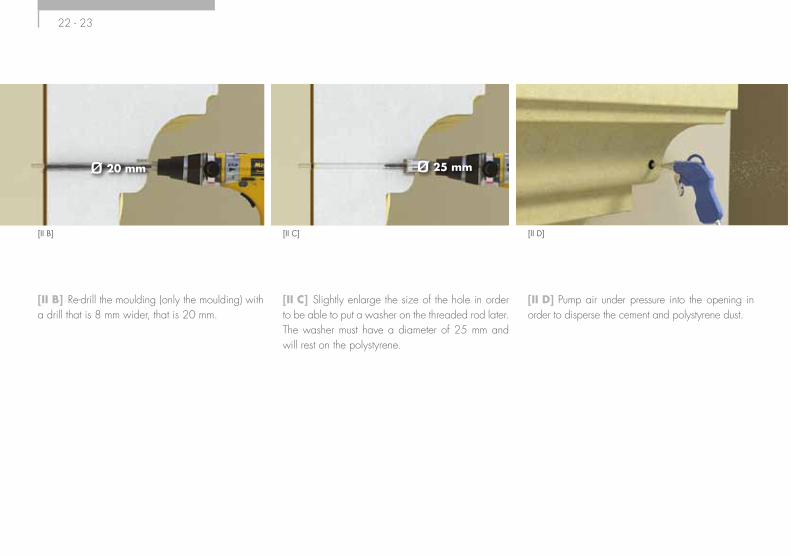
[ii b] Re-drill the moulding (only the moulding) witha drill that is 8 mm wider, that is 20 mm.
[ii d] Pump air under pressure into the opening in order to disperse the cement and polystyrene dust.
[ii C] Slightly enlarge the size of the hole in order to be able to put a washer on the threaded rod later. The washer must have a diameter of 25 mm and will rest on the polystyrene.
[ii B] [ii c] [ii D]

DOMOSTYL®
[ii e] Inject the proper dose of chemical sealant (SPIT Epomax 380 ml) into the hole in the substrate (not in the moulding).
[ii g] Fill the space with PU foam extruded by spray can.
[ii F] Slide in the threaded rod (cut to the right size) and drive it into the hole in the substrate using a hammer.
[ii E] [ii F] [ii G]
DOMOSTYL® CUSTOMIZED

24 - 25
[ii h] Delicately put the washer and the nut in place by hand (wait 24 hours before giving it a final tightening). The end of the rod must be well inside the moulding and may not protrude beyond it.
[ii i] Re-fill with DOMOSTYL® FILLER mastic. Use the sand provided with the mouldings to give the product an homogeneous surface.
8. COnTaCT SUrFaCe MOULding/Façade
[8a] In order to avoid infiltration of water between the moulding and the substrate it is essential to put down a waterproof seal with the DOMOSTYL® FILLER mastic over the entire outer edge of the moulding. This will be immediately smoothed with a finger and may not contain any break.
[ii H] [ii i] [8a] [8a]

DOMOSTYL®
9. FiniSheS
The DOMOSTYL® CUSTOMIZED façade moul-dings must be painted exclusively with acrylic paint intended for façades. NMC recommends applying a minimum of two coats of paint. The mouldings can be painted 12 hours after installation.
DOMOSTYL® CUSTOMIZEDadditional information
1. COnSTrUCTiOn OF windOw SiLLS
The DOMOSTYL® CUSTOMIZED moulding se-lected for constructing window sills must be adapted to suit the dimensions of the opening. They have a slope of ± 5% on the upper part and a drip groove on the underside in order to facilitate water drain-off.
[1a] The ends of the window sills must be finished with corners cut at 45° (mitre cuts). To save time, the ends (corners cut at 45°) can be assembled with the window sill before fastening to the façade (the day before, for example) or if not, at the same time as the installation.
[1a] [1a]
DOMOSTYL® CUSTOMIZED

26 - 27
[1b] When the DOMOSTYL® CUSTOMIZED mouldings are installed as a window sill, it is always necessary to make sure that there is a good jointing between the window sill and the opening by instal-ling a covering made of zinc or aluminium.
2. SpeCiaL CaSeS
Certain cases necessitate a special mounting. Please refer to the illustrations.
[2a] Rainwater pipes
When a rainwater pipe is present, the moulding must be cut on both sides and must end with a 45° mitre cut.
[1B] [2a]

DOMOSTYL®
[2b] Moulding on the upper part over ETI
When the moulding is in an acroterion (for example in the junction with a flat roof), a zinc cap has proven to be indispensable.
[2C] Installation of a string course over ETI. [2d] Handling of window sills over ETI.
[2B] [2c] [2D]
DOMOSTYL® CUSTOMIZED

esthétique & durabilitéwww.nmc.be
3007
527
- 12/
2015
© N
MC
sa,
201
5 –
Ed. r
esp.
: NM
C s
a –
Ger
t-Noë
l-Str.
– B
-473
1 B-
Eyna
tten
nMC sa Gert-noël-strasse – B-4731 Eynatten tel.: +32 87 85 85 00 – Fax : +32 87 85 85 11E-Mail : [email protected]