i n t e r a c e - t r a n s f e r f o r b u s in e s s · interac e -transfer, a dministrator t...
TRANSCRIPT

Interac e-Transfer for Business User Guide
User Guide - Interac e-Transfer for Business 1

Contents
Welcome to ATB Online Business 2
Sending & Receiving with Interac e-Transfer 3
Initial Access 3
Not authorized 5
Getting started: administrator 6
Company profile setup 6
Add user entitlements 7
Manage company name 15
Manage recipients 16
Manage e-Transfers 19
Send via Interac e-Transfer 19
Receive money with Interac e-Transfer 22
Cancel a transfer 23
Re-send a notification 25
Workflow & approvals 25
Autodeposit 27
Create a rule 27
Sending money to a recipient with autodeposit 30
Request Money 31
Sending a request 31
Fulfilling a request 35
History: Interac e-Transfer 37
Funds sent 37
Frequently asked questions 40
User Guide - Interac e-Transfer for Business 2

Welcome to ATB Online Business
ATB Online Business provides secure, convenient access to your business accounts and services 24 hours a day, seven days a week. With Interac e-Transfer you can quickly and securely send and receive money from anyone with a Canadian bank account. All you need is an email address and access to ATB Online Business.
The following guide is organized into three sections – What to expect the first time you send or receive an Interac e-Transfer, Administrator tools and User tips, and FAQs. Each section walks you through how to get started and reviews the key features of the service, including tips and troubleshooting advice.
Before we dive in, here are a few quick highlights:
1. Introducing Interac e-Transfer Request Money and Autodeposit for Business. Request Money is a new, easy (and a lot less awkward) way to remind people to send what they owe you. And with Autodeposit, the payment can be put automatically into your bank account—no security questions asked!
2. Interac e-Transfer is guaranteed, so when funds are deposited they are immediately available. The flip side of that is an Interac e-Transfer can’t be reversed once the recipient accepts it.
3. You can cancel an Interac e-Transfer after it has been sent, as long as the recipient has not yet accepted the funds.
4. The company administrator can manage access to Interac e-Transfer functionality for other company users. Other company users can be set up to send and receive money on specific accounts, have custom sending limits, and have their transfers flagged for additional approvals.
Thank you for choosing ATB Financial. Let’s get started!
User Guide - Interac e-Transfer for Business 3

Sending & Receiving with Interac e-Transfer
Initial Access
When your company administrator successfully signs in to ATB Online Business and clicks on the Interac e-Transfer tab for the first time, they will be prompted to create a company profile with Interac.
The company name will be pre-filled based on what ATB Financial has on record. You can edit this name if you want to, but remember it will appear in the email communications Interac sends to your recipients. You will also need to provide a company email address. This is the email address that will receive Interac notifications about your transfers, like when your transfers have been accepted.
Make sure you hit Save on this page – no one will be able to send or receive any money until it’s been completed.
User Guide - Interac e-Transfer for Business 4

Here is an example of how your Company Name will be used in the notification email when you send a transfer:
Not authorized
If your company has multiple users, it’s possible that not all users are authorized to set up the company profile. Until the company profile has been set up, users trying to access or deposit funds using the Interac e-Transfer tab in ATB Online Business will be redirected to set up the company profile (if they have been authorized to “Manage Profile”) or see an error message advising them to contact the company administrator. The solution? See the Getting Started: Administrator section.
User Guide - Interac e-Transfer for Business 5

Getting started: administrator
Company profile setup
A company Administrator will need to set up your company profile before any transfers can be sent or received. Here’s how to set up your profile:
1. Log in to ATB Online Business and click on the Interac e-Transfer tab.
2. Update your Company Name (if you want to) and add a Company Email Address.
Tip: Want to manage multiple business entities, like sub-companies? See the Manage Company Names section.
User Guide - Interac e-Transfer for Business 6

3. Click the Save button.
Add user entitlements
The company administrator can set up access and permissions to the Interac e-Transfer service for other company users.
To add user entitlements:
1. Select the Administration tab in ATB Online Business.
2. On the Manage Roles screen, click the user role you want to add Interac e-Transfer entitlements to. You can also create a new role with Interac e-Transfer entitlements.
User Guide - Interac e-Transfer for Business 7
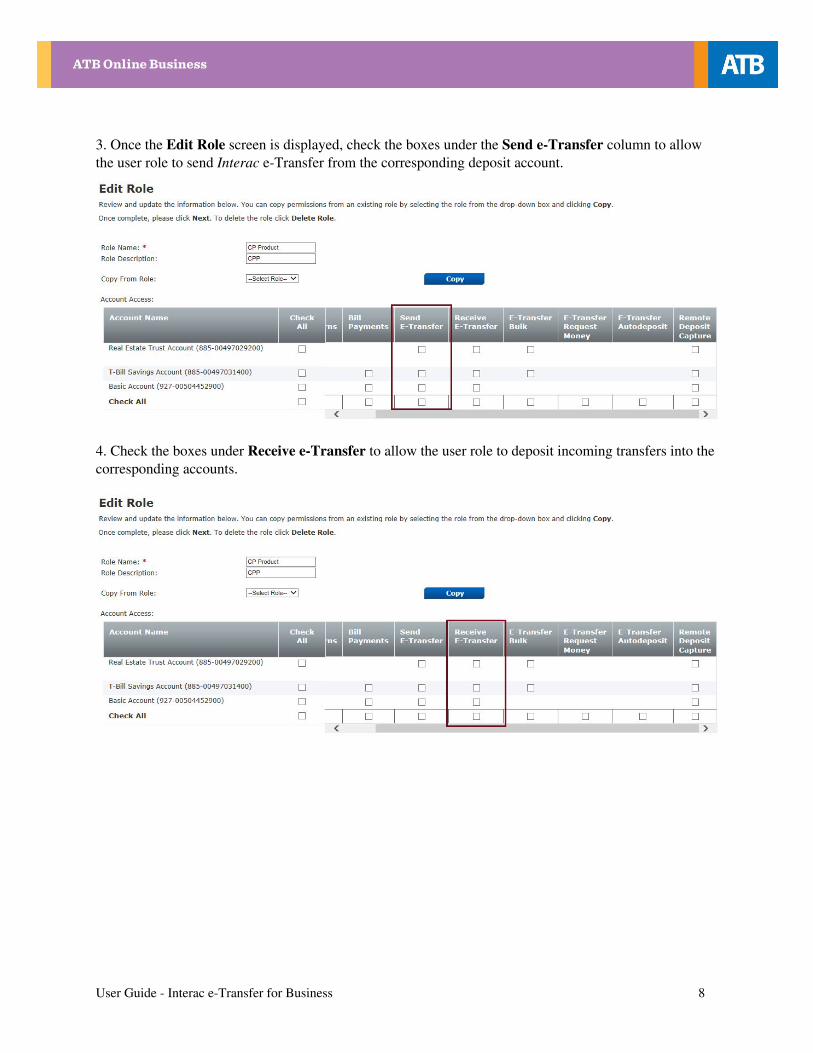
3. Once the Edit Role screen is displayed, check the boxes under the Send e-Transfer column to allow the user role to send Interac e-Transfer from the corresponding deposit account.
4. Check the boxes under Receive e-Transfer to allow the user role to deposit incoming transfers into the corresponding accounts.
User Guide - Interac e-Transfer for Business 8

5. Check the boxes under E-Transfer Request Money to allow the user to send money requests from the corresponding accounts.
6. Check the boxes under E-Transfer Autodeposit to allow the user to set up an autodeposit rule for the corresponding accounts.
Tip: Fulfilling a money request falls under the Send e-Transfer entitlement.
User Guide - Interac e-Transfer for Business 9

7. Click the Next button to continue to the second entitlements screen.
8. On the Role Details screen, scroll down to the Interac e-Transfers section. Check the “Manage Profile” box to allow the user to create or edit the company profile.
If the Manage Profile box is not checked, users assigned to this role cannot see the Profile submenu item or related screen.
9. Check the Manage Autodeposit Rules box to allow users to add/edit/delete autodeposit rules.
User Guide - Interac e-Transfer for Business 10

10. Check the Manage Recipients box to allow users to add/edit/delete recipient profiles.
11. Click the Receive e-Transfer box to allow the user role to deposit incoming transfers into a deposit account.
Tip: The user role will only be able to deposit transfers into the accounts you selected under “Receive e-Transfer” in step 4.
12. Inside the Transaction Type table, check the Release box in the Send Single e-Transfer row to allow the user role to be able to send money by Interac e-Transfer. Anything over the value in the Limit field will require approval or be denied (see the next step for details).
Tip: The user role will only be able to send Interac e-Transfers from the accounts you selected under “Send e-Transfer” in step 3.
User Guide - Interac e-Transfer for Business 11

13. Let’s jump ahead one spot in this table. For the Approval drop-down menu, choose a workflow approval setting for outgoing Interac e-Transfers created by this user role.
● No Approval Required: User does not require any secondary approval and the transaction limit
is the same as what’s been set for the company (i.e., $10,000 maximum per transaction). ● Single Approval Required: Any transaction that exceeds either the transaction or daily limit
must be approved by one other user. Amounts below a limit do not require approval. ● Dual Approval Required: Any transaction that exceeds either the transaction or daily limit must
be approved by two other users. Amounts below a limit do not require approval. ● Deny: Any transaction that exceeds a limit is denied.
14. Now go back to the previous section in the table. Check the Approve box to allow the user role to approve outgoing transfers created by other users.
15. Finally, you can enter a limit amount for single transfers and for a daily total, which cannot exceed what’s been set for the company. This amount ties to the entitlements set in steps 12 and 13.
User Guide - Interac e-Transfer for Business 12

16. To manage entitlements for money requests, inside the Transaction Type table, check the Release box in the Send Money Request row to allow the user role to request money by Interac e-Transfer. Anything over the value in the Limit field will require approval or be denied (see the next step for details).
Tip: The user role will only be able to have their filled money requests deposited into the accounts you selected under “E-Transfer Request Money” in step 5.
17. Let’s jump ahead one spot in this table. For the Approval drop-down menu, choose a workflow approval setting for outgoing money requests created by this role.
● No Approval Required: User does not require any secondary approval and the transaction limit
is the same as what’s been set for the company (i.e., $10,000 maximum per transaction). ● Single Approval Required: Any transaction that exceeds the transaction limit must be approved
by one other user. Amounts below the transaction limit do not require approval. ● Dual Approval Required: Any transaction that exceeds the transaction limit must be approved
by two other users. Amounts below the limit do not require approval. ● Deny: Any transaction that exceeds the transaction limit is denied.
User Guide - Interac e-Transfer for Business 13

18. You can enter a transaction limit amount for money requests.
19. Now go back to the previous section in the table. Check the Approve box to allow the user role to approve outgoing transfers created by other users.
20. Click Save Role to save changes.
User Guide - Interac e-Transfer for Business 14

Manage company name
If you have access to multiple business entities through your ATB Online Business access, you can change the company name and email address that will be displayed each time an Interac e-Transfer is sent. Here’s how:
1. Go to the Profile screen.
2. On the Profile screen, update the Company Name and/or Company Email Address.
Tip: By updating the company name, any reminder notifications you send will use this name even if you originally sent the transfer under a different company name.
3. Click Save.
User Guide - Interac e-Transfer for Business 15

Manage recipients
When you are ready to send money via Interac e-Transfer, you first need to set up a recipient.
1. Select the Recipients page.
2. Click Add Recipient.
3. Enter a unique recipient Name.
User Guide - Interac e-Transfer for Business 16

4. Select the Preferred Contact Method – either E-mail or SMS.
5. When E-mail is selected, enter a valid E-mail address.
User Guide - Interac e-Transfer for Business 17

6. When SMS is selected, you will need to enter both an E-mail and a Mobile Phone Number.
7. Select the Language Preference – this will determine what language is used in the notification email.
User Guide - Interac e-Transfer for Business 18

8. Enter a Security Question and the Security Answer. The answer must be provided to the recipient using another method, such as a separate email or text message.
Tip: Do not provide the answer in the memo text of a transfer.
9. Enter the answer to the question. This must be provided to the recipient using another method, such as a separate email or text message.
Manage e-Transfers
Send via Interac e-Transfer
1. Go to the Send Money screen.
User Guide - Interac e-Transfer for Business 19

2. Click on the arrow to see a list of your existing recipients.
3. Selecting the desired recipient will bring up their security question.
Tip: Click on the Edit Recipient link if you need to change the security question.
4. Select an account to fund the transfer. Only those accounts you have entitlements for will be shown in the list.
5. Enter the Amount.
User Guide - Interac e-Transfer for Business 20

6. Enter an optional message, up to 400 characters.
7. Click Continue.
8. Verify the details, and click Submit to send the transfer. You can click Back if you wish to correct any of the details.
User Guide - Interac e-Transfer for Business 21

Receive money with Interac e-Transfer
When you receive an Interac e-Transfer email you will be asked whether you want to deposit the funds into a personal (ATB Online) or business (ATB Online Business) account.
To deposit the funds into your business account, select the ATB Online Business option.
User Guide - Interac e-Transfer for Business 22

Cancel a transfer
You can cancel a transaction you’ve sent and have the funds returned to your account as long as the transaction is in “Pending” status (meaning the recipient hasn’t yet accepted the transfer).
To cancel a pending transfer:
1. Select History from the Interac e-Transfer page.
2. Select Transaction Type of Funds Sent.
User Guide - Interac e-Transfer for Business 23

3. Find the transaction you wish to cancel and confirm it says Pending in the Status column.
4. Click the Cancel link in the far-right column.
A pop-up will ask you to confirm the action. Select Cancel e-Transfer.
User Guide - Interac e-Transfer for Business 24

Re-send a notification
Email is great but it isn’t perfect. If a recipient can’t find the notification message from Interac allowing them to claim the money you’ve sent, you can re-send them the notification email.
Tip: This can also be done if you used the wrong email address initially. Simply correct the email address in the recipient’s profile, then go to the History screen to send a new notification message.
1. Access the History page. Select Transaction Type of Funds Sent.
2. Locate the Interac e-Transfer you want to send a new notification message to. Click the Resend Notification link in the far-right column.
Workflow & approvals
Company administrators can set up approval permissions that give users the authority to send money via Interac e-Transfer and give other users the responsibility to review it before it gets submitted. An “originator” creates the transaction, and an “approver” approves or rejects the transaction.
User Guide - Interac e-Transfer for Business 25

1. If you have approval entitlements, you can find transactions pending approval on the Account Summary screen when you first log in to ATB Online Business.
2. If there are items pending approval, click on the Approvals item to expand the list.
3. Click on the first link that indicates the number of transactions pending approval.
User Guide - Interac e-Transfer for Business 26

4. On the Approvals screen, click the checkbox beside each transaction you wish to approve (or decline) and then click the appropriate decision button at the bottom of the transaction list.
Autodeposit Creating an autodeposit rule allows you to receive money via Interac e-Transfer without having to answer a security question. You simply associate an email address with one of your accounts, and then every time someone sends you money via Interac e-Transfer to that email address, the money is immediately deposited into your account.
Create a rule
You may only create one rule for each unique email address, although you may associate more than one email address to a deposit account.
1. Go to the Autodeposit page.
2. Enter the email address where you will be receiving Interac e-Transfer notification emails.
User Guide - Interac e-Transfer for Business 27

3. Select the deposit account where funds will be automatically deposited.
4. Select the account where funds will be automatically deposited.
5. You will notice that your company’s legal name is displayed, which may not be the same as what you have currently saved on the Profile page. This Registered Company Name is your company’s legal name, which may also include your trade name, provided to ATB at the time you set up your account. This is the company name which will be displayed to anyone sending money via Interac e-Transfer to any email address used to create an autodeposit rule.
Tip: If either your legal or trade name has changed since you signed up, you may correct the information by providing updated documentation to your ATB representative.
User Guide - Interac e-Transfer for Business 28

6. Click Save.
7. A confirmation message is shown.
8. The new rule shows as pending until you confirm the rule with Interac.
User Guide - Interac e-Transfer for Business 29
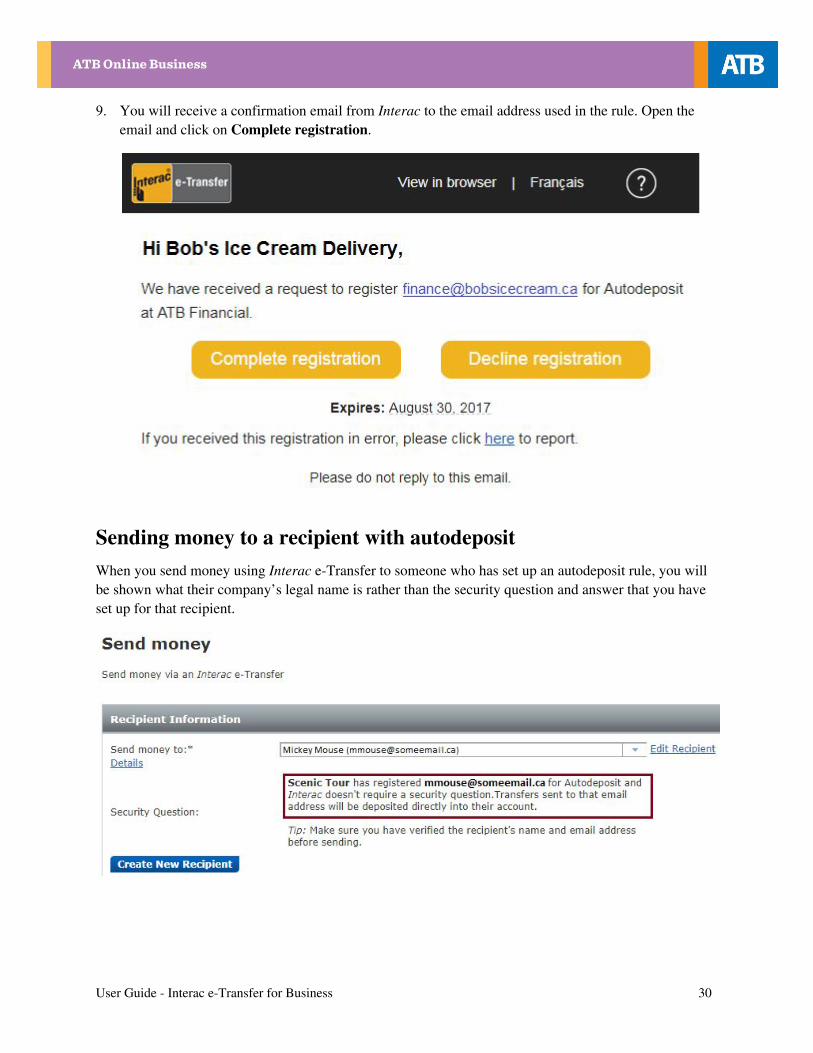
9. You will receive a confirmation email from Interac to the email address used in the rule. Open the email and click on Complete registration.
Sending money to a recipient with autodeposit
When you send money using Interac e-Transfer to someone who has set up an autodeposit rule, you will be shown what their company’s legal name is rather than the security question and answer that you have set up for that recipient.
User Guide - Interac e-Transfer for Business 30

Request Money The request money service allows you to send a request for money to any of your recipients, which they will fulfill using Interac e-Transfer. Any fulfilled money request will be automatically deposited into an account that you have pre-selected.
Sending a request
1. Select Request Money from the menu.
2. Select the recipient you would like to request money from.
Tip: Click Create New Recipient to add a new recipient. Once they have been added, you will be returned to the Request Money screen.
User Guide - Interac e-Transfer for Business 31

3. Select an account where you want the funds to be deposited, when the recipient fulfills your request for money.
Tip: A user may only select a deposit account for which they have been given entitlements.
4. Enter the Amount of your request. The recipient of the request must either pay in full or decline the request.
5. You may optionally provide an Invoice Number.
User Guide - Interac e-Transfer for Business 32

6. Provide an Invoice Due Date for the payment if desired, which can be any date between the current date and 90 days in the future.
7. An optional Message can be entered, to provide the recipient of the request additional details about your request.
8. Your company’s legal name, and trade name if applicable, will be shown. This is the name that the request recipient will be shown.
User Guide - Interac e-Transfer for Business 33

9. Click Continue to review details before the money request is sent.
You may click Back to correct any information, then when you are ready to send the request click Submit.
User Guide - Interac e-Transfer for Business 34

Fulfilling a request
When someone sends you a request for money, you will receive an email from Interac with the details of the request provided by the requester.
1. If you recognize the request, click Accept Request and select ATB from the list of available banks.
Tip: After you have responded to your first request, future requests will provide a link to ATB within the money request email.
User Guide - Interac e-Transfer for Business 35

2. If you do not wish to fulfill the request, click on Decline Request in the email. You will be taken to an Interac website where you will have the option of declining this, and if you wish, all future requests from the requester.
Tip: The requester will receive an email indicating you have declined the request along with your reason for declining.
User Guide - Interac e-Transfer for Business 36

History: Interac e-Transfer You can view Interac e-Transfer history from the last 12 months on the Interac e-Transfer history screen.
Funds sent
1. Go to History.
2. Select the Transaction Type.
3. The initial list of search results are for the past 7 days. Change From Date, To Date then Search to change the results timeframe.
User Guide - Interac e-Transfer for Business 37

4. To change the number of results displayed on each page, change the value for Items per page.
5. You can filter a long list of results by entering a keyword found in the Recipient column, then clicking Filter Results.
6. Click on any underlined column heading to sort ascending by that column. Click again to sort descending.
User Guide - Interac e-Transfer for Business 38

7. Select from the Status list in order to filter results for just that status, for the specified date range.
8. Click Download to export the current list of results to a CSV file.
Contact us For more information or if you have any questions please contact us.
Business & Agriculture clients call 1-888-655-5152.
Corporate Financial Services clients call 1-877-363-4855.
User Guide - Interac e-Transfer for Business 39

Frequently asked questions What happens to the money when one of my recipients declines or never accepts an Interac e-transfer?
After 30 days, the transfer will expire. Your recipient will receive a notification that they can no longer accept the Interac e-Transfer. You will receive a notification advising you to cancel the transaction to reclaim your funds.
If you do not cancel the transactions, after a period of time, ATB Financial will cancel it on your behalf and the funds will be returned to the originating account.
Why do I have to choose between ATB Online and ATB Online Business when I am receiving an Interac e-transfer, and what if I pick the wrong one?
ATB Financial has two Online Banking platforms, one for our personal banking clients, and one for our business clients. Some users have two sets of login credentials, one for each platform. If you select the wrong platform, simply close the browser, and go back to the notification message that Interac has sent you. This will restart the process and allow you to re-select the correct platform.
One of my recipients is in Quebec so I selected French as the language of preference, however the Interac e-Transfer email text is still in English – what does selecting French as the preferred language do?
Selecting French as the preferred language for one of your clients means that the security question and answer will be in French. The rest of the Interac e-Transfer will be conducted in English.
What accounts are eligible to use the Interac e-Transfer service?
All business and agricultural deposit accounts, along with some retail accounts are eligible to use the Interac e-Transfer send and receive services, as long as your company is enrolled in the service and your user role has been given entitlements to conduct transactions.
You cannot use non-deposit accounts like your MasterCard, HELOC, or an investment product to send or receive an Interac e-Transfer.
Why do I have to answer a security question when I have an autodeposit rule setup?
The bank that the person is using to send you the money is not yet set up to handle transferring funds through autodeposit.
User Guide - Interac e-Transfer for Business 40