ibm control desk: installation guide (ibm websphere)...“increasing aix paging space” on page 9...
TRANSCRIPT
IBM Control DeskVersion 7 Release 5.3
Installation Guide(IBM WebSphere)
���

NoteBefore using this information and the product it supports, read the information in “Notices” on page 295.

Contents
Chapter 1. Preparing for installation . . 1Before you begin . . . . . . . . . . . . . 1
Programmatically verifying prerequisites . . . . 2Checking port availability . . . . . . . . . 7Accessing system directories . . . . . . . . 7AIX and HP-UX tar command requirements . . . 8AIX font requirements . . . . . . . . . . 8Increasing AIX file size and number of descriptors 8Increasing AIX paging space . . . . . . . . 9Verifying large page size support for AIX . . . 10Enabling asynchronous I/O on AIX . . . . . 10Checking for required libraries on Linux. . . . 11Configuring the JRE in Linux . . . . . . . 11Setting the ulimit . . . . . . . . . . . 12Setting the swap size . . . . . . . . . . 12Setting shared memory . . . . . . . . . 12Remote configuration enablement . . . . . . 13Enabling SSL client authentication . . . . . . 14System password policy settings . . . . . . 15Backing up the Deployment Engine database . . 15Specifying host name values. . . . . . . . 16
Establishing a fully qualified host name onWindows systems . . . . . . . . . . 16Forcing the middleware installer to usealphanumeric hostnames . . . . . . . . 16
Enabling full text search for IBM DB2 . . . . 17Launchpad . . . . . . . . . . . . . . 17
Starting the launchpad . . . . . . . . . 17
Chapter 2. Deploy with automaticmiddleware configuration. . . . . . . 19Middleware installation program middlewaredeployment plan overview . . . . . . . . . 19Installing middleware using the middlewareinstallation program . . . . . . . . . . . 19
Middleware installation program logs . . . . 22Middleware installation program log reference 24
Configuring IBM Tivoli Directory Server user andgroup strings . . . . . . . . . . . . . 34Configuring SSL between Microsoft ActiveDirectory and WebSphere Application ServerNetwork Deployment . . . . . . . . . . 35
Uninstalling middleware . . . . . . . . . . 39Reinstalling middleware with IBM DB2 . . . . . 40Installation program overview . . . . . . . . 41
Simple installation path values . . . . . . . 42Installing the product and automaticallyconfiguring middleware . . . . . . . . . 44Installing optional content . . . . . . . . 50Installing optional integration modules . . . . 50
Language deployment after database updatedeferral . . . . . . . . . . . . . . . . 51
Manually deploying languages after databaseupdate deferral . . . . . . . . . . . . 51
Chapter 3. Deploying automaticallyreusing existing middleware . . . . . 53Run the middleware installation program onexisting middleware servers . . . . . . . . . 53
Configuring an existing DB2 with themiddleware installation program . . . . . . 55Verifying an existing IBM Tivoli Directory Serverusing the middleware installer . . . . . . . 57Preparing Microsoft Active Directory for reuse . 58
Installation program overview . . . . . . . . 59Simple installation path values . . . . . . . 61Installing the product and automaticallyconfiguring middleware . . . . . . . . . 63Installing optional content . . . . . . . . 69Installing optional integration modules . . . . 69
Language deployment after database updatedeferral . . . . . . . . . . . . . . . . 70
Manually deploying languages after databaseupdate deferral . . . . . . . . . . . . 70
Chapter 4. Deploying manually reusingexisting middleware . . . . . . . . . 73Control Desk installation with manual middlewareconfiguration . . . . . . . . . . . . . . 73
Manually configuring the database . . . . . 73Manually configuring DB2 9.x . . . . . . 74Manually configuring Oracle 11g . . . . . 75Manually configuring Oracle 10g . . . . . 78Manually configuring Microsoft SQL Server 80
Manually configuring the directory server . . . 82Manually configuring IBM Tivoli DirectoryServer . . . . . . . . . . . . . . 83Manually configuring Microsoft ActiveDirectory . . . . . . . . . . . . . 87
Manually configuring the J2EE server . . . . 91Manually configuring WebSphere ApplicationServer Network Deployment . . . . . . 91
Installing the product and manually configuringmiddleware . . . . . . . . . . . . . . 132Installing optional content . . . . . . . . . 138Installing optional integration modules . . . . . 138Language deployment after database updatedeferral . . . . . . . . . . . . . . . 139
Manually deploying languages after databaseupdate deferral . . . . . . . . . . . . 139
Chapter 5. Silent installation . . . . . 141Installing Control Desk silently . . . . . . . 141Silent installation properties . . . . . . . . 143
© Copyright IBM Corp. 2014 iii

Chapter 6. Programmatically verifyingthat the installation was successful . . 165
Chapter 7. Verifying the installationmanually . . . . . . . . . . . . . 171
Chapter 8. Configuring the HTTPOnlyattribute. . . . . . . . . . . . . . 173
Chapter 9. Installing IntegrationComposer . . . . . . . . . . . . . 175Integration Composer overview . . . . . . . 175Hardware and software requirements . . . . . 175Installation prerequisites. . . . . . . . . . 176Performing an Integration Composer installation 176
Installing Integration Composer using theLaunchpad . . . . . . . . . . . . . 177Installing Integration Composer on UNIXoperating systems in console mode . . . . . 178
Performing an Integration Composer upgrade . . 181Upgrading Integration Composer using theLaunchpad . . . . . . . . . . . . . 181Upgrading Integration Composer on UNIXoperating systems in console mode . . . . . 182
Confirming the installation . . . . . . . . . 184Post-installation tasks. . . . . . . . . . . 184
Verifying the settings in the IntegrationComposer fusion.properties file . . . . . 184Changing the memory allocation in thestartFusion file (optional) . . . . . . . . 186Changing the memory allocation in theexecuteMapping file (optional) . . . . . . . 187
Uninstalling Integration Composer . . . . . . 188Uninstalling Integration Composer on Windowsoperating systems . . . . . . . . . . . 188Uninstalling Integration Composer on UNIXoperating systems . . . . . . . . . . . 188
Chapter 10. Installing the Deployer'sWorkbench . . . . . . . . . . . . 191
Chapter 11. Installing IBM ControlDesk Everyplace . . . . . . . . . . 193Installing as part of a new product installation . . 193Installing as part of a product upgrade . . . . . 194Installing after Control Desk has been installed . . 194
Chapter 12. Post installation tasks 195Accessing product documentation . . . . . . 195Initial data configuration . . . . . . . . . 195
Signing in using a default user ID . . . . . 195Configuring SMTP . . . . . . . . . . 196Create currency codes . . . . . . . . . 197Create item and company sets . . . . . . . 197Create an organization . . . . . . . . . 197Create a general ledger account component . . 198Applying changes to the database . . . . . 198Create a general ledger account . . . . . . 199
Update General Ledger Component TypeAuthorization . . . . . . . . . . . . 199Update Company-Related Accounts . . . . . 200Create default insert site. . . . . . . . . 200Create worktypes . . . . . . . . . . . 200Create a classification structure for IT assets . . 201Specify a top-level class for IT assets andsoftware . . . . . . . . . . . . . . 202Signing out and signing in . . . . . . . . 203
Before working with BIRT reports . . . . . . 203Generating xml request pages . . . . . . . . 203Synchronizing users and groups . . . . . . . 204Understanding and configuring security . . . . 204
Chapter 13. Middleware clean upscripts . . . . . . . . . . . . . . 205Using the middleware cleanup scripts . . . . . 205
Chapter 14. Uninstalling the product 209Uninstalling an automatically configureddeployment . . . . . . . . . . . . . . 209
Running the product uninstallation program forautomatically configured middleware . . . . 210
Uninstalling a manually configured deployment 211Running the product uninstall program formanually configured middleware. . . . . . 211Database configuration recovery . . . . . . 212
Restoring the DB2 database server . . . . 212Restoring the Oracle database . . . . . . 213Restoring the Microsoft SQL Server database 214
Uninstalling the product without the uninstallationprogram . . . . . . . . . . . . . . . 215
Uninstall program recovery tool . . . . . . 215Using the uninstallation program recoverytool. . . . . . . . . . . . . . . 215
Manual uninstallation . . . . . . . . . 219Recovering WebSphere Application Serverconfiguration . . . . . . . . . . . 219Removing files from the system . . . . . 222
Chapter 15. Starting and stoppingmiddleware . . . . . . . . . . . . 223Restarting middleware on Windows . . . . . . 223Restarting middleware on UNIX . . . . . . . 224Stopping middleware on Windows . . . . . . 225Stopping middleware on Linux and AIX . . . . 226
Chapter 16. Process solution packageinstallation methods . . . . . . . . 229Software life cycle operations . . . . . . . . 229Process solution packages . . . . . . . . . 230Package types . . . . . . . . . . . . . 230Aggregation packages . . . . . . . . . . 231Determining which process solution installationprogram to use . . . . . . . . . . . . . 231Supported operations for the process solutioninstallation programs . . . . . . . . . . . 232Before using the process solution installationprograms . . . . . . . . . . . . . . . 233
iv IBM Control Desk: Installation Guide (IBM WebSphere)
Managing process solution deployment from theadministrative workstation . . . . . . . . . 233Typical deployment operation . . . . . . . . 234Selectable features . . . . . . . . . . . . 234Deferring J2EE and database configuration . . . 239
Manually completing deployment . . . . . 240Pre-deployment system check . . . . . . . . 241Installing process managers using the processsolution installation wizard. . . . . . . . . 242Process solution installation client command-lineinterface . . . . . . . . . . . . . . . 244
Starting the process solution installation clientCLI. . . . . . . . . . . . . . . . 244
General syntax . . . . . . . . . . . 244Perform action . . . . . . . . . . . 244Summary of supported parameters . . . . 245
Process solution command-line interfacereference . . . . . . . . . . . . . . 247
install action - install\ a package . . . . . 247modfeatures action - modify existing featuresof a deployed package . . . . . . . . 248
Process solution installation logs . . . . . . . 249
Chapter 17. Advanced installationtopics. . . . . . . . . . . . . . . 253WebSphere Application Server NetworkDeployment management . . . . . . . . . 253
Starting the application server from thecommand line . . . . . . . . . . . . 253Starting the application server from theadministrative console . . . . . . . . . 254Securing the WebSphere Application ServerNetwork Deployment administrative console . . 255Configuring Windows services . . . . . . 256
Configuring the WebSphere ApplicationServer Network Deployment applicationserver to run as a Windows service . . . . 256
Changing the middleware installation programconfiguration parameters . . . . . . . . . 257Maintaining EAR files . . . . . . . . . . 258
Building EAR files. . . . . . . . . . . 259Manually uninstalling applications fromWebSphere Application Server NetworkDeployment . . . . . . . . . . . . . 259Manually installing applications in WebSphereApplication Server Network Deployment . . . 259
Chapter 18. Middleware on Solarisand HP-UX . . . . . . . . . . . . 261Operating system preparation . . . . . . . . 261
Middleware installation on Solaris . . . . . 261HP-UX . . . . . . . . . . . . . . 261
Installing the components . . . . . . . . . 262Installing DB2 . . . . . . . . . . . . 262Installing IBM Tivoli Directory Server on Solaris 264Installing WebSphere Application ServerNetwork Deployment . . . . . . . . . 265
Creating WebSphere Application ServerNetwork Deployment profiles . . . . . . 266Manually configuring Virtual MemberManager on WebSphere Application ServerNetwork Deployment . . . . . . . . 268Installing the WebSphere update installer . . 272Installing and configuring IBM HTTP Server 272Installing the WebSphere plug-in . . . . . 275
Configuring Virtual Member Manager on IBMWebSphere Application Server NetworkDeployment . . . . . . . . . . . . . . 277
Chapter 19. Backup and restoration 279Backing up the administrative workstation . . . 279Restoring the administrative workstation . . . . 279Installation properties . . . . . . . . . . 280
Updating environment data . . . . . . . 293
Notices . . . . . . . . . . . . . . 295Trademarks . . . . . . . . . . . . . . 297
Index . . . . . . . . . . . . . . . 299
Contents v

vi IBM Control Desk: Installation Guide (IBM WebSphere)

Chapter 1. Preparing for installation
These topics provide information about product media, preinstallationconsiderations, overview of the installation procedure, and instructions on usingthe Control Desk launchpad.
Use the planning information to familiarize yourself with the overall process of aControl Desk deployment before you use this information to conduct theinstallation.
Before you beginA set of tasks must be completed before installing Control Desk. In some cases, toperform the steps, you must be logged in as a user with administrator privilegeson Windows or as root on UNIX. Some processes, such as anti-virus programs, cannegatively affect Control Desk installation on the system. You must temporarilyshut down any noncritical processes before running the Control Desk installationprogram.
Most tasks must be completed for middleware installed on UNIX systems,regardless of whether you intend to use the middleware installation program toinstall and configure Control Desk middleware. These tasks must be completed forany UNIX systems hosting middleware you intend to use with Control Desk.
Note: Make a copy of the image of the system, database, and application server onwhich you are planning to install the product.
Note: IBM® publishes updates to the middleware installation program. Beforeusing it, visit the IBM Support Portal to see whether there is an updated copy ofthe installation program available for your use.
Ensure that you have adequate disk space for the future on the systems being usedfor the Control Desk deployment. Filling up the disk space on a Control Deskdeployment system can cause problems with Control Desk operations.
Fully qualified host names provided to the installation programs must resolvebetween systems involved in the product deployment. Ensure all IP addressesconfigured for systems targeted for the product deployment are reachable usingthe ping command from the administrative workstation.
“Checking port availability” on page 7You need to ensure that certain ports are available before using the productinstallation programs.“AIX and HP-UX tar command requirements” on page 8Both the native UNIXtar command and the GNU version of the tar commandare required by the middleware installation program. Because the native utilitydoes not support long file names, ensure that GNU tar version 1.14 or higher isinstalled. GNU tar version 1.14 ensures that installation files can be extracted.“Increasing AIX file size and number of descriptors” on page 8For Control Desk to function correctly, you must increase the default number offile descriptors that are allowed for the root user and set the maximumallowable file size to unlimited.
© Copyright IBM Corp. 2014 1

“Increasing AIX paging space” on page 9To successfully install and run Control Desk, you must increase the defaultpaging space for the AIX® system to a minimum of 4 GB, or, preferably, thetotal amount of physical memory in the system.“Enabling asynchronous I/O on AIX” on page 10IBM Tivoli® Directory Server requires asynchronous I/O be enabled on AIXsystems.“Checking for required libraries on Linux” on page 11The Control Desk deployment requires certain Linux system libraries.“Configuring the JRE in Linux” on page 11In some cases, the middleware installation program fails on Red Hat EnterpriseLinux 5 systems, or other systems with Security-Enhanced Linux (SELinux)enabled.“Setting the ulimit” on page 12This section details how to set the ulimit in Linux, which is used to define usersystem and process resource limits.“Setting the swap size” on page 12Control Desk can be a resource-intensive application. Configure and tune yoursystem for maximum performance. This section details how to set the size ofthe swap space used in Linux systems.“Setting shared memory” on page 12This section details how to set a minimum shared memory value in Linux.“Remote configuration enablement” on page 13The Control Desk installation program can automatically configure middleware.You must enable a remote access protocol for each system on which you intendto install the middleware.“Enabling SSL client authentication” on page 14The Control Desk installation program and the process solution installer fail ifthe client authentication feature of secure sockets layer (SSL) is enabled in theIBM HTTP Server. You can use a workaround to enable client authenticationduring installation.“System password policy settings” on page 15Be familiar with the password policies of systems you are using as part of aControl Desk deployment.“Backing up the Deployment Engine database” on page 15These instructions are for backing up the Deployment Engine database.Backups are used to restore the database to the state it was before installing.“Programmatically verifying prerequisites”You can use the prerequisite verification utility to verify that installationprogram prerequisites are present on a system. Use this utility before startingthe middleware and product installation programs.
Programmatically verifying prerequisitesYou can use the prerequisite verification utility to verify that installation programprerequisites are present on a system. Use this utility before starting themiddleware and product installation programs.
About this task
The prerequisite verification utility checks the following items:v Operating system requirements, including fix packs.v Hardware requirements, including memory and hard disk space.
2 IBM Control Desk: Installation Guide (IBM WebSphere)

v Port availability.v Middleware requirements such as software packages, library files, directory
permissions, host names, and installation locations.
You can start the prerequisite verification utility from the product installationlaunchpad or from the command line. When started from the launchpad, the utilityruns in interactive mode. When started from the command line, the prerequisiteverification utility accepts various parameters. The prerequisite verification utilitymust be run on the system hosting the prerequisite being checked. You cannot usethis utility to check prerequisites on a remote system.
Table 1. System verification parameters
Parameters Details
-component Specifies the type of component being verified. At least one component must beused with the prerequisite verification utility.
dbserverUse the dbserver parameter to have the prerequisite verification utility checkfor DB2® prerequisites.
dirserverUse the dirserver parameter to have the prerequisite verification utility checkfor IBM Tivoli Directory Server prerequisites.
j2eeserverUse the j2eeserver parameter to have the prerequisite verification utilitycheck for WebSphere® Application Server Network Deployment prerequisites.
bsiUse the bsi parameter to have the prerequisite verification utility check forprerequisites required by the product installation program. Run theprerequisite verification utility with the bsi parameter on the administrativeworkstation.
Syntax example:
tpae_req_check.bat -component bsi
If you do not use the -component parameter, you are prompted to specifycomponents when using the utility.
Multiple components can be specified as comma-separated values.
Chapter 1. Preparing for installation 3

Table 1. System verification parameters (continued)
Parameters Details
-input The prerequisite verification utility can accept a property file as input. The utilityverifies property values found in the file.
For example, the default DB2 server port parameter is DB2_SERVER_PORT=50000.The prerequisite verification utility verifies that this port is available on the DB2server host.
The default input property file is tpae.properties, and is found on themiddleware installation media in the SystemRequirements directory. There are alsoseveral sample property files found in the SystemRequirements\sample_property_files. These sample property files contain custom valuesdefined for particular operating systems. You can copy these property files to thesystem and modify them, or create your own, before running the prerequisiteverification utility.
Syntax example:
tpae_req_check.bat -component dbserver -input path to the property file
If you do not use the input parameter when you run the prerequisite verificationutility, the utility is run in interactive mode. You are prompted for individualvalues to be verified.
-mode The prerequisite verification utility can be run in silent or interactive mode.
interactiveBy default, the prerequisite verification utility is run in interactive mode. Ifyou do not specify the -mode parameter, the utility defaults to running ininteractive mode. When started from the launchpad, the utility runs ininteractive mode.
silentIf you use the silent qualifier, you can also use the input parameter andsupply a property file. If an input file not provided, default property valuesare used. The output must also be directed to a file to view the results.
Syntax example:
tpae_req_check.bat-component dbserver-mode silent-input path to the property file > prereqresults.log
-lang Parameter used to specify the locale of the system being verified.
Syntax example:
tpae_req_check.bat-component dbserver-lang en
Results are produced in the language of the locale specified.
This is an optional parameter.
By default, the language set in the system locale is used. If the resource bundle isnot found for the system locale, or, the system locale language is not supported,messages are displayed in English.
4 IBM Control Desk: Installation Guide (IBM WebSphere)
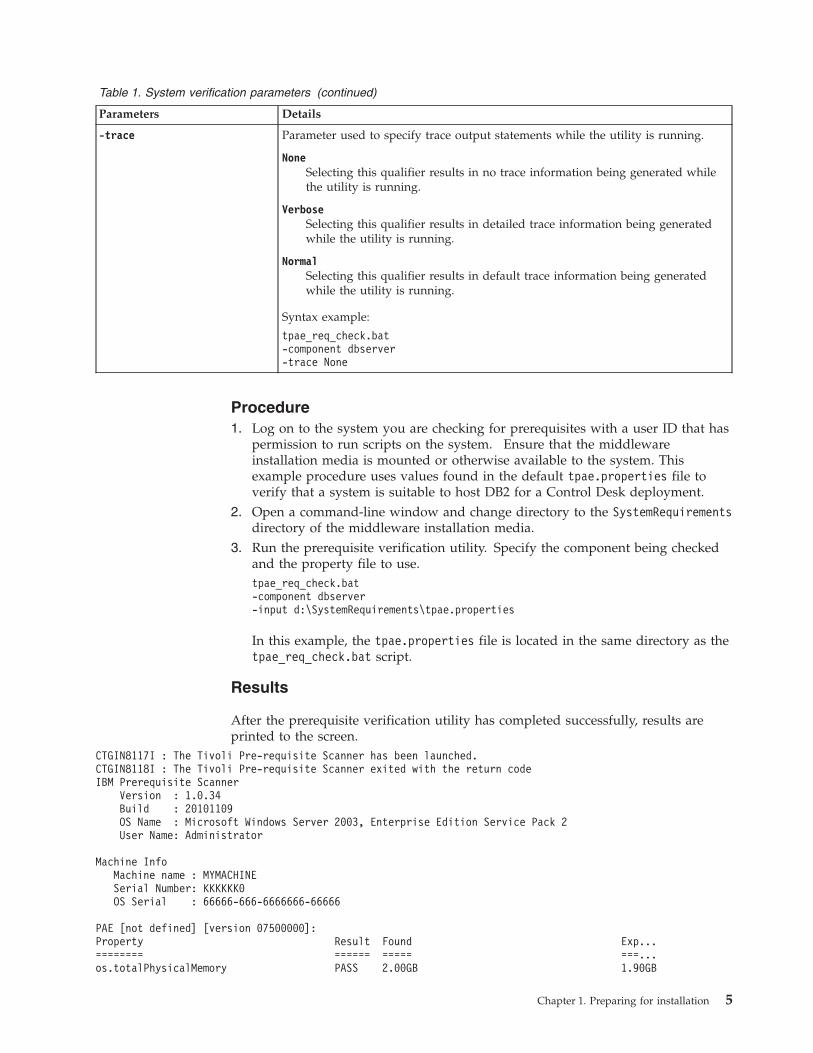
Table 1. System verification parameters (continued)
Parameters Details
-trace Parameter used to specify trace output statements while the utility is running.
NoneSelecting this qualifier results in no trace information being generated whilethe utility is running.
VerboseSelecting this qualifier results in detailed trace information being generatedwhile the utility is running.
NormalSelecting this qualifier results in default trace information being generatedwhile the utility is running.
Syntax example:
tpae_req_check.bat-component dbserver-trace None
Procedure1. Log on to the system you are checking for prerequisites with a user ID that has
permission to run scripts on the system. Ensure that the middlewareinstallation media is mounted or otherwise available to the system. Thisexample procedure uses values found in the default tpae.properties file toverify that a system is suitable to host DB2 for a Control Desk deployment.
2. Open a command-line window and change directory to the SystemRequirementsdirectory of the middleware installation media.
3. Run the prerequisite verification utility. Specify the component being checkedand the property file to use.tpae_req_check.bat-component dbserver-input d:\SystemRequirements\tpae.properties
In this example, the tpae.properties file is located in the same directory as thetpae_req_check.bat script.
Results
After the prerequisite verification utility has completed successfully, results areprinted to the screen.
CTGIN8117I : The Tivoli Pre-requisite Scanner has been launched.CTGIN8118I : The Tivoli Pre-requisite Scanner exited with the return codeIBM Prerequisite Scanner
Version : 1.0.34Build : 20101109OS Name : Microsoft Windows Server 2003, Enterprise Edition Service Pack 2User Name: Administrator
Machine InfoMachine name : MYMACHINESerial Number: KKKKKK0OS Serial : 66666-666-6666666-66666
PAE [not defined] [version 07500000]:Property Result Found Exp...======== ====== ===== ===...os.totalPhysicalMemory PASS 2.00GB 1.90GB
Chapter 1. Preparing for installation 5

network.hasFQDN FAIL False TrueDisk#1 (C:\ibm\tivoli\mwi\workspace) PASS 27.99GB 300MBDisk#2 (C:\Temp\1) PASS 27.99GB 1000MBDisk#3 (C:\Temp\1) PASS 27.99GB 250MBnetwork.availablePorts.db2 PASS 135,445,1025,2967,3389,5800,5900,139 50000network.availablePorts.ctginst PASS 135,445,1025,2967,3389,5800,5900,139 50005Disk#4 (C:\Program Files\IBM\SQLLIB) PASS 27.99GB 1.40GB
ALL COMPONENTS :Property Result Found Exp...======== ====== ===== ===...C: PASS 27.99GB 2.91GB
Prereq Scanner Overall Result: FAILprereq_checker.bat 1
These values can also be redirected to a file when starting the command from thecommand line.
If any of the verification steps report a failure, resolve the issue and rerun theverification utility before installing Control Desk components.
Table 2 contains a list of the properties checked. Use this information to analyzeprerequisite verification utility results.
Table 2. Prerequisite verification utility properties
Property Description
CpuArchitecture Verifies the machine architecture is supported.
disk(rw permissions) Checks read/write permissions of required directories.
network.availablePorts.* Verifies required ports are available.
The following example checks to ensure a port required by DB2 is available.
network.availablePorts.db2inst=50000
network.dns Verifies there is a DNS entry for the system on the DNS server.
network.fqdn Verifies that the system host name is fully qualified.
os.architecture Verifies the operating system architecture is supported.
os.dir.tmp/home Verifies required permissions for the system directories
os.FreePagingSpace Verifies adequate free paging space is available on the system.
os.iodevicestatus Verifies the I/O device status of the system.
os.lib.ksh Checks the ksh library.
os.lib.libstdc++.so.5 Verifies a prerequisite library is available on the system.
os.lib.xlC.rte=xlC.rte.9.0.0.8+ Verifies a prerequisite library is available on the system.
os.mountcheck Checks for the existence of nosuid on the file system.
os.package.rpm Verifies prerequisite packages are available on the system.
os.RAMSize Reports system RAM available.
os.SELinux Determines if selinux is enabled.
os.servicePack Verifies required service packs are installed on the system.
os.shell.default Determines the default shell for users.
6 IBM Control Desk: Installation Guide (IBM WebSphere)
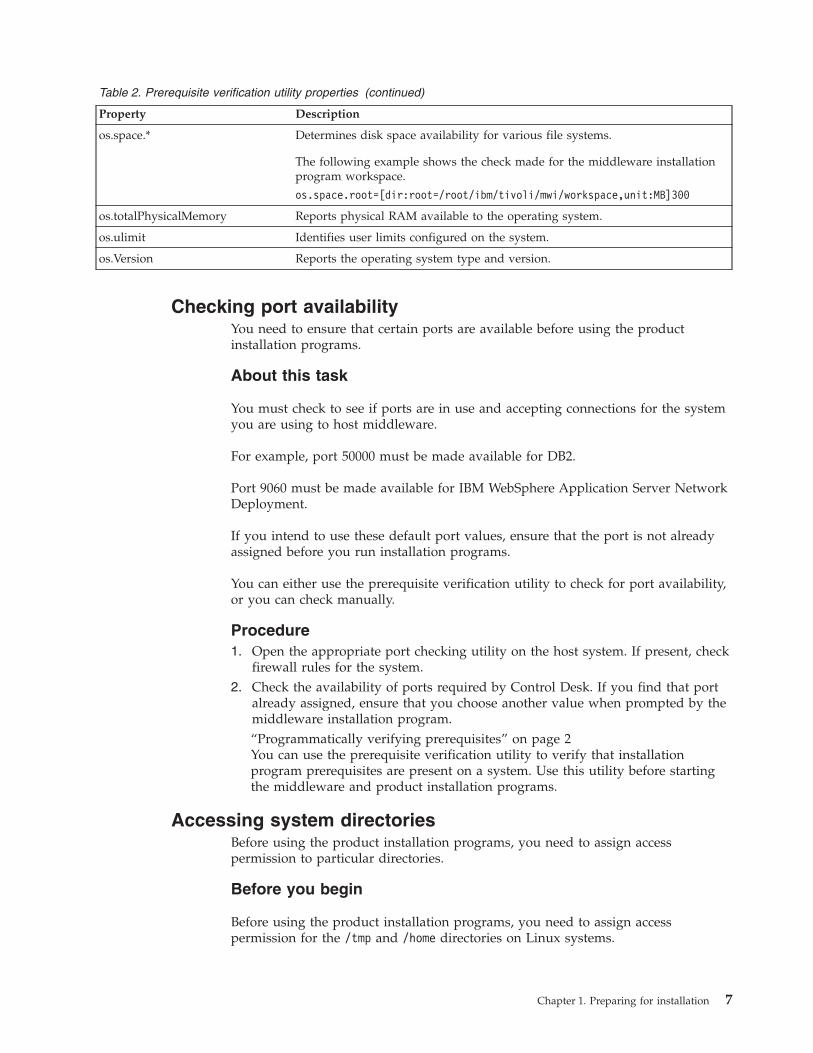
Table 2. Prerequisite verification utility properties (continued)
Property Description
os.space.* Determines disk space availability for various file systems.
The following example shows the check made for the middleware installationprogram workspace.
os.space.root=[dir:root=/root/ibm/tivoli/mwi/workspace,unit:MB]300
os.totalPhysicalMemory Reports physical RAM available to the operating system.
os.ulimit Identifies user limits configured on the system.
os.Version Reports the operating system type and version.
Checking port availabilityYou need to ensure that certain ports are available before using the productinstallation programs.
About this task
You must check to see if ports are in use and accepting connections for the systemyou are using to host middleware.
For example, port 50000 must be made available for DB2.
Port 9060 must be made available for IBM WebSphere Application Server NetworkDeployment.
If you intend to use these default port values, ensure that the port is not alreadyassigned before you run installation programs.
You can either use the prerequisite verification utility to check for port availability,or you can check manually.
Procedure1. Open the appropriate port checking utility on the host system. If present, check
firewall rules for the system.2. Check the availability of ports required by Control Desk. If you find that port
already assigned, ensure that you choose another value when prompted by themiddleware installation program.“Programmatically verifying prerequisites” on page 2You can use the prerequisite verification utility to verify that installationprogram prerequisites are present on a system. Use this utility before startingthe middleware and product installation programs.
Accessing system directoriesBefore using the product installation programs, you need to assign accesspermission to particular directories.
Before you begin
Before using the product installation programs, you need to assign accesspermission for the /tmp and /home directories on Linux systems.
Chapter 1. Preparing for installation 7

About this task
The user that starts the product installation programs requires read, write, andexecute permissions for the /tmp and /home directories. If one of these directoriesuses a symbolic link, for example, /products/home, ensure that symbolic linkdirectory also has the proper access.
Procedure1. Log in to the system as a user with root authority on the system.2. Enter the following commands:
#chmod 777 /tmp#chmod 777 /home
AIX and HP-UX tar command requirementsBoth the native UNIXtar command and the GNU version of the tar command arerequired by the middleware installation program. Because the native utility doesnot support long file names, ensure that GNU tar version 1.14 or higher isinstalled. GNU tar version 1.14 ensures that installation files can be extracted.
Verify that the system path variable contains both native UNIX tar and GNU tarpaths. The GNU tar path must be defined before the native UNIX tar path. Forexample, the native tar utility is installed in /usr/bin and the GNU tar utility isinstalled in /opt/freeware/bin/tar.
If you have set a symbolic link to overwrite the native UNIX tar command withthe GNU tar command an error occurs.
http://www.ibm.com/systems/p/os/aix/linux/toolbox/download.html
AIX font requirementsAIX requires specific fonts in order to produce reports.
About this task
When producing reports from AIX systems, TrueType fonts must be available onthe system.
Procedure1. Install TrueType fonts on the AIX system.2. Ensure the fonts-path environment variable refers to the location of the fonts.
Increasing AIX file size and number of descriptorsFor Control Desk to function correctly, you must increase the default number offile descriptors that are allowed for the root user and set the maximum allowablefile size to unlimited.
About this task
To increase the allowable file size and number of allowable descriptors for the rootuser in AIX, complete the following steps:
Procedure1. Edit the /etc/security/limits file by opening it in a text editor.
8 IBM Control Desk: Installation Guide (IBM WebSphere)

2. Locate the section for the root user, and change the parameters to the followingvalues:root:
fsize = -1nofiles = 8192
A value of -1 for the fsize parameter indicates no limit.3. Save and exit the file. You must log out as root and log back in for these
changes to take effect.4. Verify the settings from a command window using the following command:
ulimit -a
Output from the ulimit command is like the following example:time(seconds) unlimitedfile(blocks) unlimiteddata(kbytes) 2097152stack(kbytes) 32768memory(kbytes) unlimitedcoredump(blocks) 2097151nofiles(descriptors) 8192
Increasing AIX paging spaceTo successfully install and run Control Desk, you must increase the default pagingspace for the AIX system to a minimum of 4 GB, or, preferably, the total amount ofphysical memory in the system.
About this task
In order to add more paging space, you add more logical partitions to the system.
Procedure1. Determine the current amount of paging space available to the server by
issuing the following command.lsps -a
This command results output contains the following information, for example:
Page Space Physical Volume Volume Group Size Used
hd6 hdisk0 rootvg 5632MB 2
2. Determine the size of a logical partition by issuing the following command:lslv hd6
This command results in output that includes partition information, forexample:
Table 3.
LPs PP Size
44 127 megabytes
In the example output, there are a total of 44 Logical Partitions that are each128 Mb in size. These results show a total of 5632 Mb of paging space availableto the system.
3. Add more logical partitions, which are required in order to add more pagingspace, by issuing the following command:chps -s xx yyy
Chapter 1. Preparing for installation 9

Where xx is the number of logical partitions to add and yyy identifies thelogical volume. For example,chps -s 10 hd6
adds 10 logical partitions to the logical volume hd6, which results in adding1280 Mb to the paging space.
Verifying large page size support for AIXFor Control Desk to function correctly, large page size support must be enabled onAIX servers that host WebSphere Application Server.
About this task
If you are deploying Control Desk on WebSphere Application Server hosted on anAIX system, that system must be configured to support large page sizes.
Large page usage is primarily intended to provide performance improvements tohigh performance computing applications. Typically this feature is enabled bydefault on AIX systems.
Procedure1. Log on to the AIX system that hosts WebSphere Application Server and open a
console window. You must have root authority to work with the AIX operatingsystem commands.
2. Verify large page size support by running the following command:ps -Z
Output from the command includes 4K and 64K page sizes listed for processes,for example:# ps -Z
PID TTY TIME DPGSZ SPGSZ TPGSZ CMD311342 pts/4 0:00 4K 4K 4K ksh397526 pts/4 0:00 4K 4K 4K ps487558 pts/4 0:00 64K 64K 4K sleep
Enabling asynchronous I/O on AIXIBM Tivoli Directory Server requires asynchronous I/O be enabled on AIX systems.
About this task
Enabling asynchronous I/O on AIX is an installation requirement, so this stepmust be run before running the middleware installation program. You need toperform this step only if the system hosts the IBM Tivoli Directory Server.
Without asynchronous I/O, DB2 database instances cannot be started successfully.
Without asynchronous I/O, Oracle database instances cannot be startedsuccessfully.
To turn on asynchronous I/O follow these steps:
Procedure1. Log in to the system as root.2. Open a terminal and run the following command:
10 IBM Control Desk: Installation Guide (IBM WebSphere)

smit chgaio
3. From the System Management Interface Tool (SMIT) dialog box, change STATEto be configured at system restart from defined to available.
4. Click OK.5. Exit SMIT.6. Run the following command from the command line:
smit aio
7. In the System Management Interface Tool (SMIT) dialog box, select ConfigureDefined Asynchronous I/O, and then click Enter.
8. Reboot the system to enable the changes.
Checking for required libraries on LinuxThe Control Desk deployment requires certain Linux system libraries.
Procedure1. Locate the libstdc++.so.5 library in the /usr/lib/ directory. If this library is
not installed, the middleware installation program throws an error whenrunning the middleware installation program in graphical mode. If you cannotlocate this library on your system, locate the RPM package for your system thatcontains this library and install the package.
2. Ensure that you have the libstdc++33-32bit-3.3.3-11.9.x86_64.rpm packageinstalled before running the product installation program. SUSE LinuxEnterprise Server 10 64-bit systems hosting manually configured middlewaremust host this package.
3. Ensure you have the compat-libstdc++ library installed on Red Hat EnterpriseLinux v6 systems running the product installation program or the processsolution installation program.
Configuring the JRE in LinuxIn some cases, the middleware installation program fails on Red Hat EnterpriseLinux 5 systems, or other systems with Security-Enhanced Linux (SELinux)enabled.
About this task
In one scenario, the middleware installation program fails with an error statingthat the Java™ Runtime Environment (JRE) cannot be found. In another scenario,the middleware installation program fails stating that it cannot find the VM.
Complete the following steps to avoid these problems:
Procedure1. Temporarily disable SELinux by using the setenforce 0 command.2. Run the middleware installation program.3. Re-enable SELinux by using the setenforce 1 command.4. Manually issue the chcon -R -t textrel_shlib_t install_home/jvm/jre> command.
Results
The middleware installation program is now able to locate the JRE. Alternatively,you can edit the /etc/selinux/config file and set SELINUX to either permissive or
Chapter 1. Preparing for installation 11
disabled for a more permanent fix. This solution, however, affects the level ofsecurity for the entire system.
Setting the ulimitThis section details how to set the ulimit in Linux, which is used to define usersystem and process resource limits.
About this task
For Linux systems, you must set the ulimit for the system before using themiddleware installation program.
If you set the ulimit in .profile for root, the ulimit setting applies to all processes.
To set the ulimit, complete the following steps:
For AIX systems, see “Increasing AIX file size and number of descriptors” on page8.
Procedure1. From a command line, type ulimit -f unlimited
2. From a command line, type ulimit -n 8192
Setting the swap sizeControl Desk can be a resource-intensive application. Configure and tune yoursystem for maximum performance. This section details how to set the size of theswap space used in Linux systems.
About this task
Typically, the swap size for Linux is set to twice the amount of physical RAM inthe server. See the product documentation for your Linux distribution for moreinformation. For AIX systems, See “Increasing AIX paging space” on page 9.
Additional swap space can be made available to the system by:
Procedurev increasing the size of the existing swap partitionv creating a new, additional swap partitionv creating a swap file
Setting shared memoryThis section details how to set a minimum shared memory value in Linux.
About this task
For Linux systems, you must set a minimum shared memory value for the systembefore using the middleware installer.
To set the minimum shared memory value, complete the following steps:
12 IBM Control Desk: Installation Guide (IBM WebSphere)

Procedure1. From a command line, type sysctl kernel.shmmax and determine if the value is
less than 268435456 bytes (256 Mb).2. If you must increase the value, from a command line, type sysctl -w
kernel.shmmax=268435456.3. Update the value in /etc/sysctl.conf.
Remote configuration enablementThe Control Desk installation program can automatically configure middleware.You must enable a remote access protocol for each system on which you intend toinstall the middleware.
Use SSH for logging on to and configuring remote Linux and UNIX systems. UseWindows SMB for logging on to and configuring remote Windows systems.Windows SMB is a Windows protocol. The IBM JRE on the administrativeworkstation includes SSH.
You do not need an SSH client to remotely configure middleware on Linux orUNIX systems. But, you must install OpenSSH on remote non-Windowsworkstations so that you can log on to them, using SSH protocol.
Before you start the installation program, ensure that you can log on to any remoteservers with the protocols that you intend to use. Use the credentials that you planto supply to the installation program.
For remote Windows systems, ensure that the following requirements are metbefore installing the software:v The user name that you provide to the installation program must exist as a local
account on the remote system. This user must be a member of the WindowsAdministrators group.
v The following Windows services must be started on the remote system beforeyou begin a remote installation and configuration:– winmgmt (Windows Management Instrumentation)– RemoteRegistry (Remote Registry)– lanmanserver (Service)
v The SMB protocol must be enabled and configured to send NetBIOS overTCP/IP, by choosing to use port 139. Alternatively, you can configure SMB touse TCP/IP as the transport protocol, without NetBIOS, by configuring it to useport 445.
v Ensure that any ports that you use for remote protocols are not blocked byfirewalls or security policies, including ports 137 and 139. Port 139 is used ifSMB is configured to run on NetBIOS over TCP/IP. Port 445 is used if SMB isrun directly on TCP/IP, without NetBIOS.
v To disable simple file sharing, start Windows Explorer. Click Tools > FolderOptions, and clear the Use Simple File Sharing check box.
v The Windows administrative share (C$) and the interprocess communications(IPC$) folder must be shared.
v For Microsoft Windows Server 2008 systems that support password-protectedsharing, disable password-protection. Shares must be shared for the Guest orEveryone accounts.
v For Windows systems that have User Account Control (UAC) enabled, it mustbe disabled before software can be remotely installed and configured.
Chapter 1. Preparing for installation 13
v If Cygwin is installed on the remote Windows system the SSH daemon (sshd)must be uninstalled or disabled.
For remote Linux or UNIX systems, ensure that the following requirements are metbefore installing the software:v For AIX systems, set the following SSH parameters located in the
/etc/ssh/sshd_config file:– ClientAliveInterval 900– ClientAliveCountMax 10
Stop the SSH daemon using the stopsrc -s sshd command and then restart itusing the startsrc -s sshd command.
v For AIX systems, set the TMOUT and TIMEOUT variables in the user profilescript to 0. This setting prevents the user from idling out and being logged offthe remote system during the installation.
v The user name that you provide to the installation program must exist as aprivileged account (for example, root) on the remote systems.
v Ensure that a current version of OpenSSH is installed and running. Do not useOpenSSH 4.7.0.5302.
v For Oracle Solaris systems, the remote access protocols require the use ofinternal shell scripts that must be run within the korn (ksh) shell. The methodsneed ksh, even if the user ID that you use to log on to the remote system isconfigured to use a different shell. Consequently, Oracle Solaris systems musthave the ksh environment installed and properly configured.
v If you plan to remotely configure software on remote Linux or UNIX computers,ensure that SSH is installed.
Remote configuration does not support accessing network drives on the local orremote system.
Enabling SSL client authenticationThe Control Desk installation program and the process solution installer fail if theclient authentication feature of secure sockets layer (SSL) is enabled in the IBMHTTP Server. You can use a workaround to enable client authentication duringinstallation.
Before you begin
The Control Desk installation and process solution installer programs use HTTPclient requests for various configuration actions. The Control Desk installationprogram does not configure WebSphere Application Server Network Deploymentnor IBM HTTP Server to use SSL. However, they do function in environmentswhere WebSphere Application Server Network Deployment and IBM HTTP Serverare manually configured to use SSL. Control Desk installation programs andstandard deployment procedures do not work correctly when the clientauthentication feature of SSL is enabled in the IBM HTTP Server. As a result, thevalidation of product administration credentials or the import of data withMaximo® Enterprise Adapter fails. Client authentication is enabled in the IBMHTTP Server, by using the SSLClientAuth Required directive in the httpd.confconfiguration file.
14 IBM Control Desk: Installation Guide (IBM WebSphere)

About this task
If client authentication must be enabled for the IBM HTTP Server, use thefollowing workaround procedure to install the product.
Procedure1. Remove the SSLClientAuth Required directive in the httpd.conf configuration
file of the IBM HTTP Server.2. Stop and restart the IBM HTTP Server.3. Run the Control Desk installation program or process solution installation
programs.4. Add the SSLClientAuth Required directive back to the httpd.conf
configuration file of the IBM HTTP Server.5. Stop and restart the IBM HTTP Server.
System password policy settingsBe familiar with the password policies of systems you are using as part of aControl Desk deployment.
Your organization might have password policy regulations enforced on systems onyour network. Before deploying Control Desk, be sure that you are familiar withthe password policies of systems used in the deployment, or you might experienceerrors during installation.
For example, Microsoft Windows Server 2008 systems have a stricter set ofpassword requirements than previous versions configured by default. If you arenot familiar with these stronger password requirements, you might experience anerror during the installation of Control Desk. This error occurs when creating userson a Microsoft Windows Server 2008 system.
Password values that you provide during the Control Desk installation must becompliant with the password policies set for the target system. Passwords are notvalidated against the password policies of target systems at the time you enterthem on the installation program panels. If your passwords do not conform to thepassword policies of systems used to deploy the product, errors occur when theinstallation program attempts to create these passwords during the configurationstep,
Backing up the Deployment Engine databaseThese instructions are for backing up the Deployment Engine database. Backupsare used to restore the database to the state it was before installing.
Before you begin
Back up the Deployment Engine database of the system before and after applyingany updates to an existing deployment. Use backups to recover from partialinstallation attempts.
About this task
To back up the Deployment Engine database, complete the following steps:
Chapter 1. Preparing for installation 15

Procedure1. Set up the environment using the following command:
Windowsc:\install_home\ctg_DE\acsi\setenv.cmd
UNIXcd install_home/ctg_DE/acsi./setenv.sh
2. Run the command to back up the Deployment Engine registry:
Windowsc:\install_home\ctg_DE\acsi\bin\backupdb.cmd backup file name
UNIXcd install_home/ctg_DE/acsi/bin./backupdb.sh backup file name
Use a meaningful name for backup file name to reflect the fact that it contains thestate of the registry after your installation of Control Desk. For example,DEBackupAfterInstall.
Specifying host name valuesDo not use localhost for host name values in the installation program. Specify thefully qualified host name or IP address of the system on which you are installing.
For Linux or UNIX systems, if the hostname -f command does not return a fullyqualified host name, consult the system documentation for assistance.
Establishing a fully qualified host name on Windows systemsUse this task to establish a fully qualified host name on Windows systems.
About this task
To establish a fully qualified host name on Windows systems, complete thefollowing steps.
Procedure1. On the desktop, right-click My Computer.2. Select Properties.3. On the Computer Name tab, click Change.4. Enter a fully qualified host name in the Computer name field, and then click
More.Alternatively, you can provide the IP address for the system.5. In the DNS Suffix and NetBIOS Computer Name window, verify that the
Primary DNS suffix field displays a domain name, and then click OK.6. In the Computer Name Changes window, click OK.7. Click Apply and close the System Properties window.
Forcing the middleware installer to use alphanumeric hostnamesYou can force the use of alphanumeric host name use within the middlewareinstallation program by starting it from the command line and using theforceHostname=true parameter.
Example
The following example shows a use of the forceHostname=true parameter:mwi-console -V forceHostname=true
16 IBM Control Desk: Installation Guide (IBM WebSphere)

What to do next
If you launched the middleware installation program from the command line usingthe forceHostname=true parameter, then you are required to provide analphanumeric value in the Hostname field. An IP address results in an errormessage.
Enabling full text search for IBM DB2Full text search is a search option that lets you search for words and phrases, aswell as perform more complex searches using wildcards and logical operators. ForControl Desk 7.5.3, it is essential to install and enable the Text Search feature thatcomes with DB2 9.7.5 or later.
About this task
The steps that you take depend on whether you are installing a new instance ofControl Desk 7.5.3 , or you are upgrading from an earlier release. This procedureapplies to a new installation. If you are upgrading from an earlier release, refer tothe Upgrade Guide.
Important: Follow this procedure before you install Control Desk.
Procedure1. Ensure that DB2 9.7.5 or later is installed.2. From the DB2 server, enable full text search. For more information, see
Installing and configuring DB2 Text Search .3. Install Control Desk.
LaunchpadThe IBM Control Desk launchpad serves as a centralized interface for launching acollection of installation programs and product information.
The launchpad application assists you in choosing which product installationprograms you must install and indicates the order in which they must be installed.
Use the Control Desk launchpad to:v start the middleware installation program.v start the prerequisite checker utility.v start the Control Desk installation program.v start the Service Provider support installation program.v access the Control Desk information center, including information used to plan
the Control Desk installation and deployment.
Just before starting the launchpad, ensure that you meet the middlewareprerequisites. Ensure that you have the correct service pack levels for yourenvironments and always use fully qualified domain names when entering valuesfor the installation program.
Starting the launchpadUse the following information to start the Control Desk launchpad
Chapter 1. Preparing for installation 17
Before you begin
Launchpad generated messages are captured in a hidden log frame while thelaunchpad is running. To show the log frame on the bottom of the launchpadpanels, hold the CTRL key while simultaneously clicking the banner frame of thelaunchpad. Messages that are generated while the launchpad is running are notautomatically saved on the hard disk drive. You can manually save the messagesfrom a session by clicking Save at the bottom of the log frame and then specifyingwhere you want to save the file.
About this task
To start the IBM Control Desk launchpad, complete the following steps:
Procedure1. Log on to an account with system administration privileges on the computer
where you want Control Desk components to be installed.2. Start the launchpad from the root directory of the installation image:
v Windows: Start the launchpad by using the launchpad.exe program.v AIX: Start the launchpad from the root directory by using the launchpad.sh
program.The launchpad program uses the system default browser to run. If thedefault browser on AIX is Firefox, it is likely that the launchpad programdoes not run properly due to the ksh shell interface. If you must use thelaunchpad with the Firefox browser, follow these steps to modify it.a. Download and extract the launchpad images as described in the
download document.b. Modify /user_dir/launchpad/Firefox.sh and remove the following lines:
typeset +r LOGNAME 2>/dev/nullLOGNAME=lp_user_$$; export LOGNAME
c. Run the launchpad from /user_dir
v Linux: Start the launchpad by using the launchpad.sh program.For example,./launchpad.sh
18 IBM Control Desk: Installation Guide (IBM WebSphere)

Chapter 2. Deploy with automatic middleware configuration
Use this information to use product installation programs and tools to install andautomatically configure a Control Desk deployment within your enterprise.
This information provides a high-level overview or road map of tasks you need tocomplete in order to deploy Control Desk with automatic middlewareconfiguration.
In this scenario, you use the middleware installation program to install andautomatically configure new instances of the following components:v DB2v WebSphere Application Server Network Deploymentv IBM Tivoli Directory Server
You use the product installation program to perform further middlewareconfiguration tasks automatically before finally deploying the product itself.
You can use the middleware installation program to install DB2. You then use theControl Desk installation program to automatically configure it.
Middleware installation program middleware deployment plan overviewThe deployment plan resides in the workspace directory and is generated fromdeployment choices selected in the middleware installation program.
The plan is a series of deployment steps and configuration parameters. Each step isresponsible for installing and uninstalling one portion of the middleware. Whendeployment choices are changed, the existing deployment plan is deleted andreplaced with the new deployment plan.
Installing middleware using the middleware installation programYou use the middleware installation program to install middleware components foruse with IBM Control Desk. The middleware components that you choose toinstall, and the associated configuration parameters, are recorded in a deploymentplan for the target system.
Before you beginv Plan your installation.v Use the planning worksheets for middleware installation to record the values
that you need to specify during the installation procedure.
About this task
These instructions cover the use of the middleware installation program to installand configure middleware components on a single server. The single serverdeployment scenario is suitable for demonstration, test, or training purposes.
The following middleware components are installed:v DB2
© Copyright IBM Corp. 2014 19
v WebSphere Application Server Network Deploymentv Tivoli Directory Server
You must run the middleware installation program locally on the target system.You can start the program by using the launchpad or a setup script. When you usethe launchpad, the program files are copied to a temporary directory on the targetsystem. When you use a setup script, no files are copied to the target system. Ifyou are installing on a 64-bit Windows system, you must use a setup script to startthe program.
Procedure1. Log in to the target system as a user with administrative authority. If you are
running the middleware installation program from a Linux or UNIX terminalwindow, you must be logged in as the root user.
2. Start the middleware installation program by using the launchpad or a setupscript.v Use the launchpad to start the middleware installation program.
a. Start the launchpad.
Windows (32-bit only)From the root directory of the installation image, run thefollowing command: launchpad.exe.
Linux and UNIXFrom the root directory of the installation image or productmedia, run the following command: launchpad.sh.
b. Run the middleware installation requirements checking utility.c. Click Middleware.
v Run the following command to launch a setup script which starts themiddleware installation program:
Windowslaunchpad\Install\MWI\setupwin.bat /l
Linux and UNIXlaunchpad/Install/MWI/setupUNIX.sh -l
3. Specify the workspace location for this installation of middleware.4. On the Deployment Choices panel, select the components that you want to
install on this system.5. Review the summary of the generated deployment plan and click Next to
proceed with configuration of the specified components. When you click Next,the middleware installation program verifies the prerequisites for installingthe specified components.
6. To specify a host name for the target system other than the default host name,select Override the local machine hostname and enter a host name in theHostname field. You cannot clear this option after it has been selected,however, you can change the value in the Hostname field.
7. Optional: To specify a default password that can be used throughout themiddleware installation program, select Use this password as the value forall subsequent passwords and enter the required password.
8. Specify the following details for DB2 Enterprise Edition Server:a. Specify the installation directory.
20 IBM Control Desk: Installation Guide (IBM WebSphere)

b. Specify administrative account details for the DB2 Administration Server.The password that you specify is also used as the password for the DB2default database instance.
c. If you are installing on a Linux or AIX system, specify fenced user accountdetails for DB2.
9. Specify an instance name, port, and user name for the default databaseinstance.
10. Specify an instance name, port, and user account details for the Control Deskdatabase instance.
11. Specify names for the DB2 administrators and users groups. A users groupname is required only if DB2 Enterprise Edition Server is installed on aWindows system.
12. Specify the following details for IBM Tivoli Directory Server:a. Specify the installation directory.b. Specify a distinguished name and password for the Tivoli Directory Server
administrator.13. Specify the configuration parameters that are required for Tivoli Directory
Server, including the organizational unit, organization suffix, and countrysuffix that are required when the directory server is used with Control Desk.
14. Specify the following details for the Tivoli Directory Server database instance:a. Specify the name of the DB2 database that you are using to hold Tivoli
Directory Server data.b. Specify the name and password of the Tivoli Directory Server database
instance.15. Specify the configuration parameters that are required when Tivoli Directory
Server is being used as the LDAP resource for WebSphere Application ServerNetwork Deployment security.
16. Specify the bind distinguished name and password that are required forbinding to the LDAP instance. When you click Next, the middlewareinstallation program validates the host and directory information that youspecified for the directory server. The specified information must be verifiedbefore the installation can proceed.
17. Specify the install location and administrative account details for WebSphereApplication Server Network Deployment.
18. Specify the profile names for the WebSphere Application Server NetworkDeployment deployment manager and application servers.
19. Specify the following details for WebSphere Application Server NetworkDeployment:a. Specify the WebSphere Application Server Network Deployment cell name.b. Specify the names of the WebSphere Application Server Network
Deployment deployment manager and application server nodes.c. Specify the install location WebSphere Application Server Network
Deployment update installer.20. Specify the install location, the port used by IBM HTTP Server, and the port
that must be used to administer IBM HTTP Server. If you install IBM HTTPServer into a directory path that includes spaces, for example, the defaultinstall location for Windows systems, you cannot start and stop it from theadministrative console. If the directory path includes spaces, you must startand stop the IBM HTTP Server from the command line.
Chapter 2. Deploying with automatic middleware configuration 21
21. Accept the default profile name for the WebSphere Application ServerNetwork Deployment plug-in for IBM HTTP Server by clicking Next. Thisvalue cannot be changed.
22. Specify whether you need to copy the Control Desk middleware installationimages from the product media to your file system:v If you need to copy the middleware installation images from the product
media, specify the source and destination directories.v If the middleware installation images are already saved to the file system,
specify the directory where they are located.23. Optional: Before you deploy, verify the integrity of the middleware installation
images by selecting the option for checksum validation. If the checksumoperation fails, click Back and recopy the images. If you do not select thisoption and the middleware installation images are corrupted or otherwiseinaccessible from the directory specified, an error occurs. If you encounter thiserror, you must replace the corrupted middleware installation images andthen restart the middleware installation program.
24. Specify a directory to use for middleware installation program temporary filesand extracted middleware installation images.
25. Select Deploy the plan to confirm that you are ready to install and configurethe selected middleware components.
26. Click Deploy to initiate the installation process.27. When the deployment is complete, click Finish to close the installation
wizard.
Middleware installation program logsMiddleware installation program log files are in the workspace directory that wasdefined in the middleware installation program.
There are several types of log files.
User interface logsThe logs generated by the middleware installation program user interfaceare in the workspace directory.
The middleware installation program logs all information in<workspace_loc>/mwi.log: Default workspace locations for all platforms areas follows:
WindowsC:\ibm\tivoli\mwi\workspace
Linux /root/ibm/tivoli/mwi/workspace
AIX /ibm/tivoli/mwi/workspace
The mwi.log file is the high-level log file that was generated by the mostrecent invocation of the middleware installation program. If an erroroccurs, examine this log file first. An entry in this log file might direct youto a lower-level log file.
Log files named mwi.logX, where X is a number, are copies of the mwi.logfile from earlier invocations of the middleware installation program. So, forexample, mwi.log0 is produced after the first invocation of the middlewareinstallation program. mwi.log1 is produced after the second invocation ofthe middleware installation program.
22 IBM Control Desk: Installation Guide (IBM WebSphere)

Logs for steps run by the user interfaceIn addition to collecting input from the user, the user interface of themiddleware installation program also performs several system checks.Examples of system checks run by the user interface runs include:v dependency checking to ensure that the operating system meets the
deployment requirementsv inventorying the software on the system to locate existing instances of
middleware products deployed by the middleware installation programv checking the available disk space to ensure that there is enough for the
deployment
Each of these checks is produced in the form of a step so that it can also berun as part of the deployment plan. When the user interface runs a step, itcopies the step into a subdirectory of the workspace directory. The log filesgenerated by a step are in the same subdirectory. These files follow thesame pattern as a step that is run as part of the deployment plan.
Logs for the deployment planThe deployment plan is in the directory <Workspace Directory>/hostname/deploymentPlan, where host name is the host name of the currentsystem. Each time the deployment plan is used to install or uninstallmiddleware products, a process ID is assigned and log files are generated.
The log files for the deployment plan are in the subdirectorylogs/processID. The primary log file for the deployment plan isDeploymentPlan.log, a high-level log file that lists the steps started as partof the deployment plan.
Logs for the workstation planThe machine plan is located in the directory <Workspace Directory>/hostname/deploymentPlan/MachinePlan_host name. The log files for the machineplan are in the logs subdirectory. The primary log files for the machineplan are named MachinePlan_host name_processID. These log files containthe output generated by Apache ANT when running the machine planANT script.
Logs for steps in the deployment planEach step in the deployment plan is in a directory named <WorkspaceDirectory>/host name/deploymentPlan/MachinePlan_hostname/stepNum_stepID, where stepNum is the sequence number of this stepin installation processing order of the deployment plan and stepIDidentifies the step. The log files for the step are in the logs subdirectory.
Some steps might provide a message log file namedstepID_processID.message, which contains a few entries that summarizethe result of starting the step. All steps provide a trace log file namedstepID_processID.log, which contains many entries, typically includinginformation about the input parameters and the substeps started.
Logs for substepsEach step contains one or more substeps. The substeps perform the actualinstallation, uninstall, and checking work for the middleware installationprogram.
Each substep is in the directory <Workspace Directory>/hostname/deploymentPlan/MachinePlan_host name/stepNum_stepID/operation/substepNum_substepID, where operation is the ANT target in the step ANTscript that starts this substep. substepNum is the sequence number of this
Chapter 2. Deploying with automatic middleware configuration 23
substep in the processing order of the step, and substepID identifies thesubstep. Typical values for operation are install, uninstall, and check.
The log files for the substep are typically in a subdirectory namedprocessID/logs.
Log files generated by the native middleware installation programs arealso kept here.
As an example, the log file generated by the middleware installation programduring DB2 installation on a UNIX system would be found in the followingdirectory: <workspace>/<machine_name>/deploymentPlan/MachinePlan_<machine_name>/000XX_DB2_9.7/install/01_BASE/<Time_Stamp>/logs/db2setup.log
Middleware installation program log referenceThe following logs are produced during the use of the middleware installationprogram.
DB2 Installation Step
DB2 installation logs can be found in the following locations:
DB2 baseThe following DB2 base log files can be found in the <workspace>/<machine_name>/deploymentPlan/MachinePlan_<machine_name>/000XX_DB2_9.7/install/01_BASE/<Time_Stamp>/logs directory:v DB2_ESE_InstallProduct_<TimeStamp>.err
v DB2_ESE_InstallProduct_<TimeStamp>.log
v DB2_ESE_MoveDB2InstallLogsToLogsLoc_<TimeStamp>.err
v DB2_ESE_MoveDB2InstallLogsToLogsLoc_<TimeStamp>.log
v DB2_ESE_Register_DB_<TimeStamp>.err
v DB2_ESE_Register_DB_<TimeStamp>.log
v DB2_ESE_Verify_DB2_Level_<TimeStamp>.err
v DB2_ESE_Verify_DB2_Level_<TimeStamp>.log
v db2setup.log
v de_processreq.log
v de_processreq.log_utf8
v de_trace.log
For Windows, the following additional files will be available:v DB2_ESE_Verify_DB2_Service_20080805_063132GMT.err
v serviceList.log
The de_processreq.log contains status information. This log file providesdetails on which action has failed. The failed action log can be examinedfor more information. The db2setup.log file is the native product log forDB2. This log contains DB2 installation information.
DB2 fix packThe following DB2 fix pack log files can be found in the<workspace>/<machine_name>/deploymentPlan/MachinePlan_<machine_name>/000XX_DB2_XX/install/02_FP/<Time_Stamp>/logs directory:v DB2_ESE_FP2MoveDB2LogsToLogsLoc_<Time_Stamp>.err
24 IBM Control Desk: Installation Guide (IBM WebSphere)

v DB2_ESE_FP2MoveDB2LogsToLogsLoc_<Time_Stamp>.log
v DB2_ESE_InstallDB2Fixpack_<Time_Stamp>.err
v DB2_ESE_InstallDB2Fixpack_<Time_Stamp>.log
v DB2_ESE_ListDB2FPAdmin_<Time_Stamp>.err
v DB2_ESE_ListDB2FPAdmin_<Time_Stamp>.log
v DB2_ESE_ListDB2FPinstance_<Time_Stamp>.err
v DB2_ESE_ListDB2FPinstance_<Time_Stamp>.log
v DB2_ESE_StartDB2FPAdminInstance_<Time_Stamp>.err
v DB2_ESE_StartDB2FPAdminInstance_<Time_Stamp>.log
v DB2_ESE_StopDB2FPAdminInstance_<Time_Stamp>.err
v DB2_ESE_StopDB2FPAdminInstance_<Time_Stamp>.log
v DB2_ESE_UpdateDB2_<Time_Stamp>.err
v DB2_ESE_UpdateDB2_<Time_Stamp>.log
v DB2_ESE_Verify_DB2_FP_Level_<Time_Stamp>.err
v DB2_ESE_Verify_DB2_FP_Level_<Time_Stamp>.log
v de_processreq.log
v de_processreq.log_utf8
v de_trace.log
v installFixPack.log
The de_processreq.log contains status information. This log file providesdetails on which action has failed. The failed action log can be examinedfor more information. The installFixPack.log file is the native log for thefix pack. This log contains DB2 fix pack installation information.
No fix pack logs are available on Windows systems.
If you encounter a failure wrapper failure, more information can be found in the$(_TempLocation) directory in the <Time_Stamp> folder. This directory contains thelogs related to DB2 installation
DB2 Configuration Step
The following DB2 configuration logs can be found in <workspace>/<machine_name>/deploymentPlan/MachinePlan_<machine_name>/000XX_DB2_Configuration/install/01_CONFIG/<Time_Stamp>/logs:v checkpasswdCreated.log
v createuser.log
v etcgroupfile.log
v etcpasswdfile.log
v setUserPassword.log
For Linux, including Linux on IBM System z®, the following additional files areproduced:v permissions.log
v catalogLocalNode.log (produced in the 02_CONFIG folder)v catalogLocalNode.log (produced in the 02_CONFIG folder)v startDB2.log
For Windows, the following additional files are produced:
Chapter 2. Deploying with automatic middleware configuration 25

v createDB2instance.log
v localEnvVariables.log
v setTCPIPCommForDB2instance.log
v setTCPIPPortForDB2instance.log
v setWindowsServiceToAutoStart.log
For UNIX, including Linux, Linux on IBM System z, and AIX, the followingadditional files are produced:v createinstance.log
v SetTCPIPCOMM.log
v stopDB2.log
v updatePort.log
IBM Tivoli Directory Server DB2 for Control Desk Step
The following IBM Tivoli Directory Server DB2 for Control Desk logs can be foundin <workspace>/<machine_name>/deploymentPlan/MachinePlan_<machine_name>/000XX_ITDS_DB2_CCMDB/check/01_CHECKS/<Time_Stamp>/logs:v etcgroupfile.log
v etcpasswdfile.log
IBM Tivoli Directory Server Installation Step
IBM Tivoli Directory Server installation logs can be found in the followinglocations:
GSKITThe following IBM Tivoli Directory Server installation log files can befound in the <workspace>/<machine_name>/deploymentPlan/MachinePlan_<machine_name>/000XX_ITDS_6.3/install/01_GSKIT/<Time_Stamp>/logs directory.v de_processreq.log
v de_trace.log
For Windows and Linux, including Linux on IBM System z, the followingadditional files are produced:v GSKit_Install_GSKit_<Time_Stamp>.log
v GSKit_Install_GSKit_<Time_Stamp>.err
For 32-bit Windows systems, the following additional file is produced:v gskInstall.log
For 32-bit Windows systems, the following additional files are produced:v ISScript_Install.log
v gskInstall.log
For AIX systems, the following additional files are produced:v GSKit_Install_JS_RTE_20080721_084044GMT-06.00.log
v GSKit_Install_SA_RTE_20080721_084044GMT-06.00.log
v vGSKit_Install_TA_RTE_20080721_084044GMT-06.00.log
v rteList.log
26 IBM Control Desk: Installation Guide (IBM WebSphere)

The de_processreq.log contains status information. This log file providesdetails on which action has failed. The failed action log can be examinedfor more information.
IBM Tivoli Directory Server baseThe following IBM Tivoli Directory Server base log files can be found inthe <workspace>/<machine_name>/deploymentPlan/MachinePlan_<machine_name>/000XX_ITDS_6.3/install/02_BASE/<Time_Stamp>/logs directory:v de_processreq.log
v de_trace.log
For Windows, the following additional files are available:v ldapinst.log
v registryList.log
For Linux, including Linux on IBM System z, the following additional filesare produced:v ITDS6.3_CheckRPMEntry_<Time_Stamp>.err
v ITDS6.3_CheckRPMEntry_<Time_Stamp>.log
v rpmList.log
For AIX systems, the following additional files are produced:v ITDS6.3_CheckRTEEntry_<Time_Stamp>.log
v ITDS6.3_CheckRTEEntry_<Time_Stamp>.err
v rteList.log
The de_processreq.log contains status information. This log file providesdetails on which action has failed. The failed action log can be examinedfor more information.
IBM Tivoli Directory Server fix packThe following IBM Tivoli Directory Server fix pack log files can be foundin the <workspace>/<machine_name>/deploymentPlan/MachinePlan_<machine_name>/000XX_ITDS_6.3/install/02A_FP/<Time_Stamp>/logs directory:v de_processreq.log
v de_trace.log
For Windows, the following additional file are available:v ldapinst.log
For Linux, the following additional files are produced:v ITDS6.3_CheckRPMEntry_<Time_Stamp>.err
v ITDS_InstallFixpack_<Time_Stamp>.log
v rpmList.log
For AIX systems, the following additional files are produced:v ITDS_InstallFixpack_<Time_Stamp>.err
v ITDS_InstallFixpack_<Time_Stamp>.log
v ITDS6.3_CheckRTEEntry_<Time_Stamp>.log
v ITDS6.3_CheckRTEEntry_<Time_Stamp>.err
v rteList.log
Chapter 2. Deploying with automatic middleware configuration 27

The de_processreq.log contains status information. This log file providesdetails on which action has failed. The failed action log can be examinedfor more information.
IBM Tivoli Directory Server language packThe following IBM Tivoli Directory Server language pack log files can befound in the <workspace>/<machine_name>/deploymentPlan/MachinePlan_<machine_name>/000XX_ITDS_6.3/install/03_LP/<Time_Stamp>/logs directory:v de_processreq.log
v de_trace.log
For Windows, the following additional files are available:v ldapLP_inst.log
v registryList.log
For Linux, including Linux on IBM System z, the following additional fileis produced:v checkIfRPMEntryExists_<Time_Stamp>.log
For AIX systems, the following additional files are produced:v checkIfRTEEntryExists_<Time_Stamp>.log
v checkIfRTEEntryExists_<Time_Stamp>.err
IBM Tivoli Directory Server Configuration Step
The following IBM Tivoli Directory Server configuration logs can be found in<workspace>/<machine_name>/deploymentPlan/MachinePlan_<machine_name>/000XX_ITDS_Configuration/install/01_CONFIG/logs:v createUsers.log
v netUserCheck.log
For Windows, the following additional files are produced:v PasswdNeverExpires.log
v configureDB.log (produced in the 02_CONFIG folder)v configureDNPassword.log (produced in the 02_CONFIG folder)v configureSuffix.log (produced in the 02_CONFIG folder)v startInstanceTool.log (produced in the 02_CONFIG folder)v startServer.log (produced in the 02_CONFIG folder)v audit.log (produced in the C:\idsslapd-idsccmdb\logs folder)
v bulkload.log (produced in the C:\idsslapd-idsccmdb\logs folder)
v db2clicmds.log (produced in the C:\idsslapd-idsccmdb\logs folder)
v lostandfound.log (produced in the C:\idsslapd-idsccmdb\logs folder)
v traceibmslapd.log (produced in the C:\idsslapd-idsccmdb\logs folder)
v adminaudit.log (produced in the C:\idsslapd-idsccmdb\logs folder)
v ibmdiradm.log (produced in the C:\idsslapd-idsccmdb\logs folder)
v db2cli.log (produced in the C:\idsslapd-idsccmdb\logs folder)
v perftune_stat.log (produced in the C:\idsslapd-idsccmdb\logs folder)
v idstools.log (produced in the C:\idsslapd-idsccmdb\logs folder)
For UNIX, including Linux,Linux on IBM System z, and AIX, the followingadditional files are produced:
28 IBM Control Desk: Installation Guide (IBM WebSphere)
v permissions.log
v ITDS_LDAP_Config.encrypted.ldif (produced in the 03_CONFIG folder)v addLDIFData.log (produced in the 03_CONFIG/logs folder)v idsadm.log (produced in the /var/idsldap/V6.3 folder)
v idsadmdb2.log (produced in the /var/idsldap/V6.3 folder)
v idsadmdb2cmds.log (produced in the /var/idsldap/V6.3 folder)
WebSphere Application Server Network Deployment Installation Step
WebSphere Application Server Network Deployment installation logs can be foundin the following locations:
WebSphere Application Server Network DeploymentThe following WebSphere Application Server Network Deploymentinstallation log files can be found in the <workspace>/<machine_name>/deploymentPlan/MachinePlan_<machine_name>/000XX_WAS_ND_7.0/install/01_BASE/<Time_Stamp>/logs directory.v de_processreq.log
v de_processreq.log_utf8
v de_trace.log
v ProductInstall.log
v WAS_ND_InstallProduct_<Time_Stamp>.err
v WAS_ND_InstallProduct_<Time_Stamp>.log
UpdateInstallerThe following UpdateInstaller installation log files can be found in the<workspace>/<machine_name>/deploymentPlan/MachinePlan_<machine_name>/000XX_WAS_ND_7.0/install/01_UPDT_INST/<Time_Stamp>/logs directory.v de_processreq.log
v de_processreq.log_utf8
v de_trace.log
v ProductInstall.log
v Update_Installer_InstallProduct_<Time_Stamp>.err
v Update_Installer_InstallProduct_<Time_Stamp>.log
v UpdateInstaller_MoveUpdateInstallerInstallLogsToLogsLoc.err
v UpdateInstaller_MoveUpdateInstallerInstallLogsToLogsLoc.log
The de_processreq.log contains status information. This log file provides detailson which action has failed. The failed action log can be examined for moreinformation. The ProductInstall.log file is the native log for the fix pack. This logcontains WebSphere Network Deployment and UpdateInstaller installationinformation.
WebSphere Application Server Network Deployment ConfigurationStep
WebSphere Application Server Network Deployment configuration logs can befound in the <workspace>/<machine_name>/deploymentPlan/MachinePlan_<machine_name>/000XX_WAS_ND_Configuration/install/01_CONFIG/<Time_Stamp>/logs directory:v createAppServer.log
Chapter 2. Deploying with automatic middleware configuration 29
v MXServer_serverStatus.log
v nodeagent_serverStatus.log
v setupcmd.log
v startManager.log
v startServer.log
v UnixAugmentProfileDMgrForISC.log
v UnixCreateProfileAppSvr.log
v UnixCreateProfileDMgr.log
v verifyProfile.log
v startManager.log (produced in the 02_CONFIG folder)
v stopManager.log (produced in the 02_CONFIG folder)
v stopNode.log (produced in the 02_CONFIG folder)
v syncNode.log (produced in the 02_CONFIG folder)
v VMMConfigData.log (produced in the 02_CONFIG folder)
v SystemErr.log (produced in the <WAS_HOME>/profiles/ctgDmgr01/logs/dmgrfolder)
v SystemOut.log (produced in the <WAS_HOME>/profiles/ctgDmgr01/logs/dmgrfolder)
v addNode.log (produced in the <WAS_HOME>/profiles/ctgAppSrv01/logs folder)
v runAddNode.log (produced in the <WAS_HOME>/profiles/ctgAppSrv01/logsfolder)
v syncNode.log (produced in the <WAS_HOME>/profiles/ctgAppSrv01/logsfolder)
v wsadmin.traceout (produced in the <WAS_HOME>/profiles/ctgAppSrv01/logsfolder)
v SystemErr.log (produced in the <WAS_HOME>/profiles/ctgAppSrv01/logs/nodeagent folder)
v SystemOut.log (produced in the <WAS_HOME>/profiles/ctgAppSrv01/logs/nodeagent folder)
v startServer.log (produced in the <WAS_HOME>/profiles/ctgAppSrv01/logs/MXServer folder)
v stopServer.log (produced in the <WAS_HOME>/profiles/ctgAppSrv01/logs/MXServer folder)
v SystemErr.log (produced in the <WAS_HOME>/profiles/ctgAppSrv01/logs/MXServer folder)
v SystemOut.log (produced in the <WAS_HOME>/profiles/ctgAppSrv01/logs/MXServer folder)
IBM HTTP Server Installation Step
IBM HTTP Server installation logs can be found in the following locations:
IBM HTTP Server BaseThe following IBM HTTP Server base installation log files can be found inthe <workspace>/<machine_name>/deploymentPlan/MachinePlan_<machine_name>/000XX_IHS_7.0/install/01_BASE/<Time_Stamp>/logs directory.v de_processreq.log
v de_processreq.log_utf8
30 IBM Control Desk: Installation Guide (IBM WebSphere)

v de_trace.log
v IHS_InstallProduct_<Time_Stamp>.err
v IHS_InstallProduct_<Time_Stamp>.log
v ProductInstall.log
The de_processreq.log contains status information. This log file providesdetails on which action has failed. The failed action log can be examinedfor more information. ProductInstall.log is the native product log. Thislog contains IBM HTTP Server installation information.
IBM HTTP Server fix packThe following IBM HTTP Server fix pack log files can be found in the<workspace>/<machine_name>/deploymentPlan/MachinePlan_<machine_name>/000XX_IHS_7.0/install/01A_FP/<Time_Stamp>/logs directory:v de_processreq.log
v de_processreq.log_utf8
v de_trace.log
v IHS_Fixpack_GetIHSUpdateVersion_<Time_Stamp>.err
v IHS_Fixpack_GetIHSUpdateVersion_<Time_Stamp>.log
v IHS_Fixpack_InstallIHSFixpack_<Time_Stamp>.err
v IHS_Fixpack_InstallIHSFixpack_<Time_Stamp>.log
v IHS_Fixpack_MoveIHSFixInstallLogsToLogsLoc_<Time_Stamp>.err
v IHS_Fixpack_MoveIHSFixInstallLogsToLogsLoc_<Time_Stamp>.log
For Windows, the following additional files are available:v IHS_Fixpack_StartIHSAdminService_<Time_Stamp>.err
v IHS_Fixpack_StartIHSAdminService_<Time_Stamp>.log
v IHS_Fixpack_StartService_<Time_Stamp>.err
v IHS_Fixpack_StartService_<Time_Stamp>.log
v IHS_Fixpack_StopIHSAdminService_<Time_Stamp>.err
v IHS_Fixpack_StopIHSAdminService_<Time_Stamp>.log
v v IHS_Fixpack_StopService_<Time_Stamp>.err
v v IHS_Fixpack_StopService_<Time_Stamp>.log
For UNIX, including Linux,Linux on IBM System z, and AIX, the followingadditional files are produced:v IHS_Fixpack_StartServiceLinux_<Time_Stamp>.err
v IHS_Fixpack_StartServiceLinux_<Time_Stamp>.log
v IHS_Fixpack_StopServiceLinux_<Time_Stamp>.err
v IHS_Fixpack_StopServiceLinux_<Time_Stamp>.log
v ProductInstall.log
The de_processreq.log contains status information. This log file providesdetails on which action has failed. The failed action log can be examinedfor more information. ProductInstall.log is the native product log. Thislog contains IBM HTTP Server fix pack installation information.
WebSphere plug-insThe following WebSphere plug-in logs can be found in the<workspace>/<machine_name>/deploymentPlan/MachinePlan_<machine_name>/000XX_IHS_7.0/install/02_WAS_PLUGIN/<Time_Stamp>/logs directory:
Chapter 2. Deploying with automatic middleware configuration 31

v de_processreq.log
v de_processreq.log_utf8
v de_trace.log
v ProductInstall.log
v WAS_plugins_for_WAS_InstallProduct_<Time_Stamp>.err
v WAS_plugins_for_WAS_InstallProduct_<Time_Stamp>.log
The de_processreq.log contains status information. This log file providesdetails on which action has failed. The failed action log can be examinedfor more information. ProductInstall.log is the native product log. Thislog contains IBM HTTP Server fix pack installation information.
WebSphere plug-in fix packThe following WebSphere plug-in logs can be found in the<workspace>/<machine_name>/deploymentPlan/MachinePlan_<machine_name>/000XX_IHS_7.0/install/02A_FP/<Time_Stamp>/logs directory:v de_processreq.log
v de_processreq.log_utf8
v de_trace.log
v ProductInstall.log
v WAS_Plugins_for_WAS_Fixpack_GetWASPluginUpdateVersion_<Time_Stamp>.err
v WAS_Plugins_for_WAS_Fixpack_GetWASPluginUpdateVersion_<Time_Stamp>.log
v WAS_Plugins_for_WAS_Fixpack_InstallWASPluginsFixpack_<Time_Stamp>.err
v WAS_Plugins_for_WAS_Fixpack_InstallWASPluginsFixpack_<Time_Stamp>.log
v WAS_Plugins_for_WAS_Fixpack_MoveIHSFixInstallLogsToLogsLoc_<Time_Stamp>.err
v WAS_Plugins_for_WAS_Fixpack_MoveIHSFixInstallLogsToLogsLoc_<Time_Stamp>.log
The de_processreq.log contains status information. This log file providesdetails on which action has failed. The failed action log can be examinedfor more information. ProductInstall.log is the native product log. Thislog contains IBM HTTP Server fix pack installation information.
For Windows, the following additional files are available:v WASPlugin _Fixpack_StartIHSAdminService_<Time_Stamp>.err
v WASPlugin _Fixpack_StartIHSAdminService_<Time_Stamp>.log
v WASPlugin _Fixpack_StartService_<Time_Stamp>.err
v WASPlugin _Fixpack_StartService_<Time_Stamp>.log
v WASPlugin _Fixpack_StopIHSAdminService_<Time_Stamp>.err
v WASPlugin _Fixpack_StopIHSAdminService_<Time_Stamp>.log
v WASPlugin _Fixpack_StopService_<Time_Stamp>.err
v WASPlugin _Fixpack_StopService_<Time_Stamp>.log
For UNIX, including Linux,Linux on IBM System z, and AIX, the followingadditional files are produced:v WASPlugin_Fixpack_StartServiceLinux_<Time_Stamp>.err
32 IBM Control Desk: Installation Guide (IBM WebSphere)

v WASPlugin_Fixpack_StartServiceLinux_<Time_Stamp>.log
v WASPlugin_Fixpack_StopServiceLinux_<Time_Stamp>.err
v WASPlugin_Fixpack_StopServiceLinux_<Time_Stamp>.log
The de_processreq.log contains status information. This log file providesdetails on which action has failed. The failed action log can be examinedfor more information. ProductInstall.log is the native product log. Thislog contains IBM HTTP Server fix pack installation information.
IBM HTTP Server WebSphere plug-in configurationThe following IBM HTTP Server WebSphere plug-in configuration logs canbe found in the <workspace>/<machine_name>/deploymentPlan/MachinePlan_<machine_name>/000XX_IHS_7.0/install/03_CONFIG/<Time_Stamp>/logs directory:v configure.webserver.command.out
v ConfigureIHSPlugin.out
v start.http.server.out
v SystemErr.log (produced in the <WAS_HOME>/profiles/ctgDmgr01/logs/dmgr folder)
v SystemOut.log (produced in the <WAS_HOME>/profiles/ctgDmgr01/logs/dmgr folder)
Authentication service
Authentication service logs can be found in the <workspace>/<machine_name>/deploymentPlan/MachinePlan_<machine_name>/000XX_ESS_XX/install/01_CONFIG/<Time_Stamp>/logs directory:v configureESS.log
v exportWASLTPAKeys.log
v importLTPAKeys.log
v installESS.log
v installWIM.log
v key.file
v modifyLTPASettings.log
v save.log
v startManager.01.log
v startManager.02.log
v startNode.01.log
v startNode.02.log
v startServer.01.log
v startServer.02.log
v stopManager.01.log
v stopManager.02.log
v stopNode.01.log
v stopNode.02.log
v stopServer.01.log
v stopServer.02.log
v sync.log
v SystemErr.log (produced in the <WAS_HOME>/profiles/ctgDmgr01/logs/dmgr/folder)
Chapter 2. Deploying with automatic middleware configuration 33

v SystemOut.log (produced in the <WAS_HOME>/profiles/ctgDmgr01/logs/dmgr/folder)
v addNode.log (produced in the <WAS_HOME>/profiles/ctgAppSrv01/logs/folder)
v runAddNode.log (produced in the <WAS_HOME>/profiles/ctgAppSrv01/logs/folder)
v syncNode.log (produced in the <WAS_HOME>/profiles/ctgAppSrv01/logs/folder)
v wsadmin.traceout (produced in the <WAS_HOME>/profiles/ctgAppSrv01/logs/folder)
v SystemErr.log (produced in the <WAS_HOME>/profiles/ctgAppSrv01/logs/nodeagent/ folder)
v SystemOut.log (produced in the <WAS_HOME>/profiles/ctgAppSrv01/logs/nodeagent/ folder)
v SystemErr.log (produced in the <WAS_HOME>/profiles/ctgAppSrv01/logs/MXServer/ folder)
v SystemOut.log (produced in the <WAS_HOME>/profiles/ctgAppSrv01/logs/MXServer/ folder)
Configuring IBM Tivoli Directory Server user and groupstrings
You can configure user and group strings in IBM Tivoli Directory Server to adapt itto your deployment needs.
About this task
You can manually create user and group strings for Tivoli Directory Server duringinstallation.
If you configure directory server user and group strings for a system that hostsonly the IBM Tivoli Directory Server , you must manually create properties in theinput.properties file of the ITDS_CONFIGURATION step of the deployment plan.
Procedure1. Edit the input.properties file that is in the directory server folder at:
Workspace\machine name\deploymentPlan\MachinePlan_machineshortname\00006_ITDS_Configuration. For example, in Windows, the defaultlocation of the input.properties file is C:\ibm\tivoli\mwi\workspace\mymachine.ibm.com\deploymentPlan\MachinePlan_mymachine\00006_ITDS_Configuration.
2. Add the following properties:was_nd.secure.GroupSuffix=ou\=groups,ou\=SWG,o\=IBM,c\=USwas_nd.secure.UserSuffix=ou\=users,ou\=SWG,o\=IBM,c\=US
3. If Tivoli Directory Server configuration parameters are customized, change theapplicable values to your custom values on the configuration parameters panel.For example, if your custom values are ou=SWG1 and the Organizationcountry suffix is o=IBM1,c=US1, you must manually replace all occurrences ofthose values in the input.properties file:was_nd.secure.GroupSuffix=ou\=groups,ou\=SWG1,o\=IBM1,c\=US1was_nd.secure.UserSuffix=ou\=users,ou\=SWG1,o\=IBM1,c\=US1
34 IBM Control Desk: Installation Guide (IBM WebSphere)

Configuring SSL between Microsoft Active Directory andWebSphere Application Server Network Deployment
Configuring SSL between Microsoft Active Directory and WebSphere ApplicationServer Network Deployment enables the installation program to automaticallycreate users and groups.
Before you begin
To enable the installation program to automatically create users and groups withinMicrosoft Active Directory, you must configure SSL communication betweenMicrosoft Active Directory and WebSphere Application Server NetworkDeployment. This procedure is only required if you choose to allow the productinstallation program to automatically configure WebSphere Application ServerNetwork Deployment. You also want the product installation program toautomatically create users in Microsoft Active Directory.
You must enable SSL for Microsoft Active Directory, generate a certificate, and thenadd that certificate to WebSphere Application Server Network Deployment.
Changing the name or domain of the certificate authority at any point invalidatescertificates previously issued from that authority.
Ensure that you have host name resolution setup properly in yourenvironment. Communication failures occur if the system hosting Microsoft ActiveDirectory cannot resolve host names for systems that have been issued certificates.
Ensure that you have already installed Microsoft Internet Information Services withASP extensions enabled on the system before configuring the certificate servicerequired for SSL. Microsoft Internet Information Services are a prerequisite of thecertificate service. Microsoft Internet Information Services can be added as aWindows component from the Add/Remove Programs dialog. Add thiscomponent by selecting the Internet Information Services or Application Servercomponent and installing it. If you have IBM HTTP Server installed on the samesystem, you cannot use port 80 for IBM HTTP Server. If IBM HTTP Server wasconfigured to use port 80, you must change it to another value because MicrosoftInternet Information Services must use port 80. After you verify that these twoconditions are met, proceed with setting up certificate services as described in thisprocedure.
Procedure1. Add the Certificate Services component:
a. From the Control Panel of the Microsoft Active Directory server, selectAdd or Remove Programs. Then select Add/Remove WindowsComponents.
b. From the Windows Components panel, select the Certificate Servicesoption, and then click Next.
c. From the CA Type panel, select Stand alone root CA, select the Usecustom settings to generate the key pair and CA certificate option, andthen click Next.
d. From the Public and Private Key Pair panel, select Microsoft StrongCryptographic Provider for the CSP value, select SHA-1 as the Hashalgorithm, set the Key length to 2048, and then click Next.
e. From the CA Identifying Information panel, enter mymachine.ism75.com inthe Common name for this CA field, enter DC=ism75,DC=com for the
Chapter 2. Deploying with automatic middleware configuration 35

Distinguished name suffix, set the Validity period to 5 years, and thenclick Next. The values used in this step are example values only. Replacethese values with the details of the system hosting Microsoft ActiveDirectory.
f. From the Certificate Database Settings panel, you can keep the defaultvalue of C:\WINDOWS\system32\CertLog for both the Certificate databaseand Certificate database log fields, and then click Next. Configuration ofthe component now begins.
g. Click Finish.h. Restart the system.
2. Download a CA certificate:a. Start Internet Explorer.b. Select Tools > Internet Options > Security and click Sites.c. From the Trusted Sites dialog box, enter http://mymachine.ism75.com in
the Add this Web site to the zone: field, click Add, and then click Close.d. Enter the following address in the browser: http://mymachine.ism75.com/
certsrv
e. From the Certificate Services page, click Download a CA certificate,Certificate Chain, or CRL.
f. From the Download a CA Certificate, Certificate Chain, or CRL page, clickinstall this CA certificate chain. When the task has completed successfully,click Back.
g. From the Download CA Certificate, Certificate Chain, or CRL page selectCurrent for the CA certificate value, choose Base 64 for the Encodingmethod, and then click Download a CA Certificate.
h. When prompted, specify the type as Security Certificate and save thesecurity certificate file as serverRootCA.cer.
3. Add the Certificates Snap-in:a. Start the Microsoft Management Console.b. Select File > Add/Remove Snap-in.c. From the Add/Remove Snap-in dialog box, click Add.d. From the Add stand-alone Snap-in dialog box, select Certificates and then
click Add.e. Select Computer account and then click Next.f. Select Local computer: (the computer this console is running on) and click
Finish.g. From the Add stand-alone Snap-in dialog box, select Certification
Authority and then click Add.h. Select Local computer: (the computer this console is running on) and
click Finish.i. Click Close to close the Add stand-alone Snap-in dialog box.j. Click OK.
4. Transfer certificates to a store:a. In the Microsoft Management Console, navigate to Console Root >
Certificates (Local Computer) > Third-Party Root CertificationAuthorities.
b. Right-click Certificates and select All Tasks > Import.c. From the File to Import panel of the Certificate Import wizard, browse to
the location of the serverRootCA.cer file, select it, and then click Next.
36 IBM Control Desk: Installation Guide (IBM WebSphere)
d. From the Certificate Store panel, select Place all certificates in thefollowing store, click Next, and then click Finish.
5. Create and submit a request to the CA:a. Using Internet Explorer, navigate to http://mymachine.ism75.com/certsrv.
From the Certificate Services page, click Request a certificate.b. From the Request a Certificate page, click advanced certificate request.c. From the Advanced Certificate Request page, click Create and submit a
request to this CA.d. From the Advanced Certificate Request page, enter the following
information and then click Submit.
Identifying InformationEnter the fully qualified name of the machine hosting MicrosoftActive Directory in the Name field. This value must be capitalized,for example MYMACHINE.ISM75.COM.
Type of Certificate NeededSelect Server Authentication Certificate.
Key OptionsFor the CSP field, select Microsoft RSA SChannel CryptographicProvider.
Select the Automatic key container name, Mark keys asexportable, and Store certificate in the local computer certificatestore options.
For the Key Size field, you can either accept the default value of1024, or change it to a more appropriate value.
Additional OptionsSet the Request Format option to PKCS10.
For the Hash Algorithm field, select SHA-1.
For the Friendly Name field, enter the same exact value as enteredfor the Name field.
Default values are sufficient for the remaining fields on this page.e. Click Home to return to the home page for Certificate Services.
6. Install the certificate:a. In the Microsoft Management Console, navigate to Console Root >
Certification Authority (Local) > mycomputer.ism75.com > PendingRequests.
b. Right-click the ID of the request, and then select All Tasks > Issue.c. From Internet Explorer, on the Certificate Services page, click View the
status of a pending certificate request.d. From the View the Status of a Pending Certificate Request page, click the
certificate request you created.e. From the Certificate Issued page, click Install this certificate.f. Restart the system.
7. Verify the private key:a. When the system has restarted, invoke the Microsoft Management Console
and navigate to Console Root > Certificates (Local Computer) > Personal> Certificates.
b. Double-click the entry displayed in uppercase.
Chapter 2. Deploying with automatic middleware configuration 37

c. From the Certificate dialog box, ensure you can find the statement Youhave a private key that corresponds to this certificate, and then click OK.
d. Double-click the entry displayed in lowercase.e. From the Certificate dialog box, ensure you can find the statement You
have a private key that corresponds to this certificate, and then click OK.8. Configure the connection:
a. Launch the Microsoft LDP utility.b. Select Connection.c. Select Connect.d. Enter mymachine.ism72.com for Server, 636 for Port, select SSL, and then
click OK. Review the information displayed to verify your configurationvalues.
9. Export certificate files:a. Launch the Microsoft Management Console and navigate to Console Root
> Certificates (Local Computer) > Personal > Certificates.b. Right-click the uppercase certificate entry and select All Tasks > Export
c. From the Certificate Export wizard Welcome panel, click Next.d. From the Export Private Key panel, select No, do not export private key,
and then click Next.e. From the Export File Format panel, select Base-64 encoded X.509(.CER),
and then click Next.f. From the File to Export panel, export the certificate as serverRootCA.cer,
click Next, and then click Finish.g. Right-click the lowercase certificate entry and select All Tasks > Export
h. From the Certificate Export wizard Welcome panel, click Next.i. From the Export Private Key panel, select No, do not export private key,
and then click Next.j. From the Export File Format panel, select Base-64 encoded X.509(.CER),
and then click Next.k. From the File to Export panel, export the certificate as serverAuthCert.cer,
click Next, and then click Finish.10. Add signer certificates:
a. Copy serverRootCA.cer and serverAuthCert.cer to the WebSphereApplication Server Network Deployment system.
b. Invoke the WebSphere Application Server Network Deploymentadministrative console.
c. From the WebSphere Application Server Network Deploymentadministrative console, select Security > SSL certificate and keymanagement.
d. Click Keystores and certificates.e. Click CellDefaultTrustStore.f. Click Signer certificates and then click Add.g. From the Add signer certificate page, enter MSADServerRootCA for the Alias,
enter the path (including the file name) to the serverRootCA.cer file in theFile name field, and then click OK.
h. Click Add.i. Enter MSADServerAuthCert for the Alias, enter the path (including the file
name) to the serverAuthCert.cer file in the File name field, and then clickOK.
38 IBM Control Desk: Installation Guide (IBM WebSphere)
11. Configure security:a. From the WebSphere Application Server Network Deployment
administrative console, select Security > Secure administration,applications, and infrastructure.
b. From the Available realm definitions drop-down list, select Federatedrepositories, and then click Configure.
c. Click the repository identifier for Microsoft Active Directory listed inRepositories in the realm table.
d. Update the following properties and then click OK.
Port Update this value to 636.
Login propertiesSet this value to cn.
Requires SSL communicationsEnsure that this option is selected.
Use specific SSL aliasEnsure that this option is selected with a value ofCellDefaultSSLSettings.
e. Click Supported entity types and verify that the PersonAccount entitytype is set to cn. If it is not set to cn, click the PersonAccount entity typeand set it and then save the changes.
f. Restart the domain manager.
Uninstalling middlewareTo uninstall IBM Control Desk middleware, you must run the middlewareinstallation program and select the options to remove the previous deployment.
Before you begin
If you chose to deploy Control Desk middleware with a directory server, ensurethat it is active. You must remove the J2EE server before you can remove thedirectory server.
About this task
The middleware installation program creates a registry when installing ControlDesk middleware. Using the native middleware uninstall programs causes thisregistry to be out of sync with what is deployed. As a result, errors occur whenyou attempt to reinstall middleware with the middleware installation program.
Procedure1. Stop and start servers as required:
a. Stop the IBM Tivoli Directory Server (IBM Tivoli Directory Server v6.3 -idsccmdb).
b. Stop the IBM Tivoli Directory Server daemon (IBM Tivoli Directory AdminServer v6.3 - idsccmdb).
c. Start DB2.d. Start the idsccmdb DB2 instance (DB2 - DB2COPY1 - IDSCCMDB).e. Start the IBM Tivoli Directory Server daemon (IBM Tivoli Directory Admin
Server v6.3 - idsccmdb)2. Log in as Administrator on Windows and root on Linux and AIX.
Chapter 2. Deploying with automatic middleware configuration 39
3. Start the launchpad by running the following command from the rootdirectory of the downloaded installation image:
Option Description
Windows launchpad.exe
Linux launchpad.sh
AIX launchpad.sh
4. In the launchpad navigation pane, click Install Product.5. In the Install the middleware section, click Middleware and step through the
launchpad panels.6. When you are prompted to browse to a workspace, specify the workspace
directory that contains the currently deployed plan, and click Next. Thedefault location for the workspace is the last workspace location specified. Ifyou did not specify a path previously, the default location for the workspaceisc:\ibm\tivoli\mwi\workspace
7. In the Select Operation panel, select Undeploy the plan, and click Next.8. From the undeployment preview panel, click Next to undeploy the plan.9. Exit the middleware installation program.
10. On UNIX systems, remove the following DB2 references from the/etc/services file:v db2c_db2insxy 50001/tcpv db2c_db2inst1 50000/tcp
Reinstalling middleware with IBM DB2You can run an installation of the middleware with the DB2 user and groupsettings from a previous installation.
Before you begin
Remove all middleware products and their components before you reinstall themiddleware.
About this task
When DB2 is uninstalled, users and groups are not removed. You can specify thesame DB2 user and group values or replace them with new users and groupswhen you run the installation program.
Procedure1. Verify that all middleware products were properly removed by examining the
deployment plan log files. The log files are in the subdirectory WorkspaceDirectory/host name/deploymentPlan/logs/processID. The primary log file forthe deployment plan is DeploymentPlan.log.
2. The middleware installation program creates a default instance for DB2 andadds the owner of the default instance to the DB2 administrator group that youspecify. Specify the DB2 users and groups that you want to use for thisinstallation:v Provide the same values that were previously used for the DB2
administrators group.
40 IBM Control Desk: Installation Guide (IBM WebSphere)
v Remove the existing instance owner and specify a new administrators group.You cannot specify an existing instance owner with a new DB2administrators group.
3. Start the middleware installation program from the launchpad.
Installation program overviewThe Control Desk installation program provides an interface for installing anddeploying Control Desk, which includes the process automation engine andprocess managers.
The Control Desk installation program records choices you make about yourControl Desk deployment. It records configuration parameters associated withthose choices, and then installs and deploys Control Desk based upon theinformation you entered.
There are two installation paths available to you when you are installing ControlDesk.
SimpleA simple deployment consists of installing Control Desk middleware onone system. You do not have the option of using existing middlewarewithin your organization with Control Desk. All middleware used withControl Desk must be installed on the system with the middlewareinstallation program with default values. Control Desk is installed withdefault values provided by the middleware installation program andControl Desk installation program.
If you intend to override default values used by the simple deploymentpath, you must use the custom deployment path instead.
CustomA custom deployment typically involves deploying Control Desk acrossseveral systems. Some of these systems might already host middlewareproducts that you want to use with your Control Desk deployment. Youcan modify default installation values when you deploy with the custominstallation path.
This deployment option does not require you to spread the Control Deskdeployment across several systems. You can enter the name of the localhost as the destination for all Control Desk components.
The Control Desk installation program can automate the configuration of somemiddleware for use with Control Desk.
If you choose not to have the Control Desk installation program automaticallyconfigure middleware, you must configure that piece of middleware manuallybefore the installation of Control Desk.
Important: When you are entering LDAP values for Control Desk installationpanel fields, be aware of the product-specific syntax rules for using specialcharacters in an LDAP string. In most cases, special characters must be precededby an escape character in order to make it readable by the directory server. Failingto escape special characters contained in an LDAP string used with Control Deskresults in Control Desk errors.
Chapter 2. Deploying with automatic middleware configuration 41
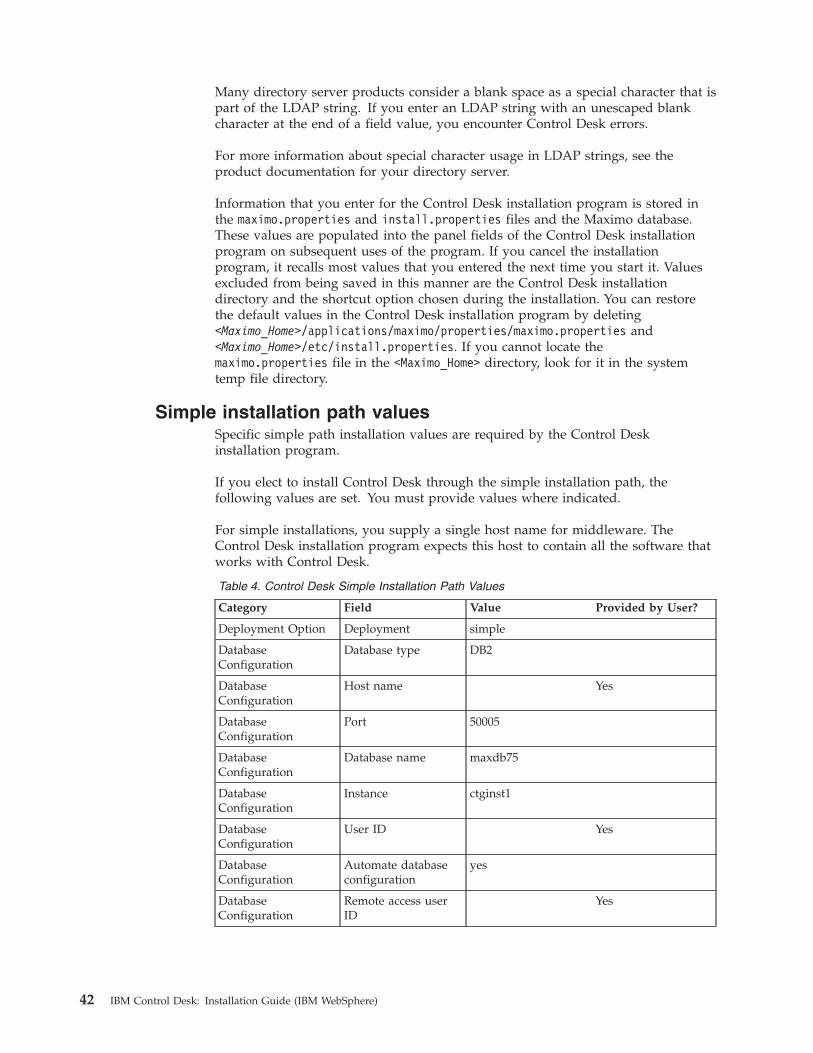
Many directory server products consider a blank space as a special character that ispart of the LDAP string. If you enter an LDAP string with an unescaped blankcharacter at the end of a field value, you encounter Control Desk errors.
For more information about special character usage in LDAP strings, see theproduct documentation for your directory server.
Information that you enter for the Control Desk installation program is stored inthe maximo.properties and install.properties files and the Maximo database.These values are populated into the panel fields of the Control Desk installationprogram on subsequent uses of the program. If you cancel the installationprogram, it recalls most values that you entered the next time you start it. Valuesexcluded from being saved in this manner are the Control Desk installationdirectory and the shortcut option chosen during the installation. You can restorethe default values in the Control Desk installation program by deleting<Maximo_Home>/applications/maximo/properties/maximo.properties and<Maximo_Home>/etc/install.properties. If you cannot locate themaximo.properties file in the <Maximo_Home> directory, look for it in the systemtemp file directory.
Simple installation path valuesSpecific simple path installation values are required by the Control Deskinstallation program.
If you elect to install Control Desk through the simple installation path, thefollowing values are set. You must provide values where indicated.
For simple installations, you supply a single host name for middleware. TheControl Desk installation program expects this host to contain all the software thatworks with Control Desk.
Table 4. Control Desk Simple Installation Path Values
Category Field Value Provided by User?
Deployment Option Deployment simple
DatabaseConfiguration
Database type DB2
DatabaseConfiguration
Host name Yes
DatabaseConfiguration
Port 50005
DatabaseConfiguration
Database name maxdb75
DatabaseConfiguration
Instance ctginst1
DatabaseConfiguration
User ID Yes
DatabaseConfiguration
Automate databaseconfiguration
yes
DatabaseConfiguration
Remote access userID
Yes
42 IBM Control Desk: Installation Guide (IBM WebSphere)
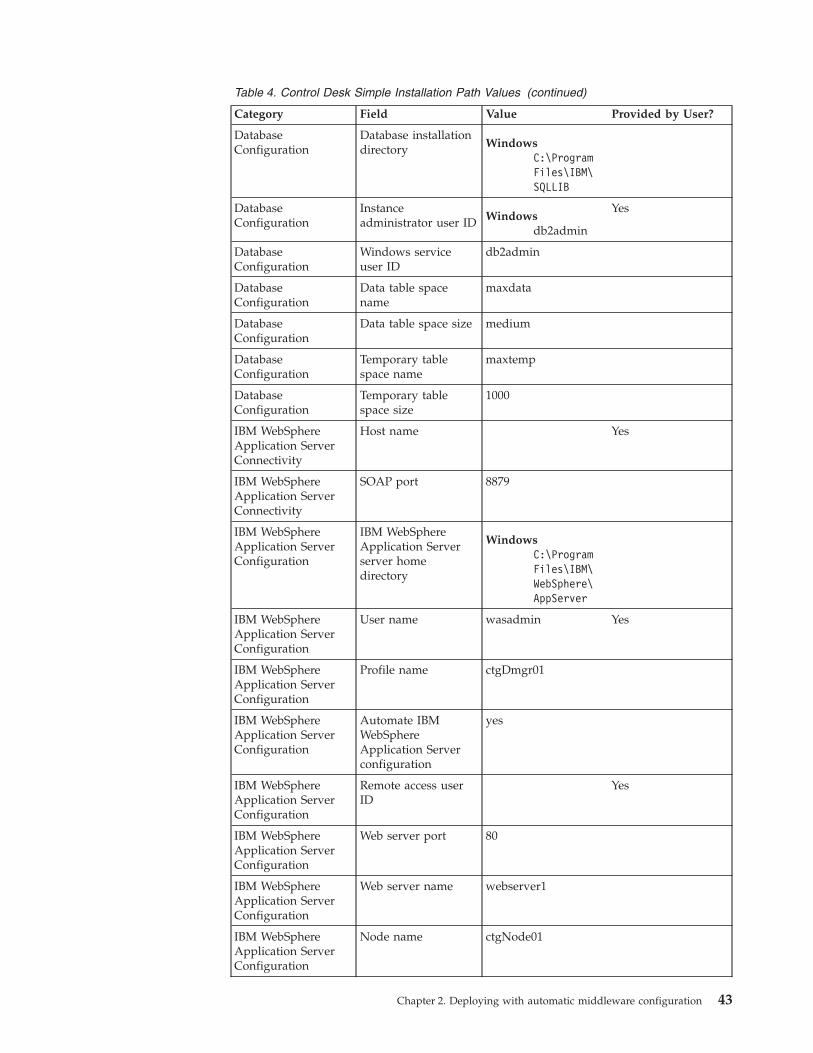
Table 4. Control Desk Simple Installation Path Values (continued)
Category Field Value Provided by User?
DatabaseConfiguration
Database installationdirectory Windows
C:\ProgramFiles\IBM\SQLLIB
DatabaseConfiguration
Instanceadministrator user ID Windows
db2admin
Yes
DatabaseConfiguration
Windows serviceuser ID
db2admin
DatabaseConfiguration
Data table spacename
maxdata
DatabaseConfiguration
Data table space size medium
DatabaseConfiguration
Temporary tablespace name
maxtemp
DatabaseConfiguration
Temporary tablespace size
1000
IBM WebSphereApplication ServerConnectivity
Host name Yes
IBM WebSphereApplication ServerConnectivity
SOAP port 8879
IBM WebSphereApplication ServerConfiguration
IBM WebSphereApplication Serverserver homedirectory
WindowsC:\ProgramFiles\IBM\WebSphere\AppServer
IBM WebSphereApplication ServerConfiguration
User name wasadmin Yes
IBM WebSphereApplication ServerConfiguration
Profile name ctgDmgr01
IBM WebSphereApplication ServerConfiguration
Automate IBMWebSphereApplication Serverconfiguration
yes
IBM WebSphereApplication ServerConfiguration
Remote access userID
Yes
IBM WebSphereApplication ServerConfiguration
Web server port 80
IBM WebSphereApplication ServerConfiguration
Web server name webserver1
IBM WebSphereApplication ServerConfiguration
Node name ctgNode01
Chapter 2. Deploying with automatic middleware configuration 43

Table 4. Control Desk Simple Installation Path Values (continued)
Category Field Value Provided by User?
IBM WebSphereApplication ServerConfiguration
Cluster name MAXIMOCLUSTER
IBM WebSphereApplication ServerConfiguration
Application server MXServer This valuecannot be changed.
Integration AdapterJMS Configuration
JMS data sourcename
meajmsds
Integration AdapterJMS Configuration
Persist JMS messages no
SecurityConfiguration
Use default schema yes
SecurityConfiguration
Create usersautomatically
yes
MaximoConfiguration
Install directory C:\IBM\SMP Yes
Configuration Step Run configurationnow
yes
.
Installing the product and automatically configuringmiddleware
To install Control Desk, you run the installation program from the launchpad. Theinstallation procedure automatically configures middleware on multiple servers,using default values.
Before you begin
Ensure that you meet prerequisite conditions.v The database server, the directory server, and application server services must be
started and active.v The /tmp and /var/tmp directories must be present on the system. The
installation program depends on these directories for information duringdeployments on IBM WebSphere Application Server Network Deployment.
v On the administrative workstation, temporarily shut down any noncriticalprocesses that can have a negative effect on the installation, such as antivirussoftware.
v Ensure that the Windows DEP setting does not prevent the launchpad fromrunning: Select Start > Settings > Control Panel > System > Advanced >Performance > Settings > Data Execution Prevention. Select Turn on DEP foressential Windows programs and services only and click Apply. You might beasked to reboot the server.
v For Linux and UNIX systems with middleware installed, the command hostname-f must return a fully qualified host name. If necessary, consult thedocumentation for your operating system. Alternatively, you can provide the IPaddress for the system.
44 IBM Control Desk: Installation Guide (IBM WebSphere)
v Enable a remote execution and access service on every system that hasmiddleware installed. Each remote system must support a remote accessprotocol. It must also accept remote logins from a user name and password thatwere configured on the target server. Remote access protocols include SSH andWindows SMB. If the remote system is a Windows server, you must configureremote execution and access to use SMB.
v The DB2 database must be prepared.– If DB2 is installed on a Linux or UNIX system, you must create the instance
user and the home directory for the user on the DB2 server.– The database instance owner home directory must have 8 GB of space
available regardless of whether a database is installed in that location.– The user ID for the DB2 instance administrator must have SYSADM (system
administration) authority. You specify this user ID during the productinstallation program. See the DB2 product documentation for informationabout creating a user with SYSADM authority on the DB2 server. You mustadd root to a group with SYSADM authority for UNIX systems.
About this task
The instructions are for a multiple server installation that uses default values.
If you experience problems with the user interface of the installation programwhen installing on AIX 6.x systems remotely, reattempt the installation locally. Usethe console or an X terminal on the system locally.
Procedure1. Log in on the administrative system.2. Start the product installation program from the launchpad.
a. Start the launchpad. Browse to the root directory of the downloadedinstallation image, and run the following command:
Windowslaunchpad.exe
UNIX launchpad.shIf the launchpad does not start the installation, you can start the productinstallation program directly. On the downloaded installation image, browseto \Install\\, and run one of the following commands:
Windows
v install.bat
v install_win64.bat
UNIX
v install_aix64.sh
v install_linux32.sh
v install_linux64.sh
3. Select a language for the installation and click OK.4. On the Choose Installation Folder panel, specify the path to the location
where you want to install Control Desk.You can specify a description for the installation. A description is useful fordifferentiating between multiple installations that are hosted on the sameadministrative workstation.
Chapter 2. Deploying with automatic middleware configuration 45

5. Review the information that is on the Verify Installation Location panel. Thepanel shows any previous installation information that was found based onthe installation directory that you specified on the previous panel. After youadvance past this panel, you cannot go back and change the installationdirectory for this installation.If a more recent version of the installation program is found in the specifiedtarget directory, you are notified. The notification means that you are using anolder version of the installation program. The version found on theadministrative workstation is newer and can contain important features andenhancements. To use the newer version of the installation program, select theoption on the notification panel and click Next. This action exits the currentinstallation process and restarts the installation process with the newerinstallation program. If you do not select the option, you continue theinstallation with the older version of the installation program.
6. On the Package Summary panel, review the package deployment information.This panel lists version information for both new and existing packages on thesystem. Target package version information indicates the package versionbeing currently deployed.
7. On the Choose Deployment panel, specify Simple or Custom as thedeployment type.
8. On the Import Middleware Configuration Information panel, you selectImport middleware configuration information to have the productinstallation program reuse the middleware installation program values. Thesevalues are used as default values for the same fields in the productinstallation program.The Workspace location field refers to the location of the topology file thatcontains the values that were specified for the middleware installationprogram. The file is located in the workspace that was defined during themiddleware installation task. For example, C:\ibm\tivoli\mwi\workspace forWindows or /root/ibm/tivoli/mwi/workspace for UNIX.If you selected the simple deployment, the middleware default information isnot used.
9. On the Database Type panel, specify the software to use for the Maximodatabase.
10. On the Database panel, specify configuration information for your databasesoftware.For things such as the database user ID, the database name, the databaseinstance for Control Desk, and the schema name, if the values do not existwhen you specify them, they are created.For DB2, the user ID cannot be the same as the instance administrator user ID.Database users and database instance names cannot contain spaces.For DB2, the database instance is created if it does not exist, but the user andits associated home directory must exist on the DB2 server. For DB2, theschema name can be the same value as the owner of the table spaces that aredefined or it can be a different value, such as maximo.After you specify configuration information for your database software, theinstallation program validates the information with the database server.
11. On the Automate Database Configuration panel, you can specify that databasecreation and configuration is to be automated.If you do not select the option, you must configure the database manually.
46 IBM Control Desk: Installation Guide (IBM WebSphere)

12. On the Remote Access Authorization panel, specify authorization informationfor the automatic database configuration feature. Specifying the values enablesremote configuration.
13. On the Database Administration panel, specify configuration informationabout the database. The required information varies by database platform.For DB2, the instance administrator user ID cannot be the same as thedatabase user ID. And the Windows service user ID must have administrativeauthority on the system.
14. On the Database Tablespace panel, specify information about the table spaceof the database.When you click Next, the product installation program connects to thedatabase server and validates the information that you specified.
15. When the database validation is complete, on the Application Server Typepanel, specify the application server type for the product deployment.You have the option of configuring WebSphere Application Server NetworkDeployment automatically through the product installation program.
16. On the WebSphereConnectivity panel, specify host information for theWebSphere Application Server Network Deployment.
17. On the WebSphere Remote Access Authorization panel, specify authorizationinformation for WebSphere Application Server Network Deploymentconfiguration.
18. On the WebSphere Application Server Network Deployment Configurationpanel, specify configuration information for WebSphere Application ServerNetwork Deployment.The web server port must match an existing HTTP server port value that youconfigured when you set up WebSphere Application Server NetworkDeployment. If you specify a different value for the web server port, you mustrestart WebSphere Application Server Network Deployment at the conclusionof the installation. Restarting the server activates the new port and makes itavailable for incoming requests.The application server name that you specify is created if it does not exist.
19. On the Security panel, specify the method to use for authenticating andauthorizing users.
20. On the Specify Maximo Users panel, enter Maximo database user information.
Maximo administration userThe product administrator user ID that is used for initial configurationand adding users.
Maximo system registration userThe user ID that is used for the self-registration of users.
Maximo system integration userThe user ID that is used with enterprise adapters.
Custom user ID and password values are stored in the Maximo database. Thedefault user IDs of maxadmin, maxreg, and maxintadm are also created asusers in the Maximo database. Creation of the default user IDs is done forinternal processing purposes. If you use Maximo database security forauthentication and authorization, the default user IDs can be used to log in tothe application. If you regard this condition as a security risk, you can modifythe passwords for the default user IDs. You modify passwords for the userIDs in the Users application.
Chapter 2. Deploying with automatic middleware configuration 47

21. On the Security panel, specify the names of the user and group base entriesand specify how Control Desk users are created.
User base entryIf you do not plan to use the default LDAP schema that is providedwith Control Desk, specify the user base entry that you want to use.
Group base entryIf you do not plan to use the default LDAP schema , specify the groupbase entry that you want to use.
You can specify that the installation program creates the required users.Otherwise, you must create users manually before continuing.If you are not using the default LDAP schema that is provided, you mustcreate it yourself before advancing beyond this panel. The values that arespecified for the User base entry and Group base entry fields are used toconfigure the VMMSYNC cron task. To create your own LDAP schema andcreate users manually, you can modify the default add-on LDIF data andimport it into your LDAP repository
22. On the Integration Adapter JMS Configuration panel, specify Java MessageService configuration information. A JMS server requires a DB2 datarepository to be configured to maintain messages. If you are using anotherdatabase type, you cannot configure message persistence. If you specify thatJMS messages are not to be persisted, you can configure the JMSimplementation manually later.Specify the name of the database to be used by JMS. For DB2, you can specifywhether to persist JMS messages within DB2.Select Do not persist JMS messages if you are deploying Control Desk withOracle or Microsoft SQL Server. When you click Next, the installation wizardskips to the SMTP Configuration panel.
23. If you specified that JMS messages should persist, specify additional JMSconfiguration information in the DB2 Database Server Configuration panel.The JMS data store can be created as a DB2 database only.
24. If you specified that JMS messages should persist, specify authorizationinformation for the automatic configuration feature in the DB2 DatabaseServer Remote Access Authorization panel.For Windows, the user ID must be a member of the DB2ADMNS group.For Linux or UNIX, the user ID must be root and a member of a group withSYSADM authority for the database instance.
25. If you specified that JMS messages should persist, specify additional DB2information in the DB2 Database Instance Configuration panel.
26. On the SMTP Configuration panel, specify the SMTP configurationinformation that is used by workflows to communicate with workflowparticipants.The administrator e-mail address is the e-mail address that is used to sendmessages. If you leave the fields blank, you must configure the SMTPparameters through the product interface as a post-installation task.
27. On the Data Integration and Context Menu Services Options panel, click theoption that indicates where the database tables for these functions are created:in the Maximo ("same") database, or in a separate database instance that youcreated for this purpose. If you are installing the Entry edition, choose theMaximo database. These tables are created but are not used by the Entryedition.
48 IBM Control Desk: Installation Guide (IBM WebSphere)
28. On the Base Language Selection panel, specify the base language for theinstallation.
29. On the Additional Language Selection panel, you can optionally specify oneor more additional languages that the installation is to support.
30. On the Run Configuration Step panel, specify how to perform theconfiguration step of the installation. If you do not select an option, theconfiguration step proceeds when you click Next.
Copy files now, but perform the installation configuration step laterSelect this option to copy files from the installation source to theadministrative workstation. You must perform the configuration stepat a later time to complete the deployment.
Important: Do not install another product before you complete theconfiguration step of the original installation. Installing anotherproduct before you run the configuration step for this installationoverwrites the taskstore, which prevents the original installation fromever being deployed.
The configuration values that you specify are stored in theinstall_home\maximo\applications\maximo\properties\maximo.properties and install_home\etc\install.properties files.You run the configuration steps outside of the product installationprogram by using the taskrunner utility, in the install_home\scriptsdirectory. Run the taskrunner utility from the command line.install_home\scripts\taskrunner [CONTINUE <STOPONERROR|NOSTOPONERROR>]
The taskrunner uses the configuration values that are stored in themaximo.properties and install.properties files to configure ControlDesk.
If you run taskrunner with the NOSTOPONERROR parameter, thetaskrunner continues despite errors. If you run taskrunner with theSTOPONERROR parameter, the taskrunner stops when it encounters anerror. If you used STOPONERROR, you can rectify the conditions thatcaused the error. You can then resume the installation where the lastsuccessfully completed task was recorded in the previous attempt bystarting taskrunner with the CONTINUE parameter.
Deploy application files manually laterSelect this option to manually deploy application files to theapplication server.
Defer the update of the Maximo databaseSelect this option if you want to manually run the database updatetask for the product deployment. This option can be used when thereis a fix pack available that addresses known issues with the updatedbscript. In this scenario, you choose the Defer the update of theMaximo database option, apply the fix pack, and then run theupdatedb -v1 command manually.
31. On the Choose Shortcut Folder panel, specify where you want Control Deskicons created.If you select In the Start Menu and use Internet Explorer, add the ControlDesk URL to the trusted sites web content zone. Disable the option thatrequires server verification for all sites in the zone.Do not select In the Quick Launch Bar. The selection does not create ashortcut in the Quick Launch bar.
Chapter 2. Deploying with automatic middleware configuration 49

Attention: Shortcuts are created for Windows systems only. BecauseWebLogic Server deployments are a manual process, you must manuallyupdate any shortcuts that you create. You update shortcuts after youmanually deployed the Control Desk EAR files.
32. On the Input Summary panel, review the information that you provided forthe product installation program.If necessary, use Previous to return to previous panels to change values.
33. On the Pre-Installation Summary panel, review the installation information,then click Install.The installation process begins. You can monitor the progress of theinstallation by viewing the messages that are shown.
34. On the Installation Completed panel, review any information presented, thenclick Done.Attention: In some cases, on AIX systems, the Installation Completed panelmight appear blank. Click Done to exit the installation program.
“Restarting middleware on Windows” on page 223This procedure describes how to restart middleware on Windows, if you mustrestart any middleware services.“Restarting middleware on UNIX” on page 224Middleware services on Linux and AIX platforms occasionally must berestarted, such as when a reboot occurs. Middleware servers and services mustbe active before running the Control Desk installation program.
Installing optional contentInstall the relevant optional content package for your edition of the product.
Optional content is often used in development environments as a way to begindeveloping your own content.
If you do not install optional content during the product installation process, youcan install it later. If you install it later, you must update the database and rebuildand deploy the maximo.ear file.
Installing optional integration modulesInstall integration module packages in order to set up integrations with otherproducts.
You can install these integration modules from the Integrations page of thelaunchpad:
IBM Tivoli Provisioning Manager Integration ModuleThis integration module enables you to integrate Tivoli ProvisioningManager with the release management process. For example, you can useTivoli Provisioning Manager as a Definitive Media Library. See the Releasemanagement section of the information center for more information aboutthis integration.
Deployed Assets CMS LIC Enablement PackageThis package is required if you plan to use the Context Menu Service tomanage launch-in-context actions for deployed assets. See the Planningsection of the information center for information about options forlaunch-in-context actions.
50 IBM Control Desk: Installation Guide (IBM WebSphere)

CI AppsCMS LIC Enablement PackageThis package is required if you plan to use the Context Menu Service tomanage launch-in-context actions for actual configuration items. See thePlanning section of the information center for information about optionsfor launch-in-context actions.
Rational ClearQuest OSLC IntegrationsThis integration enables you to use the Open Services for LifecycleCollaboration (OSLC) technology to link from the Problems application toRational ClearQuest to share information about problems and theirsolutions.
Rational Team Concert™ OSLC IntegrationsThis integration enables you to use the Open Services for LifecycleCollaboration (OSLC) technology to link from the Problems application toRational Team Concert to share information about problems and theirsolutions.
If you do not install integration modules during the product installation process,you can install them later. If you install them later, you must update the databaseand rebuild and deploy the maximo.ear file.
Language deployment after database update deferralSelecting the option to defer the update of the Maximo database when installingthe product, affects how you deploy languages.
During installation, you have the option to defer the database update task. Thisoption prevents writing data to the database during the installation. Theinstallation program is limited to copying files to the administrative system andregistering product process solution packages. You add languages by completingthe installation, manually updating the database, and then updating languagesmanually.
“Manually deploying languages after database update deferral”Languages must be deployed manually if you defer database updates by theinstallation program.
Manually deploying languages after database update deferralLanguages must be deployed manually if you defer database updates by theinstallation program.
Before you begin
You must have run updatedb command before manually configuring languages forPSI packages.
About this task
To manually configure languages for PSI packages, complete the following steps:
Procedure1. Update language support for the core components.
Files for the language selections you made during the installation are extractedto the C:\IBM\SMP\Maximo\Tools\Maximo\locale\xliff\ directory on the system.
Chapter 2. Deploying with automatic middleware configuration 51
a. To update a language as the base language to use for the product, run thefollowing command:install_home\maximo\tools\maximo\TDToolkit.bat-IMPORT-SLEN-TLlocale-maxmessfix
b. To add one or more languages as additional languages for use with theproduct, run the following command for each language you want to add:install_home\maximo\tools\maximo\TDToolkit.bat-ADDLANGlocale-maxmessfix
2. Update languages for additional packages.In order to determine which packages you need to update, change directory toinstall_home\maximo\tools\maximo\en\xliff. Each folder located in the xliffdirectory, with the exception of MAXUPG folder, is used as input for the-pmpupdate operation of TDToolkit. Unlike the process for updating languagesfor Control Desk, you run the TDToolkit command once for each package.TDToolkit determines which languages are currently deployed and updates alllanguages.a. Change directory to install_home\maximo\tools\maximo\en\xliff. and
identify a package folder to update, for example calibration.b. Update languages for the chosen package.
C:\IBM\SMP\maximo\tools\maximo\TDToolkit.bat-pmpupdatepackagedirectory
In this example, pmpupdatepackagedirectory could be pmpupdatecalibrationor pmpupdateconfig_pmp for example.
c. Repeat for each additional package that require language updates.
52 IBM Control Desk: Installation Guide (IBM WebSphere)
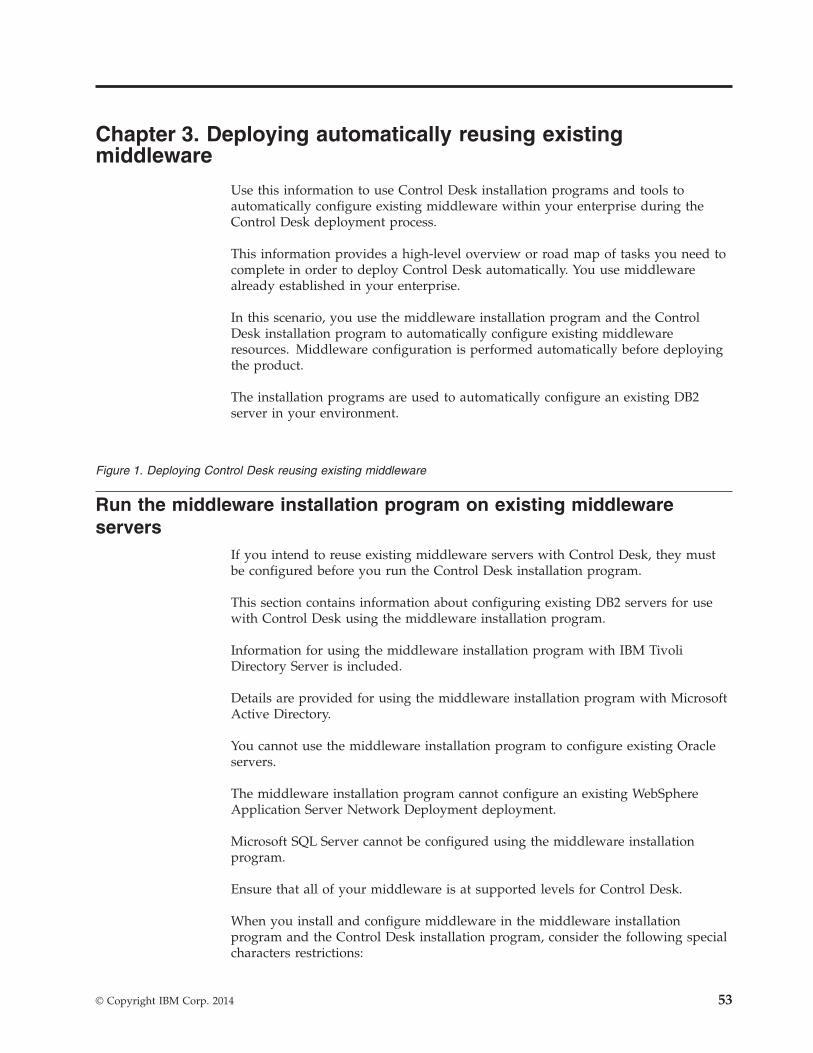
Chapter 3. Deploying automatically reusing existingmiddleware
Use this information to use Control Desk installation programs and tools toautomatically configure existing middleware within your enterprise during theControl Desk deployment process.
This information provides a high-level overview or road map of tasks you need tocomplete in order to deploy Control Desk automatically. You use middlewarealready established in your enterprise.
In this scenario, you use the middleware installation program and the ControlDesk installation program to automatically configure existing middlewareresources. Middleware configuration is performed automatically before deployingthe product.
The installation programs are used to automatically configure an existing DB2server in your environment.
Run the middleware installation program on existing middlewareservers
If you intend to reuse existing middleware servers with Control Desk, they mustbe configured before you run the Control Desk installation program.
This section contains information about configuring existing DB2 servers for usewith Control Desk using the middleware installation program.
Information for using the middleware installation program with IBM TivoliDirectory Server is included.
Details are provided for using the middleware installation program with MicrosoftActive Directory.
You cannot use the middleware installation program to configure existing Oracleservers.
The middleware installation program cannot configure an existing WebSphereApplication Server Network Deployment deployment.
Microsoft SQL Server cannot be configured using the middleware installationprogram.
Ensure that all of your middleware is at supported levels for Control Desk.
When you install and configure middleware in the middleware installationprogram and the Control Desk installation program, consider the following specialcharacters restrictions:
Figure 1. Deploying Control Desk reusing existing middleware
© Copyright IBM Corp. 2014 53

Table 5. Middleware object naming conventions
Naming Convention Details
DB2 naming conventions for Group names,user names, and user IDs.
Group names and user IDs on Linux andUNIX operating systems can contain up to 8characters and must consist of lowercasecharacters only.
Group names and user names on Windowscan contain up to 30 characters.
Names and IDs cannot be any of thefollowing values: USERS, ADMINS,GUESTS, PUBLIC, LOCAL, or anySQL-reserved word.
Names and IDs cannot begin with IBM, SQLor SYS. They must also not begin with theunderscore (_) character.
DB2 naming conventions for DB2 instances. Instance names can have up to 8 characters.
On Windows, no instance can have the samename as a service name.
DB2 naming conventions for passwords. For UNIX systems, passwords can be amaximum of 8 characters.
For Windows systems, passwords can be amaximum of 14 characters.
IBM Tivoli Directory Server conventions fordatabases and database aliases.
Database names must be unique within thelocation in which they are cataloged. ForLinux and UNIX , this location is a directorypath. For Windows it is a logical disk.
Database alias names must be unique withinthe system database directory. When a newdatabase is created, the alias defaults to thedatabase name. As a result, you cannotcreate a database using a name that exists asa database alias, even if there is no databasewith that name.
Database and database alias names can haveup to 8 characters.
Be mindful that the special characters @, #,and $ are not common to all keyboards.Avoid these characters when you create adatabase name.
54 IBM Control Desk: Installation Guide (IBM WebSphere)
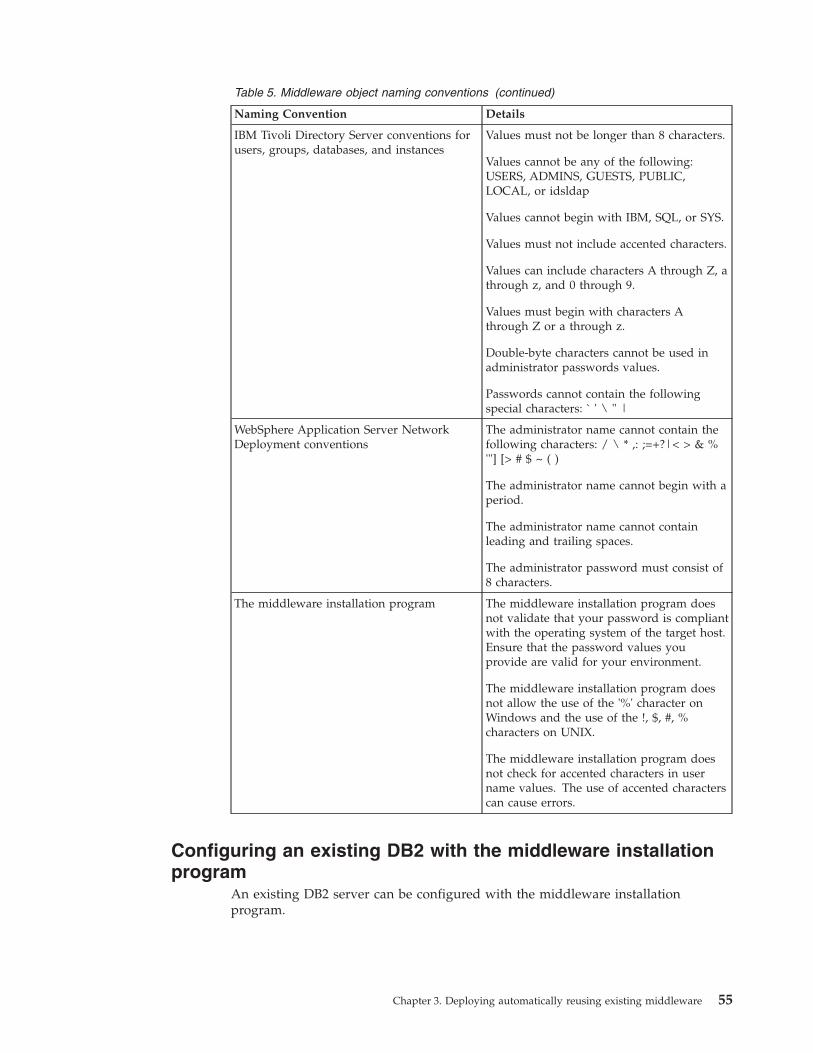
Table 5. Middleware object naming conventions (continued)
Naming Convention Details
IBM Tivoli Directory Server conventions forusers, groups, databases, and instances
Values must not be longer than 8 characters.
Values cannot be any of the following:USERS, ADMINS, GUESTS, PUBLIC,LOCAL, or idsldap
Values cannot begin with IBM, SQL, or SYS.
Values must not include accented characters.
Values can include characters A through Z, athrough z, and 0 through 9.
Values must begin with characters Athrough Z or a through z.
Double-byte characters cannot be used inadministrator passwords values.
Passwords cannot contain the followingspecial characters: ` ' \ " |
WebSphere Application Server NetworkDeployment conventions
The administrator name cannot contain thefollowing characters: / \ * ,: ;=+?|< > & %'"] [> # $ ~ ( )
The administrator name cannot begin with aperiod.
The administrator name cannot containleading and trailing spaces.
The administrator password must consist of8 characters.
The middleware installation program The middleware installation program doesnot validate that your password is compliantwith the operating system of the target host.Ensure that the password values youprovide are valid for your environment.
The middleware installation program doesnot allow the use of the '%' character onWindows and the use of the !, $, #, %characters on UNIX.
The middleware installation program doesnot check for accented characters in username values. The use of accented characterscan cause errors.
Configuring an existing DB2 with the middleware installationprogram
An existing DB2 server can be configured with the middleware installationprogram.
Chapter 3. Deploying automatically reusing existing middleware 55
Before you begin
If you plan to configure an existing DB2 server with the middleware installationprogram, a set of users and groups must exist. These users and groups are used bythe middleware installation program during configuration.
Default values for users and groups include:
Users
v db2adminv dasusr1 (UNIX)v db2fenc1 (UNIX)
Groups
v db2admns (Windows)v dasadm1 (UNIX)v dbgrp1 (UNIX)v db2fgrp1 (UNIX)
These values are default user and group values. These values can be customized ifthe values provided to the middleware installation program match the valuesfound on the system. Again, if these users do not exist on the system, you mustcreate them before you run the installation program.
About this task
If you have an existing DB2 installation that you would like to reuse for ControlDesk, you can run the middleware installation program on the system to configureit. The middleware installation program identifies instances of middleware thatexist on the system that are compatible with Control Desk, and it configures theexisting instance for use with Control Desk.
To have the middleware installation program configure an existing DB instance forreuse with Control Desk, complete the following steps:
Procedure1. Log in as a user with administrative authority.2. Start the middleware installation program from the launchpad.3. Complete the middleware installation program panels until you reach the
Deployment Choices panel.4. From the Deployment Choices panel, select Database Server, and then click
Next. The middleware installation program displays any instances of DB2found on the system.
5. From the Installation menu, select the appropriate instance to reuse, and thenclick Next.
6. Complete the remainder of the middleware installation program panels.“Installing middleware using the middleware installation program” on page 19You use the middleware installation program to install middleware componentsfor use with IBM Control Desk. The middleware components that you chooseto install, and the associated configuration parameters, are recorded in adeployment plan for the target system.
56 IBM Control Desk: Installation Guide (IBM WebSphere)

Verifying an existing IBM Tivoli Directory Server using themiddleware installer
If you have an existing IBM Tivoli Directory Server installation that you would liketo reuse for Control Desk, you can verify that it works with Control Desk using themiddleware installer.
About this task
The middleware installer validates the following items:v The version of IBM Tivoli Directory Server is compatible with Control Desk.v The IBM Tivoli Directory Server is running.v The Base DN information that you supply in the middleware installer panels are
present in the IBM Tivoli Directory Server you are using.The middleware installer does not create an instance of IBM Tivoli DirectoryServer for use with Control Desk. If you want to reuse an existing instance ofIBM Tivoli Directory Server, supply the correct Administrator DistinguishedName and password, LDAP BASE DN, directory server port, and theadministration port information for that instance on the middleware installerpanels when prompted. If you intend to host a new instance on your existingIBM Tivoli Directory Server, you must create it before you run the middlewareinstaller.
Note: While you can technically share a DB2 instance between Control Desk andthe one required by IBM Tivoli Directory Server, it is not a recommendedpractice. During the installation, the database instance is restarted, which mightdisrupt the availability of IBM Tivoli Directory Server in your enterprise. If youare using the automated installers, separate instances are created for use byControl Desk and IBM Tivoli Directory Server.
To have the middleware installer verify an existing instance of IBM Tivoli DirectoryServer for reuse with Control Desk, complete the following steps.
Procedure1. Log in to the system as a user with administrative authority.2. Start the middleware installer from the product launchpad.3. Navigate the middleware installer panels up to the point where you reach the
deployment choices panel.4. In the deployment choices panel, select Directory Server, and then click Next.
The middleware installer displays any instances of IBM Tivoli Directory Serverdiscovered on the system.
5. In the Installation menu, select the appropriate instance to reuse, and then clickNext.
6. Complete the installation by navigating the rest of the middleware installerpanels.“Manually configuring the directory server” on page 82These topics provide details on manually configuring a directory server for useby Control Desk“Installing middleware using the middleware installation program” on page 19You use the middleware installation program to install middleware componentsfor use with IBM Control Desk. The middleware components that you chooseto install, and the associated configuration parameters, are recorded in adeployment plan for the target system.
Chapter 3. Deploying automatically reusing existing middleware 57

Preparing Microsoft Active Directory for reuseAn existing Microsoft Active Directory instance can be used to secure WebSphereApplication Server Network Deployment. The middleware installation programcan be used to validate Microsoft Active Directory configuration information.
Before you begin
Before running the installation program, manually create the users. You cancomplete this task after you run the middleware installation program, but youmust complete it before you run the Control Desk installation program.
About this task
The middleware installation program prompts you for LDAP configurationparameters to use with WebSphere Application Server Network Deployment.
To validate Microsoft Active Directory configuration information using themiddleware installation program use, complete the following steps:
Procedure1. Log in as a user with administrative authority.2. Start the middleware installation program from the launchpad.3. Proceed through the middleware installation program panels until you reach
the Deployment Choices panel.4. From the Deployment Choices panel, clear the Directory Server deployment
option, and then click Next. In the next panel, you are given the choice ofselecting an existing instance of IBM Tivoli Directory Server or MicrosoftActive Directory to secure WebSphere Application Server NetworkDeployment.
5. In the Deployment Plan Summary window, click Next to configureparameters. The deployment plan is generated and you are provided detailsabout the plan.
6. In the Configurable Host Name panel, you can manually specify the hostname of the system you are running the installation from. Select the Overridethe local machine hostname option and enter a host name value in theHostname field. Select this option only if you want to manually specify thehost name of the system instead of having the installation programprogrammatically detect it. This option is useful when there is more than onehost name assigned to the system. This configuration occurs when a systemhas more than one network interface, or it is configured to support virtual IPaddresses. When this option is selected, you are required to provide aresolvable host name. You cannot clear this option after it is selected.However, you can still change the value of the Hostname field. If you startedthe middleware installation program from the command line using theforceHostname=true parameter, then you are required to provide analphanumeric value in the Hostname field. Use of an IP address causes errormessage. When this option is selected, you are not able to clear it. However,you can change the value you enter in the Hostname field.
7. In the password reuse panel, you can optionally select Use this password asthe value for all subsequent passwords. Select this option to use the samepassword as the default user password value in all panels of the middlewareinstallation program. If you do not want to use this option, ignore the Usethis password as the value for all subsequent passwords option, and clickNext.
58 IBM Control Desk: Installation Guide (IBM WebSphere)
8. Select Secure with Microsoft Active Directory, and click Next.9. Configure the following values for WebSphere Application Server Network
Deployment security, and then click Next.
LDAP Host nameEnter the fully qualified name of the server hosting Microsoft ActiveDirectory.
LDAP base entryEnter the LDAP base entry of the instance. For example,DC=ism75,DC=com
User suffixEnter the user suffix for the instance. For example,OU=Users,OU=SWG,DC=ism75,DC=com
Group suffixEnter the group suffix for the instance. For example,OU=Groups,OU=SWG,DC=ism75,DC=com
Organization container suffixEnter the organization container suffix for the instance. For example,DC=ism75,DC=com
In this example. ism75 is the domain name. You must replace ism75with the name of your own domain.
10. Supply the following configuration values for WebSphere Application ServerNetwork Deployment security, and then click Next.
Bind distinguished nameEnter the bind distinguished name for the instance. For example,CN=Administrator,CN=Users,DC=ism75,DC=com
This value assumes that the Administrator user is already a memberof the ism75 domain. You must replace ism75 with the name of yourown domain.
Bind passwordEnter the password for the Administrator user on the system hostingMicrosoft Active Directory.
11. Finish the installation by completing the remainder of the middlewareinstallation program panels.
“Installing middleware using the middleware installation program” on page 19You use the middleware installation program to install middleware componentsfor use with IBM Control Desk. The middleware components that you chooseto install, and the associated configuration parameters, are recorded in adeployment plan for the target system.“Manually configuring Microsoft Active Directory” on page 87You can manually configure Microsoft Active Directory for use with ControlDesk.
Installation program overviewThe Control Desk installation program provides an interface for installing anddeploying Control Desk, which includes the process automation engine andprocess managers.
Chapter 3. Deploying automatically reusing existing middleware 59

The Control Desk installation program records choices you make about yourControl Desk deployment. It records configuration parameters associated withthose choices, and then installs and deploys Control Desk based upon theinformation you entered.
There are two installation paths available to you when you are installing ControlDesk.
SimpleA simple deployment consists of installing Control Desk middleware onone system. You do not have the option of using existing middlewarewithin your organization with Control Desk. All middleware used withControl Desk must be installed on the system with the middlewareinstallation program with default values. Control Desk is installed withdefault values provided by the middleware installation program andControl Desk installation program.
If you intend to override default values used by the simple deploymentpath, you must use the custom deployment path instead.
CustomA custom deployment typically involves deploying Control Desk acrossseveral systems. Some of these systems might already host middlewareproducts that you want to use with your Control Desk deployment. Youcan modify default installation values when you deploy with the custominstallation path.
This deployment option does not require you to spread the Control Deskdeployment across several systems. You can enter the name of the localhost as the destination for all Control Desk components.
The Control Desk installation program can automate the configuration of somemiddleware for use with Control Desk.
If you choose not to have the Control Desk installation program automaticallyconfigure middleware, you must configure that piece of middleware manuallybefore the installation of Control Desk.
Important: When you are entering LDAP values for Control Desk installationpanel fields, be aware of the product-specific syntax rules for using specialcharacters in an LDAP string. In most cases, special characters must be precededby an escape character in order to make it readable by the directory server. Failingto escape special characters contained in an LDAP string used with Control Deskresults in Control Desk errors.
Many directory server products consider a blank space as a special character that ispart of the LDAP string. If you enter an LDAP string with an unescaped blankcharacter at the end of a field value, you encounter Control Desk errors.
For more information about special character usage in LDAP strings, see theproduct documentation for your directory server.
Information that you enter for the Control Desk installation program is stored inthe maximo.properties and install.properties files and the Maximo database.These values are populated into the panel fields of the Control Desk installationprogram on subsequent uses of the program. If you cancel the installationprogram, it recalls most values that you entered the next time you start it. Valuesexcluded from being saved in this manner are the Control Desk installation
60 IBM Control Desk: Installation Guide (IBM WebSphere)

directory and the shortcut option chosen during the installation. You can restorethe default values in the Control Desk installation program by deleting<Maximo_Home>/applications/maximo/properties/maximo.properties and<Maximo_Home>/etc/install.properties. If you cannot locate themaximo.properties file in the <Maximo_Home> directory, look for it in the systemtemp file directory.
Simple installation path valuesSpecific simple path installation values are required by the Control Deskinstallation program.
If you elect to install Control Desk through the simple installation path, thefollowing values are set. You must provide values where indicated.
For simple installations, you supply a single host name for middleware. TheControl Desk installation program expects this host to contain all the software thatworks with Control Desk.
Table 6. Control Desk Simple Installation Path Values
Category Field Value Provided by User?
Deployment Option Deployment simple
DatabaseConfiguration
Database type DB2
DatabaseConfiguration
Host name Yes
DatabaseConfiguration
Port 50005
DatabaseConfiguration
Database name maxdb75
DatabaseConfiguration
Instance ctginst1
DatabaseConfiguration
User ID Yes
DatabaseConfiguration
Automate databaseconfiguration
yes
DatabaseConfiguration
Remote access userID
Yes
DatabaseConfiguration
Database installationdirectory Windows
C:\ProgramFiles\IBM\SQLLIB
DatabaseConfiguration
Instanceadministrator user ID Windows
db2admin
Yes
DatabaseConfiguration
Windows serviceuser ID
db2admin
DatabaseConfiguration
Data table spacename
maxdata
DatabaseConfiguration
Data table space size medium
Chapter 3. Deploying automatically reusing existing middleware 61

Table 6. Control Desk Simple Installation Path Values (continued)
Category Field Value Provided by User?
DatabaseConfiguration
Temporary tablespace name
maxtemp
DatabaseConfiguration
Temporary tablespace size
1000
IBM WebSphereApplication ServerConnectivity
Host name Yes
IBM WebSphereApplication ServerConnectivity
SOAP port 8879
IBM WebSphereApplication ServerConfiguration
IBM WebSphereApplication Serverserver homedirectory
WindowsC:\ProgramFiles\IBM\WebSphere\AppServer
IBM WebSphereApplication ServerConfiguration
User name wasadmin Yes
IBM WebSphereApplication ServerConfiguration
Profile name ctgDmgr01
IBM WebSphereApplication ServerConfiguration
Automate IBMWebSphereApplication Serverconfiguration
yes
IBM WebSphereApplication ServerConfiguration
Remote access userID
Yes
IBM WebSphereApplication ServerConfiguration
Web server port 80
IBM WebSphereApplication ServerConfiguration
Web server name webserver1
IBM WebSphereApplication ServerConfiguration
Node name ctgNode01
IBM WebSphereApplication ServerConfiguration
Cluster name MAXIMOCLUSTER
IBM WebSphereApplication ServerConfiguration
Application server MXServer This valuecannot be changed.
Integration AdapterJMS Configuration
JMS data sourcename
meajmsds
Integration AdapterJMS Configuration
Persist JMS messages no
SecurityConfiguration
Use default schema yes
62 IBM Control Desk: Installation Guide (IBM WebSphere)
Table 6. Control Desk Simple Installation Path Values (continued)
Category Field Value Provided by User?
SecurityConfiguration
Create usersautomatically
yes
MaximoConfiguration
Install directory C:\IBM\SMP Yes
Configuration Step Run configurationnow
yes
.
Installing the product and automatically configuringmiddleware
To install Control Desk, you run the installation program from the launchpad. Theinstallation procedure automatically configures middleware on multiple servers,using default values.
Before you begin
Ensure that you meet prerequisite conditions.v The database server, the directory server, and application server services must be
started and active.v The /tmp and /var/tmp directories must be present on the system. The
installation program depends on these directories for information duringdeployments on IBM WebSphere Application Server Network Deployment.
v On the administrative workstation, temporarily shut down any noncriticalprocesses that can have a negative effect on the installation, such as antivirussoftware.
v Ensure that the Windows DEP setting does not prevent the launchpad fromrunning: Select Start > Settings > Control Panel > System > Advanced >Performance > Settings > Data Execution Prevention. Select Turn on DEP foressential Windows programs and services only and click Apply. You might beasked to reboot the server.
v For Linux and UNIX systems with middleware installed, the command hostname-f must return a fully qualified host name. If necessary, consult thedocumentation for your operating system. Alternatively, you can provide the IPaddress for the system.
v Enable a remote execution and access service on every system that hasmiddleware installed. Each remote system must support a remote accessprotocol. It must also accept remote logins from a user name and password thatwere configured on the target server. Remote access protocols include SSH andWindows SMB. If the remote system is a Windows server, you must configureremote execution and access to use SMB.
v The DB2 database must be prepared.– If DB2 is installed on a Linux or UNIX system, you must create the instance
user and the home directory for the user on the DB2 server.– The database instance owner home directory must have 8 GB of space
available regardless of whether a database is installed in that location.– The user ID for the DB2 instance administrator must have SYSADM (system
administration) authority. You specify this user ID during the productinstallation program. See the DB2 product documentation for information
Chapter 3. Deploying automatically reusing existing middleware 63

about creating a user with SYSADM authority on the DB2 server. You mustadd root to a group with SYSADM authority for UNIX systems.
About this task
The instructions are for a multiple server installation that uses default values.
If you experience problems with the user interface of the installation programwhen installing on AIX 6.x systems remotely, reattempt the installation locally. Usethe console or an X terminal on the system locally.
Procedure1. Log in on the administrative system.2. Start the product installation program from the launchpad.
a. Start the launchpad. Browse to the root directory of the downloadedinstallation image, and run the following command:
Windowslaunchpad.exe
UNIX launchpad.shIf the launchpad does not start the installation, you can start the productinstallation program directly. On the downloaded installation image, browseto \Install\\, and run one of the following commands:
Windows
v install.bat
v install_win64.bat
UNIX
v install_aix64.sh
v install_linux32.sh
v install_linux64.sh
3. Select a language for the installation and click OK.4. On the Choose Installation Folder panel, specify the path to the location
where you want to install Control Desk.You can specify a description for the installation. A description is useful fordifferentiating between multiple installations that are hosted on the sameadministrative workstation.
5. Review the information that is on the Verify Installation Location panel. Thepanel shows any previous installation information that was found based onthe installation directory that you specified on the previous panel. After youadvance past this panel, you cannot go back and change the installationdirectory for this installation.If a more recent version of the installation program is found in the specifiedtarget directory, you are notified. The notification means that you are using anolder version of the installation program. The version found on theadministrative workstation is newer and can contain important features andenhancements. To use the newer version of the installation program, select theoption on the notification panel and click Next. This action exits the currentinstallation process and restarts the installation process with the newerinstallation program. If you do not select the option, you continue theinstallation with the older version of the installation program.
64 IBM Control Desk: Installation Guide (IBM WebSphere)

6. On the Package Summary panel, review the package deployment information.This panel lists version information for both new and existing packages on thesystem. Target package version information indicates the package versionbeing currently deployed.
7. On the Choose Deployment panel, specify Simple or Custom as thedeployment type.
8. On the Import Middleware Configuration Information panel, you selectImport middleware configuration information to have the productinstallation program reuse the middleware installation program values. Thesevalues are used as default values for the same fields in the productinstallation program.The Workspace location field refers to the location of the topology file thatcontains the values that were specified for the middleware installationprogram. The file is located in the workspace that was defined during themiddleware installation task. For example, C:\ibm\tivoli\mwi\workspace forWindows or /root/ibm/tivoli/mwi/workspace for UNIX.If you selected the simple deployment, the middleware default information isnot used.
9. On the Database Type panel, specify the software to use for the Maximodatabase.
10. On the Database panel, specify configuration information for your databasesoftware.For things such as the database user ID, the database name, the databaseinstance for Control Desk, and the schema name, if the values do not existwhen you specify them, they are created.For DB2, the user ID cannot be the same as the instance administrator user ID.Database users and database instance names cannot contain spaces.For DB2, the database instance is created if it does not exist, but the user andits associated home directory must exist on the DB2 server. For DB2, theschema name can be the same value as the owner of the table spaces that aredefined or it can be a different value, such as maximo.After you specify configuration information for your database software, theinstallation program validates the information with the database server.
11. On the Automate Database Configuration panel, you can specify that databasecreation and configuration is to be automated.If you do not select the option, you must configure the database manually.
12. On the Remote Access Authorization panel, specify authorization informationfor the automatic database configuration feature. Specifying the values enablesremote configuration.
13. On the Database Administration panel, specify configuration informationabout the database. The required information varies by database platform.For DB2, the instance administrator user ID cannot be the same as thedatabase user ID. And the Windows service user ID must have administrativeauthority on the system.
14. On the Database Tablespace panel, specify information about the table spaceof the database.When you click Next, the product installation program connects to thedatabase server and validates the information that you specified.
15. When the database validation is complete, on the Application Server Typepanel, specify the application server type for the product deployment.
Chapter 3. Deploying automatically reusing existing middleware 65

You have the option of configuring WebSphere Application Server NetworkDeployment automatically through the product installation program.
16. On the WebSphereConnectivity panel, specify host information for theWebSphere Application Server Network Deployment.
17. On the WebSphere Remote Access Authorization panel, specify authorizationinformation for WebSphere Application Server Network Deploymentconfiguration.
18. On the WebSphere Application Server Network Deployment Configurationpanel, specify configuration information for WebSphere Application ServerNetwork Deployment.The web server port must match an existing HTTP server port value that youconfigured when you set up WebSphere Application Server NetworkDeployment. If you specify a different value for the web server port, you mustrestart WebSphere Application Server Network Deployment at the conclusionof the installation. Restarting the server activates the new port and makes itavailable for incoming requests.The application server name that you specify is created if it does not exist.
19. On the Security panel, specify the method to use for authenticating andauthorizing users.
20. On the Specify Maximo Users panel, enter Maximo database user information.
Maximo administration userThe product administrator user ID that is used for initial configurationand adding users.
Maximo system registration userThe user ID that is used for the self-registration of users.
Maximo system integration userThe user ID that is used with enterprise adapters.
Custom user ID and password values are stored in the Maximo database. Thedefault user IDs of maxadmin, maxreg, and maxintadm are also created asusers in the Maximo database. Creation of the default user IDs is done forinternal processing purposes. If you use Maximo database security forauthentication and authorization, the default user IDs can be used to log in tothe application. If you regard this condition as a security risk, you can modifythe passwords for the default user IDs. You modify passwords for the userIDs in the Users application.
21. On the Security panel, specify the names of the user and group base entriesand specify how Control Desk users are created.
User base entryIf you do not plan to use the default LDAP schema that is providedwith Control Desk, specify the user base entry that you want to use.
Group base entryIf you do not plan to use the default LDAP schema , specify the groupbase entry that you want to use.
You can specify that the installation program creates the required users.Otherwise, you must create users manually before continuing.If you are not using the default LDAP schema that is provided, you mustcreate it yourself before advancing beyond this panel. The values that arespecified for the User base entry and Group base entry fields are used to
66 IBM Control Desk: Installation Guide (IBM WebSphere)

configure the VMMSYNC cron task. To create your own LDAP schema andcreate users manually, you can modify the default add-on LDIF data andimport it into your LDAP repository
22. On the Integration Adapter JMS Configuration panel, specify Java MessageService configuration information. A JMS server requires a DB2 datarepository to be configured to maintain messages. If you are using anotherdatabase type, you cannot configure message persistence. If you specify thatJMS messages are not to be persisted, you can configure the JMSimplementation manually later.Specify the name of the database to be used by JMS. For DB2, you can specifywhether to persist JMS messages within DB2.Select Do not persist JMS messages if you are deploying Control Desk withOracle or Microsoft SQL Server. When you click Next, the installation wizardskips to the SMTP Configuration panel.
23. If you specified that JMS messages should persist, specify additional JMSconfiguration information in the DB2 Database Server Configuration panel.The JMS data store can be created as a DB2 database only.
24. If you specified that JMS messages should persist, specify authorizationinformation for the automatic configuration feature in the DB2 DatabaseServer Remote Access Authorization panel.For Windows, the user ID must be a member of the DB2ADMNS group.For Linux or UNIX, the user ID must be root and a member of a group withSYSADM authority for the database instance.
25. If you specified that JMS messages should persist, specify additional DB2information in the DB2 Database Instance Configuration panel.
26. On the SMTP Configuration panel, specify the SMTP configurationinformation that is used by workflows to communicate with workflowparticipants.The administrator e-mail address is the e-mail address that is used to sendmessages. If you leave the fields blank, you must configure the SMTPparameters through the product interface as a post-installation task.
27. On the Data Integration and Context Menu Services Options panel, click theoption that indicates where the database tables for these functions are created:in the Maximo ("same") database, or in a separate database instance that youcreated for this purpose. If you are installing the Entry edition, choose theMaximo database. These tables are created but are not used by the Entryedition.
28. On the Base Language Selection panel, specify the base language for theinstallation.
29. On the Additional Language Selection panel, you can optionally specify oneor more additional languages that the installation is to support.
30. On the Run Configuration Step panel, specify how to perform theconfiguration step of the installation. If you do not select an option, theconfiguration step proceeds when you click Next.
Copy files now, but perform the installation configuration step laterSelect this option to copy files from the installation source to theadministrative workstation. You must perform the configuration stepat a later time to complete the deployment.
Important: Do not install another product before you complete theconfiguration step of the original installation. Installing another
Chapter 3. Deploying automatically reusing existing middleware 67

product before you run the configuration step for this installationoverwrites the taskstore, which prevents the original installation fromever being deployed.
The configuration values that you specify are stored in theinstall_home\maximo\applications\maximo\properties\maximo.properties and install_home\etc\install.properties files.You run the configuration steps outside of the product installationprogram by using the taskrunner utility, in the install_home\scriptsdirectory. Run the taskrunner utility from the command line.install_home\scripts\taskrunner [CONTINUE <STOPONERROR|NOSTOPONERROR>]
The taskrunner uses the configuration values that are stored in themaximo.properties and install.properties files to configure ControlDesk.
If you run taskrunner with the NOSTOPONERROR parameter, thetaskrunner continues despite errors. If you run taskrunner with theSTOPONERROR parameter, the taskrunner stops when it encounters anerror. If you used STOPONERROR, you can rectify the conditions thatcaused the error. You can then resume the installation where the lastsuccessfully completed task was recorded in the previous attempt bystarting taskrunner with the CONTINUE parameter.
Deploy application files manually laterSelect this option to manually deploy application files to theapplication server.
Defer the update of the Maximo databaseSelect this option if you want to manually run the database updatetask for the product deployment. This option can be used when thereis a fix pack available that addresses known issues with the updatedbscript. In this scenario, you choose the Defer the update of theMaximo database option, apply the fix pack, and then run theupdatedb -v1 command manually.
31. On the Choose Shortcut Folder panel, specify where you want Control Deskicons created.If you select In the Start Menu and use Internet Explorer, add the ControlDesk URL to the trusted sites web content zone. Disable the option thatrequires server verification for all sites in the zone.Do not select In the Quick Launch Bar. The selection does not create ashortcut in the Quick Launch bar.Attention: Shortcuts are created for Windows systems only. BecauseWebLogic Server deployments are a manual process, you must manuallyupdate any shortcuts that you create. You update shortcuts after youmanually deployed the Control Desk EAR files.
32. On the Input Summary panel, review the information that you provided forthe product installation program.If necessary, use Previous to return to previous panels to change values.
33. On the Pre-Installation Summary panel, review the installation information,then click Install.The installation process begins. You can monitor the progress of theinstallation by viewing the messages that are shown.
34. On the Installation Completed panel, review any information presented, thenclick Done.
68 IBM Control Desk: Installation Guide (IBM WebSphere)
Attention: In some cases, on AIX systems, the Installation Completed panelmight appear blank. Click Done to exit the installation program.
“Restarting middleware on Windows” on page 223This procedure describes how to restart middleware on Windows, if you mustrestart any middleware services.“Restarting middleware on UNIX” on page 224Middleware services on Linux and AIX platforms occasionally must berestarted, such as when a reboot occurs. Middleware servers and services mustbe active before running the Control Desk installation program.
Installing optional contentInstall the relevant optional content package for your edition of the product.
Optional content is often used in development environments as a way to begindeveloping your own content.
If you do not install optional content during the product installation process, youcan install it later. If you install it later, you must update the database and rebuildand deploy the maximo.ear file.
Installing optional integration modulesInstall integration module packages in order to set up integrations with otherproducts.
You can install these integration modules from the Integrations page of thelaunchpad:
IBM Tivoli Provisioning Manager Integration ModuleThis integration module enables you to integrate Tivoli ProvisioningManager with the release management process. For example, you can useTivoli Provisioning Manager as a Definitive Media Library. See the Releasemanagement section of the information center for more information aboutthis integration.
Deployed Assets CMS LIC Enablement PackageThis package is required if you plan to use the Context Menu Service tomanage launch-in-context actions for deployed assets. See the Planningsection of the information center for information about options forlaunch-in-context actions.
CI AppsCMS LIC Enablement PackageThis package is required if you plan to use the Context Menu Service tomanage launch-in-context actions for actual configuration items. See thePlanning section of the information center for information about optionsfor launch-in-context actions.
Rational ClearQuest OSLC IntegrationsThis integration enables you to use the Open Services for LifecycleCollaboration (OSLC) technology to link from the Problems application toRational ClearQuest to share information about problems and theirsolutions.
Rational Team Concert OSLC IntegrationsThis integration enables you to use the Open Services for LifecycleCollaboration (OSLC) technology to link from the Problems application toRational Team Concert to share information about problems and theirsolutions.
Chapter 3. Deploying automatically reusing existing middleware 69

If you do not install integration modules during the product installation process,you can install them later. If you install them later, you must update the databaseand rebuild and deploy the maximo.ear file.
Language deployment after database update deferralSelecting the option to defer the update of the Maximo database when installingthe product, affects how you deploy languages.
During installation, you have the option to defer the database update task. Thisoption prevents writing data to the database during the installation. Theinstallation program is limited to copying files to the administrative system andregistering product process solution packages. You add languages by completingthe installation, manually updating the database, and then updating languagesmanually.
“Manually deploying languages after database update deferral” on page 51Languages must be deployed manually if you defer database updates by theinstallation program.
Manually deploying languages after database update deferralLanguages must be deployed manually if you defer database updates by theinstallation program.
Before you begin
You must have run updatedb command before manually configuring languages forPSI packages.
About this task
To manually configure languages for PSI packages, complete the following steps:
Procedure1. Update language support for the core components.
Files for the language selections you made during the installation are extractedto the C:\IBM\SMP\Maximo\Tools\Maximo\locale\xliff\ directory on the system.a. To update a language as the base language to use for the product, run the
following command:install_home\maximo\tools\maximo\TDToolkit.bat-IMPORT-SLEN-TLlocale-maxmessfix
b. To add one or more languages as additional languages for use with theproduct, run the following command for each language you want to add:install_home\maximo\tools\maximo\TDToolkit.bat-ADDLANGlocale-maxmessfix
2. Update languages for additional packages.In order to determine which packages you need to update, change directory toinstall_home\maximo\tools\maximo\en\xliff. Each folder located in the xliffdirectory, with the exception of MAXUPG folder, is used as input for the-pmpupdate operation of TDToolkit. Unlike the process for updating languages
70 IBM Control Desk: Installation Guide (IBM WebSphere)

for Control Desk, you run the TDToolkit command once for each package.TDToolkit determines which languages are currently deployed and updates alllanguages.a. Change directory to install_home\maximo\tools\maximo\en\xliff. and
identify a package folder to update, for example calibration.b. Update languages for the chosen package.
C:\IBM\SMP\maximo\tools\maximo\TDToolkit.bat-pmpupdatepackagedirectory
In this example, pmpupdatepackagedirectory could be pmpupdatecalibrationor pmpupdateconfig_pmp for example.
c. Repeat for each additional package that require language updates.
Chapter 3. Deploying automatically reusing existing middleware 71

72 IBM Control Desk: Installation Guide (IBM WebSphere)

Chapter 4. Deploying manually reusing existing middleware
Use this information if you intend to deploy Control Desk by reusing existingmiddleware servers and manually configuring them to work with Control Desk.
This information provides a high-level overview or road map of tasks you need tocomplete in order to deploy Control Desk automatically, using middleware alreadyestablished in your enterprise.
In this scenario, you manually configure existing middleware resources beforerunning the Control Desk installation program.
Control Desk installation with manual middleware configurationManually configured installations involve configuring middleware components, thedatabase server, the directory server, and the J2EE server, to work with ControlDesk before using the Control Desk installation program.
You can elect to have one or more Control Desk middleware componentsconfigured automatically by the Control Desk installation program. Alternatively,you can choose to manually configure one or more of the middleware servers towork with Control Desk.
The information contained in this section provides details on how to manuallyconfigure Control Desk middleware before running the Control Desk installationprogram.
Before you begin, ensure you have addressed the following prerequisite conditions:v You have designated a Windows or UNIX-based server to start the Control Desk
installation program.v For WebSphere Application Server Network Deployment, ensure that the Cell
and all related nodes are active.
You must complete the manual configuration of each server you plan to notconfigure using the autoconfigure feature of the Control Desk installation programbefore you actually use the Control Desk installation program to install ControlDesk.
Ensure that all of your middleware is at supported version levels.
Manually configuring the databaseYou have the option of manually configuring the database server used in ControlDesk deployment. Manual configuration of the database server must be completedbefore you use the Control Desk installation program.
For DB2 on UNIX and Linux, a minimum of 8 gigabytes (binary) free of space isrequired for DB2 table spaces. This space must be available to the databaseinstance home directory (/home/ctginst1).
Figure 2. Deploying Control Desk with manual middleware configuration
© Copyright IBM Corp. 2014 73
For DB2 on Windows, ensure that you have a minimum of 8 gigabytes of freespace in the DB2 installation directory.
Manually configuring DB2 9.xThis section contains instructions for manually configuring DB2 9.x servers for useby Control Desk.
About this task
To configure an existing DB2 9.x server for use with Control Desk, complete thefollowing steps before starting the Control Desk installation program:
Procedure1. Log in to the system as a user that has administrative permissions on the
system.2. Create system users if they do not exist on the system.
v Windows– db2admin– maximo
v Linux or UNIX– db2admin– maximo– ctgfenc1– ctginst1
The ctginst1 user ID must be assigned to the db2iadm1 group.3. Open a console window and set up the DB2 environment:
v Windowsdb2cmd
v Linux or UNIXEnsure that the /opt/ibm/db2/V9.7/bin, /opt/ibm/db2/v9.7/instance, and/opt/ibm/db2/V9.7/adm directories are added to your PATH.
4. Create the DB2 instance:v Windows
db2icrt -s ese -u db2admin,myPassword -r 50005,50005 ctginst1set db2instance=ctginst1db2startdb2 update dbm config using SVCENAME 50005 DEFERREDdb2stopdb2set DB2COMM=tcpipdb2start
v Linux orUNIXdb2icrt -s ese -u db2fenc1 -p 50005 ctginst1. /home/ctginst1/sqllib/db2profiledb2startdb2 update dbm config using SVCENAME 50005 DEFERREDdb2stopdb2set DB2COMM=tcpipdb2start
5. Create the database.db2 create db ’maxdb75’ ALIAS ’maxdb75’ using codeset UTF-8 territory US pagesize 32 Kdb2 connect to ’maxdb75’db2 GRANT DBADM ON DATABASE TO USER db2admin (windows only)db2 GRANT SECADM ON DATABASE TO USER db2admin (windows only)db2 connect reset
6. Configure the database.db2 update db cfg for maxdb75 using SELF_TUNING_MEM ONdb2 update db cfg for maxdb75 using APP_CTL_HEAP_SZ 16384 DEFERREDdb2 update db cfg for maxdb75 using APPLHEAPSZ 2048 AUTOMATIC DEFERREDdb2 update db cfg for maxdb75 using AUTO_MAINT ON DEFERREDdb2 update db cfg for maxdb75 using AUTO_TBL_MAINT ON DEFERREDdb2 update db cfg for maxdb75 using AUTO_RUNSTATS ON DEFERREDdb2 update db cfg for maxdb75 using AUTO_REORG ON DEFERREDdb2 update db cfg for maxdb75 using AUTO_DB_BACKUP ON DEFERREDdb2 update db cfg for maxdb75 using CATALOGCACHE_SZ 800 DEFERRED
74 IBM Control Desk: Installation Guide (IBM WebSphere)

db2 update db cfg for maxdb75 using CHNGPGS_THRESH 40 DEFERREDdb2 update db cfg for maxdb75 using DBHEAP AUTOMATICdb2 update db cfg for maxdb75 using LOCKLIST AUTOMATIC DEFERREDdb2 update db cfg for maxdb75 using LOGBUFSZ 1024 DEFERREDdb2 update db cfg for maxdb75 using LOCKTIMEOUT 300 DEFERREDdb2 update db cfg for maxdb75 using LOGPRIMARY 20 DEFERREDdb2 update db cfg for maxdb75 using LOGSECOND 100 DEFERREDdb2 update db cfg for maxdb75 using LOGFILSIZ 8192 DEFERREDdb2 update db cfg for maxdb75 using SOFTMAX 1000 DEFERREDdb2 update db cfg for maxdb75 using MAXFILOP 32768 DEFERRED #32-bit Windowsdb2 update db cfg for maxdb75 using MAXFILOP 65335 DEFERRED #64-bit Windowsdb2 update db cfg for maxdb75 using MAXFILOP 30720 DEFERRED #32-bit UNIXdb2 update db cfg for maxdb75 using MAXFILOP 61440 DEFERRED #64-bit UNIXdb2 update db cfg for maxdb75 using PCKCACHESZ AUTOMATIC DEFERREDdb2 update db cfg for maxdb75 using STAT_HEAP_SZ AUTOMATIC DEFERREDdb2 update db cfg for maxdb75 using STMTHEAP AUTOMATIC DEFERREDdb2 update db cfg for maxdb75 using UTIL_HEAP_SZ 10000 DEFERREDdb2 update db cfg for maxdb75 using DATABASE_MEMORY AUTOMATIC DEFERREDdb2 update db cfg for maxdb75 using AUTO_STMT_STATS OFF DEFERREDdb2 update db cfg for maxdb75 using STMT_CONC LITERALS DEFERREDdb2 update alert cfg for database on maxdb75 using db.db_backup_req SET THRESHOLDSCHECKED YESdb2 update alert cfg for database on maxdb75 using db.tb_reorg_req SET THRESHOLDSCHECKED YESdb2 update alert cfg for database on maxdb75 using db.tb_runstats_req SET THRESHOLDSCHECKED YESdb2 update dbm cfg using PRIV_MEM_THRESH 32767 DEFERREDdb2 update dbm cfg using KEEPFENCED NO DEFERREDdb2 update dbm cfg using NUMDB 2 DEFERREDdb2 update dbm cfg using RQRIOBLK 65535 DEFERREDdb2 update dbm cfg using HEALTH_MON OFF DEFERRED## Windows: AGENT_STACK_SZ 1000# Unix : AGENT_STACK_SZ 1000#db2 update dbm cfg using AGENT_STACK_SZ 1000 DEFERREDdb2 update dbm cfg using MON_HEAP_SZ AUTOMATIC DEFERREDdb2set DB2_SKIPINSERTED=ONdb2set DB2_INLIST_TO_NLJN=YESdb2set DB2_MINIMIZE_LISTPREFETCH=Ydb2set DB2_EVALUNCOMMITTED=YESdb2set DB2_FMP_COMM_HEAPSZ=65536db2set DB2_SKIPDELETED=ONdb2set DB2_USE_ALTERNATE_PAGE_CLEANING=ON
7. For Linux orUNIX log in as the ctginst1 user and then restart the DB2command-line environmensu - ctginst1db2
8. Restart DB2.db2stop forcedb2start
9. Reconnect to the database.db2 connect to ’maxdb75’
10. Create a buffer pool.db2 CREATE BUFFERPOOL MAXBUFPOOL IMMEDIATE SIZE 4096 AUTOMATIC PAGESIZE 32 K
11. Create table spaces.db2 CREATE REGULAR TABLESPACE MAXDATA PAGESIZE 32 K MANAGED BY AUTOMATIC STORAGE INITIALSIZE 5000 M BUFFERPOOL MAXBUFPOOLdb2 CREATE TEMPORARY TABLESPACE MAXTEMP PAGESIZE 32 K MANAGED BY AUTOMATIC STORAGE BUFFERPOOL MAXBUFPOOLdb2 GRANT USE OF TABLESPACE MAXDATA TO USER MAXIMO
12. Grant authority to maximo.db2 GRANT DBADM,CREATETAB,BINDADD,CONNECT,CREATE_NOT_FENCED_ROUTINE,IMPLICIT_SCHEMA,LOAD,CREATE_EXTERNAL_ROUTINE,QUIESCE_CONNECT,SECADM ON DATABASE TO USER MAXIMO
db2 GRANT USE OF TABLESPACE MAXDATA TO USER MAXIMO
db2 create schema maximo authorization maximo
db2 GRANT CREATEIN,DROPIN,ALTERIN ON SCHEMA MAXIMO TO USER MAXIMO
13. Break the database connection.db2 connect reset
14. Exit the DB2 command-line environment15. Install the appropriate fix pack indicated in the prerequisites topic in the
chapter that describes how to prepare for the installation. Ensure that youreview and complete all the installation and post-installation tasks containedwithin the fix pack readme file. Failure to do so can potentially cause theControl Desk installation to fail. See the appropriate product support page formore information.
Manually configuring Oracle 11gUse the following instructions to manually configure Oracle 11g for use withControl Desk.
Chapter 4. Deploying manually reusing existing middleware 75

Before you begin
Oracle instance names must be limited to eight characters in length. For Oracledatabases, the schema owner must use the same user ID as the database user.
About this task
To configure an existing Oracle 11g server for use with Control Desk, complete thefollowing steps before you start the Control Desk installation program:
Procedure1. Log in as the Oracle software user. Typically this user is named oracle.2. Create the database listener. The listener manages requests to connect to the
database. This step is only required if you do not already have an existinglistener in place.a. Open the Oracle Network Configuration Assistant application.b. From the Welcome panel, select Listener configuration, and then click Next.c. From the action panel, select Add, and then click Next.d. Enter a name for the listener or accept the default value, and then click
Next.e. Accept the default Selected Protocols listed by clicking Next.f. From the port panel, select Use the standard port of 1521, and then click
Next.g. Select No to indicate that you are finished configuring listeners, and then
click Next.h. From the Listener Configuration Done panel, click Next.i. Click Finish.
3. Create a database for use by Control Desk.a. Open the Oracle Database Configuration Assistant.b. Click Next.c. Select Create a Database, and then click Next.d. Select General Purpose or Transaction Processing, and then click Next.e. Enter ctginst1 for both the Global Database Name value and the SID value,
and then click Next.f. Leave the defaults selected, and click Next.g. Ensure Use the Same Administrative Password for All Accounts is
selected, enter a password for Oracle users, and then click Next.h. Ensure File System is selected as the storage mechanism to use for the
database. Ensure Use Database File Locations from Template is selected asthe value to use for database file location, and then click Next.
i. Leave defaults selected for the database recovery options panel, and thenclick Next.
j. From the Sample Schemas panel, click Next.k. From the Initialization Parameters panel, on the Memory tab, select Custom
and provide the following values (measured in Mb):
Memory ManagementSet this value to Manual Shared Memory Management.
Shared PoolSet this value to 152.
76 IBM Control Desk: Installation Guide (IBM WebSphere)

Buffer CacheSet this value to 36.
Java PoolSet this value to 32.
Large PoolSet this value to 8.
PGA SizeSet this value to 36.
l. From the Character Sets tab, select Use Unicode (AL32UTF8).m. Click All Initialization Parameters....n. Click Show Advanced Parameters.o. Locate the following parameters, change them to the values indicated, and
then click Close.
nls_length_semanticsChange this value to CHAR.
open_cursorsChange this value to 1000.
cursor_sharingSet this value to FORCE.
p. From the Initialization Parameters panel, click Next.q. From the Database Storage panel, click Next.r. From the Creation Options panel, click Finish.s. Click Exit to exit the Database Configuration Assistant. The database is
successfully created.
Note: The Oracle Database Configuration Assistant starts theORACLE_HOME/ctx/admin/defaults/drdefus.sql script as part of theconfiguration of the CTXSYS user. You must start this script manually if theOracle Database Configuration Assistant is not used.
4. Create a table space using the following command in SQL*Plus:Create tablespace maxdata datafile’C:\oracle\product\11.1.0\db_1\dbs\maxdata.dbf’size 1000M autoextend on;
Change the directory specified in the example to the database location. If thedirectory does not exist, this command fails.
5. Create a temporary table space using the following command in SQL*Pluscreate temporary tablespace maxtemp tempfile’C:\oracle\product\11.1.0\db_1\dbs\maxtemp.dbf’size 1000M autoextend on maxsize unlimited;
Change the directory specified in the example to the database location. If thedirectory does not exist, this command fails.
6. Create the maximo user and grant permissions using the following commandin SQL*Plus:create user maximo identified by maximo default tablespace maxdata temporarytablespace maxtemp;grant connect to maximo;grant create job to maximo;grant create trigger to maximo;grant create session to maximo;grant create sequence to maximo;grant create synonym to maximo;
Chapter 4. Deploying manually reusing existing middleware 77

grant create table to maximo;grant create view to maximo;grant create procedure to maximo;grant alter session to maximo;grant execute on ctxsys.ctx_ddl to maximo;alter user maximo quota unlimited on maxdata;
If you created a separate table space for indexing, you must also grant access tothat index table space to the maximo user. For example, use the followingcommand if you created a separate table space for indexing calledTSI_MAM_OWN.":alter user maximo quota unlimited on TSI_MAM_OWN
These instructions assume that you did not modify default role sets assigned tothe Oracle DBA user or user IDs created to connect to the database. If yourestricted the default privileges granted to user IDs, you must explicitly grantthem to the maximo user. For example, if you do not grant a role such as theselect_catalog_role role, you must explicitly grant that role to the maximouser. This assignment can be done by running this SQL*Plus command:grant select_catalog_role to maximo
Manually configuring Oracle 10gOracle 10g can be manually configured for use with Control Desk.
Before you begin
Oracle instance names must be limited to eight characters in length. For Oracledatabases, the schema owner must use the same user ID as the database user.
About this task
To configure an existing Oracle 10g server for use with Control Desk, complete thefollowing steps before you start the Control Desk installation program:
Procedure1. Log in as the Oracle software user. Typically this user is named oracle.2. Create the database listener. The listener manages requests to connect to the
database.a. Open the Oracle Network Configuration Assistant application.b. From the Welcome panel, select Listener configuration, and then click Next.c. From the action panel, select Add, and then click Next.d. Enter a name for the listener or accept the default value, and then click
Next.e. Accept the default Selected Protocols listed by clicking Next.f. From the port panel, select Use the standard port of 1521, and then click
Next.g. Select No to indicate that you are finished configuring listeners, and then
click Next.h. From the Listener Configuration Done panel, click Next.i. Click Finish.
3. Create a database for Control Desk.a. Open the Oracle Database Configuration Assistant.b. Click Next.c. Select Create a Database, and then click Next.
78 IBM Control Desk: Installation Guide (IBM WebSphere)

d. Select General Purpose, and then click Next.e. Enter ctginst1 for both the Global Database Name value and the SID value,
and then click Next.f. Leave the defaults selected, and click Next.g. Ensure Use the Same Password for All Accounts is selected, enter a
password for Oracle users, and then click Next
h. Ensure File System is selected as the storage mechanism to use for thedatabase, and then click Next.
i. Ensure Use Database File Locations from Template is selected as the valueto use for database file location, and then click Next.
j. Leave defaults selected for the database recovery options panel, and thenclick Next.
k. From the Sample Schemas panel, click Next.l. From the memory allocation panel, select Custom, provide the following
values (measured in bytes), and then click Next.
Shared Memory ManagementSet this value to Manual.
Shared PoolSet this value to 152.
Buffer CacheSet this value to 36.
Java PoolSet this value to 32
Large PoolSet this value to 8.
PGA SizeSet this value to 36.
m. From the Character Sets tab, select Use Unicode (AL32UTF8),
n. Click All Initialization Parameters....o. Click Show Advanced Parameters.p. Locate the following parameters, change them to the values indicated, and
then click Close.
nls_length_semanticsChange this value to CHAR
open_cursorsChange this value to 1000
cursor_sharingSet this value to FORCE.
q. From the Initialization Parameters panel, click Next.r. From the Database Storage panel, click Next.s. From the Creation Options panel, click Finish.t. After the database is created, click Password Management.u. Unlock the CTXSYS account by clearing the check mark in the Lock
Account? column for that entry, enter a password for the account, and thenclick OK.
v. Click Exit to exit the Database Configuration Assistant. The database issuccessfully created.
Chapter 4. Deploying manually reusing existing middleware 79
Note: The Oracle Database Configuration Assistant uses theORACLE_HOME/ctx/admin/defaults/drdefus.sql script as part of theconfiguration of the CTXSYS user. This script must be used manually if theOracle Database Configuration Assistant is not used.
4. Create a table space using the following command in SQL*Plus:Create tablespace maxdata datafile’C:\oracle\product\10.2.0\oradata\ctginst1\maxdata.dbf’size 1000M autoextend on;
The directory specified in the example must be changed to the installationlocation of the database. If the directory does not exist, this command fails.
5. Create a temporary table space.6. Create the maximo user and grant permissions using the following command
in SQL*Plus:create user maximo identified by maximo default tablespace maxdata temporarytablespace maxtemp;grant connect to maximo;grant create job to maximo;grant create trigger to maximo;grant create session to maximo;grant create sequence to maximo;grant create synonym to maximo;grant create table to maximo;grant create view to maximo;grant create procedure to maximo;grant alter session to maximo;grant execute on ctxsys.ctx_ddl to maximo;alter user maximo quota unlimited on maxdata;
If you have elected to create a separate table space for indexing, you must alsogrant the maximo user access to that index table space. For example, you mustperform the following additional SQL*plus command if you had created aseparate table space for indexing called TSI_CMDB_OWN:alter user maximo quota unlimited on TSI_CMDB_OWN
These instructions assume that you did not modify the default role sets that areassigned to the Oracle DBA user or other database connection user IDs. If yourestrict the default privileges granted to user IDs, you must explicitly grantthem to the maximo user. For example, the select_catalog_role role is requiredfor user IDs connecting to the database. To deploy Control Desk successfully,you must explicitly grant that role to the maximo user by using the SQL*Pluscommand:grant select_catalog_role to maximo
Manually configuring Microsoft SQL ServerYou can manually configure Microsoft SQL Server for use with Control Desk.
Before you begin
Because Microsoft SQL Server does not support UTF-8, Control Desk does not havemultilingual support when deployed with Microsoft SQL Server.
Microsoft SQL Server Database Collation settings must be set to the followingoptions:v Dictionary orderv Case-insensitivev For use with 1252 Character set
80 IBM Control Desk: Installation Guide (IBM WebSphere)

About this task
To configure an existing Microsoft SQL Server for use with Control Desk, performthe following steps before starting the Control Desk installation program:
Procedure1. Configure the listener port.
If The default instance of the Microsoft SQL Server Database Engine listens onTCP port 1433. Named instances of the Microsoft SQL Server Database Engineand Microsoft SQL Server Compact Edition are configured for dynamic ports,which means they select any available port when the service starts. Whenconnecting to a named instance across a firewall, configure the Database Engineto listen on a specific port, to open this port in the firewall.a. Open Programs > Microsoft SQL Server 2008 > Configuration Tools >
SQL Server Configuration Manager
b. From the Microsoft SQL Server Configuration Manager navigation pane,expand SQL Server Network Configuration > Protocols for <instancename>, and then double-click TCP/IP.
c. In the TCP/IP Properties dialog box, click the IP addresses tab.d. For each IP address listed, ensure that the TCP Dynamic Ports field is blank.
If the TCP Dynamic Ports field contains a value of 0, that IP address isusing dynamic ports. Since Control Desk requires Microsoft SQL Server tolisten on a static port, this field must be blank.
e. For each IP address listed, enter 1433 for the TCP Port field.f. Click OK.g. From the SQL Server Configuration Manager navigation pane, click SQL
Server Services.h. Right-click SQL Server (<instance name>) and then click Restart, to stop,
and restart Microsoft SQL Server.i. Verify the Microsoft SQL Server instance is running, and then close SQL
Server Configuration Manager.2. Verify that you enabled the Full-text Search setting during the installation of
Microsoft SQL Server 2008. To determine if Full-text Search is installed on yourexisting Microsoft SQL Server database, perform the following steps:a. Open SQL Server Management Studio, select SQL Server Authentication as
the authentication type, and enter the credentials for the sa user ID, andthen click Connect.
b. Click New Query.c. Type the following command:
select FULLTEXTSERVICEPROPERTY ( ’IsFulltextInstalled’ )
If you did not install Full-text Search (the resulting value is zero), you mustdo so at this time. To install Full-text Search, insert the Microsoft SQL Server2008 product media into the system and start the installation wizard.Navigate through the wizard and enable the Full-Text Search option locatedon the Custom portion of the Setup Type dialog box. To finish theinstallation process, restart the server.
3. Create a Microsoft SQL Server Database.a. Open SQL Server Management Studio (Start > Programs > Microsoft SQL
Server 2008 > SQL Server Management Studio)b. Right-click the Databases folder from the navigation tree , and select New
Database.
Chapter 4. Deploying manually reusing existing middleware 81

c. In the Database name entry field, specify a unique database name (forexample maxdb75)
d. For the maxdb75 Logical Name, change the Initial Size (MB) attribute to 500(MB), and also set the value of the Autogrowth field to By 1MB,unrestricted growth.
e. If you prefer, modify the log settings to accommodate your productionenvironment.
f. Click OK.4. Create the Maximo User for Microsoft SQL Server.
a. Open Microsoft SQL Server Management Studio (Start > Programs >Microsoft SQL Server 2008 > SQL Server Management Studio)
b. Click New Query.c. Select the Control Desk database (maxdb75) from the Available Databases
menu,d. Enter the following script to create the Maximo database user MAXIMO with a
password of MAXIMO.sp_addlogin MAXIMO,MAXIMOgo
This value is case-sensitive.e. Click Execute.f. Enter the following script to change the database owner to maximo.
sp_changedbowner MAXIMOgo
g. Click Execute.
What to do next
If you add additional logical names to the database and set their file group to avalue other than PRIMARY, you must complete the following steps after you setup the database and create the Maximo user:1. Run the Control Desk installation program and choose the Do not run the
configuration step now option.2. Add the following property to the install_home\etc\install.properties file:
Database.SQL.DataFilegroupName=<your logical name>
3. Run the configuration steps outside of the Control Desk installation program byusing the taskrunner utility, located in the install_home\scripts directory.
Complete these additional steps only if you added additional logical names to thedatabase and set their file group to a value other than PRIMARY.
Manually configuring the directory serverThese topics provide details on manually configuring a directory server for use byControl Desk
There are several methods you can use to secure Control Desk.If want to use adirectory server to secure Control Desk, you must complete the manualconfiguration of the directory server before you use the Control Desk installationprogram. Manual configuration is necessary if you choose to not have the ControlDesk installation program perform configuration.
82 IBM Control Desk: Installation Guide (IBM WebSphere)

Note: The base dn, bind user, and other various node values listed in thesesections are defaults. These values are replaced with values applicable to existingLDAP hierarchies within your organization.
Important: When entering LDAP values for Control Desk installation panel fields,entries in LDIF files, or values you enter directly into a directory instance usingdirectory server tools, be aware of the product-specific syntax rules for usingspecial characters in an LDAP string. In most cases, special characters must bepreceded by an escape character in order to make it readable by the directoryserver. Failing to escape special characters contained in an LDAP string used withControl Desk results in Control Desk errors.
Many directory server products consider a blank space as a special character that ispart of the LDAP string. If you mistakenly enter an LDAP string that contains ablank, at the end of a field value, for example, and you do not precede the blankcharacter with an escape character, you encounter Control Desk errors that aredifficult to troubleshoot.
See the product documentation for your directory server for more informationabout special characters in LDAP strings.
Manually configuring IBM Tivoli Directory ServerUse the following instructions to manually configure IBM Tivoli Directory Serverfor use with Control Desk.
About this task
To configure IBM Tivoli Directory Server before starting the Control Deskinstallation program, you must create an instance of IBM Tivoli Directory Server.
Note: While you can technically share a DB2 instance between Control Desk andthe one needed by IBM Tivoli Directory Server, it might lead to problems. Duringthe installation, the database instance is restarted, which might disrupt theavailability of IBM Tivoli Directory Server to your enterprise. If you are using theautomated installation programs, separate instances are created for use by ControlDesk and IBM Tivoli Directory Server.
Procedure1. Using your preferred method, create a user on the system and assign it to the
appropriate group.
WindowsCreate the user db2admin and make it a member of the followinggroups:v Windows Administratorsv DB2ADMNSv DB2USERS
UNIX Create the user idsccmdb and make it a member of the followinggroups:v dasadmn1v idsldapv dbsysadm
The root user must also be a member of the dasadm1, idsldap, anddbsysadm groups.
Chapter 4. Deploying manually reusing existing middleware 83

2. If the Instance Administration tool is not already started, ensure that you arelogged in as an administrator on the system, and then start the tool
WindowsSelect Programs > IBM Tivoli Directory Server 6.3 > InstanceAdministration Tool.
UNIX Type ./opt/IBM/ldap/V6.3/sbin/idsxinst at the command line.3. In the Instance Administration tool, click Create an instance.4. In the Create a new instance window, click Create a new directory server
instance, and then click Next.5. From the Instance details window, enter values for the following fields, and
then click Next.
User nameSelect idsccmdb as the system user ID of the user who owns theinstance. This name is also the name of the instance.
Install locationEnter the location where the instance files are stored.
Encryption seed stringType a string of characters that are used as an encryption seed. Thisvalue must be a minimum of 12 characters.
Instance descriptionEnter a brief description of the instance.
6. In the DB2 instance details panel, enter idsccmdb as the value for the DB2instance name field, and then click Next.
7. In the TCP/IP settings for multihomed hosts panel, select Listen on allconfigured IP addresses, and then click Next.
8. In the TCP/IP port settings panel, complete the following fields, and thenclick Next.
Server port numberEnter 389 as the contact port for the server.
Server secure port numberEnter 636 as the secure port for the server.
Admin daemon port numberEnter 3538 as the administration daemon port.
Admin daemon secure port numberEnter 3539 as the administration daemon secure port.
9. In the Option steps panel, leave the following options selected, and then clickNext.
Configure admin DN and passwordYou want to configure the administrator DN and password for theinstance now.
Configure databaseYou want to configure the database for the directory server now.
10. In the Configure administrator DN and password window panel, complete thefollowing fields, and then click Next.
Administrator DNEnter cn=root for the administrator distinguished name.
84 IBM Control Desk: Installation Guide (IBM WebSphere)

Administrator PasswordEnter a password for the Administrator DN.
11. From the Configure database panel, complete the following fields, and thenclick Next.
Database user nameEnter idsccmdb as the database user.
PasswordEnter the password for the idsccmdb user.
Database nameEnter idsccmdb as the database to be used with this directory instance.
12. In the Database options panel, complete the following fields, and then clickNext.
Database install locationType the location for the database.
WindowsFor Windows platforms, this value must be a drive letter.
UNIX For non-Windows platforms, the location must be a directoryname, such as /home/ldapdb.
Ensure that you have at least 80 MB of free hard disk space in thelocation you specify. Additional disk space must be available toaccommodate growth as new entries are added to the directory.
Character-set optionLeave the Create a universal DB2 database (UTF-8/UCS-2) optionselected.
13. In the Verify settings panel, review the instance creation details provided, andthen click Finish to create the idsccmdb instance.
14. Click Close to close the window and return to the main window of theInstance Administration tool.
15. Click Close to exit the Instance Administration tool.16. Start the IBM Tivoli Directory Server Configuration tool:
WindowsSelectPrograms > IBM Tivoli Directory Server 6.3 > InstanceAdministration Tool.
UNIX Type ./opt/IBM/ldap/V6.3/sbin/idsxcfg at the command line.17. Select Manage suffixes.18. In the Manage suffixes panel, type the following suffix, and then click Add.
o=IBM,c=US
19. Click OK.20. Create and save an LDIF file.
Add the DN information, for example:v ou=SWG,o=IBM,c=USv ou=users
Note: ou=SWG,o=IBM,c=US in this example is an organization unit calledSWG. SWG houses the OU=Users organization units to place the userscreated for Control Desk. DC=IBM and DC=COM would indicate a domainforest of ibm.com®. You can replace the example with the directory structureof your own organization.
Chapter 4. Deploying manually reusing existing middleware 85

Define the following users and their positions within the ou=users DN's youcreated. These users are defined in order for Virtual Member Manager to beused to secure Control Desk.
Important: Before you begin this procedure, ensure that you have thefollowing users created in the root of your LDAP repository:
Table 7. Base Control Desk required users
User
wasadmin
maxadmin
mxintadm
maxreg
Here is an example of the default base LDIF data:dn: o=ibm,c=usobjectClass: topobjectClass: organizationo: IBM
dn: ou=SWG, o=ibm,c=usou: SWGobjectClass: topobjectClass: organizationalUnit
dn: ou=users,ou=SWG, o=ibm,c=usou: usersobjectClass: topobjectClass: organizationalUnitdn: cn=wasadmin,ou=users,ou=SWG, o=ibm,c=usuid: wasadminuserpassword: passw0rdobjectclass: organizationalPersonobjectclass: inetOrgPersonobjectclass: personobjectclass: toptitle: WebSphere Administratorsn: wasadmincn: wasadmindn: uid=maxadmin,ou=users,ou=SWG, o=ibm,c=ususerPassword: maxadminuid: maxadminobjectClass: inetorgpersonobjectClass: topobjectClass: personobjectClass: organizationalPersonsn: maxadmincn: maxadmin
dn: uid=mxintadm,ou=users,ou=SWG, o=ibm,c=ususerPassword: mxintadmuid: mxintadmobjectClass: inetorgpersonobjectClass: topobjectClass: personobjectClass: organizationalPersonsn: mxintadmcn: mxintadm
dn: uid=maxreg,ou=users,ou=SWG, o=ibm,c=ususerPassword: maxreg
86 IBM Control Desk: Installation Guide (IBM WebSphere)

uid: maxregobjectClass: inetorgpersonobjectClass: topobjectClass: personobjectClass: organizationalPersonsn: maxregcn: maxreg
Note: If you create the LDIF file on Windows, ensure that you remove the ^Mcharacters from the file before using.
Note: Before you can import an LDIF file on UNIX systems, you must runthe dos2unix command to format the file.
21. In the IBM Tivoli Directory Server Configuration Tool, click Import LDIF data.22. Click Browse to locate the LDIF file.23. Click Import.24. Close the IBM Tivoli Directory Server Configuration Tool and restart the
server.
Manually configuring Microsoft Active DirectoryYou can manually configure Microsoft Active Directory for use with Control Desk.
Before you begin
Use this procedure to manually create users and groups within Microsoft ActiveDirectory. You have the option to create these users and groups automatically ifyou choose the option to configure WebSphere Application Server NetworkDeployment automatically using the product installation program. If you do notwant the product installation program to configure WebSphere Application ServerNetwork Deployment during installation, you must create users manaully. Creatingusers automatically requires SSL communication between Microsoft ActiveDirectory and WebSphere Application Server Network Deployment.
Important: The users and passwords you create in the following steps must matchthis exact configuration for the deployment to succeed. It is sometimes necessary totemporarily alter theMicrosoft Active Directory security policy to create theseaccounts in the required format. After installation, you can change these defaultpasswords to conform to a stricter security policy.
About this task
Before starting theControl Desk installation program, configure Microsoft ActiveDirectory. Complete the following steps
Procedure1. Select Start > Control Panel > Administrative Tools > Microsoft Active
Directory Users and Computers and then select the domain that you areworking with.
2. Edit the functional level of the domain by selecting Action > Raise DomainFunctional Level. The Raise Domain Functional Level dialog box is displayed.
3. Select Microsoft Windows Server 2008 from the Select an available domainfunctional level menu, and then click Raise. An alert dialog box is displayed.
4. Click OK.5. When the domain raise task has completed, click OK.
Chapter 4. Deploying manually reusing existing middleware 87

6. In the Microsoft Active Directory Users and Computers interface, using theright mouse button, click the domain to work with. Select New >Organizational Unit.
7. Enter a name for the new Organizational Unit (OU), for example, SWG, andthen click OK.
8. Create a groups object under the SWG organizational unit:a. Right-click the SWG OU, and select New > Organizational Unit.b. Enter Groups as the name for the new OU then click OK.
9. Create a users object under the SWG organizational unit:a. Right-click the SWG OU, and select New > Organizational Unit.b. Enter Users as the name for the new OU then click OK.
10. Create the wasadmin user:a. Right click the Users OU and select New > User.b. From the New Object - User dialog, enter the following values, and then
click Next:
First nameEnter wasadmin.
InitialsLeave this field blank.
Last nameLeave this field blank.
Full nameEnter wasadmin.
User login nameEnter wasadmin in the first field. Leave the default value of thesecond field.
User login name (pre-Microsoft Windows 2000)This field is filled with the same value (wasadmin) entered for theUser login name.
c. From the next panel, enter the following information, and then click Next:
PasswordEnter a password for wasadmin.
User must change password at next logonEnsure this check box is cleared.
User cannot change passwordEnsure this check box is selected.
Password never expiresEnsure this check box is selected.
Account is disabledEnsure this check box is cleared.
The preceding values are examples. Enter values that comply with thepassword policy of your organization.
d. Review the password settings in the summary panel, and click Finish.11. Create an administrator user, for example maxadmin:
a. Right click the Users OU and select New > User.
88 IBM Control Desk: Installation Guide (IBM WebSphere)

b. From the New Object - User dialog, enter the following values, and thenclick Next:
First nameEnter maxadmin.
InitialsLeave this field blank.
Last nameLeave this field blank.
Full nameEnter maxadmin.
User login nameEnter maxadmin in the first field. Leave the default value of thesecond field.
User login name (pre-Microsoft Windows 2000)This field is populated with the same value (maxadmin) enteredfor the User login name.
c. From the next panel, enter the following information, and then click Next:
PasswordEnter maxadmin as the password for the maxadmin user.
User must change password at next logonEnsure this check box is cleared.
User cannot change passwordEnsure this check box is selected.
Password never expiresEnsure this check box is selected.
Account is disabledEnsure this check box is cleared.
The preceding values are examples. Enter values that comply with thepassword policy of your organization.
d. Review the password settings in the summary panel, and click Finish.12. Create the mxintadm user:
a. Right click the Users OU and select New > User.b. From the New Object - User dialog, enter the following values, and then
click Next:
First nameEnter mxintadm.
InitialsLeave this field blank.
Last nameLeave this field blank.
Full nameEnter mxintadm.
User login nameEnter mxintadm in the first field. Leave the default value of thesecond field.
Chapter 4. Deploying manually reusing existing middleware 89

User login name (pre-Microsoft Windows 2000)This field is displayed with the same value (mxintadm) entered forthe User login name.
c. From the next panel, enter the following information, and then click Next:
PasswordEnter a value as the password for the mxintadm user.
User must change password at next logonEnsure this check box is cleared.
User cannot change passwordEnsure this check box is selected.
Password never expiresEnsure this check box is selected.
Account is disabledEnsure this check box is cleared.
The preceding values are examples. You must set these fields to valuesthat comply with the password policy of your organization.
d. Review the password settings in the summary panel, and click Finish.13. Create the maxreg user:
a. Right click the Users OU and select New > User.b. From the New Object - User dialog, enter the following values, and then
click Next:
First nameEnter maxreg.
InitialsLeave this field blank.
Last nameLeave this field blank.
Full nameEnter maxreg.
User login nameEnter maxreg in the first field. Leave the default value of thesecond field.
User login name (pre-Microsoft Windows 2000)This field is filled with the same value (maxreg) entered for theUser login name.
c. From the next panel, enter the following information, and then click Next:
PasswordEnter a value as the password for the maxreg user.
User must change password at next logonEnsure this check box is cleared.
User cannot change passwordEnsure this check box is selected.
Password never expiresEnsure this check box is selected.
Account is disabledEnsure this check box is cleared.
90 IBM Control Desk: Installation Guide (IBM WebSphere)

The preceding values are examples. Enter values that comply with thepassword policy of your organization.
d. Review the password settings in the summary panel, and click Finish.14. You can now exit the Microsoft Active Directory Users and Computers tool.
What to do next
Microsoft Active Directory configuration is finished and you are now ready toinstall the remaining Control Desk middleware and configure the J2EE server touse Microsoft Active Directory.
Manually configuring the J2EE serverThis section contains instructions for manually configuring an existing J2EE serverfor use by Control Desk.
Manual configuration of the J2EE server is required if you choose to deployControl DeskWebSphere Application Server Network Deployment and you chooseto not have the Control Desk installation program automatically configure it. Youmust complete the manual configuration before you use the Control Deskinstallation program.
Manually configuring WebSphere Application Server NetworkDeploymentThis section contains instructions for manually configuring an existing WebSphereApplication Server Network Deployment for use by Control Desk.
You must manually configure WebSphere Application Server Network Deploymentbefore you use the Control Desk installation program if you do not want theControl Desk installation program to configure it automatically.
Performing WebSphere Application Server Network Deployment configurationtasks:
Use this procedure to perform WebSphere Application Server NetworkDeployment configuration tasks.
About this task
If you elect to manually configure Control Desk middleware for use with ControlDesk, you have to manually configure the WebSphere Application Server NetworkDeployment.
Procedure
1. Manually copy the keystore file from the WebSphere Application ServerNetwork Deployment deployment manager host to a temporary directory onthe Control Desk administrative system where you are installing ControlDesk: WAS_HOME/profiles/ctgDmgr01/etc/trust.p12
2. Open a browser and access the administrative console by typing in thebrowser address bar: http://server_name:9060/admin. This URL addressdepicts the default port number (9060) and context (admin) for theadministrative console. Enter a user name to log in. The browser is redirectedto a secure port (9043).
3. Create the MXServer application server. This step is only necessary if you didnot install WebSphere Application Server Network Deployment v7 using the
Chapter 4. Deploying manually reusing existing middleware 91

middleware installation program. For WebSphere Application Server NetworkDeployment v8, you must create the application server.a. Expand Servers > Server Types > WebSphere application servers.b. Click New.c. Type MXServer and click Next.d. Accept all default settings and click Next.e. Accept default settings and click Next.f. Click Finish.g. Click Preferences.h. Select the Synchronize changes with Nodes check box, and then click
Apply.i. Click Save.j. Click OK.
4. Edit JVM Memory Settings and JVM Arguments for the application server.a. Click MXServer in the main window.b. From the Server Infrastructure group, expand the Java and Process
Management link.c. Click Process Definition.d. Click Java Virtual Machine.e. For 32-bit platforms, scroll down and type 1536 for Initial Heap Size and
Maximum Heap Size. For 64-bit platforms, set these values to 4096.f. Enter the following values in the Generic JVM arguments field, using a
space between each argument:-Dsun.rmi.dgc.ackTimeout=10000-Djava.net.preferIPv4Stack=true # for Windows-Xdisableexplicitgc-Xgcpolicy:gencon-Xmn320m # -Xmn320m for 32-bit JVM, -Xmn1024m for 64-bit JVM-Xlp64k # AIX
Figure 3. Manually create the application server
92 IBM Control Desk: Installation Guide (IBM WebSphere)

g. Click OK.h. Click Save in the messages box.
5. Edit thread pool settings for the application server.a. Click MXServer from the WebSphere application servers panel.b. From the Additional Properties group, click Thread pools.c. Click Default. Set Minimum Size to 20. Set Maximum Size to 50. Set
Thread inactivity timeout to 30000. Click OK.d. Click TCPChannel.DCS. Set Minimum Size to 5. Set Maximum Size to
20. Set Thread inactivity timeout to 5000. Click OK.e. Click WebContainer. Set Minimum Size to 50. Set Maximum Size to 50.
Set Thread inactivity timeout to 30000. Click OK.
Figure 4. Manually create the application server
Chapter 4. Deploying manually reusing existing middleware 93

6. Edit JVM Memory Settings for the deployment manager.a. From System administration, click Deployment manager.b. From the Server Infrastructure group, expand the Java and Process
Management link.c. Click Process Definition.d. Click Java Virtual Machine.e. Scroll down and type 512 for Initial Heap Size and 1024 for Maximum
Heap Size and click OK.
Figure 5. Edit thread pool settings for the application server
94 IBM Control Desk: Installation Guide (IBM WebSphere)

f. Click Save in the messages box.7. Start the application server.
a. From Servers > Server Types > WebSphere application servers, clickApplication servers.
b. Select the MXServer check box.c. Click Start.
8. Identify the HTTP Transfer Port Numbers.a. Expand Servers > Server Types > WebSphere application servers, and
click MXServer from the main window.b. Open the Web Container Settings and click Web container transport
chains.c. Note the default port number as it appears with WCInboundDefault
(9080).
Figure 6. Edit JVM Memory Settings for the deployment manager
Chapter 4. Deploying manually reusing existing middleware 95

9. Create the virtual host.a. Expand Environment.b. Click Virtual Hosts.c. Click New.d. In the General Properties section, type maximo_host in the Name box.e. Click Apply.f. Click Save.g. Click OK.h. From the Virtual Hosts window, click maximo_host.i. Click the Host Aliases link.j. Click New.k. Type * (asterisk) for host name and type the HTTP port number (by
default 80).l. Click OK.m. Click New.n. Type * (asterisk) for host name and type 9061 for the port number.o. Click OK.p. Click New.q. Type * (asterisk) for host name and type 9443 for the port number.r. Click OK.s. Click New.t. Type * (asterisk) for host name and type 9080 for the port number.u. Click OK.v. Click New.w. Type * (asterisk) for host name and type 9044 for the port number.x. Click OK and then click Save.
Figure 7. Identify the HTTP Transfer Port Numbers
96 IBM Control Desk: Installation Guide (IBM WebSphere)

10. Enable automatic startup of the application server when the node agent isstarted.a. Expand Servers > Server Types > WebSphere application servers.b. Click MXServer in the main window.c. From the Server Infrastructure group, expand Java and Process
Management.d. Click Monitoring Policy.e. Set Node restart state to RUNNING and click OK.f. Click Save in the messages box.
If you used the middleware installation program to install WebSphereApplication Server Network Deployment v7, this step has already beenperformed by the middleware installation program.
Figure 8. Create the virtual host
Figure 9. Enable automatic startup of the application server when the node agent is started
Chapter 4. Deploying manually reusing existing middleware 97

Creating a Windows service for the node agent:
You can create a Windows service for starting the WebSphere Application ServerNetwork Deployment node agent.
About this task
Although not required, you can optionally start the node agent as a Windowsservice.
If you used the middleware installation program to install WebSphere ApplicationServer Network Deployment v7, this step has already been performed by themiddleware installation program.
Procedure
1. Open a command prompt.2. Change directory to <WAS_HOME>\bin.3. Type the following command with no line breaks (case-sensitive).
WASService-add NodeAgent-serverName nodeagent-profilePath "C:\IBM\WebSphere\AppServer\profiles\ctgAppSrv01"-wasHome "C:\IBM\WebSphere\AppServer"-logRoot "C:\IBM\WebSphere\AppServer\profiles\ctgAppSrv01\logs\nodeagent"-logFile "C:\IBM\WebSphere\AppServer\profiles\ctgAppSrv01\logs\nodeagent\startServer.log"-restart true
4. Close the Command Prompt.
Configuring the authentication service:
The authentication service is used for authentication purposes when launching incontext to another product that shares credentials with Control Desk.
Manually configuring authentication service:
You can manually configure an authentication service on Control Desk thatprovides the authentication for launch in context.
Before you begin
If you used the middleware installation program to install and configure yourmiddleware, then the authentication service has already been configuredautomatically. If you did not use the middleware installation program to installand configure middleware, you must configure it manually to use this feature.
About this task
The authentication service provides launch in context from Control Desk to theuser interface of another server, for example, TADDM, provided it has theauthentication client installed and shares the same directory server forauthentication. Under this scenario, you are only required to authenticate once tothe server hosting the client.
To configure the authentication service manually, follow these steps:
98 IBM Control Desk: Installation Guide (IBM WebSphere)
Procedure
1. Open a command prompt on the system that hosts WebSphere ApplicationServer Network Deployment, and change directory to WAS_HOME/bin.
2. Restart Deployment Manager, Application Server, and MXServer using thecorrect profile names:
WindowsWAS_HOME/profiles/ctgAppsrv01/bin/stopServer.bat MXServer-username WebSphere Admin-password WebSphere Admin password
WAS_HOME/profiles/ctgAppsrv01/bin/stopNode.bat-username WebSphere Admin-password WebSphere Admin password
WAS_HOME/profiles/ctgDmgr01/bin/stopManager.bat-username WebSphere Admin-password WebSphere Admin password
WAS_HOME/profiles/ctgAppsrv01/bin/startManager.batWAS_HOME/profiles/ctgAppsrv01/bin/startNode.batWAS_HOME/profiles/ctgDmgr01/bin/startServer.bat MXServer
UNIX./stopServer.sh MXServer -profileName ctgAppSrv01
-username WebSphere Admin-password WebSphere Admin password
./stopNode.sh -profileName ctgAppSrv01-username WebSphere Admin-password WebSphere Admin password
./stopManager.sh -profileName ctgDmgr01-username WebSphere Admin-password WebSphere Admin password
./startManager.sh -profileName ctgDmgr01
./startNode.sh -profileName ctgAppSrv01
./startServer.sh MXServer -profileName ctgAppSrv01
Or:WAS_HOME/profiles/ctgAppSrv01/bin/stopServer.sh MXServer
-username WebSphere Admin-password WebSphere Admin password
WAS_HOME/profiles/ctgAppSrv01/bin/stopNode.sh-username WebSphere Admin-password WebSphere Admin password
WAS_HOME/profiles/ctgDmgr01/bin/stopManager.sh-username WebSphere Admin-password WebSphere Admin password
WAS_HOME/profiles/ctgDmgr01/bin/startManager.shWAS_HOME/profiles/ctgAppSrv01/bin/startNode.shWAS_HOME/profiles/ctgAppSrv01/bin/startServer.sh MXServer
3. Log on to the wsadmin shell by opening a command prompt and issuing thefollowing command:
Windowswsadmin.bat -username WebSphere Admin-password WebSphere Admin Password
Chapter 4. Deploying manually reusing existing middleware 99

UNIX./wsadmin.sh -username WebSphere Admin-password WebSphere Admin Password
4. Verify that you do not already have authentication services deployed:wsadmin>$AdminApp view authnsvc_ctges
This command returns an exception like the following sample exception:WASX7015E: Exception running command: "$AdminApp view authnsvc_ctges";exception information: com.ibm.ws.scripting.ScriptingException:WASX7280E: An application with name "authnsvc_ctges" does not exist.
5. Copy the IBMESSAuthnSvc.ear file to your local system. This file is located inthe Operating System\WS-ESS_6.2_GA directory of the Control Deskmiddleware DVD.
6. Deploy the IBMESSAuthnSvc.ear file.wsadmin>$AdminApp install file_path/IBMESSAuthnSvc.ear{-usedefaultbindings -deployws -appname authnsvc_ctges –node (nodeName)–server serverName |[-cluster (clustername)]}
If nodeName was set to the default value by the middleware installationprogram, the value would be ctgNode01. serverName, if set to the default valuesupplied by the Control Desk installation program, would be MXServer.
7. Save the configuration:wsadmin>$AdminConfig save
8. Identify the application manager MBean for the server that hosts theapplication and assign it to the appManager variable:set appManager [$AdminControl queryNames cell=myNodeCell,node=myNode,type=ApplicationManager,process=myServer,*]
You can use the following commands to determine the current values for thecell, node, and application server:$AdminConfig list Cell$AdminConfig list Node$AdminConfig list Server
9. Start the application:$AdminControl invoke $appManager startApplication authnsvc_ctges
10. Exit the wsadmin shell by typing exit.11. Log in to the WebSphere Application Server Network Deployment console.12. Browse to Applications > Enterprise applications, click authnsvc_ctges, and
then click Manage Modules.13. Highlight all entries listed in the Clusters and Server list, select
listtokenservice and WSFedPassiveProfile, click Apply, click OK, and thenclick Save.
14. Regenerate the WebSphere Application Server Network Deployment plug-inusing the following command:WAS_HOME/bin/GenPluginCfg.bat –cell.name myNodeCell –node.name myNode–webserver.name myServer
When the command has completed successfully, you see the followingmessage:Plugin-in configuration file generation is complete for the Web servermyNodeCell.myNode.myServer
15. Copy the regenerated WebSphere Application Server Network Deployment,for example, plugin-cfg.xml from WAS_HOME\AppServer\profiles\ctgAppSrv01\config\cells to HTTPServer_HOME\Plugins\config\webserver1.
100 IBM Control Desk: Installation Guide (IBM WebSphere)

16. Restart the HTTP Server and the HTTP admin console.17. Stop WebSphere Application Server Network Deployment and the managed
nodes:WAS_HOME/profiles/ctgAppSrv01/bin/stopNode.sh -username WebSphere Admin-password WebSphere Admin passwordWAS_HOME/profiles/ctgDmgr01/bin/stopManager.sh -username WebSphere Admin-password WebSphere Admin password
18. Copy the com.ibm.security.ess.server_config.6.2.0.jar file to theWAS_HOME/plugins directory on your local system. This file is located in theOperating System\WS-ESS_6.2_GA directory of the Control Desk middlewareDVD.
19. Restart WebSphere Application Server Network Deployment and the managednodes:WAS_HOME/profiles/ctgDmgr01/bin/startManager.(sh|bat)WAS_HOME/profiles/ctgAppSrv01/bin/startNode.(sh|bat)
20. Log back in to the wsadmin shell.21. Configure the service:
wsadmin>$AdminTask configureESS
22. Verify that the service is configured:wsadmin>$AdminTask isESSConfiguredThis command returns a value of true.
23. Create an LTPA Key:wsadmin>$AdminTask createESSLTPAKeys {-password password}If the key password is ever lost, you must generate a new key. Ensure allclients connecting to the service use the new export key file you generate.
24. Synchronize the configuration:wsadmin>$AdminConfig savewsadmin>set dmgr [$AdminControl completeObjectNametype=DeploymentManager,*]wsadmin>$AdminControl invoke $dmgr syncActiveNodes true
25. Stop and restart WebSphere Application Server Network Deployment and themanaged nodes:
WindowsWAS_HOME\profiles\ctgAppSrv01\bin\stopNode.bat-username WebSphere Admin-password WebSphere Admin password
WAS_HOME\profiles\ctgDmgr01\bin\stopManager.bat-username WebSphere Admin-password WebSphere Admin password
WAS_HOME\profiles\ctgDmgr01\bin\startManager.batWAS_HOME\profiles\ctgAppSrv01\bin\startNode.bat
UNIXWAS_HOME/profiles/ctgAppSrv01/bin/stopNode.sh-username WebSphere Admin-password WebSphere Admin passwordWAS_HOME/profiles/ctgDmgr01/bin/stopManager.sh-username WebSphere Admin-password WebSphere Admin password
WAS_HOME/profiles/ctgDmgr01/bin/startManager.shWAS_HOME/profiles/ctgAppSrv01/bin/startNode.sh
26. Add the role called TrustClientRole to the WebSphere Application ServerNetwork Deployment administrator user. This user was specified during theTADDM installation.
Chapter 4. Deploying manually reusing existing middleware 101

a. Browse to Applications > Enterprise applications, click authnsvc_ctges,and then click Security role to user/group mapping
b. Select TrustClientRole and click Look up Users
c. Move the WebSphere Application Server Network Deploymentadministrator user from the Available column to the Selected column. Usethe >> button, click OK, click OK again, and then click Save.
This step provides added security by restricting the users that can authenticateto the authentication service to those users with the TrustClientRole role.
27. Export the LTPA Keys directly from WebSphere, and use importESSLTPAKeysto import the keys into the ESS configuration.
Migrating the authentication service:
This section provides information you can use to migrate the authenticationservice.
Before you begin
If you have deployed the 7.5.1 version of CCMDB and installed WebSphereApplication Server Network Deployment using the middleware installationprogram, you already have a version of the authentication service deployed on theapplication server. When upgrading to Control Desk 7.5.3, if you intend tocontinue to use the launch in context function with IBM Tivoli ApplicationDependency Discovery Manager, you need to migrate to a newer version of theauthentication service.
Note: these steps do not provide a restore capability. Make a backup of the systembefore you begin.
About this task
To configure the authentication service manually, follow these steps:
Procedure
1. Ensure WebSphere Application Server Network Deployment services andservers are running.
2. Update the Authentication Service application:a. Log on to the wsadmin shell using the following command.
Windowswsadmin.bat
UNIX./wsadmin.sh
If you did not change the wsadmin user name or password when you firstinstalled the application server, the default is wsadmin for the user andwsadmin for the password.
b. Run the following commands:$AdminApp update authnsvc_ctges app {-operation update -contents(install_path)/IBMESSAuthnSvc.ear -usedefaultbindings-deployws}
$AdminConfig save
102 IBM Control Desk: Installation Guide (IBM WebSphere)

3. Stop WebSphere Application Server Network Deployment along with allwsadmin instances.
4. Replace back-level authentication service configuration JAR file located in theWebSphere Application Server Network Deployment plug-ins directory withthe updated JAR file.a. Delete the existing WAS_HOME/plugins/
com.ibm.security.ess.server_config.6.1.0.jar
b. Copy the new com.ibm.security.ess.server_config.6.2.0.jar to theWAS_HOME/plugins directory
c. Run the following command:WAS_HOME/profiles/PROFILE/bin/osgicfginit
5. Restart WebSphere Application Server Network Deployment.
Authentication service administrative commands:
There are several administrative commands for the authentication service that canbe used with the wsadmin tool. These commands can help you determine the stateof the currently installed authentication service.
Administrative commands
ActionisESSConfigured
PurposeChecks for authentication service configuration.
Input None.
ReturnsTrue if authentication service is configured.
False if authentication service is not configured.
ThrowsException if a system error is encountered.
Syntax$AdminTask isESSConfigured
ActionisESSConfiguredLTPAKeys
PurposeChecks for authentication service LTPA Key configuration.
Input None.
ReturnsTrue if authentication service LTPA keys are configured.
False if authentication service LTPA keys are not configured.
ThrowsException if authentication service is not configured.
Exception if a system error is encountered.
Syntax$AdminTask isESSConfiguredLTPAKeys
ActionconfigureESS
Chapter 4. Deploying manually reusing existing middleware 103

PurposeThis command configures the authentication service by creating anauthentication service configuration file in the WebSphere ApplicationServer Network Deployment configuration repository found inWAS_PROFILE/config/ibmess/authn/Configuration.xml
Input None.
ReturnsNone.
ThrowsException if a system error is encountered.
Syntax$AdminTask configureESS
ActionunconfigureESS
PurposeUnconfigures the authentication service by removing authentication serviceconfiguration from the WebSphere Application Server NetworkDeployment configuration repository WAS_PROFILE/config/ibmess/authn/Configuration.xml file.
Input None.
ReturnsNone.
ThrowsException if a system error is encountered.
Syntax$AdminTask unconfigureESS
ActioncreateESSLTPAKeys
PurposeCreates new LTPA Keys for use by authentication service. If there areexisting LTPA keys configured for the authentication service, those keys areoverwritten LTPA tokens that have been previously issued using thereplaced keys are invalidated.
Input password
Password that was used to protect the LTPA keys in the file.
ReturnsNone.
ThrowsException if authentication service is not configured.
Exception if a system error is encountered.
Exception if authentication service LTPA keys cannot be configured.
Syntax$AdminTask createESSLTPAKeys {-password password}
ActionimportESSLTPAKeys
104 IBM Control Desk: Installation Guide (IBM WebSphere)

PurposeImport LTPA keys into authentication service from an existing LTPA KeyExport file. If there are existing LTPA keys configured for theauthentication service, those keys are overwritten. LTPA tokens that havebeen previously issued using the replaced keys are invalidated.
Input pathname Path and file name of file containing LTPA keys to import intothe authentication service. This file might have been exported byWebSphere Application Server Network Deployment, or by theauthentication service through the exportESSLTPAKeys command.
password Password that was used to protect the LTPA keys in the file.
ReturnsNone.
ThrowsException if the authentication service is not configured.
Exception if a system error is encountered.
Exception if keys cannot be created.
Syntax$AdminTask importESSLTPAKeys {-pathname path name - passwordpassword}
ReferenceThis table shows the mapping of LTPA exported key file information to theauthentication service configuration fields.
Table 8. LTPA exported key file mapping
Name Type Description of Value
ltpa.partner.sharedkey String The shared key used for decryptionof the token.
This key can be taken from thecom.ibm.websphere.ltpa. 3DESKeyname-value pair of an exported LTPAkey file. This key was encryptedwhen it was exported from theWebSphere Application ServerNetwork Deployment server thatcreated it.
ltpa.partner.publickey String The public key for the partner thatsigned the token.
This key can be taken from thecom.ibm.websphere.ltpa.PublicKeyname-value pair of an exported LTPAkey file.
ltpa.partner.password String The password that was used toprotect the keys created by thepartner.
Chapter 4. Deploying manually reusing existing middleware 105
Table 8. LTPA exported key file mapping (continued)
Name Type Description of Value
ltpa.self.sharedkey String The shared key used for theencryption of the token.
This key can be taken from thecom.ibm.websphere.ltpa. 3DESKeyname-value pair of an exported LTPAkey file. This key was encryptedwhen it was exported from theWebSphere Application ServerNetwork Deployment server thatcreated it.
ltpa.self.publickey String The public key associated with theltpa.self.privatekey property.
This key can be taken from thecom.ibm.websphere.ltpa. PublicKeyname-value pair of an exported LTPAkey file.
ltpa.self.privatekey String The private key that is used forsigning the token.
This key can be taken from thecom.ibm.websphere.ltpa. PrivateKeyname-value pair of an exported LTPAkey file. This key was encryptedwhen it was exported from theWebSphere Application ServerNetwork Deployment server thatcreated it.
ltpa.self.password String The password that was used toprotect the keys that the consumingapplication created.
ActionexportESSLTPAKeys
PurposeExport LTPA keys from the authentication service and write to the LTPAkey export file.
Input pathname Path and file name to write LTPA keys to be exported from theauthentication service. After successful export from the authenticationservice, this file might be used to import LTPA keys into another theauthentication service server or into WebSphere Application ServerNetwork Deployment.
ReturnsNone.
ThrowsException if the authentication service is not configured.
Exception if a system error is encountered.
Exception if the authentication service LTPA keys have not beenconfigured.
106 IBM Control Desk: Installation Guide (IBM WebSphere)
Syntax$AdminTask exportESSLTPAKeys {-pathname path name}
ReferenceHere is an example of the LTPA key export file. Note there are no linebreaks in the LTPA key export file.#IBM WebSphere Application Server key file#Mon Jun 11 08:05:50 EDT 2007com.ibm.websphere.CreationDate=Mon Jun 11 08\:05\:50 EDT 2007com.ibm.websphere.ltpa.version=1.0com.ibm.websphere.ltpa.3DESKey=zDtRTqOEsw0F5NNhGpvzdp/xqoFFTyX0WFNxYMEpC10\=com.ibm.websphere.CreationHost=PestRHAS3com.ibm.websphere.ltpa.PrivateKey=hPyfNkqrClrwpQgRAnvNSRugf/6Su59g5Jh5FR28SrT/XapX/OOghU3/41dX1HXL496sDKm9kXE/WYhsFvh3L8JVzacEqF3T+57akZZ/wDJdga6DcDlYMmzLll91SgjV68dB6lsVgt/jFtMczYxK+RgBDpKthEurI9rQr2eq73Gm75KehgRSMCaBwew+kQi6aWFdyhWcOlQLCod8BQtesJt2aTEaQ3NDD0PFQVkDMWVpzoLvBOJBdhwhQFWX9L7gE9gMeSPoeXr19MlEA780/EX9w7kEIKYu7UzrUbvTEREoYCUFklJcE2A3Q0rMKlIzlkIJ1QGXwR6EM2sVe9w6MCPHir32A45rEYyy1lP0SuA\=com.ibm.websphere.ltpa.Realm=VmmLdapRealmcom.ibm.websphere.ltpa.PublicKey=AKj4wjeYEQoxL76Ph0g1i3gt5Siwgygu3+22xfh6Kh1JR3LZGsT+nONpAfxY9NfmPTDFxjbrIESIS/XAdp/0QgWBF9DZJ5vO1Ds0/M356seVtsnvwy3p/VVFQg4UzT6j/f1G6SJaqPQjrv2EAZyEn+TL8Okl3CWdKiFtPjtpWdh5AQAB
How ESSLTPAKeys are exported to a file:com.ibm.websphere.CreationDate=(set to the date/time when the export file iscreated)com.ibm.websphere.ltpa.version=1.0com.ibm.websphere.ltpa.3DESKey=(set from ltpa.self.sharedkey)com.ibm.websphere.CreationHost=(set to local host name)com.ibm.websphere.ltpa.PrivateKey=(set from ltpa.self.privatekey)com.ibm.websphere.ltpa.Realm=(set to the currently configured VMM realm)com.ibm.websphere.ltpa.PublicKey=(set from ltpa.self.publickey)
ActionshowESSLTPAConfiguration
PurposeReturns a property object containing the current authentication serviceLTPA configuration. The returned properties list contains version,expiration, and usefips configuration properties. After an initialconfiguration, the defaults will be returned.
Input None.
ReturnsProperties object.
ThrowsException if the authentication service is not configured.
Exception if a system error is encountered.
Syntax$AdminTask showESSLTPAConfiguration
Chapter 4. Deploying manually reusing existing middleware 107
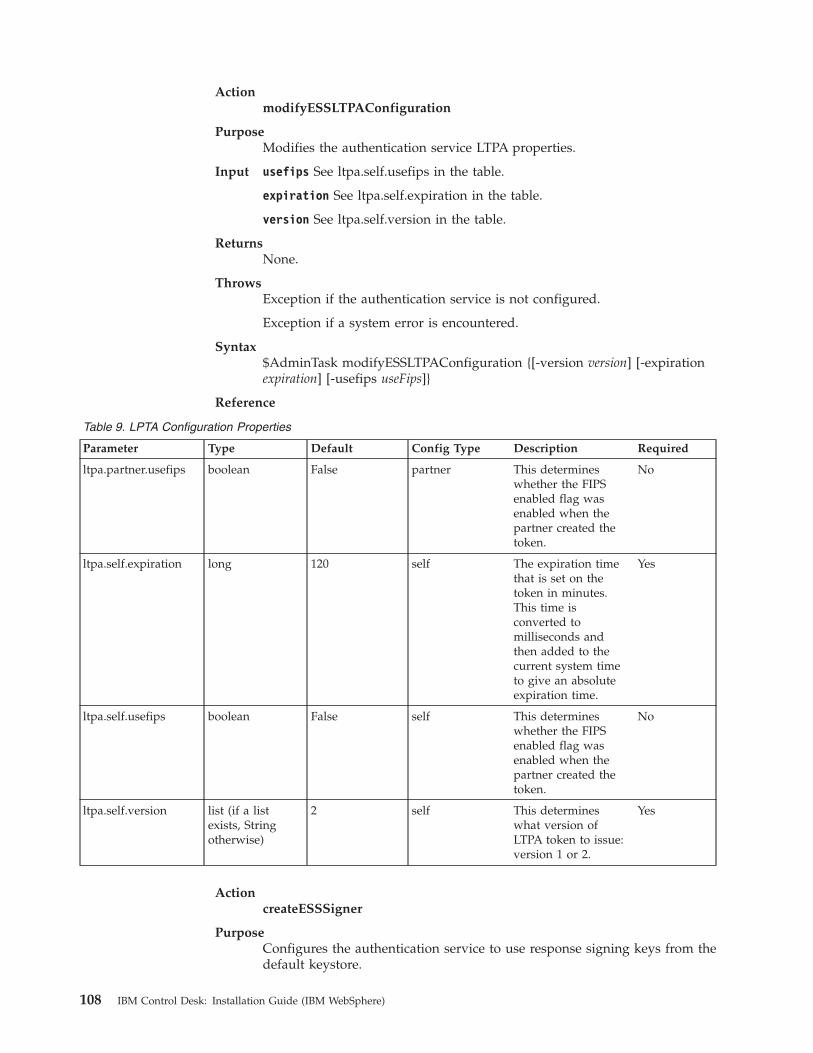
ActionmodifyESSLTPAConfiguration
PurposeModifies the authentication service LTPA properties.
Input usefips See ltpa.self.usefips in the table.
expiration See ltpa.self.expiration in the table.
version See ltpa.self.version in the table.
ReturnsNone.
ThrowsException if the authentication service is not configured.
Exception if a system error is encountered.
Syntax$AdminTask modifyESSLTPAConfiguration {[-version version] [-expirationexpiration] [-usefips useFips]}
Reference
Table 9. LPTA Configuration Properties
Parameter Type Default Config Type Description Required
ltpa.partner.usefips boolean False partner This determineswhether the FIPSenabled flag wasenabled when thepartner created thetoken.
No
ltpa.self.expiration long 120 self The expiration timethat is set on thetoken in minutes.This time isconverted tomilliseconds andthen added to thecurrent system timeto give an absoluteexpiration time.
Yes
ltpa.self.usefips boolean False self This determineswhether the FIPSenabled flag wasenabled when thepartner created thetoken.
No
ltpa.self.version list (if a listexists, Stringotherwise)
2 self This determineswhat version ofLTPA token to issue:version 1 or 2.
Yes
ActioncreateESSSigner
PurposeConfigures the authentication service to use response signing keys from thedefault keystore.
108 IBM Control Desk: Installation Guide (IBM WebSphere)

Input None.
ReturnsNone.
ThrowsException if the authentication service is not configured.
Exception if a system error is encountered.
Syntax$AdminTask createESSSigner
ActionimportESSSigner
PurposeConfigures the authentication service to use response signing keys from thespecified keystore.
Input pathname - Required – File path name of an existing keystore file to importinto Authentication Service configuration.
password - Required - Password to open the imported keystore file.
keyalias - Required - The alias of the signer key in the imported keystorefile.
keypassword - Optional - The password to access the signer key in thekeystore file.
ReturnsNone.
ThrowsException if the authentication service is not configured.
Exception if a system error is encountered.
Exception if required parameter is missing.
Exception if the keystore file cannot be located.
Syntax$AdminTask importESSSigner {-pathname path name -passwordpassword-keyalias alias -keypassword password }
ActionexportESSSigner
PurposeExport the configured response signer keys to the specified keystore, to beused for synchronization with other authentication service instances.
Input pathname Required - Path and filename of a keystore into which configuredresponse signer keys are exported. If the keystore exists it is updated.
password Required - Password for accessing the specified export keystorefile.
keyalias Required - Alias to specify to store the exported response.
keypassword Required - The password to specify to encrypt the signer keyin the keystore file.
ReturnsNone.
Chapter 4. Deploying manually reusing existing middleware 109

ThrowsException if the authentication service is not configured.
Exception if a system error is encountered.
Exception if the keystore file cannot be located.
Syntax$AdminTask exportESSSigner {-pathname path name -password password-keyalias alias -keypassword password }
ActionexportESSSignerCert
PurposeExport the configured response signer certificate to the specified keystore,to be used by an Authentication Client for response signature validation.
Input pathname Required - Path and filename of a keystore into which configuredresponse signer keys are exported. If the keystore exists it is updated.
password Required - Password for accessing the specified export keystorefile.
certalias Required - Alias of the certificate to export, associated with theresponse signer key.
ReturnsNone.
ThrowsException if the authentication service is not configured Exception if asystem error is encountered Exception if the keystore file cannot be located
Syntax$AdminTask exportESSSignerCert {-pathname path name -passwordpassword -certalias alias}
ActionshowESSWSFedConfiguration
PurposeDisplay the current WS-Federation SSO servlet configuration settings.
Input None.
ReturnsProperties object with current SSO redirect WS-Federation servletproperties
ThrowsException if the authentication service is not configured.
Exception if a system error is encountered.
Syntax$AdminTask showESSWSFedConfiguration
ActionmodifyESSWSFedConfiguration
PurposeModifies SSO redirect WS-Federation servlet cookie properties.
Input domain See domain in the table.
secure See secure in the table.
110 IBM Control Desk: Installation Guide (IBM WebSphere)

maxage See maxage in the table.
ReturnsNone.
ThrowsException if the authentication service is not configured.
Exception if a system error is encountered.
Syntax$AdminTask modifyESSWSFedConfiguration {[-domain domain] [-securetrue|false] [-maxage milliseconds|-1]}
Reference
Table 10. modifyESSWSFedConfiguration parameters
Parameter Type Default Description Required
domain string Default Specifies the domainfield of a sessiontracking cookie. Thisvalue controlswhether a browsersends a cookie toparticular servers.
For example, if youspecify a particulardomain, sessioncookies are sent tohosts in that domain.A browser does notaccept the cookie ifthe cookie domainconflicts with thedomain specified inthe request URL. Ifnot specified, thedefault domain is thedomain of this server.
#Examples:# domain = .ibm.com# domain = none# domain = default
No.
secure boolean True Specifies that thesession cookiesinclude the securefield. Enabling thefeature restricts theexchange of cookiesto HTTPS sessionsonly.
No.
Chapter 4. Deploying manually reusing existing middleware 111

Table 10. modifyESSWSFedConfiguration parameters (continued)
Parameter Type Default Description Required
maxage integer / string Session Specifies the amountof time that thecookie lives on theclient browser.Specify the maximumage in seconds.Setting maxage to“session” specifies alifetime of currentbrowser session.
No.
Configuring the TrustClientRole for the authentication service:
If single sign-on is enabled, the authnsvc_ctges authentication service applicationinstalls into the WebSphere Application Server Network Deployment server. Theauthentication service contains a role called TrustClientRole. If WebSphereApplication Server Network Deployment security is enabled, the WebSphereApplication Server Network Deployment administrator assigns users or groups toTrustClientRole.
Before you begin
When single sign-on clients are configured and application security is enabled, theclients are configured with an identity that authenticates the client to WebSphereApplication Server Network Deployment when it calls the authentication service.That identity needs to be registered with WebSphere Application Server NetworkDeployment, and it is either mapped to the TrustClientRole role of theauthentication service, or added to a group that is mapped to the TrustClientRolerole of the authentication service.
Note: This section does not apply to embedded WebSphere. The embeddedWebSphere ISC console does not provide application role mapping capability.Wsadmin interfaces must be used to map application roles under embeddedWebSphere.
About this task
To add users and groups to the TrustClientRole of the authentication service in theWebSphere Application Server Network Deployment console, follow these steps:
Procedure
1. Open Applications > Enterprise Applications > authnsvc_ctges > Security roleto user/group mapping.
2. Use Look up users or groups to select the users or groups to add to theTrustClientRole role. You can, alternatively, select Everyone? or Allauthenticated? boxes.
3. Click OK.4. Save the configuration.
112 IBM Control Desk: Installation Guide (IBM WebSphere)

Results
To query the users and groups currently mapped to the TrustClientRole of theauthentication service, use the wsadmin AdminApp view command:wsadmin>$AdminApp view authnsvc_ctges
Alternatively, users and groups can be added to the TrustClientRole of theauthentication service using the wsadmin AdminApp edit command. For example, toset the TrustClientRole to allow access to all authenticated users you would use thefollowing command:wsadmin>$AdminApp edit authnsvc_ctges{-MapRolesToUsers { {"TrustClientRole" no yes "" ""}} }
See the WebSphere Application Server Network Deployment documentation formore information about the AdminApp edit command and the use of the–MapRolesToUsers option.
The following sample Jython script called setAuthnSvcRoleAll.py sets theTrustClientRole role to allow access to all authenticated users:import sys
global AdminConfigglobal AdminControl# Usage:# was_profile_dir/bin/wsadmin -lang jython -f setAuthnSvcRoleAll.py# where was_profile_dir is the WebSphere profile directory
AdminApp.edit("authnsvc_ctges", ["-MapRolesToUsers",[["TrustClientRole", "No", "Yes", "", ""]]] )AdminConfig.save()
Clock synchronization:
Verify that the time, date, and time zone are synchronized among all serversparticipating in the protected domain.
Because single sign-on authentication uses time-sensitive tokens, you must verifythat the time, date, and time zone are synchronized. This verification must bedone for all servers that are participating in the protected domain, such as the theWebSphere Application Server Network Deployment server and the TivoliApplication Dependency Discovery Manager server.
If the time difference is too high between servers, the single sign-on token mightprematurely expire on some servers and cause authentication or validation failures.
WebSphere Application Server Network Deployment and authenticationservice-based single sign-on tokens are assigned a lifetime of two hours by default.For best results, servers must be synchronized to within 5 minutes to ensure thatsingle sign-on tokens are evaluated consistently.
Authentication service logging:
The authentication service LTPA token provider and the authentication servicetoken service infrastructure logs can be useful when troubleshooting connectionerrors related to the authentication service.
Chapter 4. Deploying manually reusing existing middleware 113

Configuration of the authnsvc_ctges authentication service LTPA token providerlogging
Authentication service LTPA token provider logging is performed using thejava.util.logging.Logger message and trace logging facility. Loggingcharacteristics can be configured using the WebSphere Application ServerNetwork Deployment administrator console.1. From the WebSphere Application Server Network Deployment
administrator console, select Troubleshooting > Logs and trace >server 1 > Change Log Detail Levels.
2. Set the com.ibm.security.ess.authn.provider log level to All Messagesand Traces under both the Configuration and Runtime tabs.
3. Click OK and then save.4. Restart the server.
Configuration of authnsvc_ctges authentication service token serviceinfrastructure logging
Authentication service user name provider and token service infrastructurelogging is performed using the Log4J utility. Logging characteristics can beconfigured by modifying the WAS_PROFILE/installedApps/cellname/authnsvc_ctges.ear/com.ibm.security.ess.war/WEB-INF/classes/log4j.properties file, then restarting the server.
Format of the log4j.properties file:### direct log messages to stdout ###
log4j.appender.stdout=org.apache.log4j.ConsoleAppenderlog4j.appender.stdout.Target=System.outlog4j.appender.stdout.layout=org.apache.log4j.PatternLayoutlog4j.appender.stdout.layout.ConversionPattern=%d{HH:mm:ss,SSS} %5p %C{1}.%M(%L): %m%n
### set log levels - for more verbose logging change ’info’ to ’debug’ ###
log4j.rootLogger=TRACE, stdoutlog4j.logger.org.eclipse=infolog4j.logger.org.apache=infolog4j.logger.org.apache.xml.security=infolog4j.logger.org.xmlsoap.schemas.ws=infolog4j.logger.org.eclipse.higgins=tracelog4j.logger.org.eclipse.alf=infolog4j.logger.org.apache.axis.transport.http.HTTPSender=infolog4j.logger.org.openid=infolog4j.logger.com.ibm.openid=infolog4j.logger.com.ibm.security.ess=trace
In most cases, only the log4j.logger.org.eclipse.higgins andlog4j.logger.com.ibm.security.ess properties must be set to trace.
Logging levels, listed in order of least to most inclusive, are:1. fatal2. error3. warn4. info5. debug6. trace
Authentication service configuration AdminTask command loggingAuthentication service configuration AdminTask command logging isperformed using the java.util.logging.Logger message and trace logging
114 IBM Control Desk: Installation Guide (IBM WebSphere)

facility. Logging characteristics can be configured using the WebSphereApplication Server Network Deployment administrator console.1. From the WebSphere Application Server Network Deployment
administrator console, select Troubleshooting > Logs and trace >server 1 > Change Log Detail Levels.
2. Set the com.ibm.security.ess.authn.provider log level to All Messagesand Traces under both the Configuration and Runtime tabs.
3. Click OK and then save.4. Restart the server.
Manually configuring JMS queues:
This procedure provides details on steps to configure JMS queues, which must becompleted before using the product installation program.
About this task
During the installation process, the Control Desk installation program providesyou with the option of automatically configuring Control Desk middleware. If youelect to have the Control Desk installation program automatically configure ControlDesk middleware, it creates and configures JMS message queues for you. If youelect to manually configure Control Desk middleware for use with Control Desk,you must manually configure these message queues.
To configure the JMS queues, complete the following steps:
Procedure
1. Start the WebSphere Application Server Network Deployment applicationserver.
2. Start Internet Explorer and open the WebSphere Application Server NetworkDeployment administrative console by typing the following URL:http://<server_name>:<port_number>/ibm/console
For example, enter a URL like the following sample URL:http://localhost:9060/ibm/console
3. At the login screen, enter your user ID, then click Log in. This action opensthe Welcome screen for the WebSphere Application Server NetworkDeployment administrative console.
4. Click Service Integration > Buses to open the Buses dialog. A bus is a groupof interconnected servers and clusters that have been added as members ofthe bus.
5. Click New to open the Create a new Service Integration Bus panel whereyou can add a new service integration bus.
6. Enter intjmsbus as the name of the new bus in the Name field.7. Clear the Bus security check box. If you leave this box checked, intjmsbus
inherits the Global Security setting of the cell.
Chapter 4. Deploying manually reusing existing middleware 115

8. Click Next.9. Click Finish.
10. Click Save. This step propagates the JMS bus setup to the clusterconfiguration.
Adding a server to the service integration bus:
A server must be defined for the service integration bus.
About this task
Complete the following steps to add a server to the service integration bus:
Procedure
1. From the WebSphere Application Server Network Deployment administrativeconsole, click Service Integration > Buses to open the Buses dialog box.
2. Click intjmsbus to open the Buses > intjmsbus dialog box.3. Under Topology, click Bus members.4. In the Buses > intjmsbus > Bus members dialog box, click Add to open the
Add a new bus member dialog box.5. Select the Server option, and select the server name ctgNode01:MXServer to
add to the bus, and then click Next.6. Check that the Data store radio button is selected, and then click Next.
Alternatively, you can use a file store to store messages by selecting File store.7. From the Specify data store properties panel, select Use existing data source.8. For Data source JNDI name , enter jdbc/intjmsds. For Authentication alias,
select ctgCellManager01/maxJaasAlias, and then click Next.9. From the Tune application server for messaging performance panel, click
Next.10. Click Finish.11. Click Save.
Figure 10. Create a new Service Integration Bus
116 IBM Control Desk: Installation Guide (IBM WebSphere)

Creating the service integration bus destination for the continuous inbound (CQINBD)queue:
You must create a service integration bus destination for the continuous inbound(CQINBD) queue.
About this task
To add a logical address for the continuous inbound bus destination queue(CQINBD) within the JMS bus, complete the following steps:
Procedure
1. From the WebSphere Application Server Network Deployment AdministrativeConsole, click Service Integration > Buses to open the Buses dialog box.
2. Click intjmsbus to open the Buses > intjmsbus dialog box.3. Click Destinations under Destination resources to open the Buses >
intjmsbus > Destinations dialog box.A bus destination, for example CQINBD, is a virtual place within a serviceintegration bus where applications can attach and exchange messages.
4. Click New to open the Create new destination dialog box.5. Leave Queue checked as the destination type, and click Next to open the
Create new queue dialog box.6. Type CQINBD in the Identifier field and Continuous Queue Inbound in the
Description field, then click Next to open the Create a new queue forpoint-to-point messaging dialog box.
7. Select the Bus Member pull-down and chooseNode=ctgNode01:Server=MXServer as the bus member that will store andprocess messages for the CQINBD bus destination queue.
8. Click Next to open the Confirm queue creation dialog box.9. Review your selections, then click Finish to complete the creation of the
CQINBD bus destination queue.10. Navigate the path Buses > intjmsbus > Destinations, then click CQINBD to
open the configuration dialog box.11. Click None as the Exception destination value.12. Click Apply.
Figure 11. Add a server to the service integration bus
Chapter 4. Deploying manually reusing existing middleware 117

13. Click Save.
Creating the service integration bus destination for the sequential inbound (SQINBD)queue:
You must create the service integration bus destination for the sequential inbound(SQINBD) queue.
About this task
To add a logical address for the sequential inbound bus destination queue(SQINBD) within the service integration bus, complete the following steps:
Procedure
1. From the WebSphere Application Server Network Deployment AdministrativeConsole, click Service Integration > Buses to open the Buses dialog box.
2. Click intjmsbus to open the Buses > intjmsbus dialog box.3. Click Destinations under Destination resources to open the Buses >
intjmsbus > Destinations dialog box. A bus destination is a virtual placewithin a service integration bus where applications can attach and exchangemessages.
4. Click New to open the Create new destination dialog box.5. Leave Queue checked as the destination type, and click Next to open the
Create new queue dialog box.6. Enter SQINBD in the Identifier field and Sequential Queue Inbound in the
Description field, then click Next to open the Create a new queue forpoint-to-point messaging dialog box. Note that you must use this value and itmust contain only uppercase letters.
7. Select the Bus Member pull-down and chooseNode=ctgNode01:Server=MXServer
8. Click Next to open the Confirm queue creation dialog box.9. Review your selections, then click Finish to complete the creation of the
SQINBD bus destination queue.10. Navigate the path Buses > intjmsbus > Destinations, then click SQINBD to
open the configuration dialog box.11. Click None as the Exception destination value.12. Click Apply.13. Click Save.
118 IBM Control Desk: Installation Guide (IBM WebSphere)

Creating the service integration bus destination for the sequential outbound (SQOUTBD)queue:
You must create the service integration bus destination for the sequential outbound(SQOUTBD) queue.
About this task
To add a logical address for the sequential outbound bus destination queue(SQOUTBD) within the service integration bus, complete the following steps:
Procedure
1. From the WebSphere Application Server Network Deployment administrativeconsole, click Service Integration > Buses to open the Buses dialog box.
2. Click intjmsbus to open the Buses > intjmsbus dialog box.3. Click Destinations under Destination resources to open the Buses >
intjmsbus > Destinations dialog box. A bus destination, for exampleSQOUTBD, is a virtual place within a service integration bus whereapplications can attach and exchange messages.
4. Click New to open the Create new destination dialog box.5. Leave Queue checked as the destination type, and click Next to open the
Create new queue dialog box.6. Enter SQOUTBD in the Identifier field and Sequential Queue Outbound in the
Description field, then click Next to open the Create a new queue forpoint-to-point messaging dialog box. You must use this value and it mustcontain only uppercase letters.
7. Select the Bus Member menu and choose Node=ctgNode01:Server=MXServeras the bus member that stores and processes messages for the SQOUTBD busdestination queue.
8. Click Next to open the Confirm queue creation dialog box.9. Review your selections, then click Finish to complete the creation of the
queue.10. Navigate the path Buses > intjmsbus > Destinations, then click SQOUTBD
to open the configuration dialog box where you must make the followingchanges:
11. Click None as the Exception destination value.
Figure 12. Add a logical address for the sequential inbound bus destination queue
Chapter 4. Deploying manually reusing existing middleware 119

12. Click Apply.13. Click Save.
Creating the JMS connection factory:
Add a connection factory for creating connections to the associated JMS providerof point-to-point messaging queues.
About this task
To create the JMS connection factory, complete the following steps:
Procedure
1. From the WebSphere Application Server Network Deployment administrativeconsole, click Resources > JMS > Connection factories.
2. From the Scope drop-down list, select Cell=ctgCell01.3. Click New.4. Verify that the Default Messaging Provider is selected and click OK.5. Enter the following information:
Name Enter intjmsconfact.
JNDI nameEnter jms/maximo/int/cf/intcf.
Bus nameSelect intjmsbus.
6. Click Apply.
Figure 13. Create the JMS connection factory
120 IBM Control Desk: Installation Guide (IBM WebSphere)

7. Click Save.
Creating the continuous inbound (CQIN) JMS queue:
You must create a JMS queue (CQIN) as the destination for continuous inboundpoint-to-point messages.
About this task
To create the CQIN JMS queue, complete the following steps:
Procedure
1. From the WebSphere Application Server Network Deployment administrativeconsole, click Resources > JMS > Queues.
2. From the Scope drop-down list, select Cell=ctgCell01.3. Click New.4. Verify that the Default Messaging Provider is selected and click OK.5. Enter the following information, and click OK.
Name Enter CQIN.
This value must contain only uppercase letters.
JNDI nameEnter jms/maximo/int/queues/cqin
Bus nameSelect intjmsbus.
Queue nameSelect CQINBD.
Figure 14. Create the CQIN JMS queue
Chapter 4. Deploying manually reusing existing middleware 121

6. Click OK.7. Click Save.
Creating the sequential inbound (SQIN) JMS queue:
You must create a JMS queue (SQIN) as the destination for sequential inboundpoint-to-point messages.
About this task
To create the SQIN JMS queue, complete the following steps:
Procedure
1. From the WebSphere Application Server Network Deployment administrativeconsole, click Resources > JMS > Queues.
2. From the Scope drop-down list, select Cell=ctgCell01.3. Click New.4. Verify that the Default Messaging Provider is selected and click OK.5. Enter the following information, and click OK.
Name Enter SQIN.
This value must contain only uppercase letters.
JNDI nameEnter jms/maximo/int/queues/sqin
Bus nameSelect intjmsbus.
Queue nameSelect SQINBD.
122 IBM Control Desk: Installation Guide (IBM WebSphere)

6. Click OK.7. Click Save.
Creating the sequential outbound (SQOUT) JMS queue:
You must create a JMS queue (SQOUT) as the destination for sequential outboundpoint-to-point messages.
About this task
To create the SQOUT JMS queue, complete the following steps:
Procedure
1. From the WebSphere Application Server Network Deployment administrativeconsole, click Resources > JMS > Queues.
2. From the Scope drop-down list, select Cell=ctgCell01.3. Click New.4. Verify that the Default Messaging Provider is selected and click OK.5. Enter the following information, and click OK.
Name Enter SQOUT.
This value must contain only uppercase letters.
JNDI nameEnter jms/maximo/int/queues/sqout
Bus nameSelect intjmsbus.
Queue nameSelect SQOUTBD.
Figure 15. Create the SQIN JMS queue
Chapter 4. Deploying manually reusing existing middleware 123

6. Click OK.7. Click Save.
Creating JMS activation specification for the continuous inbound queue (CQIN):
You must activate the continuous inbound queue (CQIN) before it can receivemessages.
About this task
Complete the following steps to activate the CQIN queue:
Procedure
1. From the WebSphere Application Server Network Deployment administrativeconsole, click Resources > JMS > Activation Specifications.
2. From the Scope drop-down list, select Cell=ctgCell01.3. Click New.4. Select Default messaging provider and then click OK.5. Enter the following information, and then click OK.
Name intjmsact
This value is case-sensitive. This value must be lowercase.
JNDI nameintjmsact
Destination typeQueue
Destination JNDI namejms/maximo/int/queues/cqin
Figure 16. Create the SQOUT JMS queue
124 IBM Control Desk: Installation Guide (IBM WebSphere)
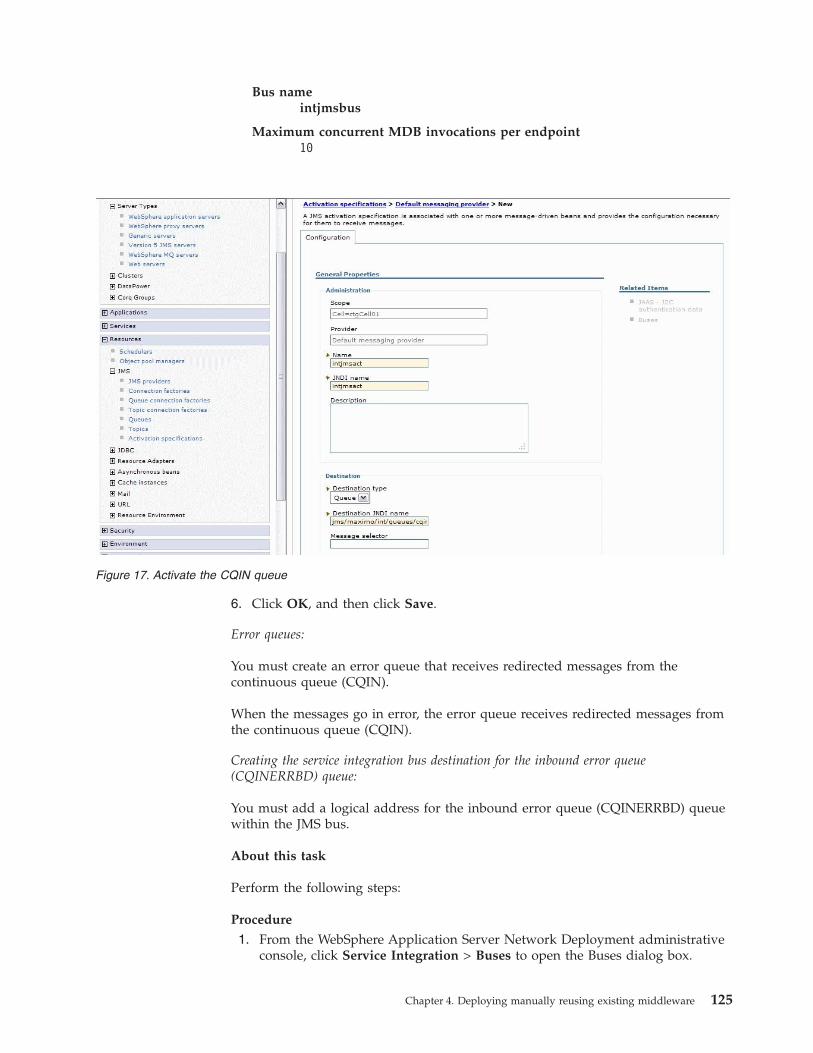
Bus nameintjmsbus
Maximum concurrent MDB invocations per endpoint10
6. Click OK, and then click Save.
Error queues:
You must create an error queue that receives redirected messages from thecontinuous queue (CQIN).
When the messages go in error, the error queue receives redirected messages fromthe continuous queue (CQIN).
Creating the service integration bus destination for the inbound error queue(CQINERRBD) queue:
You must add a logical address for the inbound error queue (CQINERRBD) queuewithin the JMS bus.
About this task
Perform the following steps:
Procedure
1. From the WebSphere Application Server Network Deployment administrativeconsole, click Service Integration > Buses to open the Buses dialog box.
Figure 17. Activate the CQIN queue
Chapter 4. Deploying manually reusing existing middleware 125
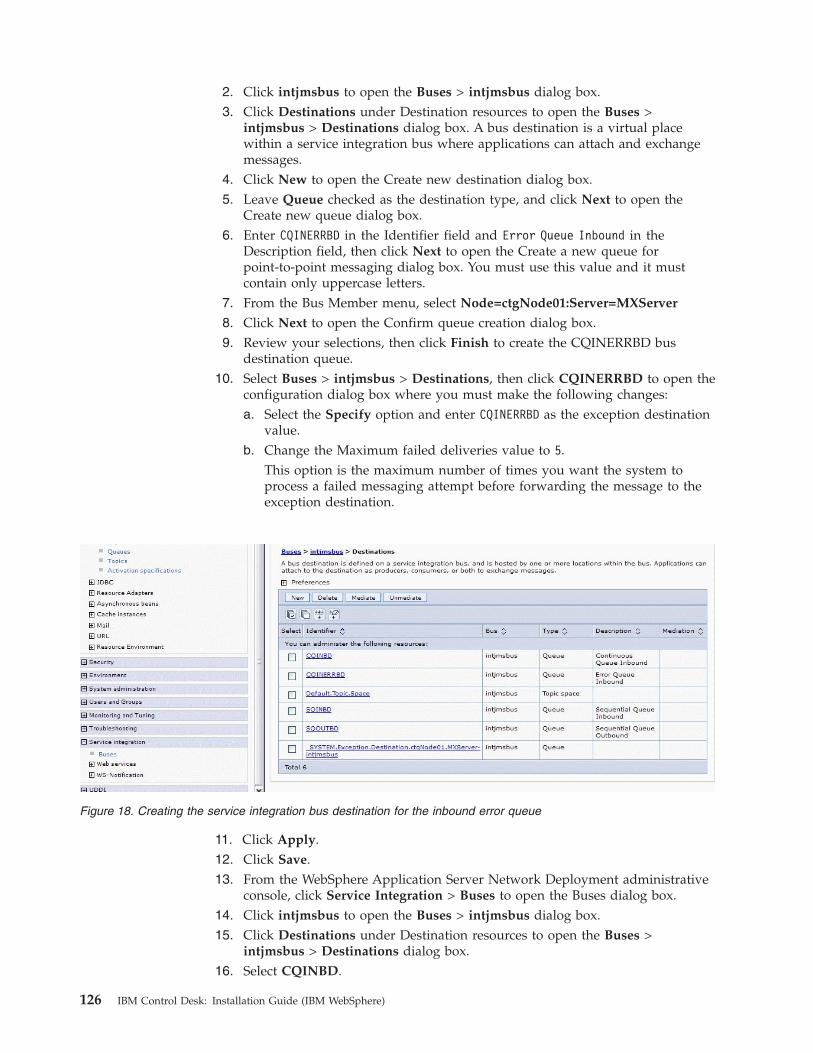
2. Click intjmsbus to open the Buses > intjmsbus dialog box.3. Click Destinations under Destination resources to open the Buses >
intjmsbus > Destinations dialog box. A bus destination is a virtual placewithin a service integration bus where applications can attach and exchangemessages.
4. Click New to open the Create new destination dialog box.5. Leave Queue checked as the destination type, and click Next to open the
Create new queue dialog box.6. Enter CQINERRBD in the Identifier field and Error Queue Inbound in the
Description field, then click Next to open the Create a new queue forpoint-to-point messaging dialog box. You must use this value and it mustcontain only uppercase letters.
7. From the Bus Member menu, select Node=ctgNode01:Server=MXServer
8. Click Next to open the Confirm queue creation dialog box.9. Review your selections, then click Finish to create the CQINERRBD bus
destination queue.10. Select Buses > intjmsbus > Destinations, then click CQINERRBD to open the
configuration dialog box where you must make the following changes:a. Select the Specify option and enter CQINERRBD as the exception destination
value.b. Change the Maximum failed deliveries value to 5.
This option is the maximum number of times you want the system toprocess a failed messaging attempt before forwarding the message to theexception destination.
11. Click Apply.12. Click Save.13. From the WebSphere Application Server Network Deployment administrative
console, click Service Integration > Buses to open the Buses dialog box.14. Click intjmsbus to open the Buses > intjmsbus dialog box.15. Click Destinations under Destination resources to open the Buses >
intjmsbus > Destinations dialog box.16. Select CQINBD.
Figure 18. Creating the service integration bus destination for the inbound error queue
126 IBM Control Desk: Installation Guide (IBM WebSphere)

17. Specify CQINERRBD as the exception destination. Set the Maximum faileddeliveries value to 5.
18. Click OK.19. Click Save.
Creating the error (CQINERR) JMS queue:
After creating the Error Queue Bus Destination, you create the Error queue.
About this task
To create the Error queue, complete the following steps.
Procedure
1. From the WebSphere Application Server Network Deployment administrativeconsole, click Resources > JMS > Queues.
2. From the Scope drop-down list, select Cell=ctgCell01.3. Click New.4. Verify that the Default Messaging Provider is selected and click OK.5. Enter the following information, and click OK.
Name Enter CQINERR.
This value must contain only uppercase letters.
JNDI nameEnter jms/maximo/int/queues/cqinerr
Figure 19. Set the exception destination
Chapter 4. Deploying manually reusing existing middleware 127

Bus nameSelect intjmsbus.
Queue nameSelect CQINERRBD.
6. Click OK.7. Click Save.
Creating JMS activation specification for the inbound error queue (CQINERR):
You must activate the continuous inbound queue (CQINERR) before it can receivemessages.
About this task
Complete the following steps to activate the CQINERR queue:
Procedure
1. From the WebSphere Application Server Network Deployment administrativeconsole, click Resources > JMS > Activation Specifications.
2. From the Scope menu, select Cell=ctgCell01, and then click Apply.3. Click New to complete the General Properties section for the new JMS
activation specification.4. Click OK.5. Enter the following information, and click OK.
Name Enter intjmsacterr.
This value must only contain lowercase letters.
Figure 20. Create the Error queue
128 IBM Control Desk: Installation Guide (IBM WebSphere)

JNDI nameEnter intjmsacterr.
This value must be the same as the one used for the Name field.
Destination typeEnter Queue.
Destination JNDI namejms/maximo/int/queues/cqinerr
Bus nameintjmsbus
Maximum concurrent MDB invocations per endpoint10
6. Click OK.7. Click Save.8. Ensure that you stop all IBM-related processes and daemons.9. You must now restart these processes for the update to take effect.
10. Start the bus member for the ctgNode MXServer intjmsbus if it is not started.If you cannot start ctgNode MXServer intjmsbus, restart MXServer underServers > Application servers.
Manually creating a data source for the persistent store:
If you chose to manually configure WebSphere Application Server NetworkDeployment, you must create a data source in order to store JMS messages in aDB2 database.
Figure 21. Activate the continuous inbound queue
Chapter 4. Deploying manually reusing existing middleware 129

About this task
You have the option of having WebSphere Application Server NetworkDeployment use a DB2 database to store JMS messages. For more informationabout WebSphere Application Server Network Deployment message storage,including the usage of products other than DB2, see the WebSphere ApplicationServer Network Deployment Knowledgecenter.
To create a data source for the persistent store, complete the following steps:
Procedure
1. Create a system user and password on the server hosting the database server.For example, a user named mxsibusr with a password of mxsibusr.
2. Create and configure the database.a. Open DB2 Control Center.b. Browse to the Databases folder listed under your system.c. Right-click the Databases folder and select Create Database > Standard.d. Create a database named maxsibdb using default settings.e. After the database has been created, expand the maxsibdb database and
select User and Group objects.f. Right-click DB Users and select Add.g. Select mxsibusr from the User menu.h. Grant all authorities to the mxsibusr except Security administrator authority.i. Click Apply.j. Verify that you can connect to the database using the mxsibusr user by
right-clicking maxsibdb and selecting Connect.3. Configure J2C authentication data and JDBC provider in WebSphere
Application Server Network Deployment.a. Open and login to the WebSphere Application Server Network Deployment
administrative console.b. Browse to Security > Global Security.c. Under the Authentication header, click Java Authentication and
Authorization Service > J2C authentication data.d. Click New.e. Complete the following fields in the User identity form.
Alias maxJaasAlias
User IDmxsibusr
PasswordPassword you created for mxsibusr.
DescriptionSIB database user alias.
f. Click Apply, and then click Save.g. From the WebSphere Application Server administrative console, browse to
Resources > JDBC > JDBC Providers.h. Under Scope, click Show scope selection drop-down list with the all
scopes option, select Cell=ctgCell01, and then, under Preferences, clickApply.
130 IBM Control Desk: Installation Guide (IBM WebSphere)

i. Click New.j. Specify the following values, and then click Apply:
Database typeDB2
Provider typeDB2 Universal JDBC Driver Provider
Implementation typeXA data source
Name maxJdbcProvider
k. Click Next.l. Complete the WebSphere Application Server variable
${DB2UNIVERSAL_JDBC_DRIVER_PATH} field with a value of<WAS_HOME>ctgMX\lib. For example, C:\Program Files\IBM\WebSphere\AppServer\ctgMX\lib.
m. Click Next.
n. Click Finish.o. Click Save.
4. Open a command prompt and copy <DB2_HOME>/java/db2jcc.jar and<DB2_HOME>/java/db2jcc_license_cu.jar to the <WAS_HOME>\ctgMX\libdirectory. Go back to Resources > JDBC > JDBC Providers >maxJdbcProvider, and correct the class path if required for both db2jcc.jarand db2jcc_license_cu.jar. Ensure that each jar file has the full path from${DB2UNIVERSAL_JDBC_DRIVER_PATH}
5. Configure WebSphere Application Server:a. From the WebSphere Application Server Network Deployment
administrative console, browse to Resources > JDBC > Data sources.b. Under Scope, click Show scope selection drop-down list with the all
scopes option, select Cell=ctgCell01, and then, under Preferences, clickApply.
c. Click New.
Figure 22. Create a new JDBC provider
Chapter 4. Deploying manually reusing existing middleware 131

d. Specify the following values:
Data source nameintjmsds
JNDI namejdbc/intjmsds
e. From the Component-managed authentication alias and XA recoveryauthentication alias menu, select maxJaasAlias
f. Click Next.g. Choose Select an existing JDBC provider, and then select maxJdbcProvider
from the menu.h. Click Next.i. Specify the following values:
Database namemaxsibdb
Driver type4
Server nameSpecify the DB2 server host name.
Port numberSpecify the DB2 port number. For example, 50005.
j. Ensure the Use this data source in container managed persistence (CMP)option is selected, and then click Next.
k. Click Finish.l. Click Save.
6. Verify the data source by selecting intjmsds, and then clicking TestConnection.
Installing the product and manually configuring middlewareYou can deploy Control Desk with configured middleware before the installationbegins. You use this procedure if your organization has specific policies andprocedures that govern how you create databases, database instances, and userswithin your organization.
Before you begin
Ensure that you meet prerequisite conditions.v The database server, the directory server, and application server services must be
started and active.v The /tmp and /var/tmp directories must be present on the system. The
installation program depends on these directories for information duringdeployments on IBM WebSphere Application Server Network Deployment.
v On the administrative workstation, temporarily shut down any noncriticalprocesses that can have a negative effect on the installation, such as antivirussoftware.
v Ensure that the Windows DEP setting does not prevent the launchpad fromrunning: Select Start > Settings > Control Panel > System > Advanced >Performance > Settings > Data Execution Prevention. Select Turn on DEP foressential Windows programs and services only and click Apply. You might beasked to reboot the server.
132 IBM Control Desk: Installation Guide (IBM WebSphere)
v For Linux and UNIX systems with middleware installed, the command hostname-f must return a fully qualified host name. If necessary, consult thedocumentation for your operating system. Alternatively, you can provide the IPaddress for the system.
v Enable a remote execution and access service on every system that hasmiddleware installed. Each remote system must support a remote accessprotocol. Each system must accept remote logins from a user name andpassword that were configured on the target server. Remote access protocolsinclude SSH and Windows SMB. If the remote system is a Windows server, youmust configure remote execution and access to use SMB.
v The DB2 database must be prepared.– If DB2 is installed on a Linux or UNIX system, you must create the instance
user and the home directory for the user on the DB2 server.– The database instance owner home directory must have 8 GB of space
available regardless of whether a database is installed in that location.– The user ID for the DB2 instance administrator must have SYSADM (system
administration) authority. You specify this user ID during the productinstallation program. See the DB2 product documentation for informationabout creating a user with SYSADM authority on the DB2 server. You mustadd root to a group with SYSADM authority for UNIX systems.
– To avoid high system memory usage by DB2, you can set the following DB2property and then restart the DB2 server:db2 update dbm cfg using KEEPFENCED NO
v If you use DB2 on UNIX systems with Control Desk, you must add root to agroup with SYSADM authority for the database instance. This membership mustbe in place before you start the Control Desk installation program.
About this task
The instructions are for a multiple server installation that uses default values.
If you experience problems with the user interface of the installation programwhen you install on AIX 6.x systems remotely, reattempt the installation locally.Use the console or an X terminal on the system locally.
Procedure1. Log in on the administrative system.2. Start the product installation program from the launchpad.
a. Start the launchpad. Browse to the root directory of the downloadedinstallation image, and run the following command:
Windowslaunchpad.exe
UNIX launchpad.shIf the launchpad does not start the installation, you can start the productinstallation program directly. On the downloaded installation image, browseto \Install\\, and run one of the following commands:
Windows
v install.bat
v install_win64.bat
UNIX
Chapter 4. Deploying manually reusing existing middleware 133
v install_aix64.sh
v install_linux32.sh
v install_linux64.sh
3. Select a language for the installation and click OK.4. On the Choose Installation Folder panel, specify the path to the location
where you want to install Control Desk.You can specify a description for the installation. A description is useful fordifferentiating between multiple installations that are hosted on the sameadministrative workstation.
5. Review the information that is on the Verify Installation Location panel. Thepanel shows any previous installation information that was found based onthe installation directory that you specified on the previous panel. After youadvance past this panel, you cannot go back and change the installationdirectory for this installation.If a more recent version of the installation program is found in the specifiedtarget directory, you are notified. The notification means that you are using anolder version of the installation program. The version found on theadministrative workstation is newer and can contain important features andenhancements. To use the newer version of the installation program, select theoption on the notification panel and click Next. This action exits the currentinstallation process and restarts the installation process with the newerinstallation program. If you do not select the option, you continue theinstallation with the older version of the installation program.
6. On the Package Summary panel, review the package deployment information.This panel lists version information for both new and existing packages on thesystem. Target package version information indicates the package versionbeing currently deployed.
7. On the Choose Deployment panel, specify Simple or Custom as thedeployment type.
8. On the Import Middleware Configuration Information panel, you selectImport middleware configuration information to have the productinstallation program reuse the middleware installation program values. Thesevalues are used as default values for the same fields in the productinstallation program.The Workspace location field refers to the location of the topology file thatcontains the values that were specified for the middleware installationprogram. The file is located in the workspace that was defined during themiddleware installation task. For example, C:\ibm\tivoli\mwi\workspace forWindows or /root/ibm/tivoli/mwi/workspace for UNIX.If you selected the simple deployment, the middleware default information isnot used.
9. On the Database Type panel, specify the software to use for the Maximodatabase.
10. On the Database panel, specify configuration information for your databasesoftware.For things such as the database user ID, the database name, the databaseinstance for Control Desk, and the schema name, if the values do not existwhen you specify them, they are created. Database users and databaseinstance names cannot contain spaces.For DB2, the user ID cannot be the same as the instance administrator user ID.For DB2, the database instance is created if it does not exist, but the user andits associated home directory must exist on the DB2 server. For DB2, the
134 IBM Control Desk: Installation Guide (IBM WebSphere)

schema name can be the same value as the owner of the table spaces that aredefined or it can be a different value, such as maximo.After you specify configuration information for your database software, theinstallation program validates the information with the database server.
11. On the Automate Database Configuration panel, select The database hasalready been created and configured and click Next.This step assumes that you created a database instance, a database, tablespaces, a user, and schema for use with Control Desk. See “Manuallyconfiguring the database” on page 73. If you have not manually configuredthe database before selecting The database has already been created andconfigured you are prompted to complete them before you restart theinstallation program.
12. On the Database Tablespace panel, specify information about the table spaceof the database.When you click Next, the product installation program connects to thedatabase server and validates the information that you specified.
13. When the database validation is complete, on the Application Server Typepanel, specify the application server type for the product deployment.You have the option of configuring WebSphere Application Server NetworkDeployment automatically through the product installation program.
14. On the WebSphere Connectivity panel, specify host information for theWebSphere Application Server Network Deployment.
15. On the WebSphere Remote Access Authorization panel, specify authorizationinformation for WebSphere Application Server Network Deploymentconfiguration.
16. On the WebSphere Application Server Network Deployment Configurationpanel, specify configuration information for WebSphere Application ServerNetwork Deployment.The web server port should match an existing HTTP server port value thatyou configured when you set up WebSphere Application Server NetworkDeployment. If you specify a different value for the web server port, you mustrestart WebSphere Application Server Network Deployment at the conclusionof the installation. Restarting the server activates the new port and makes itavailable for incoming requests.The application server name that you specify is created if it does not exist.
17. On the Security panel, specify the method to use for authenticating andauthorizing users.
18. On the Specify Maximo Users panel, enter Maximo database user information.
Maximo administration userThe product administrator user ID that is used for initial configurationand adding users.
Maximo system registration userThe user ID that is used for the self-registration of users.
Maximo system integration userThe user ID that is used with enterprise adapters.
Custom user ID and password values are stored in the Maximo database. Thedefault user IDs of maxadmin, maxreg, and maxintadm are also created asusers in the Maximo database. Creation of the default user IDs is done forinternal processing purposes. If you use Maximo database security forauthentication and authorization, the default user IDs can be used to log in to
Chapter 4. Deploying manually reusing existing middleware 135

the application. If you regard this condition as a security risk, you can modifythe passwords for the default user IDs. You modify passwords for the userIDs in the Users application.
19. On the Security panel, specify the names of the user and group base entriesand specify how Control Desk users are created.
User base entryIf you do not plan to use the default LDAP schema that is providedwith Control Desk, specify the user base entry that you want to use.
Group base entryIf you do not plan to use the default LDAP schema, specify the groupbase entry that you want to use.
You can specify that the installation program creates the required users.Otherwise, you must create users manually before you continue.If you are not using the default LDAP schema that is provided, you mustcreate it yourself before you advance beyond this panel. The values that arespecified for the User base entry and Group base entry fields are used toconfigure the VMMSYNC cron task. To create your own LDAP schema andcreate users manually, you can modify the default add-on LDIF data andimport it into your LDAP repository
20. On the Integration Adapter JMS Configuration panel, specify Java MessageService configuration information. A JMS server requires a DB2 datarepository to be configured to maintain messages. If you are using anotherdatabase type, you cannot configure message persistence. If you specify thatJMS messages are not to be persisted, you can configure the JMSimplementation manually later.Specify the name of the database to be used by JMS. For DB2, you can specifywhether to persist JMS messages within DB2.Select Do not persist JMS messages if you are deploying Control Desk withOracle or Microsoft SQL Server. When you click Next, the installation wizardskips to the SMTP Configuration panel.
21. If you specified that JMS messages should persist, specify additional JMSconfiguration information in the DB2 Database Server Configuration panel.The JMS data store can be created as a DB2 database only.
22. If you specified that JMS messages should persist, specify authorizationinformation for the automatic configuration feature in the DB2 DatabaseServer Remote Access Authorization panel.For Windows, the user ID must be a member of the DB2ADMNS group.For Linux or UNIX, the user ID must be root and a member of a group withSYSADM authority for the database instance.
23. If you specified that JMS messages should persist, specify additional DB2information in the DB2Database Instance Configuration panel.
24. In the WebSphere Application Server Network Deployment keystore file panel,browse to where you copied the trust.p12 keystore, and then click Next.
25. On the SMTP Configuration panel, specify the SMTP configurationinformation that is used by workflows to communicate with workflowparticipants.The administrator e-mail address is the e-mail address that is used to sendmessages. If you leave the fields blank, you must configure the SMTPparameters through the product interface as a post-installation task.
26. On the Data Integration and Context Menu Services Options panel, select theoption that indicates where the database tables for these functions should be
136 IBM Control Desk: Installation Guide (IBM WebSphere)

created: in the Maximo ("same") database, or in a separate database instancethat you have already created for this purpose. If you are installing the Entryedition, choose the Maximo database. These tables are created but are not bythe Entry edition.
27. On the Base Language Selection panel, specify the base language for theinstallation.
28. On the Additional Language Selection panel, you can optionally specify oneor more additional languages that the installation is to support.
29. On the Run Configuration Step panel, specify how to perform theconfiguration step of the installation. If you do not select an option, theconfiguration step proceeds when you click Next.
Copy files now, but perform the installation configuration step laterSelect this option to copy files from the installation source to theadministrative workstation. You must perform the configuration stepat a later time to complete the deployment.
Important: Do not install another product before completing theconfiguration step of the original installation. Installing anotherproduct before running the configuration step for this installationoverwrites the taskstore, which prevents the original installation fromever being deployed.
The configuration values that you specify are stored in theinstall_home\maximo\applications\maximo\properties\maximo.properties and install_home\etc\install.properties files.You run the configuration steps outside of the product installationprogram by using the taskrunner utility, in the install_home\scriptsdirectory. Run the taskrunner utility from the command line.install_home\scripts\taskrunner [CONTINUE <STOPONERROR|NOSTOPONERROR>]
The taskrunner uses the configuration values that are stored in themaximo.properties and install.properties files to configure ControlDesk.
If you run taskrunner with the NOSTOPONERROR parameter, thetaskrunner continues despite errors. If you run taskrunner with theSTOPONERROR parameter, the taskrunner stops when it encounters anerror. If you used STOPONERROR, you can rectify the conditions thatcaused the error. You can then resume the installation at the pointwhere the last successfully completed task was recorded in theprevious attempt by starting taskrunner with the CONTINUE parameter.
Deploy application files manually laterSelect this option to manually deploy application files to theapplication server.
Defer the update of the Maximo databaseSelect this option if you want to manually run the database updatetask for the product deployment. This option can be used when thereis a fix pack available that addresses known issues with the updatedbscript. In this scenario, you choose the Defer the update of theMaximo database option, apply the fix pack, and then run theupdatedb -v1 command manually.
30. On the Choose Shortcut Folder panel, specify where you want Control Deskicons created.
Chapter 4. Deploying manually reusing existing middleware 137

If you select In the Start Menu and use Internet Explorer, add the ControlDesk URL to the trusted sites web content zone. Disable the option thatrequires server verification for all sites in the zone.Do not select In the Quick Launch Bar. The selection does not create ashortcut in the Quick Launch bar.Attention: Shortcuts are created for Windows systems only.
31. On the Input Summary panel, review the information that you have providedfor the product installation program.If necessary, use Previous to return to previous panels to change values.
32. On the Pre-Installation Summary panel, review the installation information,then click Install.The installation process begins. You can monitor the progress of theinstallation by viewing the messages that are shown.
33. On the Installation Completed panel, review any information presented, thenclick Done.Attention: In some cases, on AIX systems, the Installation Completed panelmight appear blank. Click Done to exit the installation program.
What to do next
Complete the post installation tasks that are required for installing with manualmiddleware configuration.
If you selected the Deploy application files manually later option, you must nowdeploy the maximo.ear and maximoiehs.ear files.
You can install optional content and integration modules from the launchpad.“Maintaining EAR files” on page 258This section contains information about maintaining Control Desk EAR files.
Installing optional contentInstall the relevant optional content package for your edition of the product.
Optional content is often used in development environments as a way to begindeveloping your own content.
If you do not install optional content during the product installation process, youcan install it later. If you install it later, you must update the database and rebuildand deploy the maximo.ear file.
Installing optional integration modulesInstall integration module packages in order to set up integrations with otherproducts.
You can install these integration modules from the Integrations page of thelaunchpad:
IBM Tivoli Provisioning Manager Integration ModuleThis integration module enables you to integrate Tivoli ProvisioningManager with the release management process. For example, you can use
138 IBM Control Desk: Installation Guide (IBM WebSphere)

Tivoli Provisioning Manager as a Definitive Media Library. See the Releasemanagement section of the information center for more information aboutthis integration.
Deployed Assets CMS LIC Enablement PackageThis package is required if you plan to use the Context Menu Service tomanage launch-in-context actions for deployed assets. See the Planningsection of the information center for information about options forlaunch-in-context actions.
CI AppsCMS LIC Enablement PackageThis package is required if you plan to use the Context Menu Service tomanage launch-in-context actions for actual configuration items. See thePlanning section of the information center for information about optionsfor launch-in-context actions.
Rational ClearQuest OSLC IntegrationsThis integration enables you to use the Open Services for LifecycleCollaboration (OSLC) technology to link from the Problems application toRational ClearQuest to share information about problems and theirsolutions.
Rational Team Concert OSLC IntegrationsThis integration enables you to use the Open Services for LifecycleCollaboration (OSLC) technology to link from the Problems application toRational Team Concert to share information about problems and theirsolutions.
If you do not install integration modules during the product installation process,you can install them later. If you install them later, you must update the databaseand rebuild and deploy the maximo.ear file.
Language deployment after database update deferralSelecting the option to defer the update of the Maximo database when installingthe product, affects how you deploy languages.
During installation, you have the option to defer the database update task. Thisoption prevents writing data to the database during the installation. Theinstallation program is limited to copying files to the administrative system andregistering product process solution packages. You add languages by completingthe installation, manually updating the database, and then updating languagesmanually.
“Manually deploying languages after database update deferral” on page 51Languages must be deployed manually if you defer database updates by theinstallation program.
Manually deploying languages after database update deferralLanguages must be deployed manually if you defer database updates by theinstallation program.
Before you begin
You must have run updatedb command before manually configuring languages forPSI packages.
Chapter 4. Deploying manually reusing existing middleware 139

About this task
To manually configure languages for PSI packages, complete the following steps:
Procedure1. Update language support for the core components.
Files for the language selections you made during the installation are extractedto the C:\IBM\SMP\Maximo\Tools\Maximo\locale\xliff\ directory on the system.a. To update a language as the base language to use for the product, run the
following command:install_home\maximo\tools\maximo\TDToolkit.bat-IMPORT-SLEN-TLlocale-maxmessfix
b. To add one or more languages as additional languages for use with theproduct, run the following command for each language you want to add:install_home\maximo\tools\maximo\TDToolkit.bat-ADDLANGlocale-maxmessfix
2. Update languages for additional packages.In order to determine which packages you need to update, change directory toinstall_home\maximo\tools\maximo\en\xliff. Each folder located in the xliffdirectory, with the exception of MAXUPG folder, is used as input for the-pmpupdate operation of TDToolkit. Unlike the process for updating languagesfor Control Desk, you run the TDToolkit command once for each package.TDToolkit determines which languages are currently deployed and updates alllanguages.a. Change directory to install_home\maximo\tools\maximo\en\xliff. and
identify a package folder to update, for example calibration.b. Update languages for the chosen package.
C:\IBM\SMP\maximo\tools\maximo\TDToolkit.bat-pmpupdatepackagedirectory
In this example, pmpupdatepackagedirectory could be pmpupdatecalibrationor pmpupdateconfig_pmp for example.
c. Repeat for each additional package that require language updates.
140 IBM Control Desk: Installation Guide (IBM WebSphere)
Chapter 5. Silent installation
Control Desk provides the option of installing silently.
The Control Desk silent installation option allows you to interface with the ControlDesk installation program using a command prompt (not the Control Desklaunchpad), and a response file.
Installing Control Desk silentlyControl Desk can be installed silently by using an installation response file.
Before you begin
You must complete a successful Control Desk installation to produce a responsefile that can be used for a silent installation. Alternatively, you can use one of thesample response files that are provided on the product media and modify itaccording to your needs.
You must verify that all response file paths are formatted correctly. For example, aUNIX style path statement in the response file might look like the followingstatement: USER_INSTALL_DIR=K:/IBM/max_dev. If a path such asUSER_INSTALL_DIR=K:/IBM/max_dev is contained in a response file that is used witha Windows administrative system, an error occurs. The Windows equivalent in thisexample must be formatted for a Windows system: USER_INSTALL_DIR=K:\\IBM\\max_dev
Note: You can use a silent installation response file to populate Control Deskinstallation program fields during an attended installation. Remove theINSTALLER_UI=silent property from the response file before you use it with theControl Desk installation program. The installation program uses default values byreading from the response file. The Control Desk installation program uses theresponse file automatically when it is named installer.properties orinstall.properties and it is in the same directory. You do not have to specify theresponse file name when you start the Control Desk installation program.
Note: This response file can also be used with the Control Desk uninstallationprogram to uninstall Control Desk silently.
About this task
To install Control Desk silently, complete the following steps:
Procedure1. Make configuration choices by using the Control Desk installation program,
and record those choices in a response file:a. Start the Control Desk installation program from the product image. Use
the following command for 32–bit systems:install.exe -r <response file path and name>
For 64–bit systems, use the following command:install_win64.exe -r <response file path and name>
© Copyright IBM Corp. 2014 141
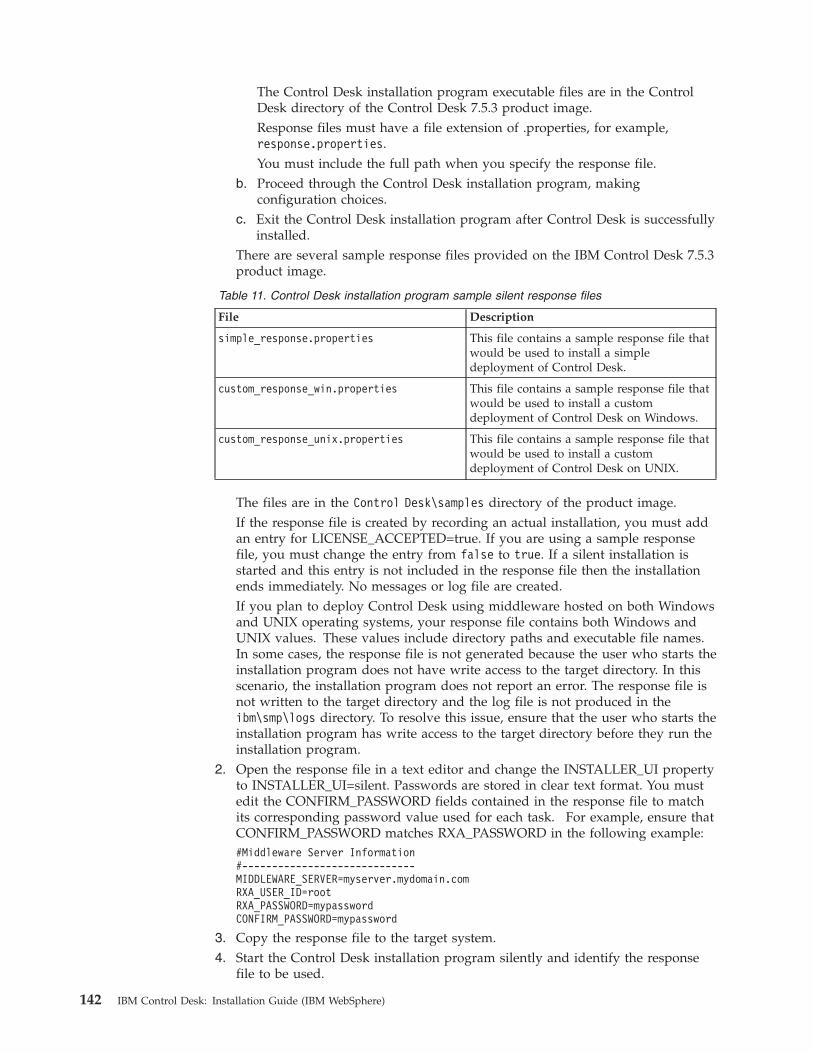
The Control Desk installation program executable files are in the ControlDesk directory of the Control Desk 7.5.3 product image.Response files must have a file extension of .properties, for example,response.properties.You must include the full path when you specify the response file.
b. Proceed through the Control Desk installation program, makingconfiguration choices.
c. Exit the Control Desk installation program after Control Desk is successfullyinstalled.
There are several sample response files provided on the IBM Control Desk 7.5.3product image.
Table 11. Control Desk installation program sample silent response files
File Description
simple_response.properties This file contains a sample response file thatwould be used to install a simpledeployment of Control Desk.
custom_response_win.properties This file contains a sample response file thatwould be used to install a customdeployment of Control Desk on Windows.
custom_response_unix.properties This file contains a sample response file thatwould be used to install a customdeployment of Control Desk on UNIX.
The files are in the Control Desk\samples directory of the product image.If the response file is created by recording an actual installation, you must addan entry for LICENSE_ACCEPTED=true. If you are using a sample responsefile, you must change the entry from false to true. If a silent installation isstarted and this entry is not included in the response file then the installationends immediately. No messages or log file are created.If you plan to deploy Control Desk using middleware hosted on both Windowsand UNIX operating systems, your response file contains both Windows andUNIX values. These values include directory paths and executable file names.In some cases, the response file is not generated because the user who starts theinstallation program does not have write access to the target directory. In thisscenario, the installation program does not report an error. The response file isnot written to the target directory and the log file is not produced in theibm\smp\logs directory. To resolve this issue, ensure that the user who starts theinstallation program has write access to the target directory before they run theinstallation program.
2. Open the response file in a text editor and change the INSTALLER_UI propertyto INSTALLER_UI=silent. Passwords are stored in clear text format. You mustedit the CONFIRM_PASSWORD fields contained in the response file to matchits corresponding password value used for each task. For example, ensure thatCONFIRM_PASSWORD matches RXA_PASSWORD in the following example:#Middleware Server Information#-----------------------------MIDDLEWARE_SERVER=myserver.mydomain.comRXA_USER_ID=rootRXA_PASSWORD=mypasswordCONFIRM_PASSWORD=mypassword
3. Copy the response file to the target system.4. Start the Control Desk installation program silently and identify the response
file to be used.
142 IBM Control Desk: Installation Guide (IBM WebSphere)

install.exe -f <response file path and name>
You must include the full path when you specify the response file and it mustbe on the C:\ drive of your system.
Results
The installation proceeds silently with the values that you provided in the responsefile.
Response files that include fields for Oracle configuration must be edited toremove extraneous backslashes. A response file that includes Oracle as adeployment option is generated with fields like the following excerpt:DB_INSTALL_DIR=C\:/oracle/product/10.2.0/db_1INSTANCE_LOCATION=C\:/oracle/product/10.2.0/db_1/dbsWAS_HOME_DIR=C\:/Program Files/IBM/WebSphere/AppServerUSER_INSTALL_DIR=C\:/IBM/USER_SHORTCUTS=C\:/Documents and Settings/All Users/Start Menu/Programs/process automation engineMAXIMO_INSTALL_DIR=C\:/IBM/maximo
You must remove the backslash that is directly after the drive letter, so that yourresponse file looks like following excerpt:DB_INSTALL_DIR=C:/oracle/product/10.2.0/db_1INSTANCE_LOCATION=C:/oracle/product/10.2.0/db_1/dbsWAS_HOME_DIR=C:/Program Files/IBM/WebSphere/AppServerUSER_INSTALL_DIR=C:/IBM/USER_SHORTCUTS=C:/Documents and Settings/All Users/Start Menu/Programs/process automation engineMAXIMO_INSTALL_DIR=C:/IBM/maximo
If you attempt to install Control Desk silently and the installation UI is shown,check inside the response file to ensure that it contains this line:INSTALLER_UI=silent
Silent installation propertiesSilent installation properties are recorded in an installation response file. Silentinstallation response files are generated when the installation program is startedwith the parameters described in the silent installation procedure. Alternatively, asilent installation response file can be created and populated manually.
Common silent installation properties
The following properties are common to all deployments.
Table 12. Common silent installation response file properties
Category Property Definition
File header INSTALLER_UI=SILENT This property must be set so thefile can be used with the productinstallation program.
Packagedeployment set
INSTALL_SOME_PACKAGES=0 If only a subset of packages can beinstalled, set this value to 1. Thissetting allows the productinstallation program to continue.
LicenseAgreement
LICENSE_ACCEPTED=TRUE Set this value to true to accept thelicense agreement or false to rejectit.
Chapter 5. Silent installation 143
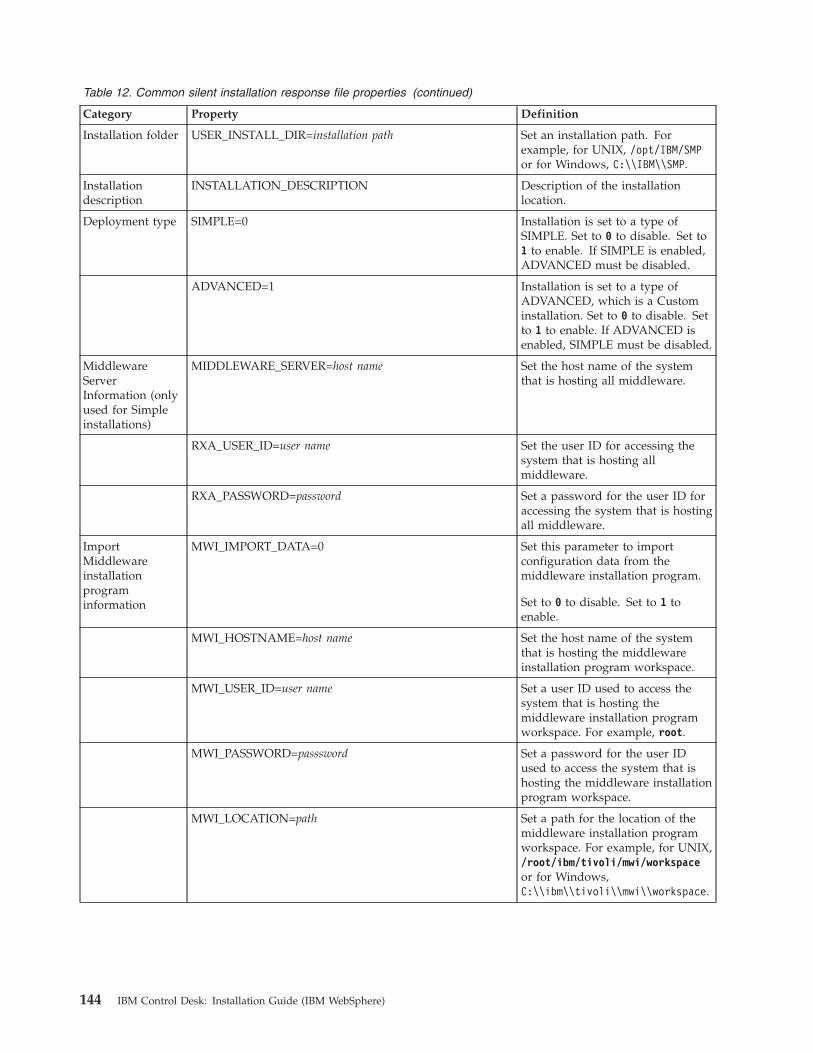
Table 12. Common silent installation response file properties (continued)
Category Property Definition
Installation folder USER_INSTALL_DIR=installation path Set an installation path. Forexample, for UNIX, /opt/IBM/SMPor for Windows, C:\\IBM\\SMP.
Installationdescription
INSTALLATION_DESCRIPTION Description of the installationlocation.
Deployment type SIMPLE=0 Installation is set to a type ofSIMPLE. Set to 0 to disable. Set to1 to enable. If SIMPLE is enabled,ADVANCED must be disabled.
ADVANCED=1 Installation is set to a type ofADVANCED, which is a Custominstallation. Set to 0 to disable. Setto 1 to enable. If ADVANCED isenabled, SIMPLE must be disabled.
MiddlewareServerInformation (onlyused for Simpleinstallations)
MIDDLEWARE_SERVER=host name Set the host name of the systemthat is hosting all middleware.
RXA_USER_ID=user name Set the user ID for accessing thesystem that is hosting allmiddleware.
RXA_PASSWORD=password Set a password for the user ID foraccessing the system that is hostingall middleware.
ImportMiddlewareinstallationprograminformation
MWI_IMPORT_DATA=0 Set this parameter to importconfiguration data from themiddleware installation program.
Set to 0 to disable. Set to 1 toenable.
MWI_HOSTNAME=host name Set the host name of the systemthat is hosting the middlewareinstallation program workspace.
MWI_USER_ID=user name Set a user ID used to access thesystem that is hosting themiddleware installation programworkspace. For example, root.
MWI_PASSWORD=passsword Set a password for the user IDused to access the system that ishosting the middleware installationprogram workspace.
MWI_LOCATION=path Set a path for the location of themiddleware installation programworkspace. For example, for UNIX,/root/ibm/tivoli/mwi/workspaceor for Windows,C:\\ibm\\tivoli\\mwi\\workspace.
144 IBM Control Desk: Installation Guide (IBM WebSphere)
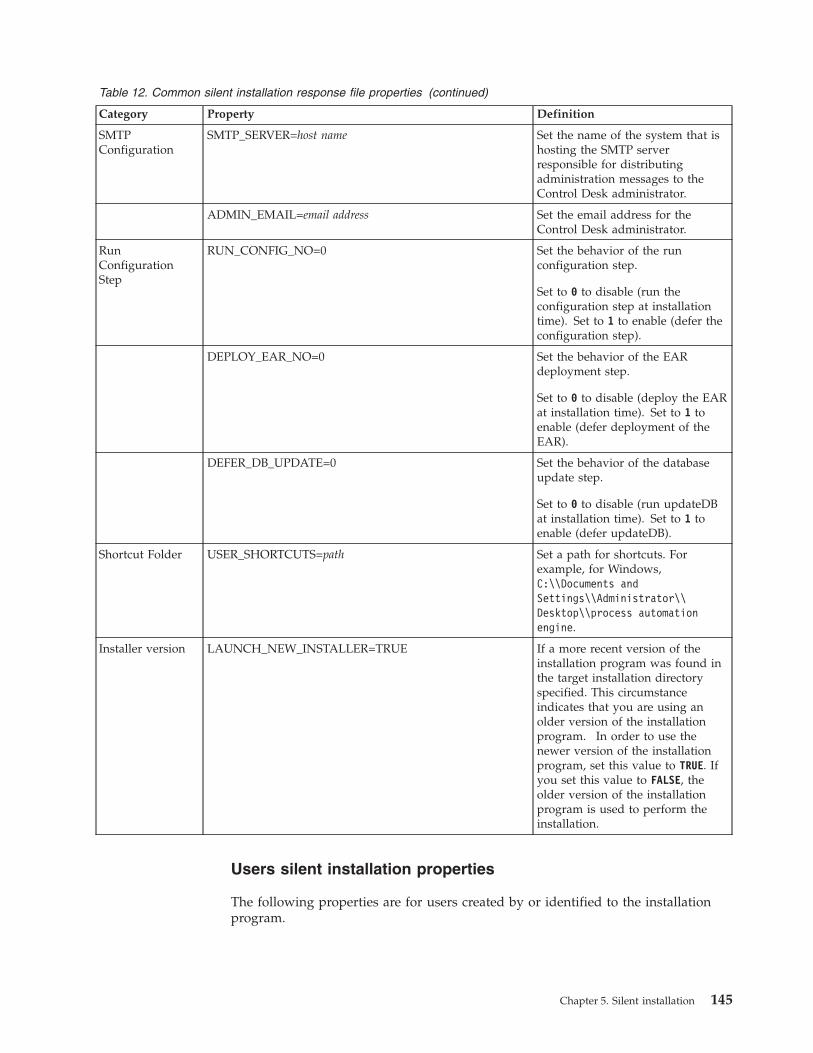
Table 12. Common silent installation response file properties (continued)
Category Property Definition
SMTPConfiguration
SMTP_SERVER=host name Set the name of the system that ishosting the SMTP serverresponsible for distributingadministration messages to theControl Desk administrator.
ADMIN_EMAIL=email address Set the email address for theControl Desk administrator.
RunConfigurationStep
RUN_CONFIG_NO=0 Set the behavior of the runconfiguration step.
Set to 0 to disable (run theconfiguration step at installationtime). Set to 1 to enable (defer theconfiguration step).
DEPLOY_EAR_NO=0 Set the behavior of the EARdeployment step.
Set to 0 to disable (deploy the EARat installation time). Set to 1 toenable (defer deployment of theEAR).
DEFER_DB_UPDATE=0 Set the behavior of the databaseupdate step.
Set to 0 to disable (run updateDBat installation time). Set to 1 toenable (defer updateDB).
Shortcut Folder USER_SHORTCUTS=path Set a path for shortcuts. Forexample, for Windows,C:\\Documents andSettings\\Administrator\\Desktop\\process automationengine.
Installer version LAUNCH_NEW_INSTALLER=TRUE If a more recent version of theinstallation program was found inthe target installation directoryspecified. This circumstanceindicates that you are using anolder version of the installationprogram. In order to use thenewer version of the installationprogram, set this value to TRUE. Ifyou set this value to FALSE, theolder version of the installationprogram is used to perform theinstallation.
Users silent installation properties
The following properties are for users created by or identified to the installationprogram.
Chapter 5. Silent installation 145

Table 13. Users silent installation properties
Category Property Definition
User Information MAXADMIN_USER_NAME=user name Set a user name for the Maximoadministrator. For example,maxadmin.
MAXADMIN_PASSWORD=password Set a password for the Maximoadministrator. For example,maxadmin.
MAXREG_USER_NAME=user name Set a user name for the selfregistration user. This user isresponsible for the process bywhich users can create their ownaccounts. For example, maxreg.
MAXREG_PASSWORD=password Set a password for the selfregistration user. For example,maxreg.
MXINTADM_USER_NAME=user name Set a user name for the internaluser. For example, mxintadm.
MXINTADM_PASSWORD=password Set a password for the internaluser. For example, mxintadm.
Common database silent installation properties
The following properties contain common information about the database used forthe deployment.
Table 14. Common database silent installation response file properties
Category Property Definition
Database Type DB_TYPE_DB2=1 Set the database type to DB2. Setto 0 to disable. Set to 1 toenable. Only one Database Typecan be enabled.
DB_TYPE_ORACLE=0 Set the database type to Oracle. Setto 0 to disable. Set to 1 to enable.Only one Database Type can beenabled.
DB_TYPE_SQLSERVER=0 Set the database type to MicrosoftSQL Server. Set to 0 to disable. Setto 1 to enable. Only one DatabaseType can be enabled.
Database DB_HOST_NAME=host name Set the host name of the databaseserver.
DB_PORT=port Set the database port. Forexample, 50005.
DB_NAME=name Set a name for the database. Forexample, maxdb75.
DB2
DB_NAME=name Set a name for the database. Forexample, maxdb75.
Microsoft SQL Server
146 IBM Control Desk: Installation Guide (IBM WebSphere)

Table 14. Common database silent installation response file properties (continued)
Category Property Definition
DB_INSTANCE=instance Set a name for the databaseinstance to use with the product.For example, ctginst1.
DB2
DB_INSTANCE=instance Set a name for the databaseinstance to use with the product.For example, ctginst1.
Oracle
DB_USER=user name Set the name of the user ID toaccess the database. For example,maximo.
DB_PASSWORD=password Set a password for the databaseuser ID. For example, maximo.
DatabaseConfigurationAutomation
AUTOMATE_DB=1 Configure the automaticconfiguration of the database bythe installation program. Set to 0 todisable. Set to 1 to enable. EitherAUTOMATE_DB orDO_NOT_AUTOMATE_DB can beenabled at one time.
DO_NOT_AUTOMATE_DB=0 Configure the automaticconfiguration of the database bythe installation program. Set to 0 todisable. Set to 1 to enable. EitherAUTOMATE_DB orDO_NOT_AUTOMATE_DB can beenabled at one time.
Remote AccessAuthorization
DB_RXA_USER=user name Set the name of the user ID toaccess the remote database serversystem. For example, root.
Only required if AUTOMATE_DBwas enabled.
DB2
Remote AccessAuthorization
DB_RXA_USER=user name Set the name of the user ID toaccess the remote database serversystem. For example, root.
Only required if AUTOMATE_DBwas enabled.
Oracle
DB_RXA_PASSWORD=password Set a password for the remoteaccess user ID.
Only required if AUTOMATE_DBwas enabled.
DB2
Chapter 5. Silent installation 147
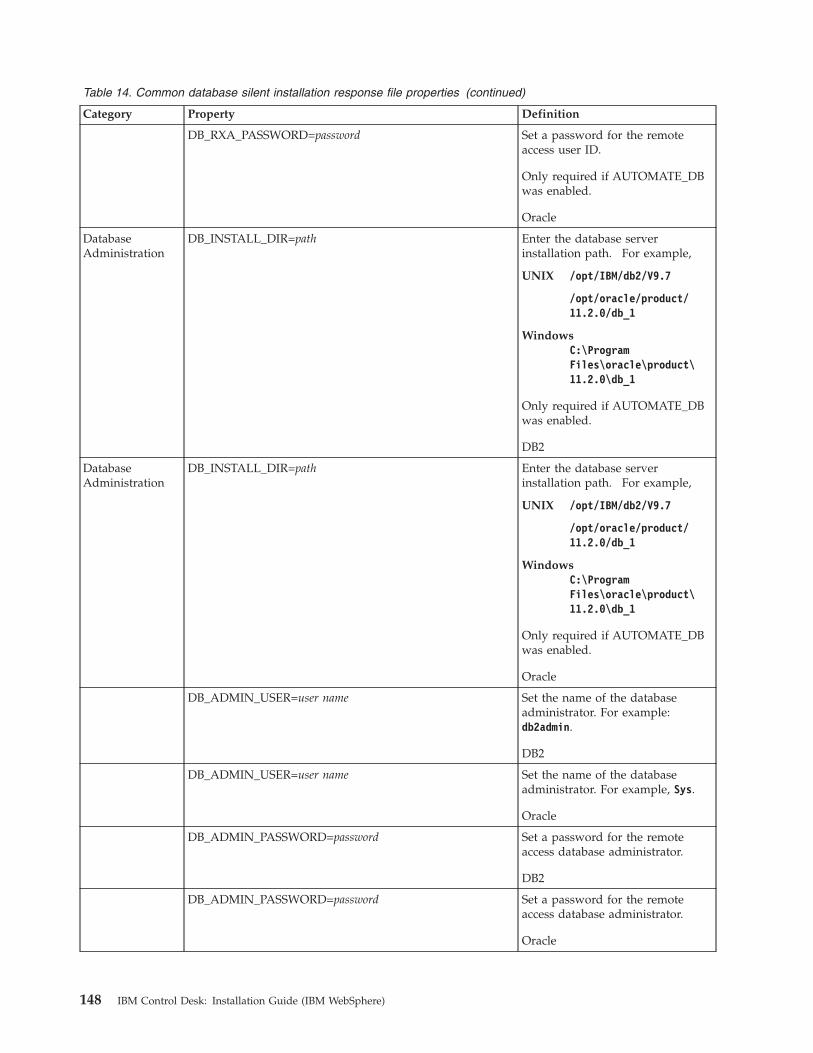
Table 14. Common database silent installation response file properties (continued)
Category Property Definition
DB_RXA_PASSWORD=password Set a password for the remoteaccess user ID.
Only required if AUTOMATE_DBwas enabled.
Oracle
DatabaseAdministration
DB_INSTALL_DIR=path Enter the database serverinstallation path. For example,
UNIX /opt/IBM/db2/V9.7
/opt/oracle/product/11.2.0/db_1
WindowsC:\ProgramFiles\oracle\product\11.2.0\db_1
Only required if AUTOMATE_DBwas enabled.
DB2
DatabaseAdministration
DB_INSTALL_DIR=path Enter the database serverinstallation path. For example,
UNIX /opt/IBM/db2/V9.7
/opt/oracle/product/11.2.0/db_1
WindowsC:\ProgramFiles\oracle\product\11.2.0\db_1
Only required if AUTOMATE_DBwas enabled.
Oracle
DB_ADMIN_USER=user name Set the name of the databaseadministrator. For example:db2admin.
DB2
DB_ADMIN_USER=user name Set the name of the databaseadministrator. For example, Sys.
Oracle
DB_ADMIN_PASSWORD=password Set a password for the remoteaccess database administrator.
DB2
DB_ADMIN_PASSWORD=password Set a password for the remoteaccess database administrator.
Oracle
148 IBM Control Desk: Installation Guide (IBM WebSphere)
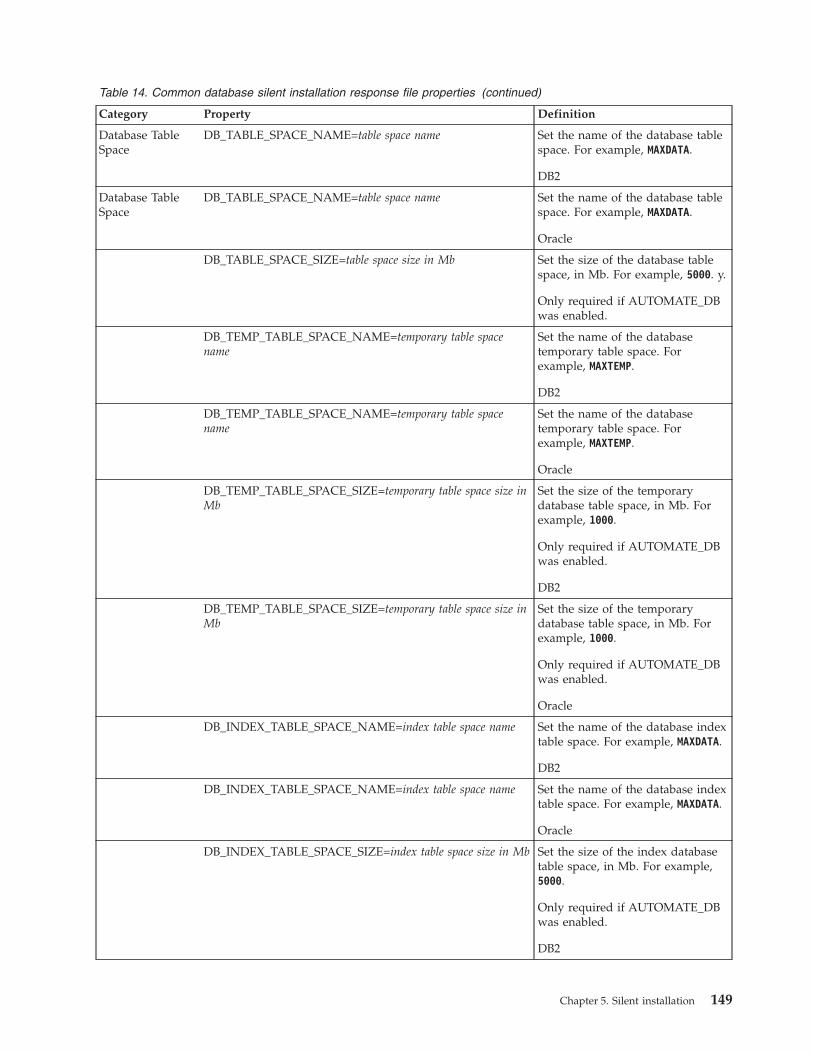
Table 14. Common database silent installation response file properties (continued)
Category Property Definition
Database TableSpace
DB_TABLE_SPACE_NAME=table space name Set the name of the database tablespace. For example, MAXDATA.
DB2
Database TableSpace
DB_TABLE_SPACE_NAME=table space name Set the name of the database tablespace. For example, MAXDATA.
Oracle
DB_TABLE_SPACE_SIZE=table space size in Mb Set the size of the database tablespace, in Mb. For example, 5000. y.
Only required if AUTOMATE_DBwas enabled.
DB_TEMP_TABLE_SPACE_NAME=temporary table spacename
Set the name of the databasetemporary table space. Forexample, MAXTEMP.
DB2
DB_TEMP_TABLE_SPACE_NAME=temporary table spacename
Set the name of the databasetemporary table space. Forexample, MAXTEMP.
Oracle
DB_TEMP_TABLE_SPACE_SIZE=temporary table space size inMb
Set the size of the temporarydatabase table space, in Mb. Forexample, 1000.
Only required if AUTOMATE_DBwas enabled.
DB2
DB_TEMP_TABLE_SPACE_SIZE=temporary table space size inMb
Set the size of the temporarydatabase table space, in Mb. Forexample, 1000.
Only required if AUTOMATE_DBwas enabled.
Oracle
DB_INDEX_TABLE_SPACE_NAME=index table space name Set the name of the database indextable space. For example, MAXDATA.
DB2
DB_INDEX_TABLE_SPACE_NAME=index table space name Set the name of the database indextable space. For example, MAXDATA.
Oracle
DB_INDEX_TABLE_SPACE_SIZE=index table space size in Mb Set the size of the index databasetable space, in Mb. For example,5000.
Only required if AUTOMATE_DBwas enabled.
DB2
Chapter 5. Silent installation 149

Table 14. Common database silent installation response file properties (continued)
Category Property Definition
DB_INDEX_TABLE_SPACE_SIZE=index table space size in Mb Set the size of the index databasetable space, in Mb. For example,5000.
Only required if AUTOMATE_DBwas enabled.
Oracle only.
DB2 silent installation properties
The following properties contain information about an DB2 database used for thedeployment. These properties are only necessary if you are using a DB2 databasefor deployment.
Table 15. DB2 silent installation response file properties
Category Property Definition
DB2 DB_SCHEMA=schema Designate the databaseschema. For example, maximo.
DB_WIN_SERVICE_USER=user name Set the name of the databaseservice owner in Windows. Forexample, ctginst1.
Only required if AUTOMATE_DBwas enabled.
DB_WIN_SERVICE_PASSWORD=password Set a password for the databaseservice owner in Windows.
Only required if AUTOMATE_DBwas enabled.
DB2_VARCHAR=0 Configure varchar or vargraphic inthe database by the installationprogram. Set to 0 to use vargraphicformatting. Set to 1 to use varchar.
varchar formatting supportsEnglish only.
Oracle silent installation properties
The following properties contain information about an Oracle database used forthe deployment. These properties are only necessary if you are using an Oracledatabase for deployment.
Table 16. Oracle silent installation response file properties
Category Property Definition
Oracle ORACLE_OWNER_ID=user name Set the Oracle software owner userID. For example, oracle.
Only required if AUTOMATE_DBwas enabled.
150 IBM Control Desk: Installation Guide (IBM WebSphere)

Table 16. Oracle silent installation response file properties (continued)
Category Property Definition
ORACLE_OWNER_PASSWORD=password Set the Oracle software ownerpassword.
Only required if AUTOMATE_DBwas enabled.
INSTANCE_LOCATION=instance location Set the Oracle database instancelocation. For example,/opt/oracle/product/11.2.0/db_1.
Only required if AUTOMATE_DBwas enabled.
Microsoft SQL Server silent installation properties
The following properties contain information about a Microsoft SQL Serverdatabase used for the deployment. These properties are only necessary if you areusing a Microsoft SQL Server database for deployment.
Table 17. Microsoft SQL Server silent installation response file properties
Category Property Definition
Microsoft SQLServer
SQL_DATA_FILE_NAME=data file name Set the file name for the MicrosoftSQL Server data source. Forexample, maxdb75_dat.
Only required if AUTOMATE_DBwas enabled.
DB_TABLE_SPACE_SIZE=data source size in Mb Set the size of the Microsoft SQLServer data source, in Mb. Forexample, 1000.
Only required if AUTOMATE_DBwas enabled.
SQL_ADMIN=user name Set the name of the Microsoft SQLServer administrator. For example,sa.
Only required if AUTOMATE_DBwas enabled.
SQL_ADMIN_PW=password Set a password for the MicrosoftSQL Server administrator.
Only required if AUTOMATE_DBwas enabled.
SQL_LOG_FILE_NAME Microsoft SQL Server logname. For example, maxdb75_log
Only required if AUTOMATE_DBwas enabled.
Common application server silent installation properties
The following properties contain common information about the application serverused for the deployment.
Chapter 5. Silent installation 151

Table 18. Common application server silent installation response file properties
Category Property Definition
ApplicationServer Type
APPLICATION_SERVER_TYPE_WAS=1 Configure the application serverused for the deployment. Set to 0to disable. Set to 1 to enable.
Only one Application Server Typecan be enabled.
IBM WebSphere Application Server Network Deployment silentinstallation properties
The following properties contain information about a IBM WebSphere ApplicationServer Network Deployment application server used for the deployment. Theseproperties are only necessary if you are using an IBM WebSphere ApplicationServer Network Deployment application server for deployment.
Table 19. IBM WebSphere Application Server Network Deployment silent installation response file properties
Category Property Definition
IBMWebSphereApplicationServer NetworkDeploymentConnectivity
WAS_HOSTNAME=host name Set the host name of the IBMWebSphere Application ServerNetwork Deployment server.
WAS_SOAP_PORT=port Set the SOAP port. For example,8879.
AutomateWebSphereApplicationServer NetworkDeploymentConfiguration
AUTOMATE_WAS_CLIENT=1 Automatic configuration of theWebSphere Application ServerNetwork Deployment thin client bythe Control Desk installationprogram. Set to 0 to disable. Set to1 to enable.
WebSphereApplicationServer NetworkDeploymentRemote AccessAuthorization
WAS_CLIENT_RXA_USER=user name Set the name of the user ID toaccess the remote WebSphereApplication Server NetworkDeployment server system. Forexample, root.
WAS_CLIENT_RXA_PASSWORD=passsword Set a password for the remoteaccess user ID.
WebSphereApplicationServer NetworkDeploymentDeploymentManagerConfiguration
WAS_HOME_DIR=path Enter the installation path forWebSphere Application ServerNetwork Deployment. Forexample, for UNIX,/opt/IBM/WebSphere/AppServer orfor Windows, C:\\ProgramFiles\\IBM\\WebSphere\\AppServer.
WAS_USER=user name Set the name of the user ID used toaccess the WebSphere ApplicationServer Network Deploymentserver. For example, wasadmin.
152 IBM Control Desk: Installation Guide (IBM WebSphere)

Table 19. IBM WebSphere Application Server Network Deployment silent installation response fileproperties (continued)
Category Property Definition
WAS_PASSWORD=passsword Set a password for the WebSphereApplication Server NetworkDeployment user ID.
WAS_PROFILE=profile name Set a name for the domainmanager profile. For example,ctgDmgr01.
WebSphereApplicationServer NetworkDeploymentApplicationServerConfiguration
WAS_VIRTUAL_HOST_PORT=port Set a port for the virtual host. Forexample, 80.
WAS_WEB_SERVER_NAME=Web server name Set a name for the Web server. Forexample, webserver1.
WAS_NODE_NAME=node name Set a name for the node. Forexample, ctgNode01.
WAS_APPLICATION_SERVER_NAME=host name Set a name for the applicationserver. For example, MXServer.
IntegrationAdapter JMSConfiguration
WAS_SIB_DS_NAME=data source name Set a name for the data source thatis used to persist JMS messages.For example, intjmsds.
WAS_JMS_PERSIST_DATASTORE=1 Persist JMS messages in a datasource. Set to 0 to disable. Set to 1to enable.
Only one parameter betweenWAS_JMS_PERSIST_DATASTOREandWAS_JMS_DO_NOT_PERSIST_DATASTORE can be enabled.
WAS_JMS_DO_NOT_PERSIST_DATASTORE=0 Do not persist JMS messages. Set to0 to disable. Set to 1 to enable.
Only one parameter betweenWAS_JMS_PERSIST_DATASTOREandWAS_JMS_DO_NOT_PERSIST_DATASTORE can be enabled.
DB2 DatabaseServerConfiguration
WAS_SIB_DB_SERVER_NAME=host name Set the name of the system that ishosting the database used to persistJMS messages.
Only required ifWAS_JMS_PERSIST_DATASTOREwas enabled.
WAS_SIB_DB_SERVER_PORT=port Set the access port of the databaseused to persist JMS messages. Forexample, 50005.
Only required ifWAS_JMS_PERSIST_DATASTOREwas enabled.
Chapter 5. Silent installation 153

Table 19. IBM WebSphere Application Server Network Deployment silent installation response fileproperties (continued)
Category Property Definition
WAS_SIB_DB_NAME=database name Set a name for the database used topersist JMS messages. For example,maxsibdb.
Only required ifWAS_JMS_PERSIST_DATASTOREwas enabled.
WAS_SIB_DB_USER_NAME=user name Set the name of the user ID used toaccess the database used to persistJMS messages. For example,maximo.
Only required ifWAS_JMS_PERSIST_DATASTOREwas enabled.
WAS_SIB_DB_USER_PASS=passsword Set a password for the data sourcedatabase user ID.
Only required ifWAS_JMS_PERSIST_DATASTOREwas enabled.
DB2 DatabaseServer RemoteAccessAuthorization
WAS_SIB_DB_REMOTE_ACCESS_USER=user name Set a name for the user ID used toaccess the remote database serverused to persist JMS messages. Forexample, Administrator.
Only required ifWAS_JMS_PERSIST_DATASTOREwas enabled.
WAS_SIB_DB_REMOTE_ACCESS_PASSWORD=
passsword
Set a password for the user IDused to access the remote databaseserver used to persist JMSmessages.
Only required ifWAS_JMS_PERSIST_DATASTOREwas enabled.
DB2 DatabaseInstanceConfiguration
WAS_DB_HOME_DIR=path Enter the installation path forDB2. For example, for UNIX,/opt/IBM/db2/V9.7 or forWindows, C:\\ProgramFiles\\IBM\\SQLLIB.
Only required ifWAS_JMS_PERSIST_DATASTOREwas enabled.
WAS_SIB_DB_INSTANCE=database instance name Set a name for the databaseinstance used to persist JMSmessages. For example, ctginst1.
Only required ifWAS_JMS_PERSIST_DATASTOREwas enabled.
154 IBM Control Desk: Installation Guide (IBM WebSphere)

Table 19. IBM WebSphere Application Server Network Deployment silent installation response fileproperties (continued)
Category Property Definition
WAS_SIB_DB_INSTANCE_ADMIN_USER=user name Set a name for the administrator ofthe database instance used topersist JMS messages. For example,db2admin.
Only required ifWAS_JMS_PERSIST_DATASTOREwas enabled.
WAS_SIB_DB_INSTANCE_ADMIN_PASSWORD=
passsword
Set a password for theadministrator of the databaseinstance used to persist JMSmessages.
Only required ifWAS_JMS_PERSIST_DATASTOREwas enabled.
Security silent installation properties
The following properties are used to configure security.
Table 20. Security silent installation response file properties
Category Property Definition
Security LDAP_OPTION1=1 Configure security so that an LDAPresource is used for userauthorization and authentication.
Set to 0 to disable. Set to 1 toenable.
Only one LDAP_OPTIONparameter can be enabled at onetime.
If LDAP_OPTION1 is enabled, thenthe VMM_USER_RDN,VMM_GROUP_RDN andCREATE_DEFAULT_USERSproperties are also required to havevalid values.
LDAP_OPTION2=0 Configure security so that an LDAPresource is used for userauthentication only. Groupmanagement is managed from theControl Deskapplication. Authorization data isstored in the database.
Set to 0 to disable. Set to 1 toenable.
Only one LDAP_OPTIONparameter can be enabled at onetime.
Chapter 5. Silent installation 155

Table 20. Security silent installation response file properties (continued)
Category Property Definition
LDAP_OPTION3=0 Configure security so that userauthentication and authorizationare both managed from the ControlDesk application. Authenticationand authorization data is stored inthe database.
Set to 0 to disable. Set to 1 toenable.
Only one LDAP_OPTIONparameter can be enabled at onetime.
VMM_USER_RDN=user RDN Set a relative distinguished namefor users for VMM. For example,ou=users,ou=SWG,o=IBM,c=US.
VMM_GROUP_RDN=group RDN Set a relative distinguished namefor groups for VMM. For example,ou=groups,ou=SWG,o=IBM,c=US.
CREATE_DEFAULT_USERS=1 Have the Control Desk installationprogram create default usersautomatically.
Set to 0 to disable. Set to 1 toenable.
Language silent installation properties
The following properties are used to configure languages.
Table 21. Language silent installation response file properties
Category Property Definition
BaseLanguage
BASE_ARABIC=0 Set this languageas the baselanguage used bythe Control Deskapplication.
Set to 0 todisable. Set to 1to enable.
BASE_BRAZILIAN_PORTUGUESE=0 Set this languageas the baselanguage used bythe Control Deskapplication.
Set to 0 todisable. Set to 1to enable.
156 IBM Control Desk: Installation Guide (IBM WebSphere)
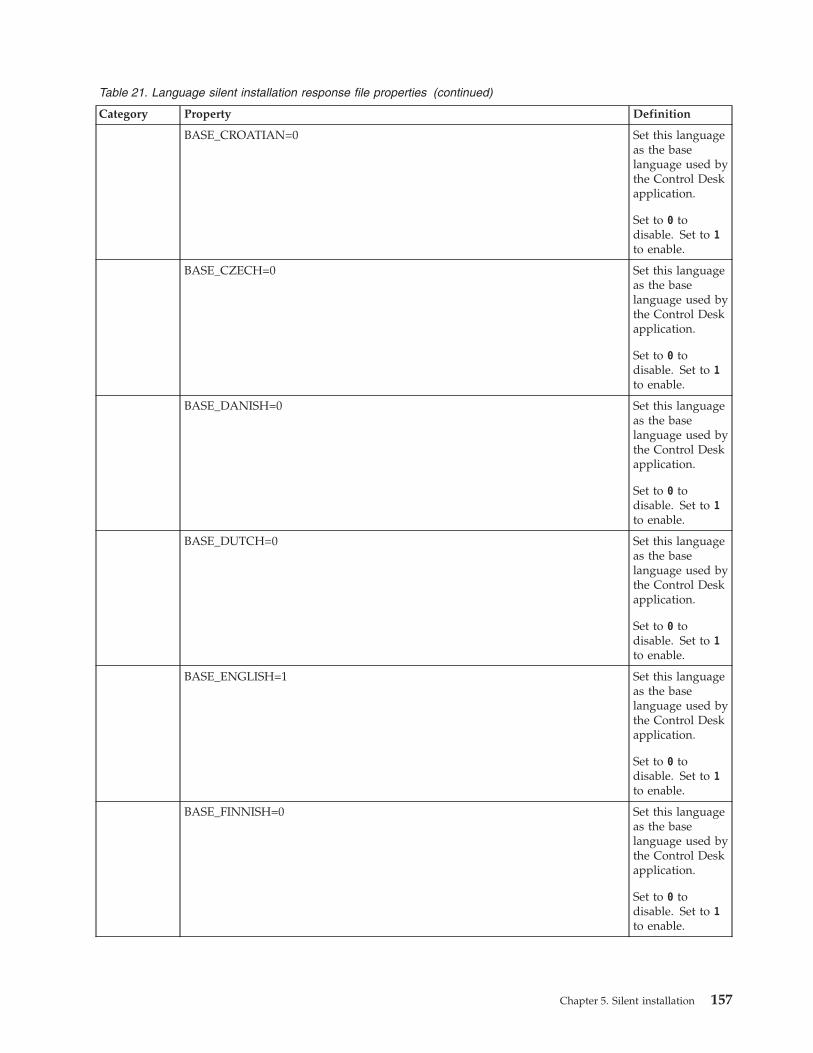
Table 21. Language silent installation response file properties (continued)
Category Property Definition
BASE_CROATIAN=0 Set this languageas the baselanguage used bythe Control Deskapplication.
Set to 0 todisable. Set to 1to enable.
BASE_CZECH=0 Set this languageas the baselanguage used bythe Control Deskapplication.
Set to 0 todisable. Set to 1to enable.
BASE_DANISH=0 Set this languageas the baselanguage used bythe Control Deskapplication.
Set to 0 todisable. Set to 1to enable.
BASE_DUTCH=0 Set this languageas the baselanguage used bythe Control Deskapplication.
Set to 0 todisable. Set to 1to enable.
BASE_ENGLISH=1 Set this languageas the baselanguage used bythe Control Deskapplication.
Set to 0 todisable. Set to 1to enable.
BASE_FINNISH=0 Set this languageas the baselanguage used bythe Control Deskapplication.
Set to 0 todisable. Set to 1to enable.
Chapter 5. Silent installation 157

Table 21. Language silent installation response file properties (continued)
Category Property Definition
BASE_FRENCH=0 Set this languageas the baselanguage used bythe Control Deskapplication.
Set to 0 todisable. Set to 1to enable.
BASE_GERMAN=0 Set this languageas the baselanguage used bythe Control Deskapplication.
Set to 0 todisable. Set to 1to enable.
BASE_HEBREW=0 Set this languageas the baselanguage used bythe Control Deskapplication.
Set to 0 todisable. Set to 1to enable.
BASE_HUNGARIAN=0 Set this languageas the baselanguage used bythe Control Deskapplication.
Set to 0 todisable. Set to 1to enable.
BASE_ITALIAN=0 Set this languageas the baselanguage used bythe Control Deskapplication.
Set to 0 todisable. Set to 1to enable.
BASE_JAPANESE=0 Set this languageas the baselanguage used bythe Control Deskapplication.
Set to 0 todisable. Set to 1to enable.
158 IBM Control Desk: Installation Guide (IBM WebSphere)

Table 21. Language silent installation response file properties (continued)
Category Property Definition
BASE_KOREAN=0 Set this languageas the baselanguage used bythe Control Deskapplication.
Set to 0 todisable. Set to 1to enable.
BASE_NORWEGIAN=0 Set this languageas the baselanguage used bythe Control Deskapplication.
Set to 0 todisable. Set to 1to enable.
BASE_POLISH=0 Set this languageas the baselanguage used bythe Control Deskapplication.
Set to 0 todisable. Set to 1to enable.
BASE_RUSSIAN=0 Set this languageas the baselanguage used bythe Control Deskapplication.
Set to 0 todisable. Set to 1to enable.
BASE_SIMPLIFIED_CHINESE=0 Set this languageas the baselanguage used bythe Control Deskapplication.
Set to 0 todisable. Set to 1to enable.
BASE_SLOVAK=0 Set this languageas the baselanguage used bythe Control Deskapplication.
Set to 0 todisable. Set to 1to enable.
Chapter 5. Silent installation 159
Table 21. Language silent installation response file properties (continued)
Category Property Definition
BASE_SLOVENIAN=0 Set this languageas the baselanguage used bythe Control Deskapplication.
Set to 0 todisable. Set to 1to enable.
BASE_SPANISH=0 Set this languageas the baselanguage used bythe Control Deskapplication.
Set to 0 todisable. Set to 1to enable.
BASE_SWEDISH=0 Set this languageas the baselanguage used bythe Control Deskapplication.
Set to 0 todisable. Set to 1to enable.
BASE_TRADITIONAL_CHINESE=0 Set this languageas the baselanguage used bythe Control Deskapplication.
Set to 0 todisable. Set to 1to enable.
BASE_TURKISH=0 Set this languageas the baselanguage used bythe Control Deskapplication.
Set to 0 todisable. Set to 1to enable.
AdditionalLanguages
ADD_ARABIC=0 Set this languageas an additionallanguage used bythe Control Deskapplication.
Set to 0 todisable. Set to 1to enable.
160 IBM Control Desk: Installation Guide (IBM WebSphere)

Table 21. Language silent installation response file properties (continued)
Category Property Definition
ADD_BRAZILIAN_PORTUGUESE=0 Set this languageas an additionallanguage used bythe Control Deskapplication.
Set to 0 todisable. Set to 1to enable.
ADD_CROATIAN=0 Set this languageas an additionallanguage used bythe Control Deskapplication.
Set to 0 todisable. Set to 1to enable.
ADD_CZECH=0 Set this languageas an additionallanguage used bythe Control Deskapplication.
Set to 0 todisable. Set to 1to enable.
ADD_DANISH=0 Set this languageas an additionallanguage used bythe Control Deskapplication.
Set to 0 todisable. Set to 1to enable.
ADD_DUTCH=0 Set this languageas an additionallanguage used bythe Control Deskapplication.
Set to 0 todisable. Set to 1to enable.
ADD_ENGLISH=0 Set this languageas an additionallanguage used bythe Control Deskapplication.
Set to 0 todisable. Set to 1to enable.
Chapter 5. Silent installation 161

Table 21. Language silent installation response file properties (continued)
Category Property Definition
ADD_FINNISH=0 Set this languageas an additionallanguage used bythe Control Deskapplication.
Set to 0 todisable. Set to 1to enable.
ADD_FRENCH=0 Set this languageas an additionallanguage used bythe Control Deskapplication.
Set to 0 todisable. Set to 1to enable.
ADD_GERMAN=0 Set this languageas an additionallanguage used bythe Control Deskapplication.
Set to 0 todisable. Set to 1to enable.
ADD_HEBREW=0 Set this languageas an additionallanguage used bythe Control Deskapplication.
Set to 0 todisable. Set to 1to enable.
ADD_HUNGARIAN=0 Set this languageas an additionallanguage used bythe Control Deskapplication.
Set to 0 todisable. Set to 1to enable.
ADD_ITALIAN=0 Set this languageas an additionallanguage used bythe Control Deskapplication.
Set to 0 todisable. Set to 1to enable.
162 IBM Control Desk: Installation Guide (IBM WebSphere)
Table 21. Language silent installation response file properties (continued)
Category Property Definition
ADD_JAPANESE=0 Set this languageas an additionallanguage used bythe Control Deskapplication.
Set to 0 todisable. Set to 1to enable.
ADD_KOREAN=0 Set this languageas an additionallanguage used bythe Control Deskapplication.
Set to 0 todisable. Set to 1to enable.
ADD_NORWEGIAN=0 Set this languageas an additionallanguage used bythe Control Deskapplication.
Set to 0 todisable. Set to 1to enable.
ADD_POLISH=0 Set this languageas an additionallanguage used bythe Control Deskapplication.
Set to 0 todisable. Set to 1to enable.
ADD_RUSSIAN=0 Set this languageas an additionallanguage used bythe Control Deskapplication.
Set to 0 todisable. Set to 1to enable.
ADD_SIMPLIFIED_CHINESE=0 Set this languageas an additionallanguage used bythe Control Deskapplication.
Set to 0 todisable. Set to 1to enable.
Chapter 5. Silent installation 163

Table 21. Language silent installation response file properties (continued)
Category Property Definition
ADD_SLOVAK=0 Set this languageas an additionallanguage used bythe Control Deskapplication.
Set to 0 todisable. Set to 1to enable.
ADD_SLOVENIAN=0 Set this languageas an additionallanguage used bythe Control Deskapplication.
Set to 0 todisable. Set to 1to enable.
ADD_SPANISH=1 Set this languageas an additionallanguage used bythe Control Deskapplication.
Set to 0 todisable. Set to 1to enable.
ADD_SPANISH=1 Set this languageas an additionallanguage used bythe Control Deskapplication.
Set to 0 todisable. Set to 1to enable.
ADD_TRADITIONAL_CHINESE=0 Set this languageas an additionallanguage used bythe Control Deskapplication.
Set to 0 todisable. Set to 1to enable.
ADD_TURKISH=0 Set this languageas an additionallanguage used bythe Control Deskapplication.
Set to 0 todisable. Set to 1to enable.
164 IBM Control Desk: Installation Guide (IBM WebSphere)

Chapter 6. Programmatically verifying that the installation wassuccessful
After you have exited the Control Desk installation program without encounteringany errors, you can verify that the installation completed successfully. Theinstallation is programmatically verified through the use of post installationvalidation utilities.
Before you begin
The JAVA_HOME environment variable must be set on the system before you canuse the verification utilities.
About this task
During installation, the Control Desk installation program performs a simplehealth check. This health check consists of logging in to the application to verifyavailability. This health check might not be sufficient to verify a successfulinstallation in all deployment scenarios. For example, if, during installation, youselect the option to deploy the application EAR file at a later date, this healthcheck cannot verify the installation. This simple health check is also insufficient forverifying an upgrade.
Post installation validation utilities are available after the product has beendeployed.
The middlewareValidate utility is used to verify the middleware.
The installValidation utility is used to validate the product installation. Thesecommand-line utilities are used to verify the installation and configuration of theproduct in a more complete manner. These utilities can also be used to verify anexisting deployment after changes in the environment, such as changes to hostnames, user IDs, and passwords.
Results of the installValidation utility are logged ininstallValidationTrace00.log. This log is found in the \ibm\smp\logs directoryon the administrative workstation.
Procedure1. Log in to the server using the user ID that was used to run the installation
program. If you intend to use the installValidation utility, log in to theadministrative workstation. If you intend to use the middlewareValidateutility, log in to the server hosting the middleware.
2. Ensure the JAVA_HOME environment variable is set properly to the location ofa JRE 1.6 installation.
3. To verify product installation, from the administrative workstation, changedirectory to \ibm\smp\scripts and run the installValidation.bat command.For either command, use the parameters described below: To verifymiddleware installation, from the middleware image, update themiddleware.properties file with the installation parameter values formiddleware components to be verified, change directory to \HealthCheck andrun the middlewareValidate.[sh|bat] command.
© Copyright IBM Corp. 2014 165
Table 22. Verification utilities parameters
Program Syntax parameters Input
installValidation.bat -action Use -action validate to start thevalidation of the product installation.
The -action parameter is the onlymandatory parameter when using theinstallValidation utility.
-trace Verification progress information iswritten to the screen during theverification process. You can modifythe output using the -tracingparameter.
v minimal
Progress information is limited toerror information.
v normal
Information includes individualtest progress, individual testresults, and overall progress of theentire verification process.
This is the default mode of tracing.
v verbose
In addition to providing normalprogress information, verbosetracing includes the test classname, test method name, andcorrective action information.
-confirm You are prompted before each test isstarted. You must confirm each testto be performed. There is no inputfor this parameter.
-component You can provide a comma-delimitedlist of directories containing the testobjects to limit testing to a specificset of tests.
These test objects must be located inthe \ibm\smp\HealthValidation\directory. For the product installationprogram, only the CTGIN folder isprovided.
-dbuser Provide the user ID used to accessthe database.
-dbpwd Provide the password of the user IDused to access the database.
-wasuser Provide the WebSphere ApplicationServer Network Deployment user.
-waspwd Provide the password for theWebSphere Application ServerNetwork Deployment user.
-maxuser Provide the Control Deskadministrator user ID. For example,maxadmin.
166 IBM Control Desk: Installation Guide (IBM WebSphere)

Table 22. Verification utilities parameters (continued)
Program Syntax parameters Input
-maxpwd Provide the password for the ControlDesk administrator user ID.
middlewareValidate.[sh|bat] -middlewareproperties Use
-middlewareproperties file
where file is the location of themiddleware.properties file. Bydefault, this file is found on themiddleware installation media in the\HealthCheck directory.
The middleware.properties containsthe middleware installationproperties, such as installationlocations and ports. User names andpasswords are not stored in thisplain-text file. Some of the propertiescommon to all platforms have beendefined default values, butplatform-specific properties likeinstallation locations need to beupdated in this file before startingthe middlewareValidate utility.
The -middlewarepropertiesparameter is the only mandatoryparameter when using themiddlewareValidate utility.
-trace Verification progress information iswritten to the screen during theverification process. You can modifythe output using the -traceparameter.
v minimal
Progress information is limited toerror information.
v normal
Information includes individualtest progress, individual testresults, and overall progress of theentire verification process.
v verbose
In addition to providing normalprogress information, verbosetracing includes the test classname, test method name, andcorrective action information.
If this option is not provided, bydefault, no output displayed.
Chapter 6. Programmatically verifying that the installation was successful 167

Table 22. Verification utilities parameters (continued)
Program Syntax parameters Input
-component Specify the middleware components:
v DBSERVER - verify installation ofthe IBM DB2 server.
v DIRSERVER - verify installation ofthe optional IBM Tivoli DirectoryServer.
v LDAPSERVER - verifyconfiguration of the optional IBMTivoli Directory Server.
v J2EESERVER - verify installation ofthe WebSphere Application Serverserver
One or more of these keywords canbe specified as comma separated list.If this argument is skipped, the toolassumes all the components areselected to verify.
-bindUser Provide the bind user.
Required to verify LDAPSERVER.The bind user credentials, bindDistinguished Name and bindpassword are required to be specifiedwith the -bindUser and -bindPassoptions.
-bindPass Provide the password for the binduser.
Required to verify LDAPSERVER.The bind user credentials, bindDistinguished Name and bindpassword are required to be specifiedwith the -bindUser and -bindPassoptions.
-wasuser Provide the WebSphere ApplicationServer user.
WebSphere Application Serveradministrative user credentials arerequired for the LDAPSERVER andJ2EESERVER component checks.
-waspwd Provide the password for theWebSphere Application Server user.
WebSphere Application Serveradministrative user credentials arerequired for the LDAPSERVER andJ2EESERVER component checks.
For example,installValidation.bat -action validate
168 IBM Control Desk: Installation Guide (IBM WebSphere)
Results
The installValidation.bat validation utility results are logged inctginstallvalidationtrace00.log. This log is found in the \ibm\smp\logsdirectory on the administrative workstation.
The middlewareValidate.[sh|bat] validation utility results are logged inCTGInstallValidationTrace.log. This log is found in the HealthCheck directory.
Chapter 6. Programmatically verifying that the installation was successful 169

170 IBM Control Desk: Installation Guide (IBM WebSphere)
Chapter 7. Verifying the installation manually
After you exit the Control Desk installation program without errors, you canfurther verify that the installation completed successfully. The installation ismanually verified by locating key artifacts and performing a few simple tasks.
Before you begin
The product installation program performs installation verification, or a healthcheck, by logging on to the product before exiting the installation. The productinstallation program returns a success message if all installation steps, includingthe product log in task, are successful. If the health check task is unsuccessful, aHealthCheckFailed error is thrown for the getUrlContentString function. Thiserror is in the install_home\logs\CTGInstallTraceXX.log file, where XX is atwo-digit number such as 00.
About this task
To further verify that the Control Desk installation was completed successfully,perform the following verification procedures:
Procedure1. Examine the CTGInstallTrace00.log file for success messages.
The following success messages are found in the CTGInstallTrace00.log fileand can be used to verify which phases of the installation were successful:v CTGIN2114I: The database was created successfullyv CTGIN2135I: Tablespace maxdata created successfullyv CTGIN2135I: Tablespace maxtemp created successfullyv CTGIN2079I: process automation engine database configuration completed
successfully (This message indicates that maxinst finished successfully.)v CTGIN2222I: WebSphere Application Server creation successfulv CTGIN2188I: Creation and configuration of service integration bus
successfully completedv CTGIN2184I: Creation and configuration of JMS resources successfully
completedv CTGIN2310I: Application server security was successfully enabled for process
automation enginev CTGIN2253I: buildmaximoear.cmd completed successfullyv CTGIN2224I: Deployment of application MAXIMO was successfulv CTGIN2253I: buildhelpear.cmd completed successfullyv CTGIN2224I: Deployment of application MAXIMOIEHS was successfulv CTGIN2208I: runConfigurationStep completed successfullyv CTGIN2370I: The installation finished successfullyIf you automatically configured WebSphere Application Server NetworkDeployment certain messages indicate success. The following messages, foundin CTGInstallTrace00.log, indicate that the configuration was successful:
© Copyright IBM Corp. 2014 171
<symptom>CTGIN2228I.*client</symptom><symptom>CTGIN2230I.*node</symptom><symptom>CTGIN2232I.*NodeAgent</symptom><symptom>CTGIN2240I.*server</symptom><symptom>CTGIN2238I.*security</symptom>
Search the CTGInstallTrace00.log file for the following message, whichindicates that the maxinst task completed successfully:CTGIN2079I, maxinst.*completed
2. Compare the packages chosen for installation with the packages that wereinstalled. The Package Summary panel of the Control Desk installation programprovides a summary of all the packages to be installed. You can compare thecontents of that panel with a listing of what was installed on the system. Usethe solutioninstaller command to list installed packages:install_home\bin\setupPSIenv.batinstall_home\bin\solutionInstaller.bat -action showInstalled -type all
The resulting list matches the packages listed in the Package Summary panel.3. Log in to the product and verify that applications are present. Being able to log
in to the product manually is a good indicator that the installation wassuccessful. Once you have logged in, verify that you can access expectedapplications. If you experience access problems with the product, clear thecache of your browser and try again.
172 IBM Control Desk: Installation Guide (IBM WebSphere)
Chapter 8. Configuring the HTTPOnly attribute
If applications do not start from the user interface in IBM WebSphere ApplicationServer Network Deployment 8 environments, the problem can often be attributedto a security setting within IBM WebSphere Application Server NetworkDeployment. In particular, if the HTTPOnly attribute is set for session cookies, theapplications are not accessible.
Procedure1. Log on to the administrative console for IBM WebSphere Application Server
Network Deployment.2. From the navigation pane, browse to Servers > Server Types > WebSphere
spplication servers.3. Click the application server created for the product you want to update, for
example, MXServer.4. From the Configuration panel, under Container Settings, click Session
management.5. Under General properties, click Enable cookies. Do not clear this option. Click
the label only.6. Clear the Set session cookies to HTTPOnly check box to help prevent
cross-site scripting attacks.7. Click OK, save the changes, and then click OK.8. Click Save and then click OK.9. Navigate back to the Application servers table, and select the application
server required.10. Click Restart to restart the application server in order to apply the changes
made.
© Copyright IBM Corp. 2014 173

174 IBM Control Desk: Installation Guide (IBM WebSphere)

Chapter 9. Installing Integration ComposerAfter you have successfully installed the IBM ControlDesk components, you can optionally install (orupgrade) Integration Composer, an integration tool thatimports information technology (IT) data into theMaximo database.
IBM Control Desk installations use the Launchpad as aninterface for installing Integration Composer. However,if necessary, you can install Integration Composer on aUNIX operating system in console mode, from thecommand line.
When you install Integration Composer and IBMControl Desk from the Launchpad, the installerautomatically updates the Integration Composerdatabase tables in the Integration Composer repositoryfor you.
Integration Composer overviewIntegration Composer is the IBM application for transforming and importinginventory data about deployed hardware and software. This inventory data isimported from a discovery or system management tool database into the Maximodatabase tables for deployed assets or configuration items.
With Integration Composer, an enterprise can aggregate data collected by externaldiscovery tools and integrate it into the Maximo database, creating a centralrepository for enterprise IT asset management, reporting, and decision support.The Maximo database is the repository used by Control Desk.
To collect the data about deployed assets or configuration items, a discovery toolscans computers, network devices, and network printers deployed in an enterpriseand records information about the hardware and software it finds there.Integration Composer uses an integration adapter to transform the data collectedby the discovery tool and move it from the discovery tool database into theMaximo database.
You can view imported data from various applications on your system. The data isalso used to generate reports.
Note: Integration Composer is used to import hardware and software inventorydata from a discovery tool database into the Deployed Asset, Actual CI, or (for thepurposes of asset initialization) Asset tables in the Maximo database. The import orexport of data into or out of other tables within the Maximo database isaccomplished using a different tool, the integration framework
Hardware and software requirementsBefore you begin your installation, review the hardware and software requirementsfor Integration Composer to ensure that your server has the appropriate hardwareand software installed.
© Copyright IBM Corp. 2014 175
For information about the hardware and software requirements, see the IntegrationComposer hardware and software requirements page in the Control Desk wiki.
Installation prerequisitesBefore installing, you must have the IBM Java Software Development Kitprerequisite for Integration Composer on your system, and any software thatadversely affects the InstallAnywhere installation program must be removed.
IBM Java SDK 6.0 for the appropriate operating system is an installationprerequisite that must be present on the Integration Composer computer. The IBMJava SDK is provided on the product DVDs.
The installation or upgrade has to run on JRE 1.6, so it must be set as the system'sJava virtual machine (JVM). If more than one JRE is installed on the computer, thePATH and CLASSPATH system variables must indicate JRE 1.6.
UNIX On UNIX-based operating systems, be sure the PATH environmentvariable includes the location of the Java Virtual Machine (for example, Java60).
Because the following software can adversely affect InstallAnywhere—theinstallation program used by Integration Composer—disable the followingprograms before attempting to install Integration Composer:v Antivirus software, such as Norton Antivirus or Symantec Client Firewallv Dell OpenManagev Search software, such as pcAnywhere
Use of these software programs affects the ability of InstallAnywhere to installprograms; however, the problem is not specific to Integration Composer.
[Installation only] Before beginning your installation, make sure you have on handthe information on the target (Maximo) database described in Table 23 on page 177.
Performing an Integration Composer installationControl Desk installations that want to use Integration Composer should install itfrom the Launchpad, as described herein. If you need to install IntegrationComposer on a UNIX operating system in console mode, instructions to do thatare also described.
Results
When the installation completes successfully, you can access Integration Composeras follows:
Windows From the Start menu, or by entering the command: itic_installation_dir\bin\startFusion.bat
The default Integration Composer installation directory for Windowsoperating systems is C:\Integration Composer.
UNIX By entering the command: itic_installation_dir/bin/startFusion.sh
The default Integration Composer installation directory for UNIX operatingsystems is /home/user/Integration_Composer.
176 IBM Control Desk: Installation Guide (IBM WebSphere)

Installing Integration Composer using the LaunchpadWindows UNIX For IBM Control Desk installations, the recommended way to
install Integration Composer is from the Launchpad. Use the Launchpad to installIntegration Composer on Windows or UNIX operating systems.
Before you begin
Make sure that you have up to 70 MB of free space for the installation directory.
Procedure1. Insert the Launchpad DVD into the server where you install Integration
Composer.If you are installing on a UNIX operating system, you might have to start theLaunchpad manually by running the launchpad.sh command, which is locatedin the root directory of the Launchpad DVD. (On Windows operatingsystems, the launchpad.exe command runs automatically.)
Note: Confirm that the java -version command returns 1.6 before startingthe installation. IBM Java SDK 6.0 with JRE 1.6 is provided on the productDVDs.
2. From the Launchpad, launch the Integration Composer installation programby clicking the link under Install IBM Tivoli Integration Composer.
3. In the IBM Tivoli Integration Composer window, select your language fromthe drop-down list at the bottom and click OK.
4. [UNIX only] In the Select Install Type window, select New Install and clickNext.
5. In the Introduction window, review the information and click Next.6. In the Choose IBM SDK Location window, type the directory where IBM Java
SDK 6.0 is located, or click Choose to browse and select the directory. Thenclick Next.
7. In the Choose Install Folder window, accept the default location or type a filepath to specify where you want to install the product. (Or you can clickChoose to browse and select the location you want.) Then click Next.
8. In the Database Type window, select your Maximo database type (the Maximodatabase is where the Integration Composer repository is installed) and clickNext. IBM DB2 is the default.The Database Login Information window is displayed.
9. On the Database Login Information window, type login specifications for thedatabase and click Next.The Database Login Information window is where you define the parametersfor connecting to the Maximo database. The fields displayed in this windowvary slightly, depending on the type of database you chose in the previousstep. The following table defines the fields that the installation programdisplays for the supported databases.
Table 23. Login specifications for the Maximo database
Field Description
Database Server Name Name of the server on which the Maximo databaseresides
Port Number Port number of the server on which the Maximodatabase resides
Chapter 9. Installing Integration Composer 177

Table 23. Login specifications for the Maximo database (continued)
Field Description
Database Name (SID)
or
Database Name
For Oracle databases, this is the session identifier(SID) for the database; that is, the databaseinstance
For SQL Server or IBM databases, this is simplythe name of the database
Database Username Valid user name for signing in to the Maximodatabase
Database/Schema Owner Database or schema owner
Tip: Make note of the values that you specified here. Later, when you launchIntegration Composer, use the values entered in these fields to defineconnection parameters for the Maximo database.
10. On the Update Software Instances window, select one of the following optionsand click Next:
Yes, disable software updatesIf you select this option, when Integration Composer imports data intothe Maximo database, Integration Composer inserts or deletessoftware records but does not update software records. This option ispreferred.
No, don't disable software updatesIf you select this option, when Integration Composer imports data intothe Maximo database, Integration Composer updates existing softwarerecords.
In the Software Class Name field, it is recommended to accept the defaultvalue Software. The Software Class name is used to identify the class that youdo not want to update based on the choice you made. In the Deployed Assetstarget schema, the name is Software.
11. [UNIX only] In the Choose Internet Browser File window, accept the defaultbrowser or choose another browser to be used for displaying the IntegrationComposer online help, then click Next.
12. On the Preinstallation Summary window, review the installation details. (Ifnecessary, use the Previous buttons to go back and make corrections, and usethe Next buttons to return to this window.) When satisfied with the summarydata, click Install.The Installing Integration Composer progress window displays duringinstallation. When installing is finished, the Installation Complete window isdisplayed.
13. In the Installation Complete window, click Done.
Installing Integration Composer on UNIX operating systems inconsole mode
UNIX Use the procedure described here if you have to install IntegrationComposer on a UNIX computer in console (command line) mode.
Before you begin
Make sure you have up to 70 MB of free space for the installation directory.
178 IBM Control Desk: Installation Guide (IBM WebSphere)

About this task
The Integration Composer files are located in either the \ITIC or \Install\ITICdirectory on the version 7.5.3 product DVD. Use the setup.bin command from theDVD layout to start the upgrade process:setup.bin ←setup.exe
The steps for installing Integration Composer on a UNIX-based operating systemfollow.
Procedure1. Sign on to the server as an administrator (for example, as root).2. Save the binary Integration Composer installation file, setup.bin, on the
server where you intend to install Integration Composer.3. Make sure JRE 1.6 is in your system path.
To add JRE 1.6 to the path, enter the following commands (where JRE_locationis the path for your IBM JRE; for example, /opt/ibm/java-i386-60/jre/bin:$PATH):JAVA_HOME=JRE_locationexport JAVA_HOMEPATH=$JAVA_HOME:$PATHexport PATH
4. Navigate to the location where you saved the setup.bin file.5. Enter the following command to make the binary installation file executable:
chmod +x setup.bin
6. Run the Integration Composer installation program in console mode byentering the following command at the shell prompt:sh ./setup.bin -i console
In console mode, you are prompted to enter information line by line.
Note: Confirm that the java -version command returns 1.6 before startingthe installation. IBM Java SDK 6.0 with JRE 1.6 is provided on the productDVDs.
7. In the Choose Locale step, type the number of your locale from the list oflocales and press Enter.
8. In the Introduction step, review the Introduction information and press Enter.9. In the Select Install Type step, press Enter to accept the default (New Install).
10. In the IBM SDK Location step, specify the file path where IBM Java SDK 6.0 isinstalled by doing one of the following:v Accept the default location and press Enter.v Type a different file path for the location and press Enter.
11. In the Choose Install Folder step, specify where you want to install IntegrationComposer by doing one of the following:v Accept the default location and press Enter.v Type a different file path for the location and press Enter; then type y to
confirm the new location, and press Enter again.12. In the Database Type step, indicate your Maximo database type (the Maximo
database is where the Integration Composer repository will be installed) bytyping the associated number; then press Enter. The Database LoginInformation step is displayed.
Chapter 9. Installing Integration Composer 179

This Database Login Information step is where you define the parameters forconnecting to the Maximo database. The fields displayed in this step varyslightly, depending on the type of database you chose in the previous step.The following table defines the fields that the installation program displaysfor the supported databases.
Field Description
Database Server Name Name of the server on which the target databaseresides
Port Number Port number of the server on which the targetdatabase resides
Database Name (SID)
or
Database Name
For Oracle databases, this is the session identifier(SID) for the database; that is, the database instance
For SQL Server or databases provided by IBM, thisis simply the name of the database
Database Username Valid user name for signing in to the targetdatabase
Database/Schema Owner Database or schema owner
13. In the Database Login Information step, type each login specification for thedatabase, one at a time, pressing Enter after each entry to advance to the nextspecification.
Tip: Make note of the values that you specified here. Later, when you launchIntegration Composer, use the values entered in these fields to defineconnection parameters for the target data source.
14. In the Update Software Instances step, type a number to select one of thefollowing options, and press Enter:v Yes, disable software updates
If you select this option, when Integration Composer imports data into thetarget database, Integration Composer inserts or deletes software recordsbut does not update software records. This option is preferred forperformance reasons.
v No, don't disable software updates
If you select this option, when Integration Composer imports data into thetarget database, Integration Composer updates existing software records.
15. In the Software Class Name step, accept the default and press Enter.16. In the Choose Internet Browser File step, specify a browser and press Enter.17. In the Preinstallation Summary step, review the installation details and press
Enter to begin installing Integration Composer. The Installing progress bardisplays during installation.When installation is complete, the Installation Complete step is displayed.
18. In the Installation Complete step, press Enter. The installation is done and youare returned to the UNIX command prompt.
180 IBM Control Desk: Installation Guide (IBM WebSphere)

Performing an Integration Composer upgradeIBM Control Desk installations that want to upgrade Integration Composer shoulddo so from the Launchpad, as described herein. If you need to upgrade IntegrationComposer on a UNIX operating system in console mode, instructions to do thatare also described.
About this task
This upgrade is for any Integration Composer 7.2.1 or later release, includingIntegration Composer 7.2.1, 7.2.2, and 7.2.2.1. The installation program does notpermit upgrades from earlier releases. On Windows operating systems, theinstallation program automatically checks for a valid current release prior toupgrading.
Results
When the upgrade completes successfully, you can access Integration Composer asfollows:
Windows From the Start menu, or by entering the command: itic_installation_dir\bin\startFusion.bat
The default Integration Composer installation directory for Windowsoperating systems is C:\Integration Composer.
UNIX By entering the command: itic_installation_dir/bin/startFusion.sh
The default Integration Composer installation directory for UNIX operatingsystems is /home/user/Integration_Composer.
Upgrading Integration Composer using the LaunchpadWindows UNIX For Control Desk installations, the recommended way to
upgrade Integration Composer is from the Launchpad. Use the Launchpad toupgrade Integration Composer on Windows or UNIX operating systems.
Before you begin
To avoid losing any of your current data, back up your Integration Composerdata\dataschema and data\mappings directories before upgrading.
Attention: For this release, the Naming and Reconciliation Service (NRS) wasupgraded to Data Integration Services (DIS). As part of this Integration Composerinstallation, the nameReconciliation.logging.properties file is removed from theproperties subdirectory in the Integration Composer installation directory, and theremoved file is replaced with the dis.logging.properties file. As a result, anycustomizations that were made to the originalnameReconciliation.logging.properties file are lost.
Before upgrading to this release of Integration Composer, note your currentcustomization information if you plan to to reuse any of that information in thenew dis.logging.properties file. For additional details about these propertiesfiles, see the book IBM Tivoli Integration Composer Administrator Guide.
Make sure that you have up to 70 MB of free space for the installation directory.
Chapter 9. Installing Integration Composer 181

Procedure1. Insert the Launchpad DVD into the server where you upgrade Integration
Composer.If you are upgrading on a UNIX operating system, you might have to start theLaunchpad manually by running the launchpad.sh command, which is locatedin the root directory of the Launchpad DVD. (On Windows operating systems,the launchpad.exe command runs automatically.)
Note: Confirm that the java -version command returns 1.6 before starting theupgrade. IBM Java SDK 6.0 with JRE 1.6 is provided on the product DVDs.
2. From the Launchpad, launch the Integration Composer upgrade program byclicking the link under Install IBM Tivoli Integration Composer.
3. In the IBM Tivoli Integration Composer window, select your language from thedrop-down list at the bottom and click OK.
4. Read the information in the Introduction window and click OK.5. [UNIX only] In the Select Install Type window, select Upgrade and click Next.6. In the Choose Install Folder window, accept the default location or type a file
path to specify where you want to upgrade the product. (Or you can clickChoose to browse and select the location you want.) Then click Next.
7. In the Choose IBM SDK Location window, type the directory where IBM JavaSDK 6.0 is located, or click Choose to browse and select the directory. Thenclick Next.
8. On the Preinstallation Summary window, review the upgrade details. (Ifnecessary, use the Previous buttons to go back and make corrections, and usethe Next buttons to return to this window.) When satisfied with the summarydata, click Install.The Installing Integration Composer progress window displays duringupgrade. When upgrading is finished, the Installation Complete window isdisplayed.
9. In the Installation Complete window, click Done.
Upgrading Integration Composer on UNIX operating systemsin console mode
UNIX Use the procedure described here if you have to upgrade IntegrationComposer on a UNIX computer in console (command line) mode.
Before you begin
Installing Integration Composer 7.5.3, as described in this section, will upgrade theprevious version of Integration Composer. You do not need to remove the previousversion first. To avoid losing any of your current data, back up your IntegrationComposer data\dataschema and data\mappings directories before upgrading.
182 IBM Control Desk: Installation Guide (IBM WebSphere)
Attention: For this release, the Naming and Reconciliation Service (NRS) wasupgraded to Data Integration Services (DIS). As part of this Integration Composerinstallation, the nameReconciliation.logging.properties file is removed from theproperties subdirectory in the Integration Composer installation directory, and theremoved file is replaced with the dis.logging.properties file. As a result, anycustomizations that were made to the originalnameReconciliation.logging.properties file are lost.
Before installing this release of Integration Composer, note your currentcustomization information if you plan to to reuse any of that information in thenew dis.logging.properties file. For additional details about these propertiesfiles, see the book IBM Tivoli Integration Composer Administrator Guide.
Make sure you have up to 70 MB of free space for the installation directory.
About this task
The Integration Composer files are located in either the \ITIC or \Install\ITICdirectory on the version 7.5.3 product DVD. Use the setup.bin command from theDVD layout to start the upgrade process:setup.bin ←setup.exe
The steps for upgrading Integration Composer on a UNIX-based operating systemfollow.
Procedure1. Sign on to the server as an administrator (for example, as root).2. Save the binary Integration Composer installation file, setup.bin, on the
server where you intend to install Integration Composer.3. Make sure JRE 1.6 is in your system path.
To add JRE 1.6 to the path, enter the following commands (where JRE_locationis the path for your IBM JRE; for example, /opt/ibm/java-i386-60/jre/bin:$PATH):JAVA_HOME=JRE_locationexport JAVA_HOMEPATH=$JAVA_HOME:$PATHexport PATH
4. Navigate to the location where you saved the setup.bin file.5. Enter the following command to make the binary installation file executable:
chmod +x setup.bin
6. Run the Integration Composer installation program in console mode byentering the following command at the shell prompt:sh ./setup.bin -i console
In console mode, you are prompted to enter information line by line.
Note: Confirm that the java -version command returns 1.6 before startingthe upgrade. IBM Java SDK 6.0 with JRE 1.6 is provided on the productDVDs.
7. In the Choose Locale step, type the number of your locale from the list oflocales and press Enter.
8. In the Introduction step, review the Introduction information and press Enter.
Chapter 9. Installing Integration Composer 183

9. In the Select Install Type step, type the number for the Upgrade selection andpress Enter. This indicates that you want to upgrade Integration Composerfrom the previous release.
10. In the Choose Install Folder step, type the location (absolute path) whereIntegration Composer is currently installed and press Enter. Or just pressEnter to accept the displayed path.
11. In the IBM SDK Location step, specify the file path where IBM Java SDK 6.0 isinstalled by doing one of the following:v Accept the default location and press Enter.v Type a different file path for the location and press Enter.
12. In the Preinstallation Summary step, review the installation details and pressEnter to begin installing Integration Composer. The Installing progress bardisplays during installation.When installation is complete, the Installation Complete step is displayed.
13. In the Installation Complete step, press Enter. The installation is done and youare returned to the UNIX command prompt.
Confirming the installationThis section explains how to verify that your new Integration Composerinstallation (or upgrade) is installed correctly.
Procedure1. Open the Integration Composer application by doing one of the following
things:
Windows From the Windows Start menu, select Start > Programs > IBM Tivoli >Integration Composer > IBM Tivoli Integration Composer
or
from the command line, enter the command: startFusion.bat
UNIX Enter the command: ./startFusion.sh.
2. Sign in to the Integration Composer application using the database (or schemaowner) username and password that you supplied during the installation.
3. From the Help menu in the Integration Composer main window, select About.4. On the About Integration Composer window, check that the number in the
Version field is 7.5.3. If this number is displayed, Integration Composer wassuccessfully installed.
Post-installation tasksThis section provides instructions for verifying that Integration Composer isconfigured correctly after you install or upgrade.
Verifying the settings in the Integration Composerfusion.properties file
The fusion.properties file is the properties file for Integration Composer. Theseproperties specify database-related properties and application properties. This
184 IBM Control Desk: Installation Guide (IBM WebSphere)
verification task is to ensure that, after you have installed or upgraded IntegrationComposer, critical property settings in the fusion.properties file are correct.
Before you begin
The Integration Composer fusion.properties file is located as follows:
itic_install_dir\data\properties\fusion.properties
Procedure1. Locate the Integration Composer fusion.properties file in your Integration
Composer installation directory, itic_install_dir.2. In the IBM Tivoli Integration Composer Mapping Execution Properties section,
verify that NRS is enabled (set to true) if you are using NRS:mxe.fusion.mapping.nrs.enable=true
or disabled (set to false) if you are not using NRS:mxe.fusion.mapping.nrs.enable=false
Naming and Reconciliation Service (NRS), which is part of Data IntegrationServices (DIS), is an optional component that Integration Composer works withto uniquely identify deployed assets or actual CIs (configuration items) andavoid duplication of asset or CI records in your database.By default, Integration Composer is configured to use this component, whichassigns a globally unique identifier, the DIS GUID, to a deployed asset or actualCI based on defined naming rules. However, Integration Composer will notoperate successfully if it is configured to use NRS (if the NRS property is set totrue) but NRS is not installed and running. So, if you do not use NRS, be sureto set the NRS property to false so that Integration Composer runssuccessfully.IBM Control Desk, a product that uses Integration Composer to importdeployed assets and actual CIs, requires DIS/NRS to perform automated linkingof their authorized asset and CI counterparts. If you use IBM Control Desk, runDIS/NRS and set the NRS property in the fusion.properties file to true.Integration Composer recommends that DIS/NRS is installed and enabled. TheNRS property is enabled (set to true) by default.
3. In the IBM Tivoli Maximo Database Related Properties section, verify that thedatabase schema owner, JDBC driver specification, and JDBC URL specificationare correct. Use the following table as a guide:
Property Description Value
mxe.db.schemaowner Database schemaowner
Enter the appropriate schema for your database; for example, dbo.
Chapter 9. Installing Integration Composer 185

Property Description Value
mxe.db.driver JDBC driverspecification
This varies depending on the database, for example:
IBM DB2:com.ibm.db2.jcc.DB2Driver
Oracle JDBC Thin driver:oracle.jdbc.driver.OracleDriver
Microsoft JDBC driver (SqlServer):com.microsoft.sqlserver.jdbc.SQLServerDriver
i-net Opta driver (SqlServer):com.inet.tds.TdsDriverNote: Users upgrading from a previous release and whoalready have this (deprecated) driver can still use it forMicrosoft SQL Server support. However, in the future, usingthe Microsoft JDBC driver for your SQL Server isrecommended.
mxe.db.url JDBC database URL This varies depending on the database, for example:
IBM DB2:jdbc:db2://host_name:host_port/database_name
Oracle JDBC Thin driver:jdbc:oracle:thin:@host_name:host_port:host_SID
Microsoft JDBC driver (SqlServer):jdbc:sqlserver://host_name:host_port;databaseName=database_name;integratedSecurity=false;
i-net Opta driver (SqlServer 7.0 or higher):jdbc:inetdae7:host_name:host_port?database=database_nameNote: Users upgrading from a previous release and whoalready have this (deprecated) driver can still use it forMicrosoft SQL Server support. However, in the future, usingthe Microsoft JDBC driver for your SQL Server isrecommended.
mxe.db.user Database user loginname
Note: Windows For Windows operating systems, the browser always defaultsto Microsoft Windows Explorer.
Changing the memory allocation in the startFusion file(optional)
The startFusion file, named startFusion.bat in Windows operating systems orstartFusion.sh in UNIX-based operating systems, is the startup file for theIntegration Composer graphical user interface. This verification task is to ensurethat, after you have installed or upgraded Integration Composer, the memoryallocation in the startFusion file is correct.
186 IBM Control Desk: Installation Guide (IBM WebSphere)

Before you begin
This task is optional. You need to perform it only if the Integration Composergraphical user interface does not start as described in “Confirming the installation”on page 184.
About this task
The Integration Composer startFusion file is located in the Windows and UNIXinstallation directories, as follows:
Windows itic_install_dir\bin\startFusion.bat
UNIX itic_install_dir/bin/startfusion.sh
When you install Integration Composer, the installation program assigns 1536megabytes as the default amount of virtual RAM to allocate to the application. But,for example, if your server only has 1GB of physical memory, the 1536M setting willnot work for you.
Procedure
If the Integration Composer graphical user interface does not start, check thememory setting for the start javaw.exe command in the startFusion file, anddecrease memory as necessary.
Example
For example, change -Xmx1536M to -Xmx1024M.
Changing the memory allocation in the executeMapping file(optional)
The executeMapping file, named executeMapping.bat in Windows operating systemsor executeMapping.sh in UNIX-based operating systems, is the IntegrationComposer script for running a mapping. This verification task is to ensure that,after you have installed Integration Composer, the memory allocation in theexecuteMapping file is correct.
Before you begin
This task is optional. You need to perform it only if the Integration Composermapping does not run, or if you just upgraded and had increased the amount ofmemory allocated to Integration Composer in your previously installed version.
About this task
The Integration Composer executeMapping file is located in the Windows andUNIX-based installation directories, as follows:
Windows itic_install_dir\bin\executeMapping.bat
UNIX itic_install_dir/bin/executeMapping.sh
Chapter 9. Installing Integration Composer 187

When you install Integration Composer, the installation program assigns 1536 MBas the default amount of virtual RAM to allocate to the application. But, forexample, if your server only has 1 GB of physical memory, the 1536M setting willnot work for you.
Procedurev If the Integration Composer mapping does not run, check the memory setting
for the java command in the executeMapping file, and decrease memory. To doso, edit the executeMapping file and change the –Xmx parameter in the javacommand.For example, change -Xmx1536M to -Xmx1024M
v [Upgrade only] If you previously increased the amount of memory allocated toIntegration Composer imports, verify that your memory settings have notchanged. If you have to increase the amount of memory assigned, edit theexecuteMapping file and change the –Xmx parameter in the java command.For example: change -Xmx1536M to -Xmx2048M
Uninstalling Integration ComposerThis section provides instructions for removing Integration Composer fromMicrosoft Windows and UNIX-based operating systems.
Uninstalling Integration Composer on Windows operatingsystems
Windows Use the procedure described here to remove Integration Composer froma Windows-based operating system.
Procedure1. In Microsoft Windows Explorer, go to the uninstall folder, installation_dir\
Uninstall_Integration_Composer, where Integration Composer 7.5.3 wasinstalled.
2. In the uninstall folder, double-click the uninstall file,Uninstall_Integration_Composer.exe. The Integration Composer utility foruninstalling the application displays the Uninstall IBM Tivoli IntegrationComposer window.
3. Click Uninstall. The Uninstall IBM Tivoli Integration Composer progresswindow is displayed as the uninstall utility removes the application.
Note: If necessary, you can click Cancel to stop the uninstallation.When the removal of Integration Composer is finished, the Uninstall Completewindow is displayed.
4. Click Done. The removal of Integration Composer is completed.5. Optional: When the utility removes Integration Composer, one or more files
sometimes remain in the installation directory. (For example, these files mightbe files that someone manually put into the directory, such as mapping files orschema files that the user imported, or they might be log files that IntegrationComposer created.) You can delete these files manually.
Uninstalling Integration Composer on UNIX operating systemsUNIX Use the procedure described here to remove Integration Composer from
a UNIX-based operating system.
188 IBM Control Desk: Installation Guide (IBM WebSphere)

Procedure1. Go to the uninstall folder, itic_install_dir\Uninstall_Integration_Composer,
where Integration Composer 7.5.3 was installed.2. In the uninstall folder, do one of the following options:
v If you installed the Integration Composer using the X Window Systemapplication, type:sh ./Uninstall_IBM_Tivoli_Integration_Composer
v If you installed the Integration Composer using console mode, type:sh ./Uninstall_IBM_Tivoli_Integration_Composer -i console
The instructions that follow describe the remaining uninstallation steps usingconsole mode.
3. Press Enter to initiate the command from the previous step. The Uninstallingprogress bar is displayed as the uninstall utility removes the application.When the removal of Integration Composer is finished, you are returned to thecommand prompt.
4. Optional: After the utility removes Integration Composer, one or more filessometimes remain in the installation directory. (For example, these files mightbe files that someone manually put into the directory, such as mapping files orschema files that the user imported, or they might be log files that IntegrationComposer created.) You can delete these files manually.
Chapter 9. Installing Integration Composer 189

190 IBM Control Desk: Installation Guide (IBM WebSphere)

Chapter 10. Installing the Deployer's Workbench
The Deployer's Workbench is a separately installed, Eclipse-based workbench thatis the best-practice tool for creating authorized CI spaces. Install it on a Windowsworkstation that can connect to your Control Desk server.
About this task
If you are installing the Entry edition of Control Desk, you do not need to installthe Deployer's Workbench.
You can install the Deployer's Workbench using either the Control Desk launchpador the native installer. In either case, the DVD1 image or physical DVD must beaccessible from the workstation where you want to install the Deployer'sWorkbench.
Procedure1. Start the Deployer's Workbench installer. Either start the Control Desk
launchpad, click Install the Product, and click Install Deployer's Workbench,or to use the native installer, cd to the DW directory and run install.exe.
2. You might see a message saying that Install Anywhere is preparing to install.When the Deployer's Workbench screen appears, choose a language from thedrop-down list and click OK.
3. Review the information on the Introduction screen. Click Next to continue.4. Choose the installation folder and where to install icons.5. Review the pre-installation summary. Click Previous to make any changes.
Click Install to begin the installation.6. You will see a progress bar indicating the progress of the installation procedure.
After the installation has completed, click Done to exit the installer.
© Copyright IBM Corp. 2014 191

192 IBM Control Desk: Installation Guide (IBM WebSphere)

Chapter 11. Installing IBM Control Desk Everyplace
Use the information in this section to install the optional component IBM ControlDesk Everyplace®.
IBM Control Desk Everyplace comes with its own launchpad, which you can useto install it on the same administrative workstation where you installed ControlDesk. The installation process does not create a new EAR file; it updates themaximo.ear file, which you must then rebuild and redeploy. The installationprocess does not update the maximoiehs.ear file, so you do not need to rebuildand redeploy this file. The installation procedure depends on your scenario.Choose the link that matches your situation.
Installing as part of a new product installationFollow these steps if you are installing IBM Control Desk Everyplace as part of afresh installation of Control Desk.
About this task
When you begin the installation of Control Desk, be sure to defer the update of thedatabase and the deployment of the ear file. You must complete these steps afterrunning the Control Desk installer and before updating the database.
Procedure1. Insert the IBM Control Desk Everyplace installation DVD or link to the
installable image.2. Issue the command to start the launchpad that is appropriate for your
administrative workstation:
launchpad.exeUse this command for 32-bit Windows workstations.
launchpad64.exeUse this command for 64-bit Windows workstations.
launchpad.shUse this command for workstations running other operating systems.
3. To install IBM Control Desk Everyplace, open the Install Product page and clickthe link to start the installer.
4. As you run the installer, be sure to choose Deploy application files manuallylater and Defer the update of the Maximo database. This causes the IBMControl Desk Everyplace code to be added to the Control Desk files whoseinstallation will be completed in subsequent steps.
5. When the installation is complete, in the Package Successfully Deployedwindow, click Done.
What to do next
After you have installed IBM Control Desk Everyplace, you must return to theproduct installer to complete the installation of all components, the updating of thedatabase, and the building and deployment of the EAR file.
© Copyright IBM Corp. 2014 193

Installing as part of a product upgradeIf you are installing IBM Control Desk Everyplace as part of an upgrade to ControlDesk, follow the steps in the Upgrade Guide.
About this task
The Upgrade guide includes information on installing IBM Control DeskEveryplace as part of an upgrade. You can find the Upgrade Guide on theInstalling, Migrating and Upgrading page of the Control Desk wiki.
Installing after Control Desk has been installedFollow these steps if you are installing IBM Control Desk Everyplace after youhave completed the installation of Control Desk.
About this task
You can install IBM Control Desk Everyplace as an addition to an existinginstallation of Control Desk.
The following procedure assumes that you want to minimize the time for whichyour J2EE server is down.
Procedure1. Insert the IBM Control Desk Everyplace installation DVD or link to the
installable image.2. Issue the command to start the launchpad that is appropriate for your
administrative workstation:
launchpad.exeUse this command for 32-bit Windows workstations.
launchpad64.exeUse this command for 64-bit Windows workstations.
launchpad.shUse this command for workstations running other operating systems.
3. To install IBM Control Desk Everyplace, open the Install Product page and clickthe link to start the installer.
4. Select the installation path for Control Desk from the drop-down menu.5. Do not choose Deploy application files manually later or Defer the update of
the Maximo database. Instead, allow the installer to complete all steps.6. When the installation is complete, in the Package Successfully Deployed
window, click Done.
194 IBM Control Desk: Installation Guide (IBM WebSphere)
Chapter 12. Post installation tasks
There are several post installation tasks required in order to complete the ControlDesk deployment.
Accessing product documentationAccessing the Control Desk information center documentation and product onlinehelp.
Important: The WebSphere Application Server deployment manager must berestarted after the installation of Control Desk. Restarting enables the full functionof the information center and online help.
In order to be able to access the product documentation system with the product,complete the following steps after you install Control Desk.1. Stop the deployment manager by running the following command:
c:\Program Files\IBM\WebSphere\AppServer\profiles\<dmgr profile>\bin\stopManager-username wasadmin -password <password>
2. Start the deployment manager by running the following command:c:\Program Files\IBM\WebSphere\AppServer\profiles\<dmgr profile>\bin\startManager
If you manually configured the application server after you ran the productinstallation program, you must set the property for the product documentationserver. For more information, see https://www.ibm.com/support/docview.wss?uid=swg21508594.
Important: The deployment manager (a component of WebSphere ApplicationServer Network Deployment) allows for remote management and deploymentoperations. While the deployment manager is stopped, all management anddeployment operations, including outside of Control Desk, are affected (stopped).
Initial data configuration
After you have successfully installed and configured Control Desk components,there are several data configuration tasks you must complete before using ControlDesk.Related information:Integrating data with external applications
Signing in using a default user IDUser management can be managed through the Maximo application or though thedirectory server you have configured to use with Control Desk
© Copyright IBM Corp. 2014 195
Before you begin
When first installed, Control Desk contains the following default user IDs:
Table 24. Control Desk users
User
wasadmin
maxadmin
mxintadm
maxreg
Important: Before you begin this procedure, if you are using a directory server aspart of your deployment, ensure that these users are created in your LDAPrepository.
Note: User names and passwords are case-sensitive. The defaultuser names arelowercase.
About this task
To sign in, complete the following steps:
Procedure1. Open a browser window.2. Navigate to the Control Desk login URL. For example: http://host
name:port/maximo.3. Enter the user name maxadmin (lower case).4. Enter the password you entered during the installation, and click Enter. The
default start center for maxadmin is displayed.
Configuring SMTPInstallation panels provide an opportunity to configure an SMTP server to send anadministrator, or other users, e-mail notifications of system events. If you skipthese panels when you install Control Desk, you can use the Control Desk interfaceto configure SMTP parameters.
Before you begin
This task must be completed before you apply changes to the database.
About this task
To configure SMTP for Control Desk, complete the following steps.
Procedure1. Log in to the console as maxadmin.2. Open the System Configuration > Platform Configuration > System
Properties application.3. Using the Filter feature, search for the mail.smtp.host Property Name.4. Expand the mail.smtp.host property and set the Global Value attribute to
your SMTP host.
196 IBM Control Desk: Installation Guide (IBM WebSphere)
5. Select the mail.smtp.host record check box.6. Click the Live Refresh icon in the toolbar.7. From the Live Refresh dialog, click OK.8. Using the Filter feature, search for the mxe.adminEmail Property Name.9. Expand the mxe.adminEmail property and set the Global Value attribute to
your e-mail address.10. Select the mxe.adminEmail record check box.11. Click the Live Refresh icon in the toolbar.12. From the Live Refresh dialog, click OK.
“Applying changes to the database” on page 198When you create a general ledger account component, it must be applied to theMaximo database.
Create currency codesYou must define a currency code for an organization.
About this task
To define a currency code for an organization, complete the following steps.
Procedure1. Open the Financial > Currency Code application.2. Click New Row.3. Enter a currency name. For example, USD.4. Click the Save icon.
Create item and company setsYou must define item and company sets for an organization.
About this task
To define item and company sets for an organization, complete the following steps:
Procedure1. Open the Administration > Sets application.2. Click New Row.3. Enter an item name. For example, IT Items.4. Enter ITEM in the Type field.5. Click New Row.6. Enter a company set name. For example, IT Comps.7. Enter COMPANY in the Type field.8. Click the Save icon.
Create an organizationYou must define at least one organization for Control Desk.
About this task
To define an organization, complete the following steps.
Chapter 12. Post installation tasks 197
Procedure1. Open the Administration > Organizations application.2. Click the New Organization icon in the toolbar.3. Enter an organization name in the Organization field. For example, ENGLENA.4. Enter the base currency you defined in the Base Currency 1 field. For
example, USD.5. Enter the item set you defined in the Item Set field. For example, IT Items.6. Enter the company set you defined in the Company Set field. For example,
IT Comps.7. Enter the default item status of PENDING in the Default Item Status field.8. Click theSites tab.9. Click New Row.
10. Enter a site name in the Site field. For example, B901.11. Click the Save icon.
Create a general ledger account componentYou must create a general ledger account component for Control Desk.
About this task
To create a general ledger account component, complete the following steps.
Procedure1. Open the System Configuration > Platform Configuration > Database
Configuration application.2. Choose the GL Account Configuration action.3. Click New Row.4. Enter a component name in the Component field. For example, MYCOMPONENT.5. Enter a numeric length for the component. For example, 5.6. Enter a type for the component. For example, ALN.7. Click OK.
Applying changes to the databaseWhen you create a general ledger account component, it must be applied to theMaximo database.
About this task
To apply configuration changes to the Maximo database, complete the followingsteps.
Procedure1. Log in to the Maximo console as maxadmin2. Open the System Configuration > Platform Configuration > Database
Configuration application. Every object that must be updated in the Maximodatabase has a status of To Be Added.
3. Choose the Manage Admin Mode action.
198 IBM Control Desk: Installation Guide (IBM WebSphere)
4. Click Turn Admin Mode ON, and then click OK when prompted. This tasktakes several minutes to complete. You can use the Refresh Status button toview progress.
5. After Admin Mode has been enabled, select Apply Configuration Changes, toapply the changes to the Maximo database. To Be Changed must not appear inthe status column for objects listed.
6. Turn Admin Mode OFF.a. Open the System Configuration > Platform Configuration > Database
Configuration application.b. Choose the Manage Admin Mode action.c. Click Turn Admin Mode OFF, and then click OK when prompted. Failing
to turn off Admin Mode within the application causes cron tasks to fail.
Create a general ledger accountYou must create a general ledger account for Control Desk.
About this task
To create a general ledger account, complete the following steps:
Procedure1. Open the Financial > Chart of Accounts application.2. Click the name of your organization to select it. For example, click
ENGLENA.3. Choose the GL Component Maintenance action.4. Click New Row.5. Add a GL Component value and a description and then click OK. For
example, 1234.6. Click New Row.7. Select your General Ledger Account.8. Click Save.9. Open the Goto > Administration > Organizations application.
10. Click the organization name you created. For example, ENGLENA.11. From the Clearing Account field, select the General Ledger Account you just
created.12. Select Active.13. Click the Save icon.
Update General Ledger Component Type AuthorizationYou must update the general ledger component type authorization for ControlDesk.
About this task
To authorize a Security Group to change a general ledge component type, completethe following steps:
Procedure1. Open the Security > Security Groups application.2. Select the Group that provides authorization (for example, PMSCOA).
Chapter 12. Post installation tasks 199
3. Click the GL Components tab.4. Click the Authorized check box for each GL Component.5. Click Save
Update Company-Related AccountsYou must update the company-related accounts for Control Desk.
About this task
To update the company-related accounts, complete the following steps:
Procedure1. Open the Financials > Chart of Accounts application.2. From the action menu, select Company-Related Accounts.3. On the dialog click New Row.4. Select company type 'C'.5. Set the RBNI Account, AP Suspense Account, and AP Control Account to the
components you created.6. Click OK.7. From the action menu, select Update Database.8. Click OK.
Create default insert siteYou must create a default insert site for Control Desk.
About this task
To create a default insert site, complete the following steps.
If you encounter an error message that indicates that the record is being updatedby another user, log out as maxadmin and then log back in.
Procedure1. Open the Security > Users application.2. Search for maxadmin and then select it to open the record for maxadmin.3. Enter the site you created earlier in the Default Insert Site field. For example,
B901.4. Enter the site you created earlier in the Storeroom Site for Self-Service
Requisitions field. For example, B901.5. Click Save.
Create worktypesYou must create worktypes for Control Desk.
About this task
To create a worktype, complete the following steps.
200 IBM Control Desk: Installation Guide (IBM WebSphere)

Procedure1. Open the Administration > Organizations application.2. Search for the organization you created. For example, ENGLENA.3. Click the name of the organization to open the record for that organization.4. Select Work Order Options > Work Type from the Select Action menu.5. Click New Row.6. Select PMCFGWO as the Work Order class.7. Set the Work Type as AR.8. Set Start Status as INPRG.9. Set Complete Status as COMP.
10. Click New Row.11. Select PMCFGWO as the Work Order class.12. Set the Work Type as UR.13. Set Start Status as INPRG.14. Set Complete Status as COMP.15. Click OK.16. Click Save.17. Restart the MXServer application server.
Create a classification structure for IT assetsBefore you can implement IT asset management, you need to define a classificationstructure for IT assets.
About this task
You can use the Classifications application to set up a nested, hierarchical structurein which to classify information about your company's assets. This structure letsyou group assets with similar or common characteristics into categories or classes.You can use the classification to retrieve instances of assets that belong to the class.For example, you can specify that the class computers has the following subclasses:notebooks, servers, desktops. If you want to analyze or review data about allnotebooks in your enterprise, you can search for all assets classified as notebooksand retrieve instances of notebooks.
Best practices content for creating classifications is provided in the Open ProcessAutomation Library.
The steps for creating classifications follow.
Procedure1. On the navigation bar in Control Desk, open the Administration >
Classifications application.2. In the Classifications application, create classifications as needed. For
instructions about creating classifications and other information related toclassifications, see the integrated online help for the Classifications applicationin the Control Desk user interface.
Chapter 12. Post installation tasks 201

What to do next
After you create an IT asset classification structure, specify the top-level IT assetclassification and the top-level software classification in the Organizationsapplication.
Specify a top-level class for IT assets and softwareTo distinguish IT assets from other types of assets, specify a top-level class for ITassets. Any asset that belongs to the hierarchy of the top-level IT asset class is anIT asset. Also, define a top-level class for software.
Before you begin
Before you can specify top-level classifications for IT assets and software, create aclassification structure for IT assets and software in the Classifications application.
About this task
The class structure ID that is displayed in the System Settings window is a valuestored in the database. If the classifications structure changes such that thetop-level IT asset class no longer exists at the same place in the hierarchy, the ITAsset Class Structure ID field will remain populated, but the IT Asset Top-LevelClass field will be blank or show the wrong class. Consequently, if changes aremade to the database, and the classification is moved within the classificationstructure, or deleted and re-added, repeat this procedure to update the classstructure ID.
Procedure1. Open the Administration > Organizations application.2. From the Select Action menu in the Organizations application, select System
Settings.3. To specify the top-level IT asset, complete the following steps:
a. In the IT Options section in the Systems Settings window, in the IT AssetTop-Level Class field, click the Detail Menu and select Classify. Ifnecessary, you can select Clear Classification to clear the value displayedand then click Classify.
b. In the Classify window, select the top-level asset class for IT assets byclicking the blue square to the left of the classification name. Theapplication closes the Classify dialog box and populates the IT AssetTop-Level Class field.
4. To specify the top-level software classification, complete the following steps:a. In the IT Options section in the Systems Settings window, in the IT
Software Top-Level Class field, click the Detail Menu and select Classify.b. In the Classify window, select the top-level asset class for IT assets by
clicking the blue square to the left of the classification name. Theapplication closes the Classify dialog box and populates the IT SoftwareTop-Level Class field.
5. Click OK to save the settings and close the dialog box.
202 IBM Control Desk: Installation Guide (IBM WebSphere)

Signing out and signing inWhen you change a security group that includes your user ID, you must sign outand sign in to see the changes. For example, even though you have granted agroup permission to create start center templates, the actions are not visible untilyou sign in again.
Procedure1. Sign out.2. Sign in as the same user.
Before working with BIRT reportsBefore running any reports, you need to set up manually themxe.report.birt.tempfolder in JVM system Properties in the BIRT report engine.
Before you begin
The mxe.report.birt.tempfolder property specifies the location of a temporaryfolder on the reporting server for BIRT.
About this task
To configure BIRT, set up JVM System Properties mxe.report.birt.tempfolder.
Procedure1. Log in to WebSphere Application Server.2. Go to Servers > Application servers.3. From the right panel, click the server name where you have deployed Control
Desk.4. Go to Process Definition under Server Infrastructure.5. Click Java Virtual Machine under Additional Properties.6. Add -Dmxe.report.birt.tempfolder=c:\tempReport\BIRT-TEMP to Generic JVM
Argument, and then click Save.7. Restart the server.
Generating xml request pagesPerform this task after you install Control Desk and before you run request pages.This procedure needs to be performed for every language that is enabled on yoursystem.
Before you begin
When multiple languages are enabled in Maximo applications, request pages haveto be generated in each of the enabled languages.
Procedure1. Log in as a maxadmin user.2. From the Start menu, go to Administrator > Reporting > Report
Administration.3. Review all rows in the list view then in the bottom right corner click Generate
Request Page button. Wait a couple of minutes for the process to complete.
Chapter 12. Post installation tasks 203

Synchronizing users and groupsWhen you select application server security, the scheduled synchronization of usersand groups that occurs between LDAP repositories and Control Desk is governedby the federated repositories.
About this task
LDAP repositories managed by IBM WebSphere Application Server NetworkDeployment through Virtual Member Manager are synchronized through theVMMSYNC cron task.
To configure the synchronization schedule between LDAP repositories and ControlDesk, complete the following steps:
Procedure1. Open a web browser and point to http://host name:port/maximo.2. Log in to Control Desk using the maxadmin user ID.3. From the Control Desk interface, open the System Configuration > Platform
Configuration > Cron Task Setup application.4. Search for the appropriate cron task in the Cron Task field and configure it.5. Set the task to active.
What to do next
By default, the cron task performs its task every 5 minutes. Change the Schedulefield of the cron task if you want to change the interval.
Understanding and configuring securityYou must configure security to ensure that only authorized users can log on toControl Desk. You must also ensure that the appropriate users have access to theirapplications and configuration items.
The Security information contained in the Control Desk information centerprovides an overview of the following information:v How security is implemented.v The steps you perform to configure security.
204 IBM Control Desk: Installation Guide (IBM WebSphere)

Chapter 13. Middleware clean up scripts
Middleware clean up scripts are available to remove middleware components andobjects installed and created by the middleware installation program.
Middleware clean up scripts are provided to clean up components that wereinstalled on a system by the middleware installation program. These scripts can beused after experiencing a middleware installation program failure, as well assuccessful install. These scripts work with the middleware installation programuninstall feature and are capable of removing one or more middleware installationcomponents. These components include middleware installed, the workspace,installation directories, and users created by the middleware installation program.
Using the middleware cleanup scriptsMiddleware clean up scripts can be used to remove all artifacts and componentsinstalled on a system by the middleware installation program.
About this task
When using the middleware cleanup scripts, you are prompted to confirm that youwant to remove the component specified. A timestamped log file is created in theworking directory for each action. If the script detects that the installation of acomponent experienced an error, you might have to uninstall that productmanually by using the uninstallation program provided with that program.
Table 25. Middleware clean up script parameters
Parameter Description
-default This is the default option for cleaning upobjects created by the middlewareinstallation program. This option removesany middleware that was installed, theworkspace, and the deployment engine.
This option does not remove users andgroups created by the middlewareinstallation program.
-workspace This option reads the middlewareinstallation program workspace. Thedeployment plan contained in the workspaceserves as a roadmap for the clean up script.
-all This option removes all components andobjects from the system that were installedand created by the middleware installationprogram.
This option also removes middleware usersand groups. This is true for users andgroups created by the middlewareinstallation program and also users andgroups created manually that were used forconfiguration during use of the middlewareinstallation program.
© Copyright IBM Corp. 2014 205

Table 25. Middleware clean up script parameters (continued)
Parameter Description
-mw This option refers to the middlewareinstallation program workspace for objectsto remove.
You must provide extra confirmations toremove users, groups, and DB2 instances.
-db2 This option removes DB2. All DB2 instancesare dropped, the DB2 server is stopped, DB2is uninstalled, and the DB2 installationdirectories are removed.
-itds This option removes IBM Tivoli DirectoryServer. All IBM Tivoli Directory Serverinstances are dropped, the IBM TivoliDirectory Server server is stopped, IBMTivoli Directory Server is uninstalled, andthe IBM Tivoli Directory Server installationdirectories are removed.
-was This option removes WebSphere ApplicationServer. All WebSphere Application Serverinstances are dropped, the WebSphereApplication Server server is stopped,WebSphere Application Server is uninstalled,and the WebSphere Application Serverinstallation directories are removed.
This option also removes IBM HTTP Serverand the WebSphere Application Serverupdate installer.
-deMWI This option removes the deployment engine.If there are entries in the deployment engineregistry that were not deployed by themiddleware installation program, you arewarned and asked to confirm that you stillwant to remove the deployment engine.
Once the deployment engine has beenremoved, you are given the option toremove the workspace.
-users This option removes users and groupscreated by the middleware installationprogram. It removes the default userscreated by the program and also promptsyou to enter additional user and groupnames associated with the middlewareinstallation that you want removed.
-prop This option allows you to use themwi.properties file to supply input to theclean up scripts.
-f This option allows you to skip confirmationby confirming all prompts y or n.
Procedure1. From the product installation image, change directory to the
MWICleanupScripts\operating_system directory.
206 IBM Control Desk: Installation Guide (IBM WebSphere)

2. Start the clean up script and provide input parameters:v Windows
mwiclean.bat
v Linux and UNIXmwiClean.sh
For example:mwiclean.bat -deMWI
3. Type y or n when prompted for confirmation.4. When prompted, reboot the system. Rebooting the system removes the
temporary entries which can remain after the cleanup procedure has completed.
Chapter 13. Middleware clean up scripts 207

208 IBM Control Desk: Installation Guide (IBM WebSphere)
Chapter 14. Uninstalling the product
Uninstalling Control Desk 7.5.3 is dependant upon how it was deployed.
The procedures and instructions provided here are based upon a scenario in whichthe Control Desk installation program has experienced an error or failure.
Control Desk uninstallation is a comprehensive procedure and does not supportpartial removal of individual components or process managers, including processmanagers deployed by other products. Process managers of previously deployedproducts are also removed when you uninstall Control Desk.
The Control Desk uninstallation program can only be run once. If there are errors,messages are generated that indicate conditions that you must resolve manuallybefore attempting a reinstall. Resolution includes manually removing files from theadministrative workstation.
Control Desk can only be uninstalled using the Control Desk uninstallationprogram as directed. Do not use other methods to attempt to uninstall ControlDesk, such as using the Add/Remove Programs panel.
The uninstall procedure you follow depends on the type of Control Deskdeployment you are uninstalling. For uninstallation purposes, Control Deskdeployments falls into one of the following categories:
Fully-automated configurationIn this scenario, you selected the option to allow the Control Deskinstallation program to automatically configure middleware duringdeployment.
Manual configurationIn this scenario, you selected the option to manually configure middleware.You did not allow the Control Desk installation program to automaticallyconfigure middleware during deployment.
After the Control Desk uninstall process is complete, you can reinstall ControlDesk by restarting the Control Desk installation program.
“Uninstalling an automatically configured deployment”Uninstalling a Control Desk deployment that was deployed using the automaticmiddleware configuration options is an automated process.“Uninstalling a manually configured deployment” on page 211Uninstalling a Control Desk deployment that was deployed with middlewarethat you configured manually includes additional manual tasks.
Uninstalling an automatically configured deploymentUninstalling a Control Desk deployment that was deployed using the automaticmiddleware configuration options is an automated process.
Deployments consisting of automatic middleware configuration can be uninstalledusing automated methods.
© Copyright IBM Corp. 2014 209

Running the product uninstallation program for automaticallyconfigured middleware
Running the Control Desk uninstallation program reverts the administrativesystem and middleware servers back to their previous state.
Before you begin
Ensure that all applicable services are running and all middleware servers areaccessible.
The Control Desk uninstallation program must be able to access the database usedwith Control Desk to fetch installation properties and configuration data. If theuninstallation program cannot access an unavailable, corrupted, or otherwiseinaccessible database, it removes files from the administrative workstation. It theninforms you that some manual recovery might be required before another ControlDesk installation can be successful.
The uninstallation program uses values entered during the initial installationduring uninstallation. If credentials used to access the database and J2EE server arestill valid, you are not prompted to enter them again. If the uninstallation programis unable to validate these credentials you are prompted to supply the updatedinformation. The uninstallation program would not be able to validate credentialsif you updated passwords since the original installation.
Procedure1. To run the Control Desk uninstallation program, from the administrative
workstation, open a command prompt and issue the following command:v Windows
install_home\_uninstall\uninstall.bat
v UNIXinstall_home\_uninstall\uninstall.sh
2. From the application server information panel, enter the following informationand then click Next.
Remote user IDEnter a user ID in order to access the system hosting the applicationserver. The remote user ID must be able to access the server using theremote access protocol enabled on that system.
Remote passwordEnter a password for the remote user ID.
User IDEnter the password for the application server administrator.
PasswordEnter the password for the application server administrator user ID.
3. From the database administration panel, enter the information requested, andthen click Next. For DB2, enter the following information:
Remote user IDEnter a user ID in order to access the system that is hosting thedatabase. The remote user ID must be able to access the server usingthe remote access protocol enabled on that system.
Remote passwordEnter a password for the remote user ID.
210 IBM Control Desk: Installation Guide (IBM WebSphere)

Instance administrator user IDEnter the database instance administrator user ID that you enteredduring the installation.
Instance administrator passwordEnter the password for the database instance administrator user ID.
For Oracle, supply credentials for the Administrator user ID and the Oraclesoftware owner ID. For Microsoft SQL Server, supply the Microsoft SQL Serveradministrator user ID and password.
4. Review the components that are listed in the uninstallation summary panel,and then click Uninstall.
5. After the uninstallation process completes, specify whether you want to restartthe computer now or later, and click Done to exit the program.
6. Remove the Control Desk installation directory, for example, c:\ibm\smp. Youmust manually remove this directory before you proceed to the reinstallationprocess.
Uninstalling a manually configured deploymentUninstalling a Control Desk deployment that was deployed with middleware thatyou configured manually includes additional manual tasks.
Uninstalling a manually configured Control Desk deployment consists of twotasks:v Running the Control Desk uninstallation programv Manually dropping and recreating the database you intend to use with the
reinstall process
Running the product uninstall program for manuallyconfigured middleware
Running the Control Desk uninstall program reverts the administrative system andmiddleware servers back to a state where you can rerun the Control Deskinstallation program.
Before you begin
Ensure that all applicable services are running and all middleware servers areaccessible.
The Control Desk uninstall program must be able to access the database used withControl Desk to fetch installation properties and configuration data. If the uninstallprogram cannot access an unavailable, corrupted, or otherwise inaccessibledatabase, it removes files from the administrative workstation. It then informs youthat some manual recovery might be required before another Control Deskinstallation can be successful.
The uninstall program uses values entered during the initial installation duringuninstall. If credentials used to access the database and J2EE server are still valid,you are not prompted to enter them again. If the uninstall program is unable tovalidate these credentials you are prompted to supply the updated information.The uninstall program would not be able to validate credentials if you updatedpasswords since the original installation.
Chapter 14. Uninstalling the product 211

Procedure1. To run the Control Desk uninstall program, from the administrative
workstation, open a command prompt and issue the following command:
Windowsinstall_home\_uninstall\uninstall.bat
UNIXinstall_home\_uninstall\uninstall.sh
2. From the Introduction panel, read the introductory information and then clickNext.
3. From the application server information panel, enter the following informationand then click Next.
User IDEnter the password for the application server administrator.
PasswordEnter the password for the application server administrator user ID.
4. Review the components that are listed in the uninstall summary panel, andthen click Uninstall.
5. After the uninstall process has completed, click Done to exit the program.6. Remove the Control Desk installation directory, for example, c:\ibm\smp. You
must manually remove this directory before you proceed to the reinstallationprocess.
What to do next
You can now proceed with recovery of your manually configured database.
Database configuration recoveryDatabase objects created before running the Control Desk installation programmust be deleted after a failed installation before the Control Desk installationprogram is run again.
Before rerunning the Control Desk installation program, you must drop theControl Desk database and recreate it.
Note: Alternatively, if you want to preserve the instance, you can examine thedatabase for objects (tables, views, and procedures, for example) that were createdby the maxadmin user. You can then drop those objects individually.
Restoring the DB2 database serverIn order to rerun the Control Desk installation program, you must first restore theDB2 database server to the same state as before Control Desk was installed.
Before you begin
Ensure that the MXServer application server on the IBM WebSphere ApplicationServer Network Deployment is stopped before you drop the database.
About this task
To restore the DB2 database server to its previous state, drop the Control Deskdatabase that you manually created. You then recreate it before you rerun theControl Desk installation program.
212 IBM Control Desk: Installation Guide (IBM WebSphere)

To restore the Control Desk database, complete the following steps:
Procedure1. Log on to the system that hosts the DB2 server.2. Start a DB2 command session or run db2cmd from the command prompt.3. First list and then force all applications connected to the database to close using
the following commands:a. To list applications, type this command:
db2 list applications
You might see output like the following sample output:
Table 26. DB2 list command sample output
Auth IdApplicationName
Appl.Handle Application ID DB Name # of Agents
CTGINST1 db2taskd 507 *LOCAL.DB2.071113150237 MAXDB75 1
CTGINST1 db2stmm 506 *LOCAL.DB2.071113150236 MAXDB75 1
CTGINST1 db2bp 504 *LOCAL.ctginst1.071113150234 MAXDB75 1
b. If any connections exist, close the connect application using a command likethe following sample command:db2 force application ’( 507,506,504 )’
4. Drop the Control Desk database (MAXDB75, by default):db2 drop database MAXDB75
5. Manually recreate the maxdb75 database.“Manually configuring DB2 9.x” on page 74This section contains instructions for manually configuring DB2 9.x servers foruse by Control Desk.
Restoring the Oracle databaseIn order to rerun the Control Desk installation program, you must first restore theOracle database server to the same state as before Control Desk was installed.
Before you begin
The MXServer application server must be stopped before deleting the database.
About this task
Drop the Control Desk database schema user to restore the Oracle database serverto its previous state. This task must be completed before you rerun the ControlDesk installation program.
To restore the Control Desk database, complete the following steps:
Procedure1. Log in to the Oracle database server as the Oracle software owner.2. Log in to the Oracle instance with SQLPlus as a DBA user: The Oracle SID for
a clean installation is ctginst1. If you are using an existing Oracle instance withControl Desk, use the Oracle SID associated with the existing instance.
AIX, Linux, HP-UX, Solaris
a. Set the environment variable from the command line:
Chapter 14. Uninstalling the product 213

ORACLE_SID=<your sid>export ORACLE_SID
b. Start SQLPlus from the command line:sqlplus /nolog
c. Login to SQLPlus as a DBA user:connect sys/<sys password> as sysdba
Windows
a. Set the environment variable from the command line:set ORACLE_SID=<your sid>
b. Start SQLPlus from the command line:sqlplus /nolog
c. Login to SQLPlus as a DBA user:connect sys/<sys password> as sysdba
3. Delete the Control Desk database user (maximo, by default) using an SQLcommand like the following sample command:drop user maximo cascade;
Do not disconnect from the database. If you receive an error that you cannotdrop a currently connected user, issue the following commands and use theSQL drop command:shutdown immediate;startup;
4. Manually recreate the database.“Manually configuring Oracle 11g” on page 75Use the following instructions to manually configure Oracle 11g for use withControl Desk.“Manually configuring Oracle 10g” on page 78Oracle 10g can be manually configured for use with Control Desk.
Restoring the Microsoft SQL Server databaseIn order to rerun the Control Desk installation program, you must first restore theMicrosoft SQL Server database server to the same state as before Control Desk wasinstalled.
Before you begin
Stop the MXServer application server before you delete the database.
About this task
To restore the Microsoft SQL Server database server to its previous state, drop theControl Desk database that you manually created. You then recreate it before yourerun the Control Desk installation program.
To restore the Control Desk database, complete the following steps:
Procedure1. Open the Microsoft SQL Server Management Studio.2. Log in to the instance of Microsoft SQL Server that is used by Control Desk
installation using the sa user ID, and then click Connect.
214 IBM Control Desk: Installation Guide (IBM WebSphere)

3. Expand the instance tree down to the databases node. Using the right mousebutton, click the database name you created during installation (MAXDB75 forexample). Click Delete to delete the database.
4. In the Delete Object window, select Delete backup and restore historyinformation for databases and Close existing connections, and then click OK.
5. Manually recreate the maxdb75 database.“Manually configuring Microsoft SQL Server” on page 80You can manually configure Microsoft SQL Server for use with Control Desk.
Uninstalling the product without the uninstallation programUninstalling the product when a failed installation does not produce anuninstallation program.
If the installation program has experienced a failure that causes it to not producethe product uninstallation program, you must perform alternative uninstallationtasks.
If uninstallation program was not produced, you must complete one of thefollowing tasks in order to uninstall the product:v Run the uninstallation recovery tool described in “Uninstall program recovery
tool.”v Complete the uninstallation manually using the following steps:
1. “Recovering WebSphere Application Server configuration” on page 219.2. Recover the database as described in “Database configuration recovery” on
page 212.3. Manually remove files from the system as described in “Removing files from
the system” on page 222.
Uninstall program recovery toolThe uninstall program recovery tool is used to automatically uninstall ControlDesk when the installation program fails to produce the product uninstallationprogram.
The uninstall program recovery tool is run on the administrative workstationfollowing a failed installation. This tool performs the same functions of the ControlDesk uninstallation program. This tool is intended to restore the administrativeworkstation and middleware servers so the Control Desk installation can be runagain. The uninstall program recovery tool is available on the product media andalso from the product support site.
Using the uninstallation program recovery toolUse the uninstallation program recovery tool to restore the administrativeworkstation and middleware servers so the Control Desk installation can be runagain.
About this task
The uninstallation program recovery tool is a command line tool that prompts youfor input. This information is used as input for a collection of scripts that are runserially. These scripts perform the steps necessary to restore the administrativeworkstation and middleware servers so the installation program can be rerun. If
Chapter 14. Uninstalling the product 215
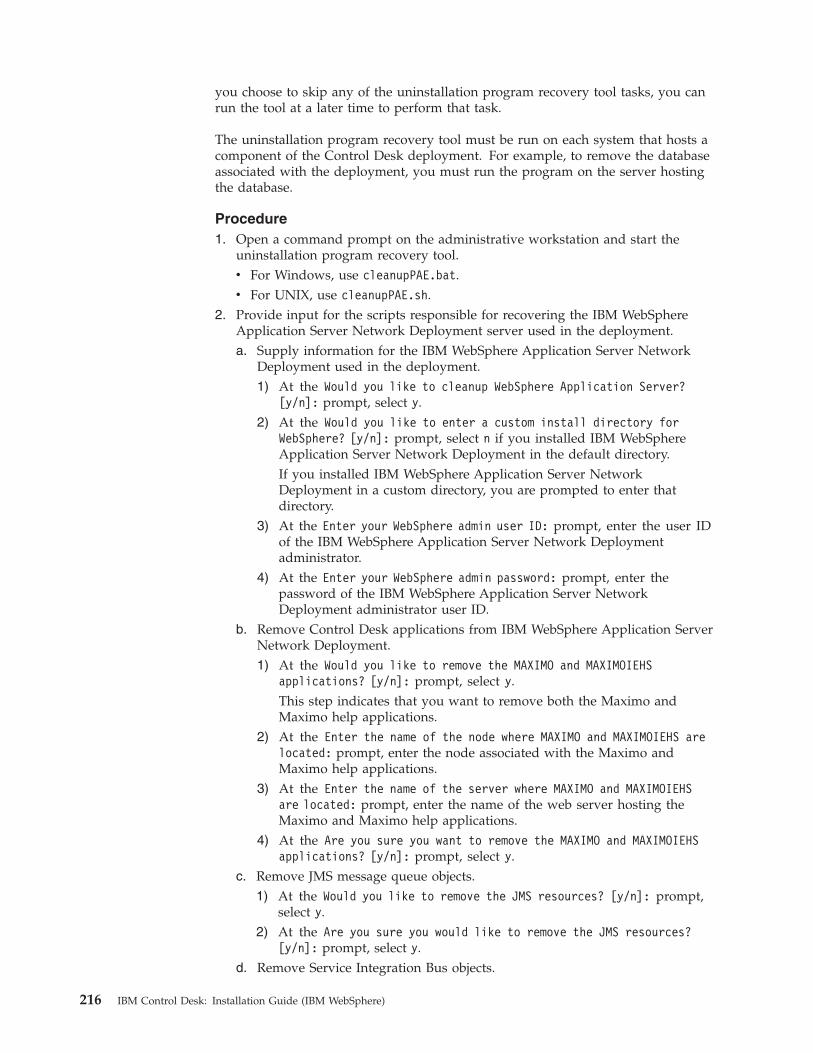
you choose to skip any of the uninstallation program recovery tool tasks, you canrun the tool at a later time to perform that task.
The uninstallation program recovery tool must be run on each system that hosts acomponent of the Control Desk deployment. For example, to remove the databaseassociated with the deployment, you must run the program on the server hostingthe database.
Procedure1. Open a command prompt on the administrative workstation and start the
uninstallation program recovery tool.v For Windows, use cleanupPAE.bat.v For UNIX, use cleanupPAE.sh.
2. Provide input for the scripts responsible for recovering the IBM WebSphereApplication Server Network Deployment server used in the deployment.a. Supply information for the IBM WebSphere Application Server Network
Deployment used in the deployment.1) At the Would you like to cleanup WebSphere Application Server?
[y/n]: prompt, select y.2) At the Would you like to enter a custom install directory for
WebSphere? [y/n]: prompt, select n if you installed IBM WebSphereApplication Server Network Deployment in the default directory.If you installed IBM WebSphere Application Server NetworkDeployment in a custom directory, you are prompted to enter thatdirectory.
3) At the Enter your WebSphere admin user ID: prompt, enter the user IDof the IBM WebSphere Application Server Network Deploymentadministrator.
4) At the Enter your WebSphere admin password: prompt, enter thepassword of the IBM WebSphere Application Server NetworkDeployment administrator user ID.
b. Remove Control Desk applications from IBM WebSphere Application ServerNetwork Deployment.1) At the Would you like to remove the MAXIMO and MAXIMOIEHS
applications? [y/n]: prompt, select y.This step indicates that you want to remove both the Maximo andMaximo help applications.
2) At the Enter the name of the node where MAXIMO and MAXIMOIEHS arelocated: prompt, enter the node associated with the Maximo andMaximo help applications.
3) At the Enter the name of the server where MAXIMO and MAXIMOIEHSare located: prompt, enter the name of the web server hosting theMaximo and Maximo help applications.
4) At the Are you sure you want to remove the MAXIMO and MAXIMOIEHSapplications? [y/n]: prompt, select y.
c. Remove JMS message queue objects.1) At the Would you like to remove the JMS resources? [y/n]: prompt,
select y.2) At the Are you sure you would like to remove the JMS resources?
[y/n]: prompt, select y.d. Remove Service Integration Bus objects.
216 IBM Control Desk: Installation Guide (IBM WebSphere)
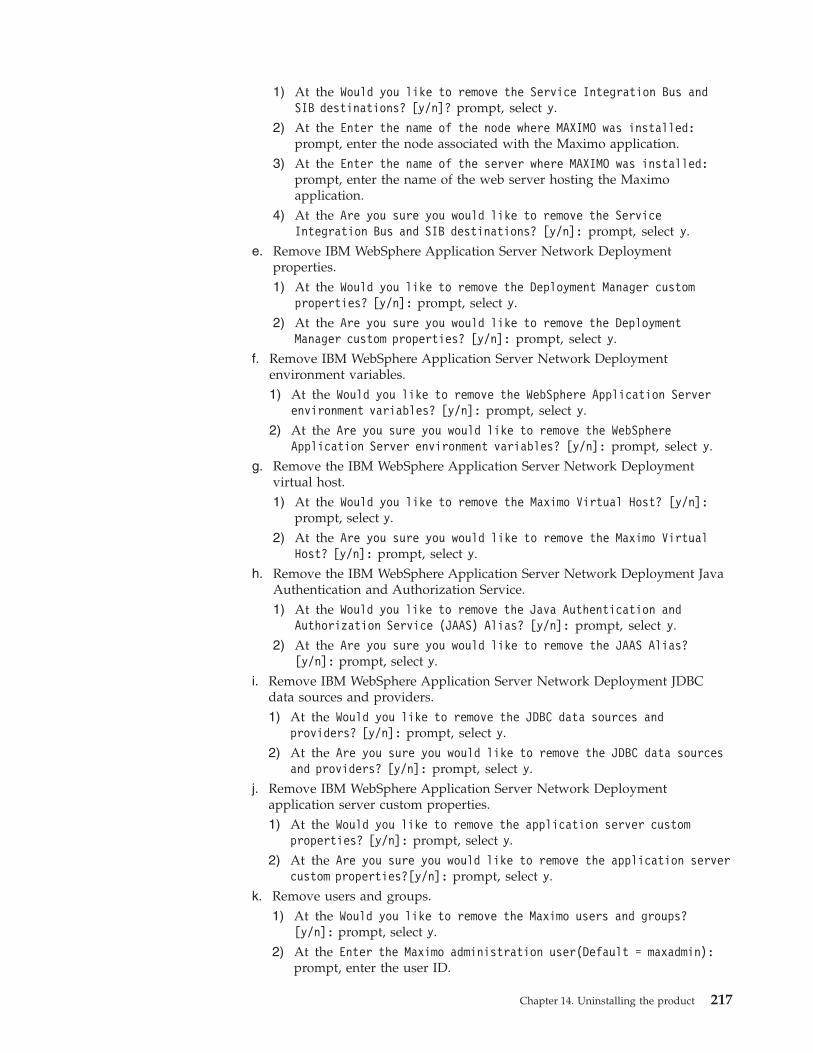
1) At the Would you like to remove the Service Integration Bus andSIB destinations? [y/n]? prompt, select y.
2) At the Enter the name of the node where MAXIMO was installed:prompt, enter the node associated with the Maximo application.
3) At the Enter the name of the server where MAXIMO was installed:prompt, enter the name of the web server hosting the Maximoapplication.
4) At the Are you sure you would like to remove the ServiceIntegration Bus and SIB destinations? [y/n]: prompt, select y.
e. Remove IBM WebSphere Application Server Network Deploymentproperties.1) At the Would you like to remove the Deployment Manager custom
properties? [y/n]: prompt, select y.2) At the Are you sure you would like to remove the Deployment
Manager custom properties? [y/n]: prompt, select y.f. Remove IBM WebSphere Application Server Network Deployment
environment variables.1) At the Would you like to remove the WebSphere Application Server
environment variables? [y/n]: prompt, select y.2) At the Are you sure you would like to remove the WebSphere
Application Server environment variables? [y/n]: prompt, select y.g. Remove the IBM WebSphere Application Server Network Deployment
virtual host.1) At the Would you like to remove the Maximo Virtual Host? [y/n]:
prompt, select y.2) At the Are you sure you would like to remove the Maximo Virtual
Host? [y/n]: prompt, select y.h. Remove the IBM WebSphere Application Server Network Deployment Java
Authentication and Authorization Service.1) At the Would you like to remove the Java Authentication and
Authorization Service (JAAS) Alias? [y/n]: prompt, select y.2) At the Are you sure you would like to remove the JAAS Alias?
[y/n]: prompt, select y.i. Remove IBM WebSphere Application Server Network Deployment JDBC
data sources and providers.1) At the Would you like to remove the JDBC data sources and
providers? [y/n]: prompt, select y.2) At the Are you sure you would like to remove the JDBC data sources
and providers? [y/n]: prompt, select y.j. Remove IBM WebSphere Application Server Network Deployment
application server custom properties.1) At the Would you like to remove the application server custom
properties? [y/n]: prompt, select y.2) At the Are you sure you would like to remove the application server
custom properties?[y/n]: prompt, select y.k. Remove users and groups.
1) At the Would you like to remove the Maximo users and groups?[y/n]: prompt, select y.
2) At the Enter the Maximo administration user(Default = maxadmin):prompt, enter the user ID.
Chapter 14. Uninstalling the product 217

3) At the Enter the Maximo system registration user(Default =maxreg): prompt, enter the user ID.
4) At the Enter the Maximo system integration user(Default =mxintadm): prompt, enter the user ID.
5) At the Are you sure you would like to remove the Maximo users andgroups? [y/n]: prompt, select y.
3. Provide input for the scripts responsible for recovering the database serverused in the deployment.v DB2
a. Supply information for the database used in the deployment.1) At the Would you like to cleanup the database? [y/n]: prompt,
select y.2) At the Which database type would you like to cleanup? [DB2,
Oracle, SQLServer (BAT only)]: prompt, select DB2.3) At the Enter database name: prompt, enter the name of the database
used in the deployment.4) At the Enter database instance administrator user ID: prompt,
enter the database instance administrator user ID.5) At the Enter database instance administrator password: prompt,
enter the password for the database instance administrator user ID.6) At the Enter database instance name: prompt, enter the name of the
database instance.b. Confirm you want to drop the database.
1) At the Are you sure you would like to drop the <database name>database? [y/n]: prompt, select y.
2) Verify the database was dropped.v Oracle
a. Supply information for the database used in the deployment.1) At the Would you like to cleanup the database? [y/n]: prompt,
select y.2) At the Which database type would you like to cleanup? [DB2,
Oracle, SQLServer (BAT only)]: prompt, select Oracle.3) At the Enter the SID of the Oracle instance: prompt, enter the
Oracle System ID of the Oracle instance used in the deployment.4) At the Enter the Oracle install directory: prompt, enter the
Oracle installation path.b. Supply user information.
1) At the Enter the SYSDBA user: prompt, enter the SYSDBA user ID.2) At the Enter the SYSDBA password: prompt, enter the password for
the SYSDBA user ID.3) At the Enter database user: prompt, enter the Oracle database user
ID.4) At the Would you like to delete the <database user name>
database user? [y/n]: prompt, select y.c. Delete the Oracle table spaces and the Oracle instance.
1) At the Would you like to delete the 'maxdata', 'maxtemp', and'maxindex' tablespaces? [y/n]: prompt, select y.
2) At the Would you like to delete the oracle instance? [y/n]:prompt, select y.
218 IBM Control Desk: Installation Guide (IBM WebSphere)

v Microsoft SQL Servera. At the Enter database name: prompt, enter the name of the database
used in the deployment.b. At the Are you sure you would like to drop the <database name>
database? [y/n]: prompt, select y.4. Provide input for the scripts responsible for recovering the administrative
workstation used in the deployment.a. At the Would you like to cleanup the administrator workstation?
[y/n]: prompt, select y.b. At the Would you like to enter a custom install directory? [y/n]:
prompt, select n if you installed Control Desk in the default directory. If youinstalled Control Desk in a custom directory, you are prompted to enter thatdirectory.
c. At the Are you sure you would like to cleanup the following directory:<install directory>? [y/n]: prompt, select y.
Manual uninstallationManual uninstallation steps are sometimes necessary to uninstall Control Deskwhen the installation program fails to produce the product uninstallation program.
Manual uninstallation steps are performed following a failed installation. Thesesteps are used to remove the same objects as the Control Desk uninstallationprogram. These steps are intended to restore the administrative workstation andmiddleware servers so the Control Desk installation can be run again.
Recovering WebSphere Application Server configurationFollow these instructions to delete WebSphere Application Server objects that arecreated or changed by the installation program and restore WebSphere ApplicationServer to the same state as when first installed by the middleware installationprogram.
About this task
As the result of a failed installation, it is possible that not all of the objects listed inthese instructions were created or configured. Steps apply only to relevant objectsthat were created by the installation process. In addition, if you have manuallycreated or configured WebSphere Application Server objects, you must take yourown actions to ensure that they remain intact before attempting this recoveryprocess.
Assuming that the middleware installation failure caused WebSphere ApplicationServer to be in a nonworking state, ensure that the deployment manager and thenode are running.
When you complete the WebSphere Application Server recovery process, you canproceed to the next step of the uninstall process which involves database recoverysteps.
Procedure1. Using the WebSphere Application Server administrator ID, log in to the IBM
Console for WebSphere Application Server. https://<dmgrhost>:9043/ibm/console.
2. Delete the installed Enterprise Applications:
Chapter 14. Uninstalling the product 219
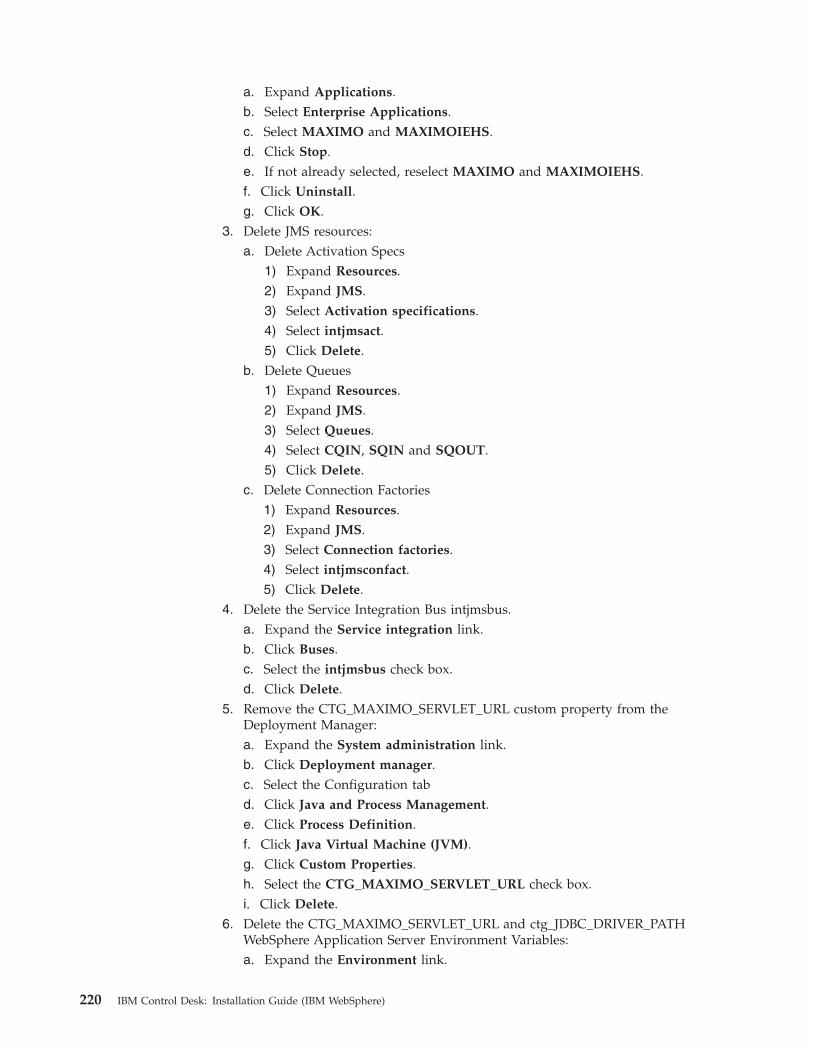
a. Expand Applications.b. Select Enterprise Applications.c. Select MAXIMO and MAXIMOIEHS.d. Click Stop.e. If not already selected, reselect MAXIMO and MAXIMOIEHS.f. Click Uninstall.g. Click OK.
3. Delete JMS resources:a. Delete Activation Specs
1) Expand Resources.2) Expand JMS.3) Select Activation specifications.4) Select intjmsact.5) Click Delete.
b. Delete Queues1) Expand Resources.2) Expand JMS.3) Select Queues.4) Select CQIN, SQIN and SQOUT.5) Click Delete.
c. Delete Connection Factories1) Expand Resources.2) Expand JMS.3) Select Connection factories.4) Select intjmsconfact.5) Click Delete.
4. Delete the Service Integration Bus intjmsbus.a. Expand the Service integration link.b. Click Buses.c. Select the intjmsbus check box.d. Click Delete.
5. Remove the CTG_MAXIMO_SERVLET_URL custom property from theDeployment Manager:a. Expand the System administration link.b. Click Deployment manager.c. Select the Configuration tabd. Click Java and Process Management.e. Click Process Definition.f. Click Java Virtual Machine (JVM).g. Click Custom Properties.h. Select the CTG_MAXIMO_SERVLET_URL check box.i. Click Delete.
6. Delete the CTG_MAXIMO_SERVLET_URL and ctg_JDBC_DRIVER_PATHWebSphere Application Server Environment Variables:a. Expand the Environment link.
220 IBM Control Desk: Installation Guide (IBM WebSphere)

b. Select WebSphere Variables.c. Select Cell=ctgCell01 from the Scope menu.d. Click Apply. If you have Scope set for WebSphere Application Server
variables, you are not required to click Apply to apply changes.e. Select the CTG_MAXIMO_SERVLET_URL and
ctg_JDBC_DRIVER_PATH check boxes.f. Click Delete.
7. Delete the Virtual Host maximo_host:a. Expand the Environment link.b. Select Virtual Hosts.c. Select maximo_host.d. Click Delete.
8. Delete the existing Java Authentication and Authorization Service (JAAS) Alias(maxJaasAlias):a. Expand the Security link.b. Select Secure administration, applications, and infrastructure.c. Select the Configuration tab.d. Select Java Authentication and Authorization Service.e. Select J2C authentication data.f. Select maxJaasAlias.g. Click Delete.
9. Delete created JDBC data sources:
Delete V 4.0 data sources:
a. Expand Resources.b. Expand JDBC.c. Select Data sources (WebSphere Application Server V4).d. Select DB2 Universal JDBC Driver - 4.0 XA Data Source.e. Click Delete.
Delete data sources:
a. Expand Resources.b. Expand JDBC.c. Select Data sources.d. Select DB2 Universal JDBC Driver XA Data Source and intjmsds.e. Click Delete.
Delete JDBC providers:
a. Expand Resources.b. Expand JDBC.c. Select JDBC providers.d. Select maxJdbcProvider.e. Click Delete.
10. Remove added properties associated with Application server MXServer:a. Expand Servers.b. Select Application servers.c. Select MXServer.d. Select the Configuration tab.
Chapter 14. Uninstalling the product 221

e. Expand Java and Process Management.f. Select Process Definition
g. Select Java Virtual Machine.h. Select Custom Properties.i. Select com.collation.home and sun.rmi.dgc.ackTimeout.j. Click Delete.
11. Delete Maximo users:a. Expand Users and Groups.b. Click Manage Users.c. Click Search and search by user ID.d. Locate and select the maxadmin, maxreq and mxintadm user IDs, and
then click Delete.12. From the message dialog box, click Save to save all configuration changes.
Ensure that you are synchronizing all changes with nodes.13. Remove the IBM DB2 JDBC driver JAR files from the file system by deleting
the db2jcc.jar and db2jcc_license_cu.jar files from the ctgMX\lib folderwhich is in the WebSphere Application Server home directory. For example,C:\Program Files\IBM\WebSphere\AppServer.
“Database configuration recovery” on page 212Database objects created before running the Control Desk installation programmust be deleted after a failed installation before the Control Desk installationprogram is run again.
Removing files from the systemIf an uninstallation program is unavailable due to failed installation, product filesmust be manually removed from the system.
About this task
Remove files from the system by completing the following steps:
Procedure1. Ensure that you are logged in to the system with the same user ID used to start
the product installation program.2. Manually delete the Control Desk home directory. For Windows, the default
location of this directory is C:\IBM\SMP. For UNIX systems, this directory is/opt/IBM/SMP.
222 IBM Control Desk: Installation Guide (IBM WebSphere)

Chapter 15. Starting and stopping middleware
Use this information to start and stop middleware when necessary.
There might be occasions when you have to stop or restart middleware.
Restarting middleware on WindowsThis procedure describes how to restart middleware on Windows, if you mustrestart any middleware services.
About this task
To properly start middleware products on Windows, use the following scripts inthe order in which they are listed:
Procedure1. Log in as a user with Administrative permissions.2. If you installed DB2, start ctginst1.
a. Click Start, and select Run.b. Type services.msc, and click OK.c. Select DB2 - DB2COPY1 - CTGINST1-0, and click Start the service.
Alternatively, you can use the db2start command from a command line to startCTGINST1.
3. If you installed IBM Tivoli Directory Server, start the IBM Tivoli DirectoryServer Admin Daemon.a. Click Start, and select Run.b. Type services.msc, and click OK.c. Select IBM Tivoli Directory Admin Daemon V6.3 - idsccmdb, and click Start
the service.
Alternatively, you can use the following command from the command line tostart the IBM Tivoli Directory Server admin daemon:idsdiradm -I idsccmdb
4. If you installed IBM Tivoli Directory Server, start the IBM Tivoli DirectoryServer instance.a. Click Start, and select Run.b. Type services.msc, and click OK.c. Select IBM Tivoli Directory Server Instance V6.3 - idsccmdb, and click
Start the service.
Alternatively, you can use the following command to start the IBM TivoliDirectory Server instance:idsslapd -I idsccmdb
Important: The IBM Tivoli Directory Server Instance must remain as a manualstartup type. It must be started manually to synchronize correctly with thedatabase in the context of Control Desk.
5. If you installed WebSphere Application Server, start Domain Manager
© Copyright IBM Corp. 2014 223

a. Click Start, and select Run.b. Type services.msc, and click OK.c. Select IBMWAS70Service - ctgCellManager01, and click Start the service.
Alternatively, you can use the following command from the command line tostart the domain manager:WAS_HOME\profiles\ctgDmgr01\bin\startManager.bat
6. If you installed WebSphere Application Server, start Nodea. Click Start, and select Run.b. Type services.msc, and click OK.c. Select IBMWAS70Service - nodeagent, and click Start the service.
Alternatively, you can use the following command from the command line tostart the node:WAS_HOME\profiles\ctgAppSvr01\bin\startNode.bat
7. If you installed WebSphere Application Server, start MXServer. If you created aservice for starting the MXServer application server, you can use the Servicescontrol panel to start and stop it. Alternatively, you can use the followingcommand from the command line to start the application server:WAS_HOME\profiles\ctgAppSrv01\bin\startServer.bat MXServer
8. If you installed WebSphere Application Server, start IBM HTTP Server andwebserver1.a. Click Start and select Run.b. Type services.msc, and click OK.c. Select IBM HTTP Server 7.0, and click Start the service.
Alternatively, you can type apache from the command line to start the HTTPServer.
Restarting middleware on UNIXMiddleware services on Linux and AIX platforms occasionally must be restarted,such as when a reboot occurs. Middleware servers and services must be activebefore running the Control Desk installation program.
About this task
To properly start middleware products on UNIX, perform the following steps:
Procedure1. Log in as root.2. Start servers by using the following scripts in the order in which they are
listed:
If you installed DB2, start ctginst1 instancesu - ctginst1 -c db2start
If you installed IBM Tivoli Directory Server, start IBM Tivoli DirectoryServer Admin Daemon
<ITDS_HOME>/sbin/idsdiradm -I idsccmdb
If you installed IBM Tivoli Directory Server, start IBM Tivoli DirectoryServer daemon
<ITDS_HOME>/sbin/idsslapd -I <instancename>
224 IBM Control Desk: Installation Guide (IBM WebSphere)
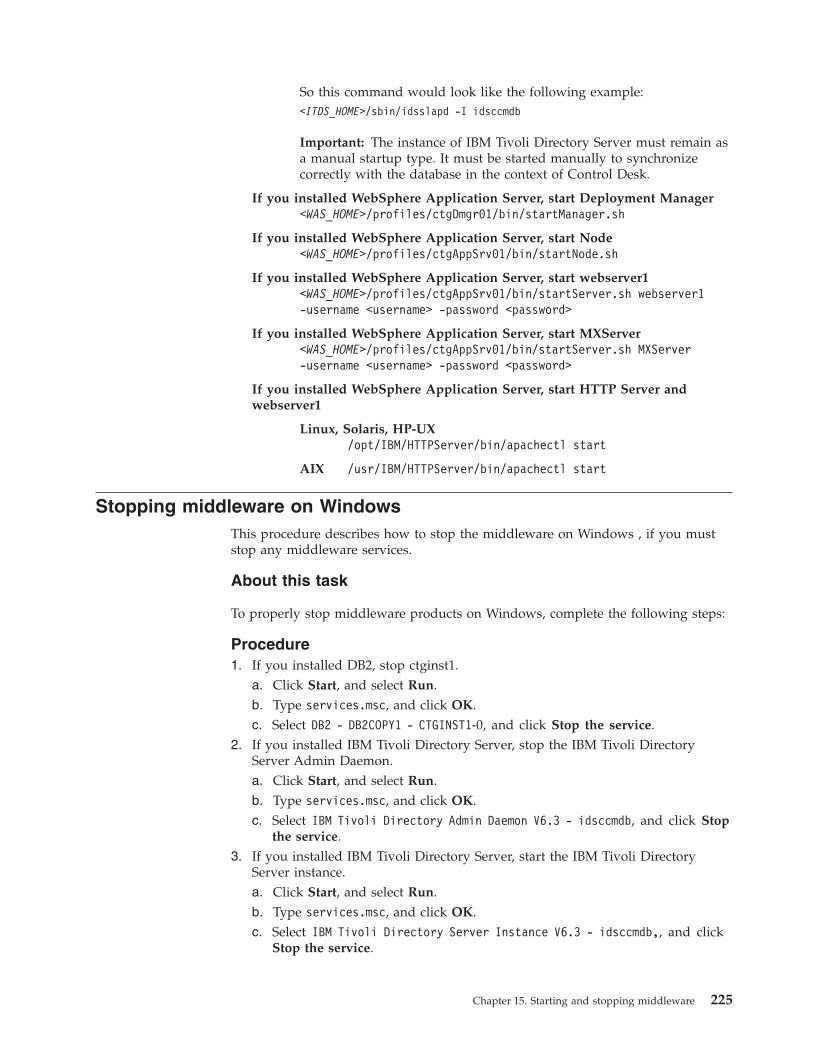
So this command would look like the following example:<ITDS_HOME>/sbin/idsslapd -I idsccmdb
Important: The instance of IBM Tivoli Directory Server must remain asa manual startup type. It must be started manually to synchronizecorrectly with the database in the context of Control Desk.
If you installed WebSphere Application Server, start Deployment Manager<WAS_HOME>/profiles/ctgDmgr01/bin/startManager.sh
If you installed WebSphere Application Server, start Node<WAS_HOME>/profiles/ctgAppSrv01/bin/startNode.sh
If you installed WebSphere Application Server, start webserver1<WAS_HOME>/profiles/ctgAppSrv01/bin/startServer.sh webserver1-username <username> -password <password>
If you installed WebSphere Application Server, start MXServer<WAS_HOME>/profiles/ctgAppSrv01/bin/startServer.sh MXServer-username <username> -password <password>
If you installed WebSphere Application Server, start HTTP Server andwebserver1
Linux, Solaris, HP-UX/opt/IBM/HTTPServer/bin/apachectl start
AIX /usr/IBM/HTTPServer/bin/apachectl start
Stopping middleware on WindowsThis procedure describes how to stop the middleware on Windows , if you muststop any middleware services.
About this task
To properly stop middleware products on Windows, complete the following steps:
Procedure1. If you installed DB2, stop ctginst1.
a. Click Start, and select Run.b. Type services.msc, and click OK.c. Select DB2 - DB2COPY1 - CTGINST1-0, and click Stop the service.
2. If you installed IBM Tivoli Directory Server, stop the IBM Tivoli DirectoryServer Admin Daemon.a. Click Start, and select Run.b. Type services.msc, and click OK.c. Select IBM Tivoli Directory Admin Daemon V6.3 - idsccmdb, and click Stop
the service.3. If you installed IBM Tivoli Directory Server, start the IBM Tivoli Directory
Server instance.a. Click Start, and select Run.b. Type services.msc, and click OK.c. Select IBM Tivoli Directory Server Instance V6.3 - idsccmdb,, and click
Stop the service.
Chapter 15. Starting and stopping middleware 225

4. If you installed WebSphere Application Server, stop IBM HTTP Server andwebserver1.a. Click Start and select Run.b. Type services.msc, and click OK.c. Select IBM HTTP Server 7.0, and click Stop the service.
5. If you installed WebSphere Application Server, start Domain Managera. Click Start, and select Run.b. Type services.msc, and click OK.c. Select IBMWAS70Service - ctgCellManager01, and click Stop the service.
6. If you installed WebSphere Application Server, stop servers by using thefollowing scripts in the order in which they are listed:
Stop Node<WAS_HOME>\profiles\ctgAppSvr01\bin\stopNode.bat
Note: If this process is configured to run as a service, then stop theservice:a. Click Start > Services > Control Panel.b. Click IBM WebSphere Application Server V7.0 - nodeagent.c. Right click and click Stop.
Stop MXServer<WAS_HOME>\profiles\ctgAppSrv01\bin\stopServer.bat MXServer-username <username> -password <password>
Note: Unless you changed the installation locations, the following are thedefault values:
<HTTP_SERVER_HOME> is C:\Program Files\IBM\HTTPServer\bin
<WAS_HOME> is C:\Program Files\IBM\WebSphere\AppServer
“Configuring the WebSphere Application Server Network Deploymentapplication server to run as a Windows service” on page 256Configuring the WebSphere Application Server Network Deployment to run asa Windows service can make it more convenient to manage.
Stopping middleware on Linux and AIXThis procedure describes how to stop the middleware on Linux and AIX platforms,if you must stop any middleware services.
About this task
To properly stop middleware products on Linux and AIX, perform the followingsteps:
Procedure1. Log in as root.2. If you installed WebSphere Application Server, stop servers by using the
following scripts in the order in which they are listed:
If you installed DB2, stop ctginst1 instancesu - ctginst1 -c db2stop
226 IBM Control Desk: Installation Guide (IBM WebSphere)

If you installed IBM Tivoli Directory Server, stop IBM Tivoli DirectoryServer Admin Daemon
<ITDS_HOME>/sbin/idsdiradm -h idsccmdb
If you installed IBM Tivoli Directory Server, stop IBM Tivoli DirectoryServer daemon
<ITDS_HOME>/sbin/ibmslapd -I <instancename> -k
Important: The instance of IBM Tivoli Directory Server must remain asa manual startup type. It must be started manually to synchronizecorrectly with the database in the context of Control Desk.
If you installed WebSphere Application Server, stop HTTP Server andwebserver1
Linux, Solaris, HP-UX/opt/IBM/HTTPServer/bin/apachectl stop
AIX /usr/IBM/HTTPServer/bin/apachectl stop
If you installed WebSphere Application Server, stop Deployment Manager<WAS_HOME>/profiles/ctgDmgr01/bin/stopManager.sh
If you installed WebSphere Application Server, stop node<WAS_HOME>/profiles/ctgAppSrv01/bin/stopNode.sh -username<username> -password <password>
If you installed WebSphere Application Server, stop webserver1<WAS_HOME>/profiles/ctgAppSrv01/bin/stopServer.sh webserver1-username <username> -password <password>
f you installed WebSphere Application Server, stop MXServer<WAS_HOME>/profiles/ctgAppSrv01/bin/stopServer.sh MXServer-username <username> -password <password>
Chapter 15. Starting and stopping middleware 227

228 IBM Control Desk: Installation Guide (IBM WebSphere)

Chapter 16. Process solution package installation methods
Included within Control Desk are common installation programs that provide youwith the ability to manage the software life cycle of Control Desk processsolutions, including functions to query, install, upgrade, and uninstall processsolution packages. These common installation programs are collectively known asthe process solution installation programs.
Control Desk provides a flexible approach for incremental deployment of servicemanagement functionality using separately packaged process solutions. Processsolutions can be partitioned into Process Manager Products and IntegrationModules.
Process solution packages can be installed and deployed using two mechanisms:
Process Solution Installation WizardThe process solution installation wizard provides you with an interface forinstalling process solution packages.
Process Solution Command Line InterfaceThe process solution command-line interface allows you to install processsolution packages from a command line.
Control Desk must have been deployed, including post-installation steps, beforethe installation and deployment of additional process managers.
Software life cycle operationsProcess solutions are software components with versions. The process solutioninstallation programs support various software life cycle operations that can beapplied against process solutions.
The following software life cycle operations are available:v The Base Install operation installs and deploys a new process solution into your
Control Desk environment.v The Add Feature and Modify Feature operations add or remove specific features of
a package after the package has been installed.v Once installed, a process solution can be updated in several ways. An
Incremental Update or Upgrade operation modifies the existing installed processsolution and changes its version. Often a process solution fix pack is appliedusing the Incremental Update operation.
v Another operation that can be used to update an installed process solution is theApply Fix operation. This operation is used to install individual interim fixes orpatches to a currently installed process solution.
v Some Incremental Updates or Fixes are designed to be able to be removed orbacked off. The Undo operation is used to remove the effects of an IncrementalUpdate operation and return the process solution to its previous version andstate. The Undo Fix operation removes a currently installed interim fix from aprocess solution.
v The Uninstall operation removes a currently installed process solution.
© Copyright IBM Corp. 2014 229

Process solution packagesA process solution package is a self-contained archive file of installation artifacts anddeployment logic that can be deployed using the process solution installationprograms.
Installation artifacts are the files and content that are installed into your ControlDesk environment. These artifacts enable the services management functionality ofthe Process Manager Product or Integration Module. For example, a ProcessManager Product provides J2EE application content and database content.
The deployment logic consists of the actions that are carried out in order to deploythe process solution into the Control Desk environment. These actions includebuilding and deploying J2EE applications, running database scripts that load theprocess solution content into the database, and adding users and groups forsecurity. Additionally, optional sample data can be installed.
Control Desk packages are automatically installed when Control Desk is installed.
Package typesClosely related to the concept of the software life cycle operation is softwarepackage type.
The process solution installation programs are able to process the followingpackage types:v A Base Install Package is required to install a new process solution using the Base
Install operation.v An Incremental Update Package is required when performing an Upgrade
operation.v A Fix Package is required when applying an interim fix to a process solution.v A Full Update Package can be used in two separate operations. It can be used to
perform a Base Install operation if no instance of the process solution iscurrently installed or it can be used to perform an Upgrade operation on acurrently installed process solution.
v An Aggregation package consist of multiple PSI installable packages that can bedeployed as one package in a single process solution installation client CLI orinterface session.
The process solution installation programs ensure that the appropriate packagetype is processed for any given operation.
The Process Solution Command Line Interface issues appropriate messages whenan inappropriate package type is specified for a life cycle operation. For example, amessage would be issued if a Fix Package was specified for a Base Installoperation. You can use the showavail action of the Process Solution Command LineInterface to determine the package type associated with a process solutioninstallable package.
The Process Solution Installation Wizard determines the operation to employ basedon the type of the package and the current state of the installed components. Forexample, if you select to deploy a Full Update Package, the Process SolutionInstallation Wizard performs an Upgrade operation if a suitable base version of theprocess solution is already installed and a Base Install operation if no suitable base
230 IBM Control Desk: Installation Guide (IBM WebSphere)

version is detected. When using the Process Solution Installation Wizard, you canview the package type for the package you selected on the Package ValidationResults panel.
The following table highlights the supported operations with their requiredpackage types:
Table 27. Operations and package types
Operation Package Type
Base Install Base Install Package or Full Update Package
Incremental Update/Fix Pack Incremental Update Package or Full UpdatePackage
Apply Interim Fix Fix Package
Aggregation packagesThis section contains information about aggregation packages.
A process solution package can be composed from other process solution packages.This technique allows construction of single offering-level packages that may bedeployed using a single session with the process solution installation programs.Such a package is known as a process solution aggregate package. The subpackages that are bundled within a process solution aggregate package are knownas child packages.
Process solution aggregate packages are deployed using the same mechanismsused to deploy non-aggregate packages. All actions defined within the processsolution command-line interface can be applied to a process solution aggregatepackage. Similarly, the process solution installation wizard can be used to baseinstall, upgrade, and apply fixes to a process solution aggregate package.
Process solution aggregate packages support the same package types (Base Install,Full Update, Incremental Update, and Fix) and the same life cycle operations asnon-aggregate packages.
Process solution aggregate packages often expose their child packages as selectablefeatures of the aggregate. You can selectively deploy only the pieces of theaggregate that you prefer.
A process solution aggregate has a version, unique identifier, and display nameinformation just like a non-aggregate package. When you use the showinstalledaction of the process solution command-line interface, the output includesinformation about the installed parent aggregate package. Out also containsinformation about the child packages within that parent aggregate package thathave also been installed.
Determining which process solution installation program to useThe process solution installation programs provided each have unique benefits andboth must be used in the appropriate scenario.
Consider the following facts when deciding which process solution installationprogram to use.
Chapter 16. Process solution package installation methods 231

v The Process Solution Installation wizard provides a user experience typical ofmost software installation programs. You select the process solution package toinstall and provide additional installation options from wizard panels. TheProcess Solution Installation wizard is an attended installation.
v The Process Solution Command Line Interface provides a simple command-linesyntax for specifying the life cycle operation to perform and the package againstwhich the operation is performed. You enter the Process Solution CommandLine Interface command and messages and command output are displayed tothe command line as the command is processed.
v All functions and operations are available in the Process Solution CommandLine Interface program. Only a subset of those functions is supported in theProcess Solution Installation Wizard. Generally, use the Process SolutionInstallation wizard if it supports the operation you must perform.
v The Process Solution Installation Command Line Interface is useful where yourequire an unattended or silent installation. The Process Solution InstallationCommand Line Interface passes return codes detailing the success of thecommand back to the operating system. The Process Solution InstallationCommand Line Interface is suitable for use in a higher-level deploymentautomation package or script.
Supported operations for the process solution installation programsThere are multiple operations and functions that are supported by the ProcessSolution Installation wizard and Process Solution Command Line Interface.
The following table highlights the operations and functions that are supported bythe Process Solution Installation wizard and Process Solution Command LineInterface.
Table 28. Process solution operations
OperationSupported by CommandLine Interface
Supported by Installationwizard
List Installed Packages Yes No
List Available Packages Yes No
Base Installation Yes Yes
Incremental Update/Fix Pack Yes Yes
Full Update Yes Yes
Undo IncrementalUpdate/Fix Pack
Yes No
Uninstall Yes No
Apply interim fix Yes Yes
Undo interim fix Yes No
List Installed Fixes for aPackage
Yes No
Refresh language support Yes No
Load Language Support Files Yes Yes
Add Features Yes Yes
Remove Features Yes Yes
Show Available Features Yes Yes
232 IBM Control Desk: Installation Guide (IBM WebSphere)

Note: The process solution installation programs allow an uninstall action to beinitiated against a package. However, not all packages support the uninstallaction. If an uninstall action is initiated against a package that does not supportthis action, a message detailing this condition is shown. If you want to restore yourenvironment to the state before the installation of the Control Desk processmanagers, you must back up your affected middleware servers before running theControl Desk installation program.
Before using the process solution installation programsReview the following prerequisite information before using process solutioninstallation programs.
When you perform a deployment operation using the process solution installationprograms, you are running actions that modify the configuration and content ofyour J2EE, database, and directory middleware servers. Review the following stepsbefore starting the process solution installation programs.
Have Middleware Login Information AvailableThe process solution installation programs require access to middlewareservers in order to automate the deployment of the process solutionpackage. You must know the administrative user IDs and passwords forthe affected middleware servers. The actual middleware servers whoselogin information is required depends on the process solution packagebeing installed. The process solution installation programs ensure that anyrequired login information is specified before continuing with thedeployment operation.
Backup Middleware Servers and Administrative WorkstationYou should create backups for affected J2EE, database, and directoryservers before you deploy a process solution package using the processsolution installation programs. Backup the installation folder of theadministrative workstation, C:\IBM\SMP, for example. Also, backup thedeployment engine registry.
Ensure Middleware Servers Are StartedStart any affected middleware servers before running the process solutioninstallation programs. Before the actions associated with a package arestarted, the process solution installation programs attempts to connect tothe middleware servers using the middleware login information that youspecify. If the targeted middleware servers are not started or if connectionsto the middleware servers cannot be established with the specifiedmiddleware login information, then the process solution installationprograms displays error messages and not continue on with thedeployment actions.
“Backing up the Deployment Engine database” on page 15These instructions are for backing up the Deployment Engine database.Backups are used to restore the database to the state it was before installing.
Managing process solution deployment from the administrativeworkstation
Process solution deployment is managed from the administrative workstation.
Chapter 16. Process solution package installation methods 233

Process solution installation programs are installed on the administrativeworkstation when the Control Desk is installed. In addition to starting processsolution installation programs from the administrative workstation, you must alsohave access to any process solution packages from the administrative workstation.
The administrative workstation provides a deployment hub from which theprocess solution packages are deployed. In order to automate deployment, theprocess solution installation programs connects to either local or remotemiddleware servers from the administrative workstation
Typical deployment operationProcess solution deployment is integrated tightly with Control Desk deployment
Process solutions use the Control Desk deployment model. In this model, asprocess solution packages are deployed, database content and metadata in thepackage is loaded into the Maximo database and the Maximo core J2EEapplications are redeployed with Java code provided in the process solutionpackage. This model effectively merges the features of the process solution packageinto the Maximo database and Maximo J2EE application.
High-level deployment steps are:1. Files in the process solution package are unpacked onto the Maximo
installation directory on the Control Desk administrative workstation. TheMaximo installation directory contains the Maximo content for the processsolution being deployed and any other currently installed Control Desk processsolutions or Maximo applications and industry solutions.
2. J2EE applications are rebuilt on the Control Desk administrative workstation tocontain the features of the process solution package. This feature includes Javaclasses, report definitions, and other artifacts.
3. The process solution installation programs deploy the update J2EE applicationsto the J2EE application server. This server can be local or remote to the ControlDesk administrative workstation.
4. Database content scripts associated with the package being installed areprocessed on the Control Desk administrative workstation. This results inupdates to the database.
Important: When you deploy process solution packages, the updates are made tothe J2EE and database servers, which include redeploying the Control Deskapplication. Deployment must be scheduled for a time when a brief interruption ofservice can be tolerated, such as during a scheduled maintenance period.
Selectable featuresThis section contains information about managing selectable content using features.
A process solution package might define one or more features that representuser-selectable, optional content. Examples of typical features include globalizationand samples. Process solution installation methods support operations on features,including capabilities for querying, adding, and removing features.
Feature support in a process solution package is optional. Features are alsopackage-specific. The process solution installation methods examine the processsolution install package and ensure that only features defined within the packageare able to be manipulated.
234 IBM Control Desk: Installation Guide (IBM WebSphere)

Attributes of a Feature
Associated with every feature are the following attributes:v Feature Identifier represents a non-localized name by which the feature is
uniquely identified within its package. When using the process solutioncommand-line interface, the Feature Identifier is used to specify the feature toadd or remove.
v Feature Display Name is a localized label for the feature.v Parent Identifier identifies the parent feature associated with a feature. A feature
with no parent is termed a top-level feature.v Install State indicates whether the feature is installed.v Required Attribute indicates whether the feature is a required feature. A required
feature is a feature that must be installed if its parent feature is installed and cannot be installed if its parent feature is not installed. A top-level feature that isrequired is always installed.
Operations Associated with Features
Both the process solution command-line interface and process solution installationwizard provide features for managing features associated with a process installpackage. This section describes those capabilities.
Installing Features during a Base InstallIf a process solution package defines features, you can select the features toinstallation during the base installation of the package.
Installing Features Using the wizardFor the process solution installation wizard, a Feature SelectionPanel is displayed after license acceptance processing if thepackage being deployed supports features. The Feature SelectionPanel displays a tree where the nodes in the tree are features andthe tree nesting represents parent feature and child featurerelationships. Each node has a check box that indicates theselection state of the feature. You select a feature to be installed byselecting the check box for the feature.
Installing Features Using the Command Line InterfaceFor the process solution command-line interface, the -addfeatlistparameter on the install action allows you to specify the featuresto be installed during the base installation of the package. Thevalue specified for this parameter is a colon separated list ofFeature Identifiers representing the features to install.
Adding FeaturesAfter the base installation of a package, you can incrementally add featuresif there exists at least one feature not already installed for that package.
Adding Features Using the wizardWhen using the process solution installation wizard, if the packageis already installed but has at least one feature not alreadyinstalled, you can elect to install additional features after thePackage Validation Panel is displayed.
Note that the Deployment Engine does not support bothincremental feature add and removal in the same deploymentoperation. If the state of the installed features on a package is suchthat features can be both added or removed, then the Add or
Chapter 16. Process solution package installation methods 235

Remove Features Panel is displayed that allows you to selectwhether you want to add or remove features from the package.
If you select to install additional features from the Add or RemoveFeatures Panel, the Feature Selection Panel is again displayed withthe currently installed features checked and disabled. You cannotuninstall currently installed features in this mode, but you canselect additional features for installation.
Adding Features Using the Command Line InterfaceFor the process solution command-line interface, a newmodfeatures action allows you to install features to an alreadyinstalled process solution package. The parameters on this actionare like the install action. You specify the path of the processsolution package and required middleware user IDs andpasswords. The -addfeatlist parameter on the modfeatures actionallows you to specify the features to be added. The value specifiedfor this parameter is a colon separated list of Feature Identifiersrepresenting the features to be installed.
Removing FeaturesAfter the base installation of a package, you can incrementally remove oruninstall features if there exists at least one feature already installed forthat package.
Feature uninstallation is OptionalSupport for uninstallation of features is optional. A processsolution package that supports incremental feature installationmight not support uninstallation of its features. If the processsolution package does not support uninstallation of its features,then the process solution installation programs do not permit youto uninstall features on the package. The process solutioninstallation wizard does not allow you to initiate featureuninstallation operations against the package. The process solutioncommand-line interface will issue messages if uninstallationoperations are attempted against a package that does not supportfeature uninstallation.
Removing Features Using the wizardWhen using the process solution installation wizard, if the packageis already installed and has at least one feature already installed,you can elect to uninstall features after the Package ValidationPanel is displayed.
As described above, if the state of the installed features on apackage is such that features can be both added or removed, thenthe Add or Remove Features Panel is displayed that allows you toselect whether you want to add or remove features from thepackage.
If you select to uninstall currently installed features from the Addor Remove Features Panel, the Feature Selection Panel is againdisplayed with the currently installed features checked. You maynot install new features in this mode, but you can clear currentlyinstalled features to trigger the uninstallation operation againstthose features.
Removing Features Using the Command Line InterfaceFor the process solution command-line interface, the modfeaturesaction described above also allows you to uninstall features that
236 IBM Control Desk: Installation Guide (IBM WebSphere)

are already installed on a currently installed process solutionpackage. The -delfeatlist parameter on the modfeatures actionallows you to specify the features to be uninstalled. The valuespecified for this parameter is a colon separated list of FeatureIdentifiers representing the features to be uninstalled.
Showing Feature Information for a PackageThe process solution installation programs allow you to displayinformation about the supported and installed features for a processsolution package.
Showing Feature Information Using the WizardThe Feature Selection Panel of the process solution installationwizard displays the feature tree of a process solution package. Thispanel depicts the parent-child relationships between the featuresand also displays whether the features are currently installed.
Showing Feature Information Using the Command Line InterfaceFor the process solution command-line interface, the showfeaturesaction allows you to display information about the featuresassociated with a process solution package. Input to the action isthe path to the process solution package. The output lists thefeature attributes for the features defined for the package. Thoseattributes are detailed in “Attributes of a Feature” on page 235.
Feature Selection Processing Rules and Behavior
When using the process solution installation programs to manage the features, theactual collection of features to install or uninstall are derived using a combinationof the input selections/deselections you specify and a set of feature selectionsrules. For example, you can select a single feature for installation, but, due tofeature selection rule processing, additional features can also be installed.
When you install or uninstall features, the process solution installation programsenforce these feature selection rules to ensure that the derived set of featureselections are valid and meet all the feature selection rules.
This section highlights the feature selection rules that are enforced by the processsolution installation programs.
Summary of Feature Selection Rules
1. Features can be arranged in a parent-child tree structure. Child featurescannot be installed unless their parent feature is installed.
2. A feature can be marked as required which indicates that the featuremust be installed if its parent is installed. A top-level feature that ismarked required is always installed.
3. Features that are marked required can never be selected/deselectedexplicitly by you. The selection state of a required feature is alwaysderived from the selection state of their parent feature.
4. A feature can have real content (files/actions) or can be a nestingfeature which acts as a parent feature for other child features.
5. A Nesting Feature cannot be installed unless at least one of its childfeatures (with content) is also installed. This violation is detectedduring Feature Selection Validation. Message CTGIN0200E is issuedwhen this rule is violated.
Chapter 16. Process solution package installation methods 237
6. Special select-if-selected rules can be coded into the package to assertprerequisite dependencies between features. These rules are specific toa particular package. For example, select-if-selected rules can be definedin a package that ensures that Feature A is installed if Features B or Care installed.
Feature Selection Processing
1. When a child feature is selected, all its ancestor features (Parent,Grandparent, and so on) are selected as well.
2. When a parent feature is selected, any of its required child features areautomatically selected.
3. When a feature is selected, select-if-selected rules are evaluated and anydependent features are automatically selected.
4. The rules are applied against all features in the tree until there are nomore features to select.
Feature Deselection Processing
1. When a parent feature is cleared, all its descendant features (Childfeatures, Grandchild features, and so on) are cleared as well.
2. When a feature is cleared, all select-if-selected rules targeting thatfeature are evaluated and any dependent features are cleared.
3. These rules are applied against all features in the tree until there are nomore features to clear.
Feature Selection ValidationThe process solution installation programs enforce feature selection rulesby performing a feature selection validation process. This is the process ofderiving the complete set of features that are to be processed anddetermining if the user input violates any rules. If any feature ruleviolations are detected, then the operation to install or uninstall features isnot carried out by the process solution installation programs.
Feature Validation Using the WizardWhen you use the process solution installation wizard, most rulesare dynamically enforced as selections/deselections are madeagainst the feature tree on the Feature Selection Panel. Forexample, when you select a child feature, all of its ancestor featuresare automatically selected.
Additional rules are validated when you have finished makingyour selections and attempt to move to the next panel. If anyviolations of the rules are detected, messages describing theviolations are displayed on the Feature Selection Panel and youmust correct your input before proceeding.
Feature Validation Using the Command Line InterfaceFor the process solution command-line interface, the same featureselection rules are enforced and the complete set of features toinstall or uninstall is derived using those rules.
For example, if you specify only a child feature in your -addfeatlistparameter, the PSI CLI adds all ancestor features to the list that areactually installed. Similarly, if you specify a parent Feature on the-delfeatlist parameter, then any installed child features under thatparent feature is also uninstalled.
238 IBM Control Desk: Installation Guide (IBM WebSphere)
Additionally, the process solution command-line interface alsoperforms additional checks against the features you specify. Thesechecks include:1. Ensuring that any feature identifier specified is a valid
identifier for the package.2. Ensuring that features specified using the -addfeatlist
parameter are not already installed for the package.3. Ensuring that features specified using the -delfeatlist parameter
are already installed for the package.
Deferring J2EE and database configurationYou can defer the automated redeployment of J2EE applications and updates to theMaximo database for process solution packages.
There are several reasons for why you might want to elect to skip automateddeployment.v Your organization might have policies that prohibit remote access and update of
the J2EE application, database, or directory servers from the Control Deskadministrative workstation.
v You might not have the authority to perform administrative functions againstthe targeted middleware servers.
v Your organization might have existing procedures in place for how applicationsget deployed to middleware servers.
Using the Installation WizardWhen using the Process Solution Installation wizard, you can defer J2EEand database-related configuration steps. You defer them by selecting thedefer options on the Package Installation Options panel.
Using the Command Line InterfaceWhen using the Process Solution Command Line Interface, you can deferJ2EE and database-related configuration steps by specifying the-skipj2eecfg and -skipdbcfg command-line flags.
You might want to defer the automatic J2EE deployment if you are installingmultiple process solution packages in sequence. The regeneration andredeployment of the Maximo J2EE applications is processing and time intensive.
You can improve overall deployment time by performing the regeneration andredeployment of J2EE applications after all packages have been unpacked to theadministrative workstation.
For example, assume that you are installing Process Manager Products A, B, and Cas part of your deployment scenario. You would skip the regeneration/redeployment of the J2EE applications when deploying Process Manager ProductsA and B. When deploying Process Manager Product C, you would specify theoptions to perform the redeployment of the Maximo J2EE applications.
If you do not automate the update of the Maximo database, do not use the processsolution installation program with the -loadsampdata option. The sample data isnot loaded.
Always defer the configuration of the J2EE and database together. Never defer oneand not the other.
Chapter 16. Process solution package installation methods 239
Deferring J2EE configuration while configuring the database causes the database tobe updated updated with the content of the process solution package. However,the J2EE applications are not regenerated and redeployed with the content of thatprocess solution package. You can browse to the application associated with theprocess solution package. However, when you create records with thoseapplications, you get errors. The applications contained in the installed packageremain unusable until the Maximo J2EE applications are regenerated andredeployed. Deferring database configuration while configuring the J2EE servercauses J2EE applications to be regenerated and redeployed with the content of theprocess solution package. However, the database is not updated with the contentof that process solution package. Applications associated with the process solutionpackage appear under the list of applications displayed from Help → System. Theseapplications do not appear in the list of selectable applications. The applicationscontained in the installed package remain unusable until the databaseconfiguration task is completed.
If you must manually rebuild and redeploy the Maximo EAR file, see the SystemAdministrator Guide for instructions.
Manually completing deploymentThis procedure provides task information for manually deploying the processsolution package when opting out of automatic middleware configuration.
About this task
When you elect to defer automated configuration, you are responsible for manuallystarting the configuration operations required to complete the deployment of theprocess solution package. Until the manual configuration steps are completed, theprocess solution package is in an incomplete and unusable state.
The following procedure assumes that you have run the process solutioninstallation program and deferred the J2EE and database configuration duringpackage deployment.
To manually deploy the process solution package, complete the following steps:
Procedure1. Log in to WebSphere Application Server Network Deployment, browse to
Servers > Application Servers, and stop the MXServer server.2. Update the Maximo database:
<MAXIMO_HOME>\tools\maximo\updatedb -sl
3. Rebuild the maximo.ear and maximoiehs.ear files.<MAXIMO_HOME>\deployment\buildmaximoear<MAXIMO_HOME>\deployment\buildmxiehsear
4. Uninstall the MAXIMO and MAXIMOIEHS applications from withinWebSphere Application Server Network Deployment.
5. Reinstall the MAXIMO and MAXIMOIEHS applications within WebSphereApplication Server Network Deployment.
6. Restart the MXServer.
240 IBM Control Desk: Installation Guide (IBM WebSphere)

Pre-deployment system checkBefore the actions associated with a software life cycle operation are initiated, theprocess solution installation programs perform a system check activity. Associatedwith each process solution package are a set of requirements that must be satisfiedbefore the deployment operation is carried out. The system check is a process thatanalyzes the requirements to determine that all requirements have been satisfiedbefore continuing on with the deployment operation.
The actual requirements are specific to each process solution package.Requirements include disk space and memory consumption checks for the packageand dependency checks between a process solution package and other processsolution packages. When unsatisfied requirements are detected during the systemcheck, the process solution installation programs display messages that describethe failed requirements. Before trying the deployment operation again, you mustupdate your environment such that all requirements associated with the processsolution package are satisfied.
Bypassing Unsatisfied RequirementsUnder certain circumstances, you may find it necessary to bypass thesystem check processing and carry out a deployment operation even if oneor more requirements associated with the process solution package are notsatisfied. For example, a process solution package might have embeddedan incorrectly specified disk space check which would prohibit the packagefrom being installed on a system that has adequate free disk space requiredby the package.
Both process solution installation programs provide mechanisms that allowyou to bypass failed requirements and continue with the deploymentoperation.
Using the Installation wizardWhen using the Process Solution Installation wizard, a SystemCheck Failed panel displays messages for any failed requirements.From this panel, you can bypass the system check failures byselecting the check box entitled Ignore System Check Failures.When you select this check box, the Process Solution Installationwizard continues with the deployment of the process solutionpackage.
Using the Command Line InterfaceWhen using the Process Solution Command Line Interface, you canbypass unsatisfied system check requirements by specifying the-force command-line flag.
Package requirements represent criteria put in place to ensure a successfuldeployment. While you must not bypass any requirements normally, theprocess solution installation programs permit the following types ofrequirements to be bypassed:v Capacity and consumption checks, for example, disk space and memory
requirements for a package.v Prerequisite, corequisite, and exrequisite relationships defined for a root
package. For example, Package B might require that Package A isinstalled before Package B can be installed. You can force processing ofthe installation operation for Package B even if Package A is notcurrently installed.
v Property checks defined for the package, for example, a check of thetype of operating system on which the installation is being performed.
Chapter 16. Process solution package installation methods 241

v Any custom checks defined for the package.
Note: Prerequisite, corequisite, and exrequisite dependencies definedbetween fix packages cannot be overridden.
System check progress messagesDuring the processing of the system check, the IBM Autonomic ComputingDeployment Engine publishes events detailing the progress of the systemcheck. The process solution installation programs receive the events andconvert them into localized messages with identifier CTGIN0146I whichare displayed to the user. The messages include the label for the checkbeing performed, the number of completed checks, and the total number ofchecks that are to be performed.
The IBM Autonomic Computing Deployment Engine is not able tocompute the total number of checks to be carried out before any checks areprocessed. The counter associated with the total number of checks to beperformed can increase during system check processing. For example, thefollowing set of messages might be issued during the system checkprocessing. The counter associated with the total number of checks is notfixed, but recalculated and increased during system check processing.CTGIN0146I: Completed system check for check "1" of "2". Check display name:"Check_Common_PMP_Installed".CTGIN0146I: Completed system check for check "2" of "3". Check display name:"Check_LTA_WAR_Package_Installed".CTGIN0146I: Completed system check for check "3" of "4". Check display name:"Check_Foundation_PM_Package_Installed".CTGIN0146I: Completed system check for check "4" of "4". Check display name:"MaximoDiskSpaceCheck".
Installing process managers using the process solution installationwizard
Process managers can be installed using the process solution installation wizard
About this task
Complete the following steps to install a process solution package into ControlDesk using the process solution installation wizard:
Procedure1. Start the process solution installation program by navigating to the
<install_home>\bin directory of your Control Desk installation, and usingsolutionInstallerGUI.bat. As with the Process Solution InstallationCommand Line Interface Client, the Process Solution Installation InstallAnywhere installation program starts on the administrative workstation. Thelaunch script is deployed and configured by the Control Desk installationprogram. No post-installation configuration is required. StartsolutionInstallerGUI.bat and the wizard is started.Alternatively, if you elected to create program shortcuts during the ControlDesk installation, a link to the Process Solution installation program UI can beavailable from the Start menu, a desktop icon, or a quick launch bar.
2. Select a language for your installation, and then click OK.3. From the Introduction panel, click Next.
242 IBM Control Desk: Installation Guide (IBM WebSphere)

4. From the Choose PSI Package panel, click Choose and navigate to the packagefile you want to deploy, select it, and then click Open. The PSI packageselected can be a base install, incremental update, full update, or fix packageOnce a package has been selected and you click Next, the process solutioninstallation program performs a series of validation checks to verify that thepackage you selected is valid. The system is checked to ensure that thepackage has not already been deployed, or, if the package is intended as anupgrade, the system is checked to ensure that the base package has alreadybeen installed.
5. From the Package Validation Results panel, review and verify the informationdisplayed, and then click Next.
6. If this is the first time you have installed this process manager, the processsolution installation program license agreement window is displayed. Readthe license information and select I accept the terms in the license agreementif you agree with the terms. Click Next. If you are incrementally adding orremoving features from a previously installed process manager, you encounteran Add or Remove Features? panel where you declare whether you areadding or removing features from the process manager, followed by anotherpanel where you select which specific features you are adding or removing.
7. If this is the first time you have installed this process manager and it hasselectable features, you are prompted by the Feature Selection panel to selector clear features you would like to install or uninstall from the previouslydeployed package.
8. From the Middleware Login Information panel, enter the credentials for whichyou are being prompted, and then click Next. The contents of this panel areconstructed dynamically, depending on the type of package you are installing.The package is queried to determine what middleware login credentials arenecessary to complete the installation of the package.Once you have entered the requested user IDs and passwords, the processsolution installation wizard validates the credentials by connecting to themiddleware servers using the supplied credentials.
9. After the credentials have been verified, a package options panel is displayedthat details the deployment options that the package supports. If the PSIinstallable package supports the Overwrite Customer Modified Data duringUpdate option, you can select it from this page. After you specify whichoptions are used, the process solution installation program will perform asystem check. to ensure that all system requirements necessary for thepackage to be installed are present. Click Next to advance.
10. From the Pre-Install Summary panel, review and verify the informationdisplayed, and then click Next. The process solution installation programbegins the package installation process. A progress panel informs you of thedeployment progress of the installation.
11. When the installation has completed successfully, from the PackageSuccessfully Deployed panel, click Next. If there is a package failure, amessage appears for the step that failed. If this was a Feature Add, orRemoval, a message displays indicating the feature was added or removedsuccessfully.
12. From the Install Another Package panel, select Install Another Package? andclick Done, to install another package. Otherwise, ensure that Install AnotherPackage? is cleared and click Done to exit the process solution installationwizard.
Chapter 16. Process solution package installation methods 243

Results
You might see an installation progress bar displayed briefly after you click Done.The Process Solution Installation wizard is actually terminating and no installationactivities are being performed. The deployment of the Process Solution Packageyou were installing has already completed and the progress bar can be safelyignored.
Process solution installation client command-line interfaceUse the process solution installation client command-line interface (CLI) to query,install, upgrade, and uninstall process solution packages.
Process solution packages can consist of process modules and integration modules.
Starting the process solution installation client CLIA launch script is provided for starting the Process Solution Command LineInterface. The script is named solutionInstaller.bat and is deployed andconfigured in the <install_home>\bin directory. The Process Solution CommandLine Interface is used on the administrative workstation. The launch script isdeployed and configured by the Control Desk installation program. Nopost-installation configuration is required. Start solutionInstaller.bat with thepreferred command string and the action is performed.
During processing of the command, the Process Solution Command Line Interfacewrites messages to the standard output of the command window from which thecommand was launched.
General syntaxGeneral syntax of starting the solution installation program.
solutionInstaller syntax
The syntax for starting solutionInstaller is:solutionInstaller.bat parameter-clause-1 parameter-clause-2 ... parameter-clause-n
v Each parameter-clause consists of either -parameterName parameterValue or-parameterName.
v -parameterName parameterValue is used for parameters that require a parametervalue.
v -parameterName is used for parameters that represent switches or flags which donot require a parameter value.
v parameterName represents the name of one of the supported parameters.v parameterNames are always prefaced with a dash.v parameterValue represents the value associated with a particular parameter name.v parameterValues that contained embedded spaces must be enclosed in double
quotation marks
Perform actionThe solution installation program uses an action parameter when interfacing withpackages.
A special parameter, -action, must be specified on each invocation ofsolutionInstaller. This parameter specifies the action or software life cycleoperation to be performed. Based on the value specified for this parameter,
244 IBM Control Desk: Installation Guide (IBM WebSphere)

additional parameters can be specified. For example, when -action showinstall isspecified, the type parameter must also be provided. The following table identifiesthe supported actions that can be specified for the Process Solution Command LineInterface.
Table 29. Process solution command-line interface actions
Operation Value of -action Parameter
List Installed Packages showinstalled
List Available Packages showavail
Base Install install
Incremental Update/Fix Pack upgrade
Undo Incremental Update/Fix Pack undo
Uninstall uninstall
Apply interim fix applyfix
Undo interim fix undofix
List Installed Fixes for a Package showfixes
Refresh Language Support Files for aPackage
refreshlangs
Add or Remove Features modfeatures
Show Available Features showfeatures
Summary of supported parametersThis section contains a summary of parameters supported by the command-lineinterface.
The collection of supported parameters for the Process Solution Command LineInterface is described in the following table.
Table 30. Process solution command-line interface supported parameters
Parameter Name Description
-action Specify the function or software life cycleoperation to perform.
-addfeatlist Specifies the list of features to be installed. Afeature is identified by its untranslatedEnglish Feature Identifier. Multiple featuresin the list are separated by a colon character.If any of the Feature Identifiers includes aspace, then the entire value for thisparameter must be enclosed in doublequotation marks.
-dbpwd Specifies the password of the database userID that is used to access the Maximodatabase.
-dbuser Specifies the database user ID that is used toaccess the Maximo database.
Chapter 16. Process solution package installation methods 245

Table 30. Process solution command-line interface supported parameters (continued)
Parameter Name Description
-delfeatlist Specifies the list of features to be deleted. Afeature is identified by its untranslatedEnglish Feature Identifier. Multiple featuresin the list are separated by a colon character.If any of the Feature Identifiers includes aspace, then the entire value for thisparameter must be enclosed in doublequotation marks.
-fixid Specifies the unique identifier of an interimfix/patch that you want processed.
-force Specifies whether to continue on with adeployment operation even if there are oneor more unsatisfied requirements associatedwith the package being processed.
-license Automatically accept the license agreementor be prompted for the acceptance orrejection of the license agreement by usingone of the following values: accept orprompt.
-loadlanguages Specifies whether options Language Supportfiles for the package must be loaded into theMaximo Database
-loadsampdata Specifies whether to load sample ordemonstration data associated with thepackage being processed.
-maxpwd Specifies the password of the Control Deskadministrative user that is used to access theControl Desk application.
-maxuser Specifies the Control Desk administrativeuser ID that is used to access the Maximoconsole.
-pkgpath Specifies the file path of a process solutionpackage. Paths that have embedded spacesmust be enclosed in double quotation marks.
-pkguuid Specifies the unique identifier of the processsolution package that you want processed.
-pkgver Specifies the version of the process solutionpackage that you want processed.
-skipdbcfg Specifies whether to defer the update of theMaximo database during packagedeployment.
-skipj2eecfg Specifies whether to defer the regenerationand redeployment of the Maximo J2EEApplications during package deployment.
-type Specify one of the following types ofsolution element package to be returnedwhen the showavail or showinstalled actionsare used. Valid values are processmodule,integrationmodule, or all.
246 IBM Control Desk: Installation Guide (IBM WebSphere)
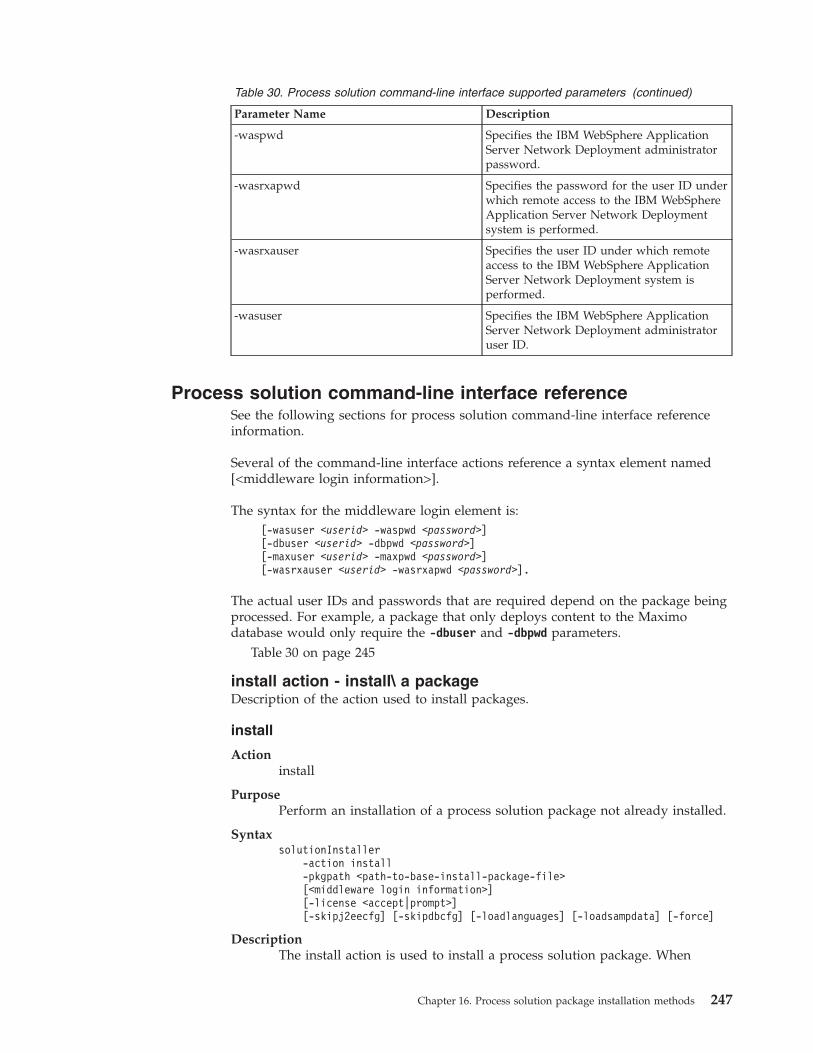
Table 30. Process solution command-line interface supported parameters (continued)
Parameter Name Description
-waspwd Specifies the IBM WebSphere ApplicationServer Network Deployment administratorpassword.
-wasrxapwd Specifies the password for the user ID underwhich remote access to the IBM WebSphereApplication Server Network Deploymentsystem is performed.
-wasrxauser Specifies the user ID under which remoteaccess to the IBM WebSphere ApplicationServer Network Deployment system isperformed.
-wasuser Specifies the IBM WebSphere ApplicationServer Network Deployment administratoruser ID.
Process solution command-line interface referenceSee the following sections for process solution command-line interface referenceinformation.
Several of the command-line interface actions reference a syntax element named[<middleware login information>].
The syntax for the middleware login element is:[-wasuser <userid> -waspwd <password>][-dbuser <userid> -dbpwd <password>][-maxuser <userid> -maxpwd <password>][-wasrxauser <userid> -wasrxapwd <password>].
The actual user IDs and passwords that are required depend on the package beingprocessed. For example, a package that only deploys content to the Maximodatabase would only require the -dbuser and -dbpwd parameters.
Table 30 on page 245
install action - install\ a packageDescription of the action used to install packages.
install
Actioninstall
PurposePerform an installation of a process solution package not already installed.
SyntaxsolutionInstaller
-action install-pkgpath <path-to-base-install-package-file>[<middleware login information>][-license <accept|prompt>][-skipj2eecfg] [-skipdbcfg] [-loadlanguages] [-loadsampdata] [-force]
DescriptionThe install action is used to install a process solution package. When
Chapter 16. Process solution package installation methods 247

installing a package, the file name of the process solution package archivefile to be installed is specified using the -pkgpath parameter.
PreconditionsBefore using this action, you must ensure that:v The process solution package archive file you specify is a valid Base
Install package.v The package is not already installed. You can check by using the
showinstalled action.v All additional requirements associated with the package specified are
satisfied.
Sample Usage
modfeatures action - modify existing features of a deployedpackageDescription of the action used to modify existing features of a deployed package.
modfeatures
Actionmodfeatures
PurposeModify features of a currently installed process solution package.
SyntaxsolutionInstaller
-action modfeatures-pkgpath <path-to-base-install-package-file>[-addfeatlist FeatA:FeatB:¦:Featn][-delfeatlist FeatA:FeatB:¦:Featn][<middleware login information>][-skipj2eecfg] [-skipdbcfg] [-force]
DescriptionThe modfeatures action is used to modify the installed features for acurrently installed process solution package. When modifying features, thefile name of the process solution package archive file containing thefeatures to be modified is specified using the -pkgpath parameter. To addnew features not already installed, you use the –addfeatlist parameter. Toremove currently installed features, you use the –delfeatlist parameter.You cannot both add and remove features with one invocation. One andexactly one of either the –addfeatlist or the –delfeatlist parametersmust be provided when this command is started.
248 IBM Control Desk: Installation Guide (IBM WebSphere)

Process solution installation logsIf you experience any problems or encounter any error messages during the use ofthe process solution installation program, see these log files.
Log files are kept in the following locations:
Table 31. Process solution installation logs
Log type Description Location
Package log These are log files containingthe StdOut/StdErr output ofexternal commands launchedby the package as it isprocessed by theDeployment Engine. Theselog files are typically vital tothe proper debugging ofpackage issues.
In general, logs have twoparts, a ".out" and ".err" file,both with the samepre-extension file name. .outfiles contain the contents ofthe Standard Output streamas output by the externalcommand. .err files containthe contents of the StandardError stream. It is normal forone to be blank, providedthere was no error output (orthere was ONLY erroroutput).
Note that you might discovernumerous (10-20) packagelog files generated for anyparticular package installed.
<install_home>\solutions\logs\<PACKAGE_NAME>\
Chapter 16. Process solution package installation methods 249

Table 31. Process solution installation logs (continued)
Log type Description Location
Control Desk log These are logs kept by thePSI subsystem.
<install_home>\logs\CTGInstallMessageXX.log<install_home>\logs\CTGInstallTraceXX.log
XX is a two-digit numbersuch as 00. These logscontain the trace output ofthe PSI subsystem.
Note: You might encountermessages like the followingin theMAXIMO_DEPLOY_ERR.err filefound in the<install_home>\solutions\logs directory for a processmanager once it has beeninstalled:
v *sys-package-mgr*:processing new jar,'C:\IBM\SMP\lib\icl.jar'
v *sys-package-mgr*:processing new jar,'C:\IBM\SMP\lib\CTGInstallCommon.jar'
v *sys-package-mgr*:processing new jar,'C:\IBM\SMP\lib\CTGInstallResources.jar'
Although these messagesappear in an error log file,they are informational only,and do not representdeployment errors. Thesemessages can be safelyignored.
Solution Install/DeploymentEngine Logs
These are logs kept by theIBM Solution installationprogram/Deployment enginerun time. PSI utilizes theIBM technology as the meansto install and track installedpackages. This run time hasits own logging system.
Note: After an installationthese logs contain sensitivecredentials. Remove logsafter a successful installation.
C:\IBM\SMP\CTG_DE\acsi\logs\<USERNAME>\de_msg.log
C:\IBM\SMP\CTG_DE\acsi\logs\<USERNAME>\de_trace.log
So for instance, if youinstalled under the username "Administrator", thelogs would be found under:C:\IBM\SMP\CTG_DE\acsi\logs\Administrator\de_msg.log
250 IBM Control Desk: Installation Guide (IBM WebSphere)
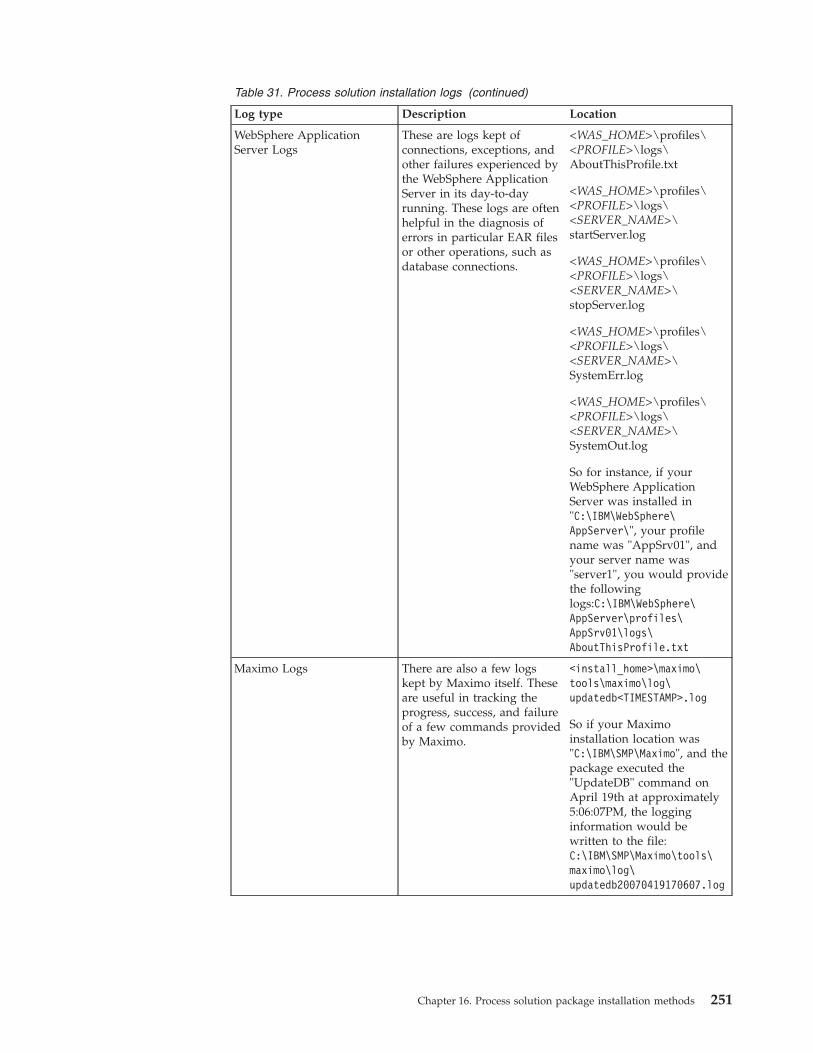
Table 31. Process solution installation logs (continued)
Log type Description Location
WebSphere ApplicationServer Logs
These are logs kept ofconnections, exceptions, andother failures experienced bythe WebSphere ApplicationServer in its day-to-dayrunning. These logs are oftenhelpful in the diagnosis oferrors in particular EAR filesor other operations, such asdatabase connections.
<WAS_HOME>\profiles\<PROFILE>\logs\AboutThisProfile.txt
<WAS_HOME>\profiles\<PROFILE>\logs\<SERVER_NAME>\startServer.log
<WAS_HOME>\profiles\<PROFILE>\logs\<SERVER_NAME>\stopServer.log
<WAS_HOME>\profiles\<PROFILE>\logs\<SERVER_NAME>\SystemErr.log
<WAS_HOME>\profiles\<PROFILE>\logs\<SERVER_NAME>\SystemOut.log
So for instance, if yourWebSphere ApplicationServer was installed in"C:\IBM\WebSphere\AppServer\", your profilename was "AppSrv01", andyour server name was"server1", you would providethe followinglogs:C:\IBM\WebSphere\AppServer\profiles\AppSrv01\logs\AboutThisProfile.txt
Maximo Logs There are also a few logskept by Maximo itself. Theseare useful in tracking theprogress, success, and failureof a few commands providedby Maximo.
<install_home>\maximo\tools\maximo\log\updatedb<TIMESTAMP>.log
So if your Maximoinstallation location was"C:\IBM\SMP\Maximo", and thepackage executed the"UpdateDB" command onApril 19th at approximately5:06:07PM, the logginginformation would bewritten to the file:C:\IBM\SMP\Maximo\tools\maximo\log\updatedb20070419170607.log
Chapter 16. Process solution package installation methods 251
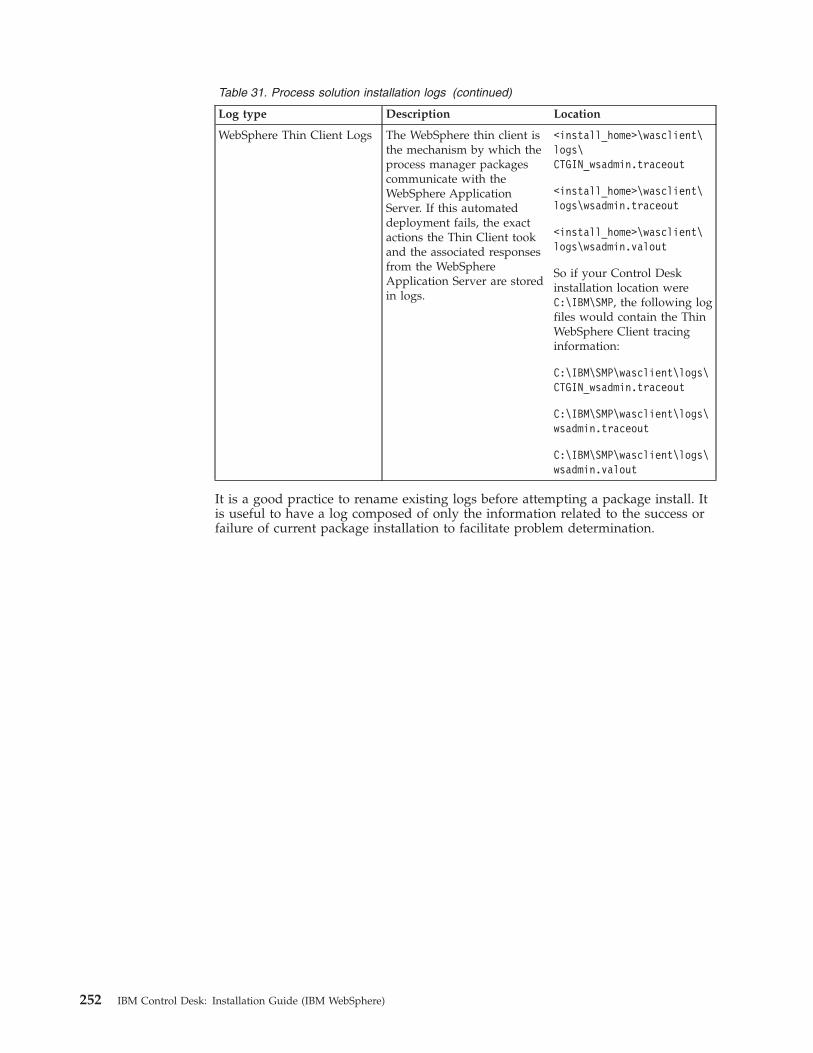
Table 31. Process solution installation logs (continued)
Log type Description Location
WebSphere Thin Client Logs The WebSphere thin client isthe mechanism by which theprocess manager packagescommunicate with theWebSphere ApplicationServer. If this automateddeployment fails, the exactactions the Thin Client tookand the associated responsesfrom the WebSphereApplication Server are storedin logs.
<install_home>\wasclient\logs\CTGIN_wsadmin.traceout
<install_home>\wasclient\logs\wsadmin.traceout
<install_home>\wasclient\logs\wsadmin.valout
So if your Control Deskinstallation location wereC:\IBM\SMP, the following logfiles would contain the ThinWebSphere Client tracinginformation:
C:\IBM\SMP\wasclient\logs\CTGIN_wsadmin.traceout
C:\IBM\SMP\wasclient\logs\wsadmin.traceout
C:\IBM\SMP\wasclient\logs\wsadmin.valout
It is a good practice to rename existing logs before attempting a package install. Itis useful to have a log composed of only the information related to the success orfailure of current package installation to facilitate problem determination.
252 IBM Control Desk: Installation Guide (IBM WebSphere)

Chapter 17. Advanced installation topics
This section contains information useful for advanced Control Desk deploymentscenarios.
Refer to this information for installation and configuration information in advanceddeployments.
WebSphere Application Server Network Deployment managementPerform these tasks if you installed WebSphere Application Server NetworkDeployment, or used an existing server.
Comprehensive information about running and administering can be found on theWebSphere Application Server Network Deployment support site.
Starting the application server from the command lineAn application server named MXServer is created during Control Deskdeployment, either manually, or automatically by the Control Desk installationprogram.
About this task
To start the MXServer application server from the command line, complete thefollowing steps:
Procedure1. Start the deployment manager:
UNIX and Linux<WAS_HOME>/AppServer/profiles/ctgDmgr01/bin/startManager.sh
Windows<WAS_HOME>\profiles\ctgDmgr01\bin\startManager.bat
2. Start the node:
UNIX and Linux<WAS_HOME>r/profiles/ctgAppSrv01/bin/startNode.sh
Windows<WAS_HOME>\profiles\ctgAppSrv01\bin\startNode.bat
3. Start the web server:
UNIX and Linux<WAS_HOME>/profiles/ctgAppSrv01/bin/startServer.sh webserver1
Windows<WAS_HOME>\profiles\ctgAppSrv01\bin\startServer.bat webserver1
4. Start the application server:
UNIX and Linux<WAS_HOME>/profiles/ctgAppSrv01/bin/startServer.sh MXServer
Windows<WAS_HOME>\profiles\ctgAppSrv01\bin\startServer.bat MXServer
© Copyright IBM Corp. 2014 253
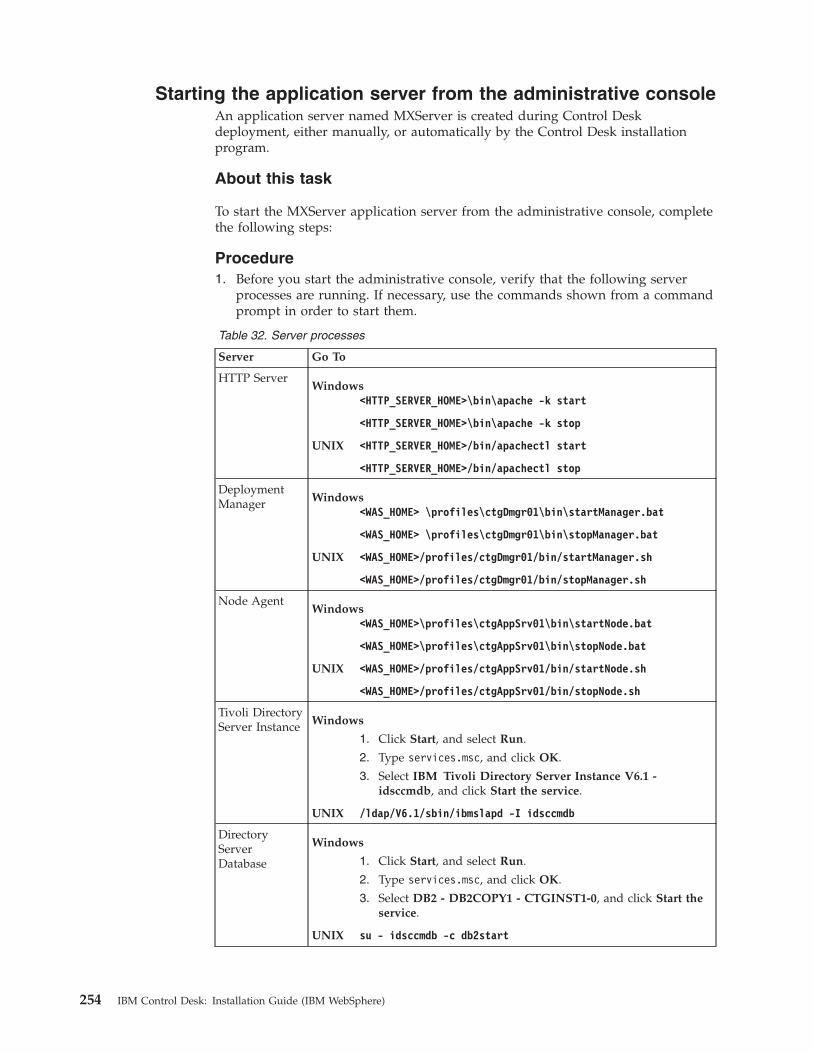
Starting the application server from the administrative consoleAn application server named MXServer is created during Control Deskdeployment, either manually, or automatically by the Control Desk installationprogram.
About this task
To start the MXServer application server from the administrative console, completethe following steps:
Procedure1. Before you start the administrative console, verify that the following server
processes are running. If necessary, use the commands shown from a commandprompt in order to start them.
Table 32. Server processes
Server Go To
HTTP ServerWindows
<HTTP_SERVER_HOME>\bin\apache -k start
<HTTP_SERVER_HOME>\bin\apache -k stop
UNIX <HTTP_SERVER_HOME>/bin/apachectl start
<HTTP_SERVER_HOME>/bin/apachectl stop
DeploymentManager Windows
<WAS_HOME> \profiles\ctgDmgr01\bin\startManager.bat
<WAS_HOME> \profiles\ctgDmgr01\bin\stopManager.bat
UNIX <WAS_HOME>/profiles/ctgDmgr01/bin/startManager.sh
<WAS_HOME>/profiles/ctgDmgr01/bin/stopManager.sh
Node AgentWindows
<WAS_HOME>\profiles\ctgAppSrv01\bin\startNode.bat
<WAS_HOME>\profiles\ctgAppSrv01\bin\stopNode.bat
UNIX <WAS_HOME>/profiles/ctgAppSrv01/bin/startNode.sh
<WAS_HOME>/profiles/ctgAppSrv01/bin/stopNode.sh
Tivoli DirectoryServer Instance Windows
1. Click Start, and select Run.
2. Type services.msc, and click OK.
3. Select IBM Tivoli Directory Server Instance V6.1 -idsccmdb, and click Start the service.
UNIX /ldap/V6.1/sbin/ibmslapd -I idsccmdb
DirectoryServerDatabase
Windows
1. Click Start, and select Run.
2. Type services.msc, and click OK.
3. Select DB2 - DB2COPY1 - CTGINST1-0, and click Start theservice.
UNIX su - idsccmdb -c db2start
254 IBM Control Desk: Installation Guide (IBM WebSphere)

2. To start the administrative console, open a browser window and enter thefollowing URL: http://<server_name>:9060/ibm/console Where <machine_name>is the host name of the WebSphere Application Server Network Deploymentand 9060 is the default port number for the administrative console.
3. Enter an administrative user ID and password to log in, if one is required.4. From the administrative console, click Servers > Server Types > Application
Servers.5. Select the check box next to MXServer, the name of the WebSphere Application
Server Network Deployment.6. Click Start. Notice that the icon in the Status column changes to running. To
stop the WebSphere Application Server Network Deployment, you can clickStop, which causes the icon in the Status column to change to stopped.
Securing the WebSphere Application Server NetworkDeployment administrative console
You can secure the administrative console so that only authenticated users can useit.
About this task
After enabling Virtual Member Manager for WebSphere Application ServerNetwork Deployment security, you complete several steps to secure the console.First you identify users (or groups) that are defined in the active user registry.After you decide which users you want to access the console, you can determinetheir level of access by assigning roles. The roles determine the administrativeactions that a user can complete. After you enable security, a user must enter avalid administrator user ID and password to access the console.
You can use the Administrative Group Roles page to give groups-specific authorityto administer application servers using the administrative console. Click Security> Secure administration, applications, and infrastructure > Administrative GroupRoles to view the available administrative group roles.
Table 33. Administrative group roles
Admin Role Description
Administrator Has operator permissions, configurator permissions, and thepermission that is required to access sensitive data.
Operator Has monitor permissions and can change the run time state. Forexample, the operator can start or stop services.
Configurator Has monitor permissions and can change the application serverconfiguration.
Monitor Has the least permissions. This role primarily confines the userto viewing the application server configuration and current state.
deployer Users granted this role can configuration and run applications.
adminsecuritymanager Fine-grained administrative security is available using wsadminonly. However, you can assign users and groups to theadminsecuritymanager role on the cell level using wsadminscripts and the administrative console. Using theadminsecuritymanager role, you can assign users and groups tothe administrative user roles and administrative group roles.However, an administrator cannot assign users and groups to theadministrative user roles and administrative group rolesincluding the adminsecuritymanager role.
Chapter 17. Advanced installation topics 255

Table 33. Administrative group roles (continued)
Admin Role Description
iscadmins Has administrator privileges for managing users and groupsfrom within the administrative console only.
Note: To manage users and groups, click Users and Groups in the console andthen click either Manage Users or Manage Groups.
Complete the following steps to map users and groups to security roles:
Procedure1. Select Applications > Enterprise applications > application_name.2. Under Detail properties, click Security role to user/group mapping.3. Select the role and click either Look up users or Look up groups. Different
roles can have different security authorizations. Mapping users or groups to arole authorizes those users or groups to access applications defined by the role.Users and groups are associated with roles defined in an application when theapplication is installed or configured. Use the Search pattern field to displayusers in the Available list. Click >> to add users from the Available list to theSelected list.
4. Restart all the application servers.
Configuring Windows servicesCreating the WebSphere Application Server Network Deployment applicationserver and node agent to run as Windows services.
These services must be created so that they start in the correct order. Use thefollowing procedures to create these services. First create the node agent service,then create the MXServer service.
Configuring the WebSphere Application Server NetworkDeployment application server to run as a Windows serviceConfiguring the WebSphere Application Server Network Deployment to run as aWindows service can make it more convenient to manage.
About this task
To configure the WebSphere Application Server Network Deployment applicationserver to run as a Windows service, complete the following steps:
Procedure1. Start the WebSphere Application Server Network Deployment administrative
console by opening a browser window and entering the following URLhttp://<server_name>:9060/ibm/console
2. Enter an administrative user ID and password3. Click Servers > Application Servers.4. In the Application Servers pane, select MXServer and click Start. This action
creates a server log folder used by the WASService command.5. Select MXServer, and click Stop.6. Open a command prompt window.
256 IBM Control Desk: Installation Guide (IBM WebSphere)

7. Navigate to the bin folder where you installed the Maximo application server.For example: C:\Program Files\IBM\WebSphere\AppServer\bin
8. Run the WASService command with the following parameters:
serverNameName of Maximo application server, MXServer
profilePathThe profile directory of the server, for example, C:\ProgramFiles\IBM\WebSphere\AppServer\profiles\ctgAppSrv01
wasHomeHome folder for MXServer, for example, C:\ProgramFiles\IBM\WebSphere\AppServer\profiles
logRootFolder location of MXServer log file, for example, C:\ProgramFiles\IBM\WebSphere\AppServer\logs\ manageprofiles\ctgAppSrv01
logFileLog file name for MXServer (startServer.log)
restart Restarts the existing service automatically if the service fails when setto true.
9. Enter the WASService command using the following syntax:WASService-add MXServer-serverName MXServer-profilePath "C:\IBM\WebSphere\AppServer\profiles\ctgAppSrv01"-wasHome "C:\IBM\WebSphere\AppServer"-logRoot "C:\IBM\WebSphere\AppServer\profiles\ctgAppSrv01\logs\MXServer"-logFile "C:\IBM\WebSphere\AppServer\profiles\ctgAppSrv01\logs\MXServer\startServer.log"-restart true
10. Press Enter after you type the WASService command, and you see aconfirmation message.
11. Open a Services window and double-click MXServer. Then perform thefollowing actions:a. Change the Startup type field value to Automatic.b. Click Start to start the service.c. Click OK.
Changing the middleware installation program configurationparameters
You can change the configuration parameters you have entered for a deploymentplan before deploying the plan. You would use this option if you chose to cancelthe deployment of the deployment plan you developed by exiting the middlewareinstallation program. Configuration parameters for a plan can be changed onlybefore deploying the deployment plan.
About this task
These instructions assume that you have developed a deployment plan, enteredconfiguration parameters for the plan, and then exited the middleware installationprogram before actually deploying the deployment plan.
Chapter 17. Advanced installation topics 257

Procedure1. Relaunch the middleware installation program from the launchpad and
advance along the installation program panels until you reach the ChooseWorkspace panel.
2. From the Choose Workspace panel, specify the directory you previously usedas the middleware installation program workspace, and then click Next.
3. Select Edit the configuration parameters, and then click Next.4. Advance along the middleware installation program panels and make changes.5. When you reach the Deployment Plan Operation panel, select Deploy the plan,
and then click Next.6. From the Deployment Plan and Parameter Configuration summary panel,
review the contents of the summary, and then click Next to initiate theinstallation and configuration of the middleware you selected.
7. From the Select Middleware Image Directories panel, enter the location forcompressed images for the middleware contained in the deployment plan, anda directory to use to hold the uncompressed images. After you have entered thetwo locations, click Next. During deployment, the middleware images areuncompressed onto the system.
8. Click Finish to exit.
Maintaining EAR filesThis section contains information about maintaining Control Desk EAR files.
The following instructions are used to manually build or uninstall the ControlDesk maximo.ear and maximoiehs.ear files on WebSphere Application ServerNetwork Deployment.
Although the Control Desk installation program deploys these EAR files when youinstall, there might be a few instances where it would be desirable to rebuild theseEAR files manually:v If you modify any database connection parameters in the maximo.properties file
after the initial installation, you must rebuild of the maximo.ear file, and thenredeploy it in WebSphere Application Server Network Deployment. In thisscenario, you would likely only rebuild and redeploy the maximo.ear file. Youwould not be required to rebuild and redeploy the maximoiehs.ear file.
v Control Desk must be installed into a WebSphere Application Server NetworkDeployment application server. However, Control Desk can be run within theframework of a WebSphere Application Server Network Deployment cluster. Ifyou want to deploy Control Desk in a cluster, you can either redeploy theControl Desk EAR files into a cluster, or, create a cluster from the applicationserver used during the install. If you have already installed Control Desk into anapplication server but would like to redeploy into a cluster, then you must eitheruninstall the MAXIMO application (“Manually uninstalling applications fromWebSphere Application Server Network Deployment” on page 259), or provide anew name for the application when installing the MAXIMO application into acluster (“Manually installing applications in WebSphere Application ServerNetwork Deployment” on page 259).
v If you have installed Control Desk into a development environment, you mightat some point like to migrate the deployment into a test or productionenvironment. In this scenario, you must deploy both the maximo and maximohelp applications into the new environment.
258 IBM Control Desk: Installation Guide (IBM WebSphere)
The steps outlined in “Manually installing applications in WebSphereApplication Server Network Deployment” should be performed for bothapplications.
Building EAR filesYou can manually build Control Desk EAR files if, for example, you modify adatabase connection parameter in the maximo.properties file after the initialinstallation.
About this task
To manually build Control Desk EAR files, complete the following steps:
Procedure1. Build the maximo EAR file:
Windowsinstall_home\maximo\deployment\buildmaximoear.cmd
Linux and UNIXinstall_home/maximo/deployment/buildmaximoear.sh
2. Build the maximo help system EAR file:
Windowsinstall_home\maximo\deployment\buildmxiehsear.cmd
Linux and UNIXinstall_home/maximo/deployment/buildmxiehsear.sh
Manually uninstalling applications from WebSphereApplication Server Network Deployment
This section contains information about uninstalling Control Desk applicationsfrom WebSphere Application Server Network Deployment.
Procedure1. Log in to the WebSphere Application Server Network Deployment
administrative console, select Servers > Server Types > WebSphere applicationservers, select MXServer and click Stop.
2. Click the Applications link.3. Select the check box next to the application you are uninstalling. By default, the
Control Desk applications are named maximo and maximoiehs.4. Click Uninstall.
Manually installing applications in WebSphere ApplicationServer Network Deployment
Control Desk applications can be added to WebSphere Application Server NetworkDeployment.
Procedure1. Log on to the WebSphere Application Server Network Deployment
administrative console.2. Browse to Applications > New Application > New Enterprise Application.3. From the Specify the EAR, WAR, JAR, or SAR module to upload and install
page, select Local file system.
Chapter 17. Advanced installation topics 259

4. Browse to the location on your system of the maximo.ear file and click Next.5. Select Detailed and then click Next.6. From the Application Security Warnings panel, click Continue.7. Click Step 2: Map modules to servers.8. Highlight all entries listed in the Clusters and servers field, check all check
boxes for Modules listed in the table, and click Apply.9. Click Step 11: Map virtual hosts for Web modules.
10. Check all check boxes for web modules listed in the table.11. Expand Apply Multiple Mappings.12. Select a virtual host, for example, maximo_host, from the Virtual Host menu,
and click Apply.13. Click Step 15: Map security roles to users or groups.14. Select the check box for maximouser in the Role table, and then select
Everyone from the Map Special Subjects menu.15. Click Step 17: Summary, review the summary information, and click Finish.
260 IBM Control Desk: Installation Guide (IBM WebSphere)

Chapter 18. Middleware on Solaris and HP-UX
Middleware versions that are not installable by the middleware installationprogram are installed by using graphical installation programs that are providedwith each middleware product.
The procedures in this document can be used to manually install the followingproducts on the following operating systems:
Solaris 11 SPARC and HP-UX 11i v2+3 64 bit
v IBM DB2 Enterprise Server Edition 9.7v IBM Tivoli Directory Server 6.3.
IBM Tivoli Directory Server 6.3 is only supported for Solaris 11.v IBM WebSphere Application Server Network Deployment 7v IBM HTTP Server 7
Operating system preparationSome operating system default configuration settings must be change to providean environment that can host middleware operations.
The steps needed to prepare each newly supported operating system are operatingsystem dependent.
Perform the operating system preparation steps before installing any middleware.
Middleware installation on SolarisSome of the default kernel configuration parameters on Solaris might not besufficient to run IBM DB2 9.7.
Ensure that your Solaris system includes required kernel parameters by runningthe db2osconf utility after you install IBM DB2, but before you create any databaseobjects.Related information:
pic.dhe.ibm.com/infocenter/db2luw/v9r7/index.jsp
HP-UXIn order for IBM DB2 9.7 to run correctly on HP-UX, certain group membershiprequirements must be addressed following the installation of IBM DB2.
After IBM DB2 9.7 is installed, you must ensure that the root user is assigned as amember of the db2iadm1 group.
Run the db2osconf utility to ensure that your HP-UX system has required kernelparameters in place. This utility must be run after you install IBM DB2, but beforeyou create any database objects.Related information:
pic.dhe.ibm.com/infocenter/db2luw/v9r7/index.jsp
© Copyright IBM Corp. 2014 261

Installing the componentsAfter the operating system is configured as needed, install the middlewarecomponents.
Middleware components are installed in the following order:1. IBM DB22. IBM Tivoli Directory Server3. IBM WebSphere Application Server Network Deployment4. IBM HTTP Server
Note: The media or web site you use to install middleware has directory-specificlocations for each supported operating system. The directory structure isos/product.
These commands display the contents of the os/product directory.cd osls
Within each os subdirectory are the installation directories for each middlewareproduct.ls solarisDB2-ESE_9.7_FP3aTIV-DirectoryServer_6.3WS-ESS_6.2.1WS-WAS_IHS_7.0_FP15WS-WAS_ND_7.0_Custom_FP15WS-WAS_ND_7.0_SupplementalWS-WAS_Plugins_7.0_FP15WS-WAS_UpdateInstaller_7.0.0.15
Installing DB2Run the db2setup program to install DB2.
Before you begin
Before you install DB2, review the requirements.
There are a number of things you must check to ensure a successful installation.Before you start the DB2 setup wizard, consider the following prerequisiteconditions:v If you choose to automate database configuration when you install Control
Desk, the user maximo is typically created for you on the system that hosts thedatabase server. For Solaris and HP-UX systems, you must manually create theuser even if the Control Desk installation program configures the databaseautomatically. Before you install Control Desk, ensure that you create themaximo user on the database server.
v db2setup starts a wizard installer so X Window System must be installed andrunning before you start the DB2 installer program. Export your display:export DISPLAY= your_ip_address:0
v If NIS, NIS+, or similar security software is used in your environment, you mustmanually create the required DB2 users, before you start the DB2 setup program.See the centralized user-management considerations topic in the DB2information center, before you begin.
262 IBM Control Desk: Installation Guide (IBM WebSphere)
v In general, you can choose to defer some installation activities. For example, ifyou choose to not set up email notifications of database events at installationtime. If you want to defer specific installation activities, select that option, andconfigure them later.
v Some middleware products have specific requirements or conventions foraccount names and other settings. Override the installation defaults as shown ifthe defaults provided are not satisfactory. On panels that prompt for passwords,both the password and its confirmation entry must be specified before theinstaller can continue to the next panel.
About this task
This procedure describes how to perform a typical installation of DB2 on a singlecomputer. If you want to install DB2 components on multiple computers, see theDB2 information center for those instructions.
Databases must contain a single partition and Unicode data (UTF-8).
DB2 is installed, by default, in the /opt/IBM/db2/V9.7 directory.
The /opt/IBM/db2/V9.7/logs directory contains a db2install.history file. This filecontains the installation settings used, and errors that occurred during theinstallation process. The vmrfis.history file contains information aboutmaintenance that has been applied to DB2, such as fix packs that have beeninstalled.
The db2setup.log file captures all DB2 installation information including errors.The db2setup.err file captures any error output that is returned by Java (forexample, exceptions and trap information). By default, both logs are created in the/tmp directory unless you change that location during the installation process.
Procedure1. Log in as root.2. Copy the DB2 Enterprise Server Edition tar file to a writable disk.
For SolarisCopy solaris/DB2-ESE_9.7_FP3a/v9.7fp3a_sun64_server.tar.gz
For HP-UXCopy hpux-ia64/DB2-ESE_9.7_FP3a/v9.7fp3a_hpipf64_server.tar.gz
3. Change to the directory where you copied the compressed file anduncompress it.
4. Extract the file DB2_Enterp_Svr_OEM_Activation.zip into an appropriatedirectory. For example, for Solaris, solaris/DB2-ESE_9.7/
5. Start the installer. Type ./db2setup.6. From the launchpad, select Install a Product.7. Click Install New.8. Accept the license agreement.9. In general, accept all defaults, except where you must provide custom values.
For example, the email address of the recipient of email notifications ofdatabase events defaults to host name@local_server_name. This value must bechanged to a valid email address if you choose to enable SMTP notifications.This value can also be changed at a later time.
Chapter 18. Middleware on Solaris and HP-UX 263

10. Leave the check boxes for the GUI and UID options selected; the systemassigns them for you.
11. On the Start copying files and create response file panel, click Finish to initiatethe installation.
12. Start the DB2 instance.13. Register the DB2 server license:
a. Extract the license file.b. Use the DB2 license management tool command to apply the license:
DB2_HOME/adm/db2licm -a full path to the license file
The license file can be found in the appropriate folder for your operatingsystem. For Solaris, the license file is in solaris/DB2-ESE_9.7/DB2_Enterp_Svr_OEM_Activation/db2/license/db2ese_o.lic.
c. Stop and then restart the DB2 instance by using the db2stop and db2startcommands.
d. Verify that the license was installed successfully:DB2_HOME/adm/db2licm -l
This command results in output like the following information:Product name: "DB2 Enterprise Server Edition"License type: "Restricted"Expiry date: "Permanent"Product identifier: "db2ese"Version information: "9.7"
pic.dhe.ibm.com/infocenter/db2luw/v9r7/index.jsp
pic.dhe.ibm.com/infocenter/db2luw/v9r7/topic/com.ibm.db2.luw.qb.server.doc/doc/r0007059.html
Installing IBM Tivoli Directory Server on SolarisYou typically install IBM Tivoli Directory Server on a computer that does not hostother middleware products.
Procedure1. Login as root.2. Copy the tar files for IBM Tivoli Directory Server to a writable disk. For
Solaris, copy the tds63-solaris-sparc-base.tar and tds63-solaris-sparc-gskit.tar files from solaris64/TIV-DirectoryServer_6.3.
3. Unpack the files:tar -xvf tds63-solaris-sparc-base.tartar -xvf tds63-solaris-sparc-gskit.tar
4. Change to the /tdsV6.3/tds directory and then type ./install_tds.bin
If you prefer, you can specify a temporary directory other than the systemtemporary directory. Change to the appropriate directory and type thefollowing command at a command prompt:./install_tds.bin -is:tempdir directory
. The variable directory is the directory you want to use for temporary space.Be sure that you have at least 400 MB of free space in this directory. Forexample:./install_tds.bin -is:tempdir /opt/tmp
264 IBM Control Desk: Installation Guide (IBM WebSphere)

5. When the installation wizard starts, select a language to use for theinstallation process, accept the license agreement, and choose a Custominstallation.
6. Select the Proxy Server, Server, C Client, Java Client, and WebAdministration Tool options, and then click Next.
7. Select Do not specify. I will manually deploy at a later time, then click Next.8. Click Install.9. Close the Instance Administration tool.
10. Click Finish.11. Create the idsccmdb instance.12. Start the directory server, type the following commands:
a. /opt/ibm/ldap/V6.3/sbin/idsdiradm -I idsccmdb
b. /opt/ibm/ldap/V6.3/sbin/idsdirctl -D admin user ID -w admin userpassword
Installing WebSphere Application Server Network DeploymentYou must install WebSphere Application Server Network Deployment and createtwo profiles that are required at a later stage.
Procedure1. Login as root.2. Copy the WebSphere Application Server compressed file to a writable disk.
The file is in the WS-WAS_ND_7.0_Custom_FP15 directory.v For Solaris, copy the WS-WAS_ND_7.0_Custom_FP15/WAS-ND_Solaris-Sparc-
Custom_v7015.tar.gz file.v For HP-UX, copy the WS-WAS_ND_7.0_Custom_FP15/WAS-
ND_HpuxIA64_Custom_v7015.tar.gz file.3. Uncompress and unpack the file:
gzip -dfv filename.gz | tar xvf -
4. Remove the compressed files.5. Change to the directory where you unpacked the tar file.6. Change to the WAS directory.7. Type ./install
8. Proceed through the initial panels, accepting the license agreement. Acceptdefaults provided unless you have a specific reason to change them.
9. On the Installation directory panel, accept the default installation directory.The default directory is /opt/IBM/WebSphere/AppServer.If you change the installation directory, do not use symbolic links as thedestination directory and do not add space characters to the path.
10. From the WebSphere Application Server Network Deployment environmentspanel, select None as your environment, and then click Next.Selecting None means that you plan to create the deployment cell,deployment manager profile, and the application server profile with theprofile management tool.
11. Click Yes to indicate that you want to proceed.12. Advance to the end of the installation and click Finish.
Chapter 18. Middleware on Solaris and HP-UX 265
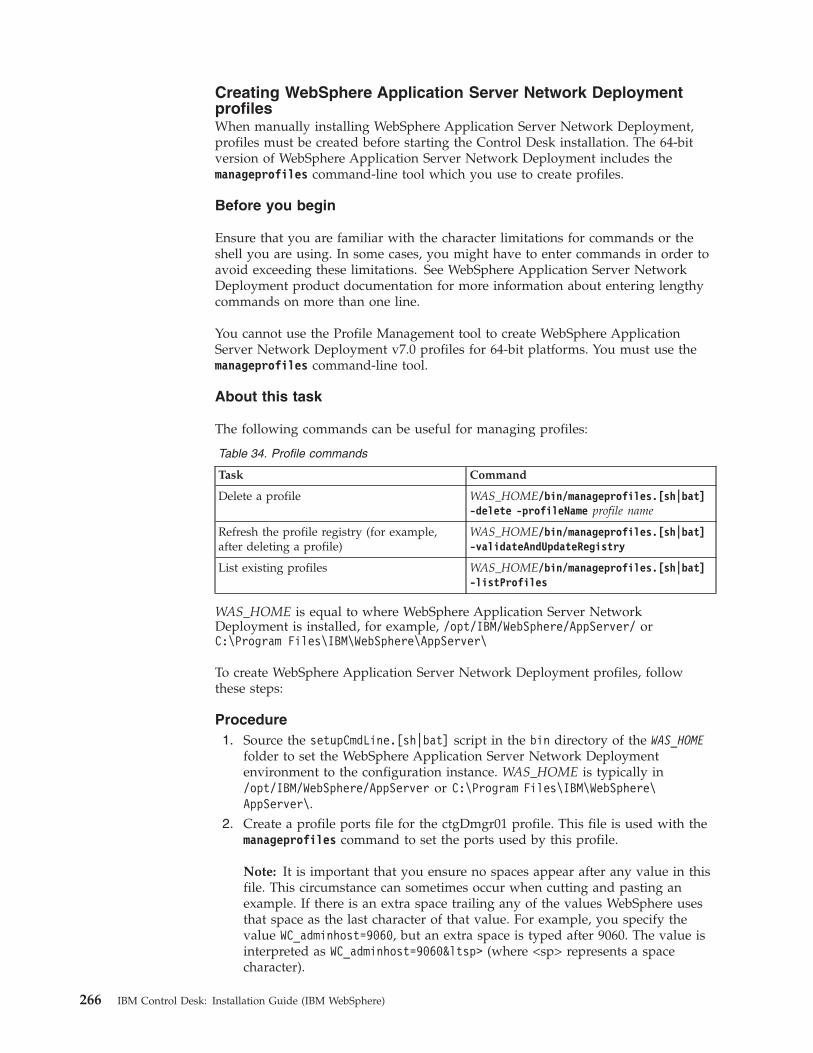
Creating WebSphere Application Server Network DeploymentprofilesWhen manually installing WebSphere Application Server Network Deployment,profiles must be created before starting the Control Desk installation. The 64-bitversion of WebSphere Application Server Network Deployment includes themanageprofiles command-line tool which you use to create profiles.
Before you begin
Ensure that you are familiar with the character limitations for commands or theshell you are using. In some cases, you might have to enter commands in order toavoid exceeding these limitations. See WebSphere Application Server NetworkDeployment product documentation for more information about entering lengthycommands on more than one line.
You cannot use the Profile Management tool to create WebSphere ApplicationServer Network Deployment v7.0 profiles for 64-bit platforms. You must use themanageprofiles command-line tool.
About this task
The following commands can be useful for managing profiles:
Table 34. Profile commands
Task Command
Delete a profile WAS_HOME/bin/manageprofiles.[sh|bat]-delete -profileName profile name
Refresh the profile registry (for example,after deleting a profile)
WAS_HOME/bin/manageprofiles.[sh|bat]-validateAndUpdateRegistry
List existing profiles WAS_HOME/bin/manageprofiles.[sh|bat]-listProfiles
WAS_HOME is equal to where WebSphere Application Server NetworkDeployment is installed, for example, /opt/IBM/WebSphere/AppServer/ orC:\Program Files\IBM\WebSphere\AppServer\
To create WebSphere Application Server Network Deployment profiles, followthese steps:
Procedure1. Source the setupCmdLine.[sh|bat] script in the bin directory of the WAS_HOME
folder to set the WebSphere Application Server Network Deploymentenvironment to the configuration instance. WAS_HOME is typically in/opt/IBM/WebSphere/AppServer or C:\Program Files\IBM\WebSphere\AppServer\.
2. Create a profile ports file for the ctgDmgr01 profile. This file is used with themanageprofiles command to set the ports used by this profile.
Note: It is important that you ensure no spaces appear after any value in thisfile. This circumstance can sometimes occur when cutting and pasting anexample. If there is an extra space trailing any of the values WebSphere usesthat space as the last character of that value. For example, you specify thevalue WC_adminhost=9060, but an extra space is typed after 9060. The value isinterpreted as WC_adminhost=9060<sp> (where <sp> represents a spacecharacter).
266 IBM Control Desk: Installation Guide (IBM WebSphere)

a. Open a new text file named _portdef_DMgr.props and enter the followingtext:CSIV2_SSL_SERVERAUTH_LISTENER_ADDRESS=9403WC_adminhost=9060DCS_UNICAST_ADDRESS=9352BOOTSTRAP_ADDRESS=9809SAS_SSL_SERVERAUTH_LISTENER_ADDRESS=9401CELL_DISCOVERY_ADDRESS=7277SOAP_CONNECTOR_ADDRESS=8879ORB_LISTENER_ADDRESS=9100CSIV2_SSL_MUTUALAUTH_LISTENER_ADDRESS=9402WC_adminhost_secure=9043
b. Place the file in the WAS_HOME directory.3. Create the ctgDmgr01 profile using the manageprofiles command. Type the
following command, all on one line, with a space between each entry:WAS_HOME/bin/manageprofiles.[sh|bat]
-create-templatePath WAS_HOME/profileTemplates/dmgr-hostName yourfullyqualifiedhost-profileName ctgDmgr01-profilePath WAS_HOME/profiles/ctgDmgr01-portsFile WAS_HOME/_portdef_DMgr.props-cellName ctgCell01-nodeName ctgCellManager01-enableAdminSecurity "false"
4. Start the ctgDmgr01 server:WAS_HOME/profiles/ctgDmgr01/bin/startManager.[sh|bat]
5. Create a profile ports file for the ctgAppSrv01 profile. This file is used by themanageprofiles command to set the ports that are used by this profile.a. Open a new text file named _portdef_AppSvr.props and enter the
following text:CSIV2_SSL_SERVERAUTH_LISTENER_ADDRESS=9201DCS_UNICAST_ADDRESS=9353NODE_DISCOVERY_ADDRESS=7272NODE_IPV6_MULTICAST_DISCOVERY_ADDRESS=5001BOOTSTRAP_ADDRESS=2809SAS_SSL_SERVERAUTH_LISTENER_ADDRESS=9901SOAP_CONNECTOR_ADDRESS=8878NODE_MULTICAST_DISCOVERY_ADDRESS=5000ORB_LISTENER_ADDRESS=9101CSIV2_SSL_MUTUALAUTH_LISTENER_ADDRESS=9202
b. Place the file in the WAS_HOMEdirectory.6. Create the ctgAppSrv01 profile using the manageprofiles command:
WAS_HOME/bin/manageprofiles.[sh|bat]-create
-templatePath WAS_HOME/profileTemplates/managed-hostName yourfullyqualifiedhost-profileName ctgAppSrv01-profilePath WAS_HOME/profiles/ctgAppSrv01-cellName ctgNodeCell01-nodeName ctgNode01-portsFile WAS_HOME/_portdef_AppSvr.props-dmgrHost yourfullyqualifiedhost-dmgrPort 8879-isDefault
7. Start the ctgAppSrv01 node.WAS_HOME/profiles/ctgAppSrv01/bin/startNode.[sh|bat]
8. Augment the ctgDmgr01 profile:
Chapter 18. Middleware on Solaris and HP-UX 267
WAS_HOME/bin/manageprofiles.[sh|bat]-augment-templatePath WAS_HOME/profileTemplates/iscae71-profileName ctgDmgr01-serverName dmgr
9. Restart servers.WAS_HOME/profiles/ctgDmgr01/bin/stopManager.[sh|bat]WAS_HOME/profiles/ctgDmgr01/bin/startManager.[sh|bat]WAS_HOME/profiles/ctgAppSrv01/bin/stopNode.[sh|bat]WAS_HOME/profiles/ctgAppSrv01/bin/startNode.[sh|bat]
10. Start firststeps.[sh|bat] and select the Installation Verification option toconfirm that your server has been properly installed and started.WAS_HOME/profiles/ctgDmgr01/firststeps/firststeps.[sh|bat]
“Manually configuring Virtual Member Manager on WebSphere ApplicationServer Network Deployment”Some deployment environments require the manual configuration of VirtualMember Manager to secure Control Desk.
Manually configuring Virtual Member Manager on WebSphereApplication Server Network DeploymentSome deployment environments require the manual configuration of VirtualMember Manager to secure Control Desk.
Before you begin
For a review of Control Desk security options, see the security planninginformation in this document.
Important: Before you begin this procedure, ensure that you have a wasadminuser created in your LDAP repository.
If you intend to configure Virtual Member Manager to use SSL with a federatedLDAP repository, it must be done only after a successful Control Desk installation.If Virtual Member Manager is configured to use SSL with a federated LDAPrepository before completing the Control Desk installation, the installation fails. Donot configure a Virtual Member Manager LDAP federated repository to use SSLwith an LDAP directory before installing Control Desk. Configure SSL after theControl Desk installation program has completed successfully.
About this task
During the installation process, the Control Desk installation program providedyou with the option of automatically configuring Control Desk middleware. If youelected to have the Control Desk installation program automatically configureControl Desk middleware, then it will, among other tasks, perform Virtual MemberManager configuration for you. If you elected to manually configure Control Deskmiddleware for use with Control Desk, you must manually configure VirtualMember Manager.
Virtual Member Manager provides you with the ability to access and maintain userdata in multiple repositories, and federate that data into a single virtual repository.The federated repository consists of a single named realm, which is a set ofindependent user repositories. Each repository can be an entire external repositoryor, in the case of LDAP, a subtree within that repository. The root of eachrepository is mapped to a base entry within the federated repository. The root is astarting point within the hierarchical namespace of the virtual realm.
268 IBM Control Desk: Installation Guide (IBM WebSphere)
To add an LDAP directory to the Virtual Member Manager virtual repository, youmust first add the LDAP directory to the list of repositories available forconfiguration for the federated repository. You must then add the root ofbaseEntries to a search base within the LDAP directory. Multiple base entries canbe added with different search bases for a single LDAP directory.
The values provided here are example purposes only. If you are using IBM TivoliDirectory Server, enter the values used during the installation and configuration ofIBM Tivoli Directory Server. If you are configuring Virtual Member Manager to useMicrosoft Active Directory, substitute values where appropriate in this procedure.You must modify the VMMCRONTASK accordingly.
To add the IBM Tivoli Directory Server or Microsoft Active Directory to VMM,complete the following steps:
Procedure1. Start the WebSphere Application Server Network Deployment application
server.2. Start Internet Explorer and open the WebSphere Application Server Network
Deployment administrative console by typing the following URL:http://<server_name>:<port_number>/ibm/console
For example, enter a URL like the following sample URL:http://localhost:9060/ibm/console
3. At the login screen, enter your user ID, then click Log in. This action opensthe Welcome screen for the WebSphere Application Server NetworkDeployment administrative console.
4. Select Security > Secure administration, applications, and infrastructure.5. Locate the User account repository area and pick Federated repositories from
the Available realm definition field, and then click Configure.6. Click Manage repositories, located under Related Items.7. Click Add to create new repository definition under the current default realm.8. Enter the following values, click Apply, and then click Save.
Repository identifierFor IBM Tivoli Directory Server, enter ISMITDS.
For Microsoft Active Directory, enter ISMMSAD .
Directory typeFor IBM Tivoli Directory Server, select IBM Tivoli Directory Server.
For Microsoft Active Directory, select Microsoft Windows Server 2003Active Directory.
Primary host nameEnter the fully qualified host name or IP address of the directoryserver.
Port Enter 389.
Support referrals to other LDAP serversSet this value to ignore.
Bind distinguished nameFor IBM Tivoli Directory Server, enter cn=root.
For Microsoft Active Directory, enterCN=Administrator,CN=Users,DC=ism75,DC=com.
Chapter 18. Middleware on Solaris and HP-UX 269
Bind passwordEnter the password for the bind distinguished name.
Login propertiesLeave this value blank.
Certificate mappingSelect EXACT_DN
9. Return to the Federated repositories panel by clicking Security > Secureadministration, applications, and infrastructure, selecting Federatedrepositories from the Available realm definitions menu, and then clickingConfigure.
10. Locate the Repositories in the realm area and click Add Base entry to Realm.If there is an existing file repository entry in the Repositories in the realmtable, you must select it click Remove. Save the change after creating theentry.
11. Enter the following values, click Apply, and then click Save.
RepositoryFor IBM Tivoli Directory Server, select ISMITDS.
For Microsoft Active Directory, select ISMMSAD .
Distinguished name of a base entry that uniquely identifies this set ofentries in the realm
For IBM Tivoli Directory Server, enter ou=SWG,o=IBM,c=US.
For Microsoft Active Directory, enter DC=ism75,DC=com.
Distinguished name of a base entry in this repositoryFor IBM Tivoli Directory Server, enter ou=SWG,o=IBM,c=US.
For Microsoft Active Directory, enter DC=ism75,DC=com.12. From the Federated repositories configuration area, enter the following values,
click Apply, and then click Save:
Realm nameEnter ISMRealm.
Primary administrative user nameEnter wasadmin. This value must be a valid user from the configuredLDAP repository.
Server user identitySelect Automatically generated server identity.
Ignore case for authorizationSelect this check box.
13. Click Supported entity types, and then click PersonAccount.14. From the PersonAccount configuration area, enter the following values:
Entity typeVerify that the value is PersonAccount.
Base entry for the default parentFor IBM Tivoli Directory Server, enter ou=users,ou=SWG,o=IBM,c=US.
For Microsoft Active Directory, enter CN=Users,DC=ism75,DC=com.
Relative Distinguished Name propertiesEnter uid.
15. Click OK and then click Save.
270 IBM Control Desk: Installation Guide (IBM WebSphere)
16. Click Supported entity types, and then click Group.17. From the Group configuration area, enter the following values:
Entity typeVerify that the value is Group.
Base entry for the default parentFor IBM Tivoli Directory Server, enter ou=groups,ou=SWG,o=IBM,c=US.
For Microsoft Active Directory, enterou=groups,CN=Groups,DC=ism75,DC=com.
Relative Distinguished Name propertiesEnter cn.
18. Click OK and then click Save.19. Click Supported entity types, and then click OrgContainer.20. From the OrgContainer configuration area, enter or verify the following
values:
Entity typeVerify that the value is OrgContainer.
Base entry for the default parentFor IBM Tivoli Directory Server, enter ou=SWG,o=IBM,c=US.
For Microsoft Active Directory, enter DC=ism75,DC=com.
Relative Distinguished Name propertiesEnter o;ou;dc;cn.
21. Click OK and then click Save.22. Browse to Security > Secure administration, applications, and infrastructure.23. From the Secure administration, applications, and infrastructure configuration
page, complete the following:a. Enable Enable administrative security.b. Enable Enable application security.c. Clear the option for Use Java 2 security to restrict application access to
local resources.d. From Available realm definition, select Federated repositories.e. Click Set as current.
24. Click Apply, and then click Save.25. Restart WebSphere Application Server Network Deployment and the managed
nodes by running the following commands:a. <WAS_HOME>\profiles\ctgDmgr01\bin\stopManager.bat
b. <WAS_HOME>\profiles\ctgAppSrv01\bin\stopNode.bat
c. <WAS_HOME>\profiles\ctgDmgr01\bin\startManager.bat
d. <WAS_HOME>\profiles\ctgAppSrv01\bin\startNode.bat
Note: Substitute UNIX path and file extension values where appropriate.“Performing WebSphere Application Server Network Deployment configurationtasks” on page 91Use this procedure to perform WebSphere Application Server NetworkDeployment configuration tasks.“Preparing Microsoft Active Directory for reuse” on page 58An existing Microsoft Active Directory instance can be used to secure
Chapter 18. Middleware on Solaris and HP-UX 271

WebSphere Application Server Network Deployment. The middlewareinstallation program can be used to validate Microsoft Active Directoryconfiguration information.“Manually configuring Microsoft Active Directory” on page 87You can manually configure Microsoft Active Directory for use with ControlDesk.
Installing the WebSphere update installerThis procedure uses the update installer to apply maintenance.
Before you begin
Complete documentation for the update installer is at http://www-01.ibm.com/support/knowledgecenter/SSLKT6/sslkt6_welcome.html. Review the prerequisitesbefore you install the update installer.
About this task
The update installer simplifies maintenance of WebSphere Application ServerNetwork Deployment and related components. These components include thingssuch as the HTTP server plug-in and fix packs.
Procedure1. Copy the update installer compressed file to a writable disk. The file is in the
WS-WAS_UpdateInstaller_7.0.0.15 directory.v For Solaris, copy the 7.0.0.15-WS-UPDI-SolarisSparc64.tar.gz file.v For HP-UX, copy the 7.0.0.15-WS-UPDI-HpuxIA64.tar.gz file.
2. Uncompress the file. Type unzip fileName.zip.3. Change to the directory that contains the uncompressed files and type
./install.4. Accept the license agreement.5. The default installation directory is opt/IBM/WebSphere/UpdateInstaller.
Change this value if required; otherwise accept the default location.6. Before you finish the installation, clear the option to Launch IBM Update
Installer for WebSphere software on exit.
Installing and configuring IBM HTTP ServerThis procedure provides task information for manually installing and configuringIBM HTTP Server.
Procedure1. Log on as root, on the system where you installed WebSphere Application
Server Network Deployment.2. Log in to the administrative console. Ensure the ctgDmgr01 deployment
manager is running and that the SOAP port is set to listen at the correct port(8879 is the default).If the deployment manager must be started, use the following command:<WAS_HOME>/profiles/ctgDmgr01/bin/startManager.sh
3. Copy the IBM HTTP Server compressed file to a writable disk.
For SolarisCopy solaris64/WS-WAS_ND_7.0_Supplemental/C1G3IML.tar.gz
272 IBM Control Desk: Installation Guide (IBM WebSphere)

For HP-UXCopy hpux-ia64/WS-WAS_ND_7.0_Supplemental/C1G2XML.tar.gz
4. Uncompress the C1G3IML.tar.gz or C1G2XML.tar.gz file.5. Extract the contents of the C1G3IML.tar or C1G2XML.tar file.6. Change to the IHS directory and start the installation program:
./install
7. From the Welcome panel, click Next.8. Accept the license agreement and click Next to display the installation root
directory panel.9. From the System prerequisites check panel, click Next.
10. Specify the installation location, the default is /opt/IBM/HTTPServer, and clickNext.
11. From the Port Values Assignment panel, specify the following values, andclick Next.
HTTP Port80
HTTP Administration Port8008
12. From the HTTP Administration Server Authentication panel, specify thefollowing values, and click Next.
Create a user ID for IBM HTTP administration server authenticationEnable this option by selecting this check box.
User IDSpecify wasadmin
PasswordSpecify the password for the wasadmin user.
13. From the Setup HTTP Administration Server panel, specify the followingvalues, and click Next.
Set up IBM HTTP administration server to administer IBM HTTP ServerEnable this option by selecting this check box.
Create a unique user ID and group for IBM HTTP Server administrationEnable this option by selecting this check box.
User IDSpecify wasadmin.
Group Specify ihsadmin
14. From the IBM HTTP Server plug-in for WebSphere Application Server panel,specify the following values, and click Next.
Install the IBM HTTP Server plug-in for IBM WebSphere ApplicationServer Enable or clear this check box to disable this option as is appropriate
for your configuration. In an environment where you have multipledeployment manager profiles, it is more practical to run the webserver plug-ins installation task separately. This task is done byrunning the plug-in installation program after exiting the IBM HTTPServer installation program. However, if your WebSphere environmentonly contains a single deployment manager profile, you can leave theWebSphere plug-in option selected. When it is selected, the web serverplug-ins installation task starts when you click Next.
Chapter 18. Middleware on Solaris and HP-UX 273

If you decide to install the IBM HTTP Server plug-in now, you mustconfigure it. Perform the following steps to configure the plug-in.
a. Stop and start the deployment manager:WAS_HOME/profiles/ctgDmgr01/bin/stopManager.sh
WAS_HOME/profiles/ctgDmgr01/bin/startManager.sh
b. Copy the /opt/IBM/HTTPServer/Plugins/bin/configurewebserver1.sh fileto WAS_HOME/bin/
c. Change directory to WAS_HOME/bin and then use the following command:./configurewebserver1.sh
d. Start the IBM HTTP Server servers:/opt/IBM/HTTPServer/bin/adminctl start/opt/IBM/HTTPServer/bin/apachectl start
e. Log in to the WebSphere administrator console and ensure that webserver1has started.
pic.dhe.ibm.com/infocenter/wasinfo/v7r0/index.jsp?topic=/com.ibm.websphere.ihs.doc/info/welcome_ihs.html
Installing IBM HTTP Server fix packs:
IBM HTTP Server fix pack must be installed. This fix pack updates the baseinstallation of the IBM HTTP Server to the latest maintenance level.
Procedure
1. Copy the fix pack file to the /opt/IBM/HTTPServer/maintenance directory.Create this directory if it does not exist.v For Solaris, copy the solaris/WS-WAS_IHS_7.0_FP15/7.0.0-WS-IHS-
SolarisSparc64-FP0000015.pak file.v For HP-UX, copy the hpux-ia64/WS-WAS_IHS_7.0_FP15/7.0.0-WS-IHS-
HpuxIA64-FP0000015.pak file.2. Stop IBM HTTP Server. Type /opt/IBM/HttpServer/bin/apachectl stop.3. Stop the admin server. Type /opt/IBM/HttpServer/bin/adminctl stop.4. Stop WebSphere Application Server and the managed nodes using the
following commands.a. WAS_HOME/profiles/ctgAppSrv01/bin/stopNode.shb. WAS_HOME/profiles/ctgDmgr01/bin/stopManager.sh
5. Install the fix pack.a. Start the update installer wizard:
/opt/IBM/WebSphere/UpdateInstaller/update.sh
b. Click Next.c. From the Product Selection panel, select the IBM HTTP Server directory by
browsing to the /opt/IBM/HTTPServer directory, and then clicking Next.d. From the Maintenance Operation Selection panel, select Install maintenance
package, and then click Next.e. From the Maintenance Package Directory Selection panel, browse to the
/opt/IBM/HTTPServer/maintenance directory, and then click Next.f. From the Available Maintenance Package to Install panel, click Select
Recommended Updates, select the target update, and click Next.g. On the Installation Summary screen, click Next to begin the installation of
the critical fixes.
274 IBM Control Desk: Installation Guide (IBM WebSphere)
6. Start IBM HTTP Server. Type /opt/IBM/HTTPServer/bin/apachectl start.7. Start the admin server. Type /opt/IBM/HTTPServer/bin/adminctl start.8. Restart WebSphere Application Server and the managed nodes:
a. WAS_HOME/profiles/ctgDmgr01/bin/startManager.shb. WAS_HOME/profiles/ctgAppSrv01/bin/startNode.sh
Installing the WebSphere plug-inThis procedure provides task information for manually installing and configuringWebSphere plug-in for IBM HTTP Server. This procedure is optional if you choseto install and configure the WebSphere plug-in when you installed the IBM HTTPServer.
Procedure1. Logon as root to the system where you WebSphere is installed.2. Change to the directory where you previously extracted the C1G3IML or
C1G2XML tar file (when you installed IBM HTTP Server). For example, forSolaris, this path might be solaris64/WS-WAS_ND_7.0_Supplemental/plugin.
3. Change to the plugin directory.4. From a command line, start the WebSphere plug-in installation program.
./install
5. On the Welcome panel, clear the option to learn more about the Installationroadmap: Overview and installation scenarios. Click Next.
6. Accept the license agreement and click Next.7. From the plug-in selection panel, select the IBM HTTP Server V7 plug-in, and
then click Next.8. From the installation scenario panel, select WebSphere Application Server
machine (local), and then click Next.9. Accept or change the installation directory; the default is /opt/IBM/
HTTPServer/Plugins because you chose to install after exiting the installationfor IBM HTTP Server. Click Next.
10. Specify the location where you installed the application server; the default is/opt/IBM/WebSphere/AppServer. Click Next.
11. From the select profile panel, select ctgDmgr01 from the list, and then clickNext.
12. From the web server configuration file panel, specify the followinginformation:
Select the existing IBM HTTP Server httpd.conf fileBrowse to the location of the httpd.conf file; the default is/opt/IBM/HTTPServer/conf/httpd.conf.
Specify the Web server portThe default is port 80.
Clicking Next might produce warning message that indicates that the selectedIBM HTTP Server configuration file already contains plug-in entries. If youproceed, this configuration file is updated with a new plugin-cfg xml filelocation. You can click OK to proceed.
13. From the web server definition panel, specify a unique web server definitionname; the default name (webserver1) is satisfactory.
14. Accept the default web server plug-in configuration file name(plugin-cfg.xml) and location.
Chapter 18. Middleware on Solaris and HP-UX 275

15. Click Next to acknowledge the manual configuration steps.16. From the installation summary panel, click Next.17. When the installation is complete, click Finish.18. Stop and start the deployment manager:
WAS_HOME/profiles/ctgDmgr01/bin/stopManager.sh
WAS_HOME/profiles/ctgDmgr01/bin/startManager.sh
19. Copy the /opt/IBM/HTTPServer/Plugins/bin/configurewebserver1.sh file toWAS_HOME/bin/
20. Change directory to <WAS_HOME>/bin and then run the following command:./configurewebserver1.sh
21. Start the IBM HTTP Server servers:/opt/IBM/HTTPServer/bin/adminctl start/opt/IBM/HTTPServer/bin/apachectl start
22. Login to the WebSphere administrator console and ensure that webserver1 isstarted.
Installing WebSphere Application Server Network Deployment plug-in fixpacks:
The WebSphere Application Server Network Deployment plug-in fix pack 17 isrequired. This task updates the base installation of the plug-in to the latestmaintenance level.
Procedure
1. Copy the fix pack file to the /opt/IBM/WebSphere/UpdateInstaller/maintenancedirectory. Create this directory if it does not exist.v For Solaris, copy the solaris64/WS-WAS_Plugins_7.0_FP17/7.0.0-WS-PLG-
SolarisSparc64-FP0000017.pak file.v For HP-UX, copy the hpux-ia64/WS-WAS_Plugins_7.0_FP17/7.0.0-WS-PLG-
HpuxIA64-FP0000017.pak file.2. Stop the IBM HTTP Server. Type /opt/IBM/HTTPServer/bin/apachectl stop.3. Stop WebSphere Application Server Network Deployment and the managed
nodes. Use the following commands.a. WAS_HOME/profiles/ctgAppSrv01/bin/stopNode.sh
b. WAS_HOME/profiles/ctgDmgr01/bin/stopManager.sh
4. Install the fix pack.a. Launch the update installer wizard:
/opt/IBM/WebSphere/UpdateInstaller/update.sh
b. Click Next.c. From the Product Selection panel, select the IBM HTTP Server Plugin
directory by browsing to the /opt/IBM/HTTPServer/Plugin directory, andthen clicking Next.
d. From the Maintenance Operation Selection panel, select Install maintenancepackage, and then click Next.
e. From the Maintenance Package Directory Selection panel, browse to the/opt/IBM/WebSphere/UpdateInstaller/maintenance directory, and then clickNext.
f. From the Available Maintenance Package to Install panel, click SelectRecommended Updates, select the target update, and click Next.
276 IBM Control Desk: Installation Guide (IBM WebSphere)
g. On the Installation Summary screen, click Next to begin the installation ofthe critical fixes.
5. Start the IBM HTTP Server. Type /opt/IBM/HTTPServer/bin/apachectl start
6. Restart WebSphere Application Server Network Deployment and the managednodes:a. WAS_HOME/profiles/ctgDmgr01/bin/startManager.sh
b. WAS_HOME/profiles/ctgAppSrv01/bin/startNode.sh
Configuring Virtual Member Manager on IBM WebSphere ApplicationServer Network Deployment
Virtual Member Manager (VMM) provides you with the ability to access andmaintain user data in multiple repositories. You can also federate that data into asingle virtual repository.
Before you begin
Before configuring VMM, you might consider creating a system backup image.Having a backup allows you to restore the system to a pre-VMM state. If youchosoe to relocate your LDAP data in the future, you can reconfigure VMM to usea different LDAP server
About this task
See “Manually configuring Virtual Member Manager on WebSphere ApplicationServer Network Deployment” on page 268 to add an IBM Tivoli Directory Serverrepository to VMM. This task is required and must be performed.
The federated repository managed by VMM consists of a single named realm,which is a set of independent user repositories. Each repository can be an entireexternal repository or, in the case of LDAP, a subtree within that repository. Theroot of each repository is mapped to a base entry within the federatedrepository. The root is a starting point within the hierarchical namespace of thevirtual realm.
Procedure1. To add an LDAP directory to the VMM virtual repository, you must first add
the LDAP directory to the list of repositories. This list consists of therepositories that are available for configuration for the federated repository.
2. Add the root of baseEntries to a search base within the LDAP directory.Multiple base entries can be added with different search bases for a singleLDAP directory.
Chapter 18. Middleware on Solaris and HP-UX 277

278 IBM Control Desk: Installation Guide (IBM WebSphere)

Chapter 19. Backup and restoration
Like all important business data, it is a good idea to establish a process andschedule for backing up Control Desk data.
Back up and restore middleware application data using the methods described inthe documentation for that product is important. Also, establish a process forbacking up data contained on the Control Desk administrative workstation.
The default installation directory on the Control Desk administrative workstation isC:\ibm. This directory contains the critical files for your Control Desk deployment,which includes all class files and customizations that have been performed in yourenvironment, the current Enterprise Archive (EAR) file, and the properties files andinstallation tools used for your environment. Plan to back up Control Deskadministrative workstation data just after initial deployment and schedule periodicbackups on an ongoing basis.
Backing up the administrative workstationIt is recommended that you back up all Control Desk middleware applications andControl Desk administrative workstation on a regular basis.
About this task
The default installation directory on the administrative workstation is C:\ibm. Thisdirectory contains the critical files for your Control Desk deployment.
Specifically, the administrative workstation contains the following items:v Class files and customizations performed in your environment.v The current Enterprise Archive (EAR) file that was deployed to the application
server..v The properties files and installation tools used for your environment.
It is important to make a back up of the database at the same time that you backup the administrative workstation. During restoration, you restore the databaseback up at the same time you restore the administrative workstation back up itwas paired with.
To back up critical Control Desk information, complete the following steps:
Procedure1. Back up the Control Desk database, J2EE server, and authentication server
information using the instructions provided by your middleware vendors.2. Create a backup of the installation directory. By default, this directory is
C:\IBM\SMP. Ensure that all file permissions are preserved.
Restoring the administrative workstationThis section details how to restore previously backed up Control Deskadministrative workstation information to a Windows workstation. Thisinformation can be used to return an existing Control Desk administrativeworkstation to a previous state.
© Copyright IBM Corp. 2014 279

Before you begin
It is important to restore the back up of the database that was made when youbacked up the administrative workstation. A database back up should be restoredwith the administrative workstation back up it was paired with.
About this task
To restore Control Desk information to an administrative workstation, complete thefollowing steps:
Procedure1. Restore the database back up that was paired with the administrative
workstation back up you are restoring.2. Log on to the target administrative system with the same user ID that was used
to install the product on the existing administrative workstation.3. Copy the Control Desk installation files and directories to the file system of the
target administrative system. You must maintain the directory structure of theoriginal installation. For example, if the Control Desk installation directory onthe existing administrative system is C:\IBM\SMP, you cannot copy those files toa C:\NewAdminWS\IBM\SMP directory on the target administrative workstation.
Installation propertiesInstallation properties are recorded in properties files during a deployment and areused as input by future install-related actions. Installation properties are found inthe install.properties and maximo.properties files as well as the database. Youshould only modify properties found in the install.properties file that arerelated to host names or user IDs. Changing values for other properties canseverely impact your ability to perform future installation actions, upgrades and fixpack installations.
Table 35. Installation properties
Category Property Definition
MAXIMO Properties Maximo.InstallLocation Install location of the maximo directory.
For example, C:\\IBM\\SMP\\maximo
mxe.db.user Database user that the server uses to attachto the database server.
For example, maximo
mxe.db.schemaowner Owner of the database schema.
For example, maximo
This value must be dbo for Microsoft SQLServer.
mxe.db.password Password for the database user name.
mail.smtp.host SMTP host server.
mxe.workflow.admin E-mail account of the workflowadministrator.
mxe.adminEmail Valid e-mail address used by workflows tocommunicate with workflow participants.
280 IBM Control Desk: Installation Guide (IBM WebSphere)

Table 35. Installation properties (continued)
Category Property Definition
mxe.name Name to bind the MXServer server object toin the RMI registry.
For example, mxserver.
mxe.hostname Name of the machine and port hostingMXServer.
mxe.rmi.port RMI communication port. If set at zero, RMIuses any available port. You can selectanother available port number.
mxe.registry.port The port number used to bind RMI/JRMPcommunications.
For example, 13400.
The RMI registry is started by the firstinstance of the maximo application to run.An environment could have multipleinstances of the product application running.This registry coordinates these instances.There is a single central RMI registry server.This value is the port available for the otherapplication instances to communicate withthe central server.
mxe.allowLocalObjects Set to true in production environments, toimprove system performance. Set to false fordevelopment work, or for customapplications.
The default is false.
mxe.useAppServerSecurity Indicates whether to use LDAP or nativeauthentication. Setting this value to 1indicates you are using LDAP for security.
mxe.MLCacheLazyLoad By default, the multi-language metadatacache loads one object at a time. Set this flagto 1 to load all objects simultaneously forone language.
mxe.UserLicenseKey The product enabler (license key) is usedduring installation. If the product enablerchanges this value must be updated.
mxe.adminuserid The administrative user. Used by the serverfor administrative tasks and to run crontasks. This user must have access to all Sitesin the system.
mxe.adminuserloginid Defines the default login user ID for theproduct application.
The default value is maxadmin.
mxe.adminPasswd The password for the mxe.adminuserloginiduser.
mxe.system.reguser Self registration user. This user isresponsible for the process by which userscan create their own accounts.
The default value is maxreg.
Chapter 19. Backup and restoration 281

Table 35. Installation properties (continued)
Category Property Definition
mxe.system.regpassword User registration login password. This valueis the password for the user listed formxe.system.reguser.
mxe.email.charset The character set for e-mail notifications sentfrom the product.
When this property is defined, it is thecharset that is used to encode the subjectand message when an e-mail notification issent.
mxe.reorder.previewtimeout The reorder preview time out period (inminutes). This value must be set to the samevalue as the Web server session time out.
The default value is 30 minutes.
mxe.security.provider The security provider is obtained from thepolicy file, which is normallycom.sun.crypto.provider.SunJCE.
To use a different provider, you can specifya value for this parameter.
mxe.mbocount Displays the number of business objectscreated by the server.
The default is 1. Changing the value to 0disables this feature.
mxe.esig.defaultuserid Set this flag to true if you want theEsignature login dialog to default to thelogin ID.
The default value is true.
maximo.min.required.db.version Defines what the minimum level of databaseis required for an upgrade. An examplevalue would be 7100.
mxe.encrypted Property used by the application todetermine if property files are encrypted.
This value is set to true if the file isencrypted.
mxe.LDAPUserMgmt Indicates whether LDAP owns usermanagement whenmxe.userAppServerSecurity = 1.
The default value is 1.
Control Desk specificProperties
CCMDB.InstallLocation Product install location.
For example, C:\\IBM\\SMP.
CCMDB.JREInstallLocation JRE install location.
For example, C:\\IBM\\SMP\\JRE.
CCMDB.SDKInstallLocation SDK install location.
For example, C:\\IBM\\SMP\\SDK.
CCMDB.PMP Unused property.
282 IBM Control Desk: Installation Guide (IBM WebSphere)

Table 35. Installation properties (continued)
Category Property Definition
CCMDB.Locale The locale setting of the administrativeworkstation system.
For example, en.
CCMDB.BaseLanguage Base language that was set for the product.
For example, en.
CCMDB.AdditionalLanguages Additional languages installed for theproduct.
CCMDB.DeploySampleData Binary value that determines whethersample data is to be loaded during theinstallation.
For example, false.
CCMDB.UserShortcuts Location of the menu for process solutioninstaller and the product console shortcuts.
CCMDB.InstallType Type of installation, which includes fix pack,upgrade, or new installation.
For example, Install.
CCMDB.DeployEar Binary value that indicates if EAR files aredeployed during the installation.
For example, true.
process automationengine specificproperties
BASE.DeployOptionalContent Binary value that indicates if optionalcontent is deployed during the installation.
For example, true.
BASE.DeployOptionalContentSet Indicates whether you selected to deployoptional content during the initial upgrade.This value, once set, is a fixed value andcannot be changed. This value will be usedfor all future upgrades and fix packs.
BASE.VersionUpgradingFrom The previous version of process automationengine that was installed.
WebSphere ApplicationServer NetworkDeployment ThinClient specificProperties
WAS.ThinClientInstallLocation WebSphere Application Server NetworkDeployment thin client install location.
For example, C:\\IBM\\SMP\\WASClient.
WAS.SOAPConnectorPort SOAP port of the WebSphere ApplicationServer Network Deployment deploymentmanager.
For example, 8879.
WAS.ThinClientFullyAutomatedConfig Binary value that indicates if the installationprogram downloaded the keystore from theWebSphere Application Server NetworkDeployment deployment manager.
If this value is set to false, the user has tocopy it manually.
Chapter 19. Backup and restoration 283

Table 35. Installation properties (continued)
Category Property Definition
WAS.ThinClientLocalKeystore Location of the keystore file.
For example, C:\\ibm\\WebSphere\\AppServer\\profiles\\ctgDmgr02\\etc\\trust.p12.
WAS.Scripts.Location Location of scripts used by the installationprogram.
For example, C:\\IBM\\SMP
WebSphere ApplicationServer NetworkDeployment RMI port
WAS.RMIConnectorPort RMI port on the WebSphere ApplicationServer Network Deployment deploymentmanager. This port is used if SOAP is notbeing used.
Needed when using IPV6
WebSphere ApplicationServer NetworkDeployment specificproperties
WAS.AutomateConfig Binary value that indicates if WebSphereApplication Server Network Deployment isautomatically configured by the installationprogram.
A value of false indicates WebSphereApplication Server Network Deploymentwas manually configured before running theinstallation program.
WAS.InstallLocation Installation location for WebSphereApplication Server Network Deployment.
For example, C:\\IBM\\WebSphere\\AppServer
WAS.DeploymentManagerHostName Host name of the WebSphere ApplicationServer Network Deployment deploymentmanager.
WAS.CellName WebSphere Application Server NetworkDeployment CELL name.
For example, ctgCell01.
WAS.DeploymentManagerProfileName WebSphere Application Server NetworkDeployment profile name.
For example, ctgDmgr01
WAS.DeploymentManagerProfileRoot Location of the WebSphere ApplicationServer Network Deployment profile.
For example, C:/IBM/WebSphere/AppServer/profiles/ctgDmgr01
WAS.ServerProfileName WebSphere Application Server NetworkDeployment application server profile name.
For example, ctgAppSrv01
WAS.NodeName WebSphere Application Server NetworkDeployment node name.
For example, ctgNode01
284 IBM Control Desk: Installation Guide (IBM WebSphere)

Table 35. Installation properties (continued)
Category Property Definition
WAS.ApplicationServerName WebSphere Application Server NetworkDeployment application server name.
For example, MXServer
WAS.ClusterName WebSphere Application Server NetworkDeployment cluster name.
For example, MAXIMOCLUSTER.
This property is designated for future use.
WAS.AdminUserName WebSphere Application Server NetworkDeployment administrator name.
For example, wasadmin
WAS.AdminPassword WebSphere Application Server NetworkDeployment administrator password.
WAS.RemoteAccessUserName WebSphere Application Server NetworkDeployment deployment manager systemuser ID used for tasks such as copying ISCWAR files and fetching the keystore.
WAS.RemoteAccessPassword WebSphere Application Server NetworkDeployment deployment manager systemuser password.
WAS.VirtualHost Name of the WebSphere Application ServerNetwork Deployment virtual host.
For example, maximo_host.
WAS.VirtualHostPort Port for virtual host for listening for HTTPserver.
For example, 80.
WAS.WebServerHostName Host name where the HTTP server islocated.
WAS.AppServerJvmHeapMin Minimum heap size setting for theapplication server JVM.
For example, 512.
WAS.AppServerJvmHeapMax Maximum heap size setting for theapplication server JVM.
For example, 1024.
WAS.SibName Name of the service integration bus.
For example, intjmsbus.
WAS.SibHiMsg Service integration bus high message count.
For example, 500000.
WAS.WebServerName Name of the WebSphere Application ServerNetwork Deployment web server. Used tomanage HTTP server from withinWebSphere Application Server NetworkDeployment.
For example, webserver1.
Chapter 19. Backup and restoration 285

Table 35. Installation properties (continued)
Category Property Definition
WAS.SibPersistMessages Binary value that indicates if serviceintegration bus messages are persisted ineither the product database or a local derbydatabase.
A value of true indicates that the messagesare persisted.
WAS.SibDSName Service integration bus data source namecreated to access the service integration buspersistence store.
For example, intjmsds.
WAS.SibDBType Database type where the service integrationbus messages are being stored.
For example, DB2.
WAS.SibDBName Name of the service integration busmessages database.
WAS.SibDBInstance Instance name of the service integration busdatabase.
WAS.SibDBServerName Server name of the system hosting theservice integration bus message database.
WAS.SibDBServerPort Database server port for the databasecontaining the service integration busmessages.
For example, 50005.
WAS.SibDBUserName User ID used to access the persistence datastore database for service integration busmessages.
WAS.SibDBUserPass Password for user ID named inWAS.SibDBUserName.
WAS.SibDBInstallDir Where the service integration bus databaseis installed.
For example, C:\Program Files\IBM\SQLLIB.
WAS.SibDbFencedUser Fenced user ID for the service integrationbus database. This property is only used fordatabases hosted on UNIX systems.
For example, db2fenc1.
WAS.SibDbInstanceAdminUser Instance owner for the service integrationbus database.
WAS.SibDbInstanceAdminPassword Password for the instance owner of theservice integration bus database.
WAS.SibDbRemoteAccessUser Database server system user used toconfigure the service integration busremotely.
WAS.SibDbRemoteAccessPassword Password for user ID named inWAS.SibDbRemoteAccessUser.
WAS.UseDefaultVmmSchema Unused property.
286 IBM Control Desk: Installation Guide (IBM WebSphere)
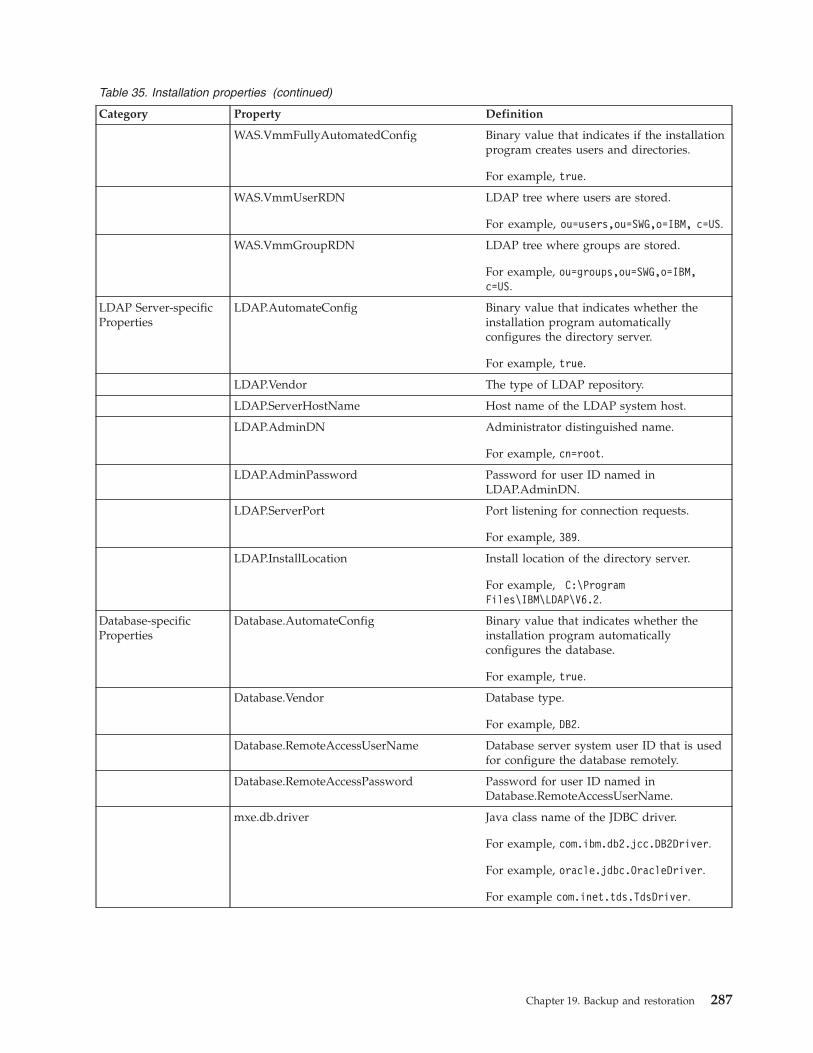
Table 35. Installation properties (continued)
Category Property Definition
WAS.VmmFullyAutomatedConfig Binary value that indicates if the installationprogram creates users and directories.
For example, true.
WAS.VmmUserRDN LDAP tree where users are stored.
For example, ou=users,ou=SWG,o=IBM, c=US.
WAS.VmmGroupRDN LDAP tree where groups are stored.
For example, ou=groups,ou=SWG,o=IBM,c=US.
LDAP Server-specificProperties
LDAP.AutomateConfig Binary value that indicates whether theinstallation program automaticallyconfigures the directory server.
For example, true.
LDAP.Vendor The type of LDAP repository.
LDAP.ServerHostName Host name of the LDAP system host.
LDAP.AdminDN Administrator distinguished name.
For example, cn=root.
LDAP.AdminPassword Password for user ID named inLDAP.AdminDN.
LDAP.ServerPort Port listening for connection requests.
For example, 389.
LDAP.InstallLocation Install location of the directory server.
For example, C:\ProgramFiles\IBM\LDAP\V6.2.
Database-specificProperties
Database.AutomateConfig Binary value that indicates whether theinstallation program automaticallyconfigures the database.
For example, true.
Database.Vendor Database type.
For example, DB2.
Database.RemoteAccessUserName Database server system user ID that is usedfor configure the database remotely.
Database.RemoteAccessPassword Password for user ID named inDatabase.RemoteAccessUserName.
mxe.db.driver Java class name of the JDBC driver.
For example, com.ibm.db2.jcc.DB2Driver.
For example, oracle.jdbc.OracleDriver.
For example com.inet.tds.TdsDriver.
Chapter 19. Backup and restoration 287

Table 35. Installation properties (continued)
Category Property Definition
mxe.db.url JDBC URL of the database.
For example,
jdbc:db2://mymachine.mydomain.com:50005/maxdb75
jdbc:inetdae7a:mymachine.mydomain.com:1433?database=maxdb75&language=us_english&nowarnings=true&mars=false
jdbc:oracle:thin:@mymachine.mydomain.com:1521:ctginst1
mxe.db.initialConnections Number of database connections to createwhen the application server is started.
For example, 8.
mxe.db.maxFreeConnections Maximum number of free databaseconnections available in the connection pool.
For example, 8.
mxe.db.minFreeConnections Minimum number of free databaseconnections needed in the connection poolin order for more connections to beallocated.
For example, 5.
mxe.db.newConnectionCount Number of new connections to be createdwhen the minimum free connections areavailable in the connection pool.
For example, 3.
mxe.db.transaction_isolation The system install sets the value to:TRANSACTION_READ_COMMITTED.
This value cannot be modified.
mxe.db.format.upper This value defines the database uppercasefunction for the system.
This value cannot be modified.
mxe.db.autocommit This value sets the autocommit mode usedfor the Write connections. Can be either trueor false. The default is false.
This value cannot be modified.
mxe.db.systemdateformat System date format.
For DB2, the value is current timestamp.
For Oracle, the value is sysdate, and thedefault value cannot be edited.
For Microsoft SQL Server, the value isgetdate().
288 IBM Control Desk: Installation Guide (IBM WebSphere)
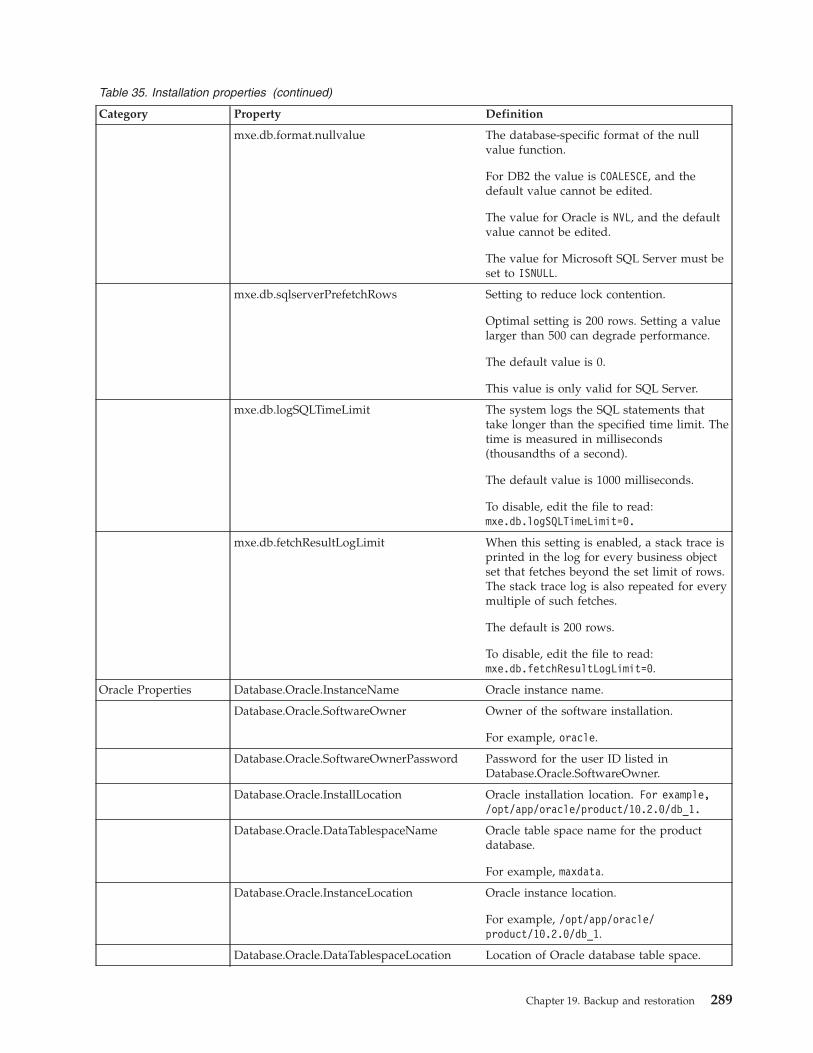
Table 35. Installation properties (continued)
Category Property Definition
mxe.db.format.nullvalue The database-specific format of the nullvalue function.
For DB2 the value is COALESCE, and thedefault value cannot be edited.
The value for Oracle is NVL, and the defaultvalue cannot be edited.
The value for Microsoft SQL Server must beset to ISNULL.
mxe.db.sqlserverPrefetchRows Setting to reduce lock contention.
Optimal setting is 200 rows. Setting a valuelarger than 500 can degrade performance.
The default value is 0.
This value is only valid for SQL Server.
mxe.db.logSQLTimeLimit The system logs the SQL statements thattake longer than the specified time limit. Thetime is measured in milliseconds(thousandths of a second).
The default value is 1000 milliseconds.
To disable, edit the file to read:mxe.db.logSQLTimeLimit=0.
mxe.db.fetchResultLogLimit When this setting is enabled, a stack trace isprinted in the log for every business objectset that fetches beyond the set limit of rows.The stack trace log is also repeated for everymultiple of such fetches.
The default is 200 rows.
To disable, edit the file to read:mxe.db.fetchResultLogLimit=0.
Oracle Properties Database.Oracle.InstanceName Oracle instance name.
Database.Oracle.SoftwareOwner Owner of the software installation.
For example, oracle.
Database.Oracle.SoftwareOwnerPassword Password for the user ID listed inDatabase.Oracle.SoftwareOwner.
Database.Oracle.InstallLocation Oracle installation location. For example,/opt/app/oracle/product/10.2.0/db_1.
Database.Oracle.DataTablespaceName Oracle table space name for the productdatabase.
For example, maxdata.
Database.Oracle.InstanceLocation Oracle instance location.
For example, /opt/app/oracle/product/10.2.0/db_1.
Database.Oracle.DataTablespaceLocation Location of Oracle database table space.
Chapter 19. Backup and restoration 289
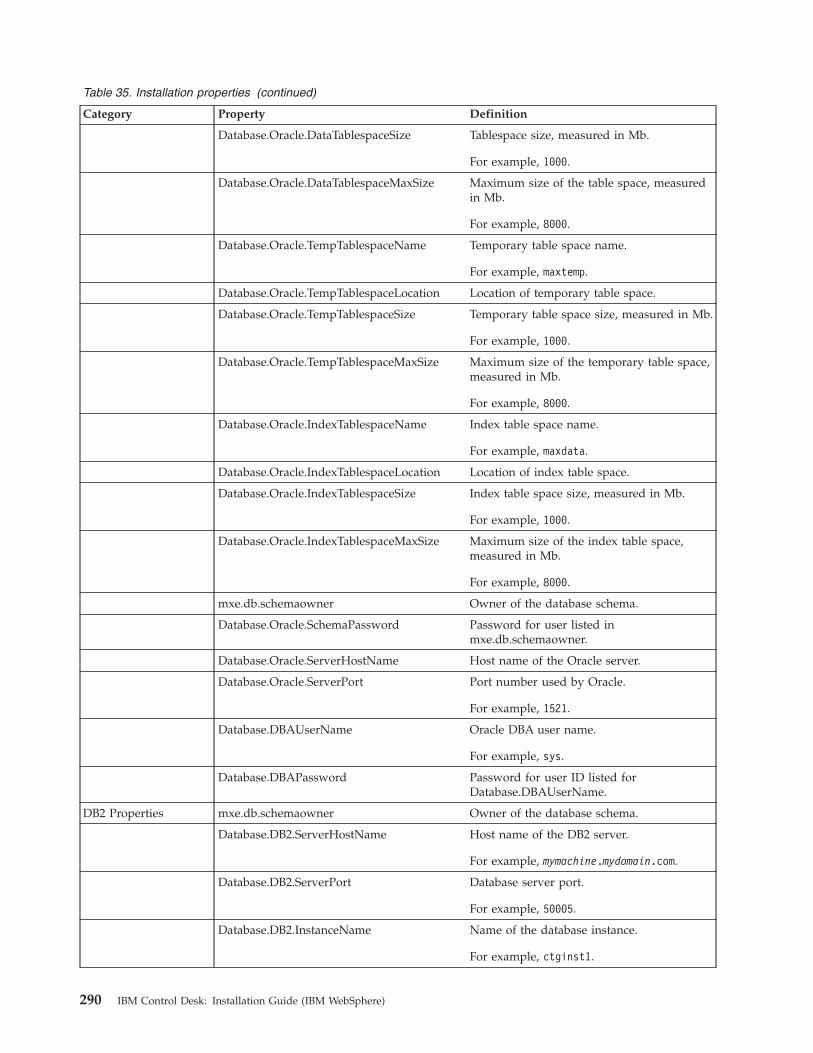
Table 35. Installation properties (continued)
Category Property Definition
Database.Oracle.DataTablespaceSize Tablespace size, measured in Mb.
For example, 1000.
Database.Oracle.DataTablespaceMaxSize Maximum size of the table space, measuredin Mb.
For example, 8000.
Database.Oracle.TempTablespaceName Temporary table space name.
For example, maxtemp.
Database.Oracle.TempTablespaceLocation Location of temporary table space.
Database.Oracle.TempTablespaceSize Temporary table space size, measured in Mb.
For example, 1000.
Database.Oracle.TempTablespaceMaxSize Maximum size of the temporary table space,measured in Mb.
For example, 8000.
Database.Oracle.IndexTablespaceName Index table space name.
For example, maxdata.
Database.Oracle.IndexTablespaceLocation Location of index table space.
Database.Oracle.IndexTablespaceSize Index table space size, measured in Mb.
For example, 1000.
Database.Oracle.IndexTablespaceMaxSize Maximum size of the index table space,measured in Mb.
For example, 8000.
mxe.db.schemaowner Owner of the database schema.
Database.Oracle.SchemaPassword Password for user listed inmxe.db.schemaowner.
Database.Oracle.ServerHostName Host name of the Oracle server.
Database.Oracle.ServerPort Port number used by Oracle.
For example, 1521.
Database.DBAUserName Oracle DBA user name.
For example, sys.
Database.DBAPassword Password for user ID listed forDatabase.DBAUserName.
DB2 Properties mxe.db.schemaowner Owner of the database schema.
Database.DB2.ServerHostName Host name of the DB2 server.
For example, mymachine.mydomain.com.
Database.DB2.ServerPort Database server port.
For example, 50005.
Database.DB2.InstanceName Name of the database instance.
For example, ctginst1.
290 IBM Control Desk: Installation Guide (IBM WebSphere)

Table 35. Installation properties (continued)
Category Property Definition
Database.DB2.DatabaseName Name of the database.
For example, maxdb75.
Database.DB2.InstallLocation Install location of the database.
For example, /opt/IBM/db2/V9.7
Database.DB2.LogFileSize Set the size for transaction logs.
For example, 4096
Database.DB2.AppCtlHeapSize Application control heap size.
For example, 1024
Database.DB2.ApplHeapSize Application heap size.
For example, 1024
Database.DB2.LockListSize Size allocated to the lock list.
For example, 30000
Database.DB2.LogSecond Number of secondary log files allowed.
For example, 4
Database.DB2.ServiceUser User ID used to autostart.
Database.DB2.ServicePassword Password for Database.DB2.ServiceUser.
Database.DB2.PageSize Page size setting.
Measured in kb. For example, 32
Database.DB2.ExtentSize Number of pages per extent (group ofpages).
For example, 32
Database.DB2.FencedUser Fenced user ID for DB2 on Linux or UNIXsystems.
For example, db2fenc1.
Database.DB2.AuthType Method DB2 uses to authenticate users.
For example, server.
Database.DB2.DataTablespaceName DB2 table space name for the productdatabase.
For example, maxdata.
Database.DB2.BufferPoolName DB2 buffer pool name.
For example, MAXBUFPOOL.
Database.DB2.BufferPoolLocation Location of the buffer pool.
Database.DB2.BufferPoolSize Size of the buffer pool.
For example, 32
Database.DB2.DataTablespaceLocation Location of DB2 database table space.
Database.DB2.DataTablespaceSize Tablespace size, measured in Mb.
For example, 1000.
Chapter 19. Backup and restoration 291

Table 35. Installation properties (continued)
Category Property Definition
Database.DB2.DataTablespaceMaxSize Maximum size of the table space, measuredin Mb.
For example, 8000.
Database.DB2.TempTablespaceName Temporary table space name.
For example, maxtemp.
Database.DB2.TempTablespaceLocation Location of temporary table space.
Database.DB2.TempTablespaceSize Temporary table space size, measured in Mb.
For example, 1000.
Database.DB2.TempTablespaceMaxSize Maximum size of the table space, measuredin Mb.
For example, 8000.
Database.DB2.IndexTablespaceName Index table space name.
For example, maxdata.
Database.DB2.IndexTablespaceLocation Location of index table space.
Database.DB2.IndexTablespaceSize Temporary table space size, measured in Mb.
For example, 1000.
Database.DB2.IndexTablespaceMaxSize Maximum size of the index table space,measured in Mb.
For example, 8000.
Database.DB2.InstanceAdminUserName Administrative user or the database instance.
Database.DB2.InstanceAdminPassword Password for the user ID specified forDatabase.DB2.InstanceAdminUserName
Microsoft SQL ServerProperties
mxe.db.schemaowner Owner of the database schema.
Database.SQL.DatabaseName Name of the database.
For example, maxdb75.
Database.SQL.InstallLocation Microsoft SQL Server installationlocation. For example,C:\\ProgramFiles\\Microsoft SQL Server\\90.
Database.SQL.DataFileLocation Location for database data file
Database.SQL.DataFileName A way to specify the name of the data fileused for the database. For example,maxdb75_dat.
Database.SQL.DataFileMaxSize Maximum size for data file for database.
Database.SQL.DataFileSize Initial size for data file for database.
Database.SQL.LogFileName A way to specify the name for the databasetransaction log file. For example,maxdb75_log.
Database.SQL.LogFileSize Microsoft SQL Server Database transactionlog file size.
Database.SQL.DataFilegroupName Database logical name file group. Forexample, PRIMARY.
292 IBM Control Desk: Installation Guide (IBM WebSphere)

Table 35. Installation properties (continued)
Category Property Definition
Database.SQL.ServerHostName Host name of the database server. Forexample, myhost.mydomain.com.
Database.SQL.ServerPort Database server port. For example, 1433.
Database.SQL.InstanceAdminUserName Administrative user for the Microsoft SQLServer instance. used during install forcreating database, creating database user,and modifying the database.
Database.SQL.InstanceAdminPassword Administrative users password.
ADE (DE) Properties DE.InstalllLocation Location of the deployment engine.
Application ServerType Properties
ApplicationServer.Vendor Indicates which application server waschosen during installation. For example,WebSphere.
Updating environment dataWhen you install a second product on the same administrative workstation, orupgrade a single product, the installation program uses values recorded from theprevious deployment. These values are stored on the administrative system in theinstall.properties and maximo.properties files, and also in the database. If youmade any environmental changes to any of the systems used for the originaldeployment, they must be recorded in the install.properties andmaximo.properties files. They also must be updated in the database. Typically,these types of changes include changing a host name or updating a password.
Before you begin
During a follow-up installation task, the installation program uses values found inthe install.properties and maximo.properties files to complete the upgrade orinstallation of an additional product. Pending successful use of these credentials,you are not prompted to provide them again. If the installation program fails tolog on to the system with the credentials from the properties files, you areprompted to supply current credentials. These values are then written to theappropriate property file.
This method of updating credential information in property files has one exception.Database connection and credential information must always be current before youattempt an upgrade operation. Information for the database connection andcredentials are stored in the maximo.properties file. Any changes to thisinformation from the time of the original deployment must be recorded manuallyin the maximo.properties file before you upgrade.
Passwords are encrypted within properties files. Update the encrypted values inthe properties files with clear text values and then re-encrypt the property file.
About this task
Updates to properties files can be performed by manually editing the appropriatevalue in a property file. There is a reconfiguration tool available from theIntegrated Service Management Library that can be used to update properties. Seethe Integrated Service Management Library (https://www.ibm.com/software/brandcatalog/ismlibrary/) and search for IBM Maximo Reconfiguration Tool forAdministrative Workstations.
Chapter 19. Backup and restoration 293

Procedure1. Update the property value in the database by using the System Properties
application in Control Desk.2. Update the database properties in the maximo.properties file:
a. As a precaution, create a backup of the c:\ibm\smp\maximo\applications\maximo\properties\maximo.properties file.
b. Delete the c:\ibm\smp\maximo\applications\maximo\properties\maximo.properties file.
c. Copy c:\ibm\smp\etc\maximo.properties_orig to c:\ibm\smp\maximo\applications\maximo\properties\maximo.properties
d. Rename c:\ibm\smp\maximo\applications\maximo\properties\maximo.properties_orig to c:\ibm\smp\maximo\applications\maximo\properties\maximo.properties.
e. Edit c:\ibm\smp\maximo\applications\maximo\properties\maximo.properties and update the credential or connection information forthe target database server.
f. Encrypt the file c:\ibm\smp\maximo\tools\maximo\encryptproperties.batfile.
3. Update the c:\ibm\smp\etc\install.properties file on the administrativeworkstation with any properties that changed. Do not change encryptedpassword properties. Encrypted password properties are prefixed by [enc] inthe installation.properties file. Passwords can be updated during the nextupgrade. If you must update the host name for the IBM WebSphere ApplicationServer Network Deployment server, complete the steps in step 4.
4. Optional: Update the host name for the WebSphere Application Server NetworkDeployment server.a. Copy the keystore file from the WebSphere Application Server Network
Deployment deployment manager host to the c:\ibm\smp\wasclient\etcdirectory of the administrative system. The keystore file can be found inWAS_HOME/profiles/ctgDmgr01/etc/trust.p12.
b. Update the WAS.DeploymentManagerHostName property in theinstall.properties file of the administrative system in the targetenvironment.
c. Edit the C:\ibm\smp\wasclient\thinwasadmin.bat file and update thefollowing line with the host name of the WebSphere Application ServerNetwork Deployment server:set wsadminHost=-Dcom.ibm.ws.scripting.host=fully_qualified_host_name
d. Run C:\ibm\smp\wasclient\thinwasadmin.bat:thinwsadmin.bat -domain manager user name -password
Results
After completing these updates, you can upgrade, install a fix pack, or installanother product with the corrected values.
294 IBM Control Desk: Installation Guide (IBM WebSphere)

Notices
This information was developed for products and services offered in the U.S.A.
IBM may not offer the products, services, or features discussed in this document inother countries. Consult your local IBM representative for information on theproducts and services currently available in your area. Any reference to an IBMproduct, program, or service is not intended to state or imply that only that IBMproduct, program, or service may be used. Any functionally equivalent product,program, or service that does not infringe any IBM intellectual property right maybe used instead. However, it is the user's responsibility to evaluate and verify theoperation of any non-IBM product, program, or service.
IBM may have patents or pending patent applications covering subject matterdescribed in this document. The furnishing of this document does not grant youany license to these patents. You can send license inquiries, in writing, to:
IBM Director of LicensingIBM CorporationNorth Castle DriveArmonk, NY 10504-1785U.S.A.
For license inquiries regarding double-byte (DBCS) information, contact the IBMIntellectual Property Department in your country or send inquiries, in writing, to:
Intellectual Property LicensingLegal and Intellectual Property LawIBM Japan, Ltd.19-21, Nihonbashi-Hakozakicho, Chuo-kuTokyo 103-8510, Japan
The following paragraph does not apply to the United Kingdom or any othercountry where such provisions are inconsistent with local law:INTERNATIONAL BUSINESS MACHINES CORPORATION PROVIDES THISPUBLICATION “AS IS” WITHOUT WARRANTY OF ANY KIND, EITHEREXPRESS OR IMPLIED, INCLUDING, BUT NOT LIMITED TO, THE IMPLIEDWARRANTIES OF NON-INFRINGEMENT, MERCHANTABILITY OR FITNESSFOR A PARTICULAR PURPOSE. Some states do not allow disclaimer of express orimplied warranties in certain transactions, therefore, this statement may not applyto you.
This information could include technical inaccuracies or typographical errors.Changes are periodically made to the information herein; these changes will beincorporated in new editions of the publication. IBM may make improvementsand/or changes in the product(s) and/or the program(s) described in thispublication at any time without notice.
Any references in this information to non-IBM Web sites are provided forconvenience only and do not in any manner serve as an endorsement of those Websites. The materials at those Web sites are not part of the materials for this IBMproduct and use of those Web sites is at your own risk.
© Copyright IBM Corp. 2014 295

IBM may use or distribute any of the information you supply in any way itbelieves appropriate without incurring any obligation to you.
Licensees of this program who wish to have information about it for the purposeof enabling: (i) the exchange of information between independently createdprograms and other programs (including this one) and (ii) the mutual use of theinformation which has been exchanged, should contact:
IBM CorporationSoftware Interoperability Coordinator, Department 49XA3605 Highway 52 NRochester, MN 55901U.S.A.
Such information may be available, subject to appropriate terms and conditions,including in some cases, payment of a fee.
The licensed program described in this information and all licensed materialavailable for it are provided by IBM under terms of the IBM Customer Agreement,IBM International Program License Agreement, or any equivalent agreementbetween us.
Any performance data contained herein was determined in a controlledenvironment. Therefore, the results obtained in other operating environments mayvary significantly. Some measurements may have been made on development-levelsystems and there is no guarantee that these measurements will be the same ongenerally available systems. Furthermore, some measurements may have beenestimated through extrapolation. Actual results may vary. Users of this documentshould verify the applicable data for their specific environment.
Information concerning non-IBM products was obtained from the suppliers ofthose products, their published announcements or other publicly available sources.IBM has not tested those products and cannot confirm the accuracy ofperformance, compatibility or any other claims related to non-IBM products.Questions on the capabilities of non-IBM products should be addressed to thesuppliers of those products.
All statements regarding IBM's future direction or intent are subject to change orwithdrawal without notice, and represent goals and objectives only.
All IBM prices shown are IBM's suggested retail prices, are current and are subjectto change without notice. Dealer prices may vary.
This information is for planning purposes only. The information herein is subject tochange before the products described become available.
This information contains examples of data and reports used in daily businessoperations. To illustrate them as completely as possible, the examples include thenames of individuals, companies, brands, and products. All of these names arefictitious and any similarity to the names and addresses used by an actual businessenterprise is entirely coincidental.
COPYRIGHT LICENSE:
This information contains sample application programs in source language, whichillustrate programming techniques on various operating platforms. You may copy,
296 IBM Control Desk: Installation Guide (IBM WebSphere)
modify, and distribute these sample programs in any form without payment toIBM, for the purposes of developing, using, marketing or distributing applicationprograms conforming to the application programming interface for the operatingplatform for which the sample programs are written. These examples have notbeen thoroughly tested under all conditions. IBM, therefore, cannot guarantee orimply reliability, serviceability, or function of these programs.
Each copy or any portion of these sample programs or any derivative work, mustinclude a copyright notice as follows:
© IBM Corp. 2013. Portions of this code are derived from IBM Corp. SamplePrograms. © Copyright IBM Corp. 2012. All rights reserved.
If you are viewing this information softcopy, the photographs and colorillustrations may not appear.
TrademarksFor trademark attribution, visit the IBM Terms of Use Web site(http://www.ibm.com/legal/us/)
The following terms are trademarks of International Business MachinesCorporation in the United States, other countries, or both:
IBM, the IBM logo, AIX, Tivoli, the Tivoli logo, and WebSphere are trademarks orregistered trademarks of International Business Machines Corporation in theUnited States, other countries, or both.
Intel, the Intel logo, and Pentium are trademarks of Intel Corporation in the UnitedStates, other countries, or both.
Microsoft, Windows, the Windows logo, and Internet Explorer are trademarks ofMicrosoft Corporation in the United States, other countries, or both.
Linux is a trademark of Linus Torvalds in the United States, other countries, orboth.
UNIX is a registered trademark of The Open Group in the United States and othercountries.
Java and all Java-based trademarks and logos are trademarks or registeredtrademarks of Oracle and/or its affiliates.
Other company, product, and service names may be trademarks or service marksof others.
Notices 297

298 IBM Control Desk: Installation Guide (IBM WebSphere)

Index
Aaction
install 244showavail 244showinstalled 244undo 244uninstall 244upgrade 244
administrative workstationbacking up 279restoring 280
aggregation packages 231AIX
large page size support 10application server
starting from the administrativeconsole 254
starting from the command line 253authentication service 98, 102, 112
Bbackup 279
Ccompany related accounts
updating 200configure 196configure SMTP 196configuring 112
database server 73configuring Windows services 256confirming the Integration Composer
installation 184continuous inbound (CQIN) JMS queue
creating 121CQINERR JMS queue
creating 127currency codes
creating 197
Ddata source
manually creating for the persistentstore 130
databaseapplying changes 198
database server 73defer configuration 239
DB2configuring existing server with the
middleware installationprogram 56
install on Solaris and HP-UX 262manual configuration, 9.x 74
default insert sitecreating 200
deployment enginebacking up 15
deployment operationstypical 234
deployment planoverview 19
directory servermanually configuring 82
EEAR files
building manually 259maintaining 258
environmental dataupdating 293
error queue 125executeMapping command 187
Ffonts
AIX 8
Ggeneral ledger account
creating 199general ledger account component
creating 198general ledger component type
authorizationupdating 199
group 34
Hhardware and software requirements,
Integration Composer 176help 195HTTP server 14HTTPOnly
configuring 173
IIBM HTTP Server
installing and configuring 272installing fix packs 274
IBM Tivoli Directory Server 34install on Solaris 264manually configuring 83verifying existing server using the
middleware installationprogram 57
IBM WebSphere Application ServerNetwork Deployment
HTTPOnly 173
installautomatic middleware
configuration 19simple
path values 42, 61install action 247install silently 141installation
advanced topics 253automatically configuring existing
middleware 53deploying using manual middleware
configuration 73deploying with manually configured
middleware 73Integration Composer
with Launchpad 175preparing 1product, automatically configured
middleware 44, 63product, manually configured
middleware 132properties 280Tivoli Integration Composer 177, 181
Installationpost installation tasks 195
installation prerequisites, IntegrationComposer 176
installing 98, 102prerequisite software products 19,
141silent 141
Integration Composerinstalling
with process solution installationpackage 178, 182
UNIX systems 178, 182Integration Composer installation
prerequisites 176Integration Composer installation,
confirming 184Integration Composer overview 175Integration Composer requirements,
hardware and software 176Integration Composer, uninstalling 188item and company sets
creating 197
JJ2EE server
defer configuration 239manually configuring 91
JMS activation specificationcreating for the continuous inbound
queue (CQIN) 124creating for the inbound error queue
(CQINERR) 128JMS connection factory
creating 120
© Copyright IBM Corp. 2014 299

JMS queuesmanually configure 115
JREconfiguring in Linux 11
Llanguage enablement 203languages
deploying after database updatedeferral 51, 70, 139
launchpadoverview 17starting 18
librariesLinux 11
logsmiddleware installation program 22,
24process solution installation
program 249
Mmemory allocation
changing 187Microsoft Active Directory
configuring 87configuring with middleware
installation program 58Microsoft SQL Server
manual configuration 80restoring 214
middleware 19, 141changing configuration
parameters 257install on Solaris and HP-UX 261,
262install preparation on Solaris and
HP-UX 261installing on HP-UX 261installing on Solaris 261remote configuration 13starting and stopping 223starting on UNIX 224starting on Windows 223stopping on Linux and AIX 226stopping on Windows 225uninstalling 39
middleware clean up scripts 205middleware cleanup scripts 205middleware installation
before you begin 1middleware installation program
log reference 24logs 22
modfeatures action 248
Nnode agent
creating as a Windows service 98nstallation
before you begin 1
Oonline help 195Oracle
manual configuration, 10g 78manual configuration, 11g 76restoring 213
organizationcreating 197
overview, Integration Composer 175
Ppackage types 230packages 230page size support 10port availability
checking 7post installation 195post-installation tasks 184
top-level class for ITassets 202software 202
pre-deployment system checkprocess solution installation
program 241prerequisite 19, 141process managers
installing using the process solutioninstallation wizard 242
process solution command line interfacereference 247
process solution deploymentmanaging from the administrative
workstation 234process solution installation
packages 230process solution installation client 244process solution installation
program 247, 248before you begin 233choosing 231logs 249supported operations 232
process solution packageinstallation methods 229
product installationbefore you begin 1
product installation programoverview 41, 60
propertiesinstallation 280silent product installation 143
Rrecovery tool
uninstall 215restoration 279
Ssecurity
configuring 204selectable features 234
sequential inbound (SQIN) JMS queuecreating 122
sequential outbound (SQOUT) JMS queuecreating 123
service integration busadding a server 116
service integration bus destinationcreating for the continuous inbound
(CQINBD) queue 117creating for the inbound error queue
(CQINERRBD) queue 125creating for the sequential inbound
(SQINBD) queue 118creating for the sequential outbound
(SQOUTBD) queue 119shared memory
setting 12signing in 196signing in and out 203silent install 141silent product installation
properties 143simple install
path values 42, 61SMTP 196software life cycle operations 229solution installation program
command line interface supportedparameters 245
solution installer programaction 244
solution package deploymentmanually completing 240
solution packagescommand line interface 244
solutionInstallersyntax 244
solutionInstaller scriptsolutionInstaller.bat 244solutionInstaller.sh 244
SSLclient authentication workaround 14configuring 35
startFusion filememory allocation 187
swap sizesetting 12
system directoriesaccessing 7
system password policyconsiderations 15
Ttar command
AIX 8Tivoli Integration Composer
installation 177upgrade 181
Uulimit
setting 12
300 IBM Control Desk: Installation Guide (IBM WebSphere)

uninstallautomatically configured
deployment 209database configuration recover 212manual 219manually configured deployment 211manually configured middleware 211manually removing files 222product 209
without uninstallationprogram 215
recovery tool 215uninstall program recovery tool 215
uninstallationautomatically configured
middleware 210uninstalling Integration Composer 188uninstalling Integration Composer on
Unix-based operating systems 189uninstalling Integration Composer on
Windows operating systems 188user 34users
groupssynchronizing 204
synchronizing 204
Vverifying prerequisites
programmatically 2verifying the installation
manually 171programmatically 165
Virtual Member Managerconfiguring 277
VMMmanual configuration 268
WWebSphere Application Server
recovering configuration 219WebSphere Application Server Network
DeploymentSee also managementconfiguration tasks 91configuring to run as a Windows
service 256install Control Desk applications 259install on Solaris and HP-UX 265installing the update installer 272manually configuring 91manually creating profiles 266manually uninstalling 259
WebSphere Application Server NetworkDeployment administrative console
See securingWebSphere Application Server Network
Deployment Application Server(MXServer) 256
WebSphere node agent 256WebSphere plug-in
See installingWebSphere plug-in fix packs
installing 276
Windows servicesconfiguring 256
worktypescreating 200
Xxml request pages 203
Index 301

302 IBM Control Desk: Installation Guide (IBM WebSphere)


����
Printed in USA