ibm mobile systems s37l-2095-00 workpad z50 mobile
TRANSCRIPT

S37L-2095-00IBM Mobile Systems
WorkPad z50 Mobile Companion (2608-1Ax)Hardware Maintenance Manual March 1999

© Copyright IBM Corp. 1999 iii
Note
Before using this information and the product it supports,be sure to read the general information under “Notices”on page 61.
First Edition (March 1999)
The following paragraph does not apply to the UnitedKingdom or any country where such provisions areinconsistent with local law:INTERNATIONAL BUSINESS MACHINESCORPORATION PROVIDES THIS PUBLICATION “AS IS”WITHOUT ANY WARRANTY OF ANY KIND, EITHEREXPRESS OR IMPLIED, INCLUDING, BUT NOT LIMITEDTO, THE LIMITED WARRANTIES OF MERCHANTABILITYOR FITNESS FOR A PARTICULAR PURPOSE. Somestates do not allow disclaimer or express or impliedwarranties in certain transactions; therefore, this statementmay not apply to you.
This publication could include technical inaccuracies ortypographical errors. Changes are periodically made to theinformation herein; these changes will be incorporated innew editions of the publication. IBM may makeimprovements or changes to the products or the programsdescribed in this publication at any time.
It is possible that this publication may contain references to,or information about, IBM products (machines andprograms), programming, or services that are not announcedin your country. Such references or information must not beconstrued to mean that IBM intends to announce such IBMproducts, programming, or services in your country.
Requests for technical information about IBM productsshould be made to your IBM authorized dealer or your IBMmarketing representative.
© Copyright International Business MachinesCorporation 1999. All rights reserved. Note to USGovernment Users – Documentation related to restrictedrights – Use, duplication, or disclosure is subject torestrictions set forth in GSA ADP Schedule Contract withIBM Corp.

iv IBM WorkPad z50, Mobile Companion iv
About This Manual
This manual contains service and reference information forthe WorkPad z50, Mobile Companion. Use this manualalong with the diagnostic software to troubleshoot problemseffectively.
This manual is divided into sections as follows:
• The Introduction section provides general information,and safety information required to service computers.
• The product-specific section includes service,reference, and product-specific parts information.
Important
This manual is intended for trained service personnel whoare familiar with WorkPad products.
Before servicing an IBM WorkPad product, be sure toreview the safety information under “Safety Notices” onpage viii and “Safety Information” on page xii.

© Copyright IBM Corp. 1999 v
Contents
Introduction ......................................................................... viiIMPORTANT SERVICE INFORMATION VII
FRU Replacement Strategy .......................................................viiSAFETY NOTICES (MULTI-LINGUAL TRANSLATIONS) VIII
SAFETY INFORMATION XII
General Safety............................................................................xiiElectrical Safety ........................................................................xiiiSafety Inspection Guide............................................................ xivHandling Electrostatic Discharge-Sensitive Devices............. xviGrounding Requirements ......................................................... xvi
WORKPAD Z50 MOBILE COMPANION (2608) 1READ THIS FIRST 1SCREW TIGHTENING INFORMATION 2PRODUCT OVERVIEW 5CHECKOUT GUIDE 6
Audio Checkout............................................................................7Keyboard Checkout .....................................................................8Memory Checkout........................................................................8Modem Checkout .........................................................................9Power Systems Checkout.............................................................9Backup Battery Checkout (Nonrechargeable) .........................13The Battery Calibration Application ........................................13ROM Card Checkout .................................................................14TrackPoint Checkout .................................................................15Cradle Checkout ........................................................................15External Monitor Self-Test ........................................................15
INSTALLING THE ROM/DRAM CARD 17Removing the ROM/DRAM Card..............................................18Brightness/Contrast Buttons Checkout ....................................19
POWER MANAGEMENT FEATURES 20Full Power Mode .......................................................................20Suspend Mode ............................................................................20
SYMPTOM-TO-FRU INDEX 21Numeric Error Codes ................................................................21Function-Related Symptoms......................................................23Indicator-Related Symptoms .....................................................23Infrared-Related Symptoms.......................................................23Keyboard- or TrackPoint-Related Symptoms ..........................24LCD-Related Symptoms.............................................................24Peripheral Device Related Symptoms ......................................25Power-Related Symptoms..........................................................25Other Symptoms.........................................................................25Intermittent Problems ................................................................26Undetermined Problems............................................................26
RUNNING THE DIAGNOSTICS 27PC Card Slot Test ......................................................................27UUID ..........................................................................................28
RELATED SERVICE PROCEDURES 28Status Indicators and Control Buttons .....................................28Application Launching Key Assignments .................................29
REMOVING AND REPLACING DEFECTIVE FRUS 30Important Notice ........................................................................32Removal reference .....................................................................341010 Backup Batteries..............................................................351020 ROM/DRAM Card...........................................................361030 Battery Pack.....................................................................38

vi IBM WorkPad z50, Mobile Companion vi
1040 Keyboard Assembly .........................................................391050 Bottom Cover...................................................................401060 Mainboard .......................................................................421070 LCD Bezel ........................................................................431080 LCD Unit..........................................................................441090 Inverter Card and LCD Panel ........................................451110 FPC Assembly..................................................................461120 Speaker.............................................................................471130 Microphone......................................................................471140 Audio Ports ......................................................................481150 PC Card Slot Assembly ...................................................481160 RJ-11 Assembly ...............................................................501170 Hardware Button Board .................................................511180 Top Cover ........................................................................52
LOCATIONS 53Front Right View........................................................................53Left View.....................................................................................54Right View ..................................................................................54Rear View ...................................................................................55Bottom View ...............................................................................55
PARTS LISTING 56System Unit FRU List ................................................................57LCD Unit Parts List...................................................................58Miscellaneous and Other Parts.................................................59Option Parts FRU List...............................................................59Other Parts .................................................................................59CRU ............................................................................................59Tools ...........................................................................................59Power Cord ................................................................................60
NOTICES 61Trademarks ................................................................................61

© Copyright IBM Corp. 1998 vii
Introduction
Important Service Information
Important
Software fixes are customer installable. Such fixes arelocated on the PC Company Bulletin Board Service(BBS). The direct line for modem connection is 919-557-0001 or tieline 255-0001 (IBM internal phone number).
Advise customers to contact the PC CompanyHelpCenter at 800-722-2227 if they need assistance inobtaining or installing software fixes.
Customers in Canada should call IBM HelpPC at 800-565-3344 for assistance or down-load information. The CanadianBBS phone numbers are:
Montreal 515-938-3022
Toronto 905-316-4255
Vancouver 604-664-6464
Winnipeg 204-934-2735
FRU Replacement Strategy
Before Replacing Parts
Ensure that all software fixes are installed prior toreplacing any FRUs listed in this manual.
Use the following strategy to prevent unnecessary FRUreplacement and service expense:
• If you are instructed to replace a FRU and thatdoes not correct the problem, reinstall theoriginal FRU before you continue.
• Some computers have both a processor board and amainboard. If you are instructed to replace either theprocessor board or the mainboard, and the first boardthat you replaced does not correct the problem,reinstall the original board, and then replace the other(processor or system) board.
• If an adapter or device consists of more than oneFRU, an error code may be caused by any of theFRUs. Before replacing the adapter or device,remove the FRUs, one by one, to see if thesymptoms change. Replace only the faulty FRU.

viii IBM WorkPad z50, Mobile Companion viii
Safety Notices (Multi-lingual Translations)In this manual, safety notices appear in English with a pagenumber reference to the appropriate multi-lingual, translatedsafety notice found in this section.
The following safety notices are provided in English, French,German, Italian, and Spanish languages.
Safety Notice 1
Before the computer is powered-on after FRUreplacement, make sure all screws, springs, or othersmall parts are in place and are not left loose inside thecomputer. Verify this by shaking the computer andlistening for rattling sounds. Metallic parts or metal flakescan cause electrical shorts.
Avant de remettre l'ordinateur sous tension aprèsremplacement d'une unité en clientèle, vérifiez que tousles ressorts, vis et autres pièces sont bien en place etbien fixées. Pour ce faire, secouez l'unité et assurez-vous qu'aucun bruit suspect ne se produit. Des piècesmétalliques ou des copeaux de métal pourraient causerun court-circuit.
Bevor nach einem FRU-Austausch der Computer wiederangeschlossen wird, muß sichergestellt werden, daßkeine Schrauben, Federn oder andere Kleinteile fehlenoder im Gehäuse vergessen wurden. Der Computer mußgeschüttelt und auf klappergeräusche geprüft werden.Metallteile oder splitter können Kurzschlüsse erzeugen.
Prima di accendere l'elaboratore dopo che è stataeffettuata la sostituzione di una FRU, accertarsi che tuttele viti, le molle e tune le altri parti di piccole dimensionisiano nella corretta posizione e non siano sparseall'interno dell'elaboratore. Verificare ciò scuotendol'elaboratore e prestando attenzione ad eventuali rumori;eventuali parti o pezzetti metallici possono provocarecortocircuiti pericolosi.
Antes de encender el sistema despues de sustituir unaFRU, compruebe que todos los tornillos, muelles y demáspiezas pequeñas se encuentran en su sitio y no seencuentran sueltas dentro del sistema. Compruébeloagitando el sistema y escuchando los posibles ruidos queprovocarían. Las piezas metálicas pueden causarcortocircuitos eléctricos.

© Copyright IBM Corp. 1998 ix
Safety Notice 2
The battery pack contains small amounts of harmfulsubstances. Do not disassemble it, throw it into fire orwater, or short-circuit it. Dispose of the battery asrequired by local ordinances or regulations. Use only thebattery in the appropriate parts listing when replacing thebattery pack. Use of an incorrect battery can result inignition or explosion of the battery.
La batterie contient du nickel. Ne la démontez pas, nel'exposez ni au feu ni á l'eau. Ne la mettez pas en court-circuit. Pour la mettre au rebut, conformez-vous a laréglementation en vigueur. Lorsque vous remplacez labatterie, veillez à n'utiliser que les modèles cités dans laliste de pièces détachées adéquate. En eftet, une batterieinappropriée risque de prendre feu ou d'exploser.
Akkus enthalten geringe Mengen von Nickel. Sie durfennicht zerlegt, wiederaufgeladen, kurzgeschlossen, oderFeuer oder Wasser ausgesetzt werden. Bei derEntsorgung die örtlichen Bestimmungen für Sondermüllbeachten. Beim Ersetzen der Batterie nur Batterien desTyps verwenden, der in der Ersatzteilliste aufgeführt ist.Der Einsatz falscher Batterien kann zu Entzündung oderExplosion führen.
La batteria contiene piccole quantità di nichel. Nonsmontarla, gettarla nel fuoco o nell'acqua nécortocircuitarla. Smaltirla secondo la normativa in vigore(DPR 915/82, successive disposizioni e disposizionilocali). Quando Si sostituisce la batteria, utilizzaresoltanto i tipi inseriti nell'appropriato Catalogo parti.L'impiego di una batteria non adatta potrebbedeterminare l'incendio o l'esplosione della batteria stessa.
Las baterías contienen pequeñas cantidades de níquel.No las desmonte, ni recargue, ni las eche al fuego o alagua ni las cortocircuite. Deséchelas tal como dispone lanormativa local. Utilice sólo baterías que se encuentrenen la lista de piezas al sustituir la batería. La utilizaciónde una batería no apropiada puede provocar la ignición oexplosión de la misma.

x IBM WorkPad z50, Mobile Companion x
Safety Notice 3
If the LCD breaks and the fluid from inside the LCD getsinto your eyes or on your hands, immediately wash theaffected areas with water for at least 15 minutes. Seekmedical care if any symptoms from the fluid are presentafter washing.
Si le panneau d'aftichage à cristaux liquides se brise etque vous recevez dans les yeux ou sur les mains unepartie du fluide, rincez-les abondamment pendant aumoins quinze minutes. Consultez un médecin si dessymptômes persistent apres le lavage.
Die Leuchtstoffröhre im LCD~BiIdschirm enthältQuecksilber. Bei der Entsorgung die örtlichenBestimmungen für Sondermüll beachten. Der LCD-Bildschirm besteht aus Glas und kann zerbrechen, wenner unsachgemaß behandelt wird oder der Computer aufden Boden fällt. Wenn der Bildschirm beschädigt ist unddie darin befindliche Flüssigkeit in Kontakt mit Haut undAugen gerät, sollten die betroffenen Stellen mindestens15 Minuten mit Wasser abgespült und bei Beschwerdenanschließend ein Arzt aufgesucht werden.
Nel caso che caso l'LCD si dovesse rompere ed ii liquidoin esso contenuto entrasse in contatto con gli occhi o lemani, lavare immediatamente le parti interessate conacqua corrente per almeno 15 minuti; poi consultare unmedico se i sintomi dovessero permanere.
Si la LCD se rompe y el fluido de su interior entra encontacto con sus ojos o sus manos, lave inmediatamentelas áreas afectadas con agua durante 15 minutos comomínimo. Obtenga atención medica si se presenta algúnsíntoma del fluido despues de lavarse.
Safety Notice 4
To avoid shock, do not remove the plastic cover thatsurrounds the lower portion of the inverter card.
Afin d'éviter tout risque de choc électrique, ne retirez pasle cache en plastique protegéant la partie inférieure de lacarte d'alimentation.
Aus Sicherheitsgründen die Kunststoffabdeckung, dieden unteren Teil der Spannungswandlerplatine umgibt,nicht entfernen.
Per evitare scosse elettriche, non rimuovere la coperturain plastica che avvolge la parte inferiore della schedainvertitore.
Para evitar descargas, no quite la cubierta de plásticoque rodea la parte baja de la tarjeta invertida.
© Copyright IBM Corp. 1998 xi
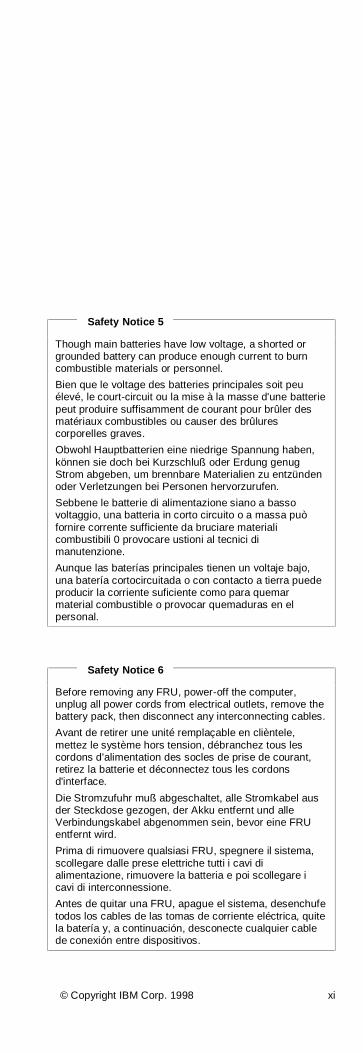
Safety Notice 5
Though main batteries have low voltage, a shorted orgrounded battery can produce enough current to burncombustible materials or personnel.
Bien que le voltage des batteries principales soit peuélevé, le court-circuit ou la mise à la masse d'une batteriepeut produire suffisamment de courant pour brûler desmatériaux combustibles ou causer des brûlurescorporelles graves.
Obwohl Hauptbatterien eine niedrige Spannung haben,können sie doch bei Kurzschluß oder Erdung genugStrom abgeben, um brennbare Materialien zu entzündenoder Verletzungen bei Personen hervorzurufen.
Sebbene le batterie di alimentazione siano a bassovoltaggio, una batteria in corto circuito o a massa puòfornire corrente sufficiente da bruciare materialicombustibili 0 provocare ustioni al tecnici dimanutenzione.
Aunque las baterías principales tienen un voltaje bajo,una batería cortocircuitada o con contacto a tierra puedeproducir la corriente suficiente como para quemarmaterial combustible o provocar quemaduras en elpersonal.
Safety Notice 6
Before removing any FRU, power-off the computer,unplug all power cords from electrical outlets, remove thebattery pack, then disconnect any interconnecting cables.
Avant de retirer une unité remplaçable en clièntele,mettez le système hors tension, débranchez tous lescordons d'alimentation des socles de prise de courant,retirez la batterie et déconnectez tous les cordonsd'interface.
Die Stromzufuhr muß abgeschaltet, alle Stromkabel ausder Steckdose gezogen, der Akku entfernt und alleVerbindungskabel abgenommen sein, bevor eine FRUentfernt wird.
Prima di rimuovere qualsiasi FRU, spegnere il sistema,scollegare dalle prese elettriche tutti i cavi dialimentazione, rimuovere la batteria e poi scollegare icavi di interconnessione.
Antes de quitar una FRU, apague el sistema, desenchufetodos los cables de las tomas de corriente eléctrica, quitela batería y, a continuación, desconecte cualquier cablede conexión entre dispositivos.

xii IBM WorkPad z50, Mobile Companion xii
Safety InformationThe following section contains the safety information thatyou need to be familiar with before servicing an IBM mobilecomputer.
General SafetyFollow these rules to ensure general safety:
• Observe good housekeeping in the area of themachines during and after maintenance.
• When lifting any heavy object:1. Ensure you can stand safely without slipping.2. Distribute the weight of the object equally
between your feet.3. Use a slow lifting force. Never move suddenly or
twist when you attempt to lift.4. Lift by standing or by pushing up with your leg
muscles; this action removes the strain from themuscles in your back. Do not attempt to lift anyobjects that weigh more than 16 kg (35 lb) orobjects that you think are too heavy for you.
• Do not perform any action that causes hazards to thecustomer, or that makes the equipment unsafe.
• Before you start the machine, ensure that otherservice representatives and the customer’s personnelare not in a hazardous position.
• Place removed covers and other parts in a safeplace, away from all personnel, while you areservicing the machine.
• Keep your tool case away from walk areas so thatother people will not trip over it.
• Do not wear loose clothing that can be trapped in themoving parts of a machine. Ensure that your sleevesare fastened or rolled up above your elbows. If yourhair is long, fasten it.
• Insert the ends of your necktie or scarf inside clothingor fasten it with a nonconductive clip, approximately 8centimeters (3 inches) from the end.
• Do not wear jewelry, chains, metal-frame eyeglasses,or metal fasteners for your clothing.
Attention: Metal objects are good electricalconductors.
• Wear safety glasses when you are: hammering,drilling, soldering, cutting wire, attaching springs,using solvents, or working in any other conditions thatmight be hazardous to your eyes.
• After service, reinstall all safety shields, guards,labels, and ground wires. Replace any safety devicethat is worn or defective.
• Reinstall all covers correctly before returning themachine to the customer.

© Copyright IBM Corp. 1998 xiii
Electrical SafetyObserve the following rules when working on electricalequipment.
Important
Use only approved tools and test equipment. Some handtools have handles covered with a soft material that doesnot insulate you when working with live electrical currents.
Many customers have, near their equipment, rubber floormats that contain small conductive fibers to decreaseelectrostatic discharges. Do not use this type of mat toprotect yourself from electrical shock.
• Find the room emergency power-off (EPO) switch,disconnecting switch, or electrical outlet. If anelectrical accident occurs, you can then operate theswitch or unplug the power cord quickly.
• Do not work alone under hazardous conditions ornear equipment that has hazardous voltages.Disconnect all power before:
- Performing a mechanical inspection- Working near power supplies- Removing or installing main units
• Before you start to work on the machine, unplug thepower cord. If you cannot unplug it, ask the customerto power-off the wall box that supplies power to themachine and to lock the wall box in the off position.
• If you need to work on a machine that has exposedelectrical circuits, observe the following precautions:
- Ensure that another person, familiar with thepower-off controls, is near you.
Attention: Another person must be there toswitch off the power, if necessary.
- Use only one hand when working withpowered-on electrical equipment; keep theother hand in your pocket or behind your back.
Attention: There must be a complete circuitto cause electrical shock. By observing theabove rule, you may prevent a current frompassing through your body.
- When using testers, set the controls correctlyand use the approved probe leads andaccessories for that tester.
- Stand on suitable rubber mats (obtainedlocally, if necessary) to insulate you fromgrounds such as metal floor strips andmachine frames.
Observe the special safety precautions when youwork with very high voltages; these instructions are inthe safety sections of maintenance information. Useextreme care when measuring high voltages.

xiv IBM WorkPad z50, Mobile Companion xiv
• Regularly inspect and maintain your electrical handtools for safe operational condition.
• Do not use worn or broken tools and testers.• Never assume that power has been disconnected
from a circuit. First, check that it has been powered-off.
• Always look carefully for possible hazards in yourwork area. Examples of these hazards are moistfloors, nongrounded power extension cables, powersurges, and missing safety grounds.
• Do not touch live electrical circuits with the reflectivesurface of a plastic dental mirror. The surface isconductive; such touching can cause personal injuryand machine damage.
• Do not service the following parts with the power onwhen they are removed from their normal operatingplaces in a machine:
- Power supply units- Pumps- Blowers and fans- Motor generators
and similar units. (This practice ensures correctgrounding of the units.)
• If an electrical accident occurs:- Use caution; do not become a victim
yourself.- Switch off power.- Send another person to get medical aid
while first aid is being administered.
Safety Inspection GuideThe intent of this inspection guide is to assist you inidentifying potentially unsafe conditions on these products.Each machine, as it was designed and built, had requiredsafety items installed to protect users and service personnelfrom injury. This guide addresses only those items.However, good judgment should be used to identify potentialsafety hazards due to attachment of non-IBM features oroptions not covered by this inspection guide.
If any unsafe conditions are present, you must determinehow serious the apparent hazard could be and whether youcan continue without first correcting the problem.
Consider these conditions and the safety hazards theypresent:
• Electrical hazards, especially primary power (primaryvoltage on the frame can cause serious or fatalelectrical shock)
• Explosive hazards, such as a damaged CRT face orbulging capacitor
• Mechanical hazards, such as loose or missinghardware

© Copyright IBM Corp. 1998 xv
The guide consists of a series of steps presented in achecklist. Begin the checks with the power off, and thepower cord disconnected.
Checklist:
1. Check exterior covers for damage (loose, broken, orsharp edges).
2. Power-off the computer. Disconnect the powercord.
3. Check the power cord for:
a. A third-wire ground connector in goodcondition. Use a meter to measure third-wireground continuity for 0.1 ohm or less betweenthe external ground pin and frame ground.
b. The power cord should be the appropriate typeas specified in the parts listings.
c. Insulation must not be frayed or worn.
4. Remove the cover.5. Check for any obvious non-IBM alterations. Use
good judgment as to the safety of any non-IBMalterations.
6. Check inside the unit for any obvious unsafeconditions, such as metal filings, contamination, wateror other liquids, or signs of fire or smoke damage.
7. Check for worn, frayed, or pinched cables.8. Check that the power-supply cover fasteners (screws
or rivets) have not been removed or tampered with.
xvi IBM WorkPad z50, Mobile Companion xvi
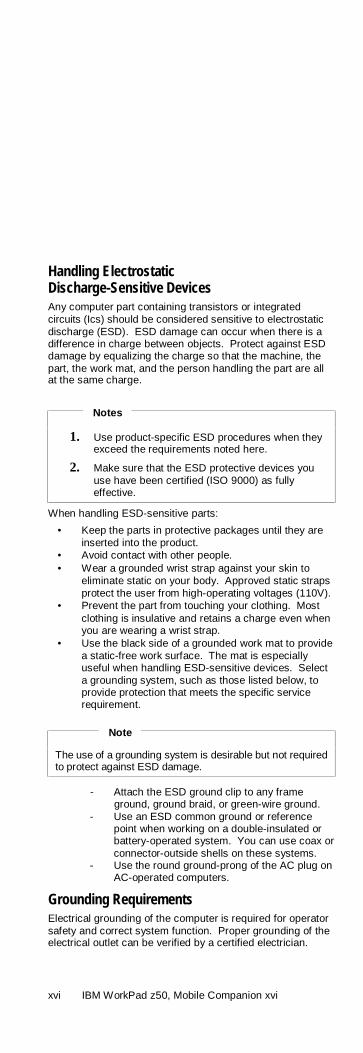
Handling ElectrostaticDischarge-Sensitive DevicesAny computer part containing transistors or integratedcircuits (Ics) should be considered sensitive to electrostaticdischarge (ESD). ESD damage can occur when there is adifference in charge between objects. Protect against ESDdamage by equalizing the charge so that the machine, thepart, the work mat, and the person handling the part are allat the same charge.
Notes
1. Use product-specific ESD procedures when theyexceed the requirements noted here.
2. Make sure that the ESD protective devices youuse have been certified (ISO 9000) as fullyeffective.
When handling ESD-sensitive parts:
• Keep the parts in protective packages until they areinserted into the product.
• Avoid contact with other people.• Wear a grounded wrist strap against your skin to
eliminate static on your body. Approved static strapsprotect the user from high-operating voltages (110V).
• Prevent the part from touching your clothing. Mostclothing is insulative and retains a charge even whenyou are wearing a wrist strap.
• Use the black side of a grounded work mat to providea static-free work surface. The mat is especiallyuseful when handling ESD-sensitive devices. Selecta grounding system, such as those listed below, toprovide protection that meets the specific servicerequirement.
Note
The use of a grounding system is desirable but not requiredto protect against ESD damage.
- Attach the ESD ground clip to any frameground, ground braid, or green-wire ground.
- Use an ESD common ground or referencepoint when working on a double-insulated orbattery-operated system. You can use coax orconnector-outside shells on these systems.
- Use the round ground-prong of the AC plug onAC-operated computers.
Grounding RequirementsElectrical grounding of the computer is required for operatorsafety and correct system function. Proper grounding of theelectrical outlet can be verified by a certified electrician.

WorkPad z50 Mobile Companion 1
WorkPad z50 Mobile Companion (2608)Read This FirstBefore you go to the checkout guide, be sure to read thissection.
Important
• Only certified trained personnel should servicethe computer.
• Read FRU service procedures before replacingany FRUs.
• Replace FRUs only for the correct model.When you replace the FRU, make sure the modelof the machine and FRU part number are correctby referring to the parts list.
• FRUs should not be replaced because of asingle, unreproducible failure. Single failurescan occur from a variety of reasons that havenothing to do with a hardware problem, such ascosmic radiation, electrostatic discharge, orsoftware errors. FRU replacement should beconsidered only when a recurring problem exists.If this is suspected, clear the log error and run thetest again. Do not replace any FRUs if log errorsdo not appear.
• Be careful not to replace a nondefective FRU.
2 IBM WorkPad z50, Mobile Companion 2
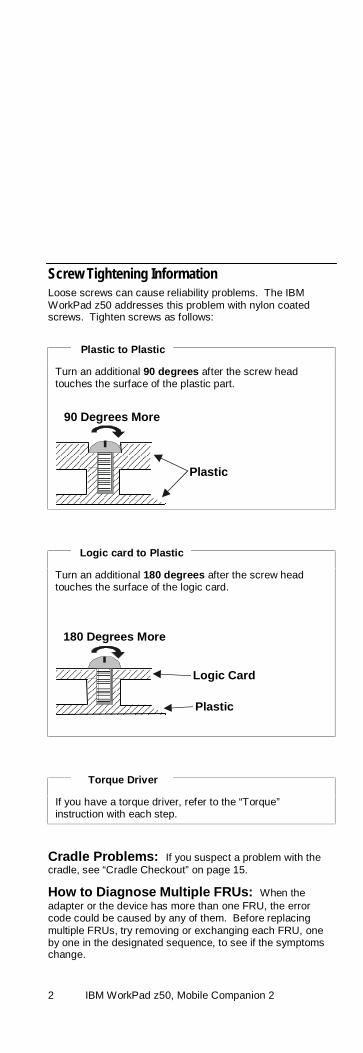
Screw Tightening InformationLoose screws can cause reliability problems. The IBMWorkPad z50 addresses this problem with nylon coatedscrews. Tighten screws as follows:
Plastic to Plastic
Turn an additional 90 degrees after the screw headtouches the surface of the plastic part.
90 Degrees More
Plastic
Logic card to Plastic
Turn an additional 180 degrees after the screw headtouches the surface of the logic card.
180 Degrees More
Plastic
Logic Card
Torque Driver
If you have a torque driver, refer to the “Torque”instruction with each step.
Cradle Problems: If you suspect a problem with thecradle, see “Cradle Checkout” on page 15.
How to Diagnose Multiple FRUs: When theadapter or the device has more than one FRU, the errorcode could be caused by any of them. Before replacingmultiple FRUs, try removing or exchanging each FRU, oneby one in the designated sequence, to see if the symptomschange.

WorkPad z50 Mobile Companion 3
Attention
Pushing the WorkPad z50’s Power button will power on(or resume) the system, or put the system in suspendmode: there is no power-off state.
If the AC Adapter, battery pack, and backup battery areremoved, the system is reset and all the stored data islost. There is no lithium battery to retain memory whilethese power sources are removed.
What to Do First: The service personnel must fill in thefollowing information in the parts exchange form or partsreturn form that is attached to the returned FRU:
__ 1 Name and phone number of service personnel__ 2 Date of service__ 3 Date when the part failed__ 4 Date of purchase__ 5 Failure symptoms, error codes appearing on the monitor, and
beep symptoms__ 6 Procedure index and page number in which the failing FRU
was detected__ 7 Failing FRU name and part number__ 8 Machine type, model number, and serial number__ 9 Customer’s name and address
Before checking problems with the computer, determinewhether the damage is covered under the warranty byreferring to the following:
During the warranty period, the customer may beresponsible for repair costs if the computer damage wascaused by misuse, accident, modification, unsuitablephysical or operating environment, or improper maintenanceby the customer. The following list provides some commonitems that are not covered under warranty and somesymptoms that may indicate that the system was subjectedto stress beyond normal use:
The following is not covered under warranty:
• LCD panel cracked from the application ofexcessive force or from being dropped.
• Scratched (cosmetic) parts• Cracked or broken plastic parts, broken latches,
broken pins, or broken connectors caused byexcessive force
• Damage caused by liquid spilled into the system• Damage caused by the improper insertion of a PC
Card or the installation of an incompatible card• Fuses blown by attachment of a nonsupported
device

4 IBM WorkPad z50, Mobile Companion 4
The following symptoms might indicate damagecaused by non warranted activities:
Missing parts may be a symptom of unauthorized serviceor modification.
Attention
When resetting the system, all programs and stored dataother than the operating system will be erased.
Any password that is set for testing purposes should bedisabled before returning the WorkPad z50 to thecustomer.
WorkPad z50 Mobile Companion 5
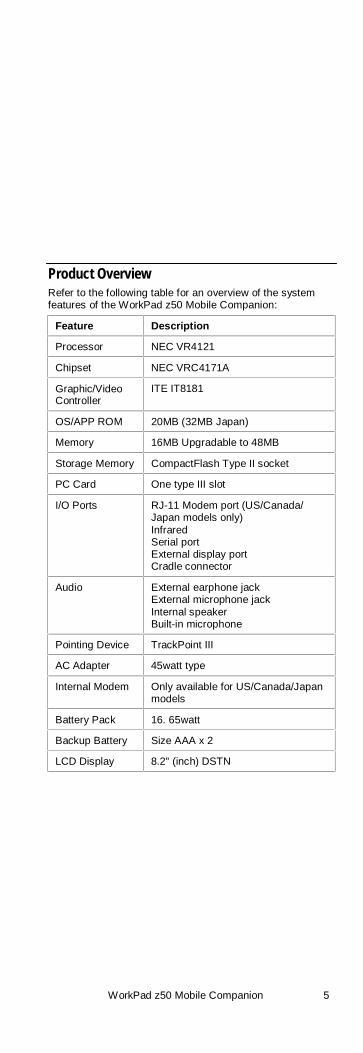
Product OverviewRefer to the following table for an overview of the systemfeatures of the WorkPad z50 Mobile Companion:
Feature Description
Processor NEC VR4121
Chipset NEC VRC4171A
Graphic/VideoController
ITE IT8181
OS/APP ROM 20MB (32MB Japan)
Memory 16MB Upgradable to 48MB
Storage Memory CompactFlash Type II socket
PC Card One type III slot
I/O Ports RJ-11 Modem port (US/Canada/Japan models only)InfraredSerial portExternal display portCradle connector
Audio External earphone jackExternal microphone jackInternal speakerBuilt-in microphone
Pointing Device TrackPoint III
AC Adapter 45watt type
Internal Modem Only available for US/Canada/Japanmodels
Battery Pack 16. 65watt
Backup Battery Size AAA x 2
LCD Display 8.2" (inch) DSTN

6 IBM WorkPad z50, Mobile Companion 6
Checkout GuideUse the following procedure as a guide for computerproblems.
1. Obtain the failing symptoms in as much detail aspossible.
2. Verify the symptoms by attempting to re-create thefailure by running the diagnostic test (refer to“Running the Diagnostics Test” on page 27) or byrepeating the same operation.
Note
To run the diagnostics test, refer to “Running theDiagnostics” on page 27.
If the symptoms are intermittent and cannot be re-created(and therefore not verified), go to “Symptom-to-FRUIndex” on page 21 and then go to “Intermittent Problems”on page 26.
3. Use the following table with the verified symptom todetermine which page to go to. Search thesymptoms column, and find the description that bestmatches your symptom; then go to the page shown inthe “Refer To” column.
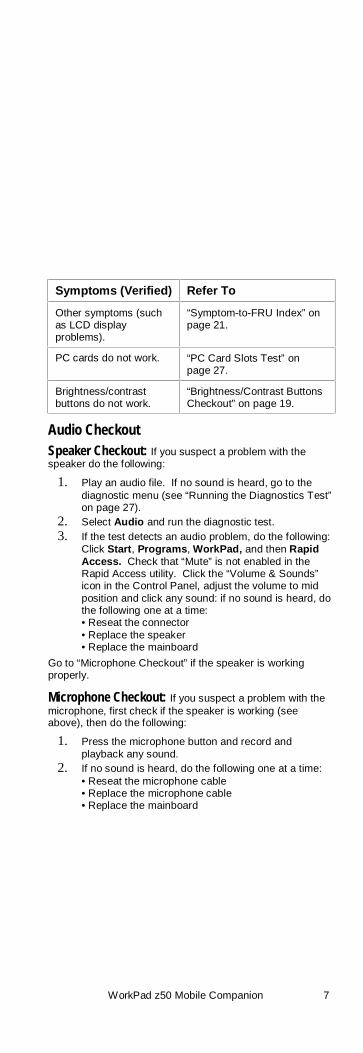
Symptoms (Verified) Refer To
Power failure: Thepower indicators (ACAdapter LED or Poweron/Battery status LED)are not lit.
“Power Systems Checkout”on page 9.
Audio is not properlyfunctioning.
“Audio Checkout” on page 7.
Keyboard does not workproperly.
“Keyboard Checkout” onpage 8.
Internal fax/modem doesnot work.
“Modem Checkout” on page 9.
Suspect mainboard orROM card problems.
“ROM Card Checkout” onpage 14.
TrackPoint problems. “TrackPoint Checkout” onpage 15.
Cradle does notcommunicate properly.
“Cradle Checkout” on page15.
External monitor doesnot display.
“External Monitor Self-Test”on page 15.
The diagnostic testdetected an error anddisplayed an error code.
“Running the DiagnosticsTest” on page 27.
WorkPad z50 Mobile Companion 7
Symptoms (Verified) Refer To
Other symptoms (suchas LCD displayproblems).
“Symptom-to-FRU Index” onpage 21.
PC cards do not work. “PC Card Slots Test” onpage 27.
Brightness/contrastbuttons do not work.
“Brightness/Contrast ButtonsCheckout” on page 19.
Audio CheckoutSpeaker Checkout: If you suspect a problem with thespeaker do the following:
1. Play an audio file. If no sound is heard, go to thediagnostic menu (see “Running the Diagnostics Test”on page 27).
2. Select Audio and run the diagnostic test.3. If the test detects an audio problem, do the following:
Click Start, Programs, WorkPad, and then RapidAccess. Check that “Mute” is not enabled in theRapid Access utility. Click the “Volume & Sounds”icon in the Control Panel, adjust the volume to midposition and click any sound: if no sound is heard, dothe following one at a time:• Reseat the connector• Replace the speaker• Replace the mainboard
Go to “Microphone Checkout” if the speaker is workingproperly.
Microphone Checkout: If you suspect a problem with themicrophone, first check if the speaker is working (seeabove), then do the following:
1. Press the microphone button and record andplayback any sound.
2. If no sound is heard, do the following one at a time:• Reseat the microphone cable• Replace the microphone cable• Replace the mainboard

8 IBM WorkPad z50, Mobile Companion 8
Keyboard CheckoutIf the keyboard does not work or an unexpected characterappears, make sure that the flexible cable extending fromthe keyboard is correctly seated in the connector on themainboard. If the keyboard cable connection is correct, runthe Keyboard Test by doing the following:
1. Go to the diagnostic menu (see “Running theDiagnostics Test” on page 27).
2. Select Keyboard and run the diagnostic test. Alayout of the keyboard appears on the screen.
3. Check that when each key is pressed, the key’sposition on the keyboard layout on the screenchanges to a blue square.
4. Press OK to end the test.
If the tests detect a keyboard problem, do the following oneat a time to correct the problem. Do not replace anondefective FRU:
• Reseat the keyboard cable.• Replace the keyboard.• Replace the mainboard.
Memory CheckoutThe WorkPad z50 Mobile Companion is shipped with 16MBon-board memory. Memory can be upgraded to 48MB byadding a single 32MB DRAM card.
Defective memory cards may show an error message duringthe POST or cause the system to hang or stop systemoperations.
Refer to the following to isolate memory problems:
1. Remove all power sources (AC power, battery pack,and backup battery). Remove any installed DRAMcard from its slot (see page 18).
2. Connect to a power source and turn on theWorkPad z50.
3. If an error appears during POST, replace themainboard.
4. Remove all power sources (AC power, battery pack,and backup battery) and reinstall the DRAM card.
5. Connect to a power source, then turn on theWorkPad z50.
6. If an error appears during POST, replace the DRAMcard.
WorkPad z50 Mobile Companion 9
Modem CheckoutIf a modem problem occurs, do the following:
1. Open the Terminal program. Double click the “Makea New Session” icon to open the Session Propertieswindow.
2. Click “Configure…”. In the Device Propertieswindow check the “Manual Dial” box.
3. Issue the ATA command.4. If there is no sound, replace the mainboard.
Note: The US, Canada, and Japan models have aninternal fax/modem; the European models donot.
Power Systems CheckoutTo determine whether a power systems problem is due tothe AC Adapter or the battery pack, do the following:
1. Remove the battery pack.2. Connect the AC Adapter and lock the battery release
lock. Check that power is supplied.3. Disconnect the AC Adapter and install the charged
battery pack; then check that power is supplied by thebattery pack.
If you suspect the problem is due to the AC Adapter, go to“AC Adapter Checkout”.
If you suspect the problem is due to the battery pack, go to“Battery Pack Checkout”.
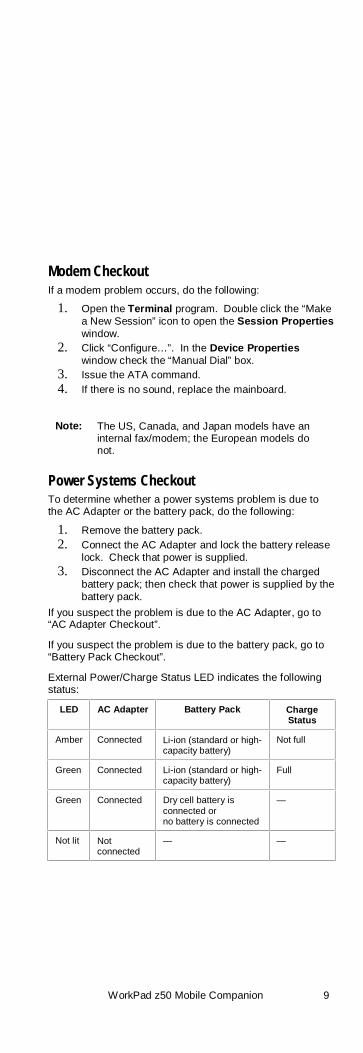
External Power/Charge Status LED indicates the followingstatus:
LED AC Adapter Battery Pack ChargeStatus
Amber Connected Li-ion (standard or high-capacity battery)
Not full
Green Connected Li-ion (standard or high-capacity battery)
Full
Green Connected Dry cell battery isconnected orno battery is connected
—
Not lit Notconnected
— —
10 IBM WorkPad z50, Mobile Companion 10
AC Adapter Checkout: You are here because theWorkPad z50 fails only when the AC Adapter is used.
• If the power problem occurs only when the cradle isused, replace the cradle.
• If the power-on indicator for the AC Adapter does notturn on, check the power cord of the AC Adapter forcorrect continuity and installation.
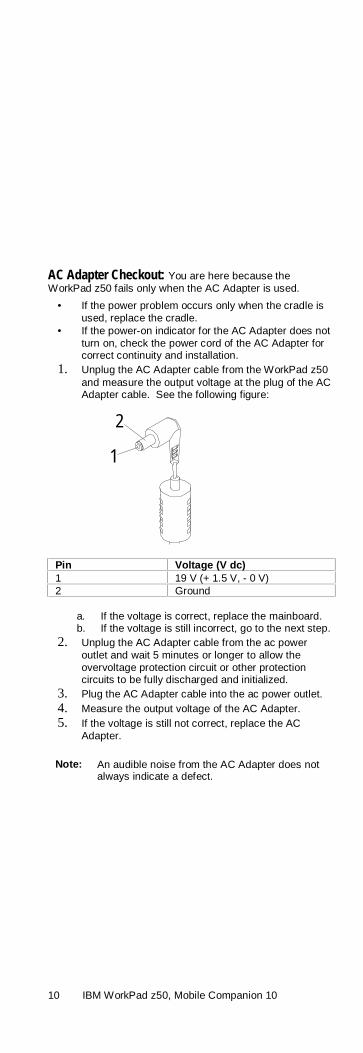
1. Unplug the AC Adapter cable from the WorkPad z50and measure the output voltage at the plug of the ACAdapter cable. See the following figure:
1
2
Pin Voltage (V dc)1 19 V (+ 1.5 V, - 0 V)2 Ground
a. If the voltage is correct, replace the mainboard.b. If the voltage is still incorrect, go to the next step.
2. Unplug the AC Adapter cable from the ac poweroutlet and wait 5 minutes or longer to allow theovervoltage protection circuit or other protectioncircuits to be fully discharged and initialized.
3. Plug the AC Adapter cable into the ac power outlet.4. Measure the output voltage of the AC Adapter.5. If the voltage is still not correct, replace the AC
Adapter.
Note: An audible noise from the AC Adapter does notalways indicate a defect.
WorkPad z50 Mobile Companion 11
Battery Pack Checkout: If the battery pack or the optionalhigh-capacity battery have a problem, refer to the following:
1. Enter suspend mode by pressing the Power button.2. Remove the battery pack and check for any
mechanical damage. Replace the battery pack if it isdamaged.
Note: Damage to the battery pack caused by thecustomer is not covered by the warranty.
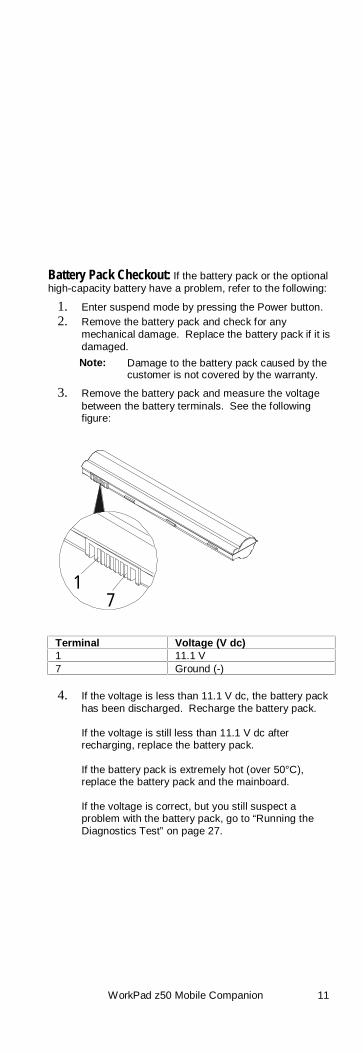
3. Remove the battery pack and measure the voltagebetween the battery terminals. See the followingfigure:
71
Terminal Voltage (V dc)1 11.1 V7 Ground (-)
4. If the voltage is less than 11.1 V dc, the battery packhas been discharged. Recharge the battery pack.
If the voltage is still less than 11.1 V dc afterrecharging, replace the battery pack.
If the battery pack is extremely hot (over 50°C),replace the battery pack and the mainboard.
If the voltage is correct, but you still suspect aproblem with the battery pack, go to “Running theDiagnostics Test” on page 27.

12 IBM WorkPad z50, Mobile Companion 12
Checking Operational Charging: There is no difference inbattery charging time whether the system is fully operationalor not. To check the battery charging, use a dischargedbattery pack or a battery pack that has less than 50% of totalpower remaining.
Turn on the WorkPad z50 while the AC Adapter is connectedto the system. The External Power/Charge Status LED willchange to amber while the battery is charging. When thebattery is fully charged (after about 1 – 2.5 hrs., dependingon the battery’s initial charge) the battery terminal voltageshould be around 12.6V dc. If the voltage is far less, or hasnot increased from the initial voltage, then repeat theprocedure with another discharged battery pack. If thisbrings the same result, then suspect a mainboard failure.
Optional Dry Cell Battery Checkout: If the optional DryCell Kit (dry cell battery pack) has a problem, refer to thefollowing:
1. Enter suspend mode by pressing the Power button.2. Remove the dry cell battery pack and measure the
voltage between the battery terminals. See thefollowing figure:
17
Terminal Voltage (V dc)1 8.8 – 12.8 V7 Ground (-)
3. If the voltage is less than 8.8 V dc, the dry cell batterypack has been discharged. Replace the dry cells.
If the dry cell battery pack is extremely hot, it must bereplaced.
WorkPad z50 Mobile Companion 13
Backup Battery Checkout(Nonrechargeable)If removing all power sources except for the backup batteryresults in the system being reset, suspect a problem with thebackup batteries. Refer to the following:
1. Enter suspend mode by pressing the Power button.2. Remove the AAA batteries and measure the voltage
between the battery terminals. The voltage should be1.1–1.6 V dc per battery.
• If the voltage is correct, replace the mainboard.• If the voltage is less than 1.1 V dc per battery, then
the batteries have been discharged. Replace thebatteries.
• If the backup battery discharges quickly afterreplacement, replace the mainboard.
Note: Make sure either the battery pack is installed orthe AC Adapter is connected. If the backupbatteries are removed and no other powersource is available (AC Adapter or battery pack),the system is reset, and all the stored data islost.
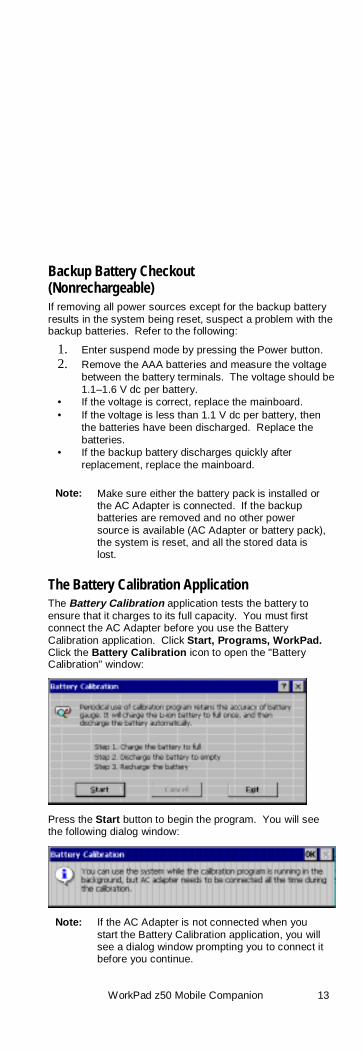
The Battery Calibration ApplicationThe Battery Calibration application tests the battery toensure that it charges to its full capacity. You must firstconnect the AC Adapter before you use the BatteryCalibration application. Click Start, Programs, WorkPad.Click the Battery Calibration icon to open the "BatteryCalibration" window:
Press the Start button to begin the program. You will seethe following dialog window:
Note: If the AC Adapter is not connected when youstart the Battery Calibration application, you willsee a dialog window prompting you to connect itbefore you continue.
14 IBM WorkPad z50, Mobile Companion 14
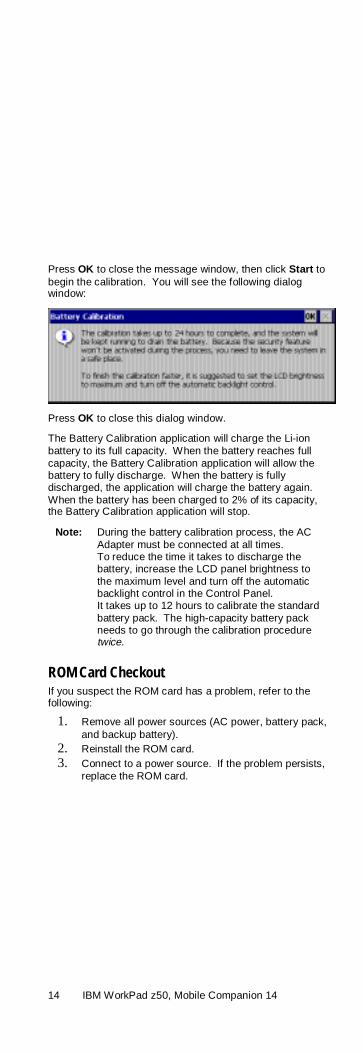
Press OK to close the message window, then click Start tobegin the calibration. You will see the following dialogwindow:
Press OK to close this dialog window.
The Battery Calibration application will charge the Li-ionbattery to its full capacity. When the battery reaches fullcapacity, the Battery Calibration application will allow thebattery to fully discharge. When the battery is fullydischarged, the application will charge the battery again.When the battery has been charged to 2% of its capacity,the Battery Calibration application will stop.
Note: During the battery calibration process, the ACAdapter must be connected at all times.To reduce the time it takes to discharge thebattery, increase the LCD panel brightness tothe maximum level and turn off the automaticbacklight control in the Control Panel.It takes up to 12 hours to calibrate the standardbattery pack. The high-capacity battery packneeds to go through the calibration proceduretwice.
ROM Card CheckoutIf you suspect the ROM card has a problem, refer to thefollowing:
1. Remove all power sources (AC power, battery pack,and backup battery).
2. Reinstall the ROM card.3. Connect to a power source. If the problem persists,
replace the ROM card.
WorkPad z50 Mobile Companion 15
TrackPoint CheckoutThe TrackPoint adjusts the pointer sensor automatically.During this process, the pointer moves on the screenautomatically for a short time. This self-acting pointermovement can occur when a slight, steady pressure isapplied to the TrackPoint pointer. You must readjust it if thetemperature has exceeded its normal temperature range.This symptom does not indicate a hardware problem. Noservice actions are necessary if the pointer movement stopsin a short period of time.
If a click button problem or a pointing stick problem occurs,do the following:
1. Go to the diagnostic menu (see “Running theDiagnostics Test” on page 27).
2. Select TrackPoint and run the diagnostics tests.3. Verify that the item is selected.4. Move to another item with the pointing stick.5. Press the pointing stick (press-to-select) and verify
that the item is selected.6. Verify that both buttons work correctly.
If the click buttons do not work, replace the mainboard. Ifthe pointing stick does not work, do the following actions oneat a time to correct the problem. Do not replace anondefective FRU.
• Reseat the TrackPoint cable.• Replace the keyboard.• Replace the mainboard.
Cradle CheckoutUse the following procedure to isolate a problem with thecradle. The cradle attaches to the system expansionconnector at the bottom of the WorkPad z50.
1. Enter suspend mode.2. Remove the failing device from the cradle.3. Unplug the AC Adapter from the cradle, if attached.4. Remove the cradle from the WorkPad z50.5. Reconnect the failing device directly to the WorkPad
z50. (If another device is already connected to theWorkPad z50, remove it first.)
6. If the failing device works properly, replace the cradle.
External Monitor Self-TestIf a monitor problem occurs, use the following instructions tocorrect the problem:
1. Test the external monitor and cable on anothersystem to make sure they are working correctly.
2. Connect the monitor to the WorkPad z50.3. Go to the diagnostic menu (see “Running the
Diagnostics Test” on page 27) and select Display.4. If the external monitor does not display correctly,
change the mainboard.

16 IBM WorkPad z50, Mobile Companion 16
WorkPad z50 Mobile Companion 17
Installing the ROM/DRAM CardThis section describes how to install the ROM card or theoptional DRAM card to the WorkPad z50.
Note: When you remove the ROM/DRAM card, you will loseall stored data. Before you remove the ROM/DRAM card, besure to back up all data and applications in the basememory.
Caution: Before removing or inserting the ROM/DRAM card,all power sources (AC power, the main battery pack, and thebackup batteries) must be removed.
Follow these instructions when inserting the ROM/DRAMcard:
1. Place the WorkPad z50 into suspend mode anddisconnect AC power.
2. Turn the WorkPad z50 upside down.
3. Remove the main battery and remove the backupbatteries.
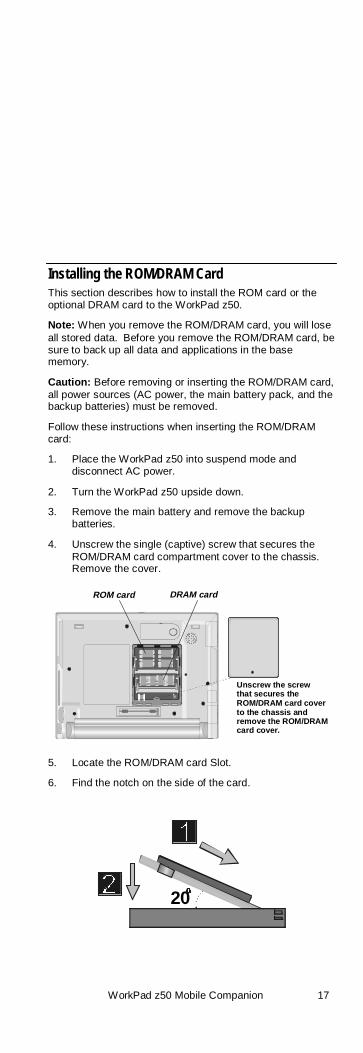
4. Unscrew the single (captive) screw that secures theROM/DRAM card compartment cover to the chassis.Remove the cover.
Unscrew the screwthat secures the ROM/DRAM card coverto the chassis and remove the ROM/DRAMcard cover.
ROM card DRAM card
5. Locate the ROM/DRAM card Slot.
6. Find the notch on the side of the card.
20

18 IBM WorkPad z50, Mobile Companion 18
7. With the notched end of the card toward the right sideof the socket, insert the card at an angle ofapproximately 20 degrees into the socket; press it infirmly as shown (1). Gently pivot the card until it snapsinto place (2).
Attention
To avoid damaging the ROM/DRAM card, do not touch itscontact edge.
8. Ensure that the ROM/DRAM card is securely inserted inthe slot.
9. Replace the ROM/DRAM card cover over the memoryslot, aligning the back side of the cover first; thentighten the screw.
10. Attach the main battery and insert the backup batteries.
11. Turn the WorkPad z50 top side up. Connect the ACAdapter and cables; then turn on the WorkPad z50.
Attention
Handling a Screwdriver
• Use a screwdriver that fits the screw.
• Use the screwdriver perpendicular to the head of thescrew.
Handle the screwdriver properly; otherwise, you mightdamage the screw.
Removing the ROM/DRAM CardNote: Before removing the ROM/DRAM card, back up alldata and applications in the base memory. All data andinstalled applications will be lost by removing theROM/DRAM card. The ROM needs to be reinstalled beforestarting the POST or running Windows CE.
Caution: Before removing the ROM/DRAM card, all powersources (AC power, the main battery pack, and the backupbatteries) must be removed.
Follow these instructions when removing the ROM/DRAMcard:
1. Turn off the WorkPad z50.
2. Disconnect AC power.
3. Turn the WorkPad z50 upside down.
4. Remove the main battery and remove the backupbatteries.

WorkPad z50 Mobile Companion 19
5. Unscrew the single (captive) screw that secures theROM/DRAM card compartment cover to the chassis.Remove the cover.
6. Using your fingers or a small screwdriver, press out thetwo latches on the sides of the card away from the slots.The ROM/DRAM card should pop out slightly.
Removing the DRAMand ROM Cards
Pull the tabs inthe direction of the arrowsto release the cards.
DRAM Card
ROM Card
7. Gently pull out the card.
8. Replace the ROM/DRAM card cover over the memoryslot, aligning the back side of the cover first; thentighten the screw.
9. Attach the main battery and insert the backup batteries.
10. Turn the WorkPad z50 top side up. Connect the ACAdapter and cables; then turn on the WorkPad z50.
Brightness/Contrast Buttons CheckoutIf you suspect a problem with the brightness/contrast buttonsdo the following actions one at a time to correct the problem.Do not replace a nondefective FRU:
• Reseat the inverter cables and connectors to themainboard and the LCD panel.
• Replace the inverter card• Replace the mainboard

20 IBM WorkPad z50, Mobile Companion 20
Power Management FeaturesThe power management features are designed to save asmuch electricity as possible by putting components into alow-power consumption mode as often as possible. Thislow-power mode is referred to as “suspend” mode.
Full Power ModeThe WorkPad z50 operates in Full power mode when powermanagement is disabled and the AC Adapter is connected.
Suspend ModeIn suspend mode, the system is powered off except for thesystem DRAM. The WorkPad z50 enters suspend modewhen the system remains idle for a specified amount of timeor under one of the following conditions:
• The Power button is pressed.• The LCD panel is closed.• A Windows CE power management time-out occurs.• The Windows CE Suspend icon is clicked.• The battery release lock is released.• The remaining battery capacity of the battery pack is
very low.• A notification event set in the “Alarms” window of the
World Clock application in the Control Panel occurs.
Attention
The system will not enter suspend mode after an idletime-out under the following conditions:The serial port is connected to another system runningWindows CE services.The WorkPad z50 is connected to a network through thePCMCIA LAN card.
The system will resume to full power mode under one of thefollowing conditions:
• The Power button is pressed while in suspend mode.• An application launching key is pressed.• The LCD panel is opened.• An internal fax/modem ring-in occurs.• The Microphone button is pushed.• The Notification button is pushed when the
notification LED blinks.• A built-in data/fax modem ring occurs.• The serial port is connected to another system for
transmitting and receiving data.

WorkPad z50 Mobile Companion 21
Symptom-to-FRU IndexThe symptom-to-FRU Index lists the symptoms and errorsand the possible causes. The most likely cause is listed first.
Note: Perform the FRU replacement or actions in thesequence shown in the “FRU/Action” columns. Ifa FRU replacement did not solve the problem, putthe original part back in the WorkPad z50. Do notreplace a nondefective FRU.
This index can also help you determine the next possibleFRUs to be replaced when servicing the WorkPad z50.
Numeric error codes show the errors detected in systemoperation. In the following error codes, X can be anynumber. If no codes are available, use narrative symptoms.If the symptom is not listed, go to “Undetermined Problems”on page 26.
Note: For IBM devices not supported by diagnosticcodes in WorkPad computers, see the manualfor that device.
Numeric Error CodesSymptom / Error FRU / Action in Sequence
1XX101 IR error
101 IR error Mainboard
2XX201 checksum error202 DRAM test error (onboard)203 DRAM test error(DRAM module)204 VRAM test error
201 ROM checksum error 1. Reinstall ROM card
2. ROM card
3. Mainboard
202 DRAM test error (onboard DRAM)
Mainboard
203 DRAM test error (DRAMmodule)
1. Reinstall DRAM module
2. DRAM module
3. Mainboard
204 VRAM test error Mainboard
3XX301 Keyboard error
301 Keyboard error 1. Reinstall keyboard
2. Keyboard
3. Mainboard
4XX

22 IBM WorkPad z50, Mobile Companion 22
401 LED board error
Symptom / Error FRU / Action in Sequence
401 LED board error 1. LED board
2. Mainboard
5XX501 Battery error
501 Battery error 1. Battery
2. Mainboard
6XX601 Audio playback error602 Audio recording error
601 Audio playback error 1. Speaker
2. Mainboard
602 Audio recording error 1. Microphone
2. Mainboard
7XX701 Display error
701 Display error 1. LCD panel
2. Mainboard
8XX801 Serial port test error
801 Serial port error 1. Serial cable
2. Mainboard
9XX901 PC card/CF test error
901 PC card/CF test error Mainboard
86XX8601 Mouse test error
8601 Mouse test error Mainboard

WorkPad z50 Mobile Companion 23
Function-Related SymptomsSymptom / Error FRU / ACTION IN SEQUENCE
The system does notsuspend or resume when theLCD is closed or opened.
1. Go to “Suspend Mode”on page 20, and checkthat the WorkPad z50can enter suspendmode.
2. LCD panel
3. Mainboard
The memory count (size)appears different from actualsize.
Go to “Memory Checkout” onpage 8.
The system hangsintermittently.
Go to “Intermittent Problems”on page 26.
Indicator-Related SymptomsSymptom / Error FRU / Action in Sequence
The indicator incorrectlyremains off or on, but systemruns correctly.
Mainboard
The external/power statusLED indicator blinks fromgreen to amber.
1. Check that a correctbattery is installed.
2. Battery pack
3. Mainboard
The battery indicator does notturn on when the battery isinstalled.
1. Battery pack
2. Mainboard
Infrared-Related SymptomsSymptom / Error FRU / Action in Sequence
Unable to communicate usingthe Infrared (IR) Port.
1. Make sure the setup forthe IR is correct. Usethe WorkPad z50Configuration utility.
2. Make sure there are nofluorescent lights near theWorkPad z50. TheWorkPad z50 may receiveoptical noise from thefluorescent light.
3. Run the advanceddiagnostic test. If an erroroccurs, replace the partsshown by the FRU code.

24 IBM WorkPad z50, Mobile Companion 24
Keyboard- or TrackPoint-Related SymptomsSymptom / Error FRU / Action in Sequence
The keyboard (one or morekeys) does not work.
1. On the WindowsTaskbar, check thatCaps Lock or Num Lockare not enabled.
2. Reseat the keyboard cableon the mainboard.
3. Keyboard
4. Mainboard
The TrackPoint does notwork.
1. Check the “TrackPoint”settings in the ControlPanel.
2. Reseat the keyboard cableon the mainboard.
3. Go to “TrackPointCheckout” on page15.
4. Keyboard
5. Mainboard
The pointer movesautomatically or does notwork correctly.
See “TrackPoint Checkout”on page 15.
LCD-Related SymptomsSymptom / Error FRU / Action in Sequence
LCD backlight not working.
LCD too dark.
LCD brightness cannot beadjusted.
LCD contrast cannot beadjusted.
1. Open the “DisplayProperties” window inthe Control Panel.Check that the auto dimsetting is not enabledunder the “B acklight”tab.
2. Reseat the LCD cable andconnectors.
3. LCD assembly
4. Inverter assembly
5. Mainboard
LCD screen unreadable.
Non-readable characters.
Screen abnormal.
Wrong color displayed.
1. Reseat the LCD cableand connectors.
2. LCD assembly
3. Inverter assembly
4. Mainboard
LCD has extra horizontal orvertical lines displayed.
LCD assembly
LCD lid is loose. 1. Hinge screws
2. Hinge group
WorkPad z50 Mobile Companion 25
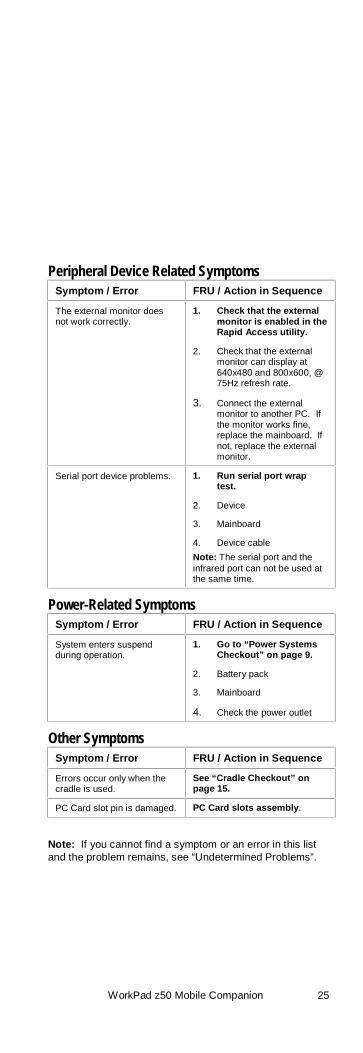
Peripheral Device Related SymptomsSymptom / Error FRU / Action in Sequence
The external monitor doesnot work correctly.
1. Check that the externalmonitor is enabled in theRapid Access utility.
2. Check that the externalmonitor can display at640x480 and 800x600, @75Hz refresh rate.
3. Connect the externalmonitor to another PC. Ifthe monitor works fine,replace the mainboard. Ifnot, replace the externalmonitor.
Serial port device problems. 1. Run serial port wraptest.
2. Device
3. Mainboard
4. Device cable
Note: The serial port and theinfrared port can not be used atthe same time.
Power-Related SymptomsSymptom / Error FRU / Action in Sequence
System enters suspendduring operation.
1. Go to “Power SystemsCheckout” on page 9.
2. Battery pack
3. Mainboard
4. Check the power outlet
Other SymptomsSymptom / Error FRU / Action in Sequence
Errors occur only when thecradle is used.
See “Cradle Checkout” onpage 15.
PC Card slot pin is damaged. PC Card slots assembly .
Note: If you cannot find a symptom or an error in this listand the problem remains, see “Undetermined Problems”.

26 IBM WorkPad z50, Mobile Companion 26
Intermittent ProblemsIntermittent system hang problems can be caused by avariety of reasons that have nothing to do with a hardwaredefect, such as: cosmic radiation, electrostatic discharge, orsoftware errors. FRU replacement should be consideredonly when a recurring problem exists.
When analyzing the intermittent problem, do the following:
1. Run the diagnostic test for the mainboard in loopmode.
2. If no error is detected, do not replace any FRUs.3. If any error is detected, replace the FRU shown by
the FRU code. Rerun the test to verify that no moreerrors exist.
Undetermined ProblemsYou are here because the diagnostic tests did not identifywhich adapter or device failed, installed devices areincorrect, a short circuit is suspected, or the system isinoperative. Follow these procedures to isolate the failingFRU (do not isolate nondefective FRUs).
Verify that all attached devices are supported by theWorkPad z50.
Verify that the power supply being used at the time of thefailure is operating correctly. (See “Power SystemsCheckout” on page 9.)
1. Enter suspend mode.2. Visually check them for damage. If any problems are
found, replace the FRU.3. Remove or disconnect all of the following devices:
a. Non-IBM devicesb. Devices attached to the cradlec. External devicesd. Battery packe. DRAMf. PC Cardsg. Compact Flash Cards
4. Turn on the WorkPad z50.5. Determine if the problem has changed.6. If the problem does not reoccur, reconnect the
removed devices one at a time until you find thefailing FRU.
7. If the problem remains, replace the following FRUsone at a time. Do not replace a nondefective FRU.a. Mainboardb. LCD assembly
WorkPad z50 Mobile Companion 27
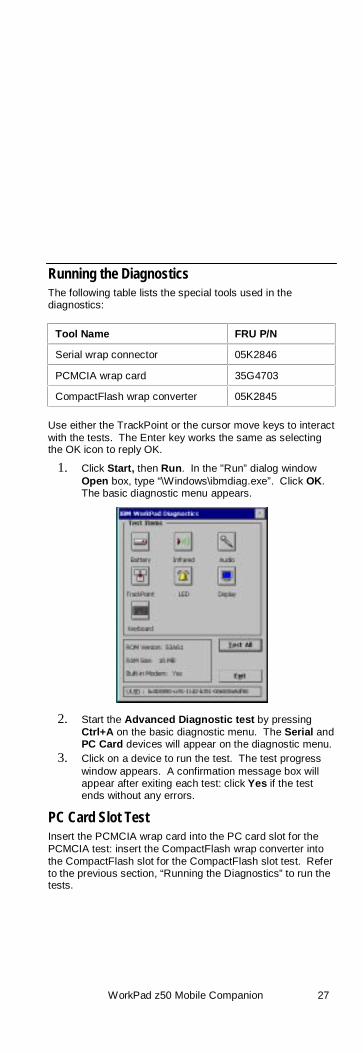
Running the DiagnosticsThe following table lists the special tools used in thediagnostics:
Tool Name FRU P/N
Serial wrap connector 05K2846
PCMCIA wrap card 35G4703
CompactFlash wrap converter 05K2845
Use either the TrackPoint or the cursor move keys to interactwith the tests. The Enter key works the same as selectingthe OK icon to reply OK.
1. Click Start, then Run. In the "Run” dialog windowOpen box, type “\Windows\ibmdiag.exe”. Click OK.The basic diagnostic menu appears.
2. Start the Advanced Diagnostic test by pressingCtrl+A on the basic diagnostic menu. The Serial andPC Card devices will appear on the diagnostic menu.
3. Click on a device to run the test. The test progresswindow appears. A confirmation message box willappear after exiting each test: click Yes if the testends without any errors.
PC Card Slot TestInsert the PCMCIA wrap card into the PC card slot for thePCMCIA test: insert the CompactFlash wrap converter intothe CompactFlash slot for the CompactFlash slot test. Referto the previous section, “Running the Diagnostics” to run thetests.

28 IBM WorkPad z50, Mobile Companion 28
UUIDA UUID (universal unique ID) is uniquely assigned to eachsystem board for system management purposes. The UUIDis stored on the EEPROM on the board.
Related Service ProceduresThis section provides information about the following:
• “Status Indicators and Control Buttons”• “Application Launching Key Assignments” on page 29
Status Indicators and Control ButtonsThe system status indicators show the current WorkPad z50status in different colors (green and amber). The controlbuttons—1.Notification, 3.Microphone, and 5.Power—areshown in the illustration below.
Indicator Color Meaning
1. Notification Amber The system is receiving atransfer call. Push theNotification button to stopthe transfer.
Green The battery is fullycharged or therechargeable battery packis absent (see “PowerSystems Checkout” onpage 9).
5. ExternalPower/ChargeStatus (this LEDis on wheneverthe AC Adapteris connected)
Amber Battery charging(see “Power SystemsCheckout” on page 9)
To record a message, push the Microphone button; theVoice Recorder window will appear. Click the Record buttonto start recording; click the Stop button to stop recording.There is no record LED.

WorkPad z50 Mobile Companion 29
Application Launching Key AssignmentsThe applications keys are programmed to launch presetsoftware applications. The following table shows theapplication keys and their corresponding functions:
Key Description
A1 Launch or switch to the Windows CE Inbox
A2 Launch Windows Explorer or switch to nextExplorer Window
A3 Launch or switch to Calendar
A4 Launch or switch to Contacts
A5 Launch or switch to Tasks
A6 Launch Pocket Word or switch to next PocketWord window
A7 Launch Pocket Excel or switch to next PocketExcel window
A8 Launch Pocket PowerPoint or switch to nextPocket PowerPoint window
A9 Launch Pocket Access or switch to nextPocket Access window
A10 Launch or switch to Calculator
A11 Launch or switch to Voice Recorder
A12 Launch or switch to Rapid Access
To view the application keys and their correspondingfunctions, click on the Launching Keys icon in the ControlPanel to bring up the “Launching Keys Properties” window.

30 IBM WorkPad z50, Mobile Companion 30
Removing and Replacing Defective FRUsThis section provides information on removing and replacingFRUs.
• Do not damage any part. Only certified and trainedpersonnel should service the WorkPad z50 MobileCompanion.
• The arrows in the “Removals and Replacements”section show the direction of movement to remove aFRU, or to turn a screw to release the FRU. Thearrows are marked in numeric order, in squarecallouts, to show the correct sequence of removal.
• When other FRUs must be removed before the failingFRU is removed, they are listed at the top of thepage.
• To replace a FRU, reverse the removal procedureand follow any notes that pertain to replacement.
• When replacing a FRU, use the correct screw size asshown in the procedures.
Safety Notice 1: Translation on page viii
Before the WorkPad z50 is powered-on after FRUreplacement, make sure all screws, springs, or othersmall parts are in place and are not left loose inside theWorkPad z50. Verify this by shaking the WorkPad z50and listening for rattling sounds. Metallic parts or metalflakes can cause electrical shorts.
Safety Notice 2: Translation on page ix
The battery pack contains small amounts of harmfulsubstances. Do not disassemble it, throw it into fire orwater, or short-circuit it. Dispose of the battery pack orbackup battery as required by local ordinances orregulations. Use only the battery in the appropriate partslisting when replacing the battery pack. Use of anincorrect battery can result in ignition or explosion of thebattery.
Safety Notice 6: Translation on page xi
Before removing any FRU, place the WorkPad z50 intosuspend mode, unplug all power cords from electricaloutlets, then disconnect any interconnecting cables andremove the battery pack and backup batteries.
CAUTION:If all power sources are removed from the WorkPad z50,all data and applications will be lost. If the problem isconsidered a software problem stored on DRAMmemory, approach the problem from that standpointbefore removing all power sources.
Attention: The mainboard is sensitive to, and can bedamaged by, electrostatic discharge.

WorkPad z50 Mobile Companion 31
An electrostatic discharge (ESD) strap (P/N 6405959) mustbe used to establish personal grounding.
32 IBM WorkPad z50, Mobile Companion 32
Important NoticeThe WorkPad z50 Mobile Companion uses special nylon-coated screws with the following characteristics:
• They maintain tight connections.• They do not easily come loose, even with shock or
vibration.
But:
• They need additional force to tighten.• They should be used only once.
Do the following when you service this machine:
• Keep the screw kit (P/N 05K5941) in your tool bag.• Always use new screws.• Use a torque screwdriver.
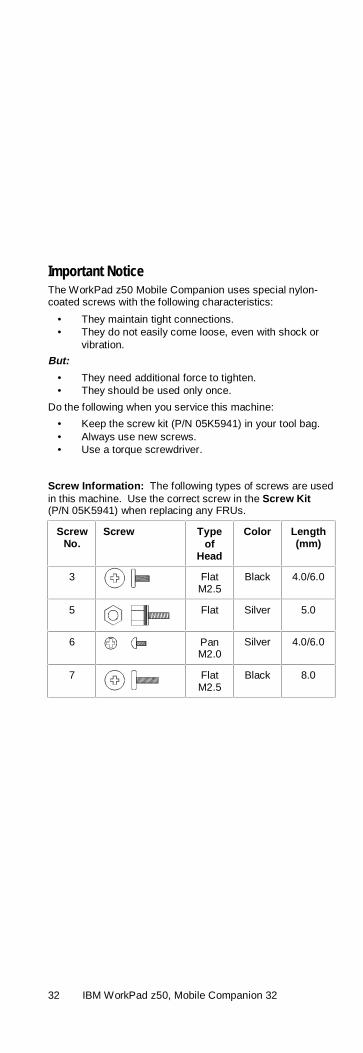
Screw Information: The following types of screws are usedin this machine. Use the correct screw in the Screw Kit(P/N 05K5941) when replacing any FRUs.
ScrewNo.
Screw Typeof
Head
Color Length(mm)
3 FlatM2.5
Black 4.0/6.0
5 Flat Silver 5.0
6 PanM2.0
Silver 4.0/6.0
7 FlatM2.5
Black 8.0

WorkPad z50 Mobile Companion 33
Unplugging and Plugging Flexible Cables:Two types of cable and connectors are used in the WorkPadz50. Some connectors have a clasp, which must beunlocked before removing the cable. Unlock the connectorby pulling up the clasp with your fingernail or a small flat-tipped screwdriver. Then pull out the cable from theconnector. Refer to the following illustrations:
34 IBM WorkPad z50, Mobile Companion 34
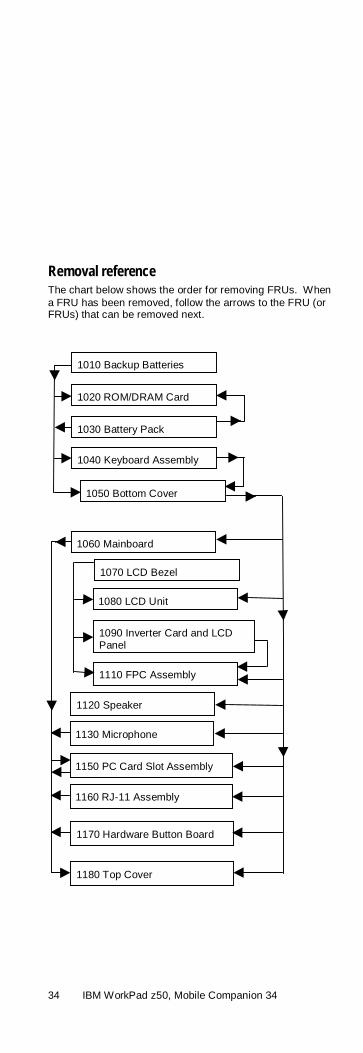
Removal referenceThe chart below shows the order for removing FRUs. Whena FRU has been removed, follow the arrows to the FRU (orFRUs) that can be removed next.
1010 Backup Batteries
1020 ROM/DRAM Card
1030 Battery Pack
1040 Keyboard Assembly
1050 Bottom Cover
1060 Mainboard
1070 LCD Bezel
1080 LCD Unit
1090 Inverter Card and LCDPanel
1120 Speaker
1130 Microphone
1150 PC Card Slot Assembly
1170 Hardware Button Board
1110 FPC Assembly
1160 RJ-11 Assembly
1180 Top Cover

WorkPad z50 Mobile Companion 35
1010 Backup Batteries1.Turn the WorkPad z50 upside down.
Step Size (Quantity) Color Torque Length
2 Coin screwM2.5 (1)
Black 3 kgcm 4.0 mm
Note: You can loosen the captive screw in step 2, butcannot remove it from the backup battery cover.

36 IBM WorkPad z50, Mobile Companion 36
1020 ROM/DRAM Card• Backup Batteries (1010)• Battery Pack (1030)
Attention
Remove all power sources from the WorkPad z50 beforereplacing the ROM/DRAM card.
1.Turn the WorkPad z50 upside down.
DRAM Card
ROM Card
Step Size (Quantity) Color Torque Length
2 M2.5 (1) Black 3 kgcm 4.0 mm
Note: You can loosen the captive screw in step 2, butcannot remove it from the ROM/DRAM card cover.

WorkPad z50 Mobile Companion 37

38 IBM WorkPad z50, Mobile Companion 38
1030 Battery Pack1.Turn the WorkPad z50 upside down.
Note
At step 3 you must push and hold the battery release lockas you slide the lock in the direction indicated by thearrow.
WorkPad z50 Mobile Companion 39
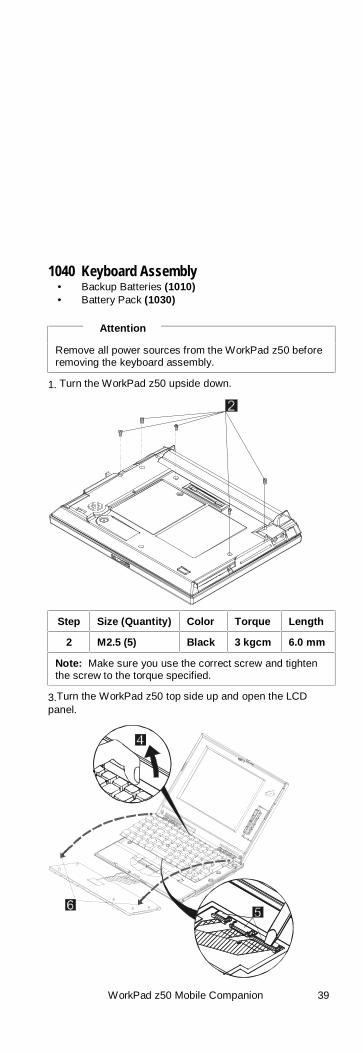
1040 Keyboard Assembly• Backup Batteries (1010)• Battery Pack (1030)
Attention
Remove all power sources from the WorkPad z50 beforeremoving the keyboard assembly.
1. Turn the WorkPad z50 upside down.
Step Size (Quantity) Color Torque Length
2 M2.5 (5) Black 3 kgcm 6.0 mm
Note: Make sure you use the correct screw and tightenthe screw to the torque specified.
3.Turn the WorkPad z50 top side up and open the LCDpanel.

40 IBM WorkPad z50, Mobile Companion 40
1050 Bottom Cover• Backup Batteries (1010)• Battery Pack (1030)• Keyboard Assembly (1040)

WorkPad z50 Mobile Companion 41
Attention!
Attention
Be careful when assembling the bottom cover and thebattery shield not to pinch the cables.
Step Size (Quantity) Color Torque Length
3 M2.5 (4) Black 3 kgcm 6.0 mm
4 M2.0 (2) Silver 3 kgcm 4.0 mm
5 Hex (2) Silver 3 kgcm 5.0 mm
6 M2.5 (2) Black 3 kgcm 8.0 mm
Note: Make sure you use the correct screw and tightenthe screw to the torque specified.
42 IBM WorkPad z50, Mobile Companion 42
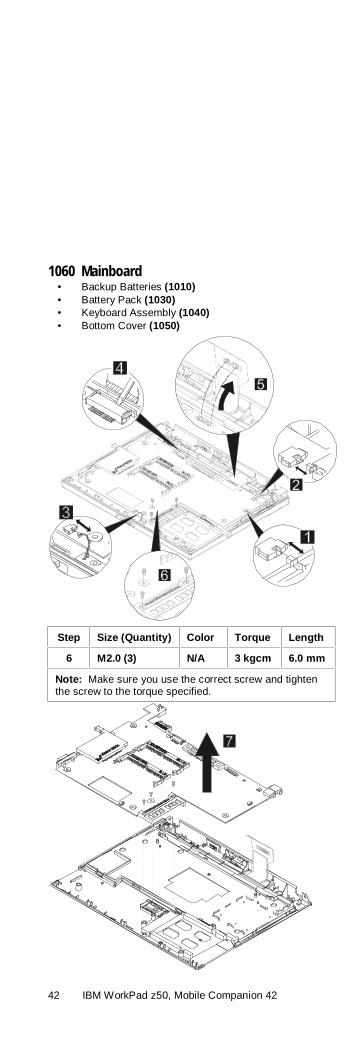
1060 Mainboard• Backup Batteries (1010)• Battery Pack (1030)• Keyboard Assembly (1040)• Bottom Cover (1050)
Step Size (Quantity) Color Torque Length
6 M2.0 (3) N/A 3 kgcm 6.0 mm
Note: Make sure you use the correct screw and tightenthe screw to the torque specified.

WorkPad z50 Mobile Companion 43
1070 LCD Bezel
Attention
Be careful when lifting the bezel cover loose. The plastictabs that hold it securely to the LCD unit are easilydamaged.
Remove the screw covers
Step Size (Quantity) Color Torque Length
2 M2.5 (2) Black 3 kgcm 4.0 mm
Note: Make sure you use the correct screw and tightenthe screw to the torque specified.
44 IBM WorkPad z50, Mobile Companion 44
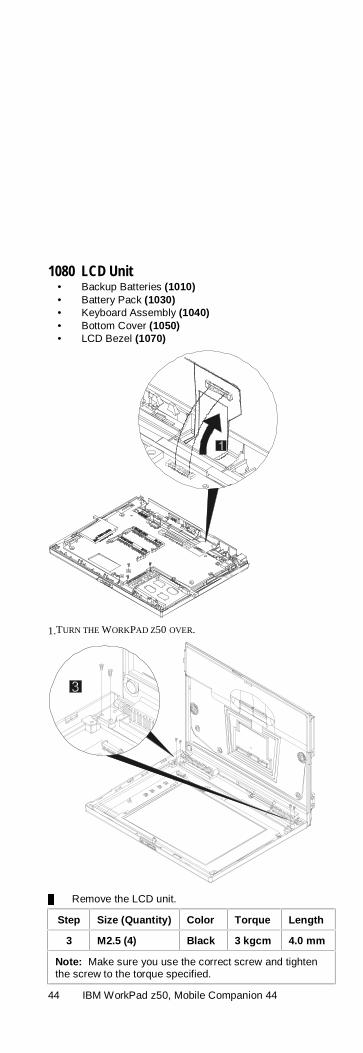
1080 LCD Unit• Backup Batteries (1010)• Battery Pack (1030)• Keyboard Assembly (1040)• Bottom Cover (1050)• LCD Bezel (1070)
1.TURN THE WORKPAD Z50 OVER.
$ Remove the LCD unit.
Step Size (Quantity) Color Torque Length
3 M2.5 (4) Black 3 kgcm 4.0 mm
Note: Make sure you use the correct screw and tightenthe screw to the torque specified.

WorkPad z50 Mobile Companion 45
1090 Inverter Card and LCD Panel• Backup Batteries (1010)• Battery Pack (1030)• Keyboard Assembly (1040)• Bottom Cover (1050)• LCD Bezel (1070)
46 IBM WorkPad z50, Mobile Companion 46
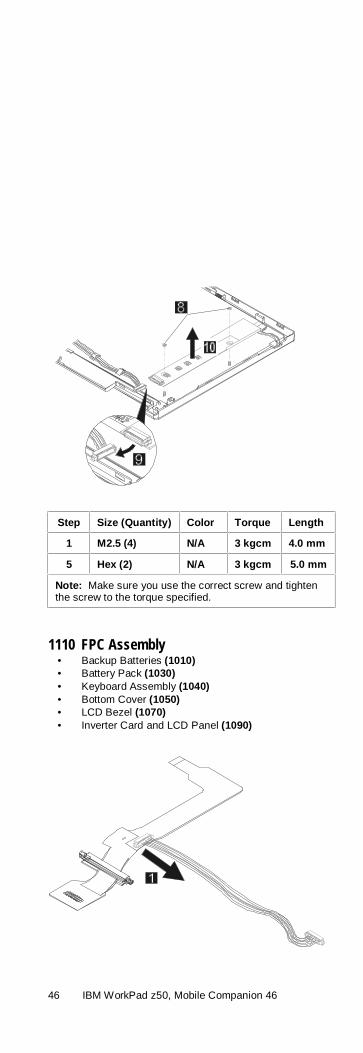
Step Size (Quantity) Color Torque Length
1 M2.5 (4) N/A 3 kgcm 4.0 mm
5 Hex (2) N/A 3 kgcm 5.0 mm
Note: Make sure you use the correct screw and tightenthe screw to the torque specified.
1110 FPC Assembly• Backup Batteries (1010)• Battery Pack (1030)• Keyboard Assembly (1040)• Bottom Cover (1050)• LCD Bezel (1070)• Inverter Card and LCD Panel (1090)

WorkPad z50 Mobile Companion 47
1120 Speaker• Backup Batteries (1010)• Battery Pack (1030)• Keyboard Assembly (1040)• Bottom Cover (1050)
1130 Microphone• Backup Batteries (1010)• Battery Pack (1030)• Keyboard Assembly (1040)• Bottom Cover (1050)

48 IBM WorkPad z50, Mobile Companion 48
1140 Audio PortsThe ear jack and speaker out ports are all built into themainboard. If any of these devices has malfunctioned, youmust replace the mainboard.
1150 PC Card Slot Assembly• Backup Batteries (1010)• Battery Pack (1030)• Keyboard Assembly (1040)• Bottom Cover (1050)• Mainboard (1060)
Step Size (Quantity) Color Torque Length
1 M2.0 (2) N/A 3 kgcm 4.0 mm

WorkPad z50 Mobile Companion 49
Note: Make sure you use the correct screw and tightenthe screw to the torque specified.

50 IBM WorkPad z50, Mobile Companion 50
1160 RJ-11 Assembly• Backup Batteries (1010)• Battery Pack (1030)• Keyboard Assembly (1040)• Bottom Cover (1050)

WorkPad z50 Mobile Companion 51
1170 Hardware Button Board• Backup Batteries (1010)• Battery Pack (1030)• Keyboard Assembly (1040)• Bottom Cover (1050)
Step Size (Quantity) Color Torque Length
1 M2.0 (1) N/A 3 kgcm 6.0 mm
Note: Make sure you use the correct screw and tightenthe screw to the torque specified.

52 IBM WorkPad z50, Mobile Companion 52
1180 Top Cover• Backup Batteries (1010)• Battery Pack (1030)• Keyboard Assembly (1040)• Bottom Cover (1050)• Mainboard (1060)• LCD Bezel (1070)• LCD Unit (1080)• Microphone (1130)• PC Card Slot Assembly (1150)• RJ-11 Assembly (1160)• Hardware Button Board (1170)
Step Size (Quantity) Color Torque Length
1 M2.5 (4) Black 3 kgcm 4.0 mm
Note: Make sure you use the correct screw and tightenthe screw to the torque specified.

WorkPad z50 Mobile Companion 53
Locations
Front Right View1. LCD cover release latch
2. LCD display
3. Brightness control buttons
4. Contrast control buttons
5. Notification button6. Notification LED
7. Microphone button
8. External Power/Charge status LED
9. Power button
10. TrackPoint
11. TrackPoint buttons
12. Keyboard
13. Built-in microphone
54 IBM WorkPad z50, Mobile Companion 54
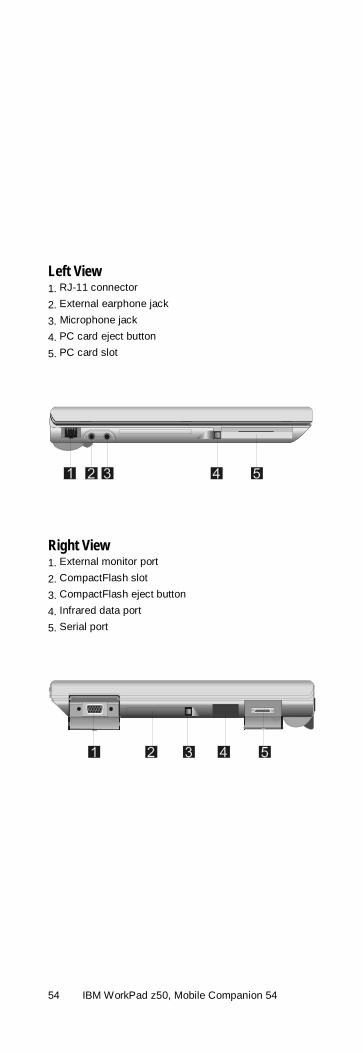
Left View1. RJ-11 connector
2. External earphone jack
3. Microphone jack
4. PC card eject button
5. PC card slot
Right View1. External monitor port
2. CompactFlash slot
3. CompactFlash eject button
4. Infrared data port
5. Serial port
WorkPad z50 Mobile Companion 55
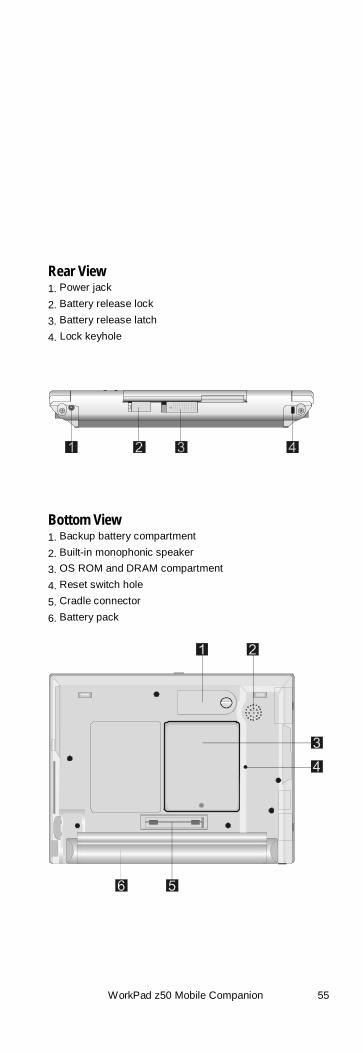
Rear View1. Power jack
2. Battery release lock
3. Battery release latch
4. Lock keyhole
Bottom View1. Backup battery compartment
2. Built-in monophonic speaker
3. OS ROM and DRAM compartment
4. Reset switch hole
5. Cradle connector
6. Battery pack

56 IBM WorkPad z50, Mobile Companion 56
System Unit Parts Listing
1
2
3
4
5
6
7
89
10
11

WorkPad z50 Mobile Companion (2608-1Ax) 57
System Unit FRU List
No. FRU PART DESCRIPTION FRU ELEMENTS FRU P/N QTY CRU
1 POINTING STICK CAP 84G6536 1 √K/B ASS’Y (USA) 02K4862 1
K/B ASS’Y (CAN-FRE) 02K4867 1
K/B ASS’Y (FRE) 02K4865 1
K/B ASS’Y (JAP) 02K4863 1
K/B ASS’Y (UK) 02K4864 1
2
K/B ASS’Y (GERMANY) 02K4866 1
TOP COVER ASS’Y 05K5936 1
TOP COVER 1
LED LENS 2
POWER BTN 1
TOUCH BTN (R) 1
TOUCH BTN (L) 1
INDICATOR BTN 2
BATTERY LATCH 1
BATTERY SPRING 1
INDICATOR SPRING 2
TOP ESD MYLAR 1
BATT-REL LATCH 1
BATT-REL BRACKET 1
CUSHION PLATE 1
K/B SEAL SUPPORT 1
K/B WATERPROOFTAPE
4
EMI SPONGE(740031*5m/m)
1
3
H/W BTN BOARD ASS’Y 1
MAIN BOARD ASS’Y 10L1217 14 MAIN BOARD ASS’Y-EU 30L2168 1
ROM CARD (USA) 10L1218 1
ROM CARD (JAP) 10L1256 1
ROM CARD (FRE) 10L1258 15
ROM CARD (GER) 10L1257 1
√
BOTTOM COVER ASS’Y U/C/J 05K5938 1
BOTTOM COVER ASS’Y EMEA 27L6431 1
BOTTOM COVER 1
SMART CARD DOOR 1
BASE ESD MYLAR 1
DOCKING SHUTTER (R) 1
DOCKING SHUTTER (L) 1
VGA DOOR-P 1
SERIAL DOOR-P 1
IR LENS 1
BACKUP BATT TERMINAL 1
RATING LABEL 1
6
RUBBER FOOT 2
7 BATTERY PACK 02K6565 1 √
8 BACKUP BATTERY 02K6566 1 √BOTTOM DOOR GROUP 05K5939 1
EXTEND DOOR 1
BACKUP BATTERY DOOR 1
DUMMY PC CARDASS’Y
19
DUMMY CF CARD 1
√
10 PC CARD SLOT ASS’Y 05K5937 1
11 SEE MISC PART GROUP 1
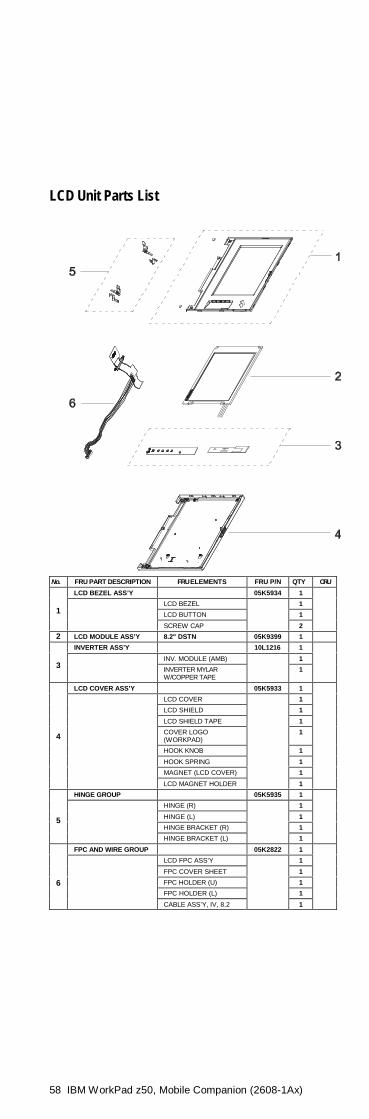
58 IBM WorkPad z50, Mobile Companion (2608-1Ax)
LCD Unit Parts List
No. FRU PART DESCRIPTION FRU ELEMENTS FRU P/N QTY CRU
LCD BEZEL ASS’Y 05K5934 1
LCD BEZEL 1
LCD BUTTON 11
SCREW CAP 2
2 LCD MODULE ASS’Y 8.2" DSTN 05K9399 1
INVERTER ASS’Y 10L1216 1
INV. MODULE (AMB) 13 INVERTER MYLAR
W/COPPER TAPE1
LCD COVER ASS’Y 05K5933 1
LCD COVER 1
LCD SHIELD 1
LCD SHIELD TAPE 1
COVER LOGO(WORKPAD)
1
HOOK KNOB 1
HOOK SPRING 1
MAGNET (LCD COVER) 1
4
LCD MAGNET HOLDER 1
HINGE GROUP 05K5935 1
HINGE (R) 1
HINGE (L) 1
HINGE BRACKET (R) 15
HINGE BRACKET (L) 1
FPC AND WIRE GROUP 05K2822 1
LCD FPC ASS’Y 1
FPC COVER SHEET 1
FPC HOLDER (U) 1
FPC HOLDER (L) 16
CABLE ASS’Y, IV, 8.2 1

WorkPad z50 Mobile Companion (2608-1Ax) 59
Miscellaneous and Other PartsDESCRIPTION FRU ELEMENTS QTY FRU P/N CRU
MISC PART GROUP 1 1 05K5940
HOOK KNOB 1
HOOK SPRING 1
IR LENS 1
DOCKING SHUTTER 1
RUBBER FOOT 2
COVER SWITCH/B ASS’Y 1
H/W BTN BOARD ASS’Y 1
CABLE ASS’Y, MIC 1
CABLE ASS’Y, RJ-11 1
RJ-11 DOOR (EMEA ONLY) 1
BATT SLOT BRACKET 1
LABEL CAN HOMO,(US/CA/JA ONLY)
1
SPEAKER BRACKET 1
SPEAKER MYLAR 1
CABLE ASS’Y, SP 1
TAPE 3
MISC PART GROUP 2 1 46L2666
TEMPLATE, TEXT 1
TEMPLATE, ICON 1
STICKER 1
√
SCREW KIT 1 05K5941
SCREW (M2.0*3-P-NI-NYLOK) 10
SCREW (M2.0*6-P-NI-NYLOK 10
SCREW (M2.5*6-I-BNI-NYLOK) 20
SCREW (M2.5*8-1-BNI-NI-NYLOK) 10
SCREW (M2.5*4-P-BNI-NYLOK) 20
STUD 10
I/V NUT 10
SCREW CAP 10
Option Parts FRU ListITEM DESCRIPTION QTY FRU P/N CRU
MEMORY EXPANSION 32MB 1 20L0244 √HIGH CAPACITY BATTERY PACK 1 02K6575 √DRY CELL BATTERY CASE 1 02K6142 √CRADLE 1 02K6143 √
Other PartsITEM DESCRIPTION QTY FRU P/N CRU
SERIAL CABLE 1 05K2823 √MODEM CABLE 1 05K2824 √AC ADAPTOR (45w, 2-prong) 1 02K6560 √AC ADAPTOR (45w, 3-prong) 1 02K6562 √
CRUTo find out which parts can be replaced by the customer, refer to thetables under “System Unit Parts Listing” starting on page 52. All partsmarked “√” in the CRU column are considered CRU parts.
ToolsSee the table of tools on page 26.

60 IBM WorkPad z50, Mobile Companion 60
Power CordIBM power cords for a specific country are usually availableonly in that country:
For 2-pin power cords:
IBMPowerCordPartNumber
Used in These Countries CRU
13H5273 Japan √
For 3-pin power cords:
IBMPowerCordPartNumber
Used in These Countries CRU
76H3514 Argentina, Australia, Papua New Guinea,New Zealand, Paraguay, Uruguay
√
76H3516 Bahamas, Barbados, Bermuda, Bolivia,Canada, Cayman Islands, Colombia, CostaRica, Dominican Republic, Ecuador, ElSalvador, Guatemala, Guyana, Haiti,Honduras, Jamaica, Mexico, NetherlandsAntilles, Nicaragua, Panama, Peru,Philippines, Saudi Arabia, Suriname,Taiwan, Trinidad (West Indies), UnitedStates of America, Venezuela
√
76H3518 Austria, Belgium, Bulgaria, Czech Republic,Egypt, Finland, France, Germany, Greece,Hungary, Iceland, Indonesia, Netherlands,Norway, Poland, Portugal, Romania,Slovakia, Spain, Sweden, Turkey, formerYugoslavia
√
76H3520 Denmark √
76H3522 Bangladesh, Pakistan, South Africa, SriLanka
√
76H3524 Abu Dhabi, Albania, Antigua, Bahrain,Brunei, Dubai, Fiji, India, Ireland, Kenya,Kuwait, Macao, Malaysia, Nigeria, Oman,People’s Republic of China (including HongKong), Qatar, Singapore, United Kingdom
√
76H3528 Liechtenstein, Switzerland √
76H3530 Chile, Ethiopia, Italy, Libya √
76H3532 Israel √
76H3535 Korea √
76H4866 Thailand √

WorkPad z50 Mobile Companion 61
NoticesReferences in this publication to IBM products, programs, orservices do not imply that IBM intends to make theseavailable in all countries in which IBM operates. Anyreference to an IBM product, program, or service is notintended to state or imply that only that IBM product,program, or service may be used. Any functionallyequivalent product, program, or service that does not infringeany of the intellectual property rights of IBM may be usedinstead of the IBM product, program, or service. Theevaluation and verification of operation in conjunction withother products, except those expressly designated by IBM,are the responsibility of the user.
IBM may have patents or pending patent applicationscovering subject matter in this document. The furnishing ofthis document does not give you any license to thesepatents. You can send license inquiries, in writing, to:
IBM Director of LicensingIBM Corporation500 Columbus AvenueThornwood, NY 10594U.S.A.
TrademarksThe following terms are trademarks of the IBM Corporationin the United States or other countries or both:
IBM
WorkPad
TrackPoint
Microsoft and Windows are trademarks or registeredtrademarks of Microsoft Corporation.
CompactFlash is the registered trademark of SandiskCorporation.
Other company, product, and service names, which may bedenoted by a double asterisk (**), may be trademarks orservice marks of others.

IBM
Part Number: 37L2095
Printed in U.S.A.
S37L-2ð95-ðð