ibm® sterling gentran:server® for iseries® user...
TRANSCRIPT

IBM Sterling Gentran:Server for iSeries
User GuideRelease 3.6
0241-350-USER01-0001

This edition applies to the 3.6 Version of IBM® Sterling Gentran:Server® for iSeries® and to allsubsequent releases and modifications until otherwise indicated in new editions.
Before using this information and the product it supports, read the information in Notices on pageN-1
Licensed Materials - Property of IBMIBM® Sterling Gentran:Server® for iSeries© Copyright IBM Corp. 1990, 2011. All Rights Reserved.US Government Users Restricted Rights - Use, duplication or disclosure restricted by GSA ADPSchedule Contract with IBM Corp.

IBM Sterling Gentran:Server for iSeries Release 3.6 User Guide i
Table of ContentsPreface Before You Begin
How is the Documentation Organized? .................................................................... P-1In this Book .............................................................................................................. P-1What is in Each Chapter? ......................................................................................... P-2Other Sterling Gentran:Server for iSeries Manuals .................................................. P-3How To Get Help ..................................................................................................... P-4
Chapter 1 System EssentialsIn this Chapter .......................................................................................................... 1-1What is Sterling Gentran:Server? ............................................................................. 1-2What Does Sterling Gentran:Server Do? ................................................................. 1-3Take a Closer Look at Sterling Gentran:Server ....................................................... 1-5Use the Sterling Gentran:Server Panels ................................................................... 1-9Get Help .................................................................................................................. 1-30Use the ezEDI Feature ............................................................................................ 1-36Print Reports in Sterling Gentran:Server ................................................................ 1-39Product Support and Remote Maintenance ............................................................ 1-41
Chapter 2 Environment ControlIn this Chapter .......................................................................................................... 2-1What is Environment Control? ................................................................................. 2-1What Does the Environment Control Subsystem Do? ............................................. 2-2Panel Quick Reference ............................................................................................. 2-2Use the Environment Control Panels ....................................................................... 2-3Reports .................................................................................................................... 2-14Common Questions ................................................................................................ 2-18
Chapter 3 PartnerIn this Chapter .......................................................................................................... 3-1What is a Partner? ..................................................................................................... 3-1What does the Partner Subsystem Do? ..................................................................... 3-2Take a Closer Look at the Partner Profile ................................................................ 3-3Prepare to Set Up the Partner Profile ....................................................................... 3-6Panel Quick Reference ............................................................................................. 3-8

Table of Contents
ii IBM Sterling Gentran:Server for iSeries Release 3.6 User Guide
Use the Partner Panels ............................................................................................ 3-11Use the ezPART Command .................................................................................. 3-100Reports .................................................................................................................. 3-103Common Questions .............................................................................................. 3-109
Chapter 4 Mapping: Getting StartedIn this Chapter .......................................................................................................... 4-1What is Mapping? ..................................................................................................... 4-2Mapping Features ..................................................................................................... 4-2Interface with Application Systems .......................................................................... 4-3Mapping Theory in Sterling Gentran:Server ............................................................ 4-6
Chapter 5 Application DefinitionIn this Chapter .......................................................................................................... 5-1What is an Application Definition? .......................................................................... 5-3What does the Application Definition Subsystem Do? ............................................ 5-3Panel Quick Reference ............................................................................................. 5-4Access the Application Definition Subsystem ......................................................... 5-6Application Definition for Externally Defined Physical Files ................................. 5-8Application Definition for Internally Defined File ................................................ 5-34Application Definition for Externally Defined Multi-format Logical File ............ 5-57Copy Application Definition .................................................................................. 5-78Copy Application Definition Between Libraries (APPCPY) ................................. 5-79Renumber Application Records/Files and Fields (APPRENBR) ........................... 5-81Synchronize an Application Definition (APPSYNCH) ......................................... 5-83Print Application Definitions ................................................................................. 5-85Re-retrieve DDS (RRTVDDS) ............................................................................... 5-87Use the ezAPPDEF Command ............................................................................... 5-88Reports .................................................................................................................... 5-91Common Questions .............................................................................................. 5-108
Chapter 6 Transaction MappingIn this Chapter .......................................................................................................... 6-1What is a Transaction Map? ..................................................................................... 6-1What Does the Transaction Mapping Subsystem Do? ............................................. 6-2Panel Quick Reference ............................................................................................. 6-3Use the Transaction Mapping Panels ....................................................................... 6-7The ezMap Command .......................................................................................... 6-171Reports .................................................................................................................. 6-174Common Questions .............................................................................................. 6-205

Table of Contents
IBM Sterling Gentran:Server for iSeries Release 3.6 User Guide iii
Chapter 7 StandardsIn this Chapter .......................................................................................................... 7-1What are Standards? ................................................................................................. 7-1What Does the Standards Subsystem Do? ................................................................ 7-2Panel Quick Reference ............................................................................................. 7-3Using the Standards Panels ...................................................................................... 7-7Reports .................................................................................................................... 7-54Common Questions ................................................................................................ 7-66
GlossaryDefinition of Terms ................................................................................................. G-1Reserved Word Constants ..................................................................................... G-12Application Data Types ......................................................................................... G-19EDI Data Types ..................................................................................................... G-25
Notices
Index

Table of Contents
iv IBM Sterling Gentran:Server for iSeries Release 3.6 User Guide

Preface
IBM Sterling Gentran:Server for iSeries Release 3.6 User Guide P - 1
Before You Begin
How is the Documentation Organized?Information about IBM® Sterling Gentran:Server® for iSeries® Release 3.6 is available through both online help and user documentation (provided on CD-ROM). Online help contains reference material (for example, panel definitions or field definitions). It gives you quick access to relevant documentation as you are using the Sterling Gentran:Server for iSeries system. The user documentation, on the other hand, describes procedures (“how to. . .”) and is intended to complement and enhance the online help.
Both the organization and flow of information in this manual follow the online organization of the Sterling Gentran:Server system and the natural way you might work as you set up your EDI system. For this reason, you can expect to find variations in the style and content of individual chapters as they are tailored to the needs of their particular audiences.
In this BookThis manual is task-oriented. You can use the Table of Contents to locate information about specific tasks and procedures. The index, on the other hand, can help you if you need information regarding individual panels or field definitions. For more detailed descriptions of individual panels and field definitions as they apply to each panel, please use the online help.
Apart from the opening chapter, “System Essentials,” which everyone should read, most Sterling Gentran:Server users do not need to read every chapter in this manual. The following chapter summaries will help you determine which areas are most pertinent to your use of the system.

Before You Begin What is in Each Chapter?
P - 2 IBM Sterling Gentran:Server for iSeries Release 3.6 User Guide
What is in Each Chapter?1. System Essentials
This chapter provides an overview of the Sterling Gentran:Server system, including the online help feature. The chapter also covers general techniques for using the system. It explains how to move from one panel to the next, how to use the function keys and options, and other important information.We recommend that everyone read this chapter.
2. Environment Control
This chapter presents the procedures for setting up each user’s personal work environment, including the parameters for output destinations, batch job description, and data formats. The chapter also covers the procedures for defining security at the Subsystem, Function, and Data levels.
The audience for this chapter is the EDI Coordinator or Security Officer (QSECOFR), who should be solely responsible for these tasks.
3. Partner
This chapter defines the procedures associated with creating and managing the Trading Partner profile. It includes instructions for using the ezPART command and explanations of some common scenarios you might encounter. This chapter also includes recommendations for parameter settings and in-depth explanations for the more advanced user.
4. Mapping: Getting Started
The Application Definition and Mapping tasks are closely associated. This chapter provides an overview and introduction to the entire process. Information is included about the types of application files that can be interfaced with Sterling Gentran:Server as well as how to structure the application files. If you are not familiar with Mapping or if you simply want to know more details about the Mapping process, this chapter is very useful.
5. Application Definition
The Application Definition defines the application interface format for translation. You need to set up the Application Definition before you can begin the Mapping process. This chapter defines the step-by-step procedures to set up and maintain Outbound and Inbound Application Definitions.
The chapter also includes instructions for using the ezAPPDEF command as well as more detailed information about the three types of application files with which Sterling Gentran:Server can interface.
6. Transaction Mapping
The Transaction Map defines how your data is converted from the Application Definition format to the EDI format requested by your Trading Partner. This chapter explains how to perform several mapping tasks and provides instructions for using the ezMAP command.
Other Sterling Gentran:Server for iSeries Manuals Before You Begin
IBM Sterling Gentran:Server for iSeries Release 3.6 User Guide P - 3
7. Standards
This chapter explains the procedures for viewing and printing Standards online, applying changes to the Standards to meet your business requirements, creating new Standards, and selecting specific Transactions for the batch Standards file.
Other Sterling Gentran:Server for iSeries Manuals
The Sterling Gentran:Server for iSeries documentation set includes several other manuals and instructional materials. The following publications are available as part of the licensed system:
IBM® Sterling Gentran:Server® for iSeries® Release 3.6 Manager’s Implementation Planner
The Manager’s Implementation Planner is designed to assist you with the process of collecting, organizing and prioritizing the information required to successfully implement EDI. The Planner includes EDI tutorial materials and other planning and implementation materials.
IBM® Sterling Gentran:Server® for iSeries® Release 3.6 Technical Reference Guide
The Technical Reference Guide provides information on advanced topics and technical system information for operating the Sterling Gentran:Server system. The guide includes system messages and program and command names.
IBM® Sterling Gentran:Server® for iSeries® Release 3.6 Communications Guide
The Communications Guide provides includes a communications tutorial, detailed descriptions of communication configurations, and troubleshooting techniques.
IBM® Sterling Gentran:Server® for iSeries® Release 3.6 Release Notes (including Impact to Existing Users)
The Release Notes describe system enhancements and new functions that have been incorporated into this release. Please read the Release 3.6 Release Notes carefully prior to installing Sterling Gentran:Server.
The Impact section of the Release Notes gives users of previous Sterling Gentran:Server for iSeries releases information on structural changes, including any changes to commands, CLs, and database files. These may necessitate changes to your implementation of Sterling Gentran:Server for iSeries. Please read the Impact section carefully prior to installation of this version of Sterling Gentran:Server.
IBM® Sterling Gentran:Server® for iSeries® Release 3.6 Installation/Conversion Guide and Cumulative Fix Guide
The Installation/Conversion Guide and Cumulative Fix Guide provide step-by-step installation and conversion instructions. Please read all the instructions prior to beginning the installation.

Before You Begin How To Get Help
P - 4 IBM Sterling Gentran:Server for iSeries Release 3.6 User Guide
How To Get HelpIBM® Sterling Customer Center provides a wealth of online resources that are available around the clock to enrich your business experience with IBM® Sterling Gentran®. By using Sterling Customer Center, you gain access to many self-support tools, including a Knowledge-Base, Documentation, Education, and Case Management. Access Sterling Customer Center at http://customer.sterlingcommerce.com.
Once logged in, select Support Center from the top navigation menu, and then locate Sterling Gentran product-specific support information from the left navigation menu.
Additionally, our Customer Support Reference Guide outlines our support hours, contact information, and key information that will enhance your support experience with us. For detailed information about Customer Support, please refer to the Customer Support Reference Guide accessible from the login page. (http://customer.sterlingcommerce.com)
Chapter
IBM Sterling Gentran:Server for iSeries Release 3.6 User Guide 1
1 System Essentials
In this ChapterSterling Gentran:Server provides the flexibility, efficiency, and thoroughness needed to meet even the most demanding EDI requirements. To take full advantage of this powerful system, it is important that you understand some basic concepts before you begin. “System Essentials” serves as an introductory chapter to help you become familiar with the system’s purpose, features, organization, and operation. This chapter covers the following topics:
What is Sterling Gentran:Server? . . . . . . . . . . . . . . . . . . . . . . . . . . . . . . . . . . . . . . . . . . 1-2
What Does Sterling Gentran:Server Do? . . . . . . . . . . . . . . . . . . . . . . . . . . . . . . . . . . . . 1-3
Take a Closer Look at Sterling Gentran:Server . . . . . . . . . . . . . . . . . . . . . . . . . . . . . . . 1-5
Use the Sterling Gentran:Server Panels . . . . . . . . . . . . . . . . . . . . . . . . . . . . . . . . . . . . . 1-9
• The ‘Work with’ Concept . . . . . . . . . . . . . . . . . . . . . . . . . . . . . . . . . . . . . . . . . . . . 1-10
• Understand the Panel Structure . . . . . . . . . . . . . . . . . . . . . . . . . . . . . . . . . . . . . . . 1-11
• The Components of a Sterling Gentran:Server Panel. . . . . . . . . . . . . . . . . . . . . . . 1-13
Shortcuts . . . . . . . . . . . . . . . . . . . . . . . . . . . . . . . . . . . . . . . . . . . . . . . . . . . . . . . . . . . . 1-23
• Access a Panel from a Service . . . . . . . . . . . . . . . . . . . . . . . . . . . . . . . . . . . . . . . . 1-27
• Use the Command Line . . . . . . . . . . . . . . . . . . . . . . . . . . . . . . . . . . . . . . . . . . . . . 1-28
Get Help . . . . . . . . . . . . . . . . . . . . . . . . . . . . . . . . . . . . . . . . . . . . . . . . . . . . . . . . . . . . 1-30
• Use Online Help . . . . . . . . . . . . . . . . . . . . . . . . . . . . . . . . . . . . . . . . . . . . . . . . . . . 1-30
• Use the Search Index . . . . . . . . . . . . . . . . . . . . . . . . . . . . . . . . . . . . . . . . . . . . . . . 1-35
Use the ezEDI Feature . . . . . . . . . . . . . . . . . . . . . . . . . . . . . . . . . . . . . . . . . . . . . . . . . 1-36
Print Reports in Sterling Gentran:Server . . . . . . . . . . . . . . . . . . . . . . . . . . . . . . . . . . . 1-39
Product Support and Remote Maintenance. . . . . . . . . . . . . . . . . . . . . . . . . . . . . . . . . . 1-41

What is Sterling Gentran:Server?
2 IBM Sterling Gentran:Server for iSeries Release 3.6 User Guide
What is Sterling Gentran:Server?Sterling Gentran:Server is a data translation and management system. It is an integral part of Electronic Data Interchange (EDI), which is the application-to-application exchange of key business documents in a standard format via a computer-to-computer communication link. This exchange takes place between you and your trading partners (those with whom you do business). For example, EDI would allow you to electronically transmit purchase orders to a supplier if that supplier had set up their computer system to perform EDI with your organization.
In EDI, trading partners typically transmit files to each other in special formats called “Standards.” EDI requires data to be translated in two directions:
1. Inbound — Translate data received from your trading partner in EDI standard format into the proper format for input to your application programs
2. Outbound — Translate output files from your application programs into the EDI standard required to send data to your partner
This is where Sterling Gentran:Server fits into the EDI process. Sterling Gentran:Server acts as an interface between your in-house applications and the EDI standards. It allows you to present all your business documents in an EDI standard format and to interpret documents that you receive in standard format. The following figure shows the role Sterling Gentran:Server plays in the flow of data during EDI.
(SEE the IBM® Sterling Gentran:Server® for iSeries® Release 3.6 Manager’s Implementation Planner (MIP) for more information about EDI in general. The MIP manual contains an excellent introduction and diagrams depicting typical EDI transactions.)
ApplicationValue-
AddedNetwork
TradingPartner
Translates data from EDI standards to applicationfile format and visa versa
Sterling Gentran:Server

What Does Sterling Gentran:Server Do?
IBM Sterling Gentran:Server for iSeries Release 3.6 User Guide 3
What Does Sterling Gentran:Server Do?Supports Translation Processing
The previous section defined the purpose of Sterling Gentran:Server as translating data from an EDI standard to your application file format and visa versa. This definition actually presents a simplified view of the system’s functionality.
Translation would be a relatively simple procedure if you were dealing with just one standard and one partner. However, each industry has specific requirements, and every partner has different business specifications. This means that you must have the ability to communicate in the appropriate standard for each partner. The process is further complicated by the need to acknowledge the receipt of documents, to monitor data for errors, and to manage the entire process of sending and receiving EDI transmissions.
Sterling Gentran:Server also supports EDI in many other ways. The powerful Mapping module translates data between your application and an EDI standard format (ANSI X12, UCS, WINS, TDCC, TRADACOMS, or EDIFACT). The system also checks the syntax of inbound and outbound data thoroughly to ensure it complies with the specified EDI standard.
With Sterling Gentran:Server, you can set many options on a per-partner basis to tailor the system to both your environment and your partner’s environment. The sophisticated, yet simple-to-use, online interface allows you to easily manage Sterling Gentran:Server – without the need for system programming. Management controls provide Audit Trails, Environment Control and error reporting.
Makes EDI StraightforwardIn addition to the general capabilities described above, Sterling Gentran:Server facilitates your EDI work with the following specific features:
Simplifies start up with ezEDI: This is a helpful feature that automatically guides you through the tasks of setting up the basic files and data necessary to begin using Sterling Gentran:Server.
Offers online help: Sterling Gentran:Server provides context-sensitive help at a field and panel level as well as a key word search index, which is integrated into Sterling Gentran:Server.
Handles all EDI transactions: The system uses tables to define all EDI transactions, segments and elements, which include ANSI X12 transactions as well as the Air, Ocean, Motor, and Rail standards of TDCC, UCS, WINS, TRADACOMS, and EDIFACT.
Supports multiple versions: You may use as many or as few versions as your trading partners require. New versions of standards are supplied by IBM after they are published by the appropriate standards committee.
Translates standards to readily-used formats: Transactions received by your computer in ANSI X12 or other standard formats are variable length, variable position logical segments. Sterling Gentran:Server translates the data from this variable format into user-defined application formats.
What Does Sterling Gentran:Server Do?
4 IBM Sterling Gentran:Server for iSeries Release 3.6 User Guide
Allows partner-specific decisions: Many specifications can vary by trading partner. For example, each partner may have different mapping and acknowledgment requirements.
Provides Audit functions: Sterling Gentran:Server can perform audit functions on all incoming and outgoing transactions, groups and interchanges. In addition, an Audit Inquiry function is available.
Allows you to reprocess suspended data: Inbound data that does not meet all predefined requirements is stored in a suspense file so you can determine how to process it later.
Generates envelope segments: Specify the partner envelope information once and Sterling Gentran:Server uses it thereafter to generate envelopes. The system automatically generates the appropriate interchange, functional group and transaction envelope segments.
Take a Closer Look at Sterling Gentran:Server
IBM Sterling Gentran:Server for iSeries Release 3.6 User Guide 5
Take a Closer Look at Sterling Gentran:Server
This section explains the main modules within Sterling Gentran:Server, and how they are organized.
As we discussed earlier, Sterling Gentran:Server acts as an interface between your in-house applications and the EDI standards. After you define your trading partner’s requirements, the system performs the translations as a batch process. Even the communications can be fully automated. You can initiate system processing through the menu interface or by scheduling it to run at a predefined time.
Day-to-day user interaction is recommended to review the online Audit and Communications systems to monitor the EDI document flow. A specially designed process window (Audit) gives you an online view of the EDI document flow. It allows you to monitor the periodic tasks and data to ensure that normal processing occurs.
(SEE the other chapters in this manual and the IBM® Sterling Gentran:Server® for iSeries® Release 3.6 Technical Reference Guide for detailed explanations of how Sterling Gentran:Server manages EDI transactions. The “Processing” chapter in the IBM® Sterling Gentran:Server® for iSeries® Release 3.6 Technical Reference Guide thoroughly explains how data flows through Sterling Gentran:Server during the batch operations. You can also access information through the online help and the Search Index features.)
Take a Closer Look at Sterling Gentran:Server
6 IBM Sterling Gentran:Server for iSeries Release 3.6 User Guide
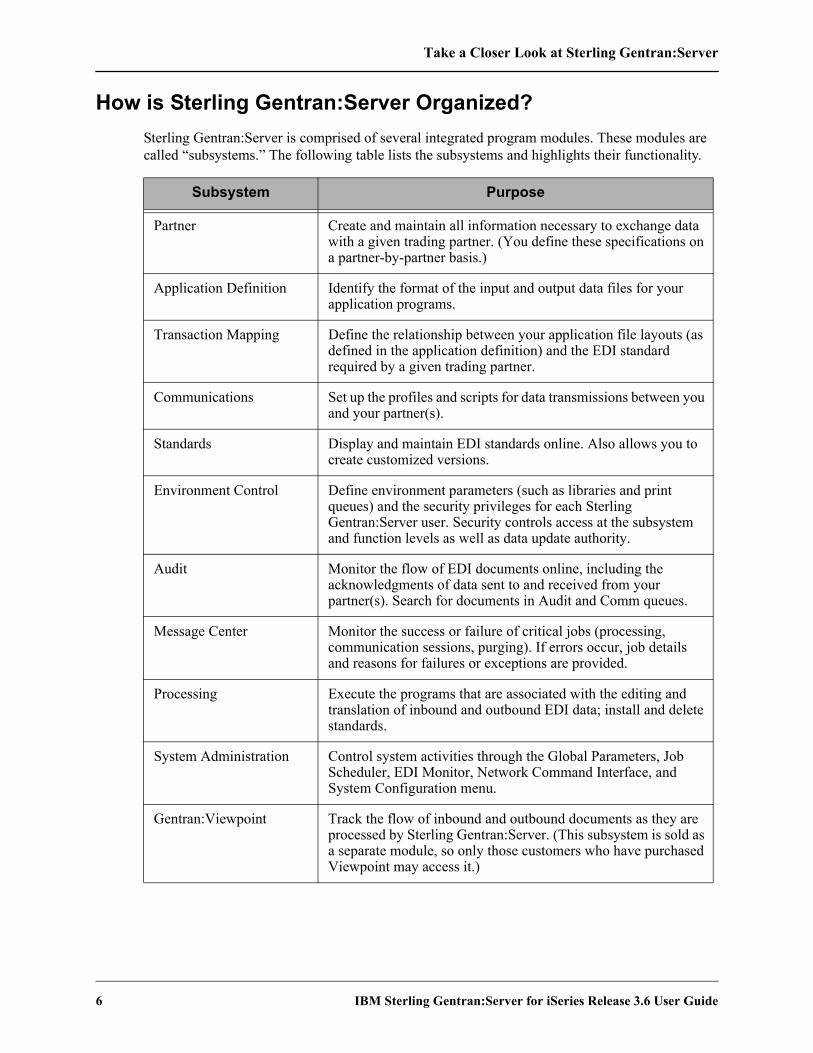
How is Sterling Gentran:Server Organized?Sterling Gentran:Server is comprised of several integrated program modules. These modules are called “subsystems.” The following table lists the subsystems and highlights their functionality.
Subsystem Purpose
Partner Create and maintain all information necessary to exchange data with a given trading partner. (You define these specifications on a partner-by-partner basis.)
Application Definition Identify the format of the input and output data files for your application programs.
Transaction Mapping Define the relationship between your application file layouts (as defined in the application definition) and the EDI standard required by a given trading partner.
Communications Set up the profiles and scripts for data transmissions between you and your partner(s).
Standards Display and maintain EDI standards online. Also allows you to create customized versions.
Environment Control Define environment parameters (such as libraries and print queues) and the security privileges for each Sterling Gentran:Server user. Security controls access at the subsystem and function levels as well as data update authority.
Audit Monitor the flow of EDI documents online, including the acknowledgments of data sent to and received from your partner(s). Search for documents in Audit and Comm queues.
Message Center Monitor the success or failure of critical jobs (processing, communication sessions, purging). If errors occur, job details and reasons for failures or exceptions are provided.
Processing Execute the programs that are associated with the editing and translation of inbound and outbound EDI data; install and delete standards.
System Administration Control system activities through the Global Parameters, Job Scheduler, EDI Monitor, Network Command Interface, and System Configuration menu.
Gentran:Viewpoint Track the flow of inbound and outbound documents as they are processed by Sterling Gentran:Server. (This subsystem is sold as a separate module, so only those customers who have purchased Viewpoint may access it.)
Take a Closer Look at Sterling Gentran:Server
IBM Sterling Gentran:Server for iSeries Release 3.6 User Guide 7
Locate Subsystems and Functions within Sterling Gentran:Server
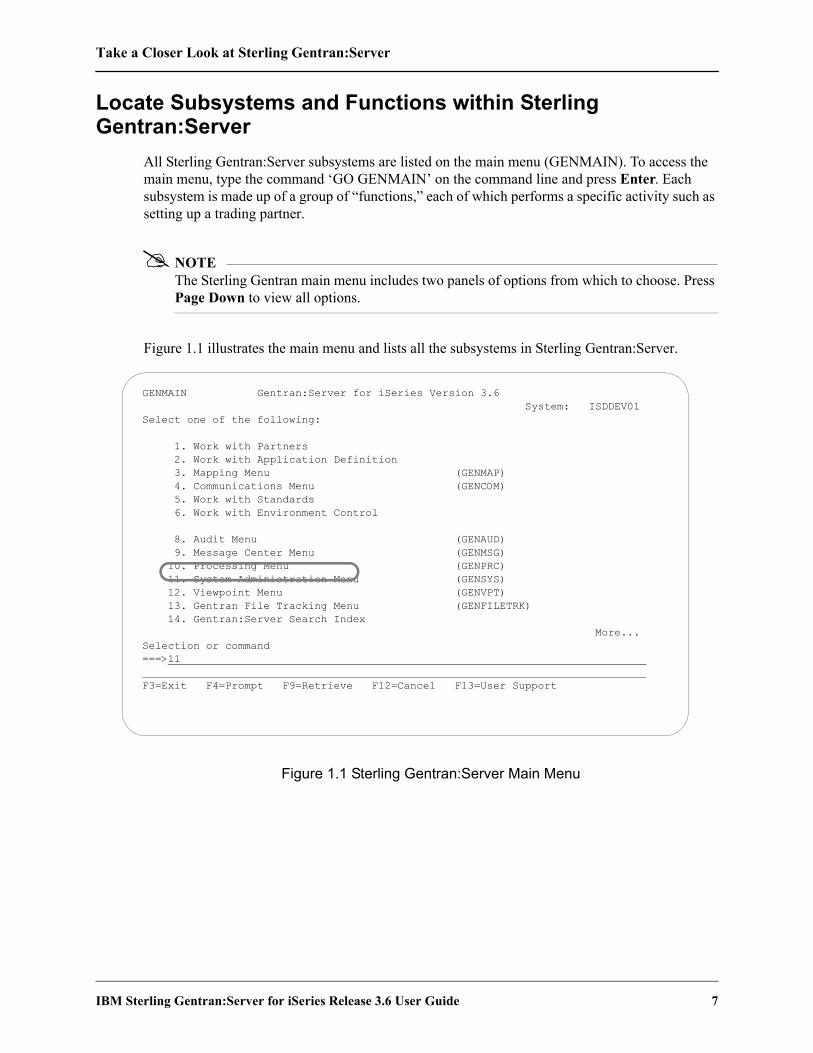
All Sterling Gentran:Server subsystems are listed on the main menu (GENMAIN). To access the main menu, type the command ‘GO GENMAIN’ on the command line and press Enter. Each subsystem is made up of a group of “functions,” each of which performs a specific activity such as setting up a trading partner.
NOTEThe Sterling Gentran main menu includes two panels of options from which to choose. Press Page Down to view all options.
Figure 1.1 illustrates the main menu and lists all the subsystems in Sterling Gentran:Server.
Figure 1.1 Sterling Gentran:Server Main Menu
GENMAIN Gentran:Server for iSeries Version 3.6 System: ISDDEV01 Select one of the following: 1. Work with Partners 2. Work with Application Definition 3. Mapping Menu (GENMAP) 4. Communications Menu (GENCOM) 5. Work with Standards 6. Work with Environment Control 8. Audit Menu (GENAUD) 9. Message Center Menu (GENMSG) 10. Processing Menu (GENPRC) 11. System Administration Menu (GENSYS) 12. Viewpoint Menu (GENVPT) 13. Gentran File Tracking Menu (GENFILETRK) 14. Gentran:Server Search Index More... Selection or command ===>11 F3=Exit F4=Prompt F9=Retrieve F12=Cancel F13=User Support

Take a Closer Look at Sterling Gentran:Server
8 IBM Sterling Gentran:Server for iSeries Release 3.6 User Guide
Figure 1.2 illustrates the functions that make up the System Administration subsystem. This subsystem has an underlying menu that lists its functions, but that is not true for all the other subsystems. Most subsystems go directly into “Work with” panels.
Figure 1.2 Functions in the System Administration Subsystem
As you use Sterling Gentran:Server, keep in mind that the functions within each subsystem are linked together like a network. Your path (the sequence of panels that display) depends on the data that you type on each panel. This flexible structure allows Sterling Gentran:Server to move quickly between the functions without multiple layers of menu trees.
NOTEIn addition to the subsystems, the main menu includes the Sterling Gentran:Server Search Index, which displays online help for glossary terms, field definitions, and other topical information available as hypertext.
GENSYS Gentran:Server System Administration 3.6 System: ISDDEV01 Select one of the following: 1. Global Parameters 2. Work with Job Scheduler 3. Work with EDI Monitor 4. Work with Network Command Interface 5. Work with Batch Error Message File 6. Set TELEKOM Network Processing Parameters (SETTELEKOM) 7. Display Current Point Release (PTR) 10. System Configuration Menu (GENSYSCFG) 90. Sign off Selection or command ===> F3=Exit F4=Prompt F9=Retrieve F12=Cancel F13=User Support

Use the Sterling Gentran:Server Panels
IBM Sterling Gentran:Server for iSeries Release 3.6 User Guide 9
Use the Sterling Gentran:Server PanelsThis section presents basic instructions for using the Sterling Gentran:Server panels and commands. Although the many system features vary in complexity from “simple” to “expert” level, most of the system can be operated with just a few basic commands.
To use Sterling Gentran:Server, you must have a valid iSeries user profile. Sterling Gentran:Server uses your iSeries User ID to identify who you are, to control which subsystems and functions you can access, and to track the changes that you make in any files.
Your iSeries Security Officer can give you instructions for using the terminal hardware and operating system at your location. You should be familiar with basic iSeries concepts prior to using Sterling Gentran:Server.
Based on the configuration of your iSeries user profile and the conventions in place at your site, you might start up Sterling Gentran:Server in one of three ways.
As Part of Your Login Routine
Your iSeries user profile can be set up so that each time you log on to the iSeries, you automatically access the Sterling Gentran:Server main menu. If this is the case, you can immediately begin to use Sterling Gentran:Server menu options.
From a Menu
Many sites set up their own menu structure or customize third-party software so Sterling Gentran can be invoked from a menu.
From the iSeries Command Line
If Sterling Gentran:Server is not offered as a menu option at your site, you can invoke it by using the iSeries GO (go to menu) command. Type ‘GO GENMAIN’ on the iSeries command line and press Enter. The system displays the Sterling Gentran:Server main menu, allowing you to begin accessing menu options for Sterling Gentran.
Other Sterling Gentran:Server menus available from the command line include: Processing (GO GENPRC), System Administration (GO GENSYS), System Configuration (GO GENSYSCFG), Audit (GO GENAUD), Communications (GO GENCOM), and Message Center (GO GENMSG).
To use Sterling Gentran security, you can invoke all menus (except GENMAIN) using the GENEXMNU command and pass the menu name, that is, ‘GENEXMNU GENPRC.’ This performs security checking to see if the user is authorized to access the subsystem before invoking the menu.
NOTEPrior to accessing Sterling Gentran, you may have to add one or more Sterling Gentran:Server libraries to your library list. If you are unsure about this process, contact your System Administrator for instructions on adding or modifying entries in your library list. The default libraries that are supplied with Sterling Gentran:Server are G3X6DTA, G3X6PGM, G3X6SAMP, and G3X6TOOL. Make sure the library QTEMP is in your library list.

Use the Sterling Gentran:Server Panels
10 IBM Sterling Gentran:Server for iSeries Release 3.6 User Guide
The ‘Work with’ ConceptSterling Gentran:Server uses the iSeries ‘Work With’ concept. When you first access the Sterling Gentran:Server system, the main menu (GENMAIN) displays, as shown in Figure 1.3.
From GENMAIN, you can access any of the Sterling Gentran:Server subsystems by typing the associated option number on the command line and pressing Enter. For example, if you want to Work with Partners, type ‘1’ on the command line and press Enter.
Figure 1.3 Typing the subsystem number on the command line.
Sterling Gentran:Server displays the data entry panel, Work with Partners (EDIX005-FMT01). At this point, you can enter the field values required to set up your partner.
For most Sterling Gentran:Server subsystems, selecting a main menu option displays a data entry panel. There are some subsystems, however, such as Processing, that display another menu. In this case, simply select a menu option on the new menu so a data entry or command panel displays.
If Sterling Gentran:Server does not display a menu, the next panel to display depends on the entries that you made on the previous panel. In a sense, Sterling Gentran:Server “protects” you from making mistakes or omissions. Based on the entries you make on various Sterling Gentran:Server panels, the system leads you through a series of related panels on which you need to fill in information before you can complete the task. This “captive” feature ensures that the EDI transactions you create have all the information necessary to be processed successfully.
GENMAIN Gentran:Server for iSeries Version 3.6 System: ISDDEV01 Select one of the following: 1. Work with Partners 2. Work with Application Definition 3. Mapping Menu (GENMAP) 4. Communications Menu (GENCOM) 5. Work with Standards 6. Work with Environment Control 8. Audit Menu (GENAUD) 9. Message Center Menu (GENMSG) 10. Processing Menu (GENPRC) 11. System Administration Menu (GENSYS) 12. Viewpoint Menu (GENVPT) 13. Gentran File Tracking Menu (GENFILETRK) 14. Gentran:Server Search Index More... Selection or command ===> 1 F3=Exit F4=Prompt F9=Retrieve F12=Cancel F13=User Support
Menu option ‘1’ is chosen

Use the Sterling Gentran:Server Panels
IBM Sterling Gentran:Server for iSeries Release 3.6 User Guide 11
Understand the Panel StructureThe online screens Sterling Gentran:Server displays are called “panels.” All Sterling Gentran:Server panels have the same “look and feel.” That is, all panels have the same general appearance and respond to your input in a similar way. There are several components on a Sterling Gentran:Server panel. Some components are always present; other components occur only on certain types of panels.
The following list contains components that are present on all Sterling Gentran:Server panels:
Program and Format Name
Panel Description
User’s Initials
Message Line
Function Keys
Panel Fields
System Date/Time
The following list contains components that are present only on some Sterling Gentran:Server panels:
Option Fields
Option Codes
Panel Continuation
Command Line
Key Entry Line

Use the Sterling Gentran:Server Panels
12 IBM Sterling Gentran:Server for iSeries Release 3.6 User Guide
Figure 1.4 shows the components of a typical Sterling Gentran:Server panel.
Figure 1.4 The components of a typical Sterling Gentran:Server panel
NOTESterling Gentran:Server command prompt panels vary from the panel format shown above. (SEE the “Programs and Commands” chapter in the IBM® Sterling Gentran:Server® for iSeries® Release 3.6 Technical Reference Guide for a list of the Sterling Gentran:Server commands.)
EDIX030 Work with Partner Groups EDI 03/30/11FMT01 pgmlib: G3X6PGM dtalib: G3X6DTA 12:00:00 Position to Partner ID . Qual Group Type option (and Information), press Enter. 1=Create 2=Revise 3=Copy 4=Delete 5=View 11=Transactions Opt Partner ID Qual Group ID !GENTRAN-RESERVED-PARTNER-ID-1 !!!DFT AAA WAREHOUSE CO 11 01 !!!DFT AAA WAREHOUSE CO 11 01 RO BG-PARTNER !!!DFT BG-PARTNER QG C13579 !!!DFT C13579 FA C13579 IN C13579 PO More... Parameters or command ===> F1=Help F3=Exit F12=Cancel F15=Sort F24=More Keys Function key not allowed
program and format name
panel description option
panelfields
option fields
function keysmessage line panel
continuation
codes
user’sinitials
currentsystemdate &time
keyentryline
Current active programand data libraries

Use the Sterling Gentran:Server Panels
IBM Sterling Gentran:Server for iSeries Release 3.6 User Guide 13
The Components of a Sterling Gentran:Server Panel
Program and Format NameMost Sterling Gentran:Server panels have a unique program name and format name on the upper left corner of the panel. The program name remains the same for all panels in a multi-panel function. The format name changes for each panel in a multi-panel function.
Panel DescriptionThis is a textual name for the panel. Since panel descriptions are not always unique, be careful when you refer to panels by name. Always check both the panel description and the program/format name.
NOTEUsing Captive PanelsMany Sterling Gentran:Server panels are “captive.” This means that the panel automatically displays based on the values you entered on a previous panel. You can tell whether a new panel has displayed by checking the program name and format name, which are unique identifiers located on the upper left corner of the panel. (SEE the sections on options and function keys later in this chapter for more information about moving between panels.)
Program and Data LibrariesThe current active program and data libraries are shown below the panel description. This information is retrieved from the data area GENLIB.
Option CodesOption codes display only on panels that display multiple records. Option codes are numbers that represent actions to be performed on one or more of the records. For example, in the previous figure, the panel displays multiple partner profiles. The option codes represent actions that can be performed on one or more of the partners. Additional option codes can be shown by pressing F23 (More Options), where available.
Option FieldsTo select an option, type the number in the Option field to the left of the appropriate line item(s) and press Enter. You can perform more than one option (that is, View, Copy, Add, Change, Delete) associated with a field maintenance task at a time. Type as many option codes in the option fields as you like, then press Enter. The system performs the options starting at the top of the panel and continuing down to the bottom of the page.
NOTEWith the exception of “Work with” panels, options can be carried forward from one page to the next.

Use the Sterling Gentran:Server Panels
14 IBM Sterling Gentran:Server for iSeries Release 3.6 User Guide
Panel FieldsYou must enter values in one or more fields on each panel. These fields describe the EDI transactions you are creating and/or instruct Sterling Gentran:Server on what to do with the transactions you are creating. Depending on the types of information being entered, the panel fields display on various areas of the panel. The field values that you enter are not entered into the system until you press a specific function key, usually Enter or F10 (Update). Pressing this key enters all the field values on the panel into the system at the same time. (SEE the “Function Keys” section later in this chapter for more information about entering data into the system).
User’s InitialsYour initials are defined in the Environment Control subsystem. These always display in the upper right corner of the panel. (By the way, have you been introduced to Elizabeth D. Ingram? Liz was kind enough to supply all the tutorial materials for this manual and her initials (EDI) display on every panel.)
System Date and TimeThe current date and time are shown in the upper right corner of the panel. The date displays in a variety of date formats with various separators and can be customized for each user.
Key Entry LineThis is the blank line at the top of the subfile in which you enter the key fields necessary to advance to the next panel, as specified by the option code selected.
Message LineIn response to actions that you perform, the system displays messages just below the function keys. Always be sure to read the messages displayed in this area. For additional information, place the cursor on the message and press F1 (Help). This is available for most messages.
Function KeysThe list of function keys displays at the bottom of the panel. Function keys perform many actions such as exiting from a panel, printing a report or sorting a file. Sterling Gentran:Server uses a wide variety of function keys. Each panel displays only those functions keys that are active for that particular panel. Consult your hardware manual for information about using multiple key strokes to access the higher numbered function keys. Additional function keys can be shown by pressing F24 (More Keys).
Panel ContinuationSome panels contain more information than the screen can display at one time. These panels are designed as multiple “pages.” Panels with multiple pages display the word “More...” at the bottom right corner of the panel. Use the Page Up (Roll Down) and Page Down (Roll Up) keys on your keyboard to move between the multiple pages of the panel.

Use the Sterling Gentran:Server Panels
IBM Sterling Gentran:Server for iSeries Release 3.6 User Guide 15
Basic System Terms and ConceptsBefore we can explain the options and function keys available in Sterling Gentran:Server, we must first define some basic terms that are used throughout this manual in discussing the panels.
Access ModeThis defines the type of activity you can perform on a panel. Typically, the mode is determined by the option you selected on the previous panel. For example, you could select option ‘1’ (Create) on a panel so the next panel is accessed in “create mode,” allowing you to add a new record.
Captive PanelCaptive panels refer to panels that are “tied” together and must be reviewed before “creates” are performed. This arrangement prevents you from inadvertently missing a panel which contains important information critical for processing.
In create mode, if F10 (Update) is pressed from a panel that has associated captive panels, the system displays the next captive panel with a message indicating that you must review this panel before updating. Once all captive panels have been reviewed, press F10 again to actually add the record and return to the calling panel.
To access captive panels in any mode, press Enter or F8 (Next) to advance forward or press F7 (Back) to advance backward. To confirm updates, press F10.
Key Entry LineThis is the blank line at the top of the list on a “Work with” panel in which you enter the key fields necessary to advance to the next panel, as specified by the option code selected.
Use the Function KeysActive function keys display at the bottom of each panel. Press F24 (More Keys) repeatedly to display additional function keys. The following standard function keys are active on most panels:
F1=HelpProvides either additional information about the panel in general or about a specific field within the panel depending on where the cursor is located on the panel when you press F1. When displaying help information for a field, you can press F2 (Extended help) to get panel help. This help can be printed. (SEE “Getting Help” later in this chapter for more information about online help.)
F3=ExitEnds the current function and returns you to the display from which the function was started.
F4=PromptSupplies a window containing valid field values or a selection list for the appropriate file. When you press F4 on a menu or in a field on a “Work with” panel for which no values have been defined, the system displays the iSeries’ Major Command Groups (MAJOR) panel. Press F3 (Exit) or F12 (Cancel) to return to the active panel.

Use the Sterling Gentran:Server Panels
16 IBM Sterling Gentran:Server for iSeries Release 3.6 User Guide
F5=RefreshRedisplays the panel with the most recent information and removes any outstanding selections or keyed data.
F7=BackDisplays the previous panel associated with a captive panel (associated with the same record).
F8=NextDisplays the next panel associated with a captive panel.
F9=RetrieveShows the last command entered on the command line along with any included parameters. Press this key once to retrieve the last command you ran. Press this key twice to retrieve the next to the last command you ran. Press additional times for each corresponding command you wish to retrieve.
If no commands were entered, or, you are not authorized to use the iSeries command line (as defined in your iSeries user profile), no command is retrieved and the panel redisplays.
F10=UpdateUpdates the record and returns to the calling program from which you invoked this panel.
F11=DeleteConfirms the delete operation and deletes all records associated with this ID. The system automatically returns to the calling program from which you invoked this panel.
F12=CancelReturns to the previous menu or display. When on a single record panel, outstanding updates (must apply using (Update)) are cancelled.
On a multi-record panel, updates applied by pressing Enter are not lost when F12 (Cancel) is pressed.
F13=ServicesDisplays a pop-up window with available options for other functions that can be invoked. The system suspends actions for the current panel and branches to the selected function (if authorized). Upon completion, the system returns to the Services Window. You can select another option or cancel (F12) to the calling program from which you invoked the Services function. Typically, options are available for tasks related to the current panel.
F15=SortDisplays a pop-up window with available sort criteria. The cursor is positioned next to the field currently controlling the Sort order for the display. Selecting different sorting options affects the Position-to field(s) shown at the top of the panel. The default sort order for each of the “Work With” panels is set in the System Configuration file (SEE the “System Considerations” chapter in the IBM® Sterling Gentran:Server® for iSeries® Release 3.6 Technical Reference Guide for more information about the System Configuration file.)
Use the Sterling Gentran:Server Panels
IBM Sterling Gentran:Server for iSeries Release 3.6 User Guide 17
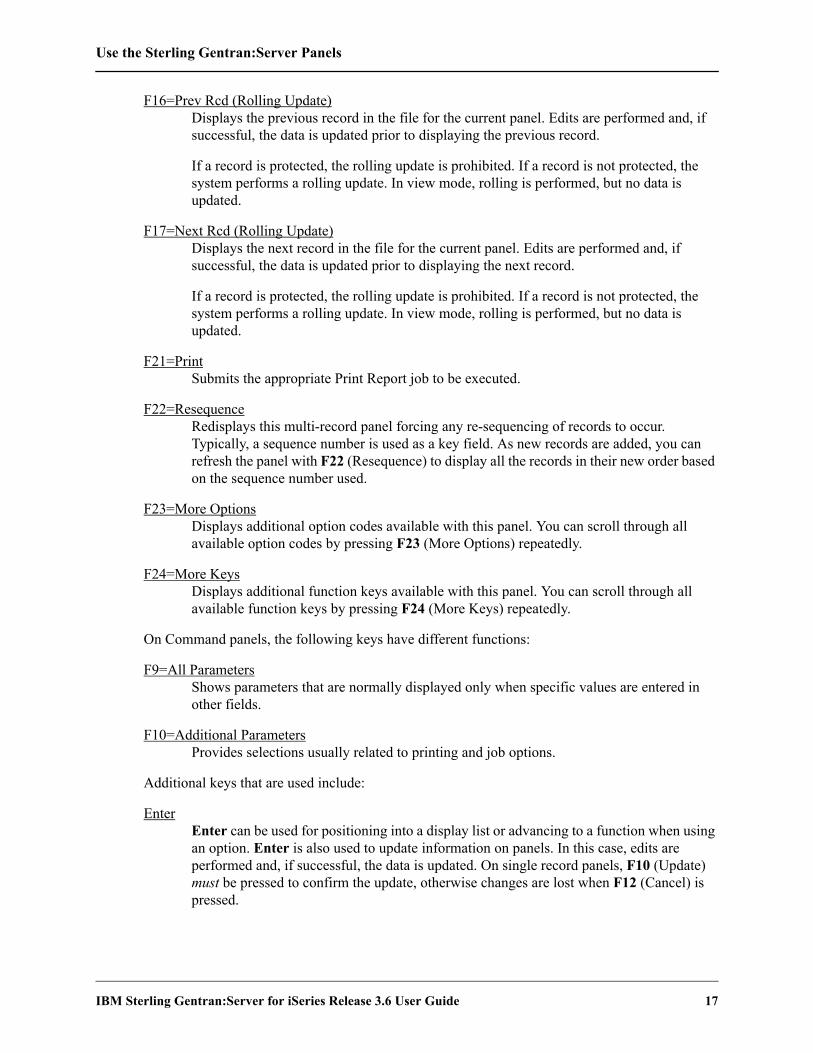
F16=Prev Rcd (Rolling Update)Displays the previous record in the file for the current panel. Edits are performed and, if successful, the data is updated prior to displaying the previous record.
If a record is protected, the rolling update is prohibited. If a record is not protected, the system performs a rolling update. In view mode, rolling is performed, but no data is updated.
F17=Next Rcd (Rolling Update)Displays the next record in the file for the current panel. Edits are performed and, if successful, the data is updated prior to displaying the next record.
If a record is protected, the rolling update is prohibited. If a record is not protected, the system performs a rolling update. In view mode, rolling is performed, but no data is updated.
F21=PrintSubmits the appropriate Print Report job to be executed.
F22=ResequenceRedisplays this multi-record panel forcing any re-sequencing of records to occur. Typically, a sequence number is used as a key field. As new records are added, you can refresh the panel with F22 (Resequence) to display all the records in their new order based on the sequence number used.
F23=More OptionsDisplays additional option codes available with this panel. You can scroll through all available option codes by pressing F23 (More Options) repeatedly.
F24=More KeysDisplays additional function keys available with this panel. You can scroll through all available function keys by pressing F24 (More Keys) repeatedly.
On Command panels, the following keys have different functions:
F9=All ParametersShows parameters that are normally displayed only when specific values are entered in other fields.
F10=Additional ParametersProvides selections usually related to printing and job options.
Additional keys that are used include:
EnterEnter can be used for positioning into a display list or advancing to a function when using an option. Enter is also used to update information on panels. In this case, edits are performed and, if successful, the data is updated. On single record panels, F10 (Update) must be pressed to confirm the update, otherwise changes are lost when F12 (Cancel) is pressed.

Use the Sterling Gentran:Server Panels
18 IBM Sterling Gentran:Server for iSeries Release 3.6 User Guide
HelpProvides additional information about using the panel or a specific field on the panel. Some keyboards have a specific Help key that can also be used to access the same Help information as F1 (Help).
HomeWhen pressed on a Sterling Gentran panel, Home moves the cursor to the primary “Position-to” field at the top of the panel.
Page Down (Roll Up)Pages down to the next set of items until the bottom of the file is reached. The indicator “Bottom” displays at the end of the file; “More...” displays if more items remain.
Page Up (Roll Down)Pages up to the previous set of items until the top of the file is reached.
PrintPrints information currently displayed. Print does not print data from files. Use the separate options and function keys within Sterling Gentran to print data.
Tab KeyTab moves the cursor from one field to the next on the panel, left to right, top to bottom. To move the cursor in reverse (bottom to top, right to left), press Shift and Tab simultaneously.
Using a mouseIf your computer hardware is configured with a mouse, you can position the mouse cursor on a panel field anywhere on the panel, click the mouse button and begin to enter values in the field. Additionally, to execute a menu option or function key, you can double click the mouse button on that menu option or function key. See your System Administrator to determine if you have the proper hardware and software to use your mouse with the iSeries.
Use the Option CodesIn Sterling Gentran:Server, option codes are grouped in categories for consistency as shown below (greater than ‘10’ have special uses as shown).
• 1-10 standard option codes
• 11-29 vary according to the panel on which they display
• 30-39 invoke Processing commands
• 40-49 invoke purge and retrieve commands
• 50 invokes ezEDI commands
Many panels include a list of available option codes you can use for navigation to advance to a desired panel or function. Available option codes display in the top portion of the panel. Press F23 (More Options) repeatedly to display additional option codes.

Use the Sterling Gentran:Server Panels
IBM Sterling Gentran:Server for iSeries Release 3.6 User Guide 19
To use the options, type the option code in the Opt (Option) field next to the desired identifiers and press Enter. You can type option codes next to more than one entry at a time to perform more than one task, one after the other.
The key entry line must be used when creating a record. It can also be used for other options with entry of the specific parameters.
1=CreateTo create a new record, type ‘1’ in the option field, fill in the required identifier(s) on the key entry line and press Enter. The system advances you to a subsequent panel in create mode, where you can add the record by completing the required fields and pressing F10 (Update).
2=ReviseTo revise an existing record, type ‘2’ in the option field next to the desired entry and press Enter. You can also type in the desired identifier(s) on the key entry line with option ‘2’ and press Enter. The system advances you to a subsequent panel in revise mode where you can modify the record by updating the desired fields and pressing F10 (Update).
3=CopyThe copy function can be performed at several levels. When selected on a “Work with” panel, the entire selected definition is copied to a new definition. For example, if the copy function was selected from the Work with Application Definition panel (EDIX550-FMT01), the entire definition is copied to a new definition.
On lower levels within a subsystem, the copy function, in many places, only copies a single record. For example, if the copy function was selected on the Application Fields panel (EDIX554-CTL01), only a single record is copied.
When the copy function is invoked, a pop-up window displays to allow entry of the key fields necessary to create the new record(s). For more information, press F1 (Help) while in the copy window.
4=DeleteThe delete function can be performed at several levels. When using this function on a “Work with” panel, the entire selected definition is deleted. On lower levels within a subsystem, the delete function might only delete a single record. For example, if the delete function was selected on the Application Fields panel (EDIX554-CTL01), only a single record is deleted.
When accessing a panel in delete mode, F11 (Delete) must be pressed to confirm the deletion, On multi-record panels, option ‘4’ must be typed to indicate the records to be deleted. In this case, no confirmation is requested.
5=ViewThe view option is selected as an access mode for single record panels when no information should be changed. When using F16 (Prev Rcd) and F17 (Next Rcd), records are accessed in a rolling view mode instead of a rolling update mode.
Since you cannot specify a view-only mode on multi-record panels, you must ensure no changes are made. The data rights for a subsystem can be set to ‘3’ to ensure a user can only view data throughout that entire subsystem. Alternately, the entire definition can be

Use the Sterling Gentran:Server Panels
20 IBM Sterling Gentran:Server for iSeries Release 3.6 User Guide
protected by setting the Update-Allowed flag to ‘N.’ (SEE the “Environment Control” chapter for more information about the Update-Allowed flag.)
6=PrintThe print option prompts the appropriate print report command for the user to submit. If selected beside an ID on a “Work with” panel, the identifier is pre-loaded into the command.
The print function is also available on many panels by using F21 (Print). This function automatically submits the appropriate print report to batch for the currently displayed identifier.
Use the Prompt KeyWhen you are creating or editing existing entries, Sterling Gentran:Server requires you to enter specific information. These entries may be either a reference to a record that you created elsewhere in the system, or a value from a list of valid choices.
F4 (Prompt) is very helpful in these situations, and may be pressed while on a field. This function key displays at the bottom of many Sterling Gentran:Server panels such as the one in the following figure.
On “Work with” panels, you must enter an option on the key entry line, with F4 (Prompt) pressed on any field on the key entry line; if available, a list of valid values displays. If you press F4 (Prompt) without an option specified or pressed outside the key entry line, the system displays the iSeries Major Command Groups (MAJOR) menu.
The following two examples illustrate using the F4 (Prompt) feature from a file maintenance panel and a “Work with” panel.

Use the Sterling Gentran:Server Panels
IBM Sterling Gentran:Server for iSeries Release 3.6 User Guide 21
Selecting a Value from a File Maintenance PanelIn Figure 1.5, the cursor is placed on the Functional Groups field. The system requires you to specify a Group ID to be associated with this application definition. If you know the Group ID, you can type it and press Tab to move the cursor to the next field. However, you could also move the cursor to the field and then press F4 (Prompt). You would then see a pop-up window with a list of Group IDs from the standards. At this point you could select an entry by typing ‘1’ in the option field next to the Group ID and then pressing Enter.
Figure 1.5 Using the F4 (Prompt) Function Key from a File Maintenance panel
NOTEIf an option is entered and the cursor is on a field for which there is no prompt information available when F4 (Prompt) is pressed, the system displays the message “Prompt function not defined for (fieldname).”
EDIX552 Application Definition EDI 03/30/11 FMT01 12:00:00 Application ID . . . . . . . . . . POFILE Send or Receive. . . . . . . . . . S Division . . . . . . . . . . . . . 000 Description. . . . . . . . . . . . Outbound Purchase Order Functional Groups. . . . . . . . . PO Position to Code . . . . . . . . . PO 1=Select Code Description Fil 1 PO PURCHASE ORDER TRANSACTION (850) 360 EDI PR PURCHASE ORDER ACKNOWLEDGEMENT (855) 360 EDI PS PLANNING SCHEDULE WITH RELEASE (830) 360 Rec PT PRODUCT TRANSFER AND RESALE 077 1 90 Len More... App F1=Help F3=Exit F12=Cancel F15=Sort Upd F1=Help F4=Prompt F10=Update F12=Cancel F21=Prt App F24=More Keys
Place cursor here and press F4 (Prompt)
Use the Sterling Gentran:Server Panels
22 IBM Sterling Gentran:Server for iSeries Release 3.6 User Guide
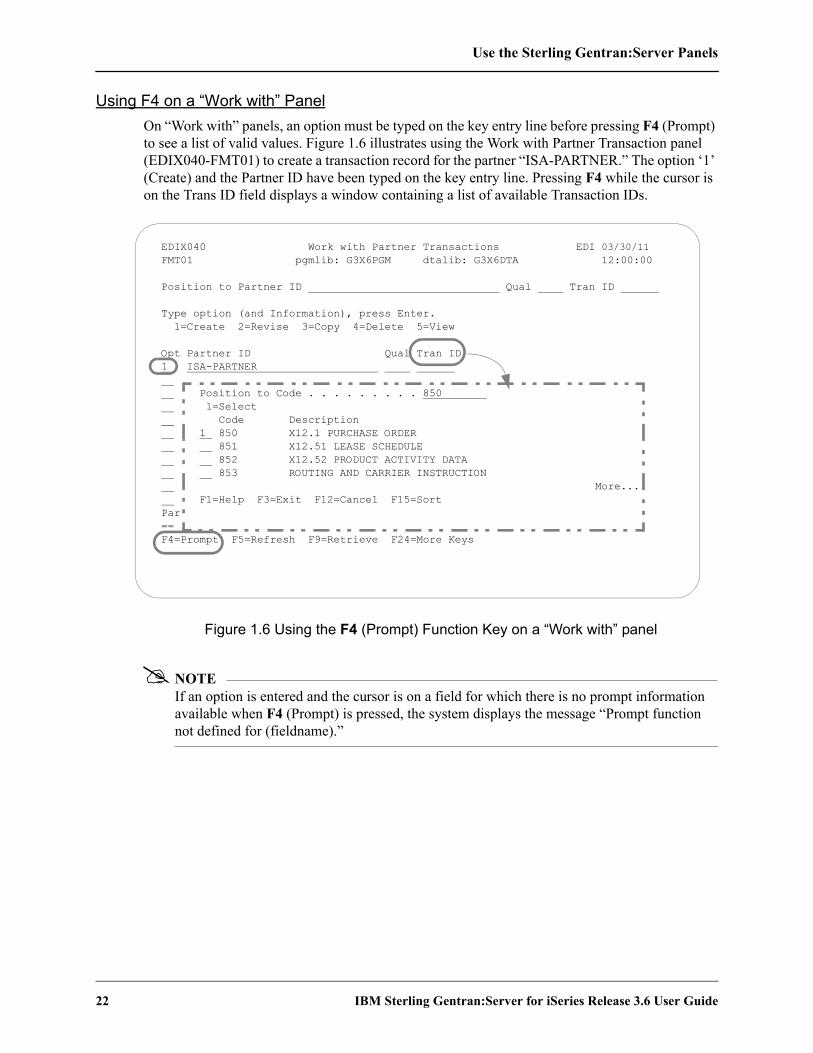
Using F4 on a “Work with” PanelOn “Work with” panels, an option must be typed on the key entry line before pressing F4 (Prompt) to see a list of valid values. Figure 1.6 illustrates using the Work with Partner Transaction panel (EDIX040-FMT01) to create a transaction record for the partner “ISA-PARTNER.” The option ‘1’ (Create) and the Partner ID have been typed on the key entry line. Pressing F4 while the cursor is on the Trans ID field displays a window containing a list of available Transaction IDs.
Figure 1.6 Using the F4 (Prompt) Function Key on a “Work with” panel
NOTEIf an option is entered and the cursor is on a field for which there is no prompt information available when F4 (Prompt) is pressed, the system displays the message “Prompt function not defined for (fieldname).”
EDIX040 Work with Partner Transactions EDI 03/30/11 FMT01 pgmlib: G3X6PGM dtalib: G3X6DTA 12:00:00 Position to Partner ID Qual Tran ID Type option (and Information), press Enter. 1=Create 2=Revise 3=Copy 4=Delete 5=View Opt Partner ID Qual Tran ID 1 ISA-PARTNER Position to Code . . . . . . . . . 850 1=Select Code Description 1 850 X12.1 PURCHASE ORDER 851 X12.51 LEASE SCHEDULE 852 X12.52 PRODUCT ACTIVITY DATA 853 ROUTING AND CARRIER INSTRUCTION More... F1=Help F3=Exit F12=Cancel F15=Sort Par == F4=Prompt F5=Refresh F9=Retrieve F24=More Keys
Use the Sterling Gentran:Server Panels
IBM Sterling Gentran:Server for iSeries Release 3.6 User Guide 23
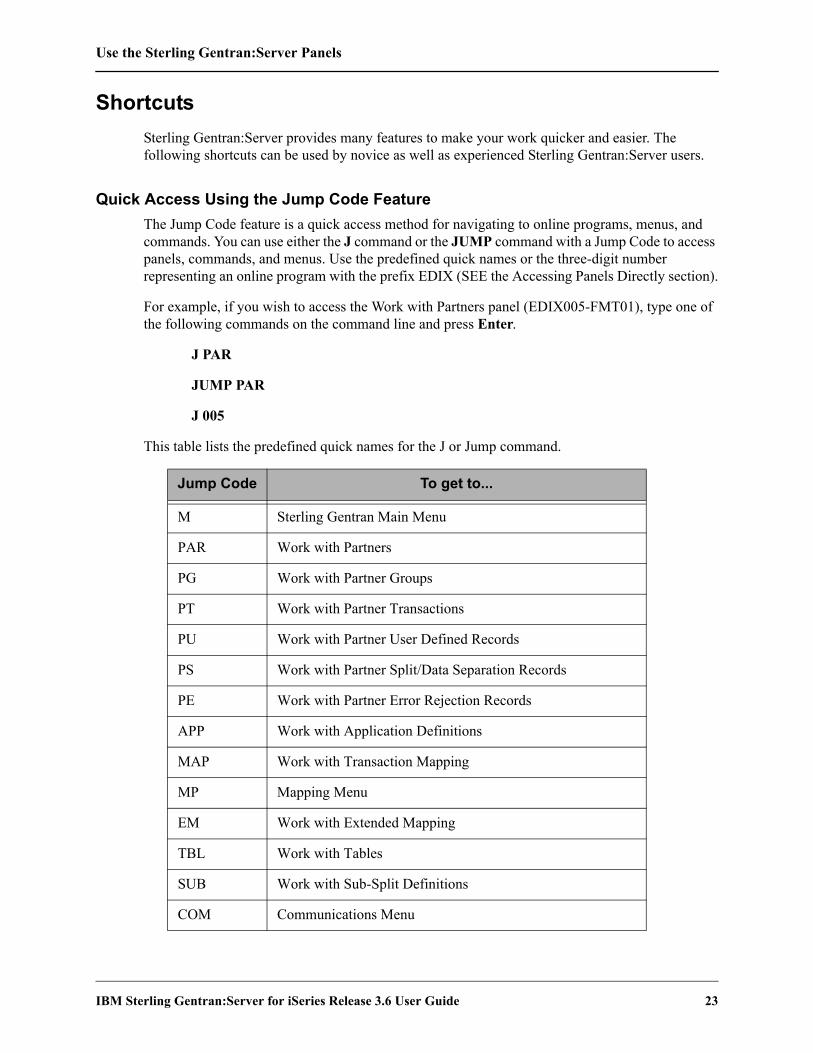
ShortcutsSterling Gentran:Server provides many features to make your work quicker and easier. The following shortcuts can be used by novice as well as experienced Sterling Gentran:Server users.
Quick Access Using the Jump Code FeatureThe Jump Code feature is a quick access method for navigating to online programs, menus, and commands. You can use either the J command or the JUMP command with a Jump Code to access panels, commands, and menus. Use the predefined quick names or the three-digit number representing an online program with the prefix EDIX (SEE the Accessing Panels Directly section).
For example, if you wish to access the Work with Partners panel (EDIX005-FMT01), type one of the following commands on the command line and press Enter.
J PAR
JUMP PAR
J 005
This table lists the predefined quick names for the J or Jump command.
Jump Code To get to...
M Sterling Gentran Main Menu
PAR Work with Partners
PG Work with Partner Groups
PT Work with Partner Transactions
PU Work with Partner User Defined Records
PS Work with Partner Split/Data Separation Records
PE Work with Partner Error Rejection Records
APP Work with Application Definitions
MAP Work with Transaction Mapping
MP Mapping Menu
EM Work with Extended Mapping
TBL Work with Tables
SUB Work with Sub-Split Definitions
COM Communications Menu

Use the Sterling Gentran:Server Panels
24 IBM Sterling Gentran:Server for iSeries Release 3.6 User Guide
CM Work with Communications
OQ Work with Outbound Queue
IQ Work with Inbound Queue
CH Work with Comm History Log
CS Work with Comm Scripts
CJ Work with Communication Jobs
MQ Work with MQ Links
LIN Sterling Gentran Line Pools
SSN Start Communications Session
MQR Receive File from MQ Queue
MQS Send File to MQ Queue
STD Work with Standards
ST Standards Transactions
SS Standards Segments
SE Standards Segment Elements
SD Standards Data Dictionary Definition
SC Standards Codes
SAC Standards Activity
ENV Work with Environment Control
AUD Audit Menu
SA Search Audit Utility
AI Work with Audit Interchanges
AG Work with Audit Groups
AT Work with Audit Transactions
MSG Message Center Menu
MC Work with Message Center
PRC Processing Menu
Jump Code To get to...

Use the Sterling Gentran:Server Panels
IBM Sterling Gentran:Server for iSeries Release 3.6 User Guide 25
IN Process Transactions Inbound
OUT Process Transactions Outbound
SPL Split File Inquiry
ADD Add Data to Comm Queues
EXT Extract Data from Comm Queues
SYS System Administration Menu
GLB Global Parameters
SCH Work with Job Scheduler
SCE Work with Scheduled Entries
MON Work with EDI Monitor
INS Work with Network Command Interface (INS Network)
ERR Work with Batch Error Messages
CFG System Configuration Menu
VPT Sterling Gentran:Viewpoint Menu
VP Work with Sterling Gentran:Viewpoint Documents
VPQ Work with Sterling Gentran:Viewpoint Queries
AN Work with Automatic Notification
EML Work with Auto Notification E-mail (EDIX632-FMT02)
PAG Work with Auto Notification Paging (EDIX634-FMT02)
USR Work with Auto Notification User Exit
MS Sterling Gentran Main Menu with IBM® Sterling Gen-tran:Server® Extension for SAP R/3
SAP Sterling Gentran:Server Extension Menu
SIN SAPIN command for Sterling Gentran:Server Extension Inbound Processing
Jump Code To get to...

Use the Sterling Gentran:Server Panels
26 IBM Sterling Gentran:Server for iSeries Release 3.6 User Guide
Access Panels Directly from the Command Line or User-MenusSometimes you may prefer not to access panels through the “Work with” subsystems and the various functions below them. Sterling Gentran has a special feature that allows you to directly access most Sterling Gentran functions from the command line. EXCPGM is a specialized “call” command that is supplied with Sterling Gentran to give you direct access to most functions. The Jump Code feature uses this feature and can be used instead of the EXCPGM command.
To directly access a Sterling Gentran program (for online screens), type the following command on the command line and press Enter:
EXCPGM EDIXnnn Where ‘nnn’ is the panel number.
There are many situations in which this feature could be useful. Perhaps a co-worker asks you for information about EDI information that is in Sterling Gentran which is totally unrelated to the work that you are currently doing. If you know the program name of the function that contains this information, you can use the EXCPGM command to quickly display that function and then return to your work. (SEE the “Programs and Commands” chapter in the IBM® Sterling Gentran:Server® for iSeries® Release 3.6 Technical Reference Guide for more information.) Also, it is common to create your own menus providing direct access to pertinent functions.
Access Sterling Gentran Commands Directly from the Command Line or User-Menus
When accessing Sterling Gentran commands from outside the Sterling Gentran system using the command line or your own custom menus, you can use the OS/400 method to invoke or prompt the command or use a special Sterling Gentran command to prompt the command.
The special command, GENEXCMD, performs Sterling Gentran security authorization checking prior to prompting. To use this method, type the following command on the command line and press Enter or use in a menu source as follows:
GENEXCMD <Sterling Gentran Command Name>
Access Sterling Gentran Menus Directly from the Command Line or User-MenusWhen accessing Sterling Gentran menus from outside the Sterling Gentran system, such as from the command line or from your own custom menus, you can use the OS/400 method to invoke (using the GO command) or you can use a special Sterling Gentran command to invoke the menu. The Jump Code feature uses the special Sterling Gentran Command.
The special command, GENEXMNU, performs Sterling Gentran security authorization checking prior to invoking the menu. To use this method, type the following command on the command line and press Enter or use in your own menu source as follows:
GENEXMNU <Sterling Gentran Menu Name>
Use the Sterling Gentran:Server Panels
IBM Sterling Gentran:Server for iSeries Release 3.6 User Guide 27
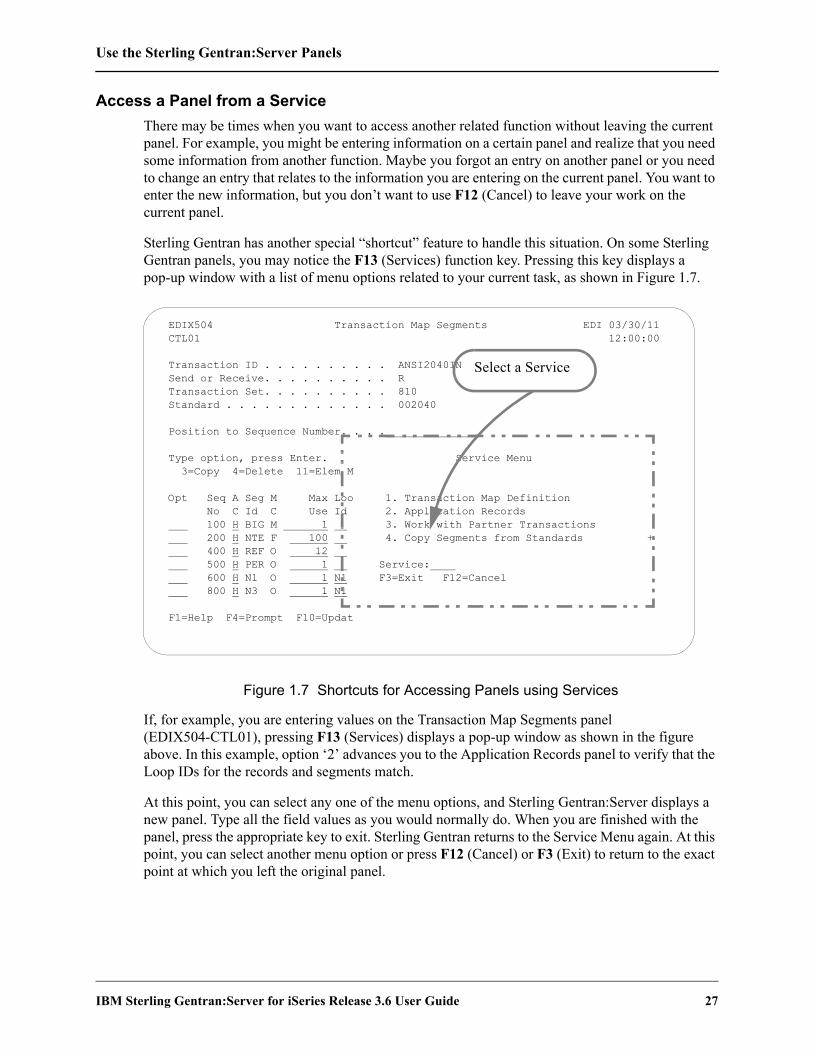
Access a Panel from a ServiceThere may be times when you want to access another related function without leaving the current panel. For example, you might be entering information on a certain panel and realize that you need some information from another function. Maybe you forgot an entry on another panel or you need to change an entry that relates to the information you are entering on the current panel. You want to enter the new information, but you don’t want to use F12 (Cancel) to leave your work on the current panel.
Sterling Gentran has another special “shortcut” feature to handle this situation. On some Sterling Gentran panels, you may notice the F13 (Services) function key. Pressing this key displays a pop-up window with a list of menu options related to your current task, as shown in Figure 1.7.
Figure 1.7 Shortcuts for Accessing Panels using Services
If, for example, you are entering values on the Transaction Map Segments panel (EDIX504-CTL01), pressing F13 (Services) displays a pop-up window as shown in the figure above. In this example, option ‘2’ advances you to the Application Records panel to verify that the Loop IDs for the records and segments match.
At this point, you can select any one of the menu options, and Sterling Gentran:Server displays a new panel. Type all the field values as you would normally do. When you are finished with the panel, press the appropriate key to exit. Sterling Gentran returns to the Service Menu again. At this point, you can select another menu option or press F12 (Cancel) or F3 (Exit) to return to the exact point at which you left the original panel.
EDIX504 Transaction Map Segments EDI 03/30/11 CTL01 12:00:00 Transaction ID . . . . . . . . . . ANSI2040IN Send or Receive. . . . . . . . . . R Transaction Set. . . . . . . . . . 810 Standard . . . . . . . . . . . . . 002040 Position to Sequence Number. . . . Type option, press Enter. Service Menu 3=Copy 4=Delete 11=Elem M Opt Seq A Seg M Max Loo 1. Transaction Map Definition No C Id C Use Id 2. Application Records 100 H BIG M 1 3. Work with Partner Transactions 200 H NTE F 100 4. Copy Segments from Standards + 400 H REF O 12 500 H PER O 1 Service: 600 H N1 O 1 N1 F3=Exit F12=Cancel 800 H N3 O 1 N1 F1=Help F4=Prompt F10=Updat
Select a Service

Use the Sterling Gentran:Server Panels
28 IBM Sterling Gentran:Server for iSeries Release 3.6 User Guide
Use the Command LineAny iSeries, Sterling Gentran-specific, or user-specific command may be executed from the command line (Sterling Gentran supports iSeries security authorization). To use the command line, type the command, then press F4 to prompt or Enter. The following figure shows the PRCTRNIN command typed on the GENMAIN command line. Entering the command displays the Process Transactions Inbound (PRCTRNIN) panel, where parameters can be entered and the job submitted.
NOTECommand line usage is determined by your iSeries user profile. SEE your System Administrator for more information.

Use the Sterling Gentran:Server Panels
IBM Sterling Gentran:Server for iSeries Release 3.6 User Guide 29
Figure 1.8 illustrates prompting the Process Transactions Inbound (PRCTRNIN) command from the command line using F4.
Figure 1.8 Using the PRCTRNIN command from the command line
NOTEWhen you execute a Sterling Gentran-specific command from the command line, information is retrieved from your Sterling Gentran:Server environment profile to control the runtime environment. (SEE the “Environment Control” chapter for more information.)
GENMAIN Gentran:Server for iSeries Version 3.6 System: ISDDEV01 Select one of the following: 1. Work with Partners 2. Work with Application Definition 3. Mapping Menu (GENMAP) 4. Communications Menu (GENCOM) 5. Work with Standards 6. Work with Environment Control 8. Audit Menu (GENAUD) 9. Message Center Menu (GENMSG) 10. Processing Menu (GENPRC) 11. System Administration Menu (GENSYS) 12. Viewpoint Menu (GENVPT) 13. Gentran File Tracking Menu (GENFILETRK) 14. Gentran:Server Search Index More... Selection or command ===> PRCTRNIN F3=Exit F4=Prompt F9=Retrieve F12=Cancel F13=User Support
Process Transactions Inbound command
Process Transactions Inbound (PRCTRNIN) Type choices, press Enter. Comm Profile ID (Editor) . . . . > CN3BSC *NONE, *ALL, Comm Profile Id + for more values Application ID (Mapper) . . . . > *NONE *NONE, *ALL, Application Id + for more values Mapper Debug Report? . . . . . . *NO *YES, *NO Clear Temporary Files? . . . . . *YES *YES, *NO Acknowledgment Reports: Print Report? . . . . . . . . *NO *YES, *NO Split File . . . . . . . . . . 00000 00000-00080, SLIDE Sub-Split File . . . . . . . . 00 00-80 Application File Member . . . . *FIRST *FIRST, *UNIQUE Replace Data in App. Files? . . *YES *YES, *NO Run Interactively? . . . . . . . *NO *YES, *NO More... F3=Exit F4=Prompt F5=Refresh F12=Cancel F13=How to use this display F24=More keys

Get Help
30 IBM Sterling Gentran:Server for iSeries Release 3.6 User Guide
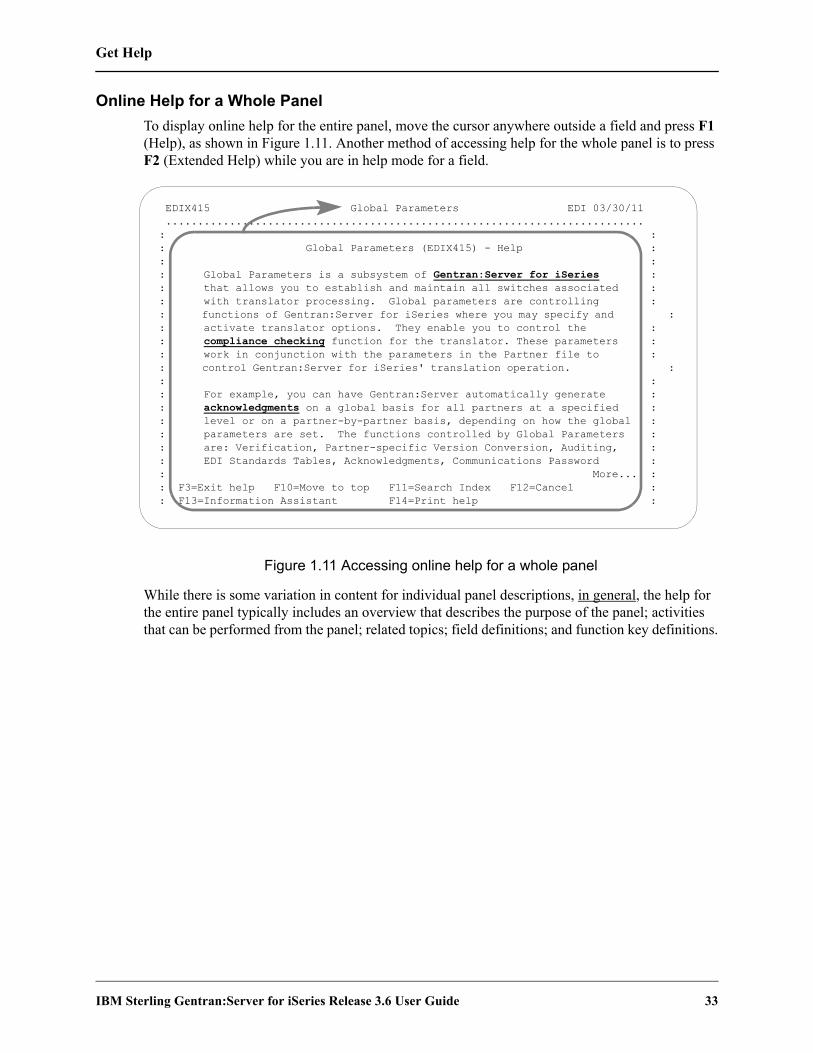
Get HelpAdditional help for using Sterling Gentran:Server for iSeries, beyond what you find in the documentation set, is available in a variety of ways.
Use Online HelpOne of the most exciting features in Sterling Gentran:Server for iSeries is the online help. Sterling Gentran:Server uses the iSeries User Interface Manager (UIM)© Search Index/Help feature. Through online help, you can access information such as field definitions and panel descriptions while you are working, without interrupting any data entry activities.
Sterling Gentran:Server for iSeries online help is context-sensitive. This means that the information displayed is based on the current panel and the position of the cursor on the panel. This allows you to access either specific information about a field or general information about the whole panel.
Online help is accessed by first positioning the cursor in one of the context-sensitive areas of the panel, as shown in the following figure. Press F1 (Help) or the HELP key, depending on your keyboard, and a pop-up help window displays on top of the current panel so that the given field is still visible.

Get Help
IBM Sterling Gentran:Server for iSeries Release 3.6 User Guide 31
Figure 1.9 shows the areas on a panel for which Sterling Gentran:Server for iSeries provides context-sensitive help.
Figure 1.9 The context-sensitive online help areas of a typical panel
Pressing F1 (Help) with the cursor in the System message area activates the iSeries help utility for system messages. All messages issued for the online panels have first level help. Many errors also have second level help that further explains that specific error, identifies its cause, or suggests a course of action to remedy the error. To display second level help, place the cursor on any message and press F1 (Help).
Sometimes more than one message is issued. A plus sign (+) displays at the right side of the message line whenever additional messages exist. Move the cursor to the message line and press Page Down (Roll Up) or Page Up (Roll Down) to scroll through all error messages issued.
Messages are shown from the language-specific error message file, GENERRxxx, where ‘xxx’ represents the language ID (i.e., GENERRENU is the English error message file).
EDIX005 Work with Partners EDI 03/30/11 FMT01 pgmlib: G3X6PGM dtalib: G3X6DTA 12:00:00 Position to Partner ID . . . . . . Qual Type option (and Information), press Enter. 1=Create 2=Revise 3=Copy 4=Delete 5=View 6=Print 11=Group Opt Partner ID Qual Partner Name |GENTRAN-RESERVED-PARTNER-ID-1 Global Reserved Partner AAA WAREHOUSE CO 11 01 ARNOLD/ALLEN/ATWELL WAREHOUSE BG-PARTNER EXAMPLE OF A BG PARTNER C13579 INTERNATIONAL PARTS & SERVICE ICS-PARTNER EXAMPLE OF AN ICS PARTNER ISA-PARTNER EXAMPLE OF AN ISA PARTNER MYCOMPANY MYCOMPANY (used for inb splitting) STX-PARTNER EXAMPLE OF A STX PARTNER UNA-PARTNER EXAMPLE OF A UNA PARTNER More... Parameters or command ===> F1=Help F3=Exit F9=Retrieve F15=Sort F23=More Options F24=More Keys Partner ID cannot be blank. +
Help for the Entire PanelHelp for Options
Help for FieldDefinitions Help for System
Messages

Get Help
32 IBM Sterling Gentran:Server for iSeries Release 3.6 User Guide
Online Help for a Single Field DefinitionOnline help is also available for individual field definitions. Position the cursor anywhere on a field and press F1 (Help), as shown in Figure 1.10. For field information specific to the current panel, refer to the online help for the whole panel and to the paper documentation.
NOTEIn most cases, the generic field definitions are not included in the paper documentation. As you read the manuals, you may find it convenient to have an active Sterling Gentran session in front of you so that you can access the field definitions and other online information.
Figure 1.10 Accessing online help for a field definition
EDIX100 Work with Standards EDI 03/30/11 FMT01 pgmlib: G3X6PGM dtalib: G3X6DTA 12:00:00 Position to Version ID . . . . . . ................................................................ Type option ( :Position to (Version ID, Name) - Help : 1=Create 2 : : : Use this field to go to a specific area in the list. It : Opt Version I : is used for quick repositioning of the list, not for : : creating a subset of the list. The system will position : ABI001 : the list to the closest matching entry. : ANA001 : : A2/4 : If more than 1 field exists for positioning, the second : A2/5 : field is only used if a full entry occurs for the first : A2/6 : position-to field. : A2/7 : : A2/8 : When the position-to field is a date or time, the value : C2/4 : entered is not validated for normal dates and times. : C2/5 : Bottom : : F2=Extended help F10=Move to top F11=Search Index : Parameters or : F12=Cancel F13=Information Assistant F24=More keys : ===> : : F1=Help F3=E :..............................................................:
Get Help
IBM Sterling Gentran:Server for iSeries Release 3.6 User Guide 33
Online Help for a Whole PanelTo display online help for the entire panel, move the cursor anywhere outside a field and press F1 (Help), as shown in Figure 1.11. Another method of accessing help for the whole panel is to press F2 (Extended Help) while you are in help mode for a field.
Figure 1.11 Accessing online help for a whole panel
While there is some variation in content for individual panel descriptions, in general, the help for the entire panel typically includes an overview that describes the purpose of the panel; activities that can be performed from the panel; related topics; field definitions; and function key definitions.
EDIX415 Global Parameters EDI 03/30/11 ........................................................................... : :: Global Parameters (EDIX415) - Help :: :: Global Parameters is a subsystem of Gentran:Server for iSeries :: that allows you to establish and maintain all switches associated :: with translator processing. Global parameters are controlling :: functions of Gentran:Server for iSeries where you may specify and :: activate translator options. They enable you to control the :: compliance checking function for the translator. These parameters :: work in conjunction with the parameters in the Partner file to :: control Gentran:Server for iSeries' translation operation. :: :: For example, you can have Gentran:Server automatically generate :: acknowledgments on a global basis for all partners at a specified :: level or on a partner-by-partner basis, depending on how the global :: parameters are set. The functions controlled by Global Parameters :: are: Verification, Partner-specific Version Conversion, Auditing, :: EDI Standards Tables, Acknowledgments, Communications Password :: More... :: F3=Exit help F10=Move to top F11=Search Index F12=Cancel :: F13=Information Assistant F14=Print help :

Get Help
34 IBM Sterling Gentran:Server for iSeries Release 3.6 User Guide
Use HypertextOn some online help panels, certain words or phrases are underlined and/or highlighted in high-intensity. This indicates that additional information (hypertext) is available for the highlighted text. To display the additional information, either move the mouse or press Tab until the cursor is positioned in the highlighted text. Press Enter.
NOTEAll of the definitions available through hypertext are also available through the Search Index. (SEE “Using the Search Index” section.)
Figure 1.12 shows words that have hypertext definitions available through Sterling Gentran online help.
Figure 1.12 Accessing hypertext definitions by moving the cursor onto the word and pressing Enter
EDIX005 Work with Partners EDI 03/30/11 ............................................................................ : Work with Partners - General Information - Help : : : : Work with Partners - General Information : : : : The 'Work with Partners' feature is used to define each Trading : : Partner on your Partner File. The system displays Partner ID's and : : related records that are currently on file. The related records : : (Group, Transaction, Name & Address, etc.) contain information that : : defines the Trading Partner. : : : : There are 13 panel options, with a total of 34 screens, available in : : the 'Work With Partners' feature. Some panels allow you to perform : : "sub-tasks" and are only accessible from another panel. These : : "sub-tasks", or "windows", are generated by pressing function keys : : and overlaying existing panels. : : : : When working with the partner file, keep in mind: : : More... : : F3=Exit help F10=Move to top F11=Search Index F12=Cancel : : F13=Information Assistant F14=Print help ::..........................................................................:
Hypertext

Get Help
IBM Sterling Gentran:Server for iSeries Release 3.6 User Guide 35
Use the Search IndexThe Search Index is another way to obtain online help. Here are two ways that you can access the Search Index from Sterling Gentran:Server:
From any online help panel: press F11
From the Sterling Gentran:Server main menu (GENMAIN): select menu option ‘12’ (Search Index)
NOTEThe Sterling Gentran:Server Search Index is called “GENSCHIDX” and is found in the Sterling Gentran:Server program library (G3X6PGM).
How to Select Topics in the Search IndexThe Search Index contains an alphabetic list of all topics that are linked to hypertext throughout the Sterling Gentran documentation. It also contains other topical entries that are found only here. You can view topics in one of two ways:
Using either the mouse or the Tab key, position the cursor in the option field next to the selection you would like to view or print. Type ‘5’ to view the topic, and ‘6’ to print the topic. Multiple entries may be selected at one time.
Type a key word or a portion of a key word or phrase on the command line and press Enter. The system searches an internal table of key words and synonyms and displays a list of topics that best match the words you entered. Type ‘5’ to view the topic; ‘6’ to print the topic.
Hints for Entering Search WordsThe following tips can help you take full advantage of the Search Index.
You can use either upper or lowercase letters – the search is not case sensitive.
Make the topic you enter as complete and specific as possible. For example, if you type only the word “job,” the system displays a long list of topics about jobs. For a shorter list of more specific topics, you could type “changing the position of a job queue.”
(SEE the iSeries documentation for more information.)

Use the ezEDI Feature
36 IBM Sterling Gentran:Server for iSeries Release 3.6 User Guide
Use the ezEDI FeatureThe ezEDI feature is a learning tool for Sterling Gentran:Server users who are not familiar with the system. This feature leads you through the essential panels to set up the basic information necessary to get started using Sterling Gentran:Server. ezEDI is a quick, simple way to set up the partner profile, application definition, transaction map, global parameters, and communications profile.
The ezEDI feature consists of five separate commands, each of which can be entered on the command line independently, or selected from the corresponding “Work with” panel. (Also see Figure 1.13.)
NOTELike other commands, the ezEDI commands can be executed from the command line only if you have Limit Capabilities set to ‘*No’ or ‘*Partial’ in your iSeries user profile.
The five ezEDI commands are:
ezEDI
The ezEDI command is a tool to help you get started with setting up your EDI system with Sterling Gentran:Server. The command steps you through all the panels associated with all of the other ezEDI commands as well as the global parameters.
Setting up your EDI system consists of the following steps: defining a trading partner, an application definition, a map definition, setting the global parameters to customize the EDI system or leaving the default settings as is, and finally defining a communication Profile ID. For each step, you are shown the minimum panels necessary to define the information. Typically, this command would be used just to get you started. As additional information needs to be defined, the individual ezEDI commands can be used.
The global parameters were set with default values when you installed your software. You have the capability of customizing your EDI system by modifying these parameters, which are used during the batch translation process. ezEDI steps you through three global parameter panels, allowing you to customize these values or leave the default settings.
ezPART
The ezPART command is a tool to help you define your trading partners to the system. In EDI, anyone with whom you transfer documents is called a trading partner. Setting up a partner is similar to making an entry in an electronic Rolodex. All the information needed to do EDI with the partner (i.e., an electronic mailing address and documents being traded) is stored in one place where it can be conveniently accessed.
The ezPART command steps you through a series of panels which are essential for defining information about your trading partners. This includes the control (interchange) group, transaction, name and address (optional), and cross reference panels.

Use the ezEDI Feature
IBM Sterling Gentran:Server for iSeries Release 3.6 User Guide 37
ezAPPDEFThe ezAPPDEF command is a tool to help you define the application definition to be used in conjunction with the map definition. This identifies the layout of the application file(s) to be used during translation with the EDI format. For example, if you are sending invoices electronically, the application definition needs to identify all the files and fields to be used to generate the invoice, such as the invoice header and detail line item file.The ezAPPDEF command steps you through the panels which are essential for defining the application definition. This includes the Application ID, files/records, and fields panels.
ezMAPThe ezMAP command is a tool to help you define the mapping definition to be used during translation to convert data between an application layout and an EDI layout. The application layout must be defined prior to defining the map and is done via the application definition. The EDI layout is defined by selecting those segments from the standards that will be sent or received and then linked to the application by defining how the fields are associated with the EDI elements.The ezMAP command steps you through the panels which are essential for defining the map (transaction definition). This includes the Transaction ID panel, the Copy Segments panel, and the Map Segments panel.
ezCOMMThe ezCOMM command is a tool that helps you customize the communication profile (CN3BSC for BSC or CN3SNA for SNA) supplied with the software to communicate with COMMERCE:Network (the Value Added Network for IBM). The communication profile contains information necessary for the system to create a line, controller, and device description, which is used in the actual communication session. It is necessary to modify the default parameters to work with your modem and choice of protocol (i.e., line speed and manual or auto-dial) and specific phone number to be dialed.The ezCOMM command steps you through the panels essential for customizing the CN3BSC or CN3SNA profile. This includes the Profile maintenance panels and the Network Profile panel, which is used to define your mailbox ID and password to access Commerce:Network.
You can use the ezEDI commands to create new entries, edit existing entries and/or delete entries. If you have questions about panel or field definitions, remember that you can access online help for any panel or field by positioning the cursor and then pressing F1 (Help). (SEE “Using Online Help” in this chapter for more detailed instructions.)
CAUTIONSTOP
The ezEDI commands proceed forward only through all the associated panels. Once the command is entered, you cannot interrupt the process or back up to previous panels. Be sure to collect all your materials and allow yourself sufficient time prior to initiating an ezEDI command.
NOTEFor more detailed information regarding individual panels associated with each ezEDI command, please refer to the online help as well as the documentation for each particular subsystem in this manual.
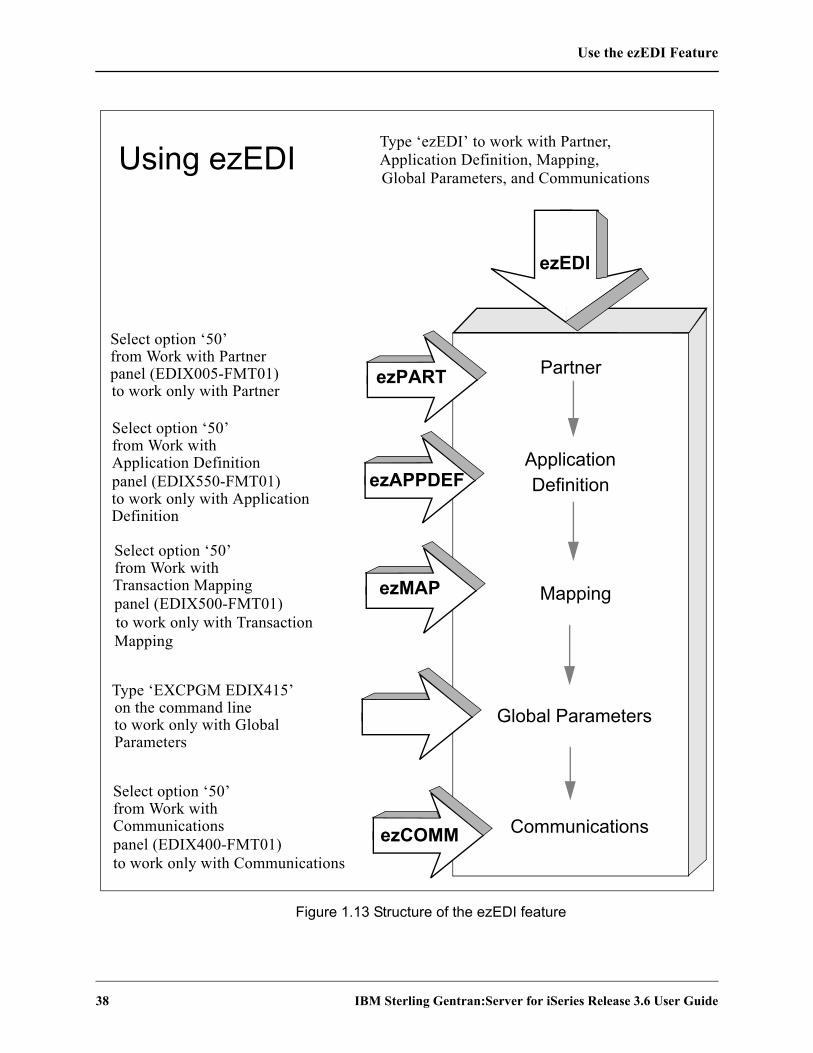
Use the ezEDI Feature
38 IBM Sterling Gentran:Server for iSeries Release 3.6 User Guide
Figure 1.13 Structure of the ezEDI feature
Global ParametersType ‘EXCPGM EDIX415’
Type ‘ezEDI’ to work with Partner, Application Definition, Mapping, Using ezEDI
Mapping
Partner
Communications
Application Definition
ezEDI
ezMAP
ezPART
ezCOMM
ezAPPDEF
Global Parameters, and Communications
Select option ‘50’from Work with Partner
Select option ‘50’from Work withApplication Definition
panel (EDIX005-FMT01)
panel (EDIX550-FMT01)
Select option ‘50’from Work with
panel (EDIX500-FMT01)Transaction Mapping
Select option ‘50’from Work with
panel (EDIX400-FMT01)Communications
on the command line
to work only with Partner
to work only with ApplicationDefinition
to work only with TransactionMapping
to work only with Global
to work only with Communications
Parameters

Print Reports in Sterling Gentran:Server
IBM Sterling Gentran:Server for iSeries Release 3.6 User Guide 39
Print Reports in Sterling Gentran:ServerReports are integrated throughout the Sterling Gentran:Server system. Report options are found throughout the subsystems on panels wherever appropriate. Reports can also be run from the command line using one of the command prompts (see information earlier in this chapter).
There are two general types of reports in Sterling Gentran:Server; User-generated reports and System-generated reports, which are illustrated in the following figures.
User-generated reportsUser-generated reports are optional reports which are initiated by a user request. This usually occurs when you select Option ‘6’ (Print) or you press F21 (Print). Many of these reports can also be generated from the command line.
System-generated reportsSystem-generated reports occur automatically, regardless of requests by the user. These types of reports generally occur when activities such as purges and processing occur. At these times the system automatically creates a report documenting the task just performed.
System-generated reports are generated automatically as a result of executing a job. The following figure shows an example of this situation. When the Process Transactions Inbound (PRCTRNIN) command is executed, the system generates the Inbound Editor and Mapper reports, as shown in Figure 1.14.
Figure 1.14 Inbound Editor and Mapper reports are generated automatically
Process Transactions Inbound (PRCTRNIN) Type choices, press Enter. Comm Profile ID (Editor) . . . . > CN3BSC *NONE, *ALL, Comm Profile Id + for more values Application ID (Mapper) . . . . > *NONE *NONE, *ALL, Application Id + for more values Mapper Debug Report? . . . . . . *NO *YES, *NO Clear Temporary Files? . . . . . *YES *YES, *NO Acknowledgment Reports: Print Report? . . . . . . . . *NO *YES, *NO Split File . . . . . . . . . . 00000 00000-00080, SLIDE Sub-Split File . . . . . . . . 00 00-80 Application File Member . . . . *FIRST *FIRST, *UNIQUE Replace Data in App. Files? . . *YES *YES, *NO Run Interactively? . . . . . . . *NO *YES, *NO
More... F3=Exit F4=Prompt F5=Refresh F12=Cancel F13=How to use this display F24=More keys
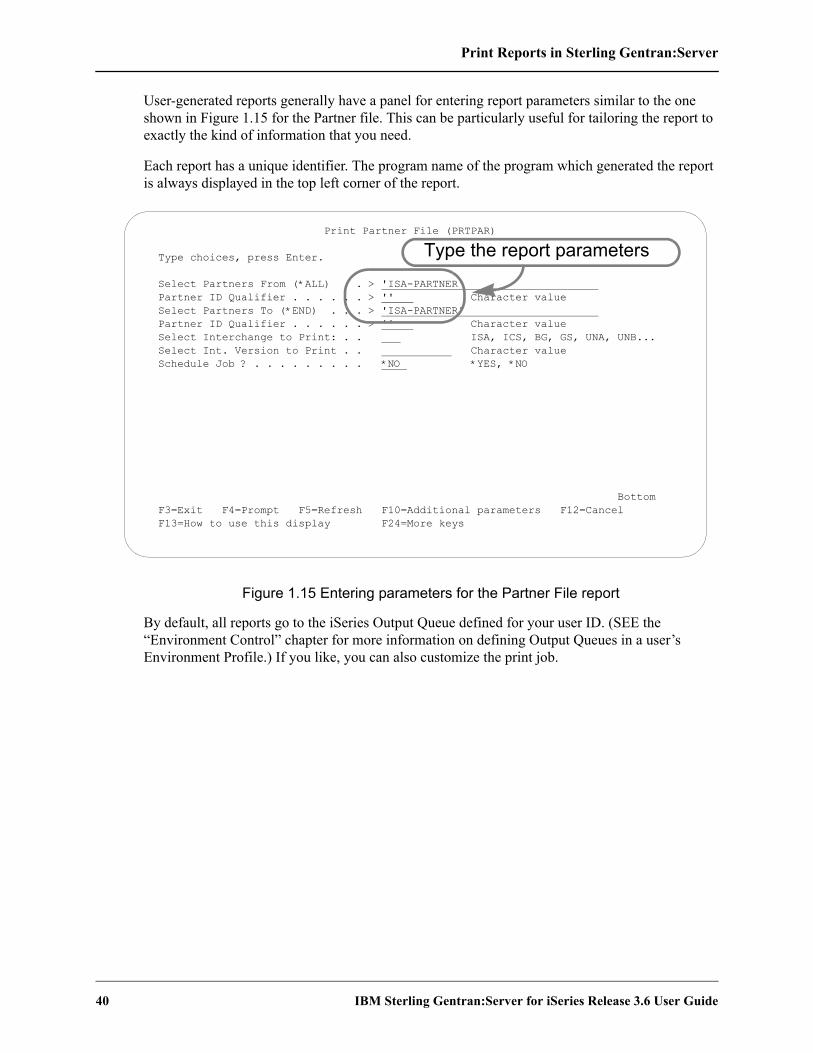
Print Reports in Sterling Gentran:Server
40 IBM Sterling Gentran:Server for iSeries Release 3.6 User Guide
User-generated reports generally have a panel for entering report parameters similar to the one shown in Figure 1.15 for the Partner file. This can be particularly useful for tailoring the report to exactly the kind of information that you need.
Each report has a unique identifier. The program name of the program which generated the report is always displayed in the top left corner of the report.
Figure 1.15 Entering parameters for the Partner File report
By default, all reports go to the iSeries Output Queue defined for your user ID. (SEE the “Environment Control” chapter for more information on defining Output Queues in a user’s Environment Profile.) If you like, you can also customize the print job.
Print Partner File (PRTPAR)
Type choices, press Enter.
Select Partners From (*ALL) . . > 'ISA-PARTNER' Partner ID Qualifier . . . . . . > '' Character value Select Partners To (*END) . . . > 'ISA-PARTNER' Partner ID Qualifier . . . . . . > '' Character value Select Interchange to Print: . . ISA, ICS, BG, GS, UNA, UNB... Select Int. Version to Print . . Character value Schedule Job ? . . . . . . . . . *NO *YES, *NO
Bottom F3=Exit F4=Prompt F5=Refresh F10=Additional parameters F12=Cancel F13=How to use this display F24=More keys
Type the report parameters

Product Support and Remote Maintenance
IBM Sterling Gentran:Server for iSeries Release 3.6 User Guide 41
Product Support and Remote Maintenance
IBM Software Support
General InformationIBM Software Support configures a temporary, dial-up connection between IBM Customer Service iSeries system and your system. This connection allows IBM to directly assist you with the resolution of software problems.
The IBM connection uses display station pass-through and SNADS. This enables the support personnel to sign on to your system and diagnose the problem. If necessary, they can retrieve diagnostic data for further analysis or send you a program fix.
This allows IBM to be responsive to critical situations that demand the ultimate in customer support.
Product Support and Remote Maintenance
42 IBM Sterling Gentran:Server for iSeries Release 3.6 User Guide
Chapter
IBM Sterling Gentran:Server for iSeries Release 3.6 User Guide 1
2 Environment Control
In this ChapterWhat is Environment Control? . . . . . . . . . . . . . . . . . . . . . . . . . . . . . . . . . . . . . . . . . . . . 2-1
What Does the Environment Control Subsystem Do? . . . . . . . . . . . . . . . . . . . . . . . . . . 2-2
Panel Quick Reference . . . . . . . . . . . . . . . . . . . . . . . . . . . . . . . . . . . . . . . . . . . . . . . . . . 2-2
Use the Environment Control Panels . . . . . . . . . . . . . . . . . . . . . . . . . . . . . . . . . . . . . . . 2-3Access the Subsystem. . . . . . . . . . . . . . . . . . . . . . . . . . . . . . . . . . . . . . . . . . . . . . . . 2-3Manage User Profiles . . . . . . . . . . . . . . . . . . . . . . . . . . . . . . . . . . . . . . . . . . . . . . . . 2-3Define the Environment Profile . . . . . . . . . . . . . . . . . . . . . . . . . . . . . . . . . . . . . . . . 2-7Define the Security Profile . . . . . . . . . . . . . . . . . . . . . . . . . . . . . . . . . . . . . . . . . . . . 2-9
Reports . . . . . . . . . . . . . . . . . . . . . . . . . . . . . . . . . . . . . . . . . . . . . . . . . . . . . . . . . . . . . 2-14EBDI201—Environment Control Report . . . . . . . . . . . . . . . . . . . . . . . . . . . . . . . 2-14
Common Questions. . . . . . . . . . . . . . . . . . . . . . . . . . . . . . . . . . . . . . . . . . . . . . . . . . . . 2-18
What is Environment Control?Environment Control is an administration tool for creating and managing Sterling Gentran:Server user profiles for each user on the system. In this chapter, the term “user profile” refers to the combination of these two files:
1. Environment profile – parameters (such as the User ID, Name, Division, Output Queue, Language ID, Date Format, etc.) that affect the environment in which the user runs jobs.
2. Security profile – authority codes that define which Sterling Gentran:Server subsystems and functions the user can access and whether the user has privilege to view data only or to update data.

What Does the Environment Control Subsystem Do?
2 IBM Sterling Gentran:Server for iSeries Release 3.6 User Guide
What Does the Environment Control Subsystem Do?
The Environment Control subsystem provides these capabilities:
Add new users to the Sterling Gentran:Server system by creating a new user profile or copying an existing one.View, modify, or delete existing user profiles.Define environment options that control how the user’s jobs run.Identify which subsystems and functions each user can access.Define each user’s update privileges for the subsystems and/or functions to which they have access.Print environment control profiles.
Panel Quick ReferenceThe following table gives the purpose and access methods for the primary Environment Control panels.
Panel Name Purpose Access Methods
EDIX200-FMT01
Work with Environment Control
Create, revise, copy, delete, or view a user profile
Select option ‘6’ on the GENMAIN Menu
Type ‘EXCPGM EDIX200’ on the command line
EDIX201-FMT01
Environ. Control
Define the user’s environment profile
Select an option and User ID on panel EDIX200-FMT01
Type ‘EXCPGM EDIX201’ on the command line
EDIX201-CTL02
Environ. Control
Define the user’s security profile
Press Enter or F8 on panel EDIX201-FMT01
Press F10 in create mode on panel EDIX201-FMT01
PRTENV
Print Environment Control
Print an environment control profile
Select option ‘6’ (Print) on panel EDIX200-FMT01
Press F21 (Prt Env) on panel EDIX201-FMT01 or EDIX201-CTL02
Type ‘PRTENV’ on the command line
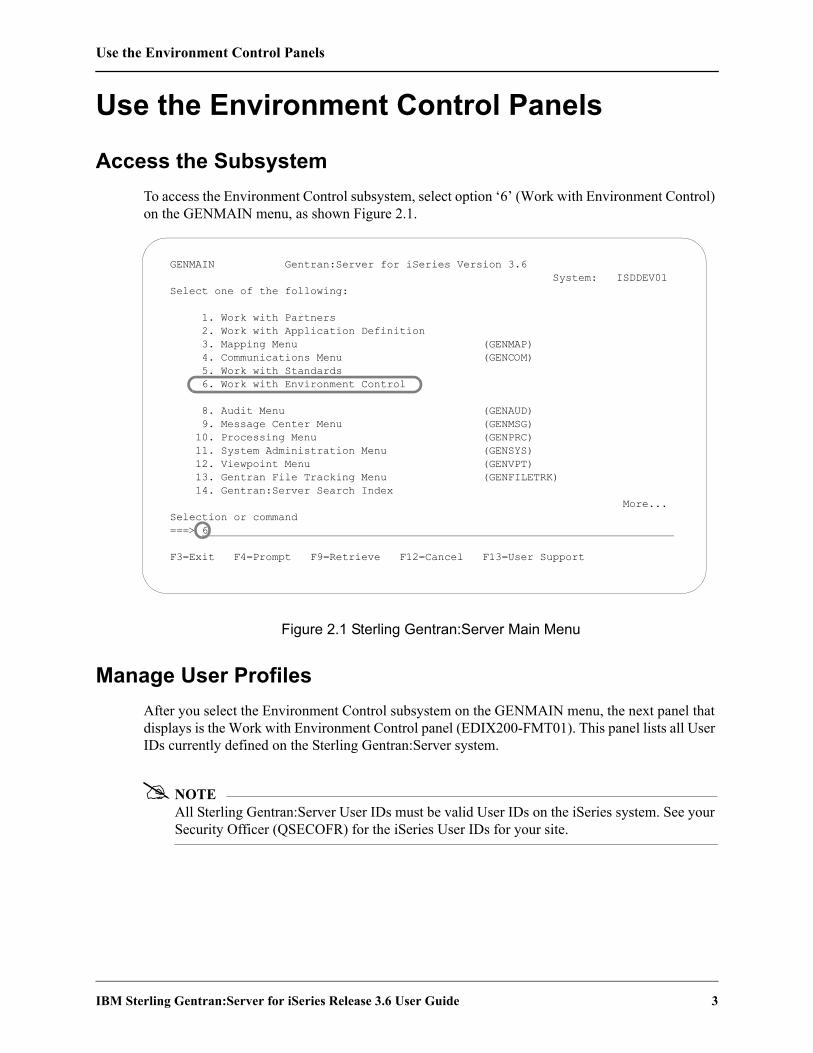
Use the Environment Control Panels
IBM Sterling Gentran:Server for iSeries Release 3.6 User Guide 3
Use the Environment Control Panels
Access the SubsystemTo access the Environment Control subsystem, select option ‘6’ (Work with Environment Control) on the GENMAIN menu, as shown Figure 2.1.
Figure 2.1 Sterling Gentran:Server Main Menu
Manage User ProfilesAfter you select the Environment Control subsystem on the GENMAIN menu, the next panel that displays is the Work with Environment Control panel (EDIX200-FMT01). This panel lists all User IDs currently defined on the Sterling Gentran:Server system.
NOTEAll Sterling Gentran:Server User IDs must be valid User IDs on the iSeries system. See your Security Officer (QSECOFR) for the iSeries User IDs for your site.
GENMAIN Gentran:Server for iSeries Version 3.6 System: ISDDEV01 Select one of the following: 1. Work with Partners 2. Work with Application Definition 3. Mapping Menu (GENMAP) 4. Communications Menu (GENCOM) 5. Work with Standards 6. Work with Environment Control 8. Audit Menu (GENAUD) 9. Message Center Menu (GENMSG) 10. Processing Menu (GENPRC) 11. System Administration Menu (GENSYS) 12. Viewpoint Menu (GENVPT) 13. Gentran File Tracking Menu (GENFILETRK) 14. Gentran:Server Search Index More... Selection or command ===> 6 F3=Exit F4=Prompt F9=Retrieve F12=Cancel F13=User Support
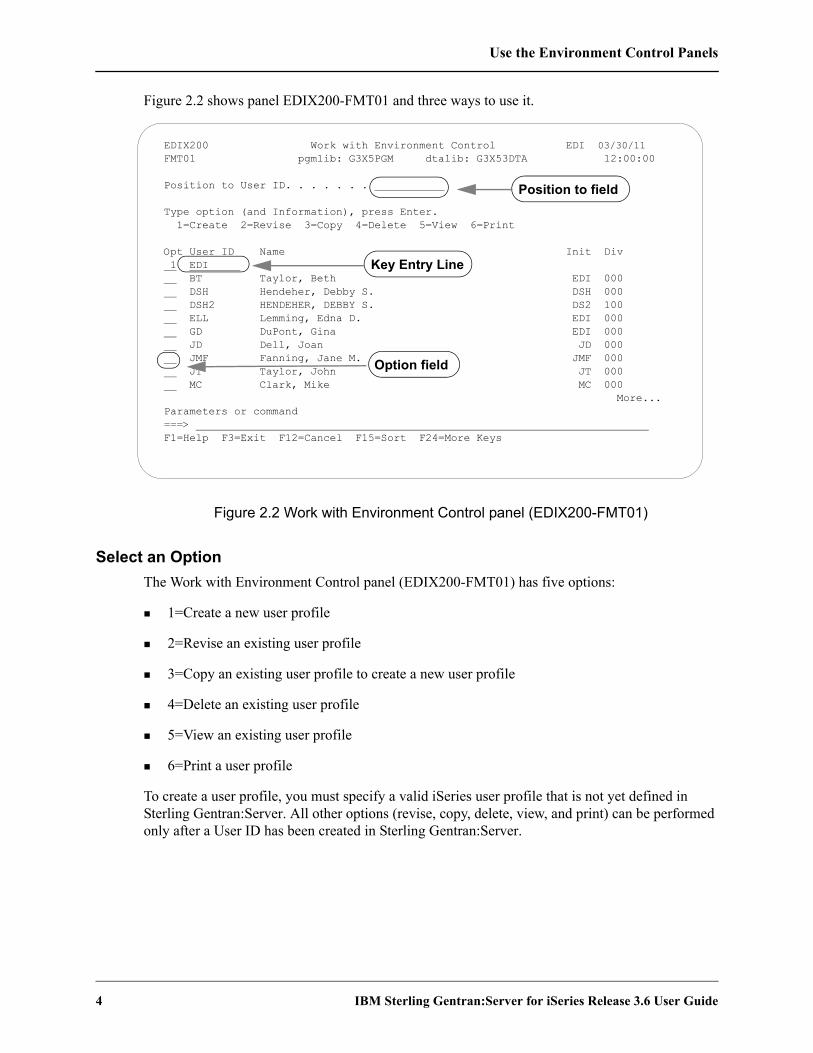
Use the Environment Control Panels
4 IBM Sterling Gentran:Server for iSeries Release 3.6 User Guide
Figure 2.2 shows panel EDIX200-FMT01 and three ways to use it.
Figure 2.2 Work with Environment Control panel (EDIX200-FMT01)
Select an OptionThe Work with Environment Control panel (EDIX200-FMT01) has five options:
1=Create a new user profile
2=Revise an existing user profile
3=Copy an existing user profile to create a new user profile
4=Delete an existing user profile
5=View an existing user profile
6=Print a user profile
To create a user profile, you must specify a valid iSeries user profile that is not yet defined in Sterling Gentran:Server. All other options (revise, copy, delete, view, and print) can be performed only after a User ID has been created in Sterling Gentran:Server.
EDIX200 Work with Environment Control EDI 03/30/11 FMT01 pgmlib: G3X5PGM dtalib: G3X53DTA 12:00:00 Position to User ID. . . . . . . Type option (and Information), press Enter. 1=Create 2=Revise 3=Copy 4=Delete 5=View 6=Print Opt User ID Name Init Div 1 EDI BT Taylor, Beth EDI 000 DSH Hendeher, Debby S. DSH 000 DSH2 HENDEHER, DEBBY S. DS2 100 ELL Lemming, Edna D. EDI 000 GD DuPont, Gina EDI 000 JD Dell, Joan JD 000 JMF Fanning, Jane M. JMF 000 JT Taylor, John JT 000 MC Clark, Mike MC 000 More... Parameters or command ===> F1=Help F3=Exit F12=Cancel F15=Sort F24=More Keys
Position to field
Key Entry Line
Option field

Use the Environment Control Panels
IBM Sterling Gentran:Server for iSeries Release 3.6 User Guide 5
Specify a User IDThere are three ways to specify a User ID on panel EDIX200-FMT01:
Use the option fieldMove the cursor next to the User ID you want to select, type the appropriate option (‘2,’ ‘3,’ ‘4,’ or ‘5’) in the option field and press Enter.
Use the key entry lineType the appropriate option (‘1,’ ‘2,’ ‘3,’ ‘4,’ or ‘5’) and the User ID on the key entry line and press Enter. You must use the key entry line when creating a new User ID from scratch.
Use the Position to fieldType a complete or partial User ID in the Position to User ID field and press Enter. The system displays the closest match at the top of the list of users. To select a User ID, you still have to use one of the methods above.
Create a User ProfileUse this option if you are creating a new User Profile. If you are adding a user who will have the same security profile as a current user on the system, it might be easier to use option ‘3’ (Copy).
1. Type ‘1’ and the new User ID on the key entry line and press Enter. (The value you type for User ID must be a valid iSeries User ID.)
2. The system displays the Environment Control panel (EDIX201-FMT01), which defines the user’s environment profile. (This panel is shown later in the chapter.) Notice that the field entries are the environment parameters from the iSeries user profile. Change the appropriate fields and press Enter, F8 (Next), or F10 (Update).
When you create a new Sterling Gentran:Server User ID through the copy option, the system copies the specified environment profile as it currently exists. The copy option does not retrieve the parameters from the iSeries user profile.
3. The system advances to the Environment Control panel (EDIX201-CTL02), which defines the user’s Security Profile. (This panel is also described later in the chapter.) Change the appropriate authority codes and press F10 (Update).
4. The system adds the new Sterling Gentran:Server User ID and returns to the Work with Environment Control panel (EDIX200-FMT01).

Use the Environment Control Panels
6 IBM Sterling Gentran:Server for iSeries Release 3.6 User Guide
Revise a User Profile1. Type ‘2’ in the option field next to the appropriate User ID and press Enter.
—OR—
Type ‘2’ and the User ID on the key entry line and press Enter.
2. The system displays the Environment Control panel (EDIX201-FMT01), which defines the Environment Profile. (This panel is shown later in the chapter.) Type the new information in the appropriate fields and press Enter or F8 (Next).
3. The system displays the Environment Control panel (EDIX201-CTL02), which defines the user’s Security Profile. (This panel is also described later in the chapter.) Change the appropriate authority codes and press F10 (Update).
Copy an Existing User Profile1. Type ‘3’ in the option field next to the appropriate User ID and press Enter.
—OR—
Type ‘3’ and the existing User ID on the key entry line and press Enter.
2. A pop-up window displays with a single field, “Copy To.” Type the User ID for the new User Profile in this field. (Remember that you must type a valid iSeries User ID.) The system displays panel EDIX201-FMT01.
3. If you need to make changes to the new User Profile, follow Steps 2, 3, and 4 in the procedure topic “Create a User Profile.”
Delete a User Profile1. Type ‘4’ in the option field next to the appropriate User ID and press Enter.
—OR —
Type ‘4’ and the User ID on the key entry line and press Enter.
2. Confirm that you want to delete the record by pressing F11 (Delete). To cancel the Delete function, press F12 (Cancel).
View an Existing User Profile1. Type ‘5’ in the option field next to the appropriate User ID and press Enter.
—OR— Type ‘5’ and the User ID on the key entry line and press Enter.
Use the Environment Control Panels
IBM Sterling Gentran:Server for iSeries Release 3.6 User Guide 7
2. The system displays the Environment Control panel (EDIX201-FMT01), which defines the environment profile and is described later in the section.
3. To view the security profile, press Enter or F8 (Next) and the system displays the Environment Control panel (EDIX201-CTL02), which is described later in the section.
Print a User ProfileType ‘6’ in the option field next to the appropriate User ID and press Enter.
—OR—
Type ‘6’ and the User ID on the key entry line and press Enter.
Define the Environment ProfileThe Environment Control panel (EDIX201-FMT01), Figure 2.3, defines a user’s environment profile. The fields on this panel determine the controlling environment under which Processing runs.
Figure 2.3 Environment Control panel (EDIX201-FMT01)
When you first access panel EDIX201-FMT01 to create a new user, the fields contain the run time parameters from the user’s iSeries user profile. (SEE the iSeries documentation or your Security Officer (QSECOFR) for more information.) Any values you change on this panel will override the user’s iSeries options for Sterling Gentran jobs that are executed.
EDIX201 Environment Control EDI 03/30/11 FMT01 12:00:00 User ID. . . . . . . . . . . . . . EDI Division . . . . . . . . . . . . . 000 Last Name. . . . . . . . . . . . . Ingram First Name . . . . . . . . . . . . Elizabeth MI . . . . . . . . . . . . . . . . D Initials . . . . . . . . . . . . . EDI Job Description. . . . . . . . . . G3X6JOBD Print Device . . . . . . . . . . . PCPRT02 Output Queue . . . . . . . . . . . QPRINT Message Queue. . . . . . . . . . . EDI Job Queue. . . . . . . . . . . . . QBATCH Print File . . . . . . . . . . . . QSYSPRT Gentran:Server Program Library . . G3X6PGM Gentran:Server Data Library. . . . G3X6DTA Date Format/Date Separator . . . . *USA / Language ID. . . . . . . . . . . . ENU F1=Help F4=Prompt F8=Next F10=Update F12=Cancel F24=More Keys
Use the Environment Control Panels
8 IBM Sterling Gentran:Server for iSeries Release 3.6 User Guide
Field InformationThis section contains information about specific fields, and in some cases, recommendations for settings.
Output Queue FieldFor the Output Queue field, we recommend you specify a queue that is not associated with an active writer. This allows both system-generated and user-generated reports to be spooled rather than printed immediately. At any time, you can print the spooled output by moving it to a queue associated with an active writer. (SEE the iSeries online help for more information about queues, devices, and printing.)
Date Format and Date Separator FieldsThe default value in both the Date Format and Date Separator fields is *SYSVAL. When *SYSVAL is used, Sterling Gentran:Server retrieves the date format from the system value in QDATFMT and the date separator from the system value in QDATSEP. To see a list of valid options for the current field, press F4 (Prompt). If new values are specified, the following dates are impacted by these settings.
Date fields on panels (excluding commands, which are controlled through the system configuration file – see Note below)
Report dates
NOTETo apply these date settings to command panels, use *ENVCTL as the value in the ‘Set Sterling Gentran Date Formats for Commands’ option on the system configuration file. (SEE the “System Configuration” chapter in the IBM® Sterling Gentran:Server® for iSeries® Release 3.6 Technical Reference Guide for more information.)
Language IDThe Language ID identifies the language-specific message file used for Sterling Gentran processing. By default, the system supports English message files (denoted as ENU or ENP). Press F4 (Prompt) for a list of valid values.

Use the Environment Control Panels
IBM Sterling Gentran:Server for iSeries Release 3.6 User Guide 9
Define the Security ProfileSterling Gentran:Server uses a hierarchical security scheme based on authority codes that are defined at three levels: subsystem, function, and data. These authority codes determine both the user’s system access and data update privileges.
The Environment Control panel (EDIX201-CTL02) defines a user’s security profile. This panel allows the EDI Coordinator to control each user’s access to whole subsystems and to individual functions within subsystems. Panel EDIX201-CTL02 also determines the data privileges (view only or update) for the subsystems and/or functions to which the user has access.
RECOMMENDATIONThe EDI Coordinator (System Administrator) and iSeries Security Officer (QSECOFR) should be the only ones with update access to the Environment Control panel (EDIX201-CTL02). This is necessary to protect the integrity of the system.
Figure 2.4 shows the primary components on the Environment Control panel (EDIX201-CTL02).
Figure 2.4 Environment Control panel (EDIX201-CTL02)
As you work with panel EDIX201-CTL02, keep in mind that you can use online help to display the valid authority codes (and their meanings) for each level. To do this, move the cursor to the authority code field and press F1 (Help). To select a code, press F4 (Prompt).
When you create a new user profile, all the authority codes are initially set to ‘1.’ To change the authority codes, move the cursor and type over the existing value. When you finish making changes, press Enter or F10 (Update). Press Enter to resequence information on the panel (the subsystem, function, and data level entries) based on the new authority codes you entered on the panel. Press F10 (Update) to confirm the add of the new user profile and return to the Work with Environment Control panel (EDIX200-FMT01).
EDIX201 Environment Control EDI 03/30/11 CTL02 12:00:00 User ID. . . . . . . . . . . . . . EDI Name . . . . . . . . . . . . . . . Elizabeth D. Ingram Subsystem Level Function Name 1 Application Definition Subsystem 1 Application Definition Data 1 Audit Subsystem 1 Audit Data 1 Communications Subsystem 1 Communications Data 1 Environment Control Subsystem 1 Environment Control Data 1 Message Center Subsystem 1 Message Center Data 1 Partner Subsystem 1 Partner Data 1 Processing Subsystem 1 Processing Data More... F1=Help F4=Prompt F7=Back F10=Update F12=Cancel F24=More Keys
Authority Code

Use the Environment Control Panels
10 IBM Sterling Gentran:Server for iSeries Release 3.6 User Guide
Define Authority CodesTo fully explain the authority codes, we must first define the other fields on the Environment Control panel (EDIX201-CTL02).
SubsystemThis field lists the subsystems:
Application DefinitionAuditCommunicationsEnvironment ControlMessage CenterPartnerProcessingSAP Extension
StandardsSystem AdministrationTransaction MappingViewpoint
NOTEThe Utilities subsystem is listed with the Sterling Gentran:Server subsystems on the Environment Control panel (EDIX201-CTL02). This subsystem is for internal use only. The authority code should be set to ‘1.’
LevelThis field defines the scope of the authority code. Security can be defined for these three levels:
Subsystem – the authority code applies to accessing the whole subsystem identified underneath “Subsystem” on the panel.
Function – the authority code applies to accessing the part of the subsystem identified underneath “Function Name” on the panel. Function names are either panel names (like Work with Application Definition and Application Fields) or F4 (Prompt) windows such as Application Definition Search. Function levels display on the panel only if the Subsystem level authority code is ‘2’ (partial access). The valid values for authority codes are explained in the subtopic “Authority Codes.”
Data – the authority code applies to the data on the panels within the whole subsystem (if the Subsystem level authority code is ‘1’) or within a function (if the Subsystem level authority code is ‘2’). Data levels do not display on the panel if the Subsystem level authority code is ‘3’ (no access).

Use the Environment Control Panels
IBM Sterling Gentran:Server for iSeries Release 3.6 User Guide 11
Function NameWhen the Level field is set to Function, there is an entry in the Function Name field, otherwise this field is blank. The function name consists of the program or command name and a corresponding description.
Authority CodesThe authority codes vary in meaning based on whether the Level field (two columns to the right of the authority code) contains “Subsystem,” “Function,” or “Data.”
Subsystem Level Authority CodesSubsystem level can have an authority code of ‘1,’ ‘2,’ or ‘3,’ as explained below.
‘1’ ALL – The user has access to the entire subsystem. When the Subsystem level authority code is ‘1,’ the panel does not display individual functions since the user has access to all functions in the subsystem. The panel displays the Data level authority code, which determines the user’s data update privileges for the given subsystem. In the security profiles for the EDI coordinator and Security Officer (QSECOFR), every Subsystem level authority code should be ‘1.’
‘2’ PARTIAL – The user’s access to the subsystem is defined on a function-by-function basis. Access is determined by the authority code on each line that contains “Function” in the Level field. (SEE “Function” below for details.) When the Subsystem level authority code is ‘2,’ the panel displays all the functions in the subsystem, with an authority code associated with each one. The panel also displays the Data level authority codes, which determines the user’s data update privileges for the subsystem.
NOTEThe Subsystem level authority code must be set to ‘2’ (PARTIAL) if you want to define access at the Function level (on a function-by-function basis).
‘3’ NONE – The user cannot access the subsystem. (The name of the subsystem still displays on the GENMAIN menu, but the user cannot access the subsystem panels.) When the Subsystem level authority code is ‘3,’ the panel does not display Function level or Data level authority codes since they have no meaning in this case.
Function Level Authority CodesFunction level can have an authority code of ‘1’ or ‘3,’ as explained below.
‘1’ ALL – The user can access the function listed under “Function Name.”
‘3’ NONE – The user cannot access the function listed under “Function Name.”
Use the Environment Control Panels
12 IBM Sterling Gentran:Server for iSeries Release 3.6 User Guide
Data Level Authority Codes
NOTEThe Data level authority code determines the user’s data update privileges for the subsystem. To define Data level privileges, the Subsystem level authority code must be set to ‘1’ (ALL) or ‘2’ (PARTIAL).
If the Subsystem level authority code is ‘1,’ then the Data level code applies to the data on any panel within the whole subsystem.
If the Subsystem level authority code is ‘2,’ then the Data level authority code applies to data on only those panels within the given function.
Data level can have an authority code of ‘1,’ ‘2,’ or ‘3,’ as explained below.
‘1’ ALL – The user can update the data if the Update Allowed field is set to ‘Y.’ The user can change the Update Allowed field.
‘2’ PARTIAL – The user can update the data if the Update Allowed field is ‘Y.’ The user has display only rights if the Update Allowed field is ‘N.’ The user cannot change the Update Allowed field.
‘3’ NONE – The user can only display the data. The user cannot change the data or the Update Allowed field.
Quick Reference for Setting Authority CodesThe following table gives an overview of the security scheme. It shows the possible combinations of authority codes and their meanings.
Subsystem Level Authority
Code:
Function Level Authority
Code:
Data Level Authority
Code:User’s Rights:
1 — 1 Access all functions within the subsystem. Can update data if the Update Allowed field is ‘Y.’ Can change the Update Allowed field.
1 — 2 Access all functions within the subsystem. Can update data if the Update Allowed field is ‘Y.’ Cannot change the Update Allowed field.
1 — 3 Access all functions within the subsystem with view only privileges.
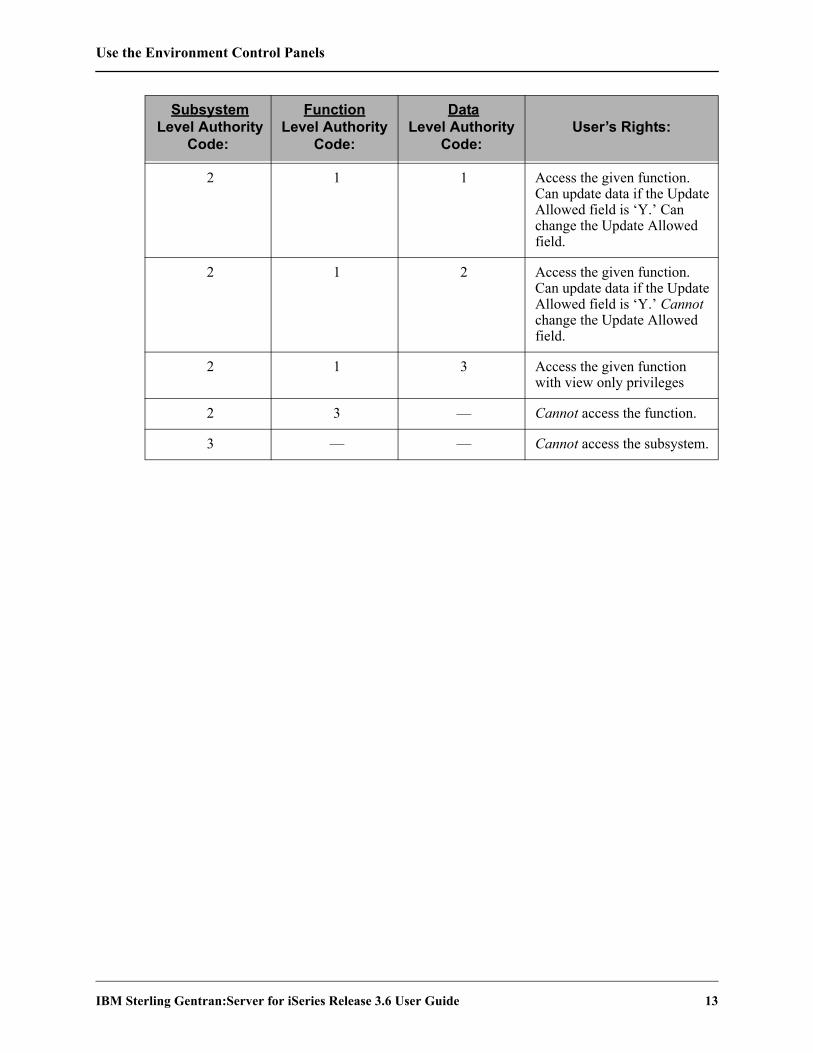
Use the Environment Control Panels
IBM Sterling Gentran:Server for iSeries Release 3.6 User Guide 13
2 1 1 Access the given function. Can update data if the Update Allowed field is ‘Y.’ Can change the Update Allowed field.
2 1 2 Access the given function. Can update data if the Update Allowed field is ‘Y.’ Cannot change the Update Allowed field.
2 1 3 Access the given function with view only privileges
2 3 — Cannot access the function.
3 — — Cannot access the subsystem.
Subsystem Level Authority
Code:
Function Level Authority
Code:
Data Level Authority
Code:User’s Rights:
Reports
14 IBM Sterling Gentran:Server for iSeries Release 3.6 User Guide
Reports
EBDI201—Environment Control Report
Contents of the ReportThe Environment Control Report contains information about the user’s profile and authority assigned to each subsystem.
How to Identify the ReportThe identifier “EBDI201” displays in the upper left corner of the report. The report title “ENVIRONMENT CONTROL PROFILE REPORT” displays in the center at the top of the report. The identifier “EBDI201” also displays in the User Data field associated with the spooled report in the Output Queue.
How to Generate the ReportThis is a user-generated report. It can be generated by selecting option ‘6’ (Print) on the Work with Environment Control panel (EDIX200-FMT01) and entering the appropriate information on the Print Environment Control (PRTENV) panel. It can also be generated by pressing F21 (Prt Env) on the environment control panels.
Special ConsiderationsLike all other Sterling Gentran:Server reports, the Environment Control Profile Report automatically goes to the Output Queue defined for the user running the job.

Reports
IBM Sterling Gentran:Server for iSeries Release 3.6 User Guide 15
Sample Report
EBDI201 RUN DATE 03/30/11 ENVIRONMENT CONTROL PROFILE REPORT RUN TIME 16:40:06 PAGE 1
USER ID. . . . . . . QSECOFR JOB DESCRIPTION. . . GENTRAN PRINT FILE. . . . . . . . . . . . . QSYSPRT
DIVISION . . . . . . 000 PRINT DEVICE . . . . PRTHOLD GENTRAN:SERVER PROGRAM LIBRARY. . . G3X6PGM
LAST NAME. . . . . . Officer OUTPUT QUEUE . . . . PRTHOLD GENTRAN:SERVER DATA LIBRARY . . . . G3X6TSTDTA
FIRST NAME . . . . . Security MESSAGE QUEUE. . . . QSECOFR DATE FORMAT/DATE SEPARATOR. . . . . *SYSVAL *SYSVAL
MIDDLE INITIAL . . . JOB QUEUE. . . . . . QBATCH LANGUAGE ID . . . . . . . . . . . . ENU
INITIALS . . . . . . SEC
SEC SUBSYSTEM LEVEL FUNCTION NAME
------------------------------------------------------------------------------------------------------------------------------------
1 Application Definition Subsystem
1 Application Definition Function APPCPY Copy Application ID
1 Application Definition Function APPRENBR Application Renumber
1 Application Definition Function APPSYNCH Application Synchronization
1 Application Definition Function EDIX550 Work with Application Definition
1 Application Definition Function EDIX551 Application Definition Search
1 Application Definition Function EDIX552 Application Definition
1 Application Definition Function EDIX553 Application Records
1 Application Definition Function EDIX554 Application Fields
1 Application Definition Function EDIX556 Application Key Structure
1 Application Definition Function EDIX556S Application Field Key Prompt
1 Application Definition Function EDIX559 Application Partner Reference
1 Application Definition Function EDIX559S Application Partner Reference Prompt
1 Application Definition Function EDIX560 Application Envelope Definition
1 Application Definition Function EZAPPDEF ez Application Definition
1 Application Definition Function EZAPPDEF2 ez Application Definition
1 Application Definition Function PRTAPP Print Application Definition
1 Application Definition Data
1 Audit Subsystem
1 Audit Function AUDITPURGE Purge Audit (AUDITPURGE)
1 Audit Function EBDIEDIT Edit Extracted Edi Data for Requeue
1 Audit Function EDIX251 Work with Audit Interchange Status
1 Audit Function EDIX252 Work with Audit Group Status
1 Audit Function EDIX253 Work with Audit Transaction Status
1 Audit Function EDIX254 Audit Acknowledgements
1 Audit Function EDIX255 Audit Deletes
1 Audit Function EDIX256 Audit Interchange Search
1 Audit Function EDIX257 Audit Group Search
1 Audit Function EDIX259 Work with Selected Audit Records
1 Audit Function EDIX451 Audit Interchange Data Inquiry
1 Audit Function EDIX452 Audit Group Data Inquiry
1 Audit Function EDIX453 Audit Transaction Data Inquiry
1 Audit Function EDIX454 Segment Inquiry
1 Audit Function EDIX455 Data Element Definition
1 Audit Function GENAUD Audit Menu
1 Audit Function PRGAUD Purge Audit
1 Audit Function PRGNET Purge Network Status File
1 Audit Function PRTAUD Print Audit
1 Audit Function PRTNETSTS Print Network Status Report
1 Audit Function REQUEUE Requeue EDI Data from Audit
1 Audit Function RTVAUD Retrieve Audit
1 Audit Function RTVNET Retrieve Network Status File
1 Audit Function SLTAUD Audit Search Utility
1 Audit Data
1 Communications Subsystem
1 Communications Function CHGDUP Change Duplex
1 Communications Function CHGNRZI Change NRZI Setting
1 Communications Function CHGPHNUM Change Phone Number
IBM
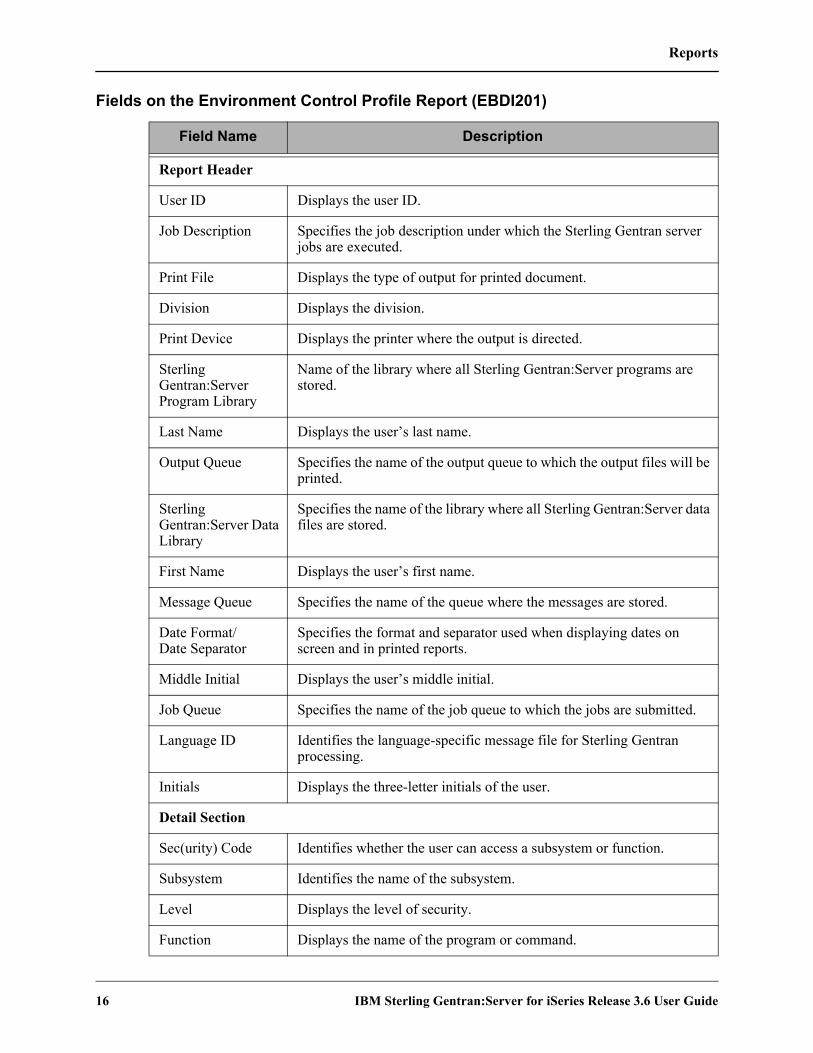
Reports
16 IBM Sterling Gentran:Server for iSeries Release 3.6 User Guide
Fields on the Environment Control Profile Report (EBDI201)
Field Name Description
Report Header
User ID Displays the user ID.
Job Description Specifies the job description under which the Sterling Gentran server jobs are executed.
Print File Displays the type of output for printed document.
Division Displays the division.
Print Device Displays the printer where the output is directed.
Sterling Gentran:Server Program Library
Name of the library where all Sterling Gentran:Server programs are stored.
Last Name Displays the user’s last name.
Output Queue Specifies the name of the output queue to which the output files will be printed.
Sterling Gentran:Server Data Library
Specifies the name of the library where all Sterling Gentran:Server data files are stored.
First Name Displays the user’s first name.
Message Queue Specifies the name of the queue where the messages are stored.
Date Format/Date Separator
Specifies the format and separator used when displaying dates on screen and in printed reports.
Middle Initial Displays the user’s middle initial.
Job Queue Specifies the name of the job queue to which the jobs are submitted.
Language ID Identifies the language-specific message file for Sterling Gentran processing.
Initials Displays the three-letter initials of the user.
Detail Section
Sec(urity) Code Identifies whether the user can access a subsystem or function.
Subsystem Identifies the name of the subsystem.
Level Displays the level of security.
Function Displays the name of the program or command.

Reports
IBM Sterling Gentran:Server for iSeries Release 3.6 User Guide 17
Name Displays a description of the program or command.
Field Name Description

Common Questions
18 IBM Sterling Gentran:Server for iSeries Release 3.6 User Guide
Common Questions
What if I want two Sterling Gentran:Server User IDs?If you are both the QSECOFR (or EDI Coordinator) and a Sterling Gentran:Server user, you may want two User IDs with different Security Profiles. Another reason for two User IDs is to define two different environment profiles (i.e. different job descriptions or division codes).
To have two Sterling Gentran:Server User IDs, you need two separate iSeries User IDs and then follow the steps in “Creating a User ID.”
How can I create a uniform running environment for multiple users?
When multiple users are using Sterling Gentran:Server, it is typical for each user to have their own environment and security profile for testing. For production processing in this scenario, it is more appropriate to set up a unique user that will always have the same environment parameters. You may choose to create an iSeries user profile called “EDI” and then create a Sterling Gentran:Server user profile for this User ID with specific environment parameters. This User ID could be used for scheduling jobs or submitting jobs manually for all production work.
The dates on command panels are showing in a different format from the dates on panels and reports – why are they different?
The format for dates displayed on panels (other than commands) is controlled through each user’s Sterling Gentran:Server environment profile. The date format for command panels is controlled by the Sterling Gentran:Server System Configuration file. If you prefer to have each individual user’s environment profile settings apply, however, make *ENVCTL the value in the ‘Set Sterling Gentran Date Format’ option in the system configuration file.
NOTESee “Define the Environment Profile” on page 7 in this chapter for more information about setting up environment profiles, and see the “System Configuration” chapter in the Technical Reference Guide for more information about working with the system configuration file.

Chapter
IBM Sterling Gentran:Server for iSeries Release 3.6 User Guide 1
3 Partner
In this ChapterThe “Partner” chapter explains what the trading partner profile is and how it is used within Sterling Gentran:Server for iSeries. You must set up a partner profile for every trading partner with whom you exchange inbound and/or outbound EDI transactions. This chapter covers the following topics:
What is a Partner? . . . . . . . . . . . . . . . . . . . . . . . . . . . . . . . . . . . . . . . . . . . . . . . . . . . . . . 3-1
What does the Partner Subsystem Do? . . . . . . . . . . . . . . . . . . . . . . . . . . . . . . . . . . . . . . 3-2
Take a Closer Look at the Partner Profile . . . . . . . . . . . . . . . . . . . . . . . . . . . . . . . . . . . . 3-3
Prepare to Set Up the Partner Profile . . . . . . . . . . . . . . . . . . . . . . . . . . . . . . . . . . . . . . . 3-6
Panel Quick Reference . . . . . . . . . . . . . . . . . . . . . . . . . . . . . . . . . . . . . . . . . . . . . . . . . . 3-8
Use the Partner Panels. . . . . . . . . . . . . . . . . . . . . . . . . . . . . . . . . . . . . . . . . . . . . . . . . . 3-11
Use the ezPART Command. . . . . . . . . . . . . . . . . . . . . . . . . . . . . . . . . . . . . . . . . . . . . 3-100
Reports . . . . . . . . . . . . . . . . . . . . . . . . . . . . . . . . . . . . . . . . . . . . . . . . . . . . . . . . . . . . 3-103
Common Questions. . . . . . . . . . . . . . . . . . . . . . . . . . . . . . . . . . . . . . . . . . . . . . . . . . . 3-109
What is a Partner?In EDI, anyone to whom you transfer documents is called your trading partner. These trading partners may have been known to you as your “Customers” or “Vendors.” You can think of the trading partner subsystem as a Rolodex that holds all the information about your trading partner(s).
If you mail a document to your trading partner, you need to know the destination address and where that information is stored. The same type of information is needed by Sterling Gentran:Server when the document is sent electronically. Setting up the partner profile entails identifying key characteristics of your EDI environment and your partner’s environment associated with “how the mail is sent” and “where it is sent.”

What does the Partner Subsystem Do?
2 IBM Sterling Gentran:Server for iSeries Release 3.6 User Guide
What does the Partner Subsystem Do?The Partner subsystem gives you these capabilities:
Maintain interchange header information for inbound and outbound processing on a partner-by-partner basis
Maintain functional group information for inbound and outbound processing on a partner-by-partner basis
Maintain transaction set information for inbound and outbound processing on a partner-by-partner basis
Add name and address information to the partner profile
Add user-defined information to the partner profile
Set up error rejection parameters on a partner-by-partner or global partner basis
Define cross references between Partner IDs and segments in the EDI control envelope
Set up parameters for data splitting.

Take a Closer Look at the Partner Profile
IBM Sterling Gentran:Server for iSeries Release 3.6 User Guide 3
Take a Closer Look at the Partner ProfileSterling Gentran:Server has the capabilities to store three different categories of information pertaining to each partner profile. Some of this information is mandatory to EDI processing; other information is optional and provides additional support for your application needs.
Figure 3.1 shows the structure of the partner profile with the eight different types of records used.
Figure 3.1 The Partner file record structure
Trading Partner ID
EDI Controls Data ManagementUser Information
Group
Transaction
Name &Address
User Defined
DataSplitting
Error Rejection
OptionalMandatory
Interchange
Cross
Reference

Take a Closer Look at the Partner Profile
4 IBM Sterling Gentran:Server for iSeries Release 3.6 User Guide
EDI Control Envelope InformationAll EDI transactions must conform to a pre-established EDI standard agreed upon by you and your trading partner. When you set up the partner profile, you identify the standards that you and your partner have chosen. (SEE the “Standards” chapter for more information about setting up EDI standards). You also provide Sterling Gentran:Server with key information about how you and your trading partner(s) will be exchanging this information.
An EDI standard contains three levels of control that allows you to verify the accuracy and completeness of the data that you exchange with your trading partner. Each level is referred to as a “control envelope.” A control envelope contains two data segments (an EDI data segment is defined as one or more related data elements):
The Envelope Header Segment precedes the EDI data to which it pertains.
The Envelope Trailer Segment directly follows that same data.
When you set up the trading partner profile in Sterling Gentran:Server, you define these controls.
User InformationBesides the required EDI control information that you identify for each trading partner, Sterling Gentran:Server allows you to define several optional pieces of information.
Name and AddressYou may define additional partner information that may be referenced and used for reporting purposes. Included in this file is the trading partner’s name, address, and phone numbers.
User DefinedThis file contains additional notes (FYI comments and scratch pads) that you may want to maintain for a particular trading partner.
This information can be particularly useful if you have a special need for accessing information stored in the Partner file from your own programs.

Take a Closer Look at the Partner Profile
IBM Sterling Gentran:Server for iSeries Release 3.6 User Guide 5
Data Management InformationThe partner profiles which you set up can range from simple to complex. Sterling Gentran:Server offers several features for managing even the most complex partner profiles.
Data Separation“Data Separation” provides the instruction on how to route or “split” the data. Splitting is used during inbound processing to route or separate the data into different intermediate processing files (called split files). These split files are passed to another step in the processing.
Although splitting is not required, it is highly recommended. Splitting improves the efficiency and throughput of the mapper. It also enables you to trap unexpected documents and it allows for better error recovery of documents trapped.
Data should be split based on the type of application it is destined for. For example, purchase order documents should be grouped together and mapped into purchase order application files. Invoice documents should be grouped together, separate from the Orders, and mapped into invoice application files. (SEE the “Splitting” chapter in the IBM® Sterling Gentran:Server® for iSeries® Release 3.6 Technical Reference Guide for more information on data splitting.)
Cross ReferencingSetting up a cross reference is like setting up an alias or a nickname. Referring back to our Rolodex address analogy, defining a cross reference is similar to setting up multiple indexes or names for the same Rolodex card. You might want to reference the card by Vendor ID, perhaps by Vendor name or zip code, or whatever is convenient for you. You still want only one card with complete information about your partner; you just want to cross reference it in a variety of ways.
The Sterling Gentran:Server cross referencing feature allows you to ‘tie’ various fields in either the EDI Control Envelope or in your application files to the partner profile. While this is not a required task in Sterling Gentran:Server, there are times when cross referencing can result in a significant savings of time and effort.
Error RejectionError rejection is managed by a combination of parameters defined in the Global Parameters subsystem and in the Partner subsystem.
Error records may be added to the partner profile to identify how Sterling Gentran:Server should manage data that does not pass compliance checking against the standards. This is done to prevent records from being sent out or from being interfaced to your applications.

Prepare to Set Up the Partner Profile
6 IBM Sterling Gentran:Server for iSeries Release 3.6 User Guide
Prepare to Set Up the Partner ProfileIf you have not already done so, it may be helpful to read the “Partner” section in the IBM® Sterling Gentran:Server® for iSeries® Release 3.6 Manager’s Implementation Planner to get an overview of the information needed to create the Partner ID.
Before you begin to enter information into the Sterling Gentran:Server Work with Partner subsystem, you may also find it beneficial to spend some time collecting and preparing the information which you will need. Doing so will significantly simplify the tasks which you will need to perform.
The following questionnaire can assist you with this process, with some examples included inside parentheses. (For a detailed worksheet, SEE the IBM® Sterling Gentran:Server® for iSeries® Release 3.6 Manager’s Implementation Planner.)
Questions to answer each time a trading partner is added
What is your partner’s name and address information?
• Partner Name• Partner Address (street, city, state, country, ZIP code)• EDI Contact Name• EDI Contact Phone Number
Which EDI standard and version will you use?For example, “X12” and “004010” for ANSI.
What is the partner’s interchange envelope choice?For example, ISA, ICS, BG, GS, UNA, UNB, SCH, or STX.
What is your trading partner’s EDI ID and Qualifier for the interchange level?Usually, a DUNS number or phone number is used. (ISA05-06)
What is your company’s EDI ID and Qualifier for the interchange level?Usually, a DUNS number or phone number is used. (ISA07-08)
What is your partner’s group level EDI ID and what is yours? (GS02/GS03)
Will you be sending the same EDI ID at the group and interchange levels?
Are you doing inbound sequence number checking? If so, at what level (interchange, group, or transaction)?Inbound sequence number checking means checking inbound control numbers to verify if they are received in the proper sequence.
For ANSI X12 users only: what is your partner’s Authorization and Qualifier, if used? (ISA01-02)
For BG users only: what is your partner’s Communication ID, if used? (BG01)

Prepare to Set Up the Partner Profile
IBM Sterling Gentran:Server for iSeries Release 3.6 User Guide 7
For ANSI X12 users only: what is your partner’s Security Code and Qualifier, if used? (ISA03-04)
For BG users only: what is your partner’s Password, if used? (BG02)
What separators and terminators does your partner require? Are there certain characters that your partner cannot recognize? Are there certain values that might be found in the data? These will be used in the envelopes for outbound data.
• Subelement Separator:If using ISA envelopes, “>” is recommended
• Element Separator:If using BG envelopes, “*” is recommendedIf using ISA envelopes, “*” is recommended
• Segment Terminator:If using BG envelopes, “HEX15” is recommendedIf using ISA envelopes, “HEX15” is recommended
Will you use a Value-Added Network or communicate directly?
If you are using a network, which one and which protocol?
The Communication Profile is used to route data for outbound transmissions.
Do you want to purge Audit records using unique partner criteria?
What Purge Audit Options will you use? (found on Audit Purge by Partner command)
These options are internal. The fields that display on the screen are: “Purge Acknowledged (Y/N),” “Purge Reported (Y/N),” and “Purge Older Than Days.”
Which documents (groups and transactions) will you exchange with this partner and which direction are they going (inbound or outbound)?
For example, an ANSI X12 purchase order is transaction ID 850.
At what level (interchange, group, or transaction) do you expect to receive/send functional acknowledgments?
For example, 997, 999, or CONTRL functional acknowledgments.
NOTE: Interchange acknowledgments are not usually used.
Will you acknowledge errors?
Do you have another internal name (Cross-Reference) for this partner?
IBM recommends that you list any name or ID that will be used to reference this partner either in envelopes (that is, Receiver ID) or by your application files. All these names will then need to be cross-referenced to the ID used to define this partner in the Partner file.
Questions to answer each time a trading partner is added
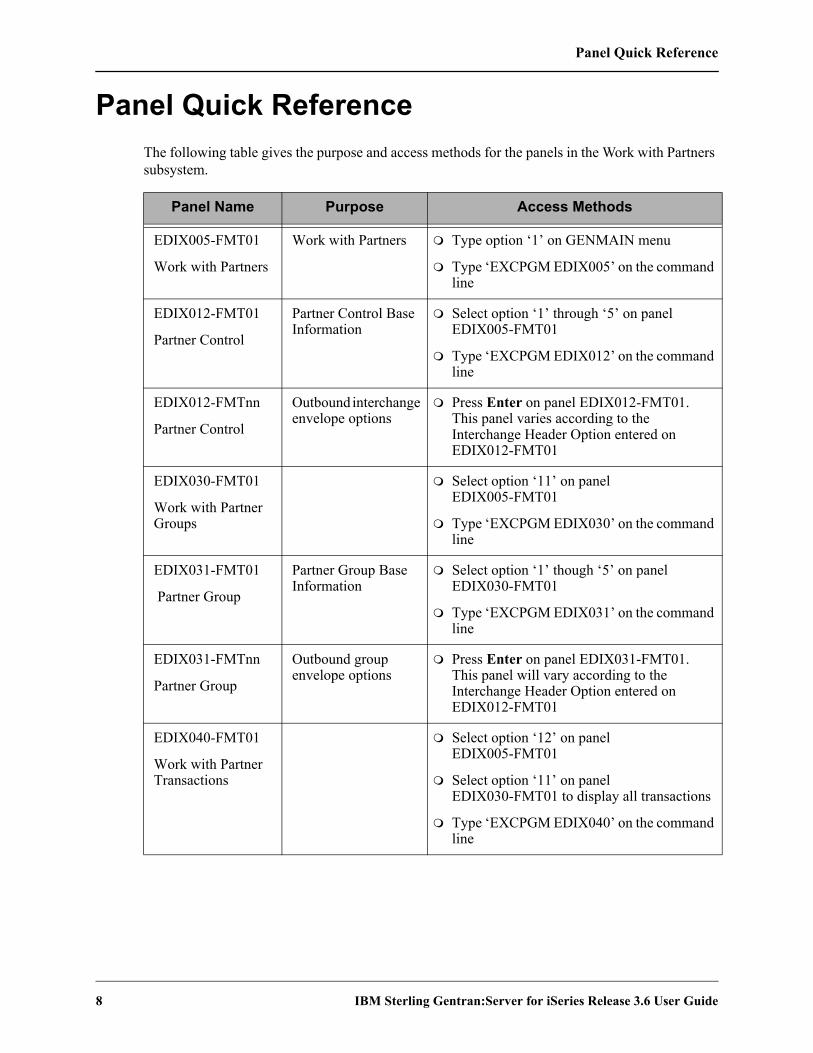
Panel Quick Reference
8 IBM Sterling Gentran:Server for iSeries Release 3.6 User Guide
Panel Quick ReferenceThe following table gives the purpose and access methods for the panels in the Work with Partners subsystem.
Panel Name Purpose Access Methods
EDIX005-FMT01
Work with Partners
Work with Partners Type option ‘1’ on GENMAIN menu
Type ‘EXCPGM EDIX005’ on the command line
EDIX012-FMT01
Partner Control
Partner Control Base Information
Select option ‘1’ through ‘5’ on panel EDIX005-FMT01
Type ‘EXCPGM EDIX012’ on the command line
EDIX012-FMTnn
Partner Control
Outbound interchange envelope options
Press Enter on panel EDIX012-FMT01. This panel varies according to the Interchange Header Option entered on EDIX012-FMT01
EDIX030-FMT01
Work with Partner Groups
Select option ‘11’ on panel EDIX005-FMT01
Type ‘EXCPGM EDIX030’ on the command line
EDIX031-FMT01
Partner Group
Partner Group Base Information
Select option ‘1’ though ‘5’ on panel EDIX030-FMT01
Type ‘EXCPGM EDIX031’ on the command line
EDIX031-FMTnn
Partner Group
Outbound group envelope options
Press Enter on panel EDIX031-FMT01. This panel will vary according to the Interchange Header Option entered on EDIX012-FMT01
EDIX040-FMT01
Work with Partner Transactions
Select option ‘12’ on panel EDIX005-FMT01
Select option ‘11’ on panel EDIX030-FMT01 to display all transactions
Type ‘EXCPGM EDIX040’ on the command line

Panel Quick Reference
IBM Sterling Gentran:Server for iSeries Release 3.6 User Guide 9
EDIX041-FMT01
Partner Transaction
Partner transaction base information
Select option ‘1’ through ‘5’ on panel EDIX040-FMT01. This panel displays for all Interchange Header Options except SCH and STX
Type ‘EXCPGM EDIX041’ on the command line
EDIX041-FMTnn
Partner Transaction
Outbound transaction/message envelope options
Press Enter on panel EDIX041-FMT01
EDIX035-FMT01
Partner Name & Address
Partner Name & Address
Select option ‘13’ on panel EDIX005-FMT01
Type ‘EXCPGM EDIX035’ on the command line
EDIX046-FMT01
Work with Partner User Defined
Select option ‘14’ on panel EDIX005-FMT01
Type ‘EXCPGM EDIX046’ on the command line
EDIX045-FMT01
Partner User Defined
Maintain miscellaneous information
Select option ‘1’ through ‘5’ on panel EDIX046-FMT01
Type ‘EXCPGM EDIX045’ on the command line
EDIX051-FMT01
Work with Partner Data Separation
Select option ‘15’ on panel EDIX005-FMT01
Type ‘EXCPGM EDIX051’ on the command line
EDIX050-FMT01
Partner Data Separation
Maintain inbound data separation/splitting information
Select option ‘1’ through ‘5’ on panel EDIX051-FMT01
Type ‘EXCPGM EDIX050’ on the command line
EDIX056-FMT01
Work with Partner Error Rejection
Select option ‘16’ on panel EDIX005-FMT01
Type ‘EXCPGM EDIX056’ on the command line
EDIX055-FMT01
Partner Error Rejection
Maintain error rejection criteria
Select option ‘1’ through ‘5’ on panel EDIX056-FMT01
Type ‘EXCPGM EDIX055’ on the command line
Panel Name Purpose Access Methods
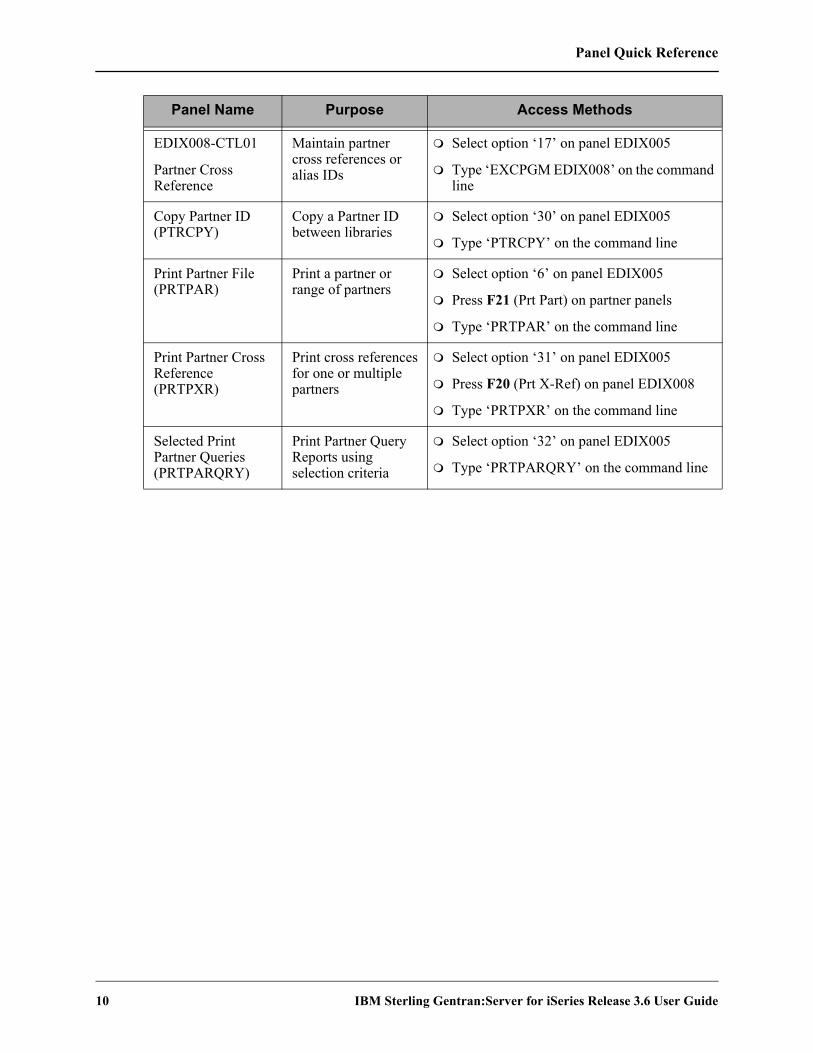
Panel Quick Reference
10 IBM Sterling Gentran:Server for iSeries Release 3.6 User Guide
EDIX008-CTL01
Partner Cross Reference
Maintain partner cross references or alias IDs
Select option ‘17’ on panel EDIX005
Type ‘EXCPGM EDIX008’ on the command line
Copy Partner ID (PTRCPY)
Copy a Partner ID between libraries
Select option ‘30’ on panel EDIX005
Type ‘PTRCPY’ on the command line
Print Partner File (PRTPAR)
Print a partner or range of partners
Select option ‘6’ on panel EDIX005
Press F21 (Prt Part) on partner panels
Type ‘PRTPAR’ on the command line
Print Partner Cross Reference (PRTPXR)
Print cross references for one or multiple partners
Select option ‘31’ on panel EDIX005
Press F20 (Prt X-Ref) on panel EDIX008
Type ‘PRTPXR’ on the command line
Selected Print Partner Queries (PRTPARQRY)
Print Partner Query Reports using selection criteria
Select option ‘32’ on panel EDIX005
Type ‘PRTPARQRY’ on the command line
Panel Name Purpose Access Methods
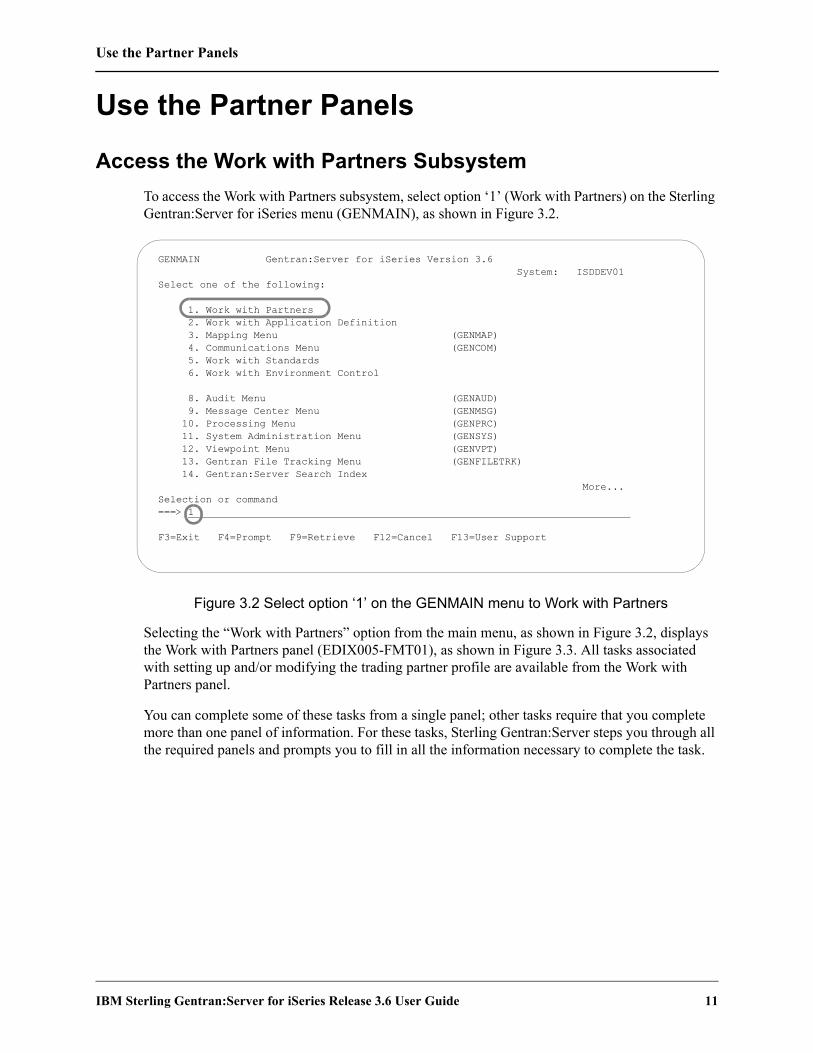
Use the Partner Panels
IBM Sterling Gentran:Server for iSeries Release 3.6 User Guide 11
Use the Partner Panels
Access the Work with Partners Subsystem To access the Work with Partners subsystem, select option ‘1’ (Work with Partners) on the Sterling Gentran:Server for iSeries menu (GENMAIN), as shown in Figure 3.2.
Figure 3.2 Select option ‘1’ on the GENMAIN menu to Work with Partners
Selecting the “Work with Partners” option from the main menu, as shown in Figure 3.2, displays the Work with Partners panel (EDIX005-FMT01), as shown in Figure 3.3. All tasks associated with setting up and/or modifying the trading partner profile are available from the Work with Partners panel.
You can complete some of these tasks from a single panel; other tasks require that you complete more than one panel of information. For these tasks, Sterling Gentran:Server steps you through all the required panels and prompts you to fill in all the information necessary to complete the task.
GENMAIN Gentran:Server for iSeries Version 3.6 System: ISDDEV01 Select one of the following: 1. Work with Partners 2. Work with Application Definition 3. Mapping Menu (GENMAP) 4. Communications Menu (GENCOM) 5. Work with Standards 6. Work with Environment Control 8. Audit Menu (GENAUD) 9. Message Center Menu (GENMSG) 10. Processing Menu (GENPRC) 11. System Administration Menu (GENSYS) 12. Viewpoint Menu (GENVPT) 13. Gentran File Tracking Menu (GENFILETRK) 14. Gentran:Server Search Index More... Selection or command ===> 1 F3=Exit F4=Prompt F9=Retrieve F12=Cancel F13=User Support

Use the Partner Panels
12 IBM Sterling Gentran:Server for iSeries Release 3.6 User Guide
Some tasks are required tasks; others are optional and can be performed as your needs dictate.
Figure 3.3 The Work with Partners panel is the starting point for all partner-related tasks
You can perform the following tasks, which are documented in this chapter, from the Work with Partner panel (EDIX005-FMT01):
Set up a New Partner Profile
Work with Partner Groups
Work with Partner Transactions
Modify the Trading Partner Name & Address Record
Add User Defined Information to the Trading Partner File
Work with Error Rejection
Perform Data Separation Activities
Print Reports
EDIX005 Work with Partners EDI 03/30/11 FMT01 pgmlib: G3X6PGM dtalib: G3X6DTA 12:00:00 Position to Partner ID . . . . . . Qual Type option (and Information), press Enter. 1=Create 2=Revise 3=Copy 4=Delete 5=View 6=Print 7=Rename 11=Groups Opt Partner ID Qual Partner Name !GENTRAN-RESERVED-PARTNER-ID-1 Global Reserved Partner AAA WAREHOUSE CO 11 01 Arnold/Allen/Atwell Warehouse BG-PARTNER Example of a BG Partner COFFEE COFFEE DIST (INB ORDER-OUT INVOIC) COFFEE DIST COFFEE DIST - Tutorial Partner C13579 International Parts & Service C24680 C24680 ICS-PARTNER Example of an ICS Partner INSPARTNER INSPARTNER More... Parameters or command ===> F1=Help F3=Exit F12=Cancel F15=Sort F23=More Options F24=More Keys
16=Error Rej 17=Cross Ref 30=Copy Partner 31=Print X-Ref 32=Print Qry
12=Transactions 13=Name & Address 14=User Defined 15=Data Sep.

Use the Partner Panels
IBM Sterling Gentran:Server for iSeries Release 3.6 User Guide 13
Access PartnersThere are several ways to access partner information by using different sorting methods. Press F15 (Sort) to access the list of Sort options. You can sort partners by:
Partner ID, Partner Qualifier
Partner Name
Partner Cross Reference, Cross Reference Qualifier
Partner ID, Partner Qualifier, Partner Cross Reference, Cross Reference Qualifier
Figure 3.4 shows the Work with Partners panel (EDIX005-FMT01) after pressing F15 (Sort).
Figure 3.4 Available Sort Options for Partner Information
The Partner Cross Reference listing is extremely useful when you have an EDI identifier from the ISA or GS envelope, for example, and you need to work with that partner. Figure 3.5 shows partners sorted by Cross Reference ID and Qualifier.
EDIX005 Work with Partners EDI 03/30/11 FMT01 pgmlib: G3X6PGM dtalib: G3X6DTA 12:00:00 Position to Partner ID . . . . . . Qual Type option (and Information), press Enter. 1=Create 2=Revise 3=Copy 4=Delete 5=View 6=Print 7=Rename 11=Groups Opt Partner ID Qual Partner Name -1 Global Reserved Partner Position/Sort By 01 ARNOLD/ALLEN/ATWELL WAREHOUSE : : EXAMPLE OF A BG PARTNER : 1=Select : INTERNATIONAL PARTS & SERVICE : : EXAMPLE OF AN ICS PARTNER : Partner/Qual : EXAMPLE OF AN ISA PARTNER : Partner Name : MODEL : 1 X-Ref/Qual : MYCOMPANY (for inbound splitting) : Partner/Qual/X-Ref/Qual : EXAMPLE OF A STX PARTNER : F3=Exit F12=Cancel : More... : : F1=Help F3=Exit F12=Cancel F15=Sort F23=More Options F24=More Keys
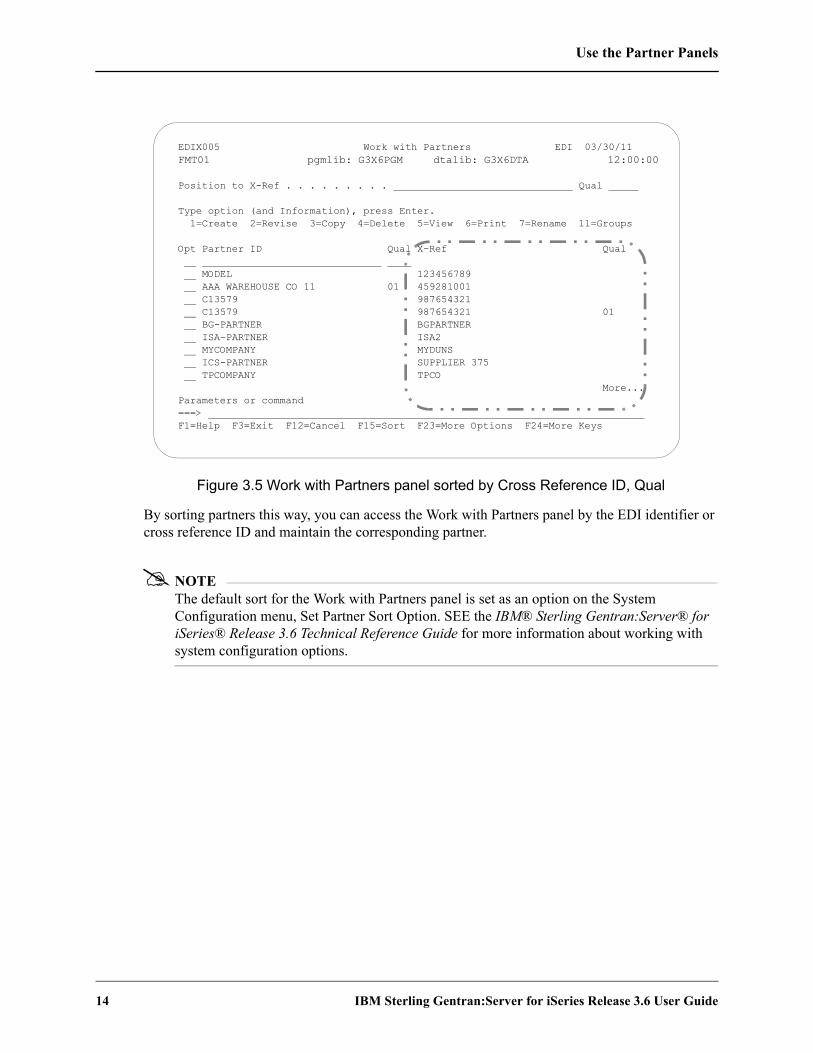
Use the Partner Panels
14 IBM Sterling Gentran:Server for iSeries Release 3.6 User Guide
Figure 3.5 Work with Partners panel sorted by Cross Reference ID, Qual
By sorting partners this way, you can access the Work with Partners panel by the EDI identifier or cross reference ID and maintain the corresponding partner.
NOTEThe default sort for the Work with Partners panel is set as an option on the System Configuration menu, Set Partner Sort Option. SEE the IBM® Sterling Gentran:Server® for iSeries® Release 3.6 Technical Reference Guide for more information about working with system configuration options.
EDIX005 Work with Partners EDI 03/30/11 FMT01 pgmlib: G3X6PGM dtalib: G3X6DTA 12:00:00 Position to X-Ref . . . . . . . . . Qual Type option (and Information), press Enter. 1=Create 2=Revise 3=Copy 4=Delete 5=View 6=Print 7=Rename 11=Groups Opt Partner ID Qual X-Ref Qual MODEL 123456789 AAA WAREHOUSE CO 11 01 459281001 C13579 987654321 C13579 987654321 01 BG-PARTNER BGPARTNER ISA-PARTNER ISA2 MYCOMPANY MYDUNS ICS-PARTNER SUPPLIER 375 TPCOMPANY TPCO More... Parameters or command ===> F1=Help F3=Exit F12=Cancel F15=Sort F23=More Options F24=More Keys

Use the Partner Panels
IBM Sterling Gentran:Server for iSeries Release 3.6 User Guide 15
Set Up a New Partner ProfileSterling Gentran:Server begins the process of collecting information about a partner profile at the interchange header level. (The interchange type is the ‘highest’ level of the EDI control envelope. The functional group and transaction headers are at ‘lower’ levels.)
During this task you will be asked to enter a new Partner ID, determine the interchange type for the partner profile and then enter information about the partner’s interchange type into various panels. Figure 3.6 illustrates the order to enter the partner information.
Figure 3.6 Steps in the ‘Setting Up a New Partner Profile’ task
NOTEThis example walks you through setting up a partner for an ISA interchange. If you need to set up a partner for a different type of interchange, such as the BG interchange (often used in the Grocery industry), you can follow the same steps as described here. The only difference is the fields on individual panels.
Work with Partners(EDIX005-FMT01)
Step 1:Determine the Partner ID
Partner Control(EDIX012-FMT01)
Step 2:Enter the Partner Control Information
Partner Control(EDIX012-FMTnn)
Step 3:Enter the Outbound Partner Information

Use the Partner Panels
16 IBM Sterling Gentran:Server for iSeries Release 3.6 User Guide
Step 1: Determine the Partner ID
Sterling Gentran:Server requires that you define a unique “profile” for every partner with whom you exchange EDI documents. The Partner ID when combined with the Partner Qualifier forms a unique identifier for the partner profile. You may use any alphanumeric value you like for the Partner ID. Typically, most users choose an easily recognizable reference.
RECOMMENDATIONChoose a Partner ID from one of these three types:1. Description ID: Select a name such as a company name. 2. Application ID: Select the partner name as recognized by your internal
applications, such as Vendor ID or Customer Number.3. EDI ID: Choose the identifier that your partner is known by on the EDI
control envelope such as a DUNS number, UCS or VICS Comm ID, orPhone Number.
Figure 3.7 Work with Partners panel (EDIX005-FMT01): Defining a new Partner IDTo define a new partner profile, on the Work with Partner panel (EDIX005-FMT01), type ‘1’ in the Option field on the key entry line, type the Partner ID on the key entry line, and press Enter.
NOTEIn Figure 3.7, TPCOMPANY is being used as the Trading Partner ID. TPCOMPANY is already defined in the Tutorial library (G3X6SAMP) where you can reference it to follow the entries added throughout the examples. If you would like to follow along with the tutorial, you can also create a new Partner ID (say, EDICOMPANY) and follow the steps, entering the values exactly as described in this section.
EDIX005 Work with Partners EDI 03/30/11 FMT01 pgmlib: G3X6PGM dtalib: G3X6DTA 12:00:00 Position to Partner ID . . . . . . Qual Type option (and Information), press Enter. 1=Create 2=Revise 3=Copy 4=Delete 5=View 6=Print 7=Rename 11=Groups Opt Partner ID Qual Partner Name 1 TPCOMPANY !GENTRAN-RESERVED-PARTNER-ID-1 Global Reserved Partner AAA WAREHOUSE CO 11 01 ARNOLD/ALLEN/ATWELL WAREHOUSE BG-PARTNER EXAMPLE OF A BG PARTNER C13579 INTERNATIONAL PARTS & SERVICE ICS-PARTNER EXAMPLE OF AN ICS PARTNER ISA-PARTNER EXAMPLE OF AN ISA PARTNER MODEL MODEL MYCOMPANY MYCOMPANY (for inbound splitting) STX-PARTNER EXAMPLE OF A STX PARTNER More... Parameters or command ===> F1=Help F3=Exit F12=Cancel F15=Sort F23=More Options F24=More Keys

Use the Partner Panels
IBM Sterling Gentran:Server for iSeries Release 3.6 User Guide 17
Step 2: Enter the Partner Control Information
The Partner Control panel (EDIX012-FMT01) displays next, as shown in Figure 3.8.
There are two panels for partner control information:
Partner Control panel (EDIX012-FMT01) contains information that helps Sterling Gentran:Server to control both inbound and outbound processing.
Partner Control panel (EDIX012-FMTnn – where ‘nn’ will vary based on the interchange type) is used only for outbound processing information and indicates the values loaded into the EDI control envelope interchange header for transmissions.
Only a few of the fields on the first partner control panel are mandatory. The rest of the fields can be either left blank or filled in at a later time when you know more about how you would like to run your application. See the description of the particular panels later in this chapter for details. For this example, we will only fill in the mandatory fields.
Figure 3.8 Required fields for the Partner Control panel (EDIX012-FMT01)
If you are not doing outbound processing, you may skip the next panel. To do so, press F10 (Update). The message “Unable to process request. Panel must be reviewed.” displays. Since the interchange envelope is not required for inbound processing, you may ignore this message. Press F10 (Update) again to return to the Work with Partners panel (EDIX005-FMT01) where you can execute other tasks.
If you are planning to do outbound processing, (for example, for invoices), then the additional panel of information must be filled in. In this case, after entering all the required information, you should press Enter. You will be automatically advanced to the next panel. The field descriptions for EDIX012-FMTnn and recommended entries follow.
EDIX012 Partner Control CB 03/30/11 FMT01 12:00:00 Partner ID . . . . . . . . . . . . TPCOMPANY Partner Qualifier. . . . . . . . . Partner Name . . . . . . . . . . . *** Name Not on File*** Division . . . . . . . . . . . . . 000 Interchange Header Option. . . . . ISA Last Incoming Sequence Number. . . GS Sender ID Qualifier . . . . . . N GS Receiver ID Qualifier . . . . . N Expect a TA1, AC1, or UCI. . . . . N Acknowledge Interchange. . . . . . N Acknowledge Group or Trans . . . . T Acknowledge Errors . . . . . . . . N Purge Acknowledged . . . . . . . . N Purge Reported . . . . . . . . . . N Purge Older Than Days. . . . . . . Last Incoming BG Password . . . . Set 209 Errors . . . N Comm Profile ID. . . . . . . . . . CN3BSC Group Profile ID . . N Last Incoming UNB/STX Seq. No. . . Update Allowed . . . Y F1=Help F4=Prompt F10=Update F12=Cancel F24=More Keys

Use the Partner Panels
18 IBM Sterling Gentran:Server for iSeries Release 3.6 User Guide
Field Descriptions (Mandatory fields)Division
The Division is defaulted from your Environment Control Profile in the Environment Control subsystem. The Division code is used to limit the information a user can see on-line or modify. The ‘000’ Division code is a Global Division code that allows the user to modify any partner created, regardless of the specific division it was assigned. If the Division code is any value other than ‘000’ when the panel displays, you have been assigned to a specific division and all created partners are under the same Division code.
This feature is not commonly used and may only benefit you if you have several users defining partners or several divisions using Sterling Gentran:Server. In these cases, users are limited from accessing or modifying partner information that is not relevant to them.
RECOMMENDATIONLeave the default value that displays. If you are unsure, talk with the individual responsible for Sterling Gentran:Server administration.
Interchange Header OptionOnly one interchange type can be selected for any given partner. If you occasionally need to send more than one type of interchange to the same partner, create a second partner in the Partner file. All subsequent panels in the partner profile depend on the interchange type selected here. The type is specific to the EDI standards. Remember that you can always press F4 (Prompt) for a list of valid interchange header types.
RECOMMENDATIONSpecify the Interchange Header Option that your partner is going to send you or is requesting from you.
Field Descriptions (Other fields)The following fields on the Partner Control panel (EDIX012-FMT01) either have default values which cannot be modified or are optional and do not have to be used at this time.
Partner NameYou may notice in Figure 3.8 that the Partner Name field contains the value “*** Name Not On File ***.” This will automatically default to the Partner ID that you entered when the record is updated. You can change the name to be something other than the Partner ID by using option 13, Name & Address. This process is described in detail later in this section.
Last Incoming Seq. No.The Last Incoming Sequence Number allows you to track the incoming interchange control number (for ANSI). EDIFACT and TRADACOMS interchanges are tracked in the Last Incoming UNB/STX Seq. No. field. By using this number, Sterling Gentran:Server also informs you when there is a gap in incoming control numbers for this partner.

Use the Partner Panels
IBM Sterling Gentran:Server for iSeries Release 3.6 User Guide 19
NOTEThe incoming control number must be numeric to activate this feature. The global parameter, Sequential Check Control or Sequential Error Control, must also be turned on (set to ‘Y’). (SEE the “Global Parameters” chapter in the IBM® Sterling Gentran:Server® for iSeries® Release 3.6 Technical Reference Guide for more information.)
For example, let’s say that the value in this field is ‘1’ and you receive an interchange from your trading partner with a control number of ‘5.’ A message displays on the Inbound Editor Report indicating that control number ‘5’ was received, but ‘2’ was expected. The control number ‘5’ is also updated for this partner.
The benefit of this feature is only realized if you contact the partner whenever this happens and try to determine if you missed some interchanges. Typically this is not done, as it is time consuming and often does not lead to missing data. It usually happens when your partner reprocessed data without resetting the control numbers, leading to a jump in the numbers you receive.
NOTEThis field is not applicable for EDIFACT or TRADACOMS documents.
RECOMMENDATIONLeave the Last Incoming Sequence Number field blank to deactivate the feature.
GS Sender ID Qualifier and GS Receiver ID Qualifier (ANSI)These two parameters affect the partner resolution task for ANSI documents (how Sterling Gentran:Server finds a partner in the Partner file is explained later in this chapter). Typically, this feature is not used (set to ‘N’). Instead, the Partner Cross Reference file is used. If this feature is used to find the partner directly in the Partner file, you may be prevented, or limited from using the Partner Cross Reference file.
If you plan on using this feature (set the flag to ‘Y’ or ‘I’), it is advisable to set the Partner ID equal to the Interchange Identifier as well as the Qualifier.
Possible values for these fields are:
‘Y’ Sterling Gentran:Server looks for a partner using two fields: the Group Identifier from the GS envelope tagged with the Qualifier from this panel.
‘N’ Sterling Gentran:Server looks for a partner using just the Group Identifier from the GS envelope. Blanks are filled in for the qualifier. If the partner is not found, the Cross Reference file is searched for a match. This value is the default.

Use the Partner Panels
20 IBM Sterling Gentran:Server for iSeries Release 3.6 User Guide
‘I’ Sterling Gentran:Server looks for a partner using two fields: the Group Identifier field from the GS envelope tagged with the Qualifier field from the partner that was selected at the interchange level.
NOTEThis field is not applicable for EDIFACT or TRADACOM documents.
RECOMMENDATIONSet these fields to ‘N’ and leave the corresponding 2-byte qualifiers blank. You need to set up all identifiers for this partner in the Partner Cross Reference file.
Expect a TA1, AC1, or UCI?This flag identifies when interchange envelopes have not been acknowledged or are printed on the Audit File report as unacknowledged. If you expect an interchange acknowledgment, specify ‘Y.’ Although this flag affects both inbound and outbound interchanges (not used for TRADACOMS), its primary impact is on interchanges sent outbound. Therefore, this flag is reviewed from the outbound perspective for simplicity. The TA1 and AC1 are special acknowledgments for just the interchange. They are sent back to the original sender of an ISA or ICS interchange envelope, respectively. The UCI segment is sent in a CONTRL acknowledgment to acknowledge an EDIFACT interchange.
When processing outbound interchanges, the Outbound Editor logs the interchange in the Audit file if the Audit Interchange global parameter is set to ‘Y.’
There is an acknowledgment status flag for every interchange logged in the Audit file. The flag can be used when printing the Audit report to determine if all documents sent to your partner have been acknowledged. If the interchange is not specifically acknowledged with this TA1 or AC1 acknowledgment or UCI segment, the status flag is blank. If you print the Audit Report showing all unacknowledged documents, the interchanges display even though you may not have expected your partner to acknowledge it. In this case, it is not an error to have not received an interchange acknowledgment. The user may want a method of turning this feature off for any document that is not expected to be acknowledged.
RECOMMENDATIONSet this to ‘N’ since interchange acknowledgments are not typically used in the industry. Normally, your partner does not acknowledge ANSI interchanges sent to them. If utilizing EDIFACT standards, the UCI interchange segment is used.
Acknowledge InterchangeThis flag is used for inbound processing to determine if an interchange acknowledgment is generated in response to the interchange just received. The interchange acknowledgment is similar to specifying that you simply received an envelope of data, but have not looked inside it to see what it contains.
Use the Partner Panels
IBM Sterling Gentran:Server for iSeries Release 3.6 User Guide 21
The Inbound Editor looks at this flag if the Acknowledge Interchange global parameter is set to ‘N’ and the Partner Acknowledge global parameter is set to ‘Y.’ If an ISA interchange was received and this partner option is set to ‘Y,’ the Inbound Editor generates the TA1 acknowledgment that acknowledges just the interchange. For an ICS interchange, the AC1 acknowledgment is generated. For a UNA or UNB interchange, a CONTRL acknowledgment is generated with the UCI segment.
There are no interchange acknowledgments for the BG interchange or TRADACOMS documents.
RECOMMENDATIONSet this to ‘N,’ unless a partner specifically asks for an interchange acknowledgment. The UCI segment for EDIFACT is more commonly used.
Acknowledge Group or TransThis flag is used for inbound processing to determine if a functional acknowledgment is generated in response to a group or transaction just received. If it is generated, the acknowledgment will contain the level of detail as specified by this flag. The functional acknowledgment is similar to looking inside the envelope and specifying how many documents were received.
The Inbound Editor looks at this flag if the Acknowledge Group and Acknowledge Transactions global parameters are set to ‘N’ and the Partner Acknowledge global parameter is ‘Y.’ Valid values are:
BLANK If left blank, no functional acknowledgment is generated.
‘G’ Indicates that only a group-level functional acknowledgment is generated in response to a single group received.
‘T’ Indicates that an acknowledgment is generated for every transaction set received.
The type of functional acknowledgment may be the 997, 999, or CONTRL. Typically, acknowledgments are sent at the transaction level so every document can be noted that it was properly received.
If this field is modified to BLANK from a G or T, then all group records for this partner are updated automatically with ‘N’ for the acknowledgement specific group and all transactions.
NOTEThis field is not applicable for TRADACOMS documents.
RECOMMENDATIONSet this to ‘T’ unless a partner has indicated that you will only acknowledge at the group level or not at all.

Use the Partner Panels
22 IBM Sterling Gentran:Server for iSeries Release 3.6 User Guide
Acknowledge ErrorsThis flag is used for inbound processing to determine if an acknowledgment (interchange or functional) is generated with errors encountered while compliance checking is being done on incoming EDI data.
If this flag is set to ‘Y,’ the acknowledgment flag is overridden and an acknowledgment is forcefully generated when an error is encountered, regardless of the level. An interchange acknowledgment is generated if an error occurred at the interchange level, or for the group and/or transaction if an error occurred at that level.
In addition, extra segments are generated in order to explain what type of error occurred, which segment it occurred in, and the value that was in error. For the 997-type of acknowledgment, the AK3 and AK4 pair of segments are sent back within the acknowledgment to convey the error information. For the 999, the A1 segment contains error information. The UCS and UCD segments convey error information for the CONTRL. Typically, errors are not used since they need to be mapped into a document to be effectively used, which is rare. Your partner must indicate if they want to see errors.
NOTEThis field is not applicable for TRADACOMS documents.
RECOMMENDATIONSet the Acknowledge Errors field to ‘N,’ unless a partner has indicated otherwise.
Purge Acknowledged, Purge Reported, Purge Older than DaysThese flags do not impact inbound or outbound processing. These three options are used to determine when data is purged from the Audit file on a partner-by-partner basis.
It is important to note that these options are only used for the Audit Purge by Partner command (AUDITPURGE). The normal mode of purging data in the Audit file is to use the Purge Audit command (PRGAUD) from the Audit subsystem. That option only uses the run-time parameters to globally purge the Audit file.
If you have a specific need to retain data longer than the run-time parameters for a partner versus another partner, you may run the customized Audit Purge command (AUDITPURGE) instead. The Audit Purge command uses no run-time parameters – only the parameters established on every partner’s Control record. (SEE the “Audit” chapter in the IBM® Sterling Gentran:Server® for iSeries® Release 3.6 Technical Reference Guide for more information on AUDITPURGE.)
These three parameters are used in conjunction with the AUDITPURGE command process to purge:
if acknowledgedand if reportedand if older than x number of days
If you want to purge “If Acknowledged” and “older than X number of days” regardless of whether it has been reported, specify ‘N’ for reported.
Use the Partner Panels
IBM Sterling Gentran:Server for iSeries Release 3.6 User Guide 23
RECOMMENDATIONSet to ‘N’ to deactivate (leave Purge Older Than Days blank). To purge the Audit file data, use the normal purge process (PRGAUD) from the Work with Audit subsystem.
Last Incoming BG PasswordThis option is only for ANSI documents with a BG interchange header option. The BG interchange contains a password in the BG02 element that identifies the Receiver ID. It is a password given your partner for use in sending data to you.
If the BG partner global parameter is set to ‘Y,’ Sterling Gentran:Server verifies that the value in the BG02 matches the BG Password field entered on this panel. If it does not match, the data is suspended. If it does match, processing continues as normal. The exception to this rule is if the BG Password was left blank in the Partner file. In this instance, no verification is performed for the partner.
If receiving BG interchanges, set the BG Password to the value expected in the incoming BG02 element.
RECOMMENDATIONTo deactivate, leave this field blank.
Set 209 ErrorsSpecify ‘Y’ to generate an ‘A’ (accepted) status on the outbound acknowledgement when an inbound 209 (duplicate audit record) error is received. Specify ‘N’ and it will produce an ‘E’ (error) status on the outbound acknowledgement when a 209 error is received. The default is ‘N.’
Comm Profile IDThis field is used for outbound processing to indicate where all outbound data for this partner is routed to in the Work with Communications subsystem, unless the group profile ID flag is set to ‘Y’ and there is a valid comm profile ID found at the group level. Unlike some translation software, Sterling Gentran:Server integrates the communication module with the translation module for one complete system. There are many Communication Profile IDs that are pre-shipped with Sterling Gentran:Server. (SEE the “Using Communications” chapter in the IBM® Sterling Gentran:Server® for iSeries® Release 3.6 Communications Guide for more information.) Additional profiles may be created for connections to other networks or with direct-connect partners.
If left blank, all data sent outbound to this partner is routed to the Communication Profile ID called DEFAULT.
NOTEThis profile ID can be overridden at the time of processing by specifying a Comm Profile ID on the PRCTRNOUT (Process Transactions Outbound) command. If the profile is specified on the processing command, all data for all partners processed in that run will be routed to the override profile ID instead of the partner’s Comm Profile ID.

Use the Partner Panels
24 IBM Sterling Gentran:Server for iSeries Release 3.6 User Guide
The Comm Profile ID is the only connection between the Processing subsystem of Sterling Gentran:Server and the Work with Communications subsystem of Sterling Gentran:Server. For example, when communications are established for a network, the information about the number to dial, the line to use, etc. is stored under the Comm Profile ID in the Work with Communication subsystem. EDI data that is ready to be transmitted to this network is loaded into the outbound queue under the specific Comm Profile ID. It is sent when a communication session is established for the specific network.
CAUTIONSTOP
The Comm Profile ID must exist in the Communications Profile directory before it can be entered on this panel. You may leave the Comm Profile ID field blank and then update it when you know the Profile ID to be used. Press F4 (Prompt) to obtain a list of valid profiles.
RECOMMENDATIONSet this to the Communication Profile ID that represents where this partner’s EDI data is sent, whether it is a Network or a Direct-Connect. If it is unknown at this time, use the Profile ID called DEFAULT.
Group Profile IDThis flag is used to indicate whether or not the communication profile ID should be overridden at the group level. If ‘Y’ is specified, it indicates that the group record should be looked up to see if there is a comm profile that should override the partner/interchange level profile. ‘N’ indicates that all data should be routed to the comm profile ID specified at the interchange/control level. The default is ‘N’.
NOTEThe system will set this flag to a ‘Y’ automatically whenever a group record for this partner is updated and contains a group level Comm Profile ID.
Last Incoming UNB/STX Seq. No.This flag is used only for EDIFACT and TRADACOMS type documents and keeps a log of the last incoming interchange control or sender’s reference number.
Update AllowedThis flag is only used for online file maintenance to determine if any updates are allowed to be made to this partner profile ID. If set to ‘N,’ no maintenance can be performed for this partner.
If maintenance needs to be performed, the user must change the Update Allowed flag to a ‘Y.’ Updates can then be made from any partner record.
NOTEThe user must have authority to change the Update Allowed flag for the partner. Authority is set in the Work with Environment Control subsystem. The user must
Use the Partner Panels
IBM Sterling Gentran:Server for iSeries Release 3.6 User Guide 25
have a Level 1 authority to the Work with Partner subsystem to change the Update Allowed Flag.
RECOMMENDATIONSet the Update Allowed to ‘Y.’ Before going into production, change the flag to ‘N’ to prevent any inadvertent changes.

Use the Partner Panels
26 IBM Sterling Gentran:Server for iSeries Release 3.6 User Guide
Step 3: Enter the Outbound Partner Control Information
The panel you see next depends on the interchange type which you entered on the previous panel. In our example, because the ISA interchange type was entered on the previous panel, the Partner Control panel (EDIX012-FMT05) displays next, as shown in Figure 3.9.
The cursor is positioned at the Authorization Qual field when this panel displays.
Figure 3.9 Outbound Partner Control Information for an ISA interchange type
To enter the outbound partner control information, type the field values as shown in Figure 3.9, then press F10 (Update) to add the field values.
NOTESEE your X12 standards manual for more information about what values are loaded into an ISA segment.
Field DescriptionsIf you are doing outbound processing, all the fields on this panel must be filled in, except for the Authorization and Security Code fields, which can be left blank. At this time however, you may not know all the information that is required to complete the panel. Enter as much information as you can at this time. Sterling Gentran:Server allows you to exit the panel without entering all the field values. If you are doing outbound processing, you must return to this panel and fill in all the ISA segment fields.
Authorization Qual and AuthorizationThis authorization information can be used to provide further identification or authorization of the sender of interchange data. If the transmission is outbound, the sender
EDIX012 Partner Control EDI 03/30/11 FMT05 12:00:00 Partner ID . . . . . . . . . . . . TPCOMPANY Partner Qualifier. . . . . . . . . Partner Name . . . . . . . . . . . *** Name Not On File *** Outbound envelope information for ISA segment Authorization Qual . . . . . ISA01 00 Authorization. . ISA02 Security Code Qual . . . . . .ISA03 00 Security Code. . ISA04 Sender ID Qual . . . . . . . .ISA05 01 Sender ID. . . . ISA06 MYDUNS Receiver ID Qual . . . . . . .ISA07 ZZ Receiver ID. . . ISA08 TPCOMPANY Control Standards ID . . . . .ISA11 U or Hex E4 Version. . . . . . . . . . . .ISA12 00400 Use. . . . . . . . . . . . . . . . D Control Number . . . . . . . .ISA13 000000000 Ack Requested. . . . . . . . .ISA14 0 (1=Yes,0=No) Subelement Separator . . . . .ISA16 > or Hex 6E Element Separator. . . . . . . . . * or Hex 5C Segment Terminator . . . . . . . . or Hex 15 F1=Help F4=Prompt F10=Update F12=Cancel F24=More Keys

Use the Partner Panels
IBM Sterling Gentran:Server for iSeries Release 3.6 User Guide 27
is usually you. However, this information is not typically used since authorization information is not usually required within the industry.
If you are not using the authorization information, the Authorization Qualifier must be coded as ‘00’ to indicate that the contents of the Authorization field are blank.
RECOMMENDATIONType the value ‘00’ in Authorization Qual and leave the Authorization field blank.
Security Code Qual and Security CodeThis security information may be used to provide security information regarding the sender of interchange data. However, this information is not typically used since security information is not usually required within the industry.
If you are not using the security information, the Security Code Qualifier needs to be coded as ‘00’ to indicate that the contents of the Security Code are blank.
RECOMMENDATIONType the value ‘00’ in Security Code Qual and leave Security Code blank.
Sender ID Qual and Sender IDThe sender information is a unique identifier to indicate yourself as the sender of the data. It is common to use a DUNS (Data Universal Number System issued from Dun and Bradstreet) number as the identifier. However, a telephone number or a descriptive identifier such as your company name may also be used.
The Sender ID Qualifier indicates what type of identifier is used in the Sender ID. For instance, if a DUNS number is used, the Qualifier is ‘01.’ If a descriptive identifier is used, the Qualifier is ‘ZZ.’ Refer to your standards manual for a complete listing of valid qualifiers and identifiers.
RECOMMENDATIONIf you know your company’s DUNS number, type the value ‘01’ in Sender ID Qual and enter your DUNS number in Sender ID. If you do not know this number, enter the value of ‘ZZ’ in Sender ID Qual and a brief descriptive name for your company in the Sender ID.
NOTEMake a note of the values for the Sender Qual and Sender ID fields. Cross reference these values back to the Partner ID used to create yourself as a partner for inbound splitting in Sterling Gentran:Server. You will set yourself up as a partner in a future step.

Use the Partner Panels
28 IBM Sterling Gentran:Server for iSeries Release 3.6 User Guide
Receiver ID Qual and Receiver IDUse a unique identifier for the receiver information to indicate your partner as the receiver of the data. It is common to use a DUNS number as the identifier. However, other identifiers, such as a telephone number or descriptive identifier, may be used. The Receiver ID Qual field indicates what type of identifier is used in the Receiver ID field. For instance, if a DUNS number is used, the Qualifier is ‘01.’ If a descriptive identifier is used, the Qualifier is ‘ZZ.’ Refer to your standards manual for a complete listing of valid qualifiers and identifiers.
Your partner provides the identifier and qualifier. Discuss this with their EDI contact.
NOTEMake a note of the values for the Receiver Qual and Receiver ID. Cross reference these values back to the Partner ID used to set up your trading partner.
Control Standards IDThe Standards ID value indicates whether this interchange is for domestic or international use. ‘U’ indicates USA EDI Community, while ‘E’ indicates EDIFACT. This flag does not impact any processing – it is just a requirement of using the ISA interchange segment.
RECOMMENDATIONType ‘U’ for the Control Standards ID flag.
VersionThis value represents the version of the interchange, not the version of the document. Typical interchange versions are: 00300, and 00400. Do not mistake this version with the document version which is similar to: 002040, 003020, 004010, etc. Not all interchange types have a version, but the ISA does. It is used to compliance check the interchange.
Typically, the interchange version is chosen based on the version of the document. Most EDI users, when sending a document in a version higher than 004010, send the interchange version as 00400. Review this value with your partner’s EDI contact.
UseThis indicator is not used for envelope generation. It is used by the Inbound and Outbound Editors to override the interchange version in the EDI data that is compliance checked. The Use flag is ONLY evaluated if the Interchange Version global parameter is set to “Y” or “A.” (SEE the “Global Parameters” chapter in the IBM® Sterling Gentran:Server® for iSeries® Release 3.6 Technical Reference Guide for more information.)
Valid values are:
‘A’ Always use the version coded in the Partner file for ISA12, regardless of the version that is actually in the data.

Use the Partner Panels
IBM Sterling Gentran:Server for iSeries Release 3.6 User Guide 29
‘I’ Use the version in the input data. Never override the version in the data. Therefore, the version coded on this panel is never used for compliance checking.
‘D’ Default. Use the version in the input data, if valid. If the version is not found in the Standards file, override the version and use the version coded in the Partner file for compliance checking.
RECOMMENDATIONSet this to ‘D’ for now and change the flag on an “as-needed” basis in the future.
Control NumberThe control number is an identifier for the electronic document. Each envelope gets “stamped” with a unique number to aid in tracking it. The interchange control number is increased by one each time an interchange is sent out to this partner. Note that the number gets increased immediately prior to loading it into the envelope. You can start the counting at any number you desire.
RECOMMENDATIONInitialize the Control Number value to ‘0.’
Ack RequestedThis flag allows you to request that an interchange acknowledgment be sent back to you. This does not mean that you are requesting a functional acknowledgment. Since the interchange acknowledgment contains little information, it is not used in the industry and is not very beneficial. The flag is similar to a “byte on/byte off” type of indicator. The value ‘0’ indicates you do not want the acknowledgment. The value ‘1’ indicates you do want the acknowledgment.
RECOMMENDATIONSet the Ack Requested value to ‘0.’ This indicates that you do not want the TA1 interchange acknowledgment.
Subelement SeparatorThis separator indicates what special character is used for subelements. Even if your EDI data does not include any subelements, this separator must still be sent and must not be equal to the element separator. Refer to your X12 standards manual for more information about subelements. Subelements were introduced to the X12 standards in version 004010, where it was added to the MEA segment.
RECOMMENDATIONThe most common subelement separator is the greater-than sign (>). Review this value with your partner’s EDI contact.
Use the Partner Panels
30 IBM Sterling Gentran:Server for iSeries Release 3.6 User Guide
Element SeparatorThis separator is placed in the outbound EDI data between each element in a segment. It must be a unique character that is not present in the data. Otherwise, it is impossible to correctly parse the data once it is received.
RECOMMENDATIONThe most common separator is the asterisk (*). Review this value with your partner’s EDI contact.
Segment TerminatorThe terminator is placed in the outbound EDI data at the end of each segment. It must be a unique character that is not present in the data and is not equal to the element separator. Otherwise, it is impossible to correctly parse the data once received.
RECOMMENDATIONThe most common terminator is Hex 15 (new line character). Review this value with your partner’s EDI contact.
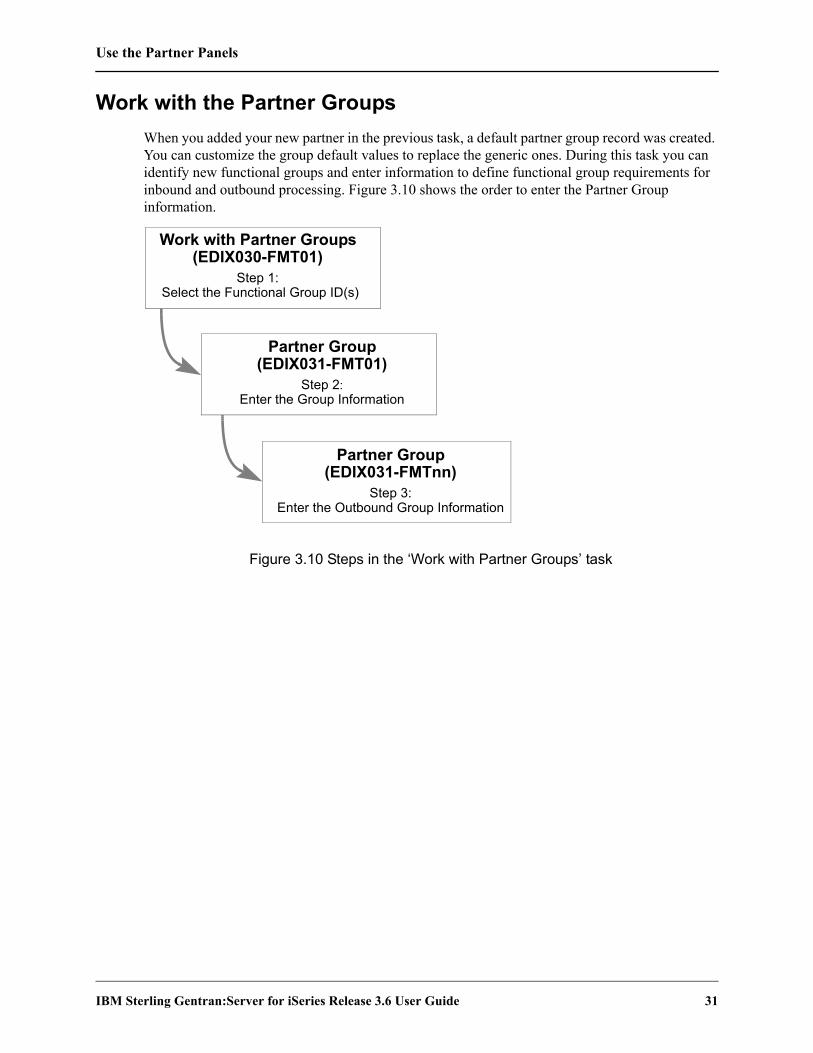
Use the Partner Panels
IBM Sterling Gentran:Server for iSeries Release 3.6 User Guide 31
Work with the Partner GroupsWhen you added your new partner in the previous task, a default partner group record was created. You can customize the group default values to replace the generic ones. During this task you can identify new functional groups and enter information to define functional group requirements for inbound and outbound processing. Figure 3.10 shows the order to enter the Partner Group information.
Figure 3.10 Steps in the ‘Work with Partner Groups’ task
Work with Partner Groups(EDIX030-FMT01)
Step 1:Select the Functional Group ID(s)
Partner Group(EDIX031-FMT01)
Step 2:Enter the Group Information
Partner Group(EDIX031-FMTnn)
Step 3:Enter the Outbound Group Information

Use the Partner Panels
32 IBM Sterling Gentran:Server for iSeries Release 3.6 User Guide
Step 1: Select the Functional Group ID(s)
The first step in working with partner groups is to select the appropriate functional group ID(s). This task begins from the Work with Partner Groups panel (EDIX030-FMT01). This panel may contain partner defined groups for all Partner IDs, or for selected Partner IDs. This is determined by the manner in which the Work with Partner Groups panel is accessed.
Figure 3.11 Access the Work with Partner Groups panel (EDIX030-FMT01) from the Work with Partners panel (EDIX005-FMT01)
Type ‘11’ in the Option field beside the Partner ID whose group ID’s you want to access on the Work with Partners panel (EDIX005-FMT01), as shown in Figure 3.11. Press Enter.
When you first access the Work with Partner Group panel (EDIX030-FMT01) as shown in Figure 3.12, you will notice that there is one Group ID already defined – !!!DFT. This is the default Functional Group ID which was automatically created when you set up the new partner profile.
Sterling Gentran:Server recommends that you create a functional group record for every type of document you intend to trade with your partner – both inbound and outbound. For this example, two functional groups will be examined:
1. An outbound invoice sent to your trading partner.
2. An inbound purchase order received from your trading partner.
EDIX005 Work with Partners EDI 03/30/11 FMT01 pgmlib: G3X6PGM dtalib: G3X6DTA 12:00:00 Position to Partner ID . . . . . . Qual Type option (and Information), press Enter. 1=Create 2=Revise 3=Copy 4=Delete 5=View 6=Print 7=Rename 11=Groups Opt Partner ID Qual Partner Name 11 TPCOMPANY TPCOMPANY UNA-PARTNER EXAMPLE OF A UNA PARTNER VENDOR-1 TUTORIAL - XYZ COMPUTER COMPANY VENDOR-2 TUTORIAL - BULK PAPER COMPANY VENDOR-3 TUTORIAL - TWO WAY COMMUNICATIONS VENDOR-4 TUTORIAL - RANDOM OFFICE SUPPLY 123456789 RECEIVER RECORD FOR SEPARATION Bottom Parameters or command ===> F1=Help F3=Exit F12=Cancel F15=Sort F23=More Options F24=More Keys

Use the Partner Panels
IBM Sterling Gentran:Server for iSeries Release 3.6 User Guide 33
Figure 3.12 describes the creation of the Group ID on the Work with Partner Groups panel (EDIX030-FMT01).
Figure 3.12 Enter a new Group ID for an outbound invoice
To create a new group ID for the partner, type ‘1’ in the Option field, and the functional group code in the Group ID field on the key entry line. Press Enter. Repeat this action for each group that needs to be created. In our example, we’ve created a group ID for inbound purchase orders (PO) and for outbound invoices (IN). After completing the necessary entries for a group code and pressing Enter on panel EDIX030-FMT01, the Partner Group panel (EDIX031-FMT01) displays.
Field DescriptionsGroup ID
The Group ID is the actual Functional Group ID from the standards in the GS01 element. You will need to refer to your standards manual for a list of group identifiers that correspond to a document, or press F4 (Prompt) for a list of valid Functional Group IDs.
For the example we need the following Group IDs:
• Group ID = PO (Purchase Orders)• Group ID = IN (Invoices)
NOTEThe Group ID MUST be valid according to the standards. If you do not have a standards manual, look up the code in Sterling Gentran:Server Work with Standards subsystem (use the Default version to find the GS segment and look for codes under the GS01).
EDIX030 Work with Partner Groups EDI 03/30/11 FMT01 pgmlib: G3X6PGM dtalib: G3X6DTA 12:00:00 Position to Group ID . . . . . For TPCOMPANY Type option (and Information), press Enter. 1=Create 2=Revise 3=Copy 4=Delete 5=View 11=Transactions Opt Group ID 1 PO !!!DFT Bottom Parameters or command ===> F1=Help F3=Exit F12=Cancel F15=Sort F24=More Keys
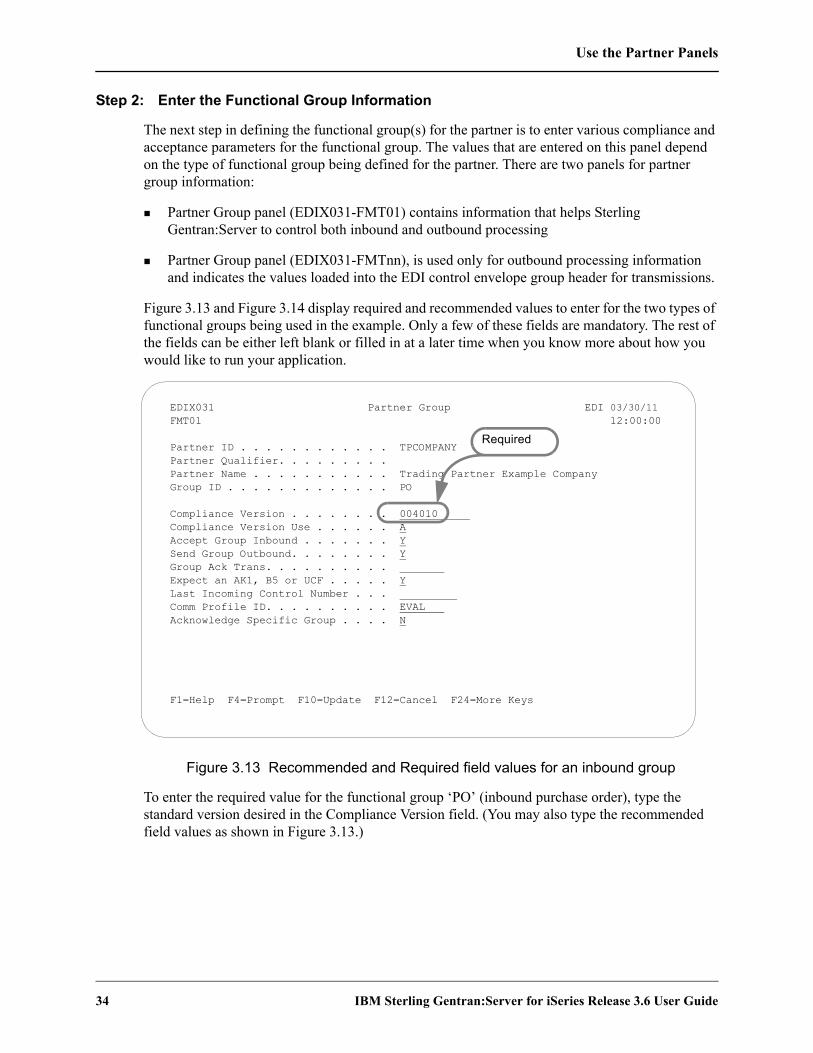
Use the Partner Panels
34 IBM Sterling Gentran:Server for iSeries Release 3.6 User Guide
Step 2: Enter the Functional Group Information
The next step in defining the functional group(s) for the partner is to enter various compliance and acceptance parameters for the functional group. The values that are entered on this panel depend on the type of functional group being defined for the partner. There are two panels for partner group information:
Partner Group panel (EDIX031-FMT01) contains information that helps Sterling Gentran:Server to control both inbound and outbound processing
Partner Group panel (EDIX031-FMTnn), is used only for outbound processing information and indicates the values loaded into the EDI control envelope group header for transmissions.
Figure 3.13 and Figure 3.14 display required and recommended values to enter for the two types of functional groups being used in the example. Only a few of these fields are mandatory. The rest of the fields can be either left blank or filled in at a later time when you know more about how you would like to run your application.
Figure 3.13 Recommended and Required field values for an inbound group
To enter the required value for the functional group ‘PO’ (inbound purchase order), type the standard version desired in the Compliance Version field. (You may also type the recommended field values as shown in Figure 3.13.)
EDIX031 Partner Group EDI 03/30/11 FMT01 12:00:00 Partner ID . . . . . . . . . . . . TPCOMPANY Partner Qualifier. . . . . . . . . Partner Name . . . . . . . . . . . Trading Partner Example Company Group ID . . . . . . . . . . . . . PO Compliance Version . . . . . . . . 004010 Compliance Version Use . . . . . . A Accept Group Inbound . . . . . . . Y Send Group Outbound. . . . . . . . Y Group Ack Trans. . . . . . . . . . Expect an AK1, B5 or UCF . . . . . Y Last Incoming Control Number . . . Comm Profile ID. . . . . . . . . . EVAL Acknowledge Specific Group . . . . N F1=Help F4=Prompt F10=Update F12=Cancel F24=More Keys
Required

Use the Partner Panels
IBM Sterling Gentran:Server for iSeries Release 3.6 User Guide 35
After completing the entries, press F10 (Update) to add the values. If the Send Group Outbound field is set to ‘Y,’ an additional Partner Group panel (EDIX031-FMTnn) displays to specify the outbound envelope information. This panel will vary based on the type of interchange selected. If Send Group Outbound is set to ‘N,’ you will be returned to the Work with Partner Group panel (EDIX030-FMT01).
Figure 3.14 Recommended & Required field values for an outbound group
To enter the required value for the functional group ‘IN’ (outbound invoice), type the standard version desired in the Compliance Version field. (You may also type the recommended field values as shown in Figure 3.14.)
After completing the entries, press F10 (Update) to add the values. If the Send Group Outbound field is set to ‘Y,’ an additional partner group panel (EDIX031-FMTnn) displays to specify the outbound envelope information. This panel will vary based on the type of interchange selected. If Send Group Outbound is set to ‘N,’ you will be returned to the Work with Partner Group panel (EDIX030-FMT01).
EDIX031 Partner Group EDI 03/30/11 FMT01 12:00:00 Partner ID . . . . . . . . . . . . TPCOMPANY Partner Qualifier. . . . . . . . . Partner Name . . . . . . . . . . . Trading Partner Example Company Group ID . . . . . . . . . . . . . IN Compliance Version . . . . . . . . 004010 Compliance Version Use . . . . . . D Accept Group Inbound . . . . . . . N Send Group Outbound. . . . . . . . Y Group Ack Trans. . . . . . . . . . Expect an AK1, B5 or UCF . . . . . Y Last Incoming Control Number . . . Comm Profile ID. . . . . . . . . . *INT Acknowledge Specific Group . . . . N F1=Help F4=Prompt F10=Update F12=Cancel F24=More Keys
Required

Use the Partner Panels
36 IBM Sterling Gentran:Server for iSeries Release 3.6 User Guide
Field Descriptions (Mandatory fields)Compliance Version
The Compliance Version is used for compliance checking by the Inbound and Outbound Editor for this functional group. In order for the version on the panel to be chosen for compliance checking, the Group Version global parameter must either be ‘A’ or ‘Y.’ This version may also be used during outbound mapping as the version loaded into the GS08 element, if the Version field on the Partner Group panel (EDIX031-FMT04) is left blank.
RECOMMENDATIONSet the Compliance Version to the value that was requested by your trading partner for this particular group.
Field Descriptions (Optional fields)Compliance Version Use
This feature is advanced and can be used to override the group version in the EDI data being compliance checked by the Inbound or Outbound Editor. The Compliance Version Use flag is evaluated ONLY if the Group Version global parameter is set to ‘Y’. (SEE the “Global Parameters” chapter in the IBM® Sterling Gentran:Server® for iSeries® Release 3.6 Technical Reference Guide for more information.
Valid values are:
‘A’ Always use the version coded in the Partner file for the Compliance Version (above), regardless of the version that is actually in the data.
‘I’ Use the version in the input data. Never override the version in the data. Therefore, the version coded on the panel above is never looked at to determine compliance checking.
‘D’ Default. Use the version in the input data if valid. If the version is not found in the Standards file, override the version and use the version coded in the Partner file for the Compliance Version (above).
RECOMMENDATIONSet the Compliance Version Use field to ‘D’ for now and change it on an “as-needed” basis in the future.
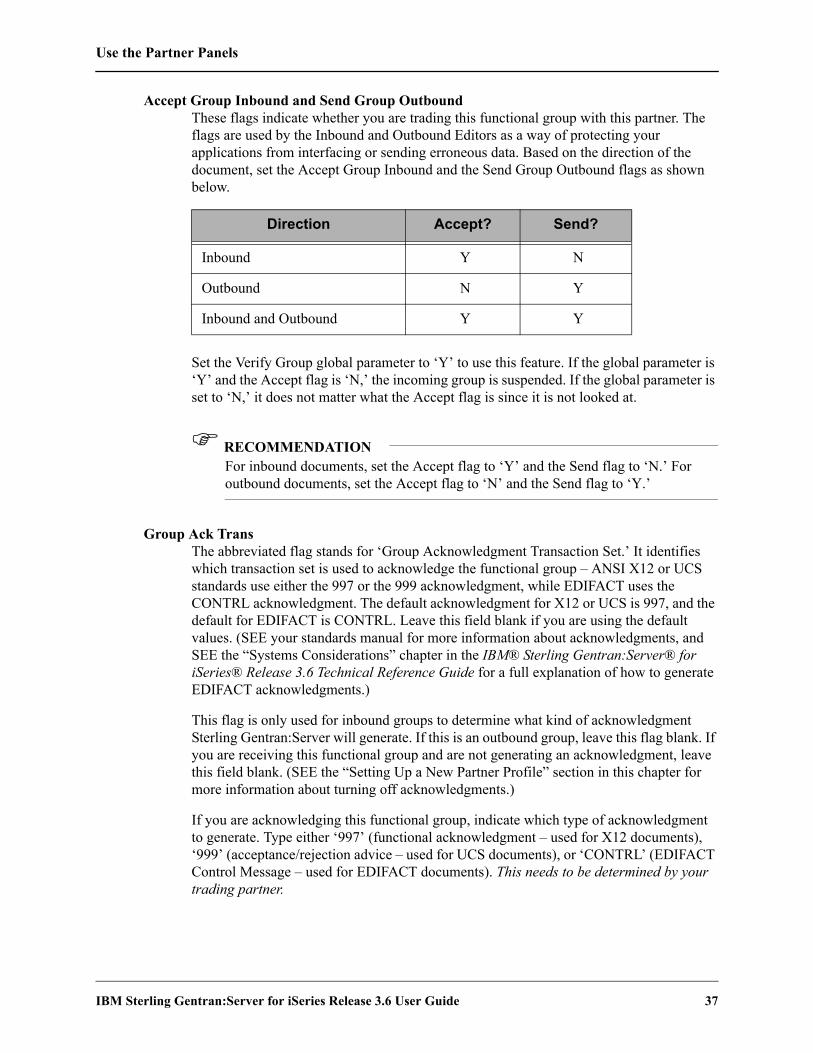
Use the Partner Panels
IBM Sterling Gentran:Server for iSeries Release 3.6 User Guide 37
Accept Group Inbound and Send Group OutboundThese flags indicate whether you are trading this functional group with this partner. The flags are used by the Inbound and Outbound Editors as a way of protecting your applications from interfacing or sending erroneous data. Based on the direction of the document, set the Accept Group Inbound and the Send Group Outbound flags as shown below.
Set the Verify Group global parameter to ‘Y’ to use this feature. If the global parameter is ‘Y’ and the Accept flag is ‘N,’ the incoming group is suspended. If the global parameter is set to ‘N,’ it does not matter what the Accept flag is since it is not looked at.
RECOMMENDATIONFor inbound documents, set the Accept flag to ‘Y’ and the Send flag to ‘N.’ For outbound documents, set the Accept flag to ‘N’ and the Send flag to ‘Y.’
Group Ack TransThe abbreviated flag stands for ‘Group Acknowledgment Transaction Set.’ It identifies which transaction set is used to acknowledge the functional group – ANSI X12 or UCS standards use either the 997 or the 999 acknowledgment, while EDIFACT uses the CONTRL acknowledgment. The default acknowledgment for X12 or UCS is 997, and the default for EDIFACT is CONTRL. Leave this field blank if you are using the default values. (SEE your standards manual for more information about acknowledgments, and SEE the “Systems Considerations” chapter in the IBM® Sterling Gentran:Server® for iSeries® Release 3.6 Technical Reference Guide for a full explanation of how to generate EDIFACT acknowledgments.)
This flag is only used for inbound groups to determine what kind of acknowledgment Sterling Gentran:Server will generate. If this is an outbound group, leave this flag blank. If you are receiving this functional group and are not generating an acknowledgment, leave this field blank. (SEE the “Setting Up a New Partner Profile” section in this chapter for more information about turning off acknowledgments.)
If you are acknowledging this functional group, indicate which type of acknowledgment to generate. Type either ‘997’ (functional acknowledgment – used for X12 documents), ‘999’ (acceptance/rejection advice – used for UCS documents), or ‘CONTRL’ (EDIFACT Control Message – used for EDIFACT documents). This needs to be determined by your trading partner.
Direction Accept? Send?
Inbound Y N
Outbound N Y
Inbound and Outbound Y Y

Use the Partner Panels
38 IBM Sterling Gentran:Server for iSeries Release 3.6 User Guide
RECOMMENDATIONIf this is an inbound transaction and your trading partner is using X12 or UCS standards, leave this field blank to accept the default value of ‘997’ unless your trading partner has requested a ‘999.’ If your trading partner is using EDIFACT standards, type ‘CONTRL.’ For outbound transactions, leave this field blank.
Expect an AK1, B5, or UCFThis flag identifies whether group envelopes which have not been acknowledged are printed on the Audit Unacknowledged Activity Report. If you expect a group acknowledgment, specify ‘Y.’ This flag affects both inbound and outbound groups. The AK1 and B5 are segments that exist in the 997 and 999 functional acknowledgments, respectively. The UCF segment exists in the CONTRL acknowledgment for EDIFACT. They acknowledge a particular GS or UNG envelope.
When processing groups outbound, the Outbound Editor (EBDI002) logs the group in the Audit file if the Audit Group global parameter is set to ‘Y’ (SEE the “Global Parameters” chapter in the IBM® Sterling Gentran:Server® for iSeries® Release 3.6 Technical Reference Guide for more information).
There is an acknowledgment status flag for every group logged in the Audit file. The flag can be used when printing the Audit Unacknowledged Activity Report to determine if all documents sent to your partner have been acknowledged. If the group has not been acknowledged by your partner with an AK1, B5, or UCF segment, the ACK status flag in the Audit file is blank. Even if you do not expect acknowledgment of documents, a blank status flag will cause a document to display if you print the Audit Report showing all unacknowledged documents.
In this case, it is not an error to have not received a group acknowledgment. You may want a method of turning this feature off for any document that is not expected to be acknowledged. The EDIFACT UNG segment is typically not used.
When processing groups inbound, the same process is true. However, the report identifies received groups that are not yet acknowledged. For those groups that you do not expect to acknowledge, set the flag to ‘N’ to not view the unacknowledged groups as errors.
Last Incoming Control NumberThis defines the control number of the last incoming group received and is used to verify whether inbound groups with this group ID have sequential control numbers. If this field is blank, no sequence checking is performed.
NOTEThe incoming control number must be numeric to activate this feature. Only applicable if used with the Sequential Check Control or Sequential Error Control global parameter.
The benefit to this feature is only realized when you contact the partner to determine if you missed some interchanges. However, this is time consuming and often does not happen. It
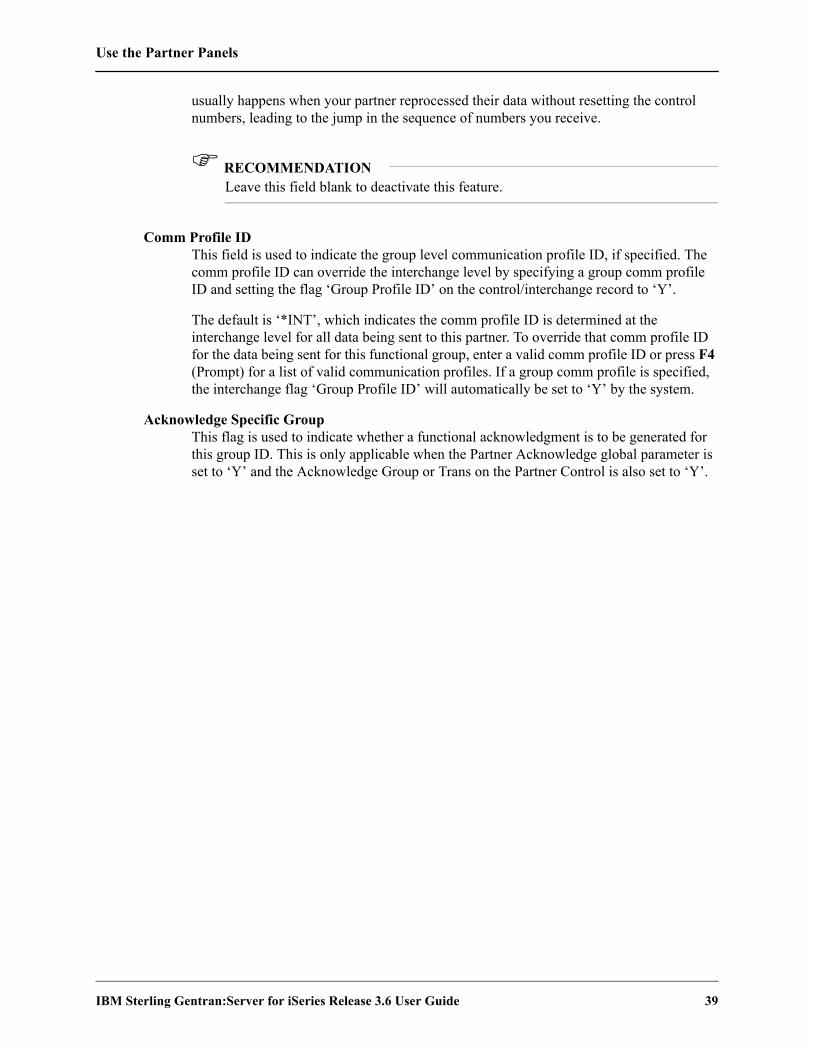
Use the Partner Panels
IBM Sterling Gentran:Server for iSeries Release 3.6 User Guide 39
usually happens when your partner reprocessed their data without resetting the control numbers, leading to the jump in the sequence of numbers you receive.
RECOMMENDATIONLeave this field blank to deactivate this feature.
Comm Profile IDThis field is used to indicate the group level communication profile ID, if specified. The comm profile ID can override the interchange level by specifying a group comm profile ID and setting the flag ‘Group Profile ID’ on the control/interchange record to ‘Y’.
The default is ‘*INT’, which indicates the comm profile ID is determined at the interchange level for all data being sent to this partner. To override that comm profile ID for the data being sent for this functional group, enter a valid comm profile ID or press F4 (Prompt) for a list of valid communication profiles. If a group comm profile is specified, the interchange flag ‘Group Profile ID’ will automatically be set to ‘Y’ by the system.
Acknowledge Specific GroupThis flag is used to indicate whether a functional acknowledgment is to be generated for this group ID. This is only applicable when the Partner Acknowledge global parameter is set to ‘Y’ and the Acknowledge Group or Trans on the Partner Control is also set to ‘Y’.
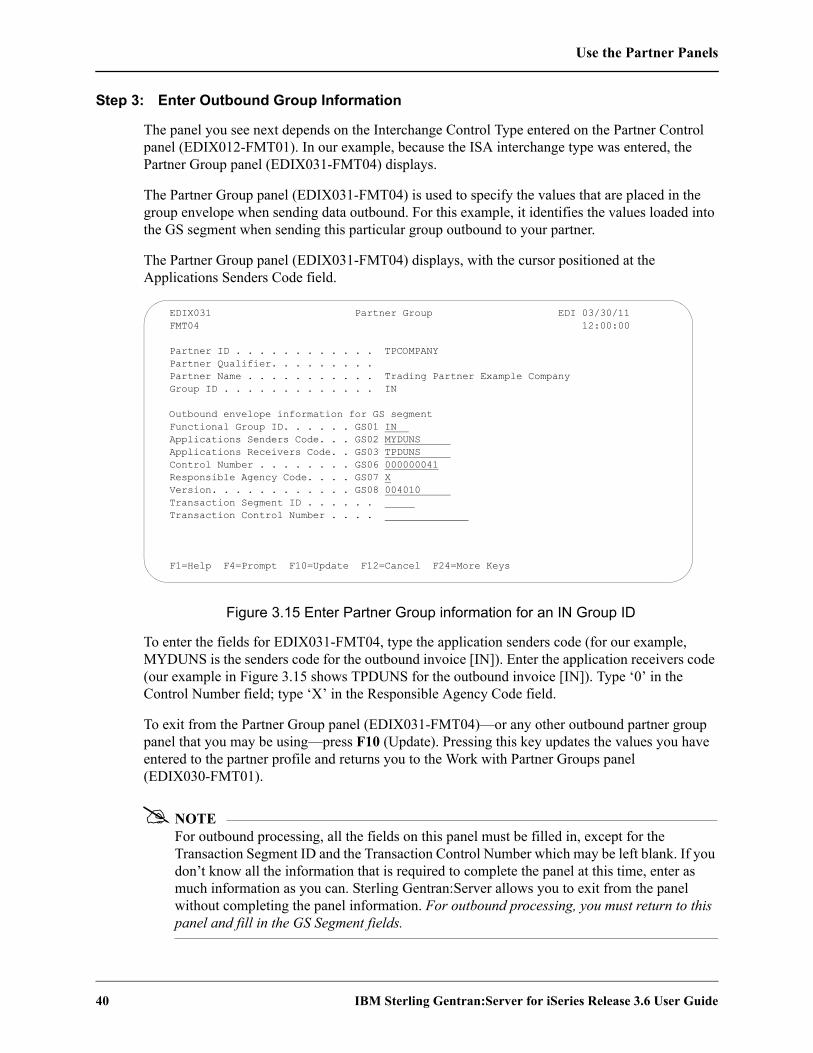
Use the Partner Panels
40 IBM Sterling Gentran:Server for iSeries Release 3.6 User Guide
Step 3: Enter Outbound Group Information
The panel you see next depends on the Interchange Control Type entered on the Partner Control panel (EDIX012-FMT01). In our example, because the ISA interchange type was entered, the Partner Group panel (EDIX031-FMT04) displays.
The Partner Group panel (EDIX031-FMT04) is used to specify the values that are placed in the group envelope when sending data outbound. For this example, it identifies the values loaded into the GS segment when sending this particular group outbound to your partner.
The Partner Group panel (EDIX031-FMT04) displays, with the cursor positioned at the Applications Senders Code field.
Figure 3.15 Enter Partner Group information for an IN Group ID
To enter the fields for EDIX031-FMT04, type the application senders code (for our example, MYDUNS is the senders code for the outbound invoice [IN]). Enter the application receivers code (our example in Figure 3.15 shows TPDUNS for the outbound invoice [IN]). Type ‘0’ in the Control Number field; type ‘X’ in the Responsible Agency Code field.
To exit from the Partner Group panel (EDIX031-FMT04)—or any other outbound partner group panel that you may be using—press F10 (Update). Pressing this key updates the values you have entered to the partner profile and returns you to the Work with Partner Groups panel (EDIX030-FMT01).
NOTEFor outbound processing, all the fields on this panel must be filled in, except for the Transaction Segment ID and the Transaction Control Number which may be left blank. If you don’t know all the information that is required to complete the panel at this time, enter as much information as you can. Sterling Gentran:Server allows you to exit from the panel without completing the panel information. For outbound processing, you must return to this panel and fill in the GS Segment fields.
EDIX031 Partner Group EDI 03/30/11 FMT04 12:00:00 Partner ID . . . . . . . . . . . . TPCOMPANY Partner Qualifier. . . . . . . . . Partner Name . . . . . . . . . . . Trading Partner Example Company Group ID . . . . . . . . . . . . . IN Outbound envelope information for GS segment Functional Group ID. . . . . . GS01 IN Applications Senders Code. . . GS02 MYDUNS Applications Receivers Code. . GS03 TPDUNS Control Number . . . . . . . . GS06 000000041 Responsible Agency Code. . . . GS07 X Version. . . . . . . . . . . . GS08 004010 Transaction Segment ID . . . . . . Transaction Control Number . . . . F1=Help F4=Prompt F10=Update F12=Cancel F24=More Keys

Use the Partner Panels
IBM Sterling Gentran:Server for iSeries Release 3.6 User Guide 41
Field Descriptions (Mandatory Fields)SEE the “Standards” chapter for more information about the values that should be entered for the GS segment.
Applications Senders CodeThis is the GS02 code. It is a unique identifier that indicates yourself as the sender of the data. It is common to use a DUNS (Data Universal Number System issued from Dun and Bradstreet) number as the identifier. However, a telephone number or your company name may be used as identifiers. It is common to use the same identifier in this element as was used for the ISA06 element.
RECOMMENDATIONIf you know your company’s DUNS number, type it in this field. If you do not know this number, type a brief descriptive name for your company.
NOTEMake a note of the Sender (GS02). This value is cross referenced back to the ID used to create yourself as a partner in Sterling Gentran:Server. For inbound splitting, you will be asked to set yourself up as a partner.
Applications Receivers CodeThis is the GS03 code. It is a unique identifier that indicates your partner as the receiver of the data. It is common to use a DUNS number as the identifier. However, other identifiers include a telephone number or a descriptive identifier such as your partner’s company name. It is common to use the same Receiver Code that was used in the ISA08 element.
RECOMMENDATIONYour partner indicates what Receiver code to use. Discuss this with your partner’s EDI contact.
NOTEMake a note of the Receiver (GS03). Cross reference this value back to the Partner ID used to set up your trading partner. You are asked to do this in a later task. It is helpful to have made a note of this value in preparation for that task.
The GS04 and GS05 codes are date and time stamps. These are generated by the system at run-time and are therefore left off the panel.
Control NumberThis is the GS06 code. The Control Number is an identifier for the electronic document. Each envelope gets “stamped” with a unique number to aid in tracking it. The group control number is increased by one each time this particular group is sent out to this
Use the Partner Panels
42 IBM Sterling Gentran:Server for iSeries Release 3.6 User Guide
partner. Note that the number is increased immediately prior to loading it into the envelope. You can start the counting at any number you desire.
RECOMMENDATIONInitialize the Control Number value to ‘0.’
Responsible Agency CodeThis is the GS07 code. It identifies which standards committee is responsible for managing the document. Values for this code are:
‘X’ ANSI X12 for cross-industry standards
‘T’ TDCC for transportation and grocery standards
RECOMMENDATIONTypically, the Responsible Agency Code is an ‘X.’ If you are sending the BG interchange, set this field to ‘T.’ Review this with your partner’s EDI contact.
VersionThe Version code is loaded into the GS08 element. If left blank, the Compliance Version on the Partner Group panel (EDIX031-FMT01) for this group is automatically loaded into the GS08 element.
Some people prefer to leave the version blank. If this field is left blank and they move up to a new version, only Compliance Version will have to be changed. The only downfall to leaving it blank is that it may not be clear to a user what value is loaded into the GS08.
RECOMMENDATIONEnter the same version as loaded in the Compliance Version on the Partner Group panel (EDIX031-FMT01), or leave it blank.
Field Descriptions (Optional Fields)Transaction Segment ID and Transaction Control Number
If either of these two fields is used, they must be used together. They can be used to sequentially increment the Transaction Control Number across all transactions underneath one specific functional group. This will only have an impact on UCS documents where more than one transaction set is linked to the same functional group.
Let’s use two examples to illustrate this feature. In these examples, the documents being used are: the 875 UCS purchase order and the 876 UCS purchase order change, both of which belong to the same functional group, ‘OG.’ In both examples, assume three purchase orders (875) are sent first, followed by two purchase order changes (876).

Use the Partner Panels
IBM Sterling Gentran:Server for iSeries Release 3.6 User Guide 43
Example 1: Transaction Segment ID = ST
The Transaction Segment ID is set to ‘ST’ and the Transaction Control Number is initialized with ‘0’. The generated control numbers are shown below.
Example 2: Transaction Segment ID = blank
The segment ID and the control number are left blank.
RECOMMENDATIONLeave both the Transaction Segment ID and the Transaction Control Number blank.
Transaction Set Control Number
875 1
875 2
875 3
876 4
876 5
Total Transactions for OG Group 5
Transaction Set Control Number
875 1
875 2
875 3
876 1
876 2
Total Transactions for OG Group 5

Use the Partner Panels
44 IBM Sterling Gentran:Server for iSeries Release 3.6 User Guide
Work with Partner TransactionsWhen you added your new partner in the ‘Setting Up a New Partner’ task, a default partner transaction record was created. You can customize the transaction default values to replace the generic ones provided. During this task, you may identify new transaction headers and enter information to define transaction header requirements for inbound and outbound processing. Figure 3.16 shows the order to enter the Partner Transaction information
Figure 3.16 Steps in the ‘Work with Partner Transactions’ task
Work with Partner Transactions(EDIX040-FMT01)
Step 1:Select the Transaction ID(s)
Partner Transaction(EDIX041-FMT01)
Step 2:Enter the Transaction Set Information
Partner Transaction(EDIX041-FMTnn)
Step 3:Enter the Outbound Transaction Information
Use the Partner Panels
IBM Sterling Gentran:Server for iSeries Release 3.6 User Guide 45
Step 1: Select the Transaction ID(s)
The first step in working with partner transactions is to select the appropriate transaction ID(s). The Work with Partner Transactions panel (EDIX040-FMT01) may contain partner defined transactions for all Partner IDs or for selected Partner IDs. This is determined by the manner in which the Work with Partner Transactions panel is accessed.
Figure 3.17 Access the Work with Partner Transactions panel (EDIX040-FMT01)
On the Work with Partners panel, type ‘12’ in the Option field next to the partner profile created in the previous task, as shown in Figure 3.17, and press Enter.
When you first access the Work with Partner Transactions panel (EDIX040-FMT01), as shown in Figure 3.18, you will notice that there is one Transaction ID already defined – !!!DFT. This is the default Transaction ID which was automatically created when you set up the new partner profile.
Sterling Gentran:Server recommends that you create a transaction record for every type of document you intend to trade with your partner – either inbound or outbound.
To continue with our example, we will examine two Transaction IDs:
1. An inbound purchase order received from your trading partner
2. An outbound invoice sent to your trading partner.
EDIX005 Work with Partners EDI 03/30/11 FMT01 pgmlib: G3X6PGM dtalib: G3X6DTA 12:00:00 Position to Partner ID . . . . . . Qual Type option (and Information), press Enter. 12=Transactions 13=Name & Address 14=User Defined 15=Data Sep. Opt Partner ID Qual Partner Name 12 TPCOMPANY TPCOMPANY UNA-PARTNER EXAMPLE OF A UNA PARTNER VENDOR-1 TUTORIAL - XYZ COMPUTER COMPANY VENDOR-2 TUTORIAL - BULK PAPER COMPANY VENDOR-3 TUTORIAL - TWO WAY COMMUNICATIONS VENDOR-4 TUTORIAL - RANDOM OFFICE SUPPLY 123456789 RECEIVER RECORD FOR SEPARATION Bottom Parameters or command ===> F1=Help F3=Exit F12=Cancel F15=Sort F23=More Options F24=More Keys
Use the Partner Panels
46 IBM Sterling Gentran:Server for iSeries Release 3.6 User Guide
Figure 3.18 Enter a new Transaction ID for an outbound invoice
To create a new Transaction ID for the partner, type ‘1’ in the Option field; in the Trans ID field, type the Transaction ID (as shown in Figure 3.18), then press Enter. When Enter is pressed, Sterling Gentran:Server automatically advances to the Partner Transaction panel (EDIX041-FMT01). To follow the example, type ‘850’ as the Trans ID for purchase orders, then repeat this step using ‘810’ as the Trans ID for invoices.
Field DescriptionsTransaction ID
This ID must be the actual Transaction Set ID from the standards in the ST01 element. (Press F4 [Prompt] or SEE your standards manual for a list of transaction set identifiers or look up the code in the Sterling Gentran:Server Work with Standards subsystem [use the default version to find the ST segment and look for codes under the ST01.].) Sterling Gentran:Server must find a transaction record for the resolved partner if the Verify Transaction global parameter is turned on. Otherwise, the transaction is suspended. This verification is performed by the Inbound and Outbound Editors.
For the example we need the following Transaction IDs:
1. Transaction ID = 850 (Purchase Orders)
2. Transaction ID = 810 (Invoices)
RECOMMENDATIONThe Transaction ID must be set to the transaction set number for the EDI document according to the standards. (SEE your standards manual for a complete listing of transaction set numbers.)
EDIX040 Work with Partner Transactions EDI 03/30/11 FMT01 pgmlib: G3X6PGM dtalib: G3X6DTA 12:00:00 Position to Tran ID For TPCOMPANY Type option (and Information), press Enter. 1=Create 2=Revise 3=Copy 4=Delete 5=View Opt Tran ID In Map Out Map 1 850 !!!DFT Bottom Parameters or command ===> F1=Help F3=Exit F12=Cancel F15=Sort F24=More Keys

Use the Partner Panels
IBM Sterling Gentran:Server for iSeries Release 3.6 User Guide 47
Step 2: Enter the Transaction Set Information
The next step is to enter various transaction mapping and validation parameters for the transaction set. The values entered on this panel depend on the type of transaction set being defined for the partner. The same panel is used for entering information for all transaction sets.
Sterling Gentran:Server allows you to exit from the Partner Transaction panel (EDIX041-FMT01) without completing the entry of field values. You may, however, want to return to this panel prior to processing in order to enter additional information. Figure 3.19 and Figure 3.20 display recommended values to enter for the two types of transaction sets being used in the example.
Figure 3.19 Recommended and Required Fields for an inbound ‘850’ Transaction Set
To enter the transaction set information for an inbound Transaction ID ‘850,’ type in the values shown in Figure 3.19 and press Enter. If the Send Transaction Outbound field is set to ‘Y,’ the Partner Transaction panel (EDIX041-FMTnn) displays next.
EDIX041 Partner Transaction EDI 09/01/04 FMT01 12:00:00 Partner ID . . . . . . . . . . . . TPCOMPANY Partner Qualifier. . . . . . . . . Partner Name . . . . . . . . . . . Trading Partner Example Company Transaction ID . . . . . . . . . . 850 Test or Production . . . . . . . . T Transaction Map ID Inbound . . . . Transaction Map ID Outbound. . . . Accept Transaction Inbound . . . . Y Send Transaction Outbound. . . . . N Validate Codes Inbound . . . . . . Y Validate Codes Outbound. . . . . . Y Expect an AK2, A2, or UCM. . . . . Y Transaction Acknowledgement Type . 997 Acknowledgment Overdue in . . . . . Hours Minutes Acknowledge Specific Trans. . . . . Y F1=Help F4=Prompt F8=Next F10=Update F12=Cancel F24=More Keys
Recommended

Use the Partner Panels
48 IBM Sterling Gentran:Server for iSeries Release 3.6 User Guide
Figure 3.20 Recommended field values for outbound ‘810’ Transaction Set
To enter the transaction set information for an outbound Transaction ID ‘810,’ type in the values shown in Figure 3.20 and press Enter. If the Send Transaction Outbound field is set to ‘Y,’ the Partner Transaction panel (EDIX041-FMTnn) displays next.
Field Descriptions (Recommended Fields)Test or Production
This flag is an FYI flag. It is used for outbound documents to help generate the status of some types of interchanges, such as the ISA. It marks whether the transaction set is considered as test or production.
The Outbound Mapper/Envelope uses this flag as partial input when determining what the ISA Test or Production flag (ISA15) is. The following table shows how the flags are used together to generate the ISA15 flag.
EDIX041 Partner Transaction EDI 09/01/04 FMT01 12:00:00 Partner ID . . . . . . . . . . . . TPCOMPANY Partner Qualifier. . . . . . . . . Partner Name . . . . . . . . . . . Trading Partner Example Company Transaction ID . . . . . . . . . . 810 Test or Production . . . . . . . . T Transaction Map ID Inbound . . . . Transaction Map ID Outbound. . . . Accept Transaction Inbound . . . . Y Send Transaction Outbound. . . . . Y Validate Codes Inbound . . . . . . Y Validate Codes Outbound. . . . . . Y Expect an AK2, A2, or UCM. . . . . Y Transaction Acknowledgement Type . Acknowledgment Overdue in . . . . . Hours Minutes Acknowledge Specific Trans. . . . . Y F1=Help F4=Prompt F8=Next F10=Update F12=Cancel F24=More Keys
Recommended
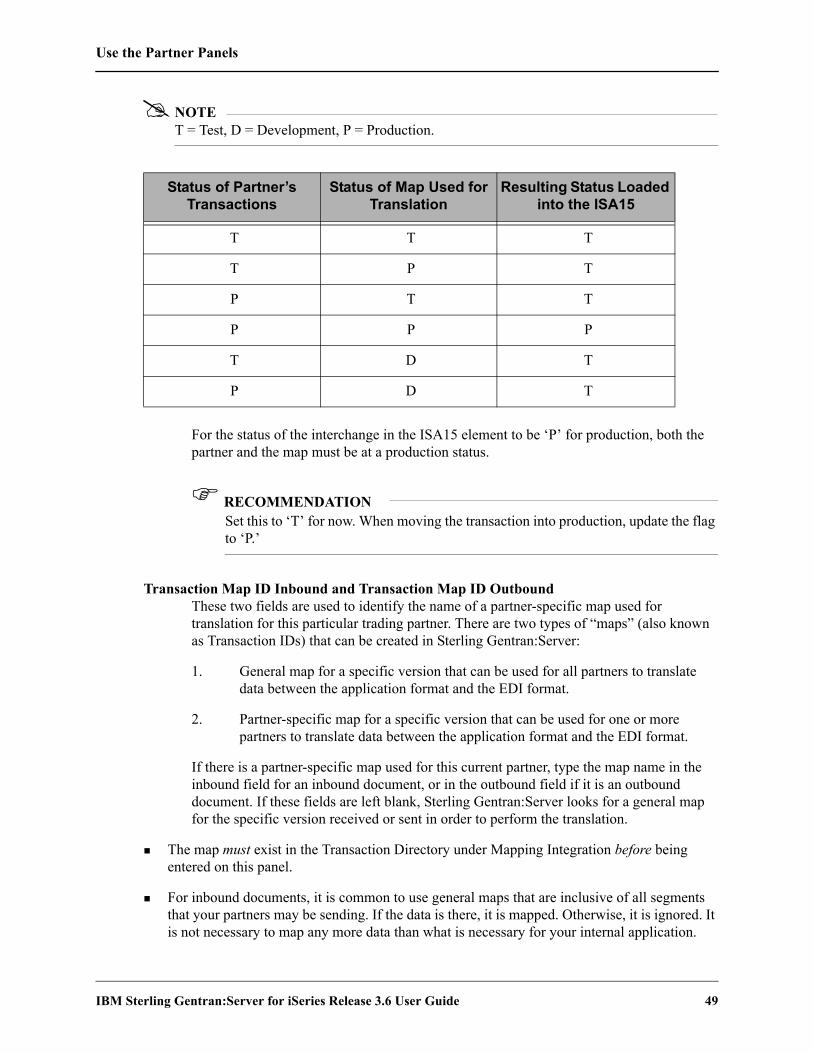
Use the Partner Panels
IBM Sterling Gentran:Server for iSeries Release 3.6 User Guide 49
NOTET = Test, D = Development, P = Production.
For the status of the interchange in the ISA15 element to be ‘P’ for production, both the partner and the map must be at a production status.
RECOMMENDATIONSet this to ‘T’ for now. When moving the transaction into production, update the flag to ‘P.’
Transaction Map ID Inbound and Transaction Map ID OutboundThese two fields are used to identify the name of a partner-specific map used for translation for this particular trading partner. There are two types of “maps” (also known as Transaction IDs) that can be created in Sterling Gentran:Server:
1. General map for a specific version that can be used for all partners to translate data between the application format and the EDI format.
2. Partner-specific map for a specific version that can be used for one or more partners to translate data between the application format and the EDI format.
If there is a partner-specific map used for this current partner, type the map name in the inbound field for an inbound document, or in the outbound field if it is an outbound document. If these fields are left blank, Sterling Gentran:Server looks for a general map for the specific version received or sent in order to perform the translation.
The map must exist in the Transaction Directory under Mapping Integration before being entered on this panel.
For inbound documents, it is common to use general maps that are inclusive of all segments that your partners may be sending. If the data is there, it is mapped. Otherwise, it is ignored. It is not necessary to map any more data than what is necessary for your internal application.
Status of Partner’s Transactions
Status of Map Used for Translation
Resulting Status Loaded into the ISA15
T T T
T P T
P T T
P P P
T D T
P D T

Use the Partner Panels
50 IBM Sterling Gentran:Server for iSeries Release 3.6 User Guide
For outbound documents, it is common to create partner-specific maps for each partner. Most partners ask for specific information to be sent. It is easier to copy an existing map and modify it for the new partner than to add special if-conditions to see if this particular partner gets a particular segment or an element.
RECOMMENDATIONLeave these fields blank. If it is decided at a later point to use partner-specific maps, the Transaction ID under the partner can be updated.
Accept Transaction Inbound and Send Transaction OutboundThese flags indicate if you trade this transaction set with this partner. The flags are used by the Inbound and Outbound Editors as a way of protecting your applications from interfacing or sending erroneous data. Based on the direction of the document, set the accept and send flags as shown below.
Set the Verify Transaction global parameter to ‘Y’ for this function. If the global parameter is ‘Y’ and the Accept Flag is ‘N,’ the incoming transaction is suspended. If the Verify Transaction global parameter is set to ‘N,’ it does not matter what the Accept flag is set to since it is not viewed.
RECOMMENDATIONFor inbound documents, set the Accept Flag to ‘Y.’ For outbound documents, set Send Flag to ‘Y.’
Validate Codes Inbound and Validate Codes OutboundThese flags can prevent validation of any ID type codes that exist in the EDI data for inbound or outbound documents if the corresponding flag is set to ‘N.’ This feature was requested by users to enhance the throughput when validation of codes is not important. By setting either flag to ‘N,’ the Inbound Editor or Outbound Editor ignores any elements having an ID data type when performing compliance checking. If either flag is set to ‘N,’ the Verify Transaction global parameter must be set to ‘Y.’ Also, if the Validate Codes global parameter is set to ‘N,’ code validation is deactivated for all partners and the Validate Codes parameters in the partner file are ignored.
RECOMMENDATIONSet these fields to ‘N’ for the direction processed. During testing, it is helpful to set this to ‘Y’ to see invalid data.
Direction Accept? Send?
Inbound Y N
Outbound N Y
Inbound and Outbound Y Y

Use the Partner Panels
IBM Sterling Gentran:Server for iSeries Release 3.6 User Guide 51
Expect an AK2, A2, or UCMThis flag identifies whether transaction envelopes, which have not been acknowledged, are printed on the Audit File report as unacknowledged. If you expect a transaction acknowledgement, specify ‘Y.’ This flag affects both inbound and outbound transactions. The AK2 and A2 are segments that exist in the 997 and 999 functional acknowledgments, respectively, that acknowledge a particular ST envelope. The UCM segment exists in the CONTRL acknowledgment that acknowledges a UNT envelope.
When processing outbound transactions, the Outbound Editor (EBDI002) logs the transaction in the Audit file if the Audit Transaction global parameter is set to ‘Y’ (SEE the “Global Parameters” chapter in the IBM® Sterling Gentran:Server® for iSeries® Release 3.6 Technical Reference Guide for more information).
There is an acknowledgment status flag for every transaction logged in the Audit file. It can be used when printing the Audit report to determine if all documents sent to your partner have been acknowledged. If the transaction has not been acknowledged by your partner with an AK2, A2, or UCM segment, the status flag is still blank. If you choose to print the Audit report showing all unacknowledged documents, the transactions display even though you may not have expected your partner to acknowledge it.
In this case, it is not an error to have not received a transaction acknowledgment. You may want a method of turning this feature off for any document that is not expected to be acknowledged.
When processing transactions inbound, the same process is true. However, the report identifies received transactions that are not yet acknowledged. For those transactions you do not expect to acknowledge, set the flag to ‘N’ to not view the unacknowledged transactions as errors.
RECOMMENDATIONSet to ‘Y’ for inbound and outbound transactions that you want to be acknowledged. For transactions not acknowledged, such as ‘997,’ ‘999,’ and CONTRL acknowledgments, set the flag to ‘N.’
Transaction Acknowledgment TypeThis indicator identifies which transaction set is used to acknowledge this transaction set. The acknowledge transaction sets for X12 and UCS are 997 and 999. The acknowledge transaction set for EDIFACT is CONTRL. The default for X12 and UCS documents is ‘997;’ the default value for EDIFACT documents is ‘CONTRL.’ (SEE your standards manual and the “System Considerations” chapter in the IBM® Sterling Gentran:Server® for iSeries® Release 3.6 Technical Reference Guide for more information about acknowledgments.)
This flag is only used for inbound transactions to determine what kind of acknowledgment Sterling Gentran:Server generates. If this is an outbound transaction, leave this field blank. If you are receiving this transaction and are not generating an acknowledgment, leave this field blank.

Use the Partner Panels
52 IBM Sterling Gentran:Server for iSeries Release 3.6 User Guide
If you are acknowledging this transaction, indicate which type of acknowledgment is to be generated: type either ‘997’ (functional acknowledgment – used for X12 documents), ‘999’ (acceptance/rejection advice – used for UCS documents), or ‘CONTRL’ (EDIFACT CONTRL message – used for EDIFACT documents). This needs to be determined by your trading partner.
RECOMMENDATIONIf this is an inbound transaction and your trading partner is using X12 or UCS standards, leave this field blank to accept the default value of ‘997’ unless your trading partner has requested a ‘999.’ If your trading partner is using EDIFACT standards, type ‘CONTRL.’ For outbound transactions, leave this field blank.
Acknowledgment Overdue in Hours/MinutesSpecify the maximum number of hours and minutes that you will allow your trading partner to send an acknowledgment for this transaction. After that time, the acknowledgment is considered overdue. This is for outbound processing only.
Acknowledge Specific TransThis flag is used to indicate whether a functional acknowledgment is to be generated for this transaction ID. This is only applicable when the Partner Acknowledge global parameter is set to ‘Y’ and the Acknowledge Group or Trans on the Partner Control is also set to ‘Y’.

Use the Partner Panels
IBM Sterling Gentran:Server for iSeries Release 3.6 User Guide 53
Step 3: Enter the Outbound Transaction Set Information
The panel you see next (EDIX041-FMTnn) depends on the interchange type entered for the partner. For our example, Partner Transaction panel (EDIX041-FMT04) displays next, because we entered it as an ISA interchange type on the Partner Control panel (EDIX012-FMT01).
The Partner Transaction panel (EDIX041-FMT04) is used to specify the values that are placed in the transaction envelope when sending data outbound. For this example, it identifies values loaded into the ST segment when sending this particular transaction set outbound to your partner.
NOTERefer to your standards manual for more information about what values should be loaded in the ST segment.
Figure 3.21 Outbound Partner Transaction Information for an 810 Transaction Set
To enter the outbound partner transaction information for an outbound transaction set, type the initial control number in the Control Number field and press F10 (Update) to add the value, as shown in Figure 3.21. You will return to the Work with Partner Transactions panel (EDIX040-FMT01).
EDIX041 Partner Transaction EDI 03/30/11 FMT04 12:00:00 Partner ID . . . . . . . . . . . . TPCOMPANY Partner Qualifier. . . . . . . . . Partner Name . . . . . . . . . . . TPCOMPANY Transaction ID . . . . . . . . . . 810 Outbound envelope information for ST segment Transaction Set Identifier . . ST01 810 Control Number . . . . . . . . ST02 000000000 Version. . . . . . . . . . . . . . F1=Help F4=Prompt F10=Update F12=Cancel F24=More Keys

Use the Partner Panels
54 IBM Sterling Gentran:Server for iSeries Release 3.6 User Guide
Field Descriptions (Recommended Fields)Control Number
The Control Number is an identifier for the electronic document. Each envelope gets “stamped” with a unique number to aid in tracking. The Transaction Control Number is increased by one each time this particular transaction is sent out to this partner. Note that the number is increased just prior to loading it into the envelope. You can start the counting at any number you desire.
RECOMMENDATIONInitialize this Control Number to ‘0.’
VersionThis field is for documentation purposes only. There is no element in the ST segment that contains the version. It is provided so the user can easily see what version is being sent outbound for this document. The actual version for this transaction set is associated with the group. Refer to the group record for this partner to determine the actual version that is used.

Use the Partner Panels
IBM Sterling Gentran:Server for iSeries Release 3.6 User Guide 55
Enter Partner Name & Address InformationWhen you added your new partner in the ‘Setting Up a New Partner’ task, a default partner name & address record was created. By now you’re probably accustomed to seeing the Partner ID in the Partner Name field on various panels throughout the example. While it is not necessary to fill in a partner name & address record, you might like to see the full name of your trading partner displayed on the panels and on reports. To do this, you need to fill in the fields on the Partner Name and Address panel (EDIX035-FMT01). Figure 3.22 shows the order to enter this information
Figure 3.22 Steps in the ‘Enter Partner Name & Address’ task
Work with Partners(EDIX005-FMT01)
Step 1:Access the Name & Address panels
Partner Control(EDIX035-FMT01)
Step 2:Enter the Name & Address Information
Use the Partner Panels
56 IBM Sterling Gentran:Server for iSeries Release 3.6 User Guide
Step 1: Access the Name & Address Panel
Only one Name and Address record can be defined for the trading partner. This task begins from the Partner Name & Address panel (EDIX035-FMT01).
Figure 3.23 Access the Partner Name & Address panel (EDIX035-FMT01)
To access this panel, on the Work with Partner panel (EDIX005-FMT01) type ‘13’ in the Option field next to the Partner ID whose name and address record you want to access, as shown in Figure 3.23. Press Enter, and Sterling Gentran:Server automatically advances to the Partner Name & Address panel (EDIX035-FMT01).
EDIX005 Work with Partners EDI 03/30/11 FMT01 pgmlib: G3X6PGM dtalib: G3X6DTA 12:00:00 Position to Partner ID . . . . . . TPCOMPANY Qual Type option (and Information), press Enter. 12=Transactions 13=Name & Address 14=User Defined 15=Data Sep. Opt Partner ID Qual Partner Name 13 TPCOMPANY TPCOMPANY UNA-PARTNER EXAMPLE OF A UNA PARTNER VENDOR-1 TUTORIAL - XYZ COMPUTER COMPANY VENDOR-2 TUTORIAL - BULK PAPER COMPANY VENDOR-3 TUTORIAL - TWO WAY COMMUNICATIONS VENDOR-4 TUTORIAL - RANDOM OFFICE SUPPLY 123456789 RECEIVER RECORD FOR SEPARATION Bottom Parameters or command ===> F4=Prompt F5=Refresh F9=Retrieve F24=More Keys

Use the Partner Panels
IBM Sterling Gentran:Server for iSeries Release 3.6 User Guide 57
Step 2: Enter the Name & Address Information
Since the contents of this panel are optional, you may enter information in the form most convenient to you.
Figure 3.24 Enter Name & Address field values
Enter the name and address of your trading partner: you may use the format shown in Figure 3.24 or one of your own. Once you have entered the information, press F10 (Update). Pressing this key will update the values you have entered to the partner profile and return you to the Work with Partner panel (EDIX005-FMT01).
Field Descriptions (Recommended Fields)Name
This is a description of the partner that displays in the partner directory and on reports that helps to identify the Partner ID. Be as descriptive as possible, including any division information if necessary
Address, City, State, Zip, Country CodeThese address lines are provided for a free form description of where this partner is located. Although this information is not used for any translation, it may differentiate one partner from another and provide a database that you can access for external applications.
Contact, Phone, International Dial Code, Fax, Dial Code, E-mail AddressEnter the primary EDI contact, phone and fax numbers, and e-mail address for this partner. This ‘optional’ information is valuable. It is extremely useful to have a central location for the EDI contact that you can access. Often, you may have to contact your partner for acknowledgments that have not been received or for additional information about a document you are preparing to trade.
EDIX035 Partner Name & Address EDI 03/30/11 FMT01 12:00:00 Partner ID . . . . . . . . . . . . TPCOMPANY Qual Name. . . . . . . . . . . . . Name . . . . . . . . . . . . . . . Trading Partner Example Company Address. . . . . . . . . . . . . . 12345 Great Lands Dr. City . . . . . . . . . . . . . . . Anycity State. . . . . . . . . . . . . . . OH Zip. . . . . . . . . . . . . . . . 43017 - Country Code . . . . . . . . . . . Contact. . . . . . . . . . . . . . EDI Contact Name/Phone Phone. . . . . . . . . . . . . . . ( 614 ) 793 - 7000 x 5101 International Dial Code. . . . . . 000 Fax. . . . . . . . . . . . . . . . ( ) - Dial Code. . . . E-mail Address . . . . . . . . . . F1=Help F10=Update F12=Cancel F24=More Keys

Use the Partner Panels
58 IBM Sterling Gentran:Server for iSeries Release 3.6 User Guide
Enter Partner User Defined InformationYou can think of the User Defined panels as a scratch pad where you can store any comments, questions, problems, start-up dates and additional EDI contacts for this partner. There is no limit on the number of user-defined records that can exist for a partner. Figure 3.25 shows the order to enter this information.
Figure 3.25 Steps in the ‘Enter Partner User Defined Information’ task
Work with Partners(EDIX005-FMT01)
Step 1:Access the User Defined Panel
Work with Partner User Defined(EDIX046-FMT01)
Step 2:Identify the User Defined Information
Work with Partner User Defined(EDIX045-FMT01)
Step 3:Enter the User Defined Records

Use the Partner Panels
IBM Sterling Gentran:Server for iSeries Release 3.6 User Guide 59
Step 1: Access the Work with Partner User Defined Panel
This task begins from the Work with Partner User Defined panel (EDIX046-FMT01).
Figure 3.26 Access the Partner User Defined panel (EDIX035-FMT01)
To access this panel, type option ‘14’ on the Work with Partners panel (EDIX005-FMT01) beside the Partner ID whose user-defined record(s) you want to access, as shown in Figure 3.26, and press Enter.
EDIX005 Work with Partners EDI 03/30/11 FMT01 pgmlib: G3X6PGM dtalib: G3X6DTA 12:00:00 Position to Partner ID . . . . . . TPCOMPANY Qual Type option (and Information), press Enter. 12=Transactions 13=Name & Address 14=User Defined 15=Data Sep. Opt Partner ID Qual Partner Name 14 TPCOMPANY TRADING PARTNER EXAMPLE COMPANY UNA-PARTNER EXAMPLE OF A UNA PARTNER VENDOR-1 TUTORIAL - XYZ COMPUTER COMPANY VENDOR-2 TUTORIAL - BULK PAPER COMPANY VENDOR-3 TUTORIAL - TWO WAY COMMUNICATIONS VENDOR-4 TUTORIAL - RANDOM OFFICE SUPPLY 123456789 RECEIVER RECORD FOR SEPARATION Bottom Parameters or command ===> F4=Prompt F5=Refresh F9=Retrieve F24=More Keys
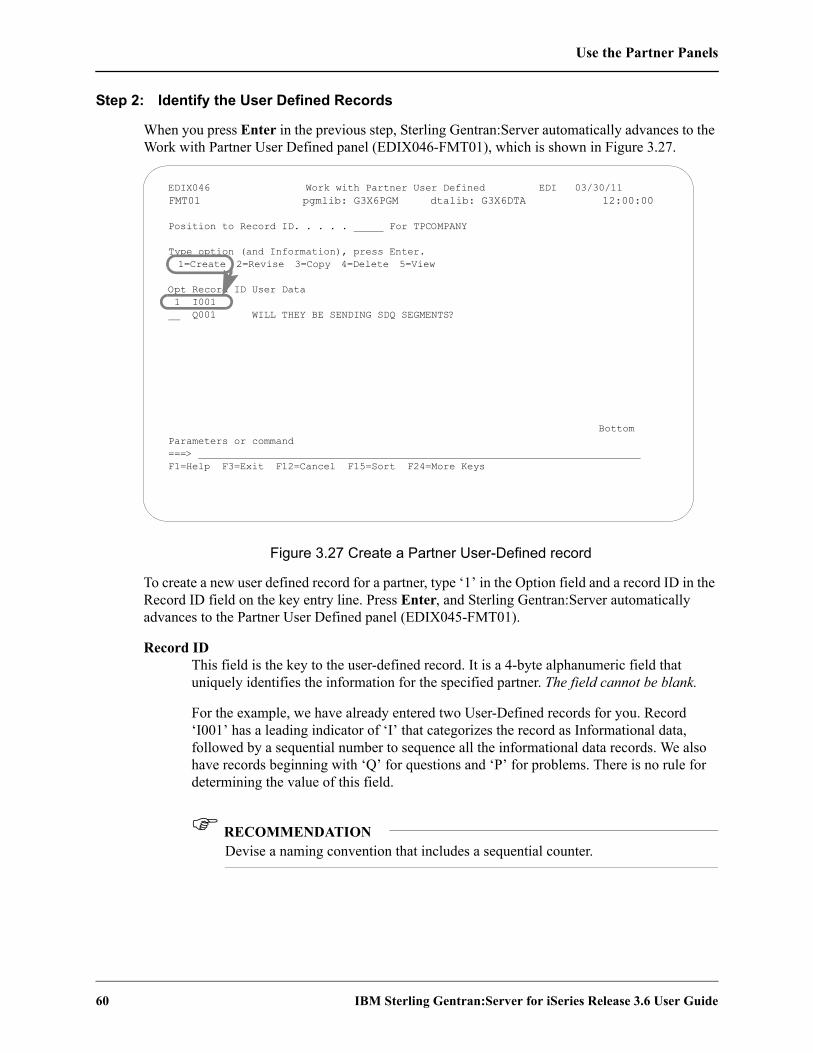
Use the Partner Panels
60 IBM Sterling Gentran:Server for iSeries Release 3.6 User Guide
Step 2: Identify the User Defined Records
When you press Enter in the previous step, Sterling Gentran:Server automatically advances to the Work with Partner User Defined panel (EDIX046-FMT01), which is shown in Figure 3.27.
Figure 3.27 Create a Partner User-Defined record
To create a new user defined record for a partner, type ‘1’ in the Option field and a record ID in the Record ID field on the key entry line. Press Enter, and Sterling Gentran:Server automatically advances to the Partner User Defined panel (EDIX045-FMT01).
Record IDThis field is the key to the user-defined record. It is a 4-byte alphanumeric field that uniquely identifies the information for the specified partner. The field cannot be blank.
For the example, we have already entered two User-Defined records for you. Record ‘I001’ has a leading indicator of ‘I’ that categorizes the record as Informational data, followed by a sequential number to sequence all the informational data records. We also have records beginning with ‘Q’ for questions and ‘P’ for problems. There is no rule for determining the value of this field.
RECOMMENDATIONDevise a naming convention that includes a sequential counter.
EDIX046 Work with Partner User Defined EDI 03/30/11 FMT01 pgmlib: G3X6PGM dtalib: G3X6DTA 12:00:00 Position to Record ID. . . . . For TPCOMPANY Type option (and Information), press Enter. 1=Create 2=Revise 3=Copy 4=Delete 5=View Opt Record ID User Data 1 I001 Q001 WILL THEY BE SENDING SDQ SEGMENTS? Bottom Parameters or command ===> F1=Help F3=Exit F12=Cancel F15=Sort F24=More Keys
Use the Partner Panels
IBM Sterling Gentran:Server for iSeries Release 3.6 User Guide 61
Step 3: Enter the User Defined Information
When Enter is pressed in the previous step, Sterling Gentran:Server automatically advances to the Work with Partner User Defined panel (EDIX045-FMT01) as shown in Figure 3.28.
Figure 3.28 Enter Partner User-Defined Information
To enter information for this record, type up to a 240-character message in the User Data field, as shown in Figure 3.28. When you have finished entering your data, press F10 (Update) to add the information. You will be returned to the Work with Partner User Defined panel (EDIX046-FMT01).
User DataThis comment field is 240-bytes in length. Any information may be stored about this partner. It can be used at your discretion. Some users have devised a format for this data portion and access the record from their own applications to retrieve specific EDI data.
EDIX045 Partner User Defined EDI 03/30/11 FMT01 12:00:00 Partner ID . . . . . . . . . . . . TPCOMPANY Qualifier. . . . . . . . . . . . . Name . . . . . . . . . . . . . . . TRADING PARTNER EXAMPLE COMPANY Record ID. . . . . . . . . . . . . I001 1 1 2 2 3 3 4 1...5....0....5....0....5....0....5....0 User Data. . . . . . . . . . . . . Request to send EDI PO’s: 7/1/99 F1=Help F4=Prompt F10=Update F12=Cancel F24=More Keys

Use the Partner Panels
62 IBM Sterling Gentran:Server for iSeries Release 3.6 User Guide
Work with Partner Error RejectionError rejection records may be added to the partner profile to identify and manage data that does not pass compliance checking against standards.
Error rejection is considered an advanced task in Sterling Gentran:Server. You should not attempt to set up error rejection until you are thoroughly familiar with what error rejection is, how it occurs and most importantly, how to recover from it. Figure 3.29 shows the order to enter this information.
Figure 3.29 Steps in the Work with Partner Error Rejection task
Work with Partners(EDIX005-FMT01)
Step 1:Access the Partner Error Rejection Panel
Work with Partner Error Rejection(EDIX056-FMT01)
Step 2:Create New Error Rejection Records
Partner Error Rejection(EDIX055-FMT01)
Step 3:Enter Additional Error Rejection Information

Use the Partner Panels
IBM Sterling Gentran:Server for iSeries Release 3.6 User Guide 63
Step 1: Access the Work with Partner Error Rejection Panel
This task begins from the Work with Partner Error Rejection panel (EDIX056-FMT01).
Figure 3.30 Access the Partner Error Rejection panel (EDIX056-FMT01) for a single partner
To access this panel, type ‘16’ in the Option field on the Work with Partners panel (EDIX005-FMT01) next to the Partner ID that you want to set up with error rejection, as shown in Figure 3.30. Press Enter.
NOTEThis access method displays only the error rejection records for the selected partner. To display all error rejection records for all partners, type ‘16’ in the Option field on the key entry line and press Enter.
EDIX005 Work with Partners EDI 03/30/11 FMT01 pgmlib: G3X6PGM dtalib: G3X6DTA 12:00:00 Position to Partner ID . . . . . . Qual Type option (and Information), press Enter. 16=Error Rej 17=Cross Ref 30=Copy Partner 31=Print X-Ref 32=Print Qry Opt Partner ID Qual Partner Name 16 TPCOMPANY Trading Partner Example Company TRADANET TRADANET UNA-PARTNER Example of a UNA Partner VENDOR-1 TUTORIAL - XYZ Computer Company VENDOR-2 TUTORIAL - Bulk Paper Company VENDOR-3 TUTORIAL - Two Way Communications VENDOR-4 TUTORIAL - Random Office Supply Bottom Parameters or command ===> F1=Help F3=Exit F12=Cancel F15=Sort F23=More Options F24=More Keys

Use the Partner Panels
64 IBM Sterling Gentran:Server for iSeries Release 3.6 User Guide
Step 2: Create New Partner Error Rejection Records
When you press Enter, Sterling Gentran:Server automatically advances to the Work with Partner Error Rejection panel (EDIX056-FMT01).
All fields must be filled in to create a new error rejection record for this partner.
Figure 3.31 Add a new error rejection record
To create a new error rejection record using the ‘Create’ option, type ‘1’ in the Option field; type the Level value (P, G, or T), Level ID, and Error Number in the appropriate fields, as shown in Figure 3.31, then press Enter.
Field Descriptions (Mandatory Fields)Level (L)
This field identifies the level where the error occurs. Some errors only occur at a particular level and it only makes sense to reject at that level. (SEE the “System Considerations” chapter in the IBM® Sterling Gentran:Server® for iSeries® Release 3.6 Technical Reference Guide for errors that occur at each level.)
If an error can occur at more than one level, you need to set up multiple rejection records at each desired level. Valid values are:
‘P’ Partner or interchange level‘G’ Group level‘T’ Transaction level
EDIX056 Work with Partner Error Rejection EDI 03/30/11 FMT01 12:00:00 Position to Level. . . . . . . For TPCOMPANY Type option (and Information), press Enter. 1=Create 2=Revise 3=Copy 4=Delete 5=View Opt L Level ID Error 1 T ALL 0209 Bottom Parameters or command ===> F1=Help F3=Exit F12=Cancel F15=Sort F24=More Keys
Use the Partner Panels
IBM Sterling Gentran:Server for iSeries Release 3.6 User Guide 65
CAUTIONSTOP
For outbound processing, if rejection occurs at any level, the entire interchange will be rejected. This is because the envelopes have already been wrapped around the data with counts that indicate the number of transaction sets.
Level IDThis field identifies which specific groups or transaction sets are rejected if the specified error occurs. The Level ID must be blank if the Level is ‘P.’ The Level ID can specify ‘ALL’ to indicate that if the specified error occurs for any transaction or group (depending on the level), the data is rejected. If you wish to reject a specific group or transaction when the error occurs, enter the actual transaction or group identifier.
For example, if you want to reject a 209 error for the group’s PO (purchase orders) and IN (invoices), you need to add two error rejection records: one for Level ID = PO and one for Level ID = IN for the same Level and the same error number.
Error NumberThis field identifies the specific error number for which you are setting up rejection. If this error occurs for the indicated transaction or group and direction, reject the data. (SEE the “System Messages” chapter in the IBM® Sterling Gentran:Server® for iSeries® Release 3.6 Technical Reference Guide for a complete list of error numbers.)
Types of errors that can be set up are syntax errors such as error #62, which means ‘Missing Indicated Element.’ These errors are those that are encountered during compliance checking by the Inbound and Outbound Editor.
CAUTIONSTOP
You cannot reject data based on the content of the data, such as an invalid item number or a missing store number. Only compliance errors for deviations from the standards format can be rejected. If data needs to be flagged or rejected based on application information, you can perform detailed mapping or you can send back the 824 Application Advice transaction to a partner to indicate those errors.

Use the Partner Panels
66 IBM Sterling Gentran:Server for iSeries Release 3.6 User Guide
Step 3: Enter Additional Error Rejection Information
The final step is to designate whether the error rejection record is to be used for inbound and/or outbound processing. Pressing Enter on the Work with Partner Error Rejection panel (EDIX056-FMT01) takes you to the Partner Error Rejection panel (EDIX055-FMT01), as shown in Figure 3.32.
Figure 3.32 Specify whether error rejection is for inbound and/or outbound processing
To define error rejection as inbound and/or outbound for this error number, type either ‘Y’ or ‘N’ in the Reject Inbound and Reject Outbound fields, then press F10 (Update). Pressing this key updates the values you have entered to the partner profile and returns you to the Partner Error Rejection panel (EDIX056-FMT01).
Field DescriptionsReject Inbound
This field is an error rejection indicator for inbound processing. If the data associated with the specified error number should be rejected when it occurs during inbound processing, set the flag to ‘Y;’ otherwise, set the flag to ‘N.’
Reject OutboundThis field is an error rejection indicator for outbound processing. If the data associated with the specified error number should be rejected when it occurs during outbound processing, set the flag to ‘Y;’ otherwise, set the flag to ‘N.’
EDIX055 Partner Error Rejection EDI 03/30/11 FMT01 12:00:00 Partner ID . . . . . . . . . . . . TPCOMPANY Partner Qual . . . . . . . . . . . Partner Name . . . . . . . . . . . TRADING PARTNER EXAMPLE COMPANY Level. . . . . . . . . . . . . . . T Level ID . . . . . . . . . . . . . ALL Error Number . . . . . . . . . . . 0209 Reject Inbound . . . . . . . . . . Y Reject Outbound. . . . . . . . . . N F1=Help F4=Prompt F10=Update F12=Cancel F24=More Keys

Use the Partner Panels
IBM Sterling Gentran:Server for iSeries Release 3.6 User Guide 67
Partner Cross ReferencesWhile cross referencing is not a required task, it is highly recommended. Cross referencing to the values stored in the actual EDI Control envelope segments or in your own application to your Sterling Gentran:Server partner profiles can significantly reduce the effort and complexity of managing partner profiles. This can relieve you of the burden of having to set up multiple partner profiles when your trading partner sends or receives EDI transactions with multiple values in the EDI Control envelope segments. Figure 3.33 shows the order to enter this information.
Figure 3.33 Steps in the ‘Work with Partner Cross Referencing’ task
Work with Partners(EDIX005-FMT01)
Step 1:Access the Cross Reference Panel
Partner Cross Reference(EDIX008-CTL01)
Step 2:Enter the Cross Reference Values
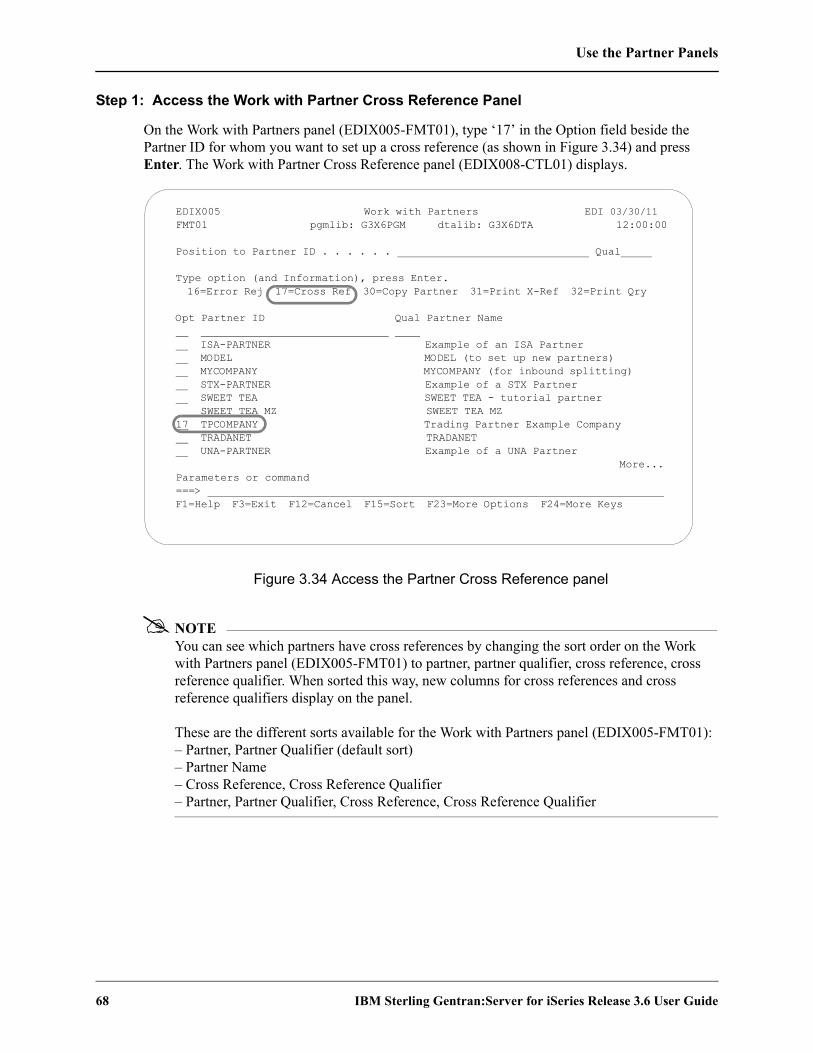
Use the Partner Panels
68 IBM Sterling Gentran:Server for iSeries Release 3.6 User Guide
Step 1: Access the Work with Partner Cross Reference Panel
On the Work with Partners panel (EDIX005-FMT01), type ‘17’ in the Option field beside the Partner ID for whom you want to set up a cross reference (as shown in Figure 3.34) and press Enter. The Work with Partner Cross Reference panel (EDIX008-CTL01) displays.
Figure 3.34 Access the Partner Cross Reference panel
NOTEYou can see which partners have cross references by changing the sort order on the Work with Partners panel (EDIX005-FMT01) to partner, partner qualifier, cross reference, cross reference qualifier. When sorted this way, new columns for cross references and cross reference qualifiers display on the panel.
These are the different sorts available for the Work with Partners panel (EDIX005-FMT01):– Partner, Partner Qualifier (default sort)– Partner Name– Cross Reference, Cross Reference Qualifier– Partner, Partner Qualifier, Cross Reference, Cross Reference Qualifier
EDIX005 Work with Partners EDI 03/30/11 FMT01 pgmlib: G3X6PGM dtalib: G3X6DTA 12:00:00 Position to Partner ID . . . . . . Qual Type option (and Information), press Enter. 16=Error Rej 17=Cross Ref 30=Copy Partner 31=Print X-Ref 32=Print Qry Opt Partner ID Qual Partner Name ISA-PARTNER Example of an ISA Partner MODEL MODEL (to set up new partners) MYCOMPANY MYCOMPANY (for inbound splitting) STX-PARTNER Example of a STX Partner SWEET TEA SWEET TEA - tutorial partner SWEET TEA MZ SWEET TEA MZ 17 TPCOMPANY Trading Partner Example Company TRADANET TRADANET UNA-PARTNER Example of a UNA Partner More... Parameters or command ===> F1=Help F3=Exit F12=Cancel F15=Sort F23=More Options F24=More Keys
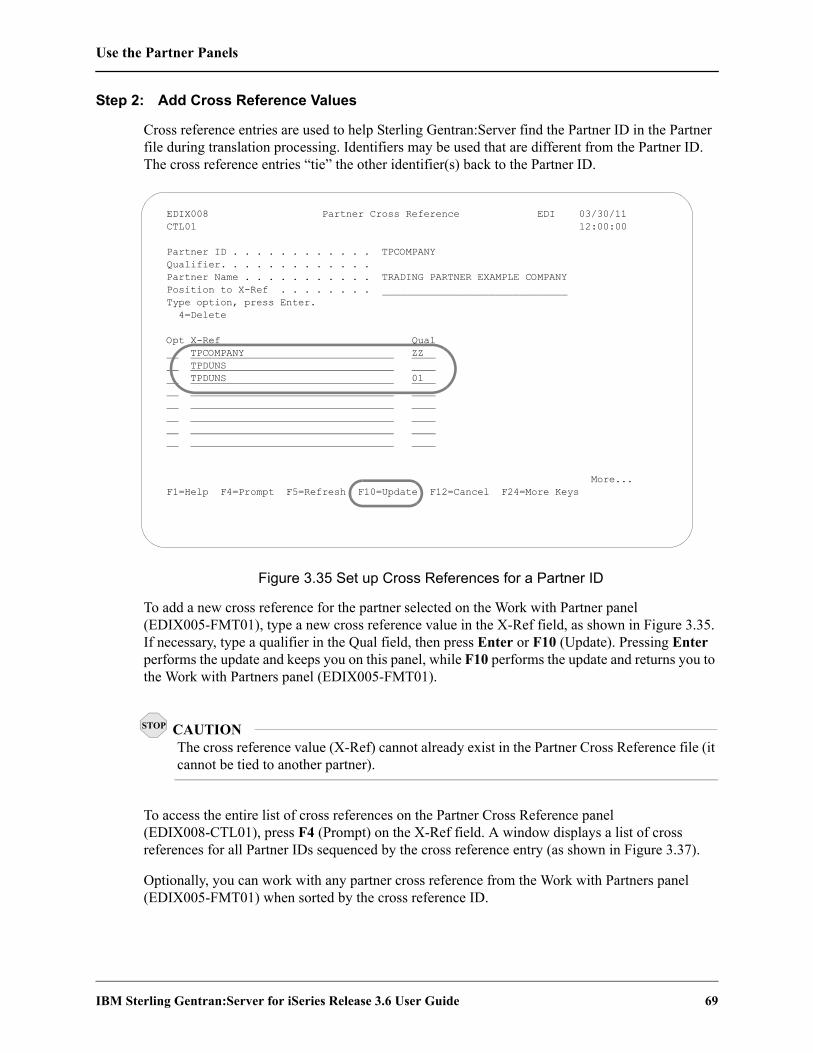
Use the Partner Panels
IBM Sterling Gentran:Server for iSeries Release 3.6 User Guide 69
Step 2: Add Cross Reference Values
Cross reference entries are used to help Sterling Gentran:Server find the Partner ID in the Partner file during translation processing. Identifiers may be used that are different from the Partner ID. The cross reference entries “tie” the other identifier(s) back to the Partner ID.
Figure 3.35 Set up Cross References for a Partner ID
To add a new cross reference for the partner selected on the Work with Partner panel (EDIX005-FMT01), type a new cross reference value in the X-Ref field, as shown in Figure 3.35. If necessary, type a qualifier in the Qual field, then press Enter or F10 (Update). Pressing Enter performs the update and keeps you on this panel, while F10 performs the update and returns you to the Work with Partners panel (EDIX005-FMT01).
CAUTIONSTOP
The cross reference value (X-Ref) cannot already exist in the Partner Cross Reference file (it cannot be tied to another partner).
To access the entire list of cross references on the Partner Cross Reference panel (EDIX008-CTL01), press F4 (Prompt) on the X-Ref field. A window displays a list of cross references for all Partner IDs sequenced by the cross reference entry (as shown in Figure 3.37).
Optionally, you can work with any partner cross reference from the Work with Partners panel (EDIX005-FMT01) when sorted by the cross reference ID.
EDIX008 Partner Cross Reference EDI 03/30/11 CTL01 12:00:00 Partner ID . . . . . . . . . . . . TPCOMPANY Qualifier. . . . . . . . . . . . . Partner Name . . . . . . . . . . . TRADING PARTNER EXAMPLE COMPANY Position to X-Ref . . . . . . . . _______________________________ Type option, press Enter. 4=Delete Opt X-Ref Qual TPCOMPANY ZZ TPDUNS TPDUNS 01 More... F1=Help F4=Prompt F5=Refresh F10=Update F12=Cancel F24=More Keys

Use the Partner Panels
70 IBM Sterling Gentran:Server for iSeries Release 3.6 User Guide
Typical scenarios where setting up cross reference entries may be required include the following:
1. Cross referencing the interchange header in the EDI control envelope to the Partner ID and qualifier:
For outbound processing, cross reference the interchange envelope Receiver ID and Qualifier. (The Receiver ID is stored in the ISA08 element; the qualifier in the ISA07 element.)
For inbound processing, cross reference the interchange envelope Sender ID and Qualifier. (The Sender ID is stored in the ISA05 element; the Qualifier in the ISA06 element)
In our example, the ‘TPCOMPANY ZZ’ ID and Qualifier have been set up for interchange header cross referencing.
2. Cross referencing the functional group header in the EDI control envelope to the Partner ID:
For outbound processing, cross reference the group envelope Receiver ID. (The Receiver ID is stored in the GS03 element.)
For inbound processing, cross reference the group envelope Sender ID. (The Sender ID is stored in the GS02 element.)
For our example, no cross reference entry is needed since the functional group envelope value is the same value as the partner, which is TPCOMPANY. (The qualifier is not retained at the functional group level in the EDI control envelope.)
3. Cross referencing the application partner reference to the Partner ID and qualifier:
For outbound processing, the partner reference fields maintained in the Application Definition subsystem can be cross referenced to a Partner ID and qualifier.
In our example, this value has yet to be determined, so no cross reference can be added at this time. However, it can be added at a later time once it is determined.
NOTESEE the “Application Definition” chapter for a detailed explanation of the partner reference fields.
If Sterling Gentran:Server rejects your input when you attempt to set up a new cross reference on the Partner Cross Reference panel (EDIX008-CTL01), it may be because the X-Ref value specified already exists in the cross reference file.

Use the Partner Panels
IBM Sterling Gentran:Server for iSeries Release 3.6 User Guide 71
If this occurs, Sterling Gentran:Server displays a message as shown in Figure 3.36:
Figure 3.36 An error detected when a cross reference is inserted
Sterling Gentran:Server is informing you that you have already set up a cross reference between the TPCOMPANY trading partner and TPDUNS with the 01 qualifier cross reference. In this particular case, it is easy to see why the error has occurred.
After you have been using Sterling Gentran:Server for a while, however, you may have many cross references set up and it may not be as easy to see where the duplication has occurred. If this is the case, you can use F4 (Prompt) to see all cross references set up for all partners. Also, you can print a Cross Reference Report (PRTPXR), sorted by cross reference or by partner ID by pressing F20 (Prt X-Ref) on this panel, or by choosing option ‘31’ (Print X-Ref) on the Work with Partners panel. (SEE the “Print a Partner X-Ref Report” section later in this chapter for more information.)
Another option for working with cross references is to use the ‘X-Ref/Qual’ alternate sort option on the Work with Partners panel (EDIX005-FMT01) and then position to the specific cross reference value.
EDIX008 Partner Cross Reference EDI 03/30/11 CTL01 12:00:00 Partner ID . . . . . . . . . . . . TPCOMPANY Qualifier. . . . . . . . . . . . . Partner Name . . . . . . . . . . . TRADING PARTNER EXAMPLE COMPANY Position to X-Ref . . . . . . . . _______________________________ Type option, press Enter. 4=Delete Opt X-Ref Qual TPCOMPANY ZZ TPDUNS TPDUNS 01 TPDUNS 01
More... F1=Help F4=Prompt F5=Refresh F10=Update F12=Cancel F24=More Keys Duplicate record key in member PARXREF.

Use the Partner Panels
72 IBM Sterling Gentran:Server for iSeries Release 3.6 User Guide
Figure 3.37 illustrates using F4 (Prompt) to see all cross references.
Figure 3.37 List of all cross references set up for all partners
This list can be useful for identifying the Partner ID associated with a specific cross reference entry (for example, when a duplicate cross reference is found). In the window, you can use F15 (Sort) to sort by X-Ref or Partner ID.
To work with partners by using the cross reference identifier, use the Work with Partners panel (EDIX005-FMT01) and press F15 (Sort) to sort by the cross reference ID.
EDIX008 Partner Cross Reference EDI 03/30/11 CTL01 12:00:00 Partner ID . . . . . . . . . . . . TPCOMPANY Qualifier. . . . . . . . . . . . . Partner Name . . . . . . . . . . . TRADING PARTNER EXAMPLE COMPANY Position to X-Ref . . . . . . . . _______________________________ Type option, press Enter. 4=Delete Opt X-Ref Qual TPCOMPANY ZZ TPDUNS TPDUNS 01
More... F1=Help F4=Prompt F5=Refresh F10=Update F12=Cancel F24=More Keys
EDIX008 Partner Cross Reference EDI 01-24-04 CTL01 12:00:00 Partner ID . . . . . . . . . . . . TPCOMPANY Qualifier. . . . . . . . . . . . . Partner Name . . . . . . . . . . . TRADING PARTNER EXAMPLE COMPANY Type option, press Enter. 4=Delete Opt X-Ref Qual Position to X-Ref. . . Qual 1=Select X-Ref Qual Partner ID Qual TPCOMPANY BULK PAPER CO ZZ VENDOR-2 BULKPAPR VENDOR-2 MYDUNS MYCOMPANY More... F1=Help F3=Exit F12=Cancel F15=Sort : :
EDIX008 Partner Cross Reference EDI 03/30/11 CTL01 12:00:00 Partner ID . . . . . . . . . . . . TPCOMPANY Qualifier. . . . . . . . . . . . . Partner Name . . . . . . . . . . . TRADING PARTNER EXAMPLE COMPANY Position to X-Ref . . . . . . . . _______________________________ Type option, press Enter. 4=Delete Opt X-Ref Qual Position to X-Ref. . . Qual 1=Select X-Ref Qual Partner ID Qual TPCOMPANY BULK PAPER CO ZZ VENDOR-2 BULKPAPR VENDOR-2 MYDUNS MYCOMPANY More... F1=Help F3=Exit F12=Cancel F15=Sort

Use the Partner Panels
IBM Sterling Gentran:Server for iSeries Release 3.6 User Guide 73
Enter Partner Data Separation InstructionsData Separation is the instruction for splitting the incoming data from partners into separate files, grouping like documents together. Splitting improves the efficiency of the mapper. All document types that need to be processed by the same application definition are routed to the same split file.
Data separation instructions are stored either under the trading partner or under the partner ID for your company. The choice of how you want splitting to work should be made early in your setup because it can only be processed by one method or the other. Splitting can occur based on the sender of the data (your trading partner) or the receiver of the data (your company). The preferred method is to set up data separation based on the receiver since it simplifies the setup and is easier to maintain.
The receiver method is used if you want to route all documents to the same split file to be processed by the same application definition. Sub-splitting can also be used to further break apart the data to be processed by different applications, provided there is some piece of unique information in the data between the transaction envelopes.
The sender method is used when you need to route the same document types to different split files to be processed by different applications based on the sender ID (trading partner) in the envelopes. Sub-splitting can also be used with this method.
NOTEThe method chosen needs to match the global parameter settings for ‘Split by Partner’. If the ‘Split by Partner’ parameter is ‘N’, data separation records are looked up during processing using the receiver ID. If ‘Y’, instruction records are looked up using the sender ID.
This section documents the procedures for completing the partner setup portion of splitting. (SEE the “Splitting” chapter in the IBM® Sterling Gentran:Server® for iSeries® Release 3.6 Technical Reference Guide for more information and troubleshooting assistance.)
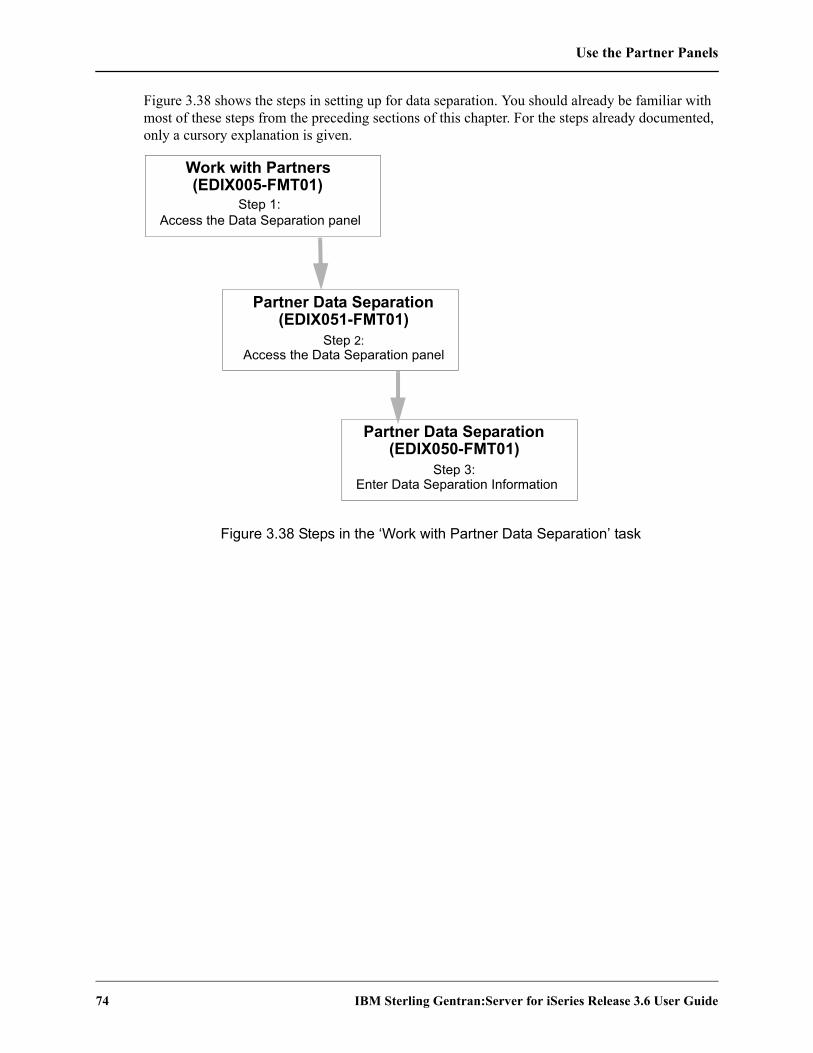
Use the Partner Panels
74 IBM Sterling Gentran:Server for iSeries Release 3.6 User Guide
Figure 3.38 shows the steps in setting up for data separation. You should already be familiar with most of these steps from the preceding sections of this chapter. For the steps already documented, only a cursory explanation is given.
Figure 3.38 Steps in the ‘Work with Partner Data Separation’ task
Work with Partners(EDIX005-FMT01)
Access the Data Separation panel
Partner Data Separation(EDIX051-FMT01)
Step 2:Access the Data Separation panel
Partner Data Separation(EDIX050-FMT01)
Step 3:Enter Data Separation Information
Step 1:

Use the Partner Panels
IBM Sterling Gentran:Server for iSeries Release 3.6 User Guide 75
Step 1: Access the Work with Partner Data Separation Panel
This task begins from the Work with Partner Data Separation panel (EDIX051-FMT01).
The Work with Partner Data separation panel (EDIX051) can be accessed for all partners or a specific partner.
Access for all partners
Figure 3.39 Access the Partner Data Separation panel for all partners
To access data separation records for all partners, type ‘15’ in the Option field on the key entry line and leave the Partner ID blank, as shown in Figure 3.39.
EDIX005 Work with Partners EDI 03/30/11 FMT01 pgmlib: G3X6PGM dtalib: G3X6DTA 12:00:00 Position to Partner ID . . . . . . Qual Type option (and Information), press Enter. 12=Transactions 13=Name & Address 14=User Defined 15=Data Sep. Opt Partner ID Qual Partner Name 15 !GENTRAN-RESERVED-PARTNER-ID-1 Global Reserved Partner AAA WAREHOUSE CO 11 01 ARNOLD/ALLEN/ATWELL WAREHOUSE BG-PARTNER EXAMPLE OF A BG PARTNER C13579 INTERNATIONAL PARTS & SERVICE ICS-PARTNER EXAMPLE OF AN ICS PARTNER ISA-PARTNER EXAMPLE OF AN ISA PARTNER MODEL MODEL MYCOMPANY MYCOMPANY (for inbound splitting) STX-PARTNER EXAMPLE OF A STX PARTNER More... Parameters or command ===> F4=Prompt F5=Refresh F24=More Keys
EDIX051 Work with Partner Data Separation EDI 03/30/11 FMT01 pgmlib: G3X6PGM dtalib: G3X6DTA 12:00:00 Position to Partner ID Qual Level ID Type option (and Information), press Enter. 1=Create 2=Revise 3=Copy 4=Delete 5=View Opt Partner ID Qual L Level ID Split C13579 G PO 0001 C13579 T 810 0001 C13579 T 850 0001 C24680 G PO 0001 C24680 T 810 0001 C24680 T 850 0001 INSPARTNER T ICLANA 0005 INSPARTNER T ORDERS 0003 INSPARTNER T ORDHDR 0003 More... Parameters or command ===> F1=Help F3=Exit F12=Cancel F15=Sort F24=More Keys

Use the Partner Panels
76 IBM Sterling Gentran:Server for iSeries Release 3.6 User Guide
Access for a specific partner
Figure 3.40 Access the Partner Data Separation panel for a specific partner
To access data separation records for a specific partner, type option ‘15’ on the Work with Partners panel (EDIX005-FMT01) beside the Partner ID whose data separation record(s) you want to access and press Enter, as shown in Figure 3.40.
NOTEIf you are setting up splitting based on the receiver ID, specify the partner ID created for your own company. You need to create a partner if one does not already exist. If you are setting up splitting based on the sender ID, select the appropriate trading partner ID.
EDIX005 Work with Partners EDI 03/30/11 FMT01 pgmlib: G3X6PGM dtalib: G3X6DTA 12:00:00 Position to Partner ID . . . . . . Qual Type option (and Information), press Enter. 12=Transactions 13=Name & Address 14=User Defined 15=Data Sep. Opt Partner ID Qual Partner Name ISA-PARTNER Example of an ISA Partner MODEL MODEL (to set up new partners) 15 MYCOMPANY MYCOMPANY (for inbound splitting) STX-PARTNER Example of a STX Partner SWEET TEA SWEET TEA - tutorial partner SWEET TEA MZ SWEET TEA MZ TPCOMPANY Trading Partner Example Company Par === F1=
EDIX051 Work with Partner Data Separation EDI 03/30/11 FMT01 pgmlib: G3X6PGM dtalib: G3X6DTA 12:00:00 Position to Level. . . . . . . For MYCOMPANY Type option (and Information), press Enter. 1=Create 2=Revise 3=Copy 4=Delete 5=View Opt L Level ID Split G FA 0025 G OG 0001 G PO 0001 G TX 0006 T ORDERS 0002 T 860 0005 Bottom Parameters or command ===> F1=Help F3=Exit F12=Cancel F15=Sort F24=More Keys

Use the Partner Panels
IBM Sterling Gentran:Server for iSeries Release 3.6 User Guide 77
Step 2: Identify the Data Separation Records
The Work with Partner Data Separation panel (EDIX051-FMT01) displays, as shown in Figure 3.41. Repeat this step for each type of inbound document you expect to receive, including acknowledgments.
NOTEThe Split Output global parameter files must be set to ‘Y’ in order for data separation to function.The Split by Partner global parameter should be set to ‘N’ when setting up records under the receiver partner (your company), and to ‘Y’ when you are setting up the records using the partner’s ID.
Figure 3.41 Enter a data separation record
To add a new data separation record, type ‘1’ in the Option field, and type the Level and Level ID on the key entry line and press Enter. Sterling Gentran:Server advances to the Partner Data Separation panel (EDIX050-FMT01). Level and Level ID are mandatory fields.
LevelThis field is one of the key fields to the data separation record. It indicates whether the splitting occurs at the group or transaction level. Applicable values are:
G (Group)
T (Transaction)
If there is not a specific need to set up splitting differently for transactions than for groups, set up splitting at the group level. This setup prevents extra direction records (instructions) from being written out for each transaction within the group. If you do not know the Group ID but do know the Transaction Set number, set up splitting at the transaction level.
Level IDThis is the second key field to the data separation record. Use the Level ID indicator for splitting. If the level is ‘G,’ the Level ID contains a valid functional group identifier. If the level is ‘T,’ the level ID contains a valid Transaction Set Number.
EDIX051 Work with Partner Data Separation EDI 03/30/11 FMT01 pgmlib: G3X6PGM dtalib: G3X6DTA 12:00:00 Position to Level. . . . . . . For MYCOMPANY Type option (and Information), press Enter. 1=Create 2=Revise 3=Copy 4=Delete 5=View Opt L Level ID Split 1 T 997 T 850 Bottom Parameters or command ===> F1=Help F3=Exit F12=Cancel F15=Sort F24=More Keys

Use the Partner Panels
78 IBM Sterling Gentran:Server for iSeries Release 3.6 User Guide
Step 3: Identify the Split Files
The Partner Data Separation panel (EDIX050-FMT01), as shown in Figure 3.42, is used to identify the split file(s) that the data is to be loaded into.
You can duplicate incoming EDI data into more than one split file by entering multiple split file numbers in the extra blanks. Even though it is not commonly used, this might help you to test or archive transactions.
Figure 3.42 Enter the split file number(s) into the blank fields
To define the split files to be used for data separation, type a number (1-80) for each split file to be used in a blank field (from left to right) and press F10 (Update) to add the values. The system returns you to the Work with Partner Data Separation panel (EDIX051-FMT01).
NOTERepeat the data separation steps 2 and 3 for each inbound document that you are currently receiving. Make sure to include the functional acknowledgment in this setup.
EDIX050 Partner Data Separation EDI 03/30/11 FMT01 12:00:00 Partner ID . . . . . . . . . . . . MYCOMPANY Partner Qual . . . . . . . . . . . Partner Name . . . . . . . . . . . MYCOMPANY (for inbound splitting) Level. . . . . . . . . . . . . . . T Level ID . . . . . . . . . . . . . 997 Output File Identifier 0025 F1=Help F4=Prompt F10=Update F12=Cancel F24=More Keys

Use the Partner Panels
IBM Sterling Gentran:Server for iSeries Release 3.6 User Guide 79
Field Descriptions (Mandatory fields)Output File Identifier
The output file is the split file. There are 80 split files available. These files are used to stage the data prior to mapping so that all documents of the same type can be grouped together and processed one time.
The reason for more than one slot for output files is so the data can be duplicated, if desired, into more than one output file. For instance, the user can take the purchase order data that is placed in Split File 1 and duplicate the data into Split file 10 if it simplifies testing.
RECOMMENDATIONType a number from 1 to 80 on the first slot available. This is where the inbound transaction set or Group ID marked in Level ID is placed prior to mapping. The Mapper needs to read the same input file for its step in translating the EDI format to the application format.

Use the Partner Panels
80 IBM Sterling Gentran:Server for iSeries Release 3.6 User Guide
Copy a Partner ProfileSterling Gentran:Server allows you to copy an entire partner profile into a new partner profile. This can be a particularly convenient feature if you work with several trading partners.
When you copy a partner profile, Sterling Gentran:Server copies all the partner records into the new partner profile with the exception of the cross reference records and the partner name & address records (where only the Name field is set to the Partner ID). These panels need to be set up individually. You can modify these panels at any time after the copy is completed. Figure 3.43 shows the order to enter this information.
Figure 3.43 Steps in the ‘Copy a Partner Profile’ task
Work with Partners(EDIX005-FMT01)
Step 1:Select the Copy Option
Partner Control(EDIX012-FMT01)
Step 2:Modify the New Partner Records
Partner Control(EDIX012-FMTnn)
Step 3:Enter Additional Partner Information
(EDIXnnn-FMTnn)Step 3:
Modify Partner Information as needed
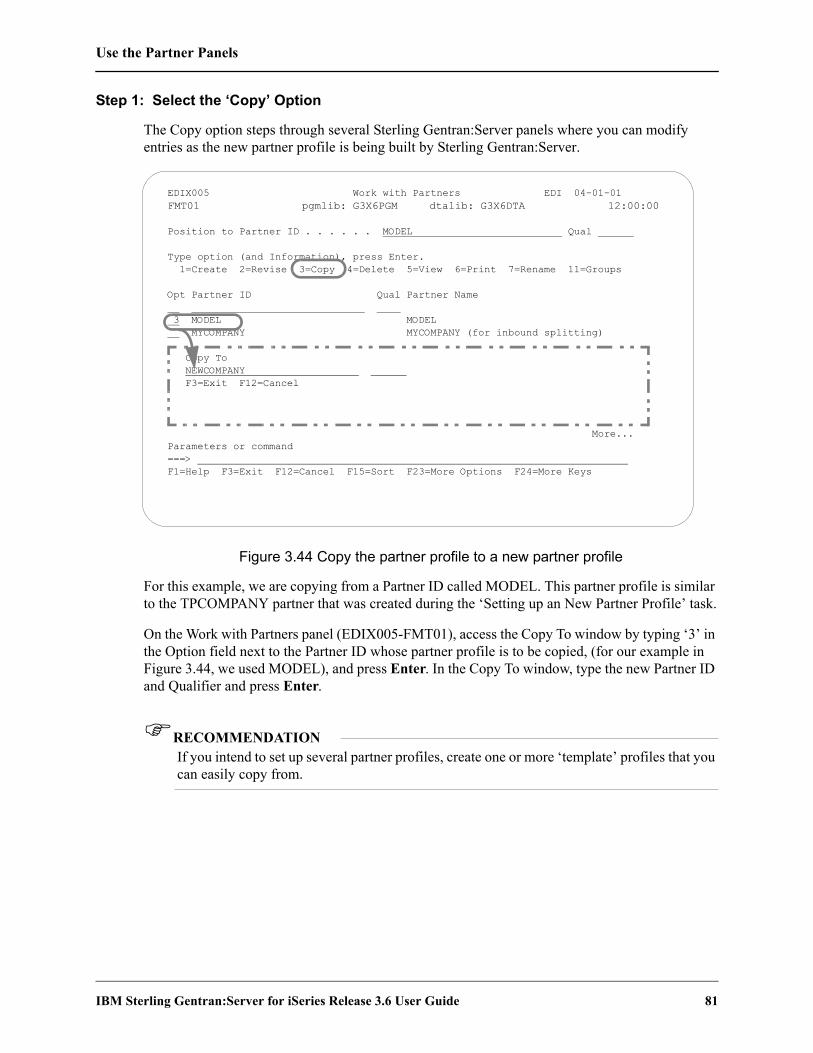
Use the Partner Panels
IBM Sterling Gentran:Server for iSeries Release 3.6 User Guide 81
Step 1: Select the ‘Copy’ Option
The Copy option steps through several Sterling Gentran:Server panels where you can modify entries as the new partner profile is being built by Sterling Gentran:Server.
Figure 3.44 Copy the partner profile to a new partner profile
For this example, we are copying from a Partner ID called MODEL. This partner profile is similar to the TPCOMPANY partner that was created during the ‘Setting up an New Partner Profile’ task.
On the Work with Partners panel (EDIX005-FMT01), access the Copy To window by typing ‘3’ in the Option field next to the Partner ID whose partner profile is to be copied, (for our example in Figure 3.44, we used MODEL), and press Enter. In the Copy To window, type the new Partner ID and Qualifier and press Enter.
RECOMMENDATIONIf you intend to set up several partner profiles, create one or more ‘template’ profiles that you can easily copy from.
EDIX005 Work with Partners EDI 04-01-01 FMT01 pgmlib: G3X6PGM dtalib: G3X6DTA 12:00:00 Position to Partner ID . . . . . . MODEL Qual Type option (and Information), press Enter. 1=Create 2=Revise 3=Copy 4=Delete 5=View 6=Print 7=Rename 11=Groups Opt Partner ID Qual Partner Name 3 MODEL MODEL MYCOMPANY MYCOMPANY (for inbound splitting) Copy To NEWCOMPANY F3=Exit F12=Cancel More... Parameters or command ===> F1=Help F3=Exit F12=Cancel F15=Sort F23=More Options F24=More Keys

Use the Partner Panels
82 IBM Sterling Gentran:Server for iSeries Release 3.6 User Guide
Step 2: Copy – Modify the New Partner Records
Pressing Enter in the previous step displays the Partner Control panel (EDIX012-FMT01), as shown in Figure 3.45. The system fills in all the field values from the original partner profile. At this point, you can either accept the panel exactly as it is, or modify the field values.
Figure 3.45 Modify New Partner Records
On the Partner Control panel (EDIX012-FMT01), leave the values as they display and press Enter.
NOTEIf you are not doing outbound processing, you may skip the next panel. To do so, press F10 (Update). The message “Unable to process request. Panel must be reviewed.” displays. Since the interchange envelope is not required for inbound processing, you may ignore this message. Press F10 (Update) again to return to the Work with Partners panel (EDIX005-FMT01) where you can launch other tasks.
If you are copying a Partner ID setup for outbound processing, to exit, either press F10 (Update) or Enter. Pressing either key takes you to the second Partner Control panel (EDIX012-FMTnn). The exact panel depends on the interchange header that was defined on the first Partner Control panel (EDIX012-FMT01).
EDIX012 Partner Control EDI 03/30/11 FMT01 12:00:00 Partner ID . . . . . . . . . . . . NEWCOMPANY Partner Qualifier. . . . . . . . . Partner Name . . . . . . . . . . . *** Name Not On File *** Division . . . . . . . . . . . . . 000 Interchange Header Option. . . . . ISA Last Incoming Sequence Number. . . GS Sender ID Qualifier . . . . . . N GS Receiver ID Qualifier . . . . . N Expect a TA1, AC1, or UCI. . . . . N Acknowledge Interchange. . . . . . N Acknowledge Group or Trans . . . . T Acknowledge Errors . . . . . . . . N Purge Acknowledged . . . . . . . . Purge Reported . . . . . . . . . . Purge Older Than Days. . . . . . . Last Incoming BG Password . . . . Set 209 Errors . . . N Comm Profile ID. . . . . . . . . . CN3BSC Group Profile ID . . N Last Incoming UNB/STX Seq. No. . . Update Allowed . . . Y F1=Help F4=Prompt F10=Update F12=Cancel F24=More Keys

Use the Partner Panels
IBM Sterling Gentran:Server for iSeries Release 3.6 User Guide 83
Step 3: Copy – Enter Additional Partner Information
The panel you will see next (EDIX012-FMTnn) depends on the type of interchange header that was defined for the partner. For our example, the ISA interchange was specified, so the Partner Control panel (EDIX012-FMT05) displays next, as shown in Figure 3.46.
Figure 3.46 Values for the new partner profile can be changed selectively
On Partner Control panel (EDIX012-FMT05), leave the values as they display and press F10 (Update) to add the values and return to the Work with Partner panel (EDIX005-FMT01).
EDIX012 Partner Control EDI 03/30/11 FMT05 12:00:00 Partner ID . . . . . . . . . . . . NEWCOMPANY Partner Qualifier. . . . . . . . . Partner Name . . . . . . . . . . . *** Name Not On File *** Outbound envelope information for ISA segment Authorization Qual . . . . . .ISA01 00 Authorization. . ISA02 Security Code Qual . . . . . .ISA03 00 Security Code. . ISA04 Sender ID Qual . . . . . . . .ISA05 01 Sender ID. . . . ISA06 MYDUNS Receiver ID Qual . . . . . . .ISA07 ZZ Receiver ID. . . ISA08 MODEL Control Standards ID . . . . .ISA11 U or Hex E4 Version. . . . . . . . . . . .ISA12 00300 Use. . . . . . . . . . . . . . . . D Control Number . . . . . . . .ISA13 000000000 Ack Requested. . . . . . . . .ISA14 0 (1=Yes,0=No) Subelement Separator . . . . .ISA16 > or Hex 6E Element Separator. . . . . . . . . * or Hex 5C Segment Terminator . . . . . . . . or Hex 15 F1=Help F4=Prompt F10=Update F12=Cancel F24=More Keys
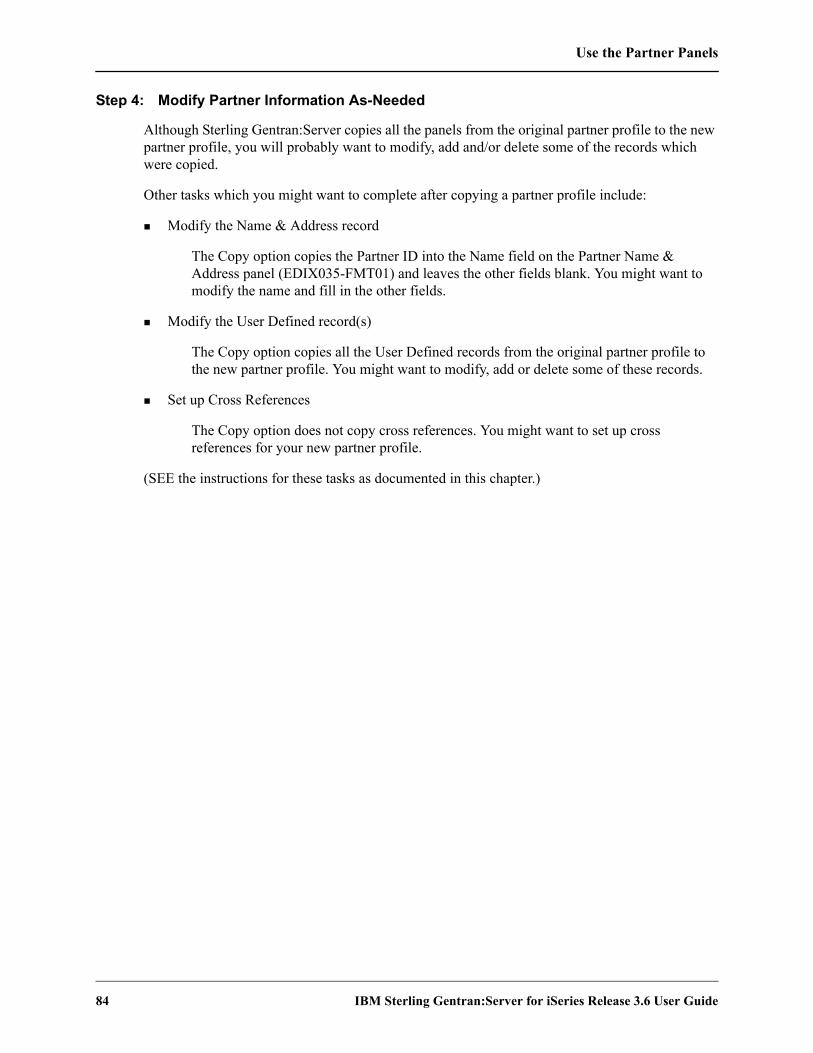
Use the Partner Panels
84 IBM Sterling Gentran:Server for iSeries Release 3.6 User Guide
Step 4: Modify Partner Information As-Needed
Although Sterling Gentran:Server copies all the panels from the original partner profile to the new partner profile, you will probably want to modify, add and/or delete some of the records which were copied.
Other tasks which you might want to complete after copying a partner profile include:
Modify the Name & Address record
The Copy option copies the Partner ID into the Name field on the Partner Name & Address panel (EDIX035-FMT01) and leaves the other fields blank. You might want to modify the name and fill in the other fields.
Modify the User Defined record(s)
The Copy option copies all the User Defined records from the original partner profile to the new partner profile. You might want to modify, add or delete some of these records.
Set up Cross References
The Copy option does not copy cross references. You might want to set up cross references for your new partner profile.
(SEE the instructions for these tasks as documented in this chapter.)

Use the Partner Panels
IBM Sterling Gentran:Server for iSeries Release 3.6 User Guide 85
Copy a Partner Profile Between LibrariesSterling Gentran:Server allows you to copy a selected partner profile to another iSeries library. This can be a particularly convenient feature if you have set up two libraries, one for a test environment; the other for production.
When you copy a partner profile between libraries, Sterling Gentran:Server copies all the partner records and all the partner field values into the new partner profile. The new partner profile is an exact duplicate of the original.
Figure 3.47 shows the order to enter this information.
Figure 3.47 Steps in the ‘Copy a Partner Profile Between Libraries’ task
Work with Partners(EDIX005-FMT01)
Step 1:Select the Copy Partner Option
Copy Partner ID(PTRCPY)
Step 2:Specify the source and destination libraries

Use the Partner Panels
86 IBM Sterling Gentran:Server for iSeries Release 3.6 User Guide
Step 1: Select the ‘Copy Partner’ Option
This task begins from the Copy Partner ID command panel (PTRCPY).
Figure 3.48 Select the Copy Partner option
On the Work with Partners panel (EDIX005-FMT01), type ‘30’ in the Option field next to the Partner ID for the partner profile that you want to copy from, and press Enter. (For our example in Figure 3.48, we used TPCOMPANY.)
EDIX005 Work with Partners EDI 03/30/11 FMT01 pgmlib: G3X6PGM dtalib: G3X6DTA 12:00:00 Position to Partner ID . . . . . . Qual Type option (and Information), press Enter. 16=Error Rej 17=Cross Ref 30=Copy Partner 31=Print X-Ref 32=Print Qry Opt Partner ID Qual Partner Name ISA-PARTNER Example of an ISA Partner MODEL MODEL (to set up new partners) MYCOMPANY MYCOMPANY (for inbound splitting) STX-PARTNER Example of a STX Partner SWEET TEA SWEET TEA - tutorial partner SWEET TEA MZ SWEET TEA MZ 30 TPCOMPANY Trading Partner Example Company TRADANET TRADANET UNA-PARTNER Example of a UNA Partner More... Parameters or command ===> F1=Help F3=Exit F12=Cancel F15=Sort F23=More Options F24=More Keys

Use the Partner Panels
IBM Sterling Gentran:Server for iSeries Release 3.6 User Guide 87
Step 2: Copy Partner – Specify the Source and Destination Libraries
Sterling Gentran:Server next displays the Copy Partner ID command panel (PTRCPY), as shown inFigure 3.49.
Figure 3.49 Specify a source and a destination library for the TPCOMPANY partner profile
At this point you must identify the source and destination libraries. Type values for the From Library field and To Library field and press Enter. Pressing this key starts the Copy Partner command and returns you to the Work with Partner panel (EDIX005-FMT01). Figure 3.49 illustrates the TPCOMPANY partner profile being copied from a test library named G3X6TSTDTA to a production library named G3X6DTA.
Copy Partner ID (PTRCPY) Type choices, press Enter. Partner ID . . . . . . . . . . . > 'TPCOMPANY' Qualifier . . . . . . . . . . . > '' Character value From Library . . . . . . . . . . G3X6TSTDTA Character value To Library . . . . . . . . . . . G3X6DTA Character value Schedule Job ? . . . . . . . . . *NO *YES, *NO Bottom F3=Exit F4=Prompt F5=Refresh F10=Additional parameters F12=Cancel F13=How to use this display F24=More keys

Use the Partner Panels
88 IBM Sterling Gentran:Server for iSeries Release 3.6 User Guide
Field DescriptionsPartner ID
This is the Partner ID for the partner profile which you want to copy. Enter the Partner ID.
CAUTIONSTOP
The partner profile to be copied cannot exist in the destination library.
QualifierThis is the Qualifier for the partner profile which you want to copy. Enter the Qualifier.
From LibraryThis is the source library in which the partner profile is currently residing.
To LibraryThis is the destination library for the copied partner profile.
CAUTIONSTOP
Before you can use this feature, you must have Sterling Gentran:Server configured in the destination library.
Schedule JobUse this field to specify whether the Copy Partner command should be scheduled as a job. The default value for this field is “*NO.”
If you decide to run the Copy Partner command using the Sterling Gentran Job Scheduler, type ‘*YES’ in this field. The system will access the Job Scheduler function, where you can further define the job run for automatic queueing. You may queue and run the Copy Partner command on a periodic basis through this process. However, the Sterling Gentran:Server Job Scheduler function in the Work with System Administration subsystem can also enable you to establish a master schedule (one-time) for the job to automatically run on a periodic basis.
Use the Partner Panels
IBM Sterling Gentran:Server for iSeries Release 3.6 User Guide 89
Rename a Partner ProfileSterling Gentran:Server allows you to rename a partner profile.
When you rename a partner profile, Sterling Gentran:Server updates all partner records and cross- reference records associated with the new partner ID and qualifier.
Figure 3.50 Work with Partners Rename Option
For this example, we are renaming the Partner ID, TPCOMPANY.
On the Work with Partners panel (EDIX005-FMT01), access the Rename To window by typing ‘7’ in the Option field next to the Partner ID whose partner profile is to be renamed, as shown in Figure 3.50. Press Enter. The Rename To window displays.
In the Rename To window, type the new Partner ID and qualifier and press Enter.
EDIX005 Work with Partners EDI 03/30/11 FMT01 pgmlib: G3X6PGM dtalib: G3X6DTA 12:00:00 Position to Partner ID . . . . . . Qual Type option (and Information), press Enter. 1=Create 2=Revise 3=Copy 4=Delete 5=View 6=Print 7=Rename 11=Groups Opt Partner ID Qual Partner Name ISA-PARTNER Example of an ISA Partner MODEL MODEL (to set up new partners) MYCOMPANY MYCOMPANY (for inbound splitting) STX-PARTNER Example of a STX Partner SWEET TEA SWEET TEA - tutorial partner SWEET TEA MZ SWEET TEA MZ 7 TPCOMPANY Trading Partner Example Company Rename To .. F3=Exit F12=Cancel

Use the Partner Panels
90 IBM Sterling Gentran:Server for iSeries Release 3.6 User Guide
Print a Partner ReportThe Sterling Gentran:Server system enables you to print a hard copy report displaying the contents of the partner profile for one or more trading partners.
The partner report is designed to duplicate the format of the on-line partner panels for easier readability. It prints a separate section for each of the components of the Partner Profile: interchange, groups, transactions sets, name & address. (SEE the sections in this chapter regarding panel layouts and field definitions for more information.)
Figure 3.51 shows the order to enter this information.
Figure 3.51 Steps in the ‘Print a Partner Report’ task
NOTESEE the “Reports” section in this chapter for a detailed description of the contents of the partner report.
Work with Partners(EDIX005-FMT01)
Step 1:Select the Print Option
Print Partner File (PRTPAR)
Step 2:Enter the Print Options

Use the Partner Panels
IBM Sterling Gentran:Server for iSeries Release 3.6 User Guide 91
Step 1: Select the ‘Print’ Option
The Print option can be used to print a report for one partner profile, a range of partner profiles or all partner profiles.
Figure 3.52 Select the Report option for a Single partner or for all partners
To access the Print Partner File command panel (PRTPAR) for an individual partner, on the Work with Partners panel (EDIX005-FMT01), type ‘6’ in the Option field next to the Partner ID for the partner profile that you want to print, then press Enter. (For our example in Figure 3.52, we used TPCOMPANY.)
EDIX005 Work with Partners EDI 03/30/11 FMT01 pgmlib: G3X6PGM dtalib: G3X6DTA 12:00:00 Position to Partner ID . . . . . . Qual Type option (and Information), press Enter. 1=Create 2=Revise 3=Copy 4=Delete 5=View 6=Print 7=Rename 11=Groups Opt Partner ID Qual Partner Name ISA-PARTNER Example of an ISA Partner MODEL MODEL (to set up new partners) MYCOMPANY MYCOMPANY (for inbound splitting) STX-PARTNER Example of a STX Partner SWEET TEA SWEET TEA - tutorial partner SWEET TEA MZ SWEET TEA MZ 6 TPCOMPANY Trading Partner Example Company TRADANET TRADANET UNA-PARTNER Example of a UNA Partner More... Parameters or command ===> F1=Help F3=Exit F12=Cancel F15=Sort F23=More Options F24=More Keys

Use the Partner Panels
92 IBM Sterling Gentran:Server for iSeries Release 3.6 User Guide
Step 2: Enter the ‘Print’ Options
The Print Partner File (PRTPAR) command panel displays next, as shown in Figure 3.53.
Figure 3.53 Print a Sterling Gentran:Server report
On the Print Partner File (PRTPAR) command panel, enter values for the fields as needed. Figure 3.53 illustrates the entries for printing a single Partner file (TPCOMPANY). Because the Print Option ‘6’ was entered next to Partner ID TPCOMPANY on the Work with Partners panel (EDIX005-FMT01), TPCOMPANY shows as the default value in the Select Partners From (*ALL) and Select Partners To (*END) fields. Leave all fields at the defaults and press Enter. You will be returned to the Work with Partner panel (EDIX005-FMT01). In the example, the Schedule Job field has been left at the default value ‘*NO.’ If this field is set to ‘*YES,’ pressing Enter takes you to the Schedule Job panel (SCHJOB). (SEE the “Job Scheduler” chapter in the IBM® Sterling Gentran:Server® for iSeries® Release 3.6 Technical Reference Guide for more detailed information on scheduling print jobs.)
Sterling Gentran:Server provides several filtering options which allow you to selectively print all or some of the partner profiles in the Partner file. The system builds the filter based on the combined values entered in the fields on the PRTPAR command panel:
Print a single Partner ID:
If you accessed the PRTPAR command by typing a ‘6’ in the Option field beside a single Partner ID, Sterling Gentran:Server displays the Partner ID in the “Select Partners From” field and the “Select Partners To” field. All the print options are already entered. Press Enter to start the report.
Print Partner File (PRTPAR) Type choices, press Enter. Select Partners From (*ALL) . . > 'TPCOMPANY' Partner ID Qualifier . . . . . . > '' Character value Select Partners To (*END) . . . > 'TPCOMPANY' Partner ID Qualifier . . . . . . > '' Character value Select Interchange to Print: . . ISA, ICS, BG, GS, UNA, UNB... Select Int. Version to Print . . Character value Schedule Job ? . . . . . . . . . *NO *YES, *NO Bottom F3=Exit F4=Prompt F5=Refresh F10=Additional parameters F12=Cancel F13=How to use this display F24=More keys
Use the Partner Panels
IBM Sterling Gentran:Server for iSeries Release 3.6 User Guide 93
Print a range of partner profiles:
A range of Partner IDs can be printed by typing in a ‘beginning’ and ‘ending’ Partner ID in the “Select Partners From (*ALL)” and the “Select Partners To (*END)” fields respectively.
NOTETyping ‘*ALL’ in the “Select Partners From (*ALL)” field prints all partner profiles regardless of the value in the “Select Partners to (*END)” field.
Print one or more partners with the same interchange header:
If you only want to print partner profiles for partners belonging to a single interchange, type the interchange value in the “Select Interchange to Print” field. Sterling Gentran:Server uses this value, combined with the values entered in the other fields, to filter the output.
Print one or more partners with the same interchange version:
If you only want to print partner profiles for partners belonging to a single version, type the interchange version value in the Select Int. Version to Print field. Sterling Gentran:Server uses this value, combined with the values entered in the other fields, to filter the output.
Sterling Gentran:Server also allows you to either print the partner report immediately, or optionally, to customize the input to the Sterling Gentran Job Scheduler.
To access the Sterling Gentran Job Scheduler from the PRTPAR command panel, type ‘*YES’ in the ‘Schedule Job’ field.

Use the Partner Panels
94 IBM Sterling Gentran:Server for iSeries Release 3.6 User Guide
Print a Partner X-Ref ReportThe Sterling Gentran:Server system enables you to print a hard copy report displaying the partner cross references for one or more trading partners. Figure 3.54 shows the order to enter this information.
Figure 3.54 Steps in the ‘Print a Partner X-Ref Report’ task
NOTESEE the “Reports” section in this chapter for a detailed description of the contents of the Partner X-Ref Report.
Work with Partners(EDIX005-FMT01)
Step 1:Select the Print Option
Print Partner X-Ref File (PRTPXR)
Step 2:Enter the Print Options
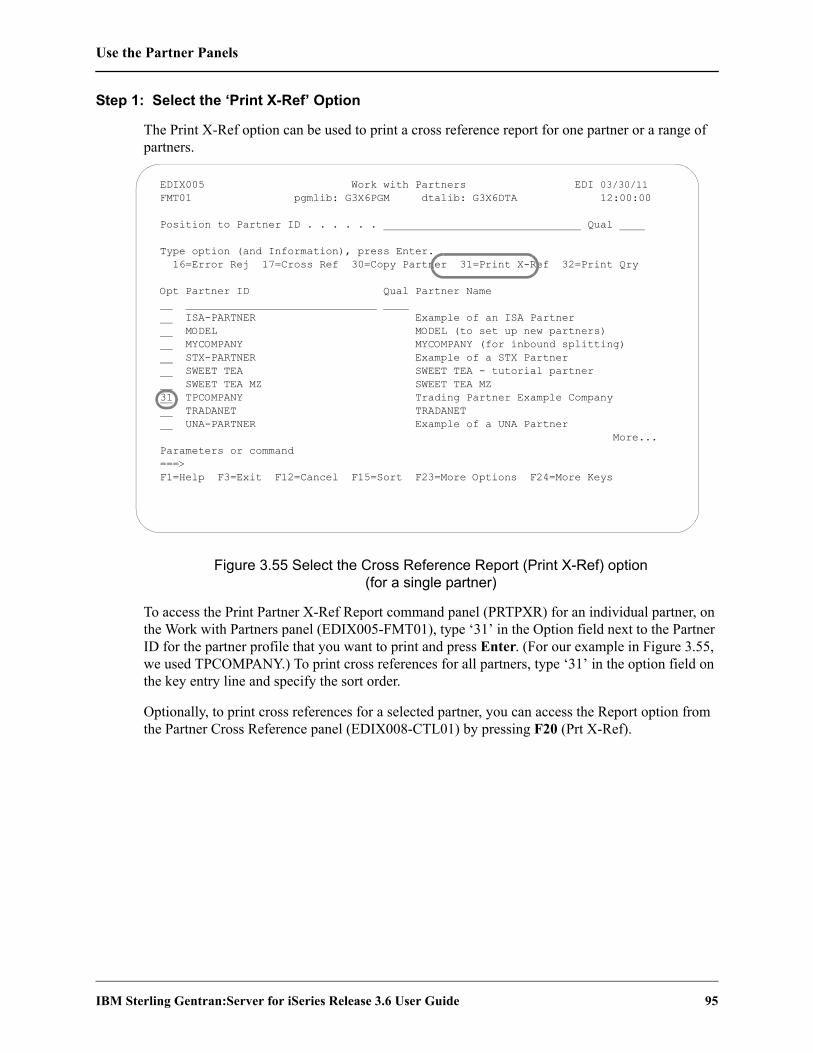
Use the Partner Panels
IBM Sterling Gentran:Server for iSeries Release 3.6 User Guide 95
Step 1: Select the ‘Print X-Ref’ Option
The Print X-Ref option can be used to print a cross reference report for one partner or a range of partners.
Figure 3.55 Select the Cross Reference Report (Print X-Ref) option(for a single partner)
To access the Print Partner X-Ref Report command panel (PRTPXR) for an individual partner, on the Work with Partners panel (EDIX005-FMT01), type ‘31’ in the Option field next to the Partner ID for the partner profile that you want to print and press Enter. (For our example in Figure 3.55, we used TPCOMPANY.) To print cross references for all partners, type ‘31’ in the option field on the key entry line and specify the sort order.
Optionally, to print cross references for a selected partner, you can access the Report option from the Partner Cross Reference panel (EDIX008-CTL01) by pressing F20 (Prt X-Ref).
EDIX005 Work with Partners EDI 03/30/11 FMT01 pgmlib: G3X6PGM dtalib: G3X6DTA 12:00:00 Position to Partner ID . . . . . . Qual Type option (and Information), press Enter. 16=Error Rej 17=Cross Ref 30=Copy Partner 31=Print X-Ref 32=Print Qry Opt Partner ID Qual Partner Name ISA-PARTNER Example of an ISA Partner MODEL MODEL (to set up new partners) MYCOMPANY MYCOMPANY (for inbound splitting) STX-PARTNER Example of a STX Partner SWEET TEA SWEET TEA - tutorial partner SWEET TEA MZ SWEET TEA MZ 31 TPCOMPANY Trading Partner Example Company TRADANET TRADANET UNA-PARTNER Example of a UNA Partner More... Parameters or command ===> F1=Help F3=Exit F12=Cancel F15=Sort F23=More Options F24=More Keys

Use the Partner Panels
96 IBM Sterling Gentran:Server for iSeries Release 3.6 User Guide
Step 2: Enter the ‘X-Ref’ Options
The Print Partner X-Ref Report (PRTPXR) command panel displays:
Figure 3.56 Print Partner X-Ref File (PRTPXR) panel
On the Print Partner X-Ref File (PRTPXR) panel, Sterling Gentran:Server provides several filtering options which allow you to selectively print all or selected partner cross references. The report can be sorted by partner or by cross reference, and can be run for a single partner or cross reference or a range of partners or cross references. The report can be printed or displayed onscreen. To quickly look at the cross references report, change the Print Output? field to ‘*’ and the report displays onscreen.
Because you typed option ‘31’ next to the Partner ID TPCOMPANY (instead of on the key entry line) on the Work with Partners panel, the PRTPXR panel will load that partner’s ID in the Select Partners From and Select Partners To fields and display and print cross references for the selected partner. This is shown in Figure 3.56. Leave all fields at the defaults and press Enter. The system returns you to the Work with Partner panel (EDIX005-FMT01).
In the example, the Schedule Job field has been left at the default value ‘*NO.’ If this field is set to ‘*YES,’ pressing Enter takes you to the Schedule Job panel (SCHJOB). (SEE the “Job Scheduler” chapter in the IBM® Sterling Gentran:Server® for iSeries® Release 3.6 Technical Reference Guide for more detailed information on scheduling print jobs.)
Print Partner X-REF File (PRTPXR) Type choices, press Enter. Sort By? . . . . . . . . . . . . > *PARTNER *XREF, *PARTNER Select Partners From (*ALL) . . > ‘TPCOMPANY’ Partner Qualifier . . . . . . . > ‘ ‘ Character value Select Partners To (*END) . . . > ‘TPCOMPANY’ Partner Qualifier . . . . . . . > ‘ ‘ Character value Print Output? . . . . . . . . . *PRINT *, *PRINT Schedule Job ? . . . . . . . . . *NO *YES, *NO Bottom F3=Exit F4=Prompt F5=Refresh F10=Additional parameters F12=Cancel F13=How to use this display F24=More keys

Use the Partner Panels
IBM Sterling Gentran:Server for iSeries Release 3.6 User Guide 97
Print a Partner Query ReportThe Sterling Gentran:Server system enables you to print query reports summarizing partners who match specific selection criteria. These queries are helpful for getting lists of partners who are set up for a specific version, transaction, division, data separation file, or error rejection, for example. Figure 3.57 shows the order to enter this information.
Figure 3.57 Steps in the ‘Print a Partner Query Report’ task
Work with Partners(EDIX005-FMT01)
Step 1:Select the Print Qry Option
Print Selected Partner Queries(PRTPARQRY)
Step 2:Enter the Print Options
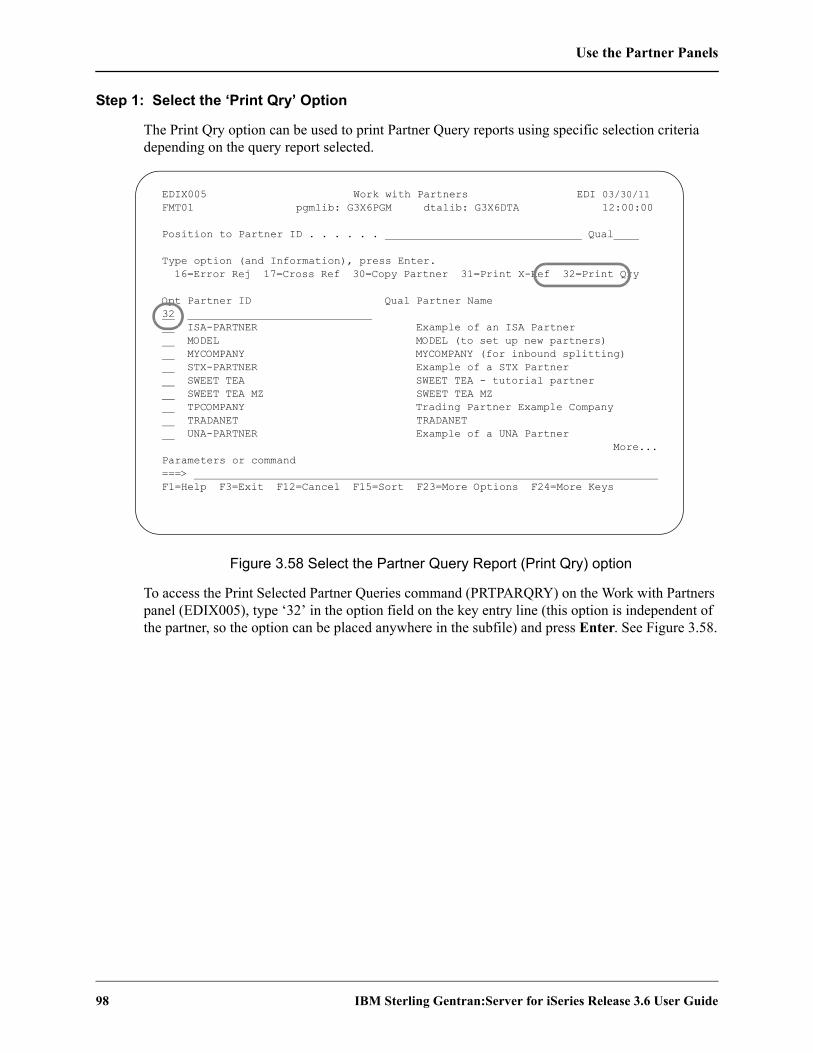
Use the Partner Panels
98 IBM Sterling Gentran:Server for iSeries Release 3.6 User Guide
Step 1: Select the ‘Print Qry’ Option
The Print Qry option can be used to print Partner Query reports using specific selection criteria depending on the query report selected.
Figure 3.58 Select the Partner Query Report (Print Qry) option
To access the Print Selected Partner Queries command (PRTPARQRY) on the Work with Partners panel (EDIX005), type ‘32’ in the option field on the key entry line (this option is independent of the partner, so the option can be placed anywhere in the subfile) and press Enter. See Figure 3.58.
EDIX005 Work with Partners EDI 03/30/11 FMT01 pgmlib: G3X6PGM dtalib: G3X6DTA 12:00:00 Position to Partner ID . . . . . . Qual Type option (and Information), press Enter. 16=Error Rej 17=Cross Ref 30=Copy Partner 31=Print X-Ref 32=Print Qry Opt Partner ID Qual Partner Name 32 ISA-PARTNER Example of an ISA Partner MODEL MODEL (to set up new partners) MYCOMPANY MYCOMPANY (for inbound splitting) STX-PARTNER Example of a STX Partner SWEET TEA SWEET TEA - tutorial partner SWEET TEA MZ SWEET TEA MZ TPCOMPANY Trading Partner Example Company TRADANET TRADANET UNA-PARTNER Example of a UNA Partner More... Parameters or command ===> F1=Help F3=Exit F12=Cancel F15=Sort F23=More Options F24=More Keys

Use the Partner Panels
IBM Sterling Gentran:Server for iSeries Release 3.6 User Guide 99
Step 2: Enter the Query Selection Options
The Print Selected Partner Queries (PRTPARQRY) command panel displays (Figure 3.59).
Figure 3.59 Print Selected Partner Queries (PRTPARQRY) panel
On the Print Selected Partner Queries (PRTPARQRY) panel, there are several types of queries that can be selected and, based upon that selection, different selection parameters display to further specify the criteria to be printed. Select the query type and press Enter. Additional selection criteria displays, depending on the query type selected. Fill in the additional selection fields (press F1 for additional help) and press Enter. The query will either be run interactively or submitted to batch to run, but defaults to run in batch.
The following table details the queries available.
Query Type Description (Print Partners with...)
*TRN Specific Transaction/Message Sets
*VER Specific Compliance Versions/Groups
*GRP Specific Functional Group IDs
*MAP Specific Map Names Tied to Partners (on Transaction Record)
*COMM Specific Comm Profile IDs (interchange or group levels)
*DIV Specific Division Codes
*SEP Specific Group/Trans IDs for Data Separation/Split Files
*REJ Specific Error Numbers for Error Rejection
*INT Specific Interchange Header Types
Print Selected Partner Queries (PRTPARQRY) Type choices, press Enter. Query Selection . . . . . . . . *TRN, *VER, *GRP, *MAP... Bottom F3=Exit F4=Prompt F5=Refresh F12=Cancel F13=How to use this display F24=More keys

Use the ezPART Command
100 IBM Sterling Gentran:Server for iSeries Release 3.6 User Guide
Use the ezPART CommandThe ezPART command steps you through a series of panels to set up information for each of your trading partners. You can use the ezEDI commands to create new entries, edit existing entries and/or delete entries. Each panel is documented in detail in the “Work with Partner Panels” section of this chapter.
CAUTIONSTOP
To keep the setup process as simple as possible, remember that the ezEDI commands, once initiated, proceed forward only through all associated panels. You cannot interrupt the process or back up to previous panels. Be sure to collect all your materials and allow yourself sufficient time prior to initiating an ezEDI command.
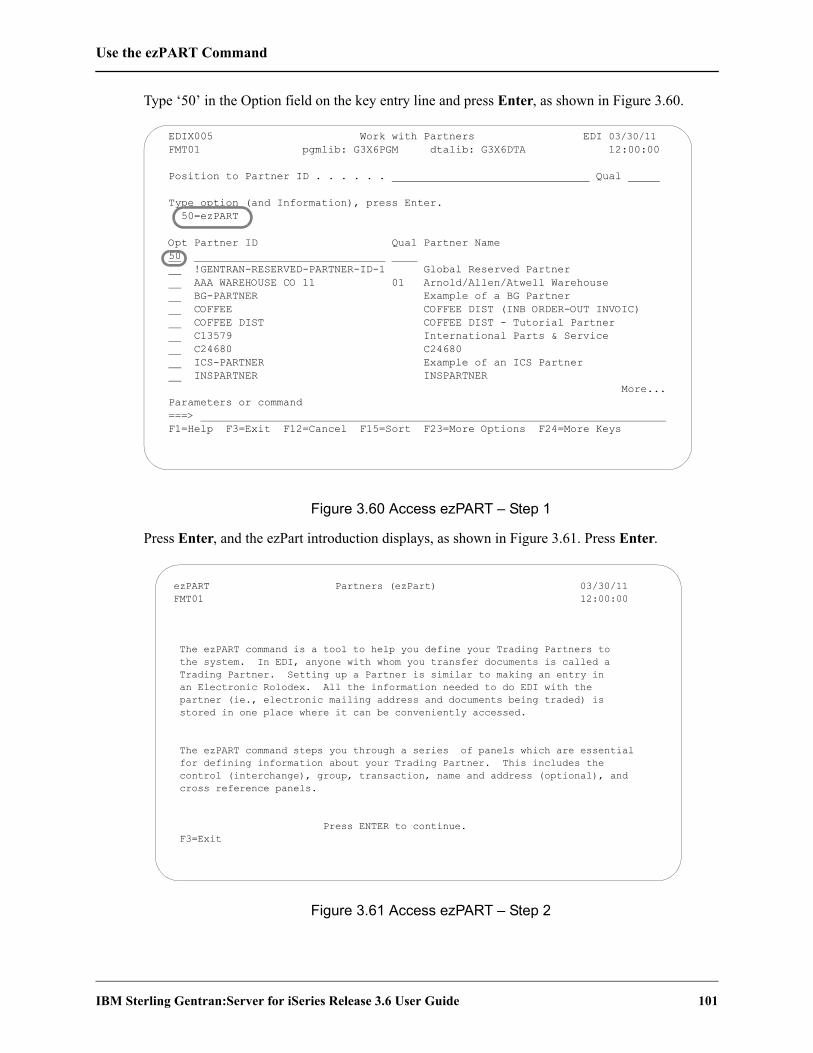
Use the ezPART Command
IBM Sterling Gentran:Server for iSeries Release 3.6 User Guide 101
Type ‘50’ in the Option field on the key entry line and press Enter, as shown in Figure 3.60.
Figure 3.60 Access ezPART – Step 1
Press Enter, and the ezPart introduction displays, as shown in Figure 3.61. Press Enter.
Figure 3.61 Access ezPART – Step 2
EDIX005 Work with Partners EDI 03/30/11 FMT01 pgmlib: G3X6PGM dtalib: G3X6DTA 12:00:00 Position to Partner ID . . . . . . Qual Type option (and Information), press Enter. 50=ezPART Opt Partner ID Qual Partner Name 50 !GENTRAN-RESERVED-PARTNER-ID-1 Global Reserved Partner AAA WAREHOUSE CO 11 01 Arnold/Allen/Atwell Warehouse BG-PARTNER Example of a BG Partner COFFEE COFFEE DIST (INB ORDER-OUT INVOIC) COFFEE DIST COFFEE DIST - Tutorial Partner C13579 International Parts & Service C24680 C24680 ICS-PARTNER Example of an ICS Partner INSPARTNER INSPARTNER More... Parameters or command ===> F1=Help F3=Exit F12=Cancel F15=Sort F23=More Options F24=More Keys
ezPART Partners (ezPart) 03/30/11 FMT01 12:00:00 The ezPART command is a tool to help you define your Trading Partners to the system. In EDI, anyone with whom you transfer documents is called a Trading Partner. Setting up a Partner is similar to making an entry in an Electronic Rolodex. All the information needed to do EDI with the partner (ie., electronic mailing address and documents being traded) is stored in one place where it can be conveniently accessed. The ezPART command steps you through a series of panels which are essential for defining information about your Trading Partner. This includes the control (interchange), group, transaction, name and address (optional), and cross reference panels. Press ENTER to continue. F3=Exit

Use the ezPART Command
102 IBM Sterling Gentran:Server for iSeries Release 3.6 User Guide
Figure 3.62 shows the ezPart panels in the order you need to enter the information.
Figure 3.62 The ezPART panels
Partner Control(EDIX012-FMT00)
See Task:Set up a New Partner Profile
Partner Control(EDIX012-FMT01)
See Task:Set up a New Partner Profile
Partner Groups(EDIX030-FMT01)
See Task:Work with Partner Groups
Partner Name & Address(EDIX035-FMT01)
See Task:Enter a Partner Name & Address
Partner Transactions(EDIX040-FMT01)
See Task:Work with Partner Transactions
Partner Cross Reference(EDIX008-CTL01)
See Task:Work with Partner Cross References

Reports
IBM Sterling Gentran:Server for iSeries Release 3.6 User Guide 103
ReportsEBDI006B – Partner File ReportContents of the Report
The Partner File Report is designed to show the format of the on-line partner profile panels. The following list contains the sections in the order they will be on the report. If there is no data pertaining to some sections, the sections will not be on the report.
Partner Interchange InformationError Rejection ControlPartner Group InformationPartner Name & AddressPartner Transactions Output Data SeparationUser DefinedPartner Cross Reference
How to Identify the ReportThe name of the Sterling Gentran:Server program that generates this report (EBDI006B) displays at the upper left corner of the report. The report title “Formatted Partner File Records” is centered at the top of the report. The identifier “EBDI006B” also displays in the User Data field associated with the spooled report in the Output Queue.
How to Generate the ReportThis is a user-generated report. It is submitted in one of two ways:
From the Work with Partners panel (EDIX005-FMT01) by selecting option ‘6’ for an individual Partner ID.
From the command line by typing ‘PRTPAR’ and pressing Enter.
In both cases, you can filter the report by entering values for one or more of the following print options:
Beginning Partner ID and qualifierEnding Partner ID and qualifierInterchange to printVersion to print

Reports
104 IBM Sterling Gentran:Server for iSeries Release 3.6 User Guide
Special ConsiderationsLike all other Sterling Gentran:Server reports, the Partner File Report (Figure 3.63 through Figure 3.65) automatically goes to your default iSeries Output Queue. You can modify the Output queue options by accessing the Sterling Gentran Job Scheduler from the PRTPAR command which submits the report. To do this, type ‘*YES’ in the Schedule Job? field.
Figure 3.63 Partner File Print Report (Partner Control Information)
EBDI006B RUN DATE 03/30/11 FORMATTED PARTNER FILE RECORDS RUN TIME 12:00:00 PAGE 1
PARTNER ID = TPCOMPANY QUAL =
************ PARTNER CONTROL DATA ************
INTERCHANGE HEADER OPTION: ISA DIVISION: 000
INTERCHANGE VERSION: 00400 USE: D
INCOMING BG PASSWORD:
LAST INCOMING INTRCHG NUM:
GS SENDER ID QUAL: N
GS RECEIV ID QUAL: N
COMM PROFILE ID: CN3BSC GROUP PROFILE ID: N
ACKNOWLEDGEMENT OPTIONS: ACK INTERCHANGE: N
ACK GROUP OR TRANS: T
ACK ERRORS: N
EXPECT INTRCHG ACK(FOR AUDIT REPORTING): N
UPDATE ALLOWED: Y
OUTBOUND (SEND) PARAMETERS FOR ISA OPTION:
INTERCHANGE VERSION: 00400
ELEMENT SEPARATOR : * OR HEX 5C
SUB ELEMENT SEPARATOR: > OR HEX 6E
SEGMENT TERMINATOR: OR HEX 15
INTERCHANGE ACK REQUEST: 0
INTERCHANGE SENDER ID: MYDUNS QUAL: ZZ
INTERCHANGE RECEIV ID: TPCOMPANY QUAL: ZZ
SECURITY CODE: QUAL: 00
AUTHORIZATION CODE: QUAL: 00
CONTROL STANDARDS IDENTIFIER: U
INTERCHANGE CONTROL NUMBER: 000000000
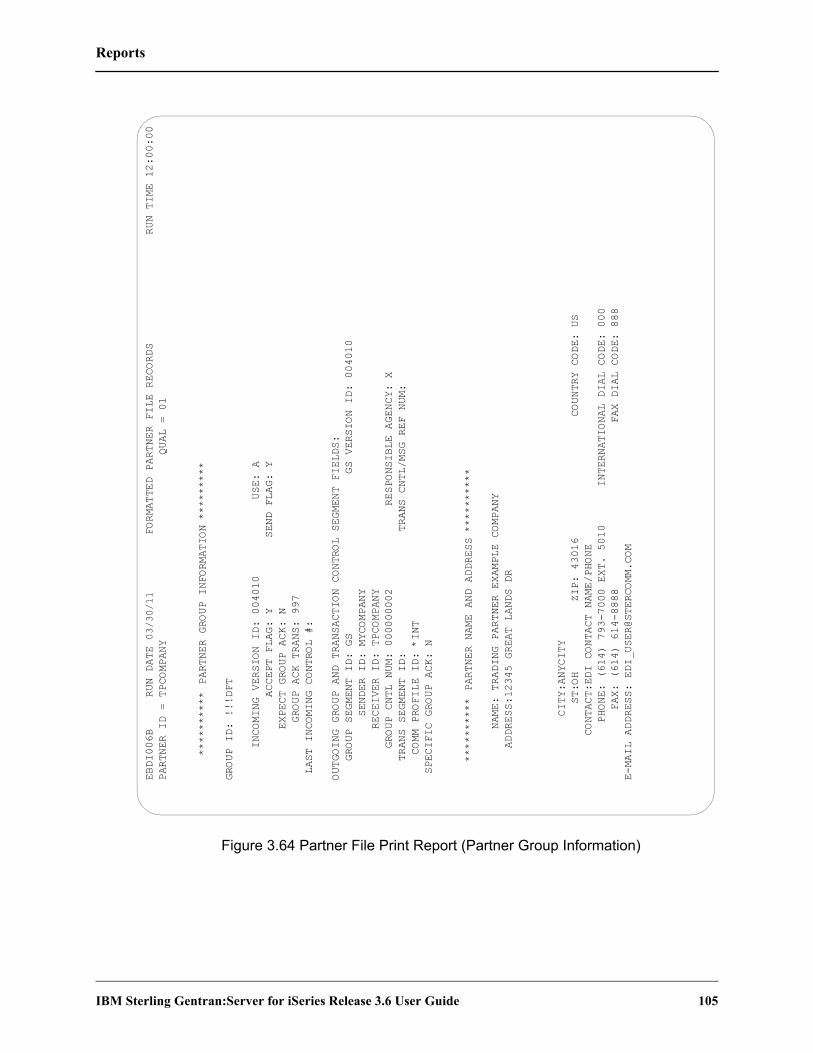
Reports
IBM Sterling Gentran:Server for iSeries Release 3.6 User Guide 105
Figure 3.64 Partner File Print Report (Partner Group Information)
EBDI006B RUN DATE 03/30/11 FORMATTED PARTNER FILE RECORDS RUN TIME 12:00:00
PARTNER ID = TPCOMPANY QUAL = 01
********** PARTNER GROUP INFORMATION *********
GROUP ID: !!!DFT
INCOMING VERSION ID: 004010 USE: A
ACCEPT FLAG: Y SEND FLAG: Y
EXPECT GROUP ACK: N
GROUP ACK TRANS: 997
LAST INCOMING CONTROL #:
OUTGOING GROUP AND TRANSACTION CONTROL SEGMENT FIELDS:
GROUP SEGMENT ID: GS GS VERSION ID: 004010
SENDER ID: MYCOMPANY
RECEIVER ID: TPCOMPANY
GROUP CNTL NUM: 000000002 RESPONSIBLE AGENCY: X
TRANS SEGMENT ID: TRANS CNTL/MSG REF NUM:
COMM PROFILE ID: *INT
SPECIFIC GROUP ACK: N
********** PARTNER NAME AND ADDRESS **********
NAME: TRADING PARTNER EXAMPLE COMPANY
ADDRESS:12345 GREAT LANDS DR
CITY:ANYCITY
ST:OH ZIP: 43016 COUNTRY CODE: US
CONTACT:EDI CONTACT NAME/PHONE
PHONE: (614) 793-7000 EXT. 5010 INTERNATIONAL DIAL CODE: 000
FAX: (614) 614-8888 FAX DIAL CODE: 888
E-MAIL ADDRESS: [email protected]
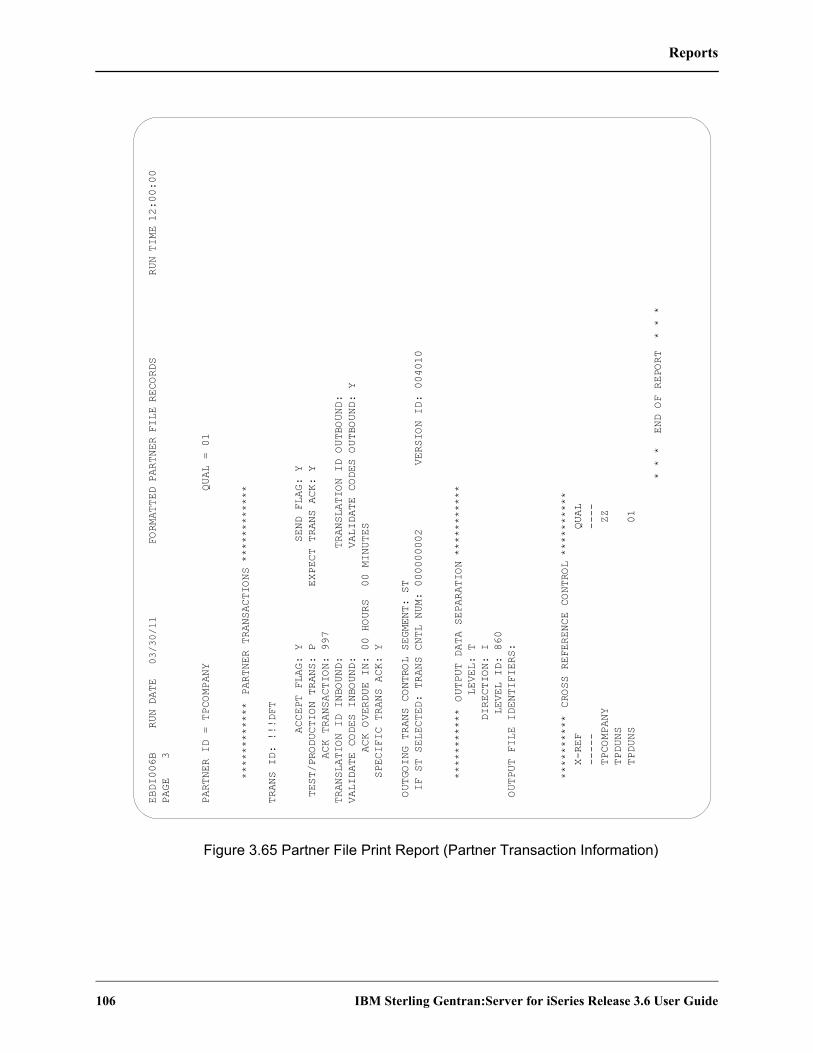
Reports
106 IBM Sterling Gentran:Server for iSeries Release 3.6 User Guide
Figure 3.65 Partner File Print Report (Partner Transaction Information)
EBDI006B RUN DATE 03/30/11 FORMATTED PARTNER FILE RECORDS RUN TIME 12:00:00
PAGE 3
PARTNER ID = TPCOMPANY QUAL = 01
************ PARTNER TRANSACTIONS ************
TRANS ID: !!!DFT
ACCEPT FLAG: Y SEND FLAG: Y
TEST/PRODUCTION TRANS: P EXPECT TRANS ACK: Y
ACK TRANSACTION: 997
TRANSLATION ID INBOUND: TRANSLATION ID OUTBOUND:
VALIDATE CODES INBOUND: VALIDATE CODES OUTBOUND: Y
ACK OVERDUE IN: 00 HOURS 00 MINUTES
SPECIFIC TRANS ACK: Y
OUTGOING TRANS CONTROL SEGMENT: ST
IF ST SELECTED: TRANS CNTL NUM: 000000002 VERSION ID: 004010
*********** OUTPUT DATA SEPARATION ***********
LEVEL: T
DIRECTION: I
LEVEL ID: 860
OUTPUT FILE IDENTIFIERS:
********** CROSS REFERENCE CONTROL **********
X-REF QUAL
----- ----
TPCOMPANY ZZ
TPDUNS
TPDUNS 01
* * * END OF REPORT * * *

Reports
IBM Sterling Gentran:Server for iSeries Release 3.6 User Guide 107
EBDI006G – Partner Cross Reference ReportContents of the Report
The Partner Cross Reference Report is designed to show a one-to-one correspondence, even though the cross reference is a one-to-many correlation. All partner cross references for each selected Partner ID are listed on the report. The report includes the following fields:
Partner IDPartner QualifierX-RefX-Ref Qualifier
SEE the section ‘Printing a Partner X-Ref Report’ for more information on defining what information is on the report.
How to Identify the ReportThe name of the Sterling Gentran:Server program that generates this report (EBDI006G) displays at the upper left corner of the report. The report title “Partner Cross Reference Report” is centered at the top of the report. The identifier “EBDI006G” also displays in the User Data field associated with the spooled report in the Output Queue.
The report columns change according to what sort order you select. If ‘*PARTNER’ is selected, then Partner ID displays as the left column. If ‘*X-REF’ is selected, then the cross reference displays as the left column. Selection criteria prints at the top of the report, identifying the run time selections.
How to Generate the ReportThis is a user-generated report. It is submitted in one of three ways:
1. From the Work with Partners panel (EDIX005-FMT01) by selecting option ‘31’ for an individual Partner ID, or on the key entry line for all partners.
2. From the command line by typing ‘PRTPXR’ and pressing F4 (Prompt).3. From the Partner Cross Reference panel (EDIX008-CTL01) by pressing F20 (Prt X-Ref).
For the first two methods above, you can select the report format by typing ‘*PARTNER’ or ‘*XREF’ in the Sort By field on the PRTPXR command panel. If you use the third method to access the report, it will automatically print the cross reference report for the currently displayed partner only.
Special ConsiderationsLike all other Sterling Gentran:Server reports, the Partner Cross Reference Report (Figure 3.66) automatically goes to your default iSeries Output Queue. You can modify the Output queue options through the Environment Control setup for this user, or by accessing the Sterling Gentran Job Scheduler from the PRTPXR command which submits the report. To do this, type ‘*YES’ in the Schedule Job? field.

Reports
108 IBM Sterling Gentran:Server for iSeries Release 3.6 User Guide
Figure 3.66 Cross Reference File Report (sorted by partner)
EBDI006G RUN DATE: 03/30/11 PARTNER CROSS REFERENCE REPORT RUN TIME 12:00:00 PAGE 1
Sort By. . . . . . . . . . . . . *PARTNER
Select Partner From ID/Qual . . *ALL /
Select Partner To ID/Qual . . . *END /
PARTNER ID QUAL X-REF QUAL
---------- ---- ---- ----
TPCOMPANY TPCOMPANY ZZ
TPCOMPANY TPDUNS
TPCOMPANY TPDUNS 01
TRAVEL PEOPLE ** NO X-REFS FOUND **
TOTAL NUMBER OF PARTNERS: 2
TOTAL NUMBER OF PARTNERS WITHOUT X-REFS: 1
TOTAL NUMBER OF X-REFS: 3

Common Questions
IBM Sterling Gentran:Server for iSeries Release 3.6 User Guide 109
Common Questions
What is the partner profile and what is it used for?The partner profile is similar to an electronic rolodex, where all the information about how to “do EDI” with a partner is stored. In EDI, anyone with whom you transfer documents is called your trading partner. These trading partners may have been known as your Customer or Vendor. If you were to mail a document to your trading partner, you need to know the destination address and where that information is stored. The same type of information is needed by Sterling Gentran:Server when the document is sent electronically.
What information is stored in the partner profile?Sterling Gentran:Server stores all partner information centrally, under a single Partner ID. Often, the partner information is referred to as the “Partner Profile.” If you are trading several different documents with the same partner, you only need one Partner ID. Information stored under the Partner ID includes:
The documents that are traded with this partner.
The EDI format (standard and version) for the documents.
The envelope type that the EDI data is “stuffed” into for transmission.
Name, Address, and EDI contact for this partner.
Additional notes (FYI comments and scratch pad).
Can I access the partner profile from my own programs?Yes. With Sterling Gentran:Server, all the information necessary for translating EDI documents is contained in the partner profile. Some users may have a special need for accessing information stored in the partner profile from their own programs. The name of the partner profile is needed to access this information. Sterling Gentran:Server stores the partner information in several files (externally-defined files). The name of the logical file (multi-format logical) that is built over these files is called GT00PRL. You are responsible for maintaining your own application interfaces if the format of the partner profile changes in future releases of Sterling Gentran:Server.

Common Questions
110 IBM Sterling Gentran:Server for iSeries Release 3.6 User Guide
How would a partner be set up if they have multiple divisions?
This issue is addressed by the advanced Sterling Gentran:Server user. If you are just starting with Sterling Gentran:Server, follow the Step-by-Step instructions for creating your partner and then refer back to this question when the need arises. There are many ways to address the situation of multiple divisions. The critical piece of information needed before deciding on the method is knowing how the data needs to be “enveloped” in each partner’s circumstance. In each scenario below, examples are provided indicating the Envelope ID, the document, and the division.
Same Interchange and Group Identifiers: If the partner identified on the interchange and group envelope is for the same entity (similar to a “corporate” identifier), different divisions are usually handled within the data (in the N1 loop). An example of this is when multiple different bill-to and ship-to identifiers are contained within the entity. In this case, only one Partner ID is needed. This method is often used when the partner is processing the EDI data centrally and then distributing it to the different divisions.
ISA: TPCORPORATE All DivisionsGS: TPCORPORATE Purchase Order All DivisionsGS: TPCORPORATE Invoice All Divisions
Same Interchange, Different Group Identifiers: There are two scenarios for this type: one for multiple divisions and one for a single company with different identifiers for each document.
If the interchange indicates a “corporate” identifier (an ID that represents the whole com-pany) while the group envelope identifies different divisions, multiple partners need to becreated in Sterling Gentran:Server, one for each unique sender/receiver combination onthe group envelope. This scenario is very common for multiple divisions. By creatingunique partners for each division, each one indicates the same identifier at the interchangelevel. However, each division has its own identifier for each group envelope.
ISA: TPCORPORATE All DivisionsGS: TPDIV1 Purchase Order Division 1GS: TPDIV1 Invoice Division 1GS: TPDIV2 Purchase Order Division 2GS: TPDIV2 Invoice Division 2
In this situation, it is advisable to create a “corporate partner” in addition to each divisional partner that is used for the sole purpose of Auditing. The interchange identifier, TPCORPORATE, may be cross referenced back to the single corporate partner. The corporate partner data is tracked in the audit file, while each group identifier is cross referenced to the divisional trading partner for map selection and envelope values.

Common Questions
IBM Sterling Gentran:Server for iSeries Release 3.6 User Guide 111
If the interchange indicates a “corporate” identifier while each document group contains adifferent identifier, only one partner is needed. This scenario is not common, but it is onethat has been required in the past. The data is for one entity (not for multiple divisions).However, a different identifier is used to distinguish between document types. Since Sterling Gentran:Server allows you to identify a different identifier on each functionalgroup record, only one single partner is needed.
ISA: TPCORPORATE All DivisionsGS: TPPO Purchase Order All DivisionsGS: TPINV Invoice All Divisions
Different Interchange, Different Group Identifiers: This option is the same as “Same Interchange, Different Group Identifiers.” Multiple partners need to be created for each sender/receiver combination. The only difference is that on the interchange, different identifiers are used for each division.
ISA: TPDIV1 Division 1GS: TPDIV1 Purchase Order Division 1GS: TPDIV1 Invoice Division 1
ISA: TPDIV2 Division 2GS: TPDIV2 Purchase Order Division 2GS: TPDIV2 Invoice Division 2
What if a single partner trades with more than one type of interchange?
Since there can only be one interchange type assigned to a partner, a second partner needs to be created for secondary interchange types. An example of this situation may occur when you trade both X12 and UCS documents with the same partner where the ISA and the BG interchanges are used. You need unique identifiers to help Sterling Gentran:Server determine which partner/interchange type is used in these different circumstances.
Common Questions
112 IBM Sterling Gentran:Server for iSeries Release 3.6 User Guide
What if the partner has been set up but cannot be found during processing?
Setting up a partner does not necessarily guarantee that Sterling Gentran:Server is able to locate the partner during translation processing. This action is similar to using the Yellow Pages to find the telephone number of a specialty store. You are fairly sure they are listed in the phone book, but you may not be able to find them, especially if you are not sure what “category” to look for. Sometimes when you do find a category, it may refer you to another location in the phone book where the phone numbers are actually listed.
Sterling Gentran:Server uses the same principle. Since there may be several different identifiers that are used to refer to the same partner, such as envelope identifiers and internal identifiers, it is tedious to set up the same partner over and over. These “alias” identifiers can be tied back to the single Partner ID by using the Cross Reference file, just like the Yellow Pages does by pointing you to the listing where the address and phone numbers are stored.
If the partner that was set up is not found, and the Partner Verification global parameter is turned on, Sterling Gentran:Server places the data in the Suspense File. Error messages are also printed on the processing reports indicating that the partner has not been found. In order to correct this problem, set up Cross-Reference entries in the Partner Cross Reference file to “tie” the unknown identifier to the Partner ID. (SEE the step-by-step procedure for creating a partner in this chapter.)

Chapter
IBM Sterling Gentran:Server for iSeries Release 3.6 User Guide 1
4 Mapping: Getting Started
In this ChapterThis chapter is an introduction to the Mapping subsystem. It is recommended that you read this chapter before starting the actual task of creating the map, using the next two chapters, “Application Definition” and “Transaction Mapping.”
NOTEYou may also want to read the “Mapping Integration” section of the IBM® Sterling Gentran:Server® for iSeries® Release 3.6 Manager’s Implementation Planner before continuing. This section includes an overview of additional material to reference and the initial steps that are performed in mapping.
This chapter contains the following sections:
What is Mapping? . . . . . . . . . . . . . . . . . . . . . . . . . . . . . . . . . . . . . . . . . . . . . . . . . . . . . . 4-2
Mapping Features . . . . . . . . . . . . . . . . . . . . . . . . . . . . . . . . . . . . . . . . . . . . . . . . . . . . . . 4-2
Interface with Application Systems . . . . . . . . . . . . . . . . . . . . . . . . . . . . . . . . . . . . . . . . 4-3
Mapping Theory in Sterling Gentran:Server . . . . . . . . . . . . . . . . . . . . . . . . . . . . . . . . . 4-6
Build Maps with Sterling Gentran:Server. . . . . . . . . . . . . . . . . . . . . . . . . . . . . . . . . . . 4-18
How the Mapper Translates Outbound and Inbound Data . . . . . . . . . . . . . . . . . . . . . . 4-19
What is Mapping?
2 IBM Sterling Gentran:Server for iSeries Release 3.6 User Guide
What is Mapping?Mapping is the definition of how to move data between your application format and the EDI format requested by your trading partner. The definition is sophisticated enough to include special manipulations that need to be done as the data is moved or special conditions that need to be evaluated before the data is manipulated or moved. Within the scope of Sterling Gentran:Server, several synonyms are used to refer to mapping. A map can also be referred to as a Transaction ID or a Transaction Definition.
The task of mapping can be broken into three basic steps: 1. Define what the application format looks like2. Define what the EDI format looks like and how to link the application to the EDI format3. Create Tables to help link the data between formats, if desired
Mapping FeaturesBelow are mapping features found in Sterling Gentran:Server.
Ability to retrieve DDS (Data Description Specifications) to define application layouts.Point-to-point connection between application data and EDI data.One mapping definition that can be used for multiple trading partners.Automatic conversion of dates (for example, converting MMDDYY to YYYYMMDD).Ability to move literal values into the target data file even if these literal values do not exist in the Source Data file (application data to EDI data, and vice versa).Ability to convert internal code values into EDI-specific code values.Creation of new maps for the same version by copying old maps.Ability to migrate maps from one EDI version to another EDI version.“Re-link” maps if the application format changes.Ability to copy application definitions, maps, and tables from one library to another library (that is, move information from a test environment to a production environment).Ability to map from application files to EDI envelopes.Provide advanced functionalities, namely:
1. Subfield mapping (that is, concatenating multiple fields together to be moved into one single EDI element or “decatenating” an EDI element into multiple application fields).
2. Arithmetic Operations (+, -, *, /).3. Conditional mapping (if... then... else logic).4. User Exits (APIs – Application Program Interfaces)
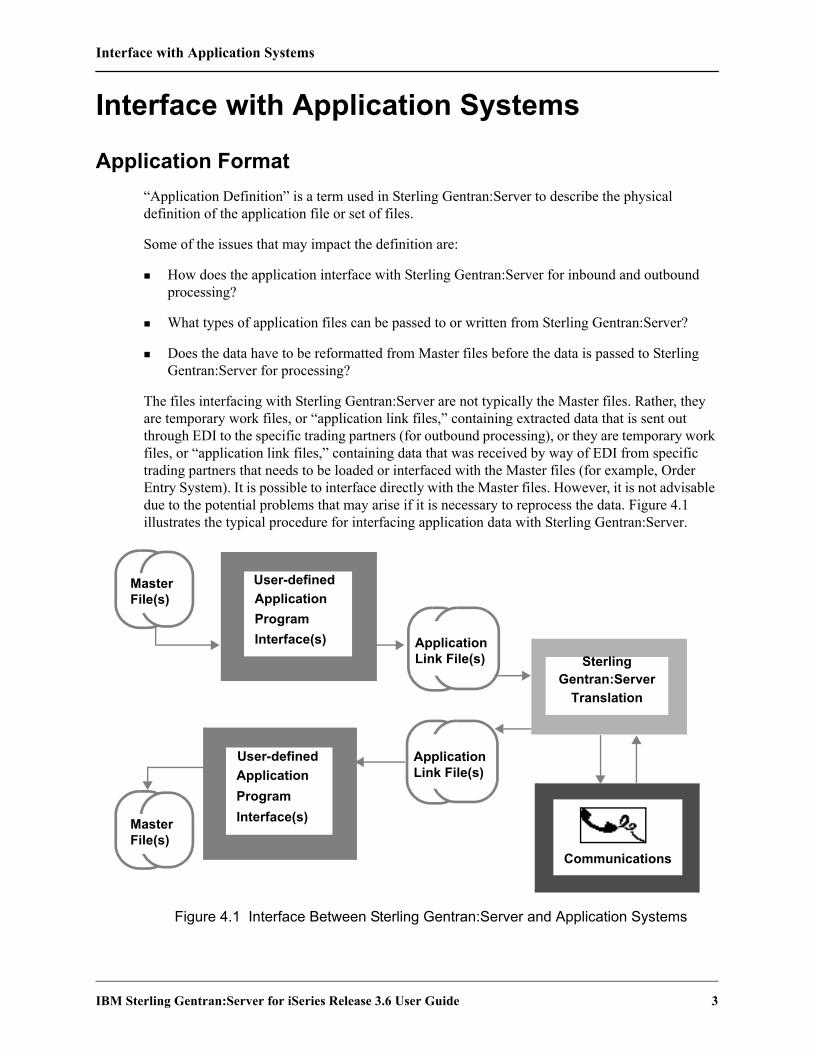
Interface with Application Systems
IBM Sterling Gentran:Server for iSeries Release 3.6 User Guide 3
Interface with Application Systems
Application Format“Application Definition” is a term used in Sterling Gentran:Server to describe the physical definition of the application file or set of files.
Some of the issues that may impact the definition are:
How does the application interface with Sterling Gentran:Server for inbound and outbound processing?
What types of application files can be passed to or written from Sterling Gentran:Server?
Does the data have to be reformatted from Master files before the data is passed to Sterling Gentran:Server for processing?
The files interfacing with Sterling Gentran:Server are not typically the Master files. Rather, they are temporary work files, or “application link files,” containing extracted data that is sent out through EDI to the specific trading partners (for outbound processing), or they are temporary work files, or “application link files,” containing data that was received by way of EDI from specific trading partners that needs to be loaded or interfaced with the Master files (for example, Order Entry System). It is possible to interface directly with the Master files. However, it is not advisable due to the potential problems that may arise if it is necessary to reprocess the data. Figure 4.1 illustrates the typical procedure for interfacing application data with Sterling Gentran:Server.
Figure 4.1 Interface Between Sterling Gentran:Server and Application Systems
ApplicationProgramInterface(s)
MasterFile(s)
ApplicationLink File(s)
ApplicationLink File(s)
Gentran:ServerTranslation
MasterFile(s)
ApplicationProgramInterface(s)
Communications
User-defined
User-defined
Sterling Gentran:Server
Translation
Interface with Application Systems
4 IBM Sterling Gentran:Server for iSeries Release 3.6 User Guide
Types of Application Files Used with Sterling Gentran:ServerThere are three types of files that Sterling Gentran:Server can directly accept for inbound and outbound processing:
Physical: Multiple externally described physical files (created using DDS).
Logical: One externally described multi-format logical file (created using DDS).
Flat file: One internally described physical file (created using record length instead of DDS).
NOTEThe record length for any file cannot exceed 10,000 bytes.
Externally Described Physical Files (P) are the most common type. Multiple physical files can be used. Most transactions require a physical file per area of the EDI document, such as one for the Header, one for the Detail, and optionally one for the Summary.
CAUTIONSTOP
For outbound processing, each physical file used must contain at least one key field, or one must be defined on the Application Key Structure panel (EDIX559-FMT01). A time stamp field (Z type field in the DDS) cannot be a key field. There cannot be more than 32 physical files defined to an application definition for outbound processing.
For outbound processing, Sterling Gentran:Server first dynamically generates DDS and creates a Multi-Format Logical file over all the physical files specified. It is impossible for Sterling Gentran:Server to process the data with integrity if there are no keys on the physical files, or no keys contained in the logical file. If no keys exist on the physical files, it is possible to identify fields that should be key fields for the multi-format logical file that is created at run-time.
The logical file that Sterling Gentran:Server creates for outbound processing is used as input to the Mapper. This enables all the records for the same document to be processed together in one file by reading the records sequentially. The keys of the physical files need to tie all the records together for a single document. It is common to use a primary key of partner first, then the document number so fewer interchanges will be generated for the single document. (HINT: This saves you time and money!)
For inbound processing, Sterling Gentran:Server does not require the physical files to contain key fields because it is not necessary to generate the multi-format logical file over them.
Externally Described Multi-format Logical Files (L) can be used effectively for outbound processing, but they are generally not used for inbound processing. If they are used, you must create the multi-format logical file yourself using DDS over the same physical files mentioned above instead of having Sterling Gentran:Server create this file.
Interface with Application Systems
IBM Sterling Gentran:Server for iSeries Release 3.6 User Guide 5
There are valid reasons for creating the logical file yourself, namely:
Record selection can be used. Since you create the DDS yourself, specific records can be selected using the SELECT/OMIT keyword in the DDS. For example, records can be selected from all physical files if a status flag indicates the data is destined for EDI but has not yet been interfaced to Sterling Gentran:Server.
Problem determination might be easier if the file was created by the user prior to processing. The file may be a permanent logical file or a temporary file that is created at the beginning of the EDI processing stream.
For large files, processing can be enhanced with the use of a logical.
Reasons for not using user-created logical files are:
Many users are not familiar with the Multi-Format Logical file and may not have the time or desire to get acquainted with it.
Extra DDS needs to be generated and maintained for the logical file.
The logical file must be created prior to processing. The file may be a permanent file that requires extra overhead for maintaining the access paths.
Internally Described Physical File (I) is also known as the “flat file,” containing multiple-record formats that are in the same offset of each record. The format of the records is typically defined internally within each program it is used in. The data needs to be sorted by the user or user program before outbound processing in the order of partner and document. All records needed to produce one single document for a partner must be grouped together.
Using the invoice as an example, the Header record for one invoice is followed by all the Detail line item records for the same invoice, then by a Header record for the second invoice, and so forth. For inbound processing, it is common to load a sort key on the front of every record during mapping so that the user’s post-processing program(s) can sort the records based on the requirements of the application interface.
Mapping Theory in Sterling Gentran:Server
6 IBM Sterling Gentran:Server for iSeries Release 3.6 User Guide
Mapping Theory in Sterling Gentran:Server
Application Format and EDI FormatIn Sterling Gentran:Server, it is only necessary to define the application format one time. Many EDI formats can then be tied back to the same application format. This “One-to-Many” concept is commonly referred to as the Bicycle Wheel Concept. The application definition is the “Hub of the Wheel” and the transaction definitions are the “Spokes of the Wheel.” This allows multiple transactions to be tied to a single application definition, hence the “hub.” When new partners are brought up in EDI for the same type of document, it is not necessary to create a new application definition. However, it may be desirable to create a new transaction definition (map). Figure 4.2 illustrates how the application definition relates to multiple transaction definitions.
Figure 4.2 Bicycle Wheel Concept: “One-to-Many Relationship”
004020810 MapPartner Spec.
004010810 MapGeneral
U3/0 880Map General
004020810 MapGeneral
004010810 MapPartner Spec.
ApplicationData ID
Transaction IDsInvoice Segments
Transaction Sets:810, 880
“Spokes of the Wheel”
Invoice File(s)Functional Groups: IN, IG
“Hub of the Wheel”
Mapping Theory in Sterling Gentran:Server
IBM Sterling Gentran:Server for iSeries Release 3.6 User Guide 7
There are two types of transactions or maps that Sterling Gentran:Server allows:
General maps
Partner-specific maps
General maps are intended to be used for many trading partners to define how the data is translated between formats for a particular EDI version. It is common to use a General map for inbound processing that is robust enough to include all the EDI data that any trading partner may send you.
Partner-specific maps are used for a specific trading partner or sets of trading partners that differs from the “general” method for translating the data between formats. It is common for outbound processing to use partner-specific maps since most trading partners request to have data sent “just the way they want it.” In this case, you can copy an existing map and modify it for the new trading partner.
NOTETo use a specific map for a trading partner, you MUST identify the map in the trading partner’s profile. (SEE the “Partner” chapter for more information.)
Structuring Application FormatsThe following figure illustrates two documents: the one on the left is a paper invoice that is mailed to your customer and the one on the right is an electronic invoice that is transmitted to your trading partner. Both documents contain the same information, but the format is different.
Your application format should be dictated by the needs of your application. In the following example, the application is structured around the invoice. Additional information is added to include information specific to EDI that is not printed on the paper invoice.
NOTEThe Header data from the paper invoice is moved into the Header portion of the electronic invoice, Detail data is moved into the Detail portion, and so on.

Mapping Theory in Sterling Gentran:Server
8 IBM Sterling Gentran:Server for iSeries Release 3.6 User Guide
Figure 4.3 describes the data that is moved into the EDI format for each segment.
Figure 4.3 Application Format for Paper Invoice to be Moved into EDI Invoice
Interchange (ISA)
Group (GS)
Transaction (ST)
BIG*20040925*971220001*20040915*24873 N/L
REF*DP*A158 N/LN1*BT*SUNNY RETAILERS*01*103868929 N/LN3*1509 N. BRIDGE AVE. N/LN4*SUNNYVALE*CA*96810 N/LN1*ST**92*508 N/LN1*RE*FANCY DESIGNERS N/LN3*PO BOX 7180 N/L
N4*RICHMOND*OH*43019 N/LITD*01*3*2**10**30 N/LDTM*011*20040125 N/L
IT1**1*EA*470.50**UP*052177002578*VP*601422 N/LPID*F****ANTIQUE CURIO CABINET N/LIT1**7*EA*95.90**UP*052177002685*VP*648019 N/LPID*F****OAK END TABLE N/LIT1**2*EA*85.00*UP*052177002653*VP*633485 N/L
PID*F****CRYSTAL ETCHED LAMP N/LIT1**4*EA*15.99**UP*052177002615*VP*486371 N/LPID*F****BRASS MAGAZINE RACK N/L
TDS*137576 N/L
CAD****UPS N/LCTT*4 N/L
Equals
INVOICE
Inv #: 971220001 PO No: 24873Inv Date: 09-25-04 PO Date: 09-15-04Bill To: Ship To:
Sunny Retailers Sunny Retailers1509 N. Bridge Ave Store # 608 Dept. A158Sunnyvale, CA 96810 1509 N. Bridge Ave.
Sunnyvale, CA 96810Bill of Lading: TermsPro #: 2% 10 Net 30Comments: Rush OrderRemit To: Fancy Designers, PO Box 7180 Richmond, OH 43019
UnitQty Item # Description Price Total 1 601422 Antique Curio 470.50 470.50
Cabinet 7 648019 Oak End Table 95.90 671.30 2 633485 Crystal Etched 85.00 170.00
Lamp 4 486371 Brass Magazine 15.99 63.96
Rack
Routing: UPS Invoice Total: $ 1375.76 Total Qty Shipped: 14
H
S
D
NTE*GEN*RUSH ORDER N/L

Mapping Theory in Sterling Gentran:Server
IBM Sterling Gentran:Server for iSeries Release 3.6 User Guide 9
Contents of the X12 Invoice (Illustrated in the previous figure)
Element Description Value Comments
Interchange Envelope Segment: ISA (for outbound processing, loaded from Partner file)
01 Authorization Qualifier 00 Indicates the Authorization code is not used.
02 Authorization Code bbbbbbbbbb Leave blank, not typically used (identifies Sender).
03 Security Qualifier 00 Indicates the Security Code is not used.
04 Security Code bbbbbbbbbb Leave blank, not typically used (identifies Receiver).
05 Sender ID Qualifier 01 Indicates what kind of code is used to identify Sender (01=DUNS, 08=VICS comm, 12=phone, ZZ=descriptive).
06 Sender ID Your DUNS # Pick the identifier you want to use to identify yourself as the Sender when sending outbound data.
07 Receiver ID Qualifier 01 Indicates what kind of code is used to identify receiver or your partner (01=DUNS, 08=VICS comm, 12=phone, ZZ=descriptive).
08 Receiver ID Partner’s DUNS #
Ask your partner what identifier you use to identify them when sending this document outbound.
09 Transmission Date System Date Sterling Gentran:Server generates this at run-time from system date (YYMMDD).
10 Transmission Time System Time Sterling Gentran:Server generates this at run-time from the system time (HHMM).
11 Standards ID U Indicates USA EDI community.
12 Interchange Version 00400 Version of the interchange (00300 or 00400). (Note: five digits)
13 Interchange Control Number
000000001 Sterling Gentran:Server increments this number for this partner each time an interchange is generated.

Mapping Theory in Sterling Gentran:Server
10 IBM Sterling Gentran:Server for iSeries Release 3.6 User Guide
Contents of the X12 Invoice (Illustrated in the previous figure)
Element Description Value Comments
Interchange Envelope Segment: ISA (for outbound processing, loaded from Partner file)
14 Interchange Ack. Requested
0 Indicates that NO interchange acknowledgment is requested. (‘0’ = No, ‘1’ = Yes) TA1 is not desired.
15 Test Indicator T Sterling Gentran:Server generates from status of partner and map...if both are P, then this is P. Else, it is T.
16 Subelement Separator > Must be different than the element separator indicated in Partner file. Industry standard is “>.”
Group Envelope Segment: GS (for outbound processing, loaded from Partner file)
01 Functional ID Code IN Indicates this is the invoice group for X12.
02 Application Sender’s Code
Your DUNS # Code to identify you as the Sender of the application (can be DUNS #, Descriptive Name, Phone #, etc.).
03 Application Receiver’s Code
Partner’s DUNS #
Ask your partner what code you use to identify them when sending this document outbound.
04 Group Creation Date System Date Sterling Gentran:Server generates this at run-time from system data as either a 6-byte date (YYMMDD) or an 8-byte date (YYYYMMDD), based on the EDI version being mapped.
05 Group Creation Time System Time Sterling Gentran:Server generates this at run-time from the system time (HHMM).
06 Group Control Number 1 Sterling Gentran:Server increments by 1 each time another group of this type is generated for this partner.
07 Responsible Agency Code X Indicates X12 (may be T for TDCC/UCS).

Mapping Theory in Sterling Gentran:Server
IBM Sterling Gentran:Server for iSeries Release 3.6 User Guide 11
Contents of the X12 Invoice (Illustrated in the previous figure)
Element Description Value Comments
Group Envelope Segment: GS (for outbound processing, loaded from Partner file)
08 Version/Release/Industry ID code
004010 The actual version of the EDI format for the document. This is Version 4, Release 1 with no industry code (i.e., 004010, 004010VICS).
Transaction Envelope Segment: ST (for outbound processing, loaded from Partner file)
01 Transaction ID Code 810 Transaction set number for this document (refer to the standards manual) 810 = X12 invoice.
02 Transaction Control Number
0001 Sterling Gentran:Server increments by 1 for each transaction/document generated for this partner.
Header Segment: BIG
01 Invoice Date 19991220 YYYYMMDD format from application.
02 Invoice Number 971220001 From application.
03 Purchase Order Date 19991210 Original PO Date (YYYYMMDD).
04 Purchase Order Number 24873 Original PO Number.
Header Segment: NTE
01 Note Qualifier GEN Indicates the Free Form Message qualifier
02 Free Form Message RUSH ORDER From application
Header Segment: REF
01 Reference Qualifier DP Indicates the reference number in REF02 is a Department #.
02 Reference Number A158 Department # of Shipto (put here instead of within the N1 loop...the partner asked for it here).

Mapping Theory in Sterling Gentran:Server
12 IBM Sterling Gentran:Server for iSeries Release 3.6 User Guide
Contents of the X12 Invoice (Illustrated in the previous figure)
Element Description Value Comments
Header Segment: N1 (1st Loop)
01 Entity ID Code BT Indicates this is Billto Name/Address information.
02 Name Sunny Retailers Descriptive name of Billto (requested by partner even though the N104 is sent).
03 ID Code Qualifier 01 Indicates that the Billto Identification Code is a DUNS #.
04 ID Code 103868929 DUNS # for Billto (this field was never needed for paper invoice, but add to the application Header record for EDI).
Header Segment: N3 (1st Loop)
01 Address Line 1 1509 N. Bridge Ave.
Address for Billto (requested by partner even though the N104 is sent).
Header Segment:N4 (1st Loop)
01 City Sunnyvale City for Billto (requested by partner even though the N104 is sent).
02 State CA State for Billto (requested by partner even though the N104 is sent).
03 Postal Code 96810 Zip code for Billto (requested by partner even though the N104 is sent).
Header Segment: N1 (2nd Loop)
01 Entity ID Code ST Indicates this is Shipto Name/Address Information.
03 ID Code Qualifier 92 Indicates the Shipto ID number assigned by the partner (it is their internal store number).
04 ID Code 508 Identifies the Shipto location as Store # 508, which implies the following address that is not sent using EDI: 1509 N. Bridge Ave., Sunnyvale, CA 96810.
Mapping Theory in Sterling Gentran:Server
IBM Sterling Gentran:Server for iSeries Release 3.6 User Guide 13
Contents of the X12 Invoice (Illustrated in the previous figure)
Element Description Value Comments
Header Segment: N1 (3rd Loop)
01 Entity ID Code RE Indicates this is Remit-to Name/Address Information (where your partner sends the $ for the invoice).
02 Name Fancy Designers
Your company name.
Header Segment: N3 (3rd Loop)
01 Address Line 1 PO Box 7180 Your company address (where the invoice $ is sent).
Header Segment: N4 (3rd Loop)
01 City Richmond Your company city (where the invoice $ is sent).
02 State OH Your company state (where the invoice $ is sent).
03 Postal Code 43019 Your company zip code (where the invoice $ is sent).
Header Segment: ITD
01 Terms Type Code 01 Basic (identifies basic type of payment terms).
02 Terms Basis Date Code 3 Terms begin as of the Invoice Date.
03 Terms Discount Percent 2 2% discount is given if the payment is received within the discount date period.
05 Terms Discount Days Due 10 Number of days (10) in the terms discount period by which payment is due if terms discount is earned.
07 Terms Net Days 30 Number of days (30) until total invoice amount is due (no discount is given).
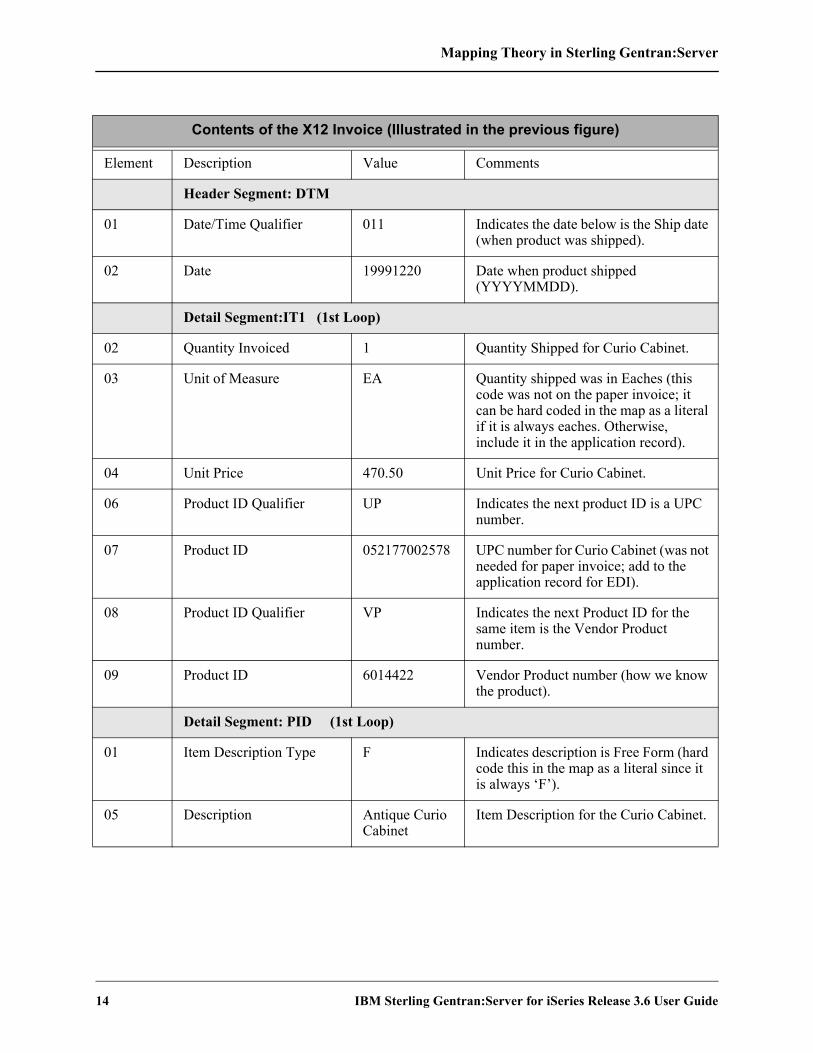
Mapping Theory in Sterling Gentran:Server
14 IBM Sterling Gentran:Server for iSeries Release 3.6 User Guide
Contents of the X12 Invoice (Illustrated in the previous figure)
Element Description Value Comments
Header Segment: DTM
01 Date/Time Qualifier 011 Indicates the date below is the Ship date (when product was shipped).
02 Date 19991220 Date when product shipped (YYYYMMDD).
Detail Segment:IT1 (1st Loop)
02 Quantity Invoiced 1 Quantity Shipped for Curio Cabinet.
03 Unit of Measure EA Quantity shipped was in Eaches (this code was not on the paper invoice; it can be hard coded in the map as a literal if it is always eaches. Otherwise, include it in the application record).
04 Unit Price 470.50 Unit Price for Curio Cabinet.
06 Product ID Qualifier UP Indicates the next product ID is a UPC number.
07 Product ID 052177002578 UPC number for Curio Cabinet (was not needed for paper invoice; add to the application record for EDI).
08 Product ID Qualifier VP Indicates the next Product ID for the same item is the Vendor Product number.
09 Product ID 6014422 Vendor Product number (how we know the product).
Detail Segment: PID (1st Loop)
01 Item Description Type F Indicates description is Free Form (hard code this in the map as a literal since it is always ‘F’).
05 Description Antique Curio Cabinet
Item Description for the Curio Cabinet.

Mapping Theory in Sterling Gentran:Server
IBM Sterling Gentran:Server for iSeries Release 3.6 User Guide 15
Contents of the X12 Invoice (Illustrated in the previous figure)
Element Description Value Comments
Detail Segment: IT1 (2nd Loop)
02 Quantity Invoiced 7 Quantity shipped for End Tables.
03 Unit of Measure EA Quantity shipped was in Eaches (this code was not on the paper invoice; it can be hard coded in the map as a literal if it is always eaches. Otherwise, include it in the application record).
04 Unit Price 95.90 Unit Price for End Table.
06 Product ID Qualifier UP Indicates the next product ID is a UPC number.
07 Product ID 052177002685 UPC number for End Table (was not needed for paper invoice; add to the application record for EDI).
08 Product ID Qualifier VP Indicates the next product ID for this same item is the Vendor Product number.
09 Product ID 648019 Vendor Product number (how we know this End Table).
Detail Segment: PID (2nd Loop)
01 Item Description Type F Indicates description is Free Form (hard code this in your map as a literal since it is always ‘F’).
05 Description Oak End Table Item Description for the End Table.
Detail Segment: IT1 (3rd Loop)
02 Quantity Invoiced 2 Quantity Shipped for Lamp.
03 Unit of Measure EA Quantity shipped was in Eaches (this code was not on the paper invoice; it can be hard coded in the map as a literal if it is always eaches. Otherwise include it in the application record).
04 Unit Price 85.00 Unit Price for Lamp.
06 Product ID Qualifier UP Indicates the next product ID is a UPC number.

Mapping Theory in Sterling Gentran:Server
16 IBM Sterling Gentran:Server for iSeries Release 3.6 User Guide
Contents of the X12 Invoice (Illustrated in the previous figure)
Element Description Value Comments
Detail Segment: IT1 (3rd Loop)
07 Product ID 052177002653 UPC number for Lamp (was not needed for paper invoice; add to the application record for EDI).
08 Product ID Qualifier VP Indicates the next product ID for the same item is a Vendor Product number.
09 Product ID 633485 Vendor Product number (how we know the Lamp).
Detail Segment: PID (3rd Loop)
01 Item Description Type F Indicates description is Free Form (hard code this in your map as a literal since it is always ‘F’).
05 Description Crystal Etched Lamp
Our Item Description for the Lamp.
Detail Segment: IT1 (4th Loop)
02 Quantity Invoiced 4 Quantity Shipped for Magazine Rack.
03 Unit of Measure EA Quantity shipped was in Eaches (this code was not on the paper invoice; it can be hard coded in the map as a literal if it is always eaches, otherwise include it in the application record).
04 Unit Price 15.99 Unit Price for Magazine Rack.
06 Product ID Qualifier UP Indicates the next product is a UPC number.
07 Product ID 052177002615 UPC number for Magazine Rack (was not needed for paper invoice; add to the application record for EDI).
08 Product ID Qualifier VP Indicates the next product ID for the same item is a Vendor Product number.
09 Product ID 486371 Vendor Product number.
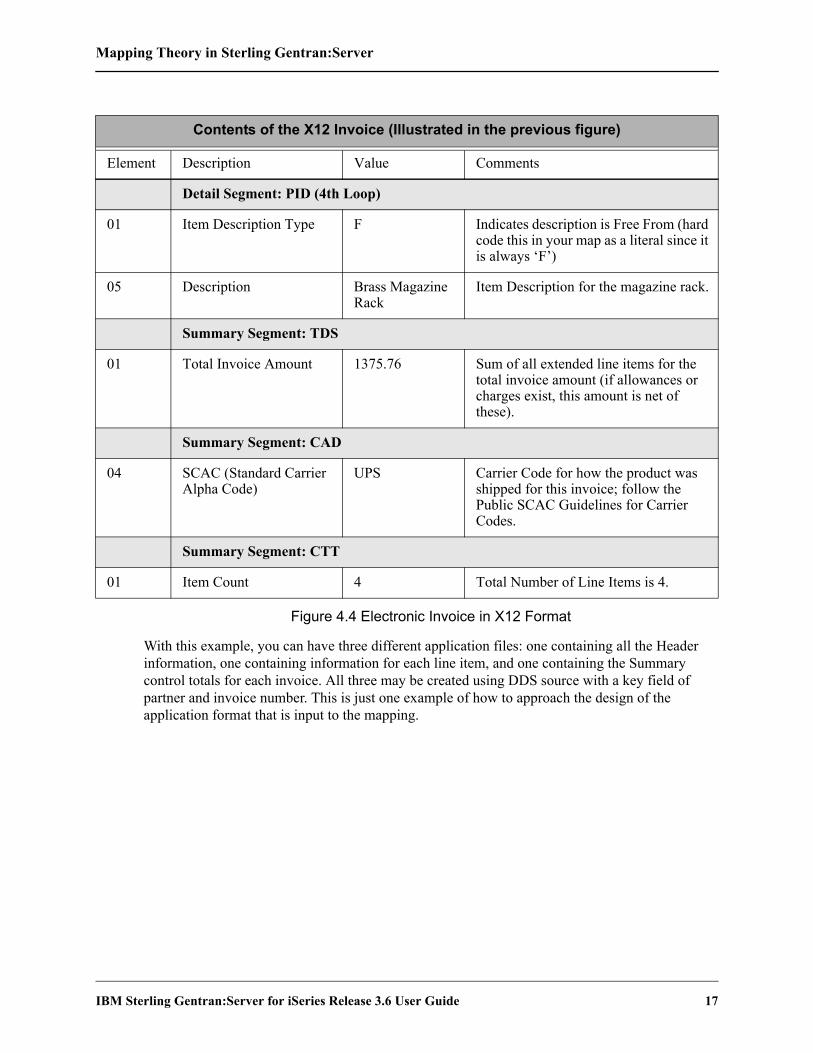
Mapping Theory in Sterling Gentran:Server
IBM Sterling Gentran:Server for iSeries Release 3.6 User Guide 17
Figure 4.4 Electronic Invoice in X12 Format
With this example, you can have three different application files: one containing all the Header information, one containing information for each line item, and one containing the Summary control totals for each invoice. All three may be created using DDS source with a key field of partner and invoice number. This is just one example of how to approach the design of the application format that is input to the mapping.
Contents of the X12 Invoice (Illustrated in the previous figure)
Element Description Value Comments
Detail Segment: PID (4th Loop)
01 Item Description Type F Indicates description is Free From (hard code this in your map as a literal since it is always ‘F’)
05 Description Brass Magazine Rack
Item Description for the magazine rack.
Summary Segment: TDS
01 Total Invoice Amount 1375.76 Sum of all extended line items for the total invoice amount (if allowances or charges exist, this amount is net of these).
Summary Segment: CAD
04 SCAC (Standard Carrier Alpha Code)
UPS Carrier Code for how the product was shipped for this invoice; follow the Public SCAC Guidelines for Carrier Codes.
Summary Segment: CTT
01 Item Count 4 Total Number of Line Items is 4.

Mapping Theory in Sterling Gentran:Server
18 IBM Sterling Gentran:Server for iSeries Release 3.6 User Guide
Build Maps with Sterling Gentran:ServerThe action steps required to build maps are as follows:
1. Select the standard, standards version, transaction set, and segments to be used.
2. Define the application files. The example provided in the previous figure can be used as a model for your document and application format.
3. Define the structure of the application file(s) to Sterling Gentran:Server. Refer to the section “Work with Application Definition” in this document for more information about how the application structure is defined to Sterling Gentran:Server.
4. Analyze the application data fields and determine which EDI elements are logically linked. Define the loops if needed.
NOTEFor outbound processing, Loop IDs must match those on the EDI transaction.
5. Determine use of constants, hash totals, accumulators, code, data, validation tables, conditional relationships, subfields, arithmetic operations, and user exits.
6. Complete mapping worksheets (blank worksheets are available at the end of the “Transaction Mapping” chapter).
7. Create the map. (SEE the “Transaction Mapping” chapter for a step-by-step procedure for creating maps in Sterling Gentran:Server.)
8. Print mapping reports to validate and refine the map.
9. Develop outbound test data (or request inbound test data from your trading partner) and thoroughly test the data through all translation processing, and verify the results.
Alternatively, you may use the Sterling Gentran:Server Mapping Job Aid in the IBM® Sterling Gentran:Server® for iSeries® Release 3.6 Manager’s Implementation Planner to build a transaction map.
NOTESEE the Glossary in this manual for a list of reserved word constants, application data types, and EDI data types. These are useful during the actual creation of the map in Sterling Gentran:Server.
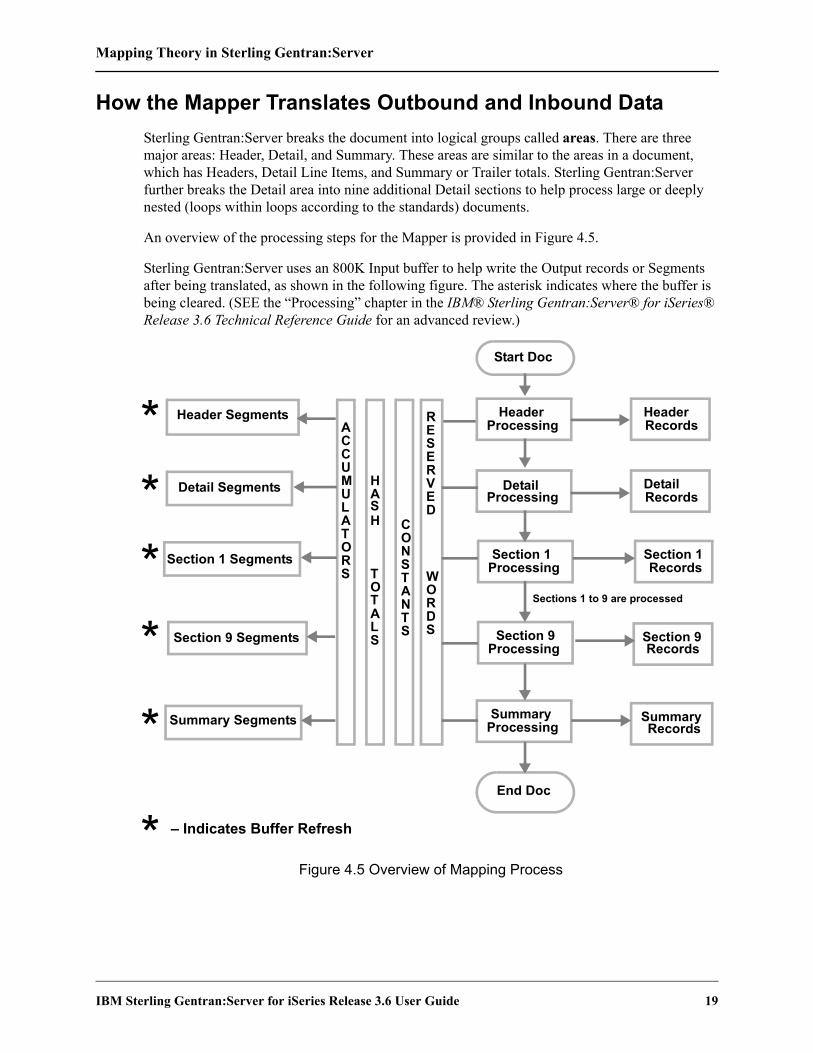
Mapping Theory in Sterling Gentran:Server
IBM Sterling Gentran:Server for iSeries Release 3.6 User Guide 19
How the Mapper Translates Outbound and Inbound DataSterling Gentran:Server breaks the document into logical groups called areas. There are three major areas: Header, Detail, and Summary. These areas are similar to the areas in a document, which has Headers, Detail Line Items, and Summary or Trailer totals. Sterling Gentran:Server further breaks the Detail area into nine additional Detail sections to help process large or deeply nested (loops within loops according to the standards) documents.
An overview of the processing steps for the Mapper is provided in Figure 4.5.
Sterling Gentran:Server uses an 800K Input buffer to help write the Output records or Segments after being translated, as shown in the following figure. The asterisk indicates where the buffer is being cleared. (SEE the “Processing” chapter in the IBM® Sterling Gentran:Server® for iSeries® Release 3.6 Technical Reference Guide for an advanced review.)
Figure 4.5 Overview of Mapping Process
Header Segments
Detail Segments
Section 1 Segments
Section 9 Segments
Summary Segments
ACCUMULATORS
HASH
TOTALS
CONSTANTS
RESERVED
WORDS
HeaderProcessing
DetailProcessing
Section 1Processing
Section 9Processing
SummaryProcessing
HeaderRecords
DetailRecords
Section 1Records
SummaryRecords
Section 9Records
Start Doc
End Doc
Sections 1 to 9 are processed
****
*
* – Indicates Buffer Refresh

Mapping Theory in Sterling Gentran:Server
20 IBM Sterling Gentran:Server for iSeries Release 3.6 User Guide

Chapter
IBM Sterling Gentran:Server for iSeries Release 3.6 User Guide 1
5 Application Definition
In this Chapter
RECOMMENDATIONIt is strongly recommended that you review the “Mapping: Getting Started” chapter in this manual before continuing. It introduces you to the theory of mapping in Sterling Gentran:Server and provides the basic information you need to create your application file format.
This chapter describes what an application definition is and where it is used. Step-by-step procedures are provided to guide you in creating an application definition for each type of application file that can be interfaced with Sterling Gentran:Server.
This chapter contains the following sections:
What is an Application Definition? . . . . . . . . . . . . . . . . . . . . . . . . . . . . . . . . . . . . . . . . 5-3
What does the Application Definition Subsystem Do? . . . . . . . . . . . . . . . . . . . . . . . . . 5-3
Panel Quick Reference . . . . . . . . . . . . . . . . . . . . . . . . . . . . . . . . . . . . . . . . . . . . . . . . . . 5-4
Access the Application Definition Subsystem . . . . . . . . . . . . . . . . . . . . . . . . . . . . . . . . 5-6
Application Definition for Externally Defined Physical Files . . . . . . . . . . . . . . . . . . . . 5-8
Application Definition for Internally Defined File . . . . . . . . . . . . . . . . . . . . . . . . . . . . 5-34
Application Definition for Externally Defined Multi-format Logical File. . . . . . . . . . 5-57
Copy Application Definition. . . . . . . . . . . . . . . . . . . . . . . . . . . . . . . . . . . . . . . . . . . . . 5-78
Copy Application Definition Between Libraries (APPCPY) . . . . . . . . . . . . . . . . . . . . 5-79
Renumber Application Records/Files and Fields (APPRENBR) . . . . . . . . . . . . . . . . . 5-81
Synchronize an Application Definition (APPSYNCH) . . . . . . . . . . . . . . . . . . . . . . . . 5-83
Print Application Definitions . . . . . . . . . . . . . . . . . . . . . . . . . . . . . . . . . . . . . . . . . . . . 5-85
Re-retrieve DDS (RRTVDDS) . . . . . . . . . . . . . . . . . . . . . . . . . . . . . . . . . . . . . . . . . . . 5-87
Use the ezAPPDEF Command . . . . . . . . . . . . . . . . . . . . . . . . . . . . . . . . . . . . . . . . . . . 5-88
Reports . . . . . . . . . . . . . . . . . . . . . . . . . . . . . . . . . . . . . . . . . . . . . . . . . . . . . . . . . . . . . 5-91
In this Chapter
2 IBM Sterling Gentran:Server for iSeries Release 3.6 User Guide
Common Questions. . . . . . . . . . . . . . . . . . . . . . . . . . . . . . . . . . . . . . . . . . . . . . . . . . . 5-108

What is an Application Definition?
IBM Sterling Gentran:Server for iSeries Release 3.6 User Guide 3
What is an Application Definition?The application definition contains all the information about the files, records, and fields used for a specific application document, such as an invoice or purchase order. It defines the application interface file format used for translation. The file definitions that exist on the iSeries are pulled into Sterling Gentran:Server, stored under a single identifier (Application ID), and called the application definition.
The application definition is then used to create a link between the application files and the transaction definition (which is the EDI format). This link is established by identifying how the application data fields are related to the EDI elements. The term “element” is similar to the term “field.”
What does the Application Definition Subsystem Do?
The Application Definition subsystem allows you to:
Create application definitions for the various types of application files
Modify existing application definitions
Delete application definitions
Maintain records/files for application definitions
Maintain fields within a record or file
Define the application partner reference for outbound application definitions
Maintain key structures for outbound application definitions that use externally defined physical files
Copy an application definition
Copy an application definition between libraries (APPCPY)
Renumber the records/files and fields of an application definition (APPRENBR)
Define envelope information, if desired, for an application definition
Print application definitions (PRTAPP)
Re-synchronize all linked maps to any given application (APPSYNCH)
Print or re-retrieve DDS for those applications that contain the changed file (RRTVDDS)

Panel Quick Reference
4 IBM Sterling Gentran:Server for iSeries Release 3.6 User Guide
Panel Quick ReferenceThe following table gives the purpose and access methods for the panels in the Application Definition subsystem.
Panel Name Purpose Access Methods
GENMAP
Sterling Gentran:Server Mapping Menu
Select an option to work with application definition
Select option ‘3’ on the GENMAIN menu
Type ‘GO GENMAP’ on the command line
EDIX550-FMT01
Work with Application Definition
Create, revise, copy, delete, or view an application definition
Select option ‘2’ on the GENMAIN menu
Select option ‘1’ on the GENMAP menu
Type ‘EXCPGM EDIX550’ on the command line
EDIX552-FMT01
Application Definition
Specify the characteristics of a particular application file
Select an option (1-5) on the Work with Application panel (EDIX550-FMT01)
Type ‘EXCPGM EDIX552’ on the command line
EDIX553-CTL01
Application Records/Files
Provide information about each unique record or file type in the application
Select option ‘11’ on panel EDIX550-FMT01
Type ‘EXCPGM EDIX553’ on the command line
EDIX554-CTL01
Application Fields
View and maintain field definitions for the specified record or file
Select option ‘11’ on panel EDIX553-CTL01
Type ‘EXCPGM EDIX554’ on the command line
EDIX556-CTL01
Application Key Structure
Revise or view the Key Structure for the outbound application
Select option ‘12’ on panel EDIX550-FMT01
Type ‘EXCPGM EDIX556’ on the command line
EDIX559-FMT01
Application Partner Reference
Define the application field(s) used to access the trading partner profile for outbound applications
Select option ‘13’ on panel EDIX550-FMT01
Type ‘EXCPGM EDIX559’ on the command line

Panel Quick Reference
IBM Sterling Gentran:Server for iSeries Release 3.6 User Guide 5
EDIX560-FMT01
Application Envelope Definition
Define envelope information for an application definition
Select option ‘14’ on panel EDIX550-FMT01
Type ‘EXCPGM EDIX560’ on the command line
APPCPY
Copy Application
Copy application definitions between libraries
Select option ‘30’ on panel EDIX550-FMT01
Prompt ‘APPCPY’ on the command line
Select option ‘16’ on the GENMAP menu
APPRENBR
Application Renumber
Renumber records within an application definition and renumber the fields within the record definitions
Select option ‘31’ on panel EDIX550-FMT01
Prompt ‘APPRENBR’ on the command line
Select option ‘18’ on the GENMAP menu
PRTAPP
Print Application Files
Print an application file Select option ‘6’ (Print) on panel EDIX550-FMT01
Press F21 (Prt App) on the application panels
Prompt PRTAPP on the command line
Select option ‘10’ on the GENMAP menu
APPSYNCH
Application Synchronization
Re-synchronize all maps linked to the application if the DDS has been re-retrieved or if manual updates have been made to the application
Re-retrieve the DDS using option ‘12’ on panel EDIX553 (submitted automatically)
Re-retrieve the DDS using F18 on panel EDIX552-FMT01 (submitted automatically)
Select option ‘32’ on panel EDIX550
Prompt ‘APPSYNCH’ on the command line
Select option ‘13’ on the GENMAP menu
Panel Name Purpose Access Methods
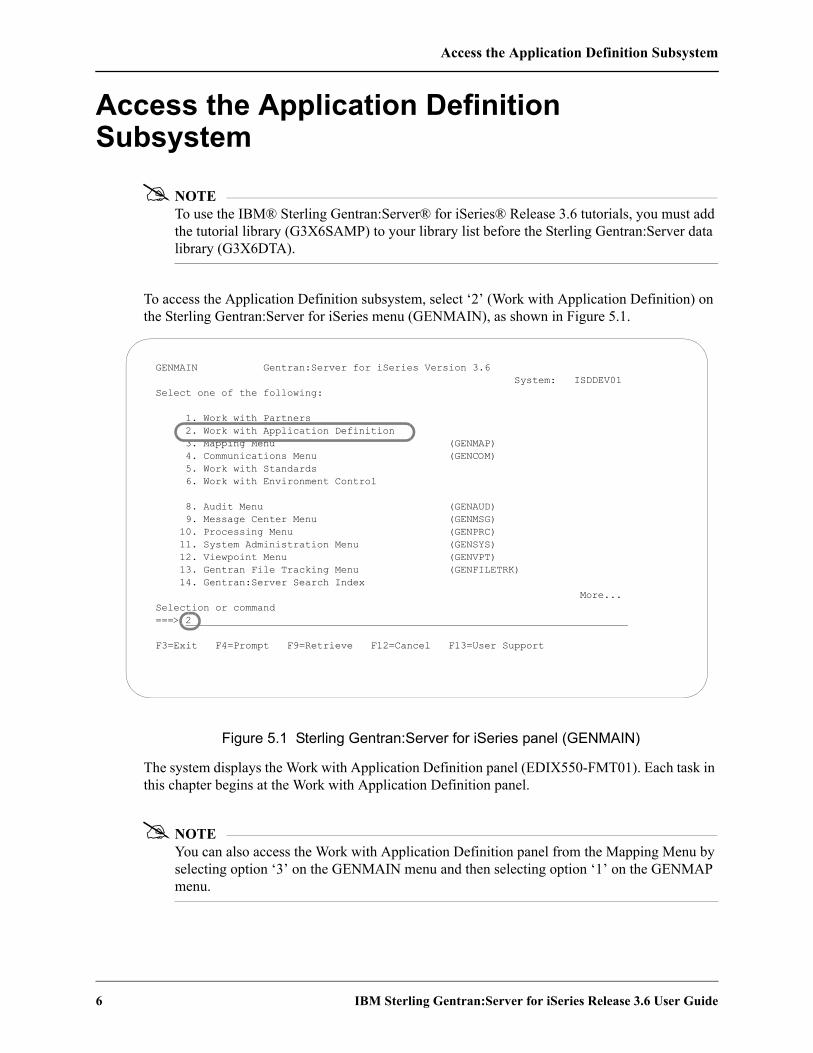
Access the Application Definition Subsystem
6 IBM Sterling Gentran:Server for iSeries Release 3.6 User Guide
Access the Application Definition Subsystem
NOTETo use the IBM® Sterling Gentran:Server® for iSeries® Release 3.6 tutorials, you must add the tutorial library (G3X6SAMP) to your library list before the Sterling Gentran:Server data library (G3X6DTA).
To access the Application Definition subsystem, select ‘2’ (Work with Application Definition) on the Sterling Gentran:Server for iSeries menu (GENMAIN), as shown in Figure 5.1.
Figure 5.1 Sterling Gentran:Server for iSeries panel (GENMAIN)
The system displays the Work with Application Definition panel (EDIX550-FMT01). Each task in this chapter begins at the Work with Application Definition panel.
NOTEYou can also access the Work with Application Definition panel from the Mapping Menu by selecting option ‘3’ on the GENMAIN menu and then selecting option ‘1’ on the GENMAP menu.
GENMAIN Gentran:Server for iSeries Version 3.6 System: ISDDEV01 Select one of the following: 1. Work with Partners 2. Work with Application Definition 3. Mapping Menu (GENMAP) 4. Communications Menu (GENCOM) 5. Work with Standards 6. Work with Environment Control 8. Audit Menu (GENAUD) 9. Message Center Menu (GENMSG) 10. Processing Menu (GENPRC) 11. System Administration Menu (GENSYS) 12. Viewpoint Menu (GENVPT) 13. Gentran File Tracking Menu (GENFILETRK) 14. Gentran:Server Search Index More... Selection or command ===> 2 F3=Exit F4=Prompt F9=Retrieve F12=Cancel F13=User Support

Access the Application Definition Subsystem
IBM Sterling Gentran:Server for iSeries Release 3.6 User Guide 7
The use of the application definition panels is illustrated in the form of tasks. The tasks in this chapter describe the following:
Application Definition for Externally Defined Physical files
Application Definition for Internally Defined file
Application Definition for Externally Defined Multi-format Logical file
Copy an Application Definition
Copy an Application Definition between libraries (APPCPY)
Renumber Application Records/Files and Fields (APPRENBR)
Print Application Definitions (PRTAPP)
Synchronize an Application Definition (APPSYNCH)
While the scenarios define specific applications, they are based on common steps taken to define any application. Use these tasks as a guide to set up your application definition.
NOTEAll files necessary for each scenario have already been created in library (G3X6SAMP).

Application Definition for Externally Defined Physical Files
8 IBM Sterling Gentran:Server for iSeries Release 3.6 User Guide
Application Definition for Externally Defined Physical Files
During this task, you will create an application definition for an outbound invoice. A step-by-step procedure is provided to assist you in creating the application definition.
Off-line PreparationBefore you define the application definition to Sterling Gentran:Server, you may find it beneficial to spend some time designing the format of your application files. Doing so makes it much easier to complete the steps to create your application definition.
Analyze your application master files to determine which fields are required to build the EDI document.
You must define the contents of each externally defined physical file including the Field Name, Field Length, and Data Type using the Data Description Specification (DDS).
NOTEIt is not necessary for your DDS to identify any fields as keys. You can use Sterling Gentran:Server to define which fields should be keys.
Design the Application DefinitionTo demonstrate how to create an outbound application definition, we will continue the example presented in the “Mapping: Getting Started” chapter for mapping an outbound invoice. Each step will illustrate how to create an application definition for the sample invoice using externally defined physical files.
Looking at the “paper invoice” on the next page (Figure 5.2), we determined that three files were necessary to send the sample invoice; Header, Comment and Detail. The Header file is used to store the Header portion of the invoice. Even though the comments are included in the Header portion of the paper invoice, they are stored in a separate file. This enables you to send multiple comments within a single electronic invoice. A Summary file is not required because we use reserved words to map the Summary Segments.

Application Definition for Externally Defined Physical Files
IBM Sterling Gentran:Server for iSeries Release 3.6 User Guide 9
Figure 5.2 Application Format for Paper Invoice to be Moved into EDI Invoice
INVOICE
Inv #: 971220001 PO No: 24873Inv Date: 09-25-04 PO Date: 09-15-04
Bill To: Ship To:Sunny Retailers Sunny Retailers1509 N. Bridge Ave. Store # 608 Dept. A158Sunnyvale, CA 96810 1509 N. Bridge Ave.
Sunnyvale, CA 96810
Bill of Lading: TermsPro #: 2% 10 Net 30Comments: Rush Order
Remit To: Fancy Designers, PO Box 7180Richmond, OH 43019
Routing: UPS Invoice Total: $ 1375.76 Total Qty Shipped: 14
Qty Item # Description Unit Price Total
1 601422 Antique Curio Cabinet 470.50 470.50
7 648019 Oak End Table 95.90 671.30
2 633485 Crystal Etched Lamp 85.00 170.00
4 486371 Brass Magazine Rack 15.99 63.96
BIG*20040925*971220001*20040915*24873 N/LNTE*GEN*RUSH ORDER N/LREF*DP*A158 N/LN1*BT*SUNNY RETAILERS*01*103868929 N/LN3*1509 N. BRIDGE AVE. N/LN4*SUNNYVALE*CA*96810 N/LN1*ST**92*508 N/LN1*RE*FANCY DESIGNERS N/LN3*PO BOX 7180 N/LN4*RICHMOND*OH*43019 N/LITD*01*3*2**10**30 N/LDTM*011*20040125 N/L
IT1**1*EA*470.50**UP*052177002578*VP*601422 N/LPID*F****ANTIQUE CURIO CABINET N/LIT1**7*EA*95.90**UP*052177002685*VP*648019 N/LPID*F****OAK END TABLE N/LIT1**2*EA*85.00*UP*052177002653*VP*633485 N/LPID*F****CRYSTAL ETCHED LAMP N/LIT1**4*EA*15.99**UP*052177002615*VP*486371 N/LPID*F****BRASS MAGAZINE RACK N/L
TDS*137576 N/LCAD****UPS N/LCTT*4 N/L
H
D
S
Interchange (ISA)
Group (GS)
Transaction (ST)

Application Definition for Externally Defined Physical Files
10 IBM Sterling Gentran:Server for iSeries Release 3.6 User Guide
Figure 5.3 shows the fields that will be needed to build the sample invoice.
Figure 5.3 Sample Application file format
Header File– one per document. WPEINVHDRDescription Field Name Data Type Field Start LengthBill To Acct # IHB2# AN 1 9Invoice # IHINV# AN 10 10Credit/Debit Flag IHCRDB AN 20 1Invoice Date IHINDT CY 21 8Purchase Order # IHPO# AN 29 20Purchase Order Date IHPODT CY 49 8Bill To Name IHB2NM AN 57 25Bill To Address Line 1 IHB2A1 AN 82 25Bill To Address Line 2 IHB2A2 AN 107 25Bill To City IHB2CT AN 132 25Bill To State IHB2ST AN 157 2Bill To Zip IHB2ZP AN 159 9Ship To Name IHS2NM AN 168 25Ship To Address Line 1 IHS2A1 AN 193 25Ship To Address Line 2 IHS2A2 AN 218 25Ship To City IHS2CT AN 243 25Ship To State IHS2ST AN 268 2Ship To Zip IHS2ZP AN 270 9Ship To Store Location IHS2LC AN 279 9Ship To Dept. # IHSDPT AN 288 4Remit To Name IHR2NM AN 292 25Remit To Address Line 1 IHR2A1 AN 317 25Remit To Address Line 2 IHR2A2 AN 342 25Remit To City IHR2CT AN 367 25Remit To State IHR2ST AN 392 2Remit To Zip 5 IHR2ZP AN 394 5Remit To Zip 4 Extension IHR2Z4 AN 399 4Bill OF Lading IHBOL AN 403 12Pro # IHPRO# AN 415 18Ship Date IHSHDT MM 433 6Terms Percent Whole IHTPCT S0 441 3Terms Net Due Days IHTNDY S0 444 3Terms Discount Due Days IHTDDY S0 447 3
Header Comment File – up to 10 per document. WPEINVCMTDescription Field Name Data Type Field Start LengthBill To Acct # ICB2# AN 1 9Invoice # ICINV# AN 10 10Message Sequence # ICSEQ# S0 20 3Message Text ICMSG AN 23 60
Detail File – up to 200,000 per document. WPEINVITMDescription Field Name Data Type Field Start LengthBill To Acct # IDB2# AN 1 9Invoice # IDINV# AN 10 10Item # (our item) IDITEM AN 20 6Quantity Shipped IDQTY P0 26 5Unit Price IDUPRI P0 31 7Unit of Measure IDUOM AN 38 4UPC # IDUPC# AN 42 12Item Description IDIDSC AN 54 30

Application Definition for Externally Defined Physical Files
IBM Sterling Gentran:Server for iSeries Release 3.6 User Guide 11
Defining the Application IDThe Work with Application Definition panel (Figure 5.4) provides you with the option to create a new application definition. Typically, most users choose a name that identifies the type of document that is being sent. The name you choose must be unique.
Figure 5.4 Work with Application Definition panel (EDIX550-FMT01)
To define an Application ID for the sample invoice:
1. Type ‘1’ (Create) in the Option field.
2. Type ‘INVOUTPEDI’ in the Application ID field and ‘S’ in the S/R (Send/Receive) field and press Enter. The name ‘INVOUTPEDI’ is an example of an Application ID to use. You may use any name you wish (that is, your company’s initials).
This action displays the Application Definition panel (EDIX552-FMT01).
EDIX550 Work with Application Definition EDI 03/30/11 FMT01 pgmlib: G3X6PGM dtalib: G3X6DTA 12:00:00 Position to Application ID . . . . S/R Type option (and Information), press Enter. 1=Create 2=Revise 3=Copy 4=Delete 5=View 6=Print 11=Rec/Files Opt Appl ID S/R Description File Type Group User 1 INVOUTPEDI S INVFILE R Invoice Inbound Internal Phys. IN EDI INVOIC S Edifact Invoice Y2K External Lgl. INVOIC EDI INVOICOUT S Tutorial EDIFACT Invoice outb External Lgl. INVOIC CB INVOUT S Tutorial X12 Invoice Outbound External Lgl. IN CB INVOUTL S Invoice Outbound (lgl) Y2K External Lgl. IN EDI INVOUTP S Invoice Outbound (Phys) Y2K External Phys. IN EDI ORDERS R Edifact Orders Inbound External Lgl. ORDERS CSG ORDERSINB R Tutorials EDIFACT Orders inb External Lgl. ORDERS CB POFILE S Outbound Purchase Order Internal Phys. PO EDI More... Parameters or command ===> F1=Help F3=Exit F12=Cancel F15=Sort F23=More Options F24=More Keys

Application Definition for Externally Defined Physical Files
12 IBM Sterling Gentran:Server for iSeries Release 3.6 User Guide
Field DescriptionsApplication ID
This field is the single identifier for your application definition under which all information is stored. Name the application based on the type of document it is (that is, INVOUTP for outbound invoices), rather than by the transaction set or partner. Make the definition comprehensive enough to interface to various different EDI formats including X12, UCS, and EDIFACT.
Send or ReceiveThe value for this field is ‘S’ for send or ‘R’ for receive. An application definition must be unique per direction. If you expect to send and receive, two definitions are required (one for each direction).
The Application Definition panel (EDIX552-FMT01), Figure 5.5, is where you specify the characteristics of a particular application definition. This is the header to the entire application definition.
Figure 5.5 Application Definition panel (EDIX552-FMT01)
You must enter the information required for this panel: Description, Functional Groups, and Application File Type.
For this sample invoice, complete the following:
1. Type the Description of the application definition as shown on the above panel.
2. Type ‘IN’ (Functional Group ID for an invoice) in the Functional Groups field. Press F4 (Prompt) for a list of valid Functional Group IDs.
EDIX552 Application Definition EDI 03/30/11 FMT01 12:00:00 Application ID . . . . . . . . . . INVOUTPEDI Send or Receive. . . . . . . . . . S Division . . . . . . . . . . . . . 000 Description. . . . . . . . . . . . INVOICE OUTBOUND - PHYSICAL Functional Groups. . . . . . . . . IN File Type. . . . . . . . . . . . . P EDI Split File . . . . . . . . . . EDI Sub-Split File . . . . . . . . Record Type Start Position . . . . Length . . . . . . . . . . . . . . Application File . . . . . . . . . Update Allowed . . . . . . . . . . Y F1=Help F4=Prompt F10=Update F12=Cancel F21=Prt App F24=More Keys

Application Definition for Externally Defined Physical Files
IBM Sterling Gentran:Server for iSeries Release 3.6 User Guide 13
3. Type ‘P’ in the File Type field to indicate that the application files are externally defined physical files. Press F4 (Prompt) for a list of valid file types.
4. Press F10 (Update) to save the information you just entered and to return to the Work with Application Definition panel (EDIX550-FMT01).
Field DescriptionsDivision Code
The Division Code is assigned from your security profile within Sterling Gentran:Server.
Description This field is used to describe the application definition. Typically, the field includes the type of document being sent. If desired, include the direction and type of files being used (that is, DDS).
Functional GroupsUp to five functional groups can be used with an application definition. You must supply valid Functional Group IDs as defined by the EDI standards.
File TypeThis field is one of the most important fields on this panel. It identifies what type of file you use to interface to Sterling Gentran:Server for a particular application definition. The type of file you use can be different from application to application.
EDI Split FileThis field is for inbound only. If you are setting up an application definition for EDI Data received from your partner, use this field to identify the intermediate file the Mapper reads to get the specific data related to this application definition. Type the value (between 1 and 80) that was entered on the receiving partner profile (this is the profile for inbound for your company). (SEE the section on working with partner data separation in the “Partner” chapter for more information on setting up split files in the partner profile.) If this field is left BLANK, the Mapper reads the Slide file (default file) for input data. Leave this field BLANK for outbound.
EDI Sub-Split FileThis field is for inbound only and is used in conjunction with the EDI Split File field. (SEE the “Sub-Splitting” section in the “Transaction Mapping” chapter for more information.) If you are using this feature, indicate a value between 1 and 80. Otherwise, leave this field BLANK.
Record Type Start Position, Length, Application FileLeave these fields BLANK for externally defined physical files.
Update AllowedSet this field to ‘Y’ to allow updates to be made to this definition. Once you begin testing, you may want to change this to ‘N’ to prevent inadvertent updates to the definition.

Application Definition for Externally Defined Physical Files
14 IBM Sterling Gentran:Server for iSeries Release 3.6 User Guide
Application Records/FilesThe first step in defining the files for your application definition is to access the Application Records/Files panel (EDIX553-CTL01).
Figure 5.6 Work with Application Definition panel (EDIX550-FMT01)
Type ‘11’ (Rec/Files) in the Option field next to the appropriate application and press Enter.
Access ‘INVOUTPEDI’ for the sample invoice application you are creating in this scenario (as shown in Figure 5.6).
EDIX550 Work with Application Definition EDI 03/30/11 FMT01 pgmlib: G3X6PGM dtalib: G3X6DTA 12:00:00 Position to Application ID . . . . INVOUTPEDI S/R Type option (and Information), press Enter. 1=Create 2=Revise 3=Copy 4=Delete 5=View 6=Print 11=Rec/Files Opt Appl ID S/R Description File Type Group User 11 INVOUTPEDI S INVOICE OUTBOUND - PHYSICAL External Phys. IN CB ORDERS R Edifact Orders Inbound External Lgl. ORDERS CSG ORDERSINB R Tutorials EDIFACT Orders inb External Lgl. ORDERS CB POFILE S Outbound Purchase Order Internal Phys. PO EDI POINB R Tutorial x12 PO Inbound External Lgl. PO CB SEMINAPPL S Class Tutorial: Outb. Invoice External Lgl. IN CSG SEMPOAPPL R Class Tutorial: Inb. PO Y2K External Lgl. PO EDI TCOMINV8P S Tradacoms Invoice 8 (Physical) External Phys. !!!DFT CV TCOMORD8P R Tradacoms Orders 8 (Physical) External Phys. !!!DFT CSG Bottom Parameters or command ===> F1=Help F3=Exit F12=Cancel F15=Sort F23=More Options F24=More Keys

Application Definition for Externally Defined Physical Files
IBM Sterling Gentran:Server for iSeries Release 3.6 User Guide 15
The next step is to add physical file names to the definition that will be interfaced with Sterling Gentran:Server.
Figure 5.7 Application Records/Files panel (EDIX553-CTL01)
You must enter the basic information required for this panel: Sequence Number, File Name, Area, Max Use, Mandatory Code, and Description (Write Flag is required for inbound). Once you press F10 (Update) or Enter, Sterling Gentran:Server automatically retrieves the DDS for each file.
1. Type ‘10’ in the Max Use field for Sequence ‘20.’
2. Type ‘D’ in the A (Area) field and ‘6000’ in the Loop ID field for Sequence ‘30.’
3. Type the description of each file as shown in Figure 5.7.
CAUTIONSTOP
Option ‘12’ (Re-retrieve DDS) re-retrieves the DDS (file layout from the external physical file). The user is prompted to confirm the re-retrieve function. Any changes made to the application fields, such as the Data Type or Field Value (inbound only) are preserved as long as the DDS type and field length have not changed. An exception report is produced and should be reviewed. Additionally, upon exiting this panel after the DDS has been re-retrieved, the APPSYNCH command is automatically submitted to re-synchronize all maps linked to this application definition. The resynch report(s) should be reviewed.
EDIX553 Application Records/Files EDI 03/30/11 CTL01 12:00:00 Application ID . . . . . . . . . . INVOUTPEDI Send or Receive. . . . . . . . . . S Description. . . . . . . . . . . . INVOICE OUTBOUND - PHYSICAL Position to Sequence Number. . . . Type option, press Enter. 3=Copy 4=Delete 11=Fields 12=Re-retrieve DDS Loop Max Last Update Opt Seq Rec/File A ID Use M W Description Date User 10 WPEINVHDR H 1 M INVOICE HEADER 03/30/11 EDI 20 WPEINVCMT H 10 M INVOICE COMMENT 03/30/11 EDI 30 WPEINVITM D 6000 1 M INVOICE ITEM DETAIL 03/30/11 EDI More... F1=Help F4=Prompt F10=Update F12=Cancel F24=More Keys

Application Definition for Externally Defined Physical Files
16 IBM Sterling Gentran:Server for iSeries Release 3.6 User Guide
Field DescriptionsSequence Number
This field helps the user to list the files in the order in which the data is processed. It is typical to sequence by 10s to allow additional files to be inserted at any time.
Record/FilesThis field contains the name of the physical file, not the record name. There is not a place to qualify the library for processing or for the DDS retrieval. The first file found in the library list is used. The same file cannot be repeated within the definition.
AreaThis field is the area code that this file is assigned to based on the corresponding EDI standards area codes. Press F4 (Prompt) for a list of valid area codes. There must be at least one Header file. It is common to have at least one file per area, with the exception of the summary.
Loop IDThis field is used to connect one or more application files with the multiple occurrence of an EDI loop. In this scenario, the Detail file has one record read per iteration of the IT1 line item loop according to the EDI format for an invoice.
If the application definition did not have the Loop ID on the Detail file (WPEINVITM), then only one ‘IT1’ line item loop is ever generated and sent out. The remaining line items are dropped.
Max UseThis field identifies how many times in a row a record is read or written per iteration of the corresponding loop or area. In this scenario, the invoice Header file has a Max Use of ‘1’ and the invoice Detail file has a Max Use of ‘1.’ This means that only one Header record is read per invoice and only one Detail record is read per iteration of a line item loop. Invoice Comments can occur up to ten times for every invoice Header file.
Mandatory CodeThis code indicates whether the file is mandatory or optional (M or O, respectively). Although it is required, it is informational only.
Write FlagThis field, with values of ‘Y’ (yes) or ‘N’ (no), indicates whether the application record is written. For outbound, this field must be left BLANK.
Set the flag to ‘Y’ for inbound, unless you have a special circumstances where you do not want records written to the file.
Description A meaningful description is recommended. It indicates the kind of information in the file and is very helpful for ongoing maintenance.
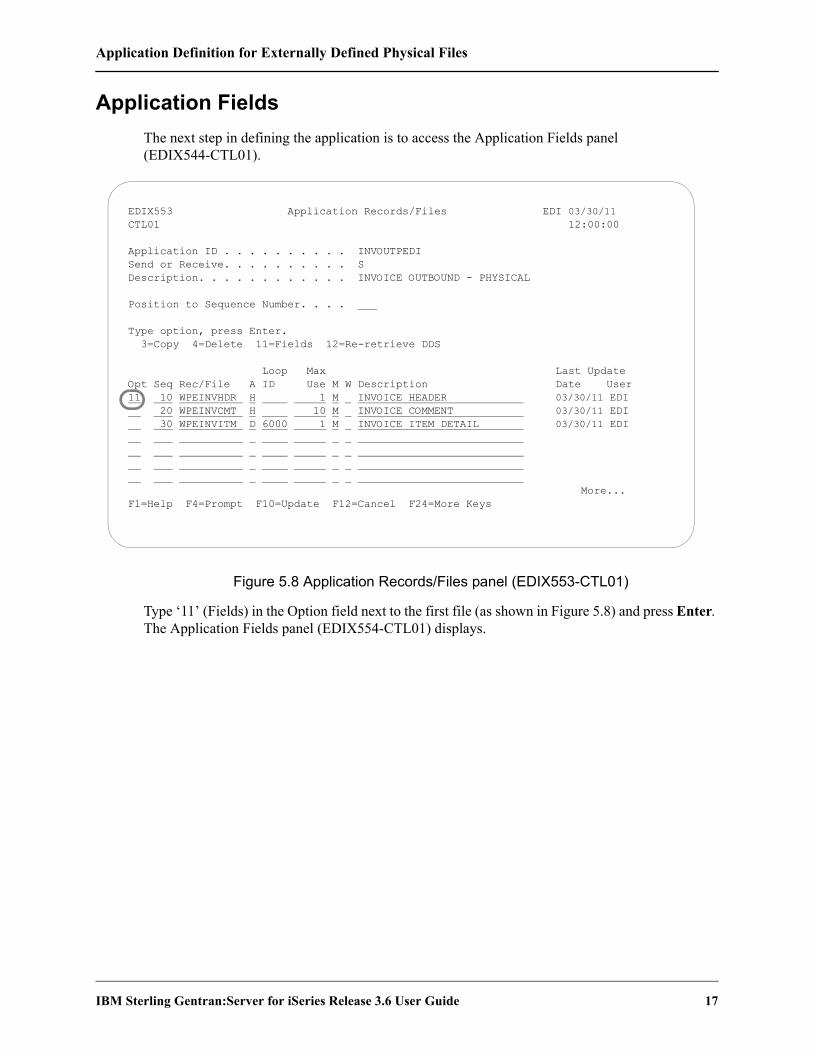
Application Definition for Externally Defined Physical Files
IBM Sterling Gentran:Server for iSeries Release 3.6 User Guide 17
Application FieldsThe next step in defining the application is to access the Application Fields panel (EDIX544-CTL01).
Figure 5.8 Application Records/Files panel (EDIX553-CTL01)
Type ‘11’ (Fields) in the Option field next to the first file (as shown in Figure 5.8) and press Enter. The Application Fields panel (EDIX554-CTL01) displays.
EDIX553 Application Records/Files EDI 03/30/11 CTL01 12:00:00 Application ID . . . . . . . . . . INVOUTPEDI Send or Receive. . . . . . . . . . S Description. . . . . . . . . . . . INVOICE OUTBOUND - PHYSICAL Position to Sequence Number. . . . Type option, press Enter. 3=Copy 4=Delete 11=Fields 12=Re-retrieve DDS Loop Max Last Update Opt Seq Rec/File A ID Use M W Description Date User 11 10 WPEINVHDR H 1 M INVOICE HEADER 03/30/11 EDI 20 WPEINVCMT H 10 M INVOICE COMMENT 03/30/11 EDI 30 WPEINVITM D 6000 1 M INVOICE ITEM DETAIL 03/30/11 EDI More... F1=Help F4=Prompt F10=Update F12=Cancel F24=More Keys

Application Definition for Externally Defined Physical Files
18 IBM Sterling Gentran:Server for iSeries Release 3.6 User Guide
Make modifications to the field definition for each file in the application. The fields retrieved from the DDS display on the panel, as shown in Figure 5.9.
Figure 5.9 Application Fields panel (EDIX554-CTL01)
Review the field information retrieved and make any necessary modifications. Page Down to review more fields. Press F17 (Next Rcd) to advance to the next file that was defined and repeat this step. When finished, press F10 (Update).
Typical modifications may include:
Data types for Date fields are changed to specific data types known to Sterling Gentran:Server to allow the conversion of the date formatField Values may be added to set the default values (for inbound only)Descriptions may be changed to clarify field definitionsMandatory Codes may be changed to optional codes
The dates in the sample invoice are stored in the YYYYMMDD format, so we need to make these changes:
1. Type ‘CY’ in the Type field for Sequence 20 and 30. This allows Sterling Gentran:Server to convert the date from a YYYYMMDD format to a YYMMDD for EDI.
2. Press F10 (Update).
NOTEIn this scenario, no modifications are required to the Comment and Detail files. If you wish to view the fields for other application files, press F17 (Next Rcd) to advance to the next file.
EDIX554 Application Fields EDI 03/30/11 CTL01 12:00:00 Application ID . . . . . . . . . . INVOUTPEDI Send or Receive. . . . . . . . . . S Record/File Sequence Number. . . . 10 Description. . . . . . . . . . . . INVOICE HEADER Record/File. . . . . . . . . . . . WPEINVHDR Position to Sequence Number. . . . Type option, press Enter. 3=Copy 4=Delete Opt Seq Field Name Ty Start Len M Description Field Value 5 F010.IHB2# AN 1 9 M BILLTO ACCT# 10 F010.IHINV# AN 10 10 M INVOICE # 15 F010.IHCRDB AN 20 1 M CREDIT/DEBIT FLAG:C OR B 20 F010.IHINDT CY 21 8 M INVOICE DATE YYMD 25 F010.IHPO# AN 29 20 M PURCHASE ORDER # 30 F010.IHPODT CY 49 8 M PO DATE YYMD More... F1=Help F4=Prompt F10=Update F12=Cancel F13=Services F24=More Keys

Application Definition for Externally Defined Physical Files
IBM Sterling Gentran:Server for iSeries Release 3.6 User Guide 19
Field DescriptionsSequence Number
This field is similar to the file Sequence number on the Application Records/Files panel. It must be a unique number within the file.
The fields are retrieved in the order they exist in the file. They need to stay in this order. When Sterling Gentran:Server retrieves the field information, it sequences them by increments of five to allow for insertion of fields.
Field NameThe field contains the actual field name retrieved from the file but is prefixed by a unique identifier for this file. This identifier always starts with ‘F’ for file and is tagged with the Sequence Number, as shown at the top of the panel. A period is used between this file identifier and the actual field name. This is the field name that is referenced for mapping in Sterling Gentran:Server (including the period).
NOTEThe field name MUST be unique across all files within an application definition. If a field has the same name in more than one file, Sterling Gentran:Server requires the name to be different. To ensure this rule, prefix each field with a unique identifier.
TypeThis field is retrieved from the file and converted to valid data types for Sterling Gentran:Server. Press F4 (Prompt) for a list of valid data types (including packed fields, signed fields, and alphanumeric fields). It cannot automatically identify the format your date fields are in. These fields are retrieved as signed or packed depending on how they were defined in your file.
Dates transmitted in the EDI format must be in YYMMDD, YYYYMMDD or DDMMYYYY format, depending on the standards being used. If your files store the dates in a different format, Sterling Gentran:Server can automatically convert your dates during the translation. To do this, define the correct data type for the date field that represents the format used in your files.
StartThis field indicates the starting position in the file. It is retrieved from the file automatically.
LengthThis field identifies the physical length of the field in the file. The physical length is the amount of space it takes up, not the actual exploded field length. For example, if you had a packed date field that took up 4 bytes, but was actually 6 bytes when unpacked, the field length is four bytes. Sterling Gentran:Server retrieves this information for you.
Mandatory CodeThis code defaults to ‘M’ for all fields upon retrieval. This code indicates whether the field is mandatory or optional (M or O, respectively). Only mark a field as mandatory when it will always be there on every occurrence of the record for which it is defined. For inbound, mandatory fields will cause a warning message to be issued if no data is found to be moved to the field.

Application Definition for Externally Defined Physical Files
20 IBM Sterling Gentran:Server for iSeries Release 3.6 User Guide
DescriptionThis description is retrieved from the DDS and may be modified to provide a more meaningful description. The entire description is not always shown during the mapping process.
RECOMMENDATIONIt may be helpful to have the most important part of the description, which differentiates the field, at the beginning of the field.
Field ValueThis value is not loaded by Sterling Gentran:Server when retrieving the DDS. This column must be loaded by the user afterwards and is ONLY used for inbound. It is used to move a default value into the application field after mapping and prior to writing the record. The default values for the L date types, T time types, and Z date/time stamp are not required here. The inbound mapper forces these values when necessary.
If the field was not loaded during the mapping process, you may want to load a default value. Literals, reserved words, and envelope values can be typed into this field to be moved into the application field. (SEE the “Glossary” for more information on reserved words). If a field already has a value (loaded during the mapping process), the contents of the Field Value will not overlay that value.
This feature can be very useful for loading key fields into a file. It is also helpful in loading information that may not be transmitted in the EDI document but needs to be added to your files prior to interfacing to your application system.
At this point, if you are creating an inbound application definition, you are ready to begin mapping. If you are creating an outbound application definition, please continue with the section on the following page.
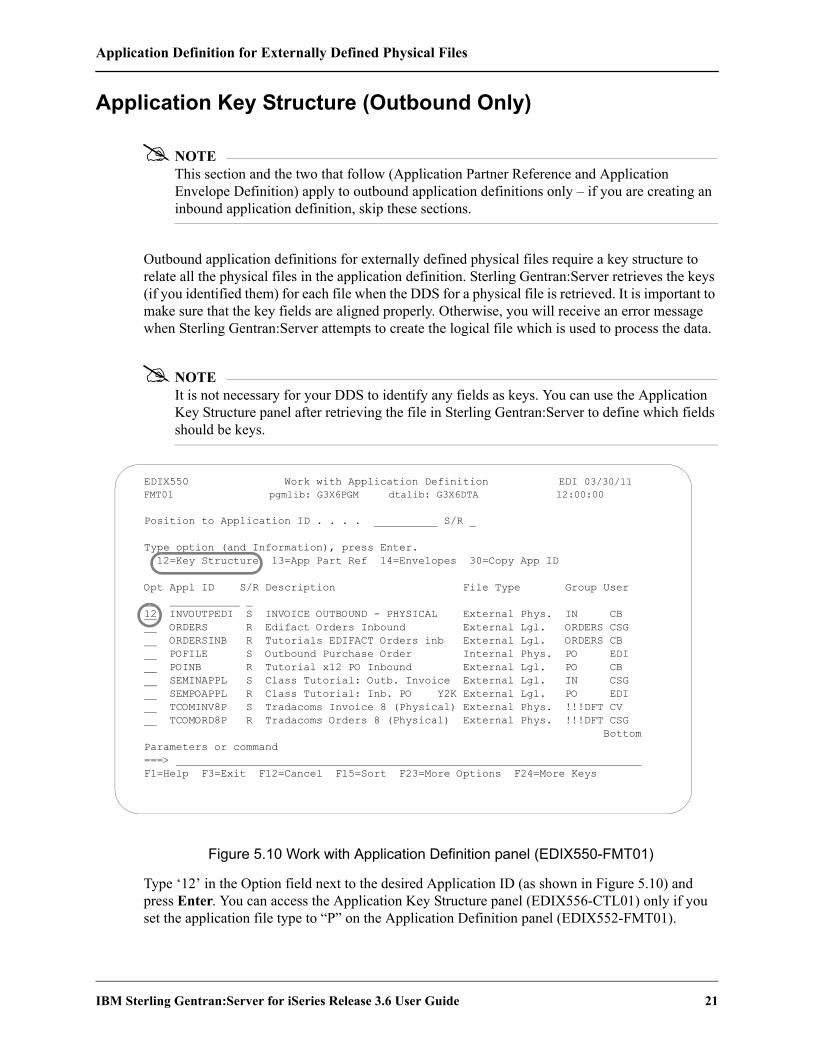
Application Definition for Externally Defined Physical Files
IBM Sterling Gentran:Server for iSeries Release 3.6 User Guide 21
Application Key Structure (Outbound Only)
NOTEThis section and the two that follow (Application Partner Reference and Application Envelope Definition) apply to outbound application definitions only – if you are creating an inbound application definition, skip these sections.
Outbound application definitions for externally defined physical files require a key structure to relate all the physical files in the application definition. Sterling Gentran:Server retrieves the keys (if you identified them) for each file when the DDS for a physical file is retrieved. It is important to make sure that the key fields are aligned properly. Otherwise, you will receive an error message when Sterling Gentran:Server attempts to create the logical file which is used to process the data.
NOTEIt is not necessary for your DDS to identify any fields as keys. You can use the Application Key Structure panel after retrieving the file in Sterling Gentran:Server to define which fields should be keys.
Figure 5.10 Work with Application Definition panel (EDIX550-FMT01)
Type ‘12’ in the Option field next to the desired Application ID (as shown in Figure 5.10) and press Enter. You can access the Application Key Structure panel (EDIX556-CTL01) only if you set the application file type to “P” on the Application Definition panel (EDIX552-FMT01).
EDIX550 Work with Application Definition EDI 03/30/11 FMT01 pgmlib: G3X6PGM dtalib: G3X6DTA 12:00:00 Position to Application ID . . . . S/R Type option (and Information), press Enter. 12=Key Structure 13=App Part Ref 14=Envelopes 30=Copy App ID Opt Appl ID S/R Description File Type Group User 12 INVOUTPEDI S INVOICE OUTBOUND - PHYSICAL External Phys. IN CB ORDERS R Edifact Orders Inbound External Lgl. ORDERS CSG ORDERSINB R Tutorials EDIFACT Orders inb External Lgl. ORDERS CB POFILE S Outbound Purchase Order Internal Phys. PO EDI POINB R Tutorial x12 PO Inbound External Lgl. PO CB SEMINAPPL S Class Tutorial: Outb. Invoice External Lgl. IN CSG SEMPOAPPL R Class Tutorial: Inb. PO Y2K External Lgl. PO EDI TCOMINV8P S Tradacoms Invoice 8 (Physical) External Phys. !!!DFT CV TCOMORD8P R Tradacoms Orders 8 (Physical) External Phys. !!!DFT CSG Bottom Parameters or command ===> F1=Help F3=Exit F12=Cancel F15=Sort F23=More Options F24=More Keys

Application Definition for Externally Defined Physical Files
22 IBM Sterling Gentran:Server for iSeries Release 3.6 User Guide
The purpose of this panel is to show the key fields defined for each physical file in your application definition. It allows you to set them up so Sterling Gentran:Server can create the Multi-Format Logical File (GENMFLF) during processing. If there are no key fields identified in the physical files that you created, you can enter the fields that should be used as keys for logical processing.
CAUTIONSTOP
EACH PHYSICAL FILE USED MUST CONTAIN AT LEAST ONE KEY FIELD DEFINED IN THE APPLICATION KEY STRUCTURE. This is mandatory because Sterling Gentran:Server dynamically generates DDS and creates a multi-format logical file over all the Physical Files (at run-time) before processing starts. It is impossible for Sterling Gentran:Server to process the data if there are no keys defined on the Application Key Structure.
Figure 5.11 Application Key Structure panel (EDIX556-CTL01) – Original
Enter the key fields to complete the basic information required for Sterling Gentran:Server to build a logical file. When finished, press F10 (Update).
In the example in Figure 5.11, the key fields for Key 3 in files WPEINVCMT and WPEINVITM do not match. Continue with the next step to make the correction.
EDIX556 Application Key Structure EDI 03/30/11 CTL01 12:00:00 Application ID . . . . . . . . . . INVOUTPEDI Send or Receive. . . . . . . . . . S Description. . . . . . . . . . . . INVOICE OUTBOUND - PHYSICAL File Key 1 Key 2 Key 3 Key 4 Key 5 WPEINVHDR IHB2# IHINV# WPEINVCMT ICB2# ICINV# ICSEQ# WPEINVITM IDB2# IDINV# IDITEM Bottom F1=Help F4=Prompt F10=Update F19=Left F20=Right F24=More Keys

Application Definition for Externally Defined Physical Files
IBM Sterling Gentran:Server for iSeries Release 3.6 User Guide 23
Figure 5.12 Application Key Structure panel (EDIX556-CTL01) – Completed
When the key fields across the files do not match, the keys need to be aligned as follows:
1. WPEINVITM does not align with WPEINVCMT. Move the item # (IDITEM) over to Key 4. The third key for the item file does not match the third key of a sequence # from the Comment file. It needs to be moved over to a new key by itself. (See Figure 5.12.)
2. Press F10 (Update) to update the key structure.
CAUTIONSTOP
The message, “Field types different for Key xx,” displays if you tried to update a file whose key fields did not match against another file. The non-matching key field number is also displayed on the panel.
EDIX556 Application Key Structure EDI 03/30/11 CTL01 12:00:00 Application ID . . . . . . . . . . INVOUTPEDI Send or Receive. . . . . . . . . . S Description. . . . . . . . . . . . INVOICE OUTBOUND - PHYSICAL File Key 1 Key 2 Key 3 Key 4 Key 5 WPEINVHDR IHB2# IHINV# WPEINVCMT ICB2# ICINV# ICSEQ# WPEINVITM IDB2# IDINV# IDITEM Bottom F1=Help F4=Prompt F10=Update F19=Left F20=Right F24=More Keys

Application Definition for Externally Defined Physical Files
24 IBM Sterling Gentran:Server for iSeries Release 3.6 User Guide
During processing, EBDI073 verifies that the DDS was generated for the logical file and that the file has the proper key alignment. If the title can’t be created, the job log shows the program message “Error Code: D,” and a spool file is generated that shows the errors encountered when OS/400 attempted to create the multi-format logical file, as shown in Figure 5.13.
Figure 5.13 Job Log with program message from EBDI073 showing DDS and error
Display Spooled File File . . . . . : QPJOBLOG Page/Line 2/45 Control . . . . . W35 Columns 35 - 112 Find . . . . . . +....4....+....5....+....6....+....7....+....8....+....9....+....0....+....1.. Message . . . . : 5900 - RCVF DEV(*FILE) RCDFMT(*FILE) WAIT(*YES) /* File name is APPHDR. */ 03/30/11 12:00:00 QCADRV QSYS 0160 EDCL032 Message . . . . : 6500 - CRTSRCPF FILE(QTEMP/APPSRC) MBR(APPSRC) 03/30/11 12:00:00 QCADRV QSYS 0160 EDCL032 Message . . . . : 6700 - CLRPFM FILE(QTEMP/APPSRC) 03/30/11 12:00:00 QCADRV QSYS 0160 EDCL032 Message . . . . : 6800 - OVRDBF FILE(APPSRC) TOFILE(QTEMP/APPSRC) LVLCHK(*NO) 03/30/11 12:00:00 QCLCLCPR QSYS 02DB EDCL032 Message . . . . : 7000 - CALL PGM(EBDI073) /* The CALL command contains parameters */ 03/30/11 12:00:00 QCADRV QSYS 0160 EDCL032 Message . . . . : 8500 - SNDPGMMSG MSG('Error Code: D') TOMSGQ(QA70) 03/30/11 12:00:00 QCADRV QSYS 0160 EDCL032 Message . . . . : 11600 - RCVMSG MSGTYPE(*NEXT) MSGKEY(*TOP) More... F3=Exit F12=Cancel F19=Left F20=Right F24=More keys

Application Definition for Externally Defined Physical Files
IBM Sterling Gentran:Server for iSeries Release 3.6 User Guide 25
The DDS from the logical file is generated if the logical file command is issued when the keys are out of alignment, as shown in Figure 5.14.
Figure 5.14 DDS not generated when key structure is incorrect (not aligned)
5738SS1 V5R1M0 971101 Data Description QTEMP/GENMFLF 12:00:00 Page 1
Compiler . . . . . . . . . . . . . . . . : IBM iSeries Data Description Source
Expanded Source
SEQNBR *...+....1....+....2....+....3....+....4....+....5....+....6....+....
100 R REINVHDR PFILE(WPEINVHDR )
200 A K IHB2#
300 A K IHINV#
500 A R REINVCMT PFILE(WPEINVCMT )
600 A K ICB2#
700 A K ICINV#
800 A K ICSEQ#
1000 A R REINVITM PFILE(WPEINVITM )
1100 A K IDB2#
1200 A K IDINV#
1300 A K IDITEM
* * * * * E N D O F E X P A N D E D S O U R C E * * * * *
5738SS1 V5R1M0 971101 Data Description QTEMP/GENMFLF 03/30/11 12:00:00 Page 2
Messages
ID Severity Number
* CPF3238 40 1 Message . . . : Key field IDITEM not same as previous formats.
Messages Summary
Total Informational Warning Error Severe
(0-9) (10-19) (20-29) (30-99)
1 0 0 0 1
* CPF7302 40 Message . . . : File GENMFLF not created in library QTEMP.
* * * * * E N D O F C O M P I L A T I O N * * * * *

Application Definition for Externally Defined Physical Files
26 IBM Sterling Gentran:Server for iSeries Release 3.6 User Guide
When Sterling Gentran:Server generates the DDS, it loads ‘*NONE’ in the non-significant keys (keys that were skipped and left BLANK on the Application Key Structure panel), as shown in Figure 5.15.
Figure 5.15 Good DDS if the keys were aligned
5738SS1 V5R1M0 971101 Data Description QTEMP/GENMFLF 03/30/11 12:00:00 Page 1
Compiler . . . . . . . . . . . . . . . . : IBM iSeries Data Description Source
Expanded Source
SEQNBR *...+....1....+....2....+....3....+....4....+....5....+....6....+....
100 R REINVHDR PFILE(WPEINVHDR )
200 A K IHB2#
300 A K IHINV#
400 A K *NONE
500 A K *NONE
700 A R REINVCMT PFILE(WPEINVCMT )
800 A K ICB2#
900 A K ICINV#
1000 A K ICSEQ#
1100 A K *NONE
1300 A R REINVITM PFILE(WPEINVITM )
1400 A K IDB2#
1500 A K IDINV#
1600 A K *NONE
1700 A K IDITEM
* * * * * E N D O F E X P A N D E D S O U R C E * * * * *
5738SS1 V5R1M0 920925 Data Description QTEMP/GENMFLF 03/30/11 12:00:00 Page 2
Messages Summary
Total Informational Warning Error Severe
(0-9) (10-19) (20-29) (30-99)
0 0 0 0 0
* CPF7301 00 Message . . . : File GENMFLF created in library QTEMP.
* * * * * E N D O F C O M P I L A T I O N * * * * *

Application Definition for Externally Defined Physical Files
IBM Sterling Gentran:Server for iSeries Release 3.6 User Guide 27
Application Partner Reference (Outbound Only)
NOTEThis section and the one that follows (Application Envelope Definition) apply to outbound application definitions only – if you are creating an inbound application definition, skip these sections.
The first step in defining the application partner reference is to access the Application Partner Reference panel (EDIX559-FMT01). The application partner reference is only used for outbound documents.
Figure 5.16 Work with Application Definition panel (EDIX550-FMT01)
Type ‘13’ (App Part Ref) in the Option field next to the desired Application ID, as shown in Figure 5.16, and press Enter. The action displays the Application Partner Reference panel (EDIX559-FMT01).
EDIX550 Work with Application Definition EDI 03/30/11 FMT01 pgmlib: G3X6PGM dtalib: G3X6DTA 12:00:00 Position to Application ID . . . . S/R Type option (and Information), press Enter. 12=Key Structure 13=App Part Ref 14=Envelopes 30=Copy App ID Opt Appl ID S/R Description File Type Group User INVFILE R Invoice Inbound Internal Phys. IN EDI INVOIC S Edifact Invoice Y2K External Lgl. INVOIC EDI INVOICOUT S Tutorial EDIFACT Invoice outb External Lgl. INVOIC CB INVOUT S Tutorial X12 Invoice Outbound External Lgl. IN CB INVOUTL S Invoice Outbound (lgl) Y2K External Lgl. IN EDI INVOUTP S Invoice Outbound (Phys) Y2K External Phys. IN EDI 13 INVOUTPEDI S INVOICE OUTBOUND - PHYSICAL External Phys. IN CB ORDERS R Edifact Orders Inbound External Lgl. ORDERS CSG ORDERSINB R Tutorials EDIFACT Orders inb External Lgl. ORDERS CB More... Parameters or command ===> F1=Help F3=Exit F12=Cancel F15=Sort F23=More Options F24=More Keys

Application Definition for Externally Defined Physical Files
28 IBM Sterling Gentran:Server for iSeries Release 3.6 User Guide
The application partner reference is the link between your data and the partner profile. It identifies a specific place in the application file where Sterling Gentran:Server will look for the partner who receives the data. The Application Partner Reference panel (EDIX559-FMT01) allows you to specify the name of a field (or fields) in the application header file that contains the application partner reference.
Figure 5.17 Application Partner Reference panel (EDIX559-FMT01)
Enter the application partner reference field and press F10 (Update).
To specify the field name that will be used as the application partner reference in the example (as shown in Figure 5.17), complete the following instructions:
1. Type ‘F010.IHB2#’ in the Application Partner Reference Field Name field.
2. Press F10 (Update) and return to the Work with Application Definition panel (EDIX550-FMT01).
NOTEIf your partner is set up in the Partner file, add a partner cross reference to point this field (or fields) back to the Partner ID as defined. If no field exists in the header for the partner, the partner needs to be provided as a run-time parameter on the outbound processing command. (SEE the “Partner” chapter for more information on cross references.)
EDIX559 Application Partner Reference EDI 03/30/11 FMT01 12:00:00
Application ID . . . . . . . . . . INVOUTPEDI Send or Receive. . . . . . . . . . S
Application Partner Reference Field Name . . . . . . . . . . . . F010.IHB2# Qual Field Name. . . . . . . . . .
Application Select Field Name . . . . . . . . . . . .
F1=Help F4=Prompt F10=Update F12=Cancel F13=Services F24=More Keys

Application Definition for Externally Defined Physical Files
IBM Sterling Gentran:Server for iSeries Release 3.6 User Guide 29
Field DescriptionsApplication Partner Reference Field Name
This application field identifies the partner that receives this data using EDI. Provide a value that is known to Sterling Gentran:Server in the application definition (including the File identifier). This field is used along with the Qual Field Name to look up the partner in the Partner file or Partner Cross Reference file.
CAUTIONSTOP
This field MUST be alphanumeric and MUST exist in a Header file in your application definition.
If your partner is not set up in the Partner file, add a partner cross reference to point this field (or fields) back to the Partner ID as defined. If no field exists in the Header for the partner, the partner needs to be provided as a run-time parameter on the outbound processing command. (SEE the “Partner” chapter for more information on cross references.)
In our example, the BILLTO ACCT# from the invoice Header File identifies our partner.
Qualifier Field NameIf a secondary field is needed to uniquely identify the partner, type the name of the second application field here. Both fields are used to find the partner in the Partner file or Partner Cross Reference file.
Application Select Field NameThis protected Data field displays if a field in the application definition was defined with the data type of ‘AS’ (Application Select). This feature can be used when more than one transaction type is tied to the same application definition to help select the correct map during Translation processing. Examples of when this feature could be useful are:
1. To process the 980 Group Totals transaction with the 210 Motor Invoice transaction.
2. To process the 850 Purchase Order transaction with the 860 Purchase Order Change transaction.
One field would need to be defined as the Application Select field, whose contents would identify which transaction map should be selected. If the 850 should be selected, the selected field contains ‘O’ for original order. If the 860 should be selected, the field contains ‘C’ for change order. These values for the Application Select field would be defined on the Transaction ID.

Application Definition for Externally Defined Physical Files
30 IBM Sterling Gentran:Server for iSeries Release 3.6 User Guide
Application Envelope Definition (Outbound Only)
NOTEThis section applies to outbound application definitions only – if you are creating an inbound application definition, skip this section.
The application envelope definition enables you to globally change an envelope value for all partners for a particular application definition. For example, if you wanted to test an application definition and indicate to all the partners who would receive the data processed that it is test data, you could use this function to change the Sender ID to ‘TESTID’ for all partners, rather than change the Sender ID on each partner’s profile. The Sender ID from the partner profiles would be overridden.
The first step is to access the Application Envelope Definition panel (EDIX560-FMT01).
Figure 5.18 Work with Application Definition panel (EDIX550-FMT01)
From the Work with Application Definition (EDIX550-FMT01) panel, type ‘14’ (Envelopes) in the Option field next to the desired Application ID (as shown in Figure 5.18), and press Enter. The action displays the Application Envelope Definition panel (EDIX560-FMT01).
EDIX550 Work with Application Definition EDI 03/30/11 FMT01 pgmlib: G3X6PGM dtalib: G3X6DTA 12:00:00 Position to Application ID . . . . S/R Type option (and Information), press Enter. 12=Key Structure 13=App Part Ref 14=Envelopes 30=Copy App ID Opt Appl ID S/R Description File Type Group User INVFILE R Invoice Inbound Internal Phys. IN EDI INVOIC S Edifact Invoice Y2K External Lgl. INVOIC EDI INVOICOUT S Tutorial EDIFACT Invoice outb External Lgl. INVOIC CB INVOUT S Tutorial X12 Invoice Outbound External Lgl. IN CB INVOUTL S Invoice Outbound (lgl) Y2K External Lgl. IN EDI INVOUTP S Invoice Outbound (Phys) Y2K External Phys. IN EDI 14 INVOUTPEDI S INVOICE OUTBOUND - PHYSICAL External Phys. IN CB ORDERS R Edifact Orders Inbound External Lgl. ORDERS CSG ORDERSINB R Tutorials EDIFACT Orders inb External Lgl. ORDERS CB More... Parameters or command ===> F1=Help F3=Exit F12=Cancel F15=Sort F23=More Options F24=More Keys

Application Definition for Externally Defined Physical Files
IBM Sterling Gentran:Server for iSeries Release 3.6 User Guide 31
The Application Envelope Definition panel (Figure 5.19) enables you to define the application data fields containing envelope field data such as sender/receiver IDs, qualifiers, control number, security and communications IDs, application reference information, priority codes and test indicators. Any remaining envelope information not entered or not available on this panel will be obtained from the Partner file.
CAUTIONSTOP
While field names are verified by Sterling Gentran:Server, no verification is performed on the data in the application data fields. It is the user’s responsibility to ensure that the data in the application file is valid.
Figure 5.19 Application Envelope Definition panel (EDIX560-FMT01)
There are no mandatory fields for this panel. Type values in the fields you want to change and press F10 (Update).
NOTEDo not specify any fields on the panel for this example.
EDIX560 Application Envelope Definition EDI 03/30/11 FMT01 12:00:00
Application ID . . . . . . . . . . INVOUTPEDI Send or Receive. . . . . . . . . . S
Outbound Envelope Field Definitions for all standards Interchange Sender ID. . . . . . . Qual . Group Sender ID. . . . . . . . . . Qual . Interchange Receiver ID. . . . . . Qual . Group Receiver ID. . . . . . . . . Qual . Interchange Control# . . . . . . . Group Cntl#. . . . . . . . . . . . Transaction Control Number . . . .
Outbound Envelope Field Definitions for individual interchanges BG Comm Id . . . . . . . . . . . . Password ISA/UNB/STX Test Ind . . . . . . . UNB/STX Appl Reference . . . . . . UNB/STX Priority Code. . . . . . . STX Recipient Trans Ref. . . . . . UNH03 Common Access Reference. . .
F1=Help F4=Prompt F10=Update F12=Cancel F24=More Keys
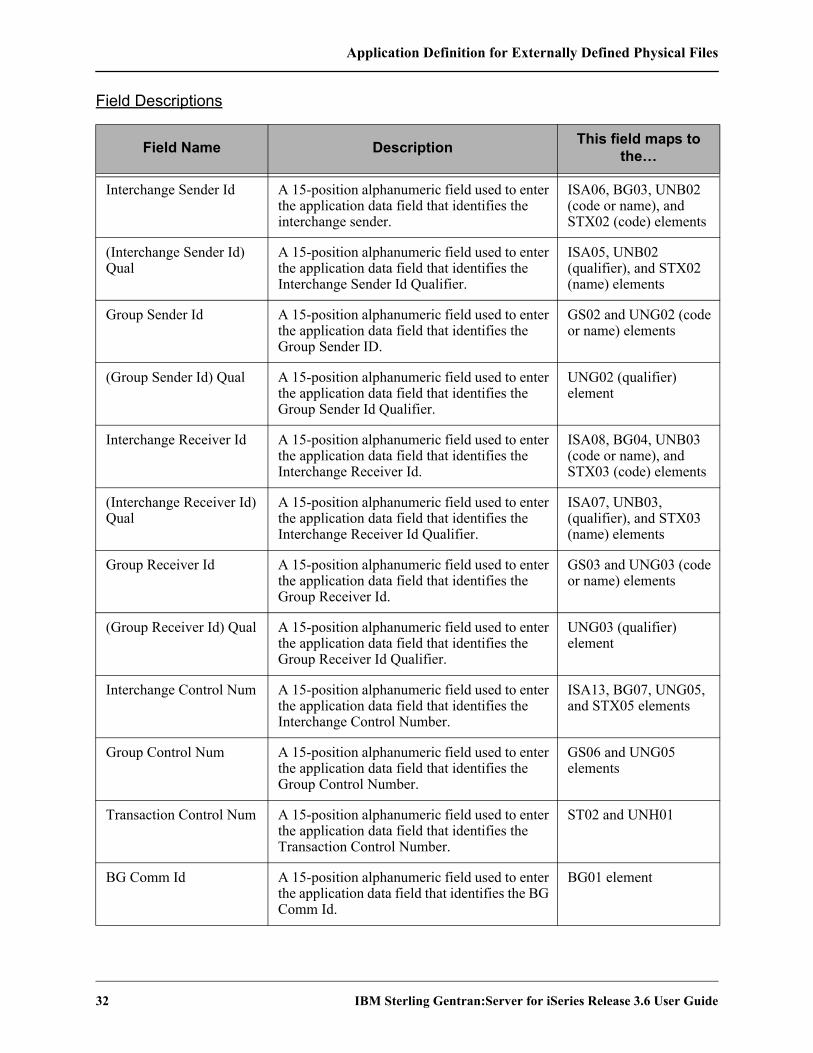
Application Definition for Externally Defined Physical Files
32 IBM Sterling Gentran:Server for iSeries Release 3.6 User Guide
Field Descriptions
Field Name Description This field maps to the…
Interchange Sender Id A 15-position alphanumeric field used to enter the application data field that identifies the interchange sender.
ISA06, BG03, UNB02 (code or name), and STX02 (code) elements
(Interchange Sender Id) Qual
A 15-position alphanumeric field used to enter the application data field that identifies the Interchange Sender Id Qualifier.
ISA05, UNB02 (qualifier), and STX02 (name) elements
Group Sender Id A 15-position alphanumeric field used to enter the application data field that identifies the Group Sender ID.
GS02 and UNG02 (code or name) elements
(Group Sender Id) Qual A 15-position alphanumeric field used to enter the application data field that identifies the Group Sender Id Qualifier.
UNG02 (qualifier) element
Interchange Receiver Id A 15-position alphanumeric field used to enter the application data field that identifies the Interchange Receiver Id.
ISA08, BG04, UNB03 (code or name), and STX03 (code) elements
(Interchange Receiver Id) Qual
A 15-position alphanumeric field used to enter the application data field that identifies the Interchange Receiver Id Qualifier.
ISA07, UNB03, (qualifier), and STX03 (name) elements
Group Receiver Id A 15-position alphanumeric field used to enter the application data field that identifies the Group Receiver Id.
GS03 and UNG03 (code or name) elements
(Group Receiver Id) Qual A 15-position alphanumeric field used to enter the application data field that identifies the Group Receiver Id Qualifier.
UNG03 (qualifier) element
Interchange Control Num A 15-position alphanumeric field used to enter the application data field that identifies the Interchange Control Number.
ISA13, BG07, UNG05, and STX05 elements
Group Control Num A 15-position alphanumeric field used to enter the application data field that identifies the Group Control Number.
GS06 and UNG05 elements
Transaction Control Num A 15-position alphanumeric field used to enter the application data field that identifies the Transaction Control Number.
ST02 and UNH01
BG Comm Id A 15-position alphanumeric field used to enter the application data field that identifies the BG Comm Id.
BG01 element

Application Definition for Externally Defined Physical Files
IBM Sterling Gentran:Server for iSeries Release 3.6 User Guide 33
At this point, you have finished creating an outbound application definition. You are ready to begin mapping.
BG Comm Password A 15-position alphanumeric field used to enter the application data field that identifies the BG Comm Password.
BG02 element
ISA/UNB Test Indicator A 15-position alphanumeric field used to enter the application data field that identifies the ISA/UNB Test Indicator.
ISA15 and UNB11 elements
UNB/STX Appl Reference
A 15-position alphanumeric field used to enter the application data field that identifies the UNB/STX application reference.
UNB07 and STX07 elements
UNB/STX Priority Code A 15-position alphanumeric field used to enter the application data field that identifies the UNB/STX Priority Code.
UNB08, and STX08 elements
STX Recipient Trans Ref A 15-position alphanumeric field used to enter the application data field that identifies the STX Recipient Transmission Reference.
STX06 element
UNH03 Common Access Reference
A 15-position alphanumeric field used to enter the application data field that identifies the UNH03 Common Access Reference.
UNH03 element
Field Name Description This field maps to the…

Application Definition for Internally Defined File
34 IBM Sterling Gentran:Server for iSeries Release 3.6 User Guide
Application Definition for Internally Defined File
Each step in this section will illustrate how to create an application definition for a purchase order using an internally defined file.
Off-line PreparationBefore you enter Sterling Gentran:Server to create an application definition, you may find it beneficial to spend some time designing the format of your application file. Doing so will make it much easier to complete the steps to create your application definition.
Analyze your application master files to determine which fields are required to build the EDI document.
You must create the “flat” file that you will define inside Sterling Gentran:Server. Use the length of the longest record when creating the physical file.
Design the Application DefinitionWe determined that three records were necessary to send the sample purchase order: Header, Comment, and Detail. The Header record stores the Header portion of the purchase order. Even though the comments are included in the Header portion of the purchase order, they are stored in a separate record. This enables you to send multiple comments within a single electronic purchase order. A Summary record is not required because we will use reserved words to map the Summary Segments.

Application Definition for Internally Defined File
IBM Sterling Gentran:Server for iSeries Release 3.6 User Guide 35
Figure 5.20 Sample Application File Format
We can see in Figure 5.20 that this file has three unique types of records. A 3-character code beginning in the 21st column of each record tells us what type of record we are dealing with.
Header Record – one per document. Record 001.Description Field Name Data Type Field Start LengthVendor Number 001-VENDOR AN 1 8Purchase Order Number 001-PO-NUMBER AN 9 12Record Type 001-REC-TYPE AN 21 3Date 001-PO-DATE MM 24 6Bill To Name 001-BILL-NAME AN 30 25Bill To Address 001-BILL-ADDR AN 55 25Bill To City 001-BILL-CITY AN 80 25Bill To State 001-BILL-STATE AN 105 2Bill To ZIP 001-BILL-ZIP AN 107 5Ship To Name 001-VEND-NAME AN 112 25Ship To Address 001-VEND-ADDR AN 137 25Ship To City 001-VEND-CITY AN 162 25Ship To State 001-VEND-STATE AN 187 2Ship To ZIP 001-VEND-ZIP AN 189 5Bill To Phone 001-BILL-PHONE AN 194 12Ship To Phone 001-VEND-PHONE AN 206 12Requested Ship Date 001-SHIP-DATE MM 218 6Bill To ZIP Extension 001-BILL-ZIP-XT AN 224 4Ship To ZIP Extension 001-VEND-ZIP-XT AN 228 4
Comment Record – up to 10 per document. Record 002Description Field Name Data Type Field Start LengthVendor Number 002-VENDOR AN 1 8Purchase Order Number 002-PO-NUMBER AN 9 12Record Type 002-REC-TYPE AN 21 3Comment 002-MESSAGE AN 24 60
Detail Record – up to 200,000 per document. Record 005Description Field Name Data Type Field Start LengthVendor Number 005-VENDOR AN 1 8Purchase Order Number 005-PO-NUMBER AN 9 12Record Type 005-REC-TYPE AN 21 3Quantity 005-QUANTITY S2 24 7Unit of Measure 005-UNT-OF-MEAS AN 31 4Price 005-PRICE S3 35 7Item Number 005-ITEM-NUMBER AN 42 15Item Description 005-ITEM-DESC AN 57 50

Application Definition for Internally Defined File
36 IBM Sterling Gentran:Server for iSeries Release 3.6 User Guide
The three types of records are:
1. Header Record (or 001 record) – This required record will occur once per document and contains most of the general information for the purchase order. Each time we encounter one of these records in the application file, we want a new EDI document generated.
2. Comment Record (or 002 record) – This is an optional record that contains free form comments about the specific purchase order we are creating. These records will follow the header record in the application file. Up to ten of these records can be generated by our application for each document. Each time one of these records is encountered, we need to generate a comment in the EDI document.
3. Detail Record (or 005 record) – One of these records will occur in the application file for each item to be ordered. At least one of these records is required per document. The current application can generate up to 200,000 of these records per document.
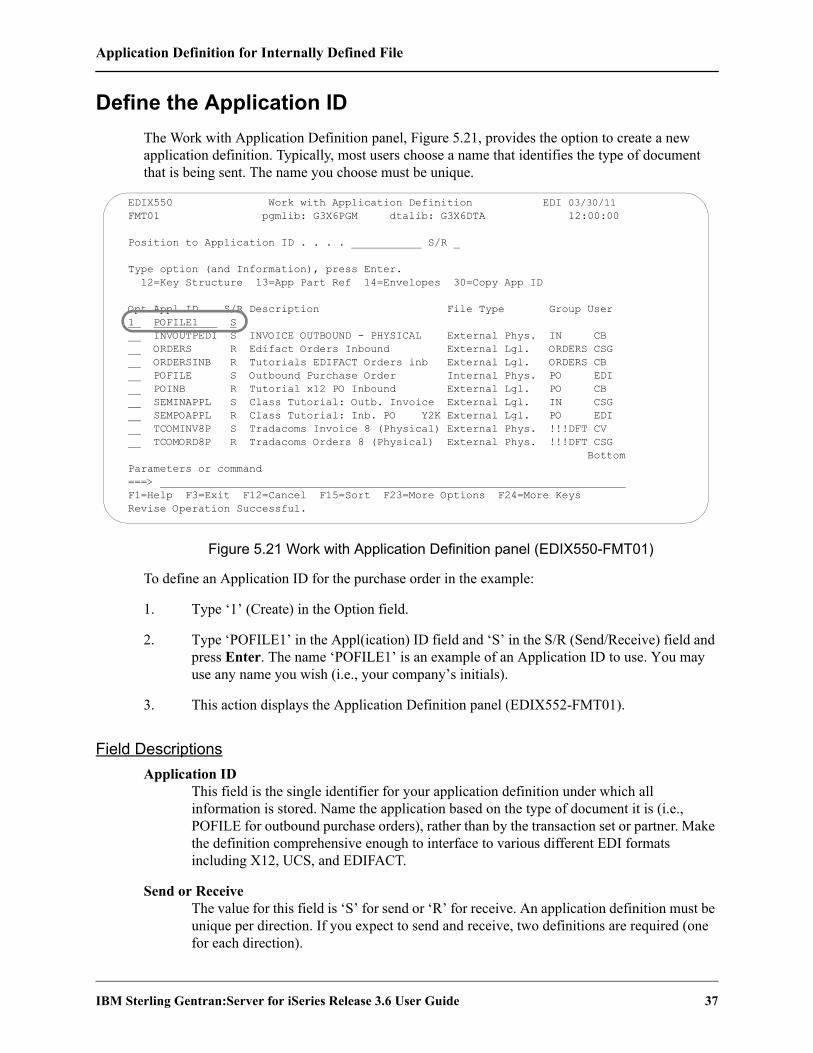
Application Definition for Internally Defined File
IBM Sterling Gentran:Server for iSeries Release 3.6 User Guide 37
Define the Application IDThe Work with Application Definition panel, Figure 5.21, provides the option to create a new application definition. Typically, most users choose a name that identifies the type of document that is being sent. The name you choose must be unique.
Figure 5.21 Work with Application Definition panel (EDIX550-FMT01)
To define an Application ID for the purchase order in the example:
1. Type ‘1’ (Create) in the Option field.
2. Type ‘POFILE1’ in the Appl(ication) ID field and ‘S’ in the S/R (Send/Receive) field and press Enter. The name ‘POFILE1’ is an example of an Application ID to use. You may use any name you wish (i.e., your company’s initials).
3. This action displays the Application Definition panel (EDIX552-FMT01).
Field DescriptionsApplication ID
This field is the single identifier for your application definition under which all information is stored. Name the application based on the type of document it is (i.e., POFILE for outbound purchase orders), rather than by the transaction set or partner. Make the definition comprehensive enough to interface to various different EDI formats including X12, UCS, and EDIFACT.
Send or ReceiveThe value for this field is ‘S’ for send or ‘R’ for receive. An application definition must be unique per direction. If you expect to send and receive, two definitions are required (one for each direction).
EDIX550 Work with Application Definition EDI 03/30/11 FMT01 pgmlib: G3X6PGM dtalib: G3X6DTA 12:00:00 Position to Application ID . . . . S/R Type option (and Information), press Enter. 12=Key Structure 13=App Part Ref 14=Envelopes 30=Copy App ID Opt Appl ID S/R Description File Type Group User 1 POFILE1 S INVOUTPEDI S INVOICE OUTBOUND - PHYSICAL External Phys. IN CB ORDERS R Edifact Orders Inbound External Lgl. ORDERS CSG ORDERSINB R Tutorials EDIFACT Orders inb External Lgl. ORDERS CB POFILE S Outbound Purchase Order Internal Phys. PO EDI POINB R Tutorial x12 PO Inbound External Lgl. PO CB SEMINAPPL S Class Tutorial: Outb. Invoice External Lgl. IN CSG SEMPOAPPL R Class Tutorial: Inb. PO Y2K External Lgl. PO EDI TCOMINV8P S Tradacoms Invoice 8 (Physical) External Phys. !!!DFT CV TCOMORD8P R Tradacoms Orders 8 (Physical) External Phys. !!!DFT CSG Bottom Parameters or command ===> F1=Help F3=Exit F12=Cancel F15=Sort F23=More Options F24=More Keys Revise Operation Successful.

Application Definition for Internally Defined File
38 IBM Sterling Gentran:Server for iSeries Release 3.6 User Guide
The Application Definition panel, Figure 5.22, is where you specify the characteristics of a particular application definition. This is the header to the entire application definition.
Figure 5.22 Application Definition panel (EDIX552-FMT01)
Enter the information required for this panel: Description, Functional Group, Application File Type, Record Type Start Position, Length, and the Application File you are going to describe.
For this sample purchase order, complete the following:
1. Type the Description of the application definition as shown on the above panel.
2. Type ‘PO’ (Functional Group ID for purchase order) in the Functional Groups field. Press F4 (Prompt) for a list of valid Functional Group IDs.
3. Type ‘I’ in the File Type field to indicate that the application file is an internally defined file. Press F4 (Prompt) for a list of valid file types.
4. Specify ‘POFILE’ as the name of the application file. Press F10 (Update) to save the information you just entered and to return you to the Work with Application Definition panel (EDIX550-FMT01).
Field DescriptionsDivision Code
The Division Code is assigned from your security profile within Sterling Gentran:Server.
Description This field is used to describe the application definition. Typically, the field includes the type of document being sent.
EDIX552 Application Definition EDI 03/30/11 FMT01 12:00:00 Application ID . . . . . . . . . . POFILE1 Send or Receive. . . . . . . . . . S Division . . . . . . . . . . . . . 000 Description. . . . . . . . . . . . PURCHASE ORDER - OUTBOUND Functional Groups. . . . . . . . . PO File Type. . . . . . . . . . . . . I EDI Split File . . . . . . . . . . EDI Sub-Split File . . . . . . . . Record Type Start Position . . . . 21 Length . . . . . . . . . . . . . . 03 Application File . . . . . . . . . POFILE Update Allowed . . . . . . . . . . Y F1=Help F4=Prompt F10=Update F12=Cancel F21=Prt App F24=More Keys
Application Definition for Internally Defined File
IBM Sterling Gentran:Server for iSeries Release 3.6 User Guide 39
Functional GroupsUp to five functional groups can be used with an application definition. You must supply valid Functional Group ID as defined by the EDI standards.
File TypeThis field is one of the most important on this panel. It identifies what type of files you use to interface to Sterling Gentran:Server for this particular application definition. The type of files you use can be different from application to application.
EDI Split FileThis field is for inbound only. If you are setting up an application definition for EDI data received from your partner, use this field to identify the intermediate file the Mapper reads to get the specific data related to this application definition. Enter the value (between 1 and 80) that was entered on the receiving partner profile (this is your company’s profile for inbound). (SEE the section on working with partner data separation in the “Partner” chapter for more information on setting up split files in the partner profile.) If this field is left BLANK, the Mapper reads the Slide file (default file) for input data. Leave this field BLANK for outbound.
EDI Sub-Split FileThis field is for Inbound only and is used in conjunction with the EDI Split File field. (SEE the “Sub-Splitting” section in the “Transaction Mapping” chapter for more information.) If you are using this feature, indicate a value between 1 and 80. Otherwise, leave this field BLANK.
Record Type Start PositionThis field is the starting position in the application record for the record type. With an internally defined file, there needs to be one field that uniquely identifies what type of record has been read. This is often referred to as the “flat” file. The only method for accessing records is sequential. When used with Sterling Gentran:Server, there are multiple record formats contained within one physical file that was created without a DDS. Each record needs to contain a different record type that occurs in the same start position in each record and for the same length. The contents of this field are used for outbound documents as the record type in the Sterling Gentran:Server application definition. The record type cannot be a packed field. For inbound, this is not a requirement and if none are needed, type a value of ‘1’.
LengthThis field contains the length of the record type mentioned above, to indicate how many bytes are used. The length cannot exceed 10 bytes. The record type and length is mandatory for outbound documents that use an internally defined file. These fields enable Sterling Gentran:Server to locate each record during processing. If inbound and the records do not have a record type, type a value of ‘1’.
Application FileThis field contains the name of the internally defined physical file that is interfaced with Sterling Gentran:Server. The file MUST exist to add the Application Data ID. For outbound processing, the file MUST exist in the library list. For inbound processing, if the file does not exist, data is written to the default physical file (GT41001) in the Sterling Gentran:Server data library (that is, G3X6DTA). This file name and a message is logged in the inbound processing job log. In the example, the file ‘POFILE’ is used.

Application Definition for Internally Defined File
40 IBM Sterling Gentran:Server for iSeries Release 3.6 User Guide
Update Allowed Set this field to ‘Y’ to allow updates to be made to this definition. Once you begin testing, you may want to change this to ‘N’ to prevent inadvertent updates to the definition.

Application Definition for Internally Defined File
IBM Sterling Gentran:Server for iSeries Release 3.6 User Guide 41
Application Records/Files The first step in defining the records for your application definition is to access the Application Records/Files panel (EDIX553-CTL01).
Figure 5.23 Work with Application Definition panel (EDIX550-FMT01)
Type ‘11’ (Rec/Files) in the Option field next to the appropriate application and press Enter.
Access ‘POFILE1’ for the sample purchase order application you are creating, as shown in Figure 5.23.
EDIX550 Work with Application Definition EDI 03/30/11 FMT01 pgmlib: G3X6PGM dtalib: G3X6DTA 12:00:00 Position to Application ID . . . . POFILE1 S/R Type option (and Information), press Enter. 1=Create 2=Revise 3=Copy 4=Delete 5=View 6=Print 11=Rec/Files Opt Appl ID S/R Description File Type Group User 11 POFILE1 S PURCHASE ORDER - OUTBOUND Internal Phys. PO CB POINB R Tutorial x12 PO Inbound External Lgl. PO CB SEMINAPPL S Class Tutorial: Outb. Invoice External Lgl. IN CSG SEMPOAPPL R Class Tutorial: Inb. PO Y2K External Lgl. PO EDI TCOMINV8P S Tradacoms Invoice 8 (Physical) External Phys. !!!DFT CV TCOMORD8P R Tradacoms Orders 8 (Physical) External Phys. !!!DFT CSG Bottom Parameters or command ===> F1=Help F3=Exit F12=Cancel F15=Sort F23=More Options F24=More Keys

Application Definition for Internally Defined File
42 IBM Sterling Gentran:Server for iSeries Release 3.6 User Guide
The next step is to add all the unique record types to the application definition that are interfaced.
Figure 5.24 Application Records/Files panel (EDIX553-CTL01)
You must enter the basic information required for this panel: Sequence Number, Record Name, Area, Max Use, Mandatory Code, and Description (Write Flag is required for inbound).
Three records will be defined for this scenario, as shown in Figure 5.24.
1. Type “010” for the first Sequence. (For subsequent records the sequence number will be 020, 030) The cursor will advance to the (Rec/File) field.
Each record is assigned a unique sequence number. It is suggested that these sequence numbers be assigned in increments of 10 to allow for future insertion.
2. Type ‘001’ for the first Rec/File entry. (For subsequent records, the Record will be 002 and 005).
The values 001, 002, and 005 describes the data that will be present in each record in the positions defined by the Record Type Start and Length fields on the Application Data panel (EDIX552-FMT01). For this application, bytes 21, 22, and 23 are used to define the record type.
3. Enter the area of the document the records will occur in the application File. In this example, type ‘H’ for record 001, ‘H’ for record 002, and ‘D’ for record 005.
4. Type ‘10’ in the Max Use field for Sequence 20.
EDIX553 Application Records/Files EDI 03/30/11 CTL01 12:00:00 Application ID . . . . . . . . . . POFILE1 Send or Receive. . . . . . . . . . S Description. . . . . . . . . . . . PURCHASE ORDER - OUTBOUND Position to Sequence Number. . . . Type option, press Enter. 3=Copy 4=Delete 11=Fields 12=Re-retrieve DDS Loop Max Last Update Opt Seq Rec/File A ID Use M W Description Date User 10 001 H 1 M PO HEADER RECORD 03/30/11 EDI 20 002 H 10 M PO COMMENTS RECORD 03/30/11 EDI 30 005 D 8000 1 M PO DETAIL RECORD 03/30/11 EDI More... F1=Help F4=Prompt F10=Update F12=Cancel F24=More Keys
Application Definition for Internally Defined File
IBM Sterling Gentran:Server for iSeries Release 3.6 User Guide 43
5. Type ‘8000’ in the Loop ID field for Record 005. The 005 Record is associated with the main detail loop of the purchase order.
6. Type the description for each record.
7. Press Enter.
Field DescriptionsSequence Number
This field helps the user to list the records in the order in which the data is processed.
Record/FilesThis field contains the name of the record. For outbound, this MUST match the actual record type that displays in the record as indicated on the Application Data ID. In our example, we indicated that the record type begins at position 21 for a length of 3. The contents of those 3 bytes are either ‘001,’ ‘002,’ or ‘005.’ For inbound, there is no restriction on the record type entered.
AreaThis field is the area code that this record is assigned to based on the corresponding EDI standards area codes. Press F4 (Prompt) for a list of valid area codes. There must be at least one Header record. It is common to have at least record per area, with the exception of the summary.
Loop IDThis field is used to connect one or more application records with the multiple occurrence of an EDI loop. In this example, the Detail record has one record read per iteration of the PO1 line item loop according to the EDI format for a purchase order. If the application definition did not have the Loop ID on the Detail record (005), then only one PO1 line item loop is ever generated and sent out. The remaining line items are dropped.
Max UseThis field identifies how many times in a row a record is read or written per iteration of the corresponding loop or area. In this example, the purchase order Header record has a Max Use of 1 and the purchase order Detail record has a Max Use of 1. This means that only one purchase order Header record is read per purchase order, and only one purchase order Detail record is read per iteration of a line item loop. The purchase order Header Comments record can occur up to ten times for every purchase order Header record.
Mandatory CodeThis code indicates whether the record is mandatory or optional (M or O, respectively). Although it is required, it is informational only.
Write FlagThis field, with values of ‘Y’ (yes) or ‘N’ (no), indicates whether the application record is written. For outbound, this field has no meaning and Sterling Gentran:Server leaves the field BLANK.
Description A meaningful description is recommended. It indicates the kind of information in the record and is very helpful for ongoing maintenance.

Application Definition for Internally Defined File
44 IBM Sterling Gentran:Server for iSeries Release 3.6 User Guide
Define the Application FieldsThe next step in defining the application is to access the Application Fields panel (EDIX554-CTL01).
Figure 5.25 Application Records/Files panel (EDIX553-CTL01)
Type ‘11’ (Fields) in the Option field next to each record, as shown in Figure 5.25, and press Enter. The Application Fields panel (EDIX554-CTL01) displays.
EDIX553 Application Records/Files EDI 03/30/11 CTL01 12:00:00 Application ID . . . . . . . . . . POFILE1 Send or Receive. . . . . . . . . . S Description. . . . . . . . . . . . PURCHASE ORDER - OUTBOUND Position to Sequence Number. . . . Type option, press Enter. 3=Copy 4=Delete 11=Fields 12=Re-retrieve DDS Loop Max Last Update Opt Seq Rec/File A ID Use M W Description Date User 11 10 001 H 1 M PO HEADER RECORD 03/30/11 EDI 11 20 002 H 10 M PO COMMENTS RECORD 03/30/11 EDI 11 30 005 D 8000 1 M PO DETAIL RECORD 03/30/11 EDI More... F1=Help F4=Prompt F10=Update F12=Cancel F24=More Keys

Application Definition for Internally Defined File
IBM Sterling Gentran:Server for iSeries Release 3.6 User Guide 45
The next step is to define the fields for each record in the application definition.
Figure 5.26 Field information for Record Sequence 10
Figure 5.27 Completed Application Fields panel (EDIX554-CTL01) Record Sequence 10
Add all the field information for this record that is shown in Figure 5.26. Use Page Down to see additional pages of fields. When finished, press Enter or F10 (Update). Repeat this step for record 002 and record 005.
Header Record – one per document. Record 001.Description Field Name Data Type Field Start LengthVendor Number 001-VENDOR AN 1 8Purchase Order Number 001-PO-NUMBER AN 9 12Record Type 001-REC-TYPE AN 21 3Date 001-PO-DATE MM 24 6Bill To Name 001-BILL-NAME AN 30 25Bill To Address 001-BILL-ADDR AN 55 25Bill To City 001-BILL-CITY AN 80 25Bill To State 001-BILL-STATE AN 105 2Bill To ZIP 001-BILL-ZIP AN 107 5Ship To Name 001-VEND-NAME AN 112 25Ship To Address 001-VEND-ADDR AN 137 25Ship To City 001-VEND-CITY AN 162 25Ship To State 001-VEND-STATE AN 187 2Ship To ZIP 001-VEND-ZIP AN 189 5Bill To Phone 001-BILL-PHONE AN 194 12Ship To Phone 001-VEND-PHONE AN 206 12Requested Ship Date 001-SHIP-DATE MM 218 6Bill To ZIP Extension 001-BILL-ZIP-XT AN 224 4Ship To ZIP Extension 001-VEND-ZIP-XT AN 228 4
EDIX554 Application Fields EDI 03/30/11 CTL01 12:00:00 Application ID . . . . . . . . . . POFILE1 Send or Receive. . . . . . . . . . S Record/File Sequence Number. . . . 10 Description. . . . . . . . . . . . PO HEADER RECORD Record/File. . . . . . . . . . . . 001 Position to Sequence Number. . . . Type option, press Enter. 3=Copy 4=Delete Opt Seq Field Name Ty Start Len M Description Field Value 10 001-VENDOR AN 1 8 M VENDOR NUMBER (SORT KEY) 20 001-PO-NUMBER AN 9 12 M PO NUMBER (SORT KEY) 30 001-REC-TYPE AN 21 3 M RECORD TYPE (SORT KEY) 40 001-PO-DATE MM 24 6 M PO DATE 50 001-BILL-NAME AN 30 25 M BILL TO NAME 60 001-BILL-ADDR AN 55 25 O BILL TO ADDRESS More... F1=Help F4=Prompt F10=Update F12=Cancel F13=Services F24=More Keys

Application Definition for Internally Defined File
46 IBM Sterling Gentran:Server for iSeries Release 3.6 User Guide
Figure 5.28 Field information for Record Sequence 20
Figure 5.29 Completed Application Fields panel (EDIX554-CTL01) Record Sequence 20
Add the fields for Sequence 20 that are shown in Figure 5.28 and press F10 (Update).
Comment Record – up to 10 per document. Record 002Description Field Name Data Type Field Start LengthVendor Number 002-VENDOR AN 1 8Purchase Order Number 002-PO-NUMBER AN 9 12Record Type 002-REC-TYPE AN 21 3Comment 002-MESSAGE AN 24 60
EDIX554 Application Fields EDI 03/30/11 CTL01 12:00:00 Application ID . . . . . . . . . . POFILE1 Send or Receive. . . . . . . . . . S Record/File Sequence Number. . . . 20 Description. . . . . . . . . . . . PO COMMENTS RECORD Record/File. . . . . . . . . . . . 002 Position to Sequence Number. . . . Type Option, press Enter. 3=Copy 4=Delete Opt Seq Field Name Ty Start Len M Description Field Value 10 002-VENDOR AN 1 8 M VENDOR NUMBER (SORT KEY) 20 002-PO-NUMBER AN 9 12 M PO NUMBER (SORT KEY) 30 002-REC-TYPE AN 21 3 M RECORD TYPE (SORT KEY) 40 002-MESSAGE AN 24 60 M PO COMMENTS/INSTRUCTIONS More... F1=Help F4=Prompt F10=Update F12=Cancel F13=Services F24=More Keys

Application Definition for Internally Defined File
IBM Sterling Gentran:Server for iSeries Release 3.6 User Guide 47
Figure 5.30 Field information for Record Sequence 30
Figure 5.31 Completed Application Fields panel (EDIX554-CTL01) Record Sequence 30
Add the fields for Sequence 30 that are shown in Figure 5.30 and press F10 (Update).
Detail Record – up to 200,000 per document. Record 005Description Field Name Data Type Field Start LengthVendor Number 005-VENDOR AN 1 8Purchase Order Number 005-PO-NUMBER AN 9 12Record Type 005-REC-TYPE AN 21 3Quantity 005-QUANTITY S2 24 7Unit of Measure 005-UNT-OF-MEAS AN 31 4Price 005-PRICE S3 35 7Item Number 005-ITEM-NUMBER AN 42 15Item Description 005-ITEM-DESC AN 57 50
EDIX554 Application Fields EDI 03/30/11 CTL01 12:00:00
Application ID . . . . . . . . . . POFILE1 Send or Receive. . . . . . . . . . S Record/File Sequence Number. . . . 30 Description. . . . . . . . . . . . PO DETAIL RECORD Record/File. . . . . . . . . . . . 005
Position to Sequence Number. . . .
Type Option, press Enter. 3=Copy 4=Delete
Opt Seq Field Name Ty Start Len M Description Field Value 10 005-VENDOR AN 1 8 M VENDOR NUMBER (SORT KEY) 20 005-PO-NUMBER AN 9 12 M PO NUMBER (SORT KEY) 30 005-REC-TYPE AN 21 3 M RECORD TYPE (SORT KEY) 40 005-QUANTITY S2 24 7 M LINE ITEM QUANTITY 50 005-UNT-OF-MEAS AN 31 4 M QUANTITY UNIT OF MEASURE 60 005-PRICE S2 35 7 M UNIT PRICE More... F1=Help F4=Prompt F10=Update F12=Cancel F13=Services F24=More Keys
Application Definition for Internally Defined File
48 IBM Sterling Gentran:Server for iSeries Release 3.6 User Guide
Field DescriptionsSequence Number
This field is similar to the record sequence number. It is used to list the fields contained in each record. It must be a unique number within the record.
Field NameThis field contains the name of the field as known to Sterling Gentran:Server.
NOTEThe field name MUST be unique across all records within an application definition. If a field has the same name in more than one record, Sterling Gentran:Server requires the name to be different. To ensure this rule, prefix each field with a unique identifier. For example, ‘001’ can be used to prefix the field name in the first Header record.
TypeThis field contains the Data Type of the application field (not the EDI Data Type). Press F4 (Prompt) for a list of valid data types.
Dates transmitted in the EDI format must be in YYMMDD, YYYYMMDD, or DDMMYYYY format, depending on the standards being used. If your application format stores the dates in a different format, let Sterling Gentran:Server automatically convert the date as it is being moved into the EDI format. To do this, define the correct data type for the date field that represents the format used in your application.
StartThis field is the starting position in the record.
LengthThis field contains the physical length of the field in the record. The physical length is the amount of space it takes up, not the actual exploded field length. For example, if you had a packed date field that took up 4 bytes, but was actually 6 bytes when unpacked, the field length is 4-bytes.
Mandatory CodeThis Code indicates whether the field is mandatory or optional (M or O, respectively). Only make a field as mandatory when it will always be there on every occurrence of the record for which it is defined. For inbound, mandatory fields will cause a warning message to be issued if no data is found to be moved to the field. For outbound, this field is informational only.
Application Definition for Internally Defined File
IBM Sterling Gentran:Server for iSeries Release 3.6 User Guide 49
DescriptionProvide a meaningful description for the application field. Within Sterling Gentran:Server, the entire description is not always shown during the mapping process.
RECOMMENDATIONIt may be helpful to have the most important part of the description, which differentiates the field, at the beginning of the field.
Field ValueThis column must be loaded by the user and is ONLY used for inbound. It is used to move a default value into the application field after mapping and prior to writing the record.
If the field was not loaded during the mapping process, you may want to load a default value. Literals, reserved words, and envelope values can be typed into this field to be moved into the application field. SEE the “Glossary” for more information on reserved words. If a field already has a value (loaded during the mapping process), the contents of the Field Value will not overlay the value previously mapped.
This feature can be very useful for loading key fields into a file. It is also helpful in loading information that may not be transmitted in the EDI document but needs to be added to your files prior to interfacing to your application system.
At this point, if you are creating an inbound application definition, you are ready to begin mapping. If you are creating an outbound application definition, please continue with the section on the following page.

Application Definition for Internally Defined File
50 IBM Sterling Gentran:Server for iSeries Release 3.6 User Guide
Application Partner Reference (Outbound Only)
NOTEThis section and the one that follows (Application Envelope Definition) apply to outbound application definitions only – if you are creating an inbound application definition, skip these sections.
The first step in defining the application partner reference is to access the Application Partner Reference panel (EDIX559-FMT01). The application partner reference is only used for outbound documents.
Figure 5.32 Work with Application Definition panel (EDIX550-FMT01)
From the Work with Application Definition (EDIX550-FMT01) panel, type ‘13’ (App Part Ref) in the Option field next to the desired Application ID and press Enter, as shown in Figure 5.32. The action displays the Application Partner Reference panel (EDIX559-FMT01).
EDIX550 Work with Application Definition EDI 03/30/11 FMT01 pgmlib: G3X6PGM dtalib: G3X6DTA 12:00:00
Position to Application ID . . . . S/R
Type Option (and Information), press Enter. 12=Key Structure 13=App Part Ref 14=Envelopes 30=Copy App ID
Opt Appl ID S/R Description File Type Group User INBPO R Purchase Order Inbound External Phys. PO EDI INVFILE R Invoice Inbound Internal Phys. IN EDI INVOUTL S Invoice Outbound (lgl file) External Lgl. IN EDI INVOUTP S Invoice Outbound (Phys file) External Phys. IN EDI POFILE S Outbound Purchase Order Internal Phys. PO EDI 13 POFILE1 S PURCHASE ORDER - OUTBOUND Internal Phys. PO EDI SEMINAPPL S Class Tutorial: Outb. Invoice External Lgl. IN EDI SEMINAPPP S Class Tutor: Outb Invoice-phys External Phys. IN EDI SEMPOAPPL R Class Tutorial: Inbound PO External Lgl. PO EDI Bottom Parameters or command ===> F1=Help F3=Exit F12=Cancel F15=Sort F23=More Options F24=More Keys
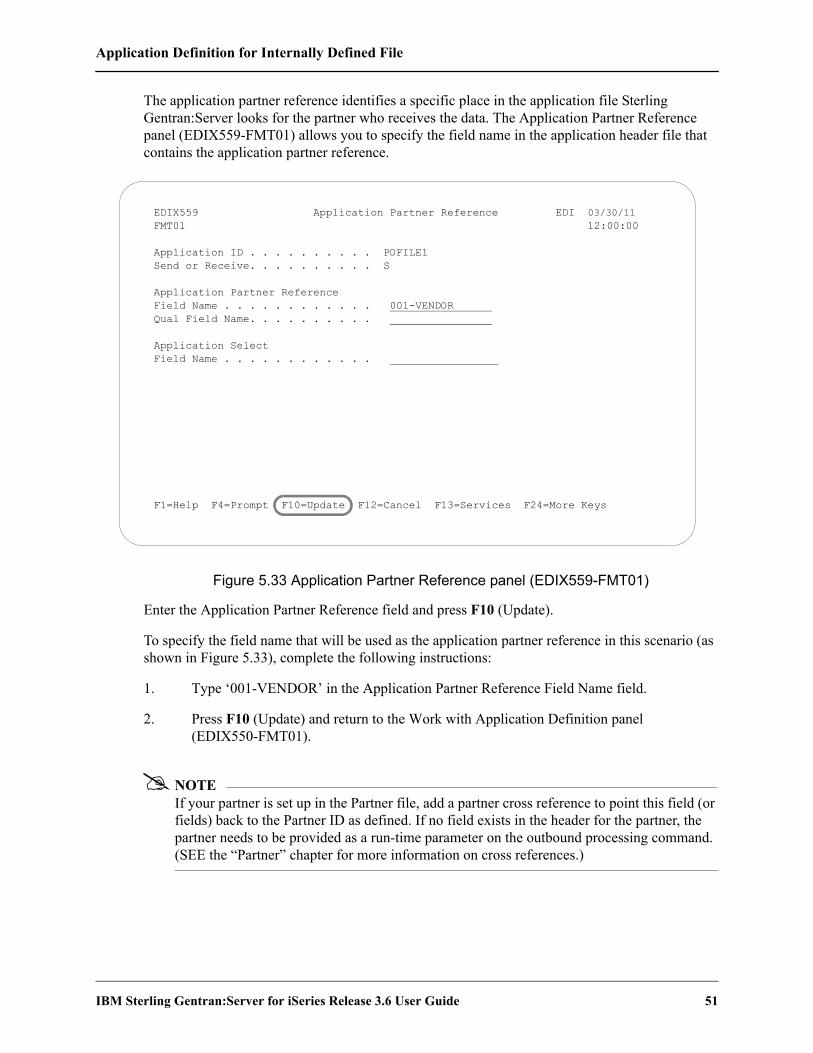
Application Definition for Internally Defined File
IBM Sterling Gentran:Server for iSeries Release 3.6 User Guide 51
The application partner reference identifies a specific place in the application file Sterling Gentran:Server looks for the partner who receives the data. The Application Partner Reference panel (EDIX559-FMT01) allows you to specify the field name in the application header file that contains the application partner reference.
Figure 5.33 Application Partner Reference panel (EDIX559-FMT01)
Enter the Application Partner Reference field and press F10 (Update).
To specify the field name that will be used as the application partner reference in this scenario (as shown in Figure 5.33), complete the following instructions:
1. Type ‘001-VENDOR’ in the Application Partner Reference Field Name field.
2. Press F10 (Update) and return to the Work with Application Definition panel (EDIX550-FMT01).
NOTEIf your partner is set up in the Partner file, add a partner cross reference to point this field (or fields) back to the Partner ID as defined. If no field exists in the header for the partner, the partner needs to be provided as a run-time parameter on the outbound processing command. (SEE the “Partner” chapter for more information on cross references.)
EDIX559 Application Partner Reference EDI 03/30/11 FMT01 12:00:00
Application ID . . . . . . . . . . POFILE1 Send or Receive. . . . . . . . . . S
Application Partner Reference Field Name . . . . . . . . . . . . 001-VENDOR Qual Field Name. . . . . . . . . .
Application Select Field Name . . . . . . . . . . . .
F1=Help F4=Prompt F10=Update F12=Cancel F13=Services F24=More Keys

Application Definition for Internally Defined File
52 IBM Sterling Gentran:Server for iSeries Release 3.6 User Guide
Field DescriptionsApplication Partner Reference Field Name
This application field identifies the partner that receives this data using EDI. Provide a value that is known to Sterling Gentran:Server in the application definition (including the File identifier). This field is used along with the Qual Field Name to look up the partner in the Partner file or Partner Cross Reference file.
CAUTIONSTOP
This field MUST be alphanumeric and MUST exist in a Header record in your application definition.
If your partner is not set up in the Partner file, add a partner cross reference to point this field (or fields) back to the Partner ID as defined. If no field exists in the Header for the partner, the partner needs to be provided as a run-time parameter on the outbound processing command. (SEE the “Partner” chapter for more information on cross references.)
In our example, the Vendor Number from the purchase order Header Record identifies our partner.
Qualifier Field NameIf a secondary field is needed to uniquely identify the partner, type the name of the second application field here. Both fields are used to find the partner in the Partner file or Partner Cross Reference file.
Application Select Field NameThis protected data field displays if a field in the application definition was defined with the data type of ‘AS’ (Application Select). This feature can be used when more than one transaction type is tied to the same application definition to help select the correct map during Translation processing. Examples of when this feature could be useful are:
1. To process the 980 Group Totals transaction with the 210 Motor Invoice transaction.
2. To process the 850 Purchase Order transaction with the 860 Purchase Order Change transaction.
One field would need to be defined as the Application Select field, whose contents would identify which transaction map should be selected. If the 850 should be selected, the selected field contains ‘O’ for original order. If the 860 should be selected, the field contains ‘C’ for change order. These values for the Application Select field would be defined on the Transaction ID.

Application Definition for Internally Defined File
IBM Sterling Gentran:Server for iSeries Release 3.6 User Guide 53
Application Envelope Definition (Outbound Only)
NOTEThis section applies to outbound application definitions only – if you are creating an inbound application definition, skip this section.
The application envelope definition enables you to globally change an envelope value for all partners for a particular application definition. For example, if you wanted to test an application definition and indicate to all the partners who would receive the data processed that it is test data, you could use this function to change the Sender ID to ‘TESTID” for all partners, rather than change the Sender ID on each partner’s profile. The Sender ID from the partner profiles would be overridden.
The first step is to access the Application Envelope Definition panel (EDIX560-FMT01).
Figure 5.34 Work with Application Definition panel (EDIX550-FMT01)
Type ‘14’ (Envelopes) in the Option field next to the desired Application ID and press Enter. The action displays the Application Envelope Definition panel (EDIX560-FMT01).
EDIX550 Work with Application Definition EDI 03/30/11 FMT01 pgmlib: G3X6PGM dtalib: G3X6DTA 12:00:00
Position to Application ID . . . . S/R
Type Option (and Information), press Enter. 12=Key Structure 13=App Part Ref 14=Envelopes 30=Copy App ID
Opt Appl ID S/R Description File Type Group User INBPO R Purchase Order Inbound External Phys. PO EDI INVFILE R Invoice Inbound Internal Phys. IN EDI INVOUTL S Invoice Outbound (lgl file) External Lgl. IN EDI INVOUTP S Invoice Outbound (Phys file) External Phys. IN EDI INVOUTPEDI S INVOICE OUTBOUND - PHYSICAL External Phys. IN EDI 14 POFILE1 S Outbound Purchase Order Internal Phys. PO EDI SEMINAPPL S Class Tutorial: Outb. Invoice External Lgl. IN EDI SEMINAPPP S Class Tutor: Outb Invoice-phys External Phys. IN EDI SEMPOAPPL R Class Tutorial: Inbound PO External Lgl. PO EDI Bottom Parameters or command ===> F1=Help F3=Exit F12=Cancel F15=Sort F23=More Options F24=More Keys

Application Definition for Internally Defined File
54 IBM Sterling Gentran:Server for iSeries Release 3.6 User Guide
The Application Envelope Definition panel enables you to define the application data fields containing envelope field data such as sender/receiver IDs, qualifiers, control number, security and communications IDs, application reference information, priority codes and test indicators. Any remaining envelope information not entered or not available on this panel will be obtained from the Partner file.
CAUTIONSTOP
While field names are verified by Sterling Gentran:Server, no verification is performed on the data in the application data fields. It is the user’s responsibility to ensure that the data in the application file is valid.
Figure 5.35 Application Envelope Definition panel (EDIX560-FMT01)
There are no mandatory fields for this panel. Type values in the fields you want to change and press F10 (Update).
NOTEDo not specify any fields on the panel for this example.
EDIX560 Application Envelope Definition EDI 03/30/11 FMT01 12:00:00
Application ID . . . . . . . . . . POFILE1 Send or Receive. . . . . . . . . . S
Outbound Envelope Field Definitions for all standards Interchange Sender ID. . . . . . . Qual . Group Sender ID. . . . . . . . . . Qual . Interchange Receiver ID. . . . . . Qual . Group Receiver ID. . . . . . . . . Qual . Interchange Control# . . . . . . . Group Cntl#. . . . . . . . . . . . Transaction Control Number . . . .
Outbound Envelope Field Definitions for individual interchanges BG Comm Id . . . . . . . . . . . . Password ISA/UNB/STX Test Ind . . . . . . . UNB/STX Appl Reference . . . . . . UNB/STX Priority Code. . . . . . . STX Recipient Trans Ref. . . . . . UNH03 Common Access Reference. . .
F1=Help F4=Prompt F10=Update F12=Cancel F24=More Keys

Application Definition for Internally Defined File
IBM Sterling Gentran:Server for iSeries Release 3.6 User Guide 55
Field Descriptions
Field Name Description This field maps to the…
Interchange Sender Id A 15-position alphanumeric field used to enter the application data field that identifies the interchange sender.
ISA06, BG03, UNB02 (code or name), and STX02 (code) elements
(Interchange Sender Id) Qual
A 15-position alphanumeric field used to enter the application data field that identifies the Interchange Sender Id Qualifier.
ISA05, UNB02 (qualifier), and STX02 (name) elements
Group Sender Id A 15-position alphanumeric field used to enter the application data field that identifies the Group Sender ID.
GS02 and UNG02 (code or name) elements
(Group Sender Id) Qual A 15-position alphanumeric field used to enter the application data field that identifies the Group Sender Id Qualifier.
UNG02 (qualifier) element
Interchange Receiver Id A 15-position alphanumeric field used to enter the application data field that identifies the Interchange Receiver Id.
ISA08, BG04, UNB03 (code or name), and STX03 (code) elements
(Interchange Receiver Id) Qual
A 15-position alphanumeric field used to enter the application data field that identifies the Interchange Receiver Id Qualifier.
ISA07, UNB03, (qualifier), and STX03 (name) elements
Group Receiver Id A 15-position alphanumeric field used to enter the application data field that identifies the Group Receiver Id.
GS03 and UNG03 (code or name) elements
(Group Receiver Id) Qual A 15-position alphanumeric field used to enter the application data field that identifies the Group Receiver Id Qualifier.
UNG03 (qualifier) element
Interchange Control Num A 15-position alphanumeric field used to enter the application data field that identifies the Interchange Control Number.
ISA13, BG07, UNG05, and STX05 elements
Group Control Num A 15-position alphanumeric field used to enter the application data field that identifies the Group Control Number.
GS06 and UNG05 elements
Transaction Control Num A 15-position alphanumeric field used to enter the application data field that identifies the Transaction Control Number.
ST02 and UNH01
BG Comm Id A 15-position alphanumeric field used to enter the application data field that identifies the BG Comm Id.
BG01 element

Application Definition for Internally Defined File
56 IBM Sterling Gentran:Server for iSeries Release 3.6 User Guide
At this point, you have finished creating an outbound application definition. You are ready to begin mapping.
BG Comm Password A 15-position alphanumeric field used to enter the application data field that identifies the BG Comm Password.
BG02 element
ISA/UNB Test Indicator A 15-position alphanumeric field used to enter the application data field that identifies the ISA/UNB Test Indicator.
ISA15 and UNB11 elements
UNB/STX Appl Reference
A 15-position alphanumeric field used to enter the application data field that identifies the UNB/STX application reference.
UNB07 and STX07 elements
UNB/STX Priority Code A 15-position alphanumeric field used to enter the application data field that identifies the UNB/STX Priority Code.
UNB08 and STX08 elements
STX Recipient Trans Ref A 15-position alphanumeric field used to enter the application data field that identifies the STX Recipient Transmission Reference.
STX06 element
UNH03 Common Access Reference
A 15-position alphanumeric field used to enter the application data field that identifies the UNH03 Common Access Reference.
UNH03 element
Field Name Description This field maps to the…

Application Definition for Externally Defined Multi-format Logical File
IBM Sterling Gentran:Server for iSeries Release 3.6 User Guide 57
Application Definition for Externally Defined Multi-format Logical File
During this task you will create an application definition for an inbound purchase order. A step-by-step procedure is provided to assist you in creating the application definition.
Off-line PreparationBefore you begin using Sterling Gentran:Server to create an application definition, you may find it beneficial to spend some time designing the format of your application files. Doing so will make it much easier to complete the steps to create your application definition.
Analyze your application master files to determine which fields must be populated by your partner’s EDI document.
To begin structuring your application definition, you must determine the files (for example, Header and Detail) required to update your application master files. For this scenario, we will use one Header and one Detail file to update the master files.
Define the contents of each physical file including the Field Name, Field Length, and Data Type using Data Description Specifications (DDS). Then create a multi-format logical file over the physical files using a DDS to identify the key fields that will be used to join the physical files.
Design the Application DefinitionIn the following steps, you will use an externally defined multi-format file to create an application definition.

Application Definition for Externally Defined Multi-format Logical File
58 IBM Sterling Gentran:Server for iSeries Release 3.6 User Guide
Figure 5.36 shows the fields that will be needed to build the sample purchase order.
Figure 5.36 Sample Inbound Application File Format
Header File – 1 per document. POHEADERDescription Field Name Data Type Field Start LengthCustomer Number CUSTNUM AN 1 3Purchase Order Date PODATE CY 9 8Purchase Order Number PONUM AN 17 10Type Code TYPCODE AN 27 2Total Amount TOTAMT S2 29 9Ship To Name SHIPTONAME AN 38 25Ship To Address Line 1 SHIPTOADD1 AN 63 25Ship To Address Line 2 SHIPTOADD2 AN 88 25Ship To Zip SHIPTOZIP AN 113 9Ship To State SHIPTOST AN 122 2Ship To City SHIPTOCITY AN 124 18Bill To Name BILLTONAME AN 142 25Bill To Address Line 1 BILLTOADD1 AN 167 25Bill To Address Line2 BILLTOADD2 AN 192 25Bill To Zip BILLTOZIP AN 217 5Bill To Zip Extension BILLTOEXT AN 222 4Bill To State BILLTOST AN 226 2Bill To City BILLTOCITY AN 228 18
Detail File – 200,000 per document. PODETAILDescription Field Name Data Type Field Start LengthCustomer Number CUSTNUM AN 1 8Purchase Order Date PODATE CY 9 8Product Code ITEMNUM AN 17 10Unit Of Measure UOM AN 27 7Unit Price UNITPR P2 34 3Purchase Order Number PONUM AN 36 10Quantity Ordered QTYORD P0 46 3Description DESC AN 48 35

Application Definition for Externally Defined Multi-format Logical File
IBM Sterling Gentran:Server for iSeries Release 3.6 User Guide 59
Define the Application IDThe Work with Application Definition panel (EDIX550-FMT01) provides you with the option for creating a new application definition. Typically, most users will choose a name that identifies the type of document that is being received. The name you choose must be unique.
Figure 5.37 Work with Application Definition panel (EDIX550-FMT01)
To define an Application ID for the sample purchase order, complete the following instructions:
1. Type ‘1’ (Create) in the Option field.
2. Type ‘SEMPOEDI’ in the Appl(ication) ID field and ‘R’ in the S/R (Send/Receive) field and press Enter. The name ‘SEMPOEDI’ is an example of an Application ID to use. You may use any name you wish (i.e., your company’s initials).
This action displays the Application Definition panel (EDIX552-FMT01).
EDIX550 Work with Application Definition EDI 03/30/11 FMT01 pgmlib: G3X6PGM dtalib: G3X6DTA 12:00:00 Position to Application ID . . . . S/R Type option (and Information), press Enter. 12=Key Structure 13=App Part Ref 14=Envelopes 30=Copy App ID Opt Appl ID S/R Description File Type Group User 1 SEMPOEDI R INVFILE R Invoice Inbound Internal Phys. IN EDI INVOIC S Edifact Invoice Y2K External Lgl. INVOIC EDI INVOICOUT S Tutorial EDIFACT Invoice outb External Lgl. INVOIC CB INVOUT S Tutorial X12 Invoice Outbound External Lgl. IN CB INVOUTL S Invoice Outbound (lgl) Y2K External Lgl. IN EDI INVOUTP S Invoice Outbound (Phys) Y2K External Phys. IN EDI INVOUTPEDI S INVOICE OUTBOUND - PHYSICAL External Phys. IN CB ORDERS R Edifact Orders Inbound External Lgl. ORDERS CSG ORDERSINB R Tutorials EDIFACT Orders inb External Lgl. ORDERS CB More... Parameters or command ===> F1=Help F3=Exit F12=Cancel F15=Sort F23=More Options F24=More Keys

Application Definition for Externally Defined Multi-format Logical File
60 IBM Sterling Gentran:Server for iSeries Release 3.6 User Guide
Field DescriptionsApplication ID
This field is the single identifier for your application definition under which all information is stored. Name the application based on the type of document it is (i.e., ‘SEMPOEDI’ for inbound purchase orders), rather than by the transaction set or partner. Make the ID comprehensive enough to interface to various EDI formats including X12, UCS, and EDIFACT.
Send or Receive The value for this field is ‘S’ for send or ‘R’ for receive. An application definition must be unique per direction. If you expect to send and receive purchase orders, two definitions are required (one for each direction).
The Application Definition panel (EDIX552-FMT01) is where you specify the characteristics of a particular application definition. This is also the panel where you identify the split and sub-split file that will be read to create the application file. (SEE the “Splitting” chapter in the IBM® Sterling Gentran:Server® for iSeries® Release 3.6 Technical Reference Guide for a complete discussion of split files.)
Figure 5.38 Application Definition panel (EDIX552-FMT01)
EDIX552 Application Definition EDI 03/30/11 FMT01 12:00:00 Application ID . . . . . . . . . . SEMPOEDI Send or Receive. . . . . . . . . . R Division . . . . . . . . . . . . . 000 Description. . . . . . . . . . . . SEM CLASS: PO INB(subsplit #1) Functional Groups. . . . . . . . . PO File Type. . . . . . . . . . . . . L EDI Split File . . . . . . . . . . 00001 EDI Sub-Split File . . . . . . . . Record Type Start Position . . . . Length . . . . . . . . . . . . . . Application File . . . . . . . . . POLGL Update Allowed . . . . . . . . . . Y F1=Help F4=Prompt F10=Update F12=Cancel F21=Prt App F24=More Keys

Application Definition for Externally Defined Multi-format Logical File
IBM Sterling Gentran:Server for iSeries Release 3.6 User Guide 61
You must enter the information required for this panel: Description, Functional Groups, Application File Type, EDI Split File (inbound only), EDI Sub-Split File (inbound only), and Application File (name of your logical file).
CAUTIONSTOP
The logical file MUST exist and be found in your current library list in order to continue. The record and field information is retrieved from this file.
For this sample purchase order, complete the following:
1. Type the description of the application definition as shown on the above panel.
2. Type ‘PO’ (Functional Group ID for a purchase order) in the Functional Groups field. Press F4 (Prompt) for a list of valid Functional Group IDs.
3. Type ‘L’ in the File Type field to indicate that the application file is a externally defined multi-format logical file. Press F4 (Prompt) for a list of valid file types.
4. Type ‘1’ in the EDI Split File field.
5. Type ‘POLGL’ as the name of the Application File.
6. Press F10 (Update) to save the information you just entered and return to the “Work with Application Definition” panel (EDIX550-FMT01).
Sterling Gentran:Server will use the multi-format logical file to retrieve the DDS and generate the file and field definitions. The message “DDS has been generated for the Application Files and Fields” displays at the bottom of the panel.
CAUTIONSTOP
F18 (Re-retv. DDS) re-retrieves the DDS (file layout from the external logical file). The user is prompted to confirm the re-retrieve function. Any changes made to the application records/files, such as the Area Code, Description, Loop ID, and Max Use are preserved if the physical file is still part of the logical file being re-retrieved. Any changes made to the application fields, such as the Data Type or Field Value (inbound only), are preserved as long as the field length and the DDS type have not changed. An exception report is produced and should be reviewed. Additionally, upon exiting this panel after the DDS has been re-retrieved, the APPSYNCH command is automatically submitted to re-synchronize all maps linked to this application definition. The resynch report(s) should be reviewed.
Application Definition for Externally Defined Multi-format Logical File
62 IBM Sterling Gentran:Server for iSeries Release 3.6 User Guide
Field DescriptionsDivision Code
The Division Code is assigned from your security profile within Sterling Gentran:Server.
Description This field is used to describe the application definition. Typically, the field includes the type of document being sent. If desired, include the direction and type of files being used (that is, DDS).
Functional GroupsUp to five functional groups can be used with an application definition. You must supply a valid Functional Group ID as defined by the EDI standards.
File TypeThis field is one of the most important on this panel. It identifies what type of file you use to interface to Sterling Gentran:Server for this particular application definition. The type of file you use can be different from application to application.
EDI Split FileThis field is for inbound only. If you are setting up an application definition for EDI Data received from your partner, use this field to identify the intermediate file the Mapper reads to get the specific data related to this application definition. Enter the value (between 1 and 80) that was entered on the receiving partner profile (this is the profile for inbound for your company). (SEE the section on working with partner data separation in the “Partner” chapter for more information on setting up split files in the partner profile.) If this field is left BLANK, the Mapper reads the Slide file (default file) for input data. Leave this field BLANK for outbound.
EDI Sub-Split FileThis field is for Inbound only and is used in conjunction with the EDI Split File field. (SEE the “Sub-Splitting” section in the “Transaction Mapping” chapter for more information.) If you are using this feature, indicate a value between 1 and 80. Otherwise, leave this field BLANK.
Record Type Start Position, LengthLeave these fields BLANK for externally defined logical file.
Application FileThis field identifies the name of the Multi-format logical file that interfaces to Sterling Gentran:Server. It is a single logical file that you must create prior to processing. The logical file must exist to create the application definition.
Update AllowedSet this field to ‘Y’ to allow updates to be made to this definition. Once you begin testing, you may want to change this to ‘N’ to prevent inadvertent updates to the definition.

Application Definition for Externally Defined Multi-format Logical File
IBM Sterling Gentran:Server for iSeries Release 3.6 User Guide 63
Application Records/FilesThe first step in defining the file for your application definition is to access the Application Records/Files panel (EDIX553-CTL01).
Figure 5.39 Work with Application Definition panel (EDIX550-FMT01)
Type ‘11’ (Rec/Files) in the Option field next to the appropriate application and press Enter.
Access ‘SEMPOEDI’ for the sample purchase order you are creating in this scenario.
EDIX550 Work with Application Definition EDI 03/30/11 FMT01 pgmlib: G3X6PGM dtalib: G3X6DTA 12:00:00 Position to Application ID . . . . S/R Type option (and Information), press Enter. 1=Create 2=Revise 3=Copy 4=Delete 5=View 6=Print 11=Rec/Files Opt Appl ID S/R Description File Type Group User POFILE S Outbound Purchase Order Internal Phys. PO EDI POFILE1 S PURCHASE ORDER - OUTBOUND Internal Phys. PO CB POINB R Tutorial x12 PO Inbound External Lgl. PO CB SEMINAPPL S Class Tutorial: Outb. Invoice External Lgl. IN CSG SEMPOAPPL R Class Tutorial: Inb. PO Y2K External Lgl. PO EDI 11 SEMPOEDI R SEM CLASS: PO INB(subsplit #1) External Lgl. PO CB TCOMINV8P S Tradacoms Invoice 8 (Physical) External Phys. !!!DFT CV TCOMORD8P R Tradacoms Orders 8 (Physical) External Phys. !!!DFT CSG Bottom Parameters or command ===> F1=Help F3=Exit F12=Cancel F15=Sort F23=More Options F24=More Keys

Application Definition for Externally Defined Multi-format Logical File
64 IBM Sterling Gentran:Server for iSeries Release 3.6 User Guide
The next step is to modify the file information in the application definition.
Figure 5.40 Application Records/Files panel (EDIX553-CTL01)
Typical modifications include: Area Code (Sterling Gentran:Server defaults as ‘H’ when retrieved), Loop ID, Max Use, Mandatory Code, (Write Flag is required for inbound), and Description.
Enter the information as shown on the above panel to define the purchase order Header and Detail files for the sample purchase order.
EDIX553 Application Records/Files EDI 03/30/11 CTL01 12:00:00 Application ID . . . . . . . . . . SEMPOEDI Send or Receive. . . . . . . . . . R Description. . . . . . . . . . . . SEM CLASS: PO INB(subsplit #1) Position to Sequence Number. . . . Type option, press Enter. 3=Copy 4=Delete 11=Fields 12=Re-retrieve DDS Loop Max Last Update Opt Seq Rec/File A ID Use M W Description Date User 10 POHEADER H 1 M Y Training Class: PO Header 03/30/11 CB 20 PODETAIL H 8000 1 M Y Training Class: PO Detail 03/30/11 CB More... F1=Help F4=Prompt F10=Update F12=Cancel F24=More Keys

Application Definition for Externally Defined Multi-format Logical File
IBM Sterling Gentran:Server for iSeries Release 3.6 User Guide 65
Field DescriptionsSequence Number
This field helps the user to list the files in the order in which the data is processed. Sterling Gentran:Server automatically generates sequence numbers.
Record/FileThis is the name for each of the physical files identified within the Logical file you created. Sterling Gentran:Server retrieves these names.
AreaThis is the area code that this file is assigned to based on the corresponding EDI standards area codes. Press F4 (Prompt) for a list of valid area codes. There must be at least one Header record. It is common to have at least one file per area, with the exception of the summary.
Loop IDThis field is used to connect one or more application files with the multiple occurrence of an EDI loop. In this example, the Detail file has one record read per iteration of the PO1 line item loop.
Max UseThis field identifies how many times in a row a record is written per iteration of the corresponding loop or area. In this example, the purchase order Header file has a Max Use of 1 and the Detail file has a Max Use of ‘1.’ This means that only one Header record is written per PO and only one Detail record is written per iteration of a single line item loop. In the case of an external logical file, Sterling Gentran:Server defaults all files to a value of ‘1.’
Mandatory CodeThis code indicates whether the file is mandatory or optional (M or O, respectively). Although it is required, it is informational only.
Write FlagThis field, with values of ‘Y’ (Yes) and ‘N’ (No), indicates whether the application record is written, For outbound, this field has no meaning and Sterling Gentran:Server leaves the field BLANK. For inbound, Sterling Gentran:Server defaults this value to ‘Y’ to indicate that the record is written.
DescriptionA meaningful description is recommended. It indicates the kind of information in the file and is very helpful for ongoing maintenance. In the case of logical file type, Sterling Gentran:Server retrieves the text description from the physical file. The description can be modified, if desired.
Application Definition for Externally Defined Multi-format Logical File
66 IBM Sterling Gentran:Server for iSeries Release 3.6 User Guide
Application FieldsThe first step in defining the application fields is to access the Application Fields panel (EDIX554-CTL01).
Figure 5.41 Application Records/Files panel (EDIX553-CTL01)
Type ‘11’ (Fields) in the Option field next to the first file and press Enter. This displays the Application Fields panel (EDIX554-CTL01).
EDIX553 Application Records/Files EDI 03/30/11 CTL01 12:00:00 Application ID . . . . . . . . . . SEMPOEDI Send or Receive. . . . . . . . . . R Description. . . . . . . . . . . . SEM CLASS: PO INB(subsplit #1) Position to Sequence Number. . . . Type option, press Enter. 3=Copy 4=Delete 11=Fields 12=Re-retrieve DDS Loop Max Last Update Opt Seq Rec/File A ID Use M W Description Date User 11 10 POHEADER H 1 M Y Training Class: PO Header 03/30/11 CB 20 PODETAIL H 8000 1 M Y Training Class: PO Detail 03/30/11 CB More... F1=Help F4=Prompt F10=Update F12=Cancel F24=More Keys

Application Definition for Externally Defined Multi-format Logical File
IBM Sterling Gentran:Server for iSeries Release 3.6 User Guide 67
Make modifications to the field definition for each file in the application. The fields retrieved from the DDS display on the panel.
Figure 5.42 Application Fields panel (EDIX554-CTL01) – PO Header file
Review the field information retrieved and make any necessary modifications. Page Down to review more fields. Press F17 (Next Rcd) to update this record and advance to the next file that was retrieved and repeat this step. When finished, press F10 (Update).
Typical modifications may include:
Data types for Date fields should be changed to specific data types known to Sterling Gentran:Server to allow the conversion of the date format
Field Values may be added to set the default values
Descriptions may be changed to clarify field definitions
Mandatory Codes may be changed to optional codes
Since the purchase order date is stored in the YYYYMMDD format in our sample application and a default value for Customer Number is required, we need to make the following changes:
1. Type ‘CY’ in the Type field for the PO Header file to convert the purchase order date to a ‘YYYYMMDD’ format.
2. Type the reserved word ‘SENDER-ID’ in the Field Value field next to the Customer Number. This instructs Sterling Gentran:Server to use the resolved sender ID (the partner cross-reference is used to locate the sender ID) as the default value to be mapped to the Customer Number field. (SEE the “Glossary” for more information on reserved words.)
3. Press F17 (Next Rcd) to update the application fields and advance to the next file.
EDIX554 Application Fields EDI 03/30/11 CTL01 12:00:00 Application ID . . . . . . . . . . SEMPOEDI Send or Receive. . . . . . . . . . R Record/File Sequence Number. . . . 10 Description. . . . . . . . . . . . Training Class: PO Header Record/File. . . . . . . . . . . . POHEADER Position to Sequence Number. . . . Type option, press Enter. 3=Copy 4=Delete Opt Seq Field Name Ty Start Len M Description Field Value 5 F010.CUSTNUM AN 1 8 M CUSTOMER NUMBER SENDER-ID 10 F010.PODATE CY 9 8 M PO DATE YYMD 15 F010.PONUM AN 17 10 M PO NUMBER 20 F010.TYPCODE AN 27 2 M TYPE CODE 25 F010.TOTAMT S2 29 9 M TOT AMT 30 F010.SHIPTONAME AN 38 25 M SHIPTO NAME More... F1=Help F4=Prompt F10=Update F12=Cancel F13=Services F24=More Keys

Application Definition for Externally Defined Multi-format Logical File
68 IBM Sterling Gentran:Server for iSeries Release 3.6 User Guide
Field DescriptionsSequence Number
This field is similar to the file Sequence number on the Application Records/Files panel. It must be a unique number within the file.
The fields are retrieved in the order they exist in the file. They need to stay in this order. When Sterling Gentran:Server retrieves the field information, it sequences them by increments of five to allow for insertion of fields. If you re-retrieve the DDS, you can override the incrementing number of ‘5’ and specify a smaller number, for example.
Field NameThe field contains the actual field name retrieved from the file but is prefixed by a unique identifier for this file. This identifier always starts with ‘F’ for file and is tagged with the Sequence Number, as shown at the top of the panel. A period is used between this file identifier and the actual field name. This is the field name that is referenced for mapping in Sterling Gentran:Server (including the period) to ensure uniqueness.
NOTEThe field name MUST be unique across all files within an application definition. If a field has the same name in more than one file, Sterling Gentran:Server requires the name to be different. To ensure this rule, prefix each field with a unique identifier.
TypeThis field is retrieved from the file and converted to valid data types for Sterling Gentran:Server. Press F4 (Prompt) for a list of valid data types. This includes packed fields, signed fields, and alphanumeric fields. Typically, it cannot automatically identify the format your date fields are in, with the exception of ‘L’ and ‘Z’ application data types. These fields are retrieved as signed or packed depending on how they were defined in your file.
Dates transmitted in the EDI format must be in YYMMDD, YYYYMMDD, or DDMMYYYY format, depending on the standards being used. If your files store the dates in a different format, Sterling Gentran:Server can automatically convert your dates during the translation. To do this, define the correct data type for the date field that represents the format used in your files.
StartThis field indicates the starting position in the file. It is retrieved from the file automatically.
LengthThis field identifies the physical length of the field in the file. The physical length is the amount of space it takes up, not the actual exploded field length. For example, if you had a packed date field that took up 4 bytes, but was actually 6 bytes when unpacked, the field length is 4-bytes. Sterling Gentran:Server retrieves this information for you.
Application Definition for Externally Defined Multi-format Logical File
IBM Sterling Gentran:Server for iSeries Release 3.6 User Guide 69
Mandatory CodeThis code defaults to ‘M’ for all fields upon retrieval. This code indicates whether the field is mandatory or optional (M or O, respectively). Only mark a field as mandatory when it will always be on every occurrence of the record for which it is defined. For inbound, mandatory fields will cause a warning message to be issued if no data is found to be moved to the field.
DescriptionThis description is retrieved from the DDS and may be modified to provide a more meaningful description. The entire description is not always shown during the mapping process.
RECOMMENDATIONIt may be helpful to have the most important part of the description, which differentiates the field, at the beginning of the field.
Field ValueThis value is not loaded by Sterling Gentran:Server when retrieving the DDS. This column must be loaded by the user afterwards and is ONLY used for inbound. It is used to move a default value into the application field after mapping and prior to writing the record. The default values for the L date types, T time types, and Z date/time stamp are not required here. The inbound mapper will force these values when necessary.
If the field was not loaded during the mapping process, you may want to load a default value. Literals, reserved words, and envelope values can be typed into this field to be moved into the application field. (SEE the “Glossary” for more information on reserved words). If a field already has a value (loaded during the mapping process), the contents of the Field Value will not overlay the value previously mapped.
This feature can be very useful for loading key fields into a file. It is also helpful in loading information that may not be transmitted in the EDI document but needs to be added to your files prior to interfacing to your application system.
In this scenario, Customer Number and PO Number are used to group the Header and Detail files for a particular purchase order.

Application Definition for Externally Defined Multi-format Logical File
70 IBM Sterling Gentran:Server for iSeries Release 3.6 User Guide
Figure 5.43 Application Fields panel (EDIX554-CTL01) – PO Detail file
To ensure the values loaded into these fields are the same as the values loaded into the corresponding fields in the Header file, make the following modifications:
1. Type ‘CY’ in the Type field to convert the purchase order date to a YYYYMMDD format for the application.
2. Type the reserved word ‘SENDER-ID’ in the Field Value field next to Customer Number. This instructs Sterling Gentran:Server to use the resolved sender ID as the default value to be mapped to the Customer Number field.
3. Type the reserved word ‘CONSTANT-02’ in the Field Value field next to PO Date. This instructs Sterling Gentran:Server to use the value stored in CONSTANT-02 as the default value to be mapped to the PO Date field. Since the PO Date is not received in the Detail area, it will be mapped to CONSTANT-02 in the Header area when you create the map.
4. Type ‘CONSTANT-01’ in the Field Value field next to PO Number. Since the PO Number is not received in the Detail area, it will be loaded to CONSTANT-01 in the Header area when you create the map.
5. Press F10 (Update) to update this record.
At this point, if you are creating an inbound application definition, you are ready to begin mapping. If you are creating an outbound application definition, please continue with the section on the following page.
EDIX554 Application Fields CB 03/30/11 CTL01 10:35:44 Application ID . . . . . . . . . . SEMPOEDI Send or Receive. . . . . . . . . . R Record/File Sequence Number. . . . 20 Description. . . . . . . . . . . . Training Class: PO Detail Record/File. . . . . . . . . . . . PODETAIL Position to Sequence Number. . . . Type option, press Enter. 3=Copy 4=Delete Opt Seq Field Name Ty Start Len M Description Field Value 5 F020.CUSTNUM AN 1 8 M CUSTOMER NUMBER SENDER-ID 10 F020.PODATE CY 9 8 M PO DATE CONSTANT-02 15 F020.ITEMNUM AN 17 10 M PRODUCT CODE 20 F020.UOM AN 27 7 M UNIT OF MEASURE 25 F020.UNITPR P2 34 2 M UNIT PRICE 30 F020.PONUM AN 36 10 M PO NUMBER CONSTANT-01 More... F1=Help F4=Prompt F10=Update F12=Cancel F13=Services F24=More Keys
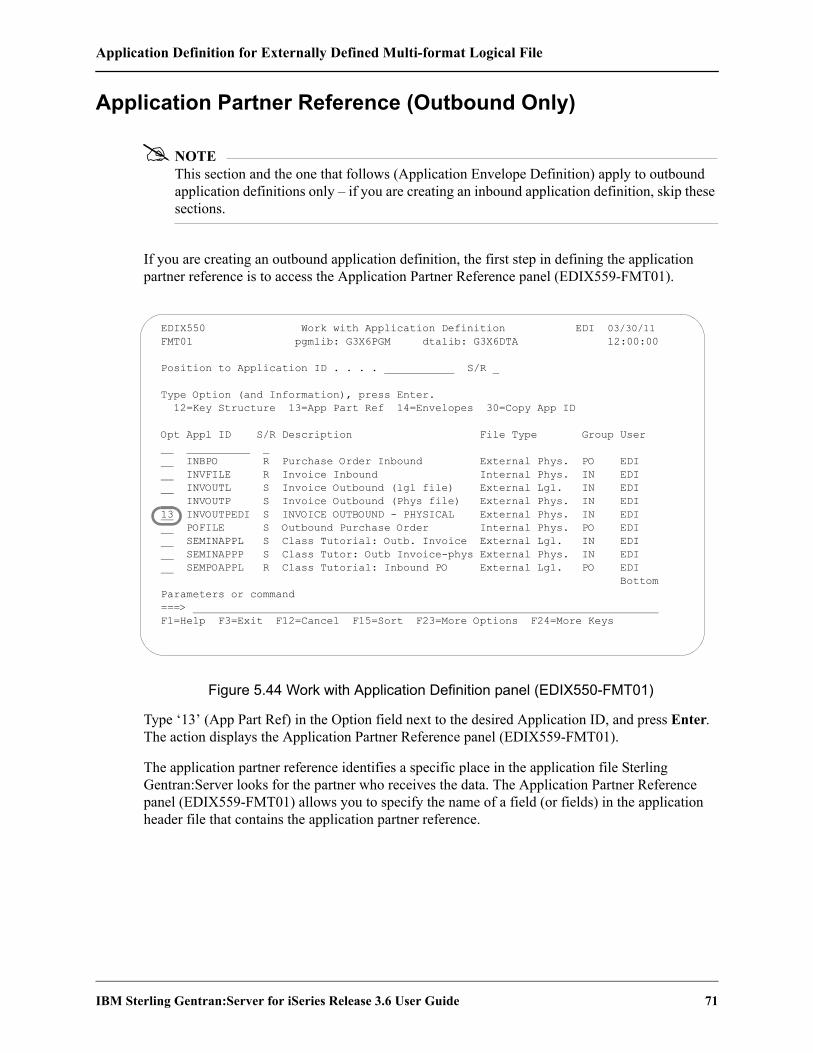
Application Definition for Externally Defined Multi-format Logical File
IBM Sterling Gentran:Server for iSeries Release 3.6 User Guide 71
Application Partner Reference (Outbound Only)
NOTEThis section and the one that follows (Application Envelope Definition) apply to outbound application definitions only – if you are creating an inbound application definition, skip these sections.
If you are creating an outbound application definition, the first step in defining the application partner reference is to access the Application Partner Reference panel (EDIX559-FMT01).
Figure 5.44 Work with Application Definition panel (EDIX550-FMT01)
Type ‘13’ (App Part Ref) in the Option field next to the desired Application ID, and press Enter. The action displays the Application Partner Reference panel (EDIX559-FMT01).
The application partner reference identifies a specific place in the application file Sterling Gentran:Server looks for the partner who receives the data. The Application Partner Reference panel (EDIX559-FMT01) allows you to specify the name of a field (or fields) in the application header file that contains the application partner reference.
EDIX550 Work with Application Definition EDI 03/30/11 FMT01 pgmlib: G3X6PGM dtalib: G3X6DTA 12:00:00
Position to Application ID . . . . S/R
Type Option (and Information), press Enter. 12=Key Structure 13=App Part Ref 14=Envelopes 30=Copy App ID
Opt Appl ID S/R Description File Type Group User INBPO R Purchase Order Inbound External Phys. PO EDI INVFILE R Invoice Inbound Internal Phys. IN EDI INVOUTL S Invoice Outbound (lgl file) External Lgl. IN EDI INVOUTP S Invoice Outbound (Phys file) External Phys. IN EDI 13 INVOUTPEDI S INVOICE OUTBOUND - PHYSICAL External Phys. IN EDI POFILE S Outbound Purchase Order Internal Phys. PO EDI SEMINAPPL S Class Tutorial: Outb. Invoice External Lgl. IN EDI SEMINAPPP S Class Tutor: Outb Invoice-phys External Phys. IN EDI SEMPOAPPL R Class Tutorial: Inbound PO External Lgl. PO EDI Bottom Parameters or command ===> F1=Help F3=Exit F12=Cancel F15=Sort F23=More Options F24=More Keys
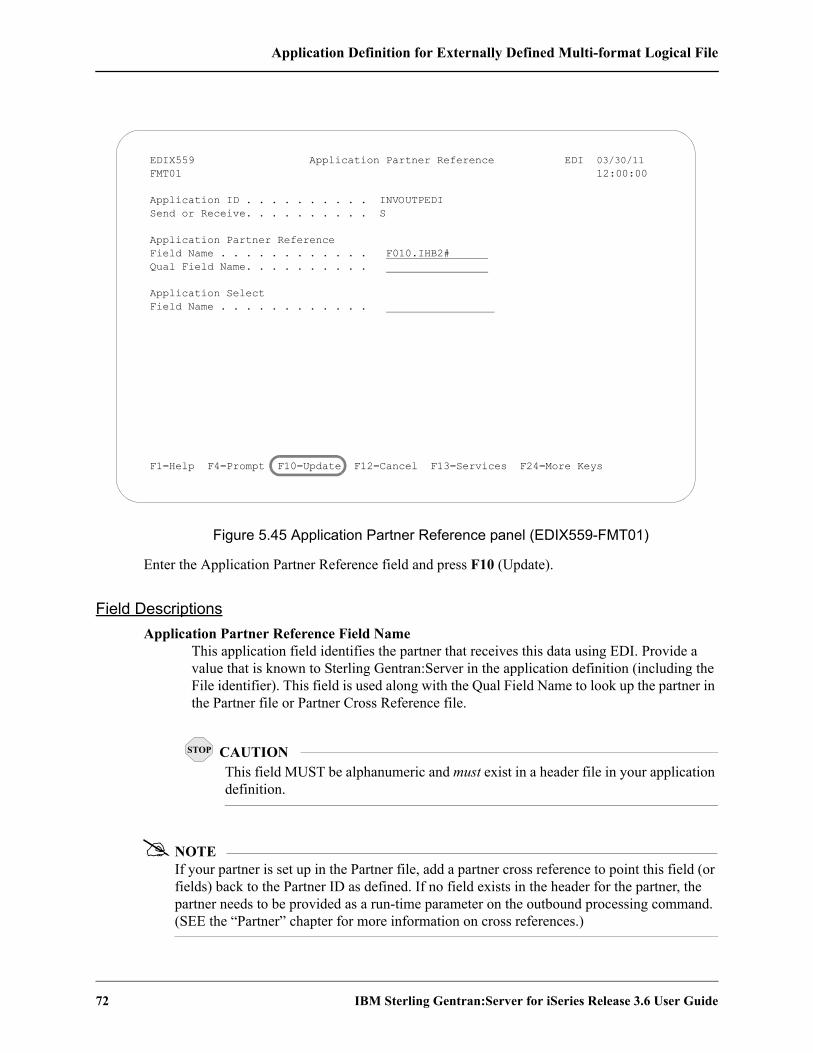
Application Definition for Externally Defined Multi-format Logical File
72 IBM Sterling Gentran:Server for iSeries Release 3.6 User Guide
Figure 5.45 Application Partner Reference panel (EDIX559-FMT01)
Enter the Application Partner Reference field and press F10 (Update).
Field DescriptionsApplication Partner Reference Field Name
This application field identifies the partner that receives this data using EDI. Provide a value that is known to Sterling Gentran:Server in the application definition (including the File identifier). This field is used along with the Qual Field Name to look up the partner in the Partner file or Partner Cross Reference file.
CAUTIONSTOP
This field MUST be alphanumeric and must exist in a header file in your application definition.
NOTEIf your partner is set up in the Partner file, add a partner cross reference to point this field (or fields) back to the Partner ID as defined. If no field exists in the header for the partner, the partner needs to be provided as a run-time parameter on the outbound processing command. (SEE the “Partner” chapter for more information on cross references.)
EDIX559 Application Partner Reference EDI 03/30/11 FMT01 12:00:00
Application ID . . . . . . . . . . INVOUTPEDI Send or Receive. . . . . . . . . . S
Application Partner Reference Field Name . . . . . . . . . . . . F010.IHB2# Qual Field Name. . . . . . . . . .
Application Select Field Name . . . . . . . . . . . .
F1=Help F4=Prompt F10=Update F12=Cancel F13=Services F24=More Keys
Application Definition for Externally Defined Multi-format Logical File
IBM Sterling Gentran:Server for iSeries Release 3.6 User Guide 73
Qualifier Field NameIf a secondary field is needed to uniquely identify the partner, type the name of the second application field here. Both fields are used to find the partner in the Partner file or Partner Cross Reference file.
Application Select Field NameThis protected Data field displays if a field in the application definition was defined with the data type of ‘AS’ (Application Select). This feature can be used when more than one transaction type is tied to the same application definition to help select the correct map during Translation processing. Examples of when this feature could be useful are:
1. To process the 980 group totals transaction with the 210 Motor invoice transaction.
2. To process the 850 purchase order transaction with the 860 purchase order change transaction.
One field would need to be defined as the Application Select field, whose contents would identify which transaction map should be selected. If the 850 should be selected, the selected field contains ‘O’ for original order. If the 860 should be selected, the field contains ‘C’ for change order. These values for the Application Select field would be defined on the Transaction ID.
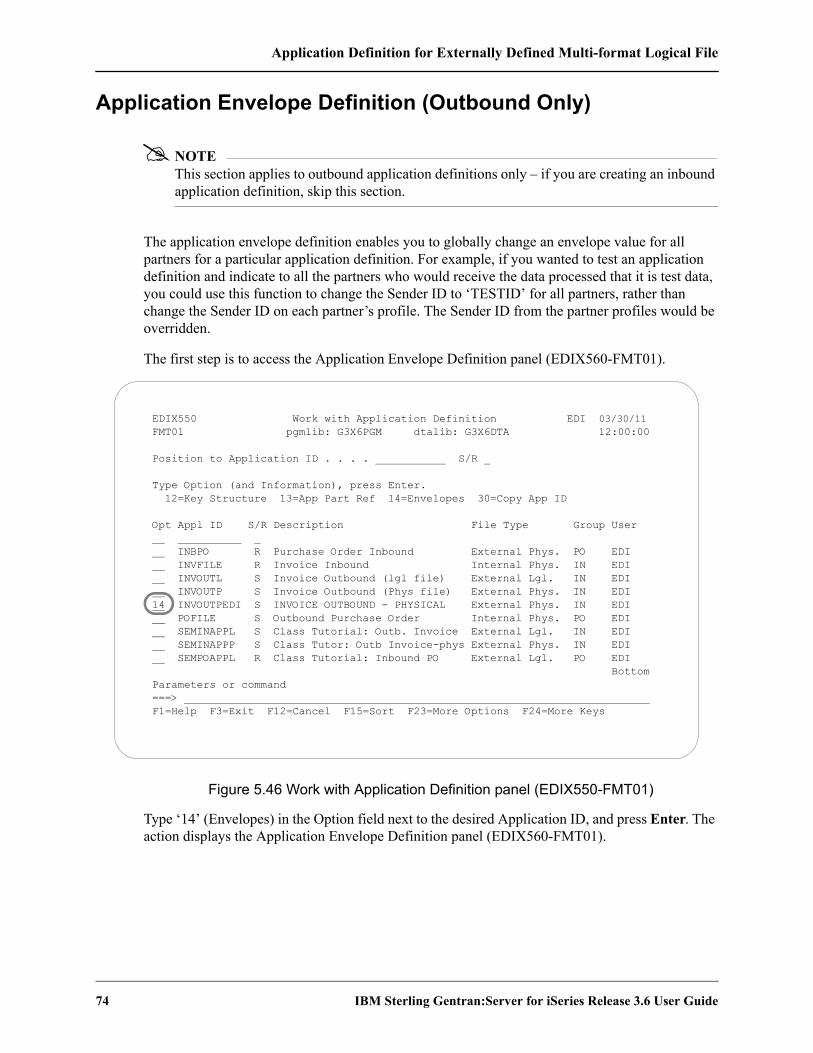
Application Definition for Externally Defined Multi-format Logical File
74 IBM Sterling Gentran:Server for iSeries Release 3.6 User Guide
Application Envelope Definition (Outbound Only)
NOTEThis section applies to outbound application definitions only – if you are creating an inbound application definition, skip this section.
The application envelope definition enables you to globally change an envelope value for all partners for a particular application definition. For example, if you wanted to test an application definition and indicate to all the partners who would receive the data processed that it is test data, you could use this function to change the Sender ID to ‘TESTID’ for all partners, rather than change the Sender ID on each partner’s profile. The Sender ID from the partner profiles would be overridden.
The first step is to access the Application Envelope Definition panel (EDIX560-FMT01).
Figure 5.46 Work with Application Definition panel (EDIX550-FMT01)
Type ‘14’ (Envelopes) in the Option field next to the desired Application ID, and press Enter. The action displays the Application Envelope Definition panel (EDIX560-FMT01).
EDIX550 Work with Application Definition EDI 03/30/11 FMT01 pgmlib: G3X6PGM dtalib: G3X6DTA 12:00:00
Position to Application ID . . . . S/R
Type Option (and Information), press Enter. 12=Key Structure 13=App Part Ref 14=Envelopes 30=Copy App ID
Opt Appl ID S/R Description File Type Group User INBPO R Purchase Order Inbound External Phys. PO EDI INVFILE R Invoice Inbound Internal Phys. IN EDI INVOUTL S Invoice Outbound (lgl file) External Lgl. IN EDI INVOUTP S Invoice Outbound (Phys file) External Phys. IN EDI 14 INVOUTPEDI S INVOICE OUTBOUND - PHYSICAL External Phys. IN EDI POFILE S Outbound Purchase Order Internal Phys. PO EDI SEMINAPPL S Class Tutorial: Outb. Invoice External Lgl. IN EDI SEMINAPPP S Class Tutor: Outb Invoice-phys External Phys. IN EDI SEMPOAPPL R Class Tutorial: Inbound PO External Lgl. PO EDI Bottom Parameters or command ===> F1=Help F3=Exit F12=Cancel F15=Sort F23=More Options F24=More Keys
Application Definition for Externally Defined Multi-format Logical File
IBM Sterling Gentran:Server for iSeries Release 3.6 User Guide 75
The Application Envelope Definition panel enables you to define the application data fields containing envelope field data such as sender/receiver IDs, qualifiers, control number, security and communications IDs, application reference information, priority codes and test indicators. Any remaining envelope information not entered or not available on this panel will be obtained from the Partner file.
CAUTIONSTOP
While field names are verified by Sterling Gentran:Server, no verification is performed on the data in the application data fields. It is the user’s responsibility to ensure that the data in the application file is valid.
Figure 5.47 Application Envelope Definition panel (EDIX560-FMT01)
There are no mandatory fields for this panel. Type values in the fields you want to change and press F10 (Update).
NOTEDo not specify any fields on the panel for this example.
EDIX560 Application Envelope Definition EDI 03/30/11 FMT01 12:00:00
Application ID . . . . . . . . . . INVOUTPEDI Send or Receive. . . . . . . . . . S
Outbound Envelope Field Definitions for all standards Interchange Sender ID. . . . . . . Qual . Group Sender ID. . . . . . . . . . Qual . Interchange Receiver ID. . . . . . Qual . Group Receiver ID. . . . . . . . . Qual . Interchange Control# . . . . . . . Group Cntl#. . . . . . . . . . . . Transaction Control Number . . . .
Outbound Envelope Field Definitions for individual interchanges BG Comm Id . . . . . . . . . . . . Password ISA/UNB/STX Test Ind . . . . . . . UNB/STX Appl Reference . . . . . . UNB/STX Priority Code. . . . . . . STX Recipient Trans Ref. . . . . . UNH03 Common Access Reference. . .
F1=Help F4=Prompt F10=Update F12=Cancel F24=More Keys
Application Definition for Externally Defined Multi-format Logical File
76 IBM Sterling Gentran:Server for iSeries Release 3.6 User Guide
Field Descriptions
Field Name Description This field maps to the…
Interchange Sender Id A 15-position alphanumeric field used to enter the application data field that identifies the interchange sender.
ISA06, BG03, UNB02 (code or name), and STX02 (code) elements
(Interchange Sender Id) Qual
A 15-position alphanumeric field used to enter the application data field that identifies the Interchange Sender Id Qualifier.
ISA05, UNB02 (qualifier), and STX02 (name) elements
Group Sender Id A 15-position alphanumeric field used to enter the application data field that identifies the Group Sender ID.
GS02 and UNG02 (code or name) elements
(Group Sender Id) Qual A 15-position alphanumeric field used to enter the application data field that identifies the Group Sender Id Qualifier.
UNG02 (qualifier) element
Interchange Receiver Id A 15-position alphanumeric field used to enter the application data field that identifies the Interchange Receiver Id.
ISA08, BG04, UNB03 (code or name), and STX03 (code) elements
(Interchange Receiver Id) Qual
A 15-position alphanumeric field used to enter the application data field that identifies the Interchange Receiver Id Qualifier.
ISA07, UNB03, (qualifier), and STX03 (name) elements
Group Receiver Id A 15-position alphanumeric field used to enter the application data field that identifies the Group Receiver Id.
GS03 and UNG03 (code or name) elements
(Group Receiver Id) Qual A 15-position alphanumeric field used to enter the application data field that identifies the Group Receiver Id Qualifier.
UNG03 (qualifier) element
Interchange Control Num A 15-position alphanumeric field used to enter the application data field that identifies the Interchange Control Number.
ISA13, BG07, UNG05, and STX05 elements
Group Control Num A 15-position alphanumeric field used to enter the application data field that identifies the Group Control Number.
GS06 and UNG05 elements
Transaction Control Num A 15-position alphanumeric field used to enter the application data field that identifies the Transaction Control Number.
ST02 and UNH01
BG Comm Id A 15-position alphanumeric field used to enter the application data field that identifies the BG Comm Id.
BG01 element

Application Definition for Externally Defined Multi-format Logical File
IBM Sterling Gentran:Server for iSeries Release 3.6 User Guide 77
At this point, you have finished creating an outbound application definition. You are ready to begin mapping.
BG Comm Password A 15-position alphanumeric field used to enter the application data field that identifies the BG Comm Password.
BG02 element
ISA/UNB Test Indicator A 15-position alphanumeric field used to enter the application data field that identifies the ISA/UNB Test Indicator.
ISA15 and UNB11 elements
UNB/STX Appl Reference
A 15-position alphanumeric field used to enter the application data field that identifies the UNB/STX application reference.
UNB07 and STX07 elements
UNB/STX Priority Code A 15-position alphanumeric field used to enter the application data field that identifies the UNB/STX Priority Code.
UNB08 and STX08 elements
STX Recipient Trans Ref A 15-position alphanumeric field used to enter the application data field that identifies the STX Recipient Transmission Reference.
STX06 element
UNH03 Common Access Reference
A 15-position alphanumeric field used to enter the application data field that identifies the UNH03 Common Access Reference.
UNH03 element
Field Name Description This field maps to the…

Copy Application Definition
78 IBM Sterling Gentran:Server for iSeries Release 3.6 User Guide
Copy Application DefinitionIn this task you will copy an existing application definition into a new application definition. Sterling Gentran:Server copies all of the records and fields into the new definition.
Figure 5.48 shows how to copy an application definition.
Figure 5.48 Work with Application Definition panel (EDIX550-FMT01)
To copy an application definition, complete the following instructions:
1. Type ‘3’ (Copy) in the Option field next to the Application ID you want to copy on the Work with Application Definition panel (EDIX550-FMT01).
2. Press Enter. The system displays a Copy To window.
3. Type the name of the new Application ID and ‘S’ for Send or ‘R’ for Receive and press Enter.
4. This action takes you to the Application Definition panel (EDIX552-FMT01) so you can modify the description.
5. Press F10 (Update). This action creates a new application definition by copying the entire definition from the existing Application ID.
CAUTIONSTOP
The application definition you are creating must not already exist.
EDIX550 Work with Application Definition EDI 03/30/11 FMT01 pgmlib: G3X6PGM dtalib: G3X6DTA 12:00:00 Position to Application ID . . . . S/R Type option (and Information), press Enter. 1=Create 2=Revise 3=Copy 4=Delete 5=View 6=Print 11=Rec/Files Opt Appl ID S/R Description File Type Group User 3 INVFILE R Invoice Inbound Internal Phys. IN EDI INVOIC S Edifact Invoice Y2K External Lgl. INVOIC EDI INVOICOUT S Tutorial EDIFACT Invoice outb External Lgl. INVOIC CB INVOUT S Tutorial X12 Invoice Outbound External Lgl. IN CB INVOUTL S Invoice Outbound (lgl) Y2K External Lgl. IN EDI INVOUTP S Invoice Outbound (Phys) Y2K External Phys. IN EDI INVOUTPEDI S INVOICE OUTBOUND - PHYSICAL External Phys. IN CB ORDERS R Edifact Orders Inbound External Lgl. ORDERS CSG ORDERSINB R Tutorials EDIFACT Orders inb External Lgl. ORDERS CB More... Parameters or command ===> F1=Help F3=Exit F12=Cancel F15=Sort F23=More Options F24=More Keys

Copy Application Definition Between Libraries (APPCPY)
IBM Sterling Gentran:Server for iSeries Release 3.6 User Guide 79
Copy Application Definition Between Libraries (APPCPY)
Sterling Gentran:Server allows you to copy a selected application definition to another iSeries library. This can be particularly useful if you have set up two libraries, one for a test environment and the other for production. When you copy an application definition between libraries, Sterling Gentran:Server copies the Header information and all record/file and field definitions into the new application definition.
The following panel shows how to access the Copy Applications (APPCPY) panel.
Figure 5.49 Work with Application Definition panel (EDIX550-FMT01)
Type ‘30’ (Copy App ID) in the Option field next to the Application ID you want to copy and press Enter.
EDIX550 Work with Application Definition EDI 03/30/11 FMT01 pgmlib: G3X6PGM dtalib: G3X6DTA 12:00:00
Position to Application ID . . . . S/R
Type option (and Information), press Enter. 12=Key Structure 13=App Part Ref 14=Envelopes 30=Copy App ID
Opt Appl ID S/R Description File Type Group User INBPO R Purchase Order Inbound External Phys. PO EDI 30 INVFILE R Invoice Inbound Internal Phys. IN EDI INVOUTL S Invoice Outbound (lgl file) External Lgl. IN EDI INVOUTP S Invoice Outbound (Phys file) External Phys. IN EDI POFILE S Outbound Purchase Order Internal Phys. PO EDI SEMINAPPL S Class Tutorial: Outb. Invoice External Lgl. IN EDI SEMINAPPP S Class Tutor: Outb Invoice-phys External Phys. IN EDI SEMPOAPPL R Class Tutorial: Inbound PO External Lgl. PO EDI
Bottom Parameters or command ===> F1=Help F3=Exit F12=Cancel F15=Sort F23=More Options F24=More Keys

Copy Application Definition Between Libraries (APPCPY)
80 IBM Sterling Gentran:Server for iSeries Release 3.6 User Guide
Next, Sterling Gentran:Server displays the Copy Applications (APPCPY) panel with the source Copy From Application ID and Send/Receive indicator already defined. The system has also supplied a default name of the library where the Copy From application definition ID resides.
Figure 5.50 Copy Applications panel (APPCPY)
To define the information for the target application definition (Copy To), complete the following instructions:
1. Type the Application ID name that you want this Application ID to have in your target environment.
2. Type ‘S’ (Send) or ‘R’ (Receive), depending on the type of Application ID you are copying.
3. Type the library name in which the Copy To Application ID will reside.
4. Confirm the name of the Copy From library.
5. At this point, you can run the copy job one of three ways: type ‘*YES’ to use the Job Scheduler feature; press Enter to immediately submit the job to your queue to run; or press F10 (Additional parameters) and type ‘*YES’ for Run Interactively to run the copy job on your screen.
CAUTIONSTOP
The Copy To Application ID cannot already exist in the Copy To library.
Copy Applications (APPCPY) Type choices, press Enter.
Copy From: Application Id . . . > 'INVFILE' Character value Send/Receive . . . . > 'R' S or R Library . . . . . . > TESTLIB Character value Copy To: Application Id . . . INVFILE Character value Send/Receive . . . . R S or R Library . . . . . . G3X6DTA Character value Schedule Job ? . . . . . . . . . *NO *YES, *NO
Bottom F3=Exit F4=Prompt F5=Refresh F10=Additional parameters F12=Cancel F13=How to use this display F24=More keys

Renumber Application Records/Files and Fields (APPRENBR)
IBM Sterling Gentran:Server for iSeries Release 3.6 User Guide 81
Renumber Application Records/Files and Fields (APPRENBR)
Sterling Gentran:Server allows you to renumber the records/files within an application definition and the fields within each record/file definition.
The first step in renumbering the application is to access the APPRENBR panel, as shown below.
Figure 5.51 Work with Application Definition panel (EDIX550-FMT01)
To access the APPRENBR panel, complete the following instructions:
Type ‘31’ (App Renumber) in the Option field next to the Application ID you want to renumber and press Enter.
NOTEAfter the application renumber has completed, the Application Synchronization (APPSYNCH) must be executed to bring the transactions into agreement with the application.
EDIX550 Work with Application Definition EDI 03/30/11 FMT01 pgmlib: G3X6PGM dtalib: G3X6DTA 12:00:00
Position to Application ID . . . . S/R
Type option (and Information), press Enter. 31=App Renumber 32=App Synch 50=ezAPPDEF
Opt Appl ID S/R Description File Type Group User INBPO R Purchase Order Inbound External Phys. PO EDI INVFILE R Invoice Inbound Internal Phys. IN EDI INVOUTL S Invoice Outbound (lgl file) External Lgl. IN EDI INVOUTP S Invoice Outbound (Phys file) External Phys. IN EDI POFILE S Outbound Purchase Order Internal Phys. PO EDI SEMINAPPL S Class Tutorial: Outb. Invoice External Lgl. IN EDI SEMINAPPP S Class Tutor: Outb Invoice-phys External Phys. IN EDI SEMPOAPPL R Class Tutorial: Inbound PO External Lgl. PO EDI 31 SEMPOEDI R SEM CLASS: PO INB(subsplit #1) External Phys. PO EDI Bottom Parameters or command ===> F1=Help F3=Exit F12=Cancel F15=Sort F23=More Options F24=More Keys
Renumber Application Records/Files and Fields (APPRENBR)
82 IBM Sterling Gentran:Server for iSeries Release 3.6 User Guide
The following panel allows you to specify the parameters to renumber the application records and fields.
Figure 5.52 Application Renumber (APPRENBR) panel
Enter the desired parameters in each field.
At this point, you can run the application renumber job one of three ways:
In batch: Press Enter. This is the default.
Interactively: Press F10 for additional parameters and type *YES for Run Interactively.
Job Scheduler: Type *YES in the Schedule Job field to run the job at a later time.
Application Renumber (APPRENBR)
Type choices, press Enter.
Application Id . . . . . . . . . SEMPOEDI Character valueSend/Receive . . . . . . . . . . R S or RStarting Record Seq . . . . . . 50 Character valueRecord Increment . . . . . . . . 05 Character valueStarting Field Seq . . . . . . . 50 Character valueField Increment . . . . . . . . 05 Character valueRestart? . . . . . . . . . . . . *NO *YES, *NOSchedule Job ? . . . . . . . . . *NO *YES, *NO
Bottom
F3=Exit F4=Prompt F5=Refresh F10=Additional parameters F12=Cancel F13=How to use this display F24=More keys

Synchronize an Application Definition (APPSYNCH)
IBM Sterling Gentran:Server for iSeries Release 3.6 User Guide 83
Synchronize an Application Definition (APPSYNCH)
Sterling Gentran:Server enables you to synchronize an application definition with the maps that are linked to it. When you re-retrieve the DDS for a file or change the sequence number of a record or field, the maps that are linked to the application need to be re-synchronized to reflect those changes. All associated maps can be re-synchronized easily using this command.
The system automatically invokes the command after re-retrieving the DDS. You can manually invoke the APPSYNCH command if you make changes without re-retrieving the DDS.
Step 1: Access the Application Synchronization (APPSYNCH) Panel
The first step in synchronizing an application is to access the Application Synchronization (APPSYNCH) panel.
Figure 5.53 Work with Application Definition (EDIX550-FMT01)
Type ‘32’ (App Synch) in the Opt field next to the appropriate Application and press Enter. The APPSYNCH panel displays.
EDIX550 Work with Application Definition EDI 03/30/11 FMT01 pgmlib: G3X6PGM dtalib: G3X6DTA 12:00:00 Position to Application ID . . . . S/R Type option (and Information), press Enter. 31=App Renumber 32=App Synch 50=ezAPPDEF Opt Appl ID S/R Description File Type Group User POFILE S Outbound Purchase Order Internal Phys. PO EDI POFILE1 S PURCHASE ORDER - OUTBOUND Internal Phys. PO CB POINB R Tutorial x12 PO Inbound External Lgl. PO CB 32 SEMINAPPL S Class Tutorial: Outb. Invoice External Lgl. IN CSG SEMPOAPPL R Class Tutorial: Inb. PO Y2K External Lgl. PO EDI SEMPOEDI R SEM CLASS: PO INB(subsplit #1) External Lgl. PO CB TCOMINV8P S Tradacoms Invoice 8 (Physical) External Phys. !!!DFT CV TCOMORD8P R Tradacoms Orders 8 (Physical) External Phys. !!!DFT CSG Bottom Parameters or command ===> F1=Help F3=Exit F12=Cancel F15=Sort F23=More Options F24=More Keys

Synchronize an Application Definition (APPSYNCH)
84 IBM Sterling Gentran:Server for iSeries Release 3.6 User Guide
Step 2: Synchronizing an Application Definition
The following panel is used to re-synchronize all maps linked to the selected application. A map is linked to an application using the Transaction Map Definition (EDIX503) panel.
Figure 5.54 Application Synchronization (APPSYNCH) panel
Type the desired parameter options and press Enter. A report (EBDI586) prints, identifying the linked maps. Then, the MAPSYNCH report (EBDI589) is printed for the re-synchronization of those maps.
NOTEThe Application Synchronization is executed automatically when you re-retrieve the DDS for a file using the Application Definition panel (EDIX552) or Application Records/Files panel (EDIX553).
Application Synchronization (APPSYNCH) Type choices, press Enter. Application ID . . . . . . . . . > 'SEMINAPPL' Character value Send/Receive . . . . . . . . . . > 'S' S or R Run Interactively? . . . . . . . *NO *YES, *NO Additional Parameters Schedule Job? . . . . . . . . . *NO *YES, *NO Bottom F3=Exit F4=Prompt F5=Refresh F12=Cancel F13=How to use this display F24=More keys

Print Application Definitions
IBM Sterling Gentran:Server for iSeries Release 3.6 User Guide 85
Print Application DefinitionsSterling Gentran:Server enables you to print a hard copy report displaying the contents of a particular application definition.
Step 1: Access the Print Application Files (PRTAPP) Panel
The first step in printing an application definition is to access the Print Application Files (PRTAPP) panel.
Figure 5.55 Work with Application Definition (EDIX550-FMT01)
Type option ‘6’ (Print) next to the application and press Enter. The Print Application Files (PRTAPP) panel displays.
EDIX550 Work with Application Definition EDI 03/30/11 FMT01 pgmlib: G3X6PGM dtalib: G3X6DTA 12:00:00 Position to Application ID . . . . S/R Type option (and Information), press Enter. 1=Create 2=Revise 3=Copy 4=Delete 5=View 6=Print 11=Rec/Files Opt Appl ID S/R Description File Type Group User INVOUT S Tutorial X12 Invoice Outbound External Lgl. IN CB INVOUTL S Invoice Outbound (lgl) Y2K External Lgl. IN EDI INVOUTP S Invoice Outbound (Phys) Y2K External Phys. IN EDI 6 INVOUTPEDI S INVOICE OUTBOUND - PHYSICAL External Phys. IN CB ORDERS R Edifact Orders Inbound External Lgl. ORDERS CSG ORDERSINB R Tutorials EDIFACT Orders inb External Lgl. ORDERS CB POFILE S Outbound Purchase Order Internal Phys. PO EDI POFILE1 S PURCHASE ORDER - OUTBOUND Internal Phys. PO CB POINB R Tutorial x12 PO Inbound External Lgl. PO CB More... Parameters or command ===> F1=Help F3=Exit F12=Cancel F15=Sort F23=More Options F24=More Keys

Print Application Definitions
86 IBM Sterling Gentran:Server for iSeries Release 3.6 User Guide
Step 2: Print Application Definitions
The Print Application Files (PRTAPP) panel allows you to print information about the files, records, and fields for a specific application document. You can specify an inbound or outbound application for printing.
Figure 5.56 Print Application Files (PRTAPP) panel
At this point, you can run the job one of three ways:
In batch: Press Enter. This is the default.
Interactively: Press F10 for additional parameters and type *YES for Run Interactively.
Job Scheduler: Type *YES in the Schedule Job field to run the job at a later time.
Print Application Files (PRTAPP) Type choices, press Enter. Application ID . . . . . . . . . > 'INVOUTPEDI' Character value Send/Receive . . . . . . . . . . > 'S' R, S Schedule Job ? . . . . . . . . . *NO *YES, *NO Additional Parameters Run Interactively ? . . . . . . *YES *YES, *NO Bottom F3=Exit F4=Prompt F5=Refresh F12=Cancel F13=How to use this display F24=More keys

Re-retrieve DDS (RRTVDDS)
IBM Sterling Gentran:Server for iSeries Release 3.6 User Guide 87
Re-retrieve DDS (RRTVDDS)Sterling Gentran:Server enables you to use the RRTVDDS command to print or re-retrieve DDS for any application files that you have made modifications to. This will assist you in synchronizing the changed files with all of your applications. If you wish to review the list before doing a re-retrieve, you can select *LIST on the LISTUPD parm. A Print Re-retrieve DDS Through RRTVDDS Command (PRTRRTVDDS) report is generated.
To re-retrieve the DDS for the changed file, select *UPDATE on the LISTUPD parm. An exception report (EDIX558) is printed and the APPSYNCH command is invoked to resynchronize the associated maps.
Access the Re-retrieve DDS (RRTVDDS) PanelThe RRTVDDS panel shown in the following figure can be accessed by selecting option ‘19’ on the GENMAP menu or by entering ‘RRTVDDS’ on the command line. Press F10 (Additional Parameters) to view all of the parameters..
Re-retrieve DDS (RRTVDDS)
Type choices, press Enter.
File Name. . . . . . . . . . . . . Character value Library Name . . . . . . . . . . . Character value List or Update?. . . . . . . . . . *LIST Character value Additional Parameters Run Interactively ? . . . . . . . *NO *YES, *NO Schedule Job ? . . . . . . . . . . *NO *YES, *NO
BottomF3=Exit F4=Prompt F5=Refresh F12=Cancel F13=How to use this display F24=More Keys

Use the ezAPPDEF Command
88 IBM Sterling Gentran:Server for iSeries Release 3.6 User Guide
Use the ezAPPDEF CommandThe ezAPPDEF command is part of the ezEDI feature, which automatically leads you through key panels to set up the basic information necessary to start using Sterling Gentran:Server. If you type ‘ezEDI’ and press Enter, the system steps through the panels required to set up Global Parameters, Application Definition, Mapping, Partner, and Communications. Or you can use the ezAPPDEF command to set up just the APPDEF portion of the system.
CAUTIONSTOP
After you type the ezEDI or ezAPPDEF command, the system proceeds forward only through all associated panels. You cannot interrupt the process or back up to previous panels. Be sure to collect all your materials and allow sufficient time before you initiate an ezEDI command.
The ezAPPDEF command leads you through the panels which are key to setting up application definitions. After global parameters are defined, Sterling Gentran:Server requires that you define the organization of your data files for each application. If your application involves sending invoices, for example, the application definition must identify all the files in your system which must be included on the invoice – a Header and Detail file, perhaps – as well as the specific requirements for each file and field.
Type ‘50’ (ezAPPDEF) on the key entry line, as shown in Figure 5.57, and press Enter.
Figure 5.57 Select ezAPPDEF
EDIX550 Work with Application Definition EDI 03/30/11 FMT01 pgmlib: G3X6PGM dtalib: G3X6DTA 12:00:00
Position to Application ID . . . . S/R
Type option (and Information), press Enter. 31=App Renumber 32=App Synch 50=ezAPPDEF
Opt Appl ID S/R Description File Type Group User 50 INBPO R Purchase Order Inbound External Phys. PO EDI INVFILE R Invoice Inbound Internal Phys. IN EDI INVOUTL S Invoice Outbound (lgl file) External Lgl. IN EDI INVOUTP S Invoice Outbound (Phys file) External Phys. IN EDI POFILE S Outbound Purchase Order Internal Phys. PO EDI SEMINAPPL S Class Tutorial: Outb. Invoice External Lgl. IN EDI SEMINAPPP S Class Tutor: Outb Invoice-phys External Phys. IN EDI SEMPOAPPL R Class Tutorial: Inbound PO External Lgl. PO EDI
Bottom Parameters or command ===> F1=Help F3=Exit F12=Cancel F15=Sort F23=More Options F24=More Keys
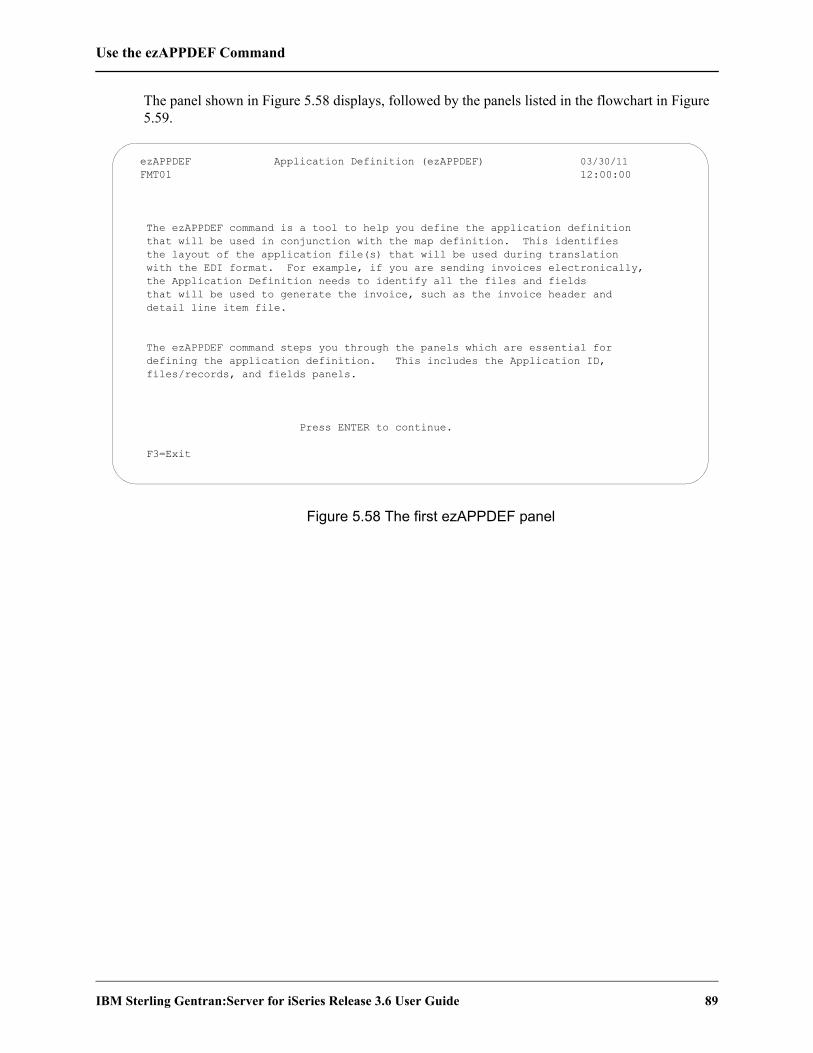
Use the ezAPPDEF Command
IBM Sterling Gentran:Server for iSeries Release 3.6 User Guide 89
The panel shown in Figure 5.58 displays, followed by the panels listed in the flowchart in Figure 5.59.
Figure 5.58 The first ezAPPDEF panel
ezAPPDEF Application Definition (ezAPPDEF) 03/30/11 FMT01 12:00:00 The ezAPPDEF command is a tool to help you define the application definition that will be used in conjunction with the map definition. This identifies the layout of the application file(s) that will be used during translation with the EDI format. For example, if you are sending invoices electronically, the Application Definition needs to identify all the files and fields that will be used to generate the invoice, such as the invoice header and detail line item file. The ezAPPDEF command steps you through the panels which are essential for defining the application definition. This includes the Application ID, files/records, and fields panels. Press ENTER to continue. F3=Exit

Use the ezAPPDEF Command
90 IBM Sterling Gentran:Server for iSeries Release 3.6 User Guide
Figure 5.59 lists the rest of the ezAPPDEF panels and the order in which they display.
Figure 5.59 Panels the system leads you through for the ezAPPDEF command
Application Definition(EDIX552-FMT00)
Application Definition(EDIX552-FMT01)
See Task:Create an Outbound Appl Def
Application Fields(EDIX554-CTL01)
See Task:Create an Outbound Appl Def
See Task:Create an Outbound Appl Def
Application Definition(EDIX553-CTL01)
See Task:Create an Outbound Appl Def
Option ‘11’(Rec/Files)
Reports
IBM Sterling Gentran:Server for iSeries Release 3.6 User Guide 91
Reports
EBDI054 – Application Definition Report
Contents of the ReportThe Application Definition Report contains information about the files, records, and fields for a particular application document. Any envelope mappings that are defined are also printed.
How to identify the ReportThe identifier “EBDI054” displays in the upper left-hand corner of the report. The report title, “Application Definition Report” is centered at the top of the report. The identifier “EBDI054” also displays in the User Data field associated with the spooled report in the Output Queue.
How to Generate the ReportThis is a user-generated report. It can be generated by selecting option ‘6’ (Print) on the Work with Application Definition panel (EDIX550-FMT01) and entering the appropriate information on the Print Application Files (PRTAPP) panel. It can also be generated by pressing F21 (Prt App) on the application panels.
Special ConsiderationsLike all other Sterling Gentran:Server reports, the Application Definition report automatically goes to the iSeries Output Queue defined for the user running the job. (SEE the “Environment Control” chapter in this guide to set up a user’s Output Queue.)

Reports
92 IBM Sterling Gentran:Server for iSeries Release 3.6 User Guide
Figure 5.60 Application Definition Report (EBDI054)
EBDI054 A P P L I C A T I O N D E F I N I T I O N R E P O R T PAGE 1
APPLICATION ID: INVFILE SEND OR RECEIVE: R NAME: Invoice Inbound DATE 03/30/11
FILE TYPE: INTERNAL PHYSICAL GROUPS: IN IG TIME 14:56:01
SPLIT/SUB: SLIDE/ DIVISION: 000 RECORD TYPE START/LENGTH: 1/ 1
SEQ M RECORD/FILE A LOOP MAX U DESCRIPTION WRITE FLAG
SEQ C ELEMENT TYP DDS LEN START KEY FIELDS
001 M 0 H 1 TRANSACTION HEADER INFO YES
010 M 0-REC-TYPE AN 1 1 RECORD TYPE
020 M 0-VENDOR AN 8 2 VENDOR NUMBER (SORT KEY
030 M 0-ORIGINAL-PO AN 12 10 ORIG PO NUMBER (SORT KEY
040 M 0-RECEIVE-DATE AN 6 22 INTERCHANGE DATE
050 M 0-RECEIVE-TIME AN 4 28 INTERCHANGE TIME
060 M 0-INT-CONTROL AN 10 32 INTERCHANGE CONTROL #
070 M 0-GRP-CONTROL AN 10 42 GROUP CONTROL #
080 M 0-TRN-CONTROL AN 10 52 TRANSACTION CONTROL #
090 M 0-MAP-PROD-TEST AN 1 62 PROD STATUS OF MAP
100 M 0-TP-PROD-TEST AN 1 63 PROD STATUS OF PARTNER
110 M 0-INT-PROD-TEST AN 1 64 PROD STATUS OF INTERCHAN
010 M 1 H 1 INVOICE HEADER INFORMATION YES
010 M 1-REC-TYPE AN 1 1 RECORD TYPE
020 M 1-VENDOR AN 8 2 VENDOR NUMBER (SORT KEY
030 M 1-ORIGINAL-PO AN 12 10 ORIG PO NUMBER (SORT KEY
040 M 1-INVOICE-NO AN 8 22 INVOICE NUMBER
050 O 1-PO-DATE YY 6 30 ORIGINAL PO DATE
060 M 1-INV-DATE YY 6 36 INVOICE DATE
070 O 1-CONTRACT-NO AN 10 42 CONTRACT NUMBER
080 O 1-CONTACT-NAME AN 20 52 CONTACT NAME
090 M 1-SHIP-DATE YY 6 72 SHIP DATE
020 M 2 H 100 INVOICE COMMENTS YES
010 M 2-REC-TYPE AN 1 1 RECORD TYPE
020 M 2-VENDOR AN 8 2 VENDOR NUMBER (SORT KEY
030 M 2-ORIGINAL-PO AN 12 10 ORIG PO NUMBER (SORT KEY
040 M 2-INV-COMMENTS AN 58 22 INVOICE COMMENTS
030 O X H 1 TERMS DUMMY RECORD NO
010 M D-DISCOUNT R 5 1 TERMS DISCOUNT -HOL
020 M D-DISCOUNT-DATE YY 6 6 TERMS DISCOUNT DATE -HOL
040 M 3 H 1 REMIT TO INFORMATION YES
010 M 3-REC-TYPE AN 1 1 RECORD TYPE
020 M 3-VENDOR AN 8 2 VENDOR NUMBER (SORT KEY
030 M 3-ORIGINAL-PO AN 12 10 ORIG PO NUMBER (SORT KEY
040 M 3-REMIT-NAME AN 15 22 REMIT TO NAME
050 M 3-REMIT-ADDR AN 15 37 REMIT TO ADDRESS
060 M 3-REMIT-CITY AN 15 52 REMIT TO CITY
070 M 3-REMIT-ST AN 2 67 REMIT TO STATE
080 M 3-REMIT-ZIP AN 9 69 REMIT TO ZIP
050 M 4 H 1 SHIP FROM INFORMATION YES

Reports
IBM Sterling Gentran:Server for iSeries Release 3.6 User Guide 93
Fields on the Application Definition Report (EBDI054)
Field Name Description
Report Header
Application ID Application Identification
Send or Receive Identifies the application definition as a send file (S) or a receive file (R)
Name User-defined name of the application definition
Date The date the report was printed
File Type Identifies the type of file used to interface to Sterling Gentran:Server
Groups Identifies functional groups used with this application definition
Time The time the report was printed in HH:MM:SS format
Split/Sub EDI split file and sub-split file used
Division Code assigned in your security profile within Sterling Gentran:Server
Record Type Start/Length Starting position in the application record for the record type and the length of the record type
Application Record Line
Seq(uence) Application record sequence number
M/C Identifies the record as mandatory (M) or optional (O)
Record/File Name of the record
Area Identifies the record as a Header (H), Detail (D), or Summary (S) record
Loop The Loop identification
Max U(se) Maximum number of times this record may be repeated in a data structure (i.e., the Header, Summary, or an application loop)
Description Description of the application record
Write Flag Determines whether that record is to be written. It shows which records are being used as “dummy” mapping records. Valid values are ‘Yes’ and ‘No’ (inbound maps only).

Reports
94 IBM Sterling Gentran:Server for iSeries Release 3.6 User Guide
Application Field Line(shown below the Application Record Number)
Seq(uence) Application field sequence number
M/C Identifies the record as mandatory (M) or optional (O)
Elem(ent) Application field name as it exists in your application file
Type Application data type
DDS Original DDS file type
Length Length of the field in the record
Start Starting position in the record
Description Description of the application field
Key Fields Fields used as keys to define the physical file
Outbound Envelope Definitions for All Standards
Interchange Sender ID/Qual Identifies the interchange sender ID and qualifier
Group Sender ID/Qual Identifies the group sender ID and qualifier
Interchange Receiver ID/Qual Identifies the interchange receiver ID and qualifier
Group Receiver ID/Qual Identifies the group receiver ID and qualifier
Interchange Control Number Identifies the interchange control number
Group Control Number Identifies the group control number
Transaction Control Number Identifies the transaction control number
Outbound Envelope Field Definitions for Individual Interchanges
BG Comm ID Identifies the BG Comm ID
Password Identifies the BG Comm password
ISA/UNB/STX Test Indicator Identifies the ISA/UNB/STX test indicator
UNB/STX Appl Reference Identifies the UNB/STX application reference
UNB/STX Priority Code Identifies the UNB/STX priority code
STX Recipient Trans Ref Identifies the STX recipient transmission reference
UNH03 Common Access Reference Identifies the UNH03 common access reference
Field Name Description

Reports
IBM Sterling Gentran:Server for iSeries Release 3.6 User Guide 95
EBDI586 – Application Synchronization Report
Contents of the ReportThe Application Synchronization Report contains a list of maps linked to a selected application definition that are being submitted for re-synchronization due to a change in the application definition.
How to Identify the ReportThe identifier “EBDI586” displays in the upper left corner of the report. The report title “APPLICATION SYNCHRONIZATION” displays in the center, at the top of the report. The identifier “EBDI586” also displays in the User Data field which is associated with the spooled report in the Output Queue.
How to Generate this ReportThis is both a user-generated report and a system-generated report. It can be generated by selecting option ‘32’ (App Synch) on the Work with Application Definition panel (EDIX550) and entering the appropriate information on the Application Synchronization (APPSYNCH) command panel.
The report is system-generated when the user re-retrieves the DDS (file layout for an externally described file) for any file in a selected application definition. This is done using option ‘12’ (Re-retrieve DDS) on the Application Records/Files panel (EDIX553) or by using F18 (Re-rtv. DDS) on the Application Definition panel (EDIX552-FMT01). Upon exiting the panel, the APPSYNCH command is automatically submitted and a report is generated.
Figure 5.61 Application Synchronization Report (EBDI586)
EBDI586 APPLICATION SYNCHRONIZATION TIME: 17:43:02
DATE: 03/30/11 Maps Linked to Application ID: DSHINVOUT S/R: S PAGE: 1
MAP NAME TRAN ID VERSION DESCRIPTION
DSH8104010 810 004010 810 4010 outb - copy(*YES)
DSH810UCS 810 004010UCS 004010ucs invoice outb-test r2
DSH139 810 004010 mid57-139
DSH058 810 004010 #058 test table w/ missing inf
DSH120 810 004010UCS 004010ucs inv outb-test r2 fix
IH85040225 810 004022 810 4010 outb - copy(*YES)
IBM
Reports
96 IBM Sterling Gentran:Server for iSeries Release 3.6 User Guide
Fields on the Application Synchronization Report (EBDI586)The following table provides the field names and descriptions.
Field Description
Program ID This field displays the program identifier, EBDI586.
Time This field shows the time the report was processed, shown in hh:mm:ss format.
Date The date the report was processed, shown in the user’s format, is provided in this field.
Application ID This field details the selected application definition to be re-synchronized with linked maps. This results from the command parameter.
S/R A code that identifies whether the application definition is outbound (S = send) or inbound (R = received) displays in this field.
Page The field lists the page number of the report.
Map Name This field provides the Transaction Map ID that is linked to the selected application definition.
Tran ID The field lists the Transaction (or Message) Set ID for the standards used in the map (for example, ‘850’ identifies a purchase order transaction).
Version This field displays the standards version number associated with the map.
Description A description for the Map ID/Name displays in this field.
No Maps Message If no maps are linked to the application, a message prints indicating no maps are linked to the specified application definition.

Reports
IBM Sterling Gentran:Server for iSeries Release 3.6 User Guide 97
EDIX558 – Application DDS Re-Retrieve Exception Report
Contents of the ReportThe Application DDS Re-retrieve Exception Report is generated as a result of using the re-retrieve DDS function on the Application Definition panel (EDIX552-FMT01) or on the Application Records/Files panel (EDIX553-CTL01). It contains summary information of the number of new and old application fields processed and the number of exceptions encountered. When exceptions are detected, an entry of the new and old fields are printed detailing the field’s information. Only one entry is printed when the exception is a new field or an old field is being deleted. The report also includes a printout of exceptions that occurred when updating additional information, such as the key fields, envelope references, and application partner reference fields.
How to Identify the ReportThe identifier “EDIX558” displays in the upper left-hand corner of the report. The report title, “APPLICATION DDS RE-RETRIEVE EXCEPTION REPORT” displays in the center, at the top of the report. The identifier “EDIX558” also displays in the User Data field associated with the spooled report in the Output Queue.
How to Generate the ReportThis is a system-generated report. It can be generated by pressing F18 (Re-retv. DDS) on the Application Definition panel (EDIX552-FMT01) or by selecting option ‘12’ (Re-retrieve DDS) on the Application Records/Files panel (EDIX553-CTL01).
Special ConsiderationsLike all other Sterling Gentran:Server reports, the Application DDS Re-retrieve Exception Report automatically goes to the iSeries Output Queue defined for the user running the job. (SEE the “Environment Control” chapter for instructions to set up a user’s Output Queue.)
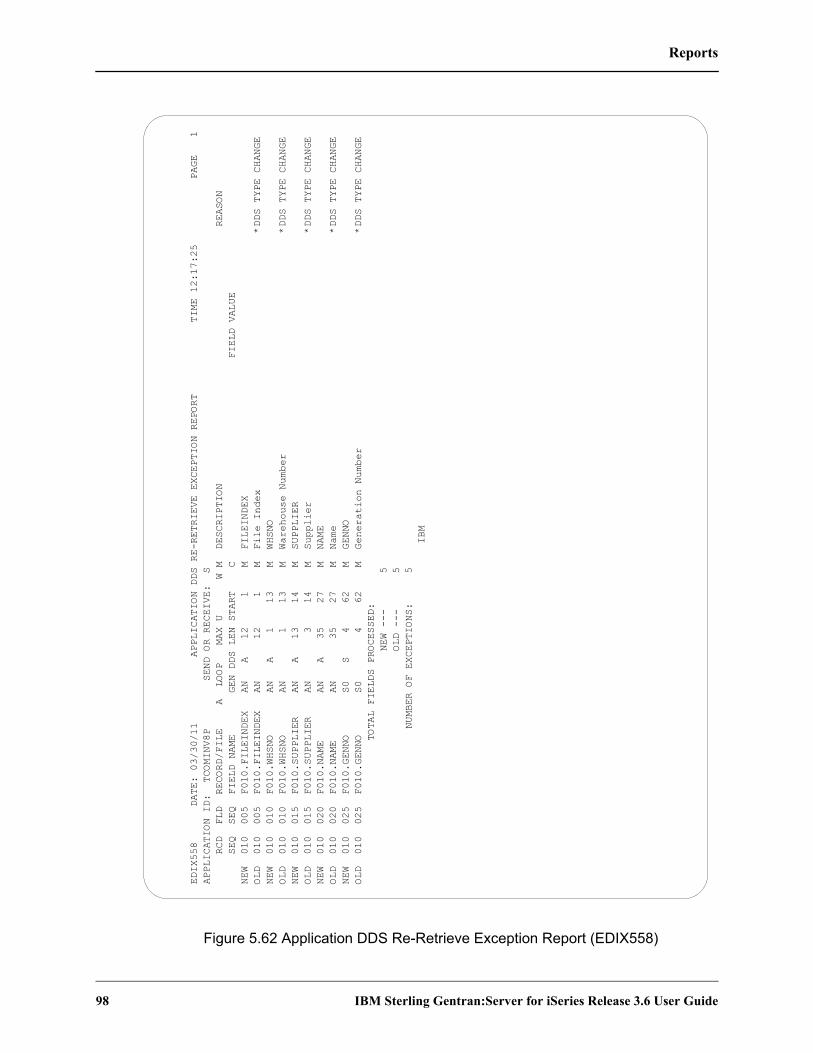
Reports
98 IBM Sterling Gentran:Server for iSeries Release 3.6 User Guide
Figure 5.62 Application DDS Re-Retrieve Exception Report (EDIX558)
EDIX558 DATE: 03/30/11 APPLICATION DDS RE-RETRIEVE EXCEPTION REPORT TIME 12:17:25 PAGE 1
APPLICATION ID: TCOMINV8P SEND OR RECEIVE: S
RCD FLD RECORD/FILE A LOOP MAX U W M DESCRIPTION REASON
SEQ SEQ FIELD NAME GEN DDS LEN START C FIELD VALUE
NEW 010 005 F010.FILEINDEX AN A 12 1 M FILEINDEX
OLD 010 005 F010.FILEINDEX AN 12 1 M File Index *DDS TYPE CHANGE
NEW 010 010 F010.WHSNO AN A 1 13 M WHSNO
OLD 010 010 F010.WHSNO AN 1 13 M Warehouse Number *DDS TYPE CHANGE
NEW 010 015 F010.SUPPLIER AN A 13 14 M SUPPLIER
OLD 010 015 F010.SUPPLIER AN 3 14 M Supplier *DDS TYPE CHANGE
NEW 010 020 F010.NAME AN A 35 27 M NAME
OLD 010 020 F010.NAME AN 35 27 M Name *DDS TYPE CHANGE
NEW 010 025 F010.GENNO S0 S 4 62 M GENNO
OLD 010 025 F010.GENNO S0 4 62 M Generation Number *DDS TYPE CHANGE
TOTAL FIELDS PROCESSED:
NEW --- 5
OLD --- 5
NUMBER OF EXCEPTIONS: 5
IBM
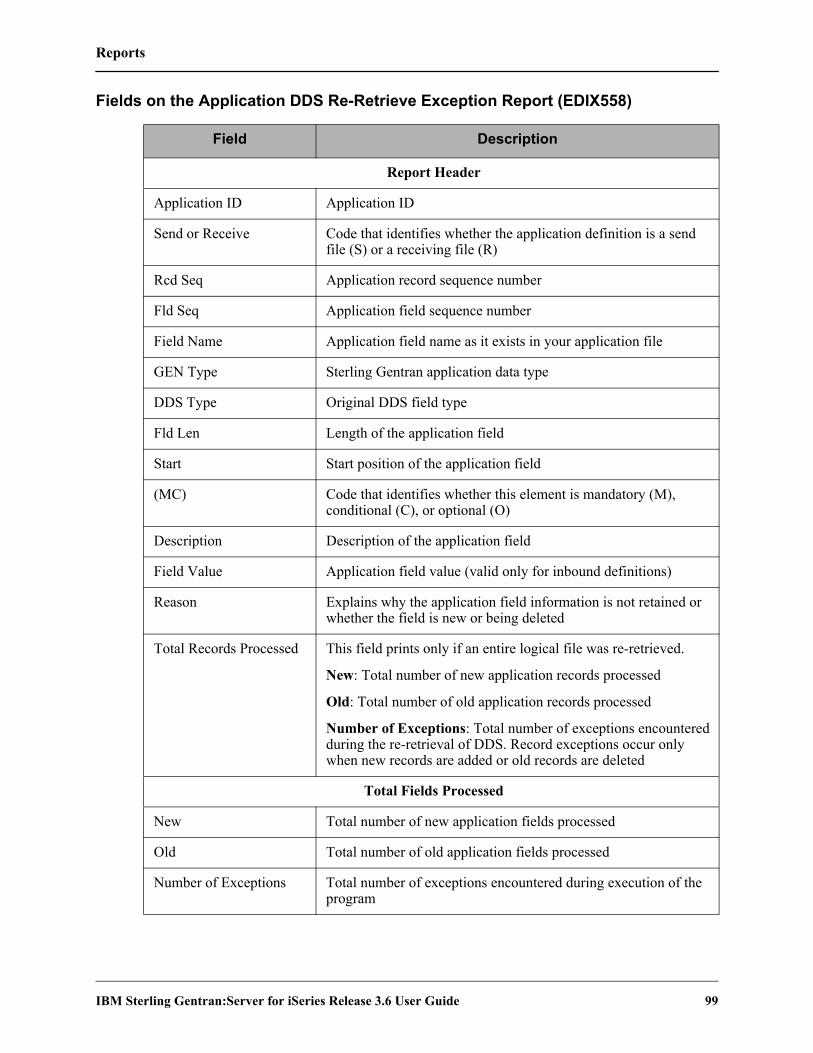
Reports
IBM Sterling Gentran:Server for iSeries Release 3.6 User Guide 99
Fields on the Application DDS Re-Retrieve Exception Report (EDIX558)
Field Description
Report Header
Application ID Application ID
Send or Receive Code that identifies whether the application definition is a send file (S) or a receiving file (R)
Rcd Seq Application record sequence number
Fld Seq Application field sequence number
Field Name Application field name as it exists in your application file
GEN Type Sterling Gentran application data type
DDS Type Original DDS field type
Fld Len Length of the application field
Start Start position of the application field
(MC) Code that identifies whether this element is mandatory (M), conditional (C), or optional (O)
Description Description of the application field
Field Value Application field value (valid only for inbound definitions)
Reason Explains why the application field information is not retained or whether the field is new or being deleted
Total Records Processed This field prints only if an entire logical file was re-retrieved.
New: Total number of new application records processed
Old: Total number of old application records processed
Number of Exceptions: Total number of exceptions encountered during the re-retrieval of DDS. Record exceptions occur only when new records are added or old records are deleted
Total Fields Processed
New Total number of new application fields processed
Old Total number of old application fields processed
Number of Exceptions Total number of exceptions encountered during execution of the program

Reports
100 IBM Sterling Gentran:Server for iSeries Release 3.6 User Guide
Exceptions to Key Fields, Partner Reference, and Envelope References
Note: This part of the report prints only for outbound definitions and only when an exception occurred updating the information specified in the report header.
Rcd Seq Application record sequence number
Fld Seq Application field sequence number
Field Name Application field name as it exists in your application
Used In Where the field is used in the application definition
Reason Displays either a warning message that the field no longer exists or that the field could not be updated due to a record lock
Field Description
Reports
IBM Sterling Gentran:Server for iSeries Release 3.6 User Guide 101
EBDI590 – Batch Application Definition Renumber Report
Contents of the ReportThe Batch Application Definition Renumber Report is generated as a result of the execution of program EBDI590. It displays any errors that are detected when application record and application field numbers are renumbered. This report also includes a printout of the maps that the program has determined are linked to the application definition by reading the application link file. These maps must then be run through the re-synch process, using program EBDI589, to bring both application and translation definitions back into synch with each other.
How to Identify the ReportThe name of the Sterling Gentran:Server program that generates this report (EBDI590) displays in the upper left corner of the report. The identifier “EBDI590” also displays in the User Data field associated with the spooled report in the Output Queue. The report title, “BATCH APPLICATION DEFINITION RENUMBER” displays in the center at the top of the report.
How to Generate this ReportThis is a system-generated report. When you execute the Application Renumber (APPRENBR) command, the system calls the EBDI590 program, which automatically generates this report.
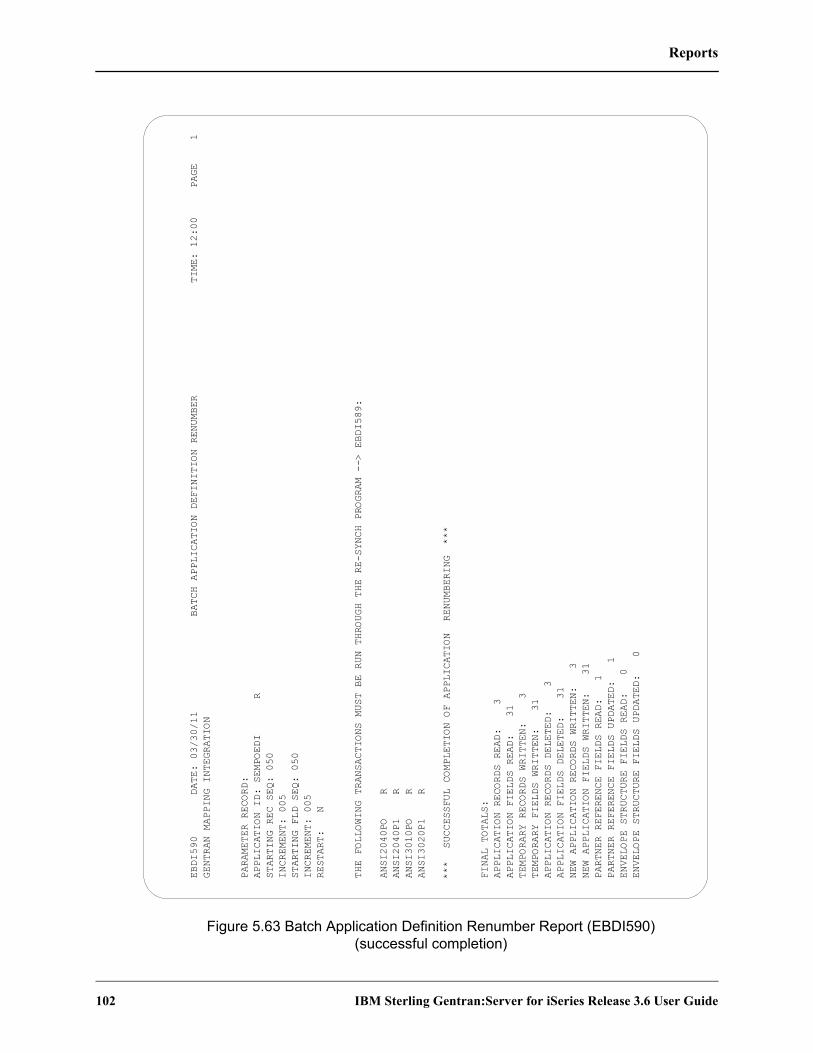
Reports
102 IBM Sterling Gentran:Server for iSeries Release 3.6 User Guide
Figure 5.63 Batch Application Definition Renumber Report (EBDI590)(successful completion)
EBDI590 DATE: 03/30/11 BATCH APPLICATION DEFINITION RENUMBER TIME: 12:00 PAGE 1
GENTRAN MAPPING INTEGRATION
PARAMETER RECORD:
APPLICATION ID: SEMPOEDI R
STARTING REC SEQ: 050
INCREMENT: 005
STARTING FLD SEQ: 050
INCREMENT: 005
RESTART: N
THE FOLLOWING TRANSACTIONS MUST BE RUN THROUGH THE RE-SYNCH PROGRAM --> EBDI589:
ANSI2040PO R
ANSI2040P1 R
ANSI3010PO R
ANSI3020P1 R
*** SUCCESSFUL COMPLETION OF APPLICATION RENUMBERING ***
FINAL TOTALS:
APPLICATION RECORDS READ: 3
APPLICATION FIELDS READ: 31
TEMPORARY RECORDS WRITTEN: 3
TEMPORARY FIELDS WRITTEN: 31
APPLICATION RECORDS DELETED: 3
APPLICATION FIELDS DELETED: 31
NEW APPLICATION RECORDS WRITTEN: 3
NEW APPLICATION FIELDS WRITTEN: 31
PARTNER REFERENCE FIELDS READ: 1
PARTNER REFERENCE FIELDS UPDATED: 1
ENVELOPE STRUCTURE FIELDS READ: 0
ENVELOPE STRUCTURE FIELDS UPDATED: 0

Reports
IBM Sterling Gentran:Server for iSeries Release 3.6 User Guide 103
Fields on the Batch Application Definition Renumber Report (EBDI590)
Field Description
Parameter Record
Application ID This field displays the application definition being renumbered.
Starting Rec Seq This field identifies the sequence number of the record (the order of the record within the document) that sequencing begins with.
Increment This field identifies the number that the program uses to increment the record sequence number.
Starting Field Seq This field identifies the sequence number of the field (the order of the field within the record) that sequencing begins with.
Increment This field identifies the number that the program uses to increment the field sequence number.
Restart This field displays the switch entered in the parameter record indicating whether or not to restart the application when processing is complete (‘Y’ = Yes, ‘N’ = No). If nothing or garbage is entered in the restart switch in the parameter record, the default is ‘N.’
The Following Transactions Must Be Run Through the Re-Synch Program —> EBDI589:
This field identifies the Transaction ID(s) of the transactions that must be processed through the Batch Transaction Mapping Definition Re-Synch program (program EBDI589).
(Message Field) This field displays a message indicating any errors encountered during program execution, or the successful completion of sequence renumbering.
Final Totals
Application Records Read This field displays the total number of application records read during execution of the program.
Application Fields Read This field displays the total number of application fields read during execution of the program.
Temporary Records Written This field displays the total number of records written to the temporary file during execution of the program.
Temporary Fields Written This field displays the total number of fields written to the temporary file during execution of the program.
Application Records Deleted This field displays the total number of application records deleted during execution of the program.

Reports
104 IBM Sterling Gentran:Server for iSeries Release 3.6 User Guide
Application Fields Deleted This field displays the total number of application fields deleted during execution of the program.
New Application Records Written
This field displays the total number of new application records written during execution of the program.
New Application Fields Written
This field displays the total number of new application fields written during execution of the program.
Partner Reference Fields Read
This field displays the total number of application partner reference fields read.
Partner Reference Fields Updated
This field displays the total number of application partner reference fields updated. If the record and field sequence have not changed, this number will be ‘0’.
Envelope Structure Fields Read
This field displays the total number of envelope structure fields read. If there are no envelope mappings defined for the application, this number will be ‘0’.
Envelope Structure Fields Updated
This field displays the total number of envelope structure fields updated. If the number read was not zero, these fields will be updated if the record or field sequence has changed.
Field Description

Reports
IBM Sterling Gentran:Server for iSeries Release 3.6 User Guide 105
PRTRRTVDDS—Print DDS Re-retrieve through RRTVDDS Command
Contents of the Report The Print DDS Re-retrieve Report is generated as a result of selecting *LIST from the RRTVDDS command. It lists applications that contain the changed file.
How to Identify the Report The identifier “PRTRRTVDDS” displays in the upper left-hand corner of the report. The report title, “PRINT DDS RE-RETRIEVE THROUGH RRTVDDS COMMAND” displays in the center, at the top of the report. The identifier “PRTRRTVDDS” also displays in the User Data field associated with the spooled report in the Output Queue.
How to Generate the Report This is a system-generated report. It can be generated by entering RRTVDDS on the command line.
Special Considerations Like all other Sterling Gentran:Server reports, the Print Re-retrieve through RRTVDDS Command automatically goes to the Output Queue defined for the user running the job. (SEE the “Environment Control” chapter for instructions to set up a user's Output Queue.)

Reports
106 IBM Sterling Gentran:Server for iSeries Release 3.6 User Guide
PRTRRTVDDS DATE: 03/30/11 PRINT DDS RE-RETRIEVE THROUGH RRTVDDS COMMAND TIME: 12:00 PAGE 1
FILE NAME: TCOMINV8D2 LIBRARY: G3X6TSTDTA
APPLICATION ID S/R DESCRIPTION FILE TYPE
TCOMINV8P S Tradacoms Invoice 8 (Physical) EXTERNAL PHYSICAL

Reports
IBM Sterling Gentran:Server for iSeries Release 3.6 User Guide 107
Fields on the Print DDS Re-retrieve through RRTVDDS Command (PRTRRTVDDS)
Field Description
File Name Name of the application file
Library Name of the library where the file is located
Application ID Application ID
S/R Send or Receive Code that identifies whether the application definition is a send file (S) or a receiving file (R)
Description Description of the application field
File Type Type of file used to interface to Sterling Gentran:Server
Common Questions
108 IBM Sterling Gentran:Server for iSeries Release 3.6 User Guide
Common Questions
What are the Max Use and Loop ID fields used for?The Max Use and Loop ID are used to align the application records to the Segments from the transaction side. Review the transaction set being sent or received prior to setting the values on the application records to see how the data loops are formatted. If you are unsure of what to load when setting up the application definition initially, type ‘1’ for Max Use and leave the Loop ID BLANK. These can be updated later, after you have determined how the records are linked to the Segments.
The Max Use identifies how many times the application record is read or written per iteration (occurrence) of the corresponding loop or area from the transaction side. The Loop ID ties multiple records together that go with a loop that occurs multiple times on the transaction side. The Loop ID also ties multiple Segments together with a particular record on the application side that occurs multiple times.
What is the Application Partner Reference used for?The application partner reference is only used for outbound processing. It is the “window” into your application data and identifies who the data is sent to.
If you pass a file to Sterling Gentran:Server for outbound processing, how is Sterling Gentran:Server supposed to know which partner it should be sent to? There are only two ways for Sterling Gentran:Server to determine who that partner is:
1. Identify the partner on the Outbound Processing Command (PRCTRNOUT) under the parameters, RECEIVER ID and RECEIVER ID QUAL. There is a problem with this method because ALL the data in the file is sent to the partner.
2. Use the application partner reference on the application data ID to identify the field that Sterling Gentran:Server looks at to determine the partner. The contents of that field is used to resolve the partner. This allows the file to contain data for multiple partners. This is the normal method chosen.

Common Questions
IBM Sterling Gentran:Server for iSeries Release 3.6 User Guide 109
What happens if my application needs to be changed?It is common to change the application files Sterling Gentran:Server interfaces with to include new or changed information that a partner requires.
Step 1: Modify the Application Definition within Sterling Gentran:Server
If you are using externally described files (physical or multi-format logical), you can retrieve the DDS again into the application definition in Sterling Gentran:Server. If you have made any modifications to the fields after the files were retrieved (such as changing the data type for dates so that the conversion takes place automatically or field values for the inbound definition), those changes are retained as long as both the DDS type and the field length have not changed. If either have changed, then modifications made to the old definition are not applied to the new field. A report is printed automatically when using the re-retrieve function that lists any exceptions that occurred (new fields added, old fields dropped, or changes to existing fields).
The re-retrieve DDS function also updates the Application Partner Reference, Envelope Definitions, and Key Structure automatically with the new location of the same fields. If a field no longer exists, part two of the report lists these exceptions.
Step 2: Re-synchronize any Transactions Tied to the Application Definition
When performing the mapping steps of “connecting the dots” between EDI Elements and application fields, the connection is stored in a database file at load time. If a field’s start position or length is changed, the underlying file that is used when processing the map needs to be updated. Other changes, such as changing the sequence number of a record or field, may create the need for this file to be updated as well.
Use the Application Synchronization (APPSYNCH) command to resynch all maps linked to the application.

Common Questions
110 IBM Sterling Gentran:Server for iSeries Release 3.6 User Guide
How Do I Re-retrieve the DDS for an Application File?To inform Sterling Gentran:Server about changes to your application file, it sometimes becomes necessary to re-retrieve the DDS. You may want to re-retrieve the DDS when you have:
• added new fields to your physical files,
• added new physical files to the logical file, or
• rearranged the order of fields in the logical file.
Re-retrieve the DDS for a Logical File On the work with Application Definition panel (EDIX550-FMT01), type ‘2’ (Revise) in the Opt field next to the application definition for which to re-retrieve the DDS.
The Application Definition panel (EDIX552-FMT01) displays, as shown in Figure 5.64.
Figure 5.64 Application Definition panel (EDIX552-FMT01)
Press F18 (Re-retv. DDS).
Press F18 a second time to confirm that you want to overlay the current DDS and generate a new DDS. A completion message displays after the DDS has been retrieved.
NOTEAn exception report is automatically generated and should be reviewed.
If the DDS was retrieved, the APPSYNCH command is automatically submitted upon exiting the panel and a message displays. This re-synchronizes all linked maps.
EDIX552 Application Definition EDI 03/30/11 FMT01 12:00:00 Application ID . . . . . . . . . . SEMPOEDI Send or Receive. . . . . . . . . . R Division . . . . . . . . . . . . . 000 Description. . . . . . . . . . . . SEM CLASS: PO INB(subsplit #1) Functional Groups. . . . . . . . . PO File Type. . . . . . . . . . . . . L EDI Split File . . . . . . . . . . 00001 EDI Sub-Split File . . . . . . . . 1 Record Type Start Position . . . . Length . . . . . . . . . . . . . . Application File . . . . . . . . . POLGL Update Allowed . . . . . . . . . . Y F5=Refresh F16=Prev Rcd F17=Next Rcd F18=Re-retv. DDS F24=More Keys Press F18 again to overlay the current DDS and generate new DDS

Common Questions
IBM Sterling Gentran:Server for iSeries Release 3.6 User Guide 111
Re-retrieve the DDS for a Physical File On the Work with Application Definition panel (EDIX550-FMT01), type ‘11’ (Rec/Files in the Opt field next to the application definition for which to re-retrieve the DDS.
The Application Records/Files panel (EDIX553-CTL01) displays, as shown in Figure 5.65.
Figure 5.65 Application Records/Files panel (EDIX553-CTL01)
Type ‘12’ (Re-retrieve DDS) in the Opt field next to the selected file and press Enter. A message displays to confirm the re-retrieve operation. Press Enter to confirm.
A message displays indicating that the DDS was re-retrieved for the file along with the incrementor number used to sequence the fields.
NOTEAn exception report is automatically generated and should be reviewed.
If the DDS was retrieved, the APPSYNCH command is automatically submitted upon exiting the panel and a message displays. This re-synchronizes all linked maps.
EDIX553 Application Records/Files EDI 03/30/11 CTL01 12:00:00 Application ID . . . . . . . . . . INVOUTP Send or Receive. . . . . . . . . . S Description. . . . . . . . . . . . Invoice Outbound (Phys file) Position to Sequence Number. . . . Type option, press Enter. 3=Copy 4=Delete 11=Fields 12=Re-retrieve DDS Loop Max Last Update Opt Seq Rec/File A ID Use M W Description Date User 12 10 WPEINVHDR H 1 M Invoice Header 03/30/11 EDI 20 WPEINVCMT H 10 O Invoice Comments 03/30/11 EDI 30 WPEINVITM D 6000 1 M Invoice Item Detail 03/30/11 EDI More... F1=Help F4=Prompt F10=Update F12=Cancel F24=More Keys
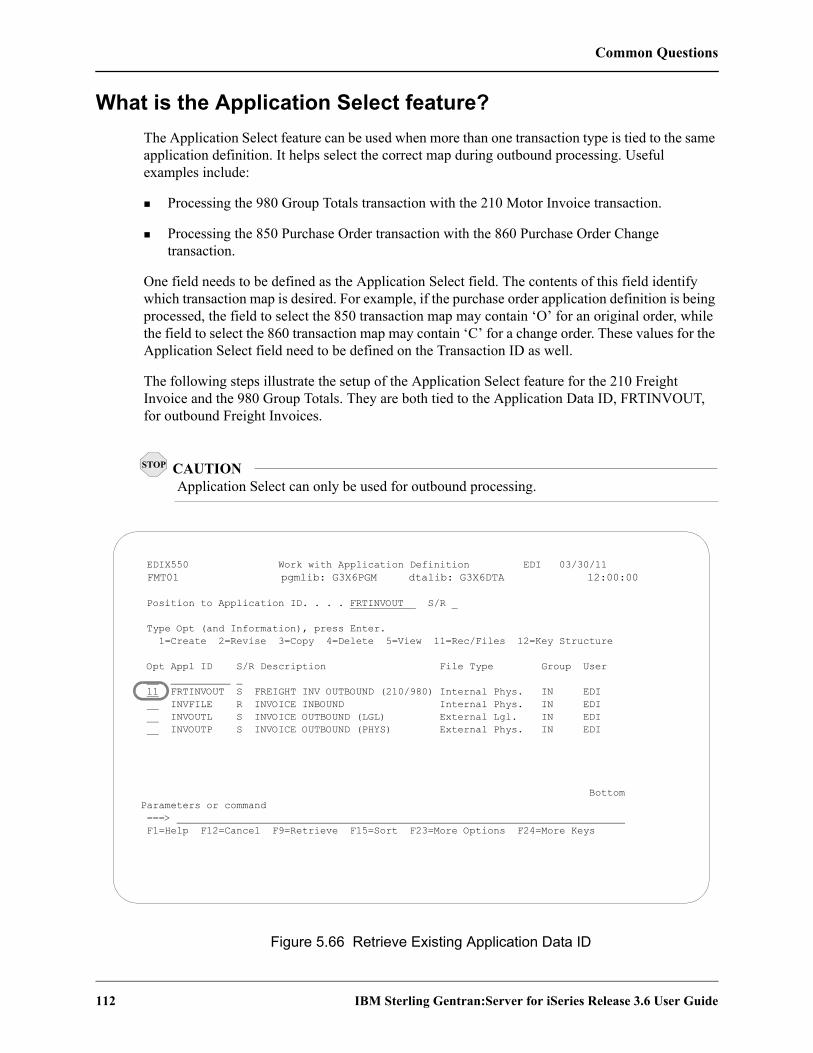
Common Questions
112 IBM Sterling Gentran:Server for iSeries Release 3.6 User Guide
What is the Application Select feature?The Application Select feature can be used when more than one transaction type is tied to the same application definition. It helps select the correct map during outbound processing. Useful examples include:
Processing the 980 Group Totals transaction with the 210 Motor Invoice transaction.
Processing the 850 Purchase Order transaction with the 860 Purchase Order Change transaction.
One field needs to be defined as the Application Select field. The contents of this field identify which transaction map is desired. For example, if the purchase order application definition is being processed, the field to select the 850 transaction map may contain ‘O’ for an original order, while the field to select the 860 transaction map may contain ‘C’ for a change order. These values for the Application Select field need to be defined on the Transaction ID as well.
The following steps illustrate the setup of the Application Select feature for the 210 Freight Invoice and the 980 Group Totals. They are both tied to the Application Data ID, FRTINVOUT, for outbound Freight Invoices.
CAUTIONSTOP
Application Select can only be used for outbound processing.
Figure 5.66 Retrieve Existing Application Data ID
EDIX550 Work with Application Definition EDI 03/30/11 FMT01 pgmlib: G3X6PGM dtalib: G3X6DTA 12:00:00
Position to Application ID. . . . FRTINVOUT S/R
Type Opt (and Information), press Enter. 1=Create 2=Revise 3=Copy 4=Delete 5=View 11=Rec/Files 12=Key Structure
Opt Appl ID S/R Description File Type Group User 11 FRTINVOUT S FREIGHT INV OUTBOUND (210/980) Internal Phys. IN EDI INVFILE R INVOICE INBOUND Internal Phys. IN EDI INVOUTL S INVOICE OUTBOUND (LGL) External Lgl. IN EDI INVOUTP S INVOICE OUTBOUND (PHYS) External Phys. IN EDI
BottomParameters or command ===> F1=Help F12=Cancel F9=Retrieve F15=Sort F23=More Options F24=More Keys

Common Questions
IBM Sterling Gentran:Server for iSeries Release 3.6 User Guide 113
Type ‘11’ (Rec/Files) next to the Application ID to be revised for the Application Select feature and press Enter.
Figure 5.67 Application Records/Files panel (EDIX553-CTL01)
Type ‘11’ (Fields) next to the Header Record/File field and press Enter.
EDIX553 Application Records/Files EDI 03/30/11CTL01 12:00:00
Application ID . . . . . . . . . . FRTINVOUTSend or Receive. . . . . . . . . . SDescription. . . . . . . . . . . . FREIGHT INV OUTBOUND (210/980)
Position to Sequence Number. . . .
Type option, press Enter. 3=Copy 4=Delete 11=Fields 12=Re-retrieve DDS
Loop Max Last UpdateOpt Seq Rec/File A ID Use M W Description Date User11 10 001 H 1 M INV HEADER RECORD 03/30/11 EDI 20 002 D 0400 1 M INV DETAIL RECORD 03/30/11 EDI More...F1=Help F4=Prompt F10=Update F12=Cancel F24=More Keys

Common Questions
114 IBM Sterling Gentran:Server for iSeries Release 3.6 User Guide
Step 1: Define the Application Select Field
Figure 5.68 Application Select Field Definition
Change the data type of the field used to determine the map selection. Here, the field ‘001-TRANS-SET’ contains the transaction set of ‘210’ or ‘980.’ It is defined with a data type of ‘AS’ for Application Select. Only one field can be defined for this feature. When finished, press F10 (Update).
NOTEYou can only define a field as an Application Select field in the Header Record or File.
EDIX554 Application Fields EDI 03/30/11 CTL01 12:00:00
Application ID . . . . . . . . . . FRTINVOUT Send or Receive. . . . . . . . . . S Record/File Sequence Number. . . . 010 Description. . . . . . . . . . . . INV HEADER RECORD Record/File. . . . . . . . . . . . 001
Position to Sequence Number. . . .
Type option, press Enter. 3=Copy 4=Delete
Opt Seq Field Name Ty Start Len M Description Field Value 10 001-VENDOR AN 1 8 M VENDOR NUMBER (SORT KEY) 20 001-INV-NUMBER AN 9 12 M INV NUMBER (SORT KEY) 30 001-REC-TYPE AN 21 3 M RECORD TYPE (SORT KEY) 40 001-INV-DATE MM 24 6 M INV DATE 50 001-TRANS-SET AS 30 3 M TRANS SET (APP. SEL) 60 001-BILL-NAME AN 33 25 M BILL TO NAME More... F1=Help F4=Prompt F10=Update F12=Cancel F13=Services F24=More Keys

Common Questions
IBM Sterling Gentran:Server for iSeries Release 3.6 User Guide 115
Step 2: Display the Application Partner Reference to verify the Application Select Field
Figure 5.69 Verify Application Partner Reference
Verify the field displayed for Application Select. Remember, this field is protected and is only displayed if a field was defined with a data type of ‘AS.’ The Application Select feature is only valid for outbound. The Application Select field must be in a Header Record/File.
EDIX559 Application Partner Reference EDI 03/30/11 FMT01 12:00:00
Application ID . . . . . . . . . . FRTINVOUT Send or Receive. . . . . . . . . . S
Application Partner Reference Field Name . . . . . . . . . . . . 001-VENDOR Qual Field Name. . . . . . . . . .
Application Select Field Name . . . . . . . . . . . . 001-TRANS-SET
F1=Help F4=Prompt F10=Update F12=Cancel F13=Services F24=More Keys

Common Questions
116 IBM Sterling Gentran:Server for iSeries Release 3.6 User Guide
Step 3: Tie the Application Select Values to the first Transaction Map
Figure 5.70 Transaction Map with Application Select
Enter Application Selection Field Values and press F10 (Update).
There are maps for two transaction sets that need to be updated with Application Select Values of 210 and 980. The field defined as the Application Select field contains the value ‘210’ when the map for the Freight invoice is selected. Type this value in the Application Select field. You may have up to six different values defined to select this map. If not using all six fields, duplicate the ‘210’ value in each slot since a BLANK value is valid for Application Select.
CAUTIONSTOP
Application Select values cannot be entered unless the Application Data ID that this Transaction ID is tied to has a field already defined as Application Select.
EDIX503 Transaction Map Definition EDI 03/30/11 FMT01 12:00:00
Transaction ID . . . . . . . . . . 210SM2/8 Send or Receive. . . . . . . . . . S
Division . . . . . . . . . . . . . 000 Description. . . . . . . . . . . . OUTBOUND 210 M2/8 (APP.SELECT) Standards Version. . . . . . . . . M2/8 Transaction Set. . . . . . . . . . 210 Transaction Set Release. . . . . . 0 Transaction Status . . . . . . . . T Use Code . . . . . . . . . . . . . G Envelope Type. . . . . . . . . . . U Application ID . . . . . . . . . . FRTINVOUT Application Selection Field Values 210 210 210 210 210 210
Update Allowed . . . . . . . . . . Y
F1=Help F4=Prompt F10=Update F12=Cancel F13=Services F24=More Keys

Common Questions
IBM Sterling Gentran:Server for iSeries Release 3.6 User Guide 117
Step 4: Tie the Application Select Values to the next Transaction Map
Figure 5.71 Transaction Map with Application Select
Enter Application Selection Field Values and press F10 (Update).
The field defined as the Application Select field contains the value '980' when the map for the Group Totals is selected. Type this value in the Application Select field. You may have up to six different values defined to select this map. If not using all six fields, duplicate the ‘980’ value in each slot since a BLANK value is valid for Application Select.
EDIX503 Transaction Map Definition EDI 03/30/11 FMT01 12:00:00
Transaction ID . . . . . . . . . . 980SM2/8 Send or Receive. . . . . . . . . . S
Division . . . . . . . . . . . . . 000 Description. . . . . . . . . . . . OUTBOUND 980 M2/8 (APP.SELECT) Standards Version. . . . . . . . . M2/8 Transaction Set. . . . . . . . . . 980 Transaction Set Release. . . . . . 0 Transaction Status . . . . . . . . T Use Code . . . . . . . . . . . . . G Envelope Type. . . . . . . . . . . U Application ID . . . . . . . . . . FRTINVOUT Application Selection Field Values 980 980 980 980 980 980
Update Allowed . . . . . . . . . . Y
F1=Help F4=Prompt F10=Update F12=Cancel F13=Services F24=More Keys

Common Questions
118 IBM Sterling Gentran:Server for iSeries Release 3.6 User Guide
Where does Sterling Gentran:Server get the Default values for the ‘L’ date type, ‘T’ time types, and ‘Z’ date/time stamp?
For an application field value of ‘L’, ‘T’, or ‘Z,’ IBM forces a specific default value for each format. It is not possible to write an application record with spaces or zeros in those date/time fields. For inbound applications, the field values have to be in the specified format or a file error will occur when trying to write the application record. The appropriate default value is forced in the inbound mapper when a valid value is not mapped to these fields. The default values for each type are shown in this table.
DDS Data Type Format Default Value (for inbound
applications)Sterling Gentran Data Type
When Retrieved by DDS
L *ISO or *JIS
0001-01-01 L
L *USA 01/01/0001 LU
L *EUR 01.01.0001 LE
Z — 0001-01-01-00.00.00.000000 The application field is broken down into two separate fields. This makes mapping easier for separate date and time elements. The date portion will have a field type of ‘L,’ with a default value of 0001-01-01, and the time portion will have a field type of ‘TS,’ with a default value of -00.00.00.000000.
T *HMS
*JIS
00:00:00 TI
T *ISO
*EUR
00.00.00 TE
T *USA 00:00 AM TU
T With *HMS Timsep
(‘ ‘)
00 00 00 TB
Chapter
IBM Sterling Gentran:Server for iSeries Release 3.6 User Guide 1
6 Transaction Mapping
In this ChapterThis chapter explains what a transaction map is and where it is used within Sterling Gentran:Server. Step-by-step procedures are provided to assist you in creating an outbound and an inbound map. As examples, an invoice was selected for the outbound map and a purchase order for the inbound map. The chapter covers the following topics:
What is a Transaction Map? . . . . . . . . . . . . . . . . . . . . . . . . . . . . . . . . . . . . . . . . . . . . . . 6-1
What Does the Transaction Mapping Subsystem Do? . . . . . . . . . . . . . . . . . . . . . . . . . . 6-2
Panel Quick Reference . . . . . . . . . . . . . . . . . . . . . . . . . . . . . . . . . . . . . . . . . . . . . . . . . . 6-3
Use the Transaction Mapping Panels . . . . . . . . . . . . . . . . . . . . . . . . . . . . . . . . . . . . . . . 6-7
The ezMap Command. . . . . . . . . . . . . . . . . . . . . . . . . . . . . . . . . . . . . . . . . . . . . . . . . 6-171
Reports . . . . . . . . . . . . . . . . . . . . . . . . . . . . . . . . . . . . . . . . . . . . . . . . . . . . . . . . . . . . 6-174
Common Questions. . . . . . . . . . . . . . . . . . . . . . . . . . . . . . . . . . . . . . . . . . . . . . . . . . . 6-205
What is a Transaction Map?“Transaction mapping” is the process of creating a map. A map contains all the information about the EDI segments and elements that are used for a specific document, such as the invoice or purchase order. It defines the transaction format that is used for translation. The segments and elements are pulled into your map and stored under a single identifier called the Transaction ID or map name.
The map is then used to create a link with the application definition. The link is established by identifying how the transaction elements are related to the application fields.
What Does the Transaction Mapping Subsystem Do?
2 IBM Sterling Gentran:Server for iSeries Release 3.6 User Guide
What Does the Transaction Mapping Subsystem Do?
The Transaction Mapping subsystem gives you the following capabilities:
Create, modify, delete, view, and copy a transaction map
Convert a transaction map to a new version (VERCNVT)
Copy a transaction map between libraries (TRNCPY)
Create, modify, delete, view, and copy Translation and Validation Tables
Copy Translation Tables and Validation Tables between libraries (CEDCPY)
Define the criteria for sub-splitting
Synchronize a transaction map (MAPSYNCH)
Print a transaction map (PRTMAP)
Print a transaction table (PRTTRNTBL)
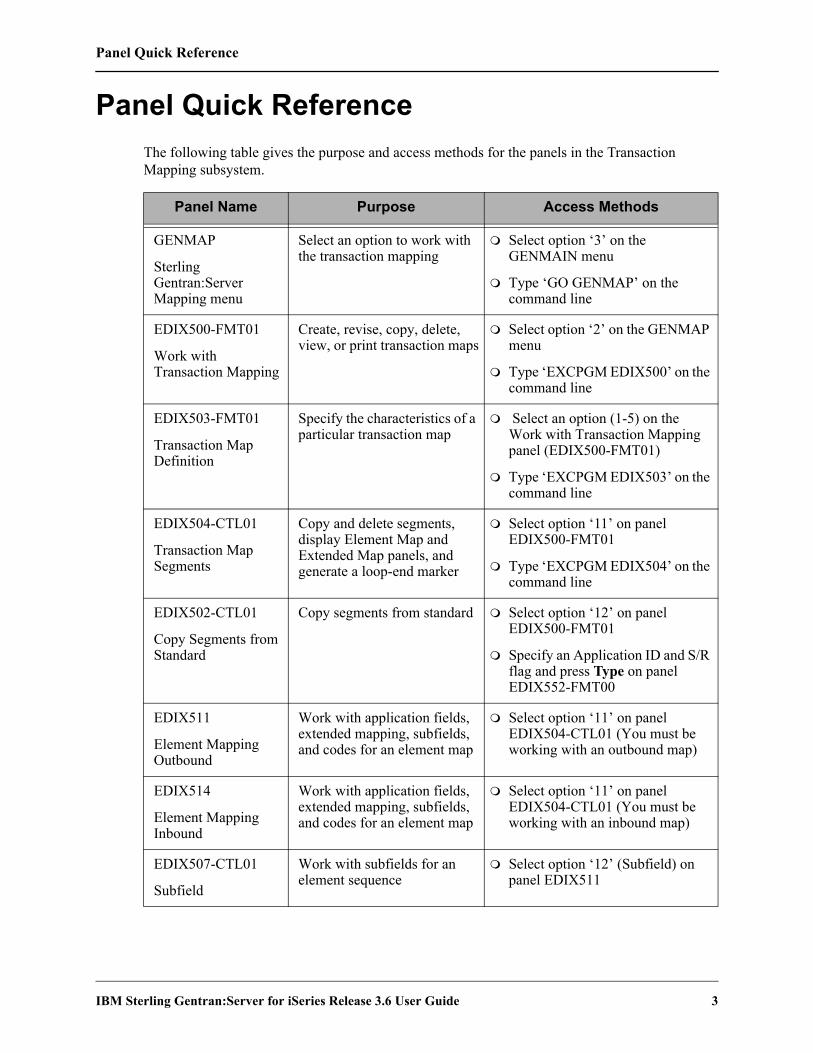
Panel Quick Reference
IBM Sterling Gentran:Server for iSeries Release 3.6 User Guide 3
Panel Quick ReferenceThe following table gives the purpose and access methods for the panels in the Transaction Mapping subsystem.
Panel Name Purpose Access Methods
GENMAP
Sterling Gentran:Server Mapping menu
Select an option to work with the transaction mapping
Select option ‘3’ on the GENMAIN menu
Type ‘GO GENMAP’ on the command line
EDIX500-FMT01
Work with Transaction Mapping
Create, revise, copy, delete, view, or print transaction maps
Select option ‘2’ on the GENMAP menu
Type ‘EXCPGM EDIX500’ on the command line
EDIX503-FMT01
Transaction Map Definition
Specify the characteristics of a particular transaction map
Select an option (1-5) on the Work with Transaction Mapping panel (EDIX500-FMT01)
Type ‘EXCPGM EDIX503’ on the command line
EDIX504-CTL01
Transaction Map Segments
Copy and delete segments, display Element Map and Extended Map panels, and generate a loop-end marker
Select option ‘11’ on panel EDIX500-FMT01
Type ‘EXCPGM EDIX504’ on the command line
EDIX502-CTL01
Copy Segments from Standard
Copy segments from standard Select option ‘12’ on panel EDIX500-FMT01
Specify an Application ID and S/R flag and press Type on panel EDIX552-FMT00
EDIX511
Element Mapping Outbound
Work with application fields, extended mapping, subfields, and codes for an element map
Select option ‘11’ on panel EDIX504-CTL01 (You must be working with an outbound map)
EDIX514
Element Mapping Inbound
Work with application fields, extended mapping, subfields, and codes for an element map
Select option ‘11’ on panel EDIX504-CTL01 (You must be working with an inbound map)
EDIX507-CTL01
Subfield
Work with subfields for an element sequence
Select option ‘12’ (Subfield) on panel EDIX511
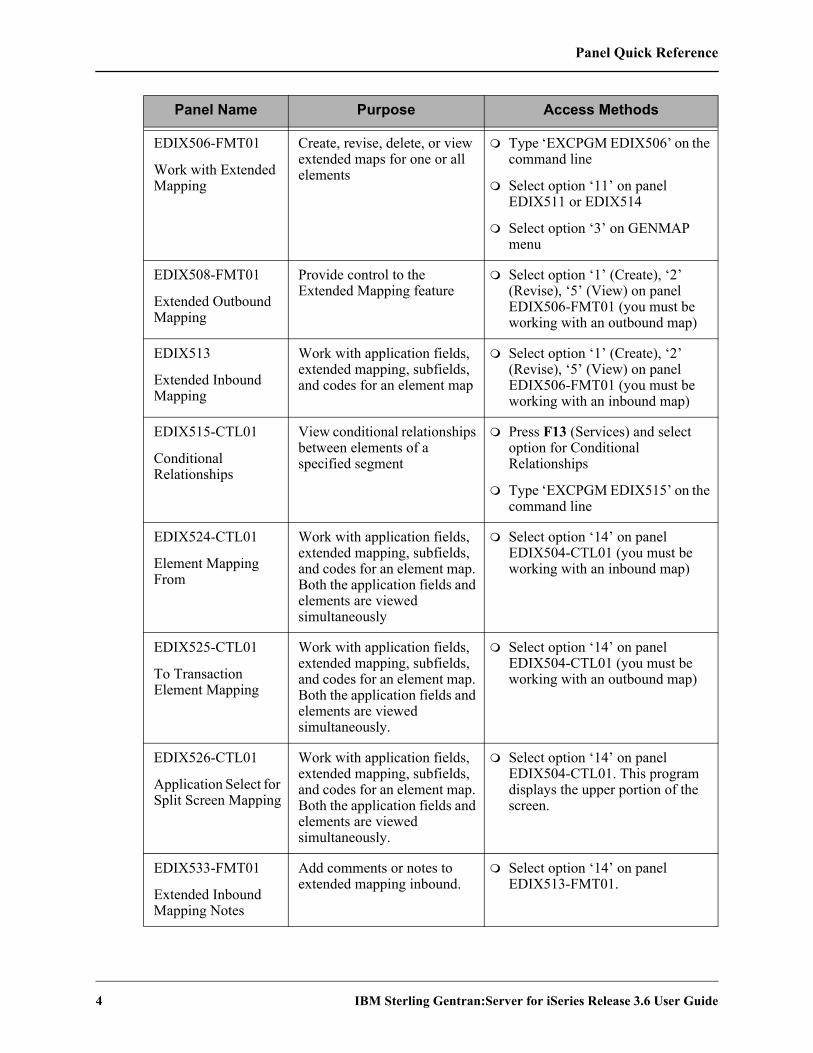
Panel Quick Reference
4 IBM Sterling Gentran:Server for iSeries Release 3.6 User Guide
EDIX506-FMT01
Work with Extended Mapping
Create, revise, delete, or view extended maps for one or all elements
Type ‘EXCPGM EDIX506’ on the command line
Select option ‘11’ on panel EDIX511 or EDIX514
Select option ‘3’ on GENMAP menu
EDIX508-FMT01
Extended Outbound Mapping
Provide control to the Extended Mapping feature
Select option ‘1’ (Create), ‘2’ (Revise), ‘5’ (View) on panel EDIX506-FMT01 (you must be working with an outbound map)
EDIX513
Extended Inbound Mapping
Work with application fields, extended mapping, subfields, and codes for an element map
Select option ‘1’ (Create), ‘2’ (Revise), ‘5’ (View) on panel EDIX506-FMT01 (you must be working with an inbound map)
EDIX515-CTL01
Conditional Relationships
View conditional relationships between elements of a specified segment
Press F13 (Services) and select option for Conditional Relationships
Type ‘EXCPGM EDIX515’ on the command line
EDIX524-CTL01
Element Mapping From
Work with application fields, extended mapping, subfields, and codes for an element map. Both the application fields and elements are viewed simultaneously
Select option ‘14’ on panel EDIX504-CTL01 (you must be working with an inbound map)
EDIX525-CTL01
To Transaction Element Mapping
Work with application fields, extended mapping, subfields, and codes for an element map. Both the application fields and elements are viewed simultaneously.
Select option ‘14’ on panel EDIX504-CTL01 (you must be working with an outbound map)
EDIX526-CTL01
Application Select for Split Screen Mapping
Work with application fields, extended mapping, subfields, and codes for an element map. Both the application fields and elements are viewed simultaneously.
Select option ‘14’ on panel EDIX504-CTL01. This program displays the upper portion of the screen.
EDIX533-FMT01
Extended Inbound Mapping Notes
Add comments or notes to extended mapping inbound.
Select option ‘14’ on panel EDIX513-FMT01.
Panel Name Purpose Access Methods

Panel Quick Reference
IBM Sterling Gentran:Server for iSeries Release 3.6 User Guide 5
EDIX538-FMT01
Extended Outbound Mapping Notes
Add comments or notes to extended mapping outbound.
Select option ‘14’ on panel EDIX538-FMT01.
EDIX580-FMT01
Work with Tables
Define translation tables, copy code or data, translate code or data, and validate data
Select option ‘13’ on panel EDIX500-FMT01
Type ‘EXCPGM EDIX580’ on the command line
Select option ‘4’ on the GENMAP menu
EDIX581-FMT01
Define Translation Table
Define a translation table Select option ‘1’ (Create), ‘2’ (Revise), ‘5’ (View) on panel EDIX580-FMT01
EDIX582-FMT01
Copy Codes From Standards
Revise an existing table by copying codes or data from a standard or another Table ID
Select option ‘11’ on panel EDIX580-FMT01
EDIX584-CTL01
Data Translation By Partner
Define data translation values Select option ‘12’ on panel EDIX580-FMT01
EDIX350-FMT01
Work with Sub-Splits
Create, revise, copy, delete, print, or view sub-split files
Select option ‘14’ on panel EDIX500-FMT01
Type ‘EXCPGM EDIX350’on the command line
Select option ‘5’ on the GENMAP menu
EDIX351-FMT01
Sub-Split Table
Work with sub-split files Select option ‘1’ (Create), ‘2’ (Revise), or ‘5’ (View) on panel EDIX350-FMT01
PRTMAP
Print Mapping Files
Print a transaction map file Select option ‘6’ (Print) on panel EDIX500-FMT01
Type ‘PRTMAP’ on the command line
Select option ‘11’ on the GENMAP menu
Panel Name Purpose Access Methods
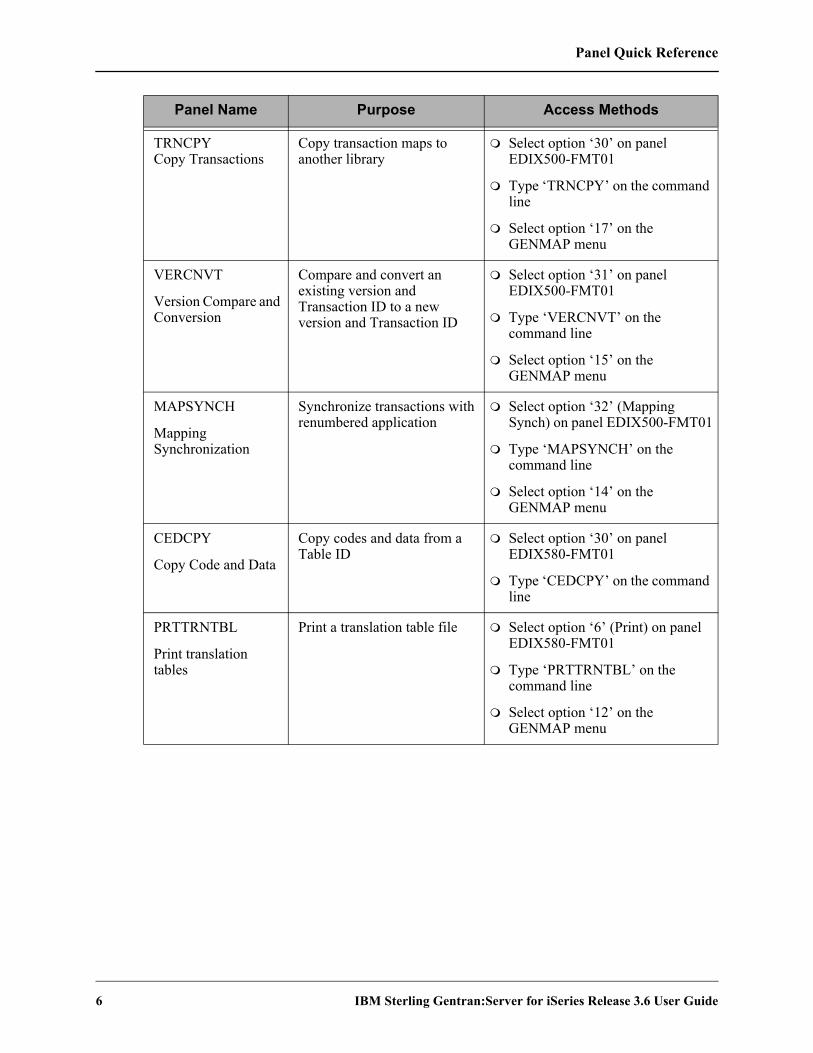
Panel Quick Reference
6 IBM Sterling Gentran:Server for iSeries Release 3.6 User Guide
TRNCPYCopy Transactions
Copy transaction maps to another library
Select option ‘30’ on panel EDIX500-FMT01
Type ‘TRNCPY’ on the command line
Select option ‘17’ on the GENMAP menu
VERCNVT
Version Compare and Conversion
Compare and convert an existing version and Transaction ID to a new version and Transaction ID
Select option ‘31’ on panel EDIX500-FMT01
Type ‘VERCNVT’ on the command line
Select option ‘15’ on the GENMAP menu
MAPSYNCH
Mapping Synchronization
Synchronize transactions with renumbered application
Select option ‘32’ (Mapping Synch) on panel EDIX500-FMT01
Type ‘MAPSYNCH’ on the command line
Select option ‘14’ on the GENMAP menu
CEDCPY
Copy Code and Data
Copy codes and data from a Table ID
Select option ‘30’ on panel EDIX580-FMT01
Type ‘CEDCPY’ on the command line
PRTTRNTBL
Print translation tables
Print a translation table file Select option ‘6’ (Print) on panel EDIX580-FMT01
Type ‘PRTTRNTBL’ on the command line
Select option ‘12’ on the GENMAP menu
Panel Name Purpose Access Methods

Use the Transaction Mapping Panels
IBM Sterling Gentran:Server for iSeries Release 3.6 User Guide 7
Use the Transaction Mapping Panels
NOTETo use the IBM® Sterling Gentran:Server® for iSeries® Release 3.6 tutorials, you must add the tutorial library (G3X6SAMP) to your library list before the Sterling Gentran:Server data library (G3X6DTA).
OverviewThis section explains how to use the Transaction Mapping panels through the following tasks:
Create an Outbound Transaction Map
Create an Inbound Transaction Map
Add a Comment to an Extended Map
Use the Split Screen Map Option
Create a Code Translation Table
Create a Data Translation Table
Create a Data Validation Table
Copy an existing Transaction Map
Copy a Transaction Map Between Libraries
Convert a Transaction Map to a New Version
Synchronize a Transaction Map
Print a Transaction Map
Print a Translation Table
Print a Transaction Extended Mapping Note
While the scenarios define specific maps and tables, they are based on common steps taken to define any map or table. Use these tasks as a guide to set up your own maps and tables.
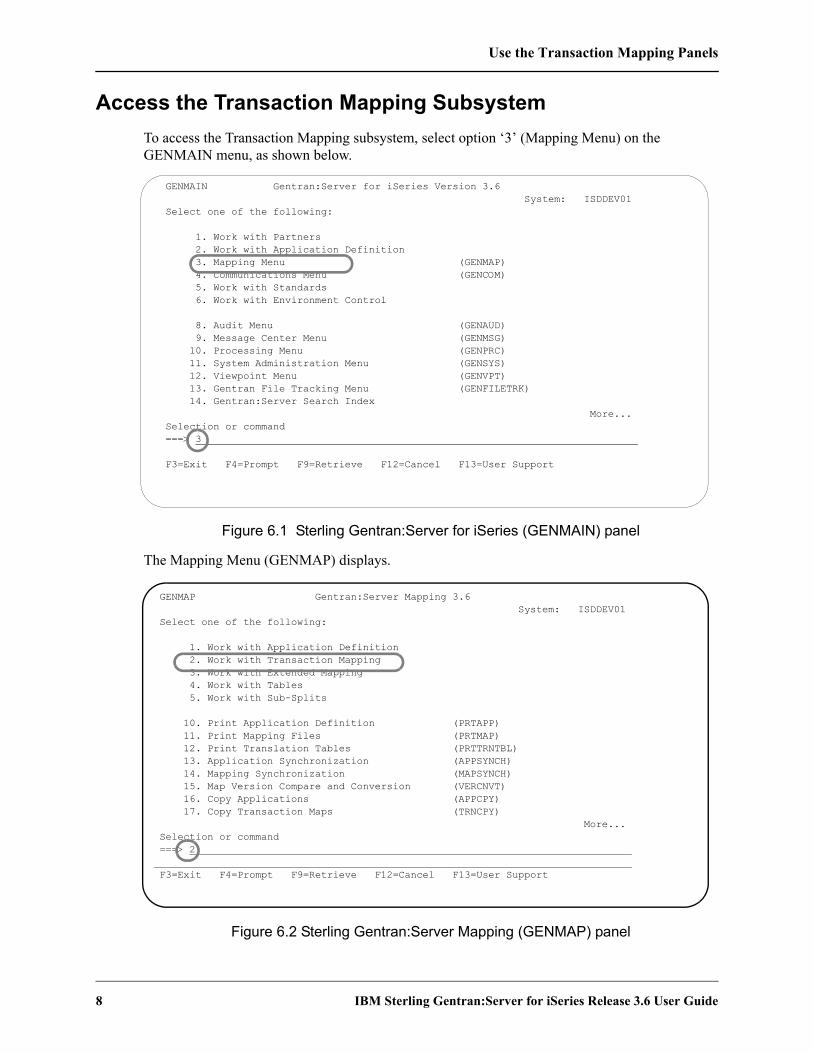
Use the Transaction Mapping Panels
8 IBM Sterling Gentran:Server for iSeries Release 3.6 User Guide
Access the Transaction Mapping SubsystemTo access the Transaction Mapping subsystem, select option ‘3’ (Mapping Menu) on the GENMAIN menu, as shown below.
Figure 6.1 Sterling Gentran:Server for iSeries (GENMAIN) panel
The Mapping Menu (GENMAP) displays.
Figure 6.2 Sterling Gentran:Server Mapping (GENMAP) panel
GENMAIN Gentran:Server for iSeries Version 3.6 System: ISDDEV01 Select one of the following: 1. Work with Partners 2. Work with Application Definition 3. Mapping Menu (GENMAP) 4. Communications Menu (GENCOM) 5. Work with Standards 6. Work with Environment Control 8. Audit Menu (GENAUD) 9. Message Center Menu (GENMSG) 10. Processing Menu (GENPRC) 11. System Administration Menu (GENSYS) 12. Viewpoint Menu (GENVPT) 13. Gentran File Tracking Menu (GENFILETRK) 14. Gentran:Server Search Index More... Selection or command ===> 3 F3=Exit F4=Prompt F9=Retrieve F12=Cancel F13=User Support
GENMAP Gentran:Server Mapping 3.6 System: ISDDEV01 Select one of the following: 1. Work with Application Definition 2. Work with Transaction Mapping 3. Work with Extended Mapping 4. Work with Tables 5. Work with Sub-Splits 10. Print Application Definition (PRTAPP) 11. Print Mapping Files (PRTMAP) 12. Print Translation Tables (PRTTRNTBL) 13. Application Synchronization (APPSYNCH) 14. Mapping Synchronization (MAPSYNCH) 15. Map Version Compare and Conversion (VERCNVT) 16. Copy Applications (APPCPY) 17. Copy Transaction Maps (TRNCPY) More... Selection or command ===> 2 F3=Exit F4=Prompt F9=Retrieve F12=Cancel F13=User Support

Use the Transaction Mapping Panels
IBM Sterling Gentran:Server for iSeries Release 3.6 User Guide 9
Select option ‘2’ from the GENMAP menu to access the Work with Transaction Mapping panel.
The Work with Transaction Mapping panel (EDIX500-FMT01) displays.
Figure 6.3 Work with Transaction Mapping panel (EDIX500-FMT01)
EDIX500 Work with Transaction Mapping EDI 09/01/04 FMT01 pgmlib: G3X6PGM dtalib: G3X6DTA 12:00:00 Position to Transaction ID . . . . S/R Type option (and Information), press Enter. 1=Create 2=Revise 3=Copy 4=Delete 5=View 6=Print 11=Segments Opt Tran ID S/R Appl ID Description User Typ ANSI2040IN R INVFILE ANSI 002040 INBOUND INVOICES CSG G ANSI2040PO S POFILE ANSI 002040 OUTBOUND POS CSG G BINARYOUT S BINARYOUT BINARY OUT SAMPLE MKK G CLS1MAPA S SEMINAPPL Class Outbound X12 Example CB P CLS2MAPA R SEMPOAPPL Class Inbound X12 Example CB G INVOIC S INVOIC Edifact OB Invoice D:94B SEC P INVOICOUT S INVOICOUT Tutorial EDIFACT Invoice D:94B CB P ORDERS R ORDERS Edifact Inb Orders D:94B CSG P More... Parameters or command ===> F1=Help F6=More/Less F12=Cancel F15=Sort F23=More Options F24=More Keys

Use the Transaction Mapping Panels
10 IBM Sterling Gentran:Server for iSeries Release 3.6 User Guide
View Additional Fields from the Work with Transaction Mapping PanelPress F6 (More/Less) from the Work with Transaction Mapping panel to view the subfile with an additional row of information.
Figure 6.4 Work with Transaction Mapping panel (EDIX500-FMT01)with additional fields
Field Definitions for the Unfolded Row (Showing Additional Fields)Last Used Date
The date the transaction map was last used to translate inbound or outbound data.
Last Used TimeThe time the transaction map was last used to translate inbound or outbound data.
Last Used by UserThe initials (User ID) of the person who last used the map to translate the data.
EDIX500 Work with Transaction Mapping EDI 09/01/04 FMT01 pgmlib: G3X6PGM dtalib: G3X6DTA 12:00:00 Position to Transaction ID . . . . S/R Type option (and Information), press Enter. 1=Create 2=Revise 3=Copy 4=Delete 5=View 6=Print 11=Segments Opt Tran ID S/R Appl ID Description User Typ ANSI2040IN R INVFILE ANSI 002040 INBOUND INVOICES CSG G Last Used Date 05/16/04 Time 15:05:32 User IH ANSI2040PO S POFILE ANSI 002040 OUTBOUND POS CSG G Last Used Date 05/16/04 Time 15:06:30 User IH BINARYOUT S BINARYOUT BINARY OUT SAMPLE MKK G Last Used Date Time 00:00:00 User CLS1MAPA S SEMINAPPL Class Outbound X12 Example CB P Last Used Date Time 00:00:00 User More... Parameters or command ===> F1=Help F6=More/Less F12=Cancel F15=Sort F23=More Options F24=More Keys

Use the Transaction Mapping Panels
IBM Sterling Gentran:Server for iSeries Release 3.6 User Guide 11
Create an Outbound Transaction MapDuring this task you will create a transaction map for the example invoice presented in the “Mapping Getting Started” chapter. The map will be modeled after an existing map, “810S41TPC1.” It will be tied to application definition “INVOUTPEDI” which was created in the “Application Definition” chapter.
Step 1: Determine a New Transaction ID
The Work with Transaction Mapping panel (EDIX500-FMT01) provides you with the option for creating a new Transaction ID. Typically, most users choose a name that identifies the transaction, version, and partner-specific code. The name you choose must be unique.
Figure 6.5 Work with Transaction Mapping panel (EDIX500-FMT01)
EDIX500 Work with Transaction Mapping EDI 03/30/11 FMT01 pgmlib: G3X6PGM dtalib: G3X6DTA 12:00:00 Position to Transaction ID . . . . S/R Type option (and Information), press Enter. 1=Create 2=Revise 3=Copy 4=Delete 5=View 6=Print 11=Segments Opt Tran ID S/R Appl ID Description User Typ 1 810S41EDI S ANSI2040IN R INVFILE ANSI 002040 INBOUND INVOICES CSG G ANSI2040PO S POFILE ANSI 002040 OUTBOUND POS CSG G INVOIC S INVOIC Edifact OB Invoice D:94B SEC P INVOICOUT S INVOICOUT Tutorial EDIFACT Invoice D:94B CB P ORDERS R ORDERS Edifact Inb Orders D:94B CSG P ORDERSINB R ORDERSINB Tutorial ORDERS Inbound D:94B CB G POMAP4010 R SEMPOAPPL Purchase Order Inbound 004010 EDI P SEMINMAP1 S SEMINAPPL SEMINAR 810 OUTBOUND MAP 2040 CSG P SEMPO4010 R SEMPOAPPL Purch. Order Inb. 004010 EDI P More... Parameters or command ===> F1=Help F3=Exit F12=Cancel F15=Sort F23=More Options F24=More Keys

Use the Transaction Mapping Panels
12 IBM Sterling Gentran:Server for iSeries Release 3.6 User Guide
To create a map for this example, complete the following instructions:
1. Type ‘1’ (Create) in the Option field.
2. Type ‘810S41EDI’ in the Tran(saction) ID field. The name “810S41EDI” is an example of a Transaction ID to use. You can use any name you choose (for example, your company’s initials).
3. Type ‘S’ in the S/R (Send/Receive) field to indicate that this map will be used to send data to your trading partner and press Enter. This action displays the Transaction Map Definition panel (EDIX503-FMT01).
Field DescriptionsTransaction ID
This field contains the single identifier under which all the connections between the EDI format and the application format are stored. It is also referred to as the map name. This is the primary key when identifying a map.
Send or ReceiveThis field identifies whether the map will be used to translate inbound or outbound data. The values are ‘S’ for send or ‘R’ for receive. It is the secondary key when identifying a map.

Use the Transaction Mapping Panels
IBM Sterling Gentran:Server for iSeries Release 3.6 User Guide 13
Transaction Map DefinitionStep 2: Define a New Transaction ID
The Transaction Map Definition panel (EDIX503-FMT01) is where you specify the characteristics of your Transaction ID.
Figure 6.6 Transaction Map Definition panel (EDIX503-FMT01)
To define the map associated with the sample invoice, complete the following instructions:
1. Type the information as shown on the panel for the following fields:
Description
Standards Version
Transaction Set and Release
Transaction Status
Use Code
Envelope Type
Application ID
EDIX503 Transaction Map Definition EDI 03/30/11 FMT01 12:00:00 Transaction ID . . . . . . . . . . 810S41EDI Send or Receive. . . . . . . . . . S Division . . . . . . . . . . . . . 000 Description. . . . . . . . . . . . Outbound Invoice 004010 (demo) Standards Version. . . . . . . . . 004010 Transaction Set. . . . . . . . . . 810 Transaction Set Release. . . . . . 0 Transaction Status . . . . . . . . T Use Code . . . . . . . . . . . . . P Envelope Type. . . . . . . . . . . X Application ID . . . . . . . . . . INVOUTPEDI Application Selection Field Values Update Allowed . . . . . . . . . . Y F1=Help F4=Prompt F10=Update F12=Cancel F13=Services F24=More Keys

Use the Transaction Mapping Panels
14 IBM Sterling Gentran:Server for iSeries Release 3.6 User Guide
NOTEPress F4 (Prompt) on each of the fields (except Description and Update Allowed) to select or see your available options. If you are unsure about what any field means or what kind of information you must enter, move the cursor into the field and press F1 (Help).
2. Make sure the Update Allowed flag is set to ‘Y’ and press F10 (Update) to update the panel. This action displays the ‘Work with Transaction Mapping’ panel (EDIX500-FMT01) and displays the message “Create Operation Successful’” at the bottom of the panel.
Field DescriptionsDivision
The division code is defaulted from your Sterling Gentran:Server user profile, which is defined in the Environmental Control subsystem. The division code is used to limit the information a user can see online or modify. The ‘000’ division code is a Global division code that allows you to modify any map, regardless of the specific division it was assigned.
Description This field is used to provide a description of the map. It displays on the Work with Transaction Mapping panel (EDIX500-FMT01) and it can be used to help differentiate maps.
Standards VersionThis field reflects the full version code as known in the standards. (SEE the “Standards” chapter for more information on available versions.) If you are using an X12 version, supply the leading zeros. Remember to tag the subset code with the version you are using (if necessary), such as 004010VICS. SEE the Standards Maintenance subsystem within online Sterling Gentran:Server if you are unsure of the version.
Transaction Set/Release This field is the actual Transaction Set ID for the document being sent in the EDI format. The value is specific to the standards and can be found in a standards manual, in Sterling Gentran:Server Standards Maintenance subsystem, or from your trading partner. The Release code is only needed if the version is for TRADACOMS. The default is ‘0.’
Transaction Status This field indicates the status of this map. It is used in conjunction with the status of the partner’s transaction record to determine the value of the Test/Production flag in the ISA15 element. If the status is ‘P’ (Production) and the status of the trading partner’s record for the transaction is ‘P,’ the value in the ISA15 element will be ‘P.’ Both statuses must be a ‘P.” Otherwise, the ISA15 element will contain a ‘T’ (Test).
Use the Transaction Mapping Panels
IBM Sterling Gentran:Server for iSeries Release 3.6 User Guide 15
Use Code This flag identifies whether the map is for general purpose or for specific trading partners. There should only be one map classified as ‘G’ (General) for a particular transaction-version combination. When processing, the first general-type map for the requested version is selected. Any additional maps for the same version and transaction are ignored. General maps are typically comprehensive and include the largest subset of segments that any partner can send.
Partner-specific maps are useful when the EDI format for a particular partner is different than the format used by most of your partners. It is common to have partner-specific maps for outbound documents. Most partners request specific segments or want some segments omitted. It is simpler to make a copy of the general map and modify it for a partner. It is fairly common to use one general map for many partners for Inbound documents.
Envelope Type This flag identifies the type of envelope or standards being used for this map. The flag corresponds to the transaction set. For example, the 810 transaction is an X12 invoice, so the type is set to ‘X.’
Application ID This field contains the name of the Application ID that this map is tied to. In “Mapping Getting Started,” there is a Bicycle Wheel diagram that shows the relationship between transactions and the Application ID. This field is where that connection is made. In this example, the map is tied to the Application ID ‘INVOUTPEDI,’ which was set up in the “Application Definition” chapter.
Application Selection Field Values These fields should be filled in only if application select logic is used. Application select logic is an advanced method of tying maps for more than one transaction set type to the same Application ID (only available for outbound maps).
Update Allowed Specify ‘Y’ (Yes) to allow updates to be made to this map while you develop and test it. When you move this map into production, you may want to set this flag to 'N’ (No) to prevent modifications from being made without the proper authority.

Use the Transaction Mapping Panels
16 IBM Sterling Gentran:Server for iSeries Release 3.6 User Guide
Copy Segments from StandardStep 3: Access the Copy Segments from Standard Panel
The next step is to copy the segments into your map.
Figure 6.7 Work with Transaction Mapping panel (EDIX500-FMT01)
Type ‘12’ (Copy Segments) in the Option field next to the Transaction ID you just created and press Enter. The Copy Segments from Standard panel (EDIX502-CTL01) displays, allowing you to select the segments to be copied.
EDIX500 Work with Transaction Mapping EDI 03/30/11 FMT01 pgmlib: G3X6PGM dtalib: G3X6DTA 12:00:00 Position to Transaction ID . . . . 810S41EDI S/R S Type option (and Information), press Enter. 12=Copy Segments 13=Tables 14=Sub-Split 15=Ext Map 30=Copy Tran ID Opt Tran ID S/R Appl ID Description User Typ 12 810S41EDI S INVOUTPEDI Outbound Invoice 004010 (demo) CB P 810S41TPC1 S INVOUTP OUTBOUND INVOICE 004010 (demo) EDI P 810S41TPC2 S INVOUTL Invoice Outbound 4010 (to TP2) EDI P 850INB R POINB Tutorial PO Inbound 004010 CB G 880SU31 S INVOUTL Outb Invoice (880) U3/1 EDI G Bottom Parameters or command ===> F1=Help F3=Exit F12=Cancel F15=Sort F23=More Options F24=More Keys

Use the Transaction Mapping Panels
IBM Sterling Gentran:Server for iSeries Release 3.6 User Guide 17
Step 4: Copy Segments from the Standard into the Map
The Copy Segments from Standard panel (EDIX502-CTL01) displays all the segments contained in the specified transaction set and standards version. It allows you to choose the EDI segments you will need for your map.
This list is an example of segments that could be requested by your partner and will be used for this example.
Figure 6.8 Segments Requested by Partner for an Outbound X12 Invoice
List of Segments Requested by Partner
Area Code Segment ID Loop ID
H BIG
H NTE
H REF
H N1 1000
H N3 1000
H N4 1000
H DTM
D IT1 6000
D PID 6100
S TDS
S CTT
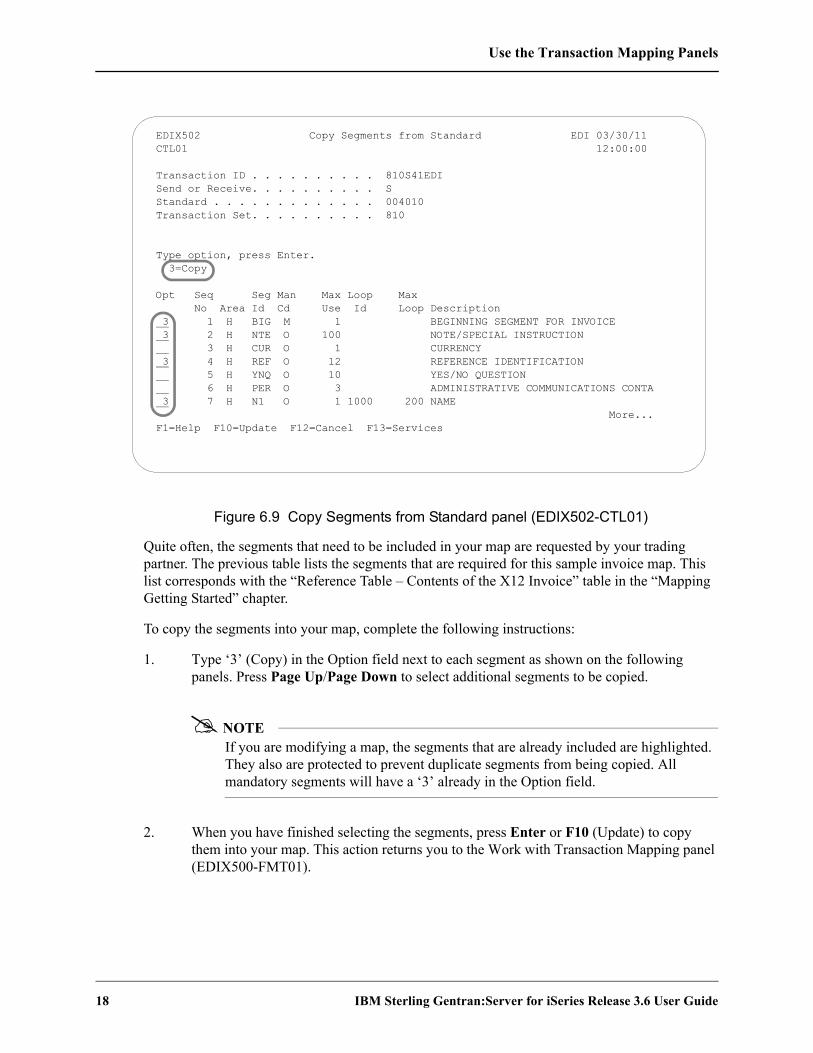
Use the Transaction Mapping Panels
18 IBM Sterling Gentran:Server for iSeries Release 3.6 User Guide
Figure 6.9 Copy Segments from Standard panel (EDIX502-CTL01)
Quite often, the segments that need to be included in your map are requested by your trading partner. The previous table lists the segments that are required for this sample invoice map. This list corresponds with the “Reference Table – Contents of the X12 Invoice” table in the “Mapping Getting Started” chapter.
To copy the segments into your map, complete the following instructions:
1. Type ‘3’ (Copy) in the Option field next to each segment as shown on the following panels. Press Page Up/Page Down to select additional segments to be copied.
NOTEIf you are modifying a map, the segments that are already included are highlighted. They also are protected to prevent duplicate segments from being copied. All mandatory segments will have a ‘3’ already in the Option field.
2. When you have finished selecting the segments, press Enter or F10 (Update) to copy them into your map. This action returns you to the Work with Transaction Mapping panel (EDIX500-FMT01).
EDIX502 Copy Segments from Standard EDI 03/30/11 CTL01 12:00:00 Transaction ID . . . . . . . . . . 810S41EDI Send or Receive. . . . . . . . . . S Standard . . . . . . . . . . . . . 004010 Transaction Set. . . . . . . . . . 810 Type option, press Enter. 3=Copy Opt Seq Seg Man Max Loop Max No Area Id Cd Use Id Loop Description 3 1 H BIG M 1 BEGINNING SEGMENT FOR INVOICE 3 2 H NTE O 100 NOTE/SPECIAL INSTRUCTION 3 H CUR O 1 CURRENCY 3 4 H REF O 12 REFERENCE IDENTIFICATION 5 H YNQ O 10 YES/NO QUESTION 6 H PER O 3 ADMINISTRATIVE COMMUNICATIONS CONTA 3 7 H N1 O 1 1000 200 NAME More... F1=Help F10=Update F12=Cancel F13=Services

Use the Transaction Mapping Panels
IBM Sterling Gentran:Server for iSeries Release 3.6 User Guide 19
The following panels show which segments to copy.
EDIX502 Copy Segments from Standard EDI 03/30/11 CTL01 12:00:00 Transaction ID . . . . . . . . . . 810S41EDI Send or Receive. . . . . . . . . . S Standard . . . . . . . . . . . . . 004010 Transaction Set. . . . . . . . . . 810 Type option, press Enter. 3=Copy Opt Seq Seg Man Max Loop Max No Area Id Cd Use Id Loop Description 8 H N2 O 2 1000 ADDITIONAL NAME INFORMATION 3 9 H N3 O 2 1000 ADDRESS INFORMATION 3 10 H N4 O 1 1000 GEOGRAPHIC LOCATION 11 H REF O 12 1000 REFERENCE IDENTIFICATION 12 H PER O 3 1000 ADMINISTRATIVE COMMUNICATIONS CONTA 13 H DMG O 1 1000 DEMOGRAPHIC INFORMATION 14 H ITD O 999999 TERMS OF SALE/DEFERRED TERMS OF SAL More... F1=Help F10=Update F12=Cancel F13=Services Highlighted segments already exist in map.
EDIX502 Copy Segments from Standard EDI 03/30/11 CTL01 12:00:00 Transaction ID . . . . . . . . . . 810S41EDI Send or Receive. . . . . . . . . . S Standard . . . . . . . . . . . . . 004010 Transaction Set. . . . . . . . . . 810 Type option, press Enter. 3=Copy Opt Seq Seg Man Max Loop Max No Area Id Cd Use Id Loop Description 3 15 H DTM O 10 DATE/TIME REFERENCE 16 H FOB O 1 F.O.B. RELATED INSTRUCTIONS 17 H PID O 200 PRODUCT/ITEM DESCRIPTION 18 H MEA O 40 MEASUREMENTS 19 H PWK O 25 PAPERWORK 20 H PKG O 25 MARKING 21 H L7 O 1 TARIFF REFERENCE More... F1=Help F10=Update F12=Cancel F13=Services Highlighted segments already exist in map.

Use the Transaction Mapping Panels
20 IBM Sterling Gentran:Server for iSeries Release 3.6 User Guide
EDIX502 Copy Segments from Standard EDI 03/30/11 CTL01 12:00:00 Transaction ID . . . . . . . . . . 810S41EDI Send or Receive. . . . . . . . . . S Standard . . . . . . . . . . . . . 004010 Transaction Set. . . . . . . . . . 810 Type option, press Enter. 3=Copy Opt Seq Seg Man Max Loop Max No Area Id Cd Use Id Loop Description 29 H V1 O 1 4000 999999 VESSEL IDENTIFICATION 30 H R4 O 999999 4000 PORT OR TERMINAL 31 H DTM O 999999 4000 DATE/TIME REFERENCE 32 H FA1 O 1 5000 999999 TYPE OF FINANCIAL ACCOUNTING DATA 33 H FA2 O 999999 5000 ACCOUNTING DATA 3 34 D IT1 O 1 6000 200000 BASELINE ITEM DATA (INVOICE) 35 D CRC O 1 6000 CONDITIONS INDICATOR More... F1=Help F10=Update F12=Cancel F13=Services
EDIX502 Copy Segments from Standard EDI 03/30/11 CTL01 12:00:00 Transaction ID . . . . . . . . . . 810S41EDI Send or Receive. . . . . . . . . . S Standard . . . . . . . . . . . . . 004010 Transaction Set. . . . . . . . . . 810 Type option, press Enter. 3=Copy Opt Seq Seg Man Max Loop Max No Area Id Cd Use Id Loop Description 3 43 D PID O 1 6100 1000 PRODUCT/ITEM DESCRIPTION 44 D MEA O 10 6100 MEASUREMENTS 45 D PWK O 25 6000 PAPERWORK 46 D PKG O 25 6000 MARKING 47 D PO4 O 1 6000 ITEM PHYSICAL DETAILS 48 D ITD O 2 6000 TERMS OF SALE/DEFERRED TERMS OF SAL 49 D REF O 999999 6000 REFERENCE IDENTIFICATION More... F1=Help F10=Update F12=Cancel F13=Services
Use the Transaction Mapping Panels
IBM Sterling Gentran:Server for iSeries Release 3.6 User Guide 21
Figure 6.10 Copy Segments from Standard panel (EDIX502-CTL01)
Press Enter to copy segments and remain on this panel or F10 to copy segments and exit.
EDIX502 Copy Segments from Standard EDI 03/30/11 CTL01 12:00:00 Transaction ID . . . . . . . . . . 810S41EDI Send or Receive. . . . . . . . . . S Standard . . . . . . . . . . . . . 004010 Transaction Set. . . . . . . . . . 810 Type option, press Enter. 3=Copy Opt Seq Seg Man Max Loop Max No Area Id Cd Use Id Loop Description 78 D FA1 O 1 6700 999999 TYPE OF FINANCIAL ACCOUNTING DATA 79 D FA2 O 999999 6000 ACCOUNTING DATA 3 80 S TDS M 1 TOTAL MONETARY VALUE SUMMARY 81 S TXI O 10 TAX INFORMATION 82 S CAD O 1 CARRIER DETAIL 83 S AMT O 999999 MONETARY AMOUNT 84 S SAC O 1 7000 25 SERVICE More... F1=Help F10=Update F12=Cancel F13=Services
EDIX502 Copy Segments from Standard EDI 03/30/11 CTL01 12:00:00 Transaction ID . . . . . . . . . . 810S41EDI Send or Receive. . . . . . . . . . S Standard . . . . . . . . . . . . . 004010 Transaction Set. . . . . . . . . . 810 Type option, press Enter. 3=Copy Opt Seq Seg Man Max Loop Max No Area Id Cd Use Id Loop Description 85 S TXI O 10 7000 TAX INFORMATION 86 S ISS O 1 8000 999999 INVOICE SHIPMENT SUMMARY 87 S PID O 1 8000 PRODUCT/ITEM DESCRIPTION 3 88 S CTT O 1 TRANSACTION TOTALS Bottom F1=Help F10=Update F12=Cancel F13=Services

Use the Transaction Mapping Panels
22 IBM Sterling Gentran:Server for iSeries Release 3.6 User Guide
Step 5: Accessing the Transaction Map Segments Panel
The next step is to access the Transaction Map Segments panel (EDIX504-CTL01) to review the copied segments.
Figure 6.11 Work with Transaction Mapping panel (EDIX500-FMT01)
Type ‘11’ (Segments) in the Option field next to the new Transaction ID and press Enter. This action displays the Transaction Map Segments panels (EDIX504-CTL01) with the segments you copied in the previous step.
EDIX500 Work with Transaction Mapping EDI 03/30/11 FMT01 pgmlib: G3X6PGM dtalib: G3X6DTA 12:00:00 Position to Transaction ID . . . . 810S41EDI S/R S Type option (and Information), press Enter. 12=Copy Segments 13=Tables 14=Sub-Split 15=Ext Map 30=Copy Tran ID Opt Tran ID S/R Appl ID Description User Typ 11 810S41EDI S INVOUTPEDI Outbound Invoice 004010 (demo) EDI P 810S41TPC1 S INVOUTP OUTBOUND INVOICE 004010 (demo) EDI P 810S41TPC2 S INVOUTL Invoice Outbound 4010 (to TP2) EDI P 850INB R POINB Tutorial PO Inbound 004010 CB G 880SU31 S INVOUTL Outb Invoice (880) U3/1 EDI G Bottom Parameters or command ===> F1=Help F3=Exit F12=Cancel F15=Sort F23=More Options F24=More Keys Update Operation Successful.
Use the Transaction Mapping Panels
IBM Sterling Gentran:Server for iSeries Release 3.6 User Guide 23
Transaction Map SegmentsStep 6: Review the list of Segments Copied
Compare the copied segments against the segments in the “List of Segments Requested by Partner” table to verify that all the segments were copied.
Figure 6.12 Transaction Map Segments (EDIX504-CTL01)
Press Page Up/Page Down to review all the segments. If extra segments were copied by accident, use option ‘4’ to delete the segments. If a segment is missing, press F13 (Services) to branch to the Copy Segments from Standard panel (EDIX502-CTL01) and copy the segment.
EDIX504 Transaction Map Segments EDI 03/30/11 CTL01 12:00:00 Transaction ID . . . . . . . . . . 810S41EDI Send or Receive. . . . . . . . . . S Transaction Set. . . . . . . . . . 810 Standard . . . . . . . . . . . . . 004010 Position to Sequence Number. . . . Type option, press Enter. 3=Copy 4=Delete 11=Elem Map 12=Ext Map 13=Loop-end 14=Split Screen Map Opt Seq A Seg M Max Loop Max Description User W No C Id C Use Id Loop Exit F 100 H BIG M 1 BEGINNING SEGMENT FOR INVOI Y 200 H NTE O 10 NOTE/SPECIAL INSTRUCTION Y 400 H REF O 1 DEPARTMENT NAME Y 700 H N1 O 1 BILLTO NAME Y 900 H N3 O 1 ADDRESS INFORMATION Y 1000 H N4 O 1 GEOGRAPHIC LOCATION Y More... F1=Help F4=Prompt F10=Update F12=Cancel F13=Services F24=More Keys

Use the Transaction Mapping Panels
24 IBM Sterling Gentran:Server for iSeries Release 3.6 User Guide
Step 7: Align the segments in the Map with the Application Records
Aligning segments with the application files or records consists of a three-step procedure: modifying segment information, copying segments for manual loops, and modifying segment information for the copied segments.
“Aligning” the segments means that the segments and loops must match the record structure in the application definition to which this map is tied.
How does Sterling Gentran:Server know when to generate multiple occurrences of segments and loops? Sterling Gentran:Server looks at the Max Use and the Loop ID fields to get more than one segment or group of segments generated. If the value in the Max Use field is greater than ‘1,’ Sterling Gentran attempts to generate another occurrence of the same segment. If a group of segments needs to be generated more than one time, a loop ID may be entered with a Max Loop value.
The application format that is used to interface with the EDI format must be considered. Each company may have different numbers of records and record structures that interface with the same EDI format. There is no “one way” to perform the alignment. Below is an abstract example that compares looping with the wheels of a car.
Think of the application record as the left wheel on a car, the transaction segment or loop as the right wheel on a car, and the Loop ID as the axle between the two wheels. The axle keeps both wheels turning in sync so the car can move forward. Likewise, if a record is read on the application side, a segment or a loop needs to be written on the EDI side to keep both in sync.
For the detail line items, one record is read and one line item loop is written. To get more occurrences, both the record and the loop are tied together with a Loop ID. This way they stay in sync and can continue to be read and written until there is no more information.
If a situation exists where one record is read and more than one segment or loop needs to be written, manual looping needs to be used instead of a Loop ID. In this case, only one crank of the wheel occurs on the application side so the transaction side needs to be modified to have only one crank of the wheel. To do this, the Max Loop values and the Loop IDs must be removed from the segments. The segments then must be manually copied to occur again. It makes no difference to the trading partner how the multiple occurrences of the segments and loops are created, only that they are present and in the correct order.
In this example, manual looping is needed for the header area. There needs to be multiple occurrences of segments and loops in the EDI format, even though all the data for the looping is coming from one single application record.
Use the Transaction Mapping Panels
IBM Sterling Gentran:Server for iSeries Release 3.6 User Guide 25
The following table illustrates how the records need to be aligned with the segments. Each record is listed with the associated segments it produces. It contains the correct settings for the Max Use and Loop ID fields for the application and transaction definition. (SEE the “Designing an Outbound Transaction Map – Segment Level” section in this chapter for more information about Max Use and Loop ID fields.) Comments are provided to explain the modifications needed for the segments in the sample map.
CAUTIONSTOP
You cannot have any mismatching Loop IDs for outbound documents. That is, there cannot be a Loop ID on the transaction side that is not on the application side and vice versa. If Loop IDs are mismatched, processing is terminated immediately with an error message.
Application Records Transaction Segments
File (Record) AreaLp
Id
Max
Use
Segment
IdArea
Max
Use
Loop
IdComments
WPEINVHDR H 1 BIG H 1 Inv #/date, Po #/date
REF * H 1 Dept. # (Change max use)
N1 * H 1 (Billto) Remove Loop Id and max loop
N3 * H 1 remove loop ID, change max use
N4 * H 1 remove loop ID
N1 * H 1 (Shipto) Copy from the N1 for Billto. N3/N4 are not requested.
N1 * H 1 (Remit) Copy from N1 for Billto
N3 * H 1 Copy from N3 for Billto
N4 * H 1 Copy from N4 to Billto
DTM * H 1 (Ship date) change max use to 1; if sending more dates, copy to occur again w/max use=1
WPEINVCMT H 10 NTE* H 10 The segment stays at seq. #200 even though it’s generated from this record. Change max use to 10.

Use the Transaction Mapping Panels
26 IBM Sterling Gentran:Server for iSeries Release 3.6 User Guide
* Denotes segments that need to be modified.
Figure 6.13 Instructions for Record-to-Segment Alignment
WPEINVITM D 6000 1 IT1 D 1 6000 Each record in WPEINVITM generates another 6000 loop
PID * D 1 6000 Change loop ID to be 6000; it occurs 1 time for every line item. Remove max loop.
TDS * D 1 6000 Copy from summary TDS; change area code to D; set the write flag to ‘N’; set loop ID to 6000
(no summary file) TDS S 1 Will get built internally by the Sterling Gentran:Server reserved words instead of from application file
CTT S 1 Will get built internally by the Sterling Gentran:Server reserved words instead of from application file
Application Records Transaction Segments
File (Record) AreaLp
Id
Max
Use
Segment
IdArea
Max
Use
Loop
IdComments

Use the Transaction Mapping Panels
IBM Sterling Gentran:Server for iSeries Release 3.6 User Guide 27
Step 8: Modify Segment Information
The next several steps show how to change and copy segment information to properly align the segments. If you skip these steps, the segments might not be written or not written as many times as expected during translation.
Figure 6.14 Modify Segment Information
To align the segments in this sample invoice map, complete the following instructions:
1. Change the Max Use for NTE to be 10 (no more than 10 segments based on the application record’s Max Use).
2. Change the Max Use for REF to be 1.
3. Remove the Loop IDs for N1, N3, and N4.
4. Remove or blank the Max Loop on the N1 segment.
5. Change the descriptions to denote specific information such as the Department Number for the REF and Billto Name for the N1. This helps in the element mapping procedure as well as in maintaining the map in the future.
6. Change the Max Use for N3 to be 1. Press Page Down to display the next panel.
EDIX504 Transaction Map Segments EDI 03/30/11 CTL01 12:00:00 Transaction ID . . . . . . . . . . 810S41EDI Send or Receive. . . . . . . . . . S Transaction Set. . . . . . . . . . 810 Standard . . . . . . . . . . . . . 004010 Position to Sequence Number. . . . Type option, press Enter. 3=Copy 4=Delete 11=Elem Map 12=Ext Map 13=Loop-end 14=Split Screen Map Opt Seq A Seg M Max Loop Max Description User W No C Id C Use Id Loop Exit F 100 H BIG M 1 BEGINNING SEGMENT FOR INVOI Y 200 H NTE O 10 NOTE/SPECIAL INSTRUCTION Y 400 H REF O 1 DEPARTMENT NAME Y 700 H N1 O 1 BILLTO NAME Y 900 H N3 O 1 ADDRESS INFORMATION Y 1000 H N4 O 1 GEOGRAPHIC LOCATION Y More... F1=Help F4=Prompt F10=Update F12=Cancel F13=Services F24=More Keys

Use the Transaction Mapping Panels
28 IBM Sterling Gentran:Server for iSeries Release 3.6 User Guide
The Transaction Map Segments panel displays.
Figure 6.15 Transaction Map Segments panel (EDIX504-CTL01)
7. Change the Max Use for DTM to 1.
8. Change the Loop ID for PID to 6000 with no Max Loop and Max Use to 1.
9. Press Enter to update the changes.
EDIX504 Transaction Map Segments EDI 03/30/11 CTL01 12:00:00 Transaction ID . . . . . . . . . . 810S41EDI Send or Receive. . . . . . . . . . S Transaction Set. . . . . . . . . . 810 Standard . . . . . . . . . . . . . 004010 Position to Sequence Number. . . . Type option, press Enter. 3=Copy 4=Delete 11=Elem Map 12=Ext Map 13=Loop-end 14=Split Screen Map Opt Seq A Seg M Max Loop Max Description User W No C Id C Use Id Loop Exit F 1500 H DTM O 1 DATE/TIME REFERENCE Y 3400 D IT1 O 1 6000 200000 BASELINE ITEM DATA (INVOICE Y 4300 D PID O 1 6000 PRODUCT/ITEM DESCRIPTION Y 4350 D TDS O 1 Dummy Segment Y 8000 S TDS M 1 TOTAL MONETARY VALUE SUMMAR Y 8800 S CTT O 1 TRANSACTION TOTALS Y More... F1=Help F4=Prompt F10=Update F12=Cancel F13=Services F24=More Keys
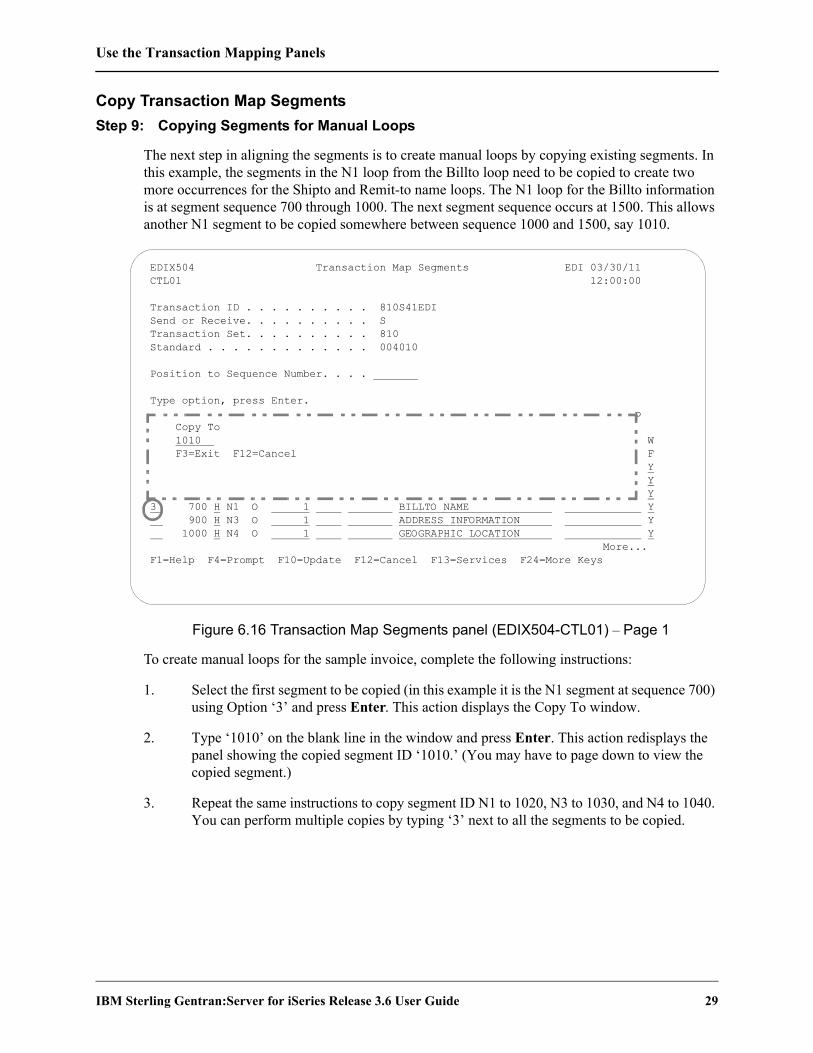
Use the Transaction Mapping Panels
IBM Sterling Gentran:Server for iSeries Release 3.6 User Guide 29
Copy Transaction Map SegmentsStep 9: Copying Segments for Manual Loops
The next step in aligning the segments is to create manual loops by copying existing segments. In this example, the segments in the N1 loop from the Billto loop need to be copied to create two more occurrences for the Shipto and Remit-to name loops. The N1 loop for the Billto information is at segment sequence 700 through 1000. The next segment sequence occurs at 1500. This allows another N1 segment to be copied somewhere between sequence 1000 and 1500, say 1010.
Figure 6.16 Transaction Map Segments panel (EDIX504-CTL01) – Page 1
To create manual loops for the sample invoice, complete the following instructions:
1. Select the first segment to be copied (in this example it is the N1 segment at sequence 700) using Option ‘3’ and press Enter. This action displays the Copy To window.
2. Type ‘1010’ on the blank line in the window and press Enter. This action redisplays the panel showing the copied segment ID ‘1010.’ (You may have to page down to view the copied segment.)
3. Repeat the same instructions to copy segment ID N1 to 1020, N3 to 1030, and N4 to 1040. You can perform multiple copies by typing ‘3’ next to all the segments to be copied.
EDIX504 Transaction Map Segments EDI 03/30/11 CTL01 12:00:00 Transaction ID . . . . . . . . . . 810S41EDI Send or Receive. . . . . . . . . . S Transaction Set. . . . . . . . . . 810 Standard . . . . . . . . . . . . . 004010 Position to Sequence Number. . . . Type option, press Enter. p Copy To 1010 W F3=Exit F12=Cancel F Y Y Y 3 700 H N1 O 1 BILLTO NAME Y 900 H N3 O 1 ADDRESS INFORMATION Y 1000 H N4 O 1 GEOGRAPHIC LOCATION Y More... F1=Help F4=Prompt F10=Update F12=Cancel F13=Services F24=More Keys
Use the Transaction Mapping Panels
30 IBM Sterling Gentran:Server for iSeries Release 3.6 User Guide
Step 10: Create a Dummy Segment
In order to generate the TDS segment in the summary section, we have to sum the extended line item dollar amounts. This can be accomplished by using a dummy segment. Dummy segments are not written out during processing and are often used to load constants, hash-totals, and accumulators.
Figure 6.17 Transaction Map Segment panel (EDIX504-CTL01) – Page 2
To create the dummy TDS segment, complete the following instructions:
1. Type ‘3’ (Copy) in the Option field next to the TDS segment (Sequence Number 8000) and press Enter. This action displays the Copy To window.
2. Type ‘4350’ on the blank line in the window and press Enter.
EDIX504 Transaction Map Segments EDI 03/30/11 CTL01 12:00:00 Transaction ID . . . . . . . . . . 810S41EDI Send or Receive. . . . . . . . . . S Transaction Set. . . . . . . . . . 810 Standard . . . . . . . . . . . . . 004010 Position to Sequence Number. . . . Copy To p 4350 F3=Exit F12=Cancel W F Y Y 3 8000 S TDS M 1 TOTAL MONETARY VALUE SUMMAR Y 8800 S CTT O 1 TRANSACTION TOTALS Y More... F1=Help F4=Prompt F10=Update F12=Cancel F13=Services F24=More Keys

Use the Transaction Mapping Panels
IBM Sterling Gentran:Server for iSeries Release 3.6 User Guide 31
Step 11: Modify the Copied Segments
The last step in aligning the segments is to modify the segments that you copied in the previous steps.
Figure 6.18 Transaction Map Segments panel (EDIX504-CTL01)
To modify the segments that were copied in this sample map:
1. Change the information in the Description fields of the N1 segments to “SHIPTO NAME” and “REMITTO NAME” respectively.
2. For the TDS at sequence number 4350, change the area code to D (detail) and type the loop ID ‘6000’ to match the loop IDs used for the detail area. If the loop ID is not included, only the last item record will be calculated for an extended amount.
3. For the detail, TDS, change the write flag from ‘Y’ to ‘N’ to prevent the segment from being written to the output EDI data file.
4. Press Enter to update.
EDIX504 Transaction Map Segments EDI 03/30/11 CTL01 12:00:00 Transaction ID . . . . . . . . . . 810S41EDI Send or Receive. . . . . . . . . . S Transaction Set. . . . . . . . . . 810 Standard . . . . . . . . . . . . . 004010 Position to Sequence Number. . . . Type option, press Enter. 3=Copy 4=Delete 11=Elem Map 12=Ext Map 13=Loop-end 14=Split Screen Map Opt Seq A Seg M Max Loop Max Description User W No C Id C Use Id Loop Exit F 1010 H N1 O 1 SHIPTO NAME Y 1020 H N1 O 1 REMITTO NAME Y 1030 H N3 O 1 ADDRESS INFORMATION Y 1040 H N4 O 1 GEOGRAPHIC LOCATION Y 1500 H DTM O 10 DATE/TIME REFERENCE Y 3400 D IT1 O 1 6000 200000 BASELINE ITEM DATA (INVOICE Y More... F1=Help F4=Prompt F10=Update F12=Cancel F13=Services F24=More Keys

Use the Transaction Mapping Panels
32 IBM Sterling Gentran:Server for iSeries Release 3.6 User Guide
Element Mapping OutboundStep 12: Access the Element Mapping Outbound Panel
Now that the segments are aligned to work with our application definition, we need to define what will be mapped to each element. The first step in element mapping is to access the Element Mapping Outbound panel (EDIX511).
Figure 6.19 Transaction Map segments panel (EDIX504-CTL01)
Type ‘11’ (Elem Map) in the Option field next to the first segment as shown on the panel and press Enter. This action displays the Element Mapping Outbound panel (EDIX511).
NOTEPlease see the “Using Split Screen Map Option” section in this chapter if you choose to use option 14, Split Screen Map.
EDIX504 Transaction Map Segments EDI 03/30/11 CTL01 12:00:00 Transaction ID . . . . . . . . . . 810S41EDI Send or Receive. . . . . . . . . . S Transaction Set. . . . . . . . . . 810 Standard . . . . . . . . . . . . . 004010 Position to Sequence Number. . . . Type option, press Enter. 3=Copy 4=Delete 11=Elem Map 12=Ext Map 13=Loop-end 14=Split Screen Map Opt Seq A Seg M Max Loop Max Description User W No C Id C Use Id Loop Exit F 11 100 H BIG M 1 BEGINNING SEGMENT FOR INVOI Y 200 H NTE O 10 NOTE/SPECIAL INSTRUCTION Y 400 H REF O 1 DEPARTMENT NAME Y 700 H N1 O 1 BILLTO NAME Y 900 H N3 O 1 ADDRESS INFORMATION Y 1000 H N4 O 1 GEOGRAPHIC LOCATION Y More... F1=Help F4=Prompt F10=Update F12=Cancel F13=Services F24=More Keys
Use the Transaction Mapping Panels
IBM Sterling Gentran:Server for iSeries Release 3.6 User Guide 33
Step 13: Map the BIG Segment
The element mapping you will perform in the next several steps is based on the instructions provided in the “Contents of the X12 Invoice” table in the “Mapping Getting Started” chapter.
Application fields can be entered in the Mapping Constant/Field field or selected from a list of available fields. The panel below shows how to use option ‘1’ (Appl Fields) to select an application field.
Figure 6.20 Element Mapping Outbound panel (EDIX511) – BIG Segment
Type ‘1’ in the Option field next to Element ‘1’ (Invoice Date) and press Enter. This action displays a window from which you can select the desired application field.
NOTEThe window displays only header fields since the BIG segment is a header segment. Data is mapped from header to header, detail to detail, and summary to summary according to established rules.
Type ‘1’ (select) in the Option field next to the desired item in the window as shown on the panel and press Enter to populate the Mapping field.
EDIX511 Element Mapping Outbound 03/30/11 Tran ID. . . . . . . . . . . . . . 810S41EDI S/R. . . . . . . . . S Seg ID . . . . . . . . . . . . . . BIG BEGINNING SEGMENT FOR INVOI Seg Seq. . . . . . . . . . . . . . 100 Area Code. . . . . . H Type option, press Enter. 1=Appl Fields 11=Ext Map 12=Subfield 13=Codes Mapping Ele Sub X M T Ele Ele C Opt Constant/Field Table ID No. Ele M C P Description Seq ID R 1 F010.IHINDT 1 M DT DATE 10 373 6 Description. . . . . . . . . . . . DATE 3 1=Select 4 Opt Rec Type No Field Name Typ Len Cde Description 8 WPEINVHDR 5 F010.IHB2# AN 9 M BILLTO ACCT# 7 WPEINVHDR 10 F010.IHINV# AN 10 M INVOICE # 0 WPEINVHDR 15 F010.IHCRDB AN 1 M CREDIT/DEBIT FLAG:C OR 3 1 WPEINVHDR 20 F010.IHINDT CY 8 M INVOICE DATE YYMD 6 WPEINVHDR 25 F010.IHPO# AN 20 M PURCHASE ORDER # 6 More... F1=Help F3=Exit F12=Cancel om

Use the Transaction Mapping Panels
34 IBM Sterling Gentran:Server for iSeries Release 3.6 User Guide
Step 14: Complete the BIG Segment
In this step you will map the remaining elements in the BIG segment.
Figure 6.21 Element Mapping Outbound panel (EDIX511) – BIG Segment
Perform the same instructions as used in the previous step to select the application fields to map to Invoice Number, Purchase Order Date, and Purchase Order Number (Element Nos. 2, 3, and 4). Press F17 (Next Rcd) to update the panel and advance to the next segment (NTE).
EDIX511 Element Mapping Outbound 03/30/11 Tran ID. . . . . . . . . . . . . . 810S41EDI S/R. . . . . . . . . S Seg ID . . . . . . . . . . . . . . BIG BEGINNING SEGMENT FOR INVOI Seg Seq. . . . . . . . . . . . . . 100 Area Code. . . . . . H Type option, press Enter. 1=Appl Fields 11=Ext Map 12=Subfield 13=Codes Mapping Ele Sub X M T Ele Ele C Opt Constant/Field Table ID No. Ele M C P Description Seq ID R F010.IHINDT 1 M DT DATE 10 373 F010.IHINV# 2 M AN INVOICE NUMBER 20 76 F010.IHPODT 3 O DT DATE 30 373 F010.IHPO# 4 O AN PURCHASE ORDER NUMBER 40 324 5 O AN RELEASE NUMBER 50 328 6 O AN CHANGE ORDER SEQUENCE 60 327 7 O ID TRANSACTION TYPE CODE 70 640 8 O ID TRANSACTION SET PURPOS 80 353 9 O ID ACTION CODE 90 306 10 O AN INVOICE NUMBER 100 76 Bottom F5=Refresh F16=Prev Rcd F17=Next Rcd F21=Prt Map F24=More Keys

Use the Transaction Mapping Panels
IBM Sterling Gentran:Server for iSeries Release 3.6 User Guide 35
Step 15: Mapping for the NTE Segment
The next several steps show how to map the NTE segment. The panel below shows how you can perform element mapping by selecting a data element code from the standards.
Figure 6.22 Element Mapping Outbound panel (EDIX511) – NTE segment
To select a data element code to map to Element No. 1, complete the following instructions:
1. Type ‘13’ (Codes) in the Option field next to Element No. 1 and press Enter.
2. From the window that displays, select option ‘1’ to pull the EDI code ‘GEN’ into your element map. The code ‘GEN’ indicates that this is a general type of message that pertains to the whole document. It qualifies the type of note reference that follows in the next element. It should be mapped only if the message exists. This can be accomplished by conditional mapping which is described in the next step.
3. Type ‘F020.ICMSG’ as shown on the next panel to map the message field into Element No. 2 and press Enter to update panel.
EDIX511 Element Mapping Outbound 03/30/11 Tran ID. . . . . . . . . . . . . . 810S41EDI S/R. . . . . . . . . S Seg ID . . . . . . . . . . . . . . NTE NOTE/SPECIAL INSTRUCTION Seg Seq. . . . . . . . . . . . . . 200 Area Code. . . . . . H Type option, press Enter. 1=Appl Fields 11=Ext Map 12=Subfield 13=Codes Mapping Ele Sub X M T Ele Ele C Opt Constant/Field Table ID No. Ele M C P Description Seq ID R 13 1 O ID NOTE REFERENCE CODE 10 363 F020.ICMSG 2 M AN DESCRIPTION 20 352 Position to Code Value . . . . . . 1=Select Code Value Description 1 GEN ENTIRE TRANSACTION SET GPI GENERAL PRODUCT OR PROCESS INFORMATION GSI GENERAL SPECIFICATION INFORMATION HHI HOUSEHOLD GOODS INFORMATION More... F1=Help F3=Exit F12=Cancel F1=He
Use the Transaction Mapping Panels
36 IBM Sterling Gentran:Server for iSeries Release 3.6 User Guide
Extended Mapping OutboundStep 16: Access the Element Mapping Outbound Panel for Extended Mapping
As stated in the previous step, the EDI code ‘GEN’ is only written if there is a message. If this condition was not set up, the code would always be moved into the NTE segment and a compliance error would occur for the conditional requirements not met. This would happen because a qualifier would exist without the element it is qualifying. Therefore, you must update the element with extended mapping information to set the condition for the data to be moved. Extended mapping allows you to define extended mapping instructions for data elements that require conditional mapping as well as calculations, user-defined routines, and accumulator value calculations for total fields. If you have a literal value that is more than 15 positions long, you can specify it on the extended mapping screen. See Step 18:.
Figure 6.23 Element Mapping Outbound panel (EDIX511) – NTE Segment
Type ‘11’ (Ext Map) in the Option field next to ‘GEN’ as shown on the panel above and press Enter. This action displays the Work with Element Mapping panel (EDIX506-FMT01).
EDIX511 Element Mapping Outbound 03/30/11 Tran ID. . . . . . . . . . . . . . 810S41EDI S/R. . . . . . . . . S Seg ID . . . . . . . . . . . . . . NTE NOTE/SPECIAL INSTRUCTION Seg Seq. . . . . . . . . . . . . . 200 Area Code. . . . . . H Type option, press Enter. 1=Appl Fields 11=Ext Map 12=Subfield 13=Codes Mapping Ele Sub X M T Ele Ele C Opt Constant/Field Table ID No. Ele M C P Description Seq ID R 11 ‘GEN’ 1 O ID NOTE REFERENCE CODE 10 363 F020.ICMSG 2 M AN DESCRIPTION 20 352 Bottom F1=Help F4=Prompt F10=Update F12=Cancel F13=Services F24=More Keys

Use the Transaction Mapping Panels
IBM Sterling Gentran:Server for iSeries Release 3.6 User Guide 37
Step 17: Access the Extended Outbound Mapping Panel
In this step you will select the element that requires extended mapping.
Figure 6.24 Work with Extended Mapping panel (EDIX506-FMT01) – NTE Segment
Type ‘2’ (Revise) in the Option field next to the ‘GEN’ constant and press Enter to display the Extended Outbound Mapping panel (EDIX508-FMT01).
EDIX506 Work with Extended Mapping EDI 03/30/11 FMT01 pgmlib: G3X6PGM dtalib: G3X6DTA 12:00:00 Position to Segment Seq. . . . . . 200 10 For 810S41EDI S Type option (and Information), press Enter. 1=Create 2=Revise 3=Copy 4=Delete 5=View Seg Ele A Seg Opt Seq Seq Map Constant/Field C ID Description 2 200 10 0 'GEN' H NTE NOTE REFERENCE CODE 200 20 0 F020.ICMSG H NTE DESCRIPTION 400 10 0 H REF REFERENCE IDENTIFICATION 400 20 0 H REF REFERENCE IDENTIFICATION 400 30 0 H REF DESCRIPTION 400 40 0 H REF REFERENCE IDENTIFICATION 400 50 0 H REF REFERENCE IDENTIFICATION 400 60 0 H REF REFERENCE IDENTIFICATION 400 70 0 H REF REFERENCE IDENTIFICATION More... Parameters or command ===> F1=Help F3=Exit F12=Cancel F15=Sort F24=More Keys

Use the Transaction Mapping Panels
38 IBM Sterling Gentran:Server for iSeries Release 3.6 User Guide
Step 18: Update the Extended Map
As mentioned in Step 16, if you have a longer literal value, you can specify it in the 65-position long Element field. This long Element field functions the same as the 15-position field, except that is cannot be used for computation. Both fields cannot be specified.
In this step you will specify an if-condition that will prevent code ‘GEN’ from being written if there is no message.
Figure 6.25 Extended Outbound Mapping panel (EDIX508-FMT01) – NTE Segment
NOTEThe default mode (either More or Less) is set in the System Configuration file and is used for the initial display of the panel.
To add the if-condition, complete the following instructions:
1. Type ‘F020.ICMSG’ on the “If” line under the Value field to identify the application field to be checked, and ‘GT’ (greater than) in the Op (Operator) field. Press F4 (Prompt) for a list of valid operators that can be used in the Operator field for the if-condition.
2. To check for a BLANK field, enter in the literal value of a single blank character. Any literal value MUST be enclosed in single quotes.
3. Press F10 (Update) to update the panel. This action returns you to the previous panel and displays the message “Revise Operation Successful” at the bottom of the panel.
EDIX508 Extended Outbound Mapping XX 03/30/11 FMT01 12:00:00 Segment ID . . . . . . . . . . . . NTE Transaction ID . . . 810S41EDIArea Code. . . . . . . . . . . . . H Send or Receive. . . S Element Number . . . . . . . . . . 10 Element ID . . . . . 0363 Segment Sequence . . . . . . . . . 200 Mapping Number . . . 0 Mapping of Data Element Element = __________________________________________________________________ Or Value Op Value Op Value Element = 'GEN' __ _______________ __ _________________ If F020.ICMSG GT ' ' And/Or _ _______________ __ _______________ Round Element. . . . #Dec Table ID . . . . . . . . . . . . . __________ Type of Table. . . . Add to Hash Total #. . . . . . . . __ Length (Minimum) . . 3 Save in Constant # . . . . . . . . __ Length (Maximum) . . 3 Add 1 to Accumulator # . . . . . . __ Group Req Cd . . . . User Exit Routine. . . . . . . . . __________ Related. . . . . . . N Mandatory Code . . . . . . . . . . O Type . . . . . . . . ID Element Group. . . . . . . . . . . Type . . . . . . . . Segment Description. . . . . . . . NOTE/SPECIAL INSTRUCTION Element Description. . . . . . . . NOTE REFERENCE CODE F1=Help F2=More/Less F10=Update F14=Notes F19=Appl F24=More Keys

Use the Transaction Mapping Panels
IBM Sterling Gentran:Server for iSeries Release 3.6 User Guide 39
4. Press F12 (Cancel) to return to the Element Mapping Outbound panel (EDIX511). Notice the ‘Y’ that displays in the Ext Map field for Element No 10. This indicates that an Extended Mapping panel exists for this element.
5. Press F17 (Next Rcd) to advance to the next segment.

Use the Transaction Mapping Panels
40 IBM Sterling Gentran:Server for iSeries Release 3.6 User Guide
Step 19: Map the REF Segment
The next several steps show how to map the REF segment.
Figure 6.26 Element Mapping Outbound panel (EDIX511) – REF Segment
To begin to map the REF segment, complete the following instructions:
1. Type the code ‘DP’ as shown on the panel. The code ‘DP’ indicates that the type of reference number that follows is a department number. It should be mapped only if the Ship-to department number exists.
2. Type ‘F010.IHSDPT’ as shown on the panel to map the Ship To department number to Element No. 2 and press Enter.
3. Type ‘11’ (Ext Map) in the Option field next to Element No. ‘1’ and press Enter. This action displays the Work with Extended Mapping panel (EDIX506-FMT01). Type ‘2’ (Revise) in the Option field next to sequence 400 element 10 and press Enter.
EDIX511 Element Mapping Outbound 03/30/11 Tran ID. . . . . . . . . . . . . . 810S41EDI S/R. . . . . . . . . S Seg ID . . . . . . . . . . . . . . REF DEPARTMENT NAME Seg Seq. . . . . . . . . . . . . . 400 Area Code. . . . . . H Type option, press Enter. 1=Appl Fields 11=Ext Map 12=Subfield 13=Codes Mapping Ele Sub X M T Ele Ele C Opt Constant/Field Table ID No. Ele M C P Description Seq ID R 11 'DP' 1 Y M AN REFERENCE IDENTIFICATI 10 128 F010.IHSDPT 2 C AN REFERENCE NUMBER 20 127 Y 3 C AN DESCRIPTION 30 352 4 1 M AN REFERENCE IDENTIFICATI 40 128 2 M AN REFERENCE IDENTIFICATI 50 127 3 C AN REFERENCE IDENTIFICATI 60 128 4 C AN REFERENCE IDENTIFICATI 70 127 5 C AN REFERENCE IDENTIFICATI 80 128 6 C AN REFERENCE IDENTIFICATI 90 127 Bottom F5=Refresh F16=Prev Rcd F17=Next Rcd F21=Prt Map F24=More Keys

Use the Transaction Mapping Panels
IBM Sterling Gentran:Server for iSeries Release 3.6 User Guide 41
Step 20: Update the Extended Map
In this step you will specify an if-condition that will prevent code ‘DP’ from being written if there is no Ship To department number.
Figure 6.27 Extended Outbound Mapping panel (EDIX508-FMT01) – REF Segment
To add an if-condition, complete the following instructions:
1. Type the information as shown on the panel for the REF segment to specify the if-condition as shown on this panel.
2. Press F10 (Update). This action returns you to the Work with Extended Mapping panel (EDIX506-FMT01).
3. Press F12 (Cancel) to return to the Element Mapping Outbound panel (EDIX511).
4. Press F17 (Next Rcd) to advance to the next segment.
EDIX508 Extended Outbound Mapping XX 03/30/11 FMT01 12:00:00 Segment ID . . . . . . . . . . . . REF Transaction ID . . . 810S41EDI Area Code. . . . . . . . . . . . . H Send or Receive. . . S Element Number . . . . . . . . . . 10 Element ID . . . . . 0128 Segment Sequence . . . . . . . . . 400 Mapping Number . . . 0 Mapping of Data Element Element = Or Value Op Value Op Value Element = 'DP' __ _______________ __ _______________ If F010.IHSDPT GT ' ' And/Or _ _______________ __ _______________ Round Element. . . . #Dec Table ID . . . . . . . . . . . . . __________ Type of Table. . . . Add to Hash Total #. . . . . . . . __ Length (Minimum) . . 2 Save in Constant # . . . . . . . . __ Length (Maximum) . . 3 Add 1 to Accumulator # . . . . . . __ Group Req Cd . . . . User Exit Routine. . . . . . . . . __ Related. . . . . . . N Mandatory Code . . . . . . . . . . M Type . . . . . . . . AN Element Group. . . . . . . . . . . Type . . . . . . . . Segment Description. . . . . . . . DEPARTMENT NAME Element Description. . . . . . . . REFERENCE IDENTIFICATI F1=Help F2=More/Less F10=Update F14=Notes F19=Appl F24=More Keys
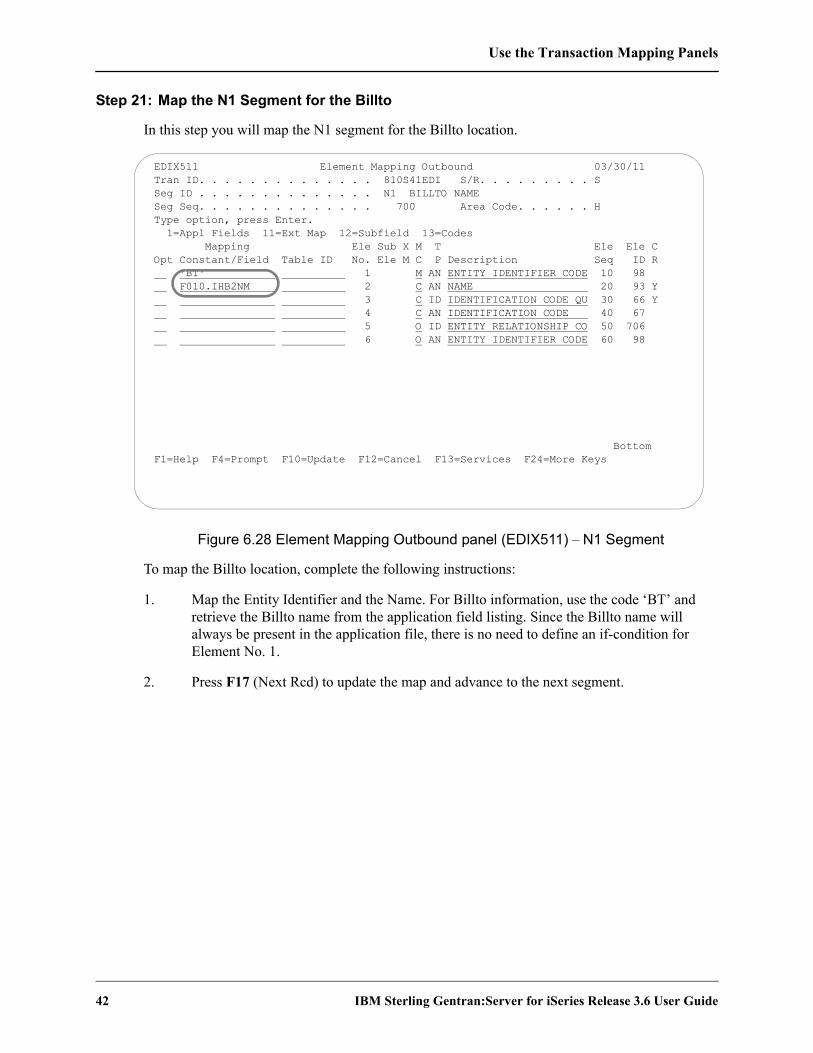
Use the Transaction Mapping Panels
42 IBM Sterling Gentran:Server for iSeries Release 3.6 User Guide
Step 21: Map the N1 Segment for the Billto
In this step you will map the N1 segment for the Billto location.
Figure 6.28 Element Mapping Outbound panel (EDIX511) – N1 Segment
To map the Billto location, complete the following instructions:
1. Map the Entity Identifier and the Name. For Billto information, use the code ‘BT’ and retrieve the Billto name from the application field listing. Since the Billto name will always be present in the application file, there is no need to define an if-condition for Element No. 1.
2. Press F17 (Next Rcd) to update the map and advance to the next segment.
EDIX511 Element Mapping Outbound 03/30/11 Tran ID. . . . . . . . . . . . . . 810S41EDI S/R. . . . . . . . . S Seg ID . . . . . . . . . . . . . . N1 BILLTO NAME Seg Seq. . . . . . . . . . . . . . 700 Area Code. . . . . . H Type option, press Enter. 1=Appl Fields 11=Ext Map 12=Subfield 13=Codes Mapping Ele Sub X M T Ele Ele C Opt Constant/Field Table ID No. Ele M C P Description Seq ID R 'BT' 1 M AN ENTITY IDENTIFIER CODE 10 98 F010.IHB2NM 2 C AN NAME 20 93 Y 3 C ID IDENTIFICATION CODE QU 30 66 Y 4 C AN IDENTIFICATION CODE 40 67 5 O ID ENTITY RELATIONSHIP CO 50 706 6 O AN ENTITY IDENTIFIER CODE 60 98 Bottom F1=Help F4=Prompt F10=Update F12=Cancel F13=Services F24=More Keys

Use the Transaction Mapping Panels
IBM Sterling Gentran:Server for iSeries Release 3.6 User Guide 43
Step 22: Map the N3 Segment for the Billto
In this step you will map the N3 segment for the Billto location.
Figure 6.29 Element Mapping Outbound panel (EDIX511) – N3 Segment
Map both the address line elements as shown on the panel and press F17 (Next Rcd) to update the map and advance to the next segment.
EDIX511 Element Mapping Outbound 03/30/11 Tran ID. . . . . . . . . . . . . . 810S41EDI S/R. . . . . . . . . S Seg ID . . . . . . . . . . . . . . N3 ADDRESS INFORMATION Seg Seq. . . . . . . . . . . . . . 900 Area Code. . . . . . H Type option, press Enter. 1=Appl Fields 11=Ext Map 12=Subfield 13=Codes Mapping Ele Sub X M T Ele Ele C Opt Constant/Field Table ID No. Ele M C P Description Seq ID R F010.IHB2A1 1 M AN ADDRESS INFORMATION 10 166 F010.IHB2A2 2 O AN ADDRESS INFORMATION 20 166 Bottom F1=Help F4=Prompt F10=Update F12=Cancel F13=Services F24=More Keys

Use the Transaction Mapping Panels
44 IBM Sterling Gentran:Server for iSeries Release 3.6 User Guide
Step 23: Map the N4 Segment for the Billto
In this step you will map the N4 segment for the Billto location.
Figure 6.30 Element Mapping Outbound panel (EDIX511) – N4 Segment
To map the elements of the N4 segment, complete the following instructions:
1. Map the City, State, and Postal Code for the Billto location as shown on the panel and press Enter.
2. Press F17 (Next Rcd) to update the panel and advance to the next segment.
EDIX511 Element Mapping Outbound 03/30/11 Tran ID. . . . . . . . . . . . . . 810S41EDI S/R. . . . . . . . . S Seg ID . . . . . . . . . . . . . . N4 GEOGRAPHIC LOCATION Seg Seq. . . . . . . . . . . . . . 1000 Area Code. . . . . . H Type option, press Enter. 1=Appl Fields 11=Ext Map 12=Subfield 13=Codes Mapping Ele Sub X M T Ele Ele C Opt Constant/Field Table ID No. Ele M C P Description Seq ID R F010.IHB2CT 1 O AN CITY NAME 10 19 F010.IHB2ST 2 O ID STATE OR PROVINCE CODE 20 156 F010.IHB2ZP 3 O ID POSTAL CODE 30 116 4 O ID COUNTRY CODE 40 26 5 C ID LOCATION QUALIFIER 50 309 6 O AN LOCATION IDENTIFIER 60 310 Y Bottom F1=Help F4=Prompt F10=Update F12=Cancel F13=Services F24=More Keys

Use the Transaction Mapping Panels
IBM Sterling Gentran:Server for iSeries Release 3.6 User Guide 45
Step 24: Map the N1 Segment for the Shipto
In this step you will map the N1 segment for the Ship To location.
Figure 6.31 Element Mapping Outbound panel (EDIX511) – N1 Segment
To map the N1 segment for the Shipto location, complete the following instructions:
1. Select or enter the application fields to map all four elements for the N1 for the Shipto as shown on the panel. The Identification Code Qualifier, ‘92,’ indicates that the Shipto Entity can be determined by the identifier in Element 4, which is a customer-supplied store number. This store number can be accessed in the user’s application system to determine the complete address for the Shipto. This prevents the N3 and N4 segments from having to be sent.
In many cases, the vendor has to maintain store information either in Sterling Gentran:Server by using a Data Translation table or in their application system.
2. Press F17 (Next Rcd) to update the panel and advance to the next segment.
EDIX511 Element Mapping Outbound 03/30/11 Tran ID. . . . . . . . . . . . . . 810S41EDI S/R. . . . . . . . . S Seg ID . . . . . . . . . . . . . . N1 SHIPTO NAME Seg Seq. . . . . . . . . . . . . . 1010 Area Code. . . . . . H Type option, press Enter. 1=Appl Fields 11=Ext Map 12=Subfield 13=Codes Mapping Ele Sub X M T Ele Ele C Opt Constant/Field Table ID No. Ele M C P Description Seq ID R 'ST' 1 M AN ENTITY IDENTIFIER CODE 10 98 F010.IHS2NM 2 C AN NAME 20 93 Y '92' 3 C ID IDENTIFICATION CODE QU 30 66 Y F010.IHS2LC 4 C AN IDENTIFICATION CODE 40 67 5 O ID ENTITY RELATIONSHIP CO 50 706 6 O AN ENTITY IDENTIFIER CODE 60 98 Bottom F1=Help F4=Prompt F10=Update F12=Cancel F13=Services F24=More Keys
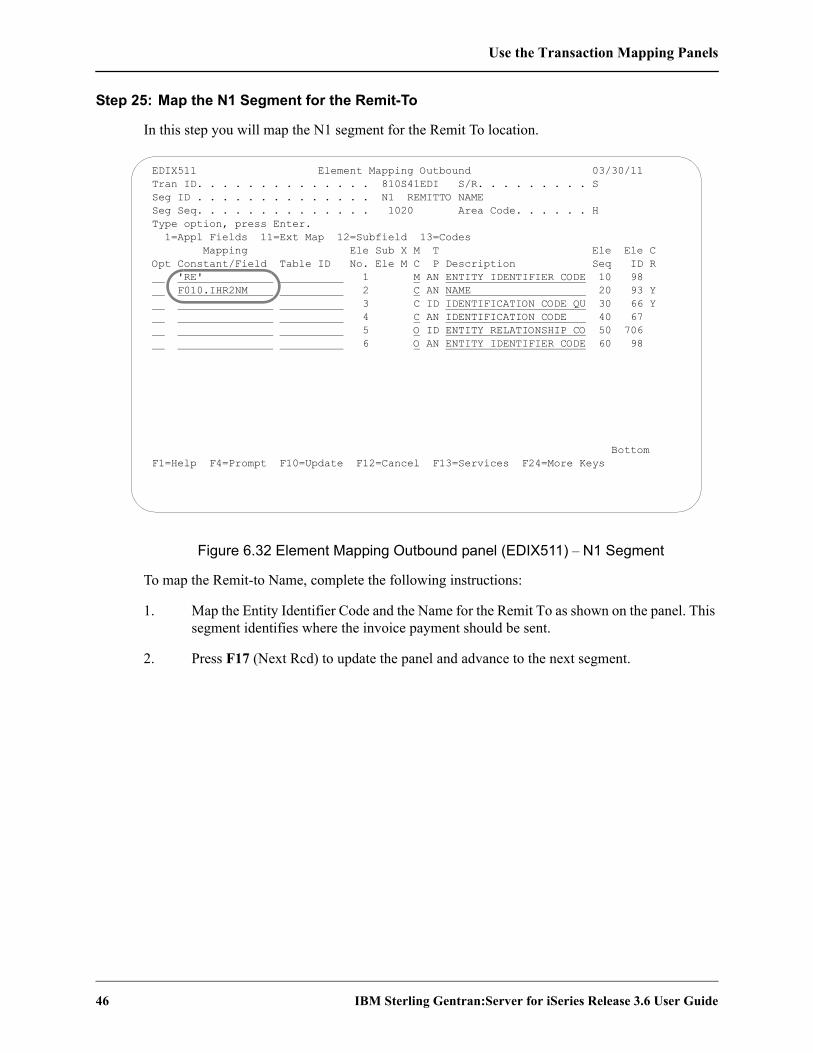
Use the Transaction Mapping Panels
46 IBM Sterling Gentran:Server for iSeries Release 3.6 User Guide
Step 25: Map the N1 Segment for the Remit-To
In this step you will map the N1 segment for the Remit To location.
Figure 6.32 Element Mapping Outbound panel (EDIX511) – N1 Segment
To map the Remit-to Name, complete the following instructions:
1. Map the Entity Identifier Code and the Name for the Remit To as shown on the panel. This segment identifies where the invoice payment should be sent.
2. Press F17 (Next Rcd) to update the panel and advance to the next segment.
EDIX511 Element Mapping Outbound 03/30/11 Tran ID. . . . . . . . . . . . . . 810S41EDI S/R. . . . . . . . . S Seg ID . . . . . . . . . . . . . . N1 REMITTO NAME Seg Seq. . . . . . . . . . . . . . 1020 Area Code. . . . . . H Type option, press Enter. 1=Appl Fields 11=Ext Map 12=Subfield 13=Codes Mapping Ele Sub X M T Ele Ele C Opt Constant/Field Table ID No. Ele M C P Description Seq ID R 'RE' 1 M AN ENTITY IDENTIFIER CODE 10 98 F010.IHR2NM 2 C AN NAME 20 93 Y 3 C ID IDENTIFICATION CODE QU 30 66 Y 4 C AN IDENTIFICATION CODE 40 67 5 O ID ENTITY RELATIONSHIP CO 50 706 6 O AN ENTITY IDENTIFIER CODE 60 98 Bottom F1=Help F4=Prompt F10=Update F12=Cancel F13=Services F24=More Keys

Use the Transaction Mapping Panels
IBM Sterling Gentran:Server for iSeries Release 3.6 User Guide 47
Step 26: Map the N3 Segment for the Remit-to
In this step you will map the N3 segment for the Remit To location.
Figure 6.33 Element Mapping Outbound panel (EDIX511) – N3 Segment
Select or enter the application field names to map the first address element. Only one address line is needed for this information. Press F17 (Next Rcd) to update the panel and advance to the next segment.
EDIX511 Element Mapping Outbound 03/30/11 Tran ID. . . . . . . . . . . . . . 810S41EDI S/R. . . . . . . . . S Seg ID . . . . . . . . . . . . . . N3 ADDRESS INFORMATION Seg Seq. . . . . . . . . . . . . . 1030 Area Code. . . . . . H Type option, press Enter. 1=Appl Fields 11=Ext Map 12=Subfield 13=Codes Mapping Ele Sub X M T Ele Ele C Opt Constant/Field Table ID No. Ele M C P Description Seq ID R F010.IHR2A1 1 M AN ADDRESS INFORMATION 10 166 2 O AN ADDRESS INFORMATION 20 166 Bottom F1=Help F4=Prompt F10=Update F12=Cancel F13=Services F24=More Keys

Use the Transaction Mapping Panels
48 IBM Sterling Gentran:Server for iSeries Release 3.6 User Guide
Subfield MappingStep 27: Map the N4 Segment for the Remit-to
In the next several steps you will map the N4 segment for the Remit To location. The postal code for the Remit To location consists of two fields. The first is 5 characters and the second is the 4-character extension. These two fields can be concatenated within Sterling Gentran:Server at the time of mapping by performing subfield mapping. Subfield mapping allows the user to break a single element into multiple “sub-elements.” An application field, constant, or literal value can be moved into each “sub-element.”
Figure 6.34 Element Mapping Outbound panel (EDIX511) – N4 Segment
Type ‘12’ in the Option field next to the Postal Code and press Enter. This action advances you to the Subfield panel (EDIX507-CTL01).
EDIX511 Element Mapping Outbound 03/30/11 Tran ID. . . . . . . . . . . . . . 810S41EDI S/R. . . . . . . . . S Seg ID . . . . . . . . . . . . . . N4 GEOGRAPHIC LOCATION Seg Seq. . . . . . . . . . . . . . 1040 Area Code. . . . . . H Type option, press Enter. 1=Appl Fields 11=Ext Map 12=Subfield 13=Codes Mapping Ele Sub X M T Ele Ele C Opt Constant/Field Table ID No. Ele M C P Description Seq ID R F010.IHR2CT 1 O AN CITY NAME 10 19 F010.IHR2ST 2 O ID STATE OR PROVINCE CODE 20 156 12 3 O SF POSTAL CODE 30 116 4 O ID COUNTRY CODE 40 26 5 C ID LOCATION QUALIFIER 50 309 6 O AN LOCATION IDENTIFIER 60 310 Y Bottom F1=Help F4=Prompt F10=Update F12=Cancel F13=Services F24=More Keys

Use the Transaction Mapping Panels
IBM Sterling Gentran:Server for iSeries Release 3.6 User Guide 49
Step 28: Create Subfields for the Postal code for Segment N4
The panel below shows how to define “sub-elements” for a particular element.
Figure 6.35 Subfield panel (EDIX507-CTL01) – N4 Segment
To create two subfields to handle the postal code, complete the following instructions:
1. Type the information shown on the above panel. Choose any sequence number between 030 and 040. Sterling Gentran:Server adds a suffix of ‘0’ on every element in the segment to allow sub-elements to be inserted between contiguous elements.
2. Press F10 (Update) to add the two “sub-elements” to the map. This action returns you to the Element Mapping Outbound panel (EDIX511).
EDIX507 SUBFIELD EDI 03/30/11 CTL01 12:00:00
Transaction ID . . . . . . . . . . 810S41EDI Segment ID . . . . . N4 Send or Receive. . . . . . . . . . S Element ID . . . . . 0116 Segment Sequence . . . . . . . . . 1040 Element Type . . . . AN Element Sequence . . . . . . . . . 30 Minimum Length . . . 3 Mandatory Code . . . . . . . . . . O Maximum Length . . . 15 Segment Description. . . . . . . . GEOGRAPHIC LOCATION Element Description. . . . . . . . POSTAL CODE
Type option, press Enter. 4=Delete
Opt Seq Positions M Type Description No From To C 31 1 5 O AN ZIP 5 32 6 9 O AN ZIP 4 More... F1=Help F4=Prompt F10=Update F12=Cancel F24=More Keys

Use the Transaction Mapping Panels
50 IBM Sterling Gentran:Server for iSeries Release 3.6 User Guide
Step 29: Map the Enhanced N4 Segment for the Geographic Location
This is the last step in mapping the N4 segment for the Remit-to location.
Figure 6.36 Element Mapping Outbound panel (EDIX511) – N4 Segment
Map the City, State, Postal code, and Postal code extension in the N4 segment. Note that Element 3 for the original Postal Code has a Data type of ‘SF’ and cannot be mapped to directly since it was subfielded. The mapping for the postal code occurs at the subfield level as illustrated above. Press F17 (Next Rcd) to update the panel and advance to the next record.
EDIX511 Element Mapping Outbound 03/30/11 Tran ID. . . . . . . . . . . . . . 810S41EDI S/R. . . . . . . . . S Seg ID . . . . . . . . . . . . . . N4 GEOGRAPHIC LOCATION Seg Seq. . . . . . . . . . . . . . 1040 Area Code. . . . . . H Type option, press Enter. 1=Appl Fields 11=Ext Map 12=Subfield 13=Codes Mapping Ele Sub X M T Ele Ele C Opt Constant/Field Table ID No. Ele M C P Description Seq ID R F010.IHR2CT 1 O AN CITY NAME 10 19 F010.IHR2ST 2 O ID STATE OR PROVINCE CODE 20 156 3 O SF POSTAL CODE 30 116 F010.IHR2ZP O AN ZIP 5 31 F010.IHR2Z4 O AN ZIP 4 32 4 O ID COUNTRY CODE 40 26 5 C ID LOCATION QUALIFIER 50 309 6 O AN LOCATION IDENTIFIER 60 310 Y Bottom F1=Help F4=Prompt F10=Update F12=Cancel F13=Services F24=More Keys
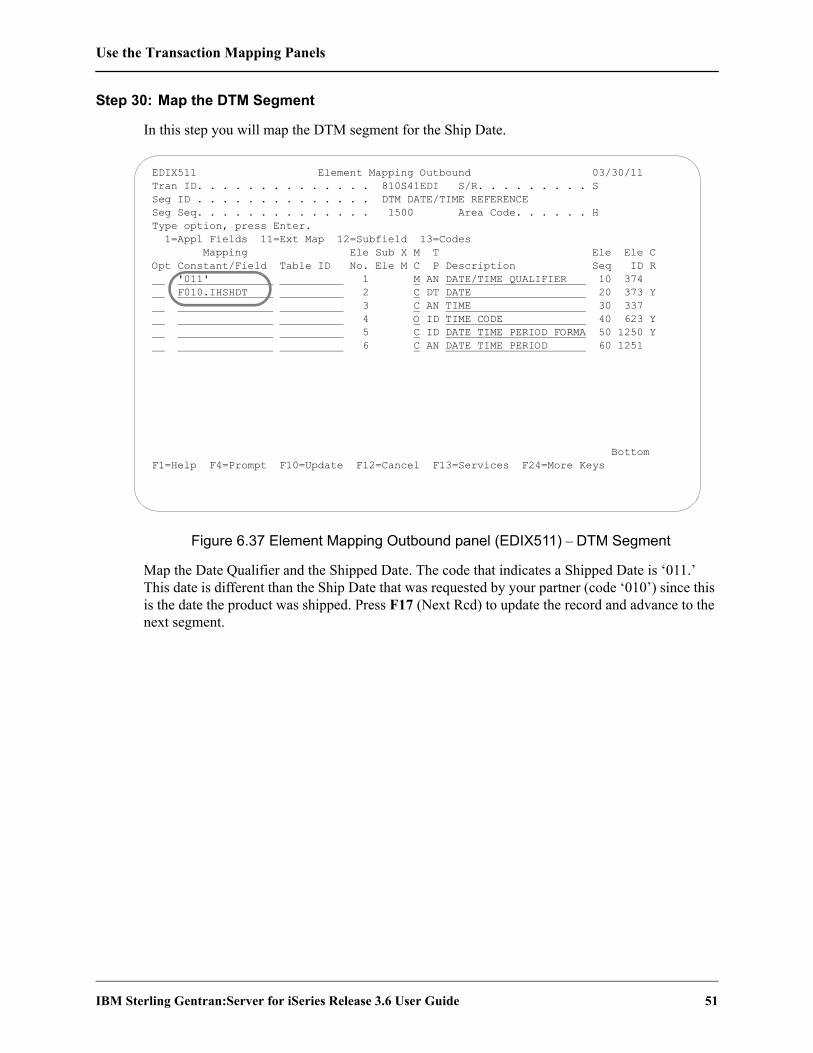
Use the Transaction Mapping Panels
IBM Sterling Gentran:Server for iSeries Release 3.6 User Guide 51
Step 30: Map the DTM Segment
In this step you will map the DTM segment for the Ship Date.
Figure 6.37 Element Mapping Outbound panel (EDIX511) – DTM Segment
Map the Date Qualifier and the Shipped Date. The code that indicates a Shipped Date is ‘011.’ This date is different than the Ship Date that was requested by your partner (code ‘010’) since this is the date the product was shipped. Press F17 (Next Rcd) to update the record and advance to the next segment.
EDIX511 Element Mapping Outbound 03/30/11 Tran ID. . . . . . . . . . . . . . 810S41EDI S/R. . . . . . . . . S Seg ID . . . . . . . . . . . . . . DTM DATE/TIME REFERENCE Seg Seq. . . . . . . . . . . . . . 1500 Area Code. . . . . . H Type option, press Enter. 1=Appl Fields 11=Ext Map 12=Subfield 13=Codes Mapping Ele Sub X M T Ele Ele C Opt Constant/Field Table ID No. Ele M C P Description Seq ID R '011' 1 M AN DATE/TIME QUALIFIER 10 374 F010.IHSHDT 2 C DT DATE 20 373 Y 3 C AN TIME 30 337 4 O ID TIME CODE 40 623 Y 5 C ID DATE TIME PERIOD FORMA 50 1250 Y 6 C AN DATE TIME PERIOD 60 1251 Bottom F1=Help F4=Prompt F10=Update F12=Cancel F13=Services F24=More Keys
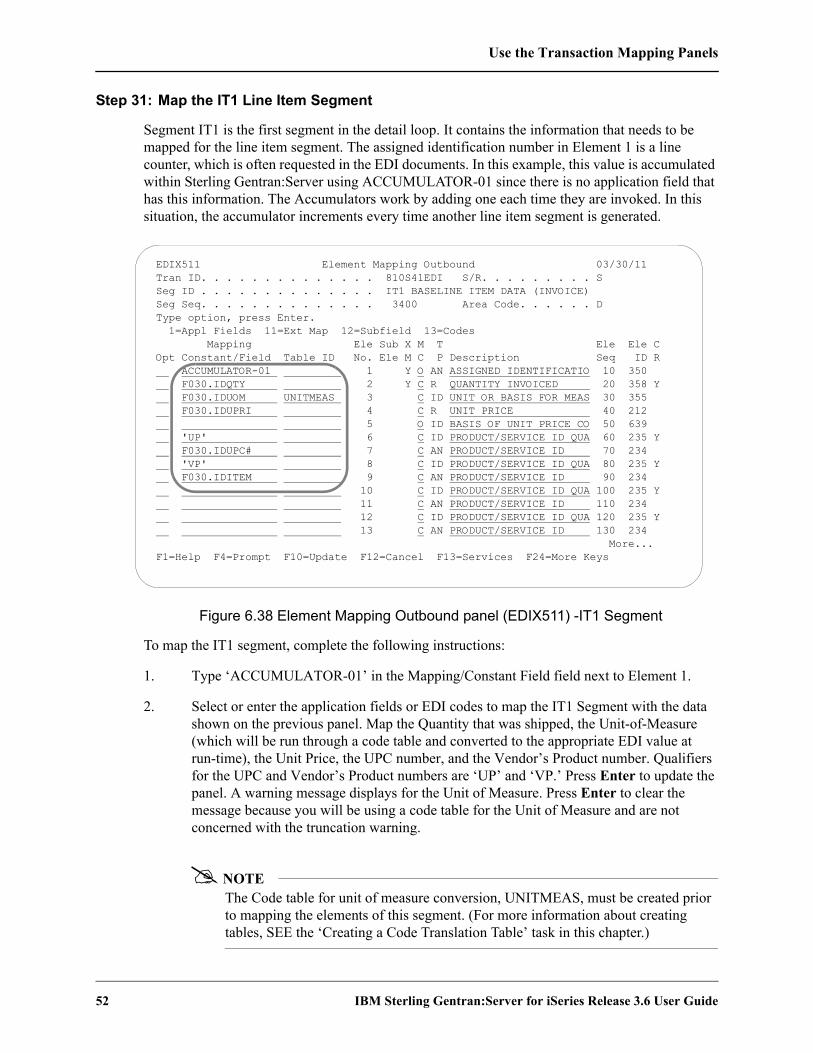
Use the Transaction Mapping Panels
52 IBM Sterling Gentran:Server for iSeries Release 3.6 User Guide
Step 31: Map the IT1 Line Item Segment
Segment IT1 is the first segment in the detail loop. It contains the information that needs to be mapped for the line item segment. The assigned identification number in Element 1 is a line counter, which is often requested in the EDI documents. In this example, this value is accumulated within Sterling Gentran:Server using ACCUMULATOR-01 since there is no application field that has this information. The Accumulators work by adding one each time they are invoked. In this situation, the accumulator increments every time another line item segment is generated.
Figure 6.38 Element Mapping Outbound panel (EDIX511) -IT1 Segment
To map the IT1 segment, complete the following instructions:
1. Type ‘ACCUMULATOR-01’ in the Mapping/Constant Field field next to Element 1.
2. Select or enter the application fields or EDI codes to map the IT1 Segment with the data shown on the previous panel. Map the Quantity that was shipped, the Unit-of-Measure (which will be run through a code table and converted to the appropriate EDI value at run-time), the Unit Price, the UPC number, and the Vendor’s Product number. Qualifiers for the UPC and Vendor’s Product numbers are ‘UP’ and ‘VP.’ Press Enter to update the panel. A warning message displays for the Unit of Measure. Press Enter to clear the message because you will be using a code table for the Unit of Measure and are not concerned with the truncation warning.
NOTEThe Code table for unit of measure conversion, UNITMEAS, must be created prior to mapping the elements of this segment. (For more information about creating tables, SEE the ‘Creating a Code Translation Table’ task in this chapter.)
EDIX511 Element Mapping Outbound 03/30/11 Tran ID. . . . . . . . . . . . . . 810S41EDI S/R. . . . . . . . . S Seg ID . . . . . . . . . . . . . . IT1 BASELINE ITEM DATA (INVOICE) Seg Seq. . . . . . . . . . . . . . 3400 Area Code. . . . . . D Type option, press Enter. 1=Appl Fields 11=Ext Map 12=Subfield 13=Codes Mapping Ele Sub X M T Ele Ele C Opt Constant/Field Table ID No. Ele M C P Description Seq ID R ACCUMULATOR-01 1 Y O AN ASSIGNED IDENTIFICATIO 10 350 F030.IDQTY 2 Y C R QUANTITY INVOICED 20 358 Y F030.IDUOM UNITMEAS 3 C ID UNIT OR BASIS FOR MEAS 30 355 F030.IDUPRI 4 C R UNIT PRICE 40 212 5 O ID BASIS OF UNIT PRICE CO 50 639 'UP' 6 C ID PRODUCT/SERVICE ID QUA 60 235 Y F030.IDUPC# 7 C AN PRODUCT/SERVICE ID 70 234 'VP' 8 C ID PRODUCT/SERVICE ID QUA 80 235 Y F030.IDITEM 9 C AN PRODUCT/SERVICE ID 90 234 10 C ID PRODUCT/SERVICE ID QUA 100 235 Y 11 C AN PRODUCT/SERVICE ID 110 234 12 C ID PRODUCT/SERVICE ID QUA 120 235 Y 13 C AN PRODUCT/SERVICE ID 130 234 More... F1=Help F4=Prompt F10=Update F12=Cancel F13=Services F24=More Keys

Use the Transaction Mapping Panels
IBM Sterling Gentran:Server for iSeries Release 3.6 User Guide 53
Step 32: Access the Extended Outbound Mapping Panel
The next several steps show how to add extended mapping to the IT1 segment.
Figure 6.39 Element Mapping Outbound panel (EDIX511) – IT1 Segment
To access the Work with Extended Mapping panel (EDIX506-FMT01), complete the following instructions:
1. Type ‘11’ in the option field next to Element 1 as shown on the above panel and press Enter. This action displays the Work with Extended Mapping panel (EDIX506-FMT01).
2. Type ‘2’ (Revise) in the option field next to the first extended map and press Enter.
EDIX511 Element Mapping Outbound 03/30/11 Tran ID. . . . . . . . . . . . . . 810S41EDI S/R. . . . . . . . . S Seg ID . . . . . . . . . . . . . . IT1 BASELINE ITEM DATA (INVOICE) Seg Seq. . . . . . . . . . . . . . 3400 Area Code. . . . . . D Type option, press Enter. 1=Appl Fields 11=Ext Map 12=Subfield 13=Codes Mapping Ele Sub X M T Ele Ele C Opt Constant/Field Table ID No. Ele M C P Description Seq ID R 11 ACCUMULATOR-01 1 Y O AN ASSIGNED IDENTIFICATIO 10 350 F030.IDQTY 2 Y C R QUANTITY INVOICED 20 358 Y F030.IDUOM UNITMEAS 3 C ID UNIT OR BASIS FOR MEAS 30 355 F030.IDUPRI 4 C R UNIT PRICE 40 212 5 O ID BASIS OF UNIT PRICE CO 50 639 'UP' 6 C ID PRODUCT/SERVICE ID QUA 60 235 Y F030.IDUPC# 7 C AN PRODUCT/SERVICE ID 70 234 'VP' 8 C ID PRODUCT/SERVICE ID QUA 80 235 Y F030.IDITEM 9 C AN PRODUCT/SERVICE ID 90 234 10 C ID PRODUCT/SERVICE ID QUA 100 235 Y 11 C AN PRODUCT/SERVICE ID 110 234 12 C ID PRODUCT/SERVICE ID QUA 120 235 Y 13 C AN PRODUCT/SERVICE ID 130 234 More... F1=Help F4=Prompt F10=Update F12=Cancel F13=Services F24=More Keys
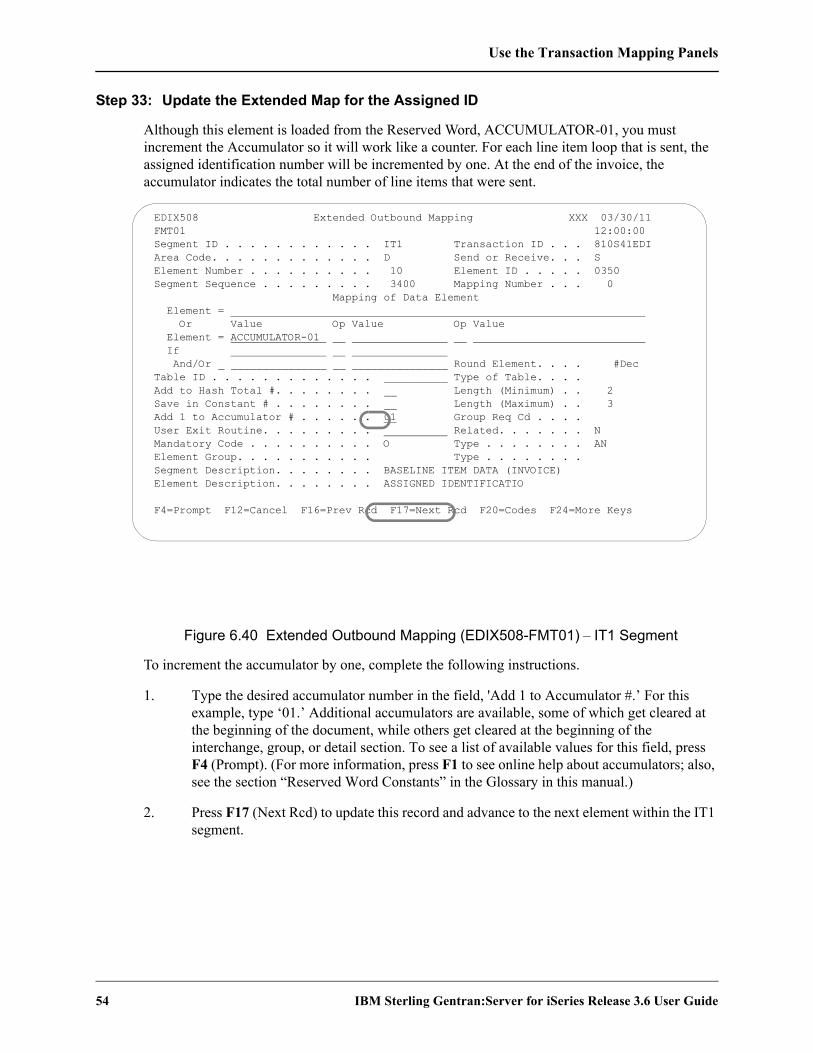
Use the Transaction Mapping Panels
54 IBM Sterling Gentran:Server for iSeries Release 3.6 User Guide
Step 33: Update the Extended Map for the Assigned ID
Although this element is loaded from the Reserved Word, ACCUMULATOR-01, you must increment the Accumulator so it will work like a counter. For each line item loop that is sent, the assigned identification number will be incremented by one. At the end of the invoice, the accumulator indicates the total number of line items that were sent.
Figure 6.40 Extended Outbound Mapping (EDIX508-FMT01) – IT1 Segment
To increment the accumulator by one, complete the following instructions.
1. Type the desired accumulator number in the field, 'Add 1 to Accumulator #.’ For this example, type ‘01.’ Additional accumulators are available, some of which get cleared at the beginning of the document, while others get cleared at the beginning of the interchange, group, or detail section. To see a list of available values for this field, press F4 (Prompt). (For more information, press F1 to see online help about accumulators; also, see the section “Reserved Word Constants” in the Glossary in this manual.)
2. Press F17 (Next Rcd) to update this record and advance to the next element within the IT1 segment.
EDIX508 Extended Outbound Mapping XXX 03/30/11 FMT01 12:00:00 Segment ID . . . . . . . . . . . . IT1 Transaction ID . . . 810S41EDI Area Code. . . . . . . . . . . . . D Send or Receive. . . S Element Number . . . . . . . . . . 10 Element ID . . . . . 0350 Segment Sequence . . . . . . . . . 3400 Mapping Number . . . 0 Mapping of Data Element Element = Or Value Op Value Op Value Element = ACCUMULATOR-01 If And/Or _ _______________ __ _______________ Round Element. . . . #Dec Table ID . . . . . . . . . . . . . __________ Type of Table. . . . Add to Hash Total #. . . . . . . . __ Length (Minimum) . . 2 Save in Constant # . . . . . . . . __ Length (Maximum) . . 3 Add 1 to Accumulator # . . . . . . 01 Group Req Cd . . . . User Exit Routine. . . . . . . . . Related. . . . . . . N Mandatory Code . . . . . . . . . . O Type . . . . . . . . AN Element Group. . . . . . . . . . . Type . . . . . . . . Segment Description. . . . . . . . BASELINE ITEM DATA (INVOICE) Element Description. . . . . . . . ASSIGNED IDENTIFICATIO F4=Prompt F12=Cancel F16=Prev Rcd F17=Next Rcd F20=Codes F24=More Keys

Use the Transaction Mapping Panels
IBM Sterling Gentran:Server for iSeries Release 3.6 User Guide 55
Step 34: Update the Extended Map for the Quantity Shipped
In this step you will add the extended map information for the Quantity Shipped. At the end of the invoice, the hash total indicates the total quantity shipped for the invoice.
Figure 6.41 Extended Outbound Mapping panel (EDIX508-FMT01) – IT1 Segment
To update the extended map, complete the following instructions:1. If you want to round the quantity shipped value, type ‘Y’ in the Round Element field and
press Enter. Since the element data type is ‘R,’ you can specify the number of decimals to round the value to. In the #Dec field, enter a value between 0 and 6.
NOTEIf you choose to round this value, it does not round the numbers first and then sum the total in HASH-TOTAL-01. If you want to round your values before summing the total, see “Map the CTT Segment.”
2. Sum the total quantity for the invoice by adding this line item’s quantity to the Reserved Word, HASH-TOTAL-01.
3. Code the desired hash total number in the field, ‘Add to Hash Total #.’ Use ‘01.’ Additional hash totals are available. They may get cleared at the beginning of the detail section, document (header section), group, or interchange. To see a list of available values for this field, press F4 (Prompt). (For more information, press F1 to see online help about hash totals; also, see “Reserved Word Constants” in the Glossary in this manual.)
4. Press F10 (Update) to return to the Work with Extended Mapping panel (EDIX506-FMT01).
5. Press F12 (Cancel) to return to the Element Mapping Outbound panel (EDIX511).
EDIX508 Extended Outbound Mapping XXX 04/21/08 FMT01 11:25:11 Segment ID . . . . . . . . . . . . IT1 Transaction ID . . . 810S41EDIArea Code. . . . . . . . . . . . . D Send or Receive. . . S Element Number . . . . . . . . . . 20 Element ID . . . . . 0358 Segment Sequence . . . . . . . . . 3400 Mapping Number . . . 0 Mapping of Data Element Element = Or Value Op Value Op Value Element = F030.IDQTY __ _______________ __ _______________ If _______________ __ _______________ And/Or _ _______________ __ _______________ Round Element. . . . N #Dec 0Table ID . . . . . . . . . . . . . __________ Type of Table. . . . Add to Hash Total #. . . . . . . . 01 Length (Minimum) . . 1 Save in Constant # . . . . . . . . __ Length (Maximum) . . 10 Add 1 to Accumulator # . . . . . . Group Req Cd . . . . User Exit Routine. . . . . . . . . __________ Related. . . . . . . Y Mandatory Code . . . . . . . . . . C Type . . . . . . . . R Element Group. . . . . . . . . . . Type . . . . . . . . Segment Description. . . . . . . . BASELINE ITEM DATA (INVOICE) Element Description. . . . . . . . QUANTITY INVOICED F1=Help F2=More/Less F10=Update F14=Notes F19=Appl F24=More Keys
Use the Transaction Mapping Panels
56 IBM Sterling Gentran:Server for iSeries Release 3.6 User Guide
6. Press F17 (Next Rcd) to advance to the next segment.
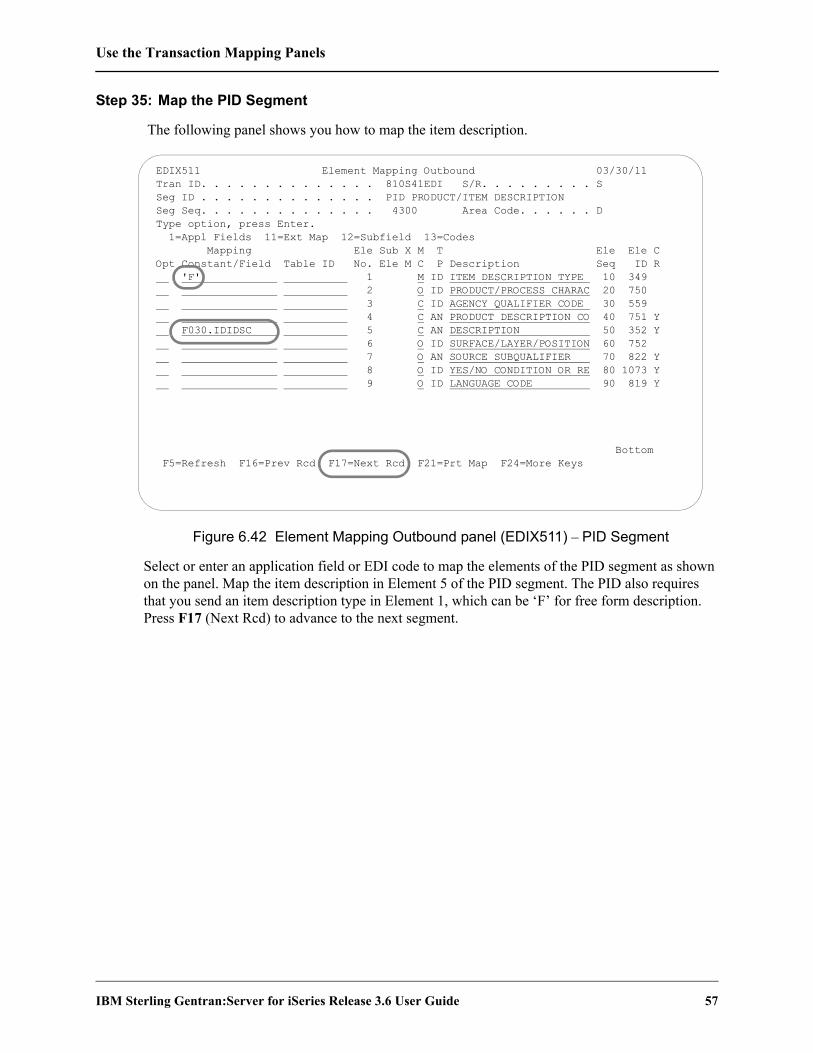
Use the Transaction Mapping Panels
IBM Sterling Gentran:Server for iSeries Release 3.6 User Guide 57
Step 35: Map the PID Segment
The following panel shows you how to map the item description.
Figure 6.42 Element Mapping Outbound panel (EDIX511) – PID Segment
Select or enter an application field or EDI code to map the elements of the PID segment as shown on the panel. Map the item description in Element 5 of the PID segment. The PID also requires that you send an item description type in Element 1, which can be ‘F’ for free form description. Press F17 (Next Rcd) to advance to the next segment.
EDIX511 Element Mapping Outbound 03/30/11 Tran ID. . . . . . . . . . . . . . 810S41EDI S/R. . . . . . . . . S Seg ID . . . . . . . . . . . . . . PID PRODUCT/ITEM DESCRIPTION Seg Seq. . . . . . . . . . . . . . 4300 Area Code. . . . . . D Type option, press Enter. 1=Appl Fields 11=Ext Map 12=Subfield 13=Codes Mapping Ele Sub X M T Ele Ele C Opt Constant/Field Table ID No. Ele M C P Description Seq ID R 'F' 1 M ID ITEM DESCRIPTION TYPE 10 349 2 O ID PRODUCT/PROCESS CHARAC 20 750 3 C ID AGENCY QUALIFIER CODE 30 559 4 C AN PRODUCT DESCRIPTION CO 40 751 Y F030.IDIDSC 5 C AN DESCRIPTION 50 352 Y 6 O ID SURFACE/LAYER/POSITION 60 752 7 O AN SOURCE SUBQUALIFIER 70 822 Y 8 O ID YES/NO CONDITION OR RE 80 1073 Y 9 O ID LANGUAGE CODE 90 819 Y Bottom F5=Refresh F16=Prev Rcd F17=Next Rcd F21=Prt Map F24=More Keys

Use the Transaction Mapping Panels
58 IBM Sterling Gentran:Server for iSeries Release 3.6 User Guide
Step 36: Access the Extended Outbound Mapping Panel
For this example, a Dummy TDS segment will be used to calculate and save the extended line item amount for each line item. The next several steps show how to use the extended mapping to sum the extended line item amounts.
Figure 6.43 Element Mapping Outbound panel (EDIX511) – Dummy TDS Segment
To access the Extended Outbound Mapping panel (EDIX508-FMT01), complete the following:
1. Type ‘11’ (Ext Map) in the Option field next to Element No. ‘1’ and press Enter. This action displays the Work with Extended Mapping panel (EDIX506-FMT01).
2. Type ‘2’ (Revise) in the Option field next to the first extended map and press Enter.
EDIX511 Element Mapping Outbound 03/30/11 Tran ID. . . . . . . . . . . . . . 810S41EDI S/R. . . . . . . . . S Seg ID . . . . . . . . . . . . . . TDS dummy seg (extended $ amt) Seg Seq. . . . . . . . . . . . . . 4350 Area Code. . . . . . D Type option, press Enter. 1=Appl Fields 11=Ext Map 12=Subfield 13=Codes Mapping Ele Sub X M T Ele Ele C Opt Constant/Field Table ID No. Ele M C P Description Seq ID R 11 1 M N2 TOTAL INVOICE AMOUNT 10 361 2 C N2 AMOUNT SUBJECT TO TERM 20 390 3 O N2 DISCOUNTED AMOUNT DUE 30 391 4 O N2 TERMS DISCOUNT AMOUNT 40 362 Bottom F1=Help F4=Prompt F10=Update F12=Cancel F13=Services F24=More Keys
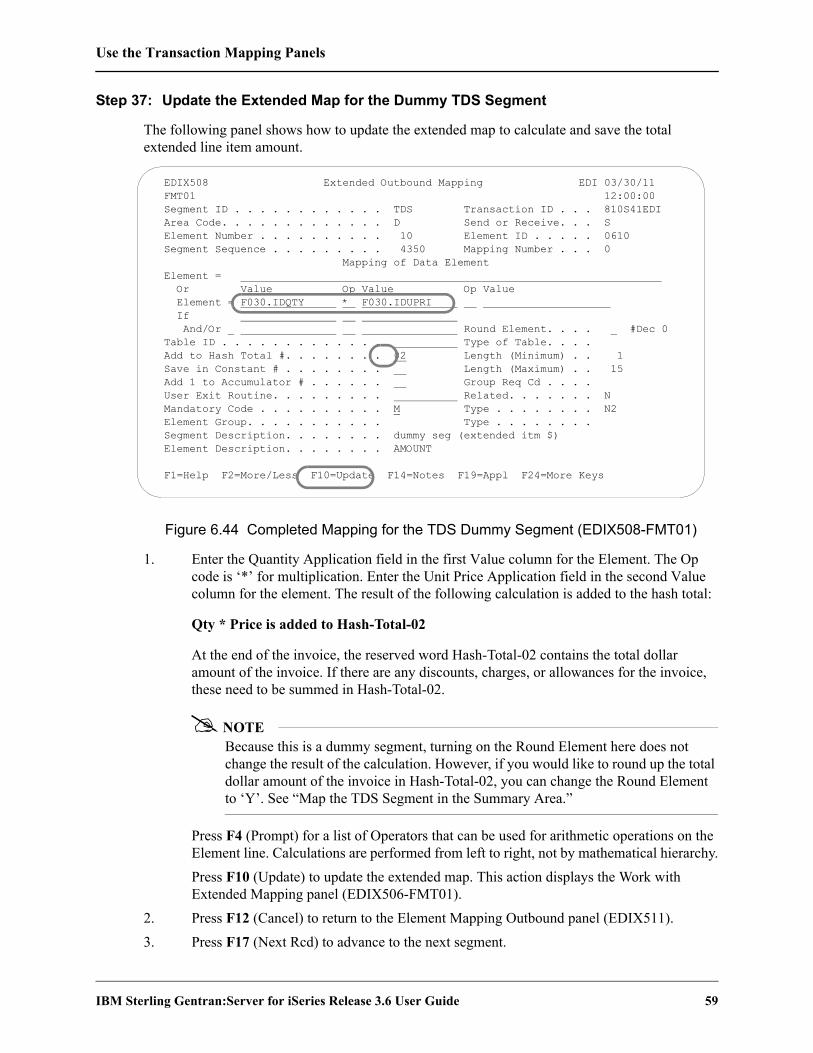
Use the Transaction Mapping Panels
IBM Sterling Gentran:Server for iSeries Release 3.6 User Guide 59
Step 37: Update the Extended Map for the Dummy TDS Segment
The following panel shows how to update the extended map to calculate and save the total extended line item amount.
Figure 6.44 Completed Mapping for the TDS Dummy Segment (EDIX508-FMT01)
1. Enter the Quantity Application field in the first Value column for the Element. The Op code is ‘*’ for multiplication. Enter the Unit Price Application field in the second Value column for the element. The result of the following calculation is added to the hash total:
Qty * Price is added to Hash-Total-02
At the end of the invoice, the reserved word Hash-Total-02 contains the total dollar amount of the invoice. If there are any discounts, charges, or allowances for the invoice, these need to be summed in Hash-Total-02.
NOTEBecause this is a dummy segment, turning on the Round Element here does not change the result of the calculation. However, if you would like to round up the total dollar amount of the invoice in Hash-Total-02, you can change the Round Element to ‘Y’. See “Map the TDS Segment in the Summary Area.”
Press F4 (Prompt) for a list of Operators that can be used for arithmetic operations on the Element line. Calculations are performed from left to right, not by mathematical hierarchy.Press F10 (Update) to update the extended map. This action displays the Work with Extended Mapping panel (EDIX506-FMT01).
2. Press F12 (Cancel) to return to the Element Mapping Outbound panel (EDIX511). 3. Press F17 (Next Rcd) to advance to the next segment.
EDIX508 Extended Outbound Mapping EDI 03/30/11 FMT01 12:00:00 Segment ID . . . . . . . . . . . . TDS Transaction ID . . . 810S41EDI Area Code. . . . . . . . . . . . . D Send or Receive. . . S Element Number . . . . . . . . . . 10 Element ID . . . . . 0610 Segment Sequence . . . . . . . . . 4350 Mapping Number . . . 0 Mapping of Data Element Element = Or Value Op Value Op Value Element = F030.IDQTY * F030.IDUPRI If And/Or Round Element. . . . #Dec 0 Table ID . . . . . . . . . . . . . Type of Table. . . . Add to Hash Total #. . . . . . . . 02 Length (Minimum) . . 1 Save in Constant # . . . . . . . . Length (Maximum) . . 15 Add 1 to Accumulator # . . . . . . Group Req Cd . . . . User Exit Routine. . . . . . . . . Related. . . . . . . N Mandatory Code . . . . . . . . . . M Type . . . . . . . . N2 Element Group. . . . . . . . . . . Type . . . . . . . . Segment Description. . . . . . . . dummy seg (extended itm $) Element Description. . . . . . . . AMOUNT F1=Help F2=More/Less F10=Update F14=Notes F19=Appl F24=More Keys
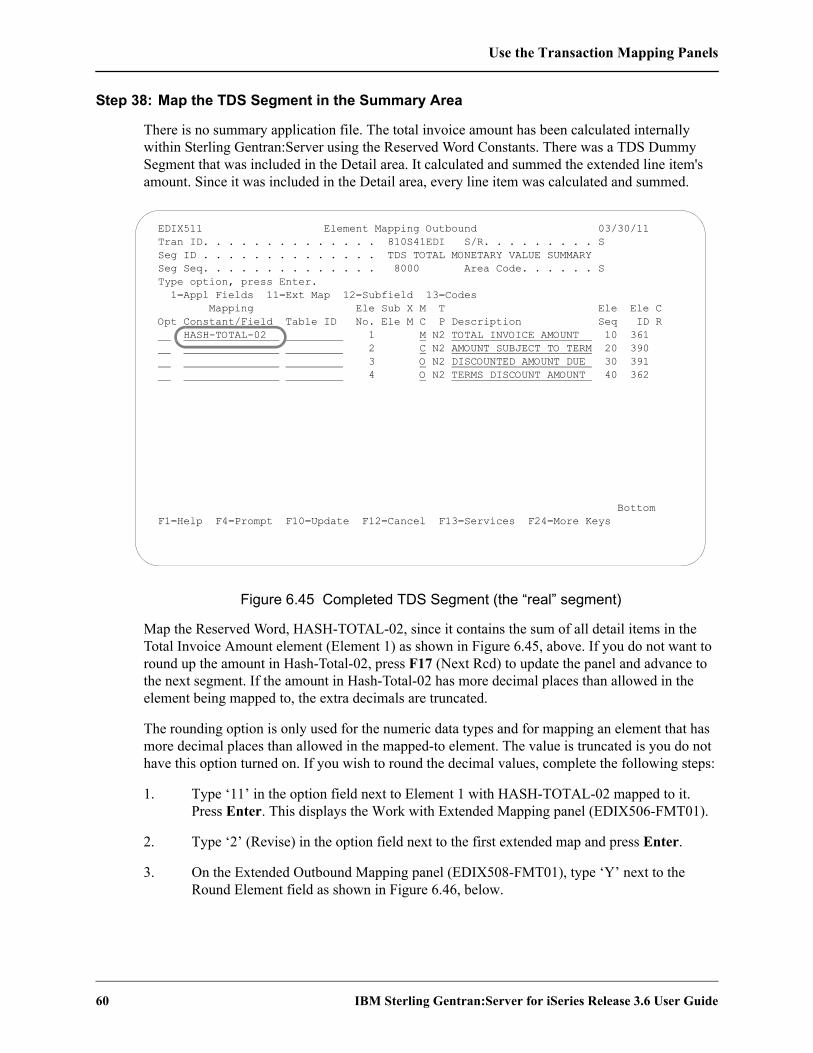
Use the Transaction Mapping Panels
60 IBM Sterling Gentran:Server for iSeries Release 3.6 User Guide
Step 38: Map the TDS Segment in the Summary Area
There is no summary application file. The total invoice amount has been calculated internally within Sterling Gentran:Server using the Reserved Word Constants. There was a TDS Dummy Segment that was included in the Detail area. It calculated and summed the extended line item's amount. Since it was included in the Detail area, every line item was calculated and summed.
Figure 6.45 Completed TDS Segment (the “real” segment)
Map the Reserved Word, HASH-TOTAL-02, since it contains the sum of all detail items in the Total Invoice Amount element (Element 1) as shown in Figure 6.45, above. If you do not want to round up the amount in Hash-Total-02, press F17 (Next Rcd) to update the panel and advance to the next segment. If the amount in Hash-Total-02 has more decimal places than allowed in the element being mapped to, the extra decimals are truncated.
The rounding option is only used for the numeric data types and for mapping an element that has more decimal places than allowed in the mapped-to element. The value is truncated is you do not have this option turned on. If you wish to round the decimal values, complete the following steps:
1. Type ‘11’ in the option field next to Element 1 with HASH-TOTAL-02 mapped to it. Press Enter. This displays the Work with Extended Mapping panel (EDIX506-FMT01).
2. Type ‘2’ (Revise) in the option field next to the first extended map and press Enter.
3. On the Extended Outbound Mapping panel (EDIX508-FMT01), type ‘Y’ next to the Round Element field as shown in Figure 6.46, below.
EDIX511 Element Mapping Outbound 03/30/11 Tran ID. . . . . . . . . . . . . . 810S41EDI S/R. . . . . . . . . S Seg ID . . . . . . . . . . . . . . TDS TOTAL MONETARY VALUE SUMMARY Seg Seq. . . . . . . . . . . . . . 8000 Area Code. . . . . . S Type option, press Enter. 1=Appl Fields 11=Ext Map 12=Subfield 13=Codes Mapping Ele Sub X M T Ele Ele C Opt Constant/Field Table ID No. Ele M C P Description Seq ID R HASH-TOTAL-02 1 M N2 TOTAL INVOICE AMOUNT 10 361 2 C N2 AMOUNT SUBJECT TO TERM 20 390 3 O N2 DISCOUNTED AMOUNT DUE 30 391 4 O N2 TERMS DISCOUNT AMOUNT 40 362 Bottom F1=Help F4=Prompt F10=Update F12=Cancel F13=Services F24=More Keys

Use the Transaction Mapping Panels
IBM Sterling Gentran:Server for iSeries Release 3.6 User Guide 61
Figure 6.46 Hash-Total-02 with Rounding Option (EDIX508-FMT01)
EDIX508 Extended Outbound Mapping EDI 03/30/11 FMT01 12:00:00 Segment ID . . . . . . . . . . . . TDS Transaction ID . . . 810S41EDI Area Code. . . . . . . . . . . . . S Send or Receive. . . S Element Number . . . . . . . . . . 10 Element ID . . . . . 0610 Segment Sequence . . . . . . . . . 8000 Mapping Number . . . 0 Mapping of Data Element Element = Or Value Op Value Op Value Element = HASH-TOTAL-02 If And/Or Round Element. . . . Y #Dec 0 Table ID . . . . . . . . . . . . . Type of Table. . . . Add to Hash Total #. . . . . . . . Length (Minimum) . . 1 Save in Constant # . . . . . . . . Length (Maximum) . . 15 Add 1 to Accumulator # . . . . . . Group Req Cd . . . . User Exit Routine. . . . . . . . . Related. . . . . . . N Mandatory Code . . . . . . . . . . M Type . . . . . . . . N2 Element Group. . . . . . . . . . . Type . . . . . . . . Segment Description. . . . . . . . TOTAL MONETARY VALUE SUMMARY Element Description. . . . . . . . AMOUNT F1=Help F2=More/Less F10=Update F14=Notes F19=Appl F24=More Keys

Use the Transaction Mapping Panels
62 IBM Sterling Gentran:Server for iSeries Release 3.6 User Guide
Step 39: Add Comments to Extended Maps
Sterling Gentran:Server for iSeries allows you to enter comments for extended maps.
To add comments to element 1 of the TDS segment, press F14 (Notes) on the Extended Outbound Mapping (EDIX508-FMT01) panel. .
The Extended Outbound Mapping Notes Panel (EDIX538-FMT01) is displayed.
EDIX508 Extended Outbound Mapping EDI 03/30/11 FMT01 12:00:00 Segment ID . . . . . . . . . . . . TDS Transaction ID . . . 810S41EDI Area Code. . . . . . . . . . . . . S Send or Receive. . . S Element Number . . . . . . . . . . 10 Element ID . . . . . 0610 Segment Sequence . . . . . . . . . 8000 Mapping Number . . . 0 Mapping of Data Element Element = Or Value Op Value Op Value Element = HASH-TOTAL-02 If And/Or Round Element. . . . Y #Dec 0 Table ID . . . . . . . . . . . . . Type of Table. . . . Add to Hash Total #. . . . . . . . Length (Minimum) . . 1 Save in Constant # . . . . . . . . Length (Maximum) . . 15 Add 1 to Accumulator # . . . . . . Group Req Cd . . . . User Exit Routine. . . . . . . . . Related. . . . . . . N Mandatory Code . . . . . . . . . . M Type . . . . . . . . N2 Element Group. . . . . . . . . . . Type . . . . . . . . Segment Description. . . . . . . . TOTAL MONETARY VALUE SUMMARY Element Description. . . . . . . . AMOUNT F1=Help F2=More/Less F10=Update F14=Notes F19=Appl F24=More Keys
EDIX538 Extended Outbound Mapping Notes EDI 03/30/11 FMT01 12:00:00 Segment ID . . . . . . . . . . . . TDS Transaction ID . . . 810S41EDI Area Code. . . . . . . . . . . . . S Send or Receive. . . S Element Number . . . . . . . . . . 10 Element ID . . . . . 0610 Segment Sequence . . . . . . . . . 8000 Mapping Number . . . 0 Mapping of Data Element Element = Value Op Value Op Value Element = HASH-TOTAL-02 If And/Or Notes. . . . . . . . . . . . . . . HASH-TOTAL-02 CONTAINS THE SUM OF ALL DETAIL ITEMS IN THE TOTAL INVOICE AMOUNT ELEMENT Last Update User . . . . . . . . . Last Update Date . . F1=Help F5=Refresh F10=Update F12=Cancel F21=Prt Notes F24=More Keys

Use the Transaction Mapping Panels
IBM Sterling Gentran:Server for iSeries Release 3.6 User Guide 63
Enter comments and press F10 (Update). Extended Outbound Mapping panel is displayed. Press F5 (Refresh), the function key ‘F14=Notes’ changes to ‘F14=Notes*. The ‘*’ denotes there are notes for this element.
Press F10 (Update) to return to the Work with Extended Mapping panel (EDIX506-FMT01).
Press F12 (cancel) to return to the Element Mapping Outbound panel (EDIX511).
Press F17 (Next Rcd) to advance to the next segment.
EDIX508 Extended Outbound Mapping EDI 03/30/11 FMT01 12:00:00 Segment ID . . . . . . . . . . . . TDS Transaction ID . . . 810S41EDI Area Code. . . . . . . . . . . . . S Send or Receive. . . S Element Number . . . . . . . . . . 10 Element ID . . . . . 0610 Segment Sequence . . . . . . . . . 8000 Mapping Number . . . 0 Mapping of Data Element Element = Or Value Op Value Op Value Element = HASH-TOTAL-02 If And/Or Round Element. . . . Y #Dec 0 Table ID . . . . . . . . . . . . . Type of Table. . . . Add to Hash Total #. . . . . . . . Length (Minimum) . . 1 Save in Constant # . . . . . . . . Length (Maximum) . . 15 Add 1 to Accumulator # . . . . . . Group Req Cd . . . . User Exit Routine. . . . . . . . . Related. . . . . . . N Mandatory Code . . . . . . . . . . M Type . . . . . . . . N2 Element Group. . . . . . . . . . . Type . . . . . . . . Segment Description. . . . . . . . TOTAL MONETARY VALUE SUMMARY Element Description. . . . . . . . AMOUNT F1=Help F2=More/Less F10=Update F14=Notes* F19=Appl F24=More Keys

Use the Transaction Mapping Panels
64 IBM Sterling Gentran:Server for iSeries Release 3.6 User Guide
Step 40: Map the CTT Segment
The CTT is a control-type segment included in many of the transaction sets. It carries some control totals used to ensure that all of the line items are included in the document. The CTT01 element in this document contains the number of line item loops generated for this document. This is calculated within Sterling Gentran:Server by using ACCUMULATOR-01. The CTT02 element is optional. If used, it contains the total quantity that was shipped (sum of all the IT102’s). This value is calculated internally by using HASH-TOTAL-01.
Figure 6.47 Element Mapping Outbound panel (EDIX511) – CTT Segment
Type the values for Elements 1 and 2 as shown on panel and press F10 (Update).
SummaryAt this point, you are finished creating an outbound map. Press F12 (Cancel) to return to the Work with Transaction Mapping panel (EDIX500-FMT01).
EDIX511 Element Mapping Outbound 03/30/11 Tran ID. . . . . . . . . . . . . . 810S41EDI S/R. . . . . . . . . S Seg ID . . . . . . . . . . . . . . CTT TRANSACTION TOTALS Seg Seq. . . . . . . . . . . . . . 8800 Area Code. . . . . . S Type option, press Enter. 1=Appl Fields 11=Ext Map 12=Subfield 13=Codes Mapping Ele Sub X M T Ele Ele C Opt Constant/Field Table ID No. Ele M C P Description Seq ID R ACCUMULATOR-01 1 M N0 NUMBER OF LINE ITEMS 10 354 HASH-TOTAL-01 2 O R HASH TOTAL 20 347 3 O R WEIGHT 30 81 Y 4 C ID UNIT OR BASIS FOR MEAS 40 355 5 O R VOLUME 50 183 Y 6 C ID UNIT OR BASIS FOR MEAS 60 355 7 O AN DESCRIPTION 70 352 Bottom F1=Help F4=Prompt F10=Update F12=Cancel F13=Services F24=More Keys

Use the Transaction Mapping Panels
IBM Sterling Gentran:Server for iSeries Release 3.6 User Guide 65
Create an Inbound Transaction MapDuring this task, you will create an inbound transaction map. A step-by-step procedure is provided to assist you in developing the map in Sterling Gentran:Server.
Off-line PreparationBefore you enter Sterling Gentran:Server to create an inbound transaction map, you may find it beneficial to use the following worksheets to establish the relationship between your EDI elements and your application fields. If the worksheets are filled out carefully, actually mapping the document will be a simpler task.
Design an Inbound Transaction Map – Field LevelTo demonstrate how to create an inbound transaction map, we will create a map for an example purchase order. This map will be modeled after an existing transaction map ‘SEMPO4010.’ It will be tied to Application ID ‘SEMPOEDI’ which was created in the “Application Definition” chapter.
The use of these worksheets presupposes the following knowledge:
1. Familiarity with your internal application structure.
2. A firm definition as to which EDI segments might be received and where in the application the received elements should go.
3. What special processing requirements are needed (that is, you must translate the EDI unit of measure received into an application unit of measure).
4. A firm understanding of the reserved word constants that are automatically loaded by the Sterling Gentran:Server inbound mapping program. (SEE the Glossary in this manual for more information about Reserved Words.)
Fill out one worksheet for each application record. List each application field defined for the record and indicate the source Element for the application field under the standard element column. Note any special processing requirements.
You will need to write down an application field twice if the field will be loaded with one value when a certain condition exists and another value when another condition exists.
Purchase Order Header FileLoad the customer number from the reserved word SENDER-ID. Load the purchase order number from the BEG02 element. Because the purchase order number is needed by the detail file, it will be saved in a constant (CONSTANT-01). Since the purchase order date is also needed in the detail file, it will be saved into a constant (CONSTANT-02).

Use the Transaction Mapping Panels
66 IBM Sterling Gentran:Server for iSeries Release 3.6 User Guide
Figure 6.48 Mapping Field Level Worksheet – Purchase Order Header Record
Application ID: SEMPOEDI Transaction ID: POMAP4010 Page 1 of 2 Application Record: PO Header
Standard Element Application Field XFER? Special Requirements
SENDER-ID CUSTNUM
BEG05 PODATE Save in Constant-02
BEG03 PONUM Save in Constant-01
BEG02 TYPCODE
TOTAMT
N102 SHIPTONAME IF N101 = “ST”
N301 SHIPTOADD1 IF N101 = “ST”
N302 SHIPTOADD2 IF N101 = “ST”
N403 SHIPTOZIP IF N101 = “ST”
N402 SHIPTOST IF N101 = “ST”
N401 SHIPTOCITY IF N101 = “ST”
N102 BILLTONAME IF N101 = “BT”
N301 BILLTOADD1 IF N101 = “BT”
N302 BILLTOADD2 IF N101 = “BT”
N403 BILLTOZIP IF N101 = “BT”
N403 BILLTOEXT IF N101 = “BT”
N402 BILLTOST IF N101 = “BT”
N401 BILLTOCITY IF N101 = “BT”

Use the Transaction Mapping Panels
IBM Sterling Gentran:Server for iSeries Release 3.6 User Guide 67
Purchase Order Detail (Line Item) FileThe customer number will be loaded from the reserved word SENDER-ID. The purchase order date and purchase order number will be loaded from CONSTANT-02 and CONSTANT-01 respectively (both were loaded in the first file).
Figure 6.49 Mapping Field Level worksheet – Purchase Order Detail Record
Design an Inbound Transaction Map – Element LevelNow that all of the data movement has been described in terms of the application records and fields, restate this information so that it is in EDI segment/element sequence to facilitate the actual entry of the mapping data.
As each element is entered on the worksheet, look for corresponding entries on the Field Level worksheets that were just completed. Make one entry on the Element Level worksheet for each reference to that element on the Field Level worksheet.
As each field level entry is transferred to the Element Level worksheet, place a check-mark in the XFER column of the Field Level worksheet, next to the entry. When this process is finished, the only entries that should remain unchecked are those that are loaded from literal or reserved word constants.
Application ID: SEMPOEDI Transaction ID: POMAP4010 Page 2 of 2 Application Record: PO Detail
Standard Element Application Field XFER? Special Requirements
SENDER-ID CUSTNUM
CONSTANT-02 PODATE
PO107 ITEMNUM Translate with SEMDATA table
PO103 UOM Translate with SEMCODE table
PO104 UNITPR
CONSTANT-01 PONUM
PO102 QTYORD
PID05 DESC

Use the Transaction Mapping Panels
68 IBM Sterling Gentran:Server for iSeries Release 3.6 User Guide
BEG SegmentThe following elements are referenced:
Figure 6.50 Mapping Element Level worksheet – BEG Segment
N1 SegmentThe following elements are referenced:
Figure 6.51 Mapping Element Level worksheet – N1 Segment
Application ID: SEMPOEDI Transaction ID: POMAP4010 Page 1 of 6 Segment ID: BEG
Application Field Standard Element Used? Special Requirements
F010.TYPCODE BEG02
F010.PONUM BEG03 Save in Constant-01
F010.PODATE BEG05 Save in Constant-02
Application ID: SEMPOEDI Transaction ID: POMAP4010 Page 2 of 6Segment ID: N1
Application Field Standard Element Used? Special Requirements
F010.SHIPTONAME N102 If N101 = ‘ST’
F010.BILLTONAME N102 If N101 = ’BT’

Use the Transaction Mapping Panels
IBM Sterling Gentran:Server for iSeries Release 3.6 User Guide 69
N3 SegmentThe following elements are referenced:
Figure 6.52 Mapping Element Level Worksheet – N3 Segment
N4 SegmentThe following elements are referenced:
Figure 6.53 Mapping Element Level Worksheet – N4 Segment
Application ID: SEMPOEDI Transaction ID: POMAP4010 Page 3 of 6Segment ID: N3
Application Field Standard Element Used? Special Requirements
F010.SHIPTOADD1 N301 If N101 = ‘ST’
F010.BILLTOADD1 N301 If N101 = ‘BT’
F010.SHIPTOADD2 N302 If N101 = ‘ST’
F010.BILLTOADD2 N302 If N101 = ‘BT’
Application ID: SEMPOEDI Transaction ID: POMAP4010 Page 4 of 6Segment ID: N4
Application Field Standard Element Used? Special Requirements
F010.SHIPTOCITY N401 If N101 = ‘ST’
F010.BILLTOCITY N401 If N101 = ‘BT’
F010.SHIPTOST N402 If N101 = ‘ST’
F010.BILLTOST N402 If N101 = ‘BT’
F010.SHIPTOZIP N403 If N101 = ‘ST’
F010.BILLTOZIP N4031 If N101 = ‘BT’ First 5 characters
F010.BILLTOEXT N4032 If N101 = ‘BT’ Last 4 characters
Use the Transaction Mapping Panels
70 IBM Sterling Gentran:Server for iSeries Release 3.6 User Guide
PO1 SegmentThe following elements are referenced:
Figure 6.54 Mapping Element Level Worksheet – PO1 Segment
PID SegmentThe following element is referenced:
Figure 6.55 Mapping Element Level Worksheet – PID Segment
F020.QTYORD PO102
F020.UOM PO103 Translate using SEMCODE table
F030.UNITPR PO104If PO106 = ‘PI’ or ‘CB,’ translate
F020.ITEMNUM PO107 EDI item # using SEMDATA table
F020.ITEMNUM PO107 If PO106 = ‘VN’
Application ID: SEMPOEDI Transaction ID: POMAP4010 Page 5 of 6Segment ID: PO1
Application Field Standard Element Used? Special Requirements
Application ID: SEMPOEDI Transaction ID: POMAP4010 Page 6 of 6Segment ID: PID
Application Field Standard Element Used? Special Requirements
F020.DESC PID05

Use the Transaction Mapping Panels
IBM Sterling Gentran:Server for iSeries Release 3.6 User Guide 71
Design an Inbound Transaction Map – Segment LevelOn the right side of the worksheet the segments to be received are listed. DO NOT list the N1 loop twice (once for bill to and once for ship from). On outbound, the generation of like segments from different application areas is handled by copying the segment(s) as often as necessary and mapping each one independently. On inbound, you don’t usually know the order that the segments will be sent (bill to may come before or after ship from). For this reason, you direct the EDI elements to different application fields by using conditional statements and alternate maps (this will be demonstrated when you actually map the elements).
For the same reason, do not eliminate the loop IDs or change the Max Use of any segment to one (1), unless you are certain that the segment will not loop. On inbound maps, assume the worst case scenario. Use the Type, Loop ID, and Max Use fields directly as copied from the standard.
List the application records down the left side of the worksheet. If an application record will be generated each time an EDI loop is processed, assign it the appropriate loop ID. Assign the application records an area and a Max Use.
Use the application file formats created in the “Application Definition” chapter as a reference. Draw lines from each application record to each segment that “contributes” data to its generation.
Examine the segment/record relationship. If any EDI segment maps to an application record in a different area of the document, then you have an error that must be corrected before you can proceed with mapping.
Use the Transaction Mapping Panels
72 IBM Sterling Gentran:Server for iSeries Release 3.6 User Guide
Figure 6.56 Mapping Segment Level worksheet – PO File
App
licat
ion
ID:
SE
MP
OE
DI
Tran
sact
ion
ID:
PO
MA
P40
10P
age
1
of
1
App
licat
ion
Rec
ord
Type
Loop
IDM
ax U
seR
elat
ions
hip
Seg
men
t ID
Type
Loop
IDM
ax U
se
PO H
eade
rH
1B
EGH
1
PO D
etai
lD
8000
1N
1H
4000
1
N3
H40
002
N4
H40
001
PO1
D80
001
PID
D81
501
CTT
S1

Use the Transaction Mapping Panels
IBM Sterling Gentran:Server for iSeries Release 3.6 User Guide 73
Enter the Map Online
Step 1: Determine a New Transaction ID or Map
The Work with Transaction Mapping panel (EDIX500-FMT01) provides you with the option for creating a new Transaction ID. Typically, most users choose a name that identifies the transaction, version, and partner-specific code. The name you choose must be unique.
Figure 6.57 Work with Transaction Mapping panel (EDIX500-FMT01)
To name the Transaction ID, follow these instructions:
1. Type ‘1’ (Create) in the Option field.
2. Type ‘POMAP4010,’ in the Transaction ID field. The name ‘POMAP4010’ is an example of a Transaction ID to use. You may use any name you wish (that is, your company’s initials).
3. Type ‘R’ in the S/R (Send/Receive) field to indicate that this is an inbound map that will be used to translate your trading partner’s EDI format and press Enter.
Field DescriptionsTransaction ID
This field contains the single identifier under which all the connections between the EDI format and the application format are stored. It is also referred to as the map name. This is the primary key when identifying a map.
Send or Receive Type ‘S’ (Send) in this field when setting up an outbound document or ‘R’ (Receive) when setting up an inbound document. It is the secondary key when identifying a map.
EDIX500 Work with Transaction Mapping EDI 03/30/11 FMT01 pgmlib: G3X6PGM dtalib: G3X6DTA 12:00:00 Position to Transaction ID . . . . S/R Type option (and Information), press Enter. 1=Create 2=Revise 3=Copy 4=Delete 5=View 6=Print 11=Segments Opt Tran ID S/R Appl ID Description User Typ 1 POMAP4010 R ANSI2040IN R INVFILE ANSI 002040 INBOUND INVOICES CSG G ANSI2040PO S POFILE ANSI 002040 OUTBOUND POS CSG G INVOIC S INVOIC Edifact OB Invoice D:94B SEC P INVOICOUT S INVOICOUT Tutorial EDIFACT Invoice D:94B CB P ORDERS R ORDERS Edifact Inb Orders D:94B CSG P ORDERSINB R ORDERSINB Tutorial ORDERS Inbound D:94B CB G SEMINMAP1 S SEMINAPPL SEMINAR 810 OUTBOUND MAP 2040 CSG P SEMPO4010 R SEMPOAPPL Purch. Order Inb. 004010 EDI P More... Parameters or command ===> F1=Help F3=Exit F12=Cancel F15=Sort F23=More Options F24=More Keys

Use the Transaction Mapping Panels
74 IBM Sterling Gentran:Server for iSeries Release 3.6 User Guide
Transaction Map DefinitionStep 2: Define the Transaction Map
The Transaction Map Definition panel (EDIX503-FMT01) is where you specify the characteristics of a particular map.
Figure 6.58 Transaction Map Definition panel (EDIX503-FMT01)
To define the characteristics as shown above in the sample purchase order:
1. Type the information as shown on the panel for the following fields.
DescriptionStandards VersionTransaction SetTransaction Status Use CodeEnvelope TypeApplication ID
NOTEYou must know the name of the Application ID previously created and to which this Transaction is “tied.” Press F4 (Prompt) for a list of applications from which to choose. The transaction (or map) is the definition of how to move data between the EDI format and the application format. It is imperative that the application definition already exist in Sterling Gentran:Server and it must be identified correctly in order for the Transaction ID to be added.
EDIX503 Transaction Map Definition EDI 03/30/11 FMT01 12:00:00 Transaction ID . . . . . . . . . . POMAP4010 Send or Receive. . . . . . . . . . R Division . . . . . . . . . . . . . 000 Description. . . . . . . . . . . . Purchase Order Inbound 004010 Standards Version. . . . . . . . . 004010 Transaction Set. . . . . . . . . . 850 Transaction Set Release. . . . . . 0 Transaction Status . . . . . . . . T Use Code . . . . . . . . . . . . . P Envelope Type. . . . . . . . . . . X Application ID . . . . . . . . . . SEMPOAPPL Application Selection Field Values Update Allowed . . . . . . . . . . Y F1=Help F4=Prompt F10=Update F12=Cancel F13=Services F24=More Keys

Use the Transaction Mapping Panels
IBM Sterling Gentran:Server for iSeries Release 3.6 User Guide 75
2. Make sure that the Update Allowed flag is set to ‘Y’ (Yes) and Press F10 (Update) to create the new transaction map. This action displays the Work with Transaction Mapping panel (EDIX500-FMT01) and displays the message ‘Create Operation Successful’ on the Message Line at the bottom of the panel.
Field DescriptionsDivision Code
Type '000,’ the Global Division Code unless you are assigned a specific division code in your security profile.
Description Provide a meaningful description for the map. It displays on the Work with Transaction Mapping panel (EDIX500-FMT01) and it can be used to help differentiate maps. If you are setting up a partner-specific map, the description should identify the partner.
Standards VersionThis field reflects the full version code as known in the standards. (SEE the “Standards” chapter for more information on available versions.) If using X12 versions, supply the leading zeros. Remember to tag the subset code with the version you are using, such as VICS. SEE the Standards Maintenance subsystem within online Sterling Gentran:Server if you are unsure of the version.
Transaction Set/Release This field is the actual Transaction Set ID for the document being received in EDI format. The value is specific to the standards and can be found in the “Standards” chapter in this document, in the Sterling Gentran:Server Standards Maintenance subsystem, or from your trading partner. The Release code is only needed if the version is for TRADACOMS.
Transaction Status This field indicates the status of this map. It is typically used to document the status of the map.
Use Code This flag identifies whether the map is for general purpose or for specific trading partners. There should only be one map classified as ‘G’ (General) for a particular transaction-version combination. When processing, the first general-type map for the requested version is selected. Any additional maps for the same version and transaction are ignored. General maps are typically comprehensive and include the largest subset of segments that any partner can send.
Partner-specific maps are useful when the EDI format for a particular partner is different than the format used by most of your partners. It is common to have partner-specific maps for outbound documents. Most partners request specific segments or want some segments omitted. It is simpler to make a copy of the general map and modify it for a partner. It is fairly common to use one general map for all partners for inbound documents.
Envelope Type This flag identifies the type of envelope or standards being used for this map. The flag corresponds to the transaction set. For example, the 850 transaction is an X12 purchase order, so the type is set to ‘X.’
Use the Transaction Mapping Panels
76 IBM Sterling Gentran:Server for iSeries Release 3.6 User Guide
Application ID This field contains the name of the Application ID that this map is tied to. In “Mapping Getting Started,” there is a Bicycle Wheel diagram that shows the relationship between transactions and the Application ID. This field is where that connection is made. In this example, the map is tied back to the Application ID ‘SEMPOEDI,’ which was created in the “Application Definition” chapter. If you didn’t create an application, you can select ‘SEMPOAPPL’ which was supplied with the system.
Update Allowed Specify ‘Y’ (Yes) to allow updates to be made to this map definition while developing and testing it. When moving this map into production, you may want to modify this flag to be 'N’ (No) to prevent modifications from being made without the proper authority.
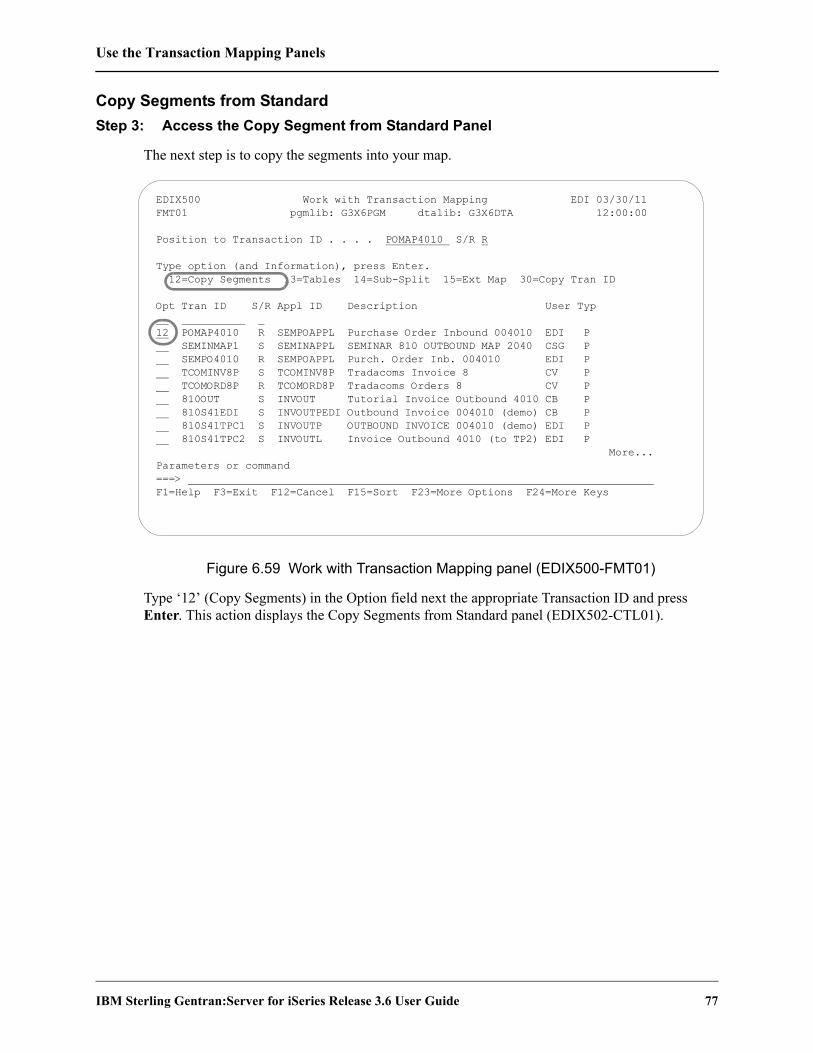
Use the Transaction Mapping Panels
IBM Sterling Gentran:Server for iSeries Release 3.6 User Guide 77
Copy Segments from StandardStep 3: Access the Copy Segment from Standard Panel
The next step is to copy the segments into your map.
Figure 6.59 Work with Transaction Mapping panel (EDIX500-FMT01)
Type ‘12’ (Copy Segments) in the Option field next the appropriate Transaction ID and press Enter. This action displays the Copy Segments from Standard panel (EDIX502-CTL01).
EDIX500 Work with Transaction Mapping EDI 03/30/11 FMT01 pgmlib: G3X6PGM dtalib: G3X6DTA 12:00:00 Position to Transaction ID . . . . POMAP4010 S/R R Type option (and Information), press Enter. 12=Copy Segments 13=Tables 14=Sub-Split 15=Ext Map 30=Copy Tran ID Opt Tran ID S/R Appl ID Description User Typ 12 POMAP4010 R SEMPOAPPL Purchase Order Inbound 004010 EDI P SEMINMAP1 S SEMINAPPL SEMINAR 810 OUTBOUND MAP 2040 CSG P SEMPO4010 R SEMPOAPPL Purch. Order Inb. 004010 EDI P TCOMINV8P S TCOMINV8P Tradacoms Invoice 8 CV P TCOMORD8P R TCOMORD8P Tradacoms Orders 8 CV P 810OUT S INVOUT Tutorial Invoice Outbound 4010 CB P 810S41EDI S INVOUTPEDI Outbound Invoice 004010 (demo) CB P 810S41TPC1 S INVOUTP OUTBOUND INVOICE 004010 (demo) EDI P 810S41TPC2 S INVOUTL Invoice Outbound 4010 (to TP2) EDI P More... Parameters or command ===> F1=Help F3=Exit F12=Cancel F15=Sort F23=More Options F24=More Keys
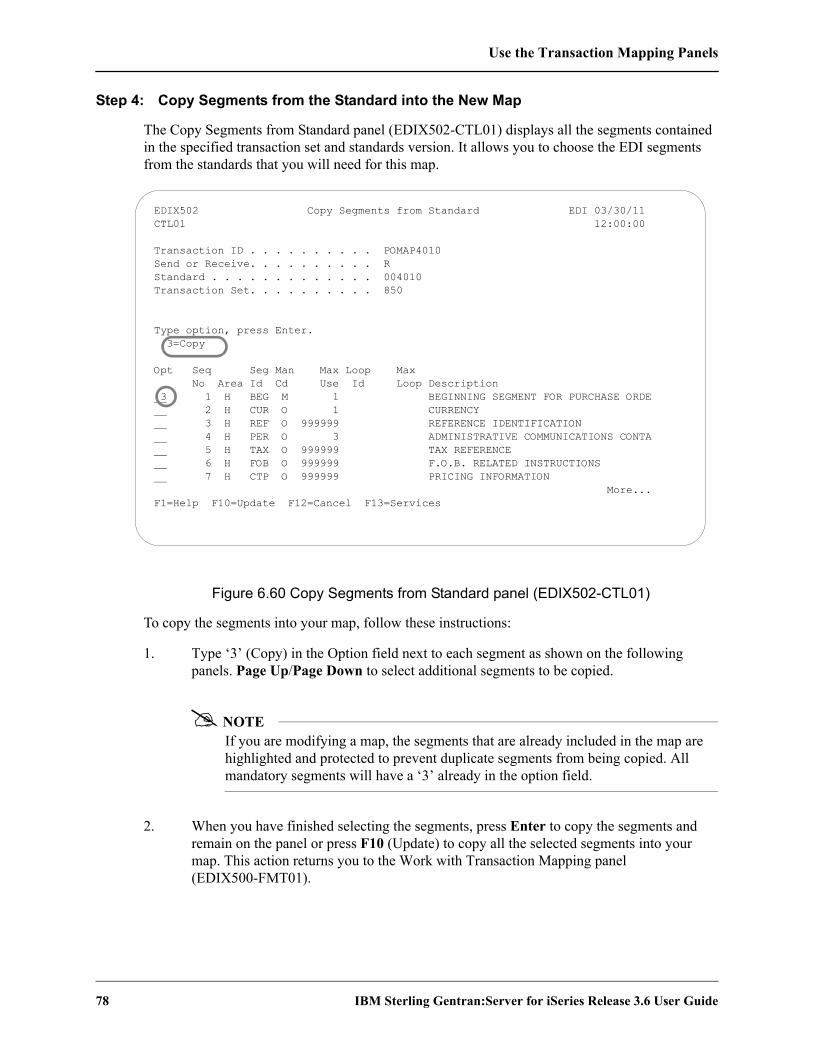
Use the Transaction Mapping Panels
78 IBM Sterling Gentran:Server for iSeries Release 3.6 User Guide
Step 4: Copy Segments from the Standard into the New Map
The Copy Segments from Standard panel (EDIX502-CTL01) displays all the segments contained in the specified transaction set and standards version. It allows you to choose the EDI segments from the standards that you will need for this map.
Figure 6.60 Copy Segments from Standard panel (EDIX502-CTL01)
To copy the segments into your map, follow these instructions:
1. Type ‘3’ (Copy) in the Option field next to each segment as shown on the following panels. Page Up/Page Down to select additional segments to be copied.
NOTEIf you are modifying a map, the segments that are already included in the map are highlighted and protected to prevent duplicate segments from being copied. All mandatory segments will have a ‘3’ already in the option field.
2. When you have finished selecting the segments, press Enter to copy the segments and remain on the panel or press F10 (Update) to copy all the selected segments into your map. This action returns you to the Work with Transaction Mapping panel (EDIX500-FMT01).
EDIX502 Copy Segments from Standard EDI 03/30/11 CTL01 12:00:00 Transaction ID . . . . . . . . . . POMAP4010 Send or Receive. . . . . . . . . . R Standard . . . . . . . . . . . . . 004010 Transaction Set. . . . . . . . . . 850 Type option, press Enter. 3=Copy Opt Seq Seg Man Max Loop Max No Area Id Cd Use Id Loop Description 3 1 H BEG M 1 BEGINNING SEGMENT FOR PURCHASE ORDE 2 H CUR O 1 CURRENCY 3 H REF O 999999 REFERENCE IDENTIFICATION 4 H PER O 3 ADMINISTRATIVE COMMUNICATIONS CONTA 5 H TAX O 999999 TAX REFERENCE 6 H FOB O 999999 F.O.B. RELATED INSTRUCTIONS 7 H CTP O 999999 PRICING INFORMATION More... F1=Help F10=Update F12=Cancel F13=Services

Use the Transaction Mapping Panels
IBM Sterling Gentran:Server for iSeries Release 3.6 User Guide 79
The following figures shows which segments need to be copied.
EDIX502 Copy Segments from Standard EDI 03/30/11 CTL01 12:00:00 Transaction ID . . . . . . . . . . POMAP4010 Send or Receive. . . . . . . . . . R Standard . . . . . . . . . . . . . 004010 Transaction Set. . . . . . . . . . 850 Type option, press Enter. 3=Copy Opt Seq Seg Man Max Loop Max No Area Id Cd Use Id Loop Description 36 H FA1 O 1 2100 999999 TYPE OF FINANCIAL ACCOUNTING DATA 37 H FA2 O 999999 2000 ACCOUNTING DATA 38 H N9 O 1 3000 1000 REFERENCE IDENTIFICATION 39 H DTM O 999999 3000 DATE/TIME REFERENCE 40 H MSG O 1000 3000 MESSAGE TEXT 3 41 H N1 O 1 4000 200 NAME 42 H N2 O 2 4000 ADDITIONAL NAME INFORMATION More... F1=Help F10=Update F12=Cancel F13=Services
EDIX502 Copy Segments from Standard EDI 03/30/11 CTL01 12:00:00 Transaction ID . . . . . . . . . . POMAP4010 Send or Receive. . . . . . . . . . R Standard . . . . . . . . . . . . . 004010 Transaction Set. . . . . . . . . . 850 Type option, press Enter. 3=Copy Opt Seq Seg Man Max Loop Max No Area Id Cd Use Id Loop Description 3 43 H N3 O 2 4000 ADDRESS INFORMATION 3 44 H N4 O 999999 4000 GEOGRAPHIC LOCATION 45 H NX2 O 999999 4000 LOCATION ID COMPONENT 46 H REF O 12 4000 REFERENCE IDENTIFICATION 47 H PER O 999999 4000 ADMINISTRATIVE COMMUNICATIONS CONTA 48 H SI O 999999 4000 SERVICE CHARACTERISTIC IDENTIFICATI 49 H FOB O 1 4000 F.O.B. RELATED INSTRUCTIONS More... F1=Help F10=Update F12=Cancel F13=Services

Use the Transaction Mapping Panels
80 IBM Sterling Gentran:Server for iSeries Release 3.6 User Guide
EDIX502 Copy Segments from Standard EDI 03/30/11 CTL01 12:00:00 Transaction ID . . . . . . . . . . POMAP4010 Send or Receive. . . . . . . . . . R Standard . . . . . . . . . . . . . 004010 Transaction Set. . . . . . . . . . 850 Type option, press Enter. 3=Copy Opt Seq Seg Man Max Loop Max No Area Id Cd Use Id Loop Description 71 H LDT O 1 6200 LEAD TIME 72 H MSG O 50 6000 MESSAGE TEXT 73 H ADV O 1 7000 999999 ADVERTISING DEMOGRAPHIC INFORMATION 74 H DTM O 999999 7000 DATE/TIME REFERENCE 75 H MTX O 999999 7000 TEXT 3 76 D PO1 M 1 8000 100000 BASELINE ITEM DATA 77 D LIN O 999999 8000 ITEM IDENTIFICATION More... F1=Help F10=Update F12=Cancel F13=Services
EDIX502 Copy Segments from Standard EDI 02-01-04 CTL01 12:00:00 Transaction ID . . . . . . . . . . POMAP4010 Send or Receive. . . . . . . . . . R Standard . . . . . . . . . . . . . 004010 Transaction Set. . . . . . . . . . 850 Type option, press Enter. 3=Copy Opt Seq Seg Man Max Loop Max No Area Id Cd Use Id Loop Description 85 D MEA O 40 8000 MEASUREMENTS 3 86 D PID O 1 8150 1000 PRODUCT/ITEM DESCRIPTION 87 D MEA O 10 8150 MEASUREMENTS 88 D PWK O 25 8000 PAPERWORK 89 D PO4 O 999999 8000 ITEM PHYSICAL DETAILS 90 D REF O 999999 8000 REFERENCE IDENTIFICATION 91 D PER O 3 8000 ADMINISTRATIVE COMMUNICATIONS CONTA More... F1=Help F10=Update F12=Cancel F13=Services

Use the Transaction Mapping Panels
IBM Sterling Gentran:Server for iSeries Release 3.6 User Guide 81
Figure 6.61 Copy Segments from Standard panel (EDIX502-CTL01)
EDIX502 Copy Segments from Standard EDI 03/30/11 CTL01 12:00:00 Transaction ID . . . . . . . . . . POMAP4010 Send or Receive. . . . . . . . . . R Standard . . . . . . . . . . . . . 004010 Transaction Set. . . . . . . . . . 850 Type option, press Enter. 3=Copy Opt Seq Seg Man Max Loop Max No Area Id Cd Use Id Loop Description 190 D PCT O 999999 8800 PERCENT AMOUNTS 191 D LM O 1 8850 999999 CODE SOURCE INFORMATION 192 D LQ O 999999 8000 INDUSTRY CODE 3 193 S CTT O 1 9000 1 TRANSACTION TOTALS 194 S AMT O 1 9000 MONETARY AMOUNT Bottom F1=Help F10=Update F12=Cancel F13=Services
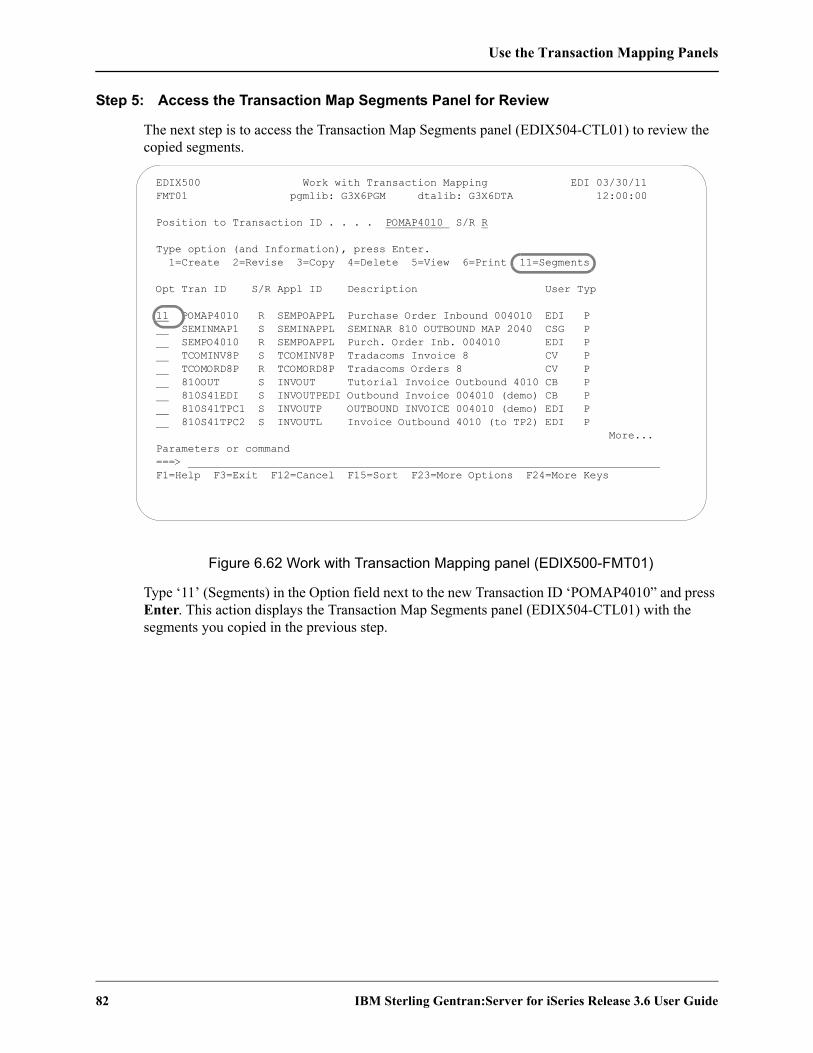
Use the Transaction Mapping Panels
82 IBM Sterling Gentran:Server for iSeries Release 3.6 User Guide
Step 5: Access the Transaction Map Segments Panel for Review
The next step is to access the Transaction Map Segments panel (EDIX504-CTL01) to review the copied segments.
Figure 6.62 Work with Transaction Mapping panel (EDIX500-FMT01)
Type ‘11’ (Segments) in the Option field next to the new Transaction ID ‘POMAP4010” and press Enter. This action displays the Transaction Map Segments panel (EDIX504-CTL01) with the segments you copied in the previous step.
EDIX500 Work with Transaction Mapping EDI 03/30/11 FMT01 pgmlib: G3X6PGM dtalib: G3X6DTA 12:00:00 Position to Transaction ID . . . . POMAP4010 S/R R Type option (and Information), press Enter. 1=Create 2=Revise 3=Copy 4=Delete 5=View 6=Print 11=Segments Opt Tran ID S/R Appl ID Description User Typ 11 POMAP4010 R SEMPOAPPL Purchase Order Inbound 004010 EDI P SEMINMAP1 S SEMINAPPL SEMINAR 810 OUTBOUND MAP 2040 CSG P SEMPO4010 R SEMPOAPPL Purch. Order Inb. 004010 EDI P TCOMINV8P S TCOMINV8P Tradacoms Invoice 8 CV P TCOMORD8P R TCOMORD8P Tradacoms Orders 8 CV P 810OUT S INVOUT Tutorial Invoice Outbound 4010 CB P 810S41EDI S INVOUTPEDI Outbound Invoice 004010 (demo) CB P 810S41TPC1 S INVOUTP OUTBOUND INVOICE 004010 (demo) EDI P 810S41TPC2 S INVOUTL Invoice Outbound 4010 (to TP2) EDI P More... Parameters or command ===> F1=Help F3=Exit F12=Cancel F15=Sort F23=More Options F24=More Keys

Use the Transaction Mapping Panels
IBM Sterling Gentran:Server for iSeries Release 3.6 User Guide 83
Transaction Map SegmentsStep 6: Review the List of Segments Copied
Review the copied segments against the Element Level worksheets to verify that all the segments were copied.
Figure 6.63 Transaction Map Segments panel (EDIX504-CTL01)
Press Page Up/Page Down to see additional segments. If extra segments were copied by accident, use Option ‘4’ to delete the segment. If a segment is missing, press F13 (Services) to branch to the Copy Segments from Standard panel (EDIX502-CTL01) and copy the segment.
EDIX504 Transaction Map Segments EDI 03/30/11 CTL01 12:00:00 Transaction ID . . . . . . . . . . POMAP4010 Send or Receive. . . . . . . . . . R Transaction Set. . . . . . . . . . 850 Standard . . . . . . . . . . . . . 004010 Position to Sequence Number. . . . Type option, press Enter. 3=Copy 4=Delete 11=Elem Map 12=Ext Map 13=Loop-end 14=Split Screen Map Opt Seq A Seg M Max Loop Max Description User W No C Id C Use Id Loop Exit F 100 H BEG M 1 BEGINNING SEGMENT FOR PURCH 4100 H N1 O 1 4000 200 NAME 4300 H N3 O 2 4000 ADDRESS INFORMATION 4400 H N4 O 999999 4000 GEOGRAPHIC LOCATION 7600 D PO1 M 1 8000 100000 BASELINE ITEM DATA 8600 D PID O 1 8150 1000 PRODUCT/ITEM DESCRIPTION More... F1=Help F4=Prompt F10=Update F12=Cancel F13=Services F24=More Keys

Use the Transaction Mapping Panels
84 IBM Sterling Gentran:Server for iSeries Release 3.6 User Guide
Element Mapping InboundStep 7: Access the Element Mapping Inbound Panel
The first step in element mapping is to access the Element Mapping Inbound panel (EDIX514).
Figure 6.64 Transaction Map segments panel (EDIX504-CTL01)
Type ‘11’ (Elem Map) in the Option field next to the first segment as shown and press Enter. This action displays the Element Mapping Inbound panel (EDIX514).
NOTEPlease see the “Using Split Screen Map Option” section in this chapter if you choose to use option 14, Split Screen Map.
EDIX504 Transaction Map Segments EDI 03/30/11 CTL01 12:00:00 Transaction ID . . . . . . . . . . POMAP4010 Send or Receive. . . . . . . . . . R Transaction Set. . . . . . . . . . 850 Standard . . . . . . . . . . . . . 004010 Position to Sequence Number. . . . Type option, press Enter. 3=Copy 4=Delete 11=Elem Map 12=Ext Map 13=Loop-end 14=Split Screen Map Opt Seq A Seg M Max Loop Max Description User W No C Id C Use Id Loop Exit F 11 100 H BEG M 1 BEGINNING SEGMENT FOR PURCH 4100 H N1 O 1 4000 200 NAME 4300 H N3 O 2 4000 ADDRESS INFORMATION 4400 H N4 O 999999 4000 GEOGRAPHIC LOCATION 7600 D PO1 M 1 8000 100000 BASELINE ITEM DATA 8600 D PID O 1 8150 1000 PRODUCT/ITEM DESCRIPTION More... F1=Help F4=Prompt F10=Update F12=Cancel F13=Services F24=More Keys

Use the Transaction Mapping Panels
IBM Sterling Gentran:Server for iSeries Release 3.6 User Guide 85
Step 8: Map the BEG Segment
In the next several steps you will map the elements in the BEG segment.
Application fields can be entered in the Mapping Constant/Field or selected from a list of available fields. The panel below shows how to use option ‘1’ (Appl Fields) to select an application field.
Figure 6.65 Element Mapping Inbound panel (EDIX514 – BEG Segment)
Type ‘1’ in the option field next to Element No. ‘2’ and press Enter. This action displays a window from which you can select the desired application field.
NOTEThe window displays only header fields since the BEG segment is a header segment. Data is mapped from header to header, detail to detail, and summary to summary according to established rules.
EDIX514 Element Mapping Inbound 03/30/11 Tran ID. . . . . . . . . . . . . . POMAP4010 S/R. . . . . . . . . R Seg ID . . . . . . . . . . . . . . BEG BEGINNING SEGMENT FOR PURCHASE Seg Seq. . . . . . . . . . . . . . 100 Mapping Number . . . 0 Area Code. . . . . . . . . . . H Field Op Field/Constant Cond . . . . . . . . . . . . . . . Type option, press Enter. 1=Appl Fields 11=Ext Map 12=Subfield 13=Codes Mapping Ele Sub X M T Ele Ele C Opt Target Field Table ID No. Ele M C P Description Seq ID R 1 M ID TRANSACTION SET PURPOS 10 353 1 2 M ID PURCHASE ORDER TYPE CO 20 92 3 M AN PURCHASE ORDER NUMBER 30 324 4 O AN RELEASE NUMBER 40 328 5 M DT DATE 50 373 6 O AN CONTRACT NUMBER 60 367 7 O ID ACKNOWLEDGMENT TYPE 70 587 8 O ID INVOICE TYPE CODE 80 1019 9 O ID CONTRACT TYPE CODE 90 1166 10 O ID PURCHASE CATEGORY 100 1232 11 O ID SECURITY LEVEL CODE 110 786 More... F1=Help F4=Prompt F10=Update F12=Cancel F19=Apply Global F24=More Keys

Use the Transaction Mapping Panels
86 IBM Sterling Gentran:Server for iSeries Release 3.6 User Guide
Step 9: Select an Application Field
The following panel shows how you can select an application field to map to an element.
Figure 6.66 Element Mapping Inbound (EDIX514) – Seg Seq 100
Type ‘1’ (Select) in the Option field next to the desired item in the window as shown in the above panel and press Enter. The field is selected and mapped to the element selected.
EDIX514 Element Mapping Inbound 03/30/11 Tran ID. . . . . . . . . . . . . . POMAP4010 S/R. . . . . . . . . R Seg ID . . . . . . . . . . . . . . BEG BEGINNING SEGMENT FOR PURCHASE Seg Seq. . . . . . . . . . . . . . 100 Mapping Number . . . 0 Area Code. . . . . . . . . . . H Field Op Field/Constant Cond . . . . . . . . . . . . . . . Type option, press Enter. 1=Appl Fields 11=Ext Map 12=Subfield 13=Codes Mapping Ele Sub X M T Ele Ele C Opt Target Field Table ID No. Ele M C P Description Seq ID R 1 Description. . . . . . . . . . . . PURCHASE ORDER TYPE CO 1=Select Opt Rec Type No Field Name Typ Len Cde Description POHEADER 5 F010.CUSTNUM AN 8 M CUSTOMER NUMBER POHEADER 10 F010.PODATE CY 8 M PO DATE YYMD POHEADER 15 F010.PONUM AN 10 M PO NUMBER 1 POHEADER 20 F010.TYPCODE AN 2 M TYPE CODE POHEADER 25 F010.TOTAMT S2 9 M TOT AMT More... F1=Help F3=Exit F12=Cancel F1=

Use the Transaction Mapping Panels
IBM Sterling Gentran:Server for iSeries Release 3.6 User Guide 87
Step 10: Select the Remaining Application Fields
In this step you will map the remaining elements in the BEG segment.
Figure 6.67 Element Mapping Inbound panel (EDIX514) – BEG Segment
Perform the same instructions as used in the previous step to select the application fields to map to Element Numbers 3 and 5.
EDIX514 Element Mapping Inbound 03/30/11 Tran ID. . . . . . . . . . . . . . POMAP4010 S/R. . . . . . . . . R Seg ID . . . . . . . . . . . . . . BEG BEGINNING SEGMENT FOR PURCHASE Seg Seq. . . . . . . . . . . . . . 100 Mapping Number . . . 0 Area Code. . . . . . . . . . . H Field Op Field/Constant Cond . . . . . . . . . . . . . . . Type option, press Enter. 1=Appl Fields 11=Ext Map 12=Subfield 13=Codes Mapping Ele Sub X M T Ele Ele C Opt Target Field Table ID No. Ele M C P Description Seq ID R 1 M ID TRANSACTION SET PURPOS 10 353 F010.TYPCODE 2 M ID PURCHASE ORDER TYPE CO 20 92 F010.PONUM 3 M AN PURCHASE ORDER NUMBER 30 324 4 O AN RELEASE NUMBER 40 328 F010.PODATE 5 M DT DATE 50 373 6 O AN CONTRACT NUMBER 60 367 7 O ID ACKNOWLEDGMENT TYPE 70 587 8 O ID INVOICE TYPE CODE 80 1019 9 O ID CONTRACT TYPE CODE 90 1166 10 O ID PURCHASE CATEGORY 100 1232 11 O ID SECURITY LEVEL CODE 110 786 More... F1=Help F4=Prompt F10=Update F12=Cancel F19=Apply Global F24=More Keys

Use the Transaction Mapping Panels
88 IBM Sterling Gentran:Server for iSeries Release 3.6 User Guide
Extended Mapping InboundStep 11: Access the Work with Extended Mapping Panel
If you recall from our worksheet that we need to save the purchase order number into a constant. Therefore, we need to add extended mapping information for Element Number 3.
The first step in entering extended mapping information is to access the Work with Extended Mapping panel (EDIX506-FMT01).
Figure 6.68 Element Mapping Inbound panel (EDIX514) – BEG Segment
Type ‘11’ in the Option field next to Purchase Order Number as shown on the panel above and press Enter. This action displays the Work with Extended Mapping panel (EDIX506-FMT01).
EDIX514 Element Mapping Inbound 03/30/11 Tran ID. . . . . . . . . . . . . . POMAP4010 S/R. . . . . . . . . R Seg ID . . . . . . . . . . . . . . BEG BEGINNING SEGMENT FOR PURCHASE Seg Seq. . . . . . . . . . . . . . 100 Mapping Number . . . 0 Area Code. . . . . . . . . . . H Field Op Field/Constant Cond . . . . . . . . . . . . . . . Type option, press Enter. 1=Appl Fields 11=Ext Map 12=Subfield 13=Codes Mapping Ele Sub X M T Ele Ele C Opt Target Field Table ID No. Ele M C P Description Seq ID R 1 M ID TRANSACTION SET PURPOS 10 353 F010.TYPCODE 2 M ID PURCHASE ORDER TYPE CO 20 92 11 F010.PONUM 3 M AN PURCHASE ORDER NUMBER 30 324 4 O AN RELEASE NUMBER 40 328 F010.PODATE 5 M DT DATE 50 373 6 O AN CONTRACT NUMBER 60 367 7 O ID ACKNOWLEDGMENT TYPE 70 587 8 O ID INVOICE TYPE CODE 80 1019 9 O ID CONTRACT TYPE CODE 90 1166 10 O ID PURCHASE CATEGORY 100 1232 11 O ID SECURITY LEVEL CODE 110 786 More... F1=Help F4=Prompt F10=Update F12=Cancel F19=Apply Global F24=More Keys
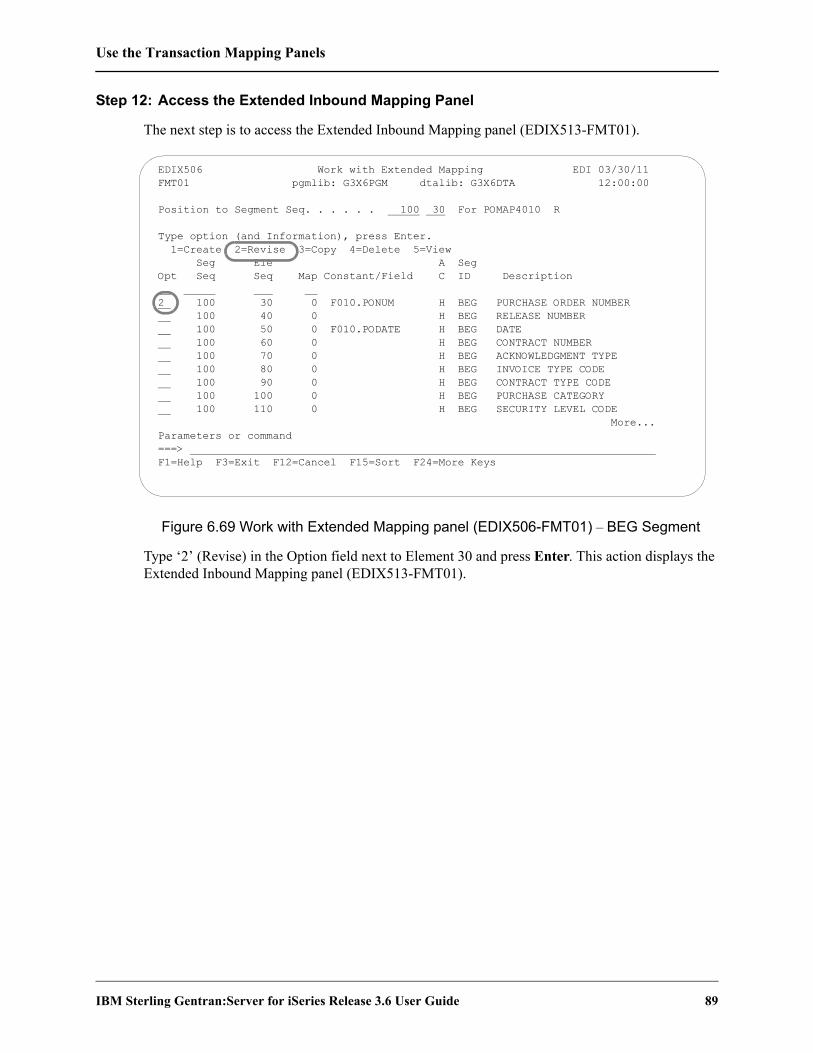
Use the Transaction Mapping Panels
IBM Sterling Gentran:Server for iSeries Release 3.6 User Guide 89
Step 12: Access the Extended Inbound Mapping Panel
The next step is to access the Extended Inbound Mapping panel (EDIX513-FMT01).
Figure 6.69 Work with Extended Mapping panel (EDIX506-FMT01) – BEG Segment
Type ‘2’ (Revise) in the Option field next to Element 30 and press Enter. This action displays the Extended Inbound Mapping panel (EDIX513-FMT01).
EDIX506 Work with Extended Mapping EDI 03/30/11 FMT01 pgmlib: G3X6PGM dtalib: G3X6DTA 12:00:00 Position to Segment Seq. . . . . . 100 30 For POMAP4010 R Type option (and Information), press Enter. 1=Create 2=Revise 3=Copy 4=Delete 5=View Seg Ele A Seg Opt Seq Seq Map Constant/Field C ID Description 2 100 30 0 F010.PONUM H BEG PURCHASE ORDER NUMBER 100 40 0 H BEG RELEASE NUMBER 100 50 0 F010.PODATE H BEG DATE 100 60 0 H BEG CONTRACT NUMBER 100 70 0 H BEG ACKNOWLEDGMENT TYPE 100 80 0 H BEG INVOICE TYPE CODE 100 90 0 H BEG CONTRACT TYPE CODE 100 100 0 H BEG PURCHASE CATEGORY 100 110 0 H BEG SECURITY LEVEL CODE More... Parameters or command ===> F1=Help F3=Exit F12=Cancel F15=Sort F24=More Keys

Use the Transaction Mapping Panels
90 IBM Sterling Gentran:Server for iSeries Release 3.6 User Guide
Step 13: View Detailed Information About the Element Being Mapped
Sterling Gentran:Server allows you to view detailed information about the element you are working with.
Figure 6.70 Extended Inbound Mapping panel (EDIX513-FMT01) – BEG Segment
Press F2 (More/Less) on the Extended Inbound Mapping panel (EDIX513-FMT01) to view the detailed information about the element you are working with. F2 is a toggle switch to display less or more information.
NOTEThe default mode (either More or Less) is set in the System Configuration file and is used for the initial display of the panel.
There are two Target fields on the EDIX513-FMT01 Panel. The 65-position Target field functions the same as the 15-position Target field, expect that no calculation can be performed on it. Only one of these fields can be specified.
EDIX513 Extended Inbound Mapping EDI 03/30/11 FMT01 12:00:00 Segment ID . . . . . . . . . . . . BEG Transaction ID . . . POMAP4010 Area Code. . . . . . . . . . . . . H Send or Receive. . . R Element Number . . . . . . . . . . 30 Element ID . . . . . 0324 Segment Sequence . . . . . . . . . 100 Mapping Number . . . . .0 Mapping of Data Element Application Target Field . . . . . F010.PONUM Target Field = Or Value Op Value Op Value Target Field = If And/Or Round Element. . . . #Dec Table ID . . . . . . . . . . . . . Type of Table. . . . Add to Hash Total #. . . . . . . . Length (Minimum) . . 1 Save in Constant # . . . . . . . . Length (Maximum) . . 22 Add 1 to Accumulator # . . . . . . Group Req Cd . . . . User Exit Routine. . . . . . . . . Related. . . . . . . N Mandatory Code . . . . . . . . . . M Type . . . . . . . . AN Element Group. . . . . . . . . . . Type . . . . . . . . Segment Description. . . . . . . . BEGINNING SEGMENT FOR PURCHASE Element Description. . . . . . . . PURCHASE ORDER NUMBER F1=Help F2=More/Less F10=Update F14=Notes F19=Appl F24=More Keys
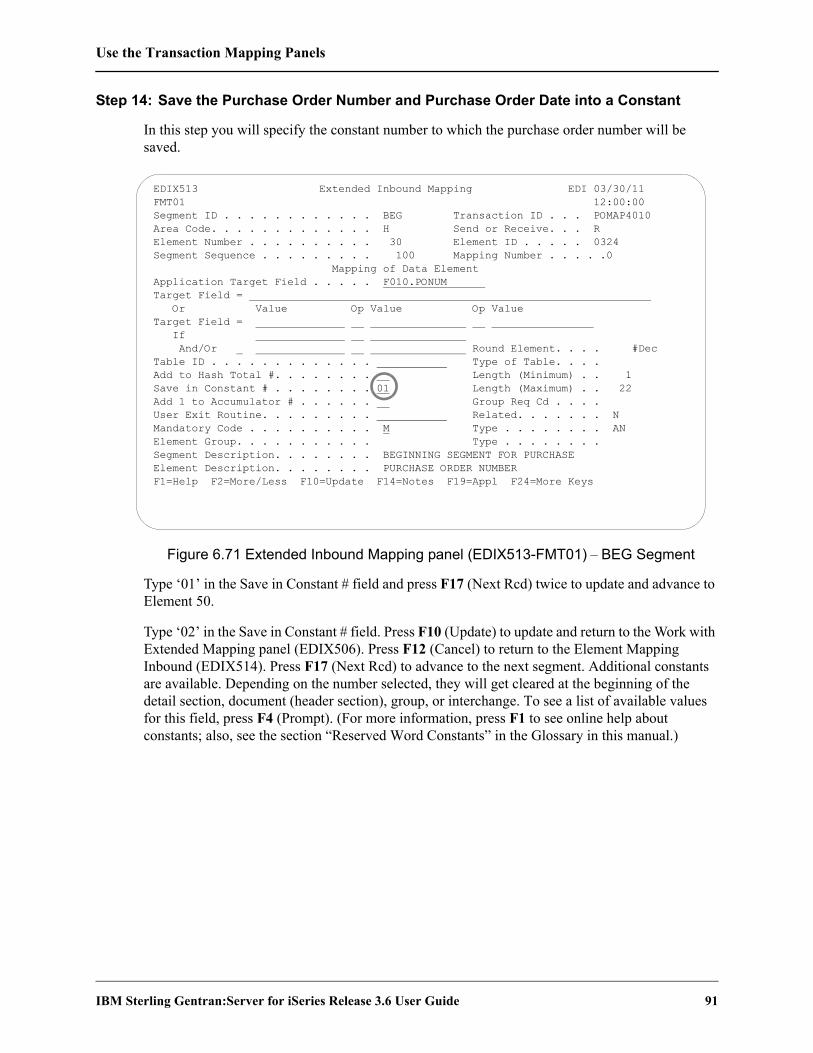
Use the Transaction Mapping Panels
IBM Sterling Gentran:Server for iSeries Release 3.6 User Guide 91
Step 14: Save the Purchase Order Number and Purchase Order Date into a Constant
In this step you will specify the constant number to which the purchase order number will be saved.
Figure 6.71 Extended Inbound Mapping panel (EDIX513-FMT01) – BEG Segment
Type ‘01’ in the Save in Constant # field and press F17 (Next Rcd) twice to update and advance to Element 50.
Type ‘02’ in the Save in Constant # field. Press F10 (Update) to update and return to the Work with Extended Mapping panel (EDIX506). Press F12 (Cancel) to return to the Element Mapping Inbound (EDIX514). Press F17 (Next Rcd) to advance to the next segment. Additional constants are available. Depending on the number selected, they will get cleared at the beginning of the detail section, document (header section), group, or interchange. To see a list of available values for this field, press F4 (Prompt). (For more information, press F1 to see online help about constants; also, see the section “Reserved Word Constants” in the Glossary in this manual.)
EDIX513 Extended Inbound Mapping EDI 03/30/11 FMT01 12:00:00 Segment ID . . . . . . . . . . . . BEG Transaction ID . . . POMAP4010 Area Code. . . . . . . . . . . . . H Send or Receive. . . R Element Number . . . . . . . . . . 30 Element ID . . . . . 0324 Segment Sequence . . . . . . . . . 100 Mapping Number . . . . .0 Mapping of Data Element Application Target Field . . . . . F010.PONUM Target Field = Or Value Op Value Op Value Target Field = If And/Or Round Element. . . . #Dec Table ID . . . . . . . . . . . . . Type of Table. . . . Add to Hash Total #. . . . . . . . Length (Minimum) . . 1 Save in Constant # . . . . . . . . 01 Length (Maximum) . . 22 Add 1 to Accumulator # . . . . . . Group Req Cd . . . . User Exit Routine. . . . . . . . . Related. . . . . . . N Mandatory Code . . . . . . . . . . M Type . . . . . . . . AN Element Group. . . . . . . . . . . Type . . . . . . . . Segment Description. . . . . . . . BEGINNING SEGMENT FOR PURCHASE Element Description. . . . . . . . PURCHASE ORDER NUMBER F1=Help F2=More/Less F10=Update F14=Notes F19=Appl F24=More Keys

Use the Transaction Mapping Panels
92 IBM Sterling Gentran:Server for iSeries Release 3.6 User Guide
Step 15: Define the Global Conditions for the N1 Shipto Element
We determined in our preparation stage that the code “ST” in element N101 would indicate a Shipto entity. Therefore, in order to populate the Shipto application fields, we need to define a global condition that checks for the code “ST” in the N1 segment.
Figure 6.72 Element Mapping Inbound panel (EDIX514) – N1 Segment
To define a global condition, follow these instructions:
1. Type ‘N1/10/4100’ (Segment ID, Element Sequence, Segment Sequence) and ‘EQ’ in the Operation field on the Condition line as shown on the above panel.
2. Type ‘ST’ in the Field/Constant field and press Enter.
NOTEValues in the field/constant field must be enclosed in single quotes (‘) to indicate a literal value.
EDIX514 Element Mapping Inbound 03/30/11 Tran ID. . . . . . . . . . . . . . POMAP4010 S/R. . . . . . . . . R Seg ID . . . . . . . . . . . . . . N1 NAME Seg Seq. . . . . . . . . . . . . . 4100 Mapping Number . . . 0 Area Code. . . . . . . . . . . H Field Op Field/Constant Cond . . . . . . . . . . . . . . . N1/010/4100 EQ 'ST' Type option, press Enter. 1=Appl Fields 11=Ext Map 12=Subfield 13=Codes Mapping Ele Sub X M T Ele Ele C Opt Target Field Table ID No. Ele M C P Description Seq ID R 1 C M AN ENTITY IDENTIFIER CODE 10 98 F010.SHIPTONAME 2 C C AN NAME 20 93 Y 3 C C ID IDENTIFICATION CODE QU 30 66 Y 4 C C AN IDENTIFICATION CODE 40 67 5 C O ID ENTITY RELATIONSHIP CO 50 706 6 C O AN ENTITY IDENTIFIER CODE 60 98 Bottom F1=Help F4=Prompt F10=Update F12=Cancel F19=Apply Global F24=More Keys

Use the Transaction Mapping Panels
IBM Sterling Gentran:Server for iSeries Release 3.6 User Guide 93
Step 16: Identify Mapping Number ‘0’ (zero)
Once you’ve defined the global condition, you must apply it to a specific map number for each element. The panel below illustrates how to apply our global Shipto condition to map number ‘0.’
Figure 6.73 Element Mapping Inbound panel (EDIX514) – N1 Segment
Press F19 (Apply Global) to specify the mapping number. Type ‘0’ in the Apply to Map window and press Enter. The previous panel is redisplayed showing all the elements to be conditioned.
EDIX514 Element Mapping Inbound 03/30/11 Tran ID . . . . . . . . . . . . . . POMAP4010 S/R. . . . . . . . . R Seg ID . . . . . . . . . . . . . . N1 NAME Seg Seq. . . . . . . . . . . . . . 4100 Mapping Number . . . 0 Area Code. . . . . . . . . . . . H Field Op Field/Constant Cond . . . . . . . . . . . . . . . N1/10/4100 EQ 'ST' Ty 1= Apply to Map 0 Op F3=Exit F12=Cancel Bottom F1=Help F4=Prompt F10=Update F12=Cancel F19=Apply Global F24=More Keys
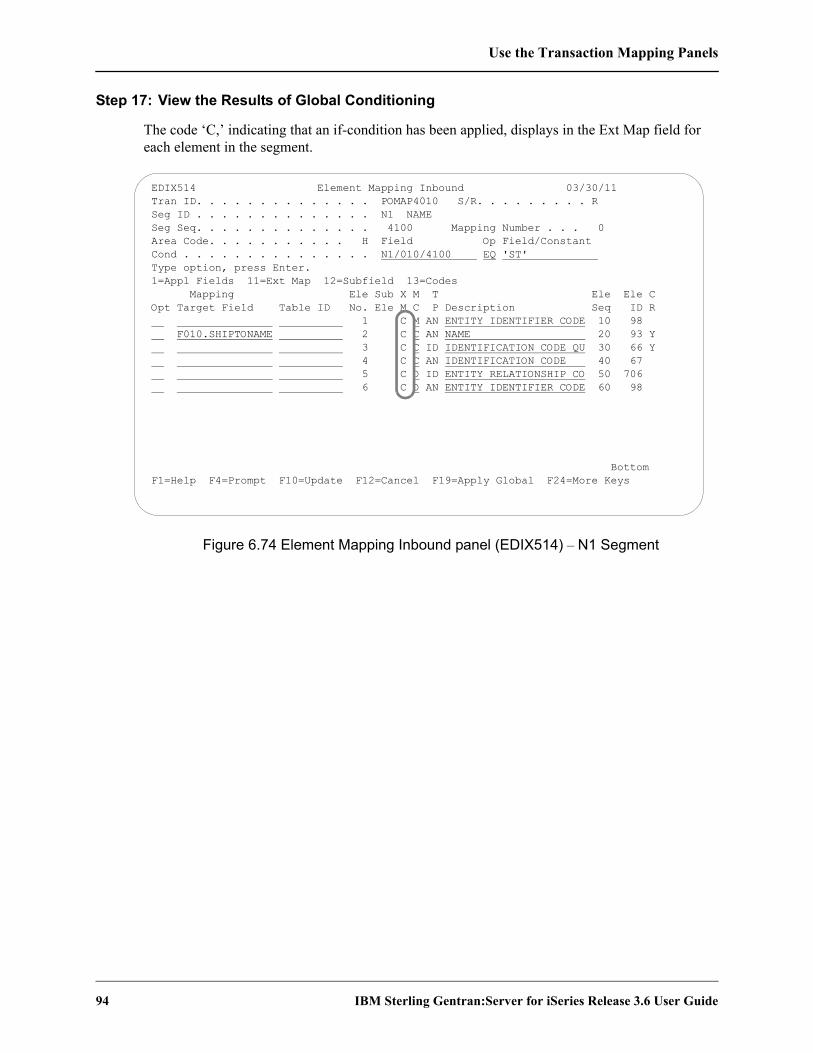
Use the Transaction Mapping Panels
94 IBM Sterling Gentran:Server for iSeries Release 3.6 User Guide
Step 17: View the Results of Global Conditioning
The code ‘C,’ indicating that an if-condition has been applied, displays in the Ext Map field for each element in the segment.
Figure 6.74 Element Mapping Inbound panel (EDIX514) – N1 Segment
EDIX514 Element Mapping Inbound 03/30/11 Tran ID. . . . . . . . . . . . . . POMAP4010 S/R. . . . . . . . . R Seg ID . . . . . . . . . . . . . . N1 NAME Seg Seq. . . . . . . . . . . . . . 4100 Mapping Number . . . 0 Area Code. . . . . . . . . . . H Field Op Field/Constant Cond . . . . . . . . . . . . . . . N1/010/4100 EQ 'ST' Type option, press Enter. 1=Appl Fields 11=Ext Map 12=Subfield 13=Codes Mapping Ele Sub X M T Ele Ele C Opt Target Field Table ID No. Ele M C P Description Seq ID R 1 C M AN ENTITY IDENTIFIER CODE 10 98 F010.SHIPTONAME 2 C C AN NAME 20 93 Y 3 C C ID IDENTIFICATION CODE QU 30 66 Y 4 C C AN IDENTIFICATION CODE 40 67 5 C O ID ENTITY RELATIONSHIP CO 50 706 6 C O AN ENTITY IDENTIFIER CODE 60 98 Bottom F1=Help F4=Prompt F10=Update F12=Cancel F19=Apply Global F24=More Keys

Use the Transaction Mapping Panels
IBM Sterling Gentran:Server for iSeries Release 3.6 User Guide 95
Step 18: Define the Global Condition for the Billto N1
Next, you’ll define a global condition for the Billto entity. Since we are using map number ‘0’ to check for the Shipto entity, we will apply the Billto global condition to map number ‘1.’
Figure 6.75 Element Mapping Inbound (EDIX514) – N1 Segment
Enter the information including ‘BT’ in the Cond(ition) line as shown on the above panel. Press F19 (Apply Global) to display the Apply to Map window. Type ‘1’ in the window and press Enter. The alternate map will be created even though the mapping panel returns to the mapping number 0 record.
NOTEWhen you press F17 (Next Rcd), the system advances to the mapping number 1 record that was just created.
EDIX514 Element Mapping Inbound 03/30/11 Tran ID . . . . . . . . . . . . . . POMAP4010 S/R. . . . . . . . . R Seg ID . . . . . . . . . . . . . . N1 NAME Seg Seq. . . . . . . . . . . . . . 4100 Mapping Number . . . 0 Area Code. . . . . . . . . . . . H Field Op Field/Constant Cond . . . . . . . . . . . . . . . N1/10/4100 EQ 'BT' Ty 1= Apply to Map 1 Op F3=Exit F12=Cancel Bottom F1=Help F4=Prompt F10=Update F12=Cancel F19=Apply Global F24=More Keys

Use the Transaction Mapping Panels
96 IBM Sterling Gentran:Server for iSeries Release 3.6 User Guide
Step 19: Map the Shipto Name on the N1 Segment
Now that you have defined the global conditions, you must identify the application fields that will be populated by the N1 segment. The next several steps illustrate how to map the N1 segment.
Figure 6.76 Element Mapping Inbound panel (EDIX514) – N1 Segment
To map Element No 2, follow these instructions:
1. Type ‘F010.SHIPTONAME’ in the Mapping Target field next to Element Number 2 and press Enter. Since the mapping number is currently set to ‘0’, “F010.SHIPTONAME” will be the Mapping Target field for map number ‘0.’
2. Press F17 (Next Rcd) to update and advance to Mapping number 1 for the N1 segment.
EDIX514 Element Mapping Inbound 03/30/11 Tran ID. . . . . . . . . . . . . . POMAP4010 S/R. . . . . . . . . R Seg ID . . . . . . . . . . . . . . N1 NAME Seg Seq. . . . . . . . . . . . . . 4100 Mapping Number . . . 0 Area Code. . . . . . . . . . . H Field Op Field/Constant Cond . . . . . . . . . . . . . . . N1/010/4100 EQ 'ST' Type option, press Enter. 1=Appl Fields 11=Ext Map 12=Subfield 13=Codes Mapping Ele Sub X M T Ele Ele C Opt Target Field Table ID No. Ele M C P Description Seq ID R 1 C M AN ENTITY IDENTIFIER CODE 10 98 F010.SHIPTONAME 2 C C AN NAME 20 93 Y 3 C C ID IDENTIFICATION CODE QU 30 66 Y 4 C C AN IDENTIFICATION CODE 40 67 5 C O ID ENTITY RELATIONSHIP CO 50 706 6 C O AN ENTITY IDENTIFIER CODE 60 98 Bottom F1=Help F4=Prompt F10=Update F12=Cancel F19=Apply Global F24=More Keys

Use the Transaction Mapping Panels
IBM Sterling Gentran:Server for iSeries Release 3.6 User Guide 97
Step 20: Map the Bill to Name on the N1 Segment
In this step, you will map the Billto Name on the N1 segment.
Figure 6.77 Element Mapping Inbound panel (EDIX514) N1 Segment
To map the Bill to Name:
1. Type ‘F010.BILLTONAME’ in the Mapping Target Field next to the element number 2 or use option 1 to prompt the list of application fields to select the BILLTONAME field. Notice you are on mapping number 1 (an alternate mapping for the N1 segment as an “else condition”).
2. Press F17 (Next Rcd) to update and advance to the next segment.
EDIX514 Element Mapping Inbound 03/30/11 Tran ID. . . . . . . . . . . . . . POMAP4010 S/R. . . . . . . . . R Seg ID . . . . . . . . . . . . . . N1 NAME Seg Seq. . . . . . . . . . . . . . 4100 Mapping Number . . . 1 Area Code. . . . . . . . . . . H Field Op Field/Constant Cond . . . . . . . . . . . . . . . N1/010/4100 EQ 'ST' Type option, press Enter. 1=Appl Fields 11=Ext Map 12=Subfield 13=Codes Mapping Ele Sub X M T Ele Ele C Opt Target Field Table ID No. Ele M C P Description Seq ID R 1 C M AN ENTITY IDENTIFIER CODE 10 98 F010.BILLTONAME 2 C C AN NAME 20 93 Y 3 C C ID IDENTIFICATION CODE QU 30 66 Y 4 C C AN IDENTIFICATION CODE 40 67 5 C O ID ENTITY RELATIONSHIP CO 50 706 6 C O AN ENTITY IDENTIFIER CODE 60 98 Bottom F1=Help F4=Prompt F10=Update F12=Cancel F19=Apply Global F24=More Keys

Use the Transaction Mapping Panels
98 IBM Sterling Gentran:Server for iSeries Release 3.6 User Guide
Step 21: Define the Global Condition for the ShipTo Address Information
As you can see from the element worksheets, we need to map the N3 segment to the address lines for both the Shipto and Billto locations. To accomplish this, we can define the same global conditions as we defined for the N1 segment.
Figure 6.78 Element Mapping Inbound panel (EDIX514) – N3 Segment
To define a global condition for the Shipto entity, follow these instructions:
1. Type ‘N1/10/4100,’ ‘EQ,’ and ‘ST’ in the Field, Op, and Field/Constant fields on the Cond(ition) line.
2. Press F19 (Apply Global) to display the Apply to Map window and type ‘0’ in the window.
3. Press Enter to apply the global condition to map ‘0.’
EDIX514 Element Mapping Inbound 03/30/11 Tran ID. . . . . . . . . . . . . . POMAP4010 S/R. . . . . . . . . R Seg ID . . . . . . . . . . . . . . N3 ADDRESS INFORMATION Seg Seq. . . . . . . . . . . . . . 4300 Mapping Number . . . 0 Area Code. . . . . . . . . . . H Field Op Field/Constant Cond . . . . . . . . . . . . . . . N1/10/4100 EQ 'BT' Type option, press Enter. 1=Appl Fields 11=Ext Map 12=Subfield 13=Codes Mapping Ele Sub X M T Ele Ele C Opt Target Field Table ID No. Ele M C P Description Seq ID R F010.SHIPTOADD1 1 C M AN ADDRESS INFORMATION 10 166 66 Apply to Map 0 F3=Exit F12=Cancel Bottom F1=Help F4=Prompt F10=Update F12=Cancel F19=Apply Global F24=More Keys

Use the Transaction Mapping Panels
IBM Sterling Gentran:Server for iSeries Release 3.6 User Guide 99
Step 22: Define the Global Condition for the Bill To Address Information
Next, you’ll need to define a global condition for the Billto address information. Since we are using map number ‘0’ to check for the Shipto address information, we will apply the Billto global condition to map number 1.
Figure 6.79 Element Mapping Inbound panel (EDIX514) – N3 Segment
Type ‘N1/10/4100,’ ‘EQ,’ and ‘BT’ on the Condition line as shown on the above panel. Press F19 (Apply Global) and type ‘1’ in the Apply to Map window. Press Enter to apply the global condition to map 1. The alternate map will be created even though the system returns to the mapping number 0 record.
EDIX514 Element Mapping Inbound 03/30/11 Tran ID. . . . . . . . . . . . . . POMAP4010 S/R. . . . . . . . . R Seg ID . . . . . . . . . . . . . . N3 ADDRESS INFORMATION Seg Seq. . . . . . . . . . . . . . 4300 Mapping Number . . . 0 Area Code. . . . . . . . . . . H Field Op Field/Constant Cond . . . . . . . . . . . . . . . N1/10/4100 EQ 'BT' Type option, press Enter. 1=Appl Fields 11=Ext Map 12=Subfield 13=Codes Mapping Ele Sub X M T Ele Ele C Opt Target Field Table ID No. Ele M C P Description Seq ID R F010.SHIPTOADD1 1 C M AN ADDRESS INFORMATION 10 166 66 Apply to Map 1 F3=Exit F12=Cancel Bottom F1=Help F4=Prompt F10=Update F12=Cancel F19=Apply Global F24=More Keys
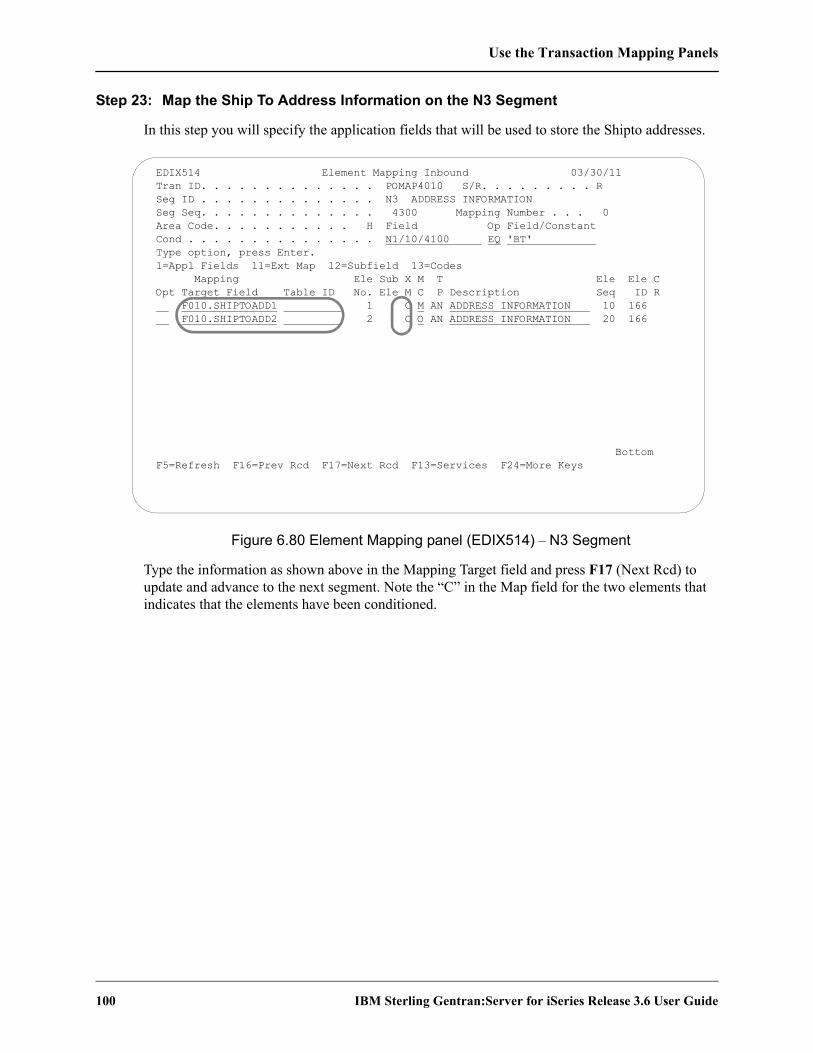
Use the Transaction Mapping Panels
100 IBM Sterling Gentran:Server for iSeries Release 3.6 User Guide
Step 23: Map the Ship To Address Information on the N3 Segment
In this step you will specify the application fields that will be used to store the Shipto addresses.
Figure 6.80 Element Mapping panel (EDIX514) – N3 Segment
Type the information as shown above in the Mapping Target field and press F17 (Next Rcd) to update and advance to the next segment. Note the “C” in the Map field for the two elements that indicates that the elements have been conditioned.
EDIX514 Element Mapping Inbound 03/30/11 Tran ID. . . . . . . . . . . . . . POMAP4010 S/R. . . . . . . . . R Seg ID . . . . . . . . . . . . . . N3 ADDRESS INFORMATION Seg Seq. . . . . . . . . . . . . . 4300 Mapping Number . . . 0 Area Code. . . . . . . . . . . H Field Op Field/Constant Cond . . . . . . . . . . . . . . . N1/10/4100 EQ 'BT' Type option, press Enter. 1=Appl Fields 11=Ext Map 12=Subfield 13=Codes Mapping Ele Sub X M T Ele Ele C Opt Target Field Table ID No. Ele M C P Description Seq ID R F010.SHIPTOADD1 1 C M AN ADDRESS INFORMATION 10 166 F010.SHIPTOADD2 2 C O AN ADDRESS INFORMATION 20 166 Bottom F5=Refresh F16=Prev Rcd F17=Next Rcd F13=Services F24=More Keys

Use the Transaction Mapping Panels
IBM Sterling Gentran:Server for iSeries Release 3.6 User Guide 101
Step 24: Map the Bill To Address on the N3 Segment
In this step you will specify the application fields that will be used to store the Billto addresses.
Figure 6.81 Element Mapping panel (EDIX514) – N3 Segment
To map the Billto address on mapping number 1, follow these instructions:
1. Type the information as shown above in the Mapping Target fields. Note the “C” in the Map field for the two elements that indicates that the elements have been conditioned.
2. Press F17 (Next Rcd) to update and advance to the next segment.
EDIX514 Element Mapping Inbound 03/30/11 Tran ID. . . . . . . . . . . . . . POMAP4010 S/R. . . . . . . . . R Seg ID . . . . . . . . . . . . . . N3 ADDRESS INFORMATION Seg Seq. . . . . . . . . . . . . . 4300 Mapping Number . . . 1 Area Code. . . . . . . . . . . H Field Op Field/Constant Cond . . . . . . . . . . . . . . . N1/10/4100 EQ 'BT' Type option, press Enter. 1=Appl Fields 11=Ext Map 12=Subfield 13=Codes Mapping Ele Sub X M T Ele Ele C Opt Target Field Table ID No. Ele M C P Description Seq ID R F010.BILLTOADD1 1 C M AN ADDRESS INFORMATION 10 166 F010.BILLTOADD2 2 C O AN ADDRESS INFORMATION 20 166 Bottom F1=Help F4=Prompt F10=Update F12=Cancel F19=Apply Global F24=More Keys
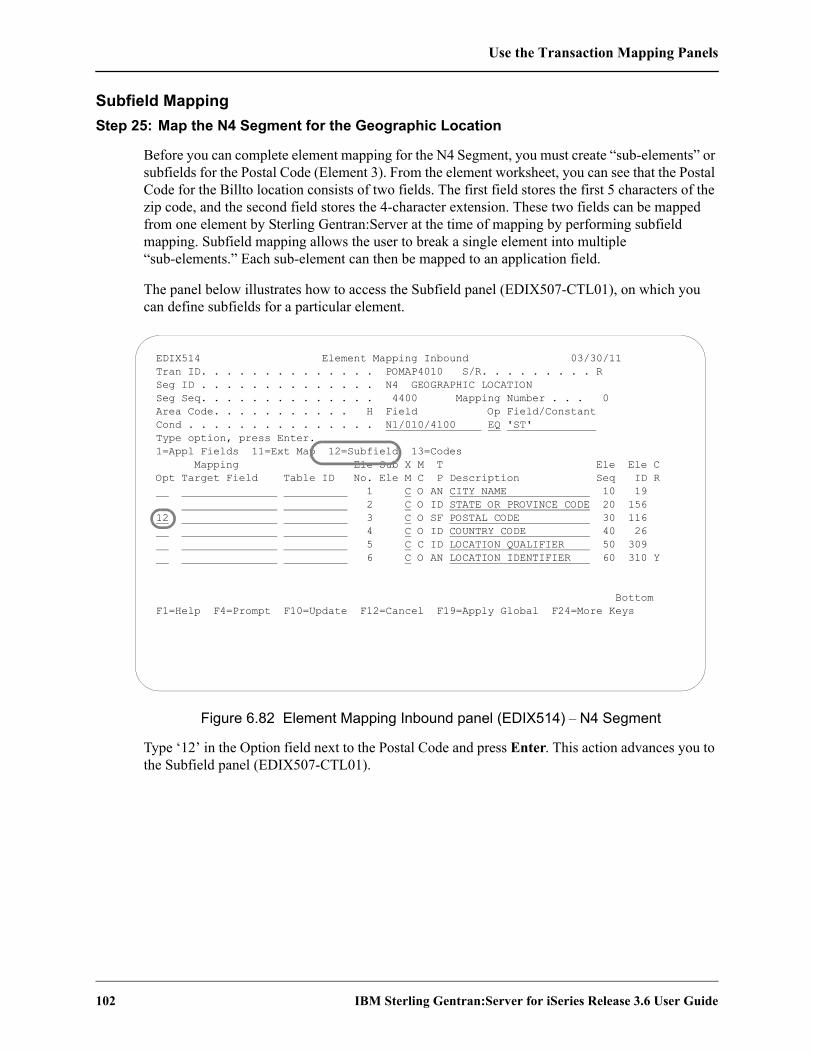
Use the Transaction Mapping Panels
102 IBM Sterling Gentran:Server for iSeries Release 3.6 User Guide
Subfield MappingStep 25: Map the N4 Segment for the Geographic Location
Before you can complete element mapping for the N4 Segment, you must create “sub-elements” or subfields for the Postal Code (Element 3). From the element worksheet, you can see that the Postal Code for the Billto location consists of two fields. The first field stores the first 5 characters of the zip code, and the second field stores the 4-character extension. These two fields can be mapped from one element by Sterling Gentran:Server at the time of mapping by performing subfield mapping. Subfield mapping allows the user to break a single element into multiple “sub-elements.” Each sub-element can then be mapped to an application field.
The panel below illustrates how to access the Subfield panel (EDIX507-CTL01), on which you can define subfields for a particular element.
Figure 6.82 Element Mapping Inbound panel (EDIX514) – N4 Segment
Type ‘12’ in the Option field next to the Postal Code and press Enter. This action advances you to the Subfield panel (EDIX507-CTL01).
EDIX514 Element Mapping Inbound 03/30/11 Tran ID. . . . . . . . . . . . . . POMAP4010 S/R. . . . . . . . . R Seg ID . . . . . . . . . . . . . . N4 GEOGRAPHIC LOCATION Seg Seq. . . . . . . . . . . . . . 4400 Mapping Number . . . 0 Area Code. . . . . . . . . . . H Field Op Field/Constant Cond . . . . . . . . . . . . . . . N1/010/4100 EQ 'ST' Type option, press Enter. 1=Appl Fields 11=Ext Map 12=Subfield 13=Codes Mapping Ele Sub X M T Ele Ele C Opt Target Field Table ID No. Ele M C P Description Seq ID R 1 C O AN CITY NAME 10 19 2 C O ID STATE OR PROVINCE CODE 20 156 12 3 C O SF POSTAL CODE 30 116 4 C O ID COUNTRY CODE 40 26 5 C C ID LOCATION QUALIFIER 50 309 6 C O AN LOCATION IDENTIFIER 60 310 Y Bottom F1=Help F4=Prompt F10=Update F12=Cancel F19=Apply Global F24=More Keys
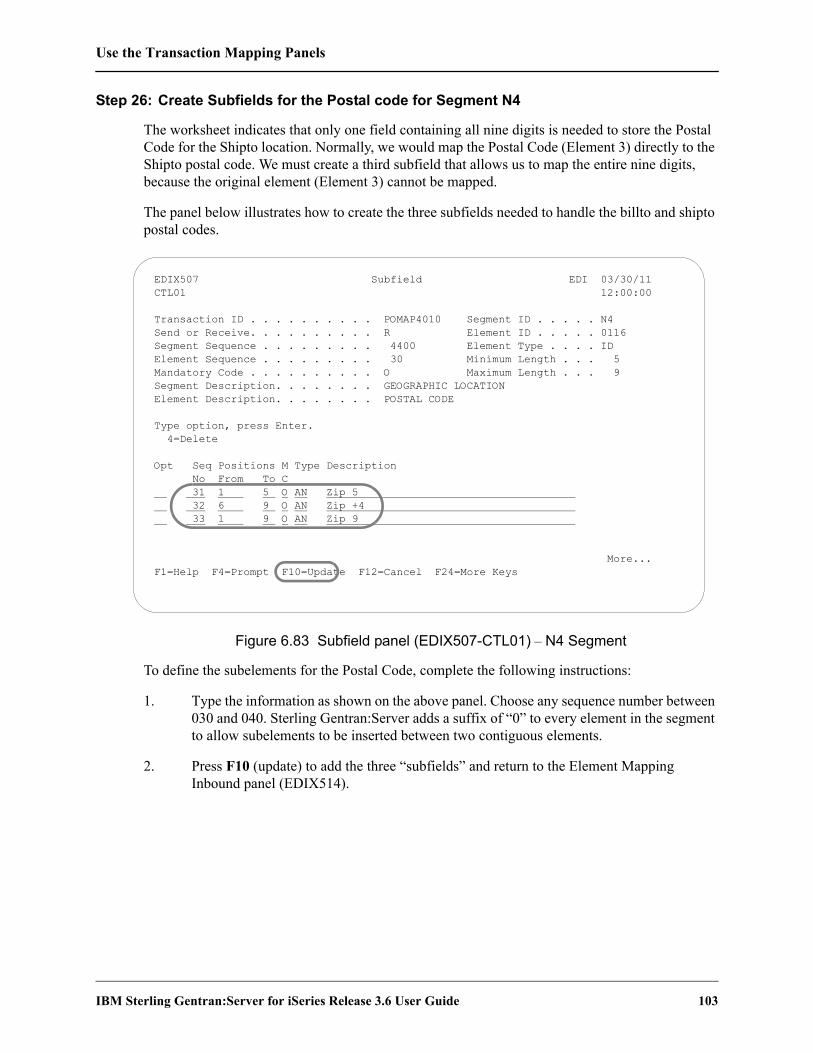
Use the Transaction Mapping Panels
IBM Sterling Gentran:Server for iSeries Release 3.6 User Guide 103
Step 26: Create Subfields for the Postal code for Segment N4
The worksheet indicates that only one field containing all nine digits is needed to store the Postal Code for the Shipto location. Normally, we would map the Postal Code (Element 3) directly to the Shipto postal code. We must create a third subfield that allows us to map the entire nine digits, because the original element (Element 3) cannot be mapped.
The panel below illustrates how to create the three subfields needed to handle the billto and shipto postal codes.
Figure 6.83 Subfield panel (EDIX507-CTL01) – N4 Segment
To define the subelements for the Postal Code, complete the following instructions:
1. Type the information as shown on the above panel. Choose any sequence number between 030 and 040. Sterling Gentran:Server adds a suffix of “0” to every element in the segment to allow subelements to be inserted between two contiguous elements.
2. Press F10 (update) to add the three “subfields” and return to the Element Mapping Inbound panel (EDIX514).
EDIX507 Subfield EDI 03/30/11 CTL01 12:00:00 Transaction ID . . . . . . . . . . POMAP4010 Segment ID . . . . . N4 Send or Receive. . . . . . . . . . R Element ID . . . . . 0116 Segment Sequence . . . . . . . . . 4400 Element Type . . . . ID Element Sequence . . . . . . . . . 30 Minimum Length . . . 5 Mandatory Code . . . . . . . . . . O Maximum Length . . . 9 Segment Description. . . . . . . . GEOGRAPHIC LOCATION Element Description. . . . . . . . POSTAL CODE Type option, press Enter. 4=Delete Opt Seq Positions M Type Description No From To C 31 1 5 O AN Zip 5 32 6 9 O AN Zip +4 33 1 9 O AN Zip 9 More... F1=Help F4=Prompt F10=Update F12=Cancel F24=More Keys

Use the Transaction Mapping Panels
104 IBM Sterling Gentran:Server for iSeries Release 3.6 User Guide
Step 27: View the Results of Creating Subfields
The panel below shows where the new subelements are inserted in the N4 segment. Note that the Postal Code element has a data type of “SF,” which indicates that it is broken into subfields. As mentioned in a previous step, this element cannot be mapped from directly.
Figure 6.84 Element Mapping Inbound panel (EDIX514) – N4 Segment
EDIX514 Element Mapping Inbound 03/30/11 Tran ID. . . . . . . . . . . . . . POMAP4010 S/R. . . . . . . . . R Seg ID . . . . . . . . . . . . . . N4 GEOGRAPHIC LOCATION Seg Seq. . . . . . . . . . . . . . 4400 Mapping Number . . . 0 Area Code. . . . . . . . . . . H Field Op Field/Constant Cond . . . . . . . . . . . . . . . N1/010/4100 EQ 'ST' Type option, press Enter. 1=Appl Fields 11=Ext Map 12=Subfield 13=Codes Mapping Ele Sub X M T Ele Ele C Opt Target Field Table ID No. Ele M C P Description Seq ID R 1 C O AN CITY NAME 10 19 2 C O ID STATE OR PROVINCE CODE 20 156 3 C O SF POSTAL CODE 30 116 C O AN Zip 5 31 C O AN Zip +4 32 C O AN Zip 9 33 4 C O ID COUNTRY CODE 40 26 5 C C ID LOCATION QUALIFIER 50 309 6 C O AN LOCATION IDENTIFIER 60 310 Y Bottom F1=Help F4=Prompt F10=Update F12=Cancel F19=Apply Global F24=More Keys
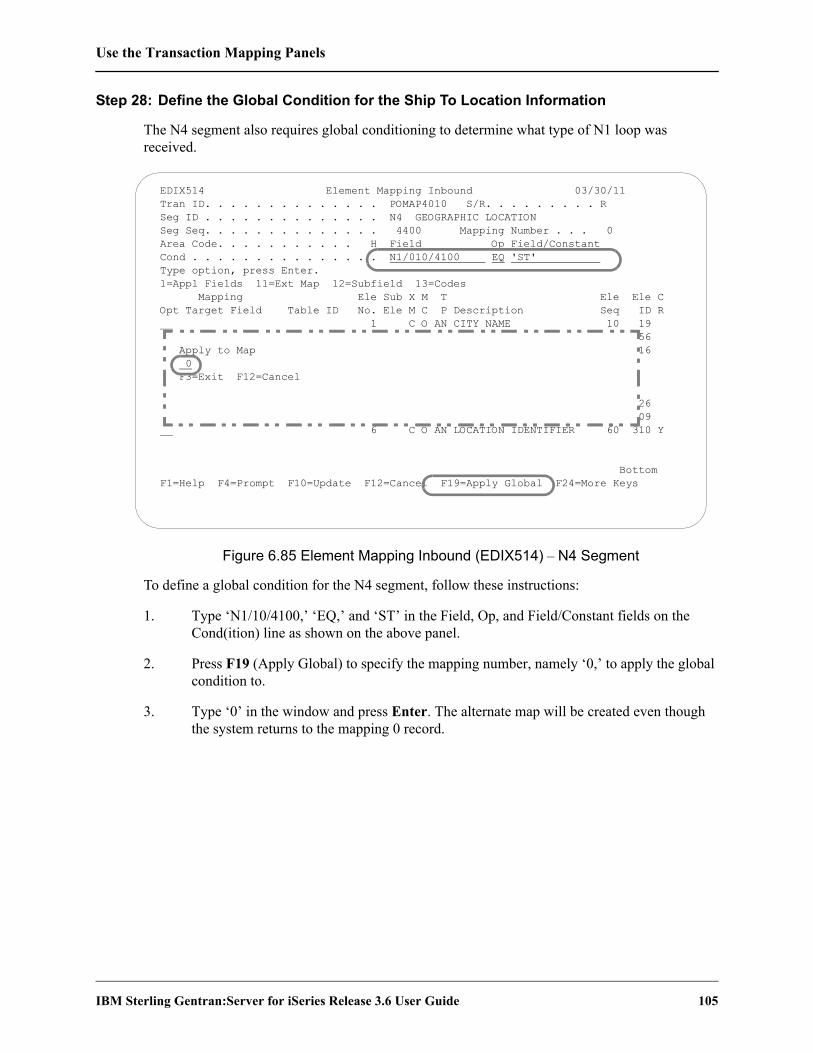
Use the Transaction Mapping Panels
IBM Sterling Gentran:Server for iSeries Release 3.6 User Guide 105
Step 28: Define the Global Condition for the Ship To Location Information
The N4 segment also requires global conditioning to determine what type of N1 loop was received.
Figure 6.85 Element Mapping Inbound (EDIX514) – N4 Segment
To define a global condition for the N4 segment, follow these instructions:
1. Type ‘N1/10/4100,’ ‘EQ,’ and ‘ST’ in the Field, Op, and Field/Constant fields on the Cond(ition) line as shown on the above panel.
2. Press F19 (Apply Global) to specify the mapping number, namely ‘0,’ to apply the global condition to.
3. Type ‘0’ in the window and press Enter. The alternate map will be created even though the system returns to the mapping 0 record.
EDIX514 Element Mapping Inbound 03/30/11 Tran ID. . . . . . . . . . . . . . POMAP4010 S/R. . . . . . . . . R Seg ID . . . . . . . . . . . . . . N4 GEOGRAPHIC LOCATION Seg Seq. . . . . . . . . . . . . . 4400 Mapping Number . . . 0 Area Code. . . . . . . . . . . H Field Op Field/Constant Cond . . . . . . . . . . . . . . . N1/010/4100 EQ 'ST' Type option, press Enter. 1=Appl Fields 11=Ext Map 12=Subfield 13=Codes Mapping Ele Sub X M T Ele Ele C Opt Target Field Table ID No. Ele M C P Description Seq ID R 1 C O AN CITY NAME 10 19 56 Apply to Map 16 0 F3=Exit F12=Cancel 26 09 6 C O AN LOCATION IDENTIFIER 60 310 Y Bottom F1=Help F4=Prompt F10=Update F12=Cancel F19=Apply Global F24=More Keys

Use the Transaction Mapping Panels
106 IBM Sterling Gentran:Server for iSeries Release 3.6 User Guide
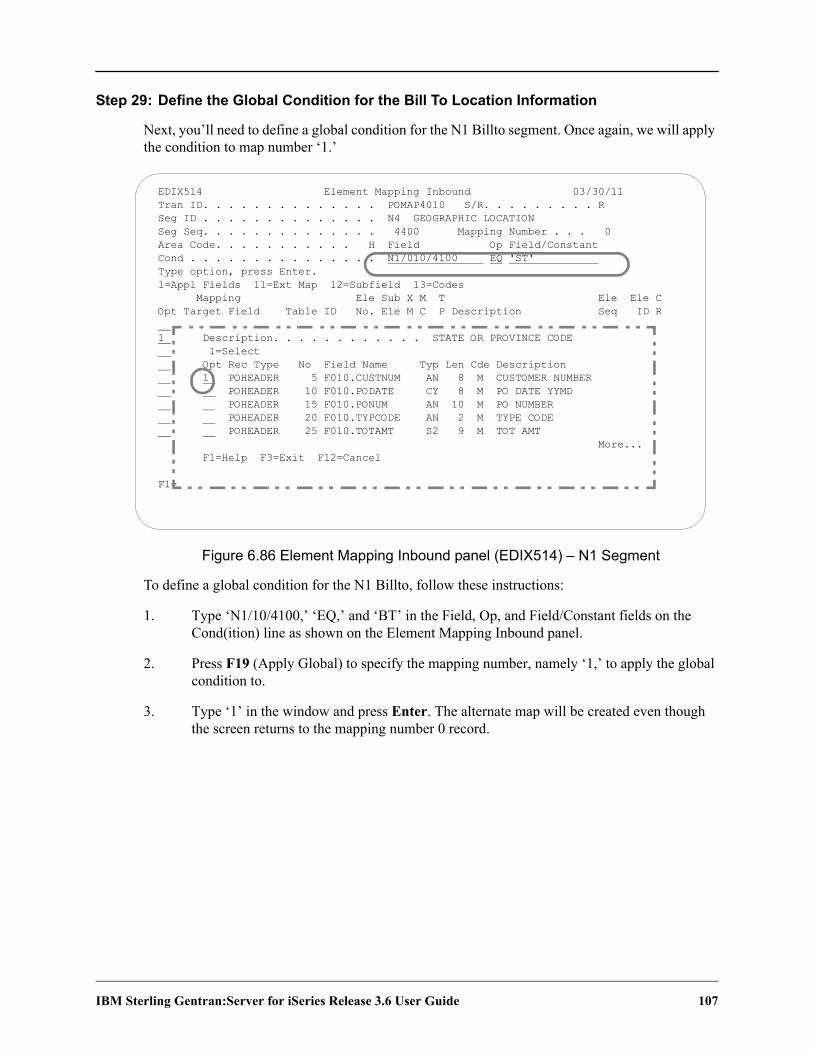
IBM Sterling Gentran:Server for iSeries Release 3.6 User Guide 107
Step 29: Define the Global Condition for the Bill To Location Information
Next, you’ll need to define a global condition for the N1 Billto segment. Once again, we will apply the condition to map number ‘1.’
Figure 6.86 Element Mapping Inbound panel (EDIX514) – N1 Segment
To define a global condition for the N1 Billto, follow these instructions:
1. Type ‘N1/10/4100,’ ‘EQ,’ and ‘BT’ in the Field, Op, and Field/Constant fields on the Cond(ition) line as shown on the Element Mapping Inbound panel.
2. Press F19 (Apply Global) to specify the mapping number, namely ‘1,’ to apply the global condition to.
3. Type ‘1’ in the window and press Enter. The alternate map will be created even though the screen returns to the mapping number 0 record.
EDIX514 Element Mapping Inbound 03/30/11 Tran ID. . . . . . . . . . . . . . POMAP4010 S/R. . . . . . . . . R Seg ID . . . . . . . . . . . . . . N4 GEOGRAPHIC LOCATION Seg Seq. . . . . . . . . . . . . . 4400 Mapping Number . . . 0 Area Code. . . . . . . . . . . H Field Op Field/Constant Cond . . . . . . . . . . . . . . . N1/010/4100 EQ 'ST' Type option, press Enter. 1=Appl Fields 11=Ext Map 12=Subfield 13=Codes Mapping Ele Sub X M T Ele Ele C Opt Target Field Table ID No. Ele M C P Description Seq ID R 1 Description. . . . . . . . . . . . STATE OR PROVINCE CODE 1=Select Opt Rec Type No Field Name Typ Len Cde Description 1 POHEADER 5 F010.CUSTNUM AN 8 M CUSTOMER NUMBER POHEADER 10 F010.PODATE CY 8 M PO DATE YYMD POHEADER 15 F010.PONUM AN 10 M PO NUMBER POHEADER 20 F010.TYPCODE AN 2 M TYPE CODE POHEADER 25 F010.TOTAMT S2 9 M TOT AMT More... F1=Help F3=Exit F12=Cancel F1=

108 IBM Sterling Gentran:Server for iSeries Release 3.6 User Guide
Step 30: Map the Ship To City/State on the N4 Segment
In this step you will specify the application fields that will be used to store the Shipto geographic location.
Figure 6.87 Element Mapping Inbound panel (EDIX514) – N4 Segment
Type the information as shown on the above panel or use option 1 to select the fields from the window. Note that Element Map Sequence 33, which has a length of 9, is mapped to the Shipto postal code.
Press F17 (Next Rcd) to update and advance to the mapping number 1 created for the N4 segment.
EDIX514 Element Mapping Inbound 03/30/11 Tran ID. . . . . . . . . . . . . . POMAP4010 S/R. . . . . . . . . R Seg ID . . . . . . . . . . . . . . N4 GEOGRAPHIC LOCATION Seg Seq. . . . . . . . . . . . . . 4400 Mapping Number . . . 0 Area Code. . . . . . . . . . . H Field Op Field/Constant Cond . . . . . . . . . . . . . . . N1/010/4100 EQ 'ST' Type option, press Enter. 1=Appl Fields 11=Ext Map 12=Subfield 13=Codes Mapping Ele Sub X M T Ele Ele C Opt Target Field Table ID No. Ele M C P Description Seq ID R F010.SHIPTOCITY 1 C O AN CITY NAME 10 19 F010.SHIPTOST 2 C O ID STATE OR PROVINCE CODE 20 156 3 C O SF POSTAL CODE 30 116 C O AN Zip 5 31 C O AN Zip +4 32 F010.SHIPTOZIP C O AN Zip 9 33 4 C O ID COUNTRY CODE 40 26 5 C C ID LOCATION QUALIFIER 50 309 6 C O AN LOCATION IDENTIFIER 60 310 Y Bottom F5=Refresh F16=Prev Rcd F17=Next Rcd F13=Services F24=More Keys

IBM Sterling Gentran:Server for iSeries Release 3.6 User Guide 109
Step 31: Map the Billto City/State on the N4 Segment
In this step you will map the Billto city and state on the N4 segment.
Figure 6.88 Element Mapping panel (EDIX514) – N4 Segment
To map the Billto information, type the field names as shown or use option 1 to select the fields from the window.
Press F17 (Next Rcd) to update and advance to the next segment.
EDIX514 Element Mapping Inbound 03/30/11 Tran ID. . . . . . . . . . . . . . POMAP4010 S/R. . . . . . . . . R Seg ID . . . . . . . . . . . . . . N4 GEOGRAPHIC LOCATION Seg Seq. . . . . . . . . . . . . . 4400 Mapping Number . . . 1 Area Code. . . . . . . . . . . H Field Op Field/Constant Cond . . . . . . . . . . . . . . . N1/010/4100 EQ 'BT' Type option, press Enter. 1=Appl Fields 11=Ext Map 12=Subfield 13=Codes Mapping Ele Sub X M T Ele Ele C Opt Target Field Table ID No. Ele M C P Description Seq ID R F010.BILLTOCITY 1 C C AN CITY NAME 10 19 F010.BILLTOST 2 C C ID STATE OR PROVINCE CODE 20 156 3 C O SF POSTAL CODE 30 116 F010.BILLTOZIP C O AN Zip 5 31 F010.BILLTOEXT C O AN Zip +4 32 C O AN Zip 9 33 4 C O ID COUNTRY CODE 40 26 5 C C ID LOCATION QUALIFIER 50 309 6 C C AN LOCATION IDENTIFIER 60 310 Y Bottom F5=Refresh F16=Prev Rcd F17=Next Rcd F13=Services F24=More Keys Invalid Option entered.

110 IBM Sterling Gentran:Server for iSeries Release 3.6 User Guide
Step 32: Map the PO1 Segment
Segment PO1 contains the line item information. It is the first segment in the detail area. The next several steps demonstrate how to map the PO1 segment in the sample purchase order.
The first step in mapping the PO1 segment is to select application field “F020.QTYORD.”
Figure 6.89 Element Mapping Inbound panel (EDIX514) – PO1 Segment
To select the Quantity Ordered application field, follow these instructions:
1. Type ‘1’ in the Option field next to the second element and press Enter to display a window as shown on the above panel.
NOTEThis window displays only detail fields as the PO1 segment is a detail segment.
2. Type ‘1’ (Select) in the window next to Quantity Ordered and press Enter.
EDIX514 Element Mapping Inbound 03/30/11 Tran ID. . . . . . . . . . . . . . POMAP4010 S/R. . . . . . . . . R Seg ID . . . . . . . . . . . . . . PO1 BASELINE ITEM DATA Seg Seq. . . . . . . . . . . . . . 7600 Mapping Number . . . 0 Area Code. . . . . . . . . . . D Field Op Field/Constant Cond . . . . . . . . . . . . . . . Type option, press Enter. 1=Appl Fields 11=Ext Map 12=Subfield 13=Codes Mapping Ele Sub X M T Ele Ele C Opt Target Field Table ID No. Ele M C P Description Seq ID R 1 Description. . . . . . . . . . . . QUANTITY ORDERED 1=Select Opt Rec Type No Field Name Typ Len Cde Description 1 PODETAIL 5 F020.CUSTNUM AN 8 M CUSTOMER NUMBER PODETAIL 10 F020.PODATE CY 8 M PO DATE PODETAIL 15 F020.ITEMNUM AN 10 M PRODUCT CODE PODETAIL 20 F020.UOM AN 7 M UNIT OF MEASURE PODETAIL 25 F020.UNITPR P2 2 M UNIT PRICE More... F1=Help F3=Exit F12=Cancel F1=

IBM Sterling Gentran:Server for iSeries Release 3.6 User Guide 111
Step 33: Map the Remaining PO1 Elements
In this step you will map:
Unit-of-Measure (which will be run through a code table and converted)
Unit Price
Item number (which will be run through a data table and converted)
NOTEThe Code and Data tables, SEMCODE and SEMDATA, must be created prior to mapping the elements of this segment. If you get an error message when you try to update this panel, you must first build these tables. Use F13 (Services) to exit this panel and build the required tables without losing any changes you may have made up to this point. SEE the “Creating a Code Translation Table” and “Creating a Data Translation” tasks in this chapter for more information about code and data translation tables.
Figure 6.90 Element Mapping Inbound panel (EDIX514) – PO1 Segment
EDIX514 Element Mapping Inbound 03/30/11 Tran ID. . . . . . . . . . . . . . POMAP4010 S/R. . . . . . . . . R Seg ID . . . . . . . . . . . . . . PO1 BASELINE ITEM DATA Seg Seq. . . . . . . . . . . . . . 7600 Mapping Number . . . 0 Area Code. . . . . . . . . . . D Field Op Field/Constant Cond . . . . . . . . . . . . . . . Type option, press Enter. 1=Appl Fields 11=Ext Map 12=Subfield 13=Codes Mapping Ele Sub X M T Ele Ele C Opt Target Field Table ID No. Ele M C P Description Seq ID R 1 O AN ASSIGNED IDENTIFICATIO 10 350 F020.QTYORD 2 C R QUANTITY ORDERED 20 330 F020.UOM SEMCODE 3 O ID UNIT OR BASIS FOR MEAS 30 355 Y F020.UNITPR 4 C R UNIT PRICE 40 212 5 O ID BASIS OF UNIT PRICE CO 50 639 Y 6 C ID PRODUCT/SERVICE ID QUA 60 235 Y F020.ITEMNUM SEMDATA 7 C C AN PRODUCT/SERVICE ID 70 234 8 C ID PRODUCT/SERVICE ID QUA 80 235 Y 9 C AN PRODUCT/SERVICE ID 90 234 10 C ID PRODUCT/SERVICE ID QUA 100 235 Y 11 C AN PRODUCT/SERVICE ID 110 234
More...
F1=Help F4=Prompt F10=Update F12=Cancel F19=Apply Global F24=More Keys
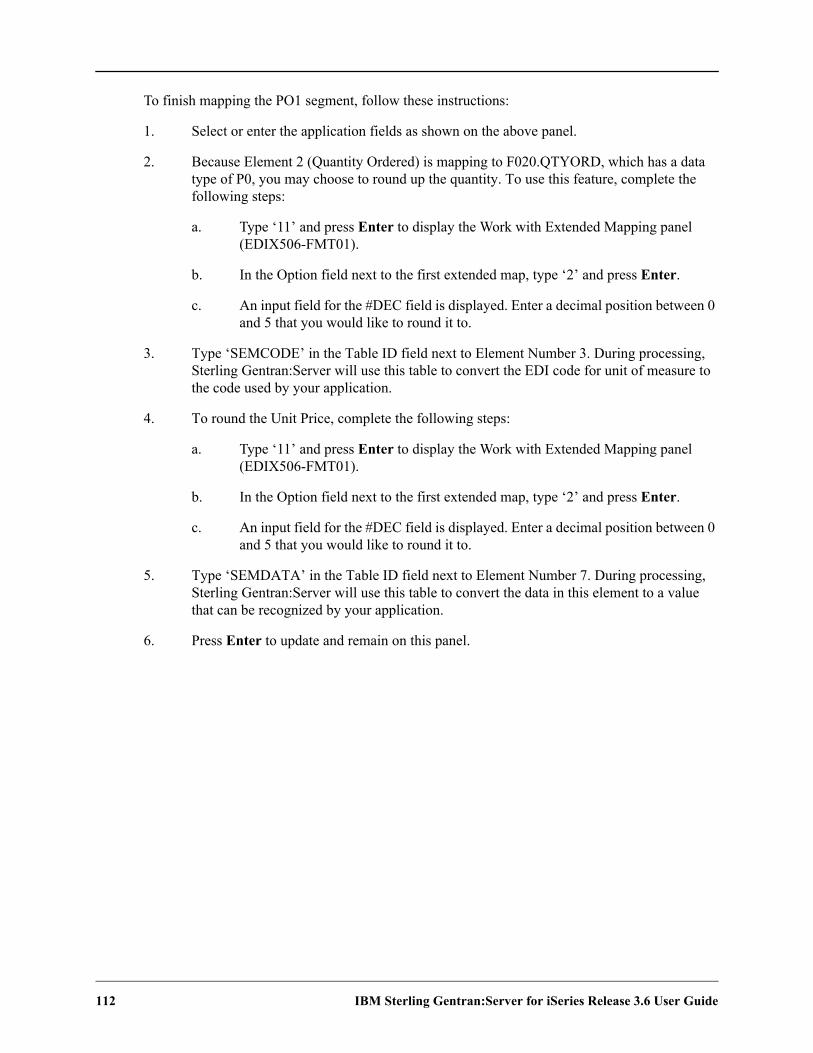
112 IBM Sterling Gentran:Server for iSeries Release 3.6 User Guide
To finish mapping the PO1 segment, follow these instructions:
1. Select or enter the application fields as shown on the above panel.
2. Because Element 2 (Quantity Ordered) is mapping to F020.QTYORD, which has a data type of P0, you may choose to round up the quantity. To use this feature, complete the following steps:
a. Type ‘11’ and press Enter to display the Work with Extended Mapping panel (EDIX506-FMT01).
b. In the Option field next to the first extended map, type ‘2’ and press Enter.
c. An input field for the #DEC field is displayed. Enter a decimal position between 0 and 5 that you would like to round it to.
3. Type ‘SEMCODE’ in the Table ID field next to Element Number 3. During processing, Sterling Gentran:Server will use this table to convert the EDI code for unit of measure to the code used by your application.
4. To round the Unit Price, complete the following steps:
a. Type ‘11’ and press Enter to display the Work with Extended Mapping panel (EDIX506-FMT01).
b. In the Option field next to the first extended map, type ‘2’ and press Enter.
c. An input field for the #DEC field is displayed. Enter a decimal position between 0 and 5 that you would like to round it to.
5. Type ‘SEMDATA’ in the Table ID field next to Element Number 7. During processing, Sterling Gentran:Server will use this table to convert the data in this element to a value that can be recognized by your application.
6. Press Enter to update and remain on this panel.

IBM Sterling Gentran:Server for iSeries Release 3.6 User Guide 113
Step 34: Extended Mapping for Element 7 of the PO1 Segment
You can see from the worksheets that we expect to receive two item numbers: Purchaser’s (PI) and Vendor’s (VN). Therefore, we need to create two if-conditions to map the item numbers to the appropriate application field.
Figure 6.91 Element Mapping Inbound panel (EDIX514) – PO1 Segment
Type ‘11’ (Ext Map) in the Option field next to the Product/Service ID (Element 7) and press Enter.
EDIX514 Element Mapping Inbound 03/30/11 Tran ID. . . . . . . . . . . . . . POMAP4010 S/R. . . . . . . . . R Seg ID . . . . . . . . . . . . . . PO1 BASELINE ITEM DATA Seg Seq. . . . . . . . . . . . . . 7600 Mapping Number . . . 0 Area Code. . . . . . . . . . . D Field Op Field/Constant Cond . . . . . . . . . . . . . . . Type option, press Enter. 1=Appl Fields 11=Ext Map 12=Subfield 13=Codes Mapping Ele Sub X M T Ele Ele C Opt Target Field Table ID No. Ele M C P Description Seq ID R 1 O AN ASSIGNED IDENTIFICATIO 10 350 F020.QTYORD 2 C R QUANTITY ORDERED 20 330 F020.UOM SEMCODE 3 O ID UNIT OR BASIS FOR MEAS 30 355 Y F020.UNITPR 4 C R UNIT PRICE 40 212 5 O ID BASIS OF UNIT PRICE CO 50 639 Y 6 C ID PRODUCT/SERVICE ID QUA 60 235 Y 11 F020.ITEMNUM SEMDATA 7 C C AN PRODUCT/SERVICE ID 70 234 8 C ID PRODUCT/SERVICE ID QUA 80 235 Y 9 C AN PRODUCT/SERVICE ID 90 234 10 C ID PRODUCT/SERVICE ID QUA 100 235 Y 11 C AN PRODUCT/SERVICE ID 110 234 More... F1=Help F4=Prompt F10=Update F12=Cancel F19=Apply Global F24=More Keys

114 IBM Sterling Gentran:Server for iSeries Release 3.6 User Guide
Step 35: Access the Extended Inbound Mapping Panel
The next step is to access the Extended Inbound Mapping panel (EDIX513-FMT01).
Figure 6.92 Work with Extended Mapping panel (EDIX506-FMT01) – Seg Seq 7600
Type ‘2’ in the Option field next to Seg Seq 7600, Ele Seq 70 and press Enter.
EDIX506 Work with Extended Mapping EDI 03/30/11 FMT01 pgmlib: G3X6PGM dtalib: G3X6DTA 12:00:00
Position to Segment Seq. . . . . . For POMAP4010 R
Type option (and Information), press Enter. 1=Create 2=Revise 3=Copy 4=Delete 5=View Seg Ele A Seg Opt Seq Seq Map Constant/Field C ID Description 2 7600 70 0 F020.ITEMNUM D PO1 PRODUCT/SERVICE ID 7600 80 0 D PO1 PRODUCT/SERVICE ID QUALIF 7600 90 0 D PO1 PRODUCT/SERVICE ID 7600 100 0 D PO1 PRODUCT/SERVICE ID QUALIF 7600 110 0 D PO1 PRODUCT/SERVICE ID 7600 120 0 D PO1 PRODUCT/SERVICE ID QUALIF 7600 130 0 D PO1 PRODUCT/SERVICE ID 7600 140 0 D PO1 PRODUCT/SERVICE ID QUALIF 7600 150 0 D PO1 PRODUCT/SERVICE ID More... Parameters or command ===> F1=Help F3=Exit F12=Cancel F15=Sort F24=More Keys

IBM Sterling Gentran:Server for iSeries Release 3.6 User Guide 115
Step 36: Update the Item Number Qualifier with Extended Mapping Information
The following panel shows how to define an if-condition to handle the purchase order number.
Figure 6.93 Extended Inbound Mapping (EDIX513-FMT01) – PO1 Segment
Type ‘PO1/60/7600,’ ‘EQ,’ and ‘PI’ on the If line. Type ‘O’ (or) in the And/Or field, and ‘PO1/60/7600,’ ‘EQ,’ and ‘CB” in the next three fields as shown above.
EDIX513 Extended Inbound Mapping EDI 03/30/11 FMT01 12:00:00 Segment ID . . . . . . . . . . . . PO1 Transaction ID . . . POMAP4010 Area Code. . . . . . . . . . . . . D Send or Receive. . . R Element Number . . . . . . . . . . 70 Element ID . . . . . 0234 Segment Sequence . . . . . . . . . 7600 Mapping Number . . . . 0 Mapping of Data Element Application Target Field . . . . . F020.ITEMNUM Target Field = Or Value Op Value Op Value Target Field = If PO1/60/7600 EQ 'PI' And/Or O PO1/60/7600 EQ 'CB' Round Element . . #Dec Table ID . . . . . . . . . . . . . SEMDATA Type of Table. . . . Add to Hash Total #. . . . . . . . Length (Minimum) . . 1 Save in Constant # . . . . . . . . Length (Maximum) . . 48 Add 1 to Accumulator # . . . . . . Group Req Cd . . . . User Exit Routine. . . . . . . . . Related. . . . . . . N Mandatory Code . . . . . . . . . . C Type . . . . . . . . AN Element Group. . . . . . . . . . . Type . . . . . . . . Segment Description. . . . . . . . BASELINE ITEM DATA Element Description. . . . . . . . PRODUCT/SERVICE ID F1=Help F2=More/Less F10=Update F14=Notes F19=Appl F24=More Keys

116 IBM Sterling Gentran:Server for iSeries Release 3.6 User Guide
Step 37: Add Comments to Extended Maps
To enter notes about this element, press F14 (Notes).
The Extended Inbound Mapping Notes panel (EDIX533-FMT01) is displayed.
EDIX513 Extended Inbound Mapping EDI 03/30/11 FMT01 12:00:00 Segment ID . . . . . . . . . . . . PO1 Transaction ID . . . POMAP4010 Area Code. . . . . . . . . . . . . D Send or Receive. . . R Element Number . . . . . . . . . . 70 Element ID . . . . . 0234 Segment Sequence . . . . . . . . . 7600 Mapping Number . . . . 0 Mapping of Data Element Application Target Field . . . . . F020.ITEMNUM Target Field = Or Value Op Value Op Value Target Field = If PO1/60/7600 EQ 'PI' And/Or O PO1/60/7600 EQ 'CB' Round Element . . #Dec Table ID . . . . . . . . . . . . . Type of Table. . . . Add to Hash Total #. . . . . . . . Length (Minimum) . . 1 Save in Constant # . . . . . . . . Length (Maximum) . . 48 Add 1 to Accumulator # . . . . . . Group Req Cd . . . . User Exit Routine. . . . . . . . . Related. . . . . . . N Mandatory Code . . . . . . . . . . C Type . . . . . . . . AN Element Group. . . . . . . . . . . Type . . . . . . . . Segment Description. . . . . . . . BASELINE ITEM DATA Element Description. . . . . . . . PRODUCT/SERVICE ID F1=Help F2=More/Less F10=Update F14=Notes F19=Appl F24=More Keys
EDIX533 Extended Inbound Mapping EDI 03/30/11 FMT01 12:00:00 Segment ID . . . . . . . . . . . . PO1 Transaction ID . . . POMAP4010 Area Code. . . . . . . . . . . . . D Send or Receive. . . R Element Number . . . . . . . . . . 70 Element ID . . . . . 0234 Segment Sequence . . . . . . . . . 7600 Mapping Number . . . . 0 Mapping of Data Element Application Target Field . . . . . F020.ITEMNUM Target Field = Or Value Op Value Op Value Target Field = If PO1/60/7600 EQ 'PI' And/Or O PO1/60/7600 EQ 'CB' Round Element . . #Dec Notes . . . . . . . . . . . . . IF PO106 = ‘PI’ OR ‘CB’, TRANSLATE EDI ITEM # USING SEMDATA TABLE Last Update User. . . . . . . . . Last Update Date . . F1=Help F5=Refresh F10=Update F12=Cancel F21=Prt Notes F24=More Keys

IBM Sterling Gentran:Server for iSeries Release 3.6 User Guide 117
Enter your comments and press F10 (Update). Extended Mapping Inbound panel is displayed. Press F5 (Refresh) and the function key ‘F14=Notes’ changes to ‘F14=Notes*’. The (*) denotes there are comments for this element.
Press F10 (Update). The Work with Extended Mapping panel (EDIX506-FMT01) displays, with the message “Revise Operation Successful”.
EDIX513 Extended Inbound Mapping EDI 03/30/11 FMT01 12:00:00 Segment ID . . . . . . . . . . . . PO1 Transaction ID . . . POMAP4010 Area Code. . . . . . . . . . . . . D Send or Receive. . . R Element Number . . . . . . . . . . 70 Element ID . . . . . 0234 Segment Sequence . . . . . . . . . 7600 Mapping Number . . . . 0 Mapping of Data Element Application Target Field . . . . . F020.ITEMNUM Target Field = Or Value Op Value Op Value Target Field = If PO1/60/7600 EQ 'PI' And/Or O PO1/60/7600 EQ 'CB' Round Element . . #Dec Table ID . . . . . . . . . . . . . Type of Table. . . . Add to Hash Total #. . . . . . . . Length (Minimum) . . 1 Save in Constant # . . . . . . . . Length (Maximum) . . 48 Add 1 to Accumulator # . . . . . . Group Req Cd . . . . User Exit Routine. . . . . . . . . Related. . . . . . . N Mandatory Code . . . . . . . . . . C Type . . . . . . . . AN Element Group. . . . . . . . . . . Type . . . . . . . . Segment Description. . . . . . . . BASELINE ITEM DATA Element Description. . . . . . . . PRODUCT/SERVICE ID F1=Help F2=More/Less F10=Update F14=Notes* F19=Appl F24=More Keys

118 IBM Sterling Gentran:Server for iSeries Release 3.6 User Guide
Step 38: Copy Extended Map 0 (Zero) to Map 1
Sterling Gentran:Server allows you to create a new extended map by copying an existing extended map.
Figure 6.94 Work with Extended Mapping panel (EDIX506-FMT01) – PO1 Segment
Type ‘3’ (Copy) in the Option field next to Element Sequence 70, Map number 0 and press Enter. A Copy To window displays. Type ‘1’ in the window and press Enter.
EDIX506 Work with Extended Mapping EDI 03/30/11 FMT01 pgmlib: G3X6PGM dtalib: G3X6DTA 12:00:00
Position to Segment Seq. . . . . . For POMAP4010 R
Type option (and Information), press Enter. 1=Create 2=Revise 3=Copy 4=Delete 5=View Seg Ele A Seg Opt Seq Seq Map Constant/Field C ID Description Copy To 1 F3=Exit F12=Cancel 3 7600 70 0 F020.ITEMNUM D PO1 PRODUCT/SERVICE ID 7600 80 0 D PO1 PRODUCT/SERVICE ID QUALIF More... Parameters or command ===> F1=Help F3=Exit F12=Cancel F15=Sort F24=More Keys

IBM Sterling Gentran:Server for iSeries Release 3.6 User Guide 119
Step 39: Revise the Copied Extended Map 1
Now that the new extended map has been created, it needs to be modified to handle the vendor’s item number.
Figure 6.95 Work with Extended Mapping panel (EDIX506-FMT01) – PO1 Segment
Type ‘2’ (Revise) in the Option field next to map 1 for Ele Seq 70 as shown on the above panel and press Enter. This action displays the Extended Inbound Mapping panel (EDIX513-FMT01).
EDIX506 Work with Extended Mapping EDI 03/30/11 FMT01 pgmlib: G3X6PGM dtalib: G3X6DTA 12:00:00 Position to Segment Seq. . . . . . For POMAP4010 R
Type option (and Information), press Enter. 1=Create 2=Revise 3=Copy 4=Delete 5=View Seg Ele A Seg Opt Seq Seq Map Constant/Field C ID Description 7600 10 0 D PO1 ASSIGNED IDENTIFICATIO 7600 20 0 F020.QTYORD D PO1 QUANTITY ORDERED 7600 30 0 F020.UOM D PO1 UNIT OF MEASUREMENT CODE 7600 40 0 F020.UNITPR D PO1 UNIT PRICE 7600 50 0 D PO1 BASIS OF UNIT PRICE CODE 7600 60 0 D PO1 PRODUCT/SERVICE ID QUALIF 7600 70 0 F020.ITEMNUM D PO1 PRODUCT/SERVICE ID 2 7600 70 1 F020.ITEMNUM D PO1 PRODUCT/SERVICE ID 7600 80 0 D PO1 PRODUCT/SERVICE ID QUALIF More...Parameters or command ===> F1=Help F3=Exit F12=Cancel F15=Sort F24=More Keys
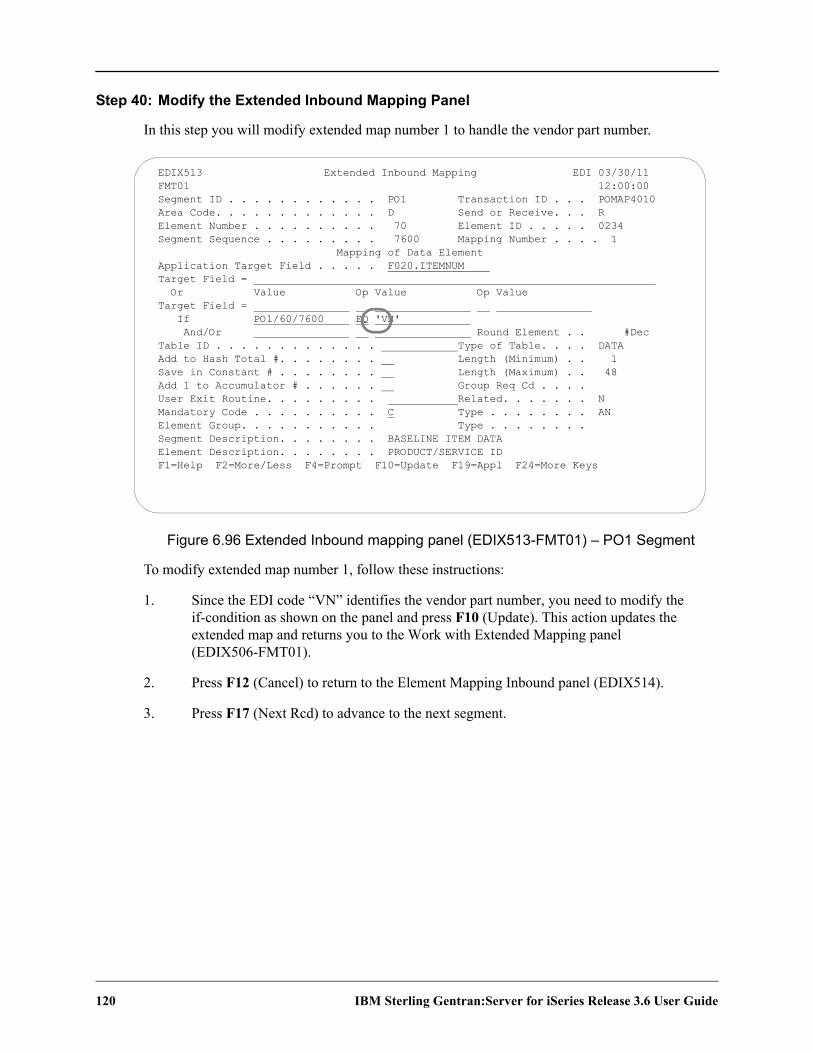
120 IBM Sterling Gentran:Server for iSeries Release 3.6 User Guide
Step 40: Modify the Extended Inbound Mapping Panel
In this step you will modify extended map number 1 to handle the vendor part number.
Figure 6.96 Extended Inbound mapping panel (EDIX513-FMT01) – PO1 Segment
To modify extended map number 1, follow these instructions:
1. Since the EDI code “VN” identifies the vendor part number, you need to modify the if-condition as shown on the panel and press F10 (Update). This action updates the extended map and returns you to the Work with Extended Mapping panel (EDIX506-FMT01).
2. Press F12 (Cancel) to return to the Element Mapping Inbound panel (EDIX514).
3. Press F17 (Next Rcd) to advance to the next segment.
EDIX513 Extended Inbound Mapping EDI 03/30/11 FMT01 12:00:00 Segment ID . . . . . . . . . . . . PO1 Transaction ID . . . POMAP4010 Area Code. . . . . . . . . . . . . D Send or Receive. . . R Element Number . . . . . . . . . . 70 Element ID . . . . . 0234 Segment Sequence . . . . . . . . . 7600 Mapping Number . . . . 1 Mapping of Data Element Application Target Field . . . . . F020.ITEMNUM Target Field = Or Value Op Value Op Value Target Field = If PO1/60/7600 EQ 'VN' And/Or Round Element . . #Dec Table ID . . . . . . . . . . . . . Type of Table. . . . DATA Add to Hash Total #. . . . . . . . Length (Minimum) . . 1 Save in Constant # . . . . . . . . Length (Maximum) . . 48 Add 1 to Accumulator # . . . . . . Group Req Cd . . . . User Exit Routine. . . . . . . . . Related. . . . . . . N Mandatory Code . . . . . . . . . . C Type . . . . . . . . AN Element Group. . . . . . . . . . . Type . . . . . . . . Segment Description. . . . . . . . BASELINE ITEM DATA Element Description. . . . . . . . PRODUCT/SERVICE ID F1=Help F2=More/Less F4=Prompt F10=Update F19=Appl F24=More Keys

IBM Sterling Gentran:Server for iSeries Release 3.6 User Guide 121
Step 41: Map the PID Segment
In this panel you will map the item description.
Figure 6.97 Element Mapping Inbound panel (EDIX514) – PID Segment
Select or enter the application field name as shown on the panel. Press F17 (Next Rcd) to update the panel and advance to the next segment.
EDIX514 Element Mapping Inbound 03/30/11 Tran ID. . . . . . . . . . . . . . POMAP4010 S/R. . . . . . . . . R Seg ID . . . . . . . . . . . . . . PID PRODUCT/ITEM DESCRIPTION Seg Seq. . . . . . . . . . . . . . 8600 Mapping Number . . . 0 Area Code. . . . . . . . . . . D Field Op Field/Constant Cond . . . . . . . . . . . . . . . Type option, press Enter. 1=Appl Fields 11=Ext Map 12=Subfield 13=Codes Mapping Ele Sub X M T Ele Ele C Opt Target Field Table ID No. Ele M C P Description Seq ID R 1 M ID ITEM DESCRIPTION TYPE 10 349 2 O ID PRODUCT/PROCESS CHARAC 20 750 3 C ID AGENCY QUALIFIER CODE 30 559 4 C AN PRODUCT DESCRIPTION CO 40 751 Y F020.DESC 5 C AN DESCRIPTION 50 352 Y 6 O ID SURFACE/LAYER/POSITION 60 752 7 O AN SOURCE SUBQUALIFIER 70 822 Y 8 O ID YES/NO CONDITION OR RE 80 1073 Y 9 O ID LANGUAGE CODE 90 819 Y Bottom F1=Help F4=Prompt F10=Update F12=Cancel F19=Apply Global F24=More Keys

122 IBM Sterling Gentran:Server for iSeries Release 3.6 User Guide
Step 42: Complete the Inbound Map
The CTT segment is a control-type segment included in many of the transaction sets. It carries summary control numbers that are used to ensure that all of the line items were included in the document. Since there is no summary application file in the sample purchase order, there is no need to map the CTT segment. However, because we expect to receive a CTT in each transaction set, it must be included in the map. Otherwise, Sterling Gentran:Server would create an error message during processing.
Figure 6.98 Element Mapping Inbound panel (EDIX514) – CTT Segment
In ConclusionAt this point, you have finished creating an inbound map. Press F12 (Cancel) twice to return you to the Work with Transaction Mapping panel (EDIX500-FMT01).
EDIX514 Element Mapping Inbound 03/30/11 Tran ID. . . . . . . . . . . . . . POMAP4010 S/R. . . . . . . . . R Seg ID . . . . . . . . . . . . . . CTT TRANSACTION TOTALS Seg Seq. . . . . . . . . . . . . . 19300 Mapping Number . . . 0 Area Code. . . . . . . . . . . S Field Op Field/Constant Cond . . . . . . . . . . . . . . . Type option, press Enter. 1=Appl Fields 11=Ext Map 12=Subfield 13=Codes Mapping Ele Sub X M T Ele Ele C Opt Target Field Table ID No. Ele M C P Description Seq ID R 1 M N0 NUMBER OF LINE ITEMS 10 354 2 O R HASH TOTAL 20 347 3 C R WEIGHT 30 81 Y 4 C ID UNIT OR BASIS FOR MEAS 40 355 5 C R VOLUME 50 183 Y 6 C ID UNIT OR BASIS FOR MEAS 60 355 7 O AN DESCRIPTION 70 352 Bottom F1=Help F4=Prompt F10=Update F12=Cancel F19=Apply Global F24=More Keys
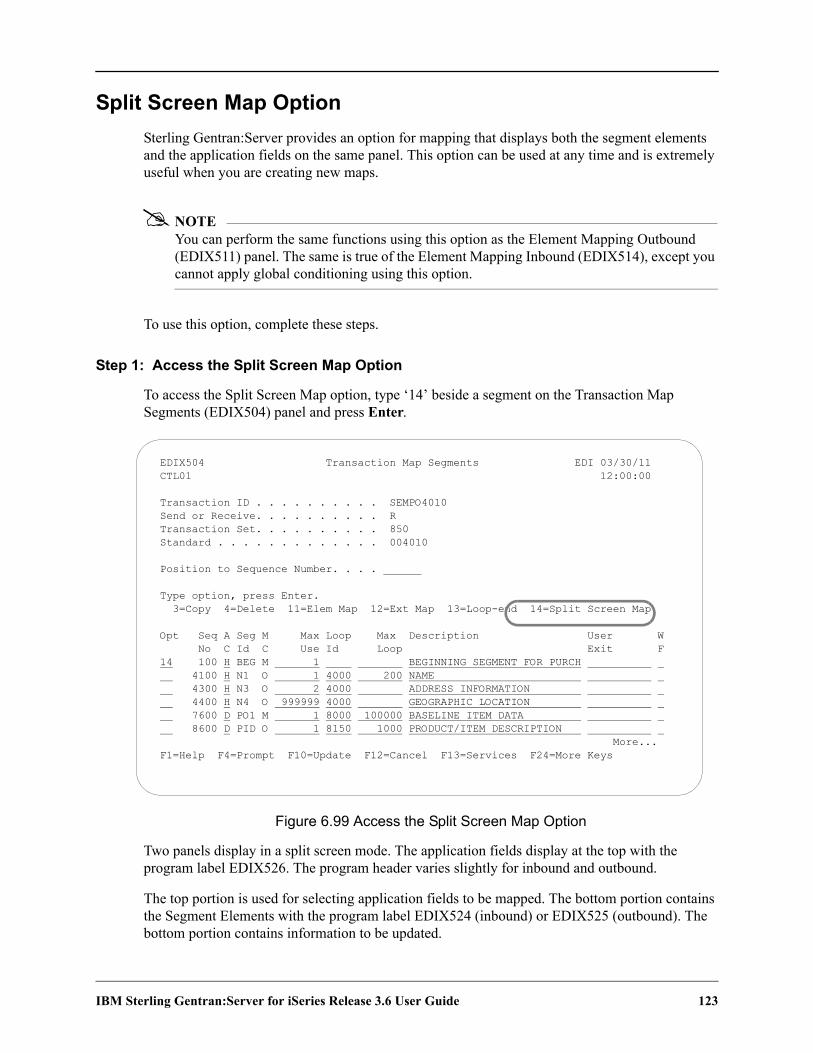
IBM Sterling Gentran:Server for iSeries Release 3.6 User Guide 123
Split Screen Map OptionSterling Gentran:Server provides an option for mapping that displays both the segment elements and the application fields on the same panel. This option can be used at any time and is extremely useful when you are creating new maps.
NOTEYou can perform the same functions using this option as the Element Mapping Outbound (EDIX511) panel. The same is true of the Element Mapping Inbound (EDIX514), except you cannot apply global conditioning using this option.
To use this option, complete these steps.
Step 1: Access the Split Screen Map Option
To access the Split Screen Map option, type ‘14’ beside a segment on the Transaction Map Segments (EDIX504) panel and press Enter.
Figure 6.99 Access the Split Screen Map Option
Two panels display in a split screen mode. The application fields display at the top with the program label EDIX526. The program header varies slightly for inbound and outbound.
The top portion is used for selecting application fields to be mapped. The bottom portion contains the Segment Elements with the program label EDIX524 (inbound) or EDIX525 (outbound). The bottom portion contains information to be updated.
EDIX504 Transaction Map Segments EDI 03/30/11 CTL01 12:00:00 Transaction ID . . . . . . . . . . SEMPO4010 Send or Receive. . . . . . . . . . R Transaction Set. . . . . . . . . . 850 Standard . . . . . . . . . . . . . 004010 Position to Sequence Number. . . . Type option, press Enter. 3=Copy 4=Delete 11=Elem Map 12=Ext Map 13=Loop-end 14=Split Screen Map Opt Seq A Seg M Max Loop Max Description User W No C Id C Use Id Loop Exit F 14 100 H BEG M 1 BEGINNING SEGMENT FOR PURCH 4100 H N1 O 1 4000 200 NAME 4300 H N3 O 2 4000 ADDRESS INFORMATION 4400 H N4 O 999999 4000 GEOGRAPHIC LOCATION 7600 D PO1 M 1 8000 100000 BASELINE ITEM DATA 8600 D PID O 1 8150 1000 PRODUCT/ITEM DESCRIPTION More... F1=Help F4=Prompt F10=Update F12=Cancel F13=Services F24=More Keys

124 IBM Sterling Gentran:Server for iSeries Release 3.6 User Guide
Examples of both inbound and outbound panels are illustrated.
Figure 6.100 Inbound Example
Figure 6.101 Outbound Example
The cursor is positioned in the bottom portion of the display. At this point, the application portion of the screen (top) is protected. The options and functions apply only to the bottom portion of the display.
EDIX526 CTL01 To Application Target Fields 03/30/11 12:00:00 Application: SEMPOAPPL S/R: R 1=Select Opt Rec Type No Field Name Typ Len Cde Description POHEADER 5 F010.CUSTNUM AN 8 M CUSTOMER NUMBER POHEADER 10 F010.PODATE CY 8 M PO DATE YYMD POHEADER 15 F010.PONUM AN 10 M PO NUMBER POHEADER 20 F010.TYPCODE AN 2 M TYPE CODE POHEADER 25 F010.TOTAMT S2 9 M TOT AMT POHEADER 30 F010.SHIPTONAME AN 25 M SHIPTO NAME More... ______________________________________________________________________________ EDIX524 CTL01 From Transaction Element Mapping Map: SEMPO4010 S/R: R 1=Select 11=Ext Map 12=Subfield 13=Codes Seg ID: BEG BEGINNING SEGMENT FOR PURCH Seq. 100 Area: H Opt Target Field Table ID Ele Sub X M Ty Description Seq ID C 1 M ID TRANSACTION SET PURPOS 10 353 F010.TYPCODE 2 M ID PURCHASE ORDER TYPE CO 20 92 F010.PONUM 3 M AN PURCHASE ORDER NUMBER 30 324 4 O AN RELEASE NUMBER 40 328 F010.PODATE 5 M DT DATE 50 373 6 O AN CONTRACT NUMBER 60 367 More... F1=Help F10=Update F12=Cancel F16=Prev Rcd F17=Next Rcd F24=More Keys
EDIX526 CTL01 From Application Fields 03/30/11 12:00:00 Application: INVOUTPEDI S/R: S 1=Select Opt Rec Type No Field Name Typ Len Cde Description WPEINVHDR 5 F010.IHB2# AN 9 M BILLTO ACCT# WPEINVHDR 10 F010.IHINV# AN 10 M INVOICE # WPEINVHDR 15 F010.IHCRDB AN 1 M CREDIT/DEBIT FLAG:C OR BLANK WPEINVHDR 20 F010.IHINDT CY 8 M INVOICE DATE YYMD WPEINVHDR 25 F010.IHPO# AN 20 M PURCHASE ORDER # WPEINVHDR 30 F010.IHPODT CY 8 M PO DATE YYMD More... ______________________________________________________________________________ EDIX525 CTL01 To Transaction Element Mapping Map: 810S41EDI S/R: S 1=Select 11=Ext Map 12=Subfield 13=Codes Seg ID: BIG BEGINNING SEGMENT FOR INVOI Seq. 100 Area: H Opt Target Field Table ID Ele Sub X M Ty Description Seq ID C F010.IHINDT 1 M DT DATE 10 373 F010.IHINV# 2 M AN INVOICE NUMBER 20 76 F010.IHPODT 3 O DT DATE 30 373 F010.IHPO# 4 O AN PURCHASE ORDER NUMBER 40 324 5 O AN RELEASE NUMBER 50 328 6 O AN CHANGE ORDER SEQUENCE 60 327 More... F1=Help F10=Update F12=Cancel F16=Prev Rcd F17=Next Rcd F24=More Keys

IBM Sterling Gentran:Server for iSeries Release 3.6 User Guide 125
Step 2: Map an Application Field to an Element
To map an application field to the element, type ‘1’ next to the element you want to map and press Enter.
Figure 6.102 Map an application field (Outbound)
Control is now transferred to the application portion of the display. The function keys change and the bottom portion of the panel is protected.
EDIX526 CTL01 From Application Fields 03/30/11 12:00:00 Application: INVOUTPEDI S/R: S 1=Select Opt Rec Type No Field Name Typ Len Cde Description WPEINVHDR 5 F010.IHB2# AN 9 M BILLTO ACCT# WPEINVHDR 10 F010.IHINV# AN 10 M INVOICE # WPEINVHDR 15 F010.IHCRDB AN 1 M CREDIT/DEBIT FLAG:C OR BLANK WPEINVHDR 20 F010.IHINDT CY 8 M INVOICE DATE YYMD WPEINVHDR 25 F010.IHPO# AN 20 M PURCHASE ORDER # WPEINVHDR 30 F010.IHPODT CY 8 M PO DATE YYMD More... ______________________________________________________________________________ EDIX525 CTL01 To Transaction Element Mapping Map: 810S41EDI S/R: S 1=Select 11=Ext Map 12=Subfield 13=Codes Seg ID: BIG BEGINNING SEGMENT FOR INVOI Seq. 100 Area: H Opt Target Field Table ID Ele Sub X M Ty Description Seq ID C 1 F010.IHINDT 1 M DT DATE 10 373 F010.IHINV# 2 M AN INVOICE NUMBER 20 76 F010.IHPODT 3 O DT DATE 30 373 F010.IHPO# 4 O AN PURCHASE ORDER NUMBER 40 324 5 O AN RELEASE NUMBER 50 328 6 O AN CHANGE ORDER SEQUENCE 60 327 More... F1=Help F10=Update F12=Cancel F16=Prev Rcd F17=Next Rcd F24=More Keys
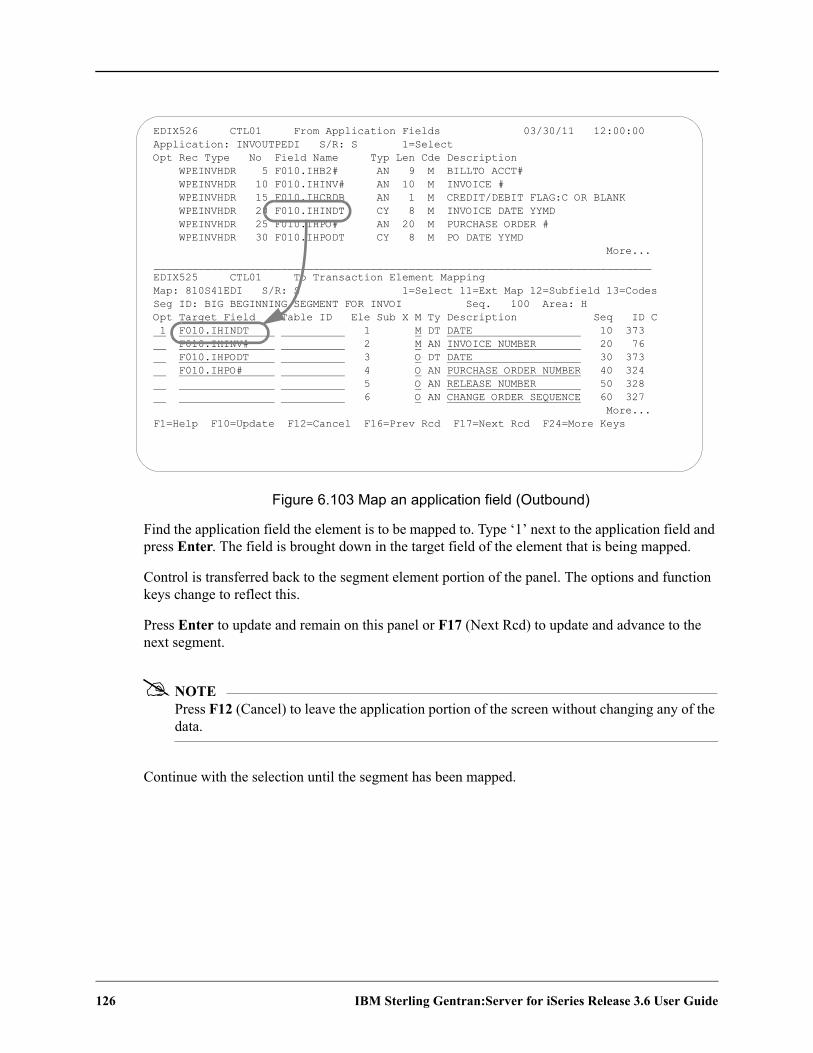
126 IBM Sterling Gentran:Server for iSeries Release 3.6 User Guide
Figure 6.103 Map an application field (Outbound)
Find the application field the element is to be mapped to. Type ‘1’ next to the application field and press Enter. The field is brought down in the target field of the element that is being mapped.
Control is transferred back to the segment element portion of the panel. The options and function keys change to reflect this.
Press Enter to update and remain on this panel or F17 (Next Rcd) to update and advance to the next segment.
NOTEPress F12 (Cancel) to leave the application portion of the screen without changing any of the data.
Continue with the selection until the segment has been mapped.
EDIX526 CTL01 From Application Fields 03/30/11 12:00:00 Application: INVOUTPEDI S/R: S 1=Select Opt Rec Type No Field Name Typ Len Cde Description WPEINVHDR 5 F010.IHB2# AN 9 M BILLTO ACCT# WPEINVHDR 10 F010.IHINV# AN 10 M INVOICE # WPEINVHDR 15 F010.IHCRDB AN 1 M CREDIT/DEBIT FLAG:C OR BLANK WPEINVHDR 20 F010.IHINDT CY 8 M INVOICE DATE YYMD WPEINVHDR 25 F010.IHPO# AN 20 M PURCHASE ORDER # WPEINVHDR 30 F010.IHPODT CY 8 M PO DATE YYMD More... ______________________________________________________________________________ EDIX525 CTL01 To Transaction Element Mapping Map: 810S41EDI S/R: S 1=Select 11=Ext Map 12=Subfield 13=Codes Seg ID: BIG BEGINNING SEGMENT FOR INVOI Seq. 100 Area: H Opt Target Field Table ID Ele Sub X M Ty Description Seq ID C 1 F010.IHINDT 1 M DT DATE 10 373 F010.IHINV# 2 M AN INVOICE NUMBER 20 76 F010.IHPODT 3 O DT DATE 30 373 F010.IHPO# 4 O AN PURCHASE ORDER NUMBER 40 324 5 O AN RELEASE NUMBER 50 328 6 O AN CHANGE ORDER SEQUENCE 60 327 More... F1=Help F10=Update F12=Cancel F16=Prev Rcd F17=Next Rcd F24=More Keys
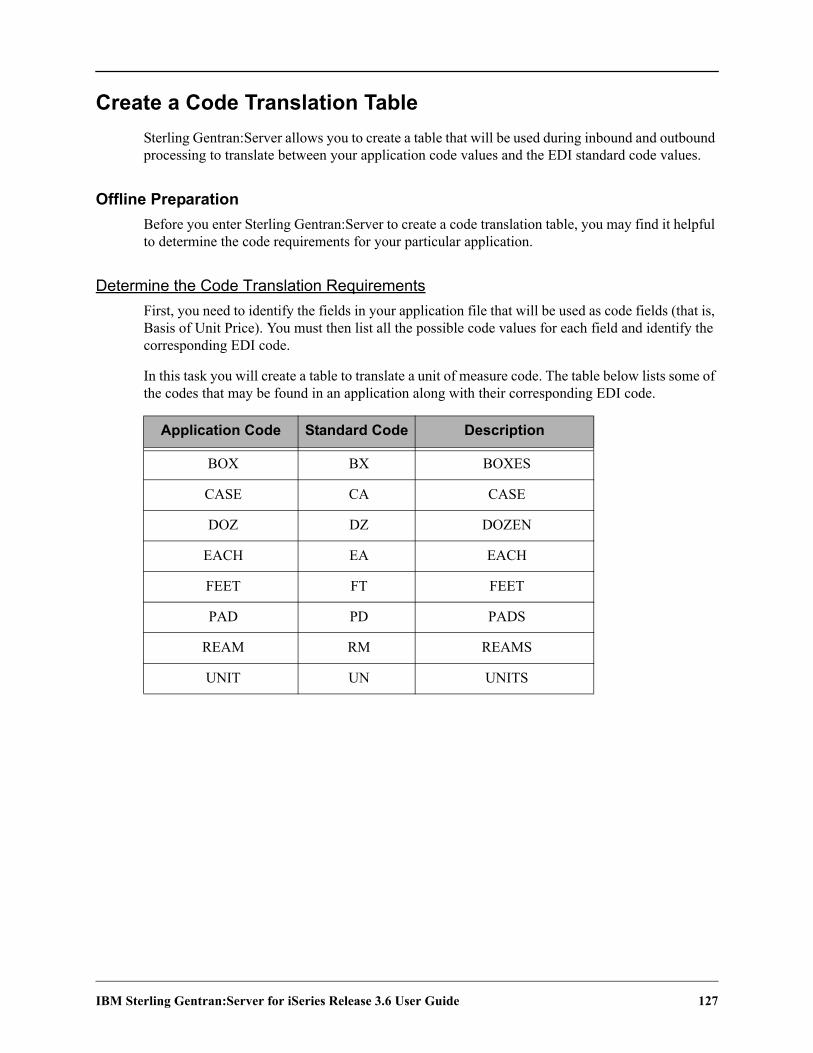
IBM Sterling Gentran:Server for iSeries Release 3.6 User Guide 127
Create a Code Translation TableSterling Gentran:Server allows you to create a table that will be used during inbound and outbound processing to translate between your application code values and the EDI standard code values.
Offline PreparationBefore you enter Sterling Gentran:Server to create a code translation table, you may find it helpful to determine the code requirements for your particular application.
Determine the Code Translation RequirementsFirst, you need to identify the fields in your application file that will be used as code fields (that is, Basis of Unit Price). You must then list all the possible code values for each field and identify the corresponding EDI code.
In this task you will create a table to translate a unit of measure code. The table below lists some of the codes that may be found in an application along with their corresponding EDI code.
Application Code Standard Code Description
BOX BX BOXES
CASE CA CASE
DOZ DZ DOZEN
EACH EA EACH
FEET FT FEET
PAD PD PADS
REAM RM REAMS
UNIT UN UNITS

128 IBM Sterling Gentran:Server for iSeries Release 3.6 User Guide
Step 1: Access the Work with Tables Panel
The first step in creating a code translation table is to access the Work with Transaction Mapping panel (EDIX500-FMT01).
Figure 6.104 Work with Transaction Mapping panel (EDIX500-FMT01)
Type ‘13’ (Tables) in the Option field on the key entry line and press Enter. This action displays the Work with Tables panel (EDIX580-FMT01). Tables are independent of the maps, so it does not matter if option 13 is specified on the key entry line or beside a map.
EDIX500 Work with Transaction Mapping EDI 03/30/11 FMT01 pgmlib: G3X6PGM dtalib: G3X6DTA 12:00:00 Position to Transaction ID . . . . S/R Type option (and Information), press Enter. 12=Copy Segments 13=Tables 14=Sub-Split 15=Ext Map 30=Copy Tran ID Opt Tran ID S/R Appl ID Description User Typ 13 ANSI2040IN R INVFILE ANSI 002040 INBOUND INVOICES CSG G ANSI2040PO S POFILE ANSI 002040 OUTBOUND POS CSG G INVOIC S INVOIC Edifact OB Invoice D:94B SEC P INVOICOUT S INVOICOUT Tutorial EDIFACT Invoice D:94B CB P ORDERS R ORDERS Edifact Inb Orders D:94B CSG P ORDERSINB R ORDERSINB Tutorial ORDERS Inbound D:94B CB G POMAP4010 R SEMPOAPPL Purchase Order Inbound 004010 EDI P SEMINMAP1 S SEMINAPPL SEMINAR 810 OUTBOUND MAP 2040 CSG P SEMPO4010 R SEMPOAPPL Purch. Order Inb. 004010 EDI P More... Parameters or command ===> F1=Help F3=Exit F12=Cancel F15=Sort F23=More Options F24=More Keys

IBM Sterling Gentran:Server for iSeries Release 3.6 User Guide 129
Step 2: Determine the Code Translation ID
This panel provides you with the option for creating a new Table ID. You may make the Table ID unique by using any value you like.
Figure 6.105 Work with Tables panel (EDIX580-FMT01)
To create a table for the Unit of Measure code ‘UNITMEAS1,’ follow these steps:
1. Type ‘1’ in the Option field on the key entry line.
2. Type ‘UNITMEAS1’ in the Table ID field and ‘C’ (for a code type table) in the Type field on the key entry line and press Enter. This action displays the Define Translation Table panel (EDIX581-FMT01) where you will define the characteristics of the Unit of Measure table.
EDIX580 Work with Tables EDI 03/30/11 FMT01 pgmlib: G3X6PGM dtalib: G3X6DTA 12:00:00 Position to Table ID . . . . . . . Type option (and Information), press Enter. 1=Create 2=Revise 3=Copy 4=Delete 5=View 6=Print 11=Copy Std Codes Opt Table ID Type Description Partner ID 1 UNITMEAS1 C SEMCODE C UNIT OF MEASURE TABLE SEMDATA D ITEM NUMBER TRANSLATION TABLE SEMDATA D ITEM NUMBER TRANSLATION TABLE C13579 SEMDATA D ITEM NUMBER TRANSLATION TABLE C24680 SEMVALID V TRANSACTION TYPE CODE TABLE STOCKCODE C CONVERT STOCK CODES UOM6411 C Unit of Measure Edifact(elem# 6411) VATCODE C VAT Code Bottom Parameters or command ===> F1=Help F3=Exit F12=Cancel F15=Sort F23=More Options F24=More Keys

130 IBM Sterling Gentran:Server for iSeries Release 3.6 User Guide
Step 3: Create the Code Translation Table
In this step, you will create a Code Translation table for the Unit of Measure code example.
Figure 6.106 Define Translation Table panel (EDIX581-FMT01)
Identify the standard element and application field information as shown on the above panel. Press F10 (Update) to create the table. The system retrieves the values for the Standard Minimum and Standard Maximum Length fields based on the values in the Standard Version and Standard Element Reference fields.
NOTEThe version entered does not mean it is only for the version specified. This table may be used for other versions of the standard if the characteristics of the element have not changed.
EDIX581 Define Translation Table EDI 03/30/11 FMT01 12:00:00 Table ID . . . . . . . . . . . . . UNITMEAS1 Partner ID . . . . . . . . . . . . Partner Qualifier. . . . . . . . . Division Code. . . . . . . . . . . 000 Type . . . . . . . . . . . . . . . C Description. . . . . . . . . . . . Internal t EDI UOM (tutorial 1) Standard Version . . . . . . . . . 004010 Standard Element Ref . . . . . . . 0355 Release. . . . . . . . . . . . . . Standard Minimum Length. . . . . . Standard Maximum Length. . . . . . Standard Data Type . . . . . . . . Application Minimum Length . . . . 1 Application Maximum Length . . . . 4 Application Data Type. . . . . . . AN Update Allowed . . . . . . . . . . Y F1=Help F4=Prompt F10=Update F12=Cancel F19=Table F21=Prt Table
IBM Sterling Gentran:Server for iSeries Release 3.6 User Guide 131
Field DescriptionsDescription
This required field is used to describe the Code Translation table. Your description displays on the Work with Tables panel (EDIX580-FMT01).
Standard VersionThis required field reflects the full version code as known in the standards. (SEE the “Standards” chapter for more information on available versions.)
Standard Element Ref(erence)This required field identifies the Element reference number as defined by your standards. Type in the Element Reference Number of the Element to translate.
Release (Number)The Release code is only used for ‘TRADACOMS.’ Leave this field BLANK except for ‘TRADACOMS,’ which is ‘0.’
Standard Data TypeThis field identifies the data element type as defined by the standards. (SEE the EDI Data Types in the Glossary for a listing of Data Types.)
Application Minimum LengthThis field displays the minimum length of the application field to be translated.
Application Maximum LengthThis field displays the maximum length of the application field to be translated.
Application Data TypeThis field identifies the application data type valid values. (SEE the “Application Data Types” section in the Glossary for a listing of data types.)
Update AllowedThis field defines whether or not the translation table may be updated. Type ‘Y’ (Yes) to indicate that this table can be modified by the user. When moving the Translation tables into production, you may want to set this flag to ‘N’ (No) to prevent modifications from being made without the proper authority.

132 IBM Sterling Gentran:Server for iSeries Release 3.6 User Guide
Step 4: Access the Code Translation Table
The next step is to access the Code Translation panel to begin entering application and standard code values.
Figure 6.107 Work with Tables panel (EDIX580-FMT01)
Type ‘12’ in the Option field next to Table ID ‘UNITMEAS1’ and press Enter.
EDIX580 Work with Tables EDI 03/30/11 FMT01 pgmlib: G3X6PGM dtalib: G3X6DTA 12:00:00 Position to Table ID . . . . . . . UNITMEAS1 Type option (and Information), press Enter. 12=Table 30=Copy Code/Data Opt Table ID Type Description Partner ID 12 UNITMEAS1 C Internal t EDI UOM (tutorial 1) UOM6411 C Unit of Measure Edifact(elem# 6411) VATCODE C VAT Code Bottom Parameters or command ===> F1=Help F3=Exit F12=Cancel F15=Sort F23=More Options F24=More Keys
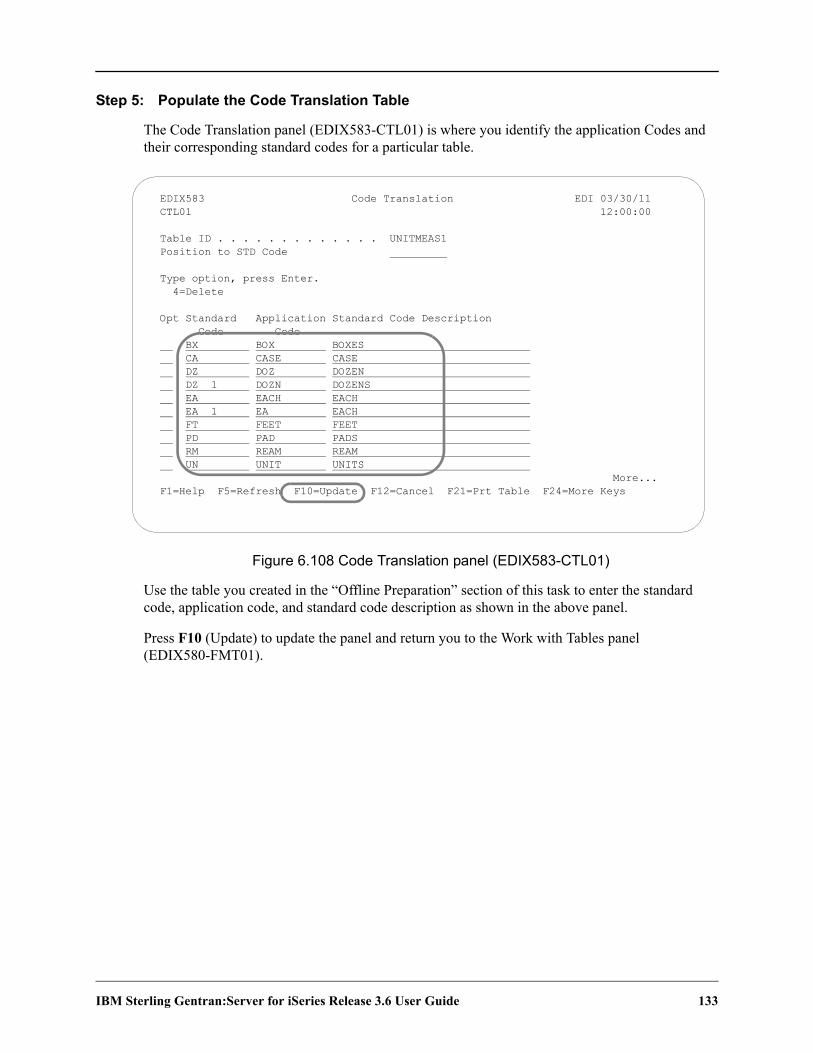
IBM Sterling Gentran:Server for iSeries Release 3.6 User Guide 133
Step 5: Populate the Code Translation Table
The Code Translation panel (EDIX583-CTL01) is where you identify the application Codes and their corresponding standard codes for a particular table.
Figure 6.108 Code Translation panel (EDIX583-CTL01)
Use the table you created in the “Offline Preparation” section of this task to enter the standard code, application code, and standard code description as shown in the above panel.
Press F10 (Update) to update the panel and return you to the Work with Tables panel (EDIX580-FMT01).
EDIX583 Code Translation EDI 03/30/11 CTL01 12:00:00 Table ID . . . . . . . . . . . . . UNITMEAS1 Position to STD Code Type option, press Enter. 4=Delete Opt Standard Application Standard Code Description Code Code BX BOX BOXES CA CASE CASE DZ DOZ DOZEN DZ 1 DOZN DOZENS EA EACH EACH EA 1 EA EACH FT FEET FEET PD PAD PADS RM REAM REAM UN UNIT UNITS More... F1=Help F5=Refresh F10=Update F12=Cancel F21=Prt Table F24=More Keys

134 IBM Sterling Gentran:Server for iSeries Release 3.6 User Guide
Create a Data Translation TableSterling Gentran:Server allows you to create a table that will be used during inbound and outbound processing to translate between your application data values and your trading partner’s data values.
Offline PreparationBefore you enter Sterling Gentran:Server to create a Data Translation table, you may find it helpful to determine the Translation Data requirements.
Determine the Data Translation RequirementsIt may be necessary to convert some of your application data to data that is recognized by your trading partner. For example, you may be required to send DUNS numbers to identify yourself and each of your vendors. Your DUNS number is no problem since you know what it is and you can “hard-code” it on every document that you send. The only reference you may have for a vendor is your internal vendor number. To solve this problem, you must establish a Data Translation table that relates your internal vendor number to the vendor’s DUNS number. The relationship is shown in the table below.
DUNS Number Internal Name Description
121212121 VENDOR-1 ABC COMPUTER STORE
333333333 VENDOR-2 BULK PAPER COMPANY
999999999 VENDOR-3 TWO-WAY COMM., INC.
012345678 VENDOR-4 RANDOM OFFICE SUPPLY
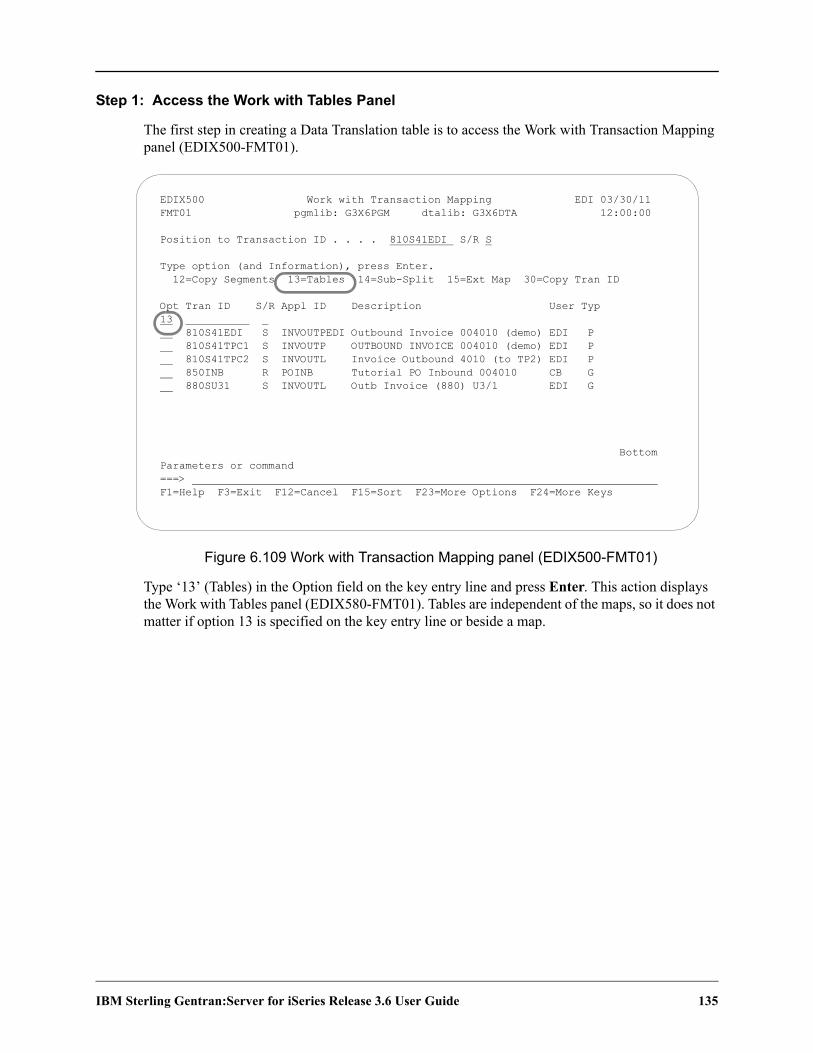
IBM Sterling Gentran:Server for iSeries Release 3.6 User Guide 135
Step 1: Access the Work with Tables Panel
The first step in creating a Data Translation table is to access the Work with Transaction Mapping panel (EDIX500-FMT01).
Figure 6.109 Work with Transaction Mapping panel (EDIX500-FMT01)
Type ‘13’ (Tables) in the Option field on the key entry line and press Enter. This action displays the Work with Tables panel (EDIX580-FMT01). Tables are independent of the maps, so it does not matter if option 13 is specified on the key entry line or beside a map.
EDIX500 Work with Transaction Mapping EDI 03/30/11 FMT01 pgmlib: G3X6PGM dtalib: G3X6DTA 12:00:00 Position to Transaction ID . . . . 810S41EDI S/R S Type option (and Information), press Enter. 12=Copy Segments 13=Tables 14=Sub-Split 15=Ext Map 30=Copy Tran ID Opt Tran ID S/R Appl ID Description User Typ 13 810S41EDI S INVOUTPEDI Outbound Invoice 004010 (demo) EDI P 810S41TPC1 S INVOUTP OUTBOUND INVOICE 004010 (demo) EDI P 810S41TPC2 S INVOUTL Invoice Outbound 4010 (to TP2) EDI P 850INB R POINB Tutorial PO Inbound 004010 CB G 880SU31 S INVOUTL Outb Invoice (880) U3/1 EDI G Bottom Parameters or command ===> F1=Help F3=Exit F12=Cancel F15=Sort F23=More Options F24=More Keys

136 IBM Sterling Gentran:Server for iSeries Release 3.6 User Guide
Step 2: Determine the Data Translation ID
This panel provides you with the option for creating a new Data Translation ID. You may make the Table ID unique by using any value you like.
Figure 6.110 Work with Tables panel (EDIX580-FMT01)
To create a new DUNS table to convert your DUNS number, Follow these instructions:
1. Type ‘1’ in the Option field and ‘DUNS1’ in the Table ID field on the key entry line.
2. Type ‘D’ in the Type field to indicate this is a Data Translation table and press Enter. This action displays the Define Translation Table panel (EDIX581-FMT00).
EDIX580 Work with Tables EDI 03/30/11 FMT01 pgmlib: G3X6PGM dtalib: G3X6DTA 12:00:00 Position to Table ID . . . . . . . Type option (and Information), press Enter. 1=Create 2=Revise 3=Copy 4=Delete 5=View 6=Print 11=Copy Std Codes Opt Table ID Type Description Partner ID 1 DUNS1 D ANACONVERT D CONVERT WAREHOUSE TO ANA NUMBERS DUNS D INTERNAL VENDOR TO DUNS CONVERSION REMIT V REMITTANCE TYPE NAME QUALIFIER SEMCODE C UNIT OF MEASURE TABLE SEMDATA D ITEM NUMBER TRANSLATION TABLE SEMDATA D ITEM NUMBER TRANSLATION TABLE C13579 SEMDATA D ITEM NUMBER TRANSLATION TABLE C24680 SEMVALID V TRANSACTION TYPE CODE TABLE STOCKCODE C CONVERT STOCK CODES More... Parameters or command ===> F1=Help F3=Exit F12=Cancel F15=Sort F23=More Options F24=More Keys
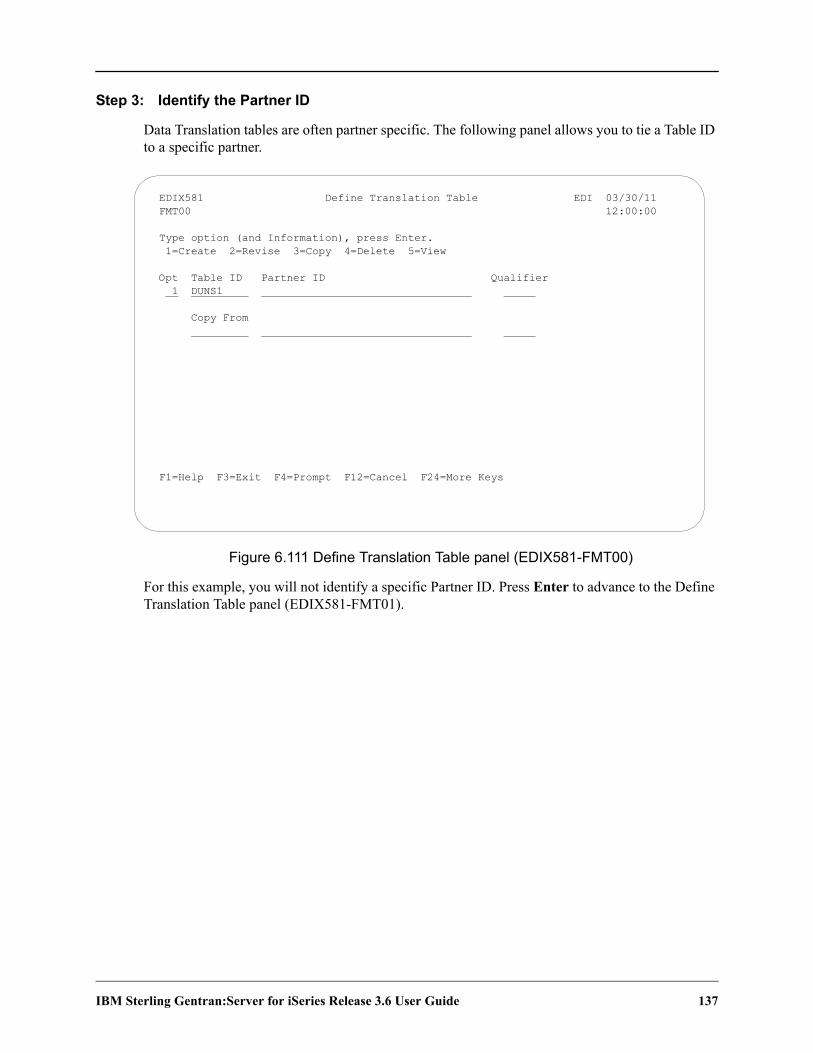
IBM Sterling Gentran:Server for iSeries Release 3.6 User Guide 137
Step 3: Identify the Partner ID
Data Translation tables are often partner specific. The following panel allows you to tie a Table ID to a specific partner.
Figure 6.111 Define Translation Table panel (EDIX581-FMT00)
For this example, you will not identify a specific Partner ID. Press Enter to advance to the Define Translation Table panel (EDIX581-FMT01).
EDIX581 Define Translation Table EDI 03/30/11 FMT00 12:00:00
Type option (and Information), press Enter. 1=Create 2=Revise 3=Copy 4=Delete 5=View
Opt Table ID Partner ID Qualifier 1 DUNS1
Copy From
F1=Help F3=Exit F4=Prompt F12=Cancel F24=More Keys
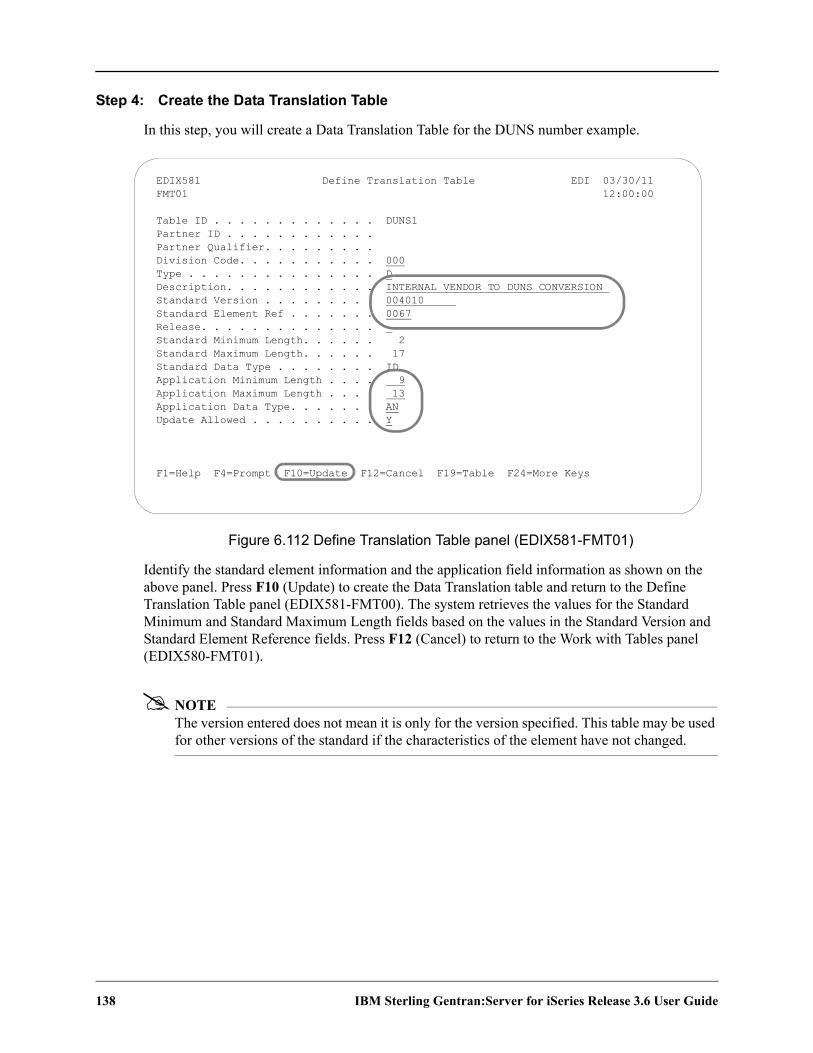
138 IBM Sterling Gentran:Server for iSeries Release 3.6 User Guide
Step 4: Create the Data Translation Table
In this step, you will create a Data Translation Table for the DUNS number example.
Figure 6.112 Define Translation Table panel (EDIX581-FMT01)
Identify the standard element information and the application field information as shown on the above panel. Press F10 (Update) to create the Data Translation table and return to the Define Translation Table panel (EDIX581-FMT00). The system retrieves the values for the Standard Minimum and Standard Maximum Length fields based on the values in the Standard Version and Standard Element Reference fields. Press F12 (Cancel) to return to the Work with Tables panel (EDIX580-FMT01).
NOTEThe version entered does not mean it is only for the version specified. This table may be used for other versions of the standard if the characteristics of the element have not changed.
EDIX581 Define Translation Table EDI 03/30/11 FMT01 12:00:00
Table ID . . . . . . . . . . . . . DUNS1 Partner ID . . . . . . . . . . . . Partner Qualifier. . . . . . . . . Division Code. . . . . . . . . . . 000 Type . . . . . . . . . . . . . . . D Description. . . . . . . . . . . . INTERNAL VENDOR TO DUNS CONVERSION Standard Version . . . . . . . . . 004010 Standard Element Ref . . . . . . . 0067 Release. . . . . . . . . . . . . . Standard Minimum Length. . . . . . 2 Standard Maximum Length. . . . . . 17 Standard Data Type . . . . . . . . ID Application Minimum Length . . . . 9 Application Maximum Length . . . . 13 Application Data Type. . . . . . . AN Update Allowed . . . . . . . . . . Y
F1=Help F4=Prompt F10=Update F12=Cancel F19=Table F24=More Keys
IBM Sterling Gentran:Server for iSeries Release 3.6 User Guide 139
Field DescriptionsDescription
This required field is used to describe the Data Translation table. Your description displays on the Work with Tables panel (EDIX580-FMT01).
Standard VersionThis required field reflects the full version code as known in the standards. (SEE the “Standards” chapter for more information on available versions.)
Standard Element Ref(erence)This required field identifies the Element reference number as defined by your standards. Type in the Element Reference Number of the Element to translate.
Release (Number)The Release code is only used for ‘TRADACOMS.’ Leave this field BLANK except for TRADACOMS, which is ‘0.’
Standard Data TypeThis field identifies the data element type as defined by the standards. (SEE the EDI Data Types in the Glossary for a listing of Data Types.)
Application Minimum LengthThis field displays the minimum length of the application field to be translated.
Application Maximum LengthThis field displays the maximum length of the application field to be translated.
Application Data TypeThis field identifies the application data type valid values. (SEE the “Application Data Types” section in the Glossary for a listing of data types.)
Update AllowedThis field defines whether or not the translation table may be updated. Type ‘Y’ (Yes) to indicate that this table can be modified by the user. When moving the Translation tables into production, you may want to set this flag to ‘N’ (No) to prevent modifications from being made without the proper authority.

140 IBM Sterling Gentran:Server for iSeries Release 3.6 User Guide
Step 5: Access the Data Translation Table
The next step is to access the Data By Partner Translation panel (EDIX584-CTL01) to begin entering the data values.
Figure 6.113 Work with Tables panel (EDIX580-FMT01)
To access the Data Translation by Partner panel, type ‘12’ (Tables) in the Option field next to the ‘DUNS1’ Table ID and press Enter.
EDIX580 Work with Tables EDI 03/30/11 FMT01 pgmlib: G3X6PGM dtalib: G3X6DTA 12:00:00 Position to Table ID . . . . . . . Type option (and Information), press Enter. 12=Table 30=Copy Code/Data Opt Table ID Type Description Partner ID 12 DUNS1 D INTERNAL VENDOR TO DUNS CONVERSION REMIT V REMITTANCE TYPE NAME QUALIFIER SEMCODE C UNIT OF MEASURE TABLE SEMDATA D ITEM NUMBER TRANSLATION TABLE SEMDATA D ITEM NUMBER TRANSLATION TABLE C13579 SEMDATA D ITEM NUMBER TRANSLATION TABLE C24680 SEMVALID V TRANSACTION TYPE CODE TABLE STOCKCODE C CONVERT STOCK CODES UNITMEAS C Internal to EDI unit of measure More... Parameters or command ===> F1=Help F3=Exit F12=Cancel F15=Sort F23=More Options F24=More Keys

IBM Sterling Gentran:Server for iSeries Release 3.6 User Guide 141
Step 6: Populate the Data Translation Table
Your application Data Translation By Partner panel (EDIX584-CTL01) is where you identify your partner’s data values and your data values.
Figure 6.114 Data Translation By Partner panel (EDIX584-CTL01)
Use the table you created in the “Offline Preparation” section of this task to enter the partner data value, your application code, and description as shown in the above panel.
Press F10 (Update) to update the panel and return you to the Work with Tables panel (EDIX580-FMT01).
EDIX584 Data Translation By Partner EDI 03/30/11 CTL01 12:00:00 Translation Table ID . . . . . . . DUNS1 Trading Partner ID . . . . . . . . Trading Partner Qualifier. . . . . Position to Your Data Value. . . . Type option, press Enter. 4=Delete Opt Partner Data Value Your Data Value Description 121212121 VENDOR-1 ABC COMPUTER STORE 333333333 VENDOR-2 BULK PAPER COMPANY 999999999 VENDOR-3 TWO-WAY COMMUNICATIONS INC. 012345678 VENDOR-4 RANDOM OFFICE SUPPLY More... F1=Help F5=Refresh F10=Update F12=Cancel F21=Prt Table F24=More Keys

142 IBM Sterling Gentran:Server for iSeries Release 3.6 User Guide
Create a Data Validation TableSterling Gentran:Server allows you to create a table that will be used during inbound and outbound processing to validate data.
Offline PreparationBefore you enter Sterling Gentran:Server to create a Data Validation table, you may find it helpful to determine what data needs to be validated.
Determine the Data Validation RequirementsFirst, you must identify the EDI elements that will require validation. You must then list all the data values for each element.
During this task, you will create a validation table for the remittance type qualifier. The following table lists the valid data values for the remittance type code.
Data Value Description
RE PARTY TO RECEIVE INVOICE REMITTANCE
RH PAYEE’S FINANCIAL INSTITUTION
SE SELLING PARTY

IBM Sterling Gentran:Server for iSeries Release 3.6 User Guide 143
Step 1: Access the Work with Tables Panel
The first step in creating a Data Validation table is to access the Work with Transaction Mapping panel (EDIX500-FMT01).
Figure 6.115 Work with Transaction Mapping panel (EDIX500-FMT01)
Type ‘13’ (Tables) in the Option field on the key entry line and press Enter. This action displays the Work with Tables panel (EDIX580-FMT01). Tables are independent of the maps, so it does not matter if option 13 is specified on the key entry line or beside a map.
EDIX500 Work with Transaction Mapping EDI 03/30/11 FMT01 pgmlib: G3X6PGM dtalib: G3X6DTA 12:00:00
Position to Transaction ID . . . . S/R
Type option (and Information), press Enter. 12=Copy Segments 13=Tables 14=Sub-Split 15=Ext Map 30=Copy Tran ID
Opt Tran ID S/R Appl ID Description User Typ 13 ANSI4010IN R INVFILE ANSI 004010 INBOUND INVOICES EDI G ANSI4010PO S POFILE ANSI 004010 OUTBOUND POS EDI G SEMINMAP1 S SEMINAPPL SEMINAR 810 OUTBOUND MAP 4010 EDI P SEMPOMAPYS R SEMPOAPPL test EDI P SEMPOMAP1 R SEMPOAPPL SEMINAR PO GENERAL MAP 4010 EDI P SEMPOMAP10 R SEMPOAPPL Tutorial Map: Inbound PO 4010 EDI P 810S41EDI S INVOUTL RT EDI P 810S41TPC1 S INVOUTP OUTBOUND INVOICE 004010 TO TP1 EDI P More...
Parameters or command ===> F1=Help F3=Exit F12=Cancel F15=Sort F23=More Options F24=More Keys
144 IBM Sterling Gentran:Server for iSeries Release 3.6 User Guide
Step 2: Determine the Data Validation ID
The following panel identifies the creation of the Data Validation table on the Work with Tables panel (EDIX580-FMT01).
Figure 6.116 Work with Tables panel (EDIX580-FMT01)
To create a Data Validation table, complete the following:
1. Type ‘1’ in the Option field and ‘REMIT1’ in the Table ID field on the key entry line.
2. Type ‘V’ for Validation in the Data Type field and press Enter. This action displays the Define Translation Table panel (EDIX581-FMT01) where the validation characteristics will be defined.
EDIX580 Work with Tables EDI 03/30/11 FMT01 pgmlib: G3X6PGM dtalib: G3X6DTA 12:00:00 Position to Table ID . . . . . . . Type option (and Information), press Enter. 1=Create 2=Revise 3=Copy 4=Delete 5=View 6=Print 11=Copy Std Codes Opt Table ID Type Description Partner ID 1 REMIT1 V ANACONVERT D CONVERT WAREHOUSE TO ANA NUMBERS DUNS D INTERNAL VENDOR TO DUNS CONVERSION DUNS1 D INTERNAL VENDOR TO DUNS CONVERSION REMIT V REMITTANCE TYPE NAME QUALIFIER SEMCODE C UNIT OF MEASURE TABLE SEMDATA D ITEM NUMBER TRANSLATION TABLE SEMDATA D ITEM NUMBER TRANSLATION TABLE C13579 SEMDATA D ITEM NUMBER TRANSLATION TABLE C24680 SEMVALID V TRANSACTION TYPE CODE TABLE More... Parameters or command ===> F1=Help F3=Exit F12=Cancel F15=Sort F23=More Options F24=More Keys

IBM Sterling Gentran:Server for iSeries Release 3.6 User Guide 145
Step 3: Create the Data Validation Table
Identify the standard element information and the application field information on the Define Translation Table panel (EDIX581-FMT01).
Figure 6.117 Define Translation Table panel (EDIX581-FMT01)
Type the information as shown on the above panel and press F10 (Update) to create the table. The system retrieves the values for the Standard Minimum and Standard Maximum Length fields based on the values in the Standard Version and Standard Element Reference fields.
NOTEThe version entered does not mean it is only for the version specified. This table may be used for other versions of the standard if the characteristics of the element have not changed.
EDIX581 Define Translation Table EDI 03/30/11 FMT01 12:00:00
Table ID . . . . . . . . . . . . . REMIT1 Partner ID . . . . . . . . . . . . Partner Qualifier. . . . . . . . . Division Code. . . . . . . . . . . 000 Type . . . . . . . . . . . . . . . V Description. . . . . . . . . . . . REMITTANCE TYPE NAME QUALIFIER Standard Version . . . . . . . . . 004010 Standard Element Ref . . . . . . . 0098 Release. . . . . . . . . . . . . . Standard Minimum Length. . . . . . 2 Standard Maximum Length. . . . . . 3 Standard Data Type . . . . . . . . ID Application Minimum Length . . . . 2 Application Maximum Length . . . . 2 Application Data Type. . . . . . . AN Update Allowed . . . . . . . . . . Y F1=Help F4=Prompt F10=Update F12=Cancel F19=Table F24=More Keys

146 IBM Sterling Gentran:Server for iSeries Release 3.6 User Guide
Field DescriptionsDescription
This required field is used to describe the Validation table. Your description displays on the Work with Tables panel (EDIX580-FMT01).
Standard VersionThis required field reflects the full version code as known in the standards. (SEE the “Standards” chapter for more information on available versions.)
Standard Element Ref(erence)This required field identifies the Element reference number as defined by your standards. Type in the Element Reference Number of the Element to translate.
Release (Number)The Release code is only used for ‘TRADACOMS.’ Leave this field BLANK except for ‘TRADACOMS,’ which is ‘0.’
Standard Data TypeThis field identifies the data element type as defined by the standards. (SEE the EDI Data Types in the Glossary for a listing of Data Types.)
Application Minimum LengthThis field displays the minimum length of the application field to be translated.
Application Maximum LengthThis field displays the maximum length of the application field to be translated.
Application Data TypeThis field identifies the application data type valid values. (SEE the “Application Data Types” section in the Glossary for a listing of data types.)
Update AllowedThis field defines whether or not the translation table may be updated. Type ‘Y’ (Yes) to indicate that this table can be modified by the user. When moving the Translation tables into production, you may want to set this flag to ‘N’ (No) to prevent modifications from being made without the proper authority.
IBM Sterling Gentran:Server for iSeries Release 3.6 User Guide 147
Step 4: Access the Data Validation Table
The next step is to access the Data Validation panel (EDIX585-FMT01) to begin entering the Data Validation fields.
Figure 6.118 Work with Tables panel (EDIX580-FMT01)
Type ‘12’ in the Option code next to the ‘REMIT1’ Table ID and press Enter.
EDIX580 Work with Tables EDI 03/30/11 FMT01 pgmlib: G3X6PGM dtalib: G3X6DTA 12:00:00 Position to Table ID . . . . . . . Type option (and Information), press Enter. 12=Table 30=Copy Code/Data Opt Table ID Type Description Partner ID 12 REMIT1 V REMITTANCE TYPE NAME QUALIFIER SEMCODE C UNIT OF MEASURE TABLE SEMDATA D ITEM NUMBER TRANSLATION TABLE SEMDATA D ITEM NUMBER TRANSLATION TABLE C13579 SEMDATA D ITEM NUMBER TRANSLATION TABLE C24680 SEMVALID V TRANSACTION TYPE CODE TABLE STOCKCODE C CONVERT STOCK CODES UNITMEAS C Internal to EDI unit of measure UNITMEAS1 C Internal t EDI UOM (tutorial 1) More... Parameters or command ===> F1=Help F3=Exit F12=Cancel F15=Sort F23=More Options F24=More Keys
148 IBM Sterling Gentran:Server for iSeries Release 3.6 User Guide
Step 5: Populate the Data Validation Table
The Data Validation panel (EDIX585-CTL01) is where you identify the description of the data values. The following panel shows you the valid data values for the ‘REMIT1’ Table ID.
Figure 6.119 Data Validation Table panel (EDIX585-CTL01)
Create the table by typing the information as shown in the above panel and press F10 (Update) to return you to the Work with Tables panel (EDIX580-FMT01). A message prints on the Message Line to inform you if the update was successful.
EDIX585 Data Validation EDI 03/30/11 CTL01 12:00:00 Table ID . . . . . . . . . . . . . REMIT1 Position to Data Value . . . . . . Type option, press Enter. 4=Delete Opt Data Value Description RE PARTY TO RECEIVE INVOICE REMITTANCE RH PAYEE'S FINANCIAL INSTITUTION SE SELLING PARTY More... F1=Help F5=Refresh F10=Update F12=Cancel F21=Prt Table F24=More Keys

IBM Sterling Gentran:Server for iSeries Release 3.6 User Guide 149
Copy a Translation TableSterling Gentran:Server allows you to create a Translation table by copying an existing Translation table. The new table copies all the codes into the new table.
In this task, you will copy the Table ID ‘UNITMEAS1’ into a new table called ‘UNITMEAS2.’ The following panel shows you how to copy a Translation Table using the Copy To window.
Figure 6.120 Work with Tables Panel Displaying Copy To Window (EDIX580-FMT01)
To copy the ‘UNITMEAS1’ table, complete the following steps:
1. Type ‘3’ (Copy) in the Option field next to the ‘UNITMEAS1’ Table ID and press Enter.
2. A “Copy To” window displays where you can type in the new table ID and the code for the table. Type ‘UNITMEAS2’ and ‘C’ for Code table and press Enter.
3. Press F10 (Update) to update the new table you just created. This action will return you to the Work with Tables panel (EDIX580-FMT01).
EDIX580 Work with Tables EDI 03/30/11 FMT01 pgmlib: G3X6PGM dtalib: G3X6DTA 12:00:00 Position to Table ID . . . . . . . UNITMEAS Type option (and Information), press Enter. 1=Create 2=Revise 3=Copy 4=Delete 5=View 6=Print 11=Copy Std Codes Opt Table ID Type Description Partner ID 3 UNITMEAS C Internal to EDI unit of measure UNITMEAS1 C Internal t EDI UOM (tutorial 1) Copy To UNITMEAS2 C F3=Exit F12=Cancel Bottom Parameters or command ===> F1=Help F3=Exit F12=Cancel F15=Sort F23=More Options F24=More Keys

150 IBM Sterling Gentran:Server for iSeries Release 3.6 User Guide
Copy a Translation Table Between LibrariesSterling Gentran:Server allows you to copy a selected Translation table to another iSeries library. This can be particularly useful if you have set up two libraries, one for a test environment and the other for production. When you copy the Translation table between libraries, Sterling Gentran:Server copies the header and table information into the new table.
CAUTIONSTOP
The Translation table that you are copying cannot exist in the destination library.
Step 1: Access the Copy Code and Data (CEDCPY) panel
The following panel shows how to access the Copy Code and Data panel (CEDCPY). In the example, we will copy the ‘UNITMEAS1’ code table we created earlier.
Figure 6.121 The Work with Tables panel (EDIX580-FMT01)
Type ‘30’ (Copy/Data) in the option field next to the appropriate Table ID and press Enter.
EDIX580 Work with Tables EDI 03/30/11 FMT01 pgmlib: G3X6PGM dtalib: G3X6DTA 12:00:00 Position to Table ID . . . . . . . Type option (and Information), press Enter. 12=Table 30=Copy Code/Data Opt Table ID Type Description Partner ID REMIT1 V REMITTANCE TYPE NAME QUALIFIER SEMCODE C UNIT OF MEASURE TABLE SEMDATA D ITEM NUMBER TRANSLATION TABLE SEMDATA D ITEM NUMBER TRANSLATION TABLE C13579 SEMDATA D ITEM NUMBER TRANSLATION TABLE C24680 SEMVALID V TRANSACTION TYPE CODE TABLE STOCKCODE C CONVERT STOCK CODES UNITMEAS C Internal to EDI unit of measure 30 UNITMEAS1 C Internal t EDI UOM (tutorial 1) More... Parameters or command ===> F1=Help F3=Exit F12=Cancel F15=Sort F23=More Options F24=More Keys

IBM Sterling Gentran:Server for iSeries Release 3.6 User Guide 151
Step 2: Copy Translation Table
Next, Sterling Gentran:Server displays the Copy Code and Data panel (CEDCPY). The values from the original table are pre-loaded into the Copy From Table ID and Table Type fields.
Figure 6.122 Copy Code and Data (CEDCPY)
Type the name of the Copy From Library, Copy to Table ID and Library. At this point, you can run the copy job one of three ways: Type ‘*YES’ to use the Job Scheduler feature, press Enter to immediately submit the job to your queue to run, or press F10 (Additional parameters) and type ‘*YES’ for Run Interactively to run the copy job on your screen.
Copy Code and Data (CEDCPY)
Type choices, press Enter.
Copy From: Table Id . . . . . . > 'UNITMEAS1' Character value Table Type . . . . . > 'C' C, D, V or blank Partner Id . . . . > '' Qualifier . . . . > '' Character value Library . . . . . . G3X6DTA Character value Copy To: Table Id . . . . . . UNITMEAS1 Character value Partner Id . . . . Qualifier . . . . Character value Library . . . . . . TESTLIB Character value Schedule Job ? . . . . . . . . . *NO *YES, *NO
Bottom F3=Exit F4=Prompt F5=Refresh F10=Additional parameters F12=Cancel F13=How to use this display F24=More keys

152 IBM Sterling Gentran:Server for iSeries Release 3.6 User Guide
Field Definitions
Copy FromTable ID
A 10-position alphanumeric field used to enter the name of the source Table ID that you want to copy from.
Table TypeA 1-position alphabetic field used to specify whether the Table ID you are copying from is:
“C” Code
“D” Data
“V” Validation
LibraryA 10-position alphanumeric field used to specify the library in which the source Table ID resides.
Copy ToTable ID
A 10-position alphanumeric field used to enter the name of the target Table ID that you want to copy the application to.
Table TypeA one-position alphabetic field used to specify whether the new table is a
“C” Code
“D” Data
“V” Validation
LibraryA 10-position alphanumeric field used to specify the library in which the target Table ID will reside.
Schedule Job?A 4-position alphabetic field used to designate whether you want to run the Table ID program by scheduling it as a job. Default value for this field is “*NO.”
If you decide to run the copy job using the Job Scheduling feature, type ‘*YES’ in this field. The system displays the Schedule Job panel that is used to further define the job run for automatic queuing. You may queue and run the copy job on a periodic basis; however, the Job Scheduling feature enables you to establish a master schedule (one-time) for the job to automatically run on a periodic basis.

IBM Sterling Gentran:Server for iSeries Release 3.6 User Guide 153
Print a Translation TableSterling Gentran:Server enables you to print a hard copy report displaying the contents of a particular translation table. You can print the report in three different formats:
Code translation table (C)
Data translation table by partner (D)
Validation translation table (V)
A report produced for the code translation table contains table definition information used by the transaction mapping system to translate between your application code values and the EDI standard codes values.
A report produced for the data translation table by partner contains the table definition information used by the transaction mapping system to translate data between you and specified trading partners.
A report produced for the validation translation table lists the data value descriptions used to validate data in the transaction mapping system.
Step 1: Access the Print Translation Table (PRTTRNTBL) Panel
The first step to printing a transaction map is to access the Print Translation Table (PRTTRNTBL) panel.
Figure 6.123 The Work with Tables panel (EDIX580--FMT01)
Type option ‘6’ (Print) next to the map and press Enter to display the PRTTRNTBL panel.
EDIX580 Work with Tables EDI 03/30/11 FMT01 pgmlib: G3X6PGM dtalib: G3X6DTA 12:00:00 Position to Table ID . . . . . . . Type option (and Information), press Enter. 1=Create 2=Revise 3=Copy 4=Delete 5=View 6=Print 11=Copy Std Codes Opt Table ID Type Description Partner ID SEMVALID V TRANSACTION TYPE CODE TABLE STOCKCODE C CONVERT STOCK CODES UNITMEAS C Internal to EDI unit of measure UNITMEAS1 C Internal t EDI UOM (tutorial 1) 6 UNITMEAS2 C Internal to EDI unit of measure UOM6411 C Unit of Measure Edifact(elem# 6411) VATCODE C VAT Code Bottom Parameters or command ===> F1=Help F3=Exit F12=Cancel F15=Sort F23=More Options F24=More Keys
154 IBM Sterling Gentran:Server for iSeries Release 3.6 User Guide
Step 2: Print a Translation Table
Specify what type of translation table to print from the Print Translation Tables (PRTTRNTBL) panel.
Figure 6.124 The Print Translation Tables (PRTTRNTBL) Panel
If you select “D” for data translation, you may specify a Partner ID/Qualifier to print, or type “*ALL’.
At this point, you can run the print job one of three ways: Type ‘*YES’ to run the job interactively, press Enter to run the job in batch (default), or press F10 for additional parameters and specify ‘*YES’ at the Schedule Job? prompt.
Print Translation Tables (PRTTRNTBL) Type choices, press Enter. Table ID . . . . . . . . . . . . > 'UNITMEAS2' Character value Table Type . . . . . . . . . . . > 'C' C, D, V Partner ID (Id, *ALL) . . . . . > '' Qualifier . . . . . . . . . . . > '' Qualifier, *ALL Run Interactively ? . . . . . . *NO *YES, *NO Additional Parameters Schedule Job ? . . . . . . . . . *NO *YES, *NO Bottom F3=Exit F4=Prompt F5=Refresh F12=Cancel F13=How to use this display F24=More keys

IBM Sterling Gentran:Server for iSeries Release 3.6 User Guide 155
Create/ Maintain Sub-Split Conditions for Incoming Transactions
Step 1: Access the Work with Sub-Splits Panel
The first step in creating sub-split conditions is to access the Work with Sub-Splits panel (EDIX350-FMT01).
Figure 6.125 Work with Transaction Mapping panel (EDIX500-FMT01)
Type ‘14’ (Sub-Split) in the Option field next to the ‘SEMPO4010’ Transaction ID. Press Enter.
EDIX500 Work with Transaction Mapping EDI 03/30/11 FMT01 pgmlib: G3X6PGM dtalib: G3X6DTA 12:00:00
Position to Transaction ID . . . . S/R
Type option (and Information), press Enter. 12=Copy Segments 13=Tables 14=Sub-Split 15=Ext Map 30=Copy Tran ID
Opt Tran ID S/R Appl ID Description User Typ ANSI4010IN R INVFILE ANSI 004010 INBOUND INVOICES EDI G ANSI4010PO S POFILE ANSI 004010 OUTBOUND POS ADM G SEMINMAP1 S SEMINAPPL SEMINAR 810 OUTBOUND MAP EDI P 14 SEMPO4010 R SEMPOAPPL SEMINAR PO GENERAL MAP EDI P 810S41TPC1 S INVOUTP OUTBOUND INVOICE 004010 TO TP1 DSH P 810S41TPC2 S INVOUTL OUTBOUND INVOICE 004010 TO TP2 DSH P
Bottom Parameters or command ===> F1=Help F3=Exit F12=Cancel F15=Sort F23=More Options F24=More Keys

156 IBM Sterling Gentran:Server for iSeries Release 3.6 User Guide
Step 2: Selecting a Sub-Split Table
The following panel allows you to select a particular sub-split table.
Figure 6.126 Work with Sub-Splits panel (EDIX350-FMT01)
Type the information shown on the above panel and press Enter. This action displays the Sub-Split Table panel (EDIX351-FMT01) where you can define the values to be used for sub-splitting.
EDIX350 Work with Sub-Splits EDI 03/30/11 FMT01 pgmlib: G3X6PGM dtalib: G3X6DTA 12:00:00 Position to Split. . . . . . . . . Sub-Split Type option (and Information), press Enter. 1=Create 2=Revise 3=Copy 4=Delete 5=View 6=Print Seg Ele Op And Seg Ele Op Value S Opt Split SS Version Trans R 1 1 1 Value 1 /Or 2 2 2 2 T 1 00001 2 004010 850 0 BEG 002 BEG 002 Parameters or command ===> F1=Help F3=Exit F12=Cancel F15=Sort F24=More Keys No Records found equal to or greater than Search request.

IBM Sterling Gentran:Server for iSeries Release 3.6 User Guide 157
Field DescriptionsSplit (File)
This field identifies the split file that will be split into sub-split files. Valid values are ‘01’ through ‘80’ or ‘SLIDE.’
SS (Sub-Split)This field identifies the sub-split file. Valid values are ‘01’ through ‘80.’
Standards VersionThis field reflects the full version code as known in the standards. SEE the “Standards” chapter in this document for more information on available versions. If using X12 versions, supply the leading zeros. Remember to tag the subset code with the version you are using, such as VICS. If you are unsure of the version, look it up in the Standards Maintenance subsystem within online Sterling Gentran:Server (SEE the “Standards” chapter in this document for more information).
Transaction Set/Release This field is the actual Transaction Set ID for the document being sent or received in EDI format. The value is specific to the standards and can be found in a Standards Manual, in the Sterling Gentran:Server Standards Maintenance subsystem, or from your trading partner. The Release code is only needed if the version is for TRADACOMS.
Seg 1 (Seg 2)This is the segment Sterling Gentran:Server checks to determine if the sub-split criteria is met.
Ele 1 (Ele 2)Sterling Gentran:Server checks the values in the fields to determine if the inbound data should be written to the sub-split file specified in the SS (Sub-Split) field.
158 IBM Sterling Gentran:Server for iSeries Release 3.6 User Guide
Step 3: Define the Sub-Split Criteria
The Sub-Split Table panel (EDIX351-FMT01) is where you specify the criteria for a sub-split table. It allows you to define conditions that Sterling Gentran:Server checks when sub-splitting inbound data.
Figure 6.127 Sub-Split Table panel (EDIX351-FMT01)
Type the information as shown on the Sub-Split Table panel and Press F10 (Update) to save the record. You must type values in the Operator 1 and Element 1 Value fields as well as in the And/Or, Operator 2, and Element 2 Value fields.
This action returns you to the Work with Sub-Splits panel (EDIX350-FMT01). You can press F12 (Cancel) on the latter panel to return to the Work with Transaction Mapping panel (EDIX500-FMT01).
EDIX351 Sub-Split Table EDI 03/30/11 FMT01 12:00:00
Split. . . . . . . . . . . . . . . 00001 Status . . . . A ACTIVE Sub-Split. . . . . . . . . . . . . 2 Version. . . . . . . . . . . . . . 004010 Transaction. . . . . . . . . . . . 850 Segment 1. . . . . . . . . . . . . BEG Element 1. . . . . . . . . . . . . 2 Operator 1 . . . . . . . . . . . . EQ Element 1 Value. . . . . . . . . . CP And/Or . . . . . . . . . . . . . . O Segment 2. . . . . . . . . . . . . BEG Element 2. . . . . . . . . . . . . 2 Operator 2 . . . . . . . . . . . . EQ Element 2 Value. . . . . . . . . . CR F1=Help F4=Prompt F10=Update F12=Cancel F24=More Keys
IBM Sterling Gentran:Server for iSeries Release 3.6 User Guide 159
Field DescriptionsOperator 1 (2)
A 2-position alphanumeric field used to enter a “logic operator” value to associate “Element Value 1” and “Element Value 2.” Valid values are:
• LT Less than• LE Less than or equal to• EQ Equal to• NE Not equal• GT Greater than• GE Greater than or equal to
Element 1 (2) ValueA 232-position alphanumeric field used to enter the argument of a logical expression.
And/OrA 1-position alphabetic field used to enter either a value of ‘A’ to indicate “And,” or a value of ‘O’ to indicate “Or,” when continuing with a compound logical expression.
StatusA 1-position alphabetic field with a description defining the status flag. This flag designates whether the sub-split record is to be Active or Inactive for processing. The default value is ‘A.’

160 IBM Sterling Gentran:Server for iSeries Release 3.6 User Guide
Copy a Transaction MapIn this task you will copy an existing transaction map into a new transaction map. It is sometimes easier to create a new transaction map by copying an existing transaction map and modifying the copy than building a new map from scratch.
CAUTIONSTOP
This task should only be performed if the new map and the original map use the same standards version. If you wish to copy a map from one version to another, you must use the Version Compare and Conversion (VERCNVT) panel.
Figure 6.128 Work with Transaction Mapping panel (EDIX500-FMT01)
Type ‘3’ (Copy) in the Option field next to the map you want to copy and press Enter. This action displays the “Copy To” window. Type the name of the new map and the appropriate send/receive indicator and press Enter. This action displays the Transaction Map Definition panel (EDIX503-FMT01).
EDIX500 Work with Transaction Mapping EDI 03/30/11 FMT01 pgmlib: G3X6PGM dtalib: G3X6DTA 12:00:00 Position to Transaction ID . . . . 810S41EDI S/R S Type option (and Information), press Enter. 1=Create 2=Revise 3=Copy 4=Delete 5=View 6=Print 11=Segments Opt Tran ID S/R Appl ID Description User Typ 810S41EDI S INVOUTPEDI Outbound Invoice 004010 (demo) CB P 810S41TPC1 S INVOUTP OUTBOUND INVOICE 004010 (demo) EDI P 3 810S41TPC2 S INVOUTL Invoice Outbound 4010 (to TP2) EDI P 850INB R POINB Tutorial PO Inbound 004010 CB G Copy To 810S41NEW S F3=Exit F12=Cancel ===> F1=Help F3=Exit F12=Cancel F15=Sort F23=More Options F24=More Keys

IBM Sterling Gentran:Server for iSeries Release 3.6 User Guide 161
Figure 6.129 Transaction Map Definition
As you can see from the above figure, Sterling Gentran:Server fills in the field values from the original map. You can accept the new map as it is or modify the field values. Typically, most users will change the description so that it reflects the purpose of the new map. Press F10 (Update) to create the map. The system copies all the segments and elements from the original map into the new map and returns you to the Work with Transaction Mapping panel (EDIX500-FMT01).
NOTEThe version and transaction set fields are protected when the Create by copy (option 3) option is used because the segments contained in the map are for a different version and/or transaction. Use the Version Conversion (VERCNVT) feature to copy a map from one version to another. If the transaction set is different, you must copy from a map with the same transaction set or create a new map (option 1).
EDIX503 Transaction Map Definition EDI 03/30/11 FMT01 12:00:00
Transaction ID . . . . . . . . . . 810S41NEW Send or Receive. . . . . . . . . . S
Division . . . . . . . . . . . . . 000 Description. . . . . . . . . . . . Outbound Invoice 004010 (demo) Standards Version. . . . . . . . . 004010 Transaction Set. . . . . . . . . . 810 Transaction Set Release. . . . . . Transaction Status . . . . . . . . T Use Code . . . . . . . . . . . . . P Envelope Type. . . . . . . . . . . X Application ID . . . . . . . . . . INVOUT Application Selection Field Values
Update Allowed . . . . . . . . . . Y
F1=Help F4=Prompt F10=Update F12=Cancel F13=Services F24=More Keys

162 IBM Sterling Gentran:Server for iSeries Release 3.6 User Guide
Copy a Transaction Map Between LibrariesSterling Gentran:Server allows you to copy a transaction map to another iSeries Library. This can be particularly convenient if you have set up two libraries, one for a test environment; the other for production. When you copy the map between libraries, Sterling Gentran:Server copies the header, segments, and elements into the new map.
CAUTIONSTOP
The transaction map to be copied cannot exist in the destination library.
Step 1: Access the Copy Transactions (TRNCPY) panel
The following panel shows you how to access the Copy Transaction (TRNCPY) panel.
Figure 6.130 Work with Transaction Mapping panel (EDIX500-FMT01)
Type ‘30’ in the Option field beside the map that you wish to copy and press Enter. In this above example, we will copy ‘810S41TPC2’ into a new library.
EDIX500 Work with Transaction Mapping EDI 03/30/11 FMT01 pgmlib: G3X6PGM dtalib: G3X6DTA 12:00:00 Position to Transaction ID . . . . 810S415PC S/R S Type option (and Information), press Enter. 12=Copy Segments 13=Tables 14=Sub-Split 15=Ext Map 30=Copy Tran ID Opt Tran ID S/R Appl ID Description User Typ 810S41TPC1 S INVOUTP OUTBOUND INVOICE 004010 (demo) EDI P 30 810S41TPC2 S INVOUTL Invoice Outbound 4010 (to TP2) EDI P 850INB R POINB Tutorial PO Inbound 004010 CB G 880SU31 S INVOUTL Outb Invoice (880) U3/1 EDI G Bottom Parameters or command ===> F1=Help F3=Exit F12=Cancel F15=Sort F23=More Options F24=More Keys

IBM Sterling Gentran:Server for iSeries Release 3.6 User Guide 163
Step 2: Copy the Map
Next, Sterling Gentran:Server displays the Copy Transactions (TRNCPY) panel. The values from the original map are pre-loaded into the Transaction ID and Send/Receive fields.
Figure 6.131 Copy Transaction (TRNCPY)
Type the name of the Copy From and Copy To libraries. Type a new name for the map in the Copy To: Transaction Map Id field. At this point, you can run the copy job one of three ways: Type ‘*YES’ to use the Job Scheduler feature, press Enter to immediately submit the job to your queue to run, or press F10 (Additional parameters) and type ‘*YES’ for Run Interactively to run the copy job on your screen.
Copy Transactions (TRNCPY)
Type choices, press Enter.
Copy From: Transaction Map Id . '810S41TPC2' Character value Send/Receive . . . . 'S' S or R Library . . . . . . Character value Copy To: Transaction Map Id . ' ' Character value Library . . . . . . Character value Schedule Job ? . . . . . . . . . *NO *YES, *NO
Bottom F3=Exit F4=Prompt F5=Refresh F10=Additional parameters F12=Cancel F13=How to use this display F24=More keys

164 IBM Sterling Gentran:Server for iSeries Release 3.6 User Guide
Convert a Transaction Map to a New VersionSterling Gentran:Server allows you to create a new map by converting an existing map to a new version of the EDI standards. This can be particularly convenient if your trading partner decides to upgrade to a more current version. Instead of building a new map to handle the new version, you simply copy the current map and let the system convert each segment and element to reflect the format of the new version.
CAUTIONSTOP
The new Transaction ID must NOT exist. If it does, the conversion fails.
Step 1: Access the Version Compare and Conversion (VERCNVT) panel
The first step in converting a map is to access the Version Compare and Conversion (VERCNVT) panel.
Figure 6.132 Work with Transaction Mapping (EDIX500-FMT01)
Type ‘31’ (Version Cnvrt.) in the option field next to the appropriate Transaction ID and press Enter. This action displays panel VERCNVT.
EDIX500 Work with Transaction Mapping EDI 03/30/11 FMT01 pgmlib: G3X6PGM dtalib: G3X6DTA 12:00:00
Position to Transaction ID . . . . S/R
Type option (and Information), press Enter. 31=Version Cnvrt. 32=Mapping Synch 50=ezMAP
Opt Tran ID S/R Appl ID Description User Typ SEMINMAP2 S SEMINAPPL SEMINAR 810 OUTBOUND MAP #2 EDI P SEMPOMAP R SEMPOAPPL SEMINAR PO GENERAL MAP EDI G SEMPOMAP1 R SEMPOAPPL SEMINAR PO GENERAL MAP EDI P 810S41TPC1 S INVOUTP OUTBOUND INVOICE 004010 TO TP1 EDI P 31 810S41TPC2 S INVOUTL OUTBOUND INVOICE 004010 TO TP2 EDI P 850R4010 R SEMPOAPPL INBOUND PO 4010 (TPDUNS) EDI P
Bottom Parameters or command ===> F1=Help F3=Exit F12=Cancel F15=Sort F23=More Options F24=More Keys

IBM Sterling Gentran:Server for iSeries Release 3.6 User Guide 165
Step 2: Convert a Map to a New Version
The conversion may be executed by two methods. The first method converts each segment to the new version of the standard. The second method (copy only) copies each segment into the new map only if it exists in the new standard. With either method, the order of the segments will not change even though they may be different in the new standard. The elements within the segments will be arranged to agree with the new version.
Figure 6.133 Version Compare and Conversion (VERCNVT)
Specify the new Transaction ID and version as shown on the above panel. At this point, you can run the job one of three ways: Type ‘*YES’ to use the Job Scheduler feature, press Enter to immediately submit the job to your queue to run, or press F10 (Additional parameters) and type ‘*YES’ for Run Interactively to run the copy job on your screen.
A report is created that must be reviewed that identifies changes that you may need to make manually to your new map.
Version Compare and Conversion (VERCNVT)
Type choices, press Enter.
Old Transaction Id . . . . . . . > '810S41TPC2' Character value Send/Receive . . . . . . . . . . > 'S' S or R New Transaction Id . . . . . . . 810S42TPC2 Character value Version . . . . . . . . . . . . 004020 Character value Release . . . . . . . . . . . . Character value Copy Only? . . . . . . . . . . . *YES *YES, *NO Schedule Job ? . . . . . . . . . *NO *YES, *NO
Bottom F3=Exit F4=Prompt F5=Refresh F10=Additional parameters F12=Cancel F13=How to use this display F24=More keys

166 IBM Sterling Gentran:Server for iSeries Release 3.6 User Guide
Synchronize a Transaction MapSterling Gentran:Server enables you to synchronize a transaction map with an application definition. Whenever you change the attributes of a field or the sequence number of a record or field in an application definition, you must “re-sync” each map that is tied to that application definition. This can be done from the application side using APPSYNCH or from the map side using MAPSYNCH.
Step 1: Access the Mapping Synchronization (MAPSYNCH) Panel
The first step in synchronizing a map is to access the Mapping Synchronization (MAPSYNCH) panel.
Figure 6.134 Work with Transaction Mapping (EDIX500-FMT01)
Type ‘32’ (Mapping Synch) in the option field next to the appropriate Transaction ID and press Enter. This action displays panel MAPSYNCH.
EDIX500 Work with Transaction Mapping EDI 03/30/11 FMT01 pgmlib: G3X6PGM dtalib: G3X6DTA 12:00:00
Position to Transaction ID . . . . S/R
Type option (and Information), press Enter. 31=Version Cnvrt. 32=Mapping Synch 50=ezMAP
Opt Tran ID S/R Appl ID Description User Typ SEMINMAP2 S SEMINAPPL SEMINAR 810 OUTBOUND MAP #2 EDI P SEMPOMAP R SEMPOAPPL SEMINAR PO GENERAL MAP EDI G SEMPOMAP1 R SEMPOAPPL SEMINAR PO GENERAL MAP EDI P 810S41TPC1 S INVOUTP OUTBOUND INVOICE 004010 TO TP1 EDI P 32 810S41TPC2 S INVOUTL OUTBOUND INVOICE 004010 TO TP2 EDI P 850R4010 R SEMPOAPPL INBOUND PO 4010 (TPDUNS) EDI P
Bottom Parameters or command ===> F1=Help F3=Exit F12=Cancel F15=Sort F23=More Options F24=More Keys

IBM Sterling Gentran:Server for iSeries Release 3.6 User Guide 167
Step 2: Synchronize a Transaction Map
The following panel allows you to synchronize 15 maps at one time.
Figure 6.135 Mapping Synchronization (MAPSYNCH) Panel
Type the name of the Transactions ID(s) and appropriate Send/Receive code(s) as shown on the above panel and press Enter. The mapping synchronization job will immediately be queued to run.
Mapping Synchronization (MAPSYNCH)
Type choices, press Enter.
Transaction Id 1 . . . . . . . . > '810S41TPC1' Character valueSend/Receive 1 . . . . . . . . . > 'S' S or RTransaction Id 2 . . . . . . . . Character valueSend/Receive 2 . . . . . . . . . S or RTransaction Id 3 . . . . . . . . Character valueSend/Receive 3 . . . . . . . . . S or RTransaction Id 4 . . . . . . . . Character valueSend/Receive 4 . . . . . . . . . S or RTransaction Id 5 . . . . . . . . Character valueSend/Receive 5 . . . . . . . . . S or RTransaction Id 6 . . . . . . . . Character valueSend/Receive 6 . . . . . . . . . S or RTransaction Id 7 . . . . . . . . Character valueSend/Receive 7 . . . . . . . . . S or RTransaction Id 8 . . . . . . . . Character valueSend/Receive 8 . . . . . . . . . S or R More...F3=Exit F4=Prompt F5=Refresh F10=Additional parameters F12=CancelF13=How to use this display F24=More keys

168 IBM Sterling Gentran:Server for iSeries Release 3.6 User Guide
Print a Transaction MapSterling Gentran:Server enables you to print a hard copy report displaying the contents of a particular transaction map. The map can be reported in four different formats:
Application Sequence
Standard Sequence
Validation
Summary of Reserved Word Usage
When a mapping report is produced in application sequence, the report illustrates the current mapping status of the records and fields in your application files to/from the segments and data elements in the EDI standards.
When a mapping report is produced in standard sequence, the report illustrates the current mapping status of segments and segment elements in the EDI standard to/from the records and fields in your application files.
The Mapping Validation Report lists errors detected by the system after it examines how the elements are mapped within an outbound transaction map.
The Summary Report lists all mapping references to reserved words, user exit programs, and mapping translation tables. The Summary Report can be generated by itself or in addition to any of the other three report formats.

IBM Sterling Gentran:Server for iSeries Release 3.6 User Guide 169
Step 1: Access the Print Mapping Files (PRTMAP) Panel
The first step in printing a transaction map is to access the Print Mapping Files (PRTMAP) panel.
Figure 6.136 Work with Transaction Mapping panel (EDIX500-FMT01)
Type option ‘6’ (Print) next to the map and press Enter. This action displays the PRTMAP panel.
EDIX500 Work with Transaction Mapping EDI 03/30/11 FMT01 pgmlib: G3X6PGM dtalib: G3X6DTA 12:00:00
Position to Transaction ID . . . . S/R S
Type option (and Information), press Enter. 1=Create 2=Revise 3=Copy 4=Delete 5=View 6=Print 11=Segments
Opt Tran ID S/R Appl ID Description User Typ 6 810S41EDI S INVOUTL OUTBOUND INVOICE 004010 (demo) EDI P 810S41TPC1 S INVOUTP OUTBOUND INVOICE 004010 TO TP1 DSH P 810S41TPC2 S INVOUTL OUTBOUND INVOICE 004010 TO TP2 DSH P
Bottom Parameters or command ===> F1=Help F3=Exit F9=Retrieve F15=Sort F23=More Options F24=More Keys
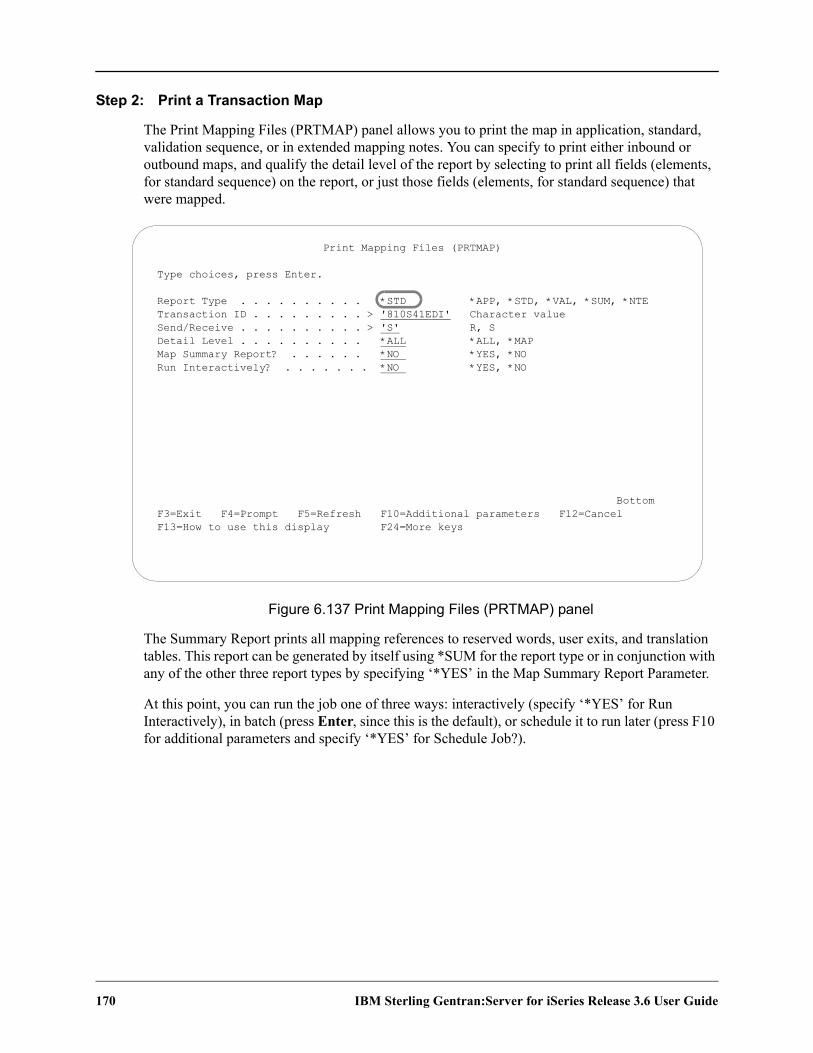
170 IBM Sterling Gentran:Server for iSeries Release 3.6 User Guide
Step 2: Print a Transaction Map
The Print Mapping Files (PRTMAP) panel allows you to print the map in application, standard, validation sequence, or in extended mapping notes. You can specify to print either inbound or outbound maps, and qualify the detail level of the report by selecting to print all fields (elements, for standard sequence) on the report, or just those fields (elements, for standard sequence) that were mapped.
Figure 6.137 Print Mapping Files (PRTMAP) panel
The Summary Report prints all mapping references to reserved words, user exits, and translation tables. This report can be generated by itself using *SUM for the report type or in conjunction with any of the other three report types by specifying ‘*YES’ in the Map Summary Report Parameter.
At this point, you can run the job one of three ways: interactively (specify ‘*YES’ for Run Interactively), in batch (press Enter, since this is the default), or schedule it to run later (press F10 for additional parameters and specify ‘*YES’ for Schedule Job?).
Print Mapping Files (PRTMAP)
Type choices, press Enter.
Report Type . . . . . . . . . . *STD *APP, *STD, *VAL, *SUM, *NTE Transaction ID . . . . . . . . . > '810S41EDI' Character value Send/Receive . . . . . . . . . . > 'S' R, S Detail Level . . . . . . . . . . *ALL *ALL, *MAP Map Summary Report? . . . . . . *NO *YES, *NO Run Interactively? . . . . . . . *NO *YES, *NO
Bottom F3=Exit F4=Prompt F5=Refresh F10=Additional parameters F12=Cancel F13=How to use this display F24=More keys

The ezMap Command
IBM Sterling Gentran:Server for iSeries Release 3.6 User Guide 171
The ezMap CommandThe ezMAP command is part of the ezEDI feature, which automatically leads you through key panels to set up the basic information necessary to start using Sterling Gentran:Server. If you type ‘ezEDI’ and press Enter, the system steps through the panels required to set up global parameters, application definition, Mapping, Partner, and Communications. Or you can use the ezMAP command to set up just the MAP portion of the system.
CAUTIONSTOP
After you enter the ezEDI or ezMAP command, the system proceeds forward only through all the associated panels. You cannot interrupt the process or back up to previous panels. Be sure to collect all your materials and allow sufficient time before you initiate an ezEDI command.
The ezMAP command steps you through the panels which are key to defining the “translation map” between your system and EDI standard formats for documents.
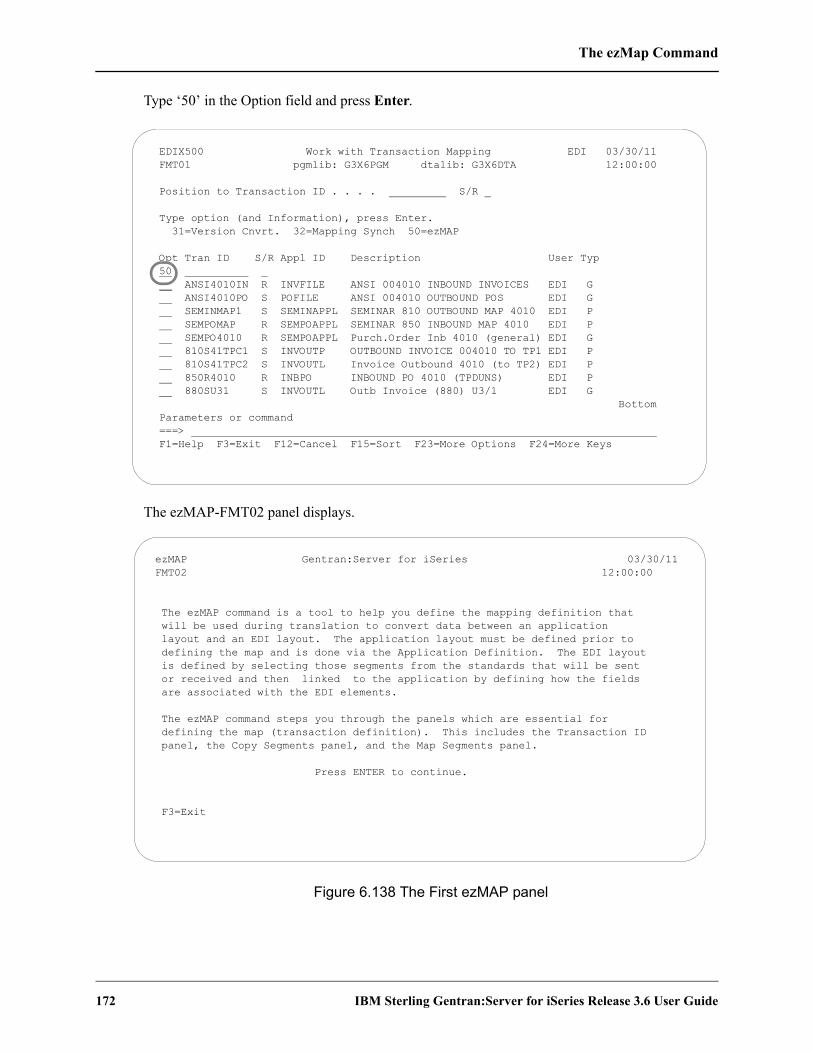
The ezMap Command
172 IBM Sterling Gentran:Server for iSeries Release 3.6 User Guide
Type ‘50’ in the Option field and press Enter.
The ezMAP-FMT02 panel displays.
Figure 6.138 The First ezMAP panel
EDIX500 Work with Transaction Mapping EDI 03/30/11 FMT01 pgmlib: G3X6PGM dtalib: G3X6DTA 12:00:00
Position to Transaction ID . . . . S/R
Type option (and Information), press Enter. 31=Version Cnvrt. 32=Mapping Synch 50=ezMAP
Opt Tran ID S/R Appl ID Description User Typ 50 __ ANSI4010IN R INVFILE ANSI 004010 INBOUND INVOICES EDI G ANSI4010PO S POFILE ANSI 004010 OUTBOUND POS EDI G SEMINMAP1 S SEMINAPPL SEMINAR 810 OUTBOUND MAP 4010 EDI P SEMPOMAP R SEMPOAPPL SEMINAR 850 INBOUND MAP 4010 EDI P SEMPO4010 R SEMPOAPPL Purch.Order Inb 4010 (general) EDI G 810S41TPC1 S INVOUTP OUTBOUND INVOICE 004010 TO TP1 EDI P 810S41TPC2 S INVOUTL Invoice Outbound 4010 (to TP2) EDI P 850R4010 R INBPO INBOUND PO 4010 (TPDUNS) EDI P 880SU31 S INVOUTL Outb Invoice (880) U3/1 EDI G Bottom Parameters or command ===> F1=Help F3=Exit F12=Cancel F15=Sort F23=More Options F24=More Keys
ezMAP Gentran:Server for iSeries 03/30/11 FMT02 12:00:00
The ezMAP command is a tool to help you define the mapping definition that will be used during translation to convert data between an application layout and an EDI layout. The application layout must be defined prior to defining the map and is done via the Application Definition. The EDI layout is defined by selecting those segments from the standards that will be sent or received and then linked to the application by defining how the fields are associated with the EDI elements.
The ezMAP command steps you through the panels which are essential for defining the map (transaction definition). This includes the Transaction ID panel, the Copy Segments panel, and the Map Segments panel.
Press ENTER to continue.
F3=Exit

The ezMap Command
IBM Sterling Gentran:Server for iSeries Release 3.6 User Guide 173
The following figure shows the rest of the ezMAP panels and the order in which they display.
Figure 6.139 Panels the system leads you through after you enter ‘ezMAP’
Transaction Map Definition(EDIX503-FMT00)
Copy Segments from Standard(EDIX502-CTL01)
Transaction Map Segments(EDIX504-CTL01)
Transaction Map Definition(EDIX503-FMT01)
See TaskCreate an Outbound Transaction Map:
See TaskCreate an Outbound Transaction Map
See TaskCreate an Outbound Transaction Map
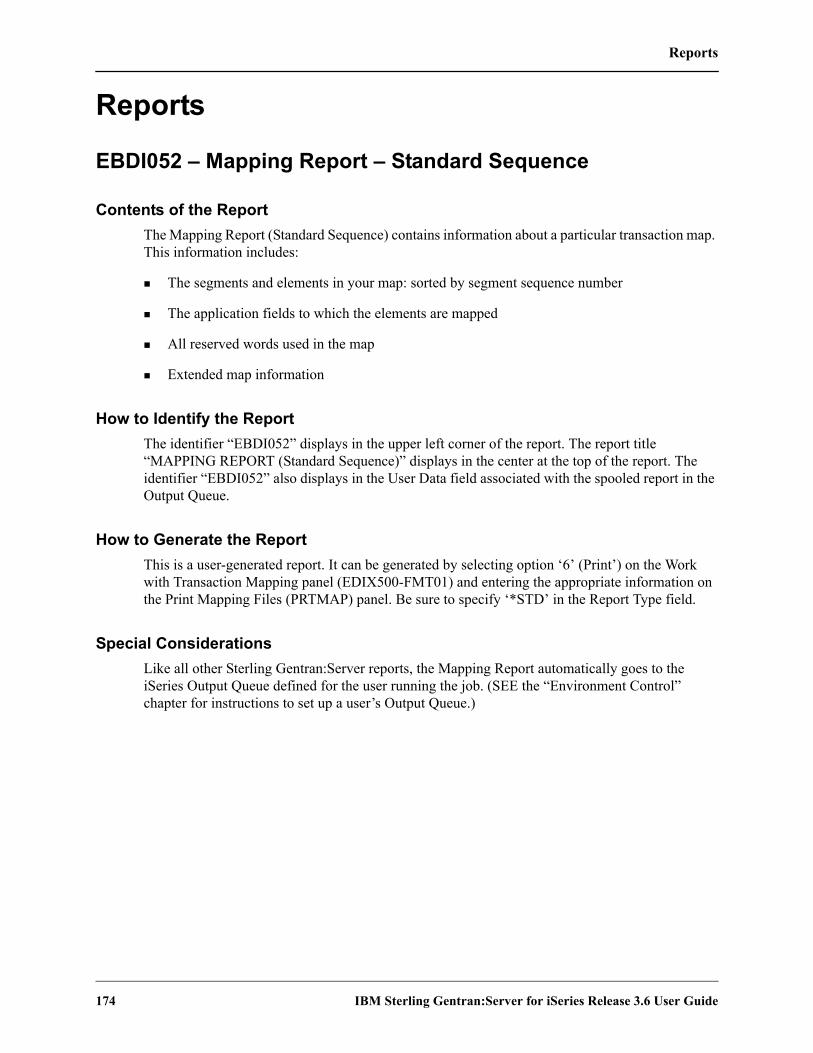
Reports
174 IBM Sterling Gentran:Server for iSeries Release 3.6 User Guide
Reports
EBDI052 – Mapping Report – Standard Sequence
Contents of the ReportThe Mapping Report (Standard Sequence) contains information about a particular transaction map. This information includes:
The segments and elements in your map: sorted by segment sequence number
The application fields to which the elements are mapped
All reserved words used in the map
Extended map information
How to Identify the ReportThe identifier “EBDI052” displays in the upper left corner of the report. The report title “MAPPING REPORT (Standard Sequence)” displays in the center at the top of the report. The identifier “EBDI052” also displays in the User Data field associated with the spooled report in the Output Queue.
How to Generate the ReportThis is a user-generated report. It can be generated by selecting option ‘6’ (Print’) on the Work with Transaction Mapping panel (EDIX500-FMT01) and entering the appropriate information on the Print Mapping Files (PRTMAP) panel. Be sure to specify ‘*STD’ in the Report Type field.
Special ConsiderationsLike all other Sterling Gentran:Server reports, the Mapping Report automatically goes to the iSeries Output Queue defined for the user running the job. (SEE the “Environment Control” chapter for instructions to set up a user’s Output Queue.)
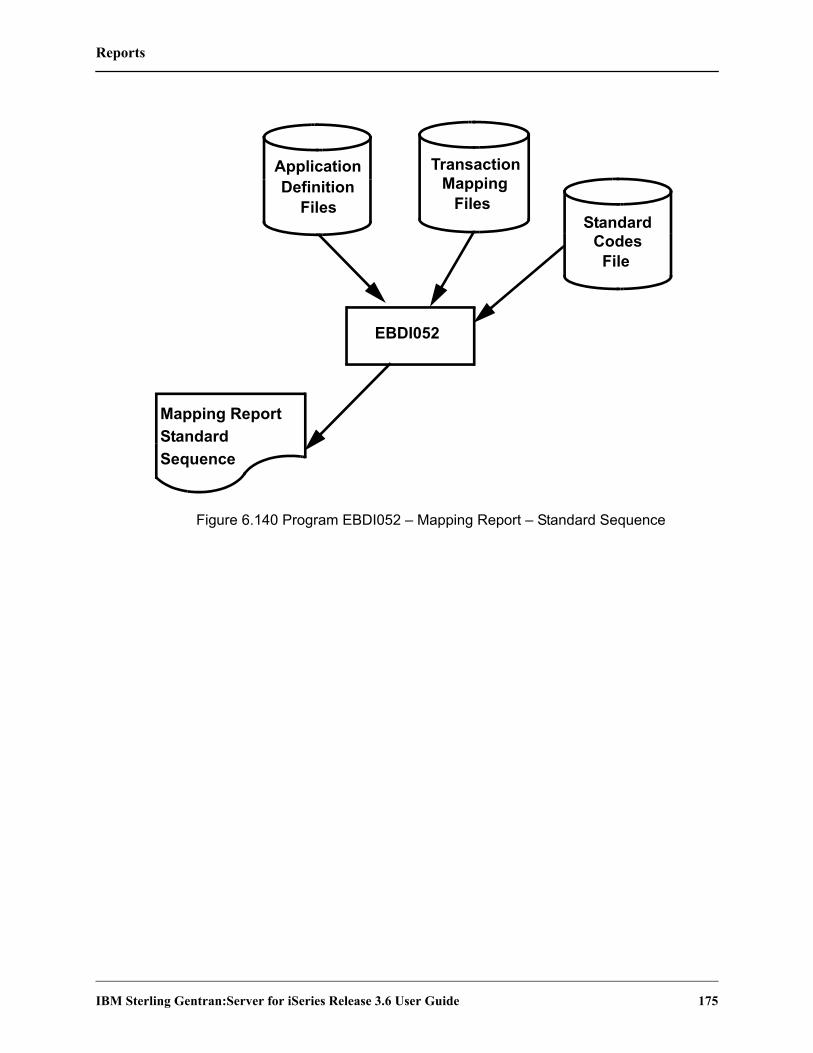
Reports
IBM Sterling Gentran:Server for iSeries Release 3.6 User Guide 175
Figure 6.140 Program EBDI052 – Mapping Report – Standard Sequence
TransactionMapping
FilesStandard
CodesFile
Mapping ReportStandardSequence
Files
ApplicationDefinition
EBDI052

Reports
176 IBM Sterling Gentran:Server for iSeries Release 3.6 User Guide
Figure 6.141 Standard Sequence Report (EBDI052)
EBDI052 M A P P I N G R E P O R T (STANDARD SEQUENCE) PAGE 1
TRANSLATION ID: 810S41EDI SEND OR RECEIVE: S NAME: OUTBOUND INVOICE 4010 (demo) DATE 03/30/11
STANDARD VERSION: 004010 TRANSACTION SET: 810 USE CODE: P ENVELOPE TYPE: X TIME 12:00:00
APPLICATION ID: INVOUTPEDI SEND OR RECEIVE: S NAME: OUTBOUND APPLICATION 810 INT/EXT: P
TRADING PARTNER FIELDS: F010.IHB2# QUAL :
SEQ H/D ID M MAX LOOP MAX L DESCRIPTION ALT WRITE FLAG
SEQ C ELEM TYPE MIN MAX MAP FIELD/CONSTANT DESCRIPTION R D LEN TY MSG
00100 H BIG M 1 BEGINNING SEGMENT FOR INVOICE YES
010 M 245 DT 6 6 INVOICE DATE F010.IHINDT INVOICE DATE 6 MM
020 M 76 AN 1 22 INVOICE NUMBER F010.IHINV# INVOICE # (KEY 2) 10 AN
030 O 323 DT 6 6 PURCHASE ORDER DATE F010.IHPODT ORIGINAL PO DATE 6 MM
040 O 324 AN 1 22 PURCHASE ORDER NUMBE F010.IHPO# ORIGINAL PO# 20 AN
050 O 328 AN 1 30 RELEASE NUMBER **
060 O 327 AN 1 8 CHANGE ORDER SEQUENC **
070 O 640 ID 2 2 TRANSACTION TYPE COD **
00200 H NTE F 10 NOTE/SPECIAL INSTRUCTION YES
010 O 363 ID 3 3 NOTE REFERENCE CODE ‘GEN’ ENTIRE TRANSACTION SET
IF F020.ICMSG GT ‘ ‘
020 M 3 AN 1 60 FREE FROM MESSAGE F020.ICMSG INV HEADER COMMENTS/MSG 60 AN
00400 H REF O 1 DEPT. NUMBER YES
010 M 128 ID 2 2 REFERENCE NUMBER QUA ‘DP’ DEPARTMENT NUMBER
IF F010.IHSDPT GT ‘ ‘
020 C 127 AN 1 30 REFERENCE NUMBER F010.IHSDPT SHIP TO DEPT # 4 AN
030 C 352 AN 1 80 DESCRIPTION **
00600 H N1 O 1 BILLTO NAME YES
010 M 98 ID 2 2 ENTITY IDENTIFIER CO ‘BT’ PARTY TO BE BILLED FOR OTH
IF F010.IHB2NM GT ‘ ‘
020 C 93 AN 1 35 NAME F010.IHB2NM BILL TO NAME 25 AN
030 C 66 ID 1 2 IDENTIFICATION CODE **
040 C 67 ID 2 17 IDENTIFICATION CODE **
00605 H N3 O 1 ADDRESS INFORMATION YES
010 M 166 AN 1 35 ADDRESS INFORMATION F010.IHB2A1 BILL TO ADDRESS 1 25 AN
020 O 166 AN 1 35 ADDRESS INFORMATION F010.IHB2A2 BILL TO ADDRESS 2 25 AN
00610 H N4 O 1 GEOGRAPHIC LOCATION YES
010 C 19 AN 2 19 CITY NAME F010.IHB2CT BILL TO CITY 25 AN W
020 C 156 ID 2 2 STATE OR PROVINCE CO F010.IHB2ST BILL TO STATE 2 AN
030 O 116 ID 4 9 POSTAL CODE F010.IHB2ZP BILL TO ZIP 9 AN
040 O 26 ID 2 2 COUNTRY CODE **
050 O 309 ID 1 2 LOCATION QUALIFIER **
060 C 310 AN 1 25 LOCATION IDENTIFIER **
00615 H N1 O 1 SHIPTO NAME YES
010 M 98 ID 2 2 ENTITY IDENTIFIER CO ‘ST’ SHIP TO
IF F010.IHS2NM GT ‘ ‘
OR F010.IHSST# GT ‘ ‘
020 C 93 AN 1 35 NAME F010.IHS2NM SHIP TO NAME 25 AN
030 C 66 ID 1 2 IDENTIFICATION CODE ‘92’ ASSIGNED BY BUYER OR BUYER
IF F010.IHSST# GT ‘ ‘
040 c 67 ID 2 17 IDENTIFICATION CODE F010.IHSST# SHIP TO STORE # 4 AN
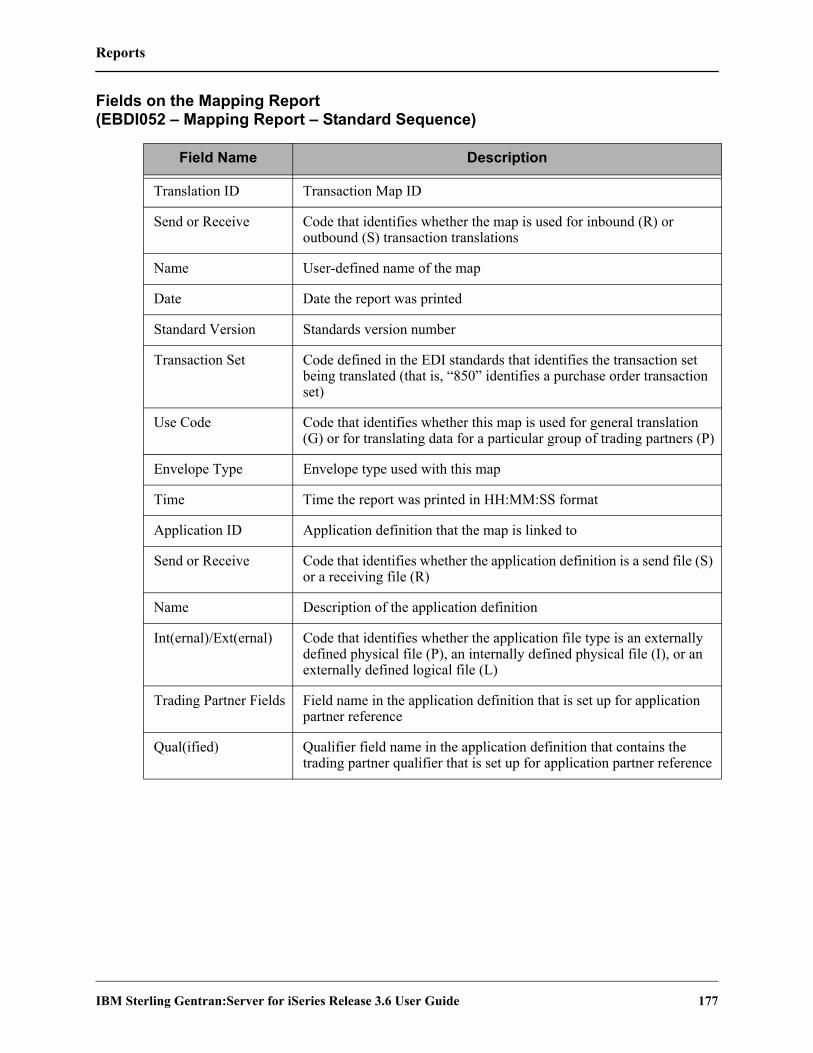
Reports
IBM Sterling Gentran:Server for iSeries Release 3.6 User Guide 177
Fields on the Mapping Report (EBDI052 – Mapping Report – Standard Sequence)
Field Name Description
Translation ID Transaction Map ID
Send or Receive Code that identifies whether the map is used for inbound (R) or outbound (S) transaction translations
Name User-defined name of the map
Date Date the report was printed
Standard Version Standards version number
Transaction Set Code defined in the EDI standards that identifies the transaction set being translated (that is, “850” identifies a purchase order transaction set)
Use Code Code that identifies whether this map is used for general translation (G) or for translating data for a particular group of trading partners (P)
Envelope Type Envelope type used with this map
Time Time the report was printed in HH:MM:SS format
Application ID Application definition that the map is linked to
Send or Receive Code that identifies whether the application definition is a send file (S) or a receiving file (R)
Name Description of the application definition
Int(ernal)/Ext(ernal) Code that identifies whether the application file type is an externally defined physical file (P), an internally defined physical file (I), or an externally defined logical file (L)
Trading Partner Fields Field name in the application definition that is set up for application partner reference
Qual(ified) Qualifier field name in the application definition that contains the trading partner qualifier that is set up for application partner reference

Reports
178 IBM Sterling Gentran:Server for iSeries Release 3.6 User Guide
Map Segment Line (shown on the Segment line)
(Segment) Seq(uence) Segment sequence number
H/D Code that identifies whether the Segment is a Header (H) Segment, Detail (D) Segment, or a Summary (S) Segment
(Segment) ID Segment identifier
M(andatory)/ C(onditional)
Code that identifies whether this segment is mandatory (M), optional (O), conditional (C), or Float (F) Segment
Max(imum) Elem(ent))
Maximum number of times this Segment may be repeated in the transaction or within a Loop
Loop Loop ID
Max L(oop) Maximum number of times that a loop may be repeated in the transaction
Description Description of the segment
Write Flag Identifies whether or not that segment is to be written. It shows what segments are being used as “dummy” mapping segments. Valid values are ‘Yes’ or ‘No’ (outbound maps only).
Segment Element Line
Seq(uence) Element sequence number
(MC) Code that identifies whether this element is mandatory (M), conditional (C), or optional (O)
Elem(ent) Element reference number as defined by the standards
Type Data type as defined by the standards
Min(imum) Minimum field length of the element as defined by the standards
Max(imum) Maximum field length of the element as defined by the standards
Description Description of the element
Field Name Description

Reports
IBM Sterling Gentran:Server for iSeries Release 3.6 User Guide 179
Application Field Line (shown directly across from each Segment Element line)
Alt(ernate Map) Number of the alternate map
Map Field/Constant Name of an application field or reserved word constant
Description Description of the application field
R(ounding) Indicates whether or not the numeric data types are to be rounded
D(ecimal) Number of decimal positions to round to
Len(gth) Length of the application field
Ty(pe) Application data type
Msg Warning flag (W) that indicates a possible non-standard application to standards mapping. The mapping process is completed even when a warning flag displays. For example, if you designate an application field as a 20 position field and the standards designate the segment element as having a maximum length of 19 positions, the system will complete the map; however, the data will be truncated to 19 positions. The warning will also alert you when invalid constant codes have been used. (SEE the “Glossary” in this manual for more information on Reserved Word Constants.)
Field Name Description

Reports
180 IBM Sterling Gentran:Server for iSeries Release 3.6 User Guide
EBDI053 – Mapping Report – Application Sequence
Contents of the ReportThe Mapping Report (Application Sequence) contains information about a particular transaction map. This information includes:
The application fields in your map: sorted by application record sequence number
The Segments and Elements to which the application fields are mapped
All reserved words used in the map
Extended map information
How to Identify the ReportThe identifier “EBDI053” displays in the upper left corner of the report. The report title “MAPPING REPORT (Application Sequence)” displays in the center at the top of the report. The identifier “EBDI053” also displays in the User Data field associated with the spooled report in the Output Queue.
How to Generate the ReportThis is a user-generated report. It can be generated by selecting option ‘6’ (Print’) on the Work with Transaction Mapping panel (EDIX500-FMT01) and entering the appropriate information on the Print Mapping Files (PRTMAP) panel. Be sure to specify ‘*APP’ in the Report Type field.
Special ConsiderationsLike all other Sterling Gentran:Server reports, the Mapping Report automatically goes to the iSeries Output Queue defined for the user running the job. (SEE the “Environment Control” chapter for instructions to set up a user’s Output Queue.)

Reports
IBM Sterling Gentran:Server for iSeries Release 3.6 User Guide 181
Figure 6.142 Program EBDI053 – Mapping Report – Application Sequence
TransactionMapping
Files
EBDI053
Mapping ReportApplicationSequence
Files
ApplicationDefinition

Reports
182 IBM Sterling Gentran:Server for iSeries Release 3.6 User Guide
Figure 6.143 Mapping Report – Application Sequence (EBDI053)
EBDI053 M A P P I N G R E P O R T (APPLICATION SEQUENCE) PAGE 1
TRANSLATION ID: SEMPOMAP SEND OR RECEIVE: R NAME: SEMINAR 850 INBOUND MAP 4010 DATE 03/30/11
STANDARD VERSION: 004010 TRANSACTION SET: 850 USE CODE: P ENVELOPE TYPE: X TIME 12:00:00
APPLICATION ID: SEMPOAPPL SEND OR RECEIVE: R NAME: Class Tutorial: Inbound PO INT/EXT: L
SEQ M FILE/TYPE H/D LOOP MAX U DESCRIPTION
ALT SEG WRITE FLAG
SEQ C ELEMENT TYP LEN START
MAP SEQ SEG/ELEM DESCRIPTION R D TY MIN MAX MSG
010 M POHEADER H
1PO Header File YES
005
MF010.CUSTNUM
AN
81
CUSTOMER NUMBER
SENDER ID
010
MF010.PODATE
MM
69
PO DATE (mdy format)
00100 BEG050 PURCHASE ORDER DATE
DT 6 6
SAVE IN CONSTANT #: 02
015
M F010.PONUM
AN
10
15
PO NUMBER
00100 BEG030 PURCHASE ORDER NUMBER
AN 1 22 W
SAVE IN CONSTANT #: 01
020
M F010.TYPCODE
AN
225
TYPE CODE
00100 BEG020 PURCHASE ORDER TYPE CODE
ID 2 2
025
M F010.TOTAMT
S2
927
TOT AMT
030
M F010.SHIPTONAME
AN
25
36
SHIPTO NAME
03000 N1 020 NAME
AN 1 35 W
IF N1/010/4100 EQ 'ST'
035
M F010.SHIPTOADD1
AN
25
61
SHIPTO ADD1 03200 N3 010 ADDRESS INFORMATION AN 1 35 W
IF N1/
040
M F010.SHIPTOADD2
AN
25
86
SHIPTO ADD2 03200 N3 020 ADDRESS INFORMATION AN 1 35 W
IF N1/010/4100 EQ 'ST'
045
M F010.SHIPTOZIP
AN
9111
SHIPTO ZIP
03205 N4 033 zip 9 AN 9 9
IF N1/010/4100 EQ 'ST'
050
M F010.SHIPTOST
AN
2120
SHIPTO STATE 03205 N4 020 STATE OR PROVINCE CODE ID 2 2
IF N1/010/4100 EQ 'ST'
055
M F010.SHIPTOCITY
AN
18
122
SHIPTO CITY
03205 N4 010 CITY NAME AN 2 19 W
IF N1/010/4100 EQ 'ST'
060
M F010.BILLTONAME
AN
25
140
BILLTO NAME 04100 N1 020 NAME AN 1 35 W
IF N1/010/4100 EQ 'BT'
065
M F010.BILLTOADD1
AN
25
165
BILLTO ADD1 03200 N3 010 ADDRESS INFORMATION AN 1 35 W
IF N1/010/4100 EQ 'BT'
070
M F010.BILLTOADD2
AN
25
190
BILLTO ADD2
03200 N3 020 ADDRESS INFORMATION AN 1 35 W
IF N1/010/4100 EQ 'BT'
075
M F010.BILLTOZIP
AN
5215
BILLTO ZIP
03205 N4 031 zip 5
IF N1/010/4100 EQ 'BT'
080
M F010.BILLTOEXT
AN
4220
BILLTO EXT
03205 N4 032 zip +4 AN 4 4
IF N1/010/4100 EQ 'BT'
085
M F010.BILLTOST
AN
2224
BILLTO STATE
03205 N4 020 STATE OR PROVINCE CODE ID 2 2
IF N1/010/4100 EQ 'BT'
090
M F010.BILLTOCITY
AN
18
226
BILLTO CITY
03205 N4 010 CITY NAME AN 2 19 W
IF N1/010/4100 EQ 'BT'
020
M PODETAIL D PO1
1 PO Detail File YES
005
M F020.CUSTNUM
AN
81
CUSTOMER NUMBER
SENDER-ID
010
M F020.PODATE
MM
69
PO DATE (mdy format)
CONSTANT-02
015
M F020.ITEMNUM
AN
10
15
PRODUCT CODE
07600 PO1070 PRODUCT/SERVICE ID
AN 1 30 W
TRANSLATION TABLE ID: SEMDATA
IF PO1/060/7600 EQ 'PI'
OR PO1/060/7600 EQ 'CB'
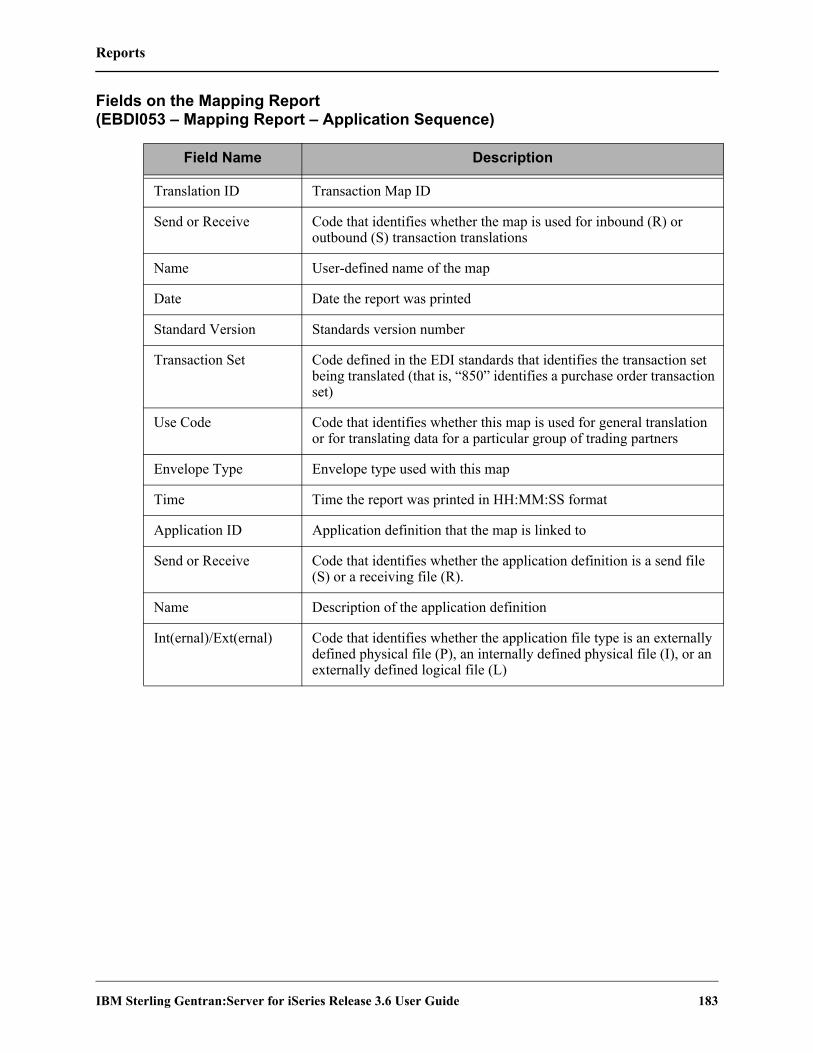
Reports
IBM Sterling Gentran:Server for iSeries Release 3.6 User Guide 183
Fields on the Mapping Report (EBDI053 – Mapping Report – Application Sequence)
Field Name Description
Translation ID Transaction Map ID
Send or Receive Code that identifies whether the map is used for inbound (R) or outbound (S) transaction translations
Name User-defined name of the map
Date Date the report was printed
Standard Version Standards version number
Transaction Set Code defined in the EDI standards that identifies the transaction set being translated (that is, “850” identifies a purchase order transaction set)
Use Code Code that identifies whether this map is used for general translation or for translating data for a particular group of trading partners
Envelope Type Envelope type used with this map
Time Time the report was printed in HH:MM:SS format
Application ID Application definition that the map is linked to
Send or Receive Code that identifies whether the application definition is a send file (S) or a receiving file (R).
Name Description of the application definition
Int(ernal)/Ext(ernal) Code that identifies whether the application file type is an externally defined physical file (P), an internally defined physical file (I), or an externally defined logical file (L)

Reports
184 IBM Sterling Gentran:Server for iSeries Release 3.6 User Guide
Application Record Line
Seq(uence) Application record sequence number
(MC) Code that identifies whether this record is mandatory (M) or optional (O)
Type Application field data type
H/D Code that identifies whether this record is a Header (H) record, Detail (D) record, or a Summary (S) record
Loop Loop ID
Max U(se) Maximum number of times this record may be repeated in a data structure (i.e., the Header area, Summary area, or an application loop)
Description Description of the application record
Write Flag Identifies whether or not that record is to be written. It shows which records are being used as “dummy” mapping records. Valid values are ‘Yes’ and ‘No’ (inbound maps only).
Application Field Line(shown below the Application Record Number)
Seq(uence) Application field sequence number
(MC) Code that identifies whether this record is mandatory (M) or optional (O)
Elem(ent) Application field name as it exists in your application file
Type Application data type
Length Length of the application field
Start Starting position of the application field
Description Description of the application field
Field Name Description

Reports
IBM Sterling Gentran:Server for iSeries Release 3.6 User Guide 185
Map Segment/Element Line(shown directly across from each Application field line)
Alt(ernate) Map Number of the Alternate map
Seg(ment) Seq(uence) Segment Sequence Number as defined by the standards
Seg(ment)/Elem(ent) Segment ID followed by the Element Sequence Number (i.e., ‘BIG030’ where ‘BIG’ identifies the Segment ID and ‘030’ identifies the Element Sequence Number)
Description Description of the Segment Element
R(ounding) Indicates whether or not the numeric data types are to be rounded
D(ecimal) Number of decimal positions to round to
Ty(pe) Data type as defined by the standards
Min(imum) Minimum field length of the element as defined by the standards
Max(imum) Maximum field length of the element as defined by the standards
Msg Warning flag (W) that indicates a possible non-standard application to standards mapping. The mapping process is completed even when a warning flag displays. For example, if you designate an application field as a 20 position field and the standards designate the segment element as having a maximum length of 19 positions, the system will complete the map; however, the data will be truncated to 19 positions. The warning will also alert you when invalid constant codes have been used. (SEE the “Glossary” in this manual for more information on Reserved Word Constants.)
Field Name Description

Reports
186 IBM Sterling Gentran:Server for iSeries Release 3.6 User Guide
EBDI055 – Mapping Summary Report
Contents of the ReportThe Mapping Summary Report includes all of the summary information for a specific map. This information includes:
All reserved words in the map
All reserved words referenced in the application field values that are used in the corresponding application (for inbound maps only)
All translation tables used in the map
All user exits within the map (segment and element level)
How to Identify the ReportThe identifier “EBDI055” displays in the upper left corner of the report. The report title “MAPPING REPORT (SUMMARY)” displays in the center at the top of the report. The identifier “EBDI055” also displays in the user data field associated with the spooled report in the Output Queue.
How to Generate the ReportThis is a user-generated report. It is generated by selecting option ‘6’ (print) on the Work with Transaction Mapping panel (EDIX500-FMT01) and then typing ‘*YES’ in the Map Summary Report parameter or by specifying ‘*SUM’ in the Report Type parameter.
Special ConsiderationsLike all other Sterling Gentran:Server reports, the mapping report automatically goes to the iSeries Output Queue defined for the user running the job. SEE the “Environment Control” chapter for instructions on how to set up a user’s Output Queue.
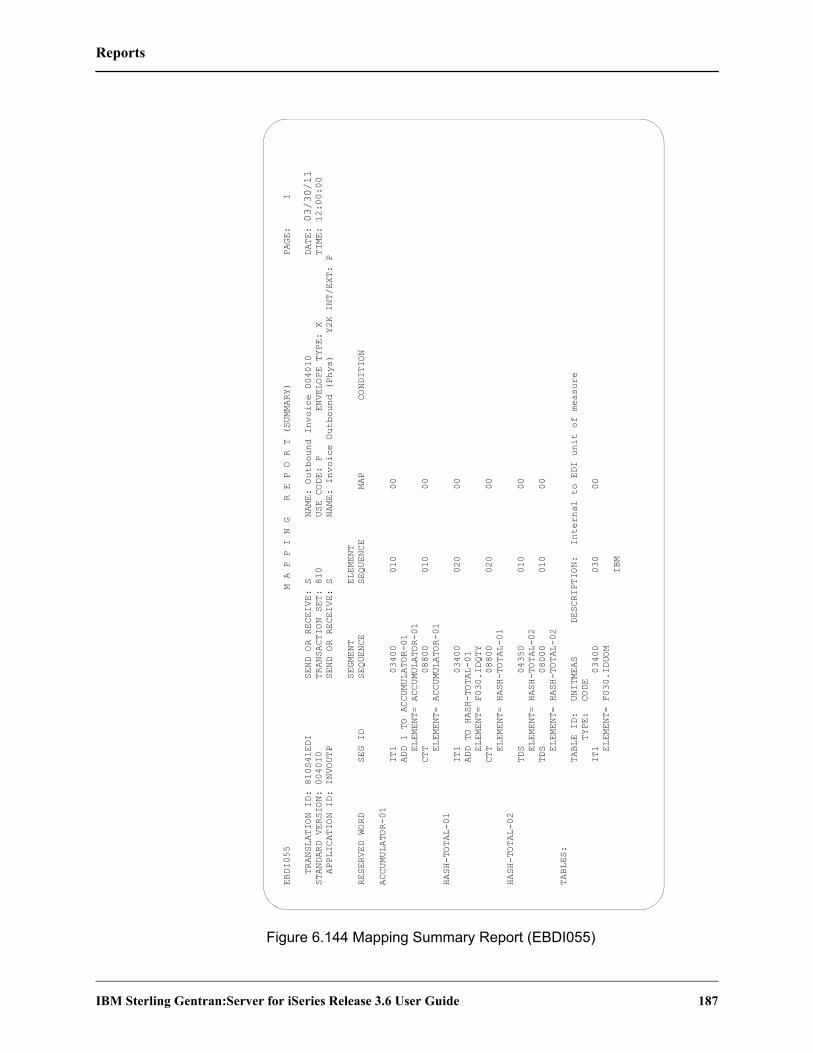
Reports
IBM Sterling Gentran:Server for iSeries Release 3.6 User Guide 187
Figure 6.144 Mapping Summary Report (EBDI055)
EBDI055 M A P P I N G R E P O R T (SUMMARY) PAGE: 1
TRANSLATION ID: 810S41EDI SEND OR RECEIVE: S NAME: Outbound Invoice 004010 DATE: 03/30/11
STANDARD VERSION: 004010 TRANSACTION SET: 810 USE CODE: P ENVELOPE TYPE: X TIME: 12:00:00
APPLICATION ID: INVOUTP SEND OR RECEIVE: S NAME: Invoice Outbound (Phys) Y2K INT/EXT: P
SEGMENT ELEMENT
RESERVED WORD SEG ID SEQUENCE SEQUENCE MAP CONDITION
ACCUMULATOR-01
IT1 03400 010 00
ADD 1 TO ACCUMULATOR-01
ELEMENT= ACCUMULATOR-01
CTT 08800 010 00
ELEMENT= ACCUMULATOR-01
HASH-TOTAL-01
IT1 03400 020 00
ADD TO HASH-TOTAL-01
ELEMENT= F030.IDQTY
CTT 08800 020 00
ELEMENT= HASH-TOTAL-01
HASH-TOTAL-02
TDS 04350 010 00
ELEMENT= HASH-TOTAL-02
TDS 08000 010 00
ELEMENT= HASH-TOTAL-02
TABLES:
TABLE ID: UNITMEAS DESCRIPTION: Internal to EDI unit of measure
TYPE: CODE
IT1 03400 030 00
ELEMENT= F030.IDUOM
IBM

Reports
188 IBM Sterling Gentran:Server for iSeries Release 3.6 User Guide
Fields on the Mapping Summary Report (EBDI055 – Mapping Report – Summary Sequence)
Field Name Description
Header Information
Translation ID Transaction Map ID
Send or Receive Code that identifies whether the map is used for inbound (R) or outbound (S) transaction translations
Name User-defined name of the map
Date Date the report was printed
Standard Version Standards version number
Transaction Set Code defined in the EDI standards that identifies the transaction set being translated (that is, “850” identifies a purchase order transaction set)
Use Code Code that identifies whether this map is used for general translation or for translating data for a particular group of trading partners
Envelope Type Envelope type used with this map
Time Time the report was printed in HH:MM:SS format
Application ID Application definition that the map is linked to
Send or Receive Code that identifies whether the application definition is a send file (S) or a receiving file (R).
Name Description of the application definition
Int(ernal)/Ext(ernal) Code that identifies whether the application file type is an externally defined physical file (P), an internally defined physical file (I), or an externally defined logical file (L)
Reserved Word Line
Reserved Word Name of the reserved word that is referenced in the map.Reserved words are shown in the following order: Accumulators, Constants, Hash-Totals, miscellaneous reserved words (envelope references and others such as Current-Date) in alphabetic sequence. Tables are shown next, followed by User Exits and Application Field Values (for inbound maps only).
Seg ID Segment Identifier where the mapping for the reserved word is defined. If the reserved word is mentioned on the definition anywhere, it should be printed.
Segment Sequence Segment Sequence number for the mapping definition.

Reports
IBM Sterling Gentran:Server for iSeries Release 3.6 User Guide 189
Element Sequence Element Sequence number for the mapping definition.
Map Element Map number for the mapping definition (from 00-99).
Condition If conditions are defined for this mapping definition. If the reserved word is referenced in the condition, the mapping definition is included.
Reserved Word Alternate Lines
Move/To Inbound maps will show a ‘Move/To’ statement indicating the segment/element (or override element) along with any calculations being mapped to an application field. The mapping relationship is defined on the segment/element printed above on the Reserved Word line.
Element= Outbound maps will show an ‘Element=’ statement indicating the field that will be moved into the segment/element printed above on the Reserved Word line.
Save in Inbound/Outbound maps will show a ‘Save in’ statement if a constant number was specified on the mapping relationship. This indicates that the resulting value being moved should also be saved in the given constant.
Add to Inbound/Outbound maps will show an ‘Add to’ statement if a hash total was specified on the mapping relationship. This indicates that the resulting value being moved should be added to the current value stored in the given hash total.
Add 1 to Inbound/Outbound maps will show an ‘Add 1 to’ statement if an accumulator number was specified on the mapping relationship. This indicates that the counter stored in the given accumulator number should be counted in increments of 1 by 1.
Table Line
Tables: Reserved Word Label indicating there is at least 1 mapping table mentioned in this map.
Table ID Table ID (or name) that is referenced in this map.
Description Description for the Table from the Table Definition Header. If the header can’t be found in the table file, a warning message is printed.
Type Type of table: Code, Validation, or Data. If the table can’t be found in the table file, only the 1-byte code (C, V or D) is printed.
Partner For Data tables, if the table is found in the table file, Partner specific information (ID and Qualifier) is printed. If more than 1 data table exists with the same name, a message is printed indicating that there are multiple partner-specific tables.
Field Name Description
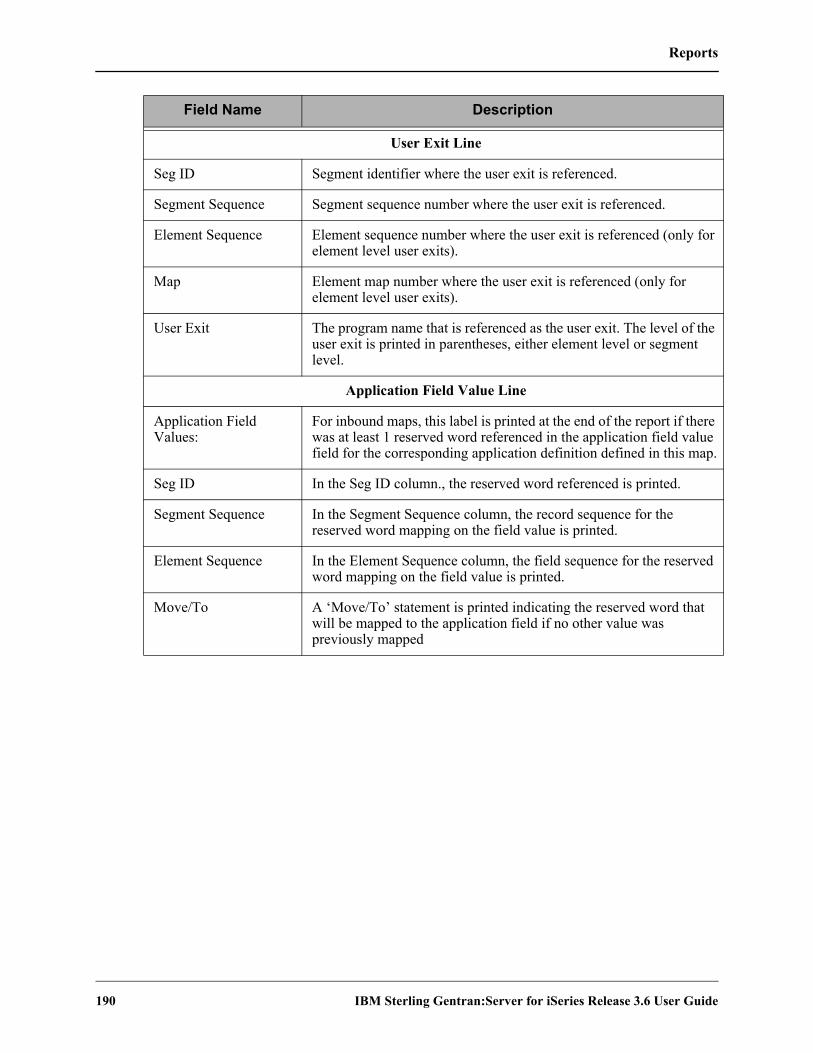
Reports
190 IBM Sterling Gentran:Server for iSeries Release 3.6 User Guide
User Exit Line
Seg ID Segment identifier where the user exit is referenced.
Segment Sequence Segment sequence number where the user exit is referenced.
Element Sequence Element sequence number where the user exit is referenced (only for element level user exits).
Map Element map number where the user exit is referenced (only for element level user exits).
User Exit The program name that is referenced as the user exit. The level of the user exit is printed in parentheses, either element level or segment level.
Application Field Value Line
Application Field Values:
For inbound maps, this label is printed at the end of the report if there was at least 1 reserved word referenced in the application field value field for the corresponding application definition defined in this map.
Seg ID In the Seg ID column., the reserved word referenced is printed.
Segment Sequence In the Segment Sequence column, the record sequence for the reserved word mapping on the field value is printed.
Element Sequence In the Element Sequence column, the field sequence for the reserved word mapping on the field value is printed.
Move/To A ‘Move/To’ statement is printed indicating the reserved word that will be mapped to the application field if no other value was previously mapped
Field Name Description
Reports
IBM Sterling Gentran:Server for iSeries Release 3.6 User Guide 191
EBDI082 – Mapping Report – Validation Sequence
Contents of the ReportThe Mapping Report (Validation Sequence) contains information Sterling Gentran:Server produces after validating an outbound map. This information includes:
General translation, standards, and application information
Detailed segment information including the Segment ID, its Sequence number, and the segment type
Detailed Element information including the specific Element, its element sequence number, and description of the element within the segment that caused the error
A description of the mapping error relationship
How to Identify the ReportThe identifier “EBDI082” displays in the upper left corner of the report. The report title “MAPPING REPORT (Validation Sequence)” displays in the center at the top of the report. The identifier “EBDI082” also displays in the User Data field associated with the spooled report in the Output Queue.
How to Generate the ReportThis is a user-generated report. It can be generated by selecting option ‘6’ (Print’) on the Work with Transaction Mapping panel (EDIX500-FMT01) and entering the appropriate information on the Print Mapping Files (PRTMAP) panel. Be sure to specify ‘*VAL’ in the Report Type field.
Special ConsiderationsLike all other Sterling Gentran:Server reports, the Mapping Report automatically goes to the iSeries Output Queue defined for the user running the job. (SEE the “Environment Control” chapter for instructions to set up a user’s Output Queue.)

Reports
192 IBM Sterling Gentran:Server for iSeries Release 3.6 User Guide
Figure 6.145 Program EBD082 – Mapping Validation Report
StandardsSegment
File
StandardsCodeFile
TransactionHeader
File
TransactionSegment
FileEBDI082
MappingValidationReport
TransactionElement
File
StandardsTransaction
File

Reports
IBM Sterling Gentran:Server for iSeries Release 3.6 User Guide 193
Figure 6.146 Mapping Validation Report (EBDI082)
EBDI082 M A P P I N G V A L I D A T I O N R E P O R T PAGE 1
TRANSLATION ID : ANSI4010P1 SEND OR RECEIVE: S NAME: ANSI 004010 OUTBOUND POS DATE 03/30/11
STANDARD VERSION: 004010 TRANSACTION SET: 850 USE CODE: G ENVELOPE TYPE: X TIME 12:00:00
APPLICATION ID : POFILE
SEG ID H/D SEG SEQ ELEM ELE SEQ DESCRIPTION MAPPING ERROR/RELATIONSHIP
** NO ERRORS ENCOUNTERED DURING VALIDATION **

Reports
194 IBM Sterling Gentran:Server for iSeries Release 3.6 User Guide
Fields on the Mapping Report (EBDI082 – Mapping Validation Report)
Field Name Description
Translation ID Transaction Map ID
Send or Receive Code that identifies whether the map is used for inbound (R) or outbound (S) transaction translations
Name User-defined name of the map
Date Date the report was printed, shown in the user’s format as defined in the Environment Control subsystem.
Standard Version Standards version number
Transaction Set Code defined in the EDI standards that identifies the transaction set being translated (that is, “850” identifies a purchase order transaction set)
Use Code Code that identifies whether this map is used for General Translation (G) or for translating data for a particular group of trading partners (P)
Envelope Type Envelope type used with this map
Time Time the report was printed in HH:MM:SS format
Application ID Application definition that the map is linked to
Seg(ment) ID Segment identifier that caused the error
H/D Code that identifies whether the segment is a header (H) segment, detail (D) segment, float (F) segment, or a summary (S) segment
Seg(ment) Seq(uence)
Sequence number of the Segment that caused the error
Elem(ent) Element reference number that caused the error
Ele(ment) Seq(uence) Sequence number of the element that caused the error
Description Description of the element
Mapping Error/Relationship
Description of the Error condition

Reports
IBM Sterling Gentran:Server for iSeries Release 3.6 User Guide 195
EBDI083 – Mapping Report – Extended Mapping Notes
Contents of the ReportThe Mapping Report (Extended Mapping Notes) contains information about an extended element mapping. This information includes:
General translation, standards, and application information
Detailed segment information including the Segment ID, its Sequence number, and the Segment Type
Detailed Element information including the specific Element, its Element Sequence Number, and a description of the Element
Any notes attached to the specific extended element mapping.
How to Identify the ReportThe identifier ‘EBDI083; displays in the upper, left corner of the report. The report title “Mapping Report (Extended Notes)” displays in the center at the top of the report. The identifier ‘EBDI083’ also displays in the User Data field associated with the spooled report in the Output Queue.
How to Generate the ReportThis is a user-generated report. You can generate this report by selecting option ‘6’ (Print’) on the Work with Transaction Mapping panel (EDIX500-FMT01) and entering the appropriate information on the Print Mapping Fields (PRTMAP) panel. Be sure to specify ‘*NTE in the Report Type field.
Special ConsiderationsLike all other Sterling Gentran:Server reports, the Mapping Report automatically goes to the iSeries Output Queue defined for the user running the jobs. (SEE the “Environment Control” chapter for instructions to set up an Output Queue).

Reports
196 IBM Sterling Gentran:Server for iSeries Release 3.6 User Guide
Figure 6.147 Extended Mapping Notes (EBDI083)
EBDI083 M A P P I N G R E P O R T (EXTENTED NOTES) PAGE 1
TRANSLATION ID: POMAP4010 SEND OR RECEIVE: R NAME: po inb 4010 DATE 04/22/08
STANDARD VERSION: 004010 TRANSACTION SET: 850 USE CODE: P ENVELOPE TYPE: X TIME 10:44:27
APPLICATION ID: SEMPOAPPL SEND OR RECEIVE: R NAME: Class Tutorial: Inbound PO INT/EXT: L
SEG ID H/D SEG SEQ ELEM ELE SEQ DESCRIPTION MAP# NOTES
PO1 D 7600 0234 70 PRODUCT/SERVICE ID IF PO106 = 'PI' OR 'CB', TRANSLATE EDI ITEM # USING SEMDATA TABLE
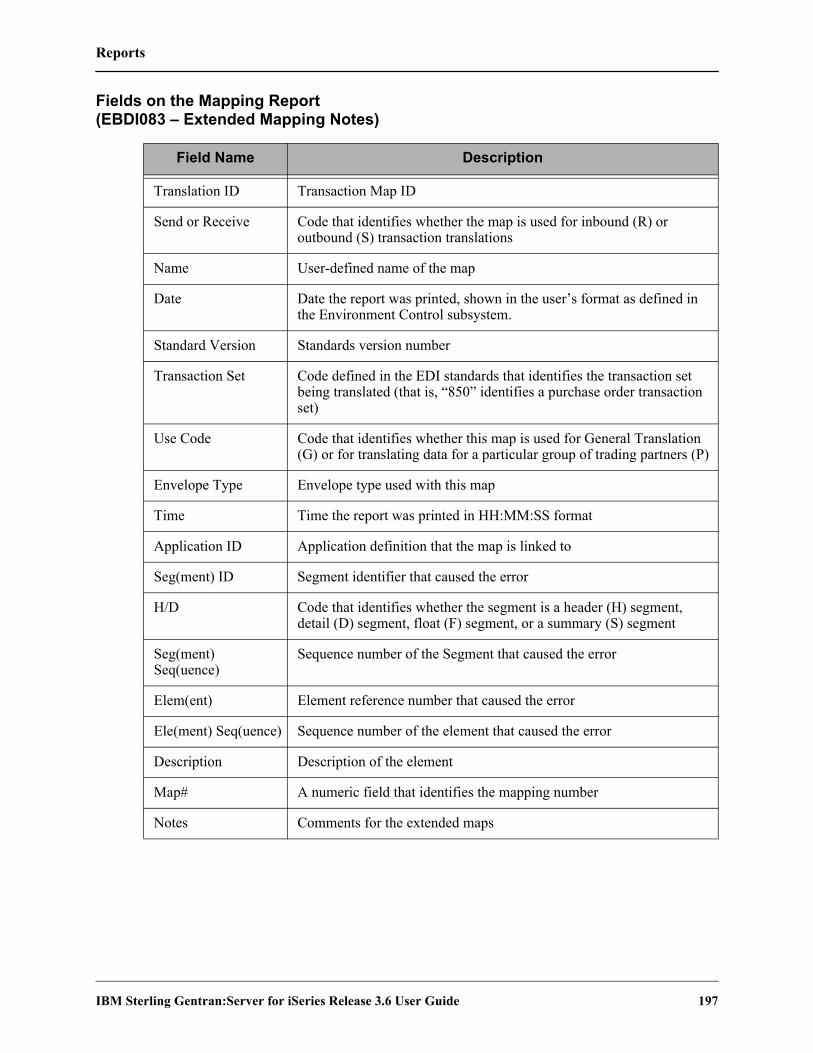
Reports
IBM Sterling Gentran:Server for iSeries Release 3.6 User Guide 197
Fields on the Mapping Report (EBDI083 – Extended Mapping Notes)
Field Name Description
Translation ID Transaction Map ID
Send or Receive Code that identifies whether the map is used for inbound (R) or outbound (S) transaction translations
Name User-defined name of the map
Date Date the report was printed, shown in the user’s format as defined in the Environment Control subsystem.
Standard Version Standards version number
Transaction Set Code defined in the EDI standards that identifies the transaction set being translated (that is, “850” identifies a purchase order transaction set)
Use Code Code that identifies whether this map is used for General Translation (G) or for translating data for a particular group of trading partners (P)
Envelope Type Envelope type used with this map
Time Time the report was printed in HH:MM:SS format
Application ID Application definition that the map is linked to
Seg(ment) ID Segment identifier that caused the error
H/D Code that identifies whether the segment is a header (H) segment, detail (D) segment, float (F) segment, or a summary (S) segment
Seg(ment) Seq(uence)
Sequence number of the Segment that caused the error
Elem(ent) Element reference number that caused the error
Ele(ment) Seq(uence) Sequence number of the element that caused the error
Description Description of the element
Map# A numeric field that identifies the mapping number
Notes Comments for the extended maps

Reports
198 IBM Sterling Gentran:Server for iSeries Release 3.6 User Guide
EBDI580 – Translation Table Report for Code, Data, and Validation
Contents of the ReportThe Translation Table Report contains particular table definitions used by the transaction mapping system. It also contains the following information depending on the type of translation table selected:
Code Translation Report – displays application and EDI standard code values
Data Translation Report – displays partner-specific data values and your application specific data values
Validation Translation Report – displays data values and the descriptions of the data values.
How to Identify the ReportThe identifier “EBDI580” displays in the upper left corner of the report. The report title, depending on the type of translation table selected, displays in the center at the top of the report.
The identifier “EBDI580” also displays in the User Data field associated with the spooled report in the Output Queue.
How to Generate the ReportThis is a user-generated report. It can be generated by selecting option ‘6’ (Print) on the Work with Tables panel (EDIX580-FMT01), or by selecting option ‘12’ from the GENMAP menu. Enter the appropriate information on the Print Translation Tables (PRTTRNTBL) panel. Be sure to specify the type of translation table to be printed on the Table Type field.
Special ConsiderationsLike all other Sterling Gentran:Server reports, the Mapping Report automatically goes to the iSeries Output Queue defined for the user running the job. (SEE the “Environment Control” chapter for instructions to set up a user’s Output Queue.)
If table type is Then
‘C’ “Code Translation Table Report” displays at the top of the report
‘D’ “Data Translation Table Report” displays at the top of the report
‘V’ “Validation Translation Table Report” displays at the top of the report

Reports
IBM Sterling Gentran:Server for iSeries Release 3.6 User Guide 199
Figure 6.148 Code Translation Table Report (EBDI580)
RUN TIME 16:14:24 PAGE 1
QUAL:
OM (tutorial 1) DIVISION: 000
APPLICATION MIN LENGTH: 1
APPLICATION MAX LENGTH: 4
APPLICATION DATA TYPE: AN
STANDARD CODE DESCRIPTION
-------------------------
BOXES
CASE
DOZEN
DOZENS
EACH
EACH
FEET
EBDI580 RUN DATE 03/30/11 CODE TRANSLATION TABLE REPORT
TABLE ID: UNITMEAS1 PARTNER ID:
TYPE: CODE DESCRIPTION: Internal t EDI U
STANDARD VERSION: 004010 STANDARD MIN LENGTH: 2
STANDARD ELEMENT REF: 0355 STANDARD MAX LENGTH: 2
RELEASE: 0 STANDARD DATA TYPE: ID
STANDARD APPLICATION
CODE CODE
-------- -----------
BX BOX
CA CASE
DZ DOZ
DZ 1 DOZN
EA EACH
EA 1 EA
FT FEET

Reports
200 IBM Sterling Gentran:Server for iSeries Release 3.6 User Guide
Fields on the Translation Table Report (EBDI580 – Code Translation Table Report)
Field Name Description
Header Information
Table ID Translation table id
Partner ID/Qual Identifies a specific trading partner for which the data translation table is valid
Type Indicates the type of translation table
Description Text description of the table
Division Designates the user-specific division code
Standard Version Standards version number
Standard Min(imum) Length
Displays the minimum length of the field as defined by the Standards.
Application Min(imum) Length
Minimum length of the application field to be translated
Standard Max(imum) Length
Displays the maximum length of the field as defined by the Standards
Application Max(imum) Length
Maximum length of the application field to be translated
Release Indicates the release number of the transaction set
Standard Data Type Identifies the data element type as defined by the standards
Application Data Type
Identifies the application data type valid values
Code Translation Table Line
Standard Code EDI standard code values
Application Code Application code values
Standard Code Description
Description of the standards code

Reports
IBM Sterling Gentran:Server for iSeries Release 3.6 User Guide 201
Figure 6.149 Data Translation Table Report (EBDI580)
EBDI580 RUN DATE 03/30/11 DATA TRANSLATION TABLE
REPORT
TABLE ID: DUNS PARTNER ID:
TYPE: DATA DESCRIPTION: INTERNAL VENDOR
STANDARD VERSION: 002040 STANDARD MIN LENGTH: 2
STANDARD ELEMENT REF: 0067 STANDARD MAX LENGTH: 17
RELEASE: 0 STANDARD DATA TYPE: ID
PARTNER DATA VALUE YOUR DATA VALUE
------------------ ---------------
121212121 VENDOR-1
333333333 VENDOR-2
999999999 VENDOR-3
012345678 VENDOR-4
IBM
RUN TIME 12:00:00 PAGE 1
QUAL:
TO DUNS CONVERSION DIVISION: 000
APPLICATION MIN LENGTH: 9
APPLICATION MAX LENGTH: 13
APPLICATION DATA TYPE: AN
DESCRIPTION
-----------
ABC COMPUTER STORE
BULK PAPER COMPANY
TWO-WAY COMMUNICATIONS INC.
RANDOM OFFICE SUPPLY

Reports
202 IBM Sterling Gentran:Server for iSeries Release 3.6 User Guide
Fields on the Translation Table Report (EBDI580 – Data Translation Table Report)
Field Name Description
Header Information
Table ID Translation table id
Partner ID/Qual Identifies a specific trading partner for which the data translation table is valid
Type Indicates the type of translation table
Description Text description of the table
Division Designates the user-specific division code
Standard Version Standards version number
Standard Min(imum) Length
Displays the minimum length of the field as defined by the Standards.
Application Min(imum) Length
Minimum length of the application field to be translated
Standard Max(imum) Length
Displays the maximum length of the field as defined by the Standards
Application Max(imum) Length
Maximum length of the application field to be translated
Release Indicates the release number of the transaction set
Standard Data Type Identifies the data element type as defined by the standards
Application Data Type
Identifies the application data type valid values
Data Translation Table Line
Partner Data Value Partner-specific data values
Your Data Value Your specific application data value
Description Description of your application data value

Reports
IBM Sterling Gentran:Server for iSeries Release 3.6 User Guide 203
Figure 6.150 Validation Translation Table Report (EBDI580)
EBDI580 RUN DATE 03/30/11 VALIDATION TRANSLATION TABLE RE
TABLE ID: REMIT1 PARTNER ID:
TYPE: VALIDATION DESCRIPTION: REMITTANCE TYPE
STANDARD VERSION: 004010 STANDARD MIN LENGTH: 2
STANDARD ELEMENT REF: 0098 STANDARD MAX LENGTH: 3
RELEASE: 0 STANDARD DATA TYPE: AN
DATA VALUE DESCRIPTION
---------- -----------
RE PARTY TO RECE
RH PAYEE'S FINAN
SE SELLING PARTY
IBM
PORT RUN TIME 12:00:00 PAGE 1
QUAL:
NAME QUALIFIER DIVISION: 000
APPLICATION MIN LENGTH: 2
APPLICATION MAX LENGTH: 2
APPLICATION DATA TYPE: AN
IVE INVOICE REMITTANCE
CIAL INSTITUTION

Reports
204 IBM Sterling Gentran:Server for iSeries Release 3.6 User Guide
Fields on the Translation Table Report (EBDI580 – Validation Translation Table Report)
Field Name Description
Header Information
Table ID Translation table id
Partner ID/Qual Identifies a specific trading partner for which the data translation table is valid
Type Indicates the type of translation table
Description Text description of the table
Division Designates the user-specific division code
Standard Version Standards version number
Standard Min(imum) Length
Displays the minimum length of the field as defined by the Standards.
Application Min(imum) Length
Minimum length of the application field to be translated
Standard Max(imum) Length
Displays the maximum length of the field as defined by the Standards
Application Max(imum) Length
Maximum length of the application field to be translated
Release Indicates the release number of the transaction set
Standard Data Type Identifies the data element type as defined by the standards
Application Data Type
Identifies the application data type valid values
Validation Translation Table Line
Data Value Partner-specific data values
Description Description of your application data value

Common Questions
IBM Sterling Gentran:Server for iSeries Release 3.6 User Guide 205
Common Questions
Can I copy a map from one version to another?Yes. A mapping utility (VERCNVT) is available that allows you to migrate an existing map to a new map for a different version. This procedure converts the map to the new version of the standard, noting any places in the map where the automated conversion was impossible and manual intervention is required. Segments and Elements are converted using the new version’s format. Characteristics about elements that changed between versions, such as data types, min/max lengths, and mandatory/optional codes are printed on the report.
My partner is upgrading to a new version of the standard; can I just change the version on my map?
No. The map is formatted for the specific version identified on the Transaction ID. Unpredictable results occur. Refer to Mapping Question # 1 to create the same map using a different version.
What types of files can be used to interface with Sterling Gentran:Server for inbound and outbound processing?
There are three types of files that Sterling Gentran:Server can directly accept for inbound and outbound processing:
Externally-described physical file (created using DDS);
Externally-described multi-format logical file (created using DDS);
Internally-described file (created using the record length parameter with multiple record types rather than DDS).
SEE the “Mapping – Getting Started” chapter for more information on file types.

Common Questions
206 IBM Sterling Gentran:Server for iSeries Release 3.6 User Guide
What rules should be followed when setting up a map?There are several rules of thumb to observe in both the application definition and the transaction map:
1. For inbound or outbound, Max Use MUST be equal to one for the first application record defined to an area such as the Header area (the first Header record identifies the beginning of a new document and can have only one per document). This is also true for the first transaction segment in an area.
2. For inbound or outbound, Max Use MUST be equal to one for the first application record in a loop, identified by having a Loop ID. For inbound, it means the record is written only one time per occurrence of the incoming loop. For outbound, it means the record occurs only once per iteration of the loop being generated.
An example is if you had one detail line item record that is used to generate a PO1 line item loop for an 850 purchase order. The Max Use on the application record should be one, indicating one record generates a single PO1 line item loop. Now it is possible to have a secondary detail record with a max use of 100. For instance, the secondary record is used to generate a single segment multiple times, such as the SDQ segment, in the transaction within the PO1 loop. In this case, the application record occurs multiple times for every occurrence of the line item record. If you had a situation where the first record in the loop occurs multiple times, add a dummy segment at the beginning of the loop that has a Max Use of one.
3. For inbound or outbound on the transaction map, only use the Max Loop on the first segment starting the loop. Max loop is only used on the transaction side and identifies how many iterations of a loop should be generated or will be coming in.
4. For outbound, the Loop IDs MUST MATCH between the application definition and the transaction map. If a mismatch of a Loop ID exists between both sides, the processing is halted immediately before any actual translation occurs. Message 673, “Transaction Loop defined that is not in Application,” or 672, “Application Loop defined that is not in Transaction,” is printed on the Mapping Error report indicating which side has a Loop ID that does not exist in the other side. The information column contains the mismatched Loop ID.
CAUTIONSTOP
A Loop ID of ‘0100’ is not equal to a Loop ID of ‘b100.’ The Loop ID is a 4-byte alphanumeric field. Likewise, a Loop ID of ‘b100’ is not the same as a Loop ID of ‘100b,’ since one has a leading blank, while the other has a trailing blank. Look closely at the Loop IDs that are printed on the Mapping report that are in error.
The Loop IDs are used to align or match records to segments between the application and the transaction. This alignment is done while trying to preserve multiple occurrences of the same data structure (like the Name/Address loop structure that may occur several times for various names and addresses).
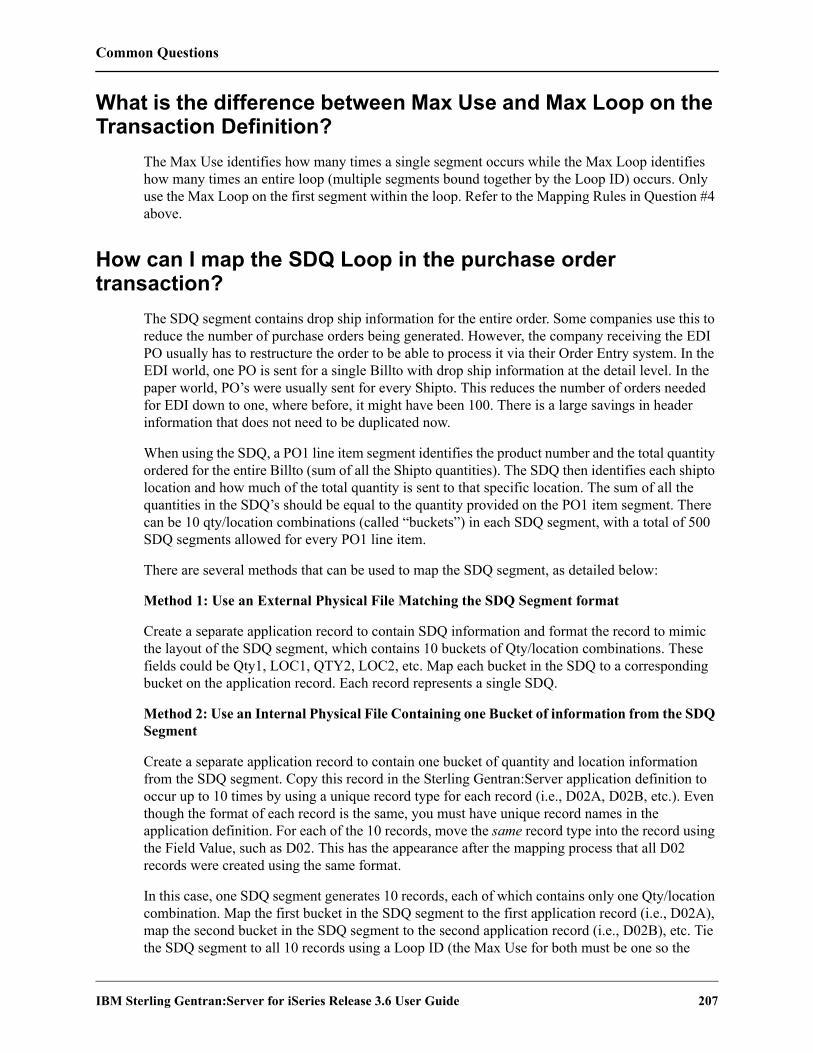
Common Questions
IBM Sterling Gentran:Server for iSeries Release 3.6 User Guide 207
What is the difference between Max Use and Max Loop on the Transaction Definition?
The Max Use identifies how many times a single segment occurs while the Max Loop identifies how many times an entire loop (multiple segments bound together by the Loop ID) occurs. Only use the Max Loop on the first segment within the loop. Refer to the Mapping Rules in Question #4 above.
How can I map the SDQ Loop in the purchase order transaction?
The SDQ segment contains drop ship information for the entire order. Some companies use this to reduce the number of purchase orders being generated. However, the company receiving the EDI PO usually has to restructure the order to be able to process it via their Order Entry system. In the EDI world, one PO is sent for a single Billto with drop ship information at the detail level. In the paper world, PO’s were usually sent for every Shipto. This reduces the number of orders needed for EDI down to one, where before, it might have been 100. There is a large savings in header information that does not need to be duplicated now.
When using the SDQ, a PO1 line item segment identifies the product number and the total quantity ordered for the entire Billto (sum of all the Shipto quantities). The SDQ then identifies each shipto location and how much of the total quantity is sent to that specific location. The sum of all the quantities in the SDQ’s should be equal to the quantity provided on the PO1 item segment. There can be 10 qty/location combinations (called “buckets”) in each SDQ segment, with a total of 500 SDQ segments allowed for every PO1 line item.
There are several methods that can be used to map the SDQ segment, as detailed below:
Method 1: Use an External Physical File Matching the SDQ Segment format
Create a separate application record to contain SDQ information and format the record to mimic the layout of the SDQ segment, which contains 10 buckets of Qty/location combinations. These fields could be Qty1, LOC1, QTY2, LOC2, etc. Map each bucket in the SDQ to a corresponding bucket on the application record. Each record represents a single SDQ.
Method 2: Use an Internal Physical File Containing one Bucket of information from the SDQ Segment
Create a separate application record to contain one bucket of quantity and location information from the SDQ segment. Copy this record in the Sterling Gentran:Server application definition to occur up to 10 times by using a unique record type for each record (i.e., D02A, D02B, etc.). Even though the format of each record is the same, you must have unique record names in the application definition. For each of the 10 records, move the same record type into the record using the Field Value, such as D02. This has the appearance after the mapping process that all D02 records were created using the same format.
In this case, one SDQ segment generates 10 records, each of which contains only one Qty/location combination. Map the first bucket in the SDQ segment to the first application record (i.e., D02A), map the second bucket in the SDQ segment to the second application record (i.e., D02B), etc. Tie the SDQ segment to all 10 records using a Loop ID (the Max Use for both must be one so the

Common Questions
208 IBM Sterling Gentran:Server for iSeries Release 3.6 User Guide
looping occurs based on the Loop ID). You can use the Loop ID of ‘SDQ’ or the Loop ID that exists on the SDQ segment in the transaction definition. Just make sure the Loop ID is the same for both the segment and all 10 records (yes, each record for the SDQ must have the Loop ID entered). If you don’t use a Loop ID, you will only get one occurrence of the SDQ mapped.
Method 3: Use an External Physical File Containing one Bucket from the SDQ Segment
Follow the Method 2 process, but use externally-described physical files instead of multiple-record formats in the internally-described file. Create 10 physical files with unique names (you can use the same DDS to create each one). Define each of the physical files to the application definition and retrieve the DDS for each one (even though they are the same). The rest of the process would be the same as Method 1.
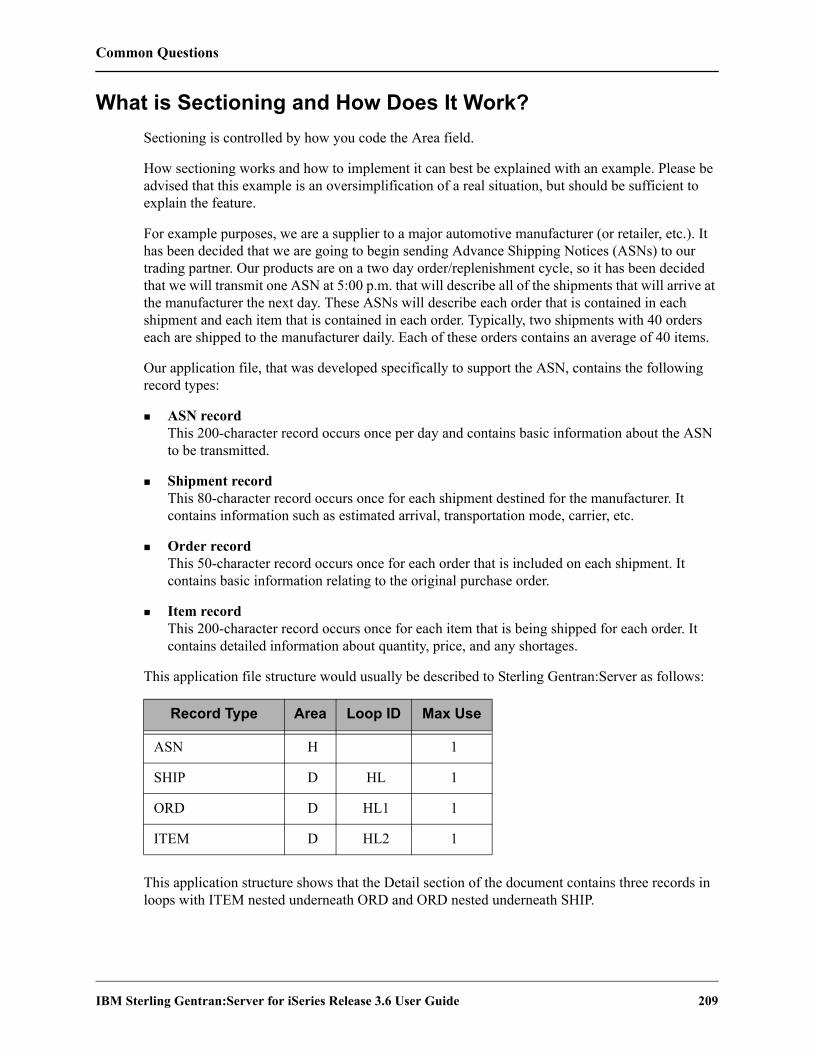
Common Questions
IBM Sterling Gentran:Server for iSeries Release 3.6 User Guide 209
What is Sectioning and How Does It Work?Sectioning is controlled by how you code the Area field.
How sectioning works and how to implement it can best be explained with an example. Please be advised that this example is an oversimplification of a real situation, but should be sufficient to explain the feature.
For example purposes, we are a supplier to a major automotive manufacturer (or retailer, etc.). It has been decided that we are going to begin sending Advance Shipping Notices (ASNs) to our trading partner. Our products are on a two day order/replenishment cycle, so it has been decided that we will transmit one ASN at 5:00 p.m. that will describe all of the shipments that will arrive at the manufacturer the next day. These ASNs will describe each order that is contained in each shipment and each item that is contained in each order. Typically, two shipments with 40 orders each are shipped to the manufacturer daily. Each of these orders contains an average of 40 items.
Our application file, that was developed specifically to support the ASN, contains the following record types:
ASN recordThis 200-character record occurs once per day and contains basic information about the ASN to be transmitted.
Shipment recordThis 80-character record occurs once for each shipment destined for the manufacturer. It contains information such as estimated arrival, transportation mode, carrier, etc.
Order recordThis 50-character record occurs once for each order that is included on each shipment. It contains basic information relating to the original purchase order.
Item recordThis 200-character record occurs once for each item that is being shipped for each order. It contains detailed information about quantity, price, and any shortages.
This application file structure would usually be described to Sterling Gentran:Server as follows:
This application structure shows that the Detail section of the document contains three records in loops with ITEM nested underneath ORD and ORD nested underneath SHIP.
Record Type Area Loop ID Max Use
ASN H 1
SHIP D HL 1
ORD D HL1 1
ITEM D HL2 1
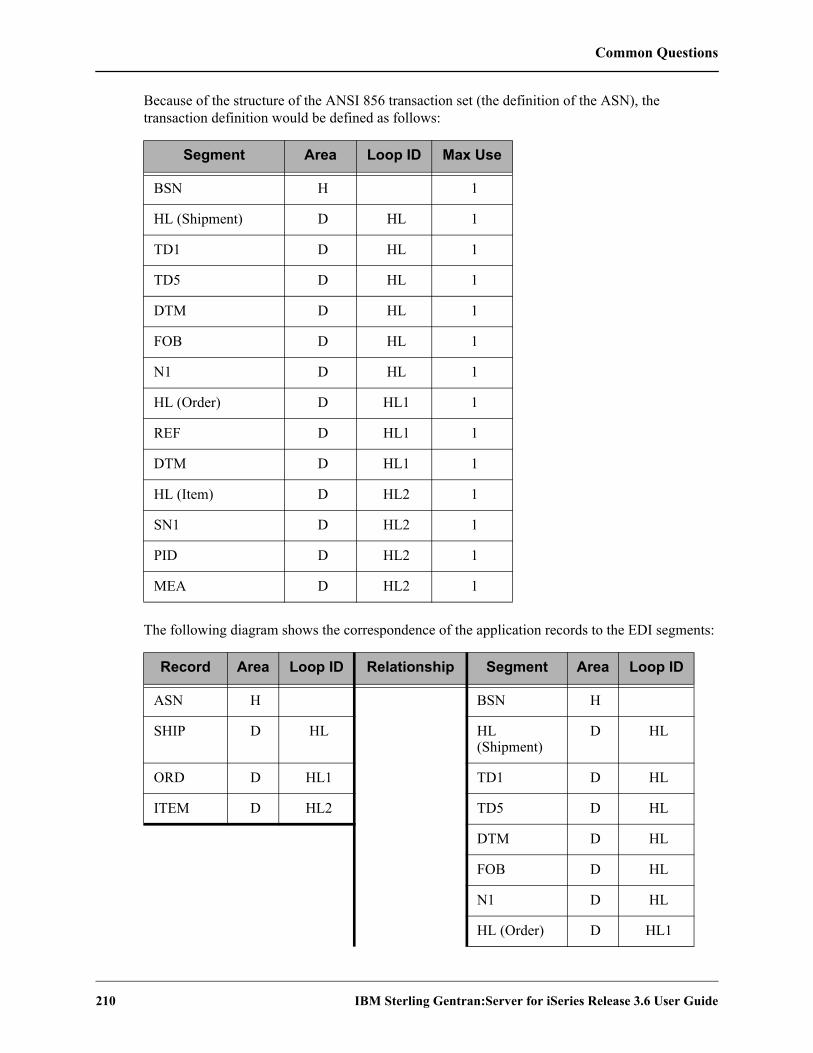
Common Questions
210 IBM Sterling Gentran:Server for iSeries Release 3.6 User Guide
Because of the structure of the ANSI 856 transaction set (the definition of the ASN), the transaction definition would be defined as follows:
The following diagram shows the correspondence of the application records to the EDI segments:
Segment Area Loop ID Max Use
BSN H 1
HL (Shipment) D HL 1
TD1 D HL 1
TD5 D HL 1
DTM D HL 1
FOB D HL 1
N1 D HL 1
HL (Order) D HL1 1
REF D HL1 1
DTM D HL1 1
HL (Item) D HL2 1
SN1 D HL2 1
PID D HL2 1
MEA D HL2 1
Record Area Loop ID Relationship Segment Area Loop ID
ASN H BSN H
SHIP D HL HL(Shipment)
D HL
ORD D HL1 TD1 D HL
ITEM D HL2 TD5 D HL
DTM D HL
FOB D HL
N1 D HL
HL (Order) D HL1
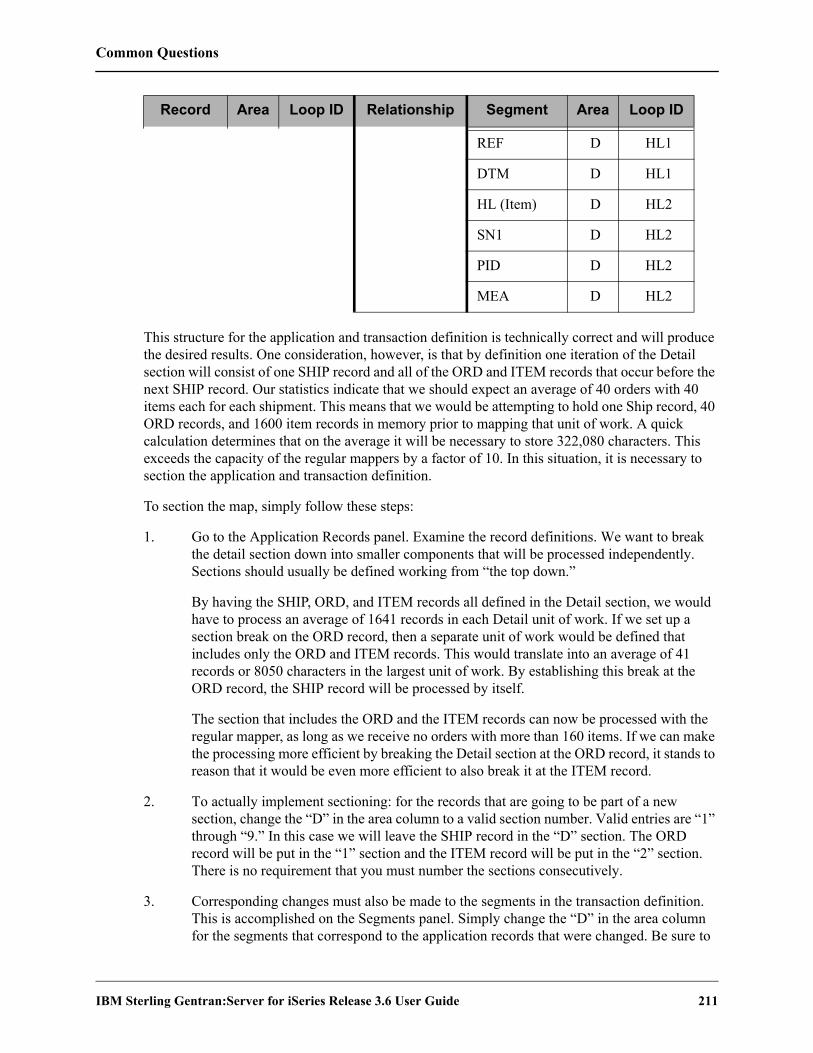
Common Questions
IBM Sterling Gentran:Server for iSeries Release 3.6 User Guide 211
This structure for the application and transaction definition is technically correct and will produce the desired results. One consideration, however, is that by definition one iteration of the Detail section will consist of one SHIP record and all of the ORD and ITEM records that occur before the next SHIP record. Our statistics indicate that we should expect an average of 40 orders with 40 items each for each shipment. This means that we would be attempting to hold one Ship record, 40 ORD records, and 1600 item records in memory prior to mapping that unit of work. A quick calculation determines that on the average it will be necessary to store 322,080 characters. This exceeds the capacity of the regular mappers by a factor of 10. In this situation, it is necessary to section the application and transaction definition.
To section the map, simply follow these steps:
1. Go to the Application Records panel. Examine the record definitions. We want to break the detail section down into smaller components that will be processed independently. Sections should usually be defined working from “the top down.”
By having the SHIP, ORD, and ITEM records all defined in the Detail section, we would have to process an average of 1641 records in each Detail unit of work. If we set up a section break on the ORD record, then a separate unit of work would be defined that includes only the ORD and ITEM records. This would translate into an average of 41 records or 8050 characters in the largest unit of work. By establishing this break at the ORD record, the SHIP record will be processed by itself.
The section that includes the ORD and the ITEM records can now be processed with the regular mapper, as long as we receive no orders with more than 160 items. If we can make the processing more efficient by breaking the Detail section at the ORD record, it stands to reason that it would be even more efficient to also break it at the ITEM record.
2. To actually implement sectioning: for the records that are going to be part of a new section, change the “D” in the area column to a valid section number. Valid entries are “1” through “9.” In this case we will leave the SHIP record in the “D” section. The ORD record will be put in the “1” section and the ITEM record will be put in the “2” section. There is no requirement that you must number the sections consecutively.
3. Corresponding changes must also be made to the segments in the transaction definition. This is accomplished on the Segments panel. Simply change the “D” in the area column for the segments that correspond to the application records that were changed. Be sure to
REF D HL1
DTM D HL1
HL (Item) D HL2
SN1 D HL2
PID D HL2
MEA D HL2
Record Area Loop ID Relationship Segment Area Loop ID

Common Questions
212 IBM Sterling Gentran:Server for iSeries Release 3.6 User Guide
use the same section number that was used for the application record. When the application and the transaction definition have been sectioned, the records to segments correspondence will be as follows:
Please note that the only thing that changed was the Area identifier for the ORD and ITEM records and the Area identifiers for the corresponding EDI segments.
Record Area Loop ID Relationship Segment Area Loop ID
ASN H BSN H
SHIP D HL HL(Shipment)
D HL
ORD 1 HL1 TD1 D HL
ITEM 2 HL2 TD5 D HL
DTM D HL
FOB D HL
N1 D HL
HL (Order) 1 HL1
REF 1 HL1
DTM 1 HL1
HL (Item) 2 HL2
SN1 2 HL2
PID 2 HL2
MEA 2 HL2
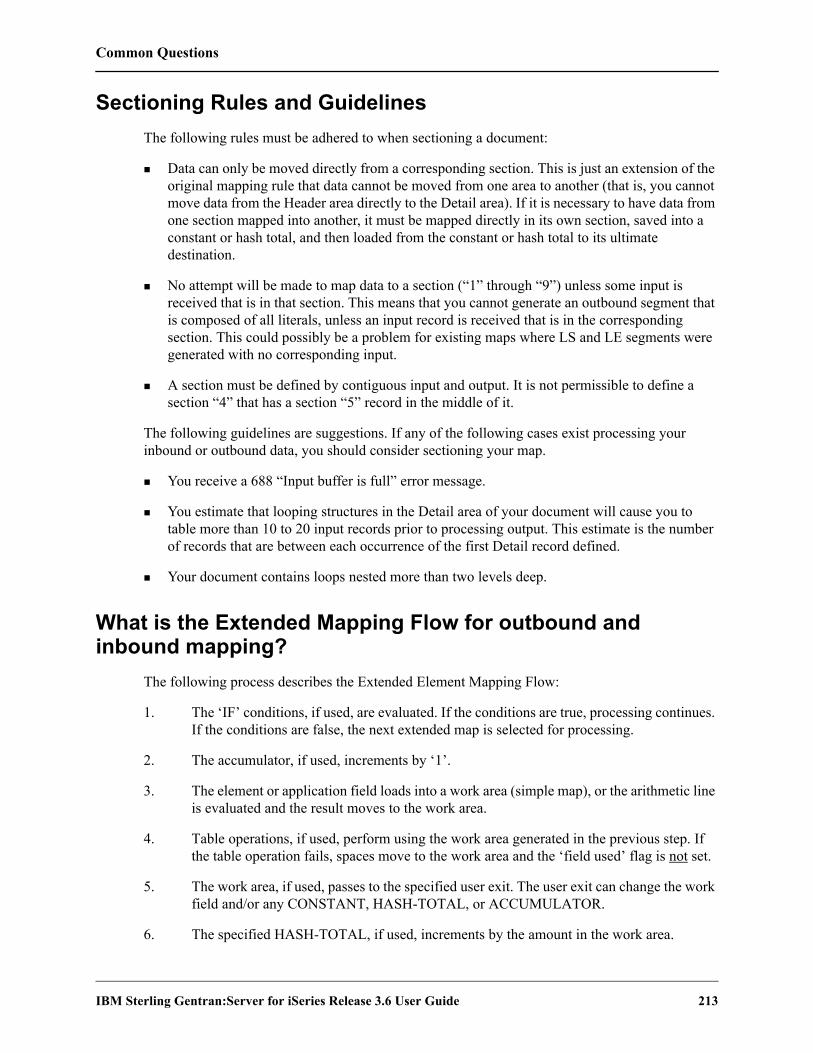
Common Questions
IBM Sterling Gentran:Server for iSeries Release 3.6 User Guide 213
Sectioning Rules and GuidelinesThe following rules must be adhered to when sectioning a document:
Data can only be moved directly from a corresponding section. This is just an extension of the original mapping rule that data cannot be moved from one area to another (that is, you cannot move data from the Header area directly to the Detail area). If it is necessary to have data from one section mapped into another, it must be mapped directly in its own section, saved into a constant or hash total, and then loaded from the constant or hash total to its ultimate destination.
No attempt will be made to map data to a section (“1” through “9”) unless some input is received that is in that section. This means that you cannot generate an outbound segment that is composed of all literals, unless an input record is received that is in the corresponding section. This could possibly be a problem for existing maps where LS and LE segments were generated with no corresponding input.
A section must be defined by contiguous input and output. It is not permissible to define a section “4” that has a section “5” record in the middle of it.
The following guidelines are suggestions. If any of the following cases exist processing your inbound or outbound data, you should consider sectioning your map.
You receive a 688 “Input buffer is full” error message.
You estimate that looping structures in the Detail area of your document will cause you to table more than 10 to 20 input records prior to processing output. This estimate is the number of records that are between each occurrence of the first Detail record defined.
Your document contains loops nested more than two levels deep.
What is the Extended Mapping Flow for outbound and inbound mapping?
The following process describes the Extended Element Mapping Flow:
1. The ‘IF’ conditions, if used, are evaluated. If the conditions are true, processing continues. If the conditions are false, the next extended map is selected for processing.
2. The accumulator, if used, increments by ‘1’.
3. The element or application field loads into a work area (simple map), or the arithmetic line is evaluated and the result moves to the work area.
4. Table operations, if used, perform using the work area generated in the previous step. If the table operation fails, spaces move to the work area and the ‘field used’ flag is not set.
5. The work area, if used, passes to the specified user exit. The user exit can change the work field and/or any CONSTANT, HASH-TOTAL, or ACCUMULATOR.
6. The specified HASH-TOTAL, if used, increments by the amount in the work area.
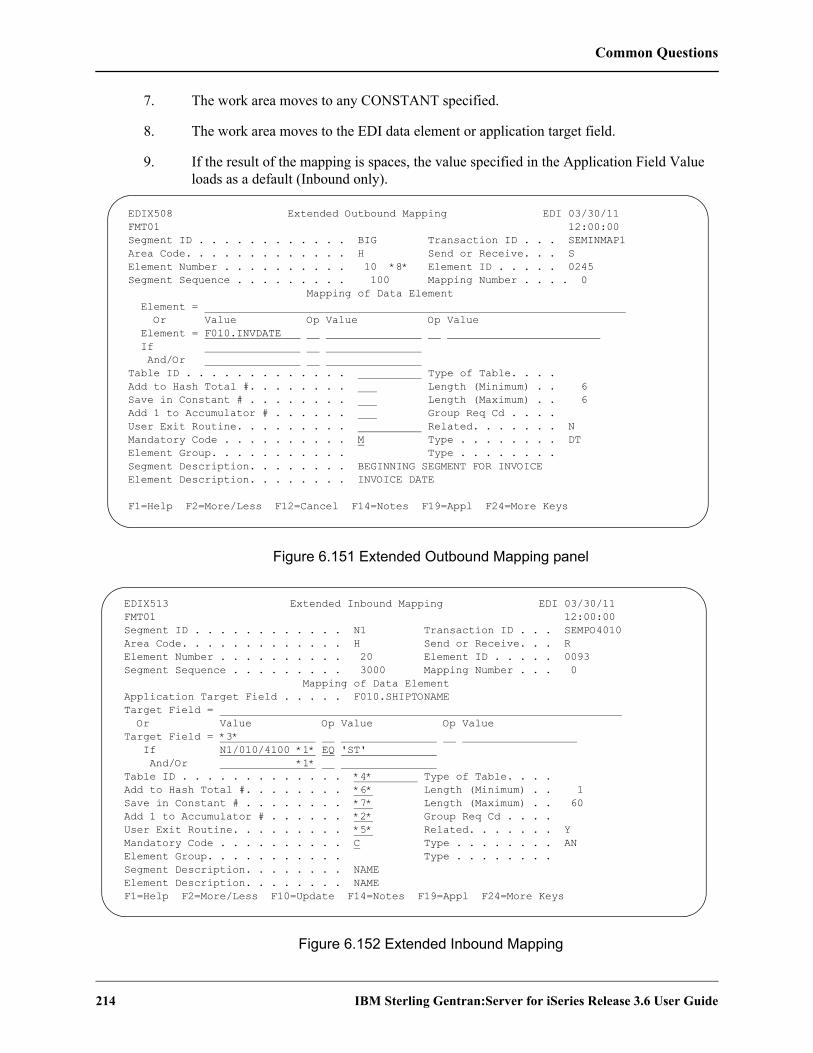
Common Questions
214 IBM Sterling Gentran:Server for iSeries Release 3.6 User Guide
7. The work area moves to any CONSTANT specified.
8. The work area moves to the EDI data element or application target field.
9. If the result of the mapping is spaces, the value specified in the Application Field Value loads as a default (Inbound only).
Figure 6.151 Extended Outbound Mapping panel
Figure 6.152 Extended Inbound Mapping
EDIX508 Extended Outbound Mapping EDI 03/30/11 FMT01 12:00:00 Segment ID . . . . . . . . . . . . BIG Transaction ID . . . SEMINMAP1 Area Code. . . . . . . . . . . . . H Send or Receive. . . S Element Number . . . . . . . . . . 10 *8* Element ID . . . . . 0245 Segment Sequence . . . . . . . . . 100 Mapping Number . . . . 0 Mapping of Data Element Element = Or Value Op Value Op Value Element = F010.INVDATE If And/Or Table ID . . . . . . . . . . . . . Type of Table. . . . Add to Hash Total #. . . . . . . . Length (Minimum) . . 6 Save in Constant # . . . . . . . . Length (Maximum) . . 6 Add 1 to Accumulator # . . . . . . Group Req Cd . . . . User Exit Routine. . . . . . . . . Related. . . . . . . N Mandatory Code . . . . . . . . . . M Type . . . . . . . . DT Element Group. . . . . . . . . . . Type . . . . . . . . Segment Description. . . . . . . . BEGINNING SEGMENT FOR INVOICE Element Description. . . . . . . . INVOICE DATE F1=Help F2=More/Less F12=Cancel F14=Notes F19=Appl F24=More Keys
EDIX513 Extended Inbound Mapping EDI 03/30/11 FMT01 12:00:00 Segment ID . . . . . . . . . . . . N1 Transaction ID . . . SEMPO4010 Area Code. . . . . . . . . . . . . H Send or Receive. . . R Element Number . . . . . . . . . . 20 Element ID . . . . . 0093 Segment Sequence . . . . . . . . . 3000 Mapping Number . . . 0 Mapping of Data Element Application Target Field . . . . . F010.SHIPTONAME Target Field = Or Value Op Value Op Value Target Field = *3* If N1/010/4100 *1* EQ 'ST' And/Or *1* Table ID . . . . . . . . . . . . . *4* Type of Table. . . . Add to Hash Total #. . . . . . . . *6* Length (Minimum) . . 1 Save in Constant # . . . . . . . . *7* Length (Maximum) . . 60 Add 1 to Accumulator # . . . . . . *2* Group Req Cd . . . . User Exit Routine. . . . . . . . . *5* Related. . . . . . . Y Mandatory Code . . . . . . . . . . C Type . . . . . . . . AN Element Group. . . . . . . . . . . Type . . . . . . . . Segment Description. . . . . . . . NAME Element Description. . . . . . . . NAME F1=Help F2=More/Less F10=Update F14=Notes F19=Appl F24=More Keys

Chapter
IBM Sterling Gentran:Server for iSeries Release 3.6 User Guide 1
7 Standards
In this ChapterThis chapter describes what Standards are and where they are used. Step-by-step procedures are provided to guide you in creating or maintaining a standards version. Various tasks you can perform with standards are described in this tutorial. This chapter contains the following sections:
What are Standards? . . . . . . . . . . . . . . . . . . . . . . . . . . . . . . . . . . . . . . . . . . . . . . . . . . . . 7-1
What Does the Standards Subsystem Do? . . . . . . . . . . . . . . . . . . . . . . . . . . . . . . . . . . . 7-2
Panel Quick Reference . . . . . . . . . . . . . . . . . . . . . . . . . . . . . . . . . . . . . . . . . . . . . . . . . . 7-3
Using the Standards Panels . . . . . . . . . . . . . . . . . . . . . . . . . . . . . . . . . . . . . . . . . . . . . . . 7-7
Reports . . . . . . . . . . . . . . . . . . . . . . . . . . . . . . . . . . . . . . . . . . . . . . . . . . . . . . . . . . . . . 7-54
Common Questions. . . . . . . . . . . . . . . . . . . . . . . . . . . . . . . . . . . . . . . . . . . . . . . . . . . . 7-66
What are Standards?Standards are what make electronic data interchange (EDI) possible. When transmitting business documents electronically, it is critical to use a common or “standard” format to allow both parties to be able to interpret and process the data. EDI standards are continually evolving because of changing business requirements. A version/release represents a “snapshot” in time of the standards format. New versions, releases, and sub-releases are published to provide new information, additional codes, or changes in the layout to meet these changing business needs. EDI users need to be able to modify standards in order to respond to changes and to be able to handle special business requirements.

What Does the Standards Subsystem Do?
2 IBM Sterling Gentran:Server for iSeries Release 3.6 User Guide
What Does the Standards Subsystem Do?The Standards subsystem provides these capabilities:
View EDI standards in full detail
Modify EDI standards for changed business requirements
Create new EDI standards for special translation requirements of a trading partner
Print EDI standards (the entire version or selected transactions)
Select specific transactions for use in data translation for one or more versions
RECOMMENDATIONUse of the Standards Maintenance feature should be restricted to the EDI Coordinator/System Administrator. All others should have data rights of ‘3’ for viewing the standards.
The entire concept behind “standardization” is that the rules remain the same for all trading partners. Alterations of public standards should be limited to agency-issued corrections and enhancements. Creation of special versions should be limited to those situations required between trading partners. (SEE the “Environment Control” chapter for more information on restrictions to the Standards Maintenance feature.)
NOTESterling Commerce will issue regular modifications to the standards versions. Therefore, you will not need to perform the Standards Maintenance to update the standard yourself, unless you intend to use these corrections before the scheduled Sterling Gentran:Server release.

Panel Quick Reference
IBM Sterling Gentran:Server for iSeries Release 3.6 User Guide 3
Panel Quick ReferenceThe following table gives the purpose and access methods for the primary panels in the Standards subsystem. Some of these panels may require you to enter certain Segment IDs or Elements on a key panel (FMT00).
Panel Name Purpose Access Methods
EDIX100-FMT01
Work with Standards
Create, revise, copy, delete, view, or print Standards versions
Select option ‘5’ on the GENMAIN menu
Type ‘EXCPGM EDIX100’ on the command line
EDIX110-FMT01
Standards Version
Define the version and set the Update Allowed flag to ‘Y’ (Yes)
Select an option (1-5) and Version ID on panel EDIX100-FMT01
Type ‘EXCPGM EDIX110’ on the command line
EDIX120-CTL01
Standards Transaction
Define the transactions within a version/release
Select option ‘11’ on panel EDIX100-FMT01
Type ‘EXCPGM EDIX120’ on the command line
EDIX125-CTL01
Group/Transaction Directory
Lists transaction name and functional group
Select option ‘18’ on panel EDIX100-FMT01
Press function key ‘F18-Grp/Trn Dir’ on panel EDIX120-CTL01
EDIX130-CTL01
Standards Segment
Define the Segments within a transaction set for a specific version
Select option ‘11’ on panel EDIX120-CTL01
Select option ‘12’ on panel EDIX100-FMT01
Type ‘EXCPGM EDIX130’ on the command line
EDIX140-CTL01
Standards Segment Element
Specify a Version ID and Segment ID to delete or view Segment Elements
Select option ‘11’ on panel EDIX130-CTL01
Select option ‘13’ on panel EDIX100-FMT01
Type ‘EXCPGM EDIX140’ on the command line

Panel Quick Reference
4 IBM Sterling Gentran:Server for iSeries Release 3.6 User Guide
EDIX141-FMT01
Standards Segment Element Conditional Code
View Conditional Area codes
Select option ‘11’ on panel EDIX140-CTL01
Type ‘EXCPGM EDIX141’ on the command line
EDIX150-FMT01
Standards Segment Element Activity
View the Activity for a Segment Element
Select option ‘12’ on panel EDIX140-CTL01
Select option ‘14’ on panel EDIX100-FMT01
Type ‘EXCPGM EDIX150’ on the command line
EDIX160-CTL01
Standards Data Element Definition
Delete or view Data Elements for a Segment ID
Select option ‘13’ on panel EDIX140-CTL01
Select option ‘15’ on panel EDIX100-FMT01
Type ‘EXCPGM EDIX160’ on the command line
EDIX170-CTL01
Data Element Code Definition
View or delete Data Elements Codes for a Data Element
Select option ‘11’ on panel EDIX160-CTL01
Select option ‘16’ on panel EDIX100-FMT01
Type ‘EXCPGM EDIX170’ on the command line.
EDIX180-CTL01
Standards Transaction in Use
View transactions in use for a standards version
Select option ‘17’ next to the Version ID on panel EDIX100-FMT01
Type ‘EXCPGM EDIX180’ on the command line
EDIX190-FMT01
Work with Batch Standards File
Displays the versions contained in your batch standards file
Select option ‘35’ on panel EDIX100-FMT01
Type ‘EXCPGM EDIX190’ on the command line
EDIX191-CTL01
Batch Standards Transactions
Displays the transactions for a specific version contained in your batch standards file
Select option ‘11’ on panel EDIX190-FMT01
Panel Name Purpose Access Methods

Panel Quick Reference
IBM Sterling Gentran:Server for iSeries Release 3.6 User Guide 5
EDIX192-CTL01
Batch Standards Segment
Displays the segments within a transaction for a specific version contained in your batch standards file
Select option ‘11’ on panel EDIX191-CTL01
EDIX193-CTL01
Batch Standards Segment Element
Displays the elements of a segment for a specific version in your batch standards file
Select option ‘11’ on panel EDIX192-CTL01
EDIX194-CTL01
Batch Standards Element Conditional Code
Displays conditional element codes for an element in your batch standards file
Select option ‘11’ on panel EDIX193-CTL01
EDIX195-CTL01
Batch Standards Element Activity
Displays the activity for a segment element in your batch standards file
Select option ‘12’ on panel EDIX193-CTL01
EDIX196-CTL01
Batch Standards Element Definition
Displays the data element definitions for an element in your batch standards file
Select option ‘13’ on panel EDIX193-CTL01
EDIX197-CTL01
Batch Standards Code Definition
Displays the data element codes for a data element in your batch standards file
Select option ‘11’ on panel EDIX196-CTL01
EDIX198-CTL01
Group/Transaction Directory
Lists transaction name and functional group
Select option ‘18’ on panel EDIX190-FMT01
Press function key ‘F18-Grp/Trn Dir’ on panel EDIX191-CTL01
Print Standards File (PRTSTD)
Print one or more transactions for a standards version
Select option ‘6’ on panel EDIX100-FMT01
Prompt ‘PRTSTD’ on the command line
Print Standards File (PRTSTD120)
Print one or more transactions for a standards version
Select option ‘6’ on panel EDIX120-CTL01
Standard File Extract (EXTSTD)
Runs program EBDI030 which loads the selected versions and transactions
Select option ‘30’ on panel EDIX100-FMT01
Type ‘EXTSTD’ on the command line
Panel Name Purpose Access Methods
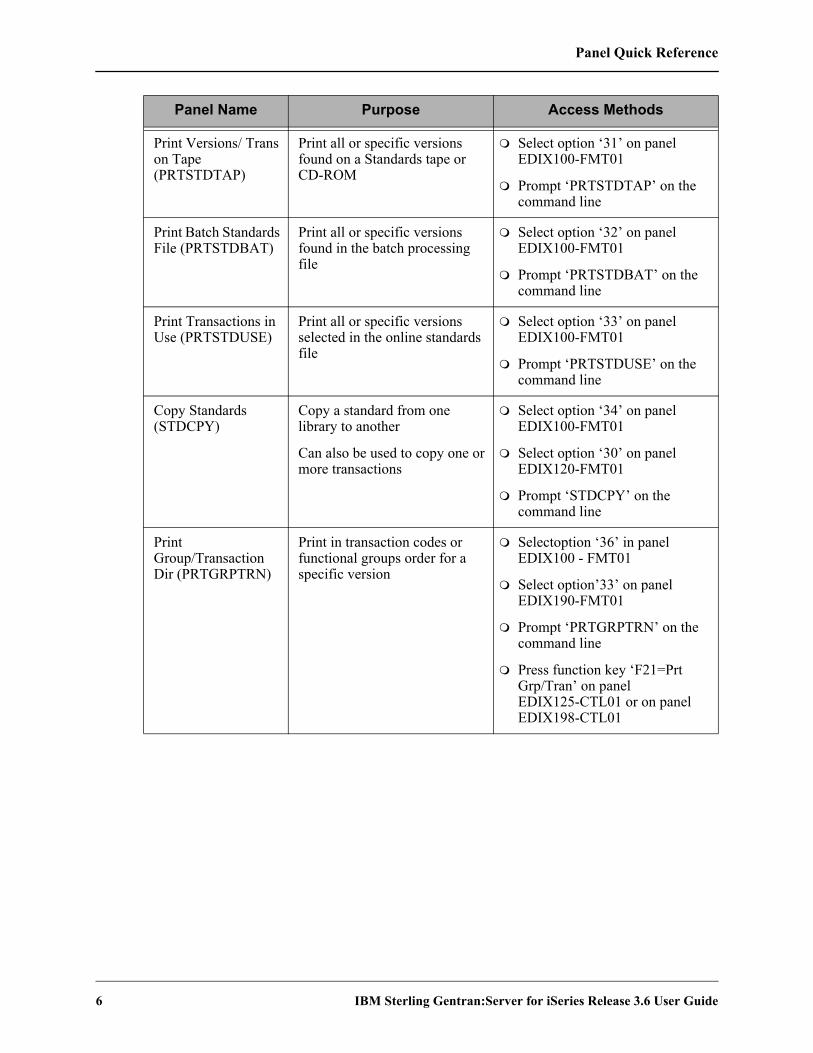
Panel Quick Reference
6 IBM Sterling Gentran:Server for iSeries Release 3.6 User Guide
Print Versions/ Trans on Tape (PRTSTDTAP)
Print all or specific versions found on a Standards tape or CD-ROM
Select option ‘31’ on panel EDIX100-FMT01
Prompt ‘PRTSTDTAP’ on the command line
Print Batch Standards File (PRTSTDBAT)
Print all or specific versions found in the batch processing file
Select option ‘32’ on panel EDIX100-FMT01
Prompt ‘PRTSTDBAT’ on the command line
Print Transactions in Use (PRTSTDUSE)
Print all or specific versions selected in the online standards file
Select option ‘33’ on panel EDIX100-FMT01
Prompt ‘PRTSTDUSE’ on the command line
Copy Standards (STDCPY)
Copy a standard from one library to another
Can also be used to copy one or more transactions
Select option ‘34’ on panel EDIX100-FMT01
Select option ‘30’ on panel EDIX120-FMT01
Prompt ‘STDCPY’ on the command line
Print Group/Transaction Dir (PRTGRPTRN)
Print in transaction codes or functional groups order for a specific version
Selectoption ‘36’ in panel EDIX100 - FMT01
Select option’33’ on panel EDIX190-FMT01
Prompt ‘PRTGRPTRN’ on the command line
Press function key ‘F21=Prt Grp/Tran’ on panel EDIX125-CTL01 or on panel EDIX198-CTL01
Panel Name Purpose Access Methods

Using the Standards Panels
IBM Sterling Gentran:Server for iSeries Release 3.6 User Guide 7
Using the Standards Panels
Access the Standards Subsystem
NOTETo use the IBM® Sterling Gentran:Server® for iSeries® Release 3.6 Tutorials, you must add the tutorial library (G3X6SAMP) to your library list before the Sterling Gentran:Server data library (G3X6DTA).
To access the Standards subsystem, select option ‘5’ (Work with Standards) on the Sterling Gentran:Server for iSeries menu (GENMAIN). All tasks associated with standards will begin through this option.
Figure 7.1 Sterling Gentran:Server for iSeries (GENMAIN) panel
The system displays the Work with Standards panel (EDIX100-FMT01). In order to complete these tasks, you will now walk through the other panels by using the “Work with Standards” panel.
Three terms that you should be familiar with in order to use the Standards panels are:
Standards refer to a set of publicly recognized EDI communication rules.
Versions are periodic releases of an EDI standard that include updates and/or changes to the standard.
GENMAIN GENTRAN:Server for iSeries Version 3.6 System: ISDDEV01 Select one of the following: 1. Work with Partners 2. Work with Application Definition 3. Mapping Menu (GENMAP) 4. Communications Menu (GENCOM) 5. Work with Standards 6. Work with Environment Control 8. Audit Menu (GENAUD) 9. Message Center Menu (GENMSG) 10. Processing Menu (GENPRC) 11. System Administration Menu (GENSYS) 12. Viewpoint Menu (GENVPT) 13. Gentran File Tracking Menu (GENFILETRK) 14. Gentran:Server Search Index More... Selection or command ===> 5 F3=Exit F4=Prompt F9=Retrieve F12=Cancel F13=User Support
Using the Standards Panels
8 IBM Sterling Gentran:Server for iSeries Release 3.6 User Guide
Transactions represent document types, such as purchase orders or invoices, that are required to effectively define the data being transmitted.
The use of the Standards panels is illustrated in the form of tasks that you may perform most frequently with standards. This tutorial consists of five individual tasks, as follows:
View the EDI standards through all levels
Use Option codes for Quick access methods to the Standards version panels
Select transactions you will use for inbound and outbound processing
Copy an existing standards version to create a new standards version
CAUTIONSTOP
Use caution if you create a new standards version. You should always, to the best of your ability, use the public EDI standards. You are responsible for maintaining any new (Proprietary) standards that you create.
Print all information for selected transactions of a specific standards version (PRTSTD)
View EDI StandardsYou may need to use the Standards Maintenance feature to modify a standards version for two basic reasons: early implementation of a new version, or to apply agency-issued interim corrections or enhancements.
Apply file maintenance of standards in the same manner as all other Sterling Gentran:Server system file maintenance using ADD, UPDATE, and DELETE. The standards records, however, are critical, so exercise extreme caution when you alter or delete them. If you modify them judiciously and with care you will be able to stay up-to-date with standards agency releases.
You can maintain (for example, change or update) a specific version at any of the three basic levels listed below.
Transaction
Segment
Segment Element
NOTEThis task is intended only to illustrate how to modify an EDI standards version. Unless you have full authority to revise, do not attempt to update information while using this tutorial.

Using the Standards Panels
IBM Sterling Gentran:Server for iSeries Release 3.6 User Guide 9
Step 1: Select the Standards and Version
The following figure shows the Work with Standards panel (EDIX100-FMT01) as it displays the Version IDs along with the applicable option codes.
Figure 7.2 Work with Standards panel (EDIX100-FMT01)
Press Home and the arrow keys to move the cursor to the Position to Version ID field at the top of the panel. Type ‘004010’ and press Enter. This version is positioned to the top of the list as shown in the above figure.
Next, type ‘2’ (Revise) in the Option field next to the selected version and press Enter. The system displays the Standards Version panel (EDIX110-FMT01) in the Revision mode.
NOTETo display the Standards Version panel, you can also use the key entry line to enter the values in the Option and Version ID fields and press Enter.
EDIX100 Work with Standards EDI 03/30/11 FMT01 pgmlib: G3X6PGM dtalib: G3X6DTA 12:00:00 Position to Version ID . . . . . . 004010 Type option (and Information), press Enter. 1=Create 2=Revise 3=Copy 4=Delete 5=View 6=Print 11=Transactions Opt Version ID Name 2 004010 ANSI VERSION 4 RELEASE 1 SUBRELEASE 0 ASC X12 004010AIAG AIAG - X12 VERSION 4, RELEASE 1, FEBRUARY 1998 004010RAIL ASSOCIATION OF AMERICAN RAILROADS (AAR) 004010RAIL 004010RIFMAT RAIL INDUSTRY FORUM VERSION 4, RELEASE 1, ASC X12 004010TI0900 X12 TELECOMMUNICATIONS INDUSTRY - ISSUE 9 (TCIF) 004010UCS UCS X12 VERSION 4 RELEASE 1 004010VICS VOLUNTARY INTER-INDUSTRY COMMERCE STANDARD 004010X061 HIPAA - GROUP PREMIUM PAYMENT FOR INSURANCE (820) 004010X091 HIPAA - HEALTH CARE CLAIM PAYMENT/ADVICE (835) More... Parameters or command ===> F1=Help F3=Exit F12=Cancel F15=Sort F23=More Options F24=More Keys

Using the Standards Panels
10 IBM Sterling Gentran:Server for iSeries Release 3.6 User Guide
Step 2: Revise the Description of the Standards Version
The Standards Version panel (EDIX110-FMT01), shown below, displays the highest level of Standards maintenance. All records are associated with a specific Version ID. The definition for the Version ID can be displayed, changed, or deleted at this level.
Figure 7.3 Standards Version panel (EDIX110-FMT01)
In order to revise any record for a version, the Update Allowed flag must be set to ‘Y’ (Yes). Type a ‘Y’ over the ‘N’ in the Update Allowed field and press F10 (Update). The system sets the Update Allowed flag to ‘Y’ and redisplays the Work with Standards panel (EDIX100-FMT01).
If the Update Allowed flag is already set to ‘Y’, press F12 (Cancel) to exit the panel and return to the Work with Standards panel.
NOTESetting the Update Allowed flag to ‘Y’ is an essential step to enable you to make updates. However, only those users with a level ‘1’ authority to the data for the standards, as defined in Environment Control, can modify this flag.
EDIX110 Standards Version EDI 03/30/11 FMT01 12:00:00 Version ID . . . . . . . . . . . . 004010 Description. . . . . . . . . . . . ANSI VERSION 4 RELEASE 1 SUBRELEASE 0 ASC X12 Envelope Type. . . . . . . . . . . X Update Allowed . . . . . . . . . . N (Y/N) Last Update Date . . . . . . . . . 01-23-04 Last Update User . . . . . . . . . DES F1=Help F4=Prompt F10=Update F12=Cancel F13=Services F24=More Keys

Using the Standards Panels
IBM Sterling Gentran:Server for iSeries Release 3.6 User Guide 11
Step 3: Access the Standards Transaction panel
To view the Standards Transaction panel (EDIX120-CTL01) for a specific Version ID, you first must access the Version ID on the Work with Standards panel. This process is shown below in the following figure.
Figure 7.4 Work with Standards panel (EDIX100-FMT01)
Type ‘11’ (Transactions) in the Option field next to the selected version on the Work with Standards panel and press Enter. A list of all the transactions that exist for this version displays on the Standards Transaction panel (EDIX120-CTL01).
EDIX100 Work with Standards EDI 03/30/11 FMT01 pgmlib: G3X6PGM dtalib: G3X6DTA 12:00:00 Position to Version ID . . . . . . 004010 Type option (and Information), press Enter. 1=Create 2=Revise 3=Copy 4=Delete 5=View 6=Print 11=Transactions Opt Version ID Name 11 004010 ANSI VERSION 4 RELEASE 1 SUBRELEASE 0 ASC X12 004010AIAG AIAG - X12 VERSION 4, RELEASE 1, FEBRUARY 1998 004010RAIL ASSOCIATION OF AMERICAN RAILROADS (AAR) 004010RAIL 004010RIFMAT RAIL INDUSTRY FORUM VERSION 4, RELEASE 1, ASC X12 004010TI0900 X12 TELECOMMUNICATIONS INDUSTRY - ISSUE 9 (TCIF) 004010UCS UCS X12 VERSION 4 RELEASE 1 004010VICS VOLUNTARY INTER-INDUSTRY COMMERCE STANDARD 004010X061 HIPAA - GROUP PREMIUM PAYMENT FOR INSURANCE (820) 004010X091 HIPAA - HEALTH CARE CLAIM PAYMENT/ADVICE (835) More... Parameters or command ===> F1=Help F3=Exit F12=Cancel F15=Sort F23=More Options F24=More Keys

Using the Standards Panels
12 IBM Sterling Gentran:Server for iSeries Release 3.6 User Guide
Step 4: Select the Transaction Segments
The Standards Transaction panel (EDIX120-CTL01) enables you to add, display, delete, and change the definition for a specific transaction within a version, and to copy transactions to another version by accessing the STDCPY command. The following figure shows how to access the specific transaction segments.
Figure 7.5 Standards Transaction panel (EDIX120-CTL01)
Press Home or Tab to the position the cursor in the field and type the Transaction Code ‘850’ (ANSI purchase order) and press Enter. The cursor will be positioned at that specified transaction.
Type ‘11’ (Segments) in the Option field next to the selected transaction and press Enter. The segments that exist for this transaction display on the Standards Segment panel (EDIX130-CTL01).
EDIX120 Standards Transaction EDI 03/30/11 CTL01 12:00:00 Version ID . . . . . . . . . . . . 004010 Position to Transaction Code . . . 850 Type option, press Enter. 4=Delete 6=Print 11=Segments 30=Copy Transaction Opt Tran Cd Rel Description 11 850 0 PURCHASE ORDER Agency X Seg Cnt 194 Nte Float Ind Prev Tran Next Tran Next Rel 0 Next Tran Next Rel 0 Func Grp 851 0 ASSET SCHEDULE Agency X Seg Cnt 37 Nte Float Ind Prev Tran N Next Tran Next Rel 0 Next Tran Next Rel Func Grp More... F1=Help F4=Prompt F10=Update F12=Cancel F18=Grp/Tran Dir F24=More Keys +

Using the Standards Panels
IBM Sterling Gentran:Server for iSeries Release 3.6 User Guide 13
Step 5: Select the Elements
The Standards Segment panel (EDIX130-CTL01) enables you to add, display, delete, and change the definition for a specific Segment within a transaction. Continue by selecting a Segment, as shown in the following figure.
Figure 7.6 Standards Segment panel (EDIX130-CTL01)
To view a specific segment for this transaction, type ‘11’ (Seg Elements) in the Option field next to the segment (‘BEG’) and press Enter. The system displays the Standards Segment Element panel (EDIX140-CTL01) where you can view all the elements for this specific Segment.
EDIX130 Standards Segment EDI 03/30/11 CTL01 12:00:00 Version ID . . . . . . . . . . . . 004010 Transaction Code . . . . . . . . . 850 Release. . . . . . . . . . . . . . 0 Position to Segment Sequence . . . Type option, press Enter. 4=Delete 11=Seg Elements ***SEGMENT*** Man Max Max Element Loop Loop Act Opt No ID Ty Req Code Use Loop Count ID B/E Count 11 1 BEG H M 1 12 1 BEGINNING SEGMENT FOR PURCHASE ORDER 2 CUR H O 1 21 CURRENCY 3 REF H O 999999 9 REFERENCE IDENTIFICATION 4 PER H O 3 9 ADMINISTRATIVE COMMUNICATIONS CONTACT More... F1=Help F4=Prompt F5=Refresh F10=Update F12=Cancel F24=More Keys

Using the Standards Panels
14 IBM Sterling Gentran:Server for iSeries Release 3.6 User Guide
Step 6: Access the Standards Data Element Definition
The Standards Segment Element panel (EDIX140-CTl01), shown below, allows you to access the Standards Data Element Definition panel (EDIX160-CTL01). You will use this process in order to update Data Element Code values.
Figure 7.7 Standards Segment Element panel (EDIX140-CTL01)
To view the definition of this element, type ‘13’ (Elem Def) in the Option field next to the first Element (Element ID ‘0353’) and press Enter. The system displays the Standards Data Element Definition panel (EDIX160-CTL01).
Note the value of ‘Y’ in the Ad In (Audit Indicator) field next to Element ID ‘0324.’ An Audit Indicator of ‘Y’ means that detailed information (for example, invoice number or purchase order number) about the segment element is passed (written) to the Doc Info field in the Audit File to relate the actual Document Number with the Control Number used in the EDI Envelope. A BLANK in this field means that detailed information is not passed or written to the Doc Info field in the Audit File.
NOTEOnly one field may be defined as the Audit Indicator for a transaction set and it must be defined on a Header Segment.
EDIX140 Standards Segment Element EDI 03/30/11 CTL01 12:00:00 Version ID . . . . . . . . . . . . 004010 Segment ID . . . . . . . . . . . . BEG Type option (and Information), press Enter. 4=Delete 11=Condition 12=Seg Activity 13=Elem Def Opt Seg Sub Man Com Ad Elem ***Group**** Seq Ele Ele Ele In ID Dsg Ty Rq Description Cd 13 1 M M 0353 TRANSACTION SET PURPOSE COD 2 M M 0092 PURCHASE ORDER TYPE CODE 3 M M Y 0324 PURCHASE ORDER NUMBER 4 O O 0328 RELEASE NUMBER 5 M M 0373 DATE 6 O O 0367 CONTRACT NUMBER 7 O O 0587 ACKNOWLEDGMENT TYPE 8 O O 1019 INVOICE TYPE CODE More... F1=Help F4=Prompt F5=Refresh F10=Update F12=Cancel F24=More Keys

Using the Standards Panels
IBM Sterling Gentran:Server for iSeries Release 3.6 User Guide 15
Step 7: View the Element Definition
The Data Element Definition panel (EDIX160-CTL01) is used to add, display, delete, and change the definition for the description of individual Segment Elements. The following figure shows how to access the codes for the Data Element.
Figure 7.8 Standards Data Element Definition panel (EDIX160-CTL01)
The cursor is positioned into the list of all Element IDs for this version next to the Element ID that you selected on the previous panel.
To view the codes for this Segment Element, type ‘11’ (Codes) in the Option field next to the selected Data Element definition and press Enter.
NOTEOnly elements of type ‘ID’ have a list of valid codes that can be used in the EDI data. The system displays the Standards Data Element Code Definition panel (EDIX170-CTL01).
EDIX160 Standards Data Element Definition EDI 03/30/11 CTL01 12:00:00 Version ID . . . . . . . . . . . . 004010 Position to Data Element ID. . . . Type option (and Information), press Enter. 4=Delete 11=Codes Opt ID Description 11 0353 TRANSACTION SET PURPOSE CODE Type ID Minimum Length 2 Maximum Length 2 Cobol Name TRANSACTION-SET-PURPO Composite Code Def 0354 NUMBER OF LINE ITEMS Type N0 Minimum Length 1 Maximum Length 6 Cobol Name NUMBER-OF-LINE-ITEMS Composite Code Def More... F1=Help F4=Prompt F10=Update F12=Cancel F24=More Keys

Using the Standards Panels
16 IBM Sterling Gentran:Server for iSeries Release 3.6 User Guide
Step 8: View the Element Codes
The Data Element Code Definition panel (EDIX170-CTL01), shown below, enables you to add, display, delete and change code values for individual data elements.
Figure 7.9 Standards Data Element Code Definition panel (EDIX170-CTL01)
The above figure illustrates how to view and access the Element codes. You may use the Position to Code field to quickly locate a specific Element Code. Use Page Up and Page Down to scroll through the list. From this panel you can press F12 (Cancel) repeatedly to return to the Work with Standards panel.
EDIX170 Standards Data Element Code Definition EDI 03/30/11 CTL01 12:00:00 Version ID . . . . . . . . . . . . 004010 Data Element ID. . . . . . . . . . 0353 Minimum Length . . . . . . . . . . 2 Maximum Length . . . . . . . . . . 2 Position to Code . . . . . . . . . 9999 Type option (and Information), press Enter. 4=Delete Composite/ Opt Code Description 70 NEW CODE More... F1=Help F4=Prompt F5=Refresh F10=Update F24=More Keys +
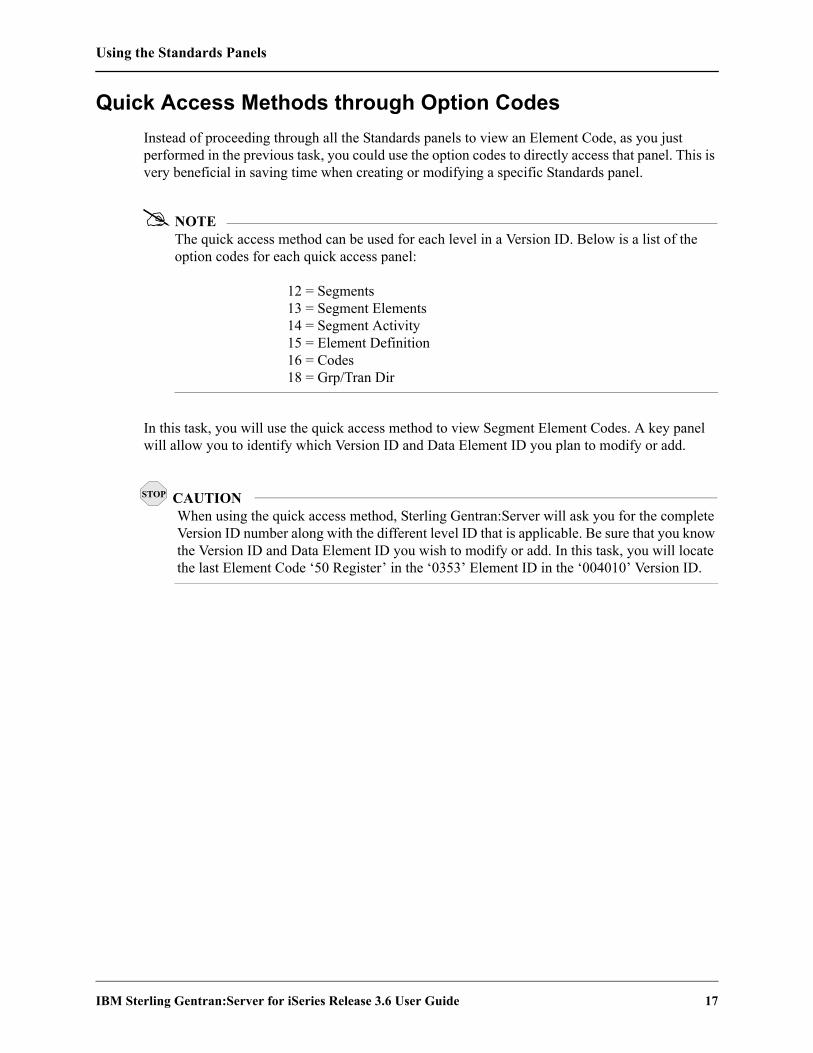
Using the Standards Panels
IBM Sterling Gentran:Server for iSeries Release 3.6 User Guide 17
Quick Access Methods through Option CodesInstead of proceeding through all the Standards panels to view an Element Code, as you just performed in the previous task, you could use the option codes to directly access that panel. This is very beneficial in saving time when creating or modifying a specific Standards panel.
NOTEThe quick access method can be used for each level in a Version ID. Below is a list of the option codes for each quick access panel:
12 = Segments13 = Segment Elements14 = Segment Activity15 = Element Definition16 = Codes18 = Grp/Tran Dir
In this task, you will use the quick access method to view Segment Element Codes. A key panel will allow you to identify which Version ID and Data Element ID you plan to modify or add.
CAUTIONSTOP
When using the quick access method, Sterling Gentran:Server will ask you for the complete Version ID number along with the different level ID that is applicable. Be sure that you know the Version ID and Data Element ID you wish to modify or add. In this task, you will locate the last Element Code ‘50 Register’ in the ‘0353’ Element ID in the ‘004010’ Version ID.
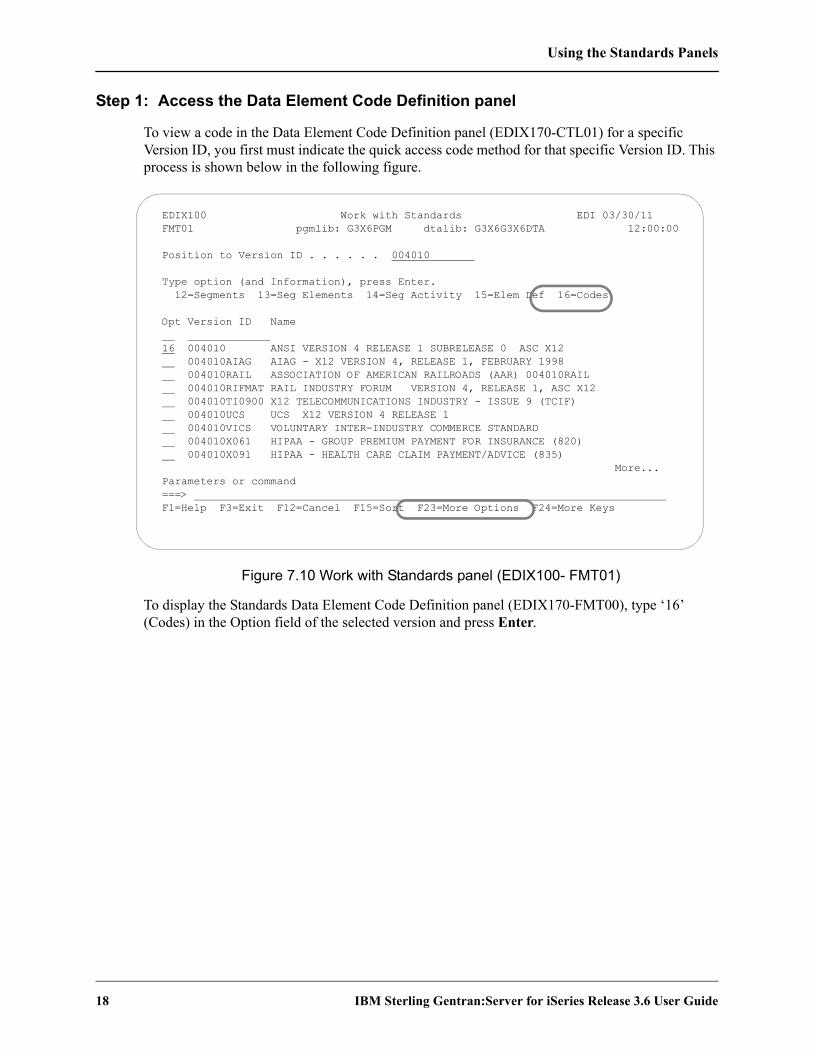
Using the Standards Panels
18 IBM Sterling Gentran:Server for iSeries Release 3.6 User Guide
Step 1: Access the Data Element Code Definition panel
To view a code in the Data Element Code Definition panel (EDIX170-CTL01) for a specific Version ID, you first must indicate the quick access code method for that specific Version ID. This process is shown below in the following figure.
Figure 7.10 Work with Standards panel (EDIX100- FMT01)
To display the Standards Data Element Code Definition panel (EDIX170-FMT00), type ‘16’ (Codes) in the Option field of the selected version and press Enter.
EDIX100 Work with Standards EDI 03/30/11 FMT01 pgmlib: G3X6PGM dtalib: G3X6G3X6DTA 12:00:00 Position to Version ID . . . . . . 004010 Type option (and Information), press Enter. 12=Segments 13=Seg Elements 14=Seg Activity 15=Elem Def 16=Codes Opt Version ID Name 16 004010 ANSI VERSION 4 RELEASE 1 SUBRELEASE 0 ASC X12 004010AIAG AIAG - X12 VERSION 4, RELEASE 1, FEBRUARY 1998 004010RAIL ASSOCIATION OF AMERICAN RAILROADS (AAR) 004010RAIL 004010RIFMAT RAIL INDUSTRY FORUM VERSION 4, RELEASE 1, ASC X12 004010TI0900 X12 TELECOMMUNICATIONS INDUSTRY - ISSUE 9 (TCIF) 004010UCS UCS X12 VERSION 4 RELEASE 1 004010VICS VOLUNTARY INTER-INDUSTRY COMMERCE STANDARD 004010X061 HIPAA - GROUP PREMIUM PAYMENT FOR INSURANCE (820) 004010X091 HIPAA - HEALTH CARE CLAIM PAYMENT/ADVICE (835) More... Parameters or command ===> F1=Help F3=Exit F12=Cancel F15=Sort F23=More Options F24=More Keys

Using the Standards Panels
IBM Sterling Gentran:Server for iSeries Release 3.6 User Guide 19
Step 2: Select the Element ID
The following figure allows you to quickly identify the Data Element ID that contains the Element Codes you wish to view.
Figure 7.11 Standards Data Element Code Definition panel (EDIX170-FMT00)
This key panel is shown so you can select the Data Element ID for which to see codes. To display the Standards Data Element Code Definition panel (EDIX170-CTL01), type ‘0353’ (Transaction Set Purpose Code) in the Data Element ID field and press Enter.
NOTEIf the Data Element ID is not known, you can press F17 (Next Rcd) to roll into the Standards Data Element Code Definition panel (EDIX170-CTL01) for the first Element ID defined for the specified version.
EDIX170 Standards Data Element Code Definition EDI 03/30/11 FMT00 12:00:00 Version ID . . . . . . . . . . . . 004010 Data Element ID. . . . . . . . . . 0353 F1=Help F3=Exit F4=Prompt F12=Cancel F24=More Keys

Using the Standards Panels
20 IBM Sterling Gentran:Server for iSeries Release 3.6 User Guide
Step 3: View the Element Codes
The Data Element Code Definition panel (EDIX170-CTL01), shown below, enables you to add, display, delete and change the definition for the description of code values for individual Data Elements.
Figure 7.12 Standards Data Element Code Definition panel (EDIX170-CTL01)
Enter the desired Element Code in the Position to Code field. New codes can be inserted at the end of the list. To quickly locate the end of the Element Code list, type all “9’s” and press Enter.
If you wish to view additional Element Codes, use Page Up and Page Down to scroll through the list. To exit, press F12 (Cancel) repeatedly to return to the Work with Standards panel.
EDIX170 Standards Data Element Code Definition EDI 03/30/11 CTL01 12:00:00 Version ID . . . . . . . . . . . . 004010 Data Element ID. . . . . . . . . . 0353 Minimum Length . . . . . . . . . . 2 Maximum Length . . . . . . . . . . 2 Position to Code . . . . . . . . . 50 Type option (and Information), press Enter. 4=Delete Composite/ Opt Code Description 49 ORIGINAL - NO RESPONSE NECESSARY 5C CHARGEABLE RESUBMISSION 50 REGISTER 51 HISTORICAL INQUIRY 52 RESPONSE TO HISTORICAL INQUIRY More... F1=Help F4=Prompt F5=Refresh F10=Update F24=More Keys +
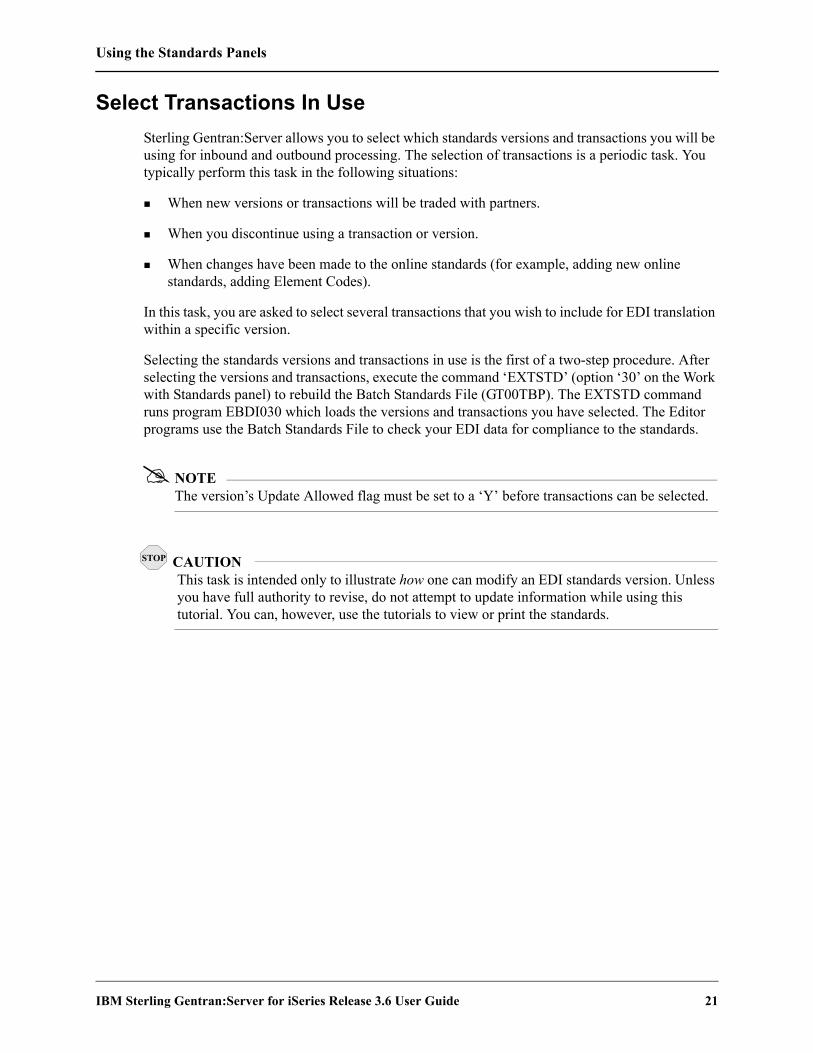
Using the Standards Panels
IBM Sterling Gentran:Server for iSeries Release 3.6 User Guide 21
Select Transactions In UseSterling Gentran:Server allows you to select which standards versions and transactions you will be using for inbound and outbound processing. The selection of transactions is a periodic task. You typically perform this task in the following situations:
When new versions or transactions will be traded with partners.
When you discontinue using a transaction or version.
When changes have been made to the online standards (for example, adding new online standards, adding Element Codes).
In this task, you are asked to select several transactions that you wish to include for EDI translation within a specific version.
Selecting the standards versions and transactions in use is the first of a two-step procedure. After selecting the versions and transactions, execute the command ‘EXTSTD’ (option ‘30’ on the Work with Standards panel) to rebuild the Batch Standards File (GT00TBP). The EXTSTD command runs program EBDI030 which loads the versions and transactions you have selected. The Editor programs use the Batch Standards File to check your EDI data for compliance to the standards.
NOTEThe version’s Update Allowed flag must be set to a ‘Y’ before transactions can be selected.
CAUTIONSTOP
This task is intended only to illustrate how one can modify an EDI standards version. Unless you have full authority to revise, do not attempt to update information while using this tutorial. You can, however, use the tutorials to view or print the standards.
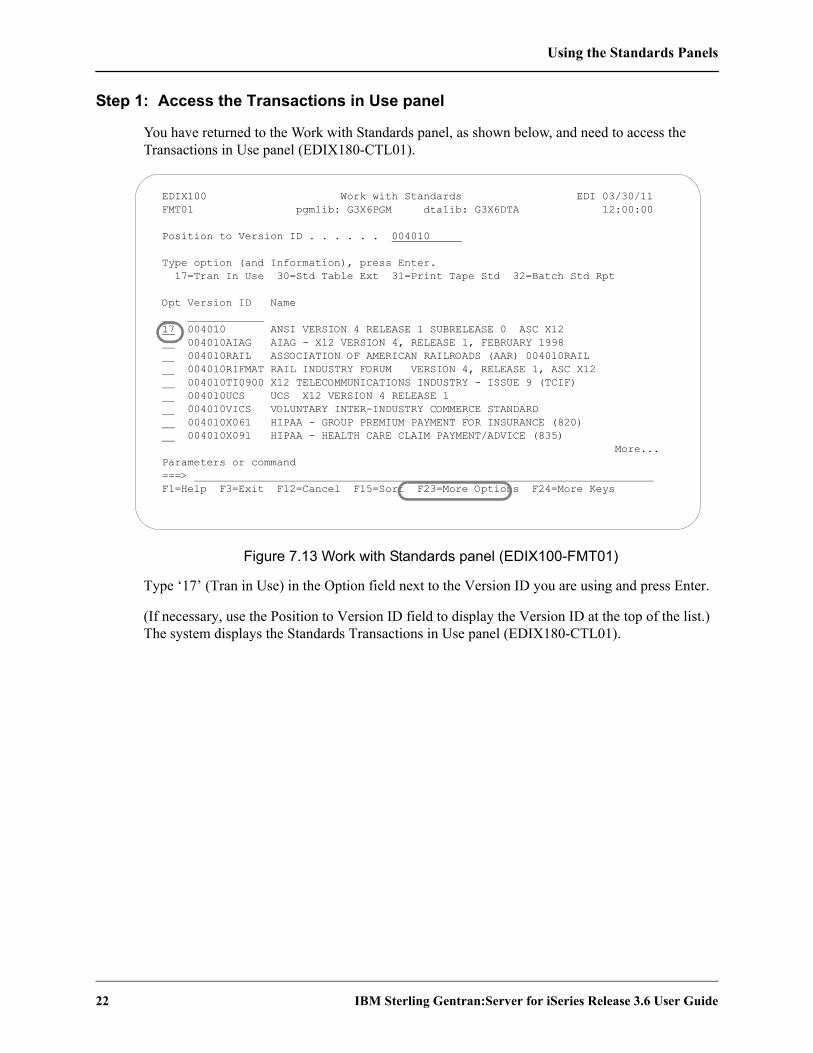
Using the Standards Panels
22 IBM Sterling Gentran:Server for iSeries Release 3.6 User Guide
Step 1: Access the Transactions in Use panel
You have returned to the Work with Standards panel, as shown below, and need to access the Transactions in Use panel (EDIX180-CTL01).
Figure 7.13 Work with Standards panel (EDIX100-FMT01)
Type ‘17’ (Tran in Use) in the Option field next to the Version ID you are using and press Enter.
(If necessary, use the Position to Version ID field to display the Version ID at the top of the list.) The system displays the Standards Transactions in Use panel (EDIX180-CTL01).
EDIX100 Work with Standards EDI 03/30/11 FMT01 pgmlib: G3X6PGM dtalib: G3X6DTA 12:00:00 Position to Version ID . . . . . . 004010 Type option (and Information), press Enter. 17=Tran In Use 30=Std Table Ext 31=Print Tape Std 32=Batch Std Rpt Opt Version ID Name 17 004010 ANSI VERSION 4 RELEASE 1 SUBRELEASE 0 ASC X12 004010AIAG AIAG - X12 VERSION 4, RELEASE 1, FEBRUARY 1998 004010RAIL ASSOCIATION OF AMERICAN RAILROADS (AAR) 004010RAIL 004010RIFMAT RAIL INDUSTRY FORUM VERSION 4, RELEASE 1, ASC X12 004010TI0900 X12 TELECOMMUNICATIONS INDUSTRY - ISSUE 9 (TCIF) 004010UCS UCS X12 VERSION 4 RELEASE 1 004010VICS VOLUNTARY INTER-INDUSTRY COMMERCE STANDARD 004010X061 HIPAA - GROUP PREMIUM PAYMENT FOR INSURANCE (820) 004010X091 HIPAA - HEALTH CARE CLAIM PAYMENT/ADVICE (835) More... Parameters or command ===> F1=Help F3=Exit F12=Cancel F15=Sort F23=More Options F24=More Keys

Using the Standards Panels
IBM Sterling Gentran:Server for iSeries Release 3.6 User Guide 23
Step 2: Select the Transactions to Use
The Transactions in Use panel (EDIX180-CTL01), shown below, enables you to select the standards version and transactions that will be used during batch processing.
Figure 7.14 Transactions In Use panel (EDIX180-CTL01)
Type ‘1’ (Select) next to each transaction that you are using for the specified version. Use Page Up or Page Down to select additional transactions for this version. When you have selected all of the necessary transactions, press Enter to update or F10 to update and exit. The system updates the version and redisplays the Work with Standards panel. A message displays, indicating that the record was successfully updated.
You must select all versions and transactions you are using before running the Standards Table Extract. The Standards Table Extract replaces your current Batch Standards File with only those versions and transactions that are selected.
EDIX180 Standards Transactions in Use EDI 03/30/11 CTL01 12:00:00 Version ID . . . . . . . . . . . . 004010 Description. . . . . . . . . . . . ANSI VERSION 4 RELEASE 1 SUBRELEASE Type option (and Information), press Enter. 1=Select Opt Tran Description 1 CONTROL TRANSACTION 100 INSURANCE PLAN DESCRIPTION 101 NAME AND ADDRESS LISTS 1 104 AIR SHIPMENT INFORMATION 105 BUSINESS ENTITY FILINGS 106 MOTOR CARRIER RATE PROPOSAL 107 REQUEST FOR MOTOR CARRIER RATE PROPOSAL 108 RESPONSE TO A MOTOR CARRIER RATE PROPOSAL 109 VESSEL CONTENT DETAILS 1 110 AIR FREIGHT DETAILS AND INVOICE 112 PROPERTY DAMAGE REPORT More... F1=Help F4=Prompt F10=Update F12=Cancel F13=Services F24=More Keys

Using the Standards Panels
24 IBM Sterling Gentran:Server for iSeries Release 3.6 User Guide
Step 3: Access the Standard File Extract (EXTSTD) panel
In order to extract the Transactions in Use, you must access the Standard File Extract (EXTSTD) panel, as shown below. This command is independent from the Version ID, so the key entry line is used.
Figure 7.15 Work with Standards panel (EDIX100-FMT01)
Type ‘30’ (Std Table Ext) on the key entry line on the Work with Standards panel (EDIX100-FMT01) and press Enter.
EDIX100 Work with Standards EDI 03/30/11 FMT01 pgmlib: G3X6PGM dtalib: G3X6DTA 12:00:00 Position to Version ID . . . . . . 004010 Type option (and Information), press Enter. 17=Tran In Use 30=Std Table Ext 31=Print Tape Std 32=Batch Std Rpt Opt Version ID Name 30 004010 ANSI VERSION 4 RELEASE 1 SUBRELEASE 0 ASC X12 004010AIAG AIAG - X12 VERSION 4, RELEASE 1, FEBRUARY 1998 004010RAIL ASSOCIATION OF AMERICAN RAILROADS (AAR) 004010RAIL 004010RIFMAT RAIL INDUSTRY FORUM VERSION 4, RELEASE 1, ASC X12 004010TI0900 X12 TELECOMMUNICATIONS INDUSTRY - ISSUE 9 (TCIF) 004010UCS UCS X12 VERSION 4 RELEASE 1 004010VICS VOLUNTARY INTER-INDUSTRY COMMERCE STANDARD 004010X061 HIPAA - GROUP PREMIUM PAYMENT FOR INSURANCE (820) 004010X091 HIPAA - HEALTH CARE CLAIM PAYMENT/ADVICE (835) More... Parameters or command ===> F1=Help F3=Exit F12=Cancel F15=Sort F23=More Options F24=More Keys

Using the Standards Panels
IBM Sterling Gentran:Server for iSeries Release 3.6 User Guide 25
Step 4: Build the Batch Standards File
The Standard File Extract (EXTSTD) command is used to build the Batch Standards file. This must be done prior to using the newly selected transactions for EDI translation.
Executing the EXTSTD command reduces the size of your Batch Standards File by extracting (for use) only the versions and transactions that you have selected in the previous steps. A smaller file may decrease the processing time needed to compliance check your EDI data to standards.
Figure 7.16 Standards File Extract panel (EXTSTD)
If you decide to schedule the Standard File Extract job, the system displays the Schedule Job (SCHJOB) panel, where you may set up the job run parameters. (SEE the “Job Scheduler” chapter in the IBM® Sterling Gentran:Server® for iSeries® Release 3.6 Technical Reference Guide for more information.)
Press F3 (Exit) or F12 (Cancel) at this time. If you want to submit the EXTSTD command, press Enter. This command should be executed by the System Administrator.
NOTEThe original version of the batch standards file, GT00TBP, will be saved and restored if the Extract Standards job does not build the batch standards file successfully.
CAUTIONSTOP
Inbound and outbound processing (PRCTRNIN and PRCTRNOUT) should not be executed while the EXTSTD command is running.
Standard File Extract (EXTSTD)
Type choices, press Enter.
Schedule Job ? . . . . . . . . . *NO *YES, *NO
Bottom F3=Exit F4=Prompt F5=Refresh F10=Additional parameters F12=Cancel F13=How to use this display F24=More keys

Using the Standards Panels
26 IBM Sterling Gentran:Server for iSeries Release 3.6 User Guide
View Transaction Name and Functional GroupThe Group/Transaction Directory panel (EDIX125-CTL01) enables you to view transaction names and their corresponding functional groups in a listing style. You can access this panel in either of the following ways:
Type ‘18’ (Grp/Tran Dir) in the Option field next to the selected version on the Work with Standards panel (EDIX100-FMT01) and then press Enter.
Figure 7.17 Work with Standards Panel (EDIX100-FMT01)
EDIX100 Work with Standards XX 03/30/11 FMT01 pgmlib: G3X6PGM dtalib: G3X6DTA 12:00:00 Position to Version ID . . . . . . 004010 Type option (and Information), press Enter. 17=Tran In Use 18=Grp/Tran Dir 30=Std Table Ext 31=Print Tape Std Opt Version ID Name 18 004010 ANSI VERSION 4 RELEASE 1 SUBRELEASE 0 ASC X12 004010AIAG AIAG - X12 VERSION 4, RELEASE 1, FEBRUARY 1998 004010RAIL ASSOCIATION OF AMERICAN RAILROADS (AAR) 004010RAIL 004010RIFMAT RAIL INDUSTRY FORUM VERSION 4, RELEASE 1, ASC X12 004010TI0900 X12 TELECOMMUNICATIONS INDUSTRY - ISSUE 9 (TCIF) 004010UCS UCS X12 VERSION 4 RELEASE 1 004010VICS VOLUNTARY INTER-INDUSTRY COMMERCE STANDARD 004010X061 HIPAA - GROUP PREMIUM PAYMENT FOR INSURANCE (820) 004010X061A1 HIPAA - GROUP PREMIUM PAYMENT FOR INSURANCE (820) More...Parameters or command ===> F1=Help F3=Exit F12=Cancel F15=Sort F23=More Options F24=More Keys

Using the Standards Panels
IBM Sterling Gentran:Server for iSeries Release 3.6 User Guide 27
Press function key F18 (Grp/Tran Dir) on the Standards Transaction panel (EDIX120-CTL01).
Figure 7.18 Standards Translation Panel (EDIX120-CTL01)
The Group/Transaction Directory panel (EDIX125-CTL01) displays.
Figure 7.19 Group/Transaction Directory Panel (EDIX125-CTL01)
Press F12 (cancel) to return to the Standards Transaction panel.
EDIX120 Standards Transaction XX 03/30/11 CTL01 12:00:00 Version ID . . . . . . . . . . . . 004010 Position to Transaction Code . . . Type option, press Enter. 4=Delete 6=Print 11=Segments 30=Copy Transaction Opt Tran Cd Rel Description 0 CONTROL TRANSACTION Agency X Seg Cnt 26 Nte Float Ind Prev Tran Next Tran Next Rel 0 Next Tran Next Rel Func Grp 100 0 INSURANCE PLAN DESCRIPTION Agency X Seg Cnt 43 Nte Float Ind Prev Tran N Next Tran Next Rel 0 Next Tran Next Rel Func Grp PG More... F1=Help F4=Prompt F10=Update F12=Cancel F18=Grp/Tran Dir F24=More Keys Version protected. No modifications allowed.
EDIX125 Group/Transaction Directory IH 03/30/11 CTL01 12:00:00 Version ID . . . . . . . . . . . . 004010 Agency . . . . . . . . . . . . . . X Standard Name. . . . . . . . . . . ANSI VERSION 4 RELEASE 1 SUBRELEASE 0 ASC Position to Transaction Code . . . Tran Cd Func Grp Description CONTROL TRANSACTION 100 PG INSURANCE PLAN DESCRIPTION 101 NL NAME AND ADDRESS LISTS 104 SA AIR SHIPMENT INFORMATION 105 BF BUSINESS ENTITY FILINGS 106 MH MOTOR CARRIER RATE PROPOSAL 107 MC REQUEST FOR MOTOR CARRIER RATE PROPOSAL 108 MK RESPONSE TO A MOTOR CARRIER RATE PROPOSAL 109 VE VESSEL CONTENT DETAILS 110 IA AIR FREIGHT DETAILS AND INVOICE More... F1=Help F3=Exit F12=Cancel F15=Sort F21=Prt Grp/Tran F24=More Keys Version protected. No modifications allowed.

Using the Standards Panels
28 IBM Sterling Gentran:Server for iSeries Release 3.6 User Guide
Create New Standards Using the Copy FunctionIn certain circumstances, you may be required to create a new or special standards version to meet the unique requirements of a trading partner.
You can create and maintain your own versions by either building them entirely from scratch (which may be time consuming), or by copying an existing standards version into a new version and making modifications.
This task is intended to illustrate how to create an entire new version by copying an existing version. Do not attempt to create or revise the standards versions during this task unless you have the data rights of ‘1.’ Only those users with strict authority should work with the standards.
Step 1: Select the ‘Copy’ option
To begin, access the Work with Standards panel (EDIX100-FMT01), as shown below, where you can apply options to the Version IDs.
Figure 7.20 Work with Standards panel (EDIX100-FMT01)
Type ‘3’ (Copy) in the Option next to the appropriate Version ID and press Enter. We will use Version ID ‘004010’ as the original sample Version ID that will be copied.
A ‘Copy To’ window displays on this panel, asking you the new name of the Version ID you plan to create. Type the new standards version in this window and press Enter. The system displays the Standards Version panel (EDIX110-FMT01).
EDIX100 Work with Standards CB 03/30/11 FMT01 pgmlib: G3X6PGM dtalib: G3X6DTA 12:00:00 Position to Version ID . . . . . . 004010 Type option (and Information), press Enter. 1=Create 2=Revise 3=Copy 4=Delete 5=View 6=Print 11=Transactions Opt Version ID Name 3 004010 ANSI VERSION 4 RELEASE 1 SUBRELEASE 0 ASC X12 Copy To 004010NEW F3=Exit F12=Cancel 004010X091 HIPAA - HEALTH CARE CLAIM PAYMENT/ADVICE (835) More... Parameters or command ===> F1=Help F3=Exit F12=Cancel F15=Sort F23=More Options F24=More Keys
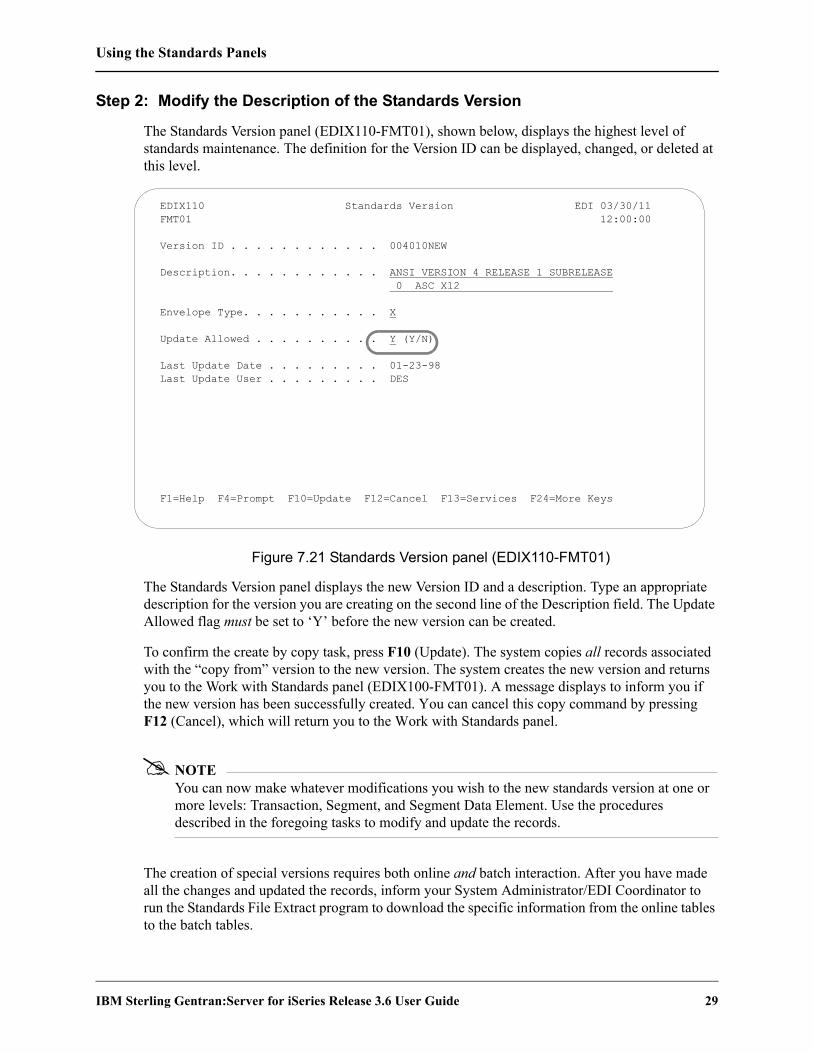
Using the Standards Panels
IBM Sterling Gentran:Server for iSeries Release 3.6 User Guide 29
Step 2: Modify the Description of the Standards Version
The Standards Version panel (EDIX110-FMT01), shown below, displays the highest level of standards maintenance. The definition for the Version ID can be displayed, changed, or deleted at this level.
Figure 7.21 Standards Version panel (EDIX110-FMT01)
The Standards Version panel displays the new Version ID and a description. Type an appropriate description for the version you are creating on the second line of the Description field. The Update Allowed flag must be set to ‘Y’ before the new version can be created.
To confirm the create by copy task, press F10 (Update). The system copies all records associated with the “copy from” version to the new version. The system creates the new version and returns you to the Work with Standards panel (EDIX100-FMT01). A message displays to inform you if the new version has been successfully created. You can cancel this copy command by pressing F12 (Cancel), which will return you to the Work with Standards panel.
NOTEYou can now make whatever modifications you wish to the new standards version at one or more levels: Transaction, Segment, and Segment Data Element. Use the procedures described in the foregoing tasks to modify and update the records.
The creation of special versions requires both online and batch interaction. After you have made all the changes and updated the records, inform your System Administrator/EDI Coordinator to run the Standards File Extract program to download the specific information from the online tables to the batch tables.
EDIX110 Standards Version EDI 03/30/11 FMT01 12:00:00 Version ID . . . . . . . . . . . . 004010NEW Description. . . . . . . . . . . . ANSI VERSION 4 RELEASE 1 SUBRELEASE 0 ASC X12 Envelope Type. . . . . . . . . . . X Update Allowed . . . . . . . . . . Y (Y/N) Last Update Date . . . . . . . . . 01-23-98 Last Update User . . . . . . . . . DES F1=Help F4=Prompt F10=Update F12=Cancel F13=Services F24=More Keys
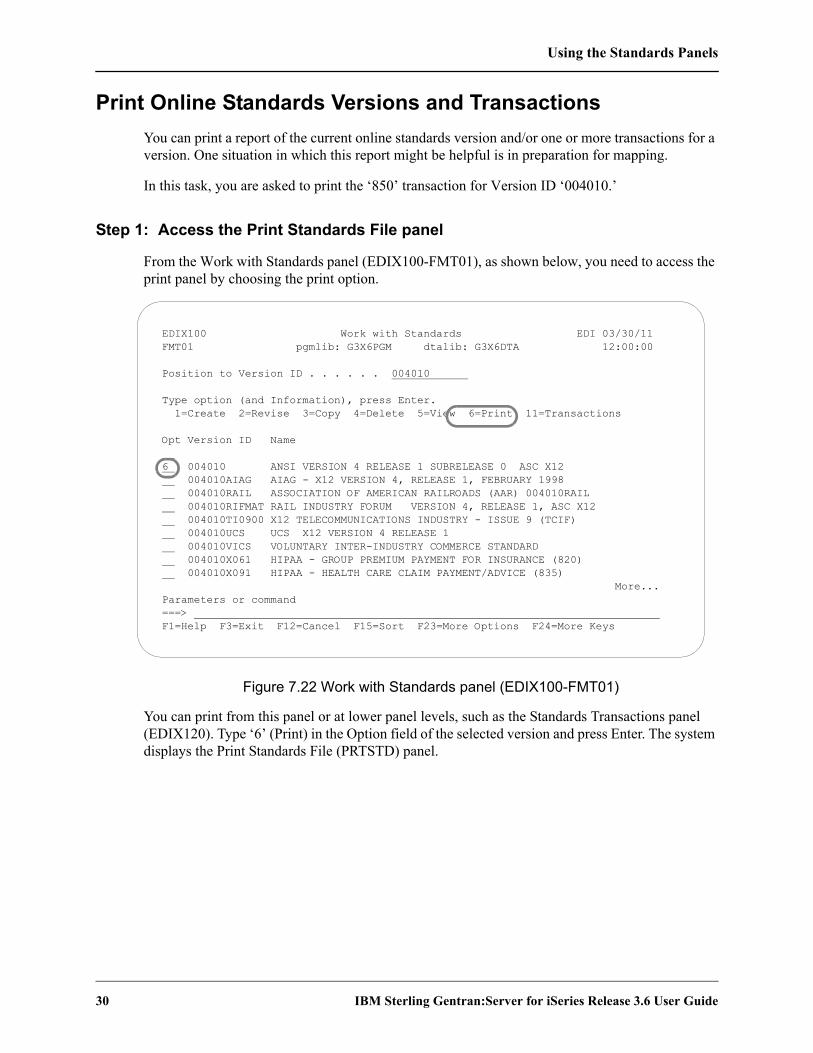
Using the Standards Panels
30 IBM Sterling Gentran:Server for iSeries Release 3.6 User Guide
Print Online Standards Versions and TransactionsYou can print a report of the current online standards version and/or one or more transactions for a version. One situation in which this report might be helpful is in preparation for mapping.
In this task, you are asked to print the ‘850’ transaction for Version ID ‘004010.’
Step 1: Access the Print Standards File panel
From the Work with Standards panel (EDIX100-FMT01), as shown below, you need to access the print panel by choosing the print option.
Figure 7.22 Work with Standards panel (EDIX100-FMT01)
You can print from this panel or at lower panel levels, such as the Standards Transactions panel (EDIX120). Type ‘6’ (Print) in the Option field of the selected version and press Enter. The system displays the Print Standards File (PRTSTD) panel.
EDIX100 Work with Standards EDI 03/30/11 FMT01 pgmlib: G3X6PGM dtalib: G3X6DTA 12:00:00 Position to Version ID . . . . . . 004010 Type option (and Information), press Enter. 1=Create 2=Revise 3=Copy 4=Delete 5=View 6=Print 11=Transactions Opt Version ID Name 6 004010 ANSI VERSION 4 RELEASE 1 SUBRELEASE 0 ASC X12 004010AIAG AIAG - X12 VERSION 4, RELEASE 1, FEBRUARY 1998 004010RAIL ASSOCIATION OF AMERICAN RAILROADS (AAR) 004010RAIL 004010RIFMAT RAIL INDUSTRY FORUM VERSION 4, RELEASE 1, ASC X12 004010TI0900 X12 TELECOMMUNICATIONS INDUSTRY - ISSUE 9 (TCIF) 004010UCS UCS X12 VERSION 4 RELEASE 1 004010VICS VOLUNTARY INTER-INDUSTRY COMMERCE STANDARD 004010X061 HIPAA - GROUP PREMIUM PAYMENT FOR INSURANCE (820) 004010X091 HIPAA - HEALTH CARE CLAIM PAYMENT/ADVICE (835) More... Parameters or command ===> F1=Help F3=Exit F12=Cancel F15=Sort F23=More Options F24=More Keys

Using the Standards Panels
IBM Sterling Gentran:Server for iSeries Release 3.6 User Guide 31
Step 2: Print the Transaction
The following figure shows you the PRTSTD panel that allows you to specify which transaction(s) you plan to print.
Figure 7.23 Print Standards File panel (PRTSTD)
Type ‘850’ for the Transaction ID in the Select Transaction for Version field and press Enter. The system submits the print job to batch by default, unless the Run Interactive parameter is changed to *YES under the additional parameters.
If the Print option was selected on the Standards panel (EDIX120), the transaction would have been pre-loaded into the command.
To print all the transactions for this version, leave the default value of ‘*ALL’ in the Select Transaction for Version field.
CAUTIONSTOP
Using the default value of ‘*ALL’ will normally generate a very large report which will take time to process your request. The above figure shows only the ‘850’ transaction to be printed.
To see just a listing of the segments as they appear in the transaction, specify *YES in the Print Segments Only parameter. Element information is omitted.
By default, the code lists for elements will not automatically print. To see the codes for all elements, specify *YES for the Print Codes parameter.
Print Standards File (PRTSTD) Type choices, press Enter. Standards Selection: Select a Version to Print . . > '004010' Version Id Select Transaction for Version 850 *ALL, Transaction Id Select Release for Transaction 0 Release Number + for more values Characters per line . . . . . . 132 132 or 80 Print Segments Only? . . . . . . *NO *YES, *NO Print Codes? . . . . . . . . . . *NO *YES, *NO Bottom F3=Exit F4=Prompt F5=Refresh F10=Additional parameters F12=Cancel F13=How to use this display F24=More keys

Using the Standards Panels
32 IBM Sterling Gentran:Server for iSeries Release 3.6 User Guide
Print Standards from TapeYou can print a report of the standards information that is contained on a standards tape or CD.
In this task, you are asked to print all the standards on a tape for all versions. You will specify that the report print the information at the version and transaction levels of detail.
Step 1: Access the Print Versions/Trans on Tape (PRTSTDTAP) panel
From the Work with Standards panel (EDIX100-FMT01), type ‘31’ on the key entry line and press Enter to access the Print Version/Trans on Tape (PRTSTDTAP) panel, as shown in the next two figures.
Figure 7.24 Work with Standards panel (EDIX100-FMT01)
EDIX100 Work with Standards EDI 03/30/11 FMT01 pgmlib: G3X6PGM dtalib: G3X6DTA 12:00:00 Position to Version ID . . . . . . 004010 Type option (and Information), press Enter. 17=Tran In Use 30=Std Table Ext 31=Print Tape Std 32=Batch Std Rpt Opt Version ID Name 31 004010 ANSI VERSION 4 RELEASE 1 SUBRELEASE 0 ASC X12 004010AIAG AIAG - X12 VERSION 4, RELEASE 1, FEBRUARY 1998 004010RAIL ASSOCIATION OF AMERICAN RAILROADS (AAR) 004010RAIL 004010RIFMAT RAIL INDUSTRY FORUM VERSION 4, RELEASE 1, ASC X12 004010TI0900 X12 TELECOMMUNICATIONS INDUSTRY - ISSUE 9 (TCIF) 004010UCS UCS X12 VERSION 4 RELEASE 1 004010VICS VOLUNTARY INTER-INDUSTRY COMMERCE STANDARD 004010X061 HIPAA - GROUP PREMIUM PAYMENT FOR INSURANCE (820) 004010X091 HIPAA - HEALTH CARE CLAIM PAYMENT/ADVICE (835) More... Parameters or command ===> F1=Help F3=Exit F12=Cancel F15=Sort F23=More Options F24=More Keys

Using the Standards Panels
IBM Sterling Gentran:Server for iSeries Release 3.6 User Guide 33
Step 2: Selecting Print Criteria for the Standards Tape Print
The following figure shows the PRTSTDTAP panel that enables you to specify what information to print.
Figure 7.25 Print Versions/Trans on Tape panel (PRTSTDTAP)
Type the name of the tape or CD drive where the standards media is located in the Device field.Type ‘*ALL’ for the standards type to be printed in the Standard Type field.Type ‘*TRAN’ in the Detail Level field to get a listing of all transactions for a specific version. To obtain a list of all versions on the media, type ‘*VER’ in the Detail Level field.
NOTEIf the value ‘*TRAN’ is entered for Detail Level, the field ‘Version IDs to Print’ is shown along with the prompt ‘+ for more values’. Enter up to ten specific version IDs to print or specify *ALL.
CAUTIONSTOP
Selecting transactions for all version types normally generates a very large report, which takes time to process.
Press Enter. The system submits the print job to batch.
Print Versions/Trans on Tape (PRTSTDTAP) Type choices, press Enter. Device . . . . . . . . . . . . . OPT01 Device Standard Type . . . . . . . . . *ALL A-ANA,E-EDIFACT, X-X12, T-TDCC Detail Level . . . . . . . . . . > *TRAN *VER, *TRAN Version IDs to Print . . . . . . *ALL *ALL, Version ID + for more values Additional Parameters End of Tape Option . . . . . . . *REWIND *REWIND, *LEAVE, *UNLOAD Run Interactively? . . . . . . . *NO *YES, *NO Bottom F3=Exit F4=Prompt F5=Refresh F12=Cancel F13=How to use this display F24=More keys

Using the Standards Panels
34 IBM Sterling Gentran:Server for iSeries Release 3.6 User Guide
Print the Batch Standards FileYou can print a report of the standards information that is contained in the Batch Standards File, GT00TBP, which is used for compliance checking during processing.
In this task, you are asked to print all of the standard versions from the Batch Standards File. You will specify that the report print the information at the transaction level of detail, and not to list elements that affect the Audit Indicator.
Step 1: Access the Print Batch Standards File (PRTSTDBAT) panel
From the Work with Standards panel (EDIX100-FMT01), type ‘32’ on the key entry line and press Enter to access the Print Batch Standards File (PRTSTDBAT) panel, as shown in the next two figures.
Figure 7.26 Work with Standards panel (EDIX100-FMT01)
EDIX100 Work with Standards EDI 03/30/11 FMT01 pgmlib: G3X6PGM dtalib: G3X6DTA 12:00:00 Position to Version ID . . . . . . 004010 Type option (and Information), press Enter. 17=Tran In Use 30=Std Table Ext 31=Print Tape Std 32=Batch Std Rpt Opt Version ID Name 32 004010 ANSI VERSION 4 RELEASE 1 SUBRELEASE 0 ASC X12 004010AIAG AIAG - X12 VERSION 4, RELEASE 1, FEBRUARY 1998 004010RAIL ASSOCIATION OF AMERICAN RAILROADS (AAR) 004010RAIL 004010RIFMAT RAIL INDUSTRY FORUM VERSION 4, RELEASE 1, ASC X12 004010TI0900 X12 TELECOMMUNICATIONS INDUSTRY - ISSUE 9 (TCIF) 004010UCS UCS X12 VERSION 4 RELEASE 1 004010VICS VOLUNTARY INTER-INDUSTRY COMMERCE STANDARD 004010X061 HIPAA - GROUP PREMIUM PAYMENT FOR INSURANCE (820) 004010X091 HIPAA - HEALTH CARE CLAIM PAYMENT/ADVICE (835) More... Parameters or command ===> F1=Help F3=Exit F12=Cancel F15=Sort F23=More Options F24=More Keys
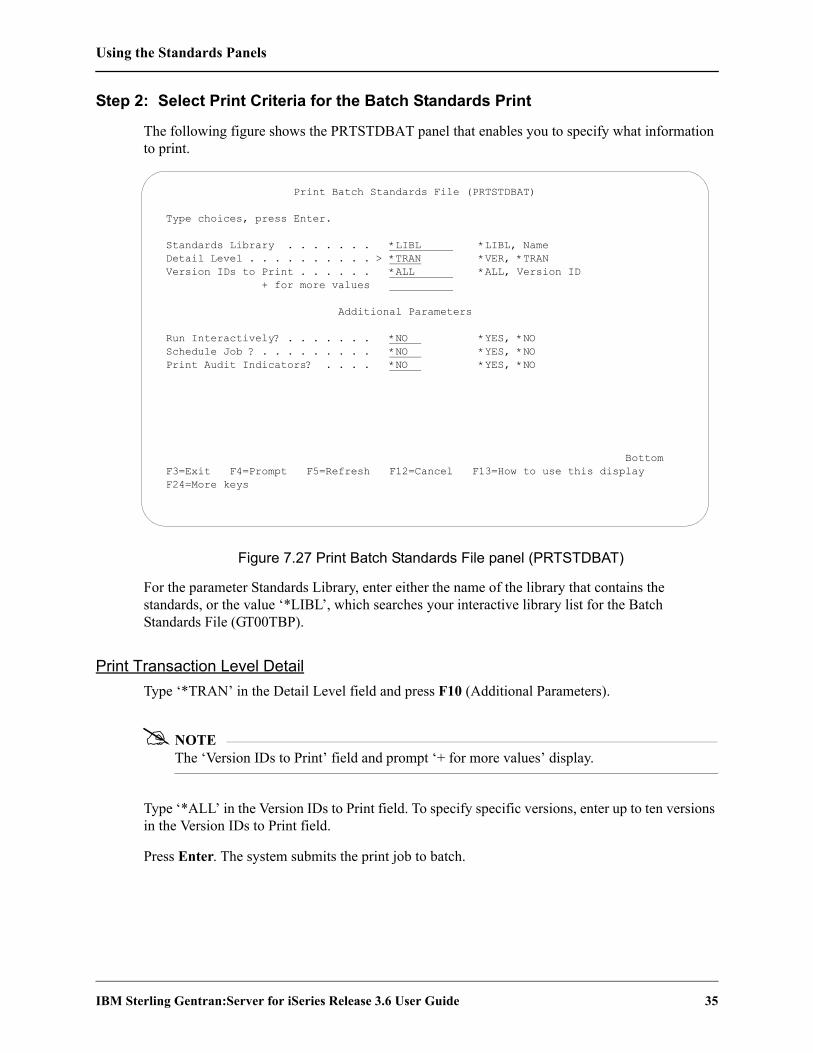
Using the Standards Panels
IBM Sterling Gentran:Server for iSeries Release 3.6 User Guide 35
Step 2: Select Print Criteria for the Batch Standards Print
The following figure shows the PRTSTDBAT panel that enables you to specify what information to print.
Figure 7.27 Print Batch Standards File panel (PRTSTDBAT)
For the parameter Standards Library, enter either the name of the library that contains the standards, or the value ‘*LIBL’, which searches your interactive library list for the Batch Standards File (GT00TBP).
Print Transaction Level DetailType ‘*TRAN’ in the Detail Level field and press F10 (Additional Parameters).
NOTEThe ‘Version IDs to Print’ field and prompt ‘+ for more values’ display.
Type ‘*ALL’ in the Version IDs to Print field. To specify specific versions, enter up to ten versions in the Version IDs to Print field.
Press Enter. The system submits the print job to batch.
Print Batch Standards File (PRTSTDBAT) Type choices, press Enter. Standards Library . . . . . . . *LIBL *LIBL, Name Detail Level . . . . . . . . . . > *TRAN *VER, *TRAN Version IDs to Print . . . . . . *ALL *ALL, Version ID + for more values Additional Parameters Run Interactively? . . . . . . . *NO *YES, *NO Schedule Job ? . . . . . . . . . *NO *YES, *NO Print Audit Indicators? . . . . *NO *YES, *NO Bottom F3=Exit F4=Prompt F5=Refresh F12=Cancel F13=How to use this display F24=More keys
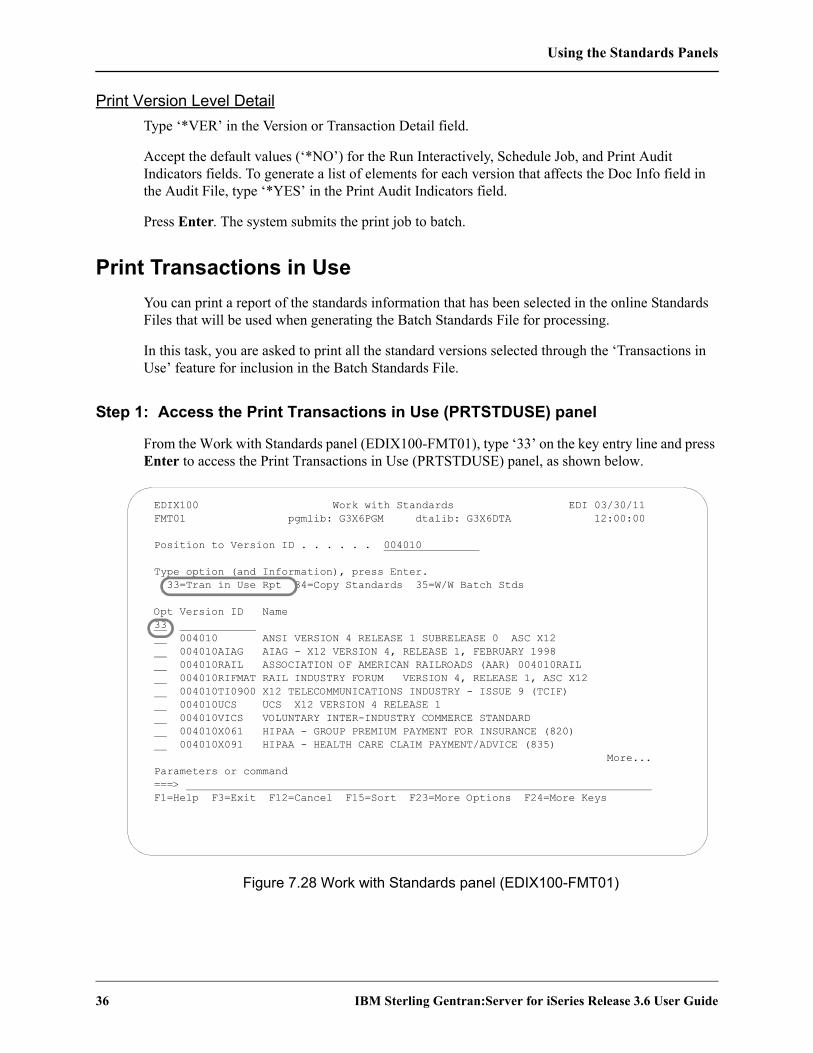
Using the Standards Panels
36 IBM Sterling Gentran:Server for iSeries Release 3.6 User Guide
Print Version Level DetailType ‘*VER’ in the Version or Transaction Detail field.
Accept the default values (‘*NO’) for the Run Interactively, Schedule Job, and Print Audit Indicators fields. To generate a list of elements for each version that affects the Doc Info field in the Audit File, type ‘*YES’ in the Print Audit Indicators field.
Press Enter. The system submits the print job to batch.
Print Transactions in UseYou can print a report of the standards information that has been selected in the online Standards Files that will be used when generating the Batch Standards File for processing.
In this task, you are asked to print all the standard versions selected through the ‘Transactions in Use’ feature for inclusion in the Batch Standards File.
Step 1: Access the Print Transactions in Use (PRTSTDUSE) panel
From the Work with Standards panel (EDIX100-FMT01), type ‘33’ on the key entry line and press Enter to access the Print Transactions in Use (PRTSTDUSE) panel, as shown below.
Figure 7.28 Work with Standards panel (EDIX100-FMT01)
EDIX100 Work with Standards EDI 03/30/11 FMT01 pgmlib: G3X6PGM dtalib: G3X6DTA 12:00:00 Position to Version ID . . . . . . 004010 Type option (and Information), press Enter. 33=Tran in Use Rpt 34=Copy Standards 35=W/W Batch Stds Opt Version ID Name 33 004010 ANSI VERSION 4 RELEASE 1 SUBRELEASE 0 ASC X12 004010AIAG AIAG - X12 VERSION 4, RELEASE 1, FEBRUARY 1998 004010RAIL ASSOCIATION OF AMERICAN RAILROADS (AAR) 004010RAIL 004010RIFMAT RAIL INDUSTRY FORUM VERSION 4, RELEASE 1, ASC X12 004010TI0900 X12 TELECOMMUNICATIONS INDUSTRY - ISSUE 9 (TCIF) 004010UCS UCS X12 VERSION 4 RELEASE 1 004010VICS VOLUNTARY INTER-INDUSTRY COMMERCE STANDARD 004010X061 HIPAA - GROUP PREMIUM PAYMENT FOR INSURANCE (820) 004010X091 HIPAA - HEALTH CARE CLAIM PAYMENT/ADVICE (835) More... Parameters or command ===> F1=Help F3=Exit F12=Cancel F15=Sort F23=More Options F24=More Keys

Using the Standards Panels
IBM Sterling Gentran:Server for iSeries Release 3.6 User Guide 37
Step 2: Select Print Criteria for the Print Transactions in Use Report
The following figure shows the PRTSTDUSE panel that allows you to specify what information you plan to print.
Figure 7.29 Print Transactions in Use (PRTSTDUSE) panel
For the parameter Standards Library, enter either the name of the library that contains the standards, or the value ‘*LIBL’, which will search your interactive library list for the set of Standards Files (STD*).
Type ‘*ALL’ for all versions in the Version IDs to Print field. To specify specific versions, enter up to ten versions in the Version IDs to Print field.
Press Enter. The system submits the print job to batch.
Print Transactions in Use (PRTSTDUSE) Type choices, press Enter. Standards Library . . . . . . . *LIBL *LIBL, Name Version IDs to Print . . . . . . *ALL *ALL, Version ID + for more values Additional Parameters Run Interactively? . . . . . . . *NO *YES, *NO Schedule Job ? . . . . . . . . . *NO *YES, *NO Bottom F3=Exit F4=Prompt F5=Refresh F12=Cancel F13=How to use this display F24=More keys

Using the Standards Panels
38 IBM Sterling Gentran:Server for iSeries Release 3.6 User Guide
Copy Standards (STDCPY) Between LibrariesYou can copy an existing standard from one library to another using the Copy Standards command (STDCPY). One common use of this command would be copying a standards version from a test environment into a production library.
This task is intended to be an illustration of how to copy a version. Do not attempt to copy the standards versions during this task unless you have the data rights of ‘1.’ Only those users with strict authority should work with the standards.
Step 1: Access the Copy Standards (STDCPY) panel
From the Work with Standards panel (EDIX100-FMT01), type ‘34’ next to the standards version to be copied and press Enter to access the Copy Standards (STDCPY) panel, as shown in the following figure.
NOTEThe Copy Standards command (STDCPY) can also be accessed by selecting option ‘30’ (Copy Transaction) on the Standards Transaction panel (EDIX120-CTL01).
Figure 7.30 Work with Standards panel (EDIX100-FMT01)
EDIX100 Work with Standards EDI 03/30/11 FMT01 pgmlib: G3X6PGM dtalib: G3X6DTA 12:00:00 Position to Version ID . . . . . . 004010 Type option (and Information), press Enter. 33=Tran in Use Rpt 34=Copy Standards 35=W/W Batch Stds Opt Version ID Name 34 004010 ANSI VERSION 4 RELEASE 1 SUBRELEASE 0 ASC X12 004010AIAG AIAG - X12 VERSION 4, RELEASE 1, FEBRUARY 1998 004010RAIL ASSOCIATION OF AMERICAN RAILROADS (AAR) 004010RAIL 004010RIFMAT RAIL INDUSTRY FORUM VERSION 4, RELEASE 1, ASC X12 004010TI0900 X12 TELECOMMUNICATIONS INDUSTRY - ISSUE 9 (TCIF) 004010UCS UCS X12 VERSION 4 RELEASE 1 004010VICS VOLUNTARY INTER-INDUSTRY COMMERCE STANDARD 004010X061 HIPAA - GROUP PREMIUM PAYMENT FOR INSURANCE (820) 004010X091 HIPAA - HEALTH CARE CLAIM PAYMENT/ADVICE (835) More... Parameters or command ===> F1=Help F3=Exit F12=Cancel F15=Sort F23=More Options F24=More Keys Command prompting ended when user pressed F12.

Using the Standards Panels
IBM Sterling Gentran:Server for iSeries Release 3.6 User Guide 39
Step 2: Select Options for Copy Standards
The following figure shows the STDCPY panel.
Figure 7.31 Copy Standards (STDCPY) panel
Press Enter to execute the copy command.
Field DescriptionsVersion
The Version field will be filled in with the version selected in the previous step.
TransactionsIf you want to copy one transaction from the version to the new library, enter the name in the first Transaction field. To copy additional individual transactions, type ‘+’ to see more entry fields. To copy all transactions from this version, type *ALL in the first Transaction field.
From LibraryEnter the name of the library where the source version resides.
To LibraryEnter the name of the library where the version and its transactions are to be copied.
Copy Standards (STDCPY) Type choices, press Enter. Version . . . . . . . . . . . . > '004010' NAME Transactions . . . . . . . . . . > '*ALL' Name, *ALL + for more values From Library . . . . . . . . . . G3X6STDTST Name To Library . . . . . . . . . . . G3X6STDPRO Name Replace or add records . . . . . *ADD *ADD, *REPLACE Create Files? . . . . . . . . . *NO *NO, *YES Schedule Job? . . . . . . . . . *NO *NO, *YES Bottom F3=Exit F4=Prompt F5=Refresh F10=Additional parameters F12=Cancel F13=How to use this display F24=More keys

Using the Standards Panels
40 IBM Sterling Gentran:Server for iSeries Release 3.6 User Guide
Replace or add recordsThis field is used to specify whether the records in the files being copied are to be added (*ADD) to the target files, or are to replace (*REPLACE) any duplicate records currently in the target files. The *REPLACE option can be used to copy any standards changes that had been made in the source files into the target files.
The version to be copied must exist in the source (copy from) files, and may exist in the target (copy to) files. If the version exists in the target files, you must use the *REPLACE option to replace the records in the target files with the records in the source files. If the version does not exist in the target files, use the *ADD option.
Create Files? Tells Sterling Gentran:Server if the standards files must be created in the target library before copying the source version into the target files. If the files already exist in the target library, type *NO in this field, otherwise type *YES.
Schedule Job? This alphanumeric field is used to designate if you want to run this option by scheduling it as a job. *NO is the default for this field.
If you want to run the job using the Job Scheduling feature, type *YES. The system displays the Schedule Job panel used to further define the job run parameters. You can queue and run the job on a periodic basis, or on a one-time only basis. The scheduling feature also enables you to establish a master schedule (one-time) for the job to run on a periodic basis.
Run Interactively? This parameter allows you to perform the process interactively (immediately). If you select to run the command in an interactive mode (*YES), you can monitor system messages that occur during processing.You are, however, locked out of the system on the terminal that you used to submit the job until the process is completed.
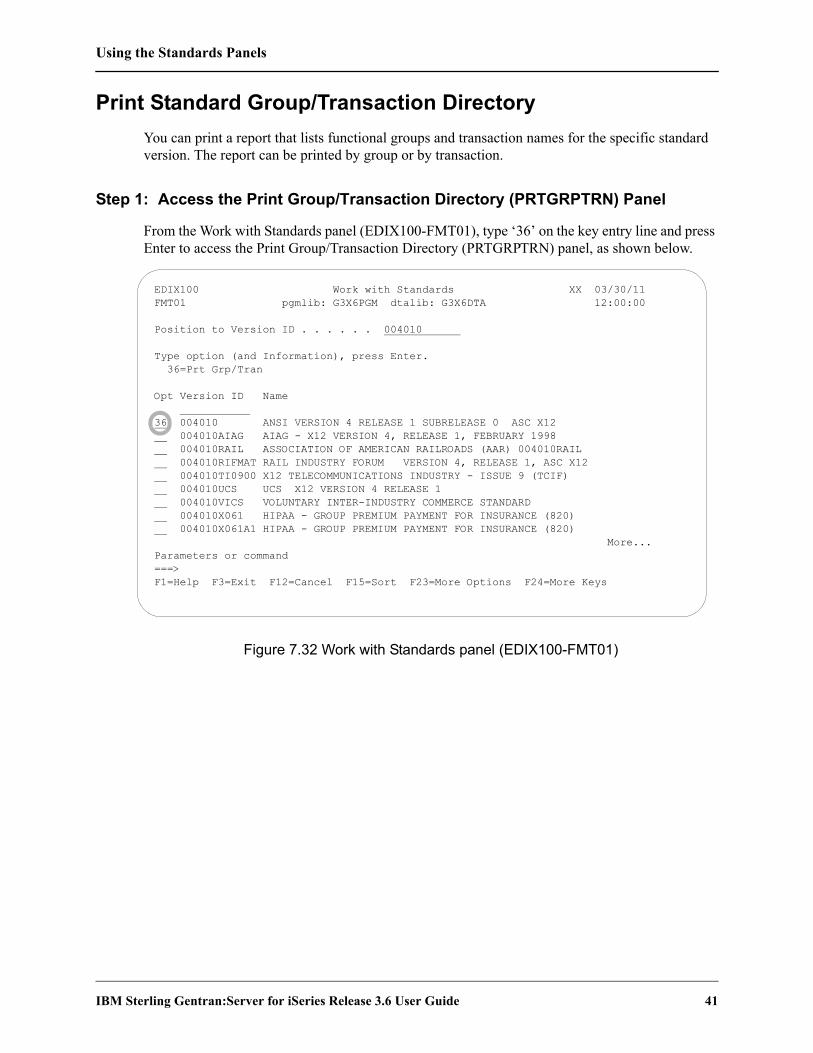
Using the Standards Panels
IBM Sterling Gentran:Server for iSeries Release 3.6 User Guide 41
Print Standard Group/Transaction DirectoryYou can print a report that lists functional groups and transaction names for the specific standard version. The report can be printed by group or by transaction.
Step 1: Access the Print Group/Transaction Directory (PRTGRPTRN) Panel
From the Work with Standards panel (EDIX100-FMT01), type ‘36’ on the key entry line and press Enter to access the Print Group/Transaction Directory (PRTGRPTRN) panel, as shown below.
Figure 7.32 Work with Standards panel (EDIX100-FMT01)
EDIX100 Work with Standards XX 03/30/11 FMT01 pgmlib: G3X6PGM dtalib: G3X6DTA 12:00:00 Position to Version ID . . . . . . 004010 Type option (and Information), press Enter. 36=Prt Grp/Tran Opt Version ID Name 36 004010 ANSI VERSION 4 RELEASE 1 SUBRELEASE 0 ASC X12 004010AIAG AIAG - X12 VERSION 4, RELEASE 1, FEBRUARY 1998 004010RAIL ASSOCIATION OF AMERICAN RAILROADS (AAR) 004010RAIL 004010RIFMAT RAIL INDUSTRY FORUM VERSION 4, RELEASE 1, ASC X12 004010TI0900 X12 TELECOMMUNICATIONS INDUSTRY - ISSUE 9 (TCIF) 004010UCS UCS X12 VERSION 4 RELEASE 1 004010VICS VOLUNTARY INTER-INDUSTRY COMMERCE STANDARD 004010X061 HIPAA - GROUP PREMIUM PAYMENT FOR INSURANCE (820) 004010X061A1 HIPAA - GROUP PREMIUM PAYMENT FOR INSURANCE (820) More... Parameters or command ===> F1=Help F3=Exit F12=Cancel F15=Sort F23=More Options F24=More Keys

Using the Standards Panels
42 IBM Sterling Gentran:Server for iSeries Release 3.6 User Guide
Step 2: Select Print Criteria for the Group/Transaction Directory
The following figure shows the PRTGRPTRN panel that enables you to specify the information to print.
Figure 7.33 Print Group/Transaction Directory panel (PRTGRPTRN)
For the parameter Group or Trans, enter either ‘*GROUP’ to print it in functional group order or ‘*TRAN’ to print it in transaction order.
Press Enter to submit the print job to batch.
Print Group/Transaction Dir (PRTGRPTRN) Type choices, press Enter. Select a Version to Print . . . > '004010' Version Id Group or Trans . . . . . . . . . *GROUP, *TRAN Additional Parameters Run Interactively? . . . . . . . *NO *YES, *NO Schedule Job? . . . . . . . . . *NO *YES, *NO Bottom F3=Exit F4=Prompt F5=Refresh F12=Cancel F13=How to use this display F24=More keys

Using the Standards Panels
IBM Sterling Gentran:Server for iSeries Release 3.6 User Guide 43
In addition, you can also access the Print Group/Transaction Directory panel (PRTGRPTRN) from the Group/Transaction Directory panel (EDIX125-CTL01), and then press function key F21 (Prt Grp/Tran).
A ‘Print by’ window displays on this panel. To print the report sorted by the transaction code, enter ‘1’ next to the Transaction Code. Enter ‘1’ next to the Functional Group to print it in functional group order. Press Enter to submit the print job to batch..
EDIX125 Group/Transaction Directory XX 03/30/11 CTL01 12:00:00 Version ID . . . . . . . . . . . . 004010 Agency . . . . . . . . . . . . . . X Standard Name. . . . . . . . . . . ANSI VERSION 4 RELEASE 1 SUBRELEASE 0 ASC Position to Transaction Code . . . Tran Cd Func Grp Description CONTROL TRANSACTION 100 PG INSURANCE PLAN DESCRIPTION 101 NL NAME AND ADDRESS LISTS 104 SA AIR SHIPMENT INFORMATION 105 BF BUSINESS ENTITY FILINGS 106 MH MOTOR CARRIER RATE PROPOSAL 107 MC REQUEST FOR MOTOR CARRIER RATE PROPOSAL 108 MK RESPONSE TO A MOTOR CARRIER RATE PROPOSAL 109 VE VESSEL CONTENT DETAILS 110 IA AIR FREIGHT DETAILS AND INVOICE More... F1=Help F3=Exit F12=Cancel F15=Sort F21=Prt Grp/Tran F24=More Keys Version protected. No modifications allowed.
EDIX125 Group/Transaction Directory IH 03/30/11 CTL01 12:00:00 Version ID . . . . . . . . . . . . 004010 Agency . . . . . . . . . . . . . . X Standard Name. . . . . . . . . . . ANSI VERSION 4 RELEASE 1 SUBRELEASE 0 ASC Position to Transaction Code . . . Tran Cd Func Grp Description Print by: CONTROL TRANSACT 100 PG INSURANCE PLAN D 1=Select 101 NL NAME AND ADDRESS 104 SA AIR SHIPMENT INF 1 Transaction Code 105 BF BUSINESS ENTITY Functional Group 106 MH MOTOR CARRIER RA 107 MC REQUEST FOR MOTO 108 MK RESPONSE TO A MO 109 VE VESSEL CONTENT D F3=Exit F12=Cancel 110 IA AIR FREIGHT DETA More... F1=Help F3=Exit F12=Cancel F15=Sort F21=Prt Grp/Tran F24=More Keys Version protected. No modifications allowed.

Using the Standards Panels
44 IBM Sterling Gentran:Server for iSeries Release 3.6 User Guide
Viewing your Batch Standards FileYou can view the contents of your batch standards file similar to the way you view your online standards files. There are a series of panels that display your versions and the transactions, segments, elements, codes, and element definitions for a selected version. You cannot modify data through these panels. They are for viewing purposes only. If you need to modify your Batch Standards file, you need to first update your online standards and then run the Standards File Extract (EXTSTD).
Step 1: Access the Work with Batch Standards (EDIX190) panel
From the Work with Standards panel (EDIX100-FMT01), type ‘35’ on any option line and press Enter to access the Work with Batch Standards (EDIX190) panel, as shown in the figure below.
NOTEThe Work with Batch Standards panel (EDIX190) can also be accessed by typing ‘EXCPGM EDIX190’ from an iSeries command line.
Figure 7.34 Work with Standards panel (EDIX100)
The system displays the Work with Batch Standards File (EDIX190-FMT01).
EDIX100 Work with Standards EDI 03/30/11FMT01 pgmlib: G3X6PGM dtalib: G3X6TSTDTA 14:11:14 Position to Version ID . . . . . . Type option (and Information), press Enter. 33=Tran in Use Rpt 34=Copy Standards 35=W/W Batch Stds Opt Version ID Name 35 ____________ __ ACHG02 ABI BROKERNET DATA STANDARDS __ ADJL01 ABI BROKERNET DATA STANDARDS __ ADJL04 ABI BROKERNET DATA STANDARDS __ ADJL05 ABI BROKERNET DATA STANDARDS __ ADJL06 ABI BROKERNET DATA STANDARDS __ ANA001 TRADACOMS UNITED KINGDOM __ ATRM01 ABI BROKERNET DATA STANDARDS __ ATRM02 ABI BROKERNET DATA STANDARDS __ ATRM04 ABI BROKERNET DATA STANDARDS More... Parameters or command ===> F1=Help F3=Exit F12=Cancel F15=Sort F23=More Options F24=More Keys

Using the Standards Panels
IBM Sterling Gentran:Server for iSeries Release 3.6 User Guide 45
View EDI Batch StandardsSince online standards changes are not reflected in the batch standards file until you execute the Standards File Extract (EXTSTD) program, this allows you to verify the contents of your batch standards file.
The following figure shows the Work with Batch Standards panel (EDIX190-FMT01) as it displays the Version IDs along with applicable option codes.
Figure 7.35 Work with Batch Standards panel (EDIX190)
Press Home and the arrow keys to move the cursor to the Position to Version ID field at the top of the panel. Type the version that you want to position to and press Enter. This version is positioned to the top of the list.
NOTEYour view will look different because it will only list those versions that are found in your batch standards file.
EDIX190 Work with Batch Standards File EDI 03/30/11FMT01 pgmlib: G3X6PGM dtalib: G3X6DTA 14:26:49 Position to Version ID . . . . . . 004010______ Type option (and Information), press Enter. 11=Transactions 18=Grp/Tran Dir 30=Std Table Ext 31=Batch Std Rpt 32=Tran in Use Rpt Opt Version ID Name __ ____________ 004010 ANSI VERSION 4 RELEASE 1 SUBRELEASE 0 ASC X12 __ 00402 INTERCHANGE CONTROL AND ACKNOWLEDGMENT __ 004020 ANSI VERSION 4 RELEASE 2 SUBRELEASE 0 ASC X12 __ 00403 INTERCHANGE CONTROL AND ACKNOWLEDGMENT __ 004030 ANSI VERSION 4 RELEASE 3 SUBRELEASE 0 ASC X12 __ 00404 INTERCHANGE CONTROL AND ACKNOWLEDGMENT __ 004040 ANSI VERSION 4 RELEASE 4 SUBRELEASE 0 ASC X12 __ 004041 ANSI VERSION 4 RELEASE 4 SUBRELEASE 1 ASC X12 __ 004042 ASC X12 VERSION 4 RELEASE 4 SUBRELEASE 2 More... Parameters or command ===> F1=Help F3=Exit F12=Cancel

Using the Standards Panels
46 IBM Sterling Gentran:Server for iSeries Release 3.6 User Guide
Access the Batch Standards Transaction panelTo view the Batch Standards Transaction panel (EDIX191-CTL01) for a specific Version ID, you first must access the Version ID on the Work with Standards panel.
Next, type ‘11’ (Transactions) in the Option field next to the selected version and press Enter. The system displays the Batch Standards Transactions panel (EDIX191- CTL01)..
Figure 7.36 Batch Standards Transactions panel (EDIX191)
A list of all the transactions that were selected for the batch standards extract for that particular version is displayed.
Use the Position to Transaction Code to locate a specific transaction.
EDIX191 Batch Standards Transactions EDI 03/30/11CTL01 14:39:56 Version ID . . . . . . . . . . . . 004010 Position to Transaction Code . . . ______ Type option, press Enter. 11=Segments Opt Tran Cd Rel Description 0 CONTROL TRANSACTION __ Agency X Seg Cnt 26 Nte Float Ind Prev Tran Next Tran __ Next Rel Next Tran Next Rel Func Grp ___ __ 100 0 INSURANCE PLAN DESCRIPTION Agency X Seg Cnt 43 Nte Float Ind Prev Tran N Next Tran Next Rel Next Tran Next Rel Func Grp PG_ F1=Help F12=Cancel F18=Grp/Tran Dir More...

Using the Standards Panels
IBM Sterling Gentran:Server for iSeries Release 3.6 User Guide 47
View the SegmentsTo view the segments for a specific transaction, type ‘11’ (Segments) in the Option field next to the Transaction and press Enter. The segments that exist for this transaction are displayed on the Batch Standards Segment panel (EDIX192-CTL01)..
Figure 7.37 Batch Standards Segment panel (EDIX192)
A list of all the segments for the selected transaction found in the batch standards file will be displayed.
Use the Position to Segment Sequence to locate a specific segment.
EDIX192 Batch Standards Segment EDI 03/30/11CTL01 12:00:00 Version ID . . . . . . . . . . . . 004010 Transaction Code . . . . . . . . . 810 Release. . . . . . . . . . . . . . 0 Position to Segment Sequence . . . ___ Type option, press Enter. 11=Seg Elements ***SEGMENT*** Man Max Max Element Loop Loop Act Opt No ID Ty Req Code Use Loop Count ID B/E Count __ 1 BIG H M 1 10 1 BEGINNING SEGMENT FOR INVOICE __ 2 NTE H O 100 2 NOTE/SPECIAL INSTRUCTION __ 3 CUR H O 1 21 CURRENCY __ 4 REF H O 12 9 REFERENCE IDENTIFICATION More... F1=Help F12=Cancel

Using the Standards Panels
48 IBM Sterling Gentran:Server for iSeries Release 3.6 User Guide
View the Segment ElementsTo view the segments elements for a specific segment, type ‘11’ (Seg Elements) in the Option field next to the desired segment and press Enter. The elements that exist for this segment are displayed on the Batch Standards Segment Element panel (EDIX193-CTL01).
Figure 7.38 Batch Standards Segment Element panel (EDIX193)
A list of all the elements for the selected segment found in the batch standards file will be displayed.
EDIX193 Batch Standards Segment Element EDI 03/30/11CTL01 12:00:00 Version ID . . . . . . . . . . . . 004010 Segment ID . . . . . . . . . . . . BIG Type option (and Information), press Enter. 11=Condition 12=Seg Activity 13=Elem Def Opt Seg Sub Man Com Ad Elem ***Group**** Seq Ele Ele Ele In ID Dsg Ty Rq Description Cd __ 1 M M 0373 DATE __ 2 M M Y 0076 INVOICE NUMBER __ 3 O O 0373 DATE __ 4 O O 0324 PURCHASE ORDER NUMBER __ 5 O O 0328 RELEASE NUMBER __ 6 O O 0327 CHANGE ORDER SEQUENCE NUMBE __ 7 O O 0640 TRANSACTION TYPE CODE __ 8 O O 0353 TRANSACTION SET PURPOSE COD More... F1=Help F12=Cancel

Using the Standards Panels
IBM Sterling Gentran:Server for iSeries Release 3.6 User Guide 49
View the Conditional Codes for an ElementTo view the Conditional codes for an element, type ‘11’ (Condition) in the Option field next to the desired element and press Enter. The Conditional element codes that exist for this element are displayed on the Batch Standards Element Conditional Code panel (EDIX194-FMT01).
NOTEThe only items that have conditional codes are those that have a ‘Y’ in Cd column on the Batch Standards Segment Element panel (EDIX193-CTL01).
Figure 7.39 Batch Standards Element Conditional Code panel (EDIX194)
The Conditional codes information is displayed for the selected element.
EDIX194 Batch Standards Element Conditional Code EDI 03/30/11FMT01 12:00:00 Version ID . . . . . . . . . . . . 004010 Segment ID . . . . . . . . . . . . CUR Sequence . . . . . . . . . . . . . 8 Description. . . . . . . . . . . . DATE Mandatory Element. . . . . . . . . O Data Element ID. . . . . . . . . . 0373 Audit Id Indicator . . . . . . . . Conditional Area Code 1 C Code 2 08 Code 3 07 Code 4 Code 5 Code 6 Code 7 Code 8 Code 9 Code 10 Code 11 Code 12 Code 13 Code 14 Code 15 F1=Help F12=Cancel

Using the Standards Panels
50 IBM Sterling Gentran:Server for iSeries Release 3.6 User Guide
View the Segment Activity for an ElementTo view the Segment Activity for an element, type ‘12’ (Seg Activity) in the Option field on panel Batch Standards Segment Element (EDIX193-CTL01) next to the desired element and press Enter. The Segment Activity for this element are displayed on the Batch Standards Element Activity panel (EDIX195-FMT01).
Figure 7.40 Batch Standards Element Activity panel (EDIX195)
The Segment Activity information is displayed for the selected element.
EDIX195 Batch Standards Element Activity EDI 03/30/11FMT01 12:00:00 Version ID . . . . . . . . . . . . 004010 Transaction. . . . . . . . . . . . 810 Segment ID . . . . . . . . . . . . BIG Position in Trans. . . . . . . . . 1 Position in Segment. . . . . . . . 1 Element ID . . . . . . . . . . . . 0373 Element Description. . . . . . . . DATE Activity Description . . . . . . . SET COUNTERS TO ZERO Action . . . . . . . . . . . . . . V V Number . . . . . . . . . . . . . . 04 05 Constant . . . . . . . . . . . . . Element Compare1 . . . . . . . . . Element Compare2 . . . . . . . . . Element Compare3 . . . . . . . . . Store Element Req. . . . . . . . .
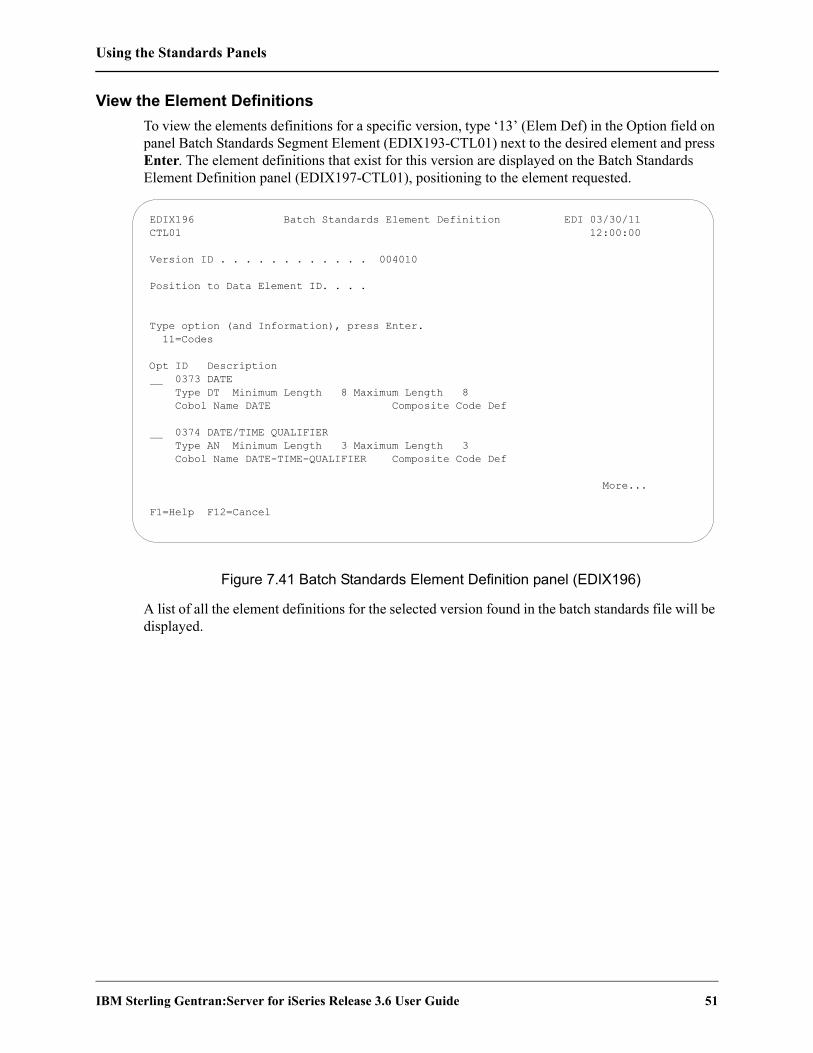
Using the Standards Panels
IBM Sterling Gentran:Server for iSeries Release 3.6 User Guide 51
View the Element DefinitionsTo view the elements definitions for a specific version, type ‘13’ (Elem Def) in the Option field on panel Batch Standards Segment Element (EDIX193-CTL01) next to the desired element and press Enter. The element definitions that exist for this version are displayed on the Batch Standards Element Definition panel (EDIX197-CTL01), positioning to the element requested.
Figure 7.41 Batch Standards Element Definition panel (EDIX196)
A list of all the element definitions for the selected version found in the batch standards file will be displayed.
EDIX196 Batch Standards Element Definition EDI 03/30/11CTL01 12:00:00 Version ID . . . . . . . . . . . . 004010 Position to Data Element ID. . . . Type option (and Information), press Enter. 11=Codes Opt ID Description __ 0373 DATE Type DT Minimum Length 8 Maximum Length 8 Cobol Name DATE Composite Code Def __ 0374 DATE/TIME QUALIFIER Type AN Minimum Length 3 Maximum Length 3 Cobol Name DATE-TIME-QUALIFIER Composite Code Def More... F1=Help F12=Cancel

Using the Standards Panels
52 IBM Sterling Gentran:Server for iSeries Release 3.6 User Guide
Access the Group/Transaction Directory Panel (EDIX198-CTL01)The Group/Transaction Directory panel (EDIX198-CTL01) enables you to view transaction names and their corresponding functional groups in the a listing style. You can access this panel in either of these ways:
Type ‘18’ (Grp/Tran Dir) in the Option field next to the selected version on the Work with Standards panel (EDIX190-FMT01) and then press Enter.
EDIX190 Work with Batch Standards File XX 03/30/11 FMT01 pgmlib: G3X6DEVPGM dtalib: G3X6DTA 12:00:00 Position to Version ID . . . . . . 004010 Type option (and Information), press Enter. 11=Transactions 18=Grp/Tran Dir 30=Std Table Ext 31=Batch Std Rpt Opt Version ID Name 18 004010 ANSI VERSION 4 RELEASE 1 SUBRELEASE 0 ASC X12 004011 ANSI VERSION 4 RELEASE 1 SUBRELEASE 1 ASC X12 004012 ANSI VERSION 4 RELEASE 1 SUBRELEASE 2 ASC X12 00402 INTERCHANGE CONTROL AND ACKNOWLEDGMENT 004020 ANSI VERSION 4 RELEASE 2 SUBRELEASE 0 ASC X12 004021 ANSI VERSION 4 RELEASE 2 SUBRELEASE 1 ASC X12 004022 ANSI VERSION 4 RELEASE 2 SUBRELEASE 2 ASC X12 00403 INTERCHANGE CONTROL AND ACKNOWLEDGMENT 004030 ANSI VERSION 4 RELEASE 3 SUBRELEASE 0 ASC X12 More... Parameters or command ===> F1=Help F3=Exit F12=Cancel
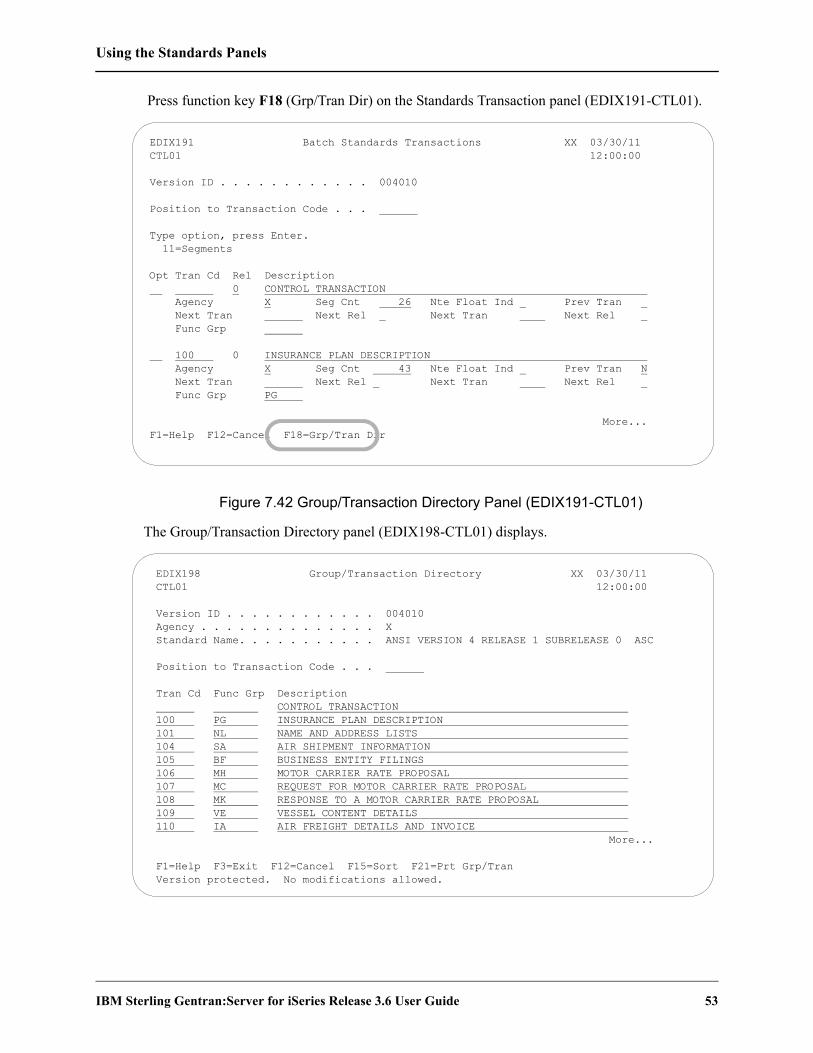
Using the Standards Panels
IBM Sterling Gentran:Server for iSeries Release 3.6 User Guide 53
Press function key F18 (Grp/Tran Dir) on the Standards Transaction panel (EDIX191-CTL01).
Figure 7.42 Group/Transaction Directory Panel (EDIX191-CTL01)
The Group/Transaction Directory panel (EDIX198-CTL01) displays.
EDIX191 Batch Standards Transactions XX 03/30/11 CTL01 12:00:00 Version ID . . . . . . . . . . . . 004010 Position to Transaction Code . . . Type option, press Enter. 11=Segments Opt Tran Cd Rel Description 0 CONTROL TRANSACTION Agency X Seg Cnt 26 Nte Float Ind Prev Tran Next Tran Next Rel Next Tran Next Rel Func Grp 100 0 INSURANCE PLAN DESCRIPTION Agency X Seg Cnt 43 Nte Float Ind Prev Tran N Next Tran Next Rel Next Tran Next Rel Func Grp PG More... F1=Help F12=Cancel F18=Grp/Tran Dir
EDIX198 Group/Transaction Directory XX 03/30/11 CTL01 12:00:00 Version ID . . . . . . . . . . . . 004010 Agency . . . . . . . . . . . . . . X Standard Name. . . . . . . . . . . ANSI VERSION 4 RELEASE 1 SUBRELEASE 0 ASC Position to Transaction Code . . . Tran Cd Func Grp Description CONTROL TRANSACTION 100 PG INSURANCE PLAN DESCRIPTION 101 NL NAME AND ADDRESS LISTS 104 SA AIR SHIPMENT INFORMATION 105 BF BUSINESS ENTITY FILINGS 106 MH MOTOR CARRIER RATE PROPOSAL 107 MC REQUEST FOR MOTOR CARRIER RATE PROPOSAL 108 MK RESPONSE TO A MOTOR CARRIER RATE PROPOSAL 109 VE VESSEL CONTENT DETAILS 110 IA AIR FREIGHT DETAILS AND INVOICE More... F1=Help F3=Exit F12=Cancel F15=Sort F21=Prt Grp/Tran Version protected. No modifications allowed.

Reports
54 IBM Sterling Gentran:Server for iSeries Release 3.6 User Guide
Reports
EBDI036 – Sterling Gentran Standards Report
Contents of the ReportThe Sterling Gentran Standards Report is a user-generated report that contains information about one or more documents (identified by Transaction IDs) for a standards version. This information includes the records for all of the segments for each transaction.
How to Identify the ReportThe name of the Sterling Gentran:Server program that generates this report (EBDI036 or EBDI036B) displays in the upper left corner of the report. The identifier “EBDI036” or “EBDI036B” also displays in the User Data field associated with the spooled report in the Output Queue. The report title, “Sterling Gentran STANDARDS REPORT,” displays in the center at the top of the report.
How to Generate the ReportYou can generate the EBDI036 or EBDI036B Sterling Gentran Standards Report four ways.
Select option ‘6’ (Print) on the Work with Standards panel (EDIX100) and enter the appropriate information on the Print Standards File (PRTSTD) panel.
Select option ‘6’ (Print) on the Standards Transaction panel (EDIX120) and enter the appropriate information on the Print Standards File (PRTSTD120) panel.
Select F21 (Prt Std) on the Standards Segment panel (EDIX130) and enter the appropriate information on the Print Standards File (PRTSTD) panel.
Prompt the command ‘PRTSTD’ or ‘PRTSTD120’ on the command line to access the command panel.
When the Characters Per Line parameter is 132, the EBDI036 Standards report is printed. When it is 80, the EBDI036B report is printed.
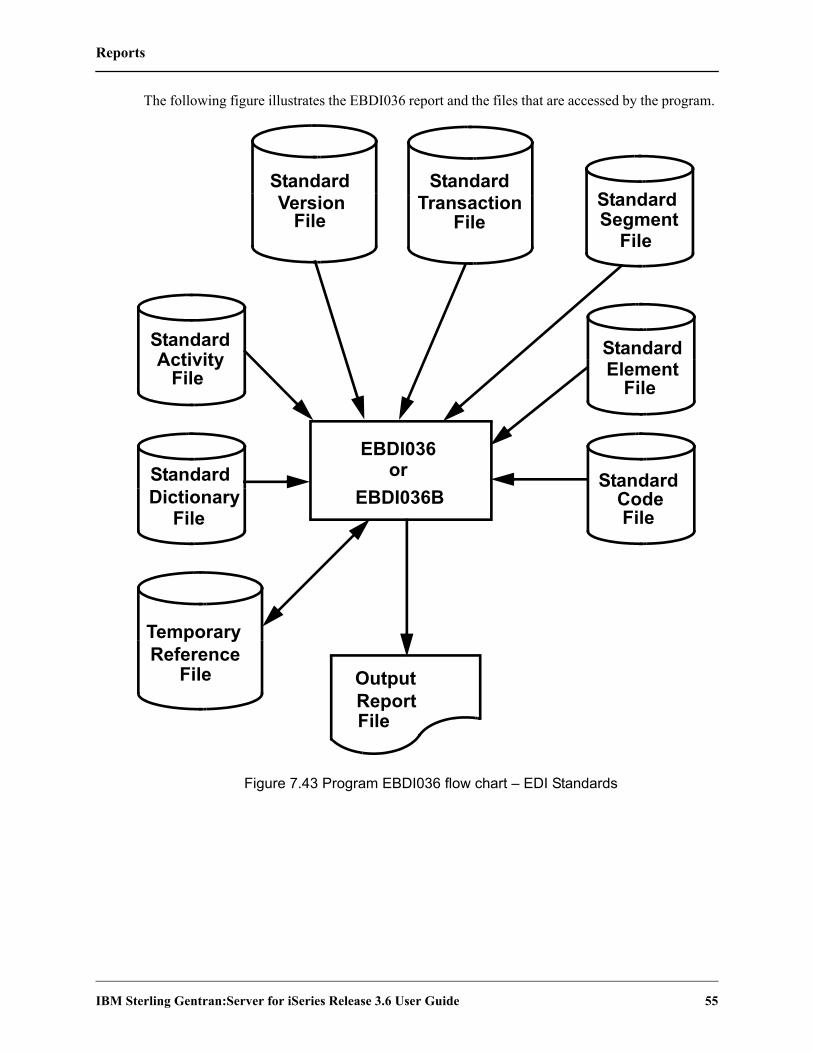
Reports
IBM Sterling Gentran:Server for iSeries Release 3.6 User Guide 55
The following figure illustrates the EBDI036 report and the files that are accessed by the program.
Figure 7.43 Program EBDI036 flow chart – EDI Standards
StandardVersion
File
StandardTransaction
FileStandardSegment
File
StandardElement
File
EBDI036
OutputReportFile
StandardCodeFile
StandardActivity
File
StandardDictionary
File
TemporaryReference
File
or EBDI036B

Reports
56 IBM Sterling Gentran:Server for iSeries Release 3.6 User Guide
Figure 7.44 Sterling Gentran:Server Standards Report—EBDI036 (Documents for
EBDI036 RUN DATE 03/30/11 GENTRAN STANDARDS REPORT RUN TIME 10:04:48 PAGE 1
DOCUMENTS FOR VERSION: 004010
VERSION: 004010 ANSI VERSION 4 RELEASE 1 SUBRELEASE 0 ASC X12
FUNC NTE NO. OF
DOCUMENT GROUP RLSE DESCRIPTION FLOAT SEGMENTS
-------- ------ ---- ------------------------------------------------------------ ----- --------
850 PO 0 PURCHASE ORDER 00194

Reports
IBM Sterling Gentran:Server for iSeries Release 3.6 User Guide 57
Version)
Figure 7.45 Sterling Gentran:Server Standards Report—EBDI036 (Segments for Document)
EBDI036 RUN DATE 03/09/2000 GENTRAN STANDARDS REPORT RUN TIME 14:34:10 PAGE 1
DOCUMENTS FOR VERSION: 004010
VERSION: 004010 ANSI VERSION 4 RELEASE 1 SUBRELEASE 0 ASC X12
NTE NO. OF
DOCUMENT RLSE DESCRIPTION FLOAT SEGMENTS
-------- ---- ------------------------------------------------------------ ----- --------
850 0 PURCHASE ORDER 00194
IBM
EBDI036 RUN DATE 03/09/2000 GENTRAN STANDARDS REPORT RUN TIME 14:34:10 PAGE 2
SEGMENTS FOR DOCUMENT: 850
VERSION : 004010 RLSE: 0
DOCUMENT : 850 PURCHASE ORDER
NO OF SEG: 00194
SEGMENT MAN. MAX MAX ELE LOOP LOOP ACT
SEQ ID TYPE REQ CODE USE LOOPS CNT ID B/E CNT DESCRIPTION
--- --- ---- --- ---- ------ ------ --- ---- ---- --- ---------------------------------------------------
001 BEG H M 000001 000000 012 001 BEGINNING SEGMENT FOR PURCHASE ORDER
002 CUR H O 000001 000000 021 000 CURRENCY
003 REF H O 999999 000000 009 000 REFERENCE IDENTIFICATION
004 PER H O 000003 000000 009 000 ADMINISTRATIVE COMMUNICATIONS CONTACT
005 TAX H O 999999 000000 013 000 TAX REFERENCE
006 FOB H O 999999 000000 009 000 F.O.B. RELATED INSTRUCTIONS
007 CTP H O 999999 000000 025 000 PRICING INFORMATION
008 PAM H O 000010 000000 029 000 PERIOD AMOUNT
009 CSH H O 000005 000000 010 000 SALES REQUIREMENTS
010 TC2 H O 999999 000000 002 000 COMMODITY
011 SAC H O 000001 000025 016 1000 B 000 SERVICE
012 CUR H O 000001 000000 021 1000 E 000 CURRENCY
013 ITD H O 999999 000000 015 000 TERMS OF SALE/DEFERRED TERMS OF SALE
014 DIS H O 000020 000000 006 000 DISCOUNT DETAIL
015 INC H O 000001 000000 019 000 INSTALLMENT INFORMATION
016 DTM H O 000010 000000 006 000 DATE/TIME REFERENCE
017 LDT H O 000012 000000 004 000 LEAD TIME
018 LIN H O 000005 000000 031 000 ITEM IDENTIFICATION
019 SI H O 999999 000000 021 000 SERVICE CHARACTERISTIC IDENTIFICATION
020 PID H O 000200 000000 009 000 PRODUCT/ITEM DESCRIPTION
021 MEA H O 000040 000000 024 000 MEASUREMENTS
022 PWK H O 000025 000000 013 000 PAPERWORK
023 PKG H O 000200 000000 006 000 MARKING
024 TD1 H O 000002 000000 010 000 CARRIER DETAILS (QUANTITY AND WEIGHT)
025 TD5 H O 000012 000000 015 000 CARRIER DETAILS (ROUTING SEQUENCE/TRANSIT TIME)
026 TD3 H O 000012 000000 010 000 CARRIER DETAILS (EQUIPMENT)
027 TD4 H O 000005 000000 005 000 CARRIER DETAILS (SPECIAL HANDLING
028 MAN H O 000010 000000 006 000 MARKS AND NUMBERS
029 PCT H O 999999 000000 002 000 PERCENT AMOUNTS
030 CTB H O 000005 000000 006 000 RESTRICTIONS/CONDITIONS
031 TXI H O 999999 000000 010 000 TAX INFORMATION
032 AMT H O 000001 999999 003 2000 B 000 MONETARY AMOUNT
033 REF H O 999999 000000 009 2000 000 REFERENCE IDENTIFICATION
034 DTM H O 000001 000000 006 2000 000 DATE/TIME REFERENCE
035 PCT H O 999999 000000 002 2000 000 PERCENT AMOUNTS
036 FA1 H O 000001 999999 003 2100 B 000 TYPE OF FINANCIAL ACCOUNTING DATA
037 FA2 H O 999999 000000 002 2000 E 000 ACCOUNTING DATA
038 N9 H O 000001 001000 012 3000 B 000 REFERENCE IDENTIFICATION
039 DTM H O 999999 000000 006 3000 000 DATE/TIME REFERENCE
040 MSG H O 001000 000000 003 3000 E 000 MESSAGE TEXT
041 N1 H O 000001 000200 006 4000 B 000 NAME
042 N2 H O 000002 000000 002 4000 000 ADDITIONAL NAME INFORMATION
043 N3 H O 000002 000000 002 4000 000 ADDRESS INFORMATION
044 N4 H O 999999 000000 006 4000 000 GEOGRAPHIC LOCATION
IBM
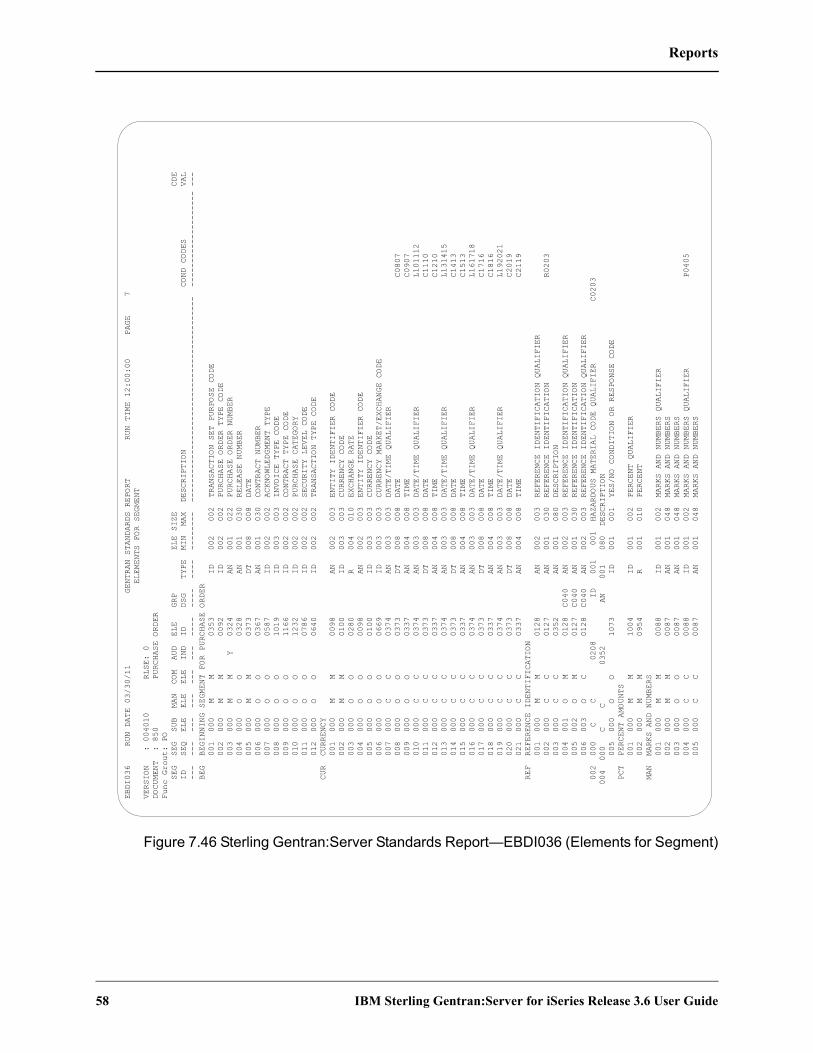
Reports
58 IBM Sterling Gentran:Server for iSeries Release 3.6 User Guide
Figure 7.46 Sterling Gentran:Server Standards Report—EBDI036 (Elements for Segment)
EBDI036 RUN DATE 03/30/11 GENTRAN STANDARDS REPORT RUN TIME 12:00:00 PAGE 7
ELEMENTS FOR SEGMENT
VERSION : 004010 RLSE: 0
DOCUMENT : 850 PURCHASE ORDER
Func Grout: PO
SEG SEG SUB MAN COM AUD ELE GRP ELE SIZE CDE
ID SEQ ELE ELE ELE IND ID DSG TYPE MIN MAX DESCRIPTION COND CODES VAL
--- --- --- --- --- --- ---- ---- ---- -------- ------------------------------------------- -------------------- ---
BEG BEGINNING SEGMENT FOR PURCHASE ORDER
001 000 M M 0353 ID 002 002 TRANSACTION SET PURPOSE CODE
002 000 M M 0092 ID 002 002 PURCHASE ORDER TYPE CODE
003 000 M M Y 0324 AN 001 022 PURCHASE ORDER NUMBER
004 000 O O 0328 AN 001 030 RELEASE NUMBER
005 000 M M 0373 DT 008 008 DATE
006 000 O O 0367 AN 001 030 CONTRACT NUMBER
007 000 O O 0587 ID 002 002 ACKNOWLEDGMENT TYPE
008 000 O O 1019 ID 003 003 INVOICE TYPE CODE
009 000 O O 1166 ID 002 002 CONTRACT TYPE CODE
010 000 O O 1232 ID 002 002 PURCHASE CATEGORY
011 000 O O 0786 ID 002 002 SECURITY LEVEL CODE
012 000 O O 0640 ID 002 002 TRANSACTION TYPE CODE
CUR CURRENCY
001 000 M M 0098 AN 002 003 ENTITY IDENTIFIER CODE
002 000 M M 0100 ID 003 003 CURRENCY CODE
003 000 O O 0280 R 004 010 EXCHANGE RATE
004 000 O O 0098 AN 002 003 ENTITY IDENTIFIER CODE
005 000 O O 0100 ID 003 003 CURRENCY CODE
006 000 O O 0669 ID 003 003 CURRENCY MARKET/EXCHANGE CODE
007 000 C C 0374 AN 003 003 DATE/TIME QUALIFIER
008 000 O O 0373 DT 008 008 DATE C0807
009 000 O O 0337 AN 004 008 TIME C0907
010 000 C C 0374 AN 003 003 DATE/TIME QUALIFIER L101112
011 000 C C 0373 DT 008 008 DATE C1110
012 000 C C 0337 AN 004 008 TIME C1210
013 000 C C 0374 AN 003 003 DATE/TIME QUALIFIER L131415
014 000 C C 0373 DT 008 008 DATE C1413
015 000 C C 0337 AN 004 008 TIME C1513
016 000 C C 0374 AN 003 003 DATE/TIME QUALIFIER L161718
017 000 C C 0373 DT 008 008 DATE C1716
018 000 C C 0337 AN 004 008 TIME C1816
019 000 C C 0374 AN 003 003 DATE/TIME QUALIFIER L192021
020 000 C C 0373 DT 008 008 DATE C2019
021 000 C C 0337 AN 004 008 TIME C2119
REF REFERENCE IDENTIFICATION
001 000 M M 0128 AN 002 003 REFERENCE IDENTIFICATION QUALIFIER
002 000 C C 0127 AN 001 030 REFERENCE IDENTIFICATION R0203
003 000 C C 0352 AN 001 080 DESCRIPTION
004 001 O M 0128 C040 AN 002 003 REFERENCE IDENTIFICATION QUALIFIER
005 002 O M 0127 C040 AN 001 030 REFERENCE IDENTIFICATION
006 003 O C 0128 C040 AN 002 003 REFERENCE IDENTIFICATION QUALIFIER
002 000 C C 0208 ID 001 001 HAZARDOUS MATERIAL CODE QUALIFIER C0203
004 000 C C 0352 AN 001 080 DESCRIPTION
005 000 O O 1073 ID 001 001 YES/NO CONDITION OR RESPONSE CODE
PCT PERCENT AMOUNTS
001 000 M M 1004 ID 001 002 PERCENT QUALIFIER
002 000 M M 0954 R 001 010 PERCENT
MAN MARKS AND NUMBERS
001 000 M M 0088 ID 001 002 MARKS AND NUMBERS QUALIFIER
002 000 M M 0087 AN 001 048 MARKS AND NUMBERS
003 000 O O 0087 AN 001 048 MARKS AND NUMBERS
004 000 C C 0088 ID 001 002 MARKS AND NUMBERS QUALIFIER P0405
005 000 C C 0087 AN 001 048 MARKS AND NUMBERS
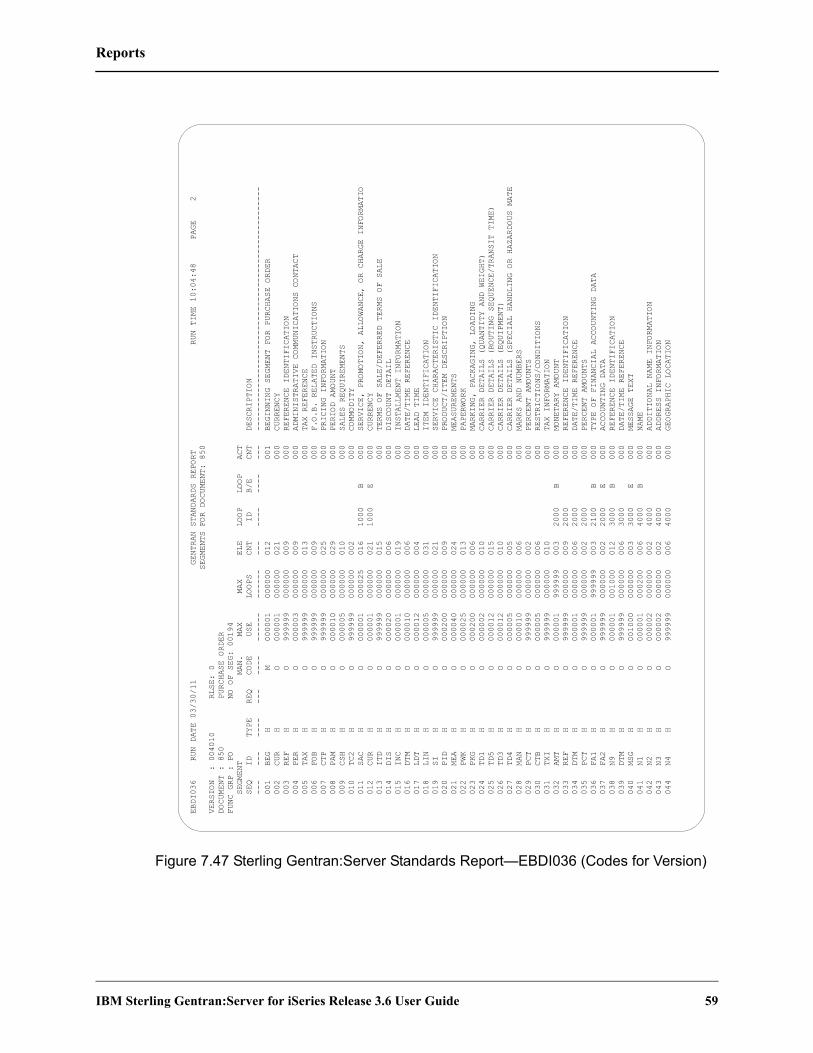
Reports
IBM Sterling Gentran:Server for iSeries Release 3.6 User Guide 59
Figure 7.47 Sterling Gentran:Server Standards Report—EBDI036 (Codes for Version)
EBDI036 RUN DATE 03/30/11 GENTRAN STANDARDS REPORT RUN TIME 10:04:48 PAGE 2
SEGMENTS FOR DOCUMENT: 850
VERSION : 004010 RLSE: 0
DOCUMENT : 850 PURCHASE ORDER
FUNC GRP : PO NO OF SEG: 00194
SEGMENT MAN. MAX MAX ELE LOOP LOOP ACT
SEQ ID TYPE REQ CODE USE LOOPS CNT ID B/E CNT DESCRIPTION
--- --- ---- --- ---- ------ ------ --- ---- ---- --- ---------------------------------------------------
001 BEG H M 000001 000000 012 001 BEGINNING SEGMENT FOR PURCHASE ORDER
002 CUR H O 000001 000000 021 000 CURRENCY
003 REF H O 999999 000000 009 000 REFERENCE IDENTIFICATION
004 PER H O 000003 000000 009 000 ADMINISTRATIVE COMMUNICATIONS CONTACT
005 TAX H O 999999 000000 013 000 TAX REFERENCE
006 FOB H O 999999 000000 009 000 F.O.B. RELATED INSTRUCTIONS
007 CTP H O 999999 000000 025 000 PRICING INFORMATION
008 PAM H O 000010 000000 029 000 PERIOD AMOUNT
009 CSH H O 000005 000000 010 000 SALES REQUIREMENTS
010 TC2 H O 999999 000000 002 000 COMMODITY
011 SAC H O 000001 000025 016 1000 B 000 SERVICE, PROMOTION, ALLOWANCE, OR CHARGE INFORMATIO
012 CUR H O 000001 000000 021 1000 E 000 CURRENCY
013 ITD H O 999999 000000 015 000 TERMS OF SALE/DEFERRED TERMS OF SALE
014 DIS H O 000020 000000 006 000 DISCOUNT DETAIL
015 INC H O 000001 000000 019 000 INSTALLMENT INFORMATION
016 DTM H O 000010 000000 006 000 DATE/TIME REFERENCE
017 LDT H O 000012 000000 004 000 LEAD TIME
018 LIN H O 000005 000000 031 000 ITEM IDENTIFICATION
019 SI H O 999999 000000 021 000 SERVICE CHARACTERISTIC IDENTIFICATION
020 PID H O 000200 000000 009 000 PRODUCT/ITEM DESCRIPTION
021 MEA H O 000040 000000 024 000 MEASUREMENTS
022 PWK H O 000025 000000 013 000 PAPERWORK
023 PKG H O 000200 000000 006 000 MARKING, PACKAGING, LOADING
024 TD1 H O 000002 000000 010 000 CARRIER DETAILS (QUANTITY AND WEIGHT)
025 TD5 H O 000012 000000 015 000 CARRIER DETAILS (ROUTING SEQUENCE/TRANSIT TIME)
026 TD3 H O 000012 000000 010 000 CARRIER DETAILS (EQUIPMENT)
027 TD4 H O 000005 000000 005 000 CARRIER DETAILS (SPECIAL HANDLING OR HAZARDOUS MATE
028 MAN H O 000010 000000 006 000 MARKS AND NUMBERS
029 PCT H O 999999 000000 002 000 PERCENT AMOUNTS
030 CTB H O 000005 000000 006 000 RESTRICTIONS/CONDITIONS
031 TXI H O 999999 000000 010 000 TAX INFORMATION
032 AMT H O 000001 999999 003 2000 B 000 MONETARY AMOUNT
033 REF H O 999999 000000 009 2000 000 REFERENCE IDENTIFICATION
034 DTM H O 000001 000000 006 2000 000 DATE/TIME REFERENCE
035 PCT H O 999999 000000 002 2000 000 PERCENT AMOUNTS
036 FA1 H O 000001 999999 003 2100 B 000 TYPE OF FINANCIAL ACCOUNTING DATA
037 FA2 H O 999999 000000 002 2000 E 000 ACCOUNTING DATA
038 N9 H O 000001 001000 012 3000 B 000 REFERENCE IDENTIFICATION
039 DTM H O 999999 000000 006 3000 000 DATE/TIME REFERENCE
040 MSG H O 001000 000000 003 3000 E 000 MESSAGE TEXT
041 N1 H O 000001 000200 006 4000 B 000 NAME
042 N2 H O 000002 000000 002 4000 000 ADDITIONAL NAME INFORMATION
043 N3 H O 000002 000000 002 4000 000 ADDRESS INFORMATION
044 N4 H O 999999 000000 006 4000 000 GEOGRAPHIC LOCATION
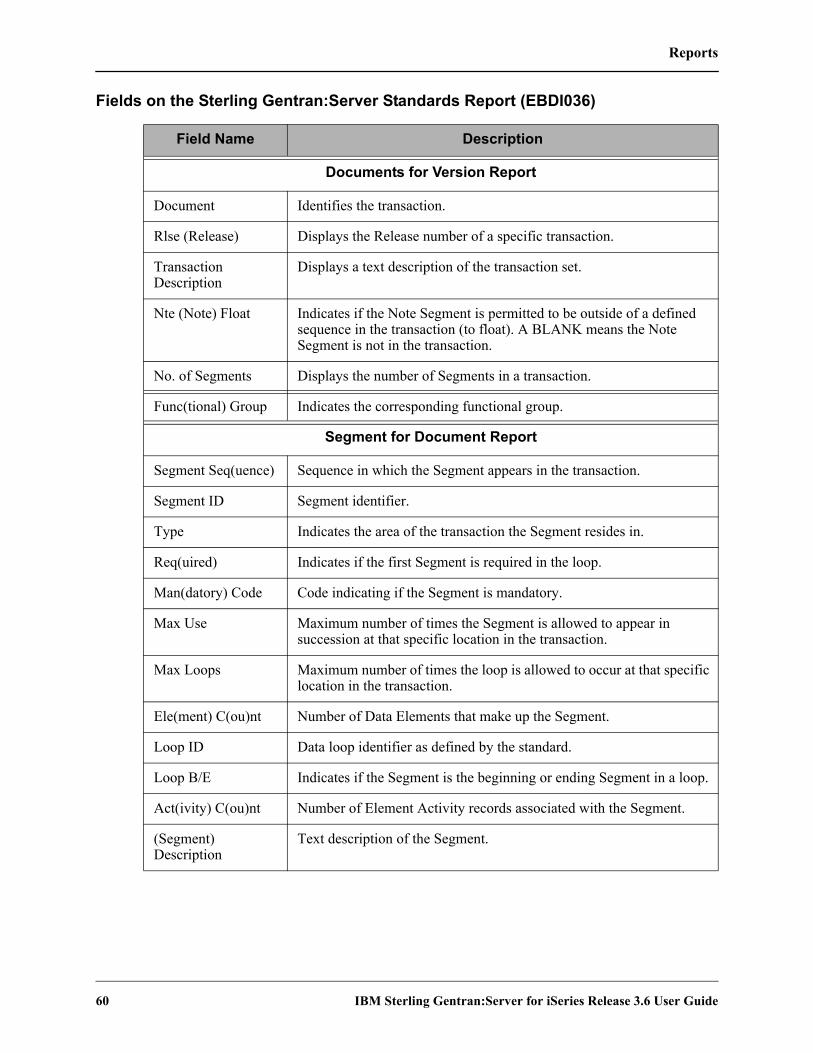
Reports
60 IBM Sterling Gentran:Server for iSeries Release 3.6 User Guide
Fields on the Sterling Gentran:Server Standards Report (EBDI036)
Field Name Description
Documents for Version Report
Document Identifies the transaction.
Rlse (Release) Displays the Release number of a specific transaction.
Transaction Description
Displays a text description of the transaction set.
Nte (Note) Float Indicates if the Note Segment is permitted to be outside of a defined sequence in the transaction (to float). A BLANK means the Note Segment is not in the transaction.
No. of Segments Displays the number of Segments in a transaction.
Func(tional) Group Indicates the corresponding functional group.
Segment for Document Report
Segment Seq(uence) Sequence in which the Segment appears in the transaction.
Segment ID Segment identifier.
Type Indicates the area of the transaction the Segment resides in.
Req(uired) Indicates if the first Segment is required in the loop.
Man(datory) Code Code indicating if the Segment is mandatory.
Max Use Maximum number of times the Segment is allowed to appear in succession at that specific location in the transaction.
Max Loops Maximum number of times the loop is allowed to occur at that specific location in the transaction.
Ele(ment) C(ou)nt Number of Data Elements that make up the Segment.
Loop ID Data loop identifier as defined by the standard.
Loop B/E Indicates if the Segment is the beginning or ending Segment in a loop.
Act(ivity) C(ou)nt Number of Element Activity records associated with the Segment.
(Segment) Description
Text description of the Segment.

Reports
IBM Sterling Gentran:Server for iSeries Release 3.6 User Guide 61
Elements for Segment Report
Seg(ment) ID Displays the Segment identifier for the specified Elements.
Seg(ment) Seq(uence)
Displays the sequence number of the Element within the Segment.
Sub Ele(ment) Specifies a Sub-Element within an Element.
Man(datory) Ele(ment)
Displays the Element Requirement Designator: M: MandatoryO: OptionalC: Conditional
Com(posite) Ele(ment)
Defines the specified Composite Element:M: MandatoryO: OptionalC: Conditional
Aud(it) Ind(icator) Displays the Audit Indicator which explains if detailed information about the Segment Element is written to the Doc Info field in the Audit file.
Ele(ment) ID Displays the dictionary reference number for the specific Data Element record.
Grp (Group) Dsg (Designator)
Describes the group that contains the Element.
Type Displays the code for the Element type:AN: AlphanumericID: IdentifierR or Rn: Decimal type with explicit decimal pointNn: Numeric with ‘n’ decimal places impliedDn: Numeric with ‘n’ decimal places impliedDT: DateTM: Time
Ele(ment) Size Min(imum)
Displays the minimum length for the Element.
Ele(ment) Size Max(imum)
Displays the maximum length for the Element.
(Element) Description
Displays a text description of the Element.
Cond(ition) Codes Displays the Conditional Codes for the Element.
Cde (Code) Val(ue) Indicates whether or not Element Codes are on the Code file
Field Name Description

Reports
62 IBM Sterling Gentran:Server for iSeries Release 3.6 User Guide
Codes for Version Report
Element ID Displays the dictionary reference number for a specific Element
Rlse (Release) Displays the Release number of a specific transaction
Composite/Code Identifies the part of the defined Data Element Code (Composite), followed by a space and then the alphanumeric field used to define the Composite value (Code)
(Code) Description Displays a text description of the Composite/Code record
Field Name Description

Reports
IBM Sterling Gentran:Server for iSeries Release 3.6 User Guide 63
EBDI193 – Sterling Gentran Standards Group/Transaction Report
Contents of the ReportThe Sterling Gentran Standards Group/Transaction Report is a user-generated report that lists functional groups and transaction names for a specific standards version.
How to Identify the ReportThe name of the Sterling Gentran:Server programs that generates this report (EBDI193) displays in the upper, left corner of the report. The identifier “EDBI193” also displays in the User Data field associated with the spooled report in the Output Queue. The report title, “Sterling Gentran STANDARDS GROUP/TRANSACTION REPORT,” displays in the center, at the top of the report.
How to Generate the ReportYou can generate the EBDI193 Sterling Gentran Standards Group/Transaction Report in the following ways:
Select option ‘36’ (Prt Grp/Tran) on the Work with Standards panel (EDIX100) and enter the appropriate information on the Print Group/Transaction Dir (PRTGRPTRN) panel.
Select option ‘33’ (Prt Grp/Tran) on the Work with Batch Standards File (EDIX190) and enter the appropriate information on the Print Group/Transaction Dir (PRTGRPTRN) panel.
Press F21 (Prt Grp/Tran) on the Group/Transaction Directory panel (EDIX125) and select to print by Transaction Code or by Functional Group.
Press F21 (Prt Grp/Tran) on the Group/Transaction Directory panel (EDIX198) and select to print by Transaction Code or by Functional Group.
Enter the command ‘PRTGRPTRAN’ on the command line to access the command panel.

Reports
64 IBM Sterling Gentran:Server for iSeries Release 3.6 User Guide
Figure 7.48 Sterling Gentran:Server Standards Report—EBDI193
EBDI193 RUN DATE 03/30/11 GENTRAN STANDARDS GROUP/TRANSACTIO
VERSION: 005040 ASC X12 VERSION 5 RELEASE 4 SUBRELEASE 0
SORT BY: *TRAN
FUNC
DOCUMENT GROUP RLSE DESCRIPTION
-------- ------ ---- -----------
0 CONTROL TRANSACTION
100 PG 0 INSURANCE PLAN DESCRIPTION
101 NL 0 NAME AND ADDRESS LISTS
102 AC 0 ASSOCIATED DATA
103 AB 0 ABANDONED PROPERTY FILINGS
104 SA 0 AIR SHIPMENT INFORMATION
105 BF 0 BUSINESS ENTITY FILINGS
106 MH 0 MOTOR CARRIER RATE PROPOSAL
107 MC 0 REQUEST FOR MOTOR CARRIER RATE PROPOSAL
108 MK 0 RESPONSE TO A MOTOR CARRIER RATE PROPOSAL
109 VE 0 VESSEL CONTENT DETAILS
110 IA 0 AIR FREIGHT DETAILS AND INVOICE
111 IF 0 INDIVIDUAL INSURANCE POLICY AND CLIENT INFORMATION
112 PQ 0 PROPERTY DAMAGE REPORT
113 CL 0 ELECTION CAMPAIGN AND LOBBYIST REPORTING
120 VC 0 VEHICLE SHIPPING ORDER
121 VS 0 VEHICLE SERVICE
124 VD 0 VEHICLE DAMAGE
125 MR 0 MULTILEVEL RAILCAR LOAD DETAILS
126 VA 0 VEHICLE APPLICATION ADVICE
127 VB 0 VEHICLE BAYING ORDER
128 DI 0 DEALER INFORMATION
129 VH 0 VEHICLE CARRIER RATE UPDATE
130 ED 0 STUDENT EDUCATIONAL RECORD (TRANSCRIPT)
131 AK 0 STUDENT EDUCATIONAL RECORD (TRANSCRIPT) ACKNOWLEDG
132 HU 0 HUMAN RESOURCE INFORMATION
133 CW 0 EDUCATIONAL INSTITUTION RECORD
135 SL 0 STUDENT AID ORIGINATION RECORD
138 TT 0 EDUCATIONAL TESTING AND PROSPECT REQUEST AND REPORT
139 SL 0 STUDENT LOAN GUARANTEE RESULT
140 WA 0 PRODUCT REGISTRATION
141 WA 0 PRODUCT SERVICE CLAIM RESPONSE
142 WA 0 PRODUCT SERVICE CLAIM
143 WA 0 PRODUCT SERVICE NOTIFICATION
144 LT 0 STUDENT LOAN TRANSFER AND STATUS VERIFICATION
146 RY 0 REQUEST FOR STUDENT EDUCATIONAL RECORD (TRANSCRIPT)
147 RZ 0 RESPONSE TO REQUEST FOR STUDENT EDUCATIONAL RECORD
148 IJ 0 REPORT OF INJURY, ILLNESS OR INCIDENT
149 NT 0 NOTICE OF TAX ADJUSTMENT OR ASSESSMENT
150 TN 0 TAX RATE NOTIFICATION
151 TA 0 ELECTRONIC FILING OF TAX RETURN DATA ACKNOWLEDGMENT
152 GR 0 STATISTICAL GOVERNMENT INFORMATION
153 CB 0 UNEMPLOYMENT INSURANCE TAX CLAIM OR CHARGE INFORMATION
154 UC 0 SECURED INTEREST FILING
155 BC 0 BUSINESS CREDIT REPORT
157 NP 0 NOTICE OF POWER OF ATTORNEY
158 TJ 0 TAX JURISDICTION SOURCING
159 MP 0 MOTION PICTURE BOOKING CONFIRMATION
160 SJ 0 TRANSPORTATION AUTOMATIC EQUIPMENT IDENTIFICATION
161 TR 0 TRAIN SHEET
163 AS 0 TRANSPORTATION APPOINTMENT SCHEDULE INFORMATION
170 ER 0 REVENUE RECEIPTS STATEMENT
IBM
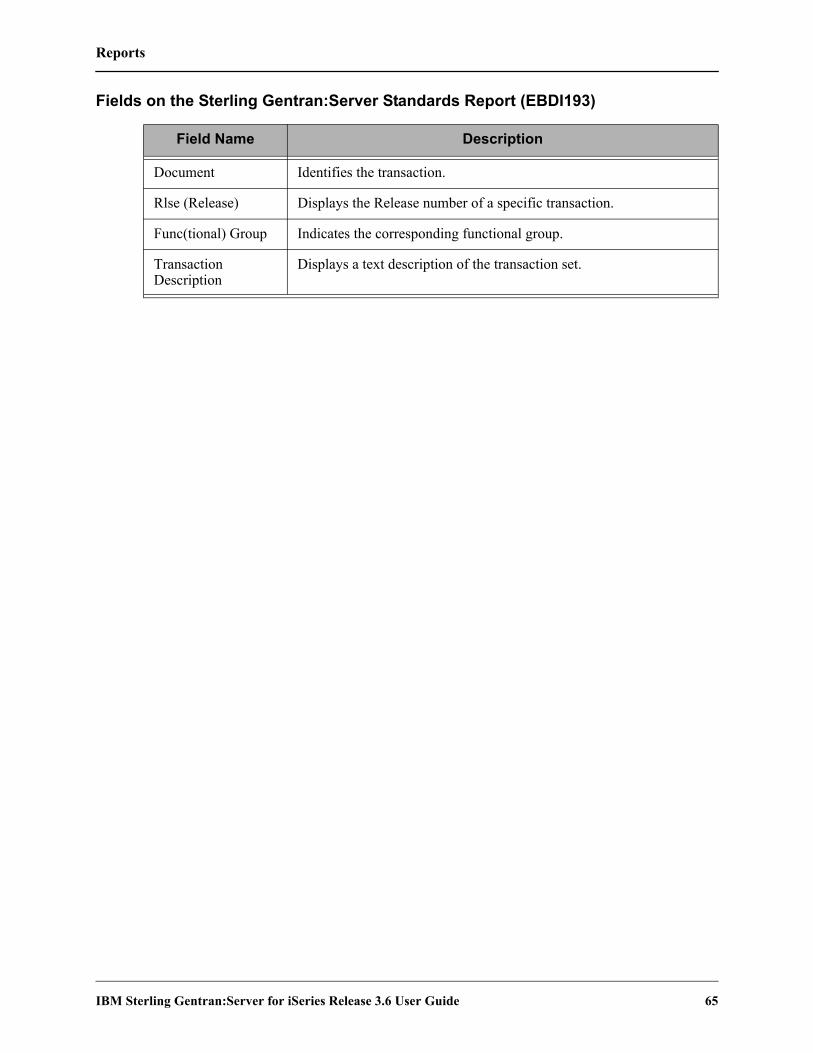
Reports
IBM Sterling Gentran:Server for iSeries Release 3.6 User Guide 65
Fields on the Sterling Gentran:Server Standards Report (EBDI193)
Field Name Description
Document Identifies the transaction.
Rlse (Release) Displays the Release number of a specific transaction.
Func(tional) Group Indicates the corresponding functional group.
Transaction Description
Displays a text description of the transaction set.

Common Questions
66 IBM Sterling Gentran:Server for iSeries Release 3.6 User Guide
Common Questions
How do I add an Element Code?The first step is to change the Update Allowed flag to ‘Y’ on the Standards Version panel (EDIX110-FMT01). This will allow changes to be made to the Version ID. Next, access the Standards Data Element Code Definition panel.
The Data Element Code Definition panel (EDIX170-CTL01), shown below, enables you to add, display, delete and change the definition for the description of code values for individual data elements.
Figure 7.49 Standards Data Element Code Definition panel (EDIX170-CTL01)
In order to add a new code, position your cursor on a blank line or type all “9’s” in the Position To field and press Enter. This takes you to the end of the list of Element Codes.
Type ‘70’ and ‘New Code’ in the Composite/Code and Description fields. Press F10 (Update) or Enter to add the code.
CAUTIONSTOP
After the Data Element Code is added, review the selected Transactions In Use and run the ‘EXTSTD’ command to rebuild the Batch Standards File.
EDIX170 Standards Data Element Code Definition EDI 03/30/11 CTL01 12:00:00 Version ID . . . . . . . . . . . . 004010NEW Data Element ID. . . . . . . . . . 0353 Minimum Length . . . . . . . . . . 2 Maximum Length . . . . . . . . . . 2 Position to Code . . . . . . . . . 9999 Type option (and Information), press Enter. 4=Delete Composite/ Opt Code Description 70 NEW CODE More... F1=Help F4=Prompt F5=Refresh F10=Update F24=More Keys

Common Questions
IBM Sterling Gentran:Server for iSeries Release 3.6 User Guide 67
What are Segment Activity Records?The Segment Activity Records are used internally by Sterling Gentran:Server during processing to validate summary control counts. With the standards supplied with Sterling Gentran:Server, only those Segments having an activity count (shown on panel EDIX130-CTL01) greater than zero have activity records associated with them.
The Inbound (EBDI001) and Outbound (EDBI002) Editor programs use activity records to add or compare the current Element contents with the total of some prior Element contents. For example, if processing an ‘850’ transaction, the number of line items (CTT01) is the accumulation of the number of PO1 Segments. If the contents of (CTT01) from the EDI data you are processing do not equal the value accumulated by the Editor, you get an error.
The example below uses the quick access method, where option ‘14’ is selected to retrieve the Segment Activity.
Step 1: Access the Segment Element Activity panel
To view the Segment Element Activity panel (EDIX150-FMT01) for a specific Segment ID, you first must select the Version ID on the Work with Standards panel (EDIX100-FMT01).
Figure 7.50 Work with Standards panel (EDIX100-FMT01)
Select option ‘14’ (Seg Activity) on the Work with Standards panel (EDIX100-FMT01) and press Enter.
EDIX100 Work with Standards EDI 03/30/11 FMT01 pgmlib: G3X6PGM dtalib: G3X6DTA 12:00:00 Position to Version ID . . . . . . 004010 Type option (and Information), press Enter. 12=Segments 13=Seg Elements 14=Seg Activity 15=Elem Def 16=Codes Opt Version ID Name 14 004010 ANSI VERSION 4 RELEASE 1 SUBRELEASE 0 ASC X12 004010AIAG AIAG - X12 VERSION 4, RELEASE 1, FEBRUARY 1998 004010NEW ANSI VERSION 4 RELEASE 1 SUBRELEASE 0 ASC X12 004010RAIL ASSOCIATION OF AMERICAN RAILROADS (AAR) 004010RAIL 004010RIFMAT RAIL INDUSTRY FORUM VERSION 4, RELEASE 1, ASC X12 004010TI0900 X12 TELECOMMUNICATIONS INDUSTRY - ISSUE 9 (TCIF) 004010UCS UCS X12 VERSION 4 RELEASE 1 004010VICS VOLUNTARY INTER-INDUSTRY COMMERCE STANDARD 004010X061 HIPAA - GROUP PREMIUM PAYMENT FOR INSURANCE (820) More... Parameters or command ===> F1=Help F3=Exit F12=Cancel F15=Sort F23=More Options F24=More Keys
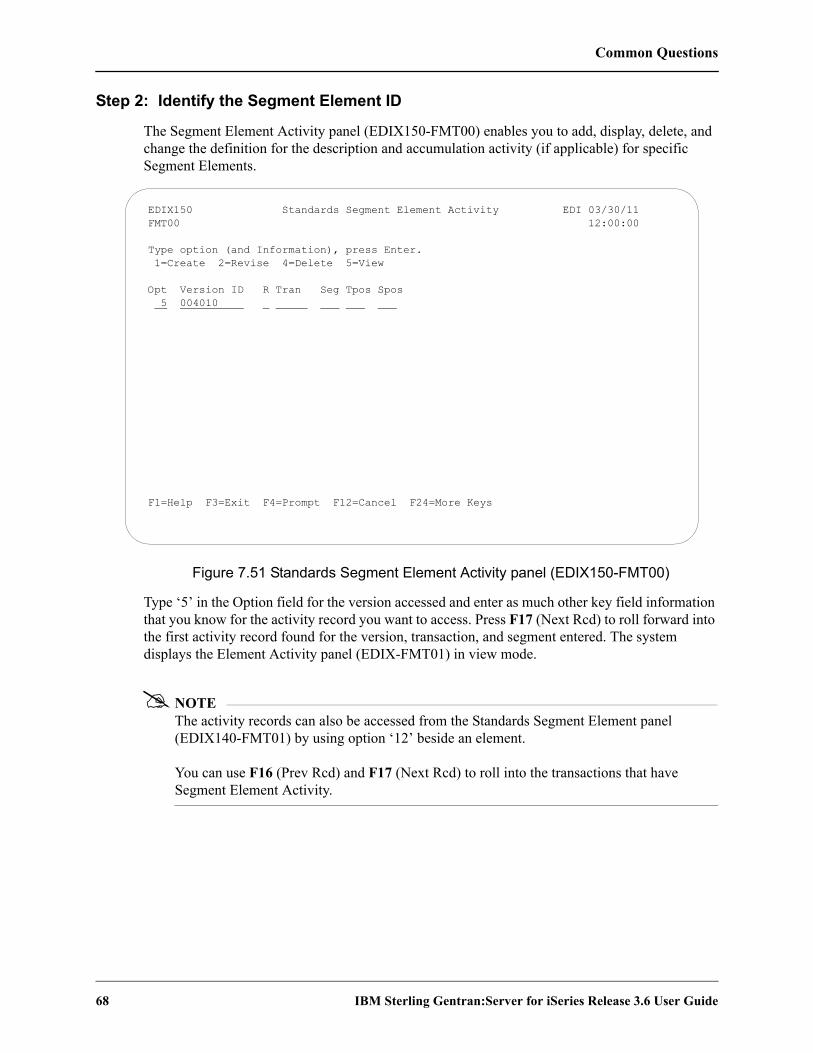
Common Questions
68 IBM Sterling Gentran:Server for iSeries Release 3.6 User Guide
Step 2: Identify the Segment Element ID
The Segment Element Activity panel (EDIX150-FMT00) enables you to add, display, delete, and change the definition for the description and accumulation activity (if applicable) for specific Segment Elements.
Figure 7.51 Standards Segment Element Activity panel (EDIX150-FMT00)
Type ‘5’ in the Option field for the version accessed and enter as much other key field information that you know for the activity record you want to access. Press F17 (Next Rcd) to roll forward into the first activity record found for the version, transaction, and segment entered. The system displays the Element Activity panel (EDIX-FMT01) in view mode.
NOTEThe activity records can also be accessed from the Standards Segment Element panel (EDIX140-FMT01) by using option ‘12’ beside an element.
You can use F16 (Prev Rcd) and F17 (Next Rcd) to roll into the transactions that have Segment Element Activity.
EDIX150 Standards Segment Element Activity EDI 03/30/11 FMT00 12:00:00 Type option (and Information), press Enter. 1=Create 2=Revise 4=Delete 5=View Opt Version ID R Tran Seg Tpos Spos 5 004010 F1=Help F3=Exit F4=Prompt F12=Cancel F24=More Keys
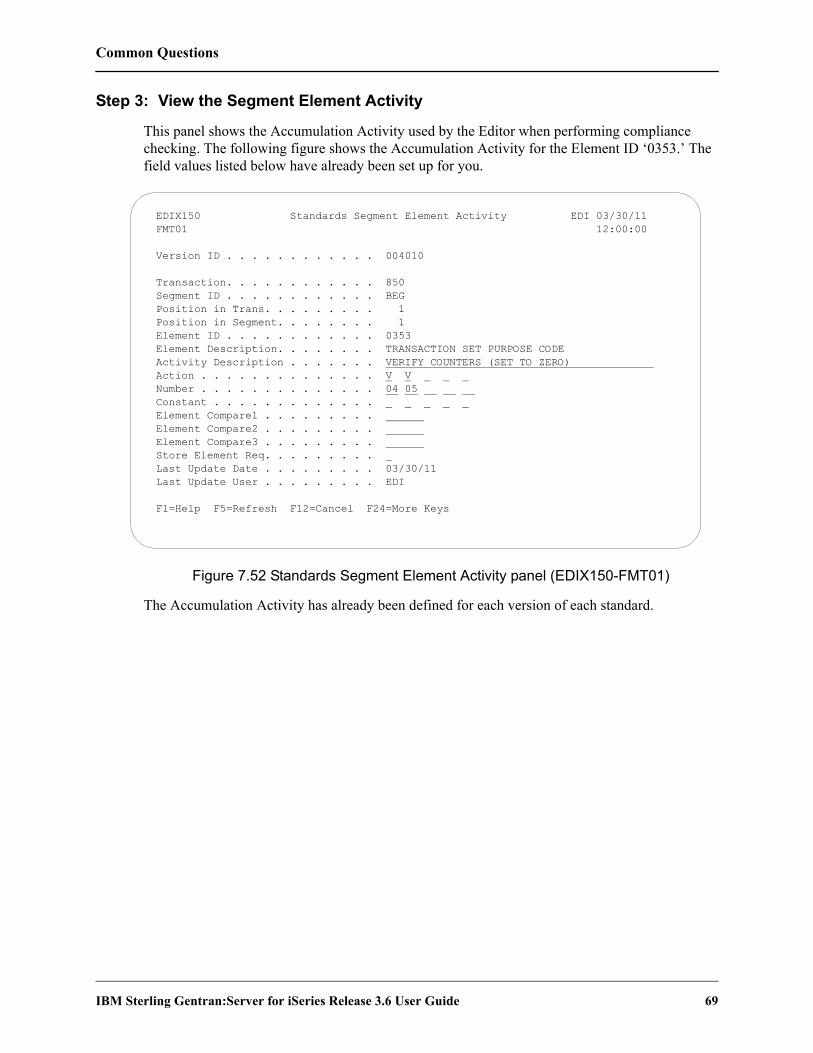
Common Questions
IBM Sterling Gentran:Server for iSeries Release 3.6 User Guide 69
Step 3: View the Segment Element Activity
This panel shows the Accumulation Activity used by the Editor when performing compliance checking. The following figure shows the Accumulation Activity for the Element ID ‘0353.’ The field values listed below have already been set up for you.
Figure 7.52 Standards Segment Element Activity panel (EDIX150-FMT01)
The Accumulation Activity has already been defined for each version of each standard.
EDIX150 Standards Segment Element Activity EDI 03/30/11 FMT01 12:00:00 Version ID . . . . . . . . . . . . 004010 Transaction. . . . . . . . . . . . 850 Segment ID . . . . . . . . . . . . BEG Position in Trans. . . . . . . . . 1 Position in Segment. . . . . . . . 1 Element ID . . . . . . . . . . . . 0353 Element Description. . . . . . . . TRANSACTION SET PURPOSE CODE Activity Description . . . . . . . VERIFY COUNTERS (SET TO ZERO) Action . . . . . . . . . . . . . . V V Number . . . . . . . . . . . . . . 04 05 Constant . . . . . . . . . . . . . Element Compare1 . . . . . . . . . Element Compare2 . . . . . . . . . Element Compare3 . . . . . . . . . Store Element Req. . . . . . . . . Last Update Date . . . . . . . . . 03/30/11 Last Update User . . . . . . . . . EDI F1=Help F5=Refresh F12=Cancel F24=More Keys

Common Questions
70 IBM Sterling Gentran:Server for iSeries Release 3.6 User Guide
What versions are used for EDIFACT Acknowledgments?EDIFACT standards require the use of special standards to produce the CONTRL acknowledgment. If you are using EDIFACT versions and will be processing acknowledgments, you need to ensure these versions are installed and the proper transactions and versions are selected for use in the batch standards file.
The versions are based upon the syntax version specified in the incoming EDIFACT interchange received. When a version already exists in the standards file for a different envelope type, such as X12, a custom version is used. In this case, version conversion is not necessary, as Sterling Gentran will automatically override the version to the UN/EDIFACT version. Use the following table as a guideline.
Syntax Version EDI Version Sterling Gentran Version
1 002001 002001UN
2 002002 002002UN
3 and higher D 3 D 3

Glossary
IBM Sterling Gentran:Server for iSeries Release 3.6 User Guide G-1
Glossary
Definition of TermsAcknowledgment
An acknowledgment is a special Transaction set (997, 999, or CONTRL) that is transmitted to the original sender to indicate the status of the transmission with respect to standards adherence. It does not imply acceptance of the contents of the associated Transaction sets.
Acknowledgments are also known as Functional Acknowledgments (the 997 Transaction set), Accept/Reject Advices (the 999 Transaction set), and Syntax and Service Report Messages (the CONTRL message).
Sterling Gentran:Server differentiates between inbound acknowledgments (those from your Trading Partner), and outbound acknowledgments (those to go to your Trading Partner). Sterling Gentran:Server also deals with “expected acknowledgments” that should be satisfied by inbound acknowledgments.
Acknowledgment ReconciliationThe primary purpose for using the Audit file is to verify the documents you sent have been received by your Trading Partner. The Functional Acknowledgment is sent by your Partner to indicate it had been received and if there were any compliance errors. When you receive the Acknowledgment, it must be processed INBOUND (PRCTRNIN). The acknowledgments do not have to be mapped, though. The reconciliation is performed by the Inbound Editor by posting a status flag on the original EDI document sent and the date of the acknowledgment.
Addressing MethodsAddressing methods are means of identifying the sender and intended receiver of incoming EDI messages. The Sterling Gentran:Server support of several addressing methods allow you to configure the system to your current technique or your industry’s preferences.
ApplicationAn in-house program designed to process specific jobs. This program is formatted by the customer for their business needs. (Example, payroll.)
Application DefinitionThe definition of the application interface file used during the mapping process.
Application FileA file, or set of files, containing application data destined to be sent out through EDI to specific Trading Partners or that has been received through EDI and translated to the application format from specific Trading Partners.

Definition of Terms
G-2 IBM Sterling Gentran:Server for iSeries Release 3.6 User Guide
Application File TypesThere are three “application file types” that can be used with Sterling Gentran: multiple externally described physical files (created using DDS), one externally described multi-format logical file (created using DDS), or one internally described physical file (flat file created using record length instead of DDS).
An external file to Sterling Gentran is a file created using DDS.
An internal file to Sterling Gentran is a “flat file” that contains multiple record types and is typically defined within each program that it is used in. It has a field that contains the record format in each record of the file.
A logical file to be used in Sterling Gentran must be a multi-format logical file. Logical files are typically used for outbound documents. By using logical files for outbound documents, you can select specific records based on some indicator field in the file if only certain records are to be processed through EDI. Only one logical file can be defined to an application definition.
A physical file is a file that has been created external to Sterling Gentran using DDS. Multiple physical files can be used within an application definition. An example application definition might have four physical files: a header file, a comments file, a detail file, and a summary file. Another application may only contain a header file and a detail file. For outbound applications, physical files must be keyed or your fields need to be identified to Sterling Gentran as the fields that should be used by Sterling Gentran for key fields for the logical file that Sterling Gentran builds over your physical files during outbound processing. There is no requirement for key fields for Inbound Processing.
Application IDA user-defined identifier indicating the source or destination of documents, typically used in reporting and routing of inbound documents.
ArchiveA permanent record of messages transmitted or received.
Audit IndicatorField on the Standards Segment Element panel (EDIX140-CTl01). An Audit Indicator of ‘Y’ means that detailed information (for example, invoice number or purchase order number) about the segment element is passed (that is, written) to the Doc Info field in the Audit File to relate the actual Document Number with the Control Number used in the EDI Envelope. A BLANK in this field means that detailed information is not passed or written to the Doc Info field in the Audit File.
Batch ProcessingA type of data processing operation and data communications transmission where related transactions are grouped together and transmitted for processing. Usually by the same computer and under the same application; generally regarded as non-real time data traffic consisting of large files; type of data traffic where network response time is not critical; compare with interactive (processing).

Definition of Terms
IBM Sterling Gentran:Server for iSeries Release 3.6 User Guide G-3
CaptiveA captive panel automatically displays based on the values you entered on a previous panel. You can tell whether a new panel has displayed by checking the program name and format name, which are unique identifiers located on the upper left corner of the panel.
Comm Profile IDThe identifier under which communications information is stored. All protocol information about how communication sessions will be performed with this entity, whether it be a Third Party Network or a Direct-connect, is also stored under this identifier. The inbound and outbound EDI data is stored in Queue files under the Comm Profile ID so that when a communication session is established with this entity, all data under this identifier will be picked up and sent to them and any data received will be stored under this identifier.
Compliance ErrorsThese are errors encountered while editing the EDI data against the Standards. They are syntax errors that relate specifically to the Standards, such as 'Missing Mandatory Segment'. These compliance errors are reported on the Editor Error Report for Inbound and Outbound Processing.
CompressionAn automated process where data is compressed and wrapped by removing trailing blanks and spaces from segments, groups, and/or transactions. Data compression reduces data field information to its minimum (for cost effectiveness). This is controlled by Sterling Gentran global parameters.
Concurrent ProcessingIn IBM® Sterling Gentran:Server® for iSeries® Release 3.6, concurrent processing enables you to run multiple processes at the same time over a single Sterling Gentran data library. For example, you can run an inbound processing job and an outbound processing job at the same time, or run two separate inbound processes at once.
Control NumbersThese are assigned by the sender for the purpose of identifying documents and transmissions, and to facilitate sequence checking by the receiver. Control numbers are maintained at three levels: the Transmission or Interchange, the Functional Group, and the Transaction Set.
Sterling Gentran:Server supports numerous methods of maintaining, formatting and checking sequence numbers to accommodate the variations in your industry.
Data DictionaryA document that describes the attributes of all data elements within a standard.
Data ElementThe smallest named item in a segment that can convey data. For example, “Bill To City” is one data element within a segment.
Data SeparationThis is commonly referred to as Splitting. It is the process during Inbound Translation that occurs to separate the edited EDI data by Application types prior to the mapping process. EDI data that is received may be from many different Partners and may contain several different types of

Definition of Terms
G-4 IBM Sterling Gentran:Server for iSeries Release 3.6 User Guide
documents. It is much more efficient to sort the data by Application type before mapping the EDI data into the Application formats.
DecompressionAn automated process to decompress or “unwrap” data received by re-inserting trailing blanks and spaces. This occurs during the inbound editing process.
DelimitersDelimiters are special characters used to separate and mark the end of segments and the beginning of data elements. Two characters are required (one is used to separate data elements, the other to separate segments) and, when used as delimiters, the characters may not be used within the data itself. A third delimiter is used in EDIFACT messages to separate subelements. Delimiters are dynamically defined by the Interchange Envelope.
Doc InfoThe Doc Info field on the Work with Audit Transaction Status panel (EDIX253-FMT01) contains the actual data from the transaction that identifies the document reference number. (SEE also ‘Audit Indicator.’)
Dummy RecordThis record is used for the purpose of mapping, but it is not actually written out. Records defined for inbound processing that have the Write Flag set to 'N', will not be written and are, therefore, called Dummy Records.
Dummy SegmentThis segment is used for the purpose of mapping, but is not actually written out. Segments defined for Outbound processing that have the Write Flag set to 'N', will not be written and are, therefore, called Dummy Segments.
EDI (Electronic Data Interchange)Electronic Data Interchange (EDI) is the exchange of routine business transaction in a computer-processable format, covering such traditional applications as inquiries, planning, purchasing, acknowledgments, pricing, order status, scheduling, test results, shipping and receiving, invoices, payments and financial reporting.
EDI Coordinator A person assigned to coordinate EDI functions for an organization. As EDI and EC (Electronic Commerce) continue to grow at a rapid pace, the role of the Coordinator is dynamically changing. Many Coordinators are asked to fill a complex role of being a business analyst, technical wizard, and liaison to the trading partner, while performing daily audits and controls.
The EDI Coordinator is responsible for the setup of partners, maps, daily processing, communications, and acknowledgment reconciliation.
EditorThe Inbound Editor uses pre-determined instructions to verify, check, and possibly reject the EDI standard data you have received from a Trading Partner, and moves the edited data to split files and then to the appropriate inbound application files using Mapping.

Definition of Terms
IBM Sterling Gentran:Server for iSeries Release 3.6 User Guide G-5
The Outbound Editor prepares your data for transmission to your Trading Partners. Outbound processing translates your application data to the chosen EDI standard being used, and checks all data to ensure compliance with the selected public standard.
ElementA unit of information with specific edit and length characteristics. This represents the smallest unit of information in the Standard. Also called a data element.
Element SeparatorA syntax character used to separate data elements within a segment. Also referred to as a “delimiter.”
EnvelopeThe transmission header and trailer enclosing an EDI message. This is automatically generated by Sterling Gentran:Server using the information on the Partner file.
There are three levels of envelopes: Interchange, Group, and Transaction.
Environment Profile The environment profile is a subset of the Sterling Gentran:Server user's profile that contains parameters specific to the environment in which the user runs Sterling Gentran:Server. These parameters include the data formats, language ID, and division code used for the online file maintenance panels as well as the following batch processing options: job description, job queue, message queue, output queue, print device, and print file.
The program and data libraries are used only when files are requested to be created without a target library. They are defaulted from the libraries defined during installation of Sterling Gentran:Server.
EOTEnd of Transmission
Error RejectionDuring the Compliance Checking process performed by the Editors, if an error is encountered that identifies that the data does not conform to the Standards, a message is printed on the Editor report. In addition, if Rejection has been established for this particular error number, for the Partner, for the Document, and for the Direction, the data is marked as rejected. If inbound, the rejected data is placed in the Reject file by the Splitter program. If outbound, the rejected data is placed in the Outbound Queue under the Comm Profile ID for the Partner with a status of ‘QE’ for Queued with Errors.
Error ProcessingThe process of reporting error messages on the Mapper and Editor reports during Translation Processing.
FieldThe smallest item of information in a record.
FunctionIn Sterling Gentran:Server, a function refers to a program or command under a subsystem that can be secured individually in the Environment Control subsystem.

Definition of Terms
G-6 IBM Sterling Gentran:Server for iSeries Release 3.6 User Guide
Functional AcknowledgmentA special transaction set transmitted by a receiver as an affirmative response to the sender. This is automatically generated and reconciled by Sterling Gentran:Server based upon the Trading Partner configuration.
Global ParametersThe switches that affect the Editing function during Translation. Typically they identify whether a feature should be performed for all Partners in the same manner or whether it should be performed on a partner-by-partner basis by looking at the Partner parameters. One feature in the Global Parameters is whether acknowledgments should be created for all Partners or on a partner-by-partner basis.
HeaderThe portion of the message that precedes the actual body and trailer of the business transaction.
In-house InterfaceRoutine(s) developed by application personnel that connect Application systems to Sterling Gentran:Server. These routines either create Application Interface files for outbound transactions or process an Application Interface file containing inbound transactions.
Job DescriptionA set of characteristics that are used by the iSeries to process a job. Attributes specified in the job description instruct the system to run the job the way you want. All jobs started on the iSeries must have an associated job description. Sterling Gentran:Server uses the job description defined in the Environment Control subsystem for each user.
Job LogA log or record of requests (such as commands) submitted to the system by a job. This is specific to the iSeries. Messages related to the requests and the actions performed by the system for the job are also recorded in this log. All jobs have a job log associated with them. Batch jobs produce job logs in a spool file. Interactive jobs have job logs that can be seen by using the System Request function. To generate a job log from an interactive session, sign off the iSeries with the option, *LIST. This is an important report that can be used in conjunction with the Sterling Gentran:Server reports to manage your EDI processing.
Job QueueA staging area for jobs that have been grouped together and are waiting their turn to run. This is specific to the iSeries. When a job is submitted to run, it is submitted to a job queue. Typically, job queues have a FIFO (first in, first out) method of processing. However, there is a priority assigned to the job that ranks the jobs in the queue to determine which job will run next. If jobs have the same priority level, the first job in the queue will run first. Job queues are holding areas for the jobs until there is room in the iSeries subsystem to actually run the job. The job queue is designated in the Job Description, which is defined in the Environment Control subsystem.
Key Entry LineThis is the blank line at the top of the subfile in which you enter the key fields necessary to advance to the next panel, as specified by the option code selected.

Definition of Terms
IBM Sterling Gentran:Server for iSeries Release 3.6 User Guide G-7
LoopLoops are used in situations where multiple EDI segments (more than one) exist that occur together more than one time. In order to evaluate the information, all the segments need to be evaluated together. It is the group of multiple segments that occur repeatedly. A common loop is the N1 loop that contains Name and Address information.
Loop IDThis is the identifier used in Sterling Gentran:Server to tie all the segments together to produce a Loop. This loop ID can also exist on the Application records to identify a single record or group of records that is associated with the loop on the EDI side.
MandatoryA statement that a segment, data element or component data element must be used.
MapA set of instructions detailing the correspondence between the EDI message standard and your Application Transaction. The Data Map is also used to document the use of EDI for your application and document your data requirements for your Partners.
MappingMap processing uses user-defined maps to translate business documents from the in-house data format to the selected EDI standard or from EDI standard to internal format. Maps are defined using the online Mapping Integration system. When data is created by the user’s application program and processing is initiated, the system selects the proper map, based on partner definitions, and translates the data into the EDI standard format.
MapperThe Inbound Mapper translates EDI data received from your Partner into your Application format based on instructions you created. The instructions are stored in the Transaction Definition in the mapping subsystem.
The Outbound Mapper translates your Application data into the specified EDI format based on instructions you created. The instructions are stored in the Transaction Definition in the mapping subsystem.
MapThe “map” is the definition of instructions for moving data between the EDI format and the Application format. It is also known as the Transaction Definition. To perform the “task of mapping” means to create the definition of how to move the data between elements and fields.
Max LoopThis is the number of times a Loop can occur on the EDI side. If the N1 loop contains Name and Address information, the Max Loop value would identify how many different Name and Address loops can occur.
Max UseThe number of times a segment or record can occur. If this value is more than one, the segment or record would be read or written multiple times before the next segment or record.

Definition of Terms
G-8 IBM Sterling Gentran:Server for iSeries Release 3.6 User Guide
MessageAn identified and structured set of data elements and segments covering the requirements for a specific transaction. Also known as a “document” or transaction set.
NetworkA network is a Third Party EDI Network (EDI mailbox). Networks are defined to Sterling Gentran:Server for the purposes of collecting and routing messages. These are commonly referred to as VANs (Value Added Networks).
No-Write FlagThe name given to the Write Flag when it is set to ‘N’. See “Write Flag.”
ParmThis term is another name for a parameter. There are several places where parameters exist: there are Partner parameters that are used by the entire system for a particular Trading Partner. There are Global Parameters that are used by the entire system for ALL Trading Partners. Command Parameters are specific to a process such as Inbound Translation (PRCTRNIN).
PartnerThe Partner is commonly known as the Trading Partner and is someone with whom you are trading EDI documents.
Partner IDThe Partner ID is the identifier used in the Partner file under which information is stored that is necessary to trade EDI documents using Sterling Gentran:Server. This identifier can be an internal identifier for how you know them in your Applications such as a customer or vendor number, or it can be a descriptive identifier such as a company name, or it can be an EDI-specific identifier such as a DUNS number or communications phone number.
Partner ProfileThe Partner Profile refers to all of the information that is stored under the Partner ID. This information includes what EDI documents are being traded, what values should be loaded into the envelopes when sending data outbound, error rejection rules, and FYI comments.
RejectionSee “Error Rejection.”
Security Officer A person assigned to control all of the security authorizations provided with an iSeries system. The Security Officer (QSECOFR) can create iSeries user profiles, grant and revoke authorities for any system object, and execute any command with full authority.
The Sterling Gentran:Server Environment Control subsystem supplies the User ID, QSECOFR, which can be accessed by the Security Officer to create and maintain additional user profiles for Sterling Gentran.
Security ProfileThe security profile is a subset of the Sterling Gentran:Server user's profile that contains authority codes defining the subsystems and functions the user can access as well as the level of access allowed to that user.
Definition of Terms
IBM Sterling Gentran:Server for iSeries Release 3.6 User Guide G-9
If the user has full or partial access to a subsystem, the level of access is determined by the data rights.
SegmentEach record in a transaction set or a string of associated data elements. A segment is like a sentence: composed of data elements that are in a specific order to convey its meaning. Envelope segments come in pairs, for example, GS/GE group parts, and ST/SE transaction set pairs.
Segment TerminatorThe syntax character that is used to identify the end of a segment. One of the most common terminators used in EDI is HEX ‘15’ (new line character).
Selection CriteriaSterling Gentran:Server allows document processing and reporting functions to be controlled by selection criteria. Examples of just some of the fields available as selection criteria are: User Document Reference (P.O. Number, Invoice Number), User, Partner, Network, Application, Transaction Type, Date, Time, Document Status, Document Acknowledgment Status, Document Validation Status, Duplicate Status, Test/Production Status, Interchange Control Numbers, and other EDI envelope information.
SeparationSee “Data Separation.”
Simple Data ElementA data element whose data item representation embodies a single concept, that is, a data element that is not made up of component data elements.
Slide FileThe Slide file is the default Split file used during Inbound Processing by the Splitter program when the Split file cannot be determined. If no Splitting instructions were set up or they cannot be found for a Partner, all the data from that Partner will be placed in the Slide file. The Slide file can still be used as input to the Mapper by leaving the Split file number blank on the Application Data ID or by indicating the Slide file as the Split file on the Application Data ID.
Split FileThe Split file is one of the work files used during the Inbound Processing by the Splitter program to separate or sort the EDI data by the Application type in preparation for Mapping. There are 80 Split files available (identified as numbers 01-80).
SplittingThis is the process during Inbound Translation that occurs to separate the edited EDI data by Application types prior to the Mapping process. EDI data that is received may be from many different Partners and may contain several different types of documents. It is much more efficient to sort the data by Application type before mapping the EDI data into the Application formats.
Sterling B2B Collaboration NetworkIBM® Sterling B2B Collaboration Network Value-Added-Network (VAN).
Definition of Terms
G-10 IBM Sterling Gentran:Server for iSeries Release 3.6 User Guide
Sterling Gentran:ServerSterling Gentran:Server is EDI translation and communications software for the IBM iSeries. It acts as an interface between your in-house applications and the EDI standards.
Sterling Gentran:ViewpointSterling Gentran:Viewpoint allows you to selectively track business documents: for example, an individual purchase order, invoice, or acknowledgment. It gives you the ability to see where your business documents are within the EDI system.
Sterling Gentran:Viewpoint is an “add on” system for IBM® Sterling Gentran:Server® for iSeries® Release 3.6; that is, you must be using Sterling Gentran:Server to use this product.
Sub-Split FileThis file is a further separation of the data within each of the 80 Split files that can be used to break the data apart more than just by the Application type by using an element in the EDI data to determine where the data should be placed. There are 80 sub-split files available per Split file.
SubsystemThis is a collection of functions categorized together to perform certain tasks in Sterling Gentran. The Partner subsystem is a group of functions that collectively allow you to define the Trading Partner.
Summary AreaThe portion of the message that follows the body of the message and contains summary information relating to the entire message.
SuspensionWhen Sterling Gentran:Server cannot determine key information necessary in order to continue processing, the data is placed in the Suspense File. Suspended data is in error and the Editor and/or Mapping Reports can be evaluated to determine the cause of the suspension. Typically, suspension occurs when the Partner ID cannot be found in the Partner file for whom the data is destined or the Transaction ID cannot be found to instruct the Mapper how to move the data between formats.
System Administrator A person assigned to perform administrative functions with the system. This may be the Security Officer or some else responsible for a specific application system.
With regard to Sterling Gentran, the System Administrator refers to the person responsible for authorizing users to access Sterling Gentran and possibly controlling operations with Sterling Gentran.
TA1 AcknowledgmentThis acknowledgment is an interchange acknowledgment for the ISA interchange. It is a single segment that is surrounded only by the ISA/IEA envelope and acknowledges an ISA interchange that was received. This level of acknowledgment is not typically used since it only indicates that an interchange was received, not what was contained within the interchange nor how the contents were disposed of.
Definition of Terms
IBM Sterling Gentran:Server for iSeries Release 3.6 User Guide G-11
Trading PartnerA Trading Partner is any organization with whom you do business. Typically, Trading Partners are customers, suppliers, and intra-company divisions.
Transaction IDWithin Sterling Gentran:Server, the mapping definition that identifies how data is moved between the EDI format and the Application format is stored under an identifier, known as the Transaction ID.
Transaction SetThe Transaction set is the EDI equivalent of an Application document. Common documents include Purchase Orders and Invoices. The X12 Transaction sets for these are 850 and 810. The UCS Transaction sets for these same documents are 875 and 880. The Transaction set is the EDI format of Segments and Elements that compose the related information for the document. These Transaction set numbers vary between Standards.
TranslationTransaction is the process of moving the data between EDI and Application formats using the mapping definition. Translation occurs in Sterling Gentran:Server by the Inbound and Outbound Mappers during PRCTRNIN and PRCTRNOUT.
User IDThe User ID refers to an individual defined in the Environment Control subsystem as someone who can access Sterling Gentran:Server. The Sterling Gentran:Server User ID is set up using the iSeries User ID.
User Document ReferenceThe User Document Reference is a user-defined field that provides a way of referring to EDI documents by your existing methods – for example, documents can be referred to by your Purchase Order Number rather than referring to an EDI control number. The User Document Reference is supported for both inbound and outbound documents.
User ExitThe point during Translation mapping that an API (Application Program Interface) can be invoked to perform some special processing. Sterling Gentran:Server mapping temporarily suspends while this API is invoked. Data from the Mapping can be passed to the API through the User Exit Call Block. User Exits can be invoked at the Element level, the Segment level, and the Mapping Run level (at the Start of and End of Mapping).
User ProfileThe user profile refers to the combination of the environment profile and the security profile that is defined for each user in Sterling Gentran:Server. This profile identifies what systems and functions the user is permitted to access as well as the data rights for each subsystem.
This profile is specific to Sterling Gentran:Server, however, it cannot be created without first having an iSeries User ID and does not supersede any of the user's iSeries authority.
For example, if a user's iSeries profile has the option “Limit Capabilities” set to '*YES', then the user cannot execute any commands from the command line, including Sterling Gentran-specific commands. Command line authority is maintained within Sterling Gentran “Work with” panels.

Reserved Word Constants
G-12 IBM Sterling Gentran:Server for iSeries Release 3.6 User Guide
Write FlagThe Write Flag refers to the segment or record that is being written during the Translation processing by the Mapper. If processing inbound, the Write Flag would exist on the Application records to determine if the record should actually be written. If processing outbound, the write flag would exist on the Transaction segments to determine if the segment should be written. In most cases, you would want to write the record or segment. It is only in special situations where you want to save some information in Constants that you may not want to write the segment or record. In order to save data in constants, you must move it into a field or element. However, if you move the data, the record or segment would be written. The Write Flag can prevent the record or segment from being written by setting it to 'N' for No.
Reserved Word Constants
Inbound and OutboundThe following reserved word constants are available for use in both inbound and outbound map fields:
CONSTANT-01 through CONSTANT-99These constants can be used on maps to hold alphanumeric information that is needed later in the map, either to be moved to an output field or used in a conditional statement. Generally, the constants are used for:
1. Loading common data into each application record during an inbound map (for example, a sort key).
2. Loading input header information into output detail or summary areas.
The following descriptions discuss unique characteristics about the constant field ranges:
CONSTANT-01 through CONSTANT-40 (Transaction Level)These constants are initialized to spaces at the beginning of each document generated (outbound) or document read (inbound).
CONSTANT-41 through CONSTANT-45 (Group Level)These constants are initialized to spaces at the beginning of each functional group generated (outbound) or functional group read (inbound).
CONSTANT-46 through CONSTANT-50 (Interchange Level)These constants are initialized to spaces at the beginning of each interchange generated (outbound) or interchange read (inbound).
CONSTANT-51 through CONSTANT-55 (Run Level)These constants are initialized to spaces at the beginning of the mapping run only.

Reserved Word Constants
IBM Sterling Gentran:Server for iSeries Release 3.6 User Guide G-13
CONSTANT-56 through CONSTANT-75 (Transaction Level)These constants are initialized to spaces at the beginning of each document generated (outbound) or document read (inbound).
CONSTANT-71 through CONSTANT-80 (Detail Item Level)These constants are initialized to zeros at the beginning of each detail loop (denoted as area ‘D’). These are not cleared for subsequent detail sections (1-9) when *NO is answered on the Clear Values at Section Break parameter located on the PRCTRNIN and PRCTRNOUT commands. These items will be cleared at the subsequent detail sections (1-9) when *YES is answered to the same parameter.
CONSTANT-76 through CONSTANT-89 (Interchange Level)These constants are initialized to spaces at the beginning of each interchange generated (outbound) or interchange read (inbound).
CONSTANT-90 through CONSTANT-99 (Detail Item Level)These constants are initialized to spaces at the beginning of every detail loop (denoted as area ‘D’). These are not cleared for subsequent detail sections (1-9).
HASH-TOTAL-01 through HASH-TOTAL-80Hash totals can be used on maps to accumulate predefined input fields that are needed later in the map, either to be moved to an output field or used in a conditional statement. Generally, hash totals are used in maps to accumulate numeric field values (for example, quantity, dollars), and map the accumulated total into a control total field.
The following descriptions discuss unique characteristics about the hash total field ranges:
HASH-TOTAL-01 through HASH-TOTAL-05 (Transaction Level)These hash totals are initialized to zeros at the beginning of each document that is generated (outbound), or each document that is read (inbound).
HASH-TOTAL-06 through HASH-TOTAL-10 (Group Level)These hash totals are initialized to zeros at the beginning of each functional group that is generated (outbound), or each functional group that is read (inbound).
HASH-TOTAL-11 through HASH-TOTAL-15 (Interchange Level)These hash totals are initialized to zeros at the beginning of each interchange that is generated (outbound), or each interchange that is read (inbound).
HASH-TOTAL-16 through HASH-TOTAL-20 (Run Level)These hash totals are initialized to zeros only at the beginning of the mapping run.
HASH-TOTAL-21 through HASH-TOTAL-40 (Transaction Level)These hash totals are initialized to zeros at the beginning of each document that is generated (outbound), or each document that is read (inbound).
HASH-TOTAL-41 through HASH-TOTAL-45 (Group Level)These hash totals are initialized to zeros at the beginning of each functional group that is generated (outbound), or each functional group that is read (inbound).

Reserved Word Constants
G-14 IBM Sterling Gentran:Server for iSeries Release 3.6 User Guide
HASH-TOTAL-46 through HASH-TOTAL-65 (Interchange Level)These hash totals are initialized to zeros at the beginning of each interchange that is generated (outbound), or each interchange that is read (inbound).
HASH-TOTAL-66 through HASH-TOTAL-70 (Run Level)These hash totals are initialized to zeros only at the beginning of the mapping run.
HASH-TOTAL-71 through HASH-TOTAL-80 (Detail Item Level)These hash totals are initialized to zeros at the beginning of every detail loop (denoted as area ‘D’). These are not cleared for subsequent detail sections (1-9) when *NO is answered on the Clear Values at Section Break parameter located on the PRCTRNOUT and PRCTRNIN commands. These items will be cleared at the subsequent detail sections (1-9) when *YES is answered to the same parameter.
Reserved Word Constants
IBM Sterling Gentran:Server for iSeries Release 3.6 User Guide G-15
ACCUMULATOR-01 through ACCUMULATOR-80Accumulators can be used on maps to maintain counters that are incremented by one (1) that are needed later in the map, either to be moved to an output field or used in a conditional statement. Generally, accumulators are used to:
1. Count the occurrence of a specific entity such as a line item.
2. Generate increasing/sequential record/line item numbers.
The following descriptions discuss unique characteristics about the accumulator field ranges:
ACCUMULATOR-01 through ACCUMULATOR-05 (Transaction Level)These accumulators are initialized to zeros at the beginning of each document that is generated (outbound), or each document that is read (inbound).
ACCUMULATOR-06 through ACCUMULATOR-10 (Group Level)These accumulators are initialized to zeros at the beginning of each functional group that is generated (outbound), or each functional group that is read (inbound).
ACCUMULATOR-11 through ACCUMULATOR-15 (Interchange Level)These accumulators are initialized to zeros at the beginning of each interchange that is generated (outbound), or each interchange that is read (inbound)
ACCUMULATOR-16 through ACCUMULATOR-20 (Run Level)These accumulators are initialized to zeros only at the beginning of the mapping run.
ACCUMULATOR-21 through ACCUMULATOR-40 (Transaction Level)These accumulators are initialized to zeros at the beginning of each document that is generated (outbound), or each document that is read (inbound).
ACCUMULATOR-41 through ACCUMULATOR-45 (Group Level)These accumulators are initialized to zeros at the beginning of each functional group that is generated (outbound), or each functional group that is read (inbound).
ACCUMULATOR-46 through ACCUMULATOR-65 (Interchange Level)These accumulators are initialized to zeros at the beginning of each interchange that is generated (outbound), or each interchange that is read (inbound)
ACCUMULATOR-66 through ACCUMULATOR-70 (Run Level)These accumulators are initialized to zeros only at the beginning of the mapping run.
ACCUMULATOR-71 through ACCUMULATOR-80 (Detail Item Level)These accumulators are initialized to zeros at the beginning of each detail loop (denoted as area ‘D’). These are not cleared for subsequent detail sections (1-9) when *NO is answered on the Clear Values at Section Break parameter located on the PRCTRNIN and PRCTRNOUT commands. These items will be cleared at the subsequent detail sections (1-9) when *YES is answered to the same parameter.

Reserved Word Constants
G-16 IBM Sterling Gentran:Server for iSeries Release 3.6 User Guide
Other Reserved Word Constants for Inbound and OutboundCURRENT-DATE
The current date according to the system. The value generated is based on the length and type of the target field.
CURRENT-TIMEThe current time according to the system. The value generated is based on the length and type of the target field.
TOTAL-SEGMENTSThis constant contains either the number of segments read (inbound) or the number of segments written (outbound). It is available to be moved into a numeric application field (inbound) or a numeric EDI element (outbound).
CAUTIONSTOP
On Inbound maps only, segments defined to the map are counted and the count will only be valid after all segments have been read. For this reason, this constant should only load an application field defined in the summary section of the application. On outbound maps this constant will not contain a valid value if more than one (1) segment is generated in the summary section of the EDI document. Envelopes are not counted in either direction.
TOTAL-ITEMSThis constant contains the number of line items generated for an application (inbound) or an EDI document (outbound). A line item is defined as the segments or records in the detail section of the application or EDI document. It is available to be moved into a numeric application field (inbound) or a numeric EDI element (outbound). This constant should only be used in the summary section of the EDI document or application.

Reserved Word Constants
IBM Sterling Gentran:Server for iSeries Release 3.6 User Guide G-17
Inbound OnlyThe following reserved word constants are all preset by the inbound mapping program. They are available to be moved into an appropriate application field.
SENDER-IDThis constant contains the resolved sender ID (partner cross-reference is used) as determined by the inbound editor.
SENDER-ID-QThis constant contains the resolved sender ID qualifier, if used, (cross-reference is used) as determined by the inbound editor.
RECEIVER-IDThis constant contains the resolved receiver ID (partner cross-reference is used) as determined by the inbound editor.
RECEIVER-ID-QThis constant contains the resolved receiver ID qualifier, if used, (cross-reference is used) as determined by the inbound editor.
PART-TEST-FLAGThis constant contains a ‘P’ if the transaction record on the partner file for the sender has a Production status. If the Trading Partner is not on file or the transaction record found is not set to production status, this constant contains a value of ‘T’.
PROD-TEST-FLAGThis constant contains a “P” if the transaction status (in Mapping) is set to Production. This constant contains a “T” if the transaction status (in Mapping) is set to Test or Development.
ISA01 through ISA16The constants contain the values of each element received in the ISA segment.
ICS01 through ICS12The constants contain the values of each element received in the ICS segment.
BG01 through BG07The constants contain the values of each element received in the BG segment.
UNA01 through UNA06The constants contain the values of each element received in the UNA segment.
UNB01 through UNB18The constants contain the values of each element received in the UNB segment.
GS01 through GS08The constants contain the values of each element received in the GS segment.

Reserved Word Constants
G-18 IBM Sterling Gentran:Server for iSeries Release 3.6 User Guide
UNG01 through UNG13The constants contain the values of each element received in the UNG segment.
ST01 through ST02The constants contain the values of each element received in the ST segment.
UNH01 through UNH09The constants contain the values of each element received in the UNH segment.
SCH01 through SCH05The constants contain the values of each element received in the SCH segment.
STX01 through STX12The constants contain the values of each element received in the STX segment.
BAT01 through BAT02The constants contain the values of each element received in the BAT segment.
MHD01 through MHD03The constants contain the values of each element received in the MHD segment.

Application Data Types
IBM Sterling Gentran:Server for iSeries Release 3.6 User Guide G-19
Application Data TypesWhen defining an application field, the length of the field and the field data type must be specified. The length of the field is the number of bytes of storage the data field will occupy in the file that is not its logical length. The data type of the field will depend on the use and format of the field.
Alphanumeric Data TypesThe alphanumeric data types are designed to describe fields that hold free-form data that contains any characters (letters, numbers, and special characters) including spaces. Data is moved to and from these fields, character-by-character, without editing. The data in the receiving field is left-justified. During inbound processing, these fields are initialized to spaces. Fields will be truncated because of field/element length considerations without causing an error condition.
If data is moved from a numeric EDI element to an alphanumeric field during an inbound map process, the numeric EDI element will be moved to the application field starting with the first significant digit of the number. Any real or implied decimal points will be shown in the data as a real decimal point.
For example:
1. EDI alphanumeric (length 35) to Application alphanumeric (length 20)
AB CORPORATION - BILLING DEPARTMENT =====>
AB CORPORATION - BIL
2. EDI numeric (type N2, length 6) to Application alphanumeric (length 9)
123456 (logically 1234.56) =====>
1234.56<space><space>
AN (Alphanumeric)This is the data type used to describe 99.9 percent of the alphanumeric fields in applications.
For “AN” data types, the length of the field is the number of characters to be written in the field.
AS (Application Select - Outbound Applications Only)This data type describes a field with the same data characteristics as “AN.” The difference is that this field also tells the mapper to select appropriate maps based on the value of the data contained in this field. Only one application select field should be coded for an application definition.
ID (Identification)This data type describes a field with the same data characteristics as “AN.” There is no reason at this time to use this data type in application definitions.

Application Data Types
G-20 IBM Sterling Gentran:Server for iSeries Release 3.6 User Guide
Numeric Data TypesThe numeric data types are designed to describe application fields that contain numeric data. Unlike the alphanumeric data types, which are interchangeable, the numeric types have very specific formats that must be adhered to. The numeric application data can be mapped to and from an alphanumeric EDI element.
S# (Signed Numeric; # = number of implied decimal positions. Valid values are S0 through S9)This data type is commonly called “zoned decimal.” Its length is defined as the number of digits in the number. The sign is represented by an “overpunch” in the last byte of the number. A six-position number with two implied decimal positions is defined to the application as data type “S2,” with a length of 6. It is represented in a COBOL program as PIC S9(4)V9(2).
P# (Signed Packed; # = number of implied decimal positions. Valid values are P0 through P9)This data type is commonly called “packed decimal.” Its length is defined as the number of digits in the number divided by 2 + 1. The sign is represented in the last half byte of the number (D=negative; C or F=positive). A 6-position number with two implied decimal positions would be defined to the application as data type “P2” with a length of 4. It is represented in a COBOL program as PIC S9(4)V9(2) COMP-3.
U# (Unsigned Packed; # = number of implied decimal positions. Valid values are U0 through U9)This data type is the same as the packed data type (P#) above except that the last half byte of the number that contains the sign will always have an “F.” A 6-position number with two implied decimal positions is defined to the application as data type “U2” with a length of 4. It is represented in a COBOL program as PIC 9(4)V9(2) COMP-3.
N# (Signed Numeric; # = number of implied decimal positions. Valid values are N0 through N9)This data type is similar to the EDI “N” data type except that the entire length of the field must be filled with numeric values. Its length is defined as the number of digits in the number. Negative numbers have an explicit minus sign (-) in the first byte. It is recommended that this data type be used for only data values that will always be positive. For example, a 6-position number with two implied decimal positions is defined to the application as data type “N2” with a length of 6. It is represented in a COBOL program as PIC 9(4)V9(2).
R (Real)This data type is similar to the EDI “R” data type except that the entire length of the field must be filled with numeric values. Its length is defined as the number of digits in the number. Negative numbers have an explicit minus sign (-) in the first byte. Decimal positions are indicated with a real decimal point. It is recommended that this data type be used only when absolutely necessary because there is a considerable amount of programming required to generate or interpret this data type compared to the other types. A 6-position number with two positions after the decimal displays as “1234.56.” For inbound, the field is padded on the right with trailing zeros. As a result, the number one (“1”) displays in a 6-position application field as “1.0000.”

Application Data Types
IBM Sterling Gentran:Server for iSeries Release 3.6 User Guide G-21
ND (Numeric Display - Outbound Applications Only)This data type is similar to the “R” data type except that any special characters encountered when translating from this field are ignored. This data type was developed to allow limited numeric processing capabilities when the application file is in report format. These fields will be converted as shown in the following example. (Assume moving to “R” type EDI element.)
1. $120.00=====>120
2. $******1.00=====>1
3. 1.2=====>-1.2
4. 1.2 CR=====>-1.2
Remember, this data type can only be used in outbound application definitions.
B (Binary)This data type supports full word, positive, binary numbers for outbound applications only. The field lengths specified must be in full-word increments (e.g., 2 bytes, 4 bytes, 6 bytes, and 8 bytes). These data types are represented in COBOL as PIC 9(#) COMP, where # is a multiple of 4.
E0 (Unpacked Large Numeric)This data type supports non-decimal unpacked numbers ranging from S9(13) to S9(18).
F0 (Packed Large Numeric)This data type supports non-decimal packed numbers ranging from S9(13) packed to S9(18) packed.
NOTEYou cannot save the E0 and F0 data types in the hash totals. If you did, unpredictable results would occur.

Application Data Types
G-22 IBM Sterling Gentran:Server for iSeries Release 3.6 User Guide
Date Data TypesThe date data types are provided to give the ability to automatically convert dates in multiple formats to the standard EDI Year/Month/Day (YYMMDD) format. For automatic data conversion to take place, the EDI element data type must be “DT,” “D8,” or “CD;” the application field data type must be one of the following data types. The application date formats are shown in the following table.
Date Format Format Packed? Y(es) or N(o) Length
YY YYMMDD N 6 bytes
MM MMDDYY N 6 bytes
DD DDMMYY N 6 bytes
CY YYYYMMDD N 8 bytes
CM MMDDYYYY N 8 bytes
CD DDMMYYYY N 8 bytes
PY YYMMDD Y 4 bytes
PM MMDDYY Y 4 bytes
PD DDMMYY Y 4 bytes
PJ YYDDD (Julian) Y 3 bytes
JD YYDDD (Julian) N 5 bytes
J8 YYYYDDD (Long Julian) N 7 bytes
ZY YYYYMMDD Y 5 bytes
ZM MMDDYYYY Y 5 bytes
ZD DDMMYYYY Y 5 bytes
ZJ YYYYDDD (Long Julian) Y 4 bytes
L“L” data type
YYYY-MM-DD (*ISO and *JIS)
Default format is 0001-01-01
N 10 bytes
LE“L” data type
DD.MM.YYYY(*EUR)
Default format is 01.01.0001
N 10 bytes
LU“L” data type
MM/DD/YYYY format (*USA)
Default format is 01/01/0001
N 10 bytes

Application Data Types
IBM Sterling Gentran:Server for iSeries Release 3.6 User Guide G-23
Time Data TypesThe time data types are provided to give the ability to automatically convert times in multiple formats to the standard EDI time format. For automatic time conversion to take place, the EDI element data type must be “TM,” “T6,” or “T8” and the application field data type must be one of the following data types. The application time formats are shown in the following table.
1P CYYMMDD
Where:C = “0” for years 1900 through 1999C = “1” for years 2000 and higher
Y 4 bytes
1J CYYDDD (Julian)
Where:C = “0” for years 1900 through 1999C = “1” for years 2000 and higher
N 6 bytes
1Y CYYMMDD
Where:C = “0” for years 1900 through 1999C = “1” for years 2000 and higher
N 7 bytes
Time Format Format Packed? Y(es) or N(o) Length
TM HHMM N 4 bytes
T6 HHMMSS N 6 bytes
T8 HHMMSSuu N 8 bytes
Z4 HHMM Y 3 bytes
Z6 HHMMSS Y 4 bytes
Z8 HHMMSSuu Y 5 bytes
TS
Time portion (last 16 bytes) of the iSeries Date/Time stamp (Z).
HH.MM.SS.uuuuuu
Default format is -00.00.00.000000
N 16 bytes
TI HH:MM:SS
Default format is 00:00:00
N 8 bytes
Date Format Format Packed? Y(es) or N(o) Length
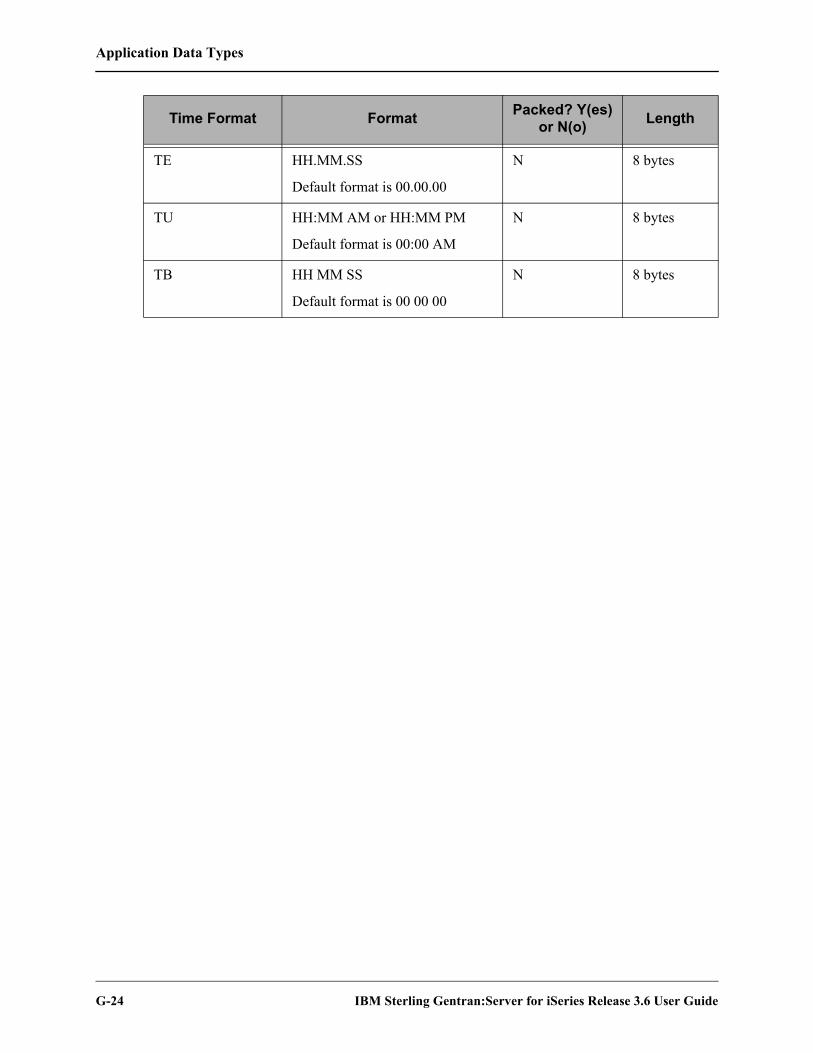
Application Data Types
G-24 IBM Sterling Gentran:Server for iSeries Release 3.6 User Guide
TE HH.MM.SS
Default format is 00.00.00
N 8 bytes
TU HH:MM AM or HH:MM PM
Default format is 00:00 AM
N 8 bytes
TB HH MM SS
Default format is 00 00 00
N 8 bytes
Time Format Format Packed? Y(es) or N(o) Length
EDI Data Types
IBM Sterling Gentran:Server for iSeries Release 3.6 User Guide G-25
EDI Data TypesThe following data types are used to describe all of the elements in an EDI document.
Alphanumeric Data TypesAN Alphanumeric
The Alphanumeric data type is used to describe most of the alphanumeric elements in EDI documents. The data in “AN” field types is free-form text.
ID IdentificationThe Identification data type describes a data field that is alphanumeric, but may contain only specified code values. If the number of these code values has a realistic, finite limit (for example, unit of measure), then the values in the fields are validated during compliance checking. If the number of valid values has no real defined limit (for example, DUNS number), then the value is not validated.
Numeric Data TypesN# Signed Numeric (# = number of implied decimal positions. Valid values are N0
through N9)The Numeric data type is defined as having an implied decimal point and an explicit minus (-) sign, if the value is negative. The value of 1.23 in an “N3” element, with a minimum length of one, is 1230.
R# Real (# = number of decimal positions. Valid values are R0 through R9)This data type is similar to the EDI “R” data type except that the entire length of the field must be filled with numeric values. Its length is defined as the number of digits in the number. Negative numbers have an explicit minus sign (-) in the first byte. Decimal positions are indicated with a real decimal point. It is recommended that this data type be used only when absolutely necessary because there is a considerable amount of programming required to generate or interpret this data type compared to the other types.
R RealThis data type is defined as having a real decimal point and an explicit minus (-) sign, if the value is negative. The value of 1.23 in an “R” element, with a minimum length of one, is 1.23.

EDI Data Types
G-26 IBM Sterling Gentran:Server for iSeries Release 3.6 User Guide
Date Data Types
Time Data Types
Date Format Format Packed? Y(es) or N(o) Length
CD DDMMYYYY N 8 bytes
D8 CCYYMMDD N 8 bytes
DT: can be either:
or:
The EDI minimum/maximum field length of 6 or 8 will determine which format is used.
YYMMDD N 6 bytes
YYYYMMDD N 8 bytes
Time Format Format Packed? Y(es) or N(o) Length
TM HHMM N 4 bytes
T6 HHMMSS N 6 bytes
T8 HHMMSSuu N 8 bytes

Notices
IBM Sterling Gentran:Server for iSeries Release 3.6 User Guide - 1
NoticesThis information was developed for products and services offered in the U.S.A.
IBM may not offer the products, services, or features discussed in this document in other countries. Consult your local IBM representative for information on the products and services currently available in your area. Any reference to an IBM product, program, or service is not intended to state or imply that only that IBM product, program, or service may be used. Any functionally equivalent product, program, or service that does not infringe any IBM intellectual property right may be used instead. However, it is the user's responsibility to evaluate and verify the operation of any non-IBM product, program, or service.
IBM may have patents or pending patent applications covering subject matter described in this document. The furnishing of this document does not grant you any license to these patents. You can send license inquiries, in writing, to:
IBM Director of Licensing
IBM Corporation
North Castle Drive
Armonk, NY 10504-1785
U.S.A.
For license inquiries regarding double-byte character set (DBCS) information, contact the IBM Intellectual
Property Department in your country or send inquiries, in writing, to:
Intellectual Property Licensing
Legal and Intellectual Property Law
IBM Japan Ltd.
1623-14, Shimotsuruma, Yamato-shi
Kanagawa 242-8502 Japan
The following paragraph does not apply to the United Kingdom or any other country where such provisions are inconsistent with local law: INTERNATIONAL BUSINESS MACHINES CORPORATION PROVIDES THIS PUBLICATION "AS IS" WITHOUT WARRANTY OF ANY KIND, EITHER EXPRESS OR IMPLIED, INCLUDING, BUT NOT LIMITED TO, THE IMPLIED WARRANTIES OF NON-INFRINGEMENT, MERCHANTABILITY OR FITNESS

- 2 IBM Sterling Gentran:Server for iSeries Release 3.6 User Guide
FOR A PARTICULAR PURPOSE. Some states do not allow disclaimer of express or implied warranties in certain transactions, therefore, this statement may not apply to you.
This information could include technical inaccuracies or typographical errors. Changes are periodically made to the information herein; these changes will be incorporated in new editions of the publication. IBM may make improvements and/or changes in the product(s) and/or the program(s) described in this publication at any time without notice.
Any references in this information to non-IBM Web sites are provided for convenience only and do not in any manner serve as an endorsement of those Web sites. The materials at those Web sites are not part of the materials for this IBM product and use of those Web sites is at your own risk.
IBM may use or distribute any of the information you supply in any way it believes appropriate without incurring any obligation to you.
Licensees of this program who wish to have information about it for the purpose of enabling: (i) the exchange of information between independently created programs and other programs (including this one) and (ii) the mutual use of the information which has been exchanged, should contact:
IBM Corporation
J46A/G4
555 Bailey Avenue
San Jose, CA__95141-1003
U.S.A.
Such information may be available, subject to appropriate terms and conditions, including in some cases, payment of a fee.
The licensed program described in this document and all licensed material available for it are provided by IBM under terms of the IBM Customer Agreement, IBM International Program License Agreement or any equivalent agreement between us.
Any performance data contained herein was determined in a controlled environment. Therefore, the results obtained in other operating environments may vary significantly. Some measurements may have been made on development-level systems and there is no guarantee that these measurements will be the same on generally available systems. Furthermore, some measurements may have been estimated through extrapolation. Actual results may vary. Users of this document should verify the applicable data for their specific environment.
Information concerning non-IBM products was obtained from the suppliers of those products, their published announcements or other publicly available sources. IBM has not tested those products and cannot confirm the accuracy of performance, compatibility or any other claims related to non-IBM products. Questions on the capabilities of non-IBM products should be addressed to the suppliers of those products.
All statements regarding IBM's future direction or intent are subject to change or withdrawal without notice, and represent goals and objectives only.

IBM Sterling Gentran:Server for iSeries Release 3.6 User Guide - 3
This information is for planning purposes only. The information herein is subject to change before the products described become available. This information contains examples of data and reports used in daily business operations. To illustrate them as completely as possible, the examples include the names of individuals, companies, brands, and products. All of these names are ficticious and any similarity to the names and addresses used by an actual business enterprise is entirely coincidental.
COPYRIGHT LICENSE:
This information contains sample application programs in source language, which illustrate programming techniques on various operating platforms. You may copy, modify, and distribute these sample programs in any form without payment to IBM, for the purposes of developing, using, marketing or distributing application programs conforming to the application programming interface for the operating platform for which the sample programs are written. These examples have not been thoroughly tested under all conditions. IBM, therefore, cannot guarantee or imply reliability, serviceability, or function of these programs. The sample programs are provided "AS IS", without warranty of any kind. IBM shall not be liable for any damages arising out of your use of the sample programs.
Each copy or any portion of these sample programs or any derivative work, must include a copyright notice as follows:
© IBM 2011. Portions of this code are derived from IBM Corp. Sample Programs. © Copyright IBM Corp. 2011.
If you are viewing this information softcopy, the photographs and color illustrations may not appear.
TrademarksIBM, the IBM logo, and ibm.com are trademarks or registered trademarks of International Business Machines Corp., registered in many jurisdictions worldwide. Other product and service names might be trademarks of IBM or other companies. A current list of IBM trademarks is available on the Web at “Copyright and trademark information” at www.ibm.com/legal/copytrade.shtml.
Adobe, the Adobe logo, PostScript, and the PostScript logo are either registered trademarks or trademarks of Adobe Systems Incorporated in the United States, and/or other countries.
IT Infrastructure Library is a registered trademark of the Central Computer and Telecommunications Agency which is now part of the Office of Government Commerce.
Intel, Intel logo, Intel Inside, Intel Inside logo, Intel Centrino, Intel Centrino logo, Celeron, Intel Xeon, Intel SpeedStep, Itanium, and Pentium are trademarks or registered trademarks of Intel Corporation or its subsidiaries in the United States and other countries.
Linux is a registered trademark of Linus Torvalds in the United States, other countries, or both.
Microsoft, Windows, Windows NT, and the Windows logo are trademarks of Microsoft Corporation in the United States, other countries, or both.

- 4 IBM Sterling Gentran:Server for iSeries Release 3.6 User Guide
ITIL is a registered trademark, and a registered community trademark of the Office of Government Commerce, and is registered in the U.S. Patent and Trademark Office.
UNIX is a registered trademark of The Open Group in the United States and other countries.
Java and all Java-based trademarks and logos are trademarks or registered trademarks of Oracle and/or its affiliates.
Cell Broadband Engine is a trademark of Sony Computer Entertainment, Inc. in the United States, other countries, or both and is used under license therefrom.
Linear Tape-Open, LTO, the LTO Logo, Ultrium and the Ultrium Logo are trademarks of HP, IBM Corp. and Quantum in the U.S. and other countries.
Connect Control Center®, Connect:Direct®, Connect:Enterprise, Gentran®, Gentran:Basic®, Gentran:Control®, Gentran:Director®, Gentran:Plus®, Gentran:Realtime®, Gentran:Server®, Gentran:Viewpoint®, Sterling Commerce™, Sterling Information Broker®, and Sterling Integrator® are trademarks or registered trademarks of Sterling Commerce, Inc., an IBM Company.
Other company, product, and service names may be trademarks or service marks of others.

IBM Sterling Gentran:Server for iSeries Release 3.6 User Guide IN - 1
IndexSymbols!!!DFT 3-45
AAccess Partners 3-13ACCUMULATOR 6-64ACCUMULATOR-01 6-52, 6-54Acknowledgment
Errors, Partner set up 3-22Interchange requested, Partner set up 3-29
Action Steps For Mapping Within Sterling Gentran:Server 4-18
APPCPY command 5-79Application data types G-19Application Definition
Access the Subsystem 5-6Application Definition for Externally Defined
Multi-format Logical File 5-57Application Definition for Externally Defined
Physical Files 5-8Application Definition for Internally Defined File
5-34Application Definition panel (EDIX552-FMT01)
5-11, 5-12, 5-37, 5-38, 5-60Application Envelope Definition 5-30, 5-53, 5-74Application Fields panel (EDIX554-CTL01) 5-17,
5-44, 5-67, 5-70Application Key Structure 5-21Application Key Structure panel (EDIX556-FMT01)
5-21Application Partner Reference 5-27, 5-50, 5-71Application Partner Reference panel
(EDIX559-FMT01) 5-28, 5-50, 5-71Application Records/Files panel (EDIX553-CTL01)
5-14, 5-42, 5-64Application Select feature, defined 5-112Bad DDS with keys not aligned 5-25Changing an application file 5-109, 5-118Copy Application Definition 5-78Copy Application Definition Between Libraries
command, see APPCPYData Description Specification (DDS) 5-8EBDI590 - Batch Application Definition Renumber
Report 5-101Good DDS if the keys were aligned 5-26
Max Use and Loop ID fields, explanation of use 5-108
Multi-Format Logical File (GENMFLF) 5-22Panel Quick Reference 5-4Renumber Application Records/Files and Fields
command, see APPRENBRReports 5-93Re-retrieving DDS for an application file 5-109,
5-118Steps for modifying application definition after
changing an application file 5-109Synchronizing a map with an application definition
6-166Use the ezAPPDEF Command 5-88What does the Application Definition Subsystem
Do? 5-3What is an Application Definition? 5-3What is the Application Partner Reference used for?
5-108Work with Application Definition panel
(EDIX550-FMT01) 5-6, 5-11, 5-59Application Definition for Externally Defined
Multi-format Logical File 5-57Off-line Preparation 5-57Sample Inbound Application file format 5-58
Application Definition for Externally Defined Physical Files 5-8
Off-line Preparation 5-8Application Definition for Internally Defined File
5-34Comment Record 5-36Detail Record 5-36Header Record 5-36Off-line Preparation 5-34Sample Application File Format. 5-35
Application Definition panel (EDIX552-FMT01) 5-11, 5-12, 5-37, 5-38, 5-60
Application Definition panel (EDIX552-FMT01) Field Descriptions 5-13, 5-38, 5-62
Application File 5-39, 5-62Description 5-13, 5-38, 5-62Division Code 5-13, 5-38, 5-62EDI Split File 5-13, 5-39, 5-62EDI Sub-Split File 5-13, 5-39, 5-62File Type 5-13, 5-39, 5-62Functional Groups 5-13, 5-39, 5-62Length 5-39

Index
IX - 2 IBM Sterling Gentran:Server for iSeries Release 3.6 User Guide
Record Type Start Position 5-39Record Type Start Position, Length 5-62Record Type Start Position, Length, Application File
5-13Update Allowed 5-13, 5-40, 5-62
Application Envelope Definition panel (EDIX560-FMT01) 5-30, 5-53, 5-74
Application FieldMap an application field to an element 6-86
Application Fields panel (EDIX554-CTL01) 5-17, 5-44, 5-67, 5-70
Application Fields panel Field DescriptionsDescription 5-20, 5-49, 5-69Field Name 5-19, 5-48, 5-68Field Value 5-20, 5-49, 5-69Length 5-19, 5-48, 5-68Mandatory Code 5-19, 5-48, 5-69Sequence Number 5-19, 5-48, 5-68Start 5-19, 5-48Type 5-19, 5-48, 5-68
Application File Type 4-4Flat File 4-4Logical File 4-4Physical File 4-4
Application FormatMaster Files 4-3Paper and EDI Invoice 4-8Temporary Work Files 4-3
Application Format for Paper Invoice to be moved into EDI Invoice 5-9
Application ID 5-3Application Key Structure panel (EDIX556-CTL01)
5-21Application Key Structure panel
(EDIX556-FMT01) 5-21Application Partner Reference panel
(EDIX559-FMT01) 5-27, 5-28, 5-50, 5-71Application Partner Reference panel Field
Descriptions 5-52Application Partner Reference 5-29, 5-52, 5-72Application Select 5-29, 5-52, 5-73Qualifier Field Name 5-29, 5-52, 5-73
Application Partner Reference, defined 5-108Application Records
Aligning segments in a map with application records 6-24
Application Records/Files panel (EDIX553-CTL01) 5-14, 5-42, 5-64
Application Records/Files panel Field DescriptionsArea 5-16, 5-43, 5-65Description 5-16, 5-43, 5-65Loop ID 5-16, 5-43, 5-65Mandatory Code 5-16, 5-43, 5-65Max Use 5-16, 5-43, 5-65Record/File 5-16, 5-43, 5-65Sequence Number 5-16, 5-43, 5-65Write Flag 5-16, 5-43, 5-65
Application Select, defined 5-112APPRENBR command 5-81Areas 4-19Audit File Report
Partner set up 3-38, 3-51Audit Indicator 7-14, 7-34, 7-36, 7-61, G-2, G-4AUDITPURGE command 3-22Authority Codes 2-9
Data Level 2-12Define 2-10Function Level 2-11Quick Reference 2-12Subsystem Level 2-11
BBatch Application Definition Renumber Report
(EBDI590) 5-101Batch Standards file, build 7-25BG Partner global parameter 3-23Bicycle Wheel Concept
“1-to-Many Relationship” 4-6Build maps 4-18Build the Batch Standards file 7-25
CCD data type G-22, G-26CEDCPY command 6-151CM data type G-22Code Translation panel (EDIX583-CTL01) 6-133Code Translation Table 6-127Code Validation
Partner set up 3-50Comm Profile ID 3-23
see System Operator GuideCommand Line
Access panels from 1-26Common Questions

Index
IBM Sterling Gentran:Server for iSeries Release 3.6 User Guide IX - 3
Can I copy a map from one version to another? 6-205How can I create a uniform running environment for
multiple users? 2-18How can I map the SDQ loop in the purchase order
transaction? 6-207How do I add an element code? 7-66How do I re-retrieve the DDS for an application file?
5-109, 5-118How would a partner be set up with multiple
divisions? 3-110My partner is upgrading to a new version of the
standards; can I just change the version on my map? 6-205
Sectioning rules and guidelines 6-213What are segment activity records? 7-67What are the Max Use and Loop ID fields used for?
5-108What happens if my application needs to be changed?
5-109What if a single partner trades with more than one
type of interchange? 3-111What if I want two User IDs? 2-18What if partner cannot be found during processing?
3-112What information is stored in the partner profile?
3-109What is Sectioning and how does it work? 6-209What is the Application Partner Reference used for?
5-108What is the Application Select feature? 5-112What is the difference between Max Use and Max
Loop on the Transaction Definition? 6-207What is the partner profile and what is it used for?
3-109What rules should be followed when setting up a
map? 6-206What types of files can be used to interface with
Gentran:Server for processing? 6-205Concepts in Sterling Gentran:Server 1-15Conditional Mapping 6-36, 6-113Conditional mapping 6-36CONSTANT 6-65, 6-91Control Number
Group, Partner set up 3-41Partner set up 3-29, 3-38Transaction, Partner set up 3-54
Control Number (GS06) 3-41Control Numbers
CTT Segment 6-122Control Segments
CTT segment 6-122
Control Totals 6-64Convert a map to new version 6-164Copy
Partner profiles 3-80Partners between libraries 3-85Transaction Map 6-160Transaction map between libraries 6-162Translation Table 6-149Translation Table Between Libraries 6-150
Copy Application Definition 5-78Copy Application Definition Between Libraries
command, see APPCPYCopy Code and Data command
see CEDCPYCopy Partner ID command (PTRCPY) 3-87Copy Segments from Standard panel
(EDIX502-CTL01) 6-17, 6-23, 6-77, 6-78, 6-83
Copy Standards from One Library to Another (STDCPY) 7-38
Copy Transactions between libraries commandsee TRNCPY
Counting line itemssee ACCUMULATOR-01
Create maps 4-18Cross Reference
Cross Reference Report (EBDI006G) 3-94Cross Reference Report (EBDI006G) 3-94Cross Reference, Partner set up 3-68CTT Segment 6-122CY data type G-22
DD8 data type G-26Data By Partner Translation panel
(EDIX584-CTL01) 6-140Data Description Specification (DDS) 5-8Data Element Code Definition panel
(EDIX170-CTL01) 7-16, 7-18, 7-20Data Separation
Directed Output global parameter 3-77Identify the Split Files 3-78Partner Data Separation panel (EDIX050-FMT01)
3-78Partner set up 3-73see Splitting 3-5, 3-73

Index
IX - 4 IBM Sterling Gentran:Server for iSeries Release 3.6 User Guide
Work with Partner Data Separation panel (EDIX051-FMT01) 3-77
Data Translation By Partner panel (EDIX584-FMT01) 6-141
Data Translation Table 6-134Data Validation panel (EDIX585-FMT01) 6-147,
6-148Data Validation Table 6-142DD data type G-22DDS
Bad DDS with keys not aligned 5-25Good DDS if the keys were aligned 5-26
DDS (Data Description Specification) 5-8Define Translation Table (EDIX581-FMT00) 6-137Define Translation Table panel (EDIX581-FMT01)
6-138, 6-144Division
Partner Setup, multiple divisions 3-110Doc Info Field G-4
see also Audit IndicatorDocument ID
see Audit IndicatorDrop Ship information 6-207DT data type G-26Dummy Segments, Create for mapping 6-30
EEDI data types G-25Editor Error Report (Outbound) (EBDI002)
Sample Report 7-57Electronic Invoice in X12 Format 4-9Element
Map an application field to an element 6-86Mapping elements 6-32Mapping elements for inbound map 6-84View detailed information for element being mapped
6-90Element Codes, adding 7-66Element Mapping Inbound panel (EDIX514) 6-84,
6-92, 6-94Element Mapping Outbound 6-32Element Mapping Outbound panel (EDIX511) 6-32,
6-33, 6-35, 6-43, 6-45, 6-47Element Separator 3-30Enter Key defined 1-17
Entering Information on a panelPrompt Key 1-20
Entry Fields 1-14Entry Line 1-14Envelope Type
Used in Mapping 6-75Environment 2-5Environment Control
Access the Subsystem 2-3Authority Codes, see also Authority Codes 2-9Copy an Existing User Profile 2-6Create a User Profile 2-5Creating two User IDs for one user 2-18Define Authority Codes 2-10Define the Security Profile 2-9Defining the Environment Profile 2-7Delete a User Profile 2-6Environment Control panel (EDIX200-FMT01) 2-5Environment Control panel (EDIX201-CTL02) 2-5Environment Control panel (EDIX201-FMT01) 2-5Environment profile 2-1Manage User Profiles 2-3Panel Quick Reference 2-2Print a User Profile 2-7Revise a User Profile 2-6Security profile 2-1Select an Option 2-4Specify a User ID 2-5Uniform Environment for Multiple Users 2-18Use the panels 2-3User Profile 2-1User’s Initials, defining 1-14View an Existing User Profile 2-6What does Environment Control do? 2-2What is Environment Control? 2-1Work with Environment Control panel
(EDIX200-FMT01) 2-3Environment Control panel (EDIX200-FMT01) 2-5Environment Control panel (EDIX201-CTL02) 2-5,
2-7, 2-9, 2-10Environment Control panel (EDIX201-FMT01) 2-5,
2-7Error
Rejection, see Error RejectionError Number
Partner set up 3-65Error Rejection 3-5Extended Inbound Mapping panel
(EDIX513-FMT01) 6-90, 6-97
Index
IBM Sterling Gentran:Server for iSeries Release 3.6 User Guide IX - 5
Extended MappingCopy Extended Maps 6-118IF-Conditions 6-113Inbound map 6-96Inbound map example 6-109Modify an extended map 6-120Revise an extended map after copy 6-119Save data into a CONSTANT 6-88Select an extended map 6-97Set up counter for line items 6-54Set up subfields in mapping 6-49Set up total quantity shipped 6-55Setting up IF-statements and conditional mapping
6-36Extended Mapping panel (EDIX506-FMT01) 6-88Extended Mapping, IF-condition 6-115Extended Outbound Mapping panel
(EDIX508-FMT01) 6-38Externally-Described Multi-format Logical File 4-4Externally-Described Physical File 4-4EXTSTD command 7-21, 7-24, 7-25ezAPPDEF 1-37, 5-88ezCOMM 1-37ezEDI 1-36
ezPART command 3-100ezMAP 1-37, 6-171ezPART 3-100
FF1 (Help) 1-15, 1-31, 1-32, 1-33F10 (Update) 1-16, 1-17F11 (Delete) 1-16F12 (Cancel) 1-16F13 (Services) 1-16, 1-27F15 (Sort) 1-16F16 (Record-1(Rolling Update)) 1-17F17 (Record+1 (Rolling Update)) 1-17F21 (Print) 1-17F22 (Resequence) 1-17F23 (More Options) 1-17F24 (More Keys) 1-17F3 (Exit) 1-15F4 (Prompt) 1-15, 1-21, 1-22F5 (Refresh) 1-16
F7 (Back) 1-16F8 (Next) 1-16F9 (Retrieve) 1-16, 1-17Field Definitions 1-32Fields 1-14File types that can interface with Gentran:Server for
processing 6-205Flat File 4-4Function Keys 1-14Function Keys, definition 1-15Functions in Sterling Gentran:Server 1-7
GGENMFLF (Multi-Format Logical File) 5-22Gentran:Server
Program Names 1-13Reports, print 1-39
Gentran:Server commandsEXTSTD 7-25PRTSTD 7-30PRTSTDBAT 7-34PRTSTDTAP 7-32PRTSTDUSE 7-36STDCPY 7-38
Get Help 1-30Get Help within Sterling Gentran:Server system 1-30Getting Help
Sterling Software Support (SSS) 1-41Global Conditions
Apply to a specific map number 6-93Inbound map 6-98, 6-99, 6-105, 6-107
GroupDefining by Partner 3-34Outbound, Partner set up 3-40
Group ID (GS01) 3-33Group Version global parameter 3-36GS Receiver ID (GS03) 3-41GS Sender ID (GS02) 3-41GS01 (Group ID) 3-33GS02 (GS Sender ID) 3-41GS03 (GS Receiver ID) 3-41GS04 (Date) 3-41GS05 (Time) 3-41GS06 (Control Number) 3-41
Index
IX - 6 IBM Sterling Gentran:Server for iSeries Release 3.6 User Guide
GS07 (Responsible Agency Code) 3-42GS08 (Version) 3-42
HHASH-TOTAL 6-55, 6-60, 6-64Help Function in Sterling Gentran:Server 1-30Help Key defined 1-18Home Key defined 1-18How Sterling Gentran:Server is organized 1-10How Sterling Gentran:Server panels are structured
1-11Hypertext 1-34
IIBM Software Support 1-41IF-Conditions 6-113IF-Statements in mapping 6-36Inbound Mapping
Application field select 6-86Copy Extended Maps 6-118Copy Segments from Standard into the Map 6-78Copy segments from Standards 6-77CTT segment 6-122Define the Transaction Map 6-74Design Transaction Map – Element Level 6-67Design Transaction Map – Field Level 6-65Design Transaction Map – Segment Level 6-71Determine a New Transaction ID or Map 6-73Element detailed information 6-90Element Mapping 6-84Extended Mapping 6-88, 6-96, 6-109Extended Mapping, Copy Extended Maps 6-118Extended Mapping, IF-condition 6-115Extended Mapping, PO1 Segment 6-113Extended Mapping, Revise 6-120Extended Mapping, Revise after Copy 6-119Extended Maps, select 6-97Global Condition 6-95Global Conditions 6-98, 6-99, 6-105, 6-107Global Conditions, define 6-92IF-condition 6-115Map a BEG Segment 6-85Map a N4 Segment 6-102Map a PO1 Segment 6-110Map an application field to an element 6-86Map Numbering 6-93Mapping Segment Level Worksheet - PO File 6-72Off-line Preparation 6-65
Review segments copied into map from Standards 6-82
Save data into a CONSTANT 6-88, 6-91Sectioning 6-209Sectioning rules and guidelines 6-213Subelements 6-102Subfield Mapping 6-102, 6-103, 6-104
InterchangeAcknowledgment, Partner set up 3-20Partner Header Option 3-18
Interface Between Sterling Gentran:Server and Application Systems 4-3
Interface To Application Systems 4-3Internally-Described Physical File 4-5Invoice example showing EDI and paper invoices
4-8
JJ command 1-23J8 data type G-22JUMP command 1-23
KKey Entry Line 1-14
LLearning about the Sterling Gentran:Server system
1-1Line item totals,see HASH-TOTALLogical File 4-4Logical Groups in EDI documents
SEE AreasLoop ID field 6-24, 6-25, 6-71
MMaintenance, Remote 1-41Map
Convert to new Version 6-164Copy 6-160Copy between libraries 6-162General 6-15Partner specific 3-49Print 6-168see Transaction Map Definition panel
(EDIX503-FMT01)Specific 6-15

Index
IBM Sterling Gentran:Server for iSeries Release 3.6 User Guide IX - 7
Synchronize a map with an application definition 6-166
Use Code 6-15Mapping
also see Inbound Mappingalso see Outbound MappingConvert a map to new version 6-164Copy a map 6-160Copying a map between libraries 6-162Copying a map from one version to another 6-205Data validation tables 6-142Features of mapping 4-2How Sterling Gentran:Server breaks down
documentsIllustration of "One-to-Many Relationship" 4-6Illustration of comparison between paper and
electronic invoices 4-8Mapping Theory in Sterling Gentran:Server 4-6Max Use and Max Loop, explanation of difference
6-207Modifying a map 6-18Print a map 6-168Reports 6-174Rules to follow when setting up a map 6-206SDQ Segment Loop 6-207Steps for mapping 4-18Sub-splitting 6-155Synchronize a map with an application definition
6-166The ezMap command 6-171Translate application code values to EDI standard
code values 6-127Translate application data values to partner’s data
values 6-134What is Mapping? 4-2
Mapping – Getting Started 4-1Interface To Application Systems 4-3
Mapping Features 4-2Mapping Report - Application Sequence (EBDI053)
6-180Mapping Report - Extended Mapping Notes
(EBDI083) 6-195Mapping Report - Validation Sequence (EBDI082)
6-191Mapping Report- Standard Sequence (EBDI052)
6-174Mapping Synchronization command(
MAPSYNCH) 6-166Mapping Theory in Sterling Gentran:Server 4-6
Bicycle Wheel Concept 4-6
One-to-Many Concept 4-6Spokes of the Wheel 4-6
MAPSYNCH command 6-166Max Loop 6-207Max Use 6-207Max Use field 6-24, 6-71Message Line 1-14Messages 1-14MM data type G-22Mouse usage defined 1-18Multi-Format Logical File 4-4Multi-Format Logical File (GENMFLF) 5-22
OOnline Help 1-30, 1-33
Field Definitions 1-32Option Codes 1-13, 7-18
1=Create 1-192=Revise 1-193=Copy 1-194=Delete 1-195=View 1-196=Print 1-20
Option fields 1-13Outbound Mapping 6-209
Accessing the Transaction Map Segments panel (EDIX504-CTL01) 6-22
Aligning segments in a map with application records 6-24
Calculate 6-59Control Totals 6-64Copy Segments from Standard panel 6-16Copy Segments from the Standard into the Map 6-17Copying segments for manual loops 6-29Create a dummy segment 6-30Defining a New Transaction ID 6-13Determining a New Transaction ID 6-11Element Mapping 6-32Extended Map for Dummy Segment 6-59Extended Mapping 6-36, 6-37, 6-38, 6-41, 6-53IF-Statements 6-36Map a BIG Segment 6-33Map a CTT Segment 6-64Map a DTM Segment 6-51Map a PID Segment 6-57, 6-121Map a TDS Segment in the Summary Area 6-60Map an IT1 Segment 6-52Map an N1 Segment, Bill to 6-42Map an N1 Segment, Remit to 6-46

Index
IX - 8 IBM Sterling Gentran:Server for iSeries Release 3.6 User Guide
Map an N1 Segment, Ship to 6-45Map an N3 Segment, Bill to 6-43Map an N3 Segment, Remit to 6-47Map an N4 Segment, Bill to 6-44Map an N4 Segment, Remit to 6-48Mapping a REF Segment 6-40Mapping an NTE Segment 6-35Modify the Copied Segments 6-31Modifying segment information 6-27Review the Copied Segments 6-23Reviewing copied segments 6-22Sectioning rules and guidelines 6-213Set up counter for line items 6-54Set up total quantity shipped 6-55Subfield mapping 6-49
PPage Down (Roll Up) Key, defined 1-18Page Up (Roll Down) Key, defined 1-18Panel Descriptions 1-13Panel Fields 1-14Panel Structure 1-11Panels
Use in Sterling Gentran:Server 1-9Partner
Access 3-13Access the Partners Subsystem 3-11Accessing the partner profile from your own
programs 3-109Control Information, entry 3-17Copy 3-80Copy a Partner between libraries 3-85Copy Partner ID command (PTRCPY) 3-87Cross Reference 3-13Cross Referencing 3-5, 3-67Data Management Information 3-5Data Separation 3-5, 3-73Determine the Partner ID 3-16EDI Control Envelope Information 3-4Error Rejection 3-5, 3-62Finding during processing 3-112Functional Group 3-34How to use the Partner Panels 3-11Multiple Division set up 3-110Multiple interchanges 3-111Name & Address panel, accessing 3-56New Partner Profile 3-15Outbound Group Information 3-40Outbound Partner Control Information 3-26Panel Quick Reference 3-8Partner Control panel (EDIX012-FMT01) 3-17
Partner Control panel (EDIX012-FMT05) 3-26Partner Control panel (EDIX012-FMTnn) 3-17Partner Data Separation panel (EDIX050-FMT01)
3-78Partner Error Rejection 3-62Partner Error Rejection panel (EDIX055-FMT01)
3-66Partner Error Rejection panel (EDIX056-FMT01)
3-63Partner File Report (EBDI006B) 3-103Partner Group panel (EDIX031-FMT01) 3-34Partner Group panel (EDIX031-FMT04) 3-34Partner Group panel (EDIX031-FMTnn) 3-35Partner Groups 3-31Partner Name & Address Information 3-55Partner Name & Address panel (EDIX035-FMT01)
3-56Partner Profile 3-109Partner Transaction panel (EDIX041-FMT01) 3-46Partner Transaction panel (EDIX041-FMT04) 3-53Partner Transaction panel (EDIX041-FMTnn) 3-47Partner User Defined Information 3-58Partner User Defined panel (EDIX045-FMT01) 3-61Preparation to set up a partner 3-6Print a Partner Report 3-90Print Cross Reference command (PRTPXR) 3-95Printing a Cross Reference Report (EBDI006G) 3-94set up a partner using ezPART 3-100Take a closer look at Partner 3-3Transaction ID, select it 3-45Transaction Set Information entry 3-47Transaction Set Information, Outbound 3-53Transactions, Work with them 3-44Use ezPART 3-100User Defined panel, accessing 3-59User Information 3-4What does the Partner Subsystem do? 3-2What is a Partner? 3-1Work with Partner Data Separation panel
(EDIX051-FMT01) 3-77Work with Partner Group panel (EDIX030-FMT01)
3-32Work with Partner panel (EDIX005-FMT01) 3-12,
3-16Work with Partner Transactions panel
(EDIX040-FMT01) 3-45Partner Control panel (EDIX012-FMT01) 3-17Partner Control panel (EDIX012-FMT05) 3-26Partner Control panel (EDIX012-FMTnn) 3-17Partner Control panel Field Descriptions
Ack Requested 3-29Acknowledge Errors 3-22

Index
IBM Sterling Gentran:Server for iSeries Release 3.6 User Guide IX - 9
Acknowledge Group or Trans 3-21Acknowledge Interchange 3-20Authorization Qual and Authorization 3-26Comm Profile ID 3-23Control Number 3-29, 3-54Control Standards ID 3-28Division 3-18Element Separator 3-30Functional Group ID 3-32GS Receiver ID Qualifier 3-19GS Sender ID Qualifier 3-19Interchange Header Option 3-18Last Incoming BG Password 3-23Last Incoming Sequence Number 3-18Partner Name 3-18Print TA1/AC1 on Audit Report 3-20Purge Acknowledged 3-22Purge Older than Days 3-22Purge Reported 3-22Receiver ID 3-28Receiver ID Qual 3-28Security Code 3-27Security Code Qual 3-27Segment Terminator 3-30Sender ID 3-27Sender ID Qual 3-27Subelement Separator 3-29Update Allowed 3-24Use 3-28Version 3-28, 3-54
Partner Data Separation panel (EDIX050-FMT01) 3-78
Partner Error Rejection panel (EDIX055-FMT01) 3-66
Partner Error Rejection panel (EDIX056-FMT01) 3-63
Partner Error Rejection panel Field DescriptionsError Number 3-65Level 3-64Level ID 3-65Reject Inbound 3-66Reject Outbound 3-66
Partner File Report (EBDI006B) 3-103Partner Group panel (EDIX031-FMT01) 3-34Partner Group panel (EDIX031-FMT04) 3-34Partner Group panel Field Descriptions 3-35, 3-40,
3-45Accept Group Inbound 3-37Applications Receivers Code 3-41Applications Senders Code 3-41Compliance Version Use 3-36
Control Number 3-41Group Ack Trans 3-37Last Incoming Control Number 3-38Print AK1/B5 on Audit Report 3-38Responsible Agency Code 3-42Send Group Outbound 3-37Transaction Control Number 3-42Transaction Segment ID 3-42Version 3-42
Partner Name & Address panel (EDIX035-FMT01) 3-56
Partner ProfileAccessing from your own programs 3-109
Partner Profile, defined 3-109Partner Resolution 3-112Partner Transaction panel (EDIX041-FMT01) 3-46Partner Transaction panel (EDIX041-FMT04) 3-53Partner Transaction panel (EDIX041-FMTnn) 3-47Partner Transaction panel Field Descriptions
Accept Transaction Inbound 3-50Send Transaction Outbound 3-50Test or Production 3-48Transaction Acknowledgment Type 3-51Transaction ID 3-46Transaction Map ID Inbound 3-49Transaction Map ID Outbound 3-49Validate Codes Inbound 3-50Validate Codes Outbound 3-50
Partner User Defined panel (EDIX045-FMT01) 3-61Partner User Defined panel Field Descriptions
Record ID 3-60PartnerProfile
Using in your programs 3-109PD data type G-22Physical File 4-4PJ data type G-22PM data type G-22Print
Transaction Map 6-168Translation Table 6-153
Print Key defined 1-18Print Mapping Files command (PRTMAP) 6-169Print reports 1-39Print Standards command (PRTSTD) 7-30Print Standards on Tape command (PRTSTDTAP)
7-32

Index
IX - 10 IBM Sterling Gentran:Server for iSeries Release 3.6 User Guide
Print the Batch Standards File command (PRTSTDBAT) 7-34
Print Transactions in Use command (PRTSTDUSE) 7-36
PrintiMap 6-168
Printing Standards 7-30Process
Validate data with tables during processing 6-142Processing
Code Translation Tables 6-127Data translation tables 6-134
PROD-TEST-FLAG G-17Product Support 1-41Program and Data Libraries 1-13Program Names 1-13Prompt Key 1-20PRTCPY command 3-87PRTMAP command 6-169PRTPAR command
Range of Partner Profiles 3-93same Interchange Header 3-93same Version 3-93single Partner ID 3-92
PRTPXR command 3-95PRTSTD command 7-30, 7-31PRTSTDBAT command 7-34PRTSTDTAP command 7-32PRTSTDUSE command 7-36Purge
Partner set up 3-22PY data type G-22
RReceiver ID 3-28Receiver ID Qualifier 3-28Reconciling Cross References
Cross Reference Report (EBDI006G) 3-94Renumbering Application Records/Files and Fields,
see APPRENBRReports 3-103
Cross Reference Report (EBDI006G) 3-94General information about printing 1-39Mapping Report - Application Sequence (EBDI053)
6-180
Mapping Report - Extended Mapping Notes (EBDI083) 6-195
Mapping Report - Validation Sequence (EBDI082) 6-191
Mapping Report- Standard Sequence (EBDI052) 6-174
Partner File Report (EBDI006B) 3-103Standards Report (EBDI036) 7-54Translation Table Report - Code Translation Table
(EBDI580) 6-198Reserved Words 6-60
ACCUMULATOR 6-64ACCUMULATOR-01 6-54CONSTANT 6-65, 6-91HASH-TOTAL 6-55, 6-64See also Glossary
Responsible Agency Code (GS07) 3-42Resync
Synchronizing a map with an application definition 6-166
SSample Application file format 5-10SCHJOB command 3-92, 3-96SDQ Segment Loop 6-207Search Index 1-35
Selecting topics 1-35Using the Search Index 1-35
Sectioning 6-209Example 6-209Rules 6-213
SegmentAligning segments in a map with application records
6-24BEG segment worksheet 6-68Building maps in Sterling Gentran:Server 4-18Copy segments from Standards 6-16, 6-77Copying segments for manual loops 6-29Copying segments into a map 6-17Create a dummy segment 6-30Defining what segments will be received 6-65Definition of a transaction map 6-1Design Transaction Map – Segment Level 6-71Illustration of comparison between paper and
electronic invoices 4-8Mapping Segment Level Worksheet - PO File 6-72Modifying a map 6-18Modifying segment information 6-27N1 segment worksheet 6-68N3 segment worksheet 6-69N4 segment worksheet 6-69

Index
IBM Sterling Gentran:Server for iSeries Release 3.6 User Guide IX - 11
PID segment worksheet 6-70PO1 segment worksheet 6-70Restating data in EDI segment/element sequence
when developing a map 6-67Review segments copied into map from Standards
6-82Reviewing segments copied into a map 6-22Segment worksheets 6-68Terminator, Partner set up 3-30Using the Mapper to translate outbound and inbound
data 4-19Segment Activity Records 7-67Segment Element Activity panel
(EDIX150-FMT01) 7-67Selecting a Value (F4) 1-21Sender ID 3-27Sequential Control
Partner set up 3-18Service (F13)
Access panels from 1-27Set 209 Errors 3-23Set 209 Errors panel Field Descriptions
Set 209 Errors 3-23Set up a partner using ezPART 3-100Setting up a Map 6-206Splitting
Sub-splitting 6-155Standard File Extract command, see EXTSTDStandards 7-1
Access Data Element Codes 7-18Access the Standards Data Element Definition 7-14Access the Standards Transaction 7-11Access the Subsystem 7-7Build the Batch Standards file 7-25Copy Standards 7-28copy transactions 7-12Copy with STDCPY command 7-38Create Standards 7-28Data Element Code Definition panel
(EDIX170-CTL01) 7-16, 7-18, 7-20Defined 7-1Element Codes 7-20, 7-66Extract Standards command (EXTSTD) 7-25Modify Standards 7-29Option Codes 7-17Panel Quick Reference 7-3Print Standards command (PRTSTD) 7-30Print Standards on Tape command (PRTSTDTAP)
7-32
Print the Batch Standards File command (PRTSTDBAT) 7-34
Print Transactions in Use command, (PRTSTDUSE) 7-36
Printing 7-30Revise the Version Description 7-10Segment Activity Records 7-67Segment Element Activity 7-69Segment Element Activity panel (EDIX150-FMT01)
7-67Segment Elements 7-67Select the Elements 7-13Select the Transaction Segments 7-12Select the Version 7-9Selecting the Element ID 7-19Standard File Extract command, see EXTSTDStandards Data Element Definition panel
(EDIX160-CTL01) 7-15Standards Segment Element Activity panel
(EDIX150-FMT01) 7-69Standards Segment Element panel
(EDIX140-CTl01) 7-14, G-2Standards Segment panel (EDIX130-CTL01) 7-13Standards Transaction panel (EDIX120-CTL01)
7-12Standards Version panel (EDIX110-FMT01) 7-10,
7-29Transactions in Use 7-21Transactions in Use panel (EDIX180-CTL01) 7-23Using the Panels 7-7View EDI Standards 7-8View the Element Codes 7-16View the Element Definition 7-15Work with Standards panel (EDIX100-FMT01) 7-9,
7-11, 7-22, 7-28, 7-30Standards Data Element Definition panel
(EDIX160-CTL01) 7-15Standards Report (EBDI036) 7-54Standards Segment Element Activity panel
(EDIX150-FMT01) 7-69Standards Segment Element panel
(EDIX140-CTl01) 7-14, G-2Standards Segment panel (EDIX130-CTL01) 7-13Standards Transaction panel (EDIX120-CTL01)
7-12Standards Version panel (EDIX110-FMT01) 7-10,
7-29STDCPY command 7-12, 7-38Sterling Gentran:Server
Command Line, use 1-28
Index
IX - 12 IBM Sterling Gentran:Server for iSeries Release 3.6 User Guide
Components of a panel 1-13ezAPPDEF 1-37ezCOMM 1-37ezEDI Feature 1-36ezMAP 1-37ezPART 1-36Function Keys 1-14
using 1-15Functions 1-7Functions, locate 1-7Help 1-30How is Sterling Gentran:Server organized? 1-6Hypertext 1-34Key Entry Line 1-14Message Line 1-14Online Help 1-30
for a whole panel 1-33for field definitions 1-32
Option Codes 1-13, 1-18Option Fields 1-13Panel Description 1-13Panels
access from Command line 1-26access from service (F13) 1-27fields 1-14structure 1-11
Print Reports 1-39Product Support and Remote Maintenance 1-41Program and Data Libraries 1-13Prompt Key 1-20Remote Maintenance 1-41Search Index 1-35Shortcuts for using the system 1-23Subsystems 1-7System Essentials 1-1Taking a Closer Look 1-5Terms and Concepts 1-15Use panels 1-9User’s Initials 1-14What does Sterling Gentran:Server do? 1-3What is Sterling Gentran:Server? 1-2Work With concept 1-10
Sterling Software Support (SSS) 1-41sub 6-49Subelement
Partner set up 3-29subfield 6-50Subfield Mapping 6-103
Example using inbound map 6-102Subfield panel (EDIX507-CTL01) 6-49, 6-102Subfields 6-49, 6-103
Sub-Split Table panel (EDIX351-FMT01) 6-158Sub-splitting
Create and Maintain Conditions 6-155Define Criteria 6-158
Subsystems in Sterling Gentran:Server 1-7Support for Sterling Gentran:Server 1-41Support, remote 1-41System Basics 1-1System Date and Time 1-14System Essentials 1-1
TTab Key defined 1-18Tables, Code Translation 6-127Terms used in Sterling Gentran:Server 1-15Test flag
Partner set up 3-48Total Quantity Shipped Amount, set up 6-55Totalling
see HASH-TOTALTransaction
Acknowledgment Type, partner set up 3-51Transaction Definition
see Inbound Mappingsee Outbound Mapping
Transaction IDDefault value !!!DFT 3-45Partner set up 3-46see Inbound Mappingsee Outbound Mapping
Transaction Map Definition panel (EDIX503-FMT01) 6-13, 6-74
Transaction Map Definition panel Field Definitions 6-74
Application ID 6-76Description 6-75Division Code 6-75Envelope Type 6-75Standards Version 6-75Transaction Set/Release 6-75Transaction Status 6-75Update Allowed 6-76Use Code 6-75
Transaction Map Definition panel Field Descriptions
Application ID 6-15Application Selection Field Values 6-15

Index
IBM Sterling Gentran:Server for iSeries Release 3.6 User Guide IX - 13
Description 6-14Division 6-14Envelope Type 6-15Standards Version 6-14Transaction Set/Release 6-14Transaction Status 6-14Update Allowed 6-15Use Code 6-15
Transaction Map Segments panel (EDIX504-CTL01) 6-22, 6-29, 6-31, 6-82
Transaction Mapping 6-1Code Translation panel (EDIX583-CTL01) 6-133Copy Code and Data command, see CEDCPYCopy Segments from Standard panel
(EDIX502-CTL01) 6-17, 6-23, 6-77, 6-83Copy Transactions Between Libraries, see TRNCPYCopying a map from one version to another 6-205Create an Inbound Transaction Map (see Inbound
Mapping)Creating an Outbound Transaction Map (see
Outbound Mapping)Data By Partner Translation panel
(EDIX584-CTL01) 6-140Data Translation By Partner panel
(EDIX584-FMT01) 6-141Data Validation panel (EDIX585-FMT01) 6-147,
6-148Define Translation Table (EDIX581-FMT00) 6-137Define Translation Table panel (EDIX581) 6-138Define Translation Table panel (EDIX581-FMT01)
6-144Element Mapping Inbound panel (EDIX514) 6-84,
6-92, 6-94Element Mapping Outbound panel (EDIX511) 6-32,
6-33, 6-35, 6-43, 6-45, 6-47Extended Inbound Mapping panel
(EDIX513-FMT01) 6-90, 6-97Extended Mapping panel (EDIX506-FMT01) 6-88Extended Outbound Mapping panel
(EDIX508-FMT01) 6-38Mapping Synchronization command (MAPSYNCH)
6-166Max Use and Max Loop, explanation of difference
6-207Panel Quick Reference 6-3Print Mapping Files command (PRTMAP) 6-169Rules to follow when setting up a map 6-206SDQ Segment Loop 6-207Sectioning 6-209Sectioning rules and guidelines 6-213Subfield panel (EDIX507-CTL01) 6-49, 6-102Sub-Split Table panel (EDIX351-FMT01) 6-158The ezMap command 6-171
Transaction Map Definition panel (EDIX503-FMT01) 6-13, 6-74
Transaction Map Segments panel (EDIX504-CTL01) 6-22, 6-29, 6-31, 6-82
Translation Table panel (EDIX581-FMT01) 6-130Using the Panels 6-7Version Compare and Conversion, see VERCNVTWhat Does Transaction Mapping Do? 6-2What is Transaction Mapping 6-1Work with Extended Mapping panel
(EDIX506-FMT01) 6-37, 6-53Work with Sub-Splits panel (EDIX350-FMT01)
6-155Work with Tables panel (EDIX580-FMT01) 6-128,
6-136, 6-143, 6-149Work with Transaction Mapping panel
(EDIX500-FMT01) 6-11, 6-73, 6-160Transaction Maps
General Maps 4-7Partner-Specific 4-7
TransactionsCopy 7-12
Transactions In Use 7-21Access Transactions in Use 7-22
Transactions in UseSelect Transactions to Use 7-23
Transactions in Use panel (EDIX180-CTL01) 7-23Translate application code values to EDI standard
code values 6-127Translate application data values to partner’s data
values 6-134Translation Table copy 6-149Translation Table panel (EDIX581-FMT01) 6-130Translation Table print 6-153Translation Table Report - Code Translation Table
(EBDI580) 6-198Translation Table, Copy between Libraries 6-150Translation, Code Tables 6-127, 6-134TRNCPY command 6-162
UUser Profile 2-1, 2-9
Authority Codes, see Authority CodesCopy Existing Profile 2-6Create 2-5Define the Security Profile 2-9Defining the Environment Profile 2-7Delete 2-6

Index
IX - 14 IBM Sterling Gentran:Server for iSeries Release 3.6 User Guide
Environment profile 2-1Manage 2-3Print a Profile 2-7Revise 2-6Security profile 2-1View an Existing Profile 2-6
User’s InitialsDefining 1-14
VValidation, Data Table 6-142VERCNVT command 6-160, 6-164Version
Compliance, Partner set up 3-36Conversion of Maps 6-205Conversion of maps 6-164Group, Partner set up 3-42Partner set up 3-28
Version (GS08) 3-42Version Compare and Conversion command, see
VERCNVT
WWhat does the Standards subsytem do? 7-2Work with Application Definition panel
(EDIX550-FMT01) 5-6, 5-11Work with Application Definition panel
(EDIX550-FMT01) (EDIX550-FMT01) 5-59
Work with Application Definition panel Field Descriptions
Application ID 5-12, 5-37, 5-60Send or Receive 5-12, 5-37, 5-60
Work With Concept 1-10Work with Environment Control panel
(EDIX200-FMT01) 2-3Work with Extended Mapping panel
(EDIX506-FMT01) 6-37, 6-53Work with Partner Data Separation panel
(EDIX051-FMT01) 3-77Work with Partner Data Separation panel Field
DescriptionsLevel 3-77Level ID 3-77
Work with Partner Group panel (EDIX030-FMT01) 3-32
Work with Partner Groups panel Field Descriptions
Group ID 3-33Work with Partner panel (EDIX005-FMT01) 3-12,
3-16Work with Partner Transactions panel
(EDIX040-FMT01) 3-45Work with Standards panel (EDIX100-FMT01) 7-9,
7-11, 7-22, 7-28, 7-30Work with Sub-Splits panel (EDIX350-FMT01)
6-155Work with Tables panel (EDIX580-FMT01) 6-128,
6-136, 6-143, 6-149Work with Transaction Mapping panel
(EDIX500-FMT01) 6-11, 6-73, 6-160
YYY data type G-22
ZZD data type G-22ZJ data type G-22ZM data type G-22ZY data type G-22