ibm websphere installation and configuration guide - · pdf filered hat jboss brms 6.3 ibm...
TRANSCRIPT

Red Hat JBoss BRMS 6.3
IBM WebSphere Installation andConfiguration Guide
For Red Hat JBoss BRMS
Last Updated: 2017-11-16


Red Hat JBoss BRMS 6.3 IBM WebSphere Installation andConfiguration GuideFor Red Hat JBoss BRMS
Red Content Services
Gemma [email protected]
Klara [email protected]
Marek [email protected]
Tomas [email protected]
Vidya [email protected]
Legal NoticeCopyright © 2017 Red Hat, Inc.
The text of and illustrations in this document are licensed by Red Hat under a CreativeCommons Attribution–Share Alike 3.0 Unported license ("CC-BY-SA"). An explanation ofCC-BY-SA is available athttp://creativecommons.org/licenses/by-sa/3.0/. In accordance with CC-BY-SA, if you distribute this document or an adaptation of it,you must provide the URL for the original version.
Red Hat, as the licensor of this document, waives the right to enforce, and agrees not toassert, Section 4d of CC-BY-SA to the fullest extent permitted by applicable law.
Red Hat, Red Hat Enterprise Linux, the Shadowman logo, JBoss, OpenShift, Fedora, theInfinity logo, and RHCE are trademarks of Red Hat, Inc., registered in the United Statesand other countries.
Linux ® is the registered trademark of Linus Torvalds in the United States and othercountries.
Java ® is a registered trademark of Oracle and/or its affiliates.
XFS ® is a trademark of Silicon Graphics International Corp. or its subsidiaries in theUnited States and/or other countries.
MySQL ® is a registered trademark of MySQL AB in the United States, the EuropeanUnion and other countries.
Node.js ® is an official trademark of Joyent. Red Hat Software Collections is not formallyrelated to or endorsed by the official Joyent Node.js open source or commercial project.
The OpenStack ® Word Mark and OpenStack logo are either registeredtrademarks/service marks or trademarks/service marks of the OpenStack Foundation, inthe United States and other countries and are used with the OpenStack Foundation'spermission. We are not affiliated with, endorsed or sponsored by the OpenStackFoundation, or the OpenStack community.
All other trademarks are the property of their respective owners.
AbstractA guide to installing and configuring Red Hat JBoss BRMS on IBM WebSphere ApplicationServer.

. . . . . . . . . . . . . . . . . . . . . . . . . . . . . . . . . . . . . . . . . . . . . . . . . . . . . . . . . . . . . . . . . . . . . . . . . . . . . . . . . . . . . . . . . . . . . . . . . . . . . . . . . . . . . . . . . . . . . . . . . . . . . . . . . . . . . . . . . . . . . . . . . . . . . . . . . . . . . . . . . . . . . . . . . . . . . . . . . . . . . . . . . . . . . . . . . . . . . . . . . . . . . . . . . . . . . . . . . . . . . . . . . . . . . . . . . . . . . . . . . . . . . . . . . . . . . . . . . . . . . . . . . . . . . . . . . . . . . . . .
. . . . . . . . . . . . . . . . . . . . . . . . . . . . . . . . . . . . . . . . . . . . . . . . . . . . . . . . . . . . . . . . . . . . . . . . . . . . . . . . . . . . . . . . . . . . . . . . . . . . . . . . . . . . . . . . . . . . . . . . . . . . . . . . . . . . . . . . . . . . . . . . . . . . . . . . . . . . . . . . . . . . . . . . . . . . . . . . . . . . . . . . . . . . . . . . . . . . . . . . . . . . . . . . . . . . . . . . . . . . . . . . . . . . . . . . . . . . . . . . . . . . . . . . . . . . . . . . . . . . . . . . . . . . . . . . . . . . . . . .
. . . . . . . . . . . . . . . . . . . . . . . . . . . . . . . . . . . . . . . . . . . . . . . . . . . . . . . . . . . . . . . . . . . . . . . . . . . . . . . . . . . . . . . . . . . . . . . . . . . . . . . . . . . . . . . . . . . . . . . . . . . . . . . . . . . . . . . . . . . . . . . . . . . . . . . . . . . . . . . . . . . . . . . . . . . . . . . . . . . . . . . . . . . . . . . . . . . . . . . . . . . . . . . . . . . . . . . . . . . . . . . . . . . . . . . . . . . . . . . . . . . . . . . . . . . . . . . . . . . . . . . . . . . . . . . . . . . . . . . .
. . . . . . . . . . . . . . . . . . . . . . . . . . . . . . . . . . . . . . . . . . . . . . . . . . . . . . . . . . . . . . . . . . . . . . . . . . . . . . . . . . . . . . . . . . . . . . . . . . . . . . . . . . . . . . . . . . . . . . . . . . . . . . . . . . . . . . . . . . . . . . . . . . . . . . . . . . . . . . . . . . . . . . . . . . . . . . . . . . . . . . . . . . . . . . . . . . . . . . . . . . . . . . . . . . . . . . . . . . . . . . . . . . . . . . . . . . . . . . . . . . . . . . . . . . . . . . . . . . . . . . . . . . . . . . . . . . . . . . . .
. . . . . . . . . . . . . . . . . . . . . . . . . . . . . . . . . . . . . . . . . . . . . . . . . . . . . . . . . . . . . . . . . . . . . . . . . . . . . . . . . . . . . . . . . . . . . . . . . . . . . . . . . . . . . . . . . . . . . . . . . . . . . . . . . . . . . . . . . . . . . . . . . . . . . . . . . . . . . . . . . . . . . . . . . . . . . . . . . . . . . . . . . . . . . . . . . . . . . . . . . . . . . . . . . . . . . . . . . . . . . . . . . . . . . . . . . . . . . . . . . . . . . . . . . . . . . . . . . . . . . . . . . . . . . . . . . . . . . . . .
Table of ContentsCHAPTER 1. INTRODUCTION
1.1. ABOUT RED HAT JBOSS BRMS1.2. SUPPORTED PLATFORMS1.3. ABOUT IBM WEBSPHERE APPLICATION SERVER1.4. ABOUT RED HAT JBOSS BRMS FOR IBM WEBSPHERE APPLICATION SERVER
CHAPTER 2. DOWNLOAD AND EXTRACT2.1. DOWNLOADING RED HAT JBOSS BRMS FOR IBM WEBSPHERE APPLICATION SERVER2.2. EXTRACTING RED HAT JBOSS BRMS FOR IBM WEBSPHERE APPLICATION SERVER
CHAPTER 3. CONFIGURE3.1. INCREASING JVM HEAP SIZE3.2. MODIFYING SECURITY SETTINGS3.3. CREATING USERS AND GROUPS3.4. SESSION MANAGEMENT CUSTOM SETTINGS3.5. SETTING UP DATA SOURCE3.6. SETTING UP JMS RESOURCES3.7. ADDING CUSTOM JVM PROPERTIES
CHAPTER 4. INSTALL4.1. INSTALLING BUSINESS CENTRAL4.2. INSTALLING REALTIME DECISION SERVER
APPENDIX A. REVISION HISTORY
33334
666
77
111113141922
252529
32
Table of Contents
1

Red Hat JBoss BRMS 6.3 IBM WebSphere Installation and Configuration Guide
2

CHAPTER 1. INTRODUCTION
1.1. ABOUT RED HAT JBOSS BRMSRed Hat JBoss BRMS is an open source decision management platform that combinesBusiness Rules Management and Complex Event Processing. It automates businessdecisions and makes that logic available to the entire business.
Red Hat JBoss BRMS use a centralized repository where all resources are stored. Thisensures consistency, transparency, and the ability to audit across the business. Businessusers can modify business logic without requiring assistance from IT personnel.
Business Resource Planner is included with this release.
Red Hat JBoss BRMS is supported for use with Red Hat Enterprise Linux 7 (RHEL7).
1.2. SUPPORTED PLATFORMSRed Hat JBoss BPM Suite and Red Hat JBoss BRMS are fully supported and tested on thefollowing platforms:
Red Hat JBoss Enterprise Application Platform 6.4.7
Red Hat JBoss Web Server 2.1, 3.0
IBM WebSphere Application Server 8.5.5
Oracle WebLogic Server 12.1.3 (12c)
Red Hat JBoss Fuse 6.2.x
1.3. ABOUT IBM WEBSPHERE APPLICATION SERVERIBM WebSphere Application Server (hereinafter referred to as WAS) is a flexible and secureweb application server that hosts Java-based web applications and provides Java EE-certified runtime environments. WAS 8.5.5 supports Java SE 8 and is fully compliant withJava EE 7 since version 8.5.5.6.
1.3.1. Getting Started with IBM WebSphere Application ServerDownloading and Installing WASIn order to install IBM WebSphere Application Server, you need to download and install IBMInstallation Manager first.
1. Download IBM Installation Manager version 1.8.5 or later from the IBM InstallationManager and Packaging Utility download links page.
2. Extract the downloaded archive, change to root, and run the following command inthe new directory:
./install
IBM Installation Manager opens. The installer will guide you through the entireprocess of installing the manager.
CHAPTER 1. INTRODUCTION
3

3. Open the installed manager, go to File → Preferences and click Add Repository.The Add Repository dialog window opens.
4. Enter the repository URL for IBM WebSphere Application Server 8.5. You can find allthe repository URLs in the Online product repositories for WebSphere ApplicationServer offerings page of the IBM Knowledge Center. For example:
http://www.ibm.com/software/repositorymanager/com.ibm.websphere.APPCLIENT.v85
5. Enter your IBM id credentials when prompted and after the Connection status turnsgreen, click OK.
6. Click Install.
7. Choose the packages you want to install and click Next. If asked, install all therecommended fixes as well.
Creating Users and Installation Verification
1. In the WebSphere Customization Toolbox 8.5, open the Profile ManagementTool.
2. Click Create… and create a user for the Application Server environment.
3. In the WebSphere Application Server - First Steps window that opens, clickInstallation Verification and verify that your server was installed properly.
Starting Server
1. Change into the bin directory of the installed application server (by default at /opt/IBM/WebSphere/AppServer).
2. Change to root and run ./startServer.sh APPLICATION_SERVER_NAME, forexample:
./startServer.sh server1
3. Navigate to http://TARGET_SERVER:9060/ibm/console in your web browser andlog in with the user credentials created in the previous procedure.The Integrated Solutions Console opens.
NOTE
Do not forget to stop the server after you are no longer using it. Log out of theconsole and run ./stopServer.sh APPLICATION_SERVER_NAME as root. Forexample:
./stopServer.sh server1
For further information, see WebSphere Application Server, version 8.5.5 documentation.
1.4. ABOUT RED HAT JBOSS BRMS FOR IBM WEBSPHEREAPPLICATION SERVER
Red Hat JBoss BRMS 6.3 IBM WebSphere Installation and Configuration Guide
4

Red Hat JBoss BRMS for IBM WebSphere Application Server is provided as two deployableweb application archives: business-central.war and kie-server.war. It is then deployedand configured as any other web application.
NOTE
Red Hat JBoss BRMS 6.3 is supported on the version 8.5.5 of IBM WebSphereApplication Server.
Installation of Red Hat JBoss BRMS on IBM WebSphere Application Server is supported sinceversion 6.0.2 of Red Hat JBoss BRMS. This guide covers the installation and configuration ofRed Hat JBoss BRMS on a full profile version of IBM WebSphere Application Server 8.5.5.
Before installation, several configuration steps need to be performed to enable a successfulsetup. Follow the procedures in this guide to configure the server.
Before you proceed, ensure you have root access to IBM WebSphere Application Server andthat you are able to successfully access the IBM WebSphere’s administrative console usinga web browser (usually at http://TARGET_SERVER:9060/ibm/console).
CHAPTER 1. INTRODUCTION
5

CHAPTER 2. DOWNLOAD AND EXTRACTFollow the steps outlined in this chapter to download and extract Red Hat JBoss BRMS forIBM WebSphere Application Server.
2.1. DOWNLOADING RED HAT JBOSS BRMS FOR IBMWEBSPHERE APPLICATION SERVERTo download the deployable Red Hat JBoss BRMS package file for IBM WebSphereApplication Server from the Red Hat Customer Portal:
1. Go to the Red Hat Customer Portal and log in.
2. Click DOWNLOADS at the top of the page.
3. In the Product Downloads page that opens, click Red Hat JBoss BRMS .
4. From the Version drop-down menu, select 6.3.
5. Navigate to Red Hat JBoss BRMS 6.3.0 Deployable for WebSphere 8.5 andclick Download.
2.2. EXTRACTING RED HAT JBOSS BRMS FOR IBMWEBSPHERE APPLICATION SERVERThe downloaded installation ZIP file for Red Hat JBoss BRMS (jboss-brms-6.3.0.GA-deployable-was8.zip) contains the Business Central WAR deployable archive (business-central.war) and the Realtime Decision Server WAR deployable archive (kie-server.war)in an unextracted format.
Extract the downloaded ZIP file so that you have access to the deployable WAR files:
unzip jboss-brms-6.3.0.GA-deployable-was8.zip
Red Hat JBoss BRMS 6.3 IBM WebSphere Installation and Configuration Guide
6

CHAPTER 3. CONFIGUREBefore you can deploy Red Hat JBoss BRMS as a web archive on IBM WebSphere ApplicationServer, configure the server to accept the deployable WAR files. Follow the steps outlinedin this section to deploy Red Hat JBoss BRMS on IBM WebSphere Application Server.
Log in to your IBM WebSphere console using an administrative login before performing anyof these steps. The usual login URL is http://TARGET_SERVER:9060/ibm/console (forexample http://localhost:9060/ibm/console).
The IBM Integrated Solutions Console with the welcome screen opens. The main menuon the left side of the console contains all the links necessary for setting the applicationserver.
Figure 3.1. IBM Integrated Solutions Console
3.1. INCREASING JVM HEAP SIZEWith the default JVM heap size, the IBM WebSphere Application Server freezes or causesdeployment errors when deploying Business Central. To increase the heap size:
1. In the Integrated Solutions Console, go to Servers → Server Types →WebSphere Application Servers.
2. In the list of application servers, click on the server on which you are going todeploy Business Central. For example server1.The configuration page for that server opens.
3. Under Server Infrastructure heading on the right side, click Java and ProcessManagement → Process Definition.
CHAPTER 3. CONFIGURE
7

Figure 3.2. Application Server Configuration Page
4. Click Java Virtual Machine under the Additional Properties heading on theright.
Red Hat JBoss BRMS 6.3 IBM WebSphere Installation and Configuration Guide
8

Figure 3.3. Process Definition Configuration Page
This will open up the configuration properties for the JVM that is used to start theserver.
5. Change both the Initial Heap Size and Maximum Heap Size to 2048. This is theconfiguration Red Hat JBoss BRMS is tested with.
CHAPTER 3. CONFIGURE
9

Figure 3.4. JVM Configuration Page
6. Click Apply at the bottom.Messages pop-up window appears at the top of the Application Serversconfiguration page. You can choose to save these configuration settings to themaster configuration at this stage.
Figure 3.5. Messages Pop-up
Red Hat JBoss BRMS 6.3 IBM WebSphere Installation and Configuration Guide
10

7. Restart the server at this point or wait till other configuration changes have beenmade.
3.2. MODIFYING SECURITY SETTINGSFor the Business Central application to work, you need to modify several security settingson IBM WebSphere Application Server. To enable the container-managed authenticationmechanisms provided by the server:
1. In the main menu, click Security → Global Security. Ensure that the option EnableApplication Security is checked. This may already be checked and overridden atthe server level.
Figure 3.6. Global Security Configuration Page
2. Click Custom Properties on the right side and then New… to enter a new customproperty with the following details:
Name: com.ibm.ws.security.web.logoutOnHTTPSessionExpire
Value: true
This property instructs the server to invalidate LTPA tokens on session invalidation,which makes the logout process consistent across multiple users using the samebrowser.
3. Click Apply and then OK.
3.3. CREATING USERS AND GROUPS1. In the main menu on the left, click Users and Groups → Manage Groups.
2. Create two new groups: admin and analyst by clicking Create….
CHAPTER 3. CONFIGURE
11

Figure 3.7. Created Groups
NOTE
Add the kie-server group as well if you are going to install theRealtime Decision Server. Also add the REST API groups if you aregoing to use the API. For further information about API roles, seeChapter 17. Remote API from Red Hat JBoss BRMS Development Guide.
3. In the main menu on the left, click Users and Groups → Manage Users.
4. Click Create… and fill in the user credentials.
IMPORTANT
Make sure that the selected User ID does not conflict with any knowntitle of a role or a group.
For example, if there is a role called admin, you should not create auser with the user name admin.
Red Hat JBoss BRMS 6.3 IBM WebSphere Installation and Configuration Guide
12

Figure 3.8. Create User Dialog Window
5. Click Group Membership and assign the user to the admin group that you createdpreviously.
NOTE
You may assign this user to any of the groups you have just created. Inthe production systems, you are likely to create separate users forseparate groups that align with business roles. The admin group is allencompassing and is therefore useful for the purposes of this setup.
6. Click Create.
3.4. SESSION MANAGEMENT CUSTOM SETTINGS1. In the main menu on the left, go to Servers → Server Types → WebSphere
Application Servers and select the server on which you are deploying BusinessCentral.
2. Click Session Management under the Container Settings heading on the right.
3. In the Additional Properties section on the right, click Custom Properties andthen New….
4. Fill in the required information:
Name: InvalidateOnUnauthorizedSessionRequestException
Value: true
5. Click Apply and then OK.
CHAPTER 3. CONFIGURE
13

3.5. SETTING UP DATA SOURCEThe Business Central application requires a data source which must be created prior to thedeployment of the actual WAR file. This means that you must have access to an underlyingdatabase to which the data source connects. Whatever your underlying database, makesure you have the data source ready. Follow the steps below to set the data source.
NOTE
In the following procedure, the data source setup is demonstrated on theOracle Database 12c.
Creating JDBC Providers
1. Open up the JDBC Providers page by clicking Resources → JDBC → JDBCProviders.
2. At the top of the JDBC Providers page, click Scope. Select the scope of this JDBCprovider to include your server and node. Note that it cannot be All scopes.
Figure 3.9. Selecting Scope of JDBC Provider
3. Click New….The Create a New JDBC Provider page opens.
4. Fill in the form based on the database driver that you have available.
Red Hat JBoss BRMS 6.3 IBM WebSphere Installation and Configuration Guide
14

Figure 3.10. First Step of Creating New JDBC Provider
If your database is not listed, select the User-Defined option from the DatabaseType selection box and provide the implementation class name.
For example, for H2, PostgreSQL, or MySQL, the implementation class name will be org.h2.jdbcx.JdbcDataSource, org.postgresql.xa.PGXADataSource, and com.mysql.jdbc.jdbc2.optional.MysqlXADataSource respectively.
5. Give the JDBC Provider a descriptive name and click Next.
6. Provide the class path information for the JDBC driver class files you defined. ClickApply.
Figure 3.11. Defining Database Class Path
7. Click Next.
8. Click Finish to accept and add this new JDBC provider.
CHAPTER 3. CONFIGURE
15

Figure 3.12. JDBC Provider Summary Page
Using this new JDBC provider, you will now need to set up the actual data source forBusiness Central.
Before you create the data source, open the persistence.xml file located in the WEB-INF/classes/META-INF directory of the Business Central WAR file (business-central.war) that you have downloaded. You will need to know the JNDI name of the datasource defined within the <jta-data-source> tag. For Business Central, it is jdbc/jbpm.
Also change the hibernate.dialect property to suit your database. For example, if yourunderlying database is Oracle Database 12c, change the property value to org.hibernate.dialect.Oracle10gDialect.
Setting up Data Source
1. Open the Data Sources page by clicking Resources → JDBC → Data Sources inthe main menu on the left and make sure that the appropriate scope has beenselected.
2. Click New….
3. Enter a unique Data Source Name by which you will refer to this data source andthe JNDI name that you found in the persistence.xml file.
Figure 3.13. First Step of Creating New Data Source
Click Next.
4. From the Select an Existing JDBC Provider drop-down menu, select the JDBCprovider created earlier and click Next.
Red Hat JBoss BRMS 6.3 IBM WebSphere Installation and Configuration Guide
16

Figure 3.14. Selecting JDBC Provider
5. In the Enter Database Specific Properties for the Data Source step, enter thedatabase JDBC URL and click Next.
Figure 3.15. Enter Database Specific Properties for Data Source Screen
6. In the Setup Security Aliases screen, set the authentication values for connectingto this data source. If the aliases are not yet created, click Global J2CAuthentication Alias at the bottom. Note that in this case, the Create a DataSource wizard will be canceled.
a. Click New….
b. Fill in the Alias, User ID, and Password.
CHAPTER 3. CONFIGURE
17

Figure 3.16. Creating New Security Alias
c. Click OK.
Go back to the Setup Security Aliases screen and set the Component-ManagedAuthentication Alias to the newly created alias and the Mapping-ConfigurationAlias to DefaultPrincipalMapping.
You can also create and set a different alias for XA recovery. If the AuthenticationAlias for XA Recovery is set to (none), the component-managed authenticationalias is used by default.
Figure 3.17. Setting Security Aliases
Click Next.
7. In the Summary screen, check the values and click Finish. Choose to save thechanges to the master configuration as well.
Red Hat JBoss BRMS 6.3 IBM WebSphere Installation and Configuration Guide
18

Figure 3.18. Creating Data Source Summary Screen
8. Choose the created data source from a list of all data sources to provide the basicmeta properties.
9. Click Custom Properties under the Additional Properties section on the right.Properties like serverName, databaseName, userName, and password must now bedefined and vary for different databases. Some example database properties areshown below.
Table 3.1. Custom Properties for Different Databases
Database Properties
H2 URL, user, password
MySQL serverName, databaseName, port, user, password
PostgreSQL serverName, databaseName, portNumber, user, password
Oracle jdbcURL
Once all the connection properties have been defined, click Test Connection to ensure thevalidity of the data source. If the connection was successful, the following messageappears at the top of the screen:
The test connection operation for data source DATA_SOURCE_NAME on server SERVER_NAME at node NODE_NAME was successful.
3.6. SETTING UP JMS RESOURCESIBM WebSphere Application Server must be configured to send and receive JMS messagesthrough Red Hat JBoss BRMS. However, before you do this, a service bus must be present.Follow the steps below to create a service bus if one does not already exist.
Setting up BusesCreating Service Bus
CHAPTER 3. CONFIGURE
19

1. In the main menu on the left, click Service Integration → Buses.
2. Click New….
3. Enter the name and make sure that the Bus Security option is unchecked.
4. Click Next and then Finish to create the service bus.
Adding Bus MemberBefore you continue, add a new bus member. A bus member is a server or a cluster thathas been added to this service bus.
1. Go to Service Integration → Buses and click on the service bus that you havecreated.
2. Under the Topology heading on the right, click Bus Members.
3. Click Add.
4. In the Add a New Bus Member wizard, choose the server and the type of messagestore for the persistence in the first two steps. Depending on the previous selection,you can also specify the properties of the message store.
5. Click Finish in the last step to add a new bus member.
Creating JMS Connection FactoriesTo send and receive messages from Red Hat JBoss BRMS, you have to create the JMSconnection factories, which are needed for establishing connections used for sendingmessages into queues.
Red Hat JBoss BRMS needs the Java Messaging Services only for the Realtime DecisionServer. Use the procedure below to create the following connection factories: KIE.SERVER.REQUEST, KIE.SERVER.RESPONSE, and KIE.SERVER.EXECUTOR.
NOTE
The factory names shown above are suggestions only and you can changethem to suit your needs and company guidelines.
1. In the main menu on the left, go to Resources → JMS → Connection Factories.
2. Make sure the correct scope is selected and click New.
3. Select the Default Messaging Provider option and click OK.
4. Enter the name and the JNDI name of the factory. For example:
Name: KIE.SERVER.REQUEST
JNDI name: jms/conn/KIE.SERVER.REQUEST
NOTE
The JNDI names for KIE.SERVER.RESPONSE and KIE.SERVER.EXECUTORare jms/conn/KIE.SERVER.RESPONSE and jms/conn/KIE.SERVER.EXECUTOR respectively.
Red Hat JBoss BRMS 6.3 IBM WebSphere Installation and Configuration Guide
20

5. From the Bus Name drop-down list, select the service bus created earlier.The rest of the options are not mandatory and can be left with default values.
6. Click Apply and choose to save the changes to the master configuration.
Creating JMS QueuesThe next step is to create the JMS queues. These queues are the destination end points forpoint-to-point messaging.
For Realtime Decision Server, create the following queues: KIE.SERVER.REQUEST (forrequests), KIE.SERVER.RESPONSE (for responses) and KIE.SERVER.EXECUTOR (for executorservices).
IMPORTANT
To prevent warnings in the log, create KIE.EXECUTOR queue as well.
To create these queues:
1. In the main menu, go to Resources → JMS → Queues.
2. Make sure the correct scope is selected and click New.
3. Select the Default Messaging Provider radio button and click OK.
4. Enter the name and the JNDI name of the queue, for example:
Name: KIE.SERVER.REQUEST
JNDI name: jms/KIE.SERVER.REQUEST
NOTE
All of the JNDI names of other queues follow the same convention asthe example above.
5. From the Bus Name drop-down list, select the service bus created earlier.
6. From the Queue Name drop-down list, make sure to select the Create ServiceIntegration Bus Destination.This will open up the Create New Queue form for creating a new serviceintegration bus. In this form, enter a unique identifier and select the bus membercreated earlier in this section.
7. Click Apply at the bottom and choose to save the changes to the masterconfiguration.
Creating JMS Activation SpecificationsA JMS activation specification is required to be the bridge between the queue and themessage-driven bean.
For Realtime Decision Server, create the following activation specifications: KIE.SERVER.REQUEST (for requests), KIE.SERVER.RESPONSE (for responses) and KIE.SERVER.EXECUTOR (for executor services).
CHAPTER 3. CONFIGURE
21

IMPORTANT
To prevent warnings in the log, create KIE.EXECUTOR activation specificationas well.
1. In the main menu, go to Resources → JMS → Activation Specifications.
2. Make sure the correct scope is selected and click New.
3. Check the Default Messaging Provider radio button and click OK.
4. Enter the name and the JNDI name of the activation specification, for example:
Name: KIE.SERVER.REQUEST
JNDI name: jms/activation/KIE.SERVER.REQUEST
NOTE
All of the JNDI names of other activation specifications follow the sameconvention as the example above.
5. From the Destination Type drop-down list, make sure to select Queue.
6. Enter the Destination JNDI Name (as created in the previous procedure), forexample jms/KIE.SERVER.REQUEST.
7. From the Bus Name drop-down list, choose the service bus created earlier.
8. Click OK at the bottom with the rest of the field values as default and choose tosave the changes to the master configuration.
You have now successfully completed the JMS configurations required for setting up RedHat JBoss BRMS on IBM WebSphere Application Server.
3.7. ADDING CUSTOM JVM PROPERTIESYou must add custom properties to the JVM that is used to start IBM WebSphere ApplicationServer. These custom properties take into consideration the configuration changes thathave been outlined in previous sections of this guide.
1. In the main menu, go to Servers → Server Types → WebSphere ApplicationServers.
2. In the list of application servers, choose the server on which you are going to deployBusiness Central.
3. Under the Server Infrastructure heading on the right, click Java and ProcessManagement → Process Definition.
4. Click Java Virtual Machine under the Additional Properties heading.This opens up the configuration properties for the JVM that is used to startWebSphere Application Server.
5. Click Custom Properties under Additional Properties.
Red Hat JBoss BRMS 6.3 IBM WebSphere Installation and Configuration Guide
22
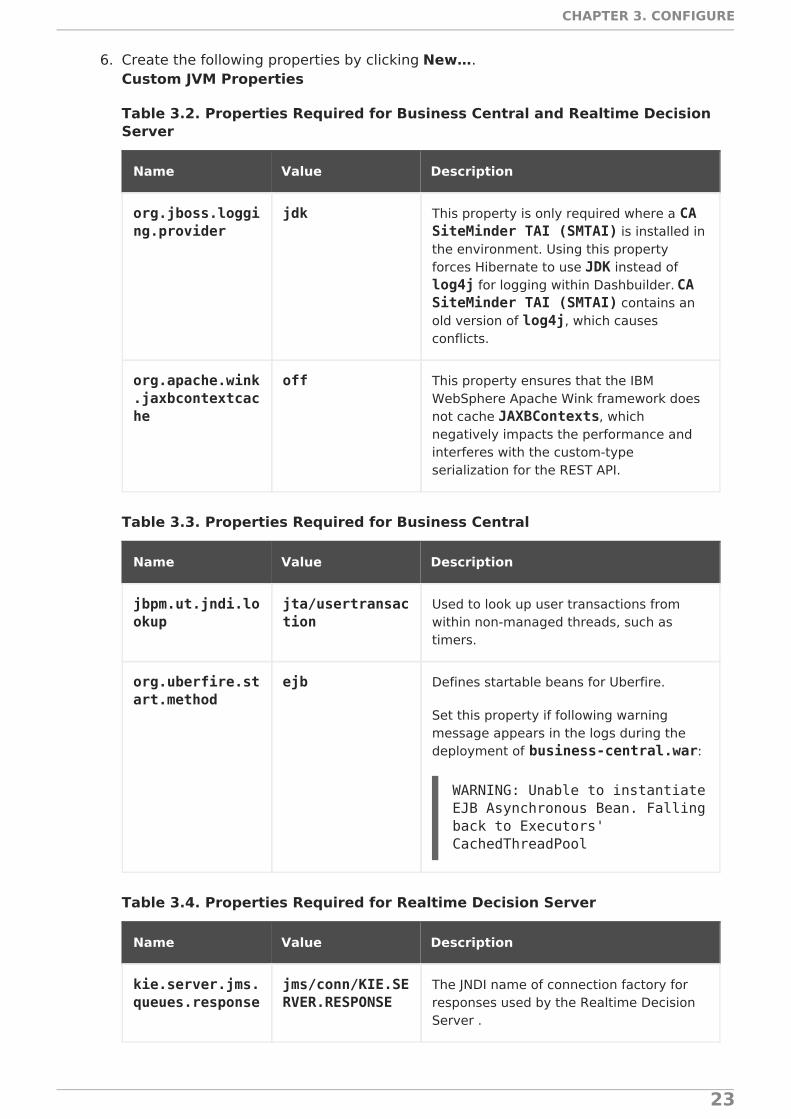
6. Create the following properties by clicking New….Custom JVM Properties
Table 3.2. Properties Required for Business Central and Realtime DecisionServer
Name Value Description
org.jboss.logging.provider
jdk This property is only required where a CA SiteMinder TAI (SMTAI) is installed inthe environment. Using this propertyforces Hibernate to use JDK instead of log4j for logging within Dashbuilder. CA SiteMinder TAI (SMTAI) contains anold version of log4j, which causesconflicts.
org.apache.wink.jaxbcontextcache
off This property ensures that the IBMWebSphere Apache Wink framework doesnot cache JAXBContexts, whichnegatively impacts the performance andinterferes with the custom-typeserialization for the REST API.
Table 3.3. Properties Required for Business Central
Name Value Description
jbpm.ut.jndi.lookup
jta/usertransaction
Used to look up user transactions fromwithin non-managed threads, such astimers.
org.uberfire.start.method
ejb Defines startable beans for Uberfire.
Set this property if following warningmessage appears in the logs during thedeployment of business-central.war:
WARNING: Unable to instantiate EJB Asynchronous Bean. Falling back to Executors' CachedThreadPool
Table 3.4. Properties Required for Realtime Decision Server
Name Value Description
kie.server.jms.queues.response
jms/conn/KIE.SERVER.RESPONSE
The JNDI name of connection factory forresponses used by the Realtime DecisionServer .
CHAPTER 3. CONFIGURE
23

org.kie.server.domain
WSLogin JAAS LoginContext domain used toauthenticate users when using JMS.
org.jbpm.designer.perspective
ruleflow This argument on the command line forcesthe default perspective in the designer to RuleFlow instead of Full.
Name Value Description
NOTE
Red Hat JBoss BRMS uses an embedded version of Git for its artifactversioning. This version of Git uses ports 9418 and 8001 for standardand SSH access (org.uberfire.nio.git.ssh.port) respectively.
Ensure that these embedded Git ports are not already in use in yourversion of IBM WebSphere Application Server.
If these ports are being used and you need to change the default Gitports, they can be changed by setting the org.uberfire.nio.git.daemon.port and org.uberfire.nio.git.ssh.port properties using the steps describedabove.
7. Save these configuration settings to the master configuration.
8. Restart IBM WebSphere Application Server for these changes to take effect.
Red Hat JBoss BRMS 6.3 IBM WebSphere Installation and Configuration Guide
24

CHAPTER 4. INSTALLNow that the basic configuration is done and IBM WebSphere Application Server is set todeploy Red Hat JBoss BRMS, you can upload the WAR deployables that were extractedearlier.
As noted previously, the Red Hat JBoss BRMS ZIP file for IBM WebSphere Application Servercontains the deployable WAR files for both Business Central and Realtime Decision Server.
4.1. INSTALLING BUSINESS CENTRALBusiness Central is uploaded as a web archive and can then be accessed at http://TARGET_SERVER:PORT/business-central. Start the deployment by installing theBusiness Central WAR as a WebSphere application.
1. In the main menu, go to Applications → Application Types → WebSphereEnterprise Applications.This will show you all the existing applications in the system and allow you to installa new one.
2. Click Install to start the installation process.
3. Upload the Business Central WAR file (business-central.war) from the local filesystem. See Section 2.2, “Extracting Red Hat JBoss BRMS for IBM WebSphereApplication Server” for more information.
Figure 4.1. Preparing for Application Installation Wizard
4. Click Next. This process may take some time.
CHAPTER 4. INSTALL
25

IMPORTANT
You may encounter an error message similar to the following:
The EAR file could be corrupt and/or incomplete. Make sure that the application is at a compatible Java(TM) Platform, Enterprise Edition (Java EE) level for the current version of WebSphere(R) Application Server.java.lang.NullPointerException
In that case, run ulimit -n in the command line. If the result is 1024,increase the number of open file descriptors. The recommended valueis 100 000.
5. Select the Fast Path radio button and click Next.
6. Change the Application Name to business-central in the Select InstallationOptions step and click Next.
7. In the Map Modules to Servers step, map the Business Central modules toservers according to your requirements.
8. In the Map Virtual Hosts for Web Modules step, leave the default values andclick Next.
9. In the next step, set the context root to business-central.
10. In the Metadata for Modules step, leave the default values and click Next.
11. In the Summary page, click Finish to install Business Central. This process can takea while. Save the changes to the master configuration at the end of this process.
You will be returned to the WebSphere Enterprise Applications page where business-central will be listed as a new application. However, it will be stopped at this stage. Beforeyou start the application, you need to map groups to roles, configure class loading, andenable the Bouncy Castle Crypto API.
Mapping Groups to Roles
1. Click on the business-central application to open the application configurationpage.
2. Click Security Role to User/Group Mapping under the Detail Propertiesheading on the left.
3. Select the admin role and click Map Groups… at the top.
4. Search for the admin group (or just click the Search button) and move it from theAvailable list to the Selected list. Click OK.This mapping gives the previously created administrator user access to the BusinessCentral application.
5. Follow the same procedure for the analyst role as well and save the configuration.
If you have other groups or users that should have access to Business Central, use thesame steps to map them to the admin or analyst roles.
Red Hat JBoss BRMS 6.3 IBM WebSphere Installation and Configuration Guide
26

NOTE
If you are also installing the Realtime Decision Server, give this user access tothe kie-server role. Additionally, map appropriate REST API roles if you aregoing to use the REST API. For further information about API roles, see Chapter17. Remote API from Red Hat JBoss BRMS Development Guide.
Class-Loading ConfigurationEnsure correct class-loading configuration by following the steps below.
1. In the main menu, go to Applications → Application Types → WebSphereEnterprise Applications.
2. Click business-central.
3. Click Class Loading and Update Detection under the Detail Properties headingon the left.
4. Check the following options:
Class Loader Order: Classes loaded with local class loader first (parentlast)
WAR Class Loader Policy: Single class loader for application
CHAPTER 4. INSTALL
27

Figure 4.2. Configuring Class Loading
5. Click OK, save the changes to the master configuration and restart the IBMWebSphere Application Server.
Enabling Bouncy Castle Crypto APITo enable Git SSH repository cloning and kie-config-cli from within Business Central, theBouncy Castle Crypto API must be set up. Enable the API by following the steps below.
1. Set the org.apache.sshd.registerBouncyCastle property to true and org.uberfire.domain property to WSLogin. See Section 3.7, “Adding Custom JVMProperties” for detailed instructions on how to set custom properties.
2. Set up the Bouncy Castle API as a shared library referenced from Business Centralusing the appropriate version of Bouncy Castle:
i. In the main menu on the left, navigate to Environment → Shared Libraries,select the appropriate scope and click New… to create a new library.
ii. Give this library a name and set the class path to the Bouncy Castle library(bcprov-jdk16-1.46.jar). Click OK and save the configuration.
Red Hat JBoss BRMS 6.3 IBM WebSphere Installation and Configuration Guide
28

NOTE
For more information about the bcprov-jdk16-1.46.jar package,see the Maven Repository — Bouncy Castle Provider page.
iii. Go to Applications → Application Types → WebSphere EnterpriseApplications and click business-central.
iv. Click Shared Library References under the References heading on the left,select the web module, click on Reference Shared Libraries and move theBouncy Castle library created in the previous step from the Available to theSelected list.
Figure 4.3. Mapping Shared Libraries
v. Click OK and save the configuration.
You have now successfully installed Business Central on IBM WebSphere Application Server.
To start the application, go back to Applications → Application Types → WebSphereEnterprise Applications page and select the business-central checkbox before clickingStart.
To access the application, navigate to http://TARGET_SERVER:PORT/business-central inyour web browser.
4.2. INSTALLING REALTIME DECISION SERVERThe Realtime Decision Server is distributed as a web application archive file (kie-server.war) and is present in your Red Hat JBoss BRMS 6.3.0 Deployable for WebSphere8.5 download.
CHAPTER 4. INSTALL
29

NOTE
It is assumed that you followed the steps described in Section 3.3, “CreatingUsers and Groups” to create the role kie-server required by the RealtimeDecision Server. If you have not done so, revisit the respective sections in thisguide.
1. In the main menu on the left, go to Applications → Application Types →WebSphere Enterprise Applications.This will show you all the existing applications in the system and allow you to installa new one.
2. Click Install to start the installation process.
3. Upload the Realtime Decision Server WAR file (kie-server.war) from the local filesystem.
4. Select the Fast Path radio button and click Next.The Install New Application wizard opens.
5. Change the Application Name to kie-server in the first step and click Next.
6. In the next step, map the Realtime Decision Server modules to servers according toyour requirements and click Next.
7. In the Bind Listeners for Message-Driven Beans step, select the ActivationSpecification radio button for both beans and enter jms/activation/KIE.SERVER.REQUEST as Target Resource JNDI Name.
8. In the next step, map resource references to actual resources. Enter the JNDI namefor the KIE.SERVER.REQUEST connection factory that you created earlier: jms/conn/KIE.SERVER.REQUEST.
9. In the Map Virtual Hosts for Web Modules step, leave the default values andclick Next.
10. In the next screen, set the context root to kie-server.
11. In the Metadata for Modules step, leave the default values and click Next.
12. Click Finish to install the Realtime Decision Server. Save the changes to the masterconfiguration at the end of this process.
Class-Loading ConfigurationEnsure correct class-loading configuration by following the steps below.
1. Navigate to Applications → Application Types → WebSphere EnterpriseApplications and click kie-server.
2. Click Class Loading and Update Detection under the Detail Properties headingon the left.
3. In the properties, change Class Loader Order to Classes loaded with local classloader first (parent last) and WAR Class Loader Policy to Single class loader forapplication.
4. Save the changes to the master configuration.
Red Hat JBoss BRMS 6.3 IBM WebSphere Installation and Configuration Guide
30

Mapping Groups to RolesIf you have already mapped the kie-server role to a user or a group, you can ignore thisprocedure. Otherwise, do the following:
1. Go back to the main configuration page for the newly installed kie-serverapplication (Applications → Application Types → WebSphere EnterpriseApplications). Click Security Role to User/Group Mapping under the DetailProperties heading on the left.
2. Select the kie-server role, click Map Groups… and search for the kie-servergroup in the next screen (or just click the Search button).
3. Move it from the Available list to the Selected list. Click OK.
This mapping gives the previously created administrator user access to the RealtimeDecision Server.
You can now save the changes and start the kie-server application.
Check whether the Realtime Decision Server REST API works by sending a GET request at http://TARGET_SERVER:PORT/kie-server/services/rest/server.
CHAPTER 4. INSTALL
31

APPENDIX A. REVISION HISTORYNote that revision numbers relate to the edition of this manual, not to version numbers ofRed Hat JBoss BRMSBPM Suite.
Revision 6.3.0-17 Mon Mar 20 2017 Tomas RadejRebuilt.
Revision 6.3.0-16 Wed Feb 22 2017 Tomas RadejRebuilt.
Revision 6.3.0-15 Fri Dec 23 2016 Tomas RadejRebuilt.
Revision 6.3.0-14 Mon Nov 28 2016 Tomas RadejRebuilt.
Revision 6.3.0-13 Wed Oct 5 2016 Tomas RadejRebuilt.
Revision 6.3.0-12 Mon Oct 3 2016 Tomas RadejBuilt for release 6.3.3.
Revision 6.3.0-11 Thu Sep 15 2016 Tomas RadejRebuilt.
Revision 6.3.0-10 Thu Sep 15 2016 Tomas RadejPublished the AsciiDoc version of the docs.
Revision 6.3.0-7 Thu Jul 14 2016 Tomas RadejUpdated documentation with release 6.3.1.
Revision 6.3.0-6 Thu Jun 2 2016 Marek CzernekReleasing the newest documentation.
Revision 6.3.0-5 Thu May 5 2016 Tomas RadejBuilt with live links.
Revision 6.3.0-4 Thu May 5 2016 Tomas RadejBootstrapping links.
Revision 6.3.0-3 Thu Apr 28 2016 Tomas RadejAll books rebuilt.
Revision 6.3.0-2 Thu Apr 28 2016 Tomas RadejAll books rebuilt.
Revision 6.3.0-1 Thu Apr 28 2016 Tomas RadejInitial build for release 6.3.0 of JBoss BPM SuiteJBoss BRMS.
Red Hat JBoss BRMS 6.3 IBM WebSphere Installation and Configuration Guide
32