ibm z/vm and linux on ibm system z: virtualization ... · international technical support...
TRANSCRIPT
ibm.com/redbooks
Front cover
IBM z/VM and Linux on IBM System zVirtualization Cookbook for Red Hat Enterprise Linux 4
Gregory GeiselhartYohichi Hara
Bradford HinsonKyle Smith
Chris Young
Installing z/VM and Linux on the mainframe using this cookbook
Running Linux servers under z/VM made simple
Using z/VM 5.2 and Red Hat Enterprise Linux 4 Update 3

International Technical Support Organization
IBM z/VM and Linux on IBM System z: Virtualization Cookbook for Red Hat Enterprise Linux 4
September 2006
SG24-7272-00

© Copyright International Business Machines Corporation 2006. All rights reserved.Note to U.S. Government Users Restricted Rights -- Use, duplication or disclosure restricted by GSA ADP ScheduleContract with IBM Corp.
First Edition (September 2006)
This edition applies to z/VM Version 5, Release 2 and multiple Linux distributions. Red Hat Enterprise Linux 4 Update 3 is used for the examples in this book.
Note: Before using this information and the product it supports, read the information in “Notices” on page ix.
Contents
Notices . . . . . . . . . . . . . . . . . . . . . . . . . . . . . . . . . . . . . . . . . . . . . . . . . . . . . . . . . . . . . . . . . ixTrademarks . . . . . . . . . . . . . . . . . . . . . . . . . . . . . . . . . . . . . . . . . . . . . . . . . . . . . . . . . . . . . . .x
Preface . . . . . . . . . . . . . . . . . . . . . . . . . . . . . . . . . . . . . . . . . . . . . . . . . . . . . . . . . . . . . . . . . xiThe team that wrote this book . . . . . . . . . . . . . . . . . . . . . . . . . . . . . . . . . . . . . . . . . . . . . . . . xiConventions . . . . . . . . . . . . . . . . . . . . . . . . . . . . . . . . . . . . . . . . . . . . . . . . . . . . . . . . . . . . . . xiiBecome a published author . . . . . . . . . . . . . . . . . . . . . . . . . . . . . . . . . . . . . . . . . . . . . . . . . . xiiComments welcome. . . . . . . . . . . . . . . . . . . . . . . . . . . . . . . . . . . . . . . . . . . . . . . . . . . . . . . xiii
Chapter 1. Introduction to z/VM and Linux . . . . . . . . . . . . . . . . . . . . . . . . . . . . . . . . . . . . 11.1 Introduction to virtualization . . . . . . . . . . . . . . . . . . . . . . . . . . . . . . . . . . . . . . . . . . . . . . 21.2 The philosophy this book adopts. . . . . . . . . . . . . . . . . . . . . . . . . . . . . . . . . . . . . . . . . . . 21.3 Choices and decisions made in this book . . . . . . . . . . . . . . . . . . . . . . . . . . . . . . . . . . . . 31.4 IBM Director and z/VM Center Extension . . . . . . . . . . . . . . . . . . . . . . . . . . . . . . . . . . . . 41.5 Infrastructure design . . . . . . . . . . . . . . . . . . . . . . . . . . . . . . . . . . . . . . . . . . . . . . . . . . . . 41.6 The chapters in this book . . . . . . . . . . . . . . . . . . . . . . . . . . . . . . . . . . . . . . . . . . . . . . . . 6
Chapter 2. Planning . . . . . . . . . . . . . . . . . . . . . . . . . . . . . . . . . . . . . . . . . . . . . . . . . . . . . . 72.1 Bill of materials . . . . . . . . . . . . . . . . . . . . . . . . . . . . . . . . . . . . . . . . . . . . . . . . . . . . . . . . 8
2.1.1 Hardware resources . . . . . . . . . . . . . . . . . . . . . . . . . . . . . . . . . . . . . . . . . . . . . . . . 82.1.2 Software resources . . . . . . . . . . . . . . . . . . . . . . . . . . . . . . . . . . . . . . . . . . . . . . . . . 82.1.3 Networking resources . . . . . . . . . . . . . . . . . . . . . . . . . . . . . . . . . . . . . . . . . . . . . . . 9
2.2 z/VM conventions . . . . . . . . . . . . . . . . . . . . . . . . . . . . . . . . . . . . . . . . . . . . . . . . . . . . . . 92.2.1 Volume labeling convention . . . . . . . . . . . . . . . . . . . . . . . . . . . . . . . . . . . . . . . . . . 92.2.2 Backup file naming convention . . . . . . . . . . . . . . . . . . . . . . . . . . . . . . . . . . . . . . . 102.2.3 The command retrieve convention . . . . . . . . . . . . . . . . . . . . . . . . . . . . . . . . . . . . 10
2.3 Password planning . . . . . . . . . . . . . . . . . . . . . . . . . . . . . . . . . . . . . . . . . . . . . . . . . . . . 112.4 Planning worksheets . . . . . . . . . . . . . . . . . . . . . . . . . . . . . . . . . . . . . . . . . . . . . . . . . . . 11
2.4.1 Usage of z/VM resources in this book. . . . . . . . . . . . . . . . . . . . . . . . . . . . . . . . . . 112.4.2 Usage of z/VM DASD in this book . . . . . . . . . . . . . . . . . . . . . . . . . . . . . . . . . . . . 122.4.3 Usage of Linux resources in this book . . . . . . . . . . . . . . . . . . . . . . . . . . . . . . . . . 132.4.4 Usage of Linux user IDs in this book. . . . . . . . . . . . . . . . . . . . . . . . . . . . . . . . . . . 13
2.5 Blank worksheets . . . . . . . . . . . . . . . . . . . . . . . . . . . . . . . . . . . . . . . . . . . . . . . . . . . . . 142.5.1 z/VM resources worksheet . . . . . . . . . . . . . . . . . . . . . . . . . . . . . . . . . . . . . . . . . . 142.5.2 z/VM DASD worksheet . . . . . . . . . . . . . . . . . . . . . . . . . . . . . . . . . . . . . . . . . . . . . 152.5.3 Linux resources worksheet . . . . . . . . . . . . . . . . . . . . . . . . . . . . . . . . . . . . . . . . . . 162.5.4 Linux user ID worksheet . . . . . . . . . . . . . . . . . . . . . . . . . . . . . . . . . . . . . . . . . . . . 16
Chapter 3. Configuring a desktop machine . . . . . . . . . . . . . . . . . . . . . . . . . . . . . . . . . . 173.1 PuTTY: A free SSH client . . . . . . . . . . . . . . . . . . . . . . . . . . . . . . . . . . . . . . . . . . . . . . . 183.2 Setting up a VNC client . . . . . . . . . . . . . . . . . . . . . . . . . . . . . . . . . . . . . . . . . . . . . . . . . 19
3.2.1 Using vncviewer on Linux . . . . . . . . . . . . . . . . . . . . . . . . . . . . . . . . . . . . . . . . . . . 193.2.2 Downloading RealVNC for Windows. . . . . . . . . . . . . . . . . . . . . . . . . . . . . . . . . . . 20
3.3 3270 emulators . . . . . . . . . . . . . . . . . . . . . . . . . . . . . . . . . . . . . . . . . . . . . . . . . . . . . . . 21
Chapter 4. Installing and configuring z/VM. . . . . . . . . . . . . . . . . . . . . . . . . . . . . . . . . . . 234.1 Installing z/VM from DVD . . . . . . . . . . . . . . . . . . . . . . . . . . . . . . . . . . . . . . . . . . . . . . . 24
4.1.1 Booting z/VM from DVD . . . . . . . . . . . . . . . . . . . . . . . . . . . . . . . . . . . . . . . . . . . . 244.1.2 Copying a vanilla z/VM system to DASD . . . . . . . . . . . . . . . . . . . . . . . . . . . . . . . 27
© Copyright IBM Corp. 2006. All rights reserved. iii

4.1.3 IPL the vanilla z/VM from DASD . . . . . . . . . . . . . . . . . . . . . . . . . . . . . . . . . . . . . . 294.1.4 Completing the z/VM installation. . . . . . . . . . . . . . . . . . . . . . . . . . . . . . . . . . . . . . 31
4.2 Customizing the SYSTEM CONFIG file . . . . . . . . . . . . . . . . . . . . . . . . . . . . . . . . . . . . 324.3 Configuring the XEDIT profile . . . . . . . . . . . . . . . . . . . . . . . . . . . . . . . . . . . . . . . . . . . . 344.4 Configuring TCP/IP . . . . . . . . . . . . . . . . . . . . . . . . . . . . . . . . . . . . . . . . . . . . . . . . . . . . 35
4.4.1 Using the IPWIZARD tool . . . . . . . . . . . . . . . . . . . . . . . . . . . . . . . . . . . . . . . . . . . 354.4.2 Configuring TCP/IP to start at IPL time. . . . . . . . . . . . . . . . . . . . . . . . . . . . . . . . . 374.4.3 Renaming the TCPIP configuration file . . . . . . . . . . . . . . . . . . . . . . . . . . . . . . . . . 394.4.4 Copying the PROFILE XEDIT file . . . . . . . . . . . . . . . . . . . . . . . . . . . . . . . . . . . . . 394.4.5 Configuring the File Transfer Protocol server . . . . . . . . . . . . . . . . . . . . . . . . . . . . 394.4.6 Shutting down and re-IPLing the system . . . . . . . . . . . . . . . . . . . . . . . . . . . . . . . 40
4.5 Adding paging volumes. . . . . . . . . . . . . . . . . . . . . . . . . . . . . . . . . . . . . . . . . . . . . . . . . 414.5.1 Formatting the paging volumes. . . . . . . . . . . . . . . . . . . . . . . . . . . . . . . . . . . . . . . 424.5.2 Formatting DASD for minidisks . . . . . . . . . . . . . . . . . . . . . . . . . . . . . . . . . . . . . . . 444.5.3 Updating the SYSTEM CONFIG file . . . . . . . . . . . . . . . . . . . . . . . . . . . . . . . . . . . 454.5.4 Testing the changes . . . . . . . . . . . . . . . . . . . . . . . . . . . . . . . . . . . . . . . . . . . . . . . 46
4.6 Creating a user ID for common files . . . . . . . . . . . . . . . . . . . . . . . . . . . . . . . . . . . . . . . 474.6.1 Defining the LNXMAINT user in the USER DIRECT file . . . . . . . . . . . . . . . . . . . . 474.6.2 Logging and customizing the new user ID . . . . . . . . . . . . . . . . . . . . . . . . . . . . . . 504.6.3 Copying a PROFILE XEDIT . . . . . . . . . . . . . . . . . . . . . . . . . . . . . . . . . . . . . . . . . 514.6.4 Creating a PROFILE EXEC . . . . . . . . . . . . . . . . . . . . . . . . . . . . . . . . . . . . . . . . . 514.6.5 Copying files associated with this book to LNXMAINT . . . . . . . . . . . . . . . . . . . . . 52
4.7 Customizing system startup and shutdown. . . . . . . . . . . . . . . . . . . . . . . . . . . . . . . . . . 534.7.1 Configuring the AUTOLOG1 PROFILE EXEC . . . . . . . . . . . . . . . . . . . . . . . . . . . 534.7.2 Testing the changes . . . . . . . . . . . . . . . . . . . . . . . . . . . . . . . . . . . . . . . . . . . . . . . 54
4.8 Addressing z/VM security issues . . . . . . . . . . . . . . . . . . . . . . . . . . . . . . . . . . . . . . . . . 554.8.1 VM security products . . . . . . . . . . . . . . . . . . . . . . . . . . . . . . . . . . . . . . . . . . . . . . 554.8.2 High level z/VM security . . . . . . . . . . . . . . . . . . . . . . . . . . . . . . . . . . . . . . . . . . . . 554.8.3 Linux user ID privilege classes . . . . . . . . . . . . . . . . . . . . . . . . . . . . . . . . . . . . . . . 554.8.4 z/VM user ID and minidisk passwords . . . . . . . . . . . . . . . . . . . . . . . . . . . . . . . . . 554.8.5 Changing passwords in USER DIRECT . . . . . . . . . . . . . . . . . . . . . . . . . . . . . . . . 55
4.9 Backing up your z/VM system to tape. . . . . . . . . . . . . . . . . . . . . . . . . . . . . . . . . . . . . . 574.10 Relabeling the system volumes . . . . . . . . . . . . . . . . . . . . . . . . . . . . . . . . . . . . . . . . . 57
4.10.1 Modifying labels in the SYSTEM CONFIG file . . . . . . . . . . . . . . . . . . . . . . . . . . 584.10.2 Modifying labels in the USER DIRECT file . . . . . . . . . . . . . . . . . . . . . . . . . . . . . 604.10.3 Changing the labels on the five volumes . . . . . . . . . . . . . . . . . . . . . . . . . . . . . . 604.10.4 Shutting down your system and restarting it . . . . . . . . . . . . . . . . . . . . . . . . . . . . 61
4.11 Restoring your z/VM system from tape . . . . . . . . . . . . . . . . . . . . . . . . . . . . . . . . . . . . 62
Chapter 5. Servicing z/VM . . . . . . . . . . . . . . . . . . . . . . . . . . . . . . . . . . . . . . . . . . . . . . . . 635.1 Applying a program temporary fix . . . . . . . . . . . . . . . . . . . . . . . . . . . . . . . . . . . . . . . . . 64
5.1.1 Getting service using Internet File Transfer Protocol . . . . . . . . . . . . . . . . . . . . . . 665.1.2 Downloading the service to z/VM . . . . . . . . . . . . . . . . . . . . . . . . . . . . . . . . . . . . . 665.1.3 Receiving, applying, and building service . . . . . . . . . . . . . . . . . . . . . . . . . . . . . . . 685.1.4 Putting the service into production . . . . . . . . . . . . . . . . . . . . . . . . . . . . . . . . . . . . 69
5.2 Applying a recommended service upgrade. . . . . . . . . . . . . . . . . . . . . . . . . . . . . . . . . . 705.2.1 Making the service available on the Internet via FTP . . . . . . . . . . . . . . . . . . . . . . 705.2.2 Downloading the service to z/VM . . . . . . . . . . . . . . . . . . . . . . . . . . . . . . . . . . . . . 715.2.3 Receiving, applying, and building the service . . . . . . . . . . . . . . . . . . . . . . . . . . . . 735.2.4 Putting the service into production . . . . . . . . . . . . . . . . . . . . . . . . . . . . . . . . . . . . 74
Chapter 6. Configuring an NFS server . . . . . . . . . . . . . . . . . . . . . . . . . . . . . . . . . . . . . . 776.1 Downloading files associated with this book . . . . . . . . . . . . . . . . . . . . . . . . . . . . . . . . . 78
iv IBM z/VM and Linux on IBM System z: Virtualization Cookbook for Red Hat Enterprise Linux 4
6.2 Setting up a Red Hat Enterprise Linux 4 install tree . . . . . . . . . . . . . . . . . . . . . . . . . . . 786.2.1 Downloading the installation discs . . . . . . . . . . . . . . . . . . . . . . . . . . . . . . . . . . . . 786.2.2 Verifying the ISO images . . . . . . . . . . . . . . . . . . . . . . . . . . . . . . . . . . . . . . . . . . . 796.2.3 Creating the install tree from physical CDs. . . . . . . . . . . . . . . . . . . . . . . . . . . . . . 806.2.4 Creating the install tree from ISO disc images . . . . . . . . . . . . . . . . . . . . . . . . . . . 80
6.3 Enabling the NFS server on Red Hat Enterprise Linux 4 . . . . . . . . . . . . . . . . . . . . . . . 81
Chapter 7. Installing Linux interactively . . . . . . . . . . . . . . . . . . . . . . . . . . . . . . . . . . . . . 837.1 Creating the user ID LNXINST . . . . . . . . . . . . . . . . . . . . . . . . . . . . . . . . . . . . . . . . . . . 847.2 Preparing Red Hat Enterprise Linux 4 bootstrap files . . . . . . . . . . . . . . . . . . . . . . . . . . 877.3 Installing the server . . . . . . . . . . . . . . . . . . . . . . . . . . . . . . . . . . . . . . . . . . . . . . . . . . . . 89
7.3.1 Stage one of the Red Hat Enterprise Linux 4 installation . . . . . . . . . . . . . . . . . . . 907.3.2 Stage two of the Red Hat Enterprise Linux 4 installation . . . . . . . . . . . . . . . . . . . 927.3.3 Booting your new Linux system from disk. . . . . . . . . . . . . . . . . . . . . . . . . . . . . . . 98
7.4 Configuring the installation server . . . . . . . . . . . . . . . . . . . . . . . . . . . . . . . . . . . . . . . . . 997.4.1 Copying files to the installation server. . . . . . . . . . . . . . . . . . . . . . . . . . . . . . . . . . 997.4.2 Turning on the NFS server . . . . . . . . . . . . . . . . . . . . . . . . . . . . . . . . . . . . . . . . . 1007.4.3 Configuring SSH keys. . . . . . . . . . . . . . . . . . . . . . . . . . . . . . . . . . . . . . . . . . . . . 1007.4.4 Configuring VDISK swap . . . . . . . . . . . . . . . . . . . . . . . . . . . . . . . . . . . . . . . . . . 1017.4.5 Rebooting the system to verify changes . . . . . . . . . . . . . . . . . . . . . . . . . . . . . . . 101
Chapter 8. Installing Linux with kickstart . . . . . . . . . . . . . . . . . . . . . . . . . . . . . . . . . . . 1038.1 Configure the installation server for kickstart . . . . . . . . . . . . . . . . . . . . . . . . . . . . . . . 1048.2 Define a new user ID for the master image. . . . . . . . . . . . . . . . . . . . . . . . . . . . . . . . . 106
8.2.1 Formatting and labeling DASD . . . . . . . . . . . . . . . . . . . . . . . . . . . . . . . . . . . . . . 1068.2.2 Defining a new user ID . . . . . . . . . . . . . . . . . . . . . . . . . . . . . . . . . . . . . . . . . . . . 1078.2.3 Adding RH4U3X to AUTOLOG1’s PROFILE EXEC . . . . . . . . . . . . . . . . . . . . . . 108
8.3 Configure the RH4U3X user for kickstart . . . . . . . . . . . . . . . . . . . . . . . . . . . . . . . . . . 1098.4 Kickstart the RH4U3X user . . . . . . . . . . . . . . . . . . . . . . . . . . . . . . . . . . . . . . . . . . . . . 110
Chapter 9. Cloning Linux . . . . . . . . . . . . . . . . . . . . . . . . . . . . . . . . . . . . . . . . . . . . . . . . 1139.1 Defining a new user ID for a virtual server . . . . . . . . . . . . . . . . . . . . . . . . . . . . . . . . . 114
9.1.1 Formatting and labeling DASD . . . . . . . . . . . . . . . . . . . . . . . . . . . . . . . . . . . . . . 1149.1.2 Defining a new user ID . . . . . . . . . . . . . . . . . . . . . . . . . . . . . . . . . . . . . . . . . . . . 1159.1.3 Adding LINUX01 to AUTOLOG1’s PROFILE EXEC. . . . . . . . . . . . . . . . . . . . . . 1169.1.4 Creating a configuration file for the new LINUX ID . . . . . . . . . . . . . . . . . . . . . . . 116
9.2 Cloning one new virtual server . . . . . . . . . . . . . . . . . . . . . . . . . . . . . . . . . . . . . . . . . . 1189.3 Cloning four more virtual servers . . . . . . . . . . . . . . . . . . . . . . . . . . . . . . . . . . . . . . . . 121
9.3.1 Formatting and labeling four new DASD. . . . . . . . . . . . . . . . . . . . . . . . . . . . . . . 1219.3.2 Defining four more user IDs . . . . . . . . . . . . . . . . . . . . . . . . . . . . . . . . . . . . . . . . 1229.3.3 Creating four new configuration files. . . . . . . . . . . . . . . . . . . . . . . . . . . . . . . . . . 1249.3.4 Granting user IDs access to VSWITCH . . . . . . . . . . . . . . . . . . . . . . . . . . . . . . . 1259.3.5 Testing logging in to a new user ID. . . . . . . . . . . . . . . . . . . . . . . . . . . . . . . . . . . 126
9.4 Reviewing system status. . . . . . . . . . . . . . . . . . . . . . . . . . . . . . . . . . . . . . . . . . . . . . . 127
Chapter 10. Three virtual servers . . . . . . . . . . . . . . . . . . . . . . . . . . . . . . . . . . . . . . . . . 12910.1 Creating a virtual Web server . . . . . . . . . . . . . . . . . . . . . . . . . . . . . . . . . . . . . . . . . . 130
10.1.1 Installing Apache RPMs . . . . . . . . . . . . . . . . . . . . . . . . . . . . . . . . . . . . . . . . . . 13010.1.2 Testing Apache . . . . . . . . . . . . . . . . . . . . . . . . . . . . . . . . . . . . . . . . . . . . . . . . . 13010.1.3 Configuring Secure Sockets Layer for Apache . . . . . . . . . . . . . . . . . . . . . . . . . 13110.1.4 Further steps. . . . . . . . . . . . . . . . . . . . . . . . . . . . . . . . . . . . . . . . . . . . . . . . . . . 13510.1.5 Apache resources . . . . . . . . . . . . . . . . . . . . . . . . . . . . . . . . . . . . . . . . . . . . . . . 135
10.2 User authentication using LDAP . . . . . . . . . . . . . . . . . . . . . . . . . . . . . . . . . . . . . . . . 13610.2.1 Installing and configuring an LDAP server . . . . . . . . . . . . . . . . . . . . . . . . . . . . 136
Contents v
10.2.2 Migrating existing users to LDAP . . . . . . . . . . . . . . . . . . . . . . . . . . . . . . . . . . . 13710.2.3 Configuring an LDAP client . . . . . . . . . . . . . . . . . . . . . . . . . . . . . . . . . . . . . . . . 13910.2.4 Adding new user accounts . . . . . . . . . . . . . . . . . . . . . . . . . . . . . . . . . . . . . . . . 14010.2.5 LDAP resources . . . . . . . . . . . . . . . . . . . . . . . . . . . . . . . . . . . . . . . . . . . . . . . . 141
10.3 Creating a virtual Samba file server . . . . . . . . . . . . . . . . . . . . . . . . . . . . . . . . . . . . . 14110.3.1 Installing necessary RPMs . . . . . . . . . . . . . . . . . . . . . . . . . . . . . . . . . . . . . . . . 14110.3.2 Editing the Samba configuration file . . . . . . . . . . . . . . . . . . . . . . . . . . . . . . . . . 14210.3.3 Adding a Samba user . . . . . . . . . . . . . . . . . . . . . . . . . . . . . . . . . . . . . . . . . . . . 14210.3.4 Starting Samba at boot time . . . . . . . . . . . . . . . . . . . . . . . . . . . . . . . . . . . . . . . 14310.3.5 Testing your changes . . . . . . . . . . . . . . . . . . . . . . . . . . . . . . . . . . . . . . . . . . . . 143
Chapter 11. Miscellaneous recipes . . . . . . . . . . . . . . . . . . . . . . . . . . . . . . . . . . . . . . . . 14511.1 Adding or extending an LVM. . . . . . . . . . . . . . . . . . . . . . . . . . . . . . . . . . . . . . . . . . . 146
11.1.1 Adding minidisks to the z/VM directory entry . . . . . . . . . . . . . . . . . . . . . . . . . . 14611.1.2 Bringing the new minidisks online. . . . . . . . . . . . . . . . . . . . . . . . . . . . . . . . . . . 14611.1.3 Formatting and partitioning the minidisks . . . . . . . . . . . . . . . . . . . . . . . . . . . . . 14711.1.4 Creating the logical volume and file system . . . . . . . . . . . . . . . . . . . . . . . . . . . 14811.1.5 Extending an existing logical volume . . . . . . . . . . . . . . . . . . . . . . . . . . . . . . . . 15011.1.6 Making the change persistent . . . . . . . . . . . . . . . . . . . . . . . . . . . . . . . . . . . . . . 151
11.2 Channel bonding . . . . . . . . . . . . . . . . . . . . . . . . . . . . . . . . . . . . . . . . . . . . . . . . . . . . 15211.2.1 OSA-Express layer 2 mode. . . . . . . . . . . . . . . . . . . . . . . . . . . . . . . . . . . . . . . . 15211.2.2 Dedicate two OSA devices . . . . . . . . . . . . . . . . . . . . . . . . . . . . . . . . . . . . . . . . 15311.2.3 Configure the physical switch . . . . . . . . . . . . . . . . . . . . . . . . . . . . . . . . . . . . . . 15411.2.4 Configuring Linux . . . . . . . . . . . . . . . . . . . . . . . . . . . . . . . . . . . . . . . . . . . . . . . 15411.2.5 Verifying the bond0 interface . . . . . . . . . . . . . . . . . . . . . . . . . . . . . . . . . . . . . . 15611.2.6 Channel bonding diagram. . . . . . . . . . . . . . . . . . . . . . . . . . . . . . . . . . . . . . . . . 157
11.3 Troubleshooting Linux. . . . . . . . . . . . . . . . . . . . . . . . . . . . . . . . . . . . . . . . . . . . . . . . 15811.3.1 Entering single user mode . . . . . . . . . . . . . . . . . . . . . . . . . . . . . . . . . . . . . . . . 15811.3.2 Entering a rescue environment . . . . . . . . . . . . . . . . . . . . . . . . . . . . . . . . . . . . . 159
Chapter 12. Monitoring systems . . . . . . . . . . . . . . . . . . . . . . . . . . . . . . . . . . . . . . . . . . 16312.1 Using indicate and other commands. . . . . . . . . . . . . . . . . . . . . . . . . . . . . . . . . . . . . 164
12.1.1 Using the indicate command. . . . . . . . . . . . . . . . . . . . . . . . . . . . . . . . . . . . . . . 16412.1.2 Using other basic commands . . . . . . . . . . . . . . . . . . . . . . . . . . . . . . . . . . . . . . 166
12.2 The z/VM Performance Toolkit . . . . . . . . . . . . . . . . . . . . . . . . . . . . . . . . . . . . . . . . . 16812.2.1 Configuring the z/VM Performance Toolkit . . . . . . . . . . . . . . . . . . . . . . . . . . . . 16912.2.2 Configuring network for Web browser support . . . . . . . . . . . . . . . . . . . . . . . . . 16912.2.3 Configuring MONDCSS . . . . . . . . . . . . . . . . . . . . . . . . . . . . . . . . . . . . . . . . . . 17012.2.4 Configuring PERFSVM virtual machine . . . . . . . . . . . . . . . . . . . . . . . . . . . . . . 17112.2.5 Using the z/VM Performance Toolkit. . . . . . . . . . . . . . . . . . . . . . . . . . . . . . . . . 17512.2.6 Examining system conditions with z/VM Performance Toolkit . . . . . . . . . . . . . 177
12.3 Creating performance reports with Performance Toolkit. . . . . . . . . . . . . . . . . . . . . . 17912.3.1 Configure a virtual machine to read monitor data . . . . . . . . . . . . . . . . . . . . . . . 17912.3.2 Save monitor data to disk . . . . . . . . . . . . . . . . . . . . . . . . . . . . . . . . . . . . . . . . . 18012.3.3 Create a report file from the saved data . . . . . . . . . . . . . . . . . . . . . . . . . . . . . . 180
12.4 Monitoring Linux information with RMF PMS . . . . . . . . . . . . . . . . . . . . . . . . . . . . . . 18212.4.1 Setting up rmfpms. . . . . . . . . . . . . . . . . . . . . . . . . . . . . . . . . . . . . . . . . . . . . . . 18312.4.2 Registering Linux images in the Performance Toolkit. . . . . . . . . . . . . . . . . . . . 186
12.5 Using the OSA-Express SNMP subagent . . . . . . . . . . . . . . . . . . . . . . . . . . . . . . . . . 18712.5.1 Obtaining and configuring osasnmpd . . . . . . . . . . . . . . . . . . . . . . . . . . . . . . . . 18712.5.2 Working with osasnmpd . . . . . . . . . . . . . . . . . . . . . . . . . . . . . . . . . . . . . . . . . . 18912.5.3 Obtaining OSA port information . . . . . . . . . . . . . . . . . . . . . . . . . . . . . . . . . . . . 190
12.6 Using OSA/SF on z/VM. . . . . . . . . . . . . . . . . . . . . . . . . . . . . . . . . . . . . . . . . . . . . . . 192
vi IBM z/VM and Linux on IBM System z: Virtualization Cookbook for Red Hat Enterprise Linux 4
12.6.1 OSA/SF on z/VM. . . . . . . . . . . . . . . . . . . . . . . . . . . . . . . . . . . . . . . . . . . . . . . . 19212.6.2 Issuing queries with OSA/SF . . . . . . . . . . . . . . . . . . . . . . . . . . . . . . . . . . . . . . 192
12.7 DASD statistics . . . . . . . . . . . . . . . . . . . . . . . . . . . . . . . . . . . . . . . . . . . . . . . . . . . . . 195
Chapter 13. Red Hat Network and up2date. . . . . . . . . . . . . . . . . . . . . . . . . . . . . . . . . . 19713.1 Registering your system with RHN . . . . . . . . . . . . . . . . . . . . . . . . . . . . . . . . . . . . . . 19813.2 Installing and updating packages using up2date . . . . . . . . . . . . . . . . . . . . . . . . . . . 19813.3 Managing your Linux guest through RHN . . . . . . . . . . . . . . . . . . . . . . . . . . . . . . . . . 19913.4 Using up2date without Internet access . . . . . . . . . . . . . . . . . . . . . . . . . . . . . . . . . . . 200
Appendix A. References . . . . . . . . . . . . . . . . . . . . . . . . . . . . . . . . . . . . . . . . . . . . . . . . . 203Important z/VM files . . . . . . . . . . . . . . . . . . . . . . . . . . . . . . . . . . . . . . . . . . . . . . . . . . . . . . 204Quick references . . . . . . . . . . . . . . . . . . . . . . . . . . . . . . . . . . . . . . . . . . . . . . . . . . . . . . . . 204
z/VM XEDIT reference . . . . . . . . . . . . . . . . . . . . . . . . . . . . . . . . . . . . . . . . . . . . . . . . . 204Linux vi text editor reference. . . . . . . . . . . . . . . . . . . . . . . . . . . . . . . . . . . . . . . . . . . . . 205
Appendix B. Additional material . . . . . . . . . . . . . . . . . . . . . . . . . . . . . . . . . . . . . . . . . . 207Locating the Web material . . . . . . . . . . . . . . . . . . . . . . . . . . . . . . . . . . . . . . . . . . . . . . . . . 207Using the Web material . . . . . . . . . . . . . . . . . . . . . . . . . . . . . . . . . . . . . . . . . . . . . . . . . . . 207
System requirements for downloading the Web material . . . . . . . . . . . . . . . . . . . . . . . 208How to use the Web material . . . . . . . . . . . . . . . . . . . . . . . . . . . . . . . . . . . . . . . . . . . . 208
Related publications . . . . . . . . . . . . . . . . . . . . . . . . . . . . . . . . . . . . . . . . . . . . . . . . . . . . 209IBM Redbooks . . . . . . . . . . . . . . . . . . . . . . . . . . . . . . . . . . . . . . . . . . . . . . . . . . . . . . . . . . 209Other publications . . . . . . . . . . . . . . . . . . . . . . . . . . . . . . . . . . . . . . . . . . . . . . . . . . . . . . . 209Online resources . . . . . . . . . . . . . . . . . . . . . . . . . . . . . . . . . . . . . . . . . . . . . . . . . . . . . . . . 210How to get IBM Redbooks . . . . . . . . . . . . . . . . . . . . . . . . . . . . . . . . . . . . . . . . . . . . . . . . . 212Help from IBM . . . . . . . . . . . . . . . . . . . . . . . . . . . . . . . . . . . . . . . . . . . . . . . . . . . . . . . . . . 212
Index . . . . . . . . . . . . . . . . . . . . . . . . . . . . . . . . . . . . . . . . . . . . . . . . . . . . . . . . . . . . . . . . . 213
Contents vii

viii IBM z/VM and Linux on IBM System z: Virtualization Cookbook for Red Hat Enterprise Linux 4

Notices
This information was developed for products and services offered in the U.S.A.
IBM may not offer the products, services, or features discussed in this document in other countries. Consult your local IBM representative for information on the products and services currently available in your area. Any reference to an IBM product, program, or service is not intended to state or imply that only that IBM product, program, or service may be used. Any functionally equivalent product, program, or service that does not infringe any IBM intellectual property right may be used instead. However, it is the user's responsibility to evaluate and verify the operation of any non-IBM product, program, or service.
IBM may have patents or pending patent applications covering subject matter described in this document. The furnishing of this document does not give you any license to these patents. You can send license inquiries, in writing, to: IBM Director of Licensing, IBM Corporation, North Castle Drive Armonk, NY 10504-1785 U.S.A.
The following paragraph does not apply to the United Kingdom or any other country where such provisions are inconsistent with local law: INTERNATIONAL BUSINESS MACHINES CORPORATION PROVIDES THIS PUBLICATION "AS IS" WITHOUT WARRANTY OF ANY KIND, EITHER EXPRESS OR IMPLIED, INCLUDING, BUT NOT LIMITED TO, THE IMPLIED WARRANTIES OF NON-INFRINGEMENT, MERCHANTABILITY OR FITNESS FOR A PARTICULAR PURPOSE. Some states do not allow disclaimer of express or implied warranties in certain transactions, therefore, this statement may not apply to you.
This information could include technical inaccuracies or typographical errors. Changes are periodically made to the information herein; these changes will be incorporated in new editions of the publication. IBM may make improvements and/or changes in the product(s) and/or the program(s) described in this publication at any time without notice.
Any references in this information to non-IBM Web sites are provided for convenience only and do not in any manner serve as an endorsement of those Web sites. The materials at those Web sites are not part of the materials for this IBM product and use of those Web sites is at your own risk.
IBM may use or distribute any of the information you supply in any way it believes appropriate without incurring any obligation to you.
Information concerning non-IBM products was obtained from the suppliers of those products, their published announcements or other publicly available sources. IBM has not tested those products and cannot confirm the accuracy of performance, compatibility or any other claims related to non-IBM products. Questions on the capabilities of non-IBM products should be addressed to the suppliers of those products.
This information contains examples of data and reports used in daily business operations. To illustrate them as completely as possible, the examples include the names of individuals, companies, brands, and products. All of these names are fictitious and any similarity to the names and addresses used by an actual business enterprise is entirely coincidental.
COPYRIGHT LICENSE: This information contains sample application programs in source language, which illustrates programming techniques on various operating platforms. You may copy, modify, and distribute these sample programs in any form without payment to IBM, for the purposes of developing, using, marketing or distributing application programs conforming to the application programming interface for the operating platform for which the sample programs are written. These examples have not been thoroughly tested under all conditions. IBM, therefore, cannot guarantee or imply reliability, serviceability, or function of these programs. You may copy, modify, and distribute these sample programs in any form without payment to IBM for the purposes of developing, using, marketing, or distributing application programs conforming to IBM's application programming interfaces.
© Copyright IBM Corp. 2006. All rights reserved. ix
TrademarksThe following terms are trademarks of the International Business Machines Corporation in the United States, other countries, or both:
AIX®DirMaint™ECKD™eServer™HiperSockets™IBM®NetView®OMEGAMON®
RACF®Redbooks™Redbooks (logo) ™Resource Link™RMF™S/390®System z™System z9™
Tivoli®Workplace™z9™z/OS®zSeries®z/VM®
The following terms are trademarks of other companies:
Java, Solaris, Sun, VSM, and all Java-based trademarks are trademarks of Sun Microsystems, Inc. in the United States, other countries, or both.
Windows, and the Windows logo are trademarks of Microsoft Corporation in the United States, other countries, or both.
UNIX is a registered trademark of The Open Group in the United States and other countries.
Linux is a trademark of Linus Torvalds in the United States, other countries, or both.
Other company, product, or service names may be trademarks or service marks of others.
x IBM z/VM and Linux on IBM System z: Virtualization Cookbook for Red Hat Enterprise Linux 4
Preface
In this IBM® Redbook, we assume that you have a general familiarity with IBM eServer™ zSeries® technology and terminology. We do not assume that you have an in-depth understanding of IBM z/VM® and Linux®. This book is written for those who want to get a quick start with z/VM and Linux on the mainframe.
This book describes how to set up your own Linux virtual servers on zSeries and IBM System z9™ under z/VM. It adopts a cookbook format that provides a clearly documented set of procedures for installing and configuring z/VM in a logical partition (LPAR) and then installing and customizing Linux. You require a zSeries LPAR with associated resources, such as a z/VM 5.2 media, and a Linux distribution. This book is based on Red Hat Enterprise Linux 4 for zSeries and it addresses both 31-bit and 64-bit distributions.
In addition, there are a few associated REXX EXECs and Linux scripts to help speed up the process. These tools, which are on the Web, are not IBM products, but they are informally supported. They are available on the Web.
The team that wrote this bookThis IBM Redbook was written by a team of specialists from around the world working at the International Technical Support Organization, Poughkeepsie Center.
Gregory Geiselhart is a Project Leader for Linux on System z™ and zSeries at the International Technical Support Organization, Poughkeepsie Center.
Yohichi Hara is a technical engineer at IBM Japan Systems Engineering Co.,Ltd. He has two years of experience in the Linux on System z field, including client-facing support roles and technical verification testing. He has instructed several education courses. His areas of expertise include designing high-availability automated configuration with Tivoli® System Automation for Multiplatforms.
Bradford Hinson is a technical account manager with Red Hat in Raleigh, North Carolina, where he serves as the primary support contact for enterprise customers. He holds a Bachelor of Science degree in computer science from the University of North Carolina at Chapel Hill, and a Masters degree from the University of North Carolina at Greensboro and Chapel Hill. His areas of expertise include multiplatform Linux support.
Kyle Smith is a software engineer at IBM Test and Integration Center for Linux in Poughkeepsie, New York, where he tests IBM middleware and enterprise Linux distributions on IBM System z. He holds a Bachelor of Science degree in computer science from Clarkson University. His areas of expertise include Linux and Java™ application development.
Chris Young is a Linux on System z specialist in Waterloo, Ontario, where he works to support internal and external customers running Linux on z/VM and System z. He holds a degree in computer science with Software Engineering specialization from the University of Western Ontario. His areas of expertise include process engineering and task automation.
© Copyright IBM Corp. 2006. All rights reserved. xi
Thanks to the following people for their contributions to this project:
Dave Bennin, Roy Costa, Bill White International Technical Support Organization, Poughkeepsie Center
Mike MacIsaac, Jin Xiong, Curtis Gearhart IBM Poughkeepsie
Jay Vosburgh IBM Linux Technology Center
ConventionsThe following font conventions are used in this book:
commands Commands the user enters on the command line
<value> You can replace the value inside the angle brackets
example File, directory, and user ID names that you have to type
This book uses the following command conventions:
� z/VM commands are prefixed with ==>� z/VM XEDIT subcommands are prefixed with ====>� Linux commands running as root are prefixed with #� Linux commands that do not fit on one line are suffixed with \� Linux commands running as non-root are prefixed with $
Become a published authorJoin us for a two week to six week residency program! Help write an IBM Redbook dealing with specific products or solutions, while getting hands-on experience with leading-edge technologies. You team with IBM technical professionals, business partners, and customers.
Your efforts help increase product acceptance and client satisfaction. As a bonus, you develop a network of contacts in IBM development labs, and increase your productivity and marketability.
Find out more about the residency program, browse the residency index, and apply online at:
ibm.com/redbooks/residencies.html
xii IBM z/VM and Linux on IBM System z: Virtualization Cookbook for Red Hat Enterprise Linux 4

Comments welcomeYour comments are important to us!
We want our IBM Redbooks™ to be as helpful as possible. Send us your comments about this or other IBM Redbooks in one of the following ways:
� Use the online Contact us review IBM Redbook form found at:
ibm.com/redbooks
� Send your comments in an e-mail to:
� Mail your comments to:
IBM Corporation, International Technical Support OrganizationDept. HYTD Mail Station P0992455 South RoadPoughkeepsie, NY 12601-5400
Preface xiii

xiv IBM z/VM and Linux on IBM System z: Virtualization Cookbook for Red Hat Enterprise Linux 4
Chapter 1. Introduction to z/VM and Linux
Assume that the Web traffic in your company’s client-facing Web site is experiencing unexpected spikes. You are receiving up to three times the traffic that is typically seen. However, if your site is hosted on an IBM System z mainframe with z/VM and Linux, then you can make the most out of the virtualization technology that z/VM possesses. The solution to the scenario presented is as follows:
11:09am Web site receiving large spikes, negatively impacting the customers’s experience.
11:10am You log on to z/VM and set up two new user IDs and disks.
11:16am You clone an existing Web server Linux master image to the new user IDs.
11:20am You boot and customize the new Linux servers.
11:30am You add the new servers to the Web server cluster to compensate for the increased load.
In the presented scenario, in a little over 20 minutes, your Web site was dynamically scaled with the virtualization capabilities of z/VM and Linux. Your company was able to react with minimal preparation, no extra cost, and very little disruption to the client.
When Linux came to the mainframe in 2000, it was a natural fit to run under z/VM. You can run tens or hundreds of Linux images on the same zSeries logical partition (LPAR). As demonstrated in the preceding scenario, z/VM and Linux infrastructures provide an incredibly scalable and flexible environment that can shrink and grow in a matter of minutes. With this powerful capability, you can launch new products, services, or entire company infrastructures with minimal planning, purchasing, installing, and configuring of new hardware and software. Some of the greatest strengths that mainframe and z/VM possess are as follows:
� z/VM and the mainframe’s virtualization capabilities are more mature and robust than any other hardware and virtualization combination.
� z/VM Virtual Switch (VSWITCH) has simplified Linux networking.
� Full volume backup of systems allows for complete disaster recovery when combined with another data center.
1
© Copyright IBM Corp. 2006. All rights reserved. 1
� z/VM is one of the easiest operating systems to customize. There are only a handful of configuration files. After you set up a z/VM, it runs for years without much maintenance or administrative requirements.
� You can easily pair the latest Linux technologies with the foundation of reliability, availability, and scalability on the z/VM and IBM System z hardware platform.
z/VM 5.2, which is available from December 2005, provides major improvements when operating on IBM System z or zSeries servers with large memory configurations. Scalability is improved with the control program (CP) that is presently using memory above the 2 GB memory address. For example, prior to z/VM 5.2, you required to move storage pages related to standard input/output (I/O) and queued direct I/O (QDIO) below the 2 GB limit before CP could access them. This resulted in an extra copy being performed every time that I/O buffers located above the 2 GB limit were fetched. With z/VM 5.2, you can perform I/O using buffers anywhere in real memory. Also, QDIO structures can reside above 2 GB, along with most other CP control blocks. These improvements offer constraint relief for large, memory-intensive, virtual server environments. For further information about zSeries virtualization capabilities, visit the Web at:
http://www.ibm.com/systems/z/virtualization
1.1 Introduction to virtualization
Virtualization is the ability of a computer system to share resources, so that one physical server can act as many virtual servers. z/VM allows the sharing of the mainframe’s physical resources, such as disk or direct access storage device (DASD), memory (storage), network adapters or open systems adapter (OSA) cards, and central processing unit (CPU) or CPs or Integrated Facilities for Linux. A hypervisor manages these resources. The z/VM hypervisor is called a control program. When a user logs in to z/VM, the hypervisor creates a virtual machine that can run one of many different mainframe operating systems. The two operating systems that this book discusses are the Conversational Monitor System (CMS) and Linux. CMS can be thought of as a z/VM shell. Virtual machines running Linux become the virtual servers.
1.2 The philosophy this book adopts
There is a great deal of excitement around virtualization technology today. Instead of presenting another theoretical paper, this book allows you to personally experience the value of an investment in virtualization. This book places the practical how to behind those theoretical publications.
The solutions in this book are as simple as possible without losing any features. This book’s primary goal is to enable you to install and run a basic Linux server in minimal time. In certain instances, the book discusses certain topics in depth and illustrates tips and tricks that you can use to make the processes run a little smoother. These processes help you preserve time and effort in the long run.
Finally, this book acts as an inspiration for your creativity. We may provide suggestions and examples that act as starting points, but it is up to you to use them and create something that adds the most value for your organization. After reading this book, you have the foundation required to go ahead and make Linux and z/VM on zSeries work for you.
2 IBM z/VM and Linux on IBM System z: Virtualization Cookbook for Red Hat Enterprise Linux 4

1.3 Choices and decisions made in this book
When deciding on installing, maintaining, and provisioning (cloning) Linux virtual servers under z/VM, there are many basic choices to make. Here are some of the more important choices and assumptions that were made in this book:
� Cloning product versus customized cloning
Cloning products, such as Aduva’s Onstage, IBM Tivoli Provisioning Manager, IBM Director function z/VM Center (briefly discussed in 1.4, “IBM Director and z/VM Center Extension” on page 4) and Levanta, are outside the scope of this book. While these are all viable solutions, the cloning described in this book allows you to customize Linux images without requiring such products. However, these products are more sophisticated than the simple EXEC’s and scripts that this book uses.
� Directory Maintenance product versus the USER DIRECT file
The USER DIRECT file is chosen over a directory maintenance product such as IBM DirMaint™ or Computer Associates’ VM:Direct. If DirMaint as a directory maintenance product is better for your enterprise, then use the book known as Getting Started With Linux, SC24-6096, to configure z/VM. You can still use this book to configure Linux.
� Provisioning versus predefined user IDs
You must predefine z/VM user IDs before you start the cloning process. There is no attempt to provision, which means to define and bring Linux user IDs online automatically, as part of the cloning process. The target Linux user ID must exist with the appropriate minidisks defined, or the cloning script fails.
� Shared read-only Linux /usr/ file system versus read/write
Many cloning solutions use an environment that shares the /usr/ file system. This choice often makes the solution more complex, especially when adding, updating, or removing software on the virtual servers. A read-write /usr/ file system on the virtual servers is chosen to keep things as simple as possible.
� Conventional 3390 ECKD™ DASD versus fixed-block architecture (FBA) disks accessed through Small Computer System Interface (SCSI) over Fibre Channel Protocol (FCP)
The zSeries server has, traditionally, only supported 3390 (or older 3380) DASD. Support has been extended to include SCSI or FBA disks in storage area networks (SANs). The support of FBA disks is more complicated than conventional DASD. To keep things as simple as possible, this book describes only the conventional DASD.
� Cloning script versus manual installation
It is easier to set up an infrastructure for cloning Linux under z/VM than it is to manually install Linux. However, the time you may take for either depends on the number of times you have actually cloned. When cloning works quickly, it can be an extremely useful tool. Therefore, this book discusses three methods of provisioning Linux servers. These methods are:
– Manual installation – Red Hat kickstart– Cloning
If you want a more robust solution, then you must look into the products that we recommend in the first bullet point.
Chapter 1. Introduction to z/VM and Linux 3
1.4 IBM Director and z/VM Center Extension
IBM Director 5.10 brings a comprehensive management functionality to Linux on IBM System z. The base IBM Director functions are currently provided for any Linux endpoint on System z. For example monitoring, event action plans, software distribution, inventory, remote control, and task scheduling. In addition, the z/VM Center Extension provides further functionality for provisioning and configuration of z/VM Linux guests.
The z/VM Center Extension includes the following tasks:
� Virtual server deployment
Creation of virtual servers and deployment of operating systems into them by using virtual server and operating system templates, management of virtual servers (create/delete/activate/properties), and provisioning resources.
� Server complexes
Automatic fashion of controlling the configuration and creation of groups of Linux guests. Handling both the z/VM and Linux aspects. Supporting z/VM Resource Manager performance goals. Virtual networking based on virtual machine (VM) Guest local area network (LAN), OSA, and VSWITCH. z/VM minidisk attachments and configuration scripts.
The integration of the z/VM Center virtualization functionality with the full breadth of IBM Director on Linux-managed end-points provides a powerful tool for managing Linux guest colonies on z/VM systems.
1.5 Infrastructure design
To clone Linux, or provision virtual servers, there must be a certain infrastructure design in place. A zSeries server with associated resources and the z/VM operating system define most of this infrastructure. Figure 1-1 shows a block diagram of an IBM System z9™ mainframe with several LPARs.
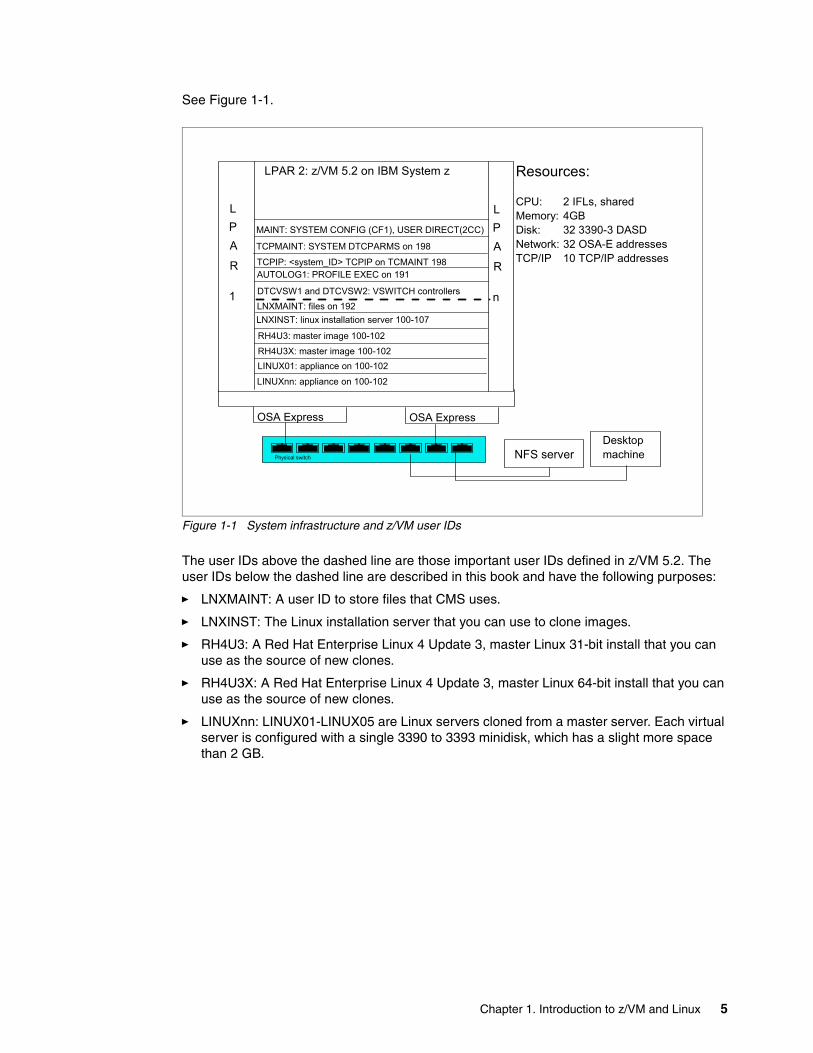
z/VM 5.2 is installed in one of these LPARs. z/VM comes with many user IDs that are predefined. The z/VM LPAR shows the most important six IDs above the dashed line. Below the dashed line, you see the user IDs that this book describes. Important z/VM minidisks and configuration files are shown next to each user ID.
4 IBM z/VM and Linux on IBM System z: Virtualization Cookbook for Red Hat Enterprise Linux 4
See Figure 1-1.
Figure 1-1 System infrastructure and z/VM user IDs
The user IDs above the dashed line are those important user IDs defined in z/VM 5.2. The user IDs below the dashed line are described in this book and have the following purposes:
� LNXMAINT: A user ID to store files that CMS uses.
� LNXINST: The Linux installation server that you can use to clone images.
� RH4U3: A Red Hat Enterprise Linux 4 Update 3, master Linux 31-bit install that you can use as the source of new clones.
� RH4U3X: A Red Hat Enterprise Linux 4 Update 3, master Linux 64-bit install that you can use as the source of new clones.
� LINUXnn: LINUX01-LINUX05 are Linux servers cloned from a master server. Each virtual server is configured with a single 3390 to 3393 minidisk, which has a slight more space than 2 GB.
L
1
R
AP
L
n
R
APMAINT: SYSTEM CONFIG (CF1), USER DIRECT(2CC)
TCPMAINT: SYSTEM DTCPARMS on 198
AUTOLOG1: PROFILE EXEC on 191
LPAR 2: z/VM 5.2 on IBM System z
TCPIP: <system_ID> TCPIP on TCMAINT 198
DTCVSW1 and DTCVSW2: VSWITCH controllers
Resources:
CPU: 2 IFLs, shared Memory: 4GBDisk: 32 3390-3 DASDNetwork: 32 OSA-E addressesTCP/IP 10 TCP/IP addresses
LNXMAINT: files on 192
RH4U3X: master image 100-102LINUX01: appliance on 100-102
LINUXnn: appliance on 100-102
OSA Express OSA Express
Physical switch NFS serverDesktopmachine
LNXINST: linux installation server 100-107
RH4U3: master image 100-102
Chapter 1. Introduction to z/VM and Linux 5
1.6 The chapters in this book
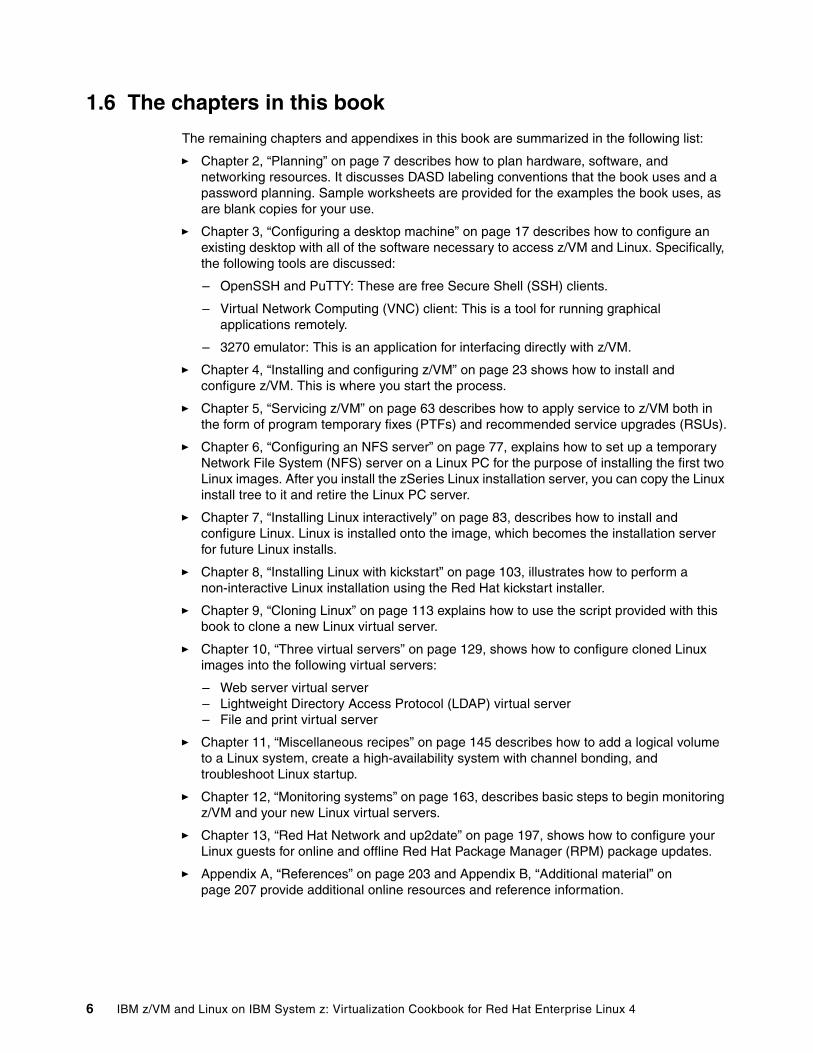
The remaining chapters and appendixes in this book are summarized in the following list:
� Chapter 2, “Planning” on page 7 describes how to plan hardware, software, and networking resources. It discusses DASD labeling conventions that the book uses and a password planning. Sample worksheets are provided for the examples the book uses, as are blank copies for your use.
� Chapter 3, “Configuring a desktop machine” on page 17 describes how to configure an existing desktop with all of the software necessary to access z/VM and Linux. Specifically, the following tools are discussed:
– OpenSSH and PuTTY: These are free Secure Shell (SSH) clients.
– Virtual Network Computing (VNC) client: This is a tool for running graphical applications remotely.
– 3270 emulator: This is an application for interfacing directly with z/VM.
� Chapter 4, “Installing and configuring z/VM” on page 23 shows how to install and configure z/VM. This is where you start the process.
� Chapter 5, “Servicing z/VM” on page 63 describes how to apply service to z/VM both in the form of program temporary fixes (PTFs) and recommended service upgrades (RSUs).
� Chapter 6, “Configuring an NFS server” on page 77, explains how to set up a temporary Network File System (NFS) server on a Linux PC for the purpose of installing the first two Linux images. After you install the zSeries Linux installation server, you can copy the Linux install tree to it and retire the Linux PC server.
� Chapter 7, “Installing Linux interactively” on page 83, describes how to install and configure Linux. Linux is installed onto the image, which becomes the installation server for future Linux installs.
� Chapter 8, “Installing Linux with kickstart” on page 103, illustrates how to perform a non-interactive Linux installation using the Red Hat kickstart installer.
� Chapter 9, “Cloning Linux” on page 113 explains how to use the script provided with this book to clone a new Linux virtual server.
� Chapter 10, “Three virtual servers” on page 129, shows how to configure cloned Linux images into the following virtual servers:
– Web server virtual server– Lightweight Directory Access Protocol (LDAP) virtual server– File and print virtual server
� Chapter 11, “Miscellaneous recipes” on page 145 describes how to add a logical volume to a Linux system, create a high-availability system with channel bonding, and troubleshoot Linux startup.
� Chapter 12, “Monitoring systems” on page 163, describes basic steps to begin monitoring z/VM and your new Linux virtual servers.
� Chapter 13, “Red Hat Network and up2date” on page 197, shows how to configure your Linux guests for online and offline Red Hat Package Manager (RPM) package updates.
� Appendix A, “References” on page 203 and Appendix B, “Additional material” on page 207 provide additional online resources and reference information.
6 IBM z/VM and Linux on IBM System z: Virtualization Cookbook for Red Hat Enterprise Linux 4
Chapter 2. Planning
This chapter covers the planning that you must perform before installing z/VM. It starts with the discussion of a bill of materials, or all the resources that you require. Then, it explains the labeling of 3390 volumes. Finally, resource worksheets are presented for:
� z/VM resources other than direct access storage device (DASD)� DASD resources� Linux resources� Linux user IDs
2
© Copyright IBM Corp. 2006. All rights reserved. 7
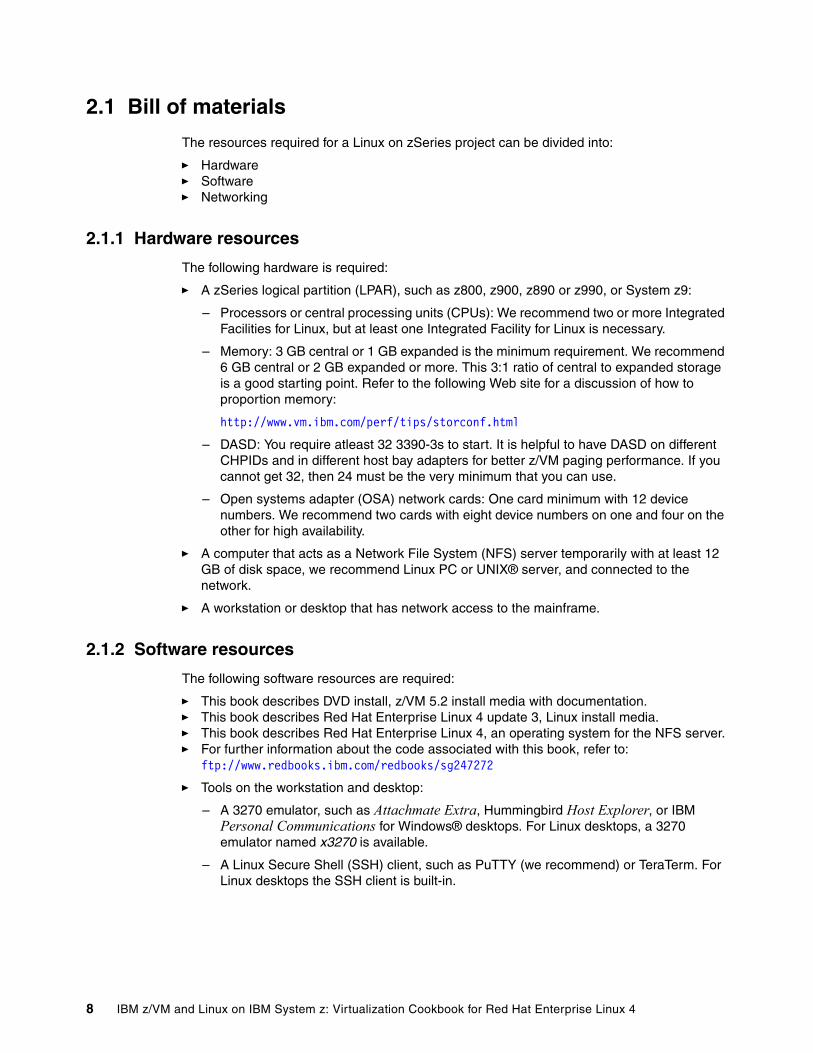
2.1 Bill of materials
The resources required for a Linux on zSeries project can be divided into:
� Hardware� Software� Networking
2.1.1 Hardware resources
The following hardware is required:
� A zSeries logical partition (LPAR), such as z800, z900, z890 or z990, or System z9:
– Processors or central processing units (CPUs): We recommend two or more Integrated Facilities for Linux, but at least one Integrated Facility for Linux is necessary.
– Memory: 3 GB central or 1 GB expanded is the minimum requirement. We recommend 6 GB central or 2 GB expanded or more. This 3:1 ratio of central to expanded storage is a good starting point. Refer to the following Web site for a discussion of how to proportion memory:
http://www.vm.ibm.com/perf/tips/storconf.html
– DASD: You require atleast 32 3390-3s to start. It is helpful to have DASD on different CHPIDs and in different host bay adapters for better z/VM paging performance. If you cannot get 32, then 24 must be the very minimum that you can use.
– Open systems adapter (OSA) network cards: One card minimum with 12 device numbers. We recommend two cards with eight device numbers on one and four on the other for high availability.
� A computer that acts as a Network File System (NFS) server temporarily with at least 12 GB of disk space, we recommend Linux PC or UNIX® server, and connected to the network.
� A workstation or desktop that has network access to the mainframe.
2.1.2 Software resources
The following software resources are required:
� This book describes DVD install, z/VM 5.2 install media with documentation.� This book describes Red Hat Enterprise Linux 4 update 3, Linux install media.� This book describes Red Hat Enterprise Linux 4, an operating system for the NFS server.� For further information about the code associated with this book, refer to:
ftp://www.redbooks.ibm.com/redbooks/sg247272
� Tools on the workstation and desktop:
– A 3270 emulator, such as Attachmate Extra, Hummingbird Host Explorer, or IBM Personal Communications for Windows® desktops. For Linux desktops, a 3270 emulator named x3270 is available.
– A Linux Secure Shell (SSH) client, such as PuTTY (we recommend) or TeraTerm. For Linux desktops the SSH client is built-in.
8 IBM z/VM and Linux on IBM System z: Virtualization Cookbook for Red Hat Enterprise Linux 4
2.1.3 Networking resources
The following network resources are required:
� A Transmission Control Protocol/ Internet Protocol (TCP/IP) address for z/VM
� A TCP/IP address for each Linux virtual server
� Associated TCP/IP information:
– Domain Name System (DNS) host name– DNS domain– DNS server TCP/IP address– TCP/IP gateway– TCP/IP subnet mask– TCP/IP broadcast address, which is usually calculated from address and subnet mask– TCP/IP maximum transmission unit (MTU) size
You must route the TCP/IP addresses to the OSA cards.
2.2 z/VM conventions
It is good to use conventions, so that you and others can recognize z/VM resources by their names. This section discusses conventions for DASD volume names and backup file names.
2.2.1 Volume labeling convention
You must have a convention for labeling DASD. Your shop may already have a labeling convention that largely determines the labels you give to the DASD, which your z/VM and Linux LPAR use.
Each zSeries DASD is addressed with a device number consisting of four hexadecimal digits. Each zSeries DASD has a six character label. It is convenient to include the four-digit address in the label, so that you can easily tell the address of each DASD from its label. If you follow this convention, it guarantees that no two DASD have the same label. This is an important issue especially when z/OS® has access to the DASD.
Sometimes DASD is shared among LPARs. In this case, your z/VM LPAR can see DASD owned by other LPARs. In this situation, it is convenient to identify the LPAR that owns the DASD. Therefore, the volume labeling convention this book uses, identifies the LPAR through the first character. This leaves the second character in the label to identify the basic function of the DASD.
The LPAR this book uses is identified by the character V. The following characters are used for the types of DASD in the second character of the label:
M Minidisk space (PERM)P Paging space (PAGE)S Spool space (SPOL)T Temporary disk space (TDISK)V z/VM operating system volumes
Note: The labels are 520RES, 520W01, 520W02, 520SPL, and 520PAG when you install z/VM.
Chapter 2. Planning 9
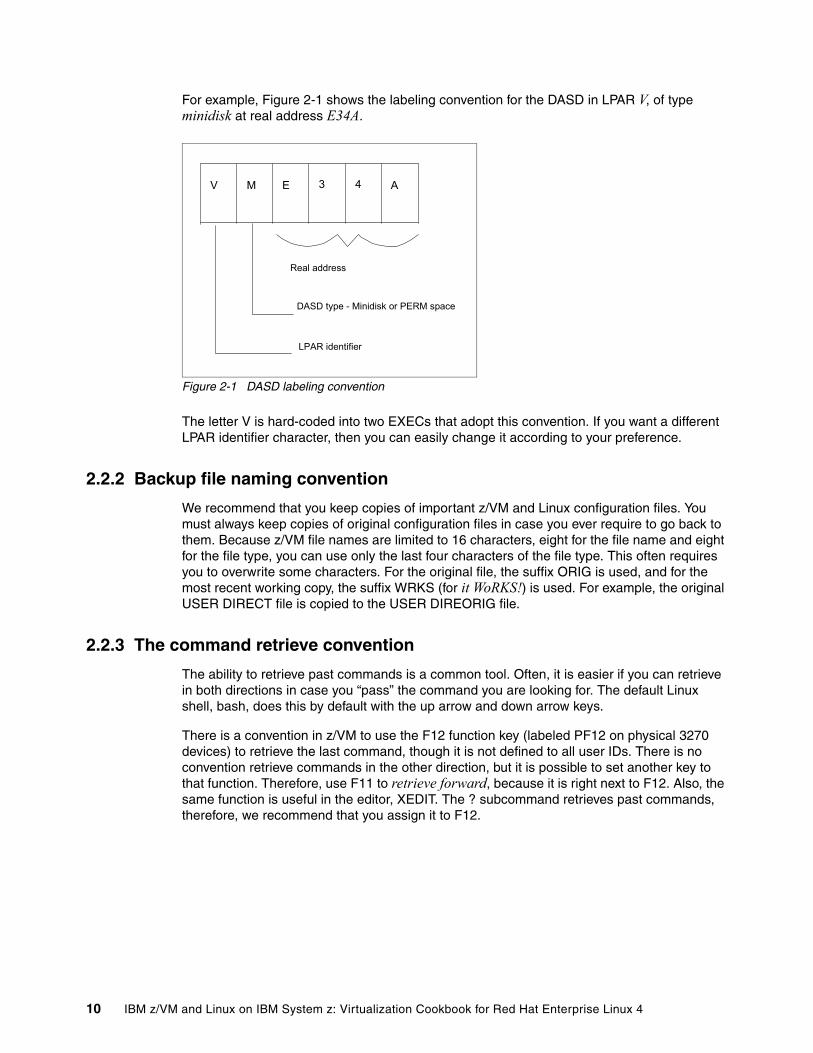
For example, Figure 2-1 shows the labeling convention for the DASD in LPAR V, of type minidisk at real address E34A.
Figure 2-1 DASD labeling convention
The letter V is hard-coded into two EXECs that adopt this convention. If you want a different LPAR identifier character, then you can easily change it according to your preference.
2.2.2 Backup file naming convention
We recommend that you keep copies of important z/VM and Linux configuration files. You must always keep copies of original configuration files in case you ever require to go back to them. Because z/VM file names are limited to 16 characters, eight for the file name and eight for the file type, you can use only the last four characters of the file type. This often requires you to overwrite some characters. For the original file, the suffix ORIG is used, and for the most recent working copy, the suffix WRKS (for it WoRKS!) is used. For example, the original USER DIRECT file is copied to the USER DIREORIG file.
2.2.3 The command retrieve convention
The ability to retrieve past commands is a common tool. Often, it is easier if you can retrieve in both directions in case you “pass” the command you are looking for. The default Linux shell, bash, does this by default with the up arrow and down arrow keys.
There is a convention in z/VM to use the F12 function key (labeled PF12 on physical 3270 devices) to retrieve the last command, though it is not defined to all user IDs. There is no convention retrieve commands in the other direction, but it is possible to set another key to that function. Therefore, use F11 to retrieve forward, because it is right next to F12. Also, the same function is useful in the editor, XEDIT. The ? subcommand retrieves past commands, therefore, we recommend that you assign it to F12.
Real address
LPAR identifier
DASD type - Minidisk or PERM space
V A43EM
10 IBM z/VM and Linux on IBM System z: Virtualization Cookbook for Red Hat Enterprise Linux 4
2.3 Password planning
Good passwords are critical to good security. However, requiring many different passwords leads to people writing them down, which detracts from good security. Sometimes it is difficult to balance these two extremes.
This book considers system administration roles:
� The z/VM system administrator� The Linux system administrator� The Linux virtual server end users
The z/VM and Linux system administrator can be the same person.
The method of backing up z/VM data onto the Linux controller means that the Linux administrator has access to all z/VM passwords. Therefore, the examples in this book set all z/VM and Linux system administration passwords to the same value, VMPASSWD. If you want that the z/VM and Linux system administrator roles are kept separate and that the Linux administrator is not to have access to the z/VM passwords, then you must choose a different method of backing up z/VM data.
Because the passwords to the z/VM Linux user IDs are the same as the system IDs, such as MAINT, the assumption is that Linux users do not log in to z/VM 3270 sessions. The root passwords of the cloned Linux virtual servers are different. Therefore, the Linux virtual server end users do not inherit the root password of the Linux master image.
You may want to define a finer granularity for passwords based on the following system administration roles:
� The main z/VM system administrator (MAINT)� The z/VM network administrator (TCPMAINT)� The z/VM Linux administrator (LNXMAINT, Linux controller, Linux virtual server user IDs)� The Linux end user (with or without authority for 3270 sessions)
The sets of passwords that you define depend on the roles that your organization adopts.
2.4 Planning worksheets
Four worksheets are included in this section. They are populated with the resources used in writing this book. There are also four corresponding blank worksheets in 2.5, “Blank worksheets” on page 14.
2.4.1 Usage of z/VM resources in this book
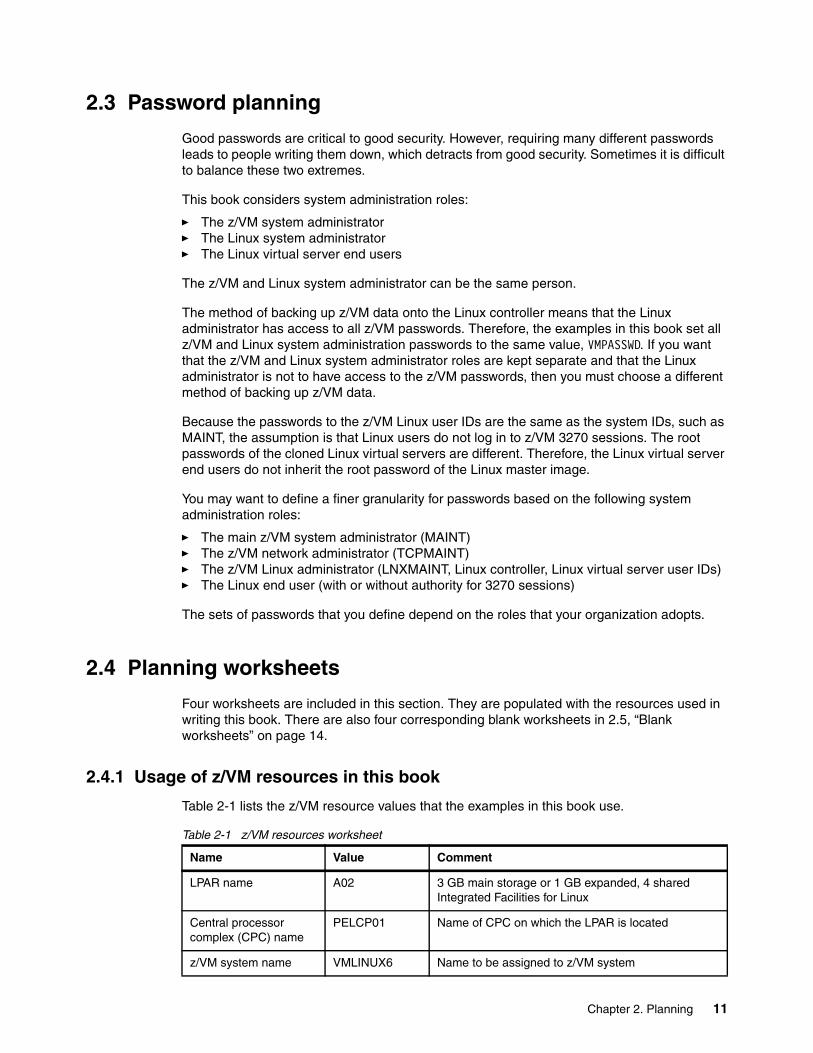
Table 2-1 lists the z/VM resource values that the examples in this book use.
Table 2-1 z/VM resources worksheet
Name Value Comment
LPAR name A02 3 GB main storage or 1 GB expanded, 4 shared Integrated Facilities for Linux
Central processor complex (CPC) name
PELCP01 Name of CPC on which the LPAR is located
z/VM system name VMLINUX6 Name to be assigned to z/VM system
Chapter 2. Planning 11
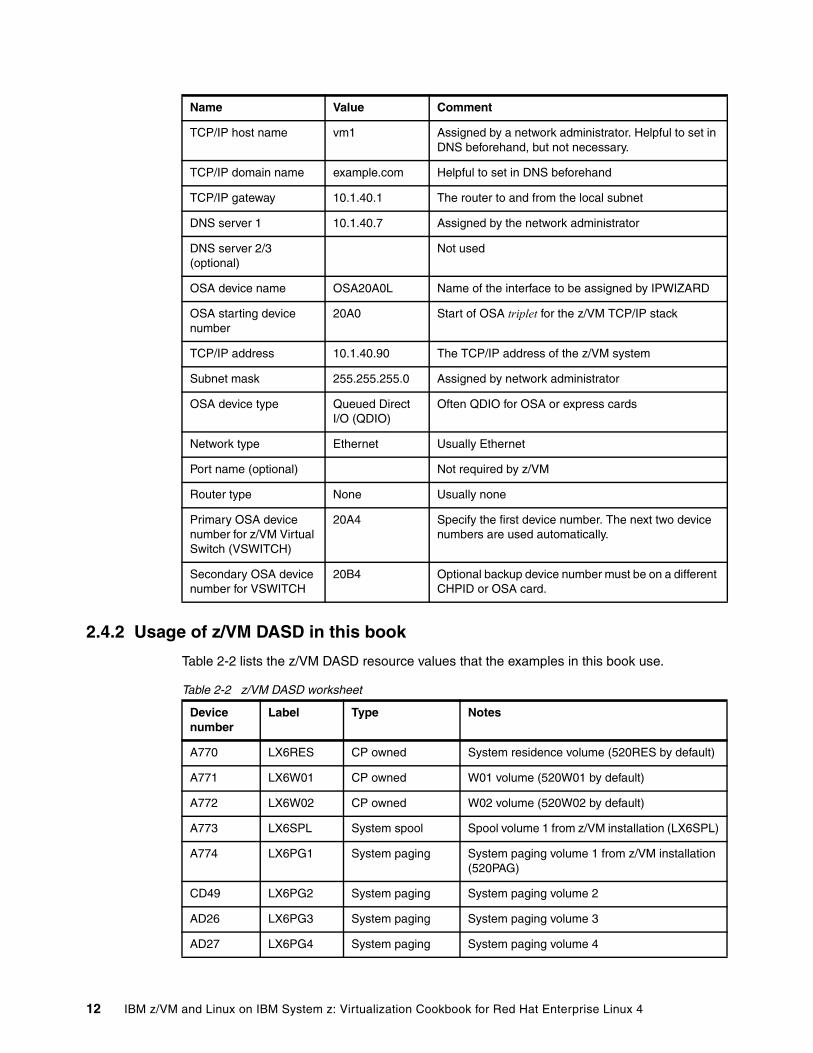
2.4.2 Usage of z/VM DASD in this book
Table 2-2 lists the z/VM DASD resource values that the examples in this book use.
Table 2-2 z/VM DASD worksheet
TCP/IP host name vm1 Assigned by a network administrator. Helpful to set in DNS beforehand, but not necessary.
TCP/IP domain name example.com Helpful to set in DNS beforehand
TCP/IP gateway 10.1.40.1 The router to and from the local subnet
DNS server 1 10.1.40.7 Assigned by the network administrator
DNS server 2/3 (optional)
Not used
OSA device name OSA20A0L Name of the interface to be assigned by IPWIZARD
OSA starting device number
20A0 Start of OSA triplet for the z/VM TCP/IP stack
TCP/IP address 10.1.40.90 The TCP/IP address of the z/VM system
Subnet mask 255.255.255.0 Assigned by network administrator
OSA device type Queued Direct I/O (QDIO)
Often QDIO for OSA or express cards
Network type Ethernet Usually Ethernet
Port name (optional) Not required by z/VM
Router type None Usually none
Primary OSA device number for z/VM Virtual Switch (VSWITCH)
20A4 Specify the first device number. The next two device numbers are used automatically.
Secondary OSA device number for VSWITCH
20B4 Optional backup device number must be on a different CHPID or OSA card.
Name Value Comment
Device number
Label Type Notes
A770 LX6RES CP owned System residence volume (520RES by default)
A771 LX6W01 CP owned W01 volume (520W01 by default)
A772 LX6W02 CP owned W02 volume (520W02 by default)
A773 LX6SPL System spool Spool volume 1 from z/VM installation (LX6SPL)
A774 LX6PG1 System paging System paging volume 1 from z/VM installation (520PAG)
CD49 LX6PG2 System paging System paging volume 2
AD26 LX6PG3 System paging System paging volume 3
AD27 LX6PG4 System paging System paging volume 4
12 IBM z/VM and Linux on IBM System z: Virtualization Cookbook for Red Hat Enterprise Linux 4
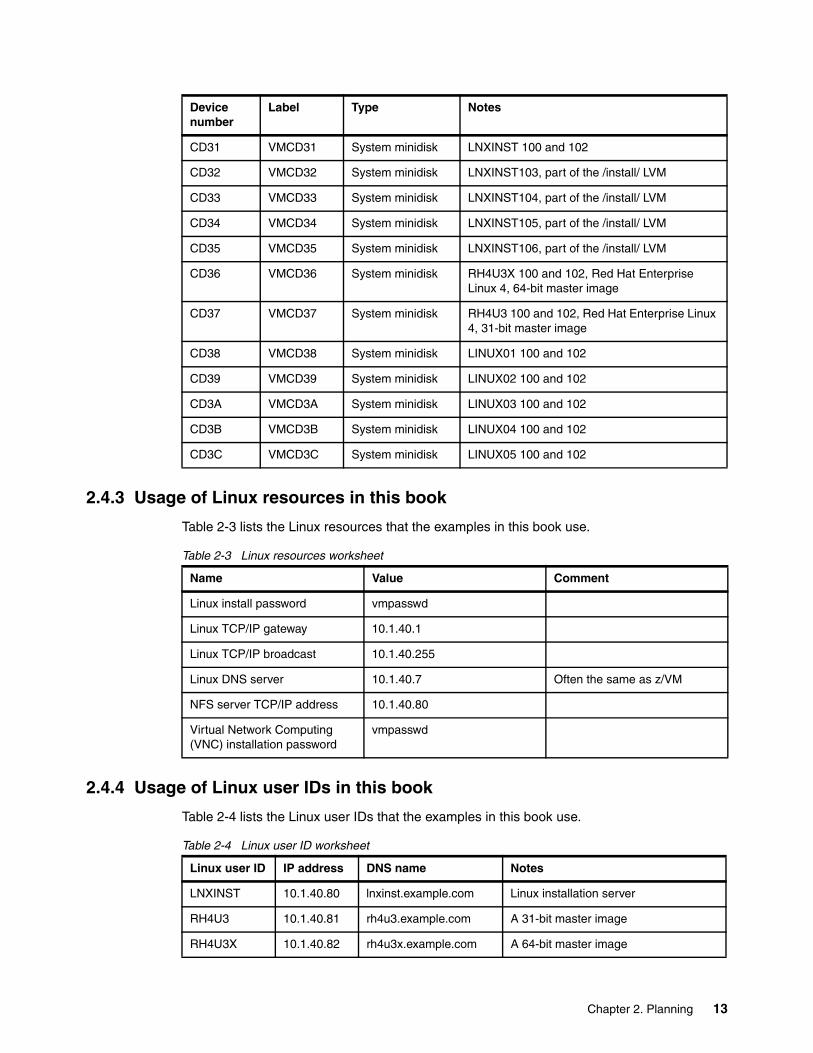
2.4.3 Usage of Linux resources in this book
Table 2-3 lists the Linux resources that the examples in this book use.
Table 2-3 Linux resources worksheet
2.4.4 Usage of Linux user IDs in this book
Table 2-4 lists the Linux user IDs that the examples in this book use.
Table 2-4 Linux user ID worksheet
CD31 VMCD31 System minidisk LNXINST 100 and 102
CD32 VMCD32 System minidisk LNXINST103, part of the /install/ LVM
CD33 VMCD33 System minidisk LNXINST104, part of the /install/ LVM
CD34 VMCD34 System minidisk LNXINST105, part of the /install/ LVM
CD35 VMCD35 System minidisk LNXINST106, part of the /install/ LVM
CD36 VMCD36 System minidisk RH4U3X 100 and 102, Red Hat Enterprise Linux 4, 64-bit master image
CD37 VMCD37 System minidisk RH4U3 100 and 102, Red Hat Enterprise Linux 4, 31-bit master image
CD38 VMCD38 System minidisk LINUX01 100 and 102
CD39 VMCD39 System minidisk LINUX02 100 and 102
CD3A VMCD3A System minidisk LINUX03 100 and 102
CD3B VMCD3B System minidisk LINUX04 100 and 102
CD3C VMCD3C System minidisk LINUX05 100 and 102
Device number
Label Type Notes
Name Value Comment
Linux install password vmpasswd
Linux TCP/IP gateway 10.1.40.1
Linux TCP/IP broadcast 10.1.40.255
Linux DNS server 10.1.40.7 Often the same as z/VM
NFS server TCP/IP address 10.1.40.80
Virtual Network Computing (VNC) installation password
vmpasswd
Linux user ID IP address DNS name Notes
LNXINST 10.1.40.80 lnxinst.example.com Linux installation server
RH4U3 10.1.40.81 rh4u3.example.com A 31-bit master image
RH4U3X 10.1.40.82 rh4u3x.example.com A 64-bit master image
Chapter 2. Planning 13

2.5 Blank worksheets
Blank copies of the same four worksheets are provided for your use.
2.5.1 z/VM resources worksheet
Use the worksheet in Table 2-5 to document the z/VM resources that you use.
Table 2-5 z/VM resources blank worksheet
LINUX01 10.1.40.91 linux01.example.com A Web virtual server
LINUX02 10.1.40.92 linux02.example.com A Lightweight Directory Access Protocol (LDAP) virtual server
LINUX03 10.1.40.93 linux03.example.com A file and print virtual server
LINUX04 10.1.40.94 linux04.example.com A channel bonded virtual server
LINUX05 10.1.40.95 linux05.example.com An extra virtual server
Linux user ID IP address DNS name Notes
Name Value Comment
LPAR name
CPC name
System name
TCP/IP host name
TCP/IP domain name
TCP/IP gateway
DNS server 1
DNS server 2/3 (optional)
OSA device name Often “eth0”
OSA starting device number
TCP/IP address
Subnet mask
OSA device type Often “QDIO”
Network Type Often “Ethernet
Port name (optional)
Router Type Often “None”
Primary OSA device number for VSWITCH
Secondary OSA device number for VSWITCH
14 IBM z/VM and Linux on IBM System z: Virtualization Cookbook for Red Hat Enterprise Linux 4
2.5.2 z/VM DASD worksheet
Use the worksheet in Table 2-6 to document the z/VM DASD that you use.
Table 2-6 z/VM DASD blank worksheet
Device number
Label Type Notes
Chapter 2. Planning 15
2.5.3 Linux resources worksheet
Use the worksheet in Table 2-7 to document your Linux resources.
Table 2-7 Linux resources blank worksheet
2.5.4 Linux user ID worksheet
Use the worksheet in Table 2-8 to document the Linux user IDs that you create.
Table 2-8 Linux user ID blank worksheet
Name Value Comment
NFS server TCP/IP address
Linux install password
Linux TCP/IP gateway
Linux TCP/IP broadcast
Linux DNS server
VNC Installation password
Linux user ID IP address DNS name Notes
16 IBM z/VM and Linux on IBM System z: Virtualization Cookbook for Red Hat Enterprise Linux 4
Chapter 3. Configuring a desktop machine
This chapter addresses the following tools that we recommend. You can use these tools to access z/VM and Linux from both a Linux and Windows desktop:
� A Secure Shell (SSH) client: OpenSSH for Linux or PuTTY for Windows� A Virtual Network Computing (VNC) client: We recommend RealVNC� A 3270 emulator: Many options are available
3
© Copyright IBM Corp. 2006. All rights reserved. 17
3.1 PuTTY: A free SSH client
In this book, we use SSH to log into Linux systems. It is simple to use and cryptographically secure. If you are using a Linux desktop system, then the OpenSSH package provides an SSH client, therefore, you can simply run SSH from a terminal window. If you are using a Windows desktop, we recommend the PuTTY SSH client. You can download it from the Web at the following address:
http://www.chiark.greenend.org.uk/~sgtatham/putty/download.html
To download from this page, click the putty.exe link for your architecture. Save the file in a folder that you can remember. You might want to include the version in the file name such as putty-0.58.exe. PuTTY is a stand-alone executable. There is no formal installation process. You may also want to create a shortcut on your desktop or task bar.
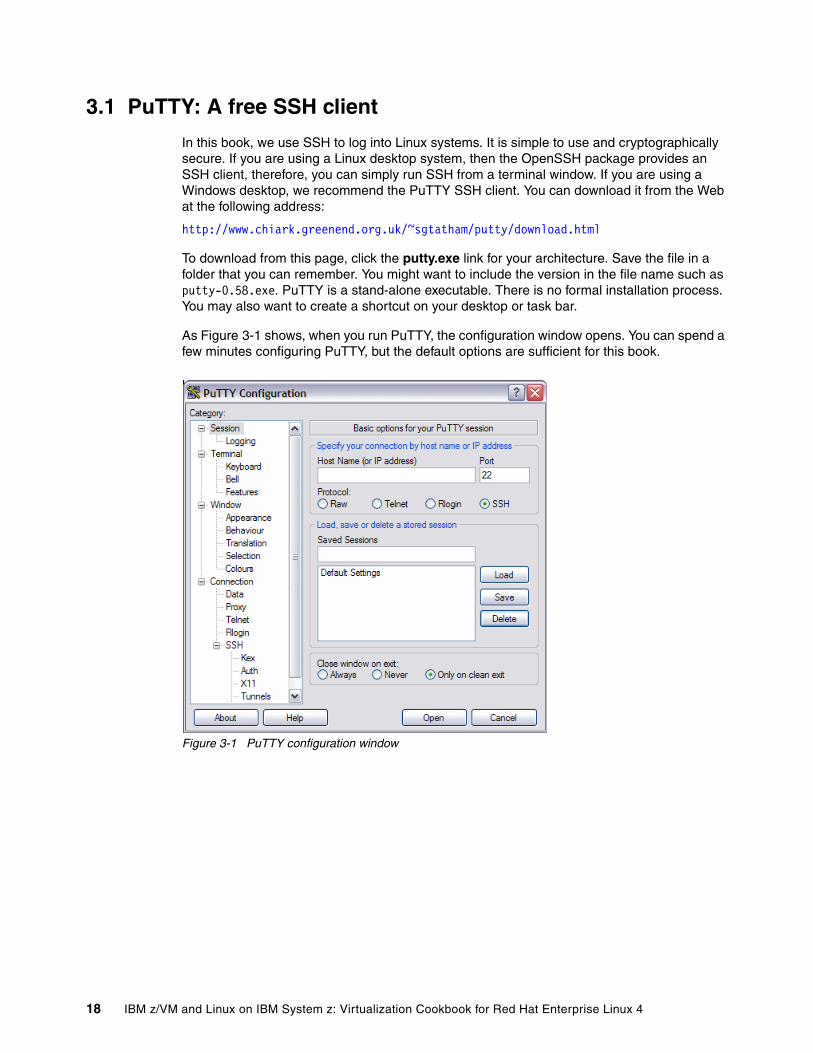
As Figure 3-1 shows, when you run PuTTY, the configuration window opens. You can spend a few minutes configuring PuTTY, but the default options are sufficient for this book.
Figure 3-1 PuTTY configuration window
18 IBM z/VM and Linux on IBM System z: Virtualization Cookbook for Red Hat Enterprise Linux 4
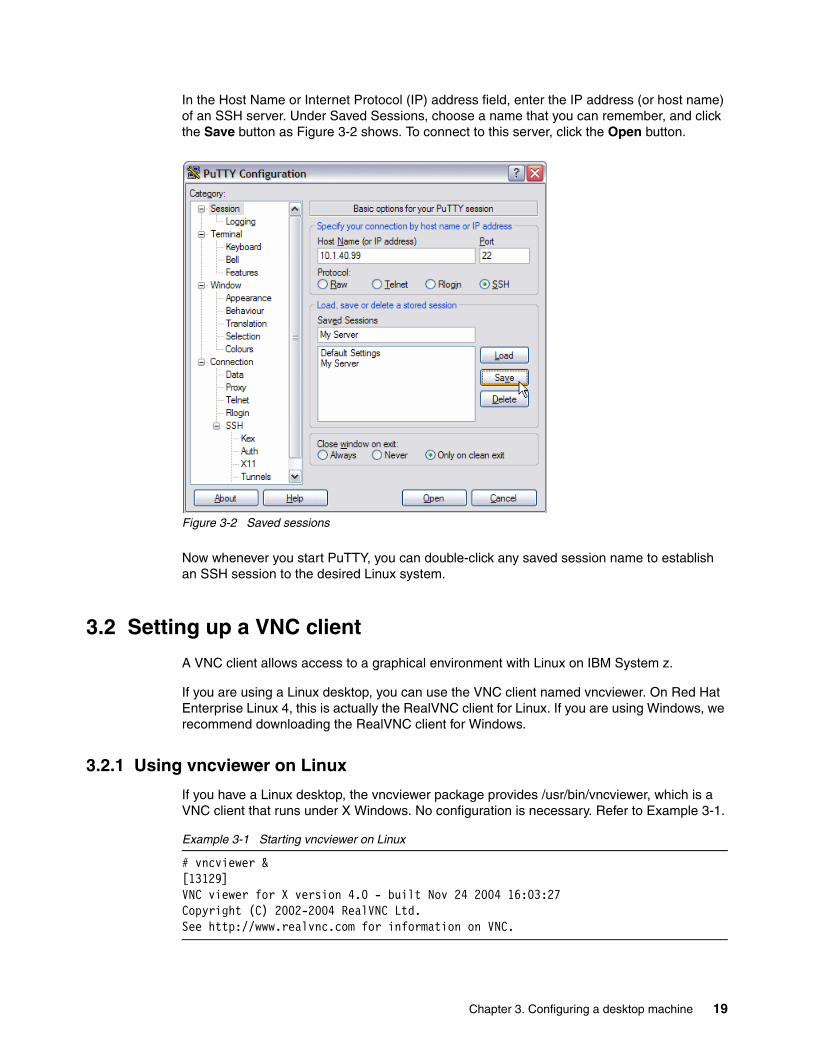
In the Host Name or Internet Protocol (IP) address field, enter the IP address (or host name) of an SSH server. Under Saved Sessions, choose a name that you can remember, and click the Save button as Figure 3-2 shows. To connect to this server, click the Open button.
Figure 3-2 Saved sessions
Now whenever you start PuTTY, you can double-click any saved session name to establish an SSH session to the desired Linux system.
3.2 Setting up a VNC client
A VNC client allows access to a graphical environment with Linux on IBM System z.
If you are using a Linux desktop, you can use the VNC client named vncviewer. On Red Hat Enterprise Linux 4, this is actually the RealVNC client for Linux. If you are using Windows, we recommend downloading the RealVNC client for Windows.
3.2.1 Using vncviewer on Linux
If you have a Linux desktop, the vncviewer package provides /usr/bin/vncviewer, which is a VNC client that runs under X Windows. No configuration is necessary. Refer to Example 3-1.
Example 3-1 Starting vncviewer on Linux
# vncviewer &[13129]VNC viewer for X version 4.0 - built Nov 24 2004 16:03:27Copyright (C) 2002-2004 RealVNC Ltd.See http://www.realvnc.com for information on VNC.
Chapter 3. Configuring a desktop machine 19
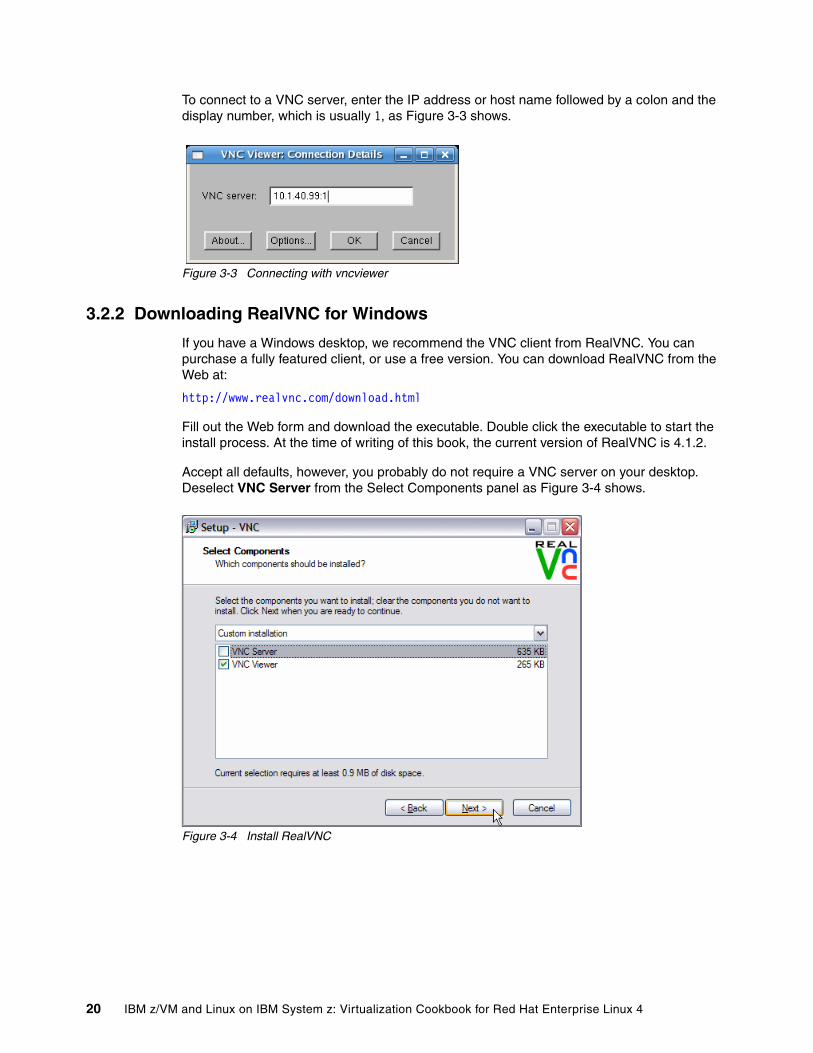
To connect to a VNC server, enter the IP address or host name followed by a colon and the display number, which is usually 1, as Figure 3-3 shows.
Figure 3-3 Connecting with vncviewer
3.2.2 Downloading RealVNC for Windows
If you have a Windows desktop, we recommend the VNC client from RealVNC. You can purchase a fully featured client, or use a free version. You can download RealVNC from the Web at:
http://www.realvnc.com/download.html
Fill out the Web form and download the executable. Double click the executable to start the install process. At the time of writing of this book, the current version of RealVNC is 4.1.2.
Accept all defaults, however, you probably do not require a VNC server on your desktop. Deselect VNC Server from the Select Components panel as Figure 3-4 shows.
Figure 3-4 Install RealVNC
20 IBM z/VM and Linux on IBM System z: Virtualization Cookbook for Red Hat Enterprise Linux 4
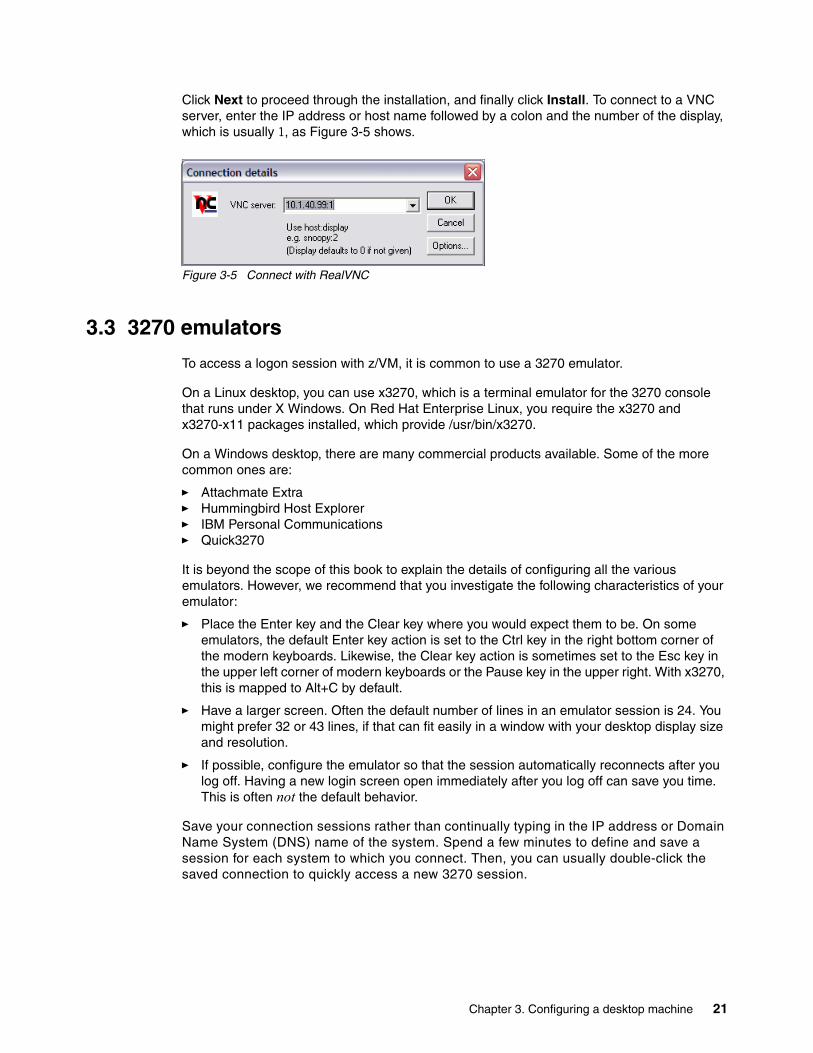
Click Next to proceed through the installation, and finally click Install. To connect to a VNC server, enter the IP address or host name followed by a colon and the number of the display, which is usually 1, as Figure 3-5 shows.
Figure 3-5 Connect with RealVNC
3.3 3270 emulators
To access a logon session with z/VM, it is common to use a 3270 emulator.
On a Linux desktop, you can use x3270, which is a terminal emulator for the 3270 console that runs under X Windows. On Red Hat Enterprise Linux, you require the x3270 and x3270-x11 packages installed, which provide /usr/bin/x3270.
On a Windows desktop, there are many commercial products available. Some of the more common ones are:
� Attachmate Extra� Hummingbird Host Explorer� IBM Personal Communications� Quick3270
It is beyond the scope of this book to explain the details of configuring all the various emulators. However, we recommend that you investigate the following characteristics of your emulator:
� Place the Enter key and the Clear key where you would expect them to be. On some emulators, the default Enter key action is set to the Ctrl key in the right bottom corner of the modern keyboards. Likewise, the Clear key action is sometimes set to the Esc key in the upper left corner of modern keyboards or the Pause key in the upper right. With x3270, this is mapped to Alt+C by default.
� Have a larger screen. Often the default number of lines in an emulator session is 24. You might prefer 32 or 43 lines, if that can fit easily in a window with your desktop display size and resolution.
� If possible, configure the emulator so that the session automatically reconnects after you log off. Having a new login screen open immediately after you log off can save you time. This is often not the default behavior.
Save your connection sessions rather than continually typing in the IP address or Domain Name System (DNS) name of the system. Spend a few minutes to define and save a session for each system to which you connect. Then, you can usually double-click the saved connection to quickly access a new 3270 session.
Chapter 3. Configuring a desktop machine 21

22 IBM z/VM and Linux on IBM System z: Virtualization Cookbook for Red Hat Enterprise Linux 4

Chapter 4. Installing and configuring z/VM
This chapter describes installing z/VM. There is a point during the installation of z/VM (instdvd) that takes over two hours. While this process is running, we recommend that you skip ahead in this book to “Configuring an NFS server” on page 77. The latter part of this chapter uses the Network File System (NFS) server to transfer some REXX EXEC scripts that are useful during z/VM configuration. Alternatively, if you have other colleagues who can work on the project, you can start both chapters at the same time on different systems.
4
© Copyright IBM Corp. 2006. All rights reserved. 23
4.1 Installing z/VM from DVD
The section that follows assumes a first level installation of z/VM from DVD to direct access storage device (DASD). If you have not already done so, complete the worksheet in 2.5.1, “z/VM resources worksheet” on page 14. You require access to the Hardware Management Console (HMC).
z/VM 5.2 is shipped on tape and DVD. z/VM installs faster from tape due to faster input/output (I/O) speeds. Installing from tape might require more trips between the HMC and the tape drive.
If you are familiar with the HMC, you can use the two page z/VM Summary for Automated Installation and Service (DVD Installation), GA76-0406 to replace or augment the description here.
If you are not familiar with the HMC and z/ VM, you might want to use the complete installation manual z/VM Guide for Automated Installation and Service Version 5 Release 2.0, GC24-6099. If you are installing z/VM at the second level (z/VM under z/VM) or to an Small Computer System Interface (SCSI) disk, use the preceding book just mentioned, because the sections that follow in this book do not address these options.
4.1.1 Booting z/VM from DVD
This section explains how to install z/VM 5.2 from an HMC with a DVD-ROM on to 3390-3 DASD. For alternative configurations such as installing from tape or onto SCSI disks, refer to the z/VM documentation. Perform the following steps:
1. On the HMC, select the logical partition (LPAR) on which you want to install z/VM.
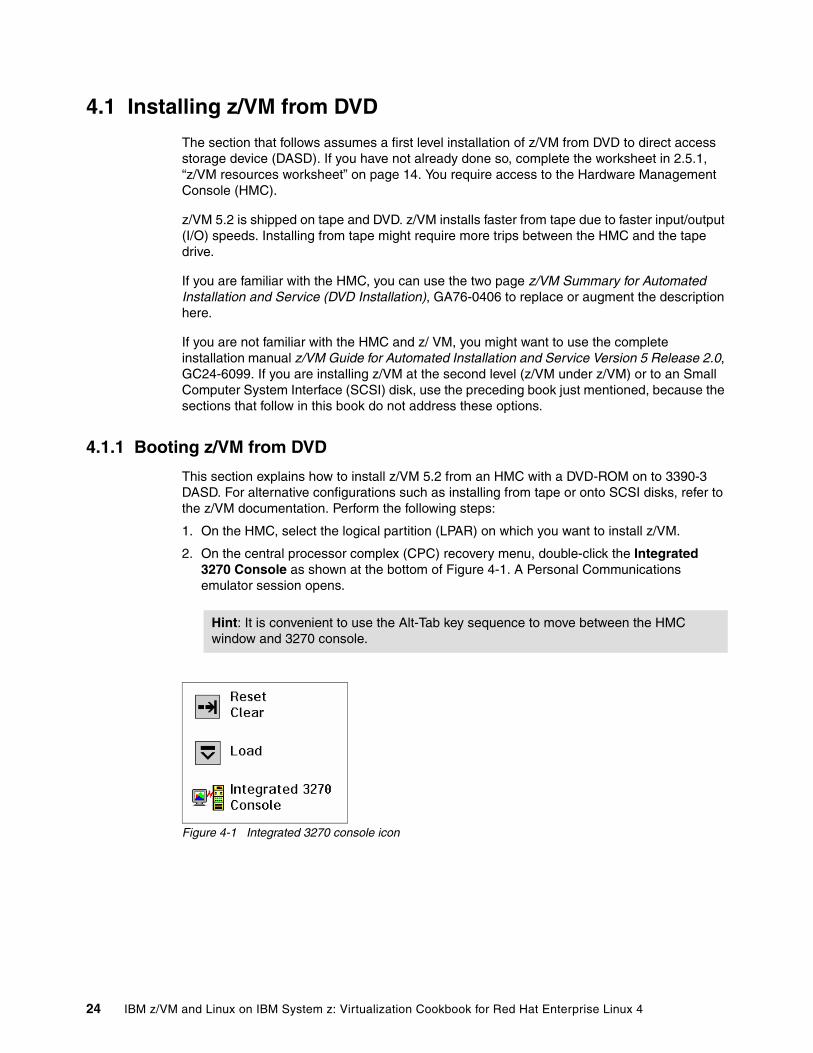
2. On the central processor complex (CPC) recovery menu, double-click the Integrated 3270 Console as shown at the bottom of Figure 4-1. A Personal Communications emulator session opens.
Figure 4-1 Integrated 3270 console icon
Hint: It is convenient to use the Alt-Tab key sequence to move between the HMC window and 3270 console.
24 IBM z/VM and Linux on IBM System z: Virtualization Cookbook for Red Hat Enterprise Linux 4

3. Place the z/VM DVD Product Package 3390 in the HMC DVD drive.
4. Switch to Single Object Operations mode. To get into this mode, perform the following steps:
a. Double-click Defined CPCs in the Groups Work Area.
b. Select your CPC.
c. If necessary, go around the racetrack, which are the buttons with circular arrows on the bottom right corner, to the CPC Recovery menu.
d. Double-click the Single Object Operations icon. Click yes to confirm. Now the Primary Support Element Workplace™ window opens. This is a window within a window.
e. Double-click Groups near the top of this window.
f. Double-click Images in the Groups Work Area.
5. Select the LPAR into which you want to install z/VM.
6. Go around the racetrack in this window to the CPC Recovery menu. Double-click the Load from CD-ROM or Server icon when you see it as Figure 4-2 shows.
Figure 4-2 CPC Recovery menu with Load from CD-ROM or Server icon
7. Confirm you want to load by clicking Yes.
8. On the Load CD-ROM or Server window as shown in Figure 4-3:
a. Select the radio button that represents Hardware Management Console CD-ROM.
b. In the same Load CD-ROM or server window, fill in File Location with /cpdvd. This is the directory on the DVD with the z/VM 5.2 installation code.
c. Click Continue.
Chapter 4. Installing and configuring z/VM 25
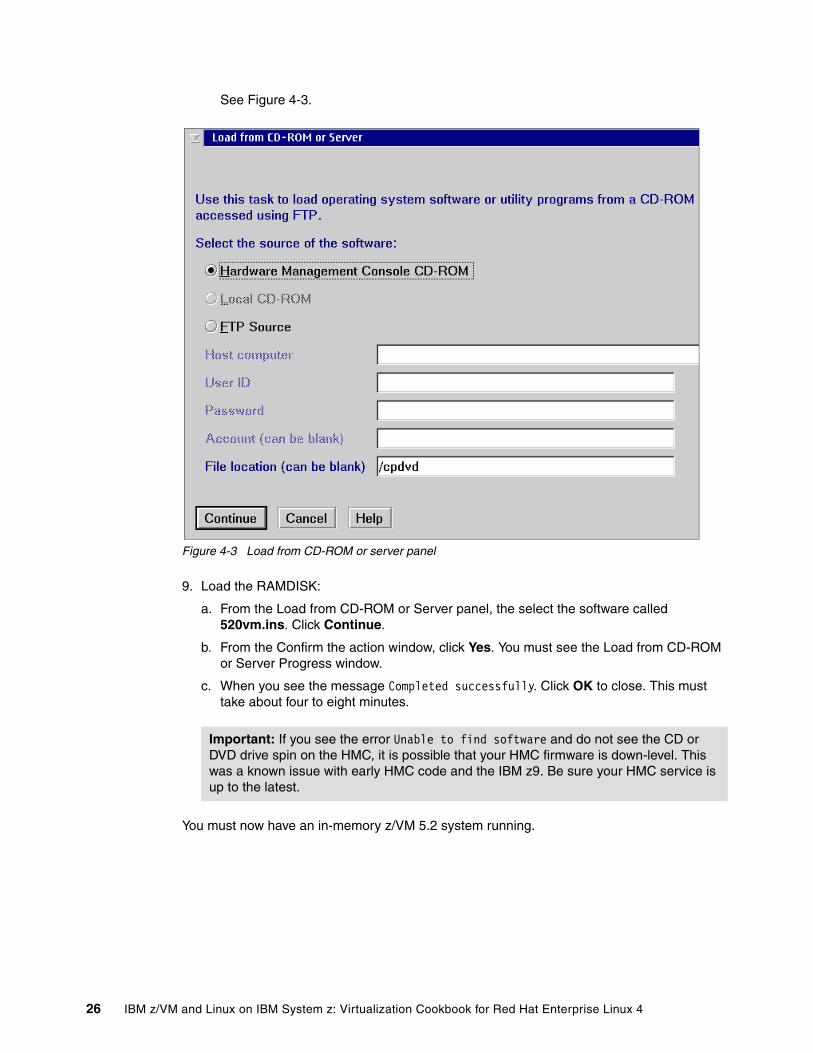
See Figure 4-3.
Figure 4-3 Load from CD-ROM or server panel
9. Load the RAMDISK:
a. From the Load from CD-ROM or Server panel, the select the software called 520vm.ins. Click Continue.
b. From the Confirm the action window, click Yes. You must see the Load from CD-ROM or Server Progress window.
c. When you see the message Completed successfully. Click OK to close. This must take about four to eight minutes.
You must now have an in-memory z/VM 5.2 system running.
Important: If you see the error Unable to find software and do not see the CD or DVD drive spin on the HMC, it is possible that your HMC firmware is down-level. This was a known issue with early HMC code and the IBM z9. Be sure your HMC service is up to the latest.
26 IBM z/VM and Linux on IBM System z: Virtualization Cookbook for Red Hat Enterprise Linux 4
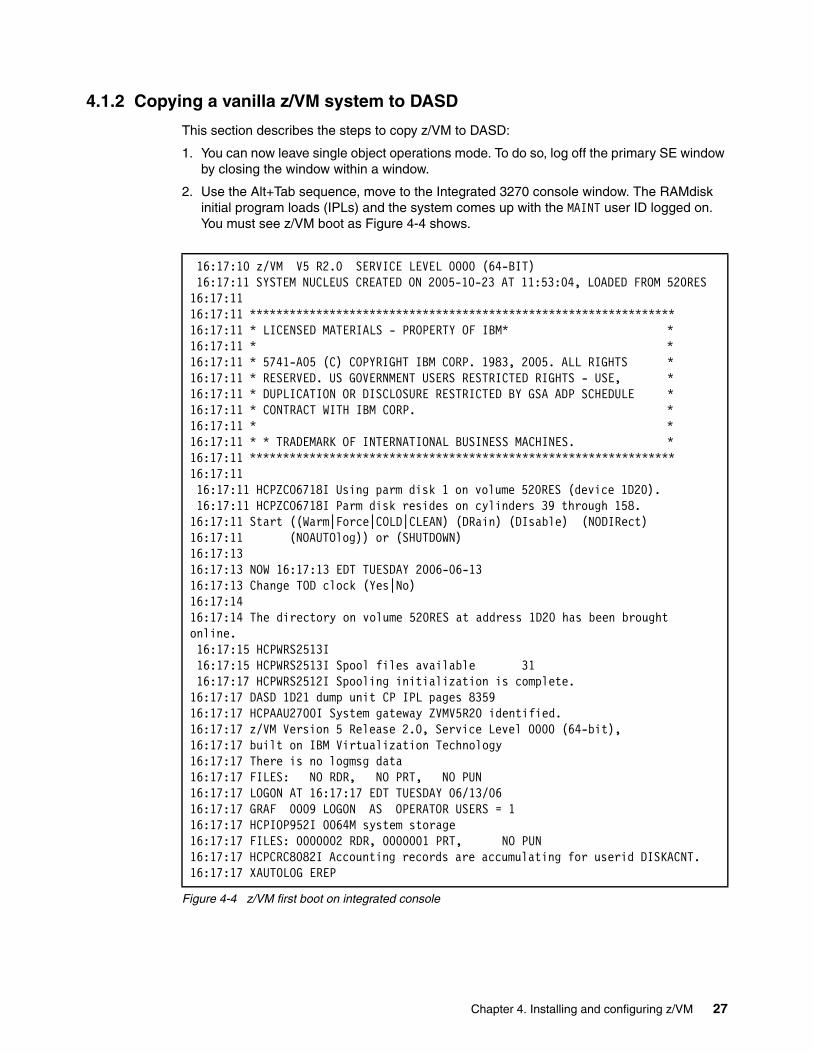
4.1.2 Copying a vanilla z/VM system to DASD
This section describes the steps to copy z/VM to DASD:
1. You can now leave single object operations mode. To do so, log off the primary SE window by closing the window within a window.
2. Use the Alt+Tab sequence, move to the Integrated 3270 console window. The RAMdisk initial program loads (IPLs) and the system comes up with the MAINT user ID logged on. You must see z/VM boot as Figure 4-4 shows.
Figure 4-4 z/VM first boot on integrated console
16:17:10 z/VM V5 R2.0 SERVICE LEVEL 0000 (64-BIT) 16:17:11 SYSTEM NUCLEUS CREATED ON 2005-10-23 AT 11:53:04, LOADED FROM 520RES 16:17:11 16:17:11 **************************************************************** 16:17:11 * LICENSED MATERIALS - PROPERTY OF IBM* * 16:17:11 * * 16:17:11 * 5741-A05 (C) COPYRIGHT IBM CORP. 1983, 2005. ALL RIGHTS * 16:17:11 * RESERVED. US GOVERNMENT USERS RESTRICTED RIGHTS - USE, * 16:17:11 * DUPLICATION OR DISCLOSURE RESTRICTED BY GSA ADP SCHEDULE * 16:17:11 * CONTRACT WITH IBM CORP. * 16:17:11 * * 16:17:11 * * TRADEMARK OF INTERNATIONAL BUSINESS MACHINES. * 16:17:11 **************************************************************** 16:17:11 16:17:11 HCPZCO6718I Using parm disk 1 on volume 520RES (device 1D20). 16:17:11 HCPZCO6718I Parm disk resides on cylinders 39 through 158. 16:17:11 Start ((Warm|Force|COLD|CLEAN) (DRain) (DIsable) (NODIRect) 16:17:11 (NOAUTOlog)) or (SHUTDOWN) 16:17:13 16:17:13 NOW 16:17:13 EDT TUESDAY 2006-06-13 16:17:13 Change TOD clock (Yes|No) 16:17:14 16:17:14 The directory on volume 520RES at address 1D20 has been brought online. 16:17:15 HCPWRS2513I 16:17:15 HCPWRS2513I Spool files available 31 16:17:17 HCPWRS2512I Spooling initialization is complete. 16:17:17 DASD 1D21 dump unit CP IPL pages 8359 16:17:17 HCPAAU2700I System gateway ZVMV5R20 identified. 16:17:17 z/VM Version 5 Release 2.0, Service Level 0000 (64-bit), 16:17:17 built on IBM Virtualization Technology 16:17:17 There is no logmsg data 16:17:17 FILES: NO RDR, NO PRT, NO PUN 16:17:17 LOGON AT 16:17:17 EDT TUESDAY 06/13/06 16:17:17 GRAF 0009 LOGON AS OPERATOR USERS = 1 16:17:17 HCPIOP952I 0064M system storage 16:17:17 FILES: 0000002 RDR, 0000001 PRT, NO PUN 16:17:17 HCPCRC8082I Accounting records are accumulating for userid DISKACNT. 16:17:17 XAUTOLOG EREP
Chapter 4. Installing and configuring z/VM 27
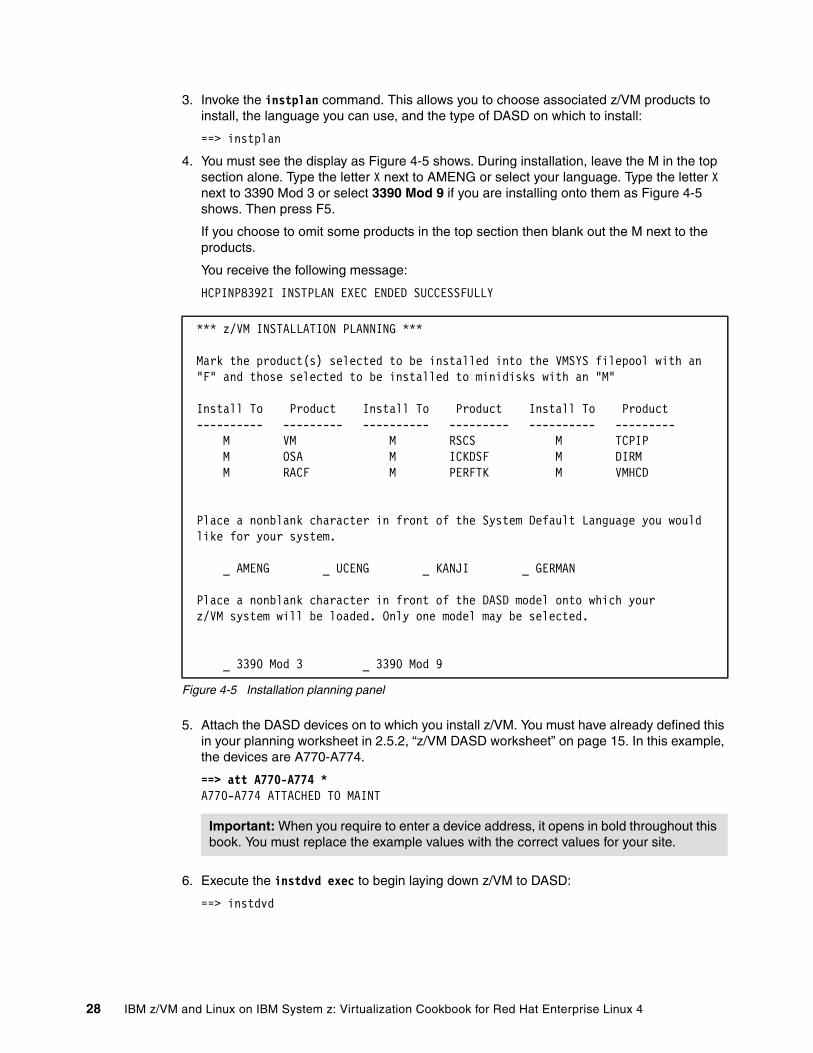
3. Invoke the instplan command. This allows you to choose associated z/VM products to install, the language you can use, and the type of DASD on which to install:
==> instplan
4. You must see the display as Figure 4-5 shows. During installation, leave the M in the top section alone. Type the letter X next to AMENG or select your language. Type the letter X next to 3390 Mod 3 or select 3390 Mod 9 if you are installing onto them as Figure 4-5 shows. Then press F5.
If you choose to omit some products in the top section then blank out the M next to the products.
You receive the following message:
HCPINP8392I INSTPLAN EXEC ENDED SUCCESSFULLY
Figure 4-5 Installation planning panel
5. Attach the DASD devices on to which you install z/VM. You must have already defined this in your planning worksheet in 2.5.2, “z/VM DASD worksheet” on page 15. In this example, the devices are A770-A774.
==> att A770-A774 *A770-A774 ATTACHED TO MAINT
6. Execute the instdvd exec to begin laying down z/VM to DASD:
==> instdvd
*** z/VM INSTALLATION PLANNING *** Mark the product(s) selected to be installed into the VMSYS filepool with an "F" and those selected to be installed to minidisks with an "M" Install To Product Install To Product Install To Product ---------- --------- ---------- --------- ---------- --------- M VM M RSCS M TCPIP M OSA M ICKDSF M DIRM M RACF M PERFTK M VMHCD Place a nonblank character in front of the System Default Language you would like for your system. _ AMENG _ UCENG _ KANJI _ GERMAN Place a nonblank character in front of the DASD model onto which your z/VM system will be loaded. Only one model may be selected. _ 3390 Mod 3 _ 3390 Mod 9
Important: When you require to enter a device address, it opens in bold throughout this book. You must replace the example values with the correct values for your site.
28 IBM z/VM and Linux on IBM System z: Virtualization Cookbook for Red Hat Enterprise Linux 4
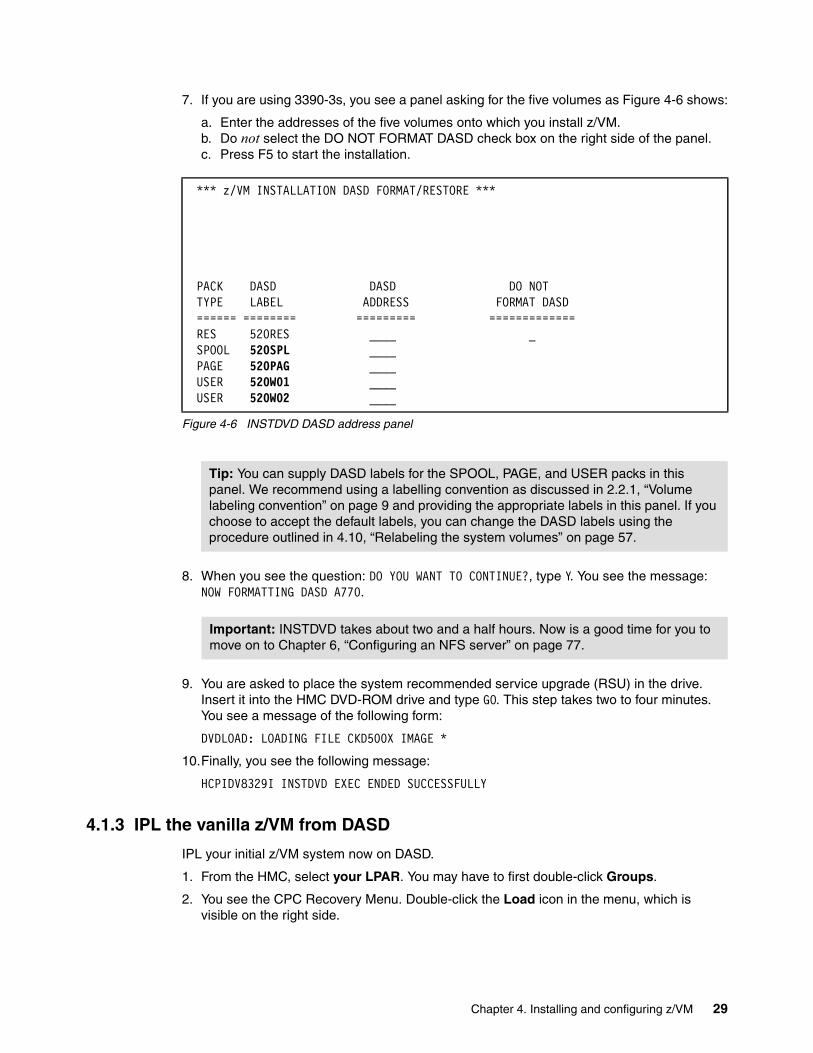
7. If you are using 3390-3s, you see a panel asking for the five volumes as Figure 4-6 shows:
a. Enter the addresses of the five volumes onto which you install z/VM. b. Do not select the DO NOT FORMAT DASD check box on the right side of the panel.c. Press F5 to start the installation.
Figure 4-6 INSTDVD DASD address panel
8. When you see the question: DO YOU WANT TO CONTINUE?, type Y. You see the message: NOW FORMATTING DASD A770.
9. You are asked to place the system recommended service upgrade (RSU) in the drive. Insert it into the HMC DVD-ROM drive and type GO. This step takes two to four minutes. You see a message of the following form:
DVDLOAD: LOADING FILE CKD500X IMAGE *
10.Finally, you see the following message:
HCPIDV8329I INSTDVD EXEC ENDED SUCCESSFULLY
4.1.3 IPL the vanilla z/VM from DASD
IPL your initial z/VM system now on DASD.
1. From the HMC, select your LPAR. You may have to first double-click Groups.
2. You see the CPC Recovery Menu. Double-click the Load icon in the menu, which is visible on the right side.
*** z/VM INSTALLATION DASD FORMAT/RESTORE *** PACK DASD DASD DO NOT TYPE LABEL ADDRESS FORMAT DASD ====== ======== ========= ============= RES 520RES ____ _ SPOOL 520SPL ____ PAGE 520PAG ____ USER 520W01 ____ USER 520W02 ____
Tip: You can supply DASD labels for the SPOOL, PAGE, and USER packs in this panel. We recommend using a labelling convention as discussed in 2.2.1, “Volume labeling convention” on page 9 and providing the appropriate labels in this panel. If you choose to accept the default labels, you can change the DASD labels using the procedure outlined in 4.10, “Relabeling the system volumes” on page 57.
Important: INSTDVD takes about two and a half hours. Now is a good time for you to move on to Chapter 6, “Configuring an NFS server” on page 77.
Chapter 4. Installing and configuring z/VM 29
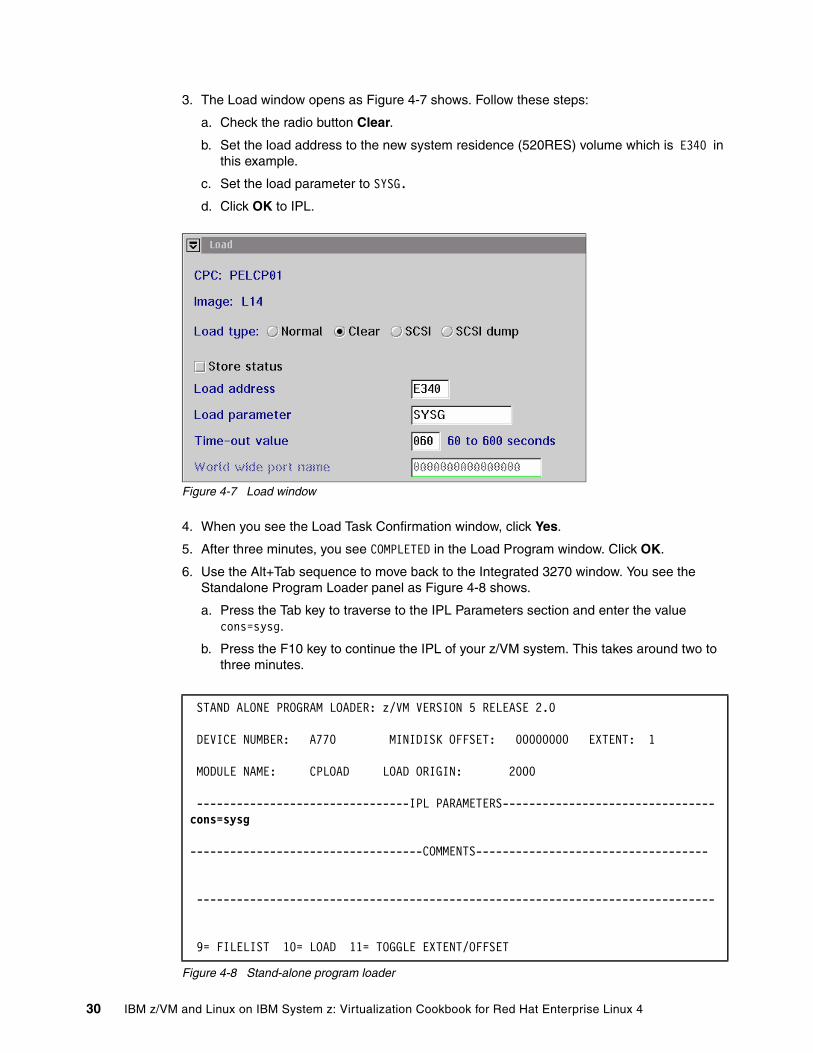
3. The Load window opens as Figure 4-7 shows. Follow these steps:
a. Check the radio button Clear.
b. Set the load address to the new system residence (520RES) volume which is E340 in this example.
c. Set the load parameter to SYSG.
d. Click OK to IPL.
Figure 4-7 Load window
4. When you see the Load Task Confirmation window, click Yes.
5. After three minutes, you see COMPLETED in the Load Program window. Click OK.
6. Use the Alt+Tab sequence to move back to the Integrated 3270 window. You see the Standalone Program Loader panel as Figure 4-8 shows.
a. Press the Tab key to traverse to the IPL Parameters section and enter the value cons=sysg.
b. Press the F10 key to continue the IPL of your z/VM system. This takes around two to three minutes.
Figure 4-8 Stand-alone program loader
STAND ALONE PROGRAM LOADER: z/VM VERSION 5 RELEASE 2.0
DEVICE NUMBER: A770 MINIDISK OFFSET: 00000000 EXTENT: 1
MODULE NAME: CPLOAD LOAD ORIGIN: 2000
--------------------------------IPL PARAMETERS--------------------------------cons=sysg
-----------------------------------COMMENTS-----------------------------------
------------------------------------------------------------------------------
9= FILELIST 10= LOAD 11= TOGGLE EXTENT/OFFSET
30 IBM z/VM and Linux on IBM System z: Virtualization Cookbook for Red Hat Enterprise Linux 4
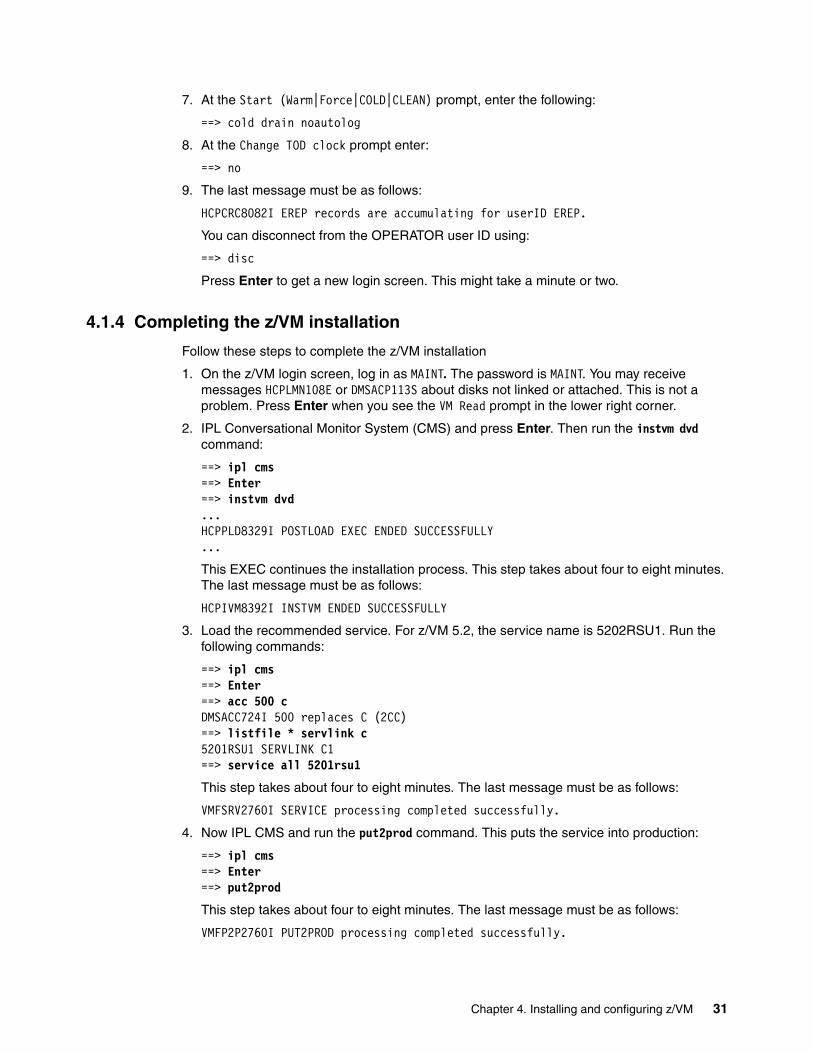
7. At the Start (Warm|Force|COLD|CLEAN) prompt, enter the following:
==> cold drain noautolog
8. At the Change TOD clock prompt enter:
==> no
9. The last message must be as follows:
HCPCRC8082I EREP records are accumulating for userID EREP.
You can disconnect from the OPERATOR user ID using:
==> disc
Press Enter to get a new login screen. This might take a minute or two.
4.1.4 Completing the z/VM installation
Follow these steps to complete the z/VM installation
1. On the z/VM login screen, log in as MAINT. The password is MAINT. You may receive messages HCPLMN108E or DMSACP113S about disks not linked or attached. This is not a problem. Press Enter when you see the VM Read prompt in the lower right corner.
2. IPL Conversational Monitor System (CMS) and press Enter. Then run the instvm dvd command:
==> ipl cms==> Enter==> instvm dvd...HCPPLD8329I POSTLOAD EXEC ENDED SUCCESSFULLY...
This EXEC continues the installation process. This step takes about four to eight minutes. The last message must be as follows:
HCPIVM8392I INSTVM ENDED SUCCESSFULLY
3. Load the recommended service. For z/VM 5.2, the service name is 5202RSU1. Run the following commands:
==> ipl cms==> Enter==> acc 500 cDMSACC724I 500 replaces C (2CC)==> listfile * servlink c5201RSU1 SERVLINK C1==> service all 5201rsu1
This step takes about four to eight minutes. The last message must be as follows:
VMFSRV2760I SERVICE processing completed successfully.
4. Now IPL CMS and run the put2prod command. This puts the service into production:
==> ipl cms==> Enter==> put2prod
This step takes about four to eight minutes. The last message must be as follows:
VMFP2P2760I PUT2PROD processing completed successfully.
Chapter 4. Installing and configuring z/VM 31
A return code of 0 is ideal. You may get a return code of 4 and the message as follows:
VMFP2P2760I PUT2PROD process completed with warnings.
In general a return code of 4 is acceptable. That means that only warnings were issued. A return code of 8 or greater generally means that errors were encountered.
5. Enter the following command to shutdown and re-IPL your system:
==> shutdown reipl SYSTEM SHUTDOWN STARTED
6. You lose your 3270 session. The system comes back in about two to four minutes. After it comes back, the last message must be as follows:
Press enter or clear key to continue
Press Enter and you see a z/VM login screen. A vanilla z/VM system is now installed.
4.2 Customizing the SYSTEM CONFIG file
The first configuration file read when z/VM IPLs is the SYSTEM CONFIG file. We recommend the following changes to it:
� Change the system name.
� Increase retrieve capacity and allow virtual disks to be created.
� Turn off the Disconnect Timeout. This prevents idle disconnected users from being forced off the system.
� Define a virtual switch (VSWITCH).
When your system comes back you must get a z/VM login panel. Then, perform the following steps:
1. Log on to MAINT. The default password for all z/VM user IDs is the same as the user ID. Therefore, enter a password of maint, which is not echoed on the screen. After entering the user ID and password, press Enter when the status area in the lower right reads VM READ.
USERID ==> maintPASSWORD ==>
2. To edit the SYSTEM CONFIG file, you must release the MAINT CF1 minidisk as a control program (CP) disk with the cprelease command. The CP disks are queried with the query cpdisk command. Note that the MAINT CF1 disk is accessed as CP disk A, before it is released but not after. See Example 4-1.
Example 4-1 QUERY CPDISK command
==> q cpdiskLabel Userid Vdev Mode Stat Vol-ID Rdev Type StartLoc EndLocMNTCF1 MAINT 0CF1 A R/O 520RES 0200 CKD 39 83MNTCF2 MAINT 0CF2 B R/O 520RES 0200 CKD 84 128MNTCF3 MAINT 0CF3 C R/O 520RES 0200 CKD 129 188==> cprel aCPRELEASE request for disk A scheduled.HCPZAC6730I CPRELEASE request for disk A completed.
32 IBM z/VM and Linux on IBM System z: Virtualization Cookbook for Red Hat Enterprise Linux 4
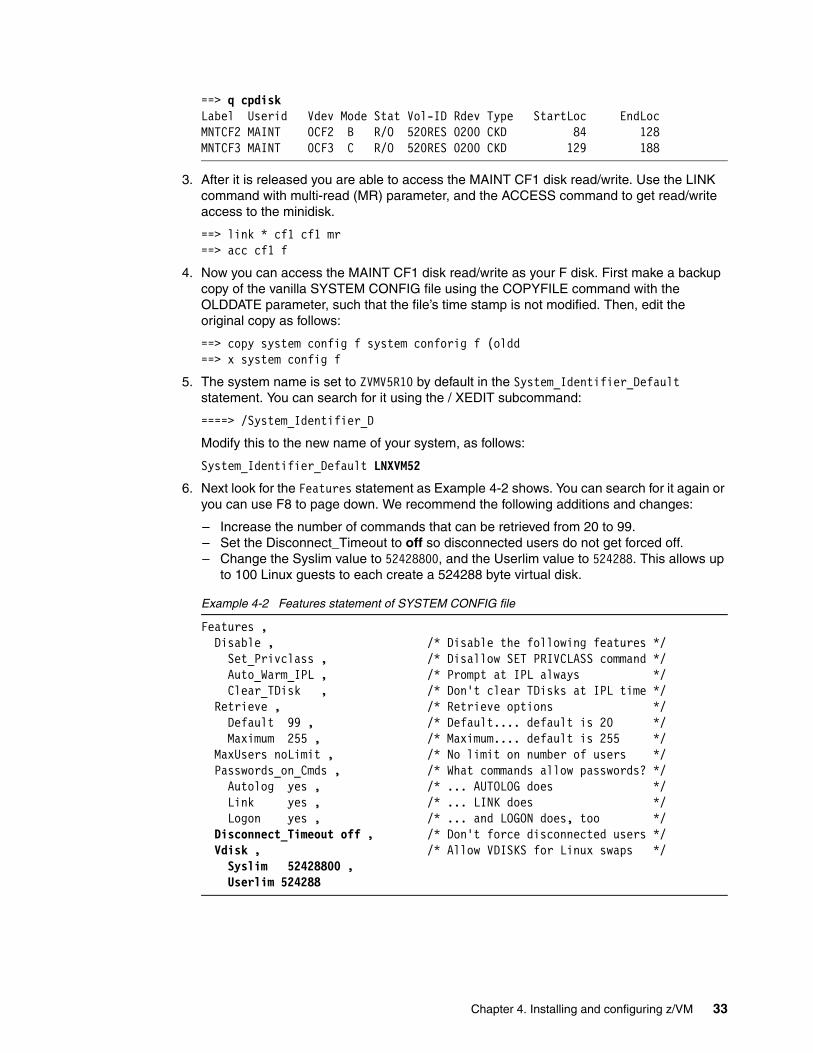
==> q cpdiskLabel Userid Vdev Mode Stat Vol-ID Rdev Type StartLoc EndLocMNTCF2 MAINT 0CF2 B R/O 520RES 0200 CKD 84 128MNTCF3 MAINT 0CF3 C R/O 520RES 0200 CKD 129 188
3. After it is released you are able to access the MAINT CF1 disk read/write. Use the LINK command with multi-read (MR) parameter, and the ACCESS command to get read/write access to the minidisk.
==> link * cf1 cf1 mr==> acc cf1 f
4. Now you can access the MAINT CF1 disk read/write as your F disk. First make a backup copy of the vanilla SYSTEM CONFIG file using the COPYFILE command with the OLDDATE parameter, such that the file’s time stamp is not modified. Then, edit the original copy as follows:
==> copy system config f system conforig f (oldd==> x system config f
5. The system name is set to ZVMV5R10 by default in the System_Identifier_Default statement. You can search for it using the / XEDIT subcommand:
====> /System_Identifier_D
Modify this to the new name of your system, as follows:
System_Identifier_Default LNXVM52
6. Next look for the Features statement as Example 4-2 shows. You can search for it again or you can use F8 to page down. We recommend the following additions and changes:
– Increase the number of commands that can be retrieved from 20 to 99.– Set the Disconnect_Timeout to off so disconnected users do not get forced off.– Change the Syslim value to 52428800, and the Userlim value to 524288. This allows up
to 100 Linux guests to each create a 524288 byte virtual disk.
Example 4-2 Features statement of SYSTEM CONFIG file
Features , Disable , /* Disable the following features */ Set_Privclass , /* Disallow SET PRIVCLASS command */ Auto_Warm_IPL , /* Prompt at IPL always */ Clear_TDisk , /* Don't clear TDisks at IPL time */ Retrieve , /* Retrieve options */ Default 99 , /* Default.... default is 20 */ Maximum 255 , /* Maximum.... default is 255 */ MaxUsers noLimit , /* No limit on number of users */ Passwords_on_Cmds , /* What commands allow passwords? */ Autolog yes , /* ... AUTOLOG does */ Link yes , /* ... LINK does */ Logon yes , /* ... and LOGON does, too */ Disconnect_Timeout off , /* Don't force disconnected users */
Vdisk , /* Allow VDISKS for Linux swaps */Syslim 52428800 ,
Userlim 524288
Chapter 4. Installing and configuring z/VM 33
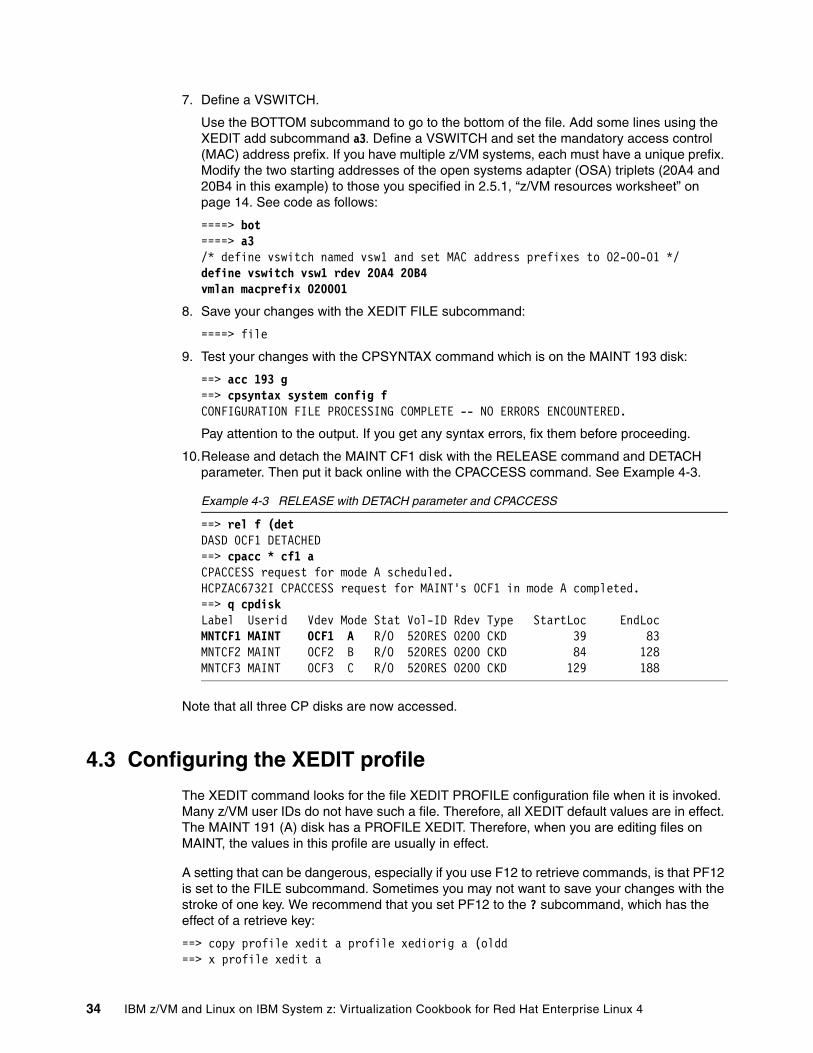
7. Define a VSWITCH.
Use the BOTTOM subcommand to go to the bottom of the file. Add some lines using the XEDIT add subcommand a3. Define a VSWITCH and set the mandatory access control (MAC) address prefix. If you have multiple z/VM systems, each must have a unique prefix. Modify the two starting addresses of the open systems adapter (OSA) triplets (20A4 and 20B4 in this example) to those you specified in 2.5.1, “z/VM resources worksheet” on page 14. See code as follows:
====> bot====> a3/* define vswitch named vsw1 and set MAC address prefixes to 02-00-01 */define vswitch vsw1 rdev 20A4 20B4vmlan macprefix 020001
8. Save your changes with the XEDIT FILE subcommand:
====> file
9. Test your changes with the CPSYNTAX command which is on the MAINT 193 disk:
==> acc 193 g==> cpsyntax system config fCONFIGURATION FILE PROCESSING COMPLETE -- NO ERRORS ENCOUNTERED.
Pay attention to the output. If you get any syntax errors, fix them before proceeding.
10.Release and detach the MAINT CF1 disk with the RELEASE command and DETACH parameter. Then put it back online with the CPACCESS command. See Example 4-3.
Example 4-3 RELEASE with DETACH parameter and CPACCESS
==> rel f (detDASD 0CF1 DETACHED==> cpacc * cf1 aCPACCESS request for mode A scheduled.HCPZAC6732I CPACCESS request for MAINT's 0CF1 in mode A completed.==> q cpdiskLabel Userid Vdev Mode Stat Vol-ID Rdev Type StartLoc EndLocMNTCF1 MAINT 0CF1 A R/O 520RES 0200 CKD 39 83MNTCF2 MAINT 0CF2 B R/O 520RES 0200 CKD 84 128MNTCF3 MAINT 0CF3 C R/O 520RES 0200 CKD 129 188
Note that all three CP disks are now accessed.
4.3 Configuring the XEDIT profile
The XEDIT command looks for the file XEDIT PROFILE configuration file when it is invoked. Many z/VM user IDs do not have such a file. Therefore, all XEDIT default values are in effect. The MAINT 191 (A) disk has a PROFILE XEDIT. Therefore, when you are editing files on MAINT, the values in this profile are usually in effect.
A setting that can be dangerous, especially if you use F12 to retrieve commands, is that PF12 is set to the FILE subcommand. Sometimes you may not want to save your changes with the stroke of one key. We recommend that you set PF12 to the ? subcommand, which has the effect of a retrieve key:
==> copy profile xedit a profile xediorig a (oldd==> x profile xedit a
34 IBM z/VM and Linux on IBM System z: Virtualization Cookbook for Red Hat Enterprise Linux 4
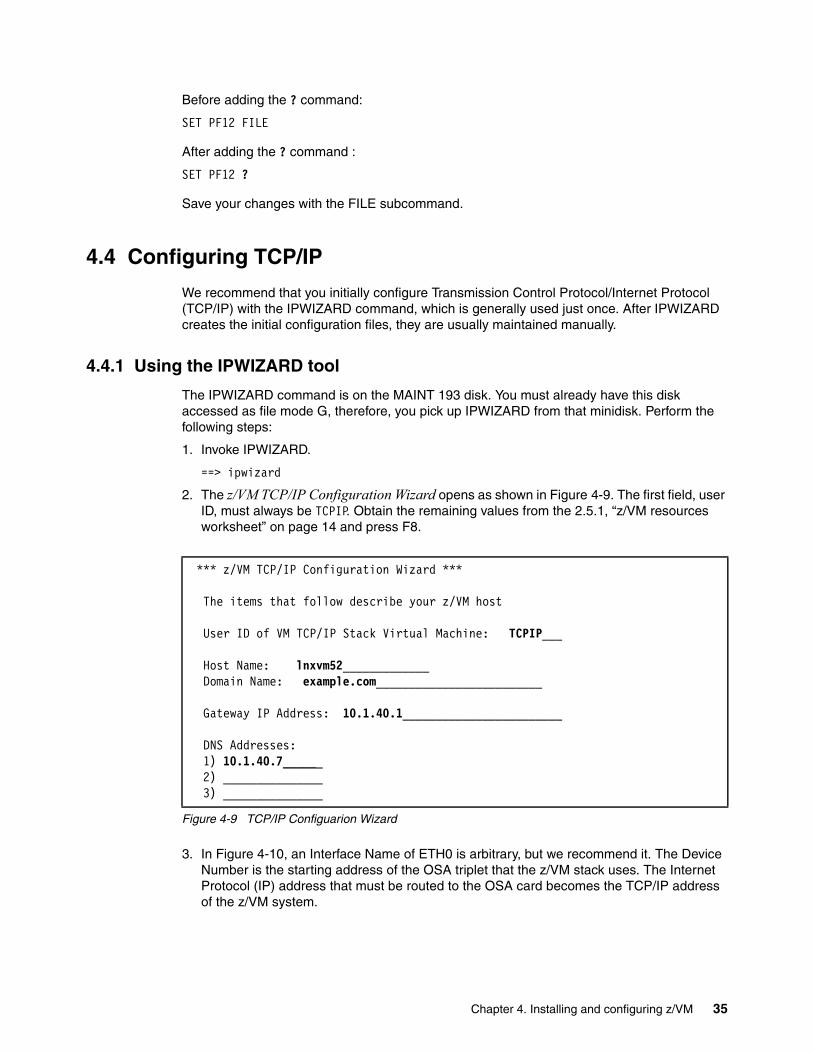
Before adding the ? command:
SET PF12 FILE
After adding the ? command :
SET PF12 ?
Save your changes with the FILE subcommand.
4.4 Configuring TCP/IP
We recommend that you initially configure Transmission Control Protocol/Internet Protocol (TCP/IP) with the IPWIZARD command, which is generally used just once. After IPWIZARD creates the initial configuration files, they are usually maintained manually.
4.4.1 Using the IPWIZARD tool
The IPWIZARD command is on the MAINT 193 disk. You must already have this disk accessed as file mode G, therefore, you pick up IPWIZARD from that minidisk. Perform the following steps:
1. Invoke IPWIZARD.
==> ipwizard
2. The z/VM TCP/IP Configuration Wizard opens as shown in Figure 4-9. The first field, user ID, must always be TCPIP. Obtain the remaining values from the 2.5.1, “z/VM resources worksheet” on page 14 and press F8.
Figure 4-9 TCP/IP Configuarion Wizard
3. In Figure 4-10, an Interface Name of ETH0 is arbitrary, but we recommend it. The Device Number is the starting address of the OSA triplet that the z/VM stack uses. The Internet Protocol (IP) address that must be routed to the OSA card becomes the TCP/IP address of the z/VM system.
*** z/VM TCP/IP Configuration Wizard ***
The items that follow describe your z/VM host
User ID of VM TCP/IP Stack Virtual Machine: TCPIP___
Host Name: lnxvm52_____________ Domain Name: example.com_________________________
Gateway IP Address: 10.1.40.1________________________
DNS Addresses: 1) 10.1.40.7______ 2) _______________ 3) _______________
Chapter 4. Installing and configuring z/VM 35

The Interface Type typically is queued direct I/O (QDIO) with modern OSA devices. When completed, press F8. See Figure 4-10.
Figure 4-10 General interface configuration
4. The QDIO interface configuration panel is shown in Figure 4-11. In general, a value for the Port Name is no longer necessary and we recommend a Router Type of None. Press F5 to complete the wizard.
Figure 4-11 QDIO Interface configuration
You must see output similar to Example 4-4.
Example 4-4 Output of TCP/IP configuration wizard
DTCIPW2508I DTCIPWIZ EXEC is attempting to create the necessaryDTCIPW2508I configuration filesUSER DSC LOGOFF AS TCPIP USERS = 2 FORCED BY MAINT...Successfully PINGed Interface (10.1.40.90)Successfully PINGed Gateway (10.1.40.1)Ping Level 520: Pinging host 10.1.40.7. Enter 'HX' followed by 'BEGIN' to interrupt.
*** General Interface Configuration Panel ***
Interface Name: ETH0____________ Device Number: <3000>
IP Address: 10.1.40.90_______Subnet Mask: 255.255.255.0____
Interface Type (Select one):
x QDIO _ LCS _ HiperSockets _ CLAW _ CTC
*** QDIO Interface Configuration Panel ***
Network Type (Select one):
x Ethernet _ Token Ring
Port Name (optional): ________
Router Type (Select one):
_ Primary _ Secondary x None
Maximum Transmission Unit (MTU) size: 1500_
36 IBM z/VM and Linux on IBM System z: Virtualization Cookbook for Red Hat Enterprise Linux 4
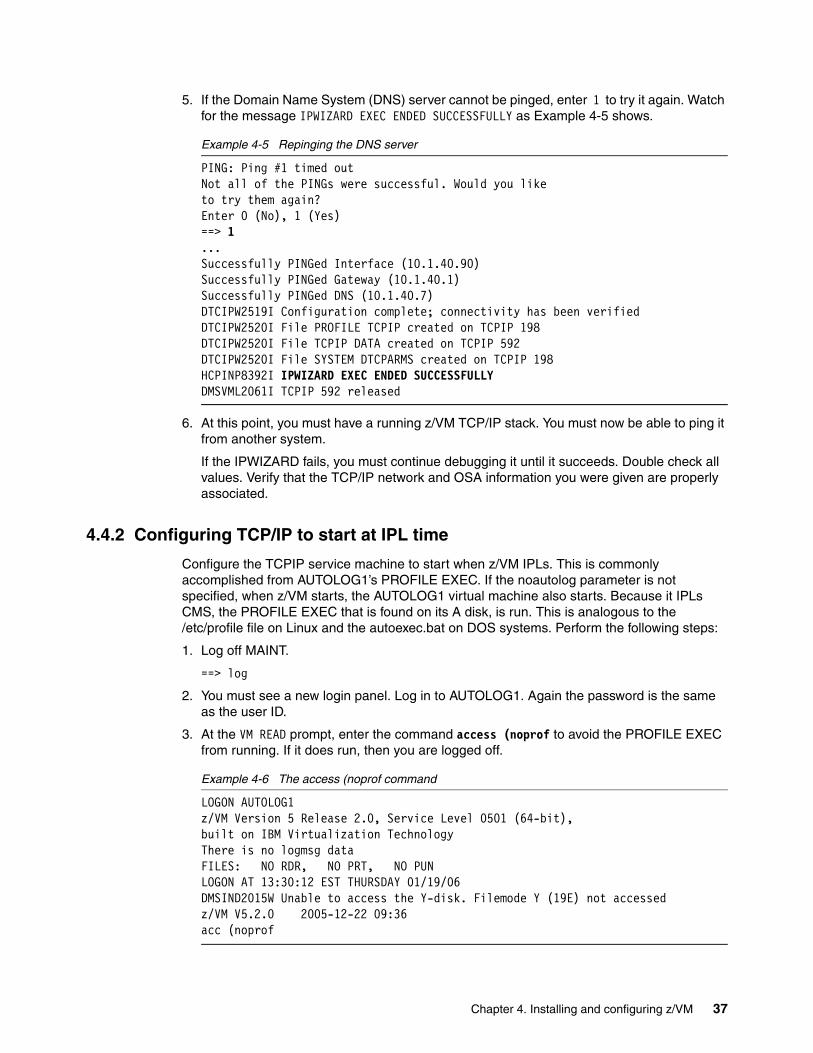
5. If the Domain Name System (DNS) server cannot be pinged, enter 1 to try it again. Watch for the message IPWIZARD EXEC ENDED SUCCESSFULLY as Example 4-5 shows.
Example 4-5 Repinging the DNS server
PING: Ping #1 timed outNot all of the PINGs were successful. Would you liketo try them again?Enter 0 (No), 1 (Yes)==> 1...Successfully PINGed Interface (10.1.40.90)Successfully PINGed Gateway (10.1.40.1)Successfully PINGed DNS (10.1.40.7)DTCIPW2519I Configuration complete; connectivity has been verifiedDTCIPW2520I File PROFILE TCPIP created on TCPIP 198DTCIPW2520I File TCPIP DATA created on TCPIP 592DTCIPW2520I File SYSTEM DTCPARMS created on TCPIP 198HCPINP8392I IPWIZARD EXEC ENDED SUCCESSFULLYDMSVML2061I TCPIP 592 released
6. At this point, you must have a running z/VM TCP/IP stack. You must now be able to ping it from another system.
If the IPWIZARD fails, you must continue debugging it until it succeeds. Double check all values. Verify that the TCP/IP network and OSA information you were given are properly associated.
4.4.2 Configuring TCP/IP to start at IPL time
Configure the TCPIP service machine to start when z/VM IPLs. This is commonly accomplished from AUTOLOG1’s PROFILE EXEC. If the noautolog parameter is not specified, when z/VM starts, the AUTOLOG1 virtual machine also starts. Because it IPLs CMS, the PROFILE EXEC that is found on its A disk, is run. This is analogous to the /etc/profile file on Linux and the autoexec.bat on DOS systems. Perform the following steps:
1. Log off MAINT.
==> log
2. You must see a new login panel. Log in to AUTOLOG1. Again the password is the same as the user ID.
3. At the VM READ prompt, enter the command access (noprof to avoid the PROFILE EXEC from running. If it does run, then you are logged off.
Example 4-6 The access (noprof command
LOGON AUTOLOG1z/VM Version 5 Release 2.0, Service Level 0501 (64-bit),built on IBM Virtualization TechnologyThere is no logmsg dataFILES: NO RDR, NO PRT, NO PUNLOGON AT 13:30:12 EST THURSDAY 01/19/06DMSIND2015W Unable to access the Y-disk. Filemode Y (19E) not accessedz/VM V5.2.0 2005-12-22 09:36acc (noprof
Chapter 4. Installing and configuring z/VM 37

4. Copy the PROFILE XEDIT from the MAINT 191 disk to allow XEDIT sessions to have a common interface among user IDs.
a. Use the VMLINK command to both link to the disk read/only and to access it as the highest available file mode. The default read password is read:
==> vmlink maint 191ENTER READ PASSWORD:readDMSVML2060I MAINT 191 linked as 0120 file mode Z
b. Copy the PROFILE XEDIT to your A disk:
==> copy profile xedit z = = a
5. Make a backup copy of the PROFILE EXEC and edit it:
==> copy profile exec a = execorig ===> x profile exec
6. You see the text in the top half of Example 4-7. Perform the following steps:
a. The z/VM Shared File System (SFS), is not required to run Linux. Therefore, you can safely delete the three lines that XAUTOLOG the user IDs VMSERVS, VMSERVR, and VMSERVU.
b. You can also safely delete the Address Command line.
c. Add a line to start the TCPIP user ID with the XAUTOLOG command and retain the two statements that start the VSWITCH controllers.
d. Add a line to log off AUTOLOG1 when the PROFILE is complete, as in Example 4-7. There is no requirement to keep the virtual machine running as its sole purpose is to run the PROFILE EXEC.
Example 4-7 Changed AUTOLOG1
Before the added line:/***************************//* Autolog1 Profile Exec *//***************************/
Address Command'CP XAUTOLOG VMSERVS''CP XAUTOLOG VMSERVU''CP XAUTOLOG VMSERVR''CP XAUTOLOG DTCVSW1''CP XAUTOLOG DTCVSW2'
After the added line:/***************************//* Autolog1 Profile Exec *//***************************/'cp xautolog tcpip' /* start up TCPIP */'CP XAUTOLOG DTCVSW1' /* start VSWITCH controller 1 */'CP XAUTOLOG DTCVSW2' /* start VSWITCH controller 2 */'cp logoff' /* logoff when done */
38 IBM z/VM and Linux on IBM System z: Virtualization Cookbook for Red Hat Enterprise Linux 4
7. Save your changes with the FILE subcommand and log off of AUTOLOG1:
====> file==> log
When your z/VM system IPLs, the TCP/IP stack comes up automatically, as long as you do not specify the notautolog parameter at IPL time.
4.4.3 Renaming the TCPIP configuration file
We recommend that you change the name of the main TCPIP configuration file from PROFILE TCPIP to <system_ID> TCPIP, where <system_ID> is the name of your new z/VM system. This is to avoid the chance of the PROFILE TCPIP file being overwritten when applying maintenance.
Log in to TCPMAINT. The PROFILE TCPIP file is on the TCPMAINT 198 disk which you can access as the D disk.
Make a backup copy of the original PROFILE TCPIP, then rename it to <SYSTEM_ID> TCPIP, where <SYSTEM_ID> is LNXVM52 in this example. When the TCPIP service machine starts, it searches for this file before it searches for the file PROFILE TCPIP.
==> copy profile tcpip d = tcpiorig = (oldd==> rename profile tcpip d lnxvm52 = =
You have now renamed you TCP/IP profile.
4.4.4 Copying the PROFILE XEDIT file
Again, copy the PROFILE XEDIT from the MAINT 191 disk for XEDIT sessions to have a common interface among user IDs. Perform the following steps:
1. Use the VMLINK command to link to the disk read/only and also to access it as the highest available file mode. The default read password is read:
==> vmlink maint 191ENTER READ PASSWORD:readDMSVML2060I MAINT 191 linked as 0120 file mode Z
2. Copy the PROFILE XEDIT to your A disk:
==> copy profile xedit z = = a
XEDIT sessions on TCPMAINT is similar.
4.4.5 Configuring the File Transfer Protocol server
We recommend that you turn on the File Transfer Protocol (FTP) server. To do so, edit the newly renamed configuration file and add an AUTOLOG statement near the top of the file with FTPSERVE as the only entry. In the PORT statement, remove the semicolons to uncomment the lines with FTPSERVE on them (ports 20 and 21).
Chapter 4. Installing and configuring z/VM 39
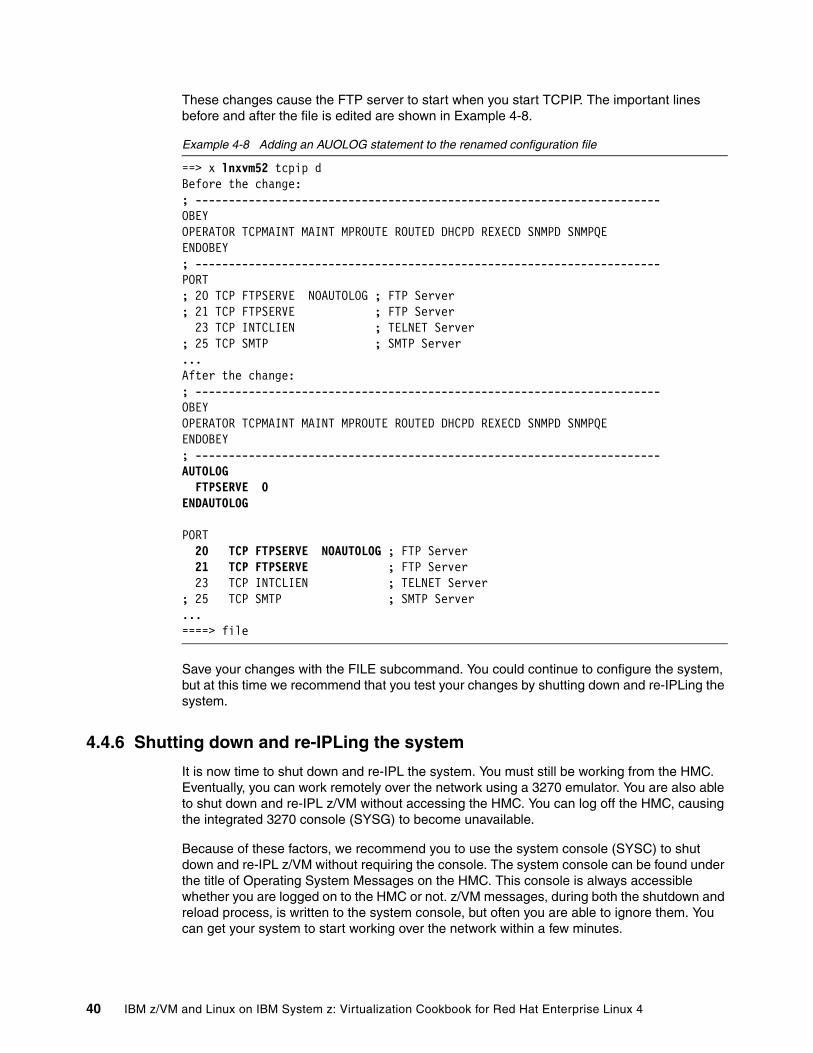
These changes cause the FTP server to start when you start TCPIP. The important lines before and after the file is edited are shown in Example 4-8.
Example 4-8 Adding an AUOLOG statement to the renamed configuration file
==> x lnxvm52 tcpip dBefore the change:; ----------------------------------------------------------------------OBEYOPERATOR TCPMAINT MAINT MPROUTE ROUTED DHCPD REXECD SNMPD SNMPQEENDOBEY; ----------------------------------------------------------------------PORT; 20 TCP FTPSERVE NOAUTOLOG ; FTP Server; 21 TCP FTPSERVE ; FTP Server 23 TCP INTCLIEN ; TELNET Server; 25 TCP SMTP ; SMTP Server...After the change:; ----------------------------------------------------------------------OBEYOPERATOR TCPMAINT MAINT MPROUTE ROUTED DHCPD REXECD SNMPD SNMPQEENDOBEY; ----------------------------------------------------------------------AUTOLOG FTPSERVE 0ENDAUTOLOG
PORT 20 TCP FTPSERVE NOAUTOLOG ; FTP Server 21 TCP FTPSERVE ; FTP Server 23 TCP INTCLIEN ; TELNET Server; 25 TCP SMTP ; SMTP Server...====> file
Save your changes with the FILE subcommand. You could continue to configure the system, but at this time we recommend that you test your changes by shutting down and re-IPLing the system.
4.4.6 Shutting down and re-IPLing the system
It is now time to shut down and re-IPL the system. You must still be working from the HMC. Eventually, you can work remotely over the network using a 3270 emulator. You are also able to shut down and re-IPL z/VM without accessing the HMC. You can log off the HMC, causing the integrated 3270 console (SYSG) to become unavailable.
Because of these factors, we recommend you to use the system console (SYSC) to shut down and re-IPL z/VM without requiring the console. The system console can be found under the title of Operating System Messages on the HMC. This console is always accessible whether you are logged on to the HMC or not. z/VM messages, during both the shutdown and reload process, is written to the system console, but often you are able to ignore them. You can get your system to start working over the network within a few minutes.
40 IBM z/VM and Linux on IBM System z: Virtualization Cookbook for Red Hat Enterprise Linux 4
Perform the following steps:
1. Pass the parameter IPLPARMS CONS=SYSC to the SHUTDOWN REPIL command:
==> shutdown reipl iplparms cons=sysc
You lose your integrated console session, but it comes back in a few minutes as described previously. You may want to watch the system console as z/VM shuts down and reinitializes.
2. Log in as MAINT. You must have TCP/IP and FTP access to z/VM.
3. Query the new VSWITCH as Example 4-9 shows.
Example 4-9 Querying the new VSWITCH
==> q vswitchVSWITCH SYSTEM VSW1 Type: VSWITCH Connected: 0 Maxconn: INFINITE PERSISTENT RESTRICTED NONROUTER Accounting: OFF VLAN Unaware State: Ready IPTimeout: 5 QueueStorage: 8 Portname: UNASSIGNED RDEV: 20A4 Controller: DTCVSW1 VDEV: 20A4 Portname: UNASSIGNED RDEV: 20B4 Controller: DTCVSW2 VDEV: 20B4 BACKUP
You must confirm that the VSWITCH exists and that there are two built-in VSWITCH controllers, DTCVSW1 and DTCVSW2. Before z/VM 5.2, you would have had to create these user IDs manually.
4. Query the changes made to the Features statement in the SYSTEM CONFIG file:
==> q vdisk userlimVDISK USER LIMIT IS INFINITE
This shows that the changes to the SYSTEM CONFIG file have taken effect.
4.5 Adding paging volumes
The z/VM operating system resides on the first three CP volumes. z/VM 5.2 also installs with one full paging volume and one full spool volume. A single spool volume is probably adequate for Linux requirements, however, a single paging volume is not. We recommend that you create additional page volumes beforehand.
We recommend that you add five paging volumes, so that you can have a total of six. If you do not have a lot of DASD, then you can reduce this number. Having adequate paging space gives you plenty of space to add more Linux virtual machines. A rule of thumb is that the amount of paging space must be twice the total combined amount of memory for all running Linux user IDs.
HMC Integrated 3270 Console or 3270 emulator: At this point you can continue working at the HMC, or you can access your new system with a 3270 emulator over the network. See 3.3, “3270 emulators” on page 21 for a brief exposition of that subject. If you use a 3270 emulator, log in as MAINT now.
Chapter 4. Installing and configuring z/VM 41
4.5.1 Formatting the paging volumes
Before adding paging volumes to the system, you must format the DASD volumes that you use for minidisk space (PERM) and paging space (PAGE). Traditionally, this is done one volume at a time via the CPFMTXA command. If you have a few volumes, then this command is useful. However, when you have many volumes to format, the process of running CPFMTXA can become time consuming and tedious and lead to errors.
Therefore, a REXX EXEC named CPFORMAT has been provided to allow you to format many volumes with a single command. It is a wrapper around CPFMTXA. To use this EXEC, you must first attach each DASD to be formatted with the virtual device address that matches the real device address using ATTACH <realDev> *.
If you want different volume labels, you can use the CPFMTXA command and manually specify each volume label.
Getting the CPFORMAT EXEC to z/VMLog off MAINT so that you are able to get the MAINT 191 disk in read/write mode with FTP.
Start a Secure Shell (SSH) session to the NFS server that stores the files associated with this book. Refer to 6.1, “Downloading files associated with this book” on page 78. Copy the CPFORMAT.EXEC from that server to z/VM with an FTP client as Example 4-10 shows. Being able to FTP to z/VM shows that both TCP/IP and the FTP server have started.
Example 4-10 Copying CPFORMAT.EXEC from NFS to z/VM
# cd /nfs/virt-cookbook/vm# ftp 10.1.40.90220-FTPSERVE IBM VM Level 520 at LNXVM52.EXAMPLE.COM, 14:53:44 EST WEDNESDAY 2006-05-08Name (10.1.40.90:root): maintPassword:...ftp> put CPFORMAT.EXEC...ftp> quit
Note: This EXEC labels the volumes according to the convention described in 2.2.1, “Volume labeling convention” on page 9.
Important: At this point, you require access to the server described in Chapter 6, “Configuring an NFS server” on page 77, in order to get the file CPFORMAT EXEC. Be sure to complete these steps.
42 IBM z/VM and Linux on IBM System z: Virtualization Cookbook for Red Hat Enterprise Linux 4
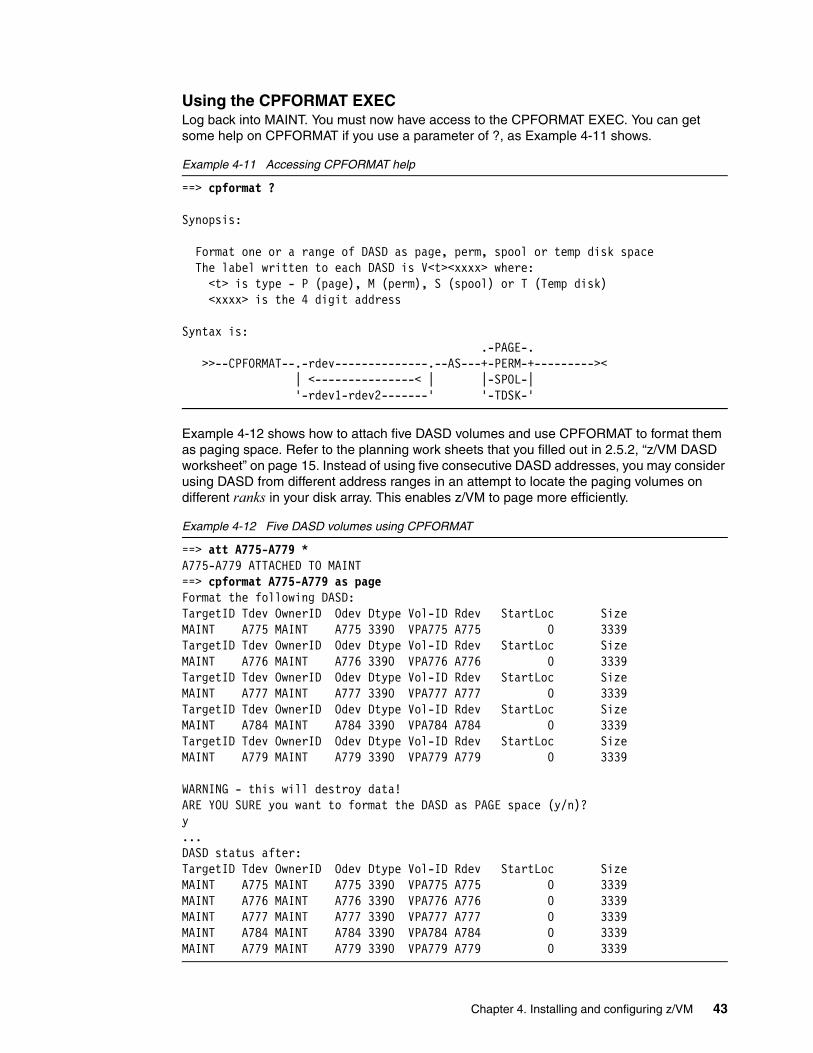
Using the CPFORMAT EXECLog back into MAINT. You must now have access to the CPFORMAT EXEC. You can get some help on CPFORMAT if you use a parameter of ?, as Example 4-11 shows.
Example 4-11 Accessing CPFORMAT help
==> cpformat ?
Synopsis:
Format one or a range of DASD as page, perm, spool or temp disk space The label written to each DASD is V<t><xxxx> where: <t> is type - P (page), M (perm), S (spool) or T (Temp disk) <xxxx> is the 4 digit address
Syntax is: .-PAGE-. >>--CPFORMAT--.-rdev--------------.--AS---+-PERM-+--------->< | <---------------< | |-SPOL-| '-rdev1-rdev2-------' '-TDSK-'
Example 4-12 shows how to attach five DASD volumes and use CPFORMAT to format them as paging space. Refer to the planning work sheets that you filled out in 2.5.2, “z/VM DASD worksheet” on page 15. Instead of using five consecutive DASD addresses, you may consider using DASD from different address ranges in an attempt to locate the paging volumes on different ranks in your disk array. This enables z/VM to page more efficiently.
Example 4-12 Five DASD volumes using CPFORMAT
==> att A775-A779 *A775-A779 ATTACHED TO MAINT==> cpformat A775-A779 as pageFormat the following DASD:TargetID Tdev OwnerID Odev Dtype Vol-ID Rdev StartLoc SizeMAINT A775 MAINT A775 3390 VPA775 A775 0 3339TargetID Tdev OwnerID Odev Dtype Vol-ID Rdev StartLoc SizeMAINT A776 MAINT A776 3390 VPA776 A776 0 3339TargetID Tdev OwnerID Odev Dtype Vol-ID Rdev StartLoc SizeMAINT A777 MAINT A777 3390 VPA777 A777 0 3339TargetID Tdev OwnerID Odev Dtype Vol-ID Rdev StartLoc SizeMAINT A784 MAINT A784 3390 VPA784 A784 0 3339TargetID Tdev OwnerID Odev Dtype Vol-ID Rdev StartLoc SizeMAINT A779 MAINT A779 3390 VPA779 A779 0 3339
WARNING - this will destroy data!ARE YOU SURE you want to format the DASD as PAGE space (y/n)?y...DASD status after:TargetID Tdev OwnerID Odev Dtype Vol-ID Rdev StartLoc SizeMAINT A775 MAINT A775 3390 VPA775 A775 0 3339MAINT A776 MAINT A776 3390 VPA776 A776 0 3339MAINT A777 MAINT A777 3390 VPA777 A777 0 3339MAINT A784 MAINT A784 3390 VPA784 A784 0 3339MAINT A779 MAINT A779 3390 VPA779 A779 0 3339
Chapter 4. Installing and configuring z/VM 43
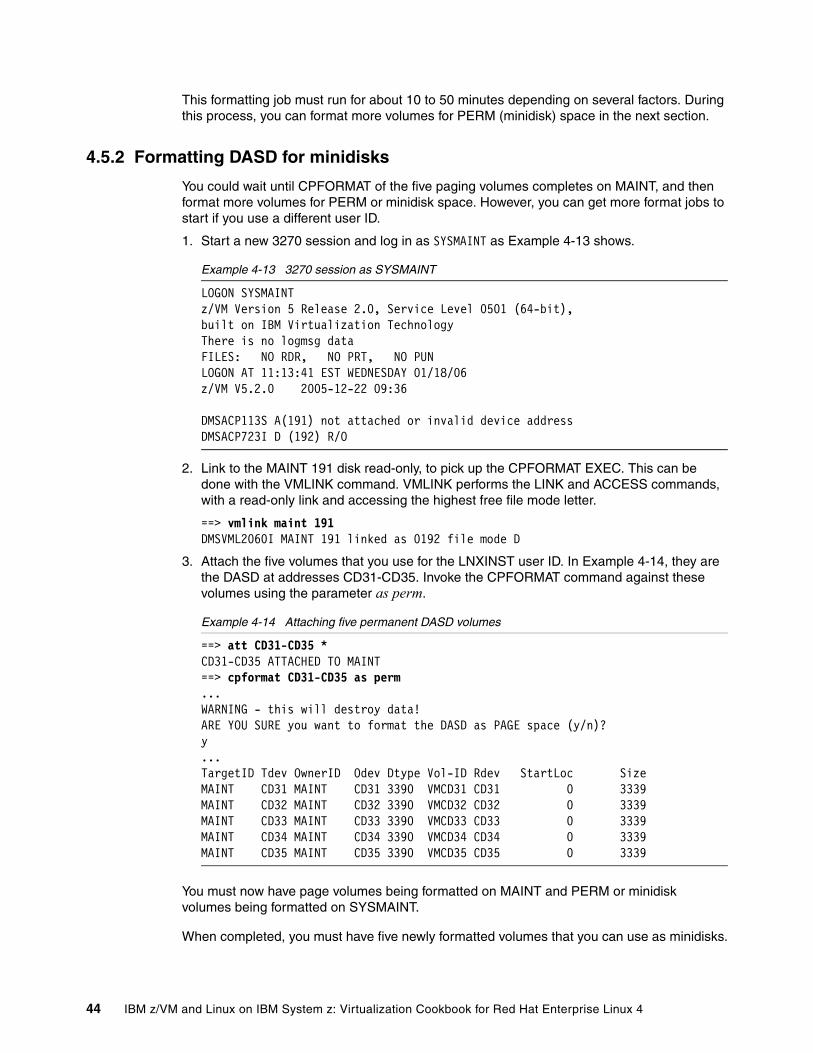
This formatting job must run for about 10 to 50 minutes depending on several factors. During this process, you can format more volumes for PERM (minidisk) space in the next section.
4.5.2 Formatting DASD for minidisks
You could wait until CPFORMAT of the five paging volumes completes on MAINT, and then format more volumes for PERM or minidisk space. However, you can get more format jobs to start if you use a different user ID.
1. Start a new 3270 session and log in as SYSMAINT as Example 4-13 shows.
Example 4-13 3270 session as SYSMAINT
LOGON SYSMAINTz/VM Version 5 Release 2.0, Service Level 0501 (64-bit),built on IBM Virtualization TechnologyThere is no logmsg dataFILES: NO RDR, NO PRT, NO PUNLOGON AT 11:13:41 EST WEDNESDAY 01/18/06z/VM V5.2.0 2005-12-22 09:36
DMSACP113S A(191) not attached or invalid device addressDMSACP723I D (192) R/O
2. Link to the MAINT 191 disk read-only, to pick up the CPFORMAT EXEC. This can be done with the VMLINK command. VMLINK performs the LINK and ACCESS commands, with a read-only link and accessing the highest free file mode letter.
==> vmlink maint 191DMSVML2060I MAINT 191 linked as 0192 file mode D
3. Attach the five volumes that you use for the LNXINST user ID. In Example 4-14, they are the DASD at addresses CD31-CD35. Invoke the CPFORMAT command against these volumes using the parameter as perm.
Example 4-14 Attaching five permanent DASD volumes
==> att CD31-CD35 *CD31-CD35 ATTACHED TO MAINT==> cpformat CD31-CD35 as perm...WARNING - this will destroy data!ARE YOU SURE you want to format the DASD as PAGE space (y/n)?y...TargetID Tdev OwnerID Odev Dtype Vol-ID Rdev StartLoc SizeMAINT CD31 MAINT CD31 3390 VMCD31 CD31 0 3339MAINT CD32 MAINT CD32 3390 VMCD32 CD32 0 3339MAINT CD33 MAINT CD33 3390 VMCD33 CD33 0 3339MAINT CD34 MAINT CD34 3390 VMCD34 CD34 0 3339MAINT CD35 MAINT CD35 3390 VMCD35 CD35 0 3339
You must now have page volumes being formatted on MAINT and PERM or minidisk volumes being formatted on SYSMAINT.
When completed, you must have five newly formatted volumes that you can use as minidisks.
44 IBM z/VM and Linux on IBM System z: Virtualization Cookbook for Red Hat Enterprise Linux 4
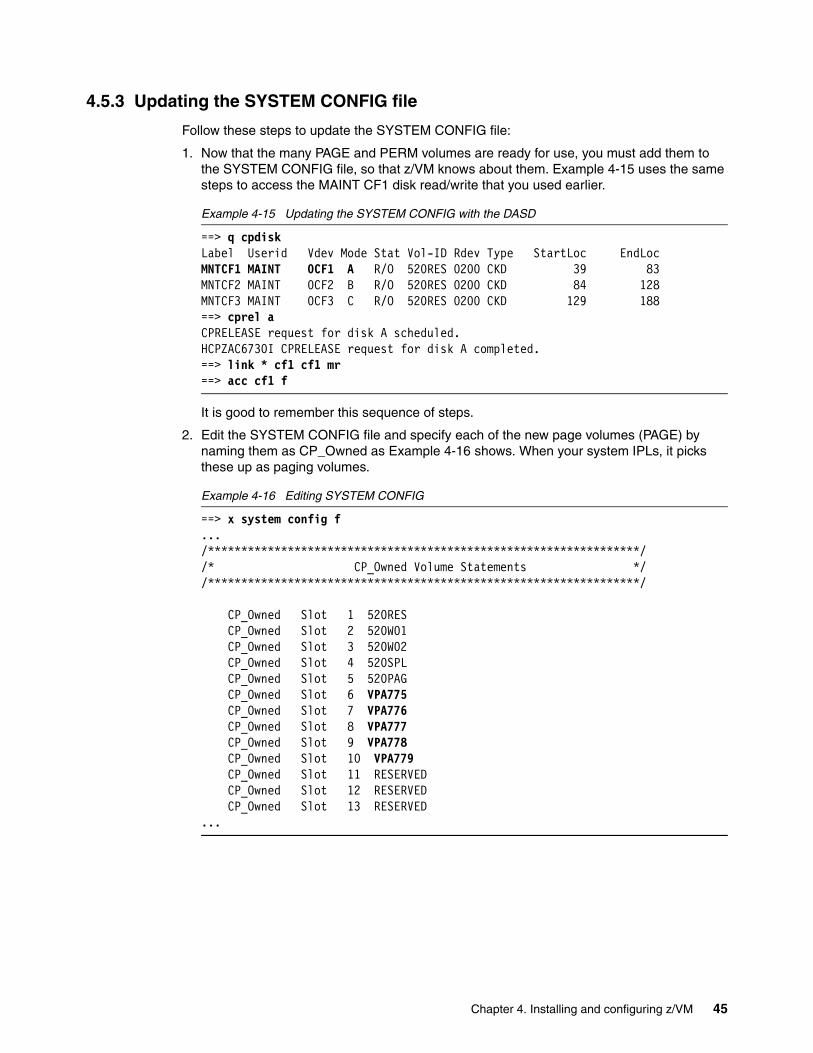
4.5.3 Updating the SYSTEM CONFIG file
Follow these steps to update the SYSTEM CONFIG file:
1. Now that the many PAGE and PERM volumes are ready for use, you must add them to the SYSTEM CONFIG file, so that z/VM knows about them. Example 4-15 uses the same steps to access the MAINT CF1 disk read/write that you used earlier.
Example 4-15 Updating the SYSTEM CONFIG with the DASD
==> q cpdiskLabel Userid Vdev Mode Stat Vol-ID Rdev Type StartLoc EndLocMNTCF1 MAINT 0CF1 A R/O 520RES 0200 CKD 39 83MNTCF2 MAINT 0CF2 B R/O 520RES 0200 CKD 84 128MNTCF3 MAINT 0CF3 C R/O 520RES 0200 CKD 129 188==> cprel aCPRELEASE request for disk A scheduled.HCPZAC6730I CPRELEASE request for disk A completed.==> link * cf1 cf1 mr==> acc cf1 f
It is good to remember this sequence of steps.
2. Edit the SYSTEM CONFIG file and specify each of the new page volumes (PAGE) by naming them as CP_Owned as Example 4-16 shows. When your system IPLs, it picks these up as paging volumes.
Example 4-16 Editing SYSTEM CONFIG
==> x system config f.../*****************************************************************//* CP_Owned Volume Statements *//*****************************************************************/
CP_Owned Slot 1 520RES CP_Owned Slot 2 520W01 CP_Owned Slot 3 520W02 CP_Owned Slot 4 520SPL CP_Owned Slot 5 520PAG CP_Owned Slot 6 VPA775
CP_Owned Slot 7 VPA776 CP_Owned Slot 8 VPA777 CP_Owned Slot 9 VPA778 CP_Owned Slot 10 VPA779 CP_Owned Slot 11 RESERVED CP_Owned Slot 12 RESERVED CP_Owned Slot 13 RESERVED...
Chapter 4. Installing and configuring z/VM 45
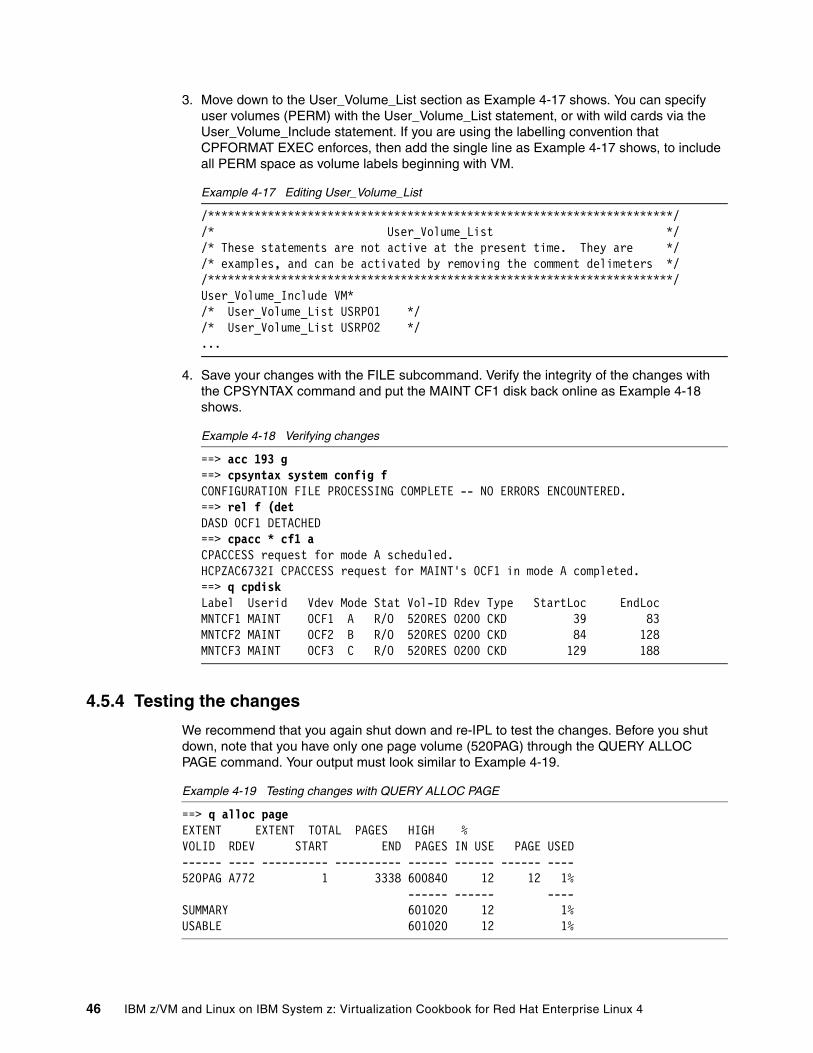
3. Move down to the User_Volume_List section as Example 4-17 shows. You can specify user volumes (PERM) with the User_Volume_List statement, or with wild cards via the User_Volume_Include statement. If you are using the labelling convention that CPFORMAT EXEC enforces, then add the single line as Example 4-17 shows, to include all PERM space as volume labels beginning with VM.
Example 4-17 Editing User_Volume_List
/**********************************************************************//* User_Volume_List *//* These statements are not active at the present time. They are *//* examples, and can be activated by removing the comment delimeters *//**********************************************************************/User_Volume_Include VM*/* User_Volume_List USRP01 *//* User_Volume_List USRP02 */...
4. Save your changes with the FILE subcommand. Verify the integrity of the changes with the CPSYNTAX command and put the MAINT CF1 disk back online as Example 4-18 shows.
Example 4-18 Verifying changes
==> acc 193 g==> cpsyntax system config fCONFIGURATION FILE PROCESSING COMPLETE -- NO ERRORS ENCOUNTERED.==> rel f (detDASD 0CF1 DETACHED==> cpacc * cf1 aCPACCESS request for mode A scheduled.HCPZAC6732I CPACCESS request for MAINT's 0CF1 in mode A completed.==> q cpdiskLabel Userid Vdev Mode Stat Vol-ID Rdev Type StartLoc EndLocMNTCF1 MAINT 0CF1 A R/O 520RES 0200 CKD 39 83MNTCF2 MAINT 0CF2 B R/O 520RES 0200 CKD 84 128MNTCF3 MAINT 0CF3 C R/O 520RES 0200 CKD 129 188
4.5.4 Testing the changes
We recommend that you again shut down and re-IPL to test the changes. Before you shut down, note that you have only one page volume (520PAG) through the QUERY ALLOC PAGE command. Your output must look similar to Example 4-19.
Example 4-19 Testing changes with QUERY ALLOC PAGE
==> q alloc pageEXTENT EXTENT TOTAL PAGES HIGH %VOLID RDEV START END PAGES IN USE PAGE USED------ ---- ---------- ---------- ------ ------ ------ ----520PAG A772 1 3338 600840 12 12 1% ------ ------ ----SUMMARY 601020 12 1%USABLE 601020 12 1%
46 IBM z/VM and Linux on IBM System z: Virtualization Cookbook for Red Hat Enterprise Linux 4
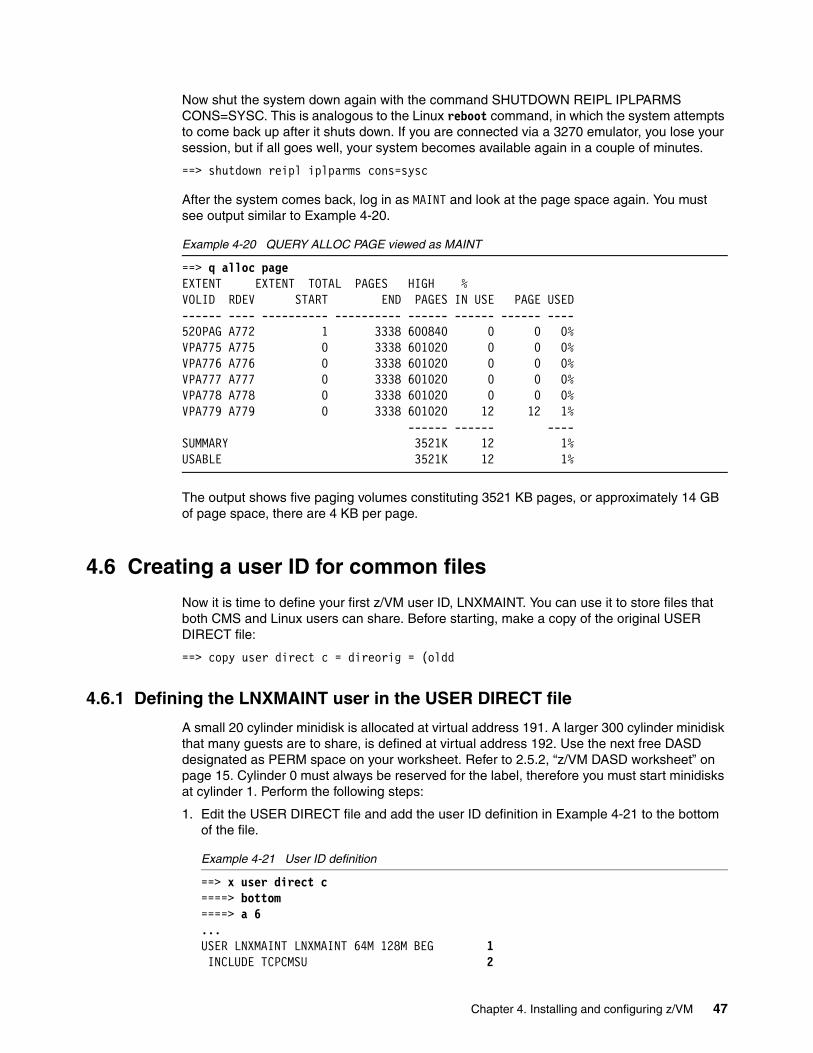
Now shut the system down again with the command SHUTDOWN REIPL IPLPARMS CONS=SYSC. This is analogous to the Linux reboot command, in which the system attempts to come back up after it shuts down. If you are connected via a 3270 emulator, you lose your session, but if all goes well, your system becomes available again in a couple of minutes.
==> shutdown reipl iplparms cons=sysc
After the system comes back, log in as MAINT and look at the page space again. You must see output similar to Example 4-20.
Example 4-20 QUERY ALLOC PAGE viewed as MAINT
==> q alloc pageEXTENT EXTENT TOTAL PAGES HIGH %VOLID RDEV START END PAGES IN USE PAGE USED------ ---- ---------- ---------- ------ ------ ------ ----520PAG A772 1 3338 600840 0 0 0%VPA775 A775 0 3338 601020 0 0 0%VPA776 A776 0 3338 601020 0 0 0%VPA777 A777 0 3338 601020 0 0 0%VPA778 A778 0 3338 601020 0 0 0%VPA779 A779 0 3338 601020 12 12 1% ------ ------ ----SUMMARY 3521K 12 1%USABLE 3521K 12 1%
The output shows five paging volumes constituting 3521 KB pages, or approximately 14 GB of page space, there are 4 KB per page.
4.6 Creating a user ID for common files
Now it is time to define your first z/VM user ID, LNXMAINT. You can use it to store files that both CMS and Linux users can share. Before starting, make a copy of the original USER DIRECT file:
==> copy user direct c = direorig = (oldd
4.6.1 Defining the LNXMAINT user in the USER DIRECT file
A small 20 cylinder minidisk is allocated at virtual address 191. A larger 300 cylinder minidisk that many guests are to share, is defined at virtual address 192. Use the next free DASD designated as PERM space on your worksheet. Refer to 2.5.2, “z/VM DASD worksheet” on page 15. Cylinder 0 must always be reserved for the label, therefore you must start minidisks at cylinder 1. Perform the following steps:
1. Edit the USER DIRECT file and add the user ID definition in Example 4-21 to the bottom of the file.
Example 4-21 User ID definition
==> x user direct c====> bottom====> a 6...USER LNXMAINT LNXMAINT 64M 128M BEG 1 INCLUDE TCPCMSU 2
Chapter 4. Installing and configuring z/VM 47
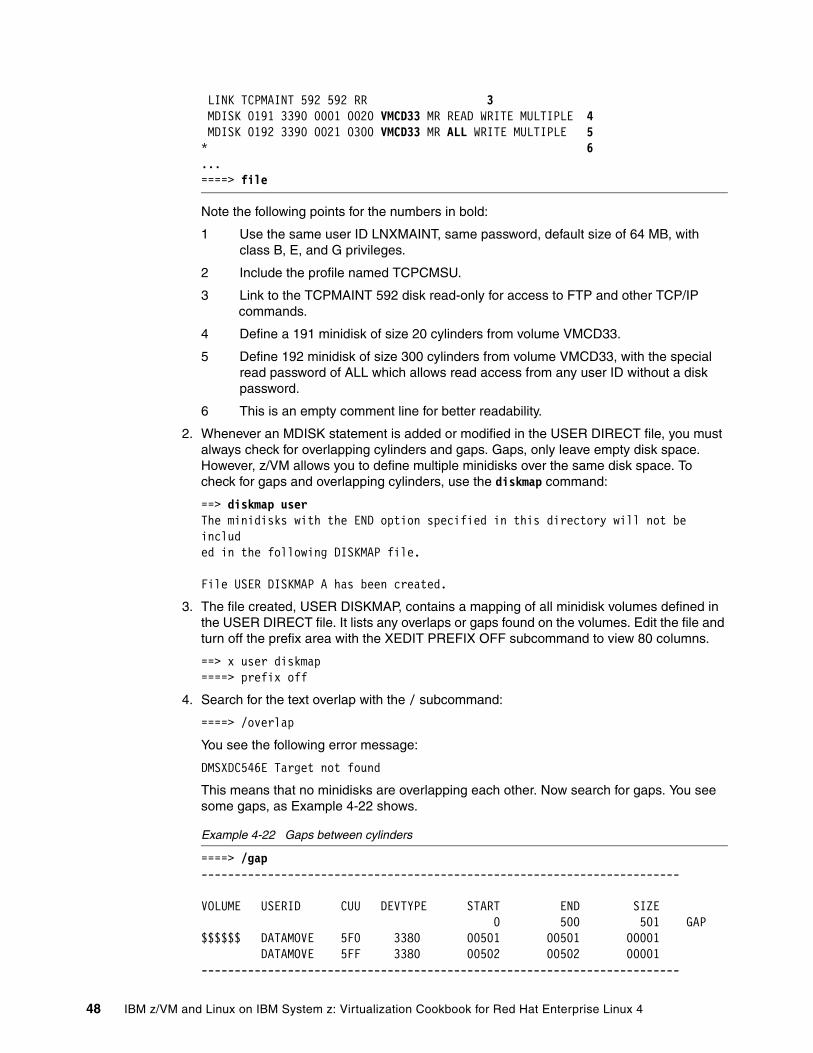
LINK TCPMAINT 592 592 RR 3 MDISK 0191 3390 0001 0020 VMCD33 MR READ WRITE MULTIPLE 4 MDISK 0192 3390 0021 0300 VMCD33 MR ALL WRITE MULTIPLE 5* 6...====> file
Note the following points for the numbers in bold:
1 Use the same user ID LNXMAINT, same password, default size of 64 MB, with class B, E, and G privileges.
2 Include the profile named TCPCMSU.
3 Link to the TCPMAINT 592 disk read-only for access to FTP and other TCP/IP commands.
4 Define a 191 minidisk of size 20 cylinders from volume VMCD33.
5 Define 192 minidisk of size 300 cylinders from volume VMCD33, with the special read password of ALL which allows read access from any user ID without a disk password.
6 This is an empty comment line for better readability.
2. Whenever an MDISK statement is added or modified in the USER DIRECT file, you must always check for overlapping cylinders and gaps. Gaps, only leave empty disk space. However, z/VM allows you to define multiple minidisks over the same disk space. To check for gaps and overlapping cylinders, use the diskmap command:
==> diskmap userThe minidisks with the END option specified in this directory will not be included in the following DISKMAP file.
File USER DISKMAP A has been created.
3. The file created, USER DISKMAP, contains a mapping of all minidisk volumes defined in the USER DIRECT file. It lists any overlaps or gaps found on the volumes. Edit the file and turn off the prefix area with the XEDIT PREFIX OFF subcommand to view 80 columns.
==> x user diskmap====> prefix off
4. Search for the text overlap with the / subcommand:
====> /overlap
You see the following error message:
DMSXDC546E Target not found
This means that no minidisks are overlapping each other. Now search for gaps. You see some gaps, as Example 4-22 shows.
Example 4-22 Gaps between cylinders
====> /gap------------------------------------------------------------------------
VOLUME USERID CUU DEVTYPE START END SIZE 0 500 501 GAP$$$$$$ DATAMOVE 5F0 3380 00501 00501 00001 DATAMOVE 5FF 3380 00502 00502 00001------------------------------------------------------------------------
48 IBM z/VM and Linux on IBM System z: Virtualization Cookbook for Red Hat Enterprise Linux 4
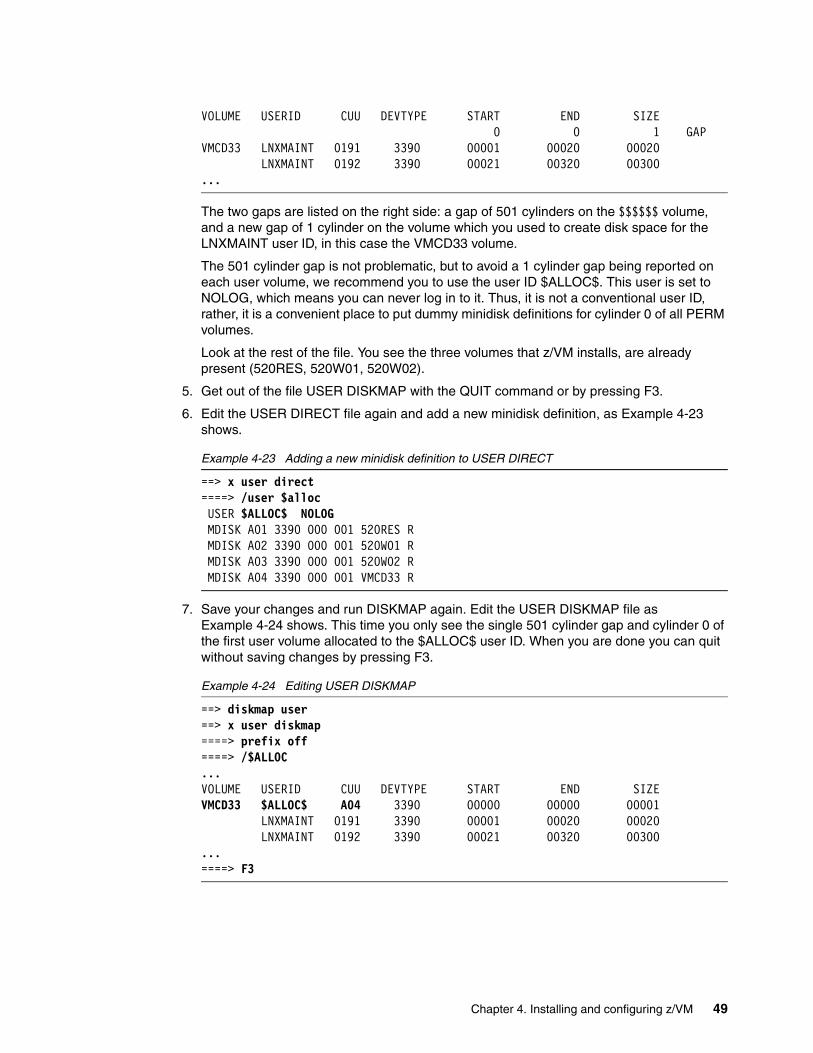
VOLUME USERID CUU DEVTYPE START END SIZE 0 0 1 GAPVMCD33 LNXMAINT 0191 3390 00001 00020 00020
LNXMAINT 0192 3390 00021 00320 00300...
The two gaps are listed on the right side: a gap of 501 cylinders on the $$$$$$ volume, and a new gap of 1 cylinder on the volume which you used to create disk space for the LNXMAINT user ID, in this case the VMCD33 volume.
The 501 cylinder gap is not problematic, but to avoid a 1 cylinder gap being reported on each user volume, we recommend you to use the user ID $ALLOC$. This user is set to NOLOG, which means you can never log in to it. Thus, it is not a conventional user ID, rather, it is a convenient place to put dummy minidisk definitions for cylinder 0 of all PERM volumes.
Look at the rest of the file. You see the three volumes that z/VM installs, are already present (520RES, 520W01, 520W02).
5. Get out of the file USER DISKMAP with the QUIT command or by pressing F3.
6. Edit the USER DIRECT file again and add a new minidisk definition, as Example 4-23 shows.
Example 4-23 Adding a new minidisk definition to USER DIRECT
==> x user direct====> /user $allocUSER $ALLOC$ NOLOG
MDISK A01 3390 000 001 520RES R MDISK A02 3390 000 001 520W01 R MDISK A03 3390 000 001 520W02 RMDISK A04 3390 000 001 VMCD33 R
7. Save your changes and run DISKMAP again. Edit the USER DISKMAP file as Example 4-24 shows. This time you only see the single 501 cylinder gap and cylinder 0 of the first user volume allocated to the $ALLOC$ user ID. When you are done you can quit without saving changes by pressing F3.
Example 4-24 Editing USER DISKMAP
==> diskmap user==> x user diskmap====> prefix off====> /$ALLOC...VOLUME USERID CUU DEVTYPE START END SIZEVMCD33 $ALLOC$ A04 3390 00000 00000 00001 LNXMAINT 0191 3390 00001 00020 00020 LNXMAINT 0192 3390 00021 00320 00300...====> F3
Chapter 4. Installing and configuring z/VM 49
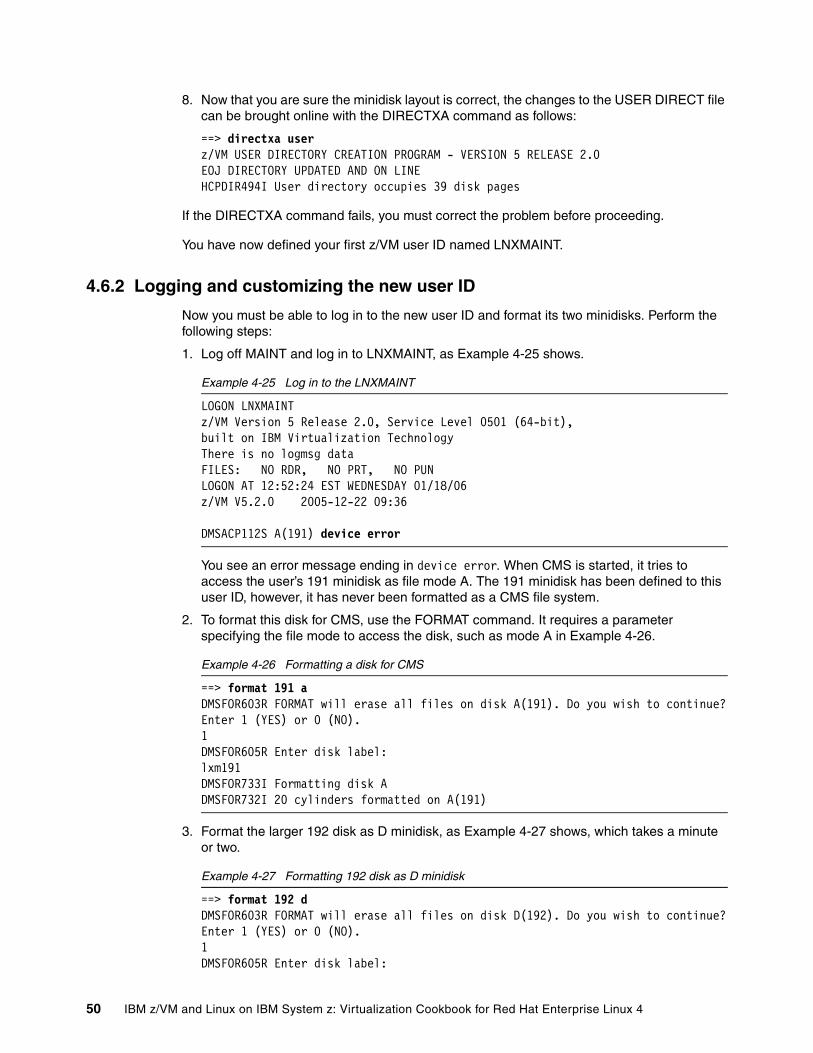
8. Now that you are sure the minidisk layout is correct, the changes to the USER DIRECT file can be brought online with the DIRECTXA command as follows:
==> directxa userz/VM USER DIRECTORY CREATION PROGRAM - VERSION 5 RELEASE 2.0EOJ DIRECTORY UPDATED AND ON LINEHCPDIR494I User directory occupies 39 disk pages
If the DIRECTXA command fails, you must correct the problem before proceeding.
You have now defined your first z/VM user ID named LNXMAINT.
4.6.2 Logging and customizing the new user ID
Now you must be able to log in to the new user ID and format its two minidisks. Perform the following steps:
1. Log off MAINT and log in to LNXMAINT, as Example 4-25 shows.
Example 4-25 Log in to the LNXMAINT
LOGON LNXMAINTz/VM Version 5 Release 2.0, Service Level 0501 (64-bit),built on IBM Virtualization TechnologyThere is no logmsg dataFILES: NO RDR, NO PRT, NO PUNLOGON AT 12:52:24 EST WEDNESDAY 01/18/06z/VM V5.2.0 2005-12-22 09:36
DMSACP112S A(191) device error
You see an error message ending in device error. When CMS is started, it tries to access the user’s 191 minidisk as file mode A. The 191 minidisk has been defined to this user ID, however, it has never been formatted as a CMS file system.
2. To format this disk for CMS, use the FORMAT command. It requires a parameter specifying the file mode to access the disk, such as mode A in Example 4-26.
Example 4-26 Formatting a disk for CMS
==> format 191 aDMSFOR603R FORMAT will erase all files on disk A(191). Do you wish to continue?Enter 1 (YES) or 0 (NO).1DMSFOR605R Enter disk label:lxm191DMSFOR733I Formatting disk ADMSFOR732I 20 cylinders formatted on A(191)
3. Format the larger 192 disk as D minidisk, as Example 4-27 shows, which takes a minute or two.
Example 4-27 Formatting 192 disk as D minidisk
==> format 192 dDMSFOR603R FORMAT will erase all files on disk D(192). Do you wish to continue?Enter 1 (YES) or 0 (NO).1DMSFOR605R Enter disk label:
50 IBM z/VM and Linux on IBM System z: Virtualization Cookbook for Red Hat Enterprise Linux 4
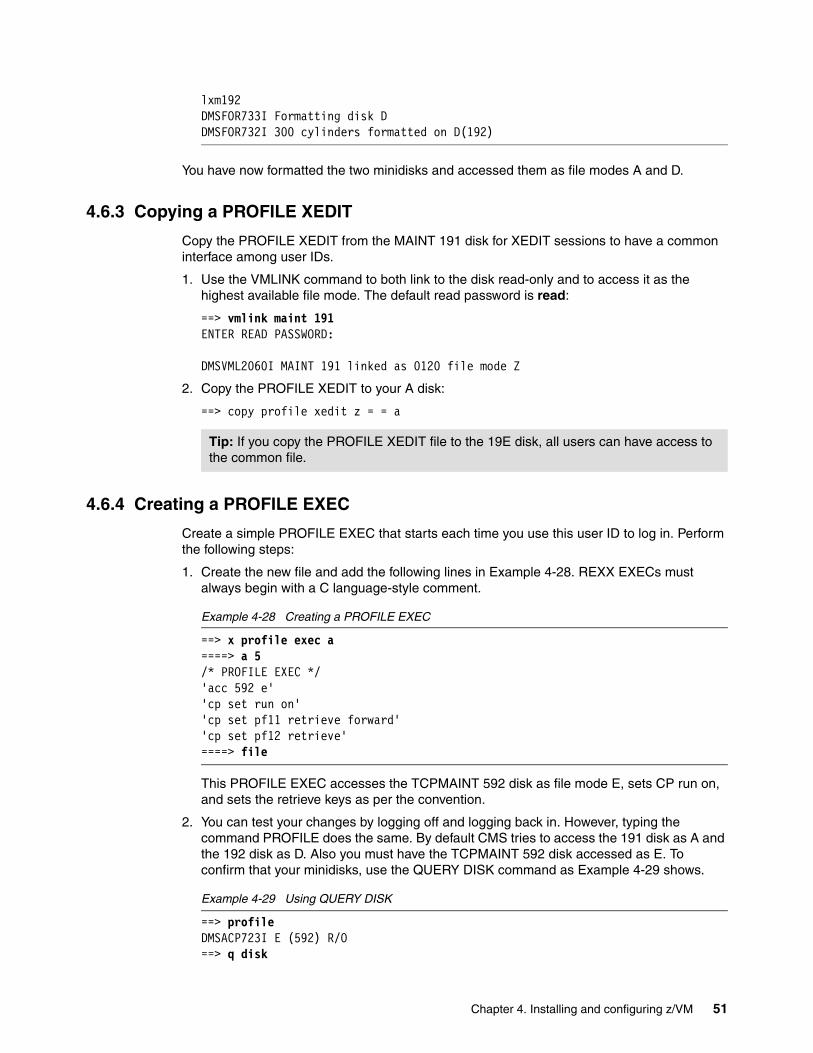
lxm192DMSFOR733I Formatting disk DDMSFOR732I 300 cylinders formatted on D(192)
You have now formatted the two minidisks and accessed them as file modes A and D.
4.6.3 Copying a PROFILE XEDIT
Copy the PROFILE XEDIT from the MAINT 191 disk for XEDIT sessions to have a common interface among user IDs.
1. Use the VMLINK command to both link to the disk read-only and to access it as the highest available file mode. The default read password is read:
==> vmlink maint 191ENTER READ PASSWORD:
DMSVML2060I MAINT 191 linked as 0120 file mode Z
2. Copy the PROFILE XEDIT to your A disk:
==> copy profile xedit z = = a
4.6.4 Creating a PROFILE EXEC
Create a simple PROFILE EXEC that starts each time you use this user ID to log in. Perform the following steps:
1. Create the new file and add the following lines in Example 4-28. REXX EXECs must always begin with a C language-style comment.
Example 4-28 Creating a PROFILE EXEC
==> x profile exec a====> a 5/* PROFILE EXEC */'acc 592 e''cp set run on''cp set pf11 retrieve forward''cp set pf12 retrieve'====> file
This PROFILE EXEC accesses the TCPMAINT 592 disk as file mode E, sets CP run on, and sets the retrieve keys as per the convention.
2. You can test your changes by logging off and logging back in. However, typing the command PROFILE does the same. By default CMS tries to access the 191 disk as A and the 192 disk as D. Also you must have the TCPMAINT 592 disk accessed as E. To confirm that your minidisks, use the QUERY DISK command as Example 4-29 shows.
Example 4-29 Using QUERY DISK
==> profileDMSACP723I E (592) R/O==> q disk
Tip: If you copy the PROFILE XEDIT file to the 19E disk, all users can have access to the common file.
Chapter 4. Installing and configuring z/VM 51
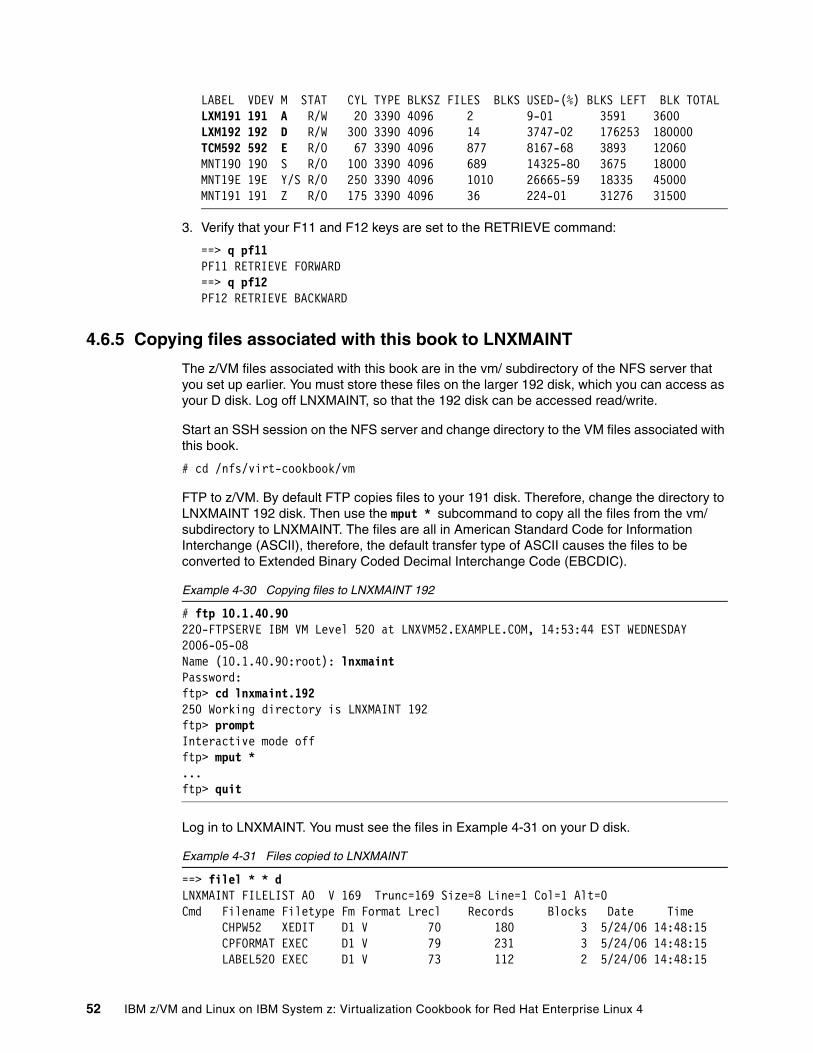
LABEL VDEV M STAT CYL TYPE BLKSZ FILES BLKS USED-(%) BLKS LEFT BLK TOTALLXM191 191 A R/W 20 3390 4096 2 9-01 3591 3600LXM192 192 D R/W 300 3390 4096 14 3747-02 176253 180000TCM592 592 E R/O 67 3390 4096 877 8167-68 3893 12060MNT190 190 S R/O 100 3390 4096 689 14325-80 3675 18000MNT19E 19E Y/S R/O 250 3390 4096 1010 26665-59 18335 45000MNT191 191 Z R/O 175 3390 4096 36 224-01 31276 31500
3. Verify that your F11 and F12 keys are set to the RETRIEVE command:
==> q pf11PF11 RETRIEVE FORWARD==> q pf12PF12 RETRIEVE BACKWARD
4.6.5 Copying files associated with this book to LNXMAINT
The z/VM files associated with this book are in the vm/ subdirectory of the NFS server that you set up earlier. You must store these files on the larger 192 disk, which you can access as your D disk. Log off LNXMAINT, so that the 192 disk can be accessed read/write.
Start an SSH session on the NFS server and change directory to the VM files associated with this book.
# cd /nfs/virt-cookbook/vm
FTP to z/VM. By default FTP copies files to your 191 disk. Therefore, change the directory to LNXMAINT 192 disk. Then use the mput * subcommand to copy all the files from the vm/ subdirectory to LNXMAINT. The files are all in American Standard Code for Information Interchange (ASCII), therefore, the default transfer type of ASCII causes the files to be converted to Extended Binary Coded Decimal Interchange Code (EBCDIC).
Example 4-30 Copying files to LNXMAINT 192
# ftp 10.1.40.90220-FTPSERVE IBM VM Level 520 at LNXVM52.EXAMPLE.COM, 14:53:44 EST WEDNESDAY 2006-05-08Name (10.1.40.90:root): lnxmaintPassword:ftp> cd lnxmaint.192250 Working directory is LNXMAINT 192ftp> promptInteractive mode offftp> mput *...ftp> quit
Log in to LNXMAINT. You must see the files in Example 4-31 on your D disk.
Example 4-31 Files copied to LNXMAINT
==> filel * * dLNXMAINT FILELIST A0 V 169 Trunc=169 Size=8 Line=1 Col=1 Alt=0Cmd Filename Filetype Fm Format Lrecl Records Blocks Date Time CHPW52 XEDIT D1 V 70 180 3 5/24/06 14:48:15 CPFORMAT EXEC D1 V 79 231 3 5/24/06 14:48:15 LABEL520 EXEC D1 V 73 112 2 5/24/06 14:48:15
52 IBM z/VM and Linux on IBM System z: Virtualization Cookbook for Red Hat Enterprise Linux 4
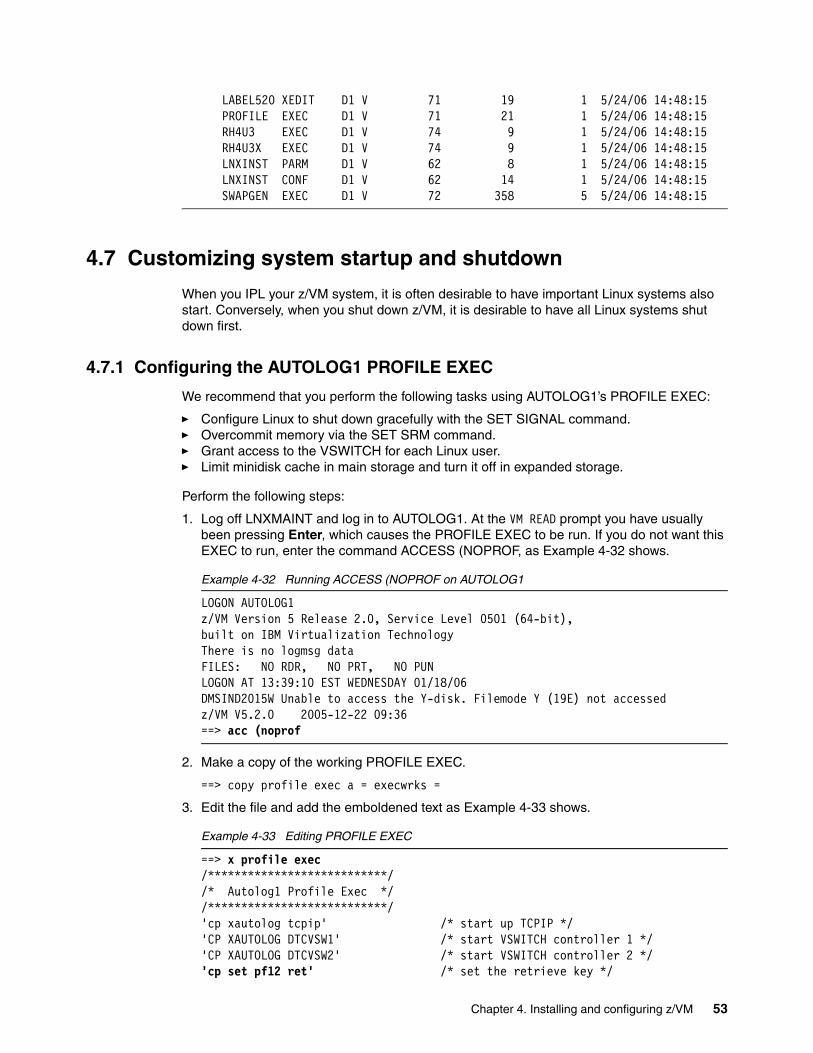
LABEL520 XEDIT D1 V 71 19 1 5/24/06 14:48:15 PROFILE EXEC D1 V 71 21 1 5/24/06 14:48:15 RH4U3 EXEC D1 V 74 9 1 5/24/06 14:48:15 RH4U3X EXEC D1 V 74 9 1 5/24/06 14:48:15 LNXINST PARM D1 V 62 8 1 5/24/06 14:48:15 LNXINST CONF D1 V 62 14 1 5/24/06 14:48:15 SWAPGEN EXEC D1 V 72 358 5 5/24/06 14:48:15
4.7 Customizing system startup and shutdown
When you IPL your z/VM system, it is often desirable to have important Linux systems also start. Conversely, when you shut down z/VM, it is desirable to have all Linux systems shut down first.
4.7.1 Configuring the AUTOLOG1 PROFILE EXEC
We recommend that you perform the following tasks using AUTOLOG1’s PROFILE EXEC:
� Configure Linux to shut down gracefully with the SET SIGNAL command.� Overcommit memory via the SET SRM command.� Grant access to the VSWITCH for each Linux user.� Limit minidisk cache in main storage and turn it off in expanded storage.
Perform the following steps:
1. Log off LNXMAINT and log in to AUTOLOG1. At the VM READ prompt you have usually been pressing Enter, which causes the PROFILE EXEC to be run. If you do not want this EXEC to run, enter the command ACCESS (NOPROF, as Example 4-32 shows.
Example 4-32 Running ACCESS (NOPROF on AUTOLOG1
LOGON AUTOLOG1z/VM Version 5 Release 2.0, Service Level 0501 (64-bit),built on IBM Virtualization TechnologyThere is no logmsg dataFILES: NO RDR, NO PRT, NO PUNLOGON AT 13:39:10 EST WEDNESDAY 01/18/06DMSIND2015W Unable to access the Y-disk. Filemode Y (19E) not accessedz/VM V5.2.0 2005-12-22 09:36==> acc (noprof
2. Make a copy of the working PROFILE EXEC.
==> copy profile exec a = execwrks =
3. Edit the file and add the emboldened text as Example 4-33 shows.
Example 4-33 Editing PROFILE EXEC
==> x profile exec/***************************//* Autolog1 Profile Exec *//***************************/'cp xautolog tcpip' /* start up TCPIP */'CP XAUTOLOG DTCVSW1' /* start VSWITCH controller 1 */'CP XAUTOLOG DTCVSW2' /* start VSWITCH controller 2 */'cp set pf12 ret' /* set the retrieve key */
Chapter 4. Installing and configuring z/VM 53
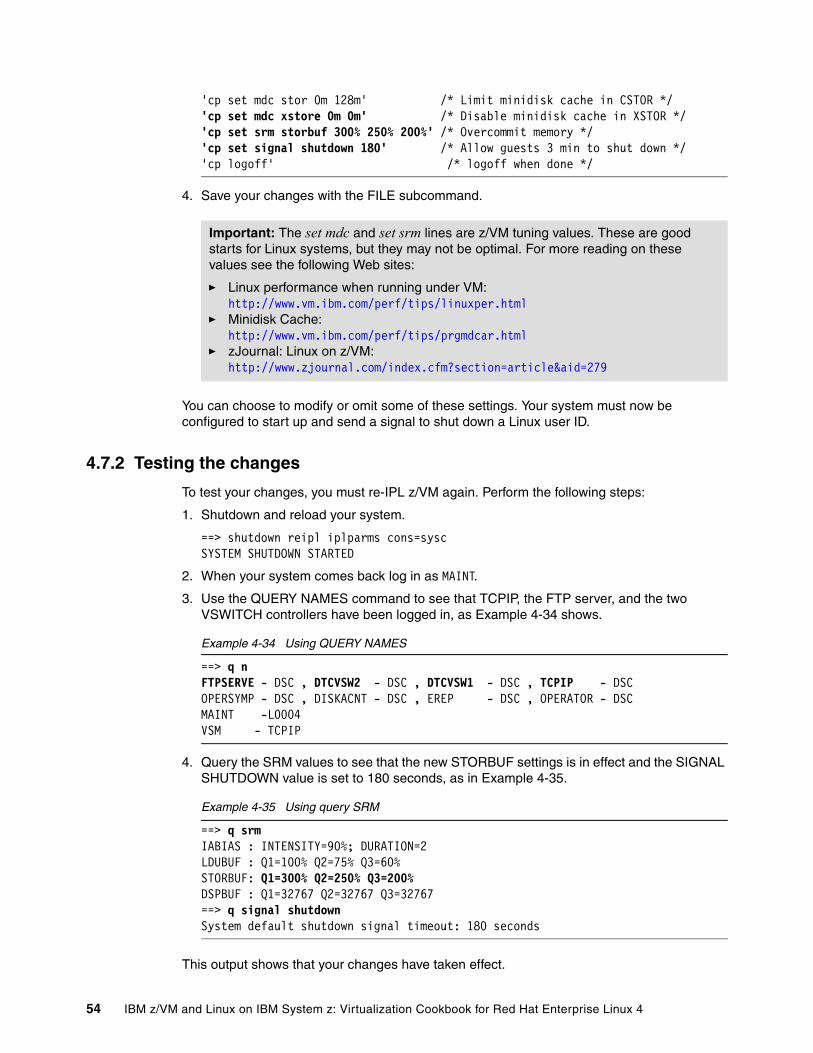
'cp set mdc stor 0m 128m' /* Limit minidisk cache in CSTOR */'cp set mdc xstore 0m 0m' /* Disable minidisk cache in XSTOR */'cp set srm storbuf 300% 250% 200%' /* Overcommit memory */'cp set signal shutdown 180' /* Allow guests 3 min to shut down */'cp logoff' /* logoff when done */
4. Save your changes with the FILE subcommand.
You can choose to modify or omit some of these settings. Your system must now be configured to start up and send a signal to shut down a Linux user ID.
4.7.2 Testing the changes
To test your changes, you must re-IPL z/VM again. Perform the following steps:
1. Shutdown and reload your system.
==> shutdown reipl iplparms cons=syscSYSTEM SHUTDOWN STARTED
2. When your system comes back log in as MAINT.
3. Use the QUERY NAMES command to see that TCPIP, the FTP server, and the two VSWITCH controllers have been logged in, as Example 4-34 shows.
Example 4-34 Using QUERY NAMES
==> q nFTPSERVE - DSC , DTCVSW2 - DSC , DTCVSW1 - DSC , TCPIP - DSCOPERSYMP - DSC , DISKACNT - DSC , EREP - DSC , OPERATOR - DSCMAINT -L0004VSM - TCPIP
4. Query the SRM values to see that the new STORBUF settings is in effect and the SIGNAL SHUTDOWN value is set to 180 seconds, as in Example 4-35.
Example 4-35 Using query SRM
==> q srmIABIAS : INTENSITY=90%; DURATION=2LDUBUF : Q1=100% Q2=75% Q3=60%STORBUF: Q1=300% Q2=250% Q3=200%DSPBUF : Q1=32767 Q2=32767 Q3=32767==> q signal shutdownSystem default shutdown signal timeout: 180 seconds
This output shows that your changes have taken effect.
Important: The set mdc and set srm lines are z/VM tuning values. These are good starts for Linux systems, but they may not be optimal. For more reading on these values see the following Web sites:
� Linux performance when running under VM:http://www.vm.ibm.com/perf/tips/linuxper.html
� Minidisk Cache:http://www.vm.ibm.com/perf/tips/prgmdcar.html
� zJournal: Linux on z/VM:http://www.zjournal.com/index.cfm?section=article&aid=279
54 IBM z/VM and Linux on IBM System z: Virtualization Cookbook for Red Hat Enterprise Linux 4
4.8 Addressing z/VM security issues
This section briefly discusses the following security issues.
� z/VM security products� High level z/VM security� Linux user ID privilege classes� z/VM user ID and minidisk passwords
4.8.1 VM security products
You might want to use a z/VM security product such as IBM Resource Access Control Facility (RACF®) or Computer Associates VM:Secure. They allow you to address further security issues, such as password aging and the auditing of users or access attempts.
4.8.2 High level z/VM security
The paper titled z/VM Security and Integrity that Cliff Laking and Alan Altmark wrote, discusses the isolation and integrity of virtual servers under z/VM. You can refer to this material on the Web at:
http://www-1.ibm.com/servers/eserver/zseries/library/techpapers/pdf/gm130145.pdf
4.8.3 Linux user ID privilege classes
Another security issue is the privilege class that Linux user IDs are assigned. The IBM Redpaper titled Running Linux Guest in less than CP Privilege Class G, REDP-3870 by Rob van der Heij addresses this issue.
4.8.4 z/VM user ID and minidisk passwords
All passwords in a vanilla z/VM system are the same as the user ID. This is a large security hole. This is a large security hole that you must address.
There are two types of passwords in the USER DIRECT file:
User IDs The password you require to log inMinidisks Separate passwords for read access, write access, and multi-write
access
Both types of passwords must be modified. You can do this using the CHPW52 XEDIT macro defined in the next section.
4.8.5 Changing passwords in USER DIRECT
You can change the passwords manually in XEDIT. However, this is both tedious and error-prone. Therefore, a profile named CHPW52 XEDIT has been included with this book.
This macro changes all z/VM passwords to the same value, which may still not be adequate security given the different function of the various user IDs. If you want different passwords, you have to modify the USER DIRECT file manually, either with or without using the CHPW52 XEDIT macro.
Chapter 4. Installing and configuring z/VM 55
To modify all user ID and minidisk passwords to the same value, perform the following steps:
1. Log in to MAINT.
2. Link and access the LNXMAINT 192 disk to pick up the CHPW52 EXEC.
==> vmlink lnxmaint 192DMSVML2060I LNXMAINT 192 linked as 0120 file mode Z
3. Make a backup copy of the USER DIRECT file and make sure that the password you want to use is not a string in the file. For example, if you want to change all passwords to VMPASSWD, then perform the following steps:
==> copy user direct c = direwrks = (oldd==> x user direct c====> /vmpasswdDMSXDC546E Target not found====> quit
The Target not found message shows that the string VMPASSWD is not used in the USER DIRECT file and therefore, it is a good candidate for a password.
4. Edit the USER DIRECT file with a parameter of (profile chpw52) followed by the new password. Rather than invoking the default profile of PROFILE XEDIT, this command invokes the XEDIT macro named CHPW52 XEDIT and pass the new password to it. For example, to change all passwords to VMPASSWD, enter the following command:
==> x user direct c (profile chpw52) vmpasswd
Changing all passwords to: VMPASSWD
DMSXCG517I 1 occurrence(s) changed on 1 line(s)DMSXCG517I 1 occurrence(s) changed on 1 line(s)DMSXCG517I 1 occurrence(s) changed on 1 line(s)...
5. When the profile finishes, you are left in the XEDIT session with all passwords modified. Examine the changes, then save the changes with the FILE subcommand:
====> file
6. Bring the changes online with the DIRECTXA command:
==> directxa userz/VM USER DIRECTORY CREATION PROGRAM - VERSION 5 RELEASE 2.0EOJ DIRECTORY UPDATED AND ON LINEHCPDIR494I User directory occupies 39 disk pages
Your new directory is online. Do not forget the new password.
Note that this XEDIT macro only works on a vanilla USER DIRECT file, because it searches for the original user IDs next to passwords. If you want to change your password again, it is much easier, because you can use the XEDIT CHANGE subcommand. For example, to change all passwords from VMPASSWD to VM5LNX, invoke the following commands:
==> x user direct c====> c/vmpasswd/vm5lnx/* *DMSXCG517I 773 occurrence(s) changed on 328 line(s)
Your z/VM system is now customized and ready for Linux. We recommend that you back up your system to tape.
56 IBM z/VM and Linux on IBM System z: Virtualization Cookbook for Red Hat Enterprise Linux 4
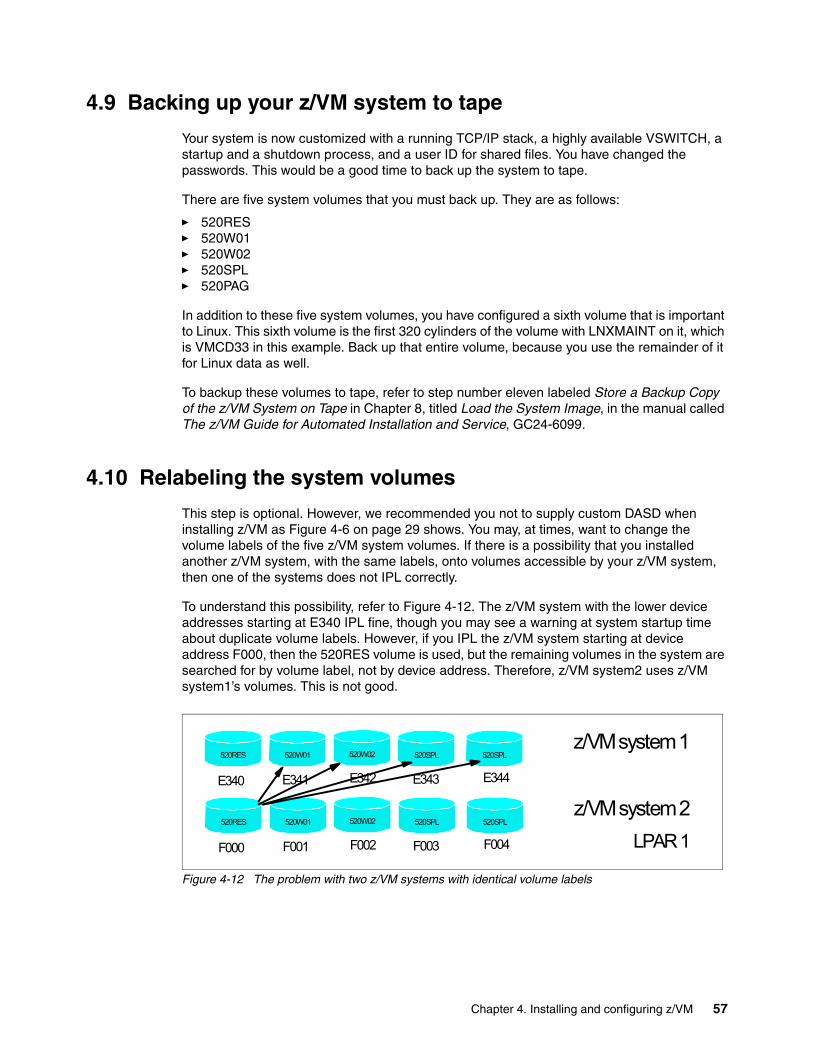
4.9 Backing up your z/VM system to tape
Your system is now customized with a running TCP/IP stack, a highly available VSWITCH, a startup and a shutdown process, and a user ID for shared files. You have changed the passwords. This would be a good time to back up the system to tape.
There are five system volumes that you must back up. They are as follows:
� 520RES� 520W01� 520W02� 520SPL� 520PAG
In addition to these five system volumes, you have configured a sixth volume that is important to Linux. This sixth volume is the first 320 cylinders of the volume with LNXMAINT on it, which is VMCD33 in this example. Back up that entire volume, because you use the remainder of it for Linux data as well.
To backup these volumes to tape, refer to step number eleven labeled Store a Backup Copy of the z/VM System on Tape in Chapter 8, titled Load the System Image, in the manual called The z/VM Guide for Automated Installation and Service, GC24-6099.
4.10 Relabeling the system volumes
This step is optional. However, we recommended you not to supply custom DASD when installing z/VM as Figure 4-6 on page 29 shows. You may, at times, want to change the volume labels of the five z/VM system volumes. If there is a possibility that you installed another z/VM system, with the same labels, onto volumes accessible by your z/VM system, then one of the systems does not IPL correctly.
To understand this possibility, refer to Figure 4-12. The z/VM system with the lower device addresses starting at E340 IPL fine, though you may see a warning at system startup time about duplicate volume labels. However, if you IPL the z/VM system starting at device address F000, then the 520RES volume is used, but the remaining volumes in the system are searched for by volume label, not by device address. Therefore, z/VM system2 uses z/VM system1’s volumes. This is not good.
Figure 4-12 The problem with two z/VM systems with identical volume labels
520W01520RES 520SPL520W02z/VM system 1
520SPL
E340 E344E343E342E341
520W01520RES 520SPL520W02z/VM system 2
520SPL
F000 F004F003F002F001 LPAR 1
Chapter 4. Installing and configuring z/VM 57
Therefore, if there is a possibility of another z/VM system being installed on DASD that this system has access to, we recommend that you perform the following steps. You require access to the HMC to perform them:
� Modifying labels in the SYSTEM CONFIG file� Modifying labels in the USER DIRECT file� Changing the labels on the five volumes� Shutting down your system and restarting it
4.10.1 Modifying labels in the SYSTEM CONFIG file
Note the first five CP-owned volumes with the QUERY CPOWNED command in Example 4-36.
Example 4-36 QUERY CPWONED output
==> q cpownedSlot Vol-ID Rdev Type Status 1 520RES A770 Own Online and attached 2 520SPL A771 Own Online and attached 3 520PAG A772 Own Online and attached 4 520W01 A773 Own Online and attached 5 520W02 A774 Own Online and attached 6 VPA775 A775 Own Online and attached 7 VPA776 A776 Own Online and attached 8 VPA777 A777 Own Online and attached 9 VPA778 A778 Own Online and attached 10 VPA779 A779 Own Online and attached 11 ------ ---- ----- Reserved 12 ------ ---- ----- Reserved...
The labeling convention described in 2.2.1, “Volume labeling convention” on page 9 suggests using V in the second character of the label. An XEDIT macro, LABEL520 XEDIT, is supplied to help make this process more reliable. You can use it on the SYSTEM CONFIG and USER DIRECT files.
To modify the labels in the SYSTEM CONFIG file, release the A CP-disk and access it read/write. Back up the SYSTEM CONFIG file, then edit it with the LABEL520 XEDIT macro, passing the five addresses of the z/VM system volumes as A770-A774 in Example 4-37.
Example 4-37 Editing the labels in SYSTEM CONFIG
==> cprel a...==> link * cf1 cf1 mr==> acc cf1 f==> copy system config f = confwrks = (oldd rep==> x system config f (profile label520) A770 A771 A772 A773 A774DMSXCG517I 3 occurrence(s) changed on 3 line(s)
Important: You must perform this process as documented in this book. Making a mistake in one of the steps can easily result in an unusable system. Check your steps carefully and check if your system restarts with no problems. Try to perform all steps in succession in a short amount of time.
58 IBM z/VM and Linux on IBM System z: Virtualization Cookbook for Red Hat Enterprise Linux 4
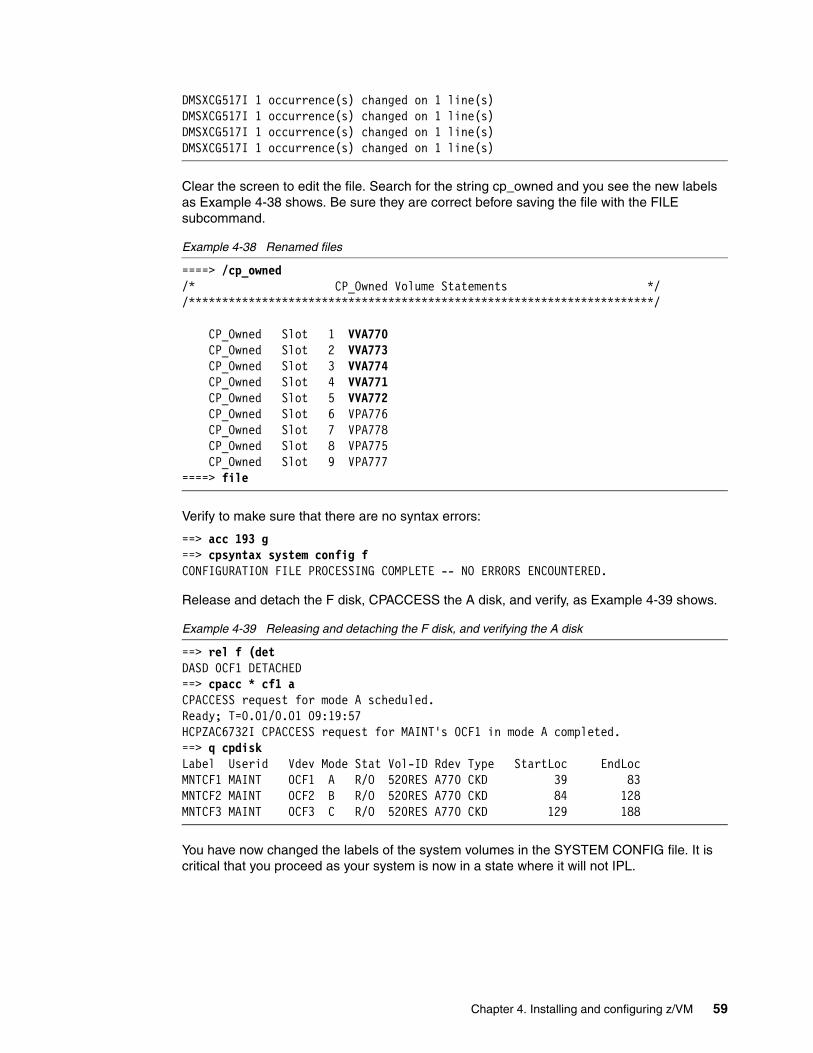
DMSXCG517I 1 occurrence(s) changed on 1 line(s)DMSXCG517I 1 occurrence(s) changed on 1 line(s)DMSXCG517I 1 occurrence(s) changed on 1 line(s)DMSXCG517I 1 occurrence(s) changed on 1 line(s)
Clear the screen to edit the file. Search for the string cp_owned and you see the new labels as Example 4-38 shows. Be sure they are correct before saving the file with the FILE subcommand.
Example 4-38 Renamed files
====> /cp_owned/* CP_Owned Volume Statements *//**********************************************************************/
CP_Owned Slot 1 VVA770 CP_Owned Slot 2 VVA773 CP_Owned Slot 3 VVA774 CP_Owned Slot 4 VVA771 CP_Owned Slot 5 VVA772 CP_Owned Slot 6 VPA776 CP_Owned Slot 7 VPA778 CP_Owned Slot 8 VPA775 CP_Owned Slot 9 VPA777====> file
Verify to make sure that there are no syntax errors:
==> acc 193 g==> cpsyntax system config fCONFIGURATION FILE PROCESSING COMPLETE -- NO ERRORS ENCOUNTERED.
Release and detach the F disk, CPACCESS the A disk, and verify, as Example 4-39 shows.
Example 4-39 Releasing and detaching the F disk, and verifying the A disk
==> rel f (detDASD 0CF1 DETACHED==> cpacc * cf1 aCPACCESS request for mode A scheduled.Ready; T=0.01/0.01 09:19:57HCPZAC6732I CPACCESS request for MAINT's 0CF1 in mode A completed.==> q cpdiskLabel Userid Vdev Mode Stat Vol-ID Rdev Type StartLoc EndLocMNTCF1 MAINT 0CF1 A R/O 520RES A770 CKD 39 83MNTCF2 MAINT 0CF2 B R/O 520RES A770 CKD 84 128MNTCF3 MAINT 0CF3 C R/O 520RES A770 CKD 129 188
You have now changed the labels of the system volumes in the SYSTEM CONFIG file. It is critical that you proceed as your system is now in a state where it will not IPL.
Chapter 4. Installing and configuring z/VM 59
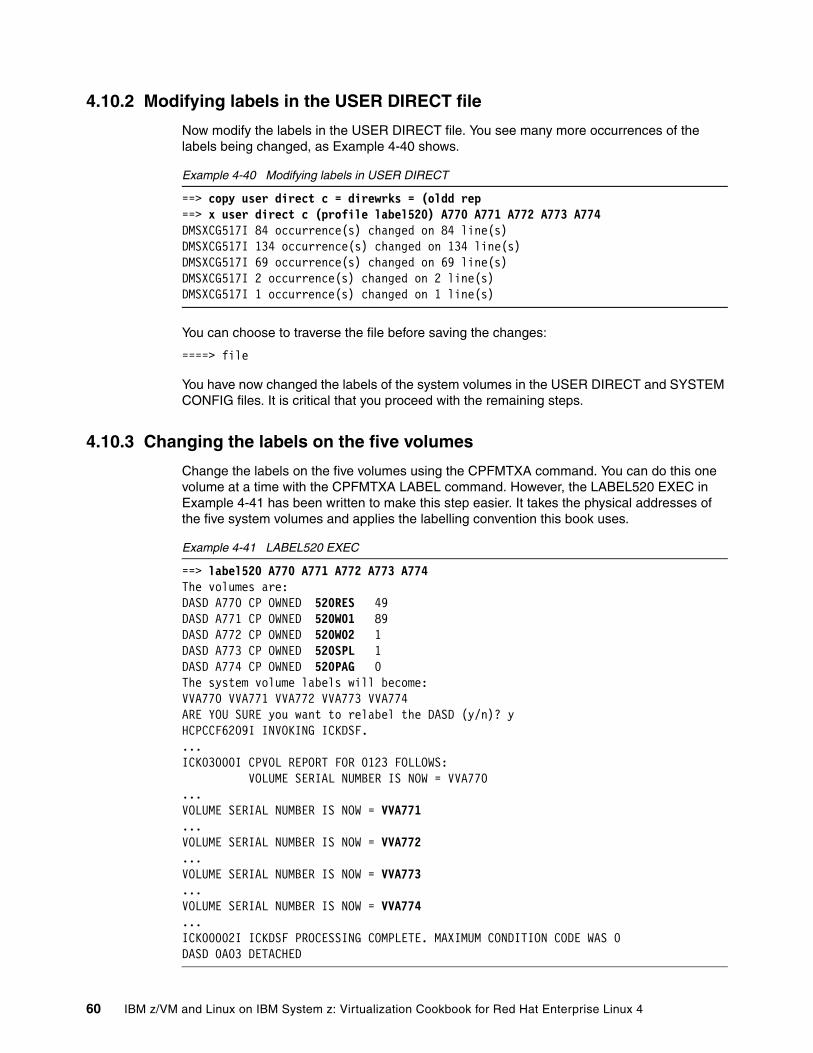
4.10.2 Modifying labels in the USER DIRECT file
Now modify the labels in the USER DIRECT file. You see many more occurrences of the labels being changed, as Example 4-40 shows.
Example 4-40 Modifying labels in USER DIRECT
==> copy user direct c = direwrks = (oldd rep==> x user direct c (profile label520) A770 A771 A772 A773 A774DMSXCG517I 84 occurrence(s) changed on 84 line(s)DMSXCG517I 134 occurrence(s) changed on 134 line(s)DMSXCG517I 69 occurrence(s) changed on 69 line(s)DMSXCG517I 2 occurrence(s) changed on 2 line(s)DMSXCG517I 1 occurrence(s) changed on 1 line(s)
You can choose to traverse the file before saving the changes:
====> file
You have now changed the labels of the system volumes in the USER DIRECT and SYSTEM CONFIG files. It is critical that you proceed with the remaining steps.
4.10.3 Changing the labels on the five volumes
Change the labels on the five volumes using the CPFMTXA command. You can do this one volume at a time with the CPFMTXA LABEL command. However, the LABEL520 EXEC in Example 4-41 has been written to make this step easier. It takes the physical addresses of the five system volumes and applies the labelling convention this book uses.
Example 4-41 LABEL520 EXEC
==> label520 A770 A771 A772 A773 A774The volumes are:DASD A770 CP OWNED 520RES 49DASD A771 CP OWNED 520W01 89DASD A772 CP OWNED 520W02 1DASD A773 CP OWNED 520SPL 1DASD A774 CP OWNED 520PAG 0The system volume labels will become:VVA770 VVA771 VVA772 VVA773 VVA774ARE YOU SURE you want to relabel the DASD (y/n)? yHCPCCF6209I INVOKING ICKDSF....ICK03000I CPVOL REPORT FOR 0123 FOLLOWS: VOLUME SERIAL NUMBER IS NOW = VVA770...VOLUME SERIAL NUMBER IS NOW = VVA771...VOLUME SERIAL NUMBER IS NOW = VVA772...VOLUME SERIAL NUMBER IS NOW = VVA773...VOLUME SERIAL NUMBER IS NOW = VVA774...ICK00002I ICKDSF PROCESSING COMPLETE. MAXIMUM CONDITION CODE WAS 0DASD 0A03 DETACHED
60 IBM z/VM and Linux on IBM System z: Virtualization Cookbook for Red Hat Enterprise Linux 4
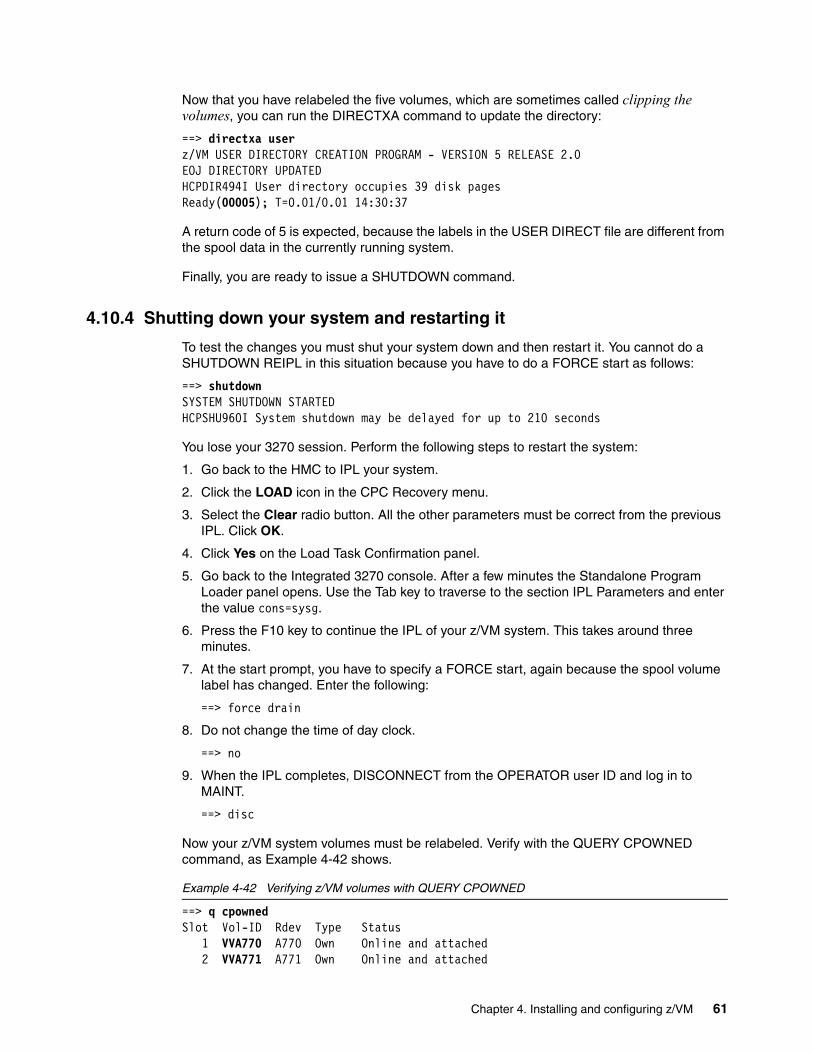
Now that you have relabeled the five volumes, which are sometimes called clipping the volumes, you can run the DIRECTXA command to update the directory:
==> directxa userz/VM USER DIRECTORY CREATION PROGRAM - VERSION 5 RELEASE 2.0EOJ DIRECTORY UPDATEDHCPDIR494I User directory occupies 39 disk pagesReady(00005); T=0.01/0.01 14:30:37
A return code of 5 is expected, because the labels in the USER DIRECT file are different from the spool data in the currently running system.
Finally, you are ready to issue a SHUTDOWN command.
4.10.4 Shutting down your system and restarting it
To test the changes you must shut your system down and then restart it. You cannot do a SHUTDOWN REIPL in this situation because you have to do a FORCE start as follows:
==> shutdownSYSTEM SHUTDOWN STARTEDHCPSHU960I System shutdown may be delayed for up to 210 seconds
You lose your 3270 session. Perform the following steps to restart the system:
1. Go back to the HMC to IPL your system.
2. Click the LOAD icon in the CPC Recovery menu.
3. Select the Clear radio button. All the other parameters must be correct from the previous IPL. Click OK.
4. Click Yes on the Load Task Confirmation panel.
5. Go back to the Integrated 3270 console. After a few minutes the Standalone Program Loader panel opens. Use the Tab key to traverse to the section IPL Parameters and enter the value cons=sysg.
6. Press the F10 key to continue the IPL of your z/VM system. This takes around three minutes.
7. At the start prompt, you have to specify a FORCE start, again because the spool volume label has changed. Enter the following:
==> force drain
8. Do not change the time of day clock.
==> no
9. When the IPL completes, DISCONNECT from the OPERATOR user ID and log in to MAINT.
==> disc
Now your z/VM system volumes must be relabeled. Verify with the QUERY CPOWNED command, as Example 4-42 shows.
Example 4-42 Verifying z/VM volumes with QUERY CPOWNED
==> q cpownedSlot Vol-ID Rdev Type Status 1 VVA770 A770 Own Online and attached 2 VVA771 A771 Own Online and attached
Chapter 4. Installing and configuring z/VM 61
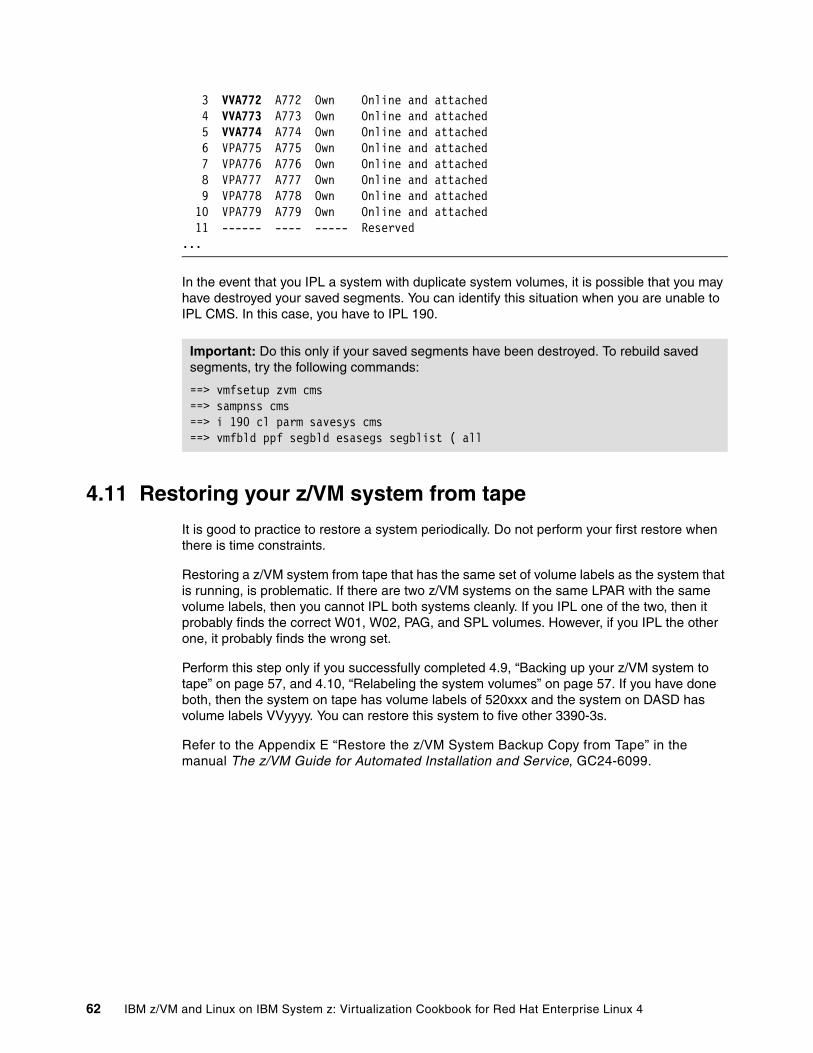
3 VVA772 A772 Own Online and attached 4 VVA773 A773 Own Online and attached 5 VVA774 A774 Own Online and attached 6 VPA775 A775 Own Online and attached 7 VPA776 A776 Own Online and attached 8 VPA777 A777 Own Online and attached 9 VPA778 A778 Own Online and attached 10 VPA779 A779 Own Online and attached 11 ------ ---- ----- Reserved...
In the event that you IPL a system with duplicate system volumes, it is possible that you may have destroyed your saved segments. You can identify this situation when you are unable to IPL CMS. In this case, you have to IPL 190.
4.11 Restoring your z/VM system from tape
It is good to practice to restore a system periodically. Do not perform your first restore when there is time constraints.
Restoring a z/VM system from tape that has the same set of volume labels as the system that is running, is problematic. If there are two z/VM systems on the same LPAR with the same volume labels, then you cannot IPL both systems cleanly. If you IPL one of the two, then it probably finds the correct W01, W02, PAG, and SPL volumes. However, if you IPL the other one, it probably finds the wrong set.
Perform this step only if you successfully completed 4.9, “Backing up your z/VM system to tape” on page 57, and 4.10, “Relabeling the system volumes” on page 57. If you have done both, then the system on tape has volume labels of 520xxx and the system on DASD has volume labels VVyyyy. You can restore this system to five other 3390-3s.
Refer to the Appendix E “Restore the z/VM System Backup Copy from Tape” in the manual The z/VM Guide for Automated Installation and Service, GC24-6099.
Important: Do this only if your saved segments have been destroyed. To rebuild saved segments, try the following commands:
==> vmfsetup zvm cms ==> sampnss cms ==> i 190 cl parm savesys cms ==> vmfbld ppf segbld esasegs segblist ( all
62 IBM z/VM and Linux on IBM System z: Virtualization Cookbook for Red Hat Enterprise Linux 4
Chapter 5. Servicing z/VM
This section describes how to apply a program temporary fix (PTF) and a recommended service upgrade (RSU) from envelope files. Both processes are basically the same.
The z/VM V5R1 Service Guide and VMSES/E Introduction and Reference, are documents that discuss the application of corrective service to z/VM. You can download these documents in PDF format from the Web at:
http://www.vm.ibm.com/library
VMSES/E is a component of z/VM that provides the SERVICE and PUT2PROD EXECs. The SERVICE EXEC:
� Installs an RSU or applies corrective service tape (COR) service fix for z/VM components, features, or products.
� Displays either the RSU level of the component specified, or whether a particular PTF or authorized program analysis report (APAR) has been applied when used with STATUS.
� Creates PTF bitmap files when used with BITMAP.
When SERVICE successfully completes, the PUT2PROD EXEC places the z/VM components, features, or products that you install on the z/VM System DASD Dump Restore (DDR) into production.
5
Important: When you are applying service, you might want to back it up. We recommend that you have a backup of your system before starting this section.
© Copyright IBM Corp. 2006. All rights reserved. 63
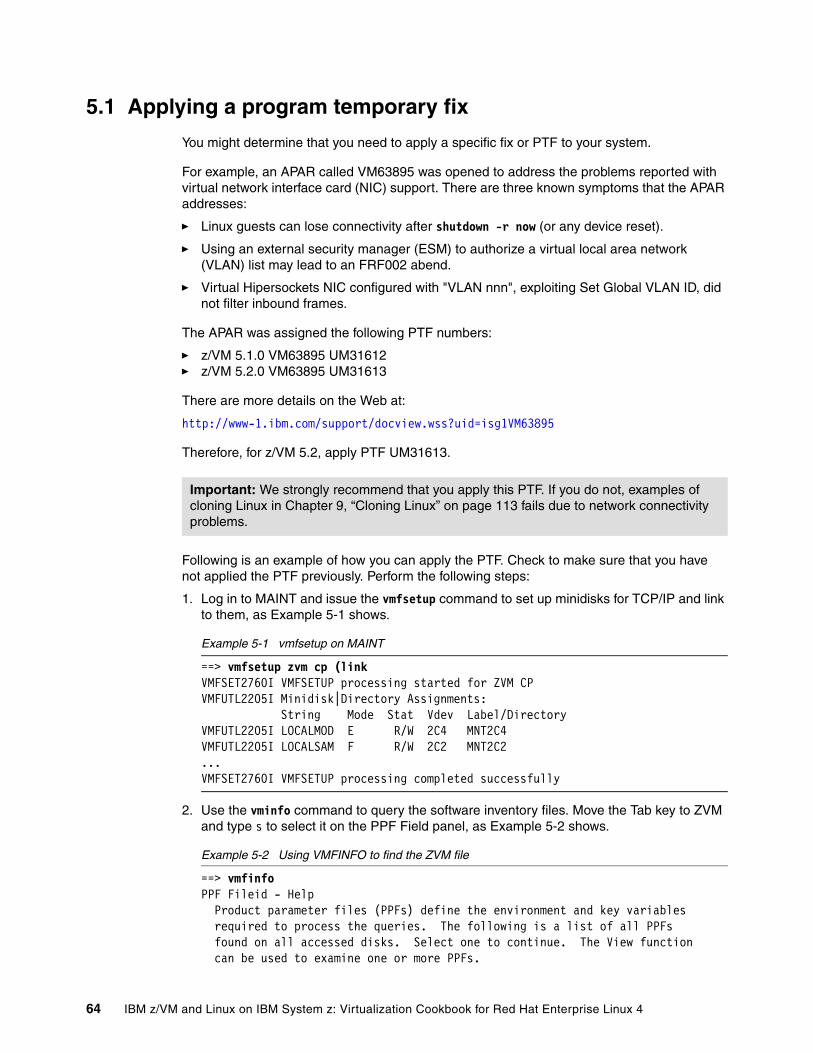
5.1 Applying a program temporary fix
You might determine that you need to apply a specific fix or PTF to your system.
For example, an APAR called VM63895 was opened to address the problems reported with virtual network interface card (NIC) support. There are three known symptoms that the APAR addresses:
� Linux guests can lose connectivity after shutdown -r now (or any device reset).
� Using an external security manager (ESM) to authorize a virtual local area network (VLAN) list may lead to an FRF002 abend.
� Virtual Hipersockets NIC configured with "VLAN nnn", exploiting Set Global VLAN ID, did not filter inbound frames.
The APAR was assigned the following PTF numbers:
� z/VM 5.1.0 VM63895 UM31612� z/VM 5.2.0 VM63895 UM31613
There are more details on the Web at:
http://www-1.ibm.com/support/docview.wss?uid=isg1VM63895
Therefore, for z/VM 5.2, apply PTF UM31613.
Following is an example of how you can apply the PTF. Check to make sure that you have not applied the PTF previously. Perform the following steps:
1. Log in to MAINT and issue the vmfsetup command to set up minidisks for TCP/IP and link to them, as Example 5-1 shows.
Example 5-1 vmfsetup on MAINT
==> vmfsetup zvm cp (linkVMFSET2760I VMFSETUP processing started for ZVM CPVMFUTL2205I Minidisk|Directory Assignments: String Mode Stat Vdev Label/DirectoryVMFUTL2205I LOCALMOD E R/W 2C4 MNT2C4VMFUTL2205I LOCALSAM F R/W 2C2 MNT2C2...VMFSET2760I VMFSETUP processing completed successfully
2. Use the vminfo command to query the software inventory files. Move the Tab key to ZVM and type s to select it on the PPF Field panel, as Example 5-2 shows.
Example 5-2 Using VMFINFO to find the ZVM file
==> vmfinfo PPF Fileid - Help Product parameter files (PPFs) define the environment and key variables required to process the queries. The following is a list of all PPFs found on all accessed disks. Select one to continue. The View function can be used to examine one or more PPFs.
Important: We strongly recommend that you apply this PTF. If you do not, examples of cloning Linux in Chapter 9, “Cloning Linux” on page 113 fails due to network connectivity problems.
64 IBM z/VM and Linux on IBM System z: Virtualization Cookbook for Red Hat Enterprise Linux 4

Type a "V" next to one or more PPFs to view their contents, or type an "S" next to one PPF to select.
Options: S - select V - view
Option PPF Fileid _ $5654260 PPF D1
_ SEGBLD PPF D2 _ SERVP2P PPF D1 _ UCENG PPF D2 s ZVM PPF D2 _ 4OSASF40 PPF D1
3. Because the description of the PTF cites a component name of virtual machine (VM) control program (CP), select CP on the component name panel.
4. Select PTFs/APARs on the VMFINFO main panel.
5. Type in the PTF number UM31613 in the PTF number field, then select Status of PTF on the PTF/APAR queries panel, as Example 5-3 shows.
Example 5-3 PTF/APAR queries panel
PTF/APAR Queries
Enter a PTF or APAR number and type an option code. Then press Enter. PPF fileid ...... ZVM PPF D Component name .. CP Setup ... NO Product ID .....: 5VMCPR20 System .. VM PTF number ...... UM31613 APAR number .....
Options: S - select Option Query s Status of PTF _ Requisites/supersedes of PTF
_ Dependencies/superseding of PTF _ User memo of PTF
_ Serviceable parts included by PTF
_ Abstract of APAR(s)
6. If the PTF has not been successfully applied, you see the message No data found in, as Example 5-4 shows.
Example 5-4 PTF not applied message
Query Output - PTF Status PPF fileid .....: ZVM PPF D Component name .: CP Setup ..: NO Product ID .....: 5VMCPR10 System .: VM ---------------------------------------------------WN:VMFSIP2481W No entries match search arguments WN: TDATA :PTF UM31198 WN: in table 5VMCPR10 SRVRECS J No data found
Chapter 5. Servicing z/VM 65
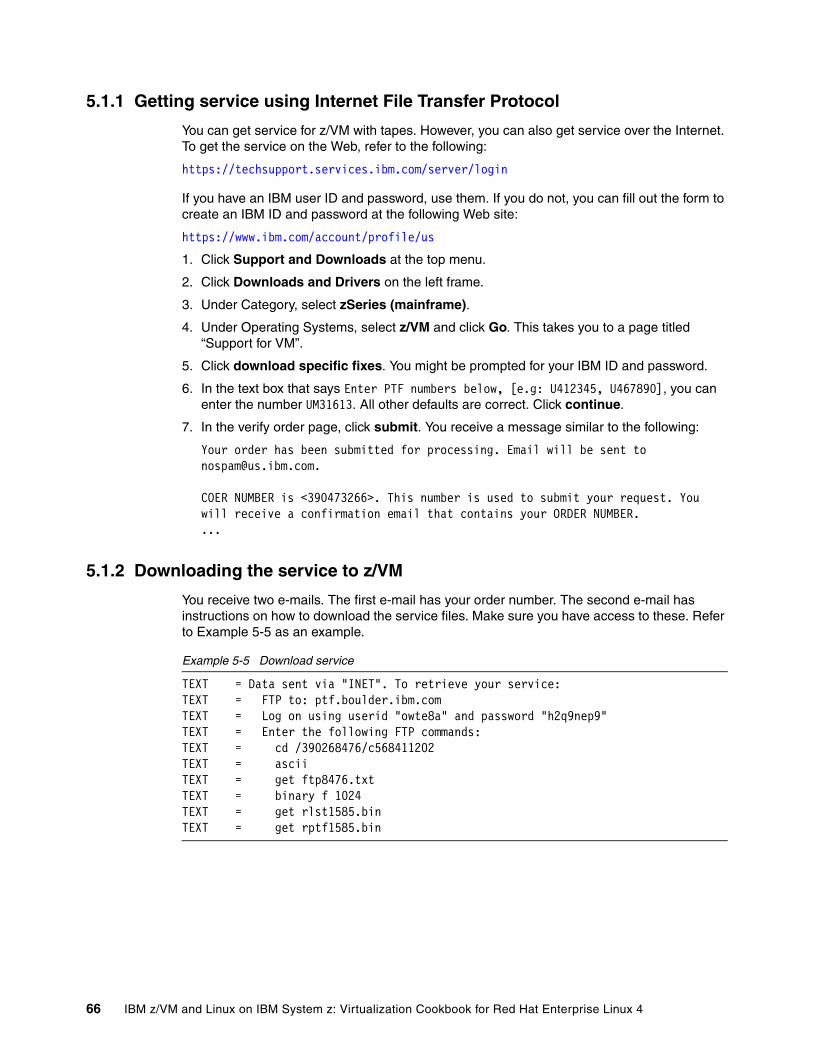
5.1.1 Getting service using Internet File Transfer Protocol
You can get service for z/VM with tapes. However, you can also get service over the Internet. To get the service on the Web, refer to the following:
https://techsupport.services.ibm.com/server/login
If you have an IBM user ID and password, use them. If you do not, you can fill out the form to create an IBM ID and password at the following Web site:
https://www.ibm.com/account/profile/us
1. Click Support and Downloads at the top menu.
2. Click Downloads and Drivers on the left frame.
3. Under Category, select zSeries (mainframe).
4. Under Operating Systems, select z/VM and click Go. This takes you to a page titled “Support for VM”.
5. Click download specific fixes. You might be prompted for your IBM ID and password.
6. In the text box that says Enter PTF numbers below, [e.g: U412345, U467890], you can enter the number UM31613. All other defaults are correct. Click continue.
7. In the verify order page, click submit. You receive a message similar to the following:
Your order has been submitted for processing. Email will be sent to [email protected].
COER NUMBER is <390473266>. This number is used to submit your request. You will receive a confirmation email that contains your ORDER NUMBER....
5.1.2 Downloading the service to z/VM
You receive two e-mails. The first e-mail has your order number. The second e-mail has instructions on how to download the service files. Make sure you have access to these. Refer to Example 5-5 as an example.
Example 5-5 Download service
TEXT = Data sent via "INET". To retrieve your service:TEXT = FTP to: ptf.boulder.ibm.comTEXT = Log on using userid "owte8a" and password "h2q9nep9"TEXT = Enter the following FTP commands:TEXT = cd /390268476/c568411202TEXT = asciiTEXT = get ftp8476.txtTEXT = binary f 1024TEXT = get rlst1585.binTEXT = get rptf1585.bin
66 IBM z/VM and Linux on IBM System z: Virtualization Cookbook for Red Hat Enterprise Linux 4
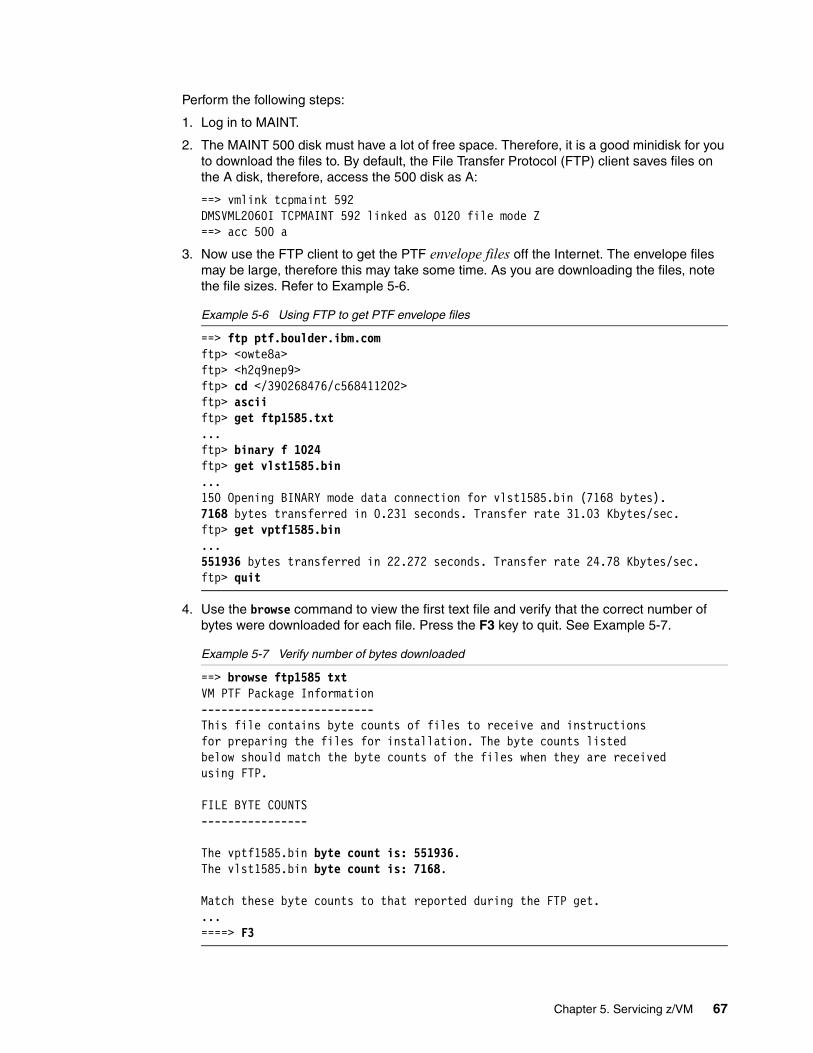
Perform the following steps:
1. Log in to MAINT.
2. The MAINT 500 disk must have a lot of free space. Therefore, it is a good minidisk for you to download the files to. By default, the File Transfer Protocol (FTP) client saves files on the A disk, therefore, access the 500 disk as A:
==> vmlink tcpmaint 592DMSVML2060I TCPMAINT 592 linked as 0120 file mode Z==> acc 500 a
3. Now use the FTP client to get the PTF envelope files off the Internet. The envelope files may be large, therefore this may take some time. As you are downloading the files, note the file sizes. Refer to Example 5-6.
Example 5-6 Using FTP to get PTF envelope files
==> ftp ptf.boulder.ibm.comftp> <owte8a>ftp> <h2q9nep9>ftp> cd </390268476/c568411202>ftp> asciiftp> get ftp1585.txt...ftp> binary f 1024ftp> get vlst1585.bin...150 Opening BINARY mode data connection for vlst1585.bin (7168 bytes).7168 bytes transferred in 0.231 seconds. Transfer rate 31.03 Kbytes/sec.ftp> get vptf1585.bin...551936 bytes transferred in 22.272 seconds. Transfer rate 24.78 Kbytes/sec.ftp> quit
4. Use the browse command to view the first text file and verify that the correct number of bytes were downloaded for each file. Press the F3 key to quit. See Example 5-7.
Example 5-7 Verify number of bytes downloaded
==> browse ftp1585 txtVM PTF Package Information--------------------------This file contains byte counts of files to receive and instructionsfor preparing the files for installation. The byte counts listedbelow should match the byte counts of the files when they are receivedusing FTP.
FILE BYTE COUNTS----------------
The vptf1585.bin byte count is: 551936.The vlst1585.bin byte count is: 7168.
Match these byte counts to that reported during the FTP get....====> F3
Chapter 5. Servicing z/VM 67
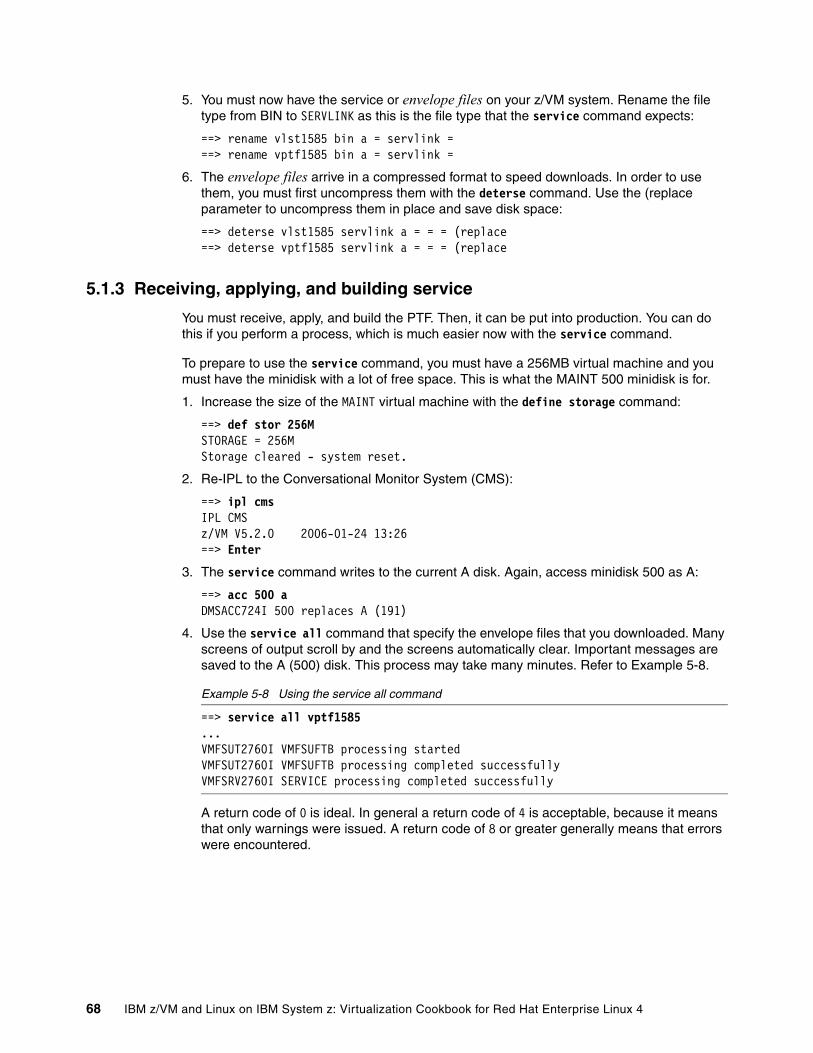
5. You must now have the service or envelope files on your z/VM system. Rename the file type from BIN to SERVLINK as this is the file type that the service command expects:
==> rename vlst1585 bin a = servlink ===> rename vptf1585 bin a = servlink =
6. The envelope files arrive in a compressed format to speed downloads. In order to use them, you must first uncompress them with the deterse command. Use the (replace parameter to uncompress them in place and save disk space:
==> deterse vlst1585 servlink a = = = (replace==> deterse vptf1585 servlink a = = = (replace
5.1.3 Receiving, applying, and building service
You must receive, apply, and build the PTF. Then, it can be put into production. You can do this if you perform a process, which is much easier now with the service command.
To prepare to use the service command, you must have a 256MB virtual machine and you must have the minidisk with a lot of free space. This is what the MAINT 500 minidisk is for.
1. Increase the size of the MAINT virtual machine with the define storage command:
==> def stor 256MSTORAGE = 256MStorage cleared - system reset.
2. Re-IPL to the Conversational Monitor System (CMS):
==> ipl cmsIPL CMSz/VM V5.2.0 2006-01-24 13:26==> Enter
3. The service command writes to the current A disk. Again, access minidisk 500 as A:
==> acc 500 aDMSACC724I 500 replaces A (191)
4. Use the service all command that specify the envelope files that you downloaded. Many screens of output scroll by and the screens automatically clear. Important messages are saved to the A (500) disk. This process may take many minutes. Refer to Example 5-8.
Example 5-8 Using the service all command
==> service all vptf1585...VMFSUT2760I VMFSUFTB processing startedVMFSUT2760I VMFSUFTB processing completed successfullyVMFSRV2760I SERVICE processing completed successfully
A return code of 0 is ideal. In general a return code of 4 is acceptable, because it means that only warnings were issued. A return code of 8 or greater generally means that errors were encountered.
68 IBM z/VM and Linux on IBM System z: Virtualization Cookbook for Red Hat Enterprise Linux 4
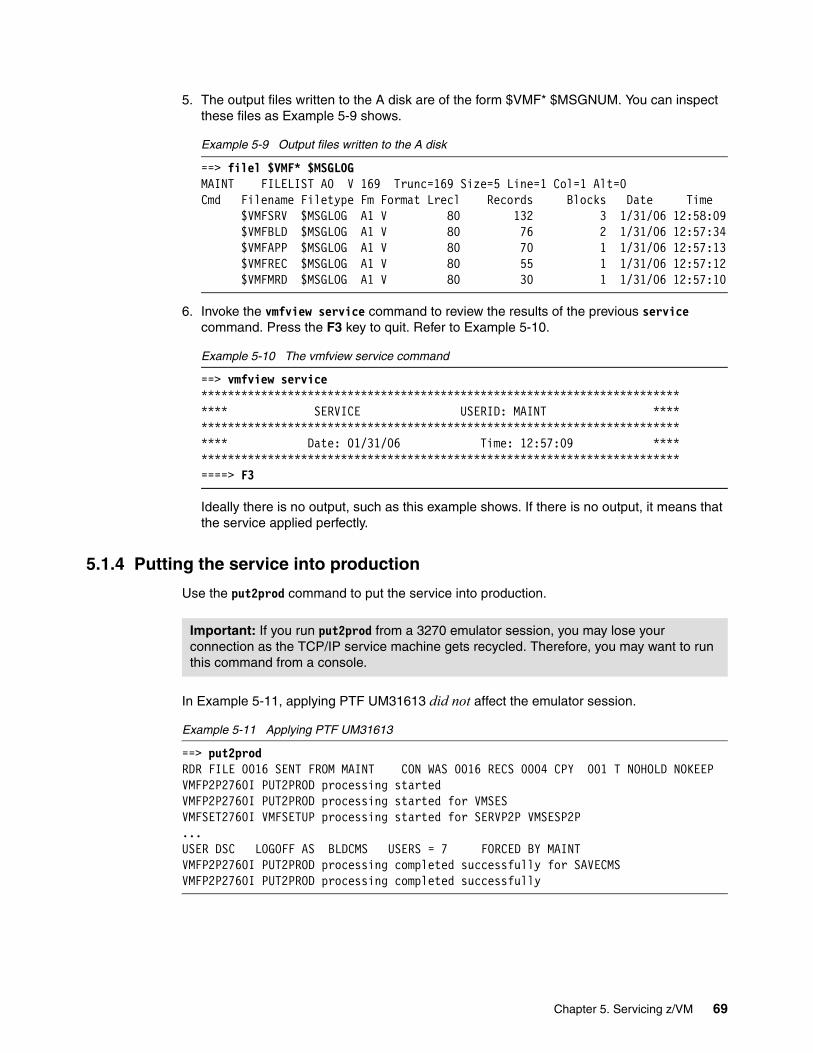
5. The output files written to the A disk are of the form $VMF* $MSGNUM. You can inspect these files as Example 5-9 shows.
Example 5-9 Output files written to the A disk
==> filel $VMF* $MSGLOGMAINT FILELIST A0 V 169 Trunc=169 Size=5 Line=1 Col=1 Alt=0Cmd Filename Filetype Fm Format Lrecl Records Blocks Date Time $VMFSRV $MSGLOG A1 V 80 132 3 1/31/06 12:58:09 $VMFBLD $MSGLOG A1 V 80 76 2 1/31/06 12:57:34 $VMFAPP $MSGLOG A1 V 80 70 1 1/31/06 12:57:13 $VMFREC $MSGLOG A1 V 80 55 1 1/31/06 12:57:12 $VMFMRD $MSGLOG A1 V 80 30 1 1/31/06 12:57:10
6. Invoke the vmfview service command to review the results of the previous service command. Press the F3 key to quit. Refer to Example 5-10.
Example 5-10 The vmfview service command
==> vmfview service**************************************************************************** SERVICE USERID: MAINT ******************************************************************************** Date: 01/31/06 Time: 12:57:09 ****************************************************************************====> F3
Ideally there is no output, such as this example shows. If there is no output, it means that the service applied perfectly.
5.1.4 Putting the service into production
Use the put2prod command to put the service into production.
In Example 5-11, applying PTF UM31613 did not affect the emulator session.
Example 5-11 Applying PTF UM31613
==> put2prodRDR FILE 0016 SENT FROM MAINT CON WAS 0016 RECS 0004 CPY 001 T NOHOLD NOKEEPVMFP2P2760I PUT2PROD processing startedVMFP2P2760I PUT2PROD processing started for VMSESVMFSET2760I VMFSETUP processing started for SERVP2P VMSESP2P...USER DSC LOGOFF AS BLDCMS USERS = 7 FORCED BY MAINTVMFP2P2760I PUT2PROD processing completed successfully for SAVECMSVMFP2P2760I PUT2PROD processing completed successfully
Important: If you run put2prod from a 3270 emulator session, you may lose your connection as the TCP/IP service machine gets recycled. Therefore, you may want to run this command from a console.
Chapter 5. Servicing z/VM 69
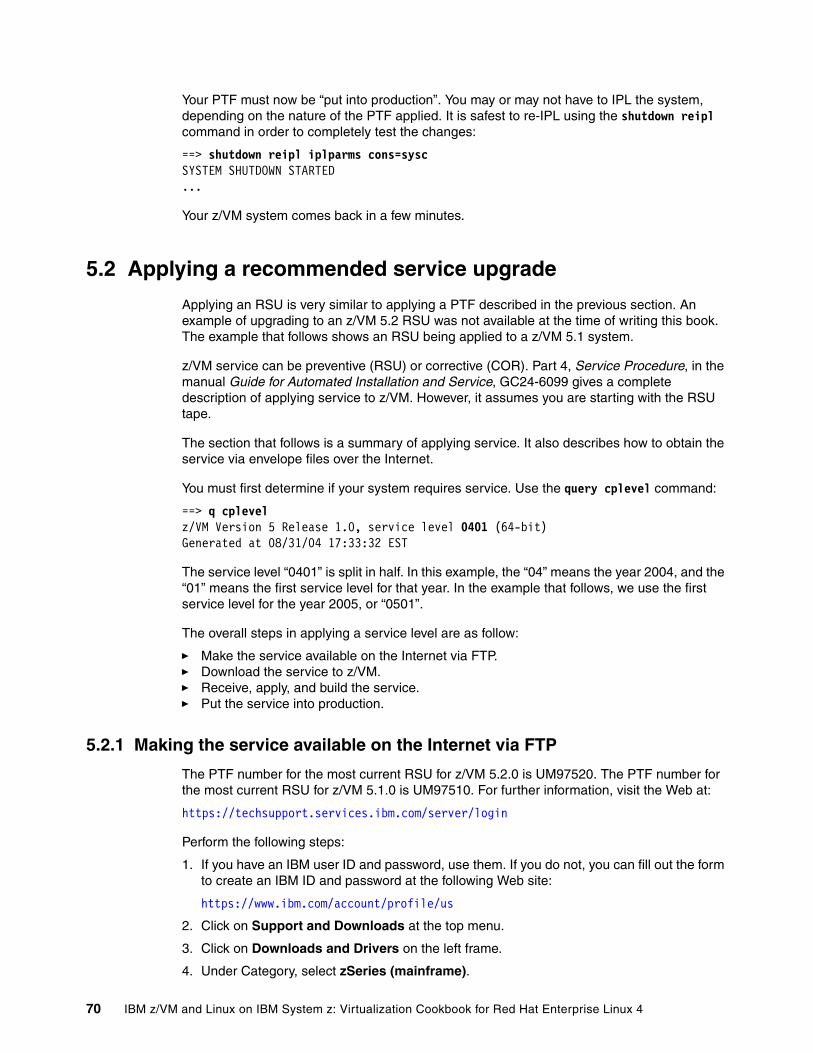
Your PTF must now be “put into production”. You may or may not have to IPL the system, depending on the nature of the PTF applied. It is safest to re-IPL using the shutdown reipl command in order to completely test the changes:
==> shutdown reipl iplparms cons=syscSYSTEM SHUTDOWN STARTED...
Your z/VM system comes back in a few minutes.
5.2 Applying a recommended service upgrade
Applying an RSU is very similar to applying a PTF described in the previous section. An example of upgrading to an z/VM 5.2 RSU was not available at the time of writing this book. The example that follows shows an RSU being applied to a z/VM 5.1 system.
z/VM service can be preventive (RSU) or corrective (COR). Part 4, Service Procedure, in the manual Guide for Automated Installation and Service, GC24-6099 gives a complete description of applying service to z/VM. However, it assumes you are starting with the RSU tape.
The section that follows is a summary of applying service. It also describes how to obtain the service via envelope files over the Internet.
You must first determine if your system requires service. Use the query cplevel command:
==> q cplevelz/VM Version 5 Release 1.0, service level 0401 (64-bit)Generated at 08/31/04 17:33:32 EST
The service level “0401” is split in half. In this example, the “04” means the year 2004, and the “01” means the first service level for that year. In the example that follows, we use the first service level for the year 2005, or “0501”.
The overall steps in applying a service level are as follow:
� Make the service available on the Internet via FTP.� Download the service to z/VM.� Receive, apply, and build the service.� Put the service into production.
5.2.1 Making the service available on the Internet via FTP
The PTF number for the most current RSU for z/VM 5.2.0 is UM97520. The PTF number for the most current RSU for z/VM 5.1.0 is UM97510. For further information, visit the Web at:
https://techsupport.services.ibm.com/server/login
Perform the following steps:
1. If you have an IBM user ID and password, use them. If you do not, you can fill out the form to create an IBM ID and password at the following Web site:
https://www.ibm.com/account/profile/us
2. Click on Support and Downloads at the top menu.
3. Click on Downloads and Drivers on the left frame.
4. Under Category, select zSeries (mainframe).
70 IBM z/VM and Linux on IBM System z: Virtualization Cookbook for Red Hat Enterprise Linux 4
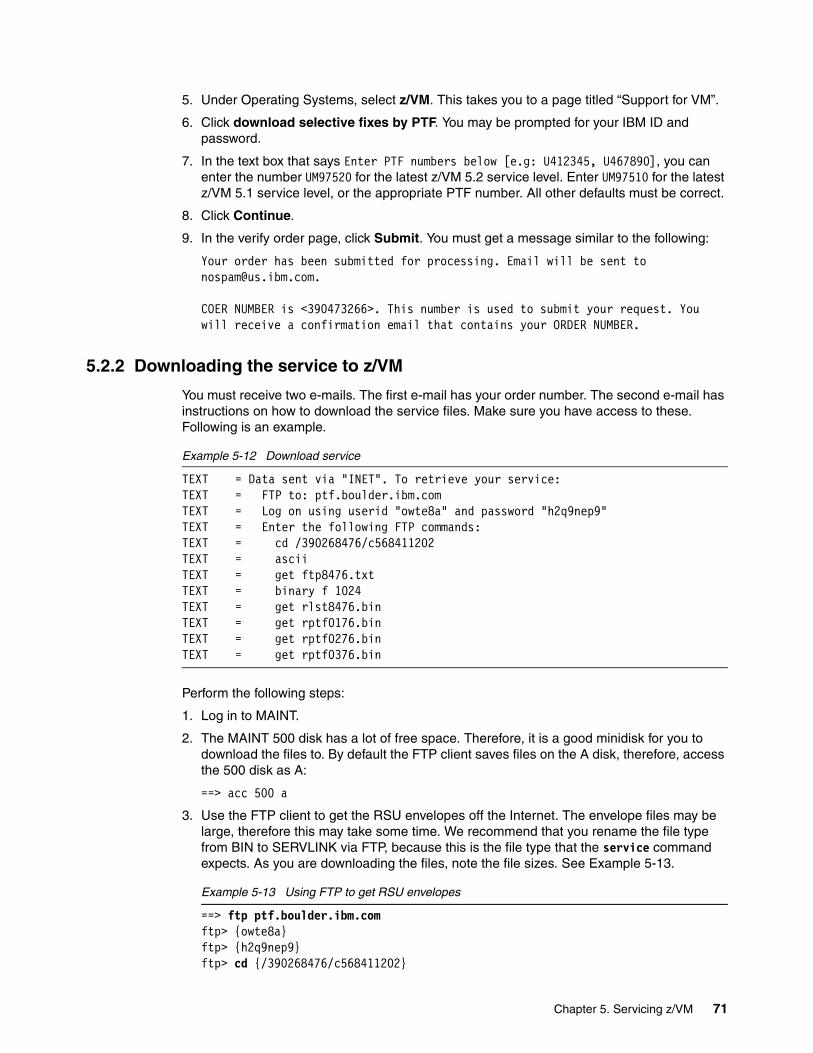
5. Under Operating Systems, select z/VM. This takes you to a page titled “Support for VM”.
6. Click download selective fixes by PTF. You may be prompted for your IBM ID and password.
7. In the text box that says Enter PTF numbers below [e.g: U412345, U467890], you can enter the number UM97520 for the latest z/VM 5.2 service level. Enter UM97510 for the latest z/VM 5.1 service level, or the appropriate PTF number. All other defaults must be correct.
8. Click Continue.
9. In the verify order page, click Submit. You must get a message similar to the following:
Your order has been submitted for processing. Email will be sent to [email protected].
COER NUMBER is <390473266>. This number is used to submit your request. You will receive a confirmation email that contains your ORDER NUMBER.
5.2.2 Downloading the service to z/VM
You must receive two e-mails. The first e-mail has your order number. The second e-mail has instructions on how to download the service files. Make sure you have access to these. Following is an example.
Example 5-12 Download service
TEXT = Data sent via "INET". To retrieve your service:TEXT = FTP to: ptf.boulder.ibm.comTEXT = Log on using userid "owte8a" and password "h2q9nep9"TEXT = Enter the following FTP commands:TEXT = cd /390268476/c568411202TEXT = asciiTEXT = get ftp8476.txtTEXT = binary f 1024TEXT = get rlst8476.binTEXT = get rptf0176.binTEXT = get rptf0276.binTEXT = get rptf0376.bin
Perform the following steps:
1. Log in to MAINT.
2. The MAINT 500 disk has a lot of free space. Therefore, it is a good minidisk for you to download the files to. By default the FTP client saves files on the A disk, therefore, access the 500 disk as A:
==> acc 500 a
3. Use the FTP client to get the RSU envelopes off the Internet. The envelope files may be large, therefore this may take some time. We recommend that you rename the file type from BIN to SERVLINK via FTP, because this is the file type that the service command expects. As you are downloading the files, note the file sizes. See Example 5-13.
Example 5-13 Using FTP to get RSU envelopes
==> ftp ptf.boulder.ibm.comftp> {owte8a}ftp> {h2q9nep9}ftp> cd {/390268476/c568411202}
Chapter 5. Servicing z/VM 71
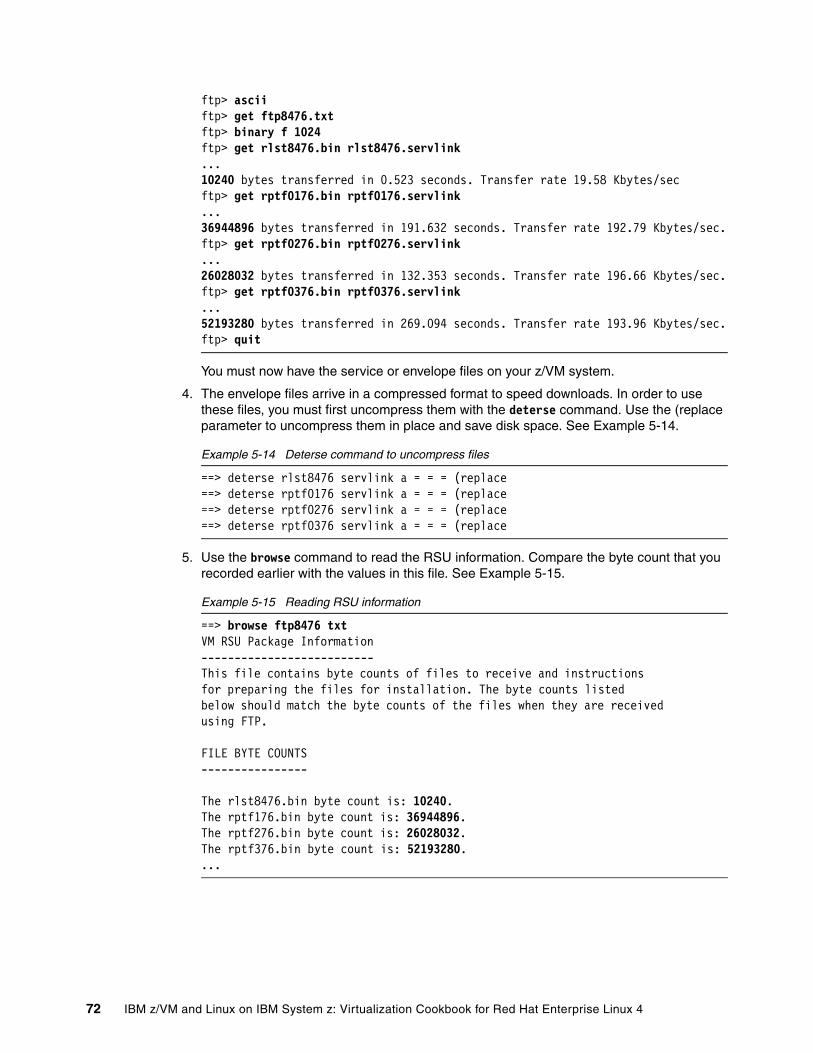
ftp> asciiftp> get ftp8476.txtftp> binary f 1024ftp> get rlst8476.bin rlst8476.servlink...10240 bytes transferred in 0.523 seconds. Transfer rate 19.58 Kbytes/secftp> get rptf0176.bin rptf0176.servlink...36944896 bytes transferred in 191.632 seconds. Transfer rate 192.79 Kbytes/sec.ftp> get rptf0276.bin rptf0276.servlink...26028032 bytes transferred in 132.353 seconds. Transfer rate 196.66 Kbytes/sec.ftp> get rptf0376.bin rptf0376.servlink...52193280 bytes transferred in 269.094 seconds. Transfer rate 193.96 Kbytes/sec.ftp> quit
You must now have the service or envelope files on your z/VM system.
4. The envelope files arrive in a compressed format to speed downloads. In order to use these files, you must first uncompress them with the deterse command. Use the (replace parameter to uncompress them in place and save disk space. See Example 5-14.
Example 5-14 Deterse command to uncompress files
==> deterse rlst8476 servlink a = = = (replace==> deterse rptf0176 servlink a = = = (replace==> deterse rptf0276 servlink a = = = (replace==> deterse rptf0376 servlink a = = = (replace
5. Use the browse command to read the RSU information. Compare the byte count that you recorded earlier with the values in this file. See Example 5-15.
Example 5-15 Reading RSU information
==> browse ftp8476 txtVM RSU Package Information -------------------------- This file contains byte counts of files to receive and instructions for preparing the files for installation. The byte counts listed below should match the byte counts of the files when they are received using FTP. FILE BYTE COUNTS ---------------- The rlst8476.bin byte count is: 10240. The rptf176.bin byte count is: 36944896. The rptf276.bin byte count is: 26028032. The rptf376.bin byte count is: 52193280. ...
72 IBM z/VM and Linux on IBM System z: Virtualization Cookbook for Red Hat Enterprise Linux 4
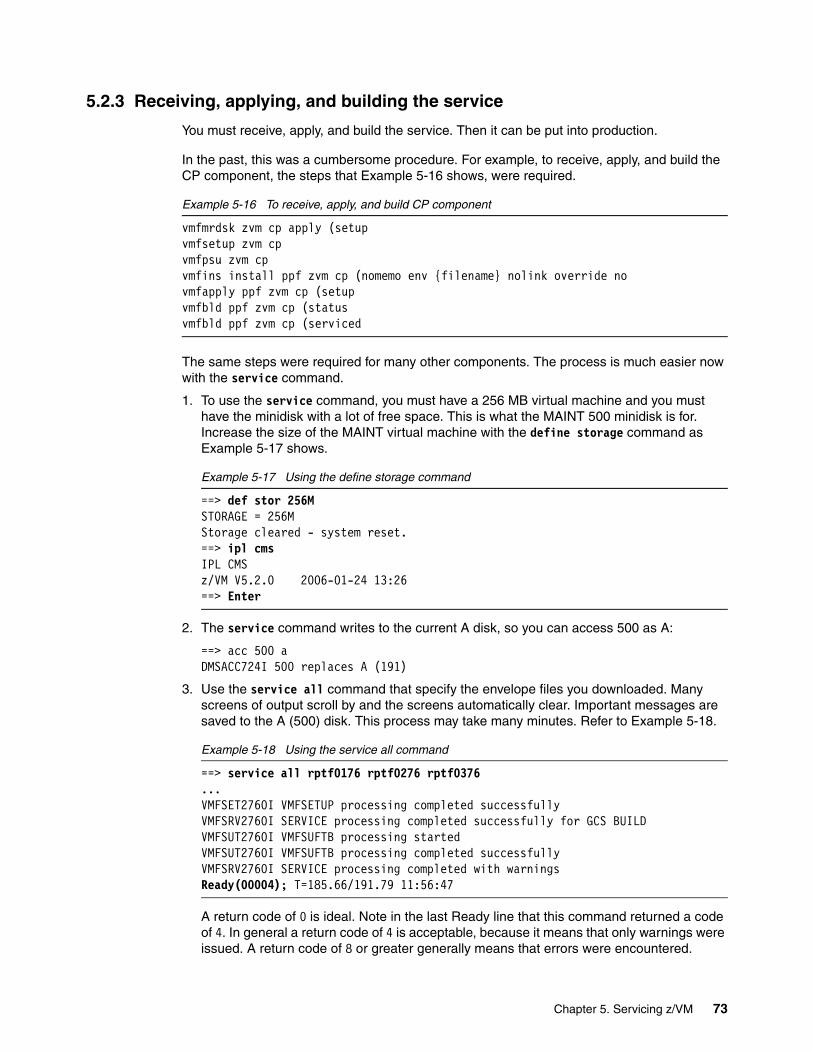
5.2.3 Receiving, applying, and building the service
You must receive, apply, and build the service. Then it can be put into production.
In the past, this was a cumbersome procedure. For example, to receive, apply, and build the CP component, the steps that Example 5-16 shows, were required.
Example 5-16 To receive, apply, and build CP component
vmfmrdsk zvm cp apply (setupvmfsetup zvm cpvmfpsu zvm cpvmfins install ppf zvm cp (nomemo env {filename} nolink override novmfapply ppf zvm cp (setupvmfbld ppf zvm cp (statusvmfbld ppf zvm cp (serviced
The same steps were required for many other components. The process is much easier now with the service command.
1. To use the service command, you must have a 256 MB virtual machine and you must have the minidisk with a lot of free space. This is what the MAINT 500 minidisk is for. Increase the size of the MAINT virtual machine with the define storage command as Example 5-17 shows.
Example 5-17 Using the define storage command
==> def stor 256MSTORAGE = 256MStorage cleared - system reset.==> ipl cmsIPL CMSz/VM V5.2.0 2006-01-24 13:26==> Enter
2. The service command writes to the current A disk, so you can access 500 as A:
==> acc 500 aDMSACC724I 500 replaces A (191)
3. Use the service all command that specify the envelope files you downloaded. Many screens of output scroll by and the screens automatically clear. Important messages are saved to the A (500) disk. This process may take many minutes. Refer to Example 5-18.
Example 5-18 Using the service all command
==> service all rptf0176 rptf0276 rptf0376...VMFSET2760I VMFSETUP processing completed successfullyVMFSRV2760I SERVICE processing completed successfully for GCS BUILDVMFSUT2760I VMFSUFTB processing startedVMFSUT2760I VMFSUFTB processing completed successfullyVMFSRV2760I SERVICE processing completed with warningsReady(00004); T=185.66/191.79 11:56:47
A return code of 0 is ideal. Note in the last Ready line that this command returned a code of 4. In general a return code of 4 is acceptable, because it means that only warnings were issued. A return code of 8 or greater generally means that errors were encountered.
Chapter 5. Servicing z/VM 73
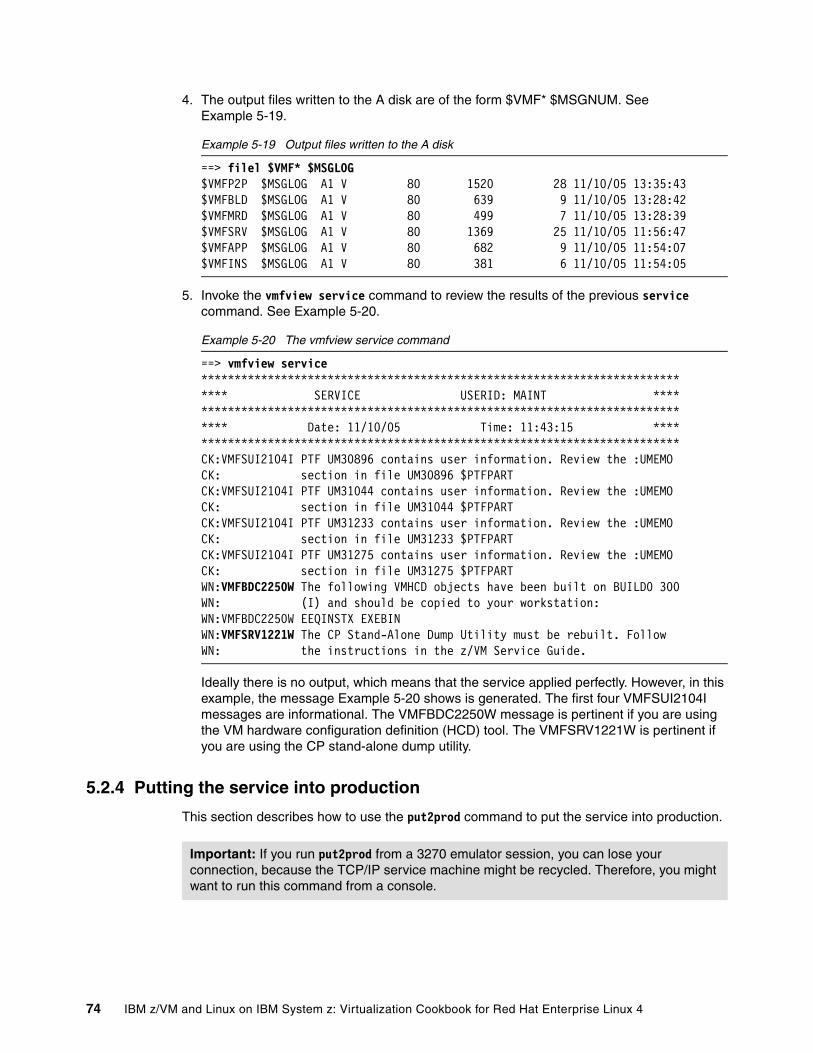
4. The output files written to the A disk are of the form $VMF* $MSGNUM. See Example 5-19.
Example 5-19 Output files written to the A disk
==> filel $VMF* $MSGLOG$VMFP2P $MSGLOG A1 V 80 1520 28 11/10/05 13:35:43$VMFBLD $MSGLOG A1 V 80 639 9 11/10/05 13:28:42$VMFMRD $MSGLOG A1 V 80 499 7 11/10/05 13:28:39$VMFSRV $MSGLOG A1 V 80 1369 25 11/10/05 11:56:47$VMFAPP $MSGLOG A1 V 80 682 9 11/10/05 11:54:07$VMFINS $MSGLOG A1 V 80 381 6 11/10/05 11:54:05
5. Invoke the vmfview service command to review the results of the previous service command. See Example 5-20.
Example 5-20 The vmfview service command
==> vmfview service**************************************************************************** SERVICE USERID: MAINT ******************************************************************************** Date: 11/10/05 Time: 11:43:15 ****************************************************************************CK:VMFSUI2104I PTF UM30896 contains user information. Review the :UMEMOCK: section in file UM30896 $PTFPARTCK:VMFSUI2104I PTF UM31044 contains user information. Review the :UMEMOCK: section in file UM31044 $PTFPARTCK:VMFSUI2104I PTF UM31233 contains user information. Review the :UMEMOCK: section in file UM31233 $PTFPARTCK:VMFSUI2104I PTF UM31275 contains user information. Review the :UMEMOCK: section in file UM31275 $PTFPARTWN:VMFBDC2250W The following VMHCD objects have been built on BUILD0 300WN: (I) and should be copied to your workstation:WN:VMFBDC2250W EEQINSTX EXEBINWN:VMFSRV1221W The CP Stand-Alone Dump Utility must be rebuilt. FollowWN: the instructions in the z/VM Service Guide.
Ideally there is no output, which means that the service applied perfectly. However, in this example, the message Example 5-20 shows is generated. The first four VMFSUI2104I messages are informational. The VMFBDC2250W message is pertinent if you are using the VM hardware configuration definition (HCD) tool. The VMFSRV1221W is pertinent if you are using the CP stand-alone dump utility.
5.2.4 Putting the service into production
This section describes how to use the put2prod command to put the service into production.
Important: If you run put2prod from a 3270 emulator session, you can lose your connection, because the TCP/IP service machine might be recycled. Therefore, you might want to run this command from a console.
74 IBM z/VM and Linux on IBM System z: Virtualization Cookbook for Red Hat Enterprise Linux 4
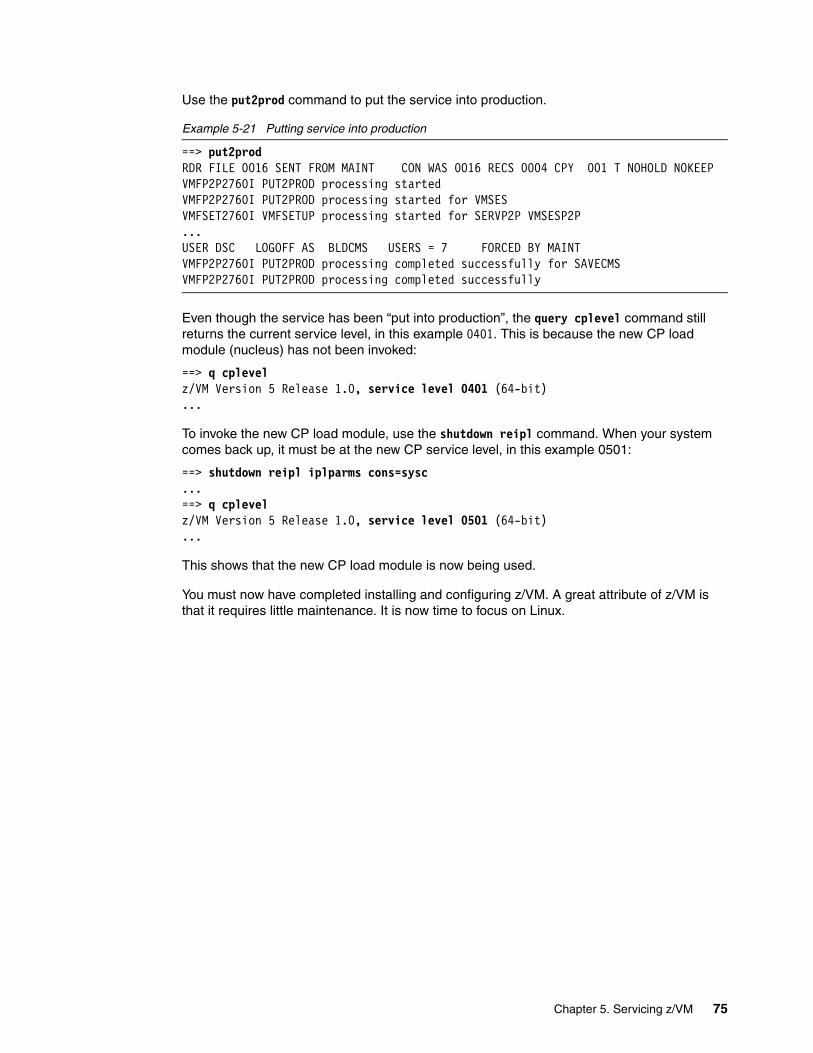
Use the put2prod command to put the service into production.
Example 5-21 Putting service into production
==> put2prodRDR FILE 0016 SENT FROM MAINT CON WAS 0016 RECS 0004 CPY 001 T NOHOLD NOKEEPVMFP2P2760I PUT2PROD processing startedVMFP2P2760I PUT2PROD processing started for VMSESVMFSET2760I VMFSETUP processing started for SERVP2P VMSESP2P...USER DSC LOGOFF AS BLDCMS USERS = 7 FORCED BY MAINTVMFP2P2760I PUT2PROD processing completed successfully for SAVECMSVMFP2P2760I PUT2PROD processing completed successfully
Even though the service has been “put into production”, the query cplevel command still returns the current service level, in this example 0401. This is because the new CP load module (nucleus) has not been invoked:
==> q cplevelz/VM Version 5 Release 1.0, service level 0401 (64-bit)...
To invoke the new CP load module, use the shutdown reipl command. When your system comes back up, it must be at the new CP service level, in this example 0501:
==> shutdown reipl iplparms cons=sysc...==> q cplevelz/VM Version 5 Release 1.0, service level 0501 (64-bit)...
This shows that the new CP load module is now being used.
You must now have completed installing and configuring z/VM. A great attribute of z/VM is that it requires little maintenance. It is now time to focus on Linux.
Chapter 5. Servicing z/VM 75

76 IBM z/VM and Linux on IBM System z: Virtualization Cookbook for Red Hat Enterprise Linux 4
Chapter 6. Configuring an NFS server
It is possible to install Linux onto the mainframe from physical CDs. However, we recommend that you install it over the network from another server using the Network File System (NFS). To accomplish this, we recommend that you set up a PC Linux system. This server supplies both the Red Hat Enterprise Linux 4 distribution and the files associated with this book.
The server must have at least 2 GB of free disk space for one install tree. It requires about 4 GB if you want both s390 (31-bit) and s390x (64-bit) trees. It can be a Linux PC, but it can also be a UNIX box (Sun™ Solaris™, Hewlett Packard HP-UX, IBM AIX® or other). The steps in this chapter explain how to configure a PC Linux box as the NFS server. Red Hat Installation Guide for the IBM S/390 and IBM eServer zSeries Architectures manual provides additional information about the installation options on the Web at:
http://www.redhat.com/docs/manuals/enterprise/
You can also choose to use a Windows workstation via File Transfer Protocol (FTP) or Hypertext Transfer Protocol (HTTP), but this book does not address these options. Often, more problems are encountered when using a Windows workstation than a Linux or Unix workstation to serve the Red Hat Enterprise Linux 4 install tree. Therefore, we do not recommend this option.
This chapter covers the following tasks:
� Downloading files associated with this book. � Setting up a Red Hat Enterprise Linux 4 install tree. � Enabling the NFS server on Red Hat Enterprise Linux 4.
6
© Copyright IBM Corp. 2006. All rights reserved. 77
6.1 Downloading files associated with this book
This book has many files associated with it that are required to set your system up quickly. You can download the tar file from the Web at:
ftp://www.redbooks.ibm.com/redbooks/SG247272/
The tar file SG24-7272.tgz is about 23 KB. For further information about this file refer to Appendix B, “Additional material” on page 207. Download the file and untar it. The following example shows the procedure to do this from the directory /nfs/:
# mkdir /nfs# cd /nfs... download or copy the file SG24-7272.tgz ...# tar xzf SG24-7272.tgz
List the files in the new directory called virt-cookbook/ as the following shows:
# ls -F virt-cookbook/*clone/ nfs-server/ README.txt vm/
You now have downloaded and untarred the files associated with this book.
6.2 Setting up a Red Hat Enterprise Linux 4 install tree
You must have a valid Red Hat entitlement for Linux on IBM System z to access the Red Hat Enterprise Linux 4 Update 3 International Organization for Standardization (ISO) images. If you do not have one, you can request a free evaluation copy at:
http://www.redhat.com/rhel/details/eval/
Follow the link named Red Hat Enterprise Linux AS for IBM eServer zSeries and IBM S/390 and create an account. You require this login to access the Red Hat Network (RHN), where you can download the installation discs at:
https://rhn.redhat.com
6.2.1 Downloading the installation discs
After you have an RHN account, log in and click Channels → Red Hat Enterprise Linux AS (v. 4 for 64-bit IBM zSeries) or Red Hat Enterprise Linux AS (v. 4 for 31-bit IBM S/390®) → Downloads to download the installation discs.
You may also want to download the Extras disc, which contains the IBM Java Runtime Environment, the IBM Java Development Kit, and original AT&T Korn shell. This disc is available in the RHEL AS (v. 4 for zSeries) Extras and RHEL AS (v. 4 for S/390) Extras subchannels, which is found on the Red Hat Network (RHN) software channels overview page on the Web at:
https://rhn.redhat.com/network/software/
Before downloading the disc images, we recommend that you create two directories to keep the 31-bit and 64-bit distributions separate:
# cd /nfs# mkdir rhel4 rhel4x
78 IBM z/VM and Linux on IBM System z: Virtualization Cookbook for Red Hat Enterprise Linux 4
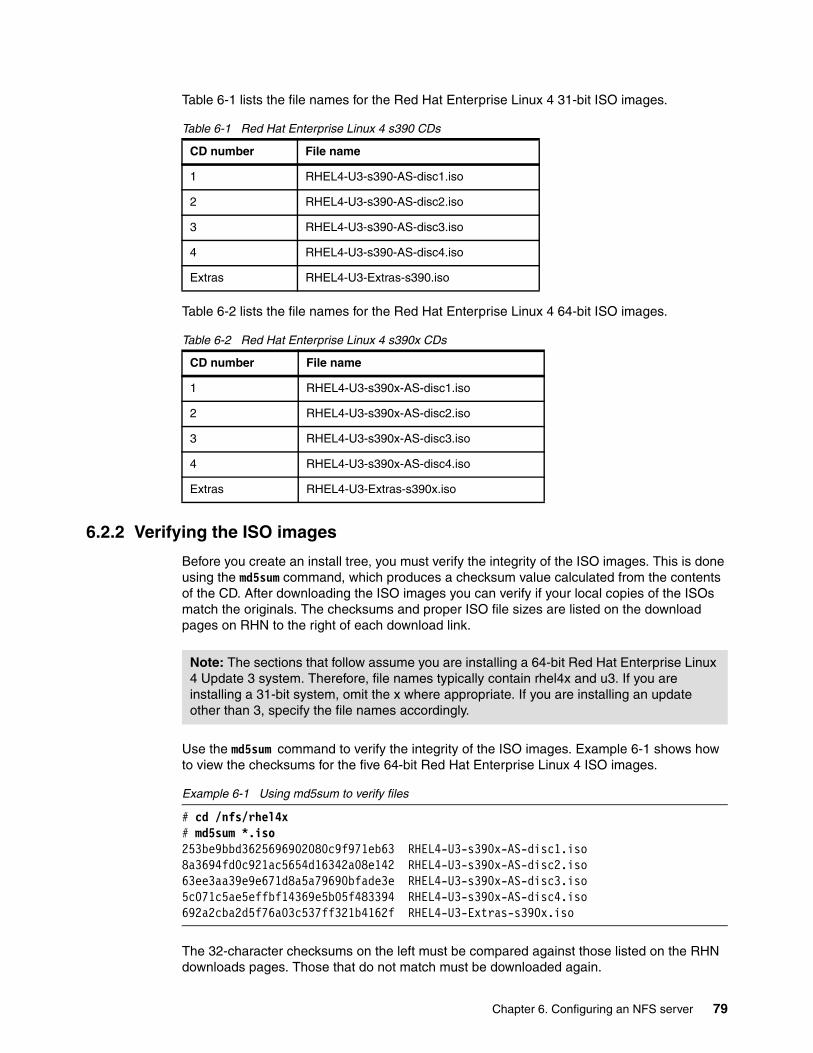
Table 6-1 lists the file names for the Red Hat Enterprise Linux 4 31-bit ISO images.
Table 6-1 Red Hat Enterprise Linux 4 s390 CDs
Table 6-2 lists the file names for the Red Hat Enterprise Linux 4 64-bit ISO images.
Table 6-2 Red Hat Enterprise Linux 4 s390x CDs
6.2.2 Verifying the ISO images
Before you create an install tree, you must verify the integrity of the ISO images. This is done using the md5sum command, which produces a checksum value calculated from the contents of the CD. After downloading the ISO images you can verify if your local copies of the ISOs match the originals. The checksums and proper ISO file sizes are listed on the download pages on RHN to the right of each download link.
Use the md5sum command to verify the integrity of the ISO images. Example 6-1 shows how to view the checksums for the five 64-bit Red Hat Enterprise Linux 4 ISO images.
Example 6-1 Using md5sum to verify files
# cd /nfs/rhel4x# md5sum *.iso253be9bbd3625696902080c9f971eb63 RHEL4-U3-s390x-AS-disc1.iso8a3694fd0c921ac5654d16342a08e142 RHEL4-U3-s390x-AS-disc2.iso63ee3aa39e9e671d8a5a79690bfade3e RHEL4-U3-s390x-AS-disc3.iso5c071c5ae5effbf14369e5b05f483394 RHEL4-U3-s390x-AS-disc4.iso692a2cba2d5f76a03c537ff321b4162f RHEL4-U3-Extras-s390x.iso
The 32-character checksums on the left must be compared against those listed on the RHN downloads pages. Those that do not match must be downloaded again.
CD number File name
1 RHEL4-U3-s390-AS-disc1.iso
2 RHEL4-U3-s390-AS-disc2.iso
3 RHEL4-U3-s390-AS-disc3.iso
4 RHEL4-U3-s390-AS-disc4.iso
Extras RHEL4-U3-Extras-s390.iso
CD number File name
1 RHEL4-U3-s390x-AS-disc1.iso
2 RHEL4-U3-s390x-AS-disc2.iso
3 RHEL4-U3-s390x-AS-disc3.iso
4 RHEL4-U3-s390x-AS-disc4.iso
Extras RHEL4-U3-Extras-s390x.iso
Note: The sections that follow assume you are installing a 64-bit Red Hat Enterprise Linux 4 Update 3 system. Therefore, file names typically contain rhel4x and u3. If you are installing a 31-bit system, omit the x where appropriate. If you are installing an update other than 3, specify the file names accordingly.
Chapter 6. Configuring an NFS server 79
After you have verified these ISO disc images, you can perform either of the following two options:
� Burn them to blank CDs as images using CD recording software, then continue with 6.2.3, “Creating the install tree from physical CDs” .
� Create the install tree by extracting the ISO images. Skip ahead to 6.2.4, “Creating the install tree from ISO disc images” on page 80.
6.2.3 Creating the install tree from physical CDs
If you are starting from physical CDs, you can simply copy the appropriate files from each CD to a folder beneath the /nfs/ directory. Begin by placing the first CD in the drive. It is usually accessed through the device /dev/cdrom. If there is no such device on your system, you must determine which device, such as /dev/hdc, corresponds to the CD drive.
Create a u3/ directory beneath /nfs/rhel4/ (for 31-bit) or /nfs/rhel4x/ (for 64-bit). Copy the folders RedHat/ and images/ from the first CD to this directory. When this is complete, insert the next CD. Copy the RedHat/ folder from CDs 2, 3, and 4 to the same folder under /nfs/. There are a few overlapping files, but they are only used for CD installs, therefore you can safely skip them if prompted.
At this point you have created the Red Hat Enterprise Linux 4 Update 3 installation tree. The next section describes creating the installation tree from the ISO disc images. Therefore, you can skip ahead to 6.3, “Enabling the NFS server on Red Hat Enterprise Linux 4” on page 81.
6.2.4 Creating the install tree from ISO disc images
Now that you have downloaded and verified the appropriate ISO images, you can create a Red Hat Enterprise Linux 4 install tree for either the 31-bit (s390) or 64-bit (s390x) distributions. Red Hat Installation Guide for the IBM S/390 and IBM eServer zSeries Architectures manual documents how to create an install tree.
For convenience, a script, mkrhel4root.sh, is available in the files associated with this book. It takes one argument, which must be either s390 to create a 31-bit tree or s390x for a 64-bit tree. The script looks for ISO images with the file names listed and creates a directory tree that you can use for installing Red Hat Enterprise Linux 4 Update 3 systems.
You must run the mkrhel4root.sh script from the directory with the ISO files, to create the Red Hat Enterprise Linux 4 install tree. This step takes about five to eight minutes. The output for a 64-bit distribution is shown in Example 6-2.
Example 6-2 mkrhel4root.sh
# cd /nfs/rhel4x# /nfs/virt-cookbook/nfs-server/mkrhel4root.sh s390xChecking that all ISOs exist before proceeding...doneExtracting RHEL4-U3-s390x-AS-disc1.iso...doneExtracting RHEL4-U3-s390x-AS-disc2.iso...doneExtracting RHEL4-U3-s390x-AS-disc3.iso...doneExtracting RHEL4-U3-s390x-AS-disc4.iso...done
Note: The file names for the ISOs must be identical to those in Table 6-1 and Table 6-2 on page 79 for the mkrhel4root.sh script to succeed.
80 IBM z/VM and Linux on IBM System z: Virtualization Cookbook for Red Hat Enterprise Linux 4
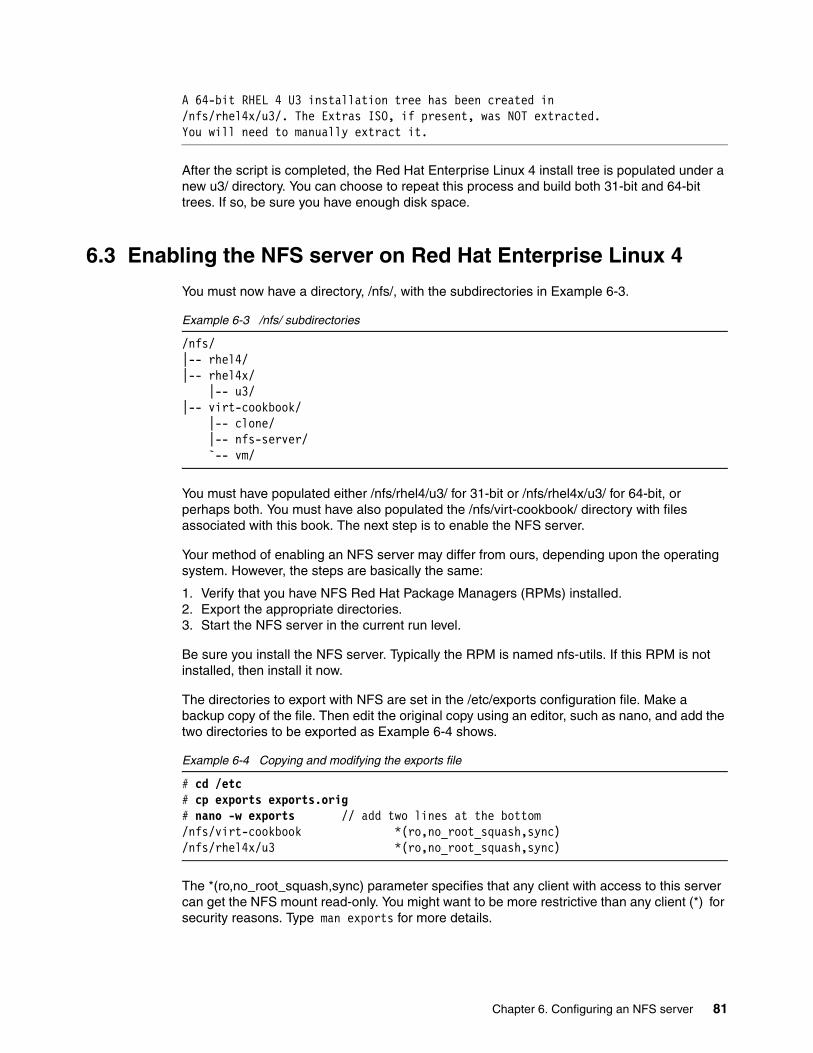
A 64-bit RHEL 4 U3 installation tree has been created in/nfs/rhel4x/u3/. The Extras ISO, if present, was NOT extracted.You will need to manually extract it.
After the script is completed, the Red Hat Enterprise Linux 4 install tree is populated under a new u3/ directory. You can choose to repeat this process and build both 31-bit and 64-bit trees. If so, be sure you have enough disk space.
6.3 Enabling the NFS server on Red Hat Enterprise Linux 4
You must now have a directory, /nfs/, with the subdirectories in Example 6-3.
Example 6-3 /nfs/ subdirectories
/nfs/|-- rhel4/|-- rhel4x/
|-- u3/|-- virt-cookbook/
|-- clone/ |-- nfs-server/ `-- vm/
You must have populated either /nfs/rhel4/u3/ for 31-bit or /nfs/rhel4x/u3/ for 64-bit, or perhaps both. You must have also populated the /nfs/virt-cookbook/ directory with files associated with this book. The next step is to enable the NFS server.
Your method of enabling an NFS server may differ from ours, depending upon the operating system. However, the steps are basically the same:
1. Verify that you have NFS Red Hat Package Managers (RPMs) installed.2. Export the appropriate directories.3. Start the NFS server in the current run level.
Be sure you install the NFS server. Typically the RPM is named nfs-utils. If this RPM is not installed, then install it now.
The directories to export with NFS are set in the /etc/exports configuration file. Make a backup copy of the file. Then edit the original copy using an editor, such as nano, and add the two directories to be exported as Example 6-4 shows.
Example 6-4 Copying and modifying the exports file
# cd /etc# cp exports exports.orig# nano -w exports // add two lines at the bottom/nfs/virt-cookbook *(ro,no_root_squash,sync)/nfs/rhel4x/u3 *(ro,no_root_squash,sync)
The *(ro,no_root_squash,sync) parameter specifies that any client with access to this server can get the NFS mount read-only. You might want to be more restrictive than any client (*) for security reasons. Type man exports for more details.
Chapter 6. Configuring an NFS server 81
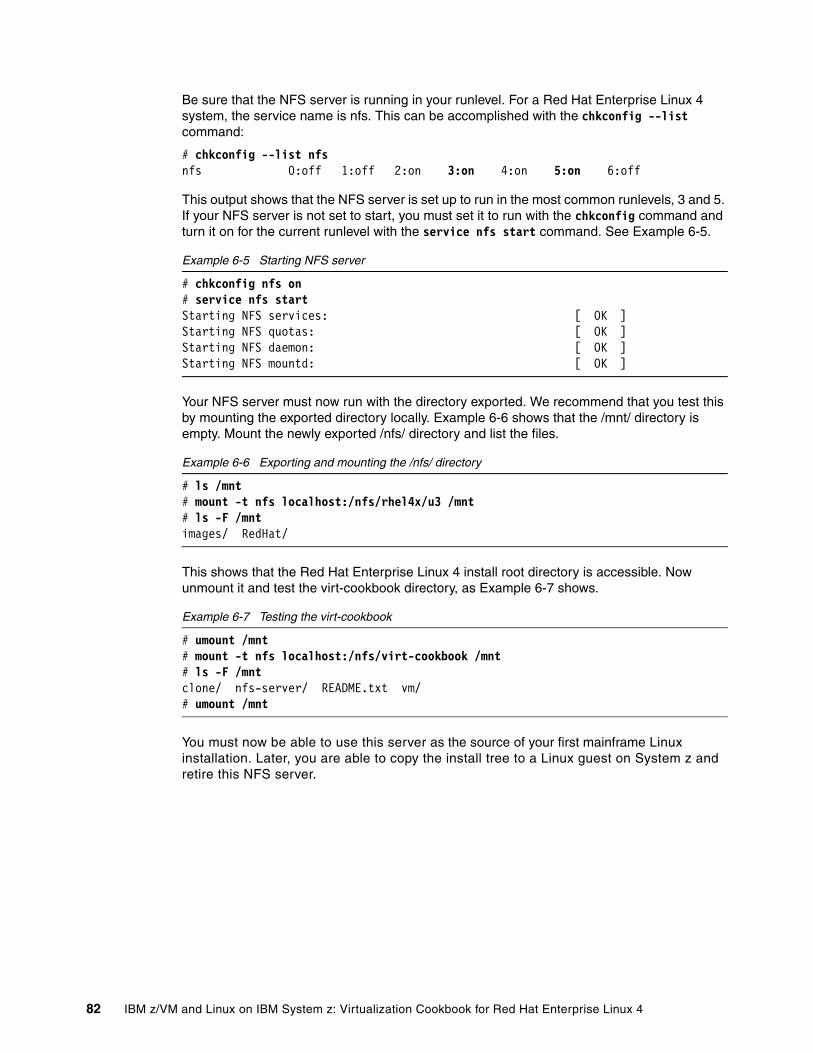
Be sure that the NFS server is running in your runlevel. For a Red Hat Enterprise Linux 4 system, the service name is nfs. This can be accomplished with the chkconfig --list command:
# chkconfig --list nfsnfs 0:off 1:off 2:on 3:on 4:on 5:on 6:off
This output shows that the NFS server is set up to run in the most common runlevels, 3 and 5. If your NFS server is not set to start, you must set it to run with the chkconfig command and turn it on for the current runlevel with the service nfs start command. See Example 6-5.
Example 6-5 Starting NFS server
# chkconfig nfs on# service nfs startStarting NFS services: [ OK ]Starting NFS quotas: [ OK ]Starting NFS daemon: [ OK ]Starting NFS mountd: [ OK ]
Your NFS server must now run with the directory exported. We recommend that you test this by mounting the exported directory locally. Example 6-6 shows that the /mnt/ directory is empty. Mount the newly exported /nfs/ directory and list the files.
Example 6-6 Exporting and mounting the /nfs/ directory
# ls /mnt# mount -t nfs localhost:/nfs/rhel4x/u3 /mnt# ls -F /mntimages/ RedHat/
This shows that the Red Hat Enterprise Linux 4 install root directory is accessible. Now unmount it and test the virt-cookbook directory, as Example 6-7 shows.
Example 6-7 Testing the virt-cookbook
# umount /mnt# mount -t nfs localhost:/nfs/virt-cookbook /mnt# ls -F /mntclone/ nfs-server/ README.txt vm/# umount /mnt
You must now be able to use this server as the source of your first mainframe Linux installation. Later, you are able to copy the install tree to a Linux guest on System z and retire this NFS server.
82 IBM z/VM and Linux on IBM System z: Virtualization Cookbook for Red Hat Enterprise Linux 4

Chapter 7. Installing Linux interactively
You must complete the instructions given in Chapter 3, “Configuring a desktop machine” on page 17, Chapter 4, “Installing and configuring z/VM” on page 23, Chapter 5, “Servicing z/VM” on page 63, and Chapter 6, “Configuring an NFS server” on page 77 before proceeding with this chapter and following chapters.
By now, you must have created a new z/VM user ID, LNXMAINT. Now it is time to create the first Linux user ID, LNXINST. This Linux ID is the installation server, and serves as the administration point for future Linux IDs. LNXINST serves the following purposes:
� Red Hat Enterprise Linux 4 installation server: This is a tree of Red Hat Package Managers (RPMs) and other files required for installation.
� Network File System (NFS) server: This exports the installation tree and possibly other useful files.
� Kickstart server: This hosts files necessary for automated installations. See Chapter 8, “Installing Linux with kickstart” on page 103.
� Clone server: This is for cloning an existing installation to a new Linux ID. See Chapter 9, “Cloning Linux” on page 113.
In this chapter, you perform the following tasks:
� Creating the user ID LNXINST � Preparing Red Hat Enterprise Linux 4 bootstrap files� Installing the server� Configuring the installation server
7
© Copyright IBM Corp. 2006. All rights reserved. 83
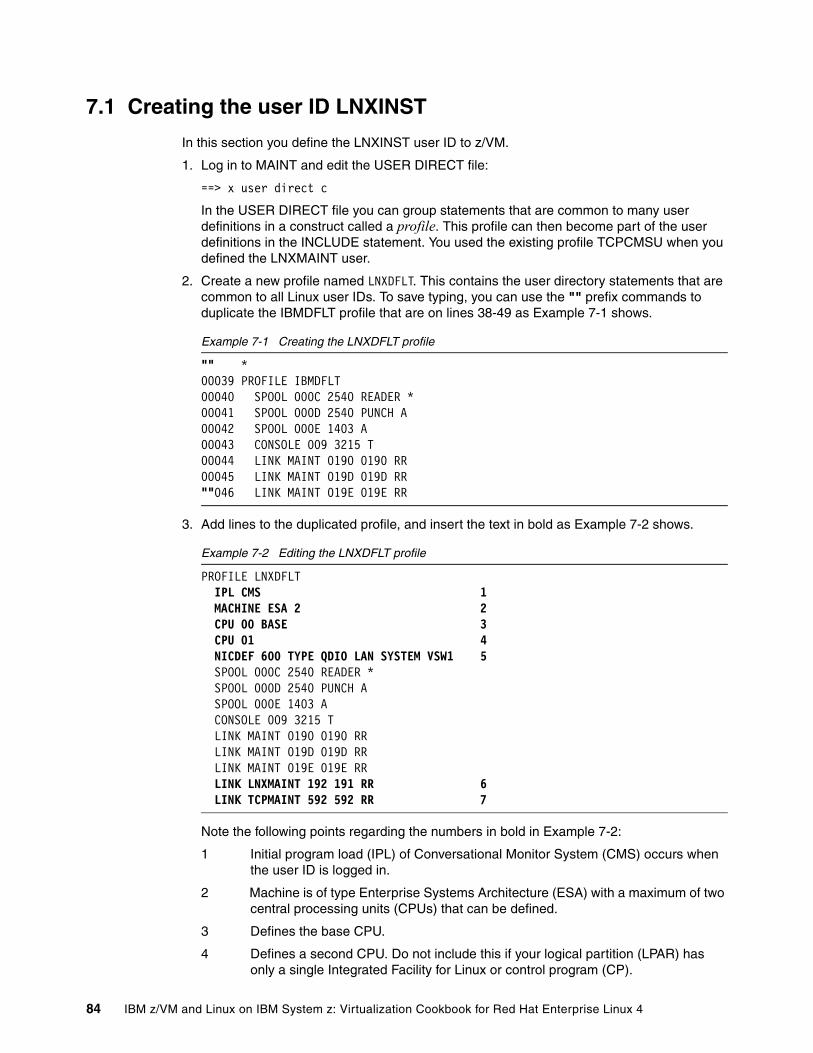
7.1 Creating the user ID LNXINST
In this section you define the LNXINST user ID to z/VM.
1. Log in to MAINT and edit the USER DIRECT file:
==> x user direct c
In the USER DIRECT file you can group statements that are common to many user definitions in a construct called a profile. This profile can then become part of the user definitions in the INCLUDE statement. You used the existing profile TCPCMSU when you defined the LNXMAINT user.
2. Create a new profile named LNXDFLT. This contains the user directory statements that are common to all Linux user IDs. To save typing, you can use the "" prefix commands to duplicate the IBMDFLT profile that are on lines 38-49 as Example 7-1 shows.
Example 7-1 Creating the LNXDFLT profile
"" *00039 PROFILE IBMDFLT00040 SPOOL 000C 2540 READER *00041 SPOOL 000D 2540 PUNCH A00042 SPOOL 000E 1403 A00043 CONSOLE 009 3215 T00044 LINK MAINT 0190 0190 RR00045 LINK MAINT 019D 019D RR""046 LINK MAINT 019E 019E RR
3. Add lines to the duplicated profile, and insert the text in bold as Example 7-2 shows.
Example 7-2 Editing the LNXDFLT profile
PROFILE LNXDFLTIPL CMS 1
MACHINE ESA 2 2 CPU 00 BASE 3 CPU 01 4
NICDEF 600 TYPE QDIO LAN SYSTEM VSW1 5SPOOL 000C 2540 READER *
SPOOL 000D 2540 PUNCH A SPOOL 000E 1403 A CONSOLE 009 3215 T LINK MAINT 0190 0190 RR LINK MAINT 019D 019D RR LINK MAINT 019E 019E RR LINK LNXMAINT 192 191 RR 6
LINK TCPMAINT 592 592 RR 7
Note the following points regarding the numbers in bold in Example 7-2:
1 Initial program load (IPL) of Conversational Monitor System (CMS) occurs when the user ID is logged in.
2 Machine is of type Enterprise Systems Architecture (ESA) with a maximum of two central processing units (CPUs) that can be defined.
3 Defines the base CPU.
4 Defines a second CPU. Do not include this if your logical partition (LPAR) has only a single Integrated Facility for Linux or control program (CP).
84 IBM z/VM and Linux on IBM System z: Virtualization Cookbook for Red Hat Enterprise Linux 4
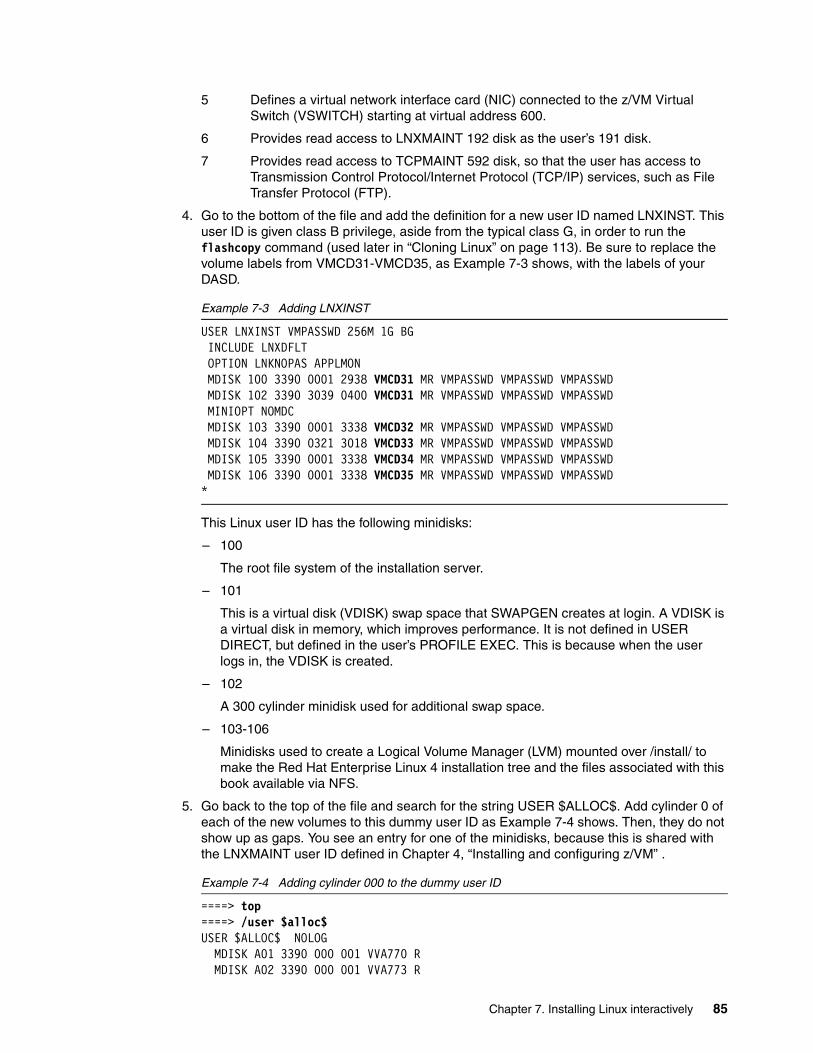
5 Defines a virtual network interface card (NIC) connected to the z/VM Virtual Switch (VSWITCH) starting at virtual address 600.
6 Provides read access to LNXMAINT 192 disk as the user’s 191 disk.
7 Provides read access to TCPMAINT 592 disk, so that the user has access to Transmission Control Protocol/Internet Protocol (TCP/IP) services, such as File Transfer Protocol (FTP).
4. Go to the bottom of the file and add the definition for a new user ID named LNXINST. This user ID is given class B privilege, aside from the typical class G, in order to run the flashcopy command (used later in “Cloning Linux” on page 113). Be sure to replace the volume labels from VMCD31-VMCD35, as Example 7-3 shows, with the labels of your DASD.
Example 7-3 Adding LNXINST
USER LNXINST VMPASSWD 256M 1G BG INCLUDE LNXDFLT OPTION LNKNOPAS APPLMON MDISK 100 3390 0001 2938 VMCD31 MR VMPASSWD VMPASSWD VMPASSWD MDISK 102 3390 3039 0400 VMCD31 MR VMPASSWD VMPASSWD VMPASSWD MINIOPT NOMDC MDISK 103 3390 0001 3338 VMCD32 MR VMPASSWD VMPASSWD VMPASSWD MDISK 104 3390 0321 3018 VMCD33 MR VMPASSWD VMPASSWD VMPASSWD MDISK 105 3390 0001 3338 VMCD34 MR VMPASSWD VMPASSWD VMPASSWD MDISK 106 3390 0001 3338 VMCD35 MR VMPASSWD VMPASSWD VMPASSWD*
This Linux user ID has the following minidisks:
– 100
The root file system of the installation server.
– 101
This is a virtual disk (VDISK) swap space that SWAPGEN creates at login. A VDISK is a virtual disk in memory, which improves performance. It is not defined in USER DIRECT, but defined in the user’s PROFILE EXEC. This is because when the user logs in, the VDISK is created.
– 102
A 300 cylinder minidisk used for additional swap space.
– 103-106
Minidisks used to create a Logical Volume Manager (LVM) mounted over /install/ to make the Red Hat Enterprise Linux 4 installation tree and the files associated with this book available via NFS.
5. Go back to the top of the file and search for the string USER $ALLOC$. Add cylinder 0 of each of the new volumes to this dummy user ID as Example 7-4 shows. Then, they do not show up as gaps. You see an entry for one of the minidisks, because this is shared with the LNXMAINT user ID defined in Chapter 4, “Installing and configuring z/VM” .
Example 7-4 Adding cylinder 000 to the dummy user ID
====> top====> /user $alloc$USER $ALLOC$ NOLOG
MDISK A01 3390 000 001 VVA770 R MDISK A02 3390 000 001 VVA773 R
Chapter 7. Installing Linux interactively 85
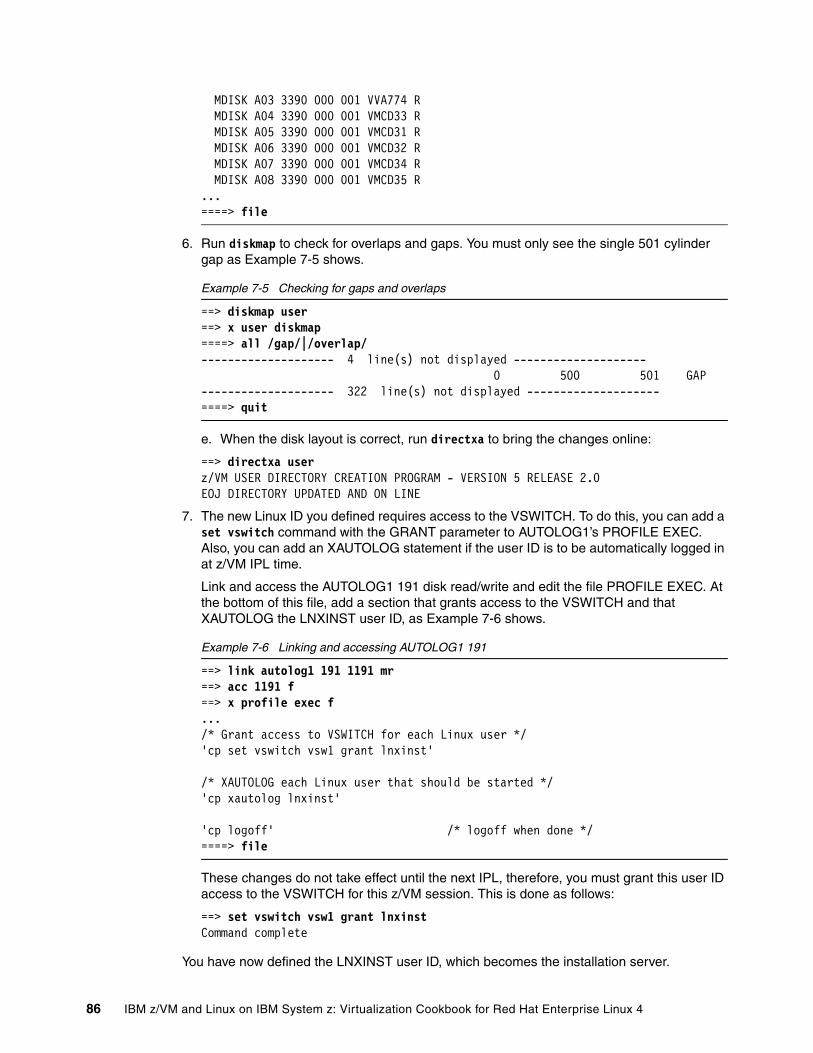
MDISK A03 3390 000 001 VVA774 R MDISK A04 3390 000 001 VMCD33 R
MDISK A05 3390 000 001 VMCD31 R MDISK A06 3390 000 001 VMCD32 R MDISK A07 3390 000 001 VMCD34 R MDISK A08 3390 000 001 VMCD35 R...====> file
6. Run diskmap to check for overlaps and gaps. You must only see the single 501 cylinder gap as Example 7-5 shows.
Example 7-5 Checking for gaps and overlaps
==> diskmap user==> x user diskmap====> all /gap/|/overlap/-------------------- 4 line(s) not displayed -------------------- 0 500 501 GAP-------------------- 322 line(s) not displayed --------------------====> quit
e. When the disk layout is correct, run directxa to bring the changes online:
==> directxa userz/VM USER DIRECTORY CREATION PROGRAM - VERSION 5 RELEASE 2.0EOJ DIRECTORY UPDATED AND ON LINE
7. The new Linux ID you defined requires access to the VSWITCH. To do this, you can add a set vswitch command with the GRANT parameter to AUTOLOG1’s PROFILE EXEC. Also, you can add an XAUTOLOG statement if the user ID is to be automatically logged in at z/VM IPL time.
Link and access the AUTOLOG1 191 disk read/write and edit the file PROFILE EXEC. At the bottom of this file, add a section that grants access to the VSWITCH and that XAUTOLOG the LNXINST user ID, as Example 7-6 shows.
Example 7-6 Linking and accessing AUTOLOG1 191
==> link autolog1 191 1191 mr==> acc 1191 f==> x profile exec f.../* Grant access to VSWITCH for each Linux user */'cp set vswitch vsw1 grant lnxinst'
/* XAUTOLOG each Linux user that should be started */'cp xautolog lnxinst'
'cp logoff' /* logoff when done */====> file
These changes do not take effect until the next IPL, therefore, you must grant this user ID access to the VSWITCH for this z/VM session. This is done as follows:
==> set vswitch vsw1 grant lnxinstCommand complete
You have now defined the LNXINST user ID, which becomes the installation server.
86 IBM z/VM and Linux on IBM System z: Virtualization Cookbook for Red Hat Enterprise Linux 4
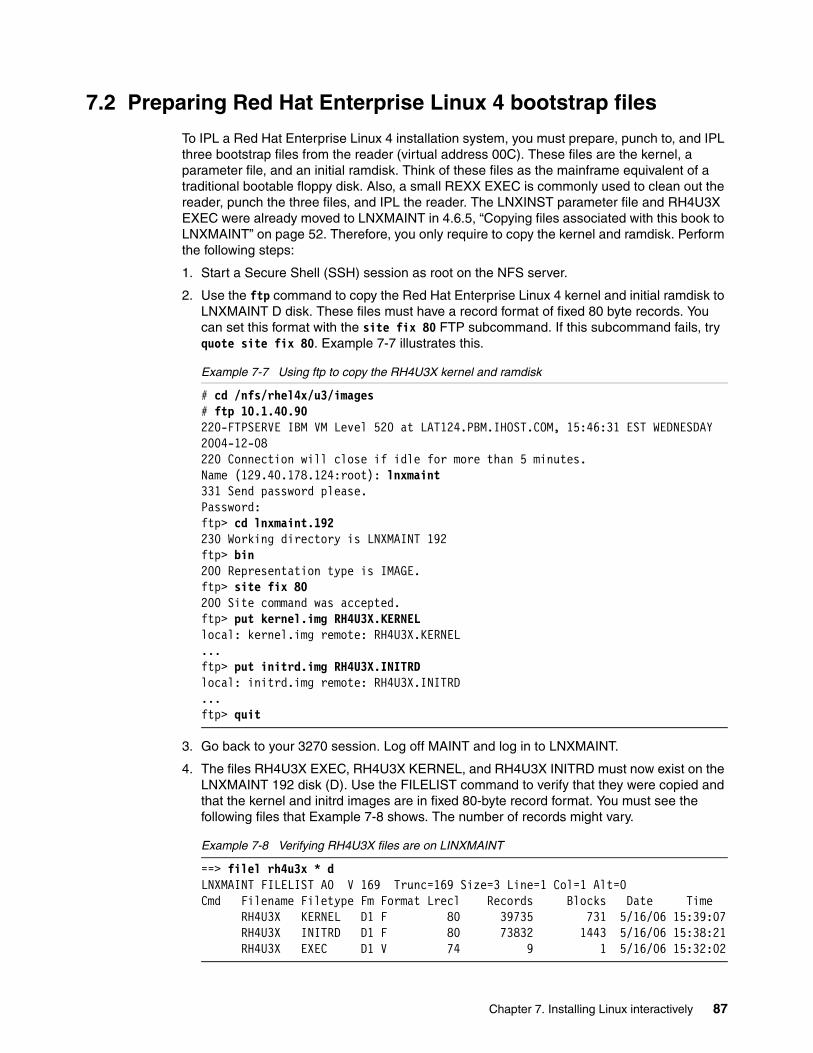
7.2 Preparing Red Hat Enterprise Linux 4 bootstrap files
To IPL a Red Hat Enterprise Linux 4 installation system, you must prepare, punch to, and IPL three bootstrap files from the reader (virtual address 00C). These files are the kernel, a parameter file, and an initial ramdisk. Think of these files as the mainframe equivalent of a traditional bootable floppy disk. Also, a small REXX EXEC is commonly used to clean out the reader, punch the three files, and IPL the reader. The LNXINST parameter file and RH4U3X EXEC were already moved to LNXMAINT in 4.6.5, “Copying files associated with this book to LNXMAINT” on page 52. Therefore, you only require to copy the kernel and ramdisk. Perform the following steps:
1. Start a Secure Shell (SSH) session as root on the NFS server.
2. Use the ftp command to copy the Red Hat Enterprise Linux 4 kernel and initial ramdisk to LNXMAINT D disk. These files must have a record format of fixed 80 byte records. You can set this format with the site fix 80 FTP subcommand. If this subcommand fails, try quote site fix 80. Example 7-7 illustrates this.
Example 7-7 Using ftp to copy the RH4U3X kernel and ramdisk
# cd /nfs/rhel4x/u3/images# ftp 10.1.40.90220-FTPSERVE IBM VM Level 520 at LAT124.PBM.IHOST.COM, 15:46:31 EST WEDNESDAY 2004-12-08220 Connection will close if idle for more than 5 minutes.Name (129.40.178.124:root): lnxmaint331 Send password please.Password:ftp> cd lnxmaint.192230 Working directory is LNXMAINT 192ftp> bin200 Representation type is IMAGE.ftp> site fix 80200 Site command was accepted.ftp> put kernel.img RH4U3X.KERNEL local: kernel.img remote: RH4U3X.KERNEL...ftp> put initrd.img RH4U3X.INITRD local: initrd.img remote: RH4U3X.INITRD...ftp> quit
3. Go back to your 3270 session. Log off MAINT and log in to LNXMAINT.
4. The files RH4U3X EXEC, RH4U3X KERNEL, and RH4U3X INITRD must now exist on the LNXMAINT 192 disk (D). Use the FILELIST command to verify that they were copied and that the kernel and initrd images are in fixed 80-byte record format. You must see the following files that Example 7-8 shows. The number of records might vary.
Example 7-8 Verifying RH4U3X files are on LINXMAINT
==> filel rh4u3x * dLNXMAINT FILELIST A0 V 169 Trunc=169 Size=3 Line=1 Col=1 Alt=0 Cmd Filename Filetype Fm Format Lrecl Records Blocks Date Time RH4U3X KERNEL D1 F 80 39735 731 5/16/06 15:39:07 RH4U3X INITRD D1 F 80 73832 1443 5/16/06 15:38:21 RH4U3X EXEC D1 V 74 9 1 5/16/06 15:32:02
Chapter 7. Installing Linux interactively 87
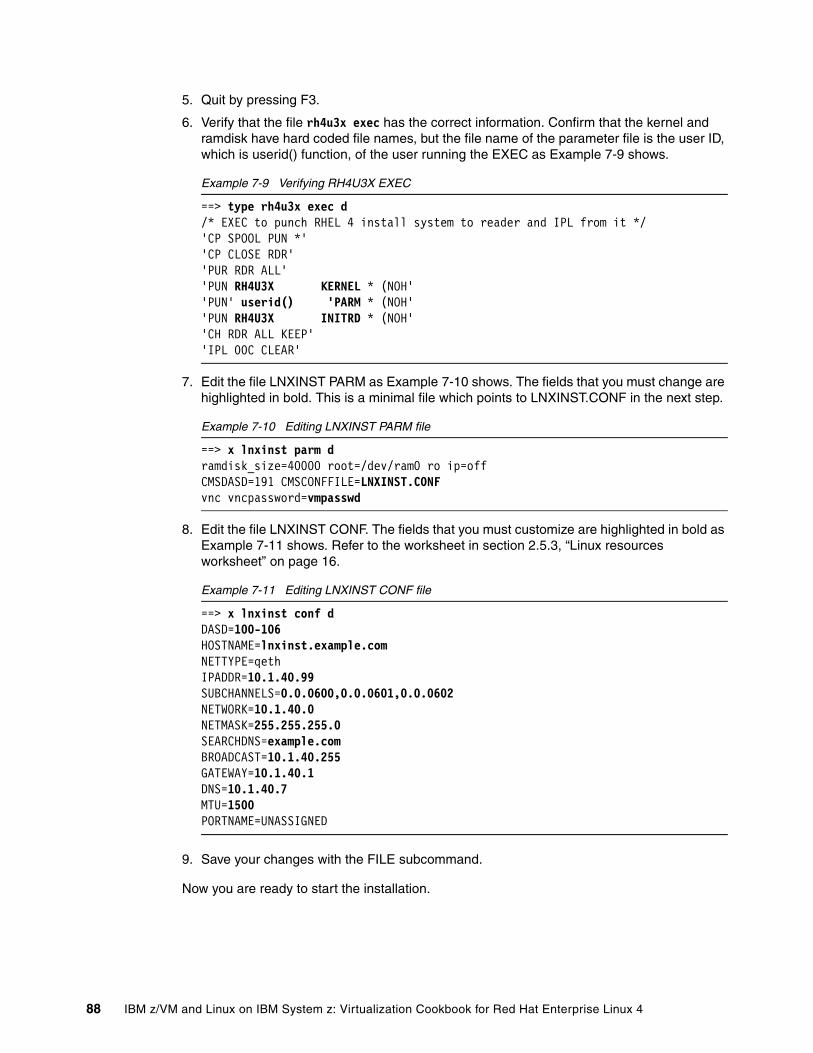
5. Quit by pressing F3.
6. Verify that the file rh4u3x exec has the correct information. Confirm that the kernel and ramdisk have hard coded file names, but the file name of the parameter file is the user ID, which is userid() function, of the user running the EXEC as Example 7-9 shows.
Example 7-9 Verifying RH4U3X EXEC
==> type rh4u3x exec d/* EXEC to punch RHEL 4 install system to reader and IPL from it */ 'CP SPOOL PUN *' 'CP CLOSE RDR' 'PUR RDR ALL' 'PUN RH4U3X KERNEL * (NOH' 'PUN' userid() 'PARM * (NOH' 'PUN RH4U3X INITRD * (NOH' 'CH RDR ALL KEEP' 'IPL 00C CLEAR'
7. Edit the file LNXINST PARM as Example 7-10 shows. The fields that you must change are highlighted in bold. This is a minimal file which points to LNXINST.CONF in the next step.
Example 7-10 Editing LNXINST PARM file
==> x lnxinst parm dramdisk_size=40000 root=/dev/ram0 ro ip=offCMSDASD=191 CMSCONFFILE=LNXINST.CONFvnc vncpassword=vmpasswd
8. Edit the file LNXINST CONF. The fields that you must customize are highlighted in bold as Example 7-11 shows. Refer to the worksheet in section 2.5.3, “Linux resources worksheet” on page 16.
Example 7-11 Editing LNXINST CONF file
==> x lnxinst conf dDASD=100-106 HOSTNAME=lnxinst.example.com NETTYPE=qeth IPADDR=10.1.40.99 SUBCHANNELS=0.0.0600,0.0.0601,0.0.0602NETWORK=10.1.40.0 NETMASK=255.255.255.0 SEARCHDNS=example.com BROADCAST=10.1.40.255 GATEWAY=10.1.40.1 DNS=10.1.40.7 MTU=1500 PORTNAME=UNASSIGNED
9. Save your changes with the FILE subcommand.
Now you are ready to start the installation.
88 IBM z/VM and Linux on IBM System z: Virtualization Cookbook for Red Hat Enterprise Linux 4
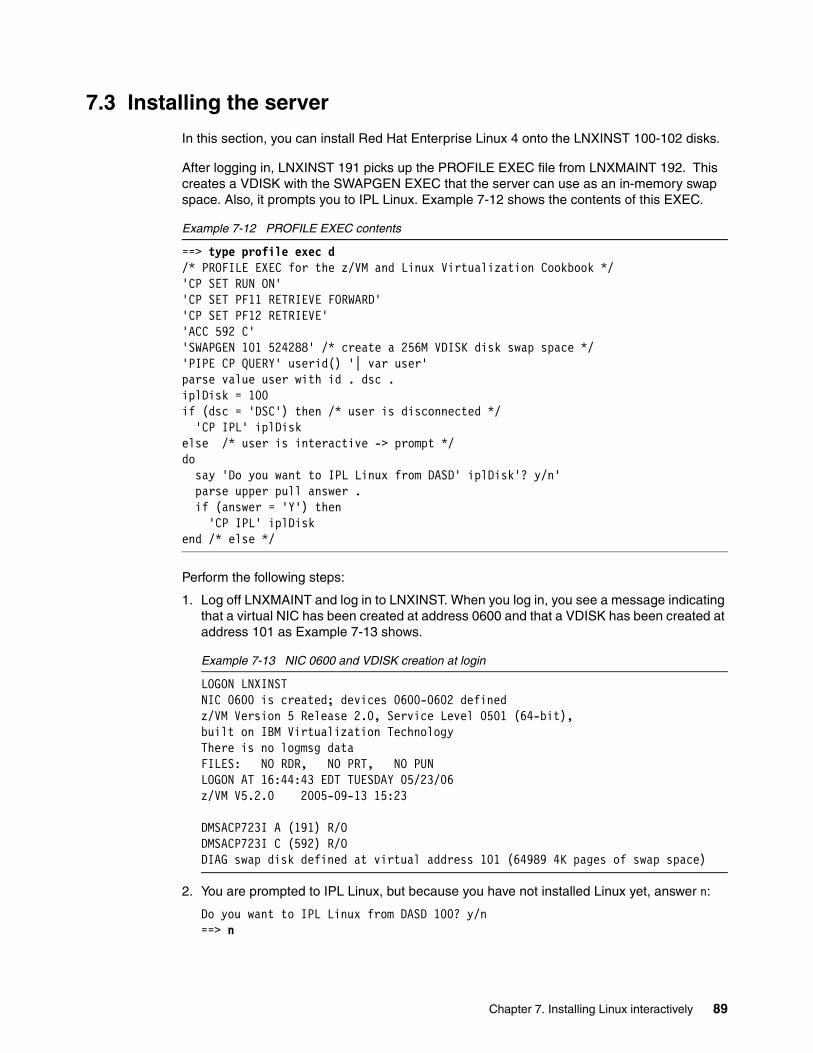
7.3 Installing the server
In this section, you can install Red Hat Enterprise Linux 4 onto the LNXINST 100-102 disks.
After logging in, LNXINST 191 picks up the PROFILE EXEC file from LNXMAINT 192. This creates a VDISK with the SWAPGEN EXEC that the server can use as an in-memory swap space. Also, it prompts you to IPL Linux. Example 7-12 shows the contents of this EXEC.
Example 7-12 PROFILE EXEC contents
==> type profile exec d/* PROFILE EXEC for the z/VM and Linux Virtualization Cookbook */'CP SET RUN ON''CP SET PF11 RETRIEVE FORWARD''CP SET PF12 RETRIEVE''ACC 592 C''SWAPGEN 101 524288' /* create a 256M VDISK disk swap space */'PIPE CP QUERY' userid() '| var user'parse value user with id . dsc .iplDisk = 100if (dsc = 'DSC') then /* user is disconnected */ 'CP IPL' iplDiskelse /* user is interactive -> prompt */do say 'Do you want to IPL Linux from DASD' iplDisk'? y/n' parse upper pull answer . if (answer = 'Y') then 'CP IPL' iplDiskend /* else */
Perform the following steps:
1. Log off LNXMAINT and log in to LNXINST. When you log in, you see a message indicating that a virtual NIC has been created at address 0600 and that a VDISK has been created at address 101 as Example 7-13 shows.
Example 7-13 NIC 0600 and VDISK creation at login
LOGON LNXINST NIC 0600 is created; devices 0600-0602 defined z/VM Version 5 Release 2.0, Service Level 0501 (64-bit), built on IBM Virtualization Technology There is no logmsg data FILES: NO RDR, NO PRT, NO PUN LOGON AT 16:44:43 EDT TUESDAY 05/23/06 z/VM V5.2.0 2005-09-13 15:23 DMSACP723I A (191) R/O DMSACP723I C (592) R/O DIAG swap disk defined at virtual address 101 (64989 4K pages of swap space)
2. You are prompted to IPL Linux, but because you have not installed Linux yet, answer n:
Do you want to IPL Linux from DASD 100? y/n==> n
Chapter 7. Installing Linux interactively 89
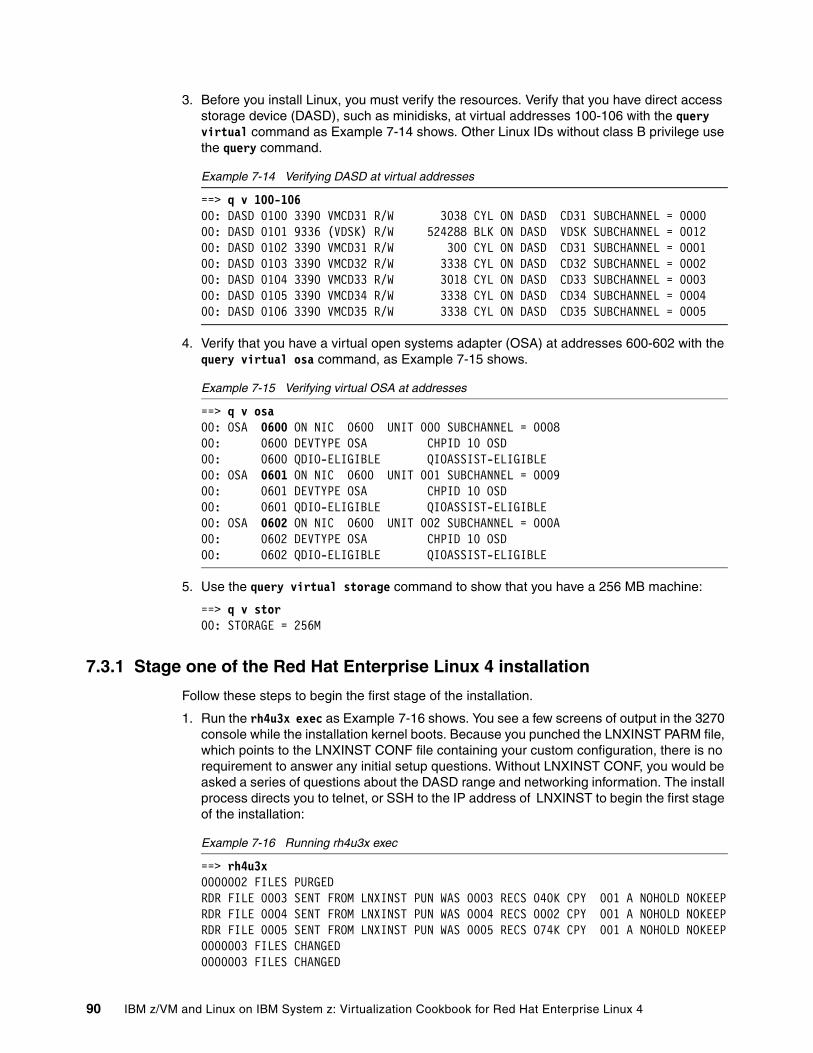
3. Before you install Linux, you must verify the resources. Verify that you have direct access storage device (DASD), such as minidisks, at virtual addresses 100-106 with the query virtual command as Example 7-14 shows. Other Linux IDs without class B privilege use the query command.
Example 7-14 Verifying DASD at virtual addresses
==> q v 100-10600: DASD 0100 3390 VMCD31 R/W 3038 CYL ON DASD CD31 SUBCHANNEL = 0000 00: DASD 0101 9336 (VDSK) R/W 524288 BLK ON DASD VDSK SUBCHANNEL = 0012 00: DASD 0102 3390 VMCD31 R/W 300 CYL ON DASD CD31 SUBCHANNEL = 0001 00: DASD 0103 3390 VMCD32 R/W 3338 CYL ON DASD CD32 SUBCHANNEL = 0002 00: DASD 0104 3390 VMCD33 R/W 3018 CYL ON DASD CD33 SUBCHANNEL = 0003 00: DASD 0105 3390 VMCD34 R/W 3338 CYL ON DASD CD34 SUBCHANNEL = 0004 00: DASD 0106 3390 VMCD35 R/W 3338 CYL ON DASD CD35 SUBCHANNEL = 0005
4. Verify that you have a virtual open systems adapter (OSA) at addresses 600-602 with the query virtual osa command, as Example 7-15 shows.
Example 7-15 Verifying virtual OSA at addresses
==> q v osa00: OSA 0600 ON NIC 0600 UNIT 000 SUBCHANNEL = 000800: 0600 DEVTYPE OSA CHPID 10 OSD00: 0600 QDIO-ELIGIBLE QIOASSIST-ELIGIBLE00: OSA 0601 ON NIC 0600 UNIT 001 SUBCHANNEL = 000900: 0601 DEVTYPE OSA CHPID 10 OSD00: 0601 QDIO-ELIGIBLE QIOASSIST-ELIGIBLE00: OSA 0602 ON NIC 0600 UNIT 002 SUBCHANNEL = 000A00: 0602 DEVTYPE OSA CHPID 10 OSD00: 0602 QDIO-ELIGIBLE QIOASSIST-ELIGIBLE
5. Use the query virtual storage command to show that you have a 256 MB machine:
==> q v stor00: STORAGE = 256M
7.3.1 Stage one of the Red Hat Enterprise Linux 4 installation
Follow these steps to begin the first stage of the installation.
1. Run the rh4u3x exec as Example 7-16 shows. You see a few screens of output in the 3270 console while the installation kernel boots. Because you punched the LNXINST PARM file, which points to the LNXINST CONF file containing your custom configuration, there is no requirement to answer any initial setup questions. Without LNXINST CONF, you would be asked a series of questions about the DASD range and networking information. The install process directs you to telnet, or SSH to the IP address of LNXINST to begin the first stage of the installation:
Example 7-16 Running rh4u3x exec
==> rh4u3x0000002 FILES PURGED RDR FILE 0003 SENT FROM LNXINST PUN WAS 0003 RECS 040K CPY 001 A NOHOLD NOKEEPRDR FILE 0004 SENT FROM LNXINST PUN WAS 0004 RECS 0002 CPY 001 A NOHOLD NOKEEPRDR FILE 0005 SENT FROM LNXINST PUN WAS 0005 RECS 074K CPY 001 A NOHOLD NOKEEP0000003 FILES CHANGED 0000003 FILES CHANGED
90 IBM z/VM and Linux on IBM System z: Virtualization Cookbook for Red Hat Enterprise Linux 4
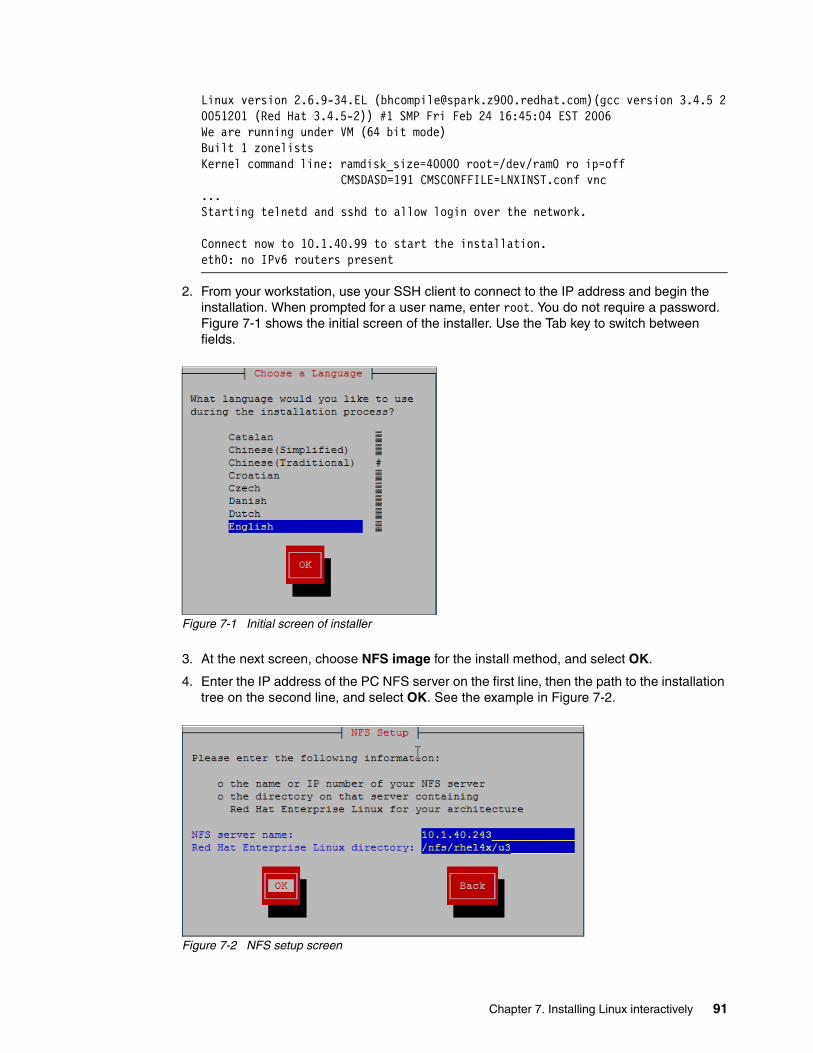
Linux version 2.6.9-34.EL ([email protected])(gcc version 3.4.5 20051201 (Red Hat 3.4.5-2)) #1 SMP Fri Feb 24 16:45:04 EST 2006 We are running under VM (64 bit mode) Built 1 zonelists Kernel command line: ramdisk_size=40000 root=/dev/ram0 ro ip=off CMSDASD=191 CMSCONFFILE=LNXINST.conf vnc ...Starting telnetd and sshd to allow login over the network. Connect now to 10.1.40.99 to start the installation. eth0: no IPv6 routers present
2. From your workstation, use your SSH client to connect to the IP address and begin the installation. When prompted for a user name, enter root. You do not require a password. Figure 7-1 shows the initial screen of the installer. Use the Tab key to switch between fields.
Figure 7-1 Initial screen of installer
3. At the next screen, choose NFS image for the install method, and select OK.
4. Enter the IP address of the PC NFS server on the first line, then the path to the installation tree on the second line, and select OK. See the example in Figure 7-2.
Figure 7-2 NFS setup screen
Chapter 7. Installing Linux interactively 91

5. The installer starts the Virtual Network Computing (VNC) server as Figure 7-3 shows.
Figure 7-3 VNC server running
6. Using your VNC client, connect to the IP address with a:1 appended to the end as shown in Figure 7-4. When prompted for a password, enter the password specified in the LNXINST PARM file. Refer to Example 7-10 on page 88.
Figure 7-4 Connecting with VNC client
7. You can disconnect from the 3270 session, and messages to the console are lost. If you stay connected, you must clear the screen periodically, or enter the following command to clear the screen automatically:
#cp term more 0 0
Otherwise, the install process might be delayed waiting for the screen to clear itself.
7.3.2 Stage two of the Red Hat Enterprise Linux 4 installation
After you have connected using VNC, perform the following steps:
1. The welcome screen opens. Click Next.
2. The installer searches for a previous installation. Because this is the first installation, nothing is found. For future installations, if a previous installation is found, the installer prompts you whether to click Upgrade or Install. You must always choose Install here.
3. The next screen allows you to configure Fibre Channel Protocol (FCP) devices. Because no FCP devices are configured, this section is blank. Click Next.
Welcome to the Red Hat Linux install environment 1.1 for zSeries
Running anaconda, the Red Hat Enterprise Linux system installer - please wait...Starting VNC...The VNC server is now running.Please connect to 10.1.40.99:1 to begin the install...Starting graphical installation...XKB extension not present on :1
92 IBM z/VM and Linux on IBM System z: Virtualization Cookbook for Red Hat Enterprise Linux 4
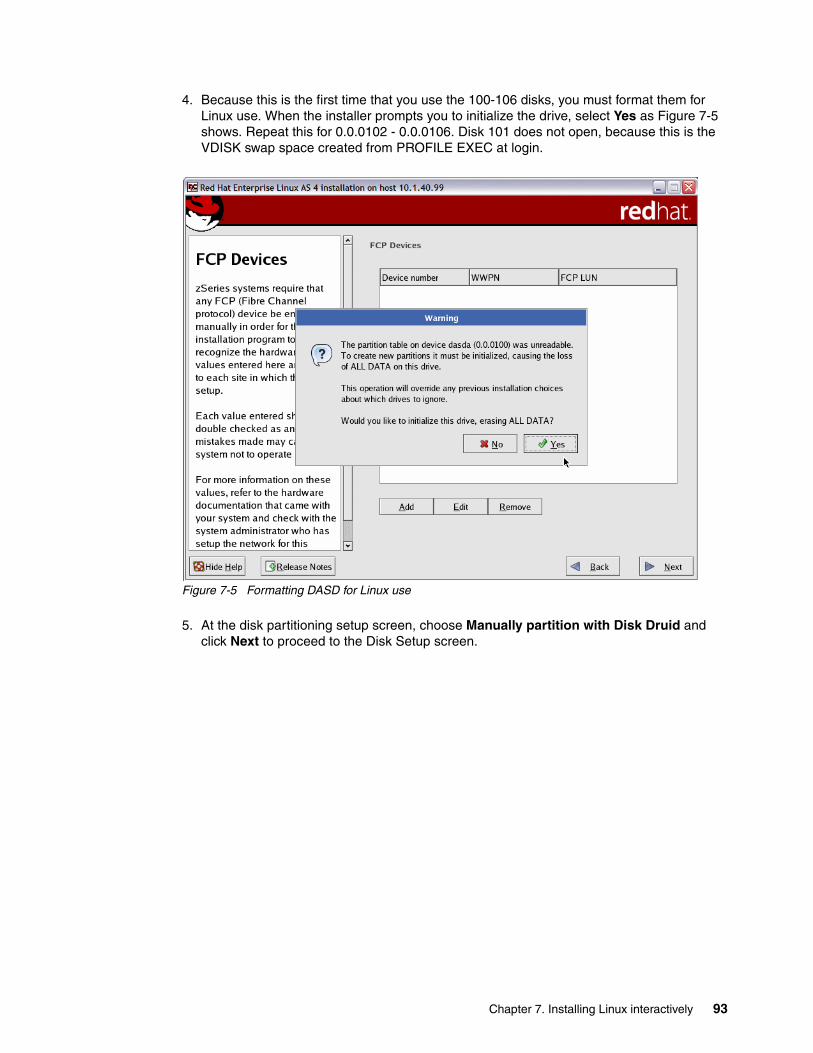
4. Because this is the first time that you use the 100-106 disks, you must format them for Linux use. When the installer prompts you to initialize the drive, select Yes as Figure 7-5 shows. Repeat this for 0.0.0102 - 0.0.0106. Disk 101 does not open, because this is the VDISK swap space created from PROFILE EXEC at login.
Figure 7-5 Formatting DASD for Linux use
5. At the disk partitioning setup screen, choose Manually partition with Disk Druid and click Next to proceed to the Disk Setup screen.
Chapter 7. Installing Linux interactively 93
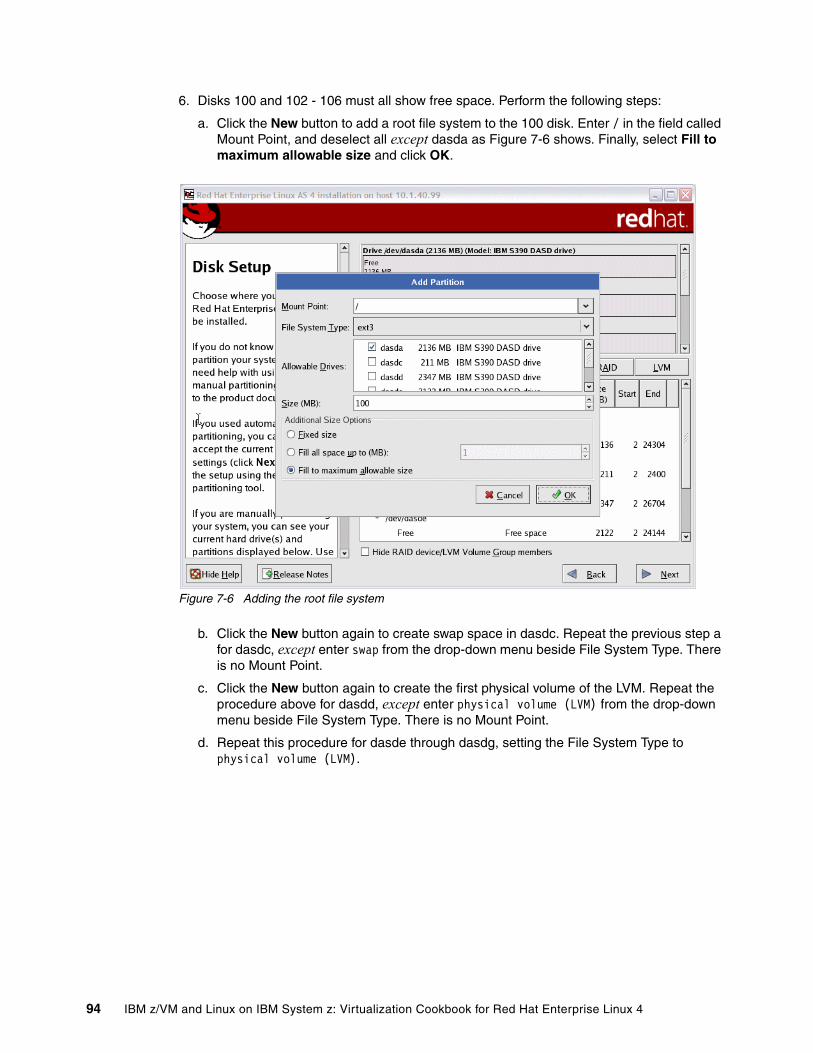
6. Disks 100 and 102 - 106 must all show free space. Perform the following steps:
a. Click the New button to add a root file system to the 100 disk. Enter / in the field called Mount Point, and deselect all except dasda as Figure 7-6 shows. Finally, select Fill to maximum allowable size and click OK.
Figure 7-6 Adding the root file system
b. Click the New button again to create swap space in dasdc. Repeat the previous step a for dasdc, except enter swap from the drop-down menu beside File System Type. There is no Mount Point.
c. Click the New button again to create the first physical volume of the LVM. Repeat the procedure above for dasdd, except enter physical volume (LVM) from the drop-down menu beside File System Type. There is no Mount Point.
d. Repeat this procedure for dasde through dasdg, setting the File System Type to physical volume (LVM).
94 IBM z/VM and Linux on IBM System z: Virtualization Cookbook for Red Hat Enterprise Linux 4
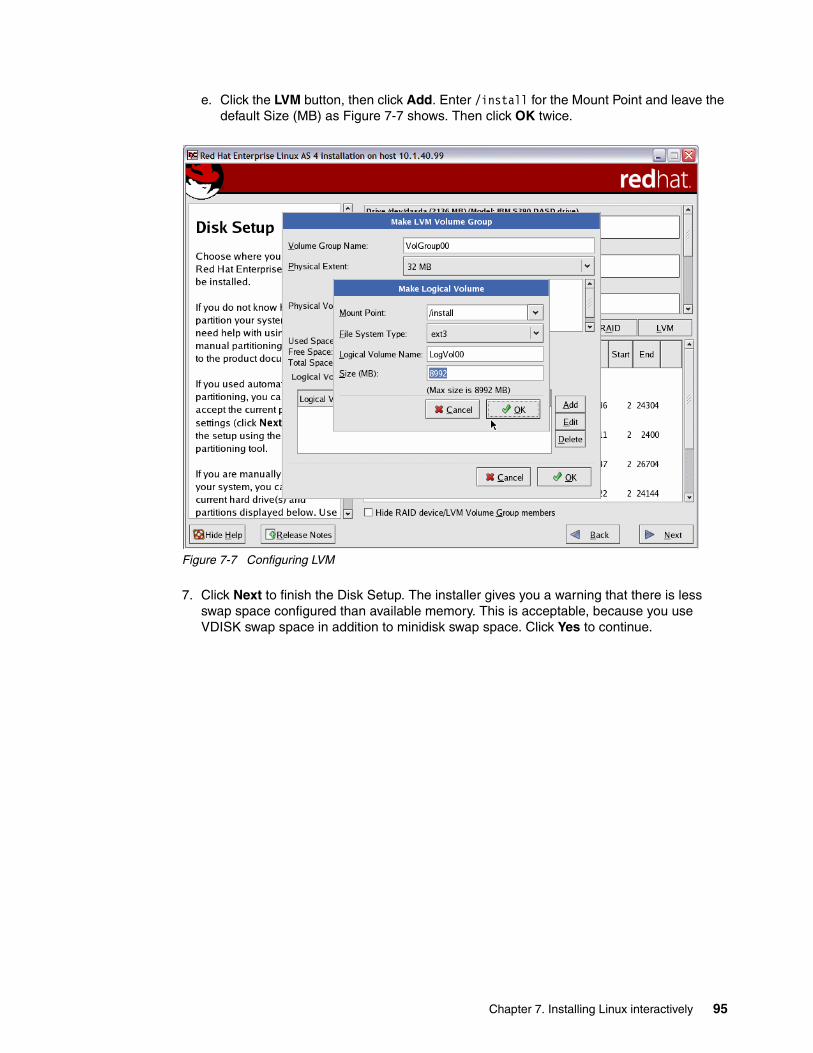
e. Click the LVM button, then click Add. Enter /install for the Mount Point and leave the default Size (MB) as Figure 7-7 shows. Then click OK twice.
Figure 7-7 Configuring LVM
7. Click Next to finish the Disk Setup. The installer gives you a warning that there is less swap space configured than available memory. This is acceptable, because you use VDISK swap space in addition to minidisk swap space. Click Yes to continue.
Chapter 7. Installing Linux interactively 95
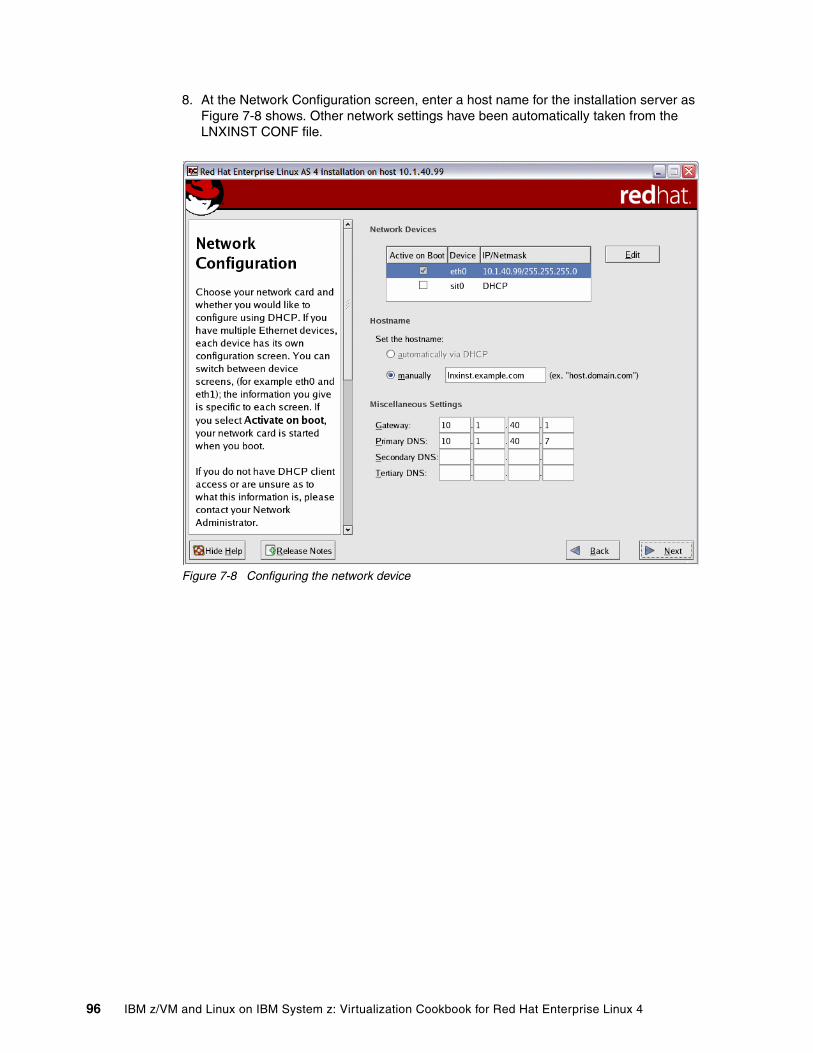
8. At the Network Configuration screen, enter a host name for the installation server as Figure 7-8 shows. Other network settings have been automatically taken from the LNXINST CONF file.
Figure 7-8 Configuring the network device
96 IBM z/VM and Linux on IBM System z: Virtualization Cookbook for Red Hat Enterprise Linux 4
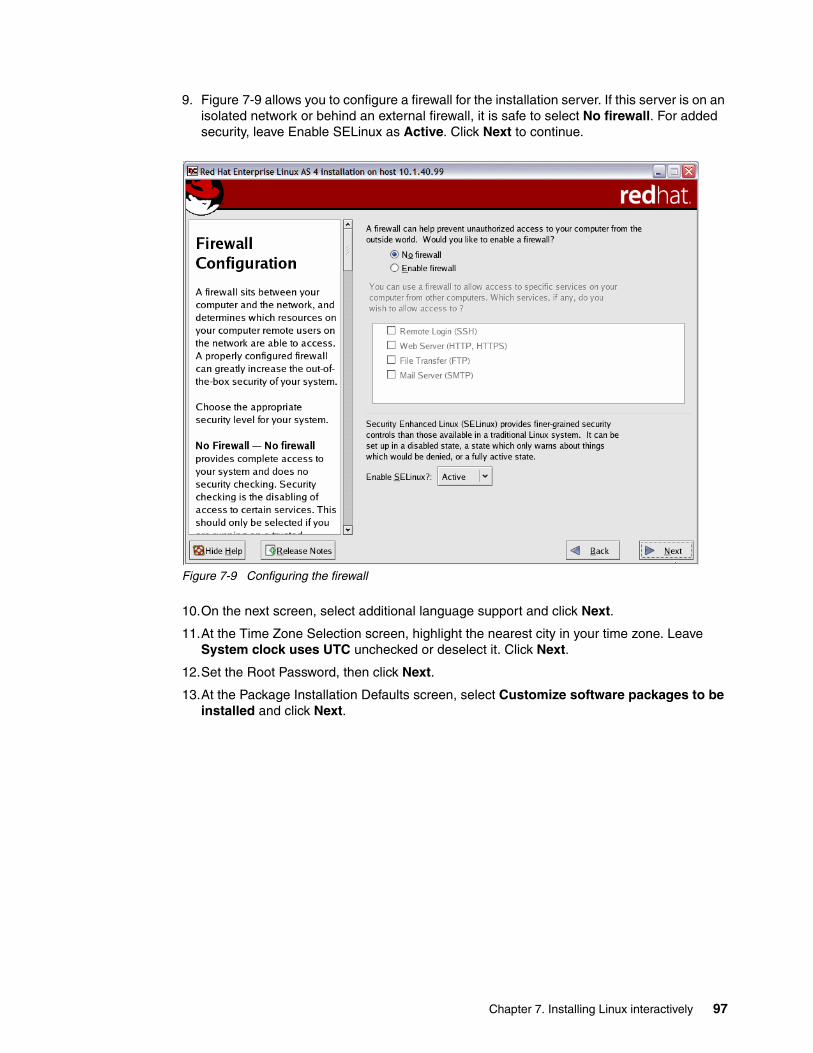
9. Figure 7-9 allows you to configure a firewall for the installation server. If this server is on an isolated network or behind an external firewall, it is safe to select No firewall. For added security, leave Enable SELinux as Active. Click Next to continue.
Figure 7-9 Configuring the firewall
10.On the next screen, select additional language support and click Next.
11.At the Time Zone Selection screen, highlight the nearest city in your time zone. Leave System clock uses UTC unchecked or deselect it. Click Next.
12.Set the Root Password, then click Next.
13.At the Package Installation Defaults screen, select Customize software packages to be installed and click Next.
Chapter 7. Installing Linux interactively 97
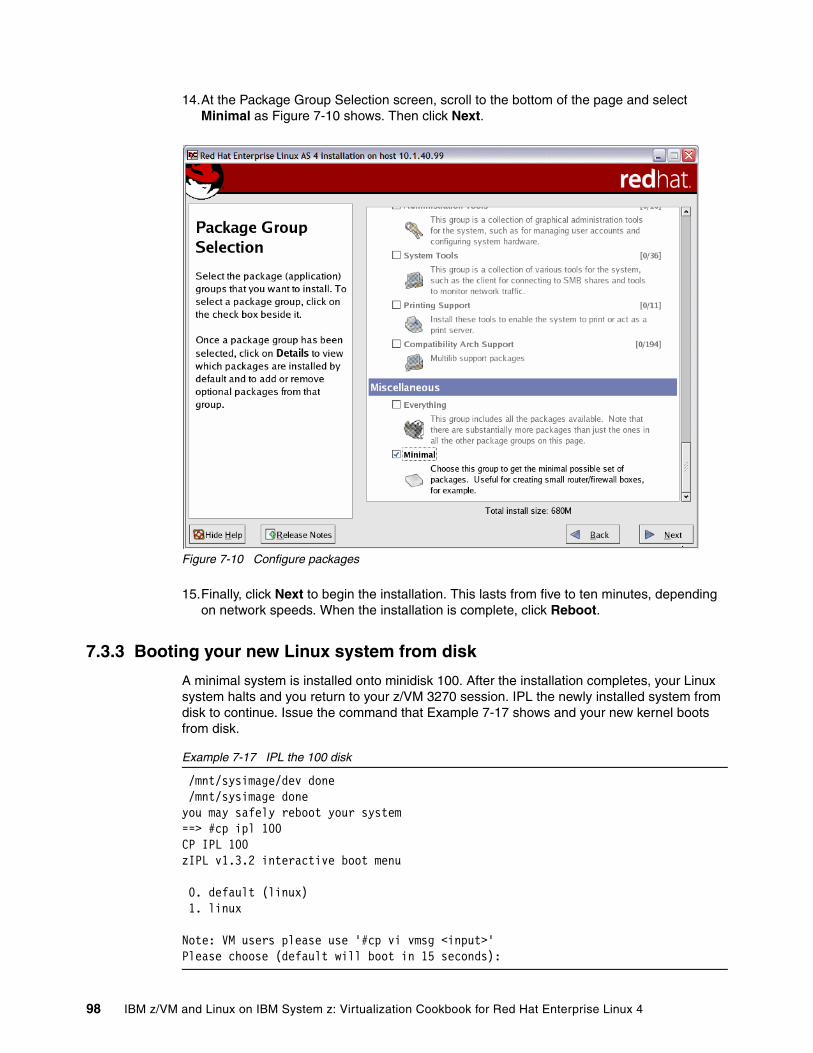
14.At the Package Group Selection screen, scroll to the bottom of the page and select Minimal as Figure 7-10 shows. Then click Next.
Figure 7-10 Configure packages
15.Finally, click Next to begin the installation. This lasts from five to ten minutes, depending on network speeds. When the installation is complete, click Reboot.
7.3.3 Booting your new Linux system from disk
A minimal system is installed onto minidisk 100. After the installation completes, your Linux system halts and you return to your z/VM 3270 session. IPL the newly installed system from disk to continue. Issue the command that Example 7-17 shows and your new kernel boots from disk.
Example 7-17 IPL the 100 disk
/mnt/sysimage/dev done /mnt/sysimage done you may safely reboot your system==> #cp ipl 100CP IPL 100 zIPL v1.3.2 interactive boot menu
0. default (linux) 1. linux
Note: VM users please use '#cp vi vmsg <input>' Please choose (default will boot in 15 seconds):
98 IBM z/VM and Linux on IBM System z: Virtualization Cookbook for Red Hat Enterprise Linux 4
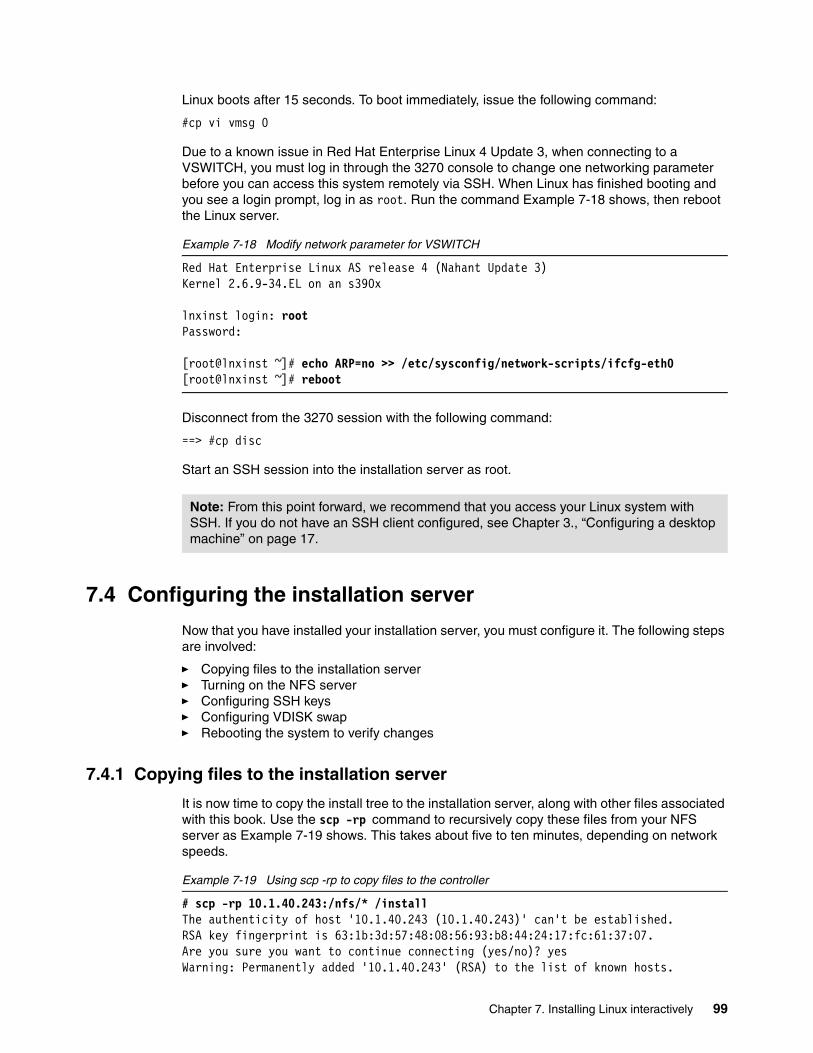
Linux boots after 15 seconds. To boot immediately, issue the following command:
#cp vi vmsg 0
Due to a known issue in Red Hat Enterprise Linux 4 Update 3, when connecting to a VSWITCH, you must log in through the 3270 console to change one networking parameter before you can access this system remotely via SSH. When Linux has finished booting and you see a login prompt, log in as root. Run the command Example 7-18 shows, then reboot the Linux server.
Example 7-18 Modify network parameter for VSWITCH
Red Hat Enterprise Linux AS release 4 (Nahant Update 3) Kernel 2.6.9-34.EL on an s390x lnxinst login: root Password: [root@lnxinst ~]# echo ARP=no >> /etc/sysconfig/network-scripts/ifcfg-eth0[root@lnxinst ~]# reboot
Disconnect from the 3270 session with the following command:
==> #cp disc
Start an SSH session into the installation server as root.
7.4 Configuring the installation server
Now that you have installed your installation server, you must configure it. The following steps are involved:
� Copying files to the installation server� Turning on the NFS server� Configuring SSH keys� Configuring VDISK swap� Rebooting the system to verify changes
7.4.1 Copying files to the installation server
It is now time to copy the install tree to the installation server, along with other files associated with this book. Use the scp -rp command to recursively copy these files from your NFS server as Example 7-19 shows. This takes about five to ten minutes, depending on network speeds.
Example 7-19 Using scp -rp to copy files to the controller
# scp -rp 10.1.40.243:/nfs/* /installThe authenticity of host '10.1.40.243 (10.1.40.243)' can't be established.RSA key fingerprint is 63:1b:3d:57:48:08:56:93:b8:44:24:17:fc:61:37:07.Are you sure you want to continue connecting (yes/no)? yesWarning: Permanently added '10.1.40.243' (RSA) to the list of known hosts.
Note: From this point forward, we recommend that you access your Linux system with SSH. If you do not have an SSH client configured, see Chapter 3., “Configuring a desktop machine” on page 17.
Chapter 7. Installing Linux interactively 99
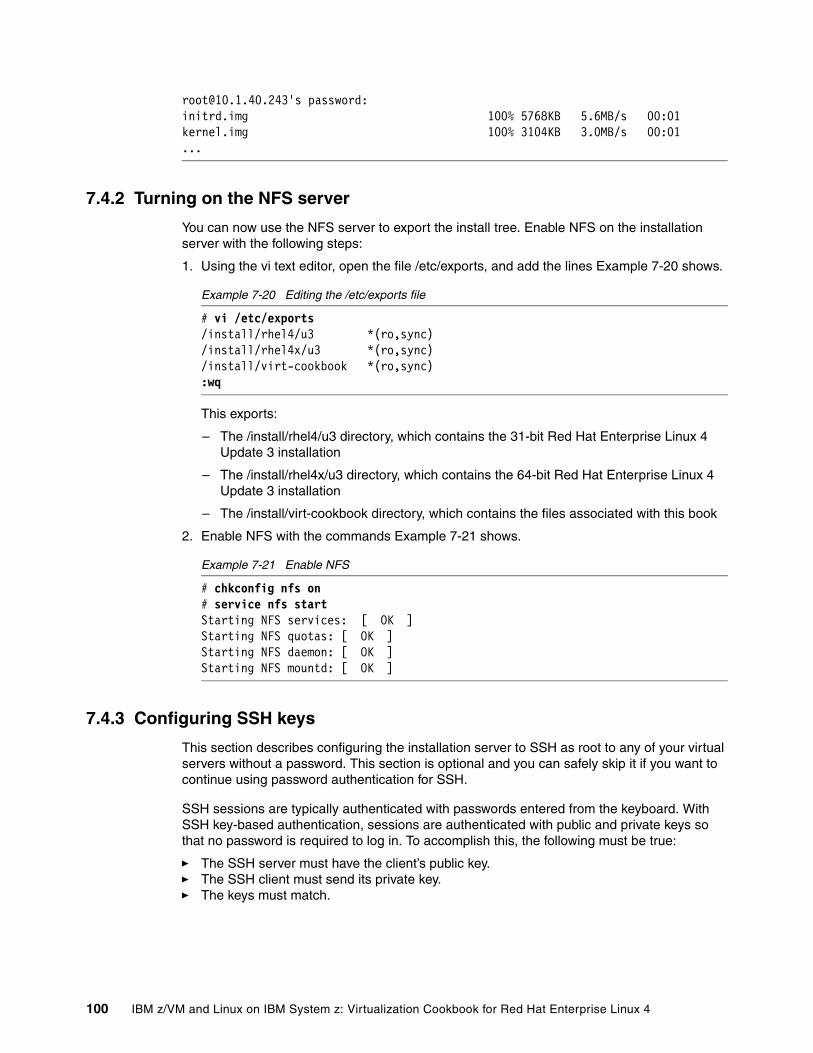
[email protected]'s password:initrd.img 100% 5768KB 5.6MB/s 00:01kernel.img 100% 3104KB 3.0MB/s 00:01...
7.4.2 Turning on the NFS server
You can now use the NFS server to export the install tree. Enable NFS on the installation server with the following steps:
1. Using the vi text editor, open the file /etc/exports, and add the lines Example 7-20 shows.
Example 7-20 Editing the /etc/exports file
# vi /etc/exports/install/rhel4/u3 *(ro,sync)/install/rhel4x/u3 *(ro,sync)/install/virt-cookbook *(ro,sync):wq
This exports:
– The /install/rhel4/u3 directory, which contains the 31-bit Red Hat Enterprise Linux 4 Update 3 installation
– The /install/rhel4x/u3 directory, which contains the 64-bit Red Hat Enterprise Linux 4 Update 3 installation
– The /install/virt-cookbook directory, which contains the files associated with this book
2. Enable NFS with the commands Example 7-21 shows.
Example 7-21 Enable NFS
# chkconfig nfs on# service nfs startStarting NFS services: [ OK ]Starting NFS quotas: [ OK ]Starting NFS daemon: [ OK ]Starting NFS mountd: [ OK ]
7.4.3 Configuring SSH keys
This section describes configuring the installation server to SSH as root to any of your virtual servers without a password. This section is optional and you can safely skip it if you want to continue using password authentication for SSH.
SSH sessions are typically authenticated with passwords entered from the keyboard. With SSH key-based authentication, sessions are authenticated with public and private keys so that no password is required to log in. To accomplish this, the following must be true:
� The SSH server must have the client’s public key.� The SSH client must send its private key.� The keys must match.
100 IBM z/VM and Linux on IBM System z: Virtualization Cookbook for Red Hat Enterprise Linux 4
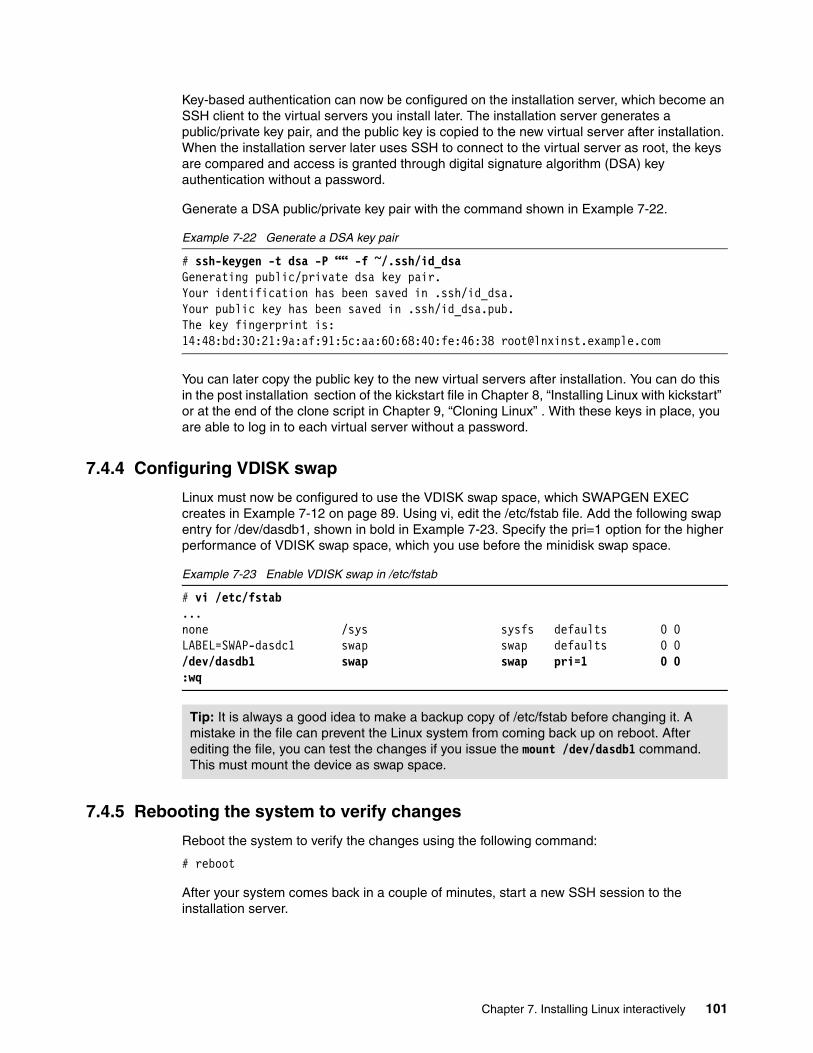
Key-based authentication can now be configured on the installation server, which become an SSH client to the virtual servers you install later. The installation server generates a public/private key pair, and the public key is copied to the new virtual server after installation. When the installation server later uses SSH to connect to the virtual server as root, the keys are compared and access is granted through digital signature algorithm (DSA) key authentication without a password.
Generate a DSA public/private key pair with the command shown in Example 7-22.
Example 7-22 Generate a DSA key pair
# ssh-keygen -t dsa -P ““ -f ~/.ssh/id_dsaGenerating public/private dsa key pair.Your identification has been saved in .ssh/id_dsa.Your public key has been saved in .ssh/id_dsa.pub.The key fingerprint is:14:48:bd:30:21:9a:af:91:5c:aa:60:68:40:fe:46:38 [email protected]
You can later copy the public key to the new virtual servers after installation. You can do this in the post installation section of the kickstart file in Chapter 8, “Installing Linux with kickstart” or at the end of the clone script in Chapter 9, “Cloning Linux” . With these keys in place, you are able to log in to each virtual server without a password.
7.4.4 Configuring VDISK swap
Linux must now be configured to use the VDISK swap space, which SWAPGEN EXEC creates in Example 7-12 on page 89. Using vi, edit the /etc/fstab file. Add the following swap entry for /dev/dasdb1, shown in bold in Example 7-23. Specify the pri=1 option for the higher performance of VDISK swap space, which you use before the minidisk swap space.
Example 7-23 Enable VDISK swap in /etc/fstab
# vi /etc/fstab...none /sys sysfs defaults 0 0LABEL=SWAP-dasdc1 swap swap defaults 0 0/dev/dasdb1 swap swap pri=1 0 0:wq
7.4.5 Rebooting the system to verify changes
Reboot the system to verify the changes using the following command:
# reboot
After your system comes back in a couple of minutes, start a new SSH session to the installation server.
Tip: It is always a good idea to make a backup copy of /etc/fstab before changing it. A mistake in the file can prevent the Linux system from coming back up on reboot. After editing the file, you can test the changes if you issue the mount /dev/dasdb1 command. This must mount the device as swap space.
Chapter 7. Installing Linux interactively 101
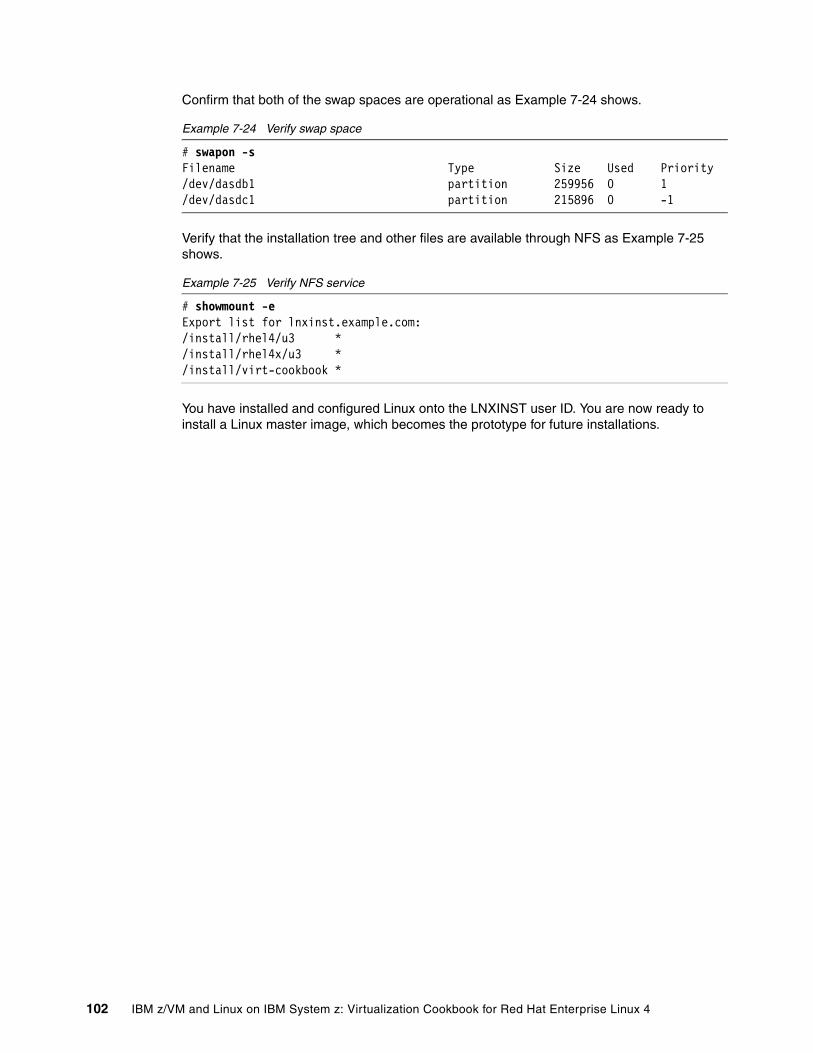
Confirm that both of the swap spaces are operational as Example 7-24 shows.
Example 7-24 Verify swap space
# swapon -sFilename Type Size Used Priority/dev/dasdb1 partition 259956 0 1/dev/dasdc1 partition 215896 0 -1
Verify that the installation tree and other files are available through NFS as Example 7-25 shows.
Example 7-25 Verify NFS service
# showmount -eExport list for lnxinst.example.com:/install/rhel4/u3 */install/rhel4x/u3 */install/virt-cookbook *
You have installed and configured Linux onto the LNXINST user ID. You are now ready to install a Linux master image, which becomes the prototype for future installations.
102 IBM z/VM and Linux on IBM System z: Virtualization Cookbook for Red Hat Enterprise Linux 4
Chapter 8. Installing Linux with kickstart
Kickstart is an automated way of installing Red Hat Enterprise Linux 4. Using kickstart, you can create a single file that answers all of the questions usually asked during an interactive installation.
The LNXINST user ID is now configured as an installation server, with the installation tree shared via Network File System (NFS). You can now configure it as a kickstart server to perform automated installations over the network. You, then, install the Linux master image with kickstart.
The following steps are involved in installing Linux with kickstart:
� Configure the installation server for kickstart � Define a new user ID for the master image � Configure the RH4U3X user for kickstart � Kickstart the RH4U3X user
8
© Copyright IBM Corp. 2006. All rights reserved. 103
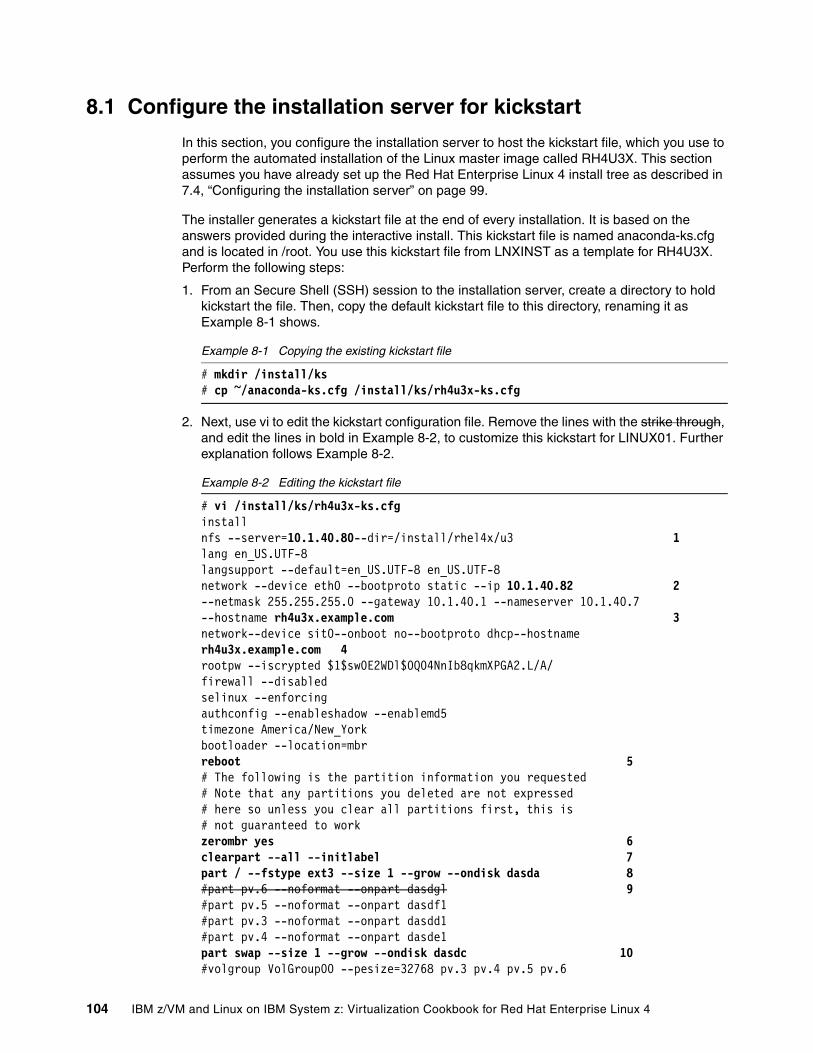
8.1 Configure the installation server for kickstart
In this section, you configure the installation server to host the kickstart file, which you use to perform the automated installation of the Linux master image called RH4U3X. This section assumes you have already set up the Red Hat Enterprise Linux 4 install tree as described in 7.4, “Configuring the installation server” on page 99.
The installer generates a kickstart file at the end of every installation. It is based on the answers provided during the interactive install. This kickstart file is named anaconda-ks.cfg and is located in /root. You use this kickstart file from LNXINST as a template for RH4U3X. Perform the following steps:
1. From an Secure Shell (SSH) session to the installation server, create a directory to hold kickstart the file. Then, copy the default kickstart file to this directory, renaming it as Example 8-1 shows.
Example 8-1 Copying the existing kickstart file
# mkdir /install/ks# cp ~/anaconda-ks.cfg /install/ks/rh4u3x-ks.cfg
2. Next, use vi to edit the kickstart configuration file. Remove the lines with the strike through, and edit the lines in bold in Example 8-2, to customize this kickstart for LINUX01. Further explanation follows Example 8-2.
Example 8-2 Editing the kickstart file
# vi /install/ks/rh4u3x-ks.cfginstallnfs --server=10.1.40.80--dir=/install/rhel4x/u3 1lang en_US.UTF-8langsupport --default=en_US.UTF-8 en_US.UTF-8network --device eth0 --bootproto static --ip 10.1.40.82 2--netmask 255.255.255.0 --gateway 10.1.40.1 --nameserver 10.1.40.7--hostname rh4u3x.example.com 3network--device sit0--onboot no--bootproto dhcp--hostname rh4u3x.example.com 4rootpw --iscrypted $1$sw0E2WDl$0Q04NnIb8qkmXPGA2.L/A/firewall --disabledselinux --enforcingauthconfig --enableshadow --enablemd5timezone America/New_Yorkbootloader --location=mbrreboot 5# The following is the partition information you requested# Note that any partitions you deleted are not expressed# here so unless you clear all partitions first, this is# not guaranteed to workzerombr yes 6clearpart --all --initlabel 7part / --fstype ext3 --size 1 --grow --ondisk dasda 8#part pv.6 --noformat --onpart dasdgl 9#part pv.5 --noformat --onpart dasdf1#part pv.3 --noformat --onpart dasdd1#part pv.4 --noformat --onpart dasde1part swap --size 1 --grow --ondisk dasdc 10#volgroup VolGroup00 --pesize=32768 pv.3 pv.4 pv.5 pv.6
104 IBM z/VM and Linux on IBM System z: Virtualization Cookbook for Red Hat Enterprise Linux 4
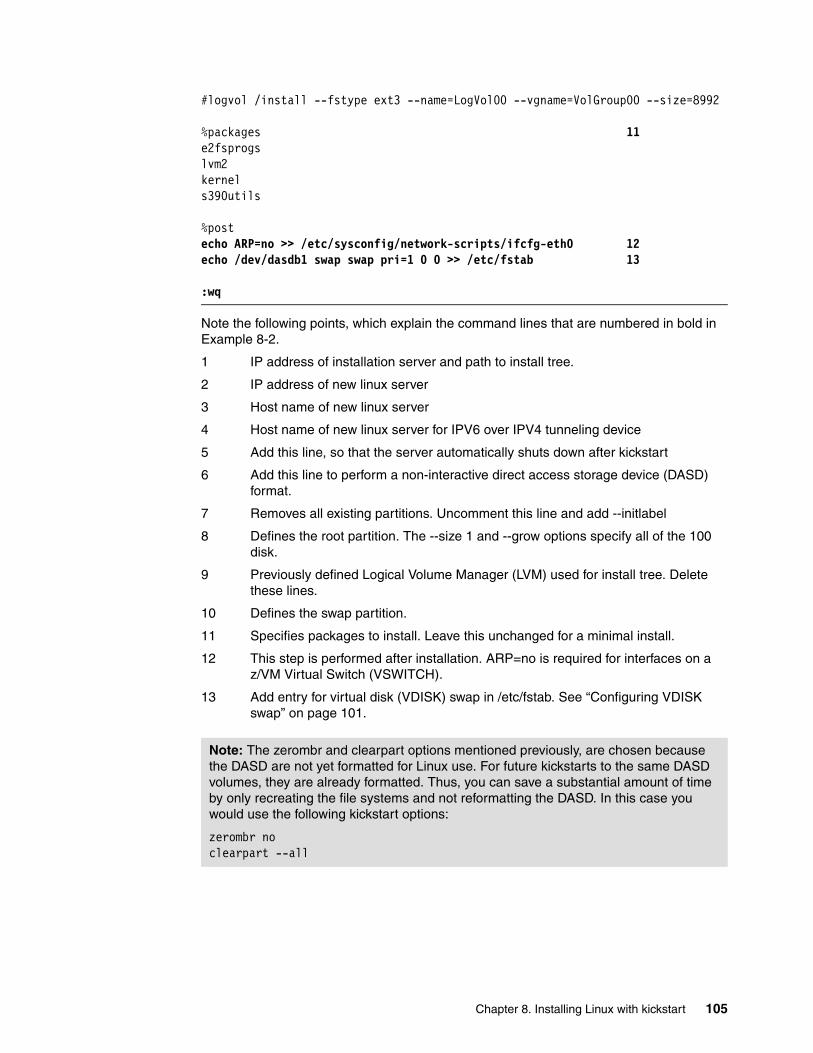
#logvol /install --fstype ext3 --name=LogVol00 --vgname=VolGroup00 --size=8992
%packages 11e2fsprogslvm2kernels390utils
%post echo ARP=no >> /etc/sysconfig/network-scripts/ifcfg-eth0 12echo /dev/dasdb1 swap swap pri=1 0 0 >> /etc/fstab 13
:wq
Note the following points, which explain the command lines that are numbered in bold in Example 8-2.
1 IP address of installation server and path to install tree.
2 IP address of new linux server
3 Host name of new linux server
4 Host name of new linux server for IPV6 over IPV4 tunneling device
5 Add this line, so that the server automatically shuts down after kickstart
6 Add this line to perform a non-interactive direct access storage device (DASD) format.
7 Removes all existing partitions. Uncomment this line and add --initlabel
8 Defines the root partition. The --size 1 and --grow options specify all of the 100 disk.
9 Previously defined Logical Volume Manager (LVM) used for install tree. Delete these lines.
10 Defines the swap partition.
11 Specifies packages to install. Leave this unchanged for a minimal install.
12 This step is performed after installation. ARP=no is required for interfaces on a z/VM Virtual Switch (VSWITCH).
13 Add entry for virtual disk (VDISK) swap in /etc/fstab. See “Configuring VDISK swap” on page 101.
Note: The zerombr and clearpart options mentioned previously, are chosen because the DASD are not yet formatted for Linux use. For future kickstarts to the same DASD volumes, they are already formatted. Thus, you can save a substantial amount of time by only recreating the file systems and not reformatting the DASD. In this case you would use the following kickstart options:
zerombr noclearpart --all
Chapter 8. Installing Linux with kickstart 105
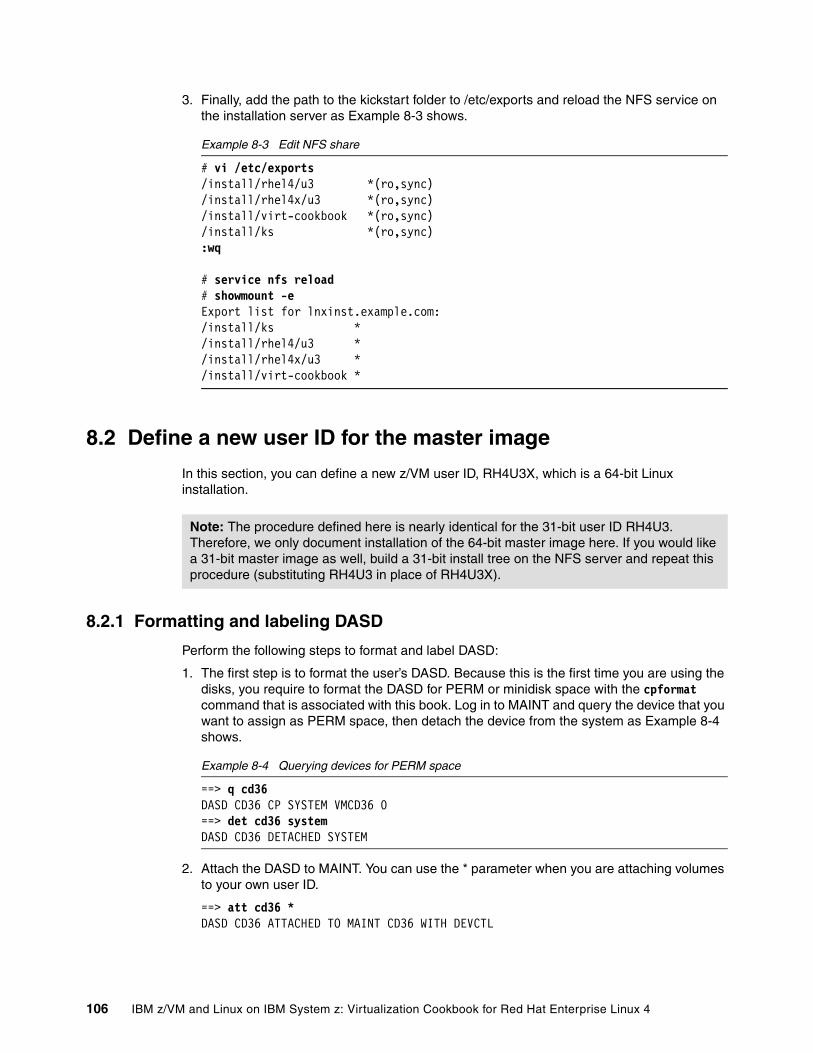
3. Finally, add the path to the kickstart folder to /etc/exports and reload the NFS service on the installation server as Example 8-3 shows.
Example 8-3 Edit NFS share
# vi /etc/exports/install/rhel4/u3 *(ro,sync)/install/rhel4x/u3 *(ro,sync)/install/virt-cookbook *(ro,sync)/install/ks *(ro,sync):wq
# service nfs reload# showmount -eExport list for lnxinst.example.com:/install/ks */install/rhel4/u3 */install/rhel4x/u3 */install/virt-cookbook *
8.2 Define a new user ID for the master image
In this section, you can define a new z/VM user ID, RH4U3X, which is a 64-bit Linux installation.
8.2.1 Formatting and labeling DASD
Perform the following steps to format and label DASD:
1. The first step is to format the user’s DASD. Because this is the first time you are using the disks, you require to format the DASD for PERM or minidisk space with the cpformat command that is associated with this book. Log in to MAINT and query the device that you want to assign as PERM space, then detach the device from the system as Example 8-4 shows.
Example 8-4 Querying devices for PERM space
==> q cd36DASD CD36 CP SYSTEM VMCD36 0==> det cd36 systemDASD CD36 DETACHED SYSTEM
2. Attach the DASD to MAINT. You can use the * parameter when you are attaching volumes to your own user ID.
==> att cd36 *DASD CD36 ATTACHED TO MAINT CD36 WITH DEVCTL
Note: The procedure defined here is nearly identical for the 31-bit user ID RH4U3. Therefore, we only document installation of the 64-bit master image here. If you would like a 31-bit master image as well, build a 31-bit install tree on the NFS server and repeat this procedure (substituting RH4U3 in place of RH4U3X).
106 IBM z/VM and Linux on IBM System z: Virtualization Cookbook for Red Hat Enterprise Linux 4
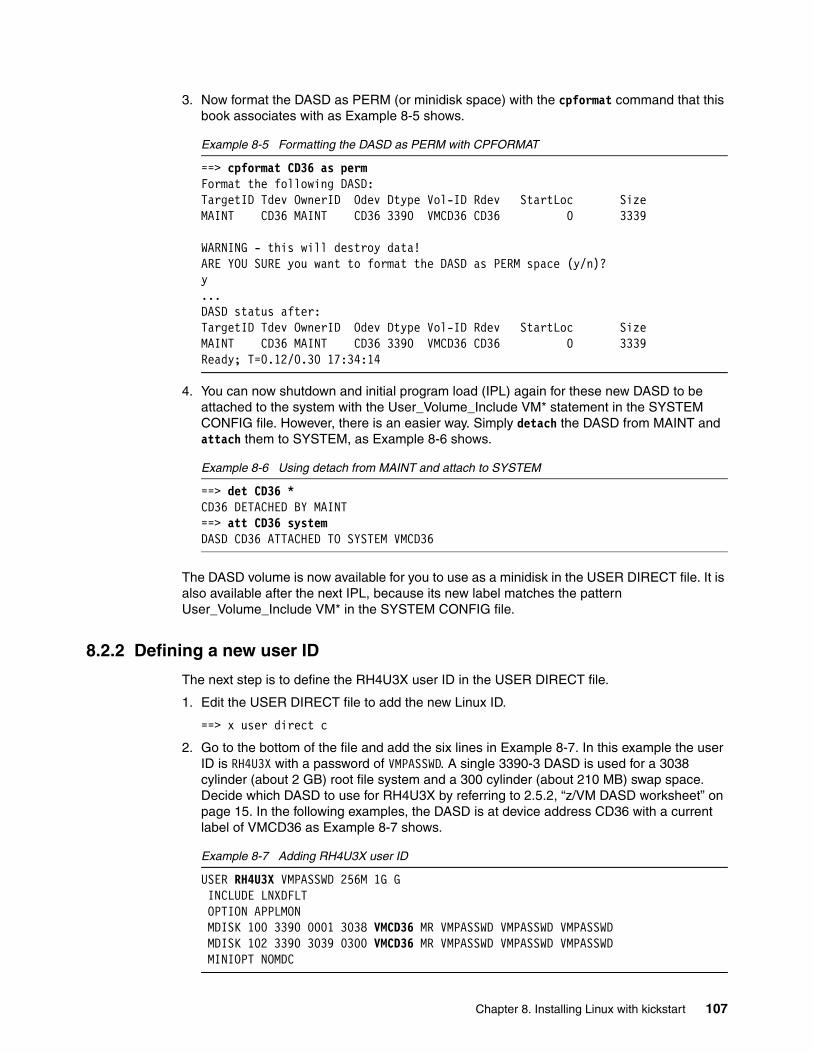
3. Now format the DASD as PERM (or minidisk space) with the cpformat command that this book associates with as Example 8-5 shows.
Example 8-5 Formatting the DASD as PERM with CPFORMAT
==> cpformat CD36 as permFormat the following DASD: TargetID Tdev OwnerID Odev Dtype Vol-ID Rdev StartLoc SizeMAINT CD36 MAINT CD36 3390 VMCD36 CD36 0 3339 WARNING - this will destroy data! ARE YOU SURE you want to format the DASD as PERM space (y/n)? y...DASD status after: TargetID Tdev OwnerID Odev Dtype Vol-ID Rdev StartLoc Size MAINT CD36 MAINT CD36 3390 VMCD36 CD36 0 3339 Ready; T=0.12/0.30 17:34:14
4. You can now shutdown and initial program load (IPL) again for these new DASD to be attached to the system with the User_Volume_Include VM* statement in the SYSTEM CONFIG file. However, there is an easier way. Simply detach the DASD from MAINT and attach them to SYSTEM, as Example 8-6 shows.
Example 8-6 Using detach from MAINT and attach to SYSTEM
==> det CD36 *CD36 DETACHED BY MAINT==> att CD36 systemDASD CD36 ATTACHED TO SYSTEM VMCD36
The DASD volume is now available for you to use as a minidisk in the USER DIRECT file. It is also available after the next IPL, because its new label matches the pattern User_Volume_Include VM* in the SYSTEM CONFIG file.
8.2.2 Defining a new user ID
The next step is to define the RH4U3X user ID in the USER DIRECT file.
1. Edit the USER DIRECT file to add the new Linux ID.
==> x user direct c
2. Go to the bottom of the file and add the six lines in Example 8-7. In this example the user ID is RH4U3X with a password of VMPASSWD. A single 3390-3 DASD is used for a 3038 cylinder (about 2 GB) root file system and a 300 cylinder (about 210 MB) swap space. Decide which DASD to use for RH4U3X by referring to 2.5.2, “z/VM DASD worksheet” on page 15. In the following examples, the DASD is at device address CD36 with a current label of VMCD36 as Example 8-7 shows.
Example 8-7 Adding RH4U3X user ID
USER RH4U3X VMPASSWD 256M 1G G INCLUDE LNXDFLTOPTION APPLMON MDISK 100 3390 0001 3038 VMCD36 MR VMPASSWD VMPASSWD VMPASSWD MDISK 102 3390 3039 0300 VMCD36 MR VMPASSWD VMPASSWD VMPASSWD MINIOPT NOMDC
Chapter 8. Installing Linux with kickstart 107
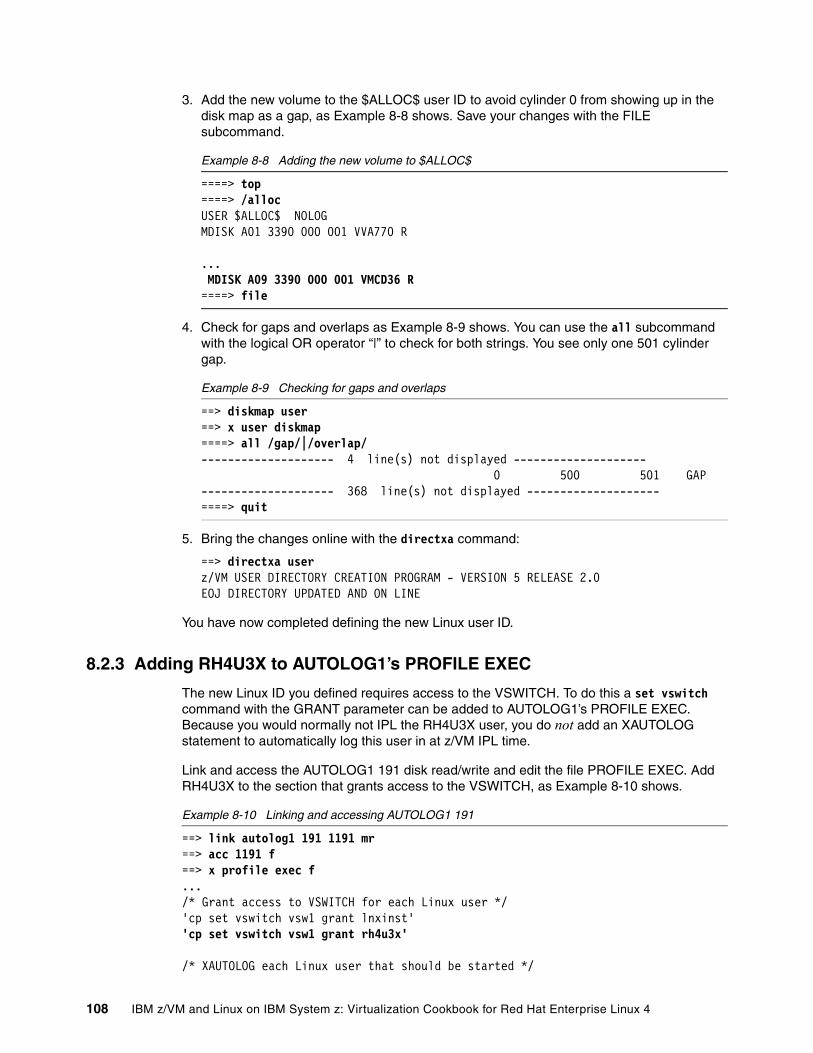
3. Add the new volume to the $ALLOC$ user ID to avoid cylinder 0 from showing up in the disk map as a gap, as Example 8-8 shows. Save your changes with the FILE subcommand.
Example 8-8 Adding the new volume to $ALLOC$
====> top====> /allocUSER $ALLOC$ NOLOGMDISK A01 3390 000 001 VVA770 R
...MDISK A09 3390 000 001 VMCD36 R====> file
4. Check for gaps and overlaps as Example 8-9 shows. You can use the all subcommand with the logical OR operator “|” to check for both strings. You see only one 501 cylinder gap.
Example 8-9 Checking for gaps and overlaps
==> diskmap user==> x user diskmap====> all /gap/|/overlap/-------------------- 4 line(s) not displayed -------------------- 0 500 501 GAP-------------------- 368 line(s) not displayed --------------------====> quit
5. Bring the changes online with the directxa command:
==> directxa userz/VM USER DIRECTORY CREATION PROGRAM - VERSION 5 RELEASE 2.0EOJ DIRECTORY UPDATED AND ON LINE
You have now completed defining the new Linux user ID.
8.2.3 Adding RH4U3X to AUTOLOG1’s PROFILE EXEC
The new Linux ID you defined requires access to the VSWITCH. To do this a set vswitch command with the GRANT parameter can be added to AUTOLOG1’s PROFILE EXEC. Because you would normally not IPL the RH4U3X user, you do not add an XAUTOLOG statement to automatically log this user in at z/VM IPL time.
Link and access the AUTOLOG1 191 disk read/write and edit the file PROFILE EXEC. Add RH4U3X to the section that grants access to the VSWITCH, as Example 8-10 shows.
Example 8-10 Linking and accessing AUTOLOG1 191
==> link autolog1 191 1191 mr==> acc 1191 f==> x profile exec f.../* Grant access to VSWITCH for each Linux user */'cp set vswitch vsw1 grant lnxinst''cp set vswitch vsw1 grant rh4u3x'
/* XAUTOLOG each Linux user that should be started */
108 IBM z/VM and Linux on IBM System z: Virtualization Cookbook for Red Hat Enterprise Linux 4

'cp xautolog lnxinst'
'cp logoff' /* logoff when done */====> file
These changes do not take effect until the next IPL. Therefore, you must grant this user ID access to the VSWITCH for this z/VM session. This is done as follows:
==> set vswitch vsw1 grant rh4u3xCommand complete
8.3 Configure the RH4U3X user for kickstart
Now that the new user ID exists, it is time to configure it for kickstart. RH4U3X must have its own PARM file and CONF file, which are again based on the LNXINST user.
Log out of MAINT and log in as LNXMAINT. Copy the PARM and CONF files from LNXINST to RH4U3X as follows:
==> copy lnxinst parm d rh4u3x = ===> copy lnxinst conf d rh4u3x = =
Edit the RH4U3X PARM file. Because this is a non-interactive installation, the vnc options are no longer required. The ks= line directs the installer to get the kickstart file from the installation server. RUNKS=1 is required for kickstarts, and the cmdline option prevents the installer’s text-based user interface from opening on the 3270 console. See Example 8-11.
Example 8-11 Editing the RH4U3X PARM file
==> x rh4u3x parm dramdisk_size=40000 root=/dev/ram0 ro ip=off CMSDASD=191 CMSCONFFILE=RH4U3X.conf ks=nfs:10.1.40.99:/install/ks/rh4u3x-ks.cfgRUNKS=1 cmdline====> file
Next, edit the RH4U3X CONF file, and change the DASD range and networking information as Example 8-12 shows.
Example 8-12 Editing the RH4U3X CONF file
==> x rh4u3x conf dDASD=100-102 HOSTNAME=rh4u3x.example.com NETTYPE=qeth IPADDR=10.1.40.81...====> file
Chapter 8. Installing Linux with kickstart 109
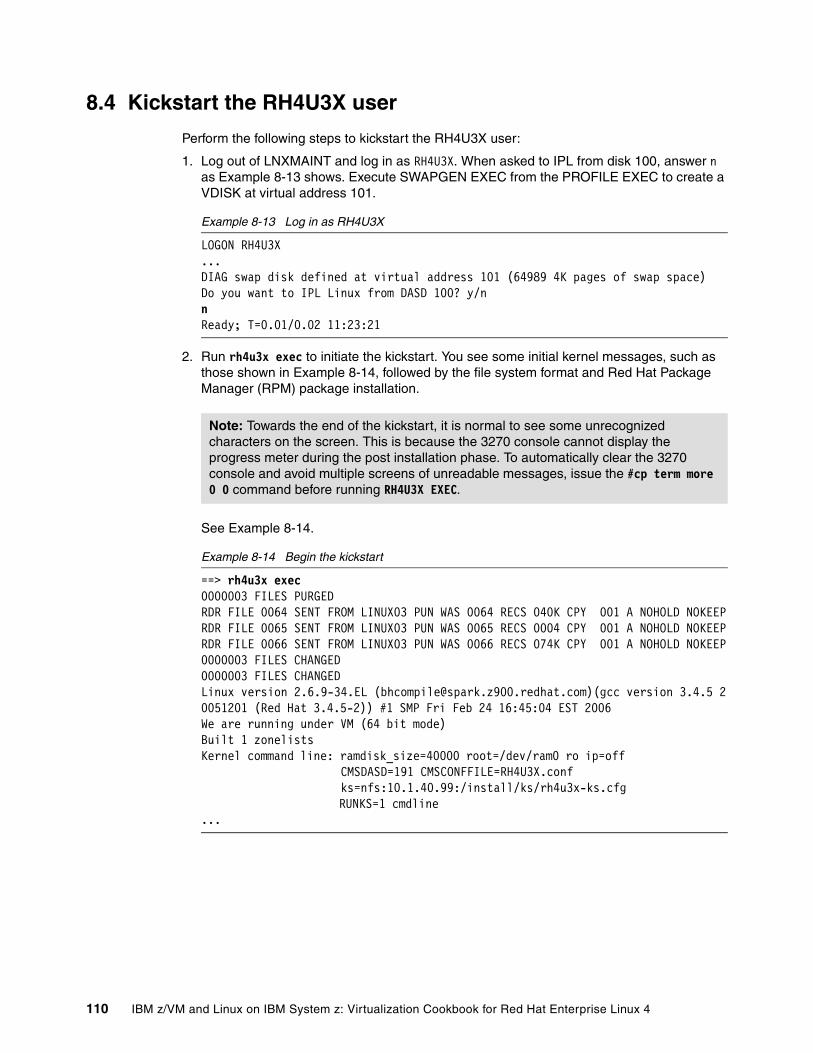
8.4 Kickstart the RH4U3X user
Perform the following steps to kickstart the RH4U3X user:
1. Log out of LNXMAINT and log in as RH4U3X. When asked to IPL from disk 100, answer n as Example 8-13 shows. Execute SWAPGEN EXEC from the PROFILE EXEC to create a VDISK at virtual address 101.
Example 8-13 Log in as RH4U3X
LOGON RH4U3X ...DIAG swap disk defined at virtual address 101 (64989 4K pages of swap space)Do you want to IPL Linux from DASD 100? y/n n Ready; T=0.01/0.02 11:23:21
2. Run rh4u3x exec to initiate the kickstart. You see some initial kernel messages, such as those shown in Example 8-14, followed by the file system format and Red Hat Package Manager (RPM) package installation.
See Example 8-14.
Example 8-14 Begin the kickstart
==> rh4u3x exec0000003 FILES PURGED RDR FILE 0064 SENT FROM LINUX03 PUN WAS 0064 RECS 040K CPY 001 A NOHOLD NOKEEPRDR FILE 0065 SENT FROM LINUX03 PUN WAS 0065 RECS 0004 CPY 001 A NOHOLD NOKEEPRDR FILE 0066 SENT FROM LINUX03 PUN WAS 0066 RECS 074K CPY 001 A NOHOLD NOKEEP0000003 FILES CHANGED 0000003 FILES CHANGED Linux version 2.6.9-34.EL ([email protected])(gcc version 3.4.5 20051201 (Red Hat 3.4.5-2)) #1 SMP Fri Feb 24 16:45:04 EST 2006 We are running under VM (64 bit mode) Built 1 zonelists Kernel command line: ramdisk_size=40000 root=/dev/ram0 ro ip=off CMSDASD=191 CMSCONFFILE=RH4U3X.conf ks=nfs:10.1.40.99:/install/ks/rh4u3x-ks.cfg RUNKS=1 cmdline ...
Note: Towards the end of the kickstart, it is normal to see some unrecognized characters on the screen. This is because the 3270 console cannot display the progress meter during the post installation phase. To automatically clear the 3270 console and avoid multiple screens of unreadable messages, issue the #cp term more 0 0 command before running RH4U3X EXEC.
110 IBM z/VM and Linux on IBM System z: Virtualization Cookbook for Red Hat Enterprise Linux 4

3. The first time kickstart is run, the installer must format the DASD for Linux use. It is normal to see DASD error messages similar to Example 8-15 before the DASD is formatted. In future kickstarts, you do not see these DASD errors.
Example 8-15 DASD errors on first use
end_request: I/O error, dev dasda, sector 0 Buffer I/O error on device dasda, logical block 0 Please wait while formatting drive dasda...
4. At the end of the kickstart, log out of RH4U3X, or IPL the 100 disk to make any changes to your Red Hat Enterprise Linux 4 master image as Example 8-16 shows.
Example 8-16 End of kickstart
/mnt/sysimage/dev done /mnt/sysimage done you may safely reboot your system ==> #cp logout
You have now installed Linux onto the master image using kickstart. This process can be repeated in the future for other master images or Linux guests. For the purpose of this book, we present a minimal installation with kickstart. However, you can completely customize the kickstart file to install different packages based on your requirements. For more information regarding kickstart options, see the kickstart chapter in the System Administration Guide at:
http://www.redhat.com/docs/manuals/enterprise/RHEL-4-Manual/sysadmin-guide/
Note: The VDISK swap device is configured in the %post section of the kickstart file as shown in Example 8-2 on page 104.
Chapter 8. Installing Linux with kickstart 111

112 IBM z/VM and Linux on IBM System z: Virtualization Cookbook for Red Hat Enterprise Linux 4

Chapter 9. Cloning Linux
At this point you have completed the install of LNXINST, the Linux installation server, and RH4U3X, the master image. The installation server must be running. In this chapter, you perform the following steps:
� Defining a new user ID for a virtual server � Cloning one new virtual server � Cloning four more virtual servers
9
© Copyright IBM Corp. 2006. All rights reserved. 113
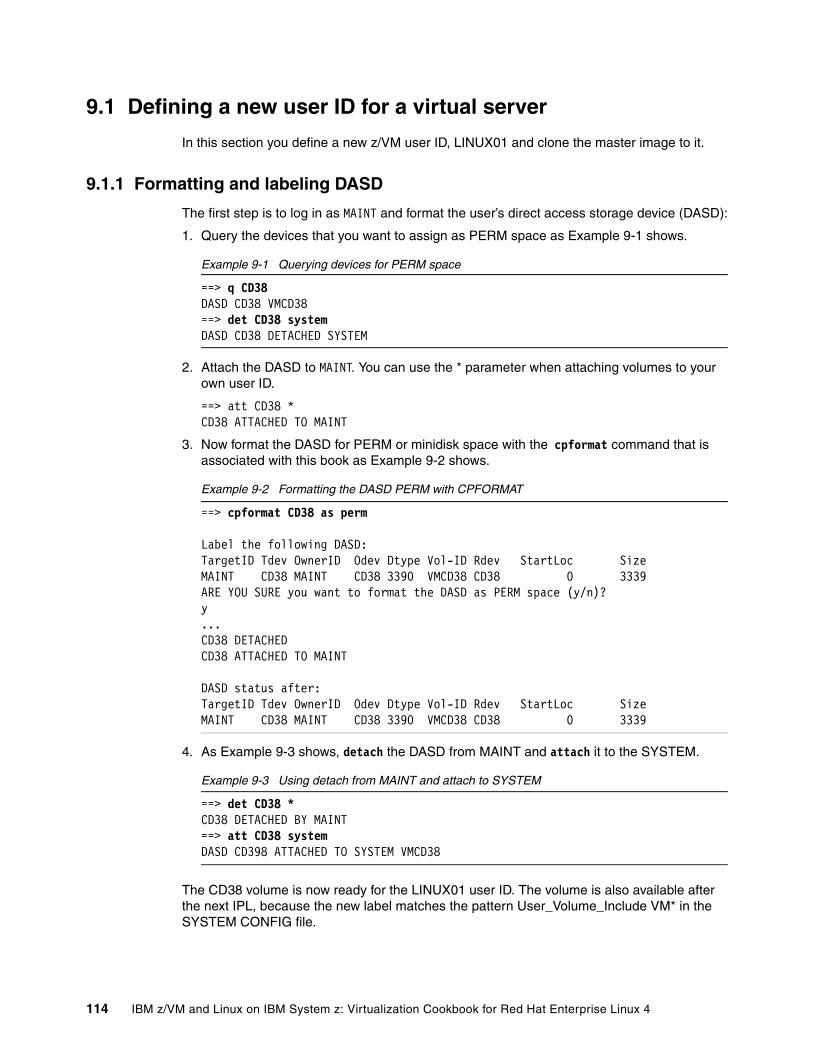
9.1 Defining a new user ID for a virtual server
In this section you define a new z/VM user ID, LINUX01 and clone the master image to it.
9.1.1 Formatting and labeling DASD
The first step is to log in as MAINT and format the user’s direct access storage device (DASD):
1. Query the devices that you want to assign as PERM space as Example 9-1 shows.
Example 9-1 Querying devices for PERM space
==> q CD38DASD CD38 VMCD38==> det CD38 systemDASD CD38 DETACHED SYSTEM
2. Attach the DASD to MAINT. You can use the * parameter when attaching volumes to your own user ID.
==> att CD38 *CD38 ATTACHED TO MAINT
3. Now format the DASD for PERM or minidisk space with the cpformat command that is associated with this book as Example 9-2 shows.
Example 9-2 Formatting the DASD PERM with CPFORMAT
==> cpformat CD38 as perm
Label the following DASD:TargetID Tdev OwnerID Odev Dtype Vol-ID Rdev StartLoc SizeMAINT CD38 MAINT CD38 3390 VMCD38 CD38 0 3339ARE YOU SURE you want to format the DASD as PERM space (y/n)?y...CD38 DETACHEDCD38 ATTACHED TO MAINT
DASD status after:TargetID Tdev OwnerID Odev Dtype Vol-ID Rdev StartLoc SizeMAINT CD38 MAINT CD38 3390 VMCD38 CD38 0 3339
4. As Example 9-3 shows, detach the DASD from MAINT and attach it to the SYSTEM.
Example 9-3 Using detach from MAINT and attach to SYSTEM
==> det CD38 *CD38 DETACHED BY MAINT==> att CD38 systemDASD CD398 ATTACHED TO SYSTEM VMCD38
The CD38 volume is now ready for the LINUX01 user ID. The volume is also available after the next IPL, because the new label matches the pattern User_Volume_Include VM* in the SYSTEM CONFIG file.
114 IBM z/VM and Linux on IBM System z: Virtualization Cookbook for Red Hat Enterprise Linux 4
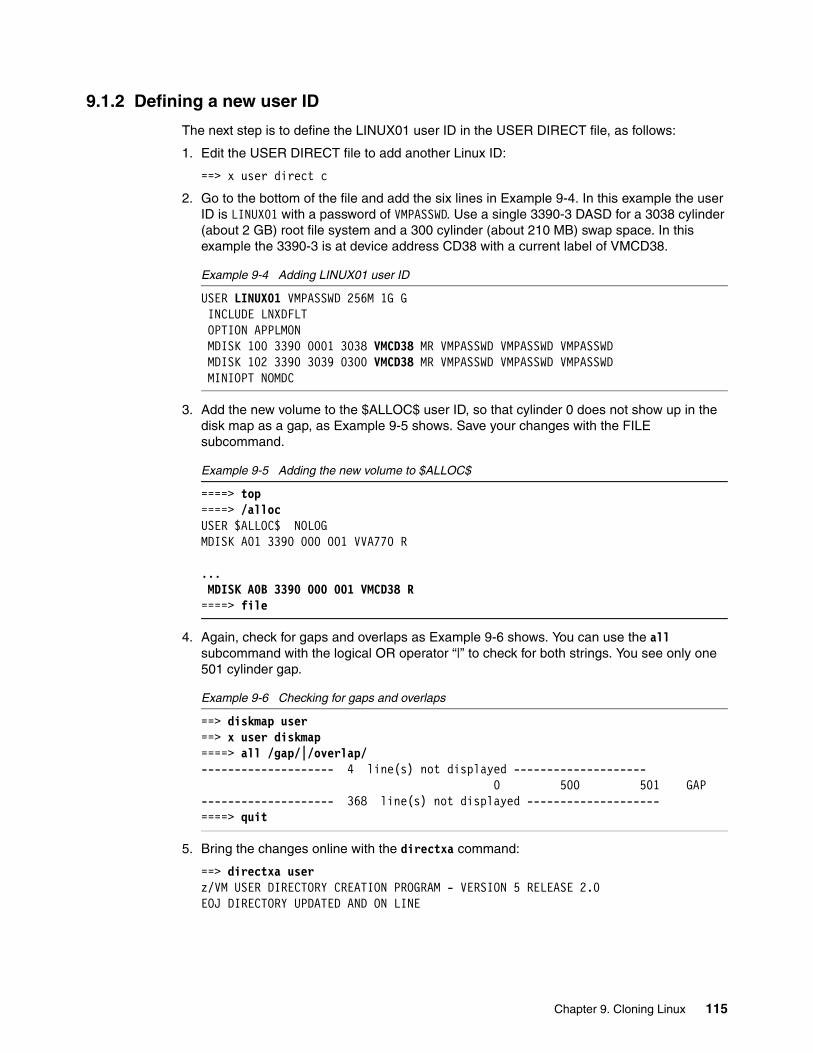
9.1.2 Defining a new user ID
The next step is to define the LINUX01 user ID in the USER DIRECT file, as follows:
1. Edit the USER DIRECT file to add another Linux ID:
==> x user direct c
2. Go to the bottom of the file and add the six lines in Example 9-4. In this example the user ID is LINUX01 with a password of VMPASSWD. Use a single 3390-3 DASD for a 3038 cylinder (about 2 GB) root file system and a 300 cylinder (about 210 MB) swap space. In this example the 3390-3 is at device address CD38 with a current label of VMCD38.
Example 9-4 Adding LINUX01 user ID
USER LINUX01 VMPASSWD 256M 1G G INCLUDE LNXDFLTOPTION APPLMON MDISK 100 3390 0001 3038 VMCD38 MR VMPASSWD VMPASSWD VMPASSWD MDISK 102 3390 3039 0300 VMCD38 MR VMPASSWD VMPASSWD VMPASSWD MINIOPT NOMDC
3. Add the new volume to the $ALLOC$ user ID, so that cylinder 0 does not show up in the disk map as a gap, as Example 9-5 shows. Save your changes with the FILE subcommand.
Example 9-5 Adding the new volume to $ALLOC$
====> top====> /allocUSER $ALLOC$ NOLOGMDISK A01 3390 000 001 VVA770 R
...MDISK A0B 3390 000 001 VMCD38 R====> file
4. Again, check for gaps and overlaps as Example 9-6 shows. You can use the all subcommand with the logical OR operator “|” to check for both strings. You see only one 501 cylinder gap.
Example 9-6 Checking for gaps and overlaps
==> diskmap user==> x user diskmap====> all /gap/|/overlap/-------------------- 4 line(s) not displayed -------------------- 0 500 501 GAP-------------------- 368 line(s) not displayed --------------------====> quit
5. Bring the changes online with the directxa command:
==> directxa userz/VM USER DIRECTORY CREATION PROGRAM - VERSION 5 RELEASE 2.0EOJ DIRECTORY UPDATED AND ON LINE
Chapter 9. Cloning Linux 115
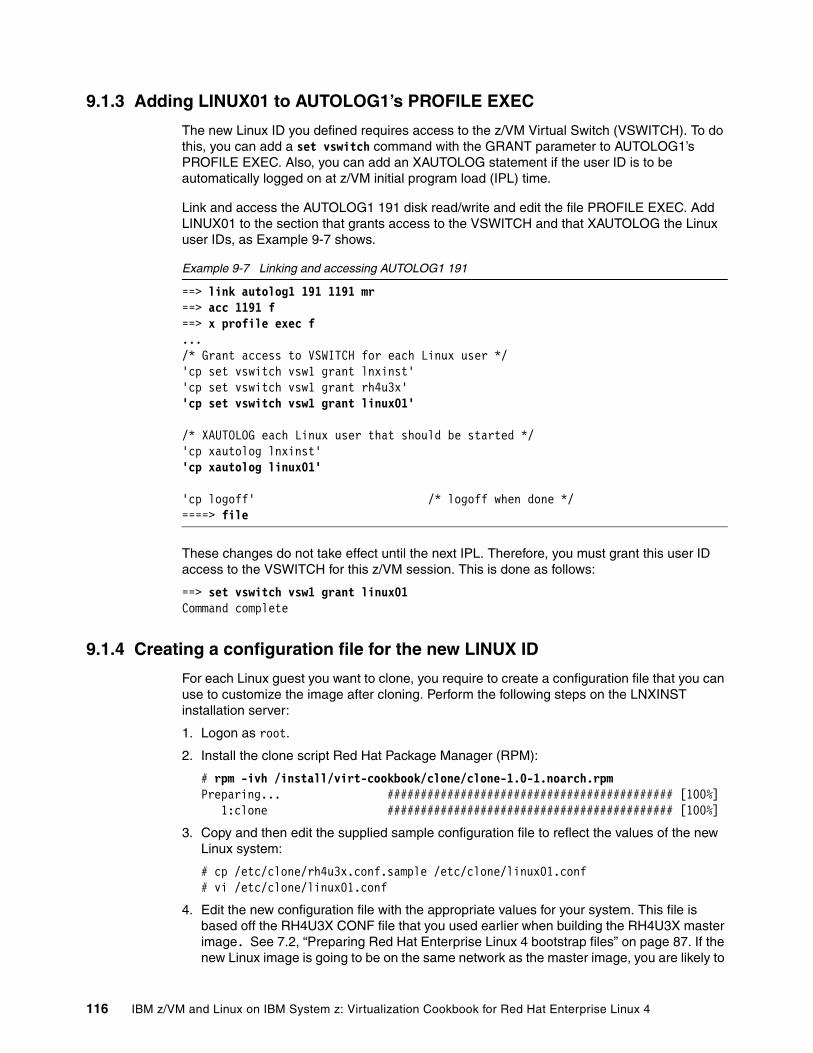
9.1.3 Adding LINUX01 to AUTOLOG1’s PROFILE EXEC
The new Linux ID you defined requires access to the z/VM Virtual Switch (VSWITCH). To do this, you can add a set vswitch command with the GRANT parameter to AUTOLOG1’s PROFILE EXEC. Also, you can add an XAUTOLOG statement if the user ID is to be automatically logged on at z/VM initial program load (IPL) time.
Link and access the AUTOLOG1 191 disk read/write and edit the file PROFILE EXEC. Add LINUX01 to the section that grants access to the VSWITCH and that XAUTOLOG the Linux user IDs, as Example 9-7 shows.
Example 9-7 Linking and accessing AUTOLOG1 191
==> link autolog1 191 1191 mr==> acc 1191 f==> x profile exec f.../* Grant access to VSWITCH for each Linux user */'cp set vswitch vsw1 grant lnxinst''cp set vswitch vsw1 grant rh4u3x''cp set vswitch vsw1 grant linux01'
/* XAUTOLOG each Linux user that should be started */'cp xautolog lnxinst''cp xautolog linux01'
'cp logoff' /* logoff when done */====> file
These changes do not take effect until the next IPL. Therefore, you must grant this user ID access to the VSWITCH for this z/VM session. This is done as follows:
==> set vswitch vsw1 grant linux01Command complete
9.1.4 Creating a configuration file for the new LINUX ID
For each Linux guest you want to clone, you require to create a configuration file that you can use to customize the image after cloning. Perform the following steps on the LNXINST installation server:
1. Logon as root.
2. Install the clone script Red Hat Package Manager (RPM):
# rpm -ivh /install/virt-cookbook/clone/clone-1.0-1.noarch.rpmPreparing... ########################################### [100%] 1:clone ########################################### [100%]
3. Copy and then edit the supplied sample configuration file to reflect the values of the new Linux system:
# cp /etc/clone/rh4u3x.conf.sample /etc/clone/linux01.conf# vi /etc/clone/linux01.conf
4. Edit the new configuration file with the appropriate values for your system. This file is based off the RH4U3X CONF file that you used earlier when building the RH4U3X master image. See 7.2, “Preparing Red Hat Enterprise Linux 4 bootstrap files” on page 87. If the new Linux image is going to be on the same network as the master image, you are likely to
116 IBM z/VM and Linux on IBM System z: Virtualization Cookbook for Red Hat Enterprise Linux 4
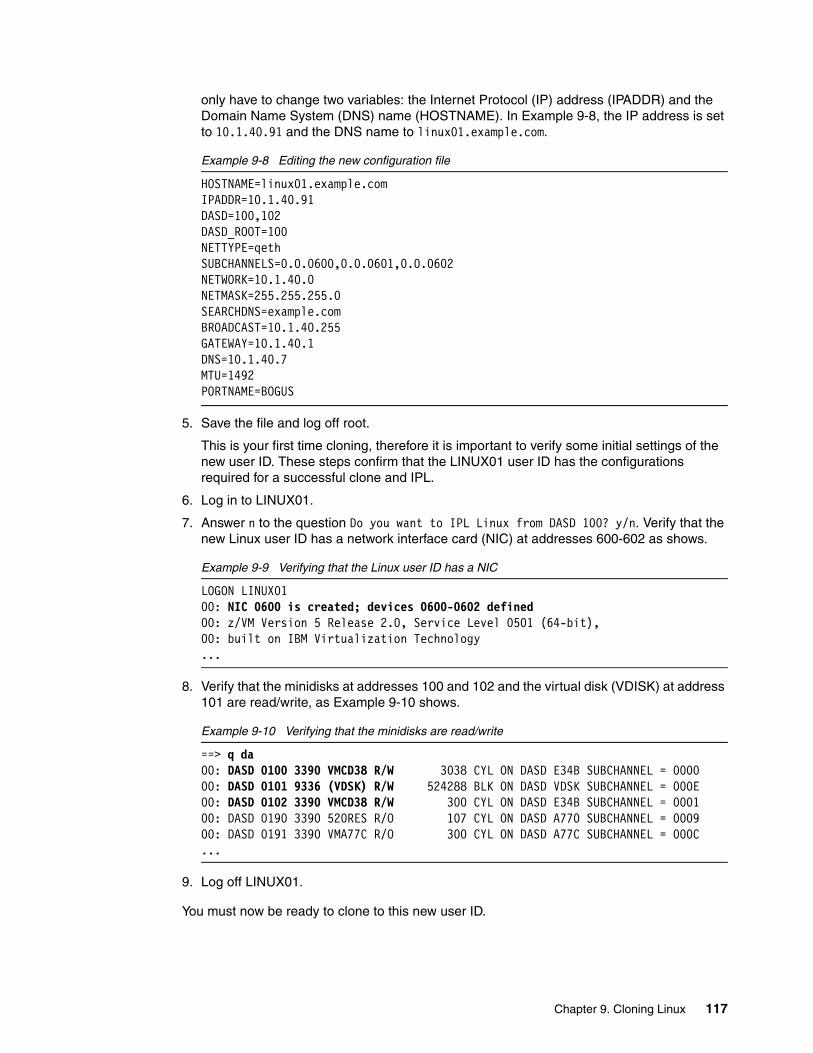
only have to change two variables: the Internet Protocol (IP) address (IPADDR) and the Domain Name System (DNS) name (HOSTNAME). In Example 9-8, the IP address is set to 10.1.40.91 and the DNS name to linux01.example.com.
Example 9-8 Editing the new configuration file
HOSTNAME=linux01.example.comIPADDR=10.1.40.91DASD=100,102DASD_ROOT=100NETTYPE=qeth SUBCHANNELS=0.0.0600,0.0.0601,0.0.0602NETWORK=10.1.40.0 NETMASK=255.255.255.0 SEARCHDNS=example.com BROADCAST=10.1.40.255 GATEWAY=10.1.40.1 DNS=10.1.40.7 MTU=1492 PORTNAME=BOGUS
5. Save the file and log off root.
This is your first time cloning, therefore it is important to verify some initial settings of the new user ID. These steps confirm that the LINUX01 user ID has the configurations required for a successful clone and IPL.
6. Log in to LINUX01.
7. Answer n to the question Do you want to IPL Linux from DASD 100? y/n. Verify that the new Linux user ID has a network interface card (NIC) at addresses 600-602 as shows.
Example 9-9 Verifying that the Linux user ID has a NIC
LOGON LINUX01 00: NIC 0600 is created; devices 0600-0602 defined 00: z/VM Version 5 Release 2.0, Service Level 0501 (64-bit),00: built on IBM Virtualization Technology...
8. Verify that the minidisks at addresses 100 and 102 and the virtual disk (VDISK) at address 101 are read/write, as Example 9-10 shows.
Example 9-10 Verifying that the minidisks are read/write
==> q da 00: DASD 0100 3390 VMCD38 R/W 3038 CYL ON DASD E34B SUBCHANNEL = 0000 00: DASD 0101 9336 (VDSK) R/W 524288 BLK ON DASD VDSK SUBCHANNEL = 000E 00: DASD 0102 3390 VMCD38 R/W 300 CYL ON DASD E34B SUBCHANNEL = 0001 00: DASD 0190 3390 520RES R/O 107 CYL ON DASD A770 SUBCHANNEL = 0009 00: DASD 0191 3390 VMA77C R/O 300 CYL ON DASD A77C SUBCHANNEL = 000C ...
9. Log off LINUX01.
You must now be ready to clone to this new user ID.
Chapter 9. Cloning Linux 117
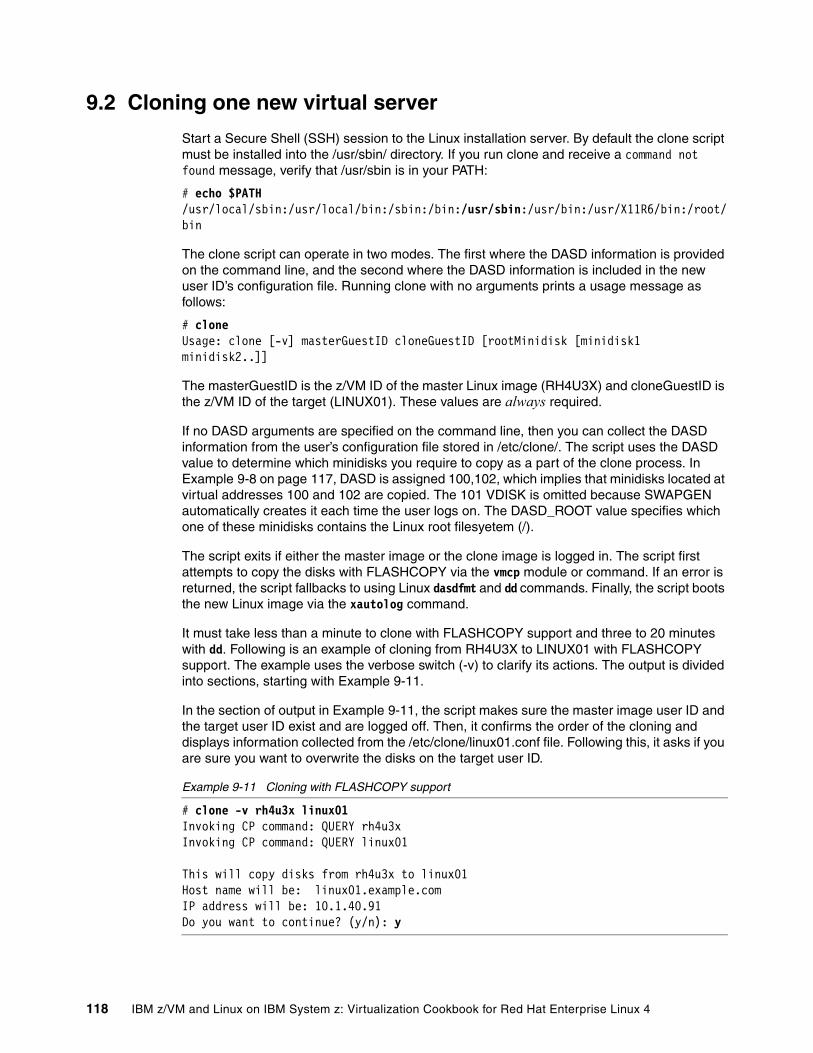
9.2 Cloning one new virtual server
Start a Secure Shell (SSH) session to the Linux installation server. By default the clone script must be installed into the /usr/sbin/ directory. If you run clone and receive a command not found message, verify that /usr/sbin is in your PATH:
# echo $PATH/usr/local/sbin:/usr/local/bin:/sbin:/bin:/usr/sbin:/usr/bin:/usr/X11R6/bin:/root/bin
The clone script can operate in two modes. The first where the DASD information is provided on the command line, and the second where the DASD information is included in the new user ID’s configuration file. Running clone with no arguments prints a usage message as follows:
# cloneUsage: clone [-v] masterGuestID cloneGuestID [rootMinidisk [minidisk1 minidisk2..]]
The masterGuestID is the z/VM ID of the master Linux image (RH4U3X) and cloneGuestID is the z/VM ID of the target (LINUX01). These values are always required.
If no DASD arguments are specified on the command line, then you can collect the DASD information from the user’s configuration file stored in /etc/clone/. The script uses the DASD value to determine which minidisks you require to copy as a part of the clone process. In Example 9-8 on page 117, DASD is assigned 100,102, which implies that minidisks located at virtual addresses 100 and 102 are copied. The 101 VDISK is omitted because SWAPGEN automatically creates it each time the user logs on. The DASD_ROOT value specifies which one of these minidisks contains the Linux root filesyetem (/).
The script exits if either the master image or the clone image is logged in. The script first attempts to copy the disks with FLASHCOPY via the vmcp module or command. If an error is returned, the script fallbacks to using Linux dasdfmt and dd commands. Finally, the script boots the new Linux image via the xautolog command.
It must take less than a minute to clone with FLASHCOPY support and three to 20 minutes with dd. Following is an example of cloning from RH4U3X to LINUX01 with FLASHCOPY support. The example uses the verbose switch (-v) to clarify its actions. The output is divided into sections, starting with Example 9-11.
In the section of output in Example 9-11, the script makes sure the master image user ID and the target user ID exist and are logged off. Then, it confirms the order of the cloning and displays information collected from the /etc/clone/linux01.conf file. Following this, it asks if you are sure you want to overwrite the disks on the target user ID.
Example 9-11 Cloning with FLASHCOPY support
# clone -v rh4u3x linux01Invoking CP command: QUERY rh4u3xInvoking CP command: QUERY linux01
This will copy disks from rh4u3x to linux01Host name will be: linux01.example.comIP address will be: 10.1.40.91Do you want to continue? (y/n): y
118 IBM z/VM and Linux on IBM System z: Virtualization Cookbook for Red Hat Enterprise Linux 4
In Example 9-12, the script links to the master clone minidisk and the target minidisk. The master minidisks are linked to LNXINST at FFFE, and the target minidisks are linked as FFFF. The FFFE links are read-only and the FFFF links are read-write. With the links in place, issue a flashcopy command to copy the master’s 100 and 102 minidisks to the clone’s 100 and 102 minidisks respectively. The script then detaches the links. If flashcopy fails, the script attempts to use dasdfmt and dd.
Example 9-12 Copying with FLASHCOPY
Cloning rh4u3x to linux01 ...Copying minidisks...Invoking CP command: QUERY VIRTUAL FFFEInvoking CP command: LINK RH4U3X 0100 FFFE RRInvoking CP command: QUERY VIRTUAL FFFFInvoking CP command: LINK LINUX01 0100 FFFF WInvoking CP command: FLASHCOPY FFFE 0 END FFFF 0 END0100 disk copied ...Invoking CP command: DETACH FFFEInvoking CP command: DETACH FFFFInvoking CP command: QUERY VIRTUAL FFFEInvoking CP command: LINK RH4U3X 0102 FFFE RRInvoking CP command: QUERY VIRTUAL FFFFInvoking CP command: LINK LINUX01 0102 FFFF WInvoking CP command: FLASHCOPY 1102 0 END FFFF 0 END0102 disk copied ...Invoking CP command: DETACH FFFEInvoking CP command: DETACH FFFF
In Example 9-13, the newly cloned root file system (LINUX01 100) is linked, activated, and mounted over /mnt/clone/. The networking information is modified in /mnt/clone/etc/sysconfig/network/ifcfg-eth0, /mnt/clone/etc/sysconfig/network, and /mnt/clone/etc/hosts.
Example 9-13 Mounting and linking the cloned system
Updating cloned image ...Invoking CP command: QUERY VIRTUAL FFFFInvoking CP command: LINK LINUX01 0100 FFFF WModifying networking info under /mnt/clone...Regenerating SSH keys in /mnt/clone/etc/ssh/ ...Invoking CP command: DETACH FFFFClone complete
Then the SSH keys are regenerated in such a way that they are unique for the new virtual server. The new root file system is then unmounted, set offline, and detached as Example 9-14 shows.
Example 9-14 Autolog the new user ID
Invoking CP command: XAUTOLOG LINUX01Booting linux01Successfully cloned RH4U3X to LINUX01
In the final section, log in the target user ID via XAUTOLOG. Because the PROFILE EXEC detects that you log in the ID in a disconnected mode, it carries out an IPL of Linux from minidisk 100.
Chapter 9. Cloning Linux 119
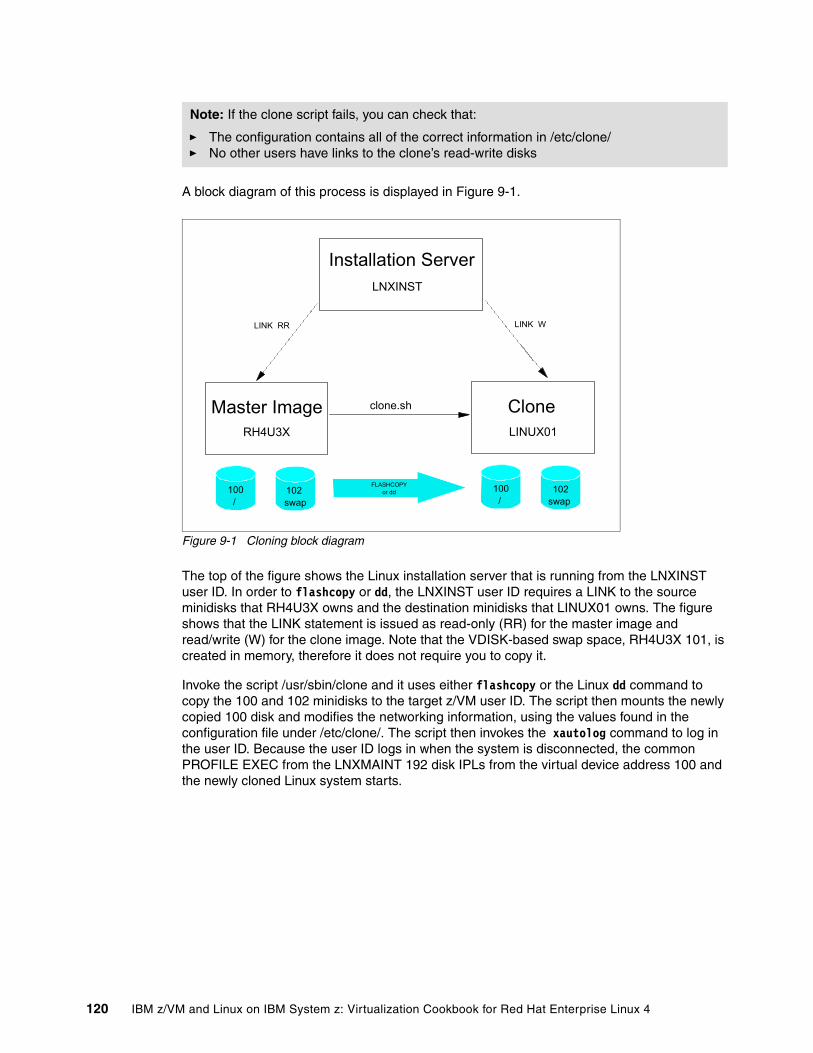
A block diagram of this process is displayed in Figure 9-1.
Figure 9-1 Cloning block diagram
The top of the figure shows the Linux installation server that is running from the LNXINST user ID. In order to flashcopy or dd, the LNXINST user ID requires a LINK to the source minidisks that RH4U3X owns and the destination minidisks that LINUX01 owns. The figure shows that the LINK statement is issued as read-only (RR) for the master image and read/write (W) for the clone image. Note that the VDISK-based swap space, RH4U3X 101, is created in memory, therefore it does not require you to copy it.
Invoke the script /usr/sbin/clone and it uses either flashcopy or the Linux dd command to copy the 100 and 102 minidisks to the target z/VM user ID. The script then mounts the newly copied 100 disk and modifies the networking information, using the values found in the configuration file under /etc/clone/. The script then invokes the xautolog command to log in the user ID. Because the user ID logs in when the system is disconnected, the common PROFILE EXEC from the LNXMAINT 192 disk IPLs from the virtual device address 100 and the newly cloned Linux system starts.
Note: If the clone script fails, you can check that:
� The configuration contains all of the correct information in /etc/clone/� No other users have links to the clone’s read-write disks
FLASHCOPYor dd
Installation Server
Master Image Clone
LINK RR
RH4U3X LINUX01
LNXINST
100/
clone.sh
102 swap
100/
102swap
LINK W
120 IBM z/VM and Linux on IBM System z: Virtualization Cookbook for Red Hat Enterprise Linux 4
9.3 Cloning four more virtual servers
At this point, you have installed Linux manually on the Linux installation server and kickstarted it on the master image. You have created a new user ID LINUX01 and cloned RH4U3X to it. Now you clone four more times, resulting in one image for each of the virtual servers described in the remaining chapters.
The following steps are involved:
� Formatting and labeling four new DASD� Defining four more user IDs� Testing logging in to a new user ID� Creating four new configuration files� Granting user IDs access to VSWITCH
9.3.1 Formatting and labeling four new DASD
Decide which DASD you want to use for the four new user IDs by referring to 2.5.2, “z/VM DASD worksheet” on page 15. Log in to MAINT. In Example 9-15, the devices are CD39-CD3E. Perform the following steps:
1. Query the devices that you want to assign as PERM space as Example 9-15 shows.
Example 9-15 Querying devices for PERM space
==> q CD39-CD3CDASD CD39 VMCD39 , DASD CD3A VMCD3A , DASD CD3B VMCD3B , DASD CD3C VMCD3C==> det CD39-CD3C systemDASD CD39 DETACHED SYSTEMDASD CD3A DETACHED SYSTEM...
2. Attach the four DASD to MAINT. You can use the * parameter when you are attaching volumes to your own user ID:
==> att CD39-CD3C *CD39-CD3C ATTACHED TO MAINT
3. Now format the DASD for PERM or minidisk space with the cpformat command that is associated with this book as Example 9-16 shows.
Example 9-16 Formatting the DASD PERM with CPFORMAT
==> cpformat CD39-CD3C as permLabel the following DASD:TargetID Tdev OwnerID Odev Dtype Vol-ID Rdev StartLoc SizeMAINT CD39 MAINT CD39 3390 VMCD39 CD39 0 3339TargetID Tdev OwnerID Odev Dtype Vol-ID Rdev StartLoc SizeMAINT CD3A MAINT CD3A 3390 VMCD3A CD3A 0 3339TargetID Tdev OwnerID Odev Dtype Vol-ID Rdev StartLoc SizeMAINT CD3B MAINT CD3B 3390 VMCD3B CD3B 0 3339TargetID Tdev OwnerID Odev Dtype Vol-ID Rdev StartLoc SizeMAINT CD3C MAINT CD3C 3390 VMCD3C CD3C 0 3339
ARE YOU SURE you want to format the DASD as PERM space (y/n)?y...CD39-CD3C DETACHED
Chapter 9. Cloning Linux 121
CD39-CD3C ATTACHED TO MAINTDASD status after:TargetID Tdev OwnerID Odev Dtype Vol-ID Rdev StartLoc SizeMAINT CD39 MAINT CD39 3390 VMCD39 CD39 0 3339MAINT CD3A MAINT CD3A 3390 VMCD3A CD3A 0 3339MAINT CD3B MAINT CD3B 3390 VMCD3B CD3B 0 3339MAINT CD3C MAINT CD3C 3390 VMCD3C CD3C 0 3339
4. You could now shut down and IPL again for these new DASD to be attached to the system with the User_Volume_Include VM* statement in the SYSTEM CONFIG file. However, there is an easier way. Simply detach the DASD from MAINT and attach them to SYSTEM, as Example 9-17 shows.
Example 9-17 Using detach from MAINT and attach to SYSTEM
==> det CD39-CD3C *CD39-CD3C DETACHED BY MAINT==> att CD39-CD3C systemDASD CD39 ATTACHED TO SYSTEM VMCD39DASD CD3A ATTACHED TO SYSTEM VMCD3ADASD CD3B ATTACHED TO SYSTEM VMCD3BDASD CD3C ATTACHED TO SYSTEM VMCD3C
The four DASD volumes are now available for you to use for minidisks in the USER DIRECT file. They are also available after the next IPL, because their new labels match the pattern User_Volume_Include VM* in the SYSTEM CONFIG file.
9.3.2 Defining four more user IDs
Define four more user IDs for Linux virtual servers named LINUX02 - LINUX05 in the USER DIRECT file. You require to use the DASD volumes you just formatted, one for each virtual server. Perform the following steps:
1. You can repeat the definition of LINUX01 four times with the block copy ""4 prefix command as Example 9-18 shows.
Example 9-18 Defining six more user IDs
==> x user direct====> /user linux01...""4 *01846 USER LINUX01 VMPASSWD 256M 1G G01847 INCLUDE LNXDFLT01848 OPTION APPLMON01849 MDISK 100 3390 0001 3038 VMCD38 MR VMPASSWD VMPASSWD VMPASSWD01850 MDISK 102 3390 3039 0300 VMCD38 MR VMPASSWD VMPASSWD VMPASSWD""4 MINIOPT NOMDC
122 IBM z/VM and Linux on IBM System z: Virtualization Cookbook for Red Hat Enterprise Linux 4
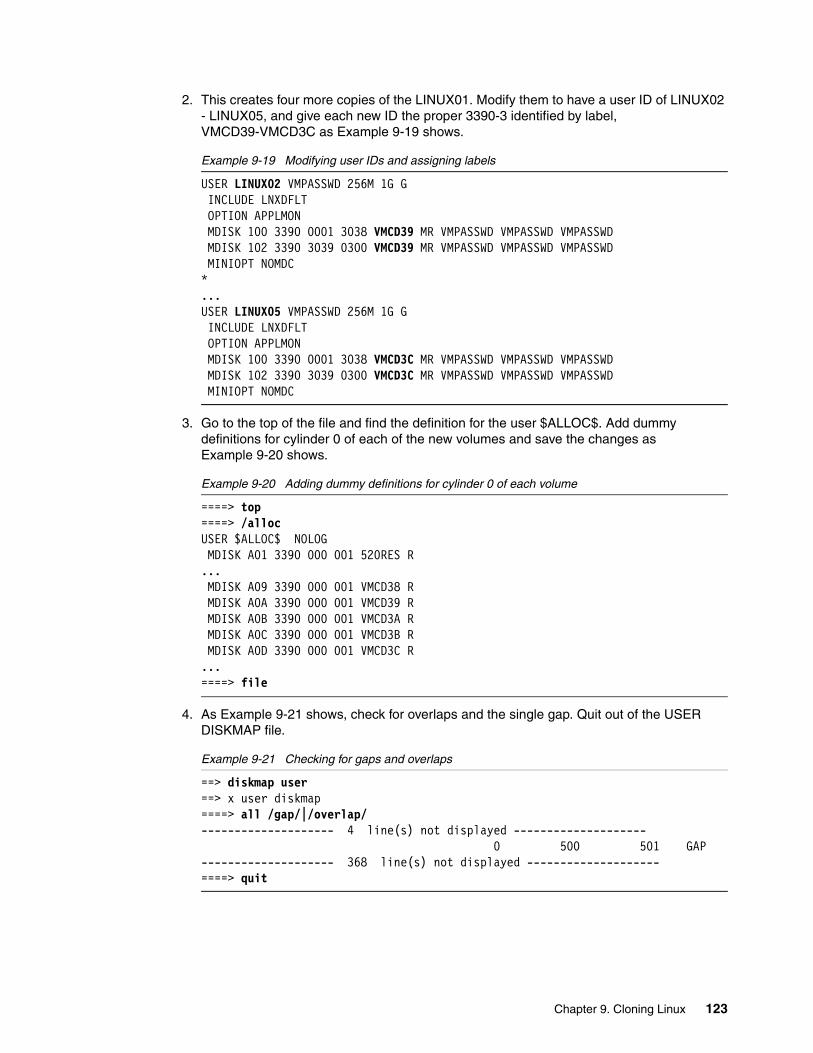
2. This creates four more copies of the LINUX01. Modify them to have a user ID of LINUX02 - LINUX05, and give each new ID the proper 3390-3 identified by label, VMCD39-VMCD3C as Example 9-19 shows.
Example 9-19 Modifying user IDs and assigning labels
USER LINUX02 VMPASSWD 256M 1G GINCLUDE LNXDFLTOPTION APPLMONMDISK 100 3390 0001 3038 VMCD39 MR VMPASSWD VMPASSWD VMPASSWDMDISK 102 3390 3039 0300 VMCD39 MR VMPASSWD VMPASSWD VMPASSWDMINIOPT NOMDC*...USER LINUX05 VMPASSWD 256M 1G GINCLUDE LNXDFLTOPTION APPLMONMDISK 100 3390 0001 3038 VMCD3C MR VMPASSWD VMPASSWD VMPASSWDMDISK 102 3390 3039 0300 VMCD3C MR VMPASSWD VMPASSWD VMPASSWDMINIOPT NOMDC
3. Go to the top of the file and find the definition for the user $ALLOC$. Add dummy definitions for cylinder 0 of each of the new volumes and save the changes as Example 9-20 shows.
Example 9-20 Adding dummy definitions for cylinder 0 of each volume
====> top====> /allocUSER $ALLOC$ NOLOG MDISK A01 3390 000 001 520RES R...MDISK A09 3390 000 001 VMCD38 R MDISK A0A 3390 000 001 VMCD39 R MDISK A0B 3390 000 001 VMCD3A R MDISK A0C 3390 000 001 VMCD3B R MDISK A0D 3390 000 001 VMCD3C R...====> file
4. As Example 9-21 shows, check for overlaps and the single gap. Quit out of the USER DISKMAP file.
Example 9-21 Checking for gaps and overlaps
==> diskmap user==> x user diskmap====> all /gap/|/overlap/-------------------- 4 line(s) not displayed -------------------- 0 500 501 GAP-------------------- 368 line(s) not displayed --------------------====> quit
Chapter 9. Cloning Linux 123
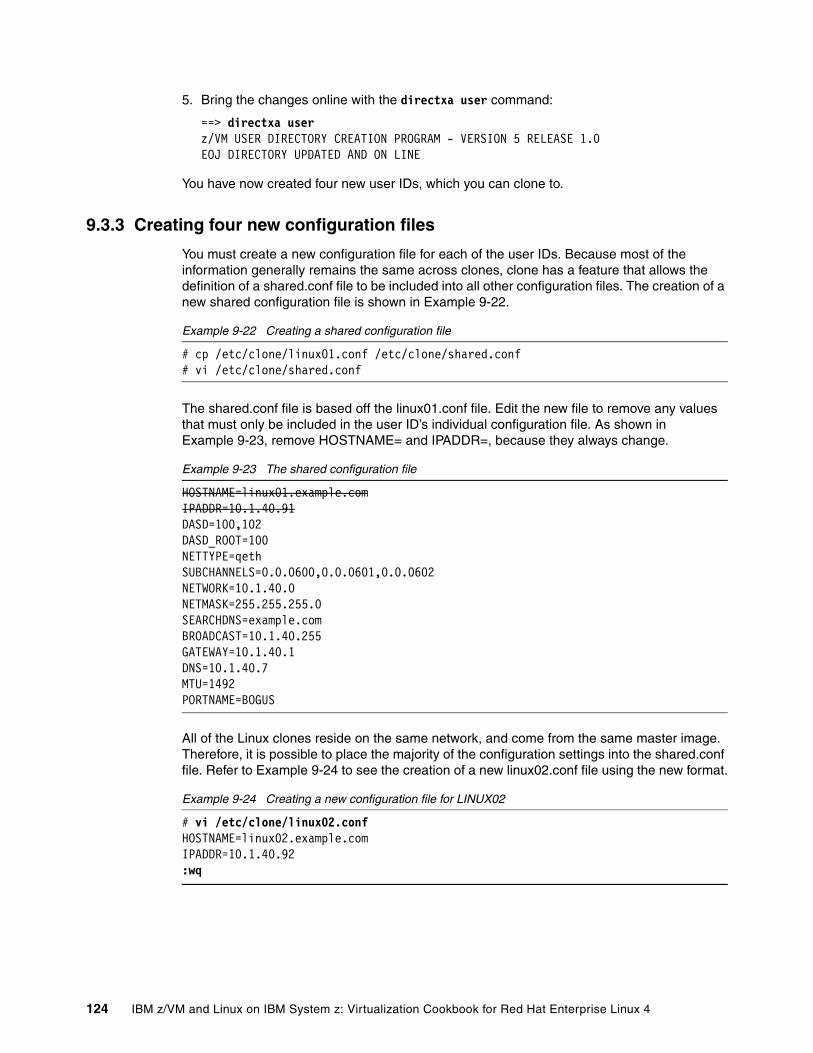
5. Bring the changes online with the directxa user command:
==> directxa userz/VM USER DIRECTORY CREATION PROGRAM - VERSION 5 RELEASE 1.0EOJ DIRECTORY UPDATED AND ON LINE
You have now created four new user IDs, which you can clone to.
9.3.3 Creating four new configuration files
You must create a new configuration file for each of the user IDs. Because most of the information generally remains the same across clones, clone has a feature that allows the definition of a shared.conf file to be included into all other configuration files. The creation of a new shared configuration file is shown in Example 9-22.
Example 9-22 Creating a shared configuration file
# cp /etc/clone/linux01.conf /etc/clone/shared.conf# vi /etc/clone/shared.conf
The shared.conf file is based off the linux01.conf file. Edit the new file to remove any values that must only be included in the user ID’s individual configuration file. As shown in Example 9-23, remove HOSTNAME= and IPADDR=, because they always change.
Example 9-23 The shared configuration file
HOSTNAME=linux01.example.comIPADDR=10.1.40.91DASD=100,102DASD_ROOT=100NETTYPE=qeth SUBCHANNELS=0.0.0600,0.0.0601,0.0.0602NETWORK=10.1.40.0 NETMASK=255.255.255.0 SEARCHDNS=example.com BROADCAST=10.1.40.255 GATEWAY=10.1.40.1 DNS=10.1.40.7 MTU=1492 PORTNAME=BOGUS
All of the Linux clones reside on the same network, and come from the same master image. Therefore, it is possible to place the majority of the configuration settings into the shared.conf file. Refer to Example 9-24 to see the creation of a new linux02.conf file using the new format.
Example 9-24 Creating a new configuration file for LINUX02
# vi /etc/clone/linux02.confHOSTNAME=linux02.example.comIPADDR=10.1.40.92 :wq
124 IBM z/VM and Linux on IBM System z: Virtualization Cookbook for Red Hat Enterprise Linux 4
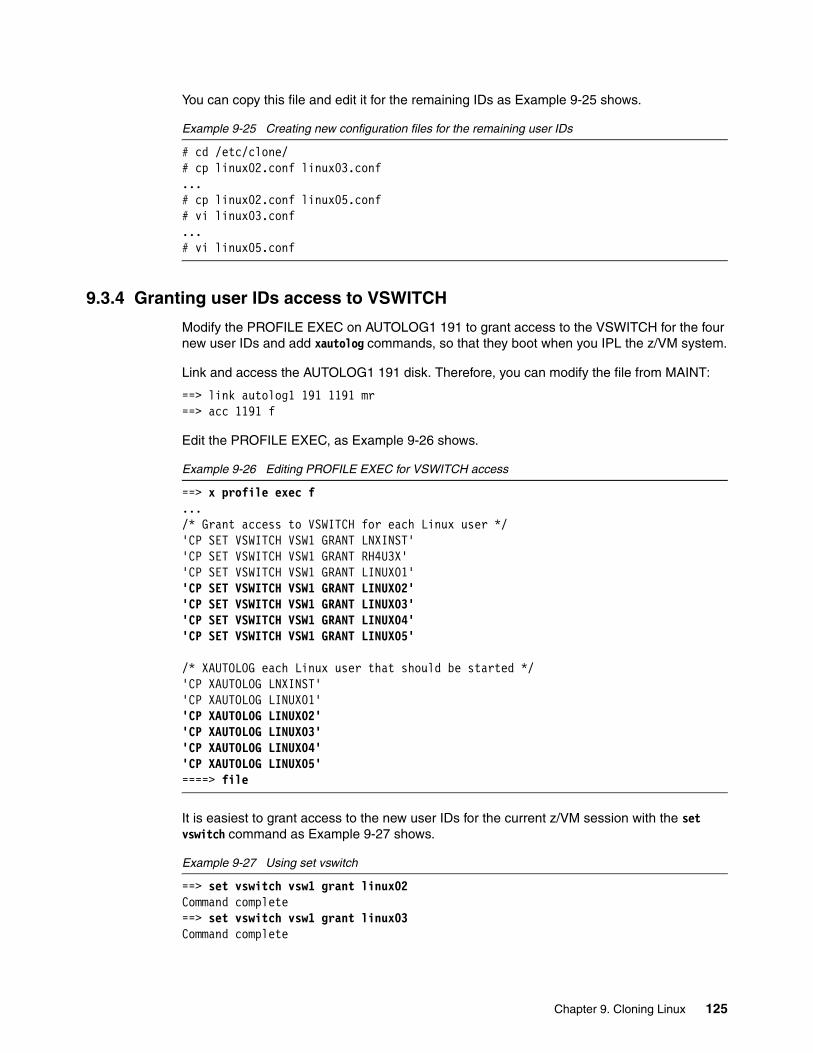
You can copy this file and edit it for the remaining IDs as Example 9-25 shows.
Example 9-25 Creating new configuration files for the remaining user IDs
# cd /etc/clone/# cp linux02.conf linux03.conf...# cp linux02.conf linux05.conf# vi linux03.conf...# vi linux05.conf
9.3.4 Granting user IDs access to VSWITCH
Modify the PROFILE EXEC on AUTOLOG1 191 to grant access to the VSWITCH for the four new user IDs and add xautolog commands, so that they boot when you IPL the z/VM system.
Link and access the AUTOLOG1 191 disk. Therefore, you can modify the file from MAINT:
==> link autolog1 191 1191 mr==> acc 1191 f
Edit the PROFILE EXEC, as Example 9-26 shows.
Example 9-26 Editing PROFILE EXEC for VSWITCH access
==> x profile exec f.../* Grant access to VSWITCH for each Linux user */'CP SET VSWITCH VSW1 GRANT LNXINST''CP SET VSWITCH VSW1 GRANT RH4U3X''CP SET VSWITCH VSW1 GRANT LINUX01''CP SET VSWITCH VSW1 GRANT LINUX02''CP SET VSWITCH VSW1 GRANT LINUX03''CP SET VSWITCH VSW1 GRANT LINUX04''CP SET VSWITCH VSW1 GRANT LINUX05'
/* XAUTOLOG each Linux user that should be started */'CP XAUTOLOG LNXINST''CP XAUTOLOG LINUX01''CP XAUTOLOG LINUX02''CP XAUTOLOG LINUX03''CP XAUTOLOG LINUX04''CP XAUTOLOG LINUX05'====> file
It is easiest to grant access to the new user IDs for the current z/VM session with the set vswitch command as Example 9-27 shows.
Example 9-27 Using set vswitch
==> set vswitch vsw1 grant linux02Command complete==> set vswitch vsw1 grant linux03Command complete
Chapter 9. Cloning Linux 125
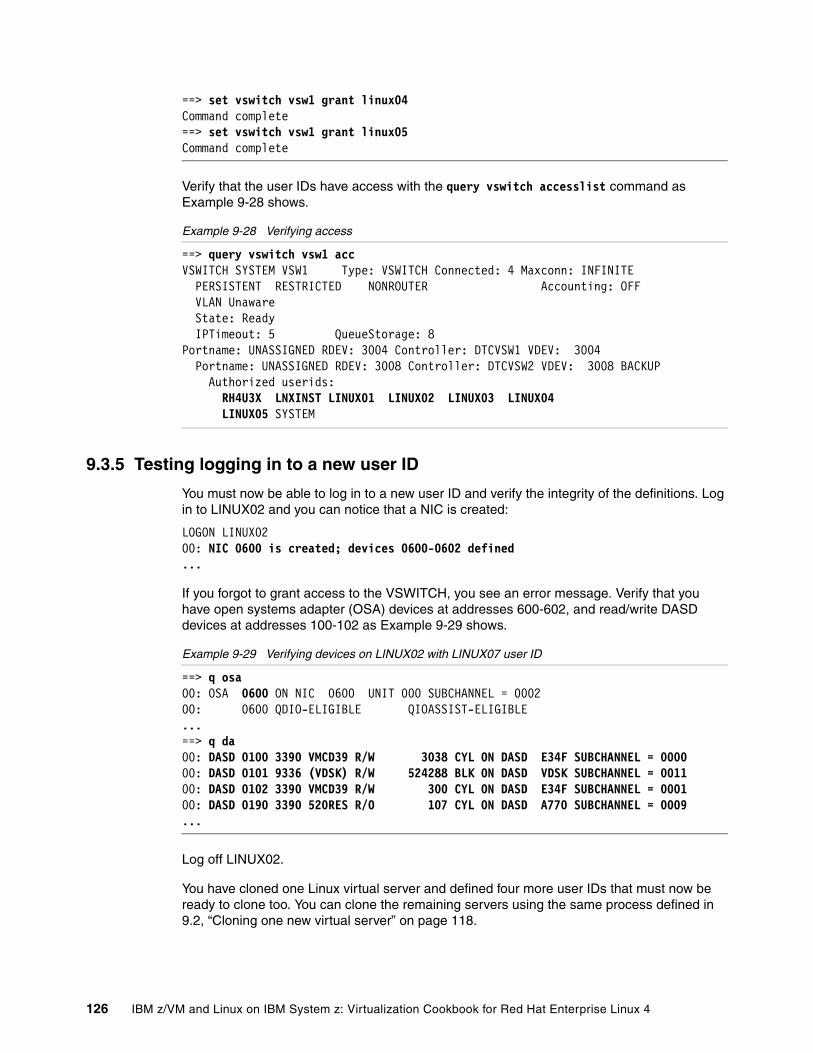
==> set vswitch vsw1 grant linux04Command complete==> set vswitch vsw1 grant linux05Command complete
Verify that the user IDs have access with the query vswitch accesslist command as Example 9-28 shows.
Example 9-28 Verifying access
==> query vswitch vsw1 accVSWITCH SYSTEM VSW1 Type: VSWITCH Connected: 4 Maxconn: INFINITE PERSISTENT RESTRICTED NONROUTER Accounting: OFF VLAN Unaware State: Ready IPTimeout: 5 QueueStorage: 8Portname: UNASSIGNED RDEV: 3004 Controller: DTCVSW1 VDEV: 3004 Portname: UNASSIGNED RDEV: 3008 Controller: DTCVSW2 VDEV: 3008 BACKUP Authorized userids:
RH4U3X LNXINST LINUX01 LINUX02 LINUX03 LINUX04 LINUX05 SYSTEM
9.3.5 Testing logging in to a new user ID
You must now be able to log in to a new user ID and verify the integrity of the definitions. Log in to LINUX02 and you can notice that a NIC is created:
LOGON LINUX0200: NIC 0600 is created; devices 0600-0602 defined...
If you forgot to grant access to the VSWITCH, you see an error message. Verify that you have open systems adapter (OSA) devices at addresses 600-602, and read/write DASD devices at addresses 100-102 as Example 9-29 shows.
Example 9-29 Verifying devices on LINUX02 with LINUX07 user ID
==> q osa00: OSA 0600 ON NIC 0600 UNIT 000 SUBCHANNEL = 000200: 0600 QDIO-ELIGIBLE QIOASSIST-ELIGIBLE...==> q da00: DASD 0100 3390 VMCD39 R/W 3038 CYL ON DASD E34F SUBCHANNEL = 000000: DASD 0101 9336 (VDSK) R/W 524288 BLK ON DASD VDSK SUBCHANNEL = 001100: DASD 0102 3390 VMCD39 R/W 300 CYL ON DASD E34F SUBCHANNEL = 000100: DASD 0190 3390 520RES R/O 107 CYL ON DASD A770 SUBCHANNEL = 0009...
Log off LINUX02.
You have cloned one Linux virtual server and defined four more user IDs that must now be ready to clone too. You can clone the remaining servers using the same process defined in 9.2, “Cloning one new virtual server” on page 118.
126 IBM z/VM and Linux on IBM System z: Virtualization Cookbook for Red Hat Enterprise Linux 4
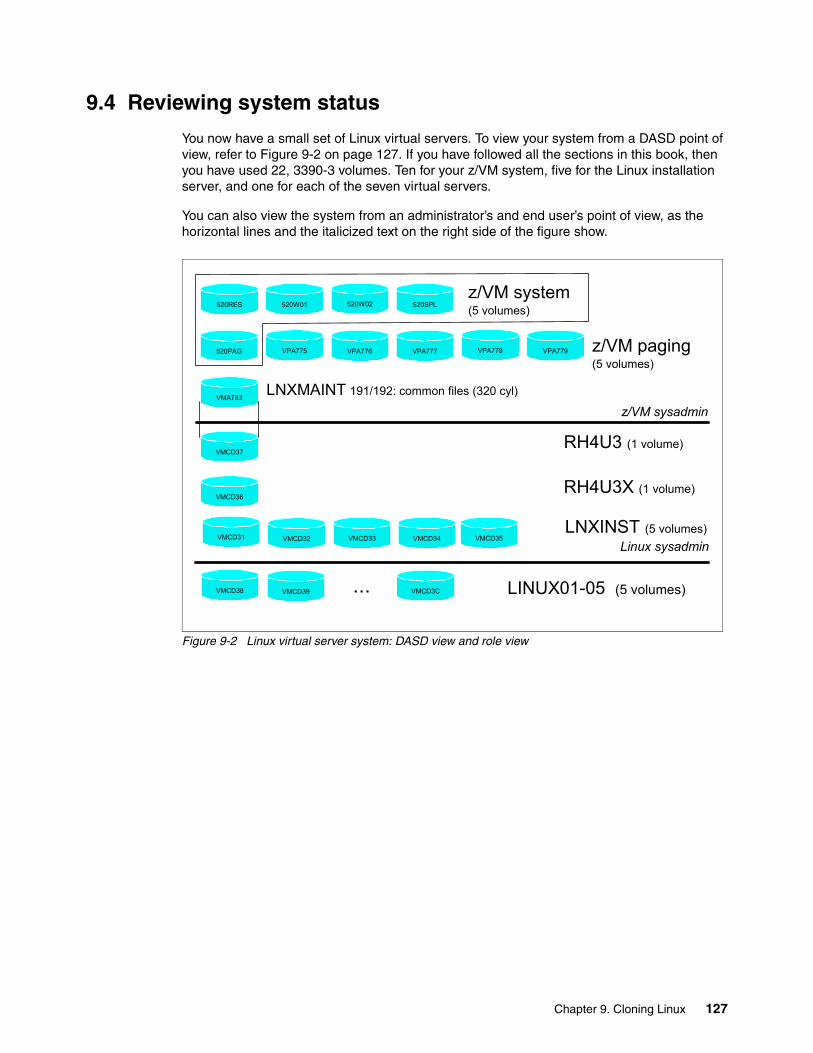
9.4 Reviewing system status
You now have a small set of Linux virtual servers. To view your system from a DASD point of view, refer to Figure 9-2 on page 127. If you have followed all the sections in this book, then you have used 22, 3390-3 volumes. Ten for your z/VM system, five for the Linux installation server, and one for each of the seven virtual servers.
You can also view the system from an administrator’s and end user’s point of view, as the horizontal lines and the italicized text on the right side of the figure show.
Figure 9-2 Linux virtual server system: DASD view and role view
520W01520RES
520PAG
520SPL520W02
VPA779VPA778VPA777VPA776VPA775
z/VM system(5 volumes)
z/VM paging(5 volumes)
VMA783LNXMAINT 191/192: common files (320 cyl)
z/VM sysadmin
VMCD38
RH4U3 (1 volume) VMCD37
LINUX01-05 (5 volumes)VMCD3CVMCD39 ...
VMCD35VMCD34VMCD33VMCD32LNXINST (5 volumes)
VMCD31Linux sysadmin
RH4U3X (1 volume) VMCD36
Chapter 9. Cloning Linux 127

128 IBM z/VM and Linux on IBM System z: Virtualization Cookbook for Red Hat Enterprise Linux 4
Chapter 10. Three virtual servers
This chapter describes how to clone and customize the following Linux virtual servers:
� Creating a virtual Web server� User authentication using LDAP� Creating a virtual Samba file server
This chapter uses the up2date command to install the necessary Red Hat Package Manager (RPM) packages onto the virtual servers. For more information about configuring up2date, see Chapter 13, “Red Hat Network and up2date” on page 197.
10
© Copyright IBM Corp. 2006. All rights reserved. 129
10.1 Creating a virtual Web server
The example in this section uses the LINUX01 user ID to create a virtual Web server. You must have a vanilla virtual server cloned to the user ID LINUX01 as described in Chapter 9, “Cloning Linux” on page 113.
10.1.1 Installing Apache RPMs
Use Secure Shell (SSH) to connect to the Internet Protocol (IP) address of the new LINUX01 server. Install the following Apache RPMs via the up2date command:
# up2date httpd httpd-manual
You see up2date output go by as the Apache RPMs are installed. When it is complete you can confirm the RPMs have been added via the rpm -qa command as Example 10-1 shows.
Example 10-1 Adding the RPMs using rpm -qa command
# rpm -qa | grep httpdhttpd-2.0.52-22.enthttpd-suexec-2.0.52-22.enthttpd-manual-2.0.52-22.ent# rpm -qa | grep aprapr-0.9.4-24.5apr-util-0.9.4-21
For a complete explanation of how to configure and use up2date, see Chapter 13, “Red Hat Network and up2date” on page 197.
10.1.2 Testing Apache
Start the Apache Web server to verify that it is installed successfully. You must start Apache as root, but it then launches child processes as a less privileged user to listen for and handle requests.
# service httpd startStarting httpd: httpd: Could not determine the server's fully qualified domain name, using 127.0.0.1 for ServerName[ OK ]
To verify that Apache is installed correctly, after you start it, point a Web browser to the server and view the Apache test page. In your Web browser, enter the host name or IP address of your Web server as the URL. For example, the virtual server running on LINUX01 has a Domain Name System (DNS) name of linux01.example.com:
http://linux01.example.com
130 IBM z/VM and Linux on IBM System z: Virtualization Cookbook for Red Hat Enterprise Linux 4
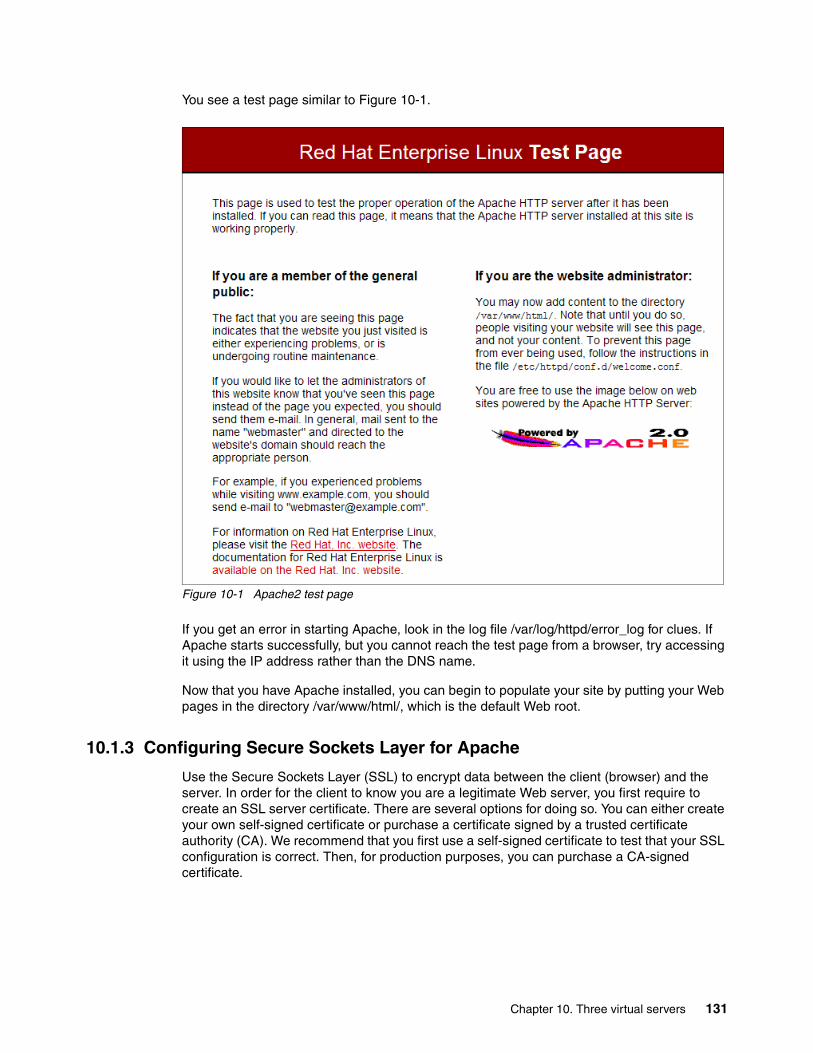
You see a test page similar to Figure 10-1.
Figure 10-1 Apache2 test page
If you get an error in starting Apache, look in the log file /var/log/httpd/error_log for clues. If Apache starts successfully, but you cannot reach the test page from a browser, try accessing it using the IP address rather than the DNS name.
Now that you have Apache installed, you can begin to populate your site by putting your Web pages in the directory /var/www/html/, which is the default Web root.
10.1.3 Configuring Secure Sockets Layer for Apache
Use the Secure Sockets Layer (SSL) to encrypt data between the client (browser) and the server. In order for the client to know you are a legitimate Web server, you first require to create an SSL server certificate. There are several options for doing so. You can either create your own self-signed certificate or purchase a certificate signed by a trusted certificate authority (CA). We recommend that you first use a self-signed certificate to test that your SSL configuration is correct. Then, for production purposes, you can purchase a CA-signed certificate.
Chapter 10. Three virtual servers 131
Installing the SSL Apache moduleThe mod_ssl package provides SSL functionality for Apache. Red Hat Enterprise Linux 4 makes it very easy to install and enable SSL support in Apache:
# up2date mod_ssl# rpm -q mod_sslmod_ssl-2.0.52-22.ent
Red Hat mod_ssl RPM automatically creates a self-signed certificate for you, which is suitable for testing purposes. It is important to note that the resulting certificate does not contain any information about your organization. Therefore, it is not suitable for conducting e-commerce transactions. If you choose to use a self-signed certificate in production instead of purchasing a certificate signed by a CA, you may want to manually create the certificate.
Manually creating a server certificateRed Hat Enterprise Linux 4 provides a tool that makes it very easy to create your own self-signed server certificate. This process has two steps:
1. Create a public/private key pair as Example 10-2 shows.
Example 10-2 Generating a key pair
# cd /usr/share/ssl/certs# make genkey umask 77 ; \/usr/bin/openssl genrsa -des3 1024 > /etc/httpd/conf/ssl.key/server.keyGenerating RSA private key, 1024 bit long modulus..++++++.....++++++e is 65537 (0x10001)Enter pass phrase:<a3tgfm>Verifying - Enter pass phrase:<a3tfgm>
2. Create a certificate request if you intend to purchase a certificate from a trusted CA as Example 10-3 shows. During this step, a prompt opens for information about your business.
Example 10-3 Generating a certificate request
# make certreq umask 77 ; \/usr/bin/openssl req -new -key /etc/httpd/conf/ssl.key/server.key -out /etc/httpd/conf/ssl.csr/server.csrEnter pass phrase for /etc/httpd/conf/ssl.key/server.key:<a3tfgm>You are about to be asked to enter information that will be incorporatedinto your certificate request.What you are about to enter is what is called a Distinguished Name or a DN.There are quite a few fields but you can leave some blankFor some fields there will be a default value,If you enter '.', the field will be left blank.-----Country Name (2 letter code) [GB]:<US>State or Province Name (full name) [Berkshire]:<New York>Locality Name (eg, city) [Newbury]:<Poughkeepsie>Organization Name (eg, company) [My Company Ltd]:<Example>Organizational Unit Name (eg, section) []:<ZYX>Common Name (eg, your name or your server's hostname) []:<Admin>
132 IBM z/VM and Linux on IBM System z: Virtualization Cookbook for Red Hat Enterprise Linux 4
Email Address []:<[email protected]>
Please enter the following 'extra' attributesto be sent with your certificate requestA challenge password []:<a3tfgm>An optional company name []:<Example>
To create your own self-signed certificate, see Example 10-4.
Example 10-4 Creating a self-signed certificate
# make testcert ...process is almost identical to Example 10-3...
If you opt to obtain a trusted CA-signed certificate, submit your certificate signing request, which is the .csr file you recently created in /etc/httpd/conf/ssl.csr/, to a trusted certificate authority for processing. See 10.1.5, “Apache resources” on page 135 for their URLs. Trusted certificate authorities include GeoTrust, VeriSign, and Thawte.
After you have an SSL certificate, either self-signed or obtained from a CA, you must restart Apache to see the changes as Example 10-5 shows.
Example 10-5 Restarting Apache to see changes
# service httpd restartStopping httpd: [ OK ]Starting httpd: httpd: Could not determine the server's fully qualified domain name, using 127.0.0.1 for ServerName[ OK ]
When creating an SSL key Red Hat Enterprise Linux 4 automatically encrypts the key, which means you are likely to see a sequence like the one Example 10-6 shows when starting or restarting Apache.
Example 10-6 Apache pass phrase interaction
Apache/2.0.52 mod_ssl/2.0.52 (Pass Phrase Dialog)Some of your private key files are encrypted for security reasons.In order to read them you have to provide the pass phrases.
Server 127.0.0.1:443 (RSA)Enter pass phrase:
This means that your Web server does not finish starting until someone manually enters the SSL key’s passphrase each time, which can be very inconvenient. The solution, as documented in Red Hat online Knowledgebase, is to decrypt the private key permanently:
http://kbase.redhat.com/faq/FAQ_85_5447.shtm
Note: The steps shown in Example 10-3 and Example 10-4 are identical up to the final two prompts, which is not shown when creating a self-signed certificate.
Chapter 10. Three virtual servers 133
This can be accomplished with the commands shown in Example 10-7.
Example 10-7 Decrypting the SSL key
# cd /etc/httpd/conf/ssl.key # cp server.key server.key.encrypted 1 # openssl rsa -in server.key.encrypted -out server.key 2 Enter pass phrase for server.key.encrypted:<a3tfgm>writing RSA key# chmod 400 server.key 3
Note the explanations of the command lines that are numbered in bold in Example 10-7:
1 We recommend that you back up the original encrypted key. Place the copy in a safe place.
2 This command decrypts the key. You see a prompt for the pass phrase.
3 We strongly recommend that you set the UNIX permissions, so that only root can read the decrypted key.
Setting up virtual hostsBecause SSL-protected Web pages run on a different port than the non-protected Web pages, you must consider them as separate Web servers. A common way of serving an SSL-enabled Web site is to create a virtual host on the Web server. Apache’s Virtual Host capability allows you to have multiple Web servers on one machine. The mod_ssl RPM automatically creates and configures an SSL-enabled virtual host for you.
If you examine the main configuration file, /etc/httpd/conf/httpd.conf, you see the following line in the middle of the file:
Include conf.d/*.conf
This directive causes Apache to automatically read additional configuration files in the conf.d directory and include them in its main configuration when starting up. Typically the configuration files for Apache modules, such as mod_ssl, go in this separate directory. If you look in the /etc/httpd/conf.d/ directory you see a file called ssl.conf. This is the mod_ssl configuration file and in it you can find the settings for the SSL virtual host.
You can create your own configuration files in the conf.d directory to create additional virtual hosts if necessary, or you can append them to the main configuration file. The steps for doing so can be found in the Apache HTTP Server Version 2.0 documentation, see 10.1.5, “Apache resources” on page 135.
Note: If you opt to leave the SSL key encrypted and are unable to enter the passphrase before the service command exits, then Apache fails to start. If you find you are unable to enter the passphrase when prompted, it is likely due to SELinux being enabled on the system. If this is the case, you have two possible solutions.
We recommend the option that allows you to grant Apache permission to access TTY devices. The other option is to disable SELinux altogether. Both options are discussed completely on Red Hat online Knowledgebase. See 10.1.5, “Apache resources” on page 135 for the associated URLs.
To grant TTY access to Apache, use the setsebool command as follows:
# setsebool -P httpd_tty_comm 1
134 IBM z/VM and Linux on IBM System z: Virtualization Cookbook for Red Hat Enterprise Linux 4
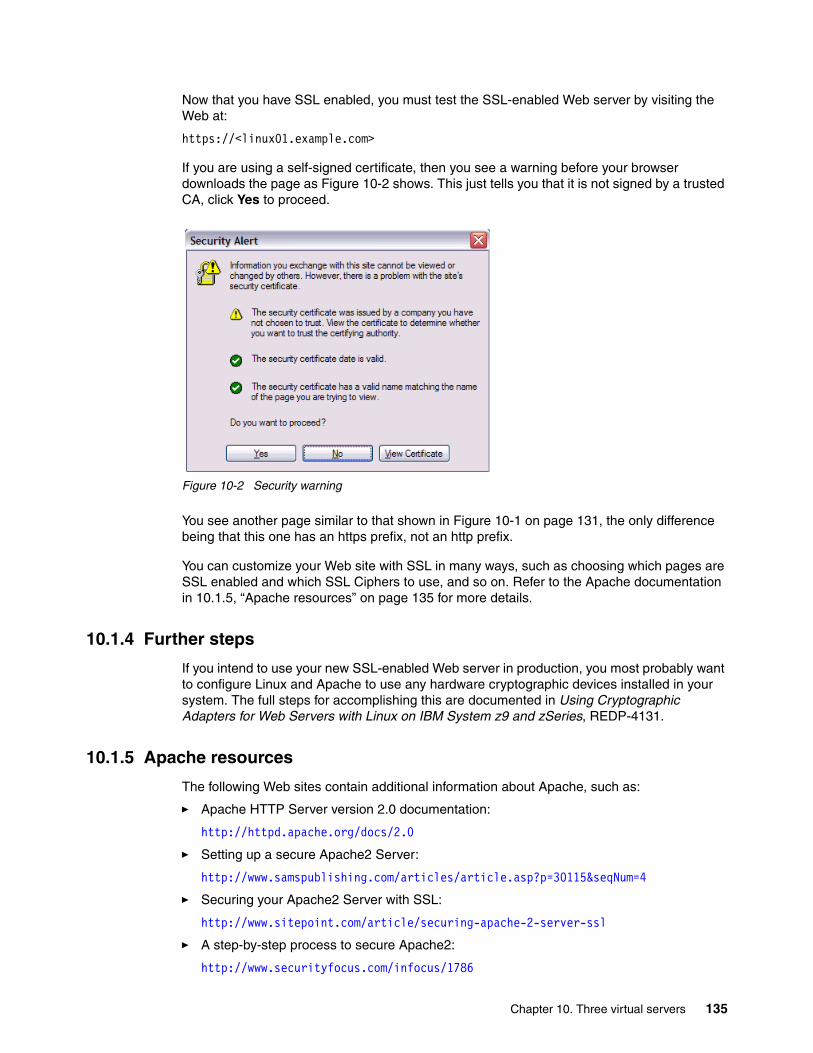
Now that you have SSL enabled, you must test the SSL-enabled Web server by visiting the Web at:
https://<linux01.example.com>
If you are using a self-signed certificate, then you see a warning before your browser downloads the page as Figure 10-2 shows. This just tells you that it is not signed by a trusted CA, click Yes to proceed.
Figure 10-2 Security warning
You see another page similar to that shown in Figure 10-1 on page 131, the only difference being that this one has an https prefix, not an http prefix.
You can customize your Web site with SSL in many ways, such as choosing which pages are SSL enabled and which SSL Ciphers to use, and so on. Refer to the Apache documentation in 10.1.5, “Apache resources” on page 135 for more details.
10.1.4 Further steps
If you intend to use your new SSL-enabled Web server in production, you most probably want to configure Linux and Apache to use any hardware cryptographic devices installed in your system. The full steps for accomplishing this are documented in Using Cryptographic Adapters for Web Servers with Linux on IBM System z9 and zSeries, REDP-4131.
10.1.5 Apache resources
The following Web sites contain additional information about Apache, such as:
� Apache HTTP Server version 2.0 documentation:
http://httpd.apache.org/docs/2.0
� Setting up a secure Apache2 Server:
http://www.samspublishing.com/articles/article.asp?p=30115&seqNum=4
� Securing your Apache2 Server with SSL:
http://www.sitepoint.com/article/securing-apache-2-server-ssl
� A step-by-step process to secure Apache2:
http://www.securityfocus.com/infocus/1786
Chapter 10. Three virtual servers 135
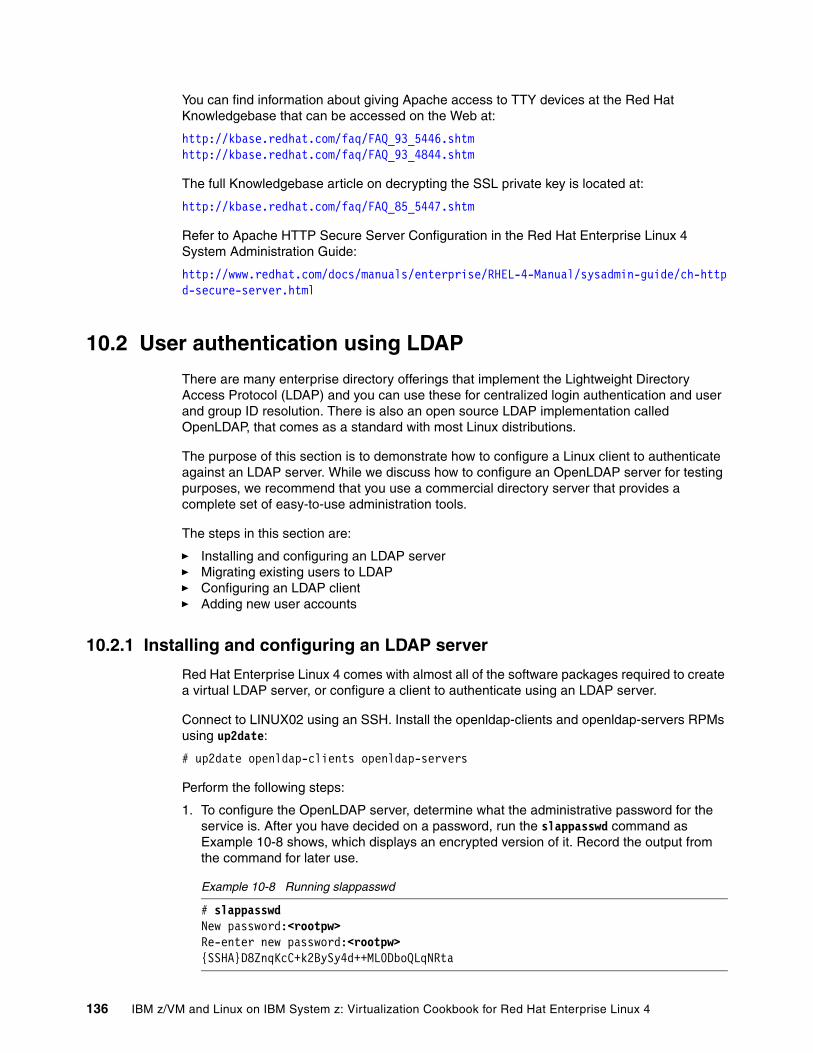
You can find information about giving Apache access to TTY devices at the Red Hat Knowledgebase that can be accessed on the Web at:
http://kbase.redhat.com/faq/FAQ_93_5446.shtmhttp://kbase.redhat.com/faq/FAQ_93_4844.shtm
The full Knowledgebase article on decrypting the SSL private key is located at:
http://kbase.redhat.com/faq/FAQ_85_5447.shtm
Refer to Apache HTTP Secure Server Configuration in the Red Hat Enterprise Linux 4 System Administration Guide:
http://www.redhat.com/docs/manuals/enterprise/RHEL-4-Manual/sysadmin-guide/ch-httpd-secure-server.html
10.2 User authentication using LDAP
There are many enterprise directory offerings that implement the Lightweight Directory Access Protocol (LDAP) and you can use these for centralized login authentication and user and group ID resolution. There is also an open source LDAP implementation called OpenLDAP, that comes as a standard with most Linux distributions.
The purpose of this section is to demonstrate how to configure a Linux client to authenticate against an LDAP server. While we discuss how to configure an OpenLDAP server for testing purposes, we recommend that you use a commercial directory server that provides a complete set of easy-to-use administration tools.
The steps in this section are:
� Installing and configuring an LDAP server� Migrating existing users to LDAP� Configuring an LDAP client� Adding new user accounts
10.2.1 Installing and configuring an LDAP server
Red Hat Enterprise Linux 4 comes with almost all of the software packages required to create a virtual LDAP server, or configure a client to authenticate using an LDAP server.
Connect to LINUX02 using an SSH. Install the openldap-clients and openldap-servers RPMs using up2date:
# up2date openldap-clients openldap-servers
Perform the following steps:
1. To configure the OpenLDAP server, determine what the administrative password for the service is. After you have decided on a password, run the slappasswd command as Example 10-8 shows, which displays an encrypted version of it. Record the output from the command for later use.
Example 10-8 Running slappasswd
# slappasswdNew password:<rootpw>Re-enter new password:<rootpw>{SSHA}D8ZnqKcC+k2BySy4d++ML0DboQLqNRta
136 IBM z/VM and Linux on IBM System z: Virtualization Cookbook for Red Hat Enterprise Linux 4
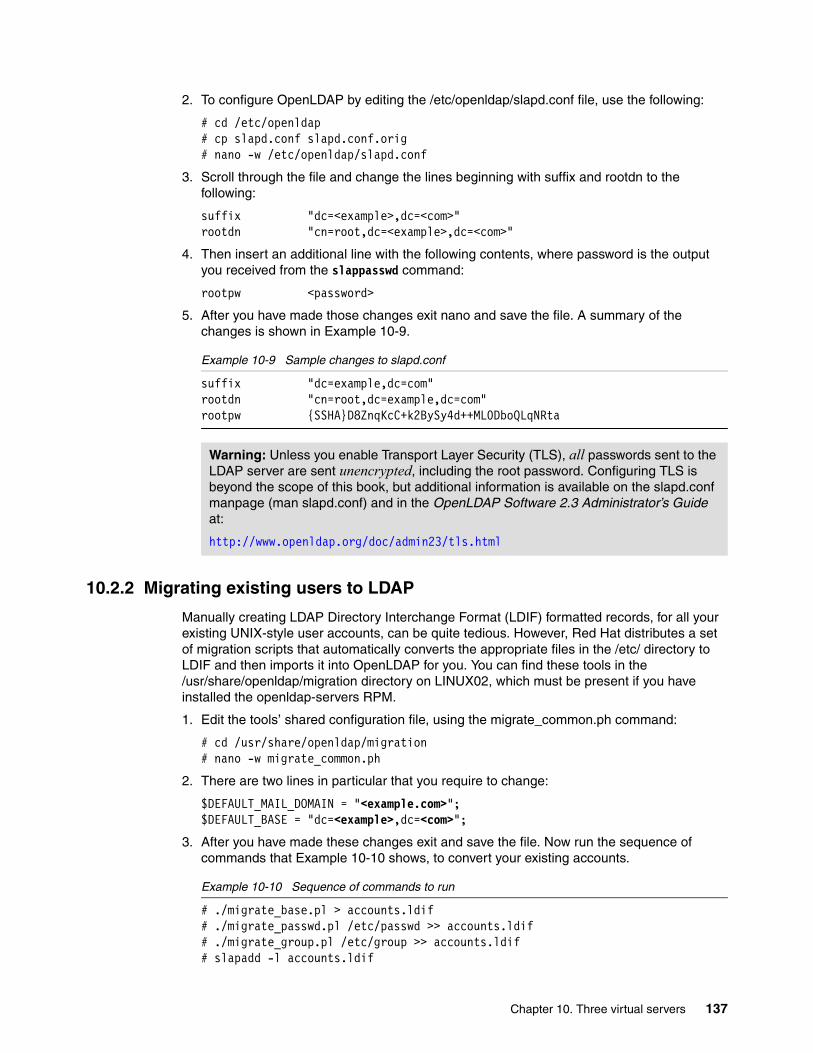
2. To configure OpenLDAP by editing the /etc/openldap/slapd.conf file, use the following:
# cd /etc/openldap# cp slapd.conf slapd.conf.orig# nano -w /etc/openldap/slapd.conf
3. Scroll through the file and change the lines beginning with suffix and rootdn to the following:
suffix "dc=<example>,dc=<com>"rootdn "cn=root,dc=<example>,dc=<com>"
4. Then insert an additional line with the following contents, where password is the output you received from the slappasswd command:
rootpw <password>
5. After you have made those changes exit nano and save the file. A summary of the changes is shown in Example 10-9.
Example 10-9 Sample changes to slapd.conf
suffix "dc=example,dc=com"rootdn "cn=root,dc=example,dc=com"rootpw {SSHA}D8ZnqKcC+k2BySy4d++ML0DboQLqNRta
10.2.2 Migrating existing users to LDAP
Manually creating LDAP Directory Interchange Format (LDIF) formatted records, for all your existing UNIX-style user accounts, can be quite tedious. However, Red Hat distributes a set of migration scripts that automatically converts the appropriate files in the /etc/ directory to LDIF and then imports it into OpenLDAP for you. You can find these tools in the /usr/share/openldap/migration directory on LINUX02, which must be present if you have installed the openldap-servers RPM.
1. Edit the tools’ shared configuration file, using the migrate_common.ph command:
# cd /usr/share/openldap/migration# nano -w migrate_common.ph
2. There are two lines in particular that you require to change:
$DEFAULT_MAIL_DOMAIN = "<example.com>";$DEFAULT_BASE = "dc=<example>,dc=<com>";
3. After you have made these changes exit and save the file. Now run the sequence of commands that Example 10-10 shows, to convert your existing accounts.
Example 10-10 Sequence of commands to run
# ./migrate_base.pl > accounts.ldif# ./migrate_passwd.pl /etc/passwd >> accounts.ldif# ./migrate_group.pl /etc/group >> accounts.ldif# slapadd -l accounts.ldif
Warning: Unless you enable Transport Layer Security (TLS), all passwords sent to the LDAP server are sent unencrypted, including the root password. Configuring TLS is beyond the scope of this book, but additional information is available on the slapd.conf manpage (man slapd.conf) and in the OpenLDAP Software 2.3 Administrator’s Guide at:
http://www.openldap.org/doc/admin23/tls.html
Chapter 10. Three virtual servers 137
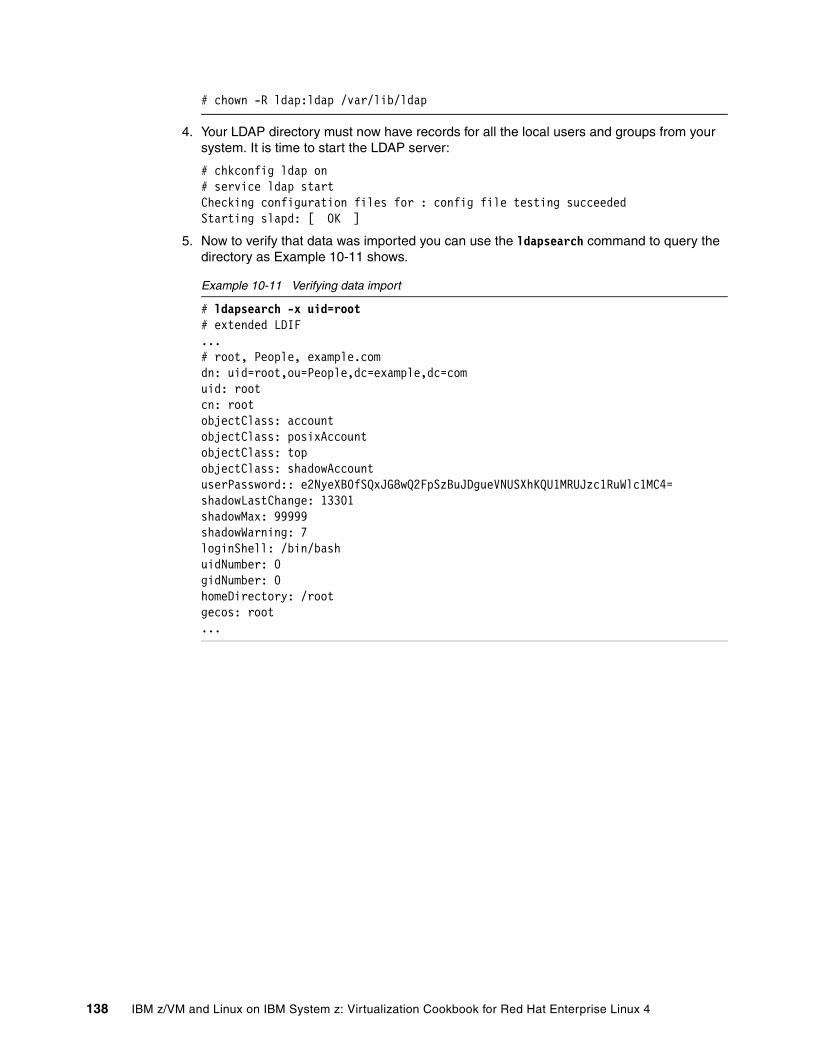
# chown -R ldap:ldap /var/lib/ldap
4. Your LDAP directory must now have records for all the local users and groups from your system. It is time to start the LDAP server:
# chkconfig ldap on# service ldap startChecking configuration files for : config file testing succeededStarting slapd: [ OK ]
5. Now to verify that data was imported you can use the ldapsearch command to query the directory as Example 10-11 shows.
Example 10-11 Verifying data import
# ldapsearch -x uid=root# extended LDIF...# root, People, example.comdn: uid=root,ou=People,dc=example,dc=comuid: rootcn: rootobjectClass: accountobjectClass: posixAccountobjectClass: topobjectClass: shadowAccountuserPassword:: e2NyeXB0fSQxJG8wQ2FpSzBuJDgueVNUSXhKQU1MRUJzc1RuWlc1MC4=shadowLastChange: 13301shadowMax: 99999shadowWarning: 7loginShell: /bin/bashuidNumber: 0gidNumber: 0homeDirectory: /rootgecos: root...
138 IBM z/VM and Linux on IBM System z: Virtualization Cookbook for Red Hat Enterprise Linux 4
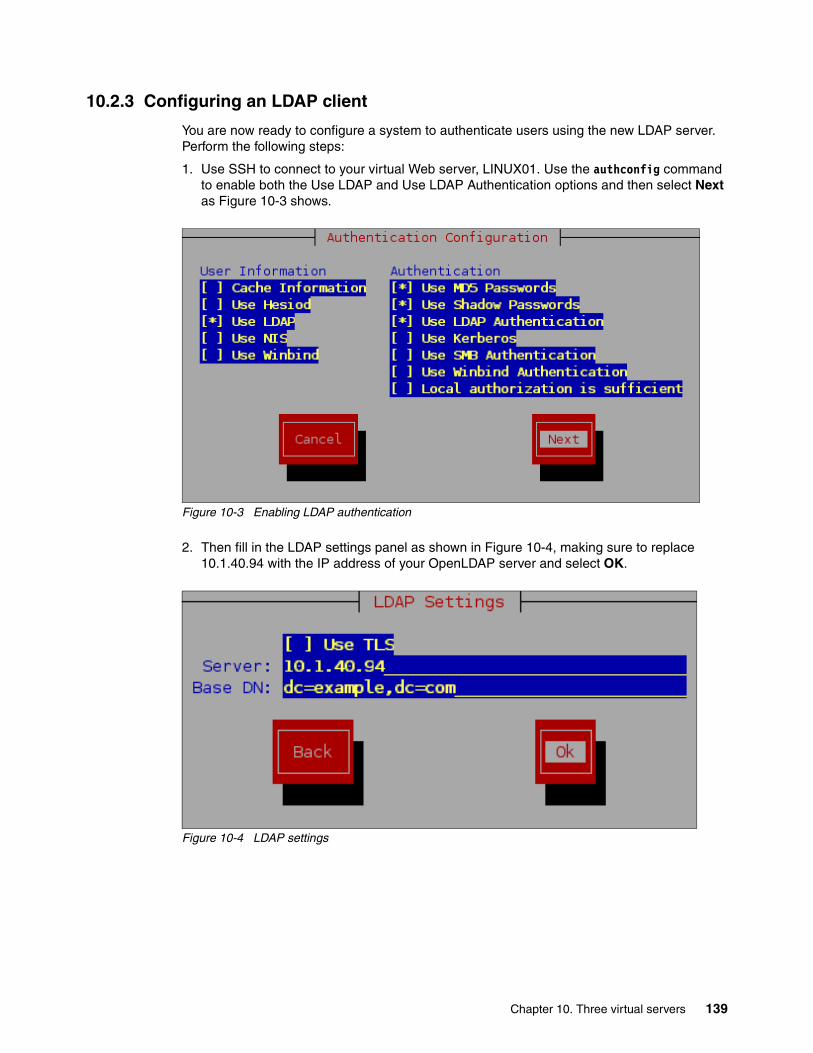
10.2.3 Configuring an LDAP client
You are now ready to configure a system to authenticate users using the new LDAP server. Perform the following steps:
1. Use SSH to connect to your virtual Web server, LINUX01. Use the authconfig command to enable both the Use LDAP and Use LDAP Authentication options and then select Next as Figure 10-3 shows.
Figure 10-3 Enabling LDAP authentication
2. Then fill in the LDAP settings panel as shown in Figure 10-4, making sure to replace 10.1.40.94 with the IP address of your OpenLDAP server and select OK.
Figure 10-4 LDAP settings
Chapter 10. Three virtual servers 139

3. Update two other files, /etc/pam.d/login and /etc/pam.d/sshd. Edit /etc/pam.d/login as shown in Example 10-12.
Example 10-12 Contents of /etc/pam.d/login
#%PAM-1.0auth required pam_securetty.so...session optional pam_console.sosession required pam_mkhomedir.so skel=/etc/skel/ umask=0022# pam_selinux.so open should be the last session rulesession required pam_selinux.so open
4. Then append the same line to /etc/pam.d/sshd as Example 10-13 shows.
Example 10-13 Contents of /etc/pam.d/sshd
#%PAM-1.0auth required pam_stack.so service=system-auth...session required pam_loginuid.sosession required pam_mkhomedir.so skel=/etc/skel/ umask=0022
These two additions automatically create a home directory for any user that logs in and does not already have one.
10.2.4 Adding new user accounts
Adding new users can be rather tricky. With the default tools that ship with Red Hat Enterprise Linux 4 the easiest solution is to add a local user, use the password migration script to generate an LDIF file with the new user’s information, and then remove the local user before importing the account into the LDAP directory. The steps for doing this are briefly covered in Example 10-14. More elegant solutions to this problem may exist, such as using the open source directory administrator tool. See “LDAP resources” on page 141 for details. However, we have left them as an exercise for the reader because most commercial directory servers provide their own proprietary management tools.
Example 10-14 Manually adding a user to OpenLDAP
# useradd <kylesm># passwd <kylesm>Changing password for user kylesm.New UNIX password:<password>Retype new UNIX password:<password>passwd: all authentication tokens updated successfully.# ./migrate_passwd /etc/passwd passwd.ldif# tail -n 17 passwd.ldif > account.ldif# userdel <kylesm># ldapadd -f account.ldif -D "cn=root,dc=example,dc=com" -x -WEnter LDAP Password:<rootpw>adding new entry "uid=kylesm,ou=People,dc=example,dc=com"# rm -f passwd.ldif account.ldif# rm -rf /home/<kylesm>
140 IBM z/VM and Linux on IBM System z: Virtualization Cookbook for Red Hat Enterprise Linux 4
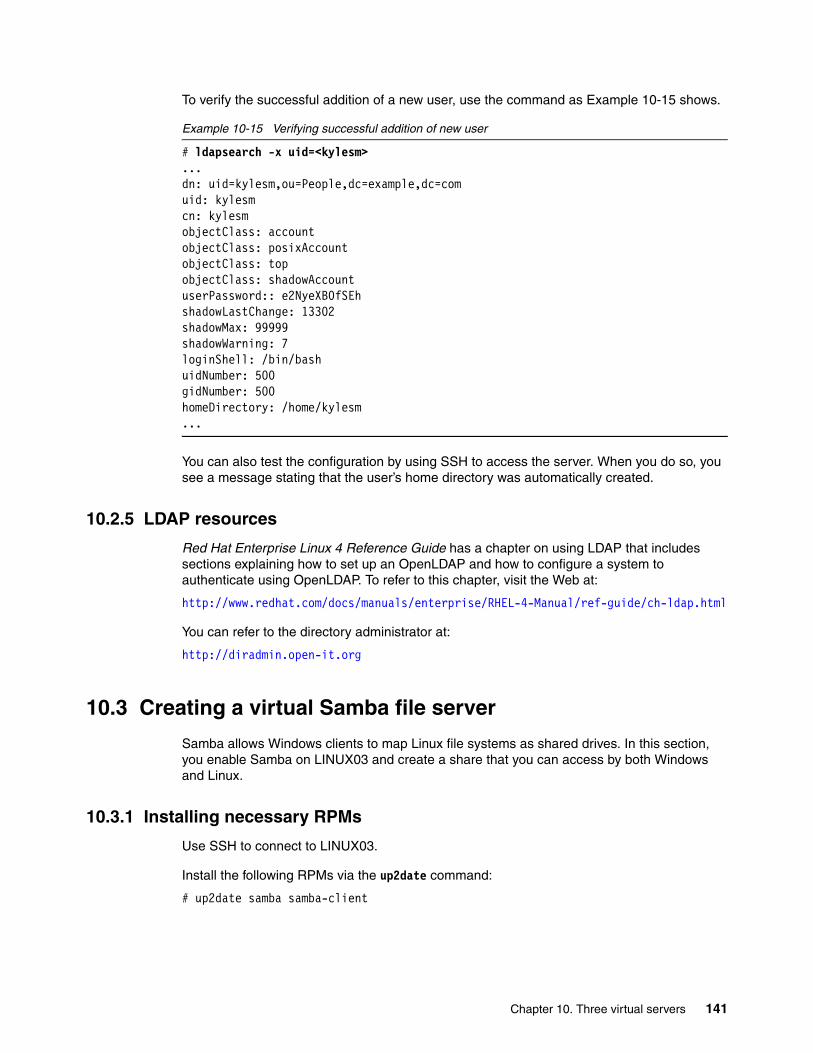
To verify the successful addition of a new user, use the command as Example 10-15 shows.
Example 10-15 Verifying successful addition of new user
# ldapsearch -x uid=<kylesm>...dn: uid=kylesm,ou=People,dc=example,dc=comuid: kylesmcn: kylesmobjectClass: accountobjectClass: posixAccountobjectClass: topobjectClass: shadowAccountuserPassword:: e2NyeXB0fSEhshadowLastChange: 13302shadowMax: 99999shadowWarning: 7loginShell: /bin/bashuidNumber: 500gidNumber: 500homeDirectory: /home/kylesm...
You can also test the configuration by using SSH to access the server. When you do so, you see a message stating that the user’s home directory was automatically created.
10.2.5 LDAP resources
Red Hat Enterprise Linux 4 Reference Guide has a chapter on using LDAP that includes sections explaining how to set up an OpenLDAP and how to configure a system to authenticate using OpenLDAP. To refer to this chapter, visit the Web at:
http://www.redhat.com/docs/manuals/enterprise/RHEL-4-Manual/ref-guide/ch-ldap.html
You can refer to the directory administrator at:
http://diradmin.open-it.org
10.3 Creating a virtual Samba file server
Samba allows Windows clients to map Linux file systems as shared drives. In this section, you enable Samba on LINUX03 and create a share that you can access by both Windows and Linux.
10.3.1 Installing necessary RPMs
Use SSH to connect to LINUX03.
Install the following RPMs via the up2date command:
# up2date samba samba-client
Chapter 10. Three virtual servers 141
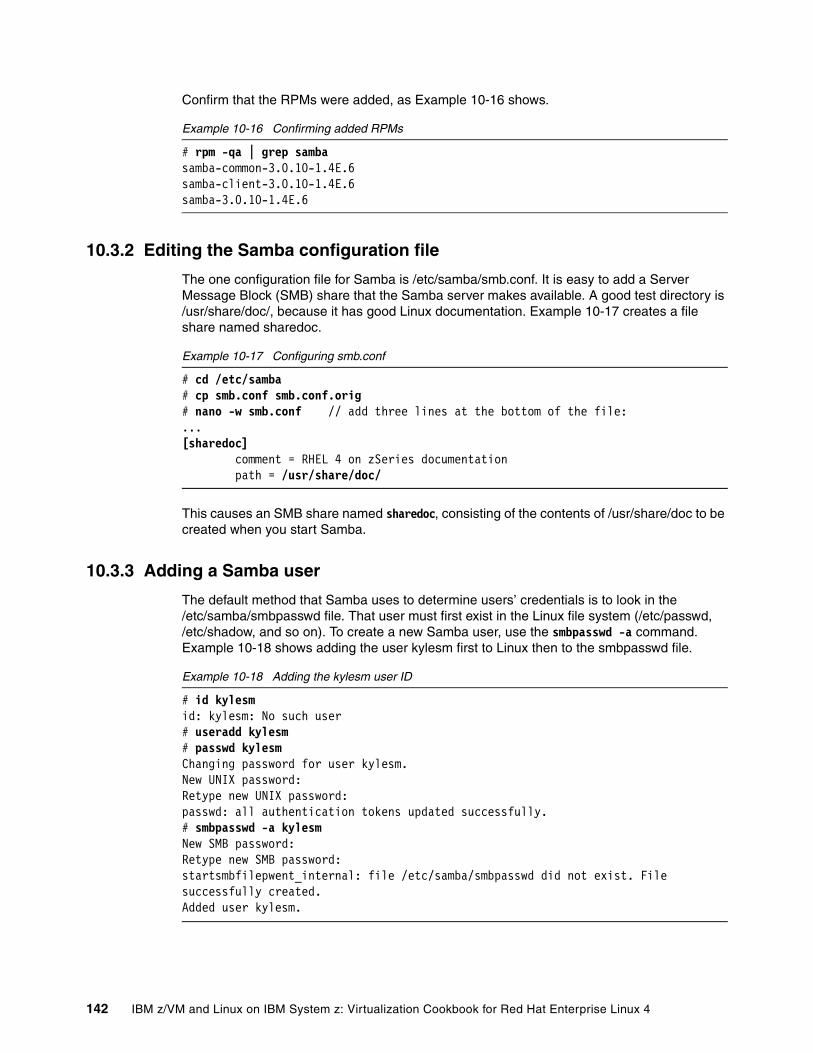
Confirm that the RPMs were added, as Example 10-16 shows.
Example 10-16 Confirming added RPMs
# rpm -qa | grep sambasamba-common-3.0.10-1.4E.6samba-client-3.0.10-1.4E.6samba-3.0.10-1.4E.6
10.3.2 Editing the Samba configuration file
The one configuration file for Samba is /etc/samba/smb.conf. It is easy to add a Server Message Block (SMB) share that the Samba server makes available. A good test directory is /usr/share/doc/, because it has good Linux documentation. Example 10-17 creates a file share named sharedoc.
Example 10-17 Configuring smb.conf
# cd /etc/samba# cp smb.conf smb.conf.orig# nano -w smb.conf // add three lines at the bottom of the file:...[sharedoc] comment = RHEL 4 on zSeries documentation path = /usr/share/doc/
This causes an SMB share named sharedoc, consisting of the contents of /usr/share/doc to be created when you start Samba.
10.3.3 Adding a Samba user
The default method that Samba uses to determine users’ credentials is to look in the /etc/samba/smbpasswd file. That user must first exist in the Linux file system (/etc/passwd, /etc/shadow, and so on). To create a new Samba user, use the smbpasswd -a command. Example 10-18 shows adding the user kylesm first to Linux then to the smbpasswd file.
Example 10-18 Adding the kylesm user ID
# id kylesmid: kylesm: No such user# useradd kylesm# passwd kylesmChanging password for user kylesm.New UNIX password:Retype new UNIX password:passwd: all authentication tokens updated successfully.# smbpasswd -a kylesmNew SMB password:Retype new SMB password:startsmbfilepwent_internal: file /etc/samba/smbpasswd did not exist. File successfully created.Added user kylesm.
142 IBM z/VM and Linux on IBM System z: Virtualization Cookbook for Red Hat Enterprise Linux 4
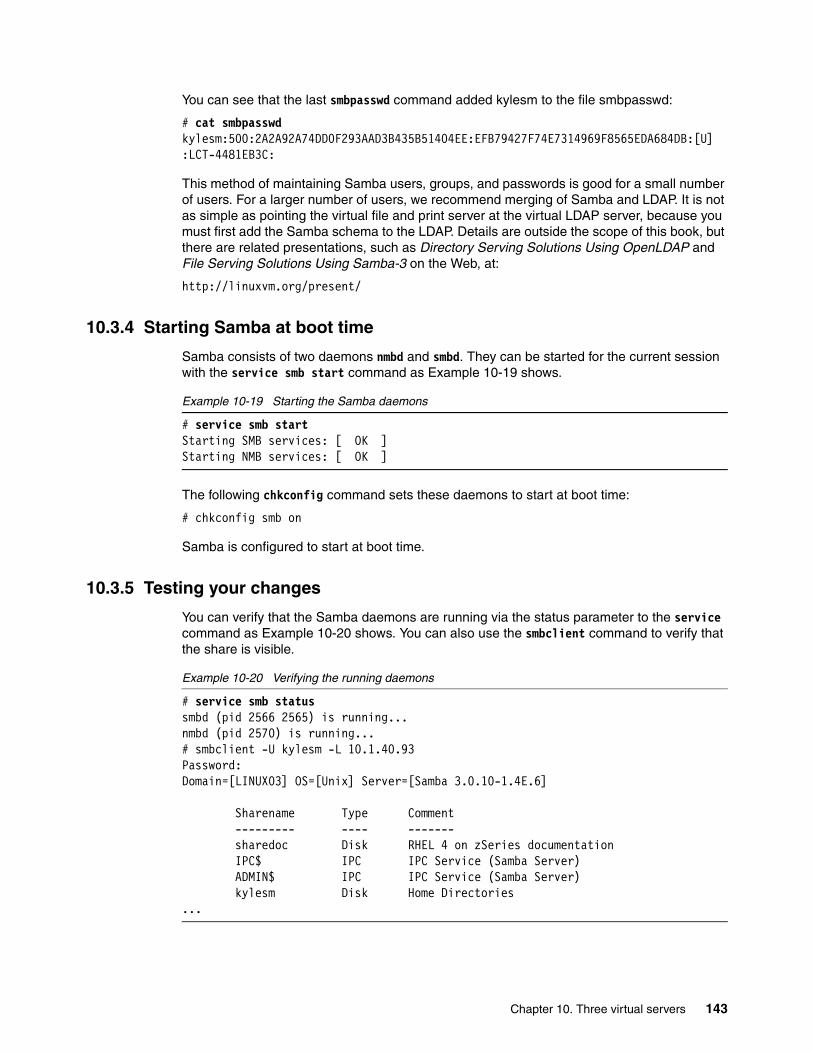
You can see that the last smbpasswd command added kylesm to the file smbpasswd:
# cat smbpasswdkylesm:500:2A2A92A74DD0F293AAD3B435B51404EE:EFB79427F74E7314969F8565EDA684DB:[U] :LCT-4481EB3C:
This method of maintaining Samba users, groups, and passwords is good for a small number of users. For a larger number of users, we recommend merging of Samba and LDAP. It is not as simple as pointing the virtual file and print server at the virtual LDAP server, because you must first add the Samba schema to the LDAP. Details are outside the scope of this book, but there are related presentations, such as Directory Serving Solutions Using OpenLDAP and File Serving Solutions Using Samba-3 on the Web, at:
http://linuxvm.org/present/
10.3.4 Starting Samba at boot time
Samba consists of two daemons nmbd and smbd. They can be started for the current session with the service smb start command as Example 10-19 shows.
Example 10-19 Starting the Samba daemons
# service smb startStarting SMB services: [ OK ]Starting NMB services: [ OK ]
The following chkconfig command sets these daemons to start at boot time:
# chkconfig smb on
Samba is configured to start at boot time.
10.3.5 Testing your changes
You can verify that the Samba daemons are running via the status parameter to the service command as Example 10-20 shows. You can also use the smbclient command to verify that the share is visible.
Example 10-20 Verifying the running daemons
# service smb statussmbd (pid 2566 2565) is running...nmbd (pid 2570) is running...# smbclient -U kylesm -L 10.1.40.93Password:Domain=[LINUX03] OS=[Unix] Server=[Samba 3.0.10-1.4E.6]
Sharename Type Comment --------- ---- ------- sharedoc Disk RHEL 4 on zSeries documentation IPC$ IPC IPC Service (Samba Server) ADMIN$ IPC IPC Service (Samba Server) kylesm Disk Home Directories...
Chapter 10. Three virtual servers 143

In Example 10-20, you can see the sharedoc Samba share, as well as the user’s home directory, which is shared by default in /etc/samba/smb.conf. You can also test the Samba share from a Windows desktop. Use the Universal Naming Convention (UNC) to specify the Samba server and share name \\10.1.40.93\sharedoc. You see a prompt for the user name and password.
You now have a virtual Samba file server configured and running with the new share available.
144 IBM z/VM and Linux on IBM System z: Virtualization Cookbook for Red Hat Enterprise Linux 4
Chapter 11. Miscellaneous recipes
This chapter has the following sections of miscellaneous tasks that you might want to perform:
� Adding or extending an LVM� Channel bonding� Troubleshooting Linux
11
© Copyright IBM Corp. 2006. All rights reserved. 145
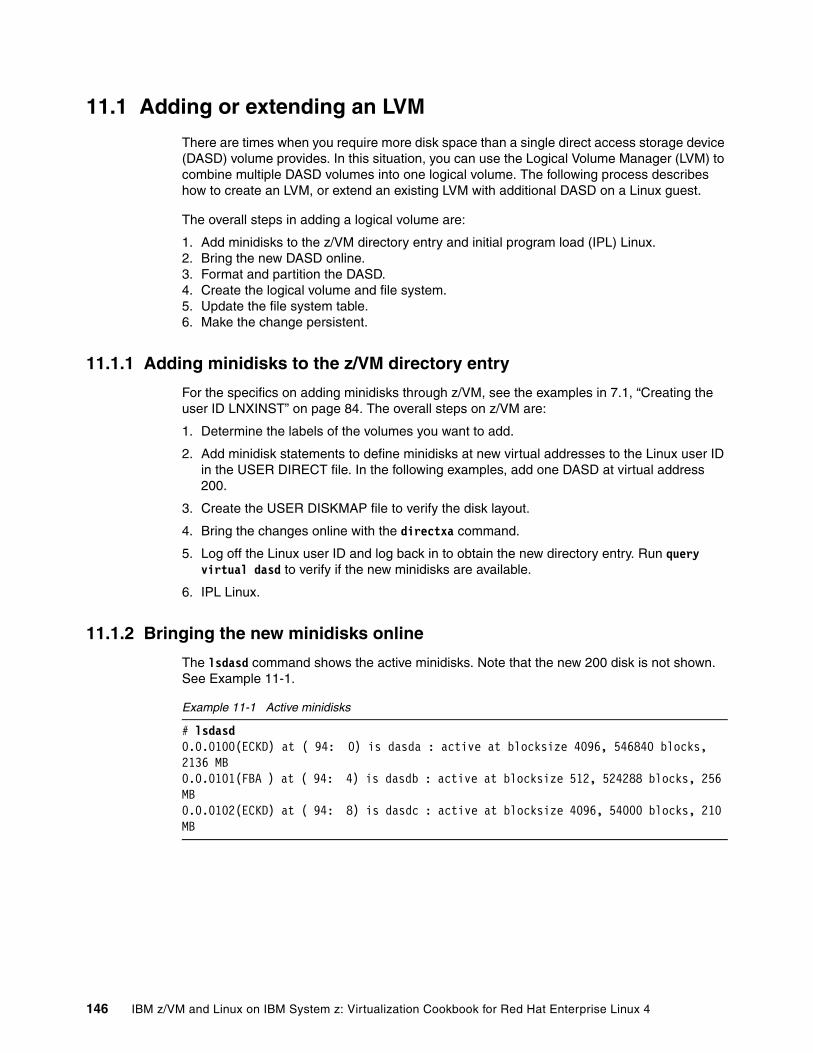
11.1 Adding or extending an LVM
There are times when you require more disk space than a single direct access storage device (DASD) volume provides. In this situation, you can use the Logical Volume Manager (LVM) to combine multiple DASD volumes into one logical volume. The following process describes how to create an LVM, or extend an existing LVM with additional DASD on a Linux guest.
The overall steps in adding a logical volume are:
1. Add minidisks to the z/VM directory entry and initial program load (IPL) Linux.2. Bring the new DASD online.3. Format and partition the DASD.4. Create the logical volume and file system.5. Update the file system table.6. Make the change persistent.
11.1.1 Adding minidisks to the z/VM directory entry
For the specifics on adding minidisks through z/VM, see the examples in 7.1, “Creating the user ID LNXINST” on page 84. The overall steps on z/VM are:
1. Determine the labels of the volumes you want to add.
2. Add minidisk statements to define minidisks at new virtual addresses to the Linux user ID in the USER DIRECT file. In the following examples, add one DASD at virtual address 200.
3. Create the USER DISKMAP file to verify the disk layout.
4. Bring the changes online with the directxa command.
5. Log off the Linux user ID and log back in to obtain the new directory entry. Run query virtual dasd to verify if the new minidisks are available.
6. IPL Linux.
11.1.2 Bringing the new minidisks online
The lsdasd command shows the active minidisks. Note that the new 200 disk is not shown. See Example 11-1.
Example 11-1 Active minidisks
# lsdasd0.0.0100(ECKD) at ( 94: 0) is dasda : active at blocksize 4096, 546840 blocks, 2136 MB0.0.0101(FBA ) at ( 94: 4) is dasdb : active at blocksize 512, 524288 blocks, 256 MB0.0.0102(ECKD) at ( 94: 8) is dasdc : active at blocksize 4096, 54000 blocks, 210 MB
146 IBM z/VM and Linux on IBM System z: Virtualization Cookbook for Red Hat Enterprise Linux 4
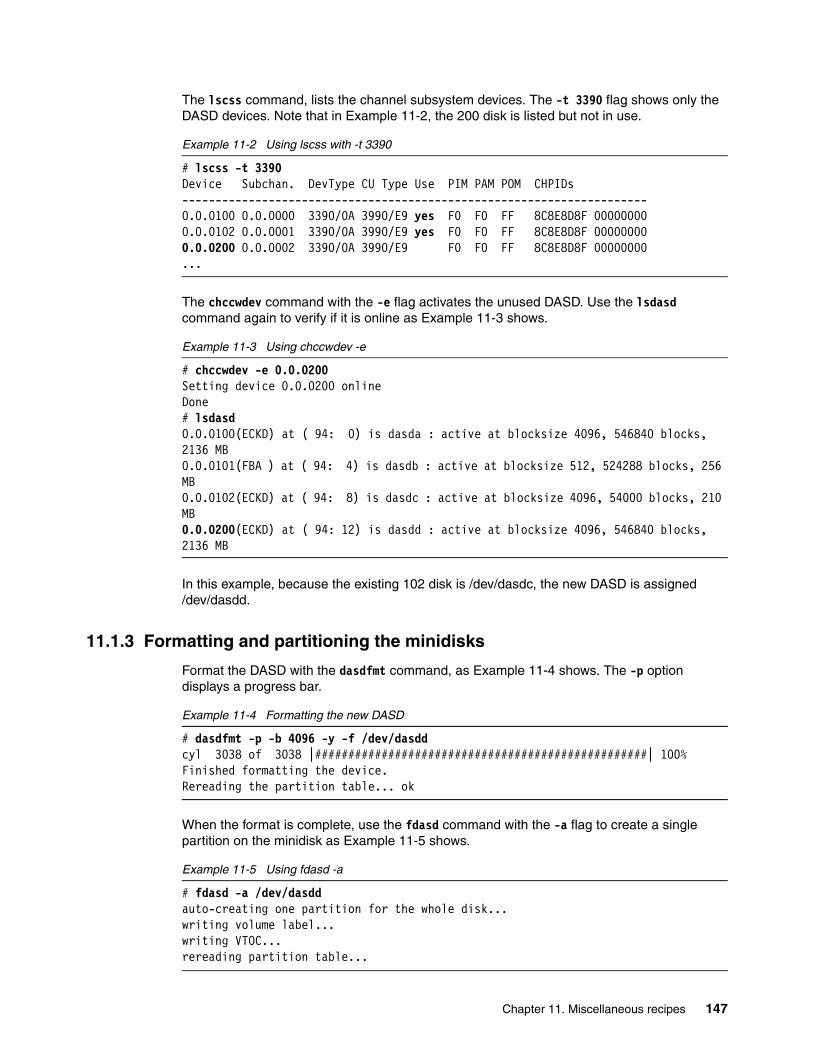
The lscss command, lists the channel subsystem devices. The -t 3390 flag shows only the DASD devices. Note that in Example 11-2, the 200 disk is listed but not in use.
Example 11-2 Using lscss with -t 3390
# lscss -t 3390Device Subchan. DevType CU Type Use PIM PAM POM CHPIDs----------------------------------------------------------------------0.0.0100 0.0.0000 3390/0A 3990/E9 yes F0 F0 FF 8C8E8D8F 000000000.0.0102 0.0.0001 3390/0A 3990/E9 yes F0 F0 FF 8C8E8D8F 000000000.0.0200 0.0.0002 3390/0A 3990/E9 F0 F0 FF 8C8E8D8F 00000000...
The chccwdev command with the -e flag activates the unused DASD. Use the lsdasd command again to verify if it is online as Example 11-3 shows.
Example 11-3 Using chccwdev -e
# chccwdev -e 0.0.0200Setting device 0.0.0200 onlineDone# lsdasd0.0.0100(ECKD) at ( 94: 0) is dasda : active at blocksize 4096, 546840 blocks, 2136 MB0.0.0101(FBA ) at ( 94: 4) is dasdb : active at blocksize 512, 524288 blocks, 256 MB0.0.0102(ECKD) at ( 94: 8) is dasdc : active at blocksize 4096, 54000 blocks, 210 MB0.0.0200(ECKD) at ( 94: 12) is dasdd : active at blocksize 4096, 546840 blocks, 2136 MB
In this example, because the existing 102 disk is /dev/dasdc, the new DASD is assigned /dev/dasdd.
11.1.3 Formatting and partitioning the minidisks
Format the DASD with the dasdfmt command, as Example 11-4 shows. The -p option displays a progress bar.
Example 11-4 Formatting the new DASD
# dasdfmt -p -b 4096 -y -f /dev/dasddcyl 3038 of 3038 |##################################################| 100%Finished formatting the device.Rereading the partition table... ok
When the format is complete, use the fdasd command with the -a flag to create a single partition on the minidisk as Example 11-5 shows.
Example 11-5 Using fdasd -a
# fdasd -a /dev/dasddauto-creating one partition for the whole disk...writing volume label...writing VTOC...rereading partition table...
Chapter 11. Miscellaneous recipes 147
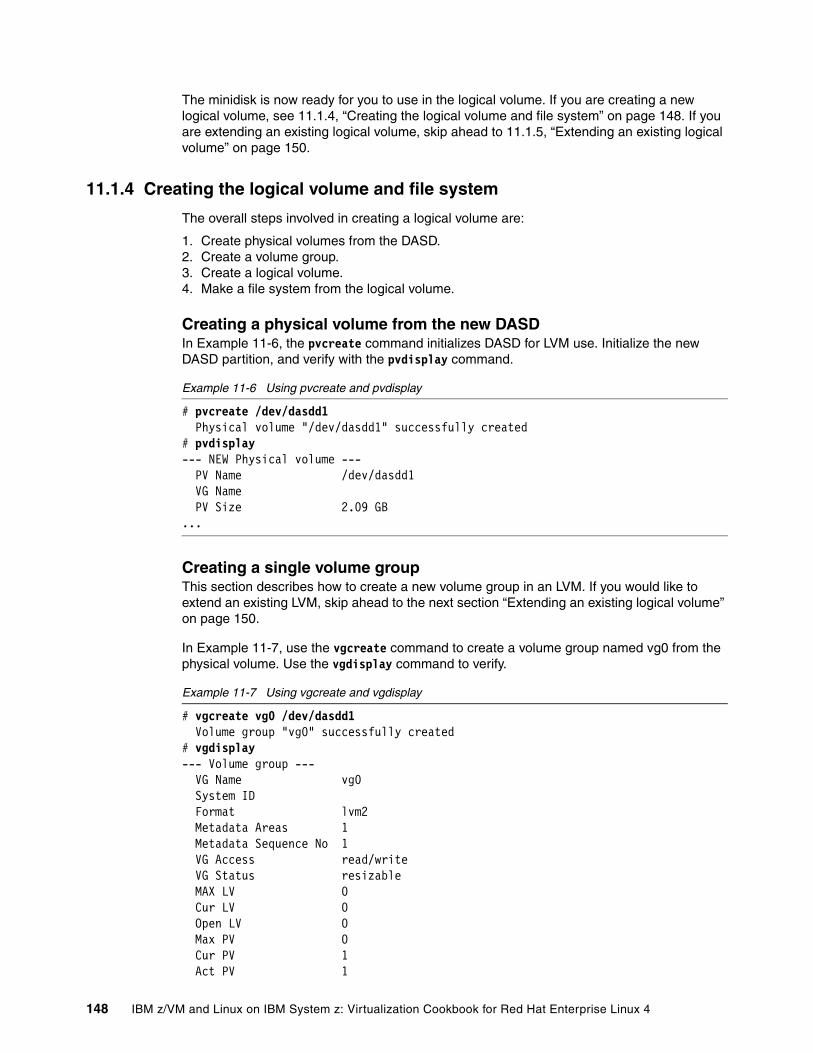
The minidisk is now ready for you to use in the logical volume. If you are creating a new logical volume, see 11.1.4, “Creating the logical volume and file system” on page 148. If you are extending an existing logical volume, skip ahead to 11.1.5, “Extending an existing logical volume” on page 150.
11.1.4 Creating the logical volume and file system
The overall steps involved in creating a logical volume are:
1. Create physical volumes from the DASD.2. Create a volume group.3. Create a logical volume.4. Make a file system from the logical volume.
Creating a physical volume from the new DASDIn Example 11-6, the pvcreate command initializes DASD for LVM use. Initialize the new DASD partition, and verify with the pvdisplay command.
Example 11-6 Using pvcreate and pvdisplay
# pvcreate /dev/dasdd1Physical volume "/dev/dasdd1" successfully created
# pvdisplay--- NEW Physical volume --- PV Name /dev/dasdd1 VG Name PV Size 2.09 GB...
Creating a single volume groupThis section describes how to create a new volume group in an LVM. If you would like to extend an existing LVM, skip ahead to the next section “Extending an existing logical volume” on page 150.
In Example 11-7, use the vgcreate command to create a volume group named vg0 from the physical volume. Use the vgdisplay command to verify.
Example 11-7 Using vgcreate and vgdisplay
# vgcreate vg0 /dev/dasdd1Volume group "vg0" successfully created
# vgdisplay--- Volume group --- VG Name vg0 System ID Format lvm2 Metadata Areas 1 Metadata Sequence No 1 VG Access read/write VG Status resizable MAX LV 0 Cur LV 0 Open LV 0 Max PV 0 Cur PV 1 Act PV 1
148 IBM z/VM and Linux on IBM System z: Virtualization Cookbook for Red Hat Enterprise Linux 4
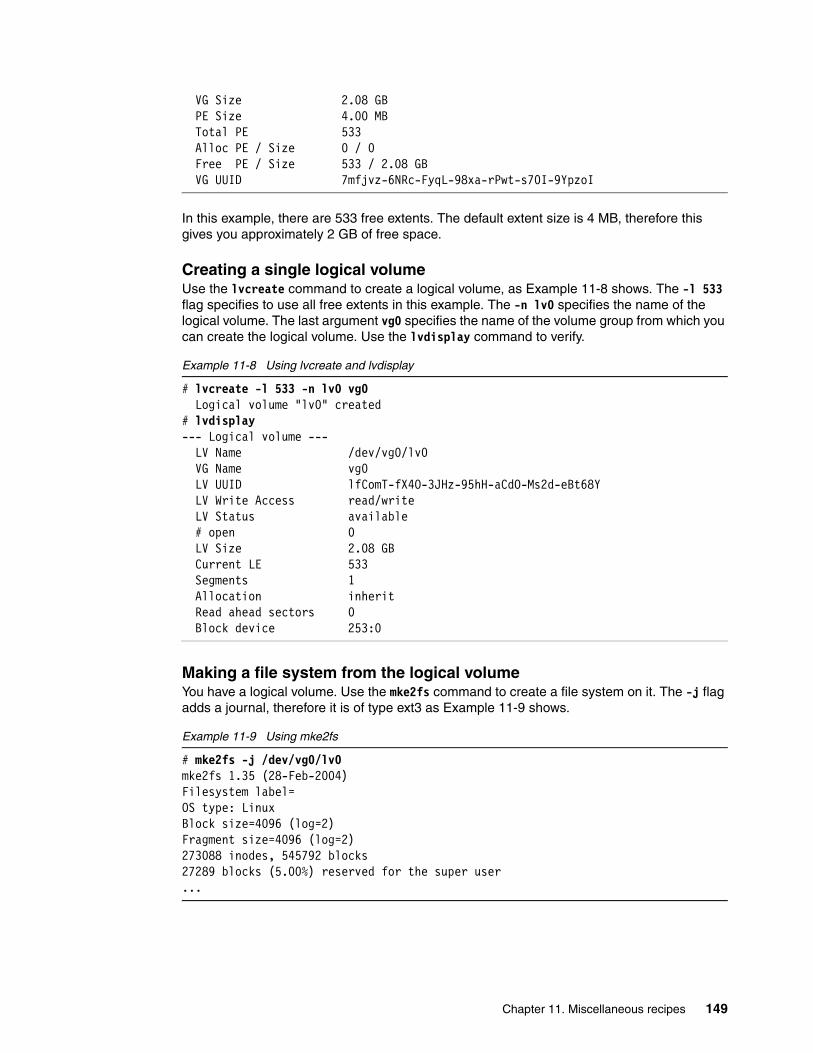
VG Size 2.08 GB PE Size 4.00 MB Total PE 533 Alloc PE / Size 0 / 0 Free PE / Size 533 / 2.08 GB VG UUID 7mfjvz-6NRc-FyqL-98xa-rPwt-s70I-9YpzoI
In this example, there are 533 free extents. The default extent size is 4 MB, therefore this gives you approximately 2 GB of free space.
Creating a single logical volumeUse the lvcreate command to create a logical volume, as Example 11-8 shows. The -l 533 flag specifies to use all free extents in this example. The -n lv0 specifies the name of the logical volume. The last argument vg0 specifies the name of the volume group from which you can create the logical volume. Use the lvdisplay command to verify.
Example 11-8 Using lvcreate and lvdisplay
# lvcreate -l 533 -n lv0 vg0Logical volume "lv0" created
# lvdisplay--- Logical volume --- LV Name /dev/vg0/lv0 VG Name vg0 LV UUID lfComT-fX4O-3JHz-95hH-aCdO-Ms2d-eBt68Y LV Write Access read/write LV Status available # open 0 LV Size 2.08 GB Current LE 533 Segments 1 Allocation inherit Read ahead sectors 0 Block device 253:0
Making a file system from the logical volumeYou have a logical volume. Use the mke2fs command to create a file system on it. The -j flag adds a journal, therefore it is of type ext3 as Example 11-9 shows.
Example 11-9 Using mke2fs
# mke2fs -j /dev/vg0/lv0mke2fs 1.35 (28-Feb-2004)Filesystem label=OS type: LinuxBlock size=4096 (log=2)Fragment size=4096 (log=2)273088 inodes, 545792 blocks27289 blocks (5.00%) reserved for the super user...
Chapter 11. Miscellaneous recipes 149
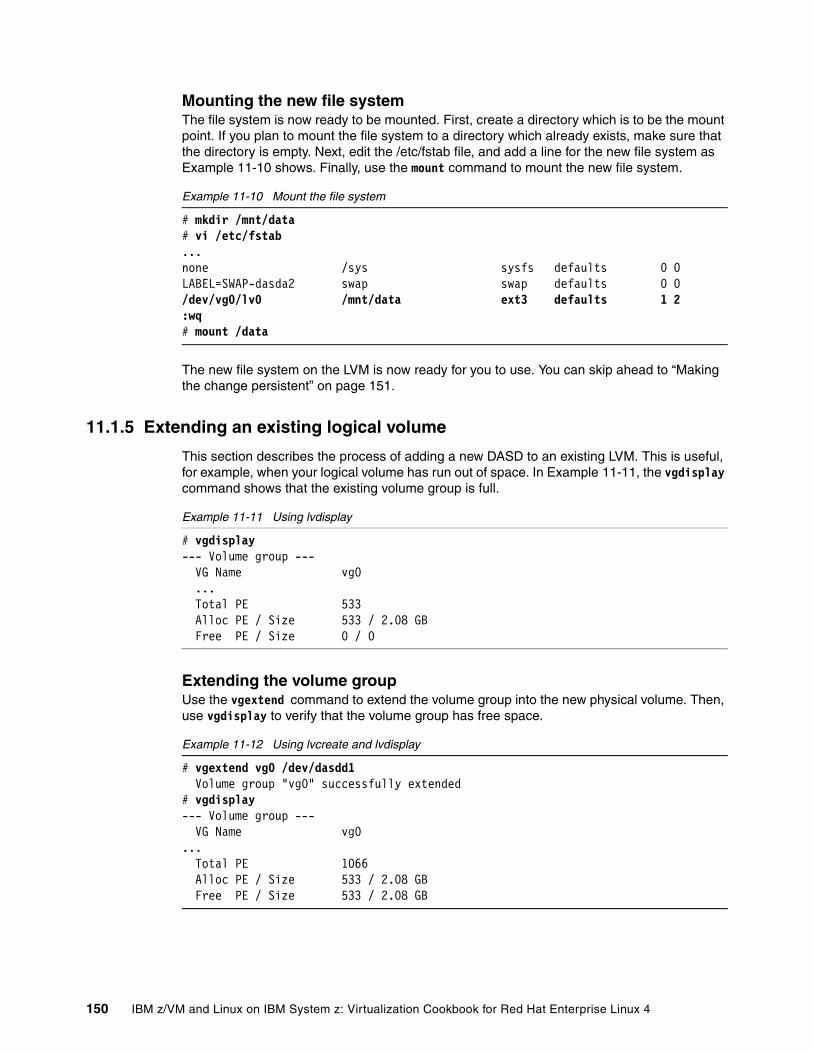
Mounting the new file systemThe file system is now ready to be mounted. First, create a directory which is to be the mount point. If you plan to mount the file system to a directory which already exists, make sure that the directory is empty. Next, edit the /etc/fstab file, and add a line for the new file system as Example 11-10 shows. Finally, use the mount command to mount the new file system.
Example 11-10 Mount the file system
# mkdir /mnt/data# vi /etc/fstab...none /sys sysfs defaults 0 0LABEL=SWAP-dasda2 swap swap defaults 0 0/dev/vg0/lv0 /mnt/data ext3 defaults 1 2:wq# mount /data
The new file system on the LVM is now ready for you to use. You can skip ahead to “Making the change persistent” on page 151.
11.1.5 Extending an existing logical volume
This section describes the process of adding a new DASD to an existing LVM. This is useful, for example, when your logical volume has run out of space. In Example 11-11, the vgdisplay command shows that the existing volume group is full.
Example 11-11 Using lvdisplay
# vgdisplay--- Volume group --- VG Name vg0
...Total PE 533
Alloc PE / Size 533 / 2.08 GB Free PE / Size 0 / 0
Extending the volume groupUse the vgextend command to extend the volume group into the new physical volume. Then, use vgdisplay to verify that the volume group has free space.
Example 11-12 Using lvcreate and lvdisplay
# vgextend vg0 /dev/dasdd1 Volume group "vg0" successfully extended# vgdisplay--- Volume group --- VG Name vg0...
Total PE 1066 Alloc PE / Size 533 / 2.08 GB Free PE / Size 533 / 2.08 GB
150 IBM z/VM and Linux on IBM System z: Virtualization Cookbook for Red Hat Enterprise Linux 4
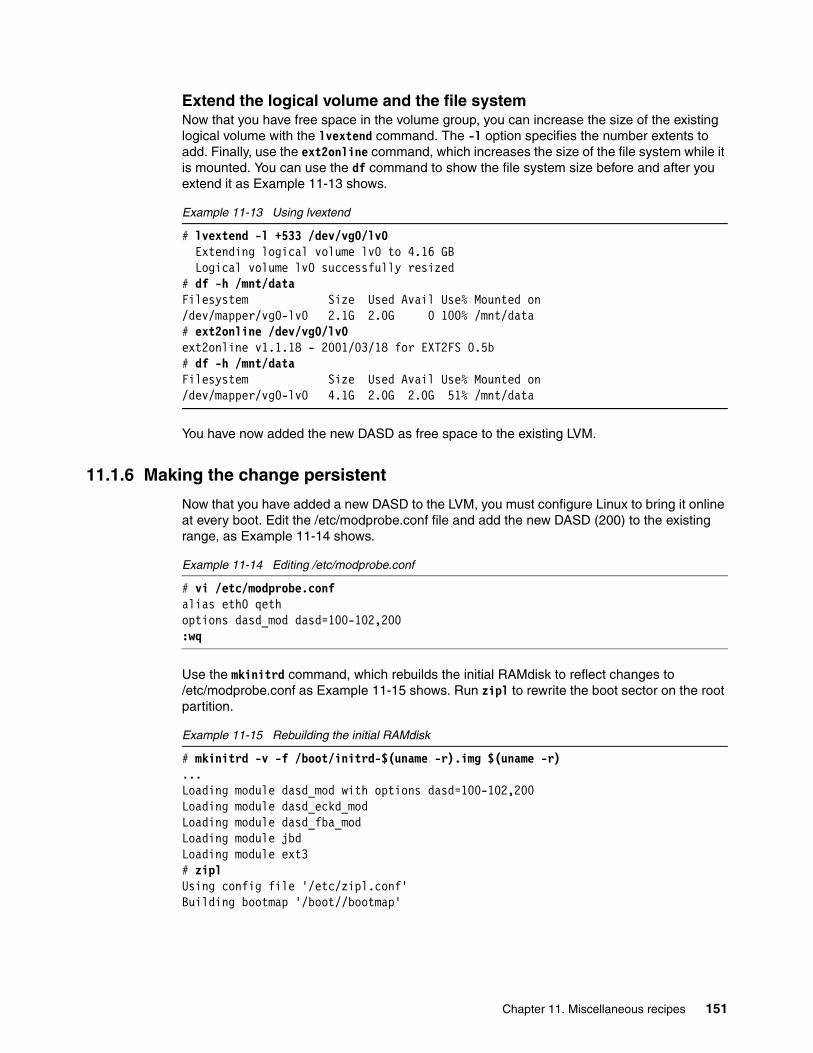
Extend the logical volume and the file systemNow that you have free space in the volume group, you can increase the size of the existing logical volume with the lvextend command. The -l option specifies the number extents to add. Finally, use the ext2online command, which increases the size of the file system while it is mounted. You can use the df command to show the file system size before and after you extend it as Example 11-13 shows.
Example 11-13 Using lvextend
# lvextend -l +533 /dev/vg0/lv0 Extending logical volume lv0 to 4.16 GB Logical volume lv0 successfully resized# df -h /mnt/dataFilesystem Size Used Avail Use% Mounted on/dev/mapper/vg0-lv0 2.1G 2.0G 0 100% /mnt/data# ext2online /dev/vg0/lv0ext2online v1.1.18 - 2001/03/18 for EXT2FS 0.5b# df -h /mnt/dataFilesystem Size Used Avail Use% Mounted on/dev/mapper/vg0-lv0 4.1G 2.0G 2.0G 51% /mnt/data
You have now added the new DASD as free space to the existing LVM.
11.1.6 Making the change persistent
Now that you have added a new DASD to the LVM, you must configure Linux to bring it online at every boot. Edit the /etc/modprobe.conf file and add the new DASD (200) to the existing range, as Example 11-14 shows.
Example 11-14 Editing /etc/modprobe.conf
# vi /etc/modprobe.confalias eth0 qethoptions dasd_mod dasd=100-102,200:wq
Use the mkinitrd command, which rebuilds the initial RAMdisk to reflect changes to /etc/modprobe.conf as Example 11-15 shows. Run zipl to rewrite the boot sector on the root partition.
Example 11-15 Rebuilding the initial RAMdisk
# mkinitrd -v -f /boot/initrd-$(uname -r).img $(uname -r)...Loading module dasd_mod with options dasd=100-102,200Loading module dasd_eckd_modLoading module dasd_fba_modLoading module jbdLoading module ext3# ziplUsing config file '/etc/zipl.conf'Building bootmap '/boot//bootmap'
Chapter 11. Miscellaneous recipes 151
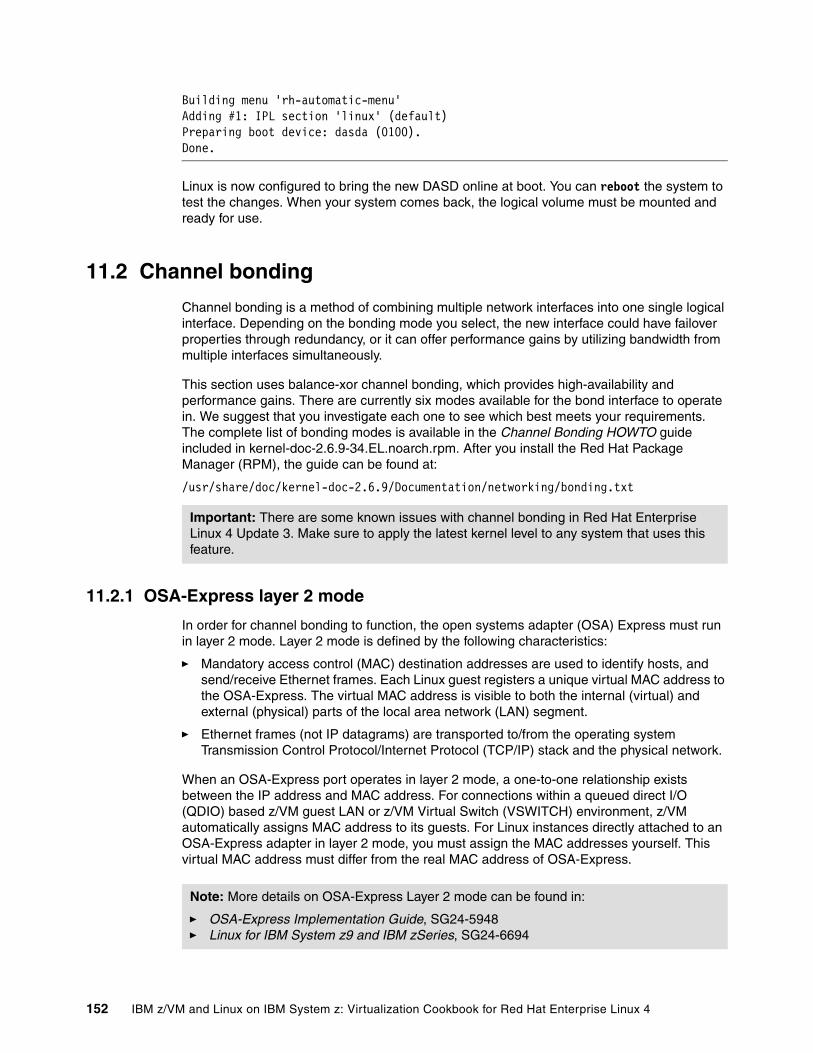
Building menu 'rh-automatic-menu'Adding #1: IPL section 'linux' (default)Preparing boot device: dasda (0100).Done.
Linux is now configured to bring the new DASD online at boot. You can reboot the system to test the changes. When your system comes back, the logical volume must be mounted and ready for use.
11.2 Channel bonding
Channel bonding is a method of combining multiple network interfaces into one single logical interface. Depending on the bonding mode you select, the new interface could have failover properties through redundancy, or it can offer performance gains by utilizing bandwidth from multiple interfaces simultaneously.
This section uses balance-xor channel bonding, which provides high-availability and performance gains. There are currently six modes available for the bond interface to operate in. We suggest that you investigate each one to see which best meets your requirements. The complete list of bonding modes is available in the Channel Bonding HOWTO guide included in kernel-doc-2.6.9-34.EL.noarch.rpm. After you install the Red Hat Package Manager (RPM), the guide can be found at:
/usr/share/doc/kernel-doc-2.6.9/Documentation/networking/bonding.txt
11.2.1 OSA-Express layer 2 mode
In order for channel bonding to function, the open systems adapter (OSA) Express must run in layer 2 mode. Layer 2 mode is defined by the following characteristics:
� Mandatory access control (MAC) destination addresses are used to identify hosts, and send/receive Ethernet frames. Each Linux guest registers a unique virtual MAC address to the OSA-Express. The virtual MAC address is visible to both the internal (virtual) and external (physical) parts of the local area network (LAN) segment.
� Ethernet frames (not IP datagrams) are transported to/from the operating system Transmission Control Protocol/Internet Protocol (TCP/IP) stack and the physical network.
When an OSA-Express port operates in layer 2 mode, a one-to-one relationship exists between the IP address and MAC address. For connections within a queued direct I/O (QDIO) based z/VM guest LAN or z/VM Virtual Switch (VSWITCH) environment, z/VM automatically assigns MAC address to its guests. For Linux instances directly attached to an OSA-Express adapter in layer 2 mode, you must assign the MAC addresses yourself. This virtual MAC address must differ from the real MAC address of OSA-Express.
Important: There are some known issues with channel bonding in Red Hat Enterprise Linux 4 Update 3. Make sure to apply the latest kernel level to any system that uses this feature.
Note: More details on OSA-Express Layer 2 mode can be found in:
� OSA-Express Implementation Guide, SG24-5948 � Linux for IBM System z9 and IBM zSeries, SG24-6694
152 IBM z/VM and Linux on IBM System z: Virtualization Cookbook for Red Hat Enterprise Linux 4
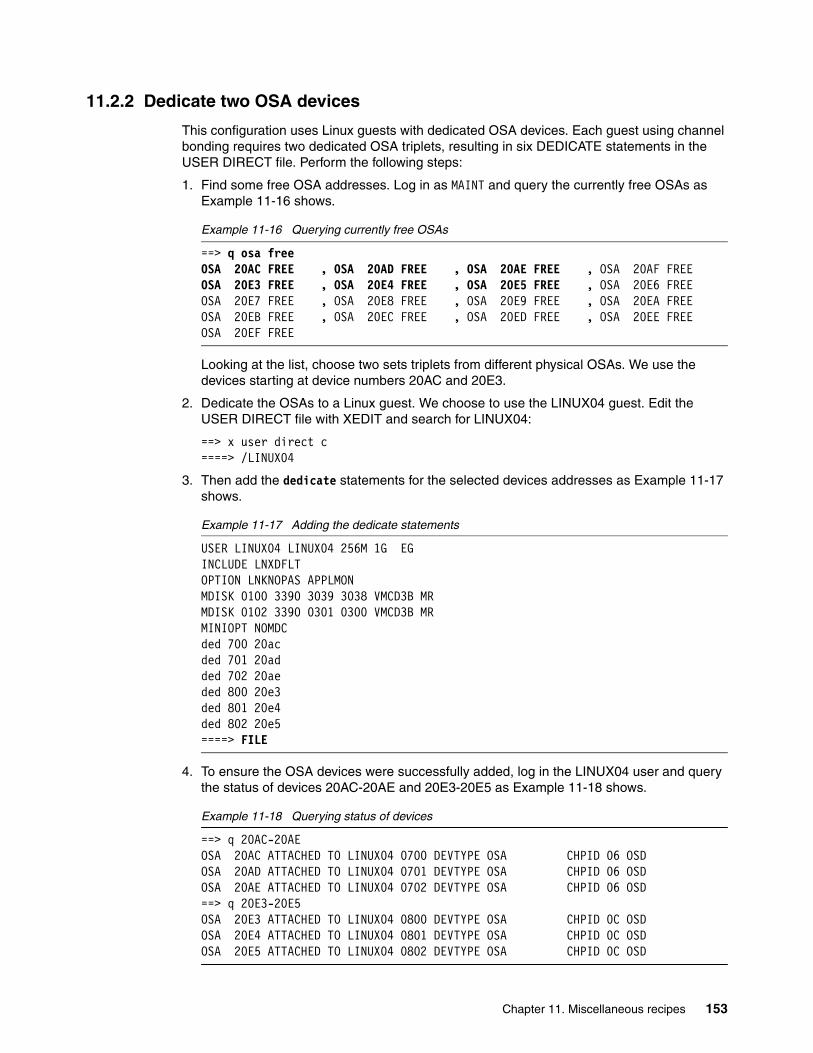
11.2.2 Dedicate two OSA devices
This configuration uses Linux guests with dedicated OSA devices. Each guest using channel bonding requires two dedicated OSA triplets, resulting in six DEDICATE statements in the USER DIRECT file. Perform the following steps:
1. Find some free OSA addresses. Log in as MAINT and query the currently free OSAs as Example 11-16 shows.
Example 11-16 Querying currently free OSAs
==> q osa freeOSA 20AC FREE , OSA 20AD FREE , OSA 20AE FREE , OSA 20AF FREEOSA 20E3 FREE , OSA 20E4 FREE , OSA 20E5 FREE , OSA 20E6 FREEOSA 20E7 FREE , OSA 20E8 FREE , OSA 20E9 FREE , OSA 20EA FREEOSA 20EB FREE , OSA 20EC FREE , OSA 20ED FREE , OSA 20EE FREEOSA 20EF FREE
Looking at the list, choose two sets triplets from different physical OSAs. We use the devices starting at device numbers 20AC and 20E3.
2. Dedicate the OSAs to a Linux guest. We choose to use the LINUX04 guest. Edit the USER DIRECT file with XEDIT and search for LINUX04:
==> x user direct c====> /LINUX04
3. Then add the dedicate statements for the selected devices addresses as Example 11-17 shows.
Example 11-17 Adding the dedicate statements
USER LINUX04 LINUX04 256M 1G EG INCLUDE LNXDFLT OPTION LNKNOPAS APPLMON MDISK 0100 3390 3039 3038 VMCD3B MR MDISK 0102 3390 0301 0300 VMCD3B MR MINIOPT NOMDC ded 700 20ac ded 701 20ad ded 702 20ae ded 800 20e3 ded 801 20e4 ded 802 20e5 ====> FILE
4. To ensure the OSA devices were successfully added, log in the LINUX04 user and query the status of devices 20AC-20AE and 20E3-20E5 as Example 11-18 shows.
Example 11-18 Querying status of devices
==> q 20AC-20AEOSA 20AC ATTACHED TO LINUX04 0700 DEVTYPE OSA CHPID 06 OSDOSA 20AD ATTACHED TO LINUX04 0701 DEVTYPE OSA CHPID 06 OSDOSA 20AE ATTACHED TO LINUX04 0702 DEVTYPE OSA CHPID 06 OSD==> q 20E3-20E5OSA 20E3 ATTACHED TO LINUX04 0800 DEVTYPE OSA CHPID 0C OSDOSA 20E4 ATTACHED TO LINUX04 0801 DEVTYPE OSA CHPID 0C OSDOSA 20E5 ATTACHED TO LINUX04 0802 DEVTYPE OSA CHPID 0C OSD
Chapter 11. Miscellaneous recipes 153

Linux now has access to two OSA devices, each you can use as one interface in the bonding configuration.
11.2.3 Configure the physical switch
For balance-xor mode to function properly, the physical switch that the OSA devices are connected to must support port aggregation. Most high end switches support channel bonding, however, the term varies across vendors, for example etherchannel or port trunking.
11.2.4 Configuring Linux
At the moment, connecting to LINUX04 is accomplished by vsw1 and the virtual network interface card (NIC) at address 0600. Upon completion of this section, connections are established through a new interface device that bonds all OSA devices at 0700 and 0800.
Log in to LINUX04 as root and create the following three interface configuration files:
� /etc/sysconfig/network-scripts/ifcfg-eth0
Example 11-19 Configuration file for eth0 (/etc/sysconfig/network-scripts/ifcfg-eth0)
DEVICE=eth0BOOTPROTO=staticNETTYPE=qethONBOOT=yesSUBCHANNELS=0.0.0700,0.0.0701,0.0.0702TYPE=EthernetOPTIONS="layer2=1"SLAVE=yesMASTER=bond0MACADDR=02:BB:CC:DD:EE:FF
� /etc/sysconfig/network-scripts/ifcfg-eth1
Example 11-20 Configuration file for eth1 (/etc/sysconfig/network-scripts/ifcfg-eth1)
DEVICE=eth1BOOTPROTO=staticNETTYPE=qethONBOOT=yesSUBCHANNELS=0.0.0800,0.0.0801,0.0.0802TYPE=EthernetOPTIONS="layer2=1"SLAVE=yesMASTER=bond0MACADDR=02:BB:CC:DD:EE:FF
Note: Because channel bonding configuration is specific to a switch vendor, we do not document the procedure here. At a high level, you must configure the switch to aggregate the ports connected to the bonded interfaces. This allows duplicate MAC addresses for the bonded interfaces, and load balances traffic across the ports. For details on configuring your switch, consult the switch manufacturer.
154 IBM z/VM and Linux on IBM System z: Virtualization Cookbook for Red Hat Enterprise Linux 4

� /etc/sysconfig/network-scripts/ifcfg-bond0
Example 11-21 Configuration file for bond0 (/etc/sysconfig/network-scripts/ifcfg-bond0)
DEVICE=bond0BOOTPROTO=staticIPADDR=10.1.40.94MTU=1492NETMASK=255.255.255.0ONBOOT=yesTYPE=Ethernet
Both ifcfg-eth0 and ifcfg-eth1 contain very similar information. The options that might be unfamiliar to you are as follows:
� SLAVE
If “yes” then the current interface is set to slave mode. In a channel bonding configuration only the bond interface must be in MASTER mode and all bonded interfaces must be in SLAVE mode.
� MASTER
Indicates which interface acts as the master for the current interface configuration. This is always the name of a bonding interface.
� OPTIONS
This is a list of name/value pairs, which you can use to modify settings in the qeth driver. In this case, we are using OSA-Express that is running in layer 2 mode. In order for Linux to cooperate with this you must define an extra configuration that sets the device to layer 2 mode.
� MACADDR
Indicates the virtual MAC address of the interface. It must be unique within your physical network. The address prefix of two hexadecimal digits are 02. This means that this MAC address falls within the allowable range of addresses classified as locally administered. If you configure the channel bonding interface with balance-xor mode, all SLAVE interfaces must have the same MAC addresses.
You require to define the bonding module in the /etc/modprobe.conf file as Example 11-22 shows. The definition includes an alias, and also a list of options that you must pass to the bonding module. The two options used are miimon and mode. The first option miimon specifies the interval in milliseconds, which you use to detect link failures. The second option is mode, which you can use to select how the channel bonding acts.
Example 11-22 Configuration file for modprobe.conf (/etc/modprobe.conf)
alias eth0 qethalias eth1 qethalias bond0 bondingoptions bonding miimon=100 mode=2options dasd_mod dasd=100-102
Chapter 11. Miscellaneous recipes 155
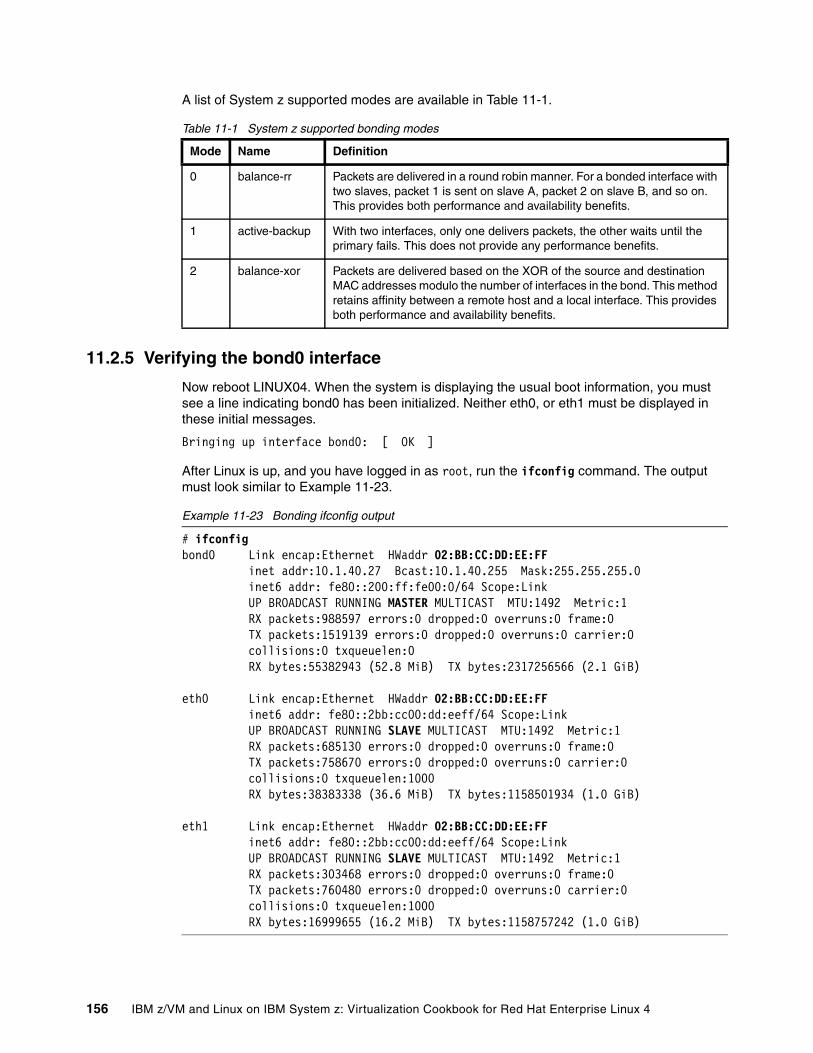
A list of System z supported modes are available in Table 11-1.
Table 11-1 System z supported bonding modes
11.2.5 Verifying the bond0 interface
Now reboot LINUX04. When the system is displaying the usual boot information, you must see a line indicating bond0 has been initialized. Neither eth0, or eth1 must be displayed in these initial messages.
Bringing up interface bond0: [ OK ]
After Linux is up, and you have logged in as root, run the ifconfig command. The output must look similar to Example 11-23.
Example 11-23 Bonding ifconfig output
# ifconfigbond0 Link encap:Ethernet HWaddr 02:BB:CC:DD:EE:FF inet addr:10.1.40.27 Bcast:10.1.40.255 Mask:255.255.255.0 inet6 addr: fe80::200:ff:fe00:0/64 Scope:Link UP BROADCAST RUNNING MASTER MULTICAST MTU:1492 Metric:1 RX packets:988597 errors:0 dropped:0 overruns:0 frame:0 TX packets:1519139 errors:0 dropped:0 overruns:0 carrier:0 collisions:0 txqueuelen:0 RX bytes:55382943 (52.8 MiB) TX bytes:2317256566 (2.1 GiB)
eth0 Link encap:Ethernet HWaddr 02:BB:CC:DD:EE:FF inet6 addr: fe80::2bb:cc00:dd:eeff/64 Scope:Link UP BROADCAST RUNNING SLAVE MULTICAST MTU:1492 Metric:1 RX packets:685130 errors:0 dropped:0 overruns:0 frame:0 TX packets:758670 errors:0 dropped:0 overruns:0 carrier:0 collisions:0 txqueuelen:1000 RX bytes:38383338 (36.6 MiB) TX bytes:1158501934 (1.0 GiB)
eth1 Link encap:Ethernet HWaddr 02:BB:CC:DD:EE:FF inet6 addr: fe80::2bb:cc00:dd:eeff/64 Scope:Link UP BROADCAST RUNNING SLAVE MULTICAST MTU:1492 Metric:1 RX packets:303468 errors:0 dropped:0 overruns:0 frame:0 TX packets:760480 errors:0 dropped:0 overruns:0 carrier:0 collisions:0 txqueuelen:1000 RX bytes:16999655 (16.2 MiB) TX bytes:1158757242 (1.0 GiB)
Mode Name Definition
0 balance-rr Packets are delivered in a round robin manner. For a bonded interface with two slaves, packet 1 is sent on slave A, packet 2 on slave B, and so on. This provides both performance and availability benefits.
1 active-backup With two interfaces, only one delivers packets, the other waits until the primary fails. This does not provide any performance benefits.
2 balance-xor Packets are delivered based on the XOR of the source and destination MAC addresses modulo the number of interfaces in the bond. This method retains affinity between a remote host and a local interface. This provides both performance and availability benefits.
156 IBM z/VM and Linux on IBM System z: Virtualization Cookbook for Red Hat Enterprise Linux 4
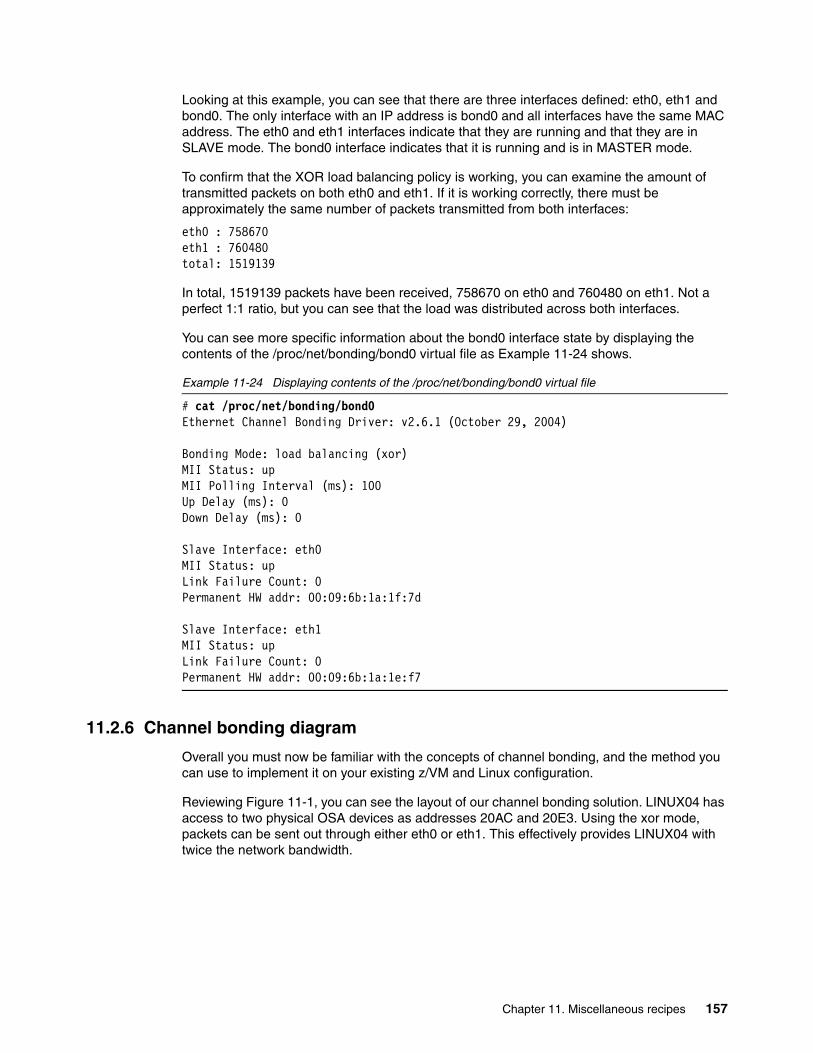
Looking at this example, you can see that there are three interfaces defined: eth0, eth1 and bond0. The only interface with an IP address is bond0 and all interfaces have the same MAC address. The eth0 and eth1 interfaces indicate that they are running and that they are in SLAVE mode. The bond0 interface indicates that it is running and is in MASTER mode.
To confirm that the XOR load balancing policy is working, you can examine the amount of transmitted packets on both eth0 and eth1. If it is working correctly, there must be approximately the same number of packets transmitted from both interfaces:
eth0 : 758670eth1 : 760480total: 1519139
In total, 1519139 packets have been received, 758670 on eth0 and 760480 on eth1. Not a perfect 1:1 ratio, but you can see that the load was distributed across both interfaces.
You can see more specific information about the bond0 interface state by displaying the contents of the /proc/net/bonding/bond0 virtual file as Example 11-24 shows.
Example 11-24 Displaying contents of the /proc/net/bonding/bond0 virtual file
# cat /proc/net/bonding/bond0Ethernet Channel Bonding Driver: v2.6.1 (October 29, 2004)
Bonding Mode: load balancing (xor)MII Status: upMII Polling Interval (ms): 100Up Delay (ms): 0Down Delay (ms): 0
Slave Interface: eth0MII Status: upLink Failure Count: 0Permanent HW addr: 00:09:6b:1a:1f:7d
Slave Interface: eth1MII Status: upLink Failure Count: 0Permanent HW addr: 00:09:6b:1a:1e:f7
11.2.6 Channel bonding diagram
Overall you must now be familiar with the concepts of channel bonding, and the method you can use to implement it on your existing z/VM and Linux configuration.
Reviewing Figure 11-1, you can see the layout of our channel bonding solution. LINUX04 has access to two physical OSA devices as addresses 20AC and 20E3. Using the xor mode, packets can be sent out through either eth0 or eth1. This effectively provides LINUX04 with twice the network bandwidth.
Chapter 11. Miscellaneous recipes 157
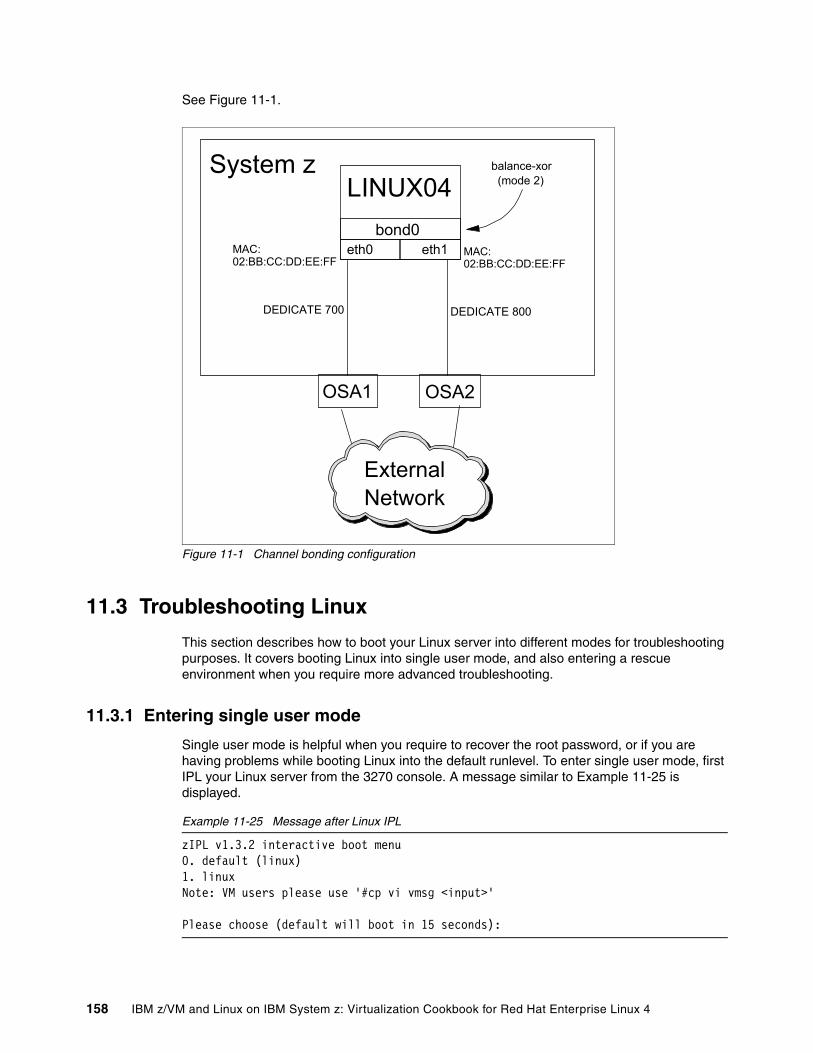
See Figure 11-1.
Figure 11-1 Channel bonding configuration
11.3 Troubleshooting Linux
This section describes how to boot your Linux server into different modes for troubleshooting purposes. It covers booting Linux into single user mode, and also entering a rescue environment when you require more advanced troubleshooting.
11.3.1 Entering single user mode
Single user mode is helpful when you require to recover the root password, or if you are having problems while booting Linux into the default runlevel. To enter single user mode, first IPL your Linux server from the 3270 console. A message similar to Example 11-25 is displayed.
Example 11-25 Message after Linux IPL
zIPL v1.3.2 interactive boot menu 0. default (linux) 1. linux Note: VM users please use '#cp vi vmsg <input>' Please choose (default will boot in 15 seconds):
OSA1 OSA2
eth0 eth1bond0
DEDICATE 800DEDICATE 700
External Network
System zLINUX04
balance-xor (mode 2)
MAC: 02:BB:CC:DD:EE:FF
MAC: 02:BB:CC:DD:EE:FF
158 IBM z/VM and Linux on IBM System z: Virtualization Cookbook for Red Hat Enterprise Linux 4
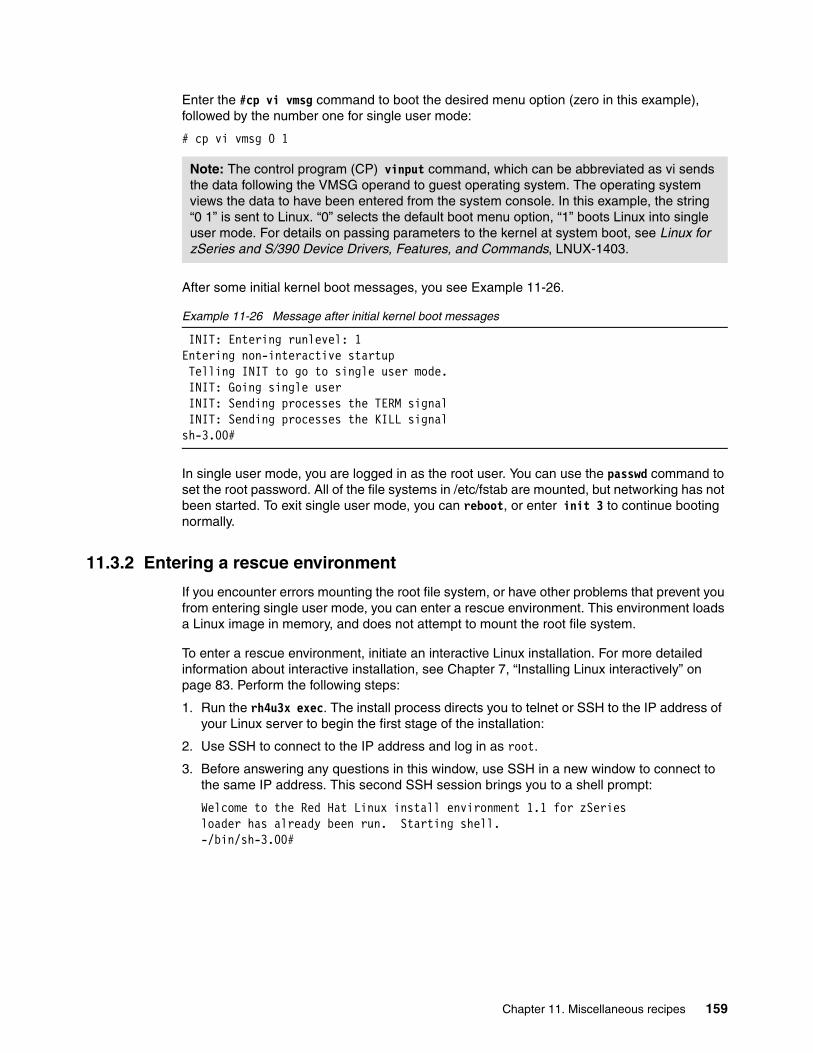
Enter the #cp vi vmsg command to boot the desired menu option (zero in this example), followed by the number one for single user mode:
# cp vi vmsg 0 1
After some initial kernel boot messages, you see Example 11-26.
Example 11-26 Message after initial kernel boot messages
INIT: Entering runlevel: 1 Entering non-interactive startup Telling INIT to go to single user mode. INIT: Going single user INIT: Sending processes the TERM signal INIT: Sending processes the KILL signal sh-3.00#
In single user mode, you are logged in as the root user. You can use the passwd command to set the root password. All of the file systems in /etc/fstab are mounted, but networking has not been started. To exit single user mode, you can reboot, or enter init 3 to continue booting normally.
11.3.2 Entering a rescue environment
If you encounter errors mounting the root file system, or have other problems that prevent you from entering single user mode, you can enter a rescue environment. This environment loads a Linux image in memory, and does not attempt to mount the root file system.
To enter a rescue environment, initiate an interactive Linux installation. For more detailed information about interactive installation, see Chapter 7, “Installing Linux interactively” on page 83. Perform the following steps:
1. Run the rh4u3x exec. The install process directs you to telnet or SSH to the IP address of your Linux server to begin the first stage of the installation:
2. Use SSH to connect to the IP address and log in as root.
3. Before answering any questions in this window, use SSH in a new window to connect to the same IP address. This second SSH session brings you to a shell prompt:
Welcome to the Red Hat Linux install environment 1.1 for zSeriesloader has already been run. Starting shell.-/bin/sh-3.00#
Note: The control program (CP) vinput command, which can be abbreviated as vi sends the data following the VMSG operand to guest operating system. The operating system views the data to have been entered from the system console. In this example, the string “0 1” is sent to Linux. “0” selects the default boot menu option, “1” boots Linux into single user mode. For details on passing parameters to the kernel at system boot, see Linux for zSeries and S/390 Device Drivers, Features, and Commands, LNUX-1403.
Chapter 11. Miscellaneous recipes 159
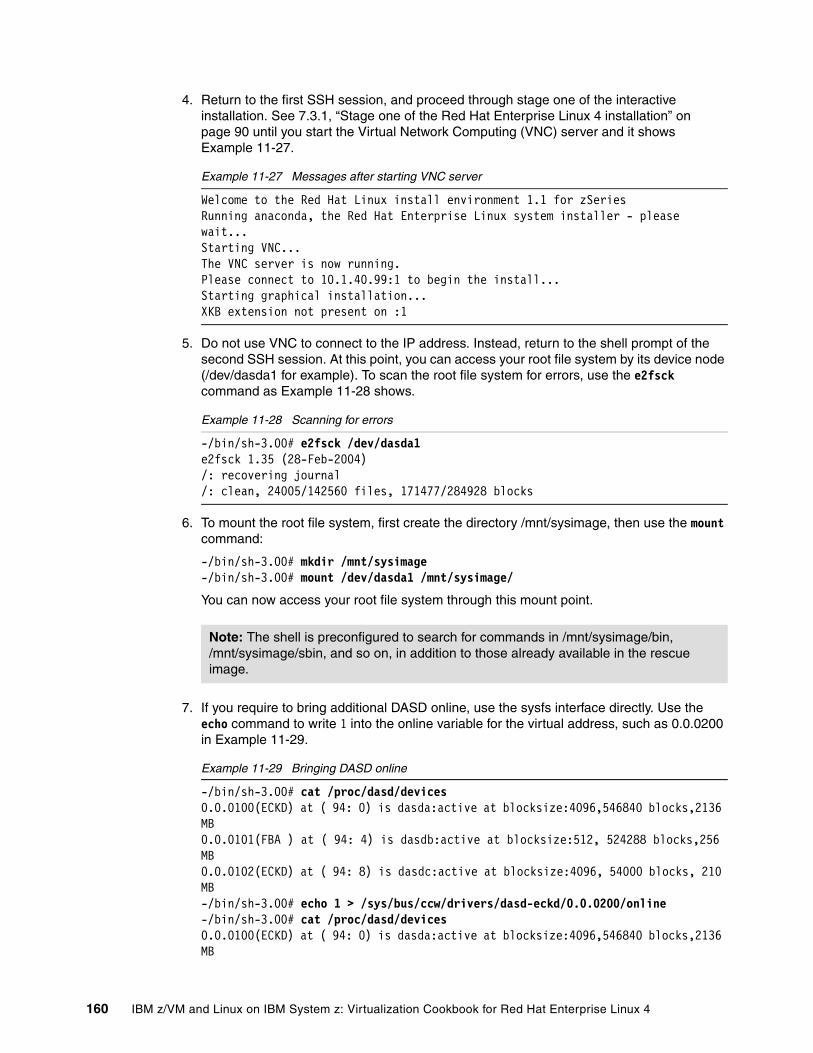
4. Return to the first SSH session, and proceed through stage one of the interactive installation. See 7.3.1, “Stage one of the Red Hat Enterprise Linux 4 installation” on page 90 until you start the Virtual Network Computing (VNC) server and it shows Example 11-27.
Example 11-27 Messages after starting VNC server
Welcome to the Red Hat Linux install environment 1.1 for zSeriesRunning anaconda, the Red Hat Enterprise Linux system installer - please wait...Starting VNC...The VNC server is now running.Please connect to 10.1.40.99:1 to begin the install...Starting graphical installation...XKB extension not present on :1
5. Do not use VNC to connect to the IP address. Instead, return to the shell prompt of the second SSH session. At this point, you can access your root file system by its device node (/dev/dasda1 for example). To scan the root file system for errors, use the e2fsck command as Example 11-28 shows.
Example 11-28 Scanning for errors
-/bin/sh-3.00# e2fsck /dev/dasda1e2fsck 1.35 (28-Feb-2004)/: recovering journal/: clean, 24005/142560 files, 171477/284928 blocks
6. To mount the root file system, first create the directory /mnt/sysimage, then use the mount command:
-/bin/sh-3.00# mkdir /mnt/sysimage-/bin/sh-3.00# mount /dev/dasda1 /mnt/sysimage/
You can now access your root file system through this mount point.
7. If you require to bring additional DASD online, use the sysfs interface directly. Use the echo command to write 1 into the online variable for the virtual address, such as 0.0.0200 in Example 11-29.
Example 11-29 Bringing DASD online
-/bin/sh-3.00# cat /proc/dasd/devices0.0.0100(ECKD) at ( 94: 0) is dasda:active at blocksize:4096,546840 blocks,2136 MB0.0.0101(FBA ) at ( 94: 4) is dasdb:active at blocksize:512, 524288 blocks,256 MB0.0.0102(ECKD) at ( 94: 8) is dasdc:active at blocksize:4096, 54000 blocks, 210 MB-/bin/sh-3.00# echo 1 > /sys/bus/ccw/drivers/dasd-eckd/0.0.0200/online-/bin/sh-3.00# cat /proc/dasd/devices0.0.0100(ECKD) at ( 94: 0) is dasda:active at blocksize:4096,546840 blocks,2136 MB
Note: The shell is preconfigured to search for commands in /mnt/sysimage/bin, /mnt/sysimage/sbin, and so on, in addition to those already available in the rescue image.
160 IBM z/VM and Linux on IBM System z: Virtualization Cookbook for Red Hat Enterprise Linux 4
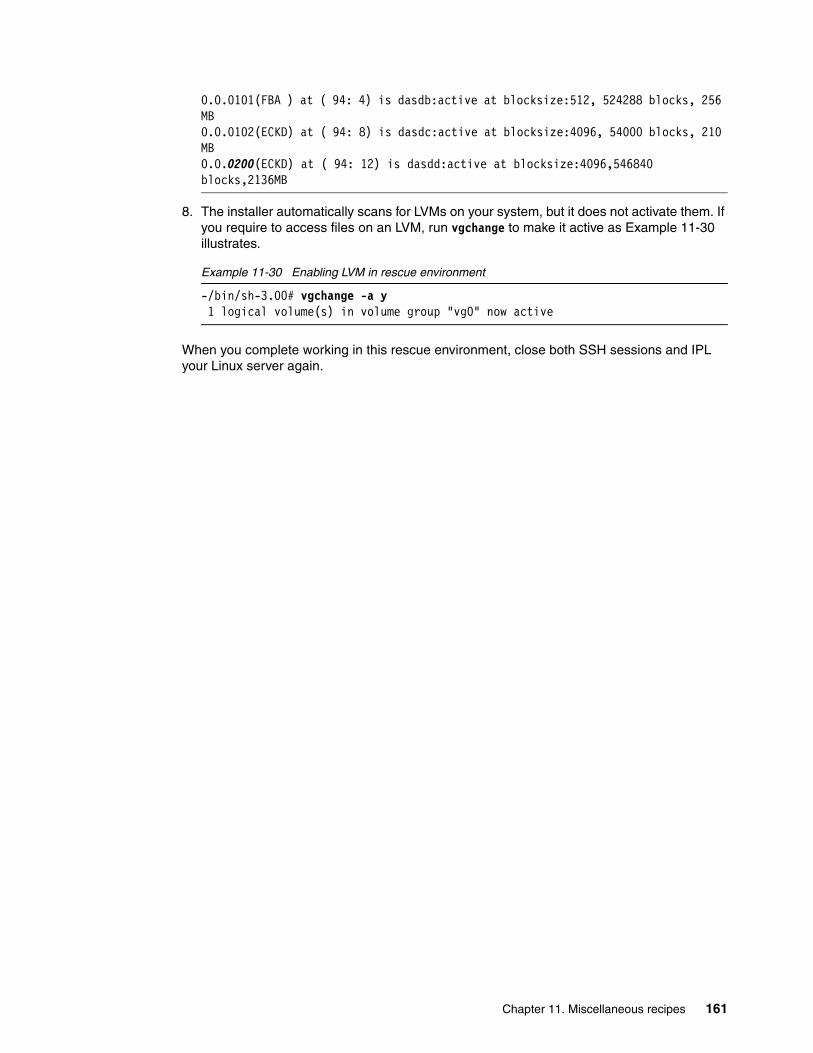
0.0.0101(FBA ) at ( 94: 4) is dasdb:active at blocksize:512, 524288 blocks, 256 MB0.0.0102(ECKD) at ( 94: 8) is dasdc:active at blocksize:4096, 54000 blocks, 210 MB0.0.0200(ECKD) at ( 94: 12) is dasdd:active at blocksize:4096,546840 blocks,2136MB
8. The installer automatically scans for LVMs on your system, but it does not activate them. If you require to access files on an LVM, run vgchange to make it active as Example 11-30 illustrates.
Example 11-30 Enabling LVM in rescue environment
-/bin/sh-3.00# vgchange -a y1 logical volume(s) in volume group "vg0" now active
When you complete working in this rescue environment, close both SSH sessions and IPL your Linux server again.
Chapter 11. Miscellaneous recipes 161

162 IBM z/VM and Linux on IBM System z: Virtualization Cookbook for Red Hat Enterprise Linux 4
Chapter 12. Monitoring systems
This chapter briefly describes how to monitor z/VM and Linux, and System z hardware while they are performing several functions.
There are a number of z/VM monitoring tools, such as Computer Associates’ VM:Monitor, IBM z/VM Performance Toolkit, IBM Tivoli OMEGAMON for z/VM, and Velocity Software’s ESALPS. Only the IBM z/VM Performance Toolkit is briefly described in this section.
For more information about Computer Associates’ VM:Monitor, see:
http://www.ca.com/
For more information about Velocity’s ESALPS, see:
http://www.velocitysoftware.com/
For more information about IBM Tivoli OMEGAMON for z/VM, see:
http://www-306.ibm.com/software/tivoli/products/omegamon-zvm/
This chapter describes the following topics:
� Using indicate and other commands� The z/VM Performance Toolkit� Creating performance reports with Performance Toolkit� Monitoring Linux information with RMF PMS� Using the OSA-Express SNMP subagent� Using OSA/SF on z/VM� DASD statistics
12
© Copyright IBM Corp. 2006. All rights reserved. 163
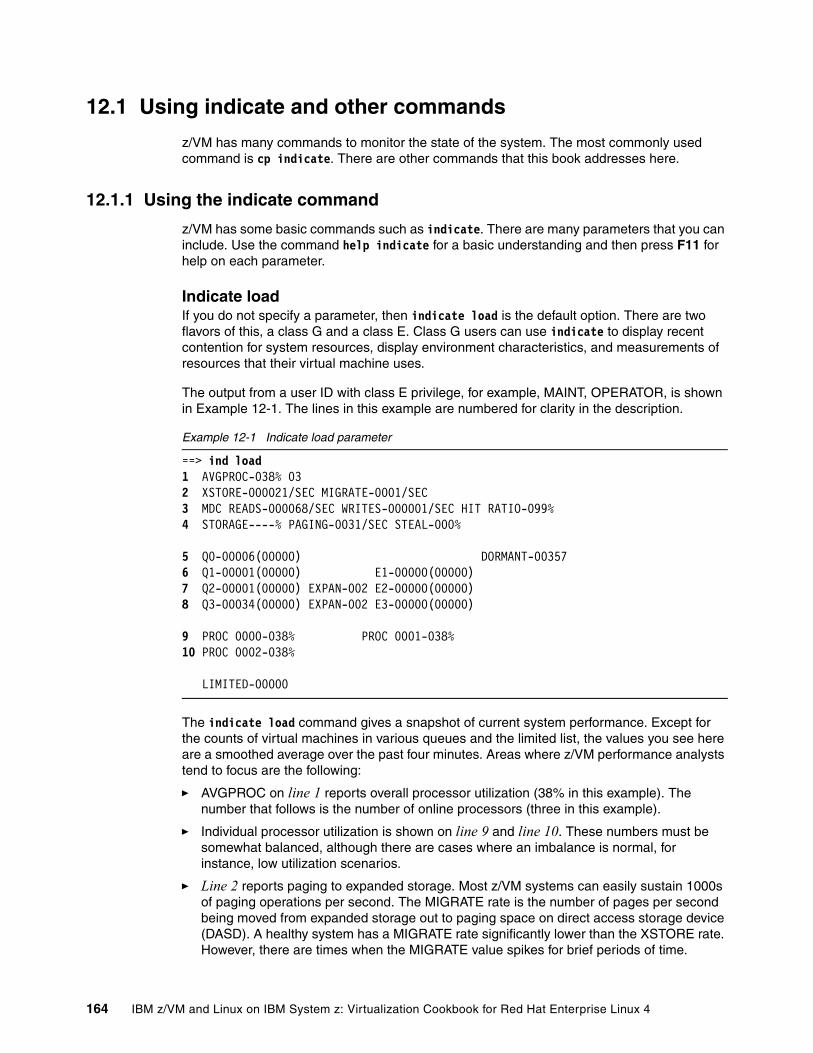
12.1 Using indicate and other commands
z/VM has many commands to monitor the state of the system. The most commonly used command is cp indicate. There are other commands that this book addresses here.
12.1.1 Using the indicate command
z/VM has some basic commands such as indicate. There are many parameters that you can include. Use the command help indicate for a basic understanding and then press F11 for help on each parameter.
Indicate loadIf you do not specify a parameter, then indicate load is the default option. There are two flavors of this, a class G and a class E. Class G users can use indicate to display recent contention for system resources, display environment characteristics, and measurements of resources that their virtual machine uses.
The output from a user ID with class E privilege, for example, MAINT, OPERATOR, is shown in Example 12-1. The lines in this example are numbered for clarity in the description.
Example 12-1 Indicate load parameter
==> ind load 1 AVGPROC-038% 03 2 XSTORE-000021/SEC MIGRATE-0001/SEC 3 MDC READS-000068/SEC WRITES-000001/SEC HIT RATIO-099% 4 STORAGE----% PAGING-0031/SEC STEAL-000%
5 Q0-00006(00000) DORMANT-00357 6 Q1-00001(00000) E1-00000(00000) 7 Q2-00001(00000) EXPAN-002 E2-00000(00000) 8 Q3-00034(00000) EXPAN-002 E3-00000(00000)
9 PROC 0000-038% PROC 0001-038% 10 PROC 0002-038%
LIMITED-00000
The indicate load command gives a snapshot of current system performance. Except for the counts of virtual machines in various queues and the limited list, the values you see here are a smoothed average over the past four minutes. Areas where z/VM performance analysts tend to focus are the following:
� AVGPROC on line 1 reports overall processor utilization (38% in this example). The number that follows is the number of online processors (three in this example).
� Individual processor utilization is shown on line 9 and line 10. These numbers must be somewhat balanced, although there are cases where an imbalance is normal, for instance, low utilization scenarios.
� Line 2 reports paging to expanded storage. Most z/VM systems can easily sustain 1000s of paging operations per second. The MIGRATE rate is the number of pages per second being moved from expanded storage out to paging space on direct access storage device (DASD). A healthy system has a MIGRATE rate significantly lower than the XSTORE rate. However, there are times when the MIGRATE value spikes for brief periods of time.
164 IBM z/VM and Linux on IBM System z: Virtualization Cookbook for Red Hat Enterprise Linux 4
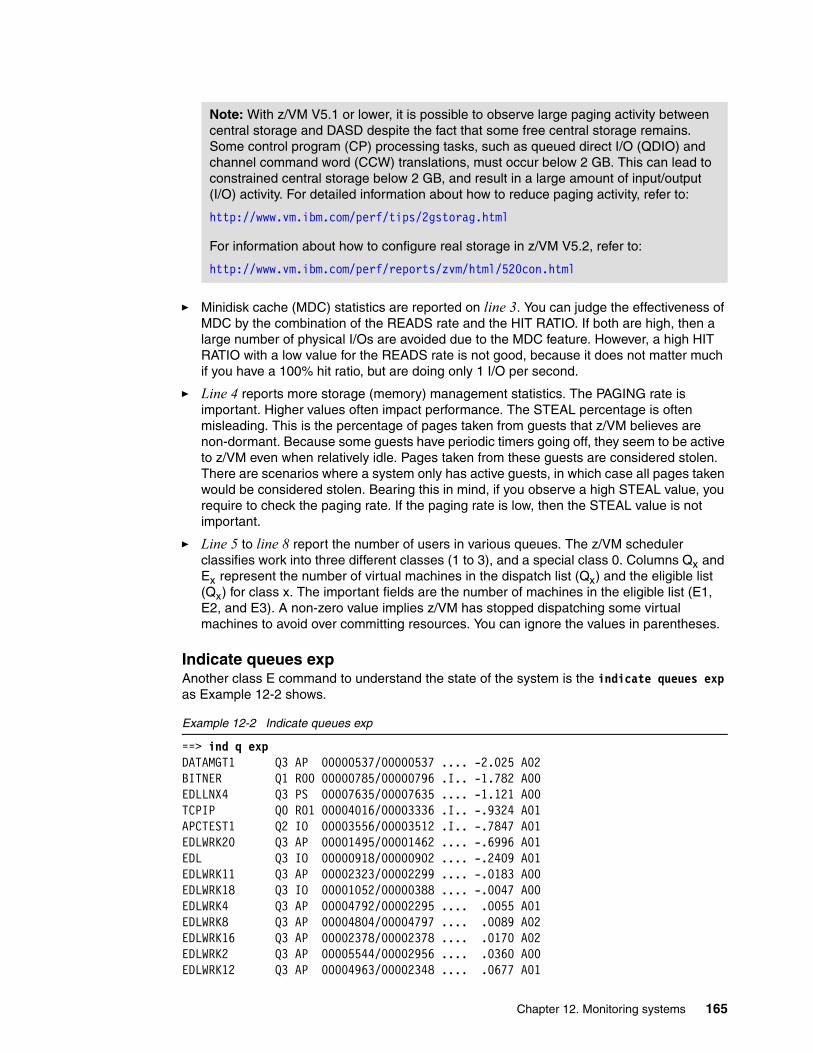
� Minidisk cache (MDC) statistics are reported on line 3. You can judge the effectiveness of MDC by the combination of the READS rate and the HIT RATIO. If both are high, then a large number of physical I/Os are avoided due to the MDC feature. However, a high HIT RATIO with a low value for the READS rate is not good, because it does not matter much if you have a 100% hit ratio, but are doing only 1 I/O per second.
� Line 4 reports more storage (memory) management statistics. The PAGING rate is important. Higher values often impact performance. The STEAL percentage is often misleading. This is the percentage of pages taken from guests that z/VM believes are non-dormant. Because some guests have periodic timers going off, they seem to be active to z/VM even when relatively idle. Pages taken from these guests are considered stolen. There are scenarios where a system only has active guests, in which case all pages taken would be considered stolen. Bearing this in mind, if you observe a high STEAL value, you require to check the paging rate. If the paging rate is low, then the STEAL value is not important.
� Line 5 to line 8 report the number of users in various queues. The z/VM scheduler classifies work into three different classes (1 to 3), and a special class 0. Columns Qx and Ex represent the number of virtual machines in the dispatch list (Qx) and the eligible list (Qx) for class x. The important fields are the number of machines in the eligible list (E1, E2, and E3). A non-zero value implies z/VM has stopped dispatching some virtual machines to avoid over committing resources. You can ignore the values in parentheses.
Indicate queues expAnother class E command to understand the state of the system is the indicate queues exp as Example 12-2 shows.
Example 12-2 Indicate queues exp
==> ind q expDATAMGT1 Q3 AP 00000537/00000537 .... -2.025 A02BITNER Q1 R00 00000785/00000796 .I.. -1.782 A00EDLLNX4 Q3 PS 00007635/00007635 .... -1.121 A00TCPIP Q0 R01 00004016/00003336 .I.. -.9324 A01APCTEST1 Q2 IO 00003556/00003512 .I.. -.7847 A01EDLWRK20 Q3 AP 00001495/00001462 .... -.6996 A01EDL Q3 IO 00000918/00000902 .... -.2409 A01EDLWRK11 Q3 AP 00002323/00002299 .... -.0183 A00EDLWRK18 Q3 IO 00001052/00000388 .... -.0047 A00EDLWRK4 Q3 AP 00004792/00002295 .... .0055 A01EDLWRK8 Q3 AP 00004804/00004797 .... .0089 A02EDLWRK16 Q3 AP 00002378/00002378 .... .0170 A02EDLWRK2 Q3 AP 00005544/00002956 .... .0360 A00EDLWRK12 Q3 AP 00004963/00002348 .... .0677 A01
Note: With z/VM V5.1 or lower, it is possible to observe large paging activity between central storage and DASD despite the fact that some free central storage remains. Some control program (CP) processing tasks, such as queued direct I/O (QDIO) and channel command word (CCW) translations, must occur below 2 GB. This can lead to constrained central storage below 2 GB, and result in a large amount of input/output (I/O) activity. For detailed information about how to reduce paging activity, refer to:
http://www.vm.ibm.com/perf/tips/2gstorag.html
For information about how to configure real storage in z/VM V5.2, refer to:
http://www.vm.ibm.com/perf/reports/zvm/html/520con.html
Chapter 12. Monitoring systems 165
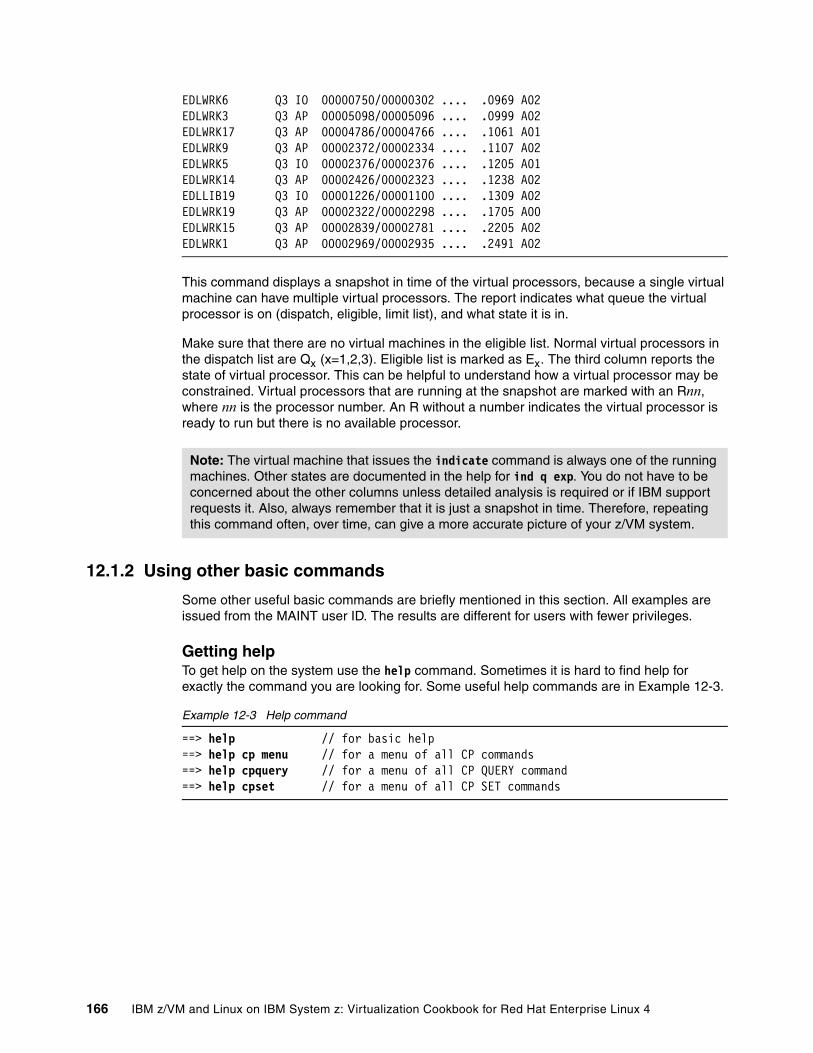
EDLWRK6 Q3 IO 00000750/00000302 .... .0969 A02EDLWRK3 Q3 AP 00005098/00005096 .... .0999 A02EDLWRK17 Q3 AP 00004786/00004766 .... .1061 A01EDLWRK9 Q3 AP 00002372/00002334 .... .1107 A02EDLWRK5 Q3 IO 00002376/00002376 .... .1205 A01EDLWRK14 Q3 AP 00002426/00002323 .... .1238 A02EDLLIB19 Q3 IO 00001226/00001100 .... .1309 A02EDLWRK19 Q3 AP 00002322/00002298 .... .1705 A00EDLWRK15 Q3 AP 00002839/00002781 .... .2205 A02EDLWRK1 Q3 AP 00002969/00002935 .... .2491 A02
This command displays a snapshot in time of the virtual processors, because a single virtual machine can have multiple virtual processors. The report indicates what queue the virtual processor is on (dispatch, eligible, limit list), and what state it is in.
Make sure that there are no virtual machines in the eligible list. Normal virtual processors in the dispatch list are Qx (x=1,2,3). Eligible list is marked as Ex. The third column reports the state of virtual processor. This can be helpful to understand how a virtual processor may be constrained. Virtual processors that are running at the snapshot are marked with an Rnn, where nn is the processor number. An R without a number indicates the virtual processor is ready to run but there is no available processor.
12.1.2 Using other basic commands
Some other useful basic commands are briefly mentioned in this section. All examples are issued from the MAINT user ID. The results are different for users with fewer privileges.
Getting helpTo get help on the system use the help command. Sometimes it is hard to find help for exactly the command you are looking for. Some useful help commands are in Example 12-3.
Example 12-3 Help command
==> help // for basic help==> help cp menu // for a menu of all CP commands==> help cpquery // for a menu of all CP QUERY command==> help cpset // for a menu of all CP SET commands
Note: The virtual machine that issues the indicate command is always one of the running machines. Other states are documented in the help for ind q exp. You do not have to be concerned about the other columns unless detailed analysis is required or if IBM support requests it. Also, always remember that it is just a snapshot in time. Therefore, repeating this command often, over time, can give a more accurate picture of your z/VM system.
166 IBM z/VM and Linux on IBM System z: Virtualization Cookbook for Red Hat Enterprise Linux 4
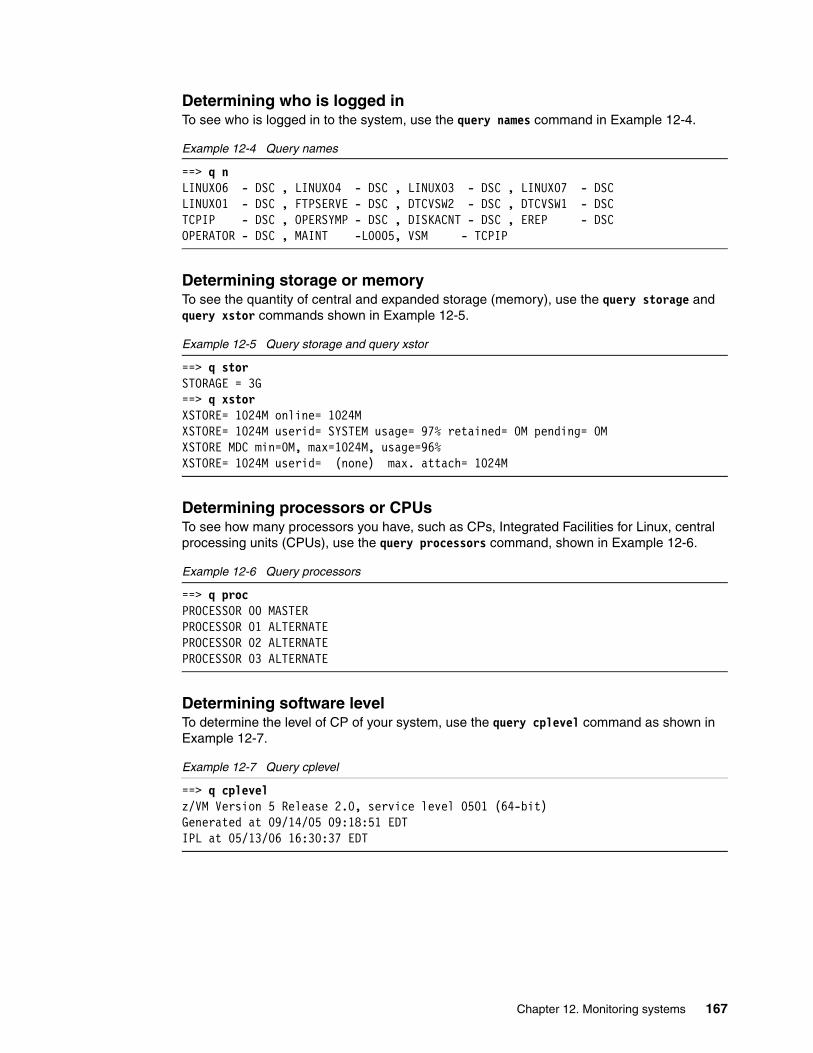
Determining who is logged inTo see who is logged in to the system, use the query names command in Example 12-4.
Example 12-4 Query names
==> q nLINUX06 - DSC , LINUX04 - DSC , LINUX03 - DSC , LINUX07 - DSC LINUX01 - DSC , FTPSERVE - DSC , DTCVSW2 - DSC , DTCVSW1 - DSC TCPIP - DSC , OPERSYMP - DSC , DISKACNT - DSC , EREP - DSC OPERATOR - DSC , MAINT -L0005, VSM - TCPIP
Determining storage or memoryTo see the quantity of central and expanded storage (memory), use the query storage and query xstor commands shown in Example 12-5.
Example 12-5 Query storage and query xstor
==> q storSTORAGE = 3G==> q xstorXSTORE= 1024M online= 1024MXSTORE= 1024M userid= SYSTEM usage= 97% retained= 0M pending= 0MXSTORE MDC min=0M, max=1024M, usage=96%XSTORE= 1024M userid= (none) max. attach= 1024M
Determining processors or CPUsTo see how many processors you have, such as CPs, Integrated Facilities for Linux, central processing units (CPUs), use the query processors command, shown in Example 12-6.
Example 12-6 Query processors
==> q procPROCESSOR 00 MASTERPROCESSOR 01 ALTERNATEPROCESSOR 02 ALTERNATEPROCESSOR 03 ALTERNATE
Determining software levelTo determine the level of CP of your system, use the query cplevel command as shown in Example 12-7.
Example 12-7 Query cplevel
==> q cplevelz/VM Version 5 Release 2.0, service level 0501 (64-bit)Generated at 09/14/05 09:18:51 EDT IPL at 05/13/06 16:30:37 EDT
Chapter 12. Monitoring systems 167
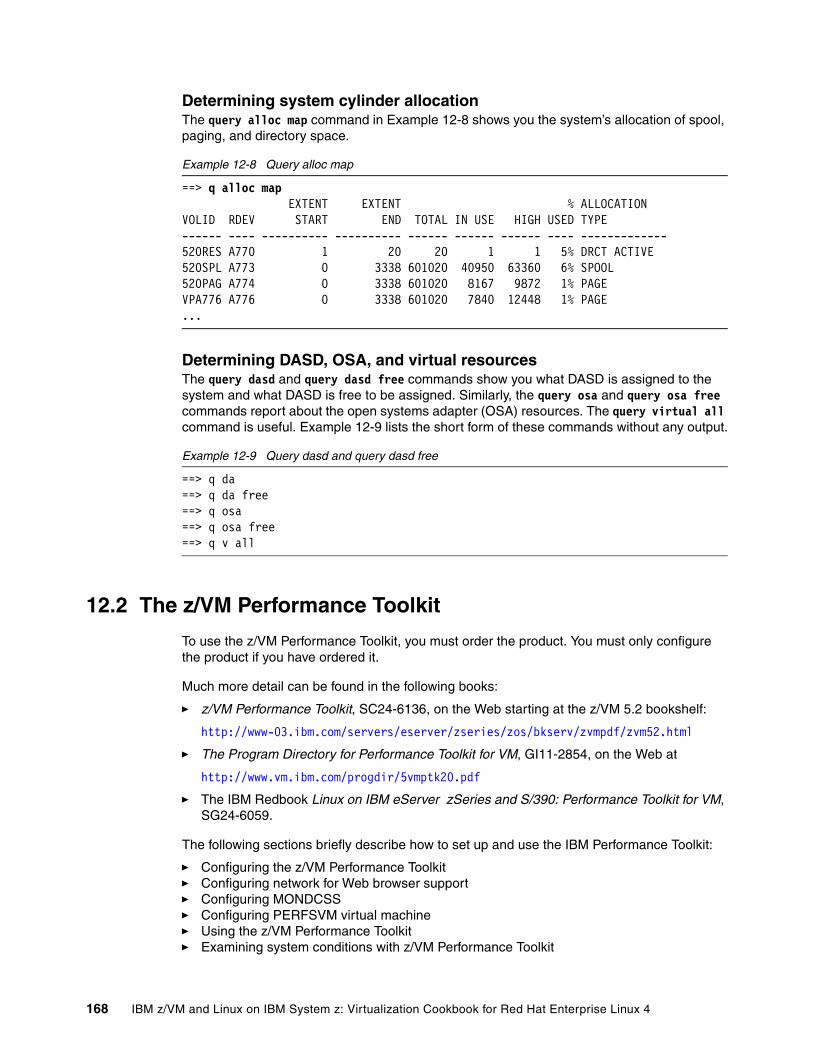
Determining system cylinder allocationThe query alloc map command in Example 12-8 shows you the system’s allocation of spool, paging, and directory space.
Example 12-8 Query alloc map
==> q alloc map EXTENT EXTENT % ALLOCATIONVOLID RDEV START END TOTAL IN USE HIGH USED TYPE------ ---- ---------- ---------- ------ ------ ------ ---- -------------520RES A770 1 20 20 1 1 5% DRCT ACTIVE520SPL A773 0 3338 601020 40950 63360 6% SPOOL520PAG A774 0 3338 601020 8167 9872 1% PAGEVPA776 A776 0 3338 601020 7840 12448 1% PAGE...
Determining DASD, OSA, and virtual resourcesThe query dasd and query dasd free commands show you what DASD is assigned to the system and what DASD is free to be assigned. Similarly, the query osa and query osa free commands report about the open systems adapter (OSA) resources. The query virtual all command is useful. Example 12-9 lists the short form of these commands without any output.
Example 12-9 Query dasd and query dasd free
==> q da==> q da free==> q osa==> q osa free==> q v all
12.2 The z/VM Performance Toolkit
To use the z/VM Performance Toolkit, you must order the product. You must only configure the product if you have ordered it.
Much more detail can be found in the following books:
� z/VM Performance Toolkit, SC24-6136, on the Web starting at the z/VM 5.2 bookshelf:
http://www-03.ibm.com/servers/eserver/zseries/zos/bkserv/zvmpdf/zvm52.html
� The Program Directory for Performance Toolkit for VM, GI11-2854, on the Web at
http://www.vm.ibm.com/progdir/5vmptk20.pdf
� The IBM Redbook Linux on IBM eServer zSeries and S/390: Performance Toolkit for VM, SG24-6059.
The following sections briefly describe how to set up and use the IBM Performance Toolkit:
� Configuring the z/VM Performance Toolkit� Configuring network for Web browser support� Configuring MONDCSS� Configuring PERFSVM virtual machine� Using the z/VM Performance Toolkit� Examining system conditions with z/VM Performance Toolkit
168 IBM z/VM and Linux on IBM System z: Virtualization Cookbook for Red Hat Enterprise Linux 4
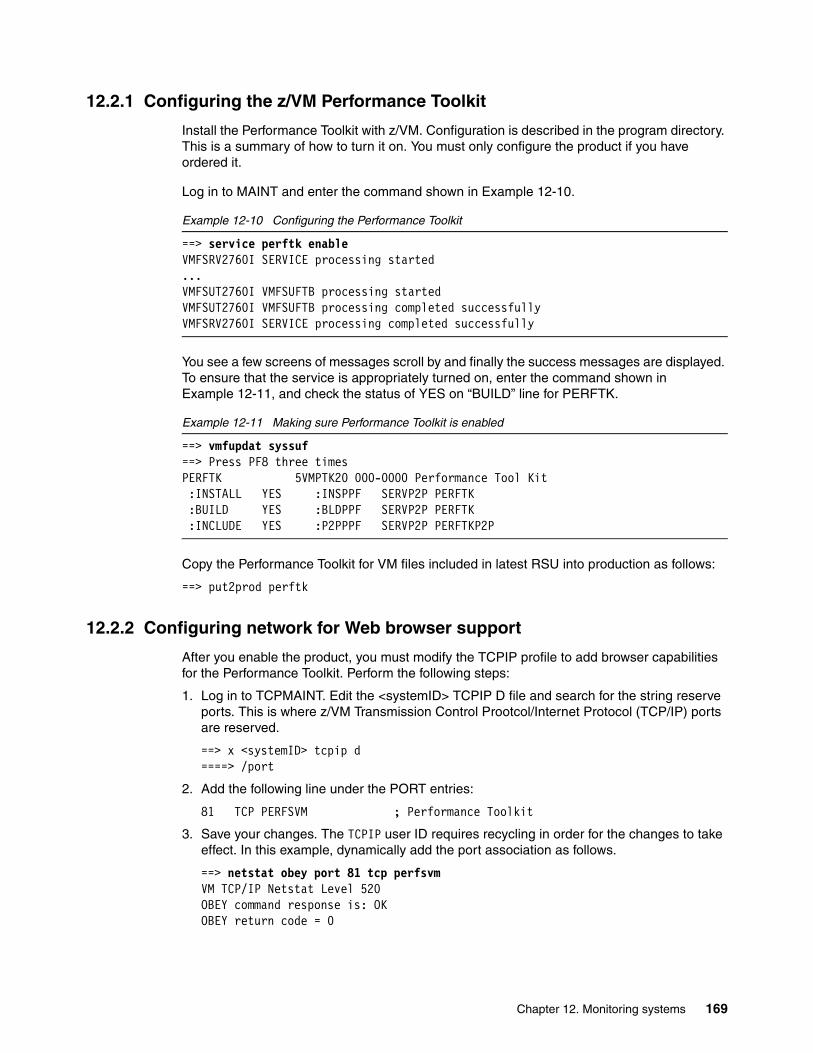
12.2.1 Configuring the z/VM Performance Toolkit
Install the Performance Toolkit with z/VM. Configuration is described in the program directory. This is a summary of how to turn it on. You must only configure the product if you have ordered it.
Log in to MAINT and enter the command shown in Example 12-10.
Example 12-10 Configuring the Performance Toolkit
==> service perftk enableVMFSRV2760I SERVICE processing started...VMFSUT2760I VMFSUFTB processing startedVMFSUT2760I VMFSUFTB processing completed successfullyVMFSRV2760I SERVICE processing completed successfully
You see a few screens of messages scroll by and finally the success messages are displayed. To ensure that the service is appropriately turned on, enter the command shown in Example 12-11, and check the status of YES on “BUILD” line for PERFTK.
Example 12-11 Making sure Performance Toolkit is enabled
==> vmfupdat syssuf==> Press PF8 three timesPERFTK 5VMPTK20 000-0000 Performance Tool Kit :INSTALL YES :INSPPF SERVP2P PERFTK :BUILD YES :BLDPPF SERVP2P PERFTK :INCLUDE YES :P2PPPF SERVP2P PERFTKP2P
Copy the Performance Toolkit for VM files included in latest RSU into production as follows:
==> put2prod perftk
12.2.2 Configuring network for Web browser support
After you enable the product, you must modify the TCPIP profile to add browser capabilities for the Performance Toolkit. Perform the following steps:
1. Log in to TCPMAINT. Edit the <systemID> TCPIP D file and search for the string reserve ports. This is where z/VM Transmission Control Prootcol/Internet Protocol (TCP/IP) ports are reserved.
==> x <systemID> tcpip d====> /port
2. Add the following line under the PORT entries:
81 TCP PERFSVM ; Performance Toolkit
3. Save your changes. The TCPIP user ID requires recycling in order for the changes to take effect. In this example, dynamically add the port association as follows.
==> netstat obey port 81 tcp perfsvmVM TCP/IP Netstat Level 520 OBEY command response is: OK OBEY return code = 0
Chapter 12. Monitoring systems 169

To check whether the service port for PERFSVM is opened, issue the command in Example 12-12.
Example 12-12 Using netstat config port to check for PERFSVM
==> netstat config port...Port: 81 Protocol: TCP IP Address: * Monitor: Yes User ID: PERFSVM Certificate: <none> ...
12.2.3 Configuring MONDCSS
System information that the Performance Toolkit uses a discontiguous shared segment (DCSS), which the CP monitor names the MONDCSS segment. You require to expand MONDCSS to a sufficient size to collect monitor records without errors. In this example, MONDCSS size is expanded to 0x1FFF from the default size of 0x7FF.
1. Log in to MAINT and check if the monitor is inactive:
==> q monitor...MONITOR EVENT INACTIVE BLOCK 4 PARTITION 0...MONITOR SAMPLE INACTIVE...
If the monitor is active, issue the monitor stop command to change the monitor to an inactive state:
==> monitor stop
2. Issue the q nss all map command to display the ranges that are already in use and determine where to define the monitor saved segment. Verify if there is free space from 0x9000 to 0xAFFF. See Example 12-13.
Example 12-13 Issuing the q nss all map command to display ranges in use
==> q nss all mapFILE FILENAME FILETYPE MINSIZE BEGPAG ENDPAG TYPE CL #USERS PARMREGS VMGROUP0031 CMSFILES DCSS N/A 01900 01BFF SR A 00003 N/A N/A 0030 CMSPIPES DCSS N/A 01800 018FF SR A 00015 N/A N/A 0028 GCS NSS 0000256K 00000 0000C EW R 00002 OMITTED YES 00400 0044E SR 0044F 0044F SW 00450 005FF SN 01000 0101A SR 0101B 011FF SN 0057 CMS NSS 0000256K 00000 0000D EW P 00008 00-15 NO 00020 00023 EW 00F00 013FF SR 0050 NLSUCENG DCSS N/A 02000 020FF SR A 00000 N/A N/A 0048 CMSVMLIB DCSS N/A 01700 017FF SR A 00015 N/A N/A 0047 INSTSEG DCSS N/A 01400 016FF SR A 00015 N/A N/A 0053 NLSAMENG DCSS N/A 02000 020FF SR A 00004 N/A N/A 0016 SCEEX DCSS N/A 02100 027FF SR A 00001 N/A N/A 0021 NLSGER DCSS N/A 02000 020FF SR A 00000 N/A N/A
170 IBM z/VM and Linux on IBM System z: Virtualization Cookbook for Red Hat Enterprise Linux 4
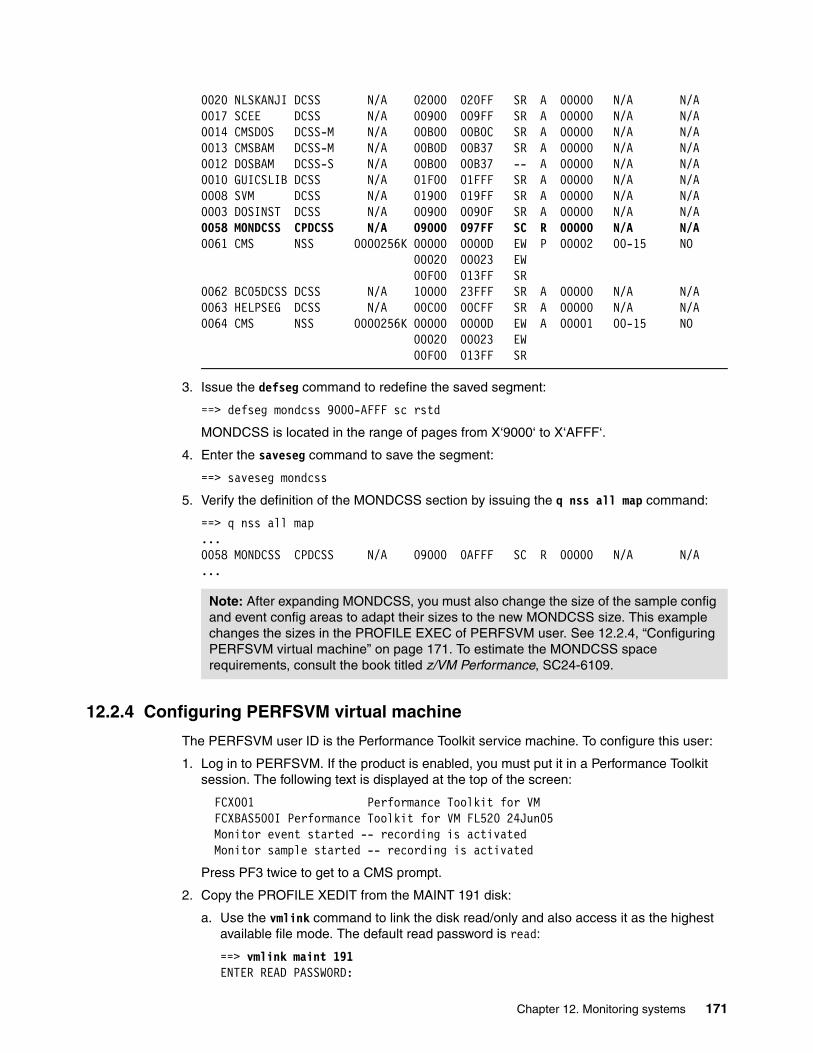
0020 NLSKANJI DCSS N/A 02000 020FF SR A 00000 N/A N/A 0017 SCEE DCSS N/A 00900 009FF SR A 00000 N/A N/A 0014 CMSDOS DCSS-M N/A 00B00 00B0C SR A 00000 N/A N/A 0013 CMSBAM DCSS-M N/A 00B0D 00B37 SR A 00000 N/A N/A 0012 DOSBAM DCSS-S N/A 00B00 00B37 -- A 00000 N/A N/A 0010 GUICSLIB DCSS N/A 01F00 01FFF SR A 00000 N/A N/A 0008 SVM DCSS N/A 01900 019FF SR A 00000 N/A N/A 0003 DOSINST DCSS N/A 00900 0090F SR A 00000 N/A N/A 0058 MONDCSS CPDCSS N/A 09000 097FF SC R 00000 N/A N/A 0061 CMS NSS 0000256K 00000 0000D EW P 00002 00-15 NO 00020 00023 EW 00F00 013FF SR 0062 BC05DCSS DCSS N/A 10000 23FFF SR A 00000 N/A N/A 0063 HELPSEG DCSS N/A 00C00 00CFF SR A 00000 N/A N/A 0064 CMS NSS 0000256K 00000 0000D EW A 00001 00-15 NO 00020 00023 EW 00F00 013FF SR
3. Issue the defseg command to redefine the saved segment:
==> defseg mondcss 9000-AFFF sc rstd
MONDCSS is located in the range of pages from X‘9000‘ to X‘AFFF‘.
4. Enter the saveseg command to save the segment:
==> saveseg mondcss
5. Verify the definition of the MONDCSS section by issuing the q nss all map command:
==> q nss all map... 0058 MONDCSS CPDCSS N/A 09000 0AFFF SC R 00000 N/A N/A ...
12.2.4 Configuring PERFSVM virtual machine
The PERFSVM user ID is the Performance Toolkit service machine. To configure this user:
1. Log in to PERFSVM. If the product is enabled, you must put it in a Performance Toolkit session. The following text is displayed at the top of the screen:
FCX001 Performance Toolkit for VM FCXBAS500I Performance Toolkit for VM FL520 24Jun05 Monitor event started -- recording is activated Monitor sample started -- recording is activated
Press PF3 twice to get to a CMS prompt.
2. Copy the PROFILE XEDIT from the MAINT 191 disk:
a. Use the vmlink command to link the disk read/only and also access it as the highest available file mode. The default read password is read:
==> vmlink maint 191ENTER READ PASSWORD:
Note: After expanding MONDCSS, you must also change the size of the sample config and event config areas to adapt their sizes to the new MONDCSS size. This example changes the sizes in the PROFILE EXEC of PERFSVM user. See 12.2.4, “Configuring PERFSVM virtual machine” on page 171. To estimate the MONDCSS space requirements, consult the book titled z/VM Performance, SC24-6109.
Chapter 12. Monitoring systems 171
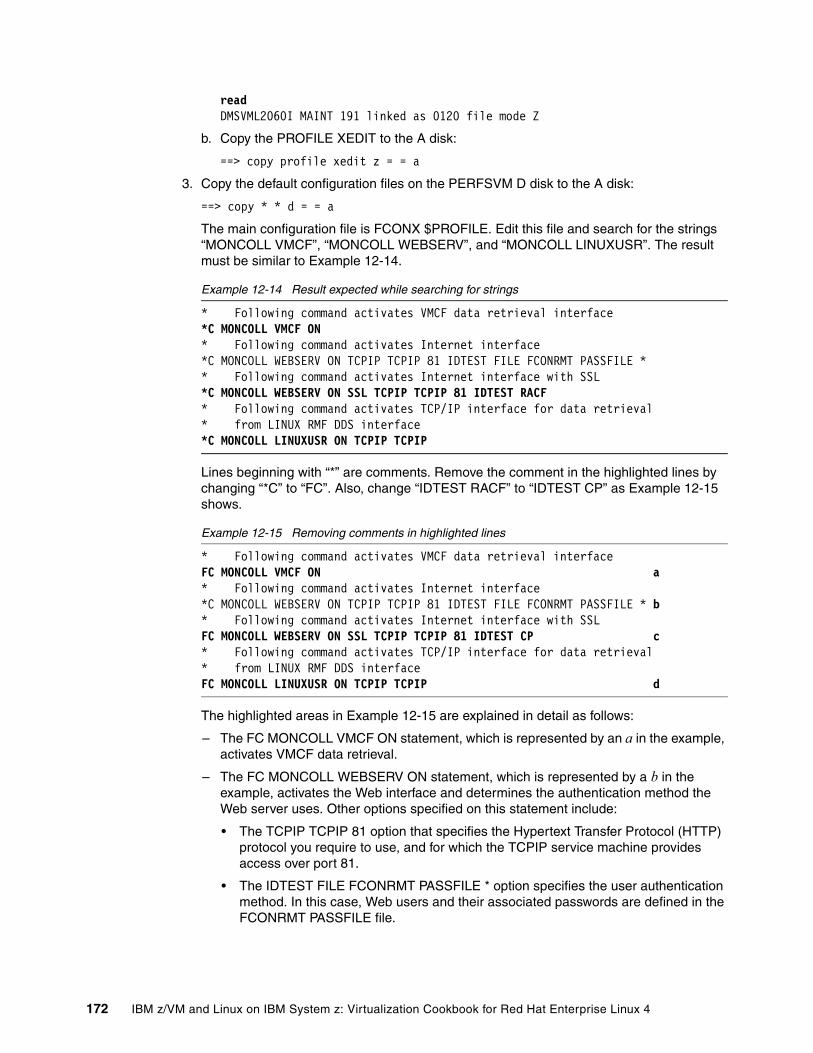
readDMSVML2060I MAINT 191 linked as 0120 file mode Z
b. Copy the PROFILE XEDIT to the A disk:
==> copy profile xedit z = = a
3. Copy the default configuration files on the PERFSVM D disk to the A disk:
==> copy * * d = = a
The main configuration file is FCONX $PROFILE. Edit this file and search for the strings “MONCOLL VMCF”, “MONCOLL WEBSERV”, and “MONCOLL LINUXUSR”. The result must be similar to Example 12-14.
Example 12-14 Result expected while searching for strings
* Following command activates VMCF data retrieval interface *C MONCOLL VMCF ON * Following command activates Internet interface *C MONCOLL WEBSERV ON TCPIP TCPIP 81 IDTEST FILE FCONRMT PASSFILE * * Following command activates Internet interface with SSL *C MONCOLL WEBSERV ON SSL TCPIP TCPIP 81 IDTEST RACF * Following command activates TCP/IP interface for data retrieval * from LINUX RMF DDS interface *C MONCOLL LINUXUSR ON TCPIP TCPIP
Lines beginning with “*” are comments. Remove the comment in the highlighted lines by changing “*C” to “FC”. Also, change “IDTEST RACF” to “IDTEST CP” as Example 12-15 shows.
Example 12-15 Removing comments in highlighted lines
* Following command activates VMCF data retrieval interface FC MONCOLL VMCF ON a * Following command activates Internet interface *C MONCOLL WEBSERV ON TCPIP TCPIP 81 IDTEST FILE FCONRMT PASSFILE * b * Following command activates Internet interface with SSL FC MONCOLL WEBSERV ON SSL TCPIP TCPIP 81 IDTEST CP c * Following command activates TCP/IP interface for data retrieval* from LINUX RMF DDS interface FC MONCOLL LINUXUSR ON TCPIP TCPIP d
The highlighted areas in Example 12-15 are explained in detail as follows:
– The FC MONCOLL VMCF ON statement, which is represented by an a in the example, activates VMCF data retrieval.
– The FC MONCOLL WEBSERV ON statement, which is represented by a b in the example, activates the Web interface and determines the authentication method the Web server uses. Other options specified on this statement include:
• The TCPIP TCPIP 81 option that specifies the Hypertext Transfer Protocol (HTTP) protocol you require to use, and for which the TCPIP service machine provides access over port 81.
• The IDTEST FILE FCONRMT PASSFILE * option specifies the user authentication method. In this case, Web users and their associated passwords are defined in the FCONRMT PASSFILE file.
172 IBM z/VM and Linux on IBM System z: Virtualization Cookbook for Red Hat Enterprise Linux 4
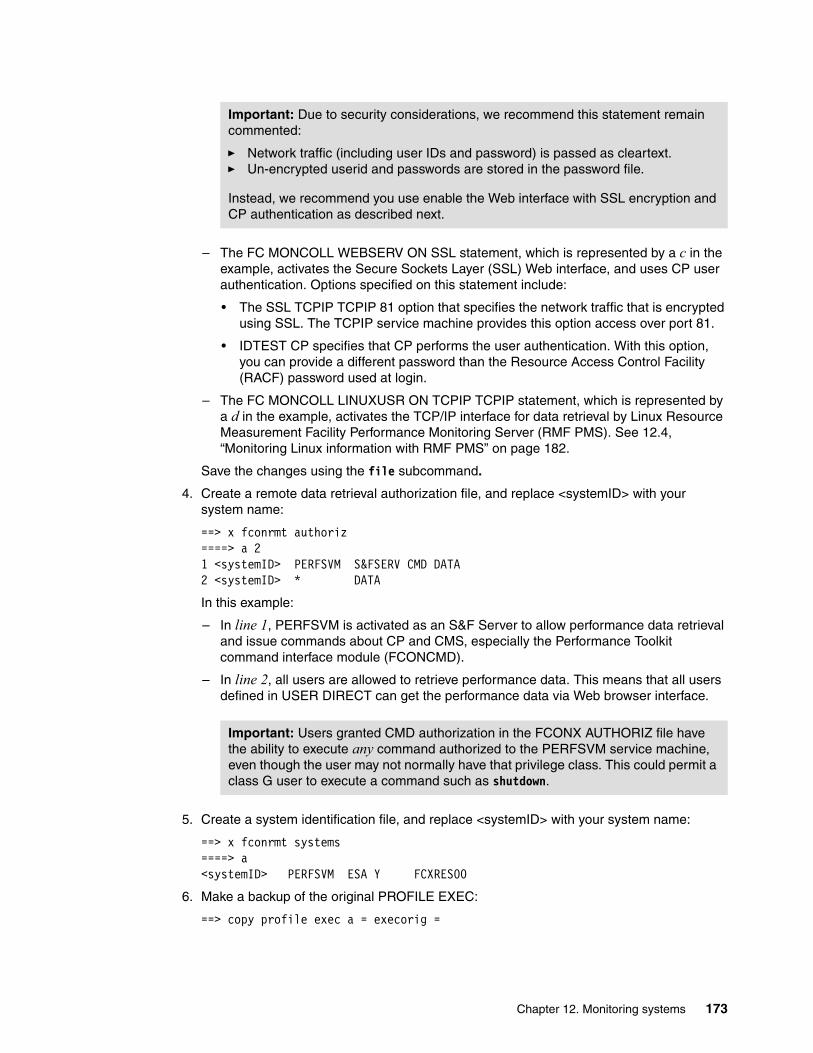
– The FC MONCOLL WEBSERV ON SSL statement, which is represented by a c in the example, activates the Secure Sockets Layer (SSL) Web interface, and uses CP user authentication. Options specified on this statement include:
• The SSL TCPIP TCPIP 81 option that specifies the network traffic that is encrypted using SSL. The TCPIP service machine provides this option access over port 81.
• IDTEST CP specifies that CP performs the user authentication. With this option, you can provide a different password than the Resource Access Control Facility (RACF) password used at login.
– The FC MONCOLL LINUXUSR ON TCPIP TCPIP statement, which is represented by a d in the example, activates the TCP/IP interface for data retrieval by Linux Resource Measurement Facility Performance Monitoring Server (RMF PMS). See 12.4, “Monitoring Linux information with RMF PMS” on page 182.
Save the changes using the file subcommand.
4. Create a remote data retrieval authorization file, and replace <systemID> with your system name:
==> x fconrmt authoriz====> a 21 <systemID> PERFSVM S&FSERV CMD DATA2 <systemID> * DATA
In this example:
– In line 1, PERFSVM is activated as an S&F Server to allow performance data retrieval and issue commands about CP and CMS, especially the Performance Toolkit command interface module (FCONCMD).
– In line 2, all users are allowed to retrieve performance data. This means that all users defined in USER DIRECT can get the performance data via Web browser interface.
5. Create a system identification file, and replace <systemID> with your system name:
==> x fconrmt systems====> a<systemID> PERFSVM ESA Y FCXRES00
6. Make a backup of the original PROFILE EXEC:
==> copy profile exec a = execorig =
Important: Due to security considerations, we recommend this statement remain commented:
� Network traffic (including user IDs and password) is passed as cleartext.� Un-encrypted userid and passwords are stored in the password file.
Instead, we recommend you use enable the Web interface with SSL encryption and CP authentication as described next.
Important: Users granted CMD authorization in the FCONX AUTHORIZ file have the ability to execute any command authorized to the PERFSVM service machine, even though the user may not normally have that privilege class. This could permit a class G user to execute a command such as shutdown.
Chapter 12. Monitoring systems 173

7. Edit the PROFILE EXEC file. The changes are shown in Example 12-16.
Example 12-16 MONITOR SAMPLE and MONITOR EVENT statements
.../*** Once you have PERFKIT enabled and running uncomment the ***//*** following comments ***/'CP MONITOR SAMPLE ENABLE PROCESSOR' 1 'CP MONITOR SAMPLE ENABLE STORAGE' 2 'CP MONITOR SAMPLE ENABLE USER ALL' 3 'CP MONITOR SAMPLE ENABLE I/O ALL' 4 'CP MONITOR SAMPLE ENABLE APPLDATA ALL' 5 'CP MONITOR EVENT ENABLE STORAGE' 6 'CP MONITOR EVENT ENABLE I/O ALL' 7
'CP MONITOR SAMPLE RATE 1 SECOND' 8 'CP MONITOR SAMPLE INTERVAL 60 SECONDS' 9
'CP MONITOR SAMPLE CONFIG SIZE 2410' 10'CP MONITOR EVENT CONFIG SIZE 680' 11
'PERFKIT' /* Invoke the PERFKIT module @FC012BD*/
Exit
The statements in the example are explained as follows:
– Line 1 to line 5 enables sample data for the processor, storage, user, I/O, and APPLDATA domains.
– Line 6 and line 7 enable event data for the storage and I/O domains.
– Line 8 sets the high-frequency sample data rate to one second. Line 9 sets the sample interval to 60 seconds. Performance Toolkit refreshes data on the monitor screen at each sample interval.
– In line 10, the saved segment reserved for sample configuration records is set to 2410 pages. In line 11, the saved segment reserved for event configuration records is set to 680 pages. A page is 4096 bytes in size.
You are now ready to run the Performance Toolkit.
Note: You can issue the MONITOR SAMPLE CONFIG SIZE and MONITOR EVENT CONFIG SIZE commands only if MONITOR has not yet been started. If the command is executed after MONITOR has started or if more than one user attempts to start MONITOR, error message HCPMNR6552E is displayed. For example, this can happen if two performance products both attempt to start MONITOR.
174 IBM z/VM and Linux on IBM System z: Virtualization Cookbook for Red Hat Enterprise Linux 4
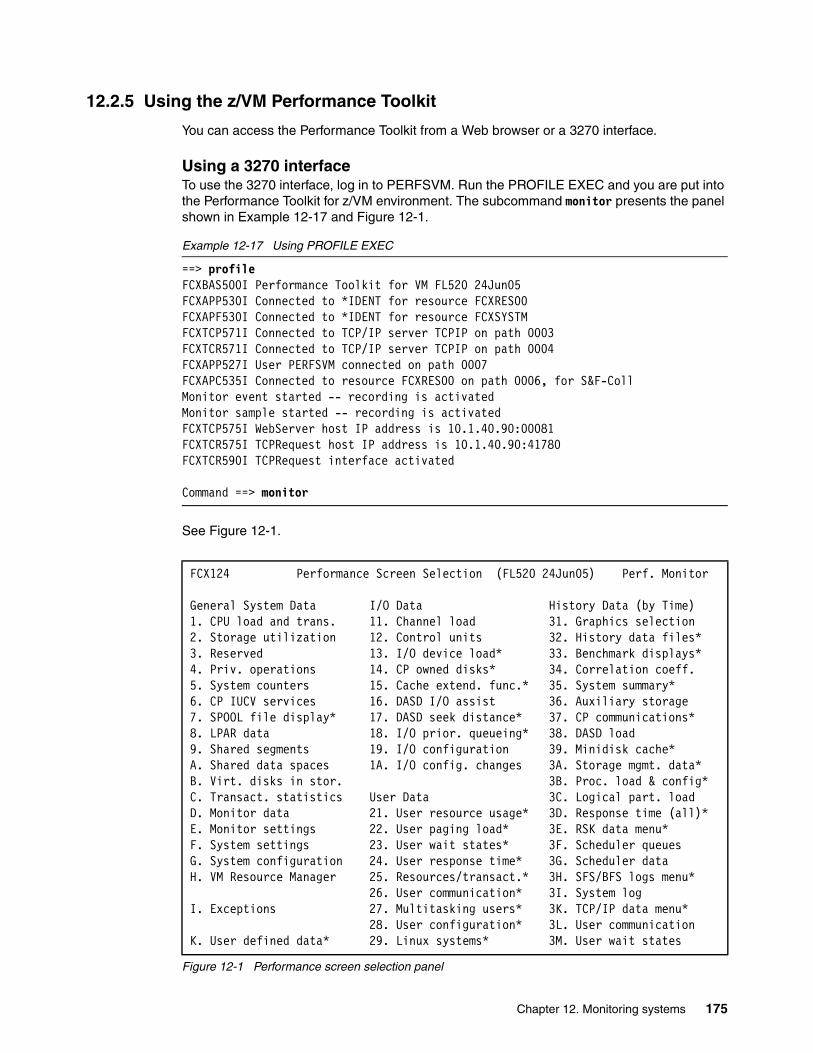
12.2.5 Using the z/VM Performance Toolkit
You can access the Performance Toolkit from a Web browser or a 3270 interface.
Using a 3270 interfaceTo use the 3270 interface, log in to PERFSVM. Run the PROFILE EXEC and you are put into the Performance Toolkit for z/VM environment. The subcommand monitor presents the panel shown in Example 12-17 and Figure 12-1.
Example 12-17 Using PROFILE EXEC
==> profileFCXBAS500I Performance Toolkit for VM FL520 24Jun05 FCXAPP530I Connected to *IDENT for resource FCXRES00 FCXAPF530I Connected to *IDENT for resource FCXSYSTM FCXTCP571I Connected to TCP/IP server TCPIP on path 0003 FCXTCR571I Connected to TCP/IP server TCPIP on path 0004 FCXAPP527I User PERFSVM connected on path 0007 FCXAPC535I Connected to resource FCXRES00 on path 0006, for S&F-Coll Monitor event started -- recording is activated Monitor sample started -- recording is activated FCXTCP575I WebServer host IP address is 10.1.40.90:00081 FCXTCR575I TCPRequest host IP address is 10.1.40.90:41780 FCXTCR590I TCPRequest interface activated
Command ==> monitor
See Figure 12-1.
Figure 12-1 Performance screen selection panel
FCX124 Performance Screen Selection (FL520 24Jun05) Perf. Monitor General System Data I/O Data History Data (by Time) 1. CPU load and trans. 11. Channel load 31. Graphics selection 2. Storage utilization 12. Control units 32. History data files* 3. Reserved 13. I/O device load* 33. Benchmark displays* 4. Priv. operations 14. CP owned disks* 34. Correlation coeff. 5. System counters 15. Cache extend. func.* 35. System summary* 6. CP IUCV services 16. DASD I/O assist 36. Auxiliary storage 7. SPOOL file display* 17. DASD seek distance* 37. CP communications* 8. LPAR data 18. I/O prior. queueing* 38. DASD load 9. Shared segments 19. I/O configuration 39. Minidisk cache* A. Shared data spaces 1A. I/O config. changes 3A. Storage mgmt. data* B. Virt. disks in stor. 3B. Proc. load & config* C. Transact. statistics User Data 3C. Logical part. load D. Monitor data 21. User resource usage* 3D. Response time (all)* E. Monitor settings 22. User paging load* 3E. RSK data menu* F. System settings 23. User wait states* 3F. Scheduler queues G. System configuration 24. User response time* 3G. Scheduler data H. VM Resource Manager 25. Resources/transact.* 3H. SFS/BFS logs menu* 26. User communication* 3I. System log I. Exceptions 27. Multitasking users* 3K. TCP/IP data menu* 28. User configuration* 3L. User communication K. User defined data* 29. Linux systems* 3M. User wait states
Chapter 12. Monitoring systems 175
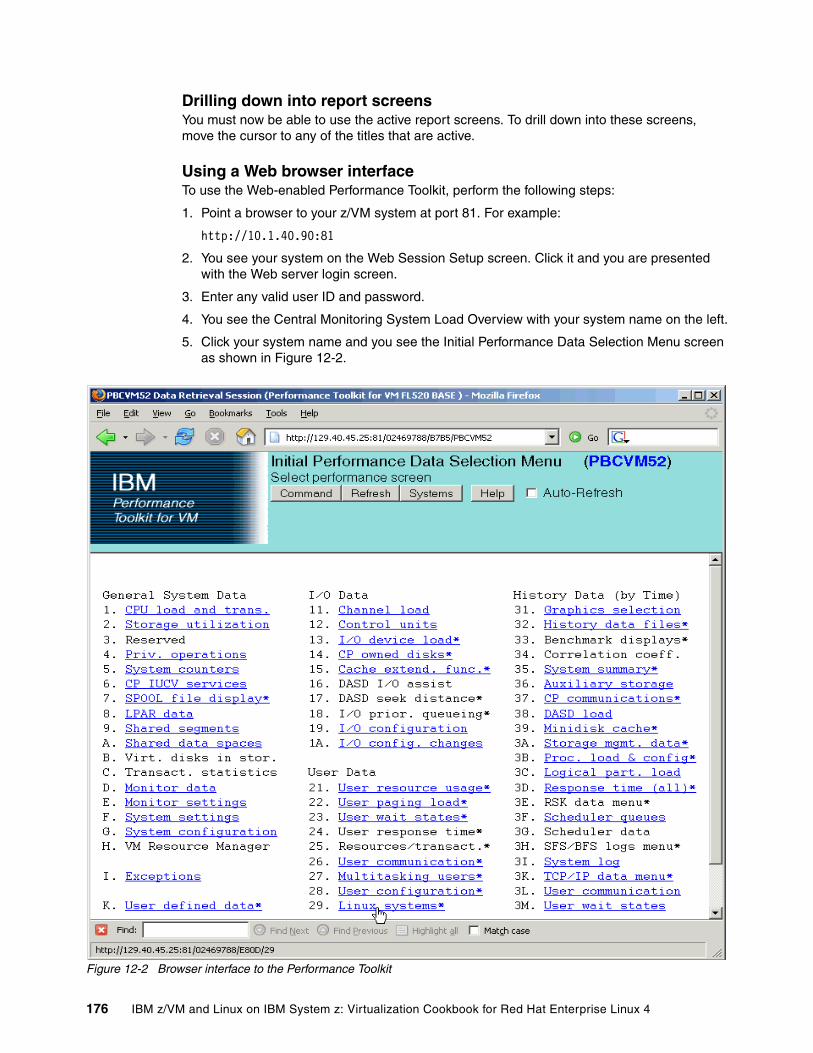
Drilling down into report screensYou must now be able to use the active report screens. To drill down into these screens, move the cursor to any of the titles that are active.
Using a Web browser interfaceTo use the Web-enabled Performance Toolkit, perform the following steps:
1. Point a browser to your z/VM system at port 81. For example:
http://10.1.40.90:81
2. You see your system on the Web Session Setup screen. Click it and you are presented with the Web server login screen.
3. Enter any valid user ID and password.
4. You see the Central Monitoring System Load Overview with your system name on the left.
5. Click your system name and you see the Initial Performance Data Selection Menu screen as shown in Figure 12-2.
Figure 12-2 Browser interface to the Performance Toolkit
176 IBM z/VM and Linux on IBM System z: Virtualization Cookbook for Red Hat Enterprise Linux 4
12.2.6 Examining system conditions with z/VM Performance Toolkit
This section discusses some specific Performance Toolkit functions to analyze performance and capacity problems. Note that the topic does not cover performance and capacity in detail.
Storage utilization statisticsStorage utilization information is available for both the z/VM system and for individual virtual machines:
� Option 2: storage utilization
The storage utilization (FCX103: General Storage Utilization) panel reports system-wide storage utilization statistics. Important values in this panel include:
– “Page moves less than 2 GB for trans”, which reports the rate pages moved below the 2 GB line for translation. A large value indicates the system is constrained below the 2 GB line, in other words, CP is thrashing on frames below 2 GB. You must carefully monitor this value for z/VM V5.1 or lower.
– “CP XSTORE utilization”, which reports the percentage of expanded storage in use. A high value indicates heavy paging to DASD is likely.
� Option 22: user paging load (FCX113: User Paging Activity and Storage Utilization)
This panel is useful for examining storage utilization by specific virtual machines. Statistics are summarized by VM user and reported in tabular form. Important values include:
– “>2GB>”, which reports page migration rates below the 2 GB line. You must monitor it carefully in z/VM V5.1 or lower.
– “WSS”, which shows the number of pages in the user’s projected working set. With this information, you can examine whether each virtual machine is currently active or not.
CPU utilization statisticsCPU utilization is also available for entire Central Electronics Complex (CEC), the z/VM system, and for individual virtual machines:
� Option 8: logical partition (LPAR) data
The LPAR data (FCX126: Logical Partition Activity Screen) panel summarizes CPU utilization for each logical partition defined to the CEC, and the load on each processor defined in an LPAR. Important values include“%Busy”.
“%Busy” reports the percentage of time a logical processor is busy, which is defined as the percentage of elapsed time during which a real processor is assigned to the logical processor. You can examine processor usage consumed by other LPARs. If the capacity of a single physical processor is 100 MIPS and “%Busy” for a single specific logical processor is reported as 10%, the amount of real CPU usage consumed is calculated as 10 MIPS.
� Option 1: CPU load and trans
This panel (FCX100: General CPU Load and User Transaction) reports CPU utilization for the z/VM system. Important statistics include:
– “%CPU”, which shows the total CPU load as a percent for each processor.
– “%SYS”, which reports the percent of CPU time spent exclusively for system services. This proportion is usually regarded as system overhead.
Note: This value applies only to shared processors. Processors dedicated to an LPAR do not report a “%Busy” value.
Chapter 12. Monitoring systems 177
� Option 35: system summary
This panel (FCX239: Layout of processor summary log screen) also reports statistics for the z/VM system. Some helpful information include:
– “Ratio T/V”, which shows the average ratio of total CPU time to virtual CPU time for all processors.
– “Ratio Capture”, which reports the CPU capture ratio, expressed as the percentage of user CPU time to total CPU time.
� Option 21: user resource usage
This panel (FCX112: General User Resource Utilization) reports data for a specific virtual machine. Some important data includes:
– “%CPU”, which shows the total CPU load as a percent. This value is based on the utilization of a single processor. Values exceeding 100% are possible for virtual machines defined with multi processors.
– “%T/V ratio”, which shows the ratio of total to virtual (emulation) CPU time used. You can examine whose activity causes significant system overhead with this field.
I/O statisticsStatistics for I/O utilization by the z/VM system is also available:
� Option 11: channel load
Busy channel paths on this screen (FCX107: Channel Load and Channel Busy Distribution) can help identify I/O performance bottlenecks.
� Option 13: I/O device load
This screen (FCX239: Layout of processor summary log screen) indicates I/O device throughput in detail:
– “Serv” is the sum of Function Pending (Pend), Connected (Conn), and Disconnect (Disc) times.
– “Resp” is the sum of “Serv” and the time during which an I/O request is waiting to be started.
– “Conn” is the actual data transfer time. It is a positive indicator if “Resp” time is close to “Conn” time.
– “Pend” is the interval between start of the SSCH instruction, and the data transfer between channel and I/O controller.
– “Disc” is the average time the device is disconnected from channel while executing an I/O request.
Note: If the z/VM LPAR uses dedicated processors, the reported data is real processor utilization. With shared processors, the reported data is logical processor utilization.
Note: Linux cannot obtain the “real” CPU usage. Linux reports CPU consumption as though Linux owned the processors. It does not know it is running under z/VM. The value reported in this field differs from the value reported by Linux.
178 IBM z/VM and Linux on IBM System z: Virtualization Cookbook for Red Hat Enterprise Linux 4
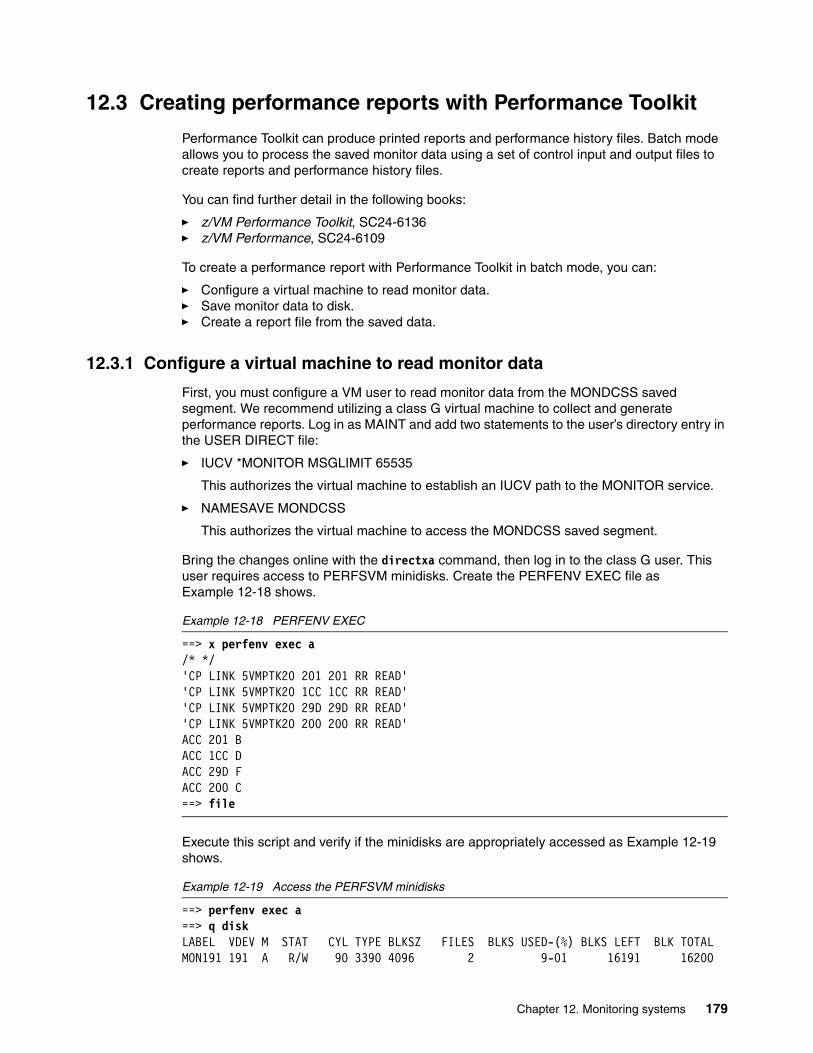
12.3 Creating performance reports with Performance Toolkit
Performance Toolkit can produce printed reports and performance history files. Batch mode allows you to process the saved monitor data using a set of control input and output files to create reports and performance history files.
You can find further detail in the following books:
� z/VM Performance Toolkit, SC24-6136 � z/VM Performance, SC24-6109
To create a performance report with Performance Toolkit in batch mode, you can:
� Configure a virtual machine to read monitor data. � Save monitor data to disk.� Create a report file from the saved data.
12.3.1 Configure a virtual machine to read monitor data
First, you must configure a VM user to read monitor data from the MONDCSS saved segment. We recommend utilizing a class G virtual machine to collect and generate performance reports. Log in as MAINT and add two statements to the user’s directory entry in the USER DIRECT file:
� IUCV *MONITOR MSGLIMIT 65535
This authorizes the virtual machine to establish an IUCV path to the MONITOR service.
� NAMESAVE MONDCSS
This authorizes the virtual machine to access the MONDCSS saved segment.
Bring the changes online with the directxa command, then log in to the class G user. This user requires access to PERFSVM minidisks. Create the PERFENV EXEC file as Example 12-18 shows.
Example 12-18 PERFENV EXEC
==> x perfenv exec a/* */ 'CP LINK 5VMPTK20 201 201 RR READ''CP LINK 5VMPTK20 1CC 1CC RR READ''CP LINK 5VMPTK20 29D 29D RR READ''CP LINK 5VMPTK20 200 200 RR READ'ACC 201 B ACC 1CC D ACC 29D F ACC 200 C ==> file
Execute this script and verify if the minidisks are appropriately accessed as Example 12-19 shows.
Example 12-19 Access the PERFSVM minidisks
==> perfenv exec a==> q diskLABEL VDEV M STAT CYL TYPE BLKSZ FILES BLKS USED-(%) BLKS LEFT BLK TOTALMON191 191 A R/W 90 3390 4096 2 9-01 16191 16200
Chapter 12. Monitoring systems 179
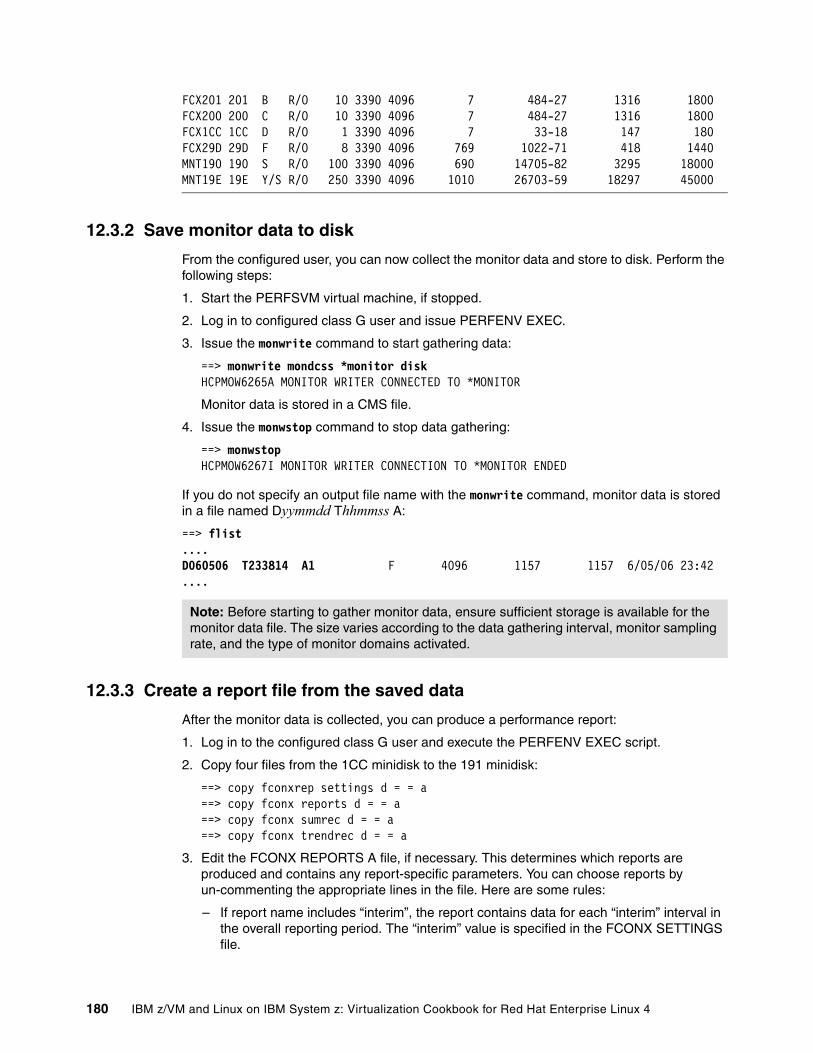
FCX201 201 B R/O 10 3390 4096 7 484-27 1316 1800FCX200 200 C R/O 10 3390 4096 7 484-27 1316 1800FCX1CC 1CC D R/O 1 3390 4096 7 33-18 147 180FCX29D 29D F R/O 8 3390 4096 769 1022-71 418 1440MNT190 190 S R/O 100 3390 4096 690 14705-82 3295 18000MNT19E 19E Y/S R/O 250 3390 4096 1010 26703-59 18297 45000
12.3.2 Save monitor data to disk
From the configured user, you can now collect the monitor data and store to disk. Perform the following steps:
1. Start the PERFSVM virtual machine, if stopped.
2. Log in to configured class G user and issue PERFENV EXEC.
3. Issue the monwrite command to start gathering data:
==> monwrite mondcss *monitor diskHCPMOW6265A MONITOR WRITER CONNECTED TO *MONITOR
Monitor data is stored in a CMS file.
4. Issue the monwstop command to stop data gathering:
==> monwstopHCPMOW6267I MONITOR WRITER CONNECTION TO *MONITOR ENDED
If you do not specify an output file name with the monwrite command, monitor data is stored in a file named Dyymmdd Thhmmss A:
==> flist....D060506 T233814 A1 F 4096 1157 1157 6/05/06 23:42....
12.3.3 Create a report file from the saved data
After the monitor data is collected, you can produce a performance report:
1. Log in to the configured class G user and execute the PERFENV EXEC script.
2. Copy four files from the 1CC minidisk to the 191 minidisk:
==> copy fconxrep settings d = = a ==> copy fconx reports d = = a==> copy fconx sumrec d = = a==> copy fconx trendrec d = = a
3. Edit the FCONX REPORTS A file, if necessary. This determines which reports are produced and contains any report-specific parameters. You can choose reports by un-commenting the appropriate lines in the file. Here are some rules:
– If report name includes “interim”, the report contains data for each “interim” interval in the overall reporting period. The “interim” value is specified in the FCONX SETTINGS file.
Note: Before starting to gather monitor data, ensure sufficient storage is available for the monitor data file. The size varies according to the data gathering interval, monitor sampling rate, and the type of monitor domains activated.
180 IBM z/VM and Linux on IBM System z: Virtualization Cookbook for Red Hat Enterprise Linux 4
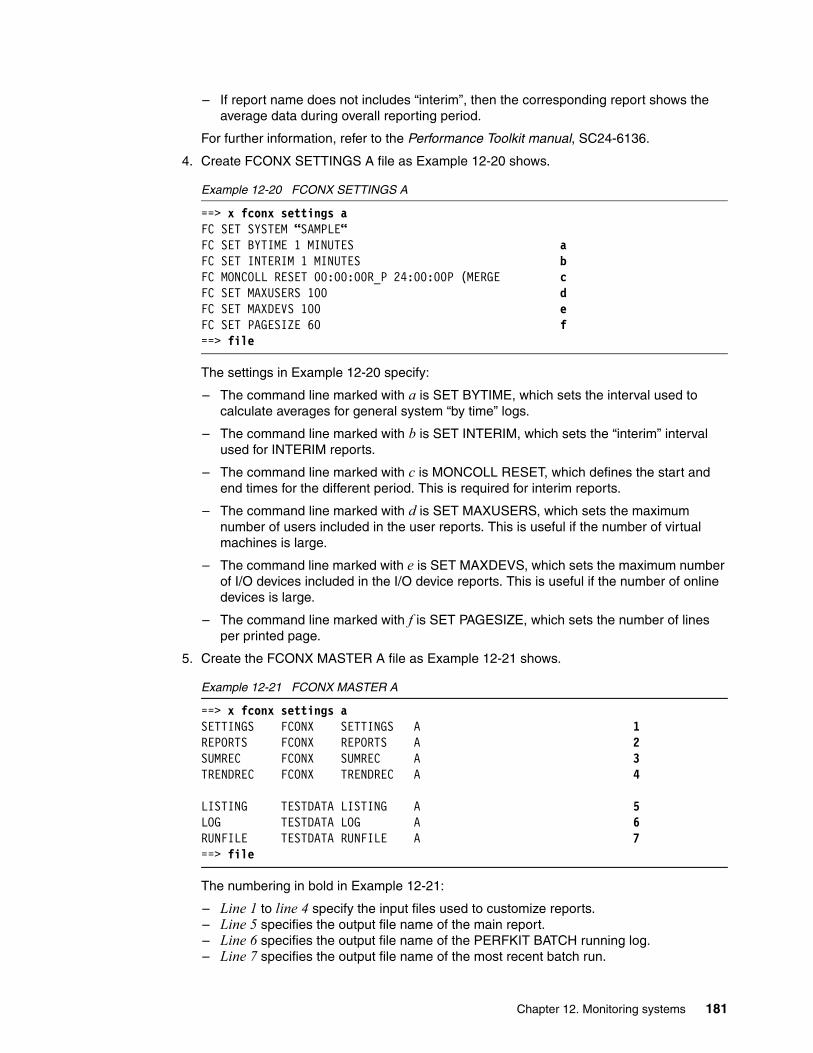
– If report name does not includes “interim”, then the corresponding report shows the average data during overall reporting period.
For further information, refer to the Performance Toolkit manual, SC24-6136.
4. Create FCONX SETTINGS A file as Example 12-20 shows.
Example 12-20 FCONX SETTINGS A
==> x fconx settings aFC SET SYSTEM “SAMPLE“ FC SET BYTIME 1 MINUTES a FC SET INTERIM 1 MINUTES b FC MONCOLL RESET 00:00:00R_P 24:00:00P (MERGE c FC SET MAXUSERS 100 d FC SET MAXDEVS 100 e FC SET PAGESIZE 60 f ==> file
The settings in Example 12-20 specify:
– The command line marked with a is SET BYTIME, which sets the interval used to calculate averages for general system “by time” logs.
– The command line marked with b is SET INTERIM, which sets the “interim” interval used for INTERIM reports.
– The command line marked with c is MONCOLL RESET, which defines the start and end times for the different period. This is required for interim reports.
– The command line marked with d is SET MAXUSERS, which sets the maximum number of users included in the user reports. This is useful if the number of virtual machines is large.
– The command line marked with e is SET MAXDEVS, which sets the maximum number of I/O devices included in the I/O device reports. This is useful if the number of online devices is large.
– The command line marked with f is SET PAGESIZE, which sets the number of lines per printed page.
5. Create the FCONX MASTER A file as Example 12-21 shows.
Example 12-21 FCONX MASTER A
==> x fconx settings aSETTINGS FCONX SETTINGS A 1 REPORTS FCONX REPORTS A 2 SUMREC FCONX SUMREC A 3 TRENDREC FCONX TRENDREC A 4 LISTING TESTDATA LISTING A 5 LOG TESTDATA LOG A 6 RUNFILE TESTDATA RUNFILE A 7 ==> file
The numbering in bold in Example 12-21:
– Line 1 to line 4 specify the input files used to customize reports. – Line 5 specifies the output file name of the main report. – Line 6 specifies the output file name of the PERFKIT BATCH running log. – Line 7 specifies the output file name of the most recent batch run.
Chapter 12. Monitoring systems 181
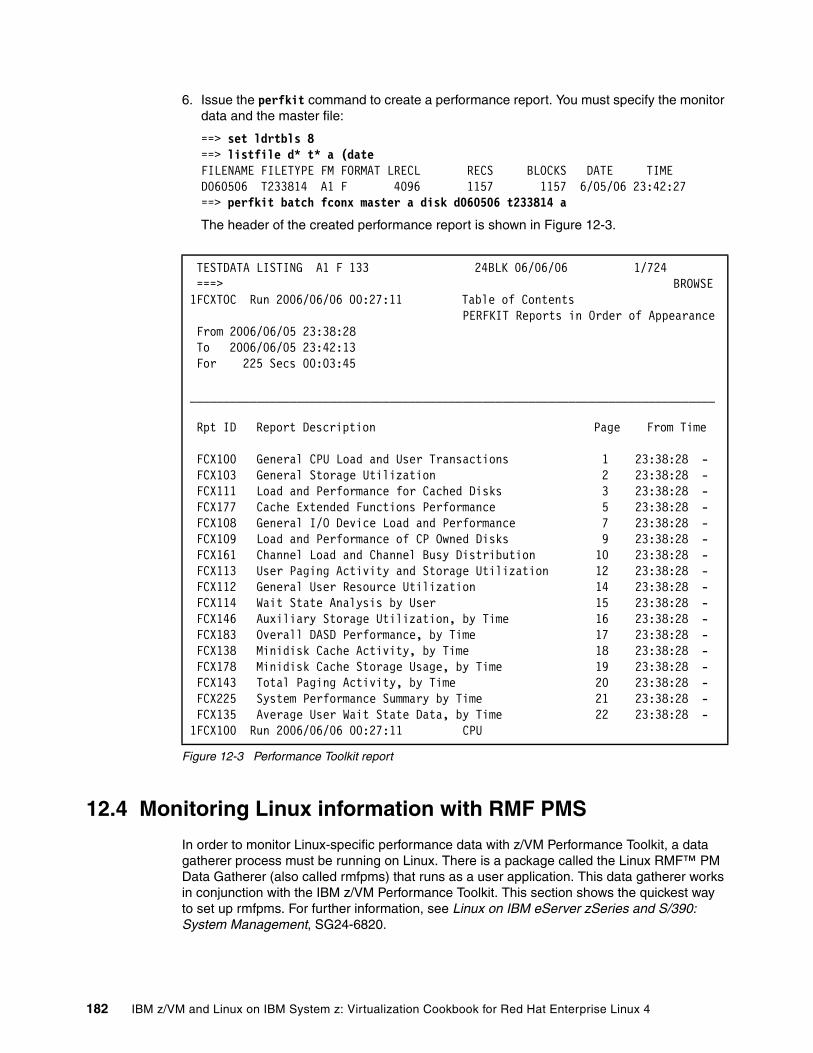
6. Issue the perfkit command to create a performance report. You must specify the monitor data and the master file:
==> set ldrtbls 8==> listfile d* t* a (dateFILENAME FILETYPE FM FORMAT LRECL RECS BLOCKS DATE TIME D060506 T233814 A1 F 4096 1157 1157 6/05/06 23:42:27==> perfkit batch fconx master a disk d060506 t233814 a
The header of the created performance report is shown in Figure 12-3.
Figure 12-3 Performance Toolkit report
12.4 Monitoring Linux information with RMF PMS
In order to monitor Linux-specific performance data with z/VM Performance Toolkit, a data gatherer process must be running on Linux. There is a package called the Linux RMF™ PM Data Gatherer (also called rmfpms) that runs as a user application. This data gatherer works in conjunction with the IBM z/VM Performance Toolkit. This section shows the quickest way to set up rmfpms. For further information, see Linux on IBM eServer zSeries and S/390: System Management, SG24-6820.
TESTDATA LISTING A1 F 133 24BLK 06/06/06 1/724 ===> BROWSE 1FCXTOC Run 2006/06/06 00:27:11 Table of Contents PERFKIT Reports in Order of Appearance From 2006/06/05 23:38:28 To 2006/06/05 23:42:13 For 225 Secs 00:03:45 _______________________________________________________________________________ Rpt ID Report Description Page From Time FCX100 General CPU Load and User Transactions 1 23:38:28 - FCX103 General Storage Utilization 2 23:38:28 - FCX111 Load and Performance for Cached Disks 3 23:38:28 - FCX177 Cache Extended Functions Performance 5 23:38:28 - FCX108 General I/O Device Load and Performance 7 23:38:28 - FCX109 Load and Performance of CP Owned Disks 9 23:38:28 - FCX161 Channel Load and Channel Busy Distribution 10 23:38:28 - FCX113 User Paging Activity and Storage Utilization 12 23:38:28 - FCX112 General User Resource Utilization 14 23:38:28 - FCX114 Wait State Analysis by User 15 23:38:28 - FCX146 Auxiliary Storage Utilization, by Time 16 23:38:28 - FCX183 Overall DASD Performance, by Time 17 23:38:28 - FCX138 Minidisk Cache Activity, by Time 18 23:38:28 - FCX178 Minidisk Cache Storage Usage, by Time 19 23:38:28 - FCX143 Total Paging Activity, by Time 20 23:38:28 - FCX225 System Performance Summary by Time 21 23:38:28 - FCX135 Average User Wait State Data, by Time 22 23:38:28 -1FCX100 Run 2006/06/06 00:27:11 CPU
182 IBM z/VM and Linux on IBM System z: Virtualization Cookbook for Red Hat Enterprise Linux 4
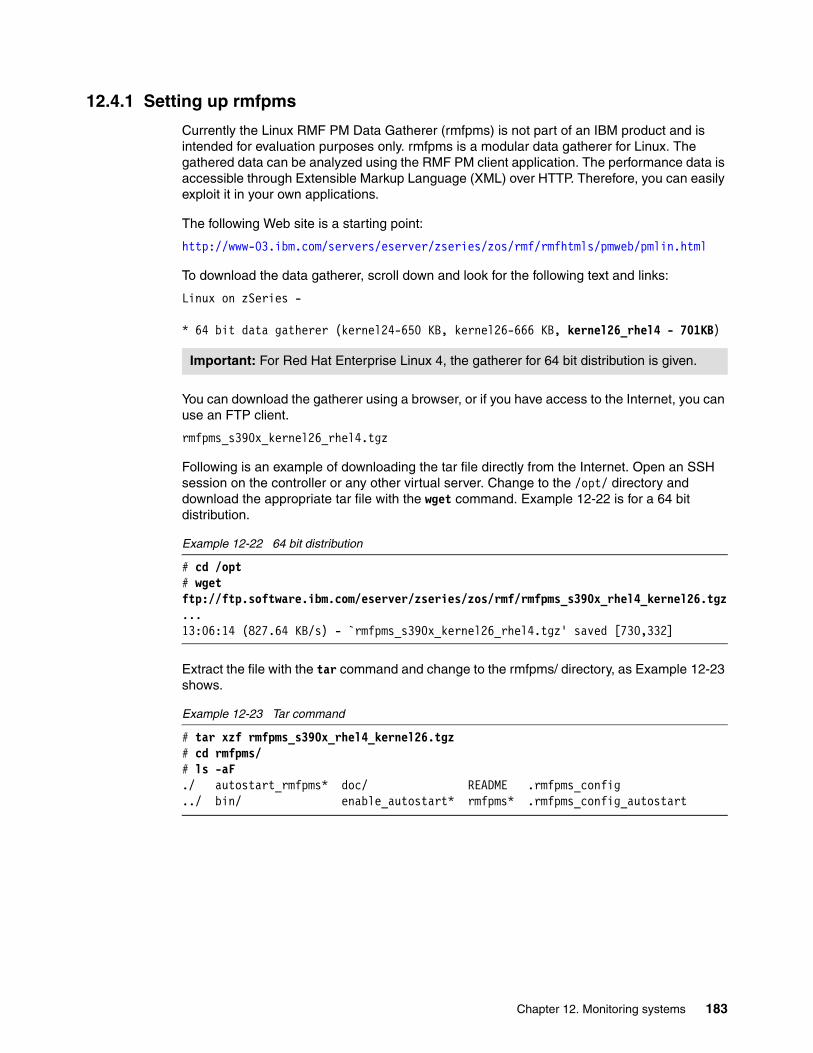
12.4.1 Setting up rmfpms
Currently the Linux RMF PM Data Gatherer (rmfpms) is not part of an IBM product and is intended for evaluation purposes only. rmfpms is a modular data gatherer for Linux. The gathered data can be analyzed using the RMF PM client application. The performance data is accessible through Extensible Markup Language (XML) over HTTP. Therefore, you can easily exploit it in your own applications.
The following Web site is a starting point:
http://www-03.ibm.com/servers/eserver/zseries/zos/rmf/rmfhtmls/pmweb/pmlin.html
To download the data gatherer, scroll down and look for the following text and links:
Linux on zSeries -
* 64 bit data gatherer (kernel24-650 KB, kernel26-666 KB, kernel26_rhel4 - 701KB)
You can download the gatherer using a browser, or if you have access to the Internet, you can use an FTP client.
rmfpms_s390x_kernel26_rhel4.tgz
Following is an example of downloading the tar file directly from the Internet. Open an SSH session on the controller or any other virtual server. Change to the /opt/ directory and download the appropriate tar file with the wget command. Example 12-22 is for a 64 bit distribution.
Example 12-22 64 bit distribution
# cd /opt# wget ftp://ftp.software.ibm.com/eserver/zseries/zos/rmf/rmfpms_s390x_rhel4_kernel26.tgz...13:06:14 (827.64 KB/s) - `rmfpms_s390x_kernel26_rhel4.tgz' saved [730,332]
Extract the file with the tar command and change to the rmfpms/ directory, as Example 12-23 shows.
Example 12-23 Tar command
# tar xzf rmfpms_s390x_rhel4_kernel26.tgz# cd rmfpms/# ls -aF./ autostart_rmfpms* doc/ README .rmfpms_config../ bin/ enable_autostart* rmfpms* .rmfpms_config_autostart
Important: For Red Hat Enterprise Linux 4, the gatherer for 64 bit distribution is given.
Chapter 12. Monitoring systems 183
You see the configuration file .rmfpms_config. Make a copy of the configuration file, edit it and change $HOME to /opt and comment out about APACHE variables, as Example 12-24 shows.
Example 12-24 Copying and editing the .rmfpms_config
# cp .rmfpms_config .rmfpms_config.orig# vi .rmfpms_config
Before:...export IBM_PERFORMANCE_REPOSITORY=$HOME/rmfpms/.rmfpmsexport IBM_PERFORMANCE_HOME=$HOME/rmfpms/bin/export IBM_PERFORMANCE_MINTIME=60export LD_LIBRARY_PATH=$IBM_PERFORMANCE_HOME:$LD_LIBRARY_PATHexport APACHE_ACCESS_LOG=/var/log/httpd/access_logexport APACHE_SERVER=localhostexport APACHE_SERVER_PORT=80...
After:...export IBM_PERFORMANCE_REPOSITORY=/opt/rmfpms/.rmfpmsexport IBM_PERFORMANCE_HOME=/opt/rmfpms/bin/export IBM_PERFORMANCE_MINTIME=60export LD_LIBRARY_PATH=$IBM_PERFORMANCE_HOME:$LD_LIBRARY_PATH# export APACHE_ACCESS_LOG=/var/log/httpd/access_log# export APACHE_SERVER=localhost# export APACHE_SERVER_PORT=80...
You can now start rmfpms in the bin/ directory with the commands shown in Example 12-25.
Example 12-25 Using rmfpms in the bin/ directory
# bin/rmfpms startCreating /opt/rmfpms/.rmfpms ...Starting performance gatherer backends ... DDSRV: RMF-DDS-Server/Linux-Beta (Jan 24 2006) started. DDSRV: Functionality Level=2.116 DDSRV: Reading exceptions from gpmexsys.ini and gpmexusr.ini.DDSRV: Server will now run as a daemon process.done!
184 IBM z/VM and Linux on IBM System z: Virtualization Cookbook for Red Hat Enterprise Linux 4
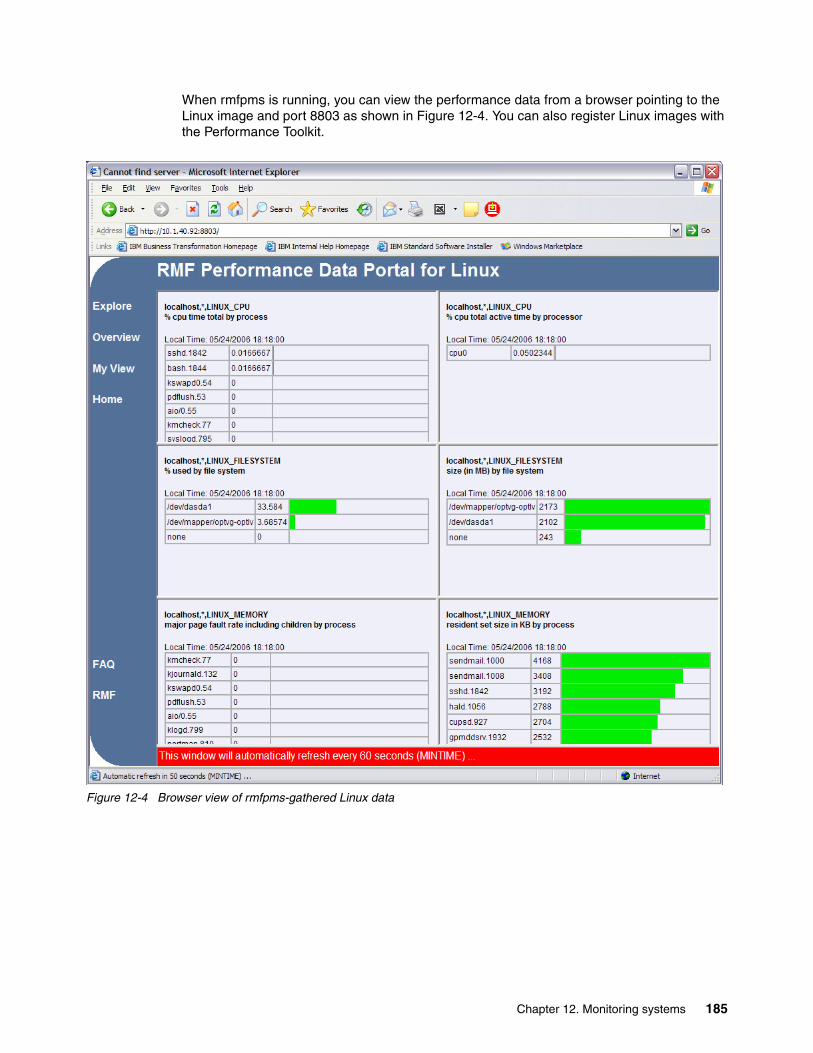
When rmfpms is running, you can view the performance data from a browser pointing to the Linux image and port 8803 as shown in Figure 12-4. You can also register Linux images with the Performance Toolkit.
Figure 12-4 Browser view of rmfpms-gathered Linux data
Chapter 12. Monitoring systems 185
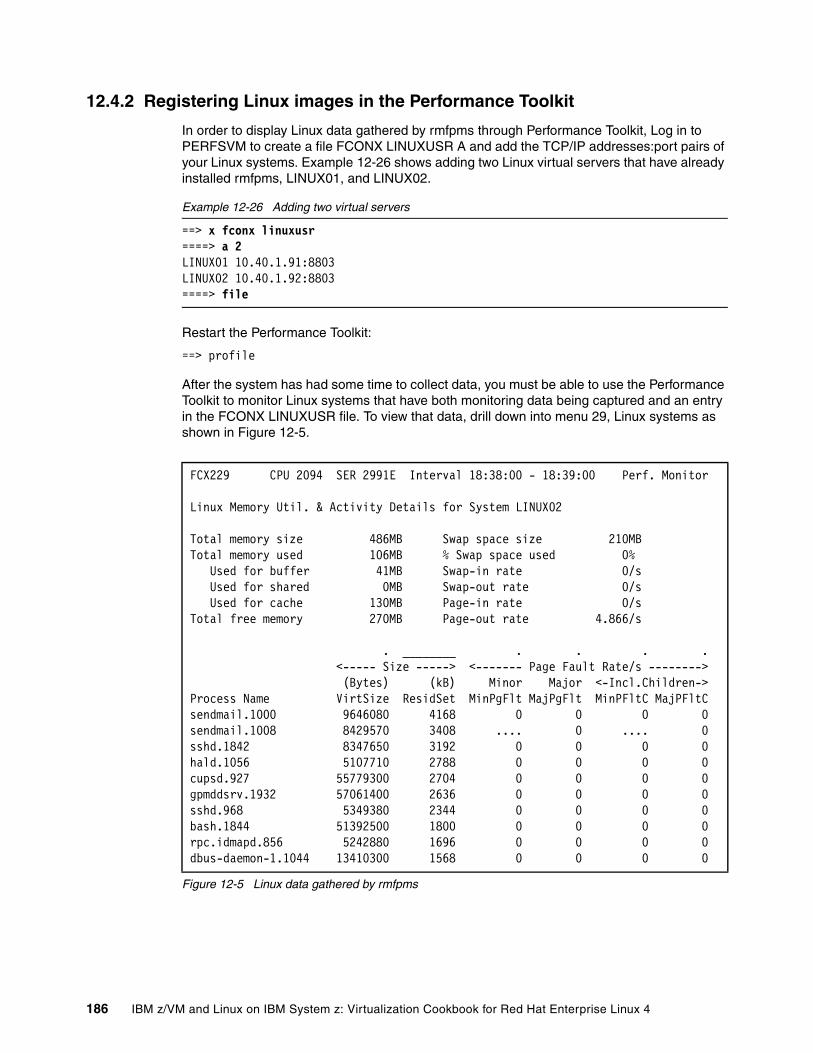
12.4.2 Registering Linux images in the Performance Toolkit
In order to display Linux data gathered by rmfpms through Performance Toolkit, Log in to PERFSVM to create a file FCONX LINUXUSR A and add the TCP/IP addresses:port pairs of your Linux systems. Example 12-26 shows adding two Linux virtual servers that have already installed rmfpms, LINUX01, and LINUX02.
Example 12-26 Adding two virtual servers
==> x fconx linuxusr====> a 2LINUX01 10.40.1.91:8803 LINUX02 10.40.1.92:8803 ====> file
Restart the Performance Toolkit:
==> profile
After the system has had some time to collect data, you must be able to use the Performance Toolkit to monitor Linux systems that have both monitoring data being captured and an entry in the FCONX LINUXUSR file. To view that data, drill down into menu 29, Linux systems as shown in Figure 12-5.
Figure 12-5 Linux data gathered by rmfpms
FCX229 CPU 2094 SER 2991E Interval 18:38:00 - 18:39:00 Perf. Monitor Linux Memory Util. & Activity Details for System LINUX02 Total memory size 486MB Swap space size 210MB Total memory used 106MB % Swap space used 0% Used for buffer 41MB Swap-in rate 0/s Used for shared 0MB Swap-out rate 0/s Used for cache 130MB Page-in rate 0/s Total free memory 270MB Page-out rate 4.866/s . ________ . . . . <----- Size -----> <------- Page Fault Rate/s --------> (Bytes) (kB) Minor Major <-Incl.Children->Process Name VirtSize ResidSet MinPgFlt MajPgFlt MinPFltC MajPFltCsendmail.1000 9646080 4168 0 0 0 0sendmail.1008 8429570 3408 .... 0 .... 0sshd.1842 8347650 3192 0 0 0 0hald.1056 5107710 2788 0 0 0 0cupsd.927 55779300 2704 0 0 0 0gpmddsrv.1932 57061400 2636 0 0 0 0sshd.968 5349380 2344 0 0 0 0bash.1844 51392500 1800 0 0 0 0rpc.idmapd.856 5242880 1696 0 0 0 0dbus-daemon-1.1044 13410300 1568 0 0 0 0
186 IBM z/VM and Linux on IBM System z: Virtualization Cookbook for Red Hat Enterprise Linux 4
12.5 Using the OSA-Express SNMP subagent
The OSA-Express Simple Network Management Protocol (SNMP) subagent (osasnmpd) supports Management Information Bases (MIBs) for OSA-Express features in QDIO mode only. You can use traditional snmp commands to obtain MIB information from the new Direct SNMP MIB, also called the OSA-Express Enterprise Specific MIB. The MIBS.DATA file provides the mapping of the names of the OSA tables and objects to their SNMP object identifiers (OIDs). The query function is supported using the SNMP “get” command, and is used to obtain real time device specifying information, such as operational status and traffic counts.
12.5.1 Obtaining and configuring osasnmpd
This section outlines the steps to obtain and configure the OSA-Express SNMP subagent. Be aware that this sample configuration does not take security-related requirements into account. For details, consult Device Drivers, Features, and Commands for the April 2004 stream at:
http://www-128.ibm.com/developerworks/linux/linux390/april2004_documentation.html
Information on net-snmp can be found at:
http://net-snmp.sourceforge.net/
Download the IBM OSA-Express MIBThe OSA-Express SNMP subagent requires you to download the IBM OSA-Express MIB. This MIB file is valid only for the OSA-Express adapter, and you can obtain it from IBM Resource Link™:
1. Sign in IBM Resource Link at:
http://ibm.com/servers/resourcelink/
A user ID and password are required. You can apply for a user ID if you do not yet have one, or use an existing user ID.
2. Select Library from the left-hand navigation area.
3. Under Library shortcuts, select Open Systems Adapter (OSA) Library.
4. Follow the link for OSA-Express Direct SNMP MIB module.
5. Select and download the MIB for your Licensed Internal Code (LIC) level. This example uses the osa10gig.mib.
6. Rename the MIB file to the name specified in the MIBs definition line. In this example, the definition line in the MIB is:
==>IBM-OSA-MIB DEFINITIONS ::= BEGIN
Then, this example renames the MIB to IBM-OSA-MIB.txt.
7. Place the MIB file in /usr/share/snmp/mibs directory and change file permission to 644.
Note: An SNMP management application, such as Tivoli NetView®, can use an SNMP for OSA-Express. This feature is currently not supported for OSA-Express adapters connected to a z/VM Virtual Switch (VSWITCH).
Note: If you use a different directory, be sure to specify the changed directory in the snmp.conf file.
Chapter 12. Monitoring systems 187

Configure osasnmpd on Red Hat Enterprise Linux 4Configure the OSA-Express SNMP subagent. Ensure the s390-tools and net-snmp-libs packages are installed. Then, perform the following steps:
1. Install net-snmp Red Hat Package Manager (RPM) and net-snmp-utils RPM as Example 12-27 shows.
Example 12-27 Installing net-snmp and net-snmp-utils
#rpm-ivh net-snmp-5.1.2-11.EL4.6.s390x.rpm net-snmp-utils-5.1.2-11.EL4.6.s390x.rpm warning: net-snmp-5.1.2-11.EL4.6.s390x.rpm:V3 DSA signature:NOKEY, key ID db42a60ePreparing... ########################################### [100%] 1:net-snmp ########################################### [ 50%] 2:net-snmp-utils ########################################### [100%]
2. Tailor the /etc/snmp/snmpd.conf file:
– In the security name section, add a line that maps a community name to a security name:
# First, map the community name "public" into a "security name"# sec.name source community#com2sec notConfigUser default publiccom2sec pubsec localhost public
This example maps the security name “pubsec” to the “public” community on the local host machine.
– In the group section, add a group for each master agent version as Example 12-28 shows. This example maps the “pubsec” security name to the group named “osagroup”. This is done for both the “v1” and “v2c” security models.
Example 12-28 Adding a group for each master agent
# Second, map the security name into a group name:# groupName securityModel securityName#group notConfigGroup v1 notConfigUser#group notConfigGroup v2c notConfigUsergroup osagroup v1 pubsecgroup osagroup v2c pubsec
– In the view section, add a line to define access rights to a subset of OIDs as Example 12-29 shows. This example defines the “allview” view with access rights to the “.1” OID subtree.
Example 12-29 Defining access rights
# Third, create a view for us to let the group have rights to:# Make at least snmpwalk -v 1 localhost -c public system fast again.# name incl/excl subtree mask(optional)#view systemview included .1.3.6.1.2.1.1#view systemview included .1.3.6.1.2.1.25.1.1view allview included .1
– This example assigns the “allview” access rights to the group “osagroup”. In the access section, assign access rights to the group:
# Finally, grant the group read-only access to the systemview view.# group context sec.model sec.level prefix read write notif
188 IBM z/VM and Linux on IBM System z: Virtualization Cookbook for Red Hat Enterprise Linux 4
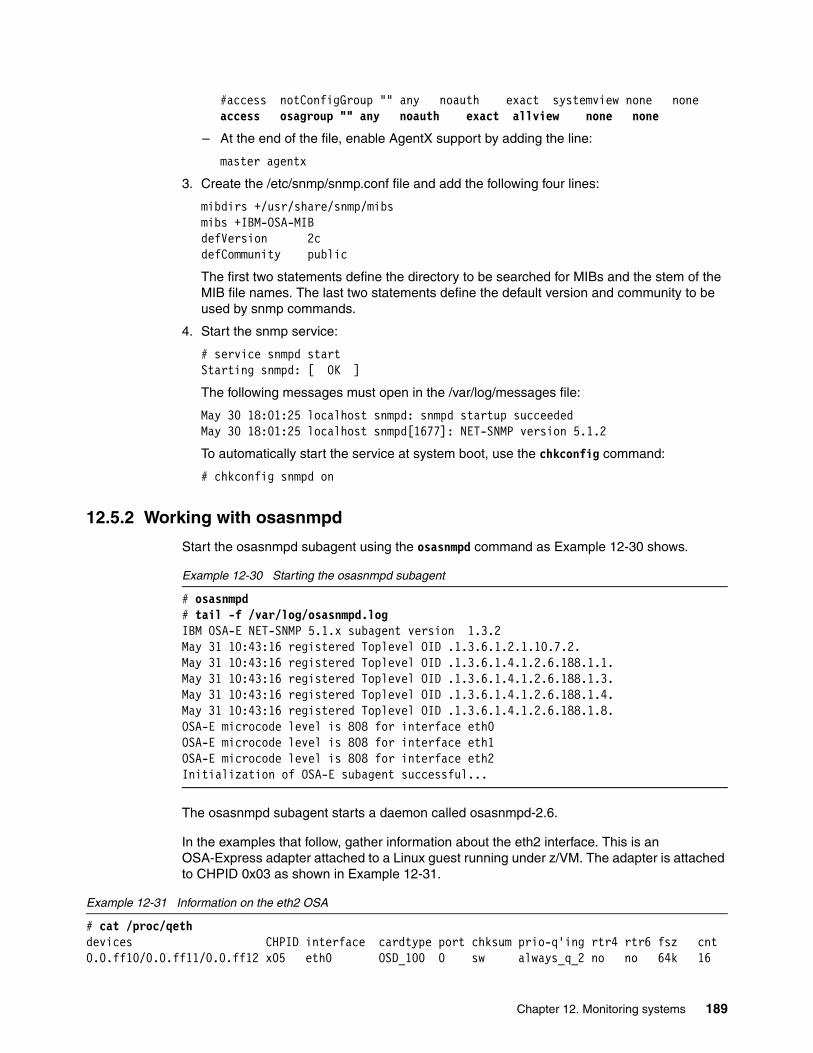
#access notConfigGroup "" any noauth exact systemview none noneaccess osagroup "" any noauth exact allview none none
– At the end of the file, enable AgentX support by adding the line:
master agentx
3. Create the /etc/snmp/snmp.conf file and add the following four lines:
mibdirs +/usr/share/snmp/mibsmibs +IBM-OSA-MIBdefVersion 2cdefCommunity public
The first two statements define the directory to be searched for MIBs and the stem of the MIB file names. The last two statements define the default version and community to be used by snmp commands.
4. Start the snmp service:
# service snmpd startStarting snmpd: [ OK ]
The following messages must open in the /var/log/messages file:
May 30 18:01:25 localhost snmpd: snmpd startup succeededMay 30 18:01:25 localhost snmpd[1677]: NET-SNMP version 5.1.2
To automatically start the service at system boot, use the chkconfig command:
# chkconfig snmpd on
12.5.2 Working with osasnmpd
Start the osasnmpd subagent using the osasnmpd command as Example 12-30 shows.
Example 12-30 Starting the osasnmpd subagent
# osasnmpd# tail -f /var/log/osasnmpd.logIBM OSA-E NET-SNMP 5.1.x subagent version 1.3.2May 31 10:43:16 registered Toplevel OID .1.3.6.1.2.1.10.7.2.May 31 10:43:16 registered Toplevel OID .1.3.6.1.4.1.2.6.188.1.1.May 31 10:43:16 registered Toplevel OID .1.3.6.1.4.1.2.6.188.1.3.May 31 10:43:16 registered Toplevel OID .1.3.6.1.4.1.2.6.188.1.4.May 31 10:43:16 registered Toplevel OID .1.3.6.1.4.1.2.6.188.1.8.OSA-E microcode level is 808 for interface eth0OSA-E microcode level is 808 for interface eth1OSA-E microcode level is 808 for interface eth2Initialization of OSA-E subagent successful...
The osasnmpd subagent starts a daemon called osasnmpd-2.6.
In the examples that follow, gather information about the eth2 interface. This is an OSA-Express adapter attached to a Linux guest running under z/VM. The adapter is attached to CHPID 0x03 as shown in Example 12-31.
Example 12-31 Information on the eth2 OSA
# cat /proc/qethdevices CHPID interface cardtype port chksum prio-q'ing rtr4 rtr6 fsz cnt0.0.ff10/0.0.ff11/0.0.ff12 x05 eth0 OSD_100 0 sw always_q_2 no no 64k 16
Chapter 12. Monitoring systems 189
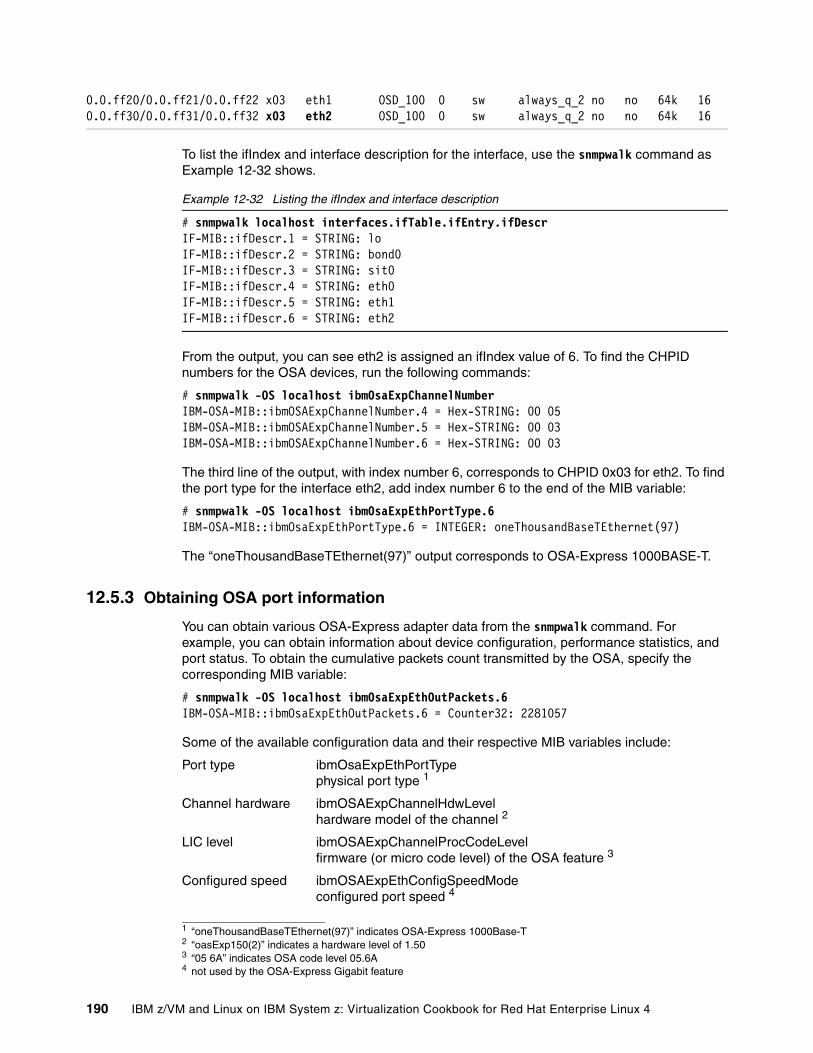
0.0.ff20/0.0.ff21/0.0.ff22 x03 eth1 OSD_100 0 sw always_q_2 no no 64k 160.0.ff30/0.0.ff31/0.0.ff32 x03 eth2 OSD_100 0 sw always_q_2 no no 64k 16
To list the ifIndex and interface description for the interface, use the snmpwalk command as Example 12-32 shows.
Example 12-32 Listing the ifIndex and interface description
# snmpwalk localhost interfaces.ifTable.ifEntry.ifDescr IF-MIB::ifDescr.1 = STRING: loIF-MIB::ifDescr.2 = STRING: bond0IF-MIB::ifDescr.3 = STRING: sit0IF-MIB::ifDescr.4 = STRING: eth0IF-MIB::ifDescr.5 = STRING: eth1IF-MIB::ifDescr.6 = STRING: eth2
From the output, you can see eth2 is assigned an ifIndex value of 6. To find the CHPID numbers for the OSA devices, run the following commands:
# snmpwalk -OS localhost ibmOsaExpChannelNumberIBM-OSA-MIB::ibmOSAExpChannelNumber.4 = Hex-STRING: 00 05IBM-OSA-MIB::ibmOSAExpChannelNumber.5 = Hex-STRING: 00 03IBM-OSA-MIB::ibmOSAExpChannelNumber.6 = Hex-STRING: 00 03
The third line of the output, with index number 6, corresponds to CHPID 0x03 for eth2. To find the port type for the interface eth2, add index number 6 to the end of the MIB variable:
# snmpwalk -OS localhost ibmOsaExpEthPortType.6IBM-OSA-MIB::ibmOsaExpEthPortType.6 = INTEGER: oneThousandBaseTEthernet(97)
The “oneThousandBaseTEthernet(97)” output corresponds to OSA-Express 1000BASE-T.
12.5.3 Obtaining OSA port information
You can obtain various OSA-Express adapter data from the snmpwalk command. For example, you can obtain information about device configuration, performance statistics, and port status. To obtain the cumulative packets count transmitted by the OSA, specify the corresponding MIB variable:
# snmpwalk -OS localhost ibmOsaExpEthOutPackets.6IBM-OSA-MIB::ibmOsaExpEthOutPackets.6 = Counter32: 2281057
Some of the available configuration data and their respective MIB variables include:
Port type ibmOsaExpEthPortType physical port type 1
Channel hardware ibmOSAExpChannelHdwLevel hardware model of the channel 2
LIC level ibmOSAExpChannelProcCodeLevel firmware (or micro code level) of the OSA feature 3
Configured speed ibmOSAExpEthConfigSpeedMode configured port speed 4
1 “oneThousandBaseTEthernet(97)” indicates OSA-Express 1000Base-T2 “oasExp150(2)” indicates a hardware level of 1.503 “05 6A” indicates OSA code level 05.6A4 not used by the OSA-Express Gigabit feature
190 IBM z/VM and Linux on IBM System z: Virtualization Cookbook for Red Hat Enterprise Linux 4
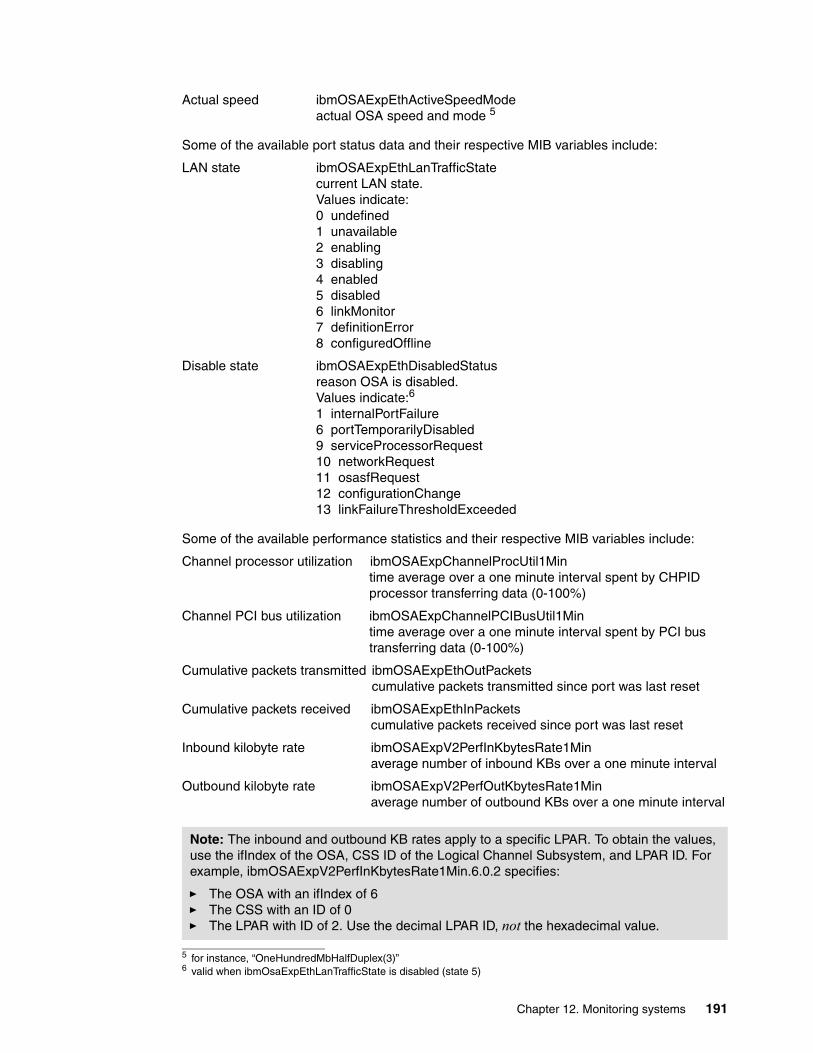
Actual speed ibmOSAExpEthActiveSpeedMode actual OSA speed and mode 5
Some of the available port status data and their respective MIB variables include:
LAN state ibmOSAExpEthLanTrafficState current LAN state. Values indicate: 0 undefined 1 unavailable 2 enabling 3 disabling 4 enabled 5 disabled 6 linkMonitor 7 definitionError 8 configuredOffline
Disable state ibmOSAExpEthDisabledStatus reason OSA is disabled. Values indicate:6 1 internalPortFailure 6 portTemporarilyDisabled 9 serviceProcessorRequest 10 networkRequest 11 osasfRequest 12 configurationChange 13 linkFailureThresholdExceeded
Some of the available performance statistics and their respective MIB variables include:
Channel processor utilization ibmOSAExpChannelProcUtil1Min time average over a one minute interval spent by CHPID processor transferring data (0-100%)
Channel PCI bus utilization ibmOSAExpChannelPCIBusUtil1Min time average over a one minute interval spent by PCI bus transferring data (0-100%)
Cumulative packets transmitted ibmOSAExpEthOutPackets cumulative packets transmitted since port was last reset
Cumulative packets received ibmOSAExpEthInPackets cumulative packets received since port was last reset
Inbound kilobyte rate ibmOSAExpV2PerfInKbytesRate1Min average number of inbound KBs over a one minute interval
Outbound kilobyte rate ibmOSAExpV2PerfOutKbytesRate1Min average number of outbound KBs over a one minute interval
5 for instance, “OneHundredMbHalfDuplex(3)” 6 valid when ibmOsaExpEthLanTrafficState is disabled (state 5)
Note: The inbound and outbound KB rates apply to a specific LPAR. To obtain the values, use the ifIndex of the OSA, CSS ID of the Logical Channel Subsystem, and LPAR ID. For example, ibmOSAExpV2PerfInKbytesRate1Min.6.0.2 specifies:
� The OSA with an ifIndex of 6 � The CSS with an ID of 0 � The LPAR with ID of 2. Use the decimal LPAR ID, not the hexadecimal value.
Chapter 12. Monitoring systems 191
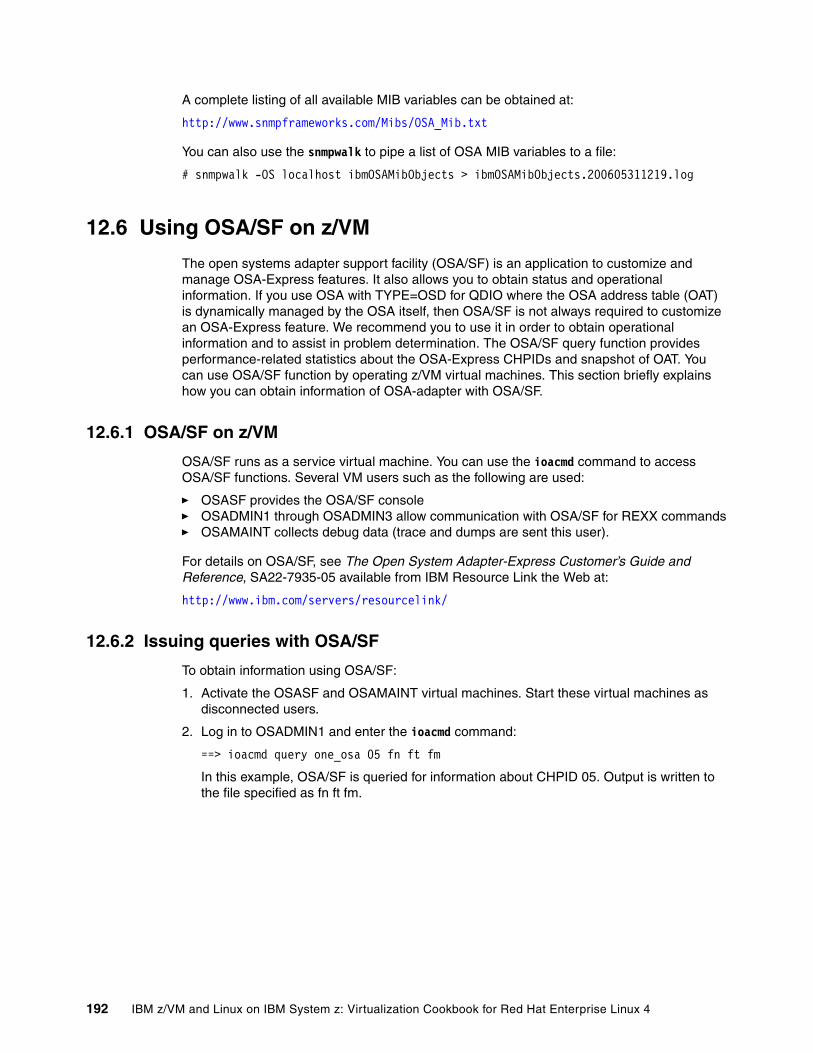
A complete listing of all available MIB variables can be obtained at:
http://www.snmpframeworks.com/Mibs/OSA_Mib.txt
You can also use the snmpwalk to pipe a list of OSA MIB variables to a file:
# snmpwalk -OS localhost ibmOSAMibObjects > ibmOSAMibObjects.200605311219.log
12.6 Using OSA/SF on z/VM
The open systems adapter support facility (OSA/SF) is an application to customize and manage OSA-Express features. It also allows you to obtain status and operational information. If you use OSA with TYPE=OSD for QDIO where the OSA address table (OAT) is dynamically managed by the OSA itself, then OSA/SF is not always required to customize an OSA-Express feature. We recommend you to use it in order to obtain operational information and to assist in problem determination. The OSA/SF query function provides performance-related statistics about the OSA-Express CHPIDs and snapshot of OAT. You can use OSA/SF function by operating z/VM virtual machines. This section briefly explains how you can obtain information of OSA-adapter with OSA/SF.
12.6.1 OSA/SF on z/VM
OSA/SF runs as a service virtual machine. You can use the ioacmd command to access OSA/SF functions. Several VM users such as the following are used:
� OSASF provides the OSA/SF console� OSADMIN1 through OSADMIN3 allow communication with OSA/SF for REXX commands� OSAMAINT collects debug data (trace and dumps are sent this user).
For details on OSA/SF, see The Open System Adapter-Express Customer’s Guide and Reference, SA22-7935-05 available from IBM Resource Link the Web at:
http://www.ibm.com/servers/resourcelink/
12.6.2 Issuing queries with OSA/SF
To obtain information using OSA/SF:
1. Activate the OSASF and OSAMAINT virtual machines. Start these virtual machines as disconnected users.
2. Log in to OSADMIN1 and enter the ioacmd command:
==> ioacmd query one_osa 05 fn ft fm
In this example, OSA/SF is queried for information about CHPID 05. Output is written to the file specified as fn ft fm.
192 IBM z/VM and Linux on IBM System z: Virtualization Cookbook for Red Hat Enterprise Linux 4
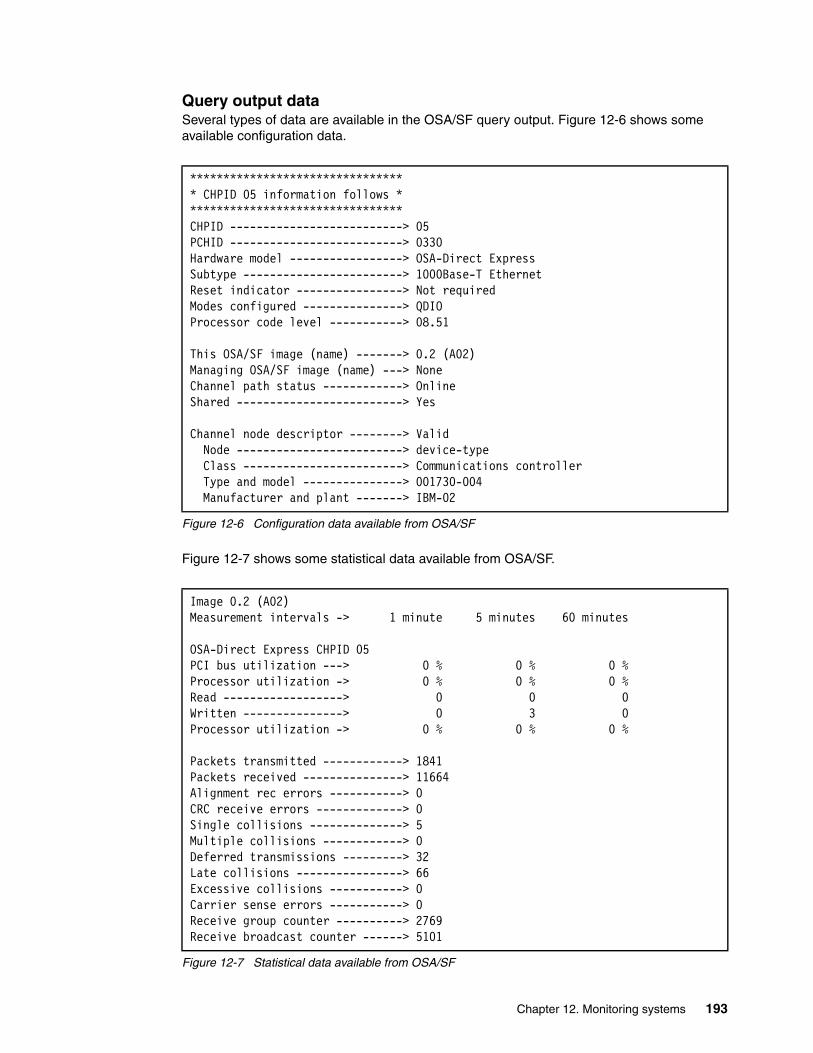
Query output dataSeveral types of data are available in the OSA/SF query output. Figure 12-6 shows some available configuration data.
Figure 12-6 Configuration data available from OSA/SF
Figure 12-7 shows some statistical data available from OSA/SF.
Figure 12-7 Statistical data available from OSA/SF
******************************** * CHPID 05 information follows * ******************************** CHPID --------------------------> 05 PCHID --------------------------> 0330 Hardware model -----------------> OSA-Direct Express Subtype ------------------------> 1000Base-T Ethernet Reset indicator ----------------> Not required Modes configured ---------------> QDIO Processor code level -----------> 08.51 This OSA/SF image (name) -------> 0.2 (A02) Managing OSA/SF image (name) ---> None Channel path status ------------> Online Shared -------------------------> Yes Channel node descriptor --------> Valid Node -------------------------> device-type Class ------------------------> Communications controller Type and model ---------------> 001730-004 Manufacturer and plant -------> IBM-02
Image 0.2 (A02)Measurement intervals -> 1 minute 5 minutes 60 minutes OSA-Direct Express CHPID 05 PCI bus utilization ---> 0 % 0 % 0 % Processor utilization -> 0 % 0 % 0 % Read ------------------> 0 0 0Written ---------------> 0 3 0Processor utilization -> 0 % 0 % 0 %
Packets transmitted ------------> 1841 Packets received ---------------> 11664Alignment rec errors -----------> 0 CRC receive errors -------------> 0 Single collisions --------------> 5 Multiple collisions ------------> 0 Deferred transmissions ---------> 32 Late collisions ----------------> 66 Excessive collisions -----------> 0 Carrier sense errors -----------> 0 Receive group counter ----------> 2769 Receive broadcast counter ------> 5101
Chapter 12. Monitoring systems 193
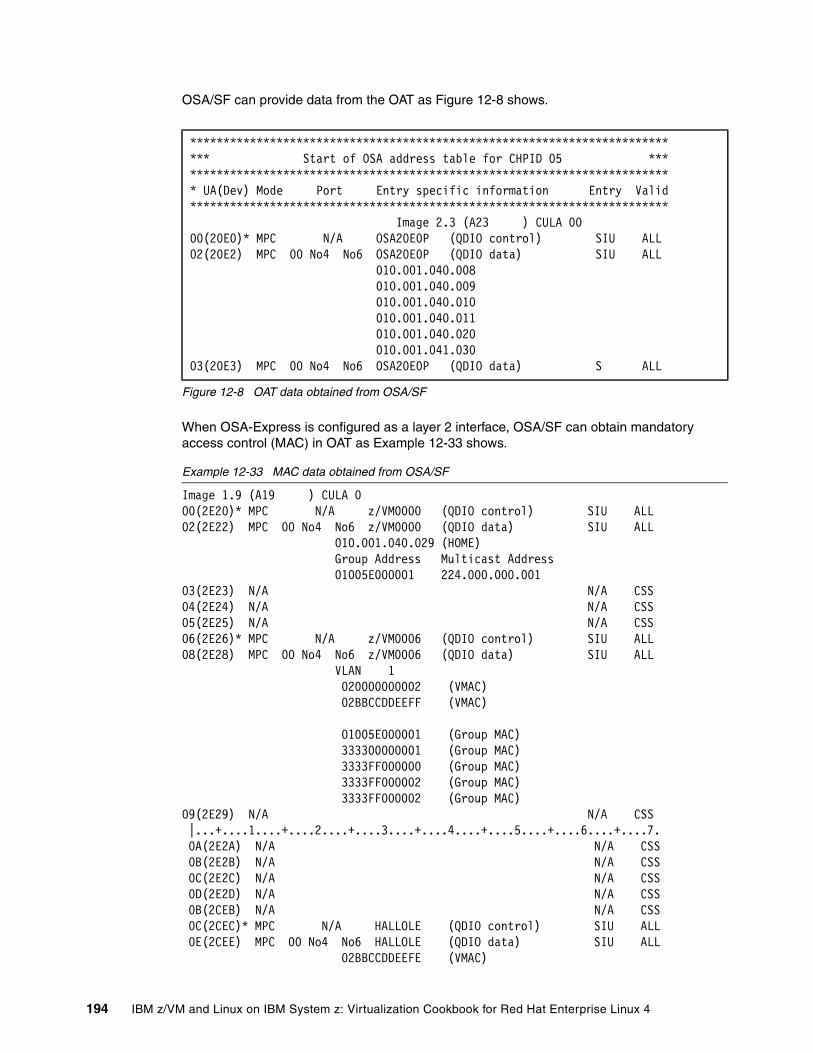
OSA/SF can provide data from the OAT as Figure 12-8 shows.
Figure 12-8 OAT data obtained from OSA/SF
When OSA-Express is configured as a layer 2 interface, OSA/SF can obtain mandatory access control (MAC) in OAT as Example 12-33 shows.
Example 12-33 MAC data obtained from OSA/SF
Image 1.9 (A19 ) CULA 0 00(2E20)* MPC N/A z/VM0000 (QDIO control) SIU ALL02(2E22) MPC 00 No4 No6 z/VM0000 (QDIO data) SIU ALL 010.001.040.029 (HOME) Group Address Multicast Address 01005E000001 224.000.000.001 03(2E23) N/A N/A CSS04(2E24) N/A N/A CSS05(2E25) N/A N/A CSS06(2E26)* MPC N/A z/VM0006 (QDIO control) SIU ALL08(2E28) MPC 00 No4 No6 z/VM0006 (QDIO data) SIU ALL VLAN 1 020000000002 (VMAC) 02BBCCDDEEFF (VMAC) 01005E000001 (Group MAC) 333300000001 (Group MAC) 3333FF000000 (Group MAC) 3333FF000002 (Group MAC) 3333FF000002 (Group MAC) 09(2E29) N/A N/A CSS |...+....1....+....2....+....3....+....4....+....5....+....6....+....7. 0A(2E2A) N/A N/A CSS 0B(2E2B) N/A N/A CSS 0C(2E2C) N/A N/A CSS 0D(2E2D) N/A N/A CSS 0B(2CEB) N/A N/A CSS 0C(2CEC)* MPC N/A HALLOLE (QDIO control) SIU ALL 0E(2CEE) MPC 00 No4 No6 HALLOLE (QDIO data) SIU ALL 02BBCCDDEEFE (VMAC)
*************************************************************************** Start of OSA address table for CHPID 05 **************************************************************************** UA(Dev) Mode Port Entry specific information Entry Valid************************************************************************
Image 2.3 (A23 ) CULA 00 00(20E0)* MPC N/A OSA20E0P (QDIO control) SIU ALL 02(20E2) MPC 00 No4 No6 OSA20E0P (QDIO data) SIU ALL 010.001.040.008 010.001.040.009 010.001.040.010 010.001.040.011 010.001.040.020 010.001.041.030 03(20E3) MPC 00 No4 No6 OSA20E0P (QDIO data) S ALL
194 IBM z/VM and Linux on IBM System z: Virtualization Cookbook for Red Hat Enterprise Linux 4
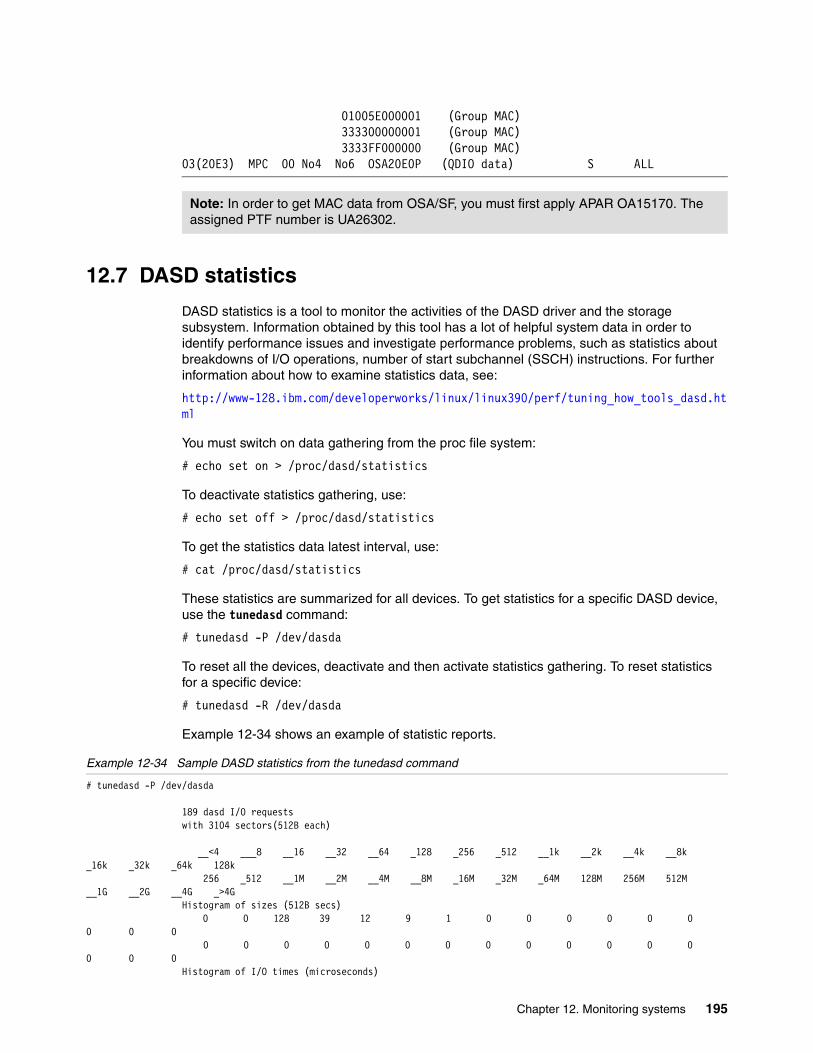
01005E000001 (Group MAC) 333300000001 (Group MAC) 3333FF000000 (Group MAC) 03(20E3) MPC 00 No4 No6 OSA20E0P (QDIO data) S ALL
12.7 DASD statistics
DASD statistics is a tool to monitor the activities of the DASD driver and the storage subsystem. Information obtained by this tool has a lot of helpful system data in order to identify performance issues and investigate performance problems, such as statistics about breakdowns of I/O operations, number of start subchannel (SSCH) instructions. For further information about how to examine statistics data, see:
http://www-128.ibm.com/developerworks/linux/linux390/perf/tuning_how_tools_dasd.html
You must switch on data gathering from the proc file system:
# echo set on > /proc/dasd/statistics
To deactivate statistics gathering, use:
# echo set off > /proc/dasd/statistics
To get the statistics data latest interval, use:
# cat /proc/dasd/statistics
These statistics are summarized for all devices. To get statistics for a specific DASD device, use the tunedasd command:
# tunedasd -P /dev/dasda
To reset all the devices, deactivate and then activate statistics gathering. To reset statistics for a specific device:
# tunedasd -R /dev/dasda
Example 12-34 shows an example of statistic reports.
Example 12-34 Sample DASD statistics from the tunedasd command
# tunedasd -P /dev/dasda
189 dasd I/O requestswith 3104 sectors(512B each)
__<4 ___8 __16 __32 __64 _128 _256 _512 __1k __2k __4k __8k _16k _32k _64k 128k
256 _512 __1M __2M __4M __8M _16M _32M _64M 128M 256M 512M __1G __2G __4G _>4G
Histogram of sizes (512B secs) 0 0 128 39 12 9 1 0 0 0 0 0 0
0 0 00 0 0 0 0 0 0 0 0 0 0 0 0
0 0 0Histogram of I/O times (microseconds)
Note: In order to get MAC data from OSA/SF, you must first apply APAR OA15170. The assigned PTF number is UA26302.
Chapter 12. Monitoring systems 195
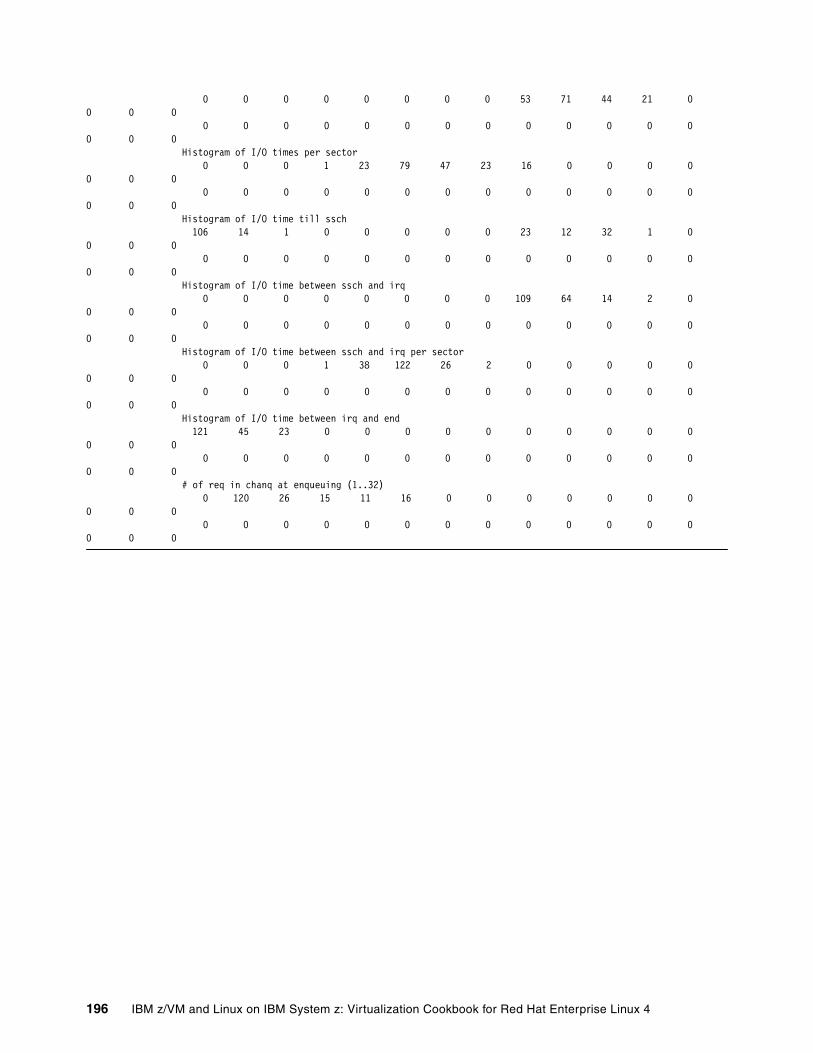
0 0 0 0 0 0 0 0 53 71 44 21 0 0 0 0
0 0 0 0 0 0 0 0 0 0 0 0 0 0 0 0
Histogram of I/O times per sector 0 0 0 1 23 79 47 23 16 0 0 0 0
0 0 0 0 0 0 0 0 0 0 0 0 0 0 0 0
0 0 0Histogram of I/O time till ssch 106 14 1 0 0 0 0 0 23 12 32 1 0
0 0 0 0 0 0 0 0 0 0 0 0 0 0 0 0
0 0 0Histogram of I/O time between ssch and irq 0 0 0 0 0 0 0 0 109 64 14 2 0
0 0 0 0 0 0 0 0 0 0 0 0 0 0 0 0
0 0 0Histogram of I/O time between ssch and irq per sector 0 0 0 1 38 122 26 2 0 0 0 0 0
0 0 0 0 0 0 0 0 0 0 0 0 0 0 0 0
0 0 0Histogram of I/O time between irq and end 121 45 23 0 0 0 0 0 0 0 0 0 0
0 0 0 0 0 0 0 0 0 0 0 0 0 0 0 0
0 0 0# of req in chanq at enqueuing (1..32) 0 120 26 15 11 16 0 0 0 0 0 0 0
0 0 0 0 0 0 0 0 0 0 0 0 0 0 0 0
0 0 0
196 IBM z/VM and Linux on IBM System z: Virtualization Cookbook for Red Hat Enterprise Linux 4
Chapter 13. Red Hat Network and up2date
This chapter describes Red Hat Network (RHN) and its ability to manage the virtual servers. Using up2date, the virtual servers can be updated when Red Hat errata are released. You can also use up2date to install new packages with automatic dependency resolution.
RHN is accessed by the following link:
http://rhn.redhat.com/
The following sections describe how to configure a Linux guest for up2date, and manage the guest through RHN:
� Registering your system with RHN.� Installing and updating packages using up2date.� Managing your Linux guest through RHN.� Using up2date without Internet access.
13
© Copyright IBM Corp. 2006. All rights reserved. 197
13.1 Registering your system with RHN
This section assumes you have already obtained a valid entitlement for Red Hat Enterprise Linux 4 on zSeries, or have completed the steps to obtain an evaluation copy. To receive a free 90-day evaluation, visit:
http://www.redhat.com/rhel/details/eval
Select the link named Red Hat Enterprise Linux AS for IBM eServer zSeries and IBM S/390 and create an account.
Before using up2date for the first time, you must import the Red Hat GPG key and register your Linux guest with RHN. Use the commands in Example 13-1 that substitute your RHN user name, password, and host name of the Linux guest.
Example 13-1 Registering your system with RHN
# rpm --import /usr/share/rhn/RPM-GPG-KEY# rhnreg_ks --username=myusername --password=mypassword --profilename=linux01.example.com
13.2 Installing and updating packages using up2date
Now that your system is registered with RHN, you can use up2date to keep the system updated. You can download and install the latest version of a package by running up2date with the RPM package name. You can also specify multiple packages on the command line separated by spaces. The up2date command installs the package if it is not present, or updates to the latest version if it is already installed. If a package has any dependencies, up2date automatically downloads and installs them for you.
Update the tar package to get the latest security fixes as Example 13-2 shows.
Example 13-2 up2date one package
# rpm -q tartar-1.14-8.RHEL4# up2date tar
Fetching Obsoletes list for channel: rhel-s390x-as-4...Fetching rpm headers...#################################Name Version Rel----------------------------------------------tar 1.14 9.RHEL4 s390xTesting package set / solving RPM inter-dependencies...###########################tar-1.14-9.RHEL4.x390x.rpm: ############# Done.Preparing ########################### [100%]
Installing...1:tar #############################[100%]
# rpm -q tartar-1.14-9.RHEL4
198 IBM z/VM and Linux on IBM System z: Virtualization Cookbook for Red Hat Enterprise Linux 4
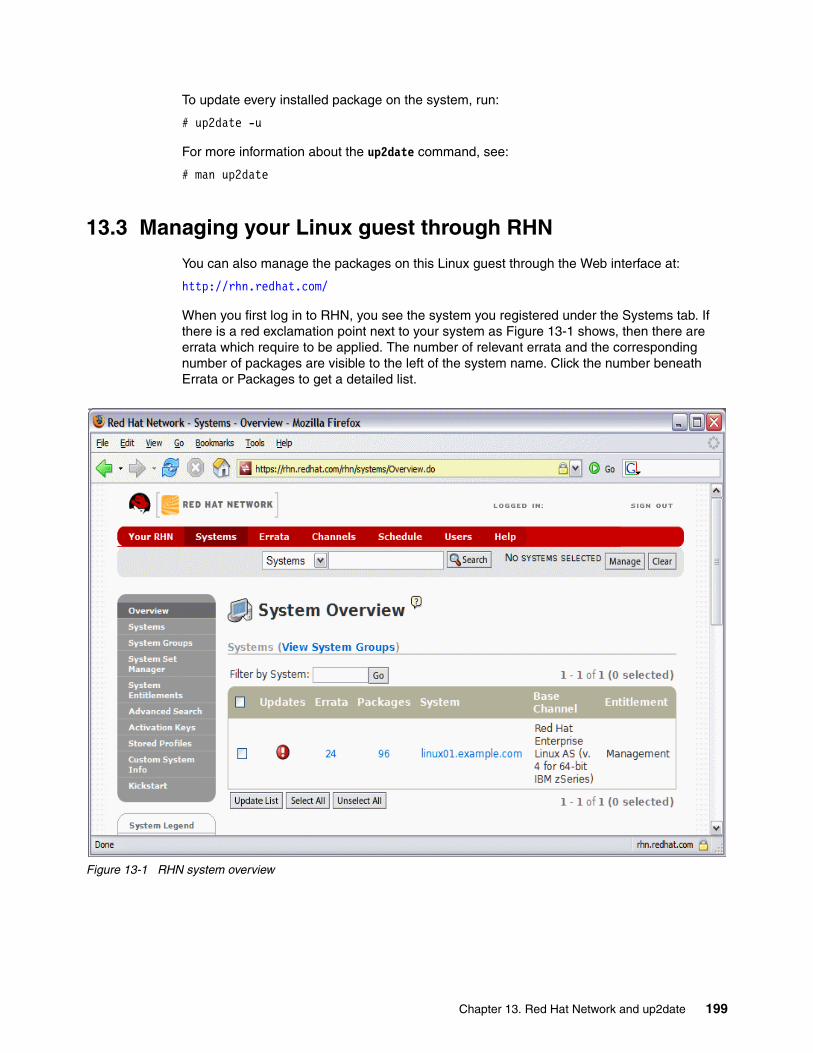
To update every installed package on the system, run:
# up2date -u
For more information about the up2date command, see:
# man up2date
13.3 Managing your Linux guest through RHN
You can also manage the packages on this Linux guest through the Web interface at:
http://rhn.redhat.com/
When you first log in to RHN, you see the system you registered under the Systems tab. If there is a red exclamation point next to your system as Figure 13-1 shows, then there are errata which require to be applied. The number of relevant errata and the corresponding number of packages are visible to the left of the system name. Click the number beneath Errata or Packages to get a detailed list.
Figure 13-1 RHN system overview
Chapter 13. Red Hat Network and up2date 199
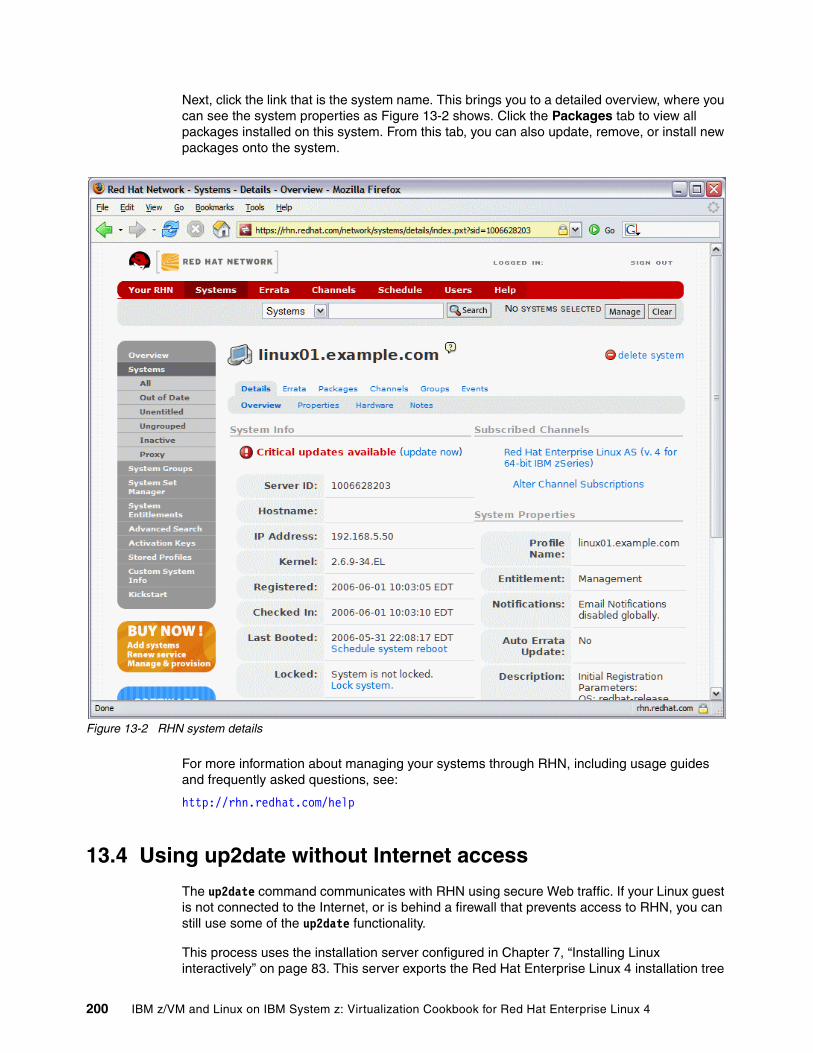
Next, click the link that is the system name. This brings you to a detailed overview, where you can see the system properties as Figure 13-2 shows. Click the Packages tab to view all packages installed on this system. From this tab, you can also update, remove, or install new packages onto the system.
Figure 13-2 RHN system details
For more information about managing your systems through RHN, including usage guides and frequently asked questions, see:
http://rhn.redhat.com/help
13.4 Using up2date without Internet access
The up2date command communicates with RHN using secure Web traffic. If your Linux guest is not connected to the Internet, or is behind a firewall that prevents access to RHN, you can still use some of the up2date functionality.
This process uses the installation server configured in Chapter 7, “Installing Linux interactively” on page 83. This server exports the Red Hat Enterprise Linux 4 installation tree
200 IBM z/VM and Linux on IBM System z: Virtualization Cookbook for Red Hat Enterprise Linux 4
over Network File System (NFS). Your Linux guest requires a read only mount point to this installation tree, which up2date uses instead of RHN.
On the Linux guest, create the directory for the mount point, then edit /etc/fstab to mount the share over NFS, as Example 13-3 shows.
Example 13-3 Mount Red Hat Enterprise Linux 4 tree from installation server
# mkdir /mnt/rh4u3x# vi /etc/fstab...LABEL=SWAP-dasdc1 swap swap defaults 0 010.1.40.99:/install/rhel4x /mnt/rh4u3x nfs hard,intr 0 0:wq
# mount /mnt/rh4u3x
Next, edit the file /etc/sysconfig/rhn/sources. Comment the line up2date default, and configure the dir entry as Example 13-4 shows.
Example 13-4 Configure up2date source
# vi /etc/sysconfig/rhn/sources...### The default RHN (using "default" as the url means use the one in the### up2date config file). This is required.#up2date default...### A local directory full of packages (a "dir" repo). For example:dir my-favorite-rpms /mnt/rh4u3x/RedHat/RPMS/...:wq
You have now configured up2date to use your installation server instead of RHN.
Note: This method has disadvantages compared to using RHN:
� The up2date command must scan the entire folder for changes the first time it is run, and any time the folder is updated on the installation server. This can cause a large delay, depending on network speed.
� There is no centralized interface for management of your system.
Chapter 13. Red Hat Network and up2date 201

202 IBM z/VM and Linux on IBM System z: Virtualization Cookbook for Red Hat Enterprise Linux 4
Appendix A. References
This chapter describes quick references for text editors and also makes a note of the important z/VM files.
A
© Copyright IBM Corp. 2006. All rights reserved. 203
Important z/VM filesz/VM differs from Linux in regard to the location and number of configuration files. In Linux, there are many configuration files and most of them are in or under the /etc/ directory. On z/VM, there are relatively few configuration files. However, they are on many different minidisks. Table A-1 provides a summary and the location of important z/VM configuration files.
Table A-1 Important z/VM configuration files
Quick referencesThis section contains quick references for the XEDIT and vi text editors.
z/VM XEDIT referenceXEDIT has line commands, such as Example A-1 shows, which are typed on the command line (===>).
Example: A-1 Line commands
a Add a linea<n> Add ‘n’ linesc/<old>/<new>/<n><m>Search for string ‘old’ and replace it with ‘new’for‘n’ lines
below the current line and ‘m’ times on each line.‘*’ can be used for ‘n’and‘m’/<string> Search for ‘string’ from the current line-/<string> Search backwards for ‘string’all /<string>/ Show all occurences of ‘string’ and hide other linesbottom Move to the bottom of the filetop Move to the top of the filedown <n> Move down ‘n’ linesup <n> Move up ‘n’ linesfile Save the current file and exit XEDITffile Save the current file and exit but don’t warn of overwrite
File Location Description
SYSTEM CONFIG MAINT CF1 This is the operating system’s main configuration file. It defines the system name, the control program (CP) volumes, user volumes, and other settings.
USER DIRECT MAINT 2CC This file defines the user directory. All user IDs or virtual machines known to the system are defined here, assuming a directory maintenance product is not being used.
<System_ID> TCPIP TCPMAINT 198 This file defines the resources for the primary z/VM Transmission Control Protocol/Internet Protocol (TCP/IP) stack, including TCP/IP address, open systems adapter (OSA) resources, subnet mask, and gateway. It is initially created by the IPWIZARD tool as PROFILE TCPIP.
SYSTEM DTCPARMS TCPMAINT 198 This file is created to define the TCP/IP stacks on the system. It is initially created by the IPWIZARD tool.
TCPIP DATA TCPMAINT 592 This file defines the Domain Name System (DNS) server, the domain name and some other settings. It is initially created by the IPWIZARD tool.
PROFILE EXEC AUTOLOG1 191 This file is a REXX EXEC that is run when the system starts up. It is analogous to the /etc/inittab file in Linux.
204 IBM z/VM and Linux on IBM System z: Virtualization Cookbook for Red Hat Enterprise Linux 4

save Save the current file but don’t exitquit Exit XEDIT if no changes have been madeqquit Exit XEIDT even if changes have not been savedleft <n> Shift ‘n’ characters to the leftright <n> Shift ‘n’ characters to the rightget <file> Copy file and insert past the current line:<n> Move to line ‘n’? Display last command= Execute last commandx <file> Edit ‘file’ and put it into the XEDIT “ring”x Move to the next file in the ring
XEDIT has prefix commands, such as Example A-2 shows, which are typed over the line numbers on the left side of the screen.
Example: A-2 Prefix commands
a Add one line a<n> Add 'n' lines c Copies one line cc Copies a block of lines d Deletes one line dd Deletes a block of lines f Line after which a copy (c) or a move (m) is to be inserted p Line before which a copy (c) or a move (m) is to be inserted i Insert a line i<n> Insert 'n' lines m Move one line mm Move a block of lines " Replicate a line"<n> Replicate a line 'n' times "" Replicate a block of lines
Linux vi text editor referenceThe following is a small subset of vi commands, representing those most commonly used. The vi editor has three modes:
� Input mode: Press the Insert, i, and o keys, to add a line below and the O key to add a line above, and other commands put you in this mode. When you are in this mode you see the text --INSERT-- in the last line.
� Command mode: If you press Esc, it gets you out of input mode and into command mode. The commands that Example A-3 shows are available.
Example: A-3 vi commands
i brings you back to input modedd deletes a line and puts it in the buffer<n>dd delete <n> linesx delete a characterdw delete a wordp add the buffer past the current locationP add the buffer before the current locationo add a line and go into insert mode/string - search for stringn do the last command again (this can be powerful)
Appendix A. References 205
jkl; cursor movementA add text at the end of the line<nn>G go to line <nn>G go to the last line in the fileyy yank a line (copy into buffer)<n>yy yank n lines
� Command line mode: If you press the colon (:) key, it brings you to this mode. These commands are shown in Example A-4.
Example: A-4 Commands from the command line
:wq save (write & quit):q! quit and discard changes:<nn> go to line number <nn>:r <file> read <file> into the current file:1,$s/old/new/g globally replace <old> with <new>:help give help
206 IBM z/VM and Linux on IBM System z: Virtualization Cookbook for Red Hat Enterprise Linux 4
Appendix B. Additional material
This IBM Redbook refers to additional material that can be downloaded from the Internet as described in the following sections.
Locating the Web materialThe Web material associated with this IBM Redbook is available in softcopy on the Internet from the IBM Redbooks Web server. Point your Web browser to:
ftp://www.redbooks.ibm.com/redbooks/SG247272
Alternatively, you can go to the IBM Redbooks Web site at:
ibm.com/redbooks
Select the Additional materials and open the directory that corresponds with the IBM Redbook form number, SG24-7272.
Using the Web materialThe additional Web material that accompanies this IBM Redbook includes the following files:
File name Description
SG24-7272.tgz This is the zipped code sample file, which contains the following files.
README.txt This is the main README file.
clone/ Clone script Red Hat Package Manager (RPM) used in “Cloning Linux” on page 113.
nfs-server/ Script used in “Configuring an NFS server” on page 77.
vm/ Helpful z/VM files used in “Installing and configuring z/VM” on page 23, and also other places throughout this book.
B
© Copyright IBM Corp. 2006. All rights reserved. 207
System requirements for downloading the Web materialThe following system configuration is recommended:
Hard disk space: 500 MB minimumOperating System: Red Hat Enterprise Linux 4Processor: IBM System z9 or zSeriesMemory: 512 MB
How to use the Web materialDownload the SG24-7272.tgz file to the Network File System (NFS) server and use it as this book describes in section 6.1, “Downloading files associated with this book” on page 78. The tar file contains a single directory named virt-cookbook/.
208 IBM z/VM and Linux on IBM System z: Virtualization Cookbook for Red Hat Enterprise Linux 4

Related publications
The publications listed in this section are considered particularly suitable for a more detailed discussion of the topics covered in this IBM Redbook.
IBM RedbooksFor information about ordering these publications, see “How to get IBM Redbooks” on page 212. Note that some of the documents referenced here may be available in softcopy only.
� OSA-Express Implementation Guide, SG24-5948
� Linux on eServer zSeries and S/390: Performance Toolkit for VM, SG24-6059
� Linux for IBM System z9 and IBM zSeries, SG24-6694
� Linux on eServer zSeries and S/390: Application Development, SG24-6807
� Linux on IBM eServer zSeries and S/390: System Management, SG24-6820
� IBM Lotus Domino 6.5 for Linux on zSeries Implementation, SG24-7021
� Printing with Linux on zSeries Using CUPS and Samba, REDP-3864
� Running Linux Guest in less than CP Privilege Class G, REDP-3870
� Using Cryptographic Adapters for Web Servers with Linux on IBM System z9 and zSeries, REDP-4131
Other publicationsThese publications are also relevant as further information sources:
� z/VM Summary for Automated Installation and Service (DVD Installation), GA76-0406
� Guide for Automated Installation and Service, GC24-6099
� System Messages and Codes — CP, GC24-6119
� TCP/IP Messages and Codes, GC24-6124
� The Program Directory for Performance Toolkit for VM, GI11-2854
� Performance Toolkit for VM Function Level 510 Program Directory, GI11-4800
� Linux for zSeries and S/390 Device Drivers, Features, and Commands, LNUX-1403
� The Open System Adapter-Express Customer’s Guide and Reference, SA22-7935
� CP Commands and Utilities Reference, SC24-6081
� CP Planning and Administration, SC24-6083
� Getting Started with Linux on zSeries, SC24-6096
� z/VM Performance, SC24-6109
� TCP/IP Planning and Customization, SC24-6125
© Copyright IBM Corp. 2006. All rights reserved. 209
� z/VM Performance Toolkit, SC24-6136
� IBM Communication Controller for Linux on zSeries V1R1 Implementation and User’s Guide, SC31-6872
Online resourcesThese Web sites and URLs are also relevant as further information sources:
� Apache HTTP Secure Server Configuration in the Red Hat Enterprise Linux 4 System Administration Guide
http://www.redhat.com/docs/manuals/enterprise/RHEL-4-Manual/sysadmin-guide/ch-httpd-secure-server.html
� Apache HTTP Server V2 documentation
http://httpd.apache.org/docs/2.0
� Computer Associates’ VM:Monitor
http://www.ca.com/
� Configure real storage in z/VM V5.2
http://www.vm.ibm.com/perf/reports/zvm/html/520con.html
� Configuring processor storage
http://www.vm.ibm.com/perf/tips/storconf.html
� Device Drivers, Features, and Commands
http://www-128.ibm.com/developerworks/linux/linux390/april2004_documentation.html
� IBM profile creation
https://www.ibm.com/account/profile/us
� IBM Resource Link
http://ibm.com/servers/resourcelink/
� IBM RMF PM with support for Linux Enterprise Server
http://www-03.ibm.com/servers/eserver/zseries/zos/rmf/rmfhtmls/pmweb/pmlin.html
� IBM Tivoli OMEGAMON for z/VM
http://www-306.ibm.com/software/tivoli/products/omegamon-zvm/
� Linux for zSeries and S/390 developerWorks
http://awlinux1.alphaworks.ibm.com/developerworks/linux390/index.shtml
� Linux performance when running under VM
http://www.vm.ibm.com/perf/tips/linuxper.html
� List of MIB variables
http://www.snmpframeworks.com/Mibs/OSA_Mib.txt
� Minidisk cache
http://www.vm.ibm.com/perf/tips/prgmdcar.html
� Online service for z/VM tapes
https://techsupport.services.ibm.com/server/login
210 IBM z/VM and Linux on IBM System z: Virtualization Cookbook for Red Hat Enterprise Linux 4
� PTF number details
http://www-1.ibm.com/support/docview.wss?uid=isg1VM63895
� PuTTY download page
http://www.chiark.greenend.org.uk/~sgtatham/putty/download.html
� RealVNC downloads
http://www.realvnc.com/download.html
� Red Hat Enterprise Linux documentation
http://www.redhat.com/docs/
� Red Hat Enterprise Linux 4 evaluation copy
http://www.redhat.com/rhel/details/eval/
� Red Hat Enterprise Linux 4: Reference Guide
http://www.redhat.com/docs/manuals/enterprise/RHEL-4-Manual/ref-guide/ch-ldap.html
� Red Hat Enterprise Linux 4: System Administration Guide
http://www.redhat.com/docs/manuals/enterprise/RHEL-4-Manual/sysadmin-guide/
� Red Hat Knowledgebase
http://kbase.redhat.com/
� Red Hat Network create account
https://rhn.redhat.com
� Red Hat Network sign in page
https://rhn.redhat.com/network/software/
� Reduce paging activity
http://www.vm.ibm.com/perf/tips/2gstorag.html
� Security Focus: A step-by-step process to secure Apache 2
http://www.securityfocus.com/infocus/1786
� Setting up a secure Apache 2 Server
http://www.samspublishing.com/articles/article.asp?p=30115&seqNum=4
� Sitepoint: Securing Apache 2 Server with SSL
http://www.sitepoint.com/article/securing-apache-2-server-ssl
� The Linux-390 list server
http://www2.marist.edu/htbin/wlvindex?linux-390
� Velocity’s ESALPS
http://www.velocitysoftware.com/
� zJournal: Linux on z/VM
http://www.zjournal.com/index.cfm?section=article&aid=279
� zSeries virtualization capabilities
http://www.ibm.com/systems/z/virtualization
� z/VM Internet library
http://www.vm.ibm.com/library
Related publications 211

� z/VM publications
http://www.vm.ibm.com/pubs/
� z/VM performance tips
http://www.vm.ibm.com/perf/tips/
� z/VM Security and Integrity
http://www-1.ibm.com/servers/eserver/zseries/library/techpapers/pdf/gm130145.pdf
How to get IBM RedbooksYou can search for, view, or download IBM Redbooks, Redpapers, Hints and Tips, draft publications and Additional materials, as well as order hardcopy IBM Redbooks or CD-ROMs, at this Web site:
ibm.com/redbooks
Help from IBMIBM Support and downloads
ibm.com/support
IBM Global Services
ibm.com/services
212 IBM z/VM and Linux on IBM System z: Virtualization Cookbook for Red Hat Enterprise Linux 4
Index
Symbols.rmfpms_config file 184/etc/apache2/httpd.conf file 134/etc/exports file 81/etc/openldap/slapd.conf 137/etc/samba/smb.conf file 142/etc/samba/smbpasswd file 142/etc/snmp/snmp.conf 189/etc/snmp/snmpd.conf 188/opt/ directory 183/proc/dasd/statistics 195/usr/share/doc/ directory 142/var/log/httpd/error_log 131/var/www/html/ 131
Numerics3270 emulators 21, 41520RES 30
AAduva onstage 3Alt+Tab sequence 24Apache 130
enabling for SSL 131resources 135virtual hosts 134
APAR OA15170 195Attachmate Extra! 21
Bbalance 152balance-xor 152bill of materials, for entire project 8
Ccertificate
self-signed 131signing request 133
certificate authority 131CHANGEPW XEDIT 55
macro 56channel bonding 152
/etc/modprobe.conf 155/etc/sysconfig/network-scripts/ifcfg-bond0 155/etc/sysconfig/network-scripts/ifcfg-eth0 154/etc/sysconfig/network-scripts/ifcfg-eth1 154balance-xor mode 152dedicated OSA devices 153etherchannel 154OSA-Express layer 2 mode 152port trunking 154
chapters
© Copyright IBM Corp. 2006. All rights reserved.
in the book 6choices made, in the book 3CHPW52 XEDIT 55clone.sh script 118
description 118cloning
six more virtual servers 121command
attach 28authconfig 139BROWSE 67chccwdev 147chkconfig 82, 143cpaccess 34cpfmtxa 42cpformat 114cpsyntax 34, 46dasdfmt
using in a for loop 147dd 118DEFSEG 171DETERSE 72diskmap 48driectxa 50, 56, 86, 124ext2online 151fdasd 147FILELIST 87FLASHCOPY 85, 118FORMAT 50grep 142HELP 166Idapsearch 138INDICATE 164INDICATE LOAD 164INDICATE QUEUES EXP 165IOACMD 192IPWIZARD 35iscss 147isdasd 146ivcreate 149ivdisplay 149ivextend 151md5sum 79migrate_common.ph 137mke2fs 149mkinitrd 151osasnmpd 189passwd 159PUT2PROD 63, 69, 75pvcreate 148pvdisplay 148Q NSS ALL MAP 170–171QUERY CPLEVEL 70, 75QUERY OSA 126QUERY VIRTUAL 90
213
QUERY VIRTUAL OSA 90QUERY VIRTUAL STORAGE 90QUERY VSWITCH ACCESSLIST 126rcapache2 130, 133reboot 101, 152rhnreg_ks 198rmfpms 182, 184SAVESEG 171SERVICE 63, 73SERVICE ALL 73SET SRM 53SET VSWITCH 116SET VSWITCH GRANT 86, 109, 116, 125setsebool 134SHUTDOWN 41SHUTDOWN REIPL 47, 54, 75slappasswd 136smbclient 143smbpasswd 142–143snmpwalk 190tar 183TERM MORE 110tunedasd 195up2date 129–130vgchange 161vgcreate 148vgdisplay 148vgextend 150VINPUT 159VMFINFO 64VMFSETUP 64VMFVIEW SERVICE 74VMLINK 44XAUTOLOG 38, 118XEDIT 34z/VM
cpaccess 34cpfmtxa 42directxa 50diskmap 48FORMAT 50HELP 166INDICATE 164INDICATE QUEUES EXP 165IPWIZARD 35PUT2PROD 31QUERY ALLOC MAP 168QUERY CPLEVEL 167QUERY DASD 168QUERY NAMES 54, 167QUERY OSA 168QUERY PROCESSORS 167QUERY STORAGE 167QUERY VIRTUAL ALL 168QUERY XSTOR command 167RELEASE command 34SET SIGNAL command 53
zipl 151Computer Associates
VM Direct 3
VM Monitor 163VM Secure 55
control program (CP) 2controller 121conventions
command retrieval 10naming backup files 10volume labeling 9
COR (corrective service) 70z/VM 70
CP (control program) 2CPFORMAT EXEC
formatting DASD fast 42using it 43
Creating 124
DDASD
3390 3ECKD 3labelling convention 9
DCSS 170desktop computer
configuring 17DirMaint 3Disconnect_Timeout 33distributions
31-bit and 64-bit xi, 222
Eext3 file system
creating 149
FFibre Channel Protocol (FCP) 92file
FCONRMT AUTHORIZ 173, 181FCONRMT SYSTEMS 173FCONX $PROFILE 172FCONX LINUXUSR 174, 186SYSTEM CONFIG
features statement 33USER DIRECT 47, 84, 122, 204
INCLUDE statement 84profile 84
USER DISKMAP 48FTP
site fix 80 subcommand 87
GGeoTrust 133
Hhardware resources 8HMC 24
CD-ROM/DVD 25load icon 29
214 IBM z/VM and Linux on IBM System z: Virtualization Cookbook for Red Hat Enterprise Linux 4
Operating System Messages 40Single Object Operations 25SYSG 30System Console (SYSC) 40
Hummingbird Host Explorer 21hypervisor 2
IIBM Personal Communications 21IBM RACF 55IBM Tivoli Provisioning Manager 3IBM z/VM Performance Toolkit
monitor subcommand 175infrastructure
block diagram 5design 4
initial RAMdisk 87Integrated 3270 Console 24, 27IPL CMS 31
Kkernel 87kickstart 104
clearpart option 105file
CONF 109configuration 104PARM 109
zerombr option 105
LLDIF 137Levanta 3Lightweight Directory Access Protocol (LDAP) 136Linux
manual installation 3monitoring 163, 183, 186–187, 189–190PC 77RMF PM Data Gatherer (rmfpms) 183
LINUX01 114, 130LNXDFLT profile 84LNXMAINT 47, 83LNXMAINT, copying files to 52logical partition xi, 1, 222logical volume 85LPAR
requirements 8LVM 85, 94, 146
MMAINT 2CC 204MAINT 500 disk 67, 71MAINT CF1 204master image 121MDISK statement 48Minidisk cache (MDC) 165Minidisk passwords 55mkrhel4root.sh script 80
mod_ssl 132
Nnano editor 81Network File System (NFS) 77networking resources 9NFS
mounting exported directory 82server
configuration on Linux PC 81starting the server 82
nmbd daemon 143
OOPTION APPLMON 107, 115, 122OSA/SF 192
configuation data 193MAC data 194OAT data 194statistical data 193
overlaps,searching for 48
Ppaging
space 42volumes 41
location 43parameter file 87
copying 124copying, for new user ID 116
passwordsplanning 11
Performance Toolkit 168–169, 1793270 interface 175browser interface 176CPU utilization statistics 177I/O statistics 178storage usage statistics 177Web browser support 169
PERFSVM user ID 170–171planning 7PROFILE EXEC
AUTOLOG1 53, 108, 116, 204LNXMAINT 51PERFSVM 175
PROFILE LNXDFLT 84PROFILE TCPIP 39Programming Temporary Fix (PTF) 63PTF UM31613 64PuTTY
customizing 18
QQuick3270 21
RRecommended Service Upgrade (RSU) 63
Index 215
applying 70Red Hat
free evaluation copy 78Red Hat Enterprise Linux xi, 222Red Hat Enterprise Linux 4 83, 88
bootstrap files 87installation 90
LNXINST CONF file 88LNXINST PARM file 88parameter file 88PARMFILE 88RH4U3X EXEC file 88
parameter file 116second half of an install 98
Red Hat Network 197register 198updating packages 198
Redbooks Web site 212Contact us xiii
rescue environment 158RH4U3X EXEC 110runlevel 158
SSamba 141
configuration 142integrating with LDAP 143
saved segmentsrebuilding 62
SCSI/FCP disks 3Secure Sockets Layer (SSL) 131share /usr/ file system 3Shared File System (SFS) 38single user mode 158smbd daemon 143SNMP 187
MIB 187OID 187OSA-Express SNMP subagent 187osasnmpd 187
SNPIBM OSA-Express MIB 187
software resources 8SSH 99
configuring keys 100key-based authentication 100
SSLwith Apache 131
Storage Area Network (SAN) 3SWAPGEN 118sysfs interface 160system administration
roles 11SYSTEM CONFIG 34, 58, 204
customizing 32file
adding PAGE and PERM disks 45SYSTEM DTCPARMS 204system startup 53system status
DASD view 127system_Identifier_Default 33
TTCP/IP resources 9TCPCMSU 48TCPIP Data 204TCPMAINT 198 204TCPMAINT 592 204Thawte 133
UUM97510 70UM97520
z/VMlatest PTFs 70
Universal Naming Convention (UNC) 144User_Volume_Include 46, 107, 114, 122User_Volume_List 46userid() function 88
VVDISK 33, 89
allowing creation of 33SWAPGEN EXEC 89
Velocity Software’s ESALPS 163VeriSign 133virtual disk (VDISK) 32virtual NIC 85virtual server 2
LDAP 136Samba 141Web server 130
virtual switch (VSWITCH) 1, 32volume group 148VSWITCH 38, 41, 125
WWindows workstation 77worksheets,examples in the book 11
XX Windows 19XEDIT
"" prefix command 84, 122? subcommand 10add subcommand 34BOTTOM subcommand 34CHANGE subcommand 56FILE subcommand 34PREFIX OFF subcommand 48search subcommand (/) 33
Zz/VM
adding paging volumes 41
216 IBM z/VM and Linux on IBM System z: Virtualization Cookbook for Red Hat Enterprise Linux 4
backing up to tape 57cons=sysg 30conventions
in the book 9customizing shutdown 53customizing startup 53disconnect timeout 32eligible list 165envelope files 67FTP server 39HIT RATIO 165INSTPLAN EXEC 28INSTVM EXEC 31Integrated 3270 Console 24MIGRATE rate 164monitoring 163paging efficiency 43PAGING rate 165reader 87relabeling system volumes 57restoring from tape 62RSU 70security issues 55service via Internet 66servicing 63shuting down 40Standalone Program Loader 30STEAL percentage 165STEAL value 165strengths 1system backup copy 57system name 33TCP/IP configuration 35TCPIP at IPL time 37user ID
default password 32userid() function 88virtual switch 1VSWITCH 1XEDIT PROFILE 34XSTORE rate 164
z/VM user ID$ALLOC$ 49, 85, 108, 115, 123AUTOLOG1 204
zSeriesvirtualization capabilities 2
Index 217

218 IBM z/VM and Linux on IBM System z: Virtualization Cookbook for Red Hat Enterprise Linux 4

(0.2”spine)0.17”<
->0.473”
90<->
249 pages
IBM z/VM
and Linux on IBM System
z: Virtualization Cookbook for Red
IBM z/VM
and Linux on IBM System
z: Virtualization Cookbook for Red Hat
IBM z/VM
and Linux on IBM System
z: Virtualization Cookbook for Red Hat Enterprise Linux 4
IBM z/VM
and Linux on IBM System
z: Virtualization Cookbook for Red Hat Enterprise Linux 4

IBM z/VM
and Linux on IBM System
z: Virtualization Cookbook for Red Hat Enterprise Linux 4
IBM z/VM
and Linux on IBM System
z: Virtualization Cookbook for Red Hat Enterprise Linux 4

®
SG24-7272-00 ISBN 073849495X
INTERNATIONAL TECHNICALSUPPORTORGANIZATION
BUILDING TECHNICAL INFORMATION BASED ON PRACTICAL EXPERIENCE
IBM Redbooks are developed by the IBM International Technical Support Organization. Experts from IBM, Customers and Partners from around the world create timely technical information based on realistic scenarios. Specific recommendations are provided to help you implement IT solutions more effectively in your environment.
For more information:ibm.com/redbooks
IBM z/VM and Linux on IBM System zVirtualization Cookbook for Red Hat Enterprise Linux 4
Installing z/VM and Linux on the mainframe using this cookbook
Running Linux servers under z/VM made simple
Using z/VM 5.2 and Red Hat Enterprise Linux 4 Update 3
In this IBM Redbook, we assume that you have a general familiarity with IBM eServer zSeries technology and terminology. We do not assume that you have an in-depth understanding of z/VM and Linux. This book is written for those who want to get a quick start with z/VM and Linux on the mainframe.
This book describes how to set up your own Linux virtual servers on zSeries and IBM System z9 under z/VM. It adopts a cookbook format that provides a clearly documented set of procedures for installing and configuring z/VM in a logical partition (LPAR) and then installing and customizing Linux.
You require a zSeries LPAR with associated resources, such as a z/VM 5.2 media, and a Linux distribution. This book is based on Red Hat Enterprise Linux 4 for zSeries and it addresses both 31-bit and 64-bit distributions.
In addition, there are a few associated REXX EXECs and Linux scripts to help speed up the process. These tools, which are on the Web, are not IBM products, but they are informally supported. They are available on the Web.
Back cover