iccv8 for cortex – c compiler for arm cortex-mimagecraft.com/help/pdf/icccortex.pdf · iccv8 for...
TRANSCRIPT

ICCV8 for Cortex – C Compiler for ARM Cortex-M
INTRODUCTION .............................................................................................5Version, Trademarks, and Copyrights .................................................. 5Software License Agreement................................................................ 6IMPORTANT: Licensing the Software ................................................ 8Transferring a License to Another Computer ....................................... 9Using the Hardware Dongle ............................................................... 10Annual Maintenance ........................................................................... 11Support................................................................................................ 12Product Updates .................................................................................. 14File Types and File Extensions ........................................................... 15ImageCraft C Compiler Extensions .................................................... 17Converting from Other ANSI C Compilers ........................................ 19Optimizations...................................................................................... 20Acknowledgments .............................................................................. 23
GETTING STARTED .....................................................................................25Quick Start Guide ............................................................................... 25Example Projects ................................................................................ 27
EMBEDDED PROGRAMMING....................................................................29Embedded Programming Basics ......................................................... 29Some Pitfalls ....................................................................................... 30Best Practices ...................................................................................... 32Bit Twiddling...................................................................................... 34General Debugging Hints ................................................................... 36
CODE::BLOCKS IDE.....................................................................................39Code::Blocks IDE ............................................................................... 39Useful General Settings for CodeBlocks IDE .................................... 41ImageCraft Enhancements to CodeBlocks ......................................... 42IDE and the Compiler ......................................................................... 43Project Management ........................................................................... 44Editor .................................................................................................. 46Handy CodeBlocks Editor Features.................................................... 47Multi-Target Support and Build Properties ........................................ 48C::B Supported Variables ................................................................... 55Menu Reference: Build Options - Project........................................... 59Build Options - Paths .......................................................................... 60Build Options - Compiler ................................................................... 61
1
ICCV8 for Cortex – C Compiler for ARM Cortex-M
Build Options - Target ........................................................................ 63Project - Debug/Download Interface .................................................. 65
JUMPSTART DEBUGGER............................................................................67JumpStart Debugger JDB ................................................................... 67Installing the USB Drivers.................................................................. 68Debugger Operations .......................................................................... 69CodeBlocks Debugger Functions ....................................................... 72Advanced Debug Toolbar (ADT) Functions ...................................... 75
C PREPROCESSOR........................................................................................79C Preprocessor Dialects ...................................................................... 79Predefined Macros .............................................................................. 80Pragmas............................................................................................... 82Supported Directives........................................................................... 85String Literals and Token Pasting....................................................... 87
C IN 16 PAGES...............................................................................................89Preamble ............................................................................................. 89Declaration.......................................................................................... 92Expressions and Type Promotions...................................................... 95Statements ......................................................................................... 100
C LIBRARY AND STARTUP FILE ............................................................103C Library General Description ......................................................... 103Overriding a Library Function .......................................................... 104Startup File........................................................................................ 105Header Files ...................................................................................... 106Character Type Functions ................................................................. 107Floating-Point Math Functions ......................................................... 109Standard IO Functions ...................................................................... 111Standard Library And Memory Allocation Functions ...................... 115String Functions ................................................................................ 118Variable Argument Functions........................................................... 121
PROGRAMMING THE CORTEX-M ..........................................................123CMSIS (Cortex Microcontroller Software Interface Standard)........ 124Interrupt and Reset Handling ............................................................ 126Clock Source..................................................................................... 130Programming the STM32 MCU Peripherals .................................... 131Cortex-M Compiler-Specific Information ........................................ 135
2

ICCV8 for Cortex – C Compiler for ARM Cortex-M
C RUNTIME ARCHITECTURE ..................................................................137Data Type Sizes ................................................................................ 137Assembly Interface and Calling Conventions .................................. 139C Machine Routines.......................................................................... 141Memory Map .................................................................................... 142Program Areas .................................................................................. 143Stack and Heap Functions................................................................. 145
COMMAND-LINE COMPILER OVERVIEW ............................................147Compilation Process ......................................................................... 147Driver ................................................................................................ 148Compiler Arguments......................................................................... 149Preprocessor Arguments ................................................................... 151Compiler Arguments......................................................................... 152Assembler Arguments....................................................................... 153Linker Arguments ............................................................................. 154
TOOL REFERENCES...................................................................................157MISRA / Lint Code Checking .......................................................... 157Code Compressor (tm)...................................................................... 168Assembler Syntax ............................................................................. 171Assembler Directives ........................................................................ 175Linker Operations ............................................................................. 180ImageCraft Debug Format ................................................................ 181Librarian............................................................................................ 189
3

ICCV8 for Cortex – C Compiler for ARM Cortex-M
4

INTRODUCTION
Version, Trademarks, and Copyrights
About this Document
This document describes version 8 of the product. The printed document and the online help are generated from a single source. Since we update our products frequently, sometimes the printed document becomes out of phase with the shipping product. When in doubt, please refer to the online document for the most up-to-date information. This document was last updated on September 14, 2016 1:18 am.
Trademarks and Copyrights
ImageCraft, ICC08, ICC11, ICC12, ICC16, ICCAVR, ICCtiny, ICCM8C, ICC430, ICCV7 for AVR, ICCV7 for ARM, ICCV7 for 430, ICCV7 for CPU12, ICCV7 for Propeller, ICCV8 for AVR, ICCV8 for Cortex, JumpStarter C, JumpStart Debugger, MIO (Machine Independent Optimizer) and Code Compressor™, and this document
copyright © 1999-2014 by ImageCraft Creations Inc. All rights reserved.
Atmel, AVR, MegaAVR, tinyAVR, XMega, Atmel Studio ® Atmel Corporation.
Motorola, HC08, MC68HC11, MC68HC12 and MC68HC16 ® Motorola Inc. and Freescale Semiconductor Inc.
ARM, Thumb, Thumb2, Cortex ® ARM Inc.
All trademarks belong to their respective owners.

ICCV8 for Cortex – C Compiler for ARM Cortex-M
Software License Agreement
This is a legal agreement between you, the end user, and ImageCraft. If you do not agree to the terms of this Agreement, please promptly return the package for a full refund.
GRANT OF LICENSE. This ImageCraft Software License Agreement permits you to use one copy of the ImageCraft software product (“SOFTWARE”) on any computer provided that only one copy is used at a time.
COPYRIGHT. The SOFTWARE is owned by ImageCraft and is protected by United States copyright laws and international treaty provisions. You must treat the SOFTWARE like any other copyrighted material (e.g., a book). You may not copy written materials accompanying the SOFTWARE.
OTHER RESTRICTIONS. You may not rent or lease the SOFTWARE, but you may transfer your rights under this License on a permanent basis provided that you transfer this License, the SOFTWARE and all accompanying written materials, you retain no copies, and the recipient agrees to the terms of this License. If the SOFTWARE is an update, any transfer must include the update and all prior versions.
LIMITED WARRANTYLIMITED WARRANTY. ImageCraft warrants that the SOFTWARE will perform substantially in accordance with the accompanying written materials and will be free from defects in materials and workmanship under normal use and service for a period of thirty (30) days from the date of receipt. Any implied warranties on the SOFTWARE are limited to 30 days. Some states do not allow limitations on the duration of an implied warranty, so the above limitations may not apply to you. This limited warranty gives you specific legal rights. You may have others, which vary from state to state.
CUSTOMER REMEDIES. ImageCraft’s entire liability and your exclusive remedy shall be, at ImageCraft’s option, (a) return of the price paid or (b) repair or replacement of the SOFTWARE that does not meet ImageCraft’s Limited Warranty and that is returned to ImageCraft. This Limited Warranty is void if failure of the SOFTWARE has resulted from accident, abuse, or misapplication. Any replacement SOFTWARE will be warranted for the remainder of the original warranty period or 30 days, whichever is longer.
NO OTHER WARRANTIES. ImageCraft disclaims all other warranties, either express or implied, including but not limited to implied warranties of merchantability and fitness for a particular purpose, with respect to the SOFTWARE, the accompanying written materials, and any accompanying hardware.
6
ICCV8 for Cortex – C Compiler for ARM Cortex-M
NO LIABILITY FOR CONSEQUENTIAL DAMAGES. In no event shall ImageCraft or its supplier be liable for any damages whatsoever (including, without limitation, damages for loss of business profits, business interruption, loss of business information, or other pecuniary loss) arising out of the use of or inability to use the SOFTWARE, even if ImageCraft has been advised of the possibility of such damages. The SOFTWARE is not designed, intended, or authorized for use in applications in which the failure of the SOFTWARE could create a situation where personal injury or death may occur. Should you use the SOFTWARE for any such unintended or unauthorized application, you shall indemnify and hold ImageCraft and its suppliers harmless against all claims, even if such claim alleges that ImageCraft was negligent regarding the design or implementation of the SOFTWARE.
7
ICCV8 for Cortex – C Compiler for ARM Cortex-M
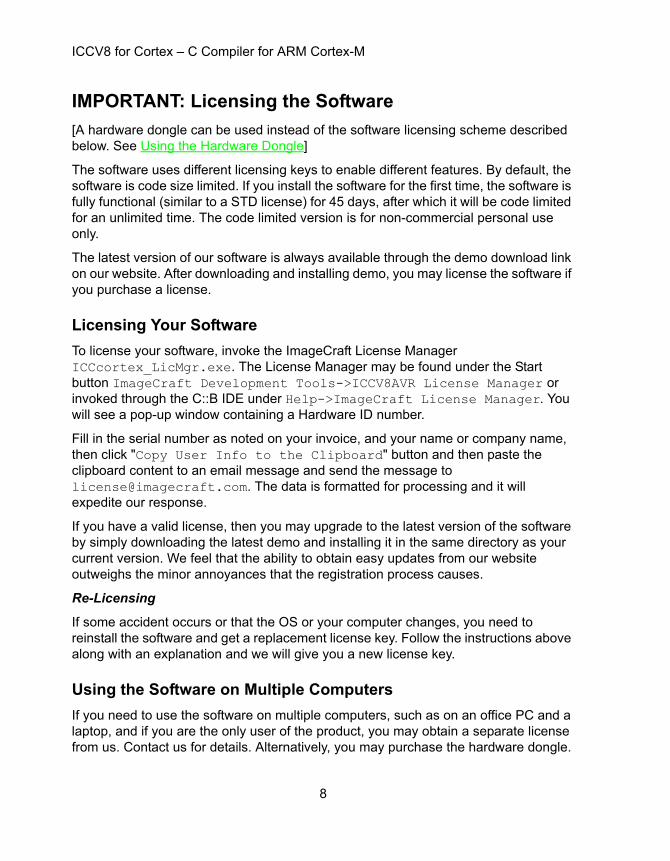
IMPORTANT: Licensing the Software
[A hardware dongle can be used instead of the software licensing scheme described below. See Using the Hardware Dongle]
The software uses different licensing keys to enable different features. By default, the software is code size limited. If you install the software for the first time, the software is fully functional (similar to a STD license) for 45 days, after which it will be code limited for an unlimited time. The code limited version is for non-commercial personal use only.
The latest version of our software is always available through the demo download link on our website. After downloading and installing demo, you may license the software if you purchase a license.
Licensing Your Software
To license your software, invoke the ImageCraft License Manager ICCcortex_LicMgr.exe. The License Manager may be found under the Start button ImageCraft Development Tools->ICCV8AVR License Manager or invoked through the C::B IDE under Help->ImageCraft License Manager. You will see a pop-up window containing a Hardware ID number.
Fill in the serial number as noted on your invoice, and your name or company name, then click "Copy User Info to the Clipboard" button and then paste the clipboard content to an email message and send the message to [email protected]. The data is formatted for processing and it will expedite our response.
If you have a valid license, then you may upgrade to the latest version of the software by simply downloading the latest demo and installing it in the same directory as your current version. We feel that the ability to obtain easy updates from our website outweighs the minor annoyances that the registration process causes.
Re-Licensing
If some accident occurs or that the OS or your computer changes, you need to reinstall the software and get a replacement license key. Follow the instructions above along with an explanation and we will give you a new license key.
Using the Software on Multiple Computers
If you need to use the software on multiple computers, such as on an office PC and a laptop, and if you are the only user of the product, you may obtain a separate license from us. Contact us for details. Alternatively, you may purchase the hardware dongle.
8

ICCV8 for Cortex – C Compiler for ARM Cortex-M
Transferring a License to Another Computer
If you wish to transfer a software license from one computer to another one permanently:
On the old machine, run ICCcortex_LicMgr.exe and click on the Uninstall button on lower left.
On the new machine, run ICCcortex_LicMgr.exe.
Email both sets of information you see to [email protected] and we will send you a license key for the new computer.
9
ICCV8 for Cortex – C Compiler for ARM Cortex-M
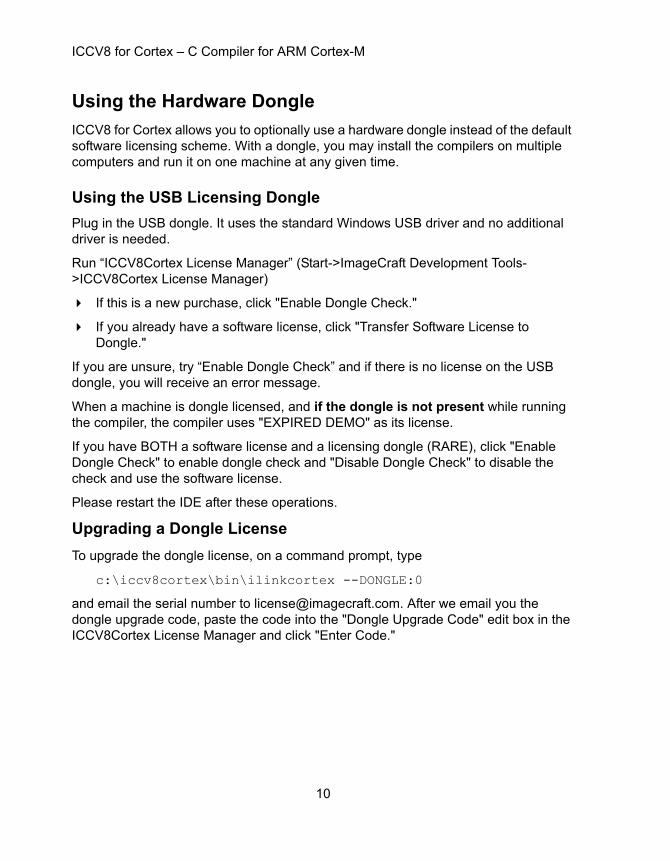
Using the Hardware Dongle
ICCV8 for Cortex allows you to optionally use a hardware dongle instead of the default software licensing scheme. With a dongle, you may install the compilers on multiple computers and run it on one machine at any given time.
Using the USB Licensing Dongle
Plug in the USB dongle. It uses the standard Windows USB driver and no additional driver is needed.
Run “ICCV8Cortex License Manager” (Start->ImageCraft Development Tools->ICCV8Cortex License Manager)
If this is a new purchase, click "Enable Dongle Check."
If you already have a software license, click "Transfer Software License to Dongle."
If you are unsure, try “Enable Dongle Check” and if there is no license on the USB dongle, you will receive an error message.
When a machine is dongle licensed, and if the dongle is not present while running the compiler, the compiler uses "EXPIRED DEMO" as its license.
If you have BOTH a software license and a licensing dongle (RARE), click "Enable Dongle Check" to enable dongle check and "Disable Dongle Check" to disable the check and use the software license.
Please restart the IDE after these operations.
Upgrading a Dongle License
To upgrade the dongle license, on a command prompt, type
c:\iccv8cortex\bin\ilinkcortex --DONGLE:0
and email the serial number to [email protected]. After we email you the dongle upgrade code, paste the code into the "Dongle Upgrade Code" edit box in the ICCV8Cortex License Manager and click "Enter Code."
10

ICCV8 for Cortex – C Compiler for ARM Cortex-M
Annual Maintenance
Purchasing a license also provides a year of maintenance support. During the maintenance period, you can upgrade to the latest version by installing the latest demo from our website and contact us at [email protected] for support.
After one year, the compiler will emit an informational message in the IDE status window informing you that your maintenance period has expired. This does not affect the generated code. You may still download the latest demo, but we may request that you have a current maintenance contract before providing support.
Maintenance is very inexpensively priced at $50 per 12 months. You may purchase it on our website on the respective compiler tools page and by providing your serial number in the customer notes. Once we process the order, we will email you a maintenance code which you enter using the ICCV8Cortex License Manager.
11

ICCV8 for Cortex – C Compiler for ARM Cortex-M
Support
Our experience since releasing our first compiler in 1994 is that most compiler “bug reports” are in fact not defects with our compilers. If you are not experienced with Standard C or embedded system programming, please refer to a good C tutorial book or websites for help or try the C FAQ site http://c-faq.com/.
Email is the best method to contact us. We will usually get back to you within the same day and sometimes even the same hour or minute. Some people assume that they will only get help if they use threatening tones or are abusive. Please do not do this. We will support you to the best of our ability. We build our reputation based on excellent support.
Before contacting us, find out the version number of the software by selecting “About ICCV8 for Cortex” in the Help menu.
E-mail support questions to [email protected]
Program updates are available free of charge for the first six months. Files are available from our website: http://www.imagecraft.com
Sometimes we will request that you send us your project files so we may duplicate a problem. If possible, please use a zip utility to include all your project files, including your own header files, in a single email attachment. If you cannot send us the entire project when requested, it is usually sufficient if you can construct a compilable function and send that to us. Please do not send us any files unless requested.
We have a mailing list called icc-cortex pertinent to our ICCV8 for Cortex product users. To subscribe, send an email to [email protected]. You do not need a Yahoo ID to join. However, if you wish to use the Yahoogroups web features (e.g., file area, checking the archive, etc.), then you must obtain a Yahoo ID.
The mailing list should not be used for general support questions. On the other hand, our customers who are active on the mailing lists probably have more hardware-specific knowledge than we do, as we are primarily a software company. We may request that you send your questions there.
Our postal address and telephone numbers are
ImageCraft2625 Middlefield Rd, #685Palo Alto, CA 94306U.S.A.
(650) 493-9326
12
ICCV8 for Cortex – C Compiler for ARM Cortex-M
(866) 889-4834 (FAX, toll free)
If you purchased the product from one of our international distributors, you may wish to query them for support first.
13

ICCV8 for Cortex – C Compiler for ARM Cortex-M
Product Updates
The product version number consists of a major number and a minor number. For example, V8.02 consists of the major number of 8 and the minor number of .02. Within the initial six months of purchase, you may update to the latest minor version free of charge. To receive updates afterward, you may purchase the low-cost annual maintenance plan. Upgrades to a new major version usually require an additional cost.
With the software protection scheme used in the product, you get the upgrades by downloading the latest “demo” available on the website and installing it in the same PC as your current installation. Your existing license will work on the newly installed files. You may have multiple versions of the products on the same machine concurrently. Do keep in mind that they share the same Windows Registry entries and all other system-related information.
14
ICCV8 for Cortex – C Compiler for ARM Cortex-M
File Types and File Extensions
File types are determined by their extensions. The IDE and the compiler base their actions on the file types of the input.
CodeBlocks IDE (C::B) and Project Files
.cbp - CodeBlocks project file.
.mak - Makefile generated by C::B. Not used by C::B itself, but for users who wish to bypass the build mechanism in C::B and use command line build system.
.prj - ImageCraft project specific information file.
The project files are stored in the project directory. Output files are stored in the project directory by default and can be overridden, see Build Options - Paths. Intermediate object files are stored in the .objs directory below the project directory.
Input Files
.a - is a library file. The package comes with several libraries. libccortex.a is the basic library containing the Standard C library and ARM Cortex-M-specific routines. The linker links in modules (or files) from a library only if the module is referenced. You may create or modify libraries as needed.
Our library format is in ASCII.
.c - is a C source file.
.h - is a header file.
.i - is a C preprocessed source file. This is removed after a successful compile.
.s - is an assembly source file or an output file from the compiler. If latter, it is removed after a successful compile.
Output Files
.dbg - ImageCraft internal debug command file.
.hex - an Intel HEX output file.
.lst - an interspersed C and asm listing file. The object code and final addresses for your program files are gathered into a single listing file.
.mp - a map file. It contains the symbol and size information of your program in a concise form.
15

ICCV8 for Cortex – C Compiler for ARM Cortex-M
.o - an object file, produced by the assembler. An output executable file is the result of linking multiple object files.
.s - for each C source file, an assembly output is generated by the compiler. This is deleted after a successful compile.
.s19 - a Motorola Motorola/Freescale S19 Record executable file.
16
ICCV8 for Cortex – C Compiler for ARM Cortex-M
ImageCraft C Compiler Extensions
Our C compilers support the C89 C Standard. In addition:
Subset of MISRA checks can be enabled in PRO edition. See MISRA / Lint Code Checking.
double is 32 bits unless you are using the PRO edition, then it’s 64 bits.
64-bit long long is supported.
Extended Keywords
__flash refers to flash objects, e.g. “__flash unsigned int i = 0x55;”
__packed modifies a struct type so that no padding is inserted between elements of the struct. __packed must appear before the struct keyword:
// correct__packed struct ...ortypedef __packed struct ...
// incorrectstruct __packed ...
Notes:
1.if placed after the struct keyword, then __packed is actually a struct tag name, and not interpreted as a keyword, e.g. as in the last example above.
2.some CPU, for example, the ARM Cortex-M0, do not support non-aligned access of 16 or 32 bit data. In that case, accesses to packed structure members may cause the compiler or your program to fail.
__inline to advise that a function should be inlined. Must be used before the return type of the function declarations and definitions:
static __inline unsigned REV(__forceregister unsigned val)
{asm("REV %val,%val");return val;}
17
ICCV8 for Cortex – C Compiler for ARM Cortex-M
__forceregister to force allocating a local variable, usually a parameter to an inline function to be allocated to a register, even if it’s not used frequently. See above example.
#pragma
The supported #pragma are described in Pragmas.
Predefined Macros
The supported predefined macros are described in Predefined Macros.
C++ Comments
If you enable Compiler Extensions (Project->Options->Compiler), you may use C++ style comments in your source code.
Binary Constants
If you enable Compiler Extensions (Project->Options->Compiler), you may use 0b<1|0>* to specify a binary constant. For example, 0b10101 is decimal 21.
Inline Assembly
You may use the pseudo function asm(“string”) to specify inline asm code.
18

ICCV8 for Cortex – C Compiler for ARM Cortex-M
Converting from Other ANSI C Compilers
This page examines some of the issues you are likely to see when you are converting source code written for other ANSI C compilers (for the same target device) to the ImageCraft compiler. If you write in portable ANSI C as much as possible in your coding, then there is a good chance that most of your code will compile and work correctly without any problems.
Our char data type is unsigned.
Extended keyword. Some compilers use extended keywords that may include far, @, port, interrupt, etc. port can be replaced with memory references. For example:
char porta @0x1000;...(our compiler)#define porta (*(volatile unsigned char *)0x1000)
Generally, we eschew extensions whenever possible. More often than not, extensions seem to be used more to lock a customer to a vendor’s environment than to provide a solution.
Some compilers do not support inline assembly and use intrinsic functions and other extensions to achieve the same goals.
The assembler directives are almost certainly different.
Some vendors’ assemblers can use C header files. Ours do not.
19

ICCV8 for Cortex – C Compiler for ARM Cortex-M
Optimizations
ImageCraft compilers are derived from the LCC compiler (see Acknowledgments). As such, the portable front end of the LCC compilers perform the following optimizations:
Algebraic Simplifications and Constant Folding.
The compiler may replace expensive algebraic expressions with simpler expressions (e.g., adding by 0, dividing by 1, etc.). The compiler also evaluates constant expressions and “folds” them (e.g., 1+1 becomes 2). The compiler also performs these optimizations on floating-point constants and the results may be slightly different if the floating-point constants are not “folded.” This is because the precision and range of the floating-point operations of the host CPU (e.g., Intel processors) differ from the target CPU. In most cases, any minor differences will not be an issue.
Basic Block Common Subexpression Elimination.
Expressions that are reused within a basic block (i.e., a sequence of straight line code without jumps) may be cached in a compiler-created temporary and not recomputed.
Switch Optimizations.
The compiler analyzes the switch values and generates code using a combination of binary searches and jump tables. The jump tables are effective for densely packed switch values and the binary searches locate the right jump table quickly. In the case where the values are widely spread or few in numbers, a simple if-then-else search is performed.
The compiler code generator (the “backend”) uses a technique called bottom-up tree rewriting with dynamic programming to generate assembly code, meaning that the generated code is locally (i.e., per expression) optimal. In addition, the backend may perform the following optimizations. Note that these are ImageCraft enhancements and not part of the standard LCC distribution.
Peephole Optimizations.
While locally optimal, the generated code may still have redundant fragments resulting from different C statements. Peephole optimizations eliminate some of these redundancies.
Register Allocation.
For targets with multiple machine registers (e.g., AVR, MSP430, and ARM), for each function, the compiler performs register allocation and tries to pack as many local variables as possible into the machine registers and thereby increase
20

ICCV8 for Cortex – C Compiler for ARM Cortex-M
generated code performance. We use a sophisticated algorithm that analyzes the variable usage (e.g., the program range where it is used) and may even put multiple variables into the same register if their usages do not overlap.
This may cause confusion while debugging, as variables may seem to change values when you don’t expect them to change. However, this is correct if the register previously allocated to a variable is now allocated to a different variable.
Register History.
This works in tandem with the register allocator. It tracks the contents of the registers and eliminates copies and other similar optimizations.
Machine Independent Optimizer (MIO)
MIO is a state-of-the-art function-level optimizer, available on the PRO edition of select compilers. It performs the following optimizations on a function level, taking into consideration the effect of control flow structures:
Constant Propagation.
Assigning constants to a local variable is tracked and the use of the variable is replaced by the constant if possible. Combined with constant folding, this can be a very effective optimization.
Global Value Numbering.
Similar to Common Subexpression Elimination. This replaces redundant expressions at a function level.
Loop Invariant Code Motion.
Expressions that do not change inside loops are moved outside.
Advanced Register Allocation.
The already powerful register allocator is augmented by a “web” (different from the Internet web) building process that effectively treats different uses of a single variable as multiple variables, allowing even better register allocation to be performed.
ImageCraft has invested a considerable amount of effort on putting a state-of-the-art optimizer infrastructure in place. Currently the MIO optimizations benefit mainly execution speed and some small improvement in code size. We will continue to tune the optimizer and add in new optimizations as time progresses.
21

ICCV8 for Cortex – C Compiler for ARM Cortex-M
The code compression optimization may be enabled in addition to the MIO optimizations. This combination gives you the smallest code while alleviating some of the speed degradation introduced by the Code Compressor.
Mixed Arithmetic Type Optimizations
ImageCraft compilers minimize the integer promotions dictated by the C Standard as long as the correct results are produced. The base STANDARD performs basic optimizations (e.g., byte operations are used whenever possible for 8-bit targets) and the PRO edition performs more aggressive optimizations (e.g. ,16-bit multiply with 32-bit result is used when it makes sense rather than promoting both operands to 32-bits and then use the slower 32-bit multiply).
22
ICCV8 for Cortex – C Compiler for ARM Cortex-M
Acknowledgments
The front end of the compiler is derived from lcc: “lcc source code (C) 1995, by David R. Hanson and AT&T. Reproduced by permission.
The C preprocessor is licensed from Unicals http://www.unicals.com.
The installation uses the 7 Zip program 7za.exe for unpacking some of the files. A copy of the program is installed under c:\iccv8cortex\bin. 7 Zip uses the GNU LGPL license and you may obtain your copy of the program from their site , http://www.7-zip.org/.
The Atmel USB drivers and installer and the AVR XML device description files are distributed with permission from Atmel Corporation.
All code used with permission. Please report all bugs to us directly.
23

ICCV8 for Cortex – C Compiler for ARM Cortex-M
24
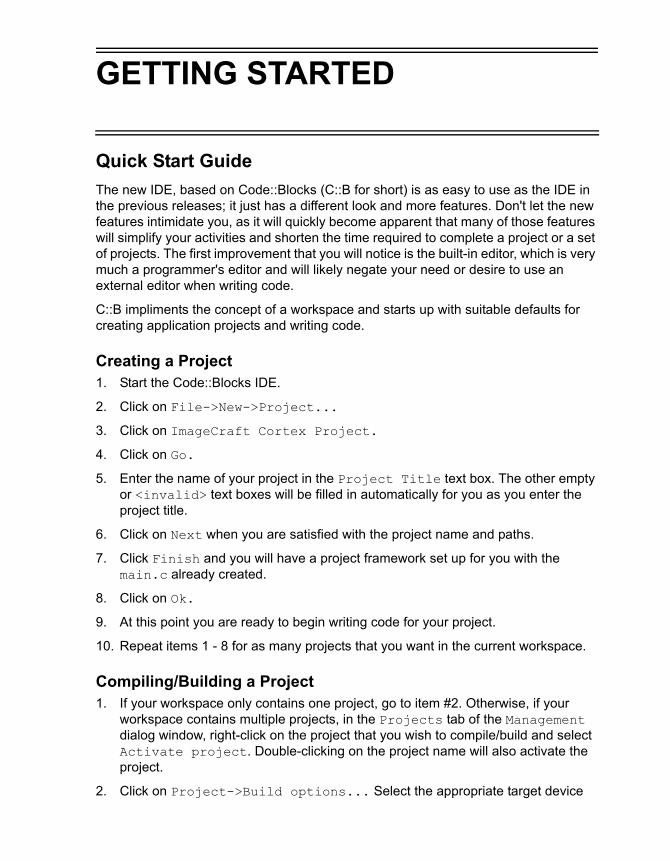
GETTING STARTED
Quick Start Guide
The new IDE, based on Code::Blocks (C::B for short) is as easy to use as the IDE in the previous releases; it just has a different look and more features. Don't let the new features intimidate you, as it will quickly become apparent that many of those features will simplify your activities and shorten the time required to complete a project or a set of projects. The first improvement that you will notice is the built-in editor, which is very much a programmer's editor and will likely negate your need or desire to use an external editor when writing code.
C::B impliments the concept of a workspace and starts up with suitable defaults for creating application projects and writing code.
Creating a Project1. Start the Code::Blocks IDE.
2. Click on File->New->Project...
3. Click on ImageCraft Cortex Project.
4. Click on Go.
5. Enter the name of your project in the Project Title text box. The other empty or <invalid> text boxes will be filled in automatically for you as you enter the project title.
6. Click on Next when you are satisfied with the project name and paths.
7. Click Finish and you will have a project framework set up for you with the main.c already created.
8. Click on Ok.
9. At this point you are ready to begin writing code for your project.
10. Repeat items 1 - 8 for as many projects that you want in the current workspace.
Compiling/Building a Project1. If your workspace only contains one project, go to item #2. Otherwise, if your
workspace contains multiple projects, in the Projects tab of the Management dialog window, right-click on the project that you wish to compile/build and select Activate project. Double-clicking on the project name will also activate the project.
2. Click on Project->Build options... Select the appropriate target device
ICCV8 for Cortex – C Compiler for ARM Cortex-M
from the Device Configuration drop-down list.
3. If you have other options that require changing, you will find most of them within the tabs of the Build options... dialog window.
You are now ready to compile your project. You may do so by clicking on Build->Build or one of the half-dozen other methods of building or rebuilding your project. You can learn about the alternatives by reading the Code::Blocks documentation. Compiling all the projects in a workspace is as simple as clicking on Build->Build workspace.
26
ICCV8 for Cortex – C Compiler for ARM Cortex-M
Example Projects
Our compiler product is designed with the philosophy of powerful professional features that are easy to use. The compilers are command-line programs with lots of command-line switches to customize their operations, but the user interface is primarily through a GUI IDE (Integrated Development Environment).
The best way to get familiarized with our tools is by working with the provided example programs. Once installed, invoke the “ICCV8 for Cortex CodeBlocks IDE” from the Start menu ImageCraft Development Tools, then File->Open, making sure that the file type is set to either “All Files” or “CB Workspace Files” and browse to c:\iccv8cortex\examples.cortex\ and select examples.workspace.
The C::B IDE organizes your work files into projects and workspace. Think of a project as a set of files that produce one executable, and a workspace consists of one or more possibly related projects. For example, you may want to organize all projects for a particular vendor under a single workspace, or you may simply work at the project level and eschew workspace altogether.
The examples.workspace comprises over a few projects. Invoking Build->Rebuild Workspace will rebuild all the projects. They are a collection of projects from various and sundry sources that are intended to give you some insight into using our development tool set and the new C::B IDE.
You will also note that some projects have warnings related to the target part being replaced by a newer part. Those projects will be updated to the newer target part in the near future.
At any given time, one of the projects is the active project, indicating by the project name being in bold in the workspace list. When you do Build->Build or Build->Rebuild, the active project will be built.
Source files are C or assembly files that are needed for the project. They have .c and .s extensions respectively. C::B display them under the “project” folder icon under each project name. Double-click on a file to open the file in the editor.
27

ICCV8 for Cortex – C Compiler for ARM Cortex-M
28

EMBEDDED PROGRAMMING
Embedded Programming Basics
With some exceptions, a basic MCU control program consists of the following pieces:
Some low-level functions that interface with the hardware, e.g., reading and writing the IO registers.
IO register and other system initialization code.
A set of interrupt handlers to handle real-world data, e.g., sensor input, timer firing, etc.
A set of “high-level” processing functions, e.g., what to do with the gathered data.
A control function. This can be a main routine that loops through all the high level functions, or may be a task switcher or an RTOS that invokes the functions as needed.
This document does not explain embedded programming in full, as there are many excellent resources and books on the subjects. Nevertheless, here are some topics that you may find useful.
ICCV8 for Cortex – C Compiler for ARM Cortex-M
Some Pitfalls
If you only have experience in writing C/C++/Java/etc. for PC, Mac, or other host platforms, there are some learning curves in writing efficient embedded programs. For example:
Our compilers are C compilers and not C++ compilers. Besides the obvious difference that C does not support classes, templates, etc., declarations are allowed only after a beginning { and the compiler does not perform much of the cross-module checking. For example, if you define a global variable to have type A, but then declare it in another module that it has type B, unless the compiler sees the conflicting types in the same translation unit, then it will not complain, unless you have the PRO edition and enable Cross Module Type Checking. See Build Options - Compiler.
Typically a “Hello World” program will not compile as is, because printf and other stdio functions require a low-level function (putchar) to write to the output device. This is highly device- and board-specific. For example, some devices may not support any UART port at all, or sometimes you want the output to be displayed on a LCD.
Therefore, to use printf and other output functions, you must supply your own putchar routines. We do provide some examples under the c:\iccv8cortex\examples.cortex\ directory.
Embedded devices typically have small memory footprints. A full implementation of printf with %f floating-point support typically uses over 10K bytes of program memory, which is sometimes bigger than the total memory available in some of these devices.
For this reason, we provide 3 versions of the printf functions, with different features and different memory requirements. You can select the different versions under Project->Build Options->Target.
Even then, sometimes you just cannot use printf and must use a lower-level function instead.
Writing code for a microcontroller (MCU) typically requires initializing the MCU peripheral devices by writing various values to their IO registers, and then read and write to other IO registers to perform some functions, such as converting an analog signal into digital value using the ADC converter.
C excels in allowing you to write such code without resorting to writing assembly code, as the IO registers usually are mapped in such a way that you can refer to them by name, e.g.
30
ICCV8 for Cortex – C Compiler for ARM Cortex-M
unsigned char c = PINA; // read from PINA
On select products, we include an Application Builder that generates peripheral initialization code through a point-and-click interface. While the vendor’s datasheet is still needed, it can save significant time in the beginning of the projects.
Unfortunately, the Application Builder requires a lot of effort to implement and support, even for a new variant of the chip that the vendor pushes out (we typically do not get support from the vendor and must plow through the datasheet ourselves) and thus the Application Builder may not be available for all devices.
If your program fails in random ways, it is almost the case that there is a random memory overwrite in the programs. Most (much higher than 90%) of the bug reports submitted to us are user errors. C has plenty of ropes to hang oneself with, and writing for embedded MCU makes the situation worse, as there is no OS to trap exceptions. Your programs would just fail, and often randomly.
Whenever possible, our compilers pack multiple variables in a single CPU register. This is not a bug. This greatly improves the efficiency of the generated code, which is important in fitting programs for small memory devices.
31

ICCV8 for Cortex – C Compiler for ARM Cortex-M
Best Practices
The best way to debug your programs is not to have bugs in the first place. The following rules may help eliminate some of the problem areas.
Enable MISRA Checks and Cross Module Type Checking. See Build Options - Compiler.
Heed the warnings from the compiler. For example, when our compiler says, “calling a function without prototype may cause a runtime error...,” we mean it. If your function returns a long and you do not declare the prototype, for example, your program may fail.
Declare handlers for all interrupts, even if you don’t expect the interrupt to trigger. Have the fail-safe handler do something that informs you that, indeed, something unexpected has happened.
Accessing a non-8-bit variable is often non-atomic on 8-bit architectures. For example,
extern unsigned counter;...while (counter != SOME_NUMBER)...
Accessing counter may require multiple instructions, which can get interrupted. If counter is modified inside an interrupt handler, then the value accessed in the loop may be inconsistent.
Setting a bit in an 8-bit variable is also often non-atomic. When in doubt, check the .lst listing file.
Pointers and arrays are not the same. Arrays have storage space associated with them. A pointer is meant to contain address of another storage space.
Access pointers and arrays with care. If a pointer does not contain a valid address, reading it will return garbage and writing to it could cause your program to crash. Do not make any assumption about variable layout in SRAM or on the stack.
C does not do array bound checking so it is possible for you to accidentally access off the array boundary. Remember that array index starts at 0 and thus the last element is one less than the size you declare.
Use typecast only when absolutely necessary.
32
ICCV8 for Cortex – C Compiler for ARM Cortex-M
Declare any variables that may change by an interrupt handler with the volatile qualifier.
Some CPUs have an alignments requirement. For example, reading a byte stream and then trying to access a 16-bit or 32-bit item in an arbitrary position of the stream may cause the CPU to fault due to the item address not being aligned.
33

ICCV8 for Cortex – C Compiler for ARM Cortex-M
Bit Twiddling
A common task in programming the microcontroller is to turn on or off some bits in the IO registers. Fortunately, Standard C is well suited to bit twiddling without resorting to assembly instructions or other non-standard C constructs. C defines some bitwise operators that are particularly useful.
Note that while our compilers generate optimal instructions for bit operations, they may be non-atomic even on 8-bit variables. Use them with care if the variable are accessed in both the main application and inside an interrupt handler.
a | b - bitwise or. The expression denoted by a is bitwise or’ed with the expression denoted by b. This is used to turn on certain bits, especially when used in the assignment form |=. For example:
PORTA |= 0x80; // turn on bit 7 (msb)
a & b - bitwise and. This operator is useful for checking if certain bits are set. For example:
if ((PINA & 0x81) == 0) // check bit 7 and bit 0
Note that the parentheses are needed around the expressions of an & operator, since it has lower precedence than the == operator. This is a source of many programming bugs in C programs. Note the use of PINA vs. PORTA to read a port.
a ^ b - bitwise exclusive or. This operator is useful for complementing a bit. For example, in the following case, bit 7 is flipped:
PORTA ^= 0x80; // flip bit 7
~a - bitwise complement. This operator performs a ones-complement on the expression. This is especially useful when combined with the bitwise and operator to turn off certain bits:
PORTA &= ~0x80; // turn off bit 7
The compiler generates optimal machine instructions for these operations. For example, the sbic instruction might be used for a bitwise and operator for conditional branching based on bit status.
Bit Macros
Some examples of macros that can be useful in handling bit manipulations are:
#define SetBit(x,y) (x|=(1<<y))#define ClrBit(x,y) (x&=~(1<<y))#define ToggleBit(x,y) (x^=(1<<y))
34
ICCV8 for Cortex – C Compiler for ARM Cortex-M
#define FlipBit(x,y) (x^=(1<<y)) // Same as ToggleBit. #define TestBit(x,y) (x&(1<<y))
Bit Twiddling vs. “bit” Variable, Bitfield etc.
Some compilers support C extensions to access individual bits, such as using PORTA.2 to access bit 2 of the IO register PORTA. By definition, extensions are not portable to other standard C compilers. Also, note that the bit-twiddling operations listed here produce the best code and are entirely portable. Furthermore, using the suggested macros above may make them easier to use. Therefore, our compilers do not support this extension.
With the exception of the Cortex-M compiler, our compilers generally generate better code for bit macros rather than bitfields. With the Cortex-M compiler, since the Cortex-M Thumb-2 instruction set supports bitfield instructions, we have optimized the Cortex compiler to fully support the bitfield instructions.
For non-Cortex compilers, we still recommend using bit macros instead of bitfields for the best code.
35

ICCV8 for Cortex – C Compiler for ARM Cortex-M
General Debugging Hints
Debugging embedded programs can be very difficult. If your program does not perform as expected, it may be due to one or more of the following reasons.
The default configurations of some CPUs may not be what is “reasonably” expected. Some examples include:
For devices with external SRAM, the hardware interface may need time to stabilize after device reset before the external SRAM can be accessed cor-rectly.
Your program must use the correct memory addresses and instruction set. Different devices from the same family may have different memory addresses or may even have slightly different instruction sets (e.g., some devices may have a hardware multiple instruction). Our IDE typically handles these details for you. When you select the device by name, the IDE generates the suitable compiler and linker switches. However, if your hardware is slightly different (e.g., you may have external SRAM) or if the device you are using is not yet directly supported by the IDE yet, you can usually select “Custom” as your device and enter the data by hand.
If your program crashes randomly, it is almost certainly a memory overwrite error caused by logic or other programming errors. For example, you may have a pointer variable pointing to an invalid address, and writing through the pointer variable may have catastrophic results that do not show up immediately, or that you overwrite beyond the bound of an array.
Another source of such memory errors is stack overflow. The stack typically shares space with variables on the SRAM, and if the stack overflows to the data variables, Bad Things May Happen (tm).
If you access a global variable inside an interrupt handler, be sure that any modifications of the global variable in the main application cannot be interrupted. Non-atomic access (i.e., access that may require multiple machine instructions) includes access to 16- or 32-bit variables, bit operations and non-basic C types (i.e., array).
Spurious or unexpected interrupt behaviors can crash your program:
You should always set up a handler for “unused” interrupts. An unexpected interrupt can cause problems.
Beware that accesses to variables larger than the natural data size of the CPU require multiple accesses. For example, writing a 16-bit value on an 8-bit CPU probably requires at least two instructions. Therefore, accessing the
36
ICCV8 for Cortex – C Compiler for ARM Cortex-M
variable in both the main application and interrupt handlers must be done with care. For example, the main program writing to the 16-bit variable may get interrupted in the middle of the 2-instruction sequence. If the interrupt handler examines the variable value, it would be in an inconsistent state.
Most CPU architectures do not allow nested interrupts by default. If you bypass the CPU mechanism and do use nested interrupts, be careful not to have unbound nested interrupts.
On most systems, it is best to set your interrupt handlers to execute as fast as possible and to use as few resources as possible. You should be careful about calling functions (your own or a library) inside an interrupt handler. For example, it is almost never a good idea to call such a heavy-duty library func-tion as printf inside an interrupt handler.
With few exceptions, our compilers generate reentrant code. That is, your function may be interrupted and called again as long as you are careful with how you use global variables. Most library functions are also reentrant, with printf and related functions being the main exceptions.
Test your external memory interface carefully. For example, do not just walk the entire external RAM range and verify write a few patterns in a single loop, as it might not detect the case where the high address bits are not working correctly.
The compiler may be doing something unexpected, even though it is correct. For example, for RISC-like targets such as the Atmel AVR, TI MSP430 and the ARM CPU, the compilers may put multiple local variables in the same machine register as long as the usage of the local variables does not overlap. This greatly improves the generated code, even though it may be surprising when debugging. For example, if you put a watch window on two variables that happen to be allocated to the same register by the compiler, both variables would appear to be changing, even though your program is modifying only one of them.
The Machine Independent Optimizer makes debugging even more challenging. MIO may eliminate or move code or modify expressions, and for RISC-like targets, the register allocator may allocate different registers or memory locations to the same variable depending on where it is used. Unfortunately, currently most debuggers have only limited support for debugging of optimized code.
You may have encountered a compiler error. If you encounter an error message of the form
“Internal Error! ...,”
this means the compiler has detected an internal inconsistence. If you see a message of the form
37

ICCV8 for Cortex – C Compiler for ARM Cortex-M
...The system cannot execute <one of the compiler programs>
this means that unfortunately the compiler crashed while processing your code. In either case, you will need to contact us. See Support.
You may have encountered a compiler bug. Unfortunately, the compiler is a set of relatively complex programs that probably contain bugs. Our front end (the part that does syntax and semantic analysis of the input C programs) is particularly robust, as we license the LCC software, a highly respected ANSI C compiler front end. We test our compilers thoroughly, including semi-exhaustively testing the basic operations of all the supported integer operators and data types.
Nevertheless, despite all our testing, the compiler may still generate incorrect code. The odds are very low, though, as most of the support issues are not compiler errors even if the customer is “certain of it.” If you think you have found a compiler problem, it always helps if you try to simplify your program or the function so that we may be able to duplicate it. See Support.
Testing Your Program Logic
Since the compiler implements the ANSI C language, a common method of program development is to use a PC compiler such as Borland C or Visual C and debug your program logic first by compiling your program as a PC program. Obviously, hardware-specific portions must be isolated and replaced or stubbed out using dummy routines. Typically, 95% or more of your program's code can be debugged using this method.
If your program fails seemingly randomly with variables having strange values or the PC (program counter) in strange locations, then possibly there are memory overwrites in your program. You should make sure that pointer variables are pointing to valid memory locations and that the stack(s) are not overwriting data memory.
Listing File
One of the output files produced by the compiler is a listing file of the name <file>.lst. The listing file contains your program's assembly code as generated by the compiler, interspersed with the C source code and the machine code and program locations. Data values are not included, and library code is shown only in the registered version.
38
CODE::BLOCKS IDE
Code::Blocks IDE
Introduced in V8 of our product line, Code::Blocks IDE (C::B) is an open-source cross-platform C/C++ IDE based on the concept of functional extensions using plugins. This allows developers to provide plugins that enhance the IDE without hard-coding these enhancements into the core IDE code.
C::B has workspace and project support and symbol browsing (e.g., jumping to a function declaration or implementation), and the editor supports all modern features such as syntax highlighting and code folding.
The base C::B is very flexible and can support a variety of host and cross compilers. Our goal in porting C::B is to make it integral to the specific product that we support. For example, you may invoke Project->Build Options and select the target device list by name, and the appropriate memory addresses will automatically be used when you build the projects.
For users of our previous generation of IDE, this is the type of features that makes our IDE very easy to use. We expended a lot of effort to bring ease-of-use features to C::B.
The C::B project has extensive documentation on the IDE at http://www.codeblocks.org/, as such we will not describe C::B in details. This chapter highlights the modifications ImageCraft made to C::B to better support our users, plus the main C::B features that are most useful to our users.
Basic Workflow
The basic workflow is to organize all files that are used to produce a single executable output into a project. The most important files are the source files (.c extension for a C source file and .s for assembly source file), but notes and include files can be added to the project. Multiple related projects (e.g., an application project and the bootloader project) can optionally be organized in a workspace.
For each project, you specify the compiler options using Project->Build Options and invoke Project->Build (or click on the Build icon on the toolbar) to build your project whenever you modify the source files. On some products, we include extras such as the Application Builder for generating peripheral initialization code via a GUI interface and direct device programming support of the target devices.
ICCV8 for Cortex – C Compiler for ARM Cortex-M
Locations of C::B Files
C::B stores certain files in different locations from the previous IDE: the project directory contains the files <project name>, <project name>.cbp, <project name>.prj, <project name>.depend, and <project name>.layout. They are used by CodeBlocks and the compiler and should not be modified.
Output files are stored in the project directory by default and can be overridden, see Build Options - Paths.
The subdirectory .objs under the project directory contains the intermediate object files.
40
ICCV8 for Cortex – C Compiler for ARM Cortex-M
Useful General Settings for CodeBlocks IDE
You invoke Project->Build Options to change compiler settings.
CodeBlocks has many other customization options, accessed through the Settings menu. The first few items, Environments, Editor and Debugger are probably the most important. The Compiler settings are generally superseded by ImageCraft specific Project->Build Options, except for the locations of the toolchain executables, which should be set correctly to c:\iccv8cortex.
Feel free to explore the different options available. Here are some that you may wish to modify:
Environments
Allow only one running instance
if unchecked, multiple copies of CodeBlocks can be run at the same time. Useful if you have multiple ImageCraft compilers installed.
Check for externally modified files
Note that CodeBlocks only checks for modified files when the focus is switched from outside of CodeBlocks to CodeBlocks.
Under the Autosave panel (click on Autosave on left pane)
Automatically save source files... and Automatically save projects...
Useful to avoid loss of files from a system crash or other catastrophes.
41
ICCV8 for Cortex – C Compiler for ARM Cortex-M
ImageCraft Enhancements to CodeBlocks
CodeBlocks uses a plugin architecture to support extensions to the IDE. We have added the following features:
User friendly option dialogs to control the compiler operations. See Menu Reference: Build Options - Project, accessed using Project->Build Options.
Duplicating a project via File->Save Project As and File->Save Project As User Template. These commands duplicate the set of project files to another location. This is useful if you have a complicated project with a lot of library source file references and you want to create another project with similar settings.
Save Project As saves the file references and all the project options, whereas Save Project As User Template only saves the basic project setting.
A number of commands are grouped under the ImageCraft menu:
Create Make File - Generate a makefile compatible with the GCC/Cygwin make program. CodeBlocks does not use makefiles but has its own build system. This option is useful for users who want to build their programs using only command line tools.
Map File Summary - Display the map file information is more user friendly form.
View Map File - Open the project .mp map file.
View List File - Open the project .lst interspersed C and asm output file.
42
ICCV8 for Cortex – C Compiler for ARM Cortex-M
IDE and the Compiler
Keep in mind that the compiler and the IDE are separate programs: the compiler is the C language translator and the IDE is a GUI shell on top to make programming using the compiler easier.
For example, the unit of translation for the compiler is a source file (usually ending with a .c extension), whereas the project management feature (see next section) is provided by the IDE. What this means is that the compiler treats things that are defined in one source file (e.g., #define, variable declaration, etc.) separate from other source files, unless one file is #included by another file. In which case, the effect is that the compiler textually substitutes the #include statement with the content of the included file.
43

ICCV8 for Cortex – C Compiler for ARM Cortex-M
Project Management
The IDE’s Project Manager allows you to group a list of files into a project. This allows you to break down your program into small modules. When you perform a project Build function, only source files that have been changed are recompiled. Header file dependencies are automatically generated. That is, if a source file includes a header file, then the source file will be automatically recompiled if the header file changes.
Unlike the IDE in the previous versions of our products, C::B does not use the standard makefile but instead uses an internal XML-based schema. Since a number of our users like the option of using a standard makefile (perhaps in their batch build and test process), C::B can generate a makefile if requested.
Creating a New Project
To create a new project, use File->New->Project. Be sure that the project type ImageCraft Projects is on the dropdown box list. Then click on the project icon and then the GO button. You can then follow the wizard’s instructions to create a new project. The project title will be used as the root name of project directories, project file, and also the output file.
When you create a new project, C::B automatically creates a main.c and add it to the project list. If you already have your own source files, you may remove the default file from your project (right-click the project name on the project pane, then expand the sources icon and select the file main.c, and then select Remove File from Project).
You can create new file using File->New->Files, and select the file type. You have the option to add the new file to the project or you may add any files to the project by Project->Add Files.
Project Build Options
Compiler options are kept with the project files so that you can have different projects with different targets. When you start a new project, a default set of options is used. You may set the current options as the default or load the default options into the current option set.
To avoid cluttering up your project directory, you may specify that the output files and the intermediate files that the tools generate reside in a separate directory. Usually this is a subdirectory under your project directory. See Build Options - Paths.
44

ICCV8 for Cortex – C Compiler for ARM Cortex-M
Building a Project
You can build a project by invoking Build->Build (Ctrl+F9)or by clicking on the Build icon. The project manager recompiles only the files that are changed. This can save a significant amount of time when your project gets larger. In some rare cases, if somehow the project manager does not rebuild a source when it should, you can perform a Build->Rebuild (Ctrl+F11) to rebuild all source files.
The various “Run” commands (e.g., Build->Build and Run) do not work for the embedded products.
45

ICCV8 for Cortex – C Compiler for ARM Cortex-M
Editor
The C::B editor has most of the features you expect from a modern editor:
language-sensitive syntax highlighting
line number display
bookmarks
code folding: i.e., collapse a block of code
automatic brace matching
block indent and outdent
integrated code browing: the editor parses the C source files and allow you to jump to function definition by selecting the function name on the drop-down list, and other features
plus many other features. Since it uses a plugin architecture, you may even download plugins that extend the functionality of the IDE and the editor. For example, Plugins->AStyle does automatic source-code formatting. To select a different formatting style, use Settings->Editor->Source Formatter.
Configuring the Editor
Settings->Editor allows you to configure the editor and various plugins.
46

ICCV8 for Cortex – C Compiler for ARM Cortex-M
Handy CodeBlocks Editor Features
Some of the more useful features of C:B are:
Code folding and unfolding to make cleaner display.
Comment / Uncomment a block of selected text using
Edit->...(comment)...
Indent a block of selected text using TAB and outdent using shift-TAB.
Jump to any function definition by drop down list (the row under the toolbox icons).
Right-click on a function name and select to find its implementation or declaration.
Right-click anywhere on the source file and select “Swap Header / Source” to open the header file with same name.
Format source code using Plugins->Source Code Formatter (AStyle).
47
ICCV8 for Cortex – C Compiler for ARM Cortex-M
Multi-Target Support and Build Properties
The CodeBlocks IDE has support for multiple targets within a project. The targets of a project share the project source files, but allow you to customize each target’s compiler settings. For example, in a Cortex project, you may have a target with its device set to STM32F401, and a different target with its device set to STM32F030. Or that one target may build most of the source files as a library, and another target builds a test program with the same source files and test harness files. These targets would share most of the same source files except for the device-specific files and Build Options.
While you can accomplish similar goals with multiple projects in a single workspace, sticking to a single project keeps the IDE much cleaner, as there is only one set of source files in the project file list.
When you first create a project, the initial target is the primary target, and has the name “default”. After creating a project, you may add, rename, or duplicate a target. Each target must have a unique name.
There is nothing magic about the name “default” per se, and you may choose to rename it if you wish (see below on how to rename a target), but there is also no particular need to do so unless you wish to. There is nothing magic about the “primary” target as compared to other targets either, just that it is the first target created.
Output Directories
The default output directory for the primary target is .\(project directory), and .\<target name> for non-default targets.
It is possible for multiple targets to share the same output directory (e.g.: the project directory), but it is recommended to use different directories for cleaner housekeeping.
The Output Directory of a target can be changed by invoking Project->Build Options, followed by switching to the Paths tab to enter the change in the Output Directory box.
Output File Names
The primary target output file names are derived from the project name. For example, if your project’s name is “MyApp”, then the files MyApp.bin, MyApp.hex etc. will be the output files.
For other targets, the output file names will be in the form of <target name>.<ext> in the target’s output directory.
48

ICCV8 for Cortex – C Compiler for ARM Cortex-M
The Output Name of a target can be changed by invoking Project->Build Options, followed by switching to the Paths tab to enter the change in the Output Name box.
Build and Debug/Download Options
When you invoke Project->Build Options, if there are multiple targets for the project, you may select the intended target from the list on the left hand side. Here we have a project with two targets: “default” and “debug”.
49
ICCV8 for Cortex – C Compiler for ARM Cortex-M
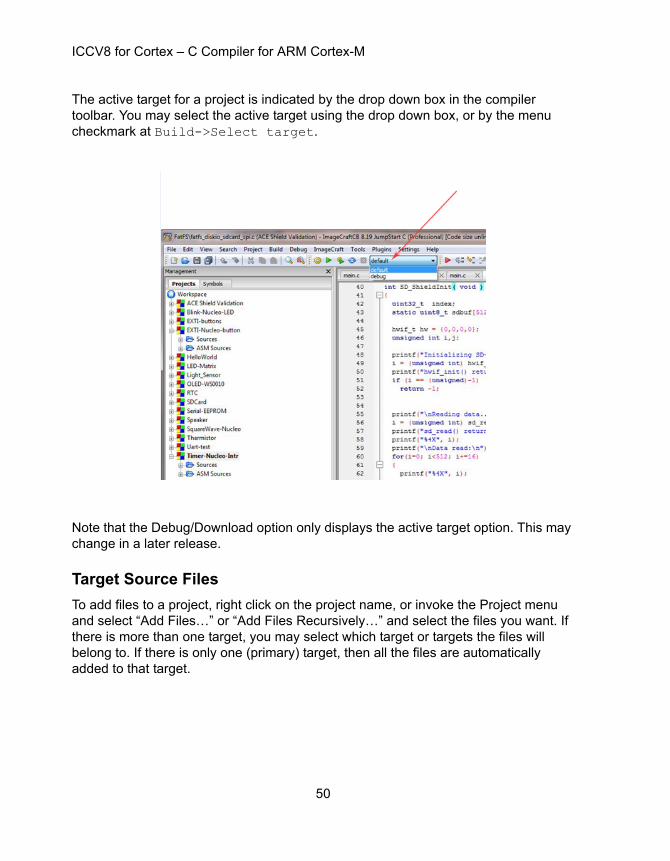
The active target for a project is indicated by the drop down box in the compiler toolbar. You may select the active target using the drop down box, or by the menu checkmark at Build->Select target.
Note that the Debug/Download option only displays the active target option. This may change in a later release.
Target Source Files
To add files to a project, right click on the project name, or invoke the Project menu and select “Add Files…” or “Add Files Recursively…” and select the files you want. If there is more than one target, you may select which target or targets the files will belong to. If there is only one (primary) target, then all the files are automatically added to that target.
50
ICCV8 for Cortex – C Compiler for ARM Cortex-M
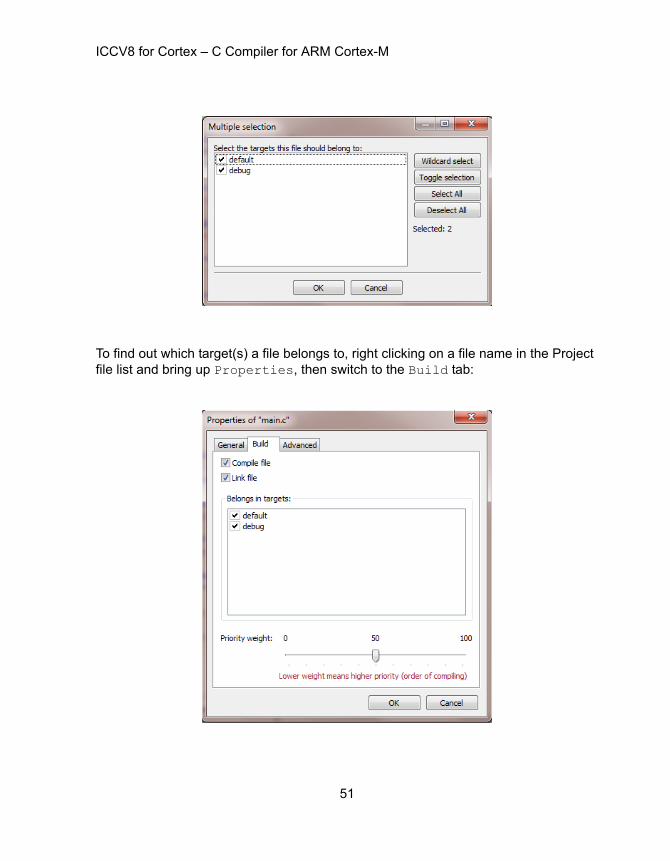
To find out which target(s) a file belongs to, right clicking on a file name in the Project file list and bring up Properties, then switch to the Build tab:
51

ICCV8 for Cortex – C Compiler for ARM Cortex-M
At any time, you may invoke Project->Properties, and then switch to the Build targets tab to examine or modify the files that belong to a target.
Adding A Target and Other Related Tasks
Invoke “Project->Properties”, switch to the “Build targets” tab to perform actions on the target.
Due to ImageCraft’s enhancements to the CodeBlocks IDE code, you cannot change the output file name using this particular dialog box. However, you may change it via Build options…, which you access either by clicking the button on this dialog box, or through the Project menu.
Be sure to enable checkboxes on any project files that belong to that target. A new target (except for the primary target) does not initially have any of the project source files check marked.
52

ICCV8 for Cortex – C Compiler for ARM Cortex-M
Add target adds a new target. You have to manually enter all its properties (compiler and device properties, source file references etc.). The output directory default to .\<target name>\, and the output name defaults to <target name>. These can be changed in Build Options.
Rename a target changes the name of the selected target. It does not change the output filename, or the output directory. You must change those manually if you so desire.
Duplicate a target is similar to New target, except that it also copies the selected target along with all its properties (compiler and device properties, source file references etc.) to another newly named target.
Delete a target removes the selected target from the project. No files are removed, however; you must remove those manually.
Virtual targets provide the ability to group multiple build targets under a "container name". Then, you may select the virtual target as the active build target, and build all the member build targets as a group. For example, you may create an “All” virtual target which includes all the targets in the group.
Dependencies allows you to specify external files on which a relink occurs.
Re-order allows you to specify the build sequence.
Build options invokes the Project Options dialog for the selected target.
Create project from target exports the selected target as a new project. The new project name will be the same as the original target name and it will have a single target also with the same name. All options including the output directory and output file names and source file references are retained.
If you move this newly exported project to a different folder, its relative file references will become invalid. You may have to remove/re-add the file references and edit the project options paths.
Building a Project
When you build a project, only the active target is built. As mentioned above, you can create a virtual target so that multiple targets can be built at once, if desired.
53

ICCV8 for Cortex – C Compiler for ARM Cortex-M
Building a Workspace
A Workspace is made up of multiple projects. Within a workspace, each project may have a different active target than the other projects in the same workspace. However, when you perform a Build->Build Workspace or Build->Rebuild Workspace, then the current active target is used for ALL projects, regardless of each project’s own active target setting. If a project does not have a target by that name, it will not be built.
Project File Changes
To support the multi-target features, new entries are needed in the .prj project file. To maintain backward compatibility, the program writes new information to <project>-v2.prj file, and any existing project files <project>.prj are left alone. This change is transparent to the users.
54

ICCV8 for Cortex – C Compiler for ARM Cortex-M
C::B Supported Variables
C:B has a rich set of built-in variables. They can be used in the Build Options edit boxes for executing commands or specifying file path, etc. The following are copied from the CodeBlocks wiki in http://www.codeblocks.org/docs/main_codeblocks_en.html.
CodeBlocks workspace
$(WORKSPACE_FILENAME), $(WORKSPACE_FILE_NAME), $(WORKSPACEFILE), $(WORKSPACEFILENAME)
The filename of the current workspace project (.workspace).
$(WORKSPACENAME), $(WORKSPACE_NAME)
The name of the workspace that is displayed in tab Projects of the Management panel.
$(WORKSPACE_DIR), $(WORKSPACE_DIRECTORY), $(WORKSPACEDIR), $(WORKSPACEDIRECTORY)
The location of the workspace directory.
Files and directories
$(PROJECT_FILENAME), $(PROJECT_FILE_NAME), $(PROJECT_FILE), $(PROJECTFILE)
The filename of the currently compiled project.
$(PROJECT_NAME)
The name of the currently compiled project.
$(PROJECT_DIR), $(PROJECTDIR), $(PROJECT_DIRECTORY)
The common top-level directory of the currently compiled project.
$(ACTIVE_EDITOR_FILENAME)
The filename of the file opened in the currently active editor.
$(ACTIVE_EDITOR_DIRNAME)
The directory containing the currently active file (relative to the common top level path).
$(ACTIVE_EDITOR_STEM)
The base name (without extension) of the currently active file.
55
ICCV8 for Cortex – C Compiler for ARM Cortex-M
$(ACTIVE_EDITOR_EXT)
The extension of the currently active file.
$(ALL_PROJECT_FILES)
A string containing the names of all files in the current project.
$(MAKEFILE)
The filename of the makefile.
$(CODEBLOCKS), $(APP_PATH), $(APPPATH), $(APP-PATH)
The path to the currently running instance of CodeBlocks.
$(DATAPATH), $(DATA_PATH), $(DATA-PATH)
The “shared” directory of the currently running instance of CodeBlocks.
$(PLUGINS)
The plugins directory of the currently running instance of CodeBlocks.
Build targets
$(FOOBAR_OUTPUT_FILE)
The output file of a specific target.
$(FOOBAR_OUTPUT_DIR)
The output directory of a specific target.
$(FOOBAR_OUTPUT_BASENAME)
The output file’s base name (no path, no extension) of a specific target.
$(TARGET_OUTPUT_DIR)
The output directory of the current target.
$(TARGET_OBJECT_DIR)
The object directory of the current target.
$(TARGET_NAME)
The name of the current target.
$(TARGET_OUTPUT_FILE)
The output file of the current target.
$(TARGET_OUTPUT_BASENAME)
56

ICCV8 for Cortex – C Compiler for ARM Cortex-M
The output file’s base name (no path, no extension) of the current target.
$(TARGET_CC), $(TARGET_CPP), $(TARGET_LD), $(TARGET_LIB)
The build tool executable (compiler, linker, etc.) of the current target.
$(TARGET_COMPILER_DIR)
The build tool executable root directory, typically c:\iccv8cortex.
Language and encoding
$(LANGUAGE)
The system language in plain language.
$(ENCODING)
The character encoding in plain language.
Time and date
$(TDAY)
Current date in the form YYYYMMDD (for example, 20051228).
$(TODAY)
Current date in the form YYYY-MM-DD (for example 2005-12-28).
$(NOW)
Timestamp in the form YYYY-MM-DD-hh.mm (for example 2005-12-28-07.15).
$(NOW_L)
Timestamp in the form YYYY-MM-DD-hh.mm.ss (for example 2005-12-28-07.15.45).
$(WEEKDAY)
Plain-language day of the week (for example, “Wednesday”).
$(TDAY_UTC), $(TODAY_UTC), $(NOW_UTC), $(NOW_L_UTC), $(WEEKDAY_UTC)
These are identical to the preceding types, but are expressed relative to UTC.
$(DAYCOUNT)
The number of the days passed since an arbitrarily chosen day zero (January 1, 2009). Useful as last component of a version/build number.
Random values
$(COIN)
57
ICCV8 for Cortex – C Compiler for ARM Cortex-M
This variable tosses a virtual coin (once per invocation) and returns 0 or 1.
$(RANDOM)
A 16-bit positive random number (0-65535).
Operating System Commands
The variable are substituted through the command of the operating system.
$(CMD_CP)
Copy command for files.
$(CMD_RM)
Remove command for files.
$(CMD_MV)
Move command for files.
$(CMD_MKDIR)
Make directory command.
$(CMD_RMDIR)
Remove directory command.
58
ICCV8 for Cortex – C Compiler for ARM Cortex-M
Menu Reference: Build Options - Project
Project Type - Enabled for PRO edition only. Allow you to build either regular executable output or library file output.
Execute Command Before Build - Execute user-defined commands before the project is built. See below for a list of variables that C::B supports.
Execute Command After Successful Build - Execute user-defined commands after the project is successfully built. See below for a list of variables that C::B supports.
59

ICCV8 for Cortex – C Compiler for ARM Cortex-M
Build Options - Paths
For any path, if you do not specify a full path (i.e., a path that does not start with a \ or a drive letter), then the path is relative to the Project directory (i.e., where the .cbp file is).
Include Paths - You may specify the directories where the compiler should search for include files. You may specify multiple directories by separating the paths with semicolons or spaces. If a path contains a space, then enclose it within double quotes.
The compiler driver automatically adds c:\iccv8cortex\include and c:\iccv8cortex\include\CMSIS to the include paths.
You may use the variable $(TARGET_COMPILER_DIR) to refer to the compiler executable root, usually c:\iccv8cortex.
Library Paths - You may specify the directories where the linker should search for library files. You may specify multiple directories by separating the paths with semicolons or spaces. If a path contains a space, then enclose it within double quotes.
The compiler driver automatically adds c:\iccv8cortex\lib to the library paths so you do not need to add it explicitly.
The compiler automatically links in a default startup file (see Startup File) and the base library (see C Library General Description) with your program. The crt*.o startup files and the library files must be located in the library directories.
Output Directory - By default, CB put the output files in the project directory. You can use this to specify another directory where the output files should go. If the directory does not exist, CB will try to create it if possible.
60
ICCV8 for Cortex – C Compiler for ARM Cortex-M
Build Options - Compiler
Strict Checking - ANSI C evolves from the original K&R C. While the ANSI C standard is a much tighter language than K&R C with more strict type checking, etc., it still allows certain operations that are potentially unsafe. If selected, the compiler warns about declarations and casts of function types without prototypes, assignments between pointers to integers and pointers to enums, and conversions from pointers to smaller integral types. It also warns about unrecognized control lines, non-ANSI language extensions and source characters in literals, unreferenced variables and static functions, and declaring arrays of incomplete types.
This option should normally be ON and all warnings should be studied to ensure that they are acceptable.
ANSI C Portability Conformance Checking - If selected, the compiler warns when your program exceeds some ANSI environmental limits, such as more than 257 cases in switch statements, or more than 512 nesting levels, etc. This does not affect the operation of your program under our compilers, but may cause problems with other ANSI C compilers.
Accept Extensions - If selected, the compiler accepts the following extensions:
C++ style comments, which treat everything up to the newline after the char-acter pair // as comments.
support for binary constants (such as 0b10101).
C++ style anonymous union and struct; e.g., you can write
struct {struct {
int a;int b;
};union {
int c;int d;
} x;
and reference x.a, x.b, x.c and x.d
Macro Define(s) - When you define macros, separate them by semicolons. Each macro definition is in the form
name[:value] or name[=value]
61
ICCV8 for Cortex – C Compiler for ARM Cortex-M
For example:
DEBUG=1;PRINT=printf
defines two macros, DEBUG and PRINT. DEBUG has the value 1 by default and PRINT is defined as printf. This is equivalent to writing
#define DEBUG 1#define PRINT printf
in the source code. A common usage is to use conditional preprocessor directives to include or exclude certain code fragments.
The C Preprocessor predefines a number of macros. See Predefined Macros.
Macro Undefine(s) - same syntax as Macro Define(s) but with the opposite meaning. It is acceptable to undefine a macro that has no definition.
Enable MISRA / Lint Checks - See MISRA / Lint Code Checking for explanations of MISRA checks. Available in the PRO edition.
Enable Cross Module Type Checking - detect inconsistence in the definitions and declarations of global functions and data variables. Available in the PRO edition.
Since the compiler encourages the use of function prototyping, this check is most useful for detecting accidental misdeclarations of global variables, which can cause your program to fail.
Output File Format - select the choice of the output format. Usually a device programmer requires simple Intel HEX or Motorola S19 format files. If you want symbolic debugging, select one of the choices that include the debugging output.
Enable 64-bit “double” - enabled for the PROFESSIONAL version. Specify the size of the double data type as 64 bits. See Data Type Sizes. Note that this is significantly slower and requires larger code space than 32-bit float.
Optimizations - control the levels and types of optimizations. Currently, the choices are
Enable Global Optimizations - enabled for the PRO edition. This invokes the MIO global optimizer and the 8-bit optimizations to improve on both code size and execution speed of your programs.
62
ICCV8 for Cortex – C Compiler for ARM Cortex-M
Build Options - Target
Address ranges are in the form <start>.<end>[:<start>.<end>]*. For example:
0x0.0x10000 ; one range0x0.0x10000:0x11000.0x20000 ; two ranges
The compiler uses up to but not including the “end” address for memory allocation. Typically the address ranges are not checked for overlaps. It’s up to you to ensure that address ranges in the same memory space from within the same program area or from different areas do not overlap. This includes any absolute memory regions used by your programs using the .org assembly directive or one of the abs_address C #pragma.
Device Configuration - Select the target device. This primarily affects the addresses that the linker uses for linking your programs. If your target device is not on the list, select “Custom” and enter the relevant parameters described below. If your device is similar to an existing device, then you should select the similar device first and then switch to “Custom.”
Flash Size - Size of the flash memory. Code, literals, interrupt vectors, etc. are stored in flash memory.
Flash Offset - Most flash memory starts at location 0. However, some devices offset the flash memory at a different address.
SRAM Size - Size of the internal SRAM.
SRAM Offset - Starting address of the internal SRAM.
Instruction Set - the Cortex-M profile instruction set.
PRINTF Version - This radio group allows you to choose which version of the printf your program is linked with. More features obviously use up more code space. Please see Standard IO Functions for details:
Small or Basic: only %c, %d, %x, %X, %u, and %s format specifier without modifiers are accepted.
Long: the long modifier. In addition to the width and precision fields, %ld, %lu, %lx, and %lX are supported.
Floating point: %e, %f and %g for floating point are supported.
63
ICCV8 for Cortex – C Compiler for ARM Cortex-M
full ftoa / dtoa - ftoa and dtoa are used for converting a 32-bit or 64-bit float point to ASCII (64-bit float available in PRO edition only) and they are used by printf to do the conversion. By default, a small and fast implementation of these functions are used.
If you get an error at runtime, either an error code from ftoa/dtoa if you call them directly, or an error message from printf (“# too small” or “# too large”), then you can enable this checkbox and a larger and slower version of ftoa/dtoa that can handle all valid floating point numbers will be used.
Additional Libraries - You may use other libraries besides the standard ones provided by the product. To use other libraries, copy the files to one of the library directories and specify the names of the library files without the lib prefix and the .a extension in the edit box. For example, rtos refers to the librtos.a library file. All library files must end with the .a extension.
Unused ROM Fill - fill the unused ROM locations with the specified integer pattern.
CRC - Specify an address in your device to store the CRC structure. The linker computes the CRC for your program and stores it in this structure. You can programmatically compute the CRC at run time to check against this value. See . The CRC structure looks like:
unsigned address;unsigned crc16;
<address> must not be used for other purpose. Typically you would specify the address at the end of the flash memory.
Non Default Startup - a startup file is always linked with your program (see Startup File). In some cases, you may have different startup files based on the project. This option allows you to specify the name of the startup file. If the filename is not an absolute pathname, then the startup file must be in one of the library directories.
Other Options - this allows you to enter any linker command-line arguments. See Linker Arguments.
64

ICCV8 for Cortex – C Compiler for ARM Cortex-M
Project - Debug/Download Interface
This dialog box allows you to specify the debug pod interface. ICCV8 for Cortex supports the Segger JLINK and the ST ST-LINK/V2 in either JTAG or SWD mode.
Both pods are supported transparently with no setup required except installing the device’s USB driver for Windows. JTAG is the older more flexible interface, but generally speaking, the newer SWD (Serial Debug Wire) has better data transfer performance and sometimes not all JTAG pins are available on a particular board as some pins may be shared with other GPIO pins.
Before you use the pod, you must install the drivers. If you reboot or plug the debug / programming pod to a different USB and receive an error message about cannot open the debug pod, you might have to reinstall the filter driver. See Installing the USB Drivers.
65

ICCV8 for Cortex – C Compiler for ARM Cortex-M
66
JUMPSTART DEBUGGER
JumpStart Debugger JDB
The JumpStart Debugger (JDB or JDB-Cortex) is a C source level debugger that has been fully integrated with the CodeBlocks IDE. No additional software needs to be downloaded in order to use it. JDB features:
Breakpoints
Variable watch window
Call stacks
C source level stepping, and assembly level stepping
Viewing of IO register contents
Step in, step over, and step return
“Poor Man’s Trace” - records of instructions and CPU register values
Target reset
The JDB license is sold separately from the compiler license. However, JDB, is fully integrated with the CodeBlocks IDE, is 100% compatible with ICCV8 for Cortex, and the IDE+JDB loads and runs much faster than competitors’ IDE/debugger, offering users a seamless edit-build-debug experience. JDB is fully functional during its 45-day demo period, as well as if you have a JDB license plus a commercial license for ICCV8 for Cortex.
Once the driver for the pod is installed (see next section), for a particular project, you can set the debug pod option by invoking Project->Debug/Download Options dialog box.
For the Cortex-M, JDB supports the Segger JLINK and ST-LINK/V2 (STM32F targets only).

ICCV8 for Cortex – C Compiler for ARM Cortex-M
Installing the USB Drivers
To use the debug pod, you must install its USB driver. When you attach the debug pod, Windows may be able to find the drivers through its facility. If not, we have snapshots of the vendors drivers in c:\iccv8cortex\Jlink_USBDriver (Segger JLINK) and c:\iccv8cortex\ST-LINK_USB_V2_Driver (ST-LINK.V2), but you may wish to check the vendor’s site for any updated drivers, especially if the unit for some reason does not perform correctly.
You can find the latest drivers at http://segger.com for the Segger JLINK drivers and http://st.com for the ST-LINK/V2 driver.
68

ICCV8 for Cortex – C Compiler for ARM Cortex-M
Debugger Operations
JumpStart Debugger (JDB) is a state-of-the art debugger which is fully integrated with the JumpStart C’s IDE; the IDE’s editor window can be used to set breakpoints, or mouse over to peek at a variable’s value etc. To provide additional debugging features without cluttering the CodeBlock User Interface (UI), JumpStart Debugger also includes the Advanced Debug Toolbar (ADT), a separate UI that provides advanced features.
CodeBlocks IDE debug commands are available under the Debug menu, or via right click popup menus. Some of the more often invoked commands are also available as toolbar icons. ADT has its own set of UI controls.
Basic Concepts
Program errors come in many forms; most often because the CPU runs the code that we actually write, instead of the code that we meant to write (“do what I meant, not what I wrote”). An MCU environment provides additional challenges ranging from interrupts occurring to memory limitations. A debugger allows you to pause a program and examine the program’s internal states. This provides insight as to what the program is doing, and sometimes even why it is executing at that location in the first place.
To debug, you typically set breakpoints in the program code prior to running the program under the debugger control. When the program execution hits a breakpoint, the CPU pauses execution, and you may then use debugger commands to examine the program states and memory contents. There are many ways to use a debugger, and users develop their own strategies of the most optimal methods for their own use.
JumpStart Debugger is a source-level debugger. Source-level means that you breakpoints are set on C source lines, and the debugger is aware of the data types of the variables. For example, if you examine the content of a struct variable, the debugger shows the member field names and their content. The debugger maintains internal structures mapping user program source information to the PC location and memory addresses. These information is generated by the compiler tools during the program build process.
A breakpoint stops at the “execution point” associated with a source line. Note that some C source statements may contain multiple execution points, e.g. a for statement for (int i = 0; i < 10; i++)contains 3 execution points, one for each part of the for loop. Setting a breakpoint at a source line with multiple execution points would pause at all execution points of that statement.
69
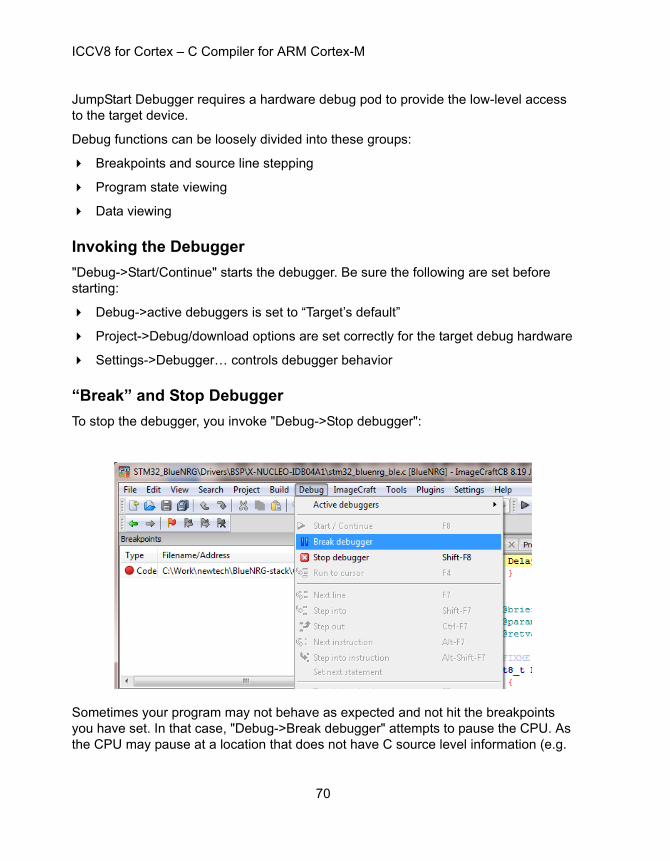
ICCV8 for Cortex – C Compiler for ARM Cortex-M
JumpStart Debugger requires a hardware debug pod to provide the low-level access to the target device.
Debug functions can be loosely divided into these groups:
Breakpoints and source line stepping
Program state viewing
Data viewing
Invoking the Debugger
"Debug->Start/Continue" starts the debugger. Be sure the following are set before starting:
Debug->active debuggers is set to “Target’s default”
Project->Debug/download options are set correctly for the target debug hardware
Settings->Debugger… controls debugger behavior
“Break” and Stop Debugger
To stop the debugger, you invoke "Debug->Stop debugger":
Sometimes your program may not behave as expected and not hit the breakpoints you have set. In that case, "Debug->Break debugger" attempts to pause the CPU. As the CPU may pause at a location that does not have C source level information (e.g.
70

ICCV8 for Cortex – C Compiler for ARM Cortex-M
within a library function provided by ImageCraft or some third party vendor), some of the debug instructions may not be available, and you may have to use the ADT to debug in assembler mode (see below).
Reset Target
This restarts the target device to allow you to restart debugging.
71

ICCV8 for Cortex – C Compiler for ARM Cortex-M
CodeBlocks Debugger Functions
Breakpoints
Breakpoints are set in the normal editor window by clicking on the “gutter” on the left hand side of the source file:
The red circle indicates that a breakpoint has been set at that source line. You can set breakpoints in C source files at function names and at any source lines with C executable statements.
The yellow triangle indicates the location of the currently paused program counter.
The following breakpoint commands are available under the Debug menu:
Debug->Toggle Breakpoint: set or clear a breakpoint at the cursor
Debug->Remove all breakpoints: remove all breakpoints from the project
Debug->Debugging windows->breakpoints: shows the breakpoint window. The breakpoint window contains all the breakpoints in the project and shows whether they are currently enabled or disabled.
A disabled breakpoint is useful to temporarily ignore a breakpoint during a debug session without removing it.
Right-clicking at an entry in the breakpoint window brings up a context-menu with further operations you can perform on the breakpoints:
72
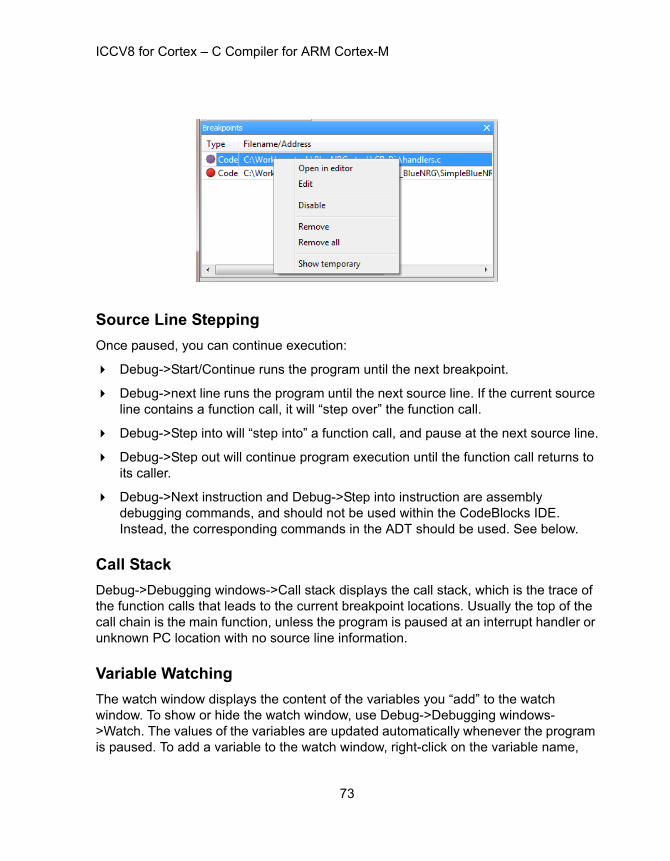
ICCV8 for Cortex – C Compiler for ARM Cortex-M
Source Line Stepping
Once paused, you can continue execution:
Debug->Start/Continue runs the program until the next breakpoint.
Debug->next line runs the program until the next source line. If the current source line contains a function call, it will “step over” the function call.
Debug->Step into will “step into” a function call, and pause at the next source line.
Debug->Step out will continue program execution until the function call returns to its caller.
Debug->Next instruction and Debug->Step into instruction are assembly debugging commands, and should not be used within the CodeBlocks IDE. Instead, the corresponding commands in the ADT should be used. See below.
Call Stack
Debug->Debugging windows->Call stack displays the call stack, which is the trace of the function calls that leads to the current breakpoint locations. Usually the top of the call chain is the main function, unless the program is paused at an interrupt handler or unknown PC location with no source line information.
Variable Watching
The watch window displays the content of the variables you “add” to the watch window. To show or hide the watch window, use Debug->Debugging windows->Watch. The values of the variables are updated automatically whenever the program is paused. To add a variable to the watch window, right-click on the variable name,
73
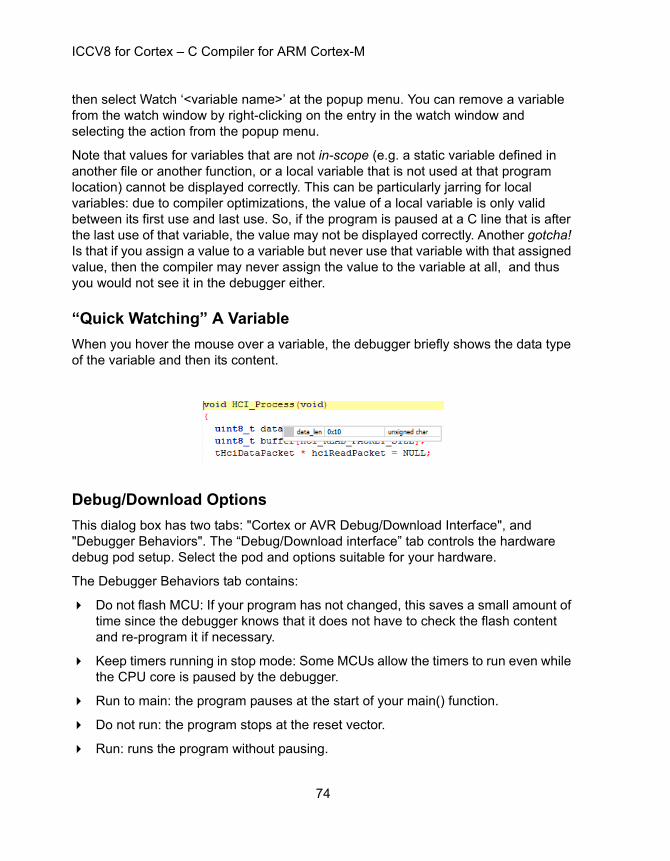
ICCV8 for Cortex – C Compiler for ARM Cortex-M
then select Watch ‘<variable name>’ at the popup menu. You can remove a variable from the watch window by right-clicking on the entry in the watch window and selecting the action from the popup menu.
Note that values for variables that are not in-scope (e.g. a static variable defined in another file or another function, or a local variable that is not used at that program location) cannot be displayed correctly. This can be particularly jarring for local variables: due to compiler optimizations, the value of a local variable is only valid between its first use and last use. So, if the program is paused at a C line that is after the last use of that variable, the value may not be displayed correctly. Another gotcha! Is that if you assign a value to a variable but never use that variable with that assigned value, then the compiler may never assign the value to the variable at all, and thus you would not see it in the debugger either.
“Quick Watching” A Variable
When you hover the mouse over a variable, the debugger briefly shows the data type of the variable and then its content.
Debug/Download Options
This dialog box has two tabs: "Cortex or AVR Debug/Download Interface", and "Debugger Behaviors". The “Debug/Download interface” tab controls the hardware debug pod setup. Select the pod and options suitable for your hardware.
The Debugger Behaviors tab contains:
Do not flash MCU: If your program has not changed, this saves a small amount of time since the debugger knows that it does not have to check the flash content and re-program it if necessary.
Keep timers running in stop mode: Some MCUs allow the timers to run even while the CPU core is paused by the debugger.
Run to main: the program pauses at the start of your main() function.
Do not run: the program stops at the reset vector.
Run: runs the program without pausing.
74
ICCV8 for Cortex – C Compiler for ARM Cortex-M
Advanced Debug Toolbar (ADT) Functions
ADT provides advanced debug features not available in base CodeBlocks IDE engine. By collecting these features in a separate more modern-looking UI window, the CodeBlocks IDE becomes less cluttered.
On Windows Task Bar, ADT uses a Ladybug icon:
The top row of icons control program execution, mirroring the toolbar icons on the CodeBlocks IDE. ADT also uses the same keyboard shortcut as the CodeBlock IDE’s control.
There are five “views” in ADT. The second row of icons is used to select the display, from left to right:
1. Core (CPU) Register View
2. Code View
3. Peripheral (I/O Register) View
4. Memory View
5. Simple Trace View
Each view is displayed as a tabbed window under the ADT control bar by default, or each can be “torn off” to be its own floating window.
75

ICCV8 for Cortex – C Compiler for ARM Cortex-M
Core (CPU) Register View
This displays the CPU registers, which is useful for low level debugging.
Code View
This displays the assembler code of the current program location, interspersed with C source code if available. You can use the ADT toolbar icon to step (over) to the next assembler or C instruction, or step into a function call.
76
ICCV8 for Cortex – C Compiler for ARM Cortex-M
Peripheral (I/O Register) View
This is one of the most useful features that makes use of the MCU’s powerful peripheral systems when debugging a program. It allows you to examine the content of the I/O registers.
A peripheral subsystem typically has multiple I/O registers associated with it. The peripheral view displays the peripheral list alphabetically. The contents of the I/O registers are only updated when you expand that peripheral’s view by clicking on the + control next to the name of the peripheral. Additional controls are available by right-clicking to invoke the popup menu:
Hide peripheral: this removes this peripheral from the project’s ADT session. This is useful for de-cluttering the display if the peripheral is not being used in this project.
Show hidden peripherals: this shows all the peripherals.
Expand multiple peripherals. As it is resource-intensive to obtain the values of the I/O registers, ADT by default only allows one peripheral to be expanded at a time. Selecting this disables that behavior.
If the single stepping is slow to execute, be sure to collapse as many non-interesting I/O registers as possible, or deselect this option.
Typically, an I/O register content is broken into different sets of bits. The debugger obtains the register content descriptions through vendor-provided XML or SVD files and displays the content accordingly.
Memory View
This displays the content of data (SRAM) memory in a variety of formats.
Simple Trace Or Poor Man’s Trace
"Simple Trace" captures the assembly instructions that you step through, and optionally captures the values of the CPU registers prior to the execution of each instruction. This allows you to determine the program flow in detail. For example, you may performed a series of program stepping, and then need to trace back and see why the program runs certain way.
In the "Trace View" window, you can save and load Trace Memory to a file, clear the trace memory, and control which CPU registers are saved during a trace. Loading trace memory from a file allows you to re-examine the data afterward.
77

ICCV8 for Cortex – C Compiler for ARM Cortex-M
78
C PREPROCESSOR
C Preprocessor Dialects
The C preprocessor is a standard C99 preprocessor.
Extensions
#pragma and _Pragma() are described in Pragmas.
#region / #endregion are ignored by the preprocessor but are used by the CodeBlocks IDE to allow manual code folding. These directives cannot improperly overlay other control directives such as #if / #else / #endif. The same effect can be achieved by using the pair
//{//}
#warning is supported in addition to #error.
ICCV8 for Cortex – C Compiler for ARM Cortex-M
Predefined Macros
The product includes support for the following Standard C predefined macros. “Current” refers to at the time of compilation:
__DATE__ expands to a string literal of the current date.
__FILE__ expands to a string literal of the current filename without the path prefix.
__LINE__ expands to an integer of the current line number (line numbers start with 1)
__STDC__ expands to the constant 1.
__TIME__ expand to a string literal of the current time in the form “hh:mm:ss”.
The following ImageCraft specific macros are defined:
__IMAGECRAFT__ expands to the constant 1. This is defined by the driver.
__ICC_LICENSE expands to the constants 0, 1 or 2, for demo or non-commercial licenses, standard license, or professional license respectively.
__ICC_VERSION expands into an integer constant of the form 8xxyy, where xxyy is the 4-digit minor version number, e.g. 80300. This is defined by the IDE. You can use this to control version-specific code:
#if __ICC_VERSION > 80300...
__BUILD expands into an integer constant representing the build number. This is defined by the IDE. The build number starts with one and increments each time a build is performed. The build number is also written to the .mp map file.
Finally, a product-specific macro is defined by the driver:
Product Predefined Macro
ICCV8 for AVR _AVR
ICCV8 for Cortex _Cortex
ICCV7 for 430 _MSP430
ICC08 _HC08
80

ICCV8 for Cortex – C Compiler for ARM Cortex-M
ICC11 _HC11
ICCV7 for CPU12 _HC12
ICCV7 for ARM _ARM
ICCM8C _M8C
ICCV7 for Propeller _PROP
Product Predefined Macro
81
ICCV8 for Cortex – C Compiler for ARM Cortex-M
Pragmas
The C Preprocessor accepts compiler-specific extensions using the #pragma control and the equivalent C99 _Pragma() keyword; e.g., the following are equivalent:
#pragma abs_address:0x1000_Pragma(“abs_address:0x1000”)
This allows you to write a macro definition that expands to a pragma control line:
#define EMOSFN(ty, f, param) PRAGMA(ctask eMOS__##f)#define PRAGMA(x) _Pragma(#x)...
EMOSFN(void, MemFreeAll, (void))
expands to
#pragma ctask eMOS__MemFreeAll
The actual code (from our eMOS RTOS) defines EMOSFN multiple ways to get both the ctask declaration and a function declaration with minimal typing, to minimize typographical errors.
#pragma
The compiler accepts the following pragmas:
#pragma warn message
Emits a warning message similar to the C preprocessor directive #warning.
#pragma ignore_unused_var name1 name2 ...
This must appear inside a function and specifies that the named arguments are intentionally unused so no warning message should be generated for them.
#pragma data:<data name>
#pragma data:noinit
#pragma data:data // to reset
Any global or file static variable definition appearing after this pragma is allocated in the <data name> area instead of the normal data area. You must use #pragma data:data to reset.
82

ICCV8 for Cortex – C Compiler for ARM Cortex-M
Use #pragma data:noinit if you don’t want the declared global variables to be initialized.
Except for noinit, you must also declare the base address of the area in the Build Options - Target “Other Options” edit box in the form of -b<data name>:<start address>.<end address>. You must also ensure that the address you specify for data name does not overlap the memory used by the compiler for the default areas. See Linker Operations.
#pragma lit:<lit area>
Any const object definition appearing after this pragma is allocated in the <lit area> area instead of the normal lit area. Use #pragma lit: lit to reset. Note that if you use this pragma, you must manually ensure that the address you specify for lit area does not overlap the memory used by the compiler for the default areas. See Linker Operations.
#pragma ram_abs_address:<address>
#prgama lit_abs_address:<address>#pragma code_abs_address:<address>
Does not use relocatable areas for the functions and global data, but instead allocates them from the absolute address starting at <address>. ram_abs_address is used for data definition, lit_abs_address is used for tables and literals and code_abs_address is for defining functions.
<address> is either an integer constant or a compile time constant expression. For example:
#define BASE 0x1000#pragma ram_abs_address: (BASE + 0x10)...
These pragmas are useful for accessing interrupt vectors and other hard-wired items. See he address is a byte address and currently it is limited to 64K bytes.
#pragma end_abs_address
Uses the normal relocatable areas for objects.
#pragma text:<text name>
#pragma text:text // to reset
83
ICCV8 for Cortex – C Compiler for ARM Cortex-M
Any function definition appearing after this pragma is allocated in the <text name> area instead of the normal text area. Use #pragma text:text to reset to the default allocation. For example:
#pragma text:mytextvoid boot() ... // function definition#pragma text:text // reset
In Build Options - Target, under “Other Options,” add
-bmytext:0x????
where 0x???? is the starting address of the area “bootloader.” Note that if you use this pragma, you must manually ensure that the address you specify for text name does not overlap the memory used by the compiler for the default areas. See Linker Operations.
#pragma once
specifies that this file should be processed only once by the C preprocessor, even if it is #include multiple times.
#pragma device_specific_function <func1> <func2> ...
This pragma is used for declaring functions that use device-specific IO registers and therefore must be compiled using the device-specific header file and IO register names. It tells the compiler to decorate the function names with the $device_specific$ suffix in the output code. For example, upon seeing
#pragma device_specific_function putchar
the compiler generates _putchar$device_specific$ whenever it sees the external identifier putchar. Upon seeing an undefined symbol with this suffix, the linker emits a suitable error message.
84
ICCV8 for Cortex – C Compiler for ARM Cortex-M
Supported Directives
Long definitions can be broken into separate lines by using the line-continuation character backslash at the end of the unfinished line.
Macro Definition
#define macname definition
A simple macro definition. All references to macname will be replaced by its definition.
#define macname(arg [,args]) definition
A function-like macro, allowing arguments to be passed to the macro definition.
#undef macname
Undefine macname as a macro. Useful for later on redefining macname to another definition.
C99 allows variable arguments in a function-like macro definition.
Conditional Processing
In conditional processing directives (#if/#ifdef/#elif/#else/#endif), a line group refers to the lines between the directive and the next conditional processing directive. Conditional directives must be well formed. For example, #else, if it exists, must be the last directive of the chain before the #endif. A sequence of conditional directives form a group, and groups of conditional directives can be nested.
defined(name)
Can only be used within the #if expression. Evaluate to 1 if name is a macro name and 0 otherwise.
#if <expr>
Conditionally process the line group if <expr> evaluates to non-zero. <expr> may contain arithmetic/logical operators and defined(name). However, since the C preprocessor is separate from the C compiler proper, it cannot contain the sizeof or typecast operators.
#ifdef name / #ifndef name
A shorthand for #if defined(name) and #if !defined(name), respectively.
#elif <expr>
85

ICCV8 for Cortex – C Compiler for ARM Cortex-M
If the previous conditions evaluate to zero and if <expr> evaluates to non-zero, then the line group following the #elif is processed.
#else
If all previous conditions evaluate to zero, then the line group following #else is processed until the #endif.
#endif
Ends a conditional processing group.
Others
#include <file> or #include “file”
Process the content of the file.
#line <line> [<“file”>]
Set the source line number and optionally the source file name.
#error “message”
Emit message as an error message.
#warning “message”
Emit message as a warning message. An ImageCraft extension.
86

ICCV8 for Cortex – C Compiler for ARM Cortex-M
String Literals and Token Pasting
A # preceding a macro argument in a macro definition creates a string literal. For example,
#define str(x) #x
str(hello) then expands to the literal string hello. This is especially useful in some inline asm commands. The C preprocessor does not expand macro names inside strings. So the following would not work:
#define PORTB 5...asm(“in R0,PORTB”); // does not work as intended
The programmer’s intention is to expand PORTB inside the string to “5,” but this will not work. Using string literal creation, it can be done like this:
#define PORTB 5#define str(x) #x#define strx(x)str(x)...asm(“in R0,” strx(PORTB));// expands to asm(“in R0,5”);
If two string literals appear together, the C compiler treats it as a single string.
If two preprocessor tokens are separated by ##, then the preprocessor creates a single token from them. For example:
foo ## bar
is treated the same as if you have written a single token foobar.
87

ICCV8 for Cortex – C Compiler for ARM Cortex-M
88
C IN 16 PAGES
Preamble
There are many good C tutorial books and websites. Google is your friend. In particular, check out the “C FAQ” website.
This section gives a very brief introduction to C using our compiler tools. Some are “good practices” that may help you to be more productive. This chapter contains our opinions; obviously there are many other good ideas and good practices out there. More importantly, this does not replace a good C tutorial or reference book.
C Standards
C “escaped” Bell Laboratories in the late 1970s into the commercial world. By the early 1980s, there were many C compilers for mainframe, PC, and even embedded processors (the more things change, the more they stay the same...). The original C standard committee had the foresight to have as one of its overriding goals to “codify existing practices as much as possible.” Consequently, the first C standard (C86) works in basically the same ways as people were used to, with just a few more keywords (const and volatile) thrown in. C’s relative simplicity helps here -- even if you hit some sort of compatibility bugs, it is often a minor exercise to tweak the programs to conform to new standards.
When ISO picked up the task of standardizing C for the international community, C86 by and large was accepted with some minor changes and became known as C89. These are the base dialects that the ImageCraft compilers more or less conform to. “More or less” because there are some small differences (i.e., we only support 64-bit double on select targets, and 32-bit floating-point for other targets, and thus are non-conforming). However, 99+% of the time, if it is in the C86/C89 language standard, it is supported by our compilers.
C99 is the latest C standard. While some people pushed for making the new C a proper subset of C++, sanity prevailed and C99 looks remarkably like C89, with the addition of a few new keywords and data types (e.g., _bool, complex, long long, long double, etc.). We may support C99 at a future date.
Order of Translation and the C Preprocessor
A C compiler consists of multiple programs that transform the C source files from one format to another. First the C PREPROCESSOR performs macro expansion (e.g., #define), text inclusion (e.g., #include), etc. on the input. Then the compiler proper translates the file into assembly code, which is then processed by the assembler. The assembler translates the file into an object file. Finally, the linker gathers all the object files and links them into a complete program.
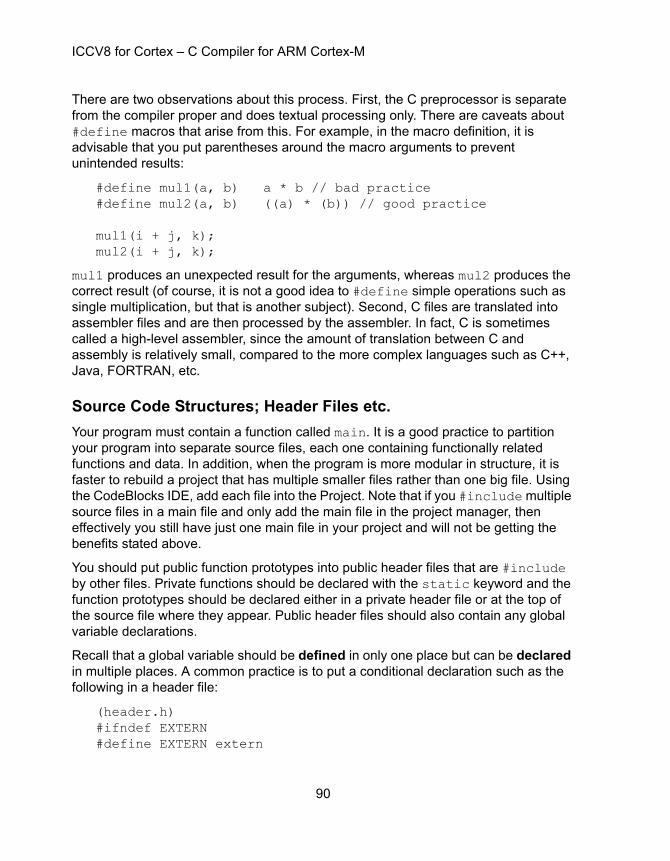
ICCV8 for Cortex – C Compiler for ARM Cortex-M
There are two observations about this process. First, the C preprocessor is separate from the compiler proper and does textual processing only. There are caveats about #define macros that arise from this. For example, in the macro definition, it is advisable that you put parentheses around the macro arguments to prevent unintended results:
#define mul1(a, b) a * b // bad practice#define mul2(a, b) ((a) * (b)) // good practice
mul1(i + j, k);mul2(i + j, k);
mul1 produces an unexpected result for the arguments, whereas mul2 produces the correct result (of course, it is not a good idea to #define simple operations such as single multiplication, but that is another subject). Second, C files are translated into assembler files and are then processed by the assembler. In fact, C is sometimes called a high-level assembler, since the amount of translation between C and assembly is relatively small, compared to the more complex languages such as C++, Java, FORTRAN, etc.
Source Code Structures; Header Files etc.
Your program must contain a function called main. It is a good practice to partition your program into separate source files, each one containing functionally related functions and data. In addition, when the program is more modular in structure, it is faster to rebuild a project that has multiple smaller files rather than one big file. Using the CodeBlocks IDE, add each file into the Project. Note that if you #include multiple source files in a main file and only add the main file in the project manager, then effectively you still have just one main file in your project and will not be getting the benefits stated above.
You should put public function prototypes into public header files that are #include by other files. Private functions should be declared with the static keyword and the function prototypes should be declared either in a private header file or at the top of the source file where they appear. Public header files should also contain any global variable declarations.
Recall that a global variable should be defined in only one place but can be declared in multiple places. A common practice is to put a conditional declaration such as the following in a header file:
(header.h)#ifndef EXTERN#define EXTERN extern
90

ICCV8 for Cortex – C Compiler for ARM Cortex-M
#endif
EXTERN int clock_ticks;
Then in one and only one of the source files (say, main.c), you can write
#define EXTERN#include “header.h”
In all other source files, you would just #include “header.h” without the preceding #define. Since main.c has EXTERN defined to be nothing, then the inclusion of header.h has the effect of defining the global variable clock_ticks. In all other source files, the EXTERN is expanded as extern, thus declaring (but not defining) clock_ticks as a global variable and allowing it to be referenced in the source files.
Use of Global Variables vs. Locals and Function Arguments
Functions can communicate using either global variables or function arguments. On some processors, it is better to use global variables; on others, it is better to use local variables and arguments; and on some others, it does not matter at all. The following summarizes the current ImageCraft compiler targets but should only be used as a guideline. You should always balance optimization needs with program maintenance needs.
Generally, using local variables is a better choice for the Atmel AVR, TI MSP 430 and ARM targets. ImageCraft compilers for these targets automatically allocate local variables to machine registers if possible and programs under these RISC processors run much faster when machine registers are used. On the Motorola HC11 and HC12/S12, it is a slight win to use local variables. On the HC08/S08, it probably does not matter at all.
On some processors that we do not support, it is much better to use global variables. For example, the 8051 is such an architecture.
91

ICCV8 for Cortex – C Compiler for ARM Cortex-M
Declaration
Everything in a C source file must be either a declaration or a statement. All variables and type names must be declared before they can be referenced. Simple data declarations are quite easy to read and to write:
[<storage class>] typename name;
Storage class is optional. It can be either auto, extern, or register. Not all storage class names can appear in all declarations. The type name is sometimes a simple type:
int, unsigned int, unsigned, signed int
short, unsigned short, signed short
char, unsigned char, signed char
float, double, and C99 added long double
a typedef’ed name
struct <tag> or union <tag>
What gets tricky is that there are three additional type modifiers: an array of ([]), a function returning (()), and a pointer to (*), and combining them can make declarations hard to write (and hard to read).
Reading a Declaration
You use the right-left rule, sort of like peeling an onion: you start with the name, and read to the right until you can’t, then you move left until you can’t, and then move right again. Nothing like a perverse example to demonstrate the point:
const int *(*f[5])(int *, char []);
Using the right-left rule, you get:
locate f, then move right, so f is an array of 5...
moving left, f is an array of 5 pointers...
moving right, f is an array of 5 pointers to a function...
continue to move right, f is an array of 5 pointers to a function with two arguments (we can skip ahead and read the function prototype later)...
moving left, f is an array of 5 pointers to function with two arguments that returns a pointer to...
92

ICCV8 for Cortex – C Compiler for ARM Cortex-M
moving left, f is an array of 5 pointers to function with two arguments that returns a pointer to int...
moving left for the last time, f is an array of 5 pointers to function with two arguments that returns a pointer to const int.
You can of course also use the right-left rule to write declarations. In the example, the type qualifier const is also used. There are two type qualifiers: const (object is read only) or volatile (object may change in unexpected ways).
volatile is for decorating an object that may be changed by an asynchronous process -- e.g., a global variable that is updated by an interrupt handler. Marking such variables as volatile tells the compilers not to cache the accessed values.
Access Atomicity and Interrupts
For most 8-bit and some 16-bit microcontrollers, accessing a 16-bit object requires two-byte-sized memory accesses. Accessing a 32-bit long would require 4 accesses, etc. For performance reasons, the compiler does not disable interrupts when performing multi-byte accesses. Most of the time, this works fine. However, there could be a problem if you write something like this:
long var;void somefunc() { .... if (var != 0) ... }...void ISR() { .... if (X) var = 0; else var++; ...}
In this example, somefunc() checks the value of a 32-bit variable that is updated in an ISR. Depending on the when the ISR executes, it is possible that somefunc will never detect var == 0 because a portion of the variable may change while it is being examined.
To work around these problem, you should either not use a multi-byte variable in this manner, or you must explicitly disable and enable interrupt around accesses to the variable to guarantee atomic access.
Access atomicity may also affect expressions such as setting a bit in a global variable -- depending on the device and where the global variable is allocated, setting a bit may require multiple instructions. This would cause problems if the operation is interrupted and the interrupt code checks or changes the same variable.
Pointers vs. Arrays
The semantics of C is such that the type of an array object is changed to the pointer to the array element type very early on. This leads some people to believe incorrectly that pointers and arrays are the “same thing.” While their types are often compatible,
93

ICCV8 for Cortex – C Compiler for ARM Cortex-M
they are not the same thing. For example, an array has storage space associated with it, whereas you must initialize a pointer to point to some valid space before accessing it.
Structure / Union Type
For whatever reasons, some beginners seem to have a lot of trouble with the struct declaration. The basic form is
struct [tag] { member-declaration * } [variable list];
The following are valid examples of declaring a struct variable:
1) struct { int junk; } var1;
2) struct tag1 { int junk; } var2;
3) struct tag2;struct tag2 { int junk; };struct tag2 var3;
The tag is optional and is useful if you want to refer to the same struct type again (for example, you can use struct tag1 to declare more variables of that type). In C, within the same file, even if you have two identical-looking struct declarations, they are different struct types. In the examples above, all of the structs have different types, even though their struct types look identical.
However, in the case of separate files, this rule is relaxed: if two structs have the same declaration, then they are equivalent. This makes sense, since in C, it is impossible to have a single declaration to appear in more than one file. Declaring the struct in a header file still means that a separate (but identical-looking) declaration appears in each file that #include the header file.
Function Prototype
In the old days of C, it was sometimes acceptable to call a function without declaring it first -- everything would work correctly anyway. However, with the ImageCraft compilers, it is important to declare a function before referencing it, including the types of the function arguments. Otherwise, it is possible that the compiler will not generate the correct code. When you declare a function with a complete argument and return type information, it’s called the function prototype of the function.
94

ICCV8 for Cortex – C Compiler for ARM Cortex-M
Expressions and Type Promotions
Semicolon Termination
The expression statement is one of the few statements in C that requires a semicolon termination. The others are break, continue, return, goto, and do statements. Sometimes you see things like:
#define foo blah blah;...void bar() { ... };
Those semicolons at the end are most likely extraneous and can possibly even cause your program to fail subtly (to compile or to execute).
lvalue and rvalue
Every expression produces a value. If the expression is on the left-hand side of an assignment, it is called an lvalue. In all other cases, an expression produces a rvalue. An lvalue is either the name of a variable, an array element reference, a pointer dereference, or a struct/union field member; everything else is not a valid lvalue. A common question is why does the compiler complain about
((char *)pc)++
and the answer is that type cast does not produce an lvalue. Some compilers may accept it as an extension, but it is not part of the standard C. This is an example of the correct method of incrementing a cast variable:
unsigned pc;...pc = (unsigned)((char *)pc + 1);
Integer Constants
Integer constants are either decimal (default), octal (starting with 0), or hexadecimal (0x or 0X). Our compilers support the extension of using 0b as a prefix for binary constants. You can explicitly change the type of an integer constant by adding U/u, L/l, or combinations of them. The type of an integer is the first type of each list in the following table that can hold the value of the constant:
95
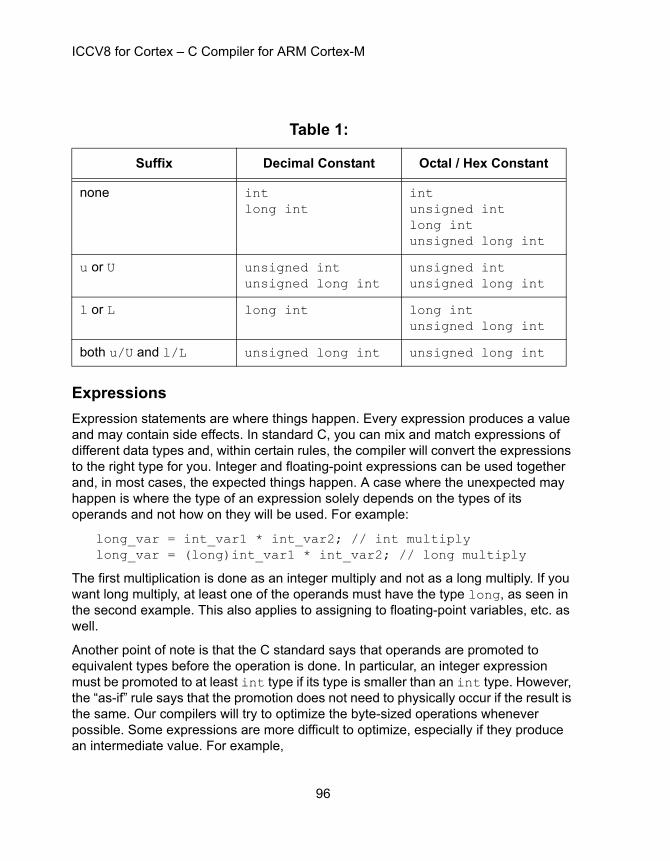
ICCV8 for Cortex – C Compiler for ARM Cortex-M
Expressions
Expression statements are where things happen. Every expression produces a value and may contain side effects. In standard C, you can mix and match expressions of different data types and, within certain rules, the compiler will convert the expressions to the right type for you. Integer and floating-point expressions can be used together and, in most cases, the expected things happen. A case where the unexpected may happen is where the type of an expression solely depends on the types of its operands and not how on they will be used. For example:
long_var = int_var1 * int_var2; // int multiplylong_var = (long)int_var1 * int_var2; // long multiply
The first multiplication is done as an integer multiply and not as a long multiply. If you want long multiply, at least one of the operands must have the type long, as seen in the second example. This also applies to assigning to floating-point variables, etc. as well.
Another point of note is that the C standard says that operands are promoted to equivalent types before the operation is done. In particular, an integer expression must be promoted to at least int type if its type is smaller than an int type. However, the “as-if” rule says that the promotion does not need to physically occur if the result is the same. Our compilers will try to optimize the byte-sized operations whenever possible. Some expressions are more difficult to optimize, especially if they produce an intermediate value. For example,
Table 1:
Suffix Decimal Constant Octal / Hex Constant
none intlong int
intunsigned intlong intunsigned long int
u or U unsigned intunsigned long int
unsigned intunsigned long int
l or L long int long intunsigned long int
both u/U and l/L unsigned long int unsigned long int
96

ICCV8 for Cortex – C Compiler for ARM Cortex-M
char *p;...... *p++...
The compiler may not be as optimal, since *p is a temporary value that needs to be preserved.
Operators
C has a rich set of operators, including bitwise operators that make handling IO registers easy. There is no “logical” or “boolean” type per se, so any non-zero value is taken as “true.” You may intermix any operators, including logical, bit-wise, etc., in an expression. The following lists the operators from high to lower precedence. Within each row, the operators have the same precedence.
Table 2: Operator Precedence and Associativity
Operators Associativity
() function call[] array element-> structure pointer field dereference. structure field reference
left to right
! logical not~ one’s complement++ pre/post increment-- pre/post decrement+ unary plus- unary minus* pointer dereference& address of(type) type castsizeof size of type
right to left
* multiply/ divide% remainder
left to right
+ addition- subtraction
left to right
97
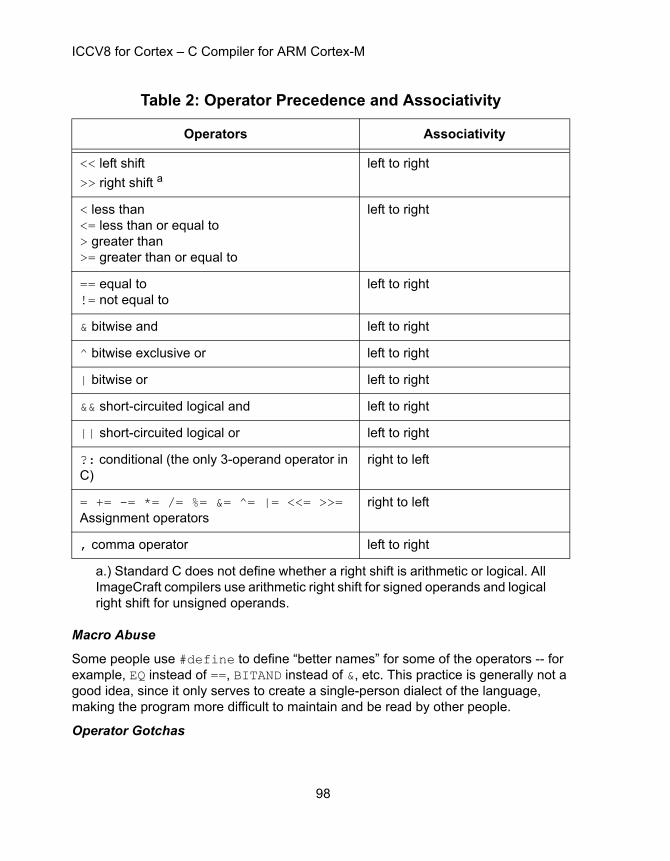
ICCV8 for Cortex – C Compiler for ARM Cortex-M
Macro Abuse
Some people use #define to define “better names” for some of the operators -- for example, EQ instead of ==, BITAND instead of &, etc. This practice is generally not a good idea, since it only serves to create a single-person dialect of the language, making the program more difficult to maintain and be read by other people.
Operator Gotchas
<< left shift
>> right shift aleft to right
< less than<= less than or equal to> greater than>= greater than or equal to
left to right
== equal to!= not equal to
left to right
& bitwise and left to right
^ bitwise exclusive or left to right
| bitwise or left to right
&& short-circuited logical and left to right
|| short-circuited logical or left to right
?: conditional (the only 3-operand operator in C)
right to left
= += -= *= /= %= &= ^= |= <<= >>=Assignment operators
right to left
, comma operator left to right
a.) Standard C does not define whether a right shift is arithmetic or logical. All ImageCraft compilers use arithmetic right shift for signed operands and logicalright shift for unsigned operands.
Table 2: Operator Precedence and Associativity
Operators Associativity
98

ICCV8 for Cortex – C Compiler for ARM Cortex-M
Incorrectly using = instead of ==. Rather than donning the sin of “macro abuse,” write carefully or use a tool such as lint or splint to catch errors like this.
Bitwise operators have higher precedence than logical operators. To many programmers, C has the ideal mix of high-level constructs with low-level accessibility. However, this is one case where even the inventors of C admit that this is a misfeature. It means that you have to write:
if ((flags & bit1) != 0 && ...
with an “extra” set of parentheses to get the semantics correct. Unfortunately, the power of backward compatibility is such that even C++ has to preserve this mistake.
99
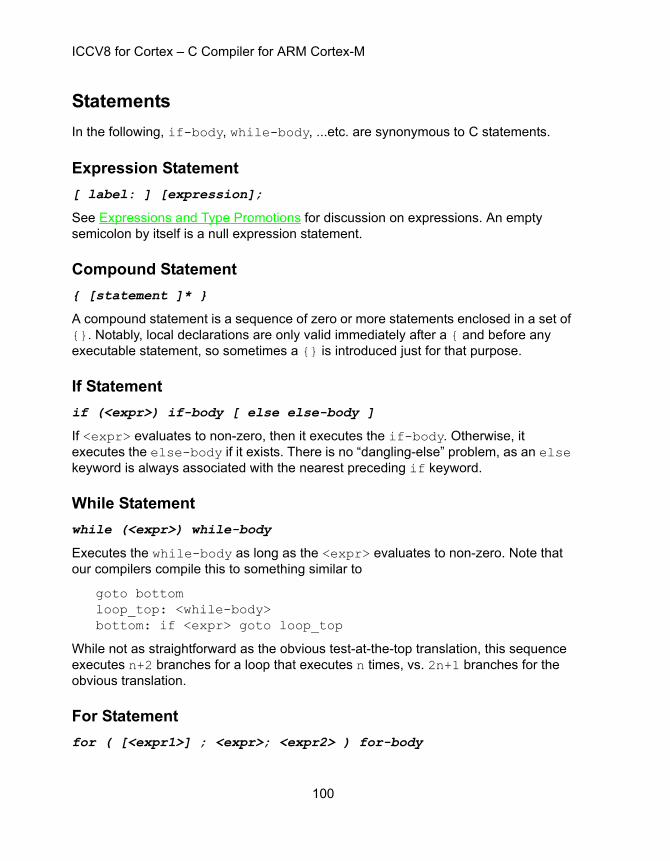
ICCV8 for Cortex – C Compiler for ARM Cortex-M
Statements
In the following, if-body, while-body, ...etc. are synonymous to C statements.
Expression Statement
[ label: ] [expression];
See Expressions and Type Promotions for discussion on expressions. An empty semicolon by itself is a null expression statement.
Compound Statement
{ [statement ]* }
A compound statement is a sequence of zero or more statements enclosed in a set of {}. Notably, local declarations are only valid immediately after a { and before any executable statement, so sometimes a {} is introduced just for that purpose.
If Statement
if (<expr>) if-body [ else else-body ]
If <expr> evaluates to non-zero, then it executes the if-body. Otherwise, it executes the else-body if it exists. There is no “dangling-else” problem, as an else keyword is always associated with the nearest preceding if keyword.
While Statement
while (<expr>) while-body
Executes the while-body as long as the <expr> evaluates to non-zero. Note that our compilers compile this to something similar to
goto bottomloop_top: <while-body>bottom: if <expr> goto loop_top
While not as straightforward as the obvious test-at-the-top translation, this sequence executes n+2 branches for a loop that executes n times, vs. 2n+1 branches for the obvious translation.
For Statement
for ( [<expr1>] ; <expr>; <expr2> ) for-body
100
ICCV8 for Cortex – C Compiler for ARM Cortex-M
Executes the for-body as long as <expr> evaluates to non-zero. <expr2> is executed after the for-body. <expr1> and <expr2> are places where you usually would put initial expressions and loop increments respectively.
Do Statement
do do-body while (<expr>);
Executes do-body at least once and, if <exp> evaluates to non-zero, repeat the process.
Break Statement
break;
Valid only inside a loop body or inside a switch statement. It causes control to fall outside of the loop or the switch. Inside a switch, execution falls through to the next case, unless it is terminated by a break statement.
Continue Statement
continue;
Valid only inside a loop body. It causes control to go to the loop test. Inside a for statement, it will skip the third expression normally executed.
Goto Statement
goto label;
Transfer control flow to label. There is no restriction on where label is located as long as it is a valid label inside the same function. In other words, while usually not a good idea, it is acceptable to jump into the middle of a loop or other “bad” places.
Return Statement
return [<expr>];
Transfer control flow back to the calling function and optionally return the value of the specified expression.
Switch Statement
switch (<int expr>) switch-body
101

ICCV8 for Cortex – C Compiler for ARM Cortex-M
Evaluates the integer expression and transfers control to the case label inside the switch-body having the same value as the expression. If there is no match and there is a default label, then control is transferred to the default case. Note that the switch-body is commonly written as
{ case <int>: [expression ;] * ... default: [expression;]* }
but this format is not required by the C language. A case label and a default label can only appear inside a switch body. Another major gotcha is that execution falls through to the next case, unless it is terminated by a break statement.
102
C LIBRARY AND STARTUP FILE
C Library General Description
The standard C defines a set of library functions that your programs may use. To use a library function, the source file that references the function must include the relevant header file where it is declared. Note that adding the header file to the CodeBlocks IDE’s project file list is for documentary purpose only and you still must use the C Preprocessor directive to include the header file in your source code. For example,
#include <ctype.h>...int c;...if (isalpha(c)) ...
The compiler automatically links in the library file when it builds your program. In addition to the standard C library functions, the library file also contains other helper functions used by compiler generated code and other functions.
Cortex-M Specific Functions
Bitband alias memory is defined in the Cortex-M3 architecture (but not necessarily implemented by all Cortex-M3 devices) that provide fast bit access to memory or peripheral registers in certain memory regions. A single bit access becomes a word load or store, which is much faster and simpler than accessing a single bit.
bitband.h defines the following macros
'a' is the address, e.g. &GPIOC->BRR, or &external_var
'b' is the bit number and must be between 0 and 31 (inclusive)
_BITBAND_CLEAR(a, b) clears the bit at address
_BITBAND_SET(a, b) sets the bit at address
_BITBAND_TOGGLE(a, b) toggles the bit at address
_BITBAND_READ(a, b) returns the bit at address
You must supply a valid address as it is not checked against the valid bitband memory region addresses. You must not use these macros on devices that do not have bitband alias memory.
ICCV8 for Cortex – C Compiler for ARM Cortex-M
Overriding a Library Function
You can write your own version of a library function. For example, you can implement your own putchar() function towrite to an LCD device. The library source code is provided so that you can use it as a starting point. You can override the default library function using one of the following methods:
You can define your function in one of your project files. The compiler will use your version and not the one in the library. Note that in this case, unlike a library module, your function will always be included in the final program output even if you do not actually call the function.
You may create your own library. See Librarian for details.
You may replace the default library version with your own. Note that when you upgrade to a new version of the product, you will need to make this replacement again. See Librarian for details on how to replace a library module.
104

ICCV8 for Cortex – C Compiler for ARM Cortex-M
Startup File
The linker links the startup file (default crtcortex.o)before your files, and links the standard library libccortex.a with your program. The startup file defines a global symbol __start, which is the starting point of your program.
The Startup file:
1. Initializes the stack pointer.
2. Copies the initialized data from the idata area to the data area.
3. Initializes the bss area to zero.
4. Calls the user main routine.
5. Defines the entry point for exit, which is defined as an infinite loop. If main ever returns, it will enter exit and gets stuck there (so much for “exit”).
The first two entries of the reset vector (usually at location 0) are also defined in the startup file. The first entry is the stack pointer value after a reset and the second entry is the program entry address. The stack pointer is set to the top of the SRAM via the symbol init_sp defined by the IDE and the program entry is set to __start. The rest of the interrupt vectors are described in Interrupt and Reset Handling.
105

ICCV8 for Cortex – C Compiler for ARM Cortex-M
Header Files
The following standard C header files are supported. Per C rules, you will only get a warning from the compiler if you use a library function but do not #include the header file (which contains the function prototype). However, your program may fail at runtime since the compiler must know about the function prototype in order to generate correct code in all cases.
assert.h - assert(), the assertion macros.
ctype.h - character type functions.
float.h - floating-point characteristics.
limits.h - data type sizes and ranges.
math.h - floating-point math functions.
stdarg.h - support for variable argument functions.
stddef.h - standard defines.
stdio.h - standard IO (input/output) functions.
stdlib.h - standard library including memory allocation functions.
string.h - string manipulation functions.
106
ICCV8 for Cortex – C Compiler for ARM Cortex-M
Character Type Functions
The following functions categorize input according to the ASCII character set. Use #include <ctype.h> > before using these functions.
int isalnum(int c)
returns non-zero if c is a digit or alphabetic character.
int isalpha(int c)
returns non-zero if c is an alphabetic character.
int iscntrl(int c)
returns non-zero if c is a control character (for example, FF, BELL, LF).
int isdigit(int c)
returns non-zero if c is a digit.
int isgraph(int c) )
returns non-zero if c is a printable character and not a space.
int islower(int c)
returns non-zero if c is a lower-case alphabetic character.
int isprint(int c)
returns non-zero if c is a printable character.
int ispunct(int c)
returns non-zero if c is a printable character and is not a space or a digit or an alphabetic character.
int isspace(int c)
returns non-zero if c is a space character, including space, CR, FF, HT, NL, and VT.
int isupper(int c)
returns non-zero if c is an upper-case alphabetic character.
int isxdigit(int c)
returns non-zero if c is a hexadecimal digit.
int tolower(int c)
returns the lower-case version of c if c is an upper-case character. Otherwise it returns c.
107

ICCV8 for Cortex – C Compiler for ARM Cortex-M
int toupper(int c)
returns the upper-case version of c if c is a lower-case character. Otherwise it returns c.
108

ICCV8 for Cortex – C Compiler for ARM Cortex-M
Floating-Point Math Functions
The following floating-point math routines are supported. You must #include <math.h> before using these functions.
float asinf(float x)
returns the arcsine of x for x in radians.
float acosf(float x)
returns the arccosine of x for x in radians.
float atanf(float x)
returns the arctangent of x for x in radians.
float atan2f(float y, float x)
returns the angle whose tangent is y/x, in the range [-pi, +pi] radians.
float ceilf(float x)
returns the smallest integer not less than x.
float cosf(float x) )
returns the cosine of x for x in radians.
float coshf(float x)
returns the hyperbolic cosine of x for x in radians.
float expf(float x)
returns e to the x power.
float exp10f(float x)
returns 10 to the x power.
float fabsf(float x)
returns the absolute value of x.
float floorf(float x)
returns the largest integer not greater than x.
float fmodf(float x, float y)
returns the remainder of x/y.
float frexpf(float x, int *pexp)
109
ICCV8 for Cortex – C Compiler for ARM Cortex-M
returns a fraction f and stores a base-2 integer into *pexp that represents the value of the input x. The return value is in the interval of [1/2, 1) and x equals f * 2**(*pexp).
float froundf(float x)
rounds x to the nearest integer.
float ldexpf(float x, int exp)
returns x * 2**exp.
float logf(float x)
returns the natural logarithm of x.
float log10f(float x)
returns the base-10 logarithm of x.
float modff(float x, float *pint)
returns a fraction f and stores an integer into *pint that represents x. f + (*pint) equal x. abs(f) is in the interval [0, 1) and both f and *pint have the same sign as x.
float powf(float x, float y) )
returns x raised to the power y.
float sqrtf(float x) )
returns the square root of x.
float sinf(float x)
returns the sine of x for x in radians.
float sinhf(float x)
returns the hyperbolic sine of x for x in radians.
float tanf(float x) )
returns the tangent of x for x in radians.
float tanhf(float x)
returns the hyperbolic tangent of x for x in radians.
110
ICCV8 for Cortex – C Compiler for ARM Cortex-M
Standard IO Functions
Since standard file IO is not meaningful for an embedded microcontroller, much of the standard stdio.h content is not applicable. Nevertheless, some IO functions are supported.
Use #include <stdio.h> before using these functions. You will need to initialize the output port. The lowest level of IO routines consists of the single-character input (getchar) and output (putchar) routines. You will need to implement these routines since they are specific to the target device. We provide example implementations and for most cases, you just need to copy the correct example file to your project. See the function descriptions below.
Once you implement the low level functions, you do not need to make modifications to the high-level standard IO functions such as printf, sprintf, scanf, etc.
Using printf on Multiple Output Devices
It is very simple to use printf on multiple devices. Your putchar() function can write to different devices depending on a global variable. Then you change the global variable whenever you want to use a different device. You can even implement a version of printf that takes some sort of device number argument by using the vfprintf() function, described below.
List of Standard IO Functions
int getchar(void)
returns a character. You must implement this function as it is device-specific. There are example functions that use the UART registers in the directory c:\iccv8cortex\examples.cortex\ with file names getchar???.c. You may make a copy of the file that matches your target and make any modifications if needed and add it to your project file list.
int printf(char *fmt, ..)
printf prints out formatted text according to the format specifiers in the fmt string. NOTE: printf is supplied in three versions, depending on your code size and feature requirements (the more features, the higher the code size):
Basic: only %c, %d, %x, %u, %p, and %s format specifiers without modifi-ers are accepted.
Long: the long modifiers %ld, %lu, %lx are supported, in addition to the width and precision fields.
111

ICCV8 for Cortex – C Compiler for ARM Cortex-M
Floating-point: all formats, including %f for floating-point, are supported.
The code size is significantly larger as you progress down the list. Select the version to use in the Build Options - Target dialog box.
The format specifiers are a subset of the standard formats:
%[flags]*[width][.precision][l]<conversion character>
The flags are:
# - alternate form. For the x or X conversion, a 0x or 0X is generated. For the floating-point conversions, a decimal point is generated even if the floating-point value is exactly an integer.
- (minus) - left-align the output
+ (plus) - add a '+' + sign character for positive integer output
' ' (space)- use space as the sign character for positive integer
0 - pad with zero instead of spaces
The width is either a decimal integer or *, denoting that the value is taken from the next argument. The width specifies the minimal number of characters that will be printed, left or right aligned if needed, and padded with either spaces or zeros, depending on the flag characters.
The precision is preceded by a '.' . and is either a decimal integer or *, denoting that the value is taken from the next argument. The precision specifies the minimal number of digits for an integer conversion, the maximum number of characters for the s-string conversion, and the number of digits after the decimal point for the floating-point conversions.
The conversion characters are as follows. If an l (letter el) appears before an integer conversion character, then the argument is taken as a long integer.
d - prints the next argument as a decimal integer
o - prints the next argument as an unsigned octal integer
x - prints the next argument as an unsigned hexadecimal integer
X - the same as %x except that upper case is used for A-F
u - prints the next argument as an unsigned decimal integer
p - prints the next argument as a void pointer. The value printed is the unsigned hexadecimal address, prefixed by 0x.
s - prints the next argument as a C null-terminated string
112

ICCV8 for Cortex – C Compiler for ARM Cortex-M
c - prints the next argument as an ASCII character
f - prints the next argument as a floating-point number in decimal notation (e.g., 31415.9)
e - prints the next argument as a floating-point number in scientific notation (e.g., 3.14159e4)
g - prints the next argument as a floating-point number in either decimal or scientific notation, whichever is more convenient.
For floating point output, please see the description for ftoa/dtoa in Standard Library And Memory Allocation Functions.
int putchar(char c)
prints out a single character. You must implement this function, as it is device-specific. There are example functions that use the UART registers in the directory c:\iccv8cortex\examples.cortex\ with file names putchar???.c. You may make a copy of the file that matches your target and make any modifications if needed and add it to your project file list.
The provided examples use a global variable named _textmode to control whether the putchar function maps a \n character to the CR-LF (carriage return and line feed) pair. This is needed if the output is to be displayed in a text terminal. For example,
extern int _textmode; // this is defined in the library..._textmode = 1;
int puts(char *s)
prints out a string followed by NL.
int sprintf(char *buf, char *fmt)
prints a formatted text into buf according to the format specifiers in fmt. The format specifiers are the same as in printf().
int scanf(char *fmt, ...)
reads the input according to the format string fmt. The function getchar() is used to read the input. Therefore, if you override the function getchar(), you can use this function to read from any device you choose.
113

ICCV8 for Cortex – C Compiler for ARM Cortex-M
Non-white white-space characters in the format string must match exactly with the input and white-space characters are matched with the longest sequence (including null size) of white-space characters in the input. % introduces a format specifier:
[l] long modifier. This optional modifier specifies that the matching argu-ment is of the type pointer to long.
d the input is a decimal number. The argument must be a pointer to a (long) int.
x/X the input is a hexadecimal number, possibly beginning with 0x or 0X. The argument must be a pointer to an unsigned (long) int.
p the input is a hexadecimal number, possibly beginning with 0x or 0X. The argument must be cast to a pointer to a “void pointer,” e.g., void **.
u the input is a decimal number. The argument must be a pointer to an unsigned (long) int.
o the input is a decimal number. The argument must be a pointer to an unsigned (long) int.
c the input is a character. The argument must be a pointer to a character.
int sscanf(char *buf char *fmt, ...)
same as scanf except that the input is taken from the buffer buf.
int vprintf(char *fmt, va_list va); ) - same as printf except that the arguments after the format string are specified using the stdarg mechanism.
114

ICCV8 for Cortex – C Compiler for ARM Cortex-M
Standard Library And Memory Allocation Functions
The Standard Library header file <stdlib.h> defines the macros NULL and RAND_MAX and typedefs size_t and declares the following functions. Note that you must initialize the heap with the _NewHeap call before using any of the memory allocation routines (calloc, malloc, and realloc).
int abs(int i)
returns the absolute value of i.
int atoi(char *s)
converts the initial characters in s into an integer, or returns 0 if an error occurs.
double atof(char *s)
converts the initial characters in s into a double and returns it.
long atol(char *s)
converts the initial characters in s into a long integer, or returns 0 if an error occurs.
void *calloc(size_t nelem, size_t size)
returns a memory chunk large enough to hold nelem number of objects, each of size size. The memory is initialized to zeros. It returns 0 if it cannot honor the request.
char *dtoa(double f, int *status)
char *ftoa(double f, int *status)
converts a 32-bit (ftoa) or 64-bit (dtoa) floating-point number to the its ASCII representation. dtoa exists in PRO edition only. It returns a static buffer of approximately 50 chars.
There are two versions of this function. The default is smaller and faster but does not support the full range of the floating point input. If the input is out of range, *status is set to the constant _FTOA_TOO_LARGE or _FTOA_TOO_SMALL, defined in stdlib.h, and 0 is returned. Otherwise, *status is set to 0 and the buffer is returned.
If you encounter the error, you can enable the larger and slower version that can handle all valid range by enabling an option. See Build Options - Target.
As with most other C functions with similar prototypes, *status means that you must pass the address of a variable to this function. Do not declare a pointer variable and pass it without initializing its pointer value.
115

ICCV8 for Cortex – C Compiler for ARM Cortex-M
void exit(status)
terminates the program. Under an embedded environment, typically it simply loops forever and its main use is to act as the return point for the user main function.
void free(void *ptr)
frees a previously allocated heap memory.
char *ftoa(float f, int *status)
see dtoa above.
void itoa(char *buf, int value, int base)
converts a signed integer value to an ASCII string, using base as the radix. base can be an integer from 2 to 36.
long labs(long i)
returns the absolute value of i.
void ltoa(char *buf, long value, int base)
converts a long value to an ASCII string, using base as the radix.
void utoa(char *buf, unsigned value, int base)
same as itoa except that the argument is taken as unsigned int.
void ultoa(char *buf, unsigned long value, int base)
same as ltoa except that the argument is taken as unsigned long.
void *malloc(size_t size)
allocates a memory chunk of size size from the heap. It returns 0 if it cannot honor the request.
void _NewHeap(void *start, void *end)
initializes the heap for memory allocation routines. malloc and related routines manage memory in the heap region. See Program Areas for information on memory layout. A typical call uses the address of the symbol _bss_end+1 as the “start” value. The symbol _bss_end defines the end of the data memory used by the compiler for global variables and strings. extern char _bss_end;unsigned start = ((unsigned)&_bss_end+4) & ~4;_NewHeap(start, start+200); // 200 bytes heap
116
ICCV8 for Cortex – C Compiler for ARM Cortex-M
Be aware that for a microcontroller with a small amount of data memory, it is often not feasible or wise to use dynamic allocation due to its overhead and potential for memory fragmentation. Often a simple statically allocated array serves one’s needs better.
int rand(void)
returns a pseudo-random number between 0 and RAND_MAX.
void *realloc(void *ptr, size_t size)
reallocates a previously allocated memory chunk with a new size.
void srand(unsigned seed)
initializes the seed value for subsequent rand() calls.
long strtol(char *s, char **endptr, int base)
converts the initial characters in s to a long integer according to the base. If base is 0, then strtol chooses the base depending on the initial characters (after the optional minus sign, if any) in s: 0x or 0X indicates a hexadecimal integer, 0 indicates an octal integer, with a decimal integer assumed otherwise. If endptr is not NULL, then *endptr will be set to where the conversion ends in s.
unsigned long strtoul(char *s, char **endptr, int base)
is similar to strtol except that the return type is unsigned long.
117
ICCV8 for Cortex – C Compiler for ARM Cortex-M
String Functions
The following string functions and macros are declared in string.h:
Macros and Types
NULL is the null pointer, defined as value 0.
size_t is the unsigned type that can hold the result of a sizeof operator.
Functions
void *memchr(void *s, int c, size_t n)
searches for the first occurrence of c in the array s of size n. It returns the address of the matching element or the null pointer if no match is found.
int memcmp(void *s1, void *s2, size_t n)
compares two arrays, each of size n. It returns 0 if the arrays are equal and greater than 0 if the first different element in s1 is greater than the corresponding element in s2. Otherwise, it returns a number less than 0.
void *memcpy(void *s1, const void *s2, size_t n)
copies n bytes starting from s2 into s1.
void *memmove(void *s1, const void *s2, size_t n)
copies s2 into s1, each of size n. The routine works correctly even if the inputs overlap. It returns s1.
void *memset(void *s, int c, size_t n)
stores c in all elements of the array s of size n. It returns s.
char *strcat(char *s1, const char *s2)
concatenates s2 onto s1 . It returns s1.
char *strchr(const char *s, int c)
searches for the first occurrence of c in s, including its terminating null character. It returns the address of the matching element or the null pointer if no match is found.
int strcmp(const char *s1, const char *s2)
compares two strings. It returns 0 if the strings are equal, and greater than 0 if the first different element in s1 is greater than the corresponding element in s2. Otherwise, it returns a number less than 0.
118

ICCV8 for Cortex – C Compiler for ARM Cortex-M
int strcoll(const char *s1, const char *s2)
compares two strings using locale information. Under our compilers, this is exactly the same as the strcmp function.
char *strcpy(char *s1, const char *s2)
copies s2 into s1. It returns s1.
size_t strcspn(const char *s1, const char *s2)
searches for the first element in s1 that matches any of the elements in s2. The terminating nulls are considered part of the strings. It returns the index in s1 where the match is found.
size_t strlen(const char *s)
returns the length of s. The terminating null is not counted.
char *strncat(char *s1, const char *s2, size_t n)
concatenates up to n elements, not including the terminating null, of s2 into s1. It then copies a null character onto the end of s1. It returns s1.
int strncmp(const char *s1, const char *s2, size_t n)
is the same as the strcmp function except it compares at most n characters.
char *strncpy(char *s1, const char *s2, size_t n)
is the same as the strcpy function except it copies at most n characters.
char *strpbrk(const char *s1, const char *s2)
does the same search as the strcspn function but returns the pointer to the matching element in s1 if the element is not the terminating null. Otherwise, it returns a null pointer.
char *strrchr(const char *s, int c)
searches for the last occurrence of c in s and returns a pointer to it. It returns a null pointer if no match is found.
size_t strspn(const char *s1, const char *s2)
searches for the first element in s1 that does not match any of the elements in s2. The terminating null of s2 is considered part of s2. It returns the index where the condition is true.
char *strstr(const char *s1, const char *s2)
119

ICCV8 for Cortex – C Compiler for ARM Cortex-M
finds the substring of s1 that matches s2. It returns the address of the substring in s1 if found and a null pointer otherwise.
char *strtok(char *s1, const char *delim)
splits s1 into tokens. Each token is separated by any of the characters in delim. You specify the source string s1 in the first call to strtok. Subsequent calls to strtok with s1 set to NULL will return the next token until no more token is found, and strtok returns NULL.
strtok modifies the content of s1 and pointers into s1 are returned as return values.
120

ICCV8 for Cortex – C Compiler for ARM Cortex-M
Variable Argument Functions
<stdarg.h> provides support for variable argument processing. It defines the pseudo-type va_list and three macros:
va_start(va_list foo, <last-arg>)
initializes the variable foo.
va_arg(va_list foo, <promoted type>)
accesses the next argument, cast to the specified type. Note that type must be a “promoted type,” such as int, long, or double. Smaller integer types such as char are invalid and will give incorrect results.
va_end(va_list foo)
ends the variable argument processing.
For example, printf() may be implemented using vfprintf() as follows:
#include <stdarg.h>
int printf(char *fmt, ...) { va_list ap;
va_start(ap, fmt); vfprintf(fmt, ap); va_end(ap); }
121

ICCV8 for Cortex – C Compiler for ARM Cortex-M
122
PROGRAMMING THE CORTEX-M
As the 7th major revision of the ARM architecture, the ARM Cortex-M is highly tuned to the needs of the C compiler. The base instruction set is Thumb-2, a mixture of 16-bit and 32-bit instructions optimized for performance, code density and power consumption.
ARM’s documentation is available on the site http://infocenter.arm.com. The most relevant documents are the ARM Cortex M (M0, M3) Architecture Reference Manuals. Silicon vendors have the device-specific data sheet and user manuals at their sites.
With Cortex-M, you can write your entire program, including interrupt handlers, in C. All is needed in most cases is just a small piece of code in the Startup File to set up the C environment, before jumping to the user main() function.
To get a program properly running, a Cortex-M program must:
1. Set up the reset and other interrupt handlers
2. Set up the clock system
3. Initialize the MCU peripherals
To create a Cortex-M based MCU, the silicon vendor licenses the Cortex core from ARM Ltd. and wrap their own peripheral modules around the core. Programming the peripherals are vendor specific.

ICCV8 for Cortex – C Compiler for ARM Cortex-M
CMSIS (Cortex Microcontroller Software Interface Stan-dard)
To ensure ease of transitions among different Cortex-M devices from different silicon vendors and different software providers, ARM has proposed the CMSIS (Cortex Microcontroller Software Interface Standard). It’s a thin layer that sits between the hardware and the user’s software, providing a uniform way to access device-specific instructions and features.
ARM provides the base header files and source files. The header files are located in c:\iccv8cortex\include\CMSIS\ and the directory is in the default search list for include files (along with c:\iccv8cortex\include\).
Silicon vendors usually provide CMSIS-compatible source and header files specific to their devices on their websites. As one of the challlenges in writing embedded programs is accessing the device’s peripheral and their functions, having these resource make the task easier.
CMSIS Usage Summary
We provide some vendor CMSIS files in c:\iccv8cortex\examples.cortex\Libraries\<vendor name>.
If you do not see them there, search on the web and download the vendor-specific CMSIS files and install them on your system. Please let us know at [email protected] and we will consider adding them to our installer.
Note that since the CMSIS files are large and there are numerous Cortex-M variants, we will not be able to include too many vendor CMSIS files in our installer.
Create a CB project as usual.
Add c:\iccv8cortex\examples.cortex\CMSIS\core_cm3.c to your project file list.
Add the vendor-specific directory to the Project->Build Options->Paths->Include Path, e.g.
c:\arm-dev\NXP\LPC17xx\
if you have installed NXP’s CMSIS files under c:\arm-dev\NXP
You do not need to add the ARM generic Cortex CMSIS header file path (which is c:\iccv8cortex\include\CMSIS\), since the compiler adds that automatically, along with c:\iccv8cortex\include\.
124

ICCV8 for Cortex – C Compiler for ARM Cortex-M
copy c:\iccv8cortex\libsrc.cortex\cortex_vectors.s to your project directory and add it to your project file list. Do not use the copy in the libsrc.cortex directory directly, as a fresh install of the compiler will wipe out your changes. Modify as needed. See CMSIS (Cortex Microcontroller Software Interface Standard).
Add the vendor’s CMSIS library source to your project. You should only add the files you actually use to avoid adding unneeded code to your program.
Initialize the clock source, see Clock Source.
125

ICCV8 for Cortex – C Compiler for ARM Cortex-M
Interrupt and Reset Handling
NOTE: this is just a summary of the topics on interrupt and reset handling related to C programming. You should consult the ARM reference manual and your chosen device’s data sheet for detailed information.
The Cortex-M architecture provides a feature-packed exception architecture that supports a number of system exceptions and external interrupts. The architecture defines a NVIC (Nested Vectored Interrupt Controller) that controls and prioritizes different interrupts. The actual NVIC is silicon vendor and device specific. For example, the number of priority levels it supports and the specific methods to program them differ between the devices. Fortunately, all vendors provide CMSIS functions to access the NVIC. Consult the vendor’s CMSIS files for details.
The Cortex-M defines 15 System Exceptions and up to 240 External Interrupts, and up to 256 levels of priorities. A Cortex-M MCU may define less than 240 External Interrupts and less than 256 levels of priorities. Beside the Reset, NMI (non-maskable interrupt) and Hard Fault (any fault that is not handled explicitly), all interrupts have programmable priorities, controlled by the NVIC.
Any function can be used as an interrupt handler and no special decoration is needed. If you are writing a handler in assembly, then you must either use the instructions BX LR or POP {PC} to return. Otherwise, the Cortex-M core will crash. The C compiler generates the correct instruction for C functions.
Interrupt Vector Table
Other than the reset vector, which is defined in the Startup File, you must define the interrupt vectors for your device. The reset vector occupies the first two words of the interrupt vectors: the first word is the initial stack point address and the second word is the reset entry, which is __start, the C startup code entry defined in the Startup File.
The file c:\iccv8cortex\libsrc.cortex\cortex_vector.s contains the basic definitions for the rest of the 15 System Exceptions. You should make a copy of this file in your project directory (any files under c:\iccv8cortex will get overridden when you install an update or performing a reinstall) and then add the entries for the external interrupts defined by the specific device. The vectors must have the lines
.area vectors(rom,rel)__vectors::
at the top as the IDE generates address for the area named vectors for the interrupt vectors. It’s a good practice to define an interrupt handler for all interrupts, otherwise the MCU will trap with a Hard Fault if there is no handler defined, which is non-recoverable. You should do this even if you do not think a particular interrupt will
126
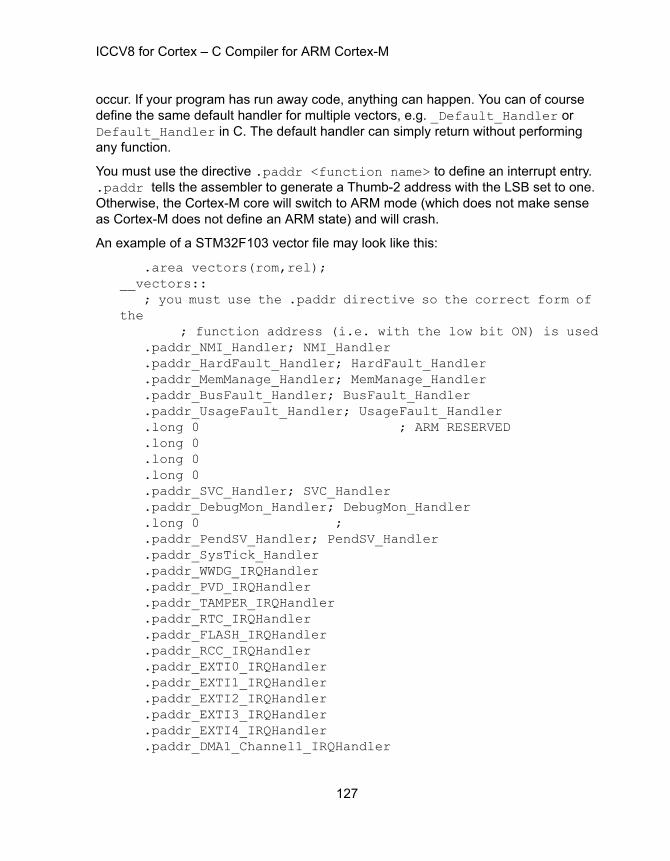
ICCV8 for Cortex – C Compiler for ARM Cortex-M
occur. If your program has run away code, anything can happen. You can of course define the same default handler for multiple vectors, e.g. _Default_Handler or Default_Handler in C. The default handler can simply return without performing any function.
You must use the directive .paddr <function name> to define an interrupt entry. .paddr tells the assembler to generate a Thumb-2 address with the LSB set to one. Otherwise, the Cortex-M core will switch to ARM mode (which does not make sense as Cortex-M does not define an ARM state) and will crash.
An example of a STM32F103 vector file may look like this:
.area vectors(rom,rel);__vectors::
; you must use the .paddr directive so the correct form of the ; function address (i.e. with the low bit ON) is used
.paddr_NMI_Handler; NMI_Handler
.paddr_HardFault_Handler; HardFault_Handler
.paddr_MemManage_Handler; MemManage_Handler
.paddr_BusFault_Handler; BusFault_Handler
.paddr_UsageFault_Handler; UsageFault_Handler
.long 0 ; ARM RESERVED
.long 0
.long 0
.long 0
.paddr_SVC_Handler; SVC_Handler
.paddr_DebugMon_Handler; DebugMon_Handler
.long 0 ;
.paddr_PendSV_Handler; PendSV_Handler
.paddr_SysTick_Handler
.paddr_WWDG_IRQHandler
.paddr_PVD_IRQHandler
.paddr_TAMPER_IRQHandler
.paddr_RTC_IRQHandler
.paddr_FLASH_IRQHandler
.paddr_RCC_IRQHandler
.paddr_EXTI0_IRQHandler
.paddr_EXTI1_IRQHandler
.paddr_EXTI2_IRQHandler
.paddr_EXTI3_IRQHandler
.paddr_EXTI4_IRQHandler
.paddr_DMA1_Channel1_IRQHandler
127

ICCV8 for Cortex – C Compiler for ARM Cortex-M
.paddr_DMA1_Channel2_IRQHandler
.paddr_DMA1_Channel3_IRQHandler
.paddr_DMA1_Channel4_IRQHandler
.paddr_DMA1_Channel5_IRQHandler
.paddr_DMA1_Channel6_IRQHandler
.paddr_DMA1_Channel7_IRQHandler
.paddr_ADC1_2_IRQHandler
.paddr_USB_HP_CAN1_TX_IRQHandler
.paddr_USB_LP_CAN1_RX0_IRQHandler
.paddr_CAN1_RX1_IRQHandler
.paddr_CAN1_SCE_IRQHandler
.paddr_EXTI9_5_IRQHandler
.paddr_TIM1_BRK_IRQHandler
.paddr_TIM1_UP_IRQHandler
.paddr_TIM1_TRG_COM_IRQHandler
.paddr_TIM1_CC_IRQHandler
.paddr_TIM2_IRQHandler
.paddr_TIM3_IRQHandler
.paddr_TIM4_IRQHandler
.paddr_I2C1_EV_IRQHandler
.paddr_I2C1_ER_IRQHandler
.paddr_I2C2_EV_IRQHandler
.paddr_I2C2_ER_IRQHandler
.paddr_SPI1_IRQHandler
.paddr_SPI2_IRQHandler
.paddr_USART1_IRQHandler
.paddr_USART2_IRQHandler
.paddr_USART3_IRQHandler
.paddr_EXTI15_10_IRQHandler
.paddr_RTCAlarm_IRQHandler
.paddr_USBWakeUp_IRQHandler
.long 0
.long 0
.long 0
.long 0
.long 0
.long 0
.long 0; .paddrBootRAM ; @0x108. This is for boot in
; RAM mode for; STM32F10x Medium Density devices.
128

ICCV8 for Cortex – C Compiler for ARM Cortex-M
The entries up to _Systick_Handler are the System Exceptions, and the remaining entries are the External Interrupt handlers specific to the STM32F103. In this case, the external handlers are defined in CMSIS files provided by STM.
NVIC Programming
Again, the NVIC is vendor/device specific, but the programming should be similar. Here’s an example from the STM32F103:
NVIC_InitTypeDef NVIC_InitStructure;...NVIC_InitStructure.NVIC_IRQChannel = TIM1_UP_IRQn;NVIC_InitStructure.NVIC_IRQChannelPreemptionPriority = 7;NVIC_InitStructure.NVIC_IRQChannelSubPriority = 0;NVIC_InitStructure.NVIC_IRQChannelCmd = ENABLE;NVIC_Init(&NVIC_InitStructure);
TIM1_UP_IRQn is just the external interrupt number, in this case, 25. This sequence setup a data structure with desired parameters and a CMSIC function NVIC_Init, provided by STM, is called to setup the NVIC for this interrupt entry.
This method of using a data structure to pass parameters to CMSIS peripheral functions is very common as then a function signature is manageable instead of having many arguments. This also allows default values to be filled out by a “initialize to default values” function, e.g.
void USART_StructInit(USART_InitTypeDef* USART_InitStruct);
initializes an “init” structure for the USART to some default values.
129

ICCV8 for Cortex – C Compiler for ARM Cortex-M
Clock Source
Before you do much of anything else, your program should set up the device’s clock source as the default out of reset probably does not run the device with the optimal settings. It can be quite daunting to set up the clock since most Cortex-M MCU have multiple primary and secondary clock sources. Typically, they can use an external oscillator or an internal RC and then run it through a PLL to generate stable system clocks.
Fortunately, once again most vendors provide CMSIS functions that make this simple. For example, for the STM32F103, the function chain
SystemInit()->SetSysClock()
(both functions provided in STM CMSIS fileset) initializes the clock source based on the #define values as described in the comments on top of the file system_stm32f10x.c.
Other silicon vendors provide similar functions for their devices’ clock initialization.
130

ICCV8 for Cortex – C Compiler for ARM Cortex-M
Programming the STM32 MCU Peripherals
Each vendor has its own method of programming the peripherals and this section addresses the methods of programming the peripherals of the STM32F Cortex M devices.
System Architecture from the STM32 Reference Manual:
For this document, we are only interested in that the Cortex-M3 core is connected to the AHB system bus, which is then split into two bridges APB1 (low speed) and APB2 (high speed) with each bridge connecting to a set of peripherals.
An MCU device is constrained by the number of physical pins. As much, very often a single physical pin may be connected to multiple peripheral functions. On reset, most IO pins are set up as GPIO (General Purpose IO) pins by the device. To use it for other functions, you have to enable the alternate function for the pin. In addition, to increase flexibility of the pin assignments, some peripherals can be “remapped” to use different set of pins. Taken these together, then the first few steps in using a peripheral are:
1. Enable the APBx bus
131

ICCV8 for Cortex – C Compiler for ARM Cortex-M
2. Enable the alternate functions if needed
3. Remap function pins if needed
4. Enable the pins
If you are using the pins as GPIO, step 2 and 3 are skipped. At the basic level, all of the above steps involve modifying the device’s IO Registers. The reference manual gives the details of the registers’ names and functions.
The Bare Metal Approach
By including the relevant system header files, you can address the IO Registers using the same names as appeared in the reference manual. With the bare metal approach, you access the IO registers and their bits directly as described by the reference manual:
RCC->APB2RSTR |= 0b101100000011101; // RESET: USART1..SPI1 TIM1 ... IOPC IOPB IOPA..AFIORCC->APB2RSTR &= ~0b101100000011101; // UNRESET:USART1..SPI1 TIM1 ... IOPC IOPB IOPA..AFIORCC->APB2ENR |= 0b101100000011101; // ENABLE: USART1..SPI1 TIM1 ... IOPC IOPB IOPA..AFIO
RCC->APB1RSTR |= 0b110 << 16; // RESET: USART3 USART2RCC->APB1RSTR &=~(0b110 << 16);// UNRESET:USART3 USART2RCC->APB1ENR |= 0b110 << 16; // ENABLE: USART3 USART2
In this code fragment, 0b is the prefix for binary constant. The first 3 executable lines set up the APB2 bus and enable power to the peripherals on that bus that we are interested in. Likewise, the next 3 executable lines do the same for the APB1 bus.
Now we can setup the peripherals:
// SPI, alternate functions for PA 4, 5, 6 and 7// does not use PA4 for NSSGPIOA->CRL &= ~(0b1111 << 16); // PA4: ISP RESETGPIOA->CRL |= (0b1011 << 16); // ALT OUT, 50 MhzGPIOA->CRL &= ~(0b1111 << 20); // PA5: SPI1 SCKGPIOA->CRL |= (0b1011 << 20); // ALT OUT, 50 MhzGPIOA->CRL &= ~(0b1111 << 24); // PA6: SPI1 MISOGPIOA->CRL |= (0b1000 << 24); // IN, PULL-UP/DOWNGPIOA->CRL &= ~(0b1111 << 28); // PA7: SPI1 MOSIGPIOA->CRL |= (0b1011 << 28); // ALT OUT, 50 Mhz
132
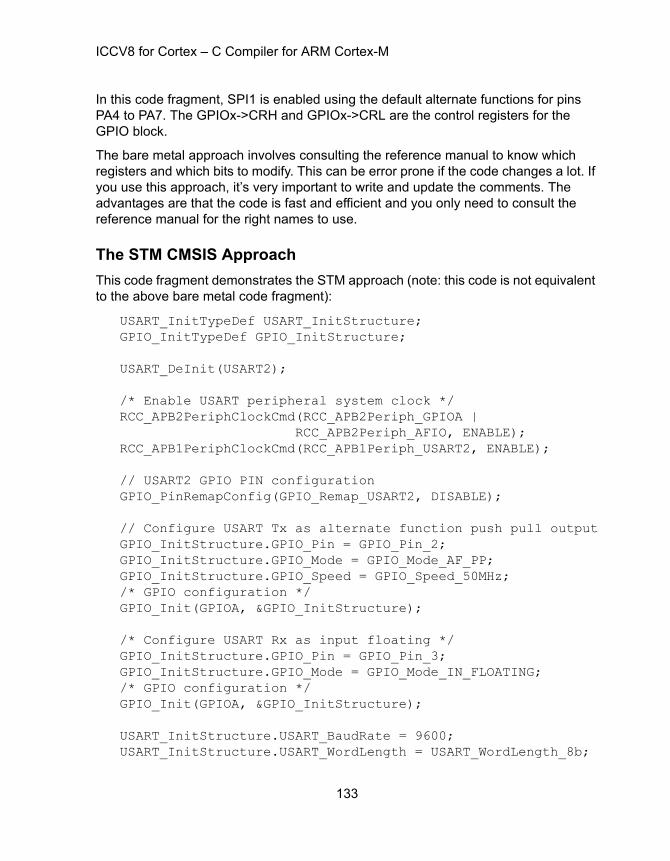
ICCV8 for Cortex – C Compiler for ARM Cortex-M
In this code fragment, SPI1 is enabled using the default alternate functions for pins PA4 to PA7. The GPIOx->CRH and GPIOx->CRL are the control registers for the GPIO block.
The bare metal approach involves consulting the reference manual to know which registers and which bits to modify. This can be error prone if the code changes a lot. If you use this approach, it’s very important to write and update the comments. The advantages are that the code is fast and efficient and you only need to consult the reference manual for the right names to use.
The STM CMSIS Approach
This code fragment demonstrates the STM approach (note: this code is not equivalent to the above bare metal code fragment):
USART_InitTypeDef USART_InitStructure;GPIO_InitTypeDef GPIO_InitStructure;
USART_DeInit(USART2);
/* Enable USART peripheral system clock */RCC_APB2PeriphClockCmd(RCC_APB2Periph_GPIOA | RCC_APB2Periph_AFIO, ENABLE);RCC_APB1PeriphClockCmd(RCC_APB1Periph_USART2, ENABLE);
// USART2 GPIO PIN configuration GPIO_PinRemapConfig(GPIO_Remap_USART2, DISABLE);
// Configure USART Tx as alternate function push pull outputGPIO_InitStructure.GPIO_Pin = GPIO_Pin_2;GPIO_InitStructure.GPIO_Mode = GPIO_Mode_AF_PP;GPIO_InitStructure.GPIO_Speed = GPIO_Speed_50MHz;/* GPIO configuration */GPIO_Init(GPIOA, &GPIO_InitStructure);
/* Configure USART Rx as input floating */GPIO_InitStructure.GPIO_Pin = GPIO_Pin_3;GPIO_InitStructure.GPIO_Mode = GPIO_Mode_IN_FLOATING;/* GPIO configuration */GPIO_Init(GPIOA, &GPIO_InitStructure);
USART_InitStructure.USART_BaudRate = 9600;USART_InitStructure.USART_WordLength = USART_WordLength_8b;
133

ICCV8 for Cortex – C Compiler for ARM Cortex-M
USART_InitStructure.USART_StopBits = USART_StopBits_1;USART_InitStructure.USART_Parity = USART_Parity_No;USART_InitStructure.USART_Mode = USART_Mode_Rx | USART_Mode_Tx;USART_InitStructure.USART_HardwareFlowControl =
USART_HardwareFlowControl_None;
/* USART configuration */USART_Init(USART2, &USART_InitStructure);
/* Enable USART */USART_Cmd(USART2, ENABLE);
Each peripheral uses a unique initialization data structure, e.g. USART_InitTypeDef and GPIO_InitTypeDef. You fill in the fields using #define names defined in the header files, then call the function xxxx_Init, e.g. USART_Init and GPIO_Init, passing along the global names USART2 and GPIOA respectively in the example. The calls initialize the IO registers, much like what are done in the bare metal approach.
The advantage of the CMSIS approach is that the #define names are self documenting and thus less error prone and easier to modify. The disadvantages are that you need to learn a different set of #define names (documented only in the STM provided header files), the functions are opaque unless you explore the CMSIS code, and the init function may need to perform calculations to locate the right bits to modify.
For example, GPIOA has 16 port pins, each pin has 4 bits in either the GPIOA->CRH or GPIOA->CRL, depending on the port pin number. In the bare metal approach, you modify the bits directly, but with the CMSIS function, it must determine which pin you are modifying, then either the CRH or CRL is accessed, after some bit shifting and masking.
These must be done at runtime and cannot be optimized by the compiler. Since these are part of the initialization code, this may not be an issue at all. However. purists may still opt for the bare metal approach since it’s also more transparent.
Most people would probably follow STM’s example and use the CMSIS functions. Even if you use the bare metal approach, some functionality is difficult to set up by hand, and a mix of CMSIS code can be interleaved with the bare metal code. For example, it’s difficult to calculate the correct value for the UART’s baudrate register, but a single call to the CMSIS function does the job nicely:
USART_SetBaudrate(USART1, 1000000);
134

ICCV8 for Cortex – C Compiler for ARM Cortex-M
Cortex-M Compiler-Specific Information
Optimizations
The compiler generates 16-Bit Thumb 2 instructions whenever possible. For example, this means that it may use the “set condition code” qualifier (.s suffix) even if the condition code is not needed, since this is sometimes needed to force 16-bit encoding outside of the IT Block. It also avoids using explicit “compare with zero” if possible if the condition code can be set as a side effect using a prior instruction.
{Not Yet Implemented} While we generally advocate the use of bit macros instead of bitfield (see Bit Twiddling), the Cortex-M compiler is fully optimized to use the Thumb-2 bitfield instructions, and you should use bitfield for the best code with the Cortex-M compiler.
Cortex-M3 is architected to have the bit-band alias memory region so that bitfield access can be done using a single load or store instruction, rather than the more complex load and extract or insert and store sequences. These can be accessed through the macros defined in bitband.h. See C Library General Description.
Unlike the 32-bit ARM instruction set, Cortex-M3’s Thumb-2 instruction does not support conditional execution on all instructions. It does has the IT block instruction that can conditionally execute up to 4 following instructions. The compiler generates optimal instructions for bodies of if and else blocks to take advantage of the IT blocks as well as the cbz/cbnz compare and branch instructions.
Literal Pools
Thumb-2 instructions cannot encode arbitrary literals and constants, although they can encode a large number of values within the instruction using some unusual encoding scheme (for example, Thumb-2 can encode any immediate value that is up to 8 bits long, starting in any bit position). The most common method of addressing non-encodable constants is to put them in a “literal pool” and load the pool into a register before use. The C compiler generates the function’s literal pool right after the function body so that the constants are usually within reach of the PC relative load. For example:
_some_func::...ldr R0,LIT_some_func+4...LIT_some_func:.long 0.long 0xDEADBEEF
135
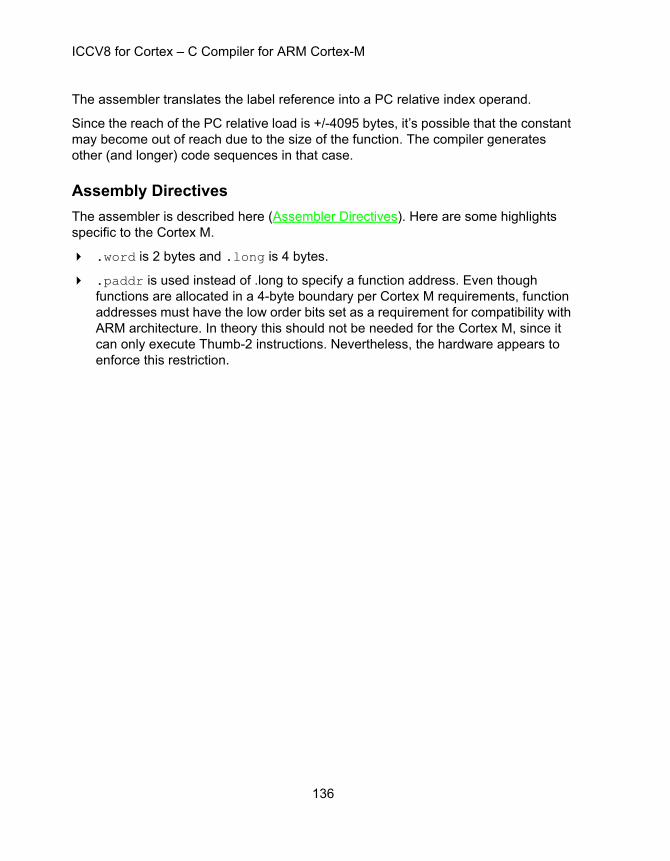
ICCV8 for Cortex – C Compiler for ARM Cortex-M
The assembler translates the label reference into a PC relative index operand.
Since the reach of the PC relative load is +/-4095 bytes, it’s possible that the constant may become out of reach due to the size of the function. The compiler generates other (and longer) code sequences in that case.
Assembly Directives
The assembler is described here (Assembler Directives). Here are some highlights specific to the Cortex M.
.word is 2 bytes and .long is 4 bytes.
.paddr is used instead of .long to specify a function address. Even though functions are allocated in a 4-byte boundary per Cortex M requirements, function addresses must have the low order bits set as a requirement for compatibility with ARM architecture. In theory this should not be needed for the Cortex M, since it can only execute Thumb-2 instructions. Nevertheless, the hardware appears to enforce this restriction.
136

C RUNTIME ARCHITECTURE
Data Type Sizes
(*) char is equivalent to unsigned char.
(**) 8 bytes / 64 bits double enabled for PRO edition only.
floats and doubles are in IEEE standard 32-bit format with 8-bit exponent, 23-bit mantissa, and 1 sign bit.
Bitfield types must be either signed or unsigned. For example:
struct {
TYPE SIZE (bytes) RANGE
unsigned char 1 0..255
signed char 1 -128..127
char (*) 1 0..255
unsigned short 2 0..65535
(signed) short 2 -32768..32767
unsigned int 4 0..4294967295
(signed) int 4 -2147483648..2147483647
pointer 4 0..4294967295
unsigned long 4 0..4294967295
(signed) long 4 -2147483648..2147483647
unsigned long long
8 0..18446744073709551615
(signed) long long
8 -9223372036854775808
..9223372036854775807
float 4 +/-1.175e-38..3.40e+38
double 4
8 (**)
+/-1.175e-38..3.40e+38
+/-2.225e-308..1.798e+308

ICCV8 for Cortex – C Compiler for ARM Cortex-M
unsigned a : 1, b : 1;};
Bitfields are packed Little Endian format, i.e., a is the least significant (right most) bit.
138
ICCV8 for Cortex – C Compiler for ARM Cortex-M
Assembly Interface and Calling Conventions
The ImageCraft compiler adheres to the ARM Procedure Call Standard (AAPCS).
External Names
External C names are prefixed with an underscore. For example, the function main is _main if referenced in an assembly module. Names are significant to 32 characters. To make an assembly object global, use two colons after the name. For example,
_foo::.word 1.blkw 1
(In the C file)
extern int foo;
Arguments and Return Registers
C arguments are passed from left to right. ICCV8 for Cortex uses the AAPCS convention and pass the first 16 bytes of arguments in registers R0 to R3. The called function may use these registers for its purpose without saving or restoring them. They are known as volatile registers. Return value is in R0 if it is 4 bytes or less, or R0/R1 for double. Any arguments beyond the first 16 bytes are passed on the stack.
Structure is always passed on the stack. When the compiler generates code for a function returning a structure, the compiler creates temporary space on the calling function’s stack and passes the address to the function. The function then writes the return result to this temporary space. All these activities are transparent to the users.
Volatile Registers
In addition to R0 to R3, a function may use R12 without saving or restoring its value.
Preserved Registers
If a function uses registers R4 to R11, then it must save their values on function entry and restore them on function exit. They are known as preserved registers.
Register Usage Convention
R0 to R3 are used to pass function arguments, or for evaluating expressions. If the compiler needs to use more registers to evaluate the expressions in a function, it will start to use R4 and up. Any registers from R4 to R10 not used for expression
139

ICCV8 for Cortex – C Compiler for ARM Cortex-M
evaluation are assigned to local variables using an advanced register allocation algorithm. Multiple local variables may be allocated to the same registers if the compiler determines that their lifetimes do not overlap.
R11 is used as a frame pointer. Local variables not allocated to registers, arguments passed on stack, and other temporary stack spaces are referenced using the frame pointer.
R12 is a scratch register used for evaluation of certain complex expressions.
R13 is the stack pointer and should not be modified by the users directly.
R14 is the link register for function calling.
R15 is the PC.
Interrupt Handlers
With the Cortex-M profile, ARM architects an interrupt handling scheme such that any C function can be used as interrupt handlers without additional assembly “glue.” The only requirement is that function return must be done using a “pop to PC,” or “BX LR” and not the otherwise equivalent “mov PC, LR” as the hardware logic looks at the bits in LR in certain instructions only to perform interrupt handler return.
Structure
Passing by Value
If passed by value, a structure is always passed through the stack, and not in registers. Passing a structure by reference (i.e., passing the address of a structure) is the same as passing the address of any data item; that is, a pointer to the structure (which is 2 bytes) is passed.
Returning a Structure by Value
When a function returning a structure is called, the calling function allocates a temporary storage and passes a secret pointer to the called function. When such a function returns, it copies the return value to this temporary storage.
140
ICCV8 for Cortex – C Compiler for ARM Cortex-M
C Machine Routines
Most C operations are translated into direct ARM Cortex-M instructions. However, there are some operations that are translated into subroutine calls because they involve many machine instructions and would cause too much code bloat if the translations were done inline. These routines are written in assembly language and can be distinguished by the fact that the routine names do not start with an underscore or have a two-underscore prefix. These routines may or may not use the standard calling convention and you should not use them directly, as we may change their names or implementations depending on the compiler releases.
141

ICCV8 for Cortex – C Compiler for ARM Cortex-M
Memory Map
On a physical device, program memory is typically in the flash memory, although for development and debugging purpose, sometimes you may use SRAM to store program memory data.
ARM architects the Cortex-M to have code memory space from 0x0 up to 0x1FFF,FFFF (512 megabytes but most devices only have 128K to 512K of code memory). The system reset and interrupt vector table are allocated starting from location 0. The interrupt vectors may be “re-mapped” to a SRAM location so that the users may modify the table easily.
Cortex-M also architects the data memory space to be up to 512 megabytes from 0x2000,0000 up to 0x3FFF,FFFF.
Device flash memory may or may not start at address 0, depending on the silicon vendor. For example, a vendor may use a bootloader ROM starting at 0 and then map flash memory to location 0 (so the reset would jump to flash code immediately) if certain hardware pins are set up certain ways.
Some devices even have SRAM not in the data memory space. In particular, the NXP1768 and similar devices split the SRAM allocation into two regions and up to 32K are present from 0x1000,0000 to 0x1000,7FFF.
With our compiler, in most cases, you just select the device by name in the IDE, and the compiler and IDE will set up the addresses for you without you writing a complicated linker file.
SRAM
Global variables are allocated starting from the bottom (low address) of the SRAM. If you define any heap memory, it starts from the end of the global variables and continues to grow toward the high address.
The stack starts at the top of the SRAM and grows downward. The stack must be 4 byte aligned at all times. If the stack ever runs into the global variables or the heap, Bad Things Will Happen.
142

ICCV8 for Cortex – C Compiler for ARM Cortex-M
Program Areas
The compiler generates code and data into different “areas.” See Assembler Directives. The areas used by the compiler are:
Read-Only Memory
idata - the initial values for the global data and strings are stored in this area and copied to the data area at startup time.text - this area contains program code.
Data Memory
data - this is the data area containing initialized global and static variables, and strings. The initial values of the global variables and strings are stored in the idata area and copied to the data area at startup time.
bss - this is the data area containing C global variables without explicit initialization. Per ANSI C definition, these variables get initialized to zero at startup time.
noinit - you use #pragma data:noinit to put global variables for which you do not want any initialization. For example:
#pragma data:noinitint junk;#pragma data:data
The job of the linker is to collect areas of the same types from all the input object files and concatenate them together in the output file. See Linker Operations.
User-Defined Memory Regions
In most cases, you do not need to specify the exact location of a particular data item. For example, if you have a global variable, it will be allocated somewhere in the data area, and you do not need to specify its location.
However, there are occasions where you want to specify the exact location for a data item or a group of data:
battery-backed SRAM, dual-port SRAM, etc. - sometimes it is necessary to allocate some items in special RAM regions.
There are two ways to handle this.
1. relocatable area - in an assembly module, you can create a new program area and then you can specify its starting address under the “Other Options” edit box in
143

ICCV8 for Cortex – C Compiler for ARM Cortex-M
Build Options - Target. For example, in an assembly file:
.area battery_sram_var1:: .blkw 1 ; note _ in the front_var2:: .blkb 1 ; and two colons
In C, these variables can be declared as:
extern int var1;extern char var2;
Let’s say the battery-backed SRAM starts at 0x4000. In the Advanced->Other Options edit box, you write:
-bbattery_sram:0x4000
Please refer to the page Build Options - Target for full description of address specifier.
2. absolute area - you can also define program areas that have absolute starting addresses, eliminating the need to specify the address to the linker. For example, using the same example as before, you can write the following in an assembly file:
.area battery_sram(abs)
.org 0x4000_var1:: .blkw 1 ; note _ in the front_var2:: .blkb 1 ; and two colons
The (abs) attribute tells the assembler that the area does not need relocation and it is valid to use the .org directive in the area. In this example, we use .org to set the starting address. In C the declaration will be exactly the same as before.
If you have data that have initialized values, then you can also use the following pragma in C to define them (note: this only works with data that have initialized values):
#pragma abs_address:0x4000int var1 = 5;char var2 = 0;#pragma end_abs_address
144
ICCV8 for Cortex – C Compiler for ARM Cortex-M
Stack and Heap Functions
Besides static program areas, the C runtime environment contains two additional data regions: the stack area and the heap area. The stack is used for procedure calls, local and temporary variables, and parameter passing. The heap is used for dynamically allocated objects created by the standard C malloc(), calloc(), and realloc() calls. To use the heap functions, you must first initialize the heap region. See Standard Library And Memory Allocation Functions.
There is no provision for stack overflow checking, so you must be careful not to overrun your stack. For example, a series of recursive calls with a large amount of local variables would eat up the stack space quickly. When the stack runs into other valid data, or if it runs past valid addresses, then Bad Things Can Happen (tm). The stack grows downward toward the lower addresses. I
If you use #pragma text / data / lit / abs_address to assign your own memory areas, you must manually ensure that their addresses do not overlap the ones used by the linker. As an attempt to overlap allocation may or may not cause the linker to generate an error, you should always check the .mp map file. Use the IDE menu selection (View->Map File) for potential problems.
145

ICCV8 for Cortex – C Compiler for ARM Cortex-M
146

COMMAND-LINE COMPILER OVERVIEW
Compilation Process
[ Underneath the user-friendly IDE is a set of command-line compiler programs. While you do not need to understand this chapter to use the compiler, this chapter is good for those who want to find out “what's under the hood.” ]
Given a list of files in a project, the compiler's job is to translate the files into an executable file in some output format. Normally, the compilation process is hidden from you through the use of the IDE’s Project Manager. However, it can be important to have an understanding of what happens “under the hood”:
1. icppw.exe, the C preprocessor, processes the # directives in a C source file.
2. iccomcortex.exe, the compiler proper, translates the preprocessed source file to an assembly file.
3. iascortex.exe, the assembler, translates each assembly file (either from the compiler or assembly files that you have written) into a relocatable object file.
4. ilnkcortex.exe is the linker. After all the files have been translated into object files, the linker combines them together to form an executable file. In addition, a map file, a listing file, and debug information files are also output.
5. ilstcortex.exe, the listing file manager, generates the .lst intersperse C and asm listing file.
All these details are handled by the compiler driver. You give it a list of files and ask it to compile them into an executable file (default) or to some intermediate stage (for example, to the object files). The driver invokes the compiler, the assembler, and the linker as needed.
The previous versions of our IDE generate a makefile and invoke the make program to interpret the makefile, which causes the compiler driver to be invoked.
Version 8’s Code::Blocks IDE (C::B) does not use the make program and uses an internal build system that calls the compiler driver directly.
ICCV8 for Cortex – C Compiler for ARM Cortex-M
Driver
The compiler driver examines each input file and acts on the file based on the file's extension and the command-line arguments it has received. The .c files and .s files are C source files and assembly source files, respectively. The design philosophy for the IDE is to make it as easy to use as possible. The command-line compiler, though, is extremely flexible. You can control its behavior by passing command-line arguments to it. If you want to interface with the compiler with your own GUI (for example, the Codewright or Multiedit editor), here are some of the things you need to know.
Error messages referring to the source files begin with !E file(line):... Warning messages use the same format but use !W as the prefix instead of !E.
To bypass the command-line length limit on Windows 95/NT, you may put command-line arguments in a file and pass it to the compiler as @file or @-file. If you pass it as @-file, the compiler will delete file after it is run.
The next section, Compiler Arguments, elaborates further on the subject.
148
ICCV8 for Cortex – C Compiler for ARM Cortex-M
Compiler Arguments
The IDE controls the behaviors of the compiler by passing command-line arguments to the compiler driver. Normally you do not need to know what these command-line arguments do, but you can see them in the Status Window when you perform a build. This section is useful if you are using command line scripts to call the compiler directly.
The best method to find the correct compiler flags is to use the IDE and invoke ImageCraft->Create Makefile and then either use the generated makefile as is or extract the relevant compiler and linker flags within. Note that the CodeBlocks IDE does not use a makefile and uses an internal build system instead.
You call the compiler driver with different arguments and the driver in turn invokes different passes of the compiler tool chain with the appropriate arguments.
The general format of a command is as follows:
icccortex [ arguments ] <file1> <file2> ... [ <lib1> ... ]
where icccortex is the name of the compiler driver. As you can see, you can invoke the driver with multiple files and the driver will perform the operations on all of the files. By default, the driver then links all the object files together to create the output file.
The driver automatically adds -I<install root>\include to the C preprocessor argument and -L<install root>\lib to the linker argument.
For most of the common options, the driver knows which arguments are destined for which compiler passes. You can also specify which pass an argument applies to by using a -W<c> prefix. For example:
-Wp is the preprocessor. For example, -Wp-e
-Wf is the compiler proper. For example,-Wais the assembler.
-Wl (letter el) is the linker.
Driver Arguments
-c
Compile the file to the object file level only (does not invoke the linker).
-o <name>
Name the output file. By default, the output file name is the same as the input file name, or the same as the first input file if you supply a list of files.
149
ICCV8 for Cortex – C Compiler for ARM Cortex-M
-v
Verbose mode. Print out each compiler pass as it is being executed.
150
ICCV8 for Cortex – C Compiler for ARM Cortex-M
Preprocessor Arguments
-D<name>[=value]
Define a macro. See Build Options - Compiler. The driver and the IDE predefines certain macros. See Predefined Macros.
-e
Accept C++ comments.
-I<dir>
(Capital letter i) Specify the location(s) to look for header files. Multiple -I flags can be supplied. The directories are searched in order they are specified.
-U<name>
Undefine a macro. See Build Options - Compiler.
151

ICCV8 for Cortex – C Compiler for ARM Cortex-M
Compiler Arguments
-A -A
Turn on strict ANSI checking. Single -A turns on some ANSI checking.
-e
Accept extensions including 0b???? binary constants. See Pragmas.
-g
Generate debug information.
-MISRA_CHECK
Enable MISRA / Lint Code Checking. PRO edition only.
152

ICCV8 for Cortex – C Compiler for ARM Cortex-M
Assembler Arguments
-m
Enable case insensitivity with macro name. The default is that macro names are case sensitive.
153

ICCV8 for Cortex – C Compiler for ARM Cortex-M
Linker Arguments
Address ranges are in the form <start>.<end>[:<start>.<end>]*. For example:
0x0.0x10000 ; one range0x0.0x10000:0x11000.0x20000 ; two ranges
The compiler uses up to but not including the “end” address for memory allocation. Typically the address ranges are not checked for overlaps. It’s up to you to ensure that address ranges in the same memory space from within the same program area or from different areas do not overlap. This includes any absolute memory regions used by your programs using the .org assembly directive or one of the abs_address C #pragma.
Specifying Addresses
If you use #pragma text / data / lit / abs_address to assign your own memory areas, you must manually ensure that their addresses do not overlap the ones used by the linker. As an attempt to overlap allocation may or may not cause the linker to generate an error, you should always check the .mp map file (use the IDE menu selection View->Map File) for potential problems.
-b<area>:<address ranges>
Assign the address ranges for the area. You can use this to create your own areas with its own address. See Program Areas. For example:
-bmyarea:0x1000.0x2000:0x3000.0x4000
specifies that myarea goes from locations 0x1000 to 0x2000 and then from 0x3000 to 0x4000.
-bdata:<address ranges>
Assign the address ranges for the area named data, which is used by your program’s global variables.
-btext:<address ranges>
Assign the address ranges for the area named text. The format is <start address>[.<end address>], where addresses are byte addresses. text is the first area for the Cortex compiler and thus this effectively declares the entire usable space in the flash.
-bvectors:<address range>
Assign the address range for the interrupt vector area. The area vectors is defined in the file cortex_vectors.s. See Interrupt and Reset Handling.
154

ICCV8 for Cortex – C Compiler for ARM Cortex-M
Others
-cross_module_type_checking
Enable Cross Module Type Checking. Available in the PRO edition only.
-d<name>:<#>
Define a link time constant. <name> should be a symbol used in an assembly instruction and cannot be used in the assembly directive .if etc.
-dinit_sp:<address>
Define the initial stack pointer value. This is typically the address of the end of SRAM and must be 4 byte aligned.
-elim[:<area>]
Enable the Unused Code Elimination optimization. PRO versions only.
-F<pat>
Fill unused ROM locations with pat. Pattern must be an integer. Use 0x prefix for hexadecimal integer.
-fintelhex
Output format is Intel HEX.
-g
Generate debug information.
-L<dir>
Specify the library directory. Multiple directories may be specified and they are searched in the reverse order (i.e., last directory specified is searched first).
-l<libname>
Link in the specific library files in addition to the default libccortex.a. This can be used to change the behavior of a function in the default library libccortex.a, since the default library is always linked in last. The libname is the library file name without the lib prefix and without the .a suffix. For example:
-llpcortex “liblpcortex.a” using full printf-lfpcortex “libfpcortex.a” using floating-point printf
-m<device name>
Specify the device name. This is emitted to the top of the .mp map file.
155
ICCV8 for Cortex – C Compiler for ARM Cortex-M
-nb:<#>
Specify the Build number of the project. The linker emits the build number, the compiler version and other documentary information to the top of the .mp map file.
-R
Do not link in the startup file or the default library file. This is useful if you are writing an assembly-only application.
-O
Enable the Code Compression optimization. ADV or PRO versions only.
-u<crt>
Use <crt> as the startup file. If the file is just a name without path information, then it must be located in the library directory.
156
TOOL REFERENCES
MISRA / Lint Code Checking
MISRA C is a coding standard for the C programming language developed by MISRA (Motor Industry Software Reliability Association, http://www.misra.org.uk). Initially aimed to improve a program’s safety and portability in the automotive industry, with the ever-rising popularity of embedded devices, MISRA C guidelines are now being adopted by many organizations in the embedded space outside of the auto industry. (Think MISRA C as a superset of Lint, if you are familiar with that tool.)
We are currently only implementing a subset of the guidelines; more will be added in subsequent releases. More importantly, while a goal of MISRA C is to increase portability, we have identified a number of MISRA C guidelines that are never going to be an issue in any 2’s-complement machine, and rather than overloading the user with even more warning messages, some of those guidelines will not be implemented. This decision fits into our philosophy of increased usability while not being so pedantic that it goes against being pragmatic.
There are also checks that are difficult to implement from a technological standpoint; mainly ones that involve whole-program behavior checking or dynamic checks. We will consider those as resources permit.
It is typical to encounter hundreds and sometimes even thousands of MISRA C warnings when you first run your project through it. However, sometimes the pain of sloughing through the messages is worthwhile, as one of our users writes:
"Thanks to these MISRA warnings, I found a bug that has been going through unnoticed for a few years”
MISRA checking is available in the PRO edition of our tools, although there are a few warnings that possibly reflect errors so they are enabled all the time. Under the Code::Blocks IDE, invoke Project->Build Options->Compiler->Enable MISRA Checks to enable this option. This corresponds to the -MISRA_CHECK compiler flag.
MISRA Usage Recommendation
We recommend that you enable the MISRA checks occasionally to weed out any obvious errors in your code. There are some MISRA rules that may or may not make sense for you or your organization; for example, use of break and continue statements are discouraged. If you need to, you can disable individual MISRA check warning by putting the warning numbers in the file c:\iccv8avr\misra.nowarns.txt. The warning numbers can be separated by spaces, tabs, commas or newlines. Any characters after a semicolon will be ignored until the next line.
ICCV8 for Cortex – C Compiler for ARM Cortex-M
Some MISRA Explanations
Most MISRA messages should be self-explanatory. Here are explanations for some common and uncommon warnings and the suggested remedies.
!W (14):[warning] [MISRA 1521]suspicious loop: `i' modifies in both the condition and increment clauses
A loop counter is a variable that is modified in the condition or the increment clause of a for loop. If a variable is modified in both the condition and increment clauses of the same for loop then it's still a loop counter, but then it is a suspicious loop and the warning is generated, e.g.:
for(i = 0; i++ < 10; i++) ... // WARNING: "i" is modified in both clauses
However, a loop that has no loop counter that is modified in both the clauses is not considered suspicious, e.g.:
for(j = 0; i < 10 && j++ < 10; i++) ... // OK: "i" and "j" are different loop counters
!W (11):[warning] [MISRA 1502]relational expression with a boolean operand
A relational expression an operand of which is another logical expression is considered suspicious, e.g.:
int g(int a, int b, int c){return a < b < c; // WARNING}
The parentheses can be used to let the compiler know that a comparison of such a kind is intended:
int f(int, int, int); int f(int a, int b, int c)
{return (a < b) < c; // OK}
158
ICCV8 for Cortex – C Compiler for ARM Cortex-M
!W (4):[warning] [MISRA 1520]loss of sign in conversion from `int' to `unsigned int'
!W (8):[warning] [MISRA 1506]potential loss of sign in conversion from `int' to `unsigned int'
One of these warnings is generated whenever a negative or potentially negative value is implicitly converted to an unsigned type and thus loses its sign, e.g.:
unsigned g = -1; // WARNING: loss of sign
unsigned f(int i){unsigned u = i; // WARNING: potential loss of signreturn u;}
Explicit cast can be used to suppress this kind of warnings:
unsigned g = (unsigned) -1; // OK
unsigned f(int i){unsigned u = (unsigned) i; // OKreturn u;}
!W (4):[warning] [MISRA 1500]empty character constant
Empty character constants are not allowed by the ISO/ANSI standards and thus are an extension of this specific compiler. For example, both the initializers are empty character constants:
int c = ''; // WARNINGint d = L''; // WARNING
Note that null characters can be specified with the null escape sequence \0 or just as the zero integer constant:
int c = 0; // OKint d = L'\0'; // OK
159

ICCV8 for Cortex – C Compiler for ARM Cortex-M
!W (10):[warning] [MISRA 1512]suspicious array-to-pointer decay in the left operand of `->'
An implicit array-to-pointer decay in the left operand of the -> member access operator is considered suspicious. For example:
struct S {int i;} a[5];
int f(void){return a -> i; // WARNING: the index is not specified}
The warning can be suppressed by specifying the index of the dereferencing array element explicitly:
int f(void){return a[0].i; // OK}
!W (8):[warning] [MISRA 1515]assignment used as conditional expression
!W (11):[warning] [MISRA 2350]assignment in conditional expression
Assignment operators used within control expressions of the conditional and loop operators are considiered suspicuous, e.g.:
if(i = j) ... // WARNING
Note that the use of compound assignments in these contexts results in the same:
if(i += j) ... // WARNING
Also, note that the increment and decrement operators are not considered to be assignments in these contexts:
if(i++) ... // OK: not an assignment
The warning can be suppressed by surrounding the assignment expression with the parentheses:
if((i = j)) ... // OK: surrounded by parentheses
160

ICCV8 for Cortex – C Compiler for ARM Cortex-M
!W (10):[warning] [MISRA 3010]pointer arithmetic used
MISRA prohibits any kind of pointer arithmetic. This includes adding an integer to a pointer and subtraction of an integer or pointer from another pointer, e.g.:
int i;int *bar(unsigned);
int *f(int *p, int *q); int *f(int *p, int *q){if(i < 33) {
return 1 + p; // WARNING: pointer + integer
} else {if(i < 55) {
return p - 1; // WARNING: pointer - integer
} else {if(i < 77) {
return bar(p - q); // WARNING: pointer - pointer
} else {/* do nothing */
}}
}return &p[2]; // OK
}
Note that array subscription ([]) and dereferencing (*, . and ->) operators are allowed, so it is usually possible to rewrite the code that uses pointer arithmetic so that it modifies integer indices instead of changing the pointers themselves. For example, the following function
int strlen(const char *s){int n = 0;while(*s != '\0') {
s++; // WARNING}return n;
}
161

ICCV8 for Cortex – C Compiler for ARM Cortex-M
can be rewritten as
int strlen(const char *s){for(i = 0; s[i] != '\0'; i++) {
/* do nothing */}return i;
}
!W (15):[warning] [MISRA 2140]expression of plain `char' type is suspicious in this context
The plain char type is the char type specified without the one of the explicit "signed" or "unsigned" type specifiers, like this:
char c;
MISRA prohibit the use of values of the plain char type, as the signedness of these values depends on the specific compiler used as well as its options as long as they may control the signedness of that type.
Note that declarations that use plain char type are still allowed. For example:
signed char s; // OK: not a plain "char"unsigned char u; // OK: not a plain "char"
char c; // OK: it's just a declarationchar *str = "Hello"; // OK: another declaration that use plain "char"void f(void)
{if(str[5] == 0xf5) { // WARNING: "s[5]" is of type plain
"char"return;
}
if((unsigned char) str[5] == 0xf5) { // OKreturn;
}}
162

ICCV8 for Cortex – C Compiler for ARM Cortex-M
!W (6):[warning] [MISRA 2180]numeric constant of type `int' encountered where constant of type `unsigned int' expected
MISRA requires numeric constants to have proper types. That means then no numeric constant shall be a subject to a conversion that changes it type; instead, where possible, the numeric constant shall be suffixed so it has the suitable type. For example:
unsigned f(unsigned i){return i + 1; // WARNING: the literal "1" has type "int"
whereas// an integer of type "unsigned int" is expected
}
double g(void){return 1.f; // WARNING: the literal "1.f" has type
"float", // but a value of type "double" is expected
}
unsigned char h(void){return 1; // OK: the literal has type "int" which
differs// from the expected type "unsigned char", but// there is no suffix for this type, so the// compiler keeps silence
}
The following functions are examples of the proper use of the numeric suffixes:
unsigned f(unsigned i){return i + 1u; // OK}
double g(void){return 1.; // OK}
163

ICCV8 for Cortex – C Compiler for ARM Cortex-M
!W (13):[warning] [MISRA 2460]expression modifies `i' more than once without an intervening sequence point
If an expression modifies a variable more than once and there is no sequence point between these two modifications, then the result of evaluation of the expression is unexpected by the definition of the C Standard and the very expression is prohibited by MISRA.
A sequence point is a point in the execution sequence of a program for which the C Standard requires that all current changes (including modifications of variables) made during previous evaluations are complete.
The following list enumerates locations of the sequence points:
The call to a function, after the arguments have been evaluated.
The end of the first operand of the following operators: logical AND &&, logical OR ||, conditional operator ? and comma operator.
The end of a full declarator;
The end of a full expression: an initializer, the expression in an expressifon statement, the controlling expression of a selection statement (if or switch), the controlling expression of a while or do statement, each of the expressions of a for statement, the expression in a return statement;
Immediately before a library function returns;
After the actions associated with each formatted input/output function conversion specifier.
Immediately before and immediately after each call to a comparison function, and also between any call to a comparison function and any movement of the objects passed as arguments to that call.
The following function mentions some expressions that violate this MISRA rule as well as some common expressions that do not. Please see the comments for explanations.
int (*fp)(int, int), (*fp2)(int, int), (*fp3)(int, int), a, b, c;
void f(int i, int j, int *p){int k;
i = i; // OK: there is no modification in the right operand
164

ICCV8 for Cortex – C Compiler for ARM Cortex-M
i = i++; // WARNING: the right operand modifies variable used in the operand
i += i; // OK: no modification in the right operand
i <<= i++; // WARNING: the writings to "i" interfere
i = j++; // OK: different variables accessed
i = (i = i); // WARNING: these two assignments modify the same variable; // note that by the Standard it doesn't matter whether the // same value is assigned or not
j = i++ + i++; // WARNING: two modifications of "i" that are not delimited // by a sequence point
j = p++[ *p++ ]; // WARNING: modifications of "p" interfere
fp(i++, j++); // OK: the arguments modify different variables
fp(j++, j++); // WARNING: modifications of "j" interfere
(fp = fp2)((fp = fp3, fp2 = fp)(0, 0), 0); // WARNING: the modification in the function designator // interfere with the use of "fp" in the function call // argument
i = (int) sizeof(j++ * j++); // OK: the operand of "sizeof" is never evaluated
i = (int) sizeof(j++) * (int) sizeof(j++); // OK: ditto
165

ICCV8 for Cortex – C Compiler for ARM Cortex-M
k = (j++, i++) + (i++, j++); // WARNING: the comma operators do not delimit the // modifications of "i" as well as they do not delimit the // modifications of "j"
k = (i++ && j++) + (j++ && i++); // WARNING: ditto
k = i++ && i++; // OK: there is a sequence point between the modifications of // "i"
k = (k == 0) ? i++ : j++; // OK: this expression modifies different variables
k = (k == 0) ? i++ : i++; // OK: only one of the "i"s is to be evaluated
k = (i++ == 0) ? i++ : j++; // OK: the modification in the condition does not interfer // with the modification in the left branch as there is a // sequence point after the first operand of the conditional // operator
k = (i++ + j++ == 0) ? i++ : j++; // OK: ditto
i = a + b++ + b++; // WARNING: the modifications of "b" interfere
i = a + b++ + c + b++; // WARNING: ditto}
166

ICCV8 for Cortex – C Compiler for ARM Cortex-M
!W (8):[warning] [MISRA 2570]`continue' statement used
!W (16):[warning] [MISRA 2580]`break' statement used with a loop
MISRA prohibits the continue and break statements within loops. Note that MISRA also prohibits the goto statement, so one way to work this around without violating the MISRA rules is to segregate such a loop to a separate function and use the return statement within that function to terminate the loop. Another possible solution is to rewrite the condition and body of the loop so that the continue and/or break statements can be eliminated.
!W (10):[warning] [MISRA 2680]local function declaration
Local function declarations are prohibited by MISRA, as they describe a global entity (namely, a function) with a symbol a scope of which is limited by the block of the declaration. This means there may be a function that has several different (probably incompatible) local declarations visible in separate portions of the code, so that the compiler doesn't check all these declarations for compatibility and probably even generates the wrong code for the calls of the function.
The following example explains which declarations are local function declarations and which are not.
int f(void); // OK: a file-scope declaration
void g(void){typedef int T(void); // OK: not a function declaration
int p(void); // WARNING: local function declaration
T q; // WARNING: ditto}
167
ICCV8 for Cortex – C Compiler for ARM Cortex-M
Code Compressor (tm)
The Code Compressor (tm) optimizer is a state-of-the-art optimization that reduces your final program size from 5-18%. It is available on the PRO edition of our compilers for select targets. It works on your entire program, searching across all files for opportunities to reduce program size. We are providing this innovative technology for commercial embedded compilers before anyone else.
A new feature in the PRO edition is the Unused Code Elimination optimization optionally performed by the Code Compressor.
Advantages
Code Compressor decreases your program size transparently. It does not interfere with traditional optimizations and can decrease code size even when aggressive traditional optimizations are done.
Code Compressor does not affect source-level debugging.
Disadvantage
There is a slight increase in execution time due to function call overhead.
Theory of Operation
The Code Compressor replaces duplicate code blocks with a call to a single instance of the code. It also optimizes long calls or jumps to relative offset calls or jumps if the target device supports such instructions. Code compression occurs (if enabled) after linking the entire code image. The Code Compressor uses the binary image of the program as its input for finding duplicate code blocks. Therefore, it works regardless whether the source code is written in C or assembly.
The Code Compressor is part of the linker, and thus it has the full debug and map file information, plus other linker internal data. These are important as the Code Compressor must only compress code and not literal data, and must adjust program counter references (e.g., branch offset, etc.).
Debugger data is also adjusted so there is no loss of debugging capabilities when the Code Compressor is used.
168

ICCV8 for Cortex – C Compiler for ARM Cortex-M
Compatibility Requirements
To make your code fully compatible with the Code Compressor, note that indirect function references must be done through a function label entry in the func_lit output area. See . This is done automatically if you are using C.
To simplify its operations, the Code Compressor only compresses code in the text area. Since the Code Compressor operates post-linking, the text area then must be the last (e.g., highest memory addresses) relocatable code area. Otherwise, the text area may be shrunk, but then there would be a hole between the end of the text area and the next code region.
If you are using C and the default areas, then this should not cause any issues. However, if you create your own areas, then you must ensure that either it is located before the text area or that it is located in an absolute location (e.g., a bootloader).
The above diagram shows a scenario that is problematic. Code areas created with the AREA directive, using a name other than text, are not compressed or fixed up following compression. If Function Y calls Function B, there is the potential that the location of Function B will be changed by the Code Compressor. The call or jump generated in the code for Function Y will go to the wrong location.
It is allowable for Function A to call a function in a non_text Area. The location for Function B can change because it is in the text Area. Calls and jumps are fixed up in the text area only. Following code compression, the call location to Function B from Function X in the non-text Area will not be compressed.
All normal user code that is to be compressed must be in the default text Area. If you create code in other area (for example, in a bootloader), then it must not call any functions in the text Area. However, it is acceptable for a function in the text Area to call functions in other areas.
"text"Area
"non_text"Area
Function A
Function B Function YCalls
Not AllowedFunction X
Allowed
169

ICCV8 for Cortex – C Compiler for ARM Cortex-M
If you reference any text area function by address, then it must be done indirectly. Its address must be put in a word in the area func_lit. At runtime, you must de-reference the content of this word to get the correct address of the function. Note that if you are using C to call a function indirectly, the compiler will take care of all these details for you. The information is useful if you are writing assembly code.
Temporarily Deactivating the Code Compressor
Sometimes you may wish to disable the code compressor temporarily. For example, perhaps the code is extremely timing-sensitive and it cannot afford to lose cycles by going through the extra function call and return overhead. You can do this by bracketing code fragments with an instruction pair:
asm(“.nocc_start”);...asm(“.nocc_end”);
The code compressor ignores the instructions between these assembler directives in the fragment.
The compiler provides the following macros in the system include file:
COMPRESS_DISABLE; // disable Code CompressorCOMPRESS_REENABLE; // enable Code Compressor again
for use in C programs.
170
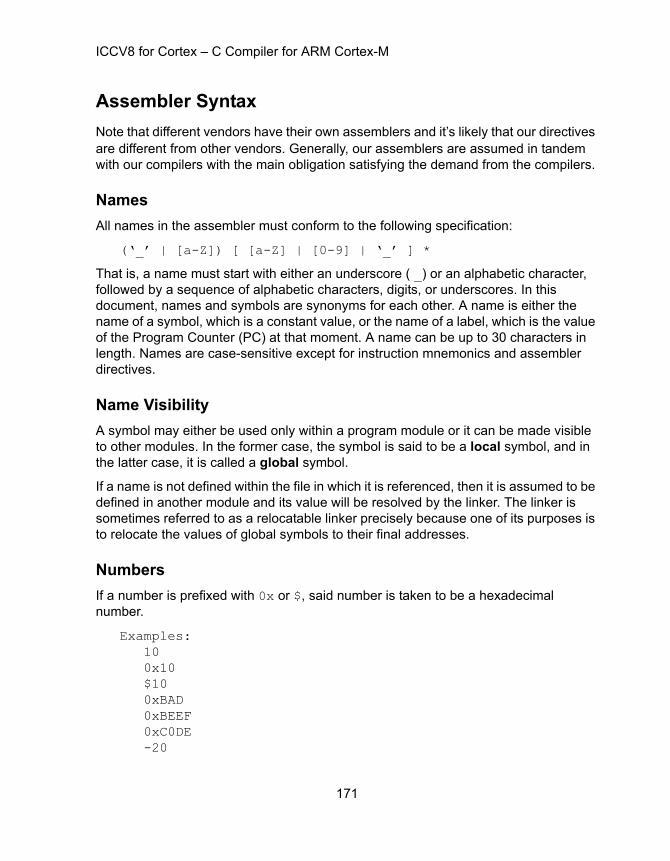
ICCV8 for Cortex – C Compiler for ARM Cortex-M
Assembler Syntax
Note that different vendors have their own assemblers and it’s likely that our directives are different from other vendors. Generally, our assemblers are assumed in tandem with our compilers with the main obligation satisfying the demand from the compilers.
Names
All names in the assembler must conform to the following specification:
(‘_’ | [a-Z]) [ [a-Z] | [0-9] | ‘_’ ] *
That is, a name must start with either an underscore ( _) or an alphabetic character, followed by a sequence of alphabetic characters, digits, or underscores. In this document, names and symbols are synonyms for each other. A name is either the name of a symbol, which is a constant value, or the name of a label, which is the value of the Program Counter (PC) at that moment. A name can be up to 30 characters in length. Names are case-sensitive except for instruction mnemonics and assembler directives.
Name Visibility
A symbol may either be used only within a program module or it can be made visible to other modules. In the former case, the symbol is said to be a local symbol, and in the latter case, it is called a global symbol.
If a name is not defined within the file in which it is referenced, then it is assumed to be defined in another module and its value will be resolved by the linker. The linker is sometimes referred to as a relocatable linker precisely because one of its purposes is to relocate the values of global symbols to their final addresses.
Numbers
If a number is prefixed with 0x or $, said number is taken to be a hexadecimal number.
Examples:100x10$100xBAD0xBEEF0xC0DE-20
171

ICCV8 for Cortex – C Compiler for ARM Cortex-M
Input File Format
Input to the assembler must be an ASCII file that conforms to certain conventions. Each line must be of the form:
[label: [:]] [command] [operands] [;comments][] – optional field// comments
Each field must be separated from another field by a sequence of one or more “space characters,” which are either spaces or tabs. All text up to the newline after the comment specifier (a semicolon, ;, or double slashes, //) are ignored. The input format is freeform. For example, you do not need to start the label at column 1 of the line.
Labels
A name followed by one or two colons denotes a label. The value of the label is the value of the Program Counter (PC) at that point of the program. A label with two colons is a global symbol; that is, it is visible to other modules.
Commands
A command can be an Cortex instruction, an assembler directive or a macro invocation. The operands field denotes the operands needed for the command. This page does not describe the Cortex instructions per se, since the assembler uses the standard vendor-defined names; consult the vendor’s documentation for instruction descriptions.
Expressions
An instruction operand may involve an expression. For example, the direct addressing mode is simply an expression:
lds R10,asymbol
The expression asymbol is an example of the simplest expression, which is just a symbol or label name. In general, an expression is described by:
expr: term | ( expr ) | unop expr | expr binop expr
term: . | name | #name
172

ICCV8 for Cortex – C Compiler for ARM Cortex-M
The dot (.) is the current program counter. Parentheses () provide grouping. Operator precedence is given below. Expressions cannot be arbitrarily complex, due to the limitations of relocation information communicated to the linker. The basic rule is that for an expression, there can only be only one relocatable symbol. For example,
lds R10,foo+bar
is invalid if both foo and bar are external symbols.
Operators
The following is the list of the operators and their precedence. Operators with higher precedence are applied first. Only the addition operator may apply to a relocatable symbol (such as an external symbol). All other operators must be applied to constants or symbols resolvable by the assembler (such as a symbol defined in the file).
Note that to get the high and low byte of an expression, you use the > and < operators, and not the high() and low() operators in the Atmel assembler.
Operator Function Type Precedence
* multiply binary 10
/ divide binary 10
% modulo binary 10
<< left shift binary 5
>> right shift binary 5
^ bitwise exclusive OR binary 4
& bitwise exclusive AND binary 4
| bitwise OR binary 4
- negate unary 11
~ one’s complement unary 11
< low byte unary 11
> high byte unary 11
173

ICCV8 for Cortex – C Compiler for ARM Cortex-M
“Dot” or Program Counter
If a dot (.) appears in an expression, the current value of the Program Counter (PC) is used in place of the dot.
174
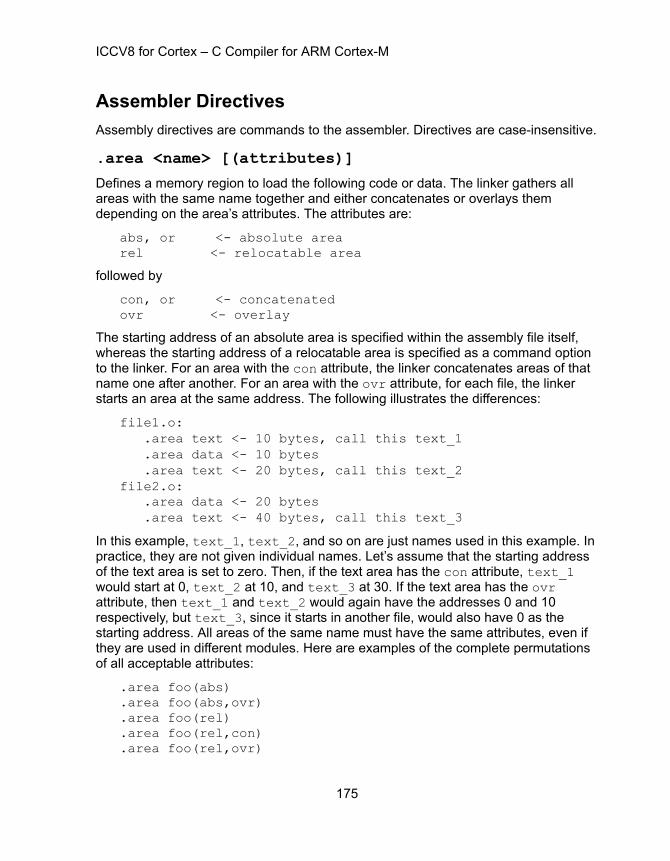
ICCV8 for Cortex – C Compiler for ARM Cortex-M
Assembler Directives
Assembly directives are commands to the assembler. Directives are case-insensitive.
.area <name> [(attributes)]
Defines a memory region to load the following code or data. The linker gathers all areas with the same name together and either concatenates or overlays them depending on the area’s attributes. The attributes are:
abs, or <- absolute arearel <- relocatable area
followed by
con, or <- concatenatedovr <- overlay
The starting address of an absolute area is specified within the assembly file itself, whereas the starting address of a relocatable area is specified as a command option to the linker. For an area with the con attribute, the linker concatenates areas of that name one after another. For an area with the ovr attribute, for each file, the linker starts an area at the same address. The following illustrates the differences:
file1.o:.area text <- 10 bytes, call this text_1.area data <- 10 bytes.area text <- 20 bytes, call this text_2
file2.o:.area data <- 20 bytes.area text <- 40 bytes, call this text_3
In this example, text_1, text_2, and so on are just names used in this example. In practice, they are not given individual names. Let’s assume that the starting address of the text area is set to zero. Then, if the text area has the con attribute, text_1 would start at 0, text_2 at 10, and text_3 at 30. If the text area has the ovr attribute, then text_1 and text_2 would again have the addresses 0 and 10 respectively, but text_3, since it starts in another file, would also have 0 as the starting address. All areas of the same name must have the same attributes, even if they are used in different modules. Here are examples of the complete permutations of all acceptable attributes:
.area foo(abs)
.area foo(abs,ovr)
.area foo(rel)
.area foo(rel,con)
.area foo(rel,ovr)
175

ICCV8 for Cortex – C Compiler for ARM Cortex-M
.ascii “strings”
.asciz “strings”
These directives are used to define strings, which must be enclosed in a delimiter pair. The delimiter can be any character as long as the beginning delimiter matches the closing delimiter. Within the delimiters, any printable ASCII characters are valid, plus the following C-style escape characters, all of which start with a backslash (\):
\e escape\b backspace\f form feed\n line feed\r carriage return\t tab\<up to 3 octal digits> character with value equal to the octal digits
.asciz adds a NUL character (\0) at the end. It is acceptable to embed \0 within the string.
Examples: .asciz “Hello World\n” .asciz “123\0456”
.byte <expr> [,<expr>]*
.word <expr> [,<expr>]*
.long <expr> [,<expr>]*
These directives define constants. The three directives denote byte constant, word constant (2 bytes), and long word constant (4 bytes), respectively. Word and long word constants are output in little endian format, the format used by the AVR microcontrollers. Note that .long can only have constant values as operands. The other two may contain relocatable expressions.
Example: .byte 1, 2, 3 .word label,foo
.blkb <value>
.blkw <value>
.blkl <value>
These directives reserve space without giving them values. The number of items reserved is given by the operand.
176

ICCV8 for Cortex – C Compiler for ARM Cortex-M
.define <symbol> <value>
Defines a textual substitution of a register name. Whenever symbol is used inside an expression when a register name is expected, it is replaced with value. For example:
.define quot R15mov quot,R16
.else
Forms a conditional clause together with a preceding .if and following .endif. If the if clause conditional is true, then all the assembly statements from the .else to the ending .endif (the else clause) are ignored. Otherwise, if the if clause conditional is false, then the if clause is ignored and the else clause is processed by the assembler. See .if.
.endif
Ends a conditional statement. See .if and .else.
.endmacro
Ends a macro statement. See .macro.
.eaddr
Use only for the M256x and the ‘ (back quote) operator. Generates the 3-byte code address of the symbol. For example:
.eaddr ‘function_name
<symbol> = <value>
Defines a numeric constant value for a symbol.
Example: foo = 5
.if <symbol name>
If the symbol name has a non-zero value, then the following code, up to either the .else statement or the .endif statement (whichever occurs first), is assembled. Conditionals can be nested up to 10 levels. For example:
.if condlds R10,a
177

ICCV8 for Cortex – C Compiler for ARM Cortex-M
.elselds R10,b.endif
would load a into R10 if the symbol cond is non-zero and load b into R10 if cond is zero.
.include “<filename>”
Processes the contents in the file specified by filename. If the file does not exist, then the assembler will try to open the filename created by concatenating the path specified via the –I command-line switch with the specified filename.
Example: .include “registers.h”
.macro <macroname>
Defines a macro. The body of the macro consists of all the statements up to the .endmacro statement. Any assembly statement is allowed in a macro body except for another macro statement. Within a macro body, the expression @digit, where digit is between 0 and 9, is replaced by the corresponding macro argument when the macro is invoked. You cannot define a macro name that conflicts with an instruction mnemonic or an assembly directive. See .endmacro and Macro Invocation. For example, the following defines a macro named foo:
.macro foolds @0,amov @1,@0.endmacro
Invoking foo with two arguments:
foo R10,R11
is equivalent to writing:
lds R10,amov R11,R10
.org <value>
Sets the Program Counter (PC) to value. This directive is only valid for areas with the abs attribute. Note that value is a byte address.
Example: .area interrupt_vectors(abs) .org 0xFFD0
178

ICCV8 for Cortex – C Compiler for ARM Cortex-M
.dc.w reset
.globl <symbol> [, <symbol>]*
Makes the symbols defined in the current module visible to other modules. This is the same as having a label name followed by two periods (.). Otherwise, symbols are local to the current module.
<macro> [<arg0> [,<args>]*]
Invokes a macro by writing the macro name as an assembly command followed by a number of arguments. The assembler replaces the statement with the body of the macro, expanding expressions of the form @digit with the corresponding macro argument. You may specify more arguments than are needed by the macro body, but it is an error if you specify fewer arguments than needed.
Example: foo bar,x
Invokes the macro named foo with two arguments, bar and x.
.paddr <function name>
Defines a function address. To be compatible with the Cortex-M hardware requirements, all Thumb-2 function addresses have the low bit set (even though the actual addresses are 4 bytes aligned).
179

ICCV8 for Cortex – C Compiler for ARM Cortex-M
Linker Operations
The main purpose of the linker is to combine multiple object files into an output file suitable to be loaded by a device programmer or target simulator. The linker can also take input from a “library,” which is basically a file containing multiple object files.In producing the output file, the linker resolves any references between the input files. In some detail, the linking steps involve:
1. Making the startup file be the first file to be linked. The startup file initializes the execution environment for the C program to run.
2. Appending any libraries that you explicitly requested (or in most cases, as were requested by the IDE) to the list of files to be linked. Library modules that are directly or indirectly referenced will be linked in. All the user-specified object files (for example, your program files) are linked.
3. Appending the standard C library libccortex.a to the end of the file list.
4. Scanning the object files to find unresolved references. The linker marks the object file (possibly in the library) that satisfies the references and adds to its list of unresolved references. It repeats the process until there are no outstanding unresolved references.
5. Combining “areas” in all marked object files into an output file and generating map and listing files as needed.
Lastly, if this is the PRO edition and if the Code Compressor (tm) optimization option is on, then the Code Compressor is called.
Memory Allocation
As the linker combines areas from the input object files, it assigns memory addresses to them based on the address ranges passed in from the command line (see Linker Arguments). These arguments in turn are normally passed down from the IDE based on the specified device. That is, in the normal case, you do not need to do anything and the IDE/compiler will do the correct memory allocation for you.
If you use #pragma text / data / lit / abs_address to assign your own memory areas, you must manually ensure that their addresses do not overlap the ones used by the linker. As an attempt to overlap allocation may or may not cause the linker to generate an error, you should always check the .mp map file (use the IDE menu selection View->Map File) for potential problems.
180

ICCV8 for Cortex – C Compiler for ARM Cortex-M
ImageCraft Debug Format
The ImageCraft debug file (.dbg extension) is a proprietary ASCII format that describes the debug information. The linker generates target “standard” debug format directly in addition to this file. For example, the AVR compiler generates a COFF format file that is compatible with AVR Studio, the HC12 compiler generates a P&E format map file, and the ARM compiler generates ELF/DWARF file.
By documenting the ASCII debug interface, we hope that third-party debuggers may choose to use this format. This document describes version 1.5 of the debug format.
Basic File Structure
The debug file is in ASCII; each line is a separate command. The debug information mirrors the structure of a mixed C and assembler project -- a debug file consists of multiple sections, and each section contains the debug information of a source file:
<file 1><function 1><block><symbols><line numbers><function 2>...<file symbols>
<file 2>...
Scope Rules
There are 3 scopes where items can be declared: FILE scope, FUNCTION scope, and BLOCK scope. They correspond to the lexical scoping in C.
Convention
<addr> is an address and is always in hexadecimal. This can be either a code or data address, depending on the context.
<line no> is a line number and is always in decimal.
<name> is a valid C or assembly name, or a file or directory name.
<type> is a data type specifier. See Type Specifier below.
<#> is a decimal number.
181

ICCV8 for Cortex – C Compiler for ARM Cortex-M
Function Prologue and Epilogue
For each function, the compiler generates a prologue and an epilogue. The prologue code includes the frame pointer setup, arguments and registers saving and local stack allocation. The code starting at the FUNC address (see below) and the first BLOCK address (non-inclusive) contains the prologue code.
FUNC address <= function prologue < BLOCK address
The epilogue code includes registers restore, stack deallocation and the return instruction. The code starting at the last BLOCKEND address and the FUNCEND address (non-inclusive) contains the epilogue code.
(last) BLOCKEND address <= epilogue < FUNCEND address
Top-Level Commands
IMAGECRAFT DEBUG FORMAT
Starting at V1.1, this is the first line of the debug file.
VERSION <#.#>
Specifies the version number of the debug format. The current version is 1.4.
CPU <name>
Specifies the target CPU. Valid choices are Cortex, HC11, HC12, HC16, AVR, M8C, HC08, MSP430, or ARM.
DIR <name>
Specifies the directory path of all subsequent FILE commands. An ending slash ‘\’ is always present.
FILE <name>
Starts a file section. All the following debug commands apply to this file until the end of file is reached or until the next FILE command is encountered. The full path name is a concatenation of the last DIR command and the current FILE command.
FUNC <name> <addr> <type>
Starts a C function section. All the following debug commands apply to this function until the FUNCEND command is encountered. For assembler modules, no FUNC command is needed. The <addr> is the starting address of the first instruction of the function.
FUNCEND <addr>
182

ICCV8 for Cortex – C Compiler for ARM Cortex-M
Ends a function section. The <addr> is the address beyond the last instruction of the function. To access the function return sequence, see BLOCKEND below.
DEFGLOBAL <name> <addr> <type>
Defines a file-scoped global symbol.
DEFSTATIC <name> <addr> <type>
Defines a file-scoped global symbol.
START <addr>
Specifies the address of the __start symbol, which is usually the starting address of an ImageCraft generated program.
Function-Level Commands
BLOCK <line no> <addr>
Starts a block in which symbols may be defined. All DEFLOCAL and DEFREG commands must come after a BLOCK command. In the current version, there is only one group of BLOCK/BLOCKEND command per function and all local variables are declared in this block, even if they are declared in an inner block in the source code. (This will be remedied in a future version of the compiler and debug format. See “Future Enhancements” below.)
The <line no> and <addr> are exactly the same as the ones specified in the LINE command that follows it.
BLOCKEND <line no> <addr>
Ends a symbol-scoped block. The <line no> and <addr> are exactly the same as the ones specified in the LINE command that follows it.
A special case is when <line no> is 0 (and this would be the last BLOCKEND in the function). In this case, the function return sequence starts at this <addr> - note that ImageCraft compiler generates only one return sequence per function.
LINE <line no> <addr>
Defines a line number and its code address.
DEFLOCAL <name> <offset> <type>
Defines a function-scoped symbol. <offset> is a decimal offset, usually from the frame pointer.
DEFREG <name> <reg> <type>
183
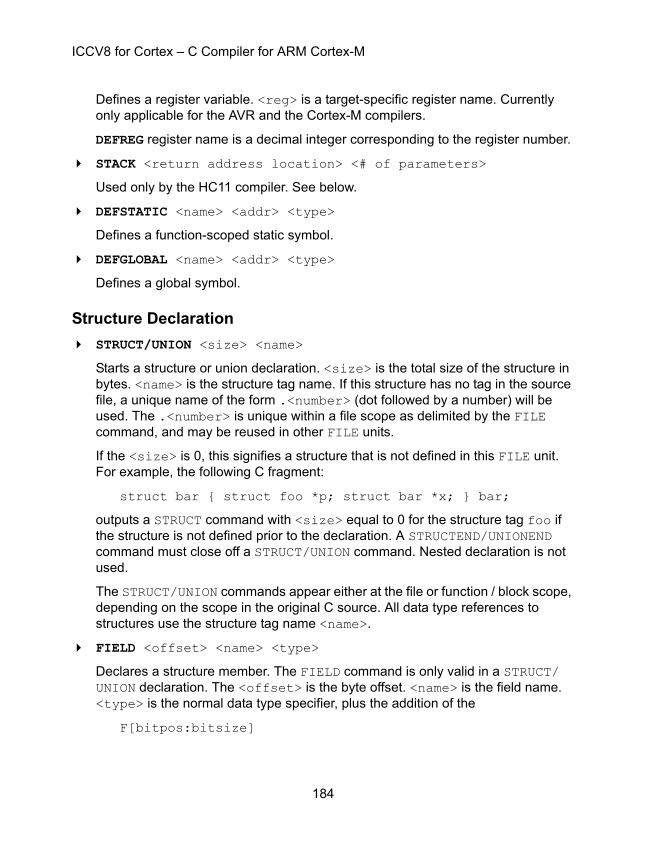
ICCV8 for Cortex – C Compiler for ARM Cortex-M
Defines a register variable. <reg> is a target-specific register name. Currently only applicable for the AVR and the Cortex-M compilers.
DEFREG register name is a decimal integer corresponding to the register number.
STACK <return address location> <# of parameters>
Used only by the HC11 compiler. See below.
DEFSTATIC <name> <addr> <type>
Defines a function-scoped static symbol.
DEFGLOBAL <name> <addr> <type>
Defines a global symbol.
Structure Declaration
STRUCT/UNION <size> <name>
Starts a structure or union declaration. <size> is the total size of the structure in bytes. <name> is the structure tag name. If this structure has no tag in the source file, a unique name of the form .<number> (dot followed by a number) will be used. The .<number> is unique within a file scope as delimited by the FILE command, and may be reused in other FILE units.
If the <size> is 0, this signifies a structure that is not defined in this FILE unit. For example, the following C fragment:
struct bar { struct foo *p; struct bar *x; } bar;
outputs a STRUCT command with <size> equal to 0 for the structure tag foo if the structure is not defined prior to the declaration. A STRUCTEND/UNIONEND command must close off a STRUCT/UNION command. Nested declaration is not used.
The STRUCT/UNION commands appear either at the file or function / block scope, depending on the scope in the original C source. All data type references to structures use the structure tag name <name>.
FIELD <offset> <name> <type>
Declares a structure member. The FIELD command is only valid in a STRUCT/UNION declaration. The <offset> is the byte offset. <name> is the field name. <type> is the normal data type specifier, plus the addition of the
F[bitpos:bitsize]
184

ICCV8 for Cortex – C Compiler for ARM Cortex-M
which signifies a bitfield. <bitpos> matches the endianess of the CPU: on a little endian machine such as the AVR, MSP430, and ARM, it’s right to left, but on a big endian machine such as the Freescale CPU, it’s left to right.
STRUCTEND/UNIONEND
Ends a structure or union declaration. Only the FIELD command may exist between a STRUCT and STRUCTEND command pair. Within a scope, the STRUCT command appears at most once for a unique tag name.
Type Specifier
Base Type
Type specifier is read from left to right, and must end with one of the following base types:
Table 1: Base Type
Base Type C Data TypeSize in Bytes
C signed char 1
S short 2
I (letter i) int 2 or 4a
L long 4
X long long 8
D float / double b 4
Y double c 8
c unsigned char 1
s unsigned short 2
i unsigned int 2 or 4
l (letter el) unsigned long 4
x unsigned long long 8
185
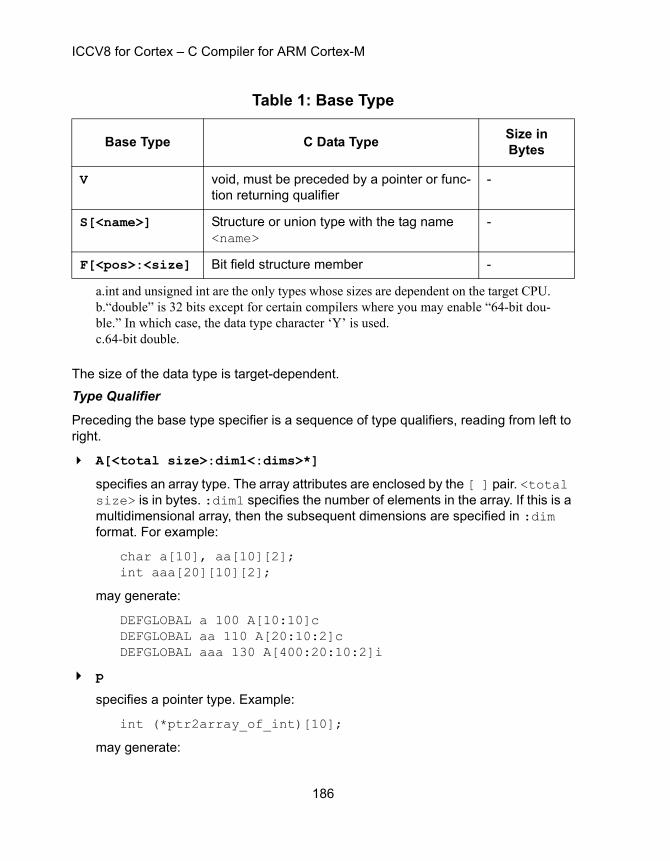
ICCV8 for Cortex – C Compiler for ARM Cortex-M
The size of the data type is target-dependent.
Type Qualifier
Preceding the base type specifier is a sequence of type qualifiers, reading from left to right.
A[<total size>:dim1<:dims>*]
specifies an array type. The array attributes are enclosed by the [ ] pair. <total size> is in bytes. :dim1 specifies the number of elements in the array. If this is a multidimensional array, then the subsequent dimensions are specified in :dim format. For example:
char a[10], aa[10][2];int aaa[20][10][2];
may generate:
DEFGLOBAL a 100 A[10:10]cDEFGLOBAL aa 110 A[20:10:2]cDEFGLOBAL aaa 130 A[400:20:10:2]i
p
specifies a pointer type. Example:
int (*ptr2array_of_int)[10];
may generate:
V void, must be preceded by a pointer or func-tion returning qualifier
-
S[<name>] Structure or union type with the tag name <name>
-
F[<pos>:<size] Bit field structure member -
a.int and unsigned int are the only types whose sizes are dependent on the target CPU.b.“double” is 32 bits except for certain compilers where you may enable “64-bit dou-ble.” In which case, the data type character ‘Y’ is used.c.64-bit double.
Table 1: Base Type
Base Type C Data TypeSize in Bytes
186
ICCV8 for Cortex – C Compiler for ARM Cortex-M
DEFGLOBAL ptr2array_of_int 100 pA[20:10]i
f
specifies a function (returning the type following). Example:
void foo() { }int (*ptr2func)();
may generate:
FUNC foo 100 fVFUNCENDDEFGLOBAL ptr2func 0 pfi
Constant (Program Memory) Qualifier
For Harvard Architecture targets with separate program and data memory spaces such as the Atmel AVR, the keyword __flash is taken to refer to the program memory. Thus, this attribute must be present in the datatype specifier.
For these targets, the character k may precede any datatype string and may appear after a p pointer qualifier. In the first case, the symbol itself is in the program memory. In the latter case, the item the pointer points to is in the program memory.
Future Enhancements
The following commands will be added to a later revision:
DEFTYPE, DEFCONST, both of which obey the scope rule.
Nested BLOCK/BLOCKEND commands and nested DEFLOCAL and DEFREG commands.
This allows the inner scope local variables to be declared in the correct lexical scope.
Target-Specific Command Information
AVR
Frame Pointer is the Y pointer register (R28/R29 pair).
HC12 / M8C
Frame Pointer is the X register.
HC08
Frame Pointer is the H:X register pair.
187

ICCV8 for Cortex – C Compiler for ARM Cortex-M
ARM Cortex-M
Frame Pointer is R11.
Asm/Linker Internal Debug Commands
If you look at a compiler-generated .s assembly file or a (non-ARM or non-Propeller) .o object file, you may see internal debug commands. All assembler debug commands in a .s file start with the .db suffix and all linker debug commands in a .o file start with the .db suffix.
These commands generally follow the syntax and semantics of the corresponding external commands documented here. However, they are subject to change and therefore will not be documented. If you modify or write them by hand, it may cause the assembler or linker to crash or not generate debug data as you may expect, as there may be fragile synchronization between the compiler and the rest of the toolchain in internal debug commands.
188
ICCV8 for Cortex – C Compiler for ARM Cortex-M
Librarian
A library is a collection of object files in a special form that the linker understands. When a library's component object file is referenced by your program directly or indirectly, the linker pulls out the library code and links it to your program. The standard supplied library is libccortex.a, which contains the standard C and ARM Cortex-M specific functions.
There are times where you need to modify or create libraries. A command-line tool called ilibw.exe is provided for this purpose. You can also create a library project using the IDE if you have the PRO edition of the compiler. See Menu Reference: Build Options - Project.
Note that a library file must have the .a extension. See Linker Operations.
Compiling a File into a Library Module
Each library module is simply an object file. Therefore, to create a library module, you need to compile a source file into an object file. The PRO edition allows you to build library project using the IDE. Otherwise, you will need to use the command line tool to compile the files and buid the library using command line tools.
Listing the Contents of a Library
On a command prompt window, change the directory to where the library is, and give the command ilibw.exe -t <library>. For example,
ilibw.exe -t libccortex.a
Adding or Replacing a Module
To add or replace a module:
1. Compile the source file into an object module.
2. Copy the library into the work directory.
3. Use the command ilibw.exe -a <library> <module> to add or replace a module.
For example, the following replaces the putchar function in libccortex.a with your version.
cd c:\iccv8cortex\libsrc.cortex<modify putchar() in putchar.c><compile putchar.c into putchar.o>
189
ICCV8 for Cortex – C Compiler for ARM Cortex-M
copy c:\iccv8cortex\lib\libccortex.a ; copy library ilibw.exe -a libccortex.a iochar.ocopy libccortex.a c:\iccv8cortex\lib ; copy back
The ilibw.exe command creates the library file if it does not exist; to create a new library, give ilibw.exe a new library file name.
Deleting a Module
The command switch -d deletes a module from the library. For example, the following deletes iochar.o from the libccortex.a library:
cd c:\iccv8cortex\libsrc.cortexcopy c:\iccv8cortex\lib\libccortex.a ; copy library ilibw.exe -d libccortex.a iochar.o ; deletecopy libccortex.a c:\iccv8cortex\lib ; copy back
190

ICCV8 for Cortex – C Compiler for ARM Cortex-M
AAcknowledgments .................................................................................................... 23Assembler Directives .............................................................................................. 175Assembler Operator Precedences ......................................................................... 173Assembly Interface ................................................................................................. 139
BBit Twiddling ............................................................................................................. 34
CC Machine Routines ............................................................................................... 141C Operator Precedences .......................................................................................... 97Code Compressor .................................................................................................. 168Compilation Process .............................................................................................. 147Compiler Arguments ............................................................................................... 149Compiler Options: Compiler ..................................................................................... 61Compiler Options: Paths .......................................................................................... 60Compiler Options: Target ......................................................................................... 63Converting from Other Compilers ............................................................................. 19Creating a New Project ............................................................................................ 44
DData Type Sizes ..................................................................................................... 137Driver ...................................................................................................................... 148
EEditor Windows ........................................................................................................ 46
FFile Types ................................................................................................................. 15Floating Point Math Functions ................................................................................ 109
IImageCraft Debug Format ...................................................................................... 181
LLinker Operations ................................................................................................... 180Listing File ................................................................................................................ 38
OOverriding a Library Function ................................................................................. 104
PProduct Updates ....................................................................................................... 14Program Areas ....................................................................................................... 143
191
ICCV8 for Cortex – C Compiler for ARM Cortex-M
Project Manager ....................................................................................................... 44
RRegistrating the Software ........................................................................................... 8
SSoftware License Agreement ...................................................................................... 6Standard IO functions ............................................................................................. 111Standard Library Functions ..................................................................................... 115String Functions ...................................................................................................... 118
TTesting Your Program Logic ..................................................................................... 38
VVariable Arguments Functions ................................................................................ 121
192