ict scheme of work - london grid for...
TRANSCRIPT

CEA@Islington - ICT Scheme of Work: p1 of 11
ICT SCHEME OF WORK
Modelling on screen in LOGO
PoS: KS 2 1c 2a 2c
Yr 4: Unit 4E
Modelling effects on screen
Class:
Date:
Theme: Children learn to enter instructions to control a screen turtle and will compare the operation of the screen turtle with a floor turtle. They learn how to write a procedure that ‘teaches’ the computer a new word and will be asked to write short sequences to produce particular shapes on screen. They understand that screen steps are smaller than floor turtle steps and will be asked to repeat procedures to produce ‘crystal flowers’ by rotating the screen turtle through 360 degrees
Where the unit fits in: This unit build on unit 2D ‘Routes: Controlling a floor turtle’ This unit assumes that children • Understand numbers larger than 100 • Know that degrees measure turns and understand that 90, 180, and 360 degrees are quarter, half and full turns.
Vocabulary:
Listed on each lesson plan.
More obvious curriculum areas
• Mathematics: shape and space
Resources • A floor turtle • A version of LOGO a free version of LOGO at www.softronix.com
or any logo program such as BlackCat Logo
• Worksheets to record sequences • Graph paper
Expectations
At the end of this unit: Most children will: create a ‘flower’ using one shape & rotating it; use the repeat instructions to duplicate the shape; change the angle of turn Some children will not have made so much progress and will: work from an example ‘flower’ & change the procedure to create their own ‘flowers’; make mistakes & need to amend their work Some children will have progressed further and will: create a ‘flower’ using more than one shape & rotating them; use the repeat instructions to duplicate the shapes.

CEA@Islington - ICT Scheme of Work: p2 of 11
Techniques To transfer floor turtle instructions to the screen and understand common language To type commands in immediate mode To write a list of commands to produce a pre-drawn shape To use pendown and penup to move the turtle To use the repeat command To use and change a pre-written procedure To write a procedure that uses other procedures to produce a result
Understanding The screen turtle can be moved on screen The screen turtle obeys the same language commands as the floor turtle The screen turtle can be given commands to produce a specific shape on screen The turtle can be moved before it starts drawing The instructions can be repeated Groups of instructions can be named Procedures can call other procedures
These lessons are based on MSW Logo, a free version of LOGO at http://www.softronix.com/, although the commands used should apply to other
versions of LOGO. There is a useful guide on using LOGO, written by Mark Warner –
http://www.teachingideas.co.uk/ict/contents.htm - this has been attached to the lessons.
These lesson plans were taken directly the Kent LEA website - http://www.kented.org.uk/ngfl/teaching/ict-ideas.html -
they were written by Helen Smith.
There are also additional lessons available on the same site – written by Lynn Milliss, Hildenborough Primary School –
we have not included these as we didn’t want to overload teachers – but do take a look.http://www.kented.org.uk/ngfl/hildenborough/year4.html

CEA@Islington - ICT Scheme of Work: p3 of 11
YR4: Unit 4E – Modelling effects on screen
Lesson Resources Activity
1. Introduction to Logo
Using FD, BK, LT and RT to draw paths and construct a square.
Large display (see weekly plan) with marker pens. Plastic or card shapes. Individuals record work on a centimetre grid – see below. Revision / oral What is special about a square? Are these squares? Why / why not?
What is the sum of the angles? What are the angles of the rhombus? How can we measure them? Is there a name for all of these shapes? Pupils may recall using the Roamer. Ask them, 'What did it do? What command did you give it to make it do that?' Key vocabulary Square Rectangle Rhombus Quadrilateral Command FD (forward) BK (back) RT (right) LT (left) CS (clear screen) REPEAT
Main activity On the large display, demonstrate FD 25. Repeat this, then RT 90. What will the turtle do if we enter FD 25 again? Ask a child to come up and try. Stress the importance of the space between the command and the value.
How can we make the turtle go back to the start? (Turn has to be determined from the turtle's viewpoint.) Alternatively, we could tell it to retrace its steps. Introduce BK, LT.
Select pupils to work on available computers. Give them the How to... sheet. Others will work on paper. Ask them to draw a 'staircase' and 'flag'. Use the scale 1 cm = 25 turtle units. Record the turtle commands. Bring the class together again to try their suggestions. Look at the flag: what shape is there? How was it drawn? There is a quicker way. Show how to draw a square with REPEAT. Support Work with a group using the Roamer. Remind them of the commands and the different step size - forward 1, not 25! Move round a square - pace it out ourselves first. Focus particularly on which way the Roamer needs to turn when it is facing you. For example, turning it to your right means a left turn for the Roamer. If plastic or card shapes are available, children may trace their fingers round the edges to 'feel' the corners.

CEA@Islington - ICT Scheme of Work: p4 of 11
YR4: Unit 4E – Modelling effects on screen
Lesson Resources Activity
Challenge Design other 'paths' which include squares:
Plan on paper first, using the scale 1 cm = 25 units. Plenary Individuals report on their work. Try their ideas. What will happen if you try: REPEAT 4 [FD 50 RT 45] How could this be modified to draw - which shape? Arrange for all to try out their work on the computer before the next lesson.

CEA@Islington - ICT Scheme of Work: p5 of 11
YR4: Unit 4E – Modelling effects on screen
Lesson Resources Activity
2. Turtling Triangles
Find the angle that the turtle turns in drawing an equilateral triangle.
Large display (see weekly plan) with marker pens. Protractors. Plastic or card shapes: triangles. Individuals record work on plain paper. Revision / oral Revise the interior angles of a triangle. Recap drawing a square with Logo. If two angles of a triangle are both 70 degrees, what is the third angle? If the first angle is 85 degrees and the second is 25 degrees, what is the third angle? Key vocabulary Interior angle Exterior angle Equilateral triangle Facing Heading
Main activity How are we going to tell the turtle draw an equilateral triangle? The turtle is facing up the screen. Draw the possibilities with a marker pen:
Focus on the turtle facing a particular direction. The screen display enables the whole class to see this. Children need to identify the angle that the turtle has to turn through. They need to see the shape from the turtle's viewpoint. The class work on plain paper, drawing the triangle with the help of a protractor, then writing the commands below. Draw the class together to try out some of their 'programs'. It's very likely that 60 degree turns will feature:
It's important to establish an atmosphere where children are not afraid to make mistakes, but where they see that feedback from the computer is helpful in planning the next step. Support Some children find it difficult to relate to the turtle's angle of turn. Ask them to pace round a triangle. Extend an arm in front, to show turning. Is it more or less than 90 degrees? Now look at the amount of turn in relation to the turtle's original heading:
If plastic or card shapes are available, children may trace their fingers round the edges to 'feel' the corners.

CEA@Islington - ICT Scheme of Work: p6 of 11
YR4: Unit 4E – Modelling effects on screen
Lesson Resources Activity
Challenge Other types of triangle can be drawn (isosceles, scalene). Finding the length of the third side challenges pupils' ability to estimate in Logo units. Constructing the shape on paper and determining a scale (e.g. 1 cm = 25 units) will help. Plenary Discuss why the turtle needs to turn 120 degrees, not 60. If the turtle continued to turn 60 degrees, what shape would it draw? Can the class predict how to draw other polygons? In every case - square, triangle, hexagon - what is the sum of turtle turns (given that it returns to face its original heading)?
3. Turtling Polygons
Calculate the turning angle to draw any regular polygon.
Large display (see weekly plan) with marker pens. Plastic or card shapes. The class will record work on paper – see below for the sheet. Revision / oral Revise the properties of a square. Recap how turtle draws a square and equilateral triangle. Remind pupils of the REPEAT command. Is a square a rectangle? Why? What is the sum of the internal angles? What do two / three angles add up to? Are these shapes squares? Why / why not?
Main activity How are we going to tell the turtle draw a hexagon? Start with the turtle facing up the screen. Draw the first side. The turtle now has to face which direction? What angle does it turn through? When the hexagon is complete, check that the turtle is facing its original heading. What is the total of the turns it has made? Groups work on available computers. Individuals work on paper grids, with a table to record their findings. First, they investigate a regular octagon. Can they see the connection between number of sides and the turtle turn? If the turtle repeatedly moves forward the same distance then RT 30, what polygon will it draw? (Dodecagon, 12 sides) Support Ask children to mark on the sheet, then measure, the angle, which the turtle turns when it draws the square, triangle and hexagon. Plastic or card shapes will help children to touch and hold, as well as see the corners. Challenge Work out the instructions for a pentagon, nonagon, and decagon.

CEA@Islington - ICT Scheme of Work: p7 of 11
YR4: Unit 4E – Modelling effects on screen
Lesson Resources Activity
Key vocabulary Regular polygon Pentagon Hexagon Heptagon Octagon Nonagon Decagon dodecagon
Plenary Look at the completed table:
Name Number of sides Turn (degrees) Total turn Equilateral triangle 3 120 360 Square 4 90 360 Hexagon 6 60 360 Octagon 8 45 360
What is the rule for telling the turtle to draw a regular polygon? How do we draw a pentagon? Test some of the children's suggestions. Computer groups: how could we draw a circle (or a shape with so many sides it looks like a circle)? Arrange times before the next lesson where all children can try their instructions on the computer.
CEA@Islington - ICT Scheme of Work: p8 of 11
YR4: Unit 4E – Modelling effects on screen
Lesson Resources Activity
4. Seeing Stars Build on the polygon rule by investigating the construction of stars.
Resources Large display (see weekly plan) with marker pens. The class will record work on plain paper. Revision / oral Look at the table from the last lesson. Recap the polygon rule: divide 360 by the number of sides to calculate the turtle turn. Review computer work. What is the angle to draw a 20-sided shape? A 15-sided shape? Why did we avoid a heptagon? (Logo will accept non-integral values, so this could be drawn!) Key vocabulary Factor Multiple Program
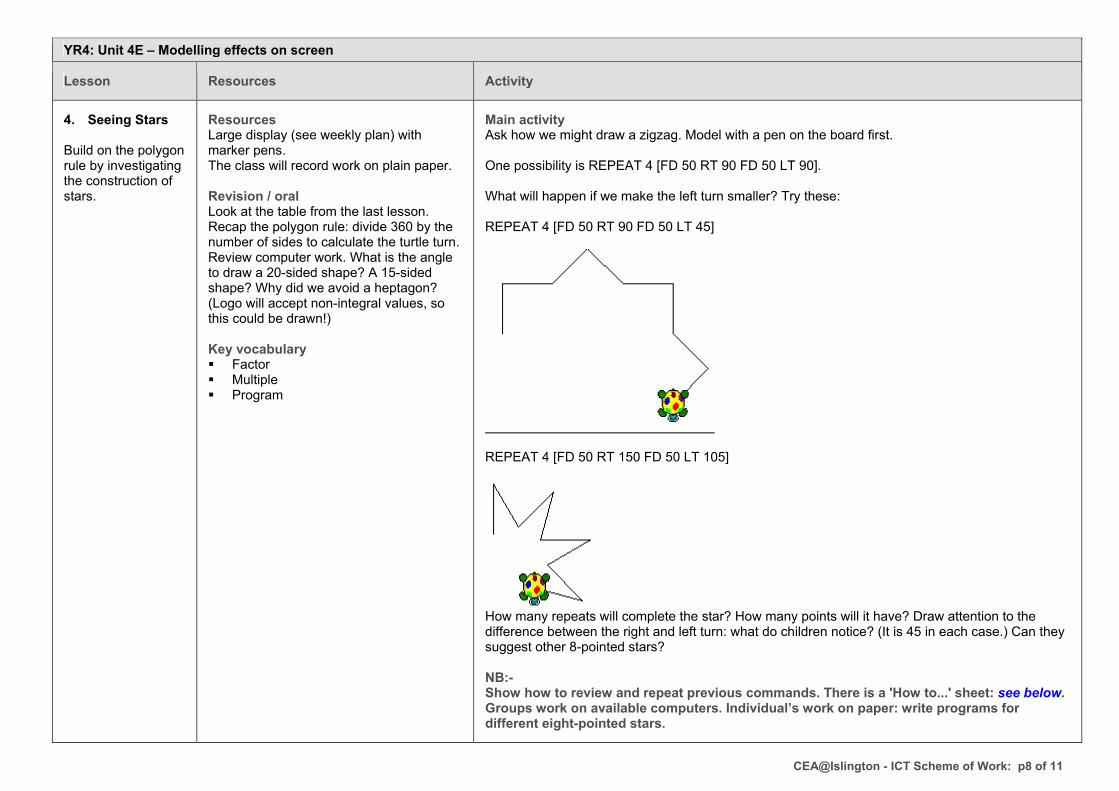
Main activity Ask how we might draw a zigzag. Model with a pen on the board first. One possibility is REPEAT 4 [FD 50 RT 90 FD 50 LT 90]. What will happen if we make the left turn smaller? Try these: REPEAT 4 [FD 50 RT 90 FD 50 LT 45]
REPEAT 4 [FD 50 RT 150 FD 50 LT 105]
How many repeats will complete the star? How many points will it have? Draw attention to the difference between the right and left turn: what do children notice? (It is 45 in each case.) Can they suggest other 8-pointed stars? NB:- Show how to review and repeat previous commands. There is a 'How to...' sheet: see below. Groups work on available computers. Individual’s work on paper: write programs for different eight-pointed stars.

CEA@Islington - ICT Scheme of Work: p9 of 11
YR4: Unit 4E – Modelling effects on screen
Lesson Resources Activity
Support Give children a printed copy of the 'bent zigzags' above. 'Walk' them with a pencil. Write each move the turtle makes, without using REPEAT. Discuss what is being repeated each time. Ask children to draw what will happen if the turtle carries on repeating. Challenge Write programs for stars with six points, nine points. Plenary What is the rule for telling the turtle to draw an eight-pointed star? Six-pointed star? Nine-pointed star? Can we suggest angles for other types of star? Test some of the children's suggestions. Quick-fire questions: 'Eight-pointed star, right turn 130 degrees, left turn - what?' Arrange times before the next lesson where all children can try their programs on the computer.

CEA@Islington - ICT Scheme of Work: p10 of 11
YR4: Unit 4E – Modelling effects on screen
Lesson Resources Activity
5. In a Spin Create procedures. Use them to make 'whirly' patterns.
Large display (see weekly plan) with marker pens. Group work following whole-class introduction. The main activity depends on computer access, so is best run alongside other work, as time permits. Revision / oral Recap the 'rules' for drawing regular polygons and stars. What do we mean by a regular shape? Quick-fire questions: Six-pointed star - right 150 degrees - left what? Enter this, to check it's correct. Key vocabulary Procedure TO END EDIT
Main activity Show on the display how to define a procedure. Stress the benefit of using a short name that you'll recognise! Refer to the ‘How to...’ sheet (see below), and have this available by the computers. Example: TO HEX >REPEAT 6 [FD 25 RT 60] >END Show that the computer now knows a new word: CS HEX FD 25 HEX and so on. Show the class how to edit a procedure, e.g. to make the hexagon bigger. EDIT "HEX For now, simply say that the 'label' stops the computer trying to draw another hexagon! Use the HEX command to draw a whirly pattern: REPEAT 12 [HEX RT 30] Why REPEAT 12? Why RT 30? Good revision of earlier work! Children plan a whirly pattern based on their favourite polygon. Try this on the computer and print. Record the Logo commands. Extension Do the same with your favourite star!

CEA@Islington - ICT Scheme of Work: p11 of 11
YR4: Unit 4E – Modelling effects on screen
Lesson Resources Activity
Support Give the children suggestions based on the simplest shapes and easily- remembered turns. Check they fully understand 360 degrees as a whole turn. Challenge Once children have made patterns, ask them to write procedures to draw a rectangle and a rhombus. It is a good idea to model on paper first. This is a good follow-up assessment activity. Can they break down the problem? Plenary Children report on their work. Using the large display, show their patterns and talk about how they were produced.

ICT Scheme of Work: Recording sheet for Lesson 1- p1 of 1 CEA@Islington
RESOURCE SHEET Recording sheet for Lesson 1

ICT Scheme of Work: Recording sheet for Lesson 3- p1 of 1 CEA@Islington
RESOURCE SHEET Recording sheet for Lesson 3
Turtling polygons
Name Number of sides Turn (degrees) Total turn (degrees) square 4 90

ICT Scheme of Work: How to enter Logo commands - p1 of 1 CEA@Islington
RESOURCE SHEET How to enter Logo commands There must be a space between a command and the value:
For example: FD 50
FD Forward e.g. FD 50 BK Back BK 28 RT Right RT 90 LT Left LT 270 PU Pen up PD Pen down PE Pen erase CS Clear screen REPEAT has a list of commands in square brackets: For example: REPEAT 4 [FD 50 RT 90] Commands can be typed in lower case. You can put several commands on one line, as long as they are all separated by spaces: For example: cs fd 20 rt 60 fd 40 pu Press the up arrow to put old commands back on the command line. Press Enter to do the commands again, or use the right and left arrows to make changes.
Type PE then repeat the command by pressing the up arrow to delete something you've just drawn. Don't forget to type PD before you draw anything else!

ICT Scheme of Work: How to define and edit a Logo procedure - p1 of 1 CEA@Islington
RESOURCE SHEET How to define and edit a Logo procedure To define a hexagon, type:
to hex repeat 6 [fd 25 rt 60] end
The commands appear like this:
Logo says, 'You defined hex.' Type hex to draw the hexagon.
Any name will do, but it's helpful to use a name that you'll recognise later. Short names mean less typing!
To change the procedure, type:
edit "hex
The speech mark character is a label. It stops Logo trying to draw another hexagon! You will see a new window:
Make changes, and then click End.

Write down the instructions to make the Roamer draw the following shapes.
1. 2. 3. 4. 5. 6.
1. 2. 3. 4. 5. 6.
1. 2. 3. 4. 5. 6.
1. 2. 3. 4. 5. 6.

Write down the instructions to make the Roamer draw the following shapes.
1. 2. 3. 4. 5. 6.
1. 2. 3. 4. 5. 6.
1. 2. 3. 4. 5. 6.
1. 2. 3. 4. 5. 6.
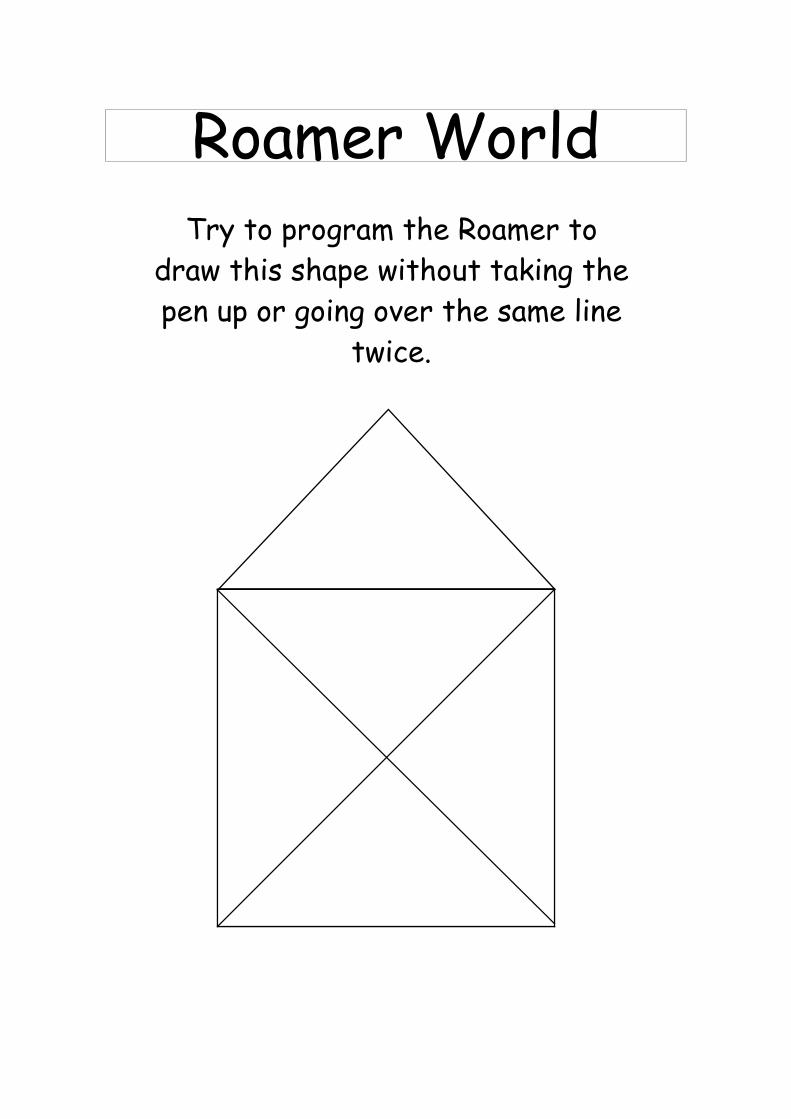
Try to program the Roamer to draw this shape without taking the pen up or going over the same line
twice.