iddero hcx-knx touch · pdf filetry google sketchup, ... iddero hcx-knx touch panels...
TRANSCRIPT

www.iddero.com 130125-02
IDDERO HCx-KNX TOUCH PANELS
Quick start guide

www.iddero.com IDDERO HCx-KNX TOUCH PANELS – Quick start guide 2
TABLE OF CONTENTS 1 INTRODUCTION............................................................................................................................... 3 2 IDDERO CONFIGURATION SOFTWARE....................................................................................... 3
2.1 Installation and First Steps .................................................................................................... 3 3 TOUCH PANEL CONFIGURATION................................................................................................. 5
3.1 The Configuration Process.................................................................................................... 5 3.2 Select the Model of Touch Panel to be Used........................................................................ 5 3.3 Create or Import Group Addresses ....................................................................................... 5 3.4 Design the Navigation Structure............................................................................................ 7 3.5 Configure the Navigation Structure ....................................................................................... 8 3.6 Configure Visual Components and Link Group Addresses................................................. 16 3.7 Save the Project .................................................................................................................. 19
4 INSTALLATION AND COMMISSIONING...................................................................................... 20 4.1 Installation............................................................................................................................ 20 4.2 Boot in “Install Mode”........................................................................................................... 20 4.3 Network Configuration ......................................................................................................... 21 4.4 Commissioning .................................................................................................................... 21 4.5 Firmware Updates ............................................................................................................... 22
© 2013 All Rights reserved. Iddero is a registered trademark of INGELABS, S.L. All other registered trademarks and trade names used in this document are the property of their respective owners. Other product and/or company
names used in this document may be protected by copyrights, trademarks, or patents.

www.iddero.com IDDERO HCx-KNX TOUCH PANELS – Quick start guide 3
1 INTRODUCTION This document is a quick guide to help you get started with the Iddero HC1-KNX, HC2-KNX, and HC2L-KNX touch panels. Detailed, step-by-step instructions are provided on how to create and configure a simple installation project, and upload it to the touch panel in order to control and monitor a KNX-based installation. This guide assumes basic knowledge and familiarity with KNX® technology and the ETS® configuration software. The text is based on ETS3 Professional. KNX® and ETS® are registered trademarks of the KNX Association cvba, Brussels.
2 IDDERO CONFIGURATION SOFTWARE
2.1 Installation and First Steps If you have not done it yet, you should now install Iddero’s configuration software. The configuration software can be downloaded free of charge from www.iddero.com. The first time you run the software, you will be asked to select language. Select “English” and accept. Next, the software will request an activation key. In order to obtain the activation key, please contact your distributor, or just contact Iddero directly by clicking on the link shown in the dialog box.
Once the activation process is complete, the main application window will be shown.

www.iddero.com IDDERO HCx-KNX TOUCH PANELS – Quick start guide 4
The main window is split in three different areas: - Project tree (A): Shows the project structure, including sections for general parameters, zones and
pages, maps, scenes, time programs, security, logic functions, and more. - Address tree (B): Shows group addresses for this project, including both regular group addresses
and internal group addresses. - Parameter area (C): When an item is selected in the project or address trees, this area will show
any configurable parameters that are available for this item. In order to insert new items in the project (e.g. a map), just right-click on the corresponding section (“Maps”) and select “Insert” from the pop-up menu. In order to configure an item, just select it (left-click), and any configurable parameters will be shown in the parameters area. In order to remove an item, right-click on it and select “Delete” from the pop-up menu.

www.iddero.com IDDERO HCx-KNX TOUCH PANELS – Quick start guide 5
3 TOUCH PANEL CONFIGURATION
3.1 The Configuration Process The touch panel configuration process can be split in the following tasks:
• Select the model of touch panel to be used • Create or import group addresses • Design and configure the navigation structure (maps, zones, pages) • Configure visual components • Link group addresses and communication objects
We will now walk through this process step by step, in order to demonstrate how to create a sample project where the Iddero touch panel will be used to control a single lamp, through a KNX-based dimmer actuator. We will assume that the KNX dimmer actuator in question implements at least the following communication objects:
• One 1-bit communication object for switching the lamp on and off (address 1/1/1) • One 1-byte communication object for setting the brightness value (1/1/2) • One 1-byte communication object that holds the current brightness value (feedback) (1/1/3)
3.2 Select the Model of Touch Panel to be Used The first thing you need to do is select the specific model of touch panel that will be used in the project. For this, first select the “Project” section in the project tree, then choose the proper model (HC1-KNX, HC2-KNX, HC2L-KNX) in the “System type” field in the parameters area. The selected touch panel model will determine the maximum resolution that is allowed for maps and images, as well as availability of certain functions such as the video door phone function, or the ability to monitor IP cameras.
3.3 Create or Import Group Addresses Although it is possible to define group addresses directly in the Iddero configuration software, it is far more common to import them from an existing ETS project. For this, you will first need to export the group addresses from the ETS software into a .esf file. Please select File → Extract Data (e.g. OPC)... in the ETS software. A dialog box “Export Foreign Format” will pop up. Click on the “Export...” button next to the “Export to OPC Server” option, and choose a suitable location for the .esf file.

www.iddero.com IDDERO HCx-KNX TOUCH PANELS – Quick start guide 6
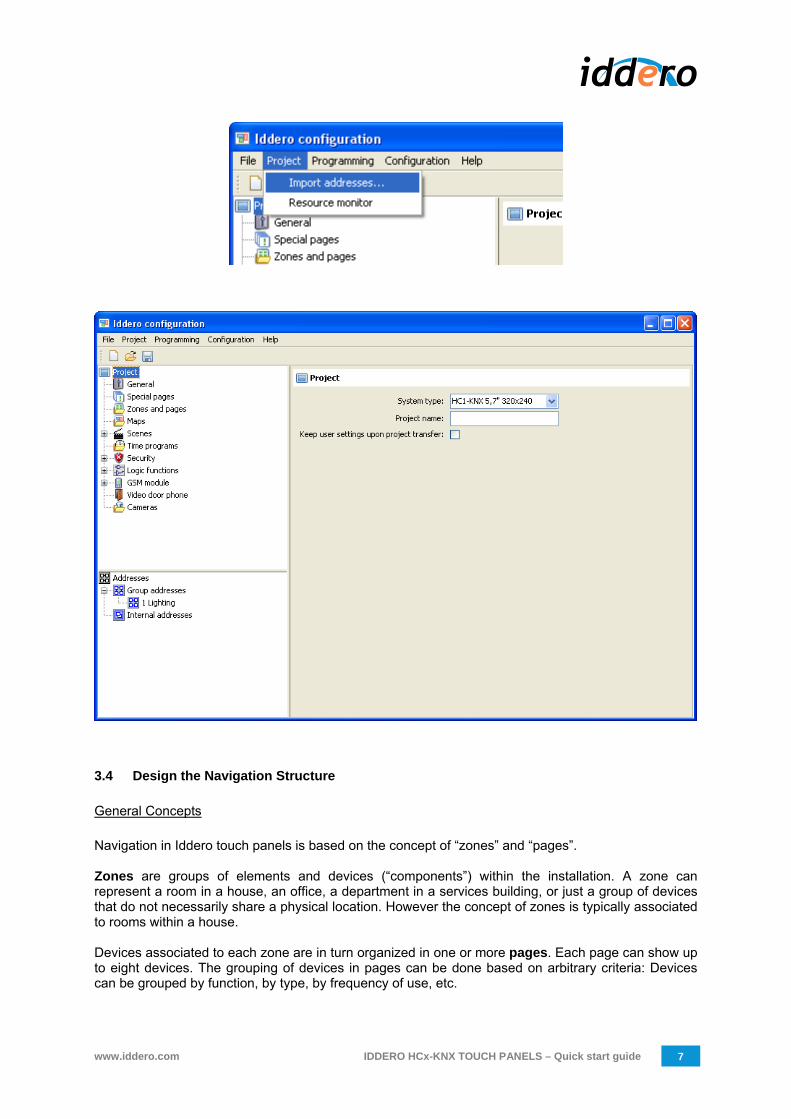
Then, from the Iddero configuration software, select Project → Import addresses... and open the .esf file you just generated. Once the group addresses have been imported, they will be shown in the address tree.
www.iddero.com IDDERO HCx-KNX TOUCH PANELS – Quick start guide 7
3.4 Design the Navigation Structure
General Concepts Navigation in Iddero touch panels is based on the concept of “zones” and “pages”. Zones are groups of elements and devices (“components”) within the installation. A zone can represent a room in a house, an office, a department in a services building, or just a group of devices that do not necessarily share a physical location. However the concept of zones is typically associated to rooms within a house. Devices associated to each zone are in turn organized in one or more pages. Each page can show up to eight devices. The grouping of devices in pages can be done based on arbitrary criteria: Devices can be grouped by function, by type, by frequency of use, etc.

www.iddero.com IDDERO HCx-KNX TOUCH PANELS – Quick start guide 8
In general, navigation in the touch panel works as follows:
1. The user selects the target zone 2. The user selects the target page within the zone, by touching the corresponding icon in the
navigation bar in the bottom of the screen 3. The user operates the target device (component) in the page
The following screenshot shows the structure of a typical page with six devices. The navigation bar at the bottom of the screen shows that the zone is made up of three different pages.
Navigation Structure In our sample project we will initially create one single zone with one single page, since we only need to control one device. In a real-world project, though, the navigation structure should be carefully planned so that navigation is as easy and comfortable as possible for the end user.
3.5 Configure the Navigation Structure
Definition of Zones In order to add a zone to the project, right-click on the “Zones and pages” section in the project tree, and select “Insert zone” from the pop-up menu.

www.iddero.com IDDERO HCx-KNX TOUCH PANELS – Quick start guide 9

www.iddero.com IDDERO HCx-KNX TOUCH PANELS – Quick start guide 10
By selecting the newly inserted zone (left-click on the new zone in the project tree, or double-click on the zone name in the table shown in the parameter area) the configurable parameters will be shown. In this case, the only parameter that can be configured is the zone name. Let’s set this to “Living room” for this zone.
Definition of Pages In order to add a page to a zone, right-click on the zone in the project tree, and select “Insert page” from the pop-up menu. By selecting the newly created, the configurable parameters will be shown in the parameter area: - Name: A descriptive name for this page. - Icon: The icon that will be shown for this page in the navigation bar in the bottom side of the
screen. - Layout: The layout of visual components within the page. Determines how many components will
be shown and how they will be represented. - Access level: The minimum access level that is required in order to access this page.

www.iddero.com IDDERO HCx-KNX TOUCH PANELS – Quick start guide 11

www.iddero.com IDDERO HCx-KNX TOUCH PANELS – Quick start guide 12
Since our page will be used for lighting control, we can just leave the default icon (a light bulb). There will be one single device in this page. Thus, we select the 1x1 layout. A component will automatically be added beneath the current page in the project tree. We will take care of its configuration in the following section. We can also leave the “Access level” parameter to its default value (“Not restricted”).
Definition of Maps and Active Areas In order to make it easier for the end user to navigate through available zones, you can define image-based maps as well as “touchable areas” that can be linked to zones or to other maps.
Note: Map definition is optional. If no maps are defined, the system will just present a list of available zones to the end user.
In order to insert a new map, right-click on the “Maps” section in the project tree and select “Insert map” in the pop-up menu. Then, just select the newly added map and the configurable map parameters will be shown in the parameter area.

www.iddero.com IDDERO HCx-KNX TOUCH PANELS – Quick start guide 13
Next step is to pick a background image for the map. Background images can be created using any drawing or picture editing software. You might want to try Google SketchUp, which is available for download from http://sketchup.google.com/ at no charge, and can be used to generate good looking 3D maps relatively easily. Once you have your background image ready, click on the “Open...” button in the map configuration section, and select the image file. GIF, JPEG, and PNG file formats are supported. If the image size is larger than the screen resolution of the selected touch panel, the image will be adapted (trimmed) to the right size automatically.

www.iddero.com IDDERO HCx-KNX TOUCH PANELS – Quick start guide 14
Now we will define one active (“touchable”) area on top of the image. Right-click on the map in the project tree, and select “Insert area” from the pop-up menu. Then, select the newly created area in the project tree. Assign a descriptive name for the area (for example, “Living room”). Then, in the “Target” combo box, select the “Living room” zone. By doing this, we are specifying the zone that should be opened when we touch this area on the map.

www.iddero.com IDDERO HCx-KNX TOUCH PANELS – Quick start guide 15
Now, the polygon associated to this touchable area must be defined. Click on the “Add points” button, then click on the image to add the vertices for the polygon. The “Delete points” and “Move points” buttons let you delete and move existing polygon vertices.
Note: You can use the mouse wheel to zoom in and out of the map. While zoomed in, hold down the middle or right mouse button and drag the mouse to pan the image.

www.iddero.com IDDERO HCx-KNX TOUCH PANELS – Quick start guide 16
3.6 Configure Visual Components and Link Group Addresses We will now configure the visual component that will be used to control the lamp from the touch panel. As described earlier, we will actually be controlling this lamp through a KNX-based dimmer actuator. Select the component beneath the first page of the “Living room” zone. Set a descriptive name, for example “Dimmable lamp L1”, and choose “Lamp control” from the “Type” combo box. The dimmer actuator in our sample project implements a 1-byte communication object that can be used to set the brightness (light intensity) value. This is often referred to as absolute dimming. Thus, you should check the “Enable Value object” checkbox. However, leave “Enable dimmer control object” unchecked (this one refers to the 4-bit object used for relative dimming). Finally, in the “Status objects” combo box, select “1 byte” since our dimmer actuator provides a 1-byte communication object that indicates the current brightness status. If you look at the project tree, you will see that several communication objects have automatically been added under the “Dimmable lamp L1” component: One 1-bit communication object (“Switching object”) and two 1-byte communication objects (“Brightness value” and “Lamp status (dimming value)”).

www.iddero.com IDDERO HCx-KNX TOUCH PANELS – Quick start guide 17
The touch panel will send On and Off telegrams to the first of these communication objects, absolute brightness values to the second one, and will use the value of the third object in order to update the graphical representation of the lamp’s status. Group addresses must now be linked to communication objects. First we will link group address 1/1/1 (“On/Off”) to the lamp’s Switching object. This is done through a drag & drop operation: Click and hold the left mouse button over the “On/Off” address node in the address tree; then, without releasing the mouse button, drag the address onto the communication object in the project tree; finally, release the mouse button. Repeat this operation with the Brightness value and Lamp status objects, and link them with group addresses 1/1/2 “Brightness (value)” and 1/1/3 “Brightness (status)”, respectively.

www.iddero.com IDDERO HCx-KNX TOUCH PANELS – Quick start guide 18

www.iddero.com IDDERO HCx-KNX TOUCH PANELS – Quick start guide 19
If you select any communication object in the project tree, the parameters area will show any linked group addresses, along with the current configuration of the communication object’s flags (these flags define the behaviour of each communication object regarding telegrams sent to and received from the bus. Please refer to the KNX standard for the detailed meaning of each flag). Likewise, if you select any group address in the address tree, the parameters area will show any linked communication objects.
3.7 Save the Project Save the project if you have not done it yet (File → Save). We can then move on to the commissioning process.

www.iddero.com IDDERO HCx-KNX TOUCH PANELS – Quick start guide 20
4 INSTALLATION AND COMMISSIONING
4.1 Installation Iddero touch panels are in-wall, flush mounted units. A mounting box is required (E-C557 or E-C610, depending on the touch panel model). The installation sheet bundled with the product provides detailed installation instructions. Before fixing the unit to the mounting box, the following connections should be made:
• Power supply (12 VDC). Only the provided power supply should be used. • KNX bus • Ethernet network • RS-485 bus, if an expansion module such as the DW-GSM will be used
The Ethernet connection is used both for initial commissioning and for certain functions during normal operation (web access, IP camera monitoring, video door phone function). Even if you don’t plan to actually use any of these functions, it is a good idea to leave an Ethernet cable connected to the unit and easily accessible, for example from the main electrical panel or from a junction box, so that you can use it later as needed, in order to make adjustments in the programming or for firmware updates.
Note: In most cases, the touch panel will connect to a local network through a hub or switch. In this case a straight (1:1) Ethernet cable should be used. However, if you want to connect the touch panel directly to a PC or notebook used for commissioning, a crossover Ethernet cable should be used.
4.2 Boot in “Install Mode” In order to upload the project data to the touch panel, you first now boot in “install mode”. For this, just touch on the lower right corner on the screen for at least three seconds during the loading process. The touch panel will beep three times to acknowledge the request and will enter install mode (the unit also enters install mode automatically the first time it boots, or when no valid project data is found.)

www.iddero.com IDDERO HCx-KNX TOUCH PANELS – Quick start guide 21
4.3 Network Configuration In order to access the touch panel from your PC, both devices must be in the same TCP/IP subnet. For example, if the touch panel’s IP address is 192.168.0.200, with subnet mask 255.255.255.0 (default values), the IP address of the PC should also be in the 192.168.0.x range (for example, 192.168.0.201), with subnet mask 255.255.255.0. The current IP address and subnet mask of the touch panel are shown on the installation screen. Please refer to your operating system’s documentation for detailed help on configuring the network settings on your PC.
4.4 Commissioning In order to upload the project data to the touch panel, select Programming → Program... in the configuration software while the unit is in installation mode. The “Connect settings” dialog will pop up.

www.iddero.com IDDERO HCx-KNX TOUCH PANELS – Quick start guide 22
Enter the IP address of the touch panel, the installer user name and the installer password (default values: “instalador” / “knxinstall”) and click “Accept”. The commissioning process may take a few seconds to complete. Make sure you do not interrupt this process or turn off the panel. Once the process is complete, a success message will be shown onscreen. Press “Reboot” and the system will reboot with the new configuration.
4.5 Firmware Updates If you need to update the firmware of the touch panel, you can do so from the configuration software by selecting Programming → Update firmware. The software will first ask you to select a valid firmware update file (.bin file type). The “Connection settings” dialog will then pop up. The rest of the process is identical to the commissioning process. It is critical that you do not interrupt the operation or turn off the touch panel during the update process. If the firmware update process is interrupted, the touch panel could be left in a locked state and would need to be returned to factory for repair.