ideas for new media geotagger ui: ui mockups
TRANSCRIPT

1
Ideas for new Media Geotagger UI:
UI Mockups
To improve consistency, these mockups use standard colors, layout, icons, and ideas from other Red Hen tools, such as isWhere and Project Loader.
Topic Slide
Geotagging Process 2
New Mockups: 3
1. Welcome 4
2. Create media collection 5
3. Import GPS data. 6
4. Select collection device. 7-8
5. Set up the device. 9-11
6. Calibrate the device. 12-17
7. Import the media. 18
8. Geotag the media 19
9. Verify the geotagging 20
Screenshots of Existing Screens 21-39
Martha Roden
March 2, 2015: Version 1

2
MediaGeotagger: General Process
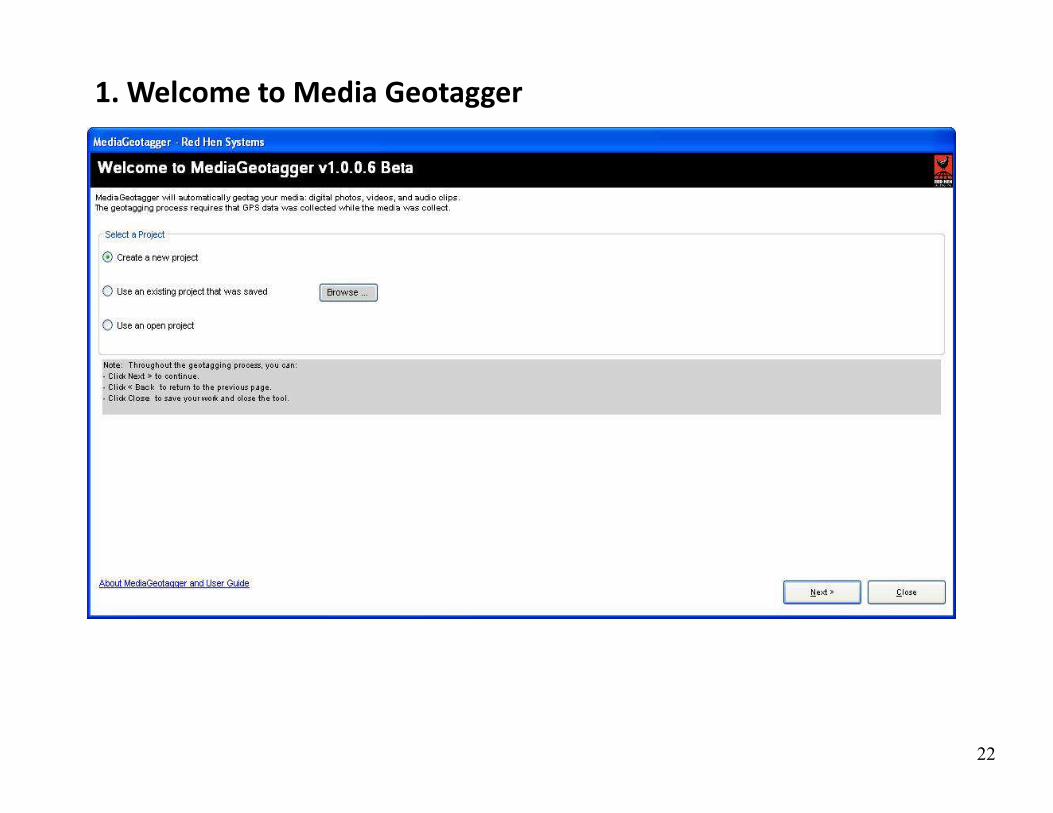
1. Launch the tool. The Welcome tab automatically appears.
2. Create a media collection.
3. Import GPS data.
4. Select the collection device.
5. Set up the device.
6. Calibrate the device.
7. Import the media.
8. Geotag the media.
9. Verify the geotagging.
The rest of this slide set shows:
• Mockups for new screens for each step
• Set of existing screens (for comparison)

3
Mockups of Suggested Screens

4
MediaGeotagger automatically geotags your media: digital photos, videos, and audio clips. This requires that GPS was collected at the same time the media was collected.
Welcome to MediaGeotagger vX.xxx.x
Media Geotagger _
Browse
CloseNext >< Back
Completed Tasks
Welcome
Create media collection
Import GPS data
Select collection device
Set up device
Calibrate device
Import media
Geotag media
Verify
Create a new project
Use a saved project
Use an open project
Select a Project
Note: Throughout the geotagging process you can:
Click Next > to continue.
Click < Back to return to the previous page.
Click Close to save your work and close Media Geotagger.
Media Geotagger Help
MediaGeotagger User Guide (PDF - X Mb)
If you need help performing tasks with IsWhere, we recommend you read the PDF User Guide for assistance. If you still have questions, please contact the Red Hen Support Team.
Phone: (970) 493-3952
Email: [email protected]
Red Hen Support Team
MediaGeotagger x.0.0.xxx
Copyright © 2015 Red Hen Systems. All rights reserved.
About
Close
Screen 1: Welcome
Collected Data
xxx
Used Red Hen colors.Added icons and check boxes.Used White to indicate current task.
Use one large tab that moves to the right as user progresses through tasks.Screen is not so wide.
Bold buttons that users can click.

5
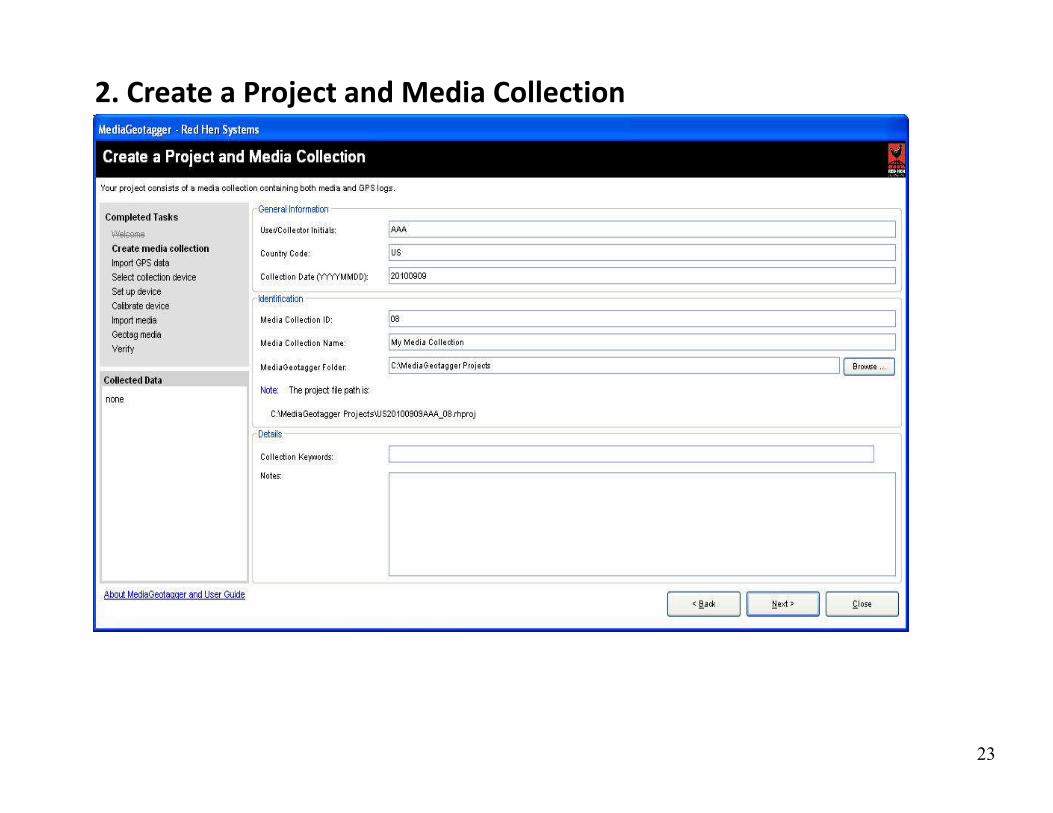
Your project consists of a media collection containing both media (photos, videos, and audio) and GPS logs.
Create a project and media collection
Media Geotagger _
CloseNext >< Back
Completed Tasks
Welcome
Create media collection
Import GPS data
Select collection device
Set up device
Calibrate device
Import media
Geotag media
Verify
Collected Data
none
User/Collector Initials:
Country Code:
Collection Date
General Information
Screen 2: Create media collection
xxx
xxx
xxx
Media Collection ID:
Media Collection Name:
MediaGeotagger Folder:
Identification
xxx
xxx
xxx
The project file path is:
C:\MediaGeotagger Projects\US20100909AAA_08.rhproj
Collection Keywords:
Notes:
xxx
xxx
Identification
Always put instructions at top.
6
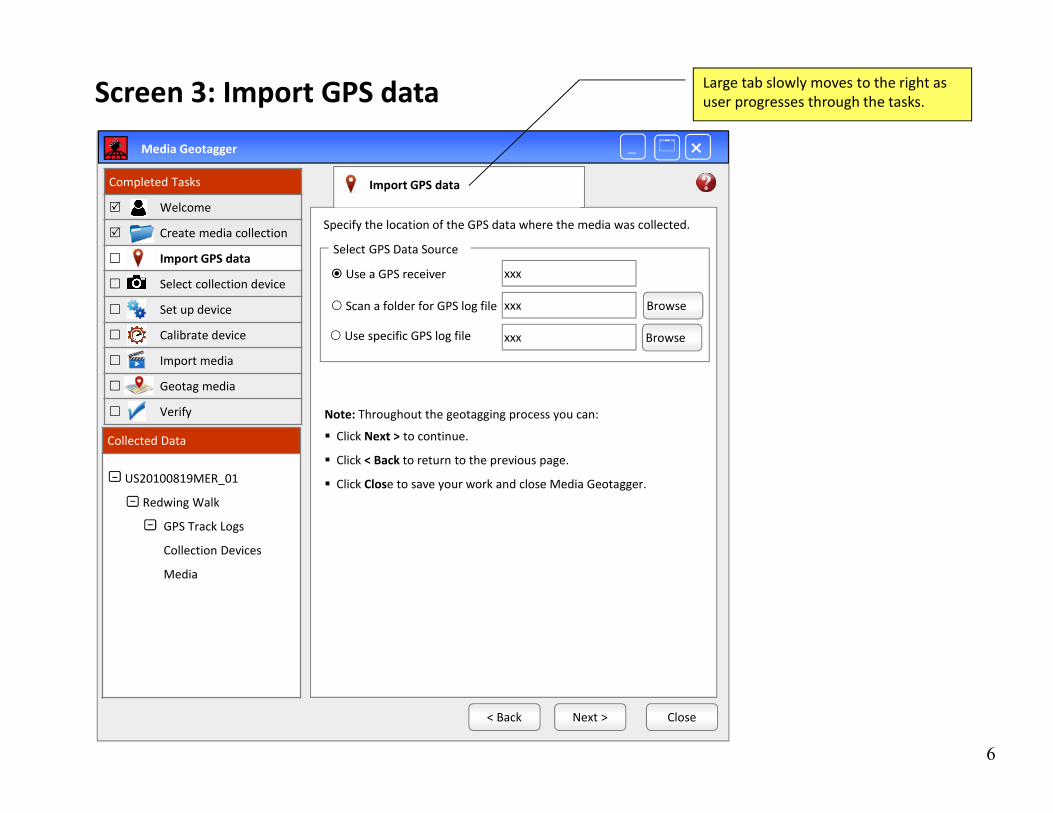
Specify the location of the GPS data where the media was collected.
Import GPS data
Media Geotagger _
CloseNext >< Back
Completed Tasks
Welcome
Create media collection
Import GPS data
Select collection device
Set up device
Calibrate device
Import media
Geotag media
Verify Note: Throughout the geotagging process you can:
Click Next > to continue.
Click < Back to return to the previous page.
Click Close to save your work and close Media Geotagger.
Screen 3: Import GPS data
Browse
Use a GPS receiver
Scan a folder for GPS log file
Use specific GPS log file
Select GPS Data Source
xxx
xxx
xxx Browse
Large tab slowly moves to the right as user progresses through the tasks.
Collected Data
US20100819MER_01
Redwing Walk
GPS Track Logs
Collection Devices
Media

7
Specify the type of device used to collect the media.
Select collection device
Media Geotagger _
CloseNext >< Back
Completed Tasks
Welcome
Create media collection
Import GPS data
Select collection device
Set up device
Calibrate device
Import media
Geotag media
Verify
Manufacturer:
Note: Selected manufacturer and model require device setup. Current device can capture audio and photos.
Select Media Collection Device
Canon
Model: Vixia HF S100
Use existing device
Add new device
Screen 4A: Select Collection Device
Collected Data
US20100819MER_01
Redwing Walk
GPS Track Logs
Collection Devices
Media

8
Add New Device
CancelOK
Identify the new device
Device Information
Sony
HDR-XR200V
Manufacturer:
Model:
Capture Capabilities
Check at least ONE that applies:
Screen 4B: Select Collection Device > Add New Device
SonyHDDevice Nickname:
Computer Interface:
Photo
Audio
Video
Note: Checking video and/or audio may require device setup.
Use consistent layout for dialog with: title bar white background basic instruction text group boxes with titles

9
Follow the setup process so you can use your media capture device with MediaGeotagger.
Set up device
Media Geotagger _
CloseNext >< Back
Completed Tasks
Welcome
Create media collection
Import GPS data
Select collection device
Set up device
Calibrate device
Import media
Geotag media
Verify
Collected Data
The setup process takes you through two back-to-back recordings:
Process
You must start and stop the device EXACTLY when prompted to do so; otherwise, you setup will NOT be reliable. However, you can point your device anywhere you want during recording.
Screen 5A: Set Up Device
20-second recording
5-second break
5-second recording
Note: Make sure the device records two separate files; not just one file with a five-second pause!
Please prepare your device to record before proceeding.
When you are ready, press the space bar and start recording with your device at the SAME time.
Used group box, title, and bullets to improve readability.
US20100819MER_01
Redwing Walk
GPS Track Logs
2/23/2015 9:34 AM
2/25/2015 10:15 AM
2/26/2015 3:27 ON
Collection Devices
Sony HDR-XR200V
Media
10
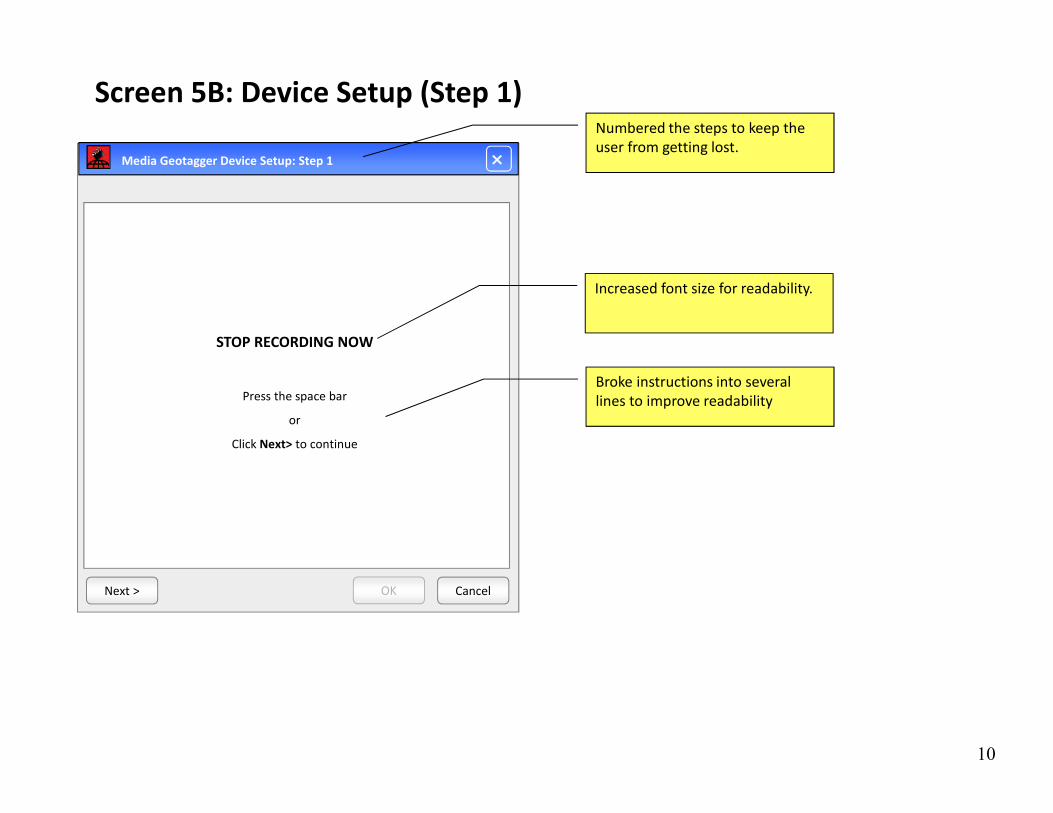
Media Geotagger Device Setup: Step 1
Screen 5B: Device Setup (Step 1)
CancelNext >
STOP RECORDING NOW
Press the space bar
or
Click Next> to continue
Broke instructions into several lines to improve readability
Increased font size for readability.
Numbered the steps to keep the user from getting lost.
OK

11
Media Geotagger Device Setup: Step 2
CancelOK
Attach media capture device and select the two files just recorded.
Files
Browsexxx
xxx Browse
First Recording:
Second Recording:
Status
Successfully set up your media capture device.
Media Geotagger Device Setup: Step 2
CancelOK
Attach media capture device and select the two files just recorded.
Files
Browsexxx
xxx Browse
First Recording:
Second Recording:
Status
Re-click Browse to select different files.
Click Redo to perform the recording process again. IMPORTANT! Make sure to press RECORD on your capture device as closely as possible to the prompts on the screen.
Click Cancel to return to the main Media Geotagger screen.
Files do not have proper time separation. Take ANY of the following actions:
Redo
Screen 5C: Device Setup (Step 2)
Setup Successful Setup Unsuccessful
Changed text

12
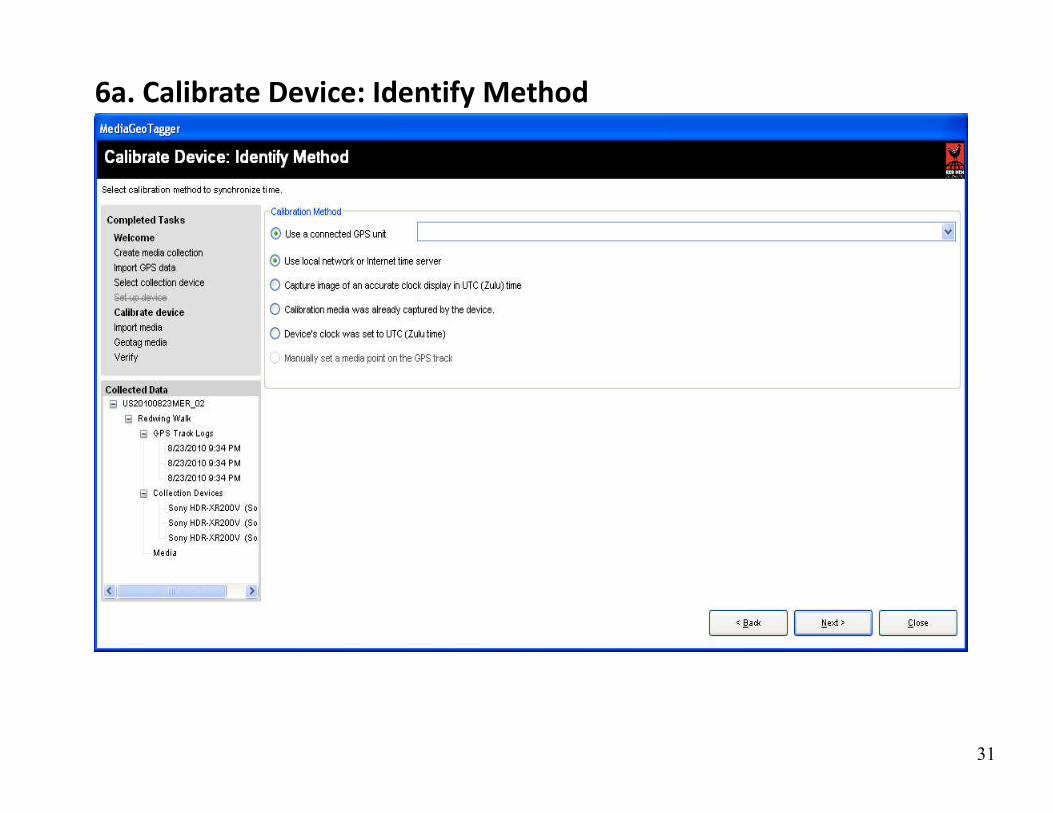
Select calibration method to synchronize time between the media and the time.
Calibrate device: Identify method
Media Geotagger _
CloseNext >< Back
Completed Tasks
Welcome
Create media collection
Import GPS data
Select collection device
Set up device
Calibrate device
Import media
Geotag media
Verify
Use a connected GPS unit
Use local network or Internet time sever
Capture image of an accurate clock display in UTC (Zulu) time
Calibration media was already captured by the device
Device’s clock was set to UTC (Zulu) time
Manually set a media point on the GPS track
Calibration Method
Screen 6A: Calibrate Device: Identify method
Collected Data
US20100819MER_01
Redwing Walk
GPS Track Logs
2/23/2015 9:34 AM
2/25/2015 10:15 AM
2/26/2015 3:27 ON
Collection Devices
Sony HDR-XR200V
Media
Changed instruction text.

13
Calibrate device: Identify method
Media Geotagger _
CloseNext >< Back
Completed Tasks
Welcome
Create media collection
Import GPS data
Select collection device
Set up device
Calibrate device
Import media
Geotag media
Verify
Screen 6B: Calibrate Device > Use a connected GPS device OR
Use local network or Internet time server (part of main screen)
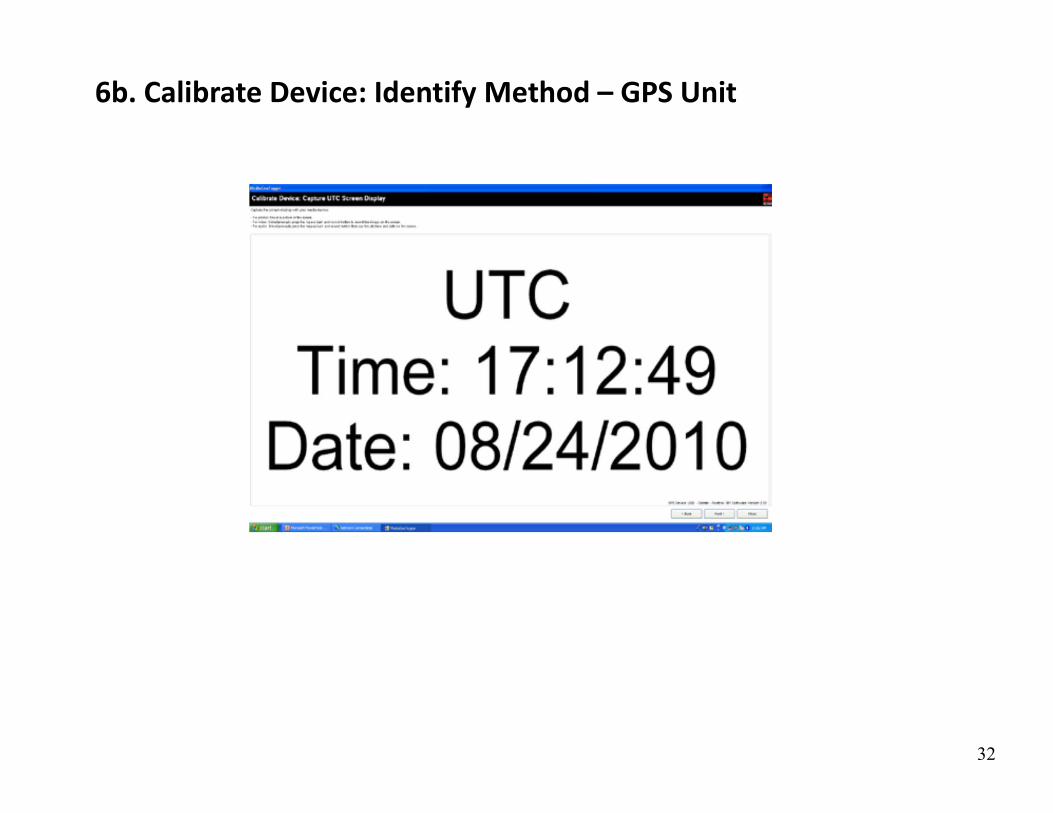
Capture the UTC display below with your media device.
Instructions
For photos: Shoot a picture of the screen.
For video: Simultaneously press the space bar (long bar at the bottom of the keyboard) and the Record button, then stop recording.
For audio: Simultaneously press the space bar (long bar at the bottom of the keyboard) and the Record button, say the UTC time and date that you see on the screen, then stop recording.
UTC
Time: 17:12:49
Date: 03/01/2015
The original software had this information appearing as part of the main screen.
For consistency, I think it should appear in a separate dialog – see next slide.
Collected Data
US20100819MER_01
Redwing Walk
GPS Track Logs
2/23/2015 9:34 AM
2/25/2015 10:15 AM
2/26/2015 3:27 ON
Collection Devices
Sony HDR-XR200V
Media

14
Calibrate time from GPS Device, local network, or Internet server
Capture the UTC display below with your media device.
Instructions
For photos: Shoot a picture of the screen.
For video: Simultaneously press the space bar (long bar at the bottom of the keyboard) and the Record button, then stop recording.
For audio: Simultaneously press the space bar (long bar at the bottom of the keyboard) and the Record button, say the UTC time and date that you see on the screen, then stop recording.
UTC
Time: 17:12:49
Date: 03/01/2015CancelOK
For consistency, this information probably should be in a separate dialog as shown here.
Cancel closes the dialog and returns the dialog to the main screen – the current page in the process: Calibrate Device
OK closes the dialog and returns the user to the main screen – the next page in the process: Import Media
Screen 6C: Calibrate Device > Use a connected GPS device OR
Use local network or Internet time server (separate dialog)

15
Screen 6D: Calibrate Device > Capture image of accurate clock
Capture image of accurate clock display
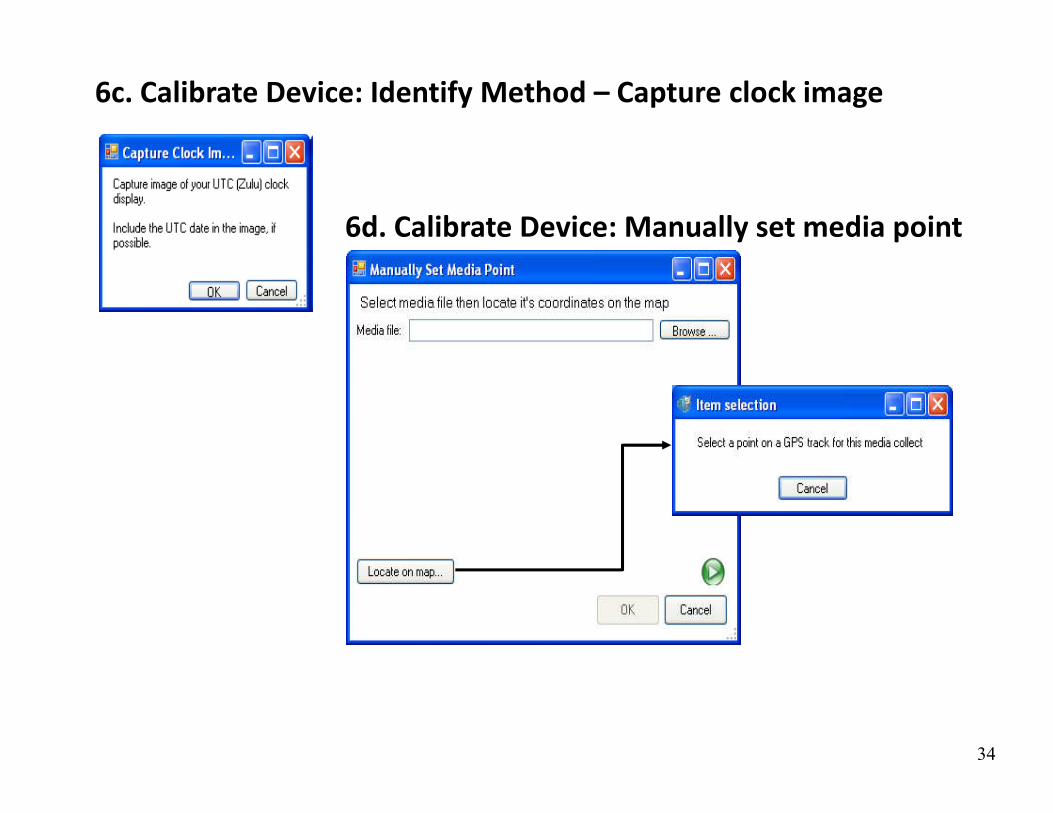
Capture image of your UTC (Zulu) clock display.
Include the UTC date in the image, if possible.
Instructions
CancelOK
Screen 6E: Calibrate Device > Capture image of accurate clock
Manually set media point
Select media file,
Instructions
CancelOK
Browsexxx
Locate its coordinates on the map:- Click the Locate button.- Select a point on the GPS track.
Locate
It makes more sense to tell the user what to so she can click Locate and then click the point on the track without the current intermediate dialog popping up with a confusing Cancelbutton.
Takes user to next tab on main screen: Calibrate Device: Set Time.

16
View or listen to the calibration media to enter the correct time.
Calibrate device: Set time
Media Geotagger _
CloseNext >< Back
Completed Tasks
Welcome
Create media collection
Import GPS data
Select collection device
Set up device
Calibrate device
Import media
Geotag media
Verify
Calibration Media
Screen 6F: Calibrate Device: Set time
Calibration File
BrowseMedia File:
Time
Enter time that matches that indicated by the calibration media.
: : / /
Hours Min Sec Month Day Year
Added group boxes and group titles for consistency and ease of use.
No file is yet selected.
Collected Data
US20100819MER_01
Redwing Walk
GPS Track Logs
2/23/2015 9:34 AM
2/25/2015 10:15 AM
2/26/2015 3:27 ON
Collection Devices
Sony HDR-XR200V
Media

17
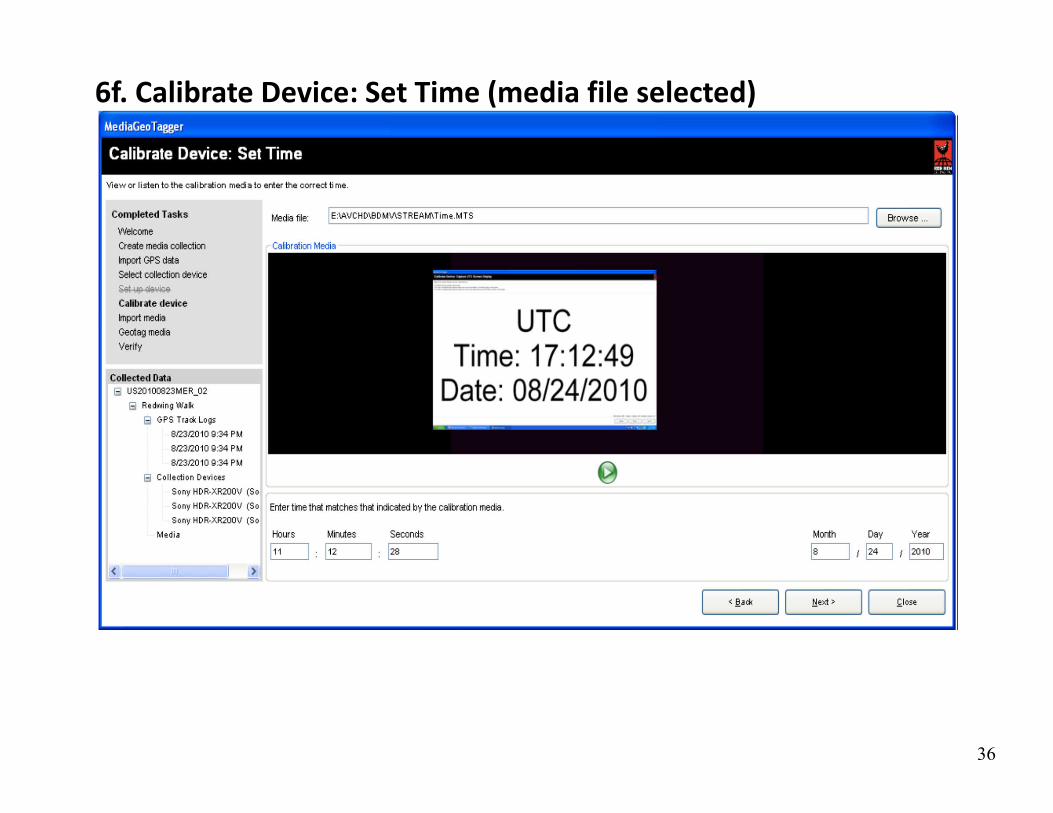
View or listen to the calibration media to enter the correct time..
Calibrate device: Set time
Media Geotagger _
CloseNext >< Back
Completed Tasks
Welcome
Create media collection
Import GPS data
Select collection device
Set up device
Calibrate device
Import media
Geotag media
Verify
Calibration Media
Screen 6G: Calibrate Device: Set time (after selecting Media File)
Calibration File
BrowseE:\AVCHD\DMV\STREAM\Time.MTSMedia File:
Time
Enter time that matches that indicated by the calibration media.
UTC
Time: 17:12:49
Date: 03/01/2015
17 : 12 : 49 03 / 01 / 2015
Hours Min Sec Month Day Year
Selected media file.
Collected Data
US20100819MER_01
Redwing Walk
GPS Track Logs
2/23/2015 9:34 AM
2/25/2015 10:15 AM
2/26/2015 3:27 ON
Collection Devices
Sony HDR-XR200V
Media

18
Identify the location of the folder containing the media you want to import for geotagging.
Import media
Media Geotagger _
Browse
CloseNext >< Back
Completed Tasks
Welcome
Create media collection
Import GPS data
Select collection device
Set up device
Calibrate device
Import media
Geotag media
Verify
Media Folder:
Location
Note: Selected device’s capture capabilities are set to import photos and video.
Include all sub-directories
E:\AVCHD\BDMV\STREAM
Screen 7: Import Media
Collected Data
US20100819MER_01
Redwing Walk
GPS Track Logs
2/23/2015 9:34 AM
2/25/2015 10:15 AM
2/26/2015 3:27 ON
Collection Devices
Sony HDR-XR200V
Media
19
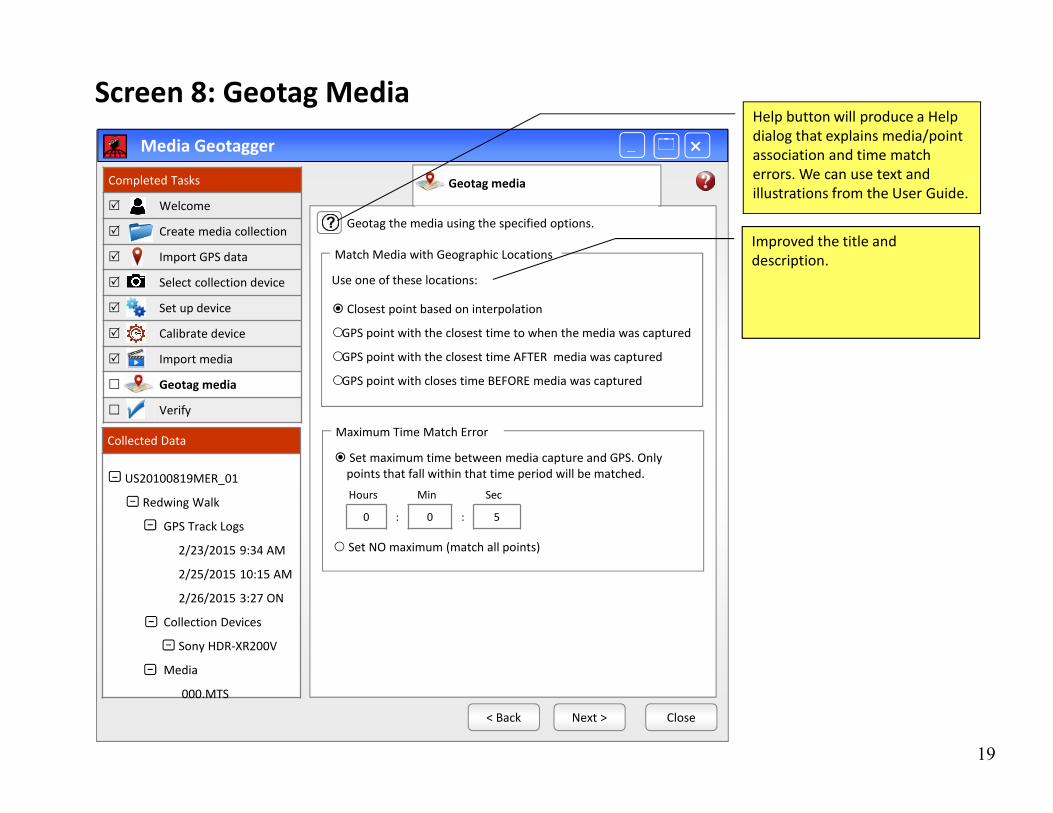
Geotag the media using the specified options.
Geotag media
Media Geotagger _
CloseNext >< Back
Completed Tasks
Welcome
Create media collection
Import GPS data
Select collection device
Set up device
Calibrate device
Import media
Geotag media
Verify
Closest point based on interpolation
GPS point with the closest time to when the media was captured
GPS point with the closest time AFTER media was captured
GPS point with closes time BEFORE media was captured
Match Media with Geographic Locations
Screen 8: Geotag Media
Use one of these locations:
Maximum Time Match Error
Set maximum time between media capture and GPS. Only points that fall within that time period will be matched.
0 : 0 : 5
Hours Min Sec
Set NO maximum (match all points)
Help button will produce a Help dialog that explains media/point association and time match errors. We can use text and illustrations from the User Guide.
Improved the title and description.
Collected Data
US20100819MER_01
Redwing Walk
GPS Track Logs
2/23/2015 9:34 AM
2/25/2015 10:15 AM
2/26/2015 3:27 ON
Collection Devices
Sony HDR-XR200V
Media
000.MTS
20
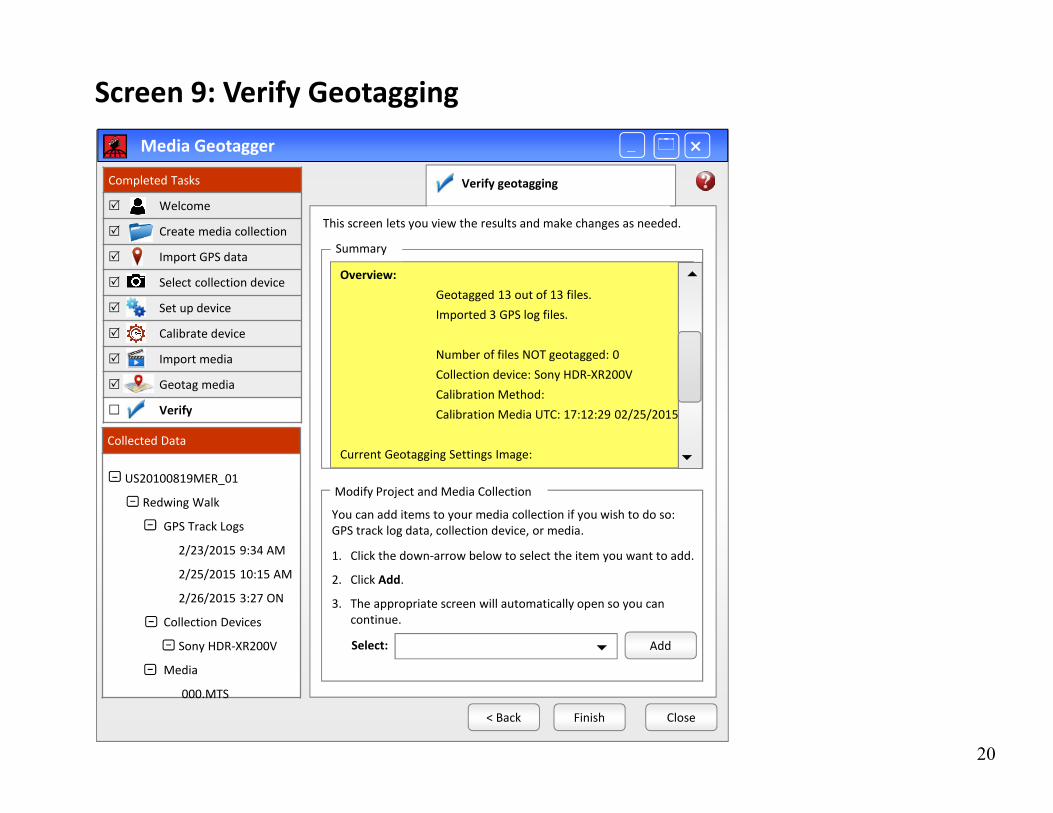
This screen lets you view the results and make changes as needed.
Verify geotagging
Media Geotagger _
CloseFinish< Back
Completed Tasks
Welcome
Create media collection
Import GPS data
Select collection device
Set up device
Calibrate device
Import media
Geotag media
Verify
Overview:
Geotagged 13 out of 13 files.
Imported 3 GPS log files.
Number of files NOT geotagged: 0
Collection device: Sony HDR-XR200V
Calibration Method:
Calibration Media UTC: 17:12:29 02/25/2015
Current Geotagging Settings Image:
Summary
You can add items to your media collection if you wish to do so: GPS track log data, collection device, or media.
Screen 9: Verify Geotagging
Collected Data
US20100819MER_01
Redwing Walk
GPS Track Logs
2/23/2015 9:34 AM
2/25/2015 10:15 AM
2/26/2015 3:27 ON
Collection Devices
Sony HDR-XR200V
Media
000.MTS
1. Click the down-arrow below to select the item you want to add.
2. Click Add.
3. The appropriate screen will automatically open so you can continue.
Modify Project and Media Collection
Select: Add

21
Screenshots of Existing Screens
22
1. Welcome to Media Geotagger
23
2. Create a Project and Media Collection

24
3. Import GPS Data

25
4a. Select Collection Device

26
4b. Select Collection Device > Add New Device

27
5a. Set Up Device

28
5b. Set Up Device: Step 1

29
5b. Set Up Device: Step 2 (no media files)

30
5b. Set Up Device: Step 2 (media files selected)
31
6a. Calibrate Device: Identify Method
32
6b. Calibrate Device: Identify Method – GPS Unit

33
6b. Calibrate Device: Identify Method – Local network or Internet server
34
6c. Calibrate Device: Identify Method – Capture clock image
6d. Calibrate Device: Manually set media point

35
6e. Calibrate Device: Set Time (no media file)
36
6f. Calibrate Device: Set Time (media file selected)

37
7. Import Media

38
8. Geotag Media

39
9. Verify Geotagging