iexpression for expressionengine 1.x &...
TRANSCRIPT

iExpression for ExpressionEngine 1.x & 2.x
User-Guide
R E D W H E N E X C I T E D
w w w. r we - u k . c o m

IntroductionWelcome to iExpression
Here at RED When Excited (RWE to its friends) we have been developing applications, games, and web-sites for over 14 years. In this time we’ve worked with multiple Content Management Systems (CMS), as well as developing our own. When the iPhone came along we started developing plans for Apps, and one of the first things we wanted to do was revamp the web-site. Throwing away our previous CMS, we adopted ExpressionEngine for its power and flexibility. However we quickly discovered that the thing we most wanted to do was keep up to date with the site, and be able to post to our blogs without needing to be sitting at our computers. We headed off to the App Store to see what was there. Whilst there are a few Apps that do integrate with ExpressionEngine we quickly discovered they are all designed for generic CMS’s, and all use a generic interface to do so. What does this mean? Limitations and an inability to really use the power of any one CMS in order to work with all CMS’s. So we decided we would write our own. iExpression is the App we use to manage our own site, and with the release of 1.3 we think that’s exactly what you’ll be doing (well, not our site obviously, your own. You get the point). Of course, you can still use the same interface the other Apps use, but to really fly we’ve got a dedicated module for ExpressionEngine 1.6.8 and above, and ExpressionEngine 2.1 and above that brings the power of ExpressionEngine onto your iPhone or iPad.
What you can do
We have an expansive plan for iExpression, and 1.4 is really just the start. However, we started out with the intention of supporting a few simple use cases, and building from there. Right now, iExpression is designed for some of the fol-lowing uses, however we are sure you’ll discover your own.
Support any number of sites or users Post on the move taking snapshots, and supporting
social networking integration and tracking
Leverage the power of ExpressionEngine custom
field groups
Core Features
iExpression is made up of a 100 of tiny features that add up into a unique mobile experience, but the core features are listed here so you have an idea of what you can achieve with this powerful little tool
• Single universal app supporting all iOS Devices from 3.1.3 onwards (fully tested in iOS 4.0.2 and with full sup-port for iPhone 4’s retina display)
• Landscape or portrait mode editing
• Supports ExpressionEngine 1.x or 2.x using either the standard Metaweblog API (limits the functionality you can use) or our very own dedicated module (available for free to all iExpression users)
• Add any number of ExpressionEngine sites, and any number of users to each site
• Configure Twitter announcements for each user (if desired)
• Geo-tag posts with your current (or edited) location
R E D W h e n E x c i t e d i E x p re s s i o n 1 . 4 U s e r G u i d e
1
• Browse and upload to ExpressionEngine upload locations (including snap-shots taken with your iOS device’s camera if it has one)
• Support for all standard ExpressionEngine field-types (based on the release of ExpressionEngine you are using)
• Add images to text fields (especially important for ExpressionEngine 1.6 users who cannot benefit from the ExpressionEngine 2.X file field-type) including controls on the maximum width and height of uploaded images
• Post/Edit/Delete in any blog or channel (controlled by the user’s permissions of course), keeping local drafts on your iOS device if you are not currently connected
• Track click-throughs to your posts, or tweets about it on twitter.com
• View your entries live on the web to make sure they are just how you wanted them
• Supports TextExpander touch for snippet expansion which can dramatically improve the experience of mobile blogging (available on iPhone/iPod Touch/iPad and Mac from SmileSoftware)
• Support for ExpressionEngine Galleries including custom fields, image uploading (and the creation of the appro-priate thumbnails) and relationships
• Support for Categories and Statuses (including easy tracking in the entry list using your custom specified colors)
• Extensive file management capabilities allowing you to upload video, audio tracks, archives or anything to an Ex-pressionEngine File Location
• Advanced Editing mode for experts enabling advanced HTML editing, completely customizable to your own settings if you wish (for experts only)
The really exciting thing is that this is just the beginning, we are planning many more exciting additions to iExpression over the coming releases, including support for third-party field types (there are one or two in 1.3, but we have more coming).
How the user-guide is organized
The core chapters all assume that ExpressionEngine has been setup with your chosen integration, with instructions on how to do this setup in the appendices at the back of the guide. This is done to ensure that (as we have designed it to be) for customers who have been recommended this application by their site-designers/admins can just focus on how to use iExpression without worrying about the technical side. However, as you’ll see getting ExpressionEngine setup and running is very easy, and normally takes less than 10 minutes, less if you’ve installed ExpressionEngine modules before.
There are differences between sites configured to use MetaWeblog and sites using the dedicated iExpression module. Where something is only available using the dedicated module, we will highlight this in the title of the section, where there are differences in the capabilities we will always describe the iExpression module behavior first, and then let Me-taWeblog users know what restrictions or differences expect at the end of the section. As a universal application, there is sometimes a dedicated user-interface for iPad owners. These will be described in the body of the text, with illustra-tions if appropriate.
Getting Help
iExpression’s starting page sports a Help button in the bottom left corner. You can get the latest version of this guide from there, find download links for the module, and contact our support staff from within the tool.
R E D W h e n E x c i t e d i E x p re s s i o n 1 . 4 U s e r G u i d e
2

Enough talk, let’s get started!
R E D W h e n E x c i t e d i E x p re s s i o n 1 . 4 U s e r G u i d e
3

Adding Sites & Users
Adding a new site
Sites are added from the starting screen of iExpression. If you don’t have any sites configured, then you’ll be immedi-ately prompted to enter the URL for your first site. If you cancel this, or are adding an additional site, just click the + button in the top-right corner of the sites screen (in the navigation panel on the iPad).
An alert will pop-up prompting you for the URL of your site. This should be the home-page URL which will most likely be in the form
http://www.yourdomain.com/
or perhaps
http://www.yourdomain.com/specificsite/
Don’t worry about adding in anything special, iExpression just wants the most basic entry point you’d give to a cus-tomer or user of the site.
You’ll then be prompted for the username and then the password. iExpression needs at least one user to get started. That user should have permission to post to at least one channel or blog, and ideally be able to upload images and files to at least one location. Have a look in the appendices for more information on how to do that.
Once you’ve supplied the password, iExpression will then automatically start trying to identify the connection point for either the iExpression module or the MetaWeblog module. It will scan first for the iExpression module, and then if that fails it will scan again for the MetaWeblog module. If it finds both, it will chose the iExpression module over MetaWe-blog as that will provide the best user experience.
iExpression groups each site and its users together (MetaWeblog users should note that they need to tap “view” to advance to the user list and site configuration, more on that in the next section), and also adds a link to configure the site. The following image shows iExpression configured with two sites, one using the iExpression module, and one using R E D W h e n E x c i t e d i E x p re s s i o n 1 . 4 U s e r G u i d e
4

the MetaWeblog module. Note that the MetaWeblog site has a grey icon (we are proud of our work) rather than the full color iExpression icon.
Note that you should ensure that either the MetaWeblog or iExpression module have been installed in your Expres-sionEngine setup, and that the user you are logging in with has access to the module and at least one channel or blog. If you are in any doubt, login for the first time with an super-user account to ensure that all everything is working before moving on to setup users from specific groups.
You could get started straight away by tapping on the user you want to access your site with, but lets explore adding new users first.
Adding new users
Now that iExpression knows about a site, you do not need to go through the process of entering a URL again. Tapping on settings will take you to the site management screen where you will see all of the users setup in iExpression as the option to add another user. Finally at the bottom of the view you’ll see some details about your site, the version of ExpressionEngine used, and the module version installed. Pay attention to this last one, you’ll be warned about any in-compatibilities between the version of iExpression you have on your device, and the one installed on your site there in addition to any other information (such as an ExpressionEngine defect that will impact the functionality available in iExpression).
R E D W h e n E x c i t e d i E x p re s s i o n 1 . 4 U s e r G u i d e
5
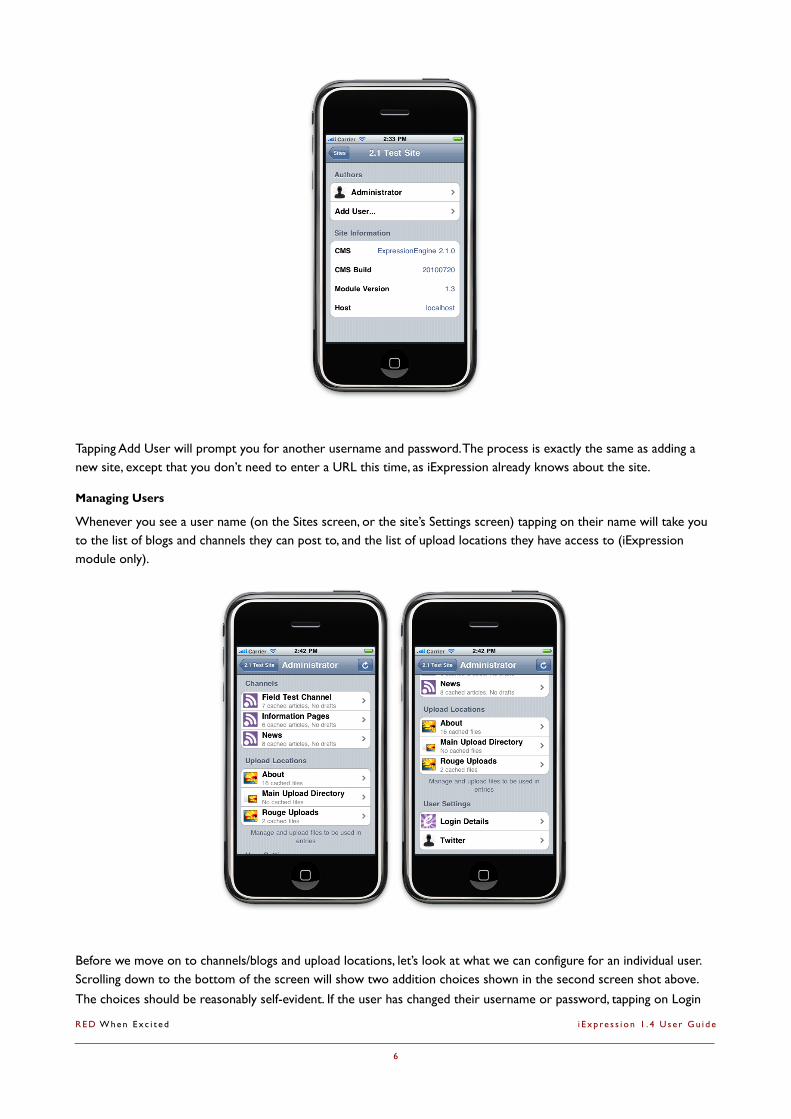
Tapping Add User will prompt you for another username and password. The process is exactly the same as adding a new site, except that you don’t need to enter a URL this time, as iExpression already knows about the site.
Managing Users
Whenever you see a user name (on the Sites screen, or the site’s Settings screen) tapping on their name will take you to the list of blogs and channels they can post to, and the list of upload locations they have access to (iExpression module only).
Before we move on to channels/blogs and upload locations, let’s look at what we can configure for an individual user. Scrolling down to the bottom of the screen will show two addition choices shown in the second screen shot above. The choices should be reasonably self-evident. If the user has changed their username or password, tapping on Login
R E D W h e n E x c i t e d i E x p re s s i o n 1 . 4 U s e r G u i d e
6

Details will take them to a screen where these can be changed. Perhaps more interestingly, you can also see a Twitter option.
Setting up Twitter
Tapping Twitter will allow you to enter a username and password for twitter.com, making it easy for you to promote your site on one of the premier social networks. iExpression uses twitter’s new authentication scheme which means that although you will enter both your username and password, only the username will be stored on the device. Finally you have a choice to enable tweeting, or disable it. This can be useful if there is something you want to post, but you don’t think it’s quite exciting enough to tweet about!
Deleting Users
Anywhere you see a user name in a list (on the Sites screen, or the site’s Settings screen) you can just swipe the user to be provided with the option to delete the user. Note that deleting the last user for a site, will remove the site from iExpression. Indeed, deleting a user will delete all the cached information for that user, including any draft posts they had been preparing.
Differences in managing users and sites when using MetaWeblog
If you are using MetaWeblog instead, the process is very slightly different. You only have one choice per site on the first screen, so tapping on that will take you to the basic site configuration. When you tap on that icon you will be taken to a list of all users, and all of the blogs/channels they can post on. To manage the site and user settings simply click on the Configure button in the tool bar at the bottom of the screen
R E D W h e n E x c i t e d i E x p re s s i o n 1 . 4 U s e r G u i d e
7
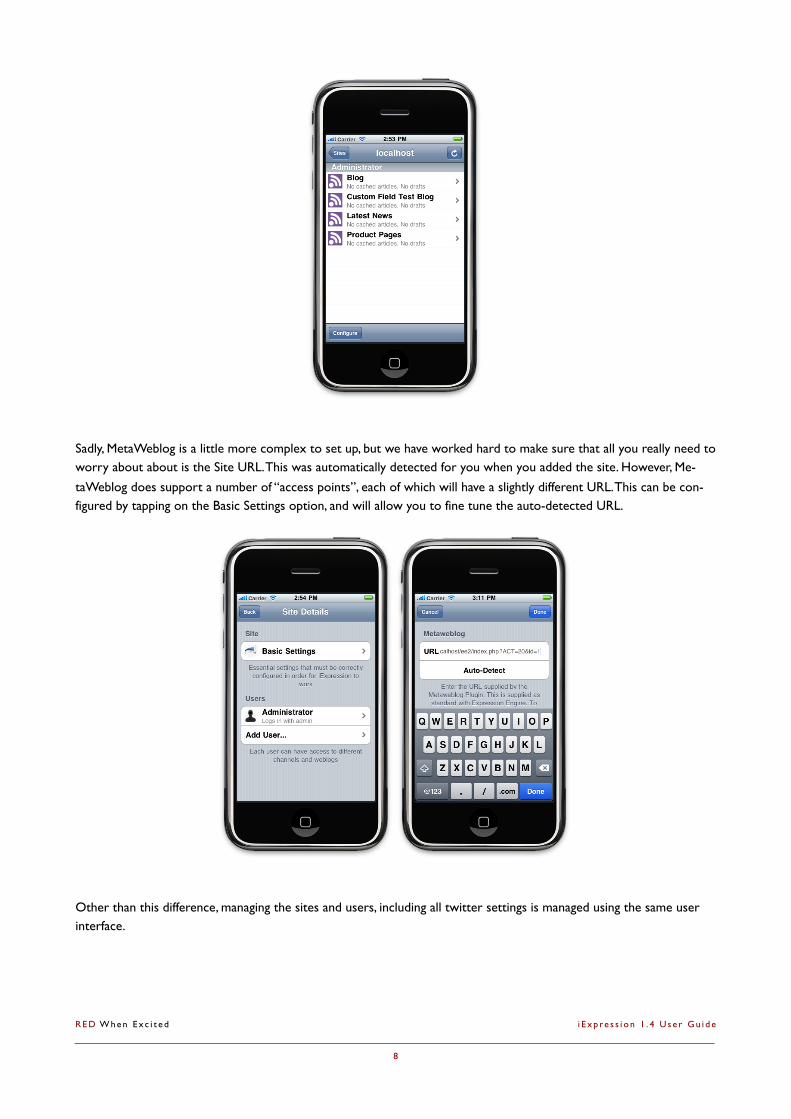
Sadly, MetaWeblog is a little more complex to set up, but we have worked hard to make sure that all you really need to worry about about is the Site URL. This was automatically detected for you when you added the site. However, Me-taWeblog does support a number of “access points”, each of which will have a slightly different URL. This can be con-figured by tapping on the Basic Settings option, and will allow you to fine tune the auto-detected URL.
Other than this difference, managing the sites and users, including all twitter settings is managed using the same user interface.
R E D W h e n E x c i t e d i E x p re s s i o n 1 . 4 U s e r G u i d e
8

Posting, Editing, Viewing and Deleting EntriesThe Channel List
From the user screen you can see all the channels and weblogs a user can post in. Selecting on of these will take you to the list of entries in that channel (note that MetaWeblog users will see a list, grouped by user for all of the channels for the selected site). Under each channel name you can see how many drafts are stored in the device, as well as how many entries have been cached on the device. This list of cached entries can be refreshed at any time by tapping the refresh button on the top right of the screen.
This will poll the server for any new content (or changes to entry titles) and update the list.
Posting Entries
On an iPhone/iPod Touch at the top of list in the drafts section is a “Create New Article...” entry, which when tapped will move you to the entry editing screen. iPad users do not have this in the navigation list, but instead have a new post icon added to the detail area of the screen. Both buttons have the same effect, creating a new post and moving you to the edit entry of iExpression.
R E D W h e n E x c i t e d i E x p re s s i o n 1 . 4 U s e r G u i d e
9

Once this screen is visible you may tap on any of the fields to start editing it. Note that on the iPhone/iPod Touch you will be taken to a dedicated screen for editing entries, whereas on the iPad all fields are displayed in a single long list, where you will not be required to move between screens to edit all of the fields. Some fields (such as date, selection, and file fields) will display a pop-up on the iPad in which the value can be entered.
On the iPhone/iPod Touch each field’s dedicated editing screen has “Next/Previous” buttons in the top right. These will move you to the next field that has been configured as “Show By Default” in ExpressionEngine. This makes it easy for you to quick skip through the important fields, without worrying about those that are perhaps less often used.
Text Area and Text Input fields have a special bar underneath their main editing area which allows images to be added (Text Area only) or report the number of characters in the field (Text Input fields only, highlighting the character count in red if you have exceeded it). This can be include images from the camera if one is present on the iOS Device. Once an image has been added, you can remove it by tapping the Remove button, or format it by tapping on the preview
R E D W h e n E x c i t e d i E x p re s s i o n 1 . 4 U s e r G u i d e
10

button (magnifying glass). Formatting choices include justification and text-wrapping. For a full description of all of the supported field types and their editors please see Appendix A.
When you are happy with your post, just tap Publish to publish your entry onto the server. In addition, if you have con-figured tweeting for the user, the title of the post, together with a shortened URL will be tweeted automatically. If you are not ready to publish your post yet (perhaps you want to skip back to an e-mail, add the image to your photo li-brary, jump back into iExpression and add it to your post?) just navigate back to the entries list and your progress so far will be saved ready for you to start again later.
Advanced Editing (iOS 3.2 and above only)
Advanced Editing can be turned on in the Settings screen and provides a very rich and powerful editing capability for more experienced users with more complex needs.
R E D W h e n E x c i t e d i E x p re s s i o n 1 . 4 U s e r G u i d e
11

When enabled, text fields will be provided with a toolbar that is generated specifically for the field type used. Although there can be different buttons on the tool bar, all buttons behave in much the same way. However there are some gen-eral features that can be applied to almost all buttons:
• The first button is a preview button. It will take the field content you have entered so far and send it Expres-sionEngine to format according the field and site settings, before presented the result to you. Note this does not layout the entire entry, but is simply intended to give you a quick visual check that this field will look the way you expect it to.
• In general, selecting text before pressing the button will cause that text to be used in the insertion. For exam-ple, pressing the b button for bold will insert empty <b></b> tags if nothing is selected, but if some text is se-lected it will be wrapped in the <b> tags and the cursor placed at the end
• For some buttons (such as the list buttons) selecting text with new lines in will stimulate special behavior. For example, each item on its own line will be turned into a list item if the ordered or unordered list buttons are used
• The image and link buttons have special capabilities, and allow you to add links to files or other entries through a dedicate UI. If you chose to Skip this UI it will intelligently parse your selection identifying wether or not it is a URL and placing the selected text in an appropriate place in the generated mark-up (that is, a URL will go in the href, plan text will go between the tags
Note that the toolbar can be scrolled, but we have tried to place more frequently used groups near the start. If you wish this toolbar can be configured, and please see Appendix D for more details.
Viewing Entries
Tapping on any published entry in the entries list will take you to the entry viewer, which will show all fields of the en-try and allow you to scroll through them. In the top right is a refresh post icon. This will reload either the just the val-ues used in the entry, or the field definitions (for the entire channel). This can be useful if the custom field group in ExpressionEngine has been updated since iExpression originally pulled the entry from the server. It should be noted that although iExpression tries to preserve as much data as it can, some changes to fields can mean that published en-tries must be re-downloaded, and draft entries may loose some of their fields.
R E D W h e n E x c i t e d i E x p re s s i o n 1 . 4 U s e r G u i d e
12
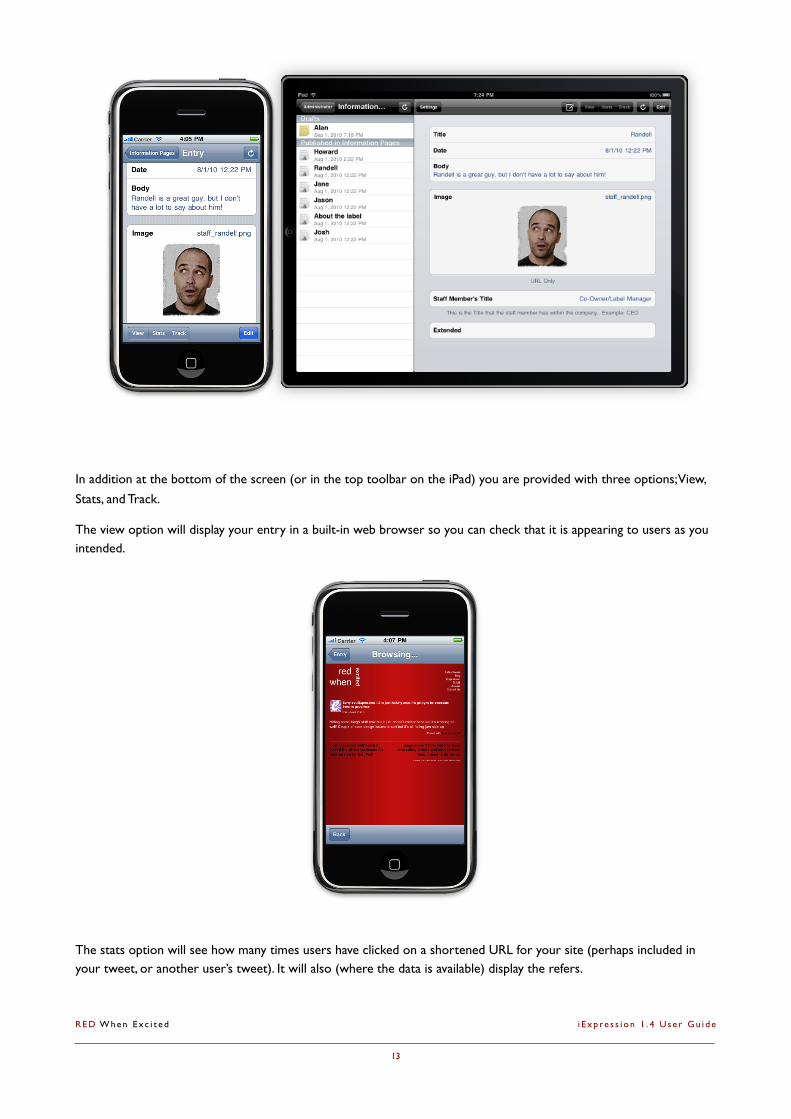
In addition at the bottom of the screen (or in the top toolbar on the iPad) you are provided with three options; View, Stats, and Track.
The view option will display your entry in a built-in web browser so you can check that it is appearing to users as you intended.
The stats option will see how many times users have clicked on a shortened URL for your site (perhaps included in your tweet, or another user’s tweet). It will also (where the data is available) display the refers.
R E D W h e n E x c i t e d i E x p re s s i o n 1 . 4 U s e r G u i d e
13

Finally, the Track button will search twitter for references to your entry, allowing you to tap on each and see what people are saying about your content!
Editing Entries
When viewing an entry an edit button will be available in the tool-bar at the bottom of your screen (iPad users will see it in the top tool-bar). Tapping this will switch the viewer back into edit mode. The icon for the entry in the entry list will also change back to the yellow draft symbol, but it should be noted that it will NOT move back up into the drafts section (to make it clear that this is an entry that is currently live on the site). The entry will remain in this state until the user publishes the entry again.
Deleting Entries
An entry can be deleted at any time by swiping it’s name in the entry list (as you would an e-mail in the Mail app) and the tapping Delete to confirm you do want to delete it. Note that users must have permission to delete an entry, oth-erwise they will be informed that the attempt to delete the entry failed.
Differences for MetaWeblog users
MetaWeblog users have a very similar interface, but there a few differences they should be aware of:
• Entries cannot be edited with MetaWeblog sites.
• Only three fields are available for MetaWeblog channels or blogs which must be configured using the MetaWe-blog module in ExpressionEngine. These are all restricted to being text fields by the MetaWeblog standard (this is why we developed our own module!)
• There are three locations you can add an image (top of post, middle of post, and bottom of post)
• On both the iPad and the iPhone/iPod Touch the editor is displayed as single long list
R E D W h e n E x c i t e d i E x p re s s i o n 1 . 4 U s e r G u i d e
14

Upload Locations (iExpression Module Only)Browsing
From the user screen a list of the file upload locations available to the user is available. Tapping on any of these will take you to a list of the contents of that location, including previews of any of the images. Note that at the top right is a refresh button which when pressed will remove any files deleted from the server from the list on your iOS Device, or add in files subsequently added to the server.
Tapping on any of these entries will take you to additional detail about that entry (including the file size for example). When referencing a file (for example in an ExpressionEngine 2.1 File Field) the same functionality is used, but there will be a “Select” button on the top-right of the detail view. Tapping this will select that file for the Field (or link).
R E D W h e n E x c i t e d i E x p re s s i o n 1 . 4 U s e r G u i d e
15

Deleting Files
When browsing the files in the location, right swiping over any entry will expose the Delete button. iExpression will then prompt you to confirm that you wish to delete the file. It should be noted that this operation cannot be undone, and if the file is used on your site any link referring to it will now be broken.
Uploading New Content
Whether you are specifically browsing a location, or are in the process of adding a file link to a field (or using Ad-vanced Edit mode) when you are viewing the list of files in a location you can use one of two buttons in the toolbar at the bottom of the screen (the iPad version has a single button in the toolbar at the top).
Tapping the Camera button will give you the choice of taking a new photograph/video or selecting an existing photo-graph or video from your iPhone’s media library (the things you can see from Apple’s built-in Photo App). It should be noted that if you have configured a maximum width or height for images in Settings, then these will be applied to pho-tographs before uploading. The same is true for any file uploading options, size requirements for images are always re-spected. Note that on iOS devices without built in cameras you will be taken directly to the Media Library.
Finally, tapping the + button will present you with some different choices for adding files. Depending on how you have configured iExpression and the version of iOS you are using you will have different options presented:
• iExpression If you have iOS 3.2 or later you can select a file from the shared documents that iExpression stores. Documents can be stored here by using iTunes to copy files over to iExpression. In addition if you are using Dropbox, files are first downloaded here before being uploaded to the server. This means that if for some reason an upload is interrupted you do not need to re-download the file from Dropbox and can simply restart the upload using the file stored locally on your iOS device. Finally, iExpression registers itself as being able to open a range of file types (such as PDF, movies, ZIP files and others). If you receive an e-mail with an attachment, or visit a web-site with one of these files available as a download you can choose to open those files with iEx-pression. When iExpression opens the file it saves them to this shared location so that it can be uploaded to one or more of your web-sites. Please note that any image uploaded will be resized to conform to the iExpression Settings.
• Dropbox If you have linked iExpression to your Dropbox account you can select any file from your Dropbox and upload it to your ExpressionEngine server. As mentioned above, the file is first downloaded to your iOS device, before the upload to ExpressionEngine is initiated. Please note that any image uploaded will be resized to conform to the iExpression Settings.
• Existing Movie or Photo this option is provided here for convenience and provides the same ability to up-load a photograph or movie (again, note that any image will be resized to conform to your iExpression settings)
R E D W h e n E x c i t e d i E x p re s s i o n 1 . 4 U s e r G u i d e
16
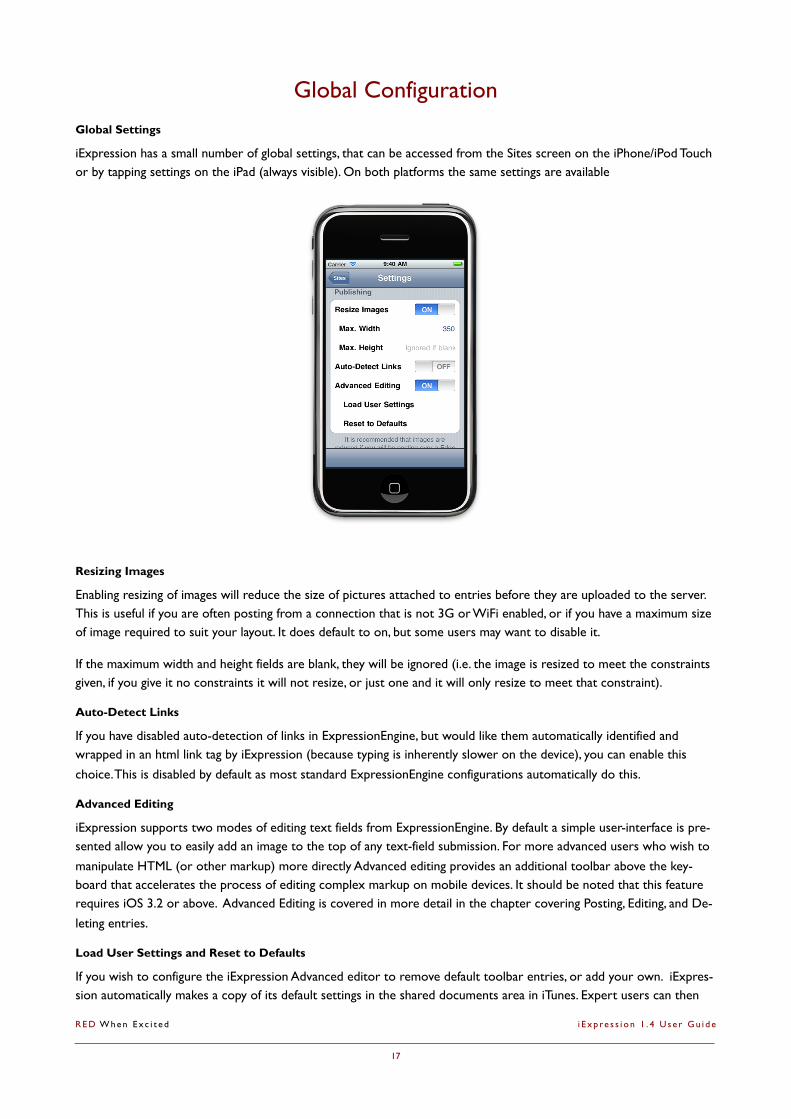
Global ConfigurationGlobal Settings
iExpression has a small number of global settings, that can be accessed from the Sites screen on the iPhone/iPod Touch or by tapping settings on the iPad (always visible). On both platforms the same settings are available
Resizing Images
Enabling resizing of images will reduce the size of pictures attached to entries before they are uploaded to the server. This is useful if you are often posting from a connection that is not 3G or WiFi enabled, or if you have a maximum size of image required to suit your layout. It does default to on, but some users may want to disable it.
If the maximum width and height fields are blank, they will be ignored (i.e. the image is resized to meet the constraints given, if you give it no constraints it will not resize, or just one and it will only resize to meet that constraint).
Auto-Detect Links
If you have disabled auto-detection of links in ExpressionEngine, but would like them automatically identified and wrapped in an html link tag by iExpression (because typing is inherently slower on the device), you can enable this choice. This is disabled by default as most standard ExpressionEngine configurations automatically do this.
Advanced Editing
iExpression supports two modes of editing text fields from ExpressionEngine. By default a simple user-interface is pre-sented allow you to easily add an image to the top of any text-field submission. For more advanced users who wish to manipulate HTML (or other markup) more directly Advanced editing provides an additional toolbar above the key-board that accelerates the process of editing complex markup on mobile devices. It should be noted that this feature requires iOS 3.2 or above. Advanced Editing is covered in more detail in the chapter covering Posting, Editing, and De-leting entries.
Load User Settings and Reset to Defaults
If you wish to configure the iExpression Advanced editor to remove default toolbar entries, or add your own. iExpres-sion automatically makes a copy of its default settings in the shared documents area in iTunes. Expert users can then
R E D W h e n E x c i t e d i E x p re s s i o n 1 . 4 U s e r G u i d e
17

copy this file (named assisted_edit.plist), make changes, and re-import this (using iTunes) into iExpression. To cause iExpression to reload it’s data you can tap on this entry in settings to force the loading of the user settings. The format and structure of this file is discussed in more detail in Appendix D, but if it any point you accidentally make a change that stops the advanced editor from working you can reset back to the default settings by tapping Reset to Defaults.
Auto Geo Tag
Auto geo tagging will automatically add a geo-tag to your posts. If it is left in its default disabled state you will still be able to geo-tag individual posts, but this will not be done automatically for you.
Dropbox
iExpression 1.4 can be linked to your Dropbox, enabling you to upload files to your server from your Dropbox. In or-der to enable this functionality you must login once to Dropbox (your login details are not stored by iExpression in anyway, but unless unlinked from either the Dropbox website or from within iExpression, the association with the ac-count will be maintained via the Dropbox official API).
There is an existing entry in the Dropbox section of the Settings view, and it will contain Link (if you have not yet linked iExpression to your iOS Device) or Unlink (if you have already linked your iOS Device to iExpression). As you might imagine Unlink will break the association between iExpression and your Dropbox account. Tapping Link will bring up the standard Dropbox login screen. Once you have entered your login details for Dropbox iExpression will contact Dropbox and seek authorization to connect. Once this authorization is received, your login details are dis-carded, but a unique key for iExpression and your device is kept that will remain until you Unlink your account from iExpression or the Dropbox website.
R E D W h e n E x c i t e d i E x p re s s i o n 1 . 4 U s e r G u i d e
18

Appendix A: Supported Field-TypesTextarea (EE 1.6.x and EE 2.x)
Textarea fields provide a large size editing panel for entering text into a field. Images can be added (they will be in-serted at the top of the field) and formatted (see below). When viewed, text area fields will strip out any HTML mark-up (this includes images, which will not be visible when the field is viewed) and display just the plain text in the field. However, any mark-up is kept, and if subsequently edited the tags will be available to be modified.
On iPhone/iPod Touch this field is edited in a dedicated screen supporting both portrait and landscape mode. On the iPad it is edited in-line with the main entry. Tapping on the Add Image button in the panel below the main editing area will display an image selection screen, which also provides the option on appropriately equipped iOS Devices to take a photograph and use it immediately in the field.
If an image has been added the Add Image button will change to a Remove button and an additional preview button will be displayed on the right.
This preview button will display a dedicated screen showing the currently selected image (iPad owners will see this in a popover rather than a separate screen). At the bottom of the preview screen are formatting options which include alignment (left, center, right) and text-wrapping (inline or floating).
R E D W h e n E x c i t e d i E x p re s s i o n 1 . 4 U s e r G u i d e
19

Text Input (EE 1.6.x and EE 2.x)
Text Input fields are treated in the same way as Textarea fields with the following differences
• An indicator is included in the information panel under the editing area which displays the number of characters typed so far. If the number is red, then the number of characters currently entered exceeds the number of char-acters specified in the field configuration as the maximum length of the field
• When using the iPad the field height is always set to approximately three rows of text in editing mode
• When viewed on an iPhone/iPod Touch the text does not appear below the field label, but instead is on the same line
Date (EE 1.6.x and EE 2.x)
Date fields are displayed as single line entries when viewed, and their display format is controlled by the preferences defined on the iOS Device for dates and times. They are edited in a dedicated screen on iPhone/iPod Touch, and in a popover on the iPad.
R E D W h e n E x c i t e d i E x p re s s i o n 1 . 4 U s e r G u i d e
20

At the bottom of the editor are three buttons, two controlling the current input mode (Date or Time) and one that will set the date to the current time (Now). Note that you are always editing a single date & time regardless of the mode selected.
Select Dropdown (EE 1.6.x and EE 2.x)
Select Dropdowns are displayed as a single line with their label and the selected value. When editing, the selection of available choices is displayed in a separate screen on an iPhone/iPod Touch or in popover on the iPad. The currently selected item is indicated by a check or tick mark. Tapping on any value will set that as the current selection.
It should be noted that iExpression does respect the settings made in the ExpressionEngine control panel that allows either manual definition of allowable values, or automatic determination of allowable values based on the selected val-ues in other select or multi-select fields (including radio buttons and check boxes). Note that the previously selected values are taken from the local database of entries.
Relationship (EE 1.6.x and EE 2.x)
Relationship fields behave in the same way as Select Dropdown fields, allowing the user to select a related entry. The field respects the settings defined in the control panel for sorting (ExpressionEngine allows sorting by title or date in ascending or descending order). Note that the local entry database is searched, and only entries cached on the device will be listed.
File (EE 2.x)
When viewing an entry a file field will display on a single line, showing the field label and the name of the selected file. iExpression will then request a thumbnail of the file if it is an image, extending the height of the cell to fit as appropri-ate.
When editing, iPhone/iPod Touch users will be forwarded to a dedicated selection screen, from where they can navi-gate through all available upload locations, and their contents. Selecting a particular item is achieved by tapping the file in the location, and in the resultant view tapping the select button at the top right. If a file had already been previously
R E D W h e n E x c i t e d i E x p re s s i o n 1 . 4 U s e r G u i d e
21

selected, you will be taken directly to that file, but can navigate back to change your selection. On the iPad, the same method is used, but the selection screens are displayed in a popover.
Multi Select (EE 2.x)
Multi-select fields are displayed and edited in the same way as Select Dropdown fields, but allow multiple selections to be made. When viewed, all selections are displayed with each on its own line. Editing is exactly the same for iPhone/iPod Touch users, but on the iPad multi-select fields are displayed with their choices in-line (no popover is displayed) reflecting more closely the list metaphor intended by this field.
Radio Buttons (EE 2.x)
Radio buttons behave in exactly the same way as Select Dropdowns, allowing only a single selection to be made.
Checkboxes (EE 2.x)
Check boxes behave in exactly the same way as Multi Select fields, enabling multiple check boxes to be ticked.
Wygwam (Pixel & Tonic)
Wygwam is supplied by Pixel & Tonic and provide a rich editing experience within ExpressionEngine and your browser, and is one of the most popular third-party field types. iExpression treats fields of this type are Textarea fields and pro-vides the same editing experience.
R E D W h e n E x c i t e d i E x p re s s i o n 1 . 4 U s e r G u i d e
22

Appendix B: ExpressionEngine 2.1 SetupSetup using the iExpression Module
Setting up the iExpression module could not be easier. Unlike MetaWeblog the iExpression is designed to work with ExpressionEngine and therefore does not require specific configuration. To install it on your site simply follow these steps:
• Upload the ee2/ixpression directory to system/expressionengine/third_party (the entire iexpression directory, not just the files)
• From the ExpressionEngine admin control panel go to Add-Ons / Modules, and click on install for iExpression.
Once this has been done you should see iExpression shown as installed in your module list and be ready to connect iExpression to your site.
Setup using Metaweblog
You must first install the MetaWeblog API module in your ExpressionEngine site. This can be found by going to Add-Ons and selecting Modules. Once installed you can click on the MetaWeblog API to change the settings. Once in-stalled you’ll see something like this
Make a note of the URL, you will need this later to set up iExpression
This URL is the link that is needed for iExpression to contact your web-site. You can set up more than one configura-tion for your site, which will provide you with multiple URLs. However, this is only required if different weblogs re-quired different configurations (see below)
R E D W h e n E x c i t e d i E x p re s s i o n 1 . 4 U s e r G u i d e
23
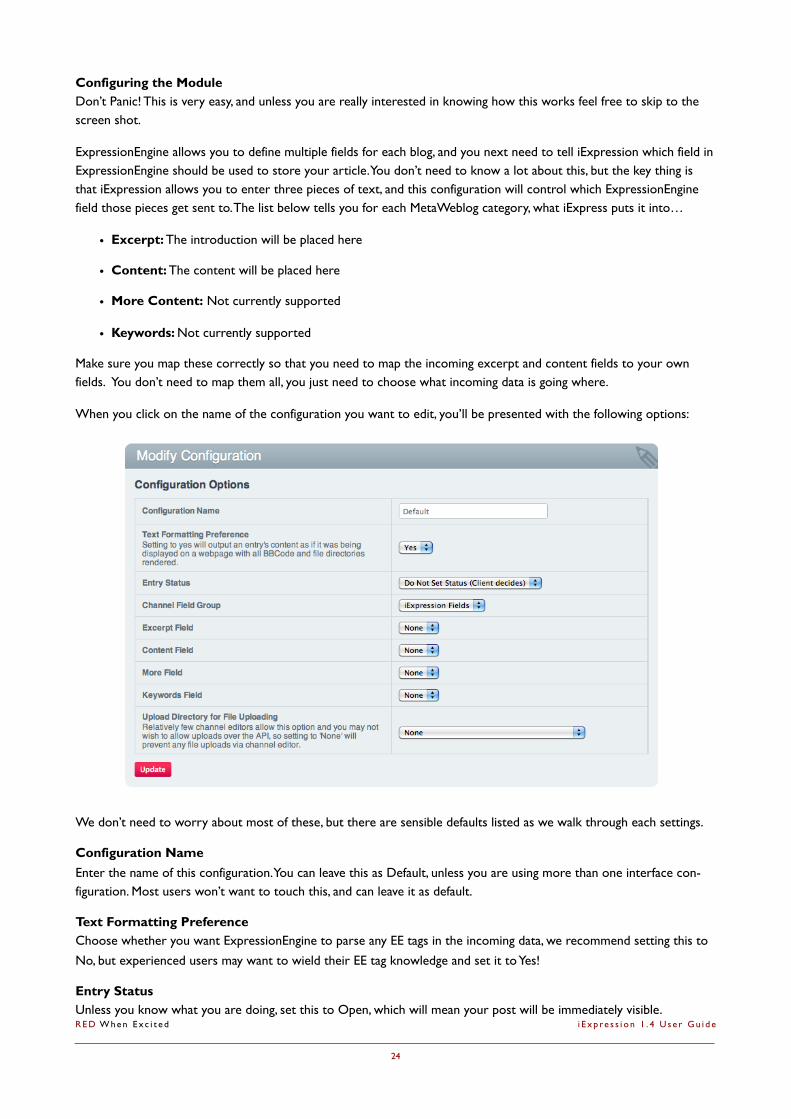
Configuring the ModuleDon’t Panic! This is very easy, and unless you are really interested in knowing how this works feel free to skip to the screen shot.
ExpressionEngine allows you to define multiple fields for each blog, and you next need to tell iExpression which field in ExpressionEngine should be used to store your article. You don’t need to know a lot about this, but the key thing is that iExpression allows you to enter three pieces of text, and this configuration will control which ExpressionEngine field those pieces get sent to. The list below tells you for each MetaWeblog category, what iExpress puts it into…
• Excerpt: The introduction will be placed here
• Content: The content will be placed here
• More Content: Not currently supported
• Keywords: Not currently supported
Make sure you map these correctly so that you need to map the incoming excerpt and content fields to your own fields. You don’t need to map them all, you just need to choose what incoming data is going where.
When you click on the name of the configuration you want to edit, you’ll be presented with the following options:
We don’t need to worry about most of these, but there are sensible defaults listed as we walk through each settings.
Configuration NameEnter the name of this configuration. You can leave this as Default, unless you are using more than one interface con-figuration. Most users won’t want to touch this, and can leave it as default.
Text Formatting PreferenceChoose whether you want ExpressionEngine to parse any EE tags in the incoming data, we recommend setting this to No, but experienced users may want to wield their EE tag knowledge and set it to Yes!
Entry StatusUnless you know what you are doing, set this to Open, which will mean your post will be immediately visible.R E D W h e n E x c i t e d i E x p re s s i o n 1 . 4 U s e r G u i d e
24

Channel Field GroupSelect the ExpressionEngine field group you want data inserted into. For most users, this should just be: Default Field Group.
Excerpt FieldSummary is a sensible field to choose. The field you choose must a be a textarea
Content FieldBody is a sensible field to choose. The field you choose must be a textarea
More FieldNot currently used. You can set this to whatever you like.
Keywords FieldNot currently used.
Upload directory for file uploadingiExpression allows you to attach images, and these will be uploaded to your site. Just pick Main Upload Directory un-less you have already created a specific location you wish to use. Images you attach to your post will be uploaded to this location.
R E D W h e n E x c i t e d i E x p re s s i o n 1 . 4 U s e r G u i d e
25

Appendix C: ExpressionEngine 1.6 SetupSetup using the iExpression Module
Setting up the iExpression module could not be easier. Unlike MetaWeblog the iExpression is designed to work with ExpressionEngine and therefore does not require specific configuration. To install it on your site simply follow these steps:
• Upload the ee1/ixpression directory to system/modules (the entire iexpression directory, not just the files)
• From the ExpressionEngine admin control panel go to modules, and click on install for iExpression.
Once this has been done you should see iExpression shown as installed in your module list and be ready to connect iExpression to your site.
Setup using Metaweblog
You must first install the MetaWeblog API module in your ExpressionEngine site. This can be found in the Modules tab of the control panel. Once installed you can click on the MetaWeblog API to change the settings. Once installed you’ll see something like this
Make a note of the URL, you may need this later to set up iExpression
This URL is the link that is needed for iExpression to contact your web-site. You can set up more than one configura-tion for your site, which will provide you with multiple URLs. However, this is only required if different weblogs re-quired different configurations (see below)
R E D W h e n E x c i t e d i E x p re s s i o n 1 . 4 U s e r G u i d e
26
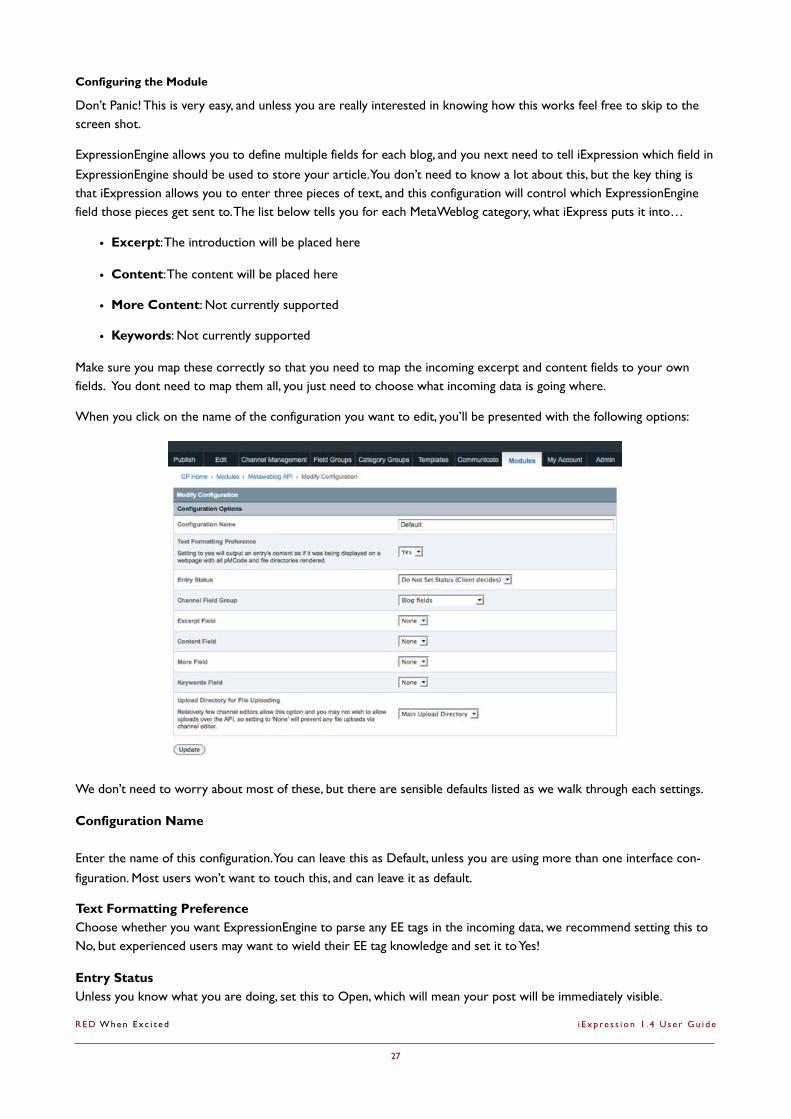
Configuring the Module
Don’t Panic! This is very easy, and unless you are really interested in knowing how this works feel free to skip to the screen shot.
ExpressionEngine allows you to define multiple fields for each blog, and you next need to tell iExpression which field in ExpressionEngine should be used to store your article. You don’t need to know a lot about this, but the key thing is that iExpression allows you to enter three pieces of text, and this configuration will control which ExpressionEngine field those pieces get sent to. The list below tells you for each MetaWeblog category, what iExpress puts it into…
• Excerpt: The introduction will be placed here
• Content: The content will be placed here
• More Content: Not currently supported
• Keywords: Not currently supported
Make sure you map these correctly so that you need to map the incoming excerpt and content fields to your own fields. You dont need to map them all, you just need to choose what incoming data is going where.
When you click on the name of the configuration you want to edit, you’ll be presented with the following options:
We don’t need to worry about most of these, but there are sensible defaults listed as we walk through each settings.
Configuration Name
Enter the name of this configuration. You can leave this as Default, unless you are using more than one interface con-figuration. Most users won’t want to touch this, and can leave it as default.
Text Formatting PreferenceChoose whether you want ExpressionEngine to parse any EE tags in the incoming data, we recommend setting this to No, but experienced users may want to wield their EE tag knowledge and set it to Yes!
Entry StatusUnless you know what you are doing, set this to Open, which will mean your post will be immediately visible.
R E D W h e n E x c i t e d i E x p re s s i o n 1 . 4 U s e r G u i d e
27

Channel Field GroupSelect the ExpressionEngine field group you want data inserted into. For most users, this should just be: Default Field Group.
Excerpt FieldSummary is a sensible field to choose. The field you choose must a be a textarea
Content FieldBody is a sensible field to choose. The field you choose must be a textarea
More FieldNot currently used. You can set this to whatever you like.
Keywords FieldNot currently used.
Upload directory for file uploadingiExpression allows you to attach images, and these will be uploaded to your site. Just pick Main Upload Directory un-less you have already created a specific location you wish to use. Images you attach to your post will be uploaded to this location.
R E D W h e n E x c i t e d i E x p re s s i o n 1 . 4 U s e r G u i d e
28

Appendix D: Modifying the Advanced Editing ToolbarA Word of Warning
We have deliberately not provided a standard UI for configuring the toolbar. Modifying the toolbar is not a trivial proc-ess and regular users should not ever need to do it. However, you may wish to download another user’s configuration and apply it to iExpression on your device, and everything you need to do in order to achieve that is described in the following section (Using iTunes to Access and Update the Advanced Editing Configuration File).
For those that want to create configurations, the subsequent sections provide some basic guidance on editing the con-figuration file, it’s structure, and what you are able to do with it.
Using iTunes to Access and Update the Advanced Editing Configuration File
Once Advanced Editing has been enabled and used, iExpression creates a copy of its default settings in the Shared Documents folder. This means that you can make a local copy on your computer of the file, edit it, before overwriting the existing file.
The process is very simple. To use a new configuration you have already created, or have downloaded from another site:
• Attach your iOS Device to your computer
• Launch iTunes, and select your iOS Device
• Select the Apps screen, and scroll down to the bottom of the page. You will see a File Sharing section with iEx-pression listed in a list on the left hand side. Select iExpression (see below)
• The list on the right-hand side will show all files available for your to access. Drag and drop your new assisted_edit.plist file into this right hand side. You will be prompted asking if you wish to overwrite the existing file. Do so.
• Sync iTunes to you iOS Device
• Open iExpression and go to settings and Load User Settings for the Advanced Editor. You may now test your new settings
R E D W h e n E x c i t e d i E x p re s s i o n 1 . 4 U s e r G u i d e
29

If you wish to edit the configuration yourself, you must first select assisted_edit.plist in the iExpression Documents list and click “Save to...”. You will be prompted to select a location to store the file.
Editing the Configuration File
Here be Dragons This section is for geeks only. You are welcome to try, but you do need to know what you are doing.
The configuration file is a binary plist file. This can be easily edited on Mac OS X by simply double clicking on the file, and it will be opened in Apple’s Property List Editor. For Windows users there are a variety of online conversion tools (such as http://lesterchan.net/plutil/) that will convert a binary plist into an XML one and back (allowing you to use a normal XML file editor to edit the .plist). Note that we are enforcing use of the binary format is conformance with Apple’s guidelines (binary plist files place a reduced memory and CPU burden on mobile devices). The remainder of this appendix will assume you are using Apple’s property list editor, but it is reasonably straight forward to see how this maps to the XML file.
Configuration File Structure
At the top-level of the plist is a dictionary (a set of key-value pairs where the value can be any other “type” that a plist supports such as another dictionary, an array, or a more basic type such as a string). iExpression takes the format speci-fied for a custom field in the ExpressionEngine Custom Field Editor and searches the dictionary for a matching key. If you would like to add support for additional formats simply add a new top-level entry with the key set to the identifier for that format (e.g. markdown).
Each top-level entry is itself a dictionary. At this point there are two supported keys (you can add more but they’ll be ignored).
• uses (String value) - If you would like one format to use the settings for another, then you can specify the key for the desired format. In the proceeding screen shot you can see that the “br” format “uses” the xhtml format for example. Although you may chain these (i.e. html could use br, which in term uses xhtml), this is not recom-mended as it could introduce performance issues during building of the the custom toolbar
• tags (Array value) - This is the most interesting key. The tags key contains an array of dictionaries each of which specify a button to be included on the tool bar, the buttons appearance, and behavior. We’ll move on to look at this tag in more detail now.
The tag Array
R E D W h e n E x c i t e d i E x p re s s i o n 1 . 4 U s e r G u i d e
30

It is important to note that the tag array is ordered. That is, the first entry in your plist will appear first in the toolbar. The property list editor allows you to drag and drop to reorder the array, so that you can fine tune the content to suit your particular needs.
The screen-shot shows the second (Item 1) item in the array. As you can see each item is itself a dictionary with more key-value pairs. It’s often a good idea to find an item that is close to what you want, copy it, and paste it where you would like it. This can often mean you just need to edit a couple of values, rather than creating completely new one. Let’s go through the supported keys for items
• tag (String value) - This is the text that will be displayed in a button. Although the image key (see below) allows you to specify an image, at this time only RED When Excited can add images. So if the tag is ‘b’, then a button with ‘b’ in it will be created in the toolbar
• image (String value) - This can refer to one of the predefined images. Given this predefinition although you may want to modify the standard behavior, you cannot at this time specify your own images. If this key is present the image will be used instead of the tag for the button, so remove it if you want to get rid of the image
• class (String value) - This tag identifies a class inside iExpression that will manage the button. Although there are few classes (listed below) each class will interpret all subsequent keys and tags slightly differently, sometimes providing specific UI to support the user’s operation. Here are the classes and their likely uses:
• AssistiveSpacer - Puts a space in the toolbar. It reads no other keys.
• AssistedFormat - The most basic class (well, apart from a spacer). It reads the insertionString key (described more fully below) and follows the ‘rule’ defined in that key’s value. In general this can be used for any fixed string insertion, single tag, or tag pair. It also can read the optional key ‘eachLine’ described below. This will apply another transformation to user selected content that is on its own line. The ordered/unordered list buttons are good example of this
• AssistedImage - Tuned for image insertions this class will allow users to select an image from a file location to insert into the generated markup. It differs from AssistedLink only in that it restricts the user to selecting an image file, and not just any file. The selected URL will be used to replace the [parameter1] marker in the insertionString key (described below)
R E D W h e n E x c i t e d i E x p re s s i o n 1 . 4 U s e r G u i d e
31

• AssistedLink - Exactly the same as AssistedImage except that it does not restrict the user to only picking an image file
• insertionString (String value) - The insertionString key provides the pattern that should be applied to the gener-ated markup. There are some specific tags in the string that will be interpreted by the class to generate the string that is placed into your field. Those tags are:
• [cursor] Specifies where the cursor should be placed after the insertion is complete. Note that if the user had a region of text selected, this is normally overridden and the cursor placed at the end of the inserted text. Some classes supporting multiple entries have more complex behavior, swapping [parameter1] and cursor depending on whether or not the highlighted text was a valid URL (for example AssistedLink or As-sistedImage both behave in this way).
• [user_selection] Specifies where any text selected by the user before the button is tapped should be placed. For example, to place user selected text between two HTML tags you would specify <my_tag>[user_selection]</mytag>
• [parameter1] At this point this only applies to AssistedLink and AssistedImage and it specifies where the supplied URL should go. However as more classes are added this should be in general treated as “If the class captures a parameter from the user, it’s value will be placed here”
• [cr_character] Inserts a new line character
• [tab_character] Inserts a tab character
• eachLine (String value) - This special key is used by AssistedFormat classes. If the user has selected some text before pressing the button, that selected text will be broken up by new lines, and the eachLine key’s value used to “wrap” the lines content. It’s format can include [cr_character],[tab_character] and the special %@ tag. The %@ refers to the content of the line (i.e. one line). An example of this is shown below for lists. If there are no lines with carriage returns (or no text was selected) this key is ignored.
R E D W h e n E x c i t e d i E x p re s s i o n 1 . 4 U s e r G u i d e
32