ifs touch apps server installation guide ......4.1 reverse proxy ifs recommend the use of a reverse...
TRANSCRIPT
1
Mobile & Scheduling Solutions
IFS TOUCH APPS SERVER INSTALLATION GUIDE
VERSION 1.13.2
2019-04-25

2
Contents
1 Abstract ................................................................................................................................. 4
2 Prepare the web server that serves IFS Extended Server ..................................................... 4
3 Prepare your IFS Applications instance ................................................................................. 4
3.1 Grant permissions ......................................................................................................... 4
4 Prepare the server where the IFS Touch Apps Server should be installed ........................... 5
4.1 Reverse Proxy ................................................................................................................ 5
4.2 .Net Framework ............................................................................................................ 5
4.3 Internet Information Services ....................................................................................... 5
4.4 Install Web Deploy ........................................................................................................ 6
4.5 Database Options .......................................................................................................... 7
5 Touch Apps Server installation .............................................................................................. 9
5.1 Welcome ....................................................................................................................... 9
5.2 License ........................................................................................................................... 9
5.3 Database ...................................................................................................................... 10
5.4 Installation information .............................................................................................. 11
5.5 IIS ................................................................................................................................. 12
5.6 Installation ................................................................................................................... 13
6 IIS Configuration .................................................................................................................. 15
6.1 HTTPS .......................................................................................................................... 15
6.2 OWASP configuration changes .................................................................................... 16
6.3 Restrict access to Customer Portal ............................................................................. 20
6.4 Application Settings ..................................................................................................... 22
6.5 Diagnostics .................................................................................................................. 23
7 OpenID Connect Provider Configuration ............................................................................ 24
7.1 Redirect URIs ............................................................................................................... 24
8 Installing IFS Touch Apps Server in a Web Farm ................................................................. 25
8.1 Database installation ................................................................................................... 25
8.2 Local SQL Server Installation ....................................................................................... 25
8.3 IIS Installation .............................................................................................................. 27
8.4 Install on the File Server .............................................................................................. 27
8.5 Create a Common User ............................................................................................... 28
8.6 Share Web Content ..................................................................................................... 31
3
8.7 Share Web Configuration ............................................................................................ 33
8.8 Export Certificate ........................................................................................................ 34
8.9 Add a Web Server ........................................................................................................ 34
8.10 Setting up a Load Balancer .......................................................................................... 35
8.11 Upgrading a Web Farm ............................................................................................... 37
8.12 Local User Authentication ........................................................................................... 37
8.13 Push Notification ......................................................................................................... 38
9 Further IFS Touch Apps Server Administration ................................................................... 39
10 Upgrading an existing IFS Touch Apps Server installation .............................................. 39
10.1 Admin Database Schema Upgrade .............................................................................. 39
11 Moving an existing IFS Touch Apps Server installation ................................................... 39
11.1 Certificate and private key .......................................................................................... 39
11.2 SQL Server Express database ...................................................................................... 39
11.3 Install on the new server ............................................................................................. 39
12 Troubleshooting .............................................................................................................. 40
12.1 Missing SMO ................................................................................................................ 40
12.2 The installation is completed but the web site folder doesn’t contain any files. ....... 40
12.3 Server Error in Application "IFS Touch Apps Server" .................................................. 40
12.4 Web Site works but apps can’t connect ...................................................................... 41
12.5 Web Site not rendering properly ................................................................................ 41
12.6 Client Affinity not working in a web farm ................................................................... 42
4
1 Abstract
IFS Touch Apps Server is an On-Premise version of the IFS Touch Apps Cloud. The On-Premise
version doesn’t need a separate installation of the IFS Cloud Uplink, that part is integrated.
The IFS Touch Apps Server is a Web Application that runs in IIS and uses a small administration
database that runs in SQL Server, SQL Server Express or Oracle.
An overview of the IFS Touch Apps Server architecture can be found in the IFS Touch Apps
Technical Overview document.
This document describes how to install IFS Touch Apps Server. Since the product and the
installation use several Microsoft Technologies, a brief instruction on how to install these is
included. For details, refer to current documentation from Microsoft.
2 Prepare the web server that serves IFS Extended Server
Since the user credentials are set up on a mobile device that is not part of your Windows
domain, single sign on – Integrated Windows Authentication – cannot be used between IFS
Touch Apps Server and your IFS Applications Extended Server. If you currently have an SSO
only policy set up in the web server that your Extended Server is connected to you will have to
allow basic http authentication on that web server or set up another web server with or
without https support which allows basic http authentication. Note that this requirement is for
traffic on your internal network only. Transporting user credentials from the mobile device
that runs the end user’s Touch App to the Touch Apps Server at your site does not rely on basic
http authentication.
3 Prepare your IFS Applications instance
You must prepare the IFS Applications instance before it can be accessed from the IFS Touch
Apps Server.
3.1 Grant permissions
End users must be granted the role FND_ENDUSER, or the presentation Object
TouchAppsEndUser.
Administrators must be granted the role FND_ADMIN, or the presentation object
TouchAppsAdministrator together with the system privilege "ADMINISTRATOR". Remember
to refresh the security cache when done.
5
4 Prepare the server where the IFS Touch Apps Server should be installed
The IFS Touch Apps Server (TAS) can be installed on Windows Server 2012 R2 or Windows
Server 2016. The server should have IIS with a Default Web site and .NET 4.6.1 or later
installed.
4.1 Reverse Proxy
IFS recommend the use of a reverse proxy in the DMZ to protect IFS Touch Apps Server, the
proxy can’t rely on cookies.
4.1.1 Microsoft Forefront Unified Access Gateway
Microsoft Forefront Unified Access Gateway (UAG) is not supported as a reverse proxy for IFS
Touch Apps Server. UAG development is discontinued and Microsoft support for UAG ended
on 14th April 2015; extended support ends on 14th April 2020.
4.2 .Net Framework
TAS requires .Net Framework v4.6.1 or later. Windows Server 2016 has .Net Framework 4.6
pre-installed. If the installer is started without a suitable version of .Net Framework installed,
a dialog is displayed allowing you to install the required version. We recommend using the
version that the Microsoft download site suggests.
4.3 Internet Information Services
TAS requires Internet Information Services (IIS) installed.
4.3.1 Windows Server 2016
The base for this guide is a new installation of Windows Server 2016 Standard. Other editions
may have a different configuration.
1. Start Server Manager
2. Select Local Server
3. ROLES AND FEATURES
4. Add Roles and Features \ Web Server (IIS)
Enable following items (and added required features):
• .NET Framework 4.6 Features \ WCF Services \ HTTP Activation
• Web Server \ Performance \ Dynamic Content Compression
4.3.2 Windows Server 2012 R2
The base for this guide is a new VM in Windows Azure, other VMs or servers might have a
different configuration.
5. Start Server Manager
6. Select Local Server
6
7. ROLES AND FEATURES
8. Add Roles and Features \ Web Server (IIS)
Enable following items (and added required features):
• .NET Framework 4.5 Features \ WCF Services \ HTTP Activation
• Web Server \ Performance \ Dynamic Content Compression
4.3.3 Configuring an existing IIS installation
The Touch Apps Server requires HTTP Activation and Dynamic Content Compression. See the
above quick guides for information on how to do this on different Windows versions.
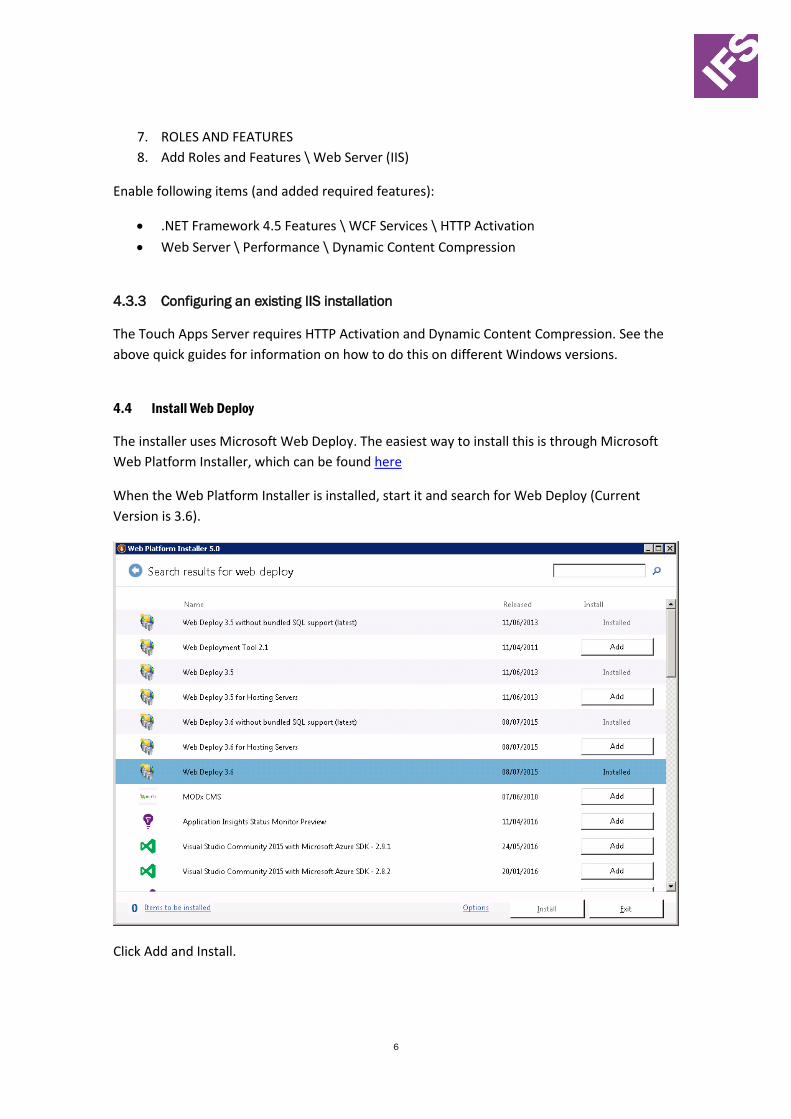
4.4 Install Web Deploy
The installer uses Microsoft Web Deploy. The easiest way to install this is through Microsoft
Web Platform Installer, which can be found here
When the Web Platform Installer is installed, start it and search for Web Deploy (Current
Version is 3.6).
Click Add and Install.
7
4.5 Database Options
The application uses a small administration database. You can either use an existing SQL Server
installation or install Microsoft SQL Server Express 2014 (or later). Starting with TAS version
1.11, Oracle is also supported.
4.5.1 SQL Server Express
Microsoft® SQL Server® 2017 can be found here.
Microsoft® SQL Server® 2016 Service Pack 1 (SP1) Express can be found here.
Microsoft® SQL Server® 2014 Service Pack 1 (SP1) Express can be found here.
The only mandatory component is the database (SQLEXPR_x64_ENU.exe option).
1 Start the downloaded SQL Server Installation Center.
2 Select New SQL Server installation. For running IFS Touch Apps Server, default values
(Basic installation) can be used.
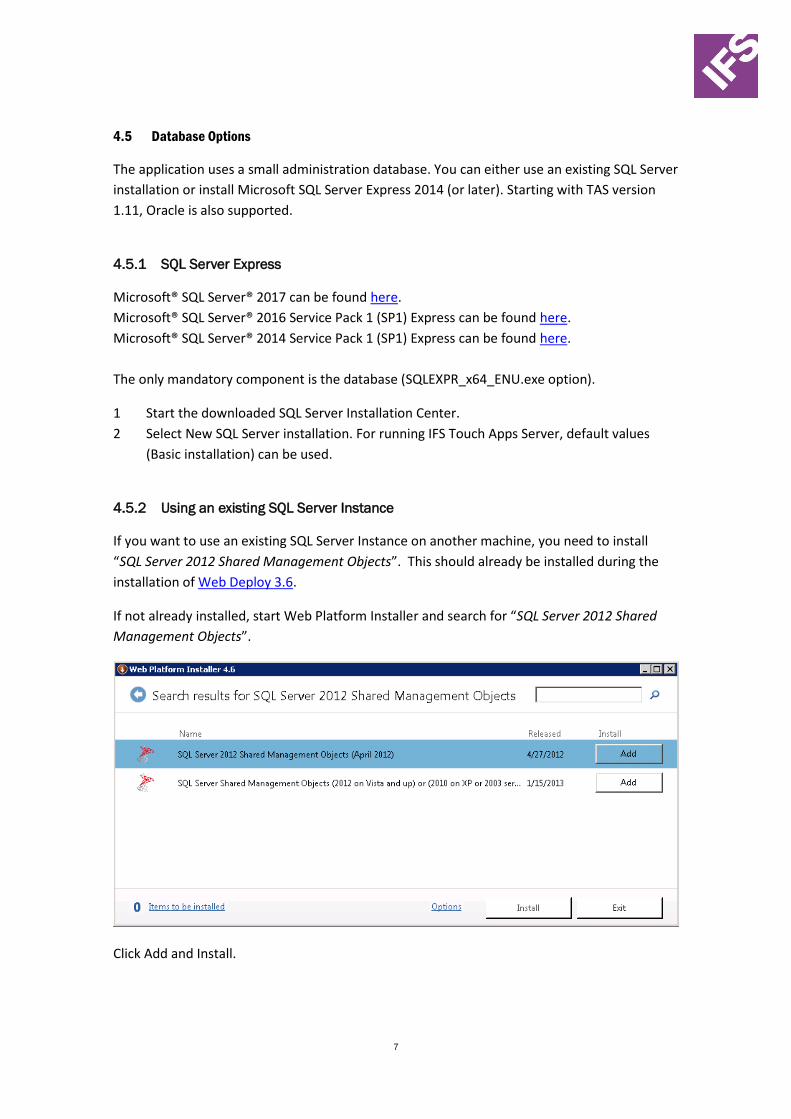
4.5.2 Using an existing SQL Server Instance
If you want to use an existing SQL Server Instance on another machine, you need to install
“SQL Server 2012 Shared Management Objects”. This should already be installed during the
installation of Web Deploy 3.6.
If not already installed, start Web Platform Installer and search for “SQL Server 2012 Shared
Management Objects”.
Click Add and Install.
8
4.5.3 Using Oracle
Starting with TAS version 1.11, you can also use an existing or new Oracle
database instance for the administration database.
An Oracle administrator must first create a user that can create/upgrade the TAS
schema (Default name below is IFSTAS).
The installation user requires the following privileges:
• Alter Session
• Create Procedure
• Create Sequence
• Create Session
• Create Synonym
• Create Table
• Create Trigger
• Create Type
• Create View
• Unlimited Tablespace.
The IFSTAS user should be given a separate tablespace.
The TAS can be run as the installation user but it's recommended that a separate
runtime user is used (Default name below is TASRUNTIME).
The runtime user requires the following privileges:
• Alter Session
• Create Synonym.
In the database folder in the TAS Installation there is a utility script
called PrepareTas.sql that creates TableSpaces and the installation user
(IFSTAS) and the runtime user (TASRUNTIME). The script should be run as sys
connected as sysdba.
9
5 Touch Apps Server installation
Download the latest version of the IFS Touch Apps Server from the IFS Cloud
(https://cloud.ifsworld.com).
Unzip and run IFSTouchAppsServerInstaller.exe. The installer requires Administrator
privileges. A User Account Control (UAC) dialog is shown, depending on your system setup.
This will launch the installation wizard that will guide you through the installation process.
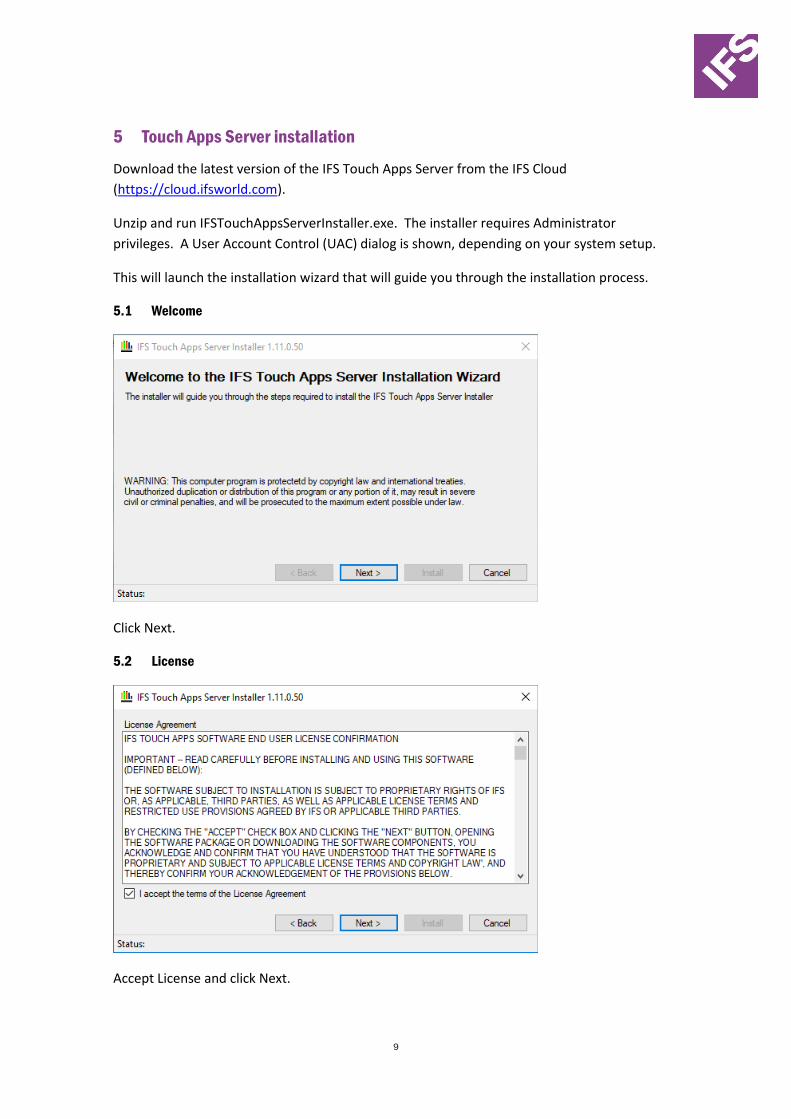
5.1 Welcome
Click Next.
5.2 License
Accept License and click Next.
10
5.3 Database
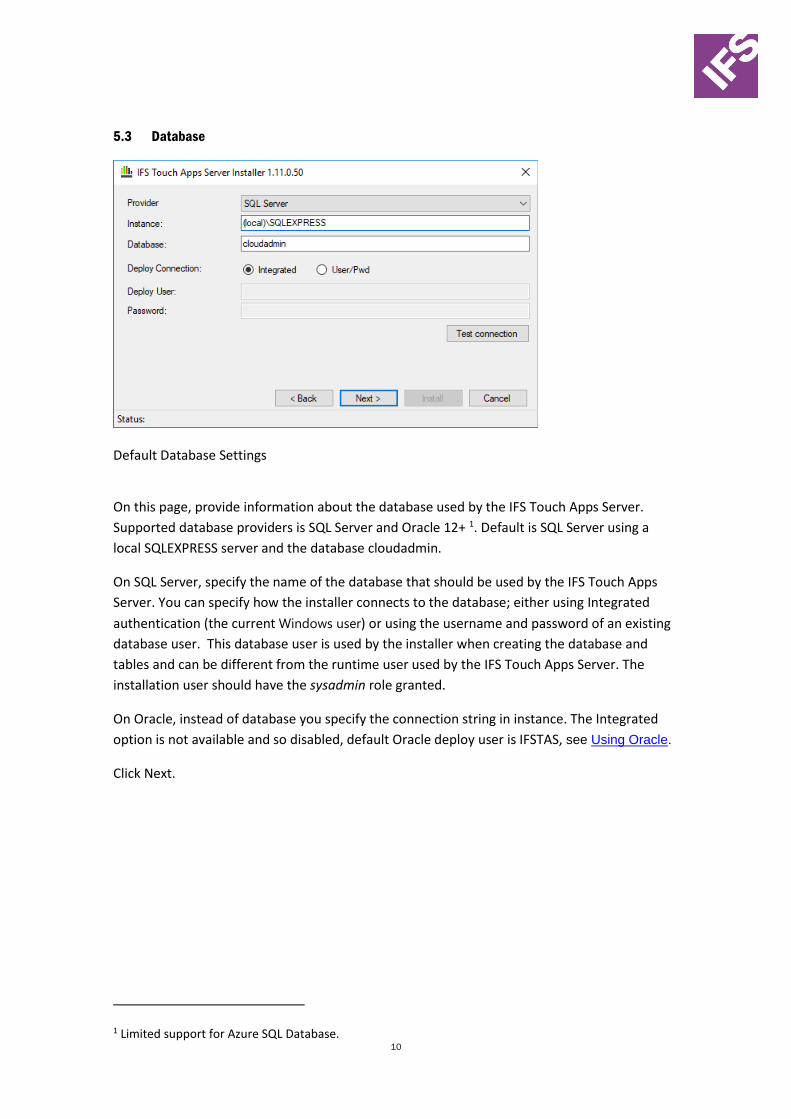
Default Database Settings
On this page, provide information about the database used by the IFS Touch Apps Server.
Supported database providers is SQL Server and Oracle 12+ 1. Default is SQL Server using a
local SQLEXPRESS server and the database cloudadmin.
On SQL Server, specify the name of the database that should be used by the IFS Touch Apps
Server. You can specify how the installer connects to the database; either using Integrated
authentication (the current Windows user) or using the username and password of an existing
database user. This database user is used by the installer when creating the database and
tables and can be different from the runtime user used by the IFS Touch Apps Server. The
installation user should have the sysadmin role granted.
On Oracle, instead of database you specify the connection string in instance. The Integrated
option is not available and so disabled, default Oracle deploy user is IFSTAS, see Using Oracle.
Click Next.
1 Limited support for Azure SQL Database.
11
5.4 Installation information
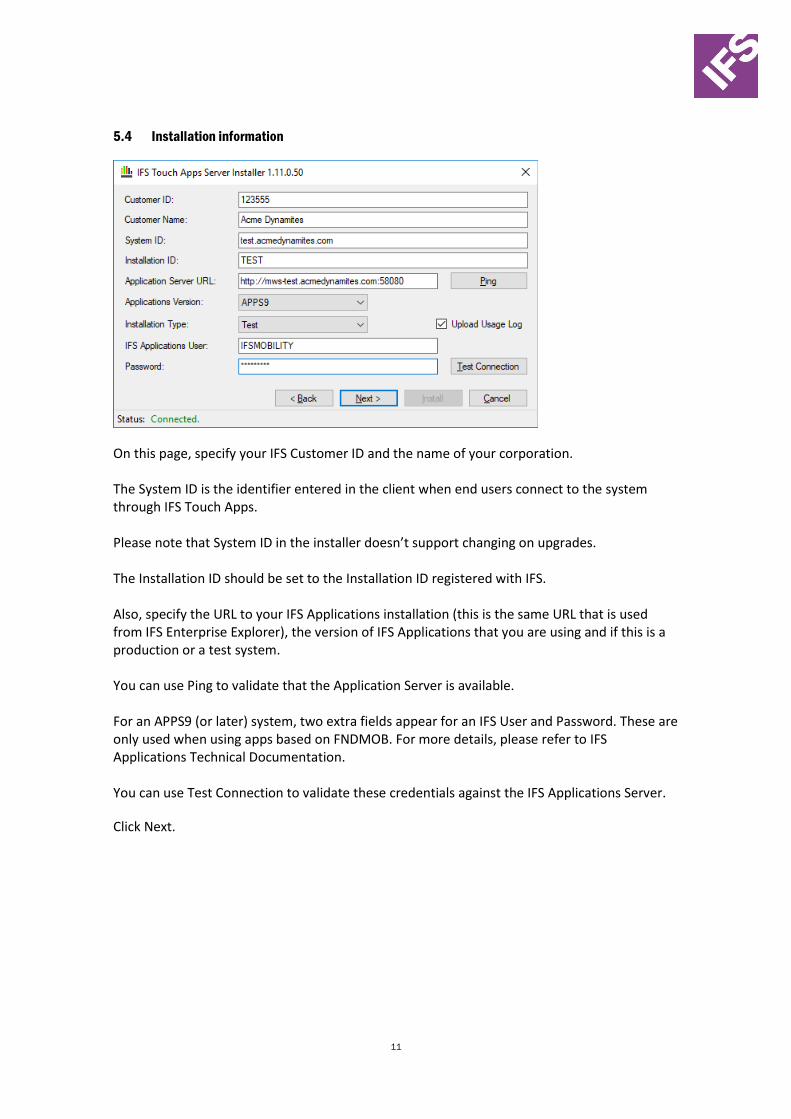
On this page, specify your IFS Customer ID and the name of your corporation. The System ID is the identifier entered in the client when end users connect to the system through IFS Touch Apps. Please note that System ID in the installer doesn’t support changing on upgrades. The Installation ID should be set to the Installation ID registered with IFS. Also, specify the URL to your IFS Applications installation (this is the same URL that is used from IFS Enterprise Explorer), the version of IFS Applications that you are using and if this is a production or a test system. You can use Ping to validate that the Application Server is available. For an APPS9 (or later) system, two extra fields appear for an IFS User and Password. These are only used when using apps based on FNDMOB. For more details, please refer to IFS Applications Technical Documentation. You can use Test Connection to validate these credentials against the IFS Applications Server.
Click Next.
12
5.5 IIS
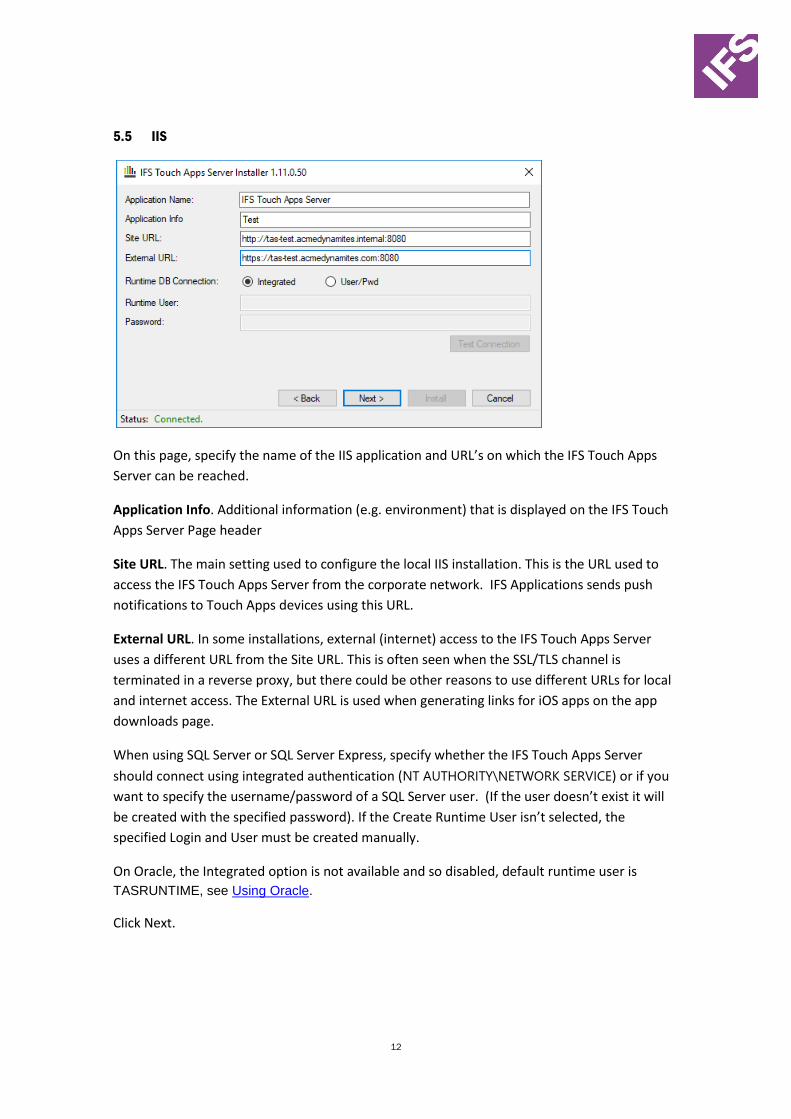
On this page, specify the name of the IIS application and URL’s on which the IFS Touch Apps
Server can be reached.
Application Info. Additional information (e.g. environment) that is displayed on the IFS Touch
Apps Server Page header
Site URL. The main setting used to configure the local IIS installation. This is the URL used to
access the IFS Touch Apps Server from the corporate network. IFS Applications sends push
notifications to Touch Apps devices using this URL.
External URL. In some installations, external (internet) access to the IFS Touch Apps Server
uses a different URL from the Site URL. This is often seen when the SSL/TLS channel is
terminated in a reverse proxy, but there could be other reasons to use different URLs for local
and internet access. The External URL is used when generating links for iOS apps on the app
downloads page.
When using SQL Server or SQL Server Express, specify whether the IFS Touch Apps Server
should connect using integrated authentication (NT AUTHORITY\NETWORK SERVICE) or if you
want to specify the username/password of a SQL Server user. (If the user doesn’t exist it will
be created with the specified password). If the Create Runtime User isn’t selected, the
specified Login and User must be created manually.
On Oracle, the Integrated option is not available and so disabled, default runtime user is
TASRUNTIME, see Using Oracle.
Click Next.
13
5.6 Installation
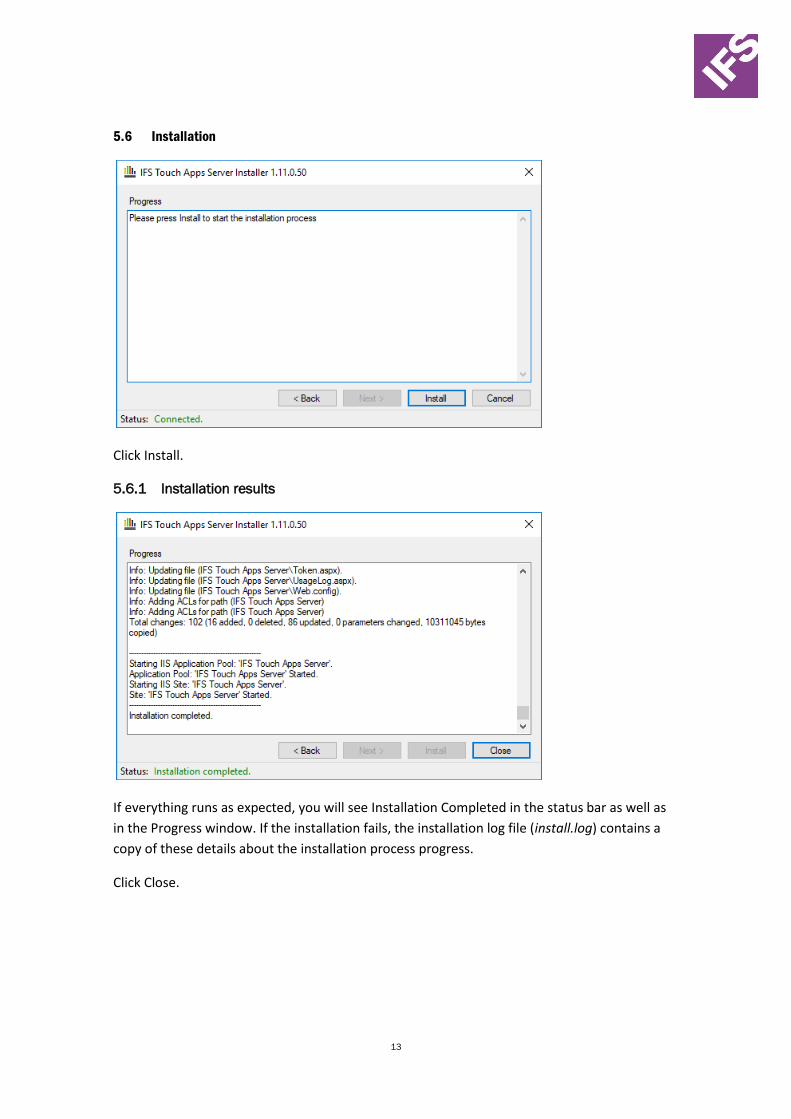
Click Install.
5.6.1 Installation results
If everything runs as expected, you will see Installation Completed in the status bar as well as
in the Progress window. If the installation fails, the installation log file (install.log) contains a
copy of these details about the installation process progress.
Click Close.
14
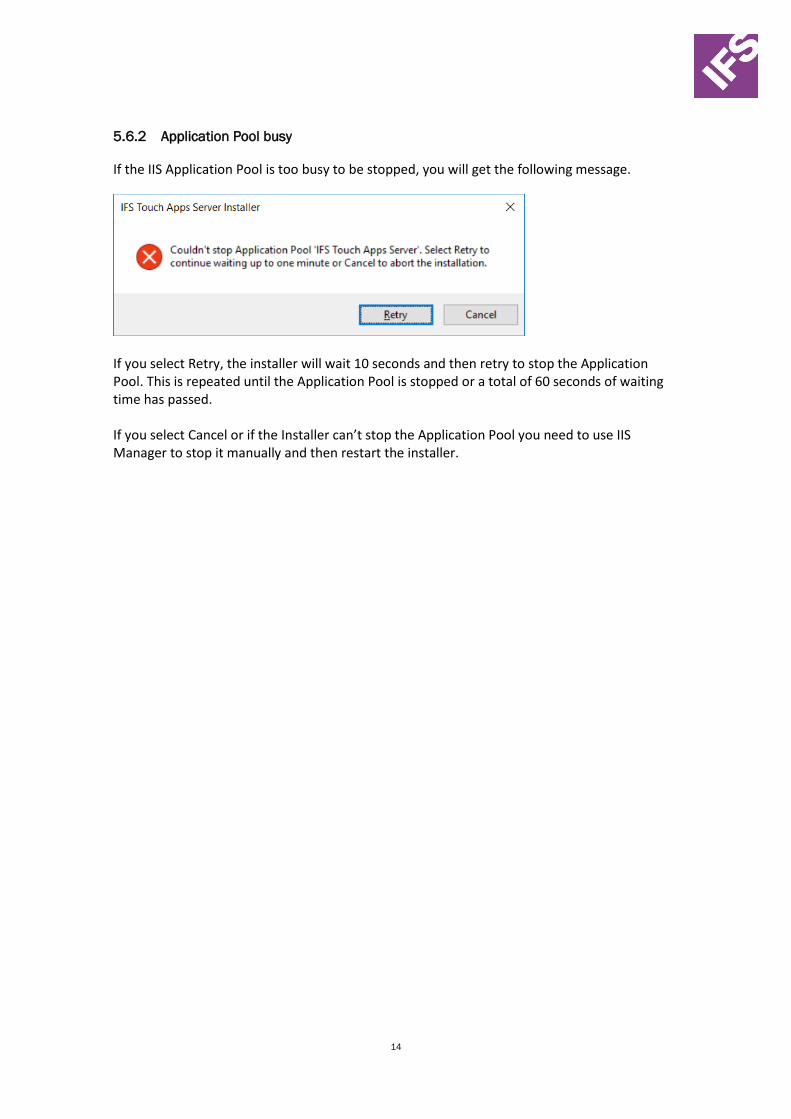
5.6.2 Application Pool busy
If the IIS Application Pool is too busy to be stopped, you will get the following message.
If you select Retry, the installer will wait 10 seconds and then retry to stop the Application Pool. This is repeated until the Application Pool is stopped or a total of 60 seconds of waiting time has passed. If you select Cancel or if the Installer can’t stop the Application Pool you need to use IIS Manager to stop it manually and then restart the installer.
15
6 IIS Configuration
The following sections detail further IIS configuration options.
6.1 HTTPS
IFS recommends that the Touch Apps Server is only available over HTTPS for connections over
the internet. The SSL connection can either be terminated in a proxy server or on the Touch
Apps Server machine itself. If you want the Touch Apps Server machine to listen to HTTPS,
specify the HTTPS address as the Site URL in the IFS Touch Apps Installer. If you want to
terminate the secure channel on a different machine, specify an HTTP address as Site URL and
set the External URL to the HTTPS address.
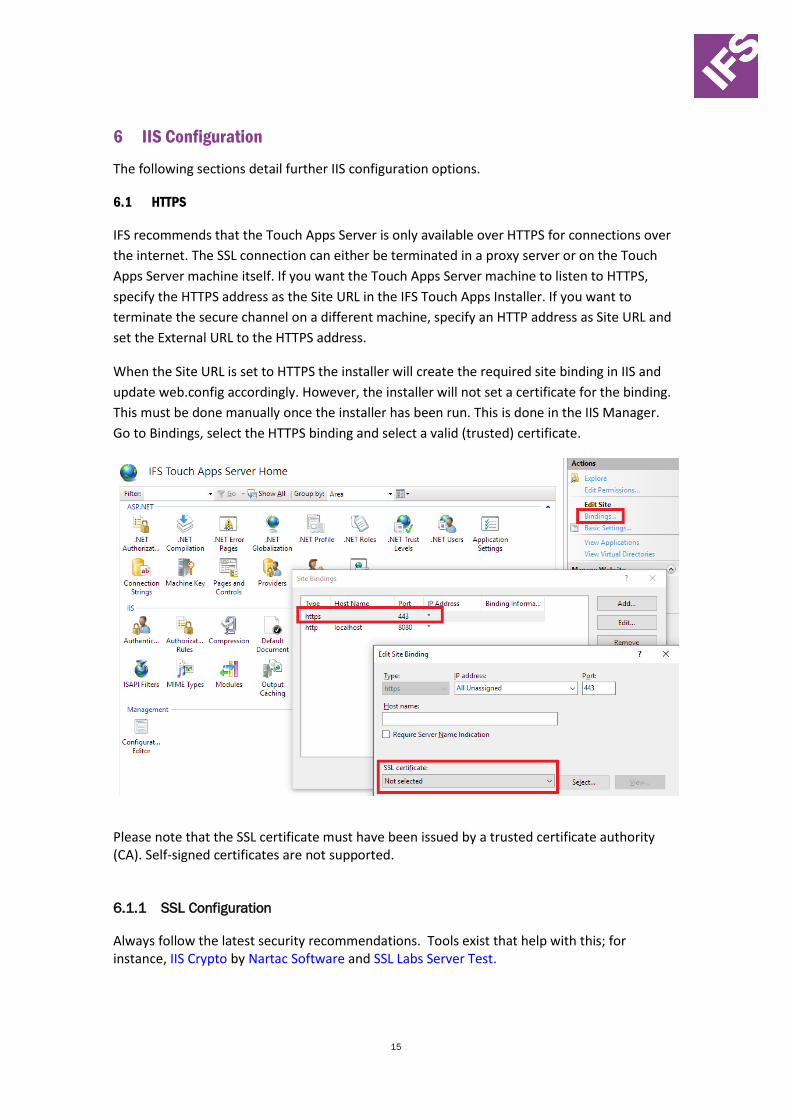
When the Site URL is set to HTTPS the installer will create the required site binding in IIS and
update web.config accordingly. However, the installer will not set a certificate for the binding.
This must be done manually once the installer has been run. This is done in the IIS Manager.
Go to Bindings, select the HTTPS binding and select a valid (trusted) certificate.
Please note that the SSL certificate must have been issued by a trusted certificate authority (CA). Self-signed certificates are not supported. 6.1.1 SSL Configuration
Always follow the latest security recommendations. Tools exist that help with this; for instance, IIS Crypto by Nartac Software and SSL Labs Server Test.
16
6.2 OWASP configuration changes
The Open Web Application Security Project (owasp.org) is an open community dedicated to
enabling organizations to conceive, develop, acquire, operate, and maintain applications that
can be trusted. The following configuration changes come from the OWASP Testing Guide.
6.2.1 OTG-INFO-002 Fingerprint Web Server
Web Servers often identify themselves in every HTTP response header.
HTTP/1.1 304 Not Modified Accept-Ranges: bytes Server: Microsoft-IIS/10.0 X-Powered-By: ASP.NET Date: Mon, 09 Oct 2017 14:21:46 GMT
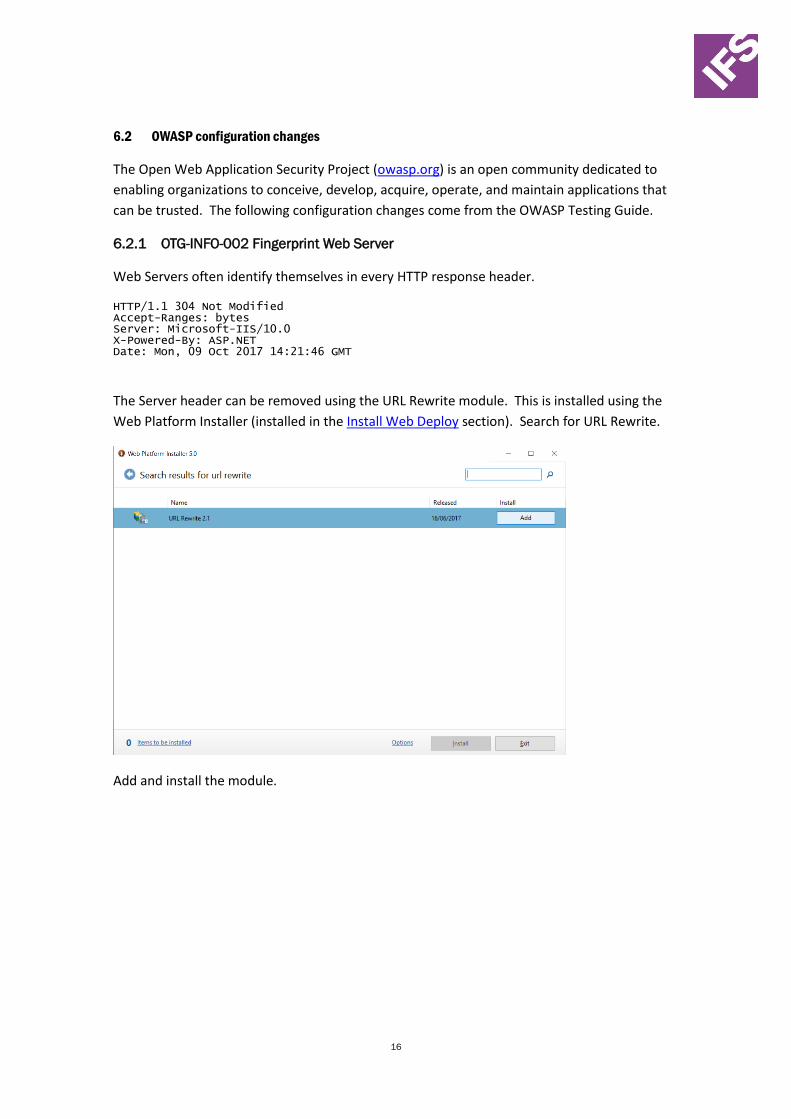
The Server header can be removed using the URL Rewrite module. This is installed using the
Web Platform Installer (installed in the Install Web Deploy section). Search for URL Rewrite.
Add and install the module.
17
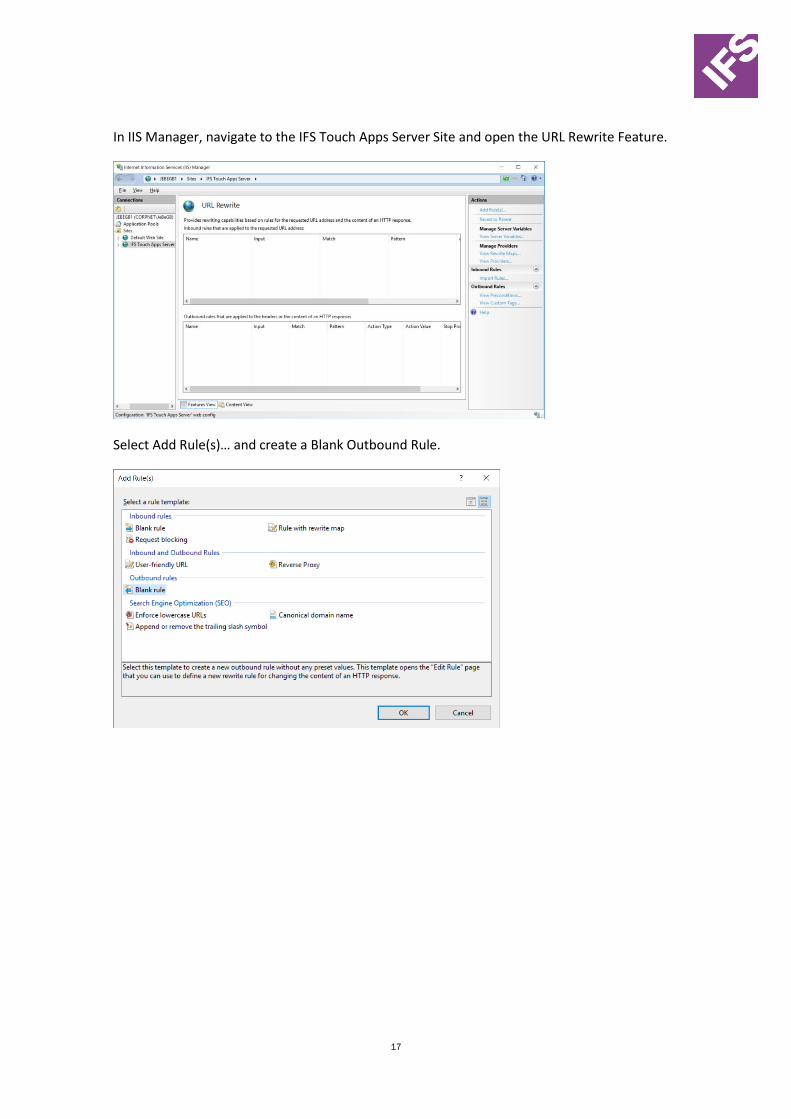
In IIS Manager, navigate to the IFS Touch Apps Server Site and open the URL Rewrite Feature.
Select Add Rule(s)… and create a Blank Outbound Rule.
18
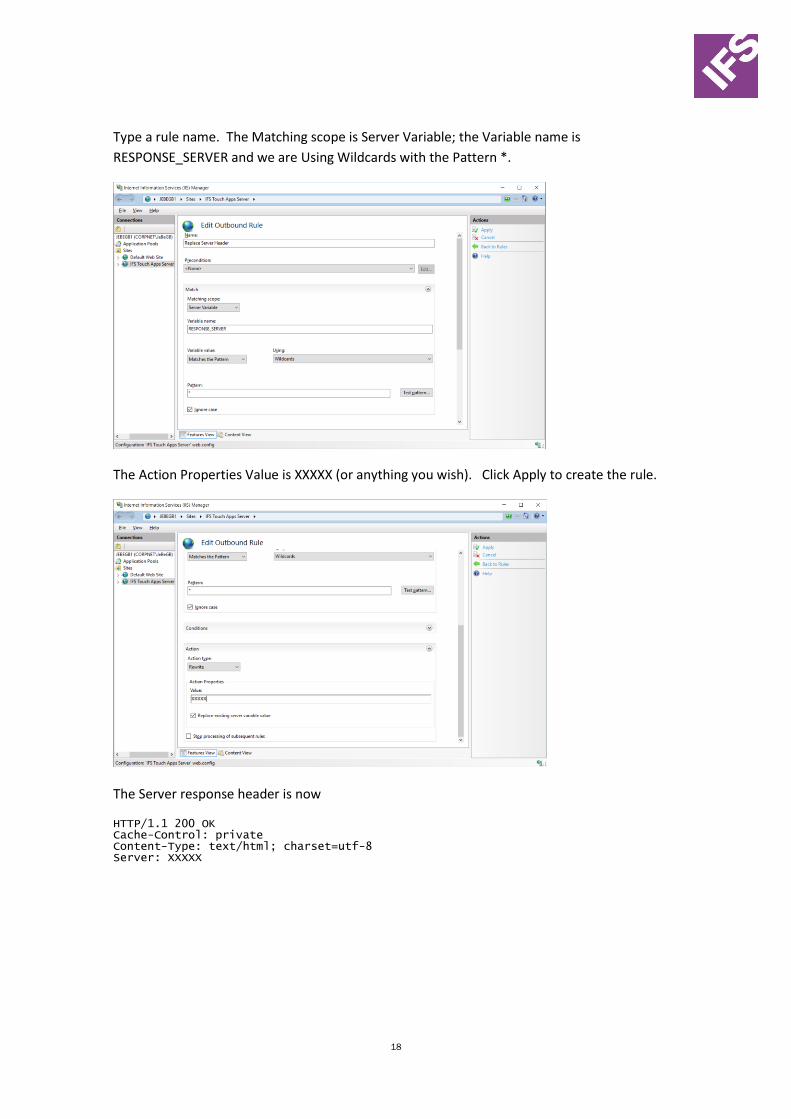
Type a rule name. The Matching scope is Server Variable; the Variable name is
RESPONSE_SERVER and we are Using Wildcards with the Pattern *.
The Action Properties Value is XXXXX (or anything you wish). Click Apply to create the rule.
The Server response header is now
HTTP/1.1 200 OK Cache-Control: private Content-Type: text/html; charset=utf-8 Server: XXXXX
19
6.2.2 OTG-INFO-008 Fingerprint Web Application Framework
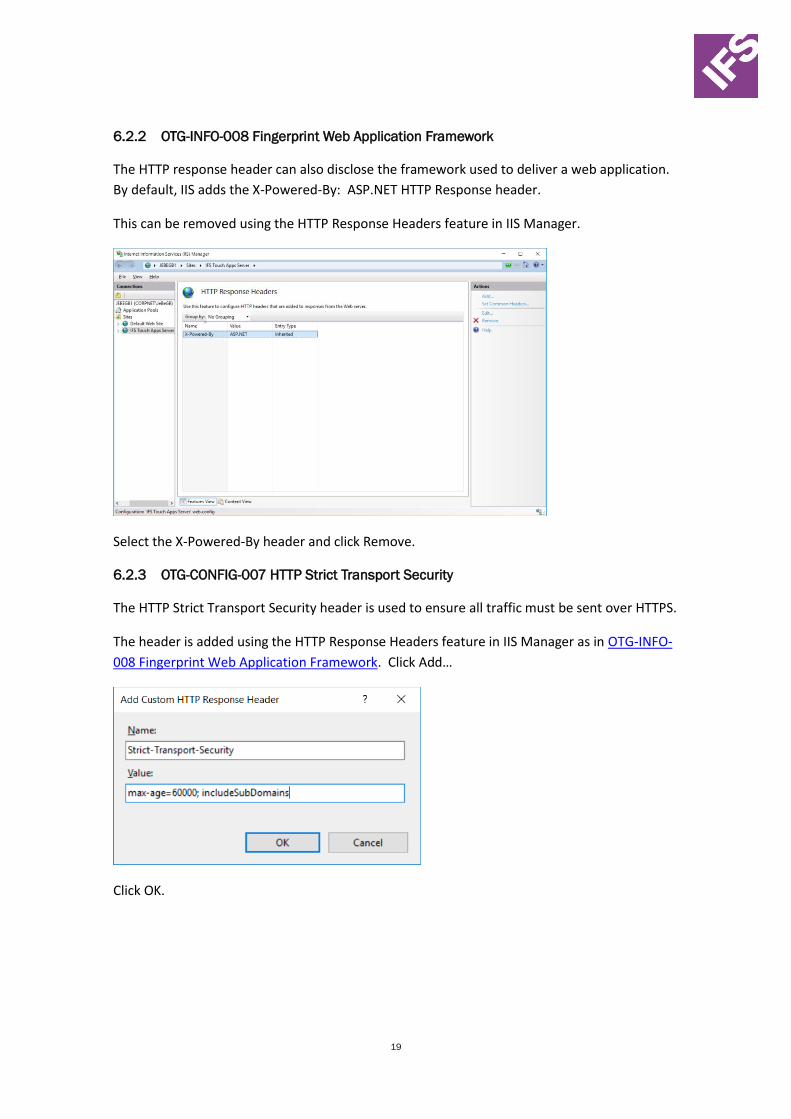
The HTTP response header can also disclose the framework used to deliver a web application.
By default, IIS adds the X-Powered-By: ASP.NET HTTP Response header.
This can be removed using the HTTP Response Headers feature in IIS Manager.
Select the X-Powered-By header and click Remove.
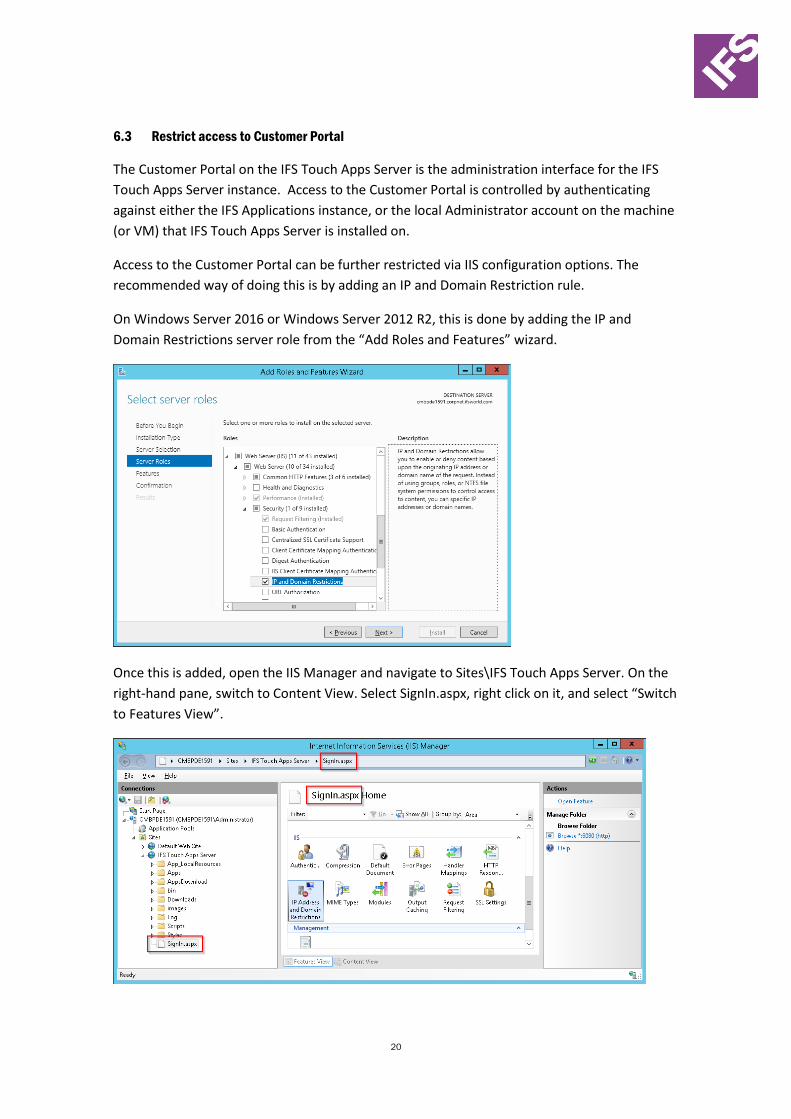
6.2.3 OTG-CONFIG-007 HTTP Strict Transport Security
The HTTP Strict Transport Security header is used to ensure all traffic must be sent over HTTPS.
The header is added using the HTTP Response Headers feature in IIS Manager as in OTG-INFO-
008 Fingerprint Web Application Framework. Click Add…
Click OK.
20
6.3 Restrict access to Customer Portal
The Customer Portal on the IFS Touch Apps Server is the administration interface for the IFS
Touch Apps Server instance. Access to the Customer Portal is controlled by authenticating
against either the IFS Applications instance, or the local Administrator account on the machine
(or VM) that IFS Touch Apps Server is installed on.
Access to the Customer Portal can be further restricted via IIS configuration options. The
recommended way of doing this is by adding an IP and Domain Restriction rule.
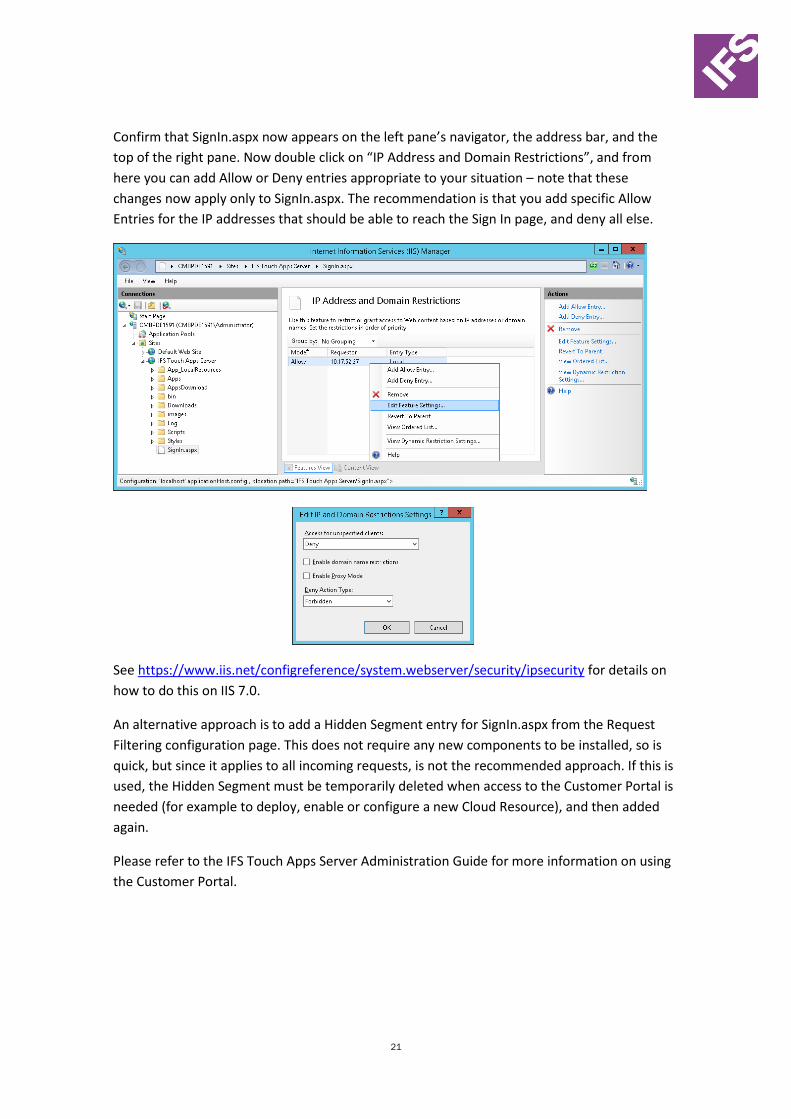
On Windows Server 2016 or Windows Server 2012 R2, this is done by adding the IP and
Domain Restrictions server role from the “Add Roles and Features” wizard.
Once this is added, open the IIS Manager and navigate to Sites\IFS Touch Apps Server. On the
right-hand pane, switch to Content View. Select SignIn.aspx, right click on it, and select “Switch
to Features View”.
21
Confirm that SignIn.aspx now appears on the left pane’s navigator, the address bar, and the
top of the right pane. Now double click on “IP Address and Domain Restrictions”, and from
here you can add Allow or Deny entries appropriate to your situation – note that these
changes now apply only to SignIn.aspx. The recommendation is that you add specific Allow
Entries for the IP addresses that should be able to reach the Sign In page, and deny all else.
See https://www.iis.net/configreference/system.webserver/security/ipsecurity for details on
how to do this on IIS 7.0.
An alternative approach is to add a Hidden Segment entry for SignIn.aspx from the Request
Filtering configuration page. This does not require any new components to be installed, so is
quick, but since it applies to all incoming requests, is not the recommended approach. If this is
used, the Hidden Segment must be temporarily deleted when access to the Customer Portal is
needed (for example to deploy, enable or configure a new Cloud Resource), and then added
again.
Please refer to the IFS Touch Apps Server Administration Guide for more information on using
the Customer Portal.
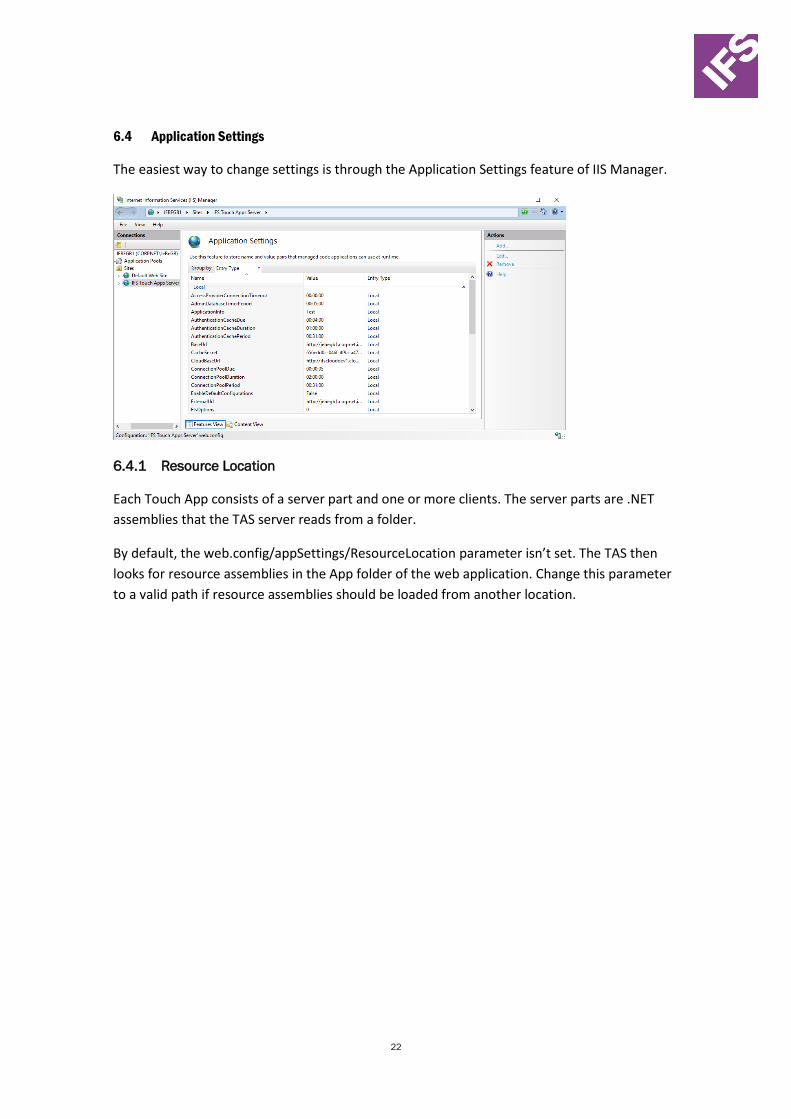
22
6.4 Application Settings
The easiest way to change settings is through the Application Settings feature of IIS Manager.
6.4.1 Resource Location
Each Touch App consists of a server part and one or more clients. The server parts are .NET
assemblies that the TAS server reads from a folder.
By default, the web.config/appSettings/ResourceLocation parameter isn’t set. The TAS then
looks for resource assemblies in the App folder of the web application. Change this parameter
to a valid path if resource assemblies should be loaded from another location.

23
6.5 Diagnostics
By default, a trace listener is set up to write errors to the file TASTrace.log in the Log folder. The Configuration Editor feature in IIS Manager can be used to change the file location or logging level.
The listeners can be configured using the “…” button.
In the filter, set initializeData to Verbose to get all trace messages. A list of logging levels can be found here. In traceOutputOptions you can check Callstack to get exception call stacks in the log file.
24
7 OpenID Connect Provider Configuration
If an IFS Applications installation is configured to use an OpenID Connect Provider for
authentication, the configuration for IFS Applications in the provider must be modified.
7.1 Redirect URIs
A specific set of “Redirect URIs” are registered with the OpenID Connect Provider for IFS
Applications. Additional Redirect URIs must be registered for Touch Apps Server.
7.1.1 TAS Portal
The Touch Apps Server Portal uses the Redirect URI <External-URL>/Token.aspx where
<External-URL> is the value specified in the IIS page of the installer.
7.1.2 Touch App Clients
Touch Apps Clients that support OpenID Connect authentication also have their own Redirect
URIs. Consult the client documentation for the specific Redirect URIs to register.
25
8 Installing IFS Touch Apps Server in a Web Farm
Helpful advice on setting up a web farm can be found from the following link
http://www.iis.net/learn/web-hosting/scenario-build-a-web-farm-with-iis-servers
Note that the SSL Central Certificate Store is only available from IIS 8 onwards: therefore, a
Windows Server 2008 web farm will not support HTTPS. The secure channel must instead be
terminated ahead of the web farm (e.g. in a reverse proxy).
8.1 Database installation
The TAS administration database must be visible to all servers in the web farm. This will
already be the case if the database is not on the local machine.
If the database is not to be a single point of failure, a failover or clustering installation should
be considered. This is not available with SQL Server Express.
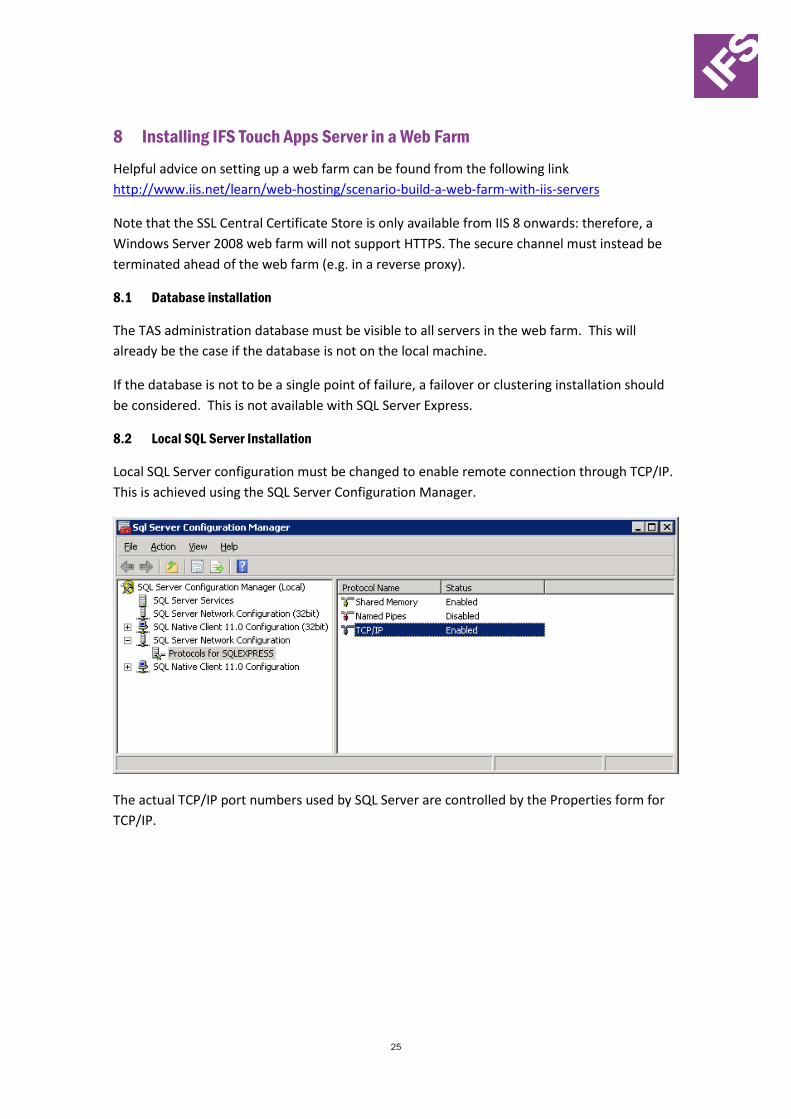
8.2 Local SQL Server Installation
Local SQL Server configuration must be changed to enable remote connection through TCP/IP.
This is achieved using the SQL Server Configuration Manager.
The actual TCP/IP port numbers used by SQL Server are controlled by the Properties form for
TCP/IP.
26
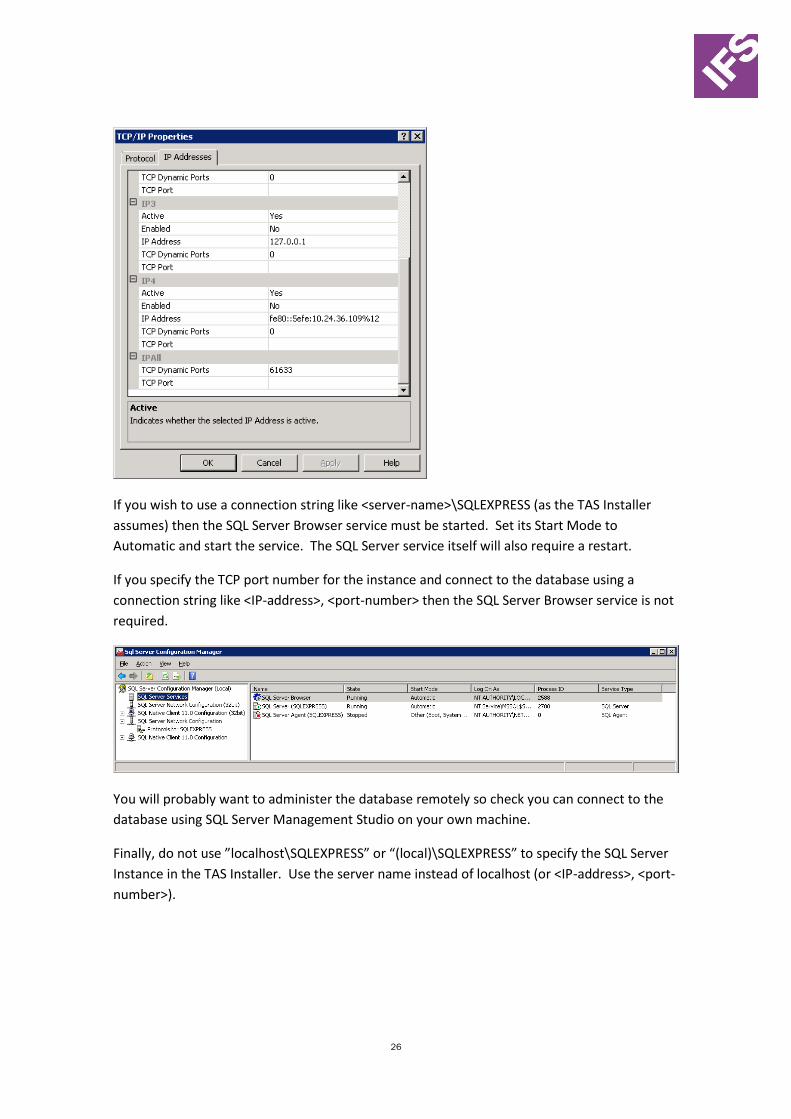
If you wish to use a connection string like <server-name>\SQLEXPRESS (as the TAS Installer
assumes) then the SQL Server Browser service must be started. Set its Start Mode to
Automatic and start the service. The SQL Server service itself will also require a restart.
If you specify the TCP port number for the instance and connect to the database using a
connection string like <IP-address>, <port-number> then the SQL Server Browser service is not
required.
You will probably want to administer the database remotely so check you can connect to the
database using SQL Server Management Studio on your own machine.
Finally, do not use ”localhost\SQLEXPRESS” or “(local)\SQLEXPRESS” to specify the SQL Server
Instance in the TAS Installer. Use the server name instead of localhost (or <IP-address>, <port-
number>).
27
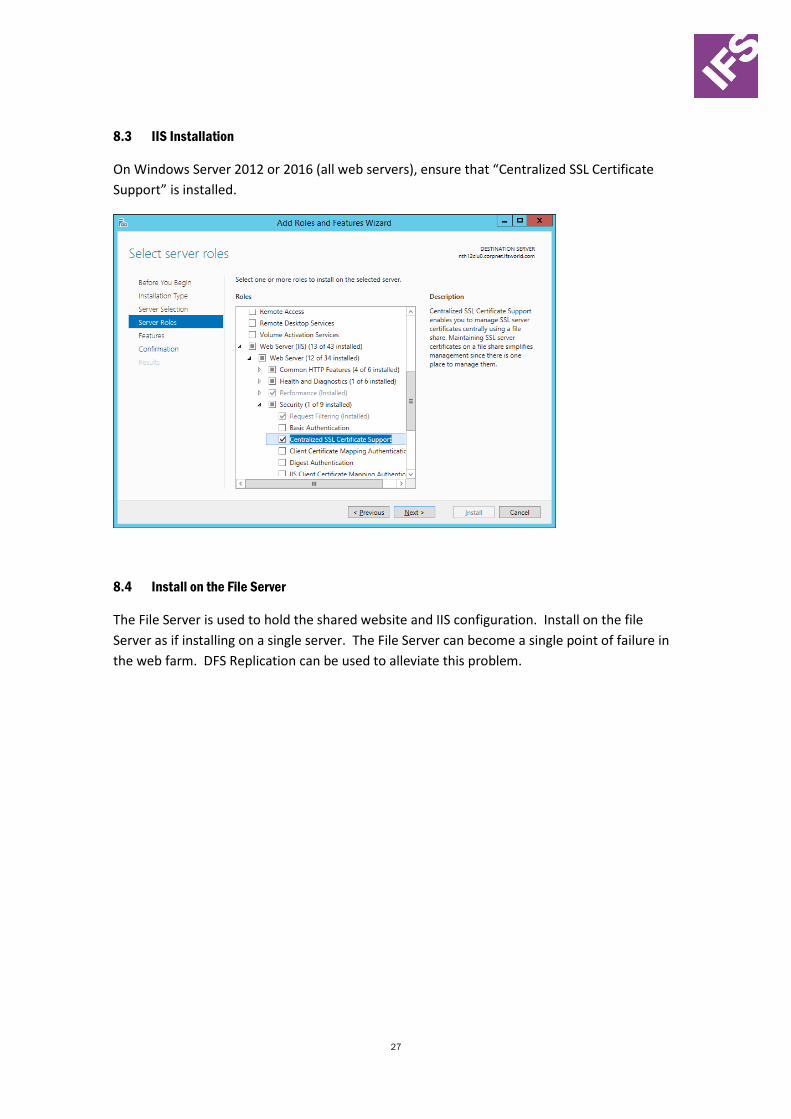
8.3 IIS Installation
On Windows Server 2012 or 2016 (all web servers), ensure that “Centralized SSL Certificate
Support” is installed.
8.4 Install on the File Server
The File Server is used to hold the shared website and IIS configuration. Install on the file
Server as if installing on a single server. The File Server can become a single point of failure in
the web farm. DFS Replication can be used to alleviate this problem.
28
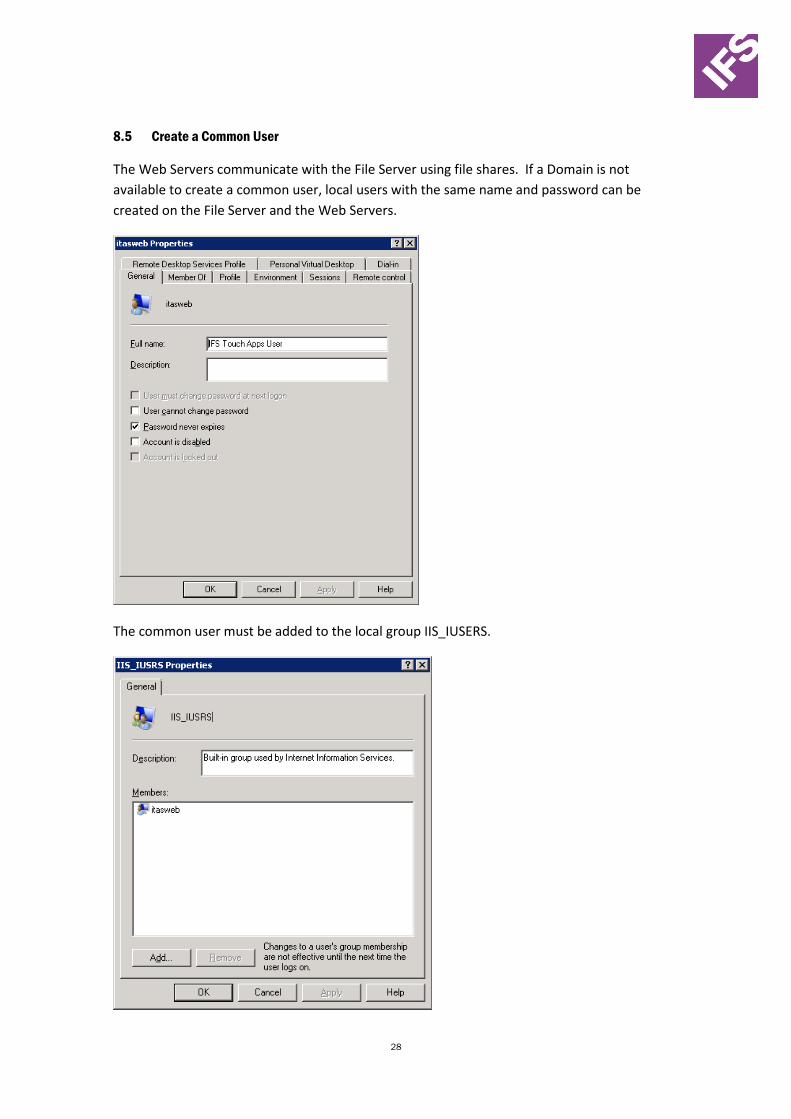
8.5 Create a Common User
The Web Servers communicate with the File Server using file shares. If a Domain is not
available to create a common user, local users with the same name and password can be
created on the File Server and the Web Servers.
The common user must be added to the local group IIS_IUSERS.

29
8.5.1 Common User modifications for SQL Server
The Common User will need to connect to the Admin Database (if using SQL Server Integrated
Security). Use SQL Server Management Studio to create a new Login for the Common User.
Ensure the User Mapping is set correctly for the Admin Database. Ensure the “itas” role exists
(it is created by the Installer) and is selected.
30
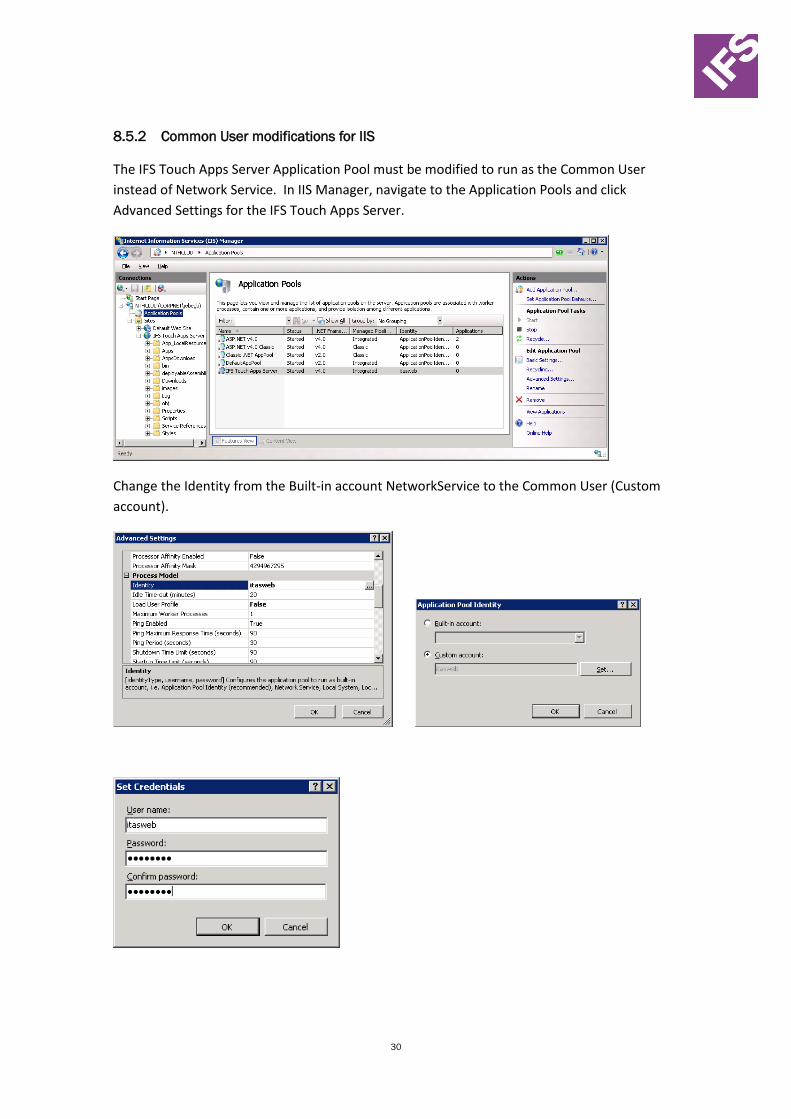
8.5.2 Common User modifications for IIS
The IFS Touch Apps Server Application Pool must be modified to run as the Common User
instead of Network Service. In IIS Manager, navigate to the Application Pools and click
Advanced Settings for the IFS Touch Apps Server.
Change the Identity from the Built-in account NetworkService to the Common User (Custom
account).
31
The common user must also be given access to the local machine certificate store through IIS.
Run (as Administrator) the following command
%windir%\Microsoft.NET\Framework\v4.0.30319\aspnet_regiis.exe –pa
IFS_TOUCHAPPS_SERVER <common-user>
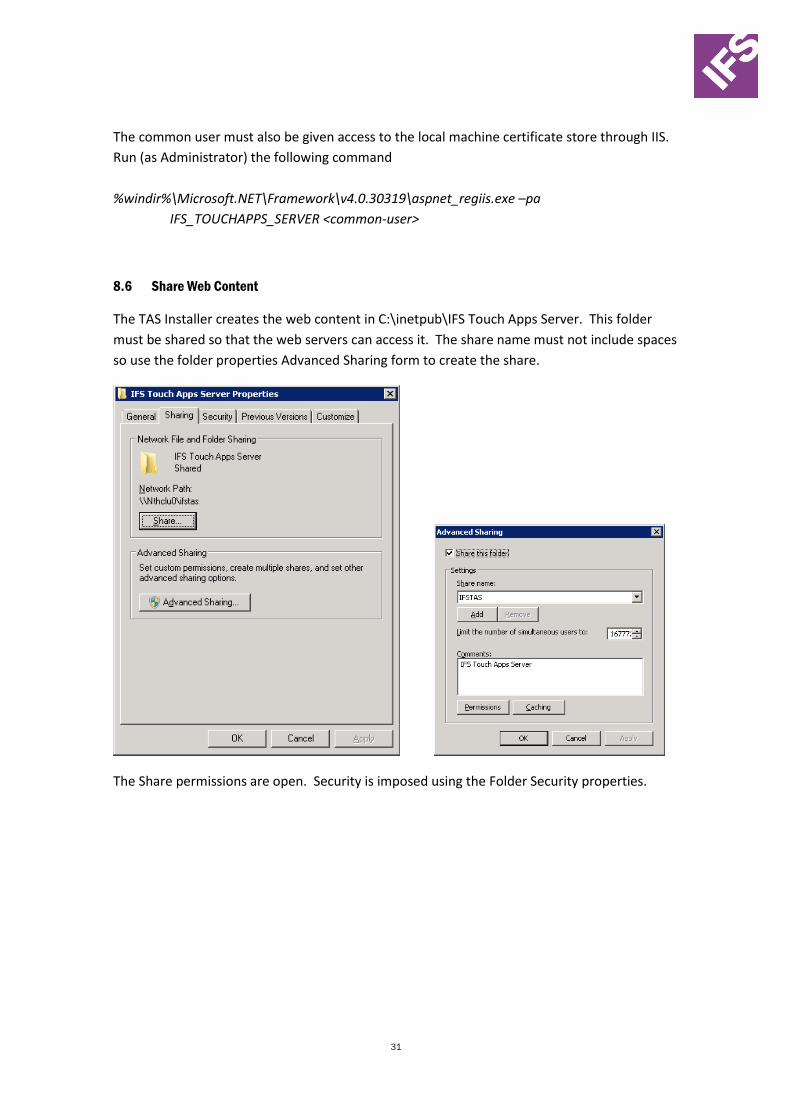
8.6 Share Web Content
The TAS Installer creates the web content in C:\inetpub\IFS Touch Apps Server. This folder
must be shared so that the web servers can access it. The share name must not include spaces
so use the folder properties Advanced Sharing form to create the share.
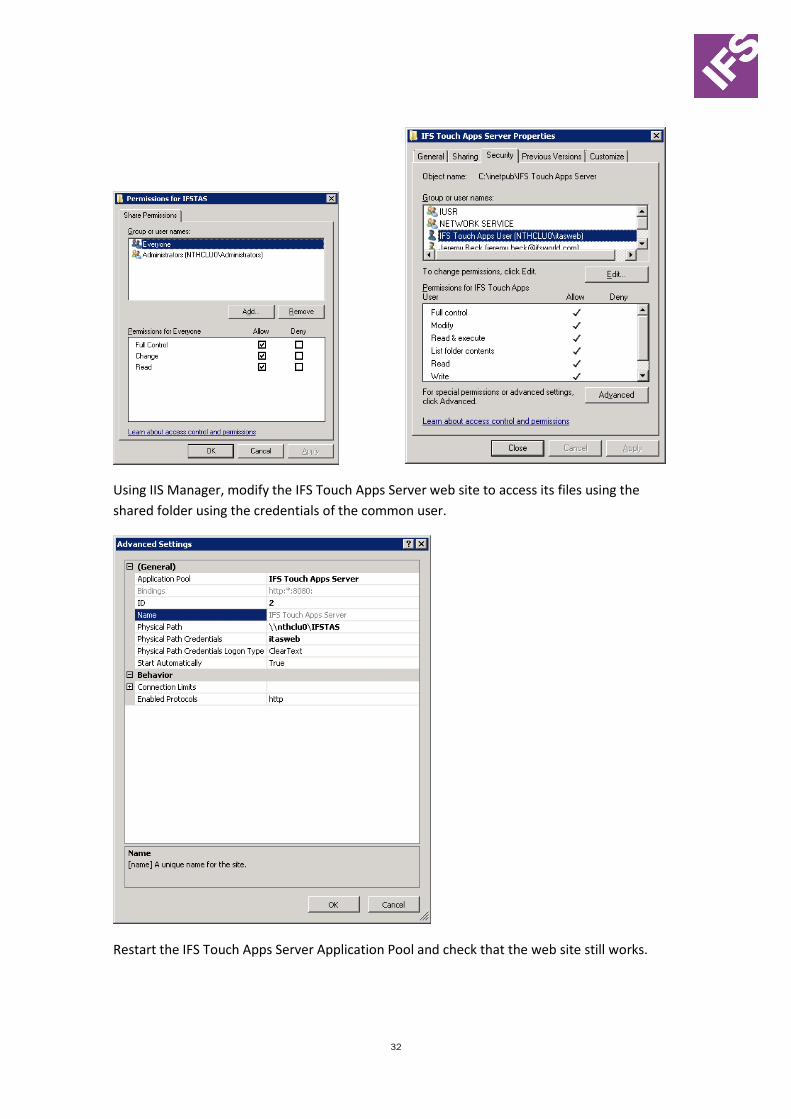
The Share permissions are open. Security is imposed using the Folder Security properties.
32
Using IIS Manager, modify the IFS Touch Apps Server web site to access its files using the
shared folder using the credentials of the common user.
Restart the IFS Touch Apps Server Application Pool and check that the web site still works.
33
8.7 Share Web Configuration
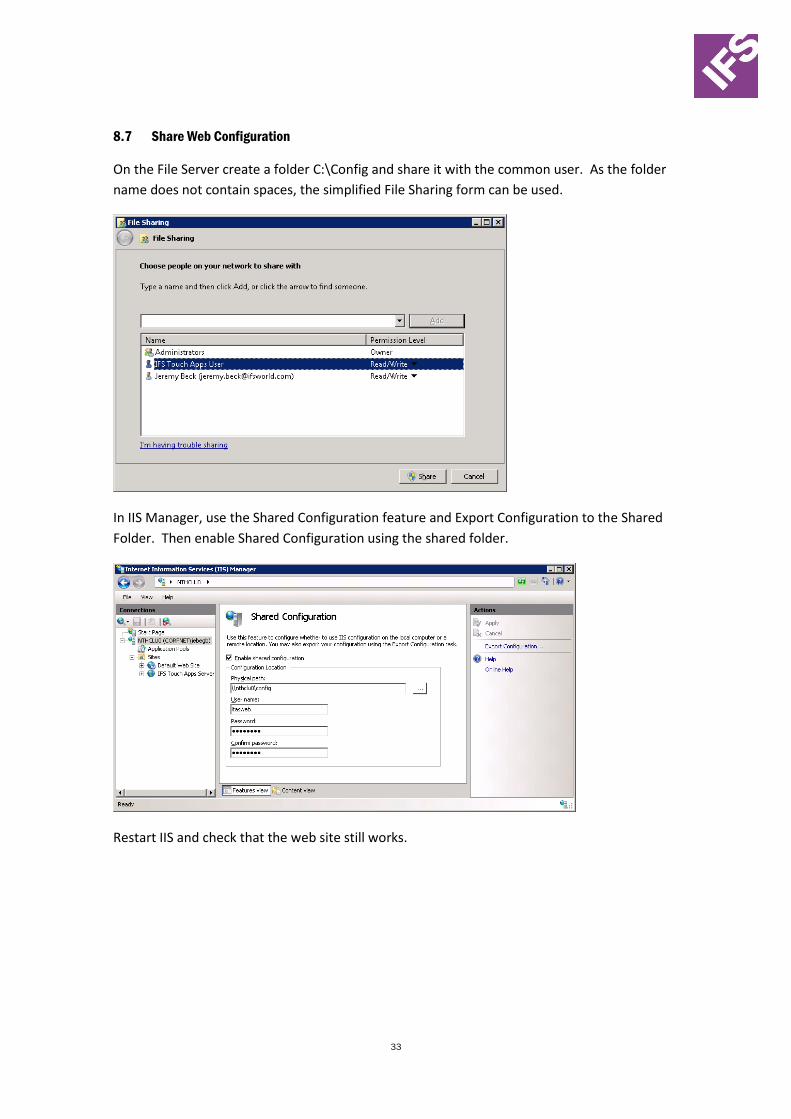
On the File Server create a folder C:\Config and share it with the common user. As the folder
name does not contain spaces, the simplified File Sharing form can be used.
In IIS Manager, use the Shared Configuration feature and Export Configuration to the Shared
Folder. Then enable Shared Configuration using the shared folder.
Restart IIS and check that the web site still works.
34
8.8 Export Certificate
The IFS Touch Apps Server Certificate must be exported from the File Server and shared so that
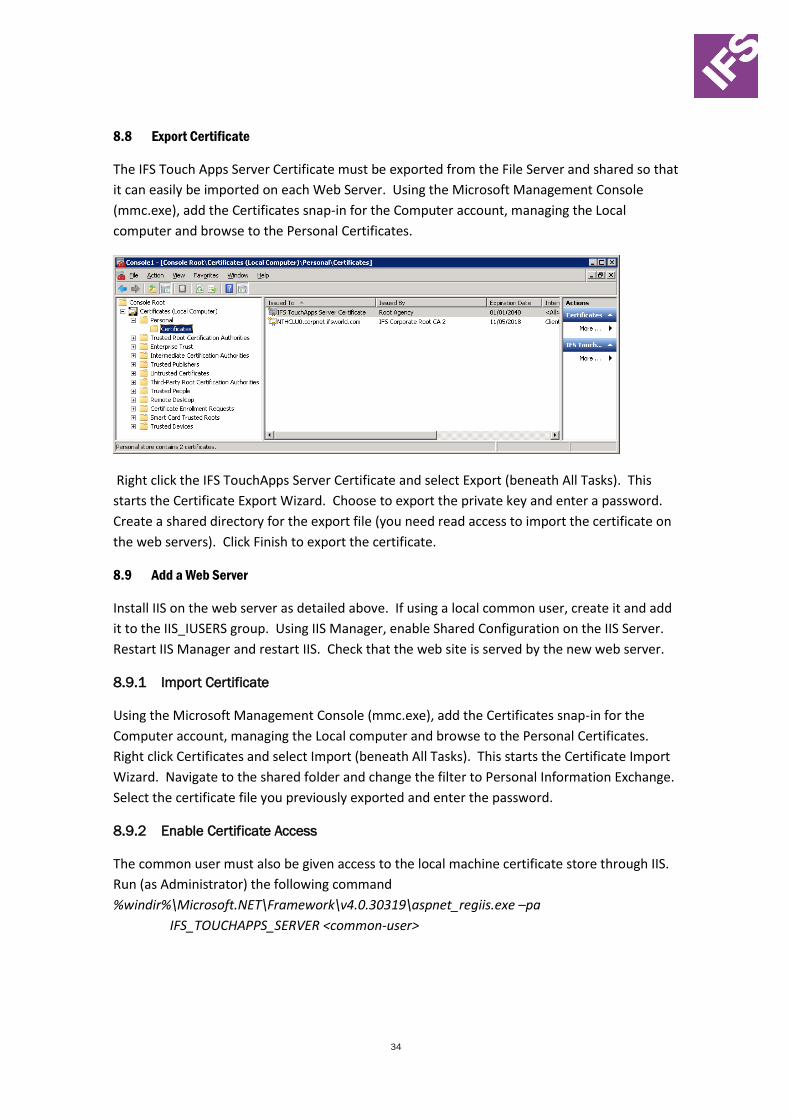
it can easily be imported on each Web Server. Using the Microsoft Management Console
(mmc.exe), add the Certificates snap-in for the Computer account, managing the Local
computer and browse to the Personal Certificates.
Right click the IFS TouchApps Server Certificate and select Export (beneath All Tasks). This
starts the Certificate Export Wizard. Choose to export the private key and enter a password.
Create a shared directory for the export file (you need read access to import the certificate on
the web servers). Click Finish to export the certificate.
8.9 Add a Web Server
Install IIS on the web server as detailed above. If using a local common user, create it and add
it to the IIS_IUSERS group. Using IIS Manager, enable Shared Configuration on the IIS Server.
Restart IIS Manager and restart IIS. Check that the web site is served by the new web server.
8.9.1 Import Certificate
Using the Microsoft Management Console (mmc.exe), add the Certificates snap-in for the
Computer account, managing the Local computer and browse to the Personal Certificates.
Right click Certificates and select Import (beneath All Tasks). This starts the Certificate Import
Wizard. Navigate to the shared folder and change the filter to Personal Information Exchange.
Select the certificate file you previously exported and enter the password.
8.9.2 Enable Certificate Access
The common user must also be given access to the local machine certificate store through IIS.
Run (as Administrator) the following command
%windir%\Microsoft.NET\Framework\v4.0.30319\aspnet_regiis.exe –pa
IFS_TOUCHAPPS_SERVER <common-user>
35
8.10 Setting up a Load Balancer
A Load Balancer is used to distribute client requests between the Web Servers. The Load
Balancer may be implemented as software or in hardware. The Load Balancer is another single
point of failure in the web farm.
Touch Apps requests require “Client Affinity”, i.e. all requests from a client (in a session), must
be handled by the same server. If a client is routed to a different server, they must re-
authenticate. Many Load Balancers (including Microsoft’s ARR) use cookies to implement
Client Affinity. Most Touch Apps clients do not support cookies yet. This can affect your
choice of Load Balancer.
For ARR installations please refer to the next section for installation guidelines.
8.10.1 Setting up ARR
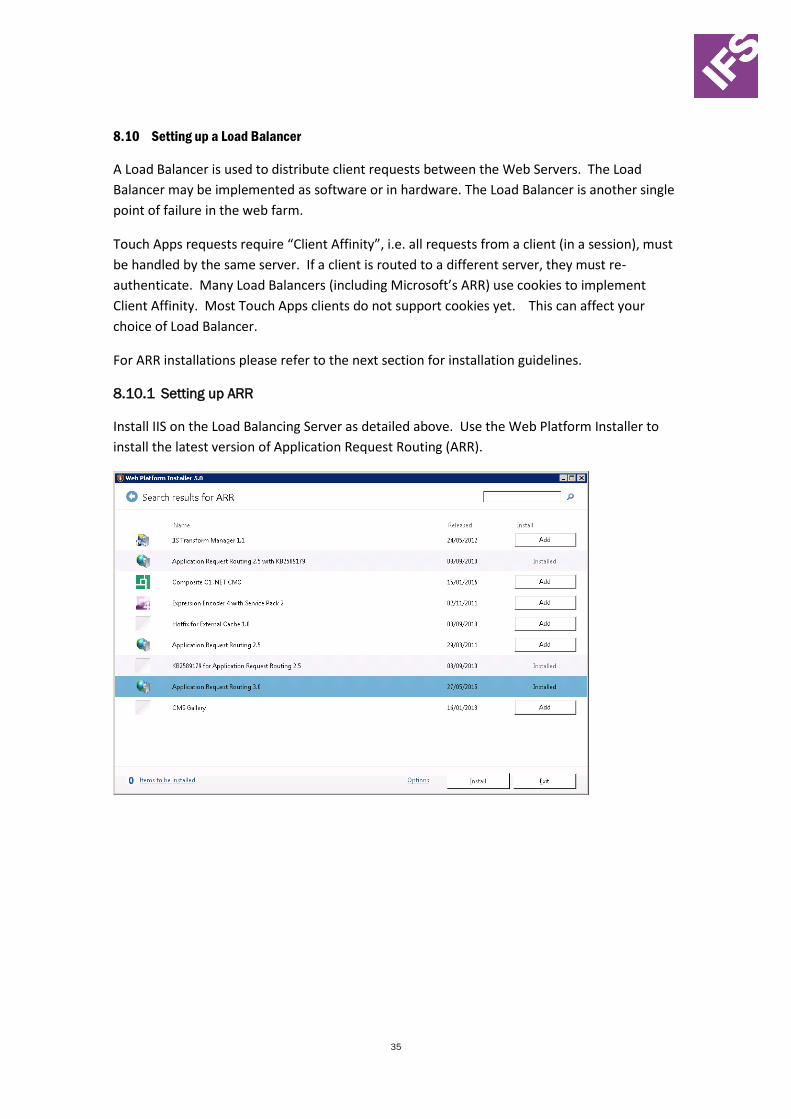
Install IIS on the Load Balancing Server as detailed above. Use the Web Platform Installer to
install the latest version of Application Request Routing (ARR).
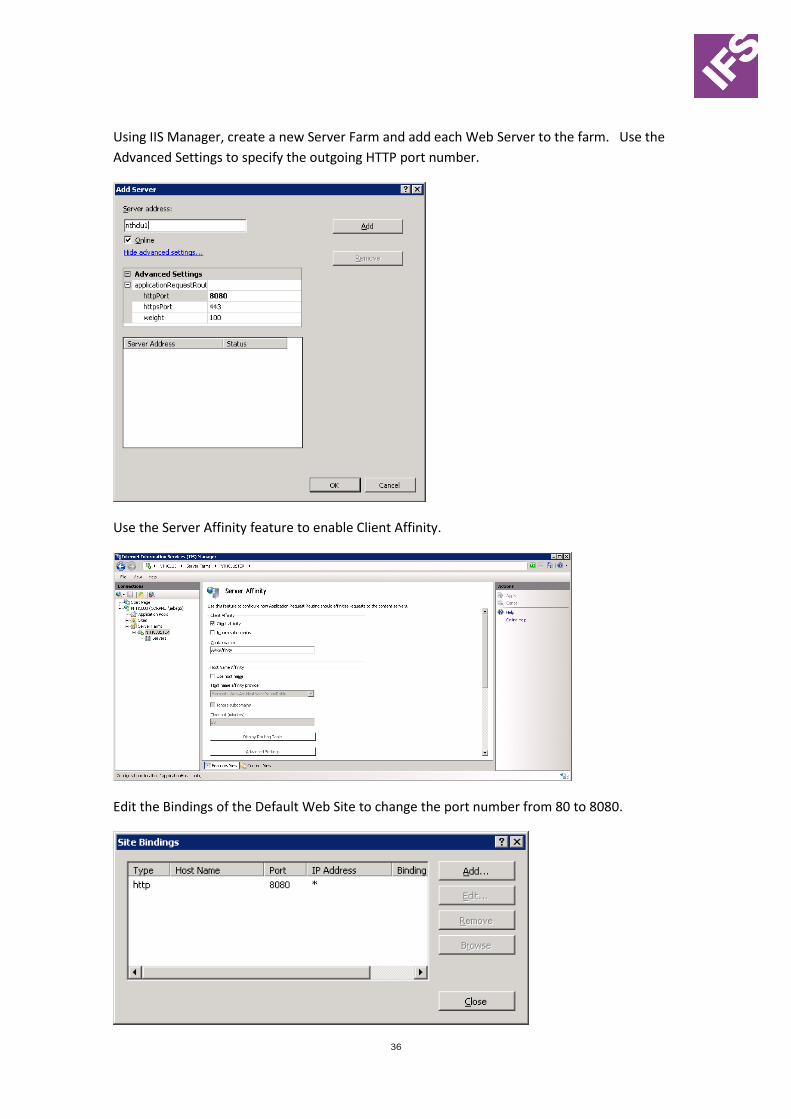
36
Using IIS Manager, create a new Server Farm and add each Web Server to the farm. Use the
Advanced Settings to specify the outgoing HTTP port number.
Use the Server Affinity feature to enable Client Affinity.
Edit the Bindings of the Default Web Site to change the port number from 80 to 8080.
37
Restart IIS and check that the Load Balancer works. Note that Client Affinity will not work
unless the machine name in the URL contains a ‘.’. Use the full machine name in the address.
8.11 Upgrading a Web Farm
As all file content and web site configuration is shared from the File server. Just upgrade the
installation on the File Server and the rest of the web farm will pick up the modifications
automatically.
8.12 Local User Authentication
The Customer Portal allows a sign in as a Local Administrator. In a clustered web farm, there is
no sensible definition of ‘Local’. In a web farm, Local Administrator sign in can only be
achieved using the IFS Touch Apps Authentication Web Service. The machine used to host the
Authentication Web Service is the “Local” machine. This is another single point of failure. The
latest Web Deployment Package for the Authentication Service can be downloaded from the
IFS Cloud.
8.12.1 IIS Modifications
By default, Web Deploy installs the Web Service on your File Server (or another Web Server)
as the Authenticate application under the Default Web Site. In IIS Manager, use Advanced
Settings to change the Application Pool for this application to ASP.NET v4.0 (or .NET v4.5).
38
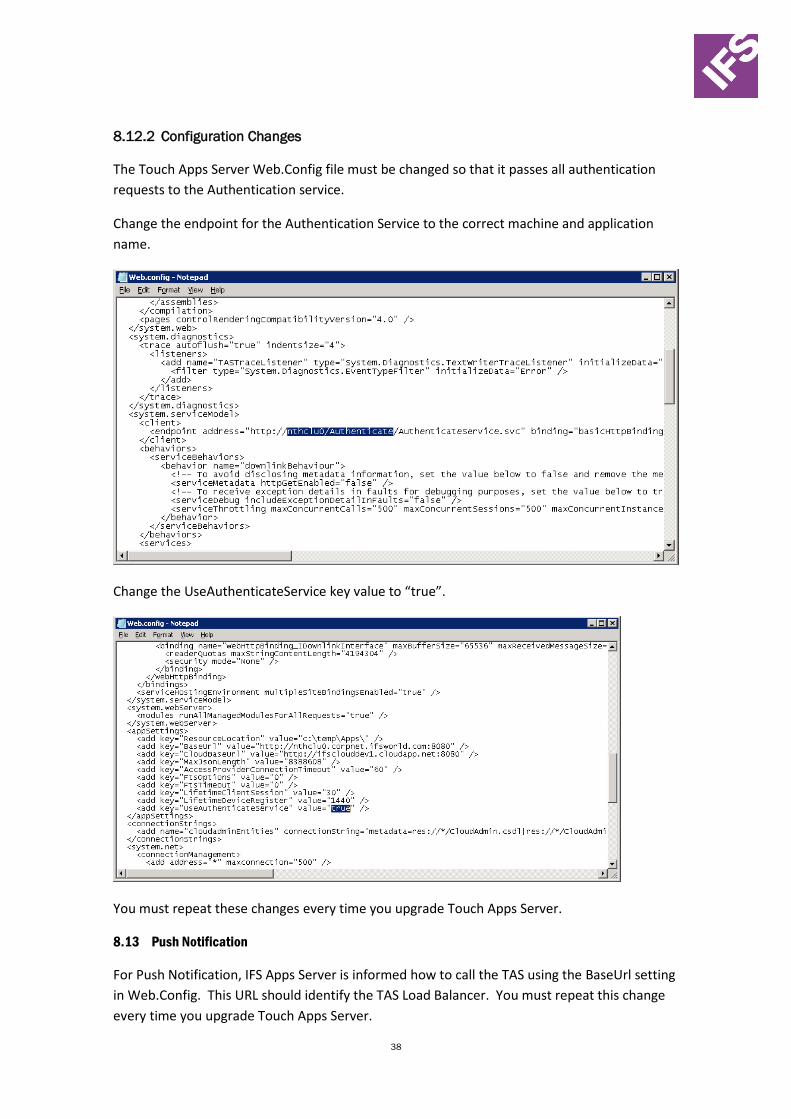
8.12.2 Configuration Changes
The Touch Apps Server Web.Config file must be changed so that it passes all authentication
requests to the Authentication service.
Change the endpoint for the Authentication Service to the correct machine and application
name.
Change the UseAuthenticateService key value to “true”.
You must repeat these changes every time you upgrade Touch Apps Server.
8.13 Push Notification
For Push Notification, IFS Apps Server is informed how to call the TAS using the BaseUrl setting
in Web.Config. This URL should identify the TAS Load Balancer. You must repeat this change
every time you upgrade Touch Apps Server.
39
9 Further IFS Touch Apps Server Administration
Please refer to IFS Touch Apps Server Administration Guide.
10 Upgrading an existing IFS Touch Apps Server installation
Upgrading an existing IFS Touch Apps Server installation is done by running the IFS Touch Apps
Server installer. Take a safe copy of the web.config file before upgrading.
When running the installer to upgrade an existing installation, you may need to enter
connection information for the existing database. You may also need to re-enter the port
number of the Touch Apps Server IIS site.
The installer will overwrite many manual changes to the web.config file. These changes must
be re-applied after the installation. You can read more about typical changes to web.config in
the IIS Configuration section.
10.1 Admin Database Schema Upgrade
The IFS Touch Apps Server installer upgrades the schema of the admin database. Older
versions of IFS Touch Apps Server will not work with the upgraded schema. Different executing
versions of IFS Touch Apps Server must connect to different admin databases. Ensure there is
a backup of the admin database before upgrading.
11 Moving an existing IFS Touch Apps Server installation
When moving an existing IFS Touch Apps Server Installation to a new server, the following
problems must be solved.
11.1 Certificate and private key
When IFS Touch Apps Server is installed, a certificate (public key) and private key pair are
generated to support asymmetric encryption. When the installation is registered with IFS
Touch Apps Cloud, the certificate (public key) is stored.
The existing certificate and private key must be exported from the existing installation. The
exported certificate information can then be imported on the new server.
Access to the private key must match the access given on the existing installation. Network
Service, the local Users group and the Common User in a Web Farm installation must have
read access to the private key.
11.2 SQL Server Express database
IFS Touch Apps Server uses a small administration database. This can be a SQL Server Express
database on the local server. The admin database should either be moved to the new server
(and remain local) or the existing database must be made accessible by the new server.
11.3 Install on the new server
After performing the above tasks, run IFS Touch Apps Server installer on the new server.
40
12 Troubleshooting
This section details some common problems installing IFS Touch Apps Server and how to solve
them.
12.1 Missing SMO
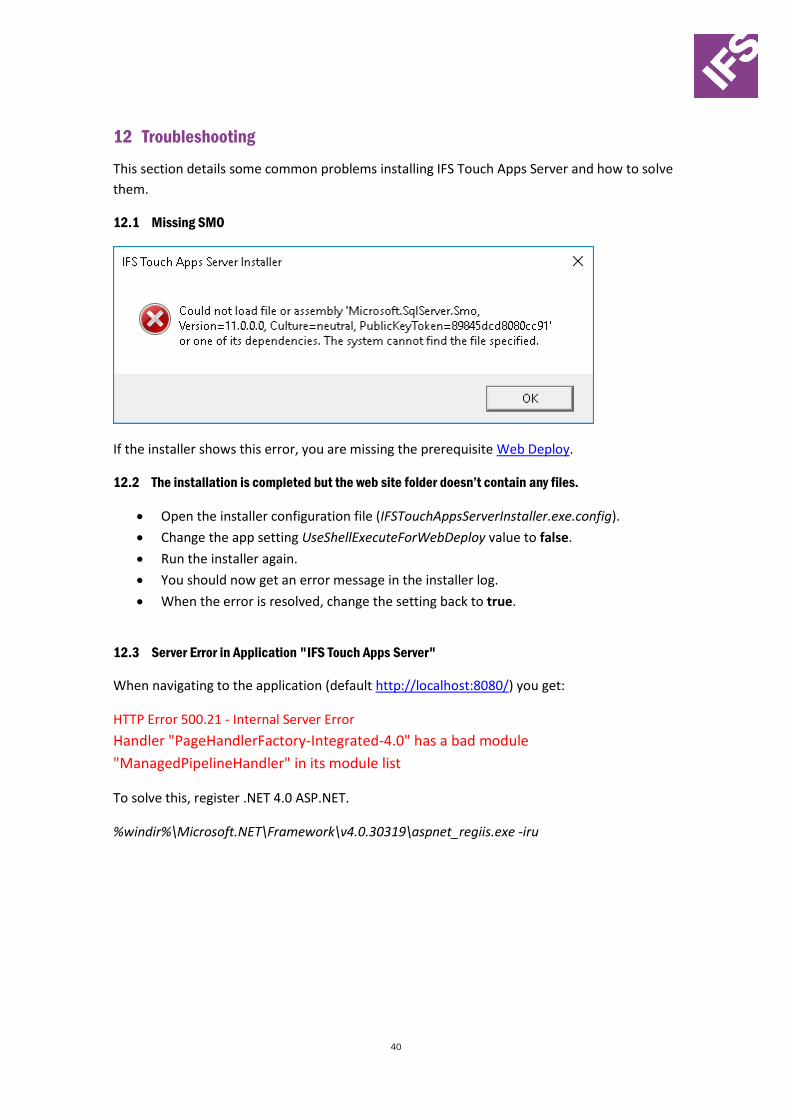
If the installer shows this error, you are missing the prerequisite Web Deploy.
12.2 The installation is completed but the web site folder doesn’t contain any files.
• Open the installer configuration file (IFSTouchAppsServerInstaller.exe.config).
• Change the app setting UseShellExecuteForWebDeploy value to false.
• Run the installer again.
• You should now get an error message in the installer log.
• When the error is resolved, change the setting back to true.
12.3 Server Error in Application "IFS Touch Apps Server"
When navigating to the application (default http://localhost:8080/) you get:
HTTP Error 500.21 - Internal Server Error
Handler "PageHandlerFactory-Integrated-4.0" has a bad module
"ManagedPipelineHandler" in its module list
To solve this, register .NET 4.0 ASP.NET.
%windir%\Microsoft.NET\Framework\v4.0.30319\aspnet_regiis.exe -iru

41
12.4 Web Site works but apps can’t connect
Ensure that you can reach the application service from your device. You can verify this in a
browser. When you navigate to <Site URL>/Downlink.svc you should see a page like this:
If you can’t reach the service, try to access the same URL from a browser on the TAS machine.
If this works, the problem is most likely firewall/proxy related. However, if the problem
remains when accessing the Downlink.svc URL locally on the TAS machine the problem could
be related to Endpoint configuration in web.config. The Endpoints should match your IIS
bindings.
If IIS has been configured for both HTTP and HTTPS, there should be two Endpoints in
web.config as shown in the example image below.
If IIS has been configured for just HTTP, there should be a single Endpoint entry in web.config
(the one with bindingConfiguration set to webHttpBinding_IDownlinkInterface).
12.5 Web Site not rendering properly
If you see the web site is not rendering properly and no styles in the pages after update to the
latest release, then first try to refresh the page by pressing CTR+F5. This will allow browser to
clean the local cache. If you still see the issues with styles/rendering of the web page (e.g. no
styles and text only page), the most common issue would be conflicted MIME types.
Issue: IFS Touch App Server installer adds MIME types for certain files (.apk, .plist and .ipa) to
the web site. If your IIS server already has the same file types in the global MIME list (IIS Web
Server level), this will conflict with the Touch App Server MIME types. Because of this
duplication, IIS will raise errors internally and the result will be empty stylesheets. This will
cause your web page to appear as text only and affects functionality including app downloads.
Solution: To fix the issue, remove those duplicated MIME types from the IIS server (global
level). After removing those duplicates, restart the IIS server and refresh your browser.
42
12.6 Client Affinity not working in a web farm
When using Application Request Routing (ARR) as a Load Balancer, Client Affinity will not work
unless the machine name in the URL contains a ‘.’. Use the full machine name in the address.