(igc) viewer training - princeton university
TRANSCRIPT

Information Governance Catalog
(IGC)
Viewer Training
1
Center for Data, Analytics and Reporting (CeDAR)
Authored by: Leah Targon
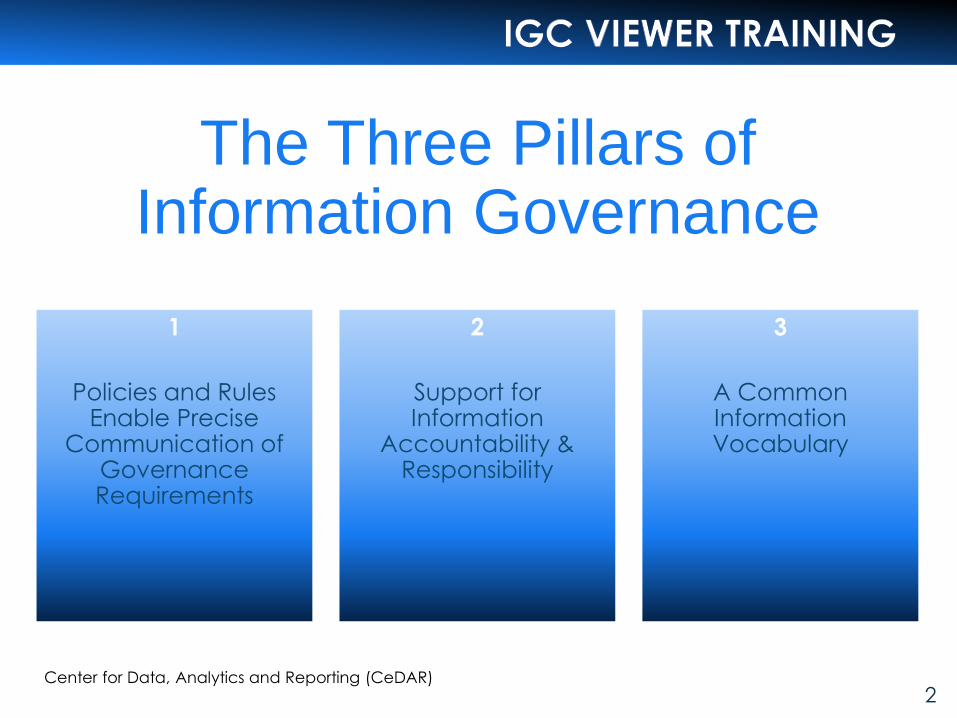
The Three Pillars of Information Governance
2Center for Data, Analytics and Reporting (CeDAR)
1
Policies and Rules Enable Precise
Communication of Governance Requirements
2
Support for Information
Accountability & Responsibility
3
A CommonInformationVocabulary

3Center for Data, Analytics and Reporting (CeDAR)
1) POLICIES AND RULES ENABLE
PRECISE COMMUNICATION OF
GOVERNANCE REQUIREMENTS
• Governance policies communicate the University’s
governance requirements.
• Governance rules implement policies by
communicating and enforcing data quality
requirements.
4Center for Data, Analytics and Reporting (CeDAR)
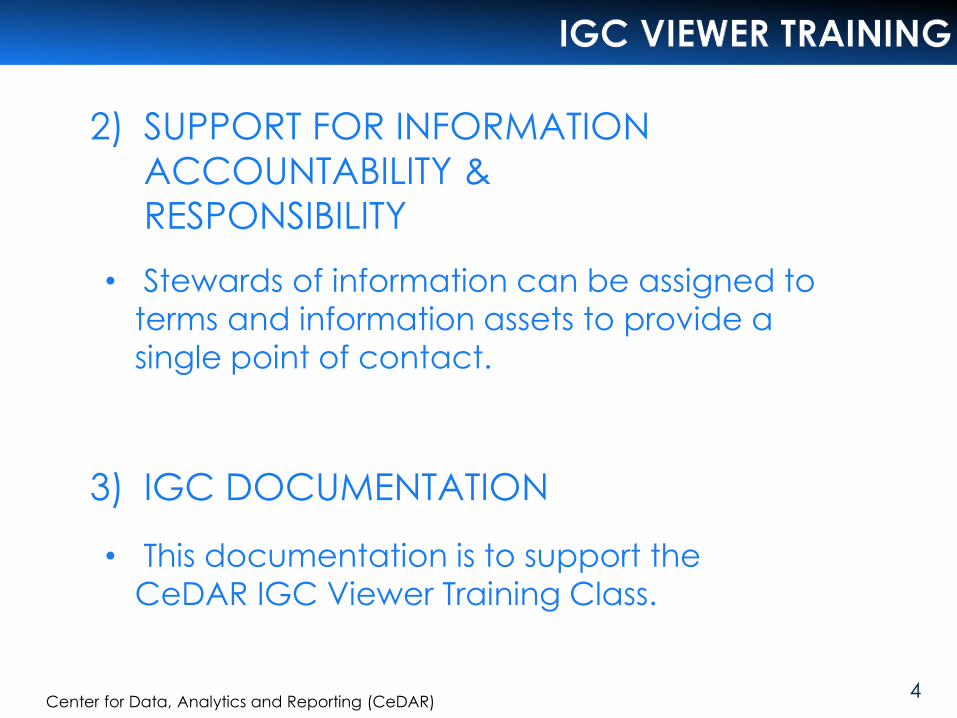
2) SUPPORT FOR INFORMATION
ACCOUNTABILITY &
RESPONSIBILITY
• Stewards of information can be assigned to
terms and information assets to provide a
single point of contact.
3) IGC DOCUMENTATION
• This documentation is to support the
CeDAR IGC Viewer Training Class.

5Center for Data, Analytics and Reporting (CeDAR)
4) A COMMON INFORMATION
VOCABULARY
1) Terms describe specific information assets,
i.e. Course ID, Primary Ethnicity, Work Order, etc.
2) Information assets (attributes) can be linked to the
terms that describe them, i.e. Princeton Data
Security classification.
3) Terms are classified within an hierarchical
structure of categories, i.e. Student Records,
Human Resources, Maximo 7.5.

6
What is the Information Governance Catalog (IGC)
• The InfoSphere Information Governance Catalog (IGC) is a
web-based tool from IBM that allows you to explore, understand
and analyze information.
• IGC can document and enact policies and rules.
• The IGC enables data stewards to share collected metadata
with University consumers. These consumers have access to the
best assets for their purpose, while still adhering to enterprise
governance requirements.
• Data stewards can create, manage and share a common
business language.
• Data lineage can be tracked and available to University
consumers.
Center for Data, Analytics and Reporting (CeDAR)

7
Princeton and the IGC
• CeDAR acquired IBM’s premier metadata management
tool, “Information Governance Catalog” or “IGC” to
help all University consumers better understand their data.
• The data items available in the Information Warehouse are
defined as “Business Terms” within the IGC. Most business
terms represent data found in Princeton’s Information
Warehouse.
• The IGC catalog organizes data definitions and presents
Business Terms by their owning department, or in which
Cognos package or packages the data items are found.
Center for Data, Analytics and Reporting (CeDAR)

8
Metadata and the IGC
• Technical metadata including database table names
and any logic required to create the data item within
the Information Warehouse can also be provided.
• Important metadata can be documented including:
1. The data item source
2. The data item location within an Information
Warehouse package or multiple packages
3. Security restrictions
4. The office which owns the data item.
Center for Data, Analytics and Reporting (CeDAR)

9
Data stewards are responsible for managing their respective categories,
terms and definitions. Business Terms are still being defined.
To date Data Stewards worked with CeDAR to:
• Define a Category hierarchy structure
• Test user permissions and capabilities
• Begin loading terms and definitions
We have defined ~640 terms within 10 Parent Categories and 29 Sub-
Categories.
Princeton and the IGC - Today
This tool is used to give the University community access to terms
and definitions so that everyone can better understand the
University’s metadata.
Center for Data, Analytics and Reporting (CeDAR)

10
Why is the IGC Important
A business term can be defined in several ways
depending upon what group is using the term.
The IGC helps us distinguish between different term
definitions.
An example of a business term that is defined
multiple ways in the IGC.
Term: Account From a Human Resources
perspective an Account is
defined as a person or entity, i.e. DCU, Departmental
Computer User.
Term: Account From a Financial perspective
an Account is found in a
ledger. It is not a person.
Center for Data, Analytics and Reporting (CeDAR)

Let’s
Get
Started!
11Center for Data, Analytics and Reporting (CeDAR)

12
Login to IGC via IE:
https://aisiw208l.princeton.edu:9445/ibm/iis/igc/
The IBM Infosphere certificate has not been installed so you will
see the below message. IGC is located behind the Princeton
firewall, and is secure. Click on the More information link.
Center for Data, Analytics and Reporting (CeDAR)

13
The webpage link will appear.
Click on the link: Go on to the webpage
Center for Data, Analytics and Reporting (CeDAR)

14
You will be taken to the IGC login page.
Log in as you would to
your PC.
Enter your netid and
password.
Select Login
Center for Data, Analytics and Reporting (CeDAR)

The IGC Welcome Page
15Center for Data, Analytics and Reporting (CeDAR)
• On this page there are tabs to access features including:
1) Search
2) Glossary
3) Information Assets
4) Labels
5) Queries
6) Collections

The Search Feature
• The Search box appears on the Welcome page.
16Center for Data, Analytics and Reporting (CeDAR)
1) You may do a simple search for Terms.
2) If you click on the Options button you can do a more
advanced search.

Simple Search
Let’s do a simple search for terms that include “name”.
17Center for Data, Analytics and Reporting (CeDAR)
1) Type “name” in the search field and select the
Search button.

Search Results
The Search Results
page opens and
returns 33 terms that
include “name” in the
term.
18Center for Data, Analytics and Reporting (CeDAR)

Term Details Dialog Box
If you hover over a term the Details dialog box opens. This is a quick way to see the short and long description, category path to the term from its parent category or categories, and status.
19Center for Data, Analytics and Reporting (CeDAR)
Note: When workflow is turned off the default status is Accepted.

Term Details Page
If you click on a term the
Term Details page opens.
This page provides
additional term
information including:
20Center for Data, Analytics and Reporting (CeDAR)
1) Associated Terms
2) Assigned Assets
3) Blueprint Elements
4) In Collections
1) Princeton Data Security Level
2) History
Other details include:

Princeton Data Security Level
The Princeton Data Security Level can be found under General Information on the Term Details page.
The Information Security Policy and explanation of classification levels can be found at:
https://www.princeton.edu/oit/it-policies/it-security-policy/
21Center for Data, Analytics and Reporting (CeDAR)
1) Restricted
2) Confidential
3) Unrestricted Within Princeton
4) Publicly Available
Classification levels include:

Classification Level Definitions
22Center for Data, Analytics and Reporting (CeDAR)
1) Restricted information includes:
• Social security number
• Bank account number
• Driver’s license number
• State identity card number
• Credit card number
• Protected health information
(defined by HIPAA)

Classification Level Definitions
23Center for Data, Analytics and Reporting (CeDAR)
2) Confidential information falls outside the Restricted
classification, but is not intended to be shared freely
within or outside the University due to its sensitive
nature and/or contractual or legal
obligations. Examples include:
• all non-Restricted information contained in
personnel files
• misconduct and law enforcement investigation
records
• internal financial data
• donor records
• education records (as defined by FERPA)

Classification Level Definitions
24Center for Data, Analytics and Reporting (CeDAR)
3) Unrestricted Within Princeton information
falls outside the Restricted and
Confidential classifications, but is not
intended to be freely shared outside the
University.
• One example is the Faculty Facebook.
4) Publicly Available information is intended
to be made available to anyone inside
and outside of Princeton University.

History
History Details include:
25Center for Data, Analytics and Reporting (CeDAR)
1) Created By
2) Created On
3) Modified On
4) Modified By
1) Date: initial date the term was created.
2) Comment: identifies if the term was created manually
or by using the import
feature.
3) Edited By: who touched the term definition.
Other History details include:

Navigating to the Category Hierarchy Structure
26Center for Data, Analytics and Reporting (CeDAR)
1) Select the Glossary pull-down menu.2) Select the Category Hierarchy link.

Viewing Categories
27Center for Data, Analytics and Reporting (CeDAR)
The Categories window opens and you will see the
Categories that you have permission to view.
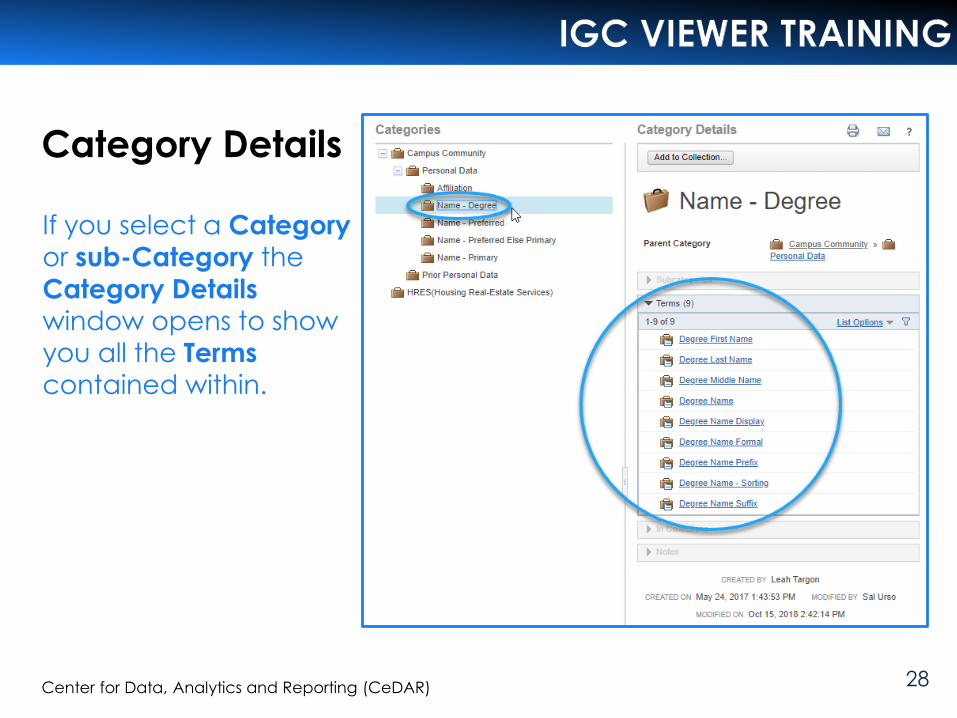
Category Details
28Center for Data, Analytics and Reporting (CeDAR)
If you select a Category
or sub-Category the
Category Details window opens to show
you all the Terms
contained within.

Query Viewing,
Building
and Exporting
29Center for Data, Analytics and Reporting (CeDAR)

Why Use Queries?
• Queries enable you to export your business
terms to Excel or a .CSV file.
• In a spreadsheet environment you can easily
work with these terms.
• As the IGC becomes a more robust metadata
repository it will offer a common platform for
learning and sharing metadata.
30Center for Data, Analytics and Reporting (CeDAR)

31
1) At the Welcome page select Queries in the blue toolbar.
Center for Data, Analytics and Reporting (CeDAR)

32
1) The Manage Queries page opens.
2) You will be able to view those queries you have created.
3) You can also view those queries which have been published
querying metadata that you have permission to view.
4) Unpublished queries can only viewed by the query creator.
Center for Data, Analytics and Reporting (CeDAR)

33
1) Below the query name is a description of the query.
2) The description includes the terms that are being queried.
3) It also includes the last modified date of the query.
4) Looking at the Term Query we see that it includes: 7 types of asset informationlike Name, Short Description, Parent Category, and Collections location &
visibility information.
Center for Data, Analytics and Reporting (CeDAR)

34
1) To run the query click on the query name.
Center for Data, Analytics and Reporting (CeDAR)

35
1) The Query Results window opens.
2) For this example we’re viewing two HRES (Housing Real-
Estate Services) terms.
Center for Data, Analytics and Reporting (CeDAR)
4) If you hover over the Asset
name the term details window
opens giving you the Short and
Long Descriptions, Parent
Category and Status.

36
1) The List Options menu is located on the right hand side of the Query Results window.
Center for Data, Analytics and Reporting (CeDAR)
a) View 10, 50 or 100 items per page
b) Sort by Name, Ascending or
Descending
c) Save List to File: CSV or XLS format
2) You may:

37
1) For this demo select Save List to File XLS.
Center for Data, Analytics and Reporting (CeDAR)
2) A window opens asking you to Open or Save the file.
3) We select Open to view the Excel spreadsheet.

38Center for Data, Analytics and Reporting (CeDAR)
1) You may save and work with the Excel spreadsheet.

39
1) Select Queries in the blue toolbar.
Center for Data, Analytics and Reporting (CeDAR)
Building a New Query in IGC

40Center for Data, Analytics and Reporting (CeDAR)
1) The Manage Queries page opens.
2) Click the New button.
41Center for Data, Analytics and Reporting (CeDAR)
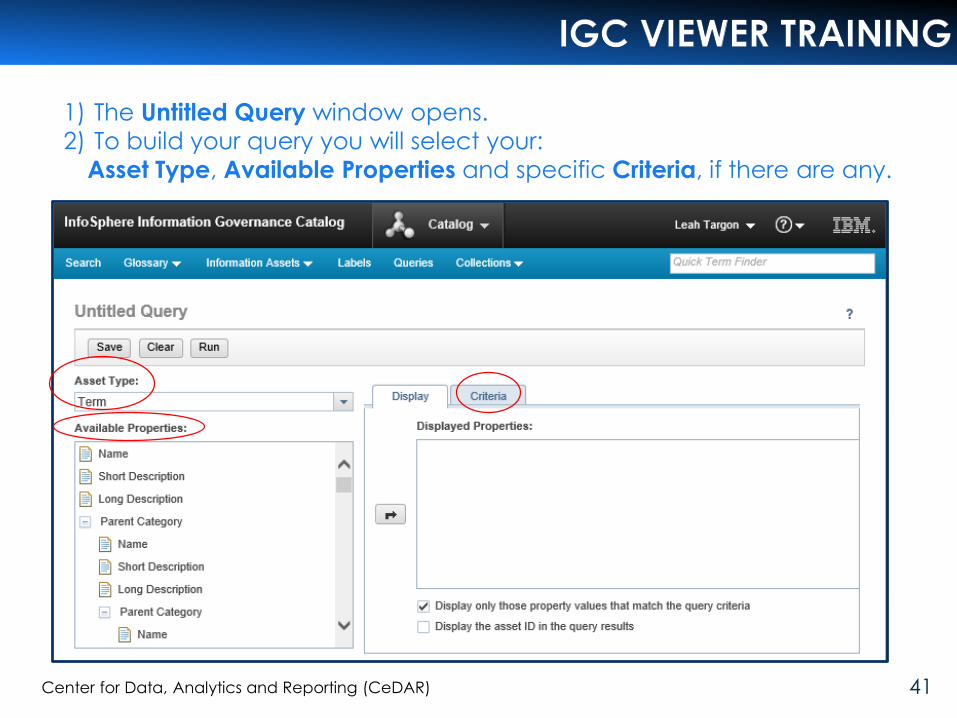
1) The Untitled Query window opens.
2) To build your query you will select your:
Asset Type, Available Properties and specific Criteria, if there are any.

42Center for Data, Analytics and Reporting (CeDAR)
1) For this query we select the Term asset type.

43Center for Data, Analytics and Reporting (CeDAR)
1) In the Available Properties window double click on the properties you
would like to add to the query.
2) Select the Display tab to the right, if it is not selected.
3) The properties will load in the Displayed Properties window on the right.
4) Select the Run button when ready to run the Query.

44Center for Data, Analytics and Reporting (CeDAR)
1) To save the query select the Save button in the Untitled Query window.

45Center for Data, Analytics and Reporting (CeDAR)
1) The Save Query window opens.
2) Name your query.
3) Add a description if you like.
4) Click Save when done.
Note: If you want your query to be
available for others to use, you must
select the Publish Query box in the
Save Query window.

46Center for Data, Analytics and Reporting (CeDAR)
1) If you click on the Queries tab the Manage Queries window opens.
2) When we scroll down we see the new Term Query Sample in the list.

47Center for Data, Analytics and Reporting (CeDAR)
We’ve built
our first
IGC Query!

CollectionsBuilding
and
Viewing
48Center for Data, Analytics and Reporting (CeDAR)

What is a Collection?
49Center for Data, Analytics and Reporting (CeDAR)
• An IGC Collection is a group of assets.
• It may include Category and Term
metadata.
• Each viewer may create a Collection(s)
containing any and all metadata that user
has permission to view.

Creating a New Collection – Choosing Categories and Terms
50Center for Data, Analytics and Reporting (CeDAR)
1) Before creating a Collection it is helpful to decide which
categories and/or terms you want to include in your Collection.
2) Under the Glossary tab select Category Hierarchy from the
pull-down menu to view the Categories and Terms you may
include in your Collection.

Selecting Your
Categories for a
New Collection
51Center for Data, Analytics and Reporting (CeDAR)
1) When we open the
Category Hierarchy we
see 2 categories and
several sub-categories.
2) In this Collection we will
use the Campus
Community sub-Category
Personal Data which
contains 67 terms.

Selecting Your Terms
for a New Collection
52Center for Data, Analytics and Reporting (CeDAR)
1) We are also going to
select a few terms from
the HRES (Housing
Real-Estate Services
category.
2) If you click on the HRES
Category you can see
that there are 66 terms
within that Category to
choose from.

Selecting Your Terms
for a New Collection
53Center for Data, Analytics and Reporting (CeDAR)
1) Let’s scroll through the
pages to see which
terms are available to
choose.
2) For this Collection we’ll
select the terms Class
Year and College from
page 2.

Selecting Your Terms
for a New Collection
54Center for Data, Analytics and Reporting (CeDAR)
1) We’ll also select Meal
Plan from page 5.
2) Identifying your
Categories and Terms
for your new collection
will make creating a
new Collection an
easier process.

Creating a Collection
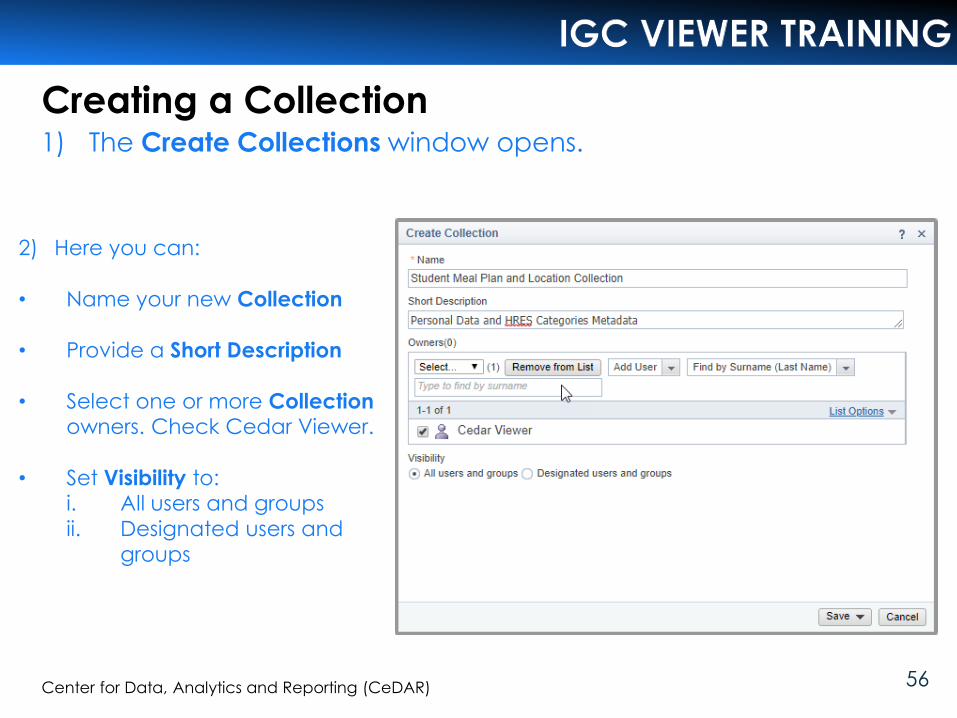
55Center for Data, Analytics and Reporting (CeDAR)
1) On the Welcome page select the Collections tab.2) Select Create Collection from the pulldown menu.
Creating a Collection
56Center for Data, Analytics and Reporting (CeDAR)
2) Here you can:
• Name your new Collection
• Provide a Short Description
• Select one or more Collectionowners. Check Cedar Viewer.
• Set Visibility to:i. All users and groups
ii. Designated users and
groups
1) The Create Collections window opens.

Set List Display Options Window
57Center for Data, Analytics and Reporting (CeDAR)
1) The List Options
window allows you to:
• Set the number of
Items Per Page
• Sort by Name,
ascending or
descending
Save Options
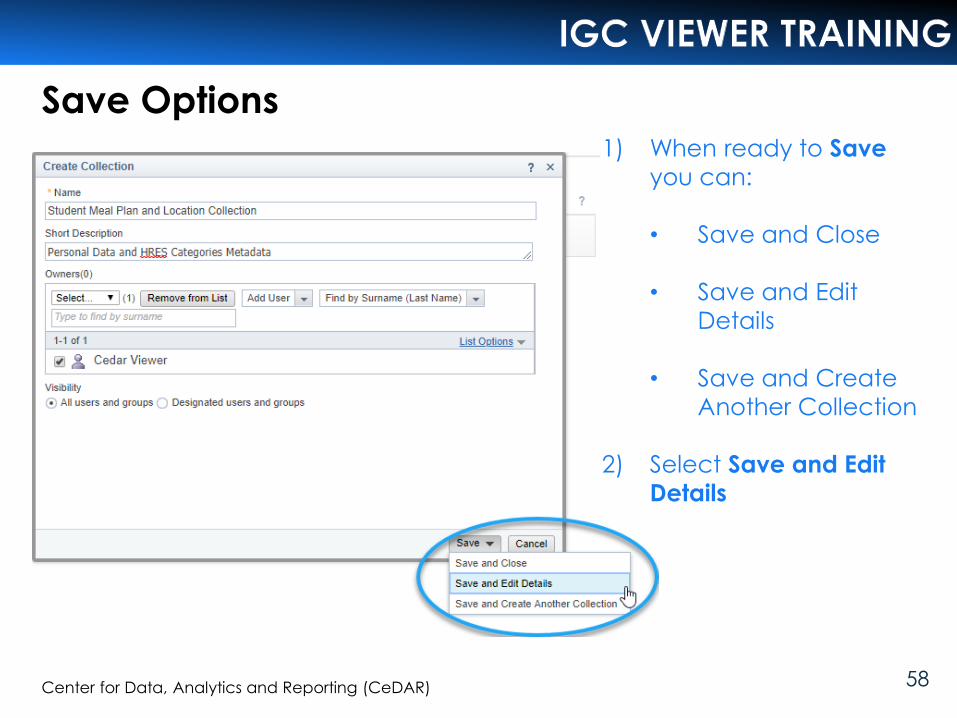
58Center for Data, Analytics and Reporting (CeDAR)
1) When ready to Save
you can:
• Save and Close
• Save and Edit
Details
• Save and Create
Another Collection
2) Select Save and Edit
Details

Edit Window
59Center for Data, Analytics and Reporting (CeDAR)
1) The Edit window opens.
Here you can add your
Assets to the new
collection.
2) If you open the pull-down
menu under Glossary and
Governance we want to
select a Category.

Edit Window - Select an Asset Category
60Center for Data, Analytics and Reporting (CeDAR)
1) Once the Category has loaded in the first box, you may begin
typing the Category we previously chose for our Collection:
Personal Data.
Note: As we begin typing available categories will appear in
the data window below the box. Personal Data under Campus
Community is the category that we earlier chose for our new
Collection. Select it from the pull-down box.

Edit Window – Display Assets
61Center for Data, Analytics and Reporting (CeDAR)
1) Once the Category has been selected it appears below the
selection window.

62Center for Data, Analytics and Reporting (CeDAR)
1) We now want to add the
Terms we chose earlier to this
Collection. They include:
• Class Year and College
from page 2.
• Meal Plan from page 5.
1) If you open the Asset
pull-down menu on the right
we want to select Term under
Glossary and Governance.
Edit Window - Selecting Asset Terms

63Center for Data, Analytics and Reporting (CeDAR)
Edit Window - Selecting Class Year Term
1) Once Term has been loaded we can begin searching for the
3 terms we want to add.
2) As you begin typing Class Year into the asset window Terms
with similar spelling will begin pre-loading.
3) Select Class Year located in the HRES Category.
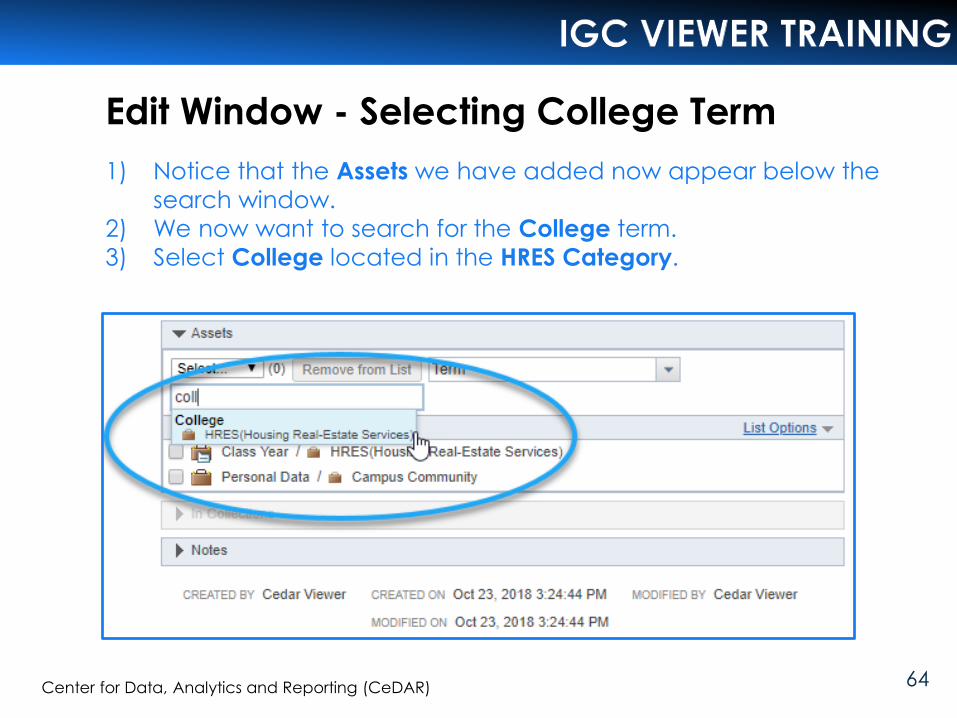
64Center for Data, Analytics and Reporting (CeDAR)
1) Notice that the Assets we have added now appear below the
search window.
2) We now want to search for the College term.
3) Select College located in the HRES Category.
Edit Window - Selecting College Term

65Center for Data, Analytics and Reporting (CeDAR)
1) We now want to search for the Meal Plan term.
2) Notice when you type just the first letter “m” there are
many Terms from which to choose. As you continue
typing the number of choices diminishes.
3) Select Meal Plan located in the HRES Category.
Edit Window - Selecting Meal Plan Term

Edit Window – Remove from List
66Center for Data, Analytics and Reporting (CeDAR)
1) If you’ve chosen the wrong Asset you may remove it from the list.
2) If you check the box to the left of the Asset. The Remove from List
button activates so you can remove the Asset.
Note: Do not remove an asset at this time.

67Center for Data, Analytics and Reporting (CeDAR)
1) We’ve selected all of our Assets for this Collection.
2) Review your Assets to be sure you have selected your
Assets from the intended Category locations.
Reviewing Your Asset Selections

68Center for Data, Analytics and Reporting (CeDAR)
1) You may Save your choices at any time, however, you must
remember to Save your selections or they will be lost once you
leave this window.
2) At the top of the Edit window you may View, Save, Cancel or
Delete this Collection.
3) Select Save.
Saving Your Collection

69Center for Data, Analytics and Reporting (CeDAR)
1) To view your Collection select the pull down menu next to
Collections in the blue tool bar.
2) Select All Collections.
Note: At this time the My Collections & Collections Shared with
Me tabs are not working correctly.
Viewing Your Collection

70Center for Data, Analytics and Reporting (CeDAR)
1) When the All Collections Window opens check the box to the left
of the Collection you have just created to select it.
All Collections Window

71Center for Data, Analytics and Reporting (CeDAR)
1) If you hover over your Collection name the metadata window
opens to give you the Short and Long Descriptions, if there are ones.
2) From this location you can also edit the Collection, add this
Collection to another Collection, and send an email to the Catalog
administrator.
Metadata Window

72Center for Data, Analytics and Reporting (CeDAR)
1) Click on the Collection name to open the Collection Details window.
Open a Collection

73Center for Data, Analytics and Reporting (CeDAR)
• In the Collection Details
window you can Edit,
Delete or Add to the
Collection.
• The Collection name
and Short Description
follow.
• General Information
includes the Owner(s) of
the Collection, and users
and groups that can
view the Collection.
• The Assets window shows
the Categories and Data
Items that comprise the
metadata Collection.
Collection Details Window

74Center for Data, Analytics and Reporting (CeDAR)
We’ve created
our first
Collection!
75Center for Data, Analytics and Reporting (CeDAR)
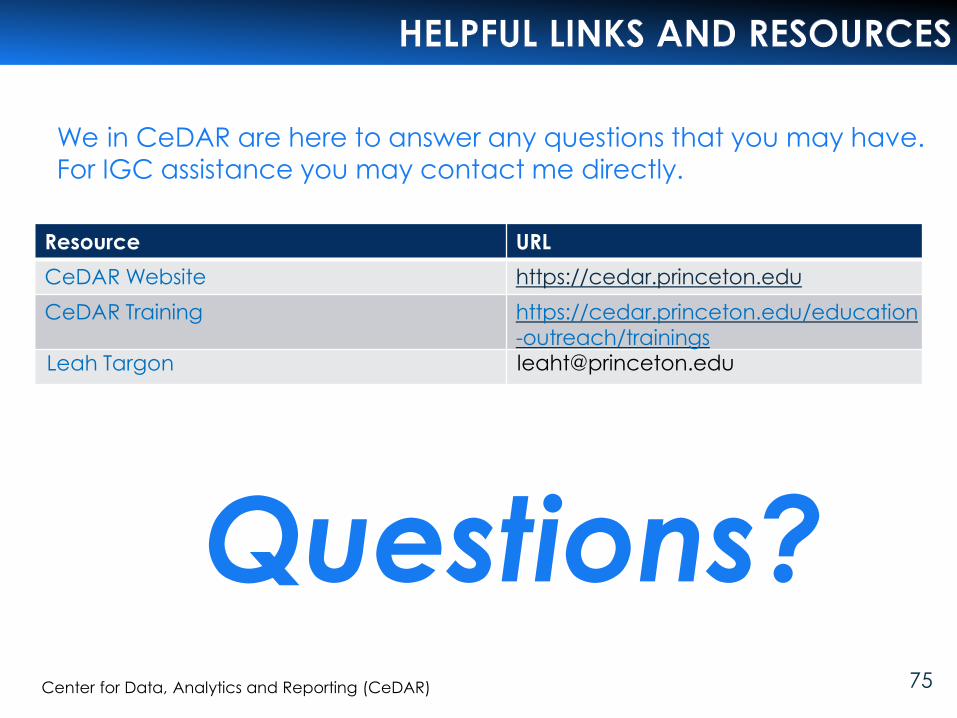
We in CeDAR are here to answer any questions that you may have.
For IGC assistance you may contact me directly.
75
Resource URL
CeDAR Website https://cedar.princeton.edu
CeDAR Training https://cedar.princeton.edu/education
-outreach/trainings
Leah Targon [email protected]
Questions?

76Center for Data, Analytics and Reporting (CeDAR)