igen th print station design and file preparation guidelines · pdf file ·...
TRANSCRIPT

D e sign a n d f i l e p rep a ra t io n gu ide l ine s
Xerox® iGen® 5 Press with the 5th Print Station

TABLE OF CONTENTS
Introduction . . . . . . . . . . . . . . . . . . . . . . . . . . . . . . . . . . . . . . . . . . . . 3
The 5th print station process . . . . . . . . . . . . . . . . . 4
Choke and spread adjustments . . . . . . . . . . . . 6
Gamut extension with 5th Color Be spot-on with brand colors . . . . . . . . . . . . 8 File preparation . . . . . . . . . . . . . . . . . . . . . . . . . . . . . . . . 10
Xerox® White Dry Ink Enhance your designs . . . . . . . . . . . . . . . . . . . . . . 13 File preparation . . . . . . . . . . . . . . . . . . . . . . . . . . . . . . . . 20 Hints + tips . . . . . . . . . . . . . . . . . . . . . . . . . . . . . . . . . . . . . . . . 26
Xerox® Clear Dry Ink Add decorative detail . . . . . . . . . . . . . . . . . . . . . . 29 File preparation . . . . . . . . . . . . . . . . . . . . . . . . . . . . . . . . 30 Hints + tips . . . . . . . . . . . . . . . . . . . . . . . . . . . . . . . . . . . . . . . . 34

Introduc t ion
When you work with print providers that have a Xerox® iGen® 5 Press with the 5th print station, you get the opportunity to produce special effects that go beyond digital CMYK.
You can offer your clients on-brand spot colors, as well as design and security enhancements using Xerox® White and Clear Dry Inks, all without sacrificing digital print’s turnaround time and cost-effectiveness.
3
This guide will walk you through several ways to use the 5th print station. Best practices for file preparation are included to help ensure print results match your design intent.
All steps included in this guide assume a working knowledge of Adobe® Creative Suite applications.
Always work with your print provider on specific file attributes and PDF export settings.
+

The 5th print station functions differently depending on what ink has been specified and how that ink is used within a design.
4
If the 5th print station is being used with one of the gamut-extending colors – Orange, Green, or Blue – that color will blend in with the press’s CMYK Dry Inks and print to your paper in one single pass.
White and Clear Dry Inks, however, are used for different – spot – purposes and do not mix in with the CMYK Dry Inks. This means their printing process is somewhat different.
The 5th pr int s tat ion process .
When a White or Clear element is layered with CMYK in a design, the ink will print in a separate pass from your four color elements. This separate pass is invisible to the casual observer as it’s happening automatically within the press, but it is important to understand.
Due to slight paper movement between the passes, small adjustments should be made to graphics calling for White
or Clear Dry Inks to ensure the final printed product matches your design intent. Those adjustments will be covered in the following pages.
Designs that place White or Clear Dry Ink elements next to CMYK do not require these adjustments because these designs will print in one single pass. It is only when White or Clear are used over or under CMYK that the press prints in multiple passes.
Helpful
terms:
Passes – The number of times a sheet of paper runs through the imaging transfer point.
Layers – The number of hits of ink that are required to meet the desired print characteristics for each job.
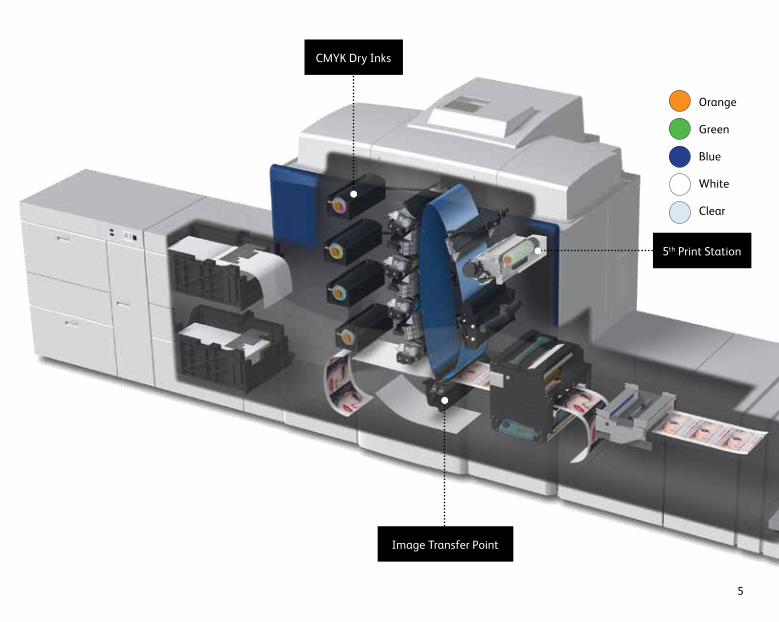
Image Transfer Point
5
Orange
Green
Blue
White
Clear
5th Print Station
CMYK Dry Inks

Choke and spread adjustments .Choke and spread are two adjustments that will help compensate for any slight movement of paper between print passes. These adjustments create a small overlap that covers unwanted gaps, specifically when using White Dry Ink. The adjustment you chose will depend on your design.
6
Choking makes an element smaller. It should be used on bottom layer elements that don’t need to be an exact size – for example, a White box under an image.
We recommend you choose a color to make the White and Clear effects easily identifiable within your files. In this guide, we will use 100% Magenta as that color.
In this case, the White area under the flowers is choked in slightly to compensate for small movements of the paper between passes.
The image then completely covers the White box under it.

Your design – along with the stock you’ve chosen and the specific iGen® 5 Press your print provider is running – will determine the exact amount of choke or spread needed. You should always request a press proof to ensure the results match your design intent.
7
Spreading makes an element larger. It should be used on top layer elements when retaining shape is more critical – for example, a CMYK logo over White Dry Ink.
Spreading the CMYK slightly will cover the bottom layer of White while retaining your intended design appearance on dark stocks.
Any extra CMYK spread blends in with the dark background stock color.

Be spot-on with brand colors . Gamut extension with 5th color
The need to accurately represent your clients’ brand colors can often be the determining factor in picking a print method. Now, the iGen® 5 Press can play a bigger part in your choice.
An optional 5th color extends the iGen® 5 Press’s gamut to put more of your clients’ brand colors in reach.
By adding Orange, Green, or Blue to CMYK Dry Inks in an iGen® 5 Press, more than 90% of the PANTONE® PLUS swatch book can be accurately reproduced. This makes digital print a highly relevant option for jobs that need fast, cost-effective turnaround –in addition to on-brand color.
8

Using the 5th color capability is easy. Once you have selected a PANTONE® color, you can quickly check to see if it would benefit from the addition of Orange, Green, or Blue by using the Xerox® iGen® 5 Press Gamut Extension Tool: xerox.com/gamut.
Simply enter your PANTONE® PLUS color and the tool will let you know if it can be accurately represented by CMYK, or if it would benefit from the addition of a 5th color.
In this case, with the addition of Orange, the specified PANTONE® color would be a “very accurate match.”
While a 5th color could be used to match this desired PANTONE® color, CMYK alone will also provide a “very accurate match.”
9

Determine whether your PANTONE® selection will benefit from a 5th color using the Gamut Extension Tool: xerox.com/gamut.
Using 5th co lor in your f i les .Gamut extension with 5th color
Once you know your PANTONE® PLUS color will benefit from Orange, Green, or Blue, you simply need to define it as a Spot color in your layout file. Your print provider – and the iGen® 5 – will do the rest.
When you hand your job off for production, be sure to tell your print provider to run it with a 5th color, and to ask for a press proof. This will help ensure the result matches your intent.
10
1 In InDesign®, add the desired PANTONE® color to your file. Designate it as a spot color.
2 Fill your shape with the new PANTONE® color swatch.
Save your file and export as a high-resolution PDF using the instructions on the next page.
1
2

Prepar ing PDF fi les for pr int ing.
Exporting as a high-res PDF from InDesign®.
11
4
2
3
1
1 From the main menu, select: File > Adobe PDF Presets > Press Quality, and click Save.
2 Select General: Compatibility > and choose Acrobat 7.
3 On the lower-right side, check: Create Acrobat Layers.
4 Select Compression: Color Images > Do Not Downsample.
Compression > JPEG, Image Quality > Maximum.
Choose the same for Grayscale Images. For Monochrome Images > CCITT Group 4.

12

Enhance your designs by adding White Dry Ink.
XEROX® white dry ink
Adding White to your color palette lets you make a bigger visual impact.
Use White Dry Ink to add visual appeal and function to both colored and transparent media by drawing attention to a graphic or emphasizing an image so it jumps right off the page.
We recommend you choose a color to make the White effects easily identifiable within your files. In this guide, we will use 100% Magenta as that color.
13

14
XEROX® white dry ink
White can be printed next to or under CMYK to enhance images and add more value to jobs.
White enhances designs that print on dark cover stock – such as the holiday card shown here – creating higher-value postcards, invitations, posters, direct mail, and more.
Media
White Dry Ink (first pass)
CMYK (second pass)

Whether running one pass of White Dry Ink or two, applying a choke to the White box(es) under the CMYK photo image will help ensure the an excellent print result.
15
You can also choose to add a second pass of White for more opacity.
Media
White Dry Ink (first pass)
White Dry Ink (second pass - optional)
CMYK (third pass)
While one layer of Xerox® White Dry Ink creates a look many clients are happy with, a second pass may be desired in some cases.
You may choose to test both options with press proofs before doing a full production run.

XEROX® white dry ink
To create a bold look on dark media, create a design that only uses White Dry Ink.
White Dry Ink
MediaWhite on its own creates dramatic effects on dark, heavy media, opening up new design possibilities for folders and collaterals.
16

A choke or spread is NOT required for two passes of White elements.
You can also choose to add a second pass of White for more opacity.
If you have selected specific elements – like the type shown to the left – to print in more than one pass, you should create a separate file for just those elements.
That will help ensure the added opacity is right where you want it.
17
White Dry Ink (image + type first pass)
White Dry Ink (type second pass)
Media

In this example, we have choked the White so it does not spread beyond the CMYK elements.
XEROX® white dry ink
In certain applications, you can use White over CMYK to add an opaque background.
White creates new possibilities for window signage on transparent media. Depending on how the signage is being applied, White can be printed either under or over CMYK.
18
Media
White Dry Ink (second pass)
CMYK (first pass)

In this example, we have spread the CMYK text to fully cover the White underlayer.
White can also be used under CMYK to make colors pop on dark stocks.
CMYK (second pass)
White Dry Ink (first pass)
White makes color pop on dark stocks, giving you a simple way to broaden the types of stocks you specify without giving up legibility or design impact.
19
Media

1 If you want a bitmap image to print in White, you will need to begin with the image in Photoshop®. If you’re starting with a color CMYK image it will need to be converted to Grayscale first. All Grayscale images then need to be inverted.
Go to Menu and select Image, then Adjustments, then select Invert.
2 To save as the correct file format, go to Menu and select Image, then Mode, then select Duotone.
Select Type as Monotone.
NOTE: Instead of Inverting, another option would be to go to Image > Adjustments > Curves, then make Output 0 and Input 100. This will give you adjustment capabilities to increase or decrease the image contrast.
Preparing bitmap images with Adobe® Photoshop®.
3 Click on Ink 1 color, then choose the PANTONE® Solid Coated library.
2
3
Adding White Dr y Ink to your f i les .XEROX® white dry ink
20

5 Select and rename the PANTONE Process Magenta as White, then select OK.
6 Save your file as a Photoshop® file so it is ready to be placed into an InDesign® layout file.
The file should bring in the color White as a 100% Magenta spot color.
Recommended file formats: psd, eps, and PDF
Preparing bitmap images with Photoshop®.
4 Select PANTONE Process Magenta, then select OK.
5
1
4
6
The name “White” is case-sensitive and should be used exactly as shown to ensure proper printing.
21

1 Create your vector graphics on designated layers in Illustrator®: one layer for CMYK, and one layer for White.
2 Add a new color in the swatches palette to identify 100% Magenta as White and name it White.
Designate the Color Type as a CMYK Spot Color.
Creating vector graphics with Adobe® Illustrator®.
3 Save out each layer as a .eps to be placed into your InDesign® file. In the example shown, the White layer needs to print under the CMYK art.
Adding White Dr y Ink to your f i les .XEROX® white dry ink
Vector graphics that are created in Illustrator® can be placed into Adobe® InDesign® and designated to print with White Dry Ink.
The name “White” is case-sensitive and should be used exactly as shown to ensure proper printing.
1
2
3
NOTE: Another option is applying overprint to the White fill if it is printing over CMYK. You can use this method instead of Multiply in InDesign. To apply in Illustrator, choose Window > Attributes > Overprint.22

1 Create a new layer in InDesign® and name the layer White.
2 Import Illustrator® .eps graphics into each designated layer within InDesign®: one layer for CMYK, and one layer for White. Add a choke to the White layer.
Pulling it all together in InDesign®.
3 For graphics imported into InDesign®, choose Multiply; for those created within InDesign®, choose Overprint.
Save your file and export as a high-resolution PDF using the instruction on the next page.
Now that you have created your imagery for White, you are ready to put it together in your final layout.
Within InDesign®, make sure that you place the CMYK elements on your CMYK layer and the White elements on your White layer, then ensure you have created the proper choke on the White elements.
1
23
23

Prepar ing PDF fi les for pr int ing.XEROX® white dry ink
It’s important to choose the correct settings when saving a PDF for printing with White Dry Ink.
Follow these steps to create a PDF preset for saving high-res PDFs right out of InDesign®.
Exporting as a high-res PDF from InDesign®.
2
3
1
1 From the main menu, select: File > Adobe PDF Presets > Press Quality, and click Save.
2 Select General: Compatibility > and choose Acrobat 7.
3 On the lower-right side, check: Create Acrobat Layers.
24

4
5 Set up with Crop Marks and Bleeds if desired.4 Select Compression: Color Images > Do Not Downsample.
Compression > JPEG, Image Quality > Maximum.
Choose the same for Grayscale Images. For Monochrome Images > CCITT Group 4.
5
Within Acrobat, you can quality check your PDF layers before printing by viewing the file in the Print Production > Output Preview window.
25

Get the most from White Dr y Ink .XEROX® white dry ink
Designing with screens of White is not recommended for text. If screens of White are used, text legibility may suffer.
Avoid serifs and small point text with White Dry Ink.
Avoid trying to trap to or overlap White to CMYK text and graphics with serifs or thin details.
White Dry Ink is intended for spot usage and not for flood needs.
A faux fill can be added as a layer within your design file to simulate a colored stock. This can help you better visualize the design (remember to delete or hide this layer when creating the PDF).
26
abc123 abc123
20% white on red paper 100% white on red paper

If the White Dry Ink did not print as you intended, you may have to enable Multiply or Overprint for overlapping elements or adjust your choke and spread settings.
If White Dry Ink isn’t printing at all, check that the custom spot is identified for each text/graphic with the same spelling in all cases (i.e., “White”).
You can preview your file in Separation Preview within InDesign® or in Acrobat (Print Production > Output Preview) to make sure the White elements are specified correctly.
Always request a hardcopy press proof to make sure printed results are matching your design intent.
Page layout can have an unlimited number of layers; however, all White text and graphics should be placed together in one layer.
27


29
Add decorat ive and secur ity ef fec t s with Clear Dr y Ink .
XEROX® clear dry ink
Emphasize important content and make an eye-catching impression that drives results.
The addition of Clear Dry Ink in the 5th print station expands the iGen® 5’s versatility and allows you to offer customers a distinctive selection of specialty embellishment options that make an impact.
We recommend you choose a color to make the Clear effects easily identifiable within your files. In this guide, we will use 100% Magenta as that color.

1 In InDesign®, add a second layer in the layers palette for Clear Dry Ink.
Name the new layer Clear.
Setting up your InDesign® file for printing with Clear Dry Ink.
2 Add a new color in the swatches palette and name it Clear.
Designate the Color Type as a CMYK Spot Color.
Fill your shape with the new Clear color swatch. The name “Clear” is case-sensitive
and should be used exactly as shown to ensure proper printing.
Adding Clear Dr y Ink to your f i les .XEROX® clear dry ink
30
1
2

3 Import vector graphics, draw and fill a shape, or select text that will have the Clear Dry Ink applied. Make sure all elements you want to print with Clear are placed on the Clear layer. In the example shown, the Clear layer will print over the CMYK art.
4 For graphics imported into InDesign®, choose Multiply; for those created within InDesign®, choose Overprint.
Save your file and export as a high-resolution PDF using the instruction on the next page.
Within InDesign®, make sure that you place the CMYK elements on your CMYK layer and the Clear elements on your Clear layer, then ensure everything is registered appropriately.
If precise alignment is needed between CMYK and Clear elements, be sure to set choke or spread in your file.
NOTE: Another option is applying overprint to the Clear fill when it is printing over CMYK. You can use this method instead of Multiply in InDesign. To apply in Illustrator, choose Window > Attributes > Overprint.
Clear will always print over CMYK.
31
43

It’s important to choose the correct settings when saving a PDF for printing with Clear Dry Ink.
Follow these steps below to create a PDF preset for saving high-res PDFs right out of InDesign®.
32
1
Exporting as a high-res PDF from InDesign®.
1
1 From the main menu, select: File > Adobe PDF Presets > Press Quality, and click Save.
2 Select General: Compatibility > and choose Acrobat 7.
3 On the lower-right side, check: Create Acrobat Layers.
Prepar ing PDF fi les for pr int ing.XEROX® clear dry ink
2
3

33
4
5 Set up with Crop Marks and Bleeds if desired.4 Select Compression: Color Images > Do Not Downsample.
Compression > JPEG, Image Quality > Maximum.
Choose the same for Grayscale Images. For Monochrome Images > CCITT Group 4.
5
Within Acrobat, you can quality check your PDF layers before printing by viewing the file in the Print Production > Output Preview window.

Get the most from Clear Dr y Ink .XEROX® clear dry ink
34
Clear Dry Ink is intended for spot usage and not for flood needs.
Clear Dry Ink increases the saturation of lighter CMYK colors and makes them pop.
Clear Dry Ink shows best on coated or silk-coated media. This is especially true for Black coated stock.
Full PageNo Clear Full PageClear

35
If the Clear Dry Ink did not print as you intended, you may have to enable Multiply or Overprint for overlapping elements or adjust your choke and spread settings.
If Clear Dry Ink isn’t printing at all, check that the custom spot is identified for each text/graphic with the same spelling in all cases (i.e., “Clear”).
You can preview your file in Separation Preview within InDesign® or in Acrobat (Print Production > Output Preview) to make sure the Clear elements are specified correctly.
Always request a hardcopy press proof to make sure printed results are matching your design intent.
Always test first when applying Clear Dry Ink over dark or saturated colors to ensure you are achieving the desired effect and appearance.

©2017 Xerox Corporation. All rights reserved. Xerox®, Xerox and Design®, and iGen® are trademarks of Xerox Corporation in the United States and/or other countries. 11/17 BR22718
The 5th print station allows you the flexibility to meet a wider variety of PANTONE® colors and elevate your prints with eye-catching appeal. With Xerox® White and Clear Dry Inks, you can easily design with enhanced creativity in mind.
To learn more about Xerox® iGen® 5 Press, please contact your Xerox representative.
With one pr int s tat ion, you get vir tual ly unl imited possibi l i t ies .