igrating from hometrak 7.1 to hometrak companion
TRANSCRIPT

1 | P a g e
MIGRATING FROM HOMETRAK 7.1 TO HOMETRAK COMPANION
This document was created to help you plan and perform the migration process.
Depending on the size of your organization, the migration process could be quite lengthy. Please make sure that you have the time to do the migration
correctly.
If Companion is missing a feature that is critical to your business, please let us know what this feature is. Do not migrate until you contact HomeTrak.
It is important that you review all documentation, and understand what Companion can and cannot do before you do the final migration.
Make sure that all users of HomeTrak 7.1 are included in the migration process, and that each one of them have a chance to use Companion before
the final migration.
HomeTrak will help you do the migration process, and answer questions you may have, but we do expect you to view the online help, view the tutorials
and watch the webinars before calling support.

2 | P a g e
Table of Contents
Suggested Time Tables ....................................................................................................................................................................................................................................... 4
Companies with less than 100 active clients.................................................................................................................................................................................................. 4
Companies with 100 to **400 Active Clients ................................................................................................................................................................................................. 5
Recommended System Requirements ............................................................................................................................................................................................................... 6
Migration Project ............................................................................................................................................................................................................................................... 7
REVIEW and CORRECT ALL CLIENT NON-ACTIVE AUTHORIZATIONS ................................................................................................................................................................. 8
REVIEW and CORRECT ALL INCORRECT CLIENT BIRTHDATES ............................................................................................................................................................................ 9
REVIEW and CORRECT ALL CLIENT FIRST CONTACT DATES ............................................................................................................................................................................. 10
REVIEW and CORRECT ALL NON-ACTIVE CAREGIVER STATUS DATES and INVALID BIRTHDATES ................................................................................................................... 11
Migration Items to Complete - People and Schedules..................................................................................................................................................................................... 12
Practice Payroll and Billing .............................................................................................................................................................................................................................. 14
COMPLETING A MOCK BILLING/PAYROLL RUN ................................................................................................................................................................................................ 15
FOLLOW THESE STEPS TO COMPLETE BILLING IN COMPANION: ................................................................................................................................................................. 16
FOLLOW THESE STEPS TO COMPLETE PAYROLL IN COMPANION: ............................................................................................................................................................... 16
HomeTrak 7.1 version Companion Reports Comparison ................................................................................................................................................................................. 17
Important Information to Understand ............................................................................................................................................................................................................. 19
Introduction to Main Module ...................................................................................................................................................................................................................... 19
Hotkeys - Keyboard Shortcuts ...................................................................................................................................................................................................................... 20
Touring the Workspace ................................................................................................................................................................................................................................ 21
Main Module Ribbon Area ........................................................................................................................................................................................................................... 22
Generic Find Area Layout ............................................................................................................................................................................................................................. 23
Manage Item Menu ...................................................................................................................................................................................................................................... 24
Find Area Filter Box ...................................................................................................................................................................................................................................... 25
Advanced Filter ............................................................................................................................................................................................................................................ 26

3 | P a g e
Select Result Section .................................................................................................................................................................................................................................... 27
'How To' Diagrams ........................................................................................................................................................................................................................................... 28
Where to Enter Different Types of People / Organizations ......................................................................................................................................................................... 28
How to Progress from Adding a Client to Billing .......................................................................................................................................................................................... 29
How to Progress from Adding a Caregiver to Payroll ................................................................................................................................................................................... 30
Viewing the webinars and tutorials is a great way to familiarize yourself with the various modules and features of HomeTrak Companion. There is a group of tutorials
that compare various functions and modules in 7.1 to those in Companion. You can find these tutorials by clicking on the Help button in the Main Module of
Companion. From there, click on the “7.1 Users” tab up at the very top of the screen, then click on the “Differences” button in the ribbon. Click on “Comparison
Tutorials” and you’ll see several tutorials to view.
Flow diagrams can be found by clicking the Help button pull-down menu and selecting “How To” flow diagrams.

4 | P a g e
Suggested Time Tables
Companies with less than 100 active clients
Stage 1 (Week 1 - 2) Assign one person to be the migration leader to make sure everyone does their jobs.
Review Migration Project. ( Page 7 ) Assign one person to review and fix Clients with incorrect information. ( Pages 8 - 10 )
Assign one person to review and fix caregivers with incorrect information (Page 11 )
Complete on-line 'HomeTrak 7.1 to Companion Migration' Initial Survey
Stage 2 (Week 3) Download and install databases and complete the first migration as outlined Download Install user on each workstation that will use companion Enroll and attend live webinars or watch previously recorded webinars
Stage 3 (Week 4) If not already completed, view webinars 2 - 4 Do items in "Migration Items to Complete - People and Schedules" ( Pages 12 – 13 ) Have a staff meeting to determine if there are any areas where your office will no longer function correctly if you migrate.
If concerns arise, please email them to your HomeTrak Consultant. Stage 4 (Week 5 - 6)
If not already completed, view webinars 5 & 6 Do items in "Practice Payroll and Billing" at least twice ( Page 14 ) Do a Mock Billing/Payroll Run at least twice (Pages 15 - 16 )
Stage 5 (End of Week 6) Have a staff meeting to determine if there are any areas where your office will no longer function correctly if you migrate.
If concerns arise, please email them to your HomeTrak Consultant. Stage 6 (Beginning of Week 7)
Complete on-line 'HomeTrak 7.1 to Companion Migration' Final Survey Stage 7 (Final Migration Middle of week 7)
Run migration again after payroll and billing is completely finished in 7.1.
Payroll and Billing must be posted.
Invoices should be printed.
Payroll and Billing must be exported to whatever external packages you use. After migration is completed, call HomeTrak support for final migration configuration.

5 | P a g e
Companies with 100 to **400 Active Clients Stage 1 (Week 1 - 3)
Assign one person to be the migration leader to make sure everyone does their jobs.
Review Migration Project. ( Page 7 ) Assign one person to review and fix Clients with incorrect information. ( Pages 8 - 10 )
Assign one person to review and fix caregivers with incorrect information (Page 11 )
Complete on-line 'HomeTrak 7.1 to Companion Migration' Initial Survey
Stage 2 (Week 3 - 4) Download and install databases and complete the first migration as outlined Download Install user on each workstation that will use companion Enroll and attend live webinars or watch previously recorded webinars
Stage 3 (Week 5) If not already completed, view webinars 2 - 4 Do items in "Migration Items to Complete - People and Schedules" (Pages 12 - 13 ) Have a staff meeting to determine if there are any areas where your office will no longer function correctly if you migrate.
If concerns arise, please email them to your HomeTrak Consultant. Stage 4 (Week 6 - 10)
If not already completed, view webinars 5 & 6 Do items in "Practice Payroll and Billing" at least twice (Page 14 ) Do a Mock Billing/Payroll Run at least twice (Pages 15 - 16 ) Have a staff meeting to determine if there are any areas where your office will no longer function correctly if you migrate.
If concerns arise, please email them to your HomeTrak Consultant. Stage 5 (Week 11)
Have all employees come into the office for a Saturday morning, and do nothing but work on Companion. Have a staff meeting after to determine if there are any areas where your office will no longer function correctly if you migrate.
If concerns arise, please email them to your HomeTrak Consultant. Stage 6 (Beginning of Week 12)
Complete on-line 'HomeTrak 7.1 to Companion Migration' Final Survey Stage 7 (Final Migration Middle of Week 12)
Run migration again after payroll and billing is completely finished in 7.1.
Payroll and Billing must be posted.
Invoices should be printed.
Payroll and Billing must be exported to whatever external packages you use. After migration is completed, call HomeTrak support for final migration configuration
**Note: If you have more than 400 active clients, add appropriate time to each stage in order for you to complete the work.

6 | P a g e
Recommended System Requirements
Computer for Databases:
Multi Core PC with 2.0 GHz or higher processor clock speed 4 GB of Ram or higher 20 GB minimum of available hard disk space CD-Rom or DVD drive 10/100/1000 Network Adapter Microsoft .NET Framework 3.5 SP1 Some type of backup system
Laptop:
PC with 1.2 GHz or higher processor clock speed 2 GB of Ram or higher (4 GB recommended) 10 GB of available hard disk space CD-Rom or DVD drive Suggested screen resolution of 1600 x 900 (minimum 1024 x 600) 10/100/1000 Network Adapter Microsoft .NET Framework 3.5 SP1
Workstation:
PC with 1.2 GHz or higher processor clock speed 2 GB of Ram or higher (4 GB recommended) 10 GB of available hard disk space CD-Rom or DVD drive Screen resolution of 1920 x 1080 22 ” Monitor or larger is strongly recommended 10/100/1000 Network Adapter Microsoft .NET Framework 3.5 SP1
Netbook:
PC with 1.2 GHz or higher processor clock speed 2 GB of Ram or higher 10 GB of available hard disk space Minimum required resolution 1024 x 600 10/100/1000 Network Adapter Microsoft .NET Framework 3.5 SP1
*Supported Operating Systems:
Windows 7 – Professional and Ultimate Windows Vista – Business and Ultimate Windows XP Professional Windows 2008 server – all editions Windows 2003 server – all editions
All computers are required to have, or be connected to:
Laser or DeskJet printer Sound card and speakers to hear training videos High Speed Internet access *Supported Operating System Microsoft .NET Framework 3.5 SP1

7 | P a g e
Migration Project Area Action to Perform Assigned To Date
Completed
Getting Started Review this complete document.
Review and fix all Clients with bad data. Pages (8-11)
Review and fix all non-active Caregiver Status Dates. Page (12)
Compare recommended hardware to your hardware. Page (6)
Installing the Companion Database
Running the migration
Installing the Companion User on each workstation
Webinars Webinar 1 - Overview of Company Set Up, Agency Office and User Defined.
Webinar 2 - The Caregiver and Contact Modules.
Webinar 3 - The Client and Payer Modules.
Webinar 4 - Scheduling and Calendars.
Webinar 5 - Payroll and Billing.
Webinar 6 - Advanced Features of Companion: Grids, Reports and Dashboard.
Day to Day Operations Migration Items to Complete in Companion - People and Schedules (Pages 12-13)
Migration Items to Complete in Companion – Practice Payroll and Billing (Page 14)
Reporting Review 'Management Reports'
Review 'Reports Module' , 'Screen Reports' and 'Daily Review'

8 | P a g e
PRE-MIGRATION DATA CLEAN-UP
You must complete a pre-migration data clean-up on your existing data within your current v7.1 software before running your Initial and Final Migrations.
Download the program from the Migration to Companion webpage (Step 2) from the following link: http://www.hometrak.com/migration-2/welcome/
REVIEW and CORRECT ALL CLIENT NON-ACTIVE AUTHORIZATIONS
Review all non-active authorizations for all clients to be sure that the authorization “To Date” date field accurately represents the date when the authorization became
closed, suspended or deceased. Non-active authorizations CANNOT have a “To Date” in the future, otherwise HomeTrak Companion will consider the
authorization/client as active and migrate the record as such.
STEPS TO FIX INCORRECT AUTHORIZATIONS:
Open the Client Module.
1. In the "Limit Client by" section, select “Authorization Check” (second pull-down field).
2. At the bottom of the screen, click on the "Current Auths" button.
3. In the Authorize Information box, uncheck "Only Active" option. (If no client records appear, then all authorizations are correct.)
4. There are two options for correcting authorization dates:
(Note: The dates shown in the graphics below are examples. You may use any date prior to today’s date as your new “To Date.”)
Option 1: To change a single authorization: Edit each authorization and enter in the correct “To Date” and press SAVE at the top of the module.
Option 2: To change all authorizations for a client to the same date: Enter the new date in the "Update All 'To Date' To" field and press GO.
NOTE: Do not use this option on ACTIVE clients’ authorizations. Use Option 1 for Active Clients.
If authorizations are displayed that you do not want to update, change the "View Above" field to show only those authorizations that have a "To Date"
after this. Tab off field to refresh information.
Move to the next client in the list using the NEXT button at the top of the module. Repeat Step 4 until all clients are corrected.

9 | P a g e
REVIEW and CORRECT ALL INCORRECT CLIENT BIRTHDATES
STEPS TO FIX INCORRECT BIRTHDATES:
Open the Client Module.
1. In the "Limit Client by" section, select "Birthday Check" (second pull-down field). (If no client records appear, then all client birth dates are correct.)
2. Correct the Client's birth date. (Hint: Usually the year is incorrect.)
3. Press SAVE at the top of the module.
4. Move to the next client in the list.
5. Repeat steps 2 - 4 until all clients are corrected.

10 | P a g e
REVIEW and CORRECT ALL CLIENT FIRST CONTACT DATES
If a client has a first contact date that is after the first day of service, the client will be migrated as potential, not active.
STEPS TO CORRECT FIRST CONTACT DATES:
Open the Client Module.
1. In the "Limit Client by" section, select "First Contact Check" (second pull-down menu).
(If no client records appear, then all clients' First Contact Check dates are correct.)
2. At the bottom of the Required Information section, click on the "Referral" option.
3. Correct the "First Contact" date. This date must be before or the same as the "Start Date".
4. Press SAVE at the top of the module.
5. Move to the next client in the list.
6. Repeat steps 3 - 5 until all clients are corrected.

11 | P a g e
REVIEW and CORRECT ALL NON-ACTIVE CAREGIVER STATUS DATES and INVALID BIRTHDATES
The “Status Date” date field must be the same as or after the “Hire Date” date, otherwise HomeTrak Companion will migrate the non-active caregiver as active.
STEPS TO CORRECT NON-ACTIVE CAREGIVER STATUS DATES AND INVALID BIRTHDATES:
Open the Caregiver Module.
1. In the "Limit Caregivers by" section, select the “Migration Check” (second pull-down field).
(If no caregivers appear, then all non-active caregiver status dates and birthdates are correct.)
2. Review and correct the Status Date if invalid.
a. Make sure the "Status Date" is the same as or after the "Hire Date".
b. For potential caregivers, the "Hire Date" should be blank.
3. Review and correct the "Birthday" field if invalid. (Hint: Usually the year is incorrect.)
4. Press SAVE at the top of the module.
5. Move to the next caregiver in the list.
6. Repeat steps 2 - 4 until all caregivers are corrected.

12 | P a g e
Migration Items to Complete in Companion - People and Schedules Area Action to Perform Assigned To Date
Completed
Contact Manager Module
In 'Main Module' select 'Contact Manager' and Add a new contact
Complete the form as you see fit
Attach an Organization to the new contact
Caregiver Module In 'Main Module' select 'Caregiver' and Add a new Caregiver
Add Communication and Languages
Add Qualifications, Tasks to Perform, Payroll Options and Payroll Rates
Add a Documented Event
Review items under 'Attach Detail' tab. Practice adding and removing items from the different
options
Add Emergency Contacts under 'Establish Relationships' tab
Add Referral Sources under 'Establish Relationships' tab
Client Module In 'Main Module' select 'Client' and Add a new Client
Attach a Referral Source if applicable
Choose another payer under 'Possible Payers'
Edit Billing Options
Add Billing Rates for the client
Create two authorizations. One for the client, and one for the other payer
Create a Care plan under 'Home' tab

13 | P a g e
Go to the 'Establish Relationships' tab and add items to each option. Once finished, press the
view diagram button . This will display all the relationships you have created for this client
Client Calendar
In 'Main Module' under 'Client Calendar' click on the new client you added above. Click on a day
in the calendar, and right click to see dropdown menu. Add a new schedule. Try using 'Caregiver
Suggestion' to find a caregiver
Edit schedule that was just added
Click on a day in the calendar, right click and select 'New Recurring Schedule'
Right click on the newly created recurring schedule, and choose 'Edit the Recurrence Master
Record'. Make changes to the schedule, and save
Delete a schedule
Expand the 'Detail Panel'. Choose a schedule. Click through all the icons on the bottom of the
detail panel to see all the information that is available on a schedule
Click on each button in the calendar toolbar. Some of them will change the way the schedule
looks, others are for printing and emailing calendars

14 | P a g e
Migration Items to Complete in Companion - Practice Payroll and Billing Area Action to Perform Assigned To Date
Completed
Enter Actual Hours In 'Main Module' select 'Actual Hours', choose a date range and press 'View'. If you wish to view for
all caregivers, press the Multi-selection button
Try each option on the toolbar. Travel time in Companion is calculated based on actual time it takes
to go to the new schedule
Finalize Schedules In 'Main Module' select 'Finalize', choose a date range and press 'View'
Click on Run 'Finalize Check Schedules'. This will mark the schedules as being ready for payroll and
billing
Payroll Module In 'Main Module' select 'Payroll', choose a date range and press 'View'
Click on Run 'Calculate Payroll'
When finished choose the 'View Calculated (Step 2)' tab. Run the reports and try different options
Click on Run 'Post Payroll'
When finished choose the 'View Posted tab'
Billing Module
In 'Main Module' select 'Billing', choose a date range and press 'View'
Click on Run 'Calculate Billing'
When finished choose the 'View Calculated (Step 2)' tab. Run the reports and try different options
Click on Run 'Post Billing'
When finished choose the 'Invoices and QuickBooks (Last Step)' tab
Print out the invoices
When finished choose the 'View Posted' tab

15 | P a g e
COMPLETING A MOCK BILLING/PAYROLL RUN
Before attempting a mock billing or payroll, please ensure that you are comfortable performing the daily steps of adding clients and caregivers, adding authorizations, scheduling, adding actual hours to a schedule, etc. Generally, there should be no active Billing or active Payroll records. The only exception is the tail-end of overnight schedules that begin on the last date of your
payroll or billing period.
The instructions below are for Billing. Follow the same steps for Payroll.
To start, confirm that you have already completely posted your last billing cycle in 7.1. This is your last posted billing date.
Now you need to prepare your current billing cycle in 7.1:
1. Confirm that all applicable schedules in this date range have actual hours, but are not finalized at this point.
NOTE: Do you have overnight schedules that begin on the last day of your billing period? (For example, if your billing period ends on Saturday, do you have overnight schedules that begin on Saturday night and end on Sunday?) If YES, complete Step 2. If NO, skip to Step 3.
2. Open the Billing Module and go to the 'Calculate Billing' screen. Select the first day after your last posted billing date.
Use this date as both your start date and end date. Click CALCULATE.
You may get a warning that the selected ending date does not coincide with your company's week-ending day. This is OK; click YES and continue.
This will pull in the tail-end of all the overnight schedules that began on the last date of your payroll or billing period. (You will only need to do this step
while you are in migration. You will not need to do this step after you go live with Companion.)
NOTE: At this point, you may receive an error message “Possible Reasons for No Billing/Payroll” detailing errors regarding unfinalized schedules. If you believe you have done Steps 1 and 2 correctly, contact us at [email protected]. In your email, be sure to include:
A) the date range of your last billing/payroll cycle; B) the date range of your current billing/payroll cycle that you are preparing; C) the date range you were calculating when you got this error.
3. If you are also processing payroll today, repeat Steps 1 and 2 in the Payroll Module. If Payroll is processed on a schedule different than Billing: When you
process payroll, complete the above steps in the Payroll Module, using dates appropriate for your payroll period.
Continue to page 16 to complete the mock billing/payroll run.
REMEMBER: Don’t finalize your schedules in 7.1 until after you’ve started another migration!
Calculate in 7.1, THEN RUN MIGRATION, then go back and Finalize in 7.1

16 | P a g e
4. Go to the server and run another migration. (Click on the Initial Migration shortcut on the desktop.)
Once you have successfully started the migration, you can complete billing and payroll in HomeTrak 7.1.
NOTE: When you start the migration, change the information in the drop-down fields, if necessary:
5. When the migration completes, open Companion and finalize the schedules, and continue in the Billing and/or Payroll Modules.
NOTE: Did you have overnight schedules that began on the last date of your billing period? If so, when you do a mock billing/payroll in Companion,
you will not see the tail-end of these schedules until you get to the ‘View Calculated’ screen. (You must still calculate first.)
FOLLOW THESE STEPS TO COMPLETE BILLING IN COMPANION:
1. Go to the Billing Module. Under the tab “Calculate (Step 1)”click on “Run Calculate Billing” icon. Move to the tab “View Calculated (Step 2)”. Click on the various reports in the ribbon to ensure all data is accurate before posting. Then click on “Run Post Billing” icon.
2. Generate invoices by moving to the “Invoices and QuickBooks (Last Step)” tab, click on “Print Standard Invoices” icon. When finished, move to the “View Posted” tab. Click on the various reports in the ribbon and successfully compare your results in Companion with your results from 7.1.
FOLLOW THESE STEPS TO COMPLETE PAYROLL IN COMPANION:
1. Go to the Payroll Module. Under the tab “Calculate (Step 1)”click on “Run Calculate Payroll” icon. Move to the tab “View Calculated (Step 2)”. Click on the various reports in the ribbon to ensure all data is accurate before posting. Then click on “Run Post Payroll” icon.
2. When finished, move to the “View Posted” tab. Click on the various reports in the ribbon and successfully compare your results in Companion with your results from 7.1.

17 | P a g e
HomeTrak 7.1 version Companion Reports Comparison 7.1 Caregiver Reports Module Tab Option
Active Assignments: Printed Reports Caregiver Recurring Events
Client Incompatibility Printed Reports Client Client Master (Caregiver Compatibility option)
Caregiver Flex Report Screen Reports Caregiver Demographics Documented Events Printed Reports Caregiver Document Events
Inactivity Report Printed Reports Caregiver Schedule Inactivity
Mailing Labels / Envelopes Printed Reports Caregiver Envelopes or Address Labels
Master List Printed Reports Caregiver Caregiver Master Mileage and Expenses Management Reports Revenue Analysis Expenses (Payroll Group)
Name Badges Printed Reports Caregiver Name Badges
Required Dates Printed Reports Caregiver Required Dates
Arrival Time Exceptions Printed Reports Caregiver Early/Late Arrival Time (Under/Over Exceptions) Hours Worked Exceptions Printed Reports Caregiver Under & Over Exceptions
Time Sheets (schedules) Printed Reports Caregiver Time Sheets By Date or Time Sheet by Client
Time Sheets (blank) Printed Reports Caregiver Blank Time Sheets
Birthdays Printed Reports Caregiver Birthdays
7.1 Client Reports Module Tab Option
Active Assignments/Related Authorizations Printed Reports Client Recurring Events
Authorizations that are going to expire Printed Reports Client Expiring Authorizations
Client Flex Report Screen Reports Client Demographics Client Information Printed Reports Client Client Master
Documented Events (Formally Logging) Printed Reports Client Documented Events
Field Supervisor Screen Reports Client Attached People
Mailing Labels / Envelopes Printed Reports Client Envelopes or Address Labels Master List Printed Reports Client Client Master
Required Dates Coming Due Printed Reports Client Required Dates
Upcoming Birthdays Printed Reports Client Birthdays
7.1 Schedule Reports Module Tab Option
Client Schedules Printed Reports Client Weekly Schedules
Caregiver 1 -> 7 days Printed Reports Caregiver Weekly Schedules Caregiver Schedules (Condensed) * Printed Reports Caregiver Weekly Schedules
Caregivers Under and Over Scheduled Printed Reports Caregiver Under&Over Exceptions
Schedule Gap Printed Reports Caregiver Schedule Gaps
18 | P a g e
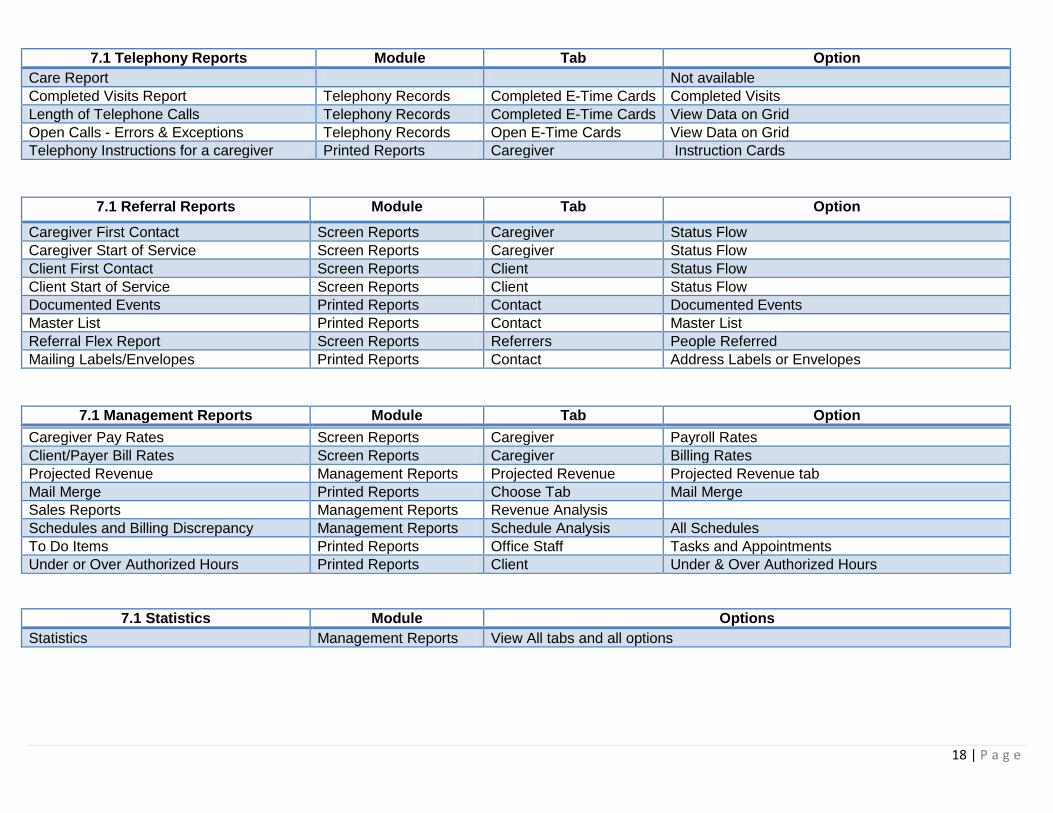
7.1 Telephony Reports Module Tab Option
Care Report Not available
Completed Visits Report Telephony Records Completed E-Time Cards Completed Visits
Length of Telephone Calls Telephony Records Completed E-Time Cards View Data on Grid
Open Calls - Errors & Exceptions Telephony Records Open E-Time Cards View Data on Grid Telephony Instructions for a caregiver Printed Reports Caregiver Instruction Cards
7.1 Referral Reports Module Tab Option
Caregiver First Contact Screen Reports Caregiver Status Flow
Caregiver Start of Service Screen Reports Caregiver Status Flow
Client First Contact Screen Reports Client Status Flow
Client Start of Service Screen Reports Client Status Flow Documented Events Printed Reports Contact Documented Events
Master List Printed Reports Contact Master List
Referral Flex Report Screen Reports Referrers People Referred
Mailing Labels/Envelopes Printed Reports Contact Address Labels or Envelopes
7.1 Management Reports Module Tab Option
Caregiver Pay Rates Screen Reports Caregiver Payroll Rates
Client/Payer Bill Rates Screen Reports Caregiver Billing Rates
Projected Revenue Management Reports Projected Revenue Projected Revenue tab
Mail Merge Printed Reports Choose Tab Mail Merge Sales Reports Management Reports Revenue Analysis Schedules and Billing Discrepancy Management Reports Schedule Analysis All Schedules
To Do Items Printed Reports Office Staff Tasks and Appointments Under or Over Authorized Hours Printed Reports Client Under & Over Authorized Hours
7.1 Statistics Module Options
Statistics Management Reports View All tabs and all options

19 | P a g e
Important Information to Understand
An Important Note about Telephony: During the migration process, HomeTrak Companion will not have any Telephony capabilities.
After final migration Telephony will be stopped on your HomeTrak 7.1 system and connected to your HomeTrak Companion.
Although you won’t have access to Telephony in Companion during your initial migration, it is important to note that Completed ETimeCards are not migrated.
Only the raw calls that were created prior to your migration will be available in Companion. This is not specific to initial migration. No completed ETimeCards,
service or item history are migrated.
Introduction to Main Module
After logging into HomeTrak Companion you will be presented with the Main Module. The Main Module allows you to navigate the different areas of Companion.
You can get to different areas of the software from the Main Module using either the tools in the ribbon or the flow diagram. Each area of the software has different information, functions and purposes that will prove to be useful in managing your company. The Daily Work flow diagram outlines the order in which areas of the software are often used. The Implementation flow diagram outlines a logical setup sequence for new users. Both flow diagrams allow for additional convenience when navigating through the system.

20 | P a g e
Hotkeys - Keyboard Shortcuts

21 | P a g e
Touring the Workspace

22 | P a g e
Main Module Ribbon Area

23 | P a g e
Generic Find Area Layout
The Find Area is used to search for the information you need. Tools and options within the Find Area allow you to navigate through the screen with ease.

24 | P a g e
Manage Item Menu
Click the dropdown arrow of the Manage Items menu, pictured above, to view a menu containing tools and options
allowing you to manipulate items in the Result Section.

25 | P a g e
Find Area Filter Box
Following is an explanation of the types of information that can be selected from the dropdown and then entered into the Filter Box.

26 | P a g e
Advanced Filter
Each advanced filter element is able to narrow down your search according to a different criterion. Click a filter element, such as Status or Rank, in the column to view the related characteristics that are available to select from. In order to filter by a characteristic, both the filter element containing the characteristic and the characteristic itself must be selected. In the image below, for instance, the Status filter element and the Active, Assessed and Potential status characteristics are selected. If we were to deselect the Status filter element, the system would not filter by status, even if Active, Assessed and Potential were still selected.
If you select a filter element and would like to save that as your default when you are in a particular module, you can use the save button in the upper right of the filter window.

27 | P a g e
Select Result Section

28 | P a g e
'How To' Diagrams
Where to Enter Different Types of People / Organizations

29 | P a g e
How to Progress from Adding a Client to Billing

30 | P a g e
How to Progress from Adding a Caregiver to Payroll