ils user guide - engravers network · 3 thank you for choosing universal laser systems®. we...
TRANSCRIPT

Industrial Laser Series (ILS) User Guide ILS9.75, ILS12.75 www.ulsinc.com

2
©2010 Universal Systems, Inc. All Rights Reserved. Universal Laser Systems logo and name are registered trademarks, and High Power Density Focusing Optics, Rapid Reconfiguration, 1-Touch Laser Photo, Laser Interface + and SuperSpeed are trademarks of Universal Laser Systems, Inc. All other company and product names are trademarks or registered trademarks of their respective companies. Universal’s laser systems are protected under one or more of U.S. Patents: 5,051,558; 5,661,746; 5,754,575; 5,867,517; 5,881,087; 5,894,493; 5,901,167; 5,982,803; 6,181,719; 6,313,433; 6,342,687; 6,423,925; 6,424,670; 6,983,001; 7,060,934; 7,415,051; 7,469,000; 7,715,454; 7,723,638. Other U.S. and international patents pending.

3
Thank you for choosing Universal Laser Systems®. We appreciate innovative customers like you who have made Universal Laser Systems an integral part of their business. Universal Laser Systems is committed to providing the highest level of customer satisfaction and support. To ensure your satisfaction, we urge you to read the documentation provided with your equipment. Since 1988, Universal Laser Systems has been committed to continually improving our technology and customer-driven laser solutions. Your satisfaction is very important to us and we welcome your feedback. Tell us about your experience with Universal Laser Systems and our systems at [email protected]. Should you have any questions, please contact Universal Laser Systems’ Customer Service Team at 480-609-0297 (USA), +43 1 402 22 50 (Austria), +81 (45) 224-2270 (Japan) or e-mail us at [email protected]. Again, thank you for choosing Universal Laser Systems.
Your Universal Laser Systems Team

4
Table of Contents USER GUIDE CD Chapter 1 – Specifications 5 Chapter 2 – Safety 8 Chapter 3 – Installation 19 Chapter 4 – Operation 38 Chapter 5 – Accessories 70 Chapter 6 – Maintenance 108 Software Your Reference Guide contains the Software Installation CD. Please follow the instructions for proper installation. Warranty Your Reference Guide contains Warranty documents pertaining to your purchase. Should you require a copy of the warranty, please contact ULS at 480-609-0297 or email [email protected]. Parts To order parts for your Universal laser system, contact ULS at 480-609-0297 or [email protected].

5
Chapter 1 - Specifications

6
ILS9.75 ILS12.75
Operating Environment
Well-ventilated office (recommended) or clean, light-duty manufacturing
Operating Temperature
50ºF (10ºC) to 95ºF (35º C) capable 73ºF (22ºC) to 77ºF (25º C) for best performance
Storage Temperature 50ºF (10ºC) to 95ºF (35º C)
Operating Humidity Non-condensing
Power Consumption up to:
Single Phase 240V AC, 10 Amp (one laser) 16 Amp (two laser), 50/60 Hz Grounded (earthed) and stable (surge and spike protected)
High-pressure vacuum blower capable of: Particulate/Odor
Outside Ventilated Exhaust System 700 CFM (cubic feet per minute) @ 6 inches
static pressure (1190 m3/hr at 1.5 kPa) 1000 CFM (cubic feet per minute) @ 6 inches static pressure (1700 m3/hr at 1.5 kPa)
Computer Requirements
(See the Installation & Set-up Guide for more
information)
Windows XP, Windows Vista, or Windows 7 2.0 GHz Processor (minimum)
1 GB of RAM (minimum) 40 GB Hard Drive (minimum)
Software Requirement
Graphics or CAD based (See page 61 for recommendations)
Laser Safety
CO2 Laser, Interlocked Safety Enclosure = Class 1 Red Diode Pointer = Class 3R
Use of the pass through side doors with Class 4 module makes the system Class 4. Special safety precautions are required when using optional Class 4 Module.

7
ILS9.75 ILS12.75
Work Area* 36 x 24 in (914 x 610 mm)
48 x 24 in (1219 x 610 mm)
Table 40.5 x 30 in (1029 x 762 mm)
52.5 x 30 in (1334 x 762 mm)
Maximum Part (WxHxD)
40.5 x 30 x 12 in (1029 x 762 x 305 mm)
52.5 x 30 x 12 in (1334 x 762 x 305 mm)
Maximum Part Weight 60 lbs (27 kg)
R Travel 360 Deg Continuous (Max Dia. 10.25 in) (260 mm)
Resolutions 1000, 500, 333, 250, 200, 83 dpi/lpi
Control Requires a dedicated PC to operate; requires Windows XP, Windows Vista, or Windows 7
(32-bit and 64-bit)
Interconnection USB 2.0 High Speed port only
Cabinet Style Floor Standing
Laser Options 10, 25, 30, 35, 40, 45, 50, 60 and 75 watts
Size* (WxHxD)
57 x 43.5 x 46 in (1448 x 1105 x 1168 mm)
69 x 43.5 x 46 in (1753 x 1105 x 1168 mm)
Weight (uncrated) 400 lbs (181.4 kg) 430 lbs (195 kg)
Exhaust Hookup Two 4-inch (10.16 cm) port
Laser Cartridge Weight
10 Watt = 13 lbs (6kg) 25/30 Watt = 20 lbs (9 kg)
35/40 Watt = 23 lbs (10 kg) 45/50 Watt = 26 lbs (12 kg)
75 Watt = 29 lbs (13 kg)
Available Options
Traveling Exhaust, HPDFO, CLASS 4 Module, Air Assist Back Sweep, Air Assist Cone, Automation Kit, Rotary Fixture, Computer Controlled Air Assist, Air
Compressor (desiccant or refrigerated dryer options), Heavy-Duty Use Air Kit, Cutting Table and Lens Kits

8
Chapter 2 - Safety

9
Description of Appropriate Use This device is designed for laser cutting and engraving in an office, laboratory, workshop or light duty manufacturing environment. Materials to be processed must fit completely inside the system for proper operation.
CAUTION: This device is not designed, tested, intended or authorized for use in any medical applications, surgical applications, medical device manufacturing or any similar procedure or process requiring approval, testing or certification by the United States Food and Drug Administration or other similar governmental entities.
General Safety Use of the equipment in a manner other than described in this manual or failure to follow the operational requirements and safety guidelines listed in this manual can result in injury to yourself and others and may cause damage to the equipment and your facility. EXPOSURE TO THE LASER BEAM MAY CAUSE PHYSICAL BURNS AND CAN CAUSE SEVERE EYE DAMAGE. Proper use and care of this system are essential to safe operation. Use of controls or adjustments or performance of procedures other than those specified herein may result in hazardous radiation exposure.
NEVER OPERATE THE LASER SYSTEM WITHOUT CONSTANT SUPERVISION OF THE CUTTING AND ENGRAVING PROCESS. Exposure to the laser beam may cause ignition of combustible materials which can lead to a fire. A properly maintained fire extinguisher should be kept on hand at all times.
NEVER LEAVE MATERIALS IN THE LASER SYSTEM AFTER LASER PROCESSING HAS FINISHED. Always remove all material including scrap material from the machine after use. Scrap material left in the laser system including materials that collect in the removable cutting table can be a fire hazard. It is also recommended you allow scrap materials to cool prior to leaving the work area. A properly maintained fire extinguisher should be kept on hand at all times. A PROPERLY CONFIGURED, INSTALLED, MAINTAINED AND OPERATIONAL PARTICULATE AND FUME EXHAUST SYSTEM IS MANDATORY WHEN OPERATING THE LASER SYSTEM. Fumes and smoke from the engraving process must be extracted from the laser system and f i l tered or exhausted outside.
SOME MATERIALS, WHEN ENGRAVED OR CUT WITH A LASER, CAN PRODUCE TOXIC AND CORROSIVE FUMES. We recommend that you obtain the Material Safety Data Sheet (MSDS) from the manufacturer of every material you intent to process in the laser system. The MSDS discloses all of the hazards when handling or processing a particular material. DISCONTINUE processing any material that causes chemical deterioration of the laser system such as rust, metal etching or pitting, peeling paint, etc. Damage to the laser system from corrosive fumes is NOT covered under warranty.
DO NOT ATTEMPT TO MOVE OR LIFT THIS SYSTEM ALONE. Obtain the assistance o f additional people when lifting or carrying (secure motion system and doors before lifting). Injury may occur if improper lifting techniques are used or the system is dropped.
10
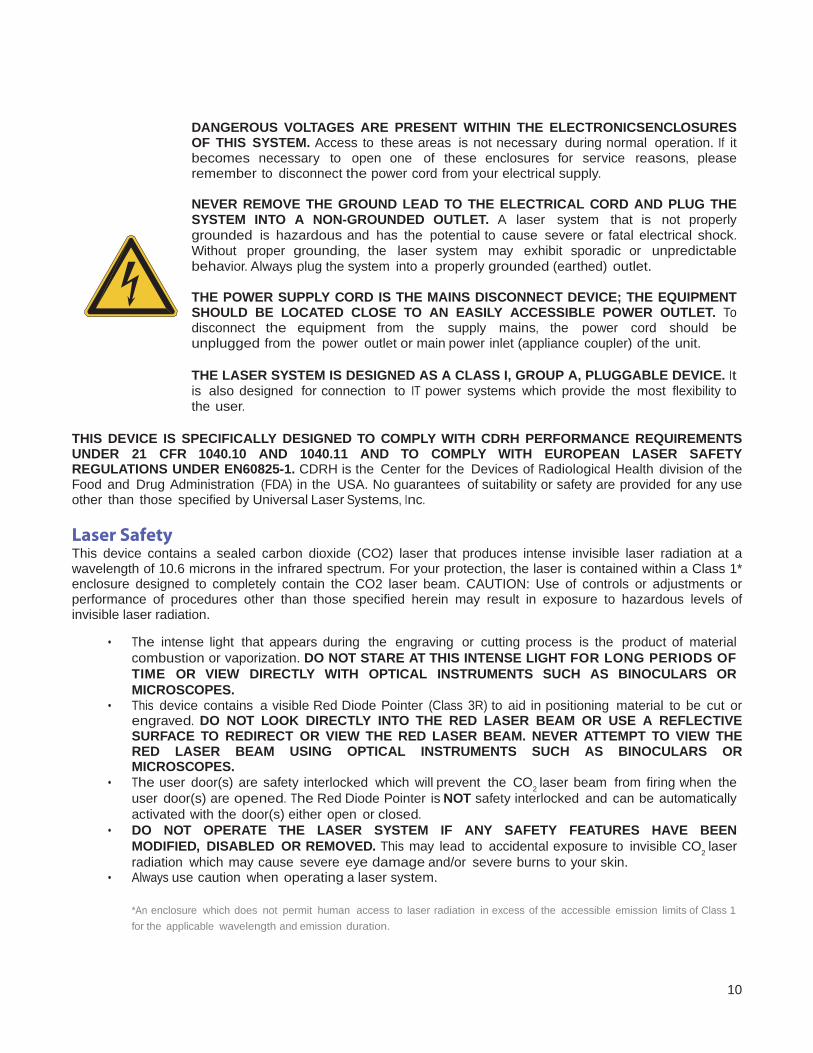
DANGEROUS VOLTAGES ARE PRESENT WITHIN THE ELECTRONICSENCLOSURES OF THIS SYSTEM. Access to these areas is not necessary during normal operation. If it becomes necessary to open one of these enclosures for service reasons, please remember to disconnect the power cord from your electrical supply.
NEVER REMOVE THE GROUND LEAD TO THE ELECTRICAL CORD AND PLUG THE SYSTEM INTO A NON-GROUNDED OUTLET. A laser system that is not properly grounded is hazardous and has the potential to cause severe or fatal electrical shock. Without proper grounding, the laser system may exhibit sporadic or unpredictable behavior. Always plug the system into a properly grounded (earthed) outlet.
THE POWER SUPPLY CORD IS THE MAINS DISCONNECT DEVICE; THE EQUIPMENT SHOULD BE LOCATED CLOSE TO AN EASILY ACCESSIBLE POWER OUTLET. To disconnect the equipment from the supply mains, the power cord should be unplugged from the power outlet or main power inlet (appliance coupler) of the unit.
THE LASER SYSTEM IS DESIGNED AS A CLASS I, GROUP A, PLUGGABLE DEVICE. It is also designed for connection to IT power systems which provide the most flexibility to the user.
THIS DEVICE IS SPECIFICALLY DESIGNED TO COMPLY WITH CDRH PERFORMANCE REQUIREMENTS UNDER 21 CFR 1040.10 AND 1040.11 AND TO COMPLY WITH EUROPEAN LASER SAFETY REGULATIONS UNDER EN60825-1. CDRH is the Center for the Devices of Radiological Health division of the Food and Drug Administration (FDA) in the USA. No guarantees of suitability or safety are provided for any use other than those specified by Universal Laser Systems, Inc. Laser Safety This device contains a sealed carbon dioxide (CO2) laser that produces intense invisible laser radiation at a wavelength of 10.6 microns in the infrared spectrum. For your protection, the laser is contained within a Class 1* enclosure designed to completely contain the CO2 laser beam. CAUTION: Use of controls or adjustments or performance of procedures other than those specified herein may result in exposure to hazardous levels of invisible laser radiation.
• The intense light that appears during the engraving or cutting process is the product of material combustion or vaporization. DO NOT STARE AT THIS INTENSE LIGHT FOR LONG PERIODS OF TIME OR VIEW DIRECTLY WITH OPTICAL INSTRUMENTS SUCH AS BINOCULARS OR MICROSCOPES.
• This device contains a visible Red Diode Pointer (Class 3R) to aid in positioning material to be cut or engraved. DO NOT LOOK DIRECTLY INTO THE RED LASER BEAM OR USE A REFLECTIVE SURFACE TO REDIRECT OR VIEW THE RED LASER BEAM. NEVER ATTEMPT TO VIEW THE RED LASER BEAM USING OPTICAL INSTRUMENTS SUCH AS BINOCULARS OR MICROSCOPES.
• The user door(s) are safety interlocked which will prevent the CO2 laser beam from firing when the user door(s) are opened. The Red Diode Pointer is NOT safety interlocked and can be automatically activated with the door(s) either open or closed.
• DO NOT OPERATE THE LASER SYSTEM IF ANY SAFETY FEATURES HAVE BEEN MODIFIED, DISABLED OR REMOVED. This may lead to accidental exposure to invisible CO2 laser radiation which may cause severe eye damage and/or severe burns to your skin.
• Always use caution when operating a laser system.
*An enclosure which does not permit human access to laser radiation in excess of the accessible emission limits of Class 1 for the applicable wavelength and emission duration.
11
Tamper Proof Labels All laser cartridges are equipped with tamper proof labels. There are NO field serviceable parts inside a Universal Laser System, Inc. (ULS) laser cartridge. If your laser cartridge needs service, please contact the Customer Service Team at 480-609-0297 (USA), +43 1 402 22 50 (Austria), +81 (45) 224-2270 (Japan) or e-mail us at [email protected]. Safety Labels CDRH and CE regulations require that all laser manufacturers affix warning labels in specific locations throughout the equipment. The following warning labels are placed on the laser system for your safety. Do not remove these labels for any reason. If the labels become damaged or have been removed for any reason, do not operate the laser system and immediately contact Universal Laser Systems, Inc. at 480-609-0297 (USA), +43 1 402 22 50 (Austria), +81 (45) 224-2270 (Japan) or e-mail us at [email protected] for a free replacement. Laser Safety When Using the Optional Class 4 Module The Industrial Laser Series (CELL 4) laser system is equipped with interlocked access doors on either side of the unit. An optional device is available to allow the user to operate the laser system with the side doors open. This device bypasses the safety interlocks on the side doors of the CELL 4 laser system. With this optional device in place, the protective system housing will not fully contain the infrared laser radiation produced by the carbon dioxide laser, creating the potential for exposure. Use of this optional device redefines the safety classification of the CELL 4 laser system from Class 1, which is considered safe for use under all conditions of normal use, to Class 4, which is considered potentially hazardous. Additionally, the system housing will not contain flames or by-products from potential ignition of materials within the system housing. It should also be noted that damage or ignition of flammable materials in the immediate or remote vicinity can be caused by infrared laser radiation escaping the housing of a system equipped with the Class 4 Laser Option. There are many mandatory safety measures set by national standards and laws and European standards which must be complied with when operating a Class 4 laser system. Certain safety measures are provided by the manufacturer through incorporation into the optional Class 4 laser device, including the following:
1. Remote Interlock Connection – A means of remotely connecting to the interlock circuit of the laser system allowing connection of remote switches to the laser system for deactivating the laser. This feature must be used to connect an interlock switch to the doors of the designated room in which the laser system will be operated so that the laser is automatically deactivated when the doors are open.
2. Key Control – A removable key that prevents unauthorized operation of the laser. 3. Laser Radiation Emission Warning Device – A visible warning light that indicates when the laser is
capable of emitting laser radiation. 4. Attenuator – A mechanical device to block emission of laser radiation. This device takes the form of a
shutter which is manually operated. 5. Class 4 Warning Label – A Class 4 warning label to indicate the laser system is classified as Class 4.

12
In addition to a properly installed exterior exhaust connected to the laser system equipped with the Class 4 Laser Option, the laser system must be operated only in a continuously well-ventilated area. Certain operational safety measures are the responsibility of owners of the CELL 4 laser system with the optional Class 4 laser device installed. These safety measures are mandatory for operation of Class 4 laser devices under Federal and State law in the United States as well as under the laws of most foreign countries. Many of these safety measures are outlined in ANSI Standard Z136.1 “American National Standard for the Safe Use of Lasers” or in equivalent standards available in most foreign countries, such as the European Standard EN 60825-1. Other safety measures may be required by state and/or local authorities, for example, the Regulation BGV B2 on laser beams of the German Employer’s Liability Insurance Association, and will be the responsibility of the Owner to understand and adhere to these laws. A brief synopsis of the most common safety requirements ad- dressed to Owners of a Class 4 laser is outlined below:
A. In any facility in which a Class 4 laser system is to be operated, an individual must be designated as a Laser Safety Officer (“LSO”) who will assume the authority and responsibility to monitor and enforce the control of laser hazards. The individual designated as the LSO should be trained in laser safety and aware of all safety measures set by law. There are many avenues available to acquire this training. Recognized sources of this training are the Laser Institute of America (www.laserinstitute.org), the Employer’s Insurance Liability Associations in the European countries or, laser safety associations within Owner’s country or territory.
B. The Owner of the Class 4 laser system will be responsible for creation of a controlled area in which a Class 4 laser system will be operated. A controlled area is an area designed to fully contain the laser radiation potentially escaping from a Class 4 laser system. and with measures in place to prevent unauthorized personnel from entering the area including lighted warning signs outside the designated and controlled area and interlocks on entryways.
C. The LSO will be responsible for designating and training all personnel authorized to operate, maintain or service a Class 4 laser system. It will also be the responsibility of the LSO to take measures to inform and restrict all unauthorized personnel from access to a Class 4 laser system.
D. The Owner of the Class 4 laser system will be responsible for identifying and providing to all authorized personnel any protective equipment such as specially designed eyewear, protective equipment and clothing needed when operating, maintaining or servicing a Class 4 laser system. Further, the Owner will ensure that no juveniles operate the laser, and that mirrors, lenses and other reflecting materials are fixed and are only moved in a controlled manner if the last is in use.
E. The LSO will be responsible for auditing all safety measures on a regular basis. This includes regular retraining of authorized personnel, serialization and regular inspection (and replacement when necessary) of all special eyewear and clothing and regular inspection of all safety measures surrounding the controlled area in which a Class 4 laser system is operated. The LSO may be required to maintain records as necessary to prove compliance.
F. The LSO will be responsible for regular medical surveillance of all authorized personnel operating a Class 4 laser system. This can include but is not restricted to mandatory annual eye exams, for example.
G. Class 4 lasers must not be used at tradeshows or exhibitions. The above list is not to be considered all inclusive. Other mandatory safety measures may be applicable and will vary from state to state and country to country. It is the responsibility of the owners of a Class 4 laser system and the owners of the facility in which it will be operated to identify and comply with all regulations pertinent to their locale. In some states, for example, anyone wishing to operate a Class 4 laser device must register with the state radiation regulatory agency, pay annual fees and submit to annual inspections. There may be penalties involved for non-compliance. The United States Occupational Safety and Health Administration (“OSHA”) has also adopted rules for safe use of lasers in the workplace. The LSO must comply with all Rules and Regulations set by law. To reiterate, the safety measures relating to operation of a Class 4 laser system are mandatory under Federal and State law in the United States as well as in most foreign countries. This optional Class 4 laser device must not be used if you are unable or unwilling to comply with all safety measures required for safe operation of a Class 4 laser system.

13
Safety Labels CDRH and CE regulations require that all laser manufacturers affix warning labels in specific locations throughout the equipment. The following warning labels are placed on the laser system for your safety. Do not remove these labels for any reason. If the labels become damaged or have been removed for any reason, do not operate the laser system and immediately contact Universal Laser Systems, Inc. at 480-609-0297 (USA), +43 1 402 22 50 (Austria), +81 (45) 224-2270 (Japan) or e-mail us at [email protected] for a free replacement.
ULS Laser Cartridge Labels

14
Front View

15
Back View

16
Inside Right Electronics Enclosure
Class 4 Module
17
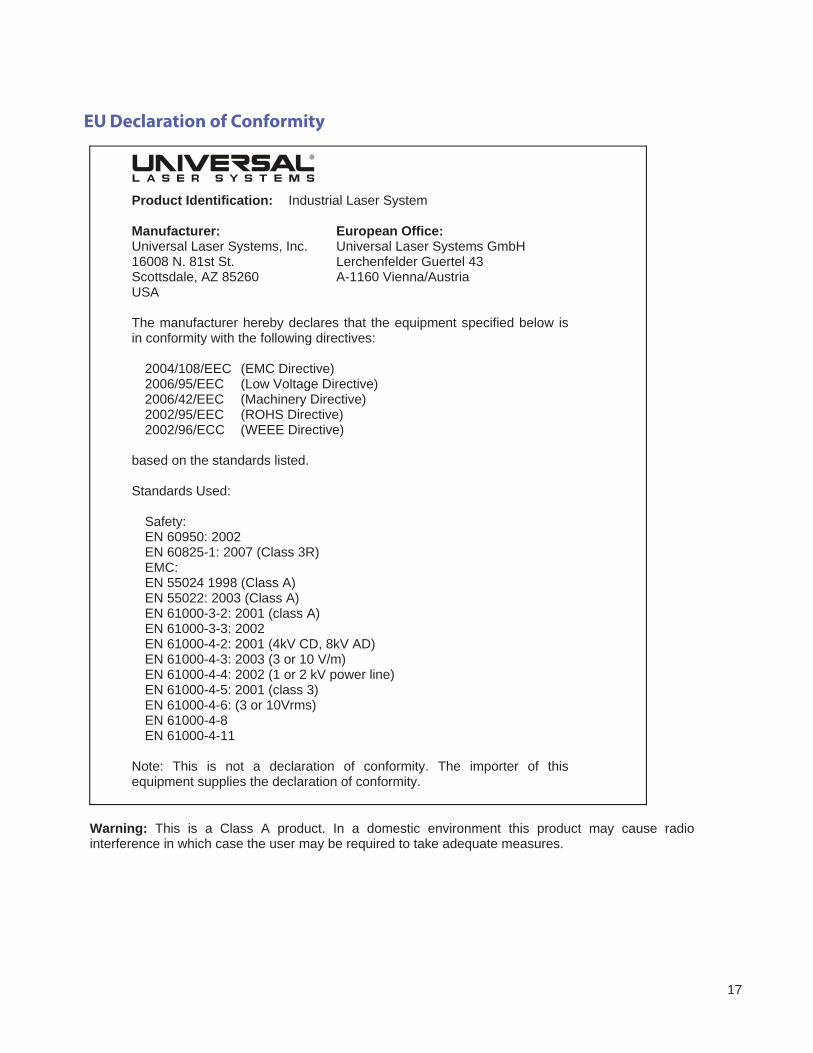
EU Declaration of Conformity
Product Identification: Industrial Laser System Manufacturer: European Office: Universal Laser Systems, Inc. Universal Laser Systems GmbH 16008 N. 81st St. Lerchenfelder Guertel 43 Scottsdale, AZ 85260 A-1160 Vienna/Austria USA The manufacturer hereby declares that the equipment specified below is in conformity with the following directives:
2004/108/EEC (EMC Directive) 2006/95/EEC (Low Voltage Directive) 2006/42/EEC (Machinery Directive) 2002/95/EEC (ROHS Directive) 2002/96/ECC (WEEE Directive)
based on the standards listed. Standards Used:
Safety: EN 60950: 2002 EN 60825-1: 2007 (Class 3R) EMC: EN 55024 1998 (Class A) EN 55022: 2003 (Class A) EN 61000-3-2: 2001 (class A) EN 61000-3-3: 2002 EN 61000-4-2: 2001 (4kV CD, 8kV AD) EN 61000-4-3: 2003 (3 or 10 V/m) EN 61000-4-4: 2002 (1 or 2 kV power line) EN 61000-4-5: 2001 (class 3) EN 61000-4-6: (3 or 10Vrms) EN 61000-4-8 EN 61000-4-11
Note: This is not a declaration of conformity. The importer of this equipment supplies the declaration of conformity.
Warning: This is a Class A product. In a domestic environment this product may cause radio interference in which case the user may be required to take adequate measures.

18
FCC Compliance This ULS laser system has been tested and found to comply with Federal Communication Commission (FCC) directives regarding Electromagnetic Compatibility (EMC). In accordance with these directives, ULS is required to provide the following information to its customers. FCC Compliance Statement and Warnings This device complied with FCC Rules Part 15. Operation is subject to the following two conditions:
1. This device may not cause harmful interference, and 2. This device must accept any interference received, including interference that may cause undesired
operation. This equipment has been tested and found to comply with the limits for a Class A digital device as set forth in Part 15 of the FCC Rules. These limits are designed to provide reasonable protection against harmful interference when the equipment is operated in a commercial environment. This equipment generates, uses and can radiate radio frequency energy and, if not installed and used in accordance with manufacturer’s instructions, may cause harmful interference to radio communications. Operation of this equipment in a residential area is likely to cause harmful interference, in which case the user will be required to correct the interference at his or her own expense. Users should be aware that changes or modifications to this equipment not expressly approved by the manufacturer could void the user’s authority to operate the equipment. This equipment has been type tested and found to comply within the limits for a Computing Device per FCC part 15, using shielded cables. Shielded cables must be used in order to insure compliance with FCC regulations. Recycling By placing the above symbol on our products and accessories, Universal Laser Systems is indicating that we are committed to helping reduce the amount of waste electronics ending up in municipal landfills. Therefore, Universal Laser Systems urges consumers to recycle this product and its accessories. Universal Laser Systems is equipped to recycle any of its electronic products and accessories and will assist our customers with their recycling options. To arrange for recycling of your ULS product or accessory, please contact Universal Laser Systems for more information at 480-609-0297 (USA), +43 1 402 22 50 (Austria), +81 (45) 224-2270 (Japan) or e-mail us at [email protected].

19
Chapter 3 - Installation

20
This provides step-by-step instructions for site preparation, computer/software setup and laser system assembly and connection. Follow the instructions in the order shown.
1. Site Preparation 2. Operating System Requirements and Software Installation 3. Assembling and Connecting Your Laser System
Note: Make sure to complete step 2 (software installation) prior to plugging the laser system into a USB port on your PC.
CAUTION: Damage to the laser system due to inadequate or improper installation or operation is not covered under the Universal Laser Systems (ULS) Warranty. See the ULS Warranty for additional information. A ULS Warranty document is supplied with your laser system. Should you require a copy of the Warranty, please contact our Customer Service Team at 480-609-0297 (USA), +43 1 402 22 50 (Austria), +81 (45) 224-2270 (Japan) or e-mail us at [email protected].
Please refer to the Safety section before operating your laser system. Step 1: Site Preparation Operating Environment (User Supplied)
1. The laser system must be installed in an office, laboratory, workshop or light duty manufacturing environment.
2. Dusty or dirty environments can damage the laser system. Keep the laser system isolated from any processes that produce airborne particles such as sandblasting, sanding, machining, etc. Also, keep the laser system isolated from any equipment requiring mists of oil or water for lubrication. Airborne dust and liquids can coat and damage optics and motion system components.
3. Avoid small, enclosed, non-ventilated areas. Some materials, after laser engraving or cutting, continue emitting fumes for several minutes after processing. Having these materials present in a confined, unventilated room can create a health hazard.
4. For best results, since the laser cartridges are air-cooled, we recommend operating the laser system between the ambient temperatures of 70ºF (21ºC) and 78ºF (25ºC).
5. Avoid storing the laser system outside the temperatures of 50ºF (10ºC) and 95ºF (35ºC) as excessively cold or hot temperatures can damage the laser cartridge or reduce its lifetime.
6. Ambient humidity levels must be non-condensing to protect optics. 7. The laser system should be at least 1 foot (300 mm) away from any wall or obstruction to allow for access
and proper ventilation.
Electrical Power Source (User Supplied) 1. For your system’s electrical requirements, please refer to the “INPUT POWER” label near the power inlet. 2. CAUTION: Never remove the ground lead to the electrical cord and plug the laser system into a non-
grounded outlet. A laser system that is not properly grounded is hazardous and has the potential to cause severe or fatal electrical shock. Without proper grounding, the laser system may exhibit sporadic or unpredictable behavior. Always plug the system into a properly grounded (earthed) outlet.
3. Noisy or unstable electricity and voltage spikes may cause interference and possible damage to the electronics of the laser system. If electrical power fluctuations, brown outs or constant power outages are a problem in your area, please contact your local Electrician to supply a power isolation and regulation module. Electrically noisy equipment, such as equipment with large motors, can also cause interference if plugged into the same outlet. It may be necessary to attach the laser system to a dedicated electrical line to resolve the problem.
4. The laser system is designed as a Class I, Group A, pluggable device. It is also designed for connection to IT Power systems which provide the most flexibility to the user.

21
Exhaust System (User Supplied)
1. We recommend you consult with a licensed contractor to meet local safety and building code requirements.
2. The exhaust system must be capable of supplying a minimum of 700 CFM (cubic feet per minute) of airflow while under a load of 6 inches of static pressure (1189m3/hr at 1.5kPa).
3. Do not install forward incline, backward incline, in-line or ventilator fans because these types of air handlers are inadequate and inappropriate for this type of installation. A high-pressure blower must be used to meet minimum airflow requirements.
4. For personal safety and noise control, we recommend that the exhaust blower be mounted outside the building.
5. Rigid tubing should be used for the majority of the connection between the blower and the laser system. The tubing should be smooth-walled and have as few 90-degree bends as possible.
6. Install exhaust gates to adjust airflow and to close off the exhaust when the laser is not in use. Place these gates near the laser system within 5 to 10 feet (1.50 to 3.00 meters).
7. Use a short piece of industrial grade, wire-reinforced rubber tubing to connect each laser system exhaust port to an exhaust gate and secure with a hose clamp. This will provide isolate exhaust blower vibrations from your laser system.
8. Wire the exhaust blower electrically to a wall switch in the same room for easy ON/OFF control. Note: The following diagram shows a typical exhaust system layout. Use this as a guideline for proper exhaust system installation. Although this diagram serves as an example, we recommend you consult with a licensed contractor to meet local safety, environmental and building code requirements and to also calculate the correct size blower required for your particular installation. Length of exhaust pipe, exhaust pipe diameter, number of 90-degree angles and other restrictions must be calculated when determining the correct exhaust blower unit. Installing an undersized or oversized blower is not only unsafe, but can also lead to excessive wear and tear to the laser system and premature failure.
1. Exhaust blower mounted outside (User Supplied) 2. Weatherproof shield (User Supplied) 3. Rigid ducting matching the diameter of the blower inlet (User Supplied) 4. Computer (User Supplied) 5. Y-pipe (User Supplied) 6. Shut-off or air-flow gate (User Supplied) 7. Flexible, wire-reinforced, industrial grade rubber hose (User Supplied) 8. Connection to laser system 9. Exhaust On/Off switch (User Supplied) 10. Optional Connection for Traveling Exhaust (User Supplied)
Important Note: A third exhaust gate will be necessary for the travelling exhaust if you plan to use it.

22
Step 2: Computer Requirements and Software Installation Your computer is a critical component in the operation of your laser system. In fact, you cannot operate the laser system if your computer is not connected, powered on, running Windows and running the Universal Control Panel (UCP) software. You can only run one laser system per computer. You will need to purchase a separate computer for each laser system you own. You must operate the laser system using the computer that is directly attached to it via the provided 6 ft (2 meters) USB cable. USB cables longer than 6 feet (2 meters) may cause the laser system to malfunction. Computer and Operating System Requirements
Minimum Computer Requirements (User Supplied) • 2.0 GHz processor (minimum) • 32 bit or 64 bit version of Windows XP, Windows Vista or Windows 7 • 2 GB of RAM (minimum) • 40 GB hard drive (15 GB free space) (minimum) • VGA monitor (minimum 1024 x 768 resolution) • CD/DVD Drive • Mouse and keyboard • Available USB 2.0 Hi-Speed compliant port only • Computer speakers (optional) • Internet connection and e-mail address (optional)
Note: Some computer manufacturers’ USB ports do not comply with USB 2.0 Hi-Speed standards. This may cause the laser system to exhibit erratic behavior. Confirm that your computer is USB 2.0 Hi-Speed compliant by checking your computer manual. For more information on USB 2.0 Hi-Speed compatibility, please visit www.usb.org.
Other USB peripheral devices that demand a large amount of computer processing power may slow down the operation and productivity of the laser system. If you experience problems with operation of the laser system while using another USB device, we recommend you discontinue use of that device while the laser system is in use. Do not connect or disconnect USB devices while the laser system is running a job.

23
Computer Power Management Power management settings on your computer can interfere with proper operation of the laser system by putting the PC in standby or sleep mode while the laser system is processing material. The settings can be controlled through the power options in the Windows control panel on your PC. The illustrations below show you how to disable power management.
XP Vista and 7
For the Power Scheme in use, select “Never” for all the options: Turn off display and Put the computer to sleep.
For the Power Scheme in use, select “Never” for all the options: Turn off monitor, turn off hard disks, system standby
and system hibernates.
24
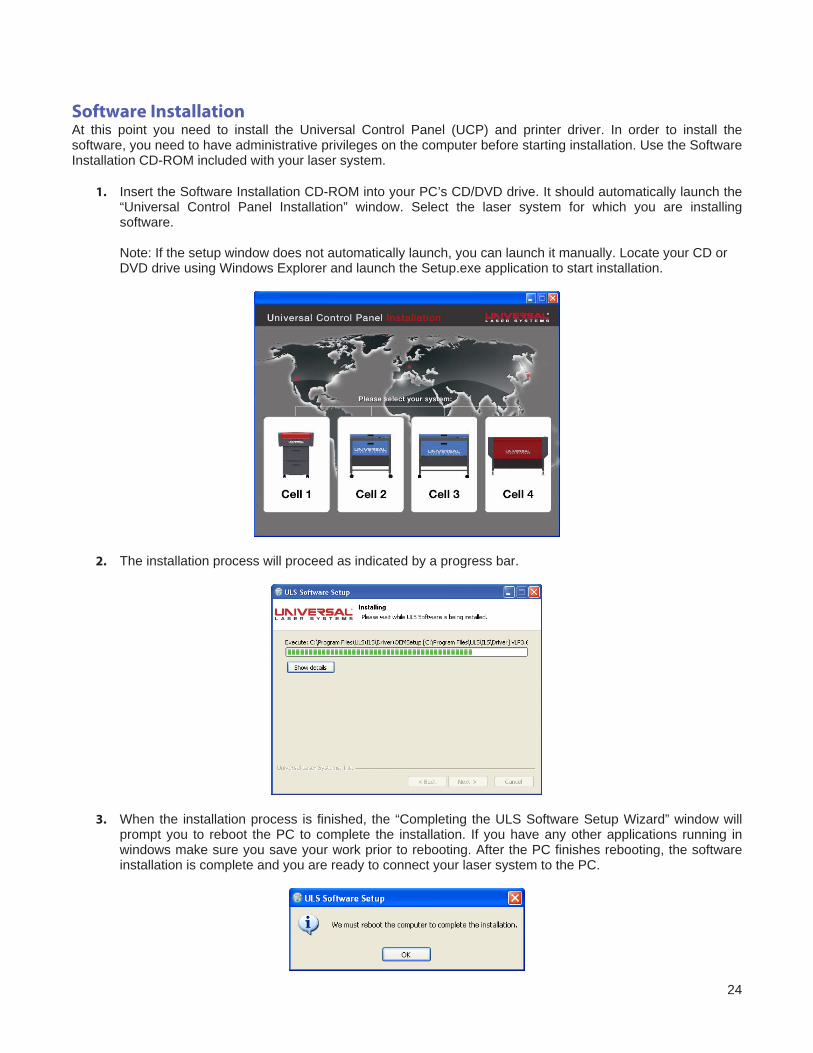
Software Installation At this point you need to install the Universal Control Panel (UCP) and printer driver. In order to install the software, you need to have administrative privileges on the computer before starting installation. Use the Software Installation CD-ROM included with your laser system.
1. Insert the Software Installation CD-ROM into your PC’s CD/DVD drive. It should automatically launch the “Universal Control Panel Installation” window. Select the laser system for which you are installing software.
Note: If the setup window does not automatically launch, you can launch it manually. Locate your CD or DVD drive using Windows Explorer and launch the Setup.exe application to start installation.
2. The installation process will proceed as indicated by a progress bar.
3. When the installation process is finished, the “Completing the ULS Software Setup Wizard” window will prompt you to reboot the PC to complete the installation. If you have any other applications running in windows make sure you save your work prior to rebooting. After the PC finishes rebooting, the software installation is complete and you are ready to connect your laser system to the PC.

25
Step 3: Assembling and Connecting Your Laser System
Familiarize yourself with the instructions before getting started. The final step in installation is to assemble your laser system, install the laser cartridge(s), level the laser system, make final connections and perform a beam alignment check. Do not power up your laser system until the final step, “Checking Beam Alignment.”
CAUTION: Do not attempt to move or lift this laser system alone. Obtain assistance from additional people when lifting or carrying the laser system and make sure to secure the motion system and doors before lifting. Injury may occur if improper lifting techniques are used or the system is dropped.
System Unpacking Before unpacking the laser system, make sure the location in which you intend to install the laser system will provide at least 3 feet (1 meter) of clearance on all sides for the access doors.
26
Your laser system will have arrived in a wooden crate. After the top and sides have been removed from the crate, the laser system must be detached from its shipping pallet and lifted onto the floor as follows:
Note: If it becomes necessary to move the laser system through narrow doorways to install it in its intended location, the system can be detached from the cart and transported in two pieces. Please contact our Customer Service Team at 480-609-0297 (USA), +43 1 402 22 50 (Austria), +81 (45) 224-2270 (Japan) or e-mail us at [email protected] for further instructions.
1. Loosen the four bolts indicated in the drawing to release the laser system from its pallet. 2. Lift the laser system, with wood supports attached, off the pallet and place it in the location in which you
intend to operate it.
a. If you have a forklift, you can lift the laser system off of the pallet by inserting the forks (spread as wide apart as possible) under the wooden supports attached to the cart legs. Lift the laser system a few inches, pull the pallet from underneath it and then place the laser system in the location in which you intend to operate it.
b. If you do not have a forklift, four people must lift the laser system up, walk it carefully off of the pallet and place it in the location in which you intend to operate it.
3. Remove the strap (1) wrapped around the laser system. 4. Remove the wooden supports clamped to the legs of the cart by unscrewing the four (4) bolts that sit
between the cart legs. 5. Attach your exhaust system’s wire-reinforced rubber tubing to the exhaust ports at the rear of the laser
system and secure with hose clamps.

27
Laser Cartridge Installation
1. Make sure that your power cord to the system is not plugged in at this time. Place your finger on the button part of the latch until the latch is released. Gently fold back the rear cover. Some laser systems are shipped with keyed locks.
Note: Access latches for the laser cover are lockable. If you lose your keys, please contact our Customer Service Team at 480-609-0297 (USA), +43 1 402 22 50 (Austria), +81 (45) 224-2270 (Japan) or e-mail us at [email protected] for new keys.
2. Locate the mounting blocks (1), the laser latches (2) and alignment forks (3). Notice that the alignment fork has a groove located between two blocks, one short and one tall.
28
3. Locate the “V” groove along the upper (3) and lower (2) part of the laser cartridge base plate and the alignment plate (1) at the end of the base plate.
4. If you have purchased two laser cartridges, mount the one cartridge onto the lower mounting blocks first. Single laser users should mount the laser cartridge in the top position.
5. Pick up the laser cartridge by the ends and tilt it at a 30° angle as shown (1). Mount the cartridge onto the
mounting blocks shown in step 2 by placing the upper “V” groove on top of the mounting blocks. Slide the cartridge to the right until the outer edge (2) of the alignment plate contacts the inside edge of the tall block of the alignment fork.

29
6. Slowly rotate the laser cartridge, making sure that the alignment plate is centered in the gap in the alignment fork. As you slowly release the weight of the laser, you should feel it lock itself smoothly into place. Never force the laser into position. If the laser does not install smoothly, check for obstructions such as pinched wires or hoses or a binding laser latch. Once installed, verify that the alignment plate is centered within the alignment fork.
7. Plug in each power connector (1) to the corresponding laser cartridge. The power connectors are labeled Top (2) or Bottom (3). Single laser cartridge users will use the top laser connector only.
8. Gently close the rear cover, making sure not to pinch any wires or hoses.
9. Once the laser cartridges have been installed, proceed to “Laser System Leveling.”
30
Laser System Leveling
Once the laser system is placed in the location in which you intend to operate it, you must level the laser system using the leveling nuts provided on the laser system leveling feet. This will ensure the laser system is not twisted due to uneven floors which can affect laser beam alignment and cause Z axis binding.
1. Once the laser system is in its proper operating location, open the top door (1), then open the front door
(2).
2. Locate the small bubble level (1) on the front of the laser system frame.

31
3. Adjust the front leveling feet using the adjustment screws (2) until the front of the laser system is level.
Once the front of the system is level, secure the front casters by tightening the nut (1) up against the cart leg.
4. Locate the small bubble level on the back frame of the laser system.
5. Adjust the caster height using the adjustment screw (2) until the back of the laser system is level from one side to the other. Once the back of the system is level, secure the back casters by tightening the nut (1) up against the cart leg.

32
6. Located within the body of the laser system, underneath the engraving table, is a box. Open the box and set the focus tool aside. You will need the focus tool for verify level.
7. Remove all of the foam packaging that holds the X-Axis Arm in place.
8. Move the Focus Carriage by hand to the upper left corner.

33
9. Place the focus tool* against the red lens plate (focus carriage) so that the flat edge of the focus tool rests against the front side of the focus carriage as illustrated. Take note of the fit of the focus tool (it should look like the diagram to the right) in the upper left corner of the system. This corner will be your reference point.
*Alternate leveling method available. See end of this section.
10. Using the upper left corner as a reference point, move the focus carriage by hand to each corner and take note of any differences between the fit of the focus tool in the upper left corner of the field and the fit of the focus tool in each of the other corners.
Perfect Fit
Gap too big
Gap too big
34
11. If one or more of the other corners does not match the upper left corner, adjust the leveling foot directly
underneath that corner up or down until the focus tool fit at that corner matches the fit at the upper left corner. First loosen the lock nut (1), then turn the adjusting screw (2) in 1/8 turns. Once the foot is at the correct height, tighten the lock nut (1). When you are done, the focus tool fit at all four corners should be the same.
*Alternate leveling method For the best leveling results, use a digital caliper and adjust the caster directly under each corner that does not match the height of the upper left corner until that corner matches the upper left corner’s height. Verify that you zero out the caliper before taking any measurements. The height at each corner should be within 0.010” (0.254 mm) of the height at the upper left corner.
35
Finalizing the Connections Make the following connections in the order described; otherwise static electricity can potentially damage the computer and/or the laser systems electronics.
1. Connect the 4-inch (101.6 mm) flexible rubber exhaust system to the rear of the laser system. 2. Connect the laser system’s power cord and your computer’s power cord to a grounded electrical outlet.
CAUTION: International users if using an adaptor or replacement power cord for local outlets, make sure that you attach the adapter correctly to the power cord and that you are using a properly grounded (earthed) adaptor and power.
3. Do not power on the laser system at this time.
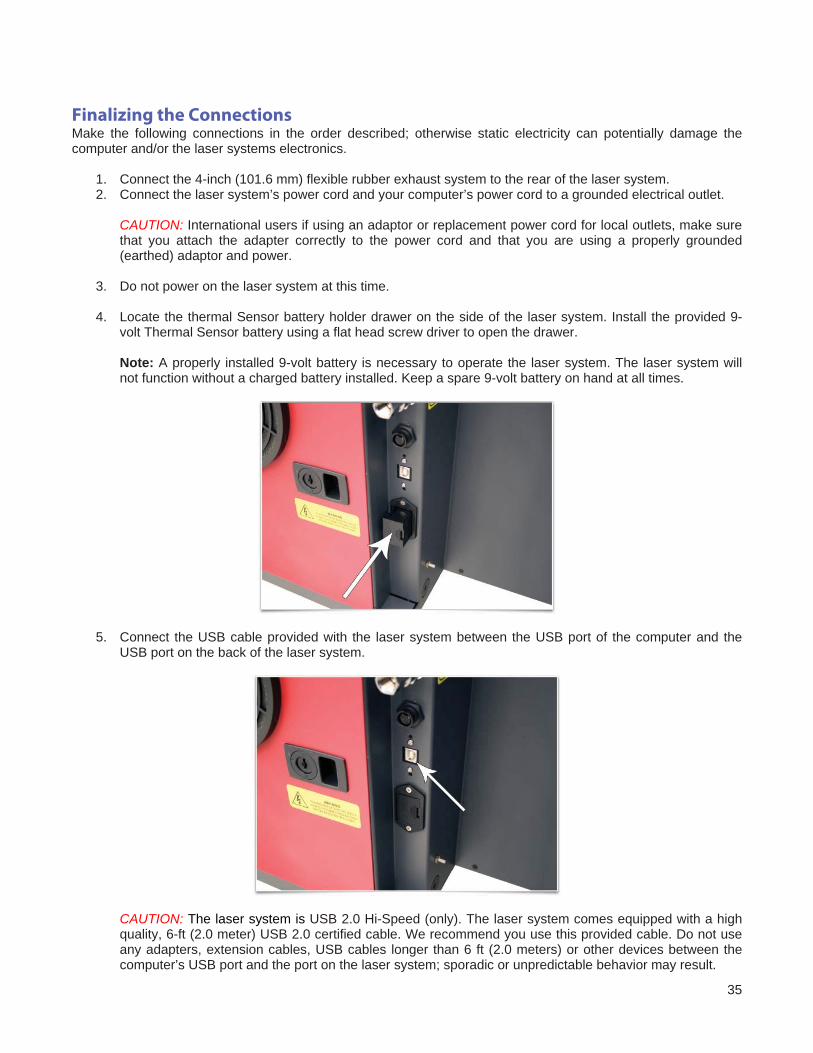
4. Locate the thermal Sensor battery holder drawer on the side of the laser system. Install the provided 9-
volt Thermal Sensor battery using a flat head screw driver to open the drawer.
Note: A properly installed 9-volt battery is necessary to operate the laser system. The laser system will not function without a charged battery installed. Keep a spare 9-volt battery on hand at all times.
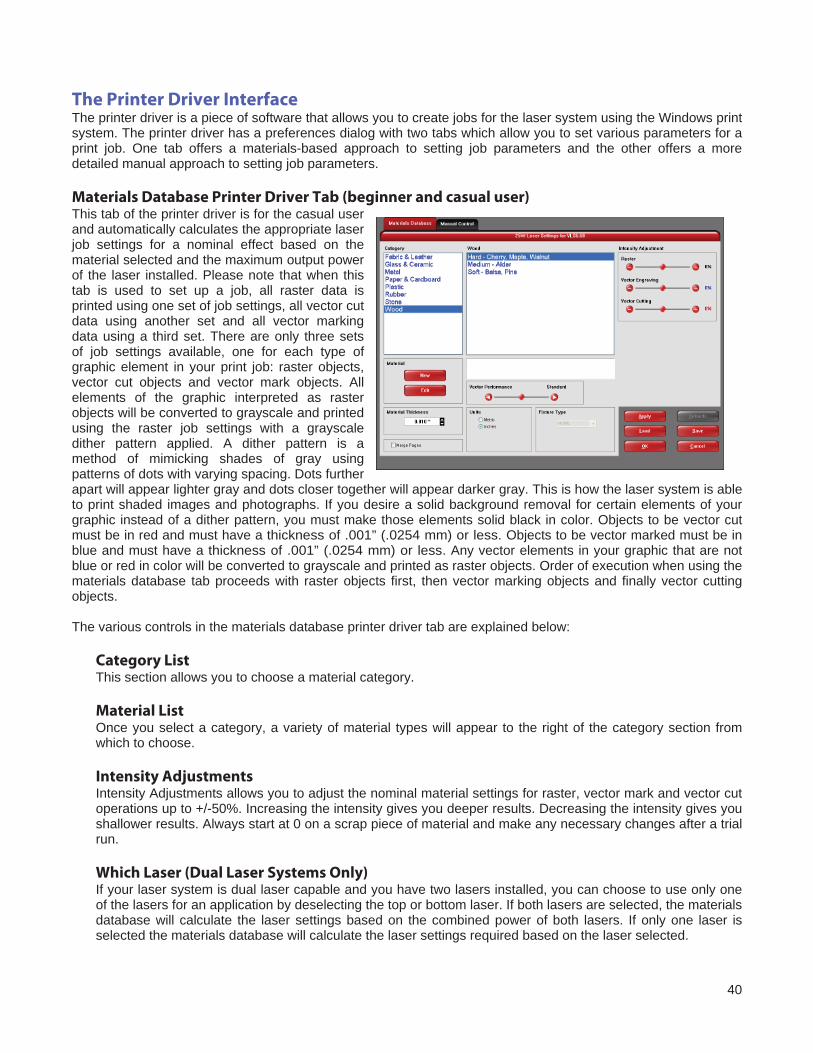
5. Connect the USB cable provided with the laser system between the USB port of the computer and the USB port on the back of the laser system.
CAUTION: The laser system is USB 2.0 Hi-Speed (only). The laser system comes equipped with a high quality, 6-ft (2.0 meter) USB 2.0 certified cable. We recommend you use this provided cable. Do not use any adapters, extension cables, USB cables longer than 6 ft (2.0 meters) or other devices between the computer’s USB port and the port on the laser system; sporadic or unpredictable behavior may result.

36
6. After connecting the USB cord, the “Found New Hardware Wizard” will open to install the drivers for the
USB connection. If the wizard offers to connect to “Windows Update” to search for software. Select “No, not at this time.” Then click “Next” to continue:
a. Select “Install the software automatically.” Then Click “Next” to continue. You do not need to insert
the Software Installation CD-ROM.
b. Select “Finish” to close the Wizard.
Note: Another set of New Hardware Wizard windows may appear after the initial USB connection. Follow the same instructions as mentioned previously. Once completed, your USB connection is established.

37
Checking Beam Alignment As a final step in the installation process you will want to check your beam alignment. You do this using the red pointer beam.
1. Open the top door. 2. Place a small piece of masking tape across the 3/4” (19 mm) hole in the focus carriage (1). Gently rub the
tape around the edge of the hole so that you can see the outline of the hole through the tape (2). 3. Power on your computer and verify that the Universal Control Panel (UCP) icon is present in the taskbar.
If not, activate it by double-clicking on the “Universal Control Panel” icon on your desktop. 4. Power on the laser system by pressing the Power switch on the keypad. 5. With the top door open, a red dot will appear on the masking tape (3). The red dot should appear
centered, within 1/8 inch (3 mm). If not, turn off the laser system, remove and re-install the laser cartridge and try again. If the red dot still does not appear centered, please contact our Customer Service Team at 480-609-0297 (USA), +43 1 402 22 50 (Austria), +81 (45) 224-2270 (Japan) or e-mail us at [email protected].
6. Once you have completed laser beam alignment verification, remove the masking tape.
Focus Carriage Beam Alignment
Accessories Your laser system includes various accessories such as a cutting table for cutting applications and Air Supply Unit along with cone and backsweep for air assisted material processing. The accessories section of the manual details how to install and use these accessories.

38
Chapter 4 – Operation

39
Important Overview
CAUTION: Please refer to the Safety section before operating the laser system. All ULS laser systems are designed to operate like a computer printer. The laser systems are provided with two software components designed for Microsoft Windows based operating systems. The first component is a printer driver that allows you to print from any Windows based graphic software capable of printing through the Windows print system. This component shows up as a printer in the printer section of the Windows control panel. The second component is a task bar application called the Universal Control Panel (UCP) which controls and operates the laser system through the USB port. Laser systems cannot function unless this component is running on the PC connected to the laser system. This component shows up as a red diamond shaped icon in the task bar. Printing through the printer driver creates a job for the laser system which is then transferred to and stored in the job queue in the UCP from which the job can be selected and run on the laser system as needed. The printer driver has a printing preferences interface which can be accessed at the time of printing to set the laser system job settings for the particular job being printed. Most of these settings can also be changed after the job is printed through the UCP. ULS laser systems operate in one of two modes. A raster mode in which images are marked or engraved into a material by etching a pattern of dots into the material at high resolutions up to 1000 dpi and a vector mode in which the laser follows a two dimensional path to cut or mark a shape into a material. The printer driver determines whether an element in the graphic data being printed is a vector or raster object by its width. Only lines and curves with a thickness of .001” (.0254 mm) or less will be interpreted as vector objects. All other elements of the graphic being printed will be interpreted as raster objects. In order to print vector elements, the software you are printing from must support creation of lines with a thickness of .001”(.0254 mm) or less. Vector cutting depth and raster engraving depth (or marking intensity if you are surface marking only) are controlled by specifying the speed of processing and the laser power level for raster engraving and by specifying the speed of processing, laser power level and number of pulses per inch (PPI) for vector cutting and marking. These parameters are specified in the printer driver printing preferences interface by one of two methods. The two methods are laid out in tabs in the printer driver interface. The first method is a materials database method which simplifies setup for beginners and casual users, the second method is a manual method with allows much more control for advanced users. Each method treats assignment of laser job settings to colors in the graphic being printed and interpretation of raster and vector elements in the graphic being printed in slightly different ways which will be described in the Printer Driver Interface section that follows.
40
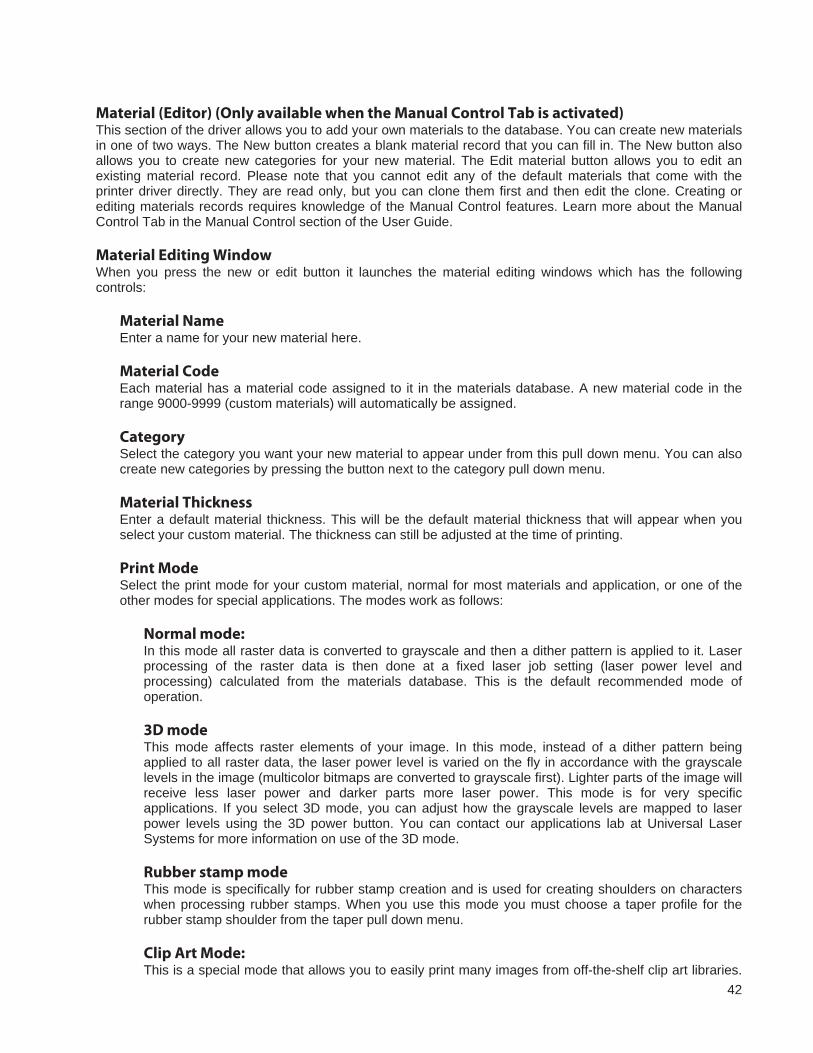
The Printer Driver Interface The printer driver is a piece of software that allows you to create jobs for the laser system using the Windows print system. The printer driver has a preferences dialog with two tabs which allow you to set various parameters for a print job. One tab offers a materials-based approach to setting job parameters and the other offers a more detailed manual approach to setting job parameters. Materials Database Printer Driver Tab (beginner and casual user) This tab of the printer driver is for the casual user and automatically calculates the appropriate laser job settings for a nominal effect based on the material selected and the maximum output power of the laser installed. Please note that when this tab is used to set up a job, all raster data is printed using one set of job settings, all vector cut data using another set and all vector marking data using a third set. There are only three sets of job settings available, one for each type of graphic element in your print job: raster objects, vector cut objects and vector mark objects. All elements of the graphic interpreted as raster objects will be converted to grayscale and printed using the raster job settings with a grayscale dither pattern applied. A dither pattern is a method of mimicking shades of gray using patterns of dots with varying spacing. Dots further apart will appear lighter gray and dots closer together will appear darker gray. This is how the laser system is able to print shaded images and photographs. If you desire a solid background removal for certain elements of your graphic instead of a dither pattern, you must make those elements solid black in color. Objects to be vector cut must be in red and must have a thickness of .001” (.0254 mm) or less. Objects to be vector marked must be in blue and must have a thickness of .001” (.0254 mm) or less. Any vector elements in your graphic that are not blue or red in color will be converted to grayscale and printed as raster objects. Order of execution when using the materials database tab proceeds with raster objects first, then vector marking objects and finally vector cutting objects. The various controls in the materials database printer driver tab are explained below:
Category List This section allows you to choose a material category. Material List Once you select a category, a variety of material types will appear to the right of the category section from which to choose.
Intensity Adjustments Intensity Adjustments allows you to adjust the nominal material settings for raster, vector mark and vector cut operations up to +/-50%. Increasing the intensity gives you deeper results. Decreasing the intensity gives you shallower results. Always start at 0 on a scrap piece of material and make any necessary changes after a trial run. Which Laser (Dual Laser Systems Only) If your laser system is dual laser capable and you have two lasers installed, you can choose to use only one of the lasers for an application by deselecting the top or bottom laser. If both lasers are selected, the materials database will calculate the laser settings based on the combined power of both lasers. If only one laser is selected the materials database will calculate the laser settings required based on the laser selected.

41
SuperSpeed (optional accessory) If the optional SuperSpeed accessory is installed a switch will be present to turn activate the feature. This feature uses a beam splitter to separate the laser beams from the top and bottom lasers by a controlled amount so that they will focus, one above the other on the material processing table with a distance between them equal to the density selected. Each laser is pulsed separately, to allow two lines of raster data to be engraved simultaneously which will cut job completion time in half. Computer Controlled Air Assist These controls allow you to configure air assist settings for the print job if desired. You can activate air for raster objects, vector cuts or vector marks individually and select the desired flow rate in 25% increments. Material Thickness You must enter the thickness of the material to be processed. This value is used by the materials database to calculate the vector cutting job settings to ensure that the laser cuts all the way through the material. This value is also used to by the laser system to move the Z axis to the proper focus height when using the auto Z mode. Using a caliper or similar measuring device, measure the thickness of your material and enter it into the Material Thickness box. Units This section allows you to switch between Metric and English units. Fixture Type
None If you are not using any type of fixture, set the drop down menu to NONE. Rotary If you have purchased this accessory, read how to install and operate this fixture in the Accessories section of the User Guide. Custom (Cutting table) This setting is used to set the height offset from the engraving table of any fixtures such as the cutting table or any custom fixtures you might use to support the material to be processed. This value is used along with the material thickness to move the Z axis to the proper focus height when using the auto Z mode.
Vector performance This setting allows you to adjust vector performance from Standard to Throughput or Quality. This affects how small geometry and curves in your graphic are processed. The Quality mode will increase job completion time, but improve vector quality. Throughput mode will decrease job completion time, but may have an adverse effect on vector quality. Merge Pages This setting allows you to treat multipage documents in different ways. By default, multipage documents are treated as separate jobs with each page having to be selected in the UCP and run individually. This setting allows you to change that behavior. Selecting this setting once will merge the pages with auto-start, meaning the pages will all be printed one after another as one job. This is useful if you want all the graphic images to print on one piece of material, but you want to control the order in which they are applied. Selecting this setting again will merge the pages with manual start, meaning the pages will all be printed one after another as one job, but with the laser system pausing in between each page. This is useful if you need to load new material in between each page.
42
Material (Editor) (Only available when the Manual Control Tab is activated) This section of the driver allows you to add your own materials to the database. You can create new materials in one of two ways. The New button creates a blank material record that you can fill in. The New button also allows you to create new categories for your new material. The Edit material button allows you to edit an existing material record. Please note that you cannot edit any of the default materials that come with the printer driver directly. They are read only, but you can clone them first and then edit the clone. Creating or editing materials records requires knowledge of the Manual Control features. Learn more about the Manual Control Tab in the Manual Control section of the User Guide. Material Editing Window When you press the new or edit button it launches the material editing windows which has the following controls:
Material Name Enter a name for your new material here. Material Code Each material has a material code assigned to it in the materials database. A new material code in the range 9000-9999 (custom materials) will automatically be assigned. Category Select the category you want your new material to appear under from this pull down menu. You can also create new categories by pressing the button next to the category pull down menu. Material Thickness Enter a default material thickness. This will be the default material thickness that will appear when you select your custom material. The thickness can still be adjusted at the time of printing. Print Mode Select the print mode for your custom material, normal for most materials and application, or one of the other modes for special applications. The modes work as follows:
Normal mode: In this mode all raster data is converted to grayscale and then a dither pattern is applied to it. Laser processing of the raster data is then done at a fixed laser job setting (laser power level and processing) calculated from the materials database. This is the default recommended mode of operation. 3D mode This mode affects raster elements of your image. In this mode, instead of a dither pattern being applied to all raster data, the laser power level is varied on the fly in accordance with the grayscale levels in the image (multicolor bitmaps are converted to grayscale first). Lighter parts of the image will receive less laser power and darker parts more laser power. This mode is for very specific applications. If you select 3D mode, you can adjust how the grayscale levels are mapped to laser power levels using the 3D power button. You can contact our applications lab at Universal Laser Systems for more information on use of the 3D mode. Rubber stamp mode This mode is specifically for rubber stamp creation and is used for creating shoulders on characters when processing rubber stamps. When you use this mode you must choose a taper profile for the rubber stamp shoulder from the taper pull down menu. Clip Art Mode: This is a special mode that allows you to easily print many images from off-the-shelf clip art libraries.

43
Many of these images are made by combining many overlapping shapes and only print correctly if converted to grayscale bitmaps. Be aware that this mode converts the entire graphic being printed into a grayscale image including vectors.
Reduction Mode: This mode is specifically for barcode engraving and adjusts the barcode elements for readability.
Taper This drop down menu is activated when Print Mode is set to Rubber Stamp and is used to choose a taper style for the rubber stamp. Print Direction Select the direction in which you want raster printing to proceed. The choices are from the top of the material processing field going down or from the bottom of the material processing field going up. Dither Type This drop down menu allows you to choose the type of dither to apply to raster elements of the graphic being printed. 3D Power button This button is used with the 3D print mode to adjust how the grayscale levels are mapped to laser power level. See the 3D mode description in the manual driver tab section of the manual for more details.
Units Choose Metric or English units for data entry. Image Density Choose your image resolution. 5 is the recommended default. 6 is for very fine images and lower values become more and more coarse. Raster Engraving Settings In this section of the Material Editor window you enter the laser job settings to be used for raster engraving. These settings must be determined for your material through testing. For a deeper explanation of these laser job settings, see the Manual Printer Driver Interface Tab section of the manual. Vector Marking - Blue Pen In this section of the Material Editor window you enter the laser job settings to be used for vector marking. These settings must be determined for your material through testing. For a deeper explanation of these laser job settings, see the Manual Printer Driver Interface Tab section of the manual. Vector Cutting - Red Pen In this section of the Material Editor window you enter the laser job settings to be used for vector marking. These settings must be determined for your material through testing. If the material can be cut by a laser you enable vector cutting by selecting the Material Can Be Vector Cut switch. In order for the materials database to automatically calculate the necessary job settings for any material thickness, you will need to determine job setting values for two different thicknesses of the material and enter them into the shallow and deep cut setting fields. The materials database will interpolate and extrapolate for other thicknesses as necessary up to the max possible depth which you can enter into the max depth field. This field allows you to limit the material thickness values that can be entered at time of printing. For a deeper explanation of these laser job settings, see the Manual Printer Driver Interface Tab section of the manual.
44
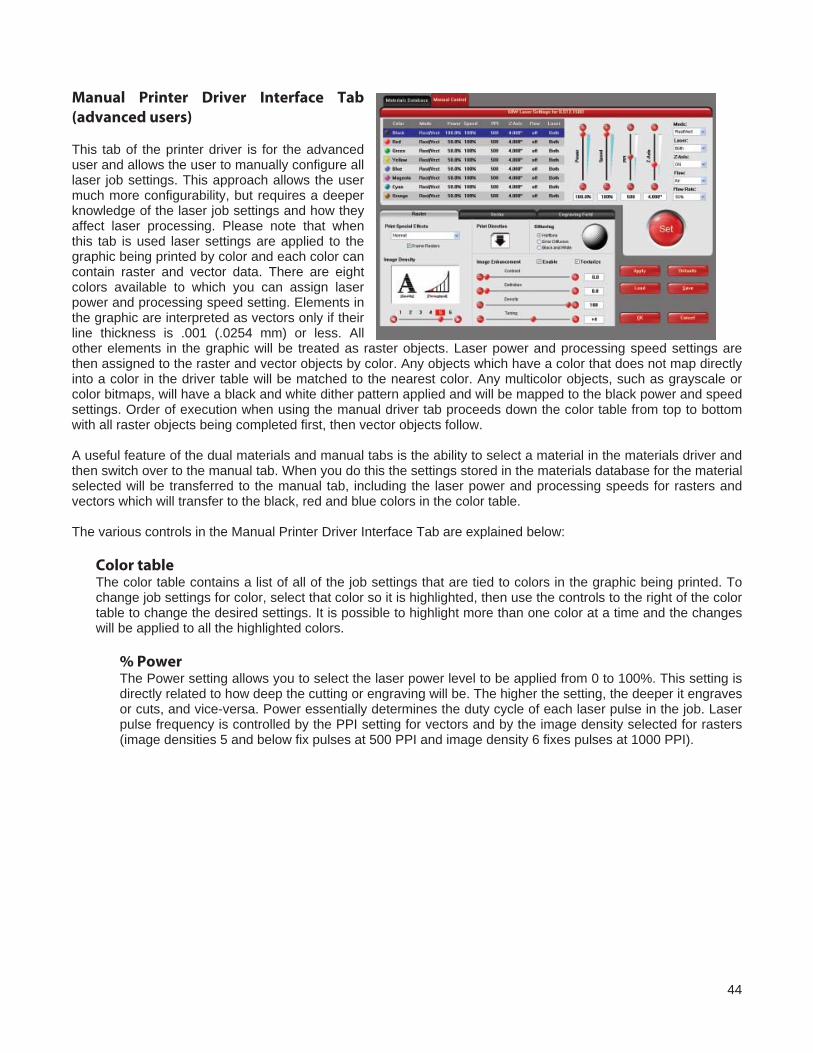
Manual Printer Driver Interface Tab (advanced users) This tab of the printer driver is for the advanced user and allows the user to manually configure all laser job settings. This approach allows the user much more configurability, but requires a deeper knowledge of the laser job settings and how they affect laser processing. Please note that when this tab is used laser settings are applied to the graphic being printed by color and each color can contain raster and vector data. There are eight colors available to which you can assign laser power and processing speed setting. Elements in the graphic are interpreted as vectors only if their line thickness is .001 (.0254 mm) or less. All other elements in the graphic will be treated as raster objects. Laser power and processing speed settings are then assigned to the raster and vector objects by color. Any objects which have a color that does not map directly into a color in the driver table will be matched to the nearest color. Any multicolor objects, such as grayscale or color bitmaps, will have a black and white dither pattern applied and will be mapped to the black power and speed settings. Order of execution when using the manual driver tab proceeds down the color table from top to bottom with all raster objects being completed first, then vector objects follow. A useful feature of the dual materials and manual tabs is the ability to select a material in the materials driver and then switch over to the manual tab. When you do this the settings stored in the materials database for the material selected will be transferred to the manual tab, including the laser power and processing speeds for rasters and vectors which will transfer to the black, red and blue colors in the color table. The various controls in the Manual Printer Driver Interface Tab are explained below:
Color table The color table contains a list of all of the job settings that are tied to colors in the graphic being printed. To change job settings for color, select that color so it is highlighted, then use the controls to the right of the color table to change the desired settings. It is possible to highlight more than one color at a time and the changes will be applied to all the highlighted colors.
% Power The Power setting allows you to select the laser power level to be applied from 0 to 100%. This setting is directly related to how deep the cutting or engraving will be. The higher the setting, the deeper it engraves or cuts, and vice-versa. Power essentially determines the duty cycle of each laser pulse in the job. Laser pulse frequency is controlled by the PPI setting for vectors and by the image density selected for rasters (image densities 5 and below fix pulses at 500 PPI and image density 6 fixes pulses at 1000 PPI).

45
% Speed This setting allows you to select processing speed from 0 to 100%. This setting determines the maximum rate of travel of the motion system. Actual engraving time (throughput) is not only dependent on the % Speed setting, but is also dependent on the size, intricacy and the placement of the graphic in the engraving field. The motion system will accelerate/decelerate at a fixed rate up to the chosen speed. If the motion system cannot achieve the chosen speed based on the size and intricacy of the graphic or graphical placement in the field, it will automatically adjust its speed to the maximum speed it can achieve. This is evident when you see the motion system automatically slow down while cutting curves or circles as opposed to straight lines. Automatic proportional pulsing (see PPI) of the laser beam will ensure that there is no difference in the depth of cut from straight lines to curves. % Power and % Speed work together in determining how deep the engraving or cutting will be. Higher power and slower speeds produce deeper results. Lower power and higher speeds produce shallower results. Note: 100% raster speed is different than 100% vector speed. Rastering is done with the X axis focus carriage which is light weight and has a high acceleration and top speed. Due to the inertia of the X-Axis arm, movements in the Y-direction have a slower acceleration and top speed making vector speeds range from one-third to one-half the maximum raster speed. PPI This setting allows you to select the pulsing frequency of the laser pulse stream being applied to the material when vector cutting from 1 to 1000 pulses per inch (PPI). The PPI setting indicates how many laser pulses, per linear inch, the laser cartridge will emit. The pulsing of the laser beam is electronically linked to the motion. These pulses will always fire, equally spaced, from one to the next, regardless of changes in speed. Higher PPI settings may cause more melting, burning or charring on the edges when cutting. Lower PPI settings may reduce this effect, but may result in a serrated looking edge. Using less than 150 PPI may result in the pulses being spread so far apart that they may or may not touch one another creating a perforated effect. A PPI setting between 300 to 500 PPI is a good nominal value for most applications, but some experimentation may be necessary. Note: In raster mode, PPI is controlled by the image density selected for rasters (image densities 5 and below fix pulses at 500 PPI and image density 6 fixes pulses at 1000 PPI). Mode (Drop Down Menu) Mode allows you to force graphical elements mapped to that color to be treated in a certain way. The choices are Rast/Vect, Rast, Vect and Skip. Rast/Vect mode is the default setting and will interpret elements in the graphic being printed that are mapped to that color as rasters or vectors depending on line width. Vectors must have a line width of .001” (.0254 mm) or less, everything else will be treated as raster objects. Rast mode will force all elements of the graphic mapped to that color to be converted to raster objects including thin line widths. Vect mode will ignore (not print) raster elements mapped to that color and only print vector objects mapped to that color. Skip will cause all elements of the graphic mapped to that color to be ignored (not printed).
Laser (Dual Laser Cartridge System Only) If your laser system comes equipped with more than one laser cartridge, you are given the choice of using both laser cartridges or only one laser cartridge (Top or Bottom.) If your laser system has one laser cartridge, this setting will not be available. Z-Axis This control lets you set the Z-Axis table to a specific height. When the auto Z feature is turned on in the UCP and a Z height is set for a color in the color table, the table moves to the height indicated before processing the elements in the print job graphic that were mapped to that color. This feature can be used as a method of focusing by entering the thickness of the material to be processed. This feature requires that the Z axis be calibrated to the focus lens being used and properly homed prior to running the job.

46
Flow (Computer Controlled Air Assist only) This feature will not appear if you do not have the Computer Controlled Air Assist option installed. This setting allows you to choose between Air or Gas inputs on the Computer Controlled Air Assist option or Off for no air flow. Flow Rate (Computer Controlled Air Assist only) This feature will not appear if you do not have the Computer Controlled Air Assist option installed. This setting allows you to select the flow rate for the air or gas input selected in 25% increments. Color Order (Order of Execution) You can change the order of the colors in the color table by dragging the color up or down the list in the table. This will change the order of execution of objects in those colors. You can only change color order when first printing a job. After printing the job to the UCP the color order becomes fixed for that job. Set Button After adjusting all of the color based settings for the colors highlighted you must push the SET button to register the changes to the color table. Also note that the changes will not be permanently saved until the OK or APPLY buttons are pressed.
Save Button The save button brings up a dialog box which allows you to save a snapshot of the laser job settings which you can then reload at a later date. All settings will be stored in a file with “.LAS” extension. Verify that you have pressed the SET button before you save any .LAS files to ensure that changes to the color table are properly registered. Load Button To recall a snapshot of the printer driver settings that have been previously saved to a .LAS file using the save button, select on the “Load” button and choose the desired .LAS settings file from the dialog box. The settings that are currently on screen will be replaced by the settings from the .LAS file. You may abort these changes by selecting Cancel; selecting OK or APPLY will approve the changes.
Default Button The Default button will reset the driver settings to factory default values. You may abort these changes by selecting Cancel; selecting OK or APPLY will approve the changes. Cancel Button The Cancel button closes the printer driver settings interface window and takes you back to the previous window without saving changes made to the settings. Apply Button The APPLY button saves all changes made to the printer driver settings. OK Button The OK button saves all changes made to the printer driver settings and closes the printer driver settings interface window and takes you back to the previous window.

47
Raster Sub-Tab The raster sub-tab on the manual control tab of the printer driver setting interface displays a group of settings which affect how raster objects are processed by the laser system. The controls in the sub-tab are described below:
Print Special Effects The drop down list allows you to choose from several special print modes, normal for most materials and applications or one of the other modes for special applications. The modes work as follows: Normal mode: In this mode all single color raster data is mapped to the closest color in the color table and processed using the job settings attached to that color. All grayscale or multicolor bitmaps are converted to grayscale and then a dither pattern is applied to them and the black color job settings are used. This is the default recommended mode of operation.
Frame Rasters A Frame Rasters feature is available in normal mode which affects the way rastered object are processed in the laser system. When this switch is off the raster strokes the X axis makes when laying down the pattern of dots on each line of the raster image can vary with the image. For example, if you are engraving a triangular shape the tip of the triangle will be engraved with short raster strokes and the strokes will get longer as the wider parts of the triangle are engraved. If this mode is turned on, the longest raster stroke for the raster object being engraved will be determined and all other raster strokes will be made equal in length to the longest raster stroke. This will increase processing time, but can improve edge quality when engraving or marking at higher processing speeds. Use this mode only if necessary. 3D mode This mode affects raster elements of your image. In this mode all raster objects regardless of color will be converted to 256 color grayscale and then during processing the laser power level is varied on the fly in accordance with the grayscale levels in the image. Lighter parts of the image will receive less laser power and darker parts more laser power resulting in a contoured depth and a three dimensional look. Special 3D software is required to produce the type of grayscale images that are compatible with this mode. Please contact our Applications Department for the latest 3D software recommendations. If you select 3D mode, you can adjust the grayscale to laser power level mapping table using the 3D Setup button. See the description of the 3D Setup button for more details. Keep in mind that it may require several passes to create enough relief in the engraving to get the desired results. By default all other colors are forced to raster mode and are not used since colored raster data is converted to grayscale. The red pen is left in rast/vect mode and it is recommended that all vector cut lines in the graphic being printed be colored red so that they will be interpreted as vectors. Any black vector lines will be converted to raster objects.
3D Setup Button This button is used with the 3D print mode to adjust the grayscale to laser power level mapping table. It only appears when 3D mode is selected. When 3D mode is selected the laser power levels mapped to the various shades of gray in the image are scaled from the laser power level you entered for the color black in the color table. The darkest shade of gray (black) in the image will be assigned the black color laser power level. The lightest shade of gray (white) will automatically be assigned a 0% laser power. All other shades of gray that fall between black and white will automatically be mapped to a laser power level in between 0% and the laser power level assigned to the black color based on the mapping table you set up in the window brought up when you press the 3D setup button. When you select the 3D setup button, the ULS 3D Power

48
Calibration window will appear. There are 16 slider bars representing the 16 shades of gray of the calibration scale. The 00 and the 15 are not adjustable as they represent white and black. The other 14 can be adjusted. Higher values result in deeper engraving than lower values. A linear mapping works for most applications (adjust the sliders in a diagonal line going up from left to right), but in some cases the setting can be varied as a sort of gamma correction for depth of engraving. The APPLY button saves any changes you have made to the mapping table. You must press the apply button before pressing the CLOSE button to exit this window or you will lose your changes.
Rubber stamp mode This mode is specifically for rubber stamp creation and is used for creating shoulders on characters and graphics when processing rubber stamps. The shoulder is created by gradually ramping the laser power up or down near the edges of each element in the graphic being printed creating a tapered edge around each graphic element that produces a pyramid-like effect in the material being processed. Most rubber stamp applications will require the graphic to be a negative image with black representing the material to be removed by the laser. The shape of the taper or shoulder can be varied as desired using the controls in the rubber stamp profile setup window by pressing the Rubber stamp setup button. In this mode all non-black raster data is converted to grayscale and a halftone dither pattern is applied to it. By default all other colors are forced to raster mode and are not used since colored raster data is halftoned to black. The red pen is left in rast/vect mode and it is recommended that all vector cut lines in the graphic being printed be colored red so that they will be interpreted as vectors. Any black vector lines will the converted to raster objects.
Rubber Stamp Setup Button When you press the Rubber Stamp Setup Button the rubber stamp shoulder controls window will appear with the following settings:
Taper Selection You can use Taper Selection to choose from a selection of predefined shoulder angles for specific rubber stamp applications. In most cases these predefined shoulders will be adequate. However, you can create custom shoulders by pressing the New button. Image Options - Invert Page This converts all black objects into white and all white objects into black for the entire page. CAUTION: When using the “Invert Page” feature you may need to reduce your page size to match your material size so that the entire work area is not engraved. Image Options - Mirror Page This mirrors the entire page from left to right (horizontally) at the time of printing. Power The Power table graphically represents the shoulder characteristics of the predefined rubber stamp shoulders and also allows you to adjust the shape of any custom shoulders you create. You will notice that you cannot adjust the settings when a predefined shoulder is selected. You must press the new button to create a clone of the selected shoulder and then you will be able to edit the settings for the cloned shoulder. You can also rename the cloned shoulder once it is created by pressing the Rename button and delete the clone by pressing the delete button. The predefined shoulders cannot be deleted.
OriginalGraphic
NegativeImage
PositiveImage
EngravedResult
Shoulder applied tonegative and positive images

49
Once you have created a custom shoulder, you can adjust the shape of the shoulder using the power table controls. A shoulder is made up of a series of steps. Each slider bar controls the laser’s power level for that step from 0 to 100%. The first and last steps in the shoulder are fixed at 0 and 100% respectively. You can vary all of the values in between to create a desired shoulder shape. The numbers beneath the power levels represent the width of each step in 0.001” (.0254 mm) increments; you can make each step up to .004” (.116 mm) wide. You do not have to employ all of the steps to make a shoulder; you can use the check boxes to deactivate steps to shorten the table. When you deactivate a step, the power level for that step is automatically set to 100%. Note: The maximum possible shoulder width is 0.064” (1.62 mm).
Clip Art Mode This is a special mode that allows you to easily print many images from off-the-shelf clip art libraries. Many of these images are made by combining many overlapping shapes and only print correctly if converted to grayscale bitmaps. Be aware that this mode converts the entire graphic being printed into a grayscale image, including vectors, and the black color job settings are used for processing. Because of this you will notice that the color table is reduced to one color (black) when this mode is selected. The dither pattern applied is the pattern currently selected in the dithering section of the raster sub tab. Reduction Mode Raster Block Reduction Mode (also known as Print Growth Management), is specifically for barcode engraving and adjusts the barcode elements for readability by removing pixels from the edges of each element of the barcode being printed to adjust them for readability. This is necessary because most barcodes are generated from barcode fonts so that the widths of the elements in the barcode are not adjustable. This mode allows you to adjust the widths of the elements at time of printing to make the barcodes more readable with barcode scanners. The Reduction Setup button allows you to control the amount of reduction that takes place.
Reduction Setup Button When you press the Reduction Setup Button the reduction setup window will appear and allow you to adjust the amount of reduction that takes place in .001” (.0254 mm) increments.
Image Density The Image Density setting determines how many lines of pixels (or dots) per vertical inch are used to render a raster image on the material being laser marked or engraved. It can also be referred to as the vertical resolution or dpi of the image. There are six image density choices available in most models (two extra density levels are available in SuperSpeed models). Higher Image Density (DPI) settings produce better quality raster images with finer detail, but reduce productivity by increasing raster engraving time. Lower Image Density (DPI) settings produce lower quality raster images, but increase productivity by decreasing raster engraving time.
Image Density (DPI) settings will also have an effect on vector quality and processing speeds when vectors objects contain many curves and small segments. Higher image densities will produce finer vector detail, but may reduce productivity and vice versa for lower image densities. By running samples on scrap materials and tying different density settings, you can find a compromise between throughput and image quality that is acceptable to you. SuperSpeed (optional accessory) If the optional SuperSpeed accessory is installed a switch will be present to turn activate the feature. This feature uses a beam splitter to separate the laser beams from the top and bottom lasers by a controlled amount so that they will focus, one above the other on the material processing table with a distance between them equal to the density selected. Each laser is pulsed separately, to allow two lines of raster data to be engraved simultaneously which will cut job completion time in half. When this switch is activated two extra densities become available. See the accessories section for more details on operation of the SuperSpeed.

50
Print Direction The default direction is Down which begins raster engraving at the top of the field and finishes at the bottom. On some materials you may get better results by starting at the bottom and engraving towards the top of the field (Up) due to the fact that smoke and fumes from the engraving process travel over the surface of the material before being exhausted and can mar the previously engraved areas. Dithering Dithering settings are used when printing graphics that contain grayscale or color bitmaps such as photographs in all printing modes except 3D mode. A dither pattern is a special screen filter that is used to convert a grayscale or color image to monochrome (black and white). The screen filter reduces the image to black and white while preserving the illusion of shades of gray by varying the spacing of pixels (dots) in the image. Darker areas have more dots spaced closer together and lighter areas have fewer dots spaced farther apart. Since the laser system is not capable of directly reproducing color or shades of gray this is the method used to mimic shades of gray in order to engrave or mark photographs onto material. There are three choices for the dither pattern applied:
Halftone The halftone dither pattern is a line-type filter which applies a 45° line screen to a color or grayscale image to convert it to black and white. The line spacing of the line screen varies with the density chosen so at lower densities the line screen is more coarse.
Image Density Lines Per Inch 6 180 5 90 4 60 3 45 2 36
Error Diffusion The error diffusion dither pattern uses a random scatter filter to place pixels in order to represent shades of gray, introducing a level of noise in the process. The pattern created will vary with density chosen. Higher density settings, such as 5, will produce a more densely packed, finer pattern and lower resolution settings, such as 2, will produce a loosely packed, coarser pattern. Black and White Mode The Black and White dither pattern is a thresholding pattern that thresholds at 50% black. Each pixel in a grayscale image that is greater than 50% black will be converted into black and each pixel that is less than 50% black will be converted into white. This dither pattern will not give good results for reproducing photographs, but is very useful when printing images that should be black and white yet may have some unintended grayscale pixels in them. A good example is a scanned image of a text document that was scanned into a computer using a grayscale scanner setting. Ideally the scanned image of text should be black text on a white background, but if a grayscale scanner setting was used there may be very light gray pixels at the edges of the characters of text. This dither pattern will remove those gray pixels. Helpful Tip Laser marking or engraving grayscale or color bitmaps onto materials requires a bit of trial and error to achieve good results. Results will vary on different materials. As a rule of thumb, use an Image Density setting of 5 using halftone or diffusion pattern on harder materials where you are marking the surface. Use an Image Density setting of 3 using the halftone or diffusion pattern for softer materials where you are engraving into the material.

51
Texturize Texturize is a special feature which adds random variation to the laser power level assigned to each color. This is useful for creating a textured effect on engraved surfaces to mask grain lines and motion artifacts. One useful application of this feature is when engraving away large areas of acrylic, but for most applications this feature is not necessary. Tuning Tuning shifts the left to right and right to left raster strokes the motion system makes when Rastering an image so that they line up vertically with respect to each other. This is necessary to compensate for laser response and mechanical lag when rastering at high speeds. A misadjusted TUNING value will cause the image to appear double- imaged or bolder than normal and edges may not be sharp and defined. The optimum tuning value will vary by material and speed of processing. TUNING will be different if you have Image Enhancements enabled vs. disabled. A typical TUNING value can be from -8 up to 0 depending on speed of processing. If you use the materials database, nominal tuning values are already set for you. You can look up the tuning value for a particular material in the database by selecting that material in the materials database tab and selecting edit. Keep in mind that the tuning value is optimized for the particular raster speed and power level stored in the database. If you need to change the speed or power significantly for your application, you may need to determine a new value by testing. Also remember that the tuning value is affected by raster enhancement settings so if the material database record has image enhancements turned on, you should use those values along with the tuning value. Procedure For Setting The Tuning Value An easy way to set the tuning value on a given material at a desired processing speed is to create a graphic consisting of about 20 thin vertical lines about 1” (25.4 mm) tall and .010” (.254 mm) apart in the center of the engraving field. The lines should have a line thickness of .001” (.0254 mm) if possible in the graphic application being used, otherwise use the thinnest the application allows. Then print the graphic to the laser system as a raster image by forcing the color the lines are drawn in to be in rast mode in the color table and the image density to 1 (draft mode). Make sure you set your speed of processing equal to the speed you plan to run your application at and the laser power set high enough to mark the material. This will result in vertical lines that look dotted. You can then look at the dots and if they are not lined up vertically, adjust the tuning value by 1-2 ticks and try again. Repeat until the dots in the dotted lines are lined up vertically.
Note: If you need to use image enhancements for you application, you should use the image enhancement tuning procedure in place of this procedure. Image Enhancement Controls Image Enhancement controls (CONTRAST, DEFINITION and DENSITY) help compensate for laser response when raster engraving or marking at higher speeds in order to make edges crisp and defined and to keep thin elements of a graphic being printed, such as certain fonts (especially at small font sizes) and thin vertical lines, from fading out. Keep in mind that the TUNING value will be different if you have Image Enhancements enabled vs. disabled. Note: The Image Enhancement feature is not available in 3D or rubberstamp printing modes.

52
Contrast CONTRAST increases laser power at the edges of thin graphical elements in areas of a graphic that are high density (a lot of detail packed close together) such as the area outlined in the figure below: Within this area, using too little CONTRAST may cause thinner parts of the letters or thin vertical lines to appear too thin, faint or even non-existent when Rastering at high speeds. Having too much CONTRAST will cause the affected areas to appear too thick, bold or over-powered. Definition DEFINITION increases laser power at the edges of thin graphical elements in areas of a graphic that are lower density (graphic elements with a lot of white space around them) such as the area outlined in the figure below:
The low density parts of the graphic are typically the ascenders and descenders of text or thin vertical lines in a graphic being printed. Within this area, using too little DEFINITION may cause thinner parts of the letters or thin vertical lines to appear too thin, faint or even non-existent when rastering at high speeds. Having too much DEFINITION will cause the affected areas to appear too thick, bold or over-powered. Density DENSITY decreases laser power at the edges of all graphical elements to compensate for laser lag in turning off at high speeds. If the DENSITY is set too high, then the entire engraved image may appear too thick, bold or over-powered. Setting the DENSITY too low may cause the image to appear too thin and thinner parts of characters and thin lines may disappear altogether. The opposite effect would occur on inverted images such as white text on a black background. How to Tune Image Enhancement Settings These three parameters (CONTRAST, DEFINITION and DENSITY) work together to compensate for laser response when rastering at higher speeds. For a given material at a given speed they must be determined by testing. If you use the materials database, these values are already determined for you. You can look up these settings for a particular material in the database by selecting that material in the materials database tab and selecting edit. Keep in mind that these settings are tuned for the particular raster speed and power level stored in the database and if you need to change the speed or power significantly for your application, you may need to establish new values by testing. Also remember that these settings are for high speed engraving on sensitive materials such as anodized aluminum and acrylic and may not be necessary for your application. Step 1: Establish the nominal power setting. The enhancement settings work best when you are not overpowering the material. The first step is to establish the minimum laser power necessary at the desired processing speed to mark the material or to engrave the material to the required depth. You should not use more laser power than necessary. The best way to determine this is to engrave a 4” (101.6 mm) wide by 0.5” (12.7 mm) tall solid black rectangle in the center of the processing field. Use a scrap piece of material to adjust laser power in a series of 5% increments at the desired processing speed until you establish the minimum power level required to produce the desired result. Make sure image enhancements are DISABLED.
Universal Laser Systems Inc.
Universal Laser Systems Inc.

53
Step 2: Use text to set the CONTRAST parameter. Type in a string of text, using the Times New Roman font, set at 8 or 10 points in size. Make sure that the text string is at least 6 inches long and that the string includes punctuation marks, spaces, lower and upper case letters as in the following example:
This is a test to set contrast definition and density for High Speed Engraving Engrave the sample text with the settings established in step 1 on a scrap piece of material, but this time ENABLE Image Enhancement and set CONTRAST to 0, DEFINITION to 0, DENSITY to 100 and the TUNING value to +4. The results may appear fuzzy, some thinner elements of characters may be missing and overall engraving quality may not be as good as expected. Keep adjusting the CONTRAST upward in increments of 5, engraving another sample between each adjustment (you may want to engrave each sample right beneath the previous one so you can compare them). Note the results after each trial. The objective is to adjust the CONTRAST just enough to cause thin parts of the text in the high density areas of the text to be sharp and clear. Ignore the appearance of the ascenders and descenders that stick out above and below the dense areas of text as they will be adjusted using the DEFINITION setting. Setting CONTRAST too high can cause the characters to appear “fat” or “bold” so find the minimum value that gives good results. Step 3: Adjust DEFINITION to enhance the ascenders and descenders. Now, increase the DEFINITION in increments of 5 at a time until the ascenders and descenders begin to appear sharp and clear. The objective is to increase the setting just enough to cause these parts of the graphic to match the appearance of the high density areas. Setting the DEFINITION too high will result in ascenders and descenders appearing too “fat” or “bold” compared to the rest of the image. Step 4: Reduce DENSITY as needed. Once CONTRAST and DEFINITION have been set to the appropriate levels you can adjust DENSITY to increase or decrease boldness of the image as a whole. If everything appears overpowered or bold, try reducing the DENSITY down from 100 in increments of 5 and note the results. For most applications this is not necessary and you can leave the DENSITY at 100 (its default value). Density can be especially useful for inverted images. Step 5: Establish the tuning value. Once the Contrast, Definition and Density are determined, an easy way to set the tuning value on a given material at a desired processing speed is to create a graphic consisting of about 20 thin vertical lines about 1” (25.4 mm) tall and .010” (.254 mm) apart in the center of the engraving field. The lines should have a line thickness of .001” (.0254 mm) if possible in the graphic application being used, otherwise use the thinnest the application allows. Then print the graphic to the laser system as a raster image by forcing the color the lines are drawn in to be in Rast Mode in the color table and the image density to 1 (draft mode). Make sure you set your processing speed equal to the speed at which you plan to run your application and the laser power set high enough to mark the material. This will result in vertical lines that look dotted. You can then look at the dots and if they are not lined up vertically, adjust the tuning value by 1-2 ticks and try again. Repeat until the dots in the dotted lines are lined up vertically.
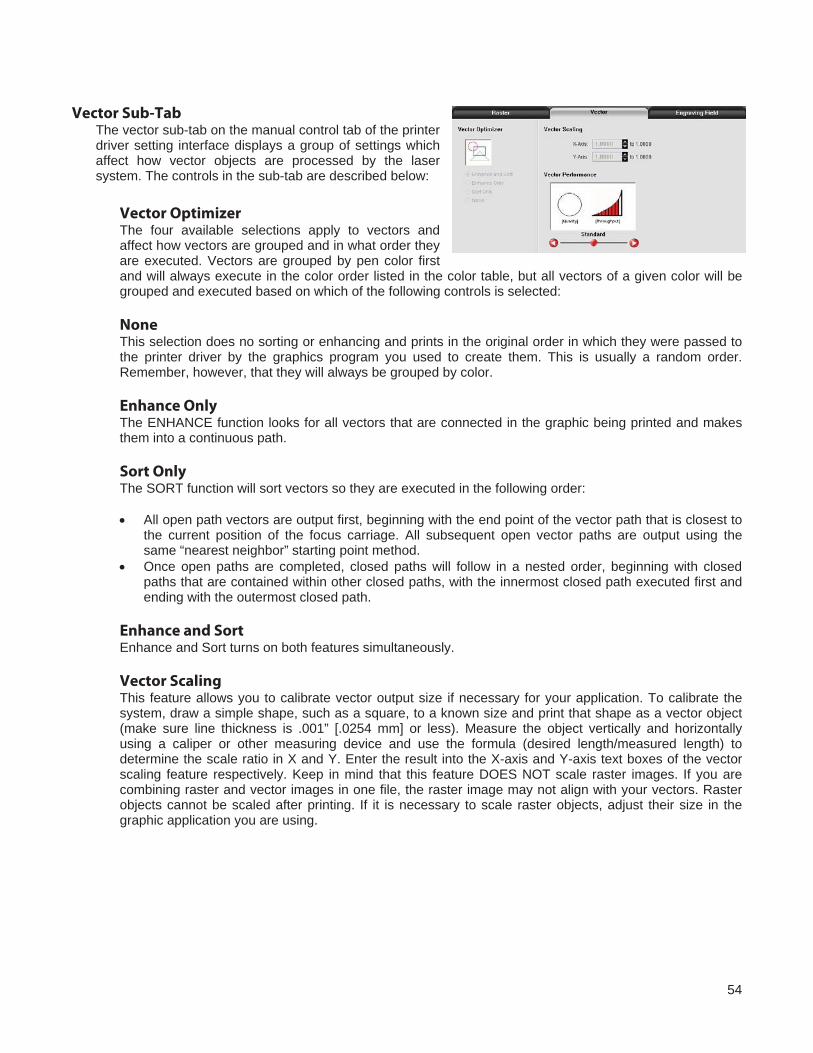
54
Vector Sub-Tab The vector sub-tab on the manual control tab of the printer driver setting interface displays a group of settings which affect how vector objects are processed by the laser system. The controls in the sub-tab are described below:
Vector Optimizer The four available selections apply to vectors and affect how vectors are grouped and in what order they are executed. Vectors are grouped by pen color first and will always execute in the color order listed in the color table, but all vectors of a given color will be grouped and executed based on which of the following controls is selected: None This selection does no sorting or enhancing and prints in the original order in which they were passed to the printer driver by the graphics program you used to create them. This is usually a random order. Remember, however, that they will always be grouped by color. Enhance Only The ENHANCE function looks for all vectors that are connected in the graphic being printed and makes them into a continuous path. Sort Only The SORT function will sort vectors so they are executed in the following order: • All open path vectors are output first, beginning with the end point of the vector path that is closest to
the current position of the focus carriage. All subsequent open vector paths are output using the same “nearest neighbor” starting point method.
• Once open paths are completed, closed paths will follow in a nested order, beginning with closed paths that are contained within other closed paths, with the innermost closed path executed first and ending with the outermost closed path.
Enhance and Sort Enhance and Sort turns on both features simultaneously.
Vector Scaling This feature allows you to calibrate vector output size if necessary for your application. To calibrate the system, draw a simple shape, such as a square, to a known size and print that shape as a vector object (make sure line thickness is .001” [.0254 mm] or less). Measure the object vertically and horizontally using a caliper or other measuring device and use the formula (desired length/measured length) to determine the scale ratio in X and Y. Enter the result into the X-axis and Y-axis text boxes of the vector scaling feature respectively. Keep in mind that this feature DOES NOT scale raster images. If you are combining raster and vector images in one file, the raster image may not align with your vectors. Raster objects cannot be scaled after printing. If it is necessary to scale raster objects, adjust their size in the graphic application you are using.

55
Vector Performance There is a tradeoff between quality of output and speed of processing when printing vectors. For longer straight line vectors (over 1 inch [25.4 mm]) you can adjust the speed of processing in the color table until you achieve the desired results. However, the motion system rarely achieves the selected processing speed when processing curves and small line segments because of the constant directional changes that occur when processing these types of vectors. Processing speed for these types of vectors is controlled by other rules in the software. This control allows you some adjustment of processing speed of curves and small line segments in order to achieve desired results. Using the quality setting jobs will take longer to complete, but will improve curve and small line segment quality. Using the throughput setting will compromise quality a bit to improve job completion time if desired.
Engraving Field Sub-Tab The engraving field sub-tab on the manual control tab of the printer driver setting interface displays a group of settings which affect the engraving field (page size) and other miscellaneous settings. The controls in the sub-tab are described below:
Units Units allows you to change units used between Metric and English. Language Select from many different languages in this drop down list. Some language changes will not take effect until the printer control panel is closed and then re-opened. Engraving Field Width and Height Normally you will want to set the width and height in printer driver at their max, matching the processing field in your laser system, and set the page size in the graphic software to match. If your graphic software does not allow large enough page sizes to match your processing field, you can reduce this engraving field size and your reduced page size will print in the upper left corner of the field in the laser system. Reduced page sizes are also useful in some special cases, such as rubber stamp engraving, so you can take advantage of the invert page feature without having to engrave the entire field of the laser system away. Important Note: Make sure that the page size in your graphic program always matches the engraving field size setup in the printer driver. Mismatched settings may cause your graphics to print in an unexpected location or not at all. Max Size Button Selecting the Max Size button restores the width and height to the maximum values your laser system can accept. Dual Head (not available on all equipment) Dual head is an optional accessory. If you have this option, you must activate it at time of printing to use the feature. Center image This selection allows you to force jobs to always be centered in the processing area.

56
Merge Pages This setting allows you to treat multipage documents in different ways. By default, multipage documents are treated as separate jobs with each page having to be selected in the UCP and run individually. This setting allows you to change that behavior. Selecting this setting once will merge the pages with auto-start, meaning the pages will all be printed one after another as one job. This is useful if you want all the graphic images to print on one piece of material, but you want to control the order in which they are applied. Selecting this setting again will merge the pages with manual start, meaning the pages will all be printed one after another as one job, but with the laser system pausing in between each page. This is useful if you need to load new material in between each page. Rotary A rotary fixture option is available for all models. Please contact Universal Laser System for more details. Diameter If a rotary fixture is installed in your laser system, the diameter of the cylindrical object being processed is entered in this field. A correct diameter must be entered for the graphics being printed to be scaled properly. Rotation Factor This factor allows you to calibrate your fixture if your application requires you to engrave or cut completely around the cylinder (360 degrees). Print a vector line or raster graphic that extends from the top of the page to the bottom of the page. If the fixture comes up short or overlaps by a few degrees, you can compensate for this. If short, increase the factor; and if long, decrease the factor. The factor is a ratio, so if you can measure the object and image circumference, you can calculate the scale. If you do not have the equipment to measure this, you can use trial and error.

57
The Universal Control Panel (UCP) When a graphic has been printed through the printer driver a laser job is created and passed to the queue in a piece of software called the Universal Control Panel (UCP). The UCP software provides a convenient interface for interacting with and controlling your laser system. Once you have installed the UCP, a red diamond-shaped icon will appear in the lower right corner of your Windows taskbar. If for any reason the UCP is deactivated, you can reactivate it by using the ULS Engraver shortcut found on your computer’s desktop. The UCP is organized into three convenient tabs: Viewer, System and Diagnostics. The following describes the features of each tab of the UCP.
Viewer Tab You send jobs to your laser system by printing to it. Anytime you print to the laser system, a job is created and inserted into the laser systems job queue. Selecting the viewer tab allows you to navigate through and manage the jobs in the laser system job queue. The viewer tab also allows you to operate your laser system right from your computer. The viewer tab has the following functions:
Laser System Controls • The same controls found on the
control panel on your laser system are duplicated here.
• The green START button begins processing the selected job.
• The PAUSE button stops the engraving process. Pressing the PAUSE button again resumes the engraving process where it was last stopped.
• The four navigation buttons move the focus carriage manually in X and Y. • The two up and down buttons move the Z-Axis table up or down. • The Home XY button re-homes the focus carriage to the upper right hand corner of the field. • The Home Z button re-homes the Z-Axis table to the bottom of the laser system. View Tab Modes A drop down list allows you to select from various modes of operation for the preview screen.
Basic View (default mode in the drop down list) The Basic View shows a preview window of the job currently selected. The cursor becomes a magnifying glass (Zoom Tool) if you pass it over the preview window. Left-
clicking the mouse zooms in and right-clicking zooms out. Selecting the Settings button takes you back to the printer driver interface to allow you to change
most of the settings for the job selected. Keep in mind that some settings cannot be changed after printing from your graphics program, such as print density and vector quality. If a setting is not adjustable after printing from your graphics program, it will be grayed out or not appear at all when you press the settings button in the UCP.

58
Focus View (drop down list) The Focus View allows you to quickly manually move the focus carriage to a desired position in the material processing field.
• To have full range of motion, verify that you are zoomed out in the preview window by right-
clicking on the mouse before entering the manual focus window. • In the focus view the cursor changes to a blue target symbol with trailing X-Y coordinates.
Pressing the mouse in the preview window moves the focus carriage to the selected position. Selecting another feature from the drop down list terminates the focus feature and moves the focus carriage back to the home position.
• To move the focus carriage to a specific location, select the GO button. Type in the X and Y coordinates and press the GO TO button and the focus carriage will move to the specified location. You can also move the engraving table to a specific Z-height using the GO feature.
Estimate View (drop down list) The estimate feature approximately calculates the amount of time it will take the laser system to process the selected job. For more complex jobs, the estimate feature can take a while to estimate the job completion time.
Relocate View (drop down list) The Relocate feature gives you the ability to move the image in the selected job to another area of the engraving field. This feature does not permanently modify the original image location. When this feature is activated, the image is surrounded by nine small squares (anchor points) representing the center and extents of the graphic. Using these anchors you can relocate the image in one of three ways: 1. You can select and hold an anchor point and drag that anchor to move the image around in the
field. 2. You can select an anchor point and type a new X-Y coordinate for that anchor point in the X-Y
fields to the right of the preview screen. 3. Using the X-Y manual motion buttons, you can move the focus carriage to a location on the
processing table in the laser system using the red pointer diode as reference, then select an anchor point in your image and press the TO POINTER button to move that anchor point to the current focus carriage location. This feature is useful for aligning an image with a piece of material you plan to process with the laser system.
Note: If you print with a page size smaller than the maximum field size of the laser system, the anchors will display at the edges of the page on the image.
Duplicate View (drop down list) The Duplicate feature gives you the ability duplicate an image in a grid pattern. You can select how many rows and columns of the image as well as the spacing between the rows and columns. After you create a grid of duplicate images you can also remove any one of the copies or the original from the group by selecting that instance in the preview window. If you need to restore a copy that you removed, click in the general area of that instance and it will return.
Settings The settings button gives you access to the printer driver settings for the selected job. Most of the settings can be changed after printing if necessary. A few of the settings like image density and print mode are not reconfigurable after initial printing and will be grayed out. Any changes made will be permanently saved with the job.

59
File Management As jobs are printed they are added to the print queue until the queue reaches the print queue limit set in the system tab. Once the Print queue reaches the maximum number of jobs, the printer driver deletes the oldest job each time a new job enters the queue (a FIFO system). Information listed above the preview screen includes the name of the currently selected job, the number of jobs stored, the date and time the selected job was stored on your hard drive and the job processing time (after the job has been run once). Just under the name of the job the Copies feature tells you how many times the selected job has been run on the laser system. Navigation Arrows on either side of the currently selected print job number allow you to navigate through the print jobs stored on your hard drive. The “folder” button displays a pop up window that allows you to further manage the jobs in the print queue by performing such functions as: importing print jobs exported from other computers, exporting print jobs, deleting print jobs, marking jobs as permanent so they will not be deleted by the FIFO systems and purging the entire queue (except jobs marked permanent). Multi-page Job Controls If you print a job from a graphics program that supports creation and printing of multi-page documents, a second set of file navigation controls will appear below the preview windows allowing you to navigate through the pages in the multi-page job. Multi-page jobs can by processed with each page manually selected in the preview screen one at a time or they can be merged and processed as a single job with or without a forced pause between pages. Use the multi-page control in the printer driver (setup button in the UCP) to control this. Laser System Status Indicators At the bottom left of the preview window two lights and some text are provided to indicate status of the laser system connected to the UCP. Blinking of the lights indicate when the UCP is talking to the laser system and the status text indicates the current state of the laser system.

60
System Tab The System Tab allows you to configure certain features of the laser system. If your laser system needs to be calibrated, you will need to do so from this tab. The System tab contains the following controls
• The PRINT CACHE number
indicates the maximum number of print jobs that will be stored on your hard drive. If you exceed the number shown, the software will automatically begin deleting the oldest jobs as newer jobs enter the queue, unless “Permanent” is checked in the File Management window.
• LANGUAGE allows you to switch between available languages according to your preference.
• UNITS allows you to choose between Metric or English units of measure.
• AUTO Z enables a feature that automatically moves the Z axis to the material thickness value entered into the printer driver properties window in the color table. If it is disabled, the Z values in the color table will be ignored and you will need to set focus manually by using the Focus Tool. If you use this feature make sure the Z axis has been properly homed.
• The TUNING value is used compensate for mechanical lag when raster engraving by shifting the left to right and right to left raster lines with respect to each other by the amount entered. This value is in pixels. This value performs the same function as the tuning value in the printer driver and the values are additive.
• The LENS SIZE selection lets the laser system know which lens you have installed. This is important for proper function of the auto Z mode in the laser system and auto-focus feature in laser systems with autofocus. Lenses are calibrated to the laser system at the factory, but if you replace a lens you will need to recalibrate the lens. Select the Calibrate feature and follow the instructions given.
• The ALIGNMENT Mode Launch button opens the Alignment Mode window for checking and adjusting alignment of the laser to the motion system. The Alignment feature should only be used if instructed by the Customer Service Team at ULS.
• CUTTING TABLE allows you to calibrate the Z axis to the top surface of a removable cutting table. You need to have the cutting table installed in the system to activate the CALIBRATE button. To calibrate, press the button and follow the instructions.
• ROTARY allows you to calibrate the Z axis to a rotary fixture. You need to have the rotary fixture installed in the system to activate the CALIBRATE button. To calibrate, press the button and follow the instructions.
• PULSE CALIBRATION is set at the factory to calibrate laser pulsing for the installed laser. It should not be adjusted unless you are instructed to do so by the Customer Service Team at ULS.
• If the SOUNDS box is checked, the computer will play the sound file selected every time the selected event occurs. You can attach sounds to the JOB COMPLETE, PAUSE and RESUME events.
• HOMING OPTIONS allows you to change behavior of the homing features in the laser system. By default after a job is complete the motion system will return home. To prevent this, select the ‘Don’t Return Home After Engraving’ switch.
• If the laser loses its Z location, the materials processing table will home at start up. To have this feature turned off, check the ‘Disable Automatic Z-Homing’ switch. Disabling this feature can also be helpful when troubleshooting Z-Axis problems.
• If you would like the laser system to re-home the X and Y axes before it processes each job, select the ‘Home XY Before Engraving’ switch.
• Your laser system may contain an Air Pressure detection switch to warn you if no air pressure is present and you have selected air assist functions in the job properties window. If the DETECT AIR PRESSURE switch is selected and sufficient air pressure is not present, then an error message is displayed. Deselect this switch to stop these error messages from being displayed.

61
Diagnostics Tab The Diagnostics Tab gives you important information about your laser system for troubleshooting purposes. The diagnostics tab contains the following:
• ENGRAVER shows the current Firmware
and FPGA version being loaded in the laser system. It also displays the Serial Number of your laser system. The Serial Number is needed when calling the Customer Service Team at ULS.
• SOFTWARE displays the current Materials Database, Language Database and Printer driver versions being used.
• OTHER DEVICES displays the current firmware version for various devices installed in the laser system as well as status information about those devices.
• LASER displays information about the current laser cartridge(s) installed in the laser system. If a red ‘x’ appears, this indicates that the laser cartridge is either not functioning properly or is disabled because one of the safety interlocked doors to the laser system is open (causing the interlock system to disable the laser).
• The Test button, under USB LATENCY, displays information about the speed of the USB connection. Typical USB 2.0 performance should be below 10 msec and worst case USB 2.0 performance should be below 100 msec.
• SYSTEM displays information about your personal computer. • ALARMS shows the status of the over-temperate circuit in the material processing area and indicates if
the Thermal Sensor circuit battery is low in power. If the Thermal Sensor inside the laser system is triggered, an alarm will sound and the laser will be shut down.
• FIXTURES indicates if a cutting table is installed on the table and properly detected. • INTERLOCKS displays the status of the Top, Front or Rear Doors of the laser system. • COMPRESSOR . shows the status of the air supply unit which supplies compressed air for the air assist
feature. • The RUNTIME DIAGNOSTICS box is for use when troubleshooting. • The PRINT button gathers the information displayed on the Diagnostics Tab into a PDF file. This PDF file
can be emailed to the Customer Service Team at ULS for aid in troubleshooting.

62
Control Panel The control panel on your laser system provides the functions necessary to setup and run jobs on your laser system. Safety Interlock Status A Red LED on the control panel provides an indication of the status of the interlock system.
Indication Condition
On All access doors to the laser system are closed. If a laser job is initiated in this state, the CO2 laser will fire.
Flashing One or more of the access doors to the laser system is open and the safety interlock system has disabled the CO2 laser. If a laser job is initiated in this state, the CO2 laser will not fire and the red target pointer will be on instead.
Keys
EMERGENCY STOP: Depressing the Emergency Stop button instantly disconnects all AC power to the system. This button should only be used in case of emergency. To reset the system after executing an E-stop, twist the red button clockwise to release the button.
ON/OFF SWITCH: This is the main power switch for the laser system.
START: Initiates processing of the laser job currently selected and visible in the preview screen of the Universal Control Panel on your PC.
PAUSE: If a laser job is in process, the Pause button stops job execution and moves the focus carriage to its home position in the upper right corner of the engraving area. If the Pause button is pressed again, it will resume job execution at the point where the motion system was paused. If the Start button is pressed while the machine is in a paused state, it will restart processing at the beginning of the laser job.
SELECT: This button activates the currently highlighted menu item on the display.
ESCAPE: This button exits from the currently selected menu item.
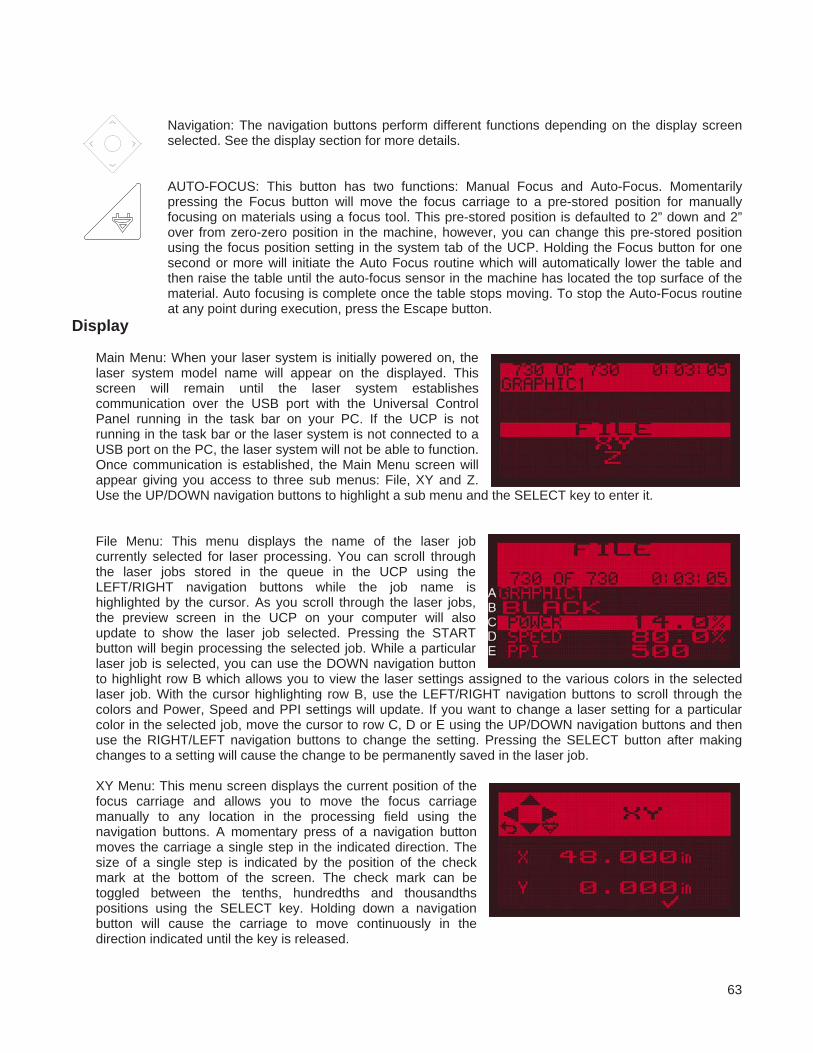
63
Navigation: The navigation buttons perform different functions depending on the display screen selected. See the display section for more details.
AUTO-FOCUS: This button has two functions: Manual Focus and Auto-Focus. Momentarily pressing the Focus button will move the focus carriage to a pre-stored position for manually focusing on materials using a focus tool. This pre-stored position is defaulted to 2” down and 2” over from zero-zero position in the machine, however, you can change this pre-stored position using the focus position setting in the system tab of the UCP. Holding the Focus button for one second or more will initiate the Auto Focus routine which will automatically lower the table and then raise the table until the auto-focus sensor in the machine has located the top surface of the material. Auto focusing is complete once the table stops moving. To stop the Auto-Focus routine at any point during execution, press the Escape button.
Display
Main Menu: When your laser system is initially powered on, the laser system model name will appear on the displayed. This screen will remain until the laser system establishes communication over the USB port with the Universal Control Panel running in the task bar on your PC. If the UCP is not running in the task bar or the laser system is not connected to a USB port on the PC, the laser system will not be able to function. Once communication is established, the Main Menu screen will appear giving you access to three sub menus: File, XY and Z. Use the UP/DOWN navigation buttons to highlight a sub menu and the SELECT key to enter it. File Menu: This menu displays the name of the laser job currently selected for laser processing. You can scroll through the laser jobs stored in the queue in the UCP using the LEFT/RIGHT navigation buttons while the job name is highlighted by the cursor. As you scroll through the laser jobs, the preview screen in the UCP on your computer will also update to show the laser job selected. Pressing the START button will begin processing the selected job. While a particular laser job is selected, you can use the DOWN navigation button to highlight row B which allows you to view the laser settings assigned to the various colors in the selected laser job. With the cursor highlighting row B, use the LEFT/RIGHT navigation buttons to scroll through the colors and Power, Speed and PPI settings will update. If you want to change a laser setting for a particular color in the selected job, move the cursor to row C, D or E using the UP/DOWN navigation buttons and then use the RIGHT/LEFT navigation buttons to change the setting. Pressing the SELECT button after making changes to a setting will cause the change to be permanently saved in the laser job. XY Menu: This menu screen displays the current position of the focus carriage and allows you to move the focus carriage manually to any location in the processing field using the navigation buttons. A momentary press of a navigation button moves the carriage a single step in the indicated direction. The size of a single step is indicated by the position of the check mark at the bottom of the screen. The check mark can be toggled between the tenths, hundredths and thousandths positions using the SELECT key. Holding down a navigation button will cause the carriage to move continuously in the direction indicated until the key is released.
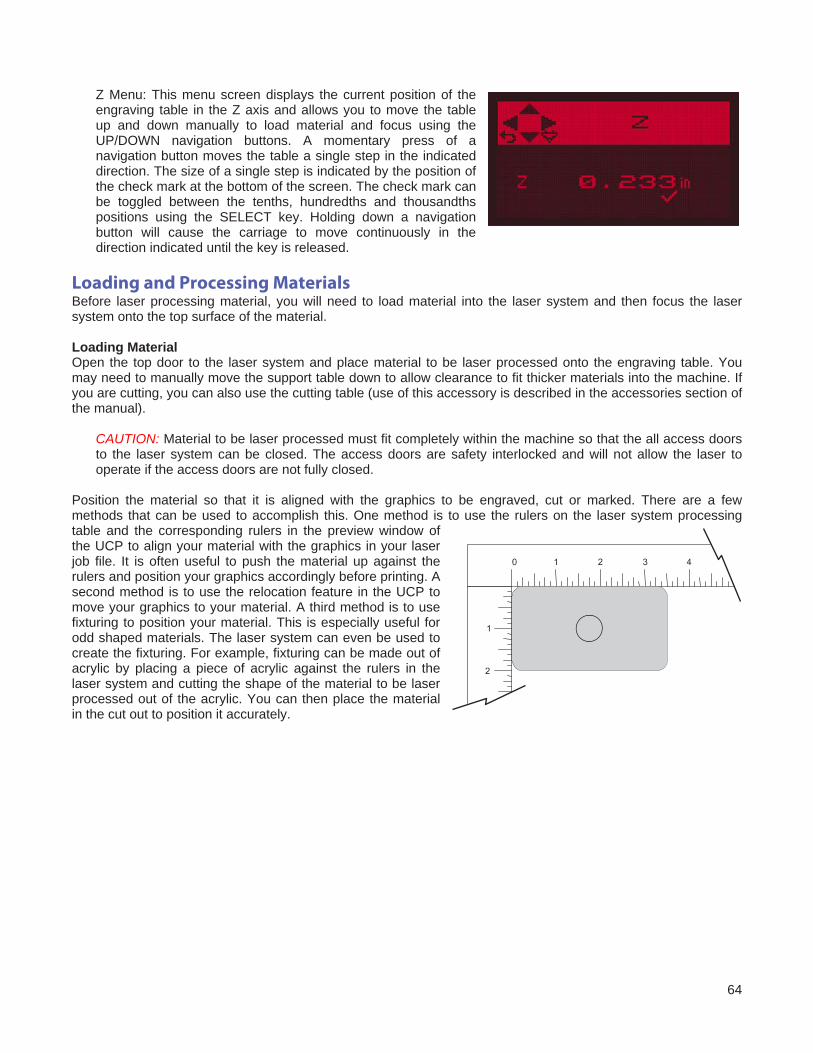
64
Z Menu: This menu screen displays the current position of the engraving table in the Z axis and allows you to move the table up and down manually to load material and focus using the UP/DOWN navigation buttons. A momentary press of a navigation button moves the table a single step in the indicated direction. The size of a single step is indicated by the position of the check mark at the bottom of the screen. The check mark can be toggled between the tenths, hundredths and thousandths positions using the SELECT key. Holding down a navigation button will cause the carriage to move continuously in the direction indicated until the key is released.
Loading and Processing Materials Before laser processing material, you will need to load material into the laser system and then focus the laser system onto the top surface of the material. Loading Material Open the top door to the laser system and place material to be laser processed onto the engraving table. You may need to manually move the support table down to allow clearance to fit thicker materials into the machine. If you are cutting, you can also use the cutting table (use of this accessory is described in the accessories section of the manual).
CAUTION: Material to be laser processed must fit completely within the machine so that the all access doors to the laser system can be closed. The access doors are safety interlocked and will not allow the laser to operate if the access doors are not fully closed.
Position the material so that it is aligned with the graphics to be engraved, cut or marked. There are a few methods that can be used to accomplish this. One method is to use the rulers on the laser system processing table and the corresponding rulers in the preview window of the UCP to align your material with the graphics in your laser job file. It is often useful to push the material up against the rulers and position your graphics accordingly before printing. A second method is to use the relocation feature in the UCP to move your graphics to your material. A third method is to use fixturing to position your material. This is especially useful for odd shaped materials. The laser system can even be used to create the fixturing. For example, fixturing can be made out of acrylic by placing a piece of acrylic against the rulers in the laser system and cutting the shape of the material to be laser processed out of the acrylic. You can then place the material in the cut out to position it accurately.
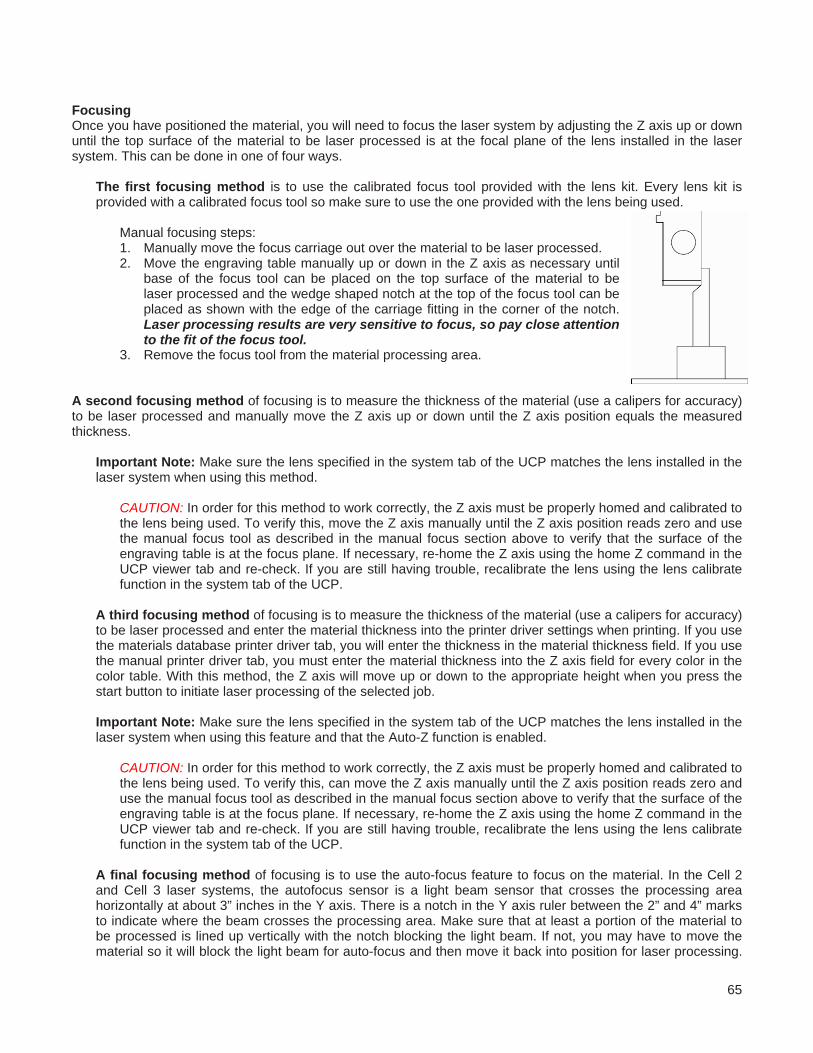
65
Focusing Once you have positioned the material, you will need to focus the laser system by adjusting the Z axis up or down until the top surface of the material to be laser processed is at the focal plane of the lens installed in the laser system. This can be done in one of four ways.
The first focusing method is to use the calibrated focus tool provided with the lens kit. Every lens kit is provided with a calibrated focus tool so make sure to use the one provided with the lens being used.
Manual focusing steps: 1. Manually move the focus carriage out over the material to be laser processed. 2. Move the engraving table manually up or down in the Z axis as necessary until
base of the focus tool can be placed on the top surface of the material to be laser processed and the wedge shaped notch at the top of the focus tool can be placed as shown with the edge of the carriage fitting in the corner of the notch. Laser processing results are very sensitive to focus, so pay close attention to the fit of the focus tool.
3. Remove the focus tool from the material processing area. A second focusing method of focusing is to measure the thickness of the material (use a calipers for accuracy) to be laser processed and manually move the Z axis up or down until the Z axis position equals the measured thickness.
Important Note: Make sure the lens specified in the system tab of the UCP matches the lens installed in the laser system when using this method.
CAUTION: In order for this method to work correctly, the Z axis must be properly homed and calibrated to the lens being used. To verify this, move the Z axis manually until the Z axis position reads zero and use the manual focus tool as described in the manual focus section above to verify that the surface of the engraving table is at the focus plane. If necessary, re-home the Z axis using the home Z command in the UCP viewer tab and re-check. If you are still having trouble, recalibrate the lens using the lens calibrate function in the system tab of the UCP.
A third focusing method of focusing is to measure the thickness of the material (use a calipers for accuracy) to be laser processed and enter the material thickness into the printer driver settings when printing. If you use the materials database printer driver tab, you will enter the thickness in the material thickness field. If you use the manual printer driver tab, you must enter the material thickness into the Z axis field for every color in the color table. With this method, the Z axis will move up or down to the appropriate height when you press the start button to initiate laser processing of the selected job. Important Note: Make sure the lens specified in the system tab of the UCP matches the lens installed in the laser system when using this feature and that the Auto-Z function is enabled.
CAUTION: In order for this method to work correctly, the Z axis must be properly homed and calibrated to the lens being used. To verify this, can move the Z axis manually until the Z axis position reads zero and use the manual focus tool as described in the manual focus section above to verify that the surface of the engraving table is at the focus plane. If necessary, re-home the Z axis using the home Z command in the UCP viewer tab and re-check. If you are still having trouble, recalibrate the lens using the lens calibrate function in the system tab of the UCP.
A final focusing method of focusing is to use the auto-focus feature to focus on the material. In the Cell 2 and Cell 3 laser systems, the autofocus sensor is a light beam sensor that crosses the processing area horizontally at about 3” inches in the Y axis. There is a notch in the Y axis ruler between the 2” and 4” marks to indicate where the beam crosses the processing area. Make sure that at least a portion of the material to be processed is lined up vertically with the notch blocking the light beam. If not, you may have to move the material so it will block the light beam for auto-focus and then move it back into position for laser processing.

66
Then press and hold the focus button on the control panel until the autofocus process initiates. When the Z axis stops moving the material is focused. Important Note: Make sure the lens specified in the system tab of the UCP matches the lens installed in the laser system when using this feature and that the Auto-Z function is enabled.
CAUTION: In order for this method to work correctly, the Z axis must be properly homed and calibrated to the lens being used. To verify this, move the Z axis manually until the Z axis position reads zero and use the manual focus tool as described in the manual focus section above to verify that the surface of the engraving table is at the focus plane. If necessary, re-home the Z axis using the home Z command in the UCP viewer tab and re-check. If you are still having trouble, recalibrate the lens using the lens calibrate function in the system tab of the UCP.
Initiating laser processing Once the material is placed and focused, you are ready to initiate laser processing of the selected laser job file. If you need to use air assist for the material to be processed, make sure you have an air assist cone or backsweep installed on the carriage and the air supply unit is properly connected (see the accessories section for details). Also ensure that your exhaust system is on and exhaust air is flowing through the machine. Then start the laser job by pressing the start button on the control panel or in the UCP.
CAUTION: Make sure proper exhaust flow is present in the laser system before initiating laser processing. If proper exhaust flow is not present, damage to optics and other laser system components can occur very quickly.
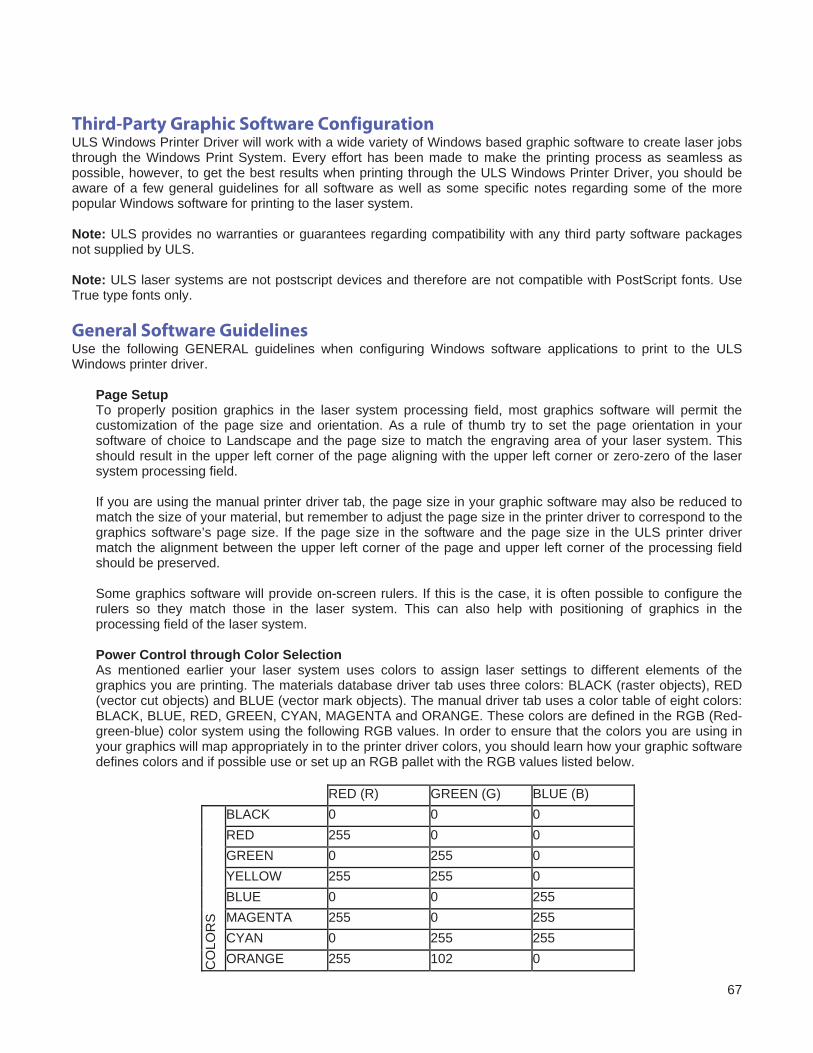
67
Third-Party Graphic Software Configuration ULS Windows Printer Driver will work with a wide variety of Windows based graphic software to create laser jobs through the Windows Print System. Every effort has been made to make the printing process as seamless as possible, however, to get the best results when printing through the ULS Windows Printer Driver, you should be aware of a few general guidelines for all software as well as some specific notes regarding some of the more popular Windows software for printing to the laser system. Note: ULS provides no warranties or guarantees regarding compatibility with any third party software packages not supplied by ULS. Note: ULS laser systems are not postscript devices and therefore are not compatible with PostScript fonts. Use True type fonts only. General Software Guidelines Use the following GENERAL guidelines when configuring Windows software applications to print to the ULS Windows printer driver.
Page Setup To properly position graphics in the laser system processing field, most graphics software will permit the customization of the page size and orientation. As a rule of thumb try to set the page orientation in your software of choice to Landscape and the page size to match the engraving area of your laser system. This should result in the upper left corner of the page aligning with the upper left corner or zero-zero of the laser system processing field. If you are using the manual printer driver tab, the page size in your graphic software may also be reduced to match the size of your material, but remember to adjust the page size in the printer driver to correspond to the graphics software’s page size. If the page size in the software and the page size in the ULS printer driver match the alignment between the upper left corner of the page and upper left corner of the processing field should be preserved. Some graphics software will provide on-screen rulers. If this is the case, it is often possible to configure the rulers so they match those in the laser system. This can also help with positioning of graphics in the processing field of the laser system. Power Control through Color Selection As mentioned earlier your laser system uses colors to assign laser settings to different elements of the graphics you are printing. The materials database driver tab uses three colors: BLACK (raster objects), RED (vector cut objects) and BLUE (vector mark objects). The manual driver tab uses a color table of eight colors: BLACK, BLUE, RED, GREEN, CYAN, MAGENTA and ORANGE. These colors are defined in the RGB (Red-green-blue) color system using the following RGB values. In order to ensure that the colors you are using in your graphics will map appropriately in to the printer driver colors, you should learn how your graphic software defines colors and if possible use or set up an RGB pallet with the RGB values listed below.
RED (R) GREEN (G) BLUE (B)
BLACK 0 0 0 RED 255 0 0 GREEN 0 255 0 YELLOW 255 255 0 BLUE 0 0 255 MAGENTA 255 0 255 CYAN 0 255 255
CO
LOR
S
ORANGE 255 102 0

68
Vector Output for Vector Cutting and Marking The printer driver distinguishes between raster objects (raster engraving) and vector objects (vector cutting and marking) by the types of elements contained in the graphic being printed. All graphics, other than outlines of very thin line widths will be interpreted as raster objects and the raster mode will be used for laser processing. Not all software is capable of printing vector output. If you want to create jobs for vector cutting, make sure your graphic software of choice allows creation of vector lines and that the line width can be 0.001” (0.0254 mm) or less. The printer driver will interpret these objects as vectors. Overlapping Raster Objects If the artwork created has raster objects that overlap, the driver will automatically filter out the portion of the object that is not visible so that only the visible part of the underlying filled area will be engraved to prevent the overlapped area from being engraved twice. This allows the color white to be used as an effective drawing tool. Since the laser system will not engrave the color white (this is the background color), it can be used to block out the undesired engraving areas of raster objects. However, you cannot use a white fill to cover a vector outline, the outline will vector cut even though you cannot see it on screen. Overlapping Vector Objects The driver does not filter vector objects that overlap each other. If you place one thin vector outline on top of another, both outlines will be cut by the laser system. This can be useful for making multiple cutting passes in one laser job for thicker materials. Bitmapped Scanned Images When printing raster objects such as photographs which are grayscale or color bitmaps, keep in mind that the printer driver uses a dither pattern filter screen to reduce the images to black and white (monochrome images) for laser processing using variable spacing between the dots to create the illusion of shades of gray. These dither patterns are relatively coarse so it is not necessary to use high resolution bitmaps. Grayscale or color photos should be reduced to 300 to 600 dpi for purposes of laser processing and scanned images should be scanned into the computer at 300 to 600 dpi. Postscript Images and Fonts The laser system is not a postscript device. This means that Postscript fills, Postscript textures and especially Postscript fonts are not compatible with the laser system and should be avoided. Font Troubles Occasionally you may have trouble printing certain fonts at certain sizes in some Windows applications. In these cases it is sometimes helpful to export the graphic to a bitmap format, such as jpeg, and re-import it into your software. This process forces the fonts to be converted to bitmap images.
Adobe Illustrator CS or CS2 Illustrator versions CS and CS2 do not properly support non square landscape pages. For this reason, in order to print effectively from these programs you must set up your page size as landscape and make the width and height both equal to the largest dimension of your laser system’s processing field. For example, if your processing field is 24” wide x 12” tall, make the page in Illustrator 24” x 24” landscape. You can then treat the upper left corner of the illustrator page as the zero-zero point in the laser system processing field and only use the upper half of the page in illustrator. Anything in the lower half of the page will not be printed. Also make sure you are using an RGB color palette and the vector line stroke width is set to .001” (.0254 mm) or less. Adobe Illustrator CS3 and higher Illustrator versions CS3 and higher treat landscape page sizes correctly, but make sure you select user defined page size at time of printing and make sure the page size in Illustrator matches the page size in the printer driver. Also make sure you are using an RGB color palette and the vector line stroke width is set to .001” (.0254 mm) or less.

69
AutoCAD and AutoCAD LT Note: AutoCAD version 2000 is not compatible with ULS laser systems. You must upgrade to version 2000i or higher.
Vector output Line widths for printing from AutoCAD products are controlled by plot styles. Make sure you set the first eight pens in the plot style you use to .001” (.0254 mm) or less in order to ensure vector objects are output. Placement of Graphics The easiest way to control placement of graphics in the processing field when using AutoCAD is to create a non-printing rectangle with a width and height equal to the processing field in your laser system. Then print using the Print Window feature and use the Pick Tool to pick the upper left and lower right corners of the rectangle as the Print Window. You can then treat the upper left corner of the rectangle as the zero-zero point in the processing field and lay out your graphics inside the rectangle as desired. Make sure you print with a 1:1 scale and make the plotter margins zero in the print setup screen. Also make sure plotter offsets are set to zero.
CorelDRAW (All versions) CorelDRAW products have a color matching feature which interferes with the proper mapping of colors in graphics being printed with colors in the printer driver. Make sure to turn color matching feature off when using CorelDraw. Solidworks When using 3D solid modeling software such as Solidworks, you must keep in mind that the laser system is a 2D device, so you must create a 2D drawing view of the object you want to laser process. You cannot print 3D parts and assemblies directly to the laser system. To control placement of your job on the processing table in the laser system, use a custom page size and make it the same size as your laser system’s material processing area. Make sure to remove any drawing templates and borders from the page or they will print also and be part of your laser job. Once your page size is set, match the material processing area in the laser system. Treat the upper left corner of the page as equivalent to the zero-zero point in the processing field of the laser system. Solidworks does not give you the ability to precisely position sketch elements on the page, so you can use the relocate feature in the UCP to more precisely position your job once you have printed them. Set the thickness for the thin line font in document properties to .001” (.0254 mm) or less to force thin lines to be output as vector objects. Then assign all line segments in the drawing view the thin line font and change colors as necessary to map to colors in the printer driver. If you are using the materials database, driver tab remember that all vector cut objects must be red and all vector mark objects blue. SPECIAL NOTE: If printing at image density 6, Solidworks will not print sketch entities assigned the color black as vector objects regardless of line thickness. Avoid the color black if you want a sketch element to print as a vector object at image density 6. At lower image densities this is not a problem.

70
Chapter 5 – Accessories

71
Manual Air Assist Manual Air Assist is employed with a backsweep or cone to control air flow onto the material during laser material processing. This feature also provides compressed air to the optics (mirrors and lenses) in the system reducing contamination. Air assists aids in removing smoke and debris from the laser processing area and directing it to the exhaust. It also helps reduce the heat affected zone in the material being processed and helps to prevent flame up when processing certain materials. Use of cone vs. backsweep is dependent on the application. The backsweep fitting is geared more toward engraving applications and the cone is geared more toward cutting applications.
NOTE: Air Assist can decrease frequency of cleaning for the optics but will not decrease the need for maintenance as a whole.
Air Supply Requirements Air Assist requires a compressed air source. ULS recommends the optional ULS Computer Controlled Compressed Air Unit which is designed specifically for ULS laser systems. If you choose to use a different source of compressed air, it must be capable of supplying 50-60 PSI (pounds per square inch) (3.4 -4.1 bar) at a constant rate of 2.5 CFM (cubic feet per minute) (4.25 cubic meters/hour). The air supply must be oil-free, moisture-free and particulate filtered.
CAUTION: A contaminated air supply can cause damage to the laser system. Air or gas supply pressures higher than 60 PSI (4.1 bar) can rupture the internal hoses. Damage to the laser system from improper air or gas supply is not covered under warranty.
Connections to the Manual Air Assist In the left rear part of the system you will find the flow adjustment valve (1), quick release fitting (2) and mating quick fitting (3) which accepts a ¼” NPT fitting.
Functions of the Manual Air Assist
From the Quick Release Fitting (1) on the back of the laser system, the compressed air source is directed to the optics protection path and also to the cone or backsweep. The optics protection path is a direct path from the air source (1) to the #2 mirror (4) and the #3 mirror (5). The cone/backsweep path goes through the flow adjustment valve (2) and then to the cone (3). The amount of air flowing through the cone is adjusted using the flow adjustment valve (2). The cone path protects the focus lens and provides a downward flow directly into the beam path at the focus point of the laser beam.

72
The Manual Air Assist also has a built in pressure sensors that will detect insufficient supply pressure and will stop laser processing. An error message, “The air pressure is low or unstable” will appear on the computer monitor, indicating that there is a problem with your supply of compressed air. Air Flow Setting Guidelines As a rule of thumb the flow rate should be set as low as possible for the application especially when using gas, start with low flow and adjust upward until the desired result such as suppression of flame up.
Maintenance The components of the Manual Air Assist are maintenance free. However, use of air assist may cause the interior of the laser system to become dirty faster. Keep you laser system clean for best performance.
Computer Controlled Air Assist Computer Controlled Air Assist is employed with a backsweep or cone to control air or gas flow onto the material during laser material processing. This feature also provides compressed air to the optics (mirrors and lenses) in the system reducing contamination. Air/Gas assist aids in removing smoke and debris from the laser processing area and directing it to the exhaust. It also helps reduce the heat affected zone in the material being processed and helps to prevent flame up when processing certain materials. Use of this system requires a supply of 60 PSI max (4.1 bar), clean, dry oil free compressed air or gas. Air can be provided by the optional ULS Computer Controlled Compressed Air Unit. Gas such as nitrogen or carbon dioxide can be supplied from pressurized gas tanks (with pressure regulator to keep pressure at 60 PSI max [4.1 bar]) which can be procured from local industrial gas vendors. Use of cone vs. backsweep is dependent on the application. The backsweep fitting is geared more toward engraving applications and the cone is geared more toward cutting applications. The computer Controlled Air assist uses solenoids to control the air flow automatically as a laser job is processed. Use of air assist is programmed through the printer driver when a laser job is created. Air or gas can be selected independently for raster, vector marking and vector cutting using the materials database tab of the printer driver and can be selected independently per color in the color table using the manual printer driver tab. Flow rate can be selected in 25% increments.
CAUTION: Do not use flammable or corrosive gases as this can result in injury or fire.
NOTE: Air Assist can decrease frequency of cleaning for the optics but will not decrease the need for maintenance as a whole.
Air Supply Requirements Air Assist requires a compressed air source. ULS recommends the optional ULS Computer Controlled Compressed Air Unit which is designed specifically for ULS laser systems. If you choose to use a different source of compressed air, it must be capable of supplying 50-60 PSI (pounds per square inch) (3.4 -4.1 bar) at a constant rate of 2.5 CFM (cubic feet per minute) (4.25 cubic meters/hour). The air supply must be oil-free, moisture-free and particulate filtered.
CAUTION: A contaminated air supply can cause damage to the laser system. Air or gas supply pressures higher than 60 PSI (4.1 bar) can rupture the internal hoses. Damage to the laser system from improper air or gas supply is not covered under warranty.
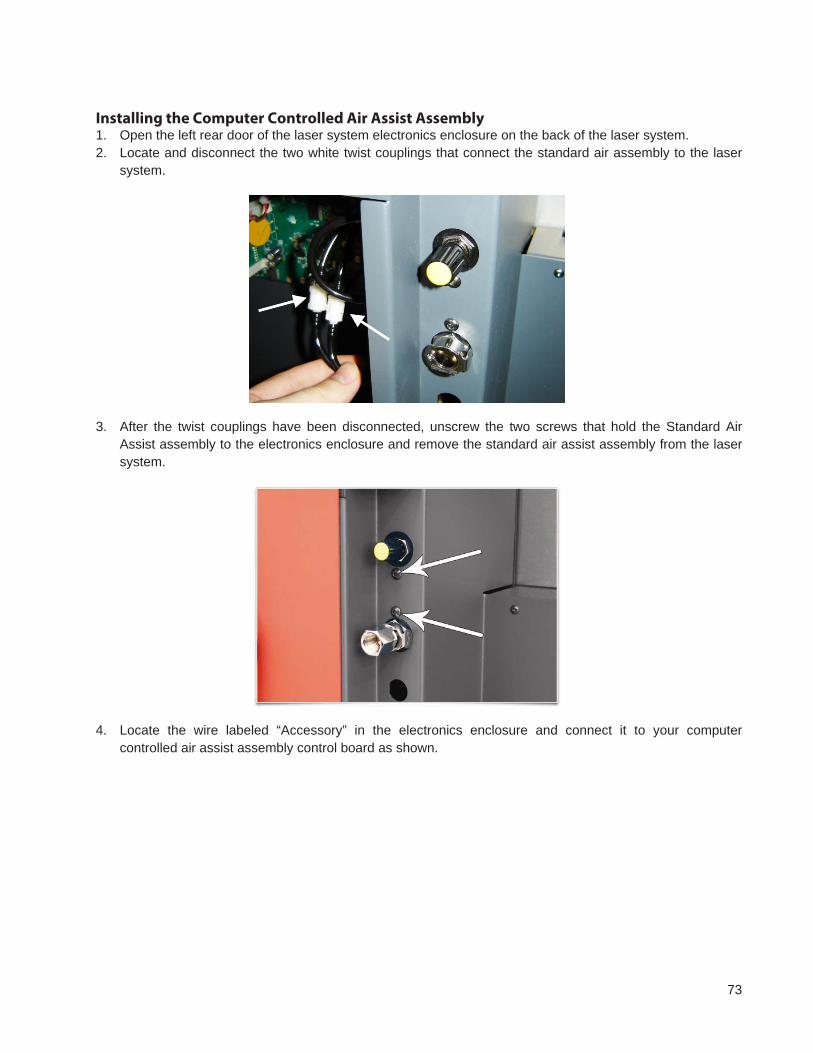
73
Installing the Computer Controlled Air Assist Assembly 1. Open the left rear door of the laser system electronics enclosure on the back of the laser system. 2. Locate and disconnect the two white twist couplings that connect the standard air assembly to the laser
system.
3. After the twist couplings have been disconnected, unscrew the two screws that hold the Standard Air Assist assembly to the electronics enclosure and remove the standard air assist assembly from the laser system.
4. Locate the wire labeled “Accessory” in the electronics enclosure and connect it to your computer controlled air assist assembly control board as shown.
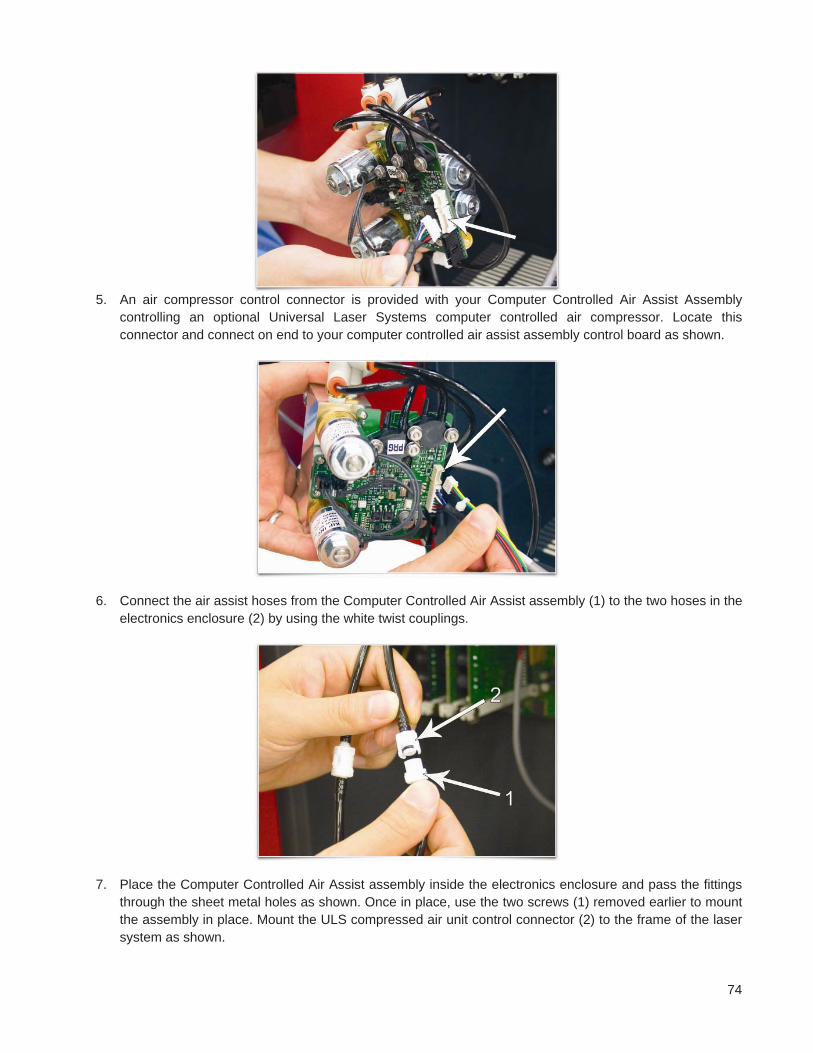
74
5. An air compressor control connector is provided with your Computer Controlled Air Assist Assembly
controlling an optional Universal Laser Systems computer controlled air compressor. Locate this connector and connect on end to your computer controlled air assist assembly control board as shown.
6. Connect the air assist hoses from the Computer Controlled Air Assist assembly (1) to the two hoses in the electronics enclosure (2) by using the white twist couplings.
7. Place the Computer Controlled Air Assist assembly inside the electronics enclosure and pass the fittings through the sheet metal holes as shown. Once in place, use the two screws (1) removed earlier to mount the assembly in place. Mount the ULS compressed air unit control connector (2) to the frame of the laser system as shown.

75
Connections to the Computer Controlled Air Assist • Compressed Air from the air supply unit or other source of
clean oil and moisture free compressed air connects to the fitting labeled “air in” (1). The quick fitting used to connect the gas supply accepts a ¼ NPT fitting.
• Gas supply is connected to the fitting labeled “gas in” (2). The quick fitting used to connect the gas supply accepts a ¼ NPT fitting.
• The control cable for the optional ULS Computer Controlled Compressed Air Unit is attached to the connector labeled compressor (3).
Functions of the Computer Controlled Air Assist
The Computer Controlled Air Assist Unit (1) (represented by the dotted lines) directs the compressed air source to the optics protection path and also to the cone or backsweep. The optics protection path is a direct path from the entry point of the compressed air source (2) to the #2 mirror (3) and #3 mirror (4). The air supply for the cone or backsweep comes from either the AIR valve (5) or the GAS valve (6), then travels through a flow control device (7) which adjusts its flow in increments of 25%, 50%, 75% or 100% and finally to the cone or backsweep. The flow control device (7) can be adjusted through the printer driver settings. The cone path protects the focus lens (8) and provides a downward flow directly into the beam path at the focus point of the laser beam. You choose which source (Gas or Air) (5 or 6) to use through the printer drivers’ settings. If you choose to use a gas to supply the cone, the supply must go through the GAS coupling (9).
As the diagram indicates, the optics protection path is not regulated nor solenoid valve controlled. So when compressed air is flowing to the laser system air will always flow to the optics to reduce contamination. When the optional ULS Computer Controlled Compressed Air Unit is in auto mode and you press the “Start” button on the laser system, the Air Assist control box will turn ON the ULS Computer Controlled Compressed Air Unit and will keep the Air supply unit ON until the file completes.

76
The Computer Controlled Air Assist Unit also has built in pressure sensors that will detect insufficient supply pressure and will stop laser processing. An error message, “The air pressure is low or unstable” will appear on the computer monitor, indicating that there is a problem with your supply of air or gas. Air Flow Setting Guidelines As a rule of thumb the flow rate should be set as low as possible for the application especially when using gas, start with low flow and adjust upward until the desired result such as suppression of flame up. Maintenance The components of the computer controlled air assist are maintenance free. However, use of air assist may cause the interior of the laser system to become dirty faster. Keep you laser system clean for best performance.
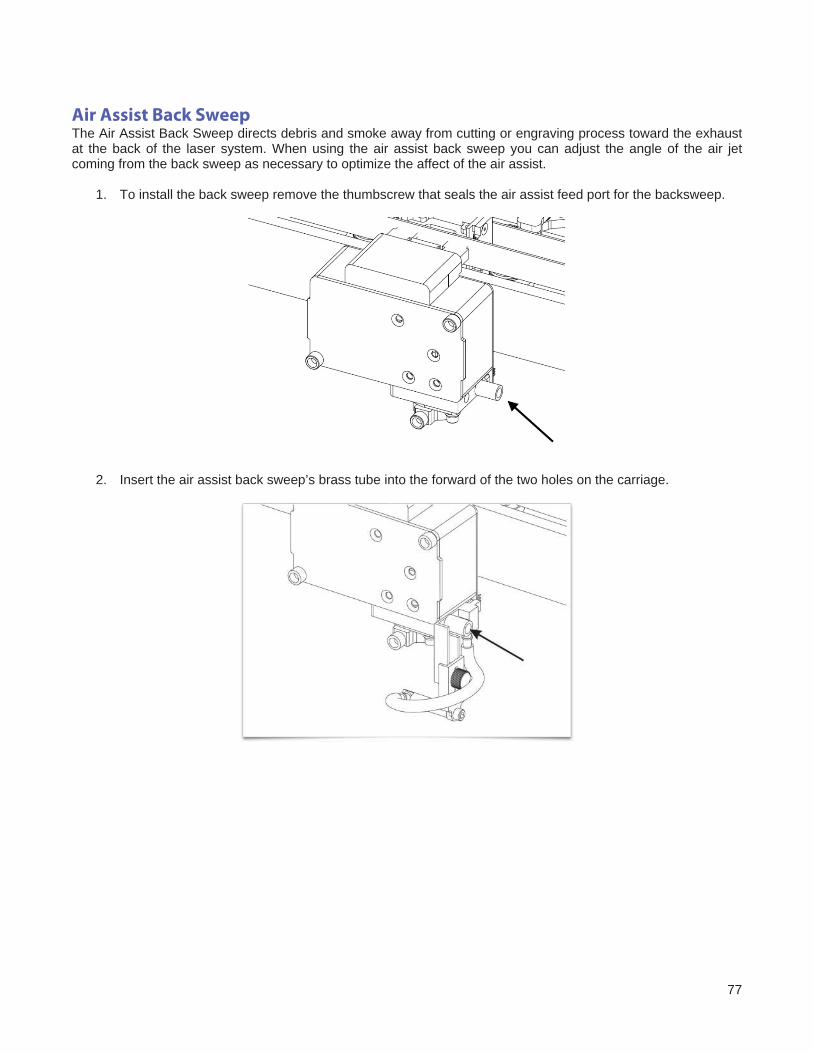
77
Air Assist Back Sweep The Air Assist Back Sweep directs debris and smoke away from cutting or engraving process toward the exhaust at the back of the laser system. When using the air assist back sweep you can adjust the angle of the air jet coming from the back sweep as necessary to optimize the affect of the air assist.
1. To install the back sweep remove the thumbscrew that seals the air assist feed port for the backsweep.
2. Insert the air assist back sweep’s brass tube into the forward of the two holes on the carriage.

78
1. Use the thumbscrew removed earlier to hold the air assist back sweep in place. Adjust the air assist back
sweep’s height by loosening the thumbscrew and adjusting it up or down. Tighten the thumbscrew once it is at the correct height. To adjust the angle of the air flow, turn the screw in small increments to direct the air jet to the desired position over the material. A convenient way to align the air flow is to focus on the material to be processed and then align the nozzle using the angle and height adjustments toward the red target laser which is on when the laser system is powered on and the top door is open.
Note: If you remove the backsweep always remember to reattach the mounting thumbscrew (1) to seal the air feed port.
Air Assist Cone To install the cone, insert the cone (1) into the cone base completely until it bottoms out. Tighten the screw on the side of the cone base (2) until it is snug. To remove the cone, simply loosen the screw (2) and pull the cone straight down. Do not remove or loosen the cone base mounting screws (3) & (4) to mount or dismount the cone. These screws keep the cone base aligned with the laser beam. If the cone becomes misaligned with the beam portions of the laser beam will be clipped causing a loss of laser power to the material. If this occurs follow instructions below to realign the cone.
CAUTION: Do not install the cone unless you plan on using Air Assist and never use the Air Assist Cone without proper airflow. Leaving the cone attached to the cone base and running the laser system without airflow will cause smoke from laser processing to be drawn up into the cone and rapidly damage the focus lens. Also remember to make sure the back sweep mounting screw is installed in the air feed hole for the back sweep when using the cone so air does not escape out the back sweep air feed port.

79
Cone Alignment Check and Adjust 1. Power the laser system ON and start the UCP. 2. Open the top door. 3. Position the focus carriage in the middle of the field. 4. Place a piece of paper (1) underneath the cone and observe the position of
the red beam (2) in relation to the center of the bottom of the cone (3). 5. If the red beam is not centered, first make sure the cone is seated correctly,
then if necessary, slightly (1/4 turn) loosen the mounting screws for the cone base and adjust the base (5) until the red diode laser comes out of the center of the cone opening.
6. Tighten the base mounting screws (4) gently and re-check the cone’s alignment.
Air Supply Unit The Air Supply Unit provides a 60 PSI @ 2.5 cfm (4.1 bar @ 4.25 cubic meters/hour) source of clean, dry, oil free compressed air for air assisted laser material processing in conjunction with the computer controlled air assist feature of the laser system. It contains a sound insulated air compressor, water dryer (refrigerated dryer) and particulate filter. It must be used in conjunction with either the Air Assist Cone or Air Assist Back Sweep accessory.
Installation 1. Make sure the laser system is turned off. 2. Plug one end of a blue coiled hose into the compressor outlet fitting and the other end into the Air inlet
fitting in refrigerated dryer unit. 3. Plug one end of a second blue coiled hose into the outlet of the refrigerated dryer unit and the other end
into the laser system air inlet. 4. Plug the one end of the control cable into the control connector on the compressor and plug the other end
into the compressor control connector on the back of the machine. 5. Plug the compressor and refrigerated dryer into a wall outlet. Please check the rating on your air
compressor and refrigerated dryer for the power requirements. 6. The compressor has a three way switch: ON, OFF and AUTO. On will leave the compressor on all the
time. The AUTO position allows the compressor to be controlled by the laser system. In AUTO mode if you have selected the Air or Gas setting in the printer driver, the Air Compressor will automatically turn ON when the a laser job is running and OFF when the job is complete.

80
Maintenance The particle filter should be inspected every 8 to 16 hours of use. Clean out the filter and change the desiccant as necessary. The filter can be inspected by unscrewing the lower bell shaped portion of the filter housing (1/8 turn) and removing the red foam filter found inside. If it needs cleaning wash it in water, dry it thoroughly and reassemble. Cutting Table The cutting table is used to support material when cutting so that exhaust flow can be redirects both above and below the material for clean cuts. Without it smoke and debris can build up underneath the material and causing the surface of the material to be damaged. The cutting table also helps to reduce damage to the surface of the material from laser back reflection which can occur when the laser reflects off of the table supporting the material if you attempt to cut without the cutting table. The cutting table is installed directly on top of the engraving table.
Installation 1. Turn on your laser system. 2. Lower the table to the bottom of its travel. 3. Remove the strip(s) from the exhaust plenums with a screw driver.

81
4. Before installing the cutting table in the laser system, loosen the screws on the side of the cutting table that allow adjustment of the duct in the back of the cutting table just enough to allow the manifold to slide in and out. Extend the adjustable manifold out as far as it can go.
5. Open the front door of the laser system and carefully insert the cutting table into the laser system, so that the so that the four feet on the bottom of the cutting table are resting on the engraving table in the laser system. Then slide the table back and to the left until the two rear feet are up against the X axis ruler and the left rear foot is up against the Y axis ruler. The feet of the cutting table must be aligned properly with the X and Y rulers in the laser system in order to ensure that the rulers on the cutting table line up with the processing field.
6. Make sure the adjustable manifold is squarely up against the exhaust plenum in the back of the machine to ensure good exhaust flow below the material and tighten the four screws on the side of the cutting table. Be careful not to move the cutting table while tightening the screws.
7. You can use the red pointer diode to ensure the cutting table is aligned to the processing field, by moving the red pointer around the edge of the field using the manual motion keys. If the cutting table is not aligned, check that the feet are properly pressed against the X Y rulers in the machine. If the feet are properly positioned and the rulers are still not aligned you can adjust them by loosening their mounting screws slightly (you may have to remove the cutting table to do this. Adjust the rulers and then retighten the screws.
Cutting Table Focus Lens Calibration
CAUTION: To properly use the cutting table with the autofocus feature or the auto Z feature in the printer driver, the cutting table must be calibrated to the lens you are using. This is done at the factory when the machine ships. You can check calibration by using the manual focus tool to focus on the surface of the cutting table. Make sure to use the manual focus tool included with the lens installed in the laser system and that the lens selected in the system tab matches the lens installed in the laser system. Once focused, the Z position indicated in the UCP should be 0” +/-.020” (.508 mm). However, if you ever have to recalibrate, there is a calibrate feature in the system tab of the UCP which will walk you through the process.

82
Maintenance As you use the cutting table material from the cutting process may fall through the honeycomb surface and collect in the bottom of the cutting table. Periodically check this area and remove any material that has collected there.
Caution: This scrap material if left to build up in the bottom of the cutting table can be a fire hazard. The honeycomb material that makes up the support surface for materials being cut will wear out over time and can easily be replaced. New honeycomb can be purchased from the Customer Service Team at ULS. To replace the material remove the rulers and flanges that hold the honeycomb in place around its edges. Remove the old honeycomb and replace it with a new one. Reinstall the edge flanges and rulers. Rulers should be installed slightly loose and then adjusted to match the edges of the processing area by placing the cutting table back into the machine and following step 7 of the installation instructions above. HPDFO High Power Density Focusing Optics (HPDFO) has a smaller focal spot size than a standard 2.0” inch lens. Depending on the type of material being processed the effective spot size produced by the HPDFO can be as small as 1/4th the size of a standard 2.0” focusing lens. With a smaller spot size (higher power density) depending on your material, you can engrave smaller text, produce sharper graphics and photographs and vector mark and cut thinner lines with the same laser power. With the HPDFO it is also possible to scribe and/or etch some uncoated metals, such as stainless steel, directly without the assistance of chemicals or coatings. The HPDFO replaces the standard lens kit in the carriage and comes with its own calibrated focal tool which should always be used when focusing with the HPDFO.
Installation 1. Turn off the laser system. 2. Bring the X-Arm forward by hand. 3. Remove the three thumbscrews that hold the lens kit in place and slide the lens kit out. 4. Replace the standard lens kit with the HPDFO lens kit. 5. Before running a file, select HPDFO from the lens size list on the UCP’s System Tab.
Lens Kits There are four Focus Lens Kits available for your laser system; 2.0 and 3.0, along with the High Power Density Focusing Optics (HPDFO). Included with each kit is its own calibrated focal tool. Different lenses produce different spot sizes and have different focal ranges. For example, the HPDFO lens produces a spot size of 0.002” (0.05 mm) and has an effective focal range of +/- 0.050” (1.25 mm). This lens can engrave very fine detail, but can only be used on very flat materials. On the opposite end of the spectrum, the 3.0 lens has a spot size of 0.010” (0.25 mm), but has an effective focal range of +/- 0.150” (3.81 mm) making it much less sensitive to flatness of material and accuracy of focus, but with the trade off of a larger spot size. Contact Universal Laser Systems customer support for help in choosing the right lens for your application.

83
Automation Kit The Automation Kit provides six inputs to initiate various laser system functions using signals from external devices such as PLC’s and provides two outputs for polling laser system status. The automation kit is automatically detected upon power-up, and is configured from the System Tab in the UCP. If the automation kit is not present, the controls for the automation kit on the systems tab of the UCP will not be visible.
CAUTION: ULS does not authorize or support third party safety devices via the Automation Kit. Outputs are intended to be used for informational purposes such as to indicate error conditions; they are not intended to drive external devices. Installation 1. Insure AC power is off to engraver and any accessories such as the compressor. 2. Mount the Automation board inside the CPU cabinet with the four screws provided.
CPU Cabinet where automation kit is to be installed

84
Mounting of automation kit with 4 screws
3. If the Standard Air Assist is installed, connect Automation Kit J1 to the CPU J1 “Accessory” cable. You will not need to use the included cable.
With Standard Air Assist: Connect Automation Kit J1 to CPU J1 “Accessory” Cable

85
4. If the Computer Controlled Air Assist is installed: The CPU J1 “Accessory” cable is already connected to the Computer Controlled Air Assist J1 “Controller”. Use the included cable to connect Automation Kit J1 to Computer Controlled Air Assist J6 “USER I/O”.
With Computer Controlled Air Assist: Connect Automation Kit J1 to Computer Controlled Air Assist J6 “USER I/O”
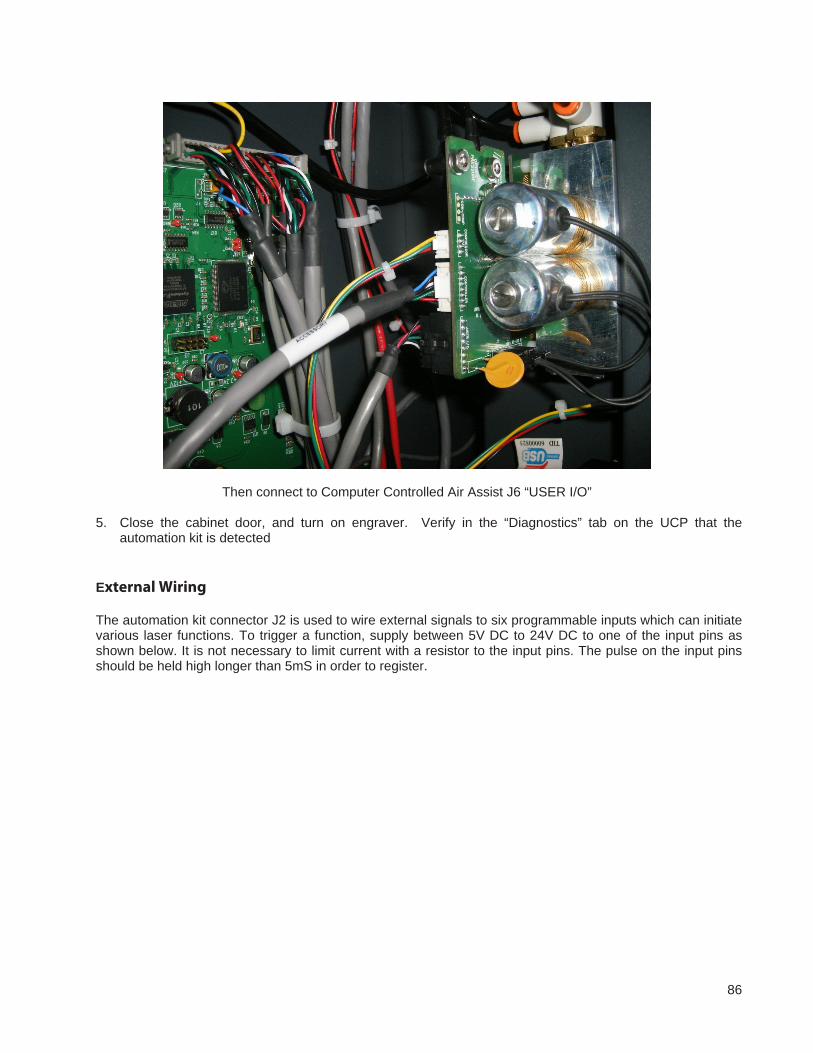
86
Then connect to Computer Controlled Air Assist J6 “USER I/O”
5. Close the cabinet door, and turn on engraver. Verify in the “Diagnostics” tab on the UCP that the automation kit is detected
External Wiring
The automation kit connector J2 is used to wire external signals to six programmable inputs which can initiate various laser functions. To trigger a function, supply between 5V DC to 24V DC to one of the input pins as shown below. It is not necessary to limit current with a resistor to the input pins. The pulse on the input pins should be held high longer than 5mS in order to register.

87
Automation Kit I/O Connections
The automation kit connector J6 is used to poll the two programmable status outputs. It can be used in two modes, selectable by the “PNP/NPN” switch on the top of the board. LED 5 indicates the position of this switch, lighting up green for PNP, or red for NPN mode. Two example diagrams are shown below to indicate the difference between the modes. PNP (also known by the name “open-collector”) mode is recommended is most cases. In both modes, the user must supply correct value resistors to limit the current to 25mA or less. The voltage used should not exceed 32V DC.

88
Example Connection for PNP mode
Example Connection for NPN mode

89
Available Automation Port Functions Input and output events are configured in the systems tab of the UCP. The controls for automation Port setup will only be visible if the automation board is plugged in and working properly. You can configure the input functions to perform the following actions: Start Job, Pause Job, Resume Job, Select Previous Job, Select Next Job, Initiate Autofocus, Display a Message, Z height, and Quit the UCP application. A delay can be programmed before each action occurs and messages can be assigned to each action. You can configure the Output Ports via the Output Events menu to supply information about the completion and abortion of jobs. Jobs are aborted when any error or a pause occurs. The output ports will change state when the event assigned to them occurs. Automation Port Configuration Example There are many ways to employee the automation port functions. In this example, we will use two functions- “start job” and “pause job”-to illustrate the Automation feature.
1. Verify that the Automation board is installed. 2. Wire signals from your control system to J2-1 and J2-2 3. and the return wires for each signal to J2-4 as indicated
in the schematics. 4. Turn on your computer and CELL 2laser system. 5. Send a job to the CELL 2 as you normally would. 6. Proceed to the UCP’s System Tab. 7. For Input Function 1, set it to Start Job and add a 5
second delay. 8. For Input Function 2, set it to Pause Job and add a 5
second delay. 9. Select Disabled for the remaining functions not being used. 10. Using your control system, activate the signal to function 1 to start the job you downloaded. The job
should start running. 11. Then using your control system, activate the signal to function 2 to pause the job. The job should pause.
Setting up messages to accompany input functions The MESSAGE button allows the user to input a custom message that appears when a function is initiated after a programmable delay. The message can also include a “Proceed” or “Cancel” button which the user would have to select before the action took place. For example, you can add a message to the Start Job command “Is the material loaded in the laser system?” and the message box can be set to display two buttons-“OK” or “CANCEL”- which the user would have to press before the job would is initiated.

90
CLASS 4 Module This device bypasses the safety interlocks on the side doors of the CELL 4 laser system, allowing you to have both side doors open for engraving and cutting. This accessory is useful for engraving or cutting large pieces of material that do not normally fit the engraving table area. Keep in mind that with this optional device in place, it is possible for the intense invisible laser radiation produced by the CO2 laser, normally contained inside the enclosure, to be reflected out one of the open side doors. This creates the potential to expose the operator and others to dangerous levels of laser radiation which can easily damage skin and eyes. Because of this potential for exposure, use of this device redefines the safety classification of the CELL 4 laser system from Class 1, which is considered safe for use under all conditions set by law, to Class 4 which is considered potentially hazardous. You must create a safe environment for operation of a class 4 device before installing this option by following the safety precautions outlined in the safety section of this manual.
CAUTION: Use of the Class 4 module makes the CELL 4 a class 4 laser device and creates laser safety hazards. You must follow the safety precautions outlined in the safety section of this manual. You must make sure you have adequate ventilation so that fumes do not escape through the side doors of the laser system. Pre-installation Before installing the class 4 module you must create a safe environment in which to operate your CELL 4 laser system in Class 4 mode. In order to create a safe environment you must follow all local laws and regulations as well as OSHA guidelines for safe use of Class 4 lasers in the work place. It is recommended that you consult an expert on laser safety if you are not sure how to create a safe environment for using a Class 4 laser system. At minimum, you should block off an area or create a room with walls that will block any stray laser radiation and place the appropriate illuminated “Laser In Use” signs at entrance to this area. Anyone inside this area when operating in Class 4 mode should wear laser safety glasses certified for use with carbon dioxide lasers producing 10.6 micron laser radiation at up to 200 watts. Installation of external interlocks A connection is provided on back of the laser system in the left side of the electronics enclosure for connecting external interlock switches. This connector allows you to interlock the entrance to the area in which the CELL 4 will operate in Class 4 mode. The external interlock circuit is a self-powered circuit at 12 volts that can be attached to two or more switches (not provided) for attaching to one or more doors. Switches should be rated for at least 12 volts and 200 milliamps. Switches should be installed as follows:

91
1. Wire external interlock switches (not provided) in series, route wiring from all external switches to the
back of the laser system and feed the wiring through the 1” (25.4 mm) round hole in the bottom of the left side of the electronics enclosure. This hole is designed to accept standard ¾” (19 mm) electrical conduit fittings (not provided).
2.
3. Remove the jumper loop connecting pins 1 and 2 of the connector marked J8 (external interlock) on the automation board.
4.
5. Attach external switches to pins 1 and 2 of J8 (external interlock) on the laser system automation board.
92
Installation of the Class 4 module
1. Make sure your laser system is turned off. 2. Open the right and left side doors. 3. Mount the Class 4 module with the screws (1) into the upper lip of the opening for the right side door.
4. Install the Class 4 Shutter onto the back wall of the engraving area inside the laser system over the top of the collimator where the laser beam enters the work area (1).

93
5. Connect the communications cable (1) provided with the Class 4 Module between the mating connector
on the underside of the Class 4 Module (2) and the mating connector on the underside of the control panel (3).
6. Locate the shutter control cable tucked inside the laser system near the underside of the control panel and plug it into the mating connector on the underside of the Class 4 module.
7. Locate the other end of the shutter cable (1) tucked inside the laser system, near the back of the left side door opening. Plug it into the mating connector (2) on the shutter.

94
Description of Controls The Class 4 Module controls consist of a Key switch, an emission indicator and a shutter switch. Operation of these controls is described below:
• Key switch – The key switch activates the lasers in the CELL 4. It has three positions: OFF, ON and START. OFF deactivates the lasers and in this position the key switch can be removed to prevent unauthorized use of the laser system in Class 4 mode. In order to activate the lasers, you must turn the key switch momentarily to the START position until the emission indicator lights up, then return the key switch to the ON position to maintain activation of the lasers.
• Emission Indicator – The emission indicator illuminates to indicate that the laser(s) are activated and capable of emitting laser radiation. If the key switch is turned to the OFF position or the external interlocks circuit is broken, such as when someone enters the area where the laser is being used in class 4 mode through an interlocked door, the emission indicator will turn off. You will need to re-activate the laser(s) by turning the key switch momentarily to the START position. There is a five-second delay when the emission indicator first lights up before the lasers are actually activated.
• Shutter Switch – The shutter switch closes and opens the shutter that blocks the laser beams and prevents them from entering the engraving area. Before starting a laser job, make sure the shutter is in the open position. The shutter can be closed when necessary to block the beam for safety.
Operation of the Class 4 Module
Caution: Remember to wear appropriate laser safe eyewear when operating a laser system in class 4 mode.
1. Turn your laser system on, make sure the UCP is running on the computer the laser system is attached to and wait for the system to connect and home.
2. Once the laser system is homed and ready to run laser jobs, take the following steps to enable the laser in class 4 mode (side doors open):
a. Make sure the front door, top door and rear laser cover are closed. b. If you have external interlocks attached to the laser system for room doors or such, make sure
those doors are closed. c. Turn the key switch on the Class 4 module to the ON position. d. Momentarily turn the key switch to the START position until the emission light is on. If the
emission light does not come on, check your external interlocked circuit. Keep in mind that there is a five-second delay after the emission light is illuminated before the laser is enabled.
e. Make sure the shutter switch is in the open position. f. If everything is working properly, the interlock indicator light on the control panel of the laser
system should be off. If this light is still blinking, then check that the shutter switch is open, the key switch is on and the emission indicator is illuminated.

95
Rotary Fixture The Rotary Fixture allows the laser system to engrave and mark on cylindrical objects. The Rotary fixture is equipped with an external cone shaped fixture mounted to the fixed, motorized end and an internal cone shaped fixture attached to the adjustable end allowing the fixture to hold a variety of objects such as wine glasses, mugs, cups, etc. Additional internal and external cone fixtures can be purchased by contacting the ULS Customer Service Team at 480-609-0297 (USA), +43 1 402 22 50 (Austria), +81 (45) 224-2270 (Japan) or e-mail us at [email protected].
Installation 1. Lower the laser system material support table enough to install the rotary fixture. Make sure the motion
system will clear the top of the rotary fixture. 2. Now turn the laser system OFF. 3. Place the rotary fixture support bracket (1) on the table positioned over the mounting holes on the right
side of the table. Install the provided thumbscrews, but leave the thumbscrews loose enough to allow adjustment of the rotary fixture.
4. Place the Rotary Fixture on top of the bracket so that its pivot bolts sit in the forks in the mounting bracket. Adjust the rotary fixture so that the center of the rotary lines up with the 10 inch mark (5) on the Y ruler, then tighten down the thumbscrews (6).

96
5. With the power to the system still OFF, connect the rotary fixture control cable to the receptacle on the laser system (7).
Loading Material Before loading material into the fixture, measure the diameter (1) of the material in the area where the engraving or marking is to be located, by using a caliper or similar measuring device. A wine glass is used for illustrative purposes here.
1. Place the open end of the material (4) on the fixed end of the rotary fixture. Lift the lever (2) on the adjustable end of the fixture and slide it up against the base of the material so the material rests firmly centered inside of the inverted cone. Push the adjustable end of the fixture (3) to the right firmly against the bottom of the material. Lower the lever on the end of the fixture to lock the material in place. The rubber pads should keep the material from slipping.
Note: If the material does not have an open end you can purchase an additional internal cone fixture to hold the material. If the material has two open ends you can purchase an additional external cone fixture to hold the material. To change out fixtures, loosen the setscrew that holds the fixture to the rotary shaft, remove the un-needed fixture and replace with the new fixture.
2. Note: If engraving a tapered object (1), the Rotary Fixture can be tilted to maintain proper focus on the tapered surface. To do this, lift the left end of the fixture and place a spacer (2) underneath. Slide the spacer left and right until the tapered surface of the object is parallel (3) to the material support table. Make sure all parts of the rotary fixture clear the motion system.
97
3. Power ON the laser system. If you are using the rotary for the first time or replaced the laser system’s CPU, rotary calibration may be needed, so proceed to the next step. If rotary calibration is not needed proceed to “Determining Graphic Placement.”
Rotary Calibration 1. Select the System Tab of the UCP and press on the CALIBRATE button in the Rotary section. 2. In the Y Position box, use the Y-Axis buttons shown to move the focus carriage so that the Y axis position
indicated is aligned with the rotational axis of the rotary fixture. In the installation section above it was recommended that you align the rotary axis with the 10” (254 mm) position on the Y rule. If you did this you can set the Y axis position to 10”.
3. Next, use the X-Axis buttons shown to move the focus carriage left or right and place the red dot pointer over the flat part of the internal cone shaped fixture normally located on the left hand side of the rotary.
4. Now use the Z-Axis buttons in the rotary calibration dialog or the Z-Axis buttons on the machine keypad to move the table up and down to focus using the Focus Tool on top of the flat surface of the internal cone shaped fixture.

98
5. After focusing, press both SAVE buttons on the Rotary Calibration dialog. If asked to overwrite an existing position, accept the new value by pressing YES.
6. Once complete, press the CLOSE button and the focus carriage will re-home. 7. Calibration is now complete.

99
Determining Graphic Placement The next step is to align the graphics to be printed with the material inserted in the rotary fixture. Again, a wine glass is used for illustration. You can use the X axis ruler or to be more precise use the Red alignment Laser and the X-Y coordinate display in the UCP to position the graphics in the X axis.
1. Using the Navigation buttons on the UPC, position the Focus Carriage above the material. 2. Move the carriage left or right until the center of the carriage or the red alignment laser is located where
you would like the top of the graphic to start on the material as indicated by the right most line in the picture below. Make note of the X coordinate on the ruler or in the UCP.
3. Now, position the center of the carriage or the red alignment laser is located where you would like the graphic to end on the material as indicated by the left most line in the picture below. Make note of the X coordinate on the ruler or in the UCP.
4. Finally rotate the material by hand until the position you want to be the center of your graphic is facing directly up. Keep in mind that the rotary fixture does not have a home location in the rotational axis so the top most part of the material (the part facing straight up) is always the center of the graphic when printing using the materials driver tab or the center of the page when printing using the manual driver tab.
Printer Driver Settings (manual driver tab) 1. Start the graphic software you plan to print the job from and open or create the artwork you plan to print to
the laser system then open the print setup dialog in your graphic software, make sure your ULS laser system printer driver is selected and open printer properties dialog.
2. In the ULS printer driver properties dialog, press the Engraving Field sub-tab within the Manual Control Tab.
3. Press the “Max Size” button to make sure the field is maximized before continuing. 4. Then select the “Enable” selection box in the Rotary section to enable rotary mode. 5. Type in the diameter of the material measured earlier. 6. Notice that while typing in the diameter, the height dimension of the engraving field changes
automatically. The new height value is equal to the circumference of the material. Make a note of this new engraving field size.

100
7. Once you have the new engraving field size, exit the printer driver properties dialog. 8. In your graphics software change the page size to equal the new engraving field size from the printer
driver dialog. 9. This new vertical dimension of the page is now the circumference of the material to be engraved. 10. Position your graphic on page so that it is located horizontally within the upper and lower engraving limits
that you determined earlier and center the graphic vertically as shown below.
11. Once you are ready to print, select print in your graphics software and check to make sure rotary mode is still enabled and the correct diameter for your material is still entered in the printer driver dialog.
12. Then set the appropriate power and speed settings before printing the job.
Note: Remember, before running a rotary job, to rotate the material by hand until the position you want to be the center of your graphic is facing directly up. Keep in mind that the rotary fixture does not have a home location in the rotational axis so the top most part of the material (the part facing straight up) is always the center of the graphic when printing using the materials driver tab or the center of the page when printing using the manual driver tab.

101
Printer Driver Settings (materials driver tab) 1. Start the graphic software you plan to print the job from and open or create the artwork you plan to print to
the laser system.
2. Position your graphic on page so that it is located horizontally within the upper and lower engraving limits that you determined earlier and center the graphic vertically as shown below.
3. Once you are ready to print, select print in your graphics software and open the printer driver preferences dialog. In the materials driver tab select the material you are going to laser process, select “Rotary” in ther fixture section and enter the diameter of the material measured earlier.
4. Finally, printing the job.
Note: Remember, before running a rotary job, to rotate the material by hand until the position you want to be the center of your graphic is facing directly up. Keep in mind that the rotary fixture does not have a home location in the rotational axis so the top most part of the material (the part facing straight up) is always the center of the graphic when printing using the materials driver tab or the center of the page when printing using the manual driver tab.
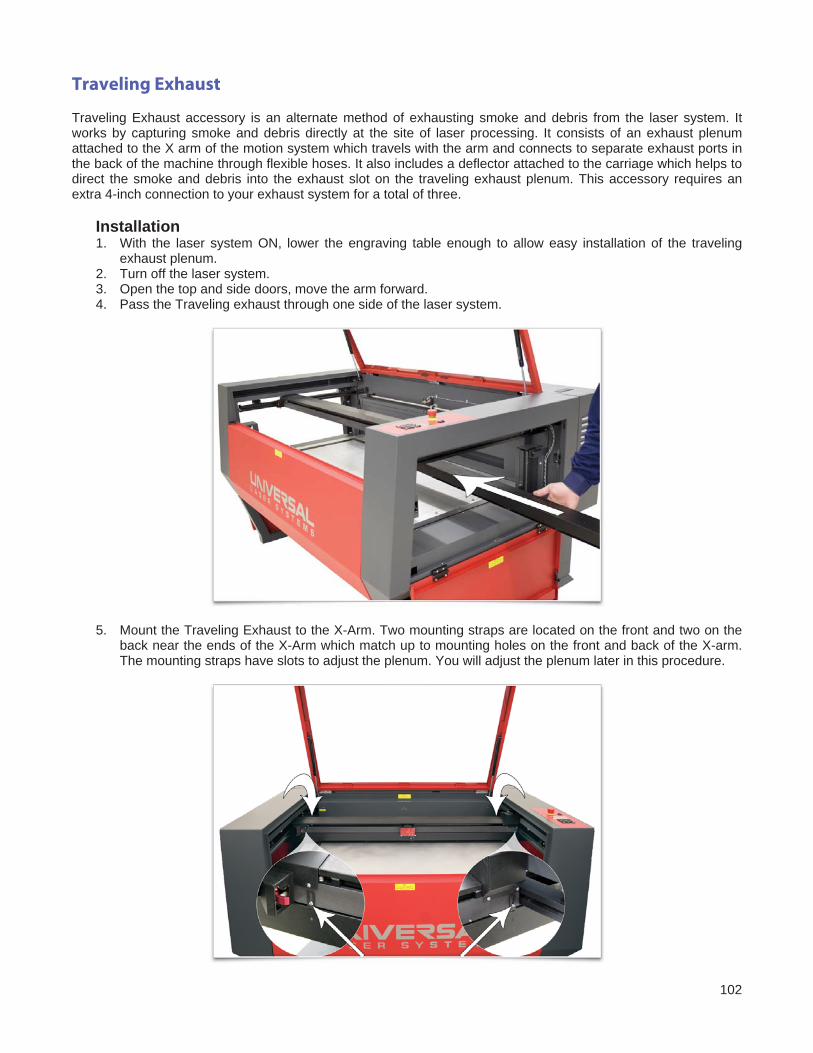
102
Traveling Exhaust Traveling Exhaust accessory is an alternate method of exhausting smoke and debris from the laser system. It works by capturing smoke and debris directly at the site of laser processing. It consists of an exhaust plenum attached to the X arm of the motion system which travels with the arm and connects to separate exhaust ports in the back of the machine through flexible hoses. It also includes a deflector attached to the carriage which helps to direct the smoke and debris into the exhaust slot on the traveling exhaust plenum. This accessory requires an extra 4-inch connection to your exhaust system for a total of three.
Installation 1. With the laser system ON, lower the engraving table enough to allow easy installation of the traveling
exhaust plenum. 2. Turn off the laser system. 3. Open the top and side doors, move the arm forward. 4. Pass the Traveling exhaust through one side of the laser system.
5. Mount the Traveling Exhaust to the X-Arm. Two mounting straps are located on the front and two on the back near the ends of the X-Arm which match up to mounting holes on the front and back of the X-arm. The mounting straps have slots to adjust the plenum. You will adjust the plenum later in this procedure.

103
6. Hang the two metal hooks on the Traveling Exhaust wire support found on the inside top of the laser
system enclosure.
7. Two flexible hoses are provided to connect the traveling exhaust plenum to the back wall of the laser system. Connect one end of each flexible hose to the Traveling Exhaust (1) with the provided hose clamps and the other end to the traveling exhaust port on the back wall of the laser system. Both left and right sides have to be connected. Slip the hose into the two metal hooks (installed earlier) at locations marked (3).

104
8. Attach the Traveling Exhaust Deflector to the focus carriage using the thumbscrew on the front of the base of the carriage (the same location as the cone).
9. Turn the machine back on and move the engraving table up, so that the surface is at the focus position, using the focus tool. Adjust the traveling exhaust plenum by loosening the screws that mount the straps to the X-arm and lower the exhaust until it rests on the rulers, then raise it about .050” (1.25 mm) above the ruler and tighten the mounting screws. Move the X-arm back and forth to ensure the traveling exhaust plenum does not rub anywhere.
10. Make sure to select the Traveling Exhaust option found in the System Tab of the UCP to make sure the system is aware the traveling exhaust is installed.
Maintenance Over time dirt and debris may collect in the traveling exhaust plenum attached to the X-arm as well as in the hoses and ducts that make up the traveling exhaust. All components are removable and can be cleaned using a mild soap solution and a hose with a spray nozzle if necessary.
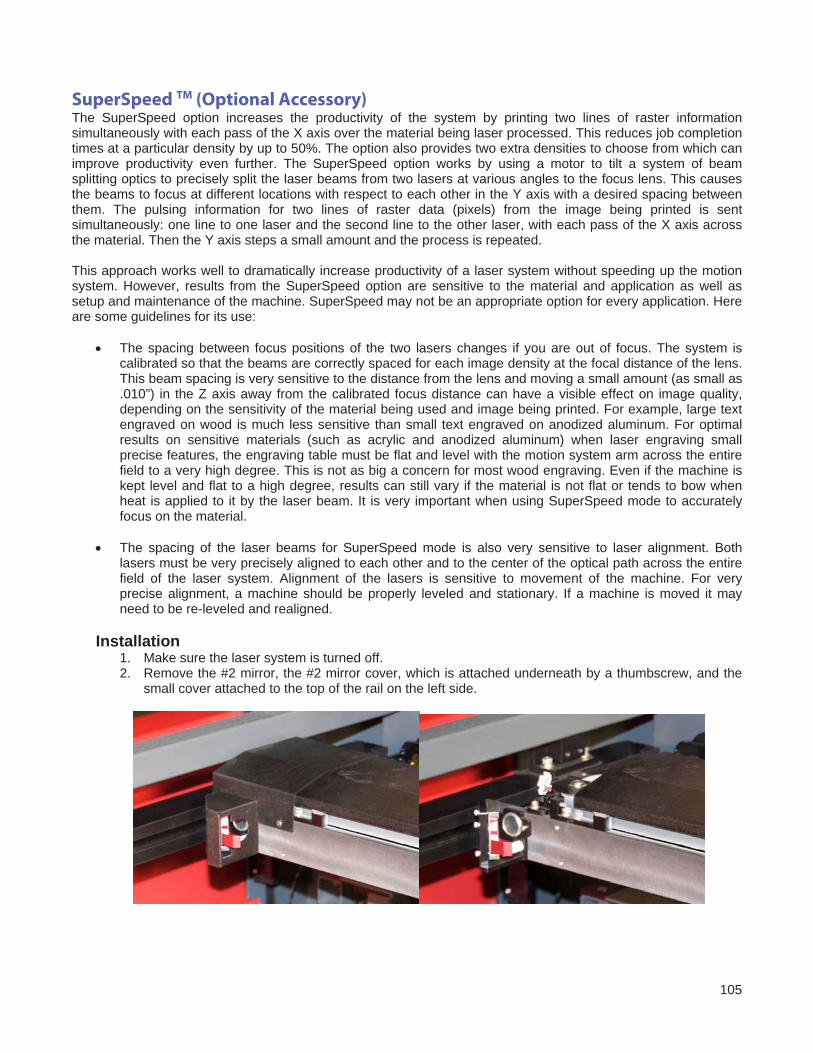
105
SuperSpeed TM (Optional Accessory) The SuperSpeed option increases the productivity of the system by printing two lines of raster information simultaneously with each pass of the X axis over the material being laser processed. This reduces job completion times at a particular density by up to 50%. The option also provides two extra densities to choose from which can improve productivity even further. The SuperSpeed option works by using a motor to tilt a system of beam splitting optics to precisely split the laser beams from two lasers at various angles to the focus lens. This causes the beams to focus at different locations with respect to each other in the Y axis with a desired spacing between them. The pulsing information for two lines of raster data (pixels) from the image being printed is sent simultaneously: one line to one laser and the second line to the other laser, with each pass of the X axis across the material. Then the Y axis steps a small amount and the process is repeated. This approach works well to dramatically increase productivity of a laser system without speeding up the motion system. However, results from the SuperSpeed option are sensitive to the material and application as well as setup and maintenance of the machine. SuperSpeed may not be an appropriate option for every application. Here are some guidelines for its use:
• The spacing between focus positions of the two lasers changes if you are out of focus. The system is calibrated so that the beams are correctly spaced for each image density at the focal distance of the lens. This beam spacing is very sensitive to the distance from the lens and moving a small amount (as small as .010”) in the Z axis away from the calibrated focus distance can have a visible effect on image quality, depending on the sensitivity of the material being used and image being printed. For example, large text engraved on wood is much less sensitive than small text engraved on anodized aluminum. For optimal results on sensitive materials (such as acrylic and anodized aluminum) when laser engraving small precise features, the engraving table must be flat and level with the motion system arm across the entire field to a very high degree. This is not as big a concern for most wood engraving. Even if the machine is kept level and flat to a high degree, results can still vary if the material is not flat or tends to bow when heat is applied to it by the laser beam. It is very important when using SuperSpeed mode to accurately focus on the material.
• The spacing of the laser beams for SuperSpeed mode is also very sensitive to laser alignment. Both lasers must be very precisely aligned to each other and to the center of the optical path across the entire field of the laser system. Alignment of the lasers is sensitive to movement of the machine. For very precise alignment, a machine should be properly leveled and stationary. If a machine is moved it may need to be re-leveled and realigned.
Installation
1. Make sure the laser system is turned off. 2. Remove the #2 mirror, the #2 mirror cover, which is attached underneath by a thumbscrew, and the
small cover attached to the top of the rail on the left side.

106
3. Remove the #2 mirror mount by loosening the laser beam tube that attaches it to the front of the rail (turn counterclockwise to loosen) and pulling it forward off of the alignment pins in the front of the rail.
4. Install SuperSpeed assembly in place of the #2 mirror assembly by aligning it with the alignment pins on the front of the rail and threading the laser beam tube (2) into the SuperSpeed assembly to secure it. Then install the two provided rear mounting screw(1).
5. Locate the SuperSpeed communications cable and attach it to the connector on the SuperSpeed module (3).
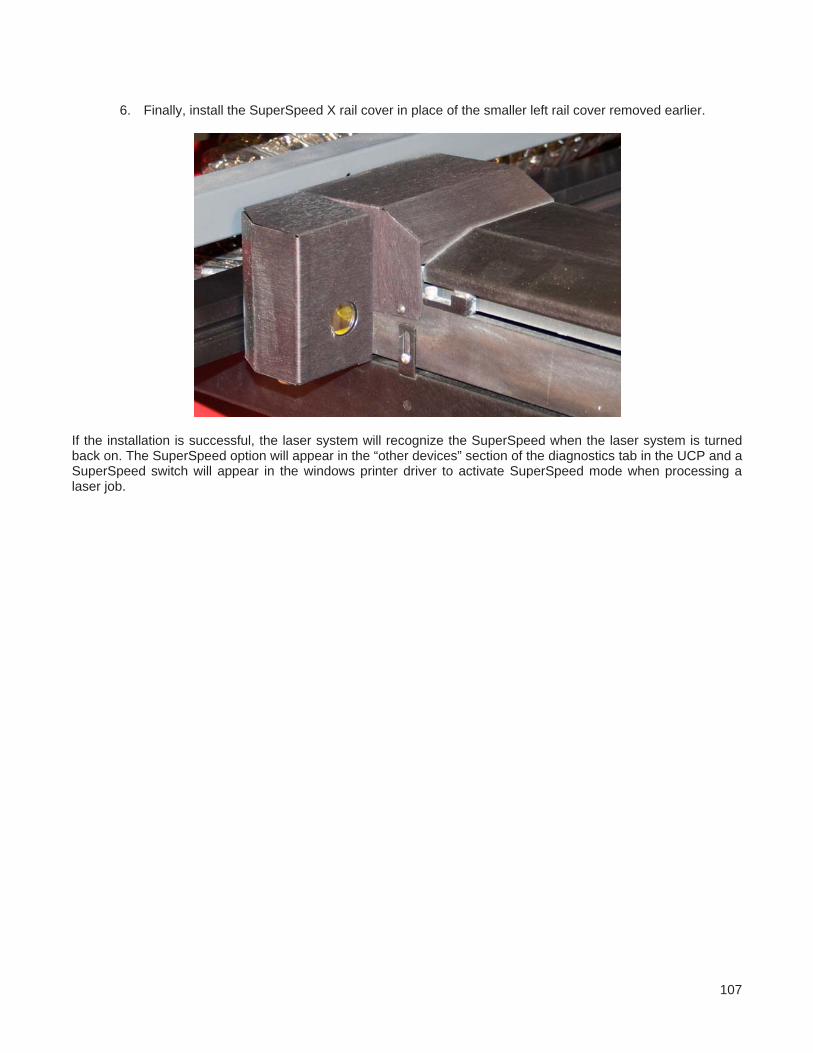
107
6. Finally, install the SuperSpeed X rail cover in place of the smaller left rail cover removed earlier.
If the installation is successful, the laser system will recognize the SuperSpeed when the laser system is turned back on. The SuperSpeed option will appear in the “other devices” section of the diagnostics tab in the UCP and a SuperSpeed switch will appear in the windows printer driver to activate SuperSpeed mode when processing a laser job.

108
Chapter 6 - Maintenance

109
Overview Accumulation of dirt and debris on the motion system components will cause uneven or rough engraving, loss of engraving position and premature failure. Accumulation of smoke or dirt on optics can result in loss of laser power and premature failure. It is important to keep your laser system as clean as possible to ensure trouble free operation and best results from laser processing. Always turn the laser engraving system OFF and unplug it before performing any cleaning procedures. Motion System Components Diagram Note: # X-Axis Rail Cover have been removed for visibility. 1. Focus carriage 2. X-Axis bearing (3) 3. #3 mirror (inside cover
plate) 4. Focus lens (inside cover
plate) 5. X-Axis rail (arm) 6. X-Axis bearing track (2) 7. X-Axis belt 8. X-Axis sensor magnet 9. X-Axis idler pulley 10. #2 mirror and holder
11. X-Axis motor and drive gear 12. Y home sensor board 13. Y-Axis belt (2) 14. Y-Axis bearing (4) (2 on right side Y-
Axis rail, 2 on left side Y-Axis rail) 15. Y-Axis rail (2)(one right side and one
left side) 16. Y-Axis rail bearing track (2) (one on
right side, one on left side) 17. Y-Axis drive gear (2) (one on right
side, one on left side)
18. Y-Axis drive shaft 19. Y-Axis shaft flex coupler (one on right
side, one on left side) 20. Y-Axis motor (not shown) 21. Y-Axis idler pulley (2) (one on right
side, one on left side) 22. Y-Axis home sensor magnet 23. Flex cable
110
Cleaning and Maintenance Supplies
• Mild soap solution mixture of 1 tablespoon (14.78 ml) liquid soap and 1 quart (liter) of water in a spray bottle
• Window cleaner • Paper towels • Cotton cloth • Denatured alcohol (do not use on any painted surface, plastic or the Top Window) • Acetone (can be used on the engraving table, but nowhere else)
CAUTION: When using acetone or denatured alcohol, please follow the instructions on the printed label of these materials for safe handling procedures.
• Cotton swabs (supplied) • Lens cleaner (supplied) • Vacuum cleaner • Set of Allen wrenches sized from 0.050 to 3/16 inch
System Cleaning and Maintenance
Motion System • Turn off and unplug the laser system. • Open the top door and thoroughly remove all loose dirt and debris from inside the laser system with a
vacuum cleaner. • Clean the processing table surface with either a soap solution, or alcohol, and a cloth or paper towels
(acetone can be used in extreme cases to remove gummy deposits, but should be handled carefully as it will melt plastic components of the laser system). Never pour or spray any solution directly into the laser system. Always dampen your paper towel or cloth with the cleaning solution outside of the laser system and then wipe down the parts you are cleaning with the dampened cloth.
• Clean X-rail and Y-rail by using either the cotton swabs or paper towels and soap solution. Pay close attention to the bearing tracks since any debris left to build up in these bearing tracks will cause the bearings to wear and the engraving quality to become uneven.
• After the rails and tracks are cleaned, use a clean swab or paper towel and soap solution to clean all of the bearings by holding the swab against each bearing and moving the motion system by hand to roll the bearings against the swab. There are seven bearings in the system, three on the focus carriage, two on the left side of the X-rail and two on the right side of the X-rail.
The Main Enclosure • Clean the top window with a cotton cloth or paper towel and window cleaner. The top window is made out
of glass; therefore, do not use abrasive cleaning cloths because they will scratch the glass. Also, do not use abrasive chemicals as these chemicals will damage the glass. Only use cleaners compatible with glass.
• Use a soft cloth or paper towels and the soap solution to clean the enclosure. Do not use alcohol, acetone or any other harsh chemical as these will damage the paint.

111
Optics A visual inspection of the #2 and #3 mirrors, collimator and focus lens should be performed at least once a day.
CAUTION: Do not clean an optic that appears clean. Excessive cleaning can damage the optical coatings. To prevent contamination, wash your hands thoroughly before handling and cleaning any optic. Try not to touch the optical surfaces with your fingers, handle optics only by the edge or optical housing. Fingerprints can damage the optical coatings.
Never clean any optic right after engraving or cutting because the optic may be hot and the cool lens cleaning solution may thermally shock the optic and crack it.
#2 Mirror To gain access to the #2 mirror, grasp its protruding handle with your thumb and forefinger and slide it out. It is held in place by magnets. Inspect the #2 mirror and clean it only if there is debris present. To clean the #2 mirror with a cotton swab, moisten the cotton swab with the lens cleaning solution supplied with the laser system. Do not use other types of cleaners or solutions. Gently roll the cotton swab across the mirror once. Do not drag the swab or roll it back and forth as this can scratch the mirror. If the mirror did not come clean, use a fresh cotton swab and repeat the procedure.
#3 Mirror and Focus Lens 1. The #3 mirror and the focus lens are both mounted to the front cover of the carriage. 2. To gain access to the #3 mirror (1) and the focus lens (2), hold the front cover (3) with one hand and
remove the three thumbscrews with the other hand. Pull the front cover straight out.

112
3. Tilt the front cover enough to enable you to apply the lens cleaning solution directly to the #3 mirror and to the focus lens.
4. Flood the reflective surface of the #3 mirror with the solution. If heavy debris is present, let the solution soak in for a minute.
5. Roll a fresh cotton swab across the mirror in one direction. Use a fresh swab for each pass. Be gentle when cleaning the optic to avoid scratching the surface. Repeat this procedure for the focus lens, but make sure you clean both sides of the lens.
Collimator The collimator is located where the laser beam enters into the processing area. It is located in the upper left hand corner of the engraving area against the back wall and is yellow in color. It is only necessary to clean the front side of the visible optic. Do not remove the optic to clean it; simply clean it in the same manner as the #2 mirror.

113
Exhaust Plenum
1. Remove the engraving table by removing screws that attach table to four brackets at the four corners of the table.
2. Locate and remove the two screws that attach the bottom of each plenum to the machine. 3. Lift each plenum straight up until the tabs of the plenum clear the two flat head screws on which they are
resting. Remove each plenum from the laser system.
4. Using the soap and water solution, clean the inside of the plenum as well as the inside rear wall of the laser system.
5. Installation is opposite of removal. Verify that the plenum tabs rest on the two flat head screws. Cooling Fan Filters This air-cooled laser system will require periodic cleaning of the cooling fan filters. Since ambient air is used to cool a laser cartridge, the air must be filtered before it passes through the laser. Dust contamination the intake filter may reduce the cooling fan’s ability to keep the laser cartridge, as well as the CPU and power supply, from overheating. An overheated laser cartridge will lose laser power during engraving and will eventually shut down completely. To service the filters, first turn OFF and unplug the laser system. To remove the 6 large square filters (1) or the 2 circular filters (2), simply snap off the black cover and remove the foam element. Wash the element in a soap and water solution, dry and re-install.
CAUTION: Never operate the laser system with the cooling fan filters removed as dust and debris can build up in the laser cooling channels, thus leading to damage.

114
Adjustments and Lubrication Periodic adjustments are not normally required. The bearings in the motion system will self-adjust to take up any clearances as they begin to wear. The belts are fiber-reinforced and will not stretch under normal use so periodic tension adjustment is not necessary. All bearings in the system are sealed and do not require lubrication. Do not lubricate the tracks that the bearings ride in. The only lubrication that may be required is to the screw threads for the Z axis lifting mechanism. Over time contaminants may adhere to the lubricant which can cause the engraving table to bind up. Periodically wipe off the contaminated grease with a soft cloth dampened with alcohol and apply fresh white lithium grease to the screw threads. Never spray any degreasing solutions directly onto the threads. Run the table up and down to work in the fresh grease. Maintenance Schedule
We recommend the following schedule:
As necessary
• Clean engraving table • Clean main enclosure • Clean top door window
Every 8 hours of engraving
• Clean X-Axis and Y-Axis bearings • Clean X-Axis and Y-Axis and bearing
tracks • Clean X-Axis belt • Check beam window, #2 mirror, #3 mirror
and focus lens for debris. Clean ONLY if dirty.
Every month • Clean cooling fan filters • Clean Z-Axis lead screws with white lithium
grease • Check for X-Axis and Y-Axis belt wear.
Replace as necessary. • Check and/or clean X-Axis and Y-Axis drive
gears • Check for X-Axis and Y-Axis bearing wear.
Replace as necessary. • Inspect system for loose screws and
mechanical parts. Tighten if necessary. Every 6 months
• Clean exhaust plenum
Note: If you have any questions about maintaining the laser system, please contact our Customer Service Team at ULS.

www.ulsinc.com