imail server getting started guide v8 - ipswitch, inc
TRANSCRIPT
IMail ServerGetting Started Guide v8.2

IMail Server
Getting Started Guide
Software Version 8.2
Ipswitch, Inc
Copyrights©1995-2005 Ipswitch, Inc. All rights reserved.IMail Server 8.2 Getting Started Guide
This manual, as well as the software described in it, is furnished under license and may be used or cop-ied only in accordance with the terms of such license. Except as permitted by such license, no part of this publication may be reproduced, photocopied, stored on a retrieval system, or transmitted, in any form or by any means, electronic, mechanical, recording, or otherwise, without the expressed prior written consent of Ipswitch, Inc.
The content of this manual is furnished for informational use only, is subject to change without notice, and should not be construed as a commitment by Ipswitch, Inc. While every effort has been made to assure the accuracy of the information contained herein, Ipswitch, Inc. assumes no responsibility for errors or omissions. Ipswitch, Inc. also assumes no liability for damages resulting from the use of the information contained in this document.
IMail, the IMail logo, WhatsUp, the WhatsUp logo, WS_FTP, the WS_FTP logos, Ipswitch Instant Messaging (IM), the Ipswitch Instant Messaging (IM) logo, Ipswitch, and the Ipswitch logo are trademarks of Ipswitch, Inc. Other products and their brands or company names, are or may be trademarks or registered trademarks, and are the property of their respective companies.
Update HistoryMay 2001 First EditionFebruary 2003 Second EditionMarch 2004 Third EditionMarch 2005 Third Edition v8.2
Ipswitch, Inc. Web: www.ipswitch.com
10 Maguire Road Phone: 781-676-5700
Suite220 Fax: 781-676-5710
Lexington, MA 02421-3110
CONTENTS
Contents
Chapter 1 Getting Started with IMail ServerOther Information Sources............................................................. 1
Visit Our Web Site ................................................................... 2Components of an Internet Mail System ....................................... 2Planning Your Installation ............................................................. 3
Step 1: What Do You Need?.................................................... 4System Requirements ......................................................... 4Hardware Environment ...................................................... 4
Step 2: Create DNS Entries for Your Mail Server................... 4Step 3: Choose the Type of User Database.............................. 6Step 4: What E-Mail Services Do You Want to Provide? ....... 7Step 5: Determine Security Levels and Access Control .......... 8
SMTP Mail Relay options.................................................. 8SMTP Authentication ................................................ 9Secure Sockets Layer (SSL)............................................... 9
Step 6: One Mail Host or Multiple Hosts?............................... 9Installing IMail Server ................................................................. 10
Step 1: Start the Installation Procedure.................................. 10Step 2: Set the Official Host Name for Your Server.............. 10Step 3: Select the User Database............................................ 10Step 4: Select the Location for IMail Files and Folders ........ 11Step 5: Set Security Options .................................................. 11Step 6: Select the IMail Services You Want to Use .............. 12Step 7: Add a Test User ......................................................... 12Step 8: Install Language Packs for Web Templates .............. 12Step 9: Restart your system.................................................... 13
Testing Your IMail Server Installation........................................ 13Step 1: Confirm your DNS Settings....................................... 13Step 2: Confirm Your IMail Server Installation .................... 15Step 3: Confirm User Database Setup.................................... 16Step 4: Sending and Receiving Mail in a Test Account ........ 18
Upgrading .................................................................................... 18Upgrading Using External Databases .................................... 19Upgrading the LDAP Database.............................................. 19Upgrading Web Messaging.................................................... 20Upgrading Language Packs for Web Templates.................... 20Upgrading Antispam Features ............................................... 21
i
CONTENTS
Re-Installing IMail Server to a Different Location................ 21Removing IMail Server ............................................................... 21Enabling Wizards......................................................................... 22Technical Support ........................................................................ 22
A Mail Servers and DNSWhat is DNS? .............................................................................. 23How a Mail Server Uses DNS ..................................................... 24Setting Up Mail Server Records in the DNS ............................... 25
Your Local Network’s DNS server........................................ 25Example of a Basic Configuration ......................................... 26Sample DNS Records............................................................. 27Other Configurations.............................................................. 27
Index .................................................................................................................. 29
ii
1Chapter
Other Information Sources
Components of an Internet Mail System
Planning Your Installation
Installing IMail Server
Testing your Installation
Upgrading
Removing IMail Server
Enabling Wizards
Technical Support
In this Chapter
Getting Started with IMail Server
This guide provides instructions for planning, installing, and testing your IMail Server.
If you purchased the IMail Server software only, use this guide to help install IMail Server. If you purchased the Ipswitch Collaboration Suite, use the ICS Getting Started Guide and this guide as a reference to install IMail Server.
Other Information Sources• IMail User Guide. Provides information about IMail Server
configuration, advanced configuration, services options, mail-ing lists, and more.
• Application Help. Help is always available by clicking Help or pressing F1 in all Ipswitch products.
• Release Notes. The release notes, located in Start > Pro-grams > IMail folder or for the ICS installation in Start > Programs > Ipswitch Collaboration Suite > Documenta-tion folder, provide an overview of changes, known issues, and bug fixes for the current release. The notes also contain template additions and modifications, instructions for upgrad-ing IMail Server and configuring external databases.
• ICS Support Center
The ICS Support center provides a number of IMail resources including the following:
• User guides
• Domain Name System (DNS) help
• Access to product updates, utilities, Knowledge Base (KB) articles, and other IMail resources.
1
IMAIL SERVER Getting Started with IMail Server
• Technical support information, such as email support forms, service agreements, and licensing information.
• IMail and ICS user forum that gives you an opportunity to interact with other IMail and ICS customers to share tips and tricks.
You can access the ICS support center at http://www.ipswitch.com/Support/ICS/index.asp.
Visit Our Web Site
For more information about Ipswitch products, to find evaluation versions, or purchase our products, visit the Ipswitch Web site at: http://www.ipswitch.com.
You can keep up-to-date on product news and view the Knowledge Base of technical information on our technical support pages. You can also browse the template gallery for a different look-and-feel for Web Messaging and visit the user created utilities page for a list of useful programs.
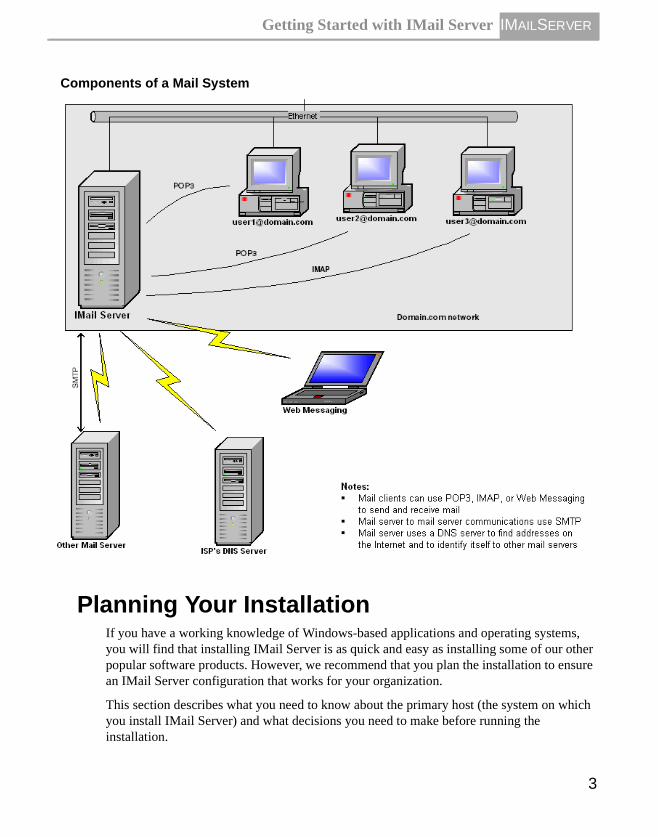
Components of an Internet Mail SystemIMail Server provides the following basic services required to implement an Internet-based mail system. (The illustration on the next page shows these components.)
• An SMTP server which lets IMail Server communicate with other mail servers on the Internet.
• A POP3 server which lets an email client retrieve mail from the mail server.
• An IMAP server which provides another method whereby an email client can access mail on the mail server.
This guide focuses on setting up the mail server; however, you also need the following software components to connect your mail system to the Internet and to provide mail capabilities for your users:
• A Domain Name System (DNS) server. The DNS server can be on your network or hosted by your Internet Service Provider.
• E-mail client software for each mail user, such as Microsoft Outlook Express®, Microsoft Outlook ®, or Qualcomm Eudora®.
Alternatively, mail users can use IMail Server Web Messaging to read and send mail through a web browser.
2
IMAILSERVERGetting Started with IMail Server
Planning Your InstallationIf you have a working knowledge of Windows-based applications and operating systems, you will find that installing IMail Server is as quick and easy as installing some of our other popular software products. However, we recommend that you plan the installation to ensure an IMail Server configuration that works for your organization.
This section describes what you need to know about the primary host (the system on which you install IMail Server) and what decisions you need to make before running the installation.
Components of a Mail System
3
IMAIL SERVER Getting Started with IMail Server
Step 1: What Do You Need?
To get the best performance and the ability to expand your mail service, we recommend that you designate a computer to function as your email server and that you do not run other servers on the computer.
System Requirements
• An Intel Pentium III 500 MHz or higher (multiple processors recommended for high mail traffic rates).
• 256 MB RAM minimum.
• Microsoft Windows 2000 Server or Microsoft Windows 2003 Server.
• For best performance we recommend that the updated server versions of the operating systems be employed. Additionally, NTFS (rather than FAT) file system is recom-mended for increased operability and security.
• Network interface card installed and configured to use Microsoft’s TCP/IP for the Win-dows operating system OR a dial-up TCP/IP connection.
• A full-time or dial-up connection to the Internet.
• Modem (optional, but required for mail-to-pager, mail-to-fax, and notifications).
• A static IP address.
Hardware Environment
IMail Server runs properly on the minimum hardware requirements recommended by the installed operating system. Performance and capacity increases are based on processor speed, RAM, and drive space. As with all server applications, it is recommended that you install IMail Server on the fastest and most powerful server that your budget allows.
Step 2: Create DNS Entries for Your Mail Server
Determine the Domain Name System (DNS) settings required for the system on which you will install IMail Server. Before you create DNS entries, plan the following for your Windows TCP/IP settings:
• Primary Host. The primary host is the system on which you install IMail Server.
• Host Name (of Primary Host). The host name for your email server, for example, imailbox.
• IP Address (of Primary Host). The IP Address is a numerical address for the email server host (i.e. 156.21.50.15).
4

IMAILSERVERGetting Started with IMail Server
• Domain Name. The domain name identifies the network that the host is on (for example, domain.com).
To identify your mail host in the DNS, use the Host Name plus the Domain name. For example, imailbox.domain.com. This is also known as the Fully Qualified Domain Name (FQDN).
To get the DNS information on a Windows 2000 system, click the System icon in the Control Panel, select the Network Identification tab, then click Properties. The Identification Changes dialog box shows the domain information.
To get the DNS information on a Windows 2003 or Windows XP system, click the System icon in the Control Panel, click Network Connections > Local Area Connections > Properties. Select Internet Protocol (TCP/IP) from the list, then click Properties > Advanced > DNS tab.
The Host Name and Domain must be registered in the DNS (Domain Name System) in order for your remote hosts (not on your local network) to communicate with your system.
To properly send and receive email, add the following records to your DNS server. If an Internet Service Provider (ISP) is hosting your DNS server, contact your ISP to have the appropriate records added to the DNS server.
• MX Records. A Mail eXchanger (MX) record is used to identify the computer that pro-cesses mail for a domain. If you plan to host multiple domains, you’ll need an MX record for each domain. The MX record points to the (fully qualified) host name of the IMail Server (the Primary Host). For example: domain.com IN MX 10 imail-box.domain.com
• A Records. Create an Address (A) record for the IMail Server that has the IP address of the IMail Server (the Primary Host). Ex: imailbox.domain.com IN A 156.21.50.15
• PTR Records. Create an A pointer (PTR) record for reverse lookups. You need a PTR record that resolves the IP address of your IMail Server (the Primary Host) to the Offi-cial Host Name of your IMail domain. Ex: 156.21.50.15 in-addr.arpa. host=imail-box.domain.com.
• SPF Records. SPF record lets other email servers use SPF filtering (if the feature is available on the mail server) to protect against incoming email from forged (spoofed) email addresses that may be associated with your mail server. As SPF records are imple-mented more widely, SPF filtering will become more effective at identifying spoofed email messages. For more information about SPF records, see the IMail User Guide.
5
IMAIL SERVER Getting Started with IMail Server
For more information about setting up the DNS entries, see:
• A primer with examples in “Mail Servers and DNS” on page 23.
• DNS tutorials on the IMail\ICS Support Center at:
http://www.ipswitch.com/Support/IMail/dns.html
• Our Knowledge Base on the IMail\ICS Support Center at:
http://www.ipswitch.com/Support/ICS/index.asp.
Step 3: Choose the Type of User Database
Identify the database used by the Primary Host to register and authenticate users. The Primary Host can use one of the following databases for registration and authentication: (Registration is the process by which user mail accounts are created. Authentication is the process by which user IDs and passwords are verified.)
• IMail Database. All user IDs and passwords for mail accounts are stored separately, from either the Windows NT or Windows 2000 user database or any external database, in a proprietary database in the Windows registry.
You can also import Windows NT or Windows 2000 users into an IMail user database without having them linked to the Windows NT or Windows 2000 user database. For details on importing Windows NT or 2000 users, refer to the IMail Server User Guide “Importing NT Users” section in Chapter 4.
• Windows NT Database. This database provides automatic creation of user mail accounts for any user listed in the Windows NT or Windows 2000 user database on your host machine.
Please note that the Primary Mail Host needs access to the Windows NT or 2000 user database for your network.
To view a current list of users, add users, or delete users in your Windows NT or 2000 user database, use the appropriate administrative tool as described in your Windows documentation (Windows NT and Windows 2000 use different tools). You cannot view, add, or delete users with IMail Administrator.
A mailbox and other user files are created for a user when the mail server receives a message for that user or when a user first accesses the IMail Server through a mail client.
Note: You can use Ipswitch WS_Ping ProPack to look up DNS information. For more information about looking up DNS information using WS_Ping ProPack, see “Step 1: Confirm your DNS Settings” on page 13.
6
IMAILSERVERGetting Started with IMail Server
• External Database. IMail Server can use an external database to register and authenti-cate users. This option lets you specify an existing ODBC-compliant user database and lets you add and delete users either from the IMail Administrator or the external data-base. IMail Server supports Microsoft SQL Server or Microsoft Access.
If you use an external database, make sure you have set up the database connection in the Windows ODBC Data Source Administrator. Before you start the IMail Server installation, you will need the ODBC System DSN name for the database and the User ID and password for logging on to the database.
Step 4: What E-Mail Services Do You Want to Provide?
In addition to the basic SMTP service, identify the other services you would like your email server to provide. For example:
• Service Monitoring (IMail Monitor Service) lets the mail administrator monitor the status of all IMail Services (SMTP, POP3, IMAP, Web Messaging).
• Web Messaging lets users read mail from the server and send mail using a web browser.
• POP3 service lets users retrieve mail and send mail using clients like Qualcomm Eudora and Microsoft Outlook. With POP3, user mail is usually stored on the user’s PC.
• IMAP4 service lets users read mail from the server and send mail using clients like Qualcomm Eudora and Microsoft Outlook. With IMAP4, mail is usually stored on the mail server.
• LDAP service uses a client/server architecture to publish user information (called “attributes”) on the server and provide access to the information from LDAP-enabled clients.
Notes:If you want to use a different ODBC database, you can modify IMail Server’s ODBCUser.dll file to support it. For more information, read the ODBC topics in our Knowledge Base at: http://support.ipswitch.com/kb To display the topics, enter ODBC in the Search for box, select IMail Server from the product list, then click Search.
Note: You can specify these services and other services during the installation.
7
IMAIL SERVER Getting Started with IMail Server
Step 5: Determine Security Levels and Access Control
Identify the levels of security and access control needed to ensure the integrity of your mail server. IMail Server provides several ways to secure your email server; for example:
SMTP Mail Relay options
Mail relay occurs when IMail Server (or any SMTP server) accepts mail destined for another host and redelivers it to that host. A message that originates on a computer other than the IMail Server host and destined for another host must pass through the IMail Server (i.e., IMail Server must relay the message). If your users use a POP3 or IMAP mail client to send mail, then IMail Server needs to relay mail for them. IMail Server allows for the following mail relay options (listed in order from most secure to least secure):
• No mail relay
• Relay mail for (Addresses)
• Relay mail for local hosts only
• Relay mail for local users only
• Relay mail for anyone
Local mail (destined for the IMail Server host or originating from the IMail Server host) does not use the relay function.
• No mail relay (recommended)
The SMTP server will not accept mail destined for other hosts (any host not on the IMail Server machine). If all of your users send and receive mail from the same host that IMail Server is on or if they use Web Messaging to access mail, you can select this option. If you select this option, make sure all mail clients are set up to SMTP Authenticate; otherwise, the client cannot send mail to non-local email addresses.
• Relay mail for anyone (not recommended)
The SMTP server accepts mail from any host that is destined for any other host, and redeliver that mail (i.e. become a mail gateway). This option is the least secure because it allows your server to be used by anyone to send mail to anyone. Some bulk mailers may take advantage of this capability to not only relay mail through your server, but to make it appear as if mail is originating from your server.
Note: During installation, you can select from four options: Relay for select addresses, No mail relay, Relay mail for anyone, and when upgrading: Do not change my existing local mail relay settings. After installation, you can change the relay setting in the SMTP Security tab in IMail Administrator.
8
IMAILSERVERGetting Started with IMail Server
If you select this option your server may be blacklisted for running an open relay. To prevent this you should select Relay mail for (Addresses).
• There are several other mail relay options available after installation including Relay mail for (Addresses), Relay for local hosts only, and Relay for local users only.
No mail relay is the best option if you are unable to use Relay mail for (Addresses) because your users dial up using dynamic IP addresses.
For more information on Mail Relay options and other security features, see the IMail Server User Guide.
SMTP Authentication
SMTP Authentication lets you verify each user who attempts to send mail through your mail server. SMTP Authentication is always enabled on the IMail Server. Users need to set their mail clients to do an SMTP login; for example, in Microsoft Outlook, select the option My outgoing mail server requires authentication.
SMTP Authentication is used in the following cases:
• If you use the No mail relay option for SMTP relay.
• If you use the Relay mail for (Addresses) option, SMTP Authentication enables users who send from IP addresses that you do not list; for example, users who are travelling and do not have a static IP address.
Secure Sockets Layer (SSL)
SSL provides user authentication and encryption Web Messaging and Web Calendaring communications and provides network traffic encryption and decryption for POP3, IMAP4, and SMTP protocols. You can also use the SSL Configuration Utility to create private keys and certificates to use during SSL connection negotiations.
For information about using the SSL Configuration Utility, in IMail Administrator, click Tools > Launch SSL Configuration Utility > Help.
Step 6: One Mail Host or Multiple Hosts?
You can have multiple hosts on one IMail Server system, with each host handling the mail for a single domain. This feature lets you provide separate mail services for separate organizations. Hosts can be added to the IMail Server after you have completed the installation of the primary host.
For information about setting up additional hosts and information about other advanced configuration options, see the IMail Server User Guide.
9
IMAIL SERVER Getting Started with IMail Server
Installing IMail ServerThis section provides instructions to install IMail Server followed by a quick test of your installation. The last two sections include information about upgrading and removing IMail Server.
Step 1: Start the Installation Procedure
1 Log on to your Windows system as a System Administrator, or to an account with System Administrator privileges.
2 Back up your Windows registry. (Run regedit.exe and select Export Registry File from the Registry menu.)
3 Do one of the following:
• If you purchased an IMail Server CD, insert the CD into the CD/DVD drive. If the CD does not automatically start the installation wizard, click the Windows Start button, select Run, then enter the CD/DVD drive letter followed by autorun.exe. For example, enter D:\autorun.exe.
• If you downloaded the IMail Server program from the Ipswitch Web site, double-click the downloaded file. On the installation screen, select the components you want to install, then click Install. ICS installs each selected component. Follow the on-screen instructions.
Step 2: Set the Official Host Name for Your Server
The first installation screen (Official Host Name) asks you to confirm (or enter) the official host name of your primary system. This will be the “primary host” for your IMail Server installation. If you don’t know the Official Host Name, see “Step 2: Create DNS Entries for Your Mail Server” on page 4 of the “Planning Your Installation” section.
If multiple hosts are required, you can add other “virtual hosts” after completing installation of the primary host.
Step 3: Select the User Database
The next screen (Database Options) asks you to select the user database option you prefer. See “Step 3: Choose the Type of User Database” on page 6 of the “Planning Your Installation” section. Select from the following database options:
• Windows NT User Database
• IMail User Database
• External Database (ODBC compliant)
10
IMAILSERVERGetting Started with IMail Server
If you select External Database, you must specify the ODBC System DSN for the database, along with the user ID and password to log on to the database server. IMAILSECDB is the default name that the IMail ODBC link uses. For example, for the System DSN, you would enter: imailsecdb;UID=imailuser;PWD=password
Step 4: Select the Location for IMail Files and Folders
On the Choose Destination Location dialog, enter the directory where you want to install IMail Server or browse to the directory where you want to install IMail Server. This directory must not be moved or renamed after installation and the path and directory must not contain spaces.
Step 5: Set Security Options
The next two screens ask whether you want to install SSL keys and what SMTP security you want to set. After you complete the installation, you can change either of these settings using the IMail Administrator.
In the SSL Keys dialog box, select one of the following options:
• Click No if you already have a third-party SSL certificate. After installing IMail Server, click Tools > Launch SSL Configuration Utility to start the IMail SSL utility. Click Help for instructions on using the utility. You can install the default keys later if you do not install them during the installation.
• Click Yes if you do NOT have a third-party SSL certificate, but want to run the IMail web server using a “self-signed” SSL certificate.
Note: Before you use IMail Server to associate an external database with a host, use the Windows Control Panel to make sure there is a System DSN (Data Source Name) that points to a valid database name. See your Windows operating system and database documentation for information on the System DSN.
11
IMAIL SERVER Getting Started with IMail Server
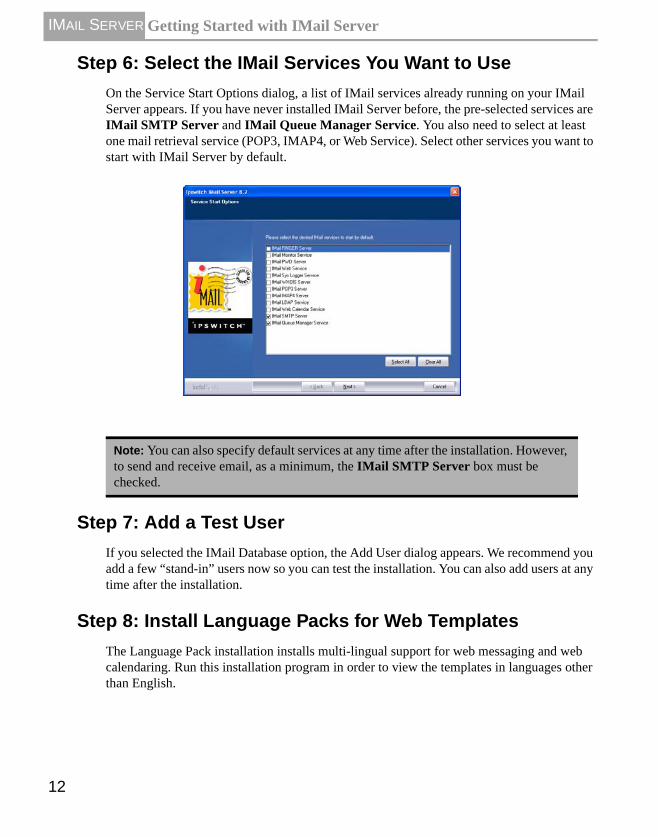
Step 6: Select the IMail Services You Want to Use
On the Service Start Options dialog, a list of IMail services already running on your IMail Server appears. If you have never installed IMail Server before, the pre-selected services are IMail SMTP Server and IMail Queue Manager Service. You also need to select at least one mail retrieval service (POP3, IMAP4, or Web Service). Select other services you want to start with IMail Server by default.
Step 7: Add a Test User
If you selected the IMail Database option, the Add User dialog appears. We recommend you add a few “stand-in” users now so you can test the installation. You can also add users at any time after the installation.
Step 8: Install Language Packs for Web Templates
The Language Pack installation installs multi-lingual support for web messaging and web calendaring. Run this installation program in order to view the templates in languages other than English.
Note: You can also specify default services at any time after the installation. However, to send and receive email, as a minimum, the IMail SMTP Server box must be checked.
12
IMAILSERVERGetting Started with IMail Server
Select Get the Latest Language Pack from Ipswitch Now. You are redirected to the Ipswitch Web site to complete the Language Pack installation.
1 Select one of the following installation options:
• Complete. Installs support for all currently available languages (English, Japanese, Korean, German, Dutch, French, Spanish, Chinese).
• Custom. Allows you to select which languages you want to install.
2 Backup Existing Files. If you already have Language Packs installed, you should back them up so that you can revert back to them if needed.
3 Installation Complete. When installation of the language pack is complete, IMail Server is fully installed.
Step 9: Restart your system
If you are prompted to restart your system, it is because the installation could not properly set up a file. A Dynamic Link Library (DLL) is most likely to cause this problem. To ensure that IMail Server runs properly, restart as soon as possible.
Testing Your IMail Server InstallationThis section provides some quick tests to ensure that you have a working IMail Server configuration. See “Mail Servers and DNS” on page 23 for detailed DNS information.
Step 1: Confirm your DNS Settings
To check the DNS record for your IMail Server, you can use either of the following tools:
• WS_Ping ProPack. If you have installed an evaluation copy of WS_Ping ProPack, you can use the Lookup tool that is a part of this suite of diagnostic tools.
• Nslookup. You can use the “nslookup” command in Windows 2000, Windows 2003, Windows XP.
To check your DNS settings using WS_Ping ProPack:
1 From the Start menu, click Programs > WS_Ping ProPack > WS_Ping ProPack, then click the LookUp tab.
2 View the MX record to verify that the domain name is pointing to the correct host name. Enter the following:
a Name or IP address: Enter the domain name (for example, domain.com).
13
IMAIL SERVER Getting Started with IMail Server
b DNS Server: Enter the host name or IP address of the domain name server you want to use.
c Query Type: Select MX from the list.
d Click Start. You get information such as:
>domain.com 10,imailbox.domain.com
3 View the A record and verify that host name is pointing to the correct IP address. Enter the following:
a Name or IP address: Enter the Official Host Name of the IMail Server host (for example, imailbox.domain.com).
b DNS Server: Enter the host name or IP address of the domain name server you want to use or select stack from the drop-down list to use your operating systems’s network stack.
c Query Type: Select A from the list.
d Click Start. You get information such as:
>imailbox.domain.com 156.21.50.10
4 View the PTR Record and verify that the IP Address points to the official host name. Enter the following:
a Name or IP address: Enter the IP address of the IMail Server host (for example, 156.21.50.10).
b DNS Server: Enter the host name or IP address of the domain name server you want to use; or, select stack from the drop-down list to use your operating system’s network stack.
c Query Type: Select PTR from the list.
d Click Start. You will get information such as:
>10.50.21.156.in-addr.arpa. host = imailbox.domain.com.
5 Record any errors. If you host your own DNS server, correct the entries. If your DNS service is hosted by an ISP, contact them and request the changes.
14
IMAILSERVERGetting Started with IMail Server
To check your DNS settings using the “nslookup” tool:
1 Run the Windows “nslookup” command to view the MX record. View the MX record to verify that the domain name is pointing to the correct host name. For example, enter:
nslookup>ls -t MX domain.comThe command returns information such as:
>domain MX 10 imailbox.domain.com
2 Under the Windows “nslookup” command, view the A record and verify that host name is pointing to the correct IP address.
nslookup>ls -t A imailbox.domain.comThe command returns information such as:
>imailbox.domain.com A 156.21.50.10
3 Under the Windows “nslookup” command, view the PTR Record and verify that the IP Address points to the official host name.
nslookup>ls -t PTR 156.21.50.10The command should return information such as:
>imailbox.domain.com PTR 156.21.50.10
4 Record any errors. If you host your own DNS server, correct the entries. If your DNS service is hosted by an ISP, contact the ISP to request the changes.
Step 2: Confirm Your IMail Server Installation
To confirm your IMail Server installation, do the following:
1 From the Start menu, select Programs > IMail > IMail Administrator.
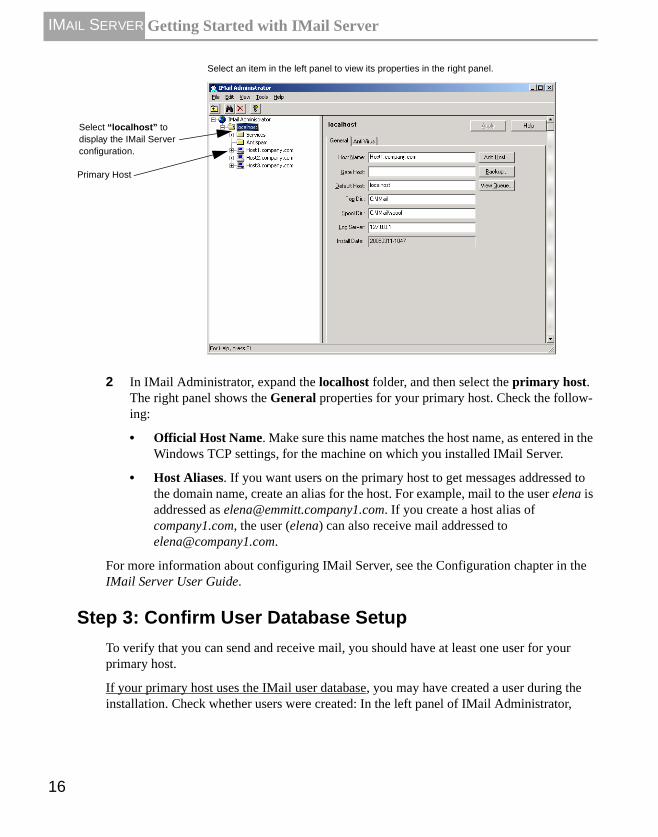
The IMail Administrator appears. The left panel provides access to system defaults, services, and to primary and virtual host settings. For each host, you can access users, aliases, and list-server mailing lists.
15
IMAIL SERVER Getting Started with IMail Server
2 In IMail Administrator, expand the localhost folder, and then select the primary host. The right panel shows the General properties for your primary host. Check the follow-ing:
• Official Host Name. Make sure this name matches the host name, as entered in the Windows TCP settings, for the machine on which you installed IMail Server.
• Host Aliases. If you want users on the primary host to get messages addressed to the domain name, create an alias for the host. For example, mail to the user elena is addressed as [email protected]. If you create a host alias of company1.com, the user (elena) can also receive mail addressed to [email protected].
For more information about configuring IMail Server, see the Configuration chapter in the IMail Server User Guide.
Step 3: Confirm User Database Setup
To verify that you can send and receive mail, you should have at least one user for your primary host.
If your primary host uses the IMail user database, you may have created a user during the installation. Check whether users were created: In the left panel of IMail Administrator,
Primary Host
Select “localhost” to display the IMail Server configuration.
Select an item in the left panel to view its properties in the right panel.
16
IMAILSERVERGetting Started with IMail Server
expand the localhost folder, select the primary host, then expand the Users folder. If you see only the “root” user, perform these steps to add a test user:
1 Select the primary host and click the General tab.
2 In the right panel, click Add User, then follow the instructions. A user ID must be 3 to 30 characters with no hyphens or spaces. For now, leave Show Advanced Settings turned off.
3 Click Next > Finish to add the user. The user ID is added to the list of registered users for the primary host. When the user ID is selected in the left panel, the user’s properties appear in the right panel.
If your primary host uses the Windows NT or Windows 2000 user database, you should have two default accounts: Administrator and Guest. If you need to add a user for test purposes, add the account in the appropriate Windows administrative tool.
If your primary host is based on an external database and the external database is not populated, perform these steps:
1 In the IMail Administrator left panel, expand the primary host and the Users folder.
2 Select the user named root.
3 On the General tab, click to clear Account Access Disabled.
4 Add a few users.
Any users you have added can receive mail through IMail Server at the host name specified in your Windows TCP/IP parameters. For example, if you added the user elena, and the host name is emmitt.company1. com, the user can receive mail addressed to [email protected].
Note: If you want users on the primary host to receive messages addressed to just the domain name, create an alias for the virtual host. For example, if you want the user shown above to receive mail addressed to [email protected], create a host alias of company1.com for jemmit.company.com. For more information, see the Configuration chapter in the IMail Server User Guide.
17
IMAIL SERVER Getting Started with IMail Server
Step 4: Sending and Receiving Mail in a Test Account
To send and receive mail in a test account, complete the following steps:
1 Check to make sure the mail servers are running. To do this, from the left panel, expand the localhost folder and select the Services folder to see if the SMTP, POP3, and IMAP4 servers are running. The status of SMTP should be “running;” this is automatically started. If the POP3 and IMAP4 are not “running,” then start them.
2 Start your email client.
If you are using IMail Client (Start > Programs > IMail > IMail Client), the users you added will appear in a drop-down list. Log on using one of the user accounts you created, and send mail to another user. Then check that the mail appears in the second user’s Main mailbox.
3 Send a test message to test mail service to remote systems. To do this, if you are con-nected to the Internet, send mail to [email protected]. We will reply to your mail. You can also test by sending mail to a user on another host and ask them to reply.
4 When you are satisfied that the mail server works properly, you can add more hosts and users.
UpgradingThis section is for users who are upgrading from a previous version of IMail Server. IMail Server is automatically installed in the same directory where you had the previous version or evaluation version. This directory should not be changed, moved, or renamed.
1 Back up the registry key,
HKEY_LOCAL_MACHINE\Software\Ipswitch\IMail(Start regedit.exe, locate this key and select Export Registry File from the Registry menu.)
Note: A version of IMail Client is automatically installed on the IMail system. This is provided for those who are administering IMail Server on the NT workstation on which IMail Server is installed. It is useful for reading the “root” mailbox, working with seldom-used accounts, and testing. The IMail Client application should not be used on the IMail Server system to view end-user mailboxes, as this may cause problems with remote access to the same mailboxes (depending on the remote clients being used).
18
IMAILSERVERGetting Started with IMail Server
2 Follow the same instructions used for new installations.
Upgrading Using External Databases
When reinstalling IMail Server over an earlier version (v 7.1 or prior), in which one or more hosts use an external user database, new columns must be added to the database tables. This is due to additional user-level data which must be stored for use with the new Web Messaging and Web Calendaring features. The new columns must be added to the user table for each IMail Server host that uses an external database.
During the install, IMail Server will determine whether your system currently uses an external database. If the answer is yes, then a dialog provides the following three options:
• Click Yes to have this install program automatically add the columns to all external database tables used to store IMail Server user settings.
• Click No to continue installation without updating the tables.
• Click Cancel if you want to manually add the necessary columns. The required col-umns can be found in the release notes. You will need to restart this install program when ready.
If a custom ODBC driver was used with a previous version of IMail Server, the driver must be modified to use the new columns. Source code for the basic ODBCUser.dll driver (tailored for SQL Server and Access) can be downloaded from the IMail Support Center at:
ftp://ftp.ipswitch.com/Ipswitch/Product_Support/IMail/odbcuser.dll
Upgrading the LDAP Database
IMail 8.1 and later uses the OpenLDAP implementation. If you have an existing LDAP database with information that you want to retain after the upgrade, you must take the following precautions, otherwise your existing LDAP information will be deleted.
• Backup your LDAP database before upgrading to ensure that you do not lose informa-tion in case an error occurs.
• Deselect Hide from Information Services before upgrading. In the IMail Administra-tor expand a host, click on a User’s folder. In the right panel, clear Hide from Informa-tion Services.
Note: Make sure that you stop all IMail services and close the IMail Administrator interface before upgrading.
Warning: If you click No and install anyway, be advised that IMail Server may not function correctly.
19
IMAIL SERVER Getting Started with IMail Server
Upgrading Web Messaging
The Web Messaging templates for IMail Server have changed format. The new format allows for easier customizations through the use of configuration files. This eliminates the need to edit HTML code in order to alter the appearance of templates. In order to use the new functionality in the 8.1 release, you must upgrade to the new format.
If the installation program detects that you have previously installed web templates for web messaging, a dialog is displayed that allows you to choose how to upgrade the templates. The dialog box, gives you the following options:
• Partial Installation. Overwrites all existing web messaging and web calendaring tem-plate files (files used to call a web page), but does not overwrite any existing configura-tion files (files in the format of config_filename.cgi).
• Complete Installation. Overwrites all existing web messaging, web calendaring, and configuration files with the templates for the new version.
• No Installation. Does not install any of the new web messaging calendaring or configu-ration files.
Your existing web messaging and web calendaring files are saved before being overwritten to the following locations:
• Web messaging files are saved to C:\[IMail Top Directory]\Web.00x
• Web calendaring files are saved to C:\[IMail Top Directory]\Web.00x
If you have customized your existing files, note that the new template format is very different from previous versions. After upgrading, you must either edit the new templates or edit the new configuration files which make customizations much easier. For a list of web messaging files that have changes, see the IMail Server release notes.
Upgrading Language Packs for Web Templates
If you have previously installed the IMail language packs for multi-lingual support in the web templates, you are presented with the following options to upgrade the language packs.
• Modify. Allows you to select which languages will be overwritten. You can also select new language packs to install, or clear language packs that you do not want t o install.
• Repair. Installs all languages that are currently installed. Note that if there are new lan-guage packs, this option does not install them.
• Remove. Uninstalls the Language packs, but not the web messaging templates.
20
IMAILSERVERGetting Started with IMail Server
Upgrading Antispam Features
If you have previously installed IMail Server, you must decide whether to overwrite the antispam-table.txt file. During installation a dialog is displayed giving you the following options to overwrite the existing anti-spam-table.txt file.
• Merge. Adds new words to your existing file. Does not delete or alter any existing entries.
• Overwrite. Overwrites your existing file. Note that if you have added words or changed word values in this file, these will be overwritten, or deleted.
• Ignore. Does not modify the file.
Re-Installing IMail Server to a Different Location
When re-installing IMail Server to a different location, the WEBDOCS value in imonitor.ini is not updated. This causes the up.gif and down.gif files in IMonitor to be missing on the Service Status page. IMonitor produces the WEBDOCS value, but does not know when a reinstall has occurred, or when a web directory has been moved. If you change the install location of IMail Server, you MUST update the WEBDOCS field in the imonitor.ini file to point to the new location so the GIFs will be loaded properly.
Removing IMail ServerTo remove IMail Server, use the Add/Remove Programs applet in the Windows Control Panel. The following occurs:
• IMail services are removed from the Control Panel Services.
• Everything is deleted in the Windows registry under HKEY_LOCAL_MACHINE\Software\Ipswitch\IMail (Ipswitch key is not removed).
• Directories and files created by setup.exe are removed if nothing has been added to them. For instance, if you haven’t added users (and root never gets mail), the Users directory is removed.
Note: You can manually merge the new word counts into your current antispam-table.txt file after installation, using the antispamseeder.exe utility. For more information see the IMail Administrator Help or the AntiSpam Chapter in the IMail User Guide.
Note: Removing IMail Server as described above does not delete the IMail directory or the subdirectories and files it contains. To remove these, you must delete them manually.
21
IMAIL SERVER Getting Started with IMail Server
Enabling WizardsThe IMail Administrator provides several wizards that help you enter information. For example, the New User wizard steps you through the creation of an account for a new user. If you enable wizards, a wizard will start when you do the following:
• Add host
• Add user
• Add alias
• Add list
To enable wizards, from the Tools menu, select Use Wizards. To disable wizards, select Use Wizards again (to remove the check mark).
Technical SupportFor more information about Ipswitch Technical Support, visit our Support Center at:http://www.ipswitch.com/support/
22
AppendixA
What is DNS?
How Mail Servers Use DNS
Setting Up Mail Server Records in DNS
In this Chapter
Mail Servers and DNSThis appendix provides background information on the Domain Name System (DNS) and how mail servers use the DNS. The section briefly describes the DNS, but the focus is on mail servers and the DNS records that mail servers use to find other mail servers.
If you are not familiar with how DNS operates, we recommend the book “DNS and Bind” published by O’Reilly and Associates, for general DNS information. Refer to your DNS server’s documentation for information about making entries in your DNS server.
What is DNS? DNS is the mechanism by a program running on your host computer can locate the address of other hosts on the Internet, and by which other hosts on the Internet can locate you. The DNS essentially provides a map of the structure of the Internet.
Organizations must register a domain name with the InterNIC and obtain addresses to use for the hosts in their domain. For example, ipswitch.com is a registered domain name, and some addresses assigned to ipswitch.com are 156.21.50.1 through 156.21.50.255. For information about registering a domain name, see the InterNIC’s web site at http://www.internic.net.
All hosts on the Internet must have a host name and an IP (Internet Protocol) address. You can give a host any host name you want, as long as it is unique within your domain. For example, some host names and addresses in the ipswitch.com network are:
test1.ipswitch.com 156.21.50.1test2.ipswitch.com 156.21.50.2test3.ipswitch.com 156.21.50.3DNS servers provide the mapping of host names to their addresses. The DNS server for ipswitch.com lists each Ipswitch host and its corresponding address. Thus, any host outside of ipswitch.com can query the DNS server for ipswitch.com to find the address of a particular host. Once it has the address, the requesting application can communicate directly with the host.Note that querying a DNS
23
APPENDIX A Mail Servers and DNS
server is also called a “DNS lookup” or a “lookup.”
When a host outside ipswitch.com wants to send mail to a user on the ipswitch.com network, it queries the DNS server for ipswitch.com to find the mail server for users on ipswitch.com. The host can then send mail to the mail server, which will deliver it to the appropriate user.
How a Mail Server Uses DNSAll SMTP mail servers that communicate with other Internet hosts use a DNS server to look up mail addresses. The basic communications between a mail server and a DNS server work as follows for incoming mail and outgoing mail.
Incoming Mail:
To illustrate how a DNS server is used to look up mail addresses, we use the example of what happens when a user on another Internet host sends mail to a user on your IMail Server host (for example to [email protected]).
1 A user sends mail to your user, [email protected].
2 The sending mail server asks the DNS server on the domain.com network for the host name of the mail server. The MX (Mail eXchanger) record in DNS identifies the Host Name of the mail server.
3 The DNS server for domain.com returns the value of the MX record, which is the host name of the mail server, in this case, mail.domain.com.
4 The sending mail server now asks the DNS server on the domain.com network for the address of the mail server host (mail.domain.com). The A record in DNS maps the host name to an IP address.
5 The DNS server for domain.com returns the value of the A record for the mail server host (mail.domain.com), which is the IP address (156.50.1.5).
6 The sending mail server connects to the receiving mail server’s IP address and sends the mail.
Outgoing Mail:
When one of your IMail Server users sends mail to a user on another Internet host (for example, to [email protected]), the same process occurs, except that it is your mail server that does the lookups for MX and A records on the DNS server for the widgets.com network.
24

APPENDIX A Mail Servers and DNS
Reverse Lookups
Note that some mail servers, upon receiving mail, will do a “reverse lookup” on the address to make sure it is valid. This is done in an attempt to thwart bulk mailers who may be illegally using someone else’s mail server to relay mail. A PTR record attempts to verify that the inbound email is originating from a mail server and not a workstation. To do a reverse lookup, the receiving mail server asks the DNS server on the sending mail server’s network to confirm that the IP address of the sending server matches the host name of the sending server.
Reverse lookups are enabled in DNS by creating a PTR record for the mail host. The PTR record maps an IP address to a host name.
Setting Up Mail Server Records in the DNSTo set up your mail server in the DNS, you must create the records that other mail servers use to find and connect to your mail server. Making these entries requires that you first have:
• A registered Internet domain name for your local network (for example, domain.com).
• A DNS server for your local network.
Your Local Network’s DNS server
Before your mail server can communicate with other mail hosts, you must configure the DNS server to recognize your mail server. Without a functional and correctly set DNS, IMail Server cannot deliver mail, except to domains that are within IMail Server.
For each mail host on your network, you must make the following entries in your DNS:
• An MX record for the mail domain (for example, domain.com). The MX record identifies the host name of the mail host. Note that mail hosts (virtual hosts) that do not have an IP address require only an MX record.
• An A record for the host name of the mail host. The A record maps a host name to an IP address.
• A PTR record for the IP address of the mail host. The PTR record maps an IP address to the host name and is used for reverse lookups.
• An SPF record lets other email servers use SPF filtering (if the feature is available on the mail server) to protect against incoming email from forged (spoofed) email addresses that may be associated with your mail server. As SPF records are imple-mented more widely, SPF filtering will become more effective at identifying spoofed email messages. For more information about SPF records, see the IMail User Guide.
Since there are DNS servers from many vendors available, we cannot describe how to create
25
APPENDIX A Mail Servers and DNS
the records for your specific DNS server. Instead, we show an example using a basic configuration for a single mail host.
Example of a Basic Configuration
In this example, we use a DNS lookup tool to query the DNS server and show the responses. You can use the Windows NT command line program, NSLOOKUP, to query a DNS server. If you are not familiar with this tool, we suggest the Ipswitch WS_Ping ProPack application, which provides a graphical interface for querying a DNS server. Use the Lookup tool in WS_Ping ProPack.
To describe the DNS entries for a mail server, we use examples from a typical small network and start with the following assumptions:
• You have one computer with a network interface card (NIC) installed.
• You have set the IP address for this computer to a valid address within your range of addresses. In the example, we will use 156.21.50.5.
• You have assigned this computer a host name that is valid in your domain. In the example, we will use mail.domain.com.
• You have designated another SMTP server to act as a backup if your mail server is down. In the example, we will use cecil.domain.com.
You must set up the following records for the computer:
• An MX record for the domain domain.com that points to the host name of the computer running IMail (mail.domain.com).
• An A record for mail.domain.com
• A PTR record for mail.domain.com
E-mail for the users on this mail host is addressed to [email protected].
First, we do an MX lookup (just as a sending mail server would do) to find the mail host for the domain.com network. To simulate this, in the WS_Ping ProPack’s Lookup tool, we enter domain.com in the Name/Address box and MX as the Query Type, which returns the following:
domain.com10, mail.domain.com50, cecil.domain.com
This shows that mail.domain.com and cecil.domain.com are both mail hosts for the domain.com network. The cecil.domain.com host is a backup mail server. The number indicates the priority of the mail host — it tells the sending mail server which mail host to try first. The lower the number, the higher the priority. In our case, mail.domain.com is the one we want other mail servers to use first; cecil.domain.com is used only if mail.domain.com is
26
APPENDIX A Mail Servers and DNS
down.
For information about how a backup mail server works, see “Setting Up IMail Server as a Backup Mail Spooler” in the IMail Server User’s Guide.
Only a host name is returned in response to an MX query. The sending mail server needs the IP address of this host name so it can connect to the mail host. The sending mail server performs another DNS lookup to get the IP address (defined in the A record) of highest priority mail host. To simulate this, in the Lookup tool, we enter mail.domain.com in the Name/Address box and A as the Query Type, which returns the following:
mail.domain.com156.21.50.5
If we query the A record for cecil.domain.com, we get:
cecil.domain.com156.21.50.100
With the IP address for the mail.domain.com host, the sending mail server can now connect to that host and deliver the mail. If the attempt is successful, there is no need to go any further. However, if the mail.domain.com host is down, the connection attempt fails and the sending mail server will have to try the next highest priority MX record, in this case, cecil.domain.com.
Sample DNS Records
If we use a DNS lookup tool to query the DNS server for the network in our example (for all information, in verbose mode), you would see entries like the following:
domain.com. IN MX 50 cecil.domain.com. IN MX 10 mail.domain.com
cecil.domain.com. IN A 156.21.50.100mail.domain.com. IN A 156.21.50.5
5.50.21.156.in-addr.arpa.,type = PTR host = mail.domain.com5.100.21.156.in-addr.arpa.,type = PTR host = cecil.domain.com
Other Configurations
If you have multiple mail hosts on your IMail Server, you will need an MX, A, and PTR record for each host. The “Configuration” chapter in the IMail Server User’s Guide describes some advanced configuration topics and describes the DNS entries you must make for these advanced configurations.
27

APPENDIX A Mail Servers and DNS
28
INDEX
AA record 24
viewing 14adding users 18alias 16antispam-table.txt 21authentication 9
Cclients
email 2
DData Source Name. See System
DSNdatabase
confirming setup 16external 7IMail 6selecting 10Windows 6
database, users 6DNS 23
and mail servers 23description 23lookup 23
DNS entries 4A records 5background information 6confirming 13MX records 5PTR records 5SPF records 5
DNS server 2domain name 4DSN 11
Eemail clients 2external user database 7
Fforum 2
Hhost
official name 10primary 4
host alias 16hosts
multiple 9
IIMail Administrator 15IMail Client 18IMail resources 1IMail user database 6Incoming mail
DNS and 24installation 10
planning 3selecting location 11testing 13
IP address 4Ipswitch Web site 2
Llookup 13Lookup, DNS 23
Mmail client 2Mail domains
DNS and 24mail server
DNS entries 4installing 10security 8services 7setting security 11testing 13
mail servicesselecting 12
mail systemcomponents 2
MX record 24viewing 13
Nnslookup 13NTFS 2, 4
OODBC database 7Official Host Name 10
PPTR record 25
viewing 14
RRe-Installing
anti-spam features 21to a different location 21web messaging 20
relay options 8Release notes 1Removing 21requirements 4Reverse lookups 25
29
INDEX
Ssecurity 8, 9
setting 11SSL 11
servicesselecting 12
services, mail 7SMTP 9SMTP Authentication 9spamming
see security 11SSL 11System DSN 11system requirements 4
TTechnical support 2technical support 22testing
send and receive mail 18
UUninstalling 21Upgrading 18
anti-spam features 21external databases 19web messaging 20
user databaseconfirming setup 16
user forum 2
WWeb Messaging 20Windows NT registry 21Windows user database 6wizards 22WS_Ping ProPack 13
30