imperial probe droid marionette craft...
TRANSCRIPT

© & TM 2015 Lucasfilm Ltd. All rights reserved.© Disney Page 1 of 5
HEAD
IMPERIAL PROBE DROID MARIONETTE CRAFT TEMPLATE

© & TM 2015 Lucasfilm Ltd. All rights reserved.© Disney Page 2 of 5
MAIN BODY
IMPERIAL PROBE DROID MARIONETTE CRAFT TEMPLATE
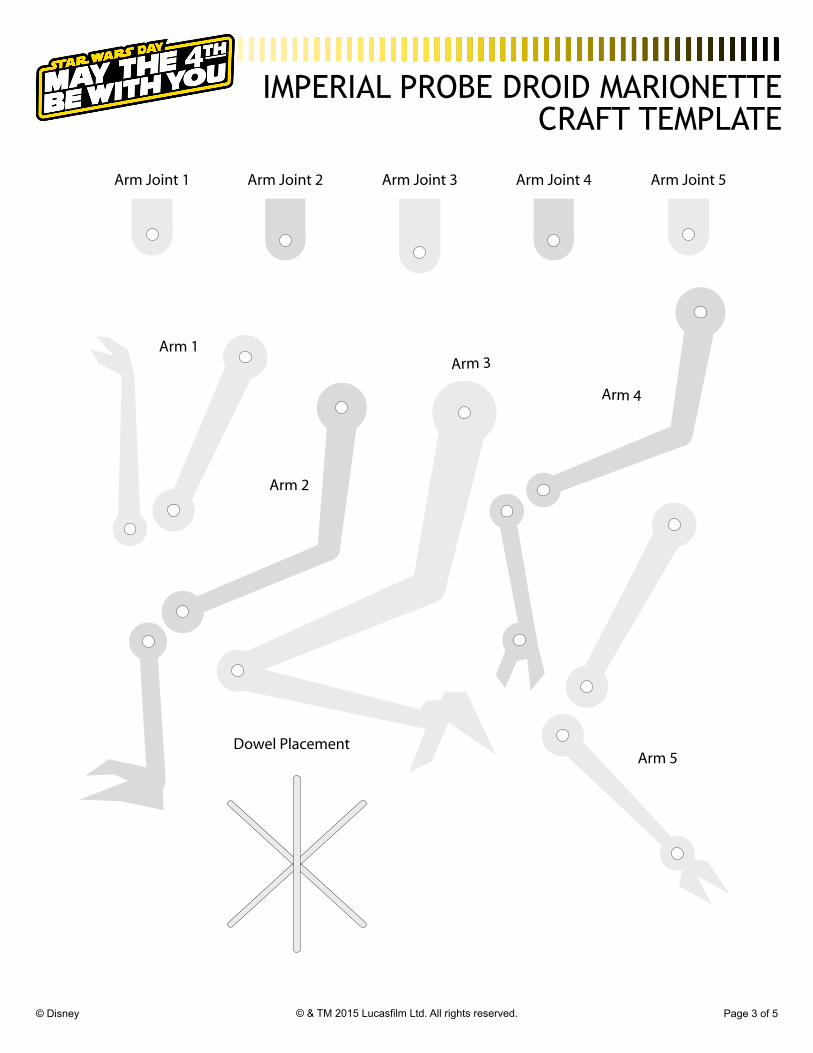
© & TM 2015 Lucasfilm Ltd. All rights reserved.© Disney Page 3 of 5
IMPERIAL PROBE DROID MARIONETTE CRAFT TEMPLATE

© & TM 2015 Lucasfilm Ltd. All rights reserved.© Disney Page 4 of 5
MATERIALS NEEDED:• PDF template
• 3 12"in x 12"in piece of heavy card stock or thin chipboard.
• transfer paper or carbon paper
• ball point pen
• burnisher or dried-out ball point pen
• heavy duty crafting scissors
• craft knife with extra blades
• straightedge or ruler with cutting rail
• self-healing cutting mat
• hot melt glue gun and extra glue sticks
• 1 paper clip
• kite string (alternatively you can use strong thread or fishing line)
• 3 12"in long dowels (3/16"in around is ideal but you can use something similar)
• small hole punch (1/8"in)
• scotch tape
• Dark gray or metallic black spray paint
• newspaper or ground cloth
WARNING: Cutting, hot-melt gluing, and spray painting is intended for adults only. Take great caution when cutting using a cutting mat and a cutting rail ruler. Keep these and all other materials out of the reach of children at all times and never leave them unattended for any reason. If for any reason you do not feel comfortable using these materials, please do not attempt to make this craft. We want you to have fun, but at all times safety must be the #1 priority.
INSTRUCTIONS:
1 2Print the template and place each of the first 3 pages on its own 12"in x 12"in piece of heavy card stock or chipboard. Slip a piece of carbon or transfer paper between each sheet of card stock and the corresponding template and tape it them all down so they do not move. Trace over each line with a ball point pen using a straight edge or a ruler for the straight lines. Make sure to so this on a hard surface, like a table, taking care to add the internal details as closely as possible including dotted lines, circles, etc. Now take a burnisher or a dried out ball point pen and score every dotted line using a straight-edge or a ruler.
Set the cardboard on your self-healing cutting mat and using a new blade, carefully cut out each element along the solid lines using your craft knife and making sure you do NOT cut any dotted lines. Alternatively you may use heavy-duty crafting scissors provided your card stock isn’t too thick. For the inner-circles on the arms and arm joints use the 1/8"in hole punch.Use a craft knife to cut the cross hairs in the center of the headband then cut away the center circle so string may pass through.
IMPERIAL PROBE DROID MARIONETTE CRAFT TEMPLATE

TM & © 2014 Lucasfilm Ltd. All rights reserved.© Disney Page 5 of 5
3
4
5
6
7
8
9
10
11
Fold and bend all dotted lines and then carefully use a modest amount of hot-melt glue along the seams to create the Head piece. Start by gluing parts A together, then B together, and finally C together. You should have a hamburger shaped Head when completed. Next glue the Main Body together starting with parts E, and then parts D.
Before gluing the Head and Main body together, thread your string through the top of the head at the center of the small cross-hair {+}. Feed your string through and tie it to the paper clip so the paper clip is on the inside of the head piece when you glue it closed. Give yourself more string than you need so you can size it to fit later. If desired you may want to glue the paper clip and knot to the inside of the Head piece to keep it from becoming loose.
Now add a moderate amount of glue around the top edge (part D) of the Main Body and press the Head down so the two main shapes stick together. Flip the combined Head and Main Body over and hot-melt glue the thin, flat ends of the arm joints to the bottom where indicated by the pink lines on the Main Body piece on page 2.
Now hot-melt glue all Sensors and Sensor Clusters on panels B on Head template on page 1 as designated. Hot-melt glue the laser canon on any part A of your choice on the Head.
Glue the “D” shaped Antennae base to either side of each antennae and glue them together on the very top of the head between the center cross-hairs and the part A panel.
If you do not want to spray paint your model, skip to step 9. Lay out some newspaper or a drop cloth outside in a well ventilated area, shake well, and lightly spray all the cardboard pieces you have cut out. Allow for drying time the paint can’s instructions and when dry turn the parts over and reapply paint lightly until all sides are well covered and even. Once completely dry go on to step 9.
Hot-melt glue 3 12"in dowels together as shown in the Dowel Placement illustration on Page 3. This will be your marionette control. Tie the center line of string you threaded earlier to the center of the dowels leaving about 10"in to 12"in of clearance between the top of the head and the bottom of the marionette control.
Loosely tie each arm together as grouped on Page 3, and loosely tie the arm base to the corresponding Arm joint.
Note: If you tie too tight the arms will lack movement. If you tie too loose you will get your arms tangled up. Play with the amount of space you need between joints until it seems right to you. Then tie a generous amount of string to any arm that has a punched hole. Each arm will connect to its own dowel. For arms without a punched hole near the claw, you may tie the string to the upper arm joint. Take care to space the arms apart so that they do not cross strings. Hang some higher and some lower but take care not to raise the arms higher than the arm joints. Also, take care not to allow too much slack in the line as tangling will occur. Once you have found the right length tape or tie the string to the dowel.
You’re finished! Now show off your skills by rocking the marionette control left, right, back and forth to make your puppet come alive
IMPERIAL PROBE DROID MARIONETTE CRAFT TEMPLATE